
Configuring SAP HANA Scale-Out System Replication with the RHEL HA Add-On on Amazon Web Services (AWS)
Contents
- 1. Overview
- 2. Required AWS Configurations
- 3. Base OS Setup
- 4. Install SAP HANA and setup HANA SR
- 5. Setting up the pacemaker cluster
- 5.1. General steps to setting up a cluster
- 5.2. Installation of the Cluster Software
- 5.3. Check AWS Software
- 5.4. Configure Red Hat High Availability Packages
- 5.5. Create the cluster
- 5.6. Enable and start the cluster
- 5.7. Configure fencing
- 5.8. Check SAP HANA Resource Agent Installation
- 5.9. Configuring the
SAPHanaTopologyresource agent - 5.10. Configuring the
SAPHanaControllerresource agent - 5.11. Configure the Overlay IP resource agent
- 5.12. Configure cluster constraints
- 5.13. Final Cluster Configuration
- 5.14. Cluster Testing
- 6. Monitoring and Troubleshooting
- 7. Additional Resources
1. Overview
This article describes how to configure SAP HANA System Replication in a scale-out scenario and in a pacemaker-based cluster on supported Red Hat Enterprise Linux (RHEL) virtual machines on Amazon Web Services.
The main difference in installing a scale-out scenario on AWS is:
- HANA Standby Nodes are not supported
- Each HANA node uses local filesystems for data and logging which are not shared
You can optionally launch EC2 instances with the right subscription for Red Hat Enterprise Linux for SAP with HA. This can be found in the Marketplace by searching “Red Hat SAP.”
For more information, see Red Hat Enterprise Linux HA Solution for SAP HANA Scale-Out and System Replication.
1.1. Supported Scenarios
For more information about supported scenarios and policies on Amazon Web Services, refer to:
- Support Policies for RHEL High Availability Clusters - Management of SAP HANA in a Cluster
- Support Policies for RHEL High Availability Clusters - Amazon Web Services (AWS) EC2 Instances as Cluster Members
1.2. Parameters for HANA
Please specify the following:
| Parameter | Value |
| SID | |
| system password | |
| sidadm password | |
| sidadm uid | |
| sapsys gid | |
| local filesystem node1--N /hana/log side1 | |
| local filesystem node1--N /hana/data side1 | |
| shared filesystem /hana/shared side1 | |
| local filesystem node1--N /hana/log side2 | |
| local filesystem node1--N /hana/data side2 | |
| shared filesystem /hana/shared side2 |
SID is used as a replacement for the real system id.
2. Required AWS Configurations
2.1. Initial AWS Setup
If you are running HANA instances on your own AWS account, proceed with the steps in 2.4. Create VPC.
To use this guide you must have created an AWS account with permissions to create and change the following AWS resources:
- An SSH Key Pair
- An IAM user with permissions to: describe and modify routing tables, create and modify security groups, stop and start EC2 instances, create IAM policies and IAM roles
- A Virtual Private Cloud (VPC) with subnets in 3 different Availability Zones
- Internet Access from your VPC subnets
- Security Group for the HANA Cluster node instances
- (Optional) Security Group for the jump server
- (Optional) Remote Desktop Protocol (RDP) for GUI Access
If you don’t have an AWS account, refer to this link on how to create one.
2.2. Choose the Supported SAP HANA Instance Type and Storage
2.2.1. SAP HANA Instances
You need to have the identical instance type for the HANA nodes (for example r5.2xlarge) and a smaller one for the majoritymaker (for example t5.large).
For more information refer to AWS Instance Types for SAP HANA - SAP HANA on AWS
Follow the guidelines in the SAP HANA Quick Start Guide, Planning the Deployment on instance types, storage, memory sizing, and Multi-AZ deployments.
- The EC2 instances need to be spread over different availability zones.
- To enable access, copy your private key to the jump server as well as each of the HANA nodes.
- The hostname should meet the SAP HANA requirement. Optionally, change the hostname following these instructions.
2.2.2. Storage Types
Here is an example list of required filesystems in 2 availability zones (DC1 and DC2):
| Mountpoint | Type | Client | Availability Zone |
| /hana/shared | EFS | All Nodes DC1 | DC1 |
| /hana/shared | EFS | All Nodes DC2 | DC2 |
| /hana/data | local filesystem | dc1node1 | DC1 |
| /hana/data | local filesystem | dc1node2 | DC1 |
| /hana/data | local filesystem | dc1node3 | DC1 |
| /hana/data | local filesystem | dc2node1 | DC2 |
| /hana/data | local filesystem | dc2node2 | DC2 |
| /hana/data | local filesystem | dc2node3 | DC2 |
| /hana/log | local filesystem | dc1node1 | DC1 |
| /hana/log | local filesystem | dc1node2 | DC1 |
| /hana/log | local filesystem | dc1node3 | DC1 |
| /hana/log | local filesystem | dc2node1 | DC2 |
| /hana/log | local filesystem | dc2node2 | DC2 |
| /hana/log | local filesystem | dc2node3 | DC2 |
| /install | EFS | optional for installation software | any |
Refer to this link for instructions on configuring EFS storage, or search for EFS in the AWS console.
To use the local storage you need to change the global.ini parameter basepath_shared to no.
2.3. Create Policies
For the cluster to work properly 3 different IAM policies need to be created:
- AWS DataProvider for SAP
- AWS Overlay IP resource agent
- AWS Fencing agent
Create an IAM Role, and attach the 3 IAM policies that were created in the previous step, and assign the role to all SAP HANA instances and to the MajorityMaker node.
To create an IAM Role, refer to this guide on the AWS portal.
After the IAM Role has been created, assign the role to the SAP HANA and to the MajorityMaker EC2 instances.
In AWS EC2 console, right click the EC2 instance -> Instance Settings -> **Attach/Replace IAM Role -> Select PacemakerRole, click Apply.
2.4. Create VPC
An AWS Virtual Private Network (VPC) needs to be created, which spans all Availability Zones.
For more information refer to What is Amazon VPC? - Amazon Virtual Private Cloud.
This VPC is used to create the EFS file systems to be accessible from all nodes.
You can create VPC and subnets here. Alternatively, you can search for vpc in the AWS console.
You need to define the CIDR to specify the IP range of the vpc. A routing table is created. You also need to add subnets per availability zone to ensure access, in order to use the overlay ip address.
2.5. Create EFS
The EFS storage is configured here. Alternatively, you can search for EFS in the AWS console.
Use the VPC defined above to create the EFS filesystems. You need to create a separate shared filesystems /hana/shared for each site.
3. Base OS Setup
The base OS setup is configured during the EC2 creation process.
Follow the guidelines in the SAP HANA Quick Start Guide, Planning the Deployment on instance types, storage, memory sizing, and Multi-AZ deployments.
- It is required to create the nodes in different availability zones.
- To enable access, copy your private key to the jump server, and each of the HANA nodes.
- The hostname should meet the SAP HANA requirement. Optionally, change the hostname following the instructions.
3.1. Create EC2 Instances
Before you create the EC2 instances that will run your SAP HANA Scale-Out cluster it is important to review and use a supported and certified EC2 instance type for SAP HANA Scale-Out. The certified EC2 instances are documented in the SAP HANA Certified IaaS Directory. For more information refer to Red Hat Enterprise Linux for SAP offerings on Amazon Web Services FAQ.
The majoritymaker node can be any EC2 instance type, with at least 2 vCPUs and 4GB RAM.
Please refer to the guidelines in SAP HANA Quick Start Guide, Planning the Deployment on EC2 instance types, EBS storage, and memory sizing.
To follow this document, you will need instances for
- (Optional) Bastion host
- 3 SAP HANA nodes per Availability Zone in two different Availability Zones ( total of 6 EC2 instances)
- 1 EC2 instance as the cluster node in a 3rd Availability Zone
Note: This solution requires the deployment of two independent SAP HANA Scale-Out installations in two different Availability Zones, and a MajorityMaker cluster node in another Availability Zone. For example, if the SAP HANA Scale-Out clusters were deployed in euc1-az1 and euc1-az2, ensuring that the node is deployed in a different Availability Zone (e.g.: euc1-az3).
Example with 3 nodes per availability zone in eu-central-1:
| Availability Zone 1 | Availability Zone 2 | Availability Zone 3 |
| euc1-az1 | euc1-az2 | euc1-az3 |
| dc1hana01 | dc2hana01 | majoritymaker |
| dc1hana02 | dc2hana02 | bastianhost |
| dc1hana03 | dc2hana03 |
To launch the SAP HANA Instances use either the Red Hat Cloud Access program, or AWS Marketplace Amazon Machine Images (AMIs).
To use the AWS Marketplace images use the following steps:
- Navigate to https://aws.amazon.com/marketplace
- Search for “Red Hat Enterprise Linux for SAP with HA and US” and select the desired version
To use Red Hat Cloud Access Program images refer to the following Knowledge Base article:
After the SAP HANA and MajorityMaker EC2 instances have been created, make a note of the following information related to your EC2 instances. This information is required for the next section:
- AWS Region: e.g. us-east-1
- Account ID of the AWS user account
- EC2 Instance ID of the all SAP HANA and
MajorityMakernodes
3.2. Install AWS CLI
Follow the Install the AWS CLI section to install and verify the AWS CLI configuration on all EC2 instances.
After installing the AWS CLI, run aws configure on all nodes and set the region according to the region where the EC2 instances are running.
3.3. Configure hostnames
EC2 instances hostnames should meet the SAP HANA requirements. Optionally, change hostname following the instructions. You can change the hostname with this command:
sudo hostnamectl set-hostname --static <persistent-hostname>
Add all changed hostname into a common /etc/hosts file and use the same /etc/hosts file in all cluster nodes using dc1hana01 instead of ec2-10-20-30-40.eu-central-1.compute.amazonaws.com | (and do the same change also in the bastion's /etc/hosts file)
3.4. Mount shared file systems /hana/shared
In 2.5 Create EFS we have defined the shared filesystems, which need to be mounted. You can list the existing filesystems with aws efs describe-file-systems.
If you have selected the right EFS ID, for example fs-e55fc1bd in eu-central-1 you can mount it with adding
fs-e55fc1bd.efs.eu-central-1.amazonaws.com:/ /hana/shared nfs4 nfsvers=4.1,rsize=1048576,wsize=1048576,hard,timeo=600,retrans=2,noresvport,_netdev 0 0`
into `/etc/fstab
on all HANA nodes.
You have different Filesystems for HANA in DC1 and HANA in DC2.
The fileystems for
/hana/data
/hana/log
will be mounted during the creation process of the EC2 HANA instances.
4. Install SAP HANA and setup HANA SR
Installation of SAP HANA and setup of HANA SR is not specific to an AWS environment and you can follow the usual procedures:
- For installing SAP HANA on RHEL - SAP Note 2009879 - SAP HANA Guidelines for RedHat Enterprise Linux (RHEL)
4.1. HANA Install Primary Datacenter
To install HANA on the first node of the datacenter please refer to the SAP HANA Installation guide.
Because AWS recommends using local filesystems for /hana/data and /hana/logs, you have to change the global.ini parameter basepath_shared to no. Changes in global.ini become active when the database is restarted.
You have to change it before you install the other nodes of this HANA database. For more information refer to 2080991 - Install a multi-host HANA DB with non-shared data and log storage
- Install first node using
hdblcm - Change
global.iniparameterbasepath_sharedto no - configure the internal network
/hana/shared/SID/hdblcm/hdblcm -action=configure_internal_network - ensure the EFS shared filesystem
/hana/sharedis mounted on all other HANA nodes of this site. cd /hana/shared/SID/hdblcmand start./hdblcmon the other HANA nodes
Please remember the system password of the database, this is necessary in 4.3.1 Backup Database.
4.2. HANA Install Secondary Datacenter
Proceed with the same installation on the other site:
- Install first node using
hdblcm - Change
global.iniparameterbasepath_sharedtono(/usr/sap/$SAPSYSTEMNAME/SYS/global/hdb/custom/config/global.ini) - configure the internal network
/hana/shared/SID/hdblcm/hdblcm -action=configure_internal_network - ensure the EFS shared filesystem
/hana/sharedis mounted on all other HANA nodes of this site. cd /hana/shared/SID/hdblcm and start ./hdblcmon the other HANA nodes
4.1 Primary Datacenter and 4.2 Secondary Datacenter can also be done in parallel.
4.3. Setting up HANA System Replication
For setting up SAP HANA SR please also check SAP HANA System Replication - SAP HANA system replication in pacemaker cluster.
Steps to enable HANA System Replication:
- Backup Database
- Copy Key Files
- Enable HANA System Replication on primary site
- Enable HANA System Replication on secondary site
4.3.1. Backup Database
Assuming that the backup location is /hana/backup and the SID is RH1 you can use this to backup the database. Use the password which is set in 4.1 Primary Datacenter.
sidadm% hdbsql -i 00 -u system -p <password> -d SYSTEMDB "BACKUP DATA USING FILE ('/hana/backup/')"
sidadm% hdbsql -i 00 -u system -p <password>  -d SYSTEMDB "BACKUP DATA FOR RH1 USING FILE ('/hana/backup/')"
4.3.2. Copy Key Files
If you want to establish HANA system replication from the primary site to the secondary site you have to copy the keyfiles from the master worker node of the primary site to the master worker node of the secondary site.
For example if SID is RH1:
dc1hana01# scp /usr/sap/RH1/SYS/global/security/rsecssfs/key/SSFS_RH1.KEY dc2hana01:/usr/sap/RH1/SYS/global/security/rsecssfs/key/SSFS_RH1.KEY
dc1hzan01# scp /usr/sap/RH1/SYS/global/security/rsecssfs/data/SSFS_RH1.DAT dc2hana01:/usr/sap/RH1/SYS/global/security/rsecssfs/data/SSFS_RH1.DAT
Replace SID RH1 with your system id.
4.3.3. Establish HANA System Replication
HANA System Replication can be now established the standard way.
To enable HANA system replication on primary site:
sidadm@dc1hana01% hdbnsutil -sr_enable --name=DC1
To establish replication on secondary side on the master worker node:
sidadm@dc2hana01% hdbnsutil -sr_register --remoteHost=dc1hana01 --remoteInstance=00 --replicationMode=syncmem --name=DC2 --online
On the primary node, the status of the system replication can be checked with the following command:
sidadm@dc1hana01% python /usr/sap/SID/HDB00/exe/python_support/systemReplicationStatus.py
`hdbnsutil -sr_state
4.3.4 Enable the SAP HANA HA/DR Provider hook
Please make sure the hook is enabled on all cluster nodes as documented in Configuring the SAP HANA HA/DR provider hook.
5. Setting up the pacemaker cluster
5.1. General steps to setting up a cluster
Systemctlstartpcsd- Change password for user
hacluster - Pcs host auth
- Create a cluster ( recommended using 2 IP-addresses for cluster intercommunication)
- Another IP address will run in the AWS environment on another physical connection
- Create fencing
- Install sap resource agent
- Configure
SAP Hana Topology - Configure
SAPHanaController - Create virtual IP address for HANA clients
- Define constraints
- Tests
The major difference in an AWS environment is the configuration of the following:
- fencing
- virtual ip address
The rest is similar to the configuration described in Red Hat Enterprise Linux HA Solution for SAP HANA Scale-Out and System Replication.
5.2. Installation of the Cluster Software
The following software packages need to be installed for the cluster:
pacemakerresource-agents-sap-hana-scaleoutawsclifence-agents-aws
It can be installed with the following command on all cluster nodes:
# yum install -y pcs pacemaker resource-agents-sap-hana-scaleout awscli fence-agents-aws
To check the installation run the following command:
# which pcs
Output: /usr/sbin/pcs to verify that the cluster software is installed.
5.3. Check AWS Software
To verify if aws cli is correctly installed and if the IAM permissions are correctly set up, run the following command:
aws ec2 describe-instances
5.4. Configure Red Hat High Availability Packages
Create a password for hacluster on all cluster nodes. Use the same password for all nodes.
Note: You must run all pcs commands as user root.
# passwd hacluster # on all cluster nodes
Start the pcs service and enable it to start on boot.
systemctl start pcsd.service
systemctl enable pcsd.service
Make sure the pcs service is running in all nodes:
systemctl status pcsd.service
pcsd.service - PCS GUI and remote configuration interface
   Loaded: loaded (/usr/lib/systemd/system/pcsd.service; enabled; vendor preset: disabled)
   Active: active (running) since Thu 2021-04-15 14:02:19 CEST; 2 weeks 4 days ago
    Docs: man:pcsd(8)
        man:pcs(8)
 Main PID: 2709 (pcsd)
    Tasks: 1 (limit: 202312)
   Memory: 74.0M
   CGroup: /system.slice/pcsd.service
        └─2709 /usr/libexec/platform-python -Es /usr/sbin/pcsd
5.5. Create the cluster
Complete the following steps to create the cluster.
On one of the nodes, enter the following command to authenticate the pcs user hacluster. Use the host name for each node in the cluster in the command.
#passwd hacluster
#pcs host auth <hostname> -u hacluster
pcs host auth <hostname1> <hostname2> <hostname3> <hostname4> -u hacluster
#pcs cluster setup --name <cluster_name> <hostname1> <hostname2> <hostname3> <hostname4> ...
5.6. Enable and start the cluster
pcs cluster enable --all
pcs cluster start --all
5.7. Configure fencing
Complete the following steps to configure fencing.
Enter the following AWS metadata query to get the Instance ID for each node. You need these IDs to configure the fence device.
# echo $(curl -s http://169.254.169.254/latest/meta-data/instance-id)
You can also use:
aws ec2 describe-instances | grep INSTANCES | cut -f 9,10,14
Use the following command to configure the fence device. Use pcmk_host_map to map the RHEL host name to the Instance ID.
# pcs stonith create <name> fence_aws region=<region> pcmk_host_map="rhel-hostname-1:Instance-ID-1;rhel-hostname-2:Instance-ID-2;rhel-hostname-3:Instance-ID-3" power_timeout=240 pcmk_reboot_timeout=600 pcmk_reboot_retries=4 op start timeout=60
Example:
pcs stonith create clusterfence fence_aws region=eu-central-1 pcmk_host_map="dc1hana02:i-065ef150f6c260f4b;dc1hana01:i-01272ef8e4c11bd53;dc1hana03:i-093221c260083f7b2;dc2hana01:i-011e58383ec41708c;dc2hana02:i-018f79d61c4d2ad5c;dc2hana03:i-08606e6dc1eb0b3d1" power_timeout=240 pcmk_reboot_timeout=600 pcmk_reboot_retries=4 op start timeout=60
Test the fencing agent for one of the other nodes.
Note: The command response may take several minutes to return to the Linux shell. If you watch the active terminal session for the node being fenced, you see that the terminal connection is immediately closed after you enter the fence command.
# pcs stonith fence <hostname> # command to fence <hostname> in a cluster
After the EC2 instance has moved to start, it should be automatically started and rejoin the cluster.
5.8. Check SAP HANA Resource Agent Installation
Check installation of the SAP HANA ScaleOut Resource agents:
# ls /usr/lib/ocf/resource.d/heartbeat/SAPHana*
The above command should display two entries. Example:
# ls /usr/lib/ocf/resource.d/heartbeat/SAPHana*
/usr/lib/ocf/resource.d/heartbeat/SAPHanaController  /usr/lib/ocf/resource.d/heartbeat/SAPHanaTopology
If no results are displayed, or you see different results, try reinstalling the resource-agents-sap-hana-scaleout package.
5.9. Configuring the SAPHanaTopology resource agent
At this point this guide assumes that following is true:
- SAP HANA is installed on all nodes and HANA system replication (HANA SR) works and is in synced mode - Checking SAP HANA System Replication state
- There is an pacemaker cluster running on all nodes and fencing of nodes was tested to work properly - Configure fencing
- AWS CLI is working on all nodes - Installing the AWS CLI
SAPHanaTopology resource gathers status and configuration of SAP HANA System Replication on each node. In addition, it starts and monitors the local SAP HostAgent which is required for starting, stopping, and monitoring the SAP HANA instances. It has the following attributes:
| Attribute Name | Required? | Default value | Description |
| SID | yes | null | The SAP System Identifier (SID) of the SAP HANA installation (must be identical for all nodes). Example: RH2 |
| InstanceNumber | yes | null | The Instance Number of the SAP HANA installation (must be identical for all nodes). Example: 02 |
Below is an example command to create the SAPHanaTopology cloned resource.
Note: the timeouts shown below for the resource operations are only examples and may need to be adjusted depending on the actual SAP HANA setup (for example large HANA databases can take longer to start up therefore the start timeout may have to be increased.)
| RHEL 7.6 and later | RHEL 8.0 and later |
pcs resource create rsc_SAPHanaTopology_RAS_HDB00 \ SAPHanaTopologyScaleOut \
|
pcs resource create rsc_SAPHanaTopology_RAS_HDB00 \ SAPHanaTopology \
|
Note: The clone-node-max parameter defines how many copies of the resource agent can be started on a single node. Interleave means that if this clone depends on another clone using an ordering constraint, it is allowed to start after the local instance of the other clone starts, rather than waiting for all instances of the other clone to start.
5.10. Configuring the SAPHanaController resource agent
After the configuration process for the SAPHanaTopology resource agent is complete, the SAPHanaController resource agent can be configured. While the SAPHanaTopology resource agent only collects data, the SAPHanaController resource agent controls the SAP environment based on the data previously collected. As shown in the following table, five important configuration parameters define the cluster functionality.
| Attribute Name | Required? | Default value | Description |
| SID | yes | null | The SAP System Identifier (SID) of the SAP HANA installation (must be identical for all nodes). Example: RH2 |
| InstanceNumber | yes | null | The InstanceNumber of the SAP HANA installation (must be identical for all nodes). Example: 02 |
| PREFER_SITE_TAKEOVER | no | null | Should resource agent prefer to switch over to the secondary instance instead of restarting primary locally? true: prefer takeover to the secondary site; false: prefer restart locally; never: under no circumstances initiate a takeover to the other node.
|
| AUTOMATED_REGISTER | no | false | If a takeover event has occurred, and the DUPLICATE_PRIMARY_TIMEOUT has expired, should the former primary instance be registered as secondary? ("false": no, manual intervention will be needed; "true": yes, the former primary will be registered by resource agent as secondary) [1] |
| DUPLICATE_PRIMARY_TIMEOUT | no | 7200 | The time difference (in seconds) needed between two primary timestamps, if a dual-primary situation occurs. If the time difference is less than the time gap, the cluster will hold one or both instances in a "WAITING" status. This is to give the system admin a chance to react to a takeover. After the time difference has passed, if AUTOMATED_REGISTER is set to true, the failed former primary will be registered as secondary. After the registration to the new primary, all data on the former primary will be overwritten by the system replication. |
[1] - As a best practice for testing and Proof of Concept (PoC) environments, it is recommended that you leave AUTOMATED_REGISTER at its default value (AUTOMATED_REGISTER="false") to prevent a failed primary instance automatically registering as a secondary instance. After testing, if the failover scenarios work as expected, particularly in a production environment, it is recommended that you set AUTOMATED_REGISTER="true" so that after a takeover, system replication will resume in a timely manner, avoiding disruption. When AUTOMATED_REGISTER="false" in case of a failure on the primary node, you must manually register it as the secondary HANA system replication node.
The following command is an example of how to create the SAPHanaController master/slave resource. The example is based on the parameters: SID RH1, InstanceNumber 10, the values true PREFER_SITE_TAKEOVER, AUTOMATED_REGISTER, and DUPLICATE_PRIMARY_TIMEOUT of 7200:
| RHEL 7.6 and later | RHEL 8.0 and later |
pcs resource create rsc_SAPHana_RAS_HDB00 \ SAPHanaController \
|
pcs resource create rsc_SAPHana_RAS_HDB00 \ SAPHanaController \
|
pcs resource master \
|
pcs resource promotable \
|
5.11. Configure the Overlay IP resource agent
On AWS, the virtual IP for IP failover is achieved by Overlay IP addresses. For details please refer to AWS documentation.
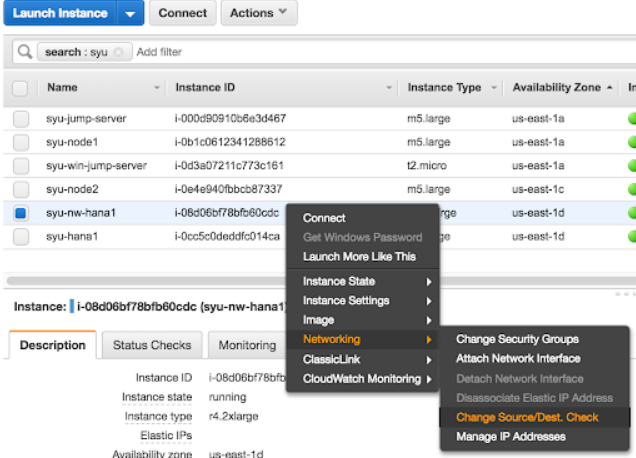
a) Disable “Source/Destination Check” on all SAP HANA nodes:
In AWS console, perform for ALL HANA nodes: in AWS EC2 console, right click the HANA node -> Networking -> Change Source/Des. Check -> In the pop up window, click Yes, Disable.
b) Create the Overlay IP in the AWS VPC routing table. On one of the SAP HANA nodes, run the the following commands:
# echo $(curl -s http://169.254.169.254/latest/meta-data/instance-id)
i-008d9dd73ca8d5ce5
# aws ec2 create-route --route-table-id rtb-9dd99ee2 --destination-cidr-block 192.168.200.201/32 --instance-id i-008d9dd73ca8d5ce5
c) Add the Overlay IP to the /etc/hosts on all SAP HANA instances and the majoritymaker node:
On every SAP HANA node, add the Overlay IP address to the /etc/hosts file with the respective virtual hostname.
d) Configure the Overlay IP address on the SAP HANA master node
On the SAP HANA master node add the Overlay IP using the ip command:
# ip address add 192.168.200.201 dev eth0
e) Add the Overlay IP to the cluster
# pcs resource create vpcip aws-vpc-move-ip ip=192.168.200.201 interface=eth0 routing_table=rtb-9dd99ee2
f) Test the failover of the Overlay IP resource
To ensure the Overlay IP agent is working correctly test it and try to failover it to a different node:
# pcs resource move vpcip
# pcs resource clear vpcip
5.12. Configure cluster constraints
For correct operation we need to ensure that SAPHanaTopology resources are started before starting the SAPHanaController resources and also that the Overlay IP address is present on the node where the Master resource of SAPHanaController is running. To achieve this, the following 2 constraints need to be created.
5.12.1. Constraint - start SAPHanaTopology before SAPHanaController
| RHEL 7.6 and later | RHEL 8.0 and later |
pcs constraint order
|
pcs constraint order start rsc_SAPHanaTopology_RAS_HDB00-clone then start rsc_SAPHana_RAS_HDB00-clone
|
5.12.2. Constraint - colocate aws-vpc-move-ip resource with Primary of SAPHanaController resource
Below is an example command that will colocate the aws-vpc-move-ip resource with SAPHanaController resource that was promoted as Master.
| RHEL 7.6 and later | RHEL 8.0 and later |
| pcs constraint colocation add
vpcip with master msl_rsc_SAPHana_RH1_HDB10 |
pcs constraint colocation add
|
Note that the constraint is using a score of 2000 instead of the default INFINITY. This allows the aws-vpc-move-ip resource to be taken down by the cluster in case there is no Master promoted in the SAPHana resource so it is still possible to use this address with tools like SAP Management Console or SAP LVM that can use this address to query the status information about the SAP Instance.
5.12.3. Constraint - avoid SAPHana and IP Resources from running in the majoritymaker node
| RHEL 7.6 and later | RHEL 8.0 and later |
pcs constraint location
|
pcs constraint location
|
pcs constraint location
|
pcs constraint location
|
pcs constraint location vpcip avoids majoritymaker
|
pcs constraint location vpcip avoids majoritymaker
|
5.12.4. Constraints - final configuration
The resulting constraint should look like one in the example below.
[root]# pcs constraint
Location Constraints:
  Resource: rsc_SAPHanaTopology_HDB_HDB00-clone
    Disabled on: mmnode (score:-INFINITY)
  Resource: rsc_SAPHana_HDB_HDB00-clone
    Disabled on: mmnode (score:-INFINITY)
  Resource: vpcip
    Disabled on: mmnode (score:-INFINITY)
    Constraint: location-vpcip
    Rule: boolean-op=and score=INFINITY
        Expression: hana_hdb_clone_state eq PROMOTED
        Expression: hana_hdb_roles eq master1:master:worker:master
Ordering Constraints:
  start rsc_SAPHanaTopology_HDB_HDB00-clone then start rsc_SAPHana_HDB_HDB00-clone (kind:Mandatory)
  promote rsc_SAPHana_HDB_HDB00-clone then start vpcip (score:2000)
Colocation Constraints:
Ticket Constraints:
5.13. Final Cluster Configuration
To complete the cluster configuration the cluster needs to be removed from maintenance mode:
pcs property set maintenance-mode=false
After removing the cluster from maintenance mode it may take a few minutes until the cluster learns about the SAP HANA topologyand refreshes its correct status.
You can verify the cluster environment is working correctly by running the following three commands:
pcs status- provides an overview of every resource and if they are functioning
correctly.pcs status --full- provides an overview of all resources and additional attribute
information of the cluster environment.pcs resource- will list all the resources which need to be enabled. This can be done withpcs resource enable <resourcename>SAPHanaSR-showAttr --sid=RH1- provides a readable overview that is based on the attribute information.
5.14. Cluster Testing
5.14.1. Test failover of SAPHana Resource
There are several ways to simulate a failure to test the proper functionality of a cluster. You can for example Stop the master node in the AWS EC2 console, or simulate a crash and panic the master node with sysrq-trigger:
[root]# echo c > /proc/sysrq-trigger
Terminate the HANA instance on the master node by running the command:
[rh2adm]# HDB kill-9
Please note that when stopping the HANA DB instance by running the HDB kill-9 command, it is expected to see the cluster's HANA resource monitor operation(s) fail. This is because the resource agents use SAP HANA commands to monitor the status of the HANA instances, and if the processes of the HANA instance are killed, then those SAP HANA commands won't work anymore and therefore the monitor will fail.
6. Monitoring and Troubleshooting
6.1. Filesystem
The most important part is space on local and shared disks. You can use df to check:
- If there is enough empty space
- If the local/external filesystem is mounted
6.2. HANA
A full filesystem is very often a reason why HANA is not working properly anymore.
Run the following commands to check if HANA is running:
sidadm# sapcontrol -nr 00 -function GetProcessList #on all HANA nodessidadm# python systemReplicationStatus #on master nodesidadm# hdbnsutil -sr_state #list system replication state, on master all the clients
6.3. Cluster
Run the following commands to check the cluster:
root# crm_mon -1Arf# Provides an overviewroot# pcs resource #Lists all resources and shows if they are runningroot# pcs constraint --full #Lists all constraint ids which should be removedroot# pcs status --fullroot# pcs node attribute #Lists node attributesroot# SAPHanaSR-monitor
6.4. AWS
root# aws --version #Checks ifawscliis installedroot# aws ec2 describe-instances --output table --query 'Reservations[*].Instances[*].[InstanceId,Tags[?Key==Name].Value]'root# aws ec2 describe-instances --output=table # list ec2 instancesroot# aws ec2 describe-availability-zonesroot# aws ec2 describe-volume-statusroot# aws efs describe-file-systems
7. Additional Resources
- Support Policies for RHEL High Availability Clusters - Management of SAP HANA in a Cluster
- Support Policies for RHEL High Availability Clusters - Amazon Web Services (AWS) EC2 Instances as Cluster Members
- SAP Note 2009879 - SAP HANA Guidelines for RedHat Enterprise Linux (RHEL)
- Red Hat Enterprise Linux HA Solution for SAP HANA Scale Out and System Replication
- SAP HANA Quick Start Guide, Planning the Deployment
- How do I create and activate a new AWS account?
- What is Amazon VPC? - Amazon Virtual Private Cloud
- AWS Instance Types for SAP HANA - SAP HANA on AWS
- Red Hat Enterprise Linux for SAP offerings on Amazon Web Services FAQ
- How to Locate Red Hat Cloud Access Gold Images on AWS EC2
More information about SAP HANA Scale-Up:
Comments