
Using Ansible to install and manage Identity Management
Using Ansible to maintain an IdM environment
Abstract
ansible-freeipa package to enable administrators to run Red Hat Identity Management (IdM) by using Ansible. You can use playbooks to install IdM and manage users, groups, hosts, access control, and configuration settings.
Making open source more inclusive
Red Hat is committed to replacing problematic language in our code, documentation, and web properties. We are beginning with these four terms: master, slave, blacklist, and whitelist. Because of the enormity of this endeavor, these changes will be implemented gradually over several upcoming releases. For more details, see our CTO Chris Wright’s message.
In Identity Management, planned terminology replacements include:
- block list replaces blacklist
- allow list replaces whitelist
- secondary replaces slave
The word master is being replaced with more precise language, depending on the context:
- IdM server replaces IdM master
- CA renewal server replaces CA renewal master
- CRL publisher server replaces CRL master
- multi-supplier replaces multi-master
Providing feedback on Red Hat documentation
We appreciate your feedback on our documentation. Let us know how we can improve it.
Submitting feedback through Jira (account required)
- Log in to the Jira website.
- Click Create in the top navigation bar.
- Enter a descriptive title in the Summary field.
- Enter your suggestion for improvement in the Description field. Include links to the relevant parts of the documentation.
- Click Create at the bottom of the dialogue.
Chapter 1. Ansible terminology
The chapters in this title use the official Ansible terminology. If you are not familiar with the terminology, read the official Ansible upstream documentation before proceeding, especially the following sections:
- The Basic concepts in Ansible section provides an overview of the most commonly used concepts in Ansible.
- The User guide outlines the most common situations and questions when starting to use Ansible, such as using the command line; working with an inventory; interacting with data; writing tasks, plays, and playbooks; and executing playbooks.
- How to build your inventory offers tips on how to design your inventory. An inventory is a list or a group of lists that Ansible uses to work against multiple managed nodes or hosts in your infrastructure.
- Intro to playbooks introduces the concept of an Ansible playbook as a repeatable and re-usable system for managing configurations, deploying machines, and deploying complex applications.
- The Ansible roles section explains how to automate loading variables, tasks, and handlers based on a known file structure.
- The Glossary explains terms that are used elsewhere in the Ansible documentation.
Chapter 2. Installing an Identity Management server using an Ansible playbook
Learn more about how to configure a system as an IdM server by using Ansible. Configuring a system as an IdM server establishes an IdM domain and enables the system to offer IdM services to IdM clients. You can manage the deployment by using the ipaserver Ansible role.
Prerequisites
You understand Ansible and IdM concepts:
- Ansible roles
- Ansible nodes
- Ansible inventory
- Ansible tasks
- Ansible modules
- Ansible plays and playbooks
2.1. Ansible and its advantages for installing IdM
Ansible is an automation tool used to configure systems, deploy software, and perform rolling updates. Ansible includes support for Identity Management (IdM), and you can use Ansible modules to automate installation tasks such as the setup of an IdM server, replica, client, or an entire IdM topology.
Advantages of using Ansible to install IdM
The following list presents advantages of installing Identity Management using Ansible in contrast to manual installation.
- You do not need to log into the managed node.
- You do not need to configure settings on each host to be deployed individually. Instead, you can have one inventory file to deploy a complete cluster.
- You can reuse an inventory file later for management tasks, for example to add users and hosts. You can reuse an inventory file even for such tasks as are not related to IdM.
2.2. Installing the ansible-freeipa package
Follow this procedure to install the ansible-freeipa package that provides Ansible roles and modules for installing and managing Identity Management (IdM) .
Prerequisites
On the managed node:
- Ensure that the managed node is a Red Hat Enterprise Linux 8 system with a static IP address and a working package manager.
On the controller:
- Ensure that the controller is a Red Hat Enterprise Linux system with a valid subscription. If this is not the case, see the official Ansible documentation Installation guide for alternative installation instructions.
-
Ensure that you can reach the managed node over the
SSHprotocol from the controller. Check that the managed node is listed in the/root/.ssh/known_hostsfile of the controller.
Procedure
Use the following procedure on the Ansible controller.
If your system is running on RHEL 8.5 and earlier, enable the required repository:
# subscription-manager repos --enable ansible-2.8-for-rhel-8-x86_64-rpmsIf your system is running on RHEL 8.5 and earlier, install the
ansiblepackage:# yum install ansibleInstall the
ansible-freeipapackage:# yum install ansible-freeipaThe roles and modules are installed into the
/usr/share/ansible/roles/and/usr/share/ansible/plugins/modulesdirectories.
2.3. Ansible roles location in the file system
By default, the ansible-freeipa roles are installed to the /usr/share/ansible/roles/ directory. The structure of the ansible-freeipa package is as follows:
The
/usr/share/ansible/roles/directory stores theipaserver,ipareplica, andipaclientroles on the Ansible controller. Each role directory stores examples, a basic overview, the license and documentation about the role in aREADME.mdMarkdown file.[root@server]# ls -1 /usr/share/ansible/roles/ ipaclient ipareplica ipaserverThe
/usr/share/doc/ansible-freeipa/directory stores the documentation about individual roles and the topology inREADME.mdMarkdown files. It also stores theplaybooks/subdirectory.[root@server]# ls -1 /usr/share/doc/ansible-freeipa/ playbooks README-client.md README.md README-replica.md README-server.md README-topology.mdThe
/usr/share/doc/ansible-freeipa/playbooks/directory stores the example playbooks:[root@server]# ls -1 /usr/share/doc/ansible-freeipa/playbooks/ install-client.yml install-cluster.yml install-replica.yml install-server.yml uninstall-client.yml uninstall-cluster.yml uninstall-replica.yml uninstall-server.yml
2.4. Setting the parameters for a deployment with an integrated DNS and an integrated CA as the root CA
Complete this procedure to configure the inventory file for installing an IdM server with an integrated CA as the root CA in an environment that uses the IdM integrated DNS solution.
The inventory in this procedure uses the INI format. You can, alternatively, use the YAML or JSON formats.
Procedure
Create a
~/MyPlaybooks/directory:$ mkdir MyPlaybooks
-
Create a
~/MyPlaybooks/inventoryfile. Open the inventory file for editing. Specify the fully-qualified domain names (
FQDN) of the host you want to use as an IdM server. Ensure that theFQDNmeets the following criteria:- Only alphanumeric characters and hyphens (-) are allowed. For example, underscores are not allowed and can cause DNS failures.
- The host name must be all lower-case.
- Specify the IdM domain and realm information.
Specify that you want to use integrated DNS by adding the following option:
ipaserver_setup_dns=yesSpecify the DNS forwarding settings. Choose one of the following options:
-
Use the
ipaserver_auto_forwarders=yesoption if you want the installer to use forwarders from the/etc/resolv.conffile. Do not use this option if the nameserver specified in the/etc/resolv.conffile is the localhost 127.0.0.1 address or if you are on a virtual private network and the DNS servers you are using are normally unreachable from the public internet. -
Use the
ipaserver_forwardersoption to specify your forwarders manually. The installation process adds the forwarder IP addresses to the/etc/named.conffile on the installed IdM server. Use the
ipaserver_no_forwarders=yesoption to configure root DNS servers to be used instead.NoteWith no DNS forwarders, your environment is isolated, and names from other DNS domains in your infrastructure are not resolved.
-
Use the
Specify the DNS reverse record and zone settings. Choose from the following options:
-
Use the
ipaserver_allow_zone_overlap=yesoption to allow the creation of a (reverse) zone even if the zone is already resolvable. -
Use the
ipaserver_reverse_zonesoption to specify your reverse zones manually. Use the
ipaserver_no_reverse=yesoption if you do not want the installer to create a reverse DNS zone.NoteUsing IdM to manage reverse zones is optional. You can use an external DNS service for this purpose instead.
-
Use the
-
Specify the passwords for
adminand for theDirectory Manager. Use the Ansible Vault to store the password, and reference the Vault file from the playbook file. Alternatively and less securely, specify the passwords directly in the inventory file. (Optional) Specify a custom
firewalldzone to be used by the IdM server. If you do not set a custom zone, IdM will add its services to the defaultfirewalldzone. The predefined default zone ispublic.ImportantThe specified
firewalldzone must exist and be permanent.Example of an inventory file with the required server information (excluding the passwords)
[ipaserver]
server.idm.example.com

[ipaserver:vars]
ipaserver_domain=idm.example.com
ipaserver_realm=IDM.EXAMPLE.COM
ipaserver_setup_dns=yes
ipaserver_auto_forwarders=yes
[...]
Example of an inventory file with the required server information (including the passwords)
[ipaserver]
server.idm.example.com

[ipaserver:vars]
ipaserver_domain=idm.example.com
ipaserver_realm=IDM.EXAMPLE.COM
ipaserver_setup_dns=yes
ipaserver_auto_forwarders=yes
ipaadmin_password=MySecretPassword123
ipadm_password=MySecretPassword234

[...]
Example of an inventory file with a custom
firewalldzone[ipaserver] server.idm.example.com [ipaserver:vars] ipaserver_domain=idm.example.com ipaserver_realm=IDM.EXAMPLE.COM ipaserver_setup_dns=yes ipaserver_auto_forwarders=yes ipaadmin_password=MySecretPassword123 ipadm_password=MySecretPassword234 ipaserver_firewalld_zone=custom zoneExample playbook to set up an IdM server using admin and Directory Manager passwords stored in an Ansible Vault file
---
- name: Playbook to configure IPA server
  hosts: ipaserver
  become: true
  vars_files:
  - playbook_sensitive_data.yml

  roles:
  - role: ipaserver
    state: present
Example playbook to set up an IdM server using admin and Directory Manager passwords from an inventory file
---
- name: Playbook to configure IPA server
  hosts: ipaserver
  become: true

  roles:
  - role: ipaserver
    state: present
Additional resources
-
For the forwarding policy default settings, see the
--forward-policydescription in theipa-dns-install(1)man page. -
For more information about DNS variables used by the
ipaserverrole, see the DNS Variables section in theREADME-server.mdfile in the/usr/share/doc/ansible-freeipadirectory. - For more information on inventory files, see How to build your inventory.
2.5. Setting the parameters for a deployment with external DNS and an integrated CA as the root CA
Complete this procedure to configure the inventory file for installing an IdM server with an integrated CA as the root CA in an environment that uses an external DNS solution.
The inventory file in this procedure uses the INI format. You can, alternatively, use the YAML or JSON formats.
Procedure
Create a
~/MyPlaybooks/directory:$ mkdir MyPlaybooks
-
Create a
~/MyPlaybooks/inventoryfile. Open the inventory file for editing. Specify the fully-qualified domain names (
FQDN) of the host you want to use as an IdM server. Ensure that theFQDNmeets the following criteria:- Only alphanumeric characters and hyphens (-) are allowed. For example, underscores are not allowed and can cause DNS failures.
- The host name must be all lower-case.
- Specify the IdM domain and realm information.
-
Make sure that the
ipaserver_setup_dnsoption is set tonoor that it is absent. -
Specify the passwords for
adminand for theDirectory Manager. Use the Ansible Vault to store the password, and reference the Vault file from the playbook file. Alternatively and less securely, specify the passwords directly in the inventory file. (Optional) Specify a custom
firewalldzone to be used by the IdM server. If you do not set a custom zone, IdM will add its services to the defaultfirewalldzone. The predefined default zone ispublic.ImportantThe specified
firewalldzone must exist and be permanent.Example of an inventory file with the required server information (excluding the passwords)
[ipaserver]
server.idm.example.com

[ipaserver:vars]
ipaserver_domain=idm.example.com
ipaserver_realm=IDM.EXAMPLE.COM
ipaserver_setup_dns=no
[...]
Example of an inventory file with the required server information (including the passwords)
[ipaserver]
server.idm.example.com

[ipaserver:vars]
ipaserver_domain=idm.example.com
ipaserver_realm=IDM.EXAMPLE.COM
ipaserver_setup_dns=no
ipaadmin_password=MySecretPassword123
ipadm_password=MySecretPassword234

[...]
Example of an inventory file with a custom
firewalldzone[ipaserver] server.idm.example.com [ipaserver:vars] ipaserver_domain=idm.example.com ipaserver_realm=IDM.EXAMPLE.COM ipaserver_setup_dns=no ipaadmin_password=MySecretPassword123 ipadm_password=MySecretPassword234 ipaserver_firewalld_zone=custom zoneExample playbook to set up an IdM server using admin and Directory Manager passwords stored in an Ansible Vault file
---
- name: Playbook to configure IPA server
  hosts: ipaserver
  become: true
  vars_files:
  - playbook_sensitive_data.yml

  roles:
  - role: ipaserver
    state: present
Example playbook to set up an IdM server using admin and Directory Manager passwords from an inventory file
---
- name: Playbook to configure IPA server
  hosts: ipaserver
  become: true

  roles:
  - role: ipaserver
    state: present
Additional resources
- For more information on inventory files, see How to build your inventory.
2.6. Deploying an IdM server with an integrated CA as the root CA using an Ansible playbook
Complete this procedure to deploy an IdM server with an integrated certificate authority (CA) as the root CA using an Ansible playbook.
The inventory in this procedure uses the INI format. You can, alternatively, use the YAML or JSON formats.
Prerequisites
You have set the parameters that correspond to your scenario by choosing one of the following procedures:
-
You have read and understood the variables you can use with the
ipaserverrole as described in the/usr/share/doc/ansible-freeipa/README-server.mdfile.
Procedure
Run the
ansible-playbookcommand with the name of the playbook file, for exampleinstall-server.yml. Specify the inventory file with the-ioption:$ ansible-playbook --vault-password-file=password_file -v -i ~/MyPlaybooks/inventory ~/MyPlaybooks/install-server.ymlSpecify the level of verbosity by using the
-v,-vv, or-vvvoption.You can view the output of the Ansible playbook script on the command-line interface (CLI). The following output shows that the script has run successfully as 0 tasks have failed:
PLAY RECAP
server.idm.example.com : ok=18   changed=10   unreachable=0    failed=0    skipped=21   rescued=0    ignored=0
Choose one of the following options:
If your IdM deployment uses external DNS: add the DNS resource records contained in the
/tmp/ipa.system.records.UFRPto.dbfile to the existing external DNS servers. The process of updating the DNS records varies depending on the particular DNS solution.... Restarting the KDC Please add records in this file to your DNS system: /tmp/ipa.system.records.UFRBto.db Restarting the web server ...
ImportantThe server installation is not complete until you add the DNS records to the existing DNS servers.
If your IdM deployment uses integrated DNS:
Add DNS delegation from the parent domain to the IdM DNS domain. For example, if the IdM DNS domain is
idm.example.com, add a name server (NS) record to theexample.comparent domain.ImportantRepeat this step each time after an IdM DNS server is installed.
-
Add an
_ntp._udpservice (SRV) record for your time server to your IdM DNS. The presence of the SRV record for the time server of the newly-installed IdM server in IdM DNS ensures that future replica and client installations are automatically configured to synchronize with the time server used by this primary IdM server.
Additional resources
- For instruction on how to deploy an IdM server with an external CA as the root CA, see Deploying an IdM server with an external CA as the root CA using an Ansible playbook
2.7. Setting the parameters for a deployment with an integrated DNS and an external CA as the root CA
Complete this procedure to configure the inventory file for installing an IdM server with an external CA as the root CA in an environment that uses the IdM integrated DNS solution.
The inventory file in this procedure uses the INI format. You can, alternatively, use the YAML or JSON formats.
Procedure
Create a
~/MyPlaybooks/directory:$ mkdir MyPlaybooks
-
Create a
~/MyPlaybooks/inventoryfile. Open the inventory file for editing. Specify the fully-qualified domain names (
FQDN) of the host you want to use as an IdM server. Ensure that theFQDNmeets the following criteria:- Only alphanumeric characters and hyphens (-) are allowed. For example, underscores are not allowed and can cause DNS failures.
- The host name must be all lower-case.
- Specify the IdM domain and realm information.
Specify that you want to use integrated DNS by adding the following option:
ipaserver_setup_dns=yesSpecify the DNS forwarding settings. Choose one of the following options:
-
Use the
ipaserver_auto_forwarders=yesoption if you want the installation process to use forwarders from the/etc/resolv.conffile. This option is not recommended if the nameserver specified in the/etc/resolv.conffile is the localhost 127.0.0.1 address or if you are on a virtual private network and the DNS servers you are using are normally unreachable from the public internet. -
Use the
ipaserver_forwardersoption to specify your forwarders manually. The installation process adds the forwarder IP addresses to the/etc/named.conffile on the installed IdM server. Use the
ipaserver_no_forwarders=yesoption to configure root DNS servers to be used instead.NoteWith no DNS forwarders, your environment is isolated, and names from other DNS domains in your infrastructure are not resolved.
-
Use the
Specify the DNS reverse record and zone settings. Choose from the following options:
-
Use the
ipaserver_allow_zone_overlap=yesoption to allow the creation of a (reverse) zone even if the zone is already resolvable. -
Use the
ipaserver_reverse_zonesoption to specify your reverse zones manually. Use the
ipaserver_no_reverse=yesoption if you do not want the installation process to create a reverse DNS zone.NoteUsing IdM to manage reverse zones is optional. You can use an external DNS service for this purpose instead.
-
Use the
-
Specify the passwords for
adminand for theDirectory Manager. Use the Ansible Vault to store the password, and reference the Vault file from the playbook file. Alternatively and less securely, specify the passwords directly in the inventory file. (Optional) Specify a custom
firewalldzone to be used by the IdM server. If you do not set a custom zone, IdM adds its services to the defaultfirewalldzone. The predefined default zone ispublic.ImportantThe specified
firewalldzone must exist and be permanent.Example of an inventory file with the required server information (excluding the passwords)
[ipaserver]
server.idm.example.com

[ipaserver:vars]
ipaserver_domain=idm.example.com
ipaserver_realm=IDM.EXAMPLE.COM
ipaserver_setup_dns=yes
ipaserver_auto_forwarders=yes
[...]
Example of an inventory file with the required server information (including the passwords)
[ipaserver]
server.idm.example.com

[ipaserver:vars]
ipaserver_domain=idm.example.com
ipaserver_realm=IDM.EXAMPLE.COM
ipaserver_setup_dns=yes
ipaserver_auto_forwarders=yes
ipaadmin_password=MySecretPassword123
ipadm_password=MySecretPassword234

[...]
Example of an inventory file with a custom
firewalldzone[ipaserver] server.idm.example.com [ipaserver:vars] ipaserver_domain=idm.example.com ipaserver_realm=IDM.EXAMPLE.COM ipaserver_setup_dns=yes ipaserver_auto_forwarders=yes ipaadmin_password=MySecretPassword123 ipadm_password=MySecretPassword234 ipaserver_firewalld_zone=custom zone [...]Create a playbook for the first step of the installation. Enter instructions for generating the certificate signing request (CSR) and copying it from the controller to the managed node.
---
- name: Playbook to configure IPA server Step 1
  hosts: ipaserver
  become: true
  vars_files:
  - playbook_sensitive_data.yml
  vars:
    ipaserver_external_ca: yes

  roles:
  - role: ipaserver
    state: present

  post_tasks:
  - name: Copy CSR /root/ipa.csr from node to "{{ groups.ipaserver[0] + '-ipa.csr' }}"
    fetch:
      src: /root/ipa.csr
      dest: "{{ groups.ipaserver[0] + '-ipa.csr' }}"
      flat: yes
Create another playbook for the final step of the installation.
---
- name: Playbook to configure IPA server Step 2
  hosts: ipaserver
  become: true
  vars_files:
  - playbook_sensitive_data.yml
  vars:
    ipaserver_external_cert_files: "/root/chain.crt"

  pre_tasks:
  - name: Copy "{{ groups.ipaserver[0] + '-chain.crt' }}" to /root/chain.crt on node
    copy:
      src: "{{ groups.ipaserver[0] + '-chain.crt' }}"
      dest: "/root/chain.crt"
      force: yes

  roles:
  - role: ipaserver
    state: present
Additional resources
-
For the forwarding policy default settings, see the
--forward-policydescription in theipa-dns-install(1)man page. -
For more information about DNS variables used by the
ipaserverrole, see the DNS Variables section in theREADME-server.mdfile in the/usr/share/doc/ansible-freeipadirectory. - For more information on inventory files, see How to build your inventory.
2.8. Setting the parameters for a deployment with external DNS and an external CA as the root CA
Complete this procedure to configure the inventory file for installing an IdM server with an external CA as the root CA in an environment that uses an external DNS solution.
The inventory file in this procedure uses the INI format. You can, alternatively, use the YAML or JSON formats.
Procedure
Create a
~/MyPlaybooks/directory:$ mkdir MyPlaybooks
-
Create a
~/MyPlaybooks/inventoryfile. Open the inventory file for editing. Specify the fully-qualified domain names (
FQDN) of the host you want to use as an IdM server. Ensure that theFQDNmeets the following criteria:- Only alphanumeric characters and hyphens (-) are allowed. For example, underscores are not allowed and can cause DNS failures.
- The host name must be all lower-case.
- Specify the IdM domain and realm information.
-
Make sure that the
ipaserver_setup_dnsoption is set tonoor that it is absent. -
Specify the passwords for
adminand for theDirectory Manager. Use the Ansible Vault to store the password, and reference the Vault file from the playbook file. Alternatively and less securely, specify the passwords directly in the inventory file. (Optional) Specify a custom
firewalldzone to be used by the IdM server. If you do not set a custom zone, IdM will add its services to the defaultfirewalldzone. The predefined default zone ispublic.ImportantThe specified
firewalldzone must exist and be permanent.Example of an inventory file with the required server information (excluding the passwords)
[ipaserver]
server.idm.example.com

[ipaserver:vars]
ipaserver_domain=idm.example.com
ipaserver_realm=IDM.EXAMPLE.COM
ipaserver_setup_dns=no
[...]
Example of an inventory file with the required server information (including the passwords)
[ipaserver]
server.idm.example.com

[ipaserver:vars]
ipaserver_domain=idm.example.com
ipaserver_realm=IDM.EXAMPLE.COM
ipaserver_setup_dns=no
ipaadmin_password=MySecretPassword123
ipadm_password=MySecretPassword234

[...]
Example of an inventory file with a custom
firewalldzone[ipaserver] server.idm.example.com [ipaserver:vars] ipaserver_domain=idm.example.com ipaserver_realm=IDM.EXAMPLE.COM ipaserver_setup_dns=no ipaadmin_password=MySecretPassword123 ipadm_password=MySecretPassword234 ipaserver_firewalld_zone=custom zone [...]Create a playbook for the first step of the installation. Enter instructions for generating the certificate signing request (CSR) and copying it from the controller to the managed node.
---
- name: Playbook to configure IPA server Step 1
  hosts: ipaserver
  become: true
  vars_files:
  - playbook_sensitive_data.yml
  vars:
    ipaserver_external_ca: yes

  roles:
  - role: ipaserver
    state: present

  post_tasks:
  - name: Copy CSR /root/ipa.csr from node to "{{ groups.ipaserver[0] + '-ipa.csr' }}"
    fetch:
      src: /root/ipa.csr
      dest: "{{ groups.ipaserver[0] + '-ipa.csr' }}"
      flat: yes
Create another playbook for the final step of the installation.
---
- name: Playbook to configure IPA server Step 2
  hosts: ipaserver
  become: true
  vars_files:
  - playbook_sensitive_data.yml
  vars:
    ipaserver_external_cert_files: "/root/chain.crt"

  pre_tasks:
  - name: Copy "{{ groups.ipaserver[0] + '-chain.crt' }}" to /root/chain.crt on node
    copy:
      src: "{{ groups.ipaserver[0] + '-chain.crt' }}"
      dest: "/root/chain.crt"
      force: yes

  roles:
  - role: ipaserver
    state: present
Additional resources
- For details on the options available to you when installing an IdM server with external DNS and an externally signed CA, see Installing an IdM server: Without integrated DNS, with an external CA as the root CA.
- For more information on inventory files, see How to build your inventory.
2.9. Deploying an IdM server with an external CA as the root CA using an Ansible playbook
Complete this procedure to deploy an IdM server with an external certificate authority (CA) as the root CA using an Ansible playbook.
The inventory file in this procedure uses the INI format. You can, alternatively, use the YAML or JSON formats.
Prerequisites
You have set the parameters that correspond to your scenario by choosing one of the following procedures:
-
You have read and understood the variables you can use with the
ipaserverrole as described in the/usr/share/doc/ansible-freeipa/README-server.mdfile.
Procedure
Run the
ansible-playbookcommand with the name of the playbook file that contains instructions for the first step of the installation, for exampleinstall-server-step1.yml. Specify the inventory file with the-ioption:$ ansible-playbook --vault-password-file=password_file -v -i ~/MyPlaybooks/inventory ~/MyPlaybooks/install-server-step1.ymlSpecify the level of verbosity by using the
-v,-vvor-vvvoption.You can view the output of the Ansible playbook script on the command-line interface (CLI). The following output shows that the script has run successfully as 0 tasks have failed:
PLAY RECAP server.idm.example.com : ok=18 changed=10 unreachable=0 failed=0 skipped=21 rescued=0 ignored=0-
Locate the
ipa.csrcertificate signing request file on the controller and submit it to the external CA. - Place the IdM CA certificate signed by the external CA in the controller file system so that the playbook in the next step can find it.
Run the
ansible-playbookcommand with the name of the playbook file that contains instructions for the final step of the installation, for exampleinstall-server-step2.yml. Specify the inventory file with the-ioption:$ ansible-playbook -v -i ~/MyPlaybooks/inventory ~/MyPlaybooks/install-server-step2.ymlChoose one of the following options:
If your IdM deployment uses external DNS: add the DNS resource records contained in the
/tmp/ipa.system.records.UFRPto.dbfile to the existing external DNS servers. The process of updating the DNS records varies depending on the particular DNS solution.... Restarting the KDC Please add records in this file to your DNS system: /tmp/ipa.system.records.UFRBto.db Restarting the web server ...
ImportantThe server installation is not complete until you add the DNS records to the existing DNS servers.
If your IdM deployment uses integrated DNS:
Add DNS delegation from the parent domain to the IdM DNS domain. For example, if the IdM DNS domain is
idm.example.com, add a name server (NS) record to theexample.comparent domain.ImportantRepeat this step each time after an IdM DNS server is installed.
-
Add an
_ntp._udpservice (SRV) record for your time server to your IdM DNS. The presence of the SRV record for the time server of the newly-installed IdM server in IdM DNS ensures that future replica and client installations are automatically configured to synchronize with the time server used by this primary IdM server.
Additional resources
For instruction on how to deploy an IdM server with an integrated CA as the root CA, see Deploying an IdM server with an integrated CA as the root CA using an Ansible playbook
2.10. Uninstalling an IdM server using an Ansible playbook
In an existing Identity Management (IdM) deployment, replica and server are interchangeable terms.
Complete this procedure to uninstall an IdM replica using an Ansible playbook. In this example:
- IdM configuration is uninstalled from server123.idm.example.com.
- server123.idm.example.com and the associated host entry are removed from the IdM topology.
Prerequisites
On the control node:
- You are using Ansible version 2.14 or later.
-
You have installed the
ansible-freeipapackage. - You have created an Ansible inventory file with the fully-qualified domain name (FQDN) of the IdM server in the ~/MyPlaybooks/ directory. In this example, the FQDN is server123.idm.example.com.
-
You have stored your
ipaadmin_passwordin the secret.yml Ansible vault. -
For the
ipaserver_remove_from_topologyoption to work, the system must be running on RHEL 8.9 or later.
On the managed node:
- The system is running on RHEL 7.6 or later.
Procedure
Create your Ansible playbook file uninstall-server.yml with the following content:
---
- name: Playbook to uninstall an IdM replica
  hosts: ipaserver
  become: true

  roles:
  - role: ipaserver
    ipaserver_remove_from_domain: true
    state: absent
The
ipaserver_remove_from_domainoption unenrolls the host from the IdM topology.NoteIf the removal of server123.idm.example.com should lead to a disconnected topology, the removal will be aborted. For more information, see Using an Ansible playbook to uninstall an IdM server even if this leads to a disconnected topology.
Uninstall the replica:
$ ansible-playbook --vault-password-file=password_file -v -i <path_to_inventory_directory>/hosts <path_to_playbooks_directory>/uninstall-server.yml- Ensure that all name server (NS) DNS records pointing to server123.idm.example.com are deleted from your DNS zones. This applies regardless of whether you use integrated DNS managed by IdM or external DNS. For more information on how to delete DNS records from IdM, see Deleting DNS records in the IdM CLI.
2.11. Using an Ansible playbook to uninstall an IdM server even if this leads to a disconnected topology
In an existing Identity Management (IdM) deployment, replica and server are interchangeable terms.
Complete this procedure to uninstall an IdM replica using an Ansible playbook even if this results in a disconnected IdM topology. In the example, server456.idm.example.com is used to remove the replica and the associated host entry with the FQDN of server123.idm.example.com from the topology, leaving certain replicas disconnected from server456.idm.example.com and the rest of the topology.
If removing a replica from the topology using only the remove_server_from_domain does not result in a disconnected topology, no other options are required. If the result is a disconnected topology, you must specify which part of the domain you want to preserve. In that case, you must do the following:
-
Specify the
ipaserver_remove_on_servervalue. -
Set
ipaserver_ignore_topology_disconnectto True.
Prerequisites
On the control node:
- You are using Ansible version 2.14 or later.
- The system is running on RHEL 8.9 or later.
-
You have installed the
ansible-freeipapackage. - You have created an Ansible inventory file with the fully-qualified domain name (FQDN) of the IdM server in the ~/MyPlaybooks/ directory. In this example, the FQDN is server123.idm.example.com.
-
You have stored your
ipaadmin_passwordin the secret.yml Ansible vault.
On the managed node:
- The system is running on RHEL 7.6 or later.
Procedure
Create your Ansible playbook file uninstall-server.yml with the following content:
--- - name: Playbook to uninstall an IdM replica hosts: ipaserver become: true roles: - role: ipaserver ipaserver_remove_from_domain: true ipaserver_remove_on_server: server456.idm.example.com ipaserver_ignore_topology_disconnect: true state: absentNoteUnder normal circumstances, if the removal of server123 does not result in a disconnected topology: if the value for
ipaserver_remove_on_serveris not set, the replica on which server123 is removed is automatically determined using the replication agreements of server123.Uninstall the replica:
$ ansible-playbook --vault-password-file=password_file -v -i <path_to_inventory_directory>/hosts <path_to_playbooks_directory>/uninstall-server.yml- Ensure that all name server (NS) DNS records pointing to server123.idm.example.com are deleted from your DNS zones. This applies regardless of whether you use integrated DNS managed by IdM or external DNS. For more information on how to delete DNS records from IdM, see Deleting DNS records in the IdM CLI.
2.12. Additional resources
- Planning the replica topology
- Backing up and restoring IdM servers using Ansible playbooks
- Inventory basics: formats, hosts, and groups
-
You can see sample Ansible playbooks for installing an IdM server and a list of possible variables in the
ansible-freeipaupstream documentation.
Chapter 3. Installing an Identity Management replica using an Ansible playbook
Configuring a system as an IdM replica by using Ansible enrolls it into an IdM domain and enables the system to use IdM services on IdM servers in the domain.
The deployment is managed by the ipareplica Ansible role. The role can use the autodiscovery mode for identifying the IdM servers, domain and other settings. However, if you deploy multiple replicas in a tier-like model, with different groups of replicas being deployed at different times, you must defined specific servers or replicas for each group.
Prerequisites
- You have installed the ansible-freeipa package on the Ansible control node.
You understand Ansible and IdM concepts:
- Ansible roles
- Ansible nodes
- Ansible inventory
- Ansible tasks
- Ansible modules
- Ansible plays and playbooks
Additional resources
3.1. Specifying the base, server and client variables for installing the IdM replica
Complete this procedure to configure the inventory file for installing an IdM replica.
Prerequisites
You have configured your Ansible control node to meet the following requirements:
- You are using Ansible version 2.14 or later.
-
You have installed the
ansible-freeipapackage on the Ansible controller.
Procedure
Open the inventory file for editing. Specify the fully-qualified domain names (FQDN) of the hosts to become IdM replicas. The FQDNs must be valid DNS names:
-
Only numbers, alphabetic characters, and hyphens (
-) are allowed. For example, underscores are not allowed and can cause DNS failures. The host name must be all lower-case.
Example of a simple inventory hosts file with only the replicas' FQDN defined
[ipareplicas]
replica1.idm.example.com
replica2.idm.example.com
replica3.idm.example.com
[...]
If the IdM server is already deployed and the SRV records are set properly in the IdM DNS zone, the script automatically discovers all the other required values.
-
Only numbers, alphabetic characters, and hyphens (
[Optional] Provide additional information in the inventory file based on how you have designed your topology:
- Scenario 1
If you want to avoid autodiscovery and have all replicas listed in the
[ipareplicas]section use a specific IdM server, set the server in the[ipaservers]section of the inventory file.Example inventory hosts file with the FQDN of the IdM server and replicas defined
[ipaservers]
server.idm.example.com

[ipareplicas]
replica1.idm.example.com
replica2.idm.example.com
replica3.idm.example.com
[...]
- Scenario 2
Alternatively, if you want to avoid autodiscovery but want to deploy specific replicas with specific servers, set the servers for specific replicas individually in the
[ipareplicas]section in the inventory file.Example inventory file with a specific IdM server defined for a specific replica
[ipaservers]
server.idm.example.com
replica1.idm.example.com

[ipareplicas]
replica2.idm.example.com
replica3.idm.example.com ipareplica_servers=replica1.idm.example.com
In the example above,
replica3.idm.example.comuses the already deployedreplica1.idm.example.comas its replication source.- Scenario 3
If you are deploying several replicas in one batch and time is a concern to you, multitier replica deployment can be useful for you. Define specific groups of replicas in the inventory file, for example
[ipareplicas_tier1]and[ipareplicas_tier2], and design separate plays for each group in theinstall-replica.ymlplaybook.Example inventory file with replica tiers defined
[ipaservers]
server.idm.example.com

[ipareplicas_tier1]
replica1.idm.example.com

[ipareplicas_tier2]
replica2.idm.example.com \ ipareplica_servers=replica1.idm.example.com,server.idm.example.com
The first entry in
ipareplica_serverswill be used. The second entry will be used as a fallback option. When using multiple tiers for deploying IdM replicas, you must have separate tasks in the playbook to first deploy replicas from tier1 and then replicas from tier2:Example of a playbook file with different plays for different replica groups
---
- name: Playbook to configure IPA replicas (tier1)
  hosts: ipareplicas_tier1
  become: true

  roles:
  - role: ipareplica
    state: present

- name: Playbook to configure IPA replicas (tier2)
  hosts: ipareplicas_tier2
  become: true

  roles:
  - role: ipareplica
    state: present
[Optional] Provide additional information regarding
firewalldand DNS:- Scenario 1
If you want the replica to use a specified
firewalldzone instead of the default one, you can specify it in the inventory file. This can be useful, for example, when you want to use an internalfirewalldzone for your IdM installation instead of a public zone that is set as default.If you do not set a custom zone, IdM will add its services to the default
firewalldzone. The predefined default zone ispublic.ImportantThe specified
firewalldzone must exist and be permanent.Example of a simple inventory hosts file with a custom
firewalldzone[ipaservers] server.idm.example.com [ipareplicas] replica1.idm.example.com replica2.idm.example.com replica3.idm.example.com [...] [ipareplicas:vars] ipareplica_firewalld_zone=custom zone- Scenario 2
If you want the replica to host the IdM DNS service, add the ipareplica_setup_dns=yes line to the
[ipareplicas:vars]section. Additionally, specify if you want to use per-server DNS forwarders:-
To configure per-server forwarders, add the
ipareplica_forwardersvariable and a list of strings to the[ipareplicas:vars]section, for example: ipareplica_forwarders=192.0.2.1,192.0.2.2 -
To configure no per-server forwarders, add the following line to the
[ipareplicas:vars]section: ipareplica_no_forwarders=yes. -
To configure per-server forwarders based on the forwarders listed in the
/etc/resolv.conffile of the replica, add theipareplica_auto_forwardersvariable to the[ipareplicas:vars]section.
Example inventory file with instructions to set up DNS and per-server forwarders on the replicas
[ipaservers]
server.idm.example.com

[ipareplicas]
replica1.idm.example.com
replica2.idm.example.com
replica3.idm.example.com
[...]

[ipareplicas:vars]
ipareplica_setup_dns=yes
ipareplica_forwarders=192.0.2.1,192.0.2.2
-
To configure per-server forwarders, add the
- Scenario 3
Specify the DNS resolver using the
ipaclient_configure_dns_resolveandipaclient_dns_serversoptions (if available) to simplify cluster deployments. This is especially useful if your IdM deployment is using integrated DNS:An inventory file snippet specifying a DNS resolver:
[...]
[ipaclient:vars]
ipaclient_configure_dns_resolver=true
ipaclient_dns_servers=192.168.100.1
NoteThe
ipaclient_dns_serverslist must contain only IP addresses. Host names are not allowed.
Additional resources
-
For more information about the
ipareplicavariables, see the/usr/share/ansible/roles/ipareplica/README.mdMarkdown file.
3.2. Specifying the credentials for installing the IdM replica using an Ansible playbook
Complete this procedure to configure the authorization for installing the IdM replica.
Prerequisites
You have configured your Ansible control node to meet the following requirements:
- You are using Ansible version 2.14 or later.
-
You have installed the
ansible-freeipapackage on the Ansible controller.
Procedure
Specify the password of a user authorized to deploy replicas, for example the IdM
admin.Red Hat recommends using the Ansible Vault to store the password, and referencing the Vault file from the playbook file, for example
install-replica.yml:Example playbook file using principal from inventory file and password from an Ansible Vault file
- name: Playbook to configure IPA replicas hosts: ipareplicas become: true vars_files: -
playbook_sensitive_data.ymlroles: - role: ipareplica state: presentFor details how to use Ansible Vault, see the official Ansible Vault documentation.
Less securely, provide the credentials of
admindirectly in the inventory file. Use theipaadmin_passwordoption in the[ipareplicas:vars]section of the inventory file. The inventory file and theinstall-replica.ymlplaybook file can then look as follows:Example inventory hosts.replica file
[...]
[ipareplicas:vars]
ipaadmin_password=Secret123
Example playbook using principal and password from inventory file
- name: Playbook to configure IPA replicas
  hosts: ipareplicas
  become: true

  roles:
  - role: ipareplica
    state: present
Alternatively but also less securely, provide the credentials of another user authorized to deploy a replica directly in the inventory file. To specify a different authorized user, use the
ipaadmin_principaloption for the user name, and theipaadmin_passwordoption for the password. The inventory file and theinstall-replica.ymlplaybook file can then look as follows:Example inventory hosts.replica file
[...]
[ipareplicas:vars]
ipaadmin_principal=my_admin
ipaadmin_password=my_admin_secret123
Example playbook using principal and password from inventory file
- name: Playbook to configure IPA replicas
  hosts: ipareplicas
  become: true

  roles:
  - role: ipareplica
    state: present
Additional resources
-
For details on the options accepted by the
ipareplicaAnsible role, see the/usr/share/ansible/roles/ipareplica/README.mdMarkdown file.
3.3. Deploying an IdM replica using an Ansible playbook
Complete this procedure to use an Ansible playbook to deploy an IdM replica.
Prerequisites
- You have configured the inventory file for installing an IdM replica.
- You have configured the authorization for installing the IdM replica.
Procedure
To install an IdM replica using an Ansible playbook, use the
ansible-playbookcommand with the name of the playbook file, for exampleinstall-replica.yml. Specify the inventory file with the-ioption:$ ansible-playbook --vault-password-file=password_file -v -i <path_to_inventory_directory>/hosts.replica <path_to_playbooks_directory>/install-replica.ymlSpecify the level of verbosity by using the
-v,-vvor-vvvoption.Ansible informs you about the execution of the Ansible playbook script. The following output shows that the script has run successfully as 0 tasks have failed:
PLAY RECAP
replica.idm.example.com : ok=18   changed=10   unreachable=0    failed=0    skipped=21   rescued=0    ignored=0
You have now installed an IdM replica.
3.4. Uninstalling an IdM replica using an Ansible playbook
In an existing Identity Management (IdM) deployment, replica and server are interchangeable terms. For information on how to uninstall an IdM server, see Uninstalling an IdM server using an Ansible playbook or Using an Ansible playbook to uninstall an IdM server even if this leads to a disconnected topology.
Additional resources
Chapter 4. Installing an Identity Management client using an Ansible playbook
Learn more about how to configure a system as an Identity Management (IdM) client by using Ansible. Configuring a system as an IdM client enrolls it into an IdM domain and enables the system to use IdM services on IdM servers in the domain.
The deployment is managed by the ipaclient Ansible role. By default, the role uses the autodiscovery mode for identifying the IdM servers, domain and other settings. The role can be modified to have the Ansible playbook use the settings specified, for example in the inventory file.
Prerequisites
- You have installed the ansible-freeipa package on the Ansible control node.
You understand Ansible and IdM concepts:
- Ansible roles
- Ansible nodes
- Ansible inventory
- Ansible tasks
- Ansible modules
- Ansible plays and playbooks
4.1. Setting the parameters of the inventory file for the autodiscovery client installation mode
To install an Identity Management client using an Ansible playbook, configure the target host parameters in an inventory file, for example inventory/hosts:
- The information about the host
- The authorization for the task
The inventory file can be in one of many formats, depending on the inventory plugins you have. The INI-like format is one of Ansible’s defaults and is used in the examples below.
To use smart cards with the graphical user interface in RHEL, ensure that you include the ipaclient_mkhomedir variable in your Ansible playbook.
Prerequisites
- You have checked the deployment instructions on the control node, see Checking the parameters in the install-client.yml file.
Procedure
Specify the fully-qualified hostname (FQDN) of the host to become an IdM client. The fully qualified domain name must be a valid DNS name:
-
Only numbers, alphabetic characters, and hyphens (
-) are allowed. For example, underscores are not allowed and can cause DNS failures. - The host name must be all lower-case. No capital letters are allowed.
If the SRV records are set properly in the IdM DNS zone, the script automatically discovers all the other required values.
Example of a simple inventory hosts file with only the client FQDN defined
[ipaclients]
client.idm.example.com
[...]
-
Only numbers, alphabetic characters, and hyphens (
Specify the credentials for enrolling the client. The following authentication methods are available:
The password of a user authorized to enroll clients. This is the default option.
Red Hat recommends using the Ansible Vault to store the password, and referencing the Vault file from the playbook file, for example
install-client.yml, directly:Example playbook file using principal from inventory file and password from an Ansible Vault file
- name: Playbook to configure IPA clients with username/password
  hosts: ipaclients
  become: true
  vars_files:
  - playbook_sensitive_data.yml

  roles:
  - role: ipaclient
    state: present
Less securely, provide the credentials of
adminusing theipaadmin_passwordoption in the[ipaclients:vars]section of theinventory/hostsfile. Alternatively, to specify a different authorized user, use theipaadmin_principaloption for the user name, and theipaadmin_passwordoption for the password. Theinventory/hostsinventory file and theinstall-client.ymlplaybook file can then look as follows:Example inventory hosts file
[...]
[ipaclients:vars]
ipaadmin_principal=my_admin
ipaadmin_password=Secret123
Example Playbook using principal and password from inventory file
- name: Playbook to unconfigure IPA clients
  hosts: ipaclients
  become: true

  roles:
  - role: ipaclient
    state: true
The client keytab from the previous enrollment if it is still available.
This option is available if the system was previously enrolled as an Identity Management client. To use this authentication method, uncomment the
#ipaclient_keytaboption, specifying the path to the file storing the keytab, for example in the[ipaclient:vars]section ofinventory/hosts.A random, one-time password (OTP) to be generated during the enrollment. To use this authentication method, use the
ipaclient_use_otp=yesoption in your inventory file. For example, you can uncomment theipaclient_use_otp=yesoption in the[ipaclients:vars]section of theinventory/hostsfile. Note that with OTP you must also specify one of the following options:-
The password of a user authorized to enroll clients, for example by providing a value for
ipaadmin_passwordin the[ipaclients:vars]section of theinventory/hostsfile. -
The admin keytab, for example by providing a value for
ipaadmin_keytabin the[ipaclients:vars]section ofinventory/hosts.
-
The password of a user authorized to enroll clients, for example by providing a value for
[Optional] Specify the DNS resolver using the
ipaclient_configure_dns_resolveandipaclient_dns_serversoptions (if available) to simplify cluster deployments. This is especially useful if your IdM deployment is using integrated DNS:An inventory file snippet specifying a DNS resolver:
[...] [ipaclients:vars] ipaadmin_password: "{{ ipaadmin_password }}" ipaclient_domain=idm.example.com ipaclient_configure_dns_resolver=true ipaclient_dns_servers=192.168.100.1NoteThe
ipaclient_dns_serverslist must contain only IP addresses. Host names are not allowed.-
Starting with RHEL 8.9, you can also specify the
ipaclient_subid: trueoption to have subid ranges configured for IdM users on the IdM level.
Additional resources
-
/usr/share/ansible/roles/ipaclient/README.md - Managing subID ranges manually
4.2. Setting the parameters of the inventory file when autodiscovery is not possible during client installation
To install an Identity Management client using an Ansible playbook, configure the target host parameters in an inventory file, for example inventory/hosts:
- The information about the host, the IdM server and the IdM domain or the IdM realm
- The authorization for the task
The inventory file can be in one of many formats, depending on the inventory plugins you have. The INI-like format is one of Ansible’s defaults and is used in the examples below.
To use smart cards with the graphical user interface in RHEL, ensure that you include the ipaclient_mkhomedir variable in your Ansible playbook.
Prerequisites
- You have checked the deployment instructions on the control node, see Checking the parameters in the install-client.yml file.
Procedure
Specify the fully-qualified hostname (FQDN) of the host to become an IdM client. The fully qualified domain name must be a valid DNS name:
-
Only numbers, alphabetic characters, and hyphens (
-) are allowed. For example, underscores are not allowed and can cause DNS failures. - The host name must be all lower-case. No capital letters are allowed.
-
Only numbers, alphabetic characters, and hyphens (
Specify other options in the relevant sections of the
inventory/hostsfile:-
The FQDN of the servers in the
[ipaservers]section to indicate which IdM server the client will be enrolled with One of the two following options:
-
The
ipaclient_domainoption in the[ipaclients:vars]section to indicate the DNS domain name of the IdM server the client will be enrolled with The
ipaclient_realmoption in the[ipaclients:vars]section to indicate the name of the Kerberos realm controlled by the IdM serverExample of an inventory hosts file with the client FQDN, the server FQDN and the domain defined
[ipaclients]
client.idm.example.com

[ipaservers]
server.idm.example.com

[ipaclients:vars]
ipaclient_domain=idm.example.com
[...]
-
The
-
The FQDN of the servers in the
Specify the credentials for enrolling the client. The following authentication methods are available:
The password of a user authorized to enroll clients. This is the default option.
Red Hat recommends using the Ansible Vault to store the password, and referencing the Vault file from the playbook file, for example
install-client.yml, directly:Example playbook file using principal from inventory file and password from an Ansible Vault file
- name: Playbook to configure IPA clients with username/password
  hosts: ipaclients
  become: true
  vars_files:
  - playbook_sensitive_data.yml

  roles:
  - role: ipaclient
    state: present
Less securely, the credentials of
adminto be provided using theipaadmin_passwordoption in the[ipaclients:vars]section of theinventory/hostsfile. Alternatively, to specify a different authorized user, use theipaadmin_principaloption for the user name, and theipaadmin_passwordoption for the password. Theinstall-client.ymlplaybook file can then look as follows:Example inventory hosts file
[...]
[ipaclients:vars]
ipaadmin_principal=my_admin
ipaadmin_password=Secret123
Example Playbook using principal and password from inventory file
- name: Playbook to unconfigure IPA clients
  hosts: ipaclients
  become: true

  roles:
  - role: ipaclient
    state: true
The client keytab from the previous enrollment if it is still available:
This option is available if the system was previously enrolled as an Identity Management client. To use this authentication method, uncomment the
ipaclient_keytaboption, specifying the path to the file storing the keytab, for example in the[ipaclient:vars]section ofinventory/hosts.A random, one-time password (OTP) to be generated during the enrollment. To use this authentication method, use the
ipaclient_use_otp=yesoption in your inventory file. For example, you can uncomment the#ipaclient_use_otp=yesoption in the[ipaclients:vars]section of theinventory/hostsfile. Note that with OTP you must also specify one of the following options:-
The password of a user authorized to enroll clients, for example by providing a value for
ipaadmin_passwordin the[ipaclients:vars]section of theinventory/hostsfile. -
The admin keytab, for example by providing a value for
ipaadmin_keytabin the[ipaclients:vars]section ofinventory/hosts.
-
The password of a user authorized to enroll clients, for example by providing a value for
-
Starting with RHEL 8.9, you can also specify the
ipaclient_subid: trueoption to have subid ranges configured for IdM users on the IdM level.
Additional resources
-
For details on the options accepted by the
ipaclientAnsible role, see the/usr/share/ansible/roles/ipaclient/README.mdfile. - Managing subID ranges manually
4.3. Checking the parameters in the install-client.yml file
The install-client.yml playbook file contains instructions for the IdM client deployment.
Procedure
Open the file and check if the instructions in the playbook correspond to what you are planning for your deployment. The contents typically look like this:
---
- name: Playbook to configure IPA clients with username/password
  hosts: ipaclients
  become: true

  roles:
  - role: ipaclient
    state: present
This is what the individual entries mean:
-
The hosts entry specifies the section of the
inventory/hostsfile where the ansible script searches theFQDNsof the hosts on which theipa-client-installscript shall be run. -
The
become: trueentry specifies that root’s credentials will be invoked during the execution of theipa-client-installscript. -
The
role: ipacliententry specifies the role that will be installed on the host: in this case, it is the ipa client role. -
The
state: presententry specifies that the client should be installed rather than uninstalled (absent).
-
The hosts entry specifies the section of the
4.4. Authorization options for IdM client enrollment using an Ansible playbook
The individual authorization options for IdM client enrollment with examples of inventory and playbook files are as follows:
Table 4.1. Authorization options for IdM client enrollment using Ansible
| Authorization option | Note | Example inventory file | Example install-client.yml playbook file |
|---|---|---|---|
| Password of a user authorized to enroll a client: Option 1 | Password stored in Ansible vault |
[ipaclients:vars] [...] |
- name: Playbook to configure IPA clients with username/password
  hosts: ipaclients
  become: true
  vars_files:
  - playbook_sensitive_data.yml

  roles:
  - role: ipaclient
    state: present
|
| Password of a user authorized to enroll a client: Option 2 | Password stored in inventory file |
[ipaclients:vars] ipaadmin_password=Secret123 |
- name: Playbook to configure IPA clients
  hosts: ipaclients
  become: true

  roles:
  - role: ipaclient
    state: true
|
| A random, one-time password (OTP): Option 1 | OTP + administrator password |
[ipaclients:vars] ipaadmin_password=Secret123 ipaclient_use_otp=true |
- name: Playbook to configure IPA clients
  hosts: ipaclients
  become: true

  roles:
  - role: ipaclient
    state: true
|
| A random, one-time password (OTP): Option 2 | OTP + an admin keytab |
[ipaclients:vars] ipaadmin_keytab=/root/admin.keytab ipaclient_use_otp=true |
- name: Playbook to configure IPA clients
  hosts: ipaclients
  become: true

  roles:
  - role: ipaclient
    state: true
|
| The client keytab from the previous enrollment |
[ipaclients:vars] ipaclient_keytab=/root/krb5.keytab |
- name: Playbook to configure IPA clients
  hosts: ipaclients
  become: true

  roles:
  - role: ipaclient
    state: true
|
As of RHEL 8.8, in the two OTP authorization scenarios described above, the requesting of the administrator’s TGT by using the kinit command occurs on the first specified or discovered IdM server. Therefore, no additional modification of the Ansible control node is required. Prior to RHEL 8.8, the krb5-workstation package was required on the control node.
4.5. Deploying an IdM client using an Ansible playbook
Complete this procedure to use an Ansible playbook to deploy an IdM client in your IdM environment.
Prerequisites
You have set the parameters of the IdM client deployment to correspond to your deployment scenario:
- You have checked the parameters in install-client.yml.
Procedure
To install an IdM client using an Ansible playbook, use the
ansible-playbookcommand with the name of the playbook file, for exampleinstall-client.yml. Specify the inventory file with the-ioption:$ ansible-playbook --vault-password-file=password_file -v -i inventory/hosts install-client.ymlSpecify the level of verbosity by using the
-v,-vvor-vvvoption.Ansible informs you about the execution of the Ansible playbook script. The following output shows that the script has run successfully as no tasks have failed:
PLAY RECAP client1.idm.example.com : ok=18 changed=10 unreachable=0 failed=0 skipped=21 rescued=0 ignored=0NoteAnsible uses different colors to provide different types of information about the running process. You can modify the default colors in the
[colors]section of the/etc/ansible/ansible.cfgfile:[colors] [...] #error = red #debug = dark gray #deprecate = purple #skip = cyan #unreachable = red #ok = green #changed = yellow [...]
You have now installed an IdM client on your host using an Ansible playbook.
4.6. Testing an Identity Management client after Ansible installation
The command-line interface (CLI) informs you that the ansible-playbook command was successful, but you can also do your own test.
To test that the Identity Management client can obtain information about users defined on the server, check that you are able to resolve a user defined on the server. For example, to check the default admin user:
[user@client1 ~]$ id admin
uid=1254400000(admin) gid=1254400000(admins) groups=1254400000(admins)
To test that authentication works correctly, su - as another already existing IdM user:
[user@client1 ~]$ su - idm_user
Last login: Thu Oct 18 18:39:11 CEST 2018 from 192.168.122.1 on pts/0
[idm_user@client1 ~]$
4.7. Uninstalling an IdM client using an Ansible playbook
Complete this procedure to use an Ansible playbook to uninstall your host as an IdM client.
Prerequisites
- IdM administrator credentials.
Procedure
To uninstall the IdM client, use the
ansible-playbookcommand with the name of the playbook file, for exampleuninstall-client.yml. Specify the inventory file with the-ioption and, optionally, specify the level of verbosity by using the-v,-vvor-vvvoptions:$ ansible-playbook --vault-password-file=password_file -v -i inventory/hosts uninstall-client.yml
The uninstallation of the client only removes the basic IdM configuration from the host but leaves the configuration files on the host in case you decide to re-install the client. In addition, the uninstallation has the following limitations:
- It does not remove the client host entry from the IdM LDAP server. The uninstallation only unenrolls the host.
- It does not remove any services residing on the client from IdM.
- It does not remove the DNS entries for the client from the IdM server.
-
It does not remove the old principals for keytabs other than
/etc/krb5.keytab.
Note that the uninstallation does remove all certificates that were issued for the host by the IdM CA.
Additional resources
Chapter 5. Preparing your environment for managing IdM using Ansible playbooks
As a system administrator managing Identity Management (IdM), when working with Red Hat Ansible Engine, it is good practice to do the following:
- Keep a subdirectory dedicated to Ansible playbooks in your home directory, for example ~/MyPlaybooks.
-
Copy and adapt sample Ansible playbooks from the
/usr/share/doc/ansible-freeipa/*and/usr/share/doc/rhel-system-roles/*directories and subdirectories into your ~/MyPlaybooks directory. - Include your inventory file in your ~/MyPlaybooks directory.
Using this practice, you can find all your playbooks in one place.
You can run your ansible-freeipa playbooks without invoking root privileges on the managed nodes. Exceptions include playbooks that use the ipaserver, ipareplica, ipaclient, ipasmartcard_server, ipasmartcard_client and ipabackup ansible-freeipa roles. These roles require privileged access to directories and the dnf software package manager.
The playbooks in the Red Hat Enterprise Linux IdM documentation assume the following security configuration:
-
The IdM
adminis your remote Ansible user on the managed nodes. -
You store the IdM
adminpassword encrypted in an Ansible vault. - You have placed the password that protects the Ansible vault in a password file.
- You block access to the vault password file to everyone except your local ansible user.
- You regularly remove and re-create the vault password file.
Consider also alternative security configurations.
5.1. Preparing a control node and managed nodes for managing IdM using Ansible playbooks
Follow this procedure to create the ~/MyPlaybooks directory and configure it so that you can use it to store and run Ansible playbooks.
Prerequisites
- You have installed an IdM server on your managed nodes, server.idm.example.com and replica.idm.example.com.
- You have configured DNS and networking so you can log in to the managed nodes, server.idm.example.com and replica.idm.example.com, directly from the control node.
-
You know the IdM
adminpassword.
Procedure
Change into the ~/MyPlaybooks/ directory:
$ cd ~/MyPlaybooksCreate the ~/MyPlaybooks/ansible.cfg file with the following content:
[defaults]
inventory = /home/your_username/MyPlaybooks/inventory
remote_user = admin
Create the ~/MyPlaybooks/inventory file with the following content:
[eu]
server.idm.example.com

[us]
replica.idm.example.com

[ipaserver:children]
eu
us
This configuration defines two host groups, eu and us, for hosts in these locations. Additionally, this configuration defines the ipaserver host group, which contains all hosts from the eu and us groups.
[Optional] Create an SSH public and private key. To simplify access in your test environment, do not set a password on the private key:
$ ssh-keygenCopy the SSH public key to the IdM
adminaccount on each managed node:$ ssh-copy-id admin@server.idm.example.com $ ssh-copy-id admin@replica.idm.example.com
These commands require that you enter the IdM
adminpassword.Create a password_file file that contains the vault password:
redhatChange the permissions to modify the file:
$ chmod 0600 password_fileCreate a secret.yml Ansible vault to store the IdM
adminpassword:Configure password_file to store the vault password:
$ ansible-vault create --vault-password-file=password_file secret.ymlWhen prompted, enter the content of the secret.yml file:
ipaadmin_password: Secret123
To use the encrypted ipaadmin_password in a playbook, you must use the vars_file directive. For example, a simple playbook to delete an IdM user can look as follows:
---
- name: Playbook to handle users
  hosts: ipaserver

  vars_files:
  - /home/user_name/MyPlaybooks/secret.yml

  tasks:
  - name: Delete user robot
    ipauser:
      ipaadmin_password: "{{ ipaadmin_password }}"
      name: robot
      state: absent
When executing a playbook, instruct Ansible use the vault password to decrypt ipaadmin_password by adding the --vault-password-file=password_file option. For example:
ansible-playbook -i inventory --vault-password-file=password_file del-user.ymlFor security reasons, remove the vault password file at the end of each session, and repeat steps 7-9 at the start of each new session.
5.2. Different methods to provide the credentials required for ansible-freeipa playbooks
There are advantages and disadvantages in the different methods for providing the credentials required for running playbooks that use ansible-freeipa roles and modules.
Storing passwords in plain text in a playbook
Benefits:
- Not being prompted all the time you run the playbook.
- Easy to implement.
Drawbacks:
- Everyone with access to the file can read the password. Setting wrong permissions and sharing the file, for example in an internal or external repository, can compromise security.
- High maintenance work: if the password is changed, it needs to be changed in all playbooks.
Entering passwords interactively when you execute a playbook
Benefits:
- No-one can steal the password as it is not stored anywhere.
- You can update the password easily.
- Easy to implement.
Drawbacks:
- If you are using Ansible playbooks in scripts, the requirement to enter the password interactively can be inconvenient.
Storing passwords in an Ansible vault and the vault password in a file:
Benefits:
- The user password is stored encrypted.
- You can update the user password easily, by creating a new Ansible vault.
-
You can update the password file that protects the ansible vault easily, by using the
ansible-vault rekey --new-vault-password-file=NEW_VAULT_PASSWORD_FILE secret.ymlcommand. - If you are using Ansible playbooks in scripts, it is convenient not to have to enter the password protecting the Ansible vault interactively.
Drawbacks:
- It is vital that the file that contains the sensitive plain text password be protected through file permissions and other security measures.
Storing passwords in an Ansible vault and entering the vault password interactively
Benefits:
- The user password is stored encrypted.
- No-one can steal the vault password as it is not stored anywhere.
- You can update the user password easily, by creating a new Ansible vault.
-
You can update the vault password easily too, by using the
ansible-vault rekey file_namecommand.
Drawbacks:
- If you are using Ansible playbooks in scripts, the need to enter the vault password interactively can be inconvenient.
Chapter 6. Configuring global IdM settings using Ansible playbooks
Using the Ansible config module, you can retrieve and set global configuration parameters for Identity Management (IdM).
- Retrieving IdM configuration using an Ansible playbook
- Configuring the IdM CA renewal server using an Ansible playbook
- Configuring the default shell for IdM users using an Ansible playbook
- Configuring a NETBIOS name for an IdM domain by using Ansible
- Ensuring that IdM users and groups have SIDs by using Ansible
6.1. Retrieving IdM configuration using an Ansible playbook
The following procedure describes how you can use an Ansible playbook to retrieve information about the current global IdM configuration.
Prerequisites
- You know the IdM administrator password.
You have configured your Ansible control node to meet the following requirements:
- You are using Ansible version 2.14 or later.
-
You have installed the
ansible-freeipapackage on the Ansible controller. - The example assumes that in the ~/MyPlaybooks/ directory, you have created an Ansible inventory file with the fully-qualified domain name (FQDN) of the IdM server.
-
The example assumes that the secret.yml Ansible vault stores your
ipaadmin_password.
-
The target node, that is the node on which the
ansible-freeipamodule is executed, is part of the IdM domain as an IdM client, server or replica.
Procedure
Open the
/usr/share/doc/ansible-freeipa/playbooks/config/retrieve-config.ymlAnsible playbook file for editing:--- - name: Playbook to handle global IdM configuration hosts: ipaserver become: no gather_facts: no vars_files: - /home/user_name/MyPlaybooks/secret.yml tasks: - name: Query IPA global configuration ipaconfig: ipaadmin_password: "{{ ipaadmin_password }}" register: serverconfig - debug: msg: "{{ serverconfig }}"Adapt the file by changing the following:
- The password of IdM administrator.
- Other values, if necessary.
- Save the file.
Run the Ansible playbook. Specify the playbook file, the file storing the password protecting the secret.yml file, and the inventory file:
$ ansible-playbook --vault-password-file=password_file -v -i path_to_inventory_directory/inventory.file /usr/share/doc/ansible-freeipa/playbooks/config/retrieve-config.yml
[...]
TASK [debug]
ok: [server.idm.example.com] => {
    "msg": {
        "ansible_facts": {
            "discovered_interpreter_
        },
        "changed": false,
        "config": {
            "ca_renewal_master_server": "server.idm.example.com",
            "configstring": [
                "AllowNThash",
                "KDC:Disable Last Success"
            ],
            "defaultgroup": "ipausers",
            "defaultshell": "/bin/bash",
            "emaildomain": "idm.example.com",
            "enable_migration": false,
            "groupsearch": [
                "cn",
                "description"
            ],
            "homedirectory": "/home",
            "maxhostname": "64",
            "maxusername": "64",
            "pac_type": [
                "MS-PAC",
                "nfs:NONE"
            ],
            "pwdexpnotify": "4",
            "searchrecordslimit": "100",
            "searchtimelimit": "2",
            "selinuxusermapdefault": "unconfined_u:s0-s0:c0.c1023",
            "selinuxusermaporder": [
                "guest_u:s0$xguest_u:s0$user_
            ],
            "usersearch": [
                "uid",
                "givenname",
                "sn",
                "telephonenumber",
                "ou",
                "title"
            ]
        },
        "failed": false
    }
}
6.2. Configuring the IdM CA renewal server using an Ansible playbook
In an Identity Management (IdM) deployment that uses an embedded certificate authority (CA), the CA renewal server maintains and renews IdM system certificates. It ensures robust IdM deployments.
For more details on the role of the IdM CA renewal server, see Using IdM CA renewal server.
The following procedure describes how you can use an Ansible playbook to configure the IdM CA renewal server.
Prerequisites
- You know the IdM administrator password.
You have configured your Ansible control node to meet the following requirements:
- You are using Ansible version 2.14 or later.
-
You have installed the
ansible-freeipapackage on the Ansible controller. - The example assumes that in the ~/MyPlaybooks/ directory, you have created an Ansible inventory file with the fully-qualified domain name (FQDN) of the IdM server.
-
The example assumes that the secret.yml Ansible vault stores your
ipaadmin_password.
-
The target node, that is the node on which the
ansible-freeipamodule is executed, is part of the IdM domain as an IdM client, server or replica.
Procedure
Optional: Identify the current IdM CA renewal server:
$ ipa config-show | grep 'CA renewal'
  IPA CA renewal master: server.idm.example.com
Create an inventory file, for example
inventory.file, and defineipaserverin it:[ipaserver] server.idm.example.com
Open the
/usr/share/doc/ansible-freeipa/playbooks/config/set-ca-renewal-master-server.ymlAnsible playbook file for editing:--- - name: Playbook to handle global DNS configuration hosts: ipaserver become: no gather_facts: no vars_files: - /home/user_name/MyPlaybooks/secret.yml tasks: - name: set ca_renewal_master_server ipaconfig: ipaadmin_password: "{{ ipaadmin_password }}" ca_renewal_master_server: carenewal.idm.example.comAdapt the file by changing:
-
The password of IdM administrator set by the
ipaadmin_passwordvariable. -
The name of the CA renewal server set by the
ca_renewal_master_servervariable.
-
The password of IdM administrator set by the
- Save the file.
Run the Ansible playbook. Specify the playbook file, the file storing the password protecting the secret.yml file, and the inventory file:
$ ansible-playbook --vault-password-file=password_file -v -i path_to_inventory_directory/inventory.file /usr/share/doc/ansible-freeipa/playbooks/config/set-ca-renewal-master-server.yml
Verification steps
You can verify that the CA renewal server has been changed:
Log into
ipaserveras IdM administrator:$ ssh admin@server.idm.example.com Password: [admin@server /]$Request the identity of the IdM CA renewal server:
$ ipa config-show | grep ‘CA renewal’ IPA CA renewal master: carenewal.idm.example.comThe output shows the carenewal.idm.example.com server is the new CA renewal server.
6.3. Configuring the default shell for IdM users using an Ansible playbook
The shell is a program that accepts and interprets commands. Several shells are available in Red Hat Enterprise Linux (RHEL), such as bash, sh, ksh, zsh, fish, and others. Bash, or /bin/bash, is a popular shell on most Linux systems, and it is normally the default shell for user accounts on RHEL.
The following procedure describes how you can use an Ansible playbook to configure sh, an alternative shell, as the default shell for IdM users.
Prerequisites
- You know the IdM administrator password.
You have configured your Ansible control node to meet the following requirements:
- You are using Ansible version 2.14 or later.
-
You have installed the
ansible-freeipapackage on the Ansible controller. - The example assumes that in the ~/MyPlaybooks/ directory, you have created an Ansible inventory file with the fully-qualified domain name (FQDN) of the IdM server.
-
The example assumes that the secret.yml Ansible vault stores your
ipaadmin_password.
-
The target node, that is the node on which the
ansible-freeipamodule is executed, is part of the IdM domain as an IdM client, server or replica.
Procedure
-
Optional: Use the
retrieve-config.ymlAnsible playbook to identify the current shell for IdM users. See Retrieving IdM configuration using an Ansible playbook for details. Create an inventory file, for example
inventory.file, and defineipaserverin it:[ipaserver] server.idm.example.com
Open the
/usr/share/doc/ansible-freeipa/playbooks/config/ensure-config-options-are-set.ymlAnsible playbook file for editing:--- - name: Playbook to ensure some config options are set hosts: ipaserver vars_files: - /home/user_name/MyPlaybooks/secret.yml tasks: # Set defaultlogin and maxusername - ipaconfig: ipaadmin_password: "{{ ipaadmin_password }}" defaultshell: /bin/bash maxusername: 64Adapt the file by changing the following:
-
The password of IdM administrator set by the
ipaadmin_passwordvariable. -
The default shell of the IdM users set by the
defaultshellvariable into/bin/sh.
-
The password of IdM administrator set by the
- Save the file.
Run the Ansible playbook. Specify the playbook file, the file storing the password protecting the secret.yml file, and the inventory file:
$ ansible-playbook --vault-password-file=password_file -v -i path_to_inventory_directory/inventory.file /usr/share/doc/ansible-freeipa/playbooks/config/ensure-config-options-are-set.yml
Verification steps
You can verify that the default user shell has been changed by starting a new session in IdM:
Log into
ipaserveras IdM administrator:$ ssh admin@server.idm.example.com Password: [admin@server /]$Display the current shell:
[admin@server /]$ echo "$SHELL" /bin/shThe logged-in user is using the
shshell.
6.4. Configuring a NetBIOS name for an IdM domain by using Ansible
The NetBIOS name is used for Microsoft Windows' (SMB) type of sharing and messaging. You can use NetBIOS names to map a drive or connect to a printer.
Follow this procedure to use an Ansible playbook to configure a NetBIOS name for your Identity Management (IdM) domain.
Prerequisites
You have configured your Ansible control node to meet the following requirements:
- You are using Ansible version 2.14 or later.
-
The
ansible-freeipapackage is installed.
Assumptions
- The example assumes that in the ~/MyPlaybooks/ directory, you have created an Ansible inventory file with the fully-qualified domain name (FQDN) of the IdM server.
-
The example assumes that the secret.yml Ansible vault stores your
ipaadmin_passwordand that you know the vault file password.
Procedure
Navigate to your ~/MyPlaybooks/ directory:
$ cd ~/MyPlaybooks/- Create a netbios-domain-name-present.yml Ansible playbook file.
Add the following content to the file:
--- - name: Playbook to change IdM domain netbios name hosts: ipaserver become: no gather_facts: no vars_files: - /home/user_name/MyPlaybooks/secret.yml tasks: - name: Set IdM domain netbios name ipaconfig: ipaadmin_password: "{{ ipaadmin_password }}" netbios_name: IPADOM- Save the file.
Run the Ansible playbook. Specify the playbook file, the file storing the password protecting the secret.yml file, and the inventory file:
$ ansible-playbook --vault-password-file=password_file -v -i inventory netbios-domain-name-present.ymlWhen prompted, provide the vault file password.
Additional resources
6.5. Ensuring that IdM users and groups have SIDs by using Ansible
The Identity Management (IdM) server can assign unique security identifiers (SIDs) to IdM users and groups internally, based on the data from the ID ranges of the local domain. The SIDs are stored in the user and group objects.
The goal of ensuring that IdM users and groups have SIDs is to allow the generation of the Privileged Attribute Certificate (PAC), which is the first step towards IdM-IdM trusts. If IdM users and groups have SIDs, IdM is able to issue Kerberos tickets with PAC data.
Follow this procedure to achieve the following goals:
- Generate SIDs for already existing IdM users and user groups.
- Enable the generation of SIDs for IdM new users and groups.
Prerequisites
You have configured your Ansible control node to meet the following requirements:
- You are using Ansible version 2.14 or later.
-
The
ansible-freeipapackage is installed.
Assumptions
- The example assumes that in the ~/MyPlaybooks/ directory, you have created an Ansible inventory file with the fully-qualified domain name (FQDN) of the IdM server.
-
The example assumes that the secret.yml Ansible vault stores your
ipaadmin_passwordand that you know the vault file password.
Procedure
Navigate to your ~/MyPlaybooks/ directory:
$ cd ~/MyPlaybooks/- Create a sids-for-users-and-groups-present.yml Ansible playbook file.
Add the following content to the file:
--- - name: Playbook to ensure SIDs are enabled and users and groups have SIDs hosts: ipaserver become: no gather_facts: no vars_files: - /home/user_name/MyPlaybooks/secret.yml tasks: - name: Enable SID and generate users and groups SIDS ipaconfig: ipaadmin_password: "{{ ipaadmin_password }}" enable_sid: true add_sids: trueThe
enable_sidvariable enables SID generation for future IdM users and groups. Theadd_sidsvariable generates SIDs for existing IdM users and groups.NoteWhen using
add_sids: true, you must also set theenable_sidvariable totrue.- Save the file.
Run the Ansible playbook. Specify the playbook file, the file storing the password protecting the secret.yml file, and the inventory file:
$ ansible-playbook --vault-password-file=password_file -v -i inventory sids-for-users-and-groups-present.ymlWhen prompted, provide the vault file password.
Additional resources
6.6. Additional resources
-
See
README-config.mdin the/usr/share/doc/ansible-freeipa/directory. -
See sample playbooks in the
/usr/share/doc/ansible-freeipa/playbooks/configdirectory.
Chapter 7. Managing user accounts using Ansible playbooks
You can manage users in IdM using Ansible playbooks. After presenting the user life cycle, this chapter describes how to use Ansible playbooks for the following operations:
-
Ensuring the presence of a single user listed directly in the
YMLfile. -
Ensuring the presence of multiple users listed directly in the
YMLfile. -
Ensuring the presence of multiple users listed in a
JSONfile that is referenced from theYMLfile. -
Ensuring the absence of users listed directly in the
YMLfile.
7.1. User life cycle
Identity Management (IdM) supports three user account states:
- Stage users are not allowed to authenticate. This is an initial state. Some of the user account properties required for active users cannot be set, for example, group membership.
- Active users are allowed to authenticate. All required user account properties must be set in this state.
- Preserved users are former active users that are considered inactive and cannot authenticate to IdM. Preserved users retain most of the account properties they had as active users, but they are not part of any user groups.
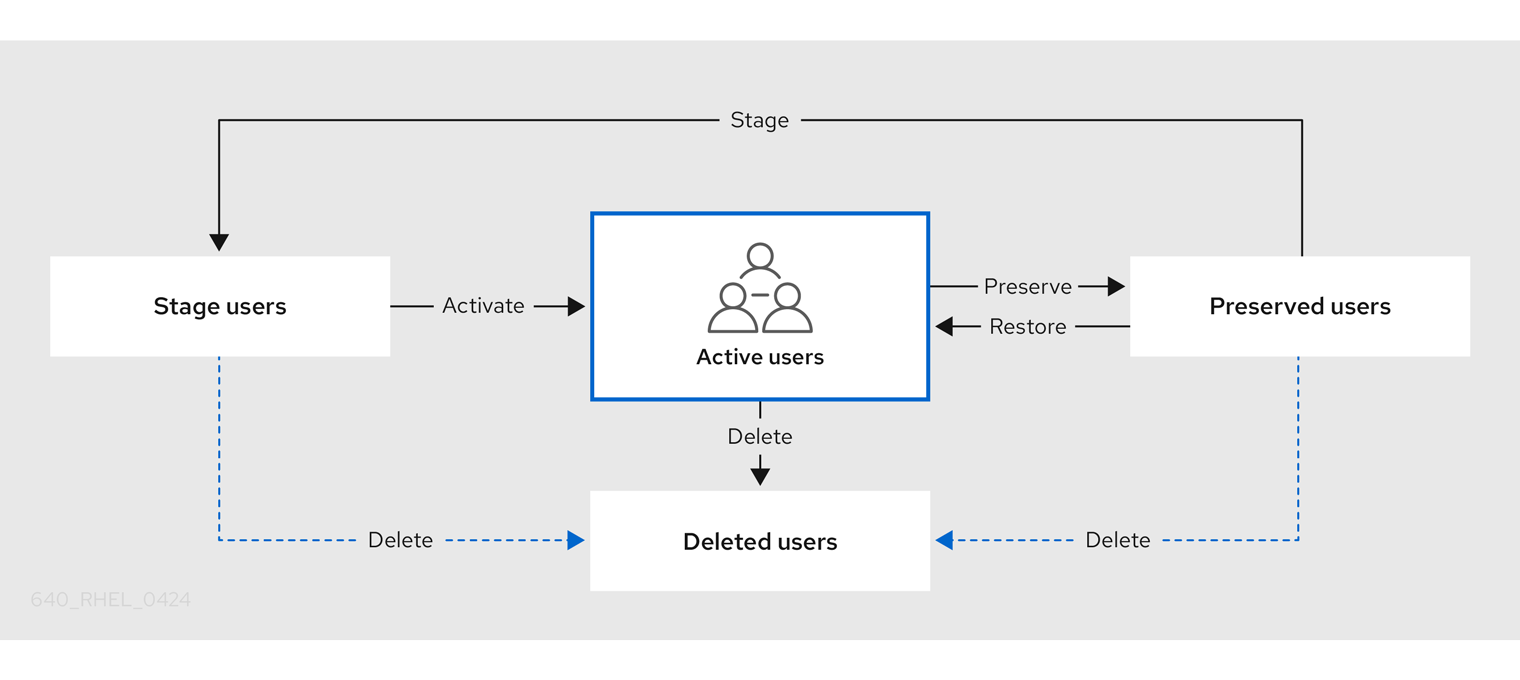
You can delete user entries permanently from the IdM database.
Deleted user accounts cannot be restored. When you delete a user account, all the information associated with the account is permanently lost.
A new administrator can only be created by a user with administrator rights, such as the default admin user. If you accidentally delete all administrator accounts, the Directory Manager must create a new administrator manually in the Directory Server.
Do not delete the admin user. As admin is a pre-defined user required by IdM, this operation causes problems with certain commands. If you want to define and use an alternative admin user, disable the pre-defined admin user with ipa user-disable admin after you granted admin permissions to at least one different user.
Do not add local users to IdM. The Name Service Switch (NSS) always resolves IdM users and groups before resolving local users and groups. This means that, for example, IdM group membership does not work for local users.
7.2. Ensuring the presence of an IdM user using an Ansible playbook
The following procedure describes ensuring the presence of a user in IdM using an Ansible playbook.
Prerequisites
-
You know the IdM
adminpassword. You have configured your Ansible control node to meet the following requirements:
- You are using Ansible version 2.14 or later.
-
You have installed the
ansible-freeipapackage on the Ansible controller. - The example assumes that in the ~/MyPlaybooks/ directory, you have created an Ansible inventory file with the fully-qualified domain name (FQDN) of the IdM server.
-
The example assumes that the secret.yml Ansible vault stores your
ipaadmin_password.
-
The target node, that is the node on which the
ansible-freeipamodule is executed, is part of the IdM domain as an IdM client, server or replica.
Procedure
Create an inventory file, for example
inventory.file, and defineipaserverin it:[ipaserver] server.idm.example.com
Create an Ansible playbook file with the data of the user whose presence in IdM you want to ensure. To simplify this step, you can copy and modify the example in the
/usr/share/doc/ansible-freeipa/playbooks/user/add-user.ymlfile. For example, to create user named idm_user and add Password123 as the user password:--- - name: Playbook to handle users hosts: ipaserver vars_files: - /home/user_name/MyPlaybooks/secret.yml tasks: - name: Create user idm_user ipauser: ipaadmin_password: "{{ ipaadmin_password }}" name: idm_user first: Alice last: Acme uid: 1000111 gid: 10011 phone: "+555123457" email: idm_user@acme.com passwordexpiration: "2023-01-19 23:59:59" password: "Password123" update_password: on_createYou must use the following options to add a user:
- name: the login name
- first: the first name string
- last: the last name string
For the full list of available user options, see the
/usr/share/doc/ansible-freeipa/README-user.mdMarkdown file.NoteIf you use the
update_password: on_createoption, Ansible only creates the user password when it creates the user. If the user is already created with a password, Ansible does not generate a new password.Run the playbook:
$ ansible-playbook --vault-password-file=password_file -v -i path_to_inventory_directory/inventory.file path_to_playbooks_directory/add-IdM-user.yml
Verification steps
You can verify if the new user account exists in IdM by using the
ipa user-showcommand:Log into
ipaserveras admin:$ ssh admin@server.idm.example.com Password: [admin@server /]$Request a Kerberos ticket for admin:
$ kinit admin Password for admin@IDM.EXAMPLE.COM:Request information about idm_user:
$ ipa user-show idm_user User login: idm_user First name: Alice Last name: Acme ....
The user named idm_user is present in IdM.
7.3. Ensuring the presence of multiple IdM users using Ansible playbooks
The following procedure describes ensuring the presence of multiple users in IdM using an Ansible playbook.
Prerequisites
-
You know the IdM
adminpassword. You have configured your Ansible control node to meet the following requirements:
- You are using Ansible version 2.14 or later.
-
You have installed the
ansible-freeipapackage on the Ansible controller. - The example assumes that in the ~/MyPlaybooks/ directory, you have created an Ansible inventory file with the fully-qualified domain name (FQDN) of the IdM server.
-
The example assumes that the secret.yml Ansible vault stores your
ipaadmin_password.
-
The target node, that is the node on which the
ansible-freeipamodule is executed, is part of the IdM domain as an IdM client, server or replica.
Procedure
Create an inventory file, for example
inventory.file, and defineipaserverin it:[ipaserver] server.idm.example.com
Create an Ansible playbook file with the data of the users whose presence you want to ensure in IdM. To simplify this step, you can copy and modify the example in the
/usr/share/doc/ansible-freeipa/playbooks/user/ensure-users-present.ymlfile. For example, to create users idm_user_1, idm_user_2, and idm_user_3, and add Password123 as the password of idm_user_1:--- - name: Playbook to handle users hosts: ipaserver vars_files: - /home/user_name/MyPlaybooks/secret.yml tasks: - name: Create user idm_users ipauser: ipaadmin_password: "{{ ipaadmin_password }}" users: - name: idm_user_1 first: Alice last: Acme uid: 10001 gid: 10011 phone: "+555123457" email: idm_user@acme.com passwordexpiration: "2023-01-19 23:59:59" password: "Password123" - name: idm_user_2 first: Bob last: Acme uid: 100011 gid: 10011 - name: idm_user_3 first: Eve last: Acme uid: 1000111 gid: 10011NoteIf you do not specify the update_password: on_create option, Ansible re-sets the user password every time the playbook is run: if the user has changed the password since the last time the playbook was run, Ansible re-sets password.
Run the playbook:
$ ansible-playbook --vault-password-file=password_file -v -i path_to_inventory_directory/inventory.file path_to_playbooks_directory/add-users.yml
Verification steps
You can verify if the user account exists in IdM by using the
ipa user-showcommand:Log into
ipaserveras administrator:$ ssh administrator@server.idm.example.com Password: [admin@server /]$Display information about idm_user_1:
$ ipa user-show idm_user_1 User login: idm_user_1 First name: Alice Last name: Acme Password: True ....
The user named idm_user_1 is present in IdM.
7.4. Ensuring the presence of multiple IdM users from a JSON file using Ansible playbooks
The following procedure describes how you can ensure the presence of multiple users in IdM using an Ansible playbook. The users are stored in a JSON file.
Prerequisites
-
You know the IdM
adminpassword. You have configured your Ansible control node to meet the following requirements:
- You are using Ansible version 2.14 or later.
-
You have installed the
ansible-freeipapackage on the Ansible controller. - The example assumes that in the ~/MyPlaybooks/ directory, you have created an Ansible inventory file with the fully-qualified domain name (FQDN) of the IdM server.
-
The example assumes that the secret.yml Ansible vault stores your
ipaadmin_password.
-
The target node, that is the node on which the
ansible-freeipamodule is executed, is part of the IdM domain as an IdM client, server or replica.
Procedure
Create an inventory file, for example
inventory.file, and defineipaserverin it:[ipaserver] server.idm.example.com
Create an Ansible playbook file with the necessary tasks. Reference the
JSONfile with the data of the users whose presence you want to ensure. To simplify this step, you can copy and modify the example in the/usr/share/doc/ansible-freeipa/ensure-users-present-ymlfile.ymlfile:--- - name: Ensure users' presence hosts: ipaserver vars_files: - /home/user_name/MyPlaybooks/secret.yml tasks: - name: Include users.json include_vars: file: users.json - name: Users present ipauser: ipaadmin_password: "{{ ipaadmin_password }}" users: "{{ users }}"Create the
users.jsonfile, and add the IdM users into it. To simplify this step, you can copy and modify the example in the/usr/share/doc/ansible-freeipa/playbooks/user/users.jsonfile. For example, to create users idm_user_1, idm_user_2, and idm_user_3, and add Password123 as the password of idm_user_1:{ "users": [ { "name": "idm_user_1", "first": "Alice", "last": "Acme", "password": "Password123" }, { "name": "idm_user_2", "first": "Bob", "last": "Acme" }, { "name": "idm_user_3", "first": "Eve", "last": "Acme" } ] }Run the Ansible playbook. Specify the playbook file, the file storing the password protecting the secret.yml file, and the inventory file:
$ ansible-playbook --vault-password-file=password_file -v -i path_to_inventory_directory/inventory.file path_to_playbooks_directory/ensure-users-present-jsonfile.yml
Verification steps
You can verify if the user accounts are present in IdM using the
ipa user-showcommand:Log into
ipaserveras administrator:$ ssh administrator@server.idm.example.com Password: [admin@server /]$Display information about idm_user_1:
$ ipa user-show idm_user_1 User login: idm_user_1 First name: Alice Last name: Acme Password: True ....
The user named idm_user_1 is present in IdM.
7.5. Ensuring the absence of users using Ansible playbooks
The following procedure describes how you can use an Ansible playbook to ensure that specific users are absent from IdM.
Prerequisites
-
You know the IdM
adminpassword. You have configured your Ansible control node to meet the following requirements:
- You are using Ansible version 2.14 or later.
-
You have installed the
ansible-freeipapackage on the Ansible controller. - The example assumes that in the ~/MyPlaybooks/ directory, you have created an Ansible inventory file with the fully-qualified domain name (FQDN) of the IdM server.
-
The example assumes that the secret.yml Ansible vault stores your
ipaadmin_password.
-
The target node, that is the node on which the
ansible-freeipamodule is executed, is part of the IdM domain as an IdM client, server or replica.
Procedure
Create an inventory file, for example
inventory.file, and defineipaserverin it:[ipaserver] server.idm.example.com
Create an Ansible playbook file with the users whose absence from IdM you want to ensure. To simplify this step, you can copy and modify the example in the
/usr/share/doc/ansible-freeipa/playbooks/user/ensure-users-present.ymlfile. For example, to delete users idm_user_1, idm_user_2, and idm_user_3:--- - name: Playbook to handle users hosts: ipaserver vars_files: - /home/user_name/MyPlaybooks/secret.yml tasks: - name: Delete users idm_user_1, idm_user_2, idm_user_3 ipauser: ipaadmin_password: "{{ ipaadmin_password }}" users: - name: idm_user_1 - name: idm_user_2 - name: idm_user_3 state: absentRun the Ansible playbook. Specify the playbook file, the file storing the password protecting the secret.yml file, and the inventory file:
$ ansible-playbook --vault-password-file=password_file -v -i path_to_inventory_directory/inventory.file path_to_playbooks_directory/delete-users.yml
Verification steps
You can verify that the user accounts do not exist in IdM by using the ipa user-show command:
Log into
ipaserveras administrator:$ ssh administrator@server.idm.example.com Password: [admin@server /]$Request information about idm_user_1:
$ ipa user-show idm_user_1 ipa: ERROR: idm_user_1: user not foundThe user named idm_user_1 does not exist in IdM.
7.6. Additional resources
-
See the
README-user.mdMarkdown file in the/usr/share/doc/ansible-freeipa/directory. -
See sample Ansible playbooks in the
/usr/share/doc/ansible-freeipa/playbooks/userdirectory.
Chapter 8. Managing user groups using Ansible playbooks
This section introduces user group management using Ansible playbooks.
A user group is a set of users with common privileges, password policies, and other characteristics.
A user group in Identity Management (IdM) can include:
- IdM users
- other IdM user groups
- external users, which are users that exist outside of IdM
The section includes the following topics:
- The different group types in IdM
- Direct and indirect group members
- Ensuring the presence of IdM groups and group members using Ansible playbooks
- Using Ansible to enable AD users to administer IdM
- Ensuring the presence of member managers in IDM user groups using Ansible playbooks
- Ensuring the absence of member managers in IDM user groups using Ansible playbooks
8.1. The different group types in IdM
IdM supports the following types of groups:
- POSIX groups (the default)
POSIX groups support Linux POSIX attributes for their members. Note that groups that interact with Active Directory cannot use POSIX attributes.
POSIX attributes identify users as separate entities. Examples of POSIX attributes relevant to users include
uidNumber, a user number (UID), andgidNumber, a group number (GID).- Non-POSIX groups
Non-POSIX groups do not support POSIX attributes. For example, these groups do not have a GID defined.
All members of this type of group must belong to the IdM domain.
- External groups
Use external groups to add group members that exist in an identity store outside of the IdM domain, such as:
- A local system
- An Active Directory domain
- A directory service
External groups do not support POSIX attributes. For example, these groups do not have a GID defined.
Table 8.1. User groups created by default
| Group name | Default group members |
|---|---|
|
| All IdM users |
|
|
Users with administrative privileges, including the default |
|
| This is a legacy group that no longer has any special privileges |
|
| Users with privileges to manage the Active Directory trusts |
When you add a user to a user group, the user gains the privileges and policies associated with the group. For example, to grant administrative privileges to a user, add the user to the admins group.
Do not delete the admins group. As admins is a pre-defined group required by IdM, this operation causes problems with certain commands.
In addition, IdM creates user private groups by default whenever a new user is created in IdM. For more information about private groups, see Adding users without a private group.
8.2. Direct and indirect group members
User group attributes in IdM apply to both direct and indirect members: when group B is a member of group A, all users in group B are considered indirect members of group A.
For example, in the following diagram:
- User 1 and User 2 are direct members of group A.
- User 3, User 4, and User 5 are indirect members of group A.
Figure 8.1. Direct and Indirect Group Membership

If you set a password policy for user group A, the policy also applies to all users in user group B.
8.3. Ensuring the presence of IdM groups and group members using Ansible playbooks
The following procedure describes ensuring the presence of IdM groups and group members - both users and user groups - using an Ansible playbook.
Prerequisites
- You know the IdM administrator password.
You have configured your Ansible control node to meet the following requirements:
- You are using Ansible version 2.14 or later.
-
You have installed the
ansible-freeipapackage on the Ansible controller. - The example assumes that in the ~/MyPlaybooks/ directory, you have created an Ansible inventory file with the fully-qualified domain name (FQDN) of the IdM server.
-
The example assumes that the secret.yml Ansible vault stores your
ipaadmin_password.
-
The target node, that is the node on which the
ansible-freeipamodule is executed, is part of the IdM domain as an IdM client, server or replica. - The users you want to reference in your Ansible playbook exist in IdM. For details on ensuring the presence of users using Ansible, see Managing user accounts using Ansible playbooks.
Procedure
Create an inventory file, for example
inventory.file, and defineipaserverin it:[ipaserver] server.idm.example.com
Create an Ansible playbook file with the necessary user and group information:
--- - name: Playbook to handle groups hosts: ipaserver vars_files: - /home/user_name/MyPlaybooks/secret.yml tasks: - name: Create group ops with gid 1234 ipagroup: ipaadmin_password: "{{ ipaadmin_password }}" name: ops gidnumber: 1234 - name: Create group sysops ipagroup: ipaadmin_password: "{{ ipaadmin_password }}" name: sysops user: - idm_user - name: Create group appops ipagroup: ipaadmin_password: "{{ ipaadmin_password }}" name: appops - name: Add group members sysops and appops to group ops ipagroup: ipaadmin_password: "{{ ipaadmin_password }}" name: ops group: - sysops - appopsRun the playbook:
$ ansible-playbook --vault-password-file=password_file -v -i path_to_inventory_directory/inventory.file path_to_playbooks_directory/add-group-members.yml
Verification steps
You can verify if the ops group contains sysops and appops as direct members and idm_user as an indirect member by using the ipa group-show command:
Log into
ipaserveras administrator:$ ssh admin@server.idm.example.com Password: [admin@server /]$Display information about ops:
ipaserver]$ ipa group-show ops Group name: ops GID: 1234 Member groups: sysops, appops Indirect Member users: idm_userThe appops and sysops groups - the latter including the idm_user user - exist in IdM.
Additional resources
-
See the
/usr/share/doc/ansible-freeipa/README-group.mdMarkdown file.
8.4. Using Ansible to add multiple IdM groups in a single task
You can use the ansible-freeipa ipagroup module to add, modify, and delete multiple Identity Management (IdM) user groups with a single Ansible task. For that, use the groups option of the ipagroup module.
Using the groups option, you can also specify multiple group variables that only apply to a particular group. Define this group by the name variable, which is the only mandatory variable for the groups option.
Complete this procedure to ensure the presence of the sysops and the appops groups in IdM in a single task. Define the sysops group as a nonposix group and the appops group as an external group.
Prerequisites
On the control node:
- You are using Ansible version 2.14 or later.
-
You have installed the
ansible-freeipapackage. - You have created an Ansible inventory file with the fully-qualified domain name (FQDN) of the IdM server in the ~/MyPlaybooks/ directory.
- You are using RHEL 8.9 and later.
-
You have stored your
ipaadmin_passwordin the secret.yml Ansible vault.
Procedure
Create your Ansible playbook file add-nonposix-and-external-groups.yml with the following content:
--- - name: Playbook to add nonposix and external groups hosts: ipaserver vars_files: - /home/user_name/MyPlaybooks/secret.yml tasks: - name: Add nonposix group sysops and external group appops ipagroup: ipaadmin_password: "{{ ipaadmin_password }}" groups: - name: sysops nonposix: true - name: appops external: trueRun the playbook:
$ ansible-playbook --vault-password-file=password_file -v -i <path_to_inventory_directory>/hosts <path_to_playbooks_directory>/add-nonposix-and-external-groups.yml
Additional resources
8.5. Using Ansible to enable AD users to administer IdM
Follow this procedure to use an Ansible playbook to ensure that a user ID override is present in an Identity Management (IdM) group. The user ID override is the override of an Active Directory (AD) user that you created in the Default Trust View after you established a trust with AD. As a result of running the playbook, an AD user, for example an AD administrator, is able to fully administer IdM without having two different accounts and passwords.
Prerequisites
-
You know the IdM
adminpassword. - You have installed a trust with AD.
-
The user ID override of the AD user already exists in IdM. If it does not, create it with the
ipa idoverrideuser-add 'default trust view' ad_user@ad.example.comcommand. - The group to which you are adding the user ID override already exists in IdM.
-
You are using the 4.8.7 version of IdM or later. To view the version of IdM you have installed on your server, enter
ipa --version. You have configured your Ansible control node to meet the following requirements:
- You are using Ansible version 2.14 or later.
-
You have installed the
ansible-freeipapackage on the Ansible controller. - The example assumes that in the ~/MyPlaybooks/ directory, you have created an Ansible inventory file with the fully-qualified domain name (FQDN) of the IdM server.
-
The example assumes that the secret.yml Ansible vault stores your
ipaadmin_password.
-
The target node, that is the node on which the
ansible-freeipamodule is executed, is part of the IdM domain as an IdM client, server or replica.
Procedure
Navigate to your ~/MyPlaybooks/ directory:
$ cd ~/MyPlaybooks/Create an
add-useridoverride-to-group.ymlplaybook with the following content:--- - name: Playbook to ensure presence of users in a group hosts: ipaserver - name: Ensure the ad_user@ad.example.com user ID override is a member of the admins group: ipagroup: ipaadmin_password: "{{ ipaadmin_password }}" name: admins idoverrideuser: - ad_user@ad.example.comIn the example:
-
Secret123 is the IdM
adminpassword. -
adminsis the name of the IdM POSIX group to which you are adding the ad_user@ad.example.com ID override. Members of this group have full administrator privileges. - ad_user@ad.example.com is the user ID override of an AD administrator. The user is stored in the AD domain with which a trust has been established.
-
Secret123 is the IdM
- Save the file.
Run the Ansible playbook. Specify the playbook file, the file storing the password protecting the secret.yml file, and the inventory file:
$ ansible-playbook --vault-password-file=password_file -v -i inventory add-useridoverride-to-group.yml
Additional resources
- ID overrides for AD users
- /usr/share/doc/ansible-freeipa/README-group.md
- /usr/share/doc/ansible-freeipa/playbooks/user
- Using ID views in Active Directory environments
- Enabling AD users to administer IdM
8.6. Ensuring the presence of member managers in IdM user groups using Ansible playbooks
The following procedure describes ensuring the presence of IdM member managers - both users and user groups - using an Ansible playbook.
Prerequisites
- You know the IdM administrator password.
You have configured your Ansible control node to meet the following requirements:
- You are using Ansible version 2.14 or later.
-
You have installed the
ansible-freeipapackage on the Ansible controller. - The example assumes that in the ~/MyPlaybooks/ directory, you have created an Ansible inventory file with the fully-qualified domain name (FQDN) of the IdM server.
-
The example assumes that the secret.yml Ansible vault stores your
ipaadmin_password.
-
The target node, that is the node on which the
ansible-freeipamodule is executed, is part of the IdM domain as an IdM client, server or replica. - You must have the name of the user or group you are adding as member managers and the name of the group you want them to manage.
Procedure
Create an inventory file, for example
inventory.file, and defineipaserverin it:[ipaserver] server.idm.example.com
Create an Ansible playbook file with the necessary user and group member management information:
--- - name: Playbook to handle membership management hosts: ipaserver vars_files: - /home/user_name/MyPlaybooks/secret.yml tasks: - name: Ensure user test is present for group_a ipagroup: ipaadmin_password: "{{ ipaadmin_password }}" name: group_a membermanager_user: test - name: Ensure group_admins is present for group_a ipagroup: ipaadmin_password: "{{ ipaadmin_password }}" name: group_a membermanager_group: group_adminsRun the playbook:
$ ansible-playbook --vault-password-file=password_file -v -i path_to_inventory_directory/inventory.file path_to_playbooks_directory/add-member-managers-user-groups.yml
Verification steps
You can verify if the group_a group contains test as a member manager and group_admins is a member manager of group_a by using the ipa group-show command:
Log into
ipaserveras administrator:$ ssh admin@server.idm.example.com Password: [admin@server /]$Display information about managergroup1:
ipaserver]$ ipa group-show group_a Group name: group_a GID: 1133400009 Membership managed by groups: group_admins Membership managed by users: test
Additional resources
-
See
ipa host-add-member-manager --help. -
See the
ipaman page.
8.7. Ensuring the absence of member managers in IdM user groups using Ansible playbooks
The following procedure describes ensuring the absence of IdM member managers - both users and user groups - using an Ansible playbook.
Prerequisites
- You know the IdM administrator password.
You have configured your Ansible control node to meet the following requirements:
- You are using Ansible version 2.14 or later.
-
You have installed the
ansible-freeipapackage on the Ansible controller. - The example assumes that in the ~/MyPlaybooks/ directory, you have created an Ansible inventory file with the fully-qualified domain name (FQDN) of the IdM server.
-
The example assumes that the secret.yml Ansible vault stores your
ipaadmin_password.
-
The target node, that is the node on which the
ansible-freeipamodule is executed, is part of the IdM domain as an IdM client, server or replica. - You must have the name of the existing member manager user or group you are removing and the name of the group they are managing.
Procedure
Create an inventory file, for example
inventory.file, and defineipaserverin it:[ipaserver] server.idm.example.com
Create an Ansible playbook file with the necessary user and group member management information:
--- - name: Playbook to handle membership management hosts: ipaserver vars_files: - /home/user_name/MyPlaybooks/secret.yml tasks: - name: Ensure member manager user and group members are absent for group_a ipagroup: ipaadmin_password: "{{ ipaadmin_password }}" name: group_a membermanager_user: test membermanager_group: group_admins action: member state: absentRun the playbook:
$ ansible-playbook --vault-password-file=password_file -v -i path_to_inventory_directory/inventory.file path_to_playbooks_directory/ensure-member-managers-are-absent.yml
Verification steps
You can verify if the group_a group does not contain test as a member manager and group_admins as a member manager of group_a by using the ipa group-show command:
Log into
ipaserveras administrator:$ ssh admin@server.idm.example.com Password: [admin@server /]$Display information about group_a:
ipaserver]$ ipa group-show group_a Group name: group_a GID: 1133400009
Additional resources
-
See
ipa host-remove-member-manager --help. -
See the
ipaman page.
Chapter 9. Using Ansible to automate group membership in IdM
Using automatic group membership, you can assign users and hosts user groups and host groups automatically, based on their attributes. For example, you can:
-
Divide employees' user entries into groups based on the employees' manager, location, position or any other attribute. You can list all attributes by entering
ipa user-add --helpon the command-line. -
Divide hosts into groups based on their class, location, or any other attribute. You can list all attributes by entering
ipa host-add --helpon the command-line. - Add all users or all hosts to a single global group.
You can use Red Hat Ansible Engine to automate the management of automatic group membership in Identity Management (IdM).
This section covers the following topics:
- Using Ansible to ensure that an automember rule for an IdM user group is present
- Using Ansible to ensure that a condition is present in an IdM user group automember rule
- Using Ansible to ensure that a condition is absent in an IdM user group automember rule
- Using Ansible to ensure that an automember rule for an IdM group is absent
- Using Ansible to ensure that a condition is present in an IdM host group automember rule
9.1. Using Ansible to ensure that an automember rule for an IdM user group is present
The following procedure describes how to use an Ansible playbook to ensure an automember rule for an Identity Management (IdM) group exists. In the example, the presence of an automember rule is ensured for the testing_group user group.
Prerequisites
-
You know the IdM
adminpassword. - The testing_group user group exists in IdM.
You have configured your Ansible control node to meet the following requirements:
- You are using Ansible version 2.14 or later.
-
You have installed the
ansible-freeipapackage on the Ansible controller. - The example assumes that in the ~/MyPlaybooks/ directory, you have created an Ansible inventory file with the fully-qualified domain name (FQDN) of the IdM server.
-
The example assumes that the secret.yml Ansible vault stores your
ipaadmin_password.
-
The target node, that is the node on which the
ansible-freeipamodule is executed, is part of the IdM domain as an IdM client, server or replica.
Procedure
Navigate to your ~/MyPlaybooks/ directory:
$ cd ~/MyPlaybooks/Copy the
automember-group-present.ymlAnsible playbook file located in the/usr/share/doc/ansible-freeipa/playbooks/automember/directory:$ cp /usr/share/doc/ansible-freeipa/playbooks/automember/automember-group-present.yml automember-group-present-copy.yml-
Open the
automember-group-present-copy.ymlfile for editing. Adapt the file by setting the following variables in the
ipaautomembertask section:-
Set the
ipaadmin_passwordvariable to the password of the IdMadmin. -
Set the
namevariable to testing_group. -
Set the
automember_typevariable to group. -
Ensure that the
statevariable is set topresent.
This is the modified Ansible playbook file for the current example:
--- - name: Automember group present example hosts: ipaserver vars_files: - /home/user_name/MyPlaybooks/secret.yml tasks: - name: Ensure group automember rule admins is present ipaautomember: ipaadmin_password: "{{ ipaadmin_password }}" name: testing_group automember_type: group state: present-
Set the
- Save the file.
Run the Ansible playbook. Specify the playbook file, the file storing the password protecting the secret.yml file, and the inventory file:
$ ansible-playbook --vault-password-file=password_file -v -i inventory automember-group-present-copy.yml
9.2. Using Ansible to ensure that a specified condition is present in an IdM user group automember rule
Additional resources
The following procedure describes how to use an Ansible playbook to ensure that a specified condition exists in an automember rule for an Identity Management (IdM) group. In the example, the presence of a UID-related condition in the automember rule is ensured for the testing_group group. By specifying the .* condition, you ensure that all future IdM users automatically become members of the testing_group.
Prerequisites
-
You know the IdM
adminpassword. - The testing_group user group and automember user group rule exist in IdM.
You have configured your Ansible control node to meet the following requirements:
- You are using Ansible version 2.14 or later.
-
You have installed the
ansible-freeipapackage on the Ansible controller. - The example assumes that in the ~/MyPlaybooks/ directory, you have created an Ansible inventory file with the fully-qualified domain name (FQDN) of the IdM server.
-
The example assumes that the secret.yml Ansible vault stores your
ipaadmin_password.
-
The target node, that is the node on which the
ansible-freeipamodule is executed, is part of the IdM domain as an IdM client, server or replica.
Procedure
Navigate to your ~/MyPlaybooks/ directory:
$ cd ~/MyPlaybooks/Copy the
automember-hostgroup-rule-present.ymlAnsible playbook file located in the/usr/share/doc/ansible-freeipa/playbooks/automember/directory and name it, for example, automember-usergroup-rule-present.yml:$ cp /usr/share/doc/ansible-freeipa/playbooks/automember/automember-hostgroup-rule-present.yml automember-usergroup-rule-present.yml-
Open the
automember-usergroup-rule-present.ymlfile for editing. Adapt the file by modifying the following parameters:
- Rename the playbook to correspond to your use case, for example: Automember user group rule member present.
- Rename the task to correspond to your use case, for example: Ensure an automember condition for a user group is present.
Set the following variables in the
ipaautomembertask section:-
Set the
ipaadmin_passwordvariable to the password of the IdMadmin. -
Set the
namevariable to testing_group. -
Set the
automember_typevariable togroup. -
Ensure that the
statevariable is set topresent. -
Ensure that the
actionvariable is set tomember. -
Set the
inclusivekeyvariable toUID. -
Set the
inclusiveexpressionvariable to .*
-
Set the
This is the modified Ansible playbook file for the current example:
--- - name: Automember user group rule member present hosts: ipaserver vars_files: - /home/user_name/MyPlaybooks/secret.yml tasks: - name: Ensure an automember condition for a user group is present ipaautomember: ipaadmin_password: "{{ ipaadmin_password }}" name: testing_group automember_type: group state: present action: member inclusive: - key: UID expression: .*
- Save the file.
Run the Ansible playbook. Specify the playbook file, the file storing the password protecting the secret.yml file, and the inventory file:
$ ansible-playbook --vault-password-file=password_file -v -i inventory automember-usergroup-rule-present.yml
Verification steps
Log in as an IdM administrator.
$ kinit adminAdd a user, for example:
$ ipa user-add user101 --first user --last 101 ----------------------- Added user "user101" ----------------------- User login: user101 First name: user Last name: 101 ... Member of groups: ipausers, testing_group ...
9.3. Using Ansible to ensure that a condition is absent from an IdM user group automember rule
Additional resources
The following procedure describes how to use an Ansible playbook to ensure a condition is absent from an automember rule for an Identity Management (IdM) group. In the example, the absence of a condition in the automember rule is ensured that specifies that users whose initials are dp should be included. The automember rule is applied to the testing_group group. By applying the condition, you ensure that no future IdM user whose initials are dp becomes a member of the testing_group.
Prerequisites
-
You know the IdM
adminpassword. - The testing_group user group and automember user group rule exist in IdM.
You have configured your Ansible control node to meet the following requirements:
- You are using Ansible version 2.14 or later.
-
You have installed the
ansible-freeipapackage on the Ansible controller. - The example assumes that in the ~/MyPlaybooks/ directory, you have created an Ansible inventory file with the fully-qualified domain name (FQDN) of the IdM server.
-
The example assumes that the secret.yml Ansible vault stores your
ipaadmin_password.
-
The target node, that is the node on which the
ansible-freeipamodule is executed, is part of the IdM domain as an IdM client, server or replica.
Procedure
Navigate to your ~/MyPlaybooks/ directory:
$ cd ~/MyPlaybooks/Copy the
automember-hostgroup-rule-absent.ymlAnsible playbook file located in the/usr/share/doc/ansible-freeipa/playbooks/automember/directory and name it, for example, automember-usergroup-rule-absent.yml:$ cp /usr/share/doc/ansible-freeipa/playbooks/automember/automember-hostgroup-rule-absent.yml automember-usergroup-rule-absent.yml-
Open the
automember-usergroup-rule-absent.ymlfile for editing. Adapt the file by modifying the following parameters:
- Rename the playbook to correspond to your use case, for example: Automember user group rule member absent.
- Rename the task to correspond to your use case, for example: Ensure an automember condition for a user group is absent.
Set the following variables in the
ipaautomembertask section:-
Set the
ipaadmin_passwordvariable to the password of the IdMadmin. -
Set the
namevariable to testing_group. -
Set the
automember_typevariable to group. -
Ensure that the
statevariable is set toabsent. -
Ensure that the
actionvariable is set tomember. -
Set the
inclusivekeyvariable toinitials. -
Set the
inclusiveexpressionvariable to dp.
-
Set the
This is the modified Ansible playbook file for the current example:
--- - name: Automember user group rule member absent hosts: ipaserver vars_files: - /home/user_name/MyPlaybooks/secret.yml tasks: - name: Ensure an automember condition for a user group is absent ipaautomember: ipaadmin_password: "{{ ipaadmin_password }}" name: testing_group automember_type: group state: absent action: member inclusive: - key: initials expression: dp
- Save the file.
Run the Ansible playbook. Specify the playbook file, the file storing the password protecting the secret.yml file, and the inventory file:
$ ansible-playbook --vault-password-file=password_file -v -i inventory automember-usergroup-rule-absent.yml
Verification steps
Log in as an IdM administrator.
$ kinit adminView the automember group:
$ ipa automember-show --type=group testing_group Automember Rule: testing_group
The absence of an Inclusive Regex: initials=dp entry in the output confirms that the testing_group automember rule does not contain the condition specified.
9.4. Using Ansible to ensure that an automember rule for an IdM user group is absent
Additional resources
The following procedure describes how to use an Ansible playbook to ensure an automember rule is absent for an Identity Management (IdM) group. In the example, the absence of an automember rule is ensured for the testing_group group.
Deleting an automember rule also deletes all conditions associated with the rule. To remove only specific conditions from a rule, see Using Ansible to ensure that a condition is absent in an IdM user group automember rule.
Prerequisites
-
You know the IdM
adminpassword. You have configured your Ansible control node to meet the following requirements:
- You are using Ansible version 2.14 or later.
-
You have installed the
ansible-freeipapackage on the Ansible controller. - The example assumes that in the ~/MyPlaybooks/ directory, you have created an Ansible inventory file with the fully-qualified domain name (FQDN) of the IdM server.
-
The example assumes that the secret.yml Ansible vault stores your
ipaadmin_password.
-
The target node, that is the node on which the
ansible-freeipamodule is executed, is part of the IdM domain as an IdM client, server or replica.
Procedure
Navigate to your ~/MyPlaybooks/ directory:
$ cd ~/MyPlaybooks/Copy the
automember-group-absent.ymlAnsible playbook file located in the/usr/share/doc/ansible-freeipa/playbooks/automember/directory:$ cp /usr/share/doc/ansible-freeipa/playbooks/automember/automember-group-absent.yml automember-group-absent-copy.yml-
Open the
automember-group-absent-copy.ymlfile for editing. Adapt the file by setting the following variables in the
ipaautomembertask section:-
Set the
ipaadmin_passwordvariable to the password of the IdMadmin. -
Set the
namevariable to testing_group. -
Set the
automember_typevariable to group. -
Ensure that the
statevariable is set toabsent.
This is the modified Ansible playbook file for the current example:
--- - name: Automember group absent example hosts: ipaserver vars_files: - /home/user_name/MyPlaybooks/secret.yml tasks: - name: Ensure group automember rule admins is absent ipaautomember: ipaadmin_password: "{{ ipaadmin_password }}" name: testing_group automember_type: group state: absent-
Set the
- Save the file.
Run the Ansible playbook. Specify the playbook file, the file storing the password protecting the secret.yml file, and the inventory file:
$ ansible-playbook --vault-password-file=password_file -v -i inventory automember-group-absent.yml
Additional resources
-
See the
README-automember.mdfile in the/usr/share/doc/ansible-freeipa/directory. -
See the
/usr/share/doc/ansible-freeipa/playbooks/automemberdirectory.
9.5. Using Ansible to ensure that a condition is present in an IdM host group automember rule
Follow this procedure to use Ansible to ensure that a condition is present in an IdM host group automember rule. The example describes how to ensure that hosts with the FQDN of .*.idm.example.com are members of the primary_dns_domain_hosts host group and hosts whose FQDN is .*.example.org are not members of the primary_dns_domain_hosts host group.
Prerequisites
-
You know the IdM
adminpassword. - The primary_dns_domain_hosts host group and automember host group rule exist in IdM.
You have configured your Ansible control node to meet the following requirements:
- You are using Ansible version 2.14 or later.
-
You have installed the
ansible-freeipapackage on the Ansible controller. - The example assumes that in the ~/MyPlaybooks/ directory, you have created an Ansible inventory file with the fully-qualified domain name (FQDN) of the IdM server.
-
The example assumes that the secret.yml Ansible vault stores your
ipaadmin_password.
-
The target node, that is the node on which the
ansible-freeipamodule is executed, is part of the IdM domain as an IdM client, server or replica.
Procedure
Navigate to your ~/MyPlaybooks/ directory:
$ cd ~/MyPlaybooks/Copy the
automember-hostgroup-rule-present.ymlAnsible playbook file located in the/usr/share/doc/ansible-freeipa/playbooks/automember/directory:$ cp /usr/share/doc/ansible-freeipa/playbooks/automember/automember-hostgroup-rule-present.yml automember-hostgroup-rule-present-copy.yml-
Open the
automember-hostgroup-rule-present-copy.ymlfile for editing. Adapt the file by setting the following variables in the
ipaautomembertask section:-
Set the
ipaadmin_passwordvariable to the password of the IdMadmin. -
Set the
namevariable to primary_dns_domain_hosts. -
Set the
automember_typevariable to hostgroup. -
Ensure that the
statevariable is set topresent. -
Ensure that the
actionvariable is set tomember. -
Ensure that the
inclusivekeyvariable is set tofqdn. -
Set the corresponding
inclusiveexpressionvariable to .*.idm.example.com. -
Set the
exclusivekeyvariable tofqdn. -
Set the corresponding
exclusiveexpressionvariable to .*.example.org.
This is the modified Ansible playbook file for the current example:
--- - name: Automember user group rule member present hosts: ipaserver vars_files: - /home/user_name/MyPlaybooks/secret.yml tasks: - name: Ensure an automember condition for a user group is present ipaautomember: ipaadmin_password: "{{ ipaadmin_password }}" name: primary_dns_domain_hosts automember_type: hostgroup state: present action: member inclusive: - key: fqdn expression: .*.idm.example.com exclusive: - key: fqdn expression: .*.example.org-
Set the
- Save the file.
Run the Ansible playbook. Specify the playbook file, the file storing the password protecting the secret.yml file, and the inventory file:
$ ansible-playbook --vault-password-file=password_file -v -i inventory automember-hostgroup-rule-present-copy.yml
Additional resources
-
See the
README-automember.mdfile in the/usr/share/doc/ansible-freeipa/directory. -
See the
/usr/share/doc/ansible-freeipa/playbooks/automemberdirectory.
Chapter 10. Using Ansible playbooks to manage self-service rules in IdM
This section introduces self-service rules in Identity Management (IdM) and describes how to create and edit self-service access rules using Ansible playbooks. Self-service access control rules allow an IdM entity to perform specified operations on its IdM Directory Server entry.
- Self-service access control in IdM
- Using Ansible to ensure that a self-service rule is present
- Using Ansible to ensure that a self-service rule is absent
- Using Ansible to ensure that a self-service rule has specific attributes
- Using Ansible to ensure that a self-service rule does not have specific attributes
10.1. Self-service access control in IdM
Self-service access control rules define which operations an Identity Management (IdM) entity can perform on its IdM Directory Server entry: for example, IdM users have the ability to update their own passwords.
This method of control allows an authenticated IdM entity to edit specific attributes within its LDAP entry, but does not allow add or delete operations on the entire entry.
Be careful when working with self-service access control rules: configuring access control rules improperly can inadvertently elevate an entity’s privileges.
10.2. Using Ansible to ensure that a self-service rule is present
The following procedure describes how to use an Ansible playbook to define self-service rules and ensure their presence on an Identity Management (IdM) server. In this example, the new Users can manage their own name details rule grants users the ability to change their own givenname, displayname, title and initials attributes. This allows them to, for example, change their display name or initials if they want to.
Prerequisites
- You know the IdM administrator password.
You have configured your Ansible control node to meet the following requirements:
- You are using Ansible version 2.14 or later.
-
You have installed the
ansible-freeipapackage on the Ansible controller. - The example assumes that in the ~/MyPlaybooks/ directory, you have created an Ansible inventory file with the fully-qualified domain name (FQDN) of the IdM server.
-
The example assumes that the secret.yml Ansible vault stores your
ipaadmin_password.
-
The target node, that is the node on which the
ansible-freeipamodule is executed, is part of the IdM domain as an IdM client, server or replica.
Procedure
Navigate to the ~/MyPlaybooks/ directory:
$ cd ~/MyPlaybooks/Make a copy of the
selfservice-present.ymlfile located in the/usr/share/doc/ansible-freeipa/playbooks/selfservice/directory:$ cp /usr/share/doc/ansible-freeipa/playbooks/selfservice/selfservice-present.yml selfservice-present-copy.yml-
Open the
selfservice-present-copy.ymlAnsible playbook file for editing. Adapt the file by setting the following variables in the
ipaselfservicetask section:-
Set the
ipaadmin_passwordvariable to the password of the IdM administrator. -
Set the
namevariable to the name of the new self-service rule. -
Set the
permissionvariable to a comma-separated list of permissions to grant:readandwrite. -
Set the
attributevariable to a list of attributes that users can manage themselves:givenname,displayname,title, andinitials.
This is the modified Ansible playbook file for the current example:
--- - name: Self-service present hosts: ipaserver vars_files: - /home/user_name/MyPlaybooks/secret.yml tasks: - name: Ensure self-service rule "Users can manage their own name details" is present ipaselfservice: ipaadmin_password: "{{ ipaadmin_password }}" name: "Users can manage their own name details" permission: read, write attribute: - givenname - displayname - title - initials-
Set the
- Save the file.
Run the Ansible playbook. Specify the playbook file, the file storing the password protecting the secret.yml file, and the inventory file:
$ ansible-playbook --vault-password-file=password_file -v -i inventory selfservice-present-copy.yml
Additional resources
- See Self-service access control in IdM.
-
See the
README-selfservice.mdfile in the/usr/share/doc/ansible-freeipa/directory. -
See the
/usr/share/doc/ansible-freeipa/playbooks/selfservicedirectory.
10.3. Using Ansible to ensure that a self-service rule is absent
The following procedure describes how to use an Ansible playbook to ensure a specified self-service rule is absent from your IdM configuration. The example below describes how to make sure the Users can manage their own name details self-service rule does not exist in IdM. This will ensure that users cannot, for example, change their own display name or initials.
Prerequisites
- You know the IdM administrator password.
You have configured your Ansible control node to meet the following requirements:
- You are using Ansible version 2.14 or later.
-
You have installed the
ansible-freeipapackage on the Ansible controller. - The example assumes that in the ~/MyPlaybooks/ directory, you have created an Ansible inventory file with the fully-qualified domain name (FQDN) of the IdM server.
-
The example assumes that the secret.yml Ansible vault stores your
ipaadmin_password.
-
The target node, that is the node on which the
ansible-freeipamodule is executed, is part of the IdM domain as an IdM client, server or replica.
Procedure
Navigate to the ~/MyPlaybooks/ directory:
$ cd ~/MyPlaybooks/Make a copy of the
selfservice-absent.ymlfile located in the/usr/share/doc/ansible-freeipa/playbooks/selfservice/directory:$ cp /usr/share/doc/ansible-freeipa/playbooks/selfservice/selfservice-absent.yml selfservice-absent-copy.yml-
Open the
selfservice-absent-copy.ymlAnsible playbook file for editing. Adapt the file by setting the following variables in the
ipaselfservicetask section:-
Set the
ipaadmin_passwordvariable to the password of the IdM administrator. -
Set the
namevariable to the name of the self-service rule. -
Set the
statevariable toabsent.
This is the modified Ansible playbook file for the current example:
--- - name: Self-service absent hosts: ipaserver vars_files: - /home/user_name/MyPlaybooks/secret.yml tasks: - name: Ensure self-service rule "Users can manage their own name details" is absent ipaselfservice: ipaadmin_password: "{{ ipaadmin_password }}" name: "Users can manage their own name details" state: absent-
Set the
- Save the file.
Run the Ansible playbook. Specify the playbook file, the file storing the password protecting the secret.yml file, and the inventory file:
$ ansible-playbook --vault-password-file=password_file -v -i inventory selfservice-absent-copy.yml
Additional resources
- See Self-service access control in IdM.
-
See the
README-selfservice.mdfile in the/usr/share/doc/ansible-freeipa/directory. -
See the sample playbooks in the
/usr/share/doc/ansible-freeipa/playbooks/selfservicedirectory.
10.4. Using Ansible to ensure that a self-service rule has specific attributes
The following procedure describes how to use an Ansible playbook to ensure that an already existing self-service rule has specific settings. In the example, you ensure the Users can manage their own name details self-service rule also has the surname member attribute.
Prerequisites
- You know the IdM administrator password.
You have configured your Ansible control node to meet the following requirements:
- You are using Ansible version 2.14 or later.
-
You have installed the
ansible-freeipapackage on the Ansible controller. - The example assumes that in the ~/MyPlaybooks/ directory, you have created an Ansible inventory file with the fully-qualified domain name (FQDN) of the IdM server.
-
The example assumes that the secret.yml Ansible vault stores your
ipaadmin_password.
-
The target node, that is the node on which the
ansible-freeipamodule is executed, is part of the IdM domain as an IdM client, server or replica. - The Users can manage their own name details self-service rule exists in IdM.
Procedure
Navigate to the ~/MyPlaybooks/ directory:
$ cd ~/MyPlaybooks/Make a copy of the
selfservice-member-present.ymlfile located in the/usr/share/doc/ansible-freeipa/playbooks/selfservice/directory:$ cp /usr/share/doc/ansible-freeipa/playbooks/selfservice/selfservice-member-present.yml selfservice-member-present-copy.yml-
Open the
selfservice-member-present-copy.ymlAnsible playbook file for editing. Adapt the file by setting the following variables in the
ipaselfservicetask section:-
Set the
ipaadmin_passwordvariable to the password of the IdM administrator. -
Set the
namevariable to the name of the self-service rule to modify. -
Set the
attributevariable tosurname. -
Set the
actionvariable tomember.
This is the modified Ansible playbook file for the current example:
--- - name: Self-service member present hosts: ipaserver vars_files: - /home/user_name/MyPlaybooks/secret.yml tasks: - name: Ensure selfservice "Users can manage their own name details" member attribute surname is present ipaselfservice: ipaadmin_password: "{{ ipaadmin_password }}" name: "Users can manage their own name details" attribute: - surname action: member-
Set the
- Save the file.
Run the Ansible playbook. Specify the playbook file, the file storing the password protecting the secret.yml file, and the inventory file:
$ ansible-playbook --vault-password-file=password_file -v -i inventory selfservice-member-present-copy.yml
Additional resources
- See Self-service access control in IdM.
-
See the
README-selfservice.mdfile available in the/usr/share/doc/ansible-freeipa/directory. -
See the sample playbooks in the
/usr/share/doc/ansible-freeipa/playbooks/selfservicedirectory.
10.5. Using Ansible to ensure that a self-service rule does not have specific attributes
The following procedure describes how to use an Ansible playbook to ensure that a self-service rule does not have specific settings. You can use this playbook to make sure a self-service rule does not grant undesired access. In the example, you ensure the Users can manage their own name details self-service rule does not have the givenname and surname member attributes.
Prerequisites
- You know the IdM administrator password.
You have configured your Ansible control node to meet the following requirements:
- You are using Ansible version 2.14 or later.
-
You have installed the
ansible-freeipapackage on the Ansible controller. - The example assumes that in the ~/MyPlaybooks/ directory, you have created an Ansible inventory file with the fully-qualified domain name (FQDN) of the IdM server.
-
The example assumes that the secret.yml Ansible vault stores your
ipaadmin_password.
-
The target node, that is the node on which the
ansible-freeipamodule is executed, is part of the IdM domain as an IdM client, server or replica. - The Users can manage their own name details self-service rule exists in IdM.
Procedure
Navigate to the ~/MyPlaybooks/ directory:
$ cd ~/MyPlaybooks/Make a copy of the
selfservice-member-absent.ymlfile located in the/usr/share/doc/ansible-freeipa/playbooks/selfservice/directory:$ cp /usr/share/doc/ansible-freeipa/playbooks/selfservice/selfservice-member-absent.yml selfservice-member-absent-copy.yml-
Open the
selfservice-member-absent-copy.ymlAnsible playbook file for editing. Adapt the file by setting the following variables in the
ipaselfservicetask section:-
Set the
ipaadmin_passwordvariable to the password of the IdM administrator. -
Set the
namevariable to the name of the self-service rule you want to modify. -
Set the
attributevariable togivennameandsurname. -
Set the
actionvariable tomember. -
Set the
statevariable toabsent.
This is the modified Ansible playbook file for the current example:
--- - name: Self-service member absent hosts: ipaserver vars_files: - /home/user_name/MyPlaybooks/secret.yml tasks: - name: Ensure selfservice "Users can manage their own name details" member attributes givenname and surname are absent ipaselfservice: ipaadmin_password: "{{ ipaadmin_password }}" name: "Users can manage their own name details" attribute: - givenname - surname action: member state: absent-
Set the
- Save the file.
Run the Ansible playbook. Specify the playbook file, the file storing the password protecting the secret.yml file, and the inventory file:
$ ansible-playbook --vault-password-file=password_file -v -i inventory selfservice-member-absent-copy.yml
Additional resources
- See Self-service access control in IdM.
-
See the
README-selfservice.mdfile in the/usr/share/doc/ansible-freeipa/directory. -
See the sample playbooks in the
/usr/share/doc/ansible-freeipa/playbooks/selfservicedirectory.
Chapter 11. Delegating permissions to user groups to manage users using Ansible playbooks
Delegation is one of the access control methods in IdM, along with self-service rules and role-based access control (RBAC). You can use delegation to assign permissions to one group of users to manage entries for another group of users.
This section covers the following topics:
- Delegation rules
- Creating the Ansible inventory file for IdM
- Using Ansible to ensure that a delegation rule is present
- Using Ansible to ensure that a delegation rule is absent
- Using Ansible to ensure that a delegation rule has specific attributes
- Using Ansible to ensure that a delegation rule does not have specific attributes
11.1. Delegation rules
You can delegate permissions to user groups to manage users by creating delegation rules.
Delegation rules allow a specific user group to perform write (edit) operations on specific attributes for users in another user group. This form of access control rule is limited to editing the values of a subset of attributes you specify in a delegation rule; it does not grant the ability to add or remove whole entries or control over unspecified attributes.
Delegation rules grant permissions to existing user groups in IdM. You can use delegation to, for example, allow the managers user group to manage selected attributes of users in the employees user group.
11.2. Creating an Ansible inventory file for IdM
When working with Ansible, it is good practice to create, in your home directory, a subdirectory dedicated to Ansible playbooks that you copy and adapt from the /usr/share/doc/ansible-freeipa/* and /usr/share/doc/rhel-system-roles/* subdirectories. This practice has the following advantages:
- You can find all your playbooks in one place.
-
You can run your playbooks without invoking
rootprivileges.
Procedure
Create a directory for your Ansible configuration and playbooks in your home directory:
$ mkdir ~/MyPlaybooks/Change into the ~/MyPlaybooks/ directory:
$ cd ~/MyPlaybooksCreate the ~/MyPlaybooks/ansible.cfg file with the following content:
[defaults] inventory = /home/<username>/MyPlaybooks/inventory [privilege_escalation] become=TrueCreate the ~/MyPlaybooks/inventory file with the following content:
[eu] server.idm.example.com [us] replica.idm.example.com [ipaserver:children] eu us
This configuration defines two host groups, eu and us, for hosts in these locations. Additionally, this configuration defines the ipaserver host group, which contains all hosts from the eu and us groups.
11.3. Using Ansible to ensure that a delegation rule is present
The following procedure describes how to use an Ansible playbook to define privileges for a new IdM delegation rule and ensure its presence. In the example, the new basic manager attributes delegation rule grants the managers group the ability to read and write the following attributes for members of the employees group:
-
businesscategory -
departmentnumber -
employeenumber -
employeetype
Prerequisites
- You know the IdM administrator password.
You have configured your Ansible control node to meet the following requirements:
- You are using Ansible version 2.14 or later.
-
You have installed the
ansible-freeipapackage on the Ansible controller. - The example assumes that in the ~/MyPlaybooks/ directory, you have created an Ansible inventory file with the fully-qualified domain name (FQDN) of the IdM server.
-
The example assumes that the secret.yml Ansible vault stores your
ipaadmin_password.
-
The target node, that is the node on which the
ansible-freeipamodule is executed, is part of the IdM domain as an IdM client, server or replica.
Procedure
Navigate to the ~/MyPlaybooks/ directory:
$ cd ~/MyPlaybooks/Make a copy of the
delegation-present.ymlfile located in the/usr/share/doc/ansible-freeipa/playbooks/delegation/directory:$ cp /usr/share/doc/ansible-freeipa/playbooks/delegation/delegation-present.yml delegation-present-copy.yml-
Open the
delegation-present-copy.ymlAnsible playbook file for editing. Adapt the file by setting the following variables in the
ipadelegationtask section:-
Set the
ipaadmin_passwordvariable to the password of the IdM administrator. -
Set the
namevariable to the name of the new delegation rule. -
Set the
permissionvariable to a comma-separated list of permissions to grant:readandwrite. -
Set the
attributevariable to a list of attributes the delegated user group can manage:businesscategory,departmentnumber,employeenumber, andemployeetype. -
Set the
groupvariable to the name of the group that is being given access to view or modify attributes. -
Set the
membergroupvariable to the name of the group whose attributes can be viewed or modified.
This is the modified Ansible playbook file for the current example:
--- - name: Playbook to manage a delegation rule hosts: ipaserver vars_files: - /home/user_name/MyPlaybooks/secret.yml tasks: - name: Ensure delegation "basic manager attributes" is present ipadelegation: ipaadmin_password: "{{ ipaadmin_password }}" name: "basic manager attributes" permission: read, write attribute: - businesscategory - departmentnumber - employeenumber - employeetype group: managers membergroup: employees-
Set the
- Save the file.
Run the Ansible playbook. Specify the playbook file, the file storing the password protecting the secret.yml file, and the inventory file:
$ ansible-playbook --vault-password-file=password_file -v -i ~/MyPlaybooks/inventory delegation-present-copy.yml
Additional resources
- See Delegation rules.
-
See the
README-delegation.mdfile in the/usr/share/doc/ansible-freeipa/directory. -
See the sample playbooks in the
/usr/share/doc/ansible-freeipa/playbooks/ipadelegationdirectory.
11.4. Using Ansible to ensure that a delegation rule is absent
The following procedure describes how to use an Ansible playbook to ensure a specified delegation rule is absent from your IdM configuration. The example below describes how to make sure the custom basic manager attributes delegation rule does not exist in IdM.
Prerequisites
- You know the IdM administrator password.
You have configured your Ansible control node to meet the following requirements:
- You are using Ansible version 2.14 or later.
-
You have installed the
ansible-freeipapackage on the Ansible controller. - The example assumes that in the ~/MyPlaybooks/ directory, you have created an Ansible inventory file with the fully-qualified domain name (FQDN) of the IdM server.
-
The example assumes that the secret.yml Ansible vault stores your
ipaadmin_password.
-
The target node, that is the node on which the
ansible-freeipamodule is executed, is part of the IdM domain as an IdM client, server or replica.
Procedure
Navigate to the ~/MyPlaybooks/ directory:
$ cd ~/MyPlaybooks>/Make a copy of the
delegation-absent.ymlfile located in the/usr/share/doc/ansible-freeipa/playbooks/delegation/directory:$ cp /usr/share/doc/ansible-freeipa/playbooks/delegation/delegation-present.yml delegation-absent-copy.yml-
Open the
delegation-absent-copy.ymlAnsible playbook file for editing. Adapt the file by setting the following variables in the
ipadelegationtask section:-
Set the
ipaadmin_passwordvariable to the password of the IdM administrator. -
Set the
namevariable to the name of the delegation rule. -
Set the
statevariable toabsent.
This is the modified Ansible playbook file for the current example:
--- - name: Delegation absent hosts: ipaserver vars_files: - /home/user_name/MyPlaybooks/secret.yml tasks: - name: Ensure delegation "basic manager attributes" is absent ipadelegation: ipaadmin_password: "{{ ipaadmin_password }}" name: "basic manager attributes" state: absent-
Set the
- Save the file.
Run the Ansible playbook. Specify the playbook file, the file storing the password protecting the secret.yml file, and the inventory file:
$ ansible-playbook --vault-password-file=password_file -v -i ~/MyPlaybooks/inventory delegation-absent-copy.yml
Additional resources
- See Delegation rules.
-
See the
README-delegation.mdfile in the/usr/share/doc/ansible-freeipa/directory. -
See the sample playbooks in the
/usr/share/doc/ansible-freeipa/playbooks/ipadelegationdirectory.
11.5. Using Ansible to ensure that a delegation rule has specific attributes
The following procedure describes how to use an Ansible playbook to ensure that a delegation rule has specific settings. You can use this playbook to modify a delegation role you have previously created. In the example, you ensure the basic manager attributes delegation rule only has the departmentnumber member attribute.
Prerequisites
- You know the IdM administrator password.
You have configured your Ansible control node to meet the following requirements:
- You are using Ansible version 2.14 or later.
-
You have installed the
ansible-freeipapackage on the Ansible controller. - The example assumes that in the ~/MyPlaybooks/ directory, you have created an Ansible inventory file with the fully-qualified domain name (FQDN) of the IdM server.
-
The example assumes that the secret.yml Ansible vault stores your
ipaadmin_password.
-
The target node, that is the node on which the
ansible-freeipamodule is executed, is part of the IdM domain as an IdM client, server or replica. - The basic manager attributes delegation rule exists in IdM.
Procedure
Navigate to the ~/MyPlaybooks/ directory:
$ cd ~/MyPlaybooks/Make a copy of the
delegation-member-present.ymlfile located in the/usr/share/doc/ansible-freeipa/playbooks/delegation/directory:$ cp /usr/share/doc/ansible-freeipa/playbooks/delegation/delegation-member-present.yml delegation-member-present-copy.yml-
Open the
delegation-member-present-copy.ymlAnsible playbook file for editing. Adapt the file by setting the following variables in the
ipadelegationtask section:-
Set the
ipaadmin_passwordvariable to the password of the IdM administrator. -
Set the
namevariable to the name of the delegation rule to modify. -
Set the
attributevariable todepartmentnumber. -
Set the
actionvariable tomember.
This is the modified Ansible playbook file for the current example:
--- - name: Delegation member present hosts: ipaserver vars_files: - /home/user_name/MyPlaybooks/secret.yml tasks: - name: Ensure delegation "basic manager attributes" member attribute departmentnumber is present ipadelegation: ipaadmin_password: "{{ ipaadmin_password }}" name: "basic manager attributes" attribute: - departmentnumber action: member-
Set the
- Save the file.
Run the Ansible playbook. Specify the playbook file, the file storing the password protecting the secret.yml file, and the inventory file:
$ ansible-playbook --vault-password-file=password_file -v -i ~/MyPlaybooks/inventory delegation-member-present-copy.yml
Additional resources
- See Delegation rules.
-
See the
README-delegation.mdfile in the/usr/share/doc/ansible-freeipa/directory. -
See the sample playbooks in the
/usr/share/doc/ansible-freeipa/playbooks/ipadelegationdirectory.
11.6. Using Ansible to ensure that a delegation rule does not have specific attributes
The following procedure describes how to use an Ansible playbook to ensure that a delegation rule does not have specific settings. You can use this playbook to make sure a delegation role does not grant undesired access. In the example, you ensure the basic manager attributes delegation rule does not have the employeenumber and employeetype member attributes.
Prerequisites
- You know the IdM administrator password.
You have configured your Ansible control node to meet the following requirements:
- You are using Ansible version 2.14 or later.
-
You have installed the
ansible-freeipapackage on the Ansible controller. - The example assumes that in the ~/MyPlaybooks/ directory, you have created an Ansible inventory file with the fully-qualified domain name (FQDN) of the IdM server.
-
The example assumes that the secret.yml Ansible vault stores your
ipaadmin_password.
-
The target node, that is the node on which the
ansible-freeipamodule is executed, is part of the IdM domain as an IdM client, server or replica. - The basic manager attributes delegation rule exists in IdM.
Procedure
Navigate to the ~/MyPlaybooks/ directory:
$ cd ~/MyPlaybooks/Make a copy of the
delegation-member-absent.ymlfile located in the/usr/share/doc/ansible-freeipa/playbooks/delegation/directory:$ cp /usr/share/doc/ansible-freeipa/playbooks/delegation/delegation-member-absent.yml delegation-member-absent-copy.yml-
Open the
delegation-member-absent-copy.ymlAnsible playbook file for editing. Adapt the file by setting the following variables in the
ipadelegationtask section:-
Set the
ipaadmin_passwordvariable to the password of the IdM administrator. -
Set the
namevariable to the name of the delegation rule to modify. -
Set the
attributevariable toemployeenumberandemployeetype. -
Set the
actionvariable tomember. -
Set the
statevariable toabsent.
This is the modified Ansible playbook file for the current example:
--- - name: Delegation member absent hosts: ipaserver vars_files: - /home/user_name/MyPlaybooks/secret.yml tasks: - name: Ensure delegation "basic manager attributes" member attributes employeenumber and employeetype are absent ipadelegation: ipaadmin_password: "{{ ipaadmin_password }}" name: "basic manager attributes" attribute: - employeenumber - employeetype action: member state: absent-
Set the
- Save the file.
Run the Ansible playbook. Specify the playbook file, the file storing the password protecting the secret.yml file, and the inventory file:
$ ansible-playbook --vault-password-file=password_file -v -i ~/MyPlaybooks/inventory delegation-member-absent-copy.yml
Additional resources
- See Delegation rules.
-
See the
README-delegation.mdfile in the/usr/share/doc/ansible-freeipa/directory. -
See the sample playbooks in the
/usr/share/doc/ansible-freeipa/playbooks/ipadelegationdirectory.
Chapter 12. Using Ansible playbooks to manage role-based access control in IdM
Role-based access control (RBAC) is a policy-neutral access-control mechanism defined around roles and privileges. The components of RBAC in Identity Management (IdM) are roles, privileges and permissions:
- Permissions grant the right to perform a specific task such as adding or deleting users, modifying a group, and enabling read-access.
- Privileges combine permissions, for example all the permissions needed to add a new user.
- Roles grant a set of privileges to users, user groups, hosts or host groups.
Especially in large companies, using RBAC can help create a hierarchical system of administrators with their individual areas of responsibility.
This chapter describes the following operations performed when managing RBAC using Ansible playbooks:
- Using Ansible to ensure an IdM RBAC role with privileges is present
- Using Ansible to ensure an IdM RBAC role is absent
- Using Ansible to ensure that a group of users is assigned to an IdM RBAC role
- Using Ansible to ensure that specific users are not assigned to an IdM RBAC role
- Using Ansible to ensure a service is a member of an IdM RBAC role
- Using Ansible to ensure a host is a member of an IdM RBAC role
- Using Ansible to ensure a host group is a member of an IdM RBAC role
12.1. Permissions in IdM
Permissions are the lowest level unit of role-based access control, they define operations together with the LDAP entries to which those operations apply. Comparable to building blocks, permissions can be assigned to as many privileges as needed.
One or more rights define what operations are allowed:
-
write -
read -
search -
compare -
add -
delete -
all
These operations apply to three basic targets:
-
subtree: a domain name (DN); the subtree under this DN -
target filter: an LDAP filter -
target: DN with possible wildcards to specify entries
Additionally, the following convenience options set the corresponding attribute(s):
-
type: a type of object (user, group, etc); setssubtreeandtarget filter -
memberof: members of a group; sets atarget filter -
targetgroup: grants access to modify a specific group (such as granting the rights to manage group membership); sets atarget
With IdM permissions, you can control which users have access to which objects and even which attributes of these objects. IdM enables you to allow or block individual attributes or change the entire visibility of a specific IdM function, such as users, groups, or sudo, to all anonymous users, all authenticated users, or just a certain group of privileged users.
For example, the flexibility of this approach to permissions is useful for an administrator who wants to limit access of users or groups only to the specific sections these users or groups need to access and to make the other sections completely hidden to them.
A permission cannot contain other permissions.
12.2. Default managed permissions
Managed permissions are permissions that come by default with IdM. They behave like other permissions created by the user, with the following differences:
- You cannot delete them or modify their name, location, and target attributes.
They have three sets of attributes:
- Default attributes, the user cannot modify them, as they are managed by IdM
- Included attributes, which are additional attributes added by the user
- Excluded attributes, which are attributes removed by the user
A managed permission applies to all attributes that appear in the default and included attribute sets but not in the excluded set.
While you cannot delete a managed permission, setting its bind type to permission and removing the managed permission from all privileges effectively disables it.
Names of all managed permissions start with System:, for example System: Add Sudo rule or System: Modify Services. Earlier versions of IdM used a different scheme for default permissions. For example, the user could not delete them and was only able to assign them to privileges. Most of these default permissions have been turned into managed permissions, however, the following permissions still use the previous scheme:
- Add Automember Rebuild Membership Task
- Add Configuration Sub-Entries
- Add Replication Agreements
- Certificate Remove Hold
- Get Certificates status from the CA
- Read DNA Range
- Modify DNA Range
- Read PassSync Managers Configuration
- Modify PassSync Managers Configuration
- Read Replication Agreements
- Modify Replication Agreements
- Remove Replication Agreements
- Read LDBM Database Configuration
- Request Certificate
- Request Certificate ignoring CA ACLs
- Request Certificates from a different host
- Retrieve Certificates from the CA
- Revoke Certificate
- Write IPA Configuration
If you attempt to modify a managed permission from the command line, the system does not allow you to change the attributes that you cannot modify, the command fails. If you attempt to modify a managed permission from the Web UI, the attributes that you cannot modify are disabled.
12.3. Privileges in IdM
A privilege is a group of permissions applicable to a role.
While a permission provides the rights to do a single operation, there are certain IdM tasks that require multiple permissions to succeed. Therefore, a privilege combines the different permissions required to perform a specific task.
For example, setting up an account for a new IdM user requires the following permissions:
- Creating a new user entry
- Resetting a user password
- Adding the new user to the default IPA users group
Combining these three low-level tasks into a higher level task in the form of a custom privilege named, for example, Add User makes it easier for a system administrator to manage roles. IdM already contains several default privileges. Apart from users and user groups, privileges are also assigned to hosts and host groups, as well as network services. This practice permits a fine-grained control of operations by a set of users on a set of hosts using specific network services.
A privilege may not contain other privileges.
12.4. Roles in IdM
A role is a list of privileges that users specified for the role possess.
In effect, permissions grant the ability to perform given low-level tasks (such as creating a user entry and adding an entry to a group), privileges combine one or more of these permissions needed for a higher-level task (such as creating a new user in a given group). Roles gather privileges together as needed: for example, a User Administrator role would be able to add, modify, and delete users.
Roles are used to classify permitted actions. They are not used as a tool to implement privilege separation or to protect from privilege escalation.
Roles can not contain other roles.
12.5. Predefined roles in Identity Management
Red Hat Identity Management provides the following range of pre-defined roles:
Table 12.1. Predefined Roles in Identity Management
| Role | Privilege | Description |
|---|---|---|
| Enrollment Administrator | Host Enrollment | Responsible for client, or host, enrollment |
| helpdesk | Modify Users and Reset passwords, Modify Group membership | Responsible for performing simple user administration tasks |
| IT Security Specialist | Netgroups Administrators, HBAC Administrator, Sudo Administrator | Responsible for managing security policy such as host-based access controls, sudo rules |
| IT Specialist | Host Administrators, Host Group Administrators, Service Administrators, Automount Administrators | Responsible for managing hosts |
| Security Architect | Delegation Administrator, Replication Administrators, Write IPA Configuration, Password Policy Administrator | Responsible for managing the Identity Management environment, creating trusts, creating replication agreements |
| User Administrator | User Administrators, Group Administrators, Stage User Administrators | Responsible for creating users and groups |
12.6. Using Ansible to ensure an IdM RBAC role with privileges is present
To exercise more granular control over role-based access (RBAC) to resources in Identity Management (IdM) than the default roles provide, create a custom role.
The following procedure describes how to use an Ansible playbook to define privileges for a new IdM custom role and ensure its presence. In the example, the new user_and_host_administrator role contains a unique combination of the following privileges that are present in IdM by default:
-
Group Administrators -
User Administrators -
Stage User Administrators -
Group Administrators
Prerequisites
- You know the IdM administrator password.
You have configured your Ansible control node to meet the following requirements:
- You are using Ansible version 2.14 or later.
-
You have installed the
ansible-freeipapackage on the Ansible controller. - The example assumes that in the ~/MyPlaybooks/ directory, you have created an Ansible inventory file with the fully-qualified domain name (FQDN) of the IdM server.
-
The example assumes that the secret.yml Ansible vault stores your
ipaadmin_password.
-
The target node, that is the node on which the
ansible-freeipamodule is executed, is part of the IdM domain as an IdM client, server or replica.
Procedure
Navigate to the ~/<MyPlaybooks>/ directory:
$ cd ~/<MyPlaybooks>/Make a copy of the
role-member-user-present.ymlfile located in the/usr/share/doc/ansible-freeipa/playbooks/role/directory:$ cp /usr/share/doc/ansible-freeipa/playbooks/role/role-member-user-present.yml role-member-user-present-copy.yml-
Open the
role-member-user-present-copy.ymlAnsible playbook file for editing. Adapt the file by setting the following variables in the
iparoletask section:-
Set the
ipaadmin_passwordvariable to the password of the IdM administrator. -
Set the
namevariable to the name of the new role. -
Set the
privilegelist to the names of the IdM privileges that you want to include in the new role. -
Optionally, set the
uservariable to the name of the user to whom you want to grant the new role. -
Optionally, set the
groupvariable to the name of the group to which you want to grant the new role.
This is the modified Ansible playbook file for the current example:
--- - name: Playbook to manage IPA role with members. hosts: ipaserver become: true gather_facts: no vars_files: - /home/user_name/MyPlaybooks/secret.yml tasks: - iparole: ipaadmin_password: "{{ ipaadmin_password }}" name: user_and_host_administrator user: idm_user01 group: idm_group01 privilege: - Group Administrators - User Administrators - Stage User Administrators - Group Administrators-
Set the
- Save the file.
Run the Ansible playbook. Specify the playbook file, the file storing the password protecting the secret.yml file, and the inventory file:
$ ansible-playbook --vault-password-file=password_file -v -i ~/<MyPlaybooks>/inventory role-member-user-present-copy.yml
Additional resources
- See Encrypting content with Ansible Vault.
- See Roles in IdM.
-
See the
README-rolefile in the/usr/share/doc/ansible-freeipa/directory. -
See the sample playbooks in the
/usr/share/doc/ansible-freeipa/playbooks/iparoledirectory.
12.7. Using Ansible to ensure an IdM RBAC role is absent
As a system administrator managing role-based access control (RBAC) in Identity Management (IdM), you may want to ensure the absence of an obsolete role so that no administrator assigns it to any user accidentally.
The following procedure describes how to use an Ansible playbook to ensure a role is absent. The example below describes how to make sure the custom user_and_host_administrator role does not exist in IdM.
Prerequisites
- You know the IdM administrator password.
You have configured your Ansible control node to meet the following requirements:
- You are using Ansible version 2.14 or later.
-
You have installed the
ansible-freeipapackage on the Ansible controller. - The example assumes that in the ~/MyPlaybooks/ directory, you have created an Ansible inventory file with the fully-qualified domain name (FQDN) of the IdM server.
-
The example assumes that the secret.yml Ansible vault stores your
ipaadmin_password.
-
The target node, that is the node on which the
ansible-freeipamodule is executed, is part of the IdM domain as an IdM client, server or replica.
Procedure
Navigate to the ~/<MyPlaybooks>/ directory:
$ cd ~/<MyPlaybooks>/Make a copy of the
role-is-absent.ymlfile located in the/usr/share/doc/ansible-freeipa/playbooks/role/directory:$ cp /usr/share/doc/ansible-freeipa/playbooks/role/role-is-absent.yml role-is-absent-copy.yml-
Open the
role-is-absent-copy.ymlAnsible playbook file for editing. Adapt the file by setting the following variables in the
iparoletask section:-
Set the
ipaadmin_passwordvariable to the password of the IdM administrator. -
Set the
namevariable to the name of the role. -
Ensure that the
statevariable is set toabsent.
This is the modified Ansible playbook file for the current example:
--- - name: Playbook to manage IPA role with members. hosts: ipaserver become: true gather_facts: no vars_files: - /home/user_name/MyPlaybooks/secret.yml tasks: - iparole: ipaadmin_password: "{{ ipaadmin_password }}" name: user_and_host_administrator state: absent-
Set the
- Save the file.
Run the Ansible playbook. Specify the playbook file, the file storing the password protecting the secret.yml file, and the inventory file:
$ ansible-playbook --vault-password-file=password_file -v -i ~/<MyPlaybooks>/inventory role-is-absent-copy.yml
Additional resources
- See Encrypting content with Ansible Vault.
- See Roles in IdM.
-
See the
README-roleMarkdown file in the/usr/share/doc/ansible-freeipa/directory. -
See the sample playbooks in the
/usr/share/doc/ansible-freeipa/playbooks/iparoledirectory.
12.8. Using Ansible to ensure that a group of users is assigned to an IdM RBAC role
As a system administrator managing role-based access control (RBAC) in Identity Management (IdM), you may want to assign a role to a specific group of users, for example junior administrators.
The following example describes how to use an Ansible playbook to ensure the built-in IdM RBAC helpdesk role is assigned to junior_sysadmins.
Prerequisites
- You know the IdM administrator password.
You have configured your Ansible control node to meet the following requirements:
- You are using Ansible version 2.14 or later.
-
You have installed the
ansible-freeipapackage on the Ansible controller. - The example assumes that in the ~/MyPlaybooks/ directory, you have created an Ansible inventory file with the fully-qualified domain name (FQDN) of the IdM server.
-
The example assumes that the secret.yml Ansible vault stores your
ipaadmin_password.
-
The target node, that is the node on which the
ansible-freeipamodule is executed, is part of the IdM domain as an IdM client, server or replica.
Procedure
Navigate to the ~/<MyPlaybooks>/ directory:
$ cd ~/<MyPlaybooks>/Make a copy of the
role-member-group-present.ymlfile located in the/usr/share/doc/ansible-freeipa/playbooks/role/directory:$ cp /usr/share/doc/ansible-freeipa/playbooks/role/role-member-group-present.yml role-member-group-present-copy.yml-
Open the
role-member-group-present-copy.ymlAnsible playbook file for editing. Adapt the file by setting the following variables in the
iparoletask section:-
Set the
ipaadmin_passwordvariable to the password of the IdM administrator. -
Set the
namevariable to the name of the role you want to assign. -
Set the
groupvariable to the name of the group. -
Set the
actionvariable tomember.
This is the modified Ansible playbook file for the current example:
--- - name: Playbook to manage IPA role with members. hosts: ipaserver become: true gather_facts: no vars_files: - /home/user_name/MyPlaybooks/secret.yml tasks: - iparole: ipaadmin_password: "{{ ipaadmin_password }}" name: helpdesk group: junior_sysadmins action: member-
Set the
- Save the file.
Run the Ansible playbook. Specify the playbook file, the file storing the password protecting the secret.yml file, and the inventory file:
$ ansible-playbook --vault-password-file=password_file -v -i ~/<MyPlaybooks>/inventory role-member-group-present-copy.yml
Additional resources
- See Encrypting content with Ansible Vault.
- See Roles in IdM.
-
See the
README-roleMarkdown file in the/usr/share/doc/ansible-freeipa/directory. -
See the sample playbooks in the
/usr/share/doc/ansible-freeipa/playbooks/iparoledirectory.
12.9. Using Ansible to ensure that specific users are not assigned to an IdM RBAC role
As a system administrator managing role-based access control (RBAC) in Identity Management (IdM), you may want to ensure that an RBAC role is not assigned to specific users after they have, for example, moved to different positions within the company.
The following procedure describes how to use an Ansible playbook to ensure that the users named user_01 and user_02 are not assigned to the helpdesk role.
Prerequisites
- You know the IdM administrator password.
You have configured your Ansible control node to meet the following requirements:
- You are using Ansible version 2.14 or later.
-
You have installed the
ansible-freeipapackage on the Ansible controller. - The example assumes that in the ~/MyPlaybooks/ directory, you have created an Ansible inventory file with the fully-qualified domain name (FQDN) of the IdM server.
-
The example assumes that the secret.yml Ansible vault stores your
ipaadmin_password.
-
The target node, that is the node on which the
ansible-freeipamodule is executed, is part of the IdM domain as an IdM client, server or replica.
Procedure
Navigate to the ~/<MyPlaybooks>/ directory:
$ cd ~/<MyPlaybooks>/Make a copy of the
role-member-user-absent.ymlfile located in the/usr/share/doc/ansible-freeipa/playbooks/role/directory:$ cp /usr/share/doc/ansible-freeipa/playbooks/role/role-member-user-absent.yml role-member-user-absent-copy.yml-
Open the
role-member-user-absent-copy.ymlAnsible playbook file for editing. Adapt the file by setting the following variables in the
iparoletask section:-
Set the
ipaadmin_passwordvariable to the password of the IdM administrator. -
Set the
namevariable to the name of the role you want to assign. -
Set the
userlist to the names of the users. -
Set the
actionvariable tomember. -
Set the
statevariable toabsent.
This is the modified Ansible playbook file for the current example:
--- - name: Playbook to manage IPA role with members. hosts: ipaserver become: true gather_facts: no vars_files: - /home/user_name/MyPlaybooks/secret.yml tasks: - iparole: ipaadmin_password: "{{ ipaadmin_password }}" name: helpdesk user - user_01 - user_02 action: member state: absent-
Set the
- Save the file.
Run the Ansible playbook. Specify the playbook file, the file storing the password protecting the secret.yml file, and the inventory file:
$ ansible-playbook --vault-password-file=password_file -v -i ~/<MyPlaybooks>/inventory role-member-user-absent-copy.yml
Additional resources
- See Encrypting content with Ansible Vault.
- See Roles in IdM.
-
See the
README-roleMarkdown file in the/usr/share/doc/ansible-freeipa/directory. -
See the sample playbooks in the
/usr/share/doc/ansible-freeipa/playbooks/iparoledirectory.
12.10. Using Ansible to ensure a service is a member of an IdM RBAC role
As a system administrator managing role-based access control (RBAC) in Identity Management (IdM), you may want to ensure that a specific service that is enrolled into IdM is a member of a particular role. The following example describes how to ensure that the custom web_administrator role can manage the HTTP service that is running on the client01.idm.example.com server.
Prerequisites
- You know the IdM administrator password.
You have configured your Ansible control node to meet the following requirements:
- You are using Ansible version 2.14 or later.
-
You have installed the
ansible-freeipapackage on the Ansible controller. - The example assumes that in the ~/MyPlaybooks/ directory, you have created an Ansible inventory file with the fully-qualified domain name (FQDN) of the IdM server.
-
The example assumes that the secret.yml Ansible vault stores your
ipaadmin_password.
-
The target node, that is the node on which the
ansible-freeipamodule is executed, is part of the IdM domain as an IdM client, server or replica. - The web_administrator role exists in IdM.
- The HTTP/client01.idm.example.com@IDM.EXAMPLE.COM service exists in IdM.
Procedure
Navigate to the ~/<MyPlaybooks>/ directory:
$ cd ~/<MyPlaybooks>/Make a copy of the
role-member-service-present.ymlfile located in the/usr/share/doc/ansible-freeipa/playbooks/role/directory:$ cp /usr/share/doc/ansible-freeipa/playbooks/role/role-member-service-present-absent.yml role-member-service-present-copy.yml-
Open the
role-member-service-present-copy.ymlAnsible playbook file for editing. Adapt the file by setting the following variables in the
iparoletask section:-
Set the
ipaadmin_passwordvariable to the password of the IdM administrator. -
Set the
namevariable to the name of the role you want to assign. -
Set the
servicelist to the name of the service. -
Set the
actionvariable tomember.
This is the modified Ansible playbook file for the current example:
--- - name: Playbook to manage IPA role with members. hosts: ipaserver become: true gather_facts: no vars_files: - /home/user_name/MyPlaybooks/secret.yml tasks: - iparole: ipaadmin_password: "{{ ipaadmin_password }}" name: web_administrator service: - HTTP/client01.idm.example.com action: member-
Set the
- Save the file.
Run the Ansible playbook. Specify the playbook file, the file storing the password protecting the secret.yml file, and the inventory file:
$ ansible-playbook --vault-password-file=password_file -v -i ~/<MyPlaybooks>/inventory role-member-service-present-copy.yml
Additional resources
- See Encrypting content with Ansible Vault.
- See Roles in IdM.
-
See the
README-roleMarkdown file in the/usr/share/doc/ansible-freeipa/directory. -
See the sample playbooks in the
/usr/share/doc/ansible-freeipa/playbooks/iparoledirectory.
12.11. Using Ansible to ensure a host is a member of an IdM RBAC role
As a system administrator managing role-based access control in Identity Management (IdM), you may want to ensure that a specific host or host group is associated with a specific role. The following example describes how to ensure that the custom web_administrator role can manage the client01.idm.example.com IdM host on which the HTTP service is running.
Prerequisites
- You know the IdM administrator password.
You have configured your Ansible control node to meet the following requirements:
- You are using Ansible version 2.14 or later.
-
You have installed the
ansible-freeipapackage on the Ansible controller. - The example assumes that in the ~/MyPlaybooks/ directory, you have created an Ansible inventory file with the fully-qualified domain name (FQDN) of the IdM server.
-
The example assumes that the secret.yml Ansible vault stores your
ipaadmin_password.
-
The target node, that is the node on which the
ansible-freeipamodule is executed, is part of the IdM domain as an IdM client, server or replica. - The web_administrator role exists in IdM.
- The client01.idm.example.com host exists in IdM.
Procedure
Navigate to the ~/<MyPlaybooks>/ directory:
$ cd ~/<MyPlaybooks>/Make a copy of the
role-member-host-present.ymlfile located in the/usr/share/doc/ansible-freeipa/playbooks/role/directory:$ cp /usr/share/doc/ansible-freeipa/playbooks/role/role-member-host-present.yml role-member-host-present-copy.yml-
Open the
role-member-host-present-copy.ymlAnsible playbook file for editing. Adapt the file by setting the following variables in the
iparoletask section:-
Set the
ipaadmin_passwordvariable to the password of the IdM administrator. -
Set the
namevariable to the name of the role you want to assign. -
Set the
hostlist to the name of the host.
This is the modified Ansible playbook file for the current example:
--- - name: Playbook to manage IPA role with members. hosts: ipaserver become: true gather_facts: no vars_files: - /home/user_name/MyPlaybooks/secret.yml tasks: - iparole: ipaadmin_password: "{{ ipaadmin_password }}" name: web_administrator host: - client01.idm.example.com action: member-
Set the
- Save the file.
Run the Ansible playbook. Specify the playbook file, the file storing the password protecting the secret.yml file, and the inventory file:
$ ansible-playbook --vault-password-file=password_file -v -i ~/<MyPlaybooks>/inventory role-member-host-present-copy.yml
Additional resources
- See Encrypting content with Ansible Vault.
- See Roles in IdM.
-
See the
README-roleMarkdown file in the/usr/share/doc/ansible-freeipa/directory. -
See the sample playbooks in the
/usr/share/doc/ansible-freeipa/playbooks/iparoledirectory.
12.12. Using Ansible to ensure a host group is a member of an IdM RBAC role
As a system administrator managing role-based access control in Identity Management (IdM), you may want to ensure that a specific host or host group is associated with a specific role. The following example describes how to ensure that the custom web_administrator role can manage the web_servers group of IdM hosts on which the HTTP service is running.
Prerequisites
- You know the IdM administrator password.
You have configured your Ansible control node to meet the following requirements:
- You are using Ansible version 2.14 or later.
-
You have installed the
ansible-freeipapackage on the Ansible controller. - The example assumes that in the ~/MyPlaybooks/ directory, you have created an Ansible inventory file with the fully-qualified domain name (FQDN) of the IdM server.
-
The example assumes that the secret.yml Ansible vault stores your
ipaadmin_password.
-
The target node, that is the node on which the
ansible-freeipamodule is executed, is part of the IdM domain as an IdM client, server or replica. - The web_administrator role exists in IdM.
- The web_servers host group exists in IdM.
Procedure
Navigate to the ~/<MyPlaybooks>/ directory:
$ cd ~/<MyPlaybooks>/Make a copy of the
role-member-hostgroup-present.ymlfile located in the/usr/share/doc/ansible-freeipa/playbooks/role/directory:$ cp /usr/share/doc/ansible-freeipa/playbooks/role/role-member-hostgroup-present.yml role-member-hostgroup-present-copy.yml-
Open the
role-member-hostgroup-present-copy.ymlAnsible playbook file for editing. Adapt the file by setting the following variables in the
iparoletask section:-
Set the
ipaadmin_passwordvariable to the password of the IdM administrator. -
Set the
namevariable to the name of the role you want to assign. -
Set the
hostgrouplist to the name of the hostgroup.
This is the modified Ansible playbook file for the current example:
--- - name: Playbook to manage IPA role with members. hosts: ipaserver become: true gather_facts: no vars_files: - /home/user_name/MyPlaybooks/secret.yml tasks: - iparole: ipaadmin_password: "{{ ipaadmin_password }}" name: web_administrator hostgroup: - web_servers action: member-
Set the
- Save the file.
Run the Ansible playbook. Specify the playbook file, the file storing the password protecting the secret.yml file, and the inventory file:
$ ansible-playbook --vault-password-file=password_file -v -i ~/<MyPlaybooks>/inventory role-member-hostgroup-present-copy.yml
Additional resources
- See Encrypting content with Ansible Vault.
- See Roles in IdM.
-
See the
README-roleMarkdown file in the/usr/share/doc/ansible-freeipa/directory. -
See the sample playbooks in the
/usr/share/doc/ansible-freeipa/playbooks/iparoledirectory.
Chapter 13. Using Ansible playbooks to manage RBAC privileges
Role-based access control (RBAC) is a policy-neutral access-control mechanism defined around roles, privileges, and permissions. Especially in large companies, using RBAC can help create a hierarchical system of administrators with their individual areas of responsibility.
This chapter describes the following operations for using Ansible playbooks to manage RBAC privileges in Identity Management (IdM):
- Using Ansible to ensure a custom RBAC privilege is present
- Using Ansible to ensure member permissions are present in a custom IdM RBAC privilege
- Using Ansible to ensure an IdM RBAC privilege does not include a permission
- Using Ansible to rename a custom IdM RBAC privilege
- Using Ansible to ensure an IdM RBAC privilege is absent
Prerequisites
- You understand the concepts and principles of RBAC.
13.1. Using Ansible to ensure a custom IdM RBAC privilege is present
To have a fully-functioning custom privilege in Identity Management (IdM) role-based access control (RBAC), you need to proceed in stages:
- Create a privilege with no permissions attached.
- Add permissions of your choice to the privilege.
The following procedure describes how to create an empty privilege using an Ansible playbook so that you can later add permissions to it. The example describes how to create a privilege named full_host_administration that is meant to combine all IdM permissions related to host administration.
Prerequisites
- You know the IdM administrator password.
You have configured your Ansible control node to meet the following requirements:
- You are using Ansible version 2.14 or later.
-
You have installed the
ansible-freeipapackage on the Ansible controller. - The example assumes that in the ~/MyPlaybooks/ directory, you have created an Ansible inventory file with the fully-qualified domain name (FQDN) of the IdM server.
-
The example assumes that the secret.yml Ansible vault stores your
ipaadmin_password.
-
The target node, that is the node on which the
ansible-freeipamodule is executed, is part of the IdM domain as an IdM client, server or replica.
Procedure
Navigate to the ~/MyPlaybooks/ directory:
$ cd ~/MyPlaybooks/Make a copy of the
privilege-present.ymlfile located in the/usr/share/doc/ansible-freeipa/playbooks/privilege/directory:$ cp /usr/share/doc/ansible-freeipa/playbooks/privilege/privilege-present.yml privilege-present-copy.yml-
Open the
privilege-present-copy.ymlAnsible playbook file for editing. Adapt the file by setting the following variables in the
ipaprivilegetask section:-
Set the
ipaadmin_passwordvariable to the password of the IdM administrator. -
Set the
namevariable to the name of the new privilege, full_host_administration. -
Optionally, describe the privilege using the
descriptionvariable.
This is the modified Ansible playbook file for the current example:
--- - name: Privilege present example hosts: ipaserver vars_files: - /home/user_name/MyPlaybooks/secret.yml tasks: - name: Ensure privilege full_host_administration is present ipaprivilege: ipaadmin_password: "{{ ipaadmin_password }}" name: full_host_administration description: This privilege combines all IdM permissions related to host administration-
Set the
- Save the file.
Run the Ansible playbook. Specify the playbook file, the file storing the password protecting the secret.yml file, and the inventory file:
$ ansible-playbook --vault-password-file=password_file -v -i inventory privilege-present-copy.yml
13.2. Using Ansible to ensure member permissions are present in a custom IdM RBAC privilege
To have a fully-functioning custom privilege in Identity Management (IdM) role-based access control (RBAC), you need to proceed in stages:
- Create a privilege with no permissions attached.
- Add permissions of your choice to the privilege.
The following procedure describes how to use an Ansible playbook to add permissions to a privilege created in the previous step. The example describes how to add all IdM permissions related to host administration to a privilege named full_host_administration. By default, the permissions are distributed between the Host Enrollment, Host Administrators and Host Group Administrator privileges.
Prerequisites
- You know the IdM administrator password.
You have configured your Ansible control node to meet the following requirements:
- You are using Ansible version 2.14 or later.
-
You have installed the
ansible-freeipapackage on the Ansible controller. - The example assumes that in the ~/MyPlaybooks/ directory, you have created an Ansible inventory file with the fully-qualified domain name (FQDN) of the IdM server.
-
The example assumes that the secret.yml Ansible vault stores your
ipaadmin_password.
-
The target node, that is the node on which the
ansible-freeipamodule is executed, is part of the IdM domain as an IdM client, server or replica. - The full_host_administration privilege exists. For information about how to create a privilege using Ansible, see Using Ansible to ensure a custom IdM RBAC privilege is present.
Procedure
Navigate to the ~/MyPlaybooks/ directory:
$ cd ~/MyPlaybooks/Make a copy of the
privilege-member-present.ymlfile located in the/usr/share/doc/ansible-freeipa/playbooks/privilege/directory:$ cp /usr/share/doc/ansible-freeipa/playbooks/privilege/privilege-member-present.yml privilege-member-present-copy.yml-
Open the
privilege-member-present-copy.ymlAnsible playbook file for editing. Adapt the file by setting the following variables in the
ipaprivilegetask section:-
Adapt the
nameof the task to correspond to your use case. -
Set the
ipaadmin_passwordvariable to the password of the IdM administrator. -
Set the
namevariable to the name of the privilege. -
Set the
permissionlist to the names of the permissions that you want to include in the privilege. -
Make sure that the
actionvariable is set tomember.
This is the modified Ansible playbook file for the current example:
--- - name: Privilege member present example hosts: ipaserver vars_files: - /home/user_name/MyPlaybooks/secret.yml tasks: - name: Ensure that permissions are present for the "full_host_administration" privilege ipaprivilege: ipaadmin_password: "{{ ipaadmin_password }}" name: full_host_administration permission: - "System: Add krbPrincipalName to a Host" - "System: Enroll a Host" - "System: Manage Host Certificates" - "System: Manage Host Enrollment Password" - "System: Manage Host Keytab" - "System: Manage Host Principals" - "Retrieve Certificates from the CA" - "Revoke Certificate" - "System: Add Hosts" - "System: Add krbPrincipalName to a Host" - "System: Enroll a Host" - "System: Manage Host Certificates" - "System: Manage Host Enrollment Password" - "System: Manage Host Keytab" - "System: Manage Host Keytab Permissions" - "System: Manage Host Principals" - "System: Manage Host SSH Public Keys" - "System: Manage Service Keytab" - "System: Manage Service Keytab Permissions" - "System: Modify Hosts" - "System: Remove Hosts" - "System: Add Hostgroups" - "System: Modify Hostgroup Membership" - "System: Modify Hostgroups" - "System: Remove Hostgroups"-
Adapt the
- Save the file.
Run the Ansible playbook. Specify the playbook file, the file storing the password protecting the secret.yml file, and the inventory file:
$ ansible-playbook --vault-password-file=password_file -v -i inventory privilege-member-present-copy.yml
13.3. Using Ansible to ensure an IdM RBAC privilege does not include a permission
As a system administrator of Identity Management (IdM), you can customize the IdM role-based access control.
The following procedure describes how to use an Ansible playbook to remove a permission from a privilege. The example describes how to remove the Request Certificates ignoring CA ACLs permission from the default Certificate Administrators privilege because, for example, the administrator considers it a security risk.
Prerequisites
- You know the IdM administrator password.
You have configured your Ansible control node to meet the following requirements:
- You are using Ansible version 2.14 or later.
-
You have installed the
ansible-freeipapackage on the Ansible controller. - The example assumes that in the ~/MyPlaybooks/ directory, you have created an Ansible inventory file with the fully-qualified domain name (FQDN) of the IdM server.
-
The example assumes that the secret.yml Ansible vault stores your
ipaadmin_password.
-
The target node, that is the node on which the
ansible-freeipamodule is executed, is part of the IdM domain as an IdM client, server or replica.
Procedure
Navigate to the ~/MyPlaybooks/ directory:
$ cd ~/MyPlaybooks/Make a copy of the
privilege-member-present.ymlfile located in the/usr/share/doc/ansible-freeipa/playbooks/privilege/directory:$ cp /usr/share/doc/ansible-freeipa/playbooks/privilege/privilege-member-absent.yml privilege-member-absent-copy.yml-
Open the
privilege-member-absent-copy.ymlAnsible playbook file for editing. Adapt the file by setting the following variables in the
ipaprivilegetask section:-
Adapt the
nameof the task to correspond to your use case. -
Set the
ipaadmin_passwordvariable to the password of the IdM administrator. -
Set the
namevariable to the name of the privilege. -
Set the
permissionlist to the names of the permissions that you want to remove from the privilege. -
Make sure that the
actionvariable is set tomember. -
Make sure that the
statevariable is set toabsent.
This is the modified Ansible playbook file for the current example:
--- - name: Privilege absent example hosts: ipaserver vars_files: - /home/user_name/MyPlaybooks/secret.yml tasks: - name: Ensure that the "Request Certificate ignoring CA ACLs" permission is absent from the "Certificate Administrators" privilege ipaprivilege: ipaadmin_password: "{{ ipaadmin_password }}" name: Certificate Administrators permission: - "Request Certificate ignoring CA ACLs" action: member state: absent-
Adapt the
- Save the file.
Run the Ansible playbook. Specify the playbook file, the file storing the password protecting the secret.yml file, and the inventory file:
$ ansible-playbook --vault-password-file=password_file -v -i inventory privilege-member-absent-copy.yml
13.4. Using Ansible to rename a custom IdM RBAC privilege
As a system administrator of Identity Management (IdM), you can customize the IdM role-based access control.
The following procedure describes how to rename a privilege because, for example, you have removed a few permissions from it. As a result, the name of the privilege is no longer accurate. In the example, the administrator renames a full_host_administration privilege to limited_host_administration.
Prerequisites
- You know the IdM administrator password.
You have configured your Ansible control node to meet the following requirements:
- You are using Ansible version 2.14 or later.
-
You have installed the
ansible-freeipapackage on the Ansible controller. - The example assumes that in the ~/MyPlaybooks/ directory, you have created an Ansible inventory file with the fully-qualified domain name (FQDN) of the IdM server.
-
The example assumes that the secret.yml Ansible vault stores your
ipaadmin_password.
-
The target node, that is the node on which the
ansible-freeipamodule is executed, is part of the IdM domain as an IdM client, server or replica. - The full_host_administration privilege exists. For more information about how to add a privilege, see Using Ansible to ensure a custom IdM RBAC privilege is present.
Procedure
Navigate to the ~/MyPlaybooks/ directory:
$ cd ~/MyPlaybooks/Make a copy of the
privilege-present.ymlfile located in the/usr/share/doc/ansible-freeipa/playbooks/privilege/directory:$ cp /usr/share/doc/ansible-freeipa/playbooks/privilege/privilege-present.yml rename-privilege.yml-
Open the
rename-privilege.ymlAnsible playbook file for editing. Adapt the file by setting the following variables in the
ipaprivilegetask section:-
Set the
ipaadmin_passwordvariable to the password of the IdM administrator. -
Set the
namevariable to the current name of the privilege. -
Add the
renamevariable and set it to the new name of the privilege. -
Add the
statevariable and set it torenamed.
-
Set the
Rename the playbook itself, for example:
--- - name: Rename a privilege hosts: ipaserverRename the task in the playbook, for example:
[...] tasks: - name: Ensure the full_host_administration privilege is renamed to limited_host_administration ipaprivilege: [...]This is the modified Ansible playbook file for the current example:
--- - name: Rename a privilege hosts: ipaserver vars_files: - /home/user_name/MyPlaybooks/secret.yml tasks: - name: Ensure the full_host_administration privilege is renamed to limited_host_administration ipaprivilege: ipaadmin_password: "{{ ipaadmin_password }}" name: full_host_administration rename: limited_host_administration state: renamed
- Save the file.
Run the Ansible playbook. Specify the playbook file, the file storing the password protecting the secret.yml file, and the inventory file:
$ ansible-playbook --vault-password-file=password_file -v -i inventory rename-privilege.yml
13.5. Using Ansible to ensure an IdM RBAC privilege is absent
As a system administrator of Identity Management (IdM), you can customize the IdM role-based access control. The following procedure describes how to use an Ansible playbook to ensure that an RBAC privilege is absent. The example describes how to ensure that the CA administrator privilege is absent. As a result of the procedure, the admin administrator becomes the only user capable of managing certificate authorities in IdM.
Prerequisites
- You know the IdM administrator password.
You have configured your Ansible control node to meet the following requirements:
- You are using Ansible version 2.14 or later.
-
You have installed the
ansible-freeipapackage on the Ansible controller. - The example assumes that in the ~/MyPlaybooks/ directory, you have created an Ansible inventory file with the fully-qualified domain name (FQDN) of the IdM server.
-
The example assumes that the secret.yml Ansible vault stores your
ipaadmin_password.
-
The target node, that is the node on which the
ansible-freeipamodule is executed, is part of the IdM domain as an IdM client, server or replica.
Procedure
Navigate to the ~/MyPlaybooks/ directory:
$ cd ~/MyPlaybooks/Make a copy of the
privilege-absent.ymlfile located in the/usr/share/doc/ansible-freeipa/playbooks/privilege/directory:$ cp /usr/share/doc/ansible-freeipa/playbooks/privilege/privilege-absent.yml privilege-absent-copy.yml-
Open the
privilege-absent-copy.ymlAnsible playbook file for editing. Adapt the file by setting the following variables in the
ipaprivilegetask section:-
Set the
ipaadmin_passwordvariable to the password of the IdM administrator. -
Set the
namevariable to the name of the privilege you want to remove. -
Make sure that the
statevariable is set it toabsent.
-
Set the
Rename the task in the playbook, for example:
[...] tasks: - name: Ensure privilege "CA administrator" is absent ipaprivilege: [...]This is the modified Ansible playbook file for the current example:
--- - name: Privilege absent example hosts: ipaserver vars_files: - /home/user_name/MyPlaybooks/secret.yml tasks: - name: Ensure privilege "CA administrator" is absent ipaprivilege: ipaadmin_password: "{{ ipaadmin_password }}" name: CA administrator state: absent
- Save the file.
Run the Ansible playbook. Specify the playbook file, the file storing the password protecting the secret.yml file, and the inventory file:
$ ansible-playbook --vault-password-file=password_file -v -i inventory privilege-absent-copy.yml
13.6. Additional resources
- See Privileges in IdM.
- See Permissions in IdM.
-
See the
README-privilegefile available in the/usr/share/doc/ansible-freeipa/directory. -
See the sample playbooks in the
/usr/share/doc/ansible-freeipa/playbooks/ipaprivilegedirectory.
Chapter 14. Using Ansible playbooks to manage RBAC permissions in IdM
Role-based access control (RBAC) is a policy-neutral access control mechanism defined around roles, privileges, and permissions. Especially in large companies, using RBAC can help create a hierarchical system of administrators with their individual areas of responsibility.
This chapter describes the following operations performed when managing RBAC permissions in Identity Management (IdM) using Ansible playbooks:
- Using Ansible to ensure an RBAC permission is present
- Using Ansible to ensure an RBAC permission with an attribute is present
- Using Ansible to ensure an RBAC permission is absent
- Using Ansible to ensure an attribute is a member of an IdM RBAC permission
- Using Ansible to ensure an attribute is not a member of an IdM RBAC permission
- Using Ansible to rename an IdM RBAC permission
Prerequisites
- You understand the concepts and principles of RBAC.
14.1. Using Ansible to ensure an RBAC permission is present
As a system administrator of Identity Management (IdM), you can customize the IdM role-based access control (RBAC).
The following procedure describes how to use an Ansible playbook to ensure a permission is present in IdM so that it can be added to a privilege. The example describes how to ensure the following target state:
-
The
MyPermissionpermission exists. -
The
MyPermissionpermission can only be applied to hosts. A user granted a privilege that contains the permission can do all of the following possible operations on an entry:
- Write
- Read
- Search
- Compare
- Add
- Delete
Prerequisites
- You know the IdM administrator password.
You have configured your Ansible control node to meet the following requirements:
- You are using Ansible version 2.14 or later.
-
You have installed the
ansible-freeipapackage on the Ansible controller. - The example assumes that in the ~/MyPlaybooks/ directory, you have created an Ansible inventory file with the fully-qualified domain name (FQDN) of the IdM server.
-
The example assumes that the secret.yml Ansible vault stores your
ipaadmin_password.
-
The target node, that is the node on which the
ansible-freeipamodule is executed, is part of the IdM domain as an IdM client, server or replica.
Procedure
Navigate to the ~/MyPlaybooks/ directory:
$ cd ~/MyPlaybooks/Make a copy of the
permission-present.ymlfile located in the/usr/share/doc/ansible-freeipa/playbooks/permission/directory:$ cp /usr/share/doc/ansible-freeipa/playbooks/permission/permission-present.yml permission-present-copy.yml-
Open the
permission-present-copy.ymlAnsible playbook file for editing. Adapt the file by setting the following variables in the
ipapermissiontask section:-
Adapt the
nameof the task to correspond to your use case. -
Set the
ipaadmin_passwordvariable to the password of the IdM administrator. -
Set the
namevariable to the name of the permission. -
Set the
object_typevariable tohost. -
Set the
rightvariable toall.
This is the modified Ansible playbook file for the current example:
--- - name: Permission present example hosts: ipaserver vars_files: - /home/user_name/MyPlaybooks/secret.yml tasks: - name: Ensure that the "MyPermission" permission is present ipapermission: ipaadmin_password: "{{ ipaadmin_password }}" name: MyPermission object_type: host right: all
-
Adapt the
- Save the file.
Run the Ansible playbook. Specify the playbook file, the file storing the password protecting the secret.yml file, and the inventory file:
$ ansible-playbook --vault-password-file=password_file -v -i inventory permission-present-copy.yml
14.2. Using Ansible to ensure an RBAC permission with an attribute is present
As a system administrator of Identity Management (IdM), you can customize the IdM role-based access control (RBAC).
The following procedure describes how to use an Ansible playbook to ensure a permission is present in IdM so that it can be added to a privilege. The example describes how to ensure the following target state:
- The MyPermission permission exists.
- The MyPermission permission can only be used to add hosts.
A user granted a privilege that contains the permission can do all of the following possible operations on a host entry:
- Write
- Read
- Search
- Compare
- Add
- Delete
-
The host entries created by a user that is granted a privilege that contains the MyPermission permission can have a
descriptionvalue.
The type of attribute that you can specify when creating or modifying a permission is not constrained by the IdM LDAP schema. However, specifying, for example, attrs: car_licence if the object_type is host later results in the ipa: ERROR: attribute "car-license" not allowed error message when you try to exercise the permission and add a specific car licence value to a host.
Prerequisites
- You know the IdM administrator password.
You have configured your Ansible control node to meet the following requirements:
- You are using Ansible version 2.14 or later.
-
You have installed the
ansible-freeipapackage on the Ansible controller. - The example assumes that in the ~/MyPlaybooks/ directory, you have created an Ansible inventory file with the fully-qualified domain name (FQDN) of the IdM server.
-
The example assumes that the secret.yml Ansible vault stores your
ipaadmin_password.
-
The target node, that is the node on which the
ansible-freeipamodule is executed, is part of the IdM domain as an IdM client, server or replica.
Procedure
Navigate to the ~/MyPlaybooks/ directory:
$ cd ~/MyPlaybooks/Make a copy of the
permission-present.ymlfile located in the/usr/share/doc/ansible-freeipa/playbooks/permission/directory:$ cp /usr/share/doc/ansible-freeipa/playbooks/permission/permission-present.yml permission-present-with-attribute.yml-
Open the
permission-present-with-attribute.ymlAnsible playbook file for editing. Adapt the file by setting the following variables in the
ipapermissiontask section:-
Adapt the
nameof the task to correspond to your use case. -
Set the
ipaadmin_passwordvariable to the password of the IdM administrator. -
Set the
namevariable to the name of the permission. -
Set the
object_typevariable tohost. -
Set the
rightvariable toall. -
Set the
attrsvariable todescription.
This is the modified Ansible playbook file for the current example:
--- - name: Permission present example hosts: ipaserver vars_files: - /home/user_name/MyPlaybooks/secret.yml tasks: - name: Ensure that the "MyPermission" permission is present with an attribute ipapermission: ipaadmin_password: "{{ ipaadmin_password }}" name: MyPermission object_type: host right: all attrs: description
-
Adapt the
- Save the file.
Run the Ansible playbook. Specify the playbook file, the file storing the password protecting the secret.yml file, and the inventory file:
$ ansible-playbook --vault-password-file=password_file -v -i inventory permission-present-with-attribute.yml
Additional resources
- See User and group schema in Linux Domain Identity, Authentication and Policy Guide in RHEL 7.
14.3. Using Ansible to ensure an RBAC permission is absent
As a system administrator of Identity Management (IdM), you can customize the IdM role-based access control (RBAC).
The following procedure describes how to use an Ansible playbook to ensure a permission is absent in IdM so that it cannot be added to a privilege.
Prerequisites
- You know the IdM administrator password.
You have configured your Ansible control node to meet the following requirements:
- You are using Ansible version 2.14 or later.
-
You have installed the
ansible-freeipapackage on the Ansible controller. - The example assumes that in the ~/MyPlaybooks/ directory, you have created an Ansible inventory file with the fully-qualified domain name (FQDN) of the IdM server.
-
The example assumes that the secret.yml Ansible vault stores your
ipaadmin_password.
-
The target node, that is the node on which the
ansible-freeipamodule is executed, is part of the IdM domain as an IdM client, server or replica.
Procedure
Navigate to the ~/MyPlaybooks/ directory:
$ cd ~/MyPlaybooks/Make a copy of the
permission-absent.ymlfile located in the/usr/share/doc/ansible-freeipa/playbooks/permission/directory:$ cp /usr/share/doc/ansible-freeipa/playbooks/permission/permission-absent.yml permission-absent-copy.yml-
Open the
permission-absent-copy.ymlAnsible playbook file for editing. Adapt the file by setting the following variables in the
ipapermissiontask section:-
Adapt the
nameof the task to correspond to your use case. -
Set the
ipaadmin_passwordvariable to the password of the IdM administrator. -
Set the
namevariable to the name of the permission.
This is the modified Ansible playbook file for the current example:
--- - name: Permission absent example hosts: ipaserver vars_files: - /home/user_name/MyPlaybooks/secret.yml tasks: - name: Ensure that the "MyPermission" permission is absent ipapermission: ipaadmin_password: "{{ ipaadmin_password }}" name: MyPermission state: absent
-
Adapt the
- Save the file.
Run the Ansible playbook. Specify the playbook file, the file storing the password protecting the secret.yml file, and the inventory file:
$ ansible-playbook --vault-password-file=password_file -v -i inventory permission-absent-copy.yml
14.4. Using Ansible to ensure an attribute is a member of an IdM RBAC permission
As a system administrator of Identity Management (IdM), you can customize the IdM role-based access control (RBAC).
The following procedure describes how to use an Ansible playbook to ensure that an attribute is a member of an RBAC permission in IdM. As a result, a user with the permission can create entries that have the attribute.
The example describes how to ensure that the host entries created by a user with a privilege that contains the MyPermission permission can have gecos and description values.
The type of attribute that you can specify when creating or modifying a permission is not constrained by the IdM LDAP schema. However, specifying, for example, attrs: car_licence if the object_type is host later results in the ipa: ERROR: attribute "car-license" not allowed error message when you try to exercise the permission and add a specific car licence value to a host.
Prerequisites
- You know the IdM administrator password.
You have configured your Ansible control node to meet the following requirements:
- You are using Ansible version 2.14 or later.
-
You have installed the
ansible-freeipapackage on the Ansible controller. - The example assumes that in the ~/MyPlaybooks/ directory, you have created an Ansible inventory file with the fully-qualified domain name (FQDN) of the IdM server.
-
The example assumes that the secret.yml Ansible vault stores your
ipaadmin_password.
-
The target node, that is the node on which the
ansible-freeipamodule is executed, is part of the IdM domain as an IdM client, server or replica. - The MyPermission permission exists.
Procedure
Navigate to the ~/MyPlaybooks/ directory:
$ cd ~/MyPlaybooks/Make a copy of the
permission-member-present.ymlfile located in the/usr/share/doc/ansible-freeipa/playbooks/permission/directory:$ cp /usr/share/doc/ansible-freeipa/playbooks/permission/permission-member-present.yml permission-member-present-copy.yml-
Open the
permission-member-present-copy.ymlAnsible playbook file for editing. Adapt the file by setting the following variables in the
ipapermissiontask section:-
Adapt the
nameof the task to correspond to your use case. -
Set the
ipaadmin_passwordvariable to the password of the IdM administrator. -
Set the
namevariable to the name of the permission. -
Set the
attrslist to thedescriptionandgecosvariables. -
Make sure the
actionvariable is set tomember.
This is the modified Ansible playbook file for the current example:
--- - name: Permission member present example hosts: ipaserver vars_files: - /home/user_name/MyPlaybooks/secret.yml tasks: - name: Ensure that the "gecos" and "description" attributes are present in "MyPermission" ipapermission: ipaadmin_password: "{{ ipaadmin_password }}" name: MyPermission attrs: - description - gecos action: member
-
Adapt the
- Save the file.
Run the Ansible playbook. Specify the playbook file, the file storing the password protecting the secret.yml file, and the inventory file:
$ ansible-playbook --vault-password-file=password_file -v -i inventory permission-member-present-copy.yml
14.5. Using Ansible to ensure an attribute is not a member of an IdM RBAC permission
As a system administrator of Identity Management (IdM), you can customize the IdM role-based access control (RBAC).
The following procedure describes how to use an Ansible playbook to ensure that an attribute is not a member of an RBAC permission in IdM. As a result, when a user with the permission creates an entry in IdM LDAP, that entry cannot have a value associated with the attribute.
The example describes how to ensure the following target state:
- The MyPermission permission exists.
-
The host entries created by a user with a privilege that contains the MyPermission permission cannot have the
descriptionattribute.
Prerequisites
- You know the IdM administrator password.
You have configured your Ansible control node to meet the following requirements:
- You are using Ansible version 2.14 or later.
-
You have installed the
ansible-freeipapackage on the Ansible controller. - The example assumes that in the ~/MyPlaybooks/ directory, you have created an Ansible inventory file with the fully-qualified domain name (FQDN) of the IdM server.
-
The example assumes that the secret.yml Ansible vault stores your
ipaadmin_password.
-
The target node, that is the node on which the
ansible-freeipamodule is executed, is part of the IdM domain as an IdM client, server or replica. - The MyPermission permission exists.
Procedure
Navigate to the ~/MyPlaybooks/ directory:
$ cd ~/MyPlaybooks/Make a copy of the
permission-member-absent.ymlfile located in the/usr/share/doc/ansible-freeipa/playbooks/permission/directory:$ cp /usr/share/doc/ansible-freeipa/playbooks/permission/permission-member-absent.yml permission-member-absent-copy.yml-
Open the
permission-member-absent-copy.ymlAnsible playbook file for editing. Adapt the file by setting the following variables in the
ipapermissiontask section:-
Adapt the
nameof the task to correspond to your use case. -
Set the
ipaadmin_passwordvariable to the password of the IdM administrator. -
Set the
namevariable to the name of the permission. -
Set the
attrsvariable todescription. -
Set the
actionvariable tomember. -
Make sure the
statevariable is set toabsent
This is the modified Ansible playbook file for the current example:
--- - name: Permission absent example hosts: ipaserver vars_files: - /home/user_name/MyPlaybooks/secret.yml tasks: - name: Ensure that an attribute is not a member of "MyPermission" ipapermission: ipaadmin_password: "{{ ipaadmin_password }}" name: MyPermission attrs: description action: member state: absent
-
Adapt the
- Save the file.
Run the Ansible playbook. Specify the playbook file, the file storing the password protecting the secret.yml file, and the inventory file:
$ ansible-playbook --vault-password-file=password_file -v -i inventory permission-member-absent-copy.yml
14.6. Using Ansible to rename an IdM RBAC permission
As a system administrator of Identity Management (IdM), you can customize the IdM role-based access control.
The following procedure describes how to use an Ansible playbook to rename a permission. The example describes how to rename MyPermission to MyNewPermission.
Prerequisites
- You know the IdM administrator password.
You have configured your Ansible control node to meet the following requirements:
- You are using Ansible version 2.14 or later.
-
You have installed the
ansible-freeipapackage on the Ansible controller. - The example assumes that in the ~/MyPlaybooks/ directory, you have created an Ansible inventory file with the fully-qualified domain name (FQDN) of the IdM server.
-
The example assumes that the secret.yml Ansible vault stores your
ipaadmin_password.
-
The target node, that is the node on which the
ansible-freeipamodule is executed, is part of the IdM domain as an IdM client, server or replica. - The MyPermission exists in IdM.
- The MyNewPermission does not exist in IdM.
Procedure
Navigate to the ~/MyPlaybooks/ directory:
$ cd ~/MyPlaybooks/Make a copy of the
permission-renamed.ymlfile located in the/usr/share/doc/ansible-freeipa/playbooks/permission/directory:$ cp /usr/share/doc/ansible-freeipa/playbooks/permission/permission-renamed.yml permission-renamed-copy.yml-
Open the
permission-renamed-copy.ymlAnsible playbook file for editing. Adapt the file by setting the following variables in the
ipapermissiontask section:-
Adapt the
nameof the task to correspond to your use case. -
Set the
ipaadmin_passwordvariable to the password of the IdM administrator. -
Set the
namevariable to the name of the permission.
This is the modified Ansible playbook file for the current example:
--- - name: Permission present example hosts: ipaserver vars_files: - /home/user_name/MyPlaybooks/secret.yml tasks: - name: Rename the "MyPermission" permission ipapermission: ipaadmin_password: "{{ ipaadmin_password }}" name: MyPermission rename: MyNewPermission state: renamed
-
Adapt the
- Save the file.
Run the Ansible playbook. Specify the playbook file, the file storing the password protecting the secret.yml file, and the inventory file:
$ ansible-playbook --vault-password-file=password_file -v -i inventory permission-renamed-copy.yml
14.7. Additional resources
- See Permissions in IdM.
- See Privileges in IdM.
-
See the
README-permissionfile available in the/usr/share/doc/ansible-freeipa/directory. -
See the sample playbooks in the
/usr/share/doc/ansible-freeipa/playbooks/ipapermissiondirectory.
Chapter 15. Using Ansible to manage the replication topology in IdM
You can maintain multiple Identity Management (IdM) servers and let them replicate each other for redundancy purposes to mitigate or prevent server loss. For example, if one server fails, the other servers keep providing services to the domain. You can also recover the lost server by creating a new replica based on one of the remaining servers.
Data stored on an IdM server is replicated based on replication agreements: when two servers have a replication agreement configured, they share their data. The data that is replicated is stored in the topology suffixes. When two replicas have a replication agreement between their suffixes, the suffixes form a topology segment.
This chapter describes how to use Red Hat Ansible Engine to manage IdM replication agreements, topology segments, and topology suffixes. The chapter contains the following sections:
- Using Ansible to ensure a replication agreement exists in IdM
- Using Ansible to ensure replication agreements exist between multiple IdM replicas
- Using Ansible to check if a replication agreement exists between two replicas
- Using Ansible to verify that a topology suffix exists in IdM
- Using Ansible to re-initialize an IdM replica
- Using Ansible to ensure a replication agreement is absent in IdM
15.1. Using Ansible to ensure a replication agreement exists in IdM
Data stored on an Identity Management (IdM) server is replicated based on replication agreements: when two servers have a replication agreement configured, they share their data. Replication agreements are always bilateral: the data is replicated from the first replica to the other one as well as from the other replica to the first one.
Follow this procedure to use an Ansible playbook to ensure that a replication agreement of the domain type exists between server.idm.example.com and replica.idm.example.com.
Prerequisites
- Ensure that you understand the recommendations for designing your IdM topology listed in Guidelines for connecting IdM replicas in a topology.
-
You know the IdM
adminpassword. You have configured your Ansible control node to meet the following requirements:
- You are using Ansible version 2.14 or later.
-
You have installed the
ansible-freeipapackage on the Ansible controller. - The example assumes that in the ~/MyPlaybooks/ directory, you have created an Ansible inventory file with the fully-qualified domain name (FQDN) of the IdM server.
-
The example assumes that the secret.yml Ansible vault stores your
ipaadmin_password.
-
The target node, that is the node on which the
ansible-freeipamodule is executed, is part of the IdM domain as an IdM client, server or replica.
Procedure
Navigate to your ~/MyPlaybooks/ directory:
$ cd ~/MyPlaybooks/Copy the
add-topologysegment.ymlAnsible playbook file located in the/usr/share/doc/ansible-freeipa/playbooks/topology/directory:$ cp /usr/share/doc/ansible-freeipa/playbooks/topology/add-topologysegment.yml add-topologysegment-copy.yml-
Open the
add-topologysegment-copy.ymlfile for editing. Adapt the file by setting the following variables in the
ipatopologysegmenttask section:-
Set the
ipaadmin_passwordvariable to the password of the IdMadmin. -
Set the
suffixvariable to eitherdomainorca, depending on what type of segment you want to add. -
Set the
leftvariable to the name of the IdM server that you want to be the left node of the replication agreement. -
Set the
rightvariable to the name of the IdM server that you want to be the right node of the replication agreement. -
Ensure that the
statevariable is set topresent.
This is the modified Ansible playbook file for the current example:
--- - name: Playbook to handle topologysegment hosts: ipaserver vars_files: - /home/user_name/MyPlaybooks/secret.yml tasks: - name: Add topology segment ipatopologysegment: ipaadmin_password: "{{ ipaadmin_password }}" suffix: domain left: server.idm.example.com right: replica.idm.example.com state: present-
Set the
- Save the file.
Run the Ansible playbook. Specify the playbook file, the file storing the password protecting the secret.yml file, and the inventory file:
$ ansible-playbook --vault-password-file=password_file -v -i inventory add-topologysegment-copy.yml
Additional resources
- See Explaining Replication Agreements, Topology Suffixes, and Topology Segments.
-
See the
README-topology.mdfile in the/usr/share/doc/ansible-freeipa/directory. -
See the sample playbooks in the
/usr/share/doc/ansible-freeipa/playbooks/topologydirectory.
15.2. Using Ansible to ensure replication agreements exist between multiple IdM replicas
Data stored on an Identity Management (IdM) server is replicated based on replication agreements: when two servers have a replication agreement configured, they share their data. Replication agreements are always bilateral: the data is replicated from the first replica to the other one as well as from the other replica to the first one.
Follow this procedure to ensure replication agreements exist between multiple pairs of replicas in IdM.
Prerequisites
- Ensure that you understand the recommendations for designing your IdM topology listed in Connecting the replicas in a topology.
-
You know the IdM
adminpassword. You have configured your Ansible control node to meet the following requirements:
- You are using Ansible version 2.14 or later.
-
You have installed the
ansible-freeipapackage on the Ansible controller. - The example assumes that in the ~/MyPlaybooks/ directory, you have created an Ansible inventory file with the fully-qualified domain name (FQDN) of the IdM server.
-
The example assumes that the secret.yml Ansible vault stores your
ipaadmin_password.
-
The target node, that is the node on which the
ansible-freeipamodule is executed, is part of the IdM domain as an IdM client, server or replica.
Procedure
Navigate to your ~/MyPlaybooks/ directory:
$ cd ~/MyPlaybooks/Copy the
add-topologysegments.ymlAnsible playbook file located in the/usr/share/doc/ansible-freeipa/playbooks/topology/directory:$ cp /usr/share/doc/ansible-freeipa/playbooks/topology/add-topologysegments.yml add-topologysegments-copy.yml-
Open the
add-topologysegments-copy.ymlfile for editing. Adapt the file by setting the following variables in the
varssection:-
Set the
ipaadmin_passwordvariable to the password of the IdMadmin. For every topology segment, add a line in the
ipatopology_segmentssection and set the following variables:-
Set the
suffixvariable to eitherdomainorca, depending on what type of segment you want to add. -
Set the
leftvariable to the name of the IdM server that you want to be the left node of the replication agreement. -
Set the
rightvariable to the name of the IdM server that you want to be the right node of the replication agreement.
-
Set the
-
Set the
In the
taskssection of theadd-topologysegments-copy.ymlfile, ensure that thestatevariable is set topresent.This is the modified Ansible playbook file for the current example:
--- - name: Add topology segments hosts: ipaserver gather_facts: false vars: ipaadmin_password: "{{ ipaadmin_password }}" ipatopology_segments: - {suffix: domain, left: replica1.idm.example.com , right: replica2.idm.example.com } - {suffix: domain, left: replica2.idm.example.com , right: replica3.idm.example.com } - {suffix: domain, left: replica3.idm.example.com , right: replica4.idm.example.com } - {suffix: domain+ca, left: replica4.idm.example.com , right: replica1.idm.example.com } vars_files: - /home/user_name/MyPlaybooks/secret.yml tasks: - name: Add topology segment ipatopologysegment: ipaadmin_password: "{{ ipaadmin_password }}" suffix: "{{ item.suffix }}" name: "{{ item.name | default(omit) }}" left: "{{ item.left }}" right: "{{ item.right }}" state: present #state: absent #state: checked #state: reinitialized loop: "{{ ipatopology_segments | default([]) }}"- Save the file.
Run the Ansible playbook. Specify the playbook file, the file storing the password protecting the secret.yml file, and the inventory file:
$ ansible-playbook --vault-password-file=password_file -v -i inventory add-topologysegments-copy.yml
Additional resources
- See Explaining Replication Agreements, Topology Suffixes, and Topology Segments.
-
See the
README-topology.mdfile in the/usr/share/doc/ansible-freeipa/directory. -
See the sample playbooks in the
/usr/share/doc/ansible-freeipa/playbooks/topologydirectory.
15.3. Using Ansible to check if a replication agreement exists between two replicas
Data stored on an Identity Management (IdM) server is replicated based on replication agreements: when two servers have a replication agreement configured, they share their data. Replication agreements are always bilateral: the data is replicated from the first replica to the other one as well as from the other replica to the first one.
Follow this procedure to verify that replication agreements exist between multiple pairs of replicas in IdM.
Prerequisites
- Ensure that you understand the recommendations for designing your Identity Management (IdM) topology listed in Connecting the replicas in a topology.
-
You know the IdM
adminpassword. You have configured your Ansible control node to meet the following requirements:
- You are using Ansible version 2.14 or later.
-
You have installed the
ansible-freeipapackage on the Ansible controller. - The example assumes that in the ~/MyPlaybooks/ directory, you have created an Ansible inventory file with the fully-qualified domain name (FQDN) of the IdM server.
-
The example assumes that the secret.yml Ansible vault stores your
ipaadmin_password.
-
The target node, that is the node on which the
ansible-freeipamodule is executed, is part of the IdM domain as an IdM client, server or replica.
Procedure
Navigate to your ~/MyPlaybooks/ directory:
$ cd ~/MyPlaybooks/Copy the
check-topologysegments.ymlAnsible playbook file located in the/usr/share/doc/ansible-freeipa/playbooks/topology/directory:$ cp /usr/share/doc/ansible-freeipa/playbooks/topology/check-topologysegments.yml check-topologysegments-copy.yml-
Open the
check-topologysegments-copy.ymlfile for editing. Adapt the file by setting the following variables in the
varssection:-
Set the
ipaadmin_passwordvariable to the password of the IdMadmin. For every topology segment, add a line in the
ipatopology_segmentssection and set the following variables:-
Set the
suffixvariable to eitherdomainorca, depending on the type of segment you are adding. -
Set the
leftvariable to the name of the IdM server that you want to be the left node of the replication agreement. -
Set the
rightvariable to the name of the IdM server that you want to be the right node of the replication agreement.
-
Set the
-
Set the
In the
taskssection of thecheck-topologysegments-copy.ymlfile, ensure that thestatevariable is set topresent.This is the modified Ansible playbook file for the current example:
--- - name: Add topology segments hosts: ipaserver gather_facts: false vars: ipaadmin_password: "{{ ipaadmin_password }}" ipatopology_segments: - {suffix: domain, left: replica1.idm.example.com, right: replica2.idm.example.com } - {suffix: domain, left: replica2.idm.example.com , right: replica3.idm.example.com } - {suffix: domain, left: replica3.idm.example.com , right: replica4.idm.example.com } - {suffix: domain+ca, left: replica4.idm.example.com , right: replica1.idm.example.com } vars_files: - /home/user_name/MyPlaybooks/secret.yml tasks: - name: Check topology segment ipatopologysegment: ipaadmin_password: "{{ ipaadmin_password }}" suffix: "{{ item.suffix }}" name: "{{ item.name | default(omit) }}" left: "{{ item.left }}" right: "{{ item.right }}" state: checked loop: "{{ ipatopology_segments | default([]) }}"- Save the file.
Run the Ansible playbook. Specify the playbook file, the file storing the password protecting the secret.yml file, and the inventory file:
$ ansible-playbook --vault-password-file=password_file -v -i inventory check-topologysegments-copy.yml
Additional resources
- For more information about the concept of topology agreements, suffixes, and segments, see Explaining Replication Agreements, Topology Suffixes, and Topology Segments.
-
See the
README-topology.mdfile in the/usr/share/doc/ansible-freeipa/directory. -
See the sample playbooks in the
/usr/share/doc/ansible-freeipa/playbooks/topologydirectory.
15.4. Using Ansible to verify that a topology suffix exists in IdM
In the context of replication agreements in Identity Management (IdM), topology suffixes store the data that is replicated. IdM supports two types of topology suffixes: domain and ca. Each suffix represents a separate back end, a separate replication topology. When a replication agreement is configured, it joins two topology suffixes of the same type on two different servers.
The domain suffix contains all domain-related data, such as users, groups, and policies. The ca suffix contains data for the Certificate System component. It is only present on servers with a certificate authority (CA) installed.
Follow this procedure to use an Ansible playbook to ensure that a topology suffix exists in IdM. The example describes how to ensure that the domain suffix exists in IdM.
Prerequisites
-
You know the IdM
adminpassword. You have configured your Ansible control node to meet the following requirements:
- You are using Ansible version 2.14 or later.
-
You have installed the
ansible-freeipapackage on the Ansible controller. - The example assumes that in the ~/MyPlaybooks/ directory, you have created an Ansible inventory file with the fully-qualified domain name (FQDN) of the IdM server.
-
The example assumes that the secret.yml Ansible vault stores your
ipaadmin_password.
-
The target node, that is the node on which the
ansible-freeipamodule is executed, is part of the IdM domain as an IdM client, server or replica.
Procedure
Navigate to your ~/MyPlaybooks/ directory:
$ cd ~/MyPlaybooks/Copy the
verify-topologysuffix.ymlAnsible playbook file located in the/usr/share/doc/ansible-freeipa/playbooks/topology/directory:$ cp /usr/share/doc/ansible-freeipa/playbooks/topology/ verify-topologysuffix.yml verify-topologysuffix-copy.yml-
Open the
verify-topologysuffix-copy.ymlAnsible playbook file for editing. Adapt the file by setting the following variables in the
ipatopologysuffixsection:-
Set the
ipaadmin_passwordvariable to the password of the IdMadmin. -
Set the
suffixvariable todomain. If you are verifying the presence of thecasuffix, set the variable toca. -
Ensure that the
statevariable is set toverified. No other option is possible.
This is the modified Ansible playbook file for the current example:
--- - name: Playbook to handle topologysuffix hosts: ipaserver vars_files: - /home/user_name/MyPlaybooks/secret.yml tasks: - name: Verify topology suffix ipatopologysuffix: ipaadmin_password: "{{ ipaadmin_password }}" suffix: domain state: verified-
Set the
- Save the file.
Run the Ansible playbook. Specify the playbook file, the file storing the password protecting the secret.yml file, and the inventory file:
$ ansible-playbook --vault-password-file=password_file -v -i inventory verify-topologysuffix-copy.yml
Additional resources
- See Explaining Replication Agreements, Topology Suffixes, and Topology Segments.
-
See the
README-topology.mdfile in the/usr/share/doc/ansible-freeipa/directory. -
See the sample playbooks in the
/usr/share/doc/ansible-freeipa/playbooks/topologydirectory.
15.5. Using Ansible to reinitialize an IdM replica
If a replica has been offline for a long period of time or its database has been corrupted, you can reinitialize it. reinitialization refreshes the replica with an updated set of data. reinitialization can, for example, be used if an authoritative restore from backup is required.
In contrast to replication updates, during which replicas only send changed entries to each other, reinitialization refreshes the whole database.
The local host on which you run the command is the reinitialized replica. To specify the replica from which the data is obtained, use the direction option.
Follow this procedure to use an Ansible playbook to reinitialize the domain data on replica.idm.example.com from server.idm.example.com.
Prerequisites
-
You know the IdM
adminpassword. You have configured your Ansible control node to meet the following requirements:
- You are using Ansible version 2.14 or later.
-
You have installed the
ansible-freeipapackage on the Ansible controller. - The example assumes that in the ~/MyPlaybooks/ directory, you have created an Ansible inventory file with the fully-qualified domain name (FQDN) of the IdM server.
-
The example assumes that the secret.yml Ansible vault stores your
ipaadmin_password.
-
The target node, that is the node on which the
ansible-freeipamodule is executed, is part of the IdM domain as an IdM client, server or replica.
Procedure
Navigate to your ~/MyPlaybooks/ directory:
$ cd ~/MyPlaybooks/Copy the
reinitialize-topologysegment.ymlAnsible playbook file located in the/usr/share/doc/ansible-freeipa/playbooks/topology/directory:$ cp /usr/share/doc/ansible-freeipa/playbooks/topology/reinitialize-topologysegment.yml reinitialize-topologysegment-copy.yml-
Open the
reinitialize-topologysegment-copy.ymlfile for editing. Adapt the file by setting the following variables in the
ipatopologysegmentsection:-
Set the
ipaadmin_passwordvariable to the password of the IdMadmin. -
Set the
suffixvariable todomain. If you are reinitializing thecadata, set the variable toca. -
Set the
leftvariable to the left node of the replication agreement. -
Set the
rightvariable to the right node of the replication agreement. -
Set the
directionvariable to the direction of the reinitializing data. Theleft-to-rightdirection means that data flows from the left node to the right node. Ensure that the
statevariable is set toreinitialized.This is the modified Ansible playbook file for the current example:
--- - name: Playbook to handle topologysegment hosts: ipaserver vars_files: - /home/user_name/MyPlaybooks/secret.yml tasks: - name: Reinitialize topology segment ipatopologysegment: ipaadmin_password: "{{ ipaadmin_password }}" suffix: domain left: server.idm.example.com right: replica.idm.example.com direction: left-to-right state: reinitialized
-
Set the
- Save the file.
Run the Ansible playbook. Specify the playbook file, the file storing the password protecting the secret.yml file, and the inventory file:
$ ansible-playbook --vault-password-file=password_file -v -i inventory reinitialize-topologysegment-copy.yml
Additional resources
- See Explaining Replication Agreements, Topology Suffixes, and Topology Segments.
-
See the
README-topology.mdfile in the/usr/share/doc/ansible-freeipa/directory. -
See the sample playbooks in the
/usr/share/doc/ansible-freeipa/playbooks/topologydirectory.
15.6. Using Ansible to ensure a replication agreement is absent in IdM
Data stored on an Identity Management (IdM) server is replicated based on replication agreements: when two servers have a replication agreement configured, they share their data. Replication agreements are always bilateral: the data is replicated from the first replica to the other one as well as from the other replica to the first one.
Follow this procedure to ensure a replication agreement between two replicas does not exist in IdM. The example describes how to ensure a replication agreement of the domain type does not exist between the replica01.idm.example.com and replica02.idm.example.com IdM servers.
Prerequisites
- Ensure that you understand the recommendations for designing your IdM topology listed in Connecting the replicas in a topology
-
You know the IdM
adminpassword. You have configured your Ansible control node to meet the following requirements:
- You are using Ansible version 2.14 or later.
-
You have installed the
ansible-freeipapackage on the Ansible controller. - The example assumes that in the ~/MyPlaybooks/ directory, you have created an Ansible inventory file with the fully-qualified domain name (FQDN) of the IdM server.
-
The example assumes that the secret.yml Ansible vault stores your
ipaadmin_password.
-
The target node, that is the node on which the
ansible-freeipamodule is executed, is part of the IdM domain as an IdM client, server or replica.
Procedure
Navigate to your ~/MyPlaybooks/ directory:
$ cd ~/MyPlaybooks/Copy the
delete-topologysegment.ymlAnsible playbook file located in the/usr/share/doc/ansible-freeipa/playbooks/topology/directory:$ cp /usr/share/doc/ansible-freeipa/playbooks/topology/delete-topologysegment.yml delete-topologysegment-copy.yml-
Open the
delete-topologysegment-copy.ymlfile for editing. Adapt the file by setting the following variables in the
ipatopologysegmenttask section:-
Set the
ipaadmin_passwordvariable to the password of the IdMadmin. -
Set the
suffixvariable todomain. Alternatively, if you are ensuring that thecadata are not replicated between the left and right nodes, set the variable toca. -
Set the
leftvariable to the name of the IdM server that is the left node of the replication agreement. -
Set the
rightvariable to the name of the IdM server that is the right node of the replication agreement. -
Ensure that the
statevariable is set toabsent.
This is the modified Ansible playbook file for the current example:
--- - name: Playbook to handle topologysegment hosts: ipaserver vars_files: - /home/user_name/MyPlaybooks/secret.yml tasks: - name: Delete topology segment ipatopologysegment: ipaadmin_password: "{{ ipaadmin_password }}" suffix: domain left: replica01.idm.example.com right: replica02.idm.example.com: state: absent-
Set the
- Save the file.
Run the Ansible playbook. Specify the playbook file, the file storing the password protecting the secret.yml file, and the inventory file:
$ ansible-playbook --vault-password-file=password_file -v -i inventory delete-topologysegment-copy.yml
Additional resources
- See Explaining Replication Agreements, Topology Suffixes, and Topology Segments.
-
See the
README-topology.mdfile in the/usr/share/doc/ansible-freeipa/directory. -
See the sample playbooks in the
/usr/share/doc/ansible-freeipa/playbooks/topologydirectory.
15.7. Additional resources
Chapter 16. Managing IdM servers by using Ansible
You can use Red Hat Ansible Engine to manage the servers in your Identity Management (IdM) topology. You can use the server module in the ansible-freeipa package to check the presence or absence of a server in the IdM topology. You can also hide any replica or make a replica visible.
The section contains the following topics:
- Checking that an IdM server is present by using Ansible
- Ensuring that an IdM server is absent from an IdM topology by using Ansible
- Ensuring the absence of an IdM server despite hosting a last IdM server role
- Ensuring that an IdM server is absent but not necessarily disconnected from other IdM servers
- Ensuring that an existing IdM server is hidden using an Ansible playbook
- Ensuring that an existing IdM server is visible using an Ansible playbook
- Ensuring that an existing IdM server has an IdM DNS location assigned
- Ensuring that an existing IdM server has no IdM DNS location assigned
16.1. Checking that an IdM server is present by using Ansible
You can use the ipaserver ansible-freeipa module in an Ansible playbook to verify that an Identity Management (IdM) server exists.
The ipaserver Ansible module does not install the IdM server.
Prerequisites
-
You know the IdM
adminpassword. You have configured your Ansible control node to meet the following requirements:
- You are using Ansible version 2.14 or later.
-
You have installed the
ansible-freeipapackage on the Ansible controller. - The example assumes that in the ~/MyPlaybooks/ directory, you have created an Ansible inventory file with the fully-qualified domain name (FQDN) of the IdM server.
-
The example assumes that the secret.yml Ansible vault stores your
ipaadmin_password.
The target node, that is the node on which the
ansible-freeipamodule is executed, is part of the IdM domain as an IdM client, server or replica.-
The
SSHconnection from the control node to the IdM server defined in the inventory file is working correctly.
-
The
Procedure
Navigate to your ~/MyPlaybooks/ directory:
$ cd ~/MyPlaybooks/Copy the
server-present.ymlAnsible playbook file located in the/usr/share/doc/ansible-freeipa/playbooks/server/directory:$ cp /usr/share/doc/ansible-freeipa/playbooks/server/server-present.yml server-present-copy.yml-
Open the
server-present-copy.ymlfile for editing. Adapt the file by setting the following variables in the
ipaservertask section and save the file:-
Set the
ipaadmin_passwordvariable to the password of the IdMadmin. -
Set the
namevariable to theFQDNof the server. TheFQDNof the example server is server123.idm.example.com.
--- - name: Server present example hosts: ipaserver vars_files: - /home/user_name/MyPlaybooks/secret.yml tasks: - name: Ensure server server123.idm.example.com is present ipaserver: ipaadmin_password: "{{ ipaadmin_password }}" name: server123.idm.example.com-
Set the
Run the Ansible playbook and specify the playbook file and the inventory file:
$ ansible-playbook --vault-password-file=password_file -v -i inventory server-present-copy.yml
Additional resources
- See Installing an Identity Management server using an Ansible playbook.
-
See the
README-server.mdfile in the/usr/share/doc/ansible-freeipa/directory. -
See the sample playbooks in the
/usr/share/doc/ansible-freeipa/playbooks/serverdirectory.
16.2. Ensuring that an IdM server is absent from an IdM topology by using Ansible
Use an Ansible playbook to ensure an Identity Management (IdM) server does not exist in an IdM topology, even as a host.
In contrast to the ansible-freeipa ipaserver role, the ipaserver module used in this playbook does not uninstall IdM services from the server.
Prerequisites
-
You know the IdM
adminpassword. You have configured your Ansible control node to meet the following requirements:
- You are using Ansible version 2.14 or later.
-
You have installed the
ansible-freeipapackage on the Ansible controller. - The example assumes that in the ~/MyPlaybooks/ directory, you have created an Ansible inventory file with the fully-qualified domain name (FQDN) of the IdM server.
-
The example assumes that the secret.yml Ansible vault stores your
ipaadmin_password.
The target node, that is the node on which the
ansible-freeipamodule is executed, is part of the IdM domain as an IdM client, server or replica.-
The
SSHconnection from the control node to the IdM server defined in the inventory file is working correctly.
-
The
Procedure
Navigate to your ~/MyPlaybooks/ directory:
$ cd ~/MyPlaybooks/Copy the
server-absent.ymlAnsible playbook file located in the/usr/share/doc/ansible-freeipa/playbooks/server/directory:$ cp /usr/share/doc/ansible-freeipa/playbooks/server/server-absent.yml server-absent-copy.yml-
Open the
server-absent-copy.ymlfile for editing. Adapt the file by setting the following variables in the
ipaservertask section and save the file:-
Set the
ipaadmin_passwordvariable to the password of the IdMadmin. -
Set the
namevariable to theFQDNof the server. TheFQDNof the example server is server123.idm.example.com. -
Ensure that the
statevariable is set toabsent.
--- - name: Server absent example hosts: ipaserver vars_files: - /home/user_name/MyPlaybooks/secret.yml tasks: - name: Ensure server server123.idm.example.com is absent ipaserver: ipaadmin_password: "{{ ipaadmin_password }}" name: server123.idm.example.com state: absent-
Set the
Run the Ansible playbook and specify the playbook file and the inventory file:
$ ansible-playbook --vault-password-file=password_file -v -i inventory server-absent-copy.yml- Make sure all name server (NS) DNS records pointing to server123.idm.example.com are deleted from your DNS zones. This applies regardless of whether you use integrated DNS managed by IdM or external DNS.
Additional resources
- See Uninstalling an IdM server.
-
See the
README-server.mdfile in the/usr/share/doc/ansible-freeipa/directory. -
See the sample playbooks in the
/usr/share/doc/ansible-freeipa/playbooks/serverdirectory.
16.3. Ensuring the absence of an IdM server despite hosting a last IdM server role
You can use Ansible to ensure that an Identity Management (IdM) server is absent even if the last IdM service instance is running on the server. A certificate authority (CA), key recovery authority (KRA), or DNS server are all examples of IdM services.
If you remove the last server that serves as a CA, KRA, or DNS server, you disrupt IdM functionality seriously. You can manually check which services are running on which IdM servers with the ipa service-find command. The principal name of a CA server is dogtag/server_name/REALM_NAME.
In contrast to the ansible-freeipa ipaserver role, the ipaserver module used in this playbook does not uninstall IdM services from the server.
Prerequisites
-
You know the IdM
adminpassword. You have configured your Ansible control node to meet the following requirements:
- You are using Ansible version 2.14 or later.
-
You have installed the
ansible-freeipapackage on the Ansible controller. - The example assumes that in the ~/MyPlaybooks/ directory, you have created an Ansible inventory file with the fully-qualified domain name (FQDN) of the IdM server.
-
The example assumes that the secret.yml Ansible vault stores your
ipaadmin_password.
The target node, that is the node on which the
ansible-freeipamodule is executed, is part of the IdM domain as an IdM client, server or replica.-
The
SSHconnection from the control node to the IdM server defined in the inventory file is working correctly.
-
The
Procedure
Navigate to your ~/MyPlaybooks/ directory:
$ cd ~/MyPlaybooks/Copy the
server-absent-ignore-last-of-role.ymlAnsible playbook file located in the/usr/share/doc/ansible-freeipa/playbooks/server/directory:$ cp /usr/share/doc/ansible-freeipa/playbooks/server/server-absent-ignore-last-of-role.yml server-absent-ignore-last-of-role-copy.yml-
Open the
server-absent-ignore-last-of-role-copy.ymlfile for editing. Adapt the file by setting the following variables in the
ipaservertask section and save the file:-
Set the
ipaadmin_passwordvariable to the password of the IdMadmin. -
Set the
namevariable to theFQDNof the server. TheFQDNof the example server is server123.idm.example.com. -
Ensure that the
ignore_last_of_rolevariable is set toyes. -
Set the
statevariable toabsent.
--- - name: Server absent with last of role skip example hosts: ipaserver vars_files: - /home/user_name/MyPlaybooks/secret.yml tasks: - name: Ensure server “server123.idm.example.com” is absent with last of role skip ipaserver: ipaadmin_password: "{{ ipaadmin_password }}" name: server123.idm.example.com ignore_last_of_role: yes state: absent-
Set the
Run the Ansible playbook and specify the playbook file and the inventory file:
$ ansible-playbook --vault-password-file=password_file -v -i inventory server-absent-ignore-last-of-role-copy.yml- Make sure all name server (NS) DNS records that point to server123.idm.example.com are deleted from your DNS zones. This applies regardless of whether you use integrated DNS managed by IdM or external DNS.
Additional resources
- See Uninstalling an IdM server.
-
See the
README-server.mdfile in the/usr/share/doc/ansible-freeipa/directory. -
See sample playbooks in the
/usr/share/doc/ansible-freeipa/playbooks/serverdirectory.
16.4. Ensuring that an IdM server is absent but not necessarily disconnected from other IdM servers
If you are removing an Identity Management (IdM) server from the topology, you can keep its replication agreements intact with an Ansible playbook. The playbook also ensures that the IdM server does not exist in IdM, even as a host.
Ignoring a server’s replication agreements when removing it is only recommended when the other servers are dysfunctional servers that you are planning to remove anyway. Removing a server that serves as a central point in the topology can split your topology into two disconnected clusters.
You can remove a dysfunctional server from the topology with the ipa server-del command.
If you remove the last server that serves as a certificate authority (CA), key recovery authority (KRA), or DNS server, you seriously disrupt the Identity Management (IdM) functionality. To prevent this problem, the playbook makes sure these services are running on another server in the domain before it uninstalls a server that serves as a CA, KRA, or DNS server.
In contrast to the ansible-freeipa ipaserver role, the ipaserver module used in this playbook does not uninstall IdM services from the server.
Prerequisites
-
You know the IdM
adminpassword. You have configured your Ansible control node to meet the following requirements:
- You are using Ansible version 2.14 or later.
-
You have installed the
ansible-freeipapackage on the Ansible controller. - The example assumes that in the ~/MyPlaybooks/ directory, you have created an Ansible inventory file with the fully-qualified domain name (FQDN) of the IdM server.
-
The example assumes that the secret.yml Ansible vault stores your
ipaadmin_password.
The target node, that is the node on which the
ansible-freeipamodule is executed, is part of the IdM domain as an IdM client, server or replica.-
The
SSHconnection from the control node to the IdM server defined in the inventory file is working correctly.
-
The
Procedure
Navigate to your ~/MyPlaybooks/ directory:
$ cd ~/MyPlaybooks/Copy the
server-absent-ignore_topology_disconnect.ymlAnsible playbook file located in the/usr/share/doc/ansible-freeipa/playbooks/server/directory:$ cp /usr/share/doc/ansible-freeipa/playbooks/server/server-absent-ignore_topology_disconnect.yml server-absent-ignore_topology_disconnect-copy.yml-
Open the
server-absent-ignore_topology_disconnect-copy.ymlfile for editing. Adapt the file by setting the following variables in the
ipaservertask section and save the file:-
Set the
ipaadmin_passwordvariable to the password of the IdMadmin. -
Set the
namevariable to theFQDNof the server. TheFQDNof the example server is server123.idm.example.com. -
Ensure that the
ignore_topology_disconnectvariable is set toyes. -
Ensure that the
statevariable is set toabsent.
--- - name: Server absent with ignoring topology disconnects example hosts: ipaserver vars_files: - /home/user_name/MyPlaybooks/secret.yml tasks: - name: Ensure server “server123.idm.example.com” with ignoring topology disconnects ipaserver: ipaadmin_password: "{{ ipaadmin_password }}" name: server123.idm.example.com ignore_topology_disconnect: yes state: absent-
Set the
Run the Ansible playbook and specify the playbook file and the inventory file:
$ ansible-playbook --vault-password-file=password_file -v -i inventory server-absent-ignore_topology_disconnect-copy.yml- [Optional] Make sure all name server (NS) DNS records pointing to server123.idm.example.com are deleted from your DNS zones. This applies regardless of whether you use integrated DNS managed by IdM or external DNS.
Additional resources
- See Uninstalling an IdM server.
-
See the
README-server.mdfile in the/usr/share/doc/ansible-freeipa/directory. -
See sample playbooks in the
/usr/share/doc/ansible-freeipa/playbooks/serverdirectory.
16.6. Ensuring that an existing IdM server is visible by using an Ansible playbook
Use the ipaserver ansible-freeipa module in an Ansible playbook to ensure that an existing Identity Management (IdM) server is visible. Note that this playbook does not install the IdM server.
Prerequisites
-
You know the IdM
adminpassword. You have configured your Ansible control node to meet the following requirements:
- You are using Ansible version 2.14 or later.
-
You have installed the
ansible-freeipapackage on the Ansible controller. - The example assumes that in the ~/MyPlaybooks/ directory, you have created an Ansible inventory file with the fully-qualified domain name (FQDN) of the IdM server.
-
The example assumes that the secret.yml Ansible vault stores your
ipaadmin_password.
The target node, that is the node on which the
ansible-freeipamodule is executed, is part of the IdM domain as an IdM client, server or replica.-
The
SSHconnection from the control node to the IdM server defined in the inventory file is working correctly.
-
The
Procedure
Navigate to your ~/MyPlaybooks/ directory:
$ cd ~/MyPlaybooks/Copy the
server-not-hidden.ymlAnsible playbook file located in the/usr/share/doc/ansible-freeipa/playbooks/server/directory:$ cp /usr/share/doc/ansible-freeipa/playbooks/server/server-not-hidden.yml server-not-hidden-copy.yml-
Open the
server-not-hidden-copy.ymlfile for editing. Adapt the file by setting the following variables in the
ipaservertask section and save the file:-
Set the
ipaadmin_passwordvariable to the password of the IdMadmin. -
Set the
namevariable to theFQDNof the server. TheFQDNof the example server is server123.idm.example.com. -
Ensure that the
hiddenvariable is set tono.
--- - name: Server not hidden example hosts: ipaserver vars_files: - /home/user_name/MyPlaybooks/secret.yml tasks: - name: Ensure server server123.idm.example.com is not hidden ipaserver: ipaadmin_password: "{{ ipaadmin_password }}" name: server123.idm.example.com hidden: no-
Set the
Run the Ansible playbook and specify the playbook file and the inventory file:
$ ansible-playbook --vault-password-file=password_file -v -i inventory server-not-hidden-copy.yml
Additional resources
- See Installing an Identity Management server using an Ansible playbook.
- See The hidden replica mode.
-
See the
README-server.mdfile in the/usr/share/doc/ansible-freeipa/directory. -
See the sample playbooks in the
/usr/share/doc/ansible-freeipa/playbooks/serverdirectory.
16.7. Ensuring that an existing IdM server has an IdM DNS location assigned
Use the ipaserver ansible-freeipa module in an Ansible playbook to ensure that an existing Identity Management (IdM) server is assigned a specific IdM DNS location.
Note that the ipaserver Ansible module does not install the IdM server.
Prerequisites
-
You know the IdM
adminpassword. - The IdM DNS location exists. The example location is germany.
-
You have
rootaccess to the server. The example server is server123.idm.example.com. You have configured your Ansible control node to meet the following requirements:
- You are using Ansible version 2.14 or later.
-
You have installed the
ansible-freeipapackage on the Ansible controller. - The example assumes that in the ~/MyPlaybooks/ directory, you have created an Ansible inventory file with the fully-qualified domain name (FQDN) of the IdM server.
-
The example assumes that the secret.yml Ansible vault stores your
ipaadmin_password.
The target node, that is the node on which the
ansible-freeipamodule is executed, is part of the IdM domain as an IdM client, server or replica.-
The
SSHconnection from the control node to the IdM server defined in the inventory file is working correctly.
-
The
Procedure
Navigate to your ~/MyPlaybooks/ directory:
$ cd ~/MyPlaybooks/Copy the
server-location.ymlAnsible playbook file located in the/usr/share/doc/ansible-freeipa/playbooks/server/directory:$ cp /usr/share/doc/ansible-freeipa/playbooks/server/server-location.yml server-location-copy.yml-
Open the
server-location-copy.ymlfile for editing. Adapt the file by setting the following variables in the
ipaservertask section and save the file:-
Set the
ipaadmin_passwordvariable to the password of the IdMadmin. -
Set the
namevariable to server123.idm.example.com. -
Set the
locationvariable to germany.
This is the modified Ansible playbook file for the current example:
--- - name: Server enabled example hosts: ipaserver vars_files: - /home/user_name/MyPlaybooks/secret.yml tasks: - name: Ensure server server123.idm.example.com with location “germany” is present ipaserver: ipaadmin_password: "{{ ipaadmin_password }}" name: server123.idm.example.com location: germany-
Set the
Run the Ansible playbook and specify the playbook file and the inventory file:
$ ansible-playbook --vault-password-file=password_file -v -i inventory server-location-copy.ymlConnect to server123.idm.example.com as
rootusingSSH:ssh root@server123.idm.example.comRestart the
named-pkcs11service on the server for the updates to take effect immediately:[root@server123.idm.example.com ~]# systemctl restart named-pkcs11
Additional resources
- See Installing an Identity Management server using an Ansible playbook.
- See Using Ansible to ensure an IdM location is present.
-
See the
README-server.mdfile in the/usr/share/doc/ansible-freeipa/directory. -
See sample playbooks in the
/usr/share/doc/ansible-freeipa/playbooks/serverdirectory.
16.8. Ensuring that an existing IdM server has no IdM DNS location assigned
Use the ipaserver ansible-freeipa module in an Ansible playbook to ensure that an existing Identity Management (IdM) server has no IdM DNS location assigned to it. Do not assign a DNS location to servers that change geographical location frequently. Note that the playbook does not install the IdM server.
Prerequisites
-
You know the IdM
adminpassword. -
You have
rootaccess to the server. The example server is server123.idm.example.com. You have configured your Ansible control node to meet the following requirements:
- You are using Ansible version 2.14 or later.
-
You have installed the
ansible-freeipapackage on the Ansible controller. - The example assumes that in the ~/MyPlaybooks/ directory, you have created an Ansible inventory file with the fully-qualified domain name (FQDN) of the IdM server.
-
The example assumes that the secret.yml Ansible vault stores your
ipaadmin_password.
The target node, that is the node on which the
ansible-freeipamodule is executed, is part of the IdM domain as an IdM client, server or replica.-
The
SSHconnection from the control node to the IdM server defined in the inventory file is working correctly.
-
The
Procedure
Navigate to your ~/MyPlaybooks/ directory:
$ cd ~/MyPlaybooks/Copy the
server-no-location.ymlAnsible playbook file located in the/usr/share/doc/ansible-freeipa/playbooks/server/directory:$ cp /usr/share/doc/ansible-freeipa/playbooks/server/server-no-location.yml server-no-location-copy.yml-
Open the
server-no-location-copy.ymlfile for editing. Adapt the file by setting the following variables in the
ipaservertask section and save the file:-
Set the
ipaadmin_passwordvariable to the password of the IdMadmin. -
Set the
namevariable to server123.idm.example.com. -
Ensure that the
locationvariable is set to ””.
--- - name: Server no location example hosts: ipaserver vars_files: - /home/user_name/MyPlaybooks/secret.yml tasks: - name: Ensure server server123.idm.example.com is present with no location ipaserver: ipaadmin_password: "{{ ipaadmin_password }}" name: server123.idm.example.com location: “”-
Set the
Run the Ansible playbook and specify the playbook file and the inventory file:
$ ansible-playbook --vault-password-file=password_file -v -i inventory server-no-location-copy.ymlConnect to server123.idm.example.com as
rootusingSSH:ssh root@server123.idm.example.comRestart the
named-pkcs11service on the server for the updates to take effect immediately:[root@server123.idm.example.com ~]# systemctl restart named-pkcs11
Additional resources
- See Installing an Identity Management server using an Ansible playbook.
- See Using Ansible to manage DNS locations in IdM.
-
See the
README-server.mdfile in the/usr/share/doc/ansible-freeipa/directory. -
See sample playbooks in the
/usr/share/doc/ansible-freeipa/playbooks/serverdirectory.
Chapter 17. Managing hosts using Ansible playbooks
Ansible is an automation tool used to configure systems, deploy software, and perform rolling updates. Ansible includes support for Identity Management (IdM), and you can use Ansible modules to automate host management.
The following concepts and operations are performed when managing hosts and host entries using Ansible playbooks:
-
Ensuring the presence of IdM host entries that are only defined by their
FQDNs - Ensuring the presence of IdM host entries with IP addresses
- Ensuring the presence of multiple IdM host entries with random passwords
- Ensuring the presence of an IdM host entry with multiple IP addresses
- Ensuring the absence of IdM host entries
17.1. Ensuring the presence of an IdM host entry with FQDN using Ansible playbooks
Follow this procedure to ensure the presence of host entries in Identity Management (IdM) using Ansible playbooks. The host entries are only defined by their fully-qualified domain names (FQDNs).
Specifying the FQDN name of the host is enough if at least one of the following conditions applies:
- The IdM server is not configured to manage DNS.
-
The host does not have a static IP address or the IP address is not known at the time the host is configured. Adding a host defined only by an
FQDNessentially creates a placeholder entry in the IdM DNS service. For example, laptops may be preconfigured as IdM clients, but they do not have IP addresses at the time they are configured. When the DNS service dynamically updates its records, the host’s current IP address is detected and its DNS record is updated.
Without Ansible, host entries are created in IdM using the ipa host-add command. The result of adding a host to IdM is the state of the host being present in IdM. Because of the Ansible reliance on idempotence, to add a host to IdM using Ansible, you must create a playbook in which you define the state of the host as present: state: present.
Prerequisites
- You know the IdM administrator password.
You have configured your Ansible control node to meet the following requirements:
- You are using Ansible version 2.14 or later.
-
You have installed the
ansible-freeipapackage on the Ansible controller. - The example assumes that in the ~/MyPlaybooks/ directory, you have created an Ansible inventory file with the fully-qualified domain name (FQDN) of the IdM server.
-
The example assumes that the secret.yml Ansible vault stores your
ipaadmin_password.
-
The target node, that is the node on which the
ansible-freeipamodule is executed, is part of the IdM domain as an IdM client, server or replica.
Procedure
Create an inventory file, for example
inventory.file, and defineipaserverin it:[ipaserver] server.idm.example.com
Create an Ansible playbook file with the
FQDNof the host whose presence in IdM you want to ensure. To simplify this step, you can copy and modify the example in the/usr/share/doc/ansible-freeipa/playbooks/host/add-host.ymlfile:--- - name: Host present hosts: ipaserver vars_files: - /home/user_name/MyPlaybooks/secret.yml tasks: - name: Host host01.idm.example.com present ipahost: ipaadmin_password: "{{ ipaadmin_password }}" name: host01.idm.example.com state: present force: yesRun the playbook:
$ ansible-playbook --vault-password-file=password_file -v -i path_to_inventory_directory/inventory.file path_to_playbooks_directory/ensure-host-is-present.yml
The procedure results in a host entry in the IdM LDAP server being created but not in enrolling the host into the IdM Kerberos realm. For that, you must deploy the host as an IdM client. For details, see Installing an Identity Management client using an Ansible playbook.
Verification steps
Log in to your IdM server as admin:
$ ssh admin@server.idm.example.com Password:Enter the
ipa host-showcommand and specify the name of the host:$ ipa host-show host01.idm.example.com Host name: host01.idm.example.com Principal name: host/host01.idm.example.com@IDM.EXAMPLE.COM Principal alias: host/host01.idm.example.com@IDM.EXAMPLE.COM Password: False Keytab: False Managed by: host01.idm.example.com
The output confirms that host01.idm.example.com exists in IdM.
17.2. Ensuring the presence of an IdM host entry with DNS information using Ansible playbooks
Follow this procedure to ensure the presence of host entries in Identity Management (IdM) using Ansible playbooks. The host entries are defined by their fully-qualified domain names (FQDNs) and their IP addresses.
Without Ansible, host entries are created in IdM using the ipa host-add command. The result of adding a host to IdM is the state of the host being present in IdM. Because of the Ansible reliance on idempotence, to add a host to IdM using Ansible, you must create a playbook in which you define the state of the host as present: state: present.
Prerequisites
- You know the IdM administrator password.
You have configured your Ansible control node to meet the following requirements:
- You are using Ansible version 2.14 or later.
-
You have installed the
ansible-freeipapackage on the Ansible controller. - The example assumes that in the ~/MyPlaybooks/ directory, you have created an Ansible inventory file with the fully-qualified domain name (FQDN) of the IdM server.
-
The example assumes that the secret.yml Ansible vault stores your
ipaadmin_password.
-
The target node, that is the node on which the
ansible-freeipamodule is executed, is part of the IdM domain as an IdM client, server or replica.
Procedure
Create an inventory file, for example
inventory.file, and defineipaserverin it:[ipaserver] server.idm.example.com
Create an Ansible playbook file with the
fully-qualified domain name(FQDN) of the host whose presence in IdM you want to ensure. In addition, if the IdM server is configured to manage DNS and you know the IP address of the host, specify a value for theip_addressparameter. The IP address is necessary for the host to exist in the DNS resource records. To simplify this step, you can copy and modify the example in the/usr/share/doc/ansible-freeipa/playbooks/host/host-present.ymlfile. You can also include other, additional information:--- - name: Host present hosts: ipaserver vars_files: - /home/user_name/MyPlaybooks/secret.yml tasks: - name: Ensure host01.idm.example.com is present ipahost: ipaadmin_password: "{{ ipaadmin_password }}" name: host01.idm.example.com description: Example host ip_address: 192.168.0.123 locality: Lab ns_host_location: Lab ns_os_version: CentOS 7 ns_hardware_platform: Lenovo T61 mac_address: - "08:00:27:E3:B1:2D" - "52:54:00:BD:97:1E" state: presentRun the playbook:
$ ansible-playbook --vault-password-file=password_file -v -i path_to_inventory_directory/inventory.file path_to_playbooks_directory/ensure-host-is-present.yml
The procedure results in a host entry in the IdM LDAP server being created but not in enrolling the host into the IdM Kerberos realm. For that, you must deploy the host as an IdM client. For details, see Installing an Identity Management client using an Ansible playbook.
Verification steps
Log in to your IdM server as admin:
$ ssh admin@server.idm.example.com Password:Enter the
ipa host-showcommand and specify the name of the host:$ ipa host-show host01.idm.example.com Host name: host01.idm.example.com Description: Example host Locality: Lab Location: Lab Platform: Lenovo T61 Operating system: CentOS 7 Principal name: host/host01.idm.example.com@IDM.EXAMPLE.COM Principal alias: host/host01.idm.example.com@IDM.EXAMPLE.COM MAC address: 08:00:27:E3:B1:2D, 52:54:00:BD:97:1E Password: False Keytab: False Managed by: host01.idm.example.com
The output confirms host01.idm.example.com exists in IdM.
17.3. Ensuring the presence of multiple IdM host entries with random passwords using Ansible playbooks
The ipahost module allows the system administrator to ensure the presence or absence of multiple host entries in IdM using just one Ansible task. Follow this procedure to ensure the presence of multiple host entries that are only defined by their fully-qualified domain names (FQDNs). Running the Ansible playbook generates random passwords for the hosts.
Without Ansible, host entries are created in IdM using the ipa host-add command. The result of adding a host to IdM is the state of the host being present in IdM. Because of the Ansible reliance on idempotence, to add a host to IdM using Ansible, you must create a playbook in which you define the state of the host as present: state: present.
Prerequisites
- You know the IdM administrator password.
You have configured your Ansible control node to meet the following requirements:
- You are using Ansible version 2.14 or later.
-
You have installed the
ansible-freeipapackage on the Ansible controller. - The example assumes that in the ~/MyPlaybooks/ directory, you have created an Ansible inventory file with the fully-qualified domain name (FQDN) of the IdM server.
-
The example assumes that the secret.yml Ansible vault stores your
ipaadmin_password.
-
The target node, that is the node on which the
ansible-freeipamodule is executed, is part of the IdM domain as an IdM client, server or replica.
Procedure
Create an inventory file, for example
inventory.file, and defineipaserverin it:[ipaserver] server.idm.example.com
Create an Ansible playbook file with the
fully-qualified domain name(FQDN) of the hosts whose presence in IdM you want to ensure. To make the Ansible playbook generate a random password for each host even when the host already exists in IdM andupdate_passwordis limited toon_create, add therandom: yesandforce: yesoptions. To simplify this step, you can copy and modify the example from the/usr/share/doc/ansible-freeipa/README-host.mdMarkdown file:--- - name: Ensure hosts with random password hosts: ipaserver vars_files: - /home/user_name/MyPlaybooks/secret.yml tasks: - name: Hosts host01.idm.example.com and host02.idm.example.com present with random passwords ipahost: ipaadmin_password: "{{ ipaadmin_password }}" hosts: - name: host01.idm.example.com random: yes force: yes - name: host02.idm.example.com random: yes force: yes register: ipahostRun the playbook:
$ ansible-playbook --vault-password-file=password_file -v -i path_to_inventory_directory/inventory.file path_to_playbooks_directory/ensure-hosts-are-present.yml [...] TASK [Hosts host01.idm.example.com and host02.idm.example.com present with random passwords] changed: [r8server.idm.example.com] => {"changed": true, "host": {"host01.idm.example.com": {"randompassword": "0HoIRvjUdH0Ycbf6uYdWTxH"}, "host02.idm.example.com": {"randompassword": "5VdLgrf3wvojmACdHC3uA3s"}}}
To deploy the hosts as IdM clients using random, one-time passwords (OTPs), see Authorization options for IdM client enrollment using an Ansible playbook or Installing a client by using a one-time password: Interactive installation.
Verification steps
Log in to your IdM server as admin:
$ ssh admin@server.idm.example.com Password:Enter the
ipa host-showcommand and specify the name of one of the hosts:$ ipa host-show host01.idm.example.com Host name: host01.idm.example.com Password: True Keytab: False Managed by: host01.idm.example.com
The output confirms host01.idm.example.com exists in IdM with a random password.
17.4. Ensuring the presence of an IdM host entry with multiple IP addresses using Ansible playbooks
Follow this procedure to ensure the presence of a host entry in Identity Management (IdM) using Ansible playbooks. The host entry is defined by its fully-qualified domain name (FQDN) and its multiple IP addresses.
In contrast to the ipa host utility, the Ansible ipahost module can ensure the presence or absence of several IPv4 and IPv6 addresses for a host. The ipa host-mod command cannot handle IP addresses.
Prerequisites
- You know the IdM administrator password.
You have configured your Ansible control node to meet the following requirements:
- You are using Ansible version 2.14 or later.
-
You have installed the
ansible-freeipapackage on the Ansible controller. - The example assumes that in the ~/MyPlaybooks/ directory, you have created an Ansible inventory file with the fully-qualified domain name (FQDN) of the IdM server.
-
The example assumes that the secret.yml Ansible vault stores your
ipaadmin_password.
-
The target node, that is the node on which the
ansible-freeipamodule is executed, is part of the IdM domain as an IdM client, server or replica.
Procedure
Create an inventory file, for example
inventory.file, and defineipaserverin it:[ipaserver] server.idm.example.com
Create an Ansible playbook file. Specify, as the
nameof theipahostvariable, thefully-qualified domain name(FQDN) of the host whose presence in IdM you want to ensure. Specify each of the multiple IPv4 and IPv6ip_addressvalues on a separate line by using the ip_address syntax. To simplify this step, you can copy and modify the example in the/usr/share/doc/ansible-freeipa/playbooks/host/host-member-ipaddresses-present.ymlfile. You can also include additional information:--- - name: Host member IP addresses present hosts: ipaserver vars_files: - /home/user_name/MyPlaybooks/secret.yml tasks: - name: Ensure host101.example.com IP addresses present ipahost: ipaadmin_password: "{{ ipaadmin_password }}" name: host01.idm.example.com ip_address: - 192.168.0.123 - fe80::20c:29ff:fe02:a1b3 - 192.168.0.124 - fe80::20c:29ff:fe02:a1b4 force: yesRun the playbook:
$ ansible-playbook --vault-password-file=password_file -v -i path_to_inventory_directory/inventory.file path_to_playbooks_directory/ensure-host-with-multiple-IP-addreses-is-present.yml
The procedure creates a host entry in the IdM LDAP server but does not enroll the host into the IdM Kerberos realm. For that, you must deploy the host as an IdM client. For details, see Installing an Identity Management client using an Ansible playbook.
Verification steps
Log in to your IdM server as admin:
$ ssh admin@server.idm.example.com Password:Enter the
ipa host-showcommand and specify the name of the host:$ ipa host-show host01.idm.example.com Principal name: host/host01.idm.example.com@IDM.EXAMPLE.COM Principal alias: host/host01.idm.example.com@IDM.EXAMPLE.COM Password: False Keytab: False Managed by: host01.idm.example.comThe output confirms that host01.idm.example.com exists in IdM.
To verify that the multiple IP addresses of the host exist in the IdM DNS records, enter the
ipa dnsrecord-showcommand and specify the following information:- The name of the IdM domain
The name of the host
$ ipa dnsrecord-show idm.example.com host01 [...] Record name: host01 A record: 192.168.0.123, 192.168.0.124 AAAA record: fe80::20c:29ff:fe02:a1b3, fe80::20c:29ff:fe02:a1b4
The output confirms that all the IPv4 and IPv6 addresses specified in the playbook are correctly associated with the host01.idm.example.com host entry.
17.5. Ensuring the absence of an IdM host entry using Ansible playbooks
Follow this procedure to ensure the absence of host entries in Identity Management (IdM) using Ansible playbooks.
Prerequisites
- IdM administrator credentials
Procedure
Create an inventory file, for example
inventory.file, and defineipaserverin it:[ipaserver] server.idm.example.com
Create an Ansible playbook file with the
fully-qualified domain name(FQDN) of the host whose absence from IdM you want to ensure. If your IdM domain has integrated DNS, use theupdatedns: yesoption to remove the associated records of any kind for the host from the DNS.To simplify this step, you can copy and modify the example in the
/usr/share/doc/ansible-freeipa/playbooks/host/delete-host.ymlfile:--- - name: Host absent hosts: ipaserver vars_files: - /home/user_name/MyPlaybooks/secret.yml tasks: - name: Host host01.idm.example.com absent ipahost: ipaadmin_password: "{{ ipaadmin_password }}" name: host01.idm.example.com updatedns: yes state: absentRun the playbook:
$ ansible-playbook --vault-password-file=password_file -v -i path_to_inventory_directory/inventory.file path_to_playbooks_directory/ensure-host-absent.yml
The procedure results in:
- The host not being present in the IdM Kerberos realm.
- The host entry not being present in the IdM LDAP server.
To remove the specific IdM configuration of system services, such as System Security Services Daemon (SSSD), from the client host itself, you must run the ipa-client-install --uninstall command on the client. For details, see Uninstalling an IdM client.
Verification steps
Log into
ipaserveras admin:$ ssh admin@server.idm.example.com Password: [admin@server /]$Display information about host01.idm.example.com:
$ ipa host-show host01.idm.example.com ipa: ERROR: host01.idm.example.com: host not found
The output confirms that the host does not exist in IdM.
17.6. Additional resources
-
See the
/usr/share/doc/ansible-freeipa/README-host.mdMarkdown file. -
See the additional playbooks in the
/usr/share/doc/ansible-freeipa/playbooks/hostdirectory.
Chapter 18. Managing host groups using Ansible playbooks
To learn more about host groups in Identity Management (IdM) and using Ansible to perform operations involving host groups in Identity Management (IdM), see the following:
- Host groups in IdM
- Ensuring the presence of IdM host groups
- Ensuring the presence of hosts in IdM host groups
- Nesting IdM host groups
- Ensuring the presence of member managers in IdM host groups
- Ensuring the absence of hosts from IdM host groups
- Ensuring the absence of nested host groups from IdM host groups
- Ensuring the absence of member managers from IdM host groups
18.1. Host groups in IdM
IdM host groups can be used to centralize control over important management tasks, particularly access control.
Definition of host groups
A host group is an entity that contains a set of IdM hosts with common access control rules and other characteristics. For example, you can define host groups based on company departments, physical locations, or access control requirements.
A host group in IdM can include:
- IdM servers and clients
- Other IdM host groups
Host groups created by default
By default, the IdM server creates the host group ipaservers for all IdM server hosts.
Direct and indirect group members
Group attributes in IdM apply to both direct and indirect members: when host group B is a member of host group A, all members of host group B are considered indirect members of host group A.
18.2. Ensuring the presence of IdM host groups using Ansible playbooks
Follow this procedure to ensure the presence of host groups in Identity Management (IdM) using Ansible playbooks.
Without Ansible, host group entries are created in IdM using the ipa hostgroup-add command. The result of adding a host group to IdM is the state of the host group being present in IdM. Because of the Ansible reliance on idempotence, to add a host group to IdM using Ansible, you must create a playbook in which you define the state of the host group as present: state: present.
Prerequisites
- You know the IdM administrator password.
You have configured your Ansible control node to meet the following requirements:
- You are using Ansible version 2.14 or later.
-
You have installed the
ansible-freeipapackage on the Ansible controller. - The example assumes that in the ~/MyPlaybooks/ directory, you have created an Ansible inventory file with the fully-qualified domain name (FQDN) of the IdM server.
-
The example assumes that the secret.yml Ansible vault stores your
ipaadmin_password.
-
The target node, that is the node on which the
ansible-freeipamodule is executed, is part of the IdM domain as an IdM client, server or replica.
Procedure
Create an inventory file, for example
inventory.file, and defineipaserverin it with the list of IdM servers to target:[ipaserver] server.idm.example.com
Create an Ansible playbook file with the necessary host group information. For example, to ensure the presence of a host group named databases, specify
name: databasesin the- ipahostgrouptask. To simplify this step, you can copy and modify the example in the/usr/share/doc/ansible-freeipa/playbooks/user/ensure-hostgroup-is-present.ymlfile.--- - name: Playbook to handle hostgroups hosts: ipaserver vars_files: - /home/user_name/MyPlaybooks/secret.yml tasks: # Ensure host-group databases is present - ipahostgroup: ipaadmin_password: "{{ ipaadmin_password }}" name: databases state: presentIn the playbook, state: present signifies a request to add the host group to IdM unless it already exists there.
Run the playbook:
$ ansible-playbook --vault-password-file=password_file -v -i path_to_inventory_directory/inventory.file path_to_playbooks_directory/ensure-hostgroup-is-present.yml
Verification steps
Log into
ipaserveras admin:$ ssh admin@server.idm.example.com Password: [admin@server /]$Request a Kerberos ticket for admin:
$ kinit admin Password for admin@IDM.EXAMPLE.COM:Display information about the host group whose presence in IdM you wanted to ensure:
$ ipa hostgroup-show databases Host-group: databases
The databases host group exists in IdM.
18.3. Ensuring the presence of hosts in IdM host groups using Ansible playbooks
Follow this procedure to ensure the presence of hosts in host groups in Identity Management (IdM) using Ansible playbooks.
Prerequisites
- You know the IdM administrator password.
You have configured your Ansible control node to meet the following requirements:
- You are using Ansible version 2.14 or later.
-
You have installed the
ansible-freeipapackage on the Ansible controller. - The example assumes that in the ~/MyPlaybooks/ directory, you have created an Ansible inventory file with the fully-qualified domain name (FQDN) of the IdM server.
-
The example assumes that the secret.yml Ansible vault stores your
ipaadmin_password.
-
The target node, that is the node on which the
ansible-freeipamodule is executed, is part of the IdM domain as an IdM client, server or replica. - The hosts you want to reference in your Ansible playbook exist in IdM. For details, see Ensuring the presence of an IdM host entry using Ansible playbooks.
- The host groups you reference from the Ansible playbook file have been added to IdM. For details, see Ensuring the presence of IdM host groups using Ansible playbooks.
Procedure
Create an inventory file, for example
inventory.file, and defineipaserverin it with the list of IdM servers to target:[ipaserver] server.idm.example.com
Create an Ansible playbook file with the necessary host information. Specify the name of the host group using the
nameparameter of theipahostgroupvariable. Specify the name of the host with thehostparameter of theipahostgroupvariable. To simplify this step, you can copy and modify the examples in the/usr/share/doc/ansible-freeipa/playbooks/hostgroup/ensure-hosts-and-hostgroups-are-present-in-hostgroup.ymlfile:--- - name: Playbook to handle hostgroups hosts: ipaserver vars_files: - /home/user_name/MyPlaybooks/secret.yml tasks: # Ensure host-group databases is present - ipahostgroup: ipaadmin_password: "{{ ipaadmin_password }}" name: databases host: - db.idm.example.com action: memberThis playbook adds the db.idm.example.com host to the databases host group. The
action: memberline indicates that when the playbook is run, no attempt is made to add the databases group itself. Instead, only an attempt is made to add db.idm.example.com to databases.Run the playbook:
$ ansible-playbook --vault-password-file=password_file -v -i path_to_inventory_directory/inventory.file path_to_playbooks_directory/ensure-hosts-or-hostgroups-are-present-in-hostgroup.yml
Verification steps
Log into
ipaserveras admin:$ ssh admin@server.idm.example.com Password: [admin@server /]$Request a Kerberos ticket for admin:
$ kinit admin Password for admin@IDM.EXAMPLE.COM:Display information about a host group to see which hosts are present in it:
$ ipa hostgroup-show databases Host-group: databases Member hosts: db.idm.example.com
The db.idm.example.com host is present as a member of the databases host group.
18.4. Nesting IdM host groups using Ansible playbooks
Follow this procedure to ensure the presence of nested host groups in Identity Management (IdM) host groups using Ansible playbooks.
Prerequisites
- You know the IdM administrator password.
You have configured your Ansible control node to meet the following requirements:
- You are using Ansible version 2.14 or later.
-
You have installed the
ansible-freeipapackage on the Ansible controller. - The example assumes that in the ~/MyPlaybooks/ directory, you have created an Ansible inventory file with the fully-qualified domain name (FQDN) of the IdM server.
-
The example assumes that the secret.yml Ansible vault stores your
ipaadmin_password.
-
The target node, that is the node on which the
ansible-freeipamodule is executed, is part of the IdM domain as an IdM client, server or replica. - The host groups you reference from the Ansible playbook file exist in IdM. For details, see Ensuring the presence of IdM host groups using Ansible playbooks.
Procedure
Create an inventory file, for example
inventory.file, and defineipaserverin it with the list of IdM servers to target:[ipaserver] server.idm.example.com
Create an Ansible playbook file with the necessary host group information. To ensure that a nested host group A exists in a host group B: in the Ansible playbook, specify, among the
- ipahostgroupvariables, the name of the host group B using thenamevariable. Specify the name of the nested hostgroup A with thehostgroupvariable. To simplify this step, you can copy and modify the examples in the/usr/share/doc/ansible-freeipa/playbooks/hostgroup/ensure-hosts-and-hostgroups-are-present-in-hostgroup.ymlfile:--- - name: Playbook to handle hostgroups hosts: ipaserver vars_files: - /home/user_name/MyPlaybooks/secret.yml tasks: # Ensure hosts and hostgroups are present in existing databases hostgroup - ipahostgroup: ipaadmin_password: "{{ ipaadmin_password }}" name: databases hostgroup: - mysql-server - oracle-server action: memberThis Ansible playbook ensures the presence of the myqsl-server and oracle-server host groups in the databases host group. The
action: memberline indicates that when the playbook is run, no attempt is made to add the databases group itself to IdM.Run the playbook:
$ ansible-playbook --vault-password-file=password_file -v -i path_to_inventory_directory/inventory.file path_to_playbooks_directory/ensure-hosts-or-hostgroups-are-present-in-hostgroup.yml
Verification steps
Log into
ipaserveras admin:$ ssh admin@server.idm.example.com Password: [admin@server /]$Request a Kerberos ticket for admin:
$ kinit admin Password for admin@IDM.EXAMPLE.COM:Display information about the host group in which nested host groups are present:
$ ipa hostgroup-show databases Host-group: databases Member hosts: db.idm.example.com Member host-groups: mysql-server, oracle-server
The mysql-server and oracle-server host groups exist in the databases host group.
18.5. Ensuring the presence of member managers in IDM host groups using Ansible Playbooks
The following procedure describes ensuring the presence of member managers in IdM hosts and host groups using an Ansible playbook.
Prerequisites
- You know the IdM administrator password.
You have configured your Ansible control node to meet the following requirements:
- You are using Ansible version 2.14 or later.
-
You have installed the
ansible-freeipapackage on the Ansible controller. - The example assumes that in the ~/MyPlaybooks/ directory, you have created an Ansible inventory file with the fully-qualified domain name (FQDN) of the IdM server.
-
The example assumes that the secret.yml Ansible vault stores your
ipaadmin_password.
-
The target node, that is the node on which the
ansible-freeipamodule is executed, is part of the IdM domain as an IdM client, server or replica. - You must have the name of the host or host group you are adding as member managers and the name of the host group you want them to manage.
Procedure
Create an inventory file, for example
inventory.file, and defineipaserverin it:[ipaserver] server.idm.example.com
Create an Ansible playbook file with the necessary host and host group member management information:
--- - name: Playbook to handle host group membership management hosts: ipaserver vars_files: - /home/user_name/MyPlaybooks/secret.yml tasks: - name: Ensure member manager user example_member is present for group_name ipahostgroup: ipaadmin_password: "{{ ipaadmin_password }}" name: group_name membermanager_user: example_member - name: Ensure member manager group project_admins is present for group_name ipahostgroup: ipaadmin_password: "{{ ipaadmin_password }}" name: group_name membermanager_group: project_adminsRun the playbook:
$ ansible-playbook --vault-password-file=password_file -v -i path_to_inventory_directory/inventory.file path_to_playbooks_directory/add-member-managers-host-groups.yml
Verification steps
You can verify if the group_name group contains example_member and project_admins as member managers by using the ipa group-show command:
Log into
ipaserveras administrator:$ ssh admin@server.idm.example.com Password: [admin@server /]$Display information about testhostgroup:
ipaserver]$ ipa hostgroup-show group_name Host-group: group_name Member hosts: server.idm.example.com Member host-groups: testhostgroup2 Membership managed by groups: project_admins Membership managed by users: example_member
Additional resources
-
See
ipa hostgroup-add-member-manager --help. -
See the
ipaman page.
18.6. Ensuring the absence of hosts from IdM host groups using Ansible playbooks
Follow this procedure to ensure the absence of hosts from host groups in Identity Management (IdM) using Ansible playbooks.
Prerequisites
- You know the IdM administrator password.
You have configured your Ansible control node to meet the following requirements:
- You are using Ansible version 2.14 or later.
-
You have installed the
ansible-freeipapackage on the Ansible controller. - The example assumes that in the ~/MyPlaybooks/ directory, you have created an Ansible inventory file with the fully-qualified domain name (FQDN) of the IdM server.
-
The example assumes that the secret.yml Ansible vault stores your
ipaadmin_password.
-
The target node, that is the node on which the
ansible-freeipamodule is executed, is part of the IdM domain as an IdM client, server or replica. - The hosts you want to reference in your Ansible playbook exist in IdM. For details, see Ensuring the presence of an IdM host entry using Ansible playbooks.
- The host groups you reference from the Ansible playbook file exist in IdM. For details, see Ensuring the presence of IdM host groups using Ansible playbooks.
Procedure
Create an inventory file, for example
inventory.file, and defineipaserverin it with the list of IdM servers to target:[ipaserver] server.idm.example.com
Create an Ansible playbook file with the necessary host and host group information. Specify the name of the host group using the
nameparameter of theipahostgroupvariable. Specify the name of the host whose absence from the host group you want to ensure using thehostparameter of theipahostgroupvariable. To simplify this step, you can copy and modify the examples in the/usr/share/doc/ansible-freeipa/playbooks/hostgroup/ensure-hosts-and-hostgroups-are-absent-in-hostgroup.ymlfile:--- - name: Playbook to handle hostgroups hosts: ipaserver vars_files: - /home/user_name/MyPlaybooks/secret.yml tasks: # Ensure host-group databases is absent - ipahostgroup: ipaadmin_password: "{{ ipaadmin_password }}" name: databases host: - db.idm.example.com action: member state: absentThis playbook ensures the absence of the db.idm.example.com host from the databases host group. The action: member line indicates that when the playbook is run, no attempt is made to remove the databases group itself.
Run the playbook:
$ ansible-playbook --vault-password-file=password_file -v -i path_to_inventory_directory/inventory.file path_to_playbooks_directory/ensure-hosts-or-hostgroups-are-absent-in-hostgroup.yml
Verification steps
Log into
ipaserveras admin:$ ssh admin@server.idm.example.com Password: [admin@server /]$Request a Kerberos ticket for admin:
$ kinit admin Password for admin@IDM.EXAMPLE.COM:Display information about the host group and the hosts it contains:
$ ipa hostgroup-show databases Host-group: databases Member host-groups: mysql-server, oracle-server
The db.idm.example.com host does not exist in the databases host group.
18.7. Ensuring the absence of nested host groups from IdM host groups using Ansible playbooks
Follow this procedure to ensure the absence of nested host groups from outer host groups in Identity Management (IdM) using Ansible playbooks.
Prerequisites
- You know the IdM administrator password.
You have configured your Ansible control node to meet the following requirements:
- You are using Ansible version 2.14 or later.
-
You have installed the
ansible-freeipapackage on the Ansible controller. - The example assumes that in the ~/MyPlaybooks/ directory, you have created an Ansible inventory file with the fully-qualified domain name (FQDN) of the IdM server.
-
The example assumes that the secret.yml Ansible vault stores your
ipaadmin_password.
-
The target node, that is the node on which the
ansible-freeipamodule is executed, is part of the IdM domain as an IdM client, server or replica. - The host groups you reference from the Ansible playbook file exist in IdM. For details, see Ensuring the presence of IdM host groups using Ansible playbooks.
Procedure
Create an inventory file, for example
inventory.file, and defineipaserverin it with the list of IdM servers to target:[ipaserver] server.idm.example.com
Create an Ansible playbook file with the necessary host group information. Specify, among the
- ipahostgroupvariables, the name of the outer host group using thenamevariable. Specify the name of the nested hostgroup with thehostgroupvariable. To simplify this step, you can copy and modify the examples in the/usr/share/doc/ansible-freeipa/playbooks/hostgroup/ensure-hosts-and-hostgroups-are-absent-in-hostgroup.ymlfile:--- - name: Playbook to handle hostgroups hosts: ipaserver vars_files: - /home/user_name/MyPlaybooks/secret.yml tasks: # Ensure hosts and hostgroups are absent in existing databases hostgroup - ipahostgroup: ipaadmin_password: "{{ ipaadmin_password }}" name: databases hostgroup: - mysql-server - oracle-server action: member state: absentThis playbook makes sure that the mysql-server and oracle-server host groups are absent from the databases host group. The
action: memberline indicates that when the playbook is run, no attempt is made to ensure the databases group itself is deleted from IdM.Run the playbook:
$ ansible-playbook --vault-password-file=password_file -v -i path_to_inventory_directory/inventory.file path_to_playbooks_directory/ensure-hosts-or-hostgroups-are-absent-in-hostgroup.yml
Verification steps
Log into
ipaserveras admin:$ ssh admin@server.idm.example.com Password: [admin@server /]$Request a Kerberos ticket for admin:
$ kinit admin Password for admin@IDM.EXAMPLE.COM:Display information about the host group from which nested host groups should be absent:
$ ipa hostgroup-show databases Host-group: databases
The output confirms that the mysql-server and oracle-server nested host groups are absent from the outer databases host group.
18.8. Ensuring the absence of IdM host groups using Ansible playbooks
Follow this procedure to ensure the absence of host groups in Identity Management (IdM) using Ansible playbooks.
Without Ansible, host group entries are removed from IdM using the ipa hostgroup-del command. The result of removing a host group from IdM is the state of the host group being absent from IdM. Because of the Ansible reliance on idempotence, to remove a host group from IdM using Ansible, you must create a playbook in which you define the state of the host group as absent: state: absent.
Prerequisites
- You know the IdM administrator password.
You have configured your Ansible control node to meet the following requirements:
- You are using Ansible version 2.14 or later.
-
You have installed the
ansible-freeipapackage on the Ansible controller. - The example assumes that in the ~/MyPlaybooks/ directory, you have created an Ansible inventory file with the fully-qualified domain name (FQDN) of the IdM server.
-
The example assumes that the secret.yml Ansible vault stores your
ipaadmin_password.
-
The target node, that is the node on which the
ansible-freeipamodule is executed, is part of the IdM domain as an IdM client, server or replica.
Procedure
Create an inventory file, for example
inventory.file, and defineipaserverin it with the list of IdM servers to target:[ipaserver] server.idm.example.com
Create an Ansible playbook file with the necessary host group information. To simplify this step, you can copy and modify the example in the
/usr/share/doc/ansible-freeipa/playbooks/user/ensure-hostgroup-is-absent.ymlfile.--- - name: Playbook to handle hostgroups hosts: ipaserver vars_files: - /home/user_name/MyPlaybooks/secret.yml tasks: - Ensure host-group databases is absent ipahostgroup: ipaadmin_password: "{{ ipaadmin_password }}" name: databases state: absentThis playbook ensures the absence of the databases host group from IdM. The
state: absentmeans a request to delete the host group from IdM unless it is already deleted.Run the playbook:
$ ansible-playbook --vault-password-file=password_file -v -i path_to_inventory_directory/inventory.file path_to_playbooks_directory/ensure-hostgroup-is-absent.yml
Verification steps
Log into
ipaserveras admin:$ ssh admin@server.idm.example.com Password: [admin@server /]$Request a Kerberos ticket for admin:
$ kinit admin Password for admin@IDM.EXAMPLE.COM:Display information about the host group whose absence you ensured:
$ ipa hostgroup-show databases ipa: ERROR: databases: host group not found
The databases host group does not exist in IdM.
18.9. Ensuring the absence of member managers from IdM host groups using Ansible playbooks
The following procedure describes ensuring the absence of member managers in IdM hosts and host groups using an Ansible playbook.
Prerequisites
- You know the IdM administrator password.
You have configured your Ansible control node to meet the following requirements:
- You are using Ansible version 2.14 or later.
-
You have installed the
ansible-freeipapackage on the Ansible controller. - The example assumes that in the ~/MyPlaybooks/ directory, you have created an Ansible inventory file with the fully-qualified domain name (FQDN) of the IdM server.
-
The example assumes that the secret.yml Ansible vault stores your
ipaadmin_password.
-
The target node, that is the node on which the
ansible-freeipamodule is executed, is part of the IdM domain as an IdM client, server or replica. - You must have the name of the user or user group you are removing as member managers and the name of the host group they are managing.
Procedure
Create an inventory file, for example
inventory.file, and defineipaserverin it:[ipaserver] server.idm.example.com
Create an Ansible playbook file with the necessary host and host group member management information:
--- - name: Playbook to handle host group membership management hosts: ipaserver vars_files: - /home/user_name/MyPlaybooks/secret.yml tasks: - name: Ensure member manager host and host group members are absent for group_name ipahostgroup: ipaadmin_password: "{{ ipaadmin_password }}" name: group_name membermanager_user: example_member membermanager_group: project_admins action: member state: absentRun the playbook:
$ ansible-playbook --vault-password-file=password_file -v -i path_to_inventory_directory/inventory.file path_to_playbooks_directory/ensure-member-managers-host-groups-are-absent.yml
Verification steps
You can verify if the group_name group does not contain example_member or project_admins as member managers by using the ipa group-show command:
Log into
ipaserveras administrator:$ ssh admin@server.idm.example.com Password: [admin@server /]$Display information about testhostgroup:
ipaserver]$ ipa hostgroup-show group_name Host-group: group_name Member hosts: server.idm.example.com Member host-groups: testhostgroup2
Additional resources
-
See
ipa hostgroup-add-member-manager --help. -
See the
ipaman page.
Chapter 19. Defining IdM password policies
This chapter describes Identity Management (IdM) password policies and how to add a new password policy in IdM using an Ansible playbook.
19.1. What is a password policy
A password policy is a set of rules that passwords must meet. For example, a password policy can define the minimum password length and the maximum password lifetime. All users affected by this policy are required to set a sufficiently long password and change it frequently enough to meet the specified conditions. In this way, password policies help reduce the risk of someone discovering and misusing a user’s password.
19.2. Password policies in IdM
Passwords are the most common way for Identity Management (IdM) users to authenticate to the IdM Kerberos domain. Password policies define the requirements that these IdM user passwords must meet.
The IdM password policy is set in the underlying LDAP directory, but the Kerberos Key Distribution Center (KDC) enforces the password policy.
Password policy attributes lists the attributes you can use to define a password policy in IdM.
Table 19.1. Password Policy Attributes
| Attribute | Explanation | Example |
|---|---|---|
| Max lifetime | The maximum amount of time in days that a password is valid before a user must reset it. The default value is 90 days. Note that if the attribute is set to 0, the password never expires. | Max lifetime = 180 User passwords are valid only for 180 days. After that, IdM prompts users to change them. |
| Min lifetime | The minimum amount of time in hours that must pass between two password change operations. | Min lifetime = 1 After users change their passwords, they must wait at least 1 hour before changing them again. |
| History size | The number of previous passwords that are stored. A user cannot reuse a password from their password history but can reuse old passwords that are not stored. | History size = 0 In this case, the password history is empty and users can reuse any of their previous passwords. |
| Character classes | The number of different character classes the user must use in the password. The character classes are: * Uppercase characters * Lowercase characters * Digits * Special characters, such as comma (,), period (.), asterisk (*) * Other UTF-8 characters Using a character three or more times in a row decreases the character class by one. For example:
*
* | Character classes = 0
The default number of classes required is 0. To configure the number, run the See also the Important note below this table. |
| Min length | The minimum number of characters in a password. If any of the additional password policy options are set, then the minimum length of passwords is 6 characters. | Min length = 8 Users cannot use passwords shorter than 8 characters. |
| Max failures | The maximum number of failed login attempts before IdM locks the user account. | Max failures = 6 IdM locks the user account when the user enters a wrong password 7 times in a row. |
| Failure reset interval | The amount of time in seconds after which IdM resets the current number of failed login attempts. | Failure reset interval = 60
If the user waits for more than 1 minute after the number of failed login attempts defined in |
| Lockout duration |
The amount of time in seconds that the user account is locked after the number of failed login attempts defined in | Lockout duration = 600 Users with locked accounts are unable to log in for 10 minutes. |
Use the English alphabet and common symbols for the character classes requirement if you have a diverse set of hardware that may not have access to international characters and symbols. For more information about character class policies in passwords, see What characters are valid in a password? in Red Hat Knowledgebase.
19.3. Ensuring the presence of a password policy in IdM using an Ansible playbook
Follow this procedure to ensure the presence of a password policy in Identity Management (IdM) using an Ansible playbook.
In the default global_policy password policy in IdM, the number of different character classes in the password is set to 0. The history size is also set to 0.
Complete this procedure to enforce a stronger password policy for an IdM group using an Ansible playbook.
You can only define a password policy for an IdM group. You cannot define a password policy for an individual user.
Prerequisites
You have configured your Ansible control node to meet the following requirements:
- You are using Ansible version 2.14 or later.
-
You have installed the
ansible-freeipapackage on the Ansible controller. - The example assumes that in the ~/MyPlaybooks/ directory, you have created an Ansible inventory file with the fully-qualified domain name (FQDN) of the IdM server.
-
The example assumes that the secret.yml Ansible vault stores your
ipaadmin_password.
-
The target node, that is the node on which the
ansible-freeipamodule is executed, is part of the IdM domain as an IdM client, server or replica. - You know the IdM administrator password.
- The group for which you are ensuring the presence of a password policy exists in IdM.
Procedure
Create an inventory file, for example
inventory.file, and define theFQDNof your IdM server in the[ipaserver]section:[ipaserver] server.idm.example.com
Create your Ansible playbook file that defines the password policy whose presence you want to ensure. To simplify this step, copy and modify the example in the
/usr/share/doc/ansible-freeipa/playbooks/pwpolicy/pwpolicy_present.ymlfile:--- - name: Tests hosts: ipaserver vars_files: - /home/user_name/MyPlaybooks/secret.yml tasks: - name: Ensure presence of pwpolicy for group ops ipapwpolicy: ipaadmin_password: "{{ ipaadmin_password }}" name: ops minlife: 7 maxlife: 49 history: 5 priority: 1 lockouttime: 300 minlength: 8 minclasses: 4 maxfail: 3 failinterval: 5For details on what the individual variables mean, see Password policy attributes.
Run the playbook:
$ ansible-playbook --vault-password-file=password_file -v -i path_to_inventory_directory/inventory.file path_to_playbooks_directory_/new_pwpolicy_present.yml
You have successfully used an Ansible playbook to ensure that a password policy for the ops group is present in IdM.
The priority of the ops password policy is set to 1, whereas the global_policy password policy has no priority set. For this reason, the ops policy automatically supersedes global_policy for the ops group and is enforced immediately.
global_policy serves as a fallback policy when no group policy is set for a user, and it can never take precedence over a group policy.
Additional resources
-
See the
README-pwpolicy.mdfile in the/usr/share/doc/ansible-freeipa/directory. - See Password policy priorities.
19.4. Additional password policy options in IdM
As an Identity Management (IdM) administrator, you can strengthen the default password requirements by enabling additional password policy options based on the libpwquality feature set. The additional password policy options include the following:
--maxrepeat- Specifies the maximum acceptable number of same consecutive characters in the new password.
--maxsequence- Specifies the maximum length of monotonic character sequences in the new password. Examples of such a sequence are 12345 or fedcb. Most such passwords will not pass the simplicity check.
--dictcheck-
If nonzero, checks whether the password, with possible modifications, matches a word in a dictionary. Currently
libpwqualityperforms the dictionary check using thecrackliblibrary. --usercheck- If nonzero, checks whether the password, with possible modifications, contains the user name in some form. It is not performed for user names shorter than 3 characters.
You cannot apply the additional password policy options to existing passwords. If you apply any of the additional options, IdM automatically sets the --minlength option, the minimum number of characters in a password, to 6 characters.
In a mixed environment with RHEL 7 and RHEL 8 servers, you can enforce the additional password policy settings only on servers running on RHEL 8.4 and later. If a user is logged in to an IdM client and the IdM client is communicating with an IdM server running on RHEL 8.3 or earlier, then the new password policy requirements set by the system administrator will not be applied. To ensure consistent behavior, upgrade or update all servers to RHEL 8.4 and later.
Additional resources:
- Applying additional password policies to an IdM group
-
pwquality(3)man page
19.5. Applying additional password policy options to an IdM group
Follow this procedure to apply additional password policy options in Identity Management (IdM). The example describes how to strengthen the password policy for the managers group by making sure that the new passwords do not contain the users' respective user names and that the passwords contain no more than two identical characters in succession.
Prerequisites
- You are logged in as an IdM administrator.
- The managers group exists in IdM.
- The managers password policy exists in IdM.
Procedure
Apply the user name check to all new passwords suggested by the users in the managers group:
$ ipa pwpolicy-mod --usercheck=True managersNoteIf you do not specify the name of the password policy, the default
global_policyis modified.Set the maximum number of identical consecutive characters to 2 in the managers password policy:
$ ipa pwpolicy-mod --maxrepeat=2 managersA password now will not be accepted if it contains more than 2 identical consecutive characters. For example, the eR873mUi111YJQ combination is unacceptable because it contains three 1s in succession.
Verification
Add a test user named test_user:
$ ipa user-add test_user First name: test Last name: user ---------------------------- Added user "test_user" ----------------------------Add the test user to the managers group:
- In the IdM Web UI, click → → .
- Click managers.
-
Click
Add. - In the Add users into user group 'managers' page, check test_user.
-
Click the
>arrow to move the user to theProspectivecolumn. -
Click
Add.
Reset the password for the test user:
- Go to → .
- Click test_user.
-
In the
Actionsmenu, clickReset Password. - Enter a temporary password for the user.
On the command line, try to obtain a Kerberos ticket-granting ticket (TGT) for the test_user:
$ kinit test_user- Enter the temporary password.
The system informs you that you must change your password. Enter a password that contains the user name of test_user:
Password expired. You must change it now. Enter new password: Enter it again: Password change rejected: Password not changed. Unspecified password quality failure while trying to change password. Please try again.
NoteKerberos does not have fine-grained error password policy reporting and, in certain cases, does not provide a clear reason why a password was rejected.
The system informs you that the entered password was rejected. Enter a password that contains three or more identical characters in succession:
Password change rejected: Password not changed. Unspecified password quality failure while trying to change password. Please try again. Enter new password: Enter it again:
The system informs you that the entered password was rejected. Enter a password that meets the criteria of the managers password policy:
Password change rejected: Password not changed. Unspecified password quality failure while trying to change password. Please try again. Enter new password: Enter it again:
View the obtained TGT:
$ klist Ticket cache: KCM:0:33945 Default principal: test_user@IDM.EXAMPLE.COM Valid starting Expires Service principal 07/07/2021 12:44:44 07/08/2021 12:44:44 krbtgt@IDM.EXAMPLE.COM@IDM.EXAMPLE.COM
The managers password policy now works correctly for users in the managers group.
Additional resources
19.6. Using an Ansible playbook to apply additional password policy options to an IdM group
You can use an Ansible playbook to apply additional password policy options to strengthen the password policy requirements for a specific IdM group. You can use the maxrepeat, maxsequence, dictcheck and usercheck password policy options for this purpose. The example describes how to set the following requirements for the managers group:
- Users' new passwords do not contain the users' respective user names.
- The passwords contain no more than two identical characters in succession.
- Any monotonic character sequences in the passwords are not longer than 3 characters. This means that the system does not accept a password with a sequence such as 1234 or abcd.
Prerequisites
You have configured your Ansible control node to meet the following requirements:
- You are using Ansible version 2.14 or later.
-
You have installed the
ansible-freeipapackage on the Ansible controller. - You have created an Ansible inventory file with the fully-qualified domain name (FQDN) of the IdM server in the ~/MyPlaybooks/ directory.
-
You have stored your
ipaadmin_passwordin the secret.yml Ansible vault.
- The group for which you are ensuring the presence of a password policy exists in IdM.
Procedure
Create your Ansible playbook file manager_pwpolicy_present.yml that defines the password policy whose presence you want to ensure. To simplify this step, copy and modify the following example:
--- - name: Tests hosts: ipaserver vars_files: - /home/user_name/MyPlaybooks/secret.yml tasks: - name: Ensure presence of usercheck and maxrepeat pwpolicy for group managers ipapwpolicy: ipaadmin_password: "{{ ipaadmin_password }}" name: managers usercheck: True maxrepeat: 2 maxsequence: 3Run the playbook:
$ ansible-playbook --vault-password-file=password_file -v -i path_to_inventory_directory/inventory.file path_to_playbooks_directory_/manager_pwpolicy_present.yml
Verification
Add a test user named test_user:
$ ipa user-add test_user First name: test Last name: user ---------------------------- Added user "test_user" ----------------------------Add the test user to the managers group:
- In the IdM Web UI, click → → .
- Click managers.
-
Click
Add. - In the Add users into user group 'managers' page, check test_user.
-
Click the
>arrow to move the user to theProspectivecolumn. -
Click
Add.
Reset the password for the test user:
- Go to → .
- Click test_user.
-
In the
Actionsmenu, clickReset Password. - Enter a temporary password for the user.
On the command line, try to obtain a Kerberos ticket-granting ticket (TGT) for the test_user:
$ kinit test_user- Enter the temporary password.
The system informs you that you must change your password. Enter a password that contains the user name of test_user:
Password expired. You must change it now. Enter new password: Enter it again: Password change rejected: Password not changed. Unspecified password quality failure while trying to change password. Please try again.
NoteKerberos does not have fine-grained error password policy reporting and, in certain cases, does not provide a clear reason why a password was rejected.
The system informs you that the entered password was rejected. Enter a password that contains three or more identical characters in succession:
Password change rejected: Password not changed. Unspecified password quality failure while trying to change password. Please try again. Enter new password: Enter it again:
The system informs you that the entered password was rejected. Enter a password that contains a monotonic character sequence longer than 3 characters. Examples of such sequences include 1234 and fedc:
Password change rejected: Password not changed. Unspecified password quality failure while trying to change password. Please try again. Enter new password: Enter it again:
The system informs you that the entered password was rejected. Enter a password that meets the criteria of the managers password policy:
Password change rejected: Password not changed. Unspecified password quality failure while trying to change password. Please try again. Enter new password: Enter it again:
Verify that you have obtained a TGT, which is only possible after having entered a valid password:
$ klist Ticket cache: KCM:0:33945 Default principal: test_user@IDM.EXAMPLE.COM Valid starting Expires Service principal 07/07/2021 12:44:44 07/08/2021 12:44:44 krbtgt@IDM.EXAMPLE.COM@IDM.EXAMPLE.COM
Additional resources
- Additional password policies in IdM
-
/usr/share/doc/ansible-freeipa/README-pwpolicy.md -
/usr/share/doc/ansible-freeipa/playbooks/pwpolicy
Chapter 20. Granting sudo access to an IdM user on an IdM client
Learn more about granting sudo access to users in Identity Management.
20.1. Sudo access on an IdM client
System administrators can grant sudo access to allow non-root users to execute administrative commands that are normally reserved for the root user. Consequently, when users need to perform an administrative command normally reserved for the root user, they precede that command with sudo. After entering their password, the command is executed as if they were the root user. To execute a sudo command as another user or group, such as a database service account, you can configure a RunAs alias for a sudo rule.
If a Red Hat Enterprise Linux (RHEL) 8 host is enrolled as an Identity Management (IdM) client, you can specify sudo rules defining which IdM users can perform which commands on the host in the following ways:
-
Locally in the
/etc/sudoersfile - Centrally in IdM
You can create a central sudo rule for an IdM client using the command line interface (CLI) and the IdM Web UI.
In RHEL 8.4 and later, you can also configure password-less authentication for sudo using the Generic Security Service Application Programming Interface (GSSAPI), the native way for UNIX-based operating systems to access and authenticate Kerberos services. You can use the pam_sss_gss.so Pluggable Authentication Module (PAM) to invoke GSSAPI authentication via the SSSD service, allowing users to authenticate to the sudo command with a valid Kerberos ticket.
Additional resources
- See Managing sudo access.
20.2. Granting sudo access to an IdM user on an IdM client using the CLI
In Identity Management (IdM), you can grant sudo access for a specific command to an IdM user account on a specific IdM host. First, add a sudo command and then create a sudo rule for one or more commands.
For example, complete this procedure to create the idm_user_reboot sudo rule to grant the idm_user account the permission to run the /usr/sbin/reboot command on the idmclient machine.
Prerequisites
- You are logged in as IdM administrator.
- You have created a user account for idm_user in IdM and unlocked the account by creating a password for the user. For details on adding a new IdM user using the CLI, see Adding users using the command line.
-
No local idm_user account is present on the idmclient host. The idm_user user is not listed in the local
/etc/passwdfile.
Procedure
Retrieve a Kerberos ticket as the IdM
admin.[root@idmclient ~]# kinit adminAdd the
/usr/sbin/rebootcommand to the IdM database ofsudocommands:[root@idmclient ~]# ipa sudocmd-add /usr/sbin/reboot ------------------------------------- Added Sudo Command "/usr/sbin/reboot" ------------------------------------- Sudo Command: /usr/sbin/rebootCreate a
sudorule named idm_user_reboot:[root@idmclient ~]# ipa sudorule-add idm_user_reboot --------------------------------- Added Sudo Rule "idm_user_reboot" --------------------------------- Rule name: idm_user_reboot Enabled: TRUEAdd the
/usr/sbin/rebootcommand to the idm_user_reboot rule:[root@idmclient ~]# ipa sudorule-add-allow-command idm_user_reboot --sudocmds '/usr/sbin/reboot' Rule name: idm_user_reboot Enabled: TRUE Sudo Allow Commands: /usr/sbin/reboot ------------------------- Number of members added 1 -------------------------Apply the idm_user_reboot rule to the IdM idmclient host:
[root@idmclient ~]# ipa sudorule-add-host idm_user_reboot --hosts idmclient.idm.example.com Rule name: idm_user_reboot Enabled: TRUE Hosts: idmclient.idm.example.com Sudo Allow Commands: /usr/sbin/reboot ------------------------- Number of members added 1 -------------------------Add the idm_user account to the idm_user_reboot rule:
[root@idmclient ~]# ipa sudorule-add-user idm_user_reboot --users idm_user Rule name: idm_user_reboot Enabled: TRUE Users: idm_user Hosts: idmclient.idm.example.com Sudo Allow Commands: /usr/sbin/reboot ------------------------- Number of members added 1 -------------------------Optionally, define the validity of the idm_user_reboot rule:
To define the time at which a
sudorule starts to be valid, use theipa sudorule-mod sudo_rule_namecommand with the--setattr sudonotbefore=DATEoption. The DATE value must follow the yyyymmddHHMMSSZ format, with seconds specified explicitly. For example, to set the start of the validity of the idm_user_reboot rule to 31 December 2025 12:34:00, enter:[root@idmclient ~]# ipa sudorule-mod idm_user_reboot --setattr sudonotbefore=20251231123400ZTo define the time at which a sudo rule stops being valid, use the
--setattr sudonotafter=DATEoption. For example, to set the end of the idm_user_reboot rule validity to 31 December 2026 12:34:00, enter:[root@idmclient ~]# ipa sudorule-mod idm_user_reboot --setattr sudonotafter=20261231123400Z
Propagating the changes from the server to the client can take a few minutes.
Verification steps
- Log in to the idmclient host as the idm_user account.
Display which
sudorules the idm_user account is allowed to perform.[idm_user@idmclient ~]$ sudo -l Matching Defaults entries for idm_user on idmclient: !visiblepw, always_set_home, match_group_by_gid, always_query_group_plugin, env_reset, env_keep="COLORS DISPLAY HOSTNAME HISTSIZE KDEDIR LS_COLORS", env_keep+="MAIL PS1 PS2 QTDIR USERNAME LANG LC_ADDRESS LC_CTYPE", env_keep+="LC_COLLATE LC_IDENTIFICATION LC_MEASUREMENT LC_MESSAGES", env_keep+="LC_MONETARY LC_NAME LC_NUMERIC LC_PAPER LC_TELEPHONE", env_keep+="LC_TIME LC_ALL LANGUAGE LINGUAS _XKB_CHARSET XAUTHORITY KRB5CCNAME", secure_path=/sbin\:/bin\:/usr/sbin\:/usr/bin User idm_user may run the following commands on idmclient: (root) /usr/sbin/reboot
Reboot the machine using
sudo. Enter the password for idm_user when prompted:[idm_user@idmclient ~]$ sudo /usr/sbin/reboot [sudo] password for idm_user:
20.3. Granting sudo access to an AD user on an IdM client using the CLI
Identity Management (IdM) system administrators can use IdM user groups to set access permissions, host-based access control, sudo rules, and other controls on IdM users. IdM user groups grant and restrict access to IdM domain resources.
You can add both Active Directory (AD) users and AD groups to IdM user groups. To do that:
- Add the AD users or groups to a non-POSIX external IdM group.
- Add the non-POSIX external IdM group to an IdM POSIX group.
You can then manage the privileges of the AD users by managing the privileges of the POSIX group. For example, you can grant sudo access for a specific command to an IdM POSIX user group on a specific IdM host.
It is also possible to add AD user groups as members to IdM external groups. This might make it easier to define policies for Windows users, by keeping the user and group management within the single AD realm.
Do not use ID overrides of AD users for SUDO rules in IdM. ID overrides of AD users represent only POSIX attributes of AD users, not AD users themselves.
You can add ID overrides as group members. However, you can only use this functionality to manage IdM resources in the IdM API. The possibility to add ID overrides as group members is not extended to POSIX environments and you therefore cannot use it for membership in sudo or host-based access control (HBAC) rules.
Follow this procedure to create the ad_users_reboot sudo rule to grant the administrator@ad-domain.com AD user the permission to run the /usr/sbin/reboot command on the idmclient IdM host, which is normally reserved for the root user. administrator@ad-domain.com is a member of the ad_users_external non-POSIX group, which is, in turn, a member of the ad_users POSIX group.
Prerequisites
-
You have obtained the IdM
adminKerberos ticket-granting ticket (TGT). - A cross-forest trust exists between the IdM domain and the ad-domain.com AD domain.
-
No local administrator account is present on the idmclient host: the administrator user is not listed in the local
/etc/passwdfile.
Procedure
Create the ad_users group that contains the ad_users_external group with the administrator@ad-domain member:
- Optional: Create or select a corresponding group in the AD domain to use to manage AD users in the IdM realm. You can use multiple AD groups and add them to different groups on the IdM side.
Create the ad_users_external group and indicate that it contains members from outside the IdM domain by adding the
--externaloption:[root@ipaserver ~]# ipa group-add --desc='AD users external map' ad_users_external --external ------------------------------- Added group "ad_users_external" ------------------------------- Group name: ad_users_external Description: AD users external mapNoteEnsure that the external group that you specify here is an AD security group with a
globaloruniversalgroup scope as defined in the Active Directory security groups document. For example, the Domain users or Domain admins AD security groups cannot be used because their group scope isdomain local.Create the ad_users group:
[root@ipaserver ~]# ipa group-add --desc='AD users' ad_users ---------------------- Added group "ad_users" ---------------------- Group name: ad_users Description: AD users GID: 129600004Add the administrator@ad-domain.com AD user to ad_users_external as an external member:
[root@ipaserver ~]# ipa group-add-member ad_users_external --external "administrator@ad-domain.com" [member user]: [member group]: Group name: ad_users_external Description: AD users external map External member: S-1-5-21-3655990580-1375374850-1633065477-513 ------------------------- Number of members added 1 -------------------------The AD user must be identified by a fully-qualified name, such as
DOMAIN\user_nameoruser_name@DOMAIN. The AD identity is then mapped to the AD SID for the user. The same applies to adding AD groups.Add ad_users_external to ad_users as a member:
[root@ipaserver ~]# ipa group-add-member ad_users --groups ad_users_external Group name: ad_users Description: AD users GID: 129600004 Member groups: ad_users_external ------------------------- Number of members added 1 -------------------------
Grant the members of ad_users the permission to run
/usr/sbin/rebooton the idmclient host:Add the
/usr/sbin/rebootcommand to the IdM database ofsudocommands:[root@idmclient ~]# ipa sudocmd-add /usr/sbin/reboot ------------------------------------- Added Sudo Command "/usr/sbin/reboot" ------------------------------------- Sudo Command: /usr/sbin/rebootCreate a
sudorule named ad_users_reboot:[root@idmclient ~]# ipa sudorule-add ad_users_reboot --------------------------------- Added Sudo Rule "ad_users_reboot" --------------------------------- Rule name: ad_users_reboot Enabled: TrueAdd the
/usr/sbin/rebootcommand to the ad_users_reboot rule:[root@idmclient ~]# ipa sudorule-add-allow-command ad_users_reboot --sudocmds '/usr/sbin/reboot' Rule name: ad_users_reboot Enabled: True Sudo Allow Commands: /usr/sbin/reboot ------------------------- Number of members added 1 -------------------------Apply the ad_users_reboot rule to the IdM idmclient host:
[root@idmclient ~]# ipa sudorule-add-host ad_users_reboot --hosts idmclient.idm.example.com Rule name: ad_users_reboot Enabled: True Hosts: idmclient.idm.example.com Sudo Allow Commands: /usr/sbin/reboot ------------------------- Number of members added 1 -------------------------Add the
ad_usersgroup to the ad_users_reboot rule:[root@idmclient ~]# ipa sudorule-add-user ad_users_reboot --groups ad_users Rule name: ad_users_reboot Enabled: TRUE User Groups: ad_users Hosts: idmclient.idm.example.com Sudo Allow Commands: /usr/sbin/reboot ------------------------- Number of members added 1 -------------------------
Propagating the changes from the server to the client can take a few minutes.
Verification steps
Log in to the idmclient host as administrator@ad-domain.com, an indirect member of the
ad_usersgroup:$ ssh administrator@ad-domain.com@ipaclient Password:Optionally, display the
sudocommands thatadministrator@ad-domain.comis allowed to execute:[administrator@ad-domain.com@idmclient ~]$ sudo -l Matching Defaults entries for administrator@ad-domain.com on idmclient: !visiblepw, always_set_home, match_group_by_gid, always_query_group_plugin, env_reset, env_keep="COLORS DISPLAY HOSTNAME HISTSIZE KDEDIR LS_COLORS", env_keep+="MAIL PS1 PS2 QTDIR USERNAME LANG LC_ADDRESS LC_CTYPE", env_keep+="LC_COLLATE LC_IDENTIFICATION LC_MEASUREMENT LC_MESSAGES", env_keep+="LC_MONETARY LC_NAME LC_NUMERIC LC_PAPER LC_TELEPHONE", env_keep+="LC_TIME LC_ALL LANGUAGE LINGUAS _XKB_CHARSET XAUTHORITY KRB5CCNAME", secure_path=/sbin\:/bin\:/usr/sbin\:/usr/bin User administrator@ad-domain.com may run the following commands on idmclient: (root) /usr/sbin/reboot
Reboot the machine using
sudo. Enter the password foradministrator@ad-domain.comwhen prompted:[administrator@ad-domain.com@idmclient ~]$ sudo /usr/sbin/reboot [sudo] password for administrator@ad-domain.com:
20.4. Granting sudo access to an IdM user on an IdM client using the IdM Web UI
In Identity Management (IdM), you can grant sudo access for a specific command to an IdM user account on a specific IdM host. First, add a sudo command and then create a sudo rule for one or more commands.
Complete this procedure to create the idm_user_reboot sudo rule to grant the idm_user account the permission to run the /usr/sbin/reboot command on the idmclient machine.
Prerequisites
- You are logged in as IdM administrator.
-
You have created a user account for
idm_userin IdM and unlocked the account by creating a password for the user. For details on adding a new IdM user using the command-line interface, see Adding users using the command line. -
No local
idm_useraccount is present on theidmclienthost. Theidm_useruser is not listed in the local/etc/passwdfile.
Procedure
Add the
/usr/sbin/rebootcommand to the IdM database ofsudocommands:- Navigate to Policy → Sudo → Sudo Commands.
- Click Add in the upper right corner to open the Add sudo command dialog box.
Enter the command you want the user to be able to perform using
sudo:/usr/sbin/reboot.Figure 20.1. Adding IdM sudo command

- Click Add.
Use the new
sudocommand entry to create a sudo rule to allow idm_user to reboot the idmclient machine:- Navigate to Policy → Sudo → Sudo rules.
- Click Add in the upper right corner to open the Add sudo rule dialog box.
-
Enter the name of the
sudorule: idm_user_reboot. - Click Add and Edit.
Specify the user:
- In the Who section, check the Specified Users and Groups radio button.
- In the User category the rule applies to subsection, click Add to open the Add users into sudo rule "idm_user_reboot" dialog box.
- In the Add users into sudo rule "idm_user_reboot" dialog box in the Available column, check the idm_user checkbox, and move it to the Prospective column.
- Click Add.
Specify the host:
- In the Access this host section, check the Specified Hosts and Groups radio button.
- In the Host category this rule applies to subsection, click Add to open the Add hosts into sudo rule "idm_user_reboot" dialog box.
- In the Add hosts into sudo rule "idm_user_reboot" dialog box in the Available column, check the idmclient.idm.example.com checkbox, and move it to the Prospective column.
- Click Add.
Specify the commands:
- In the Command category the rule applies to subsection of the Run Commands section, check the Specified Commands and Groups radio button.
- In the Sudo Allow Commands subsection, click Add to open the Add allow sudo commands into sudo rule "idm_user_reboot" dialog box.
-
In the Add allow sudo commands into sudo rule "idm_user_reboot" dialog box in the Available column, check the
/usr/sbin/rebootcheckbox, and move it to the Prospective column. - Click Add to return to the idm_sudo_reboot page.
Figure 20.2. Adding IdM sudo rule

- Click Save in the top left corner.
The new rule is enabled by default.
Propagating the changes from the server to the client can take a few minutes.
Verification steps
-
Log in to
idmclientasidm_user. Reboot the machine using
sudo. Enter the password foridm_userwhen prompted:$ sudo /usr/sbin/reboot [sudo] password for idm_user:
If the sudo rule is configured correctly, the machine reboots.
20.5. Creating a sudo rule on the CLI that runs a command as a service account on an IdM client
In IdM, you can configure a sudo rule with a RunAs alias to run a sudo command as another user or group. For example, you might have an IdM client that hosts a database application, and you need to run commands as the local service account that corresponds to that application.
Use this example to create a sudo rule on the command line called run_third-party-app_report to allow the idm_user account to run the /opt/third-party-app/bin/report command as the thirdpartyapp service account on the idmclient host.
Prerequisites
- You are logged in as IdM administrator.
-
You have created a user account for
idm_userin IdM and unlocked the account by creating a password for the user. For details on adding a new IdM user using the CLI, see Adding users using the command line. -
No local
idm_useraccount is present on theidmclienthost. Theidm_useruser is not listed in the local/etc/passwdfile. -
You have a custom application named
third-party-appinstalled on theidmclienthost. -
The
reportcommand for thethird-party-appapplication is installed in the/opt/third-party-app/bin/reportdirectory. -
You have created a local service account named
thirdpartyappto execute commands for thethird-party-appapplication.
Procedure
Retrieve a Kerberos ticket as the IdM
admin.[root@idmclient ~]# kinit adminAdd the
/opt/third-party-app/bin/reportcommand to the IdM database ofsudocommands:[root@idmclient ~]# ipa sudocmd-add /opt/third-party-app/bin/report ---------------------------------------------------- Added Sudo Command "/opt/third-party-app/bin/report" ---------------------------------------------------- Sudo Command: /opt/third-party-app/bin/reportCreate a
sudorule namedrun_third-party-app_report:[root@idmclient ~]# ipa sudorule-add run_third-party-app_report -------------------------------------------- Added Sudo Rule "run_third-party-app_report" -------------------------------------------- Rule name: run_third-party-app_report Enabled: TRUEUse the
--users=<user>option to specify the RunAs user for thesudorule-add-runasusercommand:[root@idmclient ~]# ipa sudorule-add-runasuser run_third-party-app_report --users=thirdpartyapp Rule name: run_third-party-app_report Enabled: TRUE RunAs External User: thirdpartyapp ------------------------- Number of members added 1 -------------------------The user (or group specified with the
--groups=*option) can be external to IdM, such as a local service account or an Active Directory user. Do not add a%prefix for group names.Add the
/opt/third-party-app/bin/reportcommand to therun_third-party-app_reportrule:[root@idmclient ~]# ipa sudorule-add-allow-command run_third-party-app_report --sudocmds '/opt/third-party-app/bin/report' Rule name: run_third-party-app_report Enabled: TRUE Sudo Allow Commands: /opt/third-party-app/bin/report RunAs External User: thirdpartyapp ------------------------- Number of members added 1 -------------------------Apply the
run_third-party-app_reportrule to the IdMidmclienthost:[root@idmclient ~]# ipa sudorule-add-host run_third-party-app_report --hosts idmclient.idm.example.com Rule name: run_third-party-app_report Enabled: TRUE Hosts: idmclient.idm.example.com Sudo Allow Commands: /opt/third-party-app/bin/report RunAs External User: thirdpartyapp ------------------------- Number of members added 1 -------------------------Add the
idm_useraccount to therun_third-party-app_reportrule:[root@idmclient ~]# ipa sudorule-add-user run_third-party-app_report --users idm_user Rule name: run_third-party-app_report Enabled: TRUE Users: idm_user Hosts: idmclient.idm.example.com Sudo Allow Commands: /opt/third-party-app/bin/report RunAs External User: thirdpartyapp ------------------------- Number of members added 1
Propagating the changes from the server to the client can take a few minutes.
Verification steps
-
Log in to the
idmclienthost as theidm_useraccount. Test the new sudo rule:
Display which
sudorules theidm_useraccount is allowed to perform.[idm_user@idmclient ~]$ sudo -l Matching Defaults entries for idm_user@idm.example.com on idmclient: !visiblepw, always_set_home, match_group_by_gid, always_query_group_plugin, env_reset, env_keep="COLORS DISPLAY HOSTNAME HISTSIZE KDEDIR LS_COLORS", env_keep+="MAIL PS1 PS2 QTDIR USERNAME LANG LC_ADDRESS LC_CTYPE", env_keep+="LC_COLLATE LC_IDENTIFICATION LC_MEASUREMENT LC_MESSAGES", env_keep+="LC_MONETARY LC_NAME LC_NUMERIC LC_PAPER LC_TELEPHONE", env_keep+="LC_TIME LC_ALL LANGUAGE LINGUAS _XKB_CHARSET XAUTHORITY KRB5CCNAME", secure_path=/sbin\:/bin\:/usr/sbin\:/usr/bin User idm_user@idm.example.com may run the following commands on idmclient: (thirdpartyapp) /opt/third-party-app/bin/report
Run the
reportcommand as thethirdpartyappservice account.[idm_user@idmclient ~]$ sudo -u thirdpartyapp /opt/third-party-app/bin/report [sudo] password for idm_user@idm.example.com: Executing report... Report successful.
20.6. Creating a sudo rule in the IdM WebUI that runs a command as a service account on an IdM client
In IdM, you can configure a sudo rule with a RunAs alias to run a sudo command as another user or group. For example, you might have an IdM client that hosts a database application, and you need to run commands as the local service account that corresponds to that application.
Use this example to create a sudo rule in the IdM WebUI called run_third-party-app_report to allow the idm_user account to run the /opt/third-party-app/bin/report command as the thirdpartyapp service account on the idmclient host.
Prerequisites
- You are logged in as IdM administrator.
-
You have created a user account for
idm_userin IdM and unlocked the account by creating a password for the user. For details on adding a new IdM user using the CLI, see Adding users using the command line. -
No local
idm_useraccount is present on theidmclienthost. Theidm_useruser is not listed in the local/etc/passwdfile. -
You have a custom application named
third-party-appinstalled on theidmclienthost. -
The
reportcommand for thethird-party-appapplication is installed in the/opt/third-party-app/bin/reportdirectory. -
You have created a local service account named
thirdpartyappto execute commands for thethird-party-appapplication.
Procedure
Add the
/opt/third-party-app/bin/reportcommand to the IdM database ofsudocommands:- Navigate to Policy → Sudo → Sudo Commands.
- Click Add in the upper right corner to open the Add sudo command dialog box.
Enter the command:
/opt/third-party-app/bin/report.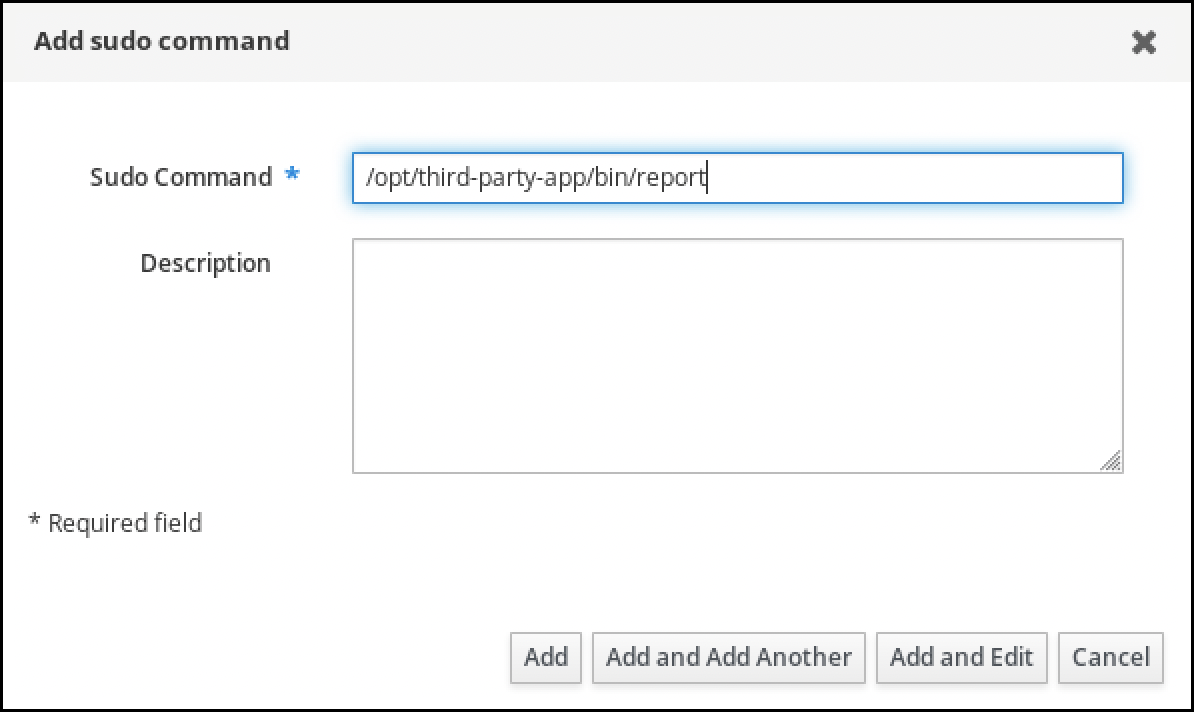
- Click Add.
Use the new
sudocommand entry to create the newsudorule:- Navigate to Policy → Sudo → Sudo rules.
- Click Add in the upper right corner to open the Add sudo rule dialog box.
Enter the name of the
sudorule: run_third-party-app_report.
- Click Add and Edit.
Specify the user:
- In the Who section, check the Specified Users and Groups radio button.
- In the User category the rule applies to subsection, click Add to open the Add users into sudo rule "run_third-party-app_report" dialog box.
In the Add users into sudo rule "run_third-party-app_report" dialog box in the Available column, check the idm_user checkbox, and move it to the Prospective column.
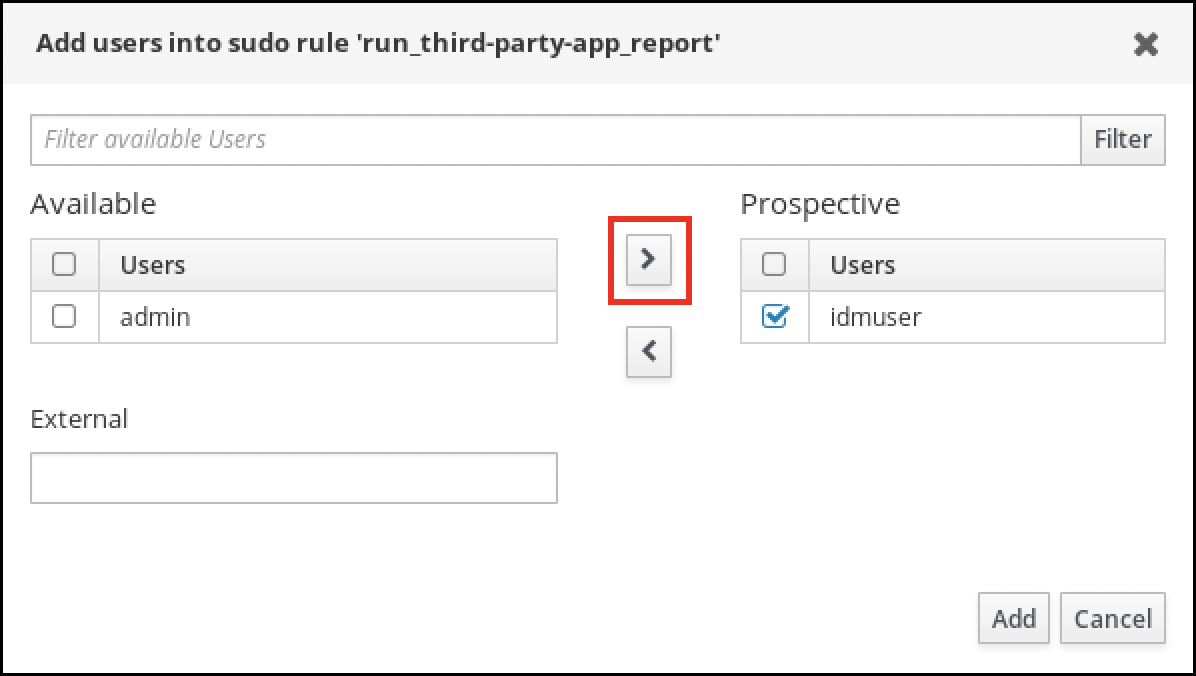
- Click Add.
Specify the host:
- In the Access this host section, check the Specified Hosts and Groups radio button.
- In the Host category this rule applies to subsection, click Add to open the Add hosts into sudo rule "run_third-party-app_report" dialog box.
In the Add hosts into sudo rule "run_third-party-app_report" dialog box in the Available column, check the idmclient.idm.example.com checkbox, and move it to the Prospective column.
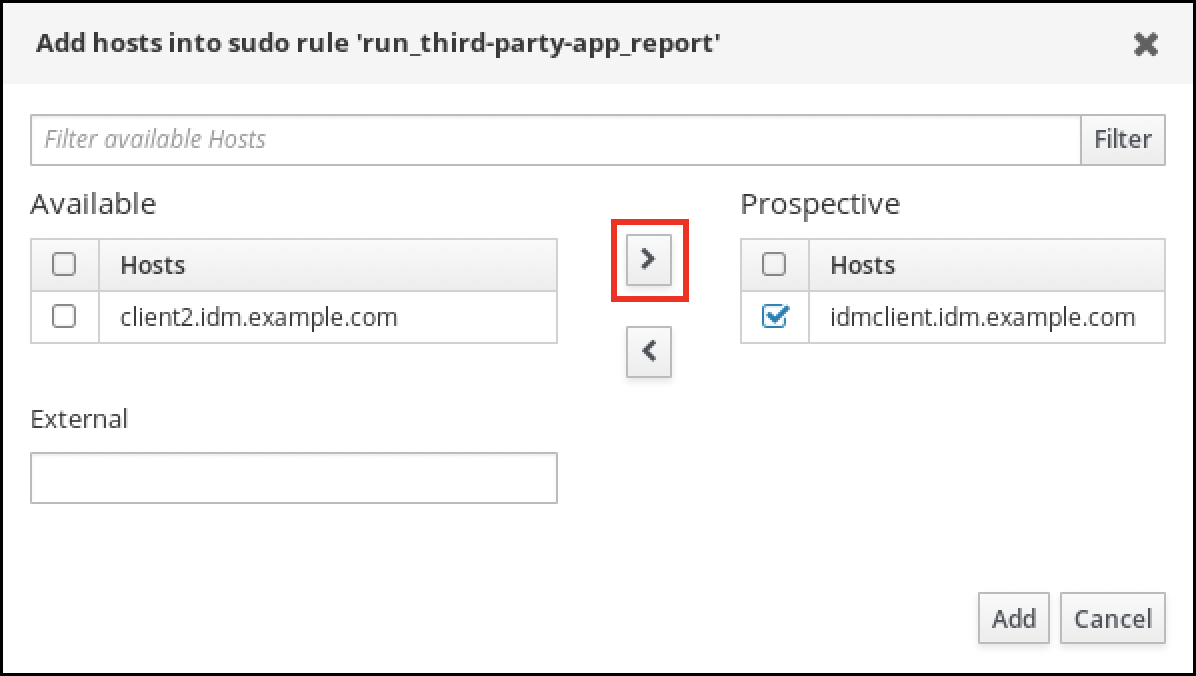
- Click Add.
Specify the commands:
- In the Command category the rule applies to subsection of the Run Commands section, check the Specified Commands and Groups radio button.
- In the Sudo Allow Commands subsection, click Add to open the Add allow sudo commands into sudo rule "run_third-party-app_report" dialog box.
In the Add allow sudo commands into sudo rule "run_third-party-app_report" dialog box in the Available column, check the
/opt/third-party-app/bin/reportcheckbox, and move it to the Prospective column.
- Click Add to return to the run_third-party-app_report page.
Specify the RunAs user:
- In the As Whom section, check the Specified Users and Groups radio button.
- In the RunAs Users subsection, click Add to open the Add RunAs users into sudo rule "run_third-party-app_report" dialog box.
In the Add RunAs users into sudo rule "run_third-party-app_report" dialog box, enter the
thirdpartyappservice account in the External box and move it to the Prospective column.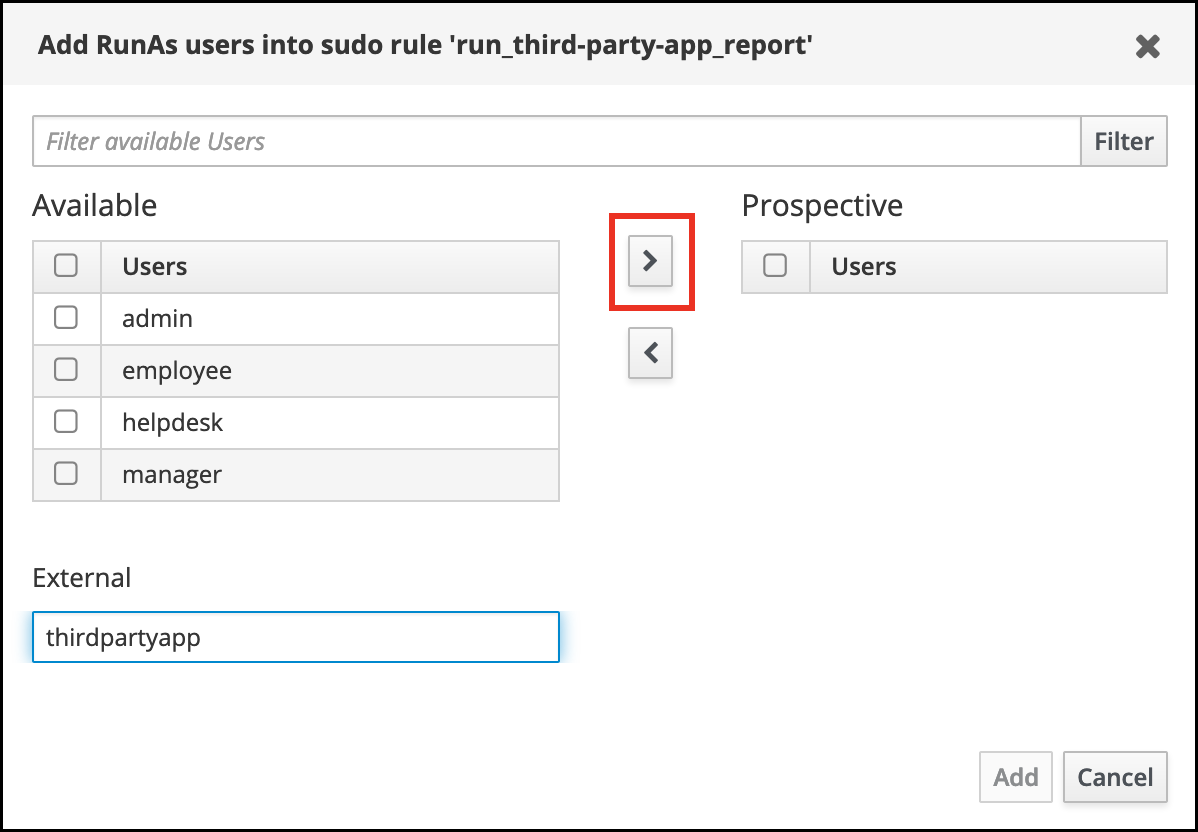
- Click Add to return to the run_third-party-app_report page.
- Click Save in the top left corner.
The new rule is enabled by default.
Figure 20.3. Details of the sudo rule

Propagating the changes from the server to the client can take a few minutes.
Verification steps
-
Log in to the
idmclienthost as theidm_useraccount. Test the new sudo rule:
Display which
sudorules theidm_useraccount is allowed to perform.[idm_user@idmclient ~]$ sudo -l Matching Defaults entries for idm_user@idm.example.com on idmclient: !visiblepw, always_set_home, match_group_by_gid, always_query_group_plugin, env_reset, env_keep="COLORS DISPLAY HOSTNAME HISTSIZE KDEDIR LS_COLORS", env_keep+="MAIL PS1 PS2 QTDIR USERNAME LANG LC_ADDRESS LC_CTYPE", env_keep+="LC_COLLATE LC_IDENTIFICATION LC_MEASUREMENT LC_MESSAGES", env_keep+="LC_MONETARY LC_NAME LC_NUMERIC LC_PAPER LC_TELEPHONE", env_keep+="LC_TIME LC_ALL LANGUAGE LINGUAS _XKB_CHARSET XAUTHORITY KRB5CCNAME", secure_path=/sbin\:/bin\:/usr/sbin\:/usr/bin User idm_user@idm.example.com may run the following commands on idmclient: (thirdpartyapp) /opt/third-party-app/bin/report
Run the
reportcommand as thethirdpartyappservice account.[idm_user@idmclient ~]$ sudo -u thirdpartyapp /opt/third-party-app/bin/report [sudo] password for idm_user@idm.example.com: Executing report... Report successful.
20.7. Enabling GSSAPI authentication for sudo on an IdM client
The following procedure describes enabling Generic Security Service Application Program Interface (GSSAPI) authentication on an IdM client for the sudo and sudo -i commands via the pam_sss_gss.so PAM module. With this configuration, IdM users can authenticate to the sudo command with their Kerberos ticket.
Prerequisites
-
You have created a
sudorule for an IdM user that applies to an IdM host. For this example, you have created theidm_user_rebootsudorule to grant theidm_useraccount the permission to run the/usr/sbin/rebootcommand on theidmclienthost. -
The
idmclienthost is running RHEL 8.4 or later. -
You need
rootprivileges to modify the/etc/sssd/sssd.conffile and PAM files in the/etc/pam.d/directory.
Procedure
-
Open the
/etc/sssd/sssd.confconfiguration file. Add the following entry to the
[domain/<domain_name>]section.[domain/<domain_name>] pam_gssapi_services = sudo, sudo-i
-
Save and close the
/etc/sssd/sssd.conffile. Restart the SSSD service to load the configuration changes.
[root@idmclient ~]# systemctl restart sssdIf you are running RHEL 8.8 or later:
[Optional] Determine if you have selected the
sssdauthselectprofile:# authselect current Profile ID: sssdThe output says that the
sssdauthselectprofile is selected.If the
sssdauthselectprofile is selected, enable GSSAPI authentication:# authselect enable-feature with-gssapiIf the
sssdauthselectprofile is not selected, select it and enable GSSAPI authentication:# authselect select sssd with-gssapi
If you are running RHEL 8.7 or earlier:
-
Open the
/etc/pam.d/sudoPAM configuration file. Add the following entry as the first line of the
authsection in the/etc/pam.d/sudofile.#%PAM-1.0 auth sufficient pam_sss_gss.so auth include system-auth account include system-auth password include system-auth session include system-auth-
Save and close the
/etc/pam.d/sudofile.
-
Open the
Verification steps
Log into the host as the
idm_useraccount.[root@idm-client ~]# ssh -l idm_user@idm.example.com localhost idm_user@idm.example.com's password:Verify that you have a ticket-granting ticket as the
idm_useraccount.[idmuser@idmclient ~]$ klist Ticket cache: KCM:1366201107 Default principal: idm_user@IDM.EXAMPLE.COM Valid starting Expires Service principal 01/08/2021 09:11:48 01/08/2021 19:11:48 krbtgt/IDM.EXAMPLE.COM@IDM.EXAMPLE.COM renew until 01/15/2021 09:11:44
(Optional) If you do not have Kerberos credentials for the
idm_useraccount, delete your current Kerberos credentials and request the correct ones.[idm_user@idmclient ~]$ kdestroy -A [idm_user@idmclient ~]$ kinit idm_user@IDM.EXAMPLE.COM Password for idm_user@idm.example.com:
Reboot the machine using
sudo, without specifying a password.[idm_user@idmclient ~]$ sudo /usr/sbin/reboot
Additional resources
- The GSSAPI entry in the IdM terminology listing
- Granting sudo access to an IdM user on an IdM client using IdM Web UI
- Granting sudo access to an IdM user on an IdM client using the CLI
-
pam_sss_gss (8)man page -
sssd.conf (5)man page
20.8. Enabling GSSAPI authentication and enforcing Kerberos authentication indicators for sudo on an IdM client
The following procedure describes enabling Generic Security Service Application Program Interface (GSSAPI) authentication on an IdM client for the sudo and sudo -i commands via the pam_sss_gss.so PAM module. Additionally, only users who have logged in with a smart card will authenticate to those commands with their Kerberos ticket.
You can use this procedure as a template to configure GSSAPI authentication with SSSD for other PAM-aware services, and further restrict access to only those users that have a specific authentication indicator attached to their Kerberos ticket.
Prerequisites
-
You have created a
sudorule for an IdM user that applies to an IdM host. For this example, you have created theidm_user_rebootsudorule to grant theidm_useraccount the permission to run the/usr/sbin/rebootcommand on theidmclienthost. -
You have configured smart card authentication for the
idmclienthost. -
The
idmclienthost is running RHEL 8.4 or later. -
You need
rootprivileges to modify the/etc/sssd/sssd.conffile and PAM files in the/etc/pam.d/directory.
Procedure
-
Open the
/etc/sssd/sssd.confconfiguration file. Add the following entries to the
[domain/<domain_name>]section.[domain/<domain_name>] pam_gssapi_services = sudo, sudo-i pam_gssapi_indicators_map = sudo:pkinit, sudo-i:pkinit
-
Save and close the
/etc/sssd/sssd.conffile. Restart the SSSD service to load the configuration changes.
[root@idmclient ~]# systemctl restart sssd-
Open the
/etc/pam.d/sudoPAM configuration file. Add the following entry as the first line of the
authsection in the/etc/pam.d/sudofile.#%PAM-1.0 auth sufficient pam_sss_gss.so auth include system-auth account include system-auth password include system-auth session include system-auth-
Save and close the
/etc/pam.d/sudofile. -
Open the
/etc/pam.d/sudo-iPAM configuration file. Add the following entry as the first line of the
authsection in the/etc/pam.d/sudo-ifile.#%PAM-1.0 auth sufficient pam_sss_gss.so auth include sudo account include sudo password include sudo session optional pam_keyinit.so force revoke session include sudo-
Save and close the
/etc/pam.d/sudo-ifile.
Verification steps
Log into the host as the
idm_useraccount and authenticate with a smart card.[root@idmclient ~]# ssh -l idm_user@idm.example.com localhost PIN for smart_cardVerify that you have a ticket-granting ticket as the smart card user.
[idm_user@idmclient ~]$ klist Ticket cache: KEYRING:persistent:1358900015:krb_cache_TObtNMd Default principal: idm_user@IDM.EXAMPLE.COM Valid starting Expires Service principal 02/15/2021 16:29:48 02/16/2021 02:29:48 krbtgt/IDM.EXAMPLE.COM@IDM.EXAMPLE.COM renew until 02/22/2021 16:29:44
Display which
sudorules theidm_useraccount is allowed to perform.[idm_user@idmclient ~]$ sudo -l Matching Defaults entries for idmuser on idmclient: !visiblepw, always_set_home, match_group_by_gid, always_query_group_plugin, env_reset, env_keep="COLORS DISPLAY HOSTNAME HISTSIZE KDEDIR LS_COLORS", env_keep+="MAIL PS1 PS2 QTDIR USERNAME LANG LC_ADDRESS LC_CTYPE", env_keep+="LC_COLLATE LC_IDENTIFICATION LC_MEASUREMENT LC_MESSAGES", env_keep+="LC_MONETARY LC_NAME LC_NUMERIC LC_PAPER LC_TELEPHONE", env_keep+="LC_TIME LC_ALL LANGUAGE LINGUAS _XKB_CHARSET XAUTHORITY KRB5CCNAME", secure_path=/sbin\:/bin\:/usr/sbin\:/usr/bin User idm_user may run the following commands on idmclient: (root) /usr/sbin/reboot
Reboot the machine using
sudo, without specifying a password.[idm_user@idmclient ~]$ sudo /usr/sbin/reboot
Additional resources
- SSSD options controlling GSSAPI authentication for PAM services
- The GSSAPI entry in the IdM terminology listing
- Configuring Identity Management for smart card authentication
- Kerberos authentication indicators
- Granting sudo access to an IdM user on an IdM client using IdM Web UI
- Granting sudo access to an IdM user on an IdM client using the CLI.
-
pam_sss_gss (8)man page -
sssd.conf (5)man page
20.9. SSSD options controlling GSSAPI authentication for PAM services
You can use the following options for the /etc/sssd/sssd.conf configuration file to adjust the GSSAPI configuration within the SSSD service.
- pam_gssapi_services
-
GSSAPI authentication with SSSD is disabled by default. You can use this option to specify a comma-separated list of PAM services that are allowed to try GSSAPI authentication using the
pam_sss_gss.soPAM module. To explicitly disable GSSAPI authentication, set this option to-. - pam_gssapi_indicators_map
This option only applies to Identity Management (IdM) domains. Use this option to list Kerberos authentication indicators that are required to grant PAM access to a service. Pairs must be in the format
<PAM_service>:_<required_authentication_indicator>_.Valid authentication indicators are:
-
otpfor two-factor authentication -
radiusfor RADIUS authentication -
pkinitfor PKINIT, smart card, or certificate authentication -
hardenedfor hardened passwords
-
- pam_gssapi_check_upn
-
This option is enabled and set to
trueby default. If this option is enabled, the SSSD service requires that the user name matches the Kerberos credentials. Iffalse, thepam_sss_gss.soPAM module authenticates every user that is able to obtain the required service ticket.
Examples
The following options enable Kerberos authentication for the sudo and sudo-i services, requires that sudo users authenticated with a one-time password, and user names must match the Kerberos principal. Because these settings are in the [pam] section, they apply to all domains:
[pam] pam_gssapi_services = sudo, sudo-i pam_gssapi_indicators_map = sudo:otp pam_gssapi_check_upn = true
You can also set these options in individual [domain] sections to overwrite any global values in the [pam] section. The following options apply different GSSAPI settings to each domain:
- For the
idm.example.comdomain -
Enable GSSAPI authentication for the
sudoandsudo -iservices. -
Require certificate or smart card authentication authenticators for the
sudocommand. -
Require one-time password authentication authenticators for the
sudo -icommand. - Enforce matching user names and Kerberos principals.
-
Enable GSSAPI authentication for the
- For the
ad.example.comdomain -
Enable GSSAPI authentication only for the
sudoservice. - Do not enforce matching user names and principals.
-
Enable GSSAPI authentication only for the
[domain/idm.example.com] pam_gssapi_services = sudo, sudo-i pam_gssapi_indicators_map = sudo:pkinit, sudo-i:otp pam_gssapi_check_upn = true ... [domain/ad.example.com] pam_gssapi_services = sudo pam_gssapi_check_upn = false ...
Additional resources
20.10. Troubleshooting GSSAPI authentication for sudo
If you are unable to authenticate to the sudo service with a Kerberos ticket from IdM, use the following scenarios to troubleshoot your configuration.
Prerequisites
-
You have enabled GSSAPI authentication for the
sudoservice. See Enabling GSSAPI authentication for sudo on an IdM client. -
You need
rootprivileges to modify the/etc/sssd/sssd.conffile and PAM files in the/etc/pam.d/directory.
Procedure
If you see the following error, the Kerberos service might not able to resolve the correct realm for the service ticket based on the host name:
Server not found in Kerberos database
In this situation, add the hostname directly to
[domain_realm]section in the/etc/krb5.confKerberos configuration file:[idm-user@idm-client ~]$ cat /etc/krb5.conf ... [domain_realm] .example.com = EXAMPLE.COM example.com = EXAMPLE.COM server.example.com = EXAMPLE.COMIf you see the following error, you do not have any Kerberos credentials:
No Kerberos credentials available
In this situation, retrieve Kerberos credentials with the
kinitutility or authenticate with SSSD:[idm-user@idm-client ~]$ kinit idm-user@IDM.EXAMPLE.COM Password for idm-user@idm.example.com:
If you see either of the following errors in the
/var/log/sssd/sssd_pam.loglog file, the Kerberos credentials do not match the username of the user currently logged in:User with UPN [<UPN>] was not found. UPN [<UPN>] does not match target user [<username>].
In this situation, verify that you authenticated with SSSD, or consider disabling the
pam_gssapi_check_upnoption in the/etc/sssd/sssd.conffile:[idm-user@idm-client ~]$ cat /etc/sssd/sssd.conf ... pam_gssapi_check_upn = falseFor additional troubleshooting, you can enable debugging output for the
pam_sss_gss.soPAM module.Add the
debugoption at the end of allpam_sss_gss.soentries in PAM files, such as/etc/pam.d/sudoand/etc/pam.d/sudo-i:[root@idm-client ~]# cat /etc/pam.d/sudo #%PAM-1.0 auth sufficient pam_sss_gss.so debug auth include system-auth account include system-auth password include system-auth session include system-auth[root@idm-client ~]# cat /etc/pam.d/sudo-i #%PAM-1.0 auth sufficient pam_sss_gss.so debug auth include sudo account include sudo password include sudo session optional pam_keyinit.so force revoke session include sudoTry to authenticate with the
pam_sss_gss.somodule and review the console output. In this example, the user did not have any Kerberos credentials.[idm-user@idm-client ~]$ sudo ls -l /etc/sssd/sssd.conf pam_sss_gss: Initializing GSSAPI authentication with SSSD pam_sss_gss: Switching euid from 0 to 1366201107 pam_sss_gss: Trying to establish security context pam_sss_gss: SSSD User name: idm-user@idm.example.com pam_sss_gss: User domain: idm.example.com pam_sss_gss: User principal: pam_sss_gss: Target name: host@idm.example.com pam_sss_gss: Using ccache: KCM: pam_sss_gss: Acquiring credentials, principal name will be derived pam_sss_gss: Unable to read credentials from [KCM:] [maj:0xd0000, min:0x96c73ac3] pam_sss_gss: GSSAPI: Unspecified GSS failure. Minor code may provide more information pam_sss_gss: GSSAPI: No credentials cache found pam_sss_gss: Switching euid from 1366200907 to 0 pam_sss_gss: System error [5]: Input/output error
20.11. Using an Ansible playbook to ensure sudo access for an IdM user on an IdM client
In Identity Management (IdM), you can ensure sudo access to a specific command is granted to an IdM user account on a specific IdM host.
Complete this procedure to ensure a sudo rule named idm_user_reboot exists. The rule grants idm_user the permission to run the /usr/sbin/reboot command on the idmclient machine.
Prerequisites
You have configured your Ansible control node to meet the following requirements:
- You are using Ansible version 2.14 or later.
-
You have installed the
ansible-freeipapackage on the Ansible controller. - The example assumes that in the ~/MyPlaybooks/ directory, you have created an Ansible inventory file with the fully-qualified domain name (FQDN) of the IdM server.
-
The example assumes that the secret.yml Ansible vault stores your
ipaadmin_password.
-
The target node, that is the node on which the
ansible-freeipamodule is executed, is part of the IdM domain as an IdM client, server or replica. - You have ensured the presence of a user account for idm_user in IdM and unlocked the account by creating a password for the user. For details on adding a new IdM user using the command-line interface, see link: Adding users using the command line.
-
No local idm_user account exists on idmclient. The idm_user user is not listed in the
/etc/passwdfile on idmclient.
Procedure
Create an inventory file, for example
inventory.file, and defineipaserversin it:[ipaservers] server.idm.example.com
Add one or more
sudocommands:Create an
ensure-reboot-sudocmd-is-present.ymlAnsible playbook that ensures the presence of the/usr/sbin/rebootcommand in the IdM database ofsudocommands. To simplify this step, you can copy and modify the example in the/usr/share/doc/ansible-freeipa/playbooks/sudocmd/ensure-sudocmd-is-present.ymlfile:--- - name: Playbook to manage sudo command hosts: ipaserver vars_files: - /home/user_name/MyPlaybooks/secret.yml tasks: # Ensure sudo command is present - ipasudocmd: ipaadmin_password: "{{ ipaadmin_password }}" name: /usr/sbin/reboot state: presentRun the playbook:
$ ansible-playbook --vault-password-file=password_file -v -i path_to_inventory_directory/inventory.file path_to_playbooks_directory/ensure-reboot-sudocmd-is-present.yml
Create a
sudorule that references the commands:Create an
ensure-sudorule-for-idmuser-on-idmclient-is-present.ymlAnsible playbook that uses thesudocommand entry to ensure the presence of a sudo rule. The sudo rule allows idm_user to reboot the idmclient machine. To simplify this step, you can copy and modify the example in the/usr/share/doc/ansible-freeipa/playbooks/sudorule/ensure-sudorule-is-present.ymlfile:--- - name: Tests hosts: ipaserver vars_files: - /home/user_name/MyPlaybooks/secret.yml tasks: # Ensure a sudorule is present granting idm_user the permission to run /usr/sbin/reboot on idmclient - ipasudorule: ipaadmin_password: "{{ ipaadmin_password }}" name: idm_user_reboot description: A test sudo rule. allow_sudocmd: /usr/sbin/reboot host: idmclient.idm.example.com user: idm_user state: presentRun the playbook:
$ ansible-playbook -v -i path_to_inventory_directory/inventory.file path_to_playbooks_directory/ensure-sudorule-for-idmuser-on-idmclient-is-present.yml
Verification steps
Test that the sudo rule whose presence you have ensured on the IdM server works on idmclient by verifying that idm_user can reboot idmclient using sudo. Note that it can take a few minutes for the changes made on the server to take effect on the client.
- Log in to idmclient as idm_user.
Reboot the machine using
sudo. Enter the password for idm_user when prompted:$ sudo /usr/sbin/reboot [sudo] password for idm_user:
If sudo is configured correctly, the machine reboots.
Additional resources
-
See the
README-sudocmd.md,README-sudocmdgroup.md, andREADME-sudorule.mdfiles in the/usr/share/doc/ansible-freeipa/directory.
Chapter 21. Ensuring the presence of host-based access control rules in IdM using Ansible playbooks
Ansible is an automation tool used to configure systems, deploy software, and perform rolling updates. It includes support for Identity Management (IdM).
Learn more about Identity Management (IdM) host-based access policies and how to define them using Ansible.
21.1. Host-based access control rules in IdM
Host-based access control (HBAC) rules define which users or user groups can access which hosts or host groups by using which services or services in a service group. As a system administrator, you can use HBAC rules to achieve the following goals:
- Limit access to a specified system in your domain to members of a specific user group.
- Allow only a specific service to be used to access systems in your domain.
By default, IdM is configured with a default HBAC rule named allow_all, which means universal access to every host for every user via every relevant service in the entire IdM domain.
You can fine-tune access to different hosts by replacing the default allow_all rule with your own set of HBAC rules. For centralized and simplified access control management, you can apply HBAC rules to user groups, host groups, or service groups instead of individual users, hosts, or services.
21.2. Ensuring the presence of an HBAC rule in IdM using an Ansible playbook
Follow this procedure to ensure the presence of a host-based access control (HBAC) rule in Identity Management (IdM) using an Ansible playbook.
Prerequisites
You have configured your Ansible control node to meet the following requirements:
- You are using Ansible version 2.14 or later.
-
You have installed the
ansible-freeipapackage on the Ansible controller. - The example assumes that in the ~/MyPlaybooks/ directory, you have created an Ansible inventory file with the fully-qualified domain name (FQDN) of the IdM server.
-
The example assumes that the secret.yml Ansible vault stores your
ipaadmin_password.
-
The target node, that is the node on which the
ansible-freeipamodule is executed, is part of the IdM domain as an IdM client, server or replica. - The users and user groups you want to use for your HBAC rule exist in IdM. See Managing user accounts using Ansible playbooks and Ensuring the presence of IdM groups and group members using Ansible playbooks for details.
- The hosts and host groups to which you want to apply your HBAC rule exist in IdM. See Managing hosts using Ansible playbooks and Managing host groups using Ansible playbooks for details.
Procedure
Create an inventory file, for example
inventory.file, and defineipaserverin it:[ipaserver] server.idm.example.com
Create your Ansible playbook file that defines the HBAC policy whose presence you want to ensure. To simplify this step, you can copy and modify the example in the
/usr/share/doc/ansible-freeipa/playbooks/hbacrule/ensure-hbacrule-allhosts-present.ymlfile:--- - name: Playbook to handle hbacrules hosts: ipaserver vars_files: - /home/user_name/MyPlaybooks/secret.yml tasks: # Ensure idm_user can access client.idm.example.com via the sshd service - ipahbacrule: ipaadmin_password: "{{ ipaadmin_password }}" name: login user: idm_user host: client.idm.example.com hbacsvc: - sshd state: presentRun the playbook:
$ ansible-playbook --vault-password-file=password_file -v -i path_to_inventory_directory/inventory.file path_to_playbooks_directory/ensure-new-hbacrule-present.yml
Verification steps
- Log in to the IdM Web UI as administrator.
- Navigate to Policy → Host-Based-Access-Control → HBAC Test.
- In the Who tab, select idm_user.
- In the Accessing tab, select client.idm.example.com.
- In the Via service tab, select sshd.
- In the Rules tab, select login.
- In the Run test tab, click the Run test button. If you see ACCESS GRANTED, the HBAC rule is implemented successfully.
Additional resources
-
See the
README-hbacsvc.md,README-hbacsvcgroup.md, andREADME-hbacrule.mdfiles in the/usr/share/doc/ansible-freeipadirectory. -
See the playbooks in the subdirectories of the
/usr/share/doc/ansible-freeipa/playbooksdirectory.
Chapter 22. Managing IdM certificates using Ansible
You can use the ansible-freeipa ipacert module to request, revoke, and retrieve SSL certificates for Identity Management (IdM) users, hosts and services. You can also restore a certificate that has been put on hold.
22.1. Using Ansible to request SSL certificates for IdM hosts, services and users
You can use the ansible-freeipa ipacert module to request SSL certificates for Identity Management (IdM) users, hosts and services. They can then use these certificates to authenticate to IdM.
Complete this procedure to request a certificate for an HTTP server from an IdM certificate authority (CA) using an Ansible playbook.
Prerequisites
On the control node:
- You are using Ansible version 2.14 or later.
-
You have installed the
ansible-freeipapackage. - You have created an Ansible inventory file with the fully-qualified domain name (FQDN) of the IdM server in the ~/MyPlaybooks/ directory.
-
You have stored your
ipaadmin_passwordin the secret.yml Ansible vault.
- Your IdM deployment has an integrated CA.
Procedure
Generate a certificate-signing request (CSR) for your user, host or service. For example, to use the
opensslutility to generate a CSR for theHTTPservice running on client.idm.example.com, enter:# openssl req -new -newkey rsa:2048 -days 365 -nodes -keyout new.key -out new.csr -subj '/CN=client.idm.example.com,O=IDM.EXAMPLE.COM'As a result, the CSR is stored in new.csr.
Create your Ansible playbook file request-certificate.yml with the following content:
--- - name: Playbook to request a certificate hosts: ipaserver vars_files: - /home/user_name/MyPlaybooks/secret.yml tasks: - name: Request a certificate for a web server ipacert: ipaadmin_password: "{{ ipaadmin_password }}" state: requested csr: | -----BEGIN CERTIFICATE REQUEST----- MIGYMEwCAQAwGTEXMBUGA1UEAwwOZnJlZWlwYSBydWxlcyEwKjAFBgMrZXADIQBs HlqIr4b/XNK+K8QLJKIzfvuNK0buBhLz3LAzY7QDEqAAMAUGAytlcANBAF4oSCbA 5aIPukCidnZJdr491G4LBE+URecYXsPknwYb+V+ONnf5ycZHyaFv+jkUBFGFeDgU SYaXm/gF8cDYjQI= -----END CERTIFICATE REQUEST----- principal: HTTP/client.idm.example.com register: certReplace the certificate request with the CSR from new.csr.
Request the certificate:
$ ansible-playbook --vault-password-file=password_file -v -i <path_to_inventory_directory>/hosts <path_to_playbooks_directory>/request-certificate.yml
Additional resources
22.2. Using Ansible to revoke SSL certificates for IdM hosts, services and users
You can use the ansible-freeipa ipacert module to revoke SSL certificates used by Identity Management (IdM) users, hosts and services to authenticate to IdM.
Complete this procedure to revoke a certificate for an HTTP server using an Ansible playbook. The reason for revoking the certificate is “keyCompromise”.
Prerequisites
On the control node:
- You are using Ansible version 2.14 or later.
-
You have installed the
ansible-freeipapackage. - You have created an Ansible inventory file with the fully-qualified domain name (FQDN) of the IdM server in the ~/MyPlaybooks/ directory.
-
You have stored your
ipaadmin_passwordin the secret.yml Ansible vault. -
You have obtained the serial number of the certificate, for example by entering the
openssl x509 -noout -text -in <path_to_certificate>command. In this example, the serial number of the certificate is 123456789.
- Your IdM deployment has an integrated CA.
Procedure
Create your Ansible playbook file revoke-certificate.yml with the following content:
--- - name: Playbook to revoke a certificate hosts: ipaserver vars_files: - /home/user_name/MyPlaybooks/secret.yml tasks: - name: Revoke a certificate for a web server ipacert: ipaadmin_password: "{{ ipaadmin_password }}" serial_number: 123456789 revocation_reason: "keyCompromise" state: revokedRevoke the certificate:
$ ansible-playbook --vault-password-file=password_file -v -i <path_to_inventory_directory>/hosts <path_to_playbooks_directory>/revoke-certificate.yml
Additional resources
22.3. Using Ansible to restore SSL certificates for IdM users, hosts, and services
You can use the ansible-freeipa ipacert module to restore a revoked SSL certificate previously used by an Identity Management (IdM) user, host or a service to authenticate to IdM.
You can only restore a certificate that was put on hold. You may have put it on hold because, for example, you were not sure if the private key had been lost. However, now you have recovered the key and as you are certain that no-one has accessed it in the meantime, you want to reinstate the certificate.
Complete this procedure to use an Ansible playbook to release a certificate for a service enrolled into IdM from hold. This example describes how to release a certificate for an HTTP service from hold.
Prerequisites
On the control node:
- You are using Ansible version 2.14 or later.
-
You have installed the
ansible-freeipapackage. - You have created an Ansible inventory file with the fully-qualified domain name (FQDN) of the IdM server in the ~/MyPlaybooks/ directory.
-
You have stored your
ipaadmin_passwordin the secret.yml Ansible vault.
- Your IdM deployment has an integrated CA.
-
You have obtained the serial number of the certificate, for example by entering the
openssl x509 -noout -text -in path/to/certificatecommand. In this example, the certificate serial number is 123456789.
Procedure
Create your Ansible playbook file restore-certificate.yml with the following content:
--- - name: Playbook to restore a certificate hosts: ipaserver vars_files: - /home/user_name/MyPlaybooks/secret.yml tasks: - name: Restore a certificate for a web service ipacert: ipaadmin_password: "{{ ipaadmin_password }}" serial_number: 123456789 state: releasedRun the playbook:
$ ansible-playbook --vault-password-file=password_file -v -i <path_to_inventory_directory>/hosts <path_to_playbooks_directory>/restore-certificate.yml
Additional resources
22.4. Using Ansible to retrieve SSL certificates for IdM users, hosts, and services
You can use the ansible-freeipa ipacert module to retrieve an SSL certificate issued for an Identity Management (IdM) user, host or a service, and store it in a file on the managed node.
Prerequisites
On the control node:
- You are using Ansible version 2.14 or later.
-
You have installed the
ansible-freeipapackage. - You have created an Ansible inventory file with the fully-qualified domain name (FQDN) of the IdM server in the ~/MyPlaybooks/ directory.
-
You have stored your
ipaadmin_passwordin the secret.yml Ansible vault.
-
You have obtained the serial number of the certificate, for example by entering the
openssl x509 -noout -text -in <path_to_certificate>command. In this example, the serial number of the certificate is 123456789, and the file in which you store the retrieved certificate is cert.pem.
Procedure
Create your Ansible playbook file retrieve-certificate.yml with the following content:
--- - name: Playbook to retrieve a certificate and store it locally on the managed node hosts: ipaserver vars_files: - /home/user_name/MyPlaybooks/secret.yml tasks: - name: Retrieve a certificate and save it to file 'cert.pem' ipacert: ipaadmin_password: "{{ ipaadmin_password }}" serial_number: 123456789 certificate_out: cert.pem state: retrievedRetrieve the certificate:
$ ansible-playbook --vault-password-file=password_file -v -i <path_to_inventory_directory>/hosts <path_to_playbooks_directory>/retrieve-certificate.yml
Additional resources
Chapter 23. Vaults in IdM
This chapter describes vaults in Identity Management (IdM). It introduces the following topics:
- The concept of the vault.
- The different roles associated with a vault.
- The different types of vaults available in IdM based on the level of security and access control.
- The different types of vaults available in IdM based on ownership.
- The concept of vault containers.
- The basic commands for managing vaults in IdM.
- Installing the key recovery authority (KRA), which is a prerequisite for using vaults in IdM.
23.1. Vaults and their benefits
A vault is a useful feature for those Identity Management (IdM) users who want to keep all their sensitive data stored securely but conveniently in one place. There are various types of vaults and you should choose which vault to use based on your requirements.
A vault is a secure location in (IdM) for storing, retrieving, sharing, and recovering a secret. A secret is security-sensitive data, usually authentication credentials, that only a limited group of people or entities can access. For example, secrets include:
- Passwords
- PINs
- Private SSH keys
A vault is comparable to a password manager. Just like a password manager, a vault typically requires a user to generate and remember one primary password to unlock and access any information stored in the vault. However, a user can also decide to have a standard vault. A standard vault does not require the user to enter any password to access the secrets stored in the vault.
The purpose of vaults in IdM is to store authentication credentials that allow you to authenticate to external, non-IdM-related services.
Other important characteristics of the IdM vaults are:
- Vaults are only accessible to the vault owner and those IdM users that the vault owner selects to be the vault members. In addition, the IdM administrator has access to the vault.
- If a user does not have sufficient privileges to create a vault, an IdM administrator can create the vault and set the user as its owner.
- Users and services can access the secrets stored in a vault from any machine enrolled in the IdM domain.
- One vault can only contain one secret, for example, one file. However, the file itself can contain multiple secrets such as passwords, keytabs or certificates.
Vault is only available from the IdM command line (CLI), not from the IdM Web UI.
23.2. Vault owners, members, and administrators
Identity Management (IdM) distinguishes the following vault user types:
- Vault owner
A vault owner is a user or service with basic management privileges on the vault. For example, a vault owner can modify the properties of the vault or add new vault members.
Each vault must have at least one owner. A vault can also have multiple owners.
- Vault member
- A vault member is a user or service that can access a vault created by another user or service.
- Vault administrator
Vault administrators have unrestricted access to all vaults and are allowed to perform all vault operations.
NoteSymmetric and asymmetric vaults are protected with a password or key and apply special access control rules (see Vault types). The administrator must meet these rules to:
- Access secrets in symmetric and asymmetric vaults.
- Change or reset the vault password or key.
A vault administrator is any user with the
Vault Administratorsprivilege. In the context of the role-based access control (RBAC) in IdM, a privilege is a group of permissions that you can apply to a role.- Vault User
The vault user represents the user in whose container the vault is located. The
Vault userinformation is displayed in the output of specific commands, such asipa vault-show:$ ipa vault-show my_vault Vault name: my_vault Type: standard Owner users: user Vault user: userFor details on vault containers and user vaults, see Vault containers.
Additional resources
- See Standard, symmetric and asymmetric vaults for details on vault types.
23.3. Standard, symmetric, and asymmetric vaults
Based on the level of security and access control, IdM classifies vaults into the following types:
- Standard vaults
- Vault owners and vault members can archive and retrieve the secrets without having to use a password or key.
- Symmetric vaults
- Secrets in the vault are protected with a symmetric key. Vault owners and members can archive and retrieve the secrets, but they must provide the vault password.
- Asymmetric vaults
- Secrets in the vault are protected with an asymmetric key. Users archive the secret using a public key and retrieve it using a private key. Vault members can only archive secrets, while vault owners can do both, archive and retrieve secrets.
23.5. Vault containers
A vault container is a collection of vaults. The table below lists the default vault containers that Identity Management (IdM) provides.
Table 23.2. Default vault containers in IdM
| Type | Description | Purpose |
|---|---|---|
| User container | A private container for a user | Stores user vaults for a particular user |
| Service container | A private container for a service | Stores service vaults for a particular service |
| Shared container | A container for multiple users and services | Stores vaults that can be shared by multiple users or services |
IdM creates user and service containers for each user or service automatically when the first private vault for the user or service is created. After the user or service is deleted, IdM removes the container and its contents.
23.6. Basic IdM vault commands
You can use the basic commands outlined below to manage Identity Management (IdM) vaults. The table below contains a list of ipa vault-* commands with the explanation of their purpose.
Before running any ipa vault-* command, install the Key Recovery Authority (KRA) certificate system component on one or more of the servers in your IdM domain. For details, see Installing the Key Recovery Authority in IdM.
Table 23.3. Basic IdM vault commands with explanations
| Command | Purpose |
|---|---|
|
| Displays conceptual information about IdM vaults and sample vault commands. |
|
|
Adding the |
|
| When accessing a vault as a vault member, you must specify the vault owner. If you do not specify the vault owner, IdM informs you that it did not find the vault: [admin@server ~]$ ipa vault-show user_vault ipa: ERROR: user_vault: vault not found |
|
| When accessing a shared vault, you must specify that the vault you want to access is a shared vault. Otherwise, IdM informs you it did not find the vault: [admin@server ~]$ ipa vault-show shared_vault ipa: ERROR: shared_vault: vault not found |
23.7. Installing the Key Recovery Authority in IdM
Follow this procedure to enable vaults in Identity Management (IdM) by installing the Key Recovery Authority (KRA) Certificate System (CS) component on a specific IdM server.
Prerequisites
-
You are logged in as
rooton the IdM server. - An IdM certificate authority is installed on the IdM server.
-
You have the
Directory Managercredentials.
Procedure
Install the KRA:
# ipa-kra-install
You can install the first KRA of an IdM cluster on a hidden replica. However, installing additional KRAs requires temporarily activating the hidden replica before you install the KRA clone on a non-hidden replica. Then you can hide the originally hidden replica again.
To make the vault service highly available and resilient, install the KRA on two IdM servers or more. Maintaining multiple KRA servers prevents data loss.
Additional resources
Chapter 24. Using Ansible to manage IdM user vaults: storing and retrieving secrets
This chapter describes how to manage user vaults in Identity Management using the Ansible vault module. Specifically, it describes how a user can use Ansible playbooks to perform the following three consecutive actions:
The user can do the storing and the retrieving from two different IdM clients.
Prerequisites
- The Key Recovery Authority (KRA) Certificate System component has been installed on one or more of the servers in your IdM domain. For details, see Installing the Key Recovery Authority in IdM.
24.1. Ensuring the presence of a standard user vault in IdM using Ansible
Follow this procedure to use an Ansible playbook to create a vault container with one or more private vaults to securely store sensitive information. In the example used in the procedure below, the idm_user user creates a vault of the standard type named my_vault. The standard vault type ensures that idm_user will not be required to authenticate when accessing the file. idm_user will be able to retrieve the file from any IdM client to which the user is logged in.
Prerequisites
- You have installed the ansible-freeipa package on the Ansible controller, that is the host on which you execute the steps in the procedure.
- You know the password of idm_user.
Procedure
Navigate to the
/usr/share/doc/ansible-freeipa/playbooks/vaultdirectory:$ cd /usr/share/doc/ansible-freeipa/playbooks/vaultCreate an inventory file, for example inventory.file:
$ touch inventory.fileOpen inventory.file and define the IdM server that you want to configure in the
[ipaserver]section. For example, to instruct Ansible to configure server.idm.example.com, enter:[ipaserver] server.idm.example.com
Make a copy of the ensure-standard-vault-is-present.yml Ansible playbook file. For example:
$ cp ensure-standard-vault-is-present.yml ensure-standard-vault-is-present-copy.yml- Open the ensure-standard-vault-is-present-copy.yml file for editing.
Adapt the file by setting the following variables in the
ipavaulttask section:-
Set the
ipaadmin_principalvariable to idm_user. -
Set the
ipaadmin_passwordvariable to the password of idm_user. -
Set the
uservariable to idm_user. -
Set the
namevariable to my_vault. Set the
vault_typevariable to standard.This the modified Ansible playbook file for the current example:
--- - name: Tests hosts: ipaserver gather_facts: false vars_files: - /home/user_name/MyPlaybooks/secret.yml tasks: - ipavault: ipaadmin_principal: idm_user ipaadmin_password: idm_user_password user: idm_user name: my_vault vault_type: standard-
Set the
- Save the file.
Run the playbook:
$ ansible-playbook --vault-password-file=password_file -v -i inventory.file ensure-standard-vault-is-present-copy.yml
24.2. Archiving a secret in a standard user vault in IdM using Ansible
Follow this procedure to use an Ansible playbook to store sensitive information in a personal vault. In the example used, the idm_user user archives a file with sensitive information named password.txt in a vault named my_vault.
Prerequisites
- You have installed the ansible-freeipa package on the Ansible controller, that is the host on which you execute the steps in the procedure.
- You know the password of idm_user.
- idm_user is the owner, or at least a member user of my_vault.
- You have access to password.txt, the secret that you want to archive in my_vault.
Procedure
Navigate to the
/usr/share/doc/ansible-freeipa/playbooks/vaultdirectory:$ cd /usr/share/doc/ansible-freeipa/playbooks/vaultOpen your inventory file and make sure that the IdM server that you want to configure is listed in the
[ipaserver]section. For example, to instruct Ansible to configure server.idm.example.com, enter:[ipaserver] server.idm.example.com
Make a copy of the data-archive-in-symmetric-vault.yml Ansible playbook file but replace "symmetric" by "standard". For example:
$ cp data-archive-in-symmetric-vault.yml data-archive-in-standard-vault-copy.yml- Open the data-archive-in-standard-vault-copy.yml file for editing.
Adapt the file by setting the following variables in the
ipavaulttask section:-
Set the
ipaadmin_principalvariable to idm_user. -
Set the
ipaadmin_passwordvariable to the password of idm_user. -
Set the
uservariable to idm_user. -
Set the
namevariable to my_vault. -
Set the
invariable to the full path to the file with sensitive information. Set the
actionvariable to member.This the modified Ansible playbook file for the current example:
--- - name: Tests hosts: ipaserver gather_facts: false vars_files: - /home/user_name/MyPlaybooks/secret.yml tasks: - ipavault: ipaadmin_principal: idm_user ipaadmin_password: idm_user_password user: idm_user name: my_vault in: /usr/share/doc/ansible-freeipa/playbooks/vault/password.txt action: member-
Set the
- Save the file.
Run the playbook:
$ ansible-playbook --vault-password-file=password_file -v -i inventory.file data-archive-in-standard-vault-copy.yml
24.3. Retrieving a secret from a standard user vault in IdM using Ansible
Follow this procedure to use an Ansible playbook to retrieve a secret from the user personal vault. In the example used in the procedure below, the idm_user user retrieves a file with sensitive data from a vault of the standard type named my_vault onto an IdM client named host01. idm_user does not have to authenticate when accessing the file. idm_user can use Ansible to retrieve the file from any IdM client on which Ansible is installed.
Prerequisites
You have configured your Ansible control node to meet the following requirements:
- You are using Ansible version 2.14 or later.
-
You have installed the
ansible-freeipapackage on the Ansible controller. - The example assumes that in the ~/MyPlaybooks/ directory, you have created an Ansible inventory file with the fully-qualified domain name (FQDN) of the IdM server.
-
The example assumes that the secret.yml Ansible vault stores your
ipaadmin_password.
-
The target node, that is the node on which the
ansible-freeipamodule is executed, is part of the IdM domain as an IdM client, server or replica. - You know the password of idm_user.
- idm_user is the owner of my_vault.
- idm_user has stored a secret in my_vault.
- Ansible can write into the directory on the IdM host into which you want to retrieve the secret.
- idm_user can read from the directory on the IdM host into which you want to retrieve the secret.
Procedure
Navigate to the
/usr/share/doc/ansible-freeipa/playbooks/vaultdirectory:$ cd /usr/share/doc/ansible-freeipa/playbooks/vaultOpen your inventory file and mention, in a clearly defined section, the IdM client onto which you want to retrieve the secret. For example, to instruct Ansible to retrieve the secret onto host01.idm.example.com, enter:
[ipahost] host01.idm.example.com
Make a copy of the retrive-data-symmetric-vault.yml Ansible playbook file. Replace "symmetric" with "standard". For example:
$ cp retrive-data-symmetric-vault.yml retrieve-data-standard-vault.yml-copy.yml- Open the retrieve-data-standard-vault.yml-copy.yml file for editing.
-
Adapt the file by setting the
hostsvariable to ipahost. Adapt the file by setting the following variables in the
ipavaulttask section:-
Set the
ipaadmin_principalvariable to idm_user. -
Set the
ipaadmin_passwordvariable to the password of idm_user. -
Set the
uservariable to idm_user. -
Set the
namevariable to my_vault. -
Set the
outvariable to the full path of the file into which you want to export the secret. Set the
statevariable to retrieved.This the modified Ansible playbook file for the current example:
--- - name: Tests hosts: ipahost gather_facts: false vars_files: - /home/user_name/MyPlaybooks/secret.yml tasks: - ipavault: ipaadmin_principal: idm_user ipaadmin_password: idm_user_password user: idm_user name: my_vault out: /tmp/password_exported.txt state: retrieved-
Set the
- Save the file.
Run the playbook:
$ ansible-playbook --vault-password-file=password_file -v -i inventory.file retrieve-data-standard-vault.yml-copy.yml
Verification steps
SSHto host01 as user01:$ ssh user01@host01.idm.example.comView the file specified by the
outvariable in the Ansible playbook file:$ vim /tmp/password_exported.txt
You can now see the exported secret.
-
For more information about using Ansible to manage IdM vaults and user secrets and about playbook variables, see the README-vault.md Markdown file available in the
/usr/share/doc/ansible-freeipa/directory and the sample playbooks available in the/usr/share/doc/ansible-freeipa/playbooks/vault/directory.
Chapter 25. Using Ansible to manage IdM service vaults: storing and retrieving secrets
This section shows how an administrator can use the ansible-freeipa vault module to securely store a service secret in a centralized location. The vault used in the example is asymmetric, which means that to use it, the administrator needs to perform the following steps:
-
Generate a private key using, for example, the
opensslutility. - Generate a public key based on the private key.
The service secret is encrypted with the public key when an administrator archives it into the vault. Afterwards, a service instance hosted on a specific machine in the domain retrieves the secret using the private key. Only the service and the administrator are allowed to access the secret.
If the secret is compromised, the administrator can replace it in the service vault and then redistribute it to those individual service instances that have not been compromised.
Prerequisites
- The Key Recovery Authority (KRA) Certificate System component has been installed on one or more of the servers in your IdM domain. For details, see Installing the Key Recovery Authority in IdM.
This section includes these procedures:
In the procedures:
- admin is the administrator who manages the service password.
- private-key-to-an-externally-signed-certificate.pem is the file containing the service secret, in this case a private key to an externally signed certificate. Do not confuse this private key with the private key used to retrieve the secret from the vault.
- secret_vault is the vault created to store the service secret.
- HTTP/webserver1.idm.example.com is the service that is the owner of the vault.
- HTTP/webserver2.idm.example.com and HTTP/webserver3.idm.example.com are the vault member services.
- service-public.pem is the service public key used to encrypt the password stored in password_vault.
- service-private.pem is the service private key used to decrypt the password stored in secret_vault.
25.1. Ensuring the presence of an asymmetric service vault in IdM using Ansible
Follow this procedure to use an Ansible playbook to create a service vault container with one or more private vaults to securely store sensitive information. In the example used in the procedure below, the administrator creates an asymmetric vault named secret_vault. This ensures that the vault members have to authenticate using a private key to retrieve the secret in the vault. The vault members will be able to retrieve the file from any IdM client.
Prerequisites
You have configured your Ansible control node to meet the following requirements:
- You are using Ansible version 2.14 or later.
-
You have installed the
ansible-freeipapackage on the Ansible controller. - The example assumes that in the ~/MyPlaybooks/ directory, you have created an Ansible inventory file with the fully-qualified domain name (FQDN) of the IdM server.
-
The example assumes that the secret.yml Ansible vault stores your
ipaadmin_password.
-
The target node, that is the node on which the
ansible-freeipamodule is executed, is part of the IdM domain as an IdM client, server or replica. - You know the IdM administrator password.
Procedure
Navigate to the
/usr/share/doc/ansible-freeipa/playbooks/vaultdirectory:$ cd /usr/share/doc/ansible-freeipa/playbooks/vaultObtain the public key of the service instance. For example, using the
opensslutility:Generate the
service-private.pemprivate key.$ openssl genrsa -out service-private.pem 2048 Generating RSA private key, 2048 bit long modulus .+++ ...........................................+++ e is 65537 (0x10001)Generate the
service-public.pempublic key based on the private key.$ openssl rsa -in service-private.pem -out service-public.pem -pubout writing RSA key
Optional: Create an inventory file if it does not exist, for example inventory.file:
$ touch inventory.fileOpen your inventory file and define the IdM server that you want to configure in the
[ipaserver]section. For example, to instruct Ansible to configure server.idm.example.com, enter:[ipaserver] server.idm.example.com
Make a copy of the ensure-asymmetric-vault-is-present.yml Ansible playbook file. For example:
$ cp ensure-asymmetric-vault-is-present.yml ensure-asymmetric-service-vault-is-present-copy.yml- Open the ensure-asymmetric-vault-is-present-copy.yml file for editing.
- Add a task that copies the service-public.pem public key from the Ansible controller to the server.idm.example.com server.
Modify the rest of the file by setting the following variables in the
ipavaulttask section:-
Set the
ipaadmin_passwordvariable to the IdM administrator password. -
Define the name of the vault using the
namevariable, for example secret_vault. -
Set the
vault_typevariable to asymmetric. -
Set the
servicevariable to the principal of the service that owns the vault, for example HTTP/webserver1.idm.example.com. Set the
public_key_fileto the location of your public key.This is the modified Ansible playbook file for the current example:
--- - name: Tests hosts: ipaserver gather_facts: false vars_files: - /home/user_name/MyPlaybooks/secret.yml tasks: - name: Copy public key to ipaserver. copy: src: /path/to/service-public.pem dest: /usr/share/doc/ansible-freeipa/playbooks/vault/service-public.pem mode: 0600 - name: Add data to vault, from a LOCAL file. ipavault: ipaadmin_password: "{{ ipaadmin_password }}" name: secret_vault vault_type: asymmetric service: HTTP/webserver1.idm.example.com public_key_file: /usr/share/doc/ansible-freeipa/playbooks/vault/service-public.pem-
Set the
- Save the file.
Run the playbook:
$ ansible-playbook --vault-password-file=password_file -v -i inventory.file ensure-asymmetric-service-vault-is-present-copy.yml
25.2. Adding member services to an asymmetric vault using Ansible
Follow this procedure to use an Ansible playbook to add member services to a service vault so that they can all retrieve the secret stored in the vault. In the example used in the procedure below, the IdM administrator adds the HTTP/webserver2.idm.example.com and HTTP/webserver3.idm.example.com service principals to the secret_vault vault that is owned by HTTP/webserver1.idm.example.com.
Prerequisites
You have configured your Ansible control node to meet the following requirements:
- You are using Ansible version 2.14 or later.
-
You have installed the
ansible-freeipapackage on the Ansible controller. - The example assumes that in the ~/MyPlaybooks/ directory, you have created an Ansible inventory file with the fully-qualified domain name (FQDN) of the IdM server.
-
The example assumes that the secret.yml Ansible vault stores your
ipaadmin_password.
-
The target node, that is the node on which the
ansible-freeipamodule is executed, is part of the IdM domain as an IdM client, server or replica. - You know the IdM administrator password.
- You have created an asymmetric vault to store the service secret.
Procedure
Navigate to the
/usr/share/doc/ansible-freeipa/playbooks/vaultdirectory:$ cd /usr/share/doc/ansible-freeipa/playbooks/vaultOptional: Create an inventory file if it does not exist, for example inventory.file:
$ touch inventory.fileOpen your inventory file and define the IdM server that you want to configure in the
[ipaserver]section. For example, to instruct Ansible to configure server.idm.example.com, enter:[ipaserver] server.idm.example.com
Make a copy of the data-archive-in-asymmetric-vault.yml Ansible playbook file. For example:
$ cp data-archive-in-asymmetric-vault.yml add-services-to-an-asymmetric-vault.yml- Open the data-archive-in-asymmetric-vault-copy.yml file for editing.
Modify the file by setting the following variables in the
ipavaulttask section:-
Set the
ipaadmin_passwordvariable to the IdM administrator password. -
Set the
namevariable to the name of the vault, for example secret_vault. -
Set the
servicevariable to the service owner of the vault, for example HTTP/webserver1.idm.example.com. -
Define the services that you want to have access to the vault secret using the
servicesvariable. Set the
actionvariable tomember.This the modified Ansible playbook file for the current example:
--- - name: Tests hosts: ipaserver gather_facts: false vars_files: - /home/user_name/MyPlaybooks/secret.yml tasks: - ipavault: ipaadmin_password: "{{ ipaadmin_password }}" name: secret_vault service: HTTP/webserver1.idm.example.com services: - HTTP/webserver2.idm.example.com - HTTP/webserver3.idm.example.com action: member-
Set the
- Save the file.
Run the playbook:
$ ansible-playbook --vault-password-file=password_file -v -i inventory.file add-services-to-an-asymmetric-vault.yml
25.3. Storing an IdM service secret in an asymmetric vault using Ansible
Follow this procedure to use an Ansible playbook to store a secret in a service vault so that it can be later retrieved by the service. In the example used in the procedure below, the administrator stores a PEM file with the secret in an asymmetric vault named secret_vault. This ensures that the service will have to authenticate using a private key to retrieve the secret from the vault. The vault members will be able to retrieve the file from any IdM client.
Prerequisites
You have configured your Ansible control node to meet the following requirements:
- You are using Ansible version 2.14 or later.
-
You have installed the
ansible-freeipapackage on the Ansible controller. - The example assumes that in the ~/MyPlaybooks/ directory, you have created an Ansible inventory file with the fully-qualified domain name (FQDN) of the IdM server.
-
The example assumes that the secret.yml Ansible vault stores your
ipaadmin_password.
-
The target node, that is the node on which the
ansible-freeipamodule is executed, is part of the IdM domain as an IdM client, server or replica. - You know the IdM administrator password.
- You have created an asymmetric vault to store the service secret.
- The secret is stored locally on the Ansible controller, for example in the /usr/share/doc/ansible-freeipa/playbooks/vault/private-key-to-an-externally-signed-certificate.pem file.
Procedure
Navigate to the
/usr/share/doc/ansible-freeipa/playbooks/vaultdirectory:$ cd /usr/share/doc/ansible-freeipa/playbooks/vaultOptional: Create an inventory file if it does not exist, for example inventory.file:
$ touch inventory.fileOpen your inventory file and define the IdM server that you want to configure in the
[ipaserver]section. For example, to instruct Ansible to configure server.idm.example.com, enter:[ipaserver] server.idm.example.com
Make a copy of the data-archive-in-asymmetric-vault.yml Ansible playbook file. For example:
$ cp data-archive-in-asymmetric-vault.yml data-archive-in-asymmetric-vault-copy.yml- Open the data-archive-in-asymmetric-vault-copy.yml file for editing.
Modify the file by setting the following variables in the
ipavaulttask section:-
Set the
ipaadmin_passwordvariable to the IdM administrator password. -
Set the
namevariable to the name of the vault, for example secret_vault. -
Set the
servicevariable to the service owner of the vault, for example HTTP/webserver1.idm.example.com. -
Set the
invariable to "{{ lookup('file', 'private-key-to-an-externally-signed-certificate.pem') | b64encode }}". This ensures that Ansible retrieves the file with the private key from the working directory on the Ansible controller rather than from the IdM server. Set the
actionvariable tomember.This the modified Ansible playbook file for the current example:
--- - name: Tests hosts: ipaserver gather_facts: false vars_files: - /home/user_name/MyPlaybooks/secret.yml tasks: - ipavault: ipaadmin_password: "{{ ipaadmin_password }}" name: secret_vault service: HTTP/webserver1.idm.example.com in: "{{ lookup('file', 'private-key-to-an-externally-signed-certificate.pem') | b64encode }}" action: member-
Set the
- Save the file.
Run the playbook:
$ ansible-playbook --vault-password-file=password_file -v -i inventory.file data-archive-in-asymmetric-vault-copy.yml
25.4. Retrieving a service secret for an IdM service using Ansible
Follow this procedure to use an Ansible playbook to retrieve a secret from a service vault on behalf of the service. In the example used in the procedure below, running the playbook retrieves a PEM file with the secret from an asymmetric vault named secret_vault, and stores it in the specified location on all the hosts listed in the Ansible inventory file as ipaservers.
The services authenticate to IdM using keytabs, and they authenticate to the vault using a private key. You can retrieve the file on behalf of the service from any IdM client on which ansible-freeipa is installed.
Prerequisites
You have configured your Ansible control node to meet the following requirements:
- You are using Ansible version 2.14 or later.
-
You have installed the
ansible-freeipapackage on the Ansible controller. - The example assumes that in the ~/MyPlaybooks/ directory, you have created an Ansible inventory file with the fully-qualified domain name (FQDN) of the IdM server.
-
The example assumes that the secret.yml Ansible vault stores your
ipaadmin_password.
-
The target node, that is the node on which the
ansible-freeipamodule is executed, is part of the IdM domain as an IdM client, server or replica. - You know the IdM administrator password.
- You have created an asymmetric vault to store the service secret.
- You have archived the secret in the vault.
-
You have stored the private key used to retrieve the service vault secret in the location specified by the
private_key_filevariable on the Ansible controller.
Procedure
Navigate to the
/usr/share/doc/ansible-freeipa/playbooks/vaultdirectory:$ cd /usr/share/doc/ansible-freeipa/playbooks/vaultOptional: Create an inventory file if it does not exist, for example inventory.file:
$ touch inventory.fileOpen your inventory file and define the following hosts:
-
Define your IdM server in the
[ipaserver]section. -
Define the hosts onto which you want to retrieve the secret in the
[webservers]section. For example, to instruct Ansible to retrieve the secret to webserver1.idm.example.com, webserver2.idm.example.com, and webserver3.idm.example.com, enter:
[ipaserver] server.idm.example.com [webservers] webserver1.idm.example.com webserver2.idm.example.com webserver3.idm.example.com
-
Define your IdM server in the
Make a copy of the retrieve-data-asymmetric-vault.yml Ansible playbook file. For example:
$ cp retrieve-data-asymmetric-vault.yml retrieve-data-asymmetric-vault-copy.yml- Open the retrieve-data-asymmetric-vault-copy.yml file for editing.
Modify the file by setting the following variables in the
ipavaulttask section:-
Set the
ipaadmin_passwordvariable to your IdM administrator password. -
Set the
namevariable to the name of the vault, for example secret_vault. -
Set the
servicevariable to the service owner of the vault, for example HTTP/webserver1.idm.example.com. -
Set the
private_key_filevariable to the location of the private key used to retrieve the service vault secret. -
Set the
outvariable to the location on the IdM server where you want to retrieve the private-key-to-an-externally-signed-certificate.pem secret, for example the current working directory. Set the
actionvariable tomember.This the modified Ansible playbook file for the current example:
--- - name: Retrieve data from vault hosts: ipaserver become: no gather_facts: false vars_files: - /home/user_name/MyPlaybooks/secret.yml tasks: - name: Retrieve data from the service vault ipavault: ipaadmin_password: "{{ ipaadmin_password }}" name: secret_vault service: HTTP/webserver1.idm.example.com vault_type: asymmetric private_key: "{{ lookup('file', 'service-private.pem') | b64encode }}" out: private-key-to-an-externally-signed-certificate.pem state: retrieved-
Set the
Add a section to the playbook that retrieves the data file from the IdM server to the Ansible controller:
--- - name: Retrieve data from vault hosts: ipaserver become: no gather_facts: false tasks: [...] - name: Retrieve data file fetch: src: private-key-to-an-externally-signed-certificate.pem dest: ./ flat: yes mode: 0600Add a section to the playbook that transfers the retrieved private-key-to-an-externally-signed-certificate.pem file from the Ansible controller on to the webservers listed in the
webserverssection of the inventory file:--- - name: Send data file to webservers become: no gather_facts: no hosts: webservers tasks: - name: Send data to webservers copy: src: private-key-to-an-externally-signed-certificate.pem dest: /etc/pki/tls/private/httpd.key mode: 0444- Save the file.
Run the playbook:
$ ansible-playbook --vault-password-file=password_file -v -i inventory.file retrieve-data-asymmetric-vault-copy.yml
25.5. Changing an IdM service vault secret when compromised using Ansible
Follow this procedure to reuse an Ansible playbook to change the secret stored in a service vault when a service instance has been compromised. The scenario in the following example assumes that on webserver3.idm.example.com, the retrieved secret has been compromised, but not the key to the asymmetric vault storing the secret. In the example, the administrator reuses the Ansible playbooks used when storing a secret in an asymmetric vault and retrieving a secret from the asymmetric vault onto IdM hosts. At the start of the procedure, the IdM administrator stores a new PEM file with a new secret in the asymmetric vault, adapts the inventory file so as not to retrieve the new secret on to the compromised web server, webserver3.idm.example.com, and then re-runs the two procedures.
Prerequisites
You have configured your Ansible control node to meet the following requirements:
- You are using Ansible version 2.14 or later.
-
You have installed the
ansible-freeipapackage on the Ansible controller. - The example assumes that in the ~/MyPlaybooks/ directory, you have created an Ansible inventory file with the fully-qualified domain name (FQDN) of the IdM server.
-
The example assumes that the secret.yml Ansible vault stores your
ipaadmin_password.
-
The target node, that is the node on which the
ansible-freeipamodule is executed, is part of the IdM domain as an IdM client, server or replica. - You know the IdM administrator password.
- You have created an asymmetric vault to store the service secret.
-
You have generated a new
httpdkey for the web services running on IdM hosts to replace the compromised old key. -
The new
httpdkey is stored locally on the Ansible controller, for example in the /usr/share/doc/ansible-freeipa/playbooks/vault/private-key-to-an-externally-signed-certificate.pem file.
Procedure
Navigate to the
/usr/share/doc/ansible-freeipa/playbooks/vaultdirectory:$ cd /usr/share/doc/ansible-freeipa/playbooks/vaultOpen your inventory file and make sure that the following hosts are defined correctly:
-
The IdM server in the
[ipaserver]section. The hosts onto which you want to retrieve the secret in the
[webservers]section. For example, to instruct Ansible to retrieve the secret to webserver1.idm.example.com and webserver2.idm.example.com, enter:[ipaserver] server.idm.example.com [webservers] webserver1.idm.example.com webserver2.idm.example.com
ImportantMake sure that the list does not contain the compromised webserver, in the current example webserver3.idm.example.com.
-
The IdM server in the
- Open the data-archive-in-asymmetric-vault-copy.yml file for editing.
Modify the file by setting the following variables in the
ipavaulttask section:-
Set the
ipaadmin_passwordvariable to the IdM administrator password. -
Set the
namevariable to the name of the vault, for example secret_vault. -
Set the
servicevariable to the service owner of the vault, for example HTTP/webserver.idm.example.com. -
Set the
invariable to "{{ lookup('file', 'new-private-key-to-an-externally-signed-certificate.pem') | b64encode }}". This ensures that Ansible retrieves the file with the private key from the working directory on the Ansible controller rather than from the IdM server. Set the
actionvariable tomember.This the modified Ansible playbook file for the current example:
--- - name: Tests hosts: ipaserver gather_facts: false vars_files: - /home/user_name/MyPlaybooks/secret.yml tasks: - ipavault: ipaadmin_password: "{{ ipaadmin_password }}" name: secret_vault service: HTTP/webserver.idm.example.com in: "{{ lookup('file', 'new-private-key-to-an-externally-signed-certificate.pem') | b64encode }}" action: member-
Set the
- Save the file.
Run the playbook:
$ ansible-playbook --vault-password-file=password_file -v -i inventory.file data-archive-in-asymmetric-vault-copy.yml- Open the retrieve-data-asymmetric-vault-copy.yml file for editing.
Modify the file by setting the following variables in the
ipavaulttask section:-
Set the
ipaadmin_passwordvariable to your IdM administrator password. -
Set the
namevariable to the name of the vault, for example secret_vault. -
Set the
servicevariable to the service owner of the vault, for example HTTP/webserver1.idm.example.com. -
Set the
private_key_filevariable to the location of the private key used to retrieve the service vault secret. -
Set the
outvariable to the location on the IdM server where you want to retrieve the new-private-key-to-an-externally-signed-certificate.pem secret, for example the current working directory. Set the
actionvariable tomember.This the modified Ansible playbook file for the current example:
--- - name: Retrieve data from vault hosts: ipaserver become: no gather_facts: false vars_files: - /home/user_name/MyPlaybooks/secret.yml tasks: - name: Retrieve data from the service vault ipavault: ipaadmin_password: "{{ ipaadmin_password }}" name: secret_vault service: HTTP/webserver1.idm.example.com vault_type: asymmetric private_key: "{{ lookup('file', 'service-private.pem') | b64encode }}" out: new-private-key-to-an-externally-signed-certificate.pem state: retrieved-
Set the
Add a section to the playbook that retrieves the data file from the IdM server to the Ansible controller:
--- - name: Retrieve data from vault hosts: ipaserver become: true gather_facts: false tasks: [...] - name: Retrieve data file fetch: src: new-private-key-to-an-externally-signed-certificate.pem dest: ./ flat: yes mode: 0600Add a section to the playbook that transfers the retrieved new-private-key-to-an-externally-signed-certificate.pem file from the Ansible controller on to the webservers listed in the
webserverssection of the inventory file:--- - name: Send data file to webservers become: true gather_facts: no hosts: webservers tasks: - name: Send data to webservers copy: src: new-private-key-to-an-externally-signed-certificate.pem dest: /etc/pki/tls/private/httpd.key mode: 0444- Save the file.
Run the playbook:
$ ansible-playbook --vault-password-file=password_file -v -i inventory.file retrieve-data-asymmetric-vault-copy.yml
25.6. Additional resources
-
See the README-vault.md Markdown file in the
/usr/share/doc/ansible-freeipa/directory. -
See the sample playbooks in the
/usr/share/doc/ansible-freeipa/playbooks/vault/directory.
Chapter 26. Ensuring the presence and absence of services in IdM using Ansible
With the Ansible service module, Identity Management (IdM) administrator can ensure that specific services that are not native to IdM are present or absent in IdM. For example, you can use the service module to:
Check that a manually installed service is present on an IdM client and automatically install that service if it is absent. For details, see:
- Check that a service enrolled in IdM has a certificate attached and automatically install that certificate if it is absent. For details, see:
- Ensuring the presence of an externally-signed certificate in an IdM service entry.
Allow IdM users and hosts to retrieve and create the service keytab. For details, see:
Allow IdM users and hosts to add a Kerberos alias to a service. For details, see:
Check that a service is not present on an IdM client and automatically remove that service if it is present. For details, see:
26.1. Ensuring the presence of an HTTP service in IdM using an Ansible playbook
Follow this procedure to ensure the presence of an HTTP server in IdM using an Ansible playbook.
Prerequisites
- The system to host the HTTP service is an IdM client.
- You have the IdM administrator password.
Procedure
Create an inventory file, for example
inventory.file:$ touch inventory.fileOpen the
inventory.fileand define the IdM server that you want to configure in the[ipaserver]section. For example, to instruct Ansible to configure server.idm.example.com, enter:[ipaserver] server.idm.example.com
Make a copy of the
/usr/share/doc/ansible-freeipa/playbooks/service/service-is-present.ymlAnsible playbook file. For example:$ cp /usr/share/doc/ansible-freeipa/playbooks/service/service-is-present.yml /usr/share/doc/ansible-freeipa/playbooks/service/service-is-present-copy.ymlOpen the
/usr/share/doc/ansible-freeipa/playbooks/service/service-is-present-copy.ymlAnsible playbook file for editing:--- - name: Playbook to manage IPA service. hosts: ipaserver gather_facts: false vars_files: - /home/user_name/MyPlaybooks/secret.yml tasks: # Ensure service is present - ipaservice: ipaadmin_password: "{{ ipaadmin_password }}" name: HTTP/client.idm.example.comAdapt the file:
-
Change the IdM administrator password defined by the
ipaadmin_passwordvariable. -
Change the name of your IdM client on which the HTTP service is running, as defined by the
namevariable of theipaservicetask.
-
Change the IdM administrator password defined by the
- Save and exit the file.
Run the Ansible playbook. Specify the playbook file, the file storing the password protecting the secret.yml file, and the inventory file:
$ ansible-playbook --vault-password-file=password_file -v -i path_to_inventory_directory/inventory.file /usr/share/doc/ansible-freeipa/playbooks/service/service-is-present-copy.yml
Verification steps
- Log into the IdM Web UI as IdM administrator.
-
Navigate to
Identity→Services.
If HTTP/client.idm.example.com@IDM.EXAMPLE.COM is listed in the Services list, the Ansible playbook has been successfully added to IdM.
Additional resources
- To secure the communication between the HTTP server and browser clients, see adding TLS encryption to an Apache HTTP Server.
- To request a certificate for the HTTP service, see the procedure described in Obtaining an IdM certificate for a service using certmonger.
26.2. Ensuring the presence of multiple services in IdM on an IdM client using a single Ansible task
You can use the ansible-freeipa ipaservice module to add, modify, and delete multiple Identity Management (IdM) services with a single Ansible task. For that, use the services option of the ipaservice module.
Using the services option, you can also specify multiple service variables that only apply to a particular service. Define this service by the name variable, which is the only mandatory variable for the services option.
Complete this procedure to ensure the presence of the HTTP/client01.idm.example.com@IDM.EXAMPLE.COM and the ftp/client02.idm.example.com@IDM.EXAMPLE.COM services in IdM with a single task.
Prerequisites
On the control node:
- You are using Ansible version 2.14 or later.
-
You have installed the
ansible-freeipapackage. - You have created an Ansible inventory file with the fully-qualified domain name (FQDN) of the IdM server in the ~/MyPlaybooks/ directory.
- You are using RHEL 8.9 and later.
-
You have stored your
ipaadmin_passwordin the secret.yml Ansible vault.
Procedure
Create your Ansible playbook file add-http-and-ftp-services.yml with the following content:
--- - name: Playbook to add multiple services in a single task hosts: ipaserver vars_files: - /home/user_name/MyPlaybooks/secret.yml tasks: - name: Add HTTP and ftp services ipaservice: ipaadmin_password: "{{ ipaadmin_password }}" services: - name: HTTP/client01.idm.example.com@IDM.EXAMPLE.COM - name: ftp/client02.idm.example.com@IDM.EXAMPLE.COMRun the playbook:
$ ansible-playbook --vault-password-file=password_file -v -i inventory add-http-and-ftp-services.yml
Additional resources
26.3. Ensuring the presence of an HTTP service in IdM on a non-IdM client using an Ansible playbook
Follow this procedure to ensure the presence of an HTTP server in IdM on a host that is not an IdM client using an Ansible playbook. By adding the HTTP server to IdM you are also adding the host to IdM.
Prerequisites
- You have installed an HTTP service on your host.
- The host on which you have set up HTTP is not an IdM client. Otherwise, follow the steps in enrolled the HTTP service into IdM.
- You have the IdM administrator password.
- The DNS A record - or the AAAA record if IPv6 is used - for the host is available.
Procedure
Create an inventory file, for example
inventory.file:$ touch inventory.fileOpen the
inventory.fileand define the IdM server that you want to configure in the[ipaserver]section. For example, to instruct Ansible to configure server.idm.example.com, enter:[ipaserver] server.idm.example.com
Make a copy of the
/usr/share/doc/ansible-freeipa/playbooks/service/service-is-present-without-host-check.ymlAnsible playbook file. For example:$ cp /usr/share/doc/ansible-freeipa/playbooks/service/service-is-present-without-host-check.yml /usr/share/doc/ansible-freeipa/playbooks/service/service-is-present-without-host-check-copy.ymlOpen the copied file,
/usr/share/doc/ansible-freeipa/playbooks/service/service-is-present-without-host-check-copy.yml, for editing. Locate theipaadmin_passwordandnamevariables in theipaservicetask:--- - name: Playbook to manage IPA service. hosts: ipaserver gather_facts: false vars_files: - /home/user_name/MyPlaybooks/secret.yml tasks: # Ensure service is present - ipaservice: ipaadmin_password: "{{ ipaadmin_password }}" name: HTTP/www2.example.com skip_host_check: yesAdapt the file:
-
Set the
ipaadmin_passwordvariable to your IdM administrator password. -
Set the
namevariable to the name of the host on which the HTTP service is running.
-
Set the
- Save and exit the file.
Run the Ansible playbook. Specify the playbook file, the file storing the password protecting the secret.yml file, and the inventory file:
$ ansible-playbook --vault-password-file=password_file -v -i path_to_inventory_directory/inventory.file /usr/share/doc/ansible-freeipa/playbooks/service/service-is-present-without-host-check-copy.yml
Verification steps
- Log into the IdM Web UI as IdM administrator.
-
Navigate to
Identity→Services.
You can now see HTTP/client.idm.example.com@IDM.EXAMPLE.COM listed in the Services list.
Additional resources
- To secure the communication, see adding TLS encryption to an Apache HTTP Server.
26.4. Ensuring the presence of an HTTP service on an IdM client without DNS using an Ansible playbook
Follow this procedure to ensure the presence of an HTTP server running on an IdM client that has no DNS entry using an Ansible playbook. The scenario implied is that the IdM host has no DNS A entry available - or no DNS AAAA entry if IPv6 is used instead of IPv4.
Prerequisites
- The system to host the HTTP service is enrolled in IdM.
- The DNS A or DNS AAAA record for the host may not exist. Otherwise, if the DNS record for the host does exist, follow the procedure in Ensuring the presence of an HTTP service in IdM using an Ansible playbook.
- You have the IdM administrator password.
Procedure
Create an inventory file, for example
inventory.file:$ touch inventory.fileOpen the
inventory.fileand define the IdM server that you want to configure in the[ipaserver]section. For example, to instruct Ansible to configure server.idm.example.com, enter:[ipaserver] server.idm.example.com
Make a copy of the
/usr/share/doc/ansible-freeipa/playbooks/service/service-is-present-with-host-force.ymlAnsible playbook file. For example:$ cp /usr/share/doc/ansible-freeipa/playbooks/service/service-is-present-with-host-force.yml /usr/share/doc/ansible-freeipa/playbooks/service/service-is-present-with-host-force-copy.ymlOpen the copied file,
/usr/share/doc/ansible-freeipa/playbooks/service/service-is-present-with-host-force-copy.yml, for editing. Locate theipaadmin_passwordandnamevariables in theipaservicetask:--- - name: Playbook to manage IPA service. hosts: ipaserver gather_facts: false vars_files: - /home/user_name/MyPlaybooks/secret.yml tasks: # Ensure service is present - ipaservice: ipaadmin_password: "{{ ipaadmin_password }}" name: HTTP/ihavenodns.info force: yesAdapt the file:
-
Set the
ipaadmin_passwordvariable to your IdM administrator password. -
Set the
namevariable to the name of the host on which the HTTP service is running.
-
Set the
- Save and exit the file.
Run the Ansible playbook. Specify the playbook file, the file storing the password protecting the secret.yml file, and the inventory file:
$ ansible-playbook --vault-password-file=password_file -v -i path_to_inventory_directory/inventory.file /usr/share/doc/ansible-freeipa/playbooks/service/service-is-present-with-host-force-copy.yml
Verification steps
- Log into the IdM Web UI as IdM administrator.
-
Navigate to
Identity→Services.
You can now see HTTP/client.idm.example.com@IDM.EXAMPLE.COM listed in the Services list.
Additional resources
- To secure the communication, see adding TLS encryption to an Apache HTTP Server.
26.5. Ensuring the presence of an externally signed certificate in an IdM service entry using an Ansible playbook
Follow this procedure to use the ansible-freeipa service module to ensure that a certificate issued by an external certificate authority (CA) is attached to the IdM entry of the HTTP service. Having the certificate of an HTTP service signed by an external CA rather than the IdM CA is particularly useful if your IdM CA uses a self-signed certificate.
Prerequisites
- You have installed an HTTP service on your host.
- You have enrolled the HTTP service into IdM.
- You have the IdM administrator password.
- You have an externally signed certificate whose Subject corresponds to the principal of the HTTP service.
Procedure
Create an inventory file, for example
inventory.file:$ touch inventory.fileOpen the
inventory.fileand define the IdM server that you want to configure in the[ipaserver]section. For example, to instruct Ansible to configure server.idm.example.com, enter:[ipaserver] server.idm.example.com
Make a copy of the
/usr/share/doc/ansible-freeipa/playbooks/service/service-member-certificate-present.ymlfile, for example:$ cp /usr/share/doc/ansible-freeipa/playbooks/service/service-member-certificate-present.yml /usr/share/doc/ansible-freeipa/playbooks/service/service-member-certificate-present-copy.ymlOptional: If the certificate is in the Privacy Enhanced Mail (PEM) format, convert the certificate to the Distinguished Encoding Rules (DER) format for easier handling through the command-line interface (CLI):
$ openssl x509 -outform der -in cert1.pem -out cert1.derDecode the
DERfile to standard output using thebase64command. Use the-w0option to disable wrapping:$ base64 cert1.der -w0 MIIC/zCCAeegAwIBAgIUV74O+4kXeg21o4vxfRRtyJm...- Copy the certificate from the standard output to the clipboard.
Open the
/usr/share/doc/ansible-freeipa/playbooks/service/service-member-certificate-present-copy.ymlfile for editing and view its contents:--- - name: Service certificate present. hosts: ipaserver gather_facts: false vars_files: - /home/user_name/MyPlaybooks/secret.yml tasks: # Ensure service certificate is present - ipaservice: ipaadmin_password: "{{ ipaadmin_password }}" name: HTTP/client.idm.example.com certificate: | - MIICBjCCAW8CFHnm32VcXaUDGfEGdDL/... [...] action: member state: presentAdapt the file:
-
Replace the certificate, defined using the
certificatevariable, with the certificate you copied from the CLI. Note that if you use thecertificate:variable with the "|" pipe character as indicated, you can enter the certificate THIS WAY rather than having it to enter it in a single line. This makes reading the certificate easier. -
Change the IdM administrator password, defined by the
ipaadmin_passwordvariable. -
Change the name of your IdM client on which the HTTP service is running, defined by the
namevariable. - Change any other relevant variables.
-
Replace the certificate, defined using the
- Save and exit the file.
Run the Ansible playbook. Specify the playbook file, the file storing the password protecting the secret.yml file, and the inventory file:
$ ansible-playbook --vault-password-file=password_file -v -i path_to_inventory_directory/inventory.file /usr/share/doc/ansible-freeipa/playbooks/service/service-member-certificate-present-copy.yml
Verification steps
- Log into the IdM Web UI as IdM administrator.
-
Navigate to
Identity→Services. - Click the name of the service with the newly added certificate, for example HTTP/client.idm.example.com.
In the Service Certificate section on the right, you can now see the newly added certificate.
26.6. Using an Ansible playbook to allow IdM users, groups, hosts, or host groups to create a keytab of a service
A keytab is a file containing pairs of Kerberos principals and encrypted keys. Keytab files are commonly used to allow scripts to automatically authenticate using Kerberos, without requiring human interaction or access to password stored in a plain-text file. The script is then able to use the acquired credentials to access files stored on a remote system.
As an Identity Management (IdM) administrator, you can allow other users to retrieve or even create a keytab for a service running in IdM. By allowing specific users and user groups to create keytabs, you can delegate the administration of the service to them without sharing the IdM administrator password. This delegation provides a more fine-grained system administration.
Follow this procedure to allow specific IdM users, user groups, hosts, and host groups to create a keytab for the HTTP service running on an IdM client. Specifically, it describes how you can allow the user01 IdM user to create a keytab for the HTTP service running on an IdM client named client.idm.example.com.
Prerequisites
- You know the IdM administrator password.
You have configured your Ansible control node to meet the following requirements:
- You are using Ansible version 2.14 or later.
-
You have installed the
ansible-freeipapackage on the Ansible controller. - The example assumes that in the ~/MyPlaybooks/ directory, you have created an Ansible inventory file with the fully-qualified domain name (FQDN) of the IdM server.
-
The example assumes that the secret.yml Ansible vault stores your
ipaadmin_password.
-
The target node, that is the node on which the
ansible-freeipamodule is executed, is part of the IdM domain as an IdM client, server or replica. - You have enrolled the HTTP service into IdM.
- The system to host the HTTP service is an IdM client.
- The IdM users and user groups that you want to allow to create the keytab exist in IdM.
- The IdM hosts and host groups that you want to allow to create the keytab exist in IdM.
Procedure
Create an inventory file, for example
inventory.file:$ touch inventory.fileOpen the
inventory.fileand define the IdM server that you want to configure in the[ipaserver]section. For example, to instruct Ansible to configure server.idm.example.com, enter:[ipaserver] server.idm.example.com
Make a copy of the
/usr/share/doc/ansible-freeipa/playbooks/service/service-member-allow_create_keytab-present.ymlAnsible playbook file. For example:$ cp /usr/share/doc/ansible-freeipa/playbooks/service/service-member-allow_create_keytab-present.yml /usr/share/doc/ansible-freeipa/playbooks/service/service-member-allow_create_keytab-present-copy.yml-
Open the
/usr/share/doc/ansible-freeipa/playbooks/service/service-member-allow_create_keytab-present-copy.ymlAnsible playbook file for editing. Adapt the file by changing the following:
-
The IdM administrator password specified by the
ipaadmin_passwordvariable. - The name of your IdM client on which the HTTP service is running. In the current example, it is HTTP/client.idm.example.com
-
The names of IdM users that are listed in the
allow_create_keytab_user:section. In the current example, it is user01. -
The names of IdM user groups that are listed in the
allow_create_keytab_group:section. -
The names of IdM hosts that are listed in the
allow_create_keytab_host:section. -
The names of IdM host groups that are listed in the
allow_create_keytab_hostgroup:section. The name of the task specified by the
namevariable in thetaskssection.After being adapted for the current example, the copied file looks like this:
--- - name: Service member allow_create_keytab present hosts: ipaserver vars_files: - /home/user_name/MyPlaybooks/secret.yml tasks: - name: Service HTTP/client.idm.example.com members allow_create_keytab present for user01 ipaservice: ipaadmin_password: "{{ ipaadmin_password }}" name: HTTP/client.idm.example.com allow_create_keytab_user: - user01 action: member-
The IdM administrator password specified by the
- Save the file.
Run the Ansible playbook. Specify the playbook file, the file storing the password protecting the secret.yml file, and the inventory file:
$ ansible-playbook --vault-password-file=password_file -v -i path_to_inventory_directory/inventory.file /usr/share/doc/ansible-freeipa/playbooks/service/service-member-allow_create_keytab-present-copy.yml
Verification steps
SSH to an IdM server as an IdM user that has the privilege to create a keytab for the particular HTTP service:
$ ssh user01@server.idm.example.com Password:Use the
ipa-getkeytabcommand to generate the new keytab for the HTTP service:$ ipa-getkeytab -s server.idm.example.com -p HTTP/client.idm.example.com -k /etc/httpd/conf/krb5.keytabThe
-soption specifies a Key Distribution Center (KDC) server to generate the keytab.The
-poption specifies the principal whose keytab you want to create.The
-koption specifies the keytab file to append the new key to. The file will be created if it does not exist.
If the command does not result in an error, you have successfully created a keytab of HTTP/client.idm.example.com as user01.
26.7. Using an Ansible playbook to allow IdM users, groups, hosts, or host groups to retrieve a keytab of a service
A keytab is a file containing pairs of Kerberos principals and encrypted keys. Keytab files are commonly used to allow scripts to automatically authenticate using Kerberos, without requiring human interaction or access to a password stored in a plain-text file. The script is then able to use the acquired credentials to access files stored on a remote system.
As IdM administrator, you can allow other users to retrieve or even create a keytab for a service running in IdM.
Follow this procedure to allow specific IdM users, user groups, hosts, and host groups to retrieve a keytab for the HTTP service running on an IdM client. Specifically, it describes how to allow the user01 IdM user to retrieve the keytab of the HTTP service running on client.idm.example.com.
Prerequisites
- You know the IdM administrator password.
You have configured your Ansible control node to meet the following requirements:
- You are using Ansible version 2.14 or later.
-
You have installed the
ansible-freeipapackage on the Ansible controller. - The example assumes that in the ~/MyPlaybooks/ directory, you have created an Ansible inventory file with the fully-qualified domain name (FQDN) of the IdM server.
-
The example assumes that the secret.yml Ansible vault stores your
ipaadmin_password.
-
The target node, that is the node on which the
ansible-freeipamodule is executed, is part of the IdM domain as an IdM client, server or replica. - You have enrolled the HTTP service into IdM.
- The IdM users and user groups that you want to allow to retrieve the keytab exist in IdM.
- The IdM hosts and host groups that you want to allow to retrieve the keytab exist in IdM.
Procedure
Create an inventory file, for example
inventory.file:$ touch inventory.fileOpen the
inventory.fileand define the IdM server that you want to configure in the[ipaserver]section. For example, to instruct Ansible to configure server.idm.example.com, enter:[ipaserver] server.idm.example.com
Make a copy of the
/usr/share/doc/ansible-freeipa/playbooks/service/service-member-allow_retrieve_keytab-present.ymlAnsible playbook file. For example:$ cp /usr/share/doc/ansible-freeipa/playbooks/service/service-member-allow_retrieve_keytab-present.yml /usr/share/doc/ansible-freeipa/playbooks/service/service-member-allow_retrieve_keytab-present-copy.yml-
Open the copied file,
/usr/share/doc/ansible-freeipa/playbooks/service/service-member-allow_retrieve_keytab-present-copy.yml, for editing: Adapt the file:
-
Set the
ipaadmin_passwordvariable to your IdM administrator password. -
Set the
namevariable of theipaservicetask to the principal of the HTTP service. In the current example, it is HTTP/client.idm.example.com -
Specify the names of IdM users in the
allow_retrieve_keytab_group:section. In the current example, it is user01. -
Specify the names of IdM user groups in the
allow_retrieve_keytab_group:section. -
Specify the names of IdM hosts in the
allow_retrieve_keytab_group:section. -
Specify the names of IdM host groups in the
allow_retrieve_keytab_group:section. Specify the name of the task using the
namevariable in thetaskssection.After being adapted for the current example, the copied file looks like this:
--- - name: Service member allow_retrieve_keytab present hosts: ipaserver vars_files: - /home/user_name/MyPlaybooks/secret.yml tasks: - name: Service HTTP/client.idm.example.com members allow_retrieve_keytab present for user01 ipaservice: ipaadmin_password: "{{ ipaadmin_password }}" name: HTTP/client.idm.example.com allow_retrieve_keytab_user: - user01 action: member-
Set the
- Save the file.
Run the Ansible playbook. Specify the playbook file, the file storing the password protecting the secret.yml file, and the inventory file:
$ ansible-playbook --vault-password-file=password_file -v -i path_to_inventory_directory/inventory.file /usr/share/doc/ansible-freeipa/playbooks/service/service-member-allow_retrieve_keytab-present-copy.yml
Verification steps
SSH to an IdM server as an IdM user with the privilege to retrieve a keytab for the HTTP service:
$ ssh user01@server.idm.example.com Password:Use the
ipa-getkeytabcommand with the-roption to retrieve the keytab:$ ipa-getkeytab -r -s server.idm.example.com -p HTTP/client.idm.example.com -k /etc/httpd/conf/krb5.keytabThe
-soption specifies a Key Distribution Center (KDC) server from which you want to retrieve the keytab.The
-poption specifies the principal whose keytab you want to retrieve.The
-koption specifies the keytab file to which you want to append the retrieved key. The file will be created if it does not exist.
If the command does not result in an error, you have successfully retrieved a keytab of HTTP/client.idm.example.com as user01.
26.8. Ensuring the presence of a Kerberos principal alias of a service using an Ansible playbook
In some scenarios, it is beneficial for IdM administrator to enable IdM users, hosts, or services to authenticate against Kerberos applications using a Kerberos principal alias. These scenarios include:
- The user name changed, but the user should be able to log into the system using both the previous and new user names.
- The user needs to log in using the email address even if the IdM Kerberos realm differs from the email domain.
Follow this procedure to create the principal alias of HTTP/mycompany.idm.example.com for the HTTP service running on client.idm.example.com.
Prerequisites
- You know the IdM administrator password.
You have configured your Ansible control node to meet the following requirements:
- You are using Ansible version 2.14 or later.
-
You have installed the
ansible-freeipapackage on the Ansible controller. - The example assumes that in the ~/MyPlaybooks/ directory, you have created an Ansible inventory file with the fully-qualified domain name (FQDN) of the IdM server.
-
The example assumes that the secret.yml Ansible vault stores your
ipaadmin_password.
-
The target node, that is the node on which the
ansible-freeipamodule is executed, is part of the IdM domain as an IdM client, server or replica. - You have set up an HTTP service on your host.
- You have enrolled the HTTP service into IdM.
- The host on which you have set up HTTP is an IdM client.
Procedure
Create an inventory file, for example
inventory.file:$ touch inventory.fileOpen the
inventory.fileand define the IdM server that you want to configure in the[ipaserver]section. For example, to instruct Ansible to configure server.idm.example.com, enter:[ipaserver] server.idm.example.com
Make a copy of the
/usr/share/doc/ansible-freeipa/playbooks/service/service-member-principal-present.ymlAnsible playbook file. For example:$ cp /usr/share/doc/ansible-freeipa/playbooks/service/service-member-principal-present.yml /usr/share/doc/ansible-freeipa/playbooks/service/service-member-principal-present-copy.yml-
Open the
/usr/share/doc/ansible-freeipa/playbooks/service/service-member-principal-present-copy.ymlAnsible playbook file for editing. Adapt the file by changing the following:
-
The IdM administrator password specified by the
ipaadmin_passwordvariable. -
The name of the service specified by the
namevariable. This is the canonical principal name of the service. In the current example, it is HTTP/client.idm.example.com. -
The Kerberos principal alias specified by the
principalvariable. This is the alias you want to add to the service defined by thenamevariable. In the current example, it is host/mycompany.idm.example.com. The name of the task specified by the
namevariable in thetaskssection.After being adapted for the current example, the copied file looks like this:
--- - name: Service member principal present hosts: ipaserver vars_files: - /home/user_name/MyPlaybooks/secret.yml tasks: - name: Service HTTP/client.idm.example.com member principals host/mycompany.idm.exmaple.com present ipaservice: ipaadmin_password: "{{ ipaadmin_password }}" name: HTTP/client.idm.example.com principal: - host/mycompany.idm.example.com action: member-
The IdM administrator password specified by the
- Save the file.
Run the Ansible playbook. Specify the playbook file, the file storing the password protecting the secret.yml file, and the inventory file:
$ ansible-playbook --vault-password-file=password_file -v -i path_to_inventory_directory/inventory.file /usr/share/doc/ansible-freeipa/playbooks/service/service-member-principal-present-copy.yml
If running the playbook results in 0 unreachable and 0 failed tasks, you have successfully created the host/mycompany.idm.example.com Kerberos principal for the HTTP/client.idm.example.com service.
Additional resources
26.9. Ensuring the absence of an HTTP service in IdM using an Ansible playbook
Follow this procedure to unenroll a service from IdM. More specifically, it describes how to use an Ansible playbook to ensure the absence of an HTTP server named HTTP/client.idm.example.com in IdM.
Prerequisites
- You have the IdM administrator password.
Procedure
Create an inventory file, for example
inventory.file:$ touch inventory.fileOpen the
inventory.fileand define the IdM server that you want to configure in the[ipaserver]section. For example, to instruct Ansible to configure server.idm.example.com, enter:[ipaserver] server.idm.example.com
Make a copy of the
/usr/share/doc/ansible-freeipa/playbooks/service/service-is-absent.ymlAnsible playbook file. For example:$ cp /usr/share/doc/ansible-freeipa/playbooks/service/service-is-absent.yml /usr/share/doc/ansible-freeipa/playbooks/service/service-is-absent-copy.yml-
Open the
/usr/share/doc/ansible-freeipa/playbooks/service/service-is-absent-copy.ymlAnsible playbook file for editing. Adapt the file by changing the following:
-
The IdM administrator password defined by the
ipaadmin_passwordvariable. The Kerberos principal of the HTTP service, as defined by the
namevariable of theipaservicetask.After being adapted for the current example, the copied file looks like this:
--- - name: Playbook to manage IPA service. hosts: ipaserver gather_facts: false vars_files: - /home/user_name/MyPlaybooks/secret.yml tasks: # Ensure service is absent - ipaservice: ipaadmin_password: "{{ ipaadmin_password }}" name: HTTP/client.idm.example.com state: absent-
The IdM administrator password defined by the
- Save and exit the file.
Run the Ansible playbook. Specify the playbook file, the file storing the password protecting the secret.yml file, and the inventory file:
$ ansible-playbook --vault-password-file=password_file -v -i path_to_inventory_directory/inventory.file /usr/share/doc/ansible-freeipa/playbooks/service/service-is-absent-copy.yml
Verification steps
- Log into the IdM Web UI as IdM administrator.
-
Navigate to
Identity→Services.
If you cannot see the HTTP/client.idm.example.com@IDM.EXAMPLE.COM service in the Services list, you have successfully ensured its absence in IdM.
26.10. Additional resources
-
See the
README-service.mdMarkdown file in the/usr/share/doc/ansible-freeipa/directory. -
See sample playbooks in the
/usr/share/doc/ansible-freeipa/playbooks/configdirectory.
Chapter 27. Managing global DNS configuration in IdM using Ansible playbooks
Using the Red Hat Ansible Engine dnsconfig module, you can configure global configuration for Identity Management (IdM) DNS. Settings defined in global DNS configuration are applied to all IdM DNS servers. However, the global configuration has lower priority than the configuration for a specific IdM DNS zone.
The dnsconfig module supports the following variables:
- The global forwarders, specifically their IP addresses and the port used for communication.
- The global forwarding policy: only, first, or none. For more details on these types of DNS forward policies, see DNS forward policies in IdM.
- The synchronization of forward lookup and reverse lookup zones.
Prerequisites
DNS service is installed on the IdM server. For more information about how to install an IdM server with integrated DNS, see one of the following links:
This chapter includes the following sections:
- How IdM ensures that global forwarders from /etc/resolv.conf are not removed by NetworkManager
- Ensuring the presence of a DNS global forwarder in IdM using Ansible
- Ensuring the absence of a DNS global forwarder in IdM using Ansible
-
The
action: memberoption in ipadnsconfig ansible-freeipa modules - An introduction to DNS forward policies in IdM
- Using an Ansible playbook to ensure that the forward first policy is set in IdM DNS global configuration
- Using an Ansible playbook to ensure that global forwarders are disabled in IdM DNS
- Using an Ansible playbook to ensure that synchronization of forward and reverse lookup zones is disabled in IdM DNS
27.1. How IdM ensures that global forwarders from /etc/resolv.conf are not removed by NetworkManager
Installing Identity Management (IdM) with integrated DNS configures the /etc/resolv.conf file to point to the 127.0.0.1 localhost address:
# Generated by NetworkManager search idm.example.com nameserver 127.0.0.1
In certain environments, such as networks that use Dynamic Host Configuration Protocol (DHCP), the NetworkManager service may revert changes to the /etc/resolv.conf file. To make the DNS configuration persistent, the IdM DNS installation process also configures the NetworkManager service in the following way:
The DNS installation script creates an
/etc/NetworkManager/conf.d/zzz-ipa.confNetworkManagerconfiguration file to control the search order and DNS server list:# auto-generated by IPA installer [main] dns=default [global-dns] searches=$DOMAIN [global-dns-domain-*] servers=127.0.0.1
-
The
NetworkManagerservice is reloaded, which always creates the/etc/resolv.conffile with the settings from the last file in the/etc/NetworkManager/conf.d/directory. This is in this case thezzz-ipa.conffile.
Do not modify the /etc/resolv.conf file manually.
27.2. Ensuring the presence of a DNS global forwarder in IdM using Ansible
Follow this procedure to use an Ansible playbook to ensure the presence of a DNS global forwarder in IdM. In the example procedure below, the IdM administrator ensures the presence of a DNS global forwarder to a DNS server with an Internet Protocol (IP) v4 address of 7.7.9.9 and IP v6 address of 2001:db8::1:0 on port 53.
Prerequisites
You have configured your Ansible control node to meet the following requirements:
- You are using Ansible version 2.14 or later.
-
You have installed the
ansible-freeipapackage on the Ansible controller. - The example assumes that in the ~/MyPlaybooks/ directory, you have created an Ansible inventory file with the fully-qualified domain name (FQDN) of the IdM server.
-
The example assumes that the secret.yml Ansible vault stores your
ipaadmin_password.
-
The target node, that is the node on which the
ansible-freeipamodule is executed, is part of the IdM domain as an IdM client, server or replica. - You know the IdM administrator password.
Procedure
Navigate to the
/usr/share/doc/ansible-freeipa/playbooks/dnsconfigdirectory:$ cd /usr/share/doc/ansible-freeipa/playbooks/dnsconfig
Open your inventory file and make sure that the IdM server that you want to configure is listed in the
[ipaserver]section. For example, to instruct Ansible to configureserver.idm.example.com, enter:[ipaserver] server.idm.example.com
Make a copy of the
forwarders-absent.ymlAnsible playbook file. For example:$ cp forwarders-absent.yml ensure-presence-of-a-global-forwarder.yml
-
Open the
ensure-presence-of-a-global-forwarder.ymlfile for editing. Adapt the file by setting the following variables:
-
Change the
namevariable for the playbook toPlaybook to ensure the presence of a global forwarder in IdM DNS. -
In the
taskssection, change thenameof the task toEnsure the presence of a DNS global forwarder to 7.7.9.9 and 2001:db8::1:0 on port 53. In the
forwarderssection of theipadnsconfigportion:-
Change the first
ip_addressvalue to the IPv4 address of the global forwarder:7.7.9.9. -
Change the second
ip_addressvalue to the IPv6 address of the global forwarder:2001:db8::1:0. -
Verify the
portvalue is set to53.
-
Change the first
Change the
statetopresent.This the modified Ansible playbook file for the current example:
--- - name: Playbook to ensure the presence of a global forwarder in IdM DNS hosts: ipaserver vars_files: - /home/user_name/MyPlaybooks/secret.yml tasks: - name: Ensure the presence of a DNS global forwarder to 7.7.9.9 and 2001:db8::1:0 on port 53 ipadnsconfig: forwarders: - ip_address: 7.7.9.9 - ip_address: 2001:db8::1:0 port: 53 state: present-
Change the
- Save the file.
Run the playbook:
$ ansible-playbook --vault-password-file=password_file -v -i inventory.file ensure-presence-of-a-global-forwarder.yml
Additional resources
-
See the
README-dnsconfig.mdfile in the/usr/share/doc/ansible-freeipa/directory.
27.3. Ensuring the absence of a DNS global forwarder in IdM using Ansible
Follow this procedure to use an Ansible playbook to ensure the absence of a DNS global forwarder in IdM. In the example procedure below, the IdM administrator ensures the absence of a DNS global forwarder with an Internet Protocol (IP) v4 address of 8.8.6.6 and IP v6 address of 2001:4860:4860::8800 on port 53.
Prerequisites
You have configured your Ansible control node to meet the following requirements:
- You are using Ansible version 2.14 or later.
-
You have installed the
ansible-freeipapackage on the Ansible controller. - The example assumes that in the ~/MyPlaybooks/ directory, you have created an Ansible inventory file with the fully-qualified domain name (FQDN) of the IdM server.
-
The example assumes that the secret.yml Ansible vault stores your
ipaadmin_password.
-
The target node, that is the node on which the
ansible-freeipamodule is executed, is part of the IdM domain as an IdM client, server or replica. - You know the IdM administrator password.
Procedure
Navigate to the
/usr/share/doc/ansible-freeipa/playbooks/dnsconfigdirectory:$ cd /usr/share/doc/ansible-freeipa/playbooks/dnsconfig
Open your inventory file and make sure that the IdM server that you want to configure is listed in the
[ipaserver]section. For example, to instruct Ansible to configureserver.idm.example.com, enter:[ipaserver] server.idm.example.com
Make a copy of the
forwarders-absent.ymlAnsible playbook file. For example:$ cp forwarders-absent.yml ensure-absence-of-a-global-forwarder.yml
-
Open the
ensure-absence-of-a-global-forwarder.ymlfile for editing. Adapt the file by setting the following variables:
-
Change the
namevariable for the playbook toPlaybook to ensure the absence of a global forwarder in IdM DNS. -
In the
taskssection, change thenameof the task toEnsure the absence of a DNS global forwarder to 8.8.6.6 and 2001:4860:4860::8800 on port 53. In the
forwarderssection of theipadnsconfigportion:-
Change the first
ip_addressvalue to the IPv4 address of the global forwarder:8.8.6.6. -
Change the second
ip_addressvalue to the IPv6 address of the global forwarder:2001:4860:4860::8800. -
Verify the
portvalue is set to53.
-
Change the first
-
Set the
actionvariable tomember. -
Verify the
stateis set toabsent.
This the modified Ansible playbook file for the current example:
--- - name: Playbook to ensure the absence of a global forwarder in IdM DNS hosts: ipaserver vars_files: - /home/user_name/MyPlaybooks/secret.yml tasks: - name: Ensure the absence of a DNS global forwarder to 8.8.6.6 and 2001:4860:4860::8800 on port 53 ipadnsconfig: forwarders: - ip_address: 8.8.6.6 - ip_address: 2001:4860:4860::8800 port: 53 action: member state: absentImportantIf you only use the
state: absentoption in your playbook without also usingaction: member, the playbook fails.-
Change the
- Save the file.
Run the playbook:
$ ansible-playbook --vault-password-file=password_file -v -i inventory.file ensure-absence-of-a-global-forwarder.yml
Additional resources
-
The
README-dnsconfig.mdfile in the/usr/share/doc/ansible-freeipa/directory -
The
action: memberoption in ipadnsconfig ansible-freeipa modules
27.4. The action: member option in ipadnsconfig ansible-freeipa modules
Excluding global forwarders in Identity Management (IdM) by using the ansible-freeipa ipadnsconfig module requires using the action: member option in addition to the state: absent option. If you only use state: absent in your playbook without also using action: member, the playbook fails. Consequently, to remove all global forwarders, you must specify all of them individually in the playbook. In contrast, the state: present option does not require action: member.
The following table provides configuration examples for both adding and removing DNS global forwarders that demonstrate the correct use of the action: member option. The table shows, in each line:
- The global forwarders configured before executing a playbook
- An excerpt from the playbook
- The global forwarders configured after executing the playbook
Table 27.1. ipadnsconfig management of global forwarders
| Forwarders before | Playbook excerpt | Forwarders after |
|---|---|---|
| 8.8.6.6 |
[...]
tasks:
- name: Ensure the presence of DNS global forwarder 8.8.6.7
ipadnsconfig:
forwarders:
- ip_address: 8.8.6.7
state: present
| 8.8.6.7 |
| 8.8.6.6 |
[...]
tasks:
- name: Ensure the presence of DNS global forwarder 8.8.6.7
ipadnsconfig:
forwarders:
- ip_address: 8.8.6.7
action: member
state: present
| 8.8.6.6, 8.8.6.7 |
| 8.8.6.6, 8.8.6.7 |
[...]
tasks:
- name: Ensure the absence of DNS global forwarder 8.8.6.7
ipadnsconfig:
forwarders:
- ip_address: 8.8.6.7
state: absent
| Trying to execute the playbook results in an error. The original configuration - 8.8.6.6, 8.8.6.7 - is left unchanged. |
| 8.8.6.6, 8.8.6.7 |
[...]
tasks:
- name: Ensure the absence of DNS global forwarder 8.8.6.7
ipadnsconfig:
forwarders:
- ip_address: 8.8.6.7
action: member
state: absent
| 8.8.6.6 |
27.5. DNS forward policies in IdM
IdM supports the first and only standard BIND forward policies, as well as the none IdM-specific forward policy.
- Forward first (default)
-
The IdM BIND service forwards DNS queries to the configured forwarder. If a query fails because of a server error or timeout, BIND falls back to the recursive resolution using servers on the Internet. The
forward firstpolicy is the default policy, and it is suitable for optimizing DNS traffic. - Forward only
-
The IdM BIND service forwards DNS queries to the configured forwarder. If a query fails because of a server error or timeout, BIND returns an error to the client. The
forward onlypolicy is recommended for environments with split DNS configuration. - None (forwarding disabled)
-
DNS queries are not forwarded with the
noneforwarding policy. Disabling forwarding is only useful as a zone-specific override for global forwarding configuration. This option is the IdM equivalent of specifying an empty list of forwarders in BIND configuration.
You cannot use forwarding to combine data in IdM with data from other DNS servers. You can only forward queries for specific subzones of the primary zone in IdM DNS.
By default, the BIND service does not forward queries to another server if the queried DNS name belongs to a zone for which the IdM server is authoritative. In such a situation, if the queried DNS name cannot be found in the IdM database, the NXDOMAIN answer is returned. Forwarding is not used.
Example 27.1. Example Scenario
The IdM server is authoritative for the test.example. DNS zone. BIND is configured to forward queries to the DNS server with the 192.0.2.254 IP address.
When a client sends a query for the nonexistent.test.example. DNS name, BIND detects that the IdM server is authoritative for the test.example. zone and does not forward the query to the 192.0.2.254. server. As a result, the DNS client receives the NXDomain error message, informing the user that the queried domain does not exist.
27.6. Using an Ansible playbook to ensure that the forward first policy is set in IdM DNS global configuration
Follow this procedure to use an Ansible playbook to ensure that global forwarding policy in IdM DNS is set to forward first.
If you use the forward first DNS forwarding policy, DNS queries are forwarded to the configured forwarder. If a query fails because of a server error or timeout, BIND falls back to the recursive resolution using servers on the Internet. The forward first policy is the default policy. It is suitable for traffic optimization.
Prerequisites
You have configured your Ansible control node to meet the following requirements:
- You are using Ansible version 2.14 or later.
-
You have installed the
ansible-freeipapackage on the Ansible controller. - The example assumes that in the ~/MyPlaybooks/ directory, you have created an Ansible inventory file with the fully-qualified domain name (FQDN) of the IdM server.
-
The example assumes that the secret.yml Ansible vault stores your
ipaadmin_password.
-
The target node, that is the node on which the
ansible-freeipamodule is executed, is part of the IdM domain as an IdM client, server or replica. - You know the IdM administrator password.
- Your IdM environment contains an integrated DNS server.
Procedure
Navigate to the
/usr/share/doc/ansible-freeipa/playbooks/dnsconfigdirectory:$ cd /usr/share/doc/ansible-freeipa/playbooks/dnsconfigOpen your inventory file and ensure that the IdM server that you want to configure is listed in the
[ipaserver]section. For example, to instruct Ansible to configure server.idm.example.com, enter:[ipaserver] server.idm.example.com
Make a copy of the set-configuration.yml Ansible playbook file. For example:
$ cp set-configuration.yml set-forward-policy-to-first.yml- Open the set-forward-policy-to-first.yml file for editing.
Adapt the file by setting the following variables in the
ipadnsconfigtask section:-
Set the
ipaadmin_passwordvariable to your IdM administrator password. Set the
forward_policyvariable to first.Delete all the other lines of the original playbook that are irrelevant. This is the modified Ansible playbook file for the current example:
--- - name: Playbook to set global forwarding policy to first hosts: ipaserver become: true tasks: - name: Set global forwarding policy to first. ipadnsconfig: ipaadmin_password: "{{ ipaadmin_password }}" forward_policy: first-
Set the
- Save the file.
Run the playbook:
$ ansible-playbook --vault-password-file=password_file -v -i inventory.file set-forward-policy-to-first.yml
Additional resources
- See DNS forward policies in IdM.
-
See the
README-dnsconfig.mdfile in the/usr/share/doc/ansible-freeipa/directory. -
For more sample playbooks, see the
/usr/share/doc/ansible-freeipa/playbooks/dnsconfigdirectory.
27.7. Using an Ansible playbook to ensure that global forwarders are disabled in IdM DNS
Follow this procedure to use an Ansible playbook to ensure that global forwarders are disabled in IdM DNS. The disabling is done by setting the forward_policy variable to none.
Disabling global forwarders causes DNS queries not to be forwarded. Disabling forwarding is only useful as a zone-specific override for global forwarding configuration. This option is the IdM equivalent of specifying an empty list of forwarders in BIND configuration.
Prerequisites
You have configured your Ansible control node to meet the following requirements:
- You are using Ansible version 2.14 or later.
-
You have installed the
ansible-freeipapackage on the Ansible controller. - The example assumes that in the ~/MyPlaybooks/ directory, you have created an Ansible inventory file with the fully-qualified domain name (FQDN) of the IdM server.
-
The example assumes that the secret.yml Ansible vault stores your
ipaadmin_password.
-
The target node, that is the node on which the
ansible-freeipamodule is executed, is part of the IdM domain as an IdM client, server or replica. - You know the IdM administrator password.
- Your IdM environment contains an integrated DNS server.
Procedure
Navigate to the
/usr/share/doc/ansible-freeipa/playbooks/dnsconfigdirectory:$ cd /usr/share/doc/ansible-freeipa/playbooks/dnsconfigOpen your inventory file and ensure that the IdM server that you want to configure is listed in the
[ipaserver]section. For example, to instruct Ansible to configure server.idm.example.com, enter:[ipaserver] server.idm.example.com
Make a copy of the disable-global-forwarders.yml Ansible playbook file. For example:
$ cp disable-global-forwarders.yml disable-global-forwarders-copy.yml- Open the disable-global-forwarders-copy.yml file for editing.
Adapt the file by setting the following variables in the
ipadnsconfigtask section:-
Set the
ipaadmin_passwordvariable to your IdM administrator password. Set the
forward_policyvariable to none.This is the modified Ansible playbook file for the current example:
--- - name: Playbook to disable global DNS forwarders hosts: ipaserver become: true tasks: - name: Disable global forwarders. ipadnsconfig: ipaadmin_password: "{{ ipaadmin_password }}" forward_policy: none-
Set the
- Save the file.
Run the playbook:
$ ansible-playbook --vault-password-file=password_file -v -i inventory.file disable-global-forwarders-copy.yml
Additional resources
- See DNS forward policies in IdM.
-
See the
README-dnsconfig.mdfile in the/usr/share/doc/ansible-freeipa/directory. -
See more sample playbooks in the
/usr/share/doc/ansible-freeipa/playbooks/dnsconfigdirectory.
27.8. Using an Ansible playbook to ensure that synchronization of forward and reverse lookup zones is disabled in IdM DNS
Follow this procedure to use an Ansible playbook to ensure that forward and reverse lookup zones are not synchronized in IdM DNS.
Prerequisites
You have configured your Ansible control node to meet the following requirements:
- You are using Ansible version 2.14 or later.
-
You have installed the
ansible-freeipapackage on the Ansible controller. - The example assumes that in the ~/MyPlaybooks/ directory, you have created an Ansible inventory file with the fully-qualified domain name (FQDN) of the IdM server.
-
The example assumes that the secret.yml Ansible vault stores your
ipaadmin_password.
-
The target node, that is the node on which the
ansible-freeipamodule is executed, is part of the IdM domain as an IdM client, server or replica. - You know the IdM administrator password.
- Your IdM environment contains an integrated DNS server.
Procedure
Navigate to the
/usr/share/doc/ansible-freeipa/playbooks/dnsconfigdirectory:$ cd /usr/share/doc/ansible-freeipa/playbooks/dnsconfigOpen your inventory file and ensure that the IdM server that you want to configure is listed in the
[ipaserver]section. For example, to instruct Ansible to configure server.idm.example.com, enter:[ipaserver] server.idm.example.com
Make a copy of the disallow-reverse-sync.yml Ansible playbook file. For example:
$ cp disallow-reverse-sync.yml disallow-reverse-sync-copy.yml- Open the disallow-reverse-sync-copy.yml file for editing.
Adapt the file by setting the following variables in the
ipadnsconfigtask section:-
Set the
ipaadmin_passwordvariable to your IdM administrator password. Set the
allow_sync_ptrvariable to no.This is the modified Ansible playbook file for the current example:
--- - name: Playbook to disallow reverse record synchronization hosts: ipaserver become: true tasks: - name: Disallow reverse record synchronization. ipadnsconfig: ipaadmin_password: "{{ ipaadmin_password }}" allow_sync_ptr: no-
Set the
- Save the file.
Run the playbook:
$ ansible-playbook --vault-password-file=password_file -v -i inventory.file disallow-reverse-sync-copy.yml
Additional resources
-
See the
README-dnsconfig.mdfile in the/usr/share/doc/ansible-freeipa/directory. -
For more sample playbooks, see the
/usr/share/doc/ansible-freeipa/playbooks/dnsconfigdirectory.
Chapter 28. Using Ansible playbooks to manage IdM DNS zones
As Identity Management (IdM) administrator, you can manage how IdM DNS zones work using the dnszone module available in the ansible-freeipa package.
- What DNS zone types are supported in IdM
- What DNS attributes you can configure in IdM
- How to use an Ansible playbook to create a primary zone in IdM DNS
- How to use an Ansible playbook to ensure the presence of a primary IdM DNS zone with multiple variables
- How to use an Ansible playbook to ensure the presence of a zone for reverse DNS lookup when an IP address is given
Prerequisites
- DNS service is installed on the IdM server. For more information about how to use Red Hat Ansible Engine to install an IdM server with integrated DNS, see Installing an Identity Management server using an Ansible playbook.
28.1. Supported DNS zone types
Identity Management (IdM) supports two types of DNS zones: primary and forward zones. These two types of zones are described here, including an example scenario for DNS forwarding.
This guide uses the BIND terminology for zone types which is different from the terminology used for Microsoft Windows DNS. Primary zones in BIND serve the same purpose as forward lookup zones and reverse lookup zones in Microsoft Windows DNS. Forward zones in BIND serve the same purpose as conditional forwarders in Microsoft Windows DNS.
- Primary DNS zones
Primary DNS zones contain authoritative DNS data and can accept dynamic DNS updates. This behavior is equivalent to the
type mastersetting in standard BIND configuration. You can manage primary zones using theipa dnszone-*commands.In compliance with standard DNS rules, every primary zone must contain
start of authority(SOA) andnameserver(NS) records. IdM generates these records automatically when the DNS zone is created, but you must copy the NS records manually to the parent zone to create proper delegation.In accordance with standard BIND behavior, queries for names for which the server is not authoritative are forwarded to other DNS servers. These DNS servers, so called forwarders, may or may not be authoritative for the query.
Example 28.1. Example scenario for DNS forwarding
The IdM server contains the
test.example.primary zone. This zone contains an NS delegation record for thesub.test.example.name. In addition, thetest.example.zone is configured with the192.0.2.254forwarder IP address for thesub.text.examplesubzone.A client querying the name
nonexistent.test.example.receives theNXDomainanswer, and no forwarding occurs because the IdM server is authoritative for this name.On the other hand, querying for the
host1.sub.test.example.name is forwarded to the configured forwarder192.0.2.254because the IdM server is not authoritative for this name.- Forward DNS zones
From the perspective of IdM, forward DNS zones do not contain any authoritative data. In fact, a forward "zone" usually only contains two pieces of information:
- A domain name
- The IP address of a DNS server associated with the domain
All queries for names belonging to the domain defined are forwarded to the specified IP address. This behavior is equivalent to the type forward setting in standard BIND configuration. You can manage forward zones using the ipa dnsforwardzone-* commands.
Forward DNS zones are especially useful in the context of IdM-Active Directory (AD) trusts. If the IdM DNS server is authoritative for the idm.example.com zone and the AD DNS server is authoritative for the ad.example.com zone, then ad.example.com is a DNS forward zone for the idm.example.com primary zone. That means that when a query comes from an IdM client for the IP address of somehost.ad.example.com, the query is forwarded to an AD domain controller specified in the ad.example.com IdM DNS forward zone.
28.2. Configuration attributes of primary IdM DNS zones
Identity Management (IdM) creates a new zone with certain default configuration, such as the refresh periods, transfer settings, or cache settings. In IdM DNS zone attributes, you can find the attributes of the default zone configuration that you can modify using one of the following options:
-
The
dnszone-modcommand in the command-line interface (CLI). For more information, see Editing the configuration of a primary DNS zone in IdM CLI. - The IdM Web UI. For more information, see Editing the configuration of a primary DNS zone in IdM Web UI.
-
An Ansible playbook that uses the
ipadnszonemodule. For more information, see Managing DNS zones in IdM.
Along with setting the actual information for the zone, the settings define how the DNS server handles the start of authority (SOA) record entries and how it updates its records from the DNS name server.
Table 28.1. IdM DNS zone attributes
| Attribute | ansible-freeipa variable | Description |
|---|---|---|
| Authoritative name server |
| Sets the domain name of the primary DNS name server, also known as SOA MNAME.
By default, each IdM server advertises itself in the SOA MNAME field. Consequently, the value stored in LDAP using |
| Administrator e-mail address |
| Sets the email address to use for the zone administrator. This defaults to the root account on the host. |
| SOA serial |
| Sets a serial number in the SOA record. Note that IdM sets the version number automatically and users are not expected to modify it. |
| SOA refresh |
| Sets the interval, in seconds, for a secondary DNS server to wait before requesting updates from the primary DNS server. |
| SOA retry |
| Sets the time, in seconds, to wait before retrying a failed refresh operation. |
| SOA expire |
| Sets the time, in seconds, that a secondary DNS server will try to perform a refresh update before ending the operation attempt. |
| SOA minimum |
| Sets the time to live (TTL) value in seconds for negative caching according to RFC 2308. |
| SOA time to live |
|
Sets TTL in seconds for records at zone apex. In zone |
| Default time to live |
|
Sets the default time to live (TTL) value in seconds for negative caching for all values in a zone that never had an individual TTL value set before. Requires a restart of the |
| BIND update policy |
| Sets the permissions allowed to clients in the DNS zone. |
| Dynamic update |
| Enables dynamic updates to DNS records for clients. Note that if this is set to false, IdM client machines will not be able to add or update their IP address. |
| Allow transfer |
| Gives a list of IP addresses or network names which are allowed to transfer the given zone, separated by semicolons (;).
Zone transfers are disabled by default. The default |
| Allow query |
| Gives a list of IP addresses or network names which are allowed to issue DNS queries, separated by semicolons (;). |
| Allow PTR sync |
| Sets whether A or AAAA records (forward records) for the zone will be automatically synchronized with the PTR (reverse) records. |
| Zone forwarders |
| Specifies a forwarder specifically configured for the DNS zone. This is separate from any global forwarders used in the IdM domain. To specify multiple forwarders, use the option multiple times. |
| Forward policy |
| Specifies the forward policy. For information about the supported policies, see DNS forward policies in IdM. |
Additional resources
-
See the
README-dnszone.mdfile in the/usr/share/doc/ansible-freeipa/directory.
28.3. Using Ansible to create a primary zone in IdM DNS
Follow this procedure to use an Ansible playbook to ensure that a primary DNS zone exists. In the example used in the procedure below, you ensure the presence of the zone.idm.example.com DNS zone.
Prerequisites
You have configured your Ansible control node to meet the following requirements:
- You are using Ansible version 2.14 or later.
-
You have installed the
ansible-freeipapackage on the Ansible controller. - The example assumes that in the ~/MyPlaybooks/ directory, you have created an Ansible inventory file with the fully-qualified domain name (FQDN) of the IdM server.
-
The example assumes that the secret.yml Ansible vault stores your
ipaadmin_password.
-
The target node, that is the node on which the
ansible-freeipamodule is executed, is part of the IdM domain as an IdM client, server or replica. - You know the IdM administrator password.
Procedure
Navigate to the
/usr/share/doc/ansible-freeipa/playbooks/dnszonedirectory:$ cd /usr/share/doc/ansible-freeipa/playbooks/dnszoneOpen your inventory file and ensure that the IdM server that you want to configure is listed in the
[ipaserver]section. For example, to instruct Ansible to configure server.idm.example.com, enter:[ipaserver] server.idm.example.com
Make a copy of the dnszone-present.yml Ansible playbook file. For example:
$ cp dnszone-present.yml dnszone-present-copy.yml- Open the dnszone-present-copy.yml file for editing.
Adapt the file by setting the following variables in the
ipadnszonetask section:-
Set the
ipaadmin_passwordvariable to your IdM administrator password. Set the
zone_namevariable to zone.idm.example.com.This is the modified Ansible playbook file for the current example:
--- - name: Ensure dnszone present hosts: ipaserver become: true tasks: - name: Ensure zone is present. ipadnszone: ipaadmin_password: "{{ ipaadmin_password }}" zone_name: zone.idm.example.com state: present-
Set the
- Save the file.
Run the playbook:
$ ansible-playbook --vault-password-file=password_file -v -i inventory.file dnszone-present-copy.yml
Additional resources
- See Supported DNS zone types.
-
See the
README-dnszone.mdfile in the/usr/share/doc/ansible-freeipa/directory. -
See sample Ansible playbooks in the
/usr/share/doc/ansible-freeipa/playbooks/dnszonedirectory.
28.4. Using an Ansible playbook to ensure the presence of a primary DNS zone in IdM with multiple variables
Follow this procedure to use an Ansible playbook to ensure that a primary DNS zone exists. In the example used in the procedure below, an IdM administrator ensures the presence of the zone.idm.example.com DNS zone. The Ansible playbook configures multiple parameters of the zone.
Prerequisites
You have configured your Ansible control node to meet the following requirements:
- You are using Ansible version 2.14 or later.
-
You have installed the
ansible-freeipapackage on the Ansible controller. - The example assumes that in the ~/MyPlaybooks/ directory, you have created an Ansible inventory file with the fully-qualified domain name (FQDN) of the IdM server.
-
The example assumes that the secret.yml Ansible vault stores your
ipaadmin_password.
-
The target node, that is the node on which the
ansible-freeipamodule is executed, is part of the IdM domain as an IdM client, server or replica. - You know the IdM administrator password.
Procedure
Navigate to the
/usr/share/doc/ansible-freeipa/playbooks/dnszonedirectory:$ cd /usr/share/doc/ansible-freeipa/playbooks/dnszoneOpen your inventory file and ensure that the IdM server that you want to configure is listed in the
[ipaserver]section. For example, to instruct Ansible to configure server.idm.example.com, enter:[ipaserver] server.idm.example.com
Make a copy of the dnszone-all-params.yml Ansible playbook file. For example:
$ cp dnszone-all-params.yml dnszone-all-params-copy.yml- Open the dnszone-all-params-copy.yml file for editing.
Adapt the file by setting the following variables in the
ipadnszonetask section:-
Set the
ipaadmin_passwordvariable to your IdM administrator password. -
Set the
zone_namevariable to zone.idm.example.com. -
Set the
allow_sync_ptrvariable to true if you want to allow the synchronization of forward and reverse records, that is the synchronization of A and AAAA records with PTR records. -
Set the
dynamic_updatevariable to true to enable IdM client machines to add or update their IP addresses. -
Set the
dnssecvariable to true to allow inline DNSSEC signing of records in the zone. -
Set the
allow_transfervariable to the IP addresses of secondary name servers in the zone. -
Set the
allow_queryvariable to the IP addresses or networks that are allowed to issue queries. -
Set the
forwardersvariable to the IP addresses of global forwarders. -
Set the
serialvariable to the SOA record serial number. -
Define the
refresh,retry,expire,minimum,ttl, anddefault_ttlvalues for DNS records in the zone. -
Define the NSEC3PARAM record for the zone using the
nsec3param_recvariable. -
Set the
skip_overlap_checkvariable to true to force DNS creation even if it overlaps with an existing zone. Set the
skip_nameserver_checkto true to force DNS zone creation even if the nameserver is not resolvable.This is the modified Ansible playbook file for the current example:
--- - name: Ensure dnszone present hosts: ipaserver become: true tasks: - name: Ensure zone is present. ipadnszone: ipaadmin_password: "{{ ipaadmin_password }}" zone_name: zone.idm.example.com allow_sync_ptr: true dynamic_update: true dnssec: true allow_transfer: - 1.1.1.1 - 2.2.2.2 allow_query: - 1.1.1.1 - 2.2.2.2 forwarders: - ip_address: 8.8.8.8 - ip_address: 8.8.4.4 port: 52 serial: 1234 refresh: 3600 retry: 900 expire: 1209600 minimum: 3600 ttl: 60 default_ttl: 90 name_server: server.idm.example.com. admin_email: admin.admin@idm.example.com nsec3param_rec: "1 7 100 0123456789abcdef" skip_overlap_check: true skip_nameserver_check: true state: present-
Set the
- Save the file.
Run the playbook:
$ ansible-playbook --vault-password-file=password_file -v -i inventory.file dnszone-all-params-copy.yml
Additional resources
- See Supported DNS zone types.
- See Configuration attributes of primary IdM DNS zones.
-
See the
README-dnszone.mdfile in the/usr/share/doc/ansible-freeipa/directory. -
See sample Ansible playbooks in the
/usr/share/doc/ansible-freeipa/playbooks/dnszonedirectory.
28.5. Using an Ansible playbook to ensure the presence of a zone for reverse DNS lookup when an IP address is given
Follow this procedure to use an Ansible playbook to ensure that a reverse DNS zone exists. In the example used in the procedure below, an IdM administrator ensures the presence of a reverse DNS lookup zone using the IP address and prefix length of an IdM host.
Providing the prefix length of the IP address of your DNS server using the name_from_ip variable allows you to control the zone name. If you do not state the prefix length, the system queries DNS servers for zones and, based on the name_from_ip value of 192.168.1.2, the query can return any of the following DNS zones:
- 1.168.192.in-addr.arpa.
- 168.192.in-addr.arpa.
- 192.in-addr.arpa.
Because the zone returned by the query might not be what you expect, name_from_ip can only be used with the state option set to present to prevent accidental removals of zones.
Prerequisites
You have configured your Ansible control node to meet the following requirements:
- You are using Ansible version 2.14 or later.
-
You have installed the
ansible-freeipapackage on the Ansible controller. - The example assumes that in the ~/MyPlaybooks/ directory, you have created an Ansible inventory file with the fully-qualified domain name (FQDN) of the IdM server.
-
The example assumes that the secret.yml Ansible vault stores your
ipaadmin_password.
-
The target node, that is the node on which the
ansible-freeipamodule is executed, is part of the IdM domain as an IdM client, server or replica. - You know the IdM administrator password.
Procedure
Navigate to the
/usr/share/doc/ansible-freeipa/playbooks/dnszonedirectory:$ cd /usr/share/doc/ansible-freeipa/playbooks/dnszoneOpen your inventory file and ensure that the IdM server that you want to configure is listed in the
[ipaserver]section. For example, to instruct Ansible to configure server.idm.example.com, enter:[ipaserver] server.idm.example.com
Make a copy of the dnszone-reverse-from-ip.yml Ansible playbook file. For example:
$ cp dnszone-reverse-from-ip.yml dnszone-reverse-from-ip-copy.yml- Open the dnszone-reverse-from-ip-copy.yml file for editing.
Adapt the file by setting the following variables in the
ipadnszonetask section:-
Set the
ipaadmin_passwordvariable to your IdM administrator password. Set the
name_from_ipvariable to the IP of your IdM nameserver, and provide its prefix length.This is the modified Ansible playbook file for the current example:
--- - name: Ensure dnszone present hosts: ipaserver become: true tasks: - name: Ensure zone for reverse DNS lookup is present. ipadnszone: ipaadmin_password: "{{ ipaadmin_password }}" name_from_ip: 192.168.1.2/24 state: present register: result - name: Display inferred zone name. debug: msg: "Zone name: {{ result.dnszone.name }}"
The playbook creates a zone for reverse DNS lookup from the 192.168.1.2 IP address and its prefix length of 24. Next, the playbook displays the resulting zone name.
-
Set the
- Save the file.
Run the playbook:
$ ansible-playbook --vault-password-file=password_file -v -i inventory.file dnszone-reverse-from-ip-copy.yml
Additional resources
- See Supported DNS zone types.
-
See the
README-dnszone.mdfile in the/usr/share/doc/ansible-freeipa/directory. -
See sample Ansible playbooks in the
/usr/share/doc/ansible-freeipa/playbooks/dnszonedirectory.
Chapter 29. Using Ansible to manage DNS locations in IdM
As Identity Management (IdM) administrator, you can manage IdM DNS locations using the location module available in the ansible-freeipa package.
29.1. DNS-based service discovery
DNS-based service discovery is a process in which a client uses the DNS protocol to locate servers in a network that offer a specific service, such as LDAP or Kerberos. One typical type of operation is to allow clients to locate authentication servers within the closest network infrastructure, because they provide a higher throughput and lower network latency, lowering overall costs.
The major advantages of service discovery are:
- No need for clients to be explicitly configured with names of nearby servers.
- DNS servers are used as central providers of policy. Clients using the same DNS server have access to the same policy about service providers and their preferred order.
In an Identity Management (IdM) domain, DNS service records (SRV records) exist for LDAP, Kerberos, and other services. For example, the following command queries the DNS server for hosts providing a TCP-based Kerberos service in an IdM DNS domain:
Example 29.1. DNS location independent results
$ dig -t SRV +short _kerberos._tcp.idm.example.com
0 100 88 idmserver-01.idm.example.com.
0 100 88 idmserver-02.idm.example.com.The output contains the following information:
-
0(priority): Priority of the target host. A lower value is preferred. -
100(weight). Specifies a relative weight for entries with the same priority. For further information, see RFC 2782, section 3. -
88(port number): Port number of the service. - Canonical name of the host providing the service.
In the example, the two host names returned have the same priority and weight. In this case, the client uses a random entry from the result list.
When the client is, instead, configured to query a DNS server that is configured in a DNS location, the output differs. For IdM servers that are assigned to a location, tailored values are returned. In the example below, the client is configured to query a DNS server in the location germany:
Example 29.2. DNS location-based results
$ dig -t SRV +short _kerberos._tcp.idm.example.com
_kerberos._tcp.germany._locations.idm.example.com.
0 100 88 idmserver-01.idm.example.com.
50 100 88 idmserver-02.idm.example.com.The IdM DNS server automatically returns a DNS alias (CNAME) pointing to a DNS location specific SRV record which prefers local servers. This CNAME record is shown in the first line of the output. In the example, the host idmserver-01.idm.example.com has the lowest priority value and is therefore preferred. The idmserver-02.idm.example.com has a higher priority and thus is used only as backup for cases when the preferred host is unavailable.
29.2. Deployment considerations for DNS locations
Identity Management (IdM) can generate location-specific service (SRV) records when using the integrated DNS. Because each IdM DNS server generates location-specific SRV records, you have to install at least one IdM DNS server in each DNS location.
The client’s affinity to a DNS location is only defined by the DNS records received by the client. For this reason, you can combine IdM DNS servers with non-IdM DNS consumer servers and recursors if the clients doing DNS service discovery resolve location-specific records from IdM DNS servers.
In the majority of deployments with mixed IdM and non-IdM DNS services, DNS recursors select the closest IdM DNS server automatically by using round-trip time metrics. Typically, this ensures that clients using non-IdM DNS servers are getting records for the nearest DNS location and thus use the optimal set of IdM servers.
29.3. DNS time to live (TTL)
Clients can cache DNS resource records for an amount of time that is set in the zone’s configuration. Because of this caching, a client might not be able to receive the changes until the time to live (TTL) value expires. The default TTL value in Identity Management (IdM) is 1 day.
If your client computers roam between sites, you should adapt the TTL value for your IdM DNS zone. Set the value to a lower value than the time clients need to roam between sites. This ensures that cached DNS entries on the client expire before they reconnect to another site and thus query the DNS server to refresh location-specific SRV records.
Additional resources
29.4. Using Ansible to ensure an IdM location is present
As a system administrator of Identity Management (IdM), you can configure IdM DNS locations to allow clients to locate authentication servers within the closest network infrastructure.
The following procedure describes how to use an Ansible playbook to ensure a DNS location is present in IdM. The example describes how to ensure that the germany DNS location is present in IdM. As a result, you can assign particular IdM servers to this location so that local IdM clients can use them to reduce server response time.
Prerequisites
- You know the IdM administrator password.
You have configured your Ansible control node to meet the following requirements:
- You are using Ansible version 2.14 or later.
-
You have installed the
ansible-freeipapackage on the Ansible controller. - The example assumes that in the ~/MyPlaybooks/ directory, you have created an Ansible inventory file with the fully-qualified domain name (FQDN) of the IdM server.
-
The example assumes that the secret.yml Ansible vault stores your
ipaadmin_password.
-
The target node, that is the node on which the
ansible-freeipamodule is executed, is part of the IdM domain as an IdM client, server or replica. - You understand the deployment considerations for DNS locations.
Procedure
Navigate to the ~/MyPlaybooks/ directory:
$ cd ~/MyPlaybooks/Make a copy of the
location-present.ymlfile located in the/usr/share/doc/ansible-freeipa/playbooks/location/directory:$ cp /usr/share/doc/ansible-freeipa/playbooks/location/location-present.yml location-present-copy.yml-
Open the
location-present-copy.ymlAnsible playbook file for editing. Adapt the file by setting the following variables in the
ipalocationtask section:-
Adapt the
nameof the task to correspond to your use case. -
Set the
ipaadmin_passwordvariable to the password of the IdM administrator. -
Set the
namevariable to the name of the location.
This is the modified Ansible playbook file for the current example:
--- - name: location present example hosts: ipaserver vars_files: - /home/user_name/MyPlaybooks/secret.yml tasks: - name: Ensure that the "germany" location is present ipalocation: ipaadmin_password: "{{ ipaadmin_password }}" name: germany
-
Adapt the
- Save the file.
Run the Ansible playbook. Specify the playbook file, the file storing the password protecting the secret.yml file, and the inventory file:
$ ansible-playbook --vault-password-file=password_file -v -i inventory location-present-copy.yml
29.5. Using Ansible to ensure an IdM location is absent
As a system administrator of Identity Management (IdM), you can configure IdM DNS locations to allow clients to locate authentication servers within the closest network infrastructure.
The following procedure describes how to use an Ansible playbook to ensure that a DNS location is absent in IdM. The example describes how to ensure that the germany DNS location is absent in IdM. As a result, you cannot assign particular IdM servers to this location and local IdM clients cannot use them.
Prerequisites
- You know the IdM administrator password.
- No IdM server is assigned to the germany DNS location.
You have configured your Ansible control node to meet the following requirements:
- You are using Ansible version 2.14 or later.
-
You have installed the
ansible-freeipapackage on the Ansible controller. - The example assumes that in the ~/MyPlaybooks/ directory, you have created an Ansible inventory file with the fully-qualified domain name (FQDN) of the IdM server.
-
The example assumes that the secret.yml Ansible vault stores your
ipaadmin_password.
-
The target node, that is the node on which the
ansible-freeipamodule is executed, is part of the IdM domain as an IdM client, server or replica. - The example assumes that you have created and configured the ~/MyPlaybooks/ directory as a central location to store copies of sample playbooks.
Procedure
Navigate to the ~/MyPlaybooks/ directory:
$ cd ~/MyPlaybooks/Make a copy of the
location-absent.ymlfile located in the/usr/share/doc/ansible-freeipa/playbooks/location/directory:$ cp /usr/share/doc/ansible-freeipa/playbooks/location/location-absent.yml location-absent-copy.yml-
Open the
location-absent-copy.ymlAnsible playbook file for editing. Adapt the file by setting the following variables in the
ipalocationtask section:-
Adapt the
nameof the task to correspond to your use case. -
Set the
ipaadmin_passwordvariable to the password of the IdM administrator. -
Set the
namevariable to the name of the DNS location. -
Make sure that the
statevariable is set toabsent.
This is the modified Ansible playbook file for the current example:
--- - name: location absent example hosts: ipaserver vars_files: - /home/user_name/MyPlaybooks/secret.yml tasks: - name: Ensure that the "germany" location is absent ipalocation: ipaadmin_password: "{{ ipaadmin_password }}" name: germany state: absent
-
Adapt the
- Save the file.
Run the Ansible playbook. Specify the playbook file, the file storing the password protecting the secret.yml file, and the inventory file:
$ ansible-playbook --vault-password-file=password_file -v -i inventory location-absent-copy.yml
29.6. Additional resources
-
See the
README-location.mdfile in the/usr/share/doc/ansible-freeipa/directory. -
See sample Ansible playbooks in the
/usr/share/doc/ansible-freeipa/playbooks/locationdirectory.
Chapter 30. Managing DNS forwarding in IdM
Follow these procedures to configure DNS global forwarders and DNS forward zones in the Identity Management (IdM) Web UI, the IdM CLI, and using Ansible:
- The two roles of an IdM DNS server
- DNS forward policies in IdM
- Adding a global forwarder in the IdM Web UI
- Adding a global forwarder in the CLI
- Adding a DNS Forward Zone in the IdM Web UI
- Adding a DNS Forward Zone in the CLI
- Establishing a DNS Global Forwarder in IdM using Ansible
- Ensuring the presence of a DNS global forwarder in IdM using Ansible
- Ensuring the absence of a DNS global forwarder in IdM using Ansible
- Ensuring DNS Global Forwarders are disabled in IdM using Ansible
- Ensuring the presence of a DNS Forward Zone in IdM using Ansible
- Ensuring a DNS Forward Zone has multiple forwarders in IdM using Ansible
- Ensuring a DNS Forward Zone is disabled in IdM using Ansible
- Ensuring the absence of a DNS Forward Zone in IdM using Ansible
30.1. The two roles of an IdM DNS server
DNS forwarding affects how a DNS service answers DNS queries. By default, the Berkeley Internet Name Domain (BIND) service integrated with IdM acts as both an authoritative and a recursive DNS server:
- Authoritative DNS server
- When a DNS client queries a name belonging to a DNS zone for which the IdM server is authoritative, BIND replies with data contained in the configured zone. Authoritative data always takes precedence over any other data.
- Recursive DNS server
- When a DNS client queries a name for which the IdM server is not authoritative, BIND attempts to resolve the query using other DNS servers. If forwarders are not defined, BIND asks the root servers on the Internet and uses a recursive resolution algorithm to answer the DNS query.
In some cases, it is not desirable to let BIND contact other DNS servers directly and perform the recursion based on data available on the Internet. You can configure BIND to use another DNS server, a forwarder, to resolve the query.
When you configure BIND to use a forwarder, queries and answers are forwarded back and forth between the IdM server and the forwarder, and the IdM server acts as the DNS cache for non-authoritative data.
30.2. DNS forward policies in IdM
IdM supports the first and only standard BIND forward policies, as well as the none IdM-specific forward policy.
- Forward first (default)
-
The IdM BIND service forwards DNS queries to the configured forwarder. If a query fails because of a server error or timeout, BIND falls back to the recursive resolution using servers on the Internet. The
forward firstpolicy is the default policy, and it is suitable for optimizing DNS traffic. - Forward only
-
The IdM BIND service forwards DNS queries to the configured forwarder. If a query fails because of a server error or timeout, BIND returns an error to the client. The
forward onlypolicy is recommended for environments with split DNS configuration. - None (forwarding disabled)
-
DNS queries are not forwarded with the
noneforwarding policy. Disabling forwarding is only useful as a zone-specific override for global forwarding configuration. This option is the IdM equivalent of specifying an empty list of forwarders in BIND configuration.
You cannot use forwarding to combine data in IdM with data from other DNS servers. You can only forward queries for specific subzones of the primary zone in IdM DNS.
By default, the BIND service does not forward queries to another server if the queried DNS name belongs to a zone for which the IdM server is authoritative. In such a situation, if the queried DNS name cannot be found in the IdM database, the NXDOMAIN answer is returned. Forwarding is not used.
Example 30.1. Example Scenario
The IdM server is authoritative for the test.example. DNS zone. BIND is configured to forward queries to the DNS server with the 192.0.2.254 IP address.
When a client sends a query for the nonexistent.test.example. DNS name, BIND detects that the IdM server is authoritative for the test.example. zone and does not forward the query to the 192.0.2.254. server. As a result, the DNS client receives the NXDomain error message, informing the user that the queried domain does not exist.
30.3. Adding a global forwarder in the IdM Web UI
Follow this procedure to add a global DNS forwarder in the Identity Management (IdM) Web UI.
Prerequisites
- You are logged in to the IdM WebUI as IdM administrator.
- You know the Internet Protocol (IP) address of the DNS server to forward queries to.
Procedure
In the IdM Web UI, select
Network Services→DNS Global Configuration→DNS.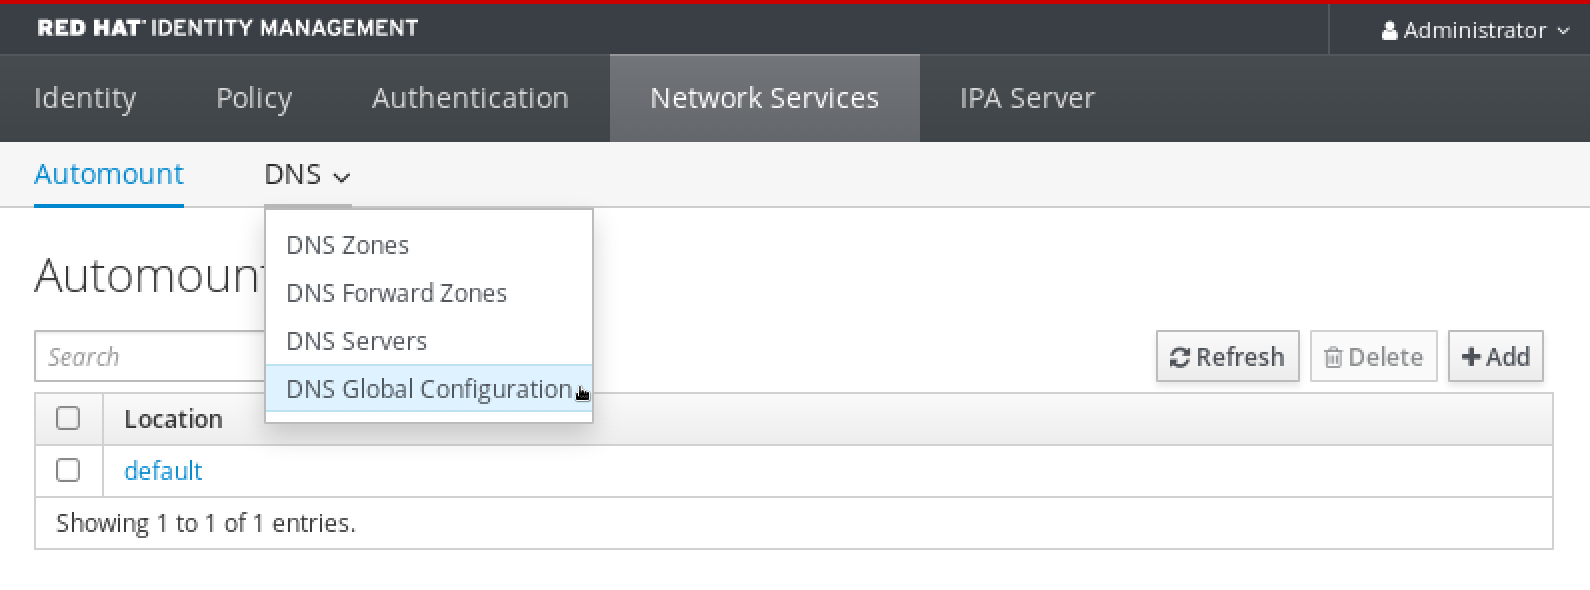
In the
DNS Global Configurationsection, clickAdd.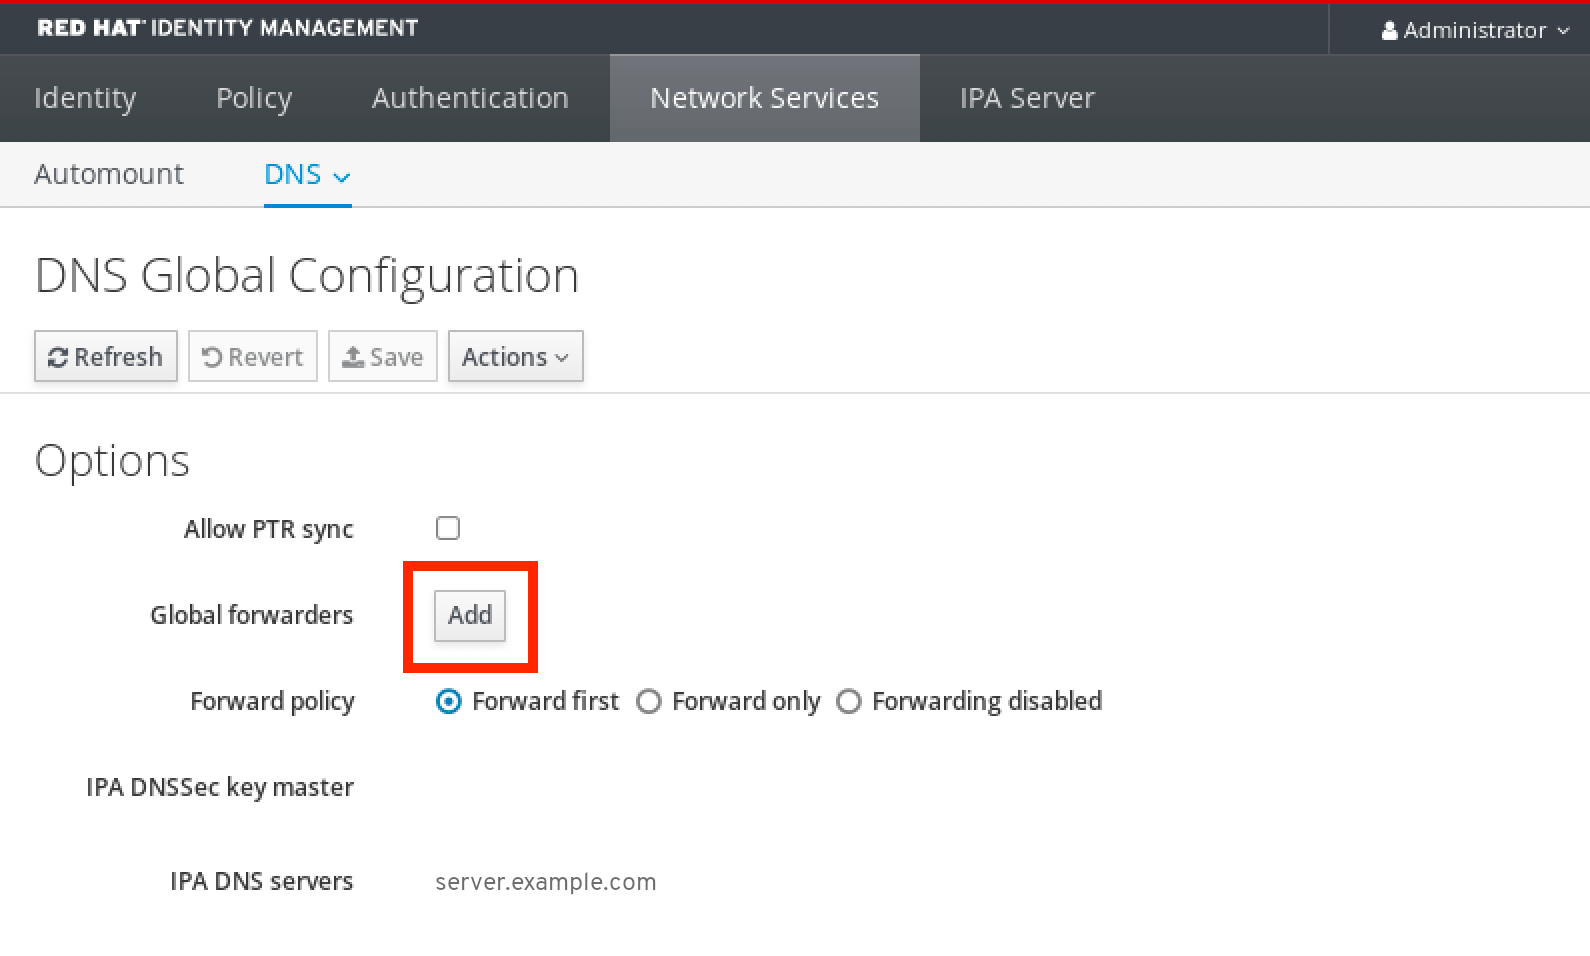
Specify the IP address of the DNS server that will receive forwarded DNS queries.
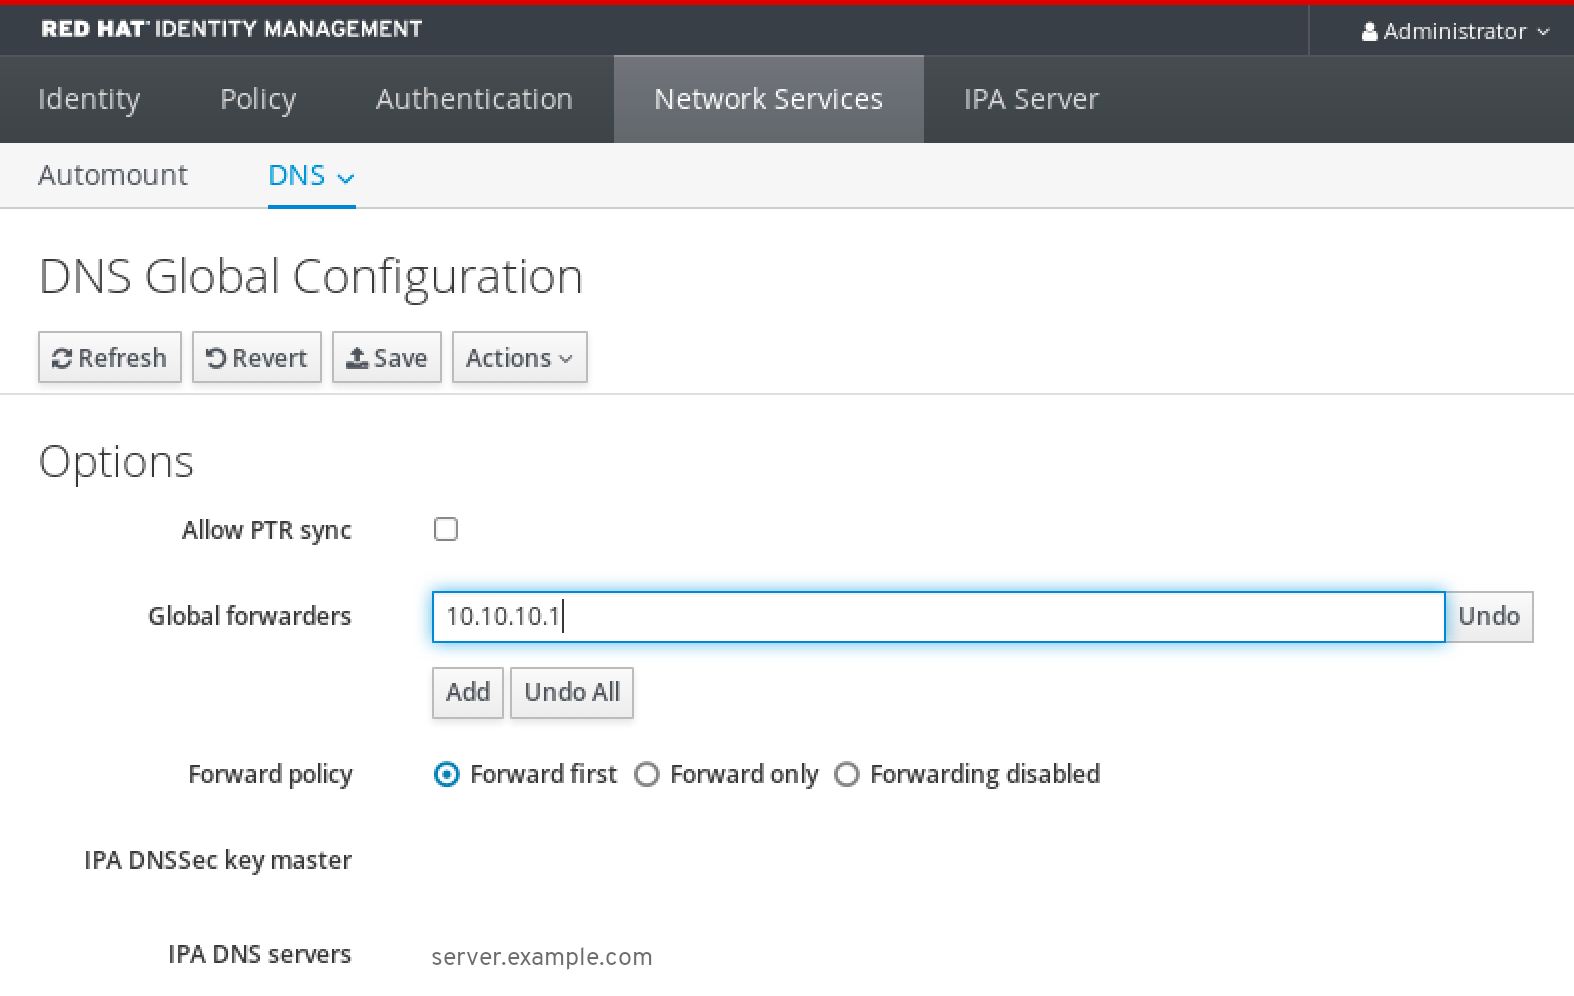
Select the
Forward policy.
-
Click
Saveat the top of the window.
Verification steps
Select
Network Services→DNS Global Configuration→DNS.Verify that the global forwarder, with the forward policy you specified, is present and enabled in the IdM Web UI.

30.4. Adding a global forwarder in the CLI
Follow this procedure to add a global DNS forwarder by using the command line interface (CLI).
Prerequisites
- You are logged in as IdM administrator.
- You know the Internet Protocol (IP) address of the DNS server to forward queries to.
Procedure
Use the
ipa dnsconfig-modcommand to add a new global forwarder. Specify the IP address of the DNS forwarder with the--forwarderoption.[user@server ~]$ ipa dnsconfig-mod --forwarder=10.10.0.1 Server will check DNS forwarder(s). This may take some time, please wait ... Global forwarders: 10.10.0.1 IPA DNS servers: server.example.com
Verification steps
Use the
dnsconfig-showcommand to display global forwarders.[user@server ~]$ ipa dnsconfig-show Global forwarders: 10.10.0.1 IPA DNS servers: server.example.com
30.5. Adding a DNS Forward Zone in the IdM Web UI
Follow this procedure to add a DNS forward zone in the Identity Management (IdM) Web UI.
Do not use forward zones unless absolutely required. Forward zones are not a standard solution, and using them can lead to unexpected and problematic behavior. If you must use forward zones, limit their use to overriding a global forwarding configuration.
When creating a new DNS zone, Red Hat recommends to always use standard DNS delegation using nameserver (NS) records and to avoid forward zones. In most cases, using a global forwarder is sufficient, and forward zones are not necessary.
Prerequisites
- You are logged in to the IdM WebUI as IdM administrator.
- You know the Internet Protocol (IP) address of the DNS server to forward queries to.
Procedure
In the IdM Web UI, select
Network Services→DNS Forward Zones→DNS.
In the
DNS Forward Zonessection, clickAdd.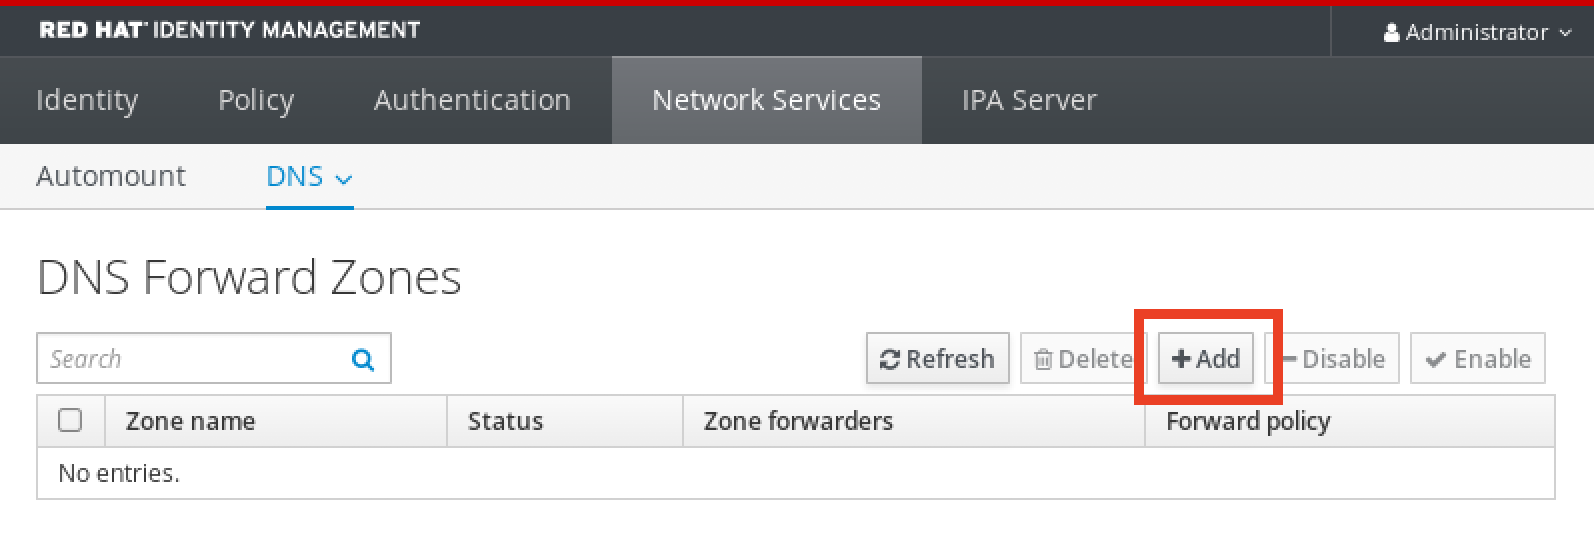
In the
Add DNS forward zonewindow, specify the forward zone name.
Click the
Addbutton and specify the IP address of a DNS server to receive the forwarding request. You can specify multiple forwarders per forward zone.
Select the
Forward policy.
-
Click
Addat the bottom of the window to add the new forward zone.
Verification steps
In the IdM Web UI, select
Network Services→DNS Forward Zones→DNS.Verify that the forward zone you created, with the forwarders and forward policy you specified, is present and enabled in the IdM Web UI.

30.6. Adding a DNS Forward Zone in the CLI
Follow this procedure to add a DNS forward zone by using the command line interface (CLI).
Do not use forward zones unless absolutely required. Forward zones are not a standard solution, and using them can lead to unexpected and problematic behavior. If you must use forward zones, limit their use to overriding a global forwarding configuration.
When creating a new DNS zone, Red Hat recommends to always use standard DNS delegation using nameserver (NS) records and to avoid forward zones. In most cases, using a global forwarder is sufficient, and forward zones are not necessary.
Prerequisites
- You are logged in as IdM administrator.
- You know the Internet Protocol (IP) address of the DNS server to forward queries to.
Procedure
Use the
dnsforwardzone-addcommand to add a new forward zone. Specify at least one forwarder with the--forwarderoption if the forward policy is notnone, and specify the forward policy with the--forward-policyoption.[user@server ~]$ ipa dnsforwardzone-add forward.example.com. --forwarder=10.10.0.14 --forwarder=10.10.1.15 --forward-policy=first Zone name: forward.example.com. Zone forwarders: 10.10.0.14, 10.10.1.15 Forward policy: first
Verification steps
Use the
dnsforwardzone-showcommand to display the DNS forward zone you just created.[user@server ~]$ ipa dnsforwardzone-show forward.example.com. Zone name: forward.example.com. Zone forwarders: 10.10.0.14, 10.10.1.15 Forward policy: first
30.7. Establishing a DNS Global Forwarder in IdM using Ansible
Follow this procedure to use an Ansible playbook to establish a DNS Global Forwarder in IdM.
In the example procedure below, the IdM administrator creates a DNS global forwarder to a DNS server with an Internet Protocol (IP) v4 address of 8.8.6.6 and IPv6 address of 2001:4860:4860::8800 on port 53.
Prerequisites
You have configured your Ansible control node to meet the following requirements:
- You are using Ansible version 2.14 or later.
-
You have installed the
ansible-freeipapackage on the Ansible controller. - The example assumes that in the ~/MyPlaybooks/ directory, you have created an Ansible inventory file with the fully-qualified domain name (FQDN) of the IdM server.
-
The example assumes that the secret.yml Ansible vault stores your
ipaadmin_password.
-
The target node, that is the node on which the
ansible-freeipamodule is executed, is part of the IdM domain as an IdM client, server or replica. - You know the IdM administrator password.
Procedure
Navigate to the
/usr/share/doc/ansible-freeipa/playbooks/dnsconfigdirectory:$ cd /usr/share/doc/ansible-freeipa/playbooks/dnsconfig
Open your inventory file and make sure that the IdM server that you want to configure is listed in the
[ipaserver]section. For example, to instruct Ansible to configureserver.idm.example.com, enter:[ipaserver] server.idm.example.com
Make a copy of the
set-configuration.ymlAnsible playbook file. For example:$ cp set-configuration.yml establish-global-forwarder.yml
-
Open the
establish-global-forwarder.ymlfile for editing. Adapt the file by setting the following variables:
-
Change the
namevariable for the playbook toPlaybook to establish a global forwarder in IdM DNS. -
In the
taskssection, change thenameof the task toCreate a DNS global forwarder to 8.8.6.6 and 2001:4860:4860::8800. In the
forwarderssection of theipadnsconfigportion:-
Change the first
ip_addressvalue to the IPv4 address of the global forwarder:8.8.6.6. -
Change the second
ip_addressvalue to the IPv6 address of the global forwarder:2001:4860:4860::8800. -
Verify the
portvalue is set to53.
-
Change the first
Change the
forward_policytofirst.This the modified Ansible playbook file for the current example:
--- - name: Playbook to establish a global forwarder in IdM DNS hosts: ipaserver vars_files: - /home/user_name/MyPlaybooks/secret.yml tasks: - name: Create a DNS global forwarder to 8.8.6.6 and 2001:4860:4860::8800 ipadnsconfig: forwarders: - ip_address: 8.8.6.6 - ip_address: 2001:4860:4860::8800 port: 53 forward_policy: first allow_sync_ptr: yes-
Change the
- Save the file.
Run the playbook:
$ ansible-playbook --vault-password-file=password_file -v -i inventory.file establish-global-forwarder.yml
Additional resources
-
See the
README-dnsconfig.mdfile in the/usr/share/doc/ansible-freeipa/directory.
30.8. Ensuring the presence of a DNS global forwarder in IdM using Ansible
Follow this procedure to use an Ansible playbook to ensure the presence of a DNS global forwarder in IdM. In the example procedure below, the IdM administrator ensures the presence of a DNS global forwarder to a DNS server with an Internet Protocol (IP) v4 address of 7.7.9.9 and IP v6 address of 2001:db8::1:0 on port 53.
Prerequisites
You have configured your Ansible control node to meet the following requirements:
- You are using Ansible version 2.14 or later.
-
You have installed the
ansible-freeipapackage on the Ansible controller. - The example assumes that in the ~/MyPlaybooks/ directory, you have created an Ansible inventory file with the fully-qualified domain name (FQDN) of the IdM server.
-
The example assumes that the secret.yml Ansible vault stores your
ipaadmin_password.
-
The target node, that is the node on which the
ansible-freeipamodule is executed, is part of the IdM domain as an IdM client, server or replica. - You know the IdM administrator password.
Procedure
Navigate to the
/usr/share/doc/ansible-freeipa/playbooks/dnsconfigdirectory:$ cd /usr/share/doc/ansible-freeipa/playbooks/dnsconfig
Open your inventory file and make sure that the IdM server that you want to configure is listed in the
[ipaserver]section. For example, to instruct Ansible to configureserver.idm.example.com, enter:[ipaserver] server.idm.example.com
Make a copy of the
forwarders-absent.ymlAnsible playbook file. For example:$ cp forwarders-absent.yml ensure-presence-of-a-global-forwarder.yml
-
Open the
ensure-presence-of-a-global-forwarder.ymlfile for editing. Adapt the file by setting the following variables:
-
Change the
namevariable for the playbook toPlaybook to ensure the presence of a global forwarder in IdM DNS. -
In the
taskssection, change thenameof the task toEnsure the presence of a DNS global forwarder to 7.7.9.9 and 2001:db8::1:0 on port 53. In the
forwarderssection of theipadnsconfigportion:-
Change the first
ip_addressvalue to the IPv4 address of the global forwarder:7.7.9.9. -
Change the second
ip_addressvalue to the IPv6 address of the global forwarder:2001:db8::1:0. -
Verify the
portvalue is set to53.
-
Change the first
Change the
statetopresent.This the modified Ansible playbook file for the current example:
--- - name: Playbook to ensure the presence of a global forwarder in IdM DNS hosts: ipaserver vars_files: - /home/user_name/MyPlaybooks/secret.yml tasks: - name: Ensure the presence of a DNS global forwarder to 7.7.9.9 and 2001:db8::1:0 on port 53 ipadnsconfig: forwarders: - ip_address: 7.7.9.9 - ip_address: 2001:db8::1:0 port: 53 state: present-
Change the
- Save the file.
Run the playbook:
$ ansible-playbook --vault-password-file=password_file -v -i inventory.file ensure-presence-of-a-global-forwarder.yml
Additional resources
-
See the
README-dnsconfig.mdfile in the/usr/share/doc/ansible-freeipa/directory.
30.9. Ensuring the absence of a DNS global forwarder in IdM using Ansible
Follow this procedure to use an Ansible playbook to ensure the absence of a DNS global forwarder in IdM. In the example procedure below, the IdM administrator ensures the absence of a DNS global forwarder with an Internet Protocol (IP) v4 address of 8.8.6.6 and IP v6 address of 2001:4860:4860::8800 on port 53.
Prerequisites
You have configured your Ansible control node to meet the following requirements:
- You are using Ansible version 2.14 or later.
-
You have installed the
ansible-freeipapackage on the Ansible controller. - The example assumes that in the ~/MyPlaybooks/ directory, you have created an Ansible inventory file with the fully-qualified domain name (FQDN) of the IdM server.
-
The example assumes that the secret.yml Ansible vault stores your
ipaadmin_password.
-
The target node, that is the node on which the
ansible-freeipamodule is executed, is part of the IdM domain as an IdM client, server or replica. - You know the IdM administrator password.
Procedure
Navigate to the
/usr/share/doc/ansible-freeipa/playbooks/dnsconfigdirectory:$ cd /usr/share/doc/ansible-freeipa/playbooks/dnsconfig
Open your inventory file and make sure that the IdM server that you want to configure is listed in the
[ipaserver]section. For example, to instruct Ansible to configureserver.idm.example.com, enter:[ipaserver] server.idm.example.com
Make a copy of the
forwarders-absent.ymlAnsible playbook file. For example:$ cp forwarders-absent.yml ensure-absence-of-a-global-forwarder.yml
-
Open the
ensure-absence-of-a-global-forwarder.ymlfile for editing. Adapt the file by setting the following variables:
-
Change the
namevariable for the playbook toPlaybook to ensure the absence of a global forwarder in IdM DNS. -
In the
taskssection, change thenameof the task toEnsure the absence of a DNS global forwarder to 8.8.6.6 and 2001:4860:4860::8800 on port 53. In the
forwarderssection of theipadnsconfigportion:-
Change the first
ip_addressvalue to the IPv4 address of the global forwarder:8.8.6.6. -
Change the second
ip_addressvalue to the IPv6 address of the global forwarder:2001:4860:4860::8800. -
Verify the
portvalue is set to53.
-
Change the first
-
Set the
actionvariable tomember. -
Verify the
stateis set toabsent.
This the modified Ansible playbook file for the current example:
--- - name: Playbook to ensure the absence of a global forwarder in IdM DNS hosts: ipaserver vars_files: - /home/user_name/MyPlaybooks/secret.yml tasks: - name: Ensure the absence of a DNS global forwarder to 8.8.6.6 and 2001:4860:4860::8800 on port 53 ipadnsconfig: forwarders: - ip_address: 8.8.6.6 - ip_address: 2001:4860:4860::8800 port: 53 action: member state: absentImportantIf you only use the
state: absentoption in your playbook without also usingaction: member, the playbook fails.-
Change the
- Save the file.
Run the playbook:
$ ansible-playbook --vault-password-file=password_file -v -i inventory.file ensure-absence-of-a-global-forwarder.yml
Additional resources
-
The
README-dnsconfig.mdfile in the/usr/share/doc/ansible-freeipa/directory -
The
action: memberoption in ipadnsconfig ansible-freeipa modules
30.10. Ensuring DNS Global Forwarders are disabled in IdM using Ansible
Follow this procedure to use an Ansible playbook to ensure DNS Global Forwarders are disabled in IdM. In the example procedure below, the IdM administrator ensures that the forwarding policy for the global forwarder is set to none, which effectively disables the global forwarder.
Prerequisites
You have configured your Ansible control node to meet the following requirements:
- You are using Ansible version 2.14 or later.
-
You have installed the
ansible-freeipapackage on the Ansible controller. - The example assumes that in the ~/MyPlaybooks/ directory, you have created an Ansible inventory file with the fully-qualified domain name (FQDN) of the IdM server.
-
The example assumes that the secret.yml Ansible vault stores your
ipaadmin_password.
-
The target node, that is the node on which the
ansible-freeipamodule is executed, is part of the IdM domain as an IdM client, server or replica. - You know the IdM administrator password.
Procedure
Navigate to the
/usr/share/doc/ansible-freeipa/playbooks/dnsconfigdirectory:$ cd /usr/share/doc/ansible-freeipa/playbooks/dnsconfig
Open your inventory file and make sure that the IdM server that you want to configure is listed in the
[ipaserver]section. For example, to instruct Ansible to configureserver.idm.example.com, enter:[ipaserver] server.idm.example.com
Verify the contents of the
disable-global-forwarders.ymlAnsible playbook file which is already configured to disable all DNS global forwarders. For example:$ cat disable-global-forwarders.yml --- - name: Playbook to disable global DNS forwarders hosts: ipaserver vars_files: - /home/user_name/MyPlaybooks/secret.yml tasks: - name: Disable global forwarders. ipadnsconfig: forward_policy: noneRun the playbook:
$ ansible-playbook --vault-password-file=password_file -v -i inventory.file disable-global-forwarders.yml
Additional resources
-
See the
README-dnsconfig.mdfile in the/usr/share/doc/ansible-freeipa/directory.
30.11. Ensuring the presence of a DNS Forward Zone in IdM using Ansible
Follow this procedure to use an Ansible playbook to ensure the presence of a DNS Forward Zone in IdM. In the example procedure below, the IdM administrator ensures the presence of a DNS forward zone for example.com to a DNS server with an Internet Protocol (IP) address of 8.8.8.8.
Prerequisites
You have configured your Ansible control node to meet the following requirements:
- You are using Ansible version 2.14 or later.
-
You have installed the
ansible-freeipapackage on the Ansible controller. - The example assumes that in the ~/MyPlaybooks/ directory, you have created an Ansible inventory file with the fully-qualified domain name (FQDN) of the IdM server.
-
The example assumes that the secret.yml Ansible vault stores your
ipaadmin_password.
-
The target node, that is the node on which the
ansible-freeipamodule is executed, is part of the IdM domain as an IdM client, server or replica. - You know the IdM administrator password.
Procedure
Navigate to the
/usr/share/doc/ansible-freeipa/playbooks/dnsconfigdirectory:$ cd /usr/share/doc/ansible-freeipa/playbooks/dnsconfig
Open your inventory file and make sure that the IdM server that you want to configure is listed in the
[ipaserver]section. For example, to instruct Ansible to configureserver.idm.example.com, enter:[ipaserver] server.idm.example.com
Make a copy of the
forwarders-absent.ymlAnsible playbook file. For example:$ cp forwarders-absent.yml ensure-presence-forwardzone.yml
-
Open the
ensure-presence-forwardzone.ymlfile for editing. Adapt the file by setting the following variables:
-
Change the
namevariable for the playbook toPlaybook to ensure the presence of a dnsforwardzone in IdM DNS. -
In the
taskssection, change thenameof the task toEnsure presence of a dnsforwardzone for example.com to 8.8.8.8. -
In the
taskssection, change theipadnsconfigheading toipadnsforwardzone. In the
ipadnsforwardzonesection:-
Add the
ipaadmin_passwordvariable and set it to your IdM administrator password. -
Add the
namevariable and set it toexample.com. In the
forwarderssection:-
Remove the
ip_addressandportlines. Add the IP address of the DNS server to receive forwarded requests by specifying it after a dash:
- 8.8.8.8
-
Remove the
-
Add the
forwardpolicyvariable and set it tofirst. -
Add the
skip_overlap_checkvariable and set it totrue. -
Change the
statevariable topresent.
This the modified Ansible playbook file for the current example:
-
Add the
--- - name: Playbook to ensure the presence of a dnsforwardzone in IdM DNS hosts: ipaserver vars_files: - /home/user_name/MyPlaybooks/secret.yml tasks: - name: Ensure the presence of a dnsforwardzone for example.com to 8.8.8.8 ipadnsforwardzone: ipaadmin_password: "{{ ipaadmin_password }}" name: example.com forwarders: - 8.8.8.8 forwardpolicy: first skip_overlap_check: true state: present-
Change the
- Save the file.
Run the playbook:
$ ansible-playbook --vault-password-file=password_file -v -i inventory.file ensure-presence-forwardzone.yml
Additional resources
-
See the
README-dnsforwardzone.mdfile in the/usr/share/doc/ansible-freeipa/directory.
30.12. Ensuring a DNS Forward Zone has multiple forwarders in IdM using Ansible
Follow this procedure to use an Ansible playbook to ensure a DNS Forward Zone in IdM has multiple forwarders. In the example procedure below, the IdM administrator ensures the DNS forward zone for example.com is forwarding to 8.8.8.8 and 4.4.4.4.
Prerequisites
You have configured your Ansible control node to meet the following requirements:
- You are using Ansible version 2.14 or later.
-
You have installed the
ansible-freeipapackage on the Ansible controller. - The example assumes that in the ~/MyPlaybooks/ directory, you have created an Ansible inventory file with the fully-qualified domain name (FQDN) of the IdM server.
-
The example assumes that the secret.yml Ansible vault stores your
ipaadmin_password.
-
The target node, that is the node on which the
ansible-freeipamodule is executed, is part of the IdM domain as an IdM client, server or replica. - You know the IdM administrator password.
Procedure
Navigate to the
/usr/share/doc/ansible-freeipa/playbooks/dnsconfigdirectory:$ cd /usr/share/doc/ansible-freeipa/playbooks/dnsconfig
Open your inventory file and make sure that the IdM server that you want to configure is listed in the
[ipaserver]section. For example, to instruct Ansible to configureserver.idm.example.com, enter:[ipaserver] server.idm.example.com
Make a copy of the
forwarders-absent.ymlAnsible playbook file. For example:$ cp forwarders-absent.yml ensure-presence-multiple-forwarders.yml
-
Open the
ensure-presence-multiple-forwarders.ymlfile for editing. Adapt the file by setting the following variables:
-
Change the
namevariable for the playbook toPlaybook to ensure the presence of multiple forwarders in a dnsforwardzone in IdM DNS. -
In the
taskssection, change thenameof the task toEnsure presence of 8.8.8.8 and 4.4.4.4 forwarders in dnsforwardzone for example.com. -
In the
taskssection, change theipadnsconfigheading toipadnsforwardzone. In the
ipadnsforwardzonesection:-
Add the
ipaadmin_passwordvariable and set it to your IdM administrator password. -
Add the
namevariable and set it toexample.com. In the
forwarderssection:-
Remove the
ip_addressandportlines. Add the IP address of the DNS servers you want to ensure are present, preceded by a dash:
- 8.8.8.8 - 4.4.4.4
-
Remove the
- Change the state variable to present.
This the modified Ansible playbook file for the current example:
-
Add the
--- - name: name: Playbook to ensure the presence of multiple forwarders in a dnsforwardzone in IdM DNS hosts: ipaserver vars_files: - /home/user_name/MyPlaybooks/secret.yml tasks: - name: Ensure presence of 8.8.8.8 and 4.4.4.4 forwarders in dnsforwardzone for example.com ipadnsforwardzone: ipaadmin_password: "{{ ipaadmin_password }}" name: example.com forwarders: - 8.8.8.8 - 4.4.4.4 state: present-
Change the
- Save the file.
Run the playbook:
$ ansible-playbook --vault-password-file=password_file -v -i inventory.file ensure-presence-multiple-forwarders.yml
Additional resources
-
See the
README-dnsforwardzone.mdfile in the/usr/share/doc/ansible-freeipa/directory.
30.13. Ensuring a DNS Forward Zone is disabled in IdM using Ansible
Follow this procedure to use an Ansible playbook to ensure a DNS Forward Zone is disabled in IdM. In the example procedure below, the IdM administrator ensures the DNS forward zone for example.com is disabled.
Prerequisites
You have configured your Ansible control node to meet the following requirements:
- You are using Ansible version 2.14 or later.
-
You have installed the
ansible-freeipapackage on the Ansible controller. - The example assumes that in the ~/MyPlaybooks/ directory, you have created an Ansible inventory file with the fully-qualified domain name (FQDN) of the IdM server.
-
The example assumes that the secret.yml Ansible vault stores your
ipaadmin_password.
-
The target node, that is the node on which the
ansible-freeipamodule is executed, is part of the IdM domain as an IdM client, server or replica. - You know the IdM administrator password.
Procedure
Navigate to the
/usr/share/doc/ansible-freeipa/playbooks/dnsconfigdirectory:$ cd /usr/share/doc/ansible-freeipa/playbooks/dnsconfig
Open your inventory file and make sure that the IdM server that you want to configure is listed in the
[ipaserver]section. For example, to instruct Ansible to configureserver.idm.example.com, enter:[ipaserver] server.idm.example.com
Make a copy of the
forwarders-absent.ymlAnsible playbook file. For example:$ cp forwarders-absent.yml ensure-disabled-forwardzone.yml
-
Open the
ensure-disabled-forwardzone.ymlfile for editing. Adapt the file by setting the following variables:
-
Change the
namevariable for the playbook toPlaybook to ensure a dnsforwardzone is disabled in IdM DNS. -
In the
taskssection, change thenameof the task toEnsure a dnsforwardzone for example.com is disabled. -
In the
taskssection, change theipadnsconfigheading toipadnsforwardzone. In the
ipadnsforwardzonesection:-
Add the
ipaadmin_passwordvariable and set it to your IdM administrator password. -
Add the
namevariable and set it toexample.com. -
Remove the entire
forwarderssection. -
Change the
statevariable todisabled.
This the modified Ansible playbook file for the current example:
-
Add the
--- - name: Playbook to ensure a dnsforwardzone is disabled in IdM DNS hosts: ipaserver vars_files: - /home/user_name/MyPlaybooks/secret.yml tasks: - name: Ensure a dnsforwardzone for example.com is disabled ipadnsforwardzone: ipaadmin_password: "{{ ipaadmin_password }}" name: example.com state: disabled-
Change the
- Save the file.
Run the playbook:
$ ansible-playbook --vault-password-file=password_file -v -i inventory.file ensure-disabled-forwardzone.yml
Additional resources
-
See the
README-dnsforwardzone.mdfile in the/usr/share/doc/ansible-freeipa/directory.
30.14. Ensuring the absence of a DNS Forward Zone in IdM using Ansible
Follow this procedure to use an Ansible playbook to ensure the absence of a DNS Forward Zone in IdM. In the example procedure below, the IdM administrator ensures the absence of a DNS forward zone for example.com.
Prerequisites
You have configured your Ansible control node to meet the following requirements:
- You are using Ansible version 2.14 or later.
-
You have installed the
ansible-freeipapackage on the Ansible controller. - The example assumes that in the ~/MyPlaybooks/ directory, you have created an Ansible inventory file with the fully-qualified domain name (FQDN) of the IdM server.
-
The example assumes that the secret.yml Ansible vault stores your
ipaadmin_password.
-
The target node, that is the node on which the
ansible-freeipamodule is executed, is part of the IdM domain as an IdM client, server or replica. - You know the IdM administrator password.
Procedure
Navigate to the
/usr/share/doc/ansible-freeipa/playbooks/dnsconfigdirectory:$ cd /usr/share/doc/ansible-freeipa/playbooks/dnsconfig
Open your inventory file and make sure that the IdM server that you want to configure is listed in the
[ipaserver]section. For example, to instruct Ansible to configureserver.idm.example.com, enter:[ipaserver] server.idm.example.com
Make a copy of the
forwarders-absent.ymlAnsible playbook file. For example:$ cp forwarders-absent.yml ensure-absence-forwardzone.yml
-
Open the
ensure-absence-forwardzone.ymlfile for editing. Adapt the file by setting the following variables:
-
Change the
namevariable for the playbook toPlaybook to ensure the absence of a dnsforwardzone in IdM DNS. -
In the
taskssection, change thenameof the task toEnsure the absence of a dnsforwardzone for example.com. -
In the
taskssection, change theipadnsconfigheading toipadnsforwardzone. In the
ipadnsforwardzonesection:-
Add the
ipaadmin_passwordvariable and set it to your IdM administrator password. -
Add the
namevariable and set it toexample.com. -
Remove the entire
forwarderssection. -
Leave the
statevariable asabsent.
This the modified Ansible playbook file for the current example:
-
Add the
--- - name: Playbook to ensure the absence of a dnsforwardzone in IdM DNS hosts: ipaserver vars_files: - /home/user_name/MyPlaybooks/secret.yml tasks: - name: Ensure the absence of a dnsforwardzone for example.com ipadnsforwardzone: ipaadmin_password: "{{ ipaadmin_password }}" name: example.com state: absent-
Change the
- Save the file.
Run the playbook:
$ ansible-playbook --vault-password-file=password_file -v -i inventory.file ensure-absence-forwardzone.yml
Additional resources
-
See the
README-dnsforwardzone.mdfile in the/usr/share/doc/ansible-freeipa/directory.
Chapter 31. Using Ansible to manage DNS records in IdM
This chapter describes how to manage DNS records in Identity Management (IdM) using an Ansible playbook. As an IdM administrator, you can add, modify, and delete DNS records in IdM. The chapter contains the following sections:
- Ensuring the presence of A and AAAA DNS records in IdM using Ansible
- Ensuring the presence of A and PTR DNS records in IdM using Ansible
- Ensuring the presence of multiple DNS records in IdM using Ansible
- Ensuring the presence of multiple CNAME records in IdM using Ansible
- Ensuring the presence of an SRV record in IdM using Ansible
31.1. DNS records in IdM
Identity Management (IdM) supports many different DNS record types. The following four are used most frequently:
- A
This is a basic map for a host name and an IPv4 address. The record name of an A record is a host name, such as
www. TheIP Addressvalue of an A record is an IPv4 address, such as192.0.2.1.For more information about A records, see RFC 1035.
- AAAA
This is a basic map for a host name and an IPv6 address. The record name of an AAAA record is a host name, such as
www. TheIP Addressvalue is an IPv6 address, such as2001:DB8::1111.For more information about AAAA records, see RFC 3596.
- SRV
Service (SRV) resource records map service names to the DNS name of the server that is providing that particular service. For example, this record type can map a service like an LDAP directory to the server which manages it.
The record name of an SRV record has the format
_service._protocol, such as_ldap._tcp. The configuration options for SRV records include priority, weight, port number, and host name for the target service.For more information about SRV records, see RFC 2782.
- PTR
A pointer record (PTR) adds a reverse DNS record, which maps an IP address to a domain name.
NoteAll reverse DNS lookups for IPv4 addresses use reverse entries that are defined in the
in-addr.arpa.domain. The reverse address, in human-readable form, is the exact reverse of the regular IP address, with thein-addr.arpa.domain appended to it. For example, for the network address192.0.2.0/24, the reverse zone is2.0.192.in-addr.arpa.The record name of a PTR must be in the standard format specified in RFC 1035, extended in RFC 2317, and RFC 3596. The host name value must be a canonical host name of the host for which you want to create the record.
NoteReverse zones can also be configured for IPv6 addresses, with zones in the
.ip6.arpa.domain. For more information about IPv6 reverse zones, see RFC 3596.
When adding DNS resource records, note that many of the records require different data. For example, a CNAME record requires a host name, while an A record requires an IP address. In the IdM Web UI, the fields in the form for adding a new record are updated automatically to reflect what data is required for the currently selected type of record.
31.2. Common ipa dnsrecord-* options
You can use the following options when adding, modifying and deleting the most common DNS resource record types in Identity Management (IdM):
- A (IPv4)
- AAAA (IPv6)
- SRV
- PTR
In Bash, you can define multiple entries by listing the values in a comma-separated list inside curly braces, such as --option={val1,val2,val3}.
Table 31.1. General Record Options
| Option | Description |
|---|---|
|
| Sets the time to live for the record. |
|
| Parses the raw DNS records and returns them in a structured format. |
Table 31.2. "A" record options
| Option | Description | Examples |
|---|---|---|
|
| Passes a single A record or a list of A records. |
|
| Can create a wildcard A record with a given IP address. |
| |
|
|
Gives the IP address for the record. When creating a record, the option to specify the |
|
[a]
The example creates a wildcard A record with the IP address of 192.0.2.123.
| ||
Table 31.3. "AAAA" record options
| Option | Description | Example |
|---|---|---|
|
| Passes a single AAAA (IPv6) record or a list of AAAA records. |
|
|
|
Gives the IPv6 address for the record. When creating a record, the option to specify the |
|
Table 31.4. "PTR" record options
| Option | Description | Example |
|---|---|---|
|
|
Passes a single PTR record or a list of PTR records. When adding the reverse DNS record, the zone name used with the |
|
|
| ||
|
| Gives the host name for the record. |
Table 31.5. "SRV" Record Options
| Option | Description | Example |
|---|---|---|
|
|
Passes a single SRV record or a list of SRV records. In the examples on the right, _ldap._tcp defines the service type and the connection protocol for the SRV record. The |
|
|
| ||
|
| Sets the priority of the record. There can be multiple SRV records for a service type. The priority (0 - 65535) sets the rank of the record; the lower the number, the higher the priority. A service has to use the record with the highest priority first. |
|
|
| Sets the weight of the record. This helps determine the order of SRV records with the same priority. The set weights should add up to 100, representing the probability (in percentages) that a particular record is used. |
|
|
| Gives the port for the service on the target host. |
|
|
| Gives the domain name of the target host. This can be a single period (.) if the service is not available in the domain. |
Additional resources
-
Run
ipa dnsrecord-add --help.
31.3. Ensuring the presence of A and AAAA DNS records in IdM using Ansible
Follow this procedure to use an Ansible playbook to ensure that A and AAAA records for a particular IdM host are present. In the example used in the procedure below, an IdM administrator ensures the presence of A and AAAA records for host1 in the idm.example.com DNS zone.
Prerequisites
You have configured your Ansible control node to meet the following requirements:
- You are using Ansible version 2.14 or later.
-
You have installed the
ansible-freeipapackage on the Ansible controller. - The example assumes that in the ~/MyPlaybooks/ directory, you have created an Ansible inventory file with the fully-qualified domain name (FQDN) of the IdM server.
-
The example assumes that the secret.yml Ansible vault stores your
ipaadmin_password.
-
The target node, that is the node on which the
ansible-freeipamodule is executed, is part of the IdM domain as an IdM client, server or replica. - You know the IdM administrator password.
- The idm.example.com zone exists and is managed by IdM DNS. For more information about adding a primary DNS zone in IdM DNS, see Using Ansible playbooks to manage IdM DNS zones.
Procedure
Navigate to the
/usr/share/doc/ansible-freeipa/playbooks/dnsrecorddirectory:$ cd /usr/share/doc/ansible-freeipa/playbooks/dnsrecordOpen your inventory file and ensure that the IdM server that you want to configure is listed in the
[ipaserver]section. For example, to instruct Ansible to configure server.idm.example.com, enter:[ipaserver] server.idm.example.com
Make a copy of the ensure-A-and-AAAA-records-are-present.yml Ansible playbook file. For example:
$ cp ensure-A-and-AAAA-records-are-present.yml ensure-A-and-AAAA-records-are-present-copy.yml- Open the ensure-A-and-AAAA-records-are-present-copy.yml file for editing.
Adapt the file by setting the following variables in the
ipadnsrecordtask section:-
Set the
ipaadmin_passwordvariable to your IdM administrator password. -
Set the
zone_namevariable to idm.example.com. -
In the
recordsvariable, set thenamevariable to host1, and thea_ip_addressvariable to 192.168.122.123. In the
recordsvariable, set thenamevariable to host1, and theaaaa_ip_addressvariable to ::1.This is the modified Ansible playbook file for the current example:
--- - name: Ensure A and AAAA records are present hosts: ipaserver become: true gather_facts: false tasks: # Ensure A and AAAA records are present - name: Ensure that 'host1' has A and AAAA records. ipadnsrecord: ipaadmin_password: "{{ ipaadmin_password }}" zone_name: idm.example.com records: - name: host1 a_ip_address: 192.168.122.123 - name: host1 aaaa_ip_address: ::1-
Set the
- Save the file.
Run the playbook:
$ ansible-playbook --vault-password-file=password_file -v -i inventory.file ensure-A-and-AAAA-records-are-present-copy.yml
Additional resources
- See DNS records in IdM.
-
See the
README-dnsrecord.mdfile in the/usr/share/doc/ansible-freeipa/directory. -
See sample Ansible playbooks in the
/usr/share/doc/ansible-freeipa/playbooks/dnsrecorddirectory.
31.4. Ensuring the presence of A and PTR DNS records in IdM using Ansible
Follow this procedure to use an Ansible playbook to ensure that an A record for a particular IdM host is present, with a corresponding PTR record. In the example used in the procedure below, an IdM administrator ensures the presence of A and PTR records for host1 with an IP address of 192.168.122.45 in the idm.example.com zone.
Prerequisites
You have configured your Ansible control node to meet the following requirements:
- You are using Ansible version 2.14 or later.
-
You have installed the
ansible-freeipapackage on the Ansible controller. - The example assumes that in the ~/MyPlaybooks/ directory, you have created an Ansible inventory file with the fully-qualified domain name (FQDN) of the IdM server.
-
The example assumes that the secret.yml Ansible vault stores your
ipaadmin_password.
-
The target node, that is the node on which the
ansible-freeipamodule is executed, is part of the IdM domain as an IdM client, server or replica. - You know the IdM administrator password.
- The idm.example.com DNS zone exists and is managed by IdM DNS. For more information about adding a primary DNS zone in IdM DNS, see Using Ansible playbooks to manage IdM DNS zones.
Procedure
Navigate to the
/usr/share/doc/ansible-freeipa/playbooks/dnsrecorddirectory:$ cd /usr/share/doc/ansible-freeipa/playbooks/dnsrecordOpen your inventory file and ensure that the IdM server that you want to configure is listed in the
[ipaserver]section. For example, to instruct Ansible to configure server.idm.example.com, enter:[ipaserver] server.idm.example.com
Make a copy of the ensure-dnsrecord-with-reverse-is-present.yml Ansible playbook file. For example:
$ cp ensure-dnsrecord-with-reverse-is-present.yml ensure-dnsrecord-with-reverse-is-present-copy.yml- Open the ensure-dnsrecord-with-reverse-is-present-copy.yml file for editing.
Adapt the file by setting the following variables in the
ipadnsrecordtask section:-
Set the
ipaadmin_passwordvariable to your IdM administrator password. -
Set the
namevariable to host1. -
Set the
zone_namevariable to idm.example.com. -
Set the
ip_addressvariable to 192.168.122.45. Set the
create_reversevariable to yes.This is the modified Ansible playbook file for the current example:
--- - name: Ensure DNS Record is present. hosts: ipaserver become: true gather_facts: false tasks: # Ensure that dns record is present - ipadnsrecord: ipaadmin_password: "{{ ipaadmin_password }}" name: host1 zone_name: idm.example.com ip_address: 192.168.122.45 create_reverse: yes state: present-
Set the
- Save the file.
Run the playbook:
$ ansible-playbook --vault-password-file=password_file -v -i inventory.file ensure-dnsrecord-with-reverse-is-present-copy.yml
Additional resources
- See DNS records in IdM.
-
See the
README-dnsrecord.mdfile in the/usr/share/doc/ansible-freeipa/directory. -
See sample Ansible playbooks in the
/usr/share/doc/ansible-freeipa/playbooks/dnsrecorddirectory.
31.5. Ensuring the presence of multiple DNS records in IdM using Ansible
Follow this procedure to use an Ansible playbook to ensure that multiple values are associated with a particular IdM DNS record. In the example used in the procedure below, an IdM administrator ensures the presence of multiple A records for host1 in the idm.example.com DNS zone.
Prerequisites
You have configured your Ansible control node to meet the following requirements:
- You are using Ansible version 2.14 or later.
-
You have installed the
ansible-freeipapackage on the Ansible controller. - The example assumes that in the ~/MyPlaybooks/ directory, you have created an Ansible inventory file with the fully-qualified domain name (FQDN) of the IdM server.
-
The example assumes that the secret.yml Ansible vault stores your
ipaadmin_password.
-
The target node, that is the node on which the
ansible-freeipamodule is executed, is part of the IdM domain as an IdM client, server or replica. - You know the IdM administrator password.
- The idm.example.com zone exists and is managed by IdM DNS. For more information about adding a primary DNS zone in IdM DNS, see Using Ansible playbooks to manage IdM DNS zones.
Procedure
Navigate to the
/usr/share/doc/ansible-freeipa/playbooks/dnsrecorddirectory:$ cd /usr/share/doc/ansible-freeipa/playbooks/dnsrecordOpen your inventory file and ensure that the IdM server that you want to configure is listed in the
[ipaserver]section. For example, to instruct Ansible to configure server.idm.example.com, enter:[ipaserver] server.idm.example.com
Make a copy of the ensure-presence-multiple-records.yml Ansible playbook file. For example:
$ cp ensure-presence-multiple-records.yml ensure-presence-multiple-records-copy.yml- Open the ensure-presence-multiple-records-copy.yml file for editing.
Adapt the file by setting the following variables in the
ipadnsrecordtask section:-
Set the
ipaadmin_passwordvariable to your IdM administrator password. -
In the
recordssection, set thenamevariable to host1. -
In the
recordssection, set thezone_namevariable to idm.example.com. -
In the
recordssection, set thea_recvariable to 192.168.122.112 and to 192.168.122.122. Define a second record in the
recordssection:-
Set the
namevariable to host1. -
Set the
zone_namevariable to idm.example.com. -
Set the
aaaa_recvariable to ::1.
This is the modified Ansible playbook file for the current example:
-
Set the
--- - name: Test multiple DNS Records are present. hosts: ipaserver become: true gather_facts: false tasks: # Ensure that multiple dns records are present - ipadnsrecord: ipaadmin_password: "{{ ipaadmin_password }}" records: - name: host1 zone_name: idm.example.com a_rec: 192.168.122.112 a_rec: 192.168.122.122 - name: host1 zone_name: idm.example.com aaaa_rec: ::1-
Set the
- Save the file.
Run the playbook:
$ ansible-playbook --vault-password-file=password_file -v -i inventory.file ensure-presence-multiple-records-copy.yml
Additional resources
- See DNS records in IdM.
-
See the
README-dnsrecord.mdfile in the/usr/share/doc/ansible-freeipa/directory. -
See sample Ansible playbooks in the
/usr/share/doc/ansible-freeipa/playbooks/dnsrecorddirectory.
31.6. Ensuring the presence of multiple CNAME records in IdM using Ansible
A Canonical Name record (CNAME record) is a type of resource record in the Domain Name System (DNS) that maps one domain name, an alias, to another name, the canonical name.
You may find CNAME records useful when running multiple services from a single IP address: for example, an FTP service and a web service, each running on a different port.
Follow this procedure to use an Ansible playbook to ensure that multiple CNAME records are present in IdM DNS. In the example used in the procedure below, host03 is both an HTTP server and an FTP server. The IdM administrator ensures the presence of the www and ftp CNAME records for the host03 A record in the idm.example.com zone.
Prerequisites
You have configured your Ansible control node to meet the following requirements:
- You are using Ansible version 2.14 or later.
-
You have installed the
ansible-freeipapackage on the Ansible controller. - The example assumes that in the ~/MyPlaybooks/ directory, you have created an Ansible inventory file with the fully-qualified domain name (FQDN) of the IdM server.
-
The example assumes that the secret.yml Ansible vault stores your
ipaadmin_password.
-
The target node, that is the node on which the
ansible-freeipamodule is executed, is part of the IdM domain as an IdM client, server or replica. - You know the IdM administrator password.
- The idm.example.com zone exists and is managed by IdM DNS. For more information about adding a primary DNS zone in IdM DNS, see Using Ansible playbooks to manage IdM DNS zones.
- The host03 A record exists in the idm.example.com zone.
Procedure
Navigate to the
/usr/share/doc/ansible-freeipa/playbooks/dnsrecorddirectory:$ cd /usr/share/doc/ansible-freeipa/playbooks/dnsrecordOpen your inventory file and ensure that the IdM server that you want to configure is listed in the
[ipaserver]section. For example, to instruct Ansible to configure server.idm.example.com, enter:[ipaserver] server.idm.example.com
Make a copy of the ensure-CNAME-record-is-present.yml Ansible playbook file. For example:
$ cp ensure-CNAME-record-is-present.yml ensure-CNAME-record-is-present-copy.yml- Open the ensure-CNAME-record-is-present-copy.yml file for editing.
Adapt the file by setting the following variables in the
ipadnsrecordtask section:-
(Optional) Adapt the description provided by the
nameof the play. -
Set the
ipaadmin_passwordvariable to your IdM administrator password. -
Set the
zone_namevariable to idm.example.com. In the
recordsvariable section, set the following variables and values:-
Set the
namevariable to www. -
Set the
cname_hostnamevariable to host03. -
Set the
namevariable to ftp. -
Set the
cname_hostnamevariable to host03.
This is the modified Ansible playbook file for the current example:
-
Set the
--- - name: Ensure that 'www.idm.example.com' and 'ftp.idm.example.com' CNAME records point to 'host03.idm.example.com'. hosts: ipaserver become: true gather_facts: false tasks: - ipadnsrecord: ipaadmin_password: "{{ ipaadmin_password }}" zone_name: idm.example.com records: - name: www cname_hostname: host03 - name: ftp cname_hostname: host03-
(Optional) Adapt the description provided by the
- Save the file.
Run the playbook:
$ ansible-playbook --vault-password-file=password_file -v -i inventory.file ensure-CNAME-record-is-present.yml
Additional resources
-
See the
README-dnsrecord.mdfile in the/usr/share/doc/ansible-freeipa/directory. -
See sample Ansible playbooks in the
/usr/share/doc/ansible-freeipa/playbooks/dnsrecorddirectory.
31.7. Ensuring the presence of an SRV record in IdM using Ansible
A DNS service (SRV) record defines the hostname, port number, transport protocol, priority and weight of a service available in a domain. In Identity Management (IdM), you can use SRV records to locate IdM servers and replicas.
Follow this procedure to use an Ansible playbook to ensure that an SRV record is present in IdM DNS. In the example used in the procedure below, an IdM administrator ensures the presence of the _kerberos._udp.idm.example.com SRV record with the value of 10 50 88 idm.example.com. This sets the following values:
- It sets the priority of the service to 10.
- It sets the weight of the service to 50.
- It sets the port to be used by the service to 88.
Prerequisites
You have configured your Ansible control node to meet the following requirements:
- You are using Ansible version 2.14 or later.
-
You have installed the
ansible-freeipapackage on the Ansible controller. - The example assumes that in the ~/MyPlaybooks/ directory, you have created an Ansible inventory file with the fully-qualified domain name (FQDN) of the IdM server.
-
The example assumes that the secret.yml Ansible vault stores your
ipaadmin_password.
-
The target node, that is the node on which the
ansible-freeipamodule is executed, is part of the IdM domain as an IdM client, server or replica. - You know the IdM administrator password.
- The idm.example.com zone exists and is managed by IdM DNS. For more information about adding a primary DNS zone in IdM DNS, see Using Ansible playbooks to manage IdM DNS zones.
Procedure
Navigate to the
/usr/share/doc/ansible-freeipa/playbooks/dnsrecorddirectory:$ cd /usr/share/doc/ansible-freeipa/playbooks/dnsrecordOpen your inventory file and ensure that the IdM server that you want to configure is listed in the
[ipaserver]section. For example, to instruct Ansible to configure server.idm.example.com, enter:[ipaserver] server.idm.example.com
Make a copy of the ensure-SRV-record-is-present.yml Ansible playbook file. For example:
$ cp ensure-SRV-record-is-present.yml ensure-SRV-record-is-present-copy.yml- Open the ensure-SRV-record-is-present-copy.yml file for editing.
Adapt the file by setting the following variables in the
ipadnsrecordtask section:-
Set the
ipaadmin_passwordvariable to your IdM administrator password. -
Set the
namevariable to _kerberos._udp.idm.example.com. -
Set the
srv_recvariable to '10 50 88 idm.example.com'. Set the
zone_namevariable to idm.example.com.This the modified Ansible playbook file for the current example:
--- - name: Test multiple DNS Records are present. hosts: ipaserver become: true gather_facts: false tasks: # Ensure a SRV record is present - ipadnsrecord: ipaadmin_password: "{{ ipaadmin_password }}" name: _kerberos._udp.idm.example.com srv_rec: ’10 50 88 idm.example.com’ zone_name: idm.example.com state: present-
Set the
- Save the file.
Run the playbook:
$ ansible-playbook --vault-password-file=password_file -v -i inventory.file ensure-SRV-record-is-present.yml
Additional resources
- See DNS records in IdM.
-
See the
README-dnsrecord.mdfile in the/usr/share/doc/ansible-freeipa/directory. -
See sample Ansible playbooks in the
/usr/share/doc/ansible-freeipa/playbooks/dnsrecorddirectory.
Chapter 33. Using Ansible to integrate IdM with NIS domains and netgroups
33.1. NIS and its benefits
In UNIX environments, the network information service (NIS) is a common way to centrally manage identities and authentication. NIS, which was originally named Yellow Pages (YP), centrally manages authentication and identity information such as:
- Users and passwords
- Host names and IP addresses
- POSIX groups
For modern network infrastructures, NIS is considered too insecure because, for example, it neither provides host authentication, nor is data sent encrypted over the network. To work around the problems, NIS is often integrated with other protocols to enhance security.
If you use Identity Management (IdM), you can use the NIS server plug-in to connect clients that cannot be fully migrated to IdM. IdM integrates netgroups and other NIS data into the IdM domain. Additionally, you can easily migrate user and host identities from a NIS domain to IdM.
Netgroups can be used everywhere that NIS groups are expected.
Additional resources
33.2. NIS in IdM
NIS objects in IdM
NIS objects are integrated and stored in the Directory Server back end in compliance with RFC 2307. IdM creates NIS objects in the LDAP directory and clients retrieve them through, for example, System Security Services Daemon (SSSD) or nss_ldap using an encrypted LDAP connection.
IdM manages netgroups, accounts, groups, hosts, and other data. IdM uses a NIS listener to map passwords, groups, and netgroups to IdM entries.
NIS Plug-ins in IdM
For NIS support, IdM uses the following plug-ins provided in the slapi-nis package:
- NIS Server Plug-in
- The NIS Server plug-in enables the IdM-integrated LDAP server to act as a NIS server for clients. In this role, Directory Server dynamically generates and updates NIS maps according to the configuration. Using the plug-in, IdM serves clients using the NIS protocol as an NIS server.
- Schema Compatibility Plug-in
The Schema Compatibility plug-in enables the Directory Server back end to provide an alternate view of entries stored in part of the directory information tree (DIT). This includes adding, dropping, or renaming attribute values, and optionally retrieving values for attributes from multiple entries in the tree.
For further details, see the
/usr/share/doc/slapi-nis-version/sch-getting-started.txtfile.
33.3. NIS netgroups in IdM
NIS entities can be stored in netgroups. Compared to UNIX groups, netgroups provide support for:
- Nested groups (groups as members of other groups).
- Grouping hosts.
A netgroup defines a set of the following information: host, user, and domain. This set is called a triple. These three fields can contain:
- A value.
-
A dash (
-), which specifies "no valid value" - No value. An empty field specifies a wildcard.
(host.example.com,,nisdomain.example.com) (-,user,nisdomain.example.com)
When a client requests a NIS netgroup, IdM translates the LDAP entry :
- To a traditional NIS map and sends it to the client over the NIS protocol by using the NIS plug-in.
- To an LDAP format that is compliant with RFC 2307 or RFC 2307bis.
33.4. Using Ansible to ensure that a netgroup is present
You can use an Ansible playbook to ensure that an IdM netgroup is present. The example describes how to ensure that the TestNetgroup1 group is present.
Prerequisites
You have configured your Ansible control node to meet the following requirements:
- You are using Ansible version 2.14 or later.
-
You have installed the
ansible-freeipapackage on the Ansible controller. - You have created an Ansible inventory file with the fully-qualified domain name (FQDN) of the IdM server in the ~/MyPlaybooks/ directory.
-
You have stored your
ipaadmin_passwordin the secret.yml Ansible vault.
Procedure
Create your Ansible playbook file netgroup-present.yml with the following content:
--- - name: Playbook to manage IPA netgroup. hosts: ipaserver become: no vars_files: - /home/user_name/MyPlaybooks/secret.yml tasks: - name: Ensure netgroup members are present ipanetgroup: ipaadmin_password: "{{ ipaadmin_password }}" name: TestNetgroup1Run the playbook:
$ ansible-playbook --vault-password-file=password_file -v -i path_to_inventory_directory/inventory.file path_to_playbooks_directory_/netgroup-present.yml
Additional resources
- NIS in IdM
-
/usr/share/doc/ansible-freeipa/README-netgroup.md -
/usr/share/doc/ansible-freeipa/playbooks/netgroup
33.5. Using Ansible to ensure that members are present in a netgroup
You can use an Ansible playbook to ensure that IdM users, groups, and netgroups are members of a netgroup. The example describes how to ensure that the TestNetgroup1 group has the following members:
- The user1 and user2 IdM users
- The group1 IdM group
- The admins netgroup
- An idmclient1 host that is an IdM client
Prerequisites
You have configured your Ansible control node to meet the following requirements:
- You are using Ansible version 2.14 or later.
-
You have installed the
ansible-freeipapackage on the Ansible controller. - You have created an Ansible inventory file with the fully-qualified domain name (FQDN) of the IdM server in the ~/MyPlaybooks/ directory.
-
You have stored your
ipaadmin_passwordin the secret.yml Ansible vault.
- The TestNetgroup1 IdM netgroup exists.
- The user1 and user2 IdM users exist.
- The group1 IdM group exists.
- The admins IdM netgroup exists.
Procedure
Create your Ansible playbook file IdM-members-present-in-a-netgroup.yml with the following content:
--- - name: Playbook to manage IPA netgroup. hosts: ipaserver become: no vars_files: - /home/user_name/MyPlaybooks/secret.yml tasks: - name: Ensure netgroup members are present ipanetgroup: ipaadmin_password: "{{ ipaadmin_password }}" name: TestNetgroup1 user: user1,user2 group: group1 host: idmclient1 netgroup: admins action: memberRun the playbook:
$ ansible-playbook --vault-password-file=password_file -v -i path_to_inventory_directory/inventory.file path_to_playbooks_directory_/IdM-members-present-in-a-netgroup.yml
Additional resources
- NIS in IdM
-
/usr/share/doc/ansible-freeipa/README-netgroup.md -
/usr/share/doc/ansible-freeipa/playbooks/netgroup
33.6. Using Ansible to ensure that a member is absent from a netgroup
You can use an Ansible playbook to ensure that IdM users are members of a netgroup. The example describes how to ensure that the TestNetgroup1 group does not have the user1 IdM user among its members. netgroup
Prerequisites
You have configured your Ansible control node to meet the following requirements:
- You are using Ansible version 2.14 or later.
-
You have installed the
ansible-freeipapackage on the Ansible controller. - You have created an Ansible inventory file with the fully-qualified domain name (FQDN) of the IdM server in the ~/MyPlaybooks/ directory.
-
You have stored your
ipaadmin_passwordin the secret.yml Ansible vault.
- The TestNetgroup1 netgroup exists.
Procedure
Create your Ansible playbook file IdM-member-absent-from-a-netgroup.yml with the following content:
--- - name: Playbook to manage IPA netgroup. hosts: ipaserver become: no vars_files: - /home/user_name/MyPlaybooks/secret.yml tasks: - name: Ensure netgroup user, "user1", is absent ipanetgroup: ipaadmin_password: "{{ ipaadmin_password }}" name: TestNetgroup1 user: "user1" action: member state: absentRun the playbook:
$ ansible-playbook --vault-password-file=password_file -v -i path_to_inventory_directory/inventory.file path_to_playbooks_directory_/IdM-member-absent-from-a-netgroup.yml
Additional resources
- NIS in IdM
-
/usr/share/doc/ansible-freeipa/README-netgroup.md -
/usr/share/doc/ansible-freeipa/playbooks/netgroup
33.7. Using Ansible to ensure that a netgroup is absent
You can use an Ansible playbook to ensure that a netgroup does not exist in Identity Management (IdM). The example describes how to ensure that the TestNetgroup1 group does not exist in your IdM domain.
Prerequisites
You have configured your Ansible control node to meet the following requirements:
- You are using Ansible version 2.14 or later.
-
You have installed the
ansible-freeipapackage on the Ansible controller. - You have created an Ansible inventory file with the fully-qualified domain name (FQDN) of the IdM server in the ~/MyPlaybooks/ directory.
-
You have stored your
ipaadmin_passwordin the secret.yml Ansible vault.
Procedure
Create your Ansible playbook file netgroup-absent.yml with the following content:
--- - name: Playbook to manage IPA netgroup. hosts: ipaserver become: no vars_files: - /home/user_name/MyPlaybooks/secret.yml tasks: - name: Ensure netgroup my_netgroup1 is absent ipanetgroup: ipaadmin_password: "{{ ipaadmin_password }}" name: my_netgroup1 state: absentRun the playbook:
$ ansible-playbook --vault-password-file=password_file -v -i path_to_inventory_directory/inventory.file path_to_playbooks_directory_/netgroup-absent.yml
Additional resources
- NIS in IdM
-
/usr/share/doc/ansible-freeipa/README-netgroup.md -
/usr/share/doc/ansible-freeipa/playbooks/netgroup
Chapter 34. Using Ansible to configure HBAC and sudo rules in IdM
Using host-based access control (HBAC) in Identity Management (IdM), you can define policies that restrict access to hosts or services based on the following:
- The user attempting to log in and this user’s groups
- The host that a user is trying to access and the host groups to which that host belongs
- The service that is being used to access a host
Using sudo, a user can run programs as another user, with different privileges, for example root privileges. In IdM, you can manage sudo rules centrally. You can define sudo rules based on user groups, host groups and command groups, as well as individual users, hosts and commands.
Complete this procedure to ensure the presence of the following HBAC and sudo rules for IdM users:
- jane can only access host client01.idm.example.com.
- john can only access host client02.idm.example.com.
-
Members of the
adminsgroup, which includes the defaultadminuser as well as the regular alice user, can access any IdM host. Members of the
adminsgroup can runsudowith the following commands on any IdM host:-
/usr/sbin/reboot -
/usr/bin/less -
/usr/sbin/setenforce
-
The following diagram represents the desired configuration described above:
Figure 34.1. IdM HBAC and SUDO rules diagram
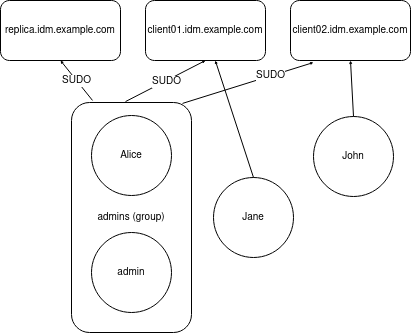
Prerequisites
On the control node:
- You are using Ansible version 2.14 or later.
-
You have installed the
ansible-freeipapackage. - You have created an Ansible inventory file with the fully-qualified domain name (FQDN) of the IdM server in the ~/MyPlaybooks/ directory.
-
You have stored your
ipaadmin_passwordin the secret.yml Ansible vault.
- The users jane, john and alice exist in IdM. Passwords are configured for these accounts.
Procedure
Create your Ansible playbook file add-hbac-and-sudo-rules-to-idm.yml with the following content:
--- - name: Playbook to manage IPA HBAC and SUDO rules hosts: ipaserver become: false gather_facts: false vars_files: - /home/<user_name>/MyPlaybooks/secret.yml module_defaults: ipahbacrule: ipaadmin_password: "{{ ipaadmin_password }}" ipagroup: ipaadmin_password: "{{ ipaadmin_password }}" ipasudocmd: ipaadmin_password: "{{ ipaadmin_password }}" ipasudocmdgroup: ipaadmin_password: "{{ ipaadmin_password }}" ipasudorule: ipaadmin_password: "{{ ipaadmin_password }}" tasks: - name: HBAC Rule for Jane - can log in to client01 ipahbacrule: # Creates the rule name: Jane_rule hbacsvc: - sshd - login host: # Host name - client01.idm.example.com user: - jane - name: HBAC Rule for John - can log in to client02 ipahbacrule: # Creates the rule name: john_rule hbacsvc: - sshd - login host: # Host name - client02.idm.example.com user: - john - name: Add user member alice to group admins ipagroup: name: admins action: member user: - alice - name: HBAC Rule for IdM administrators ipahbacrule: # Rule to allow admins full access name: admin_access # Rule name servicecat: all # All services hostcat: all # All hosts group: # User group - admins - name: Add reboot command to SUDO ipasudocmd: name: /usr/sbin/reboot state: present - name: Add less command to SUDO ipasudocmd: name: /usr/bin/less state: present - name: Add setenforce command to SUDO ipasudocmd: name: /usr/sbin/setenforce state: present - name: Create a SUDO command group ipasudocmdgroup: name: cmd_grp_1 description: "Group of important commands" sudocmd: - /usr/sbin/setenforce - /usr/bin/less - /usr/sbin/reboot action: sudocmdgroup state: present - name: Create a SUDO rule with a SUDO command group ipasudorule: name: sudo_rule_1 allow_sudocmdgroup: - cmd_grp_1 group: admins state: present - name: Disable allow_all HBAC Rule ipahbacrule: # Rule to allow admins full access name: allow_all # Rule name state: disabled # Disables rule to allow everyone the ability to loginRun the playbook:
$ ansible-playbook --vault-password-file=password_file -i inventory add-hbac-and-sudo-rules-to-idm.yml
Verification
Connect to client01 as the jane user:
~]$ ssh jane@client01 Password: Last login: Fri Aug 11 15:32:18 2023 from 192.168.122.1 [jane@client01 ~]$The output verifies that jane has logged in to client01.
Try to connect to client02 as the jane user:
~]$ ssh jane@client02 Password: Connection closed by 192.168.122.47 port 22The output verifies that jane cannot log in to client02.
Connect to client02 as the alice user:
~]$ ssh alice@client02 Password: Last login: Fri Aug 10 16:13:43 2023 from 192.168.122.1The output verifies that alice has logged in to client02.
Try to view the contents of the
/etc/sssd/sssd.conffile usinglesswithout invoking the superuser privileges:[alice@client02 ~]$ less /etc/sssd/sssd.conf /etc/sssd/sssd.conf: Permission deniedThe attempt fails as the file is not readable by anyone except the owner of the file, which is
root.Invoke the
rootprivileges to view the contents of the/etc/sssd/sssd.conffile usingless:[alice@client02 ~]$ sudo less /etc/sssd/sssd.conf [sudo] password for alice: [domain/idm.example.com] id_provider = ipa ipa_server_mode = True [...]The output verifies that alice can execute the
lesscommand on the/etc/sssd/sssd.conffile.
Additional resources
Chapter 35. Using Ansible to delegate authentication for IdM users to external identity providers
You can use the idp ansible-freeipa module to associate users with external identity providers (IdP) that support the OAuth 2 device authorization flow. If an IdP reference and an associated IdP user ID exist, you can use them to enable IdP authentication for an IdM user with the user ansible-freeipa module.
Afterward, if these users authenticate with the SSSD version 2.7.0 or later, available in RHEL 8.7 or later, they receive RHEL Identity Management (IdM) single sign-on capabilities with Kerberos tickets after performing authentication and authorization at the external IdP.
35.1. The benefits of connecting IdM to an external IdP
As an administrator, you might want to allow users stored in an external identity source, such as a cloud services provider, to access RHEL systems joined to your Identity Management (IdM) environment. To achieve this, you can delegate the authentication and authorization process of issuing Kerberos tickets for these users to that external entity.
You can use this feature to expand IdM’s capabilities and allow users stored in external identity providers (IdPs) to access Linux systems managed by IdM.
35.2. How IdM incorporates logins via external IdPs
SSSD 2.7.0 contains the sssd-idp package, which implements the idp Kerberos pre-authentication method. This authentication method follows the OAuth 2.0 Device Authorization Grant flow to delegate authorization decisions to external IdPs:
-
An IdM client user initiates OAuth 2.0 Device Authorization Grant flow, for example, by attempting to retrieve a Kerberos TGT with the
kinitutility at the command line. - A special code and website link are sent from the Authorization Server to the IdM KDC backend.
- The IdM client displays the link and the code to the user. In this example, the IdM client outputs the link and code on the command line.
The user opens the website link in a browser, which can be on another host, a mobile phone, and so on:
- The user enters the special code.
- If necessary, the user logs in to the OAuth 2.0-based IdP.
- The user is prompted to authorize the client to access information.
- The user confirms access at the original device prompt. In this example, the user hits the Enter key at the command line.
- The IdM KDC backend polls the OAuth 2.0 Authorization Server for access to user information.
What is supported:
-
Logging in remotely via SSH with the
keyboard-interactiveauthentication method enabled, which allows calling Pluggable Authentication Module (PAM) libraries. -
Logging in locally with the console via the
logindservice. -
Retrieving a Kerberos ticket-granting ticket (TGT) with the
kinitutility.
What is currently not supported:
- Logging in to the IdM WebUI directly. To log in to the IdM WebUI, you must first acquire a Kerberos ticket.
- Logging in to Cockpit WebUI directly. To log in to the Cockpit WebUI, you must first acquire a Kerberos ticket.
35.3. Using Ansible to create a reference to an external identity provider
To connect external identity providers (IdPs) to your Identity Management (IdM) environment, create IdP references in IdM. Complete this procedure to use the idp ansible-freeipa module to configure a reference to the github external IdP.
Prerequisites
You have registered IdM as an OAuth application to your external IdP, and generated a client ID and client secret on the device that an IdM user will be using to authenticate to IdM. The example assumes that:
- my_github_account_name is the github user whose account the IdM user will be using to authenticate to IdM.
-
The
client IDis 2efe1acffe9e8ab869f4. -
The
client secretis 656a5228abc5f9545c85fa626aecbf69312d398c.
- Your IdM servers are using RHEL 8.7 or later.
- Your IdM servers are using SSSD 2.7.0 or later.
You have configured your Ansible control node to meet the following requirements:
- You are using Ansible version 2.14 or later.
-
You have installed the
ansible-freeipapackage on the Ansible controller. - You are using RHEL 8.10 or later.
- The example assumes that in the ~/MyPlaybooks/ directory, you have created an Ansible inventory file with the fully-qualified domain name (FQDN) of the IdM server.
-
The example assumes that the secret.yml Ansible vault stores your
ipaadmin_password.
Procedure
On your Ansible control node, create an configure-external-idp-reference.yml playbook:
--- - name: Configure external IdP hosts: ipaserver become: false gather_facts: false tasks: - name: Ensure a reference to github external provider is available ipaidp: ipaadmin_password: "{{ ipaadmin_password }}" name: github_idp provider: github client_ID: 2efe1acffe9e8ab869f4 secret: 656a5228abc5f9545c85fa626aecbf69312d398c idp_user_id: my_github_account_name- Save the file.
Run the Ansible playbook. Specify the playbook file, the file storing the password protecting the secret.yml file, and the inventory file:
$ ansible-playbook --vault-password-file=password_file -v -i inventory configure-external-idp-reference.yml
Verification
On an IdM client, verify that the output of the
ipa idp-showcommand shows the IdP reference you have created.[idmuser@idmclient ~]$ ipa idp-show github_idp
Additional resources
-
The idp
ansible-freeipaupstream documentation
35.4. Using Ansible to enable an IdM user to authenticate via an external IdP
You can use the user ansible-freeipa module to enable an Identity Management (IdM) user to authenticate via an external identity provider (IdP). To do that, associate the external IdP reference you have previously created with the IdM user account. Complete this procedure to use Ansible to associate an external IdP reference named github_idp with the IdM user named idm-user-with-external-idp. As a result of the procedure, the user is able to use the my_github_account_name github identity to authenticate as idm-user-with-external-idp to IdM.
Prerequisites
- Your IdM client and IdM servers are using RHEL 8.7 or later.
- Your IdM client and IdM servers are using SSSD 2.7.0 or later.
- You have created a reference to an external IdP in IdM. See Using Ansible to create a reference to an external identity provider.
You have configured your Ansible control node to meet the following requirements:
- You are using Ansible version 2.14 or later.
-
You have installed the
ansible-freeipapackage on the Ansible controller. - You are using RHEL 8.10 or later.
- The example assumes that in the ~/MyPlaybooks/ directory, you have created an Ansible inventory file with the fully-qualified domain name (FQDN) of the IdM server.
-
The example assumes that the secret.yml Ansible vault stores your
ipaadmin_password.
Procedure
On your Ansible control node, create an enable-user-to-authenticate-via-external-idp.yml playbook:
--- - name: Ensure an IdM user uses an external IdP to authenticate to IdM hosts: ipaserver become: false gather_facts: false tasks: - name: Retrieve Github user ID ansible.builtin.uri: url: “https://api.github.com/users/my_github_account_name” method: GET headers: Accept: “application/vnd.github.v3+json” register: user_data - name: Ensure IdM user exists with an external IdP authentication ipauser: ipaadmin_password: "{{ ipaadmin_password }}" name: idm-user-with-external-idp first: Example last: User userauthtype: idp idp: github_idp idp_user_id: my_github_account_name- Save the file.
Run the Ansible playbook. Specify the playbook file, the file storing the password protecting the secret.yml file, and the inventory file:
$ ansible-playbook --vault-password-file=password_file -v -i inventory enable-user-to-authenticate-via-external-idp.yml
Verification
Log in to an IdM client and verify that the output of the
ipa user-showcommand for the idm-user-with-external-idp user displays references to the IdP:$ ipa user-show idm-user-with-external-idp User login: idm-user-with-external-idp First name: Example Last name: User Home directory: /home/idm-user-with-external-idp Login shell: /bin/sh Principal name: idm-user-with-external-idp@idm.example.com Principal alias: idm-user-with-external-idp@idm.example.com Email address: idm-user-with-external-idp@idm.example.com ID: 35000003 GID: 35000003 User authentication types: idp External IdP configuration: github External IdP user identifier: idm-user-with-external-idp@idm.example.com Account disabled: False Password: False Member of groups: ipausers Kerberos keys available: False
Additional resources
-
The idp
ansible-freeipaupstream documentation
35.5. Retrieving an IdM ticket-granting ticket as an external IdP user
If you have delegated authentication for an Identity Management (IdM) user to an external identity provider (IdP), the IdM user can request a Kerberos ticket-granting ticket (TGT) by authenticating to the external IdP.
Complete this procedure to:
- Retrieve and store an anonymous Kerberos ticket locally.
-
Request the TGT for the idm-user-with-external-idp user by using
kinitwith the-Toption to enable Flexible Authentication via Secure Tunneling (FAST) channel to provide a secure connection between the Kerberos client and Kerberos Distribution Center (KDC).
Prerequisites
- Your IdM client and IdM servers are using RHEL 8.7 or later.
- Your IdM client and IdM servers are using SSSD 2.7.0 or later.
- You have created a reference to an external IdP in IdM. See Using Ansible to create a reference to an external identity provider.
- You have associated an external IdP reference with the user account. See Using Ansible to enable an IdM user to authenticate via an external IdP.
- The user that you are initially logged in as has write permissions on a directory in the local filesystem.
Procedure
Use Anonymous PKINIT to obtain a Kerberos ticket and store it in a file named
./fast.ccache.$ kinit -n -c ./fast.ccache
[Optional] View the retrieved ticket:
$ klist -c fast.ccache Ticket cache: FILE:fast.ccache Default principal: WELLKNOWN/ANONYMOUS@WELLKNOWN:ANONYMOUS Valid starting Expires Service principal 03/03/2024 13:36:37 03/04/2024 13:14:28 krbtgt/IDM.EXAMPLE.COM@IDM.EXAMPLE.COM
Begin authenticating as the IdM user, using the
-Toption to enable the FAST communication channel.[root@client ~]# kinit -T ./fast.ccache idm-user-with-external-idp Authenticate at https://oauth2.idp.com:8443/auth/realms/master/device?user_code=YHMQ-XKTL and press ENTER.:
- In a browser, authenticate as the user at the website provided in the command output.
- At the command line, press the Enter key to finish the authentication process.
Verification
Display your Kerberos ticket information and confirm that the line
config: pa_typeshows152for pre-authentication with an external IdP.[root@client ~]# klist -C Ticket cache: KCM:0:58420 Default principal: idm-user-with-external-idp@IDM.EXAMPLE.COM Valid starting Expires Service principal 05/09/22 07:48:23 05/10/22 07:03:07 krbtgt/IDM.EXAMPLE.COM@IDM.EXAMPLE.COM config: fast_avail(krbtgt/IDM.EXAMPLE.COM@IDM.EXAMPLE.COM) = yes 08/17/2022 20:22:45 08/18/2022 20:22:43 krbtgt/IDM.EXAMPLE.COM@IDM.EXAMPLE.COM config: pa_type(krbtgt/IDM.EXAMPLE.COM@IDM.EXAMPLE.COM) = 152
35.6. Logging in to an IdM client via SSH as an external IdP user
To log in to an IdM client via SSH as an external identity provider (IdP) user, begin the login process on the command linel. When prompted, perform the authentication process at the website associated with the IdP, and finish the process at the Identity Management (IdM) client.
Prerequisites
- Your IdM client and IdM servers are using RHEL 8.7 or later.
- Your IdM client and IdM servers are using SSSD 2.7.0 or later.
- You have created a reference to an external IdP in IdM. See Using Ansible to create a reference to an external identity provider.
- You have associated an external IdP reference with the user account. See Using Ansible to enable an IdM user to authenticate via an external IdP.
Procedure
Attempt to log in to the IdM client via SSH.
[user@client ~]$ ssh idm-user-with-external-idp@client.idm.example.com (idm-user-with-external-idp@client.idm.example.com) Authenticate at https://oauth2.idp.com:8443/auth/realms/main/device?user_code=XYFL-ROYR and press ENTER.- In a browser, authenticate as the user at the website provided in the command output.
- At the command line, press the Enter key to finish the authentication process.
Verification
Display your Kerberos ticket information and confirm that the line
config: pa_typeshows152for pre-authentication with an external IdP.[idm-user-with-external-idp@client ~]$ klist -C Ticket cache: KCM:0:58420 Default principal: idm-user-with-external-idp@IDM.EXAMPLE.COM Valid starting Expires Service principal 05/09/22 07:48:23 05/10/22 07:03:07 krbtgt/IDM.EXAMPLE.COM@IDM.EXAMPLE.COM config: fast_avail(krbtgt/IDM.EXAMPLE.COM@IDM.EXAMPLE.COM) = yes 08/17/2022 20:22:45 08/18/2022 20:22:43 krbtgt/IDM.EXAMPLE.COM@IDM.EXAMPLE.COM config: pa_type(krbtgt/IDM.EXAMPLE.COM@IDM.EXAMPLE.COM) = 152
35.7. The provider option in the ipaidp Ansible module
The following identity providers (IdPs) support OAuth 2.0 device authorization grant flow:
- Microsoft Identity Platform, including Azure AD
- GitHub
- Keycloak, including Red Hat Single Sign-On (SSO)
- Okta
When using the idp ansible-freeipa module to create a reference to one of these external IdPs, you can specify the IdP type with the provider option in your ipaidp ansible-freeipa playbook task, which expands into additional options as described below:
provider: microsoftMicrosoft Azure IdPs allow parametrization based on the Azure tenant ID, which you can specify with the
organizationoption. If you need support for the live.com IdP, specify the optionorganization common.Choosing
provider: microsoftexpands to use the following options. The value of theorganizationoption replaces the string${ipaidporg}in the table.Option Value auth_uri: URIhttps://login.microsoftonline.com/${ipaidporg}/oauth2/v2.0/authorizedev_auth_uri: URIhttps://login.microsoftonline.com/${ipaidporg}/oauth2/v2.0/devicecodetoken_uri: URIhttps://login.microsoftonline.com/${ipaidporg}/oauth2/v2.0/tokenuserinfo_uri: URIhttps://graph.microsoft.com/oidc/userinfokeys_uri: URIhttps://login.microsoftonline.com/common/discovery/v2.0/keysscope: STRopenid emailidp_user_id: STRemailprovider: googleChoosing
provider: googleexpands to use the following options:Option Value auth_uri: URIhttps://accounts.google.com/o/oauth2/authdev_auth_uri: URIhttps://oauth2.googleapis.com/device/codetoken_uri: URIhttps://oauth2.googleapis.com/tokenuserinfo_uri: URIhttps://openidconnect.googleapis.com/v1/userinfokeys_uri: URIhttps://www.googleapis.com/oauth2/v3/certsscope: STRopenid emailidp_user_id: STRemailprovider: githubChoosing
provider: githubexpands to use the following options:Option Value auth_uri: URIhttps://github.com/login/oauth/authorizedev_auth_uri: URIhttps://github.com/login/device/codetoken_uri: URIhttps://github.com/login/oauth/access_tokenuserinfo_uri: URIhttps://openidconnect.googleapis.com/v1/userinfokeys_uri: URIhttps://api.github.com/userscope: STRuseridp_user_id: STRloginprovider: keycloakWith Keycloak, you can define multiple realms or organizations. Since it is often a part of a custom deployment, both base URL and realm ID are required, and you can specify them with the
base_urlandorganizationoptions in youripaidpplaybook task:--- - name: Playbook to manage IPA idp hosts: ipaserver become: false tasks: - name: Ensure keycloak idp my-keycloak-idp is present using provider ipaidp: ipaadmin_password: "{{ ipaadmin_password }}" name: my-keycloak-idp provider: keycloak organization: main base_url: keycloak.domain.com:8443/auth client_id: my-keycloak-client-idChoosing
provider: keycloakexpands to use the following options. The value you specify in thebase_urloption replaces the string${ipaidpbaseurl}in the table, and the value you specify for theorganization `option replaces the string `${ipaidporg}.Option Value auth_uri: URIhttps://${ipaidpbaseurl}/realms/${ipaidporg}/protocol/openid-connect/authdev_auth_uri: URIhttps://${ipaidpbaseurl}/realms/${ipaidporg}/protocol/openid-connect/auth/devicetoken_uri: URIhttps://${ipaidpbaseurl}/realms/${ipaidporg}/protocol/openid-connect/tokenuserinfo_uri: URIhttps://${ipaidpbaseurl}/realms/${ipaidporg}/protocol/openid-connect/userinfoscope: STRopenid emailidp_user_id: STRemailprovider: oktaAfter registering a new organization in Okta, a new base URL is associated with it. You can specify this base URL with the
base_urloption in theipaidpplaybook task:--- - name: Playbook to manage IPA idp hosts: ipaserver become: false tasks: - name: Ensure okta idp my-okta-idp is present using provider ipaidp: ipaadmin_password: "{{ ipaadmin_password }}" name: my-okta-idp provider: okta base_url: dev-12345.okta.com client_id: my-okta-client-idChoosing
provider: oktaexpands to use the following options. The value you specify for thebase_urloption replaces the string${ipaidpbaseurl}in the table.Option Value auth_uri: URIhttps://${ipaidpbaseurl}/oauth2/v1/authorizedev_auth_uri: URIhttps://${ipaidpbaseurl}/oauth2/v1/device/authorizetoken_uri: URIhttps://${ipaidpbaseurl}/oauth2/v1/tokenuserinfo_uri: URIhttps://${ipaidpbaseurl}/oauth2/v1/userinfoscope: STRopenid emailidp_user_id: STRemail
Additional resources
Chapter 36. Integrating RHEL systems into AD directly by using the RHEL system role
With the ad_integration system role, you can automate a direct integration of a RHEL system with Active Directory (AD) by using Red Hat Ansible Automation Platform.
The ad_integration system role is not included in the ansible-freeipa package. It is part of the rhel-system-roles package. You can install rhel-system-roles on systems with a Red Hat Enterprise Linux Server subscription attached.
36.1. The ad_integration RHEL system role
Using the ad_integration system role, you can directly connect a RHEL system to Active Directory (AD).
The role uses the following components:
- SSSD to interact with the central identity and authentication source
-
realmdto detect available AD domains and configure the underlying RHEL system services, in this case SSSD, to connect to the selected AD domain
The ad_integration role is for deployments using direct AD integration without an Identity Management (IdM) environment. For IdM environments, use the ansible-freeipa roles.
Additional resources
-
/usr/share/ansible/roles/rhel-system-roles.ad_integration/README.mdfile -
/usr/share/doc/rhel-system-roles/ad_integration/directory - Connecting RHEL systems directly to AD using SSSD
36.2. Connecting a RHEL system directly to AD by using the ad_integration RHEL system role
You can use the ad_integration system role to configure a direct integration between a RHEL system and an AD domain by running an Ansible playbook.
Starting with RHEL8, RHEL no longer supports RC4 encryption by default. If it is not possible to enable AES in the AD domain, you must enable the AD-SUPPORT crypto policy and allow RC4 encryption in the playbook.
Time between the RHEL server and AD must be synchronized. You can ensure this by using the timesync system role in the playbook.
In this example, the RHEL system joins the domain.example.com AD domain, by using the AD Administrator user and the password for this user stored in the Ansible vault. The playbook also sets the AD-SUPPORT crypto policy and allows RC4 encryption. To ensure time synchronization between the RHEL system and AD, the playbook sets the adserver.domain.example.com server as the timesync source.
Prerequisites
- You have prepared the control node and the managed nodes
- You are logged in to the control node as a user who can run playbooks on the managed nodes.
-
The account you use to connect to the managed nodes has
sudopermissions on them. The following ports on the AD domain controllers are open and accessible from the RHEL server:
Table 36.1. Ports Required for Direct Integration of Linux Systems into AD Using the
ad_integrationsystem roleSource Port Destination Port Protocol Service 1024:65535
53
UDP and TCP
DNS
1024:65535
389
UDP and TCP
LDAP
1024:65535
636
TCP
LDAPS
1024:65535
88
UDP and TCP
Kerberos
1024:65535
464
UDP and TCP
Kerberos change/set password (
kadmin)1024:65535
3268
TCP
LDAP Global Catalog
1024:65535
3269
TCP
LDAP Global Catalog SSL/TLS
1024:65535
123
UDP
NTP/Chrony (Optional)
1024:65535
323
UDP
NTP/Chrony (Optional)
Procedure
Create a playbook file, for example
~/playbook.yml, with the following content:--- - name: Configure a direct integration between a RHEL system and an AD domain hosts: managed-node-01.example.com roles: - rhel-system-roles.ad_integration vars: ad_integration_realm: "domain.example.com" ad_integration_password: !vault | vault encrypted password ad_integration_manage_crypto_policies: true ad_integration_allow_rc4_crypto: true ad_integration_timesync_source: "adserver.domain.example.com"Validate the playbook syntax:
$ ansible-playbook --syntax-check ~/playbook.ymlNote that this command only validates the syntax and does not protect against a wrong but valid configuration.
Run the playbook:
$ ansible-playbook ~/playbook.yml
Verification
Display an AD user details, such as the
administratoruser:$ getent passwd administrator@ad.example.com administrator@ad.example.com:*:1450400500:1450400513:Administrator:/home/administrator@ad.example.com:/bin/bash
Additional resources
-
/usr/share/ansible/roles/rhel-system-roles.ad_integration/README.mdfile -
/usr/share/doc/rhel-system-roles/ad_integration/directory