
Ansible and Insights Part 2 - Automating Ansible Core remediation
As we discussed in our previous blog post about enabling Ansible automation with Insights, we will look closer at taking findings from Insights and using the actionable intelligence provided to perform an automated remediation via Ansible playbook. Ansible Tower setup and remediation will be covered in an upcoming post.
Currently you can generate playbooks for Insights and Tower via Red Hat's customer portal. An upcoming release of Satellite 6 will further integrate Insights automated remediation into Satellite by allowing you to generate playbooks from the Satellite UI.
Prerequisites for being able to utilize Ansible functionality with Insights are:
- Active RHEL subscription
- Active Insights evaluation or entitlement
- RHEL 7 or RHEL 6.4 and later
- Ansible (or Ansible Tower) installed
- Insights systems registered and reporting with an identifiable problem
- Ability to manage systems via Ansible with Insights system hostname or "display name" as the hostname in your ansible inventory
Begin by logging into the Insights interface on the customer portal at https://access.redhat.com/insights


If you're already logged in, you'll be presented with the Insights Overview.
From the Overview you can see quickly if you have any systems that have automated remediation identified. In the lower right of the console under Planner you will see "# issues can be resolved automatically by Ansible" or something similar. You can use this to quickly see all items you can remediate with Ansible.
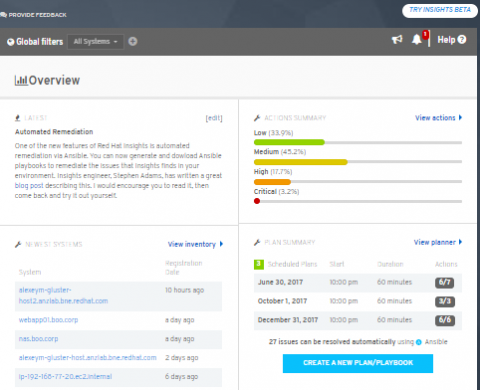

From here you have options. You can use Planner on the left nav menu to build a plan, you can click "Create a Plan/Playbook" from Overview, or you can use listed Actions (Actions -> Category) dropdowns for affected systems.
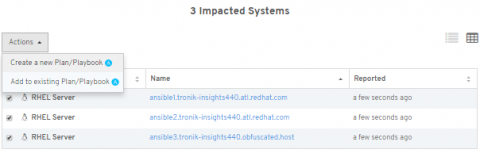
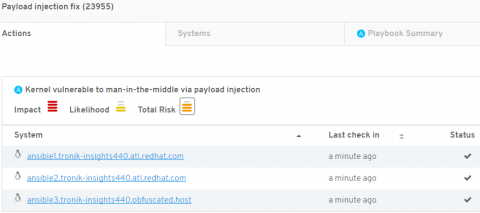
In this example we will navigate to Actions -> Security, and choose the "Kernel vulnerable to man-in-the-middle payload injection". We see that several systems are affected by this risk, and it has a medium likelihood, a critical impact, and a high overall total risk. This Action is also Ansible enabled.

Clicking into the Action itself gives us a description of the problem and a list of systems affected. From here we can create a playbook for the affected systems.
I'll choose the three affected systems and use the Actions dropdown dialogue to Create a New Plan/Playbook.
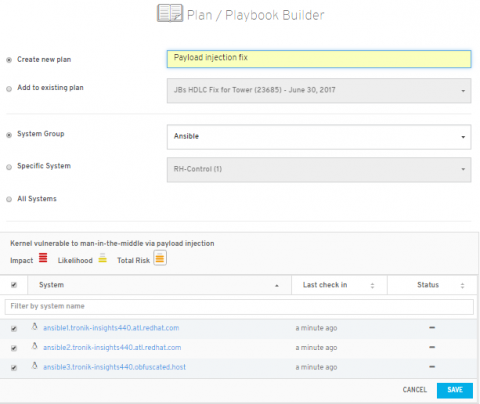
Give this plan a name (this is important; if you're using Tower integration this name is how we quickly identify the playbooks within Tower as well) and ensure the systems selected are correct. Click "Save" and the plan is created. From here you can delete or edit the plan to specify a maintenance window and duration, edit systems associated with this plan, or Generate Playbook and Export to CSV. We want to generate a playbook, so click that button.
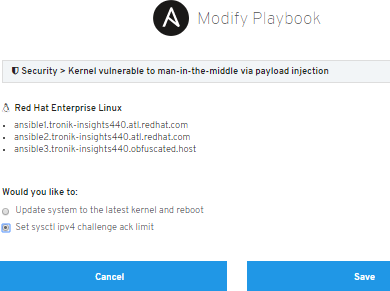
If the playbook you're building has options (like this example) you will be presented with a dialogue to decide what tasks you want to include in your Ansible playbook. Currently you may need to goto "Playbook Summary", like the graphic above, to modify the playbook options. Since the selected machines are critical to my environment, and I can't afford to take downtime to fix them with a kernel update and reboot, I'll use the active mitigation and "Set sysctl ipv4 challenge ack limit". This will allow me to actively mitigate the system and make it non-vulnerable. A more permanent fix would be to update the kernel, but if I'm sure nothing is going to change my sysctl variable back (config management tools may reverse these changes if not also updated), then I would be safe with this active mitigation.

Click Save to confirm your selection and finalize playbook generation by Downloading Playbook.
![]()
You can then use this downloaded Ansible playbook YML file to remediate the systems with: $ ansible-playbook $downloaded_filename.yml
![]()
Filenames follow a scheme of plan_name-plan_number-unixtime.yml and contain information inside about which remediation systems and rule versions are being utilized.
After watching the playbook run, assuming there are no errors you need to further investigate, refreshing Planner shows us 3/3 systems have been remediated.
![]()

Upon refreshing the Planner interface we see that the remediations were performed successfully and these systems now have a check mark as their status.

That's how simple it is to start using Ansible playbooks to remediate systems reporting risks. Stay tuned for another upcoming blog post on how to scale this to your entire infrastructure with Ansible Tower.
Let us know your thoughts on the new features highlighted in our last post, in the comments on the blogs or with the Provide Feedback button inside of Insights!

Thanks from all of us here at the Insights engineering and product teams, and happy remediating. Stay tuned for part 3, where we will be using Ansible Tower and Insights for enterprise remediation.
-Will Nix
About The Author
 Red Hat
Pro
694 points
Red Hat
Pro
694 points
Comments