
Chapter 3. Get Started
3.1. Using the RH-SSO for OpenShift Image Streams and Application Templates
Red Hat JBoss Middleware for OpenShift images are pulled on demand from the secured Red Hat Registry: registry.redhat.io, which requires authentication. To retrieve content, you will need to log into the registry using the Red Hat account.
To consume container images from registry.redhat.io in shared environments such as OpenShift, it is recommended for an administrator to use a Registry Service Account, also referred to as authentication tokens, in place of an individual person’s Red Hat Customer Portal credentials.
To create a Registry Service Account, navigate to the Registry Service Account Management Application, and log in if necessary.
- From the Registry Service Accounts page, click Create Service Account.
Provide a name for the Service Account, for example registry.redhat.io-sa. It will be prepended with a fixed, random string.
- Enter a description for the Service Account, for example Service account to consume container images from registry.redhat.io..
- Click Create.
- After the Service Account was created, click the registry.redhat.io-sa link in the Account name column of the table presented on the Registry Service Accounts page.
- Finally, click the OpenShift Secret tab, and perform all steps listed on that page.
See the Red Hat Container Registry Authentication article for more information.
To update to the latest RH-SSO for OpenShift images, run the following commands:
On your master host(s), ensure that you are logged in as a cluster administrator or a user with project administrator access to the global
openshiftproject.$ oc login -u system:admin
Run the following commands to update the core set of RH-SSO 7.2 resources for OpenShift in the
openshiftproject:$ for resource in sso72-image-stream.json \ sso72-https.json \ sso72-mysql.json \ sso72-mysql-persistent.json \ sso72-postgresql.json \ sso72-postgresql-persistent.json \ sso72-x509-https.json \ sso72-x509-mysql-persistent.json \ sso72-x509-postgresql-persistent.json do oc replace -n openshift --force -f \ https://raw.githubusercontent.com/jboss-openshift/application-templates/ose-v1.4.16/sso/${resource} doneRun the following command to install the RH-SSO 7.2 OpenShift image streams in the
openshiftproject:$ oc -n openshift import-image redhat-sso72-openshift:1.2
3.2. Preparing and Deploying the RH-SSO for OpenShift Application Templates
3.2.1. Configuring Keystores
The RH-SSO for OpenShift image requires two keystores:
- An SSL keystore to provide private and public keys for https traffic encryption.
- A JGroups keystore to provide private and public keys for network traffic encryption between nodes in the cluster.
These keystores are expected by the RH-SSO for OpenShift image, even if the application uses only http on a single-node OpenShift instance. Self-signed certificates do not provide secure communication and are intended for internal testing purposes.
For production environments Red Hat recommends that you use your own SSL certificate purchased from a verified Certificate Authority (CA) for SSL-encrypted connections (HTTPS).
See the JBoss Enterprise Application Platform Security Guide for more information on how to create a keystore with self-signed or purchased SSL certificates.
3.2.2. Generating Secrets
OpenShift uses objects called Secrets to hold sensitive information, such as passwords or keystores. See the Secrets chapter in the OpenShift documentation for more information.
The RH-SSO for OpenShift image requires one or more secrets that hold the two keystores described earlier. This provides the necessary authorization to applications in the project.
Use the SSL and JGroups keystore files to create secrets for the project:
$ oc secret new <sso-ssl-secret> <ssl.jks>
$ oc secret new <sso-jgroups-secret> <jgroups.jceks>
3.2.3. Creating Administrator Account for Red Hat Single Sign-On Server
Red Hat Single Sign-On does not provide any pre-configured management account out of the box. This administrator account is necessary for logging into the master realm’s management console and perform server maintenance operations such as, creating realms or users, or registering applications intended to be secured by Red Hat Single Sign-On.
The administrator account can be created:
- By providing values for the SSO_ADMIN_USERNAME and SSO_ADMIN_PASSWORD parameters, when deploying the RH-SSO application template, or
- By a remote shell session to particular RH-SSO pod, if the RH-SSO for OpenShift image is deployed without an application template.
Red Hat Single Sign-On allows an initial administrator account creation via the Welcome Page web form. But only if the Welcome Page is accessed from a localhost, this method of administrator account creation is not applicable for RH-SSO for OpenShift image.
3.2.3.1. Creating RH-SSO Administrator Account via Template Parameters
When deploying RH-SSO application template, SSO_ADMIN_USERNAME and SSO_ADMIN_PASSWORD parameters denote the username and password of the RH-SSO server’s administrator account to be created for the master realm.
Both of these parameters are required. If not specified, they are auto generated and displayed as an OpenShift instructional message when the template is instantiated.
The lifespan of the RH-SSO server’s administrator account depends upon the the storage type used to store the RH-SSO server’s database:
- For an in-memory database mode (sso71-https and sso72-https templates) the account exist throughout the lifecycle of the particular RH-SSO pod (stored account data is lost upon pod destruction),
- For an ephemeral database mode (sso71-mysql, sso71-postgresql, sso72-mysql, and sso72-postgresql templates) the account exist throughout the lifecycle of the database pod (even if RH-SSO pod is destructed, the stored account data is preserved under the assumption that the database pod is still running),
- For persistent database mode (sso71-mysql-persistent, sso71-postgresql-persistent, sso72-mysql-persistent, and sso72-postgresql-persistent templates) the account exists throughout the lifecycle of the persistent medium used to hold the database data. This means that the stored account data is preserved even when both, the RH-SSO and the database pods are destructed.
It is a common practice to deploy an RH-SSO application template to get the corresponding OpenShift deployment config for the application, and then reuse that deployment config multiple times (every time a new RH-SSO application needs to be instantiated).
In the case of ephemeral or persistent database mode, after creating the RH_SSO server’s administrator account, remove the SSO_ADMIN_USERNAME and SSO_ADMIN_PASSWORD variables from the deployment config before deploying new RH-SSO applications.
Run the following commands to prepare the previously created deployment config of the RH-SSO application for reuse after the administrator account has been created:
Identify the deployment config of the RH-SSO application.
$ oc get dc -o name
deploymentconfig/sso
deploymentconfig/sso-mysql
Clear the SSO_ADMIN_USERNAME and SSO_ADMIN_PASSWORD variables setting.
$ oc env dc/sso -e SSO_ADMIN_USERNAME="" SSO_ADMIN_PASSWORD=""
3.2.3.2. Creating RH-SSO Administrator Account via Remote Shell Session to RH-SSO Pod
Run following commands to create administrator account for the master realm of the RH-SSO server, when deploying the RH-SSO for OpenShift image directly from the image stream (without the template), after the RH-SSO application pod has been started:
Identify the RH-SSO application pod.
$ oc get pods
NAME                READY     STATUS    RESTARTS   AGE
sso-12-pt93n        1/1       Running   0          1m
sso-mysql-6-d97pf   1/1       Running   0          2m
Open a remote shell session to RH-SSO for OpenShift container.
$ oc rsh sso-12-pt93n
sh-4.2$
Create the RH-SSO server administrator account for the
masterrealm at the command line with theadd-user-keycloak.shscript.sh-4.2$ cd /opt/eap/bin/ sh-4.2$ ./add-user-keycloak.sh -r master -u sso_admin -p sso_password Added 'sso_admin' to '/opt/eap/standalone/configuration/keycloak-add-user.json', restart server to load user
NoteThe
sso_admin/sso_passwordcredentials in the example above are for demonstration purposes only. Refer to the password policy applicable within your organization for guidance on how to create a secure user name and password.Restart the underlying JBoss EAP server instance to load the newly added user account. Wait for the server to restart properly.
sh-4.2$ ./jboss-cli.sh --connect ':reload' { "outcome" => "success", "result" => undefined }WarningWhen restarting the server it is important to restart just the JBoss EAP process within the running RH-SSO container, and not the whole container. Because restarting the whole container recreates it from scratch, without the RH-SSO server administration account for the
masterrealm to be created.-
Log into the
masterrealm’s administration console of the RH-SSO server using the the credentials created in the steps above. In the browser, navigate to http://sso-<project-name>.<hostname>/auth/admin for the RH-SSO web server, or to https://secure-sso-<project-name>.<hostname>/auth/admin for the encrypted RH-SSO web server, and specify user name and password used to create the administrator user.
3.2.4. Using the OpenShift Web Console
Log in to the OpenShift web console:
- Click Add to project to list the default image streams and templates.
- Use the Filter by keyword search bar to limit the list to those that match sso. You may need to click See all to show the desired application template.
- Select an application template and configure the deployment parameters as required.
- Click Create to deploy the application template.
These are some of the more common variables to configure an RH-SSO deployment:
| Variable | Description |
|---|---|
| APPLICATION_NAME | The name for the RH-SSO application. |
| HOSTNAME_HTTPS | Custom hostname for https service route. Leave blank for default hostname of <application-name>.<project>.<default-domain-suffix> |
| HOSTNAME_HTTP | Custom hostname for http service route. Leave blank for default hostname of <application-name>.<project>.<default-domain-suffix> |
| HTTPS_KEYSTORE | The name of the keystore file within the secret. |
| HTTPS_PASSWORD | The password for the keystore and certificate. |
| HTTPS_SECRET | The name of the secret containing the keystore file. |
| JGROUPS_ENCRYPT_KEYSTORE | The name of the JGroups keystore file within the secret. |
| JGROUPS_ENCRYPT_PASSWORD | The password for the JGroups keystore and certificate. |
| JGROUPS_ENCRYPT_SECRET | The name of the secret containing the JGroups keystore file. |
| SSO_ADMIN_USERNAME |
Username of the administrator account for the |
| SSO_ADMIN_PASSWORD |
Password of the administrator account for the |
| SSO_REALM | The name of an additional RH-SSO realm to create during deployment. |
| SSO_SERVICE_USERNAME | RH-SSO service user name to manage the realm. |
| SSO_SERVICE_PASSWORD | RH-SSO service user password. |
See the Reference chapter for a more comprehensive list of the RH-SSO environment variables. See the Example Workflow: Preparing and Deploying the RH-SSO for OpenShift Image for an end-to-end example of RH-SSO deployment.
3.2.5. Routes
The RH-SSO for OpenShift templates use TLS passthrough termination for routes by default. This means that the destination route receives encrypted traffic without the OpenShift router providing TLS termination. Users do not need the relevant SSL certificate to connect to the RH-SSO login page.
For more information on OpenShift route types, see the Networking chapter of the OpenShift Architecture Guide.
3.2.6. Deployment Process
Once deployed, the sso71-https and sso72-https templates create a single pod that contains both the database and the RH-SSO servers. The sso71-mysql, sso72-mysql, sso71-mysql-persistent, sso72-mysql-persistent, sso71-postgresql, sso72-postgresql, sso71-postgresql-persistent, and sso72-postgresql-persistent templates create two pods, one for the database server and one for the RH-SSO web server.
After the RH-SSO web server pod has started, it can be accessed at its custom configured hostnames, or at the default hostnames:
- http://sso-<project-name>.<hostname>/auth/admin: for the RH-SSO web server, and
- https://secure-sso-<project-name>.<hostname>/auth/admin: for the encrypted RH-SSO web server.
Use the administrator user credentials to log in into the master realm’s administration console.
3.2.7. RH-SSO Clients
Clients are RH-SSO entities that request user authentication. A client can be an application requesting RH-SSO to provide user authentication, or it can be making requests for access tokens to start services on behalf of an authenticated user. See the Managing Clients chapter of the Red Hat Single Sign-On documentation for more information.
RH-SSO provides OpenID-Connect and SAML client protocols.
OpenID-Connect is the preferred protocol and utilizes three different access types:
- public: Useful for JavaScript applications that run directly in the browser and require no server configuration.
- confidential: Useful for server-side clients, such as EAP web applications, that need to perform a browser login.
- bearer-only: Useful for back-end services that allow bearer token requests.
It is required to specify the client type in the <auth-method> key of the application web.xml file. This file is read by the image at deployment. Set the value of <auth-method> element to:
- KEYCLOAK for the OpenID Connect client.
- KEYCLOAK-SAML for the SAML client.
The following is an example snippet for the application web.xml to configure an OIDC client:
...
<login-config>
        <auth-method>KEYCLOAK</auth-method>
</login-config>
...
3.2.8. Automatic and Manual RH-SSO Client Registration Methods
A client application can be automatically registered to an RH-SSO realm by using credentials passed in variables specific to the eap64-sso-s2i, eap70-sso-s2i, eap71-sso-s2i, and datavirt63-secure-s2i templates.
Alternatively, you can manually register the client application by configuring and exporting the RH-SSO client adapter and including it in the client application configuration.
3.2.9. Automatic RH-SSO Client Registration
Automatic RH-SSO client registration is determined by RH-SSO environment variables specific to the eap64-sso-s2i, eap70-sso-s2i, eap71-sso-s2i, and datavirt63-secure-s2i templates. The RH-SSO credentials supplied in the template are then used to register the client to the RH-SSO realm during deployment of the client application.
The RH-SSO environment variables included in the eap64-sso-s2i, eap70-sso-s2i, eap71-sso-s2i, and datavirt63-secure-s2i templates are:
| Variable | Description |
|---|---|
| HOSTNAME_HTTP | Custom hostname for http service route. Leave blank for default hostname of <application-name>.<project>.<default-domain-suffix> |
| HOSTNAME_HTTPS | Custom hostname for https service route. Leave blank for default hostname of <application-name>.<project>.<default-domain-suffix> |
| SSO_URL | The RH-SSO web server authentication address: https://secure-sso-<project-name>.<hostname>/auth |
| SSO_REALM | The RH-SSO realm created for this procedure. |
| SSO_USERNAME | The name of the realm management user. |
| SSO_PASSWORD | The password of the user. |
| SSO_PUBLIC_KEY | The public key generated by the realm. It is located in the Keys tab of the Realm Settings in the RH-SSO console. |
| SSO_BEARER_ONLY | If set to true, the OpenID Connect client is registered as bearer-only. |
| SSO_ENABLE_CORS | If set to true, the RH-SSO adapter enables Cross-Origin Resource Sharing (CORS). |
If the RH-SSO client uses the SAML protocol, the following additional variables need to be configured:
| Variable | Description |
|---|---|
| SSO_SAML_KEYSTORE_SECRET | Secret to use for access to SAML keystore. The default is sso-app-secret. |
| SSO_SAML_KEYSTORE | Keystore filename in the SAML keystore secret. The default is keystore.jks. |
| SSO_SAML_KEYSTORE_PASSWORD | Keystore password for SAML. The default is mykeystorepass. |
| SSO_SAML_CERTIFICATE_NAME | Alias for keys/certificate to use for SAML. The default is jboss. |
See Example Workflow: Automatically Registering EAP Application in RH-SSO with OpenID-Connect Client for an end-to-end example of the automatic client registration method using an OpenID-Connect client.
3.2.10. Manual RH-SSO Client Registration
Manual RH-SSO client registration is determined by the presence of a deployment file in the client application’s ../configuration/ directory. These files are exported from the client adapter in the RH-SSO web console. The name of this file is different for OpenID-Connect and SAML clients:
| OpenID-Connect | ../configuration/secure-deployments |
| SAML | ../configuration/secure-saml-deployments |
These files are copied to the RH-SSO adapter configuration section in the standalone-openshift.xml at when the application is deployed.
There are two methods for passing the RH-SSO adapter configuration to the client application:
- Modify the deployment file to contain the RH-SSO adapter configuration so that it is included in the standalone-openshift.xml file at deployment, or
- Manually include the OpenID-Connect keycloak.json file, or the SAML keycloak-saml.xml file in the client application’s ../WEB-INF directory.
See Example Workflow: Manually Configure an Application to Use RH-SSO Authentication, Using SAML Client for an end-to-end example of the manual RH-SSO client registration method using a SAML client.
3.2.11. Limitations
OpenShift does not currently accept OpenShift role mapping from external providers. If RH-SSO is used as an authentication gateway for OpenShift, users created in RH-SSO must have the roles added using the OpenShift Administrator oadm policy command.
For example, to allow an RH-SSO-created user to view a project namespace in OpenShift:
oadm policy add-role-to-user view <user-name> -n <project-name>
3.3. Binary Builds
To deploy existing applications on OpenShift, you can use the binary source capability.
3.3.1. Deploy Binary Build of EAP 6.4 / 7.0 JSP Service Invocation Application that Authenticates Using Red Hat Single Sign-On
The following example uses both app-jee-jsp and service-jee-jaxrs quickstarts to deploy EAP 6.4 / 7.0 JSP service application that authenticates using the Red Hat Single Sign-On.
Prerequisite:
This guide assumes the RH-SSO for OpenShift image has been previously deployed using one of the following templates:
- sso71-mysql
- sso72-mysql
- sso71-postgresql
- sso72-postgresql
- sso71-mysql-persistent
- sso72-mysql-persistent
- sso71-postgresql-persistent
- sso72-postgresql-persistent
3.3.1.1. Create RH-SSO Realm, Roles, and User for the EAP 6.4 / 7.0 JSP Application
The EAP 6.4 / 7.0 JSP service application requires dedicated RH-SSO realm, username, and password to be able to authenticate using Red Hat Single Sign-On. Perform the following steps after the RH-SSO for OpenShift image has been deployed:
Create the RH-SSO Realm
Login to the administration console of the RH-SSO server.
https://secure-sso-sso-app-demo.openshift.example.com/auth/admin
- Hover your cursor over the realm namespace (default is Master) at the top of the sidebar and click Add Realm.
-
Enter a realm name (this example uses
demo) and click Create.
Copy the Public Key
In the newly created demo realm, click the Keys tab and copy the public key that has been generated.
RH-SSO 7.1 and RH-SSO 7.2 images generate two keys by default:
- RSA key, and
- HMAC key
To copy the public key information for the RH-SSO 7.1 or RH-SSO 7.2 image, click the Public key button of the RSA row of the keys table. Then select and copy the content of the pop-up window that appears.
The information about the public key is necessary later to deploy the RH-SSO-enabled EAP 6.4 / 7.0 JSP application.
Create RH-SSO Roles
The service-jee-jaxrs quickstart exposes three endpoints by the service:
-
public- Requires no authentication. -
secured- Can be invoked by users with theuserrole. -
admin- Can be invoked by users with theadminrole.
Create user and admin roles in RH-SSO. These roles will be assigned to an RH-SSO application user to authenticate access to user applications.
Click Roles in the Configure sidebar to list the roles for this realm.
NoteThis is a new realm, so there should only be the default roles:
-
offline_accessanduma_authorizationrole for the RH-SSO 7.1 and RH-SSO 7.2 images.
-
- Click Add Role.
-
Enter the role name (
user) and click Save.
Repeat these steps for the admin role.
Create the RH-SSO Realm Management User
- Click Users in the Manage sidebar to view the user information for the realm.
- Click Add User.
-
Enter a valid Username (this example uses the user
appuser) and click Save. Edit the user configuration:
-
Click the Credentials tab in the user space and enter a password for the user (this example uses the password
apppassword). - Ensure the Temporary Password option is set to Off so that it does not prompt for a password change later on, and click Reset Password to set the user password. A pop-up window prompts for additional confirmation.
-
Click the Credentials tab in the user space and enter a password for the user (this example uses the password
3.3.1.2. Assign user RH-SSO Role to the Realm Management User
Perform the following steps to tie the previously created appuser with the user RH-SSO role:
-
Click Role Mappings to list the realm and client role configuration. In Available Roles, select the
userrole created earlier, and click Add selected>. Click Client Roles, select realm-management entry from the list, select each record in the Available Roles list.
NoteYou can select multiple items at once by holding the Ctrl key and simultaneously clicking the first
impersonationentry. While keeping the Ctrl key and the left mouse button pressed, move to the end of the list to theview-clientsentry and ensure each record is selected.- Click Add selected> to assign the roles to the client.
3.3.1.3. Prepare RH-SSO Authentication for OpenShift Deployment of the EAP 6.4 / 7.0 JSP Application
Create a new project for the EAP 6.4 / 7.0 JSP application.
$ oc new-project eap-app-demo
Add the
viewrole to thedefaultservice account. This enables the service account to view all the resources in theeap-app-demonamespace, which is necessary for managing the cluster.$ oc policy add-role-to-user view system:serviceaccount:$(oc project -q):default
The EAP template requires an SSL keystore and a JGroups keystore. This example uses
keytool, a package included with the Java Development Kit, to generate self-signed certificates for these keystores.Generate a secure key for the SSL keystore (this example uses
passwordas password for the keystore).$ keytool -genkeypair \ -dname "CN=secure-eap-app-eap-app-demo.openshift.example.com" \ -alias https \ -storetype JKS \ -keystore eapkeystore.jks
Generate a secure key for the JGroups keystore (this example uses
passwordas password for the keystore).$ keytool -genseckey \ -alias jgroups \ -storetype JCEKS \ -keystore eapjgroups.jceks
Generate the EAP 6.4 / 7.0 for OpenShift secrets with the SSL and JGroup keystore files.
$ oc secret new eap-ssl-secret eapkeystore.jks
$ oc secret new eap-jgroup-secret eapjgroups.jceks
Add the EAP application secret to the
defaultservice account.$ oc secrets link default eap-ssl-secret eap-jgroup-secret
3.3.1.4. Deploy Binary Build of the EAP 6.4 / 7.0 JSP Application
Clone the source code.
$ git clone https://github.com/keycloak/keycloak-quickstarts.git
- Configure the Red Hat JBoss Middleware Maven repository.
Build both the service-jee-jaxrs and app-jee-jsp applications.
Build the
service-jee-jaxrsapplication.$ cd keycloak-quickstarts/service-jee-jaxrs/
$ mvn clean package -DskipTests
[INFO] Scanning for projects...
[INFO]
[INFO] ------------------------------------------------------------------------
[INFO] Building Keycloak Quickstart: service-jee-jaxrs 3.1.0.Final
[INFO] ------------------------------------------------------------------------
...
[INFO] ------------------------------------------------------------------------
[INFO] BUILD SUCCESS
[INFO] ------------------------------------------------------------------------
[INFO] Total time: 2.153 s
[INFO] Finished at: 2017-06-26T12:06:12+02:00
[INFO] Final Memory: 25M/241M
[INFO] ------------------------------------------------------------------------
Comment out the
app-jee-jsp/config/keycloak.jsonrequirement of themaven-enforcer-pluginplugin and build theapp-jee-jspapplication.service-jee-jaxrs]$ cd ../app-jee-jsp/
app-jee-jsp]$ sed -i /\<executions\>/s/^/\<\!--/ pom.xml
app-jee-jsp]$ sed -i '/\(<\/executions>\)/a\-->' pom.xml
app-jee-jsp]$ mvn clean package -DskipTests
[INFO] Scanning for projects...
[INFO]
[INFO] ------------------------------------------------------------------------
[INFO] Building Keycloak Quickstart: app-jee-jsp 3.1.0.Final
[INFO] ------------------------------------------------------------------------
...
[INFO] Building war: /tmp/github/keycloak-quickstarts/app-jee-jsp/target/app-jsp.war
[INFO] ------------------------------------------------------------------------
[INFO] BUILD SUCCESS
[INFO] ------------------------------------------------------------------------
[INFO] Total time: 3.018 s
[INFO] Finished at: 2017-06-26T12:22:25+02:00
[INFO] Final Memory: 35M/310M
[INFO] ------------------------------------------------------------------------
ImportantThe app-jee-jsp quickstart requires to configure the adapter, and adapter configuration file (
keycloak.json) to be present at theconfig/directory in the root of the quickstart to successfully build the quickstart. But since this example configures the adapter later via selected environment variables available for the EAP 6.4 / 7.0 for OpenShift image, it is not necessary to specify the form ofkeycloak.jsonadapter configuration file at this moment.
Prepare the directory structure on the local file system.
Application archives in the deployments/ subdirectory of the main binary build directory are copied directly to the standard deployments directory of the image being built on OpenShift. For the application to deploy, the directory hierarchy containing the web application data must be correctly structured.
Create main directory for the binary build on the local file system and deployments/ subdirectory within it. Copy the previously built WAR archives of both the service-jee-jaxrs and app-jee-jsp quickstarts to the deployments/ subdirectory:
app-jee-jsp]$ ls
config  pom.xml  README.md  src  target
app-jee-jsp]$ mkdir -p sso-eap7-bin-demo/deployments
app-jee-jsp]$ cp target/app-jsp.war sso-eap7-bin-demo/deployments/
app-jee-jsp]$ cp ../service-jee-jaxrs/target/service.war sso-eap7-bin-demo/deployments/
app-jee-jsp]$ tree sso-eap7-bin-demo/ sso-eap7-bin-demo/ |__ deployments |__ app-jsp.war |__ service.war 1 directory, 2 filesNoteLocation of the standard deployments directory depends on the underlying base image, that was used to deploy the application. See the following table:
Table 3.1. Standard Location of the Deployments Directory
Name of the Underlying Base Image(s) Standard Location of the Deployments Directory EAP for OpenShift 6.4 and 7.0
$JBOSS_HOME/standalone/deployments
Java S2I for OpenShift
/deployments
JWS for OpenShift
$JWS_HOME/webapps
Identify the image stream for EAP 6.4 / 7.0 image.
$ oc get is -n openshift | grep eap | cut -d ' ' -f 1
jboss-eap64-openshift
jboss-eap70-openshift
jboss-eap71-openshift
Create new binary build, specifying image stream and application name.
NoteReplace
--image-stream=jboss-eap70-openshiftparameter with the--image-stream=jboss-eap64-openshiftone in the following oc command to deploy the JSP application on top of JBoss EAP 6.4 for OpenShift image.$ oc new-build --binary=true \ --image-stream=jboss-eap70-openshift \ --name=eap-app --> Found image 31895a4 (3 months old) in image stream "openshift/jboss-eap70-openshift" under tag "latest" for "jboss-eap70-openshift" JBoss EAP 7.0 ------------- Platform for building and running JavaEE applications on JBoss EAP 7.0 Tags: builder, javaee, eap, eap7 * A source build using binary input will be created * The resulting image will be pushed to image stream "eap-app:latest" * A binary build was created, use 'start-build --from-dir' to trigger a new build --> Creating resources with label build=eap-app ... imagestream "eap-app" created buildconfig "eap-app" created --> SuccessStart the binary build. Instruct
ocexecutable to use main directory of the binary build we created in previous step as the directory containing binary input for the OpenShift build. In the working directory of app-jee-jsp issue the following command.app-jee-jsp]$ oc start-build eap-app \ --from-dir=./sso-eap7-bin-demo/ \ --follow Uploading directory "sso-eap7-bin-demo" as binary input for the build ... build "eap-app-1" started Receiving source from STDIN as archive ... Copying all war artifacts from /home/jboss/source/. directory into /opt/eap/standalone/deployments for later deployment... Copying all ear artifacts from /home/jboss/source/. directory into /opt/eap/standalone/deployments for later deployment... Copying all rar artifacts from /home/jboss/source/. directory into /opt/eap/standalone/deployments for later deployment... Copying all jar artifacts from /home/jboss/source/. directory into /opt/eap/standalone/deployments for later deployment... Copying all war artifacts from /home/jboss/source/deployments directory into /opt/eap/standalone/deployments for later deployment... '/home/jboss/source/deployments/app-jsp.war' -> '/opt/eap/standalone/deployments/app-jsp.war' '/home/jboss/source/deployments/service.war' -> '/opt/eap/standalone/deployments/service.war' Copying all ear artifacts from /home/jboss/source/deployments directory into /opt/eap/standalone/deployments for later deployment... Copying all rar artifacts from /home/jboss/source/deployments directory into /opt/eap/standalone/deployments for later deployment... Copying all jar artifacts from /home/jboss/source/deployments directory into /opt/eap/standalone/deployments for later deployment... Pushing image 172.30.82.129:5000/eap-app-demo/eap-app:latest ... Pushed 6/7 layers, 86% complete Pushed 7/7 layers, 100% complete Push successful
Create a new OpenShift application based on the build.
$ oc new-app eap-app
--> Found image 6b13d36 (2 minutes old) in image stream "eap-app-demo/eap-app" under tag "latest" for "eap-app"

    eap-app-demo/eap-app-1:aa2574d9
    -------------------------------
    Platform for building and running JavaEE applications on JBoss EAP 7.0

    Tags: builder, javaee, eap, eap7

    * This image will be deployed in deployment config "eap-app"
    * Ports 8080/tcp, 8443/tcp, 8778/tcp will be load balanced by service "eap-app"
      * Other containers can access this service through the hostname "eap-app"

--> Creating resources ...
    deploymentconfig "eap-app" created
    service "eap-app" created
--> Success
    Run 'oc status' to view your app.
Stop all running containers of the EAP 6.4 / 7.0 JSP application in the current namespace.
$ oc get dc -o name
deploymentconfig/eap-app
$ oc scale dc/eap-app --replicas=0
deploymentconfig "eap-app" scaled
Further configure the EAP 6.4 / 7.0 JSP application prior the deployment.
Configure the application with proper details about the RH-SSO server instance.
WarningEnsure to replace the value of SSO_PUBLIC_KEY variable below with the actual content of the RSA public key for the
demorealm, that has been copied.$ oc set env dc/eap-app \ -e HOSTNAME_HTTP="eap-app-eap-app-demo.openshift.example.com" \ -e HOSTNAME_HTTPS="secure-eap-app-eap-app-demo.openshift.example.com" \ -e SSO_DISABLE_SSL_CERTIFICATE_VALIDATION="true" \ -e SSO_USERNAME="appuser" \ -e SSO_PASSWORD="apppassword" \ -e SSO_REALM="demo" \ -e SSO_URL="https://secure-sso-sso-app-demo.openshift.example.com/auth" \ -e SSO_PUBLIC_KEY="MIIBIjANBgkqhkiG9w0BAQEFAAOCAQ8AMIIBCgKCAQEAkdhXyKx97oIoO6HwnV/MiX2EHO55Sn+ydsPzbjJevI5F31UvUco9uA8dGl6oM8HrnaWWv+i8PvmlaRMhhl6Xs68vJTEc6d0soP+6A+aExw0coNRp2PDwvzsXVWPvPQg3+iytStxu3Icndx+gC0ZYnxoRqL7rY7zKcQBScGEr78Nw6vZDwfe6d/PQ6W4xVErNytX9KyLFVAE1VvhXALyqEM/EqYGLmpjw5bMGVKRXnhmVo9E88CkFDH8E+aPiApb/gFul1GJOv+G8ySLoR1c8Y3L29F7C81odkVBp2yMm3RVFIGSPTjHqjO/nOtqYIfY4Wyw9mRIoY5SyW7044dZXRwIDAQAB" \ -e SSO_SECRET="0bb8c399-2501-4fcd-a183-68ac5132868d" deploymentconfig "eap-app" updated
Configure the application with details about both the SSL and JGroups keystore.
$ oc set env dc/eap-app \
-e HTTPS_KEYSTORE_DIR="/etc/eap-secret-volume" \
-e HTTPS_KEYSTORE="eapkeystore.jks" \
-e HTTPS_PASSWORD="password" \
-e JGROUPS_ENCRYPT_SECRET="eap-jgroup-secret" \
-e JGROUPS_ENCRYPT_KEYSTORE_DIR="/etc/jgroups-encrypt-secret-volume" \
-e JGROUPS_ENCRYPT_KEYSTORE="eapjgroups.jceks" \
-e JGROUPS_ENCRYPT_PASSWORD="password"
deploymentconfig "eap-app" updated
Define OpenShift volumes for both the SSL and JGroups secrets created earlier.
$ oc volume dc/eap-app --add \
--name="eap-keystore-volume" \
--type=secret \
--secret-name="eap-ssl-secret" \
--mount-path="/etc/eap-secret-volume"
deploymentconfig "eap-app" updated
$ oc volume dc/eap-app --add \
--name="eap-jgroups-keystore-volume" \
--type=secret \
--secret-name="eap-jgroup-secret" \
--mount-path="/etc/jgroups-encrypt-secret-volume"
deploymentconfig "eap-app" updated
Configure the deployment config of the application to run application pods under the
defaultOpenShift service account (default setting).$ oc patch dc/eap-app --type=json \ -p '[{"op": "add", "path": "/spec/template/spec/serviceAccountName", "value": "default"}]' "eap-app" patched
Deploy container of the EAP 6.4 / 7.0 JSP application using the modified deployment config.
$ oc scale dc/eap-app --replicas=1
deploymentconfig "eap-app" scaled
Expose the service as route.
$ oc get svc -o name
service/eap-app
$ oc get route
No resources found.
$ oc expose svc/eap-app
route "eap-app" exposed
$ oc get route
NAME      HOST/PORT                                    PATH      SERVICES   PORT       TERMINATION   WILDCARD
eap-app   eap-app-eap-app-demo.openshift.example.com             eap-app    8080-tcp                 None
3.3.1.5. Access the Application
Access the application in your browser using the URL http://eap-app-eap-app-demo.openshift.example.com/app-jsp. You should see output like on the following image:
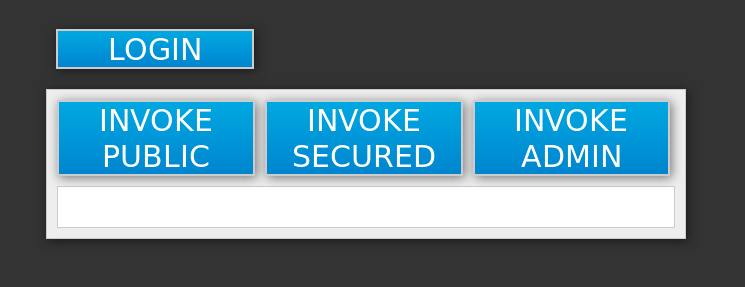
Perform the following to test the application:
Click the INVOKE PUBLIC button to access the
publicendpoint that doesn’t require authentication.You should see the Message: public output.
Click the LOGIN button to be redirected for user authentication to the RH-SSO server instance against the
demorealm.Specify username and password of the RH-SSO user configured earlier (
appuser/apppassword). Click Log in. The look of the application changes as detailed in the following image: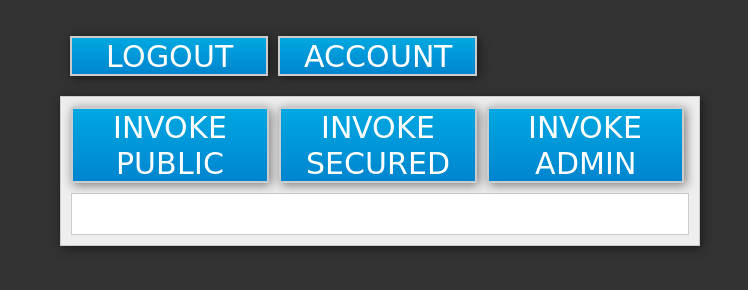
Click the INVOKE SECURED button to access the
securedendpoint.You should see the Message: secured output.
Click the INVOKE ADMIN button to access the
adminendpoint.You should see 403 Forbidden output.
NoteThe
adminendpoint requires users withadminRH-SSO role to invoke properly. Access for theappuseris forbidden because they only haveuserrole privilege, which allows them to access thesecuredendpoint.Perform the following steps to add the
appuserto theadminRH-SSO role:Access the administration console of the RH-SSO server’s instance.
https://secure-sso-sso-app-demo.openshift.example.com/auth/admin.
-
Click Users in the Manage sidebar to view the user information for the
demorealm. - Click View all users button.
- Click the ID link for the appuser or alternatively click the Edit button in the Actions column.
- Click the Role Mappings tab.
-
Select
adminentry from the Available Roles list in the Realm Roles row. -
Click Add selected> button to add the
adminrole to the user. Return to EAP 6.4 / 7.0 JSP service application.
http://eap-app-eap-app-demo.openshift.example.com/app-jsp.
-
Click the LOGOUT button to reload role mappings for the
appuser. -
Click the LOGIN button again and provider
appusercredentials. Click the INVOKE ADMIN button again.
You should see the Message: admin output already.