
Chapter 1. Deploying using local storage devices
Deploying OpenShift Container Storage on OpenShift Container Platform using local storage devices provides you with the option to create internal cluster resources. Follow this deployment method to use local storage to back persistent volumes for your OpenShift Container Platform applications.
Use this section to deploy OpenShift Container Storage on IBM Z infrastructure where OpenShift Container Platform is already installed.
To deploy Red Hat OpenShift Container Storage using local storage, follow these steps:
1.1. Requirements for installing OpenShift Container Storage using local storage devices
- You must upgrade to a latest version of OpenShift Container Platform 4.6 before deploying OpenShift Container Storage 4.6. For information, see Updating OpenShift Container Platform clusters guide.
- The Local Storage Operator version must match the Red Hat OpenShift Container Platform version in order to have the Local Storage Operator fully supported with Red Hat OpenShift Container Storage. The Local Storage Operator does not get upgraded when Red Hat OpenShift Container Platform is upgraded.
You must have at least three OpenShift Container Platform worker nodes in the cluster with locally attached storage devices on each of them.
- Each of the three selected nodes must have at least one raw block device available to be used by OpenShift Container Storage.
- The devices to be used must be empty, that is, there should be no persistent volumes (PVs), volume groups (VGs), or local volumes (LVs) remaining on the disks.
-
If you upgraded to OpenShift Container Storage 4.6 from a previous version, ensure that you have followed post-upgrade procedures to create the
LocalVolumeDiscoveryobject. See Post-update configuration changes for details. -
If you upgraded from a previous version of OpenShift Container Storage, create a
LocalVolumeSetobject to enable automatic provisioning of devices as described in Post-update configuration changes. - For minimum starting node requirements, see Resource requirements section in Planning guide.
1.2. Installing Red Hat OpenShift Container Storage Operator
You can install Red Hat OpenShift Container Storage Operator using the Red Hat OpenShift Container Platform Operator Hub. For information about the hardware and software requirements, see Planning your deployment.
Prerequisites
- You must be logged into the OpenShift Container Platform (RHOCP) cluster.
- You must have at least three worker nodes in the RHOCP cluster.
When you need to override the cluster-wide default node selector for OpenShift Container Storage, you can use the following command in command line interface to specify a blank node selector for the
openshift-storagenamespace:$ oc annotate namespace openshift-storage openshift.io/node-selector=
-
Taint a node as
infrato ensure only Red Hat OpenShift Container Storage resources are scheduled on that node. This helps you save on subscription costs. For more information, see How to use dedicated worker nodes for Red Hat OpenShift Container Storage chapter in Managing and Allocating Storage Resources guide.
Procedure
- Click Operators → OperatorHub.
- Use Filter by keyword text box or the filter list to search for OpenShift Container Storage from the list of operators.
- Click OpenShift Container Storage.
- Click Install on the OpenShift Container Storage operator page.
On the Install Operator page, the following required options are selected by default:
- Update Channel as stable-4.6
- Installation Mode as A specific namespace on the cluster
-
Installed Namespace as Operator recommended namespace openshift-storage. If Namespace
openshift-storagedoes not exist, it will be created during the operator installation.
- Select Enable operator recommended cluster monitoring on this namespace checkbox as this is required for cluster monitoring.
Approval Strategy is set to Automatic by default.
Figure 1.1. Install Operator page
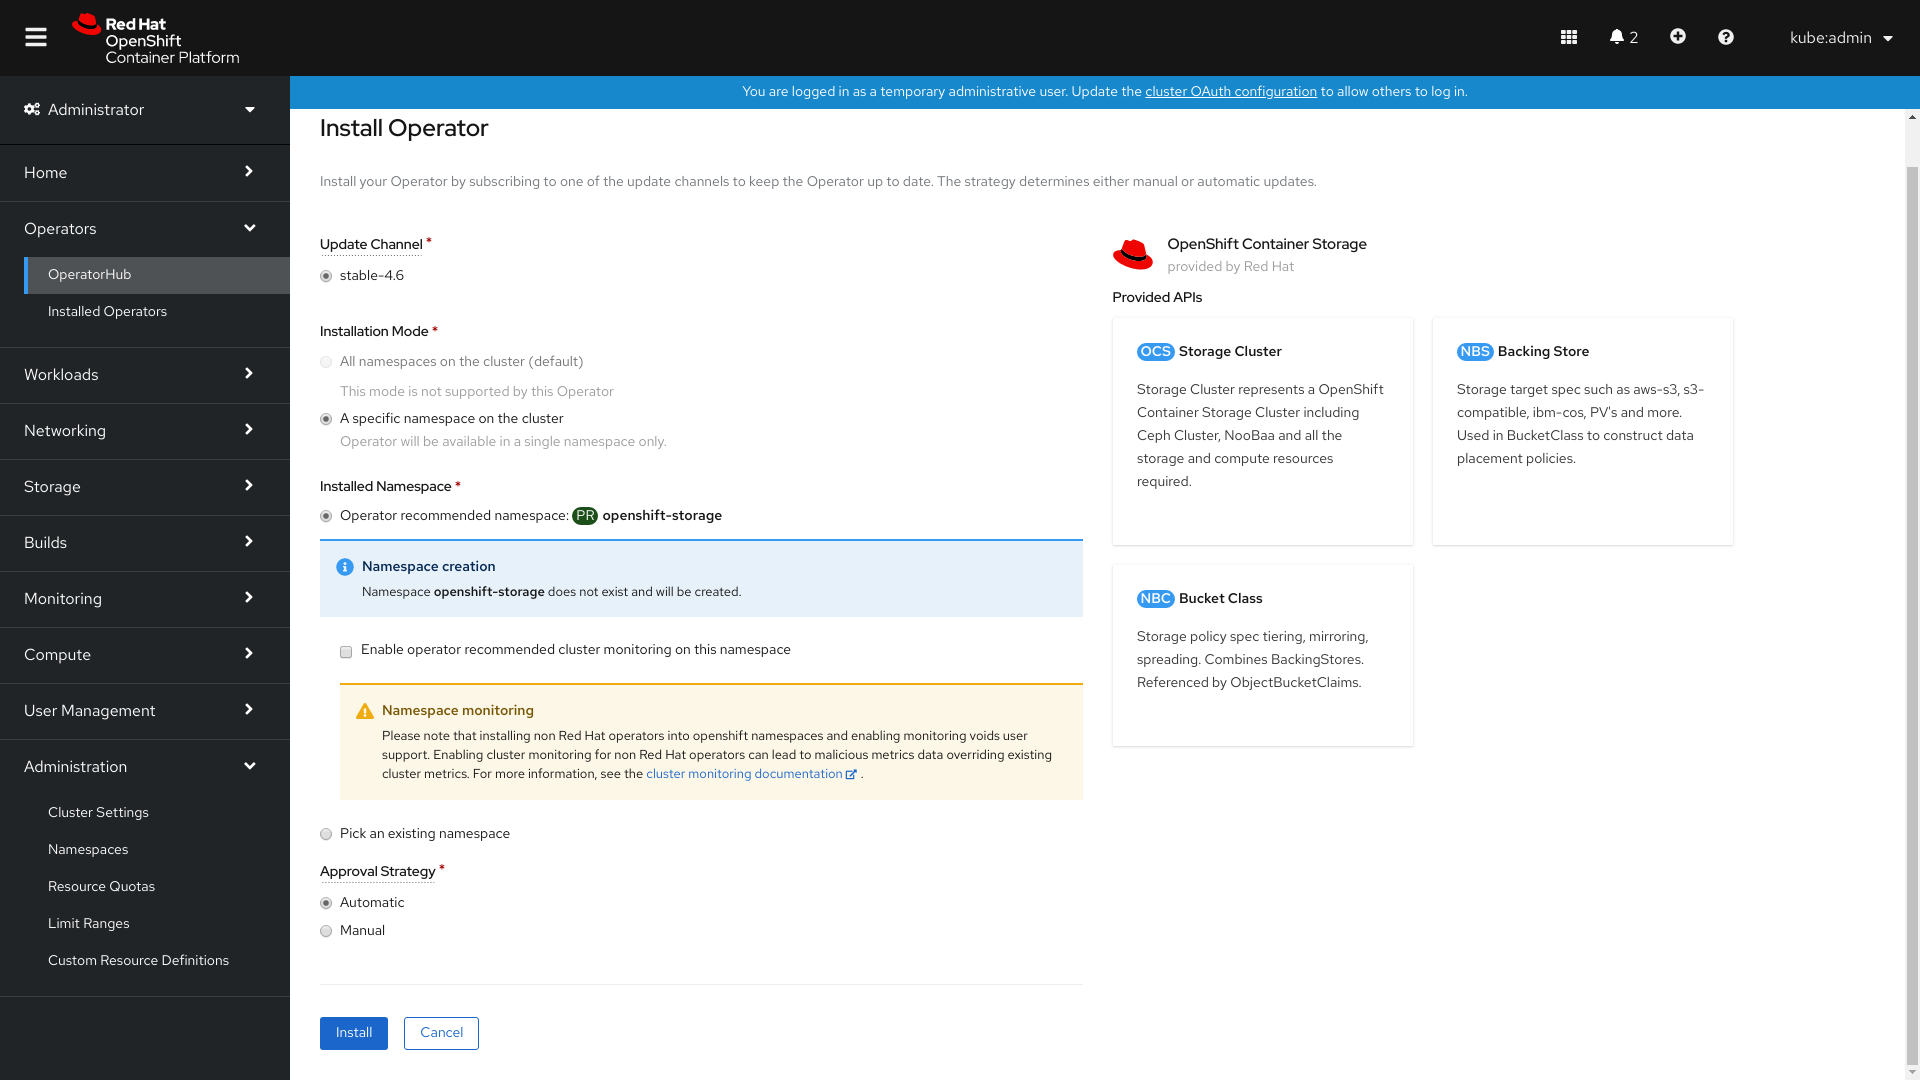
- Click Install.
Verification steps
- Verify that OpenShift Container Storage Operator shows a green tick indicating successful installation.
-
Click View Installed Operators in namespace openshift-storage link to verify that OpenShift Container Storage Operator shows the Status as
Succeededon the Installed Operators dashboard.
1.3. Installing Local Storage Operator
Use this procedure to install the Local Storage Operator from the Operator Hub before creating OpenShift Container Storage clusters on local storage devices.
Procedure
- Log in to the OpenShift Web Console.
- Click Operators → OperatorHub.
- Search for Local Storage Operator from the list of operators and click on it.
Click Install.
Figure 1.2. Install Operator page
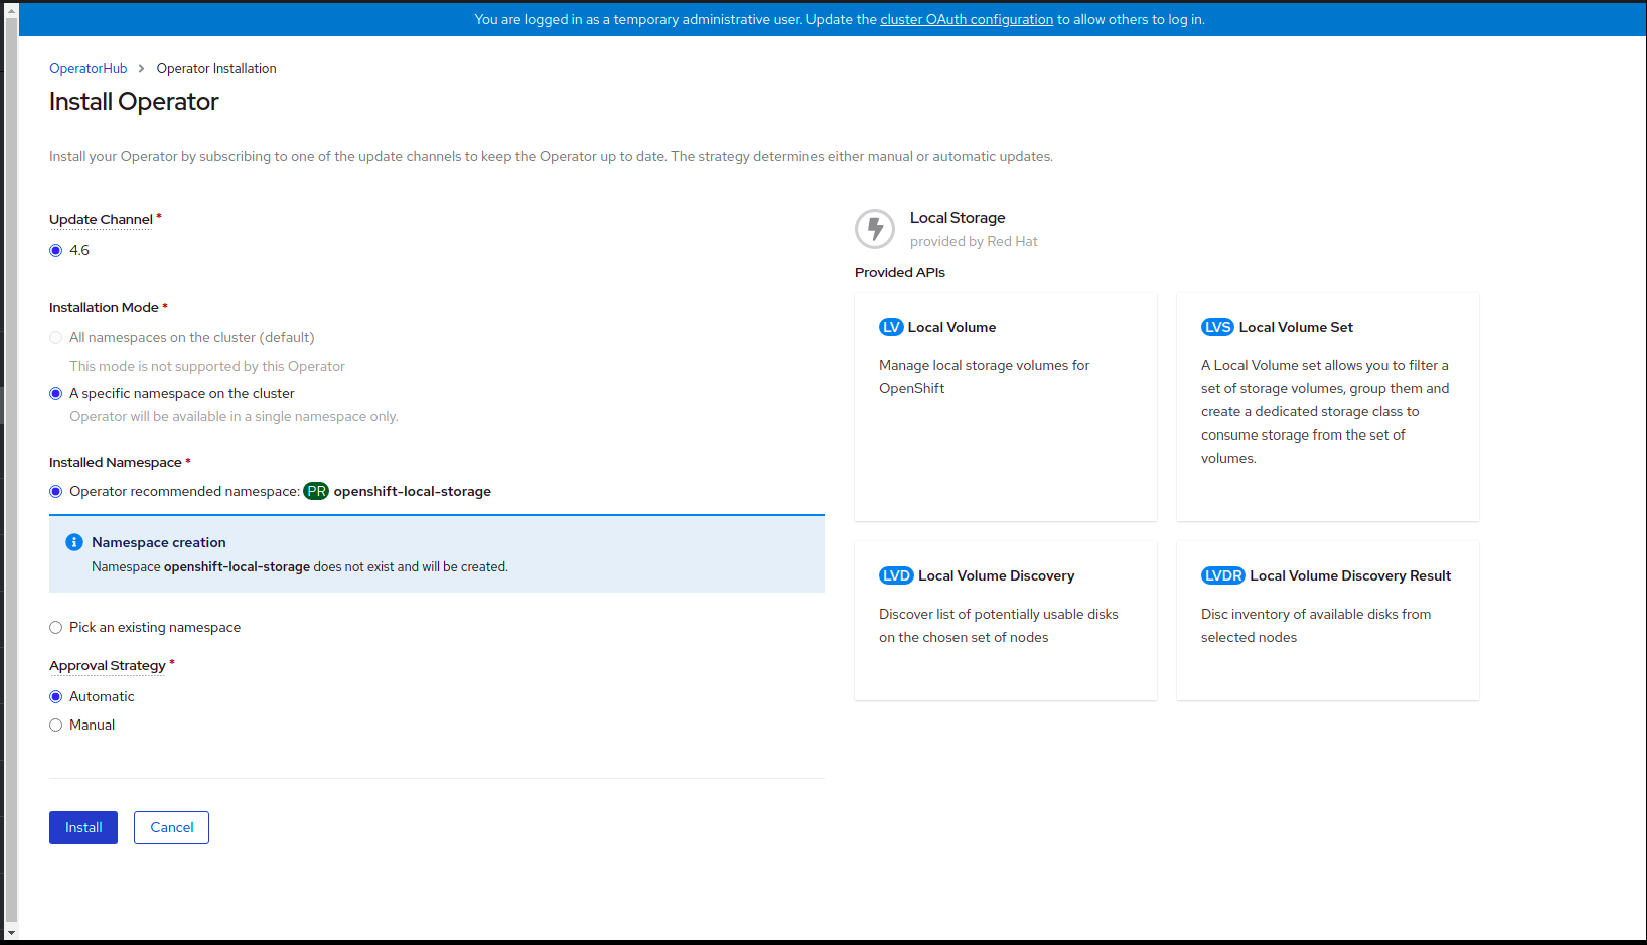
Set the following options on the Install Operator page:
- Update Channel as stable-4.6
- Installation Mode as A specific namespace on the cluster
- Installed Namespace as Operator recommended namespace openshift-local-storage.
- Approval Strategy as Automatic
- Click Install.
-
Verify that the Local Storage Operator shows the Status as
Succeeded.
1.4. Finding available storage devices
Use this procedure to identify the device names for each of the three or more worker nodes that you have labeled with the OpenShift Container Storage label cluster.ocs.openshift.io/openshift-storage='' before creating Persistent Volumes (PV) for IBM Z.
Procedure
List and verify the name of the worker nodes with the OpenShift Container Storage label.
$ oc get nodes -n openshift-storage
Example output:
NAME          STATUS   ROLES    AGE     VERSION
bmworker01    Ready    worker   6h45m   v1.16.2
bmworker02    Ready    worker   6h45m   v1.16.2
bmworker03    Ready    worker   6h45m   v1.16.2
Log in to each worker node that is used for OpenShift Container Storage resources and find the unique
by-iddevice name for each available raw block device.$ oc debug node/<Nodename>
Example output:
$ oc debug node/bmworker01
Starting pod/bmworker01-debug ...
To use host binaries, run `chroot /host`
Pod IP: 10.0.135.71
If you don't see a command prompt, try pressing enter.
sh-4.2# chroot /host
sh-4.4# lsblk
NAME                         MAJ:MIN RM   SIZE RO TYPE MOUNTPOINT
xvda                         202:0    0   120G  0 disk
|-xvda1                      202:1    0   384M  0 part /boot
|-xvda2                      202:2    0   127M  0 part /boot/efi
|-xvda3                      202:3    0     1M  0 part
`-xvda4                      202:4    0 119.5G  0 part
  `-coreos-luks-root-nocrypt 253:0    0 119.5G  0 dm   /sysroot
nvme0n1                      259:0    0   931G  0 disk
In this example, for
bmworker01, the available local device isnvme0n1.Identify the unique ID for each of the devices selected in Step 2.
sh-4.4#  ls -l /dev/disk/by-id/ | grep nvme0n1
lrwxrwxrwx. 1 root root 13 Mar 17 16:24 nvme-INTEL_SSDPE2KX010T7_PHLF733402LM1P0GGN -> ../../nvme0n1
In the above example, the ID for the local device
nvme0n1nvme-INTEL_SSDPE2KX010T7_PHLF733402LM1P0GGN
- Repeat the above step to identify the device ID for all the other nodes that have the storage devices to be used by OpenShift Container Storage. See this Knowledge Base article for more details.
1.5. Creating OpenShift Container Storage cluster on IBM Z
Use this procedure to create storage cluster on IBM Z.
Prerequisites
- Ensure that all the requirements in the Requirements for installing OpenShift Container Storage using local storage devices section are met.
- You must have three worker nodes with the same storage type and size attached to each node (for example, 2TB NVMe hard drive) to use local storage devices on bare metal.
Verify your OpenShift Container Platform worker nodes are labeled for OpenShift Container Storage:
$ oc get nodes -l cluster.ocs.openshift.io/openshift-storage -o jsonpath='{range .items[*]}{.metadata.name}{"\n"}'
To identify storage devices on each node, refer to Finding available storage devices.
Procedure
Create local persistent volumes (PVs) on the storage nodes using
LocalVolumecustom resource (CR).Example of
LocalVolumeCRlocal-storage-block.yamlusing OpenShift Container Storage label as node selector.apiVersion: local.storage.openshift.io/v1 kind: LocalVolume metadata: name: local-block namespace: local-storage labels: app: ocs-storagecluster spec: nodeSelector: nodeSelectorTerms: - matchExpressions: - key: cluster.ocs.openshift.io/openshift-storage operator: In values: - "" storageClassDevices: - storageClassName: localblock volumeMode: Block devicePaths: - /dev/disk/by-id/nvme-INTEL_SSDPEKKA128G7_BTPY81260978128A # <-- modify this line - /dev/disk/by-id/nvme-INTEL_SSDPEKKA128G7_BTPY80440W5U128A # <-- modify this line - /dev/disk/by-id/nvme-INTEL_SSDPEKKA128G7_BTPYB85AABDE128A # <-- modify this lineCreate the
LocalVolumeCR for block PVs.$ oc create -f local-storage-block.yaml
Check if the pods are created.
Example output:
NAME                                    READY   STATUS  RESTARTS AGE
local-block-local-diskmaker-cmfql       1/1     Running 0        31s
local-block-local-diskmaker-g6fzr       1/1     Running 0        31s
local-block-local-diskmaker-jkqxt       1/1     Running 0        31s
local-block-local-provisioner-jgqcc     1/1     Running 0        31s
local-block-local-provisioner-mx49d     1/1     Running 0        31s
local-block-local-provisioner-qbcvp     1/1     Running 0        31s
local-storage-operator-54bc7566c6-ddbrt 1/1     Running 0        12m
Check if the PVs are created.
$ oc get pv
Example output:
NAME                CAPACITY   ACCESS MODES   RECLAIM POLICY   STATUS      CLAIM   STORAGECLASS   REASON   AGE
local-pv-150fdc87   931Gi      RWO            Delete           Available           localblock              2m11s
local-pv-183bfc0a   931Gi      RWO            Delete           Available           localblock              2m15s
local-pv-b2f5cb25   931Gi      RWO            Delete           Available           localblock              2m21s
Check for the new
localblockStorageClass.$ oc get sc | grep localblock
Example output:
NAME            PROVISIONER                    RECLAIMPOLICY
VOLUMEBINDINGMODE ALLOWVOLUMEEXPANSION     AGE
localblock      kubernetes.io/no-provisioner   Delete
WaitForFirstConsumer  false                2m10s
Create the OpenShift Container Storage Cluster Service that uses the
localblockStorage Class.- Log into the OpenShift Web Console.
Click Installed Operators from the left pane of the OpenShift Web Console to view the installed operators.
Figure 1.3. OpenShift Container Storage Operator page

- Click the OpenShift Container Storage installed operator.
On the Operator Details page, click the Storage Cluster link.
Figure 1.4. Storage Cluster tab
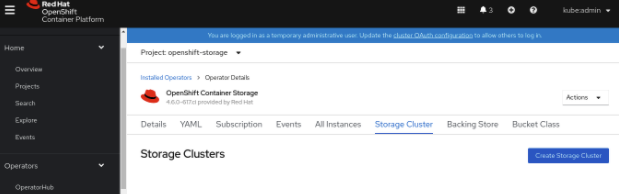
Click Create Storage Cluster.

- Select Internal-Attached devices for the Select Mode.
Perform the steps to create the storage cluster based on any of the following possible scenarios that you are in.
- Local Storage Operator is not installed and storage class not created
- You are prompted to install the Local Storage Operator. Click Install and install the operator as described in Installing Local Storage Operator.
- Proceed to the storage class creation from the wizard as described in the next steps.
- Local Storage Operator is installed but the storage class is not created
Perform the following steps in the wizard:
- Discover Disks
Figure 1.5. Discovery Disks wizard page
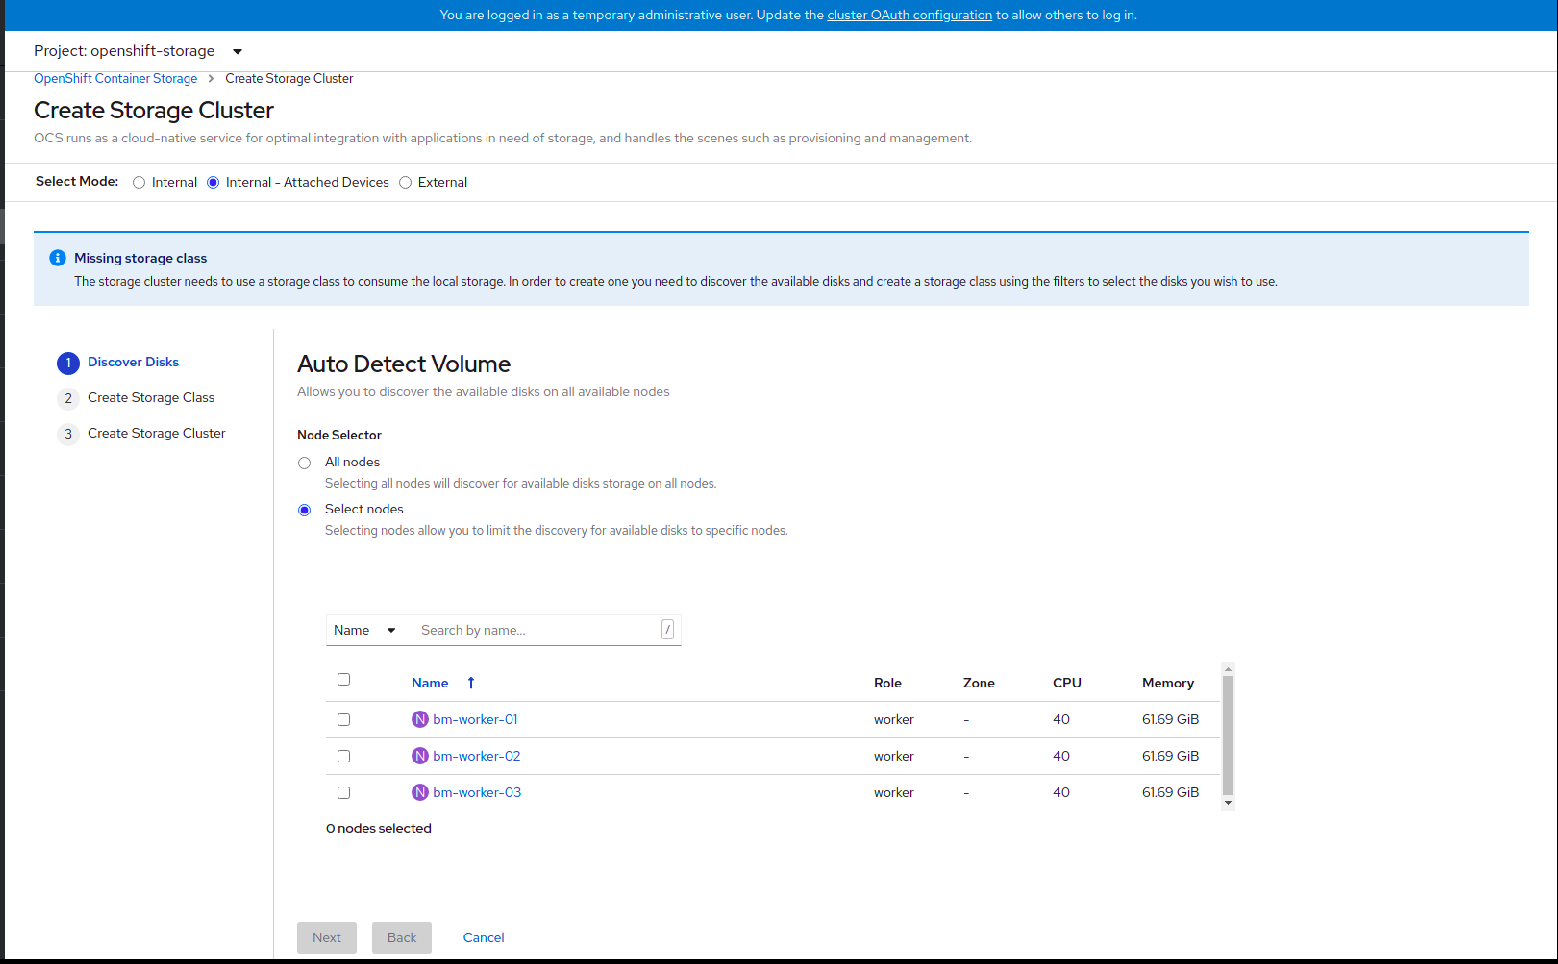
Choose one of the following:
- All nodes to discover disks in all the nodes.
Select nodes to choose a subset of nodes from the nodes listed.
To find specific worker nodes in the cluster, you can filter nodes on the basis of Name or Label. Name allows you to search by name of the node and Label allows you to search by selecting the predefined label.
It is recommended that the worker nodes are spread across three different physical nodes, racks or failure domains for high availability.
NoteEnsure OpenShift Container Storage rack labels are aligned with physical racks in the datacenter to prevent a double node failure at the failure domain level.
If the nodes selected do not match the OpenShift Container Storage cluster requirement of an aggregated 30 CPUs and 72 GiB of RAM, a minimal cluster will be deployed. For minimum starting node requirements, see Resource requirements section in Planning guide.
NoteIf the nodes to be selected are tainted and not discovered in the wizard, follow the steps provided in the Red Hat Knowledgebase Solution as a workaround.
- Click Next.
- Create Storage Class
Figure 1.6. Create Storage Class wizard page
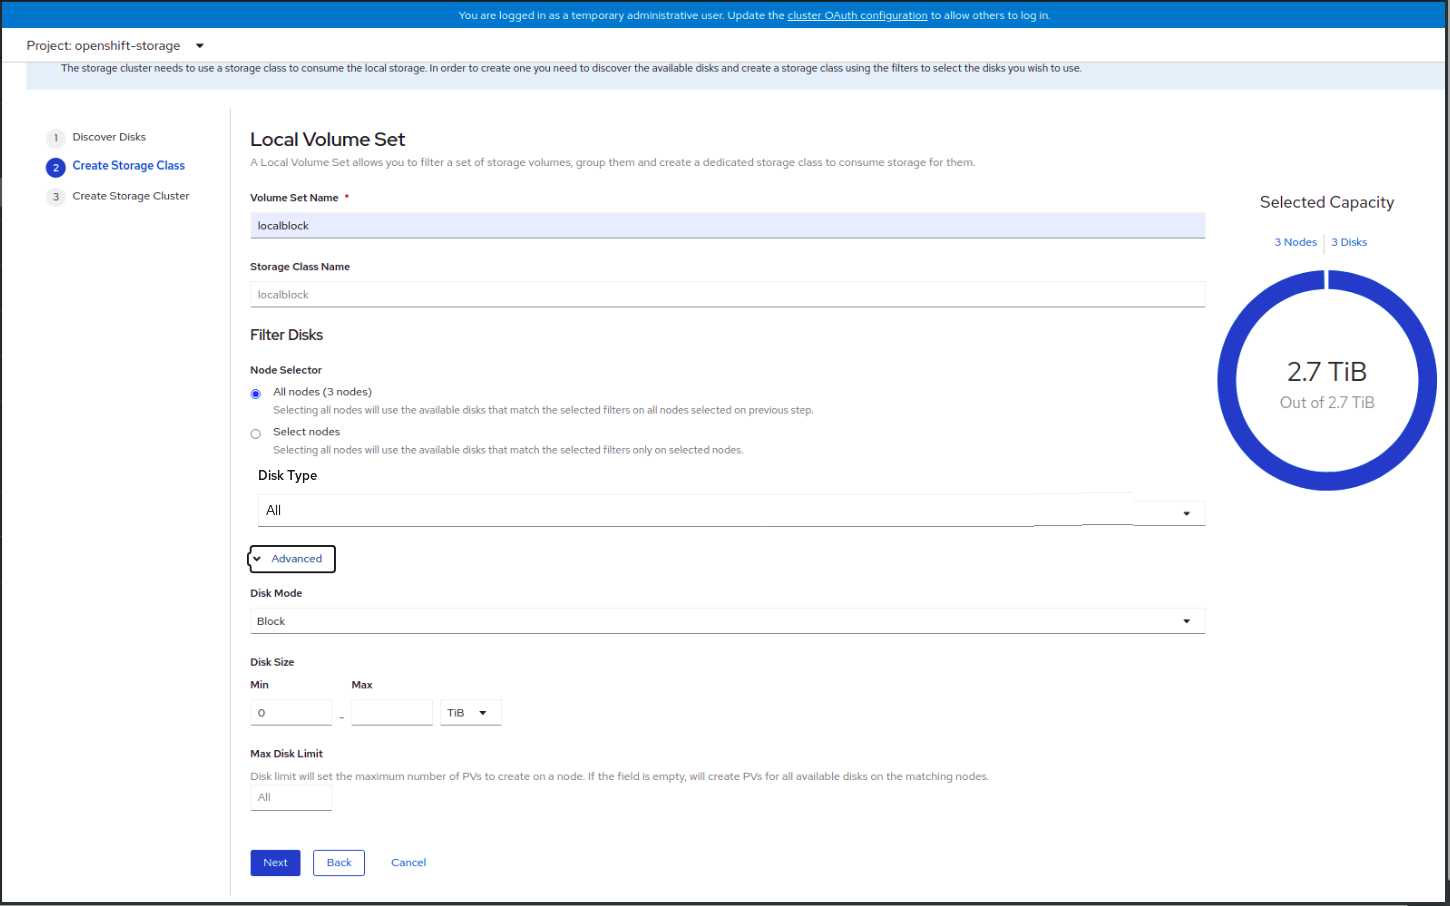
- Enter the Volume set name.
Enter the Storage class name. By default, the Volume set name appears for the storage class name.
You might need to wait for a couple of seconds for the nodes to get populated.
To select the nodes from the discovered nodes, you can choose one of the following:
- All nodes to select all the nodes for which you discovered the available disks.
- Select nodes to choose a subset of the nodes for which you discovered the available disks.
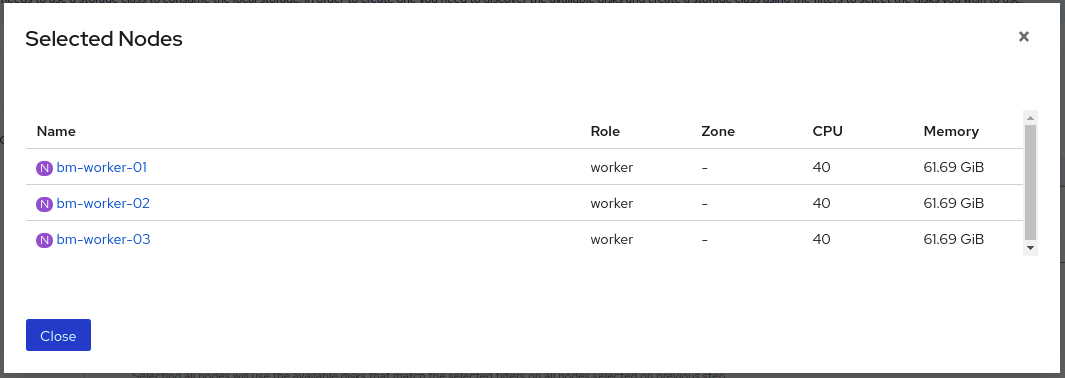
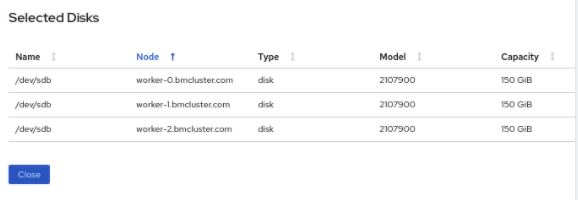
(Optional) You can view the selected capacity of the disks on the selected nodes using the donut chart. Also, you can click on the Nodes and Disks links on the chart which brings up the list of nodes and disks. You can view more details about the selected nodes and disks.
- Select the Disk type.
In the Advanced section, you can set the following options:
Disk Mode
Block is selected by default.
Disk Size
Minimum and maximum size of the device that needs to be included in Max and Min respectively.
Max Disk Limit
This indicates the maximum number of persistent volumes (PVs) that can be created on a node. If this field is left empty, then PVs are created for all the available disks on the matching nodes.
- Click Next.
Click Yes in the message alert to confirm the creation of the storage class.
After the local volume set and storage class are created, it is not possible to go back to the step.
- Local Storage Operator is installed and the storage class is created
- Create Storage Cluster
Figure 1.7. Create Storage Cluster wizard page
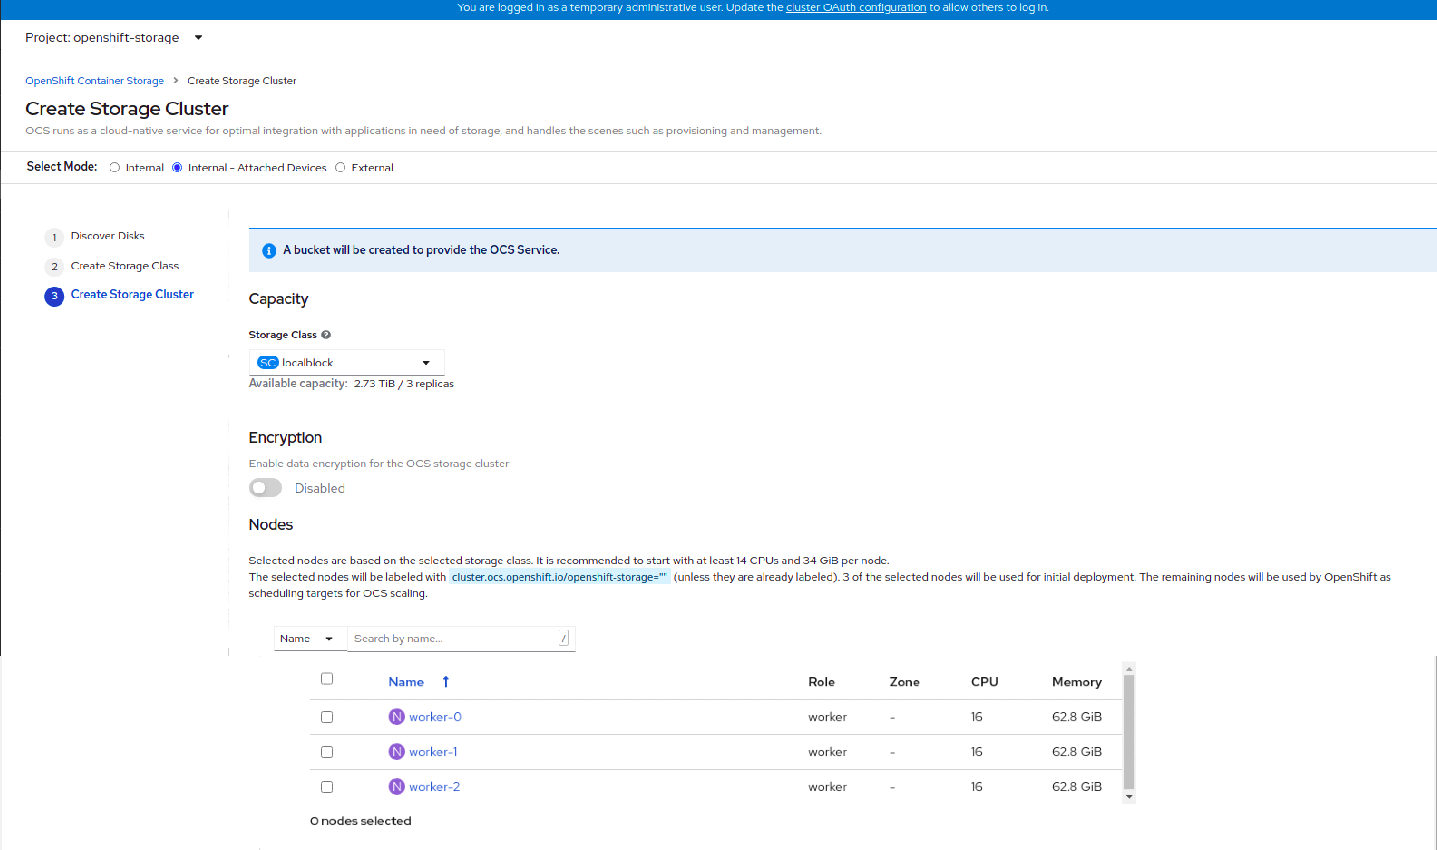
Select the required storage class.
You might need to wait a couple of minutes for the storage nodes corresponding to the selected storage class to get populated.
- (Optional) In the Encryption section, set the toggle to Enabled to enable data encryption on the cluster.
- The nodes corresponding to the storage class are displayed based on the storage class that you selected from the drop down list.
Click Create.
The Create button is enabled only when three nodes are selected. A new storage cluster of three volumes will be created with one volume per worker node. The default configuration uses a replication factor of 3.
To expand the capacity of the initial cluster, see Scaling Storage guide.
Verification steps
See Verifying your OpenShift Container Storage installation.