
2.2. Installing from an ISO Image
Important
2.2.1. Installing Red Hat Gluster Storage 3.5 on Red Hat Enterprise Linux
Important
- Download the ISO image file for Red Hat Gluster Storage Server as described in Section 2.1, “Obtaining Red Hat Gluster Storage”
- In the Welcome to Red Hat Gluster Storage 3.5 screen, select the language that will be used for the rest of the installation and click Continue. This selection will also become the default for the installed system, unless changed later.
Note
One language is pre-selected by default on top of the list. If network access is configured at this point (for example, if you booted from a network server instead of local media), the pre-selected language will be determined based on automatic location detection using the GeoIP module. - The Installation Summary screen is the central location for setting up an installation.
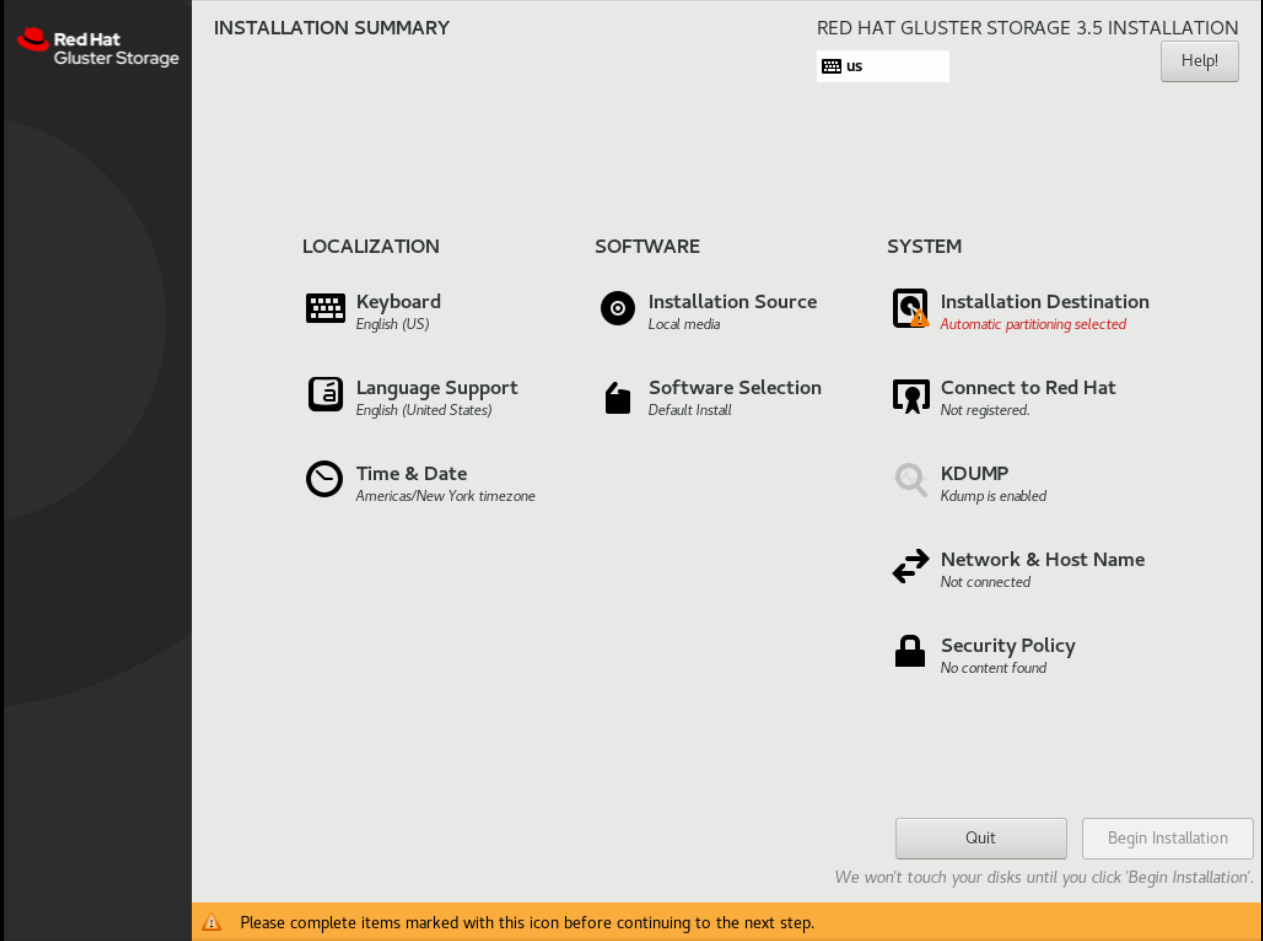
Figure 2.1. Installation Summary For Red Hat Gluster Storage 3.5 on Red Hat Enterprise Linux 8

Figure 2.2. Installation Summary for Red Hat Gluster Storage 3.5 on Red Hat Enterprise Linux 7
Instead of directing you through consecutive screens, the Red Hat Gluster Storage 3.5 installation program on Red Hat Enterprise Linux 7.7 and later allows you to configure the installation in the order you choose.Select a menu item to configure a section of the installation. When you have completed configuring a section, or if you would like to complete that section later, click the Done button located in the upper left corner of the screen.Only sections marked with a warning symbol are mandatory. A note at the bottom of the screen warns you that these sections must be completed before the installation can begin. The remaining sections are optional. Beneath each section's title, the current configuration is summarized. Using this you can determine whether you need to visit the section to configure it further.The following list provides a brief information of each of the menu item on the Installation Summary screen:- Date & TimeTo configure NTP, perform the following steps:
Important
Setting up NTP is mandatory for Gluster installation.- Click Date & Time and specify a time zone to maintain the accuracy of the system clock.
- Toggle the Network Time switch to ON.
Note
By default, the Network Time switch is enabled if you are connected to the network. - Click the configuration icon to add new NTP servers or select existing servers.
- Once you have made your addition or selection, click Done to return to the Installation Summary screen.
Note
NTP servers might be unavailable at the time of installation. In such a case, enabling them will not set the time automatically. When the servers are available, the date and time will be updated. - Language Support
To install support for additional locales and language dialects, select Language Support.
- Keyboard Configuration
To add multiple keyboard layouts to your system, select Keyboard.
- Installation Source
To specify a file or a location to install Red Hat Enterprise Linux from, select Installation Source. On this screen, you can choose between locally available installation media, such as a DVD or an ISO file, or a network location.
- Network & Hostname
To configure essential networking features for your system, select Network & Hostname.
Important
When the Red Hat Gluster Storage 3.5 on Red Hat Enterprise Linux 7.7 and later, installation finishes and the system boots for the first time, any network interfaces which you configured during the installation will be activated. However, the installation does not prompt you to configure network interfaces on some common installation paths - for example, when you install Red Hat Gluster Storage 3.5 on Red Hat Enterprise Linux 7.5 from a DVD to a local hard drive.When you install Red Hat Gluster Storage 3.5 on Red Hat Enterprise Linux 7.7 and later, from a local installation source to a local storage device, be sure to configure at least one network interface manually if you require network access when the system boots for the first time. You will also need to set the connection to connect automatically after boot when editing the configuration. - Software Selection
To specify which packages will be installed, select Software Selection. If you require the following optional Add-Ons, then select the required Add-Ons and click Done:
- RH-Gluster-AD-Integration
- RH-Gluster-NFS-Ganesha
- RH-Gluster-Samba-Server
- Installation Destination
To select the disks and partition the storage space on which you will install Red Hat Gluster Storage, select Installation Destination. For more information, see the Installation Destination section in the Red Hat Enterprise Linux 7 Installation Guide.
- Kdump
Kdump is a kernel crash dumping mechanism which, in the event of a system crash, captures information that can be invaluable in determining the cause of the crash. Use this option to select whether or not to use Kdump on the system
- After making the necessary configurations, click Begin Installation on the Installation Summary screen.
Warning
Up to this point in the installation process, no lasting changes have been made on your computer. When you click Begin Installation, the installation program will allocate space on your hard drive and start to transfer Red Hat Gluster Storage into this space. Depending on the partitioning option that you chose, this process might include erasing data that already exists on your computer.To revise any of the choices that you made up to this point, return to the relevant section of the Installation Summary screen. To cancel installation completely, click Quit or switch off your computer.If you have finished customizing the installation and are certain that you want to proceed, click Begin Installation.After you click Begin Installation, allow the installation process to complete. If the process is interrupted, for example, by you switching off or resetting the computer, or by a power outage, you will probably not be able to use your computer until you restart and complete the Red Hat Gluster Storage installation process - Once you click Begin Installation, the progress screen appears. Red Hat Gluster Storage reports the installation progress on the screen as it writes the selected packages to your system. Following is a brief description of the options on this screen:
- Root Password
The Root Password menu item is used to set the password for the root account. The root account is used to perform critical system management and administration tasks. The password can be configured either while the packages are being installed or afterwards, but you will not be able to complete the installation process until it has been configured.
- User Creation
Creating a user account is optional and can be done after installation, but it is recommended to do it on this screen. A user account is used for normal work and to access the system. Best practice suggests that you always access the system via a user account and not the root account.
- After the installation is completed, click Reboot to reboot your system and begin using Red Hat Gluster Storage.