
Chapter 4. Installing Red Hat Ceph Storage using the Cockpit web interface
This chapter describes how to use the Cockpit web-based interface to install a Red Hat Ceph Storage cluster and other components, such as Metadata Servers, the Ceph client, or the Ceph Object Gateway.
The process consists of installing the Cockpit Ceph Installer, logging into Cockpit, and configuring and starting the cluster install using different pages within the installer.
The Cockpit Ceph Installer uses Ansible and the Ansible playbooks provided by the ceph-ansible RPM to perform the actual install. It is still possible to use these playbooks to install Ceph without Cockpit. That process is relevant to this chapter and is referred to as a direct Ansible install, or using the Ansible playbooks directly.
The Cockpit Ceph installer does not currently support IPv6 networking. If you require IPv6 networking, install Ceph using the Ansible playbooks directly.
The dashboard web interface, used for administration and monitoring of Ceph, is installed by default by the Ansible playbooks in the ceph-ansible RPM, which Cockpit uses on the back-end. Therefore, whether you use Ansible playbooks directly, or use Cockpit to install Ceph, the dashboard web interface will be installed as well.
4.1. Prerequisites
- Complete the general prerequisites required for direct Ansible Red Hat Ceph Storage installs.
- A recent version of Firefox or Chrome.
- If using multiple networks to segment intra-cluster traffic, client-to-cluster traffic, RADOS Gateway traffic, or iSCSI traffic, ensure the relevant networks are already configured on the hosts. For more information, see network considerations in the Hardware Guide and the section in this chapter on completing the Network page of the Cockpit Ceph Installer
-
Ensure the default port for Cockpit web-based interface,
9090, is accessible.
4.2. Installation requirements
- One node to act as the Ansible administration node.
- One node to provide the performance metrics and alerting platform. This may be colocated with the Ansible administration node.
- One or more nodes to form the Ceph cluster. The installer supports an all-in-one installation called Development/POC. In this mode all Ceph services can run from the same node, and data replication defaults to disk rather than host level protection.
4.3. Install and configure the Cockpit Ceph Installer
Before you can use the Cockpit Ceph Installer to install a Red Hat Ceph Storage cluster, you must install the Cockpit Ceph Installer on the Ansible administration node.
Prerequisites
- Root-level access to the Ansible administration node.
-
The
ansibleuser account for use with the Ansible application.
Procedure
Verify Cockpit is installed.
$ rpm -q cockpit
Example:
[admin@jb-ceph4-admin ~]$ rpm -q cockpit
cockpit-196.3-1.el8.x86_64
If you see similar output to the example above, skip to the step Verify Cockpit is running. If the output is
package cockpit is not installed, continue to the step Install Cockpit.Optional: Install Cockpit.
For Red Hat Enterprise Linux 8:
# dnf install cockpit
For Red Hat Enterprise Linux 7:
# yum install cockpit
Verify Cockpit is running.
# systemctl status cockpit.socket
If you see
Active: active (listening)in the output, skip to the step Install the Cockpit plugin for Red Hat Ceph Storage. If instead you seeActive: inactive (dead), continue to the step Enable Cockpit.Optional: Enable Cockpit.
Use the
systemctlcommand to enable Cockpit:# systemctl enable --now cockpit.socket
You will see a line like the following:
Created symlink /etc/systemd/system/sockets.target.wants/cockpit.socket → /usr/lib/systemd/system/cockpit.socket.
Verify Cockpit is running:
# systemctl status cockpit.socket
You will see a line like the following:
Active: active (listening) since Tue 2020-01-07 18:49:07 EST; 7min ago
Install the Cockpit Ceph Installer for Red Hat Ceph Storage.
For Red Hat Enterprise Linux 8:
# dnf install cockpit-ceph-installer
For Red Hat Enterprise Linux 7:
# yum install cockpit-ceph-installer
As the Ansible user, log in to the container catalog using sudo:
NoteBy default, the Cockpit Ceph Installer uses the
rootuser to install Ceph. To use the Ansible user created as a part of the prerequisites to install Ceph, run the rest of the commands in this procedure withsudoas the Ansible user.Red Hat Enterprise Linux 7
$ sudo docker login -u CUSTOMER_PORTAL_USERNAME https://registry.redhat.ioExample
[admin@jb-ceph4-admin ~]$ sudo docker login -u myusername https://registry.redhat.io
Password:
Login Succeeded!
Red Hat Enterprise Linux 8
$ sudo podman login -u CUSTOMER_PORTAL_USERNAME https://registry.redhat.ioExample
[admin@jb-ceph4-admin ~]$ sudo podman login -u myusername https://registry.redhat.io
Password:
Login Succeeded!
Verify
registry.redhat.iois in the container registry search path.Open for editing the
/etc/containers/registries.conffile:[registries.search] registries = [ 'registry.access.redhat.com', 'registry.fedoraproject.org', 'registry.centos.org', 'docker.io']
If
registry.redhat.iois not included in the file, add it:[registries.search] registries = ['registry.redhat.io', 'registry.access.redhat.com', 'registry.fedoraproject.org', 'registry.centos.org', 'docker.io']
As the Ansible user, start the
ansible-runner-serviceusing sudo.$ sudo ansible-runner-service.sh -s
Example
[admin@jb-ceph4-admin ~]$ sudo ansible-runner-service.sh -s
Checking environment is ready
Checking/creating directories
Checking SSL certificate configuration
Generating RSA private key, 4096 bit long modulus (2 primes)
..................................................................................................................................................................................................................................++++
......................................................++++
e is 65537 (0x010001)
Generating RSA private key, 4096 bit long modulus (2 primes)
........................................++++
..............................................................................................................................................................................++++
e is 65537 (0x010001)
writing RSA key
Signature ok
subject=C = US, ST = North Carolina, L = Raleigh, O = Red Hat, OU = RunnerServer, CN = jb-ceph4-admin
Getting CA Private Key
Generating RSA private key, 4096 bit long modulus (2 primes)
.....................................................................................................++++
..++++
e is 65537 (0x010001)
writing RSA key
Signature ok
subject=C = US, ST = North Carolina, L = Raleigh, O = Red Hat, OU = RunnerClient, CN = jb-ceph4-admin
Getting CA Private Key
Setting ownership of the certs to your user account(admin)
Setting target user for ansible connections to admin
Applying SELINUX container_file_t context to '/etc/ansible-runner-service'
Applying SELINUX container_file_t context to '/usr/share/ceph-ansible'
Ansible API (runner-service) container set to rhceph/ansible-runner-rhel8:latest
Fetching Ansible API container (runner-service). Please wait...
Trying to pull registry.redhat.io/rhceph/ansible-runner-rhel8:latest...Getting image source signatures
Copying blob c585fd5093c6 done
Copying blob 217d30c36265 done
Copying blob e61d8721e62e done
Copying config b96067ea93 done
Writing manifest to image destination
Storing signatures
b96067ea93c8d6769eaea86854617c63c61ea10c4ff01ecf71d488d5727cb577
Starting Ansible API container (runner-service)
Started runner-service container
Waiting for Ansible API container (runner-service) to respond
The Ansible API container (runner-service) is available and responding to requests

Login to the cockpit UI at https://jb-ceph4-admin:9090/cockpit-ceph-installer to start the install
The last line of output includes the URL to the Cockpit Ceph Installer. In the example above the URL is
https://jb-ceph4-admin:9090/cockpit-ceph-installer. Take note of the URL printed in your environment.
4.4. Copy the Cockpit Ceph Installer SSH key to all nodes in the cluster
The Cockpit Ceph Installer uses SSH to connect to and configure the nodes in the cluster. In order for it to do this automatically the installer generates an SSH key pair so it can access the nodes without being prompted for a password. The SSH public key must be transferred to all nodes in the cluster.
Prerequisites
- An Ansible user with sudo access has been created.
- The Cockpit Ceph Installer is installed and configured.
Procedure
Log in to the Ansible administration node as the Ansible user.
ssh ANSIBLE_USER@HOST_NAME
Example:
$ ssh admin@jb-ceph4-admin
Copy the SSH public key to the first node:
sudo ssh-copy-id -f -i /usr/share/ansible-runner-service/env/ssh_key.pub _ANSIBLE_USER_@_HOST_NAME_
Example:
$ sudo ssh-copy-id -f -i /usr/share/ansible-runner-service/env/ssh_key.pub admin@jb-ceph4-mon
/bin/ssh-copy-id: INFO: Source of key(s) to be installed: "/usr/share/ansible-runner-service/env/ssh_key.pub"
admin@192.168.122.182's password:

Number of key(s) added: 1

Now try logging into the machine, with:   "ssh 'admin@jb-ceph4-mon'"
and check to make sure that only the key(s) you wanted were added.
Repeat this step for all nodes in the cluster
4.5. Log in to Cockpit
You can view the Cockpit Ceph Installer web interface by logging into Cockpit.
Prerequisites
- The Cockpit Ceph Installer is installed and configured.
- You have the URL printed as a part of configuring the Cockpit Ceph Installer
Procedure
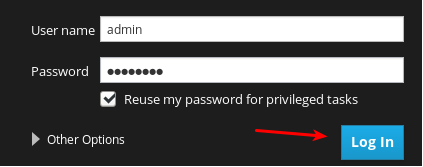
Open the URL in a web browser.
Enter the Ansible user name and its password.

Click the radio button for Reuse my password for privileged tasks.

Click Log In.
Review the welcome page to understand how the installer works and the overall flow of the installation process.
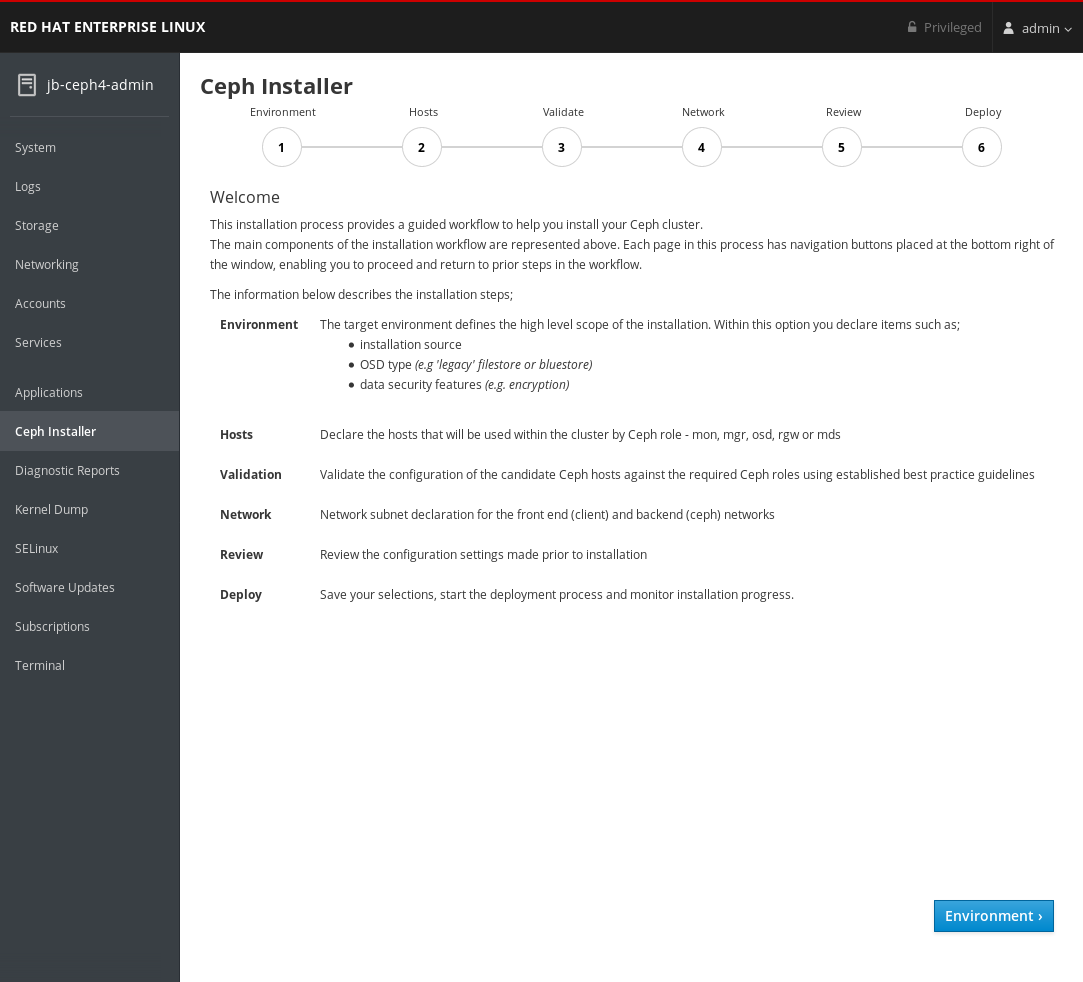
Click the Environment button at the bottom right corner of the web page after you have reviewed the information in the welcome page.
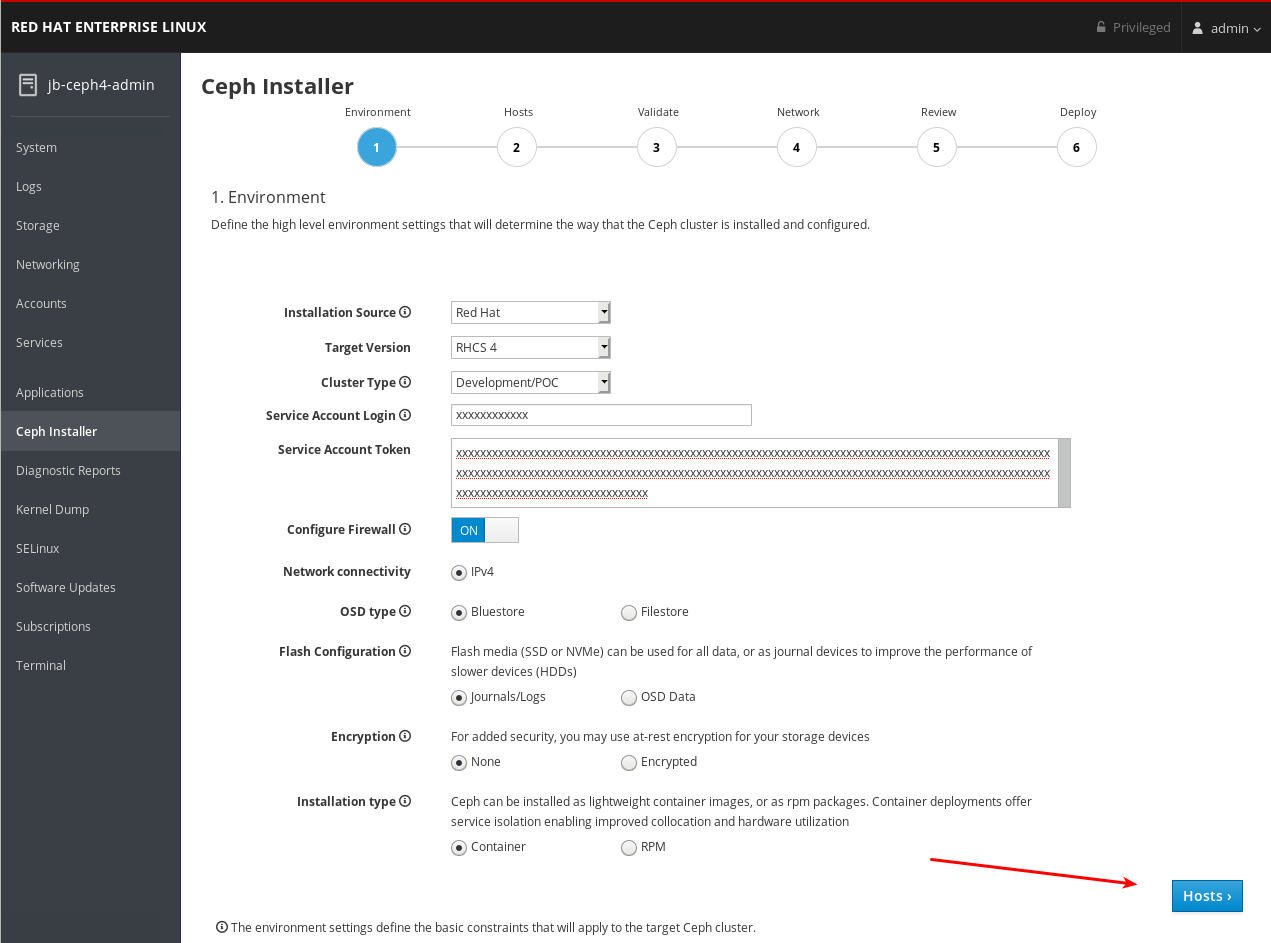
4.6. Complete the Environment page of the Cockpit Ceph Installer
The Environment page allows you to configure overall aspects of the cluster, like what installation source to use and how to use Hard Disk Drives (HDDs) and Solid State Drives (SSDs) for storage.
Prerequisites
- The Cockpit Ceph Installer is installed and configured.
- You have the URL printed as a part of configuring the Cockpit Ceph Installer.
- You have created a registry service account.
In the dialogs to follow, there are tooltips to the right of some of the settings. To view them, hover the mouse cursor over the icon that looks like an i with a circle around it.
Procedure
Select the Installation Source. Choose Red Hat to use repositories from Red Hat Subscription Manager, or ISO to use a CD image downloaded from the Red Hat Customer Portal.

If you choose Red Hat, Target Version will be set to RHCS 4 without any other options. If you choose ISO, Target Version will be set to the ISO image file.
ImportantIf you choose ISO, the image file must be in the
/usr/share/ansible-runner-service/isodirectory and its SELinux context must be set tocontainer_file_t.ImportantThe Community and Distribution options for Installation Source are not supported.
Select the Cluster Type. The Production selection prohibits the install from proceeding if certain resource requirements like CPU number and memory size are not met. To allow the cluster installation to proceed even if the resource requirements are not met, select Development/POC.
 Important
Do not use Development/POC mode to install a Ceph cluster that will be used in production.
Set the Service Account Login and Service Account Token. If you do not have a Red Hat Registry Service Account, create one using the Registry Service Account webpage.

Set Configure Firewall to ON to apply rules to
firewalldto open ports for Ceph services. Use the OFF setting if you are not usingfirewalld.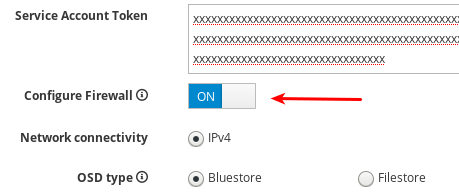
Currently, the Cockpit Ceph Installer only supports IPv4. If you require IPv6 support, discountinue use of the Cockpit Ceph Installer and proceed with installing Ceph using the Ansible scripts directly.

Set OSD Type to BlueStore or FileStore.
 Important
BlueStore is the default OSD type. Previously, Ceph used FileStore as the object store. This format is deprecated for new Red Hat Ceph Storage 4.0 installs because BlueStore offers more features and improved performance. It is still possible to use FileStore, but using it requires a support exception. For more information on BlueStore, see Ceph BlueStore in the Architecture Guide.
Set Flash Configuration to Journal/Logs or OSD data. If you have Solid State Drives (SSDs), whether they use NVMe or a traditional SATA/SAS interface, you can choose to use them just for write journaling and logs while the actual data goes on Hard Disk Drives (HDDs), or you can use the SSDs for journaling, logs, and data, and not use HDDs for any Ceph OSD functions.

Set Encryption to None or Encrypted. This refers to at rest encryption of storage devices using the LUKS1 format.

Set Installation type to Container or RPM. Traditionally, Red Hat Package Manager (RPM) was used to install software on Red Hat Enterprise Linux. Now, you can install Ceph using RPM or containers. Installing Ceph using containers can provide improved hardware utilization since services can be isolated and collocated.

Review all the Environment settings and click the Hosts button at the bottom right corner of the webpage.
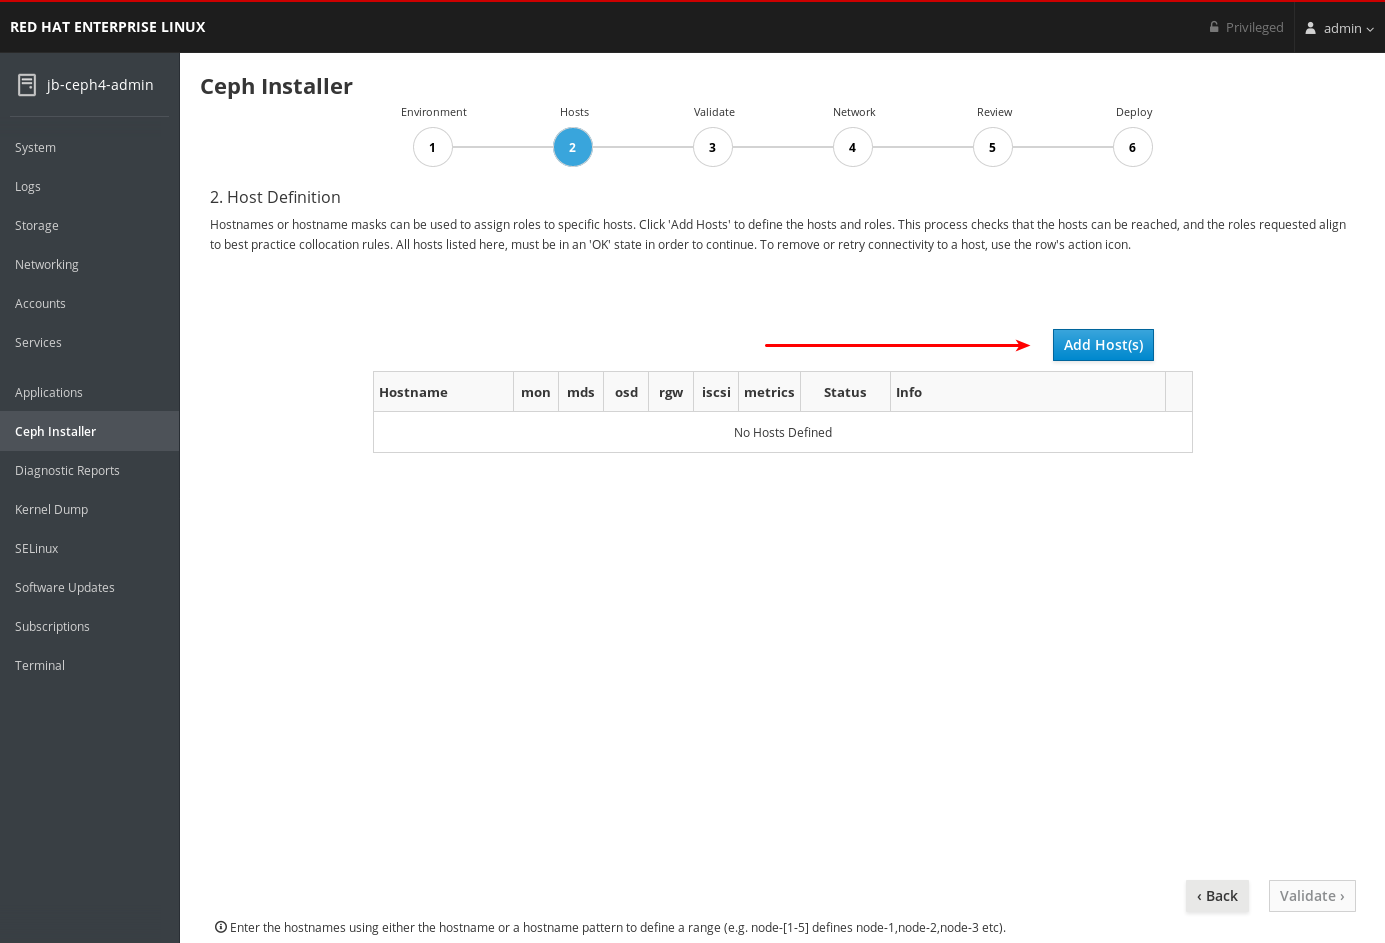
4.7. Complete the Hosts page of the Cockpit Ceph Installer
The Hosts page allows you inform the Cockpit Ceph Installer what hosts to install Ceph on, and what roles each host will be used for. As you add the hosts, the installer will check them for SSH and DNS connectivity.
Prerequisites
- The Environment page of the Cockpit Ceph Installer has been completed.
- The Cockpit Ceph Installer SSH key has been copied to all nodes in the cluster.
Procedure
Click the Add Host(s) button.
Enter the hostname for a Ceph OSD node, check the box for OSD, and click the Add button.
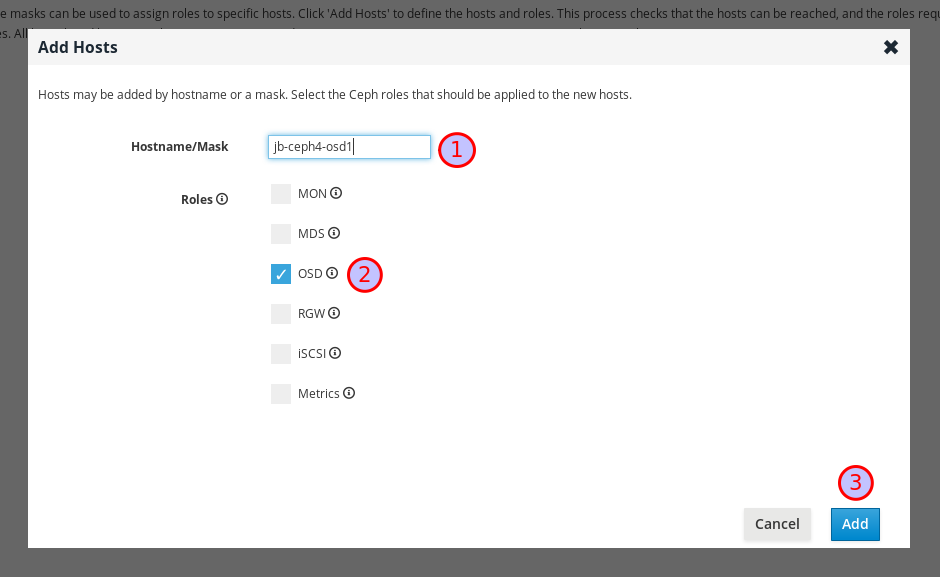
The first Ceph OSD node is added.

For production clusters, repeat this step until you have added at least three Ceph OSD nodes.
Optional: Use a host name pattern to define a range of nodes. For example, to add
jb-ceph4-osd2andjb-ceph4-osd3at the same time, enterjb-ceph4-osd[2-3].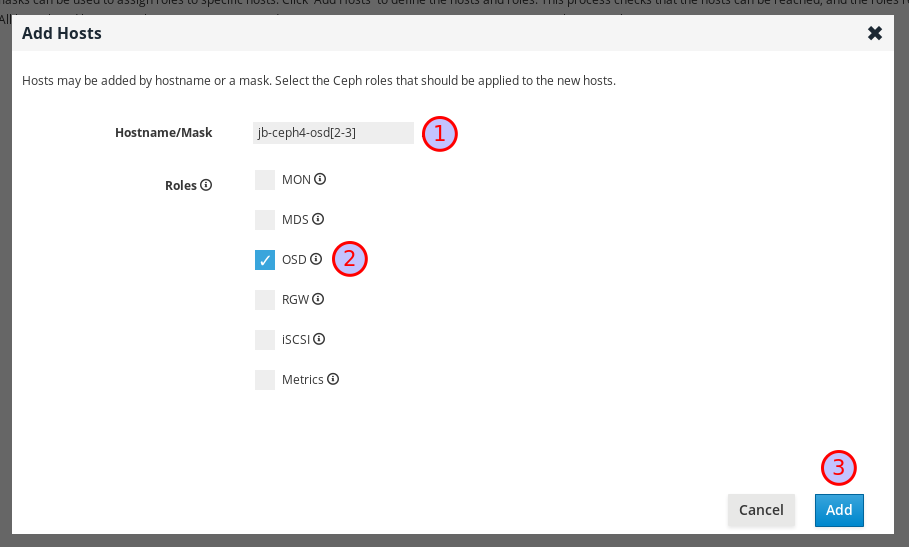
Both
jb-ceph4-osd2andjb-ceph4-ods3are added.
Repeat the above steps for the other nodes in your cluster.
-
For production clusters, add at least three Ceph Monitor nodes. In the dialog, the role is listed as
MON. -
Add a node with the
Metricsrole. TheMetricsrole installs Grafana and Prometheus to provide real-time insights into the performance of the Ceph cluster. These metrics are presented in the Ceph Dashboard, which allows you to monitor and manage the cluster. The installation of the dashboard, Grafana, and Prometheus are required. You can colocate the metrics functions on the Ansible Administration node. If you do, ensure the system resources of the node are greater than what is required for a stand alone metrics node. -
Optional: Add a node with the
MDSrole. TheMDSrole installs the Ceph Metadata Server (MDS). Metadata Server daemons are necessary for deploying a Ceph File System. -
Optional: Add a node with the
RGWrole. TheRGWrole installs the Ceph Object Gateway, also know as the RADOS gateway, which is an object storage interface built on top of the librados API to provide applications with a RESTful gateway to Ceph storage clusters. It supports the Amazon S3 and OpenStack Swift APIs. -
Optional: Add a node with the
iSCSIrole. TheiSCSIrole installs an iSCSI gateway so you can share Ceph Block Devices over iSCSI. To use iSCSI with Ceph, you must install the iSCSI gateway on at least two nodes for multipath I/O.
-
For production clusters, add at least three Ceph Monitor nodes. In the dialog, the role is listed as
Optional: Colocate more than one service on the same node by selecting multiple roles when adding the node.

For more information on colocating daemons, see Colocation of containerized Ceph daemons in the Installation Guide.
Optional: Modify the roles assigned to a node by checking or unchecking roles in the table.

Optional: To delete a node, on the far right side of the row of the node you want to delete, click the kebab icon and then click Delete.

Click the Validate button at the bottom right corner of the page after you have added all the nodes in your cluster and set all the required roles.

For production clusters, the Cockpit Ceph installer will not proceed unless you have three or five monitors. In these examples Cluster Type is set to Development/POC so the install can proceed with only one monitor.
4.8. Complete the Validate page of the Cockpit Ceph Installer
The Validate page allows you to probe the nodes you provided on the Hosts page to verify they meet the hardware requirements for the roles you intend to use them for.
Prerequisites
- The Hosts page of the Cockpit Ceph Installer has been completed.
Procedure
Click the Probe Hosts button.

To continue you must select at least three hosts which have an OK Status.
Optional: If warnings or errors were generated for hosts, click the arrow to the left of the check mark for the host to view the issues.

 Important
If you set Cluster Type to Production, any errors generated will cause Status to be NOTOK and you will not be able to select them for installation. Read the next step for information on how to resolve errors.
ImportantIf you set Cluster Type to Development/POC, any errors generated will be listed as warnings so Status is always OK. This allows you to select the hosts and install Ceph on them regardless of whether the hosts meet the requirements or suggestions. You can still resolve warnings if you want to. Read the next step for information on how to resolve warnings.
Optional: To resolve errors and warnings use one or more of the following methods.
The easiest way to resolve errors or warnings is to disable certain roles completely or to disable a role on one host and enable it on another host which has the required resources.
Experiment with enabling or disabling roles until you find a combination where, if you are installing a Development/POC cluster, you are comfortable proceeding with any remaining warnings, or if you are installing a Production cluster, at least three hosts have all the resources required for the roles assigned to them and you are comfortable proceeding with any remaining warnings.
You can also use a new host which meets the requirements for the roles required. First go back to the Hosts page and delete the hosts with issues.

Then, add the new hosts.
- If you want to upgrade the hardware on a host or modify it in some other way so it will meet the requirements or suggestions, first make the desired changes to the host, and then click Probe Hosts again. If you have to reinstall the operating system you will have to copy the SSH key again.
Select the hosts to install Red Hat Ceph Storage on by checking the box next to the host.
 Important
If installing a production cluster, you must resolve any errors before you can select them for installation.
Click the Network button at the bottom right corner of the page to review and configure networking for the cluster.

4.9. Complete the Network page of the Cockpit Ceph Installer
The Network page allows you to isolate certain cluster communication types to specific networks. This requires multiple different networks configured across the hosts in the cluster.
The Network page uses information gathered from the probes done on the Validate page to display the networks your hosts have access to. Currently, if you have already proceeded to the Network page, you cannot add new networks to hosts, go back to the Validate page, reprobe the hosts, and proceed to the Network page again and use the new networks. They will not be displayed for selection. To use networks added to the hosts after already going to the Network page you must refresh the web page completely and restart the install from the beginning.
For production clusters you must segregate intra-cluster-traffic from client-to-cluster traffic on separate NICs. In addition to segregating cluster traffic types, there are other networking considerations to take into account when setting up a Ceph cluster. For more information, see Network considerations in the Hardware Guide.
Prerequisites
- The Validate page of the Cockpit Ceph Installer has been completed.
Procedure
Take note of the network types you can configure on the Network page. Each type has its own column. Columns for Cluster Network and Public Network are always displayed. If you are installing hosts with the RADOS Gateway role, the S3 Network column will be displayed. If you are installing hosts with the iSCSI role, the iSCSI Network column will be displayed. In the example below, columns for Cluster Network, Public Network, and S3 Network are shown.
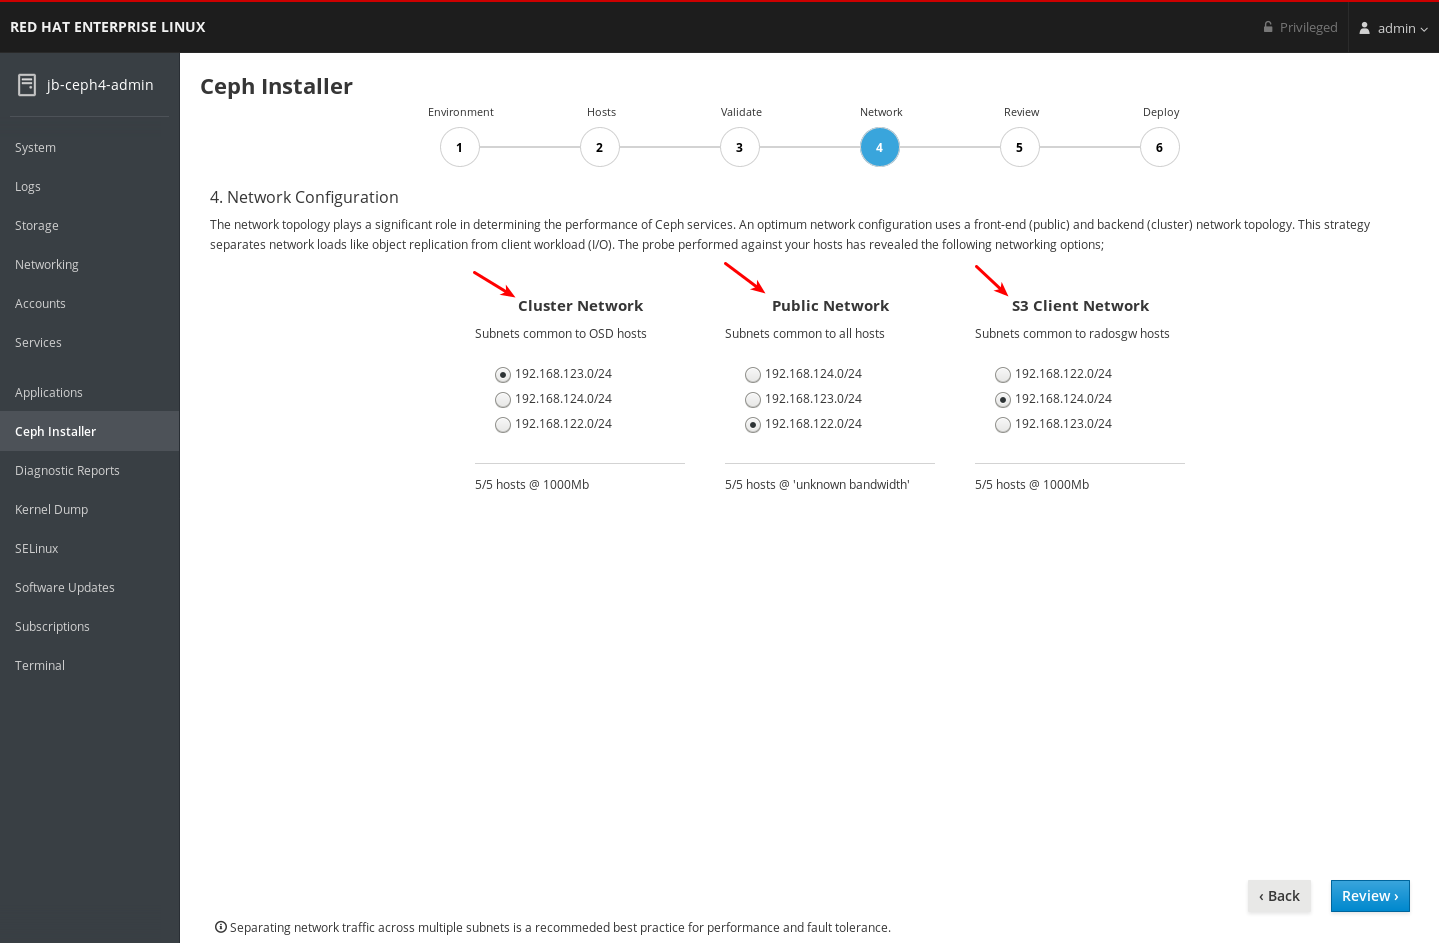
Take note of the networks you can select for each network type. Only the networks which are available on all hosts that make up a particular network type are shown. In the example below, there are three networks which are available on all hosts in the cluster. Because all three networks are available on every set of hosts which make up a network type, each network type lists the same three networks.

The three networks available are
192.168.122.0/24,192.168.123.0/24, and192.168.124.0/24.Take note of the speed each network operates at. This is the speed of the NICs used for the particular network. In the example below,
192.168.123.0/24, and192.168.124.0/24are at 1,000 mbps. The Cockpit Ceph Installer could not determine the speed for the192.168.122.0/24network.
Select the networks you want to use for each network type. For production clusters, you must select separate networks for Cluster Network and Public Network. For development/POC clusters, you can select the same network for both types, or if you only have one network configured on all hosts, only that network will be displayed and you will not be able to select other networks.
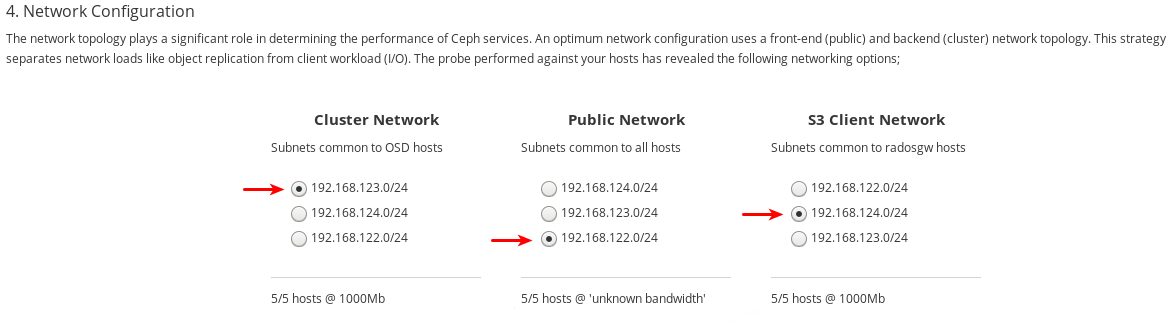
The
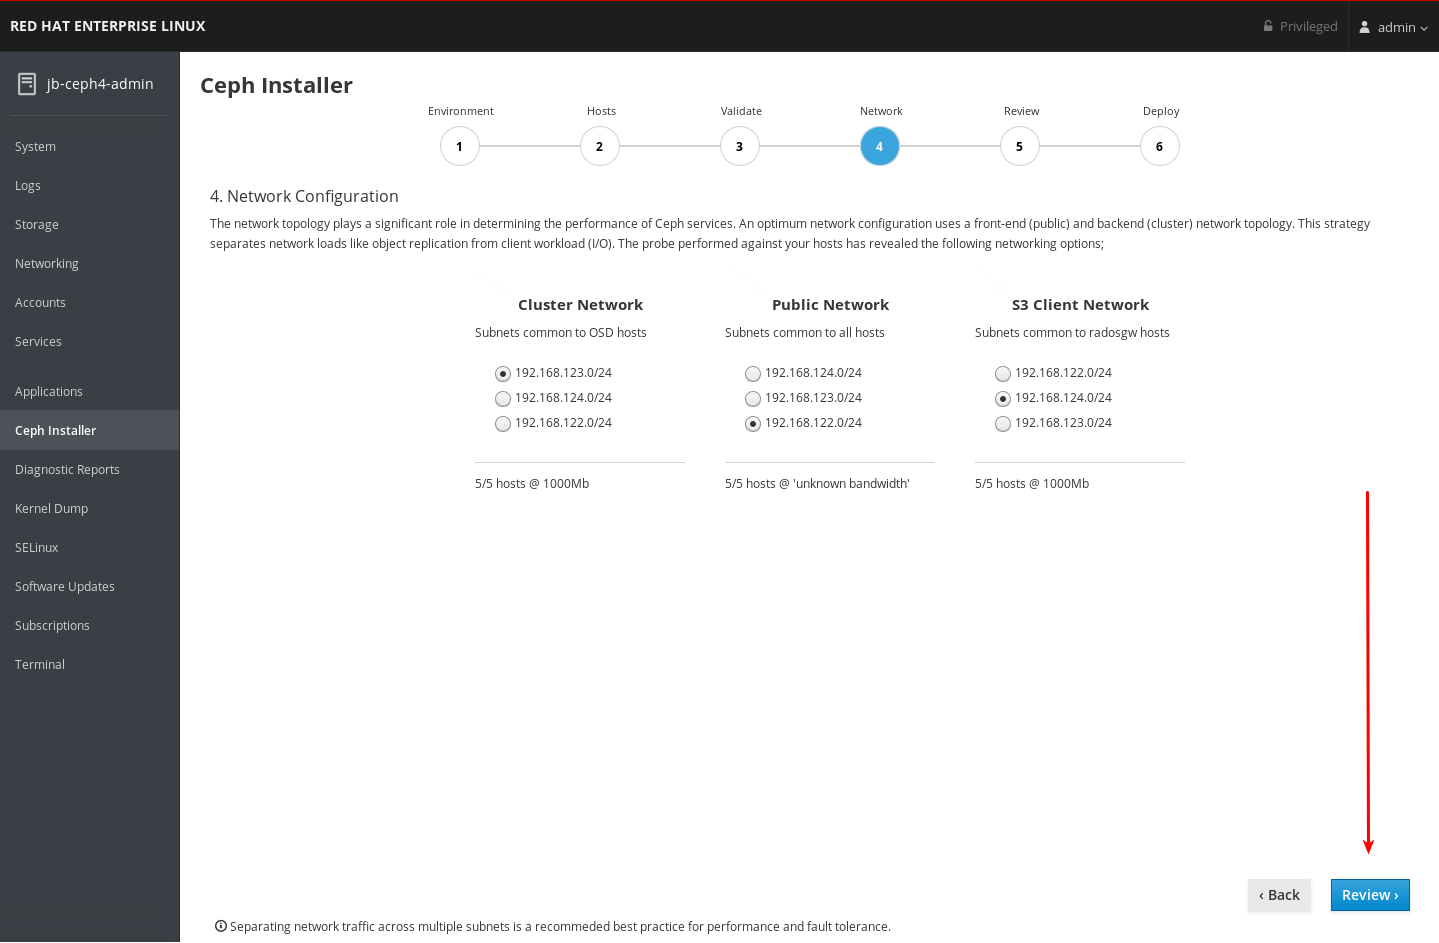
192.168.122.0/24network will be used for the Public Network, the192.168.123.0/24network will be used for the Cluster Network, and the192.168.124.0/24network will be used for the S3 Network.Click the Review button at the bottom right corner of the page to review the entire cluster configuration before installation.
4.10. Review the installation configuration
The Review page allows you to view all the details of the Ceph cluster installation configuration that you set on the previous pages, and details about the hosts, some of which were not included in previous pages.
Prerequisites
- The Network page of the Cockpit Ceph Installer has been completed.
Procedure
View the review page.

Verify the information from each previous page is as you expect it as shown on the Review page. A summary of information from the Environment page is at 1, followed by the Hosts page at 2, the Validate page at 3, the Network page at 4, and details about the hosts, including some additional details which were not included in previous pages, are at 5.

Click the Deploy button at the bottom right corner of the page to go to the Deploy page where you can finalize and start the actual installation process.

4.11. Deploy the Ceph cluster
The Deploy page allows you save the installation settings in their native Ansible format, review or modify them if required, start the install, monitor its progress, and view the status of the cluster after the install finishes successfully.
Prerequisites
- Installation configuration settings on the Review page have been verified.
Procedure
Click the Save button at the bottom right corner of the page to save the installation settings to the Ansible playbooks that will be used by Ansible to perform the actual install.

-
Optional: View or further customize the settings in the Ansible playbooks located on the Ansible administration node. The playbooks are located in
/usr/share/ceph-ansible. For more information about the Ansible playbooks and how to use them to customize the install, see Installing a Red Hat Ceph Storage cluster. -
Secure the default user names and passwords for Grafana and dashboard. Starting with Red Hat Ceph Storage 4.1, you must uncomment or set
dashboard_admin_passwordandgrafana_admin_passwordin/usr/share/ceph-ansible/group_vars/all.yml. Set secure passwords for each. Also set custom user names fordashboard_admin_userandgrafana_admin_user. Click the Deploy button at the bottom right corner of the page to start the install.

Observe the installation progress while it is running.
The information at 1 shows whether the install is running or not, the start time, and elapsed time. The information at 2 shows a summary of the Ansible tasks that have been attempted. The information at 3 shows which roles have been installed or are installing. Green represents a role where all hosts that were assigned that role have had that role installed on them. Blue represents a role where hosts that have that role assigned to them are still being installed. At 4 you can view details about the current task or view failed tasks. Use the Filter by menu to switch between current task and failed tasks.
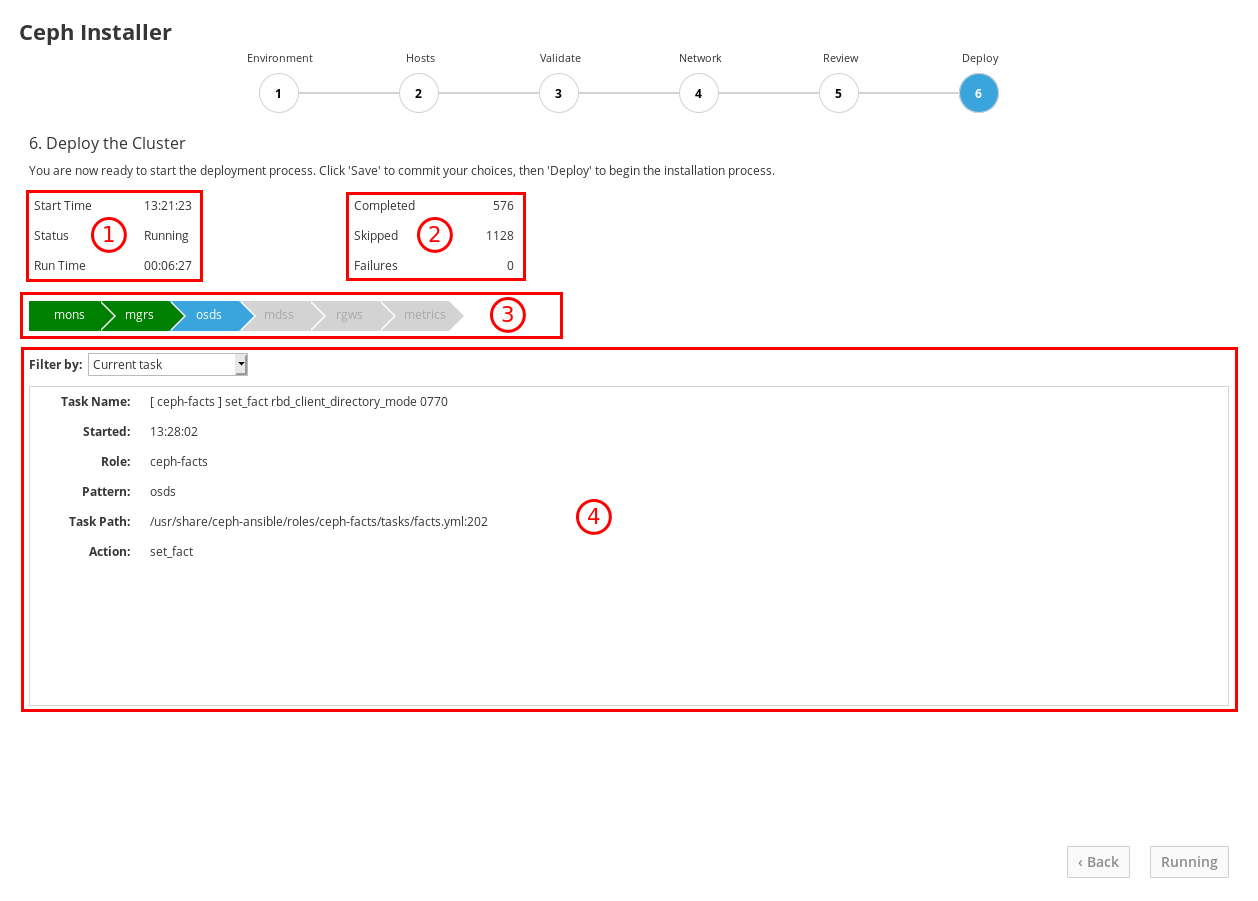
The role names come from the Ansible inventory file. The equivalency is:
monsare Monitors,mgrsare Managers, note the Manager role is installed alongside the Monitor role,osdsare Object Storage Devices,mdssare Metadata Servers,rgwsare RADOS Gateways,metricsare Grafana and Prometheus services for dashboard metrics. Not shown in the example screenshot:iscsigwsare iSCSI Gateways.After the installation finishes, click the Complete button at the bottom right corner of the page. This opens a window which displays the output of the command
ceph status, as well as dashboard access information.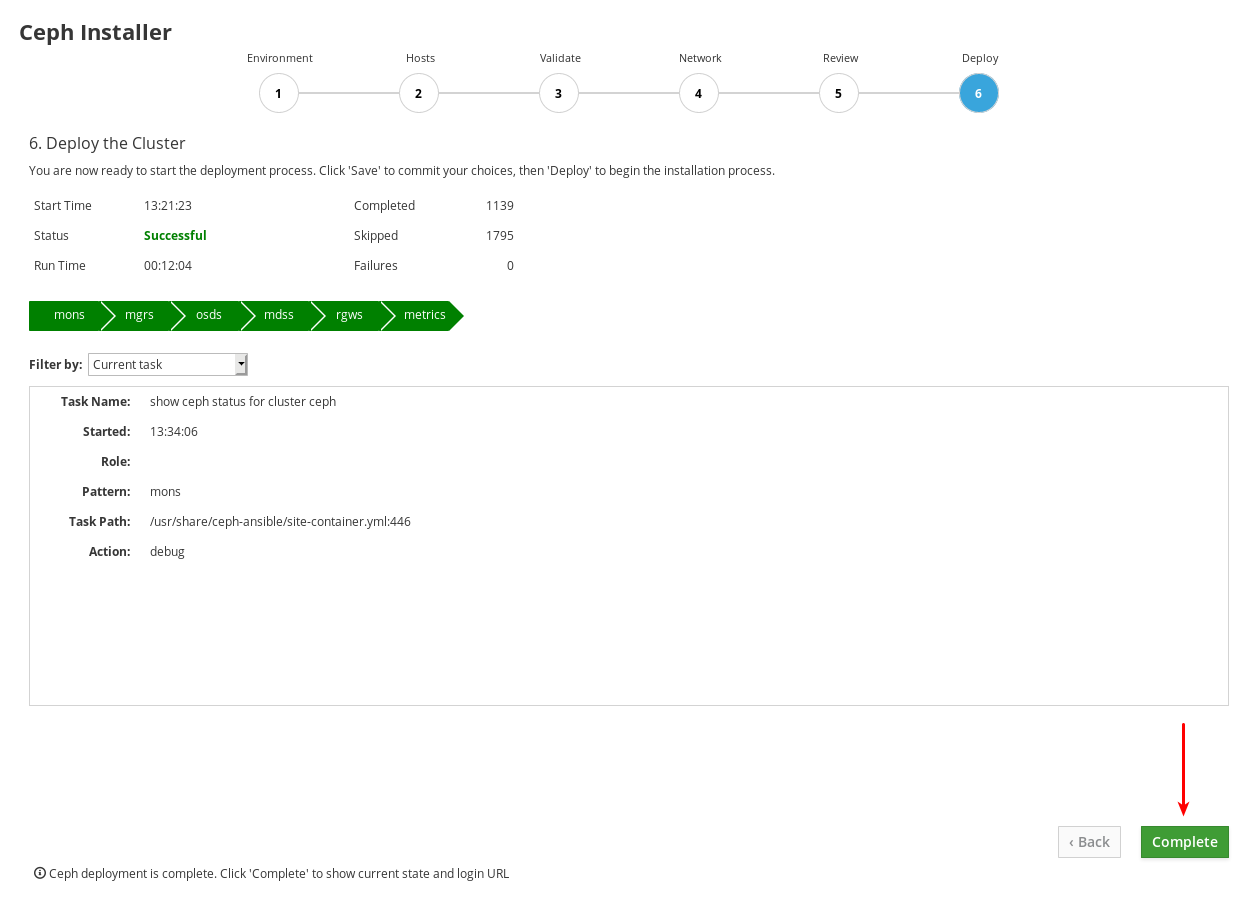
Compare cluster status information in the example below with the cluster status information on your cluster. The example shows a healthy cluster, with all OSDs up and in, and all services active. PGs are in the
active+cleanstate. If some aspects of your cluster are not the same, refer to the Troubleshoting Guide for information on how to resolve the issues.
At the bottom of the Ceph Cluster Status window, the dashboard access information is displayed, including the URL, user name, and password. Take note of this information.

Use the information from the previous step along with the Dashboard Guide to access the dashboard.

The dashboard provides a web interface so you can administer and monitor the Red Hat Ceph Storage cluster. For more information, see the Dashboard Guide.
-
Optional: View the
cockpit-ceph-installer.logfile. This file records a log of the selections made and any associated warnings the probe process generated. It is located in the home directory of the user that ran the installer script,ansible-runner-service.sh.