
Configure SAP S/4HANA ASCS/ERS ENSA2 on Amazon Web Services (AWS)
Contents
- 1. Overview
- 2. Requirements
- 3. Required AWS Configurations
- 4. Install SAP S/4
- 4.1. Configuration options used in this document
- 4.2. Prepare hosts
- 4.3. Install S/4
- 4.4. Post Installation
- 4.4.1. (A)SCS profile modification
- 4.4.2. ERS profile modification
- 4.4.3. Update the
/usr/sap/sapservicesfile - 4.4.4. Create mount points for ASCS and ERS on the failover node
- 4.4.5. Manual Testing Instance on Other Node
- 4.4.6. Check SAP HostAgent on all nodes
- 4.4.7. Install permanent SAP license keys
- 5. Install Pacemaker
- 6. Test the cluster configuration
- 7. Enable cluster to auto-start after reboot
- 8. Optional: Multi-node cluster
1. Overview
1.1. Introduction
SAP S/4HANA systems play an important role in business processes, thus it's critical for such systems to be highly available. The underlying idea of Clustering is a fairly simple one: Not a single large machine bears all of the load and risk; but rather one or more machines automatically drop in as an instant full replacement for the service or the machine that has failed. In the best case, this replacement process causes no interruption to the systems' users.
1.2. Audience
This document is intended for SAP and Red Hat certified or trained administrators and consultants who already have experience setting up high available solutions using the RHEL HA add-on or other clustering solutions. Access to both SAP Service Marketplace and Red Hat Customer Portal is required to be able to download software and additional documentation.
Red Hat Consulting is highly recommend to set up the cluster and customize the solution to meet customers' data center requirements, that are normally more complex than the solution presented in this document.
1.3. Concepts
This document describes how to set up a two-node or three-node cluster solution that conforms to the guidelines for high availability that have been established by both SAP and Red Hat. It is based on Standalone Enqueue Server 2, now the default installation in SAP S/4HANA 1809 or newer.
According to SAP, the Standalone Enqueue Server 2 (ENSA2) is the successor to the standalone enqueue server. It is a component of the SAP lock concept and manages the lock table. This principle ensures the consistency of data in an ABAP system. If there is a failover, the old Standalone Enqueue Server was required to "follow" the Enqueue Replication Server. That is, the HA software had to start the ASCS instance on the host where the ERS instance is currently running. In contrast to the old Standalone Enqueue Server, the new Standalone Enqueue Server 2 and Enqueue Replicator 2 no longer have these restrictions. For more info. on ENSA2 please refer to SAP Note 2630416 - Support for Standalone Enqueue Server 2
1.4. Support Policies
- Support Policies for RHEL High Availability Clusters
- Support Policies for RHEL High Availability Clusters - Amazon Web Services (AWS) EC2 Instances as Cluster Members
- Support Policies for RHEL High Availability Clusters - Management of SAP S/4HANA
2. Requirements
2.1 Subscription
It’s important to keep the subscription, kernel, and patch level identical on all cluster nodes. See also:
- Support Policies for RHEL High Availability Clusters - Releases and Package Versions
- Recommended Practices for Applying Software Updates to a RHEL High Availability or Resilient Storage Cluster
There are two ways to consume RHEL For SAP Solutions subscription on AWS: Pay As You Go (PAYG), or Bring Your Own Subscription (BYOS).
2.1.1. Pay As You Go - RHEL for SAP with HA and US
You can start RHEL instances using AMI image of RHEL for SAP with High Availability and Update Services in AWS Marketplace.
2.1.2. Bring Your Own Subscription - Red Hat Enterprise Linux for SAP Solutions
To port your RHEL for SAP Solutions subscriptions from on-premise to AWS, you must be enrolled in the Red Hat Cloud Access program and have unused RHEL for SAP Solutions subscriptions.
Please follow this kbase article to subscribe your systems to the Update Service for RHEL for SAP Solutions.
Note: One unused subscription migrated to AWS can be used for two RHEL EC2 instances. If you have two unused subscriptions, you can create four EC2 instances, and so on.
2.2. Pacemaker Resource Agents
The ASCS/ERS Standalone approach is supported by resource-agents-sap-4.1.1-12.el7.x86_64 or newer. It's included in the following RHEL releases:
- AWS Marketplace: RHEL for SAP with HA and US 7.6 or newer
- Cloud Access: RHEL for SAP Solutions 7.6 or newer
- On RHEL versions 7.5 or older, install resource-agents-sap-4.1.1-12.el7.x86_64 or newer
2.3. SAP S/4HANA High-Availability Architecture
A typical setup for SAP S/4HANA High-Availability consists of 3 distinctive components:
- SAP S/4 ASCS/ERS cluster resources
- SAP S/4 application servers - Primary application server (PAS) and additional application servers (AAS)
- Database: SAP HANA
This article focuses on the configuration of SAP S/4 ASCS and ERS in a pacemaker cluster. As the best practice, we recommend to install Application Servers and Database on separate nodes outside of the cluster designated for (A)SCS and ERS.
2.4. Two node cluster vs. multi node cluster
If there is a failover, the old Standalone Enqueue Server was required to "follow" the Enqueue Replication Server. That is, the HA software had to start the ASCS instance on the host where the ERS instance is currently running. In contrast to the old Standalone Enqueue Server, the new Standalone Enqueue Server 2 and Enqueue Replicator 2 no longer have these restrictions, that makes a multi-node cluster possible.
The ENSA2 in pacemaker can be configured in either a two-node or a multi-node cluster. In a two-node cluster, ASCS will failover to where ERS is running, while in a multi-node cluster, ASCS will failover to a spare node as illustrated below.

Note: Below is the architecture diagram of the example installation of a three-node cluster. The example in this article focuses on a two-node cluster setup, with a separate section on the design and configuration of a multi node cluster.

2.5. SAPInstance resource agent
SAPInstance is a pacemaker resource agent used for both ASCS and ERS resources. All operations of the SAPInstance resource agent are done by using the SAP start service framework sapstartsrv.
2.6. Storage requirements
Directories created for S/4 installation should be put on shared storage, following the rules:
2.6.1. Instance Specific Directory
The instance specific directory for 'ASCS' and 'ERS', respectively, must be present on the corresponding node. These directories must be available before the cluster is started.
- ASCS node: /usr/sap/SID/ASCS<Ins#>
- ERS node: /usr/sap/SID/ERS<Ins#>
For Application Servers, the following directory should be made available on corresponding node designated for the Application Server instance:
- App Server D<Ins#>: /usr/sap/SID/D<Ins#>
2.6.2. Shared Directories
The following mount points must be available on ASCS, ERS, and Application Servers nodes.
/sapmnt
/usr/sap/trans
/usr/sap/SID/SYS
2.6.3. Shared Directories on HANA
The following mount point(s) must be available on the HANA node.
/sapmnt
These mount points must be either managed by cluster or mounted before cluster is started.
2.6.4. Amazon EFS as Shared Storage
Amazon Elastic File System (Amazon EFS) provides simple and scalable shared file storage service for Amazon EC2 instances. The configurations in the document uses Amazon EFS as the shared storage, mounted as NFS.
3. Required AWS Configurations
3.1. Initial AWS Setup
For instructions on the initial setup of the AWS environment, please refer to Installing and Configuring a Red Hat Enterprise Linux 7.4 (and later) High-Availability Cluster on Amazon Web Services.
As a summary, you should have configured the following components:
- An AWS account
- A Key Pair
- An IAM user with permissions to: modify routing tables and create security groups, create IAM policies and roles
- A VPC
- 3 subnets: one public subnet, and two private subnets spanning in two different availability zones (that's recommended to minimize the service disruption related to zone-wise failures. However, single availability zone is also acceptable)
- NAT Gateway
- Security Group for the jump server
- Security Group for the S/4 instances
- Remote Desktop Protocol (RDP) for GUI Access
3.2. Choose the Supported SAP S4 Instance Type and Storage
Based on the sizing requirements, choose the appropriate instance type for ASCS/ERS, and application servers, respectively.
- It's recommended to create the two nodes for ASCS and ERS in different availability zones.
- To enable access, copy your private key to the jump server, and each of the S/4 nodes.
In Services -> EC2 -> IMAGES -> AMIs choose one of the following AMIs:
RHEL 7.6or newer for Bring Your Own Subscription via Cloud AccessRHEL for SAP with HA and US 7.6or newer for Pay As You Go
AMI and Instance Type of Jump Server:
- You can select an instance type from the free tier, e.g. t2.micro with 30GiB EBS storage volume.
RHEL 7.6or newer is sufficient, no need to useRHEL for SAP SolutionsnorRHEL for SAP with HA and US.
After the S/4 nodes are created, note the following information for use in the next section:
- Region: e.g.
us-east-1 - Account ID of the AWS user account
- Instance ID of the two ASCS/ERS nodes
In the example, the following EC2 instances are created:
s4node1:   ASCS/ERS cluster node 1
s4node2:   ASCS/ERS cluster node 2
s4hana1:   HANA node
s4pas:     Primary Application Server node
3.3. Create Policies
For the IAM user, you need to create three policies:
Services -> IAM -> Policies -> Create DataProvider Policy:
{
    "Version": "2012-10-17",
    "Statement": [
        {
            "Effect": "Allow",
            "Action": [
                "EC2:DescribeInstances",
                "EC2:DescribeVolumes"
            ],
            "Resource": "*"
        },
        {
            "Effect": "Allow",
            "Action": "cloudwatch:GetMetricStatistics",
            "Resource": "*"
        },
        {
            "Effect": "Allow",
            "Action": "s3:GetObject",
            "Resource": "arn:aws:s3:::aws-data-provider/config.properties"
        }
    ]
}
Services -> IAM -> Policies -> Create OverlayIPAgent Policy:
{
    "Version": "2012-10-17",
    "Statement": [
        {
            "Sid": "Stmt1424870324000",
            "Effect": "Allow",
            "Action": [
                "ec2:DescribeInstances",
                "ec2:DescribeInstanceAttribute",
                "ec2:DescribeTags",
                "ec2:DescribeRouteTables"
            ],
            "Resource": "*"
        },
        {
            "Sid": "Stmt1424860166260",
            "Action": [
                "ec2:CreateRoute",
                "ec2:DeleteRoute",
                "ec2:ReplaceRoute"
            ],
            "Effect": "Allow",
            "Resource": "arn:aws:ec2:<region>:<account-id>:route-table/<ClusterRouteTableID>"
        }
    ]
}
In the last Resource clause, replace the following parameters with the real values:
region: e.g.us-east-1account-id: the account ID of the user accountClusterRouteTableID: the route table ID for the existing cluster VPC route table, in format of rtb-XXXXX.
Services -> IAM -> Policies -> Create STONITH Policy:
{
    "Version": "2012-10-17",
    "Statement": [
        {
            "Sid": "Stmt1424870324000",
            "Effect": "Allow",
            "Action": [
                "ec2:DescribeInstances",
                "ec2:DescribeInstanceAttribute",
                "ec2:DescribeTags"
            ],
            "Resource": "*"
        },
        {
            "Sid": "Stmt1424870324001",
            "Effect": "Allow",
            "Action": [
                "ec2:ModifyInstanceAttribute",
                "ec2:RebootInstances",
                "ec2:StartInstances",
                "ec2:StopInstances"
            ],
            "Resource": [
                "arn:aws:ec2:<region>:<account-id>:instance/<instance-id-node1>",
                "arn:aws:ec2:<region>:<account-id>:instance/<instance-id-node2>"
            ]
        }
    ]
}
In the last Resource clause, replace the following parameters with the real values:
region: e.g.us-east-1account-id: the account ID of the user accountinstance-id-node1, instance-id-node2: instance ID of the two SAP ASCS/ERS instances
3.4. Create an IAM Role
Create an IAM Role, attached the 3 policies that are created in previous step, and assign the role to the two ASCS/ERS instances.
- In EC2 -> IAM -> Roles -> Create a new role, e.g.
PacemakerRole, attach the 3 policies to it:DataProvider,OverlayIPAgent, andSTONITH - Assign the role to the ASCS/ERS and HANA instances: Perform for ALL nodes: in AWS EC2 console, right click the node -> Instance Settings -> Attach/Replace IAM Role -> Select PacemakerRole, click Apply.
3.5. Install AWS CLI
Follow the Install the AWS CLI section to install and verify the AWS CLI configuration on the ASCS/ERS and HANA nodes.
3.6. Configure EFS file system
3.6.1. Create EFS file system
In the AWS console -> EFS -> Create File System -> Select the VPC of the S/4 installation, and the availability zones where the S/4 and HANA nodes are running, so the nodes can access the EFS file system:
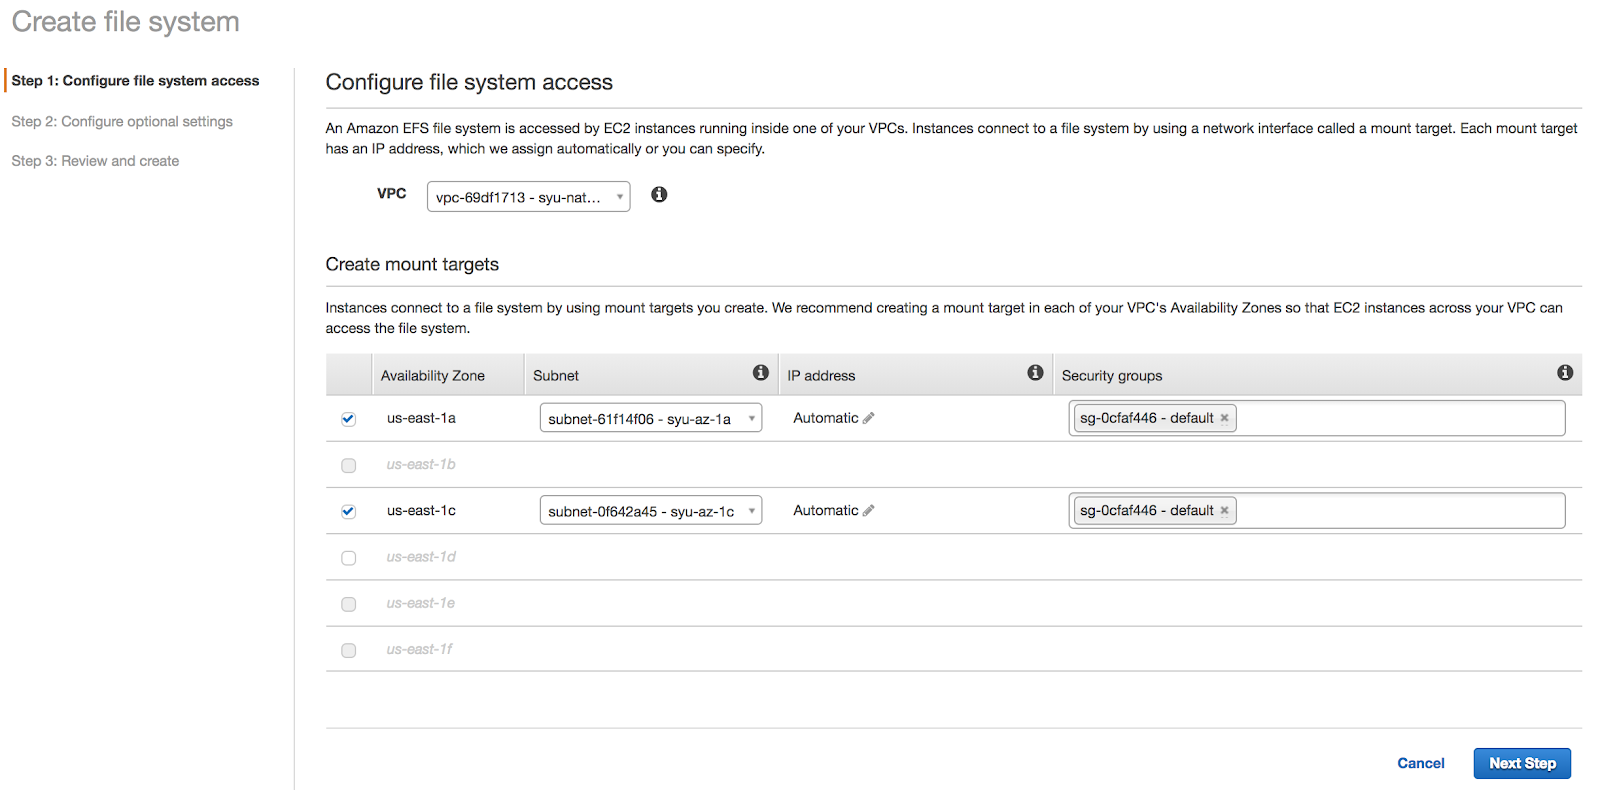
In the example, a EFS file system has been created: fs-xxxxxxxx.efs.us-east-1.amazonaws.com:/
3.6.2. Mount EFS as NFS
Mount the root directory of the EFS volume:
# mkdir /mnt/efs
# mount -t nfs4 -o nfsvers=4.1,rsize=1048576,wsize=1048576,hard,timeo=600,retrans=2,noresvport fs-xxxxxxxx.efs.us-east-1.amazonaws.com:/ /mnt/efs
3.6.3. Create sub-directories
Create sub-directories that will be used as separate file systems for the SAP S/4 HA installation and set the permissions so that the SAP installer will be able to access them during the installation of the SAP instances:
[root@s4node1 ~]# cd /mnt/efs
[root@s4node1 efs]# mkdir -p RHEL-S4-HA/sapmnt RHEL-S4-HA/trans
[root@s4node1 efs]# mkdir -p RHEL-S4-HA/S4H/SYS RHEL-S4-HA/S4H/ASCS20 RHEL-S4-HA/S4H/ERS29 RHEL-S4-HA/S4H/D21 RHEL-S4-HA/S4H/D22
[root@s4node1 efs]# chmod -R 777 RHEL-S4-HA/
3.7. Create Overlay IP addresses
On AWS, the virtual IP for IP failover is achieved by Overlay IP addresses. For details please refer to IP Failover with Overlay IP Addresses.
3.7.1. Determine the Virtual IP
In the example, the following instances need a virtual IP. Make sure the IP addresses are not in use by other applications.
ASCS virtual hostname and IP:   s4ascs    192.168.200.201
ERS  virtual hostname and IP:   s4ers     192.168.200.202
HANA virtual hostname and IP:   s4db      192.168.200.203
3.7.2. Disable Source/Dest. Check
Disable Source/Dest. Check on the 3 instances: s4node1, s4node2, and s4hana1.
In AWS console, right click the respective instance -> Networking -> Change Source/Dest. Check -> In the pop up window, click “Yes, Disable”.

3.7.3. Map Overlay IP on respective instance
For the S/4 installation, the virtual hostname and virtual IP's are mapped to the following instances, respectively:
s4node1   s4ascs    192.168.200.201
s4node2   s4ers     192.168.200.202
s4hana1   s4db      192.168.200.203
On s4node1, run the following commands. You must have AWS CLI installed. (The mapping can also be added in the routing table through AWS console)
# echo $(curl -s http://169.254.169.254/latest/meta-data/instance-id)
i-008d9dd73ca8d5ce5
# aws ec2 create-route --route-table-id rtb-9dd99ee2 --destination-cidr-block 192.168.200.201/32 --instance-id i-008d9dd73ca8d5ce5
Repeat the step on s4node2 and s4hana1.
Check AWS console, you should now see the mapping in the routing table rtb-9dd99ee2:

3.7.4. Add the Virt IP address on respective instance
Add the IP address on each corresponding instance:
[root@s4node1 ~]# ip address add 192.168.200.201 dev eth0
[root@s4node2 ~]# ip address add 192.168.200.202 dev eth0
[root@s4hana1 ~]# ip address add 192.168.200.203 dev eth0
3.7.5. Add Virt IP addresses to /etc/hosts on all instances
On every instance of the S/4 installation, add the virtual IP and Hostname mapping to /etc/hosts file:
[root]# grep s4 /etc/hosts
192.168.200.201 s4ascs
192.168.200.202 s4ers
192.168.200.203 s4db
3.7.6. Test the Virt IP addresses
Make sure the virtual IP addresses can be reached, and virtual hostnames can be resolved. Also try to ssh to the node using the virtual IP or hostname.
3.8. Optional - Configure Route 53 Agent
In order to route traffic to an Amazon EC2 Instance, Route 53 Agent is needed. Please follow the documents to configure it:
- Routing Traffic to an Amazon EC2 Instance
- Propagating the Name Change back to the On-Premises Intranet
4. Install SAP S/4
4.1. Configuration options used in this document
Below are configuration options that will be used for instances in this document:
Two nodes will be running the ASCS/ERS instances in pacemaker:
1st node hostname:      s4node1
2nd node hostname:      s4node2

SID:                    S4H

ASCS Instance number:   20
ASCS virtual hostname:  s4ascs

ERS Instance number:    29
ERS virtual hostname:   s4ers
Outside the two-node cluster:
PAS Instance number: 21
HANA database:
SID:                    S4D
HANA Instance number:   00
HANA virtual hostname:  s4db
4.2. Prepare hosts
Before starting installation ensure that:
- The correct AMI or RHEL installation media is used:
- When using
RHEL for SAP with HA and USAMI:- Create instance using the
RHEL for SAP with HA and USAMI, 7.6 or newer
- Create instance using the
- When using
RHEL for SAP Solutionsvia Cloud Access:- Install RHEL for SAP Solutions 7.6 or newer
- Register system to RHN or Satellite, enable RHEL for SAP Applications channel, or Update Services (E4S) channel
- Enable High Availability Add-on channel
- When using
- RHEL is configured according to the SAP guidelines for running SAP S/4HANA ABAP Application Platform:
- Shared storage and filesystems are present at correct mount points
- Virtual IP addresses used by instances are present and reachable by clients
- Virtual Hostnames that will be used by instances can be resolved to virtual IP addresses and vice versa
- SAP Installation media are accessible on all nodes
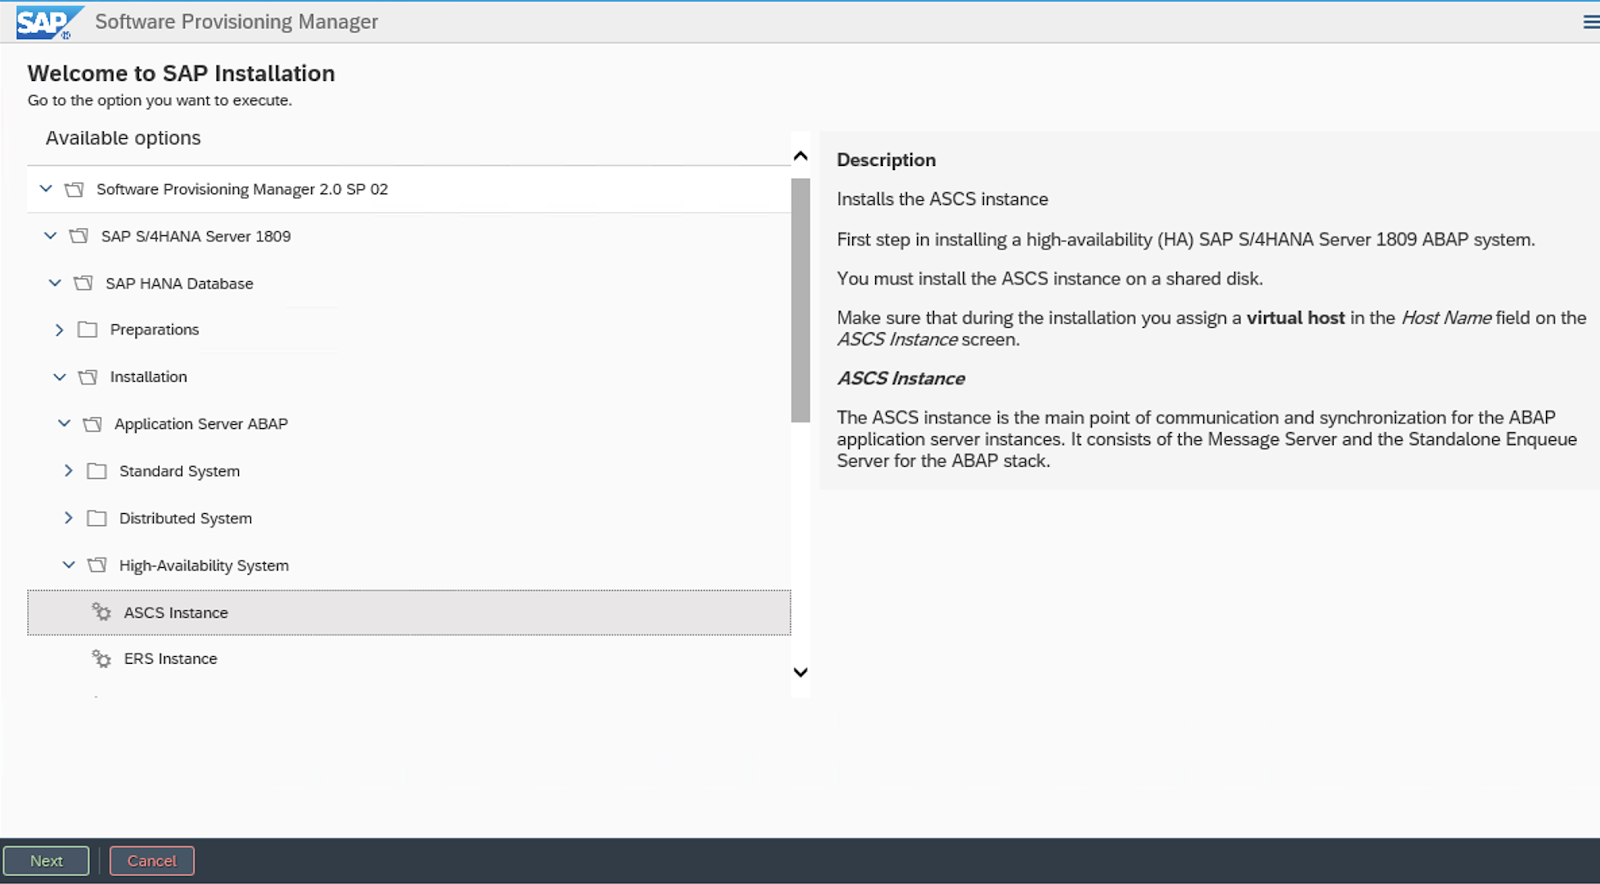
4.3. Install S/4
Using software provisioning manager (SWPM) install instances in the following order:
- ASCS instance
- ERS instance
- DB instance
- PAS instance
4.3.1. Install S/4 ASCS on s4node1
The following file systems should be mounted on node1, where ASCS will be installed:
[root@s4node1 ~]# mkdir /sapmnt
[root@s4node1 ~]# mkdir -p /usr/sap/trans /usr/sap/S4H/SYS /usr/sap/S4H/ASCS20
[root@s4node1 ~]# mount -t nfs4 -o nfsvers=4.1,rsize=1048576,wsize=1048576,hard,timeo=600,retrans=2,noresvport fs-xxxxxxxx:/RHEL-S4-HA/sapmnt /sapmnt
[root@s4node1 ~]# mount -t nfs4 -o nfsvers=4.1,rsize=1048576,wsize=1048576,hard,timeo=600,retrans=2,noresvport fs-xxxxxxxx:/RHEL-S4-HA/trans /usr/sap/trans
[root@s4node1 ~]# mount -t nfs4 -o nfsvers=4.1,rsize=1048576,wsize=1048576,hard,timeo=600,retrans=2,noresvport fs-xxxxxxxx:/RHEL-S4-HA/S4H/SYS /usr/sap/S4H/SYS
[root@s4node1 ~]# mount -t nfs4 -o nfsvers=4.1,rsize=1048576,wsize=1048576,hard,timeo=600,retrans=2,noresvport fs-xxxxxxxx:/RHEL-S4-HA/S4H/ASCS20 /usr/sap/S4H/ASCS20
Virtual IP for s4ascs should be enabled on s4node1.
Run the installer:
[root@s4node1]# ./sapinst SAPINST_USE_HOSTNAME=s4ascs
Select High-Availability System option.
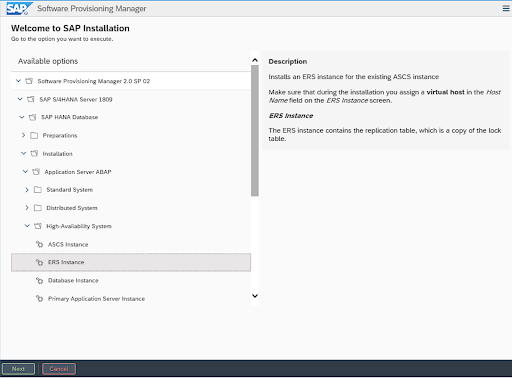
4.3.2. Install ERS on s4node2
The following file systems should be mounted on s4node2, where ERS will be installed:
[root@s4node2 ~]# mkdir /sapmnt
[root@s4node2 ~]# mkdir -p /usr/sap/trans /usr/sap/S4H/SYS /usr/sap/S4H/ERS29
[root@s4node2 ~]# mount -t nfs4 -o nfsvers=4.1,rsize=1048576,wsize=1048576,hard,timeo=600,retrans=2,noresvport fs-xxxxxxxx:/RHEL-S4-HA/sapmnt /sapmnt
[root@s4node2 ~]# mount -t nfs4 -o nfsvers=4.1,rsize=1048576,wsize=1048576,hard,timeo=600,retrans=2,noresvport fs-xxxxxxxx:/RHEL-S4-HA/trans /usr/sap/trans
[root@s4node2 ~]# mount -t nfs4 -o nfsvers=4.1,rsize=1048576,wsize=1048576,hard,timeo=600,retrans=2,noresvport fs-xxxxxxxx:/RHEL-S4-HA/S4H/SYS /usr/sap/S4H/SYS
[root@s4node2 ~]# mount -t nfs4 -o nfsvers=4.1,rsize=1048576,wsize=1048576,hard,timeo=600,retrans=2,noresvport fs-xxxxxxxx:/RHEL-S4-HA/S4H/ERS29 /usr/sap/S4H/ERS29
Virtual IP for s4ers should be enabled on s4node2.
Run the installer:
[root@s4node2]# ./sapinst SAPINST_USE_HOSTNAME=s4ers
Select High-Availability System option.
4.3.3. SAP HANA
In the example, SAP HANA will be using the following configuration. You can also use other supported database.
SAP HANA SID:                    S4D
SAP HANA Instance number:        00
SAP HANA should be installed on separate host. Optionally, Automated HANA System Replication can be installed in another pacemaker cluster by following document Configure SAP HANA System Replication in Pacemaker on Amazon Web Services.
Run the installer on the HANA host:
[root]# ./sapinst SAPINST_USE_HOSTNAME=s4db
4.3.4. Install Application Servers
The following file systems should be mounted on the host to run the Application Server instance. If you have multiple application servers, install each one on corresponding host:
/usr/sap/S4H/D<Ins#>
/usr/sap/S4H/SYS
/usr/sap/trans
/sapmnt
Run the installer:
[root]# ./sapinst
Select High-Availability System option.
4.4. Post Installation
4.4.1. (A)SCS profile modification
(A)SCS instance requires following modification in profile to prevent automatic restart of enqueue server as it will be managed by cluster. To apply the change run the following command at your ASCS profile /sapmnt/S4H/profile/S4H_ASCS20_s4ascs.
[root]# sed -i -e 's/Restart_Program_01/Start_Program_01/' /sapmnt/S4H/profile/S4H_ASCS20_s4ascs
4.4.2. ERS profile modification
ERS instance requires following modification in profile to prevent automatic restart as it will be managed by cluster. To apply the change run the following command at your ERS profile /sapmnt/S4H/profile/S4H_ERS29_s4ers.
[root]# sed -i -e 's/Restart_Program_00/Start_Program_00/' /sapmnt/S4H/profile/S4H_ERS29_s4ers
4.4.3. Update the /usr/sap/sapservices file
On both s4node1 and s4node2, make sure following two lines are commented out in /usr/sap/sapservices file:
#LD_LIBRARY_PATH=/usr/sap/S4H/ERS29/exe:$LD_LIBRARY_PATH; export LD_LIBRARY_PATH; /usr/sap/S4H/ERS29/exe/sapstartsrv pf=/usr/sap/S4H/SYS/profile/S4H_ERS29_s4ers -D -u s4hadm
#LD_LIBRARY_PATH=/usr/sap/S4H/ASCS20/exe:$LD_LIBRARY_PATH; export LD_LIBRARY_PATH; /usr/sap/S4H/ASCS20/exe/sapstartsrv pf=/usr/sap/S4H/SYS/profile/S4H_ASCS20_s4ascs -D -u s4hadm
4.4.4. Create mount points for ASCS and ERS on the failover node
Respectively:
[root@s4node1 ~]# mkdir /usr/sap/S4H/ERS29/
[root@s4node1 ~]# chown s4hadm:sapsys /usr/sap/S4H/ERS29/

[root@s4node2 ~]# mkdir /usr/sap/S4H/ASCS20
[root@s4node2 ~]# chown s4hadm:sapsys /usr/sap/S4H/ASCS20
4.4.5. Manual Testing Instance on Other Node
Stop ASCS and ERS instances. Move the instance specific directory to the other node:
[root@s4node1 ~]# umount /usr/sap/S4H/ASCS20
[root@s4node2 ~]# mount -t nfs4 -o nfsvers=4.1,rsize=1048576,wsize=1048576,hard,timeo=600,retrans=2,noresvport fs-xxxxxxxx.efs.us-east-1.amazonaws.com:/RHEL-S4-HA/S4H/ASCS20 /usr/sap/S4H/ASCS20

[root@s4node2 ~]# umount /usr/sap/S4H/ERS29
[root@s4node1 ~]# mount -t nfs4 -o nfsvers=4.1,rsize=1048576,wsize=1048576,hard,timeo=600,retrans=2,noresvport fs-xxxxxxxx.efs.us-east-1.amazonaws.com:/RHEL-S4-HA/S4H/ERS29 /usr/sap/S4H/ERS29
Move the Overlay IP of ASCS and ERS to the other node, respectively:
[root@s4node1 ~]# ip address del 192.168.200.201 dev eth0
[root@s4node2 ~]# ip address del 192.168.200.202 dev eth0

[root@s4node2 ~]# ip address add 192.168.200.201 dev eth0
[root@s4node1 ~]# ip address add 192.168.200.202 dev eth0
Manually start ASCS and ERS instances on other cluster node, then manually stop them, respectively.
4.4.6. Check SAP HostAgent on all nodes
On all nodes check if SAP HostAgent has the same version and meets the minimum version requirement:
[root]# /usr/sap/hostctrl/exe/saphostexec -version
To upgrade/install SAP HostAgent, please follow SAP Note 1031096 - Installing Package SAPHOSTAGENT.
4.4.7. Install permanent SAP license keys
SAP hardware key determination in the high-availability scenario has been improved. It might be necessary to install several SAP license keys based on the hardware key of each cluster node. Please see SAP Note 1178686 - Linux: Alternative method to generate a SAP hardware key for more information.
5. Install Pacemaker
Please check the RHEL HA Add-On documentation for general guidelines on how to set up a pacemaker based HA cluster on RHEL:
RHEL7: High Availability Add-On Administration
RHEL 8: Configuring and managing high availability clusters.
Below is a sample procedure to install pacemaker. It's recommended to work with a Red Hat consultant to install and configure Pacemaker in your environment.
5.1. Install Pacemaker rpm's
# yum -y install pcs pacemaker
# passwd hacluster
[provide a password]
# mkdir /var/log/pcsd
# systemctl enable pcsd.service; systemctl start pcsd.service
5.2. Create a Cluster
Create a cluster named s4ha, consisting of s4node1 and s4node2, and start the cluster. Please note that at this point, cluster is not yet configured to auto-start after reboot.
# mkdir /var/log/cluster
# pcs cluster auth s4node1 s4node2
# pcs cluster setup --name s4ha s4node1 s4node2
# pcs cluster start --all
5.2.1. Define General Cluster Properties
Set the resource stickiness:
# pcs resource defaults resource-stickiness=1
# pcs resource defaults migration-threshold=3
5.3. Configure STONITH
5.3.1. Look up the Instance ID
Take note of the Instance ID of node1 and node2, for use in the next step:
[root@s4node1]# echo $(curl -s http://169.254.169.254/latest/meta-data/instance-id)
i-008d9dd73ca8d5ce5
[root@s4node2]# echo $(curl -s http://169.254.169.254/latest/meta-data/instance-id)
i-02c77b4753ae1c67b
5.3.2. Create STONITH
    # pcs stonith create stonith-s4ha fence_aws region=us-east-1 \
pcmk_host_map="s4node1:i-008d9dd73ca8d5ce5;s4node2:i-02c77b4753ae1c67b" \
power_timeout=240 pcmk_reboot_timeout=600 pcmk_reboot_retries=4 \
pcmk_max_delay=45 op start timeout=600 op stop timeout=600 op monitor interval=180
# pcs config
...
Stonith Devices:
Resource: stonith-s4ha (class=stonith type=fence_aws)
  Attributes: pcmk_host_map=s4node1:i-008d9dd73ca8d5ce5;s4node2:i-02c77b4753ae1c67b pcmk_reboot_retries=4 pcmk_reboot_timeout=480 power_timeout=240 region=us-east-1
  Operations: monitor interval=60s (stonith-s4ha-monitor-interval-60s)
Fencing Levels:
...
5.3.3. Test fencing
After configuring the STONITH, on s4node1, test fencing s4node2.
[root@s4node1]# pcs stonith fence s4node2
s4node2 should be properly fenced. After fencing, start cluster on s4node2 using the following command. This is because the cluster has not yet been enabled to auto-start. Auto-start will be enabled after initial testings showing the cluster is properly configured.
[root@s4node2 ~]# pcs cluster start
5.4. Install resource-agents-sap on all cluster nodes
[root]# yum install resource-agents-sap
5.5. Configure cluster resources for shared filesystems
Configure shared filesystem to provide following mount points on all of cluster nodes.
/sapmnt
/usr/sap/trans
/usr/sap/S4H/SYS
5.5.1. Configure shared filesystems managed by the cluster
The cloned Filesystem cluster resource can be used to mount the shares from external NFS server on all cluster nodes as shown below.
NOTE: The '--clone' option works in RHEL 7 but it does not work in RHEL 8. Hence, for RHEL 8, the current way forward to create a clone resource, is to create the resource without the '--clone' and then run 'pcs resource clone' to create the clone.
For RHEL 7
[root]# pcs resource create s4h_fs_sapmnt Filesystem device='fs-xxxxxxxx.efs.us-east-1.amazonaws.com:/RHEL-S4-HA/sapmnt' directory='/sapmnt' fstype='nfs4' options='nfsvers=4.1,rsize=1048576,wsize=1048576,hard,timeo=600,retrans=2,noresvport' --clone interleave=true
[root]# pcs resource create s4h_fs_sap_trans Filesystem device='fs-xxxxxxxx.efs.us-east-1.amazonaws.com:/RHEL-S4-HA/trans' directory='/usr/sap/trans' fstype='nfs4' options='nfsvers=4.1,rsize=1048576,wsize=1048576,hard,timeo=600,retrans=2,noresvport' --clone interleave=true
[root]# pcs resource create s4h_fs_sys Filesystem device='fs-xxxxxxxx.efs.us-east-1.amazonaws.com:/RHEL-S4-HA/S4H/SYS' directory='/usr/sap/S4H/SYS'  fstype='nfs4' options='nfsvers=4.1,rsize=1048576,wsize=1048576,hard,timeo=600,retrans=2,noresvport' --clone interleave=true
For RHEL 8
[root]# pcs resource create s4h_fs_sapmnt Filesystem device='fs-xxxxxxxx.efs.us-east-1.amazonaws.com:/RHEL-S4-HA/sapmnt' directory='/sapmnt' fstype='nfs4' options='nfsvers=4.1,rsize=1048576,wsize=1048576,hard,timeo=600,retrans=2,noresvport'
[root]# pcs resource clone s4h_fs_sapmnt interleave=true
[root]# pcs resource create s4h_fs_sap_trans Filesystem device='fs-xxxxxxxx.efs.us-east-1.amazonaws.com:/RHEL-S4-HA/trans' directory='/usr/sap/trans' fstype='nfs4' options='nfsvers=4.1,rsize=1048576,wsize=1048576,hard,timeo=600,retrans=2,noresvport'
[root]# pcs resource clone s4h_fs_sap_trans interleave=true
[root]# pcs resource create s4h_fs_sys Filesystem device='fs-xxxxxxxx.efs.us-east-1.amazonaws.com:/RHEL-S4-HA/S4H/SYS' directory='/usr/sap/S4H/SYS'  fstype='nfs4' options='nfsvers=4.1,rsize=1048576,wsize=1048576,hard,timeo=600,retrans=2,noresvport'
[root]# pcs resource clone s4h_fs_sys interleave=true
After creating the Filesystem resources verify that they have started properly on all nodes.
[root]# pcs status
...
 Clone Set: s4h_fs_sapmnt-clone [s4h_fs_sapmnt]
     Started: [ s4node1 s4node2 ]
 Clone Set: s4h_fs_sap_trans-clone [s4h_fs_sap_trans]
     Started: [ s4node1 s4node2 ]
 Clone Set: s4h_fs_sys-clone [s4h_fs_sys]
     Started: [ s4node1 s4node2 ]
...
5.5.2. Configure shared filesystems managed outside of cluster
In case that shared filesystems will NOT be managed by cluster, it must be ensured that they are available before the pacemaker service is started.
In RHEL 7 due to systemd parallelization you must ensure that shared filesystems are started in resource-agents-deps target. More details on this can be found in documentation section 9.6. Configuring Startup Order for Resource Dependencies not Managed by Pacemaker (Red Hat Enterprise Linux 7.4 and later).
5.6. Configure ASCS resource group
5.6.1. Create resource for virtual IP address
# pcs resource create s4h_vip_ascs20 aws-vpc-move-ip ip=192.168.200.201 interface=eth0 routing_table=rtb-9dd99ee2 --group s4h_ASCS20_group
Note: Earlier versions of this document included the monapi=true option in the command above. This was a workaround for a bug in the probe operation that has since been fixed. However, setting monapi=true can result in unnecessary failovers due to external factors such as API throttling. For this reason, Red Hat and Amazon do not recommend setting monapi=true. Please ensure that the latest available version of the resource-agents package for your OS minor release is installed, so that the bug fix is included.
5.6.2. Create resource for ASCS filesystem
# pcs resource create s4h_fs_ascs20 Filesystem device='fs-xxxxxxxx.efs.us-east-1.amazonaws.com:/RHEL-S4-HA/S4H/ASCS20' directory=/usr/sap/S4H/ASCS20 fstype='nfs4' options='nfsvers=4.1,rsize=1048576,wsize=1048576,hard,timeo=600,retrans=2,noresvport' force_unmount=safe --group s4h_ASCS20_group \
op start interval=0 timeout=60 \
op stop interval=0 timeout=120 \
op monitor interval=200 timeout=40
5.6.3. Create resource for ASCS instance
# pcs resource create s4h_ascs20 SAPInstance InstanceName="S4H_ASCS20_s4ascs" \
START_PROFILE=/sapmnt/S4H/profile/S4H_ASCS20_s4ascs \
AUTOMATIC_RECOVER=false \
meta resource-stickiness=5000 \
--group s4h_ASCS20_group \
op monitor interval=20 on-fail=restart timeout=60 \
op start interval=0 timeout=600 \
op stop interval=0 timeout=600
Note: meta resource-stickiness=5000 is here to balance out the failover constraint with ERS so the resource stays on the node where it started and doesn't migrate around cluster uncontrollably.
Add a resource stickiness to the group to ensure that the ASCS will stay on a node if possible:
# pcs resource meta s4h_ASCS20_group resource-stickiness=3000
5.7. Configure ERS resource group
5.7.1. Create resource for virtual IP address
# pcs resource create s4h_vip_ers29 aws-vpc-move-ip ip=192.168.200.202 interface=eth0 routing_table=rtb-9dd99ee2 --group s4h_ERS29_group
Note: Earlier versions of this document included the monapi=true option in the command above. This was a workaround for a bug in the probe operation that has since been fixed. However, setting monapi=true can result in unnecessary failovers due to external factors such as API throttling. For this reason, Red Hat and Amazon do not recommend setting monapi=true. Please ensure that the latest available version of the resource-agents package for your OS minor release is installed, so that the bug fix is included.
5.7.2. Create resource for ERS filesystem
# pcs resource create s4h_fs_ers29 Filesystem device='fs-xxxxxxxx.efs.us-east-1.amazonaws.com:/RHEL-S4-HA/S4H/ERS29' directory='/usr/sap/S4H/ERS29' fstype='nfs4' options='nfsvers=4.1,rsize=1048576,wsize=1048576,hard,timeo=600,retrans=2,noresvport' force_unmount=safe --group s4h_ERS29_group \
op start interval=0 timeout=60 \
op stop interval=0 timeout=120 \
op monitor interval=200 timeout=40
5.7.3. Create resource for ERS instance
# pcs resource create s4h_ers29 SAPInstance InstanceName="S4H_ERS29_s4ers" \
START_PROFILE=/sapmnt/S4H/profile/S4H_ERS29_s4ers \
AUTOMATIC_RECOVER=false \
IS_ERS=true \
--group s4h_ERS29_group \
op monitor interval=20 on-fail=restart timeout=60 \
op start interval=0 timeout=600 \
op stop interval=0 timeout=600
5.8. Create constraints
5.8.1. Create colocation constraint for ASCS and ERS resource groups
Resource groups s4h_ASCS20_group and s4h_ERS29_group should try to avoid running on same node. Order of groups matters.
# pcs constraint colocation add s4h_ERS29_group with s4h_ASCS20_group -5000
5.8.2. Create order constraint for ASCS and ERS resource groups
Prefer to start s4h_ASCS20_group before the s4h_ERS29_group
# pcs constraint order start s4h_ASCS20_group then stop s4h_ERS29_group symmetrical=false kind=Optional
6. Test the cluster configuration
6.1. Check the constraints
# pcs constraint
Location Constraints:
Ordering Constraints:
  start s4h_ASCS20_group then stop s4h_ERS29_group (kind:Optional) (non-symmetrical)
Colocation Constraints:
  s4h_ERS29_group with s4h_ASCS20_group (score:-5000)
Ticket Constraints:
6.2. Failover ASCS due to node crash
Before the crash, ASCS is running on s4node1 while ERS running on s4node2.
# pcs status
...
 Resource Group: s4h_ASCS20_group
     s4h_fs_ascs20  (ocf::heartbeat:Filesystem):    Started s4node1
     s4h_vip_ascs20 (ocf::heartbeat:aws-vpc-move-ip):   Started s4node1
     s4h_ascs20 (ocf::heartbeat:SAPInstance):   Started s4node1
 Resource Group: s4h_ERS29_group
     s4h_fs_ers29   (ocf::heartbeat:Filesystem):    Started s4node2
     s4h_vip_ers29  (ocf::heartbeat:aws-vpc-move-ip):   Started s4node2
     s4h_ers29  (ocf::heartbeat:SAPInstance):   Started s4node2
...
On s4node2, run the following command to monitor the status changes in the cluster:
[root@s4node2 ~]# crm_mon -Arf
Crash s4node1 by running the following command. Please note that connection to s4node1 will be lost after the command.
[root@s4node1 ~]# echo c > /proc/sysrq-trigger
On s4node2, monitor the failover process. After failover, cluster should be in such state, with ASCS and ERS both on s4node2.
[root@s4node2 ~]# pcs status
...
 Resource Group: s4h_ASCS20_group
     s4h_fs_ascs20  (ocf::heartbeat:Filesystem):    Started s4node2
     s4h_vip_ascs20 (ocf::heartbeat:aws-vpc-move-ip):   Started s4node2
     s4h_ascs20 (ocf::heartbeat:SAPInstance):   Started s4node2
 Resource Group: s4h_ERS29_group
     s4h_fs_ers29   (ocf::heartbeat:Filesystem):    Started s4node2
     s4h_vip_ers29  (ocf::heartbeat:aws-vpc-move-ip):   Started s4node2
     s4h_ers29  (ocf::heartbeat:SAPInstance):   Started s4node2
...
6.3. ERS moves to the previously failed node
Bring s4node1 back online, and start the cluster:
[root@s4node1 ~]# pcs cluster start
ERS should move to s4node1, while ASCS remaining on s4node2. Wait for ERS to finish the migration, and at the end the cluster should be in such state:
[root]# pcs status
...
 Resource Group: s4h_ASCS20_group
     s4h_fs_ascs20  (ocf::heartbeat:Filesystem):    Started s4node2
     s4h_vip_ascs20 (ocf::heartbeat:aws-vpc-move-ip):   Started s4node2
     s4h_ascs20 (ocf::heartbeat:SAPInstance):   Started s4node2
 Resource Group: s4h_ERS29_group
     s4h_fs_ers29   (ocf::heartbeat:Filesystem):    Started s4node1
     s4h_vip_ers29  (ocf::heartbeat:aws-vpc-move-ip):   Started s4node1
     s4h_ers29  (ocf::heartbeat:SAPInstance):   Started s4node1
...
7. Enable cluster to auto-start after reboot
The cluster is not yet enabled to auto-start after reboot. System admin needs to manually start the cluster after the node is fenced and rebooted.
After testing the previous section, when everything works fine, enable the cluster to auto-start after reboot:
# pcs cluster enable --all
Note: in some situations it can be beneficial not to have the cluster auto-start after a node has been rebooted. For example, if there is an issue with a filesystem that is required by a cluster resource, and the filesystem needs to be repaired first before it can be used again, having the cluster auto-start but then fail because the filesystem doesn't work can cause even more trouble.
Now please rerun the tests in previous section to make sure that cluster still works fine. Please note that in section 5.3., there is no need to run command pcs cluster start after a node is rebooted. Cluster should automatically start after reboot.
By this point you have successfully configured a two-node cluster for ENSA2. You can either continue with intensive testing to get ready for production, or optionally add more nodes to the cluster.
8. Optional: Multi-node cluster
It's an option to run a multi-node cluster. However, as the complexity of the cluster increases, please design carefully following Red Hat support policies. It's recommended to work with a Red Hat cluster consultant.
8.1. Quorum Policy
The options for quorum vary depending on the configuration. Please review the configuration guidances.
- How can I configure my RHEL 7 High Availabililty Cluster with pacemaker and corosync to maintain quorum after half of the nodes fail?
- Design Guidance for RHEL High Availability Clusters - Considerations with qdevice Quorum Arbitration
Note: below is the example of adding a third node to the previously configured two-node cluster, given the assumption that quorum policy will be properly configured.
8.2. OS Configuration
Create a node that's identical to the first two nodes, in terms of resources, RHEL for SAP Solutions subscription, OS configurations, etc. If you can clone the node from the other cluster node, that's preferred.
In the example, the hostname of the node is s4node3. Make sure the /etc/hosts on each cluster node contains all cluster nodes and the virt. IP's of the SAP instances.
8.3. Create users
Create the following groups and users that are identical to other two nodes. For example:
Groups in /etc/group:
sapsys:x:1010:
sapinst:x:1011:root,s4hadm

Users in /etc/passwd:
s4hadm:x:1020:1010:SAP System Administrator:/home/s4hadm:/bin/csh
sapadm:x:1001:1010:SAP System Administrator:/home/sapadm:/bin/false
8.4. Create the mount points
Create the following mount points, you don't have to mount the file systems.
/usr/sap/S4H/ASCS20
/usr/sap/S4H/ERS29
/usr/sap/S4H/SYS
/usr/sap/trans
/sapmnt
8.5. Install pacemaker
# yum -y install pcs pacemaker
8.6. Add the node to the cluster
On one node of the existing cluster s4ha, add the third node:
# pcs cluster auth s4node3
Username: hacluster
Password:

# pcs cluster node add s4node3
8.7. Update STONITH to include the 3rd node
Depending on the STONITH setup, you may need to update the STONITH resource to include the 3rd node.
Test if fencing works properly on the 3rd node.
[root@s4node1 ~]# pcs stonith fence s4node3
After fencing, remember to manually start cluster, because cluster is not yet configured to auto-start at boot:
[root@s4node3 ~]# pcs cluster start
8.8. Update ERS resource
meta resource-stickiness=5000 is here to ensure that resource ERS stays on the node where it started and doesn't migrate around cluster uncontrollably.
# pcs resource meta s4h_ers29 resource-stickiness=5000
8.9. Test failover
8.9.1. Failover ASCS due to node crash
Before the crash, ASCS is running on s4node1 while ERS running on s4node2.
On s4node2, run the following command to monitor the status changes in the cluster:
[root@s4node2 ~]# crm_mon -Arf
Crash s4node1 by running the following command. Please note that connection to s4node1 will be lost after the command.
[root@s4node1 ~]# echo c > /proc/sysrq-trigger
On s4node2, monitor the failover process. After failover, cluster should be in such state, with ASCS running on s4node3, and ERS remaining on s4node2.
[root@s4node2 ~]# pcs status
...
 Resource Group: s4h_ASCS20_group
     s4h_fs_ascs20  (ocf::heartbeat:Filesystem):    Started s4node3
     s4h_vip_ascs20 (ocf::heartbeat:aws-vpc-move-ip):   Started s4node3
     s4h_ascs20 (ocf::heartbeat:SAPInstance):   Started s4node3
 Resource Group: s4h_ERS29_group
     s4h_fs_ers29   (ocf::heartbeat:Filesystem):    Started s4node2
     s4h_vip_ers29  (ocf::heartbeat:aws-vpc-move-ip):   Started s4node2
     s4h_ers29  (ocf::heartbeat:SAPInstance):   Started s4node2
...
8.9.2. ERS remains on current node
Bring s4node1 back online, ERS should remain on current node, instead of moving back to s4node1.
8.9.3. Test ERS crash
Similarly, test crash the node where ERS is running. ERS group should failover to the spare node while ASCS remaining intact on its current node. After the crashed node is back, the ERS group should not move back.
8.10. Enable cluster to auto-start after reboot
[root@s4node3 ~]# pcs cluster enable
Comments