
Red Hat OpenStack Certification Workflow for Red Hat OpenStack Platform
The certification tooling and workflow documented in this article is no longer valid and current. Below are two links to the new documentation.
CURRENT OPENSTACK CERTIFICATION DOCUMENTATION
OLD CLOUD CERTIFICATION DOCUMENTATION
Table of Contents
- Overview
- Known Issues
- Certification Prerequisites
- Complete the Required Prerequisites on Red Hat Connect for Technology Partners
- Install and Configure Red Hat OpenStack Platform
- Install and Configure the OpenStack Component Under Test
- OPTIONAL: Ensure that the OpenStack Deployment Under Test Includes Network, Compute and Volume OpenStack Services
- OPTIONAL: Install OpenStack Rally
- OPTIONAL: Set Up the Rally Database and Configure the Rally Configuration File
- Register the System and Attach the Required Subscription
- Subscribe to Red Hat Certification Channel
- Certification Workflow
- Set Up a Local Test Server
- Install the Required Software Packages on the OpenStack Deployment/System-Under-Test (Test Client Node)
- Edit the Required Configuration Files (For OpenStack Components which Implement the Formal Documented OpenStack APIs)
- Launch Red Hat Certification Web User Interface
- Create a New Certification Request and Open Red Hat Certification Testing Page
- Run Certification Tests from the Local Test Server on the Test Client/System-Under-Test
- View the Test Logs and Submit the Logs for Review
- Interpret Certification Results
- Re-running Red Hat OpenStack Certification Tests in Case of Failures
- Troubleshooting Issues and Submitting Feedback
Overview
The following guides contain information about the latest certification policies and workflow to certify OpenStack plugins or applications with Red Hat OpenStack Platform. The certification tooling and workflow documented in this article will be supported for a period of 90 days to support certifications which are underway. Partners must complete all new certifications using the latest certification tooling and workflow documented in the following guides.
Known Issues
Red Hat OpenStack Certification for Red Hat OpenStack Platform 8 contains the following known issue.
The python-ddt package (which allows you to multiply one test case by running it with different test data) is not available via Red Hat OpenStack Platform 8 product channels. As a consequence, DDT (Data-Driven Tests) can not be run for Red Hat OpenStack Platform 8 certifications if the python-ddt package is not installed. As a workaround, partners must run the $ pip install ddt==1.1.1 command to install the python-ddt package via the official Python Package Index.
NOTE: This issue is not applicable to Red Hat OpenStack Platform 9 certifications.
Certification Prerequisites
1. Complete the Required Prerequisites on Red Hat Connect for Technology Partners
It is mandatory to have a Vendor Single Sign On (SSO) account & profile and a Product profile on Red Hat Connect for Technology Partners before beginning the certification process. Partners must compulsorily complete the Align, Build and Certify (ABC) Workflow on Red Hat Connect for Technology Partners before beginning the certification process.
If you have questions on Vendor account/profile, Product profile or software entitlements, send an email to connect@redhat.com.
2. Install and Configure Red Hat OpenStack Platform
Install the relevant version of Red Hat OpenStack Platform with which the OpenStack product-under-test has to be certified using Red Hat OpenStack Platform Product Documentation:
- Red Hat OpenStack Platform 8 Installation Reference
- Red Hat OpenStack Platform 9 Installation Reference
After Red Hat OpenStack Platform is installed, read the relevant product documentation to understand its usage and configuration.
NOTE: We recommend the use of the Red Hat OpenStack Platform director for installation as it is the supported toolset for installing and managing a Red Hat OpenStack Platform environment in production.
3. Install and Configure the OpenStack Component Under Test
After installing Red Hat OpenStack Platform, install the driver or plugin that has to be certified.
Complete the following steps on your OpenStack deployment which is under test:
- Ensure you have a private (tenant) network and private subnet in the OpenStack deployment which is under test.
- Create an admin tenant owned router and add the private (tenant) subnet as one of that router's interfaces in your OpenStack deployment.
- Create an external (provider) network and a public subnet. Configure the external network as the above router's gateway in your OpenStack deployment.
- Run the
$ keystone role-create --name=Membercommand using the keystone command-line client to create a new keystone role named "Member".
The installation and configuration documentation for plugins, drivers or software applications that need to be certified must contain clear and concise procedures for installation and configuration of the same on Red Hat OpenStack Platform.
4. [OPTIONAL] Ensure that the OpenStack Deployment Under Test Includes Network, Compute and Volume OpenStack Services
An OpenStack deployment must include Network, Compute and Volume OpenStack services for Rally scenario tests. This prerequisite is only valid for OpenStack components/applications which implement the formal documented OpenStack APIs. You may skip this prerequisite if you do not need to run Rally benchmarking scenario tests.
IMPORTANT: It is mandatory to install all OpenStack services on the node where the system-under-test/OpenStack component-under-test is configured.
5. [OPTIONAL] Install OpenStack Rally
To run Rally benchmarking scenario tests as part of the certification test suite run, install the openstack-rally package. The openstack-rally package is available from Red Hat OpenStack Platform product channels.
NOTE: This prerequisite is only valid for OpenStack components/applications which implement the formal documented OpenStack APIs. You may skip this prerequisite if you do not need to run Rally benchmarking scenario tests.
6. [OPTIONAL] Set Up the Rally Database and Configure the Rally Configuration File
Complete the following steps on the OpenStack Deployment Under Test to set up the Rally database and configure Rally to use the database.
NOTE: This prerequisite is only valid for OpenStack components/applications which implement the formal documented OpenStack APIs. You may skip this prerequisite if you do not need to run Rally benchmarking scenario tests.
1. Run the following command from the /etc/rally directory to create a copy of the OpenStack Rally sample configuration file and rename the copied file to /etc/rally/rally.conf:
$ cp rally.conf.sample rally.conf
2. Open the /etc/rally/rally.conf file with your default text editor. Scroll to the [database] section and change the default value of the connection parameter to the following:
connection = sqlite:////var/lib/rally/rally.sqlite
3. Run the following commands to create a new directory for the Rally database and then set up the database:
$ mkdir -p /var/lib/rally/
# rally-manage db recreate
7. Register the System and Attach the Required Subscription
Complete the following steps to register the system and attach the required subscription:
1. Run the following command to register your system using Red Hat Subscription Management:
# subscription-manager register
Use your RHN credentials for the registration.
2. Run the following command to display the list of available subscriptions for your system:
# subscription-manager list --available
From the list of available subscriptions, search for the subscription which provides the Red Hat Certification (for RHEL Server) repository. Make a note of the subscription and its Pool ID.
IMPORTANT: The Red Hat Certification (for RHEL Server) repository can be used to obtain the certification packages.
3. Run the following command to attach the subscription which provides the Red Hat Certification (for RHEL Server) repository to your system:
# subscription-manager attach --pool=[pool_ID]
Replace [pool_ID] with the Pool ID of the subscription which provides the Red Hat Certification (for RHEL Server) repository.
It is mandatory to use the correct Pool ID with the # subscription-manager attach --pool command to attach the required subscription to the system.
TIP: To verify the list of subscriptions your system has currently attached, at any time, run the # subscription-manager list --consumed command. Ensure that the subscription which provides the Red Hat Certification (for RHEL Server) repository is attached to your system.
8. Subscribe to Red Hat Certification Channel
To subscribe to Red Hat Certification channel using Red Hat Subscription Management, use the following details:
Content Name
Red Hat Certification (for RHEL 7 Server)
Content Label
rhel-7-server-cert-rpms
Run the following command to subscribe to Red Hat Certification channel:
# subscription-manager repos --enable=[reponame]
Replace [reponame] with rhel-7-server-cert-rpms.
NOTE: The rhel-7-server-cert-rpms repository provides certification packages for the system-under-test/test client configured on RHEL 7.x base operating system.
Troubleshooting Issues and Submitting Feedback?
Certification Workflow
Complete the following certification workflow in the order given to certify an OpenStack deployment/system-under-test with Red Hat OpenStack Platform.
1. Set Up a Local Test Server
The primary application required in the certification workflow "Red Hat Certification" is a client server application. You may launch Red Hat Certification web UI on a different host (test server) and use the web UI to run certification tests on an OpenStack deployment-under-test (test client).
It is recommended to setup a test server to run OpenStack Certification tests on the system-under-test/test client. This allows testing of multiple test clients from a single test server, enables quick validation and prevents resource constraints.
To run certification tests on an OpenStack deployment-under-test (test client) from a different host (test server), it is mandatory to install Red Hat Certification application on the host (test server) as well as the OpenStack deployment-under-test (test client). The host (test server) and the OpenStack deployment-under-test (test client) must use the same network.
Complete the following steps on a host/node which you need to act as a test server.
NOTE: The host/node which acts a test server must use the same network as the OpenStack deployment-under-test host or the client node. Additionally, the test server host/node must have access to the OpenStack deployment-under-test (test client node) and Red Hat services.
- Register the host/node which you need to act as a test server to RHN and attach the required subscription using the topic Register the System and Attach the Required Subscription.
- Subscribe the same host/node to Red Hat Certification Channel using the topic Subscribe to Red Hat Certification Channel.
- Run the following command on the same host/node:
# yum install redhat-certification
This installs Red Hat Certification application on the host/node. This host/node can now act as a test server and be used to run certification tests on an OpenStack deployment-under-test (client node) or multiple client nodes.
2. Install the Required Software Packages on the OpenStack Deployment/System-Under-Test (Test Client Node)
Run the following command on the OpenStack deployment-under-test (test client host/node) to install the software packages required in the certification workflow:
# yum install redhat-certification redhat-certification-openstack
When Red Hat Certification application (redhat-certification) package and the certification test suite (redhat-certification-openstack) package are installed, the required dependencies (including the sos package) are installed automatically on the system-under-test.
IMPORTANT: It is mandatory to install the certification packages (redhat-certification, redhat-certification-openstack) on the OpenStack node where the system-under-test/OpenStack component-under-test is configured. The system-under-test or the node where the OpenStack component-under-test is configured is the test client.
Run the following command on the OpenStack deployment-under-test (test client host/node) to start the listener process.
# rhcertd start
The listener process on the test client/node manages connection requests and receives instructions from the test server.
Troubleshooting Issues and Submitting Feedback?
3. Edit the Required Configuration Files (For OpenStack Components which Implement the Formal Documented OpenStack APIs)
SUMMARY
The certification test suite (redhat-certification-openstack) provides the following sample configuration files which must be copied and then edited as required before running the certification tests.
NOTE: The following configuration files must be edited only for OpenStack components/applications which implement the formal documented OpenStack APIs. If the system-under-test does NOT implement any of the formal documented OpenStack APIs, but relies on OpenStack services like OpenStack management applications, refer Launch Red Hat Certification Web User Interface to launch Red Hat Certification web UI and run the relevant certification tests directly.
| File Path | Description | Related Reference |
|---|---|---|
| /etc/redhat-certification-openstack/test_config.json.sample | The OpenStack deployment configuration file. It is mandatory to edit this file. | Refer Edit the Mandatory Configuration Files for details on editing this file. |
| /etc/redhat-certification-openstack/tempest.conf.sample | A representative configuration file which provides reference information on configuring the tempest.conf file to run Tempest API tests. The tempest.conf file is auto-generated after the certification tests are run for the first time and may be reconfigured thereafter. It is mandatory to edit the tempest.conf file. | Refer Run Certification Tests (For OpenStack Components/Applications which Implement the Formal Documented OpenStack APIs) for details on editing this file. |
| /etc/redhat-certification-openstack/rally_tasks_neutron.json.sample | The OpenStack Rally task configuration file which must be copied and edited only if partners need to run Networking specific Rally benchmarking scenarios. | Refer Edit the Optional Configuration Files for details on editing this file. |
| /etc/redhat-certification-openstack/rally_tasks_cinder.json.sample | The OpenStack Rally task configuration file which must be copied and edited only if partners need to run Block Storage specific Rally benchmarking scenarios. | Refer Edit the Optional Configuration Files for details on editing this file. |
PROCEDURE: EDIT THE MANDATORY CONFIGURATION FILES
To edit the mandatory configuration files, complete the following steps on the system-under-test/test client:
1. Navigate to the /etc/redhat-certification-openstack directory and list the files in the directory. The files listed are as follows:
rally_tasks_neutron.json.sample
rally_tasks_cinder.json.sample
test_config.json.sample
tempest.conf.sample
NOTE: The above sample files are for representative purposes and should not be edited directly without creating a copy. Also, the sample files especially /etc/redhat-certification-openstack/tempest.conf.sample should not be deleted at any given point of time from the system-under-test/test client.
2. Run the following command (as a normal user) from the /etc/redhat-certification-openstack directory:
$ cp test_config.json.sample test_config.json
The above command creates a copy of the representative sample file in the /etc/redhat-certification-openstack directory and renames the copied file to test_config.json.
NOTE: The /etc/redhat-certification-openstack/test_config.json file needs to be created just once when running the certification tests for the first time on a system-under-test/plugin. The /etc/redhat-certification-openstack/test_config.json file can be used as-is (for multiple test runs for a plugin) or edited as needed (for certifying a new plugin).
3. Open the /etc/redhat-certification-openstack/test_config.json file with your default editor and edit the file as follows:
- Replace http://your_openstack:5000/v2.0 with the keystone authentication URL that allows access to service endpoints
- In the "admin_username": "admin" parameter, replace admin with the OpenStack username of a user with admin role
- In the "admin_password": "password" parameter, replace password with the corresponding OpenStack password of the user with admin role
- In the “admin_tenant_name": "admin” parameter, replace admin with the OpenStack admin tenant name against which you need to run certification tests
NOTE: It is mandatory to use administration keystone credentials in the /etc/redhat-certification-openstack/test_config.json file. - In the "keystone_region_name" = "your_keystone_region_name" parameter, replace your_keystone_region_name with your keystone region name
- In the "plugin_type": "blockstorage|networking|dataprocessing|objectstorage|image|database|identity" parameter, replace blockstorage|networking|dataprocessing|objectstorage|image|database|identity with the classification/category of the plugin that needs to be certified from the blockstorage|networking|dataprocessing|objectstorage|image|database|identity list
-
For the "supported_apis_and_extensions" parameter, remove the names of the APIs/Extensions that are not supported by your plugin from the list. Ensure that the list is left with names of all the APIs/Extensions supported by your system-under-test/plugin after editing
NOTE: The API/Extension names collected in this step are meant for certification purposes only and have no relation to the auto-generated configuration file for Tempest (/etc/redhat-certification-openstack/tempest.conf)The latest version of the certification test suite supports OpenStack Networking Load Balancer as a Service (LBaaS) tests. Do not change the default value of the "lbaas_api_version": "v2” parameter even if the system-under-test/plugin does not support OpenStack Networking LBaaS APIs.
Save the /etc/redhat-certification-openstack/test_config.json file with the latest changes.
The value of the undercloud_stackrc parameter in the /etc/redhat-certification-openstack/test_config.json file must be edited after running the openstack_director_verify tests (The OpenStack Director Verification tests). Information about running the openstack_director_verify tests, the other mandatory tests and the required configuration is covered in the subsequent topics.
RESULT
The /etc/redhat-certification-openstack/test_config.json file is edited and saved as required.
- To run Rally scenario tests (called openstack_scenarios) later in the workflow, refer Edit the Optional Configuration Files and edit the required Rally task configuration files before running the tests.
- If you do not need to run Rally scenario tests, refer Launch Red Hat Certification Web User Interface and the procedures documented thereafter to directly run certification tests and submit the test logs for review.
Troubleshooting Issues and Submitting Feedback?
PROCEDURE: EDIT THE OPTIONAL CONFIGURATION FILES (TO RUN RALLY SCENARIO TESTS)
To run Rally scenario test (called openstack_scenarios) for Networking or Block Storage components, it is mandatory to edit the Rally configuration files. Complete the following procedure on the system-under-test/test client to edit the Rally configuration files.
NOTE: Ensure that you have completed OpenStack Rally specific prerequisites from the topic Certification Prerequisites before proceeding with the steps in the following procedure.
1. Navigate to the /etc/redhat-certification-openstack directory and run the following commands from the /etc/redhat-certification-openstack directory:
$ cp rally_tasks_neutron.json.sample rally_tasks_neutron.json
$ cp rally_tasks_cinder.json.sample rally_tasks_cinder.json
The above command creates a copy of the representative sample files in the /etc/redhat-certification-openstack directory and renames the copied files to rally_tasks_neutron.json and rally_tasks_cinder.json respectively.
2. To run Networking specific Rally benchmarking scenarios: Open the /etc/redhat-certification-openstack/rally_tasks_neutron.json file with your default editor. In the /etc/redhat-certification-openstack/rally_tasks_neutron.json file, edit the values of flavor_name and image_name parameters and delete the APIs which are not supported by the system-under-test.
Save the file with the latest changes.
3. To run Block Storage specific Rally benchmarking scenarios: Open the /etc/redhat-certification-openstack/rally_tasks_cinder.json file with your default editor. In the /etc/redhat-certification-openstack/rally_tasks_cinder.json file, edit the values of flavor_name and image_name parameters and delete the APIs which are not supported by the system-under-test. Save the file with the latest changes.
IMPORTANT: We recommend you to read all the tasks in the Rally Task files (/etc/redhat-certification-openstack/rally_tasks_neutron.json and/or /etc/redhat-certification-openstack/rally_tasks_cinder.json {whichever is applicable}) before making changes. You must not change the default values of parameters in the context and the runner blocks at any given point of time.
RESULT
The Rally Task files are edited as required. Rally scenario tests (openstack_scenarios) for Networking or Block Storage components can be run later in the workflow along with the other tests. To launch Red Hat Certification web UI and run certification tests on the system-under-test/test client, refer the subsequent workflow procedures.
Troubleshooting Issues and Submitting Feedback?
4. Launch Red Hat Certification Web User Interface
Red Hat Certification is a client-server application using which you can launch Red Hat Certification web UI on a different host (test server) and use the web UI to run certification tests on an OpenStack deployment-under-test/system-under-test (test client).
PROCEDURE
Before launching Red Hat Certification web UI, ensure that you have set up a local test server/host using the topic Set Up a Local Test Server.
To launch Red Hat Certification web UI, complete the following steps on the test server/host:
1. Run the following commands to start Apache and Red Hat Certification back-end server:
# systemctl start httpd
# rhcertd start --debug=high
NOTE: It is mandatory to start the server in “high” debug mode for the desired level of debugging.
2. Launch Red Hat Certification web UI in a browser using the IP address of the test server/host:
http://machine-IP
Replace machine-IP with the IP address of the test server/host.
The test server/host may be used to run certification tests on the system-under-test or the test client.
Troubleshooting Tips
If you did not set up the test server/host and are trying to launch Red Hat Certification web UI on the OpenStack deployment-under-test/test client, the web UI can not be accessed directly on port 80 as the OpenStack Platform Dashboard service also uses port 80 by default.
You may however use Red Hat Certification web UI proxy server to launch Red Hat Certification web UI on the OpenStack deployment-under-test/test client.
To successfully launch Red Hat Certification web UI on the system-under-test/test client, complete the following steps on the system-under-test/test client.
- Install and configure a web proxy server application for example Squid on the system-under-test/test client.
-
Open the /etc/rhcert.xml file with your default editor and insert the highlighted line under the
tag in the file: <url> <proxy-url protocol="http">http://127.0.0.1:[port_no]</proxy-url> …… </url>Replace, [port_no] with the port no which runs the proxy server application.
Save the file with the latest changes.
-
Launch Red Hat Certification web UI on a browser using the following URL (proxy URL):
http://127.0.0.1:[port_no]Replace [port_no] with the port no which runs the proxy server application.
Troubleshooting Issues and Submitting Feedback?
5. Create a New Certification Request and Open Red Hat Certification Testing Page
To create a new certification request and open Red Hat Certification Testing Page, complete the following steps:
- Launch Red Hat Certification web UI on the test server using Launch Red Hat Certification Web User Interface. On Red Hat Certification web UI, click the login button.
- Log in with the username and the password of your SSO account on Red Hat Connect for Technology Partners also used to access software subscriptions.
- On Red Hat Certification Home Page, click the Server settings tab.
- In the Register a System field, enter the hostname or IP address of the test client or the system-under-test and then click Add. Ensure that the listener process is active on the test client by running the
# rhcertd statuscommand. If the listener process is inactive, run the# rhcertd listenercommand to restart the listener.
NOTE: The listener process on the test client manages connection requests and receives instructions from the test server. - Click the Red Hat Certification tab.
- Click Add Products.
- Fill the Add Products form using the following details:
- From the Products list, select products from the catalog
- From the Ecosystem list, select OpenStack
Click Next.
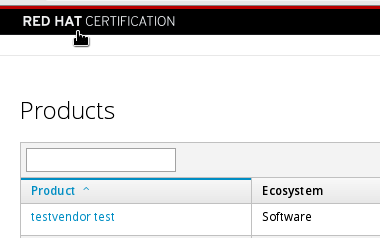
- From the Products Table, select the name of the product that needs to be certified and then click Add Selected Products.
- From the Products Table, click the name of the product added in the preceding step.
- In the Certifications Page, click Certification.
- From the Certification list, select New and then click Next.
- Fill the forms on the list of common questions and the questions specific to your system-under-test. Click Next after you fill each part.
- Click Done.
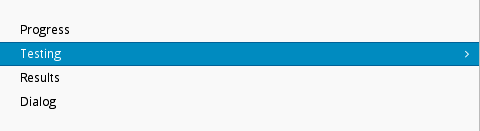
A certification request with a unique ID is created and added to the Certification Table. An email with the certification request details is sent to your designated email account. - From the Certification Table, click the certification request that you just created.
The Progress Page opens and displays the certification tests available in the certification test suite and the progress of the previous runs (if any). - Click the Testing link to open the Testing Page.
- In the Testing Page, click System.
- In the Select Host Page, select the hostname of the test client/system-under-test and then click Test.
The Testing Page opens and a certification test plan is created for the test client/system-under-test. After the certification test plan run is complete and the test plan is ready, the status column displays a “Finished test run” status and a Continue Testing button.

To run certification tests on the test client/system-under-test, complete either Procedure: Run Certification Tests (For OpenStack Components/Applications which Implement the Formal Documented OpenStack APIs) or Procedure: Run Certification Tests (For Other Applications), whichever is applicable.
5. Run Certification Tests from the Local Test Server on the Test Client/System-Under-Test
The Testing Page on Red Hat Certification web UI can be used to run certification tests on the system-under-test/test client.
You must run certification tests on the system-under-test/test client based on its type. Refer the following procedure(s) to run certification tests on the system-under-test/test client based on its type.
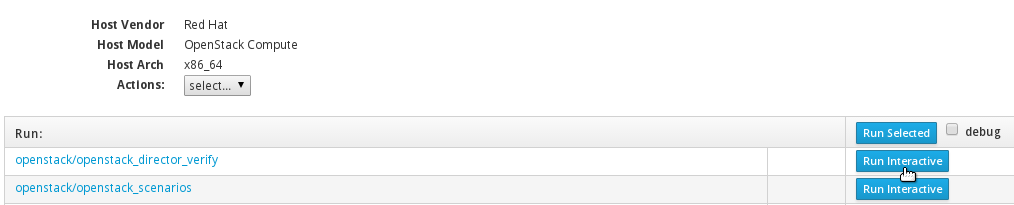
TYPES OF TESTS
Red Hat Certification web UI provides five different types of tests as displayed in the following screenshot and described in the annotations below.
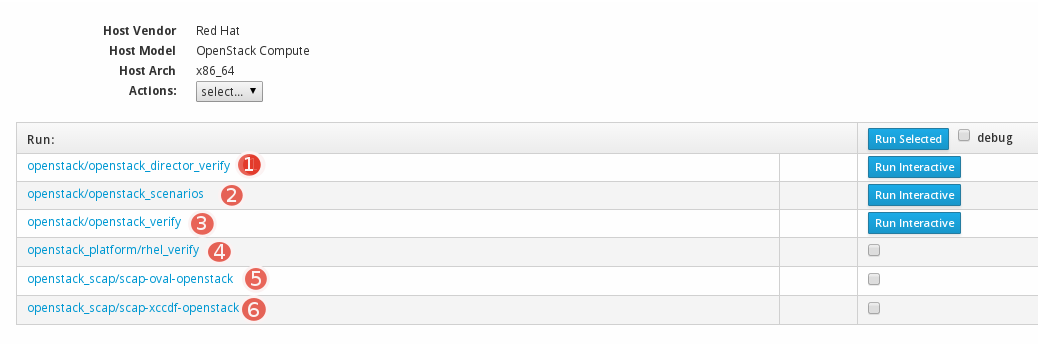
 The OpenStack Director Verification tests. These tests are mandatory for OpenStack components/applications which implement the formal documented OpenStack APIs.
 The OpenStack Rally tests for Networking or Block Storage components. These tests are optional.
 The OpenStack Tempest API tests. These tests are mandatory for OpenStack components/applications which implement the formal documented OpenStack APIs.
 OpenStack certification tests for OpenStack components/applications which DO NOT implement the formal documented OpenStack APIs. These tests are mandatory.
 and
and  OpenSCAP tests to determine the security vulnerabilities in the system-under-test. These tests are mandatory.
Refer Procedure: Run Certification Tests (For OpenStack Components/Applications which Implement the Formal Documented OpenStack APIs or Procedure: Run Certification Tests (For Other Applications) for details on running the tests based on your plugin/application type.
PROCEDURE: RUN CERTIFICATION TESTS (FOR OPENSTACK COMPONENTS/APPLICATIONS WHICH IMPLEMENT THE FORMAL DOCUMENTED OPENSTACK APIs)
For OpenStack applications which implement the formal documented OpenStack APIs, the following tests are applicable:
- openstack/openstack_director_verify
- openstack/openstack_scenarios
- openstack/openstack_verify
- OpenSCAP tests that is openstack_scap/scap-oval-openstack and openstack_scap/scap-xccdf-openstack
To run the required certification tests on OpenStack components/applications which implement the formal documented OpenStack APIs, complete the following procedures.
PROCEDURE: RUN OPENSTACK DIRECTOR VERIFICATION TESTS AND OPENSTACK TEMPEST API TESTS
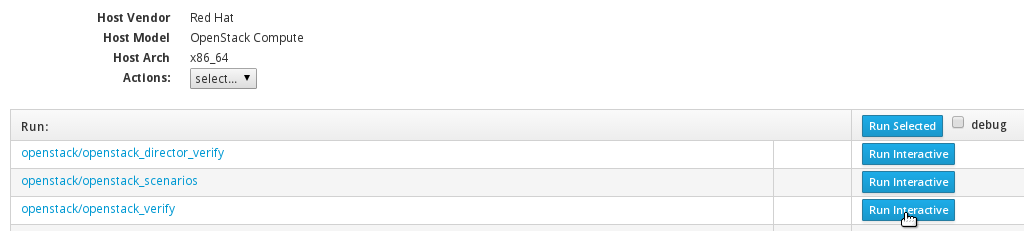
- On Red Hat Certification Testing Page, click Continue Testing.
- Perform this step on the OpenStack Undercloud controller node/Director node (using Undercloud endpoints) to run the openstack/openstack_verify tests for the OpenStack Identity service. Click Run Interactive which is next to the openstack/openstack_verify link.
NOTE: openstack/openstack_verify link is for running the Tempest API tests for OpenStack solutions that consume and implement the documented OpenStack APIs.
This step automatically generates a custom configuration file for Tempest (/etc/redhat-certification-openstack/tempest.conf) based on the deployment details provided in the /etc/redhat-certification-openstack/test_config.json file and runs the Tempest API tests. - Open the /etc/redhat-certification-openstack/test_config.json file with your default text editor. In the "undercloud_stackrc": /path/to/undercloud/stackrc_file parameter, replace /path/to/undercloud/stackrc_file with the path to the OpenStack Undercloud stackrc file or the OpenStack environment file.
- Ensure that you perform this step on the OpenStack Undercloud controller node or the Director node using Undercloud endpoints. In the Testing Page, click Run Interactive which is next to the openstack/openstack_director_verify link.
This step runs the OpenStack Director Verification tests on the OpenStack Director node and stores the test logs in a file. These test logs may be submitted later using the procedure View the Test Logs and Submit the Logs for Review. - Ensure that you perform this step on the OpenStack test client/system-under-test on the OpenStack Overcloud controller node using Overcloud endpoints. In the Testing Page, click Run Interactive which is next to the openstack/openstack_verify link.
- It is mandatory to edit the auto-generated configuration file for Tempest (/etc/redhat-certification-openstack/tempest.conf) to run specific API tests successfully at this step. Refer the following table to configure the test client/system-under-test and then edit the /etc/redhat-certification-openstack/tempest.conf file as required.
NOTE: Edit the configuration parameters in the configuration file for Tempest (/etc/redhat-certification-openstack/tempest.conf) on the system-under-test/test client based on the OpenStack service for which you need to certify.
| Type of OpenStack Service | Procedure to Run Tests for the Service |
|---|---|
| Networking | To successfully run administration tests for floating_IP OpenStack Networking API, run the $ keystone role-create --name=Member command using the keystone command-line client to create a new keystone role named "Member". |
| Block Storage |
NOTE: Block Storage backup tests are skipped in the certification test suite run and are not required for a successful certification. 1. Run the following commands to create volume type in the OpenStack deployment-under-test for both back-ends and then link the volume types to back-end names in extra-specifications: 2. Open the /etc/redhat-certification-openstack/tempest.conf file with your editor and scroll to the [volume] section. Add the following parameters under the [volume] section based on the output of the # cinder service-list command: 3. Open the /etc/redhat-certification-openstack/tempest.conf file with your editor and scroll to the [auth] section. Add the "allow_tenant_isolation = true" parameter under the [auth] section. |
| Object Storage |
1. Run the following commands using keystone command-line client to create an alternate user and tenant named alt_{your_user_name} and alt_{your_tenant_name} respectively: 2. Open the /etc/redhat-certification-openstack/tempest.conf file with your editor and scroll to the [Identity] section. Add the following values for some existing parameters like alt_username, alt_password and alt_tenant_name: |
| Data Processing |
1. Open the /etc/redhat-certification-openstack/tempest.conf file with your editor and scroll to the [data_processing] section. 2. Add the catalog_type = data-processing flag under the [data_processing] section. |
The auto-generated configuration file for Tempest (/etc/redhat-certification-openstack/tempest.conf) is edited as required to run specific tests for services like Networking (floating_IP), Block Storage, Object Storage and Data Processing successfully on the system-under-test/test client.
Troubleshooting Issues and Submitting Feedback?
RESULT
The certification test suite (redhat-certification-openstack) is executed automatically and certification tests are run on the test client/system-under-test.
Block Storage backup tests are skipped in the certification test suite run and are not required for a successful certification.
NOTE: After the certification test suite is executed it takes around 5-10 minutes for the completion of the certification tests. Red Hat Certification web UI on the test server/host remains as-is and does not show any progress during this period.
The status of the test run is displayed on the Testing Page. After a test run completes, the Testing Page displays a Finished test run status.

The test logs/results from all the above tests (openstack_director_verify, openstack_verify and OpenSCAP checks) are stored in a single file (in .xml.gz format) on the test server/host.
Before submitting the test results for validation and performing other actions on the results, refer Run OpenSCAP Tests to run OpenSCAP tests on the test client/system-under-test. Refer Run OpenStack Rally Tests to run the optional Rally scenario tests.
If OpenStack certification tests fail, refer Re-running Red Hat OpenStack Certification Tests in Case of Failures for resolving the issues and completing the certification process.
PROCEDURE: RUN OPENSCAP TESTS
OpenSCAP tests scan the security vulnerabilities in the test client/system-under-test and generate reports. To run OpenSCAP tests, complete the following procedure.
- On Red Hat Certification Testing Page, click Continue Testing.
- Select the checkboxes next to the openstack_scap/scap-oval-openstack and openstack_scap/scap-xccdf-openstack links and then click Run Selected.

OpenSCAP tests are run and the logs from the tests are stored in the same results file as for the other tests on the test server/host.
The status of the test run is displayed on the Testing Page. After a test run completes, the Testing Page displays a Finished test run status.
To run the optional Rally scenario tests, refer Run OpenStack Rally Tests and then submit the consolidated test logs for validation by using the procedure View the Test Logs and Submit the Logs for Review.
PROCEDURE: RUN OPENSTACK RALLY TESTS
To run the OpenStack Rally scenario tests (called openstack_scenarios) for Networking or Block Storage components, refer the following procedure. The OpenStack Rally tests (openstack_scenarios) are optional.
NOTE: Before running the OpenStack Rally tests (openstack_scenarios), make sure that you have completed all the Rally specific prerequisites and procedures using the topics Certification Prerequisites and Procedure: Edit the Optional Configuration Files (To Run Rally Scenario Tests). It is also mandatory to configure the /etc/redhat-certification-openstack/test_config.json file by referring Procedure: Edit the Mandatory Configuration Files.
- On Red Hat Certification Testing Page, click Continue Testing.
- Click Run Interactive which is next to the openstack/openstack_scenarios link.

This step runs the Rally scenario tests for Networking and Block Storage components and stores the test logs in the same results file as for the other tests on the test server/host.
The status of the test run is displayed on the Testing Page. After a test run completes, the Testing Page displays a Finished test run status.
To view and submit the test logs, refer View the Test Logs and Submit the Logs for Review.
Troubleshooting Issues and Submitting Feedback?
PROCEDURE: RUN CERTIFICATION TESTS (FOR OTHER APPLICATIONS)
For OpenStack applications which DO NOT implement the formal documented OpenStack APIs but rely on OpenStack services for example OpenStack management applications, the following tests are applicable:
- openstack_platform/rhel_verify
- OpenSCAP tests that are openstack_scap/scap-oval-openstack and openstack_scap/scap-xccdf-openstack
NOTE: The openstack_platform/rhel_verify tests are not applicable for OpenStack components/applications which implement the formal documented OpenStack APIs for example OpenStack Networking plugins or Block Storage drivers.
To run certification tests on OpenStack applications which DO NOT implement the formal documented OpenStack APIs, complete the following steps:
- On Red Hat Certification Testing Page, click Continue Testing.
- Select the checkboxes next to the openstack_platform/rhel_verify, openstack_scap/scap-oval-openstack and openstack_scap/scap-xccdf-openstack links and then click Run Selected.

RESULT
The certification test suite (redhat-certification-openstack) is executed automatically and certification tests are run on the test client/system-under-test. The certification test suite run in this case mainly includes a run of the Red Hat sosreport tool which collects configuration and diagnostics information about the platform and the system-under-test. OpenSCAP tests are also run as part of the run.
The status of the test run is displayed on the Testing Page. After a test run completes, the Testing Page displays a Finished test run status.
The test logs/results are stored in a single file (in .xml.gz format) on the test server/host. To view the test logs and perform actions on the logs including submission of the log file to Red Hat certification services, refer View the Test Logs and Submit the Logs for Review.
Troubleshooting Issues and Submitting Feedback?
6. View the Test Logs and Submit the Logs for Review
The test results/logs from the above tests are stored in a single log file (in .xml.gz format) on the test server/host. You must submit this test log file to Red Hat certification services for validation.
PROCEDURE
To view and submit the test log/results file using Red Hat Certification web UI, complete the following procedure.
The following procedure also provides steps to save, download and delete the test results/log file. However, it is mandatory to submit the test log file to Red Hat certification services for validation.
- Launch Red Hat Certification web UI on the test server/host. In Red Hat Certification web UI, click the Red Hat Certification tab.
- From the Products Table, click the name of the product/system-under-test.
- From the Certification Page, click the relevant certification entry.
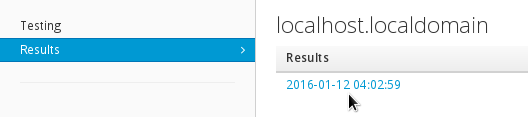
- Click the Results link to open the Results Page.

- In the Results Page, click the latest timestamped results link relevant to your host.
- From the Actions list, select an appropriate action based on the following details:

- To submit the test log file for validation, select submit. Alternatively, you may click Submit Results to submit the test log file for validation. NOTE: You may directly submit the test log file to Red Hat Certification services without downloading it on the test server/host or the system-under-test/test client.
- To close the test log file, select close
- To save the test log file on a separate system/host which has Red Hat Certification application installed, select save. The save action transfers the test log file (in .xml.gz format) to a separate system which has Red Hat Certification application installed. You may transfer the test log file to the system-under-test/test client using the save action. If you save the test log file on a different system, you must submit the log file from the same system
- To download the test log file (in .xml.gz format) on the test server/host, select download
- To delete the test log file from the server, select delete
The submit option or the Submit Results button submits the consolidated test log/test results file to Red Hat certification services for validation. The test log file is validated by Red Hat certification services and the certification results are displayed in the Results Page on Red Hat Certification web UI.
To access and interpret the certification results, refer Interpret Certification Results.
Troubleshooting Issues and Submitting Feedback?
7. Interpret Certification Results
Red Hat certification services validate the test log/results file. The certification results are displayed on Red Hat Certification web UI after a specific amount of time.
To view certification results, complete the following steps:
- Launch Red Hat Certification web UI on the test server/host. On Red Hat Certification web UI, click the Red Hat Certification tab.
- From the Products Table, select the name of the product undergoing certification.
- From the Certification Page, click the relevant certification entry for the corresponding product.
- Click the Results link to open the Results Page.
In the Results Page, verify the results table relevant to your host/system-under-test. The Validation column displays the certification status and contains links to certification test reports.

If the Validation column displays a Passed status, the certification is bound successful and the product-under-test is listed on Red Hat Certified Catalog.
If the Validation column displays a Failed status, the certification is considered failed/unsuccessful. In this case, Red Hat’s reviewers team provides fix recommendations and assists the partner’s team in resolving the issues in a timely manner.
Besides the above states, the Validation column may display one of the following states:
- Review: This status signifies that the test logs are undergoing review.
- Review_marked_passed: This status signifies that the test logs have passed Red Hat review/validation. Certifications which are marked Review_marked_passed transition to the Passed state.
The Dialog Page captures details of every certification workflow related activity between Red Hat and the partner organization in the form of comments. Partners may use the Dialog Page to interact with Red Hat certification team.

Re-running Red Hat OpenStack Certification Tests in Case of Failures
If OpenStack certification tests fail, perform the following steps to run the tests again and complete the certification process:
- Install Red Hat OpenStack Platform from scratch again and then complete the following steps on your OpenStack deployment which is under test/test client.
- Ensure you have a private (tenant) network and private subnet in your OpenStack deployment
- Create an admin tenant owned router and add the private (tenant) subnet as one of that router's interfaces in your OpenStack deployment
- Create an external (provider) network and a public subnet. Configure the external network as the above router's gateway in your OpenStack deployment
- Run the
$ keystone role-create --name=Membercommand using the keystone command-line client to create a new keystone role named "Member"
NOTE: For details on installing Red Hat OpenStack Platform and completing the above steps, refer Red Hat OpenStack Platform product documentation.
- Ensure that the local test server is set up as required using the topic Set Up the Local Test Server.
- Run the
# yum remove redhat-certification redhat-certification-backendcommand and then the# rm /etc/rhcert.xmlcommand to remove theredhat-certificationpackage and the associated configuration file from the system-under-test/test client. Install Red Hat Certification application from scratch on the system-under-test/test client. - Run the following commands on the test client/system-under-test to start Red Hat Certification back-end server afresh along with the listener:
# rhcertd stop
# rhcert-backend clean all
# rhcertd start --debug=high
Answer "yes" to the automatic prompts that are generated when you run the # rhcert-backend clean all command.
5. If the system-under-test/test client implements the formal documented OpenStack APIs, ensure that the mandatory configuration files are configured appropriately using the topic Edit the Mandatory Configuration Files.
6. Launch Red Hat Certification web UI on the test server/host using the topic Launch Red Hat Certification Web User Interface.
After launching Red Hat Certification web UI, refer Run Certification Tests from the Local Test Server on the Test Client/System-Under-Test and View the Test Logs and Submit the Test Logs for Review to re-run certification tests on the OpenStack deployment which is under test and submit the test logs for review respectively.
Troubleshooting Issues and Submitting Feedback
You may open a support case using Red Hat Customer Portal under the following instances:
- To report issues and get help with the certification process
- To submit feedback and request enhancements in the certification toolset & documentation
- To receive assistance on the Red Hat product on which your product/application is being certified. To receive Red Hat product assistance, it is mandatory to have the required product entitlements & subscriptions which are separate from certification-specific entitlements & subscriptions.
To open a support case using Red Hat Customer Portal Interface, complete the following steps:
- Log in Red Hat Customer Portal using Red Hat account credentials which are also used to access other Red Hat assets like Red Hat Connect for Technology Partners and software subscriptions.
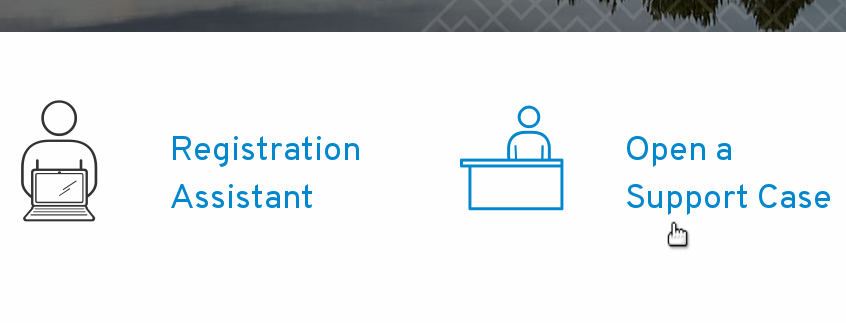
- Click Open a Support Case on Red Hat Customer Portal Home Page.
- Complete the Support Case Form with special attention to the following fields:
- From the Product field, select the name of the Red Hat product on which your product/application is being certified, based on the following details:
- For Red Hat OpenStack Certification, select Red Hat OpenStack Platform
- For Certified Cloud and Service Provider (CCSP) Certification, Red Hat Container Certification or Red Hat Hardware Certification, select Red Hat Enterprise Linux
- From the Product Version field, select the version of the Red Hat product on which your product/application is being certified.
- In the Problem Statement field, type a problem statement/issue or feedback using the following format:
{Partner Certification} (The Issue/Problem or Feedback)
Replace (The Issue/Problem or Feedback) with either the issue/problem faced in the certification process/Red Hat product or feedback on the certification toolset/documentation. For example: {Partner Certification} Error occurred while submitting certification test results using Red Hat Certification application.
IMPORTANT: It is mandatory to write the problem statement with the {Partner Certification} tag to ensure assignment of the case to the appropriate group(s).
- From the Product field, select the name of the Red Hat product on which your product/application is being certified, based on the following details:
Complete the remaining form using the details covered in this article.
NOTE: Support cases related to Certification use Severity 3 SLAs. For more details about initial and ongoing response times, visit the Production Support Service Level Agreement.
APPENDIX
OpenStack Rally Scenario Coverage
The current release of Red Hat OpenStack Certification includes scenarios from the following Rally Benchmark scenario groups.
- NeutronLoadbalancerV1
- NeutronNetworks
- Quotas
- Authenticate
- CinderVolumes
To get information about benchmark scenarios inside each scenario group, run the $ rally info find <ScenarioGroupName> command, replacing ScenarioGroupName with a scenario group from the list above.
Comments