
RHV - Installing drivers in a Windows VM for accessing the VirtIO system disk
Environment
- Red Hat Enterprise Virtualization 3.x
- Red Hat Virtualization 4.x
- Guest Server OSes: Windows Server 2019, Windows Server 2016, Windows Server 2012 R2, Windows Server 2012, Windows Server 2008 R2, Windows 2008
- Guest Client OSes: Windows 10, Windows 8, Windows 7
Issue
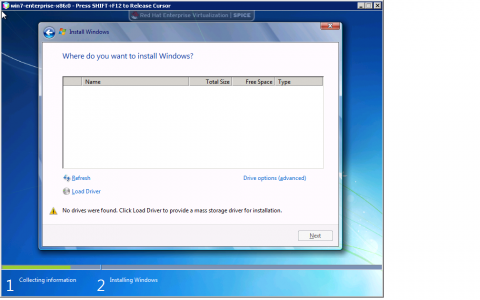
- I need to install a Windows virtual machine (VM) using virtIO devices but Windows cannot find them
- How do I install the virtIO drivers at installation time in Windows?
Resolution
The resolution will vary slightly depending on what versions you are using.
Prerequisites for All Red Hat Virtualization (3.x/4.x) versions:
-
Install the
virtio-winpackage on the RHV-M/RHEV-M system:yum install virtio-win -
Create an ISO domain (if you haven't already):
a. Documentation for configuring an NFS export
b. Documentation for attaching NFS storage in RH(E)V
Important Notes
- The latest versions of RHEL have built-in support for VirtIO, so if you're installing RHEL as guest OS this is not needed.
Red Hat Virtualization 4.X:
Be aware that the package names and tool syntax has changed a bit from RHEV3:
- To set up these you'll want to make sure the ISOs/VFDs are in the ISO Domain as seen in the documentation.
-
To upload these you can run the following command on the manager, substituting
--iso-domain=ISODomainwith your actual ISO domain name:# engine-iso-uploader --iso-domain=ISODomain upload /usr/share/virtio-win/virtio-win.iso /usr/share/virtio-win/virtio-win_x86.vfd /usr/share/virtio-win/virtio-win_amd64.vfd /usr/share/rhv-guest-tools-iso/rhv-tools-setup.iso
Red Hat Virtualization 3.x:
-
Locate the virtio-win packages and upload the *.vfd and *.iso files to the ISO storage domain using the ISO uploader utility:
rhevm-iso-uploader --iso-domain=nameOFdomain upload /usr/share/virtio-win/*.vfd
rhevm-iso-uploader --iso-domain=nameOFdomain upload /usr/share/virtio-win/*.iso
Installing Windows
- Create a new VM with a VirtIO disk interface (instead of IDE).
-
When the Windows VM is created, attach
virtio-win-xxxx.vfdas a floppy, using the Run once menu (Remember to also boot from the Windows Installation ISO using "Attach CD"). (use "VirtIO Win amd64 VFD" for 64-bit architecture and "VirtIO Win x86 VFD" for 32-bit architecture.)
- NOTE: For deploying a large number of VirtIO-based VMs, a better solution would be to slipstream the
VirtIO_blkdriver into the Windows distribution ISO file. This is possible using nLite software or the tools Microsoft provides for driver slipstreaming.
- NOTE: For deploying a large number of VirtIO-based VMs, a better solution would be to slipstream the
-
Proceed according to the version of Windows used:
- Windows Server 2016:
- When Windows prompts for the driver, click on "Load Driver", point the installer to drive A: and pick the SCSI controller driver for Windows Server 2016
- Windows Server 2012 R2 / Windows Server 2012:
- When Windows prompts for the driver, click on "Load Driver", point the installer to drive A: and pick the SCSI controller driver for Windows Server 2012 R2/Windows Server 2012.
- Windows 2008 R2:
- Choose the AMD64 drivers.
- There is a known issue where the automatic driver scanning in Windows fails to detect the correct driver. The workaround is to select the driver manually similar to the process listed below for Windows 7.
-
Windows 2008:
- When Windows prompts for the driver, click on "Load Driver", point the installer to drive A: and pick the driver that suits the OS (32-bit use x86 drivers, 64-bit use AMD64 drivers)
-
Windows 10:
- When Windows prompts for the driver, click on "Load Driver", point the installer to drive A: and pick the SCSI controller driver for Windows 10.
- Windows 8:
- When Windows prompts for the driver, click on "Load Driver", point the installer to drive A: and pick the SCSI controller driver for Windows 8.
- Windows 7:
- When Windows prompts for the driver, click on "Load Driver", point the installer to drive A: and pick the SCSI controller driver for Windows 7.

- When Windows prompts for the driver, click on "Load Driver", point the installer to drive A: and pick the SCSI controller driver for Windows 7.
- Windows Server 2016:
This solution is part of Red Hat’s fast-track publication program, providing a huge library of solutions that Red Hat engineers have created while supporting our customers. To give you the knowledge you need the instant it becomes available, these articles may be presented in a raw and unedited form.
Comments