
Evaluating OpenStack: Single-Node Deployment
Packstack is only intended for use for OpenStack Proof of Concepts / Live demos and the installer itself is not supported
Please refer to Installing and Managing Red Hat OpenStack Platform for getting more details about the Supportability matrix.
This document provides a step-by-step guide to implementing a basic Red Hat Enterprise Linux OpenStack Platform cloud using the Packstack deployment tool. To simplify networking and footprint issues, all OpenStack components are deployed on a single node (machine).
The resulting OpenStack deployment consists of a public network and a private network on one machine, hosting one CirrOS-image instance, with an attached storage volume. Installed OpenStack services include: Block Storage, Compute, Dashboard, Identity, Image, OpenStack Networking, Object Storage, and Telemetry.
Note: Packstack is a command-line utility that rapidly deploys OpenStack; Packstack deployments are intended only for POC-type testing environments, and are not suitable for production. By default, the public network is only routable from the OpenStack host.
To evaluate OpenStack using a more complex network configuration, refer to Evaluating OpenStack: Simple Networking.

Single-Node Deployment
The following procedure takes approximately 1.5 hours (includes time needed by Packstack to install the OpenStack software).
1. Install
1.1. Prerequisites
For an all-in-one deployment, you will need:
-
One Host Machine
-
One physical host machine running Red Hat Enterprise Linux 7.2
This is the machine on which you will install and run all the OpenStack cloud components. The machine must meet the following hardware requirements. -
Processor
64-bit x86 processor with support for the Intel 64 or AMD64 CPU extensions, and the AMD-V or Intel VT hardware virtualization extensions enabled. -
Memory
Minimum of 2 GB of RAM. -
Disk Space
Minimum of 20 GB is recommended.Add more memory or disk space if you plan on adding additional instances or volumes after this deployment (for details, see v5 or v6 Single-Node Deployment Requirements).
-
-
Network Access
Active network connection on the host machine for Red Hat Subscription Management registration. -
SSH Configuration
Ensure that PasswordAuthentication is enabled in the host machine's /etc/ssh/sshd_config file; otherwise, the Packstack installation will fail.
1.2. Install OpenStack
The installation process includes the following steps:
-
Ensure that you have enabled the correct software repositories using Red Hat Subscription Management.
-
Ensure Network Manager is turned off.
-
Run the Packstack deployment tool.
1.2.1. Enable OpenStack Repositories
-
If you have not done so already, register for Red Hat Subscription Management (requires your subscription user name and password):
subscription-manager register -
Find the entitlement pool for Red Hat Enterprise Linux OpenStack Platform in the output of the following command:
subscription-manager list --available --all -
Use the pool ID located in the previous step to attach the Red Hat Enterprise Linux OpenStack Platform entitlements:
subscription-manager attach --pool=POOL_ID -
Disable all repositories:
subscription-manager repos --disable=* -
Enable the RHEL and OpenStack repositories:
-
For Red Hat Enterprise Linux OpenStack Platform 5, use:
subscription-manager repos --enable=rhel-7-server-rpms subscription-manager repos --enable=rhel-7-server-openstack-5.0-rpms subscription-manager repos --enable=rhel-7-server-extras-rpms -
For Red Hat Enterprise Linux OpenStack Platform 6, use:
subscription-manager repos --enable=rhel-7-server-rpms subscription-manager repos --enable=rhel-7-server-rh-common-rpms subscription-manager repos --enable=rhel-7-server-openstack-6.0-rpms subscription-manager repos --enable=rhel-7-server-extras-rpms -
For Red Hat Enterprise Linux OpenStack Platform 7, use:
subscription-manager repos --enable=rhel-7-server-rpms subscription-manager repos --enable=rhel-7-server-rh-common-rpms subscription-manager repos --enable=rhel-7-server-openstack-7.0-rpms subscription-manager repos --enable=rhel-7-server-extras-rpms -
For Red Hat Enterprise Linux OpenStack Platform 8, use:
subscription-manager repos --enable=rhel-7-server-rpms subscription-manager repos --enable=rhel-7-server-rh-common-rpms subscription-manager repos --enable=rhel-7-server-openstack-8-rpms subscription-manager repos --enable=rhel-7-server-extras-rpms -
For Red Hat Enterprise Linux OpenStack Platform 9, use:
subscription-manager repos --enable=rhel-7-server-rpms subscription-manager repos --enable=rhel-7-server-rh-common-rpms subscription-manager repos --enable=rhel-7-server-openstack-9-rpms subscription-manager repos --enable=rhel-7-server-extras-rpms -
For Red Hat Enterprise Linux OpenStack Platform 10, use:
subscription-manager repos --enable=rhel-7-server-rpms subscription-manager repos --enable=rhel-7-server-rh-common-rpms subscription-manager repos --enable=rhel-7-server-extras-rpms subscription-manager repos --enable=rhel-7-server-openstack-10-rpms subscription-manager repos --enable=rhel-7-server-openstack-10-devtools-rpms -
For Red Hat Enterprise Linux OpenStack Platform 11, use:
subscription-manager repos --enable=rhel-7-server-rpms subscription-manager repos --enable=rhel-7-server-rh-common-rpms subscription-manager repos --enable=rhel-7-server-extras-rpms subscription-manager repos --enable=rhel-7-server-openstack-11-rpms subscription-manager repos --enable=rhel-7-server-openstack-11-devtools-rpms -
For Red Hat Enterprise Linux OpenStack Platform 12, use:
subscription-manager repos --enable=rhel-7-server-rpms subscription-manager repos --enable=rhel-7-server-rh-common-rpms subscription-manager repos --enable=rhel-7-server-extras-rpms subscription-manager repos --enable=rhel-7-server-openstack-12-rpms subscription-manager repos --enable=rhel-7-server-openstack-12-devtools-rpms -
For Red Hat Enterprise Linux OpenStack Platform 13, use:
   subscription-manager repos --enable=rhel-7-server-rpms
   subscription-manager repos --enable=rhel-7-server-rh-common-rpms
   subscription-manager repos --enable=rhel-7-server-extras-rpms
   subscription-manager repos --enable=rhel-7-server-openstack-13-rpms
   subscription-manager repos --enable=rhel-7-server-openstack-13-devtools-rpms
-
-
Install utility packages:
yum install yum-utils -
Update everything:
yum update
1.2.2. Disable Network Manager
-
OpenStack networking currently does not work on systems that have the Network Manager (NetworkManager) service enabled. To disable Network Manager, run:
systemctl disable NetworkManager -
Reboot the system:
# reboot
1.2.3. Install and Run Packstack to Deploy OpenStack
-
Install the Packstack package:
yum install -y openstack-packstack -
Run Packstack (requires the machine's root password):
packstack --allinone -
The all-in-one installation creates the 'admin' and 'demo' users. To view passwords for later use, run:
  grep OS_PASSWORD /root/keystonerc_admin
  grep OS_PASSWORD /root/keystonerc_demo
NOTE: If the packstack command fails or you run into other issues, please contact Red Hat Technical Support with a description of what happened, an sosreport, the full console output, and all packstack and answer files referenced in the console output.
2. Start up
2.1. Launch an Instance (Virtual Machine)
-
In your browser, sign in to the OpenStack Dashboard with the link: http://HOST_NAME_OR_URL/dashboard/

Login ScreenUse the 'Demo' user name and password (see previous procedure).
-
Launch the instance:
-
Click the Compute > Instances menu item.
-
Click the Launch Instance button. The Launch Instance dialog is
displayed.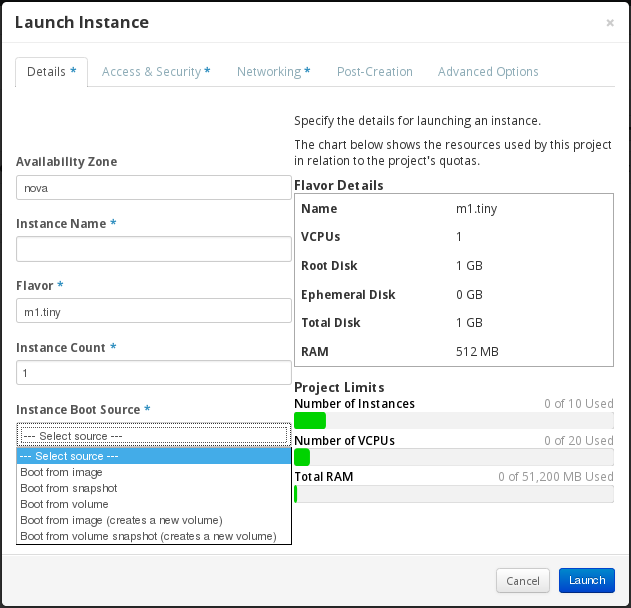
Launch Instance: Details Tab -
On the Details tab, keep the defaults and:
-
Enter an Instance Name to identify your instance.
-
Select the 'm1.tiny' Flavor for your instance.
-
Select the 'Boot from image' option from the Instance Boot Source drop-down list; a new field for Image Name is displayed.
-
Select the 'cirros (12.5 MB)' image from the drop-down list (this image is provided with your all-in-one installation).
-
-
Click the Launch button.
-
-
Create a storage volume, and attach it to the new instance:
-
Click the Compute > Volumes menu item, and click the Create Volume button. The Create Volume dialog is displayed.
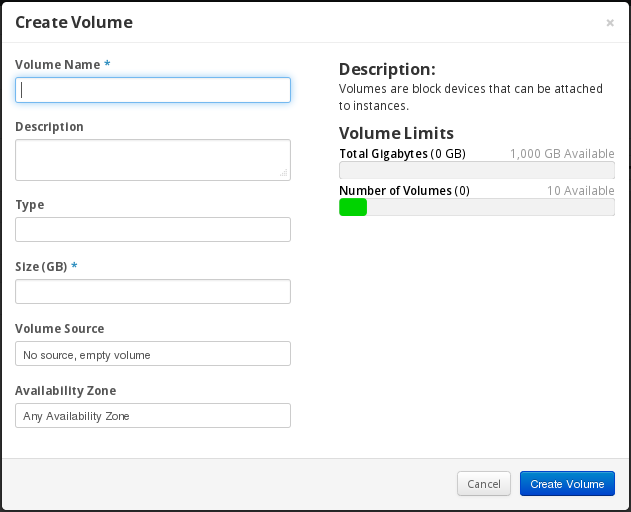
Create Volume Dialog -
Keep the defaults, and specify the following:
-
Enter a Volume Name to identify your new volume.
-
Enter the Size of your new volume in gigabytes (GB) (for example, '5'). Remember that your new volume will be allocated from the cinder-volumes volume group, so there must be enough free disk space in the group for your new volume to be allocated.
-
-
Click the Create Volume button to create the new volume.
-
Click the More button for the new volume, and select Edit Attachments.
-
In the Attach To Instance field, select your new instance, and click Attach Volume.
-
2.2. Log in to your New Instance
You can immediately log in to your new instance using the instance console:
-
In the Dashboard, click on Compute > Instances.
-
Click the instance's More button and select Console. The Instance Console is displayed.
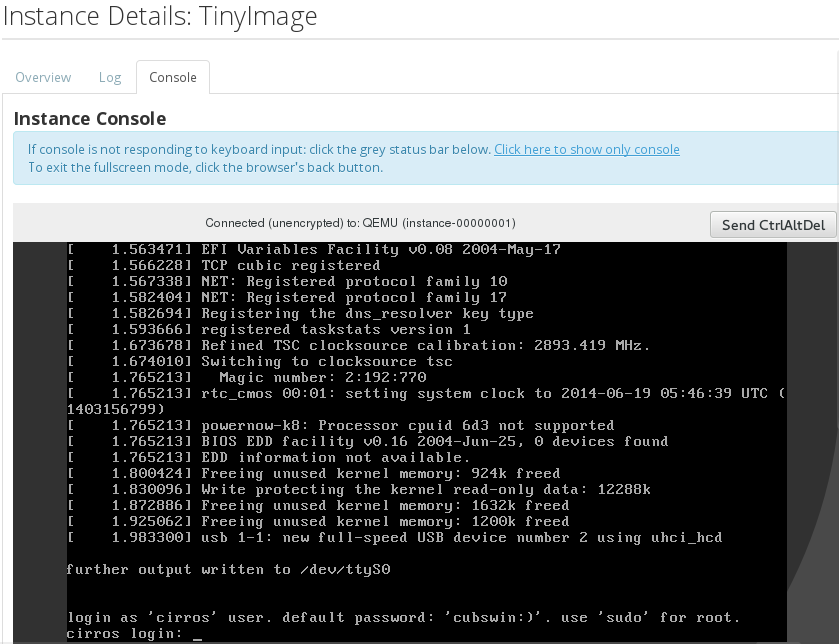
Log In Screen -
Log in using the CirrOS image's user name and password, which are displayed as a tip in the console (for example, 'cirros'/'cubswin:)').
Comments