
Red Hat Training
A Red Hat training course is available for Red Hat Enterprise Linux
10.4. Defining Role-Based Access Controls
Role-based access control grants a very different kind of authority to users compared to self-service and delegation access controls. Role-based access controls are fundamentally administrative, providing the ability to modify entries.
There are three parts to role-based access controls: the permission, the privilege and the role. A privilege consists of one or more permissions, and a role consists of one or more privileges.
- A permission defines a specific operation or set of operations (such as read, write, add, or delete) and the target entries within the IdM LDAP directory to which those operations apply. Permissions are building blocks; they can be assigned to multiple privileges as needed.With IdM permissions, you can control which users have access to which objects and even which attributes of these objects. IdM enables you to whitelist or blacklist individual attributes or change the entire visibility of a specific IdM function, such as users, groups, or sudo, to all anonymous users, all authenticated users, or just a certain group of privileged users. This flexible approach to permissions is useful in scenarios when, for example, the administrator wants to limit access of users or groups only to the specific sections these users or groups need to access and to make the other sections completely hidden to them.
- A privilege is a group of permissions that can be applied to a role. For example, a permission can be created to add, edit, and delete automount locations. Then that permission can be combined with another permission relating to managing FTP services, and they can be used to create a single privilege that relates to managing filesystems.NoteA privilege, in the context of Red Hat Identity Management, has a very specific meaning of an atomic unit of access control on which permissions and then roles are created. Privilege escalation as a concept of regular users temporarily gaining additional privileges does not exist in Red Hat Identity Management. Privileges are assigned to users by using Role-Based Access Controls (RBAC). Users either have the role that grants access, or they do not.Apart from users, privileges are also assigned to user groups, hosts, host groups and network services. This practice permits a fine-grained control of operations by a set of users on a set of hosts via specific network services.
- A role is a list of privileges which users specified for the role possess.ImportantRoles are used to classify permitted actions. They are not used as a tool to implement privilege separation or to protect from privilege escalation.
It is possible to create entirely new permissions, as well as to create new privileges based on existing permissions or new permissions. Red Hat Identity Management provides the following range of pre-defined roles.
Table 10.1. Predefined Roles in Red Hat Identity Management
| Role | Privilege | Description |
|---|---|---|
|
Helpdesk
| Modify Users and Reset passwords, Modify Group membership | Responsible for performing simple user administration tasks |
|
IT Security Specialist
| Netgroups Administrators, HBAC Administrator, Sudo Administrator | Responsible for managing security policy such as host-based access controls, sudo rules |
|
IT Specialist
| Host Administrators, Host Group Administrators, Service Administrators, Automount Administrators | Responsible for managing hosts |
|
Security Architect
| Delegation Administrator, Replication Administrators, Write IPA Configuration, Password Policy Administrator | Responsible for managing the Identity Management environment, creating trusts, creating replication agreements |
|
User Administrator
| User Administrators, Group Administrators, Stage User Administrators | Responsible for creating users and groups |
10.4.1. Roles
10.4.1.1. Creating Roles in the Web UI
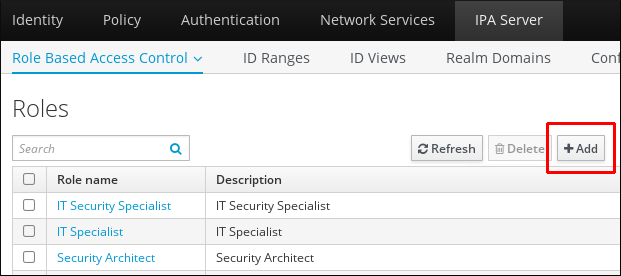
- Open the IPA Server tab in the top menu, and select the Role-Based Access Control subtab.
- Click the Add link at the top of the list of the role-based access control instructions.
Figure 10.6. Adding a New Role
- Enter the role name and a description.
Figure 10.7. Form for Adding a Role
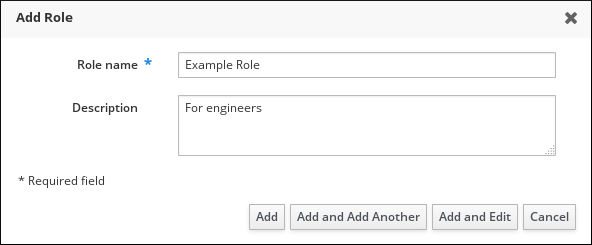
- Click the button to save the new role and go to the configuration page.
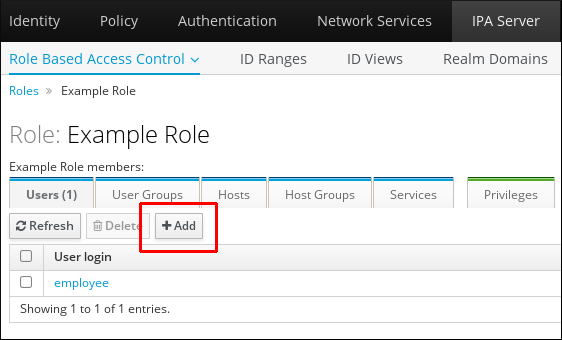
- At the top of the Users tab, or in the Users Groups tab when adding groups, click Add.
Figure 10.8. Adding Users
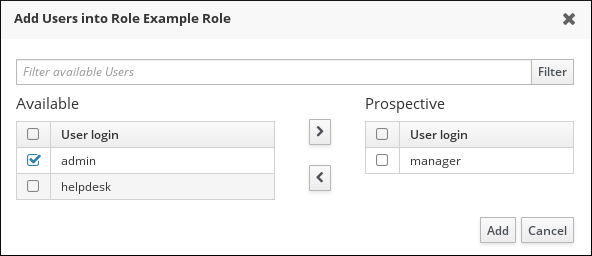
- Select the users on the left and use the button to move them to the Prospective column.
Figure 10.9. Selecting Users
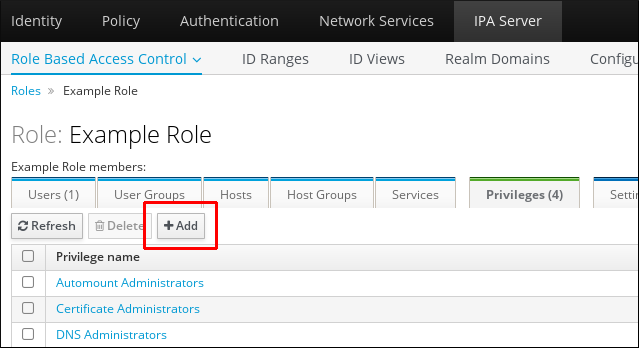
- At the top of the Privileges tab, click .
Figure 10.10. Adding Privileges
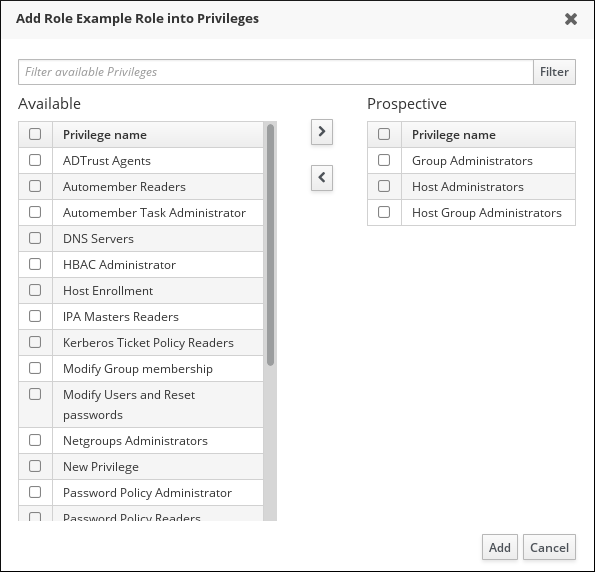
- Select the privileges on the left and use the button to move them to the Prospective column.
Figure 10.11. Selecting Privileges
- Click the button to save.
10.4.1.2. Creating Roles in the Command Line
- Add the new role:
[root@server ~]# kinit admin
[root@server ~]# ipa role-add --desc="User Administrator" useradmin
  ------------------------
  Added role "useradmin"
  ------------------------
  Role name: useradmin
  Description: User Administrator
- Add the required privileges to the role:
[root@server ~]# ipa role-add-privilege --privileges="User Administrators" useradmin
  Role name: useradmin
  Description: User Administrator
  Privileges: user administrators
  ----------------------------
  Number of privileges added 1
----------------------------
- Add the required groups to the role. In this case, we are adding only a single group,
useradmins, which already exists.[root@server ~]# ipa role-add-member --groups=useradmins useradmin Role name: useradmin Description: User Administrator Member groups: useradmins Privileges: user administrators ------------------------- Number of members added 1 -------------------------
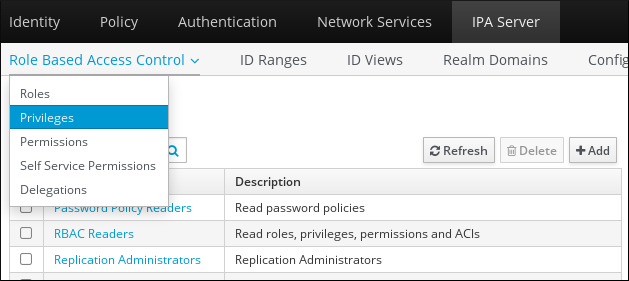
10.4.2. Permissions
10.4.2.1. Creating New Permissions from the Web UI
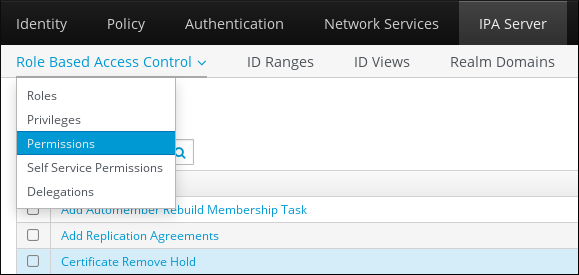
- Open the IPA Server tab in the top menu, and select the Role-Based Access Control subtab.
- Select the Permissions task link.
Figure 10.12. Permissions Task
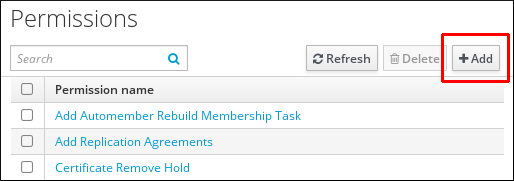
- Click the Add button at the top of the list of the permissions.
Figure 10.13. Adding a New Permission
- Define the properties for the new permission in the form that shows up.
Figure 10.14. Form for Adding a Permission
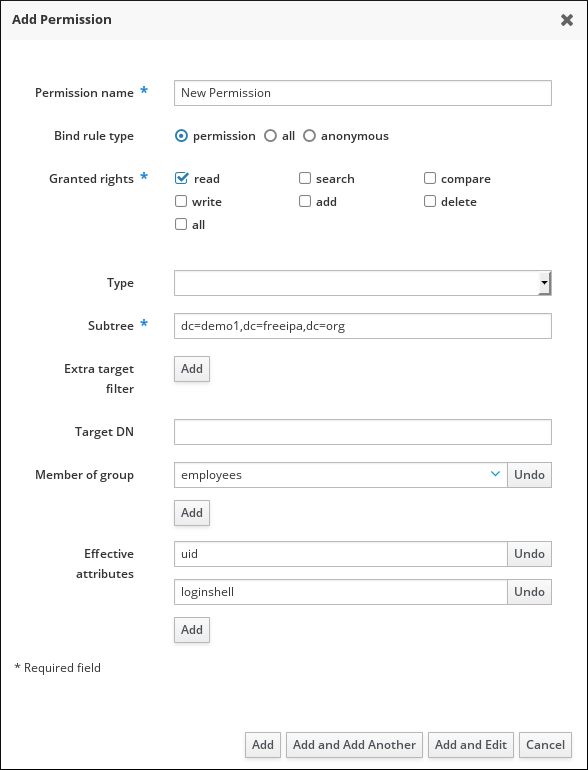
- Click the Add button under the form to save the permission.
You can specify the following permission properties:
- Enter the name of the new permission.
- Select the appropriate Bind rule type:
- permission is the default permission type, granting access through privileges and roles
- all specifies that the permission applies to all authenticated users
- anonymous specifies that the permission applies to all users, including unauthenticated users
NoteIt is not possible to add permissions with a non-default bind rule type to privileges. You also cannot set a permission that is already present in a privilege to a non-default bind rule type. - Choose the rights that the permission grants in Granted rights.
- Define the method to identify the target entries for the permission:
- Type specifies an entry type, such as user, host, or service. If you choose a value for the Type setting, a list of all possible attributes which will be accessible through this ACI for that entry type appears under Effective Attributes.Defining Type sets Subtree and Target DN to one of the predefined values.
- Subtree specifies a subtree entry; every entry beneath this subtree entry is then targeted. Provide an existing subtree entry, as Subtree does not accept wildcards or non-existent domain names (DNs). For example:
cn=automount,dc=example,dc=com
- Extra target filter uses an LDAP filter to identify which entries the permission applies to. The filter can be any valid LDAP filter, for example:
(!(objectclass=posixgroup))
IdM automatically checks the validity of the given filter. If you enter an invalid filter, IdM warns you about this after you attempt to save the permission.
- Target DN specifies the domain name (DN) and accepts wildcards. For example:
uid=*,cn=users,cn=accounts,dc=com
- Member of group sets the target filter to members of the given group.
After you fill out the filter settings and click Add, IdM validates the filter. If all the permission settings are correct, IdM will perform the search. If some of the permissions settings are incorrect, IdM will display a message informing you about which setting is set incorrectly. - If you set Type, choose the Effective attributes from the list of available ACI attributes. If you did not use Type, add the attributes manually by writing them into the Effective attributes field. Add a single attribute at a time; to add multiple attributes, click Add to add another input field.ImportantIf you do not set any attributes for the permission, then all attributes are included by default.
10.4.2.2. Creating New Permissions from the Command Line
To add a new permission, issue the ipa permission-add command. Specify the properties of the permission by supplying the corresponding options:
- Supply the name of the permission. For example:
[root@server ~]# ipa permission-add "dns admin permission"
- --bindtype specifies the bind rule type. This options accepts the all, anonymous, and permission arguments. For example:
--bindtype=all
If you do not use --bindtype, the type is automatically set to the default permission value.NoteIt is not possible to add permissions with a non-default bind rule type to privileges. You also cannot set a permission that is already present in a privilege to a non-default bind rule type. - --permissions lists the rights granted by the permission. You can set multiple attributes by using multiple --permissions options or by listing the options in a comma-separated list inside curly braces. For example:
--permissions=read --permissions=write --permissions={read,write} - --attrs gives the list of attributes over which the permission is granted. You can set multiple attributes by using multiple --attrs options or by listing the options in a comma-separated list inside curly braces. For example:
--attrs=description --attrs=automountKey
--attrs={description,automountKey}
The attributes provided with --attrs must exist and be allowed attributes for the given object type, otherwise the command fails with schema syntax errors. - --type defines the entry object type, such as user, host, or service. Each type has its own set of allowed attributes. For example:
[root@server ~]# ipa permission-add "manage service" --permissions=all --type=service --attrs=krbprincipalkey --attrs=krbprincipalname --attrs=managedby
- --subtree gives a subtree entry; the filter then targets every entry beneath this subtree entry. Provide an existing subtree entry; --subtree does not accept wildcards or non-existent domain names (DNs). Include a DN within the directory.Because IdM uses a simplified, flat directory tree structure, --subtree can be used to target some types of entries, like automount locations, which are containers or parent entries for other configuration. For example:
[root@server ~]# ipa permission-add "manage automount locations" --subtree="ldap://ldap.example.com:389/cn=automount,dc=example,dc=com" --permissions=write --attrs=automountmapname --attrs=automountkey --attrs=automountInformation
The --type and --subtree options are mutually exclusive. - --filter uses an LDAP filter to identify which entries the permission applies to. IdM automatically checks the validity of the given filter. The filter can be any valid LDAP filter, for example:
[root@server ~]# ipa permission-add "manage Windows groups" --filter="(!(objectclass=posixgroup))" --permissions=write --attrs=description
- --memberof sets the target filter to members of the given group after checking that the group exists. For example:
[root@server ~]# ipa permission-add ManageHost --permissions="write" --subtree=cn=computers,cn=accounts,dc=testrelm,dc=com --attr=nshostlocation --memberof=admins
- --targetgroup sets target to the specified user group after checking that the group exists.
The Target DN setting, available in the web UI, is not available on the command line.
Note
For information about modifying and deleting permissions, run the ipa permission-mod --help and ipa permission-del --help commands.
10.4.2.3. Default Managed Permissions
Managed permissions are permissions that come preinstalled with Identity Management. They behave like other permissions created by the user, with the following differences:
- You cannot modify their name, location, and target attributes.
- You cannot delete them.
- They have three sets of attributes:
- default attributes, which are managed by IdM and the user cannot modify them
- included attributes, which are additional attributes added by the user; to add an included attribute to a managed permission, specify the attribute by supplying the --includedattrs option with the ipa permission-mod command
- excluded attributes, which are attributes removed by the user; to add an excluded attribute to a managed permission, specify the attribute by supplying the --excludedattrs option with the ipa permission-mod command
A managed permission applies to all attributes that appear in the default and included attribute sets but not in the excluded set.
If you use the
--attrs option when modifying a managed permission, the included and excluded attribute sets automatically adjust, so that only the attributes supplied with --attrs are enabled.
Note
While you cannot delete a managed permission, setting its bind type to
permission and removing the managed permission from all privileges effectively disables it.
Names of all managed permissions start with
System:, for example System: Add Sudo rule or System: Modify Services.
Earlier versions of IdM used a different scheme for default permissions, which, for example, forbade the user from modifying the default permissions and the user could only assign them to privileges. Most of these default permissions have been turned into managed permissions, however, the following permissions still use the previous scheme:
- Add Automember Rebuild Membership Task
- Add Replication Agreements
- Certificate Remove Hold
- Get Certificates status from the CA
- Modify DNA Range
- Modify Replication Agreements
- Remove Replication Agreements
- Request Certificate
- Request Certificates from a different host
- Retrieve Certificates from the CA
- Revoke Certificate
- Write IPA Configuration
If you attempt to modify a managed permission from the web UI, the attributes that you cannot modify will be disabled.
Figure 10.15. Disabled Attributes
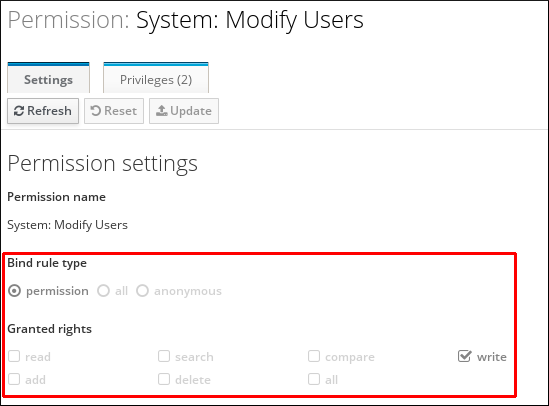
If you attempt to modify a managed permission from the command line, the system will not allow you to change the attributes that you cannot modify. For example, attempting to change a default
System: Modify Users permission to apply to groups fails:
$ ipa permission-mod 'System: Modify Users' --type=group
ipa: ERROR: invalid 'ipapermlocation': not modifiable on managed permissions
You can, however, make the
System: Modify Users permission not to apply to the GECOS attribute:
$ ipa permission-mod 'System: Modify Users' --excludedattrs=gecos
------------------------------------------
Modified permission "System: Modify Users"
10.4.2.4. Permissions in Earlier Versions of Identity Management
Earlier versions of Identity Management handled permissions differently, for example:
- The global IdM ACI granted read access to all users of the server, even anonymous ones – that is, not authenticated – users.
- Only write, add, and delete permission types were available. The read permission was available too, but it was of little practical value because all users, including unauthenticated ones, had read access by default.
The current version of Identity Management contains options for setting permissions which are much more fine-grained:
- The global IdM ACI does not grant read access to unauthenticated users.
- It is now possible to, for example, add both a filter and a subtree in the same permission.
- It is possible to add search and compare rights.
The new way of handling permissions has significantly improved the IdM capabilities for controlling user or group access, while retaining backward compatibility with the earlier versions. Upgrading from an earlier version of IdM deletes the global IdM ACI on all servers and replaces it with managed permissions.
Permissions created in the previous way are automatically converted to the current style whenever you modify them. If you do not attempt to change them, the permissions of the previous type stay unconverted. Once a permission uses the current style, it can never downgrade to the previous style.
Note
It is still possible to assign permissions to privileges on servers running an earlier version of IdM.
The ipa permission-show and ipa permission-find commands recognize both the current permissions and the permissions of the previous style. While the outputs from both of these commands display permissions in the current style, the permissions themselves remain unchanged; the commands upgrade the permission entries before outputting the data only in memory, without committing the changes to LDAP.
Permissions with both the previous and the current characteristics have effect on all servers – those running previous versions of IdM, as well as those running the current IdM version. However, you cannot create or modify permissions with the current permissions on servers running previous versions of IdM.
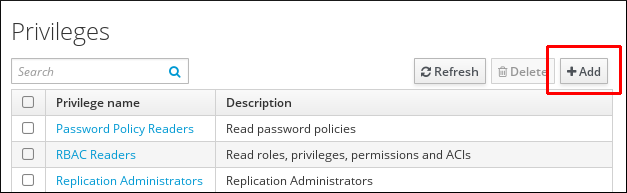
10.4.3. Privileges
10.4.3.1. Creating New Privileges from the Web UI
- Open the IPA Server tab in the top menu, and select the Role-Based Access Control subtab.
- Select the Privileges task link.
Figure 10.16. Privileges Task
- Click the Add link at the top of the list of the privileges.
Figure 10.17. Adding a New Privilege
- Enter the name and a description of the privilege.
Figure 10.18. Form for Adding a Privilege

- Click the button to go to the privilege configuration page to add permissions.
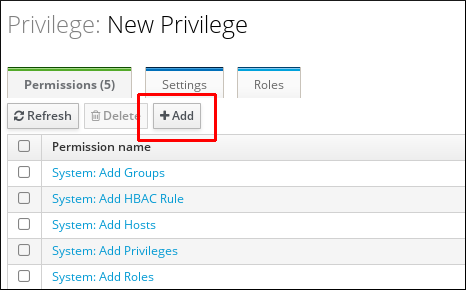
- Select the Permissions tab.
- Click Add at the top of the list of the permissions to add permission to the privilege.
Figure 10.19. Adding Permissions
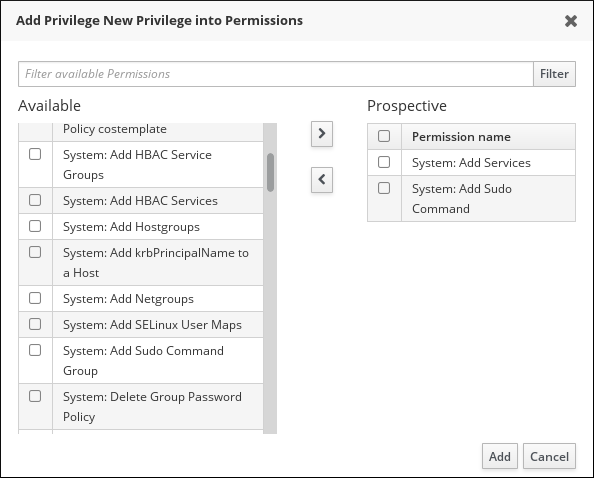
- Click the check box by the names of the permissions to add, and use the button to move the permissions to the Prospective column.
Figure 10.20. Selecting Permissions
- Click the button to save.
10.4.3.2. Creating New Privileges from the Command Line
Privilege entries are created using the privilege-add command, and then permissions are added to the privilege group using the privilege-add-permission command.
- Create the privilege entry.
[jsmith@server ~]$ ipa privilege-add "managing filesystems" --desc="for filesystems"
- Assign the required permissions. For example:
[jsmith@server ~]$ ipa privilege-add-permission "managing filesystems" --permissions="managing automount" --permissions="managing ftp services"