
Red Hat Training
A Red Hat training course is available for Red Hat Enterprise Linux
逻辑卷管理器管理
第 1 章 LVM 逻辑卷管理器
本章提供了自 Red Hat Enterprise Linux 7 初始发行版以来 LVM 逻辑卷管理器的新功能。本章还提供了逻辑卷管理器(LVM)组件的高级概述。
1.1. 新的和更改的功能
这部分列出了自 Red Hat Enterprise Linux 7 初始发行版以来 LVM 逻辑卷管理器的新功能。
1.1.1. Red Hat Enterprise Linux 7.1 的新功能和更改的功能
Red Hat Enterprise Linux 7.1 包含以下文档及功能的更新和更改:
- 对精简配置卷和精简配置快照的文档已进行了澄清。lvmthin(7) man page 中提供了有关 LVM 精简配置的附加信息。有关精简配置逻辑卷的常规信息,请参考 第 2.3.4 节 “精简配置的逻辑卷(精简卷)”。有关精简配置快照卷的详情,请参考 第 2.3.6 节 “精简配置的快照卷”。
- 这个手册现在在 第 B.2 节 “lvmconfig 命令” 中记录了 lvm dumpconfig 命令。请注意,在 Red Hat Enterprise Linux 7.2 版本中,这个命令被重命名为 lvmconfig,虽然旧格式仍可以正常工作。
- 这个手册现在在 第 B.3 节 “LVM 配置集” 中记录了 LVM 配置文件。
- 这个手册现在在 第 3.6 节 “使用 lvm 命令显示 LVM 信息” 中记录了 lvm 命令。
- 在 Red Hat Enterprise Linux 7.1 版本中,您可以使用 lvcreate 和 lvchange 命令的 -k 和 -K 选项控制精简池快照的激活,如 第 4.4.20 节 “控制逻辑卷激活” 所述。
- 这个手册记录了 vgimport 命令的
--force参数。这可让您导入缺少物理卷的卷组,然后运行 vgreduce --removemissing 命令。有关 vgimport 命令的详情,请参考 第 4.3.15 节 “将卷组移动到另一个系统”。 - 这个手册记录了 vgreduce 命令的
--mirrorsonly参数。这可让您仅从发生故障的物理卷中删除作为镜像的逻辑卷。有关使用这个选项的详情,请参考 第 4.3.15 节 “将卷组移动到另一个系统”。
此外,整个文档中也进行了小的技术修正和澄清。
1.1.2. Red Hat Enterprise Linux 7.2 的新功能和改变的功能
Red Hat Enterprise Linux 7.2 包含以下文档和功能的更新更改:
- 本文档提供了在 第 4.4.8 节 “创建 LVM 缓存逻辑卷” 中创建缓存逻辑卷的基本流程。
- 本文档的故障排除章节包含新的一章 第 6.7 节 “为多路径设备重复 PV Warning”。
- 从 Red Hat Enterprise Linux 7.2 发行版本中,lvm dumpconfig 命令被重命名为 lvmconfig,虽然旧格式仍可以正常工作。这一变化体现在本文档中。
此外,整个文档中也进行了小的技术修正和澄清。
1.1.3. Red Hat Enterprise Linux 7.3 的新功能和改变的功能
Red Hat Enterprise Linux 7.3 包含以下文档和功能的更新和更改。
- LVM 支持 RAID0 片段类型。RAID0 以条带大小的单位在多个数据子卷间分布逻辑卷数据。有关创建 RAID0 卷的详情,请参考 第 4.4.3.1 节 “创建 RAID0 卷(Red Hat Enterprise Linux 7.3 及更新版本)”。
- 您可以使用 lvm fullreport 命令一次报告物理卷、卷组、逻辑卷、物理卷片段和逻辑卷片段的信息。有关这个命令及其功能的详情,请查看 lvm-fullreport(8)手册页。
- LVM 支持日志报告,其中包含操作、消息和每个对象状态的日志,以及在 LVM 命令执行过程中收集的完整对象识别。有关 LVM 日志报告的示例,请参考 第 4.8.6 节 “命令报告(Red Hat Enterprise Linux 7.3 及更新的版本)”。有关 LVM 日志报告的详情,请查看 lvmreport(7)手册页。
- 您可以使用 LVM display 命令的
--reportformat选项以 JSON 格式显示输出。有关以 JSON 格式显示输出的示例,请参阅 第 4.8.5 节 “JSON 格式输出(Red Hat Enterprise Linux 7.3 及更新的版本)”。 - 现在,您可以通过在
lvm.conf配置文件中启用record_lvs_history元数据选项将系统配置为跟踪已删除的精简快照和精简逻辑卷。这可让您显示完整的精简快照依赖链,其中包括已经从原始依赖链中删除的逻辑卷和已变为 historical 的逻辑卷。有关历史逻辑卷的详情,请参考 第 4.4.21 节 “跟踪并显示历史逻辑卷(Red Hat Enterprise Linux 7.3 及更高版本)”。
此外,整个文档中也进行了小的技术修正和澄清。
1.1.4. Red Hat Enterprise Linux 7.4 的新功能和改变的功能
Red Hat Enterprise Linux 7.4 包括以下文档和功能的更新及更改:
- Red Hat Enterprise Linux 7.4 提供对 RAID 接管和 RAID 重塑的支持。有关这些功能的概述,请参阅 第 4.4.3.12 节 “RAID 接管(Red Hat Enterprise Linux 7.4 及更新的版本)” 和 第 4.4.3.13 节 “重塑 RAID 逻辑卷(Red Hat Enterprise Linux 7.4 及更新版本)”。
1.2. 逻辑卷
卷管理会在物理存储上创建一个提取层,以便您创建逻辑存储卷。这比直接使用物理存储的方式具有更大的灵活性。有了逻辑卷,就不会对物理磁盘大小进行限制。此外,硬件存储配置在软件中是隐藏的,因此可以在不停止应用程序或卸载文件系统的情况下调整大小和移动。这可降低操作成本。
与直接使用物理存储相比,逻辑卷具有以下优势:
- 灵活的容量当使用逻辑卷时,文件系统可在多个磁盘间扩展,您可以将磁盘和分区集合成一个逻辑卷。
- 重新调整存储池的大小您可以使用简单的软件命令扩展逻辑卷或减小逻辑卷的大小,而无需重新格式化和重新分区底层的磁盘设备。
- 在线数据重新定位部署更新、更快或者更弹性的存储子系统,可以在系统活跃时移动数据。在磁盘处于使用状态时可以重新分配磁盘。例如,您可以在删除热插拔磁盘前将其清空。
- 方便设备命名可在用户定义的和自定义命名的组中管理逻辑存储卷。
- 磁盘条带您可以创建一个在两个或者多个磁盘间条带分布数据的逻辑卷。这可显著提高吞吐量。
- 镜像卷逻辑卷为您提供了方便配置数据镜像的方法。
- 卷快照使用逻辑卷,您可以对一致性备份制作设备快照,或测试更改的效果,而不影响实际的数据。
本文档的其余部分描述了 LVM 中的这些功能的实现。
1.3. LVM 架构概述
注意
LVM2 与 LVM1 向后兼容,但快照和集群支持除外。您可以使用 vgconvert 命令将卷组从 LVM1 格式转换为 LVM2 格式。有关转换 LVM 元数据格式的详情,请参考 vgconvert(8)手册页。
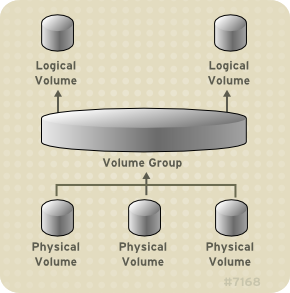
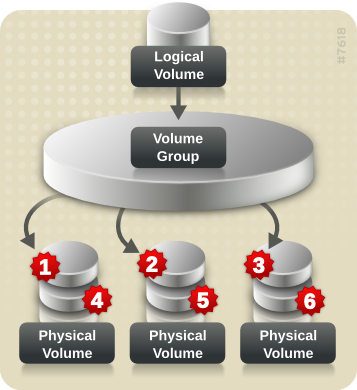
LVM 逻辑卷的基本物理存储单元是块设备,比如一个分区或者整个磁盘。将这个设备初始化为 LVM 物理卷(PV)。
要创建 LVM 逻辑卷,可将物理卷合并到 卷组(VG)中。这会创建一个磁盘空间池,用于分配 LVM 逻辑卷(LV)。这个过程和将磁盘分区的过程类似。逻辑卷被文件系统和应用程序(如数据库)使用。
图 1.1 “LVM 逻辑卷组件” 显示简单 LVM 逻辑卷的组件:
图 1.1. LVM 逻辑卷组件
[D]
有关 LVM 逻辑卷组件的详情,请参考 第 2 章 LVM 组件。
1.4. 红帽高可用性集群中的 LVM 逻辑卷
红帽高可用性附加组件以两个不同的集群配置为 LVM 卷提供支持:
- 主动/被动故障转移配置中的高可用性 LVM 卷(HA-LVM),其中在任何时间点上只能有一个集群的节点可以访问存储。
- 在主动/主动配置中使用集群逻辑卷(CLVM)扩展的 LVM 卷,其中集群中有多个节点需要同时访问存储。CLVM 是弹性存储附加组件的一部分。
1.4.1. 选择 CLVM 或 HA-LVM
何时应使用 CLVM 或 HA-LVM,应根据所部署的应用程序或服务的需求。
- 如果集群的多个节点需要同时对主动/主动系统中的 LVM 卷进行读写访问,则必须使用 CLVMD。CLVMD 提供了一个系统,用于在集群的节点之间并行协调和更改 LVM 卷。CLVMD 的集群锁定服务对 LVM 元数据提供了保护,因为集群的不同节点与卷进行交互,并更改它们的布局。这种保护取决于问题正确配置卷组,包括在
lvm.conf文件中将locking_type设置为 3,并在任何由 CLVMD 管理的卷组上设置集群标志,并在多个集群节点上同时激活。 - 如果高可用性集群被配置为以主动/被动方式管理共享资源,且每次只有一个成员需要访问给定 LVM 卷,那么您可以使用没有 CLVMD 集群锁定服务的 HA-LVM。
因为大多数应用程序没有为与其他实例同时运行而设计或进行优化,所有它们以主动/被动配置的模式运行更佳。如果逻辑卷被镜像了,选择在群集逻辑卷上运行不是集群感知的应用程序可能会导致性能下降。这是因为,在这些情况下逻辑卷本身需要有集群通信的额外开销。针对集群设计的应用程序所获得的性能提高幅度必须大于因为集群文件系统和针对集群的逻辑卷所造成的性能降低的幅度。一些应用程序和工作负载会比其他应用程序和工作负载更容易实现这一点。确定集群的要求以及是否要为活跃/主动集群进行优化,从而在两个 LVM 配置间进行选择。大多数用户使用 HA-LVM 一般会获得最佳的 HA 结果。
HA-LVM 和 CLVM 的相似之处在于,它们都会防止 LVM 元数据及其逻辑卷崩溃,如果允许多个机器进行重叠更改,则可能会发生这种情况。HA-LVM 会限制在一个时间点上只能有一个逻辑卷被激活,也就是说一次只在一个机器中激活。这意味着,只使本地(非集群)实现的存储驱动被使用。使用这种方法可以避免用于集群协调的额外开销,以提高性能。CLVM 不强制进行这些限制,用户可以自由地激活集群中所有机器上的逻辑卷;这样会强制使用集群感知型存储驱动程序,允许将集群感知型文件系统和应用程序放在最上面。
1.4.2. 在集群中配置 LVM 卷
在 Red Hat Enterprise Linux 7 中,集群通过 Pacemaker 进行管理。只支持 HA-LVM 和 CLVM 逻辑卷与 Pacemaker 集群配合使用,且必须配置为集群资源。
- 有关将 HA-LVM 卷配置为 Pacemaker 集群一部分的流程,请参阅 高可用性 Add-On 管理 中的 红帽高可用性集群中的主动/被动 Apache HTTP 服务器。请注意,这个流程包括以下步骤:
- 配置 LVM 逻辑卷
- 确保只有集群可以激活卷组
- 将 LVM 卷配置为集群资源
- 有关在集群中配置 CLVM 卷的流程,请参阅 全局文件系统 2 中的 在集群中配置 GFS2 文件系统。
第 2 章 LVM 组件
本章描述了 LVM 逻辑卷的组件。
2.1. 物理卷
LVM 逻辑卷的基本物理存储单元是块设备,比如一个分区或者整个磁盘。要将设备作为 LVM 逻辑卷使用,需要首先将其初始化为物理卷(PV)。将块设备初始化为物理卷会在接近设备起始的位置放置一个标签。
默认情况下,LVM 标签是放在第二个 512 字节扇区。在创建物理卷时,您可以将标签放置在前 4 个扇区的任何一个上,来覆盖此默认设置。如果需要,LVM 卷可与其它使用这些扇区的用户共同存在。
LVM 标签为物理设备提供正确的识别和设备排序,因为在系统启动时设备可以以任何顺序出现。LVM 标签在重新引导时具有持久性并在整个集群中可用。
LVM 标签可将该设备识别为 LVM 物理卷。它包含物理卷的随机唯一识别符(UUID)。它还以字节为单位保存块设备的大小,并记录 LVM 元数据存储在该设备中的位置。
LVM 元数据包含您系统中 LVM 卷组的配置详情。默认情况下,卷组中的每个物理卷的元数据区域都会保留一个一样的元数据副本。LVM 元数据很小,它以 ASCII 格式保存。
目前,LVM 允许您在每个物理卷中保存 0、1 或者 2 个元数据副本。默认为 1 个副本。当您在物理卷中配置元数据副本数后,您将无法再更改该号码。第一个副本保存在设备的起始位置,紧随在标签后面。如果有第二个副本,会将其放在设备的末尾。如果您不小心写入了不同于您想要写入的磁盘覆盖了磁盘起始部分,那么您可以使用在设备末尾的元数据的第二个副本恢复元数据。
有关 LVM 元数据以及更改元数据参数的详情,请参考 附录 E, LVM 卷组元数据。
2.1.1. LVM 物理卷布局
图 2.1 “物理卷布局” 显示 LVM 物理卷的布局。LVM 标签在第二个扇区,接下来是元数据区域,后面是设备的可用空间。
注意
在 Linux 内核中(以及整个此文档中),每个扇区的大小为 512K。
图 2.1. 物理卷布局

[D]
2.1.2. 一个磁盘上的多个分区
LVM 允许您在磁盘分区外创建物理卷。红帽建议您创建一个覆盖整个磁盘的单一分区,将其标记为 LVM 物理卷,理由如下:
- 方便管理如果每个真实磁盘只出现一次,那么在系统中追踪硬件就比较容易。特别是当磁盘失败时。另外,单一磁盘中有多个物理卷可导致内核在引导时发出未知分区类型警告。
- 条带化性能LVM 无法告知两个物理卷位于同一个物理磁盘中。如果您在两个物理卷位于同一物理磁盘时创建了条带逻辑卷,那么条带就可能在同一磁盘的不同分区中。这可能会降低性能,而不是提高性能。
虽然不建议您这样做,但在某些情况下可能需要将磁盘分成独立的 LVM 物理卷。例如:在有多个磁盘的系统中,当您要将现有系统迁移到 LVM 卷时,可能需要将数据在分区间转移。另外,如果您有一个很大的磁盘,并且因为管理的原因想要有一个以上卷组,那么对磁盘进行分区是很必要的。如果您的磁盘有一个以上的分区,且这些分区在同一卷组中,在创建条带卷时指定逻辑卷中应包含哪些分区。
2.2. 卷组
物理卷合并为卷组(VG)。这样就创建了一个磁盘空间池,可使用它分配逻辑卷。
在卷组中,可用于分配的磁盘空间被分成固定大小的单元,我们称之为扩展。一个扩展就是可被分配的最小空间单位。在物理卷中,扩展被称为物理扩展。
逻辑卷被分配成与物理卷扩展大小相同的逻辑扩展。因此卷组中的所有逻辑卷的扩展大小都是一样的。卷组将逻辑扩展与物理扩展匹配。
2.3. LVM 逻辑卷
在 LVM 中,卷组被分成逻辑卷。下面的部分描述了不同类型的逻辑卷类型。
2.3.1. 线性卷
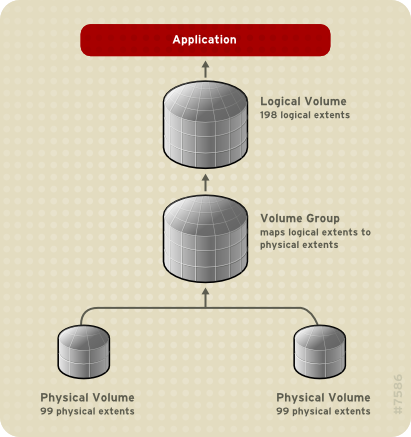
线性卷将来自一个或多个物理卷的空间集合到一个逻辑卷中。例如:如果您有两个 60GB 的磁盘,您可以创建一个 120GB 的逻辑卷。物理存储是连在一起的。
创建一个线性卷,按顺序为逻辑卷的区域分配物理扩展范围。例如:如 图 2.2 “扩展映射” 中所示,逻辑扩展 1 到 99 可映射到一个物理卷,逻辑扩展 100 到 198 可映射到第二个物理卷。从应用程序的角度来看,它是一个大小为 198 个扩展的设备。
图 2.2. 扩展映射
[D]
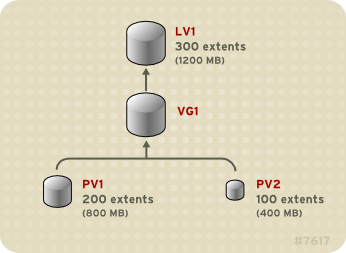
构成逻辑卷的物理卷大小应该相同。图 2.3 “具有不等物理卷的线性卷” 显示卷组
VG1,物理扩展大小为 4MB。这个卷组包括 2 个物理卷,名为 PV1 和 PV2。物理卷被分成 4MB 单元,因为这是扩展的大小。在本例中,PV1 的大小为 200 个扩展(800MB),PV2 的大小为 100 个扩展(400MB)。您可以创建一个大小在 1 到 300 个扩展(4MB 到 1200MB)的线性卷。在这个示例中,名为 LV1 的线性卷的大小为 300 个扩展。
图 2.3. 具有不等物理卷的线性卷
[D]
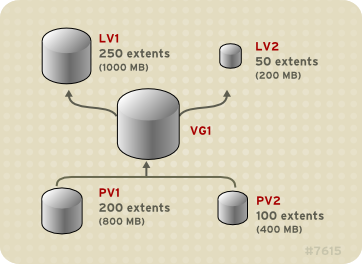
您可以从物理区块池中配置多个所需大小的线性逻辑卷。图 2.4 “多个逻辑卷” 显示与 图 2.3 “具有不等物理卷的线性卷” 相同的卷组,但在这种情况下,两个逻辑卷已从卷组中分离出来:
LV1,大小为 250 个扩展(1000MB)和 LV2,大小为 50 个扩展(200MB)。
图 2.4. 多个逻辑卷
[D]
2.3.2. 条带逻辑卷
当您向 LVM 逻辑卷写入数据时,文件系统会在基本物理卷之间部署数据。您可以通过创建一个条带逻辑卷来控制将数据写入物理卷的方法。对于大量连续的读取和写入,这样可以提高数据输入/输出的效率。
条带通过以循环模式向预定数目的物理卷写入数据来提高性能。使用条带,I/O 可以并行执行。在某些情况下,这可能会为条带中的每个额外物理卷增加近线性能。
以下示例显示数据在三个物理卷之间进行条带分布。在这个图表中:
- 数据的第一条写入第一个物理卷
- 数据的第二条写入第二个物理卷
- 数据的第三条被写入第三个物理卷
- 数据的第四条写入第一个物理卷
在条带逻辑卷中,条的大小不能超过扩展的大小。
图 2.5. 跨三个 PV 的条带数据
[D]
通过将另一组设备连接到第一个集合的末尾,可以扩展条带逻辑卷。要扩展条带逻辑卷,在基本物理卷集合中必须有足够的可用空间组成卷组来支持条带。例如:如果您有一个双向条带使用了整个卷组,那么向卷组中添加单一物理卷不会允许您扩展条带。反之,您必须在卷组中添加至少两个物理卷。有关扩展条带卷的详情,请参考 第 4.4.17 节 “扩展条带卷”。
2.3.3. RAID 逻辑卷
LVM 支持 RAID0/1/4/5/6/10。LVM RAID 卷有以下特征:
- LVM 使用 MD 内核驱动程序来创建和管理 RAID 逻辑卷。
- RAID1 镜像可以从阵列中临时分离出来,之后再合并回阵列。
- LVM RAID 卷支持快照。
有关创建 RAID 逻辑卷的详情,请参考 第 4.4.3 节 “RAID 逻辑卷”。
注意
RAID 逻辑卷不是集群感知的。虽然可以在一台机器上单独创建和激活 RAID 逻辑卷,但不能在多个机器上同时激活它们。
2.3.4. 精简配置的逻辑卷(精简卷)
逻辑卷可以使用精简模式置备。这可让您创建大于可用扩展的逻辑卷。使用精简配置,您可以管理一个空闲空间的存储池,称为精简池,可在应用程序需要时将其分配给任意数量的设备。然后,当应用程序实际写入逻辑卷时,您可以创建可绑定到精简池的设备以便以后分配。可在需要时动态扩展精简池,以便有效分配存储空间。
注意
不支持集群中跨节点的精简卷。精简池及其所有精简卷必须只在一个集群节点中单独激活。
通过使用精简配置,存储管理员可过量使用物理存储,从而避免购买额外的存储。例如:如果 10 个用户为每个应用程序请求一个 100GB 文件系统,存储管理员可以为每个用户创建一个 100GB 文件系统,但其后端的实际存储可以小于这个大小,它在需要时才使用实际的存储。
注意
在使用精简配置时,存储管理员务必要监控存储池,并在其被完全占用时添加更多容量。
要确定可以使用所有可用空间,LVM 支持数据丢弃功能。这允许重复使用丢弃文件或其他块范围使用的空间。
有关创建精简卷的详情,请参考 第 4.4.5 节 “创建精简配置的逻辑卷”。
精简卷支持新的复制时写入(COW)快照逻辑卷部署,这将允许很多虚拟设备在精简池中共享相同数据。有关精简快照卷的详情,请参考 第 2.3.6 节 “精简配置的快照卷”。
2.3.5. 快照卷
LVM 快照功能提供在特定时间创建设备的虚拟镜像且不会造成服务中断的功能。在提取快照后,当对原始设备进行修改时,快照功能会生成有变化的数据区域的副本,以便重建该设备的状态。
注意
LVM 支持精简配置的快照。有关精简配置快照卷的详情,请参考 第 2.3.6 节 “精简配置的快照卷”。
注意
不支持集群中跨节点的 LVM 快照。您不能在集群卷组中创建快照卷。
因为快照只复制创建快照后修改的数据区域,快照功能需要的存储空间较小。例如,在很少更新的原始卷中,原始容量的 3-5 % 就足以维护快照。
注意
文件系统的快照副本是虚拟副本,不是文件系统的实际介质备份。快照不能替代备份。
预留用来存储原始卷更改的空间的大小取决于快照的大小。例如:如果您要创建快照,且要完全覆盖原始卷,则快照必须至少与原始卷大小方可保存更改。您需要根据预期的更改程度调整快照大小。例如,一个以读为主的卷的短期快照(如
/usr )需要较少的空间,而不是看到大量写入的卷的长期快照,如 /home。
如果快照已满,则快照就会变得无效,因为它无法跟踪原始卷中的更改。您应该定期监控快照的大小。快照可以完全重新定义大小,因此如果您有存储容量,则可以增大快照卷以避免丢失快照。另外,如果您发现快照卷超过您的需要,您可以减小卷的大小来为其它逻辑卷最大限度腾出空间。
当您创建快照文件系统时,仍可对原始系统有完全的读和写访问。如果更改了快照中的块,则会标记那个块,永远不会从原始卷中复制该块。
快照有几个用途:
- 最典型的是。当您需要在逻辑卷中执行备份而不停止持续更新数据的 Live 系统时会提取快照。
- 您可以对快照文件系统执行 fsck 命令来检查文件系统的完整性,并确定原始文件系统是否需要文件系统修复。
- 因为快照是可读/写的,您可以根据产品数据测试应用程序,方法是提取一个快照并根据快照运行测试,从而不会影响真实数据。
- 您可以为 Red Hat Virtualization 创建 LVM 卷。LVM 快照可用来创建虚拟客体镜像的快照。这些快照可方便修改现有客户虚拟机或者使用最小附加存储创建新客户虚拟机。有关使用 Red Hat Virtualization 创建基于 LVM 的存储池的详情,请参考 虚拟化管理指南。
有关创建快照卷的详情,请参考 第 4.4.6 节 “创建快照卷”。
您可以使用 lvconvert 命令的
--merge 选项将快照合并到其原始卷中。这个功能的一个作用是在您丢失数据或者文件或者需要将系统恢复到之前的状态时执行系统恢复。合并快照卷后,得到的逻辑卷将具有原始卷的名称、次号码和 UUID,且合并的快照被删除。有关使用这个选项的详情,请参考 第 4.4.9 节 “合并快照卷”。
2.3.6. 精简配置的快照卷
Red Hat Enterprise Linux 支持精简配置的快照卷。精简快照卷允许将很多虚拟设备保存在同一个数据卷中。这简化了管理过程,并允许在快照卷间共享数据。
除了所有 LVM 快照卷以及所有精简卷一样,集群的节点不支持精简快照卷。快照卷必须在一个集群节点中完全激活。
精简快照卷提供以下优点:
- 当有相同原始卷的多个快照时,精简快照卷就可以减少磁盘用量。
- 如果同一来源有多个快照,对原始卷的写入会导致 COW 操作保留数据。增加原始卷的快照数量应该不会造成很大的性能下降。
- 精简快照卷可用于另一个快照的逻辑卷来源。这允许任意深度的递归快照(快照的快照...)。
- 精简逻辑卷的快照也创建一个精简逻辑卷。在要求 COW 操作前,或直到快照已写入前,并不会消耗数据空间。
- 精简快照卷不需要使用原始卷激活,因此当原始快照卷有很多不活跃时,用户可能只激活原始卷。
- 当您删除精简置备快照卷的原始卷时,该原始卷的每个快照都会变为独立的精简置备卷。这意味着,您不需要将快照与原始卷合并,而不必选择删除原始卷,然后使用该独立卷作为新快照的原始卷创建新置备快照。
虽然使用精简快照卷有很多优点,但在有些情况下,旧的 LVM 快照卷功能可能更适合您的需要:
- 您不能更改精简池的块大小。如果精简池的块大小较大(例如: 1MB),且您需要一个短期存在的快照且使用大块的效率不高时,可以选择使用旧的快照功能。
- 您不能限制精简快照卷的大小 ; 如果需要,快照将使用精简池中所有空间。这可能不适用于您的需要。
一般说来,在决定使用什么快照格式时,您应该考虑具体的要求。
注意
在使用精简配置时,存储管理员务必要监控存储池,并在其被完全占用时添加更多容量。有关配置和显示精简配置的快照卷的信息,请参考 第 4.4.7 节 “创建精简配置的快照卷”。
2.3.7. 缓存卷
在 Red Hat Enterprise Linux 7.1 发行版中,LVM 支持使用快速块设备(如 SSD 驱动器)作为大型慢块设备的 write-back 或 write-through 缓存。用户可以创建缓存逻辑卷来提高其现有逻辑卷的性能,或者创建由小而快速的设备组成的新缓存逻辑卷,再加上一个大型、较慢的设备。
有关创建 LVM 缓存卷的详情,请参考 第 4.4.8 节 “创建 LVM 缓存逻辑卷”。
第 3 章 LVM 管理概述
本章提供了您用来配置 LVM 逻辑卷的管理流程的概述。本章旨在提供一个对所涉及步骤的全面了解。有关常见 LVM 配置流程的具体步骤的示例,请参考 第 5 章 LVM 配置示例。
有关用于执行 LVM 管理的 CLI 命令的描述,请参考 第 4 章 使用 CLI 命令进行 LVM 管理。
3.1. 逻辑卷创建概述
以下是创建 LVM 逻辑卷所要执行的步骤的概述。
- 将要用于 LVM 卷进行分区,来作为物理卷(这会标记它们)。
- 创建卷组。
- 创建逻辑卷。
在创建逻辑卷后,您可以创建并挂载文件系统。本文档中的示例使用了 GFS2 文件系统。
- 使用 mkfs.gfs2 命令在逻辑卷中创建 GFS2 文件系统。
- 使用 mkdir 命令创建新挂载点。在集群系统中,在集群中的所有节点上创建挂载点。
- 挂载文件系统。您可能需要为系统中的每个节点向
fstab文件中添加一行。
注意
虽然 GFS2 文件系统可以在独立系统或作为集群配置的一部分实现,但对于 Red Hat Enterprise Linux 7 版本,红帽不支持将 GFS2 作为单节点文件系统使用。红帽将继续支持单节点 GFS2 文件系统来挂载集群文件系统的快照(例如用于备份目的)。
创建 LVM 卷与机器无关,因为 LVM 设置信息的存储区域位于物理卷上,而不是创建卷的机器上。使用存储的服务器有本地副本,但可以从其所在的物理卷上重新创建。如果 LVM 版本是兼容的,您可以将物理卷附加到不同的服务器上。
3.2. 增大逻辑卷上的文件系统
要在逻辑卷中增大文件系统,执行以下步骤:
- 确定现有卷组中是否有足够的未分配空间来扩展逻辑卷。如果没有,执行以下步骤:
- 使用 pvcreate 命令创建一个新的物理卷。
- 使用 vgextend 命令扩展卷组,该卷组包含您要增大的文件系统的逻辑卷,使其包含新的物理卷。
- 当卷组足够大以包含更大的文件系统后,使用 lvresize 命令扩展逻辑卷。
- 在逻辑卷中重新定义文件系统大小。
请注意,您可以使用 lvresize 命令的
-r 选项扩展逻辑卷并使用单个命令重新定义基础文件系统大小
3.3. 逻辑卷备份
每当卷组或逻辑卷有配置更改时,会自动创建元数据备份和存档,除非此功能在
lvm.conf 文件中被禁用。默认情况下,元数据备份存储在 /etc/lvm/backup 文件中,元数据存档存储在 /etc/lvm/archive 文件中。保存 /etc/lvm/archive 文件中存储的元数据存档的时长,以及保存多少存档文件由您可以在 lvm.conf 文件中设置的参数决定。每日系统备份应该在备份中包含 /etc/lvm 目录的内容。
请注意,元数据备份不会备份包含在逻辑卷中的用户和系统数据。
您可以使用 vgcfgbackup 命令将元数据手动备份到
/etc/lvm/backup 文件中。您可以使用 vgcfgrestore 命令恢复元数据。vgcfgbackup 和 vgcfgrestore 命令在 第 4.3.13 节 “备份卷组元数据” 中进行了描述。
3.4. 日志记录
所有消息输出都通过一个日志模块,该模块对以下情况具有日志级别的独立选择:
- 标准输出/错误
- syslog
- 日志文件
- 外部日志功能
日志级别在
/etc/lvm/lvm.conf 文件中设置,该文件在 附录 B, LVM 配置文件 中进行了描述。
3.5. 元数据守护进程(lvmetad)
LVM 可以选择使用中央元数据缓存,通过守护进程(lvmetad)和
udev 规则实现。元数据守护进程有两个主要目的:它提高了 LVM 命令的性能,并允许 udev 在逻辑卷或整个卷组系统可用时自动激活它们。
当
lvm.conf 配置文件中的 global/use_lvmetad 变量被设置为 1 时,LVM 被配置为使用守护进程。这是默认值。有关 lvm.conf 配置文件的详情,请参考 附录 B, LVM 配置文件。
注意
目前跨集群节点不支持 lvmetad 守护进程,需要锁定类型是基于文件的本地锁定。当您使用 lvmconf --enable-cluster/-disable-cluster 命令时,
lvm.conf 文件会被正确配置,包括 use_lvmetad 设置(对于 locking_type=3,它应该是 0)。但请注意,在 Pacemaker 集群中,oc f:heartbeat:clvm 资源代理本身将这些参数设置为启动过程的一部分。
如果将
use_lvmetad 的值从 1 改为 0,则必须使用以下命令手动重启或停止 lvmetad 服务。
# systemctl stop lvm2-lvmetad.service
通常,每个 LVM 命令都会发出一个磁盘扫描,以查找所有相关物理卷,并读取卷组元数据。但是,如果元数据守护进程正在运行且已启用,则可以跳过此昂贵的扫描。相反,lvmetad 守护进程只扫描每个设备一次,当它可用时,使用
udev 规则。这可节省大量 I/O,并减少完成 LVM 操作所需的时间,特别是对于有多个磁盘的系统。
当在运行时新卷组可用时(例如,通过热插拔或 iSCSI),必须激活其逻辑卷才使其可用。当启用 lvmetad 守护进程时,
lvm.conf 配置文件中的 activation/auto_activation_volume_list 选项可以用来配置卷组列表或应自动激活的逻辑卷。如果没有 lvmetad 守护进程,则需要激活。
注意
当 lvmetad 守护进程运行时,
/etc/lvm/lvm.conf 文件中的 filter = 设置不会在执行 pvscan --cache device 命令时应用。要过滤设备,您需要使用 global_filter = 设置。未通过全局筛选,且不会被 LVM 打开的设备,永远不会被扫描。例如,您可能需要使用全局过滤器,例如,当在虚拟机中使用 LVM 设备,且您不希望虚拟机中设备的内容被物理主机扫描时。
3.6. 使用 lvm 命令显示 LVM 信息
lvm 命令提供了几个内置选项,可用于显示有关 LVM 支持和配置的信息。
- LVM devtypes显示可识别的内置块设备类型(Red Hat Enterprise Linux 版本 6.6 及更新的版本)。
- LVM 格式显示可识别的元数据格式。
- LVM 帮助显示 LVM 帮助文本。
- LVM segtypes显示可识别的逻辑卷片段类型。
- LVM 标签显示此主机上定义的所有标签。有关 LVM 对象标签的详情,请参考 附录 D, LVM Object Tags。
- LVM 版本显示当前版本信息。
第 4 章 使用 CLI 命令进行 LVM 管理
本章总结了您可以使用 LVM 命令行界面(CLI)命令创建和维护逻辑卷执行的各个管理任务。
除了 LVM 命令行界面(CLI)外,您还可以使用系统存储管理器(SSM)来配置 LVM 逻辑卷。有关 SSM 与 LVM一起使用的详情,请参考 存储管理指南。
4.1. 使用 CLI 命令
所有 LVM CLI 命令都有一些通用功能。
当在命令行参数中需要大小时,可以明确指定其单位。如果您没有指定单位,那么就使用默认单位,通常为 KB 或者 MB。LVM CLI 命令不接受分数。
当在命令行参数中指定单位时,LVM 是不区分大小写的, M 和 m 是相同的,例如,都代表单位是 1024。但是,当在命令中指定
--units 参数时,小写表示该单位是 1024 的倍数,而大写表示该单位是 1000 的倍数。
如果命令使用卷组或者逻辑卷名称作为参数,则完整路径名称是可选的。在名为
vg0 的卷组中,名为 lvol0 的逻辑卷可以指定为 vg0/lvol0。当需要卷组列表但为空时,则使用所有卷组的列表替代。当需要列出逻辑卷但提供了一个卷组,则使用在那个卷组中的所有逻辑卷列表替代。例如,lvdisplay vg0 命令将显示卷组 vg0 中的所有逻辑卷。
所有 LVM 命令都接受
-v 参数,该参数可输入多次来增加输出的详细程度。例如,以下示例显示了 lvcreate 命令的默认输出。
# lvcreate -L 50MB new_vg
  Rounding up size to full physical extent 52.00 MB
  Logical volume "lvol0" created
以下命令显示带有
-v 参数的 lvcreate 命令的输出。
# lvcreate -v -L 50MB new_vg
    Finding volume group "new_vg"
  Rounding up size to full physical extent 52.00 MB
    Archiving volume group "new_vg" metadata (seqno 4).
    Creating logical volume lvol0
    Creating volume group backup "/etc/lvm/backup/new_vg" (seqno 5).
    Found volume group "new_vg"
    Creating new_vg-lvol0
    Loading new_vg-lvol0 table
    Resuming new_vg-lvol0 (253:2)
    Clearing start of logical volume "lvol0"
    Creating volume group backup "/etc/lvm/backup/new_vg" (seqno 5).
  Logical volume "lvol0" created
您也可以使用
-vv、-vvv 或 -vvv 参数来显示有关命令执行的更多详细信息。-vvvv 参数提供当前的最大信息量。以下示例显示了 lvcreate 命令的输出行前几行,并指定了 -vvvv 参数。
# lvcreate -vvvv -L 50MB new_vg
#lvmcmdline.c:913         Processing: lvcreate -vvvv -L 50MB new_vg
#lvmcmdline.c:916         O_DIRECT will be used
#config/config.c:864       Setting global/locking_type to 1
#locking/locking.c:138       File-based locking selected.
#config/config.c:841       Setting global/locking_dir to /var/lock/lvm
#activate/activate.c:358       Getting target version for linear
#ioctl/libdm-iface.c:1569         dm version   OF   [16384]
#ioctl/libdm-iface.c:1569         dm versions   OF   [16384]
#activate/activate.c:358       Getting target version for striped
#ioctl/libdm-iface.c:1569         dm versions   OF   [16384]
#config/config.c:864       Setting activation/mirror_region_size to 512
...
您可以使用命令的
--help 参数来显示任何 LVM CLI 命令的帮助信息。
# commandname --help
要显示某个命令的手册页,请执行 man 命令:
# man commandname
man lvm 命令提供有关 LVM 的通用在线信息。
所有 LVM 对象都通过 UUID 在内部引用,该 UUID 是在创建对象时分配的。当您删除属于卷组一部分的
/dev/sdf 物理卷时,这非常有用,当您将其插入时,您会发现它现在是 /dev/sdk。LVM 仍然会发现物理卷,因为它通过其 UUID 而不是其设备名称来识别物理卷。有关在创建物理卷时指定物理卷 UUID 的详情,请参考 第 6.3 节 “恢复物理卷元数据”。
4.2. 物理卷管理
这部分描述了执行物理卷管理的各个方面的命令。
4.2.1. 创建物理卷
以下子章节描述了用于创建物理卷的命令。
4.2.1.1. 设置分区类型
如果您将整个磁盘作为您的物理卷使用,那么磁盘就不能有分区表。对于 DOS 磁盘分区,应该使用 fdisk 或 cfdisk 命令或对等命令将分区 id 设置为 0x8e。对于整个磁盘设备,分区表必须被删除,这样会有效地破坏磁盘中的所有数据。您可以用以下命令将现有分区表的第一个扇区归零来删除分区表:
# dd if=/dev/zero of=PhysicalVolume bs=512 count=14.2.1.2. 初始化物理卷
使用 pvcreate 命令初始化要用作物理卷的块设备。初始化与格式化文件系统类似。
以下命令将
/dev/sdd、/dev/sde、/dev/sdf 初始化为 LVM 物理卷,以便稍后用作 LVM 逻辑卷的一部分。
# pvcreate /dev/sdd /dev/sde /dev/sdf
要初始化分区而不是整个磁盘:请在分区上运行 pvcreate 命令。以下示例将分区
/dev/hdb1 初始化为 LVM 物理卷,以便稍后用作 LVM 逻辑卷的一部分。
# pvcreate /dev/hdb14.2.1.3. 扫描块设备
您可以使用 lvmdiskscan 命令扫描可用作物理卷的块设备,如下例所示。
# lvmdiskscan
  /dev/ram0                    [       16.00 MB]
  /dev/sda                     [       17.15 GB]
  /dev/root                    [       13.69 GB]
  /dev/ram                     [       16.00 MB]
  /dev/sda1                    [       17.14 GB] LVM physical volume
  /dev/VolGroup00/LogVol01     [      512.00 MB]
  /dev/ram2                    [       16.00 MB]
  /dev/new_vg/lvol0            [       52.00 MB]
  /dev/ram3                    [       16.00 MB]
  /dev/pkl_new_vg/sparkie_lv   [        7.14 GB]
  /dev/ram4                    [       16.00 MB]
  /dev/ram5                    [       16.00 MB]
  /dev/ram6                    [       16.00 MB]
  /dev/ram7                    [       16.00 MB]
  /dev/ram8                    [       16.00 MB]
  /dev/ram9                    [       16.00 MB]
  /dev/ram10                   [       16.00 MB]
  /dev/ram11                   [       16.00 MB]
  /dev/ram12                   [       16.00 MB]
  /dev/ram13                   [       16.00 MB]
  /dev/ram14                   [       16.00 MB]
  /dev/ram15                   [       16.00 MB]
  /dev/sdb                     [       17.15 GB]
  /dev/sdb1                    [       17.14 GB] LVM physical volume
  /dev/sdc                     [       17.15 GB]
  /dev/sdc1                    [       17.14 GB] LVM physical volume
  /dev/sdd                     [       17.15 GB]
  /dev/sdd1                    [       17.14 GB] LVM physical volume
  7 disks
  17 partitions
  0 LVM physical volume whole disks
  4 LVM physical volumes
4.2.2. 显示物理卷
您可以使用三个命令来显示 LVM 物理卷的属性: pvs、pvdisplay 和 pvscan。
pvdisplay 命令为每个物理卷提供详细的多行输出。它以固定格式显示物理属性(大小、扩展、卷组等等)。
以下示例显示了单个物理卷的 pvdisplay 命令的输出。
# pvdisplay
  --- Physical volume ---
  PV Name               /dev/sdc1
  VG Name               new_vg
  PV Size               17.14 GB / not usable 3.40 MB
  Allocatable           yes
  PE Size (KByte)       4096
  Total PE              4388
  Free PE               4375
  Allocated PE          13
  PV UUID               Joqlch-yWSj-kuEn-IdwM-01S9-XO8M-mcpsVe
pvscan 命令扫描系统中所有支持的物理卷 LVM 块设备。
以下命令显示所有找到的物理设备:
# pvscan
 PV /dev/sdb2   VG vg0   lvm2 [964.00 MB / 0   free]
 PV /dev/sdc1   VG vg0   lvm2 [964.00 MB / 428.00 MB free]
 PV /dev/sdc2            lvm2 [964.84 MB]
 Total: 3 [2.83 GB] / in use: 2 [1.88 GB] / in no VG: 1 [964.84 MB]
您可以在
lvm.conf 文件中定义过滤器,以便这个命令避免扫描特定的物理卷。有关使用过滤器来控制扫描哪些设备的详情,请参考 第 4.5 节 “使用过滤器控制 LVM 设备扫描”。
4.2.3. 防止在物理卷上分配
您可以使用 pvchange 命令防止在一个或多个物理卷的空闲空间上分配物理扩展。这在出现磁盘错误或者要删除物理卷时是必需的。
以下命令不允许在
/dev/sdk1 上分配物理扩展。
# pvchange -x n /dev/sdk1
您也可以使用 pvchange 命令的
-xy 参数来允许在之前禁止的物理扩展上分配。
4.2.4. 重新调整物理卷大小
如果您需要出于某种原因更改底层块设备的大小,请使用 pvresize 命令来使用新大小更新 LVM。您可以在 LVM 正在使用物理卷时执行这个命令。
4.2.5. 删除物理卷
如果 LVM 不再需要某个设备,您可以使用 pvremove 命令删除 LVM 标签。执行 pvremove 命令会将空物理卷上的 LVM 元数据归零。
如果您要删除的物理卷目前是卷组的一部分,则必须使用 vgreduce 命令将其从卷组中删除,如 第 4.3.7 节 “从卷组中删除物理卷” 所述。
# pvremove /dev/ram15
  Labels on physical volume "/dev/ram15" successfully wiped
4.3. 卷组管理
这部分描述了执行卷组管理的各个方面的命令。
4.3.1. 创建卷组
以下命令创建一个名为
vg1 的卷组,其包含物理卷 /dev/sdd1 和 /dev/sde1。
# vgcreate vg1 /dev/sdd1 /dev/sde1
当使用物理卷创建卷组时,默认情况下它的磁盘空间被分成 4MB 扩展。这个扩展是增大或者减小逻辑卷容量的最小值。大量的扩展不会影响逻辑卷的 I/O 性能。
如果默认扩展大小不合适,您可以在 vgcreate 命令中使用
-s 选项,来指定扩展大小。您可以使用 vgcreate 命令的 -p 和 -l 参数来限制卷组的物理或者逻辑卷数量。
默认情况下,卷组根据常识分配物理扩展,比如不会将平行条带放在同一个物理卷中。这是 normal 分配策略。您可以使用 vgcreate 命令的 --alloc 参数来指定contiguous 、anywhere 或 cling 的分配策略。通常,只在特殊情况下需要指定非通常或非标准扩展分配时,才需要不同于 normal 的分配策略。有关 LVM 如何分配物理扩展的详情,请参考 第 4.3.2 节 “LVM 分配”。
LVM 卷组和底层逻辑卷包含在
/dev 目录中的设备特殊文件目录树中,包括以下布局:
/dev/vg/lv/
例如,如果您创建两个卷组
myvg1 和 myvg2,每个卷组都有三个名为 lv01、lv02 和 lv03 的逻辑卷,这将创建六个设备特殊文件:
/dev/myvg1/lv01
/dev/myvg1/lv02
/dev/myvg1/lv03
/dev/myvg2/lv01
/dev/myvg2/lv02
/dev/myvg2/lv03
如果相应的逻辑卷目前没有激活,则设备特殊文件不会出现。
在 64 位 CPU 上,LVM 的最大设备大小为 8 Exabytes。
4.3.2. LVM 分配
当 LVM 操作需要为一个或多个逻辑卷分配物理扩展时,分配过程如下:
- 生成卷组中的未分配物理扩展的完整集以供考虑。如果您在命令行末尾提供任意物理扩展范围,则只考虑指定物理卷中的未分配物理扩展。
- 每个分配策略依次尝试,从最严格的策略(
contiguous)开始,以使用--alloc选项指定的分配策略结束,或者将其设为特定逻辑卷或卷组的默认策略。对于每个策略,使用需要填充的空逻辑卷空间的最小数值逻辑扩展进行工作,并尽量根据分配策略实施的限制分配空间。如果需要更多空间,LVM 会进入下一个策略。
分配策略的限制如下:
contiguous分配政策要求不是逻辑卷的第一个逻辑扩展的任何逻辑扩展的物理位置紧邻它前面的逻辑扩展的物理位置。当逻辑卷为条带或镜像时,contiguous分配限制将独立应用于每个需要空间的条带或镜像(leg)。cling分配策略要求将用于任何逻辑卷的物理卷添加到现有逻辑卷中,该逻辑卷至少已被之前那个逻辑卷中的一个逻辑扩展使用。如果定义了配置参数allocation/cling_tag_list,那么在两个物理卷上都存在任何列出的标签,则两个物理卷将被视为匹配。这允许对有类似属性(比如其物理位置)的物理卷组进行标记并视为分配的目的。有关将 cling 策略与 LVM 标签结合使用的更多信息,以指定在扩展 LVM 卷时要使用的额外物理卷,请参阅 第 4.4.19 节 “使用clingAllocation 策略扩展逻辑卷”。当逻辑卷是条带或镜像时,cling分配限制将独立应用于每个需要空间的条带或镜像(leg)。normal分配策略将不会选择共享同一物理卷的物理扩展,因为逻辑扩展已分配给了位于该并行逻辑卷内的同一偏移处的并行逻辑卷(即不同的条带或镜像/leg)。当在逻辑卷保存镜像数据时分配镜像日志,normal分配策略首先会尝试为日志和数据选择不同的物理卷。如果这不可能,并且allocation/mirror_logs_require_separate_pvs配置参数被设为 0,则它将允许日志与部分数据共享物理卷。同样,在分配精简池元数据时,normal分配策略会遵循与分配镜像日志一样的考虑,具体取决于allocation/thin_pool_metadata_require_separate_pvs配置参数。- 如果有足够的可用扩展来满足分配请求,但 normal 分配策略不使用它们,而anywhere 分配策略将使用它们,即使这样会因为在同一个物理卷上放置了两个条带而降低了性能。
可使用 vgchange 命令更改分配策略。
注意
如果您使用没有包括在此文档中的分配策略,应该注意,它们的行为在将来的版本中可能会改变。例如:如果您在命令行中提供两个空物理卷,它们有相同数量的可用物理扩展可用于分配,LVM 当前会以它们列出的顺序处理它们,但不保证在将来的版本中这个行为不会有变化。如果为特定逻辑卷获取特定的布局非常重要,然后您应该通过一系列 lvcreate 和 lvconvert 步骤来构建它,以便应用到每一步骤的分配策略不让 LVM 对布局有任何自由支配权。
要查看任何特定情况下分配过程当前的工作方式,您可以读取调试日志输出,例如,将
-vvvv 选项添加到命令中。
4.3.3. 在集群中创建卷组
您可以使用 vgcreate 命令在集群环境中创建 CLVM 卷组,就像在单一节点上创建它们一样。
注意
在 Red Hat Enterprise Linux 7 中,集群通过 Pacemaker 进行管理。集群式 LVM 逻辑卷只在与 Pacemaker 集群一起使用才被支持,且必须配置为集群资源。有关在集群中配置 LVM 卷的通用信息,请参考 第 1.4 节 “红帽高可用性集群中的 LVM 逻辑卷”。
应使用 vgcreate -cy 或 vgchange -cy 命令设置的集群属性创建由集群成员共享的卷组。如果 CLVMD 正在运行,则会自动设置集群属性。这个集群属性表示这个卷组应该由 CLVMD 管理和保护。在创建任何未由集群共享的卷组且应仅对单个主机可见时,应使用 vgcreate -cn 或 vgchange -cn 命令禁用此集群属性。
默认情况下,使用集群属性在共享存储上创建的卷组对于可以访问共享存储的所有计算机都可见。但是,可以使用 vgcreate 命令的
-cn 选项创建本地卷组,使其仅对集群中的一个节点可见。
以下命令在集群环境中执行时,会创建一个卷组,该卷组与执行命令的节点同属本地。该命令创建名为
vg1 的本地卷,其中包含物理卷 /dev/sdd1 和 /dev/sde1。
# vgcreate -c n vg1 /dev/sdd1 /dev/sde1
您可以使用 vgs 命令检查现有卷组是否为集群卷组,如果卷是集群的集群,则会显示 c 属性。以下命令显示卷组
VolGroup00 和 testvg1 的属性。在本例中,VolGroup00 不是集群,而 testvg1 是集群的集群,如 Attr 标题下的 c 属性所示。
# vgs
  VG            #PV #LV #SN Attr   VSize  VFree
  VolGroup00      1   2   0 wz--n- 19.88G    0
  testvg1         1   1   0 wz--nc 46.00G 8.00M
4.3.4. 向卷组中添加物理卷
要向现有卷组中添加额外的物理卷,请使用 vgextend 命令。vgextend 命令通过添加一个或多个可用物理卷来增加卷组的容量。
以下命令将物理卷
/dev/sdf1 添加到卷组 vg1 中。
# vgextend vg1 /dev/sdf14.3.5. 显示卷组
您可以使用两个命令来显示 LVM 卷组的属性: vgs 和 vgdisplay。
vgdisplay 命令以固定格式显示卷组属性(如大小、扩展、物理卷数目等等)。以下示例显示了卷组
new_vg 的 vgdisplay 命令的输出。如果您没有指定卷组,则会显示所有现有的卷组。
# vgdisplay new_vg
  --- Volume group ---
  VG Name               new_vg
  System ID
  Format                lvm2
  Metadata Areas        3
  Metadata Sequence No  11
  VG Access             read/write
  VG Status             resizable
  MAX LV                0
  Cur LV                1
  Open LV               0
  Max PV                0
  Cur PV                3
  Act PV                3
  VG Size               51.42 GB
  PE Size               4.00 MB
  Total PE              13164
  Alloc PE / Size       13 / 52.00 MB
  Free  PE / Size       13151 / 51.37 GB
  VG UUID               jxQJ0a-ZKk0-OpMO-0118-nlwO-wwqd-fD5D32
4.3.6. 扫描卷组的磁盘来构建缓存文件
vgscan 命令扫描系统中所有支持的磁盘设备查找 LVM 物理卷和卷组。这会在
/etc/lvm/cache/.cache 文件中构建 LVM 缓存文件,该文件维护了当前 LVM 设备的列表。
LVM 在系统启动时自动启动 vgscan 命令,并在 LVM 操作过程中自动运行 vgscan 命令,比如当您执行 vgcreate 命令时,或者 LVM 检测到不一致时。
注意
当您更改硬件配置并从节点添加或删除设备时,您可能需要手动运行 vgscan 命令,从而导致系统引导时不存在的新设备可见。这可能是必要的,例如,当您向 SAN 上的系统添加新磁盘时,或热插拔一个已标记为物理卷的新磁盘时。
您可以在
/etc/lvm/lvm.conf 文件中定义过滤器,以限制扫描以避免特定设备。有关使用过滤器来控制扫描哪些设备的详情,请参考 第 4.5 节 “使用过滤器控制 LVM 设备扫描”。
以下示例显示了 vgscan 命令的输出。
# vgscan
  Reading all physical volumes.  This may take a while...
  Found volume group "new_vg" using metadata type lvm2
  Found volume group "officevg" using metadata type lvm2
4.3.7. 从卷组中删除物理卷
要从卷组中删除未使用的物理卷,请使用 vgreduce 命令。vgreduce 命令通过删除一个或多个空物理卷来缩小卷组的容量。这样就可以使不同的卷组自由使用那些物理卷,或者将其从系统中删除。
在从卷组中删除物理卷前,您可以使用 pvdisplay 命令确定物理卷没有被任何逻辑卷使用。
# pvdisplay /dev/hda1

-- Physical volume ---
PV Name               /dev/hda1
VG Name               myvg
PV Size               1.95 GB / NOT usable 4 MB [LVM: 122 KB]
PV#                   1
PV Status             available
Allocatable           yes (but full)
Cur LV                1
PE Size (KByte)       4096
Total PE              499
Free PE               0
Allocated PE          499
PV UUID               Sd44tK-9IRw-SrMC-MOkn-76iP-iftz-OVSen7
如果物理卷仍在使用,则必须使用 pvmove 命令将数据迁移到另一个物理卷中。然后使用 vgreduce 命令删除物理卷。
以下命令从卷组
my_volume_group 中删除物理卷 /dev/hda1。
# vgreduce my_volume_group /dev/hda1
如果逻辑卷包含失败的物理卷,您就无法使用该逻辑卷。要从卷组中删除缺少的物理卷,您可以使用 vgreduce 命令的
--removemissing 参数,如果缺少的物理卷上没有分配逻辑卷。
如果失败的物理卷包含镜像段类型的逻辑卷的镜像,您可以使用 vgreduce --removemissing --mirrorsonly --force 命令从镜像中删除该镜像。
有关从 LVM 镜像故障中恢复的详情,请参考 第 6.2 节 “从 LVM 镜像故障中恢复”。有关从卷组中删除丢失的物理卷的详情,请参考 第 6.5 节 “从卷组中删除丢失的物理卷”
4.3.8. 激活和停用卷组
当您创建卷组时,默认它是激活的。这意味着,那个组中的逻辑卷是可以访问的,并可以更改。
有一些情况您需要将卷组设为非活动状态,从而不为内核所知。要取消激活或激活卷组,请使用 vgchange 命令的
-a (--available)参数。
以下示例将停用卷组
my_volume_group。
# vgchange -a n my_volume_group
如果启用了集群锁定,请添加"e"来激活或停用只在一个节点上的卷组,或添加"l"来激活或/停用只在本地节点上的卷组。具有单主机快照的逻辑卷总是被专门激活,因为它们一次只能在一个节点上使用。
您可以使用 lvchange 命令取消激活独立逻辑卷,如 第 4.4.11 节 “更改逻辑卷组的参数” 所述,有关激活集群中单个节点上的逻辑卷的信息,请参阅 第 4.7 节 “激活集群中单个节点上的逻辑卷”。
4.3.9. 更改卷组的参数
vgchange 命令用于停用和激活卷组,如 第 4.3.8 节 “激活和停用卷组” 所述。您也可以使用此命令更改现有卷组的几个卷组参数。
以下命令将卷组
vg00 的最大逻辑卷数改为 128。
# vgchange -l 128 /dev/vg00
有关您可以使用 vgchange 命令更改的卷组参数的描述,请查看 vgchange (8)手册页。
4.3.10. 删除卷组
要删除不包含逻辑卷的卷组,请使用 vgremove 命令。
# vgremove officevg
  Volume group "officevg" successfully removed
4.3.11. 分割卷组
要分割卷组的物理卷并创建新卷组,请使用 vgsplit 命令。
逻辑卷不能在卷组之间分割。每个现有逻辑卷都必须完全在构成旧的或新卷组的物理上。但是,您可以使用 pvmove 命令来强制进行分割。
以下示例将新卷组
smallvg 从原始卷组 bigvg 中分割。
# vgsplit bigvg smallvg /dev/ram15
  Volume group "smallvg" successfully split from "bigvg"
4.3.12. 合并卷组
要将两个卷组合并为一个卷组,请使用 vgmerge 命令。如果这两个卷的物理扩展大小相等,且两个卷组的物理卷和逻辑卷的描述符合目的卷组的限制,您可以将一个不活跃的"源"卷与一个活跃或者不活跃的"目标"卷合并。
以下命令将不活跃的卷组
my_vg 合并到活动或不活跃的卷组 databases 中,提供详细的运行时信息。
# vgmerge -v databases my_vg4.3.13. 备份卷组元数据
在对卷组或逻辑卷的每个配置更改时自动创建元数据备份和存档,除非在
lvm.conf 文件中禁用了。默认情况下,元数据备份存储在 /etc/lvm/backup 文件中,元数据存档存储在 /etc/lvm/archive 文件中。您可以使用 vgcfgbackup 命令将元数据手动备份到 /etc/lvm/backup 文件中。
vgcfgrestore 命令将卷组的元数据从归档恢复到卷组中的所有物理卷。
有关使用
vgcfgrestore 命令恢复物理卷元数据的示例,请参考 第 6.3 节 “恢复物理卷元数据”。
4.3.14. 重命名卷组
使用 vgrename 命令重命名现有卷组。
以下任意一个命令将现有卷组
vg02 重命名为 my_volume_group
# vgrename /dev/vg02 /dev/my_volume_group
# vgrename vg02 my_volume_group4.3.15. 将卷组移动到另一个系统
您可以将整个 LVM 卷组移动到另一个系统中。建议您在执行此操作时使用 vgexport 和 vgimport 命令。
注意
您可以使用 vgimport 命令的
--force 参数。这可让您导入缺少物理卷的卷组,然后运行 vgreduce --removemissing 命令。
vgexport 命令使系统无法访问不活跃的卷组,这样就可以分离其物理卷。vgimport 命令使得在 vgexport 命令使卷组不活跃后可以再次被机器访问。
要从一个系统移动卷组到另一个系统,,执行以下步骤:
- 确定没有用户正在访问卷组中激活卷中的文件,然后卸载逻辑卷。
- 使用 vgchange 命令的
-a n参数将卷组标记为不活动状态,这样可防止对卷组进行任何进一步的活动。 - 使用 vgexport 命令导出卷组。这样可防止您要将其从中删除的系统访问该卷组。导出卷组后,在执行 pvscan 命令时物理卷将显示为在导出的卷组中,如下例所示。
#
pvscanPV /dev/sda1 is in exported VG myvg [17.15 GB / 7.15 GB free] PV /dev/sdc1 is in exported VG myvg [17.15 GB / 15.15 GB free] PV /dev/sdd1 is in exported VG myvg [17.15 GB / 15.15 GB free] ...当关闭系统时,您可以拔出组成该卷组的磁盘并将其连接到新系统。 - 当磁盘插入道新系统中时,请使用 vgimport 命令来导入卷组,使其可以被新系统访问。
- 使用 vgchange 命令的
-a y参数激活卷组。 - 挂载文件系统使其可使用。
4.3.16. 重新创建卷组目录
要重新创建卷组目录和逻辑卷特殊文件,请使用 vgmknodes 命令。这个命令检查活跃逻辑卷所需的
/dev 目录中的 LVM2 特殊文件。它会创建任何缺少的特殊文件,并删除不使用的文件。
您可以通过为 vgscan 命令指定 mknodes 参数,将 vgmknodes 命令合并到 vgscan 命令中。
4.4. 逻辑卷管理
这部分描述了执行逻辑卷管理的各个方面的命令。
4.4.1. 创建线性逻辑卷
要创建逻辑卷,请使用 lvcreate 命令。如果没有为逻辑卷指定名称,则使用默认名称
lvol#,其中 # 是逻辑卷的内部号。
当您创建逻辑卷时,其是从使用组成卷组的物理卷上的空闲扩展从卷组中切割而成的。通常,逻辑卷会在下一次空闲的基础上用尽底层物理卷上任何可用的空间。修改逻辑卷在物理卷中空闲和重新分配的空间。
下面的命令在卷组
vg1 中创建了一个大小为 10GB 的逻辑卷。
# lvcreate -L 10G vg1
逻辑卷大小的默认单位为 MB。以下命令在卷组
testvg 中创建了一个名为 testlv 的 1500MB 线性逻辑卷,创建块设备 /dev/testvg/testlv。
# lvcreate -L 1500 -n testlv testvg
以下命令从卷组
vg0 中的可用扩展创建一个名为 gfslv 的 50GB 逻辑卷。
# lvcreate -L 50G -n gfslv vg0
您可以使用 lvcreate 命令的
-l 参数来指定逻辑卷的大小(以扩展为单位)。您还可以使用此参数指定相关卷组、逻辑卷或物理卷组大小的百分比。后缀 %VG 表示卷组的总大小,后缀 %FREE 表示卷组中剩余的空闲空间,后缀 %PVS 表示指定的物理卷中的空闲空间。对于快照,其大小使用后缀 %ORIGIN 表示原始卷总大小的百分比,(100%ORIGIN 提供了整个原始卷的空间)。当以百分比表示时,该大小定义了新逻辑卷中逻辑扩展数的上限。在命令完成前,不会确定新 LV 中的逻辑扩展的确切数目。
下面的命令创建了名为
mylv 的逻辑卷,它使用卷组 testvg 中总空间的 60%。
# lvcreate -l 60%VG -n mylv testvg
以下命令创建一个名为
yourlv 的逻辑卷,它使用卷组 testvg 中所有未分配的空间。
# lvcreate -l 100%FREE -n yourlv testvg
您可以使用 lvcreate 命令的
-l 参数来创建使用整个卷组的逻辑卷。创建使用整个卷组的逻辑卷的另一种方法是使用 vgdisplay 命令来查找"Total PE"大小,并将这些结果用作 lvcreate 命令的输入。
以下命令创建名为
mylv 的逻辑卷,其填充了名为 testvg 的卷组。
#vgdisplay testvg | grep "Total PE"Total PE 10230 #lvcreate -l 10230 -n mylv testvg
如果需要删除物理卷,用于创建逻辑卷的底层物理卷非常重要,因此当创建逻辑卷时可能需要考虑这一点。有关从卷组中删除物理卷的详情,请参考 第 4.3.7 节 “从卷组中删除物理卷”。
要创建要从卷组中的特定物理卷分配的逻辑卷,请在 lvcreate 命令行的末尾指定物理卷或卷。以下命令在从物理卷
/dev/sdg1 分配的卷组 testvg 中创建一个名为 testlv 的逻辑卷,
# lvcreate -L 1500 -n testlv testvg /dev/sdg1
您可以指定要用于逻辑卷的物理卷的扩展。以下示例在卷组
testvg 中的物理卷 /dev/sda1 中创建了一个线性逻辑卷 0 到 24 个到物理卷 /dev/sdb1 的第 50 到 124 个扩展。
# lvcreate -l 100 -n testlv testvg /dev/sda1:0-24 /dev/sdb1:50-124
下面的例子在物理卷
/dev/sda1 的扩展 0 到 25 个扩展创建了一个线性逻辑卷,然后在扩展 100 时继续布局逻辑卷。
# lvcreate -l 100 -n testlv testvg /dev/sda1:0-25:100-4.4.2. 创建条带卷
对于大量顺序读和写,创建条带逻辑卷可提高数据 I/O 的效率。有关条带卷的通用信息,请参考 第 2.3.2 节 “条带逻辑卷”。
当您创建条带逻辑卷时,您可以使用 lvcreate 命令的
-i 参数指定条带的数量。这决定了逻辑卷将被条带的物理卷数量。条带的数量不能大于卷组中物理卷的数量(除非使用了 --alloc anywhere 参数)。
如果组成条带逻辑卷的底层物理设备具有不同的大小,则条带卷的最大大小由最小的底层设备决定。例如,在双 leg 的条带中,最大大小为较小设备大小的两倍。在三 leg 条带中,最大大小为最小设备大小的三倍。
下面的命令创建了一个跨 2 个物理卷、条带为 64KB 的条带逻辑卷。逻辑卷大小为 50GB,名为
gfslv,并且从卷组 vg0 中分离出来。
# lvcreate -L 50G -i 2 -I 64 -n gfslv vg0
与线性卷一样,您可以指定您要用于条带的物理卷的扩展。以下命令创建一个跨两个物理卷的条状卷 100 个扩展,名为
stripelv,且位于卷组 testvg 中。条带将使用 /dev/sda1 的 0-49 扇区,以及 /dev/sdb1 的 50-99 扇区。
# lvcreate -l 100 -i 2 -n stripelv testvg /dev/sda1:0-49 /dev/sdb1:50-99
  Using default stripesize 64.00 KB
  Logical volume "stripelv" created
4.4.3. RAID 逻辑卷
LVM 支持 RAID0/1/4/5/6/10。
注意
RAID 逻辑卷不是集群感知的。虽然可以在一台机器上单独创建和激活 RAID 逻辑卷,但不能在多个机器上同时激活它们。如果需要非独占镜像卷,您必须创建带有
镜像 片段类型的卷,如 第 4.4.4 节 “创建镜像卷” 所述。
表 4.1. RAID 段类型
| 片段类型 | 描述 | ||
|---|---|---|---|
raid1 | RAID1 镜像。当您指定 -m 但没有指定条带时,这是 lvcreate 命令的 --type 参数的默认值。 | ||
raid4 | RAID4 专用奇偶校验磁盘 | ||
raid5 | 与 raid5_ls相同 | ||
raid5_la |
| ||
raid5_ra |
| ||
raid5_ls |
| ||
raid5_rs |
| ||
raid6 | 与 raid6_zr相同 | ||
raid6_zr |
| ||
raid6_nr |
| ||
raid6_nc |
| ||
raid10 |
| ||
raid0/raid0_meta (Red Hat Enterprise Linux 7.3 及更高版本) | 条带。RAID0 以条带大小的单位在多个数据子卷间分布逻辑卷数据。这可以提高性能。如果任何数据子卷失败,逻辑卷数据将会丢失。有关创建 RAID0 卷的详情,请参考 第 4.4.3.1 节 “创建 RAID0 卷(Red Hat Enterprise Linux 7.3 及更新版本)”。 |
对于大多数用户,指定五个可用主类型之一(
raid1、raid4、raid 5、raid6、raid10)应该足够了。
当您创建 RAID 逻辑卷时,LVM 会创建一个元数据子卷,它是阵列中的每个数据或奇偶校验子卷的大小的一个区块。例如,创建一个双向 RAID1 阵列会导致两个元数据子卷(
lv_rmeta_0 和 lv_rmeta_1)以及两个数据子卷(lv_rimage_0 和 lv_rimage_1)。同样,创建三向条带(加 1 个隐式奇偶校验设备)RAID4 会导致 4 个元数据子卷(lv_rmeta_0,lv_rmeta_1,lv_rmeta_2, 和 lv_rmeta_3)和 4 个数据子卷(lv_rimage_0,lv_rimage_1,lv_rimage_2, 和 lv_rimage_3)。
以下命令在卷组
my_vg 中创建一个名为 my_lv 的双向 RAID1 阵列,大小为 1GB。
# lvcreate --type raid1 -m 1 -L 1G -n my_lv my_vg
您可以根据您为
-m 参数指定的值,来创建具有不同副本数的 RAID1 阵列。同样,您可以使用 -i 参数 为 RAID 4/5/6 逻辑卷指定条带数。您还可以使用 -I 参数指定条带大小。
以下命令在卷组
my_vg 中创建一个名为 my_lv 的 RAID5 阵列(3 个条带 + 1 个隐式奇偶校验驱动器),该阵列大小为 1GB。请注意,您可以像您为 LVM 条带卷一样指定条带的数目,自动添加正确的奇偶校验驱动器数目。
# lvcreate --type raid5 -i 3 -L 1G -n my_lv my_vg
以下命令在卷组
my_vg 中创建一个名为 my_lv 的 RAID6 阵列(3 个条带 + 2 个隐式奇偶校验驱动器),该阵列大小为 1GB。
# lvcreate --type raid6 -i 3 -L 1G -n my_lv my_vg
使用 LVM 创建 RAID 逻辑卷后,您可以激活、更改、删除、显示和使用卷,就像使用其它 LVM 逻辑卷一样。
当您创建 RAID10 逻辑卷时,使用
sync 操作初始化逻辑卷所需的后台 I/O 可能会分离对 LVM 设备的其他 I/O 操作,比如对卷组元数据的更新,特别是在创建很多 RAID 逻辑卷时。这会导致其它 LVM 操作速度下降。
您可以通过实施恢复节流来控制 RAID 逻辑卷初始化的速率。您可以使用 lvcreate 命令的
--minrecoveryrate 和 --maxrecoveryrate 选项设置这些操作的最小和最大 I/O 速率来控制执行 sync 操作的速率。如下所示指定这些选项。
--maxrecoveryrate Rate[bBsSkKmMgG]为 RAID 逻辑卷设置最大恢复率,使其不会阻断其他小的 I/O 操作。Rate 被指定为阵列中每个设备的每秒数量。如果没有给出后缀,则会假定为 kiB/sec/device。将恢复率设置为 0 表示它将不被绑定。--minrecoveryrate Rate[bBsSkKmMgG]为 RAID 逻辑卷设置最小恢复率,以确保sync操作的 I/O 达到最小吞吐量,即使存在大量 I/O。Rate 被指定为阵列中每个设备的每秒数量。如果没有给出后缀,则会假定为 kiB/sec/device。
下面的命令创建了双向 RAID10 阵列,有三个条带,大小为 10GB,最大恢复率为 128 kiB/sec/device。该数组名为
my_lv,位于卷组 my_vg 中。
# lvcreate --type raid10 -i 2 -m 1 -L 10G --maxrecoveryrate 128 -n my_lv my_vg
您还可以为 RAID 清理操作指定最小和最大恢复率。有关 RAID 清理的详情,请参考 第 4.4.3.11 节 “清理 RAID 逻辑卷”。
注意
您可以使用 LVM RAID 计算器应用程序生成在 RAID 存储上创建逻辑卷的命令。此应用程序使用您输入的有关当前或计划生成这些命令的存储的信息。LVM RAID 计算器应用程序可在 https://access.redhat.com/labs/lvmraidcalculator/ 中找到。
以下小节描述了您可以对 LVM RAID 设备执行的管理任务:
4.4.3.1. 创建 RAID0 卷(Red Hat Enterprise Linux 7.3 及更新版本)
创建 RAID0 卷的命令格式如下。
lvcreate --type raid0[_meta] --stripes Stripes --stripesize StripeSize VolumeGroup [PhysicalVolumePath ...]
表 4.2. RAID0 命令创建参数
| 参数 | 描述 |
|---|---|
--type raid0[_meta] | 指定 raid0 创建一个没有元数据卷的 RAID0 卷。指定 raid0_meta 创建一个具有元数据卷的 RAID0 卷。因为 RAID0 是不弹性的,所以不需要保存任何已镜像的数据块(如 RAID1/10),或者计算并保存任何奇偶校验块(如 RAID4/5/6)。因此,它不需要元数据卷来保持有关镜像或奇偶校验块重新同步进程的状态。但是,在从 RAID0 转换到 RAID4/5/6/10 时元数据卷是强制的,并指定 raid0_meta 预先分配这些元数据卷以防止相应的分配失败。 |
--stripes Stripes | 指定在其中分割逻辑卷的设备数。 |
--stripesize StripeSize | 以 KB 为单位指定每个条的大小。这是在移动到下一个设备前写入一个设备的数据量。 |
VolumeGroup | 指定要使用的卷组。 |
PhysicalVolumePath ... | 指定要使用的设备。如果没有指定,LVM 将选择 Stripes 选项指定的设备数,每个条带一个。 |
4.4.3.2. 将线性设备转换为 RAID 设备
您可以使用 lvconvert 命令的
--type 参数将现有线性逻辑卷转换为 RAID 设备。
以下命令将卷组
my_vg 中的线性逻辑卷 my_lv 转换为双向 RAID1 阵列。
# lvconvert --type raid1 -m 1 my_vg/my_lv
因为 RAID 逻辑卷由元数据和数据子卷对组成,因此当您将线性设备转换成 RAID1 阵列时,会生成一个新的元数据子卷,并关联到线性卷所在的同一物理卷中的原始逻辑卷之一。额外的镜像在 metadata/data 子卷对中添加。例如:如果原始设备如下:
# lvs -a -o name,copy_percent,devices my_vg
  LV     Copy%  Devices
  my_lv         /dev/sde1(0)
转换为双向 RAID1 阵列后,该设备包含以下数据和元数据子卷对:
#lvconvert --type raid1 -m 1 my_vg/my_lv#lvs -a -o name,copy_percent,devices my_vgLV Copy% Devices my_lv 6.25 my_lv_rimage_0(0),my_lv_rimage_1(0) [my_lv_rimage_0] /dev/sde1(0) [my_lv_rimage_1] /dev/sdf1(1) [my_lv_rmeta_0] /dev/sde1(256) [my_lv_rmeta_1] /dev/sdf1(0)
如果无法将与原始逻辑卷配对的元数据镜像放在同一个物理卷上,则 lvconvert 将失败。
4.4.3.3. 将 LVM RAID1 逻辑卷转换为 LVM 线性逻辑卷
您可以通过指定
-m0 参数,使用 lvconvert 命令将现有的 RAID1 LVM 逻辑卷转换为 LVM 线性逻辑卷。这会删除所有 RAID 数据子卷以及构成 RAID 阵列的所有 RAID 元数据子卷,保留顶层 RAID1 镜像作为线性逻辑卷。
下面的例子显示了现有的 LVM RAID1 逻辑卷。
# lvs -a -o name,copy_percent,devices my_vg
  LV               Copy%  Devices
  my_lv            100.00 my_lv_rimage_0(0),my_lv_rimage_1(0)
  [my_lv_rimage_0]        /dev/sde1(1)
  [my_lv_rimage_1]        /dev/sdf1(1)
  [my_lv_rmeta_0]         /dev/sde1(0)
  [my_lv_rmeta_1]         /dev/sdf1(0)
以下命令将 LVM RAID1 逻辑卷
my_vg/my_lv 转换为 LVM 线性设备。
#lvconvert -m0 my_vg/my_lv#lvs -a -o name,copy_percent,devices my_vgLV Copy% Devices my_lv /dev/sde1(1)
当您将 LVM RAID1 逻辑卷转换成 LVM 线性卷,,您可以指定要删除的物理卷。以下示例显示了由两个镜像组成的 LVM RAID1 逻辑卷布局:
/dev/sda1 和 /dev/sdb1。在这个示例中,lvconvert 命令指定要删除 /dev/sda1,保留 /dev/sdb1 作为组成线性设备的物理卷。
#lvs -a -o name,copy_percent,devices my_vgLV Copy% Devices my_lv 100.00 my_lv_rimage_0(0),my_lv_rimage_1(0) [my_lv_rimage_0] /dev/sda1(1) [my_lv_rimage_1] /dev/sdb1(1) [my_lv_rmeta_0] /dev/sda1(0) [my_lv_rmeta_1] /dev/sdb1(0) #lvconvert -m0 my_vg/my_lv /dev/sda1#lvs -a -o name,copy_percent,devices my_vgLV Copy% Devices my_lv /dev/sdb1(1)
4.4.3.4. 将镜像的 LVM 设备转换为 RAID1 设备
您可以通过指定
--type raid1 参数,使用 lvconvert 命令将片段类型为 mirror 的现有 LVM 设备转换为 RAID1 LVM 设备。这会将镜像子卷(*_mimagezFCP)重命名为 RAID 子卷(*_rimageuildDefaults)。另外,镜像日志会被移除,并在与对应数据子卷相同的物理卷上为数据子卷创建元数据子卷(*_rmetauildDefaults)。
以下示例显示了镜像逻辑卷
my_vg/my_lv 的布局。
# lvs -a -o name,copy_percent,devices my_vg
  LV               Copy%  Devices
  my_lv             15.20 my_lv_mimage_0(0),my_lv_mimage_1(0)
  [my_lv_mimage_0]        /dev/sde1(0)
  [my_lv_mimage_1]        /dev/sdf1(0)
  [my_lv_mlog]            /dev/sdd1(0)
以下命令将镜像逻辑卷
my_vg/my_lv 转换为 RAID1 逻辑卷。
#lvconvert --type raid1 my_vg/my_lv#lvs -a -o name,copy_percent,devices my_vgLV Copy% Devices my_lv 100.00 my_lv_rimage_0(0),my_lv_rimage_1(0) [my_lv_rimage_0] /dev/sde1(0) [my_lv_rimage_1] /dev/sdf1(0) [my_lv_rmeta_0] /dev/sde1(125) [my_lv_rmeta_1] /dev/sdf1(125)
4.4.3.5. 重新调整 RAID 逻辑卷的大小
您可以使用以下方法重新定义 RAID 逻辑卷大小:
- 您可以使用 lvresize 或 lvextend 命令增加任何类型 RAID 逻辑卷的大小。这不会改变 RAID 镜像的数量。对于条带的 RAID 逻辑卷,创建条带 RAID 逻辑卷时可使用同样的条带舍入约束。有关扩展 RAID 卷的详情,请参考 第 4.4.18 节 “扩展 RAID 卷”。
- 您可以使用 lvresize 或 lvreduce 命令减少任何类型的 RAID 逻辑卷的大小。这不会改变 RAID 镜像的数量。与 lvextend 命令一样,当创建条带 RAID 逻辑卷时,应用同样的条带舍入约束。有关减小逻辑卷大小的命令的示例,请参考 第 4.4.16 节 “缩小逻辑卷”。
- 从 Red Hat Enterprise Linux 7.4 开始,您可以使用 lvconvert 命令的
--stripes N参数更改条状 RAID 逻辑卷(raid4/5/6/10)上的条带数。这会通过添加或删除条带的容量来增加或减少 RAID 逻辑卷的大小。请注意,raid10卷只能添加条带。这个功能是 RAID 重塑 功能的一部分,它允许您在保持同样的 RAID 级别的情况下更改 RAID 逻辑卷的属性。有关 RAID 重塑和使用 lvconvert 命令重塑 RAID 逻辑卷的示例,请参考 lvmraid(7)手册页。
4.4.3.6. 更改现有 RAID1 设备中的镜像数
您可以更改现有 RAID1 阵列中的镜像数量,就如同在早期的 LVM 镜像部署中更改镜像数量。使用 lvconvert 命令指定要添加或删除的额外元数据/数据子卷对数。有关在早期 LVM 镜像实现中更改卷配置的详情,请参考 第 4.4.4.4 节 “更改镜像卷配置”。
当您使用 lvconvert 命令向 RAID1 设备添加镜像时,您可以指定生成的设备的镜像总数,或者您可以指定要添加到该设备中的镜像数量。您还可以有选择地指定新元数据/数据镜像对所在的物理卷。
元数据子卷(名为
*_rmetafhir)始终存在于与它们的数据子卷 *_rimageuildDefaults 相同的物理设备上。元数据/数据子卷对不会与 RAID 阵列中另一元数据/数据子卷对创建在同一物理卷上(除非您指定了 --alloc anywhere)。
在 RAID1 卷中添加镜像的命令格式如下:
lvconvert -m new_absolute_count vg/lv [removable_PVs]
lvconvert -m +num_additional_images vg/lv [removable_PVs]
例如,以下命令显示 LVM 设备
my_vg/my_lv,它是一个双向 RAID1 阵列:
# lvs -a -o name,copy_percent,devices my_vg
  LV                Copy%  Devices
  my_lv             6.25    my_lv_rimage_0(0),my_lv_rimage_1(0)
  [my_lv_rimage_0]         /dev/sde1(0)
  [my_lv_rimage_1]         /dev/sdf1(1)
  [my_lv_rmeta_0]          /dev/sde1(256)
  [my_lv_rmeta_1]          /dev/sdf1(0)
以下命令将双向 RAID1 设备
my_vg/my_lv 转换为三向 RAID1 设备:
#lvconvert -m 2 my_vg/my_lv#lvs -a -o name,copy_percent,devices my_vgLV Copy% Devices my_lv 6.25 my_lv_rimage_0(0),my_lv_rimage_1(0),my_lv_rimage_2(0) [my_lv_rimage_0] /dev/sde1(0) [my_lv_rimage_1] /dev/sdf1(1) [my_lv_rimage_2] /dev/sdg1(1) [my_lv_rmeta_0] /dev/sde1(256) [my_lv_rmeta_1] /dev/sdf1(0) [my_lv_rmeta_2] /dev/sdg1(0)
当您向 RAID1 阵列中添加镜像时,您可以指定要用于该镜像的物理卷。以下命令将双向 RAID1 设备
my_vg/my_lv 转换为三向 RAID1 设备,指定物理卷 /dev/sdd1 用于阵列:
#lvs -a -o name,copy_percent,devices my_vgLV Copy% Devices my_lv 56.00 my_lv_rimage_0(0),my_lv_rimage_1(0) [my_lv_rimage_0] /dev/sda1(1) [my_lv_rimage_1] /dev/sdb1(1) [my_lv_rmeta_0] /dev/sda1(0) [my_lv_rmeta_1] /dev/sdb1(0) #lvconvert -m 2 my_vg/my_lv /dev/sdd1#lvs -a -o name,copy_percent,devices my_vgLV Copy% Devices my_lv 28.00 my_lv_rimage_0(0),my_lv_rimage_1(0),my_lv_rimage_2(0) [my_lv_rimage_0] /dev/sda1(1) [my_lv_rimage_1] /dev/sdb1(1) [my_lv_rimage_2] /dev/sdd1(1) [my_lv_rmeta_0] /dev/sda1(0) [my_lv_rmeta_1] /dev/sdb1(0) [my_lv_rmeta_2] /dev/sdd1(0)
要从 RAID1 阵列中删除镜像,请使用以下命令。当您使用 lvconvert 命令从 RAID1 设备中删除镜像时,您可以指定生成的设备的镜像总数,或者您可以指定要从该设备中删除的镜像数量。您还可以选择指定要从中删除该设备的物理卷。
lvconvert -m new_absolute_count vg/lv [removable_PVs]
lvconvert -m -num_fewer_images vg/lv [removable_PVs]
另外,当镜像及其关联的元数据子卷被删除时,任何带有高数值的镜像都将用来填充被删除卷的位置。如果您从由 lv_rimage_0、
lv_rimage_1 和lv_rimage_1 组成的三向 RAID1 阵列中删除 lv_rimage_ 1,则会产生一个由 lv_rimage_ 0 和 lv_rimage_ 1 组成的 RAID1 阵列。lv_rimage_2 将会被重命名,并接管空插槽,成为 lv_rimage_1。
以下示例显示了一个三向 RAID1 逻辑卷
my_vg/my_lv 的布局。
# lvs -a -o name,copy_percent,devices my_vg
  LV               Copy%  Devices
  my_lv            100.00 my_lv_rimage_0(0),my_lv_rimage_1(0),my_lv_rimage_2(0)
  [my_lv_rimage_0]        /dev/sde1(1)
  [my_lv_rimage_1]        /dev/sdf1(1)
  [my_lv_rimage_2]        /dev/sdg1(1)
  [my_lv_rmeta_0]         /dev/sde1(0)
  [my_lv_rmeta_1]         /dev/sdf1(0)
  [my_lv_rmeta_2]         /dev/sdg1(0)
下面的命令可将三向 RAID1 逻辑卷转换成双向 RAID1 逻辑卷。
#lvconvert -m1 my_vg/my_lv#lvs -a -o name,copy_percent,devices my_vgLV Copy% Devices my_lv 100.00 my_lv_rimage_0(0),my_lv_rimage_1(0) [my_lv_rimage_0] /dev/sde1(1) [my_lv_rimage_1] /dev/sdf1(1) [my_lv_rmeta_0] /dev/sde1(0) [my_lv_rmeta_1] /dev/sdf1(0)
以下命令将三向 RAID1 逻辑卷转换成双向 RAID1 逻辑卷,指定包含镜像的物理卷为
/dev/sde1。
#lvconvert -m1 my_vg/my_lv /dev/sde1#lvs -a -o name,copy_percent,devices my_vgLV Copy% Devices my_lv 100.00 my_lv_rimage_0(0),my_lv_rimage_1(0) [my_lv_rimage_0] /dev/sdf1(1) [my_lv_rimage_1] /dev/sdg1(1) [my_lv_rmeta_0] /dev/sdf1(0) [my_lv_rmeta_1] /dev/sdg1(0)
4.4.3.7. 将 RAID 镜像分割为单独的逻辑卷
您可以分离 RAID 逻辑卷的镜像形成新的逻辑卷。分离 RAID 镜像的过程与分离镜像逻辑卷的冗余镜像的过程相同,如 第 4.4.4.2 节 “分离镜像逻辑卷的冗余镜像” 中所述。
分离 RAID 镜像的命令格式如下:
lvconvert --splitmirrors count -n splitname vg/lv [removable_PVs]
和您从现有 RAID1 逻辑卷中删除 RAID 镜像一样(如 第 4.4.3.6 节 “更改现有 RAID1 设备中的镜像数”中所述),当您从设备的中间删除 RAID 数据子卷(及其关联的元数据子卷)时,任何编号较高的镜像将向下移动以填充这个插槽。因此,构成 RAID 阵列的逻辑卷上的索引号将是一个完整的整数序列。
注意
如果 RAID1 阵列还没有同步,您就无法分离 RAID 镜像。
以下示例将双向 RAID1 逻辑卷
my_lv 分成两个线性逻辑卷 my_lv 和 new。
#lvs -a -o name,copy_percent,devices my_vgLV Copy% Devices my_lv 12.00 my_lv_rimage_0(0),my_lv_rimage_1(0) [my_lv_rimage_0] /dev/sde1(1) [my_lv_rimage_1] /dev/sdf1(1) [my_lv_rmeta_0] /dev/sde1(0) [my_lv_rmeta_1] /dev/sdf1(0) #lvconvert --splitmirror 1 -n new my_vg/my_lv#lvs -a -o name,copy_percent,devices my_vgLV Copy% Devices my_lv /dev/sde1(1) new /dev/sdf1(1)
以下示例将三向 RAID1 逻辑卷
my_lv 分成双向 RAID1 逻辑卷 my_lv 和线性逻辑卷 new
#lvs -a -o name,copy_percent,devices my_vgLV Copy% Devices my_lv 100.00 my_lv_rimage_0(0),my_lv_rimage_1(0),my_lv_rimage_2(0) [my_lv_rimage_0] /dev/sde1(1) [my_lv_rimage_1] /dev/sdf1(1) [my_lv_rimage_2] /dev/sdg1(1) [my_lv_rmeta_0] /dev/sde1(0) [my_lv_rmeta_1] /dev/sdf1(0) [my_lv_rmeta_2] /dev/sdg1(0) #lvconvert --splitmirror 1 -n new my_vg/my_lv#lvs -a -o name,copy_percent,devices my_vgLV Copy% Devices my_lv 100.00 my_lv_rimage_0(0),my_lv_rimage_1(0) [my_lv_rimage_0] /dev/sde1(1) [my_lv_rimage_1] /dev/sdf1(1) [my_lv_rmeta_0] /dev/sde1(0) [my_lv_rmeta_1] /dev/sdf1(0) new /dev/sdg1(1)
4.4.3.8. 分割和合并 RAID 镜像
您可以临时分离 RAID1 阵列的镜像以进行只读使用,同时使用
--trackchanges 参数和 lvconvert 命令的 --splitmirrors 参数来跟踪任何更改。这可让您以后将镜像合并到阵列中,同时只重新同步那些自镜像被分割后更改的阵列的部分。
分离 RAID 镜像的 lvconvert 命令的格式如下。
lvconvert --splitmirrors count --trackchanges vg/lv [removable_PVs]
当您使用
--trackchanges 参数分离 RAID 镜像时,您可以指定要分离哪个镜像,但您不能更改要分离的卷的名称。另外,得到的卷有以下限制。
- 创建的新卷为只读。
- 不能调整新卷的大小。
- 不能重命名剩余的数组。
- 不能调整剩余的数组大小。
- 您可以独立激活新卷和剩余的阵列。
您可以通过执行带有
--merge 参数的后续 lvconvert 命令来合并使用 --trackchanges 参数指定的镜像。当您合并镜像时,只有自镜像分割后更改的阵列部分会被重新同步。
合并 RAID 镜像的 lvconvert 命令的格式如下。
lvconvert --merge raid_image
下面的例子创建了 RAID1 逻辑卷,然后在追踪剩余的阵列时从那个卷中分离镜像。
#lvcreate --type raid1 -m 2 -L 1G -n my_lv .vgLogical volume "my_lv" created #lvs -a -o name,copy_percent,devices my_vgLV Copy% Devices my_lv 100.00 my_lv_rimage_0(0),my_lv_rimage_1(0),my_lv_rimage_2(0) [my_lv_rimage_0] /dev/sdb1(1) [my_lv_rimage_1] /dev/sdc1(1) [my_lv_rimage_2] /dev/sdd1(1) [my_lv_rmeta_0] /dev/sdb1(0) [my_lv_rmeta_1] /dev/sdc1(0) [my_lv_rmeta_2] /dev/sdd1(0) #lvconvert --splitmirrors 1 --trackchanges my_vg/my_lvmy_lv_rimage_2 split from my_lv for read-only purposes. Use 'lvconvert --merge my_vg/my_lv_rimage_2' to merge back into my_lv #lvs -a -o name,copy_percent,devices my_vgLV Copy% Devices my_lv 100.00 my_lv_rimage_0(0),my_lv_rimage_1(0),my_lv_rimage_2(0) [my_lv_rimage_0] /dev/sdb1(1) [my_lv_rimage_1] /dev/sdc1(1) my_lv_rimage_2 /dev/sdd1(1) [my_lv_rmeta_0] /dev/sdb1(0) [my_lv_rmeta_1] /dev/sdc1(0) [my_lv_rmeta_2] /dev/sdd1(0)
以下示例在跟踪剩余的阵列更改时从 RAID1 卷中分离镜像,然后将该卷合并回阵列中。
#lvconvert --splitmirrors 1 --trackchanges my_vg/my_lvlv_rimage_1 split from my_lv for read-only purposes. Use 'lvconvert --merge my_vg/my_lv_rimage_1' to merge back into my_lv #lvs -a -o name,copy_percent,devices my_vgLV Copy% Devices my_lv 100.00 my_lv_rimage_0(0),my_lv_rimage_1(0) [my_lv_rimage_0] /dev/sdc1(1) my_lv_rimage_1 /dev/sdd1(1) [my_lv_rmeta_0] /dev/sdc1(0) [my_lv_rmeta_1] /dev/sdd1(0) #lvconvert --merge my_vg/my_lv_rimage_1my_vg/my_lv_rimage_1 successfully merged back into my_vg/my_lv #lvs -a -o name,copy_percent,devices my_vgLV Copy% Devices my_lv 100.00 my_lv_rimage_0(0),my_lv_rimage_1(0) [my_lv_rimage_0] /dev/sdc1(1) [my_lv_rimage_1] /dev/sdd1(1) [my_lv_rmeta_0] /dev/sdc1(0) [my_lv_rmeta_1] /dev/sdd1(0)
从 RAID1 卷分离镜像后,您可以通过发出第二个 lvconvert --splitmirrors 命令,重复在不指定
--trackchanges 参数的情况下分割镜像的初始 lvconvert 命令。这会破坏 --trackchanges 参数创建的链接。
使用
--trackchanges 参数分割镜像后,您无法对该阵列发出后续的 lvconvert --splitmirrors 命令,除非您想永久分割被跟踪的镜像。
以下命令序列分割镜像,跟踪镜像,然后永久分离被跟踪的镜像。
#lvconvert --splitmirrors 1 --trackchanges my_vg/my_lvmy_lv_rimage_1 split from my_lv for read-only purposes. Use 'lvconvert --merge my_vg/my_lv_rimage_1' to merge back into my_lv #lvconvert --splitmirrors 1 -n new my_vg/my_lv#lvs -a -o name,copy_percent,devices my_vgLV Copy% Devices my_lv /dev/sdc1(1) new /dev/sdd1(1)
但请注意,以下命令序列将失败。
#lvconvert --splitmirrors 1 --trackchanges my_vg/my_lvmy_lv_rimage_1 split from my_lv for read-only purposes. Use 'lvconvert --merge my_vg/my_lv_rimage_1' to merge back into my_lv #lvconvert --splitmirrors 1 --trackchanges my_vg/my_lvCannot track more than one split image at a time
同样,以下命令序列也会失败,因为分割镜像不是被跟踪的镜像。
#lvconvert --splitmirrors 1 --trackchanges my_vg/my_lvmy_lv_rimage_1 split from my_lv for read-only purposes. Use 'lvconvert --merge my_vg/my_lv_rimage_1' to merge back into my_lv #lvs -a -o name,copy_percent,devices my_vgLV Copy% Devices my_lv 100.00 my_lv_rimage_0(0),my_lv_rimage_1(0) [my_lv_rimage_0] /dev/sdc1(1) my_lv_rimage_1 /dev/sdd1(1) [my_lv_rmeta_0] /dev/sdc1(0) [my_lv_rmeta_1] /dev/sdd1(0) #lvconvert --splitmirrors 1 -n new my_vg/my_lv /dev/sdc1Unable to split additional image from my_lv while tracking changes for my_lv_rimage_1
4.4.3.9. 设置 RAID 失败策略
LVM RAID 根据
lvm.conf 文件中raid_fault_policy 字段定义的首选项以自动方式处理设备故障。
- 如果将
raid_fault_policy字段设为allocate,系统将尝试使用卷组中的备用设备替换失败的设备。如果没有可用的备用设备,则会向系统日志报告。 - 如果将
raid_fault_policy字段设为warn,系统将产生一个警告,日志将表示有一个设备失败。这使得用户能够决定采取什么行动。
只要有足够的设备支持可用性,RAID 逻辑卷将继续操作。
4.4.3.9.1. 分配 RAID 失败策略
在以下示例中,在
lvm.conf 文件中,raid_fault_policy 字段已被设为 allocate。按如下方式定义 RAID 逻辑卷。
# lvs -a -o name,copy_percent,devices my_vg
  LV               Copy%  Devices
  my_lv            100.00 my_lv_rimage_0(0),my_lv_rimage_1(0),my_lv_rimage_2(0)
  [my_lv_rimage_0]        /dev/sde1(1)
  [my_lv_rimage_1]        /dev/sdf1(1)
  [my_lv_rimage_2]        /dev/sdg1(1)
  [my_lv_rmeta_0]         /dev/sde1(0)
  [my_lv_rmeta_1]         /dev/sdf1(0)
  [my_lv_rmeta_2]         /dev/sdg1(0)
如果
/dev/sde 设备失败了,系统日志将显示错误消息。
# grep lvm /var/log/messages
Jan 17 15:57:18 bp-01 lvm[8599]: Device #0 of raid1 array, my_vg-my_lv, has failed.
Jan 17 15:57:18 bp-01 lvm[8599]: /dev/sde1: read failed after 0 of 2048 at
250994294784: Input/output error
Jan 17 15:57:18 bp-01 lvm[8599]: /dev/sde1: read failed after 0 of 2048 at
250994376704: Input/output error
Jan 17 15:57:18 bp-01 lvm[8599]: /dev/sde1: read failed after 0 of 2048 at 0:
Input/output error
Jan 17 15:57:18 bp-01 lvm[8599]: /dev/sde1: read failed after 0 of 2048 at
4096: Input/output error
Jan 17 15:57:19 bp-01 lvm[8599]: Couldn't find device with uuid
3lugiV-3eSP-AFAR-sdrP-H20O-wM2M-qdMANy.
Jan 17 15:57:27 bp-01 lvm[8599]: raid1 array, my_vg-my_lv, is not in-sync.
Jan 17 15:57:36 bp-01 lvm[8599]: raid1 array, my_vg-my_lv, is now in-sync.
由于
raid_fault_policy 字段已被设为 allocate,因此失败的设备将被卷组中的新设备替换。
# lvs -a -o name,copy_percent,devices vg
  Couldn't find device with uuid 3lugiV-3eSP-AFAR-sdrP-H20O-wM2M-qdMANy.
  LV            Copy%  Devices
  lv            100.00 lv_rimage_0(0),lv_rimage_1(0),lv_rimage_2(0)
  [lv_rimage_0]        /dev/sdh1(1)
  [lv_rimage_1]        /dev/sdf1(1)
  [lv_rimage_2]        /dev/sdg1(1)
  [lv_rmeta_0]         /dev/sdh1(0)
  [lv_rmeta_1]         /dev/sdf1(0)
  [lv_rmeta_2]         /dev/sdg1(0)
请注意,虽然替换了失败的设备,但显示仍指示 LVM 无法找到失败的设备。这是因为虽然从 RAID 逻辑卷中删除了失败的设备,但故障的设备还没有从卷组中删除。要从卷组中删除失败的设备,您可以执行 vgreduce --removemissing VG。
如果
raid_fault_policy 已被设为 allocate,但没有备用设备,则分配将失败,逻辑卷保留原样。如果分配失败,您可以选择修复驱动器,然后停用并激活逻辑卷 ; 这在 第 4.4.3.9.2 节 “警告 RAID 失败策略” 中进行了描述。另外,您可以替换失败的设备,如 第 4.4.3.10 节 “替换 RAID 设备” 中所述。
4.4.3.9.2. 警告 RAID 失败策略
在以下示例中,
lvm.conf 文件中的raid_fault_policy 字段已被设为 warn。按如下方式定义 RAID 逻辑卷。
# lvs -a -o name,copy_percent,devices my_vg
  LV               Copy%  Devices
  my_lv            100.00 my_lv_rimage_0(0),my_lv_rimage_1(0),my_lv_rimage_2(0)
  [my_lv_rimage_0]        /dev/sdh1(1)
  [my_lv_rimage_1]        /dev/sdf1(1)
  [my_lv_rimage_2]        /dev/sdg1(1)
  [my_lv_rmeta_0]         /dev/sdh1(0)
  [my_lv_rmeta_1]         /dev/sdf1(0)
  [my_lv_rmeta_2]         /dev/sdg1(0)
如果
/dev/sdh 设备失败,系统日志将显示错误消息。在这种情况下,LVM 将不会自动尝试通过替换其中一个镜像修复 RAID 设备。如果设备失败,您可以使用 lvconvert 命令的 --repair 参数替换该设备,如下所示。
#lvconvert --repair my_vg/my_lv/dev/sdh1: read failed after 0 of 2048 at 250994294784: Input/output error /dev/sdh1: read failed after 0 of 2048 at 250994376704: Input/output error /dev/sdh1: read failed after 0 of 2048 at 0: Input/output error /dev/sdh1: read failed after 0 of 2048 at 4096: Input/output error Couldn't find device with uuid fbI0YO-GX7x-firU-Vy5o-vzwx-vAKZ-feRxfF. Attempt to replace failed RAID images (requires full device resync)? [y/n]:y#lvs -a -o name,copy_percent,devices my_vgCouldn't find device with uuid fbI0YO-GX7x-firU-Vy5o-vzwx-vAKZ-feRxfF. LV Copy% Devices my_lv 64.00 my_lv_rimage_0(0),my_lv_rimage_1(0),my_lv_rimage_2(0) [my_lv_rimage_0] /dev/sde1(1) [my_lv_rimage_1] /dev/sdf1(1) [my_lv_rimage_2] /dev/sdg1(1) [my_lv_rmeta_0] /dev/sde1(0) [my_lv_rmeta_1] /dev/sdf1(0) [my_lv_rmeta_2] /dev/sdg1(0)
请注意,虽然替换了失败的设备,但显示仍指示 LVM 无法找到失败的设备。这是因为虽然从 RAID 逻辑卷中删除了失败的设备,但故障的设备还没有从卷组中删除。要从卷组中删除失败的设备,您可以执行 vgreduce --removemissing VG。
如果设备失败是一个临时故障,或者您可以修复失败的设备,您可以使用 lvchange 命令的
--refresh 选项启动故障设备的恢复。之前,需要停用并激活逻辑卷。
以下命令刷新逻辑卷。
# lvchange --refresh my_vg/my_lv4.4.3.10. 替换 RAID 设备
RAID 跟传统的 LVM 镜像不同。LVM 镜像需要删除失败的设备,或者镜像逻辑卷会挂起。RAID 阵列可在有失败设备的情况下继续运行。实际上,对于 RAID1 以外的 RAID 类型,删除设备意味着将设备转换为较低级别 RAID(例如:从 RAID6 转换为 RAID5,或者从 RAID4 或者 RAID5 转换到 RAID0)。因此,LVM 允许您使用 lvconvert 命令的
--replace 参数替换 RAID 卷中的设备,而不是无条件地删除失败的设备。
lvconvert --replace 的格式如下。
lvconvert --replace dev_to_remove vg/lv [possible_replacements]
下面的例子创建了 RAID1 逻辑卷,然后替换那个卷中的一个设备。
#lvcreate --type raid1 -m 2 -L 1G -n my_lv my_vgLogical volume "my_lv" created #lvs -a -o name,copy_percent,devices my_vgLV Copy% Devices my_lv 100.00 my_lv_rimage_0(0),my_lv_rimage_1(0),my_lv_rimage_2(0) [my_lv_rimage_0] /dev/sdb1(1) [my_lv_rimage_1] /dev/sdb2(1) [my_lv_rimage_2] /dev/sdc1(1) [my_lv_rmeta_0] /dev/sdb1(0) [my_lv_rmeta_1] /dev/sdb2(0) [my_lv_rmeta_2] /dev/sdc1(0) #lvconvert --replace /dev/sdb2 my_vg/my_lv#lvs -a -o name,copy_percent,devices my_vgLV Copy% Devices my_lv 37.50 my_lv_rimage_0(0),my_lv_rimage_1(0),my_lv_rimage_2(0) [my_lv_rimage_0] /dev/sdb1(1) [my_lv_rimage_1] /dev/sdc2(1) [my_lv_rimage_2] /dev/sdc1(1) [my_lv_rmeta_0] /dev/sdb1(0) [my_lv_rmeta_1] /dev/sdc2(0) [my_lv_rmeta_2] /dev/sdc1(0)
下面的例子创建了 RAID1 逻辑卷,然后替换那个卷中的一个设备,指定要用来替换哪些物理卷。
#lvcreate --type raid1 -m 1 -L 100 -n my_lv my_vgLogical volume "my_lv" created #lvs -a -o name,copy_percent,devices my_vgLV Copy% Devices my_lv 100.00 my_lv_rimage_0(0),my_lv_rimage_1(0) [my_lv_rimage_0] /dev/sda1(1) [my_lv_rimage_1] /dev/sdb1(1) [my_lv_rmeta_0] /dev/sda1(0) [my_lv_rmeta_1] /dev/sdb1(0) #pvsPV VG Fmt Attr PSize PFree /dev/sda1 my_vg lvm2 a-- 1020.00m 916.00m /dev/sdb1 my_vg lvm2 a-- 1020.00m 916.00m /dev/sdc1 my_vg lvm2 a-- 1020.00m 1020.00m /dev/sdd1 my_vg lvm2 a-- 1020.00m 1020.00m #lvconvert --replace /dev/sdb1 my_vg/my_lv /dev/sdd1#lvs -a -o name,copy_percent,devices my_vgLV Copy% Devices my_lv 28.00 my_lv_rimage_0(0),my_lv_rimage_1(0) [my_lv_rimage_0] /dev/sda1(1) [my_lv_rimage_1] /dev/sdd1(1) [my_lv_rmeta_0] /dev/sda1(0) [my_lv_rmeta_1] /dev/sdd1(0)
您可以通过一次指定多个
replace 参数来替换多个 RAID 设备,如下例所示。
#lvcreate --type raid1 -m 2 -L 100 -n my_lv my_vgLogical volume "my_lv" created #lvs -a -o name,copy_percent,devices my_vgLV Copy% Devices my_lv 100.00 my_lv_rimage_0(0),my_lv_rimage_1(0),my_lv_rimage_2(0) [my_lv_rimage_0] /dev/sda1(1) [my_lv_rimage_1] /dev/sdb1(1) [my_lv_rimage_2] /dev/sdc1(1) [my_lv_rmeta_0] /dev/sda1(0) [my_lv_rmeta_1] /dev/sdb1(0) [my_lv_rmeta_2] /dev/sdc1(0) #lvconvert --replace /dev/sdb1 --replace /dev/sdc1 my_vg/my_lv#lvs -a -o name,copy_percent,devices my_vgLV Copy% Devices my_lv 60.00 my_lv_rimage_0(0),my_lv_rimage_1(0),my_lv_rimage_2(0) [my_lv_rimage_0] /dev/sda1(1) [my_lv_rimage_1] /dev/sdd1(1) [my_lv_rimage_2] /dev/sde1(1) [my_lv_rmeta_0] /dev/sda1(0) [my_lv_rmeta_1] /dev/sdd1(0) [my_lv_rmeta_2] /dev/sde1(0)
注意
当您使用 lvconvert --replace 命令指定替换驱动器时,从阵列中已使用的驱动器上的额外空间分配替换驱动器。例如,
lv_rimage_0 和 lv_rimage_1 不应位于同一物理卷上。
4.4.3.11. 清理 RAID 逻辑卷
LVM 提供对 RAID 逻辑卷的清理支持。RAID 清理是读取阵列中的所有数据和奇偶校验块的过程,并检查它们是否是分配的。
您可以使用 lvchange 命令的
--syncaction 选项启动 RAID 清理操作。您可以指定 check 或 repair 操作。check 操作会接管阵列,并记录阵列中的差异数,但不会修复它们。repair 操作会更正发现的差异。
清理 RAID 逻辑卷的命令格式如下:
lvchange --syncaction {check|repair} vg/raid_lv注意
lvchange --syncaction repair vg/raid_lv 操作不执行与 lvconvert --repair vg/raid_lv 操作相同的功能。lvchange --syncaction repair 操作会在阵列中启动后台同步操作,而 lvconvert --repair 操作旨在修复/替换镜像或 RAID 逻辑卷中失败的设备。
支持新的 RAID 清理操作,lvs 命令现在支持两个新的可打印字段:
raid_sync_action 和 raid_mismatch_count。默认情况下不打印这些字段。要显示您使用 lvs 的 -o 参数指定的这些字段,如下所示:
lvs -o +raid_sync_action,raid_mismatch_count vg/lv
raid_sync_action 字段显示当前 raid 卷执行的同步操作。可以是以下值之一:
idle: 所有同步操作都完成(什么都不做)resync:初始化阵列或在机器失败后恢复恢复:替换阵列中的设备检查:查找阵列不一致repair:查找并修复不一致
raid_mismatch_count 字段显示 check 操作过程中发现的差异数。
lvs 命令的
Cpy%Sync 字段现在打印任何 raid_sync_action 操作的进度,包括 check 和 repair。
lvs 命令的输出的
lv_attr 字段现在提供额外的指示器,支持 RAID 清理操作。这个字段中的第 9 位显示逻辑卷的健康状况,它现在支持以下指示器。
- (m)不匹配表示 RAID 逻辑卷中存在差异。这个字符在清理操作侦测到部分 RAID 不一致时就会显示。
- (r)刷新表示 RAID 阵列中的设备存在故障,且内核将其视为失败,即使 LVM 可以读取该设备标签,并认为该设备正常。应(r)刷新逻辑卷来通知内核设备现在可用,或者如果怀疑设备有故障,应(r)替换它。
有关 lvs 命令的信息,请参考 第 4.8.2 节 “对象显示字段”。
当您执行 RAID 清理操作时,同步操作所需的后台 I/O 可以对 LVM 设备分离其他 I/O 操作,如卷组元数据更新。
您可以使用 lvchange 命令的
--minrecoveryrate 和 --maxrecoveryrate 选项设置这些操作的最小和最大 I/O 速率来控制执行 sync 操作的速率。如下所示指定这些选项。
--maxrecoveryrate Rate[bBsSkKmMgG]为 RAID 逻辑卷设置最大恢复率,使其不会阻断其他小的 I/O 操作。Rate 被指定为阵列中每个设备的每秒数量。如果没有给出后缀,则会假定为 kiB/sec/device。将恢复率设置为 0 表示它将不被绑定。--minrecoveryrate Rate[bBsSkKmMgG]为 RAID 逻辑卷设置最小恢复率,以确保sync操作的 I/O 达到最小吞吐量,即使存在大量 I/O。Rate 被指定为阵列中每个设备的每秒数量。如果没有给出后缀,则会假定为 kiB/sec/device。
4.4.3.12. RAID 接管(Red Hat Enterprise Linux 7.4 及更新的版本)
LVM 支持 Raid 接管,这意味着将 RAID 逻辑卷从一个 RAID 级别转换成另一个 RAID 级别(比如从 RAID 5 到 RAID 6)。更改 RAID 级别通常是为了增加或降低对设备故障的恢复能力或重新条带化逻辑卷。您可以对 RAID 接管使用 lvconvert 。有关 RAID 接管的信息,以及使用 lvconvert 转换 RAID 逻辑卷的示例,请参阅 lvmraid(7)手册页。
4.4.3.13. 重塑 RAID 逻辑卷(Red Hat Enterprise Linux 7.4 及更新版本)
RAID 重塑 意味着更改 RAID 逻辑卷的属性,而同时保持相同的 RAID 级别。您可以修改的一些属性包括 RAID 布局、条带大小和条带数目。有关 RAID 重塑和使用 lvconvert 命令重塑 RAID 逻辑卷的示例,请参考 lvmraid(7)手册页。
4.4.3.14. 对 RAID1 逻辑卷控制 I/O 操作
您可以使用 lvchange 命令的
--writemostly 和 --writebehind 参数控制 RAID1 逻辑卷中设备的 I/O 操作。使用这些参数的格式如下。
--[raid]writemostly PhysicalVolume[:{t|y|n}]将 RAID1 逻辑卷中的设备标记为write-mostly。除非需要,避免对这些驱动器的所有读取。设置此参数会使驱动器中的 I/O 操作数量保持最小。默认情况下,对于逻辑卷中指定的物理卷,write-mostly属性被设为 yes。通过将:n附加到物理卷或者通过指定:t来切换值,可以删除write-mostly标志。在单个命令中可以多次指定--writemostly参数,从而可以一次为逻辑卷中的所有物理卷切换 write-mostly 属性。--[raid]writebehind IOCount指定允许对标记为write-mostly的 RAID1 逻辑卷中设备的突出写的最大数。超过这个值后,写入就变为同步行为,在阵列指示写操作完成前,所有的写操作都需要已完成。将值设为零可清除首选项,并允许系统任意选择数值。
4.4.3.15. 更改 RAID 逻辑卷上的区域大小(Red Hat Enterprise Linux 7.4 及更新版本)
当您创建 RAID 逻辑卷时,逻辑卷的区域大小将是
/etc/lvm/lvm.conf 文件中 raid_region_size 参数的值。您可以使用 lvcreate 命令的 -R 选项来覆盖此默认值。
创建 RAID 逻辑卷后,您可以使用 lvconvert 命令的
-R 选项更改卷的区域大小。以下示例将逻辑卷 vg/raidlv 的区域大小改为 4096K。必须同步 RAID 卷以便更改区域大小。
#lvconvert -R 4096K vg/raid1Do you really want to change the region_size 512.00 KiB of LV vg/raid1 to 4.00 MiB? [y/n]:yChanged region size on RAID LV vg/raid1 to 4.00 MiB.
4.4.4. 创建镜像卷
对于 Red Hat Enterprise Linux 7.0 版本,LVM 支持 RAID 1/4/5/6/10,如 第 4.4.3 节 “RAID 逻辑卷” 中所述。RAID 逻辑卷不是集群感知的。虽然可以在一台机器上单独创建和激活 RAID 逻辑卷,但不能在多个机器上同时激活它们。如果需要非独占镜像卷,您必须创建带有
mirror 段类型的卷,如本节所述。
注意
有关将片段类型为
mirror 的现有 LVM 设备转换为 RAID1 LVM 设备的详情,请参考 第 4.4.3.4 节 “将镜像的 LVM 设备转换为 RAID1 设备”。
注意
在集群中创建镜像 LVM 逻辑卷需要与在单个节点上创建片段类型为
mirror 的镜像 LVM 逻辑卷的命令和流程相同。但是,为了在集群中创建镜像 LVM 卷,集群和集群镜像基础架构必须正在运行,集群必须是 quorate,且 lvm.conf 文件中的锁定类型必须正确设置以启用集群锁定。有关在集群中创建镜像卷的示例,请参阅 第 5.5 节 “在集群中创建镜像 LVM 逻辑卷”。
尝试从集群中的多个节点连续运行多个 LVM 镜像创建和转换命令,快速成功转换可能会导致这些命令的积压。这可能会导致一些请求的操作超时,因此会失败。为了避免这个问题,建议从集群的一个节点执行集群镜像创建命令。
当您创建镜像卷时,您可以使用 lvcreate 命令的
-m 参数指定要制作的数据副本数。指定 -m1 会创建一个镜像,它生成文件系统的两个副本:线性逻辑卷加上一个副本。同样,指定 -m2 会创建两个镜像,生成文件系统的三个副本。
以下命令创建一个具有单个镜像的镜像逻辑卷。卷大小为 50GB,名为
mirrorlv,它从卷组 vg0 中分离出来:
# lvcreate --type mirror -L 50G -m 1 -n mirrorlv vg0
LVM 镜像将被复制的设备划分成区域,默认大小为 512KB。您可以使用 lvcreate 命令的
-R 参数来指定区域大小(以 MB 为单位)。您还可以通过编辑 lvm.conf 文件中的 mirror_region_size 设置来更改默认区域大小。
注意
由于集群基础架构的限制,无法使用默认大小为 512KB 的区域创建大于 1.5TB 的集群镜像。需要更大镜像的用户应将区域大小从默认值增加到更大。增加区域大小失败将导致 LVM 创建挂起,并可能会挂起其他 LVM 命令。
作为指定大于 1.5TB 的镜像的区域大小的通用指导,您可能需要以 TB 为单位的镜像大小,并将该数量舍入到下一个 2 的电源,将这个数字用作 lvcreate 命令的
-R 参数。例如,如果您的镜像大小为 1.5TB,您可以指定 -R 2。如果您的镜像大小为 3TB,您可以指定 -R 4。对于镜像大小为 5TB,您可以指定 -R 8。
以下命令创建了一个区域大小为 2MB 的镜像逻辑卷:
# lvcreate --type mirror -m 1 -L 2T -R 2 -n mirror vol_group
创建镜像后,镜像区域会同步。对于大型镜像组件,同步过程可能需要很长时间。当您创建一个不需要恢复的新镜像时,您可以指定
--nosync 参数来指示不需要从第一个设备进行初始同步。
LVM 维护一个小日志,它用于跟踪哪些区域与镜像或镜像处于同步。默认情况下,此日志保存在磁盘上,它会在重启后保留,并确保每次机器重启或崩溃时不需要重新同步镜像。您可以使用
--mirrorlog core 参数指定此日志保存在内存中。这消除了需要额外的日志设备,但它要求每次重启时重新同步整个镜像。
以下命令从卷组
bigvg 中创建镜像逻辑卷。逻辑卷名为 ondiskmirvol,只有一个镜像。卷大小为 12MB,将镜像日志保留在内存中。
# lvcreate --type mirror -L 12MB -m 1 --mirrorlog core -n ondiskmirvol bigvg
  Logical volume "ondiskmirvol" created
镜像日志创建在与创建任何镜像 leg 所在设备不同的设备上。但是,可以使用 vgcreate 命令的
--alloc anywhere 参数在与镜像 leg 相同的设备上创建镜像日志。这可能会降低性能,但允许您创建镜像,即使您只有两个底层设备。
以下命令创建一个具有单个镜像的镜像逻辑卷,镜像日志与任一镜像 leg 在同一设备上。在这个示例中,卷组
vg0 只包含两个设备。该命令在 vg0 卷组中创建一个名为 mirrorlv 的 500 MB 卷。
# lvcreate --type mirror -L 500M -m 1 -n mirrorlv -alloc anywhere vg0注意
有了集群镜像,镜像日志管理完全由当前具有最低集群 ID 的集群节点来负责。因此,当保存集群镜像日志的设备在集群子集中不可用时,集群镜像可以继续操作,而不受任何影响,只要具有最低 ID 的集群节点保留对镜像日志的访问。由于镜像未受到干扰,因此不会发出任何自动纠正操作(修复)。当最低 ID 的集群节点失去对镜像日志的访问时,自动操作将启动(不管是否可从其他节点访问日志)。
要创建自我镜像的镜像日志,您可以指定
--mirrorlog 镜像 参数。以下命令从卷组 bigvg 中创建镜像逻辑卷。逻辑卷名为 twologvol,它只有一个镜像。卷大小为 12MB,镜像日志是镜像的,每个日志保存在不同的设备上。
# lvcreate --type mirror -L 12MB -m 1 --mirrorlog mirrored -n twologvol bigvg
  Logical volume "twologvol" created
与标准镜像日志一样,可以使用 vgcreate 命令的
--alloc anywhere 参数在与镜像 leg 相同的设备上创建冗余镜像日志。这可能会降低性能,但是它允许您创建冗余镜像日志,即使您没有足够的底层设备来使每个日志保留在与镜像 leg 不同的设备上。
创建镜像后,镜像区域会同步。对于大型镜像组件,同步过程可能需要很长时间。当您创建一个不需要恢复的新镜像时,您可以指定
--nosync 参数来指示不需要从第一个设备进行初始同步。
您可以指定哪个设备用于镜像 leg 和日志,以及要使用设备的哪个扩展。要强制日志在特定的磁盘上,请在要放置它的磁盘上精确指定一个扩展。LVM 不需要遵守设备在命令行上列出的顺序。如果列出了任何物理卷,则其是要分配的唯一空间。列表中包含的任何已分配的物理区块都将被忽略。
下面的命令创建了一个具有单个镜像的镜像逻辑卷,以及没有镜像的单个日志。卷大小为 500 MB,名为
mirrorlv,它被从卷组 vg0 中分离出来。镜像的第一个 leg 位于设备 /dev/sda1 上,镜像的第二个 leg 位于设备 /dev/sdb1 上,镜像日志位于 /dev/sdc1 上。
# lvcreate --type mirror -L 500M -m 1 -n mirrorlv vg0 /dev/sda1 /dev/sdb1 /dev/sdc1
以下命令创建一个具有单个镜像的镜像逻辑卷。卷大小为 500 MB,名为
mirrorlv,它被从卷组 vg0 中分离出来。镜像的第一个 leg 位于设备 /dev/sda1 的第 0 个扩展上,镜像的第二个 leg 位于设备 /dev/sdb1 的扩展 0 到 499 上,镜像日志从设备 /dev/sdc1 的扩展 0 开始。这些是 1MB 扩展。如果已经分配了任何指定的扩展,它们将被忽略。
# lvcreate --type mirror -L 500M -m 1 -n mirrorlv vg0 /dev/sda1:0-499 /dev/sdb1:0-499 /dev/sdc1:0注意
您可以将条带和镜像合并在一个逻辑卷中。在创建逻辑卷的同时指定镜像数(
--mirrors X)和条带数(--stripes Y)会导致构成镜像设备的设备被条带化。
4.4.4.1. 镜像逻辑卷失败策略
您可以使用
lvm.conf 文件的 activation 部分中的 mirror_image_fault_policy 和 mirror_log_fault_policy 参数定义镜像逻辑卷在设备失败时的行为。当这些参数设为 remove 时,系统会尝试删除有问题的设备,并在没有它的情况下运行。当这些参数设为 allocate 时,系统会尝试删除有问题的设备,并尝试在新设备上分配空间以替换失败的设备。如果没有为替换分配适当的设备和空间,则此策略的行为与 remove 策略类似。
默认情况下,
mirror_log_fault_policy 参数设置为 allocate。对日志使用此策略很快,并保持通过崩溃和重启同步状态的能力。如果将此策略设置为 remove,当日志设备无法将镜像转换为使用内存中日志时;在这个实例中,镜像不会记住崩溃和重启时的同步状态,并且整个镜像将被重新同步。
默认情况下,
mirror_image_fault_policy 参数被设为 remove。有了这个策略,如果镜像失败,如果只有一个保留了好的副本,则镜像将转换为非镜像设备。将这个策略设置为 allocate 镜像需要镜像重新同步设备 ; 这是一个较慢的过程,但它会保留该设备的镜像特性。
注意
当 LVM 镜像出现设备故障时,会进行两阶段的恢复。第一个阶段涉及删除故障设备。这可能导致镜像缩小成一个线性设备。第二个阶段,如果
mirror_log_fault_policy 参数设置为 allocate,则尝试替换任何失败设备。但请注意,如果其他设备可用,则不能保证第二阶段会选择之前镜像使用的、不是故障的一部分的设备。
有关从 LVM 镜像故障中手动恢复的详情,请参考 第 6.2 节 “从 LVM 镜像故障中恢复”。
4.4.4.2. 分离镜像逻辑卷的冗余镜像
您可以分离镜像逻辑卷的冗余镜像来形成一个新的逻辑卷。要分离镜像,请使用 lvconvert 命令的
--splitmirrors 参数,指定要分离的冗余镜像数量。您必须使用命令的 --name 参数新分离的逻辑卷指定名称。
下面的命令从镜像逻辑卷
vg/lv 中分离出一个名为 copy 的新逻辑卷。新逻辑卷包含两个镜像 leg。在这个示例中,LVM 选择要分离哪个设备。
# lvconvert --splitmirrors 2 --name copy vg/lv
您可以指定要分离哪个设备。下面的命令从镜像逻辑卷
vg/lv 中分离出一个名为 copy 的新逻辑卷。新逻辑卷包含两个镜像 leg,它由设备 /dev/sdc1 和 /dev/sde1 组成。
# lvconvert --splitmirrors 2 --name copy vg/lv /dev/sd[ce]14.4.4.3. 修复镜像逻辑设备
您可以使用 lvconvert --repair 命令在磁盘失败后修复镜像。这会将镜像重新变回一致的状态。lvconvert --repair 命令是一个交互式命令,提示您指示是否希望系统尝试替换任何失败的设备。
- 要跳过提示并替换所有故障设备,请在命令行上指定
-y选项。 - 要跳过提示并不替换任何故障设备,请在命令行上指定
-f选项。 - 要跳过提示并仍然指明镜像镜像和镜像日志的不同替换策略,您可以指定
--use-policies参数,以使用由lvm.conf文件中的mirror_log_fault_policy和mirror_device_fault_policy参数指定的设备替换策略。
4.4.4.4. 更改镜像卷配置
您可以使用 lvconvert 命令增加或减少逻辑卷包含的镜像数。这允许您将逻辑卷从镜像卷转换为线性卷,或者从线性卷转换为镜像卷。您还可以使用这个命令重新配置现有逻辑卷的其他镜像参数,如
corelog。
当您将线性卷转换为镜像卷时,您在为现有卷创建镜像 leg。这意味着您的卷组必须包含镜像 leg 和镜像日志的设备和空间。
如果您丢失了镜像的 leg,LVM 会将卷转换为线性卷,以便您仍可以访问卷,而无需镜像冗余。替换 leg 后,使用 lvconvert 命令恢复镜像。此过程在 第 6.2 节 “从 LVM 镜像故障中恢复” 中提供。
以下命令将线性逻辑卷
vg00/lvol1 转换为镜像逻辑卷。
# lvconvert -m1 vg00/lvol1
以下命令将镜像逻辑卷
vg00/lvol1 转换为线性逻辑卷,删除镜像 leg。
# lvconvert -m0 vg00/lvol1
以下示例将额外的镜像 leg 添加到现有逻辑卷
vg00/lvol1 中。本例演示了 lvconvert 命令将卷更改为具有两个镜像 leg 的卷之前和之后卷的配置。
#lvs -a -o name,copy_percent,devices vg00LV Copy% Devices lvol1 100.00 lvol1_mimage_0(0),lvol1_mimage_1(0) [lvol1_mimage_0] /dev/sda1(0) [lvol1_mimage_1] /dev/sdb1(0) [lvol1_mlog] /dev/sdd1(0) #lvconvert -m 2 vg00/lvol1vg00/lvol1: Converted: 13.0% vg00/lvol1: Converted: 100.0% Logical volume lvol1 converted. #lvs -a -o name,copy_percent,devices vg00LV Copy% Devices lvol1 100.00 lvol1_mimage_0(0),lvol1_mimage_1(0),lvol1_mimage_2(0) [lvol1_mimage_0] /dev/sda1(0) [lvol1_mimage_1] /dev/sdb1(0) [lvol1_mimage_2] /dev/sdc1(0) [lvol1_mlog] /dev/sdd1(0)
4.4.5. 创建精简配置的逻辑卷
逻辑卷可以使用精简模式置备。这可让您创建大于可用扩展的逻辑卷。使用精简配置,您可以管理一个空闲空间的存储池,称为精简池,可在应用程序需要时将其分配给任意数量的设备。然后,当应用程序实际写入逻辑卷时,您可以创建可绑定到精简池的设备以便以后分配。可在需要时动态扩展精简池,以便有效分配存储空间。
注意
本节提供了您用来创建和增长精简配置逻辑卷的基本命令的概述。有关 LVM 精简配置的详情,以及使用带精简置备逻辑卷的 LVM 命令和工具的详情,请参考 lvmthin(7)手册页。
注意
不支持集群中跨节点的精简卷。精简池及其所有精简卷必须只在一个集群节点中单独激活。
要创建精简卷,请执行以下任务:
- 使用 vgcreate 命令创建卷组。
- 使用 lvcreate 命令创建精简池。
- 使用 lvcreate 命令在精简池中创建精简卷。
您可以使用 lvcreate 命令的
-T (或 --thin)选项来创建精简池或精简卷。您还可以使用 lvcreate 命令的 -T 选项,通过单个命令同时在该池中创建精简池和精简卷。
以下命令使用 lvcreate 命令的
-T 选项在卷组 vg001 中创建一个名为 mythinpool 的精简池,大小为 100M。请注意:由于您要创建物理空间池,您必须指定池的大小。lvcreate 命令的 -T 选项不使用参数;它会从命令指定的其他选项中推断要创建的设备类型。
#lvcreate -L 100M -T vg001/mythinpoolRounding up size to full physical extent 4.00 MiB Logical volume "mythinpool" created #lvsLV VG Attr LSize Pool Origin Data% Move Log Copy% Convert my mythinpool vg001 twi-a-tz 100.00m 0.00
以下命令使用 lvcreate 命令的
-T 选项在精简池 vg001/mythinpool 中创建一个名为 thinvolume 的精简卷。请注意:在这种情况下,您要指定虚拟大小,并且您要为容量大于包含它的卷指定虚拟大小。
#lvcreate -V 1G -T vg001/mythinpool -n thinvolumeLogical volume "thinvolume" created #lvsLV VG Attr LSize Pool Origin Data% Move Log Copy% Convert mythinpool vg001 twi-a-tz 100.00m 0.00 thinvolume vg001 Vwi-a-tz 1.00g mythinpool 0.00
以下命令使用 lvcreate 命令的
-T 选项通过为 lvcreate 命令指定大小和虚拟大小参数来在该池中创建精简池和精简卷。这个命令在卷组 vg001 中创建一个名为 mythinpool 的精简池,它还在该池中创建一个名为 thinvolume 的精简卷。
#lvcreate -L 100M -T vg001/mythinpool -V 1G -n thinvolumeRounding up size to full physical extent 4.00 MiB Logical volume "thinvolume" created #lvsLV VG Attr LSize Pool Origin Data% Move Log Copy% Convert mythinpool vg001 twi-a-tz 100.00m 0.00 thinvolume vg001 Vwi-a-tz 1.00g mythinpool 0.00
您还可以通过指定 lvcreate 命令的
--thinpool 参数来创建精简池。与 -T 选项不同,-- thinpool 参数需要一个参数,这是您要创建的精简池逻辑卷的名称。以下示例指定了 lvcreate 命令的 --thinpool 参数,来在卷组 vg001 中创建一个名为 mythinpool 的精简池,大小为 100M:
#lvcreate -L 100M --thinpool mythinpool vg001Rounding up size to full physical extent 4.00 MiB Logical volume "mythinpool" created #lvsLV VG Attr LSize Pool Origin Data% Move Log Copy% Convert mythinpool vg001 twi-a-tz 100.00m 0.00
对块大小使用以下标准:
- 较小的块大小需要更多元数据,并阻碍了性能,但它提供了更好的快照空间利用率。
- 大型块大小需要较少的元数据操作,但制作快照效率较低。
LVM2 使用以下方法计算块大小:
默认情况下,LVM 以 64KiB 块大小开始,并在精简池元数据设备的大小超过 128MiB 时增加其值,因此元数据大小会保持紧凑。这可能会导致一些大的块值,这对快照使用效率较低。在这种情况下,较小的块大小和较大的元数据大小是一个更好的选择。
如果卷数据的大小在 TiB 范围,使用 ~15.8GiB 元数据大小(这是最大支持的大小),并根据您的要求使用块大小。但是,如果您需要扩展这个卷数据的大小,且只有一个小的块大小,则无法增大元数据大小。
警告
红帽建议至少使用默认块大小。如果块太小,且您的卷空间不足用于元数据,则该卷将无法创建数据。监控逻辑卷,以确保它们在元数据卷完全变满之前扩展或创建更多的存储。确保建立了具有足够大块大小的精简池,这样就不会耗尽元数据的空间。
创建池时支持条带。以下命令在卷组
vg001 中创建一个名为 pool 的 100M 的精简池,其中有两个 64 kB 条带,块大小为 256 kB。它还创建一个 1T 精简卷 vg00/thin_lv。
# lvcreate -i 2 -I 64 -c 256 -L 100M -T vg00/pool -V 1T --name thin_lv
您可以使用 lvextend 命令扩展精简卷的大小。但是您无法缩小精简池的大小。
以下命令调整了一个已存在的精简池大小,其大小为 100M,这样就扩展为 100M。
#lvextend -L+100M vg001/mythinpoolExtending logical volume mythinpool to 200.00 MiB Logical volume mythinpool successfully resized #lvsLV VG Attr LSize Pool Origin Data% Move Log Copy% Convert mythinpool vg001 twi-a-tz 200.00m 0.00 thinvolume vg001 Vwi-a-tz 1.00g mythinpool 0.00
与其他类型的逻辑卷一样,您可以使用 lvrename 重命名卷,您可以使用 lvremove 删除卷,您可以使用 lvs 和 lvdisplay 命令显示卷的信息。
默认情况下,lvcreate 命令根据公式(Pool_LV_size / Pool_LV_chunk_size * 64)设置精简池元数据逻辑卷的大小。如果您有大量快照,或者您的精简池有小的块,并且预计以后精简池的大小会显著增长,您可能需要使用 lvcreate 命令的
--poolmetadatasize 参数增加精简池的元数据卷的默认值。精简池元数据逻辑卷支持的值在 2MiB 到 16GiB 之间。
您可以使用 lvconvert 命令的
--thinpool 参数将现有逻辑卷转换为精简池卷。当您将现有逻辑卷转换为精简池卷时,您必须将 lvconvert 的 --poolmetadata 参数与 --thinpool 参数一起使用,将现有逻辑卷转换为精简池卷的元数据卷。
注意
将逻辑卷转换成精简池卷或精简池元数据卷会破坏逻辑卷的内容,因为在这种情况下,lvconvert 不会保留设备的内容,而是覆盖其内容。
以下示例将卷组
vg001 中的现有逻辑卷 lv1 转换为精简池卷,并将卷组 vg001 中的现有逻辑卷 lv2 转换为那个精简池卷的元数据卷。
# lvconvert --thinpool vg001/lv1 --poolmetadata vg001/lv2
  Converted vg001/lv1 to thin pool.
4.4.6. 创建快照卷
注意
LVM 支持精简配置的快照。有关创建精简配置快照卷的详情,请参考 第 4.4.7 节 “创建精简配置的快照卷”。
使用 lvcreate 命令的
-s 参数来创建快照卷。快照卷是可写的。
注意
不支持集群中跨节点的 LVM 快照。您不能在集群卷组中创建快照卷。但是,如果您需要在集群逻辑卷上创建一致的数据备份,您可以只激活该卷,然后创建快照。有关在一个节点上只激活逻辑卷的详情,请参考 第 4.7 节 “激活集群中单个节点上的逻辑卷”。
注意
镜像逻辑卷支持 LVM 快照。
RAID 逻辑卷支持快照。有关创建 RAID 逻辑卷的详情,请参考 第 4.4.3 节 “RAID 逻辑卷”。
LVM 不允许创建大于原始卷大小的快照卷,以及卷所需的元数据。如果您指定大于这个卷的快照卷,则系统会创建一个只根据原始卷大小所需的快照卷。
默认情况下,在正常激活命令中会跳过快照卷。有关控制快照卷的激活的详情,请参考 第 4.4.20 节 “控制逻辑卷激活”。
以下命令创建一个大小为 100 MB 的快照逻辑卷,其大小为
/dev/vg00/snap。这会创建一个名为 /dev/vg00/lvol1 的原始逻辑卷的快照。如果原始逻辑卷包含一个文件系统,您可以在任意目录中挂载快照逻辑卷,以便访问文件系统的内容,并在不断更新原始文件系统时进行备份。
# lvcreate --size 100M --snapshot --name snap /dev/vg00/lvol1
创建快照逻辑卷后,在 lvdisplay 命令中指定原始卷会产生输出,其中包含所有快照逻辑卷的列表及其状态(活跃或不活跃)。
以下示例显示了逻辑卷
/dev/new_vg/lvol0 的状态,其快照卷 /dev/new_vg/newvgsnap 已创建。
# lvdisplay /dev/new_vg/lvol0
  --- Logical volume ---
  LV Name                /dev/new_vg/lvol0
  VG Name                new_vg
  LV UUID                LBy1Tz-sr23-OjsI-LT03-nHLC-y8XW-EhCl78
  LV Write Access        read/write
  LV snapshot status     source of
                         /dev/new_vg/newvgsnap1 [active]
  LV Status              available
  # open                 0
  LV Size                52.00 MB
  Current LE             13
  Segments               1
  Allocation             inherit
  Read ahead sectors     0
  Block device           253:2
默认情况下,lvs 命令会显示原始卷以及正在使用的快照卷的百分比。以下示例显示了包含逻辑卷
/dev/new_vg/lvol0 的 lvs 命令的默认输出,其快照卷 /dev/new_vg/newvgsnap 已创建。
# lvs
  LV         VG     Attr   LSize  Origin Snap%  Move Log Copy%
  lvol0      new_vg owi-a- 52.00M
  newvgsnap1 new_vg swi-a-  8.00M lvol0    0.20
警告
因为快照会在原始卷更改时增加大小,因此使用 lvs 命令定期监控快照卷的百分比以确保其没有填满。使用了 100% 的快照会完全丢失,因为对原始卷中未更改的部分的写入无法在不破坏快照的情况下无法成功。
当快照已满时,除了快照本身无效外,所有在那个快照设备中挂载的文件系统都会被强制卸载,这避免了访问挂载点时出现的文件系统错误。另外,您可以在
lvm.conf 文件中指定 snapshot_autoextend_threshold 选项。这个选项允许在剩余的快照空间低于您设定的阈值时自动扩展快照。这个功能要求卷组中还有未被分配的空间。
LVM 不允许创建大于原始卷大小的快照卷,以及卷所需的元数据。同样,快照的自动扩展不会将快照卷的大小增加到超过计算的快照所需的最大值。一旦快照增长到足够大来覆盖原始数据后,便不会再监控它是否发生了自动扩展。
lvm.conf 文件本身中提供了有关设置 snapshot_autoextend_threshold 和 snapshot_autoextend_percent 的信息。有关 lvm.conf 文件的详情,请参考 附录 B, LVM 配置文件。
4.4.7. 创建精简配置的快照卷
Red Hat Enterprise Linux 支持精简配置的快照卷。有关精简快照卷的优点和限制的详情,请参考 第 2.3.6 节 “精简配置的快照卷”。
注意
本节概述您用来创建和增加精简置备快照卷的基本命令。有关 LVM 精简配置的详情,以及使用带精简置备逻辑卷的 LVM 命令和工具的详情,请参考 lvmthin(7)手册页。
重要
在创建精简快照卷时,您不用指定卷的大小。如果指定了 size 参数,则创建的快照不会是一个精简快照卷,也不会使用精简池来存储数据。例如,命令
lvcreate -s vg/thinvolume -L10M 不会创建精简快照,即使原始卷是精简卷。
可为精简配置的原始卷创建精简快照,也可针对不是精简置备的原始卷创建精简快照。
您可以使用 lvcreate 命令的
--name 选项为快照卷指定名称。以下命令创建一个精简配置的逻辑卷 vg001/thinvolume 的精简配置的快照卷,名为 mysnapshot1。
#lvcreate -s --name mysnapshot1 vg001/thinvolumeLogical volume "mysnapshot1" created #lvsLV VG Attr LSize Pool Origin Data% Move Log Copy% Convert mysnapshot1 vg001 Vwi-a-tz 1.00g mythinpool thinvolume 0.00 mythinpool vg001 twi-a-tz 100.00m 0.00 thinvolume vg001 Vwi-a-tz 1.00g mythinpool 0.00
注意
在使用精简配置时,存储管理员务必要监控存储池,并在其被完全占用时添加更多容量。有关扩展精简卷大小的详情,请参考 第 4.4.5 节 “创建精简配置的逻辑卷”
精简快照卷具有与其它精简卷相同的特征。您可以独立激活卷、扩展卷、重新命名卷、删除卷、甚至快照卷。
默认情况下,在正常激活命令中会跳过快照卷。有关控制快照卷的激活的详情,请参考 第 4.4.20 节 “控制逻辑卷激活”。
您还可以为非置备的逻辑卷创建精简配置的快照。因为非精简配置的逻辑卷不包含在精简池中,所以它被称为 外部原始卷。外部原始卷可以被很多精简置备的快照卷使用和共享,即使在不同的精简池中也是如此。在创建精简置备快照时,外部原始源必须不活跃且只读。
要为外部原始卷创建一个精简配置的快照,您必须指定
--thinpool 选项。以下命令创建一个只读不活跃卷 origin_volume 的精简快照卷。精简快照卷名为 mythinsnap。然后,逻辑卷 origin_volume 在卷组 vg001 中成为精简快照卷 mythinsnap 的精简外部来源,它将使用现有的精简池 vg001/pool。因为原始卷必须与快照卷位于同一个卷组中,所以您在指定原始逻辑卷时不需要指定卷组。
# lvcreate -s --thinpool vg001/pool origin_volume --name mythinsnap
您可以创建第一个快照卷的第二个精简置备快照卷,如下例所示。
# lvcreate -s vg001/mythinsnap --name my2ndthinsnap
从 Red Hat Enterprise Linux 7.2 开始,您可以通过指定 lvs 命令的
lv_ancestors 和 lv_descendants 报告字段来显示精简快照逻辑卷的所有上级和后代的列表。
在以下示例中:
stack1是卷组vg001中的原始卷。stack2是stack1的快照stack3是stack2的快照stack4是stack3的快照
另外:
stack5也是stack2的快照stack6是stack5的快照
$ lvs -o name,lv_ancestors,lv_descendants vg001
  LV      Ancestors              Descendants
  stack1                         stack2,stack3,stack4,stack5,stack6
  stack2  stack1                 stack3,stack4,stack5,stack6
  stack3  stack2,stack1          stack4
  stack4  stack3,stack2,stack1
  stack5  stack2,stack1          stack6
  stack6  stack5,stack2,stack1
  pool
注意
lv_ancestors 和 lv_descendants 字段显示现有的依赖项,但不跟踪删除的条目,如果从链中删除了条目,则可能会破坏依赖项链。例如,如果您从这个示例配置中删除逻辑卷 stack3,如下所示:
$ lvs -o name,lv_ancestors,lv_descendants vg001
  LV      Ancestors              Descendants
  stack1                         stack2,stack5,stack6
  stack2  stack1                 stack5,stack6
  stack4
  stack5  stack2,stack1          stack6
  stack6  stack5,stack2,stack1
  pool
从 Red Hat Enterprise Linux 7.3 开始,您可以将您的系统配置为跟踪和显示已删除的逻辑卷,您可以通过指定
lv_ancestors_full 和 lv_descendants_full 字段来显示包括这些卷的完整依赖关系链。有关跟踪、显示和删除历史逻辑卷的详情,请参考 第 4.4.21 节 “跟踪并显示历史逻辑卷(Red Hat Enterprise Linux 7.3 及更高版本)”。
4.4.8. 创建 LVM 缓存逻辑卷
自 Red Hat Enterprise Linux 7.1 发行版本中,LVM 提供对 LVM 缓存逻辑卷的全面支持。缓存逻辑卷使用由快速块设备(比如 SSD 驱动器)组成的小逻辑卷,通过存储在较小的、更快的逻辑卷中存储常用的块来提高更大的、较慢的逻辑卷性能。
LVM 缓存使用以下 LVM 逻辑卷类型。所有这些相关的逻辑卷必须位于同一卷组中。
- 原始逻辑卷 - 大、慢的逻辑卷
- 缓存池逻辑卷 - 小、快的逻辑卷,由两个设备组成:缓存数据逻辑卷和缓存元数据逻辑卷
- 缓存数据逻辑卷 - 包含缓存池逻辑卷的数据块的逻辑卷
- 缓存元数据逻辑卷 - 包含缓存池逻辑卷的元数据的逻辑卷,其保存指定数据块存储位置(例如,在原始逻辑卷上或在缓存数据逻辑卷上)的记帐信息。
- 缓存逻辑卷 - 包含原始逻辑卷和缓存池逻辑卷的逻辑卷。这是封装了各种缓存卷组件的最终可用设备。
下面的流程创建了一个 LVM 缓存逻辑卷。
- 创建一个包含慢物理卷和快物理卷的卷组。在本例中:
/dev/sde1是一个较慢的设备,/dev/sdf1是一个快速设备,两个设备都包含在卷组VG中。#
pvcreate /dev/sde1#pvcreate /dev/sdf1#vgcreate VG /dev/sde1 /dev/sdf1 - 创建原始卷。这个示例创建一个名为
lv的原始卷,大小为 10GB,它由/dev/sde1(较慢的物理卷)组成。#
lvcreate -L 10G -n lv VG /dev/sde1 - 创建缓存池逻辑卷。这个示例在快速设备
/dev/sdf1上创建了一个名为cpool的缓存池逻辑卷,它是卷组VG的一部分。此命令创建的缓存池逻辑卷由隐藏的缓存数据逻辑卷cpool_cdata和隐藏的缓存元数据逻辑卷cpool_cmeta组成。#
lvcreate --type cache-pool -L 5G -n cpool VG /dev/sdf1Using default stripesize 64.00 KiB. Logical volume "cpool" created. #lvs -a -o name,size,attr,devices VGLV LSize Attr Devices [cpool] 5.00g Cwi---C--- cpool_cdata(0) [cpool_cdata] 5.00g Cwi-ao---- /dev/sdf1(4) [cpool_cmeta] 8.00m ewi-ao---- /dev/sdf1(2)对于更复杂的配置,您可能需要单独创建缓存数据和缓存元数据逻辑卷,然后将卷合并成一个缓存池逻辑卷中。有关此过程的详情,请参考 lvmcache(7)手册页。 - 通过将缓存池逻辑卷链接到原始逻辑卷来创建缓存逻辑卷。生成的用户可访问的缓存逻辑卷采用原始逻辑卷的名称。原始卷成为一个隐藏逻辑卷,
_corig附加到原始名称。请注意,此转换可以实时完成,但您必须首先执行了备份。#
lvconvert --type cache --cachepool cpool VG/lvLogical volume cpool is now cached. #lvs -a -o name,size,attr,devices vgLV LSize Attr Devices [cpool] 5.00g Cwi---C--- cpool_cdata(0) [cpool_cdata] 5.00g Cwi-ao---- /dev/sdf1(4) [cpool_cmeta] 8.00m ewi-ao---- /dev/sdf1(2) lv 10.00g Cwi-a-C--- lv_corig(0) [lv_corig] 10.00g owi-aoC--- /dev/sde1(0) [lvol0_pmspare] 8.00m ewi------- /dev/sdf1(0) - 另外,从 Red Hat Enterprise Linux 7.2 开始,您可以将缓存逻辑卷转换为精简池逻辑卷。请注意,任何从池中创建的精简逻辑卷都将共享缓存。以下命令使用快速设备
/dev/sdf1来分配精简池元数据(lv_tmeta)。这是缓存池卷使用的相同设备,这意味着精简池元数据卷与缓存数据逻辑卷cpool_cdata和缓存元数据逻辑卷cpool_cmeta共享该设备。#
lvconvert --type thin-pool VG/lv /dev/sdf1WARNING: Converting logical volume VG/lv to thin pool's data volume with metadata wiping. THIS WILL DESTROY CONTENT OF LOGICAL VOLUME (filesystem etc.) Do you really want to convert VG/lv? [y/n]:yConverted VG/lv to thin pool. #lvs -a -o name,size,attr,devices vgLV LSize Attr Devices [cpool] 5.00g Cwi---C--- cpool_cdata(0) [cpool_cdata] 5.00g Cwi-ao---- /dev/sdf1(4) [cpool_cmeta] 8.00m ewi-ao---- /dev/sdf1(2) lv 10.00g twi-a-tz-- lv_tdata(0) [lv_tdata] 10.00g Cwi-aoC--- lv_tdata_corig(0) [lv_tdata_corig] 10.00g owi-aoC--- /dev/sde1(0) [lv_tmeta] 12.00m ewi-ao---- /dev/sdf1(1284) [lvol0_pmspare] 12.00m ewi------- /dev/sdf1(0) [lvol0_pmspare] 12.00m ewi------- /dev/sdf1(1287)
有关 LVM 缓存卷的详情,包括额外的管理示例,请参阅 lvmcache(7)手册页。
有关创建精简配置的逻辑卷的详情,请参考 第 4.4.5 节 “创建精简配置的逻辑卷”。
4.4.9. 合并快照卷
您可以使用 lvconvert 命令的
--merge 选项将快照合并到其原始卷中。如果原始卷和快照卷都没有打开,则合并将立即开始。否则会在激活原始卷或快照卷并全部处于关闭状态时第一次执行合并。将快照合并到无法关闭的原始卷(如 root 文件系统)的过程中会延迟到下一次原始卷被激活时。当合并开始后,得到的逻辑卷将具有原始卷的名称、副号码和 UUID。在合并过程中,对原始卷的读取和写入将会被指向要合并的快照。当合并完成后,会删除合并的快照。
以下命令将快照卷
vg00/lvol1_snap 合并到其原始卷中。
# lvconvert --merge vg00/lvol1_snap
您可以在命令行中指定多个快照,或者您可以使用 LVM 对象标签指定要合并到其各自原始卷的快照。在以下示例中,逻辑卷
vg00/lvol1、vg00/lvol2 和 vg00/lvol3 都标记为标签 @some_tag。以下命令按顺序合并所有三个卷的快照逻辑卷: vg00/lvol1,然后 vg00/lvol2,然后 vg00/lvol3。如果使用了 --background 选项,则所有快照逻辑卷合并都将并行开始。
# lvconvert --merge @some_tag4.4.10. 持久的设备号
在载入模块的时候会自动分配主设备号码和副设备号码。如果总是使用相同的设备(主和副)号码激活块设备,有些应用程序效果最好。您可以使用以下参数通过 lvcreate 和 lvchange 命令来指定这些参数:
--persistent y --major major --minor minor
使用大的副号以确定还没有动态分配给另一个设备。
如果您要使用 NFS 导出文件系统,请在导出文件中指定
fsid 参数,这可以避免在 LVM 中设置持久的设备号。
4.4.11. 更改逻辑卷组的参数
要更改逻辑卷的参数,请使用 lvchange 命令。有关您可以更改的参数列表,请参阅 lvchange(8)手册页。
以下命令将卷组
vg00 中卷 lvol1 的权限更改为只读。
# lvchange -pr vg00/lvol14.4.12. 重命名逻辑卷
要重命名现有逻辑卷,请使用 lvrename 命令。
下面的任意一个命令将卷组
vg02 中的逻辑卷 lvold 重命名为 lvnew。
# lvrename /dev/vg02/lvold /dev/vg02/lvnew
# lvrename vg02 lvold lvnew
重命名根逻辑卷需要额外的重新配置。有关重命名根卷的详情,请参考 如何在 Red Hat Enterprise Linux 中重命名根卷组或者逻辑卷。
有关激活集群中单个节点上的逻辑卷的详情,请参考 第 4.7 节 “激活集群中单个节点上的逻辑卷”。
4.4.13. 删除逻辑卷
要删除不活跃的逻辑卷,请使用 lvremove 命令。如果逻辑卷当前已被挂载,请在删除卷前先卸载它。另外,在集群环境中,在删除逻辑卷之前,您必须先停用它。
以下命令从卷组
testvg 中删除逻辑卷 /dev/testvg/testlv。请注意,在这种情况下,逻辑卷还没有被停用。
#lvremove /dev/testvg/testlvDo you really want to remove active logical volume "testlv"? [y/n]:yLogical volume "testlv" successfully removed
在使用 lvchange -an 命令删除逻辑卷前,您可以明确取消激活它,在这种情况下,您不会看到验证是否要删除活跃逻辑卷的提示。
4.4.14. 显示逻辑卷
您可以使用三个命令来显示 LVM 逻辑卷的属性: lvs、lvdisplay 和 lvscan。
lvdisplay 命令以固定格式显示逻辑卷属性(如大小、布局和映射)。
以下命令显示
vg00 中 lvol2 的属性。如果已为这个原始逻辑卷创建了快照逻辑卷,这个命令会显示所有快照逻辑卷及其状态(活跃或不活跃)的列表。
# lvdisplay -v /dev/vg00/lvol2
lvscan 命令扫描系统中所有逻辑卷并列出它们,如下例所示。
# lvscan
 ACTIVE                   '/dev/vg0/gfslv' [1.46 GB] inherit
4.4.15. 增大逻辑卷
要增大逻辑卷的大小,请使用 lvextend 命令。
当扩展逻辑卷时,可以指定您想要增大的量,或者指定扩展它需要达到的大小。
以下命令将逻辑卷
/dev/myvg/homevol 扩展到 12GB。
# lvextend -L12G /dev/myvg/homevol
lvextend -- extending logical volume "/dev/myvg/homevol" to 12 GB
lvextend -- doing automatic backup of volume group "myvg"
lvextend -- logical volume "/dev/myvg/homevol" successfully extended
以下命令在逻辑卷
/dev/myvg/homevol 中添加了 1GB。
# lvextend -L+1G /dev/myvg/homevol
lvextend -- extending logical volume "/dev/myvg/homevol" to 13 GB
lvextend -- doing automatic backup of volume group "myvg"
lvextend -- logical volume "/dev/myvg/homevol" successfully extended
与 lvcreate 命令一样,您可以使用 lvextend 命令的
-l 参数来指定扩展数目,从而增大逻辑卷的大小。您还可以使用此参数指定卷组的比例或者卷组中剩余空间的比例。以下命令将名为 testlv 的逻辑卷扩展到卷组 myvg 中所有未分配的空间。
# lvextend -l +100%FREE /dev/myvg/testlv
  Extending logical volume testlv to 68.59 GB
  Logical volume testlv successfully resized
当扩展逻辑卷后,有必要增大文件系统的大小以匹配文件系统。
默认情况下,大多数重新定义文件系统大小的工具都会将文件系统的大小增加到基本逻辑卷的大小,这样您就不必考虑为两个命令指定相同的容量。
4.4.16. 缩小逻辑卷
您可以使用 lvreduce 命令来减小逻辑卷的大小。
注意
GFS2 或者 XFS 文件系统不支持缩小,因此您无法缩小包含 GFS2 或者 XFS 文件系统的逻辑卷大小。
如果您要缩小的逻辑卷包含一个文件系统,为了防止数据丢失,必须确定该文件系统没有使用将被缩小的逻辑卷中的空间。因此,建议您在逻辑卷包含文件系统时使用 lvreduce 命令的
--resizefs 选项。当您使用这个选项时,lvreduce 命令会在缩小逻辑卷前尝试缩小文件系统。如果缩小文件系统失败,就像文件系统已满或者文件系统不支持缩小一样,则 lvreduce 命令将失败,且不会尝试缩小逻辑卷。
警告
在大多数情况下,lvreduce 命令会警告可能的数据丢失,并要求进行确认。但是,您不应该依赖于这些确认提示来防止数据丢失,因为在某些情况下,您不会看到这些提示信息,比如当逻辑卷不活跃或者没有使用
--resizefs 选项时。
请注意,使用 lvreduce 命令的
--test 选项不指示操作是安全的,因为此选项不会检查文件系统或测试文件系统大小。
以下命令将卷组
vg00 中的逻辑卷 lvol1 缩小到 64MB。在这个示例中,lvol1 包含一个文件系统,这个命令会与逻辑卷一起调整大小。这个示例显示了该命令的输出结果。
# lvreduce --resizefs -L 64M vg00/lvol1
fsck from util-linux 2.23.2
/dev/mapper/vg00-lvol1: clean, 11/25688 files, 8896/102400 blocks
resize2fs 1.42.9 (28-Dec-2013)
Resizing the filesystem on /dev/mapper/vg00-lvol1 to 65536 (1k) blocks.
The filesystem on /dev/mapper/vg00-lvol1 is now 65536 blocks long.

  Size of logical volume vg00/lvol1 changed from 100.00 MiB (25 extents) to 64.00 MiB (16 extents).
  Logical volume vg00/lvol1 successfully resized.
在调整大小值前指定 - 符号表示将从逻辑卷的实际大小中减去该值。下面的例子显示,您希望将逻辑卷缩小到 64MB,而不是对该卷缩小 64MB。
# lvreduce --resizefs -L -64M vg00/lvol14.4.17. 扩展条带卷
要增加条带逻辑卷的大小,组成卷组的底层物理卷中必须有足够的空闲空间才能支持条带。例如,如果您有一个使用了整个卷组的双向条带,那么向卷组中添加一个物理卷将无法允许您扩展条带。反之,您必须在卷组中添加至少两个物理卷。
例如,假设一个由两个底层物理卷组成的卷组
vg,如以下 vgs 命令所示:
# vgs
  VG   #PV #LV #SN Attr   VSize   VFree
  vg     2   0   0 wz--n- 271.31G 271.31G
您可以使用整个卷组空间创建一个条带。
#lvcreate -n stripe1 -L 271.31G -i 2 vgUsing default stripesize 64.00 KB Rounding up size to full physical extent 271.31 GB Logical volume "stripe1" created #lvs -a -o +devicesLV VG Attr LSize Origin Snap% Move Log Copy% Devices stripe1 vg -wi-a- 271.31G /dev/sda1(0),/dev/sdb1(0)
请注意:卷组现在没有剩余空间。
# vgs
  VG   #PV #LV #SN Attr   VSize   VFree
  vg     2   1   0 wz--n- 271.31G    0
下面的命令在卷组中添加了另一个物理卷,它提供了 135GB 的额外空间。
#vgextend vg /dev/sdc1Volume group "vg" successfully extended #vgsVG #PV #LV #SN Attr VSize VFree vg 3 1 0 wz--n- 406.97G 135.66G
此时您不能将条带逻辑卷扩展为整个卷组大小,因为为了对数据进行条带,需要两个底层设备。
# lvextend vg/stripe1 -L 406G
  Using stripesize of last segment 64.00 KB
  Extending logical volume stripe1 to 406.00 GB
  Insufficient suitable allocatable extents for logical volume stripe1: 34480
more required
要扩展条带逻辑卷,请添加一个物理卷,然后扩展逻辑卷。在这个示例中,在卷组中添加两个物理卷,我们可将逻辑卷扩展成卷组的大小。
#vgextend vg /dev/sdd1Volume group "vg" successfully extended #vgsVG #PV #LV #SN Attr VSize VFree vg 4 1 0 wz--n- 542.62G 271.31G #lvextend vg/stripe1 -L 542GUsing stripesize of last segment 64.00 KB Extending logical volume stripe1 to 542.00 GB Logical volume stripe1 successfully resized
如果您没有足够的底层物理设备来扩展条带逻辑卷,那么如果扩展不是条带化,就可以扩展卷,这可能会导致性能不均衡。当向逻辑卷中添加空间时,默认操作是使用与现有逻辑卷的最后一段同样的条带参数,但您可以覆盖这些参数。以下示例在初始 lvextend 命令失败后,将扩展现有条带逻辑卷,以使用剩余的空闲空间。
#lvextend vg/stripe1 -L 406GUsing stripesize of last segment 64.00 KB Extending logical volume stripe1 to 406.00 GB Insufficient suitable allocatable extents for logical volume stripe1: 34480 more required #lvextend -i1 -l+100%FREE vg/stripe1
4.4.18. 扩展 RAID 卷
您可以使用 lvextend 命令增大 RAID 逻辑卷,而无需执行新 RAID 区域的同步。
如果您使用 lvcreate 命令创建 RAID 逻辑卷时指定了
--nosync 选项,则在创建逻辑卷时不会同步 RAID 区域。如果您稍后扩展使用 --nosync 选项创建的 RAID 逻辑卷,则同时不会同步 RAID 扩展。
您可以使用 lvs 命令显示卷的属性,来确定现有逻辑卷是否使用
--nosync 选项创建。如果 RAID 卷是在未使用初始同步的情况下创建的,则逻辑卷属性字段的第一个字符将显示"R",如果是使用初始同步创建的,则将显示"r"。
以下命令显示名为
lv 的 RAID 逻辑卷的属性,该逻辑卷是在初始同步的情况下创建的,在属性字段中显示"R"。属性字段中的第七个字符为"r",表示 RAID 的目标类型。有关属性字段含义的详情,请参考 表 4.5 “LVS 显示字段”。
# lvs vg
  LV   VG   Attr     LSize Pool Origin Snap%  Move Log Cpy%Sync  Convert
  lv   vg   Rwi-a-r- 5.00g                               100.00
如果您使用 lvextend 命令增大这个逻辑卷,则 RAID 扩展将不会重新同步。
如果您在没有指定 lvcreate 命令的
--nosync 选项的情况下创建了 RAID 逻辑卷,则可以通过指定 lvextend 命令的 --nosync 选项来在不重新同步镜像的情况下增大逻辑卷。
以下示例扩展了在没有使用
--nosync 选项的情况下创建的 RAID 逻辑卷,这表示 RAID 卷在创建时就同步了。但是,本例指定在卷扩展时不同步卷。请注意,卷的属性为"r",但在执行带有 --nosync 选项的 lvextend 命令后,卷具有 "R" 属性。
#lvs vgLV VG Attr LSize Pool Origin Snap% Move Log Cpy%Sync Convert lv vg rwi-a-r- 20.00m 100.00 #lvextend -L +5G vg/lv --nosyncExtending 2 mirror images. Extending logical volume lv to 5.02 GiB Logical volume lv successfully resized #lvs vgLV VG Attr LSize Pool Origin Snap% Move Log Cpy%Sync Convert lv vg Rwi-a-r- 5.02g 100.00
如果 RAID 卷不处于活跃状态,则在扩展卷时它不会自动跳过同步,即使您指定了
--nosync 选项来创建卷。相反,系统会提示您对逻辑卷的扩展部分执行全面重新同步。
注意
如果 RAID 卷正在执行恢复,如果您使用
--nosync 选项创建或扩展了卷,则无法扩展逻辑卷。但如果您没有指定 --nosync 选项,您可以在其恢复时扩展 RAID 卷。
4.4.19. 使用 cling Allocation 策略扩展逻辑卷
在扩展 LVM 卷时,您可以使用 lvextend 命令的
--alloc cling 选项来指定 cling 分配策略。这个策略将选择同一物理卷中的空间作为现有逻辑卷的最后区段。如果物理卷上没有足够的空间,且在 lvm.conf 文件中定义了标签列表,LVM 会检查是否将任何标签附加到物理卷中,并在现有扩展和新扩展之间查找匹配这些物理卷标签。
例如,如果您的逻辑卷在一个卷组的两个站点之间是镜像的,则您可以通过为物理卷标上
@site1 和 @site2 标签来根据其所在位置标记物理卷。然后您可以在 lvm.conf 文件中指定以下行:
cling_tag_list = [ "@site1", "@site2" ]
有关标记物理卷的详情,请参考 附录 D, LVM Object Tags。
在以下示例中,
lvm.conf 文件已被修改为包含以下行:
cling_tag_list = [ "@A", "@B" ]
另外在这个示例中,创建了卷组
taft,它由物理卷 /dev/sdb1、/dev/sdc1 、/dev/sdd1 、/dev/sde1 、/dev/sdf1 、/dev/sdg1 和 /dev/sdh1 组成。这些物理卷已使用标签 A、B 和 C 进行了标记。该示例不使用 C 标签,但这表明 LVM 使用标签来选择使用哪个物理卷用于镜像 leg。
# pvs -a -o +pv_tags /dev/sd[bcdefgh]
  PV         VG   Fmt  Attr PSize  PFree  PV Tags
  /dev/sdb1  taft lvm2 a--  15.00g 15.00g A
  /dev/sdc1  taft lvm2 a--  15.00g 15.00g B
  /dev/sdd1  taft lvm2 a--  15.00g 15.00g B
  /dev/sde1  taft lvm2 a--  15.00g 15.00g C
  /dev/sdf1  taft lvm2 a--  15.00g 15.00g C
  /dev/sdg1  taft lvm2 a--  15.00g 15.00g A
  /dev/sdh1  taft lvm2 a--  15.00g 15.00g A
下面的命令从卷组
taft 中创建了一个 10GB 的镜像卷。
# lvcreate --type raid1 -m 1 -n mirror --nosync -L 10G taft
  WARNING: New raid1 won't be synchronised. Don't read what you didn't write!
  Logical volume "mirror" created
以下命令显示使用哪些设备作为镜像分支和 RAID 元数据子卷。
# lvs -a -o +devices
  LV                VG   Attr       LSize  Log Cpy%Sync Devices
  mirror            taft Rwi-a-r--- 10.00g       100.00 mirror_rimage_0(0),mirror_rimage_1(0)
  [mirror_rimage_0] taft iwi-aor--- 10.00g              /dev/sdb1(1)
  [mirror_rimage_1] taft iwi-aor--- 10.00g              /dev/sdc1(1)
  [mirror_rmeta_0]  taft ewi-aor---  4.00m              /dev/sdb1(0)
  [mirror_rmeta_1]  taft ewi-aor---  4.00m              /dev/sdc1(0)
以下命令使用
cling 分配策略扩展镜像卷的大小,以指示应使用具有相同标签的物理卷扩展镜像 leg。
# lvextend --alloc cling -L +10G taft/mirror
  Extending 2 mirror images.
  Extending logical volume mirror to 20.00 GiB
  Logical volume mirror successfully resized
以下显示命令展示了已使用与 leg 具有相同标记的物理卷扩展了镜像 leg。请注意,具有标签
C 的物理卷被忽略了。
# lvs -a -o +devices
  LV                VG   Attr       LSize  Log Cpy%Sync Devices
  mirror            taft Rwi-a-r--- 20.00g       100.00 mirror_rimage_0(0),mirror_rimage_1(0)
  [mirror_rimage_0] taft iwi-aor--- 20.00g              /dev/sdb1(1)
  [mirror_rimage_0] taft iwi-aor--- 20.00g              /dev/sdg1(0)
  [mirror_rimage_1] taft iwi-aor--- 20.00g              /dev/sdc1(1)
  [mirror_rimage_1] taft iwi-aor--- 20.00g              /dev/sdd1(0)
  [mirror_rmeta_0]  taft ewi-aor---  4.00m              /dev/sdb1(0)
  [mirror_rmeta_1]  taft ewi-aor---  4.00m              /dev/sdc1(0)
4.4.20. 控制逻辑卷激活
您可以使用 lvcreate 或 lvchange 命令的
-k 或 --setactivationskip {y|n} 选项在正常激活命令中标记要跳过的逻辑卷。这个标志在停用过程中不会应用。
您可以使用 lvs 命令确定是否为逻辑卷设置了此标记,该命令显示
k 属性,如下例所示。
# lvs vg/thin1s1
LV         VG  Attr       LSize Pool  Origin
thin1s1    vg  Vwi---tz-k 1.00t pool0 thin1
默认情况下,精简快照卷标记为激活跳过。除了标准的
-ay 或 --activate y 选项外,您还可以使用 -K 或 --ignoreactivationskip 选项来激活具有 k 属性的逻辑卷。
下面的命令激活一个精简快照逻辑卷。
# lvchange -ay -K VG/SnapLV
当逻辑卷是通过指定 lvcreate 命令的
-kn 或 --setactivationskip n 选项创建时,可以关闭持久性 "activation skip" 标志。您可以通过指定 lvchange 命令的 -kn 或 --setactivationskip n 选项为现有逻辑卷关闭标志。您可以使用 -ky 或 --setactivationskip y 选项再次打开标志。
下面的命令创建了一个没有激活跳过标签的快照逻辑卷
# lvcreate --type thin -n SnapLV -kn -s ThinLV --thinpool VG/ThinPoolLV
下面的命令可从快照逻辑卷中删除激活跳过标签。
# lvchange -kn VG/SnapLV
您可以使用
/etc/lvm/lvm.conf 文件中的 auto_set_activation_skip 设置来控制默认的激活跳过设置。
4.4.21. 跟踪并显示历史逻辑卷(Red Hat Enterprise Linux 7.3 及更高版本)
从 Red Hat Enterprise Linux 7.3 开始,您可以通过在
lvm.conf 配置文件中启用 record_lvs_history 元数据选项将系统配置为跟踪已删除的精简快照和精简逻辑卷。这可让您显示完整的精简快照依赖链,其中包括已经从原始依赖链中删除的逻辑卷和已变为 historical 的逻辑卷。
您可以通过在
lvm.conf 配置文件中使用 lvs_history_retention_time 元数据选项指定保留时间(以秒为单位),将您的系统配置为保留历史卷。
历史逻辑卷保留了已删除的逻辑卷的简化表示,其中包括以下卷报告字段:
lv_time_removed:逻辑卷删除时间lv_time:逻辑卷的创建时间lv_name:逻辑卷的名称lv_uuid:逻辑卷的 UUIDvg_name:包含逻辑卷的卷组。
当删除卷时,历史逻辑卷名称会有一个 hypen 作为前缀。例如,当您删除逻辑卷
lvol1 时,历史卷的名称为 -lvol1。无法重新激活历史逻辑卷。
即使启用了
record_lvs_history 元数据选项,您可以通过指定 lvremove 命令的 --nohistory 选项来防止在删除逻辑卷时单独保留历史逻辑卷。
要在卷显示中包含历史逻辑卷,请指定 LVM display 命令的
-H|--history 选项。您可以通过指定 lv_full_ancestors 和 lv_full_descendants 报告字段以及 -H 选项来显示包括历史卷的完整精简快照依赖关系链。
下面的一系列命令提供了如何显示和管理历史逻辑卷的示例。
- 通过在
lvm.conf文件中设置record_lvs_history=1来确保保留了历史逻辑卷。默认不启用这个元数据选项。 - 输入以下命令以显示精简置备的快照链。在本例中:
lvol1是一个原始卷,链中的第一个卷。lvol2是lvol1的快照。lvol3是lvol2的快照。lvol4是lvol3的快照。lvol5也是lvol3的快照。
请注意,虽然示例 lvs display 命令包含-H选项,但还没有删除精简快照卷,且没有要显示的历史逻辑卷。#
lvs -H -o name,full_ancestors,full_descendantsLV FAncestors FDescendants lvol1 lvol2,lvol3,lvol4,lvol5 lvol2 lvol1 lvol3,lvol4,lvol5 lvol3 lvol2,lvol1 lvol4,lvol5 lvol4 lvol3,lvol2,lvol1 lvol5 lvol3,lvol2,lvol1 pool - 从快照链中删除逻辑卷
lvol3,然后再次运行以下 lvs 命令来查看历史逻辑卷是如何显示的,以及它们的 ancestors 和 descendants。#
lvremove -f vg/lvol3Logical volume "lvol3" successfully removed #lvs -H -o name,full_ancestors,full_descendantsLV FAncestors FDescendants lvol1 lvol2,-lvol3,lvol4,lvol5 lvol2 lvol1 -lvol3,lvol4,lvol5 -lvol3 lvol2,lvol1 lvol4,lvol5 lvol4 -lvol3,lvol2,lvol1 lvol5 -lvol3,lvol2,lvol1 pool - 您可以使用
lv_time_removed报告字段来显示历史卷被删除的时间。#
lvs -H -o name,full_ancestors,full_descendants,time_removedLV FAncestors FDescendants RTime lvol1 lvol2,-lvol3,lvol4,lvol5 lvol2 lvol1 -lvol3,lvol4,lvol5 -lvol3 lvol2,lvol1 lvol4,lvol5 2016-03-14 14:14:32 +0100 lvol4 -lvol3,lvol2,lvol1 lvol5 -lvol3,lvol2,lvol1 pool - 您可以通过指定 vgname/lvname 格式在 display 命令中单独引用历史逻辑卷,如下例所示。请注意,
lv_attr字段中的第五个位被设置为h,以指示卷是一个历史卷。#
lvs -H vg/-lvol3LV VG Attr LSize -lvol3 vg ----h----- 0 - 如果卷没有实时子卷(后代),LVM 不会保存历史逻辑卷。就是说,如果您在快照链末尾删除逻辑卷,则不会保留逻辑卷作为历史逻辑卷。
#
lvremove -f vg/lvol5Automatically removing historical logical volume vg/-lvol5. Logical volume "lvol5" successfully removed #lvs -H -o name,full_ancestors,full_descendantsLV FAncestors FDescendants lvol1 lvol2,-lvol3,lvol4 lvol2 lvol1 -lvol3,lvol4 -lvol3 lvol2,lvol1 lvol4 lvol4 -lvol3,lvol2,lvol1 pool - 运行以下命令以删除卷
lvol1和lvol2,并查看 lvs 命令在卷被删除后如何显示它们。#
lvremove -f vg/lvol1 vg/lvol2Logical volume "lvol1" successfully removed Logical volume "lvol2" successfully removed #lvs -H -o name,full_ancestors,full_descendantsLV FAncestors FDescendants -lvol1 -lvol2,-lvol3,lvol4 -lvol2 -lvol1 -lvol3,lvol4 -lvol3 -lvol2,-lvol1 lvol4 lvol4 -lvol3,-lvol2,-lvol1 pool - 要完全删除历史逻辑卷,您可以再次运行 lvremove 命令,指定现在包含连字符的历史卷的名称,如下例所示。
#
lvremove -f vg/-lvol3Historical logical volume "lvol3" successfully removed #lvs -H -o name,full_ancestors,full_descendantsLV FAncestors FDescendants -lvol1 -lvol2,lvol4 -lvol2 -lvol1 lvol4 lvol4 -lvol2,-lvol1 pool - 只要链中包含实时卷,就可以保留一个历史逻辑卷。这意味着,删除历史逻辑卷时也会删除链中的所有逻辑卷,如以下示例所示。
#
lvremove -f vg/lvol4Automatically removing historical logical volume vg/-lvol1. Automatically removing historical logical volume vg/-lvol2. Automatically removing historical logical volume vg/-lvol4. Logical volume "lvol4" successfully removed
4.5. 使用过滤器控制 LVM 设备扫描
在启动时,会运行 vgscan 命令扫描系统上的块设备查找 LVM 标签,以确定哪些是物理卷,读取元数据并构建卷组列表。物理卷的名称存储在系统中每个节点的 LVM 缓存文件中,即
/etc/lvm/cache/.cache。后续命令可以读取该文件以避免重新扫描。
您可以通过在
lvm.conf 配置文件中设置过滤器来控制 LVM 扫描哪些设备。lvm.conf 文件中的过滤器由一系列简单的正则表达式组成,这些表达式应用到 /dev 目录中的设备名称,以决定是否接受或拒绝找到的每个块设备。
下面的例子显示使用过滤器控制 LVM 扫描设备的过滤器。请注意,其中一些示例不一定代表推荐的做法,因为正则表达式可以自由匹配完整的路径名。例如,
a/loop/ 等同于 a/ normalloop mdadm/,并匹配 /dev/solooperation/lvol1。
下面的过滤器会添加所有发现的设备,这是默认行为,因为配置文件中没有配置过滤器:
filter = [ "a/.*/" ]
以下过滤器删除了 cdrom 设备,以避免在驱动器没有介质时的延迟:
filter = [ "r|/dev/cdrom|" ]
下面的过滤器添加了所有 loop,并删除了所有其他块设备:
filter = [ "a/loop.*/", "r/.*/" ]
下面的过滤器添加了所有 loop 和 IDE,并删除了所有其他块设备:
filter =[ "a|loop.*|", "a|/dev/hd.*|", "r|.*|" ]
下面的过滤器只添加第一个 IDE 驱动器中的分区 8,同时删除所有其它块设备:
filter = [ "a|^/dev/hda8$|", "r/.*/" ]
注意
当 lvmetad 守护进程运行时,
/etc/lvm/lvm.conf 文件中的 filter = 设置不会在执行 pvscan --cache device 命令时应用。要过滤设备,您需要使用 global_filter = 设置。未通过全局筛选,且不会被 LVM 打开的设备,永远不会被扫描。例如,您可能需要使用全局过滤器,例如,当在虚拟机中使用 LVM 设备,且您不希望虚拟机中设备的内容被物理主机扫描时。
4.6. 在线数据重新定位
您可以使用 pvmove 命令在系统正在使用时移动数据。
pvmove 命令将要移动的数据分解成多个部分,并创建一个临时镜像来移动每个部分。有关 pvmove 命令操作的更多信息,请参阅 pvmove(8)手册页。
注意
为了在集群中执行 pvmove 操作,您应该确保已安装了
cmirror 软件包,并且 cmirrord 服务正在运行。
以下命令将所有分配的空间从物理卷
/dev/sdc1 移动到卷组中的其他可用物理卷:
# pvmove /dev/sdc1
以下命令只移动逻辑卷
MyLV 的扩展。
# pvmove -n MyLV /dev/sdc1
由于 pvmove 命令可能需要很长时间才能执行,您可能希望在后台运行命令,以避免在前台显示进度更新。以下命令将分配给物理卷
/dev/sdc1 的所有扩展在后台移动到 /dev/sdf1。
# pvmove -b /dev/sdc1 /dev/sdf1
以下命令将 pvmove 命令的进度报告为 5 秒间隔的百分比。
# pvmove -i5 /dev/sdd14.7. 激活集群中单个节点上的逻辑卷
如果您在集群环境中安装了 LVM,则有时可能需要在一个节点上激活逻辑卷。
要在一个节点上只激活逻辑卷,请使用 lvchange -aey 命令。或者,您可以使用 lvchange -aly 命令仅在本地节点上激活逻辑卷,但不单独激活。之后,您可以在额外的节点上同时激活它们。
您也可以使用 LVM 标签在单个节点上激活逻辑卷,如 附录 D, LVM Object Tags 中所述。您也可以在配置文件中指定节点的激活,如 附录 B, LVM 配置文件 中所述。
4.8. 自定义 LVM 的报告
LVM 提供了大量的配置和命令行选项来生成自定义报告,并过滤报告的结果。有关 LVM 报告特性和功能的完整描述,请查看 lvmreport(7)手册页。
您可以使用 pvs、lvs 和 vgs 命令生成 LVM 对象的简明且可自定义的报告。这些命令生成的报告包括每行对象的输出结果。每行包含一个与对象相关的属性的字段的有序列表。选择要报告的对象有五种:通过物理卷、卷组、逻辑卷、物理卷段和逻辑卷段来选择。
从 Red Hat Enterprise Linux 7.3 发行版本开始,您可以使用 lvm fullreport 命令一次报告物理卷、卷组、逻辑卷、物理卷片段和逻辑卷片段的信息。有关这个命令及其功能的详情,请查看 lvm-fullreport(8)手册页。
从 Red Hat Enterprise Linux 7.3 发行版开始,LVM 支持日志报告,其包含一个操作日志、信息以及在 LVM 命令执行过程中收集的具有完整对象标识的每个对象状态。有关 LVM 日志报告的示例,请参考 第 4.8.6 节 “命令报告(Red Hat Enterprise Linux 7.3 及更新的版本)”。有关 LVM 日志报告的详情,请查看 lvmreport(7)手册页。
以下小节提供了有关使用 pvs、lvs 和 vgs 命令自定义报告的总结信息:
- 第 4.8.1 节 “格式控制”,它提供一个可用于控制报告格式的命令参数的总结。
- 第 4.8.2 节 “对象显示字段”,它提供了一个您可以为每个 LVM 对象显示的字段的列表。
- 第 4.8.3 节 “LVM 报告排序”,它提供一个可用于对所生成的报告进行排序的命令参数的总结。
- 第 4.8.4 节 “指定单位”,它提供了指定报告输出单元的说明。
- 第 4.8.5 节 “JSON 格式输出(Red Hat Enterprise Linux 7.3 及更新的版本)”它提供了一个指定 JSON 格式输出的示例(Red Hat Enterprise Linux 7.3 及更新版本)。
- 第 4.8.6 节 “命令报告(Red Hat Enterprise Linux 7.3 及更新的版本)”,它提供了一个命令日志的示例。
4.8.1. 格式控制
您是否使用 pvs、lvs 或 vgs 命令来确定显示的默认字段集和排列顺序。您可以使用以下参数来控制这些命令的输出结果:
- 您可以使用
-o参数将显示的字段更改为默认值以外的其他值。例如,以下输出是 pvs 命令的默认显示(显示有关物理卷的信息)。#
pvsPV VG Fmt Attr PSize PFree /dev/sdb1 new_vg lvm2 a- 17.14G 17.14G /dev/sdc1 new_vg lvm2 a- 17.14G 17.09G /dev/sdd1 new_vg lvm2 a- 17.14G 17.14G下面的命令只显示物理卷的名称和大小。#
pvs -o pv_name,pv_sizePV PSize /dev/sdb1 17.14G /dev/sdc1 17.14G /dev/sdd1 17.14G - 您可以使用加号(+)将字段附加到输出中,该符号与 -o 参数结合使用。下面的例子除默认字段外还显示物理卷 UUID。
#
pvs -o +pv_uuidPV VG Fmt Attr PSize PFree PV UUID /dev/sdb1 new_vg lvm2 a- 17.14G 17.14G onFF2w-1fLC-ughJ-D9eB-M7iv-6XqA-dqGeXY /dev/sdc1 new_vg lvm2 a- 17.14G 17.09G Joqlch-yWSj-kuEn-IdwM-01S9-X08M-mcpsVe /dev/sdd1 new_vg lvm2 a- 17.14G 17.14G yvfvZK-Cf31-j75k-dECm-0RZ3-0dGW-UqkCS - 向命令中添加
-v参数来包含一些额外的字段。例如,pvs -v 命令除了默认字段外还显示DevSize和PV UUID字段。#
pvs -vScanning for physical volume names PV VG Fmt Attr PSize PFree DevSize PV UUID /dev/sdb1 new_vg lvm2 a- 17.14G 17.14G 17.14G onFF2w-1fLC-ughJ-D9eB-M7iv-6XqA-dqGeXY /dev/sdc1 new_vg lvm2 a- 17.14G 17.09G 17.14G Joqlch-yWSj-kuEn-IdwM-01S9-XO8M-mcpsVe /dev/sdd1 new_vg lvm2 a- 17.14G 17.14G 17.14G yvfvZK-Cf31-j75k-dECm-0RZ3-0dGW-tUqkCS --noheadings参数可抑制标题行。这对编写脚本非常有用。以下示例将--noheadings参数与pv_name参数结合使用,这将生成一个所有物理卷的列表。#
pvs --noheadings -o pv_name/dev/sdb1 /dev/sdc1 /dev/sdd1--separator separator参数使用 分隔符 来分隔各个字段。下例使用等号(=)将 pvs 命令的默认输出字段分隔开。#
pvs --separator =PV=VG=Fmt=Attr=PSize=PFree /dev/sdb1=new_vg=lvm2=a-=17.14G=17.14G /dev/sdc1=new_vg=lvm2=a-=17.14G=17.09G /dev/sdd1=new_vg=lvm2=a-=17.14G=17.14G要在使用separator参数时保持字段对齐,请将separator参数与--aligned参数结合使用。#
pvs --separator = --alignedPV =VG =Fmt =Attr=PSize =PFree /dev/sdb1 =new_vg=lvm2=a- =17.14G=17.14G /dev/sdc1 =new_vg=lvm2=a- =17.14G=17.09G /dev/sdd1 =new_vg=lvm2=a- =17.14G=17.14G
有关显示参数的完整列表,请查看 pvs(8)、vgs(8)和 lvs(8)手册页。
可将卷组字段与物理卷(和物理卷段)字段或逻辑卷(和逻辑卷段)字段混合,但不能将物理卷与逻辑卷字段混合。例如:以下命令可显示每行物理卷的输出结果。
# vgs -o +pv_name
VG #PV #LV #SN Attr VSize VFree PV
new_vg 3 1 0 wz--n- 51.42G 51.37G /dev/sdc1
new_vg 3 1 0 wz--n- 51.42G 51.37G /dev/sdd1
new_vg 3 1 0 wz--n- 51.42G 51.37G /dev/sdb1
4.8.2. 对象显示字段
这部分提供了一系列表,列出您可以使用 pvs、vgs 和 lvs 命令显示的信息。
为方便起见,字段名称前缀如果与命令的默认名称匹配就可以省略。例如,使用 pvs 命令,
name 表示 pv_name,但使用 vgs 命令时,name 被解释为 vg_name。
执行以下命令等同于执行 pvs -o pv_free。
# pvs -o free
PFree
17.14G
17.09G
17.14G
注意
pvs、vgs 和 lvs 输出中属性字段中的字符数可能会在以后的版本中增加。现有字符字段不会改变位置,但可能会在末尾添加新字段。在编写脚本时您应该考虑到这一点,该脚本搜索特定的属性字符,根据其到字段开头的相对位置搜索字符,而不是根据其到字段结尾的相对位置。例如,要在
lv_attr 字段的第 ninth 位中搜索字符 p,您可以搜索字符串 "^/.........p/",但您不应该搜索字符串 "busyboxp$/"。
pvs 命令
表 4.3 “pvs 命令显示字段” 列出 pvs 命令的显示参数,以及字段名称,就像其在标头显示和字段描述中显示的那样。
表 4.3. pvs 命令显示字段
| 参数 | 标头 | 描述 |
|---|---|---|
dev_size | DevSize | 创建物理卷的基本设备的大小 |
pe_start | 第一个 PE | 在基础设备中调整到第一个物理扩展的起始位置 |
pv_attr | Attr | 物理卷的状态:(a)可分配的或(x)导出的。 |
pv_fmt | Fmt | 物理卷的元数据格式(lvm2 或 lvm1) |
pv_free | PFree | 物理卷中剩余的可用空间 |
pv_name | PV | 物理卷名称 |
pv_pe_alloc_count | Alloc | 已使用的物理扩展数目 |
pv_pe_count | PE | 物理扩展数目 |
pvseg_size | SSize | 物理卷的片段大小 |
pvseg_start | Start | 物理卷片段的起始物理扩展 |
pv_size | PSize | 物理卷的大小 |
pv_tags | PV 标签 | 附加到物理卷的 LVM 标签 |
pv_used | Used | 目前物理卷中已经使用的空间量 |
pv_uuid | PV UUID | 物理卷的 UUID |
pvs 命令默认显示以下字段:
pv_name,vg_name,pv_fmt,pv_attr,pv_size,pv_free.显示按照 pv_name 进行排序。
# pvs
PV VG Fmt Attr PSize PFree
/dev/sdb1 new_vg lvm2 a- 17.14G 17.14G
/dev/sdc1 new_vg lvm2 a- 17.14G 17.09G
/dev/sdd1 new_vg lvm2 a- 17.14G 17.13G
将
-v 参数与 pvs 命令一起使用,将以下字段添加到默认显示中: dev_size,pv_uuid。
# pvs -v
Scanning for physical volume names
PV VG Fmt Attr PSize PFree DevSize PV UUID
/dev/sdb1 new_vg lvm2 a- 17.14G 17.14G 17.14G onFF2w-1fLC-ughJ-D9eB-M7iv-6XqA-dqGeXY
/dev/sdc1 new_vg lvm2 a- 17.14G 17.09G 17.14G Joqlch-yWSj-kuEn-IdwM-01S9-XO8M-mcpsVe
/dev/sdd1 new_vg lvm2 a- 17.14G 17.13G 17.14G yvfvZK-Cf31-j75k-dECm-0RZ3-0dGW-tUqkCS
您可以使用 pvs 命令的
--segments 参数来显示每个物理卷段的信息。一个片段就是一组扩展。查看片段在想查看逻辑卷是否碎片时很有用。
pvs --segments 命令默认显示以下字段:
pv_name,vg_name,pv_fmt,pv_attr,pv_size,pv_free,pvseg_start,pvseg_size.该显示根据物理卷中的 pv_name 和 pvseg_size 进行排序。
# pvs --segments
PV VG Fmt Attr PSize PFree Start SSize
/dev/hda2 VolGroup00 lvm2 a- 37.16G 32.00M 0 1172
/dev/hda2 VolGroup00 lvm2 a- 37.16G 32.00M 1172 16
/dev/hda2 VolGroup00 lvm2 a- 37.16G 32.00M 1188 1
/dev/sda1 vg lvm2 a- 17.14G 16.75G 0 26
/dev/sda1 vg lvm2 a- 17.14G 16.75G 26 24
/dev/sda1 vg lvm2 a- 17.14G 16.75G 50 26
/dev/sda1 vg lvm2 a- 17.14G 16.75G 76 24
/dev/sda1 vg lvm2 a- 17.14G 16.75G 100 26
/dev/sda1 vg lvm2 a- 17.14G 16.75G 126 24
/dev/sda1 vg lvm2 a- 17.14G 16.75G 150 22
/dev/sda1 vg lvm2 a- 17.14G 16.75G 172 4217
/dev/sdb1 vg lvm2 a- 17.14G 17.14G 0 4389
/dev/sdc1 vg lvm2 a- 17.14G 17.14G 0 4389
/dev/sdd1 vg lvm2 a- 17.14G 17.14G 0 4389
/dev/sde1 vg lvm2 a- 17.14G 17.14G 0 4389
/dev/sdf1 vg lvm2 a- 17.14G 17.14G 0 4389
/dev/sdg1 vg lvm2 a- 17.14G 17.14G 0 4389
您可以使用 pvs -a 命令查看 LVM 检测到的设备,这些设备没有初始化为 LVM 物理卷。
# pvs -a
PV VG Fmt Attr PSize PFree
/dev/VolGroup00/LogVol01 -- 0 0
/dev/new_vg/lvol0 -- 0 0
/dev/ram -- 0 0
/dev/ram0 -- 0 0
/dev/ram2 -- 0 0
/dev/ram3 -- 0 0
/dev/ram4 -- 0 0
/dev/ram5 -- 0 0
/dev/ram6 -- 0 0
/dev/root -- 0 0
/dev/sda -- 0 0
/dev/sdb -- 0 0
/dev/sdb1 new_vg lvm2 a- 17.14G 17.14G
/dev/sdc -- 0 0
/dev/sdc1 new_vg lvm2 a- 17.14G 17.09G
/dev/sdd -- 0 0
/dev/sdd1 new_vg lvm2 a- 17.14G 17.14G
vgs 命令
表 4.4 “vgs 显示字段” 列出 vgs 命令的显示参数,以及在标头显示中的字段名称以及字段描述。
表 4.4. vgs 显示字段
| 参数 | 标头 | 描述 |
|---|---|---|
lv_count | #LV | 卷组包含的逻辑卷数 |
max_lv | MaxLV | 卷组中最多允许的逻辑卷数目(如果没有限制就是 0) |
max_pv | MaxPV | 卷组中最多允许的物理卷数目(如果没有限制就是 0) |
pv_count | #PV | 定义卷组的物理卷数目 |
snap_count | #SN | 卷组包含的快照数 |
vg_attr | Attr | 卷组的状态:(w)riteable、(r)eadonly、resi(z)eable、e(x)ported、(p)artial 和(c)lustered。 |
vg_extent_count | #Ext | 卷组中的物理扩展数目 |
vg_extent_size | Ext | 卷组中物理扩展的大小 |
vg_fmt | Fmt | 卷组的元数据格式(lvm2 或 lvm1) |
vg_free | VFree | 卷组中剩余可用空间大小 |
vg_free_count | Free | 卷组中可用物理扩展数目 |
vg_name | VG | 卷组名称 |
vg_seqno | seq | 代表修正卷组的数 |
vg_size | VSize | 卷组大小 |
vg_sysid | SYS ID | LVM1 系统 ID |
vg_tags | VG Tags | 附加到卷组中的 LVM 标签 |
vg_uuid | VG UUID | 卷组的 UUID |
vgs 命令默认显示以下字段:
vg_name,pv_count,lv_count,snap_count,vg_attr,vg_size,vg_free.显示按照 vg_name 进行排序。
# vgs
VG #PV #LV #SN Attr VSize VFree
new_vg 3 1 1 wz--n- 51.42G 51.36G
将
-v 参数与 vgs 命令一起使用,将以下字段添加到默认显示中: vg_extent_size,vg_uuid.
# vgs -v
Finding all volume groups
Finding volume group "new_vg"
VG Attr Ext #PV #LV #SN VSize VFree VG UUID
new_vg wz--n- 4.00M 3 1 1 51.42G 51.36G jxQJ0a-ZKk0-OpMO-0118-nlwO-wwqd-fD5D32
lvs 命令
表 4.5 “LVS 显示字段” 列出 lvs 命令的显示参数,以及在标头显示中的字段名称以及字段描述。
注意
在以后的 Red Hat Enterprise Linux 版本中,lvs 命令的输出可能会有所不同,以及输出中的其他字段。但是,这些字段的顺序将保持不变,所有附加字段也会在显示的末尾出现。
表 4.5. LVS 显示字段
| 参数 | 标头 | 描述 | ||||||||||
|---|---|---|---|---|---|---|---|---|---|---|---|---|
| Chunk | 快照卷的单位大小 | ||||||||||
copy_percent | Copy% | 镜像逻辑卷的同步百分比 ; 也在使用 pv_move 命令移动物理扩展时使用 | ||||||||||
devices | Devices | 组成逻辑卷的基本设备:物理卷、逻辑卷以及启动物理扩展和逻辑扩展 | ||||||||||
lv_ancestors | Ancestors | (Red Hat Enterprise Linux 7.2 及更新的版本)对于精简池快照,逻辑卷的敏感度 | ||||||||||
lv_descendants | descendants | (Red Hat Enterprise Linux 7.2 及更新的版本)对于精简池快照,逻辑卷的后代 | ||||||||||
lv_attr | Attr | 逻辑卷的状态。逻辑卷属性字节如下:
| ||||||||||
lv_kernel_major | KMaj | 逻辑卷的真实主设备号码(如果不活跃则为 -1) | ||||||||||
lv_kernel_minor | KMIN | 逻辑卷的真实从设备号码(如果是不活跃则为 -1) | ||||||||||
lv_major | Maj | 逻辑卷持久的主设备号码(如果未指定则为 -1) | ||||||||||
lv_minor | Min | 逻辑卷持久的从设备号(如果未指定则为 -1) | ||||||||||
lv_name | LV | 逻辑卷名称 | ||||||||||
lv_size | LSize | 逻辑卷的大小 | ||||||||||
lv_tags | LV Tags | 附加到逻辑卷的 LVM 标签 | ||||||||||
lv_uuid | LV UUID | 逻辑卷的 UUID。 | ||||||||||
mirror_log | Log | 镜像日志所在的设备 | ||||||||||
modules | 模块 | 使用这个逻辑卷需要对应的内核设备映射器目标 | ||||||||||
move_pv | Move | 使用 pvmove 命令创建的临时逻辑卷的源物理卷 | ||||||||||
Origin | Origin | 快照卷的源设备 | ||||||||||
| 区域 | 镜像的逻辑卷的单元大小 | ||||||||||
seg_count | #Seg | 逻辑卷中片段的数 | ||||||||||
seg_size | SSize | 逻辑卷中片段的大小 | ||||||||||
seg_start | Start | 逻辑卷中片段的偏移 | ||||||||||
seg_tags | Seg Tags | 附加到逻辑卷片段的 LVM 标签 | ||||||||||
segtype | 类型 | 逻辑卷的片段类型(例如:镜像、条带、线性) | ||||||||||
snap_percent | Snap% | 已使用的快照卷的比例 | ||||||||||
条带 | #Str | 逻辑卷中条带或者镜像的数目 | ||||||||||
| Stripe | 条带逻辑卷中条带逻辑卷的单元大小 |
lvs 命令默认显示以下字段:
lv_name,vg_name,lv_attr, lv_size , origin,snap_percent,move_pv,mirror_log,copy_percent,convert_lv.默认显示根据卷组中的 vg_name 和 lv_name 进行排序。
# lvs
LV VG Attr LSize Origin Snap% Move Log Copy% Convert
lvol0 new_vg owi-a- 52.00M
newvgsnap1 new_vg swi-a- 8.00M lvol0 0.20
将
-v 参数与 lvs 命令一起使用,将以下字段添加到默认显示中: seg_count,lv_major,lv_minor,lv_kernel_major,lv_kernel_minor,lv_uuid.
# lvs -v
Finding all logical volumes
LV VG #Seg Attr LSize Maj Min KMaj KMin Origin Snap% Move Copy% Log Convert LV UUID
lvol0 new_vg 1 owi-a- 52.00M -1 -1 253 3 LBy1Tz-sr23-OjsI-LT03-nHLC-y8XW-EhCl78
newvgsnap1 new_vg 1 swi-a- 8.00M -1 -1 253 5 lvol0 0.20 1ye1OU-1cIu-o79k-20h2-ZGF0-qCJm-CfbsIx
您可以使用 lvs 命令的
--segments 参数来显示带有突出显示网段信息的默认列的信息。使用 segment 参数时,seg 前缀是可选的。lvs --segments 命令默认显示以下字段: lv_name,vg_name,lv_attr,stripes,segtype,seg_size。默认显示根据卷组中的 vg_name、lv_name 和逻辑卷中的 seg_start 进行排序。如果逻辑卷有碎片化的问题,这个命令的输出会显示相关信息。
# lvs --segments
LV VG Attr #Str Type SSize
LogVol00 VolGroup00 -wi-ao 1 linear 36.62G
LogVol01 VolGroup00 -wi-ao 1 linear 512.00M
lv vg -wi-a- 1 linear 104.00M
lv vg -wi-a- 1 linear 104.00M
lv vg -wi-a- 1 linear 104.00M
lv vg -wi-a- 1 linear 88.00M
将
-v 参数与 lvs --segments 命令一起使用,将以下字段添加到默认显示中: seg_start,stripesize,chunksize.
# lvs -v --segments
Finding all logical volumes
LV VG Attr Start SSize #Str Type Stripe Chunk
lvol0 new_vg owi-a- 0 52.00M 1 linear 0 0
newvgsnap1 new_vg swi-a- 0 8.00M 1 linear 0 8.00K
以下示例显示了在配置了一个逻辑卷的系统上 lvs 命令的默认输出,后跟 lvs 命令的输出,并指定了
片段 参数。
#lvsLV VG Attr LSize Origin Snap% Move Log Copy% lvol0 new_vg -wi-a- 52.00M #lvs --segmentsLV VG Attr #Str Type SSize lvol0 new_vg -wi-a- 1 linear 52.00M
4.8.3. LVM 报告排序
通常,必须在内部生成并存储 lvs、vgs 或 pvs 命令的整个输出,然后才能正确排序和列。您可以指定
--unbuffered 参数,以在生成后马上显示未排序的输出。
要指定不同的列排序,请使用任何报告命令的
-O 参数。在输出中不一定要包含这些字段。
以下示例显示了 pvs 命令的输出,该命令显示物理卷名称、大小和可用空间。
# pvs -o pv_name,pv_size,pv_free
PV PSize PFree
/dev/sdb1 17.14G 17.14G
/dev/sdc1 17.14G 17.09G
/dev/sdd1 17.14G 17.14G
下面的例子显示相同的输出结果,根据可用空间字段排序。
# pvs -o pv_name,pv_size,pv_free -O pv_free
PV PSize PFree
/dev/sdc1 17.14G 17.09G
/dev/sdd1 17.14G 17.14G
/dev/sdb1 17.14G 17.14G
以下示例显示,您不需要显示您要排序的字段。
# pvs -o pv_name,pv_size -O pv_free
PV PSize
/dev/sdc1 17.14G
/dev/sdd1 17.14G
/dev/sdb1 17.14G
要显示反向排序,请在
-O 参数之后使用 - 字符指定的字段。
# pvs -o pv_name,pv_size,pv_free -O -pv_free
PV PSize PFree
/dev/sdd1 17.14G 17.14G
/dev/sdb1 17.14G 17.14G
/dev/sdc1 17.14G 17.09G
4.8.4. 指定单位
要指定 LVM 报告显示的单元,使用 report 命令的
--units 参数。您可以指定(b)ytes、(k)ilobytes、(m)egabytes、(g)igabytes、(e)xabytes、(p)etabytes 和(h)uman- readable。默认显示是人类可读的。您可以通过在 lvm.conf 文件 的全局 部分中设置 units 参数来覆盖默认设置。
以下示例以 MB 为单位指定 pvs 命令的输出,而不是默认的千兆字节。
# pvs --units m
PV VG Fmt Attr PSize PFree
/dev/sda1 lvm2 -- 17555.40M 17555.40M
/dev/sdb1 new_vg lvm2 a- 17552.00M 17552.00M
/dev/sdc1 new_vg lvm2 a- 17552.00M 17500.00M
/dev/sdd1 new_vg lvm2 a- 17552.00M 17552.00M
默认情况下,显示的单位是 1024 的倍数。您可以使用大写字母代表单位是 1000 的倍数(B、K、M、G、T、H)。
下面的命令以默认单位(1024 的倍数)显示输出结果。
# pvs
  PV         VG     Fmt  Attr PSize  PFree
  /dev/sdb1  new_vg lvm2 a-   17.14G 17.14G
  /dev/sdc1  new_vg lvm2 a-   17.14G 17.09G
  /dev/sdd1  new_vg lvm2 a-   17.14G 17.14G
下面的命令以 1000 的倍数为单位显示输出结果。
#  pvs --units G
  PV         VG     Fmt  Attr PSize  PFree
  /dev/sdb1  new_vg lvm2 a-   18.40G 18.40G
  /dev/sdc1  new_vg lvm2 a-   18.40G 18.35G
  /dev/sdd1  new_vg lvm2 a-   18.40G 18.40G
您也可以指定y (s)ectors(定义为 512 字节)或自定义单元。
以下示例将 pvs 命令的输出显示为多个扇区。
# pvs --units s
  PV         VG     Fmt  Attr PSize     PFree
  /dev/sdb1  new_vg lvm2 a-   35946496S 35946496S
  /dev/sdc1  new_vg lvm2 a-   35946496S 35840000S
  /dev/sdd1  new_vg lvm2 a-   35946496S 35946496S
以下示例显示了 pvs 命令的输出,单位为 4 MB。
# pvs --units 4m
  PV         VG     Fmt  Attr PSize    PFree
  /dev/sdb1  new_vg lvm2 a-   4388.00U 4388.00U
  /dev/sdc1  new_vg lvm2 a-   4388.00U 4375.00U
  /dev/sdd1  new_vg lvm2 a-   4388.00U 4388.00U
4.8.5. JSON 格式输出(Red Hat Enterprise Linux 7.3 及更新的版本)
从 Red Hat Enterprise Linux 7.3 开始,您可以使用 LVM 显示命令的
--reportformat 选项以 JSON 格式显示输出。
以下示例显示了以标准默认格式的 lvs 的输出。
# lvs
  LV      VG            Attr       LSize   Pool Origin Data%  Meta%  Move Log Cpy%Sync Convert
  my_raid my_vg         Rwi-a-r---  12.00m                                    100.00
  root    rhel_host-075 -wi-ao----   6.67g
  swap    rhel_host-075 -wi-ao---- 820.00m
以下命令显示在指定 JSON 格式时相同的 LVM 配置输出。
# lvs --reportformat json
  {
      "report": [
          {
              "lv": [
                  {"lv_name":"my_raid", "vg_name":"my_vg", "lv_attr":"Rwi-a-r---", "lv_size":"12.00m", "pool_lv":"", "origin":"", "data_percent":"", "metadata_percent":"", "move_pv":"", "mirror_log":"", "copy_percent":"100.00", "convert_lv":""},
                  {"lv_name":"root", "vg_name":"rhel_host-075", "lv_attr":"-wi-ao----", "lv_size":"6.67g", "pool_lv":"", "origin":"", "data_percent":"", "metadata_percent":"", "move_pv":"", "mirror_log":"", "copy_percent":"", "convert_lv":""},
                  {"lv_name":"swap", "vg_name":"rhel_host-075", "lv_attr":"-wi-ao----", "lv_size":"820.00m", "pool_lv":"", "origin":"", "data_percent":"", "metadata_percent":"", "move_pv":"", "mirror_log":"", "copy_percent":"", "convert_lv":""}
              ]
          }
      ]
  }
您还可以使用
output_format 设置,将报告格式设置为 /etc/lvm/lvm.conf 文件中的配置选项。但是,命令行的 --reportformat 设置优先于此设置。
4.8.6. 命令报告(Red Hat Enterprise Linux 7.3 及更新的版本)
从 Red Hat Enterprise Linux 7.3 开始,如果启用了
log/report_command_log 配置设置,则面向报告的 LVM 命令都可以报告命令日志。您可以确定要显示的一组字段,并为此报告排序。
以下示例将 LVM 配置为为 LVM 命令生成完整日志报告。在这个示例中,您可以看到逻辑卷
lvol0 和 lvol1 已被成功处理,因为 是包含卷的卷组 VG。
#lvmconfig --type full log/command_log_selectioncommand_log_selection="all" #lvsLogical Volume ============== LV LSize Cpy%Sync lvol1 4.00m 100.00 lvol0 4.00m Command Log =========== Seq LogType Context ObjType ObjName ObjGrp Msg Errno RetCode 1 status processing lv lvol0 vg success 0 1 2 status processing lv lvol1 vg success 0 1 3 status processing vg vg success 0 1 #lvchange -an vg/lvol1Command Log =========== Seq LogType Context ObjType ObjName ObjGrp Msg Errno RetCode 1 status processing lv lvol1 vg success 0 1 2 status processing vg vg success 0 1
有关配置 LVM 报告和命令日志的详情,请参考 lvmreport man page。
第 5 章 LVM 配置示例
本章提供一些基本的 LVM 配置示例。
5.1. 在 Three 磁盘中创建 LVM 逻辑卷
这个示例步骤创建一个名为
new_logical_volume 的 LVM 逻辑卷,它由 /dev/sda1、/dev /sdb1 和 /dev/sdc1 组成。
- 要在卷组中使用磁盘,请使用 pvcreate 命令将其标记为 LVM 物理卷。警告此命令销毁
/dev/sda1、和/dev/sdb1/dev/sdc1中的任何数据。#
pvcreate /dev/sda1 /dev/sdb1 /dev/sdc1Physical volume "/dev/sda1" successfully created Physical volume "/dev/sdb1" successfully created Physical volume "/dev/sdc1" successfully created - 创建由您创建的 LVM 物理卷组成的卷组。以下命令创建卷组
new_vol_group。#
vgcreate new_vol_group /dev/sda1 /dev/sdb1 /dev/sdc1Volume group "new_vol_group" successfully created您可以使用 vgs 命令显示新卷组的属性。#
vgsVG #PV #LV #SN Attr VSize VFree new_vol_group 3 0 0 wz--n- 51.45G 51.45G - 从您创建的卷组中创建逻辑卷。以下命令从卷组
new_vol_group创建逻辑卷new_logical_volume。这个示例创建的逻辑卷,它使用了卷组的 2GB。#
lvcreate -L 2G -n new_logical_volume new_vol_groupLogical volume "new_logical_volume" created - 在逻辑卷中创建文件系统。下面的命令在逻辑卷中创建了 GFS2 文件系统。
#
mkfs.gfs2 -p lock_nolock -j 1 /dev/new_vol_group/new_logical_volumeThis will destroy any data on /dev/new_vol_group/new_logical_volume. Are you sure you want to proceed? [y/n]yDevice: /dev/new_vol_group/new_logical_volume Blocksize: 4096 Filesystem Size: 491460 Journals: 1 Resource Groups: 8 Locking Protocol: lock_nolock Lock Table: Syncing... All Done下面的命令挂载逻辑卷并报告文件系统磁盘空间用量。#
mount /dev/new_vol_group/new_logical_volume /mnt#dfFilesystem 1K-blocks Used Available Use% Mounted on /dev/new_vol_group/new_logical_volume 1965840 20 1965820 1% /mnt
5.2. 创建条带逻辑卷
这个示例步骤创建一个名为
striped_logical_volume 的 LVM 条状逻辑卷,该逻辑卷在 /dev/ sda1、/dev/sdb1 和 /dev/sdc1 的磁盘间条状分布数据。
- 使用 pvcreate 命令将卷组中要使用的磁盘标记为 LVM 物理卷。警告此命令销毁
/dev/sda1、和/dev/sdb1/dev/sdc1中的任何数据。#
pvcreate /dev/sda1 /dev/sdb1 /dev/sdc1Physical volume "/dev/sda1" successfully created Physical volume "/dev/sdb1" successfully created Physical volume "/dev/sdc1" successfully created - 创建卷组
volgroup01。以下命令创建卷组volgroup01。#
vgcreate volgroup01 /dev/sda1 /dev/sdb1 /dev/sdc1Volume group "volgroup01" successfully created您可以使用 vgs 命令显示新卷组的属性。#
vgsVG #PV #LV #SN Attr VSize VFree volgroup01 3 0 0 wz--n- 51.45G 51.45G - 从您创建的卷组中创建条带逻辑卷。以下命令从卷组
volgroup01创建条状逻辑卷striped_logical_volume。这个示例创建的逻辑卷大小为 2GB,有三个条带,条带的大小为 4KB。#
lvcreate -i 3 -I 4 -L 2G -n striped_logical_volume volgroup01Rounding size (512 extents) up to stripe boundary size (513 extents) Logical volume "striped_logical_volume" created - 在条带逻辑卷中创建文件系统。下面的命令在逻辑卷中创建了 GFS2 文件系统。
#
mkfs.gfs2 -p lock_nolock -j 1 /dev/volgroup01/striped_logical_volumeThis will destroy any data on /dev/volgroup01/striped_logical_volume. Are you sure you want to proceed? [y/n]yDevice: /dev/volgroup01/striped_logical_volume Blocksize: 4096 Filesystem Size: 492484 Journals: 1 Resource Groups: 8 Locking Protocol: lock_nolock Lock Table: Syncing... All Done下面的命令挂载逻辑卷并报告文件系统磁盘空间用量。#
mount /dev/volgroup01/striped_logical_volume /mnt#dfFilesystem 1K-blocks Used Available Use% Mounted on /dev/mapper/VolGroup00-LogVol00 13902624 1656776 11528232 13% / /dev/hda1 101086 10787 85080 12% /boot tmpfs 127880 0 127880 0% /dev/shm /dev/volgroup01/striped_logical_volume 1969936 20 1969916 1% /mnt
5.3. 分割卷组
在这个示例中,有一个由三个物理卷组成的卷组。如果在物理卷中有足够的空闲空间,就可在不添加新磁盘的情况下创建新的卷组。
在初始设置中,逻辑卷
mylv 从卷组 myvol 分离,它由三个物理卷 /dev/ sda1、/dev/sdb1 和 /dev /sdc1 组成。
完成此步骤后,卷组
myvg 将包含 /dev/sda1 和 /dev/sdb1。第二个卷组 yourvg 将包含 /dev/sdc1。
- 使用 pvscan 命令确定卷组中当前有多少可用空间。
#
pvscanPV /dev/sda1 VG myvg lvm2 [17.15 GB / 0 free] PV /dev/sdb1 VG myvg lvm2 [17.15 GB / 12.15 GB free] PV /dev/sdc1 VG myvg lvm2 [17.15 GB / 15.80 GB free] Total: 3 [51.45 GB] / in use: 3 [51.45 GB] / in no VG: 0 [0 ] - 使用 pvmove 命令将
/dev/sdc1中所有使用的物理扩展移动到/dev/sdb1。执行 pvmove 命令可能需要很长时间。#
pvmove /dev/sdc1 /dev/sdb1/dev/sdc1: Moved: 14.7% /dev/sdc1: Moved: 30.3% /dev/sdc1: Moved: 45.7% /dev/sdc1: Moved: 61.0% /dev/sdc1: Moved: 76.6% /dev/sdc1: Moved: 92.2% /dev/sdc1: Moved: 100.0%移动数据后,您可以看到/dev/sdc1上的所有空间都可用。#
pvscanPV /dev/sda1 VG myvg lvm2 [17.15 GB / 0 free] PV /dev/sdb1 VG myvg lvm2 [17.15 GB / 10.80 GB free] PV /dev/sdc1 VG myvg lvm2 [17.15 GB / 17.15 GB free] Total: 3 [51.45 GB] / in use: 3 [51.45 GB] / in no VG: 0 [0 ] - 要创建新卷组
yourvg,请使用 vgsplit 命令分割卷组myvg。在分割卷组前,逻辑卷必须不活跃。如果挂载文件系统,则必须在取消激活逻辑卷前卸载该文件系统。使用 lvchange 命令或 vgchange 命令取消激活逻辑卷。以下命令取消激活逻辑卷mylv,然后将vg 的卷组yourvg从卷组myvg中分割,然后将物理卷/dev/sdc1移到新卷组yourvg中。#
lvchange -a n /dev/myvg/mylv#vgsplit myvg yourvg /dev/sdc1Volume group "yourvg" successfully split from "myvg"您可以使用 vgs 命令查看两个卷组的属性。#
vgsVG #PV #LV #SN Attr VSize VFree myvg 2 1 0 wz--n- 34.30G 10.80G yourvg 1 0 0 wz--n- 17.15G 17.15G - 创建新卷组后,创建新逻辑卷
yourlv。#
lvcreate -L 5G -n yourlv yourvgLogical volume "yourlv" created - 在新逻辑卷中创建文件系统并挂载它。
#
mkfs.gfs2 -p lock_nolock -j 1 /dev/yourvg/yourlvThis will destroy any data on /dev/yourvg/yourlv. Are you sure you want to proceed? [y/n]yDevice: /dev/yourvg/yourlv Blocksize: 4096 Filesystem Size: 1277816 Journals: 1 Resource Groups: 20 Locking Protocol: lock_nolock Lock Table: Syncing... All Done #mount /dev/yourvg/yourlv /mnt - 由于您必须停用逻辑卷
mylv,因此您需要先再次激活它,然后才能挂载它。#
lvchange -a y /dev/myvg/mylv#mount /dev/myvg/mylv /mnt#dfFilesystem 1K-blocks Used Available Use% Mounted on /dev/yourvg/yourlv 24507776 32 24507744 1% /mnt /dev/myvg/mylv 24507776 32 24507744 1% /mnt
5.4. 从逻辑卷中删除磁盘
这些示例步骤演示了如何从现有逻辑卷中删除磁盘,可以是替换磁盘,或使用磁盘作为不同卷的一部分。要删除磁盘,您必须首先将 LVM 物理卷中的扩展移动到不同的磁盘或者一组磁盘中。
5.4.1. 将扩展移动到现有物理卷中
在本例中,逻辑卷分布在卷组
myvg 中的四个物理卷中。
# pvs -o+pv_used
  PV         VG   Fmt  Attr PSize  PFree  Used
  /dev/sda1  myvg lvm2 a-   17.15G 12.15G  5.00G
  /dev/sdb1  myvg lvm2 a-   17.15G 12.15G  5.00G
  /dev/sdc1  myvg lvm2 a-   17.15G 12.15G  5.00G
  /dev/sdd1  myvg lvm2 a-   17.15G  2.15G 15.00G
这个示例将扩展从
/dev/sdb1 中移出,以便它可以从卷组中删除。
- 如果卷组中其他物理卷中有足够的可用扩展,您可以在您要删除的设备上执行 pvmove 命令,而无需其他选项,且扩展将分发到其他设备中。
#
pvmove /dev/sdb1/dev/sdb1: Moved: 2.0% ... /dev/sdb1: Moved: 79.2% ... /dev/sdb1: Moved: 100.0%执行 pvmove 命令后,扩展分布如下:#
pvs -o+pv_usedPV VG Fmt Attr PSize PFree Used /dev/sda1 myvg lvm2 a- 17.15G 7.15G 10.00G /dev/sdb1 myvg lvm2 a- 17.15G 17.15G 0 /dev/sdc1 myvg lvm2 a- 17.15G 12.15G 5.00G /dev/sdd1 myvg lvm2 a- 17.15G 2.15G 15.00G - 使用 vgreduce 命令从卷组中删除物理卷
/dev/sdb1。#
vgreduce myvg /dev/sdb1Removed "/dev/sdb1" from volume group "myvg" # pvs PV VG Fmt Attr PSize PFree /dev/sda1 myvg lvm2 a- 17.15G 7.15G /dev/sdb1 lvm2 -- 17.15G 17.15G /dev/sdc1 myvg lvm2 a- 17.15G 12.15G /dev/sdd1 myvg lvm2 a- 17.15G 2.15G
该磁盘现在可以物理删除或者分配给其他用户。
5.4.2. 将扩展移动到新磁盘中
在本例中,逻辑卷分布在卷组
myvg 中的三个物理卷中,如下所示:
# pvs -o+pv_used
  PV         VG   Fmt  Attr PSize  PFree  Used
  /dev/sda1  myvg lvm2 a-   17.15G  7.15G 10.00G
  /dev/sdb1  myvg lvm2 a-   17.15G 15.15G  2.00G
  /dev/sdc1  myvg lvm2 a-   17.15G 15.15G  2.00G
这个示例步骤将
/dev/sdb1 的扩展移到新设备 /dev/sdd1 中。
- 从
/dev/sdd1创建新物理卷。#
pvcreate /dev/sdd1Physical volume "/dev/sdd1" successfully created - 将新物理卷
/dev/sdd1添加到现有卷组myvg中。#
vgextend myvg /dev/sdd1Volume group "myvg" successfully extended #pvs -o+pv_usedPV VG Fmt Attr PSize PFree Used /dev/sda1 myvg lvm2 a- 17.15G 7.15G 10.00G /dev/sdb1 myvg lvm2 a- 17.15G 15.15G 2.00G /dev/sdc1 myvg lvm2 a- 17.15G 15.15G 2.00G /dev/sdd1 myvg lvm2 a- 17.15G 17.15G 0 - 使用 pvmove 命令将数据从
/dev/sdb1移到/dev/sdd1。#
pvmove /dev/sdb1 /dev/sdd1/dev/sdb1: Moved: 10.0% ... /dev/sdb1: Moved: 79.7% ... /dev/sdb1: Moved: 100.0% #pvs -o+pv_usedPV VG Fmt Attr PSize PFree Used /dev/sda1 myvg lvm2 a- 17.15G 7.15G 10.00G /dev/sdb1 myvg lvm2 a- 17.15G 17.15G 0 /dev/sdc1 myvg lvm2 a- 17.15G 15.15G 2.00G /dev/sdd1 myvg lvm2 a- 17.15G 15.15G 2.00G - 将数据移出
/dev/sdb1后,您可以将其从卷组中删除。#
vgreduce myvg /dev/sdb1Removed "/dev/sdb1" from volume group "myvg"
现在您可以将磁盘重新分配给另一个卷组,或者将其从系统中删除。
5.5. 在集群中创建镜像 LVM 逻辑卷
在集群中创建镜像 LVM 逻辑卷需要与在具有片段类型为
mirror 的单个节点上创建镜像 LVM 逻辑卷的命令和流程相同。但是,要在集群中创建镜像 LVM 卷:
- 集群和集群镜像基础架构必须正在运行
- 集群必须是 quorate
lvm.conf文件中的锁定类型必须正确设置以启用集群锁定,use_lvmetad设置应该是 0。但请注意,在 Red Hat Enterprise Linux 7 中,ocf:heartbeat:clvmPacemaker 资源代理本身,作为启动过程的一部分执行这些任务。
在 Red Hat Enterprise Linux 7 中,集群通过 Pacemaker 进行管理。集群式 LVM 逻辑卷只在与 Pacemaker 集群一起使用才被支持,且必须配置为集群资源。
以下流程在集群中创建镜像 LVM 卷。
- 安装集群软件和 LVM 软件包,启动集群软件并创建集群。您必须为集群配置隔离。文档 High Availability Add-On 管理 提供了创建集群并为集群中节点配置隔离的示例步骤。文档 High Availability Add-On 参考 提供有关集群配置组件的更多详情。
- 要创建由集群中所有节点共享的镜像逻辑卷,必须在集群的每个节点中的
lvm.conf文件中正确设置锁定类型。默认情况下,锁定类型被设置为 local。要更改它,在集群的每个节点中执行以下命令以启用群集式锁定:#
/sbin/lvmconf --enable-cluster - 为集群设置
dlm资源。作为克隆的资源创建资源,以便在集群中的每个节点上运行。#
pcs resource create dlm ocf:pacemaker:controld op monitor interval=30s on-fail=fence clone interleave=true ordered=true - 将
clvmd配置为集群资源。与dlm资源一样,您可以将资源创建为克隆的资源,以便它将在集群的每个节点上运行。请注意,您必须设置with_cmirrord=true参数,以便在clvmd运行的所有节点上启用 cmirrord 守护进程。#
pcs resource create clvmd ocf:heartbeat:clvm with_cmirrord=true op monitor interval=30s on-fail=fence clone interleave=true ordered=true如果您已经配置了clvmd资源,但没有指定with_cmirrord=true参数,您可以使用以下命令更新资源使其包含参数。#
pcs resource update clvmd with_cmirrord=true - 设置
clvmd和dlm依赖项并启动顺序。clvmd必须在dlm后启动,且必须在与dlm相同的节点上运行。#
pcs constraint order start dlm-clone then clvmd-clone#pcs constraint colocation add clvmd-clone with dlm-clone - 创建镜像。第一步是创建物理卷。以下命令创建三个物理卷。两个物理卷将用于镜像分支,第三个物理卷将包含镜像日志。
#
pvcreate /dev/sdb1Physical volume "/dev/sdb1" successfully created #pvcreate /dev/sdc1Physical volume "/dev/sdc1" successfully created #pvcreate /dev/sdd1Physical volume "/dev/sdd1" successfully created - 创建卷组。这个示例创建了一个卷组
vg001,它由上一步中创建的三个物理卷组成。#
vgcreate vg001 /dev/sdb1 /dev/sdc1 /dev/sdd1Clustered volume group "vg001" successfully created请注意,vgcreate命令的输出表示卷组是集群的。您可以使用 vgs 命令验证卷组是否已集群,该命令将显示卷组的属性。如果卷组已群集,它将显示 c 属性。#
vgs vg001VG #PV #LV #SN Attr VSize VFree vg001 3 0 0 wz--nc 68.97G 68.97G - 创建镜像的逻辑卷。这个示例从卷组
vg001创建逻辑卷mirrorlv。这个卷有一个镜像分支。这个示例指定将哪个物理卷扩展用于逻辑卷。#
lvcreate --type mirror -l 1000 -m 1 vg001 -n mirrorlv /dev/sdb1:1-1000 /dev/sdc1:1-1000 /dev/sdd1:0Logical volume "mirrorlv" created您可以使用 lvs 命令显示创建镜像的进度。以下示例显示,镜像为 47% 同步,然后同步 91%,然后在镜像完成时 100% 同步。#
lvs vg001/mirrorlvLV VG Attr LSize Origin Snap% Move Log Copy% Convert mirrorlv vg001 mwi-a- 3.91G vg001_mlog 47.00 #lvs vg001/mirrorlvLV VG Attr LSize Origin Snap% Move Log Copy% Convert mirrorlv vg001 mwi-a- 3.91G vg001_mlog 91.00 #lvs vg001/mirrorlvLV VG Attr LSize Origin Snap% Move Log Copy% Convert mirrorlv vg001 mwi-a- 3.91G vg001_mlog 100.00在系统日志中记录了镜像完成:May 10 14:52:52 doc-07 [19402]: Monitoring mirror device vg001-mirrorlv for events May 10 14:55:00 doc-07 lvm[19402]: vg001-mirrorlv is now in-sync
- 您可以使用带有 -o +devices 选项的 lvs 命令显示镜像的配置,包括构成镜像 leg 的设备。您可以看到此示例中的逻辑卷由两个线性镜像和一个日志组成。
#
lvs -a -o +devicesLV VG Attr LSize Origin Snap% Move Log Copy% Convert Devices mirrorlv vg001 mwi-a- 3.91G mirrorlv_mlog 100.00 mirrorlv_mimage_0(0),mirrorlv_mimage_1(0) [mirrorlv_mimage_0] vg001 iwi-ao 3.91G /dev/sdb1(1) [mirrorlv_mimage_1] vg001 iwi-ao 3.91G /dev/sdc1(1) [mirrorlv_mlog] vg001 lwi-ao 4.00M /dev/sdd1(0)您可以使用 lvs 的seg_pe_ranges选项来显示数据布局。您可以使用这个选项验证您的布局是否正确冗余。此命令的输出以与 lvcreate 和 lvresize 命令采用的格式显示 PE 范围。#
lvs -a -o +seg_pe_ranges --segmentsPE Ranges mirrorlv_mimage_0:0-999 mirrorlv_mimage_1:0-999 /dev/sdb1:1-1000 /dev/sdc1:1-1000 /dev/sdd1:0-0
注意
有关从 LVM 镜像卷的一个分支失败时恢复的详情,请参考 第 6.2 节 “从 LVM 镜像故障中恢复”。
第 6 章 LVM 故障排除
本章介绍了对各种 LVM 问题进行故障排除的说明。
6.1. 故障排除诊断
如果命令无法正常工作,您可以使用以下方法收集诊断:
- 使用
-v、-vv、-vvv或 -vvv - 如果问题与逻辑卷激活相关,请在配置文件的
log部分中设置activation = 1,并使用-vvvv参数运行命令。检查完此输出结果后,请务必将这个参数重置为 0,以避免在内存不足期间计算机锁定问题。 - 运行 lvmdump 命令,它为诊断提供信息转储。详情请查看 lvmdump(8)手册页。
- 执行 lvs -v,pvs -a, 或 dmsetup info -c 命令以获取额外的系统信息。
- 检查
/etc/lvm/backup文件中元数据的最后一个备份,并在/etc/lvm/archive文件中检查存档版本。 - 运行 lvmconfig 命令来检查当前的配置信息。
- 检查
/etc/lvm目录中的.cache文件,以查看哪个设备上有物理卷的记录。
6.2. 从 LVM 镜像故障中恢复
本节提供了从 LVM 镜像卷的一个 leg 失败时恢复的示例,因为物理卷的底层设备停机,
mirror_log_fault_policy 参数被设置为 删除。这要求您手动重建镜像。有关设置 mirror_log_fault_policy 参数的详情,请参考 第 4.4.4.1 节 “镜像逻辑卷失败策略”。
当镜像分支失败时,LVM 会将镜像卷转换为线性卷,它仍象以前运行,但没有镜像冗余。此时,您可以向系统添加新磁盘设备,以用作替换物理设备并重新构建镜像。
以下命令创建了用于镜像的物理卷。
# pvcreate /dev/sd[abcdefgh][12]
  Physical volume "/dev/sda1" successfully created
  Physical volume "/dev/sda2" successfully created
  Physical volume "/dev/sdb1" successfully created
  Physical volume "/dev/sdb2" successfully created
  Physical volume "/dev/sdc1" successfully created
  Physical volume "/dev/sdc2" successfully created
  Physical volume "/dev/sdd1" successfully created
  Physical volume "/dev/sdd2" successfully created
  Physical volume "/dev/sde1" successfully created
  Physical volume "/dev/sde2" successfully created
  Physical volume "/dev/sdf1" successfully created
  Physical volume "/dev/sdf2" successfully created
  Physical volume "/dev/sdg1" successfully created
  Physical volume "/dev/sdg2" successfully created
  Physical volume "/dev/sdh1" successfully created
  Physical volume "/dev/sdh2" successfully created
以下命令创建卷组
vg 和镜像卷组 groupfs。
#vgcreate vg /dev/sd[abcdefgh][12]Volume group "vg" successfully created #lvcreate -L 750M -n groupfs -m 1 vg /dev/sda1 /dev/sdb1 /dev/sdc1Rounding up size to full physical extent 752.00 MB Logical volume "groupfs" created
您可以使用 lvs 命令验证镜像卷的布局,以及镜像 leg 和镜像日志的底层设备。请注意,在第一个示例中,镜像还没有完全同步;您应该等到
Copy% 字段显示 100.00,然后再继续。
#lvs -a -o +devicesLV VG Attr LSize Origin Snap% Move Log Copy% Devices groupfs vg mwi-a- 752.00M groupfs_mlog 21.28 groupfs_mimage_0(0),groupfs_mimage_1(0) [groupfs_mimage_0] vg iwi-ao 752.00M /dev/sda1(0) [groupfs_mimage_1] vg iwi-ao 752.00M /dev/sdb1(0) [groupfs_mlog] vg lwi-ao 4.00M /dev/sdc1(0) #lvs -a -o +devicesLV VG Attr LSize Origin Snap% Move Log Copy% Devices groupfs vg mwi-a- 752.00M groupfs_mlog 100.00 groupfs_mimage_0(0),groupfs_mimage_1(0) [groupfs_mimage_0] vg iwi-ao 752.00M /dev/sda1(0) [groupfs_mimage_1] vg iwi-ao 752.00M /dev/sdb1(0) [groupfs_mlog] vg lwi-ao 4.00M i /dev/sdc1(0)
在这个示例中,镜像
/dev/sda1 的主要 leg 失败。任何对镜像卷的写操作会导致 LVM 检测到失败的镜像。当发生这种情况时,LVM 将镜像转换为单一线性卷。在这种情况下,要触发转换,我们执行一个 dd 命令
# dd if=/dev/zero of=/dev/vg/groupfs count=10
10+0 records in
10+0 records out
您可以使用 lvs 命令验证该设备现在是否为线性设备。由于磁盘失败,所以会出现 I/O 错误。
# lvs -a -o +devices
  /dev/sda1: read failed after 0 of 2048 at 0: Input/output error
  LV      VG   Attr   LSize   Origin Snap%  Move Log Copy%  Devices
  groupfs vg   -wi-a- 752.00M                               /dev/sdb1(0)
此时,您仍然能够使用逻辑卷,但没有镜像冗余功能。
要重建镜像的卷,替换有问题的驱动器并重新创建物理卷。如果您使用同一磁盘而不是将其替换为新磁盘,则在运行 pvcreate 命令时会看到"不一致"警告。您可以通过执行 vgreduce --removemissing 命令来防止显示该警告。
#pvcreate /dev/sdi[12]Physical volume "/dev/sdi1" successfully created Physical volume "/dev/sdi2" successfully created #pvscanPV /dev/sdb1 VG vg lvm2 [67.83 GB / 67.10 GB free] PV /dev/sdb2 VG vg lvm2 [67.83 GB / 67.83 GB free] PV /dev/sdc1 VG vg lvm2 [67.83 GB / 67.83 GB free] PV /dev/sdc2 VG vg lvm2 [67.83 GB / 67.83 GB free] PV /dev/sdd1 VG vg lvm2 [67.83 GB / 67.83 GB free] PV /dev/sdd2 VG vg lvm2 [67.83 GB / 67.83 GB free] PV /dev/sde1 VG vg lvm2 [67.83 GB / 67.83 GB free] PV /dev/sde2 VG vg lvm2 [67.83 GB / 67.83 GB free] PV /dev/sdf1 VG vg lvm2 [67.83 GB / 67.83 GB free] PV /dev/sdf2 VG vg lvm2 [67.83 GB / 67.83 GB free] PV /dev/sdg1 VG vg lvm2 [67.83 GB / 67.83 GB free] PV /dev/sdg2 VG vg lvm2 [67.83 GB / 67.83 GB free] PV /dev/sdh1 VG vg lvm2 [67.83 GB / 67.83 GB free] PV /dev/sdh2 VG vg lvm2 [67.83 GB / 67.83 GB free] PV /dev/sdi1 lvm2 [603.94 GB] PV /dev/sdi2 lvm2 [603.94 GB] Total: 16 [2.11 TB] / in use: 14 [949.65 GB] / in no VG: 2 [1.18 TB]
然后使用新物理卷扩展原始卷组。
#vgextend vg /dev/sdi[12]Volume group "vg" successfully extended #pvscanPV /dev/sdb1 VG vg lvm2 [67.83 GB / 67.10 GB free] PV /dev/sdb2 VG vg lvm2 [67.83 GB / 67.83 GB free] PV /dev/sdc1 VG vg lvm2 [67.83 GB / 67.83 GB free] PV /dev/sdc2 VG vg lvm2 [67.83 GB / 67.83 GB free] PV /dev/sdd1 VG vg lvm2 [67.83 GB / 67.83 GB free] PV /dev/sdd2 VG vg lvm2 [67.83 GB / 67.83 GB free] PV /dev/sde1 VG vg lvm2 [67.83 GB / 67.83 GB free] PV /dev/sde2 VG vg lvm2 [67.83 GB / 67.83 GB free] PV /dev/sdf1 VG vg lvm2 [67.83 GB / 67.83 GB free] PV /dev/sdf2 VG vg lvm2 [67.83 GB / 67.83 GB free] PV /dev/sdg1 VG vg lvm2 [67.83 GB / 67.83 GB free] PV /dev/sdg2 VG vg lvm2 [67.83 GB / 67.83 GB free] PV /dev/sdh1 VG vg lvm2 [67.83 GB / 67.83 GB free] PV /dev/sdh2 VG vg lvm2 [67.83 GB / 67.83 GB free] PV /dev/sdi1 VG vg lvm2 [603.93 GB / 603.93 GB free] PV /dev/sdi2 VG vg lvm2 [603.93 GB / 603.93 GB free] Total: 16 [2.11 TB] / in use: 16 [2.11 TB] / in no VG: 0 [0 ]
将线性卷重新转换为其原始镜像状态。
# lvconvert -m 1 /dev/vg/groupfs /dev/sdi1 /dev/sdb1 /dev/sdc1
  Logical volume mirror converted.
您可以使用 lvs 命令验证镜像是否已恢复。
# lvs -a -o +devices
  LV                 VG   Attr   LSize   Origin Snap%  Move Log          Copy% Devices
  groupfs            vg   mwi-a- 752.00M                    groupfs_mlog 68.62 groupfs_mimage_0(0),groupfs_mimage_1(0)
  [groupfs_mimage_0] vg   iwi-ao 752.00M                                       /dev/sdb1(0)
  [groupfs_mimage_1] vg   iwi-ao 752.00M                                       /dev/sdi1(0)
  [groupfs_mlog]     vg   lwi-ao   4.00M                                       /dev/sdc1(0)
6.3. 恢复物理卷元数据
如果物理卷的卷组元数据区域意外覆盖或被破坏,您将收到一条错误消息,表明元数据区域不正确,或者系统无法找到带有特定 UUID 的物理卷。您可以通过在物理卷中编写新元数据区域来从物理卷中恢复数据,并指定与丢失的元数据相同的 UUID。
警告
您不应该尝试使用可以正常工作的 LVM 逻辑卷执行这个步骤。如果您指定了不正确的 UUID,将会丢失您的数据。
以下示例显示了您可能看到元数据区域是否缺失或损坏的输出类型。
# lvs -a -o +devices
  Couldn't find device with uuid 'FmGRh3-zhok-iVI8-7qTD-S5BI-MAEN-NYM5Sk'.
  Couldn't find all physical volumes for volume group VG.
  Couldn't find device with uuid 'FmGRh3-zhok-iVI8-7qTD-S5BI-MAEN-NYM5Sk'.
  Couldn't find all physical volumes for volume group VG.
  ...
您可能可以通过在
/etc/lvm/archive 目录中查找覆盖的物理卷的 UUID。查看卷组的最后一个已知有效归档 LVM 元数据的 VolumeGroupName_xxxx.vg 文件。
另外,您可能会发现取消激活卷并设置
部分 (-P)参数,您可以找到缺少的物理卷的 UUID。
# vgchange -an --partial
  Partial mode. Incomplete volume groups will be activated read-only.
  Couldn't find device with uuid 'FmGRh3-zhok-iVI8-7qTD-S5BI-MAEN-NYM5Sk'.
  Couldn't find device with uuid 'FmGRh3-zhok-iVI8-7qTD-S5BI-MAEN-NYM5Sk'.
  ...
使用 pvcreate 命令的
--uuid 和 --restorefile 参数来恢复物理卷。以下示例将 /dev/sdh1 设备标记为带有上述 UUID 的物理卷,FmGRh3-zhok-iVI8-7qTD-S5BI-MAEN-NYM5Sk。此命令使用 VG_00050.vg 中包含的元数据信息恢复物理卷标签,这是卷组的最新好归档元数据。restorefile 参数指示 pvcreate 命令使新物理卷与卷组中的旧物理卷兼容,或者新元数据不会放置在旧的物理卷包含数据的位置(例如,如果原始 pvcreate 命令使用了控制元数据放置的命令行参数,或者物理卷最初是使用不同默认值的不同软件版本创建的)。pvcreate 命令只覆盖 LVM 元数据区域,不会影响现有数据区域。
# pvcreate --uuid "FmGRh3-zhok-iVI8-7qTD-S5BI-MAEN-NYM5Sk" --restorefile /etc/lvm/archive/VG_00050.vg /dev/sdh1
  Physical volume "/dev/sdh1" successfully created
然后,您可以使用 vgcfgrestore 命令恢复卷组的元数据。
# vgcfgrestore VG
  Restored volume group VG
现在您可以显示逻辑卷。
# lvs -a -o +devices
  LV     VG   Attr   LSize   Origin Snap%  Move Log Copy%  Devices
  stripe VG   -wi--- 300.00G                               /dev/sdh1 (0),/dev/sda1(0)
  stripe VG   -wi--- 300.00G                               /dev/sdh1 (34728),/dev/sdb1(0)
以下命令激活卷并显示活跃卷。
#lvchange -ay /dev/VG/stripe#lvs -a -o +devicesLV VG Attr LSize Origin Snap% Move Log Copy% Devices stripe VG -wi-a- 300.00G /dev/sdh1 (0),/dev/sda1(0) stripe VG -wi-a- 300.00G /dev/sdh1 (34728),/dev/sdb1(0)
如果磁盘中的 LVM 元数据尽可能多地消耗超过它的空间,这个命令就可以恢复物理卷。如果覆盖元数据的数据超过了元数据区域,则该卷中的数据可能会受到影响。您可能能够使用 fsck 命令恢复这些数据。
6.4. 替换物理卷
如果物理卷失败或者需要替换,您可以标记一个新的物理卷来替换现有卷组中丢失的步骤,与恢复物理卷元数据的步骤相同,如 第 6.3 节 “恢复物理卷元数据” 所述。您可以使用 vgdisplay 命令的
--partial 和 --verbose 参数来显示任何不再存在的物理卷的 UUID 和大小。如果要替换同一大小的另一个物理卷,您可以使用带有 --restorefile 和 --uuid 参数的 pvcreate 命令初始化与缺失物理卷相同的 UUID 的新设备。然后,您可以使用 vgcfgrestore 命令恢复卷组的元数据。
6.5. 从卷组中删除丢失的物理卷
如果您丢失了物理卷,您可以使用 vgchange 命令的
--partial 参数激活卷组中剩余的物理卷。您可以使用 vgreduce 命令的 --removemissing 参数从卷组中删除使用这个物理卷的所有逻辑卷。
您应该使用
--test 参数运行 vgreduce 命令,以验证您将要销毁的内容。
与大多数 LVM 操作一样,如果您立即使用 vgcfgrestore 命令将卷组元数据恢复到之前的状态,则 vgreduce 命令不可逆。例如:如果您使用没有
--test 参数的 vgreduce 命令的 --removemissing 参数,并找到您想保留的逻辑卷,您仍然可以替换物理卷,并使用另一个 vgcfgrestore 命令将卷组返回到之前的状态。
6.6. 逻辑卷可用扩展不足
当您认为逻辑卷根据 vgdisplay 或 vgs 命令的输出有足够扩展时,您可能会在创建逻辑卷时收到错误消息"Insufficient free extents"。这是因为这些命令将数字舍入为 2 个十进制位置,以提供人类可读的输出。要指定确切的大小,请使用空闲物理区块数而不是多个字节来确定逻辑卷的大小。
默认情况下,vgdisplay 命令包含此输出行来指示可用物理扩展。
# vgdisplay
  --- Volume group ---
  ...
  Free  PE / Size       8780 / 34.30 GB
另外,您可以使用 vgs 命令的
vg_free_count 和 vg_extent_count 参数来显示可用扩展以及总扩展数目。
# vgs -o +vg_free_count,vg_extent_count
  VG     #PV #LV #SN Attr   VSize  VFree  Free #Ext
  testvg   2   0   0 wz--n- 34.30G 34.30G 8780 8780
使用 8780 可用物理扩展,您可以使用小写的 l 参数使用扩展而不是字节:
# lvcreate -l 8780 -n testlv testvg
这将使用卷组中的所有可用扩展。
# vgs -o +vg_free_count,vg_extent_count
  VG     #PV #LV #SN Attr   VSize  VFree Free #Ext
  testvg   2   1   0 wz--n- 34.30G    0     0 8780
6.7. 为多路径设备重复 PV Warning
当将 LVM 与多路径存储搭配使用时,一些 LVM 命令(如 vgs 或 lvchange)可能会在列出卷组或逻辑卷时显示如下信息。
Found duplicate PV GDjTZf7Y03GJHjteqOwrye2dcSCjdaUi: using /dev/dm-5 not /dev/sdd
Found duplicate PV GDjTZf7Y03GJHjteqOwrye2dcSCjdaUi: using /dev/emcpowerb not /dev/sde
Found duplicate PV GDjTZf7Y03GJHjteqOwrye2dcSCjdaUi: using /dev/sddlmab not /dev/sdf
在为这些警告提供 root 原因信息后,本节描述了如何在以下两个情况下解决这个问题。
- 输出中显示的两个设备都是指向同一设备的单一路径
- 输出中显示的两个设备都是多路径映射
6.7.1. Duplicate PV Warning 的根本原因
使用默认配置,LVM 命令将扫描
/dev 中的设备,并检查每个生成的 LVM 元数据设备。这是因为 /etc/lvm/lvm.conf 中的默认过滤器(如下所示):
filter = [ "a/.*/" ]
当使用设备映射器多路径或其他多路径软件(如 EMC PowerPath 或 Hitachi Dynamic Link Manager (HDLM))时,特定逻辑单元号(LUN)的每个路径都会作为不同的 SCSI 设备注册,如
/dev/sdb 或 /dev/sdc。然后,多路径软件会创建一个映射到这些独立路径的新设备,如 /dev/mapper/mpath1 或 /dev/mapper/mpatha 用于设备映射器多路径,/dev/emcpowera 用于 EMC PowerPath,或用于 Hitachi HDLM 的 /dev/sddlmab。由于每个 LUN 在 /dev 中有多个指向同一底层数据的设备节点,所以它们都包含相同的 LVM 元数据,因此 LVM 命令会多次找到相同的元数据,并将其报告为重复。
这些重复的信息只是警告,并不意味着 LVM 操作失败。相反,它们会被提醒用户,只有其中一个设备被用作物理卷,而其他设备将被忽略。如果消息表示选择不正确的设备或者向用户有破坏性的警告,则可以应用过滤器来仅搜索物理卷所需的设备,并为多路径设备发出任何基础路径。
6.7.2. 单一路径的重复警告
以下示例显示了一个重复的 PV 警告,其中显示重复的设备是同一设备的单一路径。在这种情况下,
/dev/sdd 和 /dev/sdf 可以在输出中的同一多路径映射中找到到 multipath -ll 命令。
Found duplicate PV GDjTZf7Y03GJHjteqOwrye2dcSCjdaUi: using **/dev/sdd** not **/dev/sdf**
要防止这个警告出现,您可以在
/etc/lvm/lvm.conf 文件中配置过滤器来限制 LVM 将搜索元数据的设备。该过滤器是一个模式列表,它将应用于通过 /dev 扫描找到的每个设备(或 /etc/lvm/lvm.conf 文件中的 dir 关键字指定的目录)。模式是以任何字符分隔的正则表达式,前面带有 (用于接受)或 r (用于拒绝)。
您配置的过滤器应包括需要检查 LVM 元数据的所有设备,比如使用根卷组以及所有多路径设备的本地硬盘驱动器。通过拒绝到多路径设备的底层路径(如
/dev/sdb、/dev/sdd 等等),您可以避免这些重复的 PV 警告,因为每个唯一元数据区域只在多路径设备本身中找到一次。
以下示例显示了因为有多个存储路径而避免重复的 PV 警告的过滤器。
- 这个过滤器接受第一个硬盘上的第二个分区(
/dev/sda和任何 device-mapper-multipath 设备),同时拒绝所有其他分区。filter = [ "a|/dev/sda2$|", "a|/dev/mapper/mpath.*|", "r|.*|" ]
- 这个过滤器接受所有 HP SmartArray 控制器和任何 EMC PowerPath 设备。
filter = [ "a|/dev/cciss/.*|", "a|/dev/emcpower.*|", "r|.*|" ]
- 这个过滤器接受第一个 IDE 驱动器以及所有多路径设备中的任何分区。
filter = [ "a|/dev/hda.*|", "a|/dev/mapper/mpath.*|", "r|.*|" ]
注意
在
/etc/lvm/lvm.conf 文件中添加新过滤器时,请确保原始过滤器使用 # 或被注释掉。
配置过滤器并且保存了
/etc/lvm/lvm.conf 文件后,检查这些命令的输出以确保没有缺少物理卷或卷组。
#pvscan#vgscan
您还可以通过将
--config 参数添加到 LVM 命令中,而无需修改 /etc/lvm/lvm.conf 文件,而无需修改 /etc/lvm/lvm.conf 文件,如下例所示。
# lvs --config 'devices{ filter = [ "a|/dev/emcpower.*|", "r|.*|" ] }'注意
使用
--config 参数测试过滤器不会对服务器的配置进行永久更改。在测试后,请确保将正常工作的过滤器包含在 /etc/lvm/lvm.conf 文件中。
配置 LVM 过滤器后,建议您使用 dracut 命令重建
initrd 设备,以便在重启后只扫描必要的设备。
6.7.3. 多路径映射重复警告
以下示例显示两个设备都有重复的 PV 警告,它们是多路径映射。在这些示例中,我们不会查看两个不同的路径,而是两个不同的设备。
Found duplicate PV GDjTZf7Y03GJHjteqOwrye2dcSCjdaUi: using **/dev/mapper/mpatha** not **/dev/mapper/mpathc**
Found duplicate PV GDjTZf7Y03GJHjteqOwrye2dcSCjdaUi: using **/dev/emcpowera** not **/dev/emcpowerh**
对于同一设备到同一设备的设备来说,这种情况比重复的警告更加严重,因为这些警告通常意味着机器已呈现出不应看到的设备(例如 LUN 克隆或镜像)。在这种情况下,除非您了解了应该从机器中删除哪些设备,否则这种情况可以被不可恢复。建议您联系红帽技术支持来解决这个问题。
附录 A. 设备映射器
设备映射器是提供卷管理的框架的内核驱动程序。它提供了一种创建映射设备的通用方法,它可用作逻辑卷。它没有特别了解卷组或元数据格式。
设备映射器为多个更高级别的技术提供基础。除了 LVM, Device-Mapper multipath 和 dmraid 命令外,使用设备映射器。设备映射器的应用程序接口是 ioctl 系统调用。用户界面是 dmsetup 命令。
使用设备映射器激活 LVM 逻辑卷。每个逻辑卷都被转换为映射的设备。每个片段都转化为描述该设备的映射表中的一行。设备映射器支持各种映射目标,包括线性映射、条带映射和错误映射。例如,两个磁盘可以使用一对线性映射连接到一个逻辑卷中,每个磁盘一个。当 LVM 创建卷时,它会创建一个底层设备映射器设备,可以使用 dmsetup 命令查询。有关映射表中设备格式的详情,请参考 第 A.1 节 “设备表映射”。有关使用 dmsetup 命令查询设备的详情,请参考 第 A.2 节 “dmsetup 命令”。
A.1. 设备表映射
映射的设备由表定义,该表指明了如何使用受支持的 Device Table 映射来映射设备的每个逻辑扇区范围。映射的设备的表由表单的行列表构建:
start length mapping[mapping_parameters...]
在设备映射器表的第一行中,
start 参数必须等于 0。一行中的 start + length 参数必须与下一行中的 start 相同。在映射表的行中指定哪个映射参数取决于行中指定 mapping 类型。
设备映射器中的大小总是以扇区(512 字节)指定。
当设备被指定为设备映射器中的映射参数时,可以在文件系统(例如
/dev/hda)或格式为 major minor 中的设备名称引用它。首选使用 main:minor 格式,因为它可以避免路径名称查找。
下面显示了一个设备映射表示例。这个表中有四个线性目标:
0 35258368 linear 8:48 65920
35258368 35258368 linear 8:32 65920
70516736 17694720 linear 8:16 17694976
88211456 17694720 linear 8:16 256
每行的前 2 参数是片段起始块和片段的长度。next 关键字是映射目标,本例中的所有情况下都是
线性 的。行的其余部分由 线性 目标的参数组成。
以下小节描述了以下映射的格式:
- 线性
- 条带的
- mirror
- snapshot 和 snapshot-origin
- 错误
- zero
- multipath
- crypt
A.1.1. 线性映射目标
线性映射目标将持续的块范围映射到另一个块设备。线性目标的格式如下:
start lengthlineardevice offset
start- 在虚拟设备中启动块
length- 这个片段的长度
device- 块设备,由文件系统中的设备名称引用,或者由主号和次号引用
major:minor offset- 在该设备中开始映射的偏移
以下示例显示了在虚拟设备 0 的起始块(一个片段长度为 1638400)、主要数量为 8:2,以及 41146992 设备的起始偏移量。
0 16384000 linear 8:2 41156992
以下示例显示了一个线性目标,其 device 参数指定为设备
/dev/hda。
0 20971520 linear /dev/hda 384
A.1.2. 条带映射目标
条带映射目标支持在物理设备间分条。它取条带的数目和条带的块数量,后跟设备名称和扇区对列表。条带目标的格式如下:
start lengthstriped#stripes chunk_size device1 offset1 ... deviceN offsetN
每个条带都有一组
device 和 offset 参数。
start- 在虚拟设备中启动块
length- 这个片段的长度
#stripes- 虚拟设备的条带数
chunk_size- 在切换到下一个数据前写入每个条带的扇区数 ; 必须为 2 的电源,至少与内核页面大小相同
device- 块设备,由文件系统中的设备名称引用,或者由主号和次号引用,格式为
major:minor。 offset- 在该设备中开始映射的偏移
以下示例显示了三个条带的条带目标,块大小为 128:
0 73728 striped 3 128 8:9 384 8:8 384 8:7 9789824
- 0
- 在虚拟设备中启动块
- 73728
- 这个片段的长度
- 条带 3 128
- 在 3 个大小为 128 块的设备间条带
- 8:9
- 主:第一个设备的次号码
- 384
- 在第一个设备中启动映射的偏移
- 8:8
- 主:第二个设备的次号码
- 384
- 在第二个设备中启动映射的偏移
- 8:7
- 主:第三个设备的次号码
- 9789824
- 在第三个设备中启动映射的偏移
以下示例显示了 2 条带的条带化目标,包含 256 KiB 块,设备名称在文件系统中,而不是由主号码和副号码指定的设备名称。
0 65536 striped 2 512 /dev/hda 0 /dev/hdb 0
A.1.3. 镜像映射目标
镜像映射目标支持镜像逻辑设备的映射。镜像目标的格式如下:
start lengthmirrorlog_type #logargs logarg1 ... logargN #devs device1 offset1 ... deviceN offsetN
start- 在虚拟设备中启动块
length- 这个片段的长度
log_type- 可能的日志类型及其参数如下:
core- 镜像功能是本地的,镜像日志保存在内核内存中。此日志类型采用 1 - 3 参数:regionsize [[
no]sync] [block_on_error] disk- 镜像是本地的,镜像日志保存在磁盘上。此日志类型采用 2 - 4 参数:logdevice regionsize [[
no]sync] [block_on_error] clustered_core- 镜像集群是集群的,镜像日志保存在内核内存中。此日志类型采用 2 - 4 参数:regionsize UUID [[
no]sync] [block_on_error] clustered_disk- 镜像集群是集群的,镜像日志保存在磁盘上。此日志类型采用 3 - 5 参数:logdevice regionsize UUID [[
no]sync] [block_on_error]
LVM 维护一个小日志,它用于跟踪哪些区域与镜像或镜像处于同步。regionsize 参数指定这些地区的大小。在集群环境中,UUID 参数是与镜像日志设备关联的唯一标识符,以便可以在整个集群中维护日志状态。可选的[no]sync参数可以用来将镜像指定为 "in-sync" 或 "out-of-sync"。block_on_error参数用于告知镜像响应错误,而不是忽略它们。 #log_args- 在映射中指定的日志参数数
logargs- mirror 的日志参数 ; 提供的日志参数由
#log-args参数指定,有效的日志参数由log_type参数指定。 #devs- 镜像中的分支数 ; 为每个分支指定设备和偏移量
device- 每个镜像 leg 的块设备,由文件系统中的设备名称或主号和次号引用,格式为
major:minor。为每个镜像 leg 指定块设备和偏移,如#devs参数所示。 offset- 启动设备上映射的偏移。为每个镜像 leg 指定块设备和偏移,如
#devs参数所示。
以下示例显示了集群镜像的镜像映射目标,其镜像日志保存在磁盘上。
0 52428800 mirror clustered_disk 4 253:2 1024 UUID block_on_error 3 253:3 0 253:4 0 253:5 0
- 0
- 在虚拟设备中启动块
- 52428800
- 这个片段的长度
- mirror cluster_disk
- 带有日志类型的镜像目标,指定该镜像已集群,镜像日志会在磁盘上维护
- 4
- 4 个镜像日志参数将遵循
- 253:2
- 主:日志设备的次编号
- 1024
- 镜像日志用来跟踪同步情况的区域大小
UUID- 镜像日志设备的 UUID,用于维护整个集群中的日志信息
block_on_error- 镜像应响应错误
- 3
- 镜像中的分支数
- 253:3 0 253:4 0 253:5 0
- main:设备代表每个镜像分支的次编号和偏移量
A.1.4. snapshot 和 snapshot-origin Mapping 目标
当您创建卷的第一个 LVM 快照时,会使用四个设备映射器设备:
- 具有
线性映射的设备,其中包含源卷的原始映射表。 - 具有
线性映射的设备用作源卷的写时复制(COW)设备;对于每个写入,原始数据保存在每个快照的 COW 设备中,以便其可见的内容保持不变(忽略 COW 设备填满)。 - 具有组合了 #1 和 #2
的快照映射的设备,这是可见的快照卷。 - "original"卷(使用原始源卷使用的设备号),其表替换为设备 #1 的 "snapshot-origin" 映射。
固定命名方案用于创建这些设备,例如,您可以使用以下命令创建名为
base 的 LVM 卷,以及基于该卷的名为 snap 的快照卷。
#lvcreate -L 1G -n base volumeGroup#lvcreate -L 100M --snapshot -n snap volumeGroup/base
这会产生四个设备,您可以使用以下命令查看:
#dmsetup table|grep volumeGroupvolumeGroup-base-real: 0 2097152 linear 8:19 384 volumeGroup-snap-cow: 0 204800 linear 8:19 2097536 volumeGroup-snap: 0 2097152 snapshot 254:11 254:12 P 16 volumeGroup-base: 0 2097152 snapshot-origin 254:11 #ls -lL /dev/mapper/volumeGroup-*brw------- 1 root root 254, 11 29 ago 18:15 /dev/mapper/volumeGroup-base-real brw------- 1 root root 254, 12 29 ago 18:15 /dev/mapper/volumeGroup-snap-cow brw------- 1 root root 254, 13 29 ago 18:15 /dev/mapper/volumeGroup-snap brw------- 1 root root 254, 10 29 ago 18:14 /dev/mapper/volumeGroup-base
snapshot-origin 目标的格式如下:
start lengthsnapshot-originorigin
start- 在虚拟设备中启动块
length- 这个片段的长度
origin- 快照卷
snapshot-origin 通常会基于它有一个或多个快照。读取将直接映射到后备设备。对于每个写入,原始数据将保存在每个快照的 COW 设备中,以便其可见的内容保持不变,直到 COW 设备填满为止。
快照 目标的格式如下:
start lengthsnapshotorigin COW-deviceP|Nchunksize
start- 在虚拟设备中启动块
length- 这个片段的长度
origin- 快照卷
COW-device- 保存数据块的设备
- P|N
- P(Persistent)或 N(非持久性); 表示快照在重新引导后是否保留下来。对于临时快照(N)较少的元数据必须在磁盘上保存;它们可以被内核保存在内存中。
chunksize- 将存储在 COW 设备上的已更改数据块的扇区大小
以下示例显示了一个 original 目标,
原始设备 为 254:11。
0 2097152 snapshot-origin 254:11
以下示例显示了一个
快照 目标,原始设备为 254:11,而 COW 设备为 254:12。此快照设备在重启后保留,且 COW 设备中存储的数据的块大小是 16 个扇区。
0 2097152 snapshot 254:11 254:12 P 16
A.1.5. 错误映射目标
如果映射目标有错误,则所有到映射扇区的 I/O 操作都会失败。
可以使用错误映射目标进行测试。要测试设备的行为方式,您可以创建一个设备映射,在设备中间使用 bad 扇区,或者您可以交换出镜像分支,并替换为错误目标。
可以使用错误目标代替失败设备,作为避免超时并在实际设备中重试的方法。在 LVM 元数据失败时,它可以用作中间目标。
错误 映射目标除了 start 和 length 参数之外不需要额外的参数。
以下示例显示了
错误 目标。
0 65536 error
A.1.6. 零映射目标
零 映射目标是等同于 /dev/zero 的块设备。此映射的读取操作将返回零块。写入此映射的数据将被丢弃,但写入会成功。零 映射目标不使用 开始 和 长度 参数之外的其他参数。
以下示例显示了 16Tb 设备的
零 目标。
0 65536 zero
A.1.7. 多路径映射目标
多路径映射目标支持多路径设备的映射。
多路径 目标的格式如下:
start lengthmultipath#features [feature1 ... featureN] #handlerargs [handlerarg1 ... handlerargN] #pathgroups pathgroup pathgroupargs1 ... pathgroupargsN
每个路径组都有一组
pathgroupargs 参数。
start- 在虚拟设备中启动块
length- 这个片段的长度
#features- 多路径功能数量,后跟这些功能。如果此参数为零,则没有
feature参数,下一个设备映射参数为#handlerargs。目前,可以使用multipath.conf文件中的features属性queue_if_no_path设置支持的功能。这表示这个多路径设备当前设置为队列 I/O 操作(如果没有可用的路径)。在以下示例中,multipath.conf文件中的no_path_retry属性被设置为队列 I/O 操作,直到所有路径在一组尝试被使用路径后都被标记为失败。在这种情况下,映射显示如下,直到所有路径检查器都失败了指定数量的检查。0 71014400 multipath 1 queue_if_no_path 0 2 1 round-robin 0 2 1 66:128 \ 1000 65:64 1000 round-robin 0 2 1 8:0 1000 67:192 1000
当所有路径检查器都失败了指定数量的检查后,映射会显示如下。0 71014400 multipath 0 0 2 1 round-robin 0 2 1 66:128 1000 65:64 1000 \ round-robin 0 2 1 8:0 1000 67:192 1000
#handlerargs- 硬件处理程序参数的数量,后跟这些参数。硬件处理器指定在切换路径组或处理 I/O 错误时用于执行硬件特定操作的模块。如果将其设置为 0,则下一个参数为
#pathgroups。 #pathgroups- 路径组的数量。路径组是多路径设备将负载均衡的路径集合。每个路径组都有一组
pathgroupargs参数。 pathgroup- 要尝试的下一个路径组。
pathgroupsargs- 每个路径组由以下参数组成:
pathselector #selectorargs #paths #pathargs device1 ioreqs1 ... deviceN ioreqsN路径组中每个路径均有一组 path 参数。pathselector- 指定用于决定此路径组中用于下一 I/O 操作的算法。
#selectorargs- 在多路径映射中跟随这个参数的路径选择器参数数量。目前,这个参数的值始终为 0。
#paths- 这个路径组中的路径数量。
#pathargs- 为此组中每个路径指定的路径参数的数目。目前,这个数字始终为 1,即
ioreqs参数。 device- 路径的块设备号,由主号和次号引用,格式为
major:minor ioreqs- 在切换到当前组中下一个路径前,要路由到此路径的 I/O 请求数量。
图 A.1 “多路径映射目标” 显示带有两个路径组的多路径目标格式。
图 A.1. 多路径映射目标
以下示例显示了同一多路径设备的纯故障转移目标定义。在这个目标中有四个路径组,每个路径组只有一个打开路径,以便多路径设备一次只使用一个路径。
0 71014400 multipath 0 0 4 1 round-robin 0 1 1 66:112 1000 \
round-robin 0 1 1 67:176 1000 round-robin 0 1 1 68:240 1000 \
round-robin 0 1 1 65:48 1000
以下示例显示了同一多路径设备的完整分散(多线程)目标定义。在这个目标中只有一个路径组,其中包括所有路径。在这个设置中,多路径会将负载均匀分发到所有路径。
0 71014400 multipath 0 0 1 1 round-robin 0 4 1 66:112 1000 \
 67:176 1000 68:240 1000 65:48 1000
有关多路径的详情,请参考 DM 多路径 手动。
A.1.8. crypt Mapping 目标
crypt 目标加密通过指定设备传递的数据。它使用内核 Crypto API。
crypt 目标的格式如下:
start lengthcryptcipher key IV-offset device offset
start- 在虚拟设备中启动块
length- 这个片段的长度
cipher- 密码由
cipher[-chainmode]-ivmode[:iv options]组成。cipher- 可用的密码列在
/proc/crypto中(例如)。 chainmode- 始终使用
cbc。不要使用ebc,它不使用初始向量(IV)。 ivmode[:iv options]- IV 是一个初始向量,用于不同的加密。IV 模式是
plain或essiv:hash。ivmodeof-plain使用扇区号(加 IV 偏移)作为 IV。ivmode的-essiv是一个避免水位线弱点的增强。
key- 加密密钥,以 hex 提供
IV-offset- 初始向量(IV)偏移
device- 块设备,由文件系统中的设备名称引用,或者由主号和次号引用
major:minor offset- 在该设备中开始映射的偏移
以下是
crypt 目标的示例。
0 2097152 crypt aes-plain 0123456789abcdef0123456789abcdef 0 /dev/hda 0
A.2. dmsetup 命令
dmsetup 命令是与设备映射器通信的命令行打包程序。有关 LVM 设备的常规系统信息,您可以找到 dmsetup 命令的信息、
ls、status 和 deps 选项,如以下部分所述。
有关 dmsetup 命令的额外选项和功能的详情,请参考 dmsetup(8)手册页。
A.2.1. dmsetup info 命令
dmsetup info device 命令提供有关设备映射器设备的摘要信息。如果没有指定设备名称,输出会是所有当前配置的设备映射程序设备的信息。如果您指定了一个设备,这个命令只为该设备生成信息。
dmsetup info 命令提供以下类别的信息:
名称- 设备的名称。LVM 设备表示为卷组名称,逻辑卷名称用连字符隔开。原始名称中的连字符转换为两个连字符。在标准的 LVM 操作期间,您不应该使用以下格式的 LVM 设备名称直接指定 LVM 设备,而是应使用 vg/lv 替代方案。
状态- 可能的设备状态有
SUSPENDED、ACTIVE和READ-ONLY。dmsetup suspend 命令将设备状态设置为SUSPENDED。当设备被挂起时,该设备的所有 I/O 操作都会停止。dmsetup resume 命令将设备状态恢复到ACTIVE。 Read Ahead- 系统在持续读取操作的打开文件前读取的数据块数。默认情况下,内核会自动选择合适的值。您可以使用 dmsetup 命令的
--readahead选项更改这个值。 存在的表- 此类别的可能状态为 LIVE 和
INACTIVE。INACTIVE状态表示已加载了一个表,当 dmsetup resume 命令恢复设备状态变为ACTIVE时,该表的状态将变为LIVE。如需更多信息,请参阅 dmsetup 手册页。 开放计数- open reference count 表示设备打开了多少次。mount 命令打开设备。
事件号- 当前接收的事件数量。通过发出 dmsetup wait n 命令,您可以等待第 n 个事件,在收到前阻止调用。
主,次版本- 主设备号码和副设备号码。
目标数- 组成一个设备的片段数量。例如:跨越 3 个磁盘的线性设备将有 3 个目标。线性设备由磁盘开头和结尾组成,但中间没有 2 个目标。
UUID- 设备的 UUID。
以下示例显示了 dmsetup info 命令的部分输出。
# dmsetup info
Name:              testgfsvg-testgfslv1
State:             ACTIVE
Read Ahead:        256
Tables present:    LIVE
Open count:        0
Event number:      0
Major, minor:      253, 2
Number of targets: 2
UUID: LVM-K528WUGQgPadNXYcFrrf9LnPlUMswgkCkpgPIgYzSvigM7SfeWCypddNSWtNzc2N
...
Name:              VolGroup00-LogVol00
State:             ACTIVE
Read Ahead:        256
Tables present:    LIVE
Open count:        1
Event number:      0
Major, minor:      253, 0
Number of targets: 1
UUID: LVM-tOcS1kqFV9drb0X1Vr8sxeYP0tqcrpdegyqj5lZxe45JMGlmvtqLmbLpBcenh2L3
A.2.2. dmsetup ls 命令
您可以使用 dmsetup ls 命令列出映射设备的设备名称。您可以使用 dmsetup ls --target target_type 命令列出至少一个指定类型目标的设备。有关 dmsetup ls 命令的其他选项,请查看 dmsetup 手册页。
以下示例显示了列出当前配置映射设备的设备名称。
# dmsetup ls
testgfsvg-testgfslv3    (253:4)
testgfsvg-testgfslv2    (253:3)
testgfsvg-testgfslv1    (253:2)
VolGroup00-LogVol01     (253:1)
VolGroup00-LogVol00     (253:0)
以下示例显示了列出当前配置的镜像映射的设备名称。
# dmsetup ls --target mirror
lock_stress-grant--02.1722      (253, 34)
lock_stress-grant--01.1720      (253, 18)
lock_stress-grant--03.1718      (253, 52)
lock_stress-grant--02.1716      (253, 40)
lock_stress-grant--03.1713      (253, 47)
lock_stress-grant--02.1709      (253, 23)
lock_stress-grant--01.1707      (253, 8)
lock_stress-grant--01.1724      (253, 14)
lock_stress-grant--03.1711      (253, 27)
在多路径或其他设备映射器设备上堆栈的 LVM 配置可能比较复杂。dmsetup ls 命令提供了一个
--tree 选项,它将设备之间的依赖项显示为树,如下例所示。
# dmsetup ls --tree
vgtest-lvmir (253:13)
 ├─vgtest-lvmir_mimage_1 (253:12)
 │  └─mpathep1 (253:8)
 │     └─mpathe (253:5)
 │        ├─ (8:112)
 │        └─ (8:64)
 ├─vgtest-lvmir_mimage_0 (253:11)
 │  └─mpathcp1 (253:3)
 │     └─mpathc (253:2)
 │        ├─ (8:32)
 │        └─ (8:16)
 └─vgtest-lvmir_mlog (253:4)
    └─mpathfp1 (253:10)
       └─mpathf (253:6)
          ├─ (8:128)
          └─ (8:80)
A.2.3. dmsetup status 命令
dmsetup status device 命令提供指定设备中每个目标的状态信息。如果没有指定设备名称,输出会是所有当前配置的设备映射程序设备的信息。您只能使用 dmsetup status --target target_type 命令列出至少一个指定类型目标的设备状态。
以下示例显示了 命令,列出所有当前配置的已映射设备中目标的状态。
# dmsetup status
testgfsvg-testgfslv3: 0 312352768 linear
testgfsvg-testgfslv2: 0 312352768 linear
testgfsvg-testgfslv1: 0 312352768 linear
testgfsvg-testgfslv1: 312352768 50331648 linear
VolGroup00-LogVol01: 0 4063232 linear
VolGroup00-LogVol00: 0 151912448 linear
A.2.4. dmsetup deps 命令
dmsetup deps device 命令为指定设备的映射表引用的设备提供(major, minor)对列表。如果没有指定设备名称,输出会是所有当前配置的设备映射程序设备的信息。
以下示例显示,列出所有当前配置映射的设备的依赖项。
# dmsetup deps
testgfsvg-testgfslv3: 1 dependencies    : (8, 16)
testgfsvg-testgfslv2: 1 dependencies    : (8, 16)
testgfsvg-testgfslv1: 1 dependencies    : (8, 16)
VolGroup00-LogVol01: 1 dependencies     : (8, 2)
VolGroup00-LogVol00: 1 dependencies     : (8, 2)
以下示例显示了仅列出设备
lock_stress-grant--02.1722 的依赖项:
# dmsetup deps lock_stress-grant--02.1722
3 dependencies  : (253, 33) (253, 32) (253, 31)
A.3. udev 设备管理器的设备映射程序支持
udev 设备管理器的主要角色是提供在 /dev 目录中设置节点的动态方法。这些节点的创建由用户空间中的 udev 规则应用定向。这些规则在直接从内核发送的 udev 事件上处理,从而添加、删除或更改特定设备。这为热插拔支持提供了方便和集中的机制。
除了创建实际节点外,
udev 设备管理器还能够创建可命名的符号链接。这为您提供了在/dev 目录中选择自己的自定义命名和目录结构的自由(如果需要)。
每个
udev 事件都包含有关正在处理的设备的基本信息,如其名称、其所属子系统、设备的类型、其主号码和次号,以及事件的类型。因此,并且可以访问 /sys 目录中也可以可在 udev 规则中访问的所有信息,您可以根据此信息使用简单的过滤器,并根据此信息有条件地运行规则。
udev 设备管理器还提供了设置节点权限的集中方法。您可以添加一组自定义规则来为任何在处理事件时可用的信息指定的任何设备定义权限。
也可以直接在
udev 规则中添加程序 hook。udev 设备管理器可以调用这些程序来提供处理事件所需的进一步处理。另外,程序也可以根据此处理来导出环境变量。任何给定结果都可以在规则中进一步使用,作为信息的补充来源。
任何使用
udev 库的软件都可以接收和处理带有所有可用信息的 udev 事件,因此处理不只绑定到 udev 守护进程。
A.3.1. udev 与设备映射器集成
设备映射器提供对
udev 集成的直接支持。这会同步设备映射器与设备映射器设备相关的所有 udev 处理,包括 LVM 设备。需要同步,因为 udev 守护进程中的规则应用程序是一种与设备更改源(如 dmsetup 和 LVM)的程序并行处理的形式。如果没有这个支持,用户会在以前的更改事件时尝试删除仍然打开并处理的设备,这特别常见。这在设备更改之间有一个非常短的时间。
Red Hat Enterprise Linux 一般为设备映射器设备和 LVM 提供官方支持的
udev 规则。表 A.1 “Device-Mapper Devices 的 udev 规则” 总结了这些规则,这些规则安装在 /lib/udev/rules.d 中。
表 A.1. Device-Mapper Devices 的 udev 规则
| filename | 描述 | ||
|---|---|---|---|
10-dm.rules |
| ||
11-dm-lvm.rules |
| ||
13-dm-disk.rules | 包含了为所有设备映射器设备应用的规则,并在 /dev/disk/by-id 和 /dev/disk/by-uuid 目录中创建符号链接。 | ||
95-dm-notify.rules | 包含使用 libdevmapper 通知等待进程的规则(就像 LVM 和 dmsetup)。通知在应用所有之前的规则后完成,以确保任何 udev 处理完成。然后,将恢复通知的进程。 | ||
69-dm-lvm-metad.rules | 包含一个 hook,用于在系统中任何新出现的块设备上触发 LVM 扫描,并尽可能执行任何 LVM 自动激活。这支持 lvmetad 守护进程,它在 lvm.conf 文件中使用 use_lvmetad=1 设置。集群环境中不支持 lvmetad 守护进程和自动激活。 |
您可以使用
12-dm-permissions.rules 文件添加额外的自定义权限规则。此文件 没有安装 在 /lib/udev/rules 目录中;它位于 /usr/share/doc/device-mapper-版本 目录中。12-dm-permissions.rules 文件是一个模板,其中包含有关如何根据示例给出的一些匹配规则设置权限的提示;该文件包含一些常见情况的示例。您可以编辑此文件,并将其手动放在 /etc/udev/rules.d 目录中,该文件将保留下来,因此设置会保留下来。
这些规则设置处理事件时可供任何其他规则使用的所有基本变量。
以下变量在
10-dm.rules 中设置:
DM_NAME:设备映射器设备名称DM_UUID:设备映射器设备 UUIDDM_SUSPENDED: 设备映射器设备的暂停状态DM_UDEV_RULES_VSN:udev规则版本(主要用于所有其他规则检查前面提到的变量是否直接由官方设备映射器规则设置)
以下变量在
11-dm-lvm.rules 中设置:
DM_LV_NAME: 逻辑卷名称DM_VG_NAME: 卷组名称DM_LV_LAYER: LVM 层名称
所有这些变量都可以在
12-dm-permissions.rules 文件中使用,以定义特定设备映射器设备的权限,如 12-dm-permissions.rules 文件中所述。
A.3.2. 支持 udev 的命令和接口
表 A.2. dmsetup 命令支持 udev
| 命令 | 描述 |
|---|---|
| dmsetup udevcomplete | 用于通知 udev 已完成处理规则并解锁等待的进程(从 95-dm-notify.rules的 udev 规则中调用)。 |
| dmsetup udevcomplete_all | 用于手动解锁所有等待的进程的目的。 |
| dmsetup udevcookies | 用于调试目的,以显示所有现有 Cookie(系统范围信号)。 |
| dmsetup udevcreatecookie | 用于手动创建 Cookie(旗语)这在一个同步资源下运行多个进程非常有用。 |
| dmsetup udevreleasecookie | 用于等待与所有进程相关的所有 udev 处理,并置于那个同步 Cookie 下。 |
支持
udev 集成的 dmsetup 选项如下。
--udevcookie- 需要为所有
dmsetup进程定义,我们需要添加到udev事务中。它与 udevcreatecookie 和 udevreleasecookie 结合使用:COOKIE=$(dmsetup udevcreatecookie) dmsetup command --udevcookie $COOKIE .... dmsetup command --udevcookie $COOKIE .... .... dmsetup command --udevcookie $COOKIE .... dmsetup udevreleasecookie --udevcookie $COOKIE
除了使用--udevcookie选项外,您还可以将变量导出到进程的一个环境中:export DM_UDEV_COOKIE=$(dmsetup udevcreatecookie) dmsetup command ... dmsetup command ... ... dmsetup command ...
--noudevrules- 禁用
udev规则。节点/符号链接将由libdevmapper本身(旧方式)创建。如果udev无法正常工作,这个选项用于调试目的。 --noudevsync- 禁用
udev同步。这也可用于调试。
有关 dmsetup 命令及其选项的详情,请参考 dmsetup(8)手册页。
LVM 命令支持支持
udev 集成的以下选项:
--noudevrules: as for the dmsetup 命令禁用udev规则。--noudevsync: as for the dmsetup 命令禁用udev同步。
lvm.conf 文件包括以下支持 udev 集成的选项:
udev_rules: 在全局范围内为所有 LVM2 命令启用/禁用udev_rules。udev_sync:全局所有 LVM 命令启用/禁用udev同步。
有关
lvm.conf 文件选项的详情,请参考 lvm.conf 文件中的内联注释。
附录 B. LVM 配置文件
LVM 支持多个配置文件。在系统启动时,
lvm.conf 配置文件从环境变量 LVM_SYSTEM_DIR 指定的目录中加载,该文件默认设置为 /etc/lvm。
lvm.conf 文件可指定要加载的额外配置文件。后续文件中的设置将覆盖之前文件中的设置。要在加载所有配置文件后显示正在使用的设置,请执行 lvmconfig 命令。
有关载入附加配置文件的详情请参考 第 D.2 节 “主机标签”。
B.1. LVM 配置文件
以下文件用于 LVM 配置:
- /etc/lvm/lvm.conf
- 工具读取的中央配置文件。
- etc/lvm/lvm_hosttag.conf
- 对于每个主机标签,如果存在额外的配置文件:
lvm_hosttag.conf。如果该文件定义了新标签,则进一步的配置文件将附加到要读取的文件列表中。有关主机标签的详情请参考 第 D.2 节 “主机标签”。
除了 LVM 配置文件外,运行 LVM 的系统还包括以下影响 LVM 系统设置的文件:
- /etc/lvm/cache/.cache
- 设备名称过滤器缓存文件(可配置)。
- /etc/lvm/backup/
- 用于自动卷组元数据备份的目录(可配置)。
- /etc/lvm/archive/
- 用于自动卷组元数据存档的目录(可根据目录路径和归档历史记录深度进行配置)。
- /var/lock/lvm/
- 在单主机配置中,锁定文件以防止并行工具破坏元数据;集群中使用集群范围的 DLM。
B.2. lvmconfig 命令
您可以使用
lvmconfig 命令显示当前的 LVM 配置,或将配置保存到文件中。lvmconfig 命令提供的各种功能,包括以下内容:
- 您可以转储当前的 lvm 配置与任何标签配置文件合并。
- 您可以转储所有与默认值不同的当前配置设置。
- 您可以在特定 LVM 版本中转储当前 LVM 版本中引入的所有新配置设置。
- 您可以转储配置文件中可自定义的所有配置设置,可以是整个配置文件,也可以为命令和元数据配置文件单独进行。有关 LVM 配置集的详情请参考 第 B.3 节 “LVM 配置集”。
- 您只能转储特定版本的 LVM 的配置设置。
- 您可以验证当前配置。
有关指定 lvmconfig 选项支持的功能和信息的完整列表,请查看 lvmconfig 手册页。
B.3. LVM 配置集
LVM 配置集是一组所选自定义配置设置,可用于实现不同环境或用途的某些特性。通常,配置集的名称应反映该环境或用途。LVM 配置集会覆盖现有配置。
LVM 可以识别两个 LVM 配置集组: 命令 配置文件和 元数据 配置集。
- 命令配置集用于覆盖全局 LVM 命令级别的所选配置设置。该配置集在 LVM 命令执行开始时应用,在整个 LVM 命令执行过程中使用。您可以通过在执行 LVM 命令时指定
--commandprofile ProfileName选项来应用命令配置集。 - 元数据配置集用于覆盖卷组/逻辑卷级别的所选配置设置。它适用于要处理的每个卷组/逻辑卷。因此,每个卷组/逻辑卷可以存储元数据中使用的配置集名称,以便在下次处理卷组/逻辑卷时,会自动应用配置集。如果卷组及其逻辑卷中定义了不同的配置集,则首选为逻辑卷定义配置集。
- 在使用 vgcreate 或 lvcreate 命令创建卷组或逻辑卷时,您可以通过指定
--metadataprofile ProfileName选项将元数据配置文件附加到卷组或逻辑卷中。 - 您可以通过指定 lvchange 或 vgchange 命令的 --metadataprofile
ProfileName或选项,将元数据配置文件附加到现有卷组或逻辑卷。--detachprofile - 您可以指定 vgs 和 lvs 命令的
-o vg_profile和-o lv_profile输出选项,以显示当前附加到卷组或逻辑卷的元数据配置文件。
命令配置集允许的一组选项集合和用于元数据配置文件的选项集合是相互排斥的。属于这两个集合之一的设置无法组合使用,LVM 工具会拒绝此类配置集。
LVM 提供了几个预定义的配置配置文件。LVM 配置集默认存储在
/etc/lvm/profile 目录中。可以使用 /etc/lvm/lvm.conf 文件中的 profile_dir 设置来更改此位置。每个配置集配置都存储在配置集目录中的 ProfileName. profile 文件中。当在 LVM 命令中引用配置集时,省略 .profile 后缀。
您可以使用不同的值创建额外的配置集。为此,LVM 提供了
command_profile_template.profile 文件(用于命令配置文件)和 metadata_profile_template.profile 文件(用于元数据配置文件),该文件包含每种类型配置文件的所有设置。您可以复制这些模板配置文件并根据需要编辑它们。
或者,您可以使用 lvmconfig 命令为配置集文件的给定部分生成一个新的配置集,用于任一配置集类型。以下命令创建一个名为 ProfileName.profile 的新命令配置文件,它由 部分中的 设置组成。
lvmconfig --file ProfileName.profile --type profilable-command section
以下命令创建名为 ProfileName.profile 的新元数据配置文件,它由 部分中的 设置组成。
lvmconfig --file ProfileName.profile --type profilable-metadata section
如果没有指定部分,则报告可通过配置文件自定义的所有设置。
B.4. lvm.conf 文件示例
以下是
lvm.conf 配置文件示例。您的配置文件可能与该配置文件稍有不同。
注意
您可以运行以下命令,生成一个带有所有默认值以及包含的注释的
lvm.conf 文件:
lvmconfig --type default --withcomments
# This is an example configuration file for the LVM2 system.
# It contains the default settings that would be used if there was no
# /etc/lvm/lvm.conf file.
#
# Refer to 'man lvm.conf' for further information including the file layout.
#
# Refer to 'man lvm.conf' for information about how settings configured in
# this file are combined with built-in values and command line options to
# arrive at the final values used by LVM.
#
# Refer to 'man lvmconfig' for information about displaying the built-in
# and configured values used by LVM.
#
# If a default value is set in this file (not commented out), then a
# new version of LVM using this file will continue using that value,
# even if the new version of LVM changes the built-in default value.
#
# To put this file in a different directory and override /etc/lvm set
# the environment variable LVM_SYSTEM_DIR before running the tools.
#
# N.B. Take care that each setting only appears once if uncommenting
# example settings in this file.
# Configuration section config.
# How LVM configuration settings are handled.
config {
# Configuration option config/checks.
# If enabled, any LVM configuration mismatch is reported.
# This implies checking that the configuration key is understood by
# LVM and that the value of the key is the proper type. If disabled,
# any configuration mismatch is ignored and the default value is used
# without any warning (a message about the configuration key not being
# found is issued in verbose mode only).
checks = 1
# Configuration option config/abort_on_errors.
# Abort the LVM process if a configuration mismatch is found.
abort_on_errors = 0
# Configuration option config/profile_dir.
# Directory where LVM looks for configuration profiles.
profile_dir = "/etc/lvm/profile"
}
# Configuration section devices.
# How LVM uses block devices.
devices {
# Configuration option devices/dir.
# Directory in which to create volume group device nodes.
# Commands also accept this as a prefix on volume group names.
# This configuration option is advanced.
dir = "/dev"
# Configuration option devices/scan.
# Directories containing device nodes to use with LVM.
# This configuration option is advanced.
scan = [ "/dev" ]
# Configuration option devices/obtain_device_list_from_udev.
# Obtain the list of available devices from udev.
# This avoids opening or using any inapplicable non-block devices or
# subdirectories found in the udev directory. Any device node or
# symlink not managed by udev in the udev directory is ignored. This
# setting applies only to the udev-managed device directory; other
# directories will be scanned fully. LVM needs to be compiled with
# udev support for this setting to apply.
obtain_device_list_from_udev = 1
# Configuration option devices/external_device_info_source.
# Select an external device information source.
# Some information may already be available in the system and LVM can
# use this information to determine the exact type or use of devices it
# processes. Using an existing external device information source can
# speed up device processing as LVM does not need to run its own native
# routines to acquire this information. For example, this information
# is used to drive LVM filtering like MD component detection, multipath
# component detection, partition detection and others.
#
# Accepted values:
# none
# No external device information source is used.
# udev
# Reuse existing udev database records. Applicable only if LVM is
# compiled with udev support.
#
external_device_info_source = "none"
# Configuration option devices/preferred_names.
# Select which path name to display for a block device.
# If multiple path names exist for a block device, and LVM needs to
# display a name for the device, the path names are matched against
# each item in this list of regular expressions. The first match is
# used. Try to avoid using undescriptive /dev/dm-N names, if present.
# If no preferred name matches, or if preferred_names are not defined,
# the following built-in preferences are applied in order until one
# produces a preferred name:
# Prefer names with path prefixes in the order of:
# /dev/mapper, /dev/disk, /dev/dm-*, /dev/block.
# Prefer the name with the least number of slashes.
# Prefer a name that is a symlink.
# Prefer the path with least value in lexicographical order.
#
# Example
# preferred_names = [ "^/dev/mpath/", "^/dev/mapper/mpath", "^/dev/[hs]d" ]
#
preferred_names = [ "^/dev/mpath/", "^/dev/mapper/mpath", "^/dev/[hs]d" ]
# Configuration option devices/filter.
# Limit the block devices that are used by LVM commands.
# This is a list of regular expressions used to accept or reject block
# device path names. Each regex is delimited by a vertical bar '|'
# (or any character) and is preceded by 'a' to accept the path, or
# by 'r' to reject the path. The first regex in the list to match the
# path is used, producing the 'a' or 'r' result for the device.
# When multiple path names exist for a block device, if any path name
# matches an 'a' pattern before an 'r' pattern, then the device is
# accepted. If all the path names match an 'r' pattern first, then the
# device is rejected. Unmatching path names do not affect the accept
# or reject decision. If no path names for a device match a pattern,
# then the device is accepted. Be careful mixing 'a' and 'r' patterns,
# as the combination might produce unexpected results (test changes.)
# Run vgscan after changing the filter to regenerate the cache.
# See the use_lvmetad comment for a special case regarding filters.
#
# Example
# Accept every block device:
# filter = [ "a|.*/|" ]
# Reject the cdrom drive:
# filter = [ "r|/dev/cdrom|" ]
# Work with just loopback devices, e.g. for testing:
# filter = [ "a|loop|", "r|.*|" ]
# Accept all loop devices and ide drives except hdc:
# filter = [ "a|loop|", "r|/dev/hdc|", "a|/dev/ide|", "r|.*|" ]
# Use anchors to be very specific:
# filter = [ "a|^/dev/hda8$|", "r|.*/|" ]
#
# This configuration option has an automatic default value.
# filter = [ "a|.*/|" ]
# Configuration option devices/global_filter.
# Limit the block devices that are used by LVM system components.
# Because devices/filter may be overridden from the command line, it is
# not suitable for system-wide device filtering, e.g. udev and lvmetad.
# Use global_filter to hide devices from these LVM system components.
# The syntax is the same as devices/filter. Devices rejected by
# global_filter are not opened by LVM.
# This configuration option has an automatic default value.
# global_filter = [ "a|.*/|" ]
# Configuration option devices/cache_dir.
# Directory in which to store the device cache file.
# The results of filtering are cached on disk to avoid rescanning dud
# devices (which can take a very long time). By default this cache is
# stored in a file named .cache. It is safe to delete this file; the
# tools regenerate it. If obtain_device_list_from_udev is enabled, the
# list of devices is obtained from udev and any existing .cache file
# is removed.
cache_dir = "/etc/lvm/cache"
# Configuration option devices/cache_file_prefix.
# A prefix used before the .cache file name. See devices/cache_dir.
cache_file_prefix = ""
# Configuration option devices/write_cache_state.
# Enable/disable writing the cache file. See devices/cache_dir.
write_cache_state = 1
# Configuration option devices/types.
# List of additional acceptable block device types.
# These are of device type names from /proc/devices, followed by the
# maximum number of partitions.
#
# Example
# types = [ "fd", 16 ]
#
# This configuration option is advanced.
# This configuration option does not have a default value defined.
# Configuration option devices/sysfs_scan.
# Restrict device scanning to block devices appearing in sysfs.
# This is a quick way of filtering out block devices that are not
# present on the system. sysfs must be part of the kernel and mounted.)
sysfs_scan = 1
# Configuration option devices/multipath_component_detection.
# Ignore devices that are components of DM multipath devices.
multipath_component_detection = 1
# Configuration option devices/md_component_detection.
# Ignore devices that are components of software RAID (md) devices.
md_component_detection = 1
# Configuration option devices/fw_raid_component_detection.
# Ignore devices that are components of firmware RAID devices.
# LVM must use an external_device_info_source other than none for this
# detection to execute.
fw_raid_component_detection = 0
# Configuration option devices/md_chunk_alignment.
# Align PV data blocks with md device's stripe-width.
# This applies if a PV is placed directly on an md device.
md_chunk_alignment = 1
# Configuration option devices/default_data_alignment.
# Default alignment of the start of a PV data area in MB.
# If set to 0, a value of 64KiB will be used.
# Set to 1 for 1MiB, 2 for 2MiB, etc.
# This configuration option has an automatic default value.
# default_data_alignment = 1
# Configuration option devices/data_alignment_detection.
# Detect PV data alignment based on sysfs device information.
# The start of a PV data area will be a multiple of minimum_io_size or
# optimal_io_size exposed in sysfs. minimum_io_size is the smallest
# request the device can perform without incurring a read-modify-write
# penalty, e.g. MD chunk size. optimal_io_size is the device's
# preferred unit of receiving I/O, e.g. MD stripe width.
# minimum_io_size is used if optimal_io_size is undefined (0).
# If md_chunk_alignment is enabled, that detects the optimal_io_size.
# This setting takes precedence over md_chunk_alignment.
data_alignment_detection = 1
# Configuration option devices/data_alignment.
# Alignment of the start of a PV data area in KiB.
# If a PV is placed directly on an md device and md_chunk_alignment or
# data_alignment_detection are enabled, then this setting is ignored.
# Otherwise, md_chunk_alignment and data_alignment_detection are
# disabled if this is set. Set to 0 to use the default alignment or the
# page size, if larger.
data_alignment = 0
# Configuration option devices/data_alignment_offset_detection.
# Detect PV data alignment offset based on sysfs device information.
# The start of a PV aligned data area will be shifted by the
# alignment_offset exposed in sysfs. This offset is often 0, but may
# be non-zero. Certain 4KiB sector drives that compensate for windows
# partitioning will have an alignment_offset of 3584 bytes (sector 7
# is the lowest aligned logical block, the 4KiB sectors start at
# LBA -1, and consequently sector 63 is aligned on a 4KiB boundary).
# pvcreate --dataalignmentoffset will skip this detection.
data_alignment_offset_detection = 1
# Configuration option devices/ignore_suspended_devices.
# Ignore DM devices that have I/O suspended while scanning devices.
# Otherwise, LVM waits for a suspended device to become accessible.
# This should only be needed in recovery situations.
ignore_suspended_devices = 0
# Configuration option devices/ignore_lvm_mirrors.
# Do not scan 'mirror' LVs to avoid possible deadlocks.
# This avoids possible deadlocks when using the 'mirror' segment type.
# This setting determines whether LVs using the 'mirror' segment type
# are scanned for LVM labels. This affects the ability of mirrors to
# be used as physical volumes. If this setting is enabled, it is
# impossible to create VGs on top of mirror LVs, i.e. to stack VGs on
# mirror LVs. If this setting is disabled, allowing mirror LVs to be
# scanned, it may cause LVM processes and I/O to the mirror to become
# blocked. This is due to the way that the mirror segment type handles
# failures. In order for the hang to occur, an LVM command must be run
# just after a failure and before the automatic LVM repair process
# takes place, or there must be failures in multiple mirrors in the
# same VG at the same time with write failures occurring moments before
# a scan of the mirror's labels. The 'mirror' scanning problems do not
# apply to LVM RAID types like 'raid1' which handle failures in a
# different way, making them a better choice for VG stacking.
ignore_lvm_mirrors = 1
# Configuration option devices/disable_after_error_count.
# Number of I/O errors after which a device is skipped.
# During each LVM operation, errors received from each device are
# counted. If the counter of a device exceeds the limit set here,
# no further I/O is sent to that device for the remainder of the
# operation. Setting this to 0 disables the counters altogether.
disable_after_error_count = 0
# Configuration option devices/require_restorefile_with_uuid.
# Allow use of pvcreate --uuid without requiring --restorefile.
require_restorefile_with_uuid = 1
# Configuration option devices/pv_min_size.
# Minimum size in KiB of block devices which can be used as PVs.
# In a clustered environment all nodes must use the same value.
# Any value smaller than 512KiB is ignored. The previous built-in
# value was 512.
pv_min_size = 2048
# Configuration option devices/issue_discards.
# Issue discards to PVs that are no longer used by an LV.
# Discards are sent to an LV's underlying physical volumes when the LV
# is no longer using the physical volumes' space, e.g. lvremove,
# lvreduce. Discards inform the storage that a region is no longer
# used. Storage that supports discards advertise the protocol-specific
# way discards should be issued by the kernel (TRIM, UNMAP, or
# WRITE SAME with UNMAP bit set). Not all storage will support or
# benefit from discards, but SSDs and thinly provisioned LUNs
# generally do. If enabled, discards will only be issued if both the
# storage and kernel provide support.
issue_discards = 0
# Configuration option devices/allow_changes_with_duplicate_pvs.
# Allow VG modification while a PV appears on multiple devices.
# When a PV appears on multiple devices, LVM attempts to choose the
# best device to use for the PV. If the devices represent the same
# underlying storage, the choice has minimal consequence. If the
# devices represent different underlying storage, the wrong choice
# can result in data loss if the VG is modified. Disabling this
# setting is the safest option because it prevents modifying a VG
# or activating LVs in it while a PV appears on multiple devices.
# Enabling this setting allows the VG to be used as usual even with
# uncertain devices.
allow_changes_with_duplicate_pvs = 0
}
# Configuration section allocation.
# How LVM selects space and applies properties to LVs.
allocation {
# Configuration option allocation/cling_tag_list.
# Advise LVM which PVs to use when searching for new space.
# When searching for free space to extend an LV, the 'cling' allocation
# policy will choose space on the same PVs as the last segment of the
# existing LV. If there is insufficient space and a list of tags is
# defined here, it will check whether any of them are attached to the
# PVs concerned and then seek to match those PV tags between existing
# extents and new extents.
#
# Example
# Use the special tag "@*" as a wildcard to match any PV tag:
# cling_tag_list = [ "@*" ]
# LVs are mirrored between two sites within a single VG, and
# PVs are tagged with either @site1 or @site2 to indicate where
# they are situated:
# cling_tag_list = [ "@site1", "@site2" ]
#
# This configuration option does not have a default value defined.
# Configuration option allocation/maximise_cling.
# Use a previous allocation algorithm.
# Changes made in version 2.02.85 extended the reach of the 'cling'
# policies to detect more situations where data can be grouped onto
# the same disks. This setting can be used to disable the changes
# and revert to the previous algorithm.
maximise_cling = 1
# Configuration option allocation/use_blkid_wiping.
# Use blkid to detect existing signatures on new PVs and LVs.
# The blkid library can detect more signatures than the native LVM
# detection code, but may take longer. LVM needs to be compiled with
# blkid wiping support for this setting to apply. LVM native detection
# code is currently able to recognize: MD device signatures,
# swap signature, and LUKS signatures. To see the list of signatures
# recognized by blkid, check the output of the 'blkid -k' command.
use_blkid_wiping = 1
# Configuration option allocation/wipe_signatures_when_zeroing_new_lvs.
# Look for and erase any signatures while zeroing a new LV.
# The --wipesignatures option overrides this setting.
# Zeroing is controlled by the -Z/--zero option, and if not specified,
# zeroing is used by default if possible. Zeroing simply overwrites the
# first 4KiB of a new LV with zeroes and does no signature detection or
# wiping. Signature wiping goes beyond zeroing and detects exact types
# and positions of signatures within the whole LV. It provides a
# cleaner LV after creation as all known signatures are wiped. The LV
# is not claimed incorrectly by other tools because of old signatures
# from previous use. The number of signatures that LVM can detect
# depends on the detection code that is selected (see
# use_blkid_wiping.) Wiping each detected signature must be confirmed.
# When this setting is disabled, signatures on new LVs are not detected
# or erased unless the --wipesignatures option is used directly.
wipe_signatures_when_zeroing_new_lvs = 1
# Configuration option allocation/mirror_logs_require_separate_pvs.
# Mirror logs and images will always use different PVs.
# The default setting changed in version 2.02.85.
mirror_logs_require_separate_pvs = 0
# Configuration option allocation/raid_stripe_all_devices.
# Stripe across all PVs when RAID stripes are not specified.
# If enabled, all PVs in the VG or on the command line are used for raid0/4/5/6/10
# when the command does not specify the number of stripes to use.
# This was the default behaviour until release 2.02.162.
# This configuration option has an automatic default value.
# raid_stripe_all_devices = 0
# Configuration option allocation/cache_pool_metadata_require_separate_pvs.
# Cache pool metadata and data will always use different PVs.
cache_pool_metadata_require_separate_pvs = 0
# Configuration option allocation/cache_mode.
# The default cache mode used for new cache.
#
# Accepted values:
# writethrough
# Data blocks are immediately written from the cache to disk.
# writeback
# Data blocks are written from the cache back to disk after some
# delay to improve performance.
#
# This setting replaces allocation/cache_pool_cachemode.
# This configuration option has an automatic default value.
# cache_mode = "writethrough"
# Configuration option allocation/cache_policy.
# The default cache policy used for new cache volume.
# Since kernel 4.2 the default policy is smq (Stochastic multique),
# otherwise the older mq (Multiqueue) policy is selected.
# This configuration option does not have a default value defined.
# Configuration section allocation/cache_settings.
# Settings for the cache policy.
# See documentation for individual cache policies for more info.
# This configuration section has an automatic default value.
# cache_settings {
# }
# Configuration option allocation/cache_pool_chunk_size.
# The minimal chunk size in KiB for cache pool volumes.
# Using a chunk_size that is too large can result in wasteful use of
# the cache, where small reads and writes can cause large sections of
# an LV to be mapped into the cache. However, choosing a chunk_size
# that is too small can result in more overhead trying to manage the
# numerous chunks that become mapped into the cache. The former is
# more of a problem than the latter in most cases, so the default is
# on the smaller end of the spectrum. Supported values range from
# 32KiB to 1GiB in multiples of 32.
# This configuration option does not have a default value defined.
# Configuration option allocation/thin_pool_metadata_require_separate_pvs.
# Thin pool metdata and data will always use different PVs.
thin_pool_metadata_require_separate_pvs = 0
# Configuration option allocation/thin_pool_zero.
# Thin pool data chunks are zeroed before they are first used.
# Zeroing with a larger thin pool chunk size reduces performance.
# This configuration option has an automatic default value.
# thin_pool_zero = 1
# Configuration option allocation/thin_pool_discards.
# The discards behaviour of thin pool volumes.
#
# Accepted values:
# ignore
# nopassdown
# passdown
#
# This configuration option has an automatic default value.
# thin_pool_discards = "passdown"
# Configuration option allocation/thin_pool_chunk_size_policy.
# The chunk size calculation policy for thin pool volumes.
#
# Accepted values:
# generic
# If thin_pool_chunk_size is defined, use it. Otherwise, calculate
# the chunk size based on estimation and device hints exposed in
# sysfs - the minimum_io_size. The chunk size is always at least
# 64KiB.
# performance
# If thin_pool_chunk_size is defined, use it. Otherwise, calculate
# the chunk size for performance based on device hints exposed in
# sysfs - the optimal_io_size. The chunk size is always at least
# 512KiB.
#
# This configuration option has an automatic default value.
# thin_pool_chunk_size_policy = "generic"
# Configuration option allocation/thin_pool_chunk_size.
# The minimal chunk size in KiB for thin pool volumes.
# Larger chunk sizes may improve performance for plain thin volumes,
# however using them for snapshot volumes is less efficient, as it
# consumes more space and takes extra time for copying. When unset,
# lvm tries to estimate chunk size starting from 64KiB. Supported
# values are in the range 64KiB to 1GiB.
# This configuration option does not have a default value defined.
# Configuration option allocation/physical_extent_size.
# Default physical extent size in KiB to use for new VGs.
# This configuration option has an automatic default value.
# physical_extent_size = 4096
}
# Configuration section log.
# How LVM log information is reported.
log {
# Configuration option log/report_command_log.
# Enable or disable LVM log reporting.
# If enabled, LVM will collect a log of operations, messages,
# per-object return codes with object identification and associated
# error numbers (errnos) during LVM command processing. Then the
# log is either reported solely or in addition to any existing
# reports, depending on LVM command used. If it is a reporting command
# (e.g. pvs, vgs, lvs, lvm fullreport), then the log is reported in
# addition to any existing reports. Otherwise, there's only log report
# on output. For all applicable LVM commands, you can request that
# the output has only log report by using --logonly command line
# option. Use log/command_log_cols and log/command_log_sort settings
# to define fields to display and sort fields for the log report.
# You can also use log/command_log_selection to define selection
# criteria used each time the log is reported.
# This configuration option has an automatic default value.
# report_command_log = 0
# Configuration option log/command_log_sort.
# List of columns to sort by when reporting command log.
# See <lvm command> --logonly --configreport log -o help
# for the list of possible fields.
# This configuration option has an automatic default value.
# command_log_sort = "log_seq_num"
# Configuration option log/command_log_cols.
# List of columns to report when reporting command log.
# See <lvm command> --logonly --configreport log -o help
# for the list of possible fields.
# This configuration option has an automatic default value.
# command_log_cols = "log_seq_num,log_type,log_context,log_object_type,log_object_name,log_object_id,log_object_group,log_object_group_id,log_message,log_errno,log_ret_code"
# Configuration option log/command_log_selection.
# Selection criteria used when reporting command log.
# You can define selection criteria that are applied each
# time log is reported. This way, it is possible to control the
# amount of log that is displayed on output and you can select
# only parts of the log that are important for you. To define
# selection criteria, use fields from log report. See also
# <lvm command> --logonly --configreport log -S help for the
# list of possible fields and selection operators. You can also
# define selection criteria for log report on command line directly
# using <lvm command> --configreport log -S <selection criteria>
# which has precedence over log/command_log_selection setting.
# For more information about selection criteria in general, see
# lvm(8) man page.
# This configuration option has an automatic default value.
# command_log_selection = "!(log_type=status && message=success)"
# Configuration option log/verbose.
# Controls the messages sent to stdout or stderr.
verbose = 0
# Configuration option log/silent.
# Suppress all non-essential messages from stdout.
# This has the same effect as -qq. When enabled, the following commands
# still produce output: dumpconfig, lvdisplay, lvmdiskscan, lvs, pvck,
# pvdisplay, pvs, version, vgcfgrestore -l, vgdisplay, vgs.
# Non-essential messages are shifted from log level 4 to log level 5
# for syslog and lvm2_log_fn purposes.
# Any 'yes' or 'no' questions not overridden by other arguments are
# suppressed and default to 'no'.
silent = 0
# Configuration option log/syslog.
# Send log messages through syslog.
syslog = 1
# Configuration option log/file.
# Write error and debug log messages to a file specified here.
# This configuration option does not have a default value defined.
# Configuration option log/overwrite.
# Overwrite the log file each time the program is run.
overwrite = 0
# Configuration option log/level.
# The level of log messages that are sent to the log file or syslog.
# There are 6 syslog-like log levels currently in use: 2 to 7 inclusive.
# 7 is the most verbose (LOG_DEBUG).
level = 0
# Configuration option log/indent.
# Indent messages according to their severity.
indent = 1
# Configuration option log/command_names.
# Display the command name on each line of output.
command_names = 0
# Configuration option log/prefix.
# A prefix to use before the log message text.
# (After the command name, if selected).
# Two spaces allows you to see/grep the severity of each message.
# To make the messages look similar to the original LVM tools use:
# indent = 0, command_names = 1, prefix = " -- "
prefix = " "
# Configuration option log/activation.
# Log messages during activation.
# Don't use this in low memory situations (can deadlock).
activation = 0
# Configuration option log/debug_classes.
# Select log messages by class.
# Some debugging messages are assigned to a class and only appear in
# debug output if the class is listed here. Classes currently
# available: memory, devices, activation, allocation, lvmetad,
# metadata, cache, locking, lvmpolld. Use "all" to see everything.
debug_classes = [ "memory", "devices", "activation", "allocation", "lvmetad", "metadata", "cache", "locking", "lvmpolld", "dbus" ]
}
# Configuration section backup.
# How LVM metadata is backed up and archived.
# In LVM, a 'backup' is a copy of the metadata for the current system,
# and an 'archive' contains old metadata configurations. They are
# stored in a human readable text format.
backup {
# Configuration option backup/backup.
# Maintain a backup of the current metadata configuration.
# Think very hard before turning this off!
backup = 1
# Configuration option backup/backup_dir.
# Location of the metadata backup files.
# Remember to back up this directory regularly!
backup_dir = "/etc/lvm/backup"
# Configuration option backup/archive.
# Maintain an archive of old metadata configurations.
# Think very hard before turning this off.
archive = 1
# Configuration option backup/archive_dir.
# Location of the metdata archive files.
# Remember to back up this directory regularly!
archive_dir = "/etc/lvm/archive"
# Configuration option backup/retain_min.
# Minimum number of archives to keep.
retain_min = 10
# Configuration option backup/retain_days.
# Minimum number of days to keep archive files.
retain_days = 30
}
# Configuration section shell.
# Settings for running LVM in shell (readline) mode.
shell {
# Configuration option shell/history_size.
# Number of lines of history to store in ~/.lvm_history.
history_size = 100
}
# Configuration section global.
# Miscellaneous global LVM settings.
global {
# Configuration option global/umask.
# The file creation mask for any files and directories created.
# Interpreted as octal if the first digit is zero.
umask = 077
# Configuration option global/test.
# No on-disk metadata changes will be made in test mode.
# Equivalent to having the -t option on every command.
test = 0
# Configuration option global/units.
# Default value for --units argument.
units = "h"
# Configuration option global/si_unit_consistency.
# Distinguish between powers of 1024 and 1000 bytes.
# The LVM commands distinguish between powers of 1024 bytes,
# e.g. KiB, MiB, GiB, and powers of 1000 bytes, e.g. KB, MB, GB.
# If scripts depend on the old behaviour, disable this setting
# temporarily until they are updated.
si_unit_consistency = 1
# Configuration option global/suffix.
# Display unit suffix for sizes.
# This setting has no effect if the units are in human-readable form
# (global/units = "h") in which case the suffix is always displayed.
suffix = 1
# Configuration option global/activation.
# Enable/disable communication with the kernel device-mapper.
# Disable to use the tools to manipulate LVM metadata without
# activating any logical volumes. If the device-mapper driver
# is not present in the kernel, disabling this should suppress
# the error messages.
activation = 1
# Configuration option global/fallback_to_lvm1.
# Try running LVM1 tools if LVM cannot communicate with DM.
# This option only applies to 2.4 kernels and is provided to help
# switch between device-mapper kernels and LVM1 kernels. The LVM1
# tools need to be installed with .lvm1 suffices, e.g. vgscan.lvm1.
# They will stop working once the lvm2 on-disk metadata format is used.
# This configuration option has an automatic default value.
# fallback_to_lvm1 = 1
# Configuration option global/format.
# The default metadata format that commands should use.
# The -M 1|2 option overrides this setting.
#
# Accepted values:
# lvm1
# lvm2
#
# This configuration option has an automatic default value.
# format = "lvm2"
# Configuration option global/format_libraries.
# Shared libraries that process different metadata formats.
# If support for LVM1 metadata was compiled as a shared library use
# format_libraries = "liblvm2format1.so"
# This configuration option does not have a default value defined.
# Configuration option global/segment_libraries.
# This configuration option does not have a default value defined.
# Configuration option global/proc.
# Location of proc filesystem.
# This configuration option is advanced.
proc = "/proc"
# Configuration option global/etc.
# Location of /etc system configuration directory.
etc = "/etc"
# Configuration option global/locking_type.
# Type of locking to use.
#
# Accepted values:
# 0
# Turns off locking. Warning: this risks metadata corruption if
# commands run concurrently.
# 1
# LVM uses local file-based locking, the standard mode.
# 2
# LVM uses the external shared library locking_library.
# 3
# LVM uses built-in clustered locking with clvmd.
# This is incompatible with lvmetad. If use_lvmetad is enabled,
# LVM prints a warning and disables lvmetad use.
# 4
# LVM uses read-only locking which forbids any operations that
# might change metadata.
# 5
# Offers dummy locking for tools that do not need any locks.
# You should not need to set this directly; the tools will select
# when to use it instead of the configured locking_type.
# Do not use lvmetad or the kernel device-mapper driver with this
# locking type. It is used by the --readonly option that offers
# read-only access to Volume Group metadata that cannot be locked
# safely because it belongs to an inaccessible domain and might be
# in use, for example a virtual machine image or a disk that is
# shared by a clustered machine.
#
locking_type = 3
# Configuration option global/wait_for_locks.
# When disabled, fail if a lock request would block.
wait_for_locks = 1
# Configuration option global/fallback_to_clustered_locking.
# Attempt to use built-in cluster locking if locking_type 2 fails.
# If using external locking (type 2) and initialisation fails, with
# this enabled, an attempt will be made to use the built-in clustered
# locking. Disable this if using a customised locking_library.
fallback_to_clustered_locking = 1
# Configuration option global/fallback_to_local_locking.
# Use locking_type 1 (local) if locking_type 2 or 3 fail.
# If an attempt to initialise type 2 or type 3 locking failed, perhaps
# because cluster components such as clvmd are not running, with this
# enabled, an attempt will be made to use local file-based locking
# (type 1). If this succeeds, only commands against local VGs will
# proceed. VGs marked as clustered will be ignored.
fallback_to_local_locking = 1
# Configuration option global/locking_dir.
# Directory to use for LVM command file locks.
# Local non-LV directory that holds file-based locks while commands are
# in progress. A directory like /tmp that may get wiped on reboot is OK.
locking_dir = "/run/lock/lvm"
# Configuration option global/prioritise_write_locks.
# Allow quicker VG write access during high volume read access.
# When there are competing read-only and read-write access requests for
# a volume group's metadata, instead of always granting the read-only
# requests immediately, delay them to allow the read-write requests to
# be serviced. Without this setting, write access may be stalled by a
# high volume of read-only requests. This option only affects
# locking_type 1 viz. local file-based locking.
prioritise_write_locks = 1
# Configuration option global/library_dir.
# Search this directory first for shared libraries.
# This configuration option does not have a default value defined.
# Configuration option global/locking_library.
# The external locking library to use for locking_type 2.
# This configuration option has an automatic default value.
# locking_library = "liblvm2clusterlock.so"
# Configuration option global/abort_on_internal_errors.
# Abort a command that encounters an internal error.
# Treat any internal errors as fatal errors, aborting the process that
# encountered the internal error. Please only enable for debugging.
abort_on_internal_errors = 0
# Configuration option global/detect_internal_vg_cache_corruption.
# Internal verification of VG structures.
# Check if CRC matches when a parsed VG is used multiple times. This
# is useful to catch unexpected changes to cached VG structures.
# Please only enable for debugging.
detect_internal_vg_cache_corruption = 0
# Configuration option global/metadata_read_only.
# No operations that change on-disk metadata are permitted.
# Additionally, read-only commands that encounter metadata in need of
# repair will still be allowed to proceed exactly as if the repair had
# been performed (except for the unchanged vg_seqno). Inappropriate
# use could mess up your system, so seek advice first!
metadata_read_only = 0
# Configuration option global/mirror_segtype_default.
# The segment type used by the short mirroring option -m.
# The --type mirror|raid1 option overrides this setting.
#
# Accepted values:
# mirror
# The original RAID1 implementation from LVM/DM. It is
# characterized by a flexible log solution (core, disk, mirrored),
# and by the necessity to block I/O while handling a failure.
# There is an inherent race in the dmeventd failure handling logic
# with snapshots of devices using this type of RAID1 that in the
# worst case could cause a deadlock. (Also see
# devices/ignore_lvm_mirrors.)
# raid1
# This is a newer RAID1 implementation using the MD RAID1
# personality through device-mapper. It is characterized by a
# lack of log options. (A log is always allocated for every
# device and they are placed on the same device as the image,
# so no separate devices are required.) This mirror
# implementation does not require I/O to be blocked while
# handling a failure. This mirror implementation is not
# cluster-aware and cannot be used in a shared (active/active)
# fashion in a cluster.
#
mirror_segtype_default = "raid1"
# Configuration option global/raid10_segtype_default.
# The segment type used by the -i -m combination.
# The --type raid10|mirror option overrides this setting.
# The --stripes/-i and --mirrors/-m options can both be specified
# during the creation of a logical volume to use both striping and
# mirroring for the LV. There are two different implementations.
#
# Accepted values:
# raid10
# LVM uses MD's RAID10 personality through DM. This is the
# preferred option.
# mirror
# LVM layers the 'mirror' and 'stripe' segment types. The layering
# is done by creating a mirror LV on top of striped sub-LVs,
# effectively creating a RAID 0+1 array. The layering is suboptimal
# in terms of providing redundancy and performance.
#
raid10_segtype_default = "raid10"
# Configuration option global/sparse_segtype_default.
# The segment type used by the -V -L combination.
# The --type snapshot|thin option overrides this setting.
# The combination of -V and -L options creates a sparse LV. There are
# two different implementations.
#
# Accepted values:
# snapshot
# The original snapshot implementation from LVM/DM. It uses an old
# snapshot that mixes data and metadata within a single COW
# storage volume and performs poorly when the size of stored data
# passes hundreds of MB.
# thin
# A newer implementation that uses thin provisioning. It has a
# bigger minimal chunk size (64KiB) and uses a separate volume for
# metadata. It has better performance, especially when more data
# is used. It also supports full snapshots.
#
sparse_segtype_default = "thin"
# Configuration option global/lvdisplay_shows_full_device_path.
# Enable this to reinstate the previous lvdisplay name format.
# The default format for displaying LV names in lvdisplay was changed
# in version 2.02.89 to show the LV name and path separately.
# Previously this was always shown as /dev/vgname/lvname even when that
# was never a valid path in the /dev filesystem.
# This configuration option has an automatic default value.
# lvdisplay_shows_full_device_path = 0
# Configuration option global/use_lvmetad.
# Use lvmetad to cache metadata and reduce disk scanning.
# When enabled (and running), lvmetad provides LVM commands with VG
# metadata and PV state. LVM commands then avoid reading this
# information from disks which can be slow. When disabled (or not
# running), LVM commands fall back to scanning disks to obtain VG
# metadata. lvmetad is kept updated via udev rules which must be set
# up for LVM to work correctly. (The udev rules should be installed
# by default.) Without a proper udev setup, changes in the system's
# block device configuration will be unknown to LVM, and ignored
# until a manual 'pvscan --cache' is run. If lvmetad was running
# while use_lvmetad was disabled, it must be stopped, use_lvmetad
# enabled, and then started. When using lvmetad, LV activation is
# switched to an automatic, event-based mode. In this mode, LVs are
# activated based on incoming udev events that inform lvmetad when
# PVs appear on the system. When a VG is complete (all PVs present),
# it is auto-activated. The auto_activation_volume_list setting
# controls which LVs are auto-activated (all by default.)
# When lvmetad is updated (automatically by udev events, or directly
# by pvscan --cache), devices/filter is ignored and all devices are
# scanned by default. lvmetad always keeps unfiltered information
# which is provided to LVM commands. Each LVM command then filters
# based on devices/filter. This does not apply to other, non-regexp,
# filtering settings: component filters such as multipath and MD
# are checked during pvscan --cache. To filter a device and prevent
# scanning from the LVM system entirely, including lvmetad, use
# devices/global_filter.
use_lvmetad = 0
# Configuration option global/lvmetad_update_wait_time.
# The number of seconds a command will wait for lvmetad update to finish.
# After waiting for this period, a command will not use lvmetad, and
# will revert to disk scanning.
# This configuration option has an automatic default value.
# lvmetad_update_wait_time = 10
# Configuration option global/use_lvmlockd.
# Use lvmlockd for locking among hosts using LVM on shared storage.
# Applicable only if LVM is compiled with lockd support in which
# case there is also lvmlockd(8) man page available for more
# information.
use_lvmlockd = 0
# Configuration option global/lvmlockd_lock_retries.
# Retry lvmlockd lock requests this many times.
# Applicable only if LVM is compiled with lockd support
# This configuration option has an automatic default value.
# lvmlockd_lock_retries = 3
# Configuration option global/sanlock_lv_extend.
# Size in MiB to extend the internal LV holding sanlock locks.
# The internal LV holds locks for each LV in the VG, and after enough
# LVs have been created, the internal LV needs to be extended. lvcreate
# will automatically extend the internal LV when needed by the amount
# specified here. Setting this to 0 disables the automatic extension
# and can cause lvcreate to fail. Applicable only if LVM is compiled
# with lockd support
# This configuration option has an automatic default value.
# sanlock_lv_extend = 256
# Configuration option global/thin_check_executable.
# The full path to the thin_check command.
# LVM uses this command to check that a thin metadata device is in a
# usable state. When a thin pool is activated and after it is
# deactivated, this command is run. Activation will only proceed if
# the command has an exit status of 0. Set to "" to skip this check.
# (Not recommended.) Also see thin_check_options.
# (See package device-mapper-persistent-data or thin-provisioning-tools)
# This configuration option has an automatic default value.
# thin_check_executable = "/usr/sbin/thin_check"
# Configuration option global/thin_dump_executable.
# The full path to the thin_dump command.
# LVM uses this command to dump thin pool metadata.
# (See package device-mapper-persistent-data or thin-provisioning-tools)
# This configuration option has an automatic default value.
# thin_dump_executable = "/usr/sbin/thin_dump"
# Configuration option global/thin_repair_executable.
# The full path to the thin_repair command.
# LVM uses this command to repair a thin metadata device if it is in
# an unusable state. Also see thin_repair_options.
# (See package device-mapper-persistent-data or thin-provisioning-tools)
# This configuration option has an automatic default value.
# thin_repair_executable = "/usr/sbin/thin_repair"
# Configuration option global/thin_check_options.
# List of options passed to the thin_check command.
# With thin_check version 2.1 or newer you can add the option
# --ignore-non-fatal-errors to let it pass through ignorable errors
# and fix them later. With thin_check version 3.2 or newer you should
# include the option --clear-needs-check-flag.
# This configuration option has an automatic default value.
# thin_check_options = [ "-q", "--clear-needs-check-flag" ]
# Configuration option global/thin_repair_options.
# List of options passed to the thin_repair command.
# This configuration option has an automatic default value.
# thin_repair_options = [ "" ]
# Configuration option global/thin_disabled_features.
# Features to not use in the thin driver.
# This can be helpful for testing, or to avoid using a feature that is
# causing problems. Features include: block_size, discards,
# discards_non_power_2, external_origin, metadata_resize,
# external_origin_extend, error_if_no_space.
#
# Example
# thin_disabled_features = [ "discards", "block_size" ]
#
# This configuration option does not have a default value defined.
# Configuration option global/cache_disabled_features.
# Features to not use in the cache driver.
# This can be helpful for testing, or to avoid using a feature that is
# causing problems. Features include: policy_mq, policy_smq.
#
# Example
# cache_disabled_features = [ "policy_smq" ]
#
# This configuration option does not have a default value defined.
# Configuration option global/cache_check_executable.
# The full path to the cache_check command.
# LVM uses this command to check that a cache metadata device is in a
# usable state. When a cached LV is activated and after it is
# deactivated, this command is run. Activation will only proceed if the
# command has an exit status of 0. Set to "" to skip this check.
# (Not recommended.) Also see cache_check_options.
# (See package device-mapper-persistent-data or thin-provisioning-tools)
# This configuration option has an automatic default value.
# cache_check_executable = "/usr/sbin/cache_check"
# Configuration option global/cache_dump_executable.
# The full path to the cache_dump command.
# LVM uses this command to dump cache pool metadata.
# (See package device-mapper-persistent-data or thin-provisioning-tools)
# This configuration option has an automatic default value.
# cache_dump_executable = "/usr/sbin/cache_dump"
# Configuration option global/cache_repair_executable.
# The full path to the cache_repair command.
# LVM uses this command to repair a cache metadata device if it is in
# an unusable state. Also see cache_repair_options.
# (See package device-mapper-persistent-data or thin-provisioning-tools)
# This configuration option has an automatic default value.
# cache_repair_executable = "/usr/sbin/cache_repair"
# Configuration option global/cache_check_options.
# List of options passed to the cache_check command.
# With cache_check version 5.0 or newer you should include the option
# --clear-needs-check-flag.
# This configuration option has an automatic default value.
# cache_check_options = [ "-q", "--clear-needs-check-flag" ]
# Configuration option global/cache_repair_options.
# List of options passed to the cache_repair command.
# This configuration option has an automatic default value.
# cache_repair_options = [ "" ]
# Configuration option global/system_id_source.
# The method LVM uses to set the local system ID.
# Volume Groups can also be given a system ID (by vgcreate, vgchange,
# or vgimport.) A VG on shared storage devices is accessible only to
# the host with a matching system ID. See 'man lvmsystemid' for
# information on limitations and correct usage.
#
# Accepted values:
# none
# The host has no system ID.
# lvmlocal
# Obtain the system ID from the system_id setting in the 'local'
# section of an lvm configuration file, e.g. lvmlocal.conf.
# uname
# Set the system ID from the hostname (uname) of the system.
# System IDs beginning localhost are not permitted.
# machineid
# Use the contents of the machine-id file to set the system ID.
# Some systems create this file at installation time.
# See 'man machine-id' and global/etc.
# file
# Use the contents of another file (system_id_file) to set the
# system ID.
#
system_id_source = "none"
# Configuration option global/system_id_file.
# The full path to the file containing a system ID.
# This is used when system_id_source is set to 'file'.
# Comments starting with the character # are ignored.
# This configuration option does not have a default value defined.
# Configuration option global/use_lvmpolld.
# Use lvmpolld to supervise long running LVM commands.
# When enabled, control of long running LVM commands is transferred
# from the original LVM command to the lvmpolld daemon. This allows
# the operation to continue independent of the original LVM command.
# After lvmpolld takes over, the LVM command displays the progress
# of the ongoing operation. lvmpolld itself runs LVM commands to
# manage the progress of ongoing operations. lvmpolld can be used as
# a native systemd service, which allows it to be started on demand,
# and to use its own control group. When this option is disabled, LVM
# commands will supervise long running operations by forking themselves.
# Applicable only if LVM is compiled with lvmpolld support.
use_lvmpolld = 1
# Configuration option global/notify_dbus.
# Enable D-Bus notification from LVM commands.
# When enabled, an LVM command that changes PVs, changes VG metadata,
# or changes the activation state of an LV will send a notification.
notify_dbus = 1
}
# Configuration section activation.
activation {
# Configuration option activation/checks.
# Perform internal checks of libdevmapper operations.
# Useful for debugging problems with activation. Some of the checks may
# be expensive, so it's best to use this only when there seems to be a
# problem.
checks = 0
# Configuration option activation/udev_sync.
# Use udev notifications to synchronize udev and LVM.
# The --nodevsync option overrides this setting.
# When disabled, LVM commands will not wait for notifications from
# udev, but continue irrespective of any possible udev processing in
# the background. Only use this if udev is not running or has rules
# that ignore the devices LVM creates. If enabled when udev is not
# running, and LVM processes are waiting for udev, run the command
# 'dmsetup udevcomplete_all' to wake them up.
udev_sync = 1
# Configuration option activation/udev_rules.
# Use udev rules to manage LV device nodes and symlinks.
# When disabled, LVM will manage the device nodes and symlinks for
# active LVs itself. Manual intervention may be required if this
# setting is changed while LVs are active.
udev_rules = 1
# Configuration option activation/verify_udev_operations.
# Use extra checks in LVM to verify udev operations.
# This enables additional checks (and if necessary, repairs) on entries
# in the device directory after udev has completed processing its
# events. Useful for diagnosing problems with LVM/udev interactions.
verify_udev_operations = 0
# Configuration option activation/retry_deactivation.
# Retry failed LV deactivation.
# If LV deactivation fails, LVM will retry for a few seconds before
# failing. This may happen because a process run from a quick udev rule
# temporarily opened the device.
retry_deactivation = 1
# Configuration option activation/missing_stripe_filler.
# Method to fill missing stripes when activating an incomplete LV.
# Using 'error' will make inaccessible parts of the device return I/O
# errors on access. You can instead use a device path, in which case,
# that device will be used in place of missing stripes. Using anything
# other than 'error' with mirrored or snapshotted volumes is likely to
# result in data corruption.
# This configuration option is advanced.
missing_stripe_filler = "error"
# Configuration option activation/use_linear_target.
# Use the linear target to optimize single stripe LVs.
# When disabled, the striped target is used. The linear target is an
# optimised version of the striped target that only handles a single
# stripe.
use_linear_target = 1
# Configuration option activation/reserved_stack.
# Stack size in KiB to reserve for use while devices are suspended.
# Insufficent reserve risks I/O deadlock during device suspension.
reserved_stack = 64
# Configuration option activation/reserved_memory.
# Memory size in KiB to reserve for use while devices are suspended.
# Insufficent reserve risks I/O deadlock during device suspension.
reserved_memory = 8192
# Configuration option activation/process_priority.
# Nice value used while devices are suspended.
# Use a high priority so that LVs are suspended
# for the shortest possible time.
process_priority = -18
# Configuration option activation/volume_list.
# Only LVs selected by this list are activated.
# If this list is defined, an LV is only activated if it matches an
# entry in this list. If this list is undefined, it imposes no limits
# on LV activation (all are allowed).
#
# Accepted values:
# vgname
# The VG name is matched exactly and selects all LVs in the VG.
# vgname/lvname
# The VG name and LV name are matched exactly and selects the LV.
# @tag
# Selects an LV if the specified tag matches a tag set on the LV
# or VG.
# @*
# Selects an LV if a tag defined on the host is also set on the LV
# or VG. See tags/hosttags. If any host tags exist but volume_list
# is not defined, a default single-entry list containing '@*'
# is assumed.
#
# Example
# volume_list = [ "vg1", "vg2/lvol1", "@tag1", "@*" ]
#
# This configuration option does not have a default value defined.
# Configuration option activation/auto_activation_volume_list.
# Only LVs selected by this list are auto-activated.
# This list works like volume_list, but it is used only by
# auto-activation commands. It does not apply to direct activation
# commands. If this list is defined, an LV is only auto-activated
# if it matches an entry in this list. If this list is undefined, it
# imposes no limits on LV auto-activation (all are allowed.) If this
# list is defined and empty, i.e. "[]", then no LVs are selected for
# auto-activation. An LV that is selected by this list for
# auto-activation, must also be selected by volume_list (if defined)
# before it is activated. Auto-activation is an activation command that
# includes the 'a' argument: --activate ay or -a ay. The 'a' (auto)
# argument for auto-activation is meant to be used by activation
# commands that are run automatically by the system, as opposed to LVM
# commands run directly by a user. A user may also use the 'a' flag
# directly to perform auto-activation. Also see pvscan(8) for more
# information about auto-activation.
#
# Accepted values:
# vgname
# The VG name is matched exactly and selects all LVs in the VG.
# vgname/lvname
# The VG name and LV name are matched exactly and selects the LV.
# @tag
# Selects an LV if the specified tag matches a tag set on the LV
# or VG.
# @*
# Selects an LV if a tag defined on the host is also set on the LV
# or VG. See tags/hosttags. If any host tags exist but volume_list
# is not defined, a default single-entry list containing '@*'
# is assumed.
#
# Example
# auto_activation_volume_list = [ "vg1", "vg2/lvol1", "@tag1", "@*" ]
#
# This configuration option does not have a default value defined.
# Configuration option activation/read_only_volume_list.
# LVs in this list are activated in read-only mode.
# If this list is defined, each LV that is to be activated is checked
# against this list, and if it matches, it is activated in read-only
# mode. This overrides the permission setting stored in the metadata,
# e.g. from --permission rw.
#
# Accepted values:
# vgname
# The VG name is matched exactly and selects all LVs in the VG.
# vgname/lvname
# The VG name and LV name are matched exactly and selects the LV.
# @tag
# Selects an LV if the specified tag matches a tag set on the LV
# or VG.
# @*
# Selects an LV if a tag defined on the host is also set on the LV
# or VG. See tags/hosttags. If any host tags exist but volume_list
# is not defined, a default single-entry list containing '@*'
# is assumed.
#
# Example
# read_only_volume_list = [ "vg1", "vg2/lvol1", "@tag1", "@*" ]
#
# This configuration option does not have a default value defined.
# Configuration option activation/raid_region_size.
# Size in KiB of each raid or mirror synchronization region.
# For raid or mirror segment types, this is the amount of data that is
# copied at once when initializing, or moved at once by pvmove.
raid_region_size = 512
# Configuration option activation/error_when_full.
# Return errors if a thin pool runs out of space.
# The --errorwhenfull option overrides this setting.
# When enabled, writes to thin LVs immediately return an error if the
# thin pool is out of data space. When disabled, writes to thin LVs
# are queued if the thin pool is out of space, and processed when the
# thin pool data space is extended. New thin pools are assigned the
# behavior defined here.
# This configuration option has an automatic default value.
# error_when_full = 0
# Configuration option activation/readahead.
# Setting to use when there is no readahead setting in metadata.
#
# Accepted values:
# none
# Disable readahead.
# auto
# Use default value chosen by kernel.
#
readahead = "auto"
# Configuration option activation/raid_fault_policy.
# Defines how a device failure in a RAID LV is handled.
# This includes LVs that have the following segment types:
# raid1, raid4, raid5*, and raid6*.
# If a device in the LV fails, the policy determines the steps
# performed by dmeventd automatically, and the steps perfomed by the
# manual command lvconvert --repair --use-policies.
# Automatic handling requires dmeventd to be monitoring the LV.
#
# Accepted values:
# warn
# Use the system log to warn the user that a device in the RAID LV
# has failed. It is left to the user to run lvconvert --repair
# manually to remove or replace the failed device. As long as the
# number of failed devices does not exceed the redundancy of the LV
# (1 device for raid4/5, 2 for raid6), the LV will remain usable.
# allocate
# Attempt to use any extra physical volumes in the VG as spares and
# replace faulty devices.
#
raid_fault_policy = "warn"
# Configuration option activation/mirror_image_fault_policy.
# Defines how a device failure in a 'mirror' LV is handled.
# An LV with the 'mirror' segment type is composed of mirror images
# (copies) and a mirror log. A disk log ensures that a mirror LV does
# not need to be re-synced (all copies made the same) every time a
# machine reboots or crashes. If a device in the LV fails, this policy
# determines the steps perfomed by dmeventd automatically, and the steps
# performed by the manual command lvconvert --repair --use-policies.
# Automatic handling requires dmeventd to be monitoring the LV.
#
# Accepted values:
# remove
# Simply remove the faulty device and run without it. If the log
# device fails, the mirror would convert to using an in-memory log.
# This means the mirror will not remember its sync status across
# crashes/reboots and the entire mirror will be re-synced. If a
# mirror image fails, the mirror will convert to a non-mirrored
# device if there is only one remaining good copy.
# allocate
# Remove the faulty device and try to allocate space on a new
# device to be a replacement for the failed device. Using this
# policy for the log is fast and maintains the ability to remember
# sync state through crashes/reboots. Using this policy for a
# mirror device is slow, as it requires the mirror to resynchronize
# the devices, but it will preserve the mirror characteristic of
# the device. This policy acts like 'remove' if no suitable device
# and space can be allocated for the replacement.
# allocate_anywhere
# Not yet implemented. Useful to place the log device temporarily
# on the same physical volume as one of the mirror images. This
# policy is not recommended for mirror devices since it would break
# the redundant nature of the mirror. This policy acts like
# 'remove' if no suitable device and space can be allocated for the
# replacement.
#
mirror_image_fault_policy = "remove"
# Configuration option activation/mirror_log_fault_policy.
# Defines how a device failure in a 'mirror' log LV is handled.
# The mirror_image_fault_policy description for mirrored LVs also
# applies to mirrored log LVs.
mirror_log_fault_policy = "allocate"
# Configuration option activation/snapshot_autoextend_threshold.
# Auto-extend a snapshot when its usage exceeds this percent.
# Setting this to 100 disables automatic extension.
# The minimum value is 50 (a smaller value is treated as 50.)
# Also see snapshot_autoextend_percent.
# Automatic extension requires dmeventd to be monitoring the LV.
#
# Example
# Using 70% autoextend threshold and 20% autoextend size, when a 1G
# snapshot exceeds 700M, it is extended to 1.2G, and when it exceeds
# 840M, it is extended to 1.44G:
# snapshot_autoextend_threshold = 70
#
snapshot_autoextend_threshold = 100
# Configuration option activation/snapshot_autoextend_percent.
# Auto-extending a snapshot adds this percent extra space.
# The amount of additional space added to a snapshot is this
# percent of its current size.
#
# Example
# Using 70% autoextend threshold and 20% autoextend size, when a 1G
# snapshot exceeds 700M, it is extended to 1.2G, and when it exceeds
# 840M, it is extended to 1.44G:
# snapshot_autoextend_percent = 20
#
snapshot_autoextend_percent = 20
# Configuration option activation/thin_pool_autoextend_threshold.
# Auto-extend a thin pool when its usage exceeds this percent.
# Setting this to 100 disables automatic extension.
# The minimum value is 50 (a smaller value is treated as 50.)
# Also see thin_pool_autoextend_percent.
# Automatic extension requires dmeventd to be monitoring the LV.
#
# Example
# Using 70% autoextend threshold and 20% autoextend size, when a 1G
# thin pool exceeds 700M, it is extended to 1.2G, and when it exceeds
# 840M, it is extended to 1.44G:
# thin_pool_autoextend_threshold = 70
#
thin_pool_autoextend_threshold = 100
# Configuration option activation/thin_pool_autoextend_percent.
# Auto-extending a thin pool adds this percent extra space.
# The amount of additional space added to a thin pool is this
# percent of its current size.
#
# Example
# Using 70% autoextend threshold and 20% autoextend size, when a 1G
# thin pool exceeds 700M, it is extended to 1.2G, and when it exceeds
# 840M, it is extended to 1.44G:
# thin_pool_autoextend_percent = 20
#
thin_pool_autoextend_percent = 20
# Configuration option activation/mlock_filter.
# Do not mlock these memory areas.
# While activating devices, I/O to devices being (re)configured is
# suspended. As a precaution against deadlocks, LVM pins memory it is
# using so it is not paged out, and will not require I/O to reread.
# Groups of pages that are known not to be accessed during activation
# do not need to be pinned into memory. Each string listed in this
# setting is compared against each line in /proc/self/maps, and the
# pages corresponding to lines that match are not pinned. On some
# systems, locale-archive was found to make up over 80% of the memory
# used by the process.
#
# Example
# mlock_filter = [ "locale/locale-archive", "gconv/gconv-modules.cache" ]
#
# This configuration option is advanced.
# This configuration option does not have a default value defined.
# Configuration option activation/use_mlockall.
# Use the old behavior of mlockall to pin all memory.
# Prior to version 2.02.62, LVM used mlockall() to pin the whole
# process's memory while activating devices.
use_mlockall = 0
# Configuration option activation/monitoring.
# Monitor LVs that are activated.
# The --ignoremonitoring option overrides this setting.
# When enabled, LVM will ask dmeventd to monitor activated LVs.
monitoring = 1
# Configuration option activation/polling_interval.
# Check pvmove or lvconvert progress at this interval (seconds).
# When pvmove or lvconvert must wait for the kernel to finish
# synchronising or merging data, they check and report progress at
# intervals of this number of seconds. If this is set to 0 and there
# is only one thing to wait for, there are no progress reports, but
# the process is awoken immediately once the operation is complete.
polling_interval = 15
# Configuration option activation/auto_set_activation_skip.
# Set the activation skip flag on new thin snapshot LVs.
# The --setactivationskip option overrides this setting.
# An LV can have a persistent 'activation skip' flag. The flag causes
# the LV to be skipped during normal activation. The lvchange/vgchange
# -K option is required to activate LVs that have the activation skip
# flag set. When this setting is enabled, the activation skip flag is
# set on new thin snapshot LVs.
# This configuration option has an automatic default value.
# auto_set_activation_skip = 1
# Configuration option activation/activation_mode.
# How LVs with missing devices are activated.
# The --activationmode option overrides this setting.
#
# Accepted values:
# complete
# Only allow activation of an LV if all of the Physical Volumes it
# uses are present. Other PVs in the Volume Group may be missing.
# degraded
# Like complete, but additionally RAID LVs of segment type raid1,
# raid4, raid5, radid6 and raid10 will be activated if there is no
# data loss, i.e. they have sufficient redundancy to present the
# entire addressable range of the Logical Volume.
# partial
# Allows the activation of any LV even if a missing or failed PV
# could cause data loss with a portion of the LV inaccessible.
# This setting should not normally be used, but may sometimes
# assist with data recovery.
#
activation_mode = "degraded"
# Configuration option activation/lock_start_list.
# Locking is started only for VGs selected by this list.
# The rules are the same as those for volume_list.
# This configuration option does not have a default value defined.
# Configuration option activation/auto_lock_start_list.
# Locking is auto-started only for VGs selected by this list.
# The rules are the same as those for auto_activation_volume_list.
# This configuration option does not have a default value defined.
}
# Configuration section metadata.
# This configuration section has an automatic default value.
# metadata {
# Configuration option metadata/check_pv_device_sizes.
# Check device sizes are not smaller than corresponding PV sizes.
# If device size is less than corresponding PV size found in metadata,
# there is always a risk of data loss. If this option is set, then LVM
# issues a warning message each time it finds that the device size is
# less than corresponding PV size. You should not disable this unless
# you are absolutely sure about what you are doing!
# This configuration option is advanced.
# This configuration option has an automatic default value.
# check_pv_device_sizes = 1
# Configuration option metadata/record_lvs_history.
# When enabled, LVM keeps history records about removed LVs in
# metadata. The information that is recorded in metadata for
# historical LVs is reduced when compared to original
# information kept in metadata for live LVs. Currently, this
# feature is supported for thin and thin snapshot LVs only.
# This configuration option has an automatic default value.
# record_lvs_history = 0
# Configuration option metadata/lvs_history_retention_time.
# Retention time in seconds after which a record about individual
# historical logical volume is automatically destroyed.
# A value of 0 disables this feature.
# This configuration option has an automatic default value.
# lvs_history_retention_time = 0
# Configuration option metadata/pvmetadatacopies.
# Number of copies of metadata to store on each PV.
# The --pvmetadatacopies option overrides this setting.
#
# Accepted values:
# 2
# Two copies of the VG metadata are stored on the PV, one at the
# front of the PV, and one at the end.
# 1
# One copy of VG metadata is stored at the front of the PV.
# 0
# No copies of VG metadata are stored on the PV. This may be
# useful for VGs containing large numbers of PVs.
#
# This configuration option is advanced.
# This configuration option has an automatic default value.
# pvmetadatacopies = 1
# Configuration option metadata/vgmetadatacopies.
# Number of copies of metadata to maintain for each VG.
# The --vgmetadatacopies option overrides this setting.
# If set to a non-zero value, LVM automatically chooses which of the
# available metadata areas to use to achieve the requested number of
# copies of the VG metadata. If you set a value larger than the the
# total number of metadata areas available, then metadata is stored in
# them all. The value 0 (unmanaged) disables this automatic management
# and allows you to control which metadata areas are used at the
# individual PV level using pvchange --metadataignore y|n.
# This configuration option has an automatic default value.
# vgmetadatacopies = 0
# Configuration option metadata/pvmetadatasize.
# Approximate number of sectors to use for each metadata copy.
# VGs with large numbers of PVs or LVs, or VGs containing complex LV
# structures, may need additional space for VG metadata. The metadata
# areas are treated as circular buffers, so unused space becomes filled
# with an archive of the most recent previous versions of the metadata.
# This configuration option has an automatic default value.
# pvmetadatasize = 255
# Configuration option metadata/pvmetadataignore.
# Ignore metadata areas on a new PV.
# The --metadataignore option overrides this setting.
# If metadata areas on a PV are ignored, LVM will not store metadata
# in them.
# This configuration option is advanced.
# This configuration option has an automatic default value.
# pvmetadataignore = 0
# Configuration option metadata/stripesize.
# This configuration option is advanced.
# This configuration option has an automatic default value.
# stripesize = 64
# Configuration option metadata/dirs.
# Directories holding live copies of text format metadata.
# These directories must not be on logical volumes!
# It's possible to use LVM with a couple of directories here,
# preferably on different (non-LV) filesystems, and with no other
# on-disk metadata (pvmetadatacopies = 0). Or this can be in addition
# to on-disk metadata areas. The feature was originally added to
# simplify testing and is not supported under low memory situations -
# the machine could lock up. Never edit any files in these directories
# by hand unless you are absolutely sure you know what you are doing!
# Use the supplied toolset to make changes (e.g. vgcfgrestore).
#
# Example
# dirs = [ "/etc/lvm/metadata", "/mnt/disk2/lvm/metadata2" ]
#
# This configuration option is advanced.
# This configuration option does not have a default value defined.
# }
# Configuration section report.
# LVM report command output formatting.
# This configuration section has an automatic default value.
# report {
# Configuration option report/output_format.
# Format of LVM command's report output.
# If there is more than one report per command, then the format
# is applied for all reports. You can also change output format
# directly on command line using --reportformat option which
# has precedence over log/output_format setting.
# Accepted values:
# basic
# Original format with columns and rows. If there is more than
# one report per command, each report is prefixed with report's
# name for identification.
# json
# JSON format.
# This configuration option has an automatic default value.
# output_format = "basic"
# Configuration option report/compact_output.
# Do not print empty values for all report fields.
# If enabled, all fields that don't have a value set for any of the
# rows reported are skipped and not printed. Compact output is
# applicable only if report/buffered is enabled. If you need to
# compact only specified fields, use compact_output=0 and define
# report/compact_output_cols configuration setting instead.
# This configuration option has an automatic default value.
# compact_output = 0
# Configuration option report/compact_output_cols.
# Do not print empty values for specified report fields.
# If defined, specified fields that don't have a value set for any
# of the rows reported are skipped and not printed. Compact output
# is applicable only if report/buffered is enabled. If you need to
# compact all fields, use compact_output=1 instead in which case
# the compact_output_cols setting is then ignored.
# This configuration option has an automatic default value.
# compact_output_cols = ""
# Configuration option report/aligned.
# Align columns in report output.
# This configuration option has an automatic default value.
# aligned = 1
# Configuration option report/buffered.
# Buffer report output.
# When buffered reporting is used, the report's content is appended
# incrementally to include each object being reported until the report
# is flushed to output which normally happens at the end of command
# execution. Otherwise, if buffering is not used, each object is
# reported as soon as its processing is finished.
# This configuration option has an automatic default value.
# buffered = 1
# Configuration option report/headings.
# Show headings for columns on report.
# This configuration option has an automatic default value.
# headings = 1
# Configuration option report/separator.
# A separator to use on report after each field.
# This configuration option has an automatic default value.
# separator = " "
# Configuration option report/list_item_separator.
# A separator to use for list items when reported.
# This configuration option has an automatic default value.
# list_item_separator = ","
# Configuration option report/prefixes.
# Use a field name prefix for each field reported.
# This configuration option has an automatic default value.
# prefixes = 0
# Configuration option report/quoted.
# Quote field values when using field name prefixes.
# This configuration option has an automatic default value.
# quoted = 1
# Configuration option report/colums_as_rows.
# Output each column as a row.
# If set, this also implies report/prefixes=1.
# This configuration option has an automatic default value.
# colums_as_rows = 0
# Configuration option report/binary_values_as_numeric.
# Use binary values 0 or 1 instead of descriptive literal values.
# For columns that have exactly two valid values to report
# (not counting the 'unknown' value which denotes that the
# value could not be determined).
# This configuration option has an automatic default value.
# binary_values_as_numeric = 0
# Configuration option report/time_format.
# Set time format for fields reporting time values.
# Format specification is a string which may contain special character
# sequences and ordinary character sequences. Ordinary character
# sequences are copied verbatim. Each special character sequence is
# introduced by the '%' character and such sequence is then
# substituted with a value as described below.
#
# Accepted values:
# %a
# The abbreviated name of the day of the week according to the
# current locale.
# %A
# The full name of the day of the week according to the current
# locale.
# %b
# The abbreviated month name according to the current locale.
# %B
# The full month name according to the current locale.
# %c
# The preferred date and time representation for the current
# locale (alt E)
# %C
# The century number (year/100) as a 2-digit integer. (alt E)
# %d
# The day of the month as a decimal number (range 01 to 31).
# (alt O)
# %D
# Equivalent to %m/%d/%y. (For Americans only. Americans should
# note that in other countries%d/%m/%y is rather common. This
# means that in international context this format is ambiguous and
# should not be used.
# %e
# Like %d, the day of the month as a decimal number, but a leading
# zero is replaced by a space. (alt O)
# %E
# Modifier: use alternative local-dependent representation if
# available.
# %F
# Equivalent to %Y-%m-%d (the ISO 8601 date format).
# %G
# The ISO 8601 week-based year with century as adecimal number.
# The 4-digit year corresponding to the ISO week number (see %V).
# This has the same format and value as %Y, except that if the
# ISO week number belongs to the previous or next year, that year
# is used instead.
# %g
# Like %G, but without century, that is, with a 2-digit year
# (00-99).
# %h
# Equivalent to %b.
# %H
# The hour as a decimal number using a 24-hour clock
# (range 00 to 23). (alt O)
# %I
# The hour as a decimal number using a 12-hour clock
# (range 01 to 12). (alt O)
# %j
# The day of the year as a decimal number (range 001 to 366).
# %k
# The hour (24-hour clock) as a decimal number (range 0 to 23);
# single digits are preceded by a blank. (See also %H.)
# %l
# The hour (12-hour clock) as a decimal number (range 1 to 12);
# single digits are preceded by a blank. (See also %I.)
# %m
# The month as a decimal number (range 01 to 12). (alt O)
# %M
# The minute as a decimal number (range 00 to 59). (alt O)
# %O
# Modifier: use alternative numeric symbols.
# %p
# Either "AM" or "PM" according to the given time value,
# or the corresponding strings for the current locale. Noon is
# treated as "PM" and midnight as "AM".
# %P
# Like %p but in lowercase: "am" or "pm" or a corresponding
# string for the current locale.
# %r
# The time in a.m. or p.m. notation. In the POSIX locale this is
# equivalent to %I:%M:%S %p.
# %R
# The time in 24-hour notation (%H:%M). For a version including
# the seconds, see %T below.
# %s
# The number of seconds since the Epoch,
# 1970-01-01 00:00:00 +0000 (UTC)
# %S
# The second as a decimal number (range 00 to 60). (The range is
# up to 60 to allow for occasional leap seconds.) (alt O)
# %t
# A tab character.
# %T
# The time in 24-hour notation (%H:%M:%S).
# %u
# The day of the week as a decimal, range 1 to 7, Monday being 1.
# See also %w. (alt O)
# %U
# The week number of the current year as a decimal number,
# range 00 to 53, starting with the first Sunday as the first
# day of week 01. See also %V and %W. (alt O)
# %V
# The ISO 8601 week number of the current year as a decimal number,
# range 01 to 53, where week 1 is the first week that has at least
# 4 days in the new year. See also %U and %W. (alt O)
# %w
# The day of the week as a decimal, range 0 to 6, Sunday being 0.
# See also %u. (alt O)
# %W
# The week number of the current year as a decimal number,
# range 00 to 53, starting with the first Monday as the first day
# of week 01. (alt O)
# %x
# The preferred date representation for the current locale without
# the time. (alt E)
# %X
# The preferred time representation for the current locale without
# the date. (alt E)
# %y
# The year as a decimal number without a century (range 00 to 99).
# (alt E, alt O)
# %Y
# The year as a decimal number including the century. (alt E)
# %z
# The +hhmm or -hhmm numeric timezone (that is, the hour and minute
# offset from UTC).
# %Z
# The timezone name or abbreviation.
# %%
# A literal '%' character.
#
# This configuration option has an automatic default value.
# time_format = "%Y-%m-%d %T %z"
# Configuration option report/devtypes_sort.
# List of columns to sort by when reporting 'lvm devtypes' command.
# See 'lvm devtypes -o help' for the list of possible fields.
# This configuration option has an automatic default value.
# devtypes_sort = "devtype_name"
# Configuration option report/devtypes_cols.
# List of columns to report for 'lvm devtypes' command.
# See 'lvm devtypes -o help' for the list of possible fields.
# This configuration option has an automatic default value.
# devtypes_cols = "devtype_name,devtype_max_partitions,devtype_description"
# Configuration option report/devtypes_cols_verbose.
# List of columns to report for 'lvm devtypes' command in verbose mode.
# See 'lvm devtypes -o help' for the list of possible fields.
# This configuration option has an automatic default value.
# devtypes_cols_verbose = "devtype_name,devtype_max_partitions,devtype_description"
# Configuration option report/lvs_sort.
# List of columns to sort by when reporting 'lvs' command.
# See 'lvs -o help' for the list of possible fields.
# This configuration option has an automatic default value.
# lvs_sort = "vg_name,lv_name"
# Configuration option report/lvs_cols.
# List of columns to report for 'lvs' command.
# See 'lvs -o help' for the list of possible fields.
# This configuration option has an automatic default value.
# lvs_cols = "lv_name,vg_name,lv_attr,lv_size,pool_lv,origin,data_percent,metadata_percent,move_pv,mirror_log,copy_percent,convert_lv"
# Configuration option report/lvs_cols_verbose.
# List of columns to report for 'lvs' command in verbose mode.
# See 'lvs -o help' for the list of possible fields.
# This configuration option has an automatic default value.
# lvs_cols_verbose = "lv_name,vg_name,seg_count,lv_attr,lv_size,lv_major,lv_minor,lv_kernel_major,lv_kernel_minor,pool_lv,origin,data_percent,metadata_percent,move_pv,copy_percent,mirror_log,convert_lv,lv_uuid,lv_profile"
# Configuration option report/vgs_sort.
# List of columns to sort by when reporting 'vgs' command.
# See 'vgs -o help' for the list of possible fields.
# This configuration option has an automatic default value.
# vgs_sort = "vg_name"
# Configuration option report/vgs_cols.
# List of columns to report for 'vgs' command.
# See 'vgs -o help' for the list of possible fields.
# This configuration option has an automatic default value.
# vgs_cols = "vg_name,pv_count,lv_count,snap_count,vg_attr,vg_size,vg_free"
# Configuration option report/vgs_cols_verbose.
# List of columns to report for 'vgs' command in verbose mode.
# See 'vgs -o help' for the list of possible fields.
# This configuration option has an automatic default value.
# vgs_cols_verbose = "vg_name,vg_attr,vg_extent_size,pv_count,lv_count,snap_count,vg_size,vg_free,vg_uuid,vg_profile"
# Configuration option report/pvs_sort.
# List of columns to sort by when reporting 'pvs' command.
# See 'pvs -o help' for the list of possible fields.
# This configuration option has an automatic default value.
# pvs_sort = "pv_name"
# Configuration option report/pvs_cols.
# List of columns to report for 'pvs' command.
# See 'pvs -o help' for the list of possible fields.
# This configuration option has an automatic default value.
# pvs_cols = "pv_name,vg_name,pv_fmt,pv_attr,pv_size,pv_free"
# Configuration option report/pvs_cols_verbose.
# List of columns to report for 'pvs' command in verbose mode.
# See 'pvs -o help' for the list of possible fields.
# This configuration option has an automatic default value.
# pvs_cols_verbose = "pv_name,vg_name,pv_fmt,pv_attr,pv_size,pv_free,dev_size,pv_uuid"
# Configuration option report/segs_sort.
# List of columns to sort by when reporting 'lvs --segments' command.
# See 'lvs --segments -o help' for the list of possible fields.
# This configuration option has an automatic default value.
# segs_sort = "vg_name,lv_name,seg_start"
# Configuration option report/segs_cols.
# List of columns to report for 'lvs --segments' command.
# See 'lvs --segments -o help' for the list of possible fields.
# This configuration option has an automatic default value.
# segs_cols = "lv_name,vg_name,lv_attr,stripes,segtype,seg_size"
# Configuration option report/segs_cols_verbose.
# List of columns to report for 'lvs --segments' command in verbose mode.
# See 'lvs --segments -o help' for the list of possible fields.
# This configuration option has an automatic default value.
# segs_cols_verbose = "lv_name,vg_name,lv_attr,seg_start,seg_size,stripes,segtype,stripesize,chunksize"
# Configuration option report/pvsegs_sort.
# List of columns to sort by when reporting 'pvs --segments' command.
# See 'pvs --segments -o help' for the list of possible fields.
# This configuration option has an automatic default value.
# pvsegs_sort = "pv_name,pvseg_start"
# Configuration option report/pvsegs_cols.
# List of columns to sort by when reporting 'pvs --segments' command.
# See 'pvs --segments -o help' for the list of possible fields.
# This configuration option has an automatic default value.
# pvsegs_cols = "pv_name,vg_name,pv_fmt,pv_attr,pv_size,pv_free,pvseg_start,pvseg_size"
# Configuration option report/pvsegs_cols_verbose.
# List of columns to sort by when reporting 'pvs --segments' command in verbose mode.
# See 'pvs --segments -o help' for the list of possible fields.
# This configuration option has an automatic default value.
# pvsegs_cols_verbose = "pv_name,vg_name,pv_fmt,pv_attr,pv_size,pv_free,pvseg_start,pvseg_size,lv_name,seg_start_pe,segtype,seg_pe_ranges"
# Configuration option report/vgs_cols_full.
# List of columns to report for lvm fullreport's 'vgs' subreport.
# See 'vgs -o help' for the list of possible fields.
# This configuration option has an automatic default value.
# vgs_cols_full = "vg_all"
# Configuration option report/pvs_cols_full.
# List of columns to report for lvm fullreport's 'vgs' subreport.
# See 'pvs -o help' for the list of possible fields.
# This configuration option has an automatic default value.
# pvs_cols_full = "pv_all"
# Configuration option report/lvs_cols_full.
# List of columns to report for lvm fullreport's 'lvs' subreport.
# See 'lvs -o help' for the list of possible fields.
# This configuration option has an automatic default value.
# lvs_cols_full = "lv_all"
# Configuration option report/pvsegs_cols_full.
# List of columns to report for lvm fullreport's 'pvseg' subreport.
# See 'pvs --segments -o help' for the list of possible fields.
# This configuration option has an automatic default value.
# pvsegs_cols_full = "pvseg_all,pv_uuid,lv_uuid"
# Configuration option report/segs_cols_full.
# List of columns to report for lvm fullreport's 'seg' subreport.
# See 'lvs --segments -o help' for the list of possible fields.
# This configuration option has an automatic default value.
# segs_cols_full = "seg_all,lv_uuid"
# Configuration option report/vgs_sort_full.
# List of columns to sort by when reporting lvm fullreport's 'vgs' subreport.
# See 'vgs -o help' for the list of possible fields.
# This configuration option has an automatic default value.
# vgs_sort_full = "vg_name"
# Configuration option report/pvs_sort_full.
# List of columns to sort by when reporting lvm fullreport's 'vgs' subreport.
# See 'pvs -o help' for the list of possible fields.
# This configuration option has an automatic default value.
# pvs_sort_full = "pv_name"
# Configuration option report/lvs_sort_full.
# List of columns to sort by when reporting lvm fullreport's 'lvs' subreport.
# See 'lvs -o help' for the list of possible fields.
# This configuration option has an automatic default value.
# lvs_sort_full = "vg_name,lv_name"
# Configuration option report/pvsegs_sort_full.
# List of columns to sort by when reporting for lvm fullreport's 'pvseg' subreport.
# See 'pvs --segments -o help' for the list of possible fields.
# This configuration option has an automatic default value.
# pvsegs_sort_full = "pv_uuid,pvseg_start"
# Configuration option report/segs_sort_full.
# List of columns to sort by when reporting lvm fullreport's 'seg' subreport.
# See 'lvs --segments -o help' for the list of possible fields.
# This configuration option has an automatic default value.
# segs_sort_full = "lv_uuid,seg_start"
# Configuration option report/mark_hidden_devices.
# Use brackets [] to mark hidden devices.
# This configuration option has an automatic default value.
# mark_hidden_devices = 1
# Configuration option report/two_word_unknown_device.
# Use the two words 'unknown device' in place of '[unknown]'.
# This is displayed when the device for a PV is not known.
# This configuration option has an automatic default value.
# two_word_unknown_device = 0
# }
# Configuration section dmeventd.
# Settings for the LVM event daemon.
dmeventd {
# Configuration option dmeventd/mirror_library.
# The library dmeventd uses when monitoring a mirror device.
# libdevmapper-event-lvm2mirror.so attempts to recover from
# failures. It removes failed devices from a volume group and
# reconfigures a mirror as necessary. If no mirror library is
# provided, mirrors are not monitored through dmeventd.
mirror_library = "libdevmapper-event-lvm2mirror.so"
# Configuration option dmeventd/raid_library.
# This configuration option has an automatic default value.
# raid_library = "libdevmapper-event-lvm2raid.so"
# Configuration option dmeventd/snapshot_library.
# The library dmeventd uses when monitoring a snapshot device.
# libdevmapper-event-lvm2snapshot.so monitors the filling of snapshots
# and emits a warning through syslog when the usage exceeds 80%. The
# warning is repeated when 85%, 90% and 95% of the snapshot is filled.
snapshot_library = "libdevmapper-event-lvm2snapshot.so"
# Configuration option dmeventd/thin_library.
# The library dmeventd uses when monitoring a thin device.
# libdevmapper-event-lvm2thin.so monitors the filling of a pool
# and emits a warning through syslog when the usage exceeds 80%. The
# warning is repeated when 85%, 90% and 95% of the pool is filled.
thin_library = "libdevmapper-event-lvm2thin.so"
# Configuration option dmeventd/executable.
# The full path to the dmeventd binary.
# This configuration option has an automatic default value.
# executable = "/usr/sbin/dmeventd"
}
# Configuration section tags.
# Host tag settings.
# This configuration section has an automatic default value.
# tags {
# Configuration option tags/hosttags.
# Create a host tag using the machine name.
# The machine name is nodename returned by uname(2).
# This configuration option has an automatic default value.
# hosttags = 0
# Configuration section tags/<tag>.
# Replace this subsection name with a custom tag name.
# Multiple subsections like this can be created. The '@' prefix for
# tags is optional. This subsection can contain host_list, which is a
# list of machine names. If the name of the local machine is found in
# host_list, then the name of this subsection is used as a tag and is
# applied to the local machine as a 'host tag'. If this subsection is
# empty (has no host_list), then the subsection name is always applied
# as a 'host tag'.
#
# Example
# The host tag foo is given to all hosts, and the host tag
# bar is given to the hosts named machine1 and machine2.
# tags { foo { } bar { host_list = [ "machine1", "machine2" ] } }
#
# This configuration section has variable name.
# This configuration section has an automatic default value.
# tag {
# Configuration option tags/<tag>/host_list.
# A list of machine names.
# These machine names are compared to the nodename returned
# by uname(2). If the local machine name matches an entry in
# this list, the name of the subsection is applied to the
# machine as a 'host tag'.
# This configuration option does not have a default value defined.
# }
# }
附录 C. LVM 选择标准
从 Red Hat Enterprise Linux 版本 7.1 开始,许多 LVM 报告命令接受
-S 或 --select 选项来为这些命令定义选择条件。从 Red Hat Enterprise Linux release 7.2 开始,很多处理命令也支持选择标准。可以定义选择条件的命令有两种,如下所示:
- 报告命令 - 仅显示满足选择条件的行。您可以定义选择标准的报告命令的示例包括 pvs,vgs,lvs,pvdisplay,vgdisplay,lvdisplay,lvm devtypes, 和 dmsetup info -c。在
-S选项之外指定-o selected选项会显示所有行,并添加"selected"列,其中显示 1(如果行与选择条件和 0 不匹配)。 - 处理命令 - 仅处理满足选择条件的项目。您可以定义选择标准的处理命令的示例包括 pvchange,vgchange,lvchange,vgimport,vgexport,vgremove, 和 lvremove。
选择条件是一组使用比较运算符来定义特定字段的有效值来显示或进程的信息。所选的字段依次是逻辑和分组运算符。
当使用选择条件指定要显示哪些字段时,字段不需要显示选择条件。选择条件可以包含一组字段,而输出可以包含一组不同的字段。
- 有关各种 LVM 组件的可用字段列表,请参考 第 C.3 节 “选择标准字段”。
- 有关允许 Operator 的列表,请参阅 第 C.2 节 “选择标准 Operator”。运算符也在 lvm(8)man page 中提供。
- 您还可以通过为报告命令的
-S/--select选项指定help(或?)关键字来查看完整的字段和可能的运算符。例如,以下命令显示 lvs 命令的字段和可能的运算符。#
lvs -S help
对于 Red Hat Enterprise Linux 7.2 版本,您可以使用字段类型将
时间 值指定为选择条件。有关指定时间值的详情,请参考 第 C.4 节 “指定时间值”。
C.1. 选择标准字段类型
您为选择条件指定的字段是特定类型的。每个字段的帮助输出显示以括号括起的字段类型。以下帮助输出示例显示表示字段类型
string ,string_list,number,percent,size 和 time 的输出。
lv_name - Name. LVs created for internal use are enclosed in brackets.[string] lv_role - LV role. [string list] raid_mismatch_count - For RAID, number of mismatches found or repaired. [number] copy_percent - For RAID, mirrors and pvmove, current percentage in-sync. [percent] lv_size - Size of LV in current units. [size] lv_time - Creation time of the LV, if known [time]
表 C.1 “选择标准字段类型” 描述选择条件字段类型
表 C.1. 选择标准字段类型
| 字段类型 | 描述 |
|---|---|
| number | 非负整数值. |
| Size | 带有 units 的浮点值,如果未指定,则默认使用 'm' 单元。 |
| 百分比 | 带有或不带%后缀的非负整数。 |
| 字符串 | 字符用 ' 或 " 或 " 或 ' unquoted 加引号。 |
| 字符串列表 | 由 [ ] 或 { } 括起的字符串,由 "all items must match" 分隔的元素,或者"至少一个项目必须匹配"运算符。 |
您为字段指定的值可以是:
- 字段类型的 concrete 值
- 包含
string字段类型的任何字段的正则表达式,如 "+~" 运算符。 - 保留值(如 -1、unknown、未定义、undef)是所有关键字,用于表示未定义的数字值。
- 为字段值定义 synonyms,它可用于选择值的标准,就如同用于其原始值。有关字段值定义的 synonyms 列表,请参阅 表 C.14 “选择标准 Synonyms”。
C.2. 选择标准 Operator
表 C.2 “选择标准分组 Operator” 描述选择条件分组运算符。
表 C.2. 选择标准分组 Operator
| 分组 Operator | 描述 |
|---|---|
| ( ) | 用于分组语句 |
| [ ] | 用于将字符串分组为字符串列表(匹配) |
| { } | 用于将字符串分组为字符串列表(subset match) |
表 C.3 “选择标准比较 Operator” 描述选择条件比较运算符以及可以使用它们的字段类型。
表 C.3. 选择标准比较 Operator
| 比较 Operator | 描述 | 字段类型 |
|---|---|---|
| =~ | 匹配正则表达式 | regex |
| !~ | 不匹配正则表达式. | regex |
| = | 等于 | 数字、大小、百分比、字符串列表、时间 |
| != | 不等于 | 数字、大小、百分比、字符串列表、时间 |
| >= | 大于或等于 | 数字、大小、百分比、时间 |
| > | 大于 | 数字、大小、百分比、时间 |
| <= | 小于或等于 | 数字、大小、百分比、时间 |
| < | 小于 | 数字、大小、百分比、时间 |
| 自 | 从指定的时间(same 为 >=) | time |
| 之后 | 指定的时间(same 为 >) | time |
| 直到 | 直到指定时间(与 <= 的作用) | time |
| 之前 | 在指定时间前(类似于 <) | time |
表 C.4 “选择标准逻辑和分组 Operator” 描述选择条件逻辑和分组运算符。
表 C.4. 选择标准逻辑和分组 Operator
| 逻辑和分组 Operator | 描述 |
|---|---|
| && | 所有字段都必须匹配 |
| , | 所有字段都必须匹配(与 && 的作用) |
| || | 至少一个字段必须匹配 |
| # | 至少一个字段必须匹配(与 ||)一样) |
| ! | 逻辑别名 |
| ( | 左圆括号(grouping operator) |
| ) | 右圆括号(grouping operator) |
| [ | 列出开始(分组 operator) |
| ] | 列出结束(分组 operator) |
| { | 列出子集(分组 operator) |
| } | 列出子集结尾(分组 operator) |
C.3. 选择标准字段
这部分论述了您指定的逻辑卷和物理卷选择条件字段。
表 C.5 “逻辑卷字段” 描述逻辑卷字段及其字段类型。
表 C.5. 逻辑卷字段
| 逻辑卷字段 | 描述 | 字段类型 |
|---|---|---|
lv_uuid | 唯一标识符 | 字符串 |
lv_name | 名称(为内部使用创建的逻辑卷包含在括号中) | 字符串 |
lv_full_name | 逻辑卷的完整名称,包括其卷组,即 VG/LV | 字符串 |
lv_path | 逻辑卷的完整路径名(内部逻辑卷空白) | 字符串 |
lv_dm_path | 逻辑卷的内部设备映射器路径(在 /dev/mapper 目录中) | 字符串 |
lv_parent | 对于作为另一个逻辑卷组件的逻辑卷,父逻辑卷 | 字符串 |
lv_layout | 逻辑卷布局 | 字符串列表 |
lv_role | 逻辑卷角色 | 字符串列表 |
lv_initial_image_sync | 设置 if mirror/RAID 镜像处于初始重新同步 | number |
lv_image_synced | 如果同步了镜像/RAID 镜像 | number |
lv_merging | 如果快照逻辑卷正合并到原始卷中,则设置 | number |
lv_converting | 设置逻辑卷正在转换 | number |
lv_allocation_policy | 逻辑卷分配策略 | 字符串 |
lv_allocation_locked | 如果逻辑卷锁定了分配更改,则设置 | number |
lv_fixed_minor | 如果逻辑卷分配了固定副号码 | number |
lv_merge_failed | 如果快照合并失败,则设置 | number |
lv_snapshot_invalid | 如果快照逻辑卷无效,则设置 | number |
lv_skip_activation | 如果在激活中跳过逻辑卷,则设置 | number |
lv_when_full | 对于精简池,在满时的行为 | 字符串 |
lv_active | 逻辑卷主动状态 | 字符串 |
lv_active_locally | 如果逻辑卷在本地活跃,则设置 | number |
lv_active_remotely | 如果逻辑卷是远程激活的 | number |
lv_active_exclusively | 如果逻辑卷仅活跃的 | number |
lv_major | 持久性主要编号或 -1 如果非持久性 | number |
lv_minor | 持久的次要号码或 -1(如果没有持久性) | number |
lv_read_ahead | 在当前单元中读取设置 | Size |
lv_size | 当前单位的逻辑卷大小 | Size |
lv_metadata_size | 对于精简和缓存池,包含元数据的逻辑卷大小 | Size |
seg_count | 逻辑卷中片段的数目 | number |
origin | 对于快照,这个逻辑卷的源设备 | 字符串 |
origin_size | 对于快照,这个逻辑卷的源设备的大小 | Size |
data_percent | 对于快照和精简池和卷,如果逻辑卷是活跃的,则完整的百分比 | 百分比 |
snap_percent | 对于快照,如果逻辑卷活跃,则百分比为 full | 百分比 |
metadata_percent | 对于精简池,如果逻辑卷活跃,元数据已满。 | 百分比 |
copy_percent | 对于 RAID,镜像和 pvmove,当前百分比为 in-sync | 百分比 |
sync_percent | 对于 RAID,镜像和 pvmove,当前百分比为 in-sync | 百分比 |
raid_mismatch_count | 对于 RAID,发现或修复不匹配数 | number |
raid_sync_action | 对于 RAID,执行当前的同步操作 | 字符串 |
raid_write_behind | 对于 RAID1,允许写入主要设备的未完成写入数 | number |
raid_min_recovery_rate | 对于 RAID1,kiB/sec/disk 中的最小恢复 I/O 负载 | number |
raid_max_recovery_rate | 对于 RAID1,kiB/sec/disk 的最大恢复 I/O 负载 | number |
move_pv | 对于 pvmove,由 pvmove 创建的临时逻辑卷的源物理卷 | 字符串 |
convert_lv | 对于 lvconvert,由 lvconvert 创建的临时逻辑卷的名称 | 字符串 |
mirror_log | 对于镜像,包含同步日志的逻辑卷 | 字符串 |
data_lv | 对于精简和缓存池,包含相关数据的逻辑卷 | 字符串 |
metadata_lv | 对于精简和缓存池,包含相关元数据的逻辑卷 | 字符串 |
pool_lv | 对于精简卷,这个卷的精简池逻辑卷 | 字符串 |
lv_tags | 标签(若有) | 字符串列表 |
lv_profile | 附加到这个逻辑卷的配置配置集 | 字符串 |
lv_time | 创建逻辑卷的时间(如果已知) | time |
lv_host | 创建逻辑卷的主机(如果已知) | 字符串 |
lv_modules | 这个逻辑卷所需的内核设备映射器模块 | 字符串列表 |
表 C.6 “逻辑卷设备组合 Info 和 Status 字段” 描述组合了逻辑设备信息和逻辑设备状态的逻辑卷设备字段。
表 C.6. 逻辑卷设备组合 Info 和 Status 字段
| 逻辑卷字段 | 描述 | 字段类型 |
|---|---|---|
lv_attr | 根据逻辑卷设备信息以及逻辑卷状态进行选择。 | 字符串 |
表 C.7 “逻辑卷设备信息字段” 描述逻辑卷设备信息字段及其字段类型。
表 C.7. 逻辑卷设备信息字段
| 逻辑卷字段 | 描述 | 字段类型 |
|---|---|---|
lv_kernel_major | 目前分配主号码或 -1(如果逻辑卷未激活) | number |
lv_kernel_minor | 目前分配了副号码或 -1(如果逻辑卷未激活) | number |
lv_kernel_read_ahead | 当前在当前单元中使用预设置 | Size |
lv_permissions | 逻辑卷权限 | 字符串 |
lv_suspended | 如果逻辑卷被挂起,则设定 | number |
lv_live_table | 如果逻辑卷有实时表,则设置 | number |
lv_inactive_table | 如果逻辑卷存在不活跃表,则设置 | number |
lv_device_open | 如果打开逻辑卷设备,则设置 | number |
表 C.8 “逻辑卷设备状态字段” 描述逻辑卷设备状态字段及其字段类型。
表 C.8. 逻辑卷设备状态字段
| 逻辑卷字段 | 描述 | 字段类型 |
|---|---|---|
cache_total_blocks | 缓存块总数 | number |
cache_used_blocks | 使用的缓存块 | number |
cache_dirty_blocks | 脏缓存块 | number |
cache_read_hits | 缓存读取点击 | number |
cache_read_misses | 缓存读取未命中 | number |
cache_write_hits | 缓存写点击 | number |
cache_write_misses | 缓存写入未命中 | number |
lv_health_status | 逻辑卷健康状态 | 字符串 |
表 C.9 “物理卷标签字段” 描述物理卷标签字段及其字段类型。
表 C.9. 物理卷标签字段
| 物理卷字段 | 描述 | 字段类型 |
|---|---|---|
pv_fmt | 元数据类型 | 字符串 |
pv_uuid | 唯一标识符 | 字符串 |
dev_size | 当前单元中的底层设备的大小 | Size |
pv_name | 名称 | 字符串 |
pv_mda_free | 在当前单元的这个设备中释放元数据区域空间 | Size |
pv_mda_size | 这个设备中的最小元数据区大小(以当前单元为单位) | Size |
表 C.5 “逻辑卷字段” 描述物理卷字段及其字段类型。
表 C.10. 物理卷字段
| 物理卷字段 | 描述 | 字段类型 |
|---|---|---|
pe_start | 偏移到底层设备数据起始位置 | number |
pv_size | 当前单位的物理卷大小 | Size |
pv_free | 当前单位未分配空间总量 | Size |
pv_used | 在当前单元中分配空间总量 | Size |
pv_attr | 各种属性 | 字符串 |
pv_allocatable | 如果这个设备可用于分配 | number |
pv_exported | 如果导出此设备,则设置 | number |
pv_missing | 如果系统中缺少这个设备 | number |
pv_pe_count | 物理扩展总数 | number |
pv_pe_alloc_count | 分配的物理扩展总数 | number |
pv_tags | 标签(若有) | 字符串列表 |
pv_mda_count | 这个设备的元数据区域数量 | number |
pv_mda_used_count | 这个设备中使用的元数据区域数量 | number |
pv_ba_start | 在当前单元的底层设备上偏移到 PV Bootloader 区域的开头 | Size |
pv_ba_size | 当前单元中的 PV Bootloader Area 大小 | Size |
表 C.11 “卷组字段” 描述卷组字段及其字段类型。
表 C.11. 卷组字段
| 卷组字段 | 描述 | 字段类型 |
|---|---|---|
vg_fmt | 元数据类型 | 字符串 |
vg_uuid | 唯一标识符 | 字符串 |
vg_name | 名称 | 字符串 |
vg_attr | 各种属性 | 字符串 |
vg_permissions | 卷组权限 | 字符串 |
vg_extendable | 如果卷组可扩展 | number |
vg_exported | 如果导出卷组 | number |
vg_partial | 如果卷组是部分的 | number |
vg_allocation_policy | 卷组分配策略 | 字符串 |
vg_clustered | 设定卷组是否被集群 | number |
vg_size | 当前单元中的卷组总数 | Size |
vg_free | 当前单位的可用空间总量 | Size |
vg_sysid | 卷组的系统 ID 表示哪个主机拥有它 | 字符串 |
vg_systemid | 卷组的系统 ID 表示哪个主机拥有它 | 字符串 |
vg_extent_size | 当前单位的物理扩展的大小 | Size |
vg_extent_count | 物理扩展总数 | number |
vg_free_count | 未分配物理扩展总数 | number |
max_lv | 如果无限,卷组中允许的最大逻辑卷数或 0 | number |
max_pv | 如果无限,卷组中允许的最大物理卷数或 0 | number |
pv_count | 物理卷的数量 | number |
lv_count | 逻辑卷数 | number |
snap_count | 快照数量 | number |
vg_seqno | 内部元数据的修订号 - 每次更改时递增 | number |
vg_tags | 标签(若有) | 字符串列表 |
vg_profile | 附加到此卷组的配置配置集 | 字符串 |
vg_mda_count | 这个卷组的元数据区域数量 | number |
vg_mda_used_count | 这个卷组中使用的元数据区域数 | number |
vg_mda_free | 在当前单元中为这个卷组释放元数据区域 | Size |
vg_mda_size | 当前单位此卷组的最小元数据区域大小 | Size |
vg_mda_copies | 在卷组中使用元数据区域的目标数 | number |
表 C.12 “逻辑卷分割字段” 描述逻辑卷片段字段及其字段类型。
表 C.12. 逻辑卷分割字段
| 逻辑卷片段字段 | 描述 | 字段类型 |
|---|---|---|
segtype | 逻辑卷片段的类型 | 字符串 |
stripes | 条带或者镜像分支的数量 | number |
stripesize | 对于条带,在切换到下一个设备前放置的数据量 | Size |
stripe_size | 对于条带,在切换到下一个设备前放置的数据量 | Size |
regionsize | 对于镜像,同步设备时复制的数据单元 | Size |
region_size | 对于镜像,同步设备时复制的数据单元 | Size |
CHUNKSIZE | 对于快照,跟踪更改时使用的数据单元 | Size |
chunk_size | 对于快照,跟踪更改时使用的数据单元 | Size |
thin_count | 对于精简池,这个池中的精简卷数量 | number |
discards | 对于精简池,如何处理丢弃 | 字符串 |
cachemode | 对于缓存池,如何缓存写入 | 字符串 |
zero | 对于精简池,如果启用了零 | number |
transaction_id | 对于精简池,事务 ID | number |
thin_id | 对于精简卷,thin 设备 ID | number |
seg_start | 在逻辑卷中偏移到当前单元中的片段开始 | Size |
seg_start_pe | 将逻辑卷内偏移到物理扩展中片段的开头。 | number |
seg_size | 当前单位的片段大小 | Size |
seg_size_pe | 物理扩展中的片段大小 | Size |
seg_tags | 标签(若有) | 字符串列表 |
seg_pe_ranges | 命令行格式底层设备的物理扩展范围 | 字符串 |
devices | 在开始扩展编号中使用的底层设备 | 字符串 |
seg_monitor | dmeventd 监控片段的状态 | 字符串 |
cache_policy | 缓存策略(只缓存的片段) | 字符串 |
cache_settings | 缓存设置/参数(仅缓存的片段) | 字符串列表 |
表 C.13 “物理卷分割字段” 描述物理卷片段字段及其字段类型。
表 C.13. 物理卷分割字段
| 物理卷分割字段 | 描述 | 字段类型 |
|---|---|---|
pvseg_start | 片段开始的物理范围数 | number |
pvseg_size | 片段中的扩展数目 | number |
表 C.14 “选择标准 Synonyms” 列出可用于字段值的同义。这些同义均可用于选择条件,也可像原始值一样用于值。在此表中,字段值 "" 表示空字符串,可以通过指定
-S 'field_name=""' 来匹配。
在此表中,以 0 或 1 表示的字段表示二进制值。您可以为报告工具指定
--binary 选项,这会导致二进制字段显示 0 或 1,而不是在此表中表示的"some text"或 ""。
表 C.14. 选择标准 Synonyms
| 字段 | 字段值 | synonyms |
|---|---|---|
pv_allocatable | allocatable | 1 |
pv_allocatable | "" | 0 |
pv_exported | exported | 1 |
pv_exported | "" | 0 |
pv_missing | 缺少 | 1 |
pv_missing | "" | 0 |
vg_extendable | 可扩展 | 1 |
vg_extendable | "" | 0 |
vg_exported | exported | 1 |
vg_exported | "" | 0 |
vg_partial | partial | 1 |
vg_partial | "" | 0 |
vg_clustered | 集群的 | 1 |
vg_clustered | "" | 0 |
vg_permissions | 可写 | rw, 读写 |
vg_permissions | 只读 | R, ro |
vg_mda_copies | 非受管 | unknown、未定义、undef、-1 |
lv_initial_image_sync | 初始镜像同步 | 同步、1 |
lv_initial_image_sync | "" | 0 |
lv_image_synced | 镜像同步 | 同步、1 |
lv_image_synce | "" | 0 |
lv_merging | 合并 | 1 |
lv_merging | "" | 0 |
lv_converting | 转换 | 1 |
lv_converting | "" | 0 |
lv_allocation_locked | 分配锁定 | 已锁定, 1 |
lv_allocation_locked | "" | 0 |
lv_fixed_minor | 修复了次要 | 固定、1 |
lv_fixed_minor | "" | 0 |
lv_active_locally | 本地活跃 | 活跃、本地、1 |
lv_active_locally | "" | 0 |
lv_active_remotely | 远程激活 | Active、remote、1 |
lv_active_remotely | "" | 0 |
lv_active_exclusively | 只激活 | 活跃的、唯一、1 |
lv_active_exclusively | "" | 0 |
lv_merge_failed | 合并失败 | Failed, 1 |
lv_merge_failed | "" | 0 |
lv_snapshot_invalid | 快照无效 | 无效,1 |
lv_snapshot_invalid | "" | 0 |
lv_suspended | 暂停 | 1 |
lv_suspended | "" | 0 |
lv_live_table | 实时表 | 实时表格、实时、1 |
lv_live_table | "" | 0 |
lv_inactive_table | 存在非活动表 | 非活动表、非活动、1 |
lv_inactive_table | "" | 0 |
lv_device_open | 开放 | 1 |
lv_device_open | "" | 0 |
lv_skip_activation | 跳过激活 | 跳过、1 |
lv_skip_activation | "" | 0 |
zero | zero | 1 |
zero | "" | 0 |
lv_permissions | 可写 | rw, 读写 |
lv_permissions | 只读 | R, ro |
lv_permissions | read-only-override | ro-override、r-override、R |
lv_when_full | 错误 | 满时错误,如果没有空格 |
lv_when_full | 队列 | 当队列满时,如果没有空间,则队列 |
lv_when_full | "" | undefined |
cache_policy | "" | undefined |
seg_monitor | "" | undefined |
lv_health_status | "" | undefined |
C.4. 指定时间值
当为 LVM 选择指定时间值时,您可以使用标准化的时间规格格式或更自由的规格,如 第 C.4.1 节 “标准时间选择格式” 和 第 C.4.2 节 “Freeform time 选择格式” 所述。
您可以使用
/etc/lvm/lvm.conf 配置文件中的 report/time 格式配置选项指定显示时间值的方式。有关指定这个选项的信息在 lvm.conf 文件中提供。
C.4.1. 标准时间选择格式
您可以使用以下格式为 LVM 选择指定时间值。
date time timezone
表 C.15 “时间规格格式” 总结了在指定这些时间值时可以使用的格式。
表 C.15. 时间规格格式
| 字段 | 字段值 | |||
|---|---|---|---|---|
| date |
| |||
| time |
| |||
| timezone(始终使用 + 或 - 符号) |
|
完整日期/时间规格是 YYYY-MM-DD hh:mm:ss。用户可以从右到左侧保留日期/时间部分。每当这些部分被留出时,会使用第二个粒度自动假定范围。例如:
- "2015-07-07 9:51" 表示范围 "2015-07-07 9:51:00" - "2015-07-07 9:51:59"
- "2015-07" 表示范围 "2015-07-01 0:00:00" - "2015-07-31 23:59:59"
- "2015" 表示范围 "2015-01-01 0:00:00" - "2015-12-31 23:59:59"
以下示例显示了在选择条件中使用的日期/时间规格。
lvs -S 'time since "2015-07-07 9:51"' lvs -S 'time = "2015-07"" lvs -S 'time = "2015"'
C.4.2. Freeform time 选择格式
您可以使用以下授权在 LVM 选择条件中指定日期/时间规格。
- 周日名称("星期日" - "Saturday" 或缩写为"Sun" - "Sat")
- 标签用于时间("noon","midnight")
- 相对于当前日期("今天")的某一天标签.
- 使用今天的相对偏移来回点(N 是一个数字)
- ("n"秒"/"分钟"/"小时"/"小时"/"周"/"年"/"年"
- ( "N" "secs"/"mins"/"hrs" ... "ago")
- ( "N" "s"/"m"/"h" ... "ago")
- 以 hh:mm:ss 格式或 AM/PM 后缀进行时间规格
- 个月名称("January" - "December" 或缩写为"Jan" - "Dec"
以下示例显示了选择条件中使用的
自由格式 日期/时间规格。
lvs -S 'time since "yesterday 9AM"' lvs -S 'time since "Feb 3 years 2 months ago"' lvs -S 'time = "February 2015"' lvs -S 'time since "Jan 15 2015" && time until yesterday' lvs -S 'time since "today 6AM"'
C.5. 选择标准显示示例
这部分提供了一系列示例演示了如何为 LVM 显示命令使用选择条件的示例。这部分中的示例使用配置了 LVM 卷的系统,在使用选择条件时会产生以下输出。
# lvs -a -o+layout,role
LV VG Attr LSize Pool Origin Data% Meta% Layout Role
root f1 -wi-ao---- 9.01g linear public
swap f1 -wi-ao---- 512.00m linear public
[lvol0_pmspare] vg ewi------- 4.00m linear private, \
pool,spare
lvol1 vg Vwi-a-tz-- 1.00g pool 0.00 thin,sparse public
lvol2 vg Vwi-a-tz-- 1.00g pool 0.00 thin,sparse public, \
origin, \
thinorigin
lvol3 vg Vwi---tz-k 1.00g pool lvol2 thin,sparse public, \
snapshot, \
thinsnapshot
pool vg twi-aotz-- 100.00m 0.00 1.07 thin,pool private
[pool_tdata] vg Twi-ao---- 100.00m linear private, \
thin,pool, \
data
[pool_tmeta] vg ewi-ao---- 4.00m linear private, \
thin,pool, \
metadata
以下命令显示所有逻辑卷,其名称中包含"lvol[13]",使用正则表达式来指定这一操作。
# lvs -a -o+layout,role -S 'lv_name=~lvol[13]'
LV VG Attr LSize Pool Origin Data% Layout Role
lvol1 vg Vwi-a-tz-- 1.00g pool 0.00 thin,sparse public
lvol3 vg Vwi---tz-k 1.00g pool lvol2 thin,sparse public,snapshot,thinsnapshot
以下命令显示所有大于 500 MB 的逻辑卷。
# lvs -a -o+layout,role -S 'lv_size>500m'
LV VG Attr LSize Pool Origin Data% Layout Role
root f1 -wi-ao---- 9.01g linear public
swap f1 -wi-ao---- 512.00m linear public
lvol1 vg Vwi-a-tz-- 1.00g pool 0.00 thin,sparse public
lvol2 vg Vwi-a-tz-- 1.00g pool 0.00 thin,sparse public,origin,thinorigin
lvol3 vg Vwi---tz-k 1.00g pool lvol2 thin,sparse public,snapshot, \
thinsnapshot
下面的命令显示所有包含
thin 作为逻辑卷角色的逻辑卷,表示逻辑卷在用于构造精简池。这个示例使用大括号({})来指示显示中的子集。
# lvs -a -o+layout,role -S 'lv_role={thin}'
LV VG Attr LSize Layout Role
[pool_tdata] vg Twi-ao---- 100.00m linear private,thin,pool,data
[pool_tmeta] vg ewi-ao---- 4.00m linear private,thin,pool,metadata
以下命令显示所有可用顶级逻辑卷,它们是逻辑卷,角色为"public"。如果您没有在字符串列表中指定大括号({})来表示子集,默认假定是这样;指定
lv_role=public 等同于指定 lv_role={public}。
# lvs -a -o+layout,role -S 'lv_role=public'
LV VG Attr LSize Pool Origin Data% Layout Role
root f1 -wi-ao---- 9.01g linear public
swap f1 -wi-ao---- 512.00m linear public
lvol1 vg Vwi-a-tz-- 1.00g pool 0.00 thin,sparse public
lvol2 vg Vwi-a-tz-- 1.00g pool 0.00 thin,sparse public,origin,thinorigin
lvol3 vg Vwi---tz-k 1.00g pool lvol2 thin,sparse public,snapshot,thinsnapshot
以下命令显示所有带有精简布局的逻辑卷。
# lvs -a -o+layout,role -S 'lv_layout={thin}'
LV VG Attr LSize Pool Origin Data% Meta% Layout Role
lvol1 vg Vwi-a-tz-- 1.00g pool 0.00 thin,sparse public
lvol2 vg Vwi-a-tz-- 1.00g pool 0.00 thin,sparse public,origin, \
thinorigin
lvol3 vg Vwi---tz-k 1.00g pool lvol2 thin,sparse public,snapshot, \
thinsnapshot
pool vg twi-aotz-- 100.00m 0.00 1.07 thin,pool private
以下命令显示所有带有布局字段的逻辑卷,该字段与"sparse,thin"完全匹配。请注意,不需要为匹配指定字符串列表成员才能成为正面。
# lvs -a -o+layout,role -S 'lv_layout=[sparse,thin]'
LV VG Attr LSize Pool Origin Data% Layout Role
lvol1 vg Vwi-a-tz-- 1.00g pool 0.00 thin,sparse public
lvol2 vg Vwi-a-tz-- 1.00g pool 0.00 thin,sparse public,origin,thinorigin
lvol3 vg Vwi---tz-k 1.00g pool lvol2 thin,sparse public,snapshot,thinsnapshot
以下命令显示逻辑卷是精简、稀疏逻辑卷的逻辑卷名称。请注意,用于选择条件的字段列表不需要与要显示的字段列表相同。
# lvs -a -o lv_name -S 'lv_layout=[sparse,thin]'
LV
lvol1
lvol2
lvol3
C.6. 选择标准处理示例
这部分提供了一组示例,它演示了如何在处理 LVM 逻辑卷的命令中使用选择条件。
这个示例显示了一组逻辑卷的初始配置,包括精简快照。精简快照默认设置"skip activation"标志。这个示例还包括逻辑卷
lvol4,它也设置了 "skip activation" 标志。
# lvs -o name,skip_activation,layout,role
LV SkipAct Layout Role
root linear public
swap linear public
lvol1 thin,sparse public
lvol2 thin,sparse public,origin,thinorigin
lvol3 skip activation thin,sparse public,snapshot,thinsnapshot
lvol4 skip activation linear public
pool thin,pool private
下面的命令可从所有属于精简快照的逻辑卷中删除跳过激活标签。
# lvchange --setactivationskip n -S 'role=thinsnapshot'
Logical volume "lvol3" changed.
以下命令显示在执行了 lvchange 命令后逻辑卷的配置。请注意,在不是精简快照的逻辑卷中,"skip activation"标志没有取消设置。
# lvs -o name,active,skip_activation,layout,role
LV Active SkipAct Layout Role
root active linear public
swap active linear public
lvol1 active thin,sparse public
lvol2 active thin,sparse public,origin,thinorigin
lvol3 thin,sparse public,snapshot,thinsnapshot
lvol4 active skip activation linear public
pool active thin,pool private
以下命令显示在创建了额外的精简原始卷/快照卷后配置逻辑卷。
# lvs -o name,active,skip_activation,origin,layout,role
LV Active SkipAct Origin Layout Role
root active linear public
swap active linear public
lvol1 active thin,sparse public
lvol2 active thin,sparse public,origin,thinorigin
lvol3 lvol2 thin,sparse public,snapshot,thinsnapshot
lvol4 active skip activation linear public
lvol5 active thin,sparse public,origin,thinorigin
lvol6 lvol5 thin,sparse public,snapshot,thinsnapshot
pool active thin,pool private
下面的命令激活了是精简快照卷且具有
lvol2 原始卷的逻辑卷。
#lvchange -ay -S 'lv_role=thinsnapshot && origin=lvol2'#lvs -o name,active,skip_activation,origin,layout,roleLV Active SkipAct Origin Layout Role root active linear public swap active linear public lvol1 active thin,sparse public lvol2 active thin,sparse public,origin,thinorigin lvol3 active lvol2 thin,sparse public,snapshot,thinsnapshot lvol4 active skip activation linear public lvol5 active thin,sparse public,origin,thinorigin lvol6 lvol5 thin,sparse public,snapshot,thinsnapshot pool active thin,pool private
如果您在整个项目中执行命令,并指定与整个项目匹配的选择条件,则会处理整个项目。例如,如果您在从该卷组中选择一个或多个项目时更改卷组,则会选择整个卷组。这个示例选择逻辑卷
lvol1,它是卷组 vg 的一部分。卷组 vg 中的所有逻辑卷都被处理了。
#lvs -o name,vg_nameLV VG root fedora swap fedora lvol1 vg lvol2 vg lvol3 vg lvol4 vg lvol5 vg lvol6 vg pool vg #vgchange -ay -S 'lv_name=lvol1'7 logical volume(s) in volume group "vg" now active
以下示例显示了更复杂的选择条件语句。在本例中,如果逻辑卷具有 origin 角色并且也称为 lvol[456],或者逻辑卷大小超过 5GB,则所有逻辑卷都带有
mytag。
# lvchange --addtag mytag -S '(role=origin && lv_name=~lvol[456]) || lv_size > 5g'
Logical volume "root" changed.
Logical volume "lvol5" changed.
附录 D. LVM Object Tags
LVM 标签是可与同一类型的 LVM2 对象进行分组的词语。标签可以附加到对象,如物理卷、卷组和逻辑卷。标签可以附加到集群配置中的主机。
可以在命令行中指定标签以代替 PV、VG 或 LV 参数。标签应前缀为 @,以避免混淆。通过替换每个标签来将它替换为所有对象,它们都包含在命令行中位置所预期的类型类型。
LVM 标签是最多 1024 个字符的字符串。LVM 标签不能以连字符开头。
有效标签只能由有限范围字符组成。允许字符为 [A-Za-z0-9_+.-]。从 Red Hat Enterprise Linux 6.1 发行版本中,允许字符的列表已扩展,标签则可包含 /、=、!、: : # 和 & 字符。
只有卷组中的对象才能标记。物理卷如果从卷组中删除标签,则会丢失其标签;这是因为标签作为卷组元数据的一部分进行存储,并在删除物理卷时删除。
以下命令列出所有带有
数据库 标签的逻辑卷。
# lvs @database
以下命令列出当前活动的主机标签。
# lvm tagsD.1. 添加和删除对象标签
要从物理卷中添加或删除标签,请使用 pvchange 命令的
--addtag 或 --deltag 选项。
要从卷组中删除或删除标签,请使用 vgchange 或 vgcreate 命令的
--addtag 或 --deltag 选项。
要从逻辑卷添加或删除标签,请使用 lvchange 或 lvcreate 命令的
--addtag 或 --deltag 选项。
您可以在单个 pvchange、vgchange 或 lvchange 命令中指定多个
--addtag 和 --deltag 参数。例如,以下命令删除标签 T9 和 T10,并将标签 T13 和 T14 添加到卷组 授权 中。
# vgchange --deltag T9 --deltag T10 --addtag T13 --addtag T14 grantD.2. 主机标签
在集群配置中,您可以在 配置文件中定义主机标签。如果您在
tags 部分中设置了 hosttags = 1,则使用计算机的主机名自动定义主机标签。这样,您便可以使用可在所有计算机上复制的通用配置文件,以便它们拥有完全相同的文件副本,但行为可能会因主机名的不同而不同。
有关配置文件的详情请参考 附录 B, LVM 配置文件。
对于每个主机标签,则读取额外配置文件(如果存在): lvm_hosttag.conf。如果该文件定义了新标签,则进一步的配置文件将附加到要读取的文件列表中。
例如,配置文件中以下条目始终定义
tag1,并在主机名是 host1 时定义 tag2。
tags { tag1 { } tag2 { host_list = ["host1"] } }
D.3. 使用标签控制激活
您可以在 配置文件中指定只在该主机上激活特定逻辑卷的配置文件。例如,以下条目充当激活请求的过滤器(如 vgchange -ay),并且只激活
vg1/lvol0,以及在该主机上元数据中带有 database 标签的任何逻辑卷或卷组。
activation { volume_list = ["vg1/lvol0", "@database" ] }
有一个特殊的匹配 "@*",只有在任何元数据标签与该计算机上的任何主机标签匹配时才会导致匹配。
作为另一个示例,请考虑集群中的每台机器在配置文件中都有以下条目:
tags { hosttags = 1 }
如果您只想在主机
db2 上激活 vg1/lvol2,请执行以下操作:
- 从集群中的任何主机运行 lvchange --addtag @db2 vg1/lvol2。
- 运行 lvchange -ay vg1/lvol2。
此解决方案涉及在卷组元数据内存储主机名。
附录 E. LVM 卷组元数据
卷组的配置详情称为元数据。默认情况下,卷组中的每个物理卷的元数据区域都会保留一个一样的元数据副本。LVM 卷组元数据以 ASCII 形式存储。
如果卷组包含许多物理卷,则元数据的许多冗余副本效率较低。通过使用 pvcreate 命令的
--metadatacopies 0 选项,可以创建没有元数据副本的物理卷。选择了元数据数量后,会包含物理卷,您稍后将更改该物理卷。选择 0 个副本可能会导致配置更改加快。但请注意,每个卷组必须至少包含一个带有元数据区域的物理卷(除非您使用高级配置设置,允许您在文件系统中存储卷组元数据)。如果您希望在未来分割卷组,每个卷组至少需要一个元数据副本。
核心元数据以 ASCII 形式存储。元数据区域是圆形缓冲区。新元数据附加到旧元数据中,然后更新指向它起始的指针。
您可以使用 pvcreate 命令的
--metadatasize 选项指定元数据区域的大小。对于包含物理卷和位于数百个逻辑卷的卷组,默认大小可能太小。
E.1. 物理卷标签
默认情况下,pvcreate 命令将物理卷标签放在第二 512 字节扇区。此标签可以选择放在前四个扇区,因为扫描物理卷标签的 LVM 工具会检查前 4 个扇区。物理卷标签以字符串
LABELONE 开头。
物理卷标签包含:
- 物理卷 UUID
- 块设备大小(以字节为单位)
- NULL 终止数据位置列表
- NULL-terminated 元数据区域位置列表
元数据位置存储为偏移和大小(以字节为单位)。标签中大约有 15 个位置,但 LVM 工具目前使用 3 个:单一数据区域加上两个元数据区域。
E.2. 元数据内容
卷组元数据包含:
- 关于其创建方式以及何时创建的信息
- 有关卷组的信息
卷组信息包含:
- 名称和唯一 id
- 每当元数据更新时递增的版本号
- 任何属性,比如:读/write 或 resizable
- 对可能包含的物理卷和逻辑卷数量的任何管理限制
- 扩展大小(在扇区的单位,定义为 512 字节)
- 生成卷组的物理卷的未排序列表,每个卷组:
- 其 UUID,用于确定包含它的块设备
- 任何属性,比如物理卷是否为可分配量
- 在物理卷中第一个扩展的偏移点(扇区)
- 扩展数目
- 逻辑卷的未排序列表,每个列表包括
- 逻辑卷片段的有序列表。对于每个分段,元数据包括一个映射到物理卷片段或者逻辑卷片段的有序列表的映射
E.3. 元数据示例
下面显示了一个名为
myvg 的卷组元数据的示例。
# Generated by LVM2: Tue Jan 30 16:28:15 2007
contents = "Text Format Volume Group"
version = 1
description = "Created *before* executing 'lvextend -L+5G /dev/myvg/mylv /dev/sdc'"
creation_host = "tng3-1" # Linux tng3-1 2.6.18-8.el5 #1 SMP Fri Jan 26 14:15:21 EST 2007 i686
creation_time = 1170196095 # Tue Jan 30 16:28:15 2007
myvg {
id = "0zd3UT-wbYT-lDHq-lMPs-EjoE-0o18-wL28X4"
seqno = 3
status = ["RESIZEABLE", "READ", "WRITE"]
extent_size = 8192 # 4 Megabytes
max_lv = 0
max_pv = 0
physical_volumes {
pv0 {
id = "ZBW5qW-dXF2-0bGw-ZCad-2RlV-phwu-1c1RFt"
device = "/dev/sda" # Hint only
status = ["ALLOCATABLE"]
dev_size = 35964301 # 17.1491 Gigabytes
pe_start = 384
pe_count = 4390 # 17.1484 Gigabytes
}
pv1 {
id = "ZHEZJW-MR64-D3QM-Rv7V-Hxsa-zU24-wztY19"
device = "/dev/sdb" # Hint only
status = ["ALLOCATABLE"]
dev_size = 35964301 # 17.1491 Gigabytes
pe_start = 384
pe_count = 4390 # 17.1484 Gigabytes
}
pv2 {
id = "wCoG4p-55Ui-9tbp-VTEA-jO6s-RAVx-UREW0G"
device = "/dev/sdc" # Hint only
status = ["ALLOCATABLE"]
dev_size = 35964301 # 17.1491 Gigabytes
pe_start = 384
pe_count = 4390 # 17.1484 Gigabytes
}
pv3 {
id = "hGlUwi-zsBg-39FF-do88-pHxY-8XA2-9WKIiA"
device = "/dev/sdd" # Hint only
status = ["ALLOCATABLE"]
dev_size = 35964301 # 17.1491 Gigabytes
pe_start = 384
pe_count = 4390 # 17.1484 Gigabytes
}
}
logical_volumes {
mylv {
id = "GhUYSF-qVM3-rzQo-a6D2-o0aV-LQet-Ur9OF9"
status = ["READ", "WRITE", "VISIBLE"]
segment_count = 2
segment1 {
start_extent = 0
extent_count = 1280 # 5 Gigabytes
type = "striped"
stripe_count = 1 # linear
stripes = [
"pv0", 0
]
}
segment2 {
start_extent = 1280
extent_count = 1280 # 5 Gigabytes
type = "striped"
stripe_count = 1 # linear
stripes = [
"pv1", 0
]
}
}
}
}
附录 F. 修订历史记录
| 修订历史 | |||
|---|---|---|---|
| 修订 4.0-2 | Wed Aug 7 2019 | ||
| |||
| 修订 3.0-2 | Thu Oct 4 2018 | ||
| |||
| 修订 2.0-2 | Thu Mar 15 2018 | ||
| |||
| 修订 2.0-1 | Thu Dec 14 2017 | ||
| |||
| 修订 1.0-11 | Wed Jul 19 2017 | ||
| |||
| 修订 1.0-9 | Mon May 15 2017 | ||
| |||
| 修订 1.0-7 | Mon Mar 27 2017 | ||
| |||
| 修订 1.0-5 | Mon Oct 17 2016 | ||
| |||
| 修订 1.0-4 | Wed Aug 17 2016 | ||
| |||
| 修订 0.3-4 | Mon Nov 9 2015 | ||
| |||
| 修订 0.3-2 | Wed Aug 19 2015 | ||
| |||
| 修订 0.2-7 | Mon Feb 16 2015 | ||
| |||
| 修订 0.2-6 | Thu Dec 11 2014 | ||
| |||
| 修订 0.1-22 | Mon Jun 2 2014 | ||
| |||
| 修订 0.1-1 | Wed Jan 16 2013 | ||
| |||
索引
符号
- /lib/udev/rules.d directory,udev 与设备映射器集成
- 停用卷组,激活和停用卷组
- 元数据
- 元数据守护进程,元数据守护进程(lvmetad)
- 减少
- 逻辑卷,缩小逻辑卷
- 分区
- multiple,一个磁盘上的多个分区
- 分区类型,设置,设置分区类型
- 分配,LVM 分配
- 创建
- 创建 LVM 卷
- 概述,逻辑卷创建概述
- 初始化
- 删除
- 功能,新的和改变的功能,新的和更改的功能
- 单位,命令行,使用 CLI 命令
- 卷组
- 可用扩展消息不足,逻辑卷可用扩展不足
- 命令行单位,使用 CLI 命令
- 在线数据重新定位,在线数据重新定位
- 块设备
- 扫描,扫描块设备
- 增大文件系统
- 逻辑卷,增大逻辑卷上的文件系统
- 备份
- 备份文件,备份卷组元数据
- 帮助显示,使用 CLI 命令
- 归档文件,逻辑卷备份,备份卷组元数据
- 快照卷
- 定义,快照卷
- 快照逻辑卷
- 创建,创建快照卷
- 手册页显示,使用 CLI 命令
- 扩展
- 扫描
- 块设备,扫描块设备
- 扫描设备,过滤器,使用过滤器控制 LVM 设备扫描
- 报告格式, LVM 设备,自定义 LVM 的报告
- 持久的设备号,持久的设备号
- 故障排除,LVM 故障排除
- 数据重新定位,在线,在线数据重新定位
- 文件系统
- 在逻辑卷上增大,增大逻辑卷上的文件系统
- 显示
- 条带逻辑卷
- 概述
- 功能,新的和改变的功能,新的和更改的功能
- 激活卷组,激活和停用卷组
- 激活逻辑卷
- 单个节点,激活集群中单个节点上的逻辑卷
- 物理卷
- 物理扩展
- 防止分配,防止在物理卷上分配
- 管理过程,LVM 管理概述
- 精简卷
- 创建,创建精简配置的逻辑卷
- 精简快照卷,精简配置的快照卷
- 精简配置的快照卷,精简配置的快照卷
- 精简配置的快照逻辑卷
- 创建,创建精简配置的快照卷
- 精简配置的逻辑卷,精简配置的逻辑卷(精简卷)
- 创建,创建精简配置的逻辑卷
- 线性逻辑卷
- 缓存卷,缓存卷
- 缓存文件
- 缓存逻辑卷
- 创建,创建 LVM 缓存逻辑卷
- 设备号
- 设备大小,最大,创建卷组
- 设备扫描过滤器,使用过滤器控制 LVM 设备扫描
- 设备特殊文件目录,创建卷组
- 设备路径名称,使用 CLI 命令
- 详细输出,使用 CLI 命令
- 调整大小
- 物理卷,重新调整物理卷大小
- 路径名称,使用 CLI 命令
- 过滤器,使用过滤器控制 LVM 设备扫描
- 逻辑卷
- LVs 显示参数,lvs 命令
- snapshot,创建快照卷
- 减少,缩小逻辑卷
- 创建,创建线性逻辑卷
- 创建示例,在 Three 磁盘中创建 LVM 逻辑卷
- 删除,删除逻辑卷
- 历史的,跟踪并显示历史逻辑卷(Red Hat Enterprise Linux 7.3 及更高版本)
- 增长,增大逻辑卷
- 定义,逻辑卷,LVM 逻辑卷
- 扩展,增大逻辑卷
- 显示,显示逻辑卷,自定义 LVM 的报告,lvs 命令
- 更改参数,更改逻辑卷组的参数
- 本地访问,激活集群中单个节点上的逻辑卷
- 条带的,创建条带卷
- 激活,控制逻辑卷激活
- 独占访问,激活集群中单个节点上的逻辑卷
- 管理,常规,逻辑卷管理
- 精简配置,创建精简配置的逻辑卷
- 精简配置的快照,创建精简配置的快照卷
- 线性,创建线性逻辑卷
- 缓存,创建 LVM 缓存逻辑卷
- 重命名,重命名逻辑卷
- 镜像的,创建镜像卷
- 配置示例,LVM 配置示例
- 重命名
- 镜像逻辑卷
- 创建,创建镜像卷
- 失败策略,镜像逻辑卷失败策略
- 故障恢复,从 LVM 镜像故障中恢复
- 转换为线性,更改镜像卷配置
- 重新配置,更改镜像卷配置
- 集群的,在集群中创建镜像 LVM 逻辑卷
- 集群环境,红帽高可用性集群中的 LVM 逻辑卷
C
- CLVM
L
P
R
- RAID 逻辑卷,RAID 逻辑卷
- rules.d 目录,udev 与设备映射器集成
U
- udev 规则,udev 与设备映射器集成
- udev 设备管理器,udev 设备管理器的设备映射程序支持
V
- vgcfgbackup 命令,备份卷组元数据
- vgcfgrestore 命令,备份卷组元数据
- vgchange 命令,更改卷组的参数
- vgcreate 命令,创建卷组,在集群中创建卷组
- vgdisplay 命令,显示卷组
- vgexport 命令,将卷组移动到另一个系统
- vgextend 命令,向卷组中添加物理卷
- vgimport 命令,将卷组移动到另一个系统
- vgmerge 命令,合并卷组
- vgmknodes 命令,重新创建卷组目录
- vgreduce 命令,从卷组中删除物理卷
- vgrename 命令,重命名卷组
- vgs 命令,自定义 LVM 的报告
- 显示参数,vgs 命令
- vgscan 命令,扫描卷组的磁盘来构建缓存文件
- vgsplit 命令,分割卷组
法律通告
Copyright © 2018 Red Hat, Inc.
本文档由红帽根据 Creative Commons Attribution-ShareAlike 3.0 Unported License 提供许可证授权。如果您发布本文档,或者修改本文档,您必须为 Red Hat, Inc. 提供相关功能,并提供到原始版本的链接。如果修改了本文档,则必须删除所有红帽商标。
作为本文档的许可者,红帽可能会放弃强制制执行 CC-BY-SA 第4d 条款,且不声明该条款在适用条款允许的最大限度内有效。
Red Hat、Red Hat Enterprise Linux、Shadowman 徽标、红帽徽标、JBoss、OpenShift、Fedora、Infinity 徽标和 RHCE 是 Red Hat, Inc. 在美国和其他国家注册的商标。
Linux® 是 Linus Torvalds 在美国和其它国家的注册商标。
Java® 是 Oracle 和/或其附属公司的注册商标。
XFS® 是 Silicon Graphics International Corp. 或其在美国和/或其他国家子公司的商标。
MySQL®是 MySQL AB 在美国、欧盟和其它国家的注册商标。
Node.js®是 Joyent 的官方商标。红帽与官方 Joyent Node.js 开源社区或商业项目没有正式的关系或认可。
OpenStack® Word Mark 和 OpenStack 徽标是 OpenStack Foundation 在美国和其它国家注册的商标/服务标记或商标/服务标记,并在 OpenStack Foundation 授权下使用。我们不附属于 OpenStack Foundation 或 OpenStack 社区。
所有其他商标均由其各自所有者所有。