
Chapter 1. Cluster lifecycle with multicluster engine operator overview
The multicluster engine operator is the cluster lifecycle operator that provides cluster management capabilities for OpenShift Container Platform and Red Hat Advanced Cluster Management hub clusters. From the hub cluster, you can create and manage clusters, as well as destroy any clusters that you created. You can also hibernate, resume, and detach clusters. Learn more about the cluster lifecycle capabilites from the following documentation.
Information:
- Your cluster is created by using the OpenShift Container Platform cluster installer with the Hive resource. You can find more information about the process of installing OpenShift Container Platform clusters at OpenShift Container Platform installation overview in the OpenShift Container Platform documentation.
- With your OpenShift Container Platform cluster, you can use multicluster engine operator as a standalone cluster manager for cluster lifecycle function, or you can use it as part of a Red Hat Advanced Cluster Management hub cluster.
- If you are using OpenShift Container Platform only, the operator is included with subscription. Visit About multicluster engine for Kubernetes operator from the OpenShift Container Platform documentation.
- If you subscribe to Red Hat Advanced Cluster Management, you also receive the operator with installation. You can create, manage, and monitor other Kubernetes clusters with the Red Hat Advanced Cluster Management hub cluster. See the Red Hat Advanced Cluster Management Installing documentation.
Release images are the version of OpenShift Container Platform that you use when you create a cluster. For clusters that are created using Red Hat Advanced Cluster Management, you can enable automatic upgrading of your release images. For more information about release images in Red Hat Advanced Cluster Management, see Specifying release images.
The components of the cluster lifecycle management architecture are included in the Cluster lifecycle architecture.
1.1. Release notes
Learn about the current release.
Note: The 2.4 and earlier versions of Red Hat Advanced Cluster Management are removed from service, and are no longer supported. Documentation for versions 2.4 and earlier is not updated. The documentation might remain available, but is deprecated without any Errata or other updates available.
If you experience issues with one of the currently supported releases, or the product documentation, go to Red Hat Support where you can troubleshoot, view Knowledgebase articles, connect with the Support Team, or open a case. You must log in with your credentials.
You can also learn more about the Customer Portal documentation at Red Hat Customer Portal FAQ.
1.1.1. What’s new in cluster lifecycle with the multicluster engine operator
Important: Some features and components are identified and released as Technology Preview.
Learn more about what is new this release:
- If you installed Red Hat Advanced Cluster Management, get an overview of the product and release from Welcome to Red Hat Advanced Cluster Management for Kubernetes.
- The open source Open Cluster Management repository is ready for interaction, growth, and contributions from the open community. To get involved, see open-cluster-management.io. You can access the GitHub repository for more information, as well.
- Install
- Cluster lifecycle
- Hosted control planes
1.1.1.1. Install
If you installed OpenShift Container Platform or Red Hat Advanced Cluster Management, you automatically receive multicluster engine operator. If any new features exist for multicluster engine operator install only, you can view them in this section.
1.1.1.2. Cluster lifecycle
Learn about what’s new relating to Cluster lifecycle with multicluster engine operator.
-
You can now use the
cluster-proxy-addonto connect to any service on a managed cluster by using a proxy. Reach directly into the managed cluster from the hub to interact with some services. See Using cluster proxy add-ons for information. - You can now create clusters on Amazon Web Services GovCloud. See Creating a cluster on Amazon Web Services GovCloud for more information.
There are new versions of the following APIs: - Clusterset: v1beta2 - ClustersetBinding: v1beta2 See APIs for more information.
- You can use two control plane types: hosted and standalone. Standalone is the console wizard feature and Hosted provides to specific steps and guidance so that you can create the cluster from your CLI.
-
You can now update the
MultiClusterEnginecustom resource to specify whether a hub cluster is managed by itself. See Local cluster enablement for more information. -
You can modify the settings in the
ConfigMapandAgentServiceConfigfiles to specify unauthenticated registries when creating an infrastructure environment in a disconnected environment. See Enabling the central infrastructure management service for more information. - Scaling with MachinePool is now generally available so you can easily configure autoscaling to scale your resources. See Scaling with MachinePool for more information.
1.1.1.3. Hosted control planes
- Technology Preview: You can provision a hosted control plane cluster on the Amazon Web Services or bare metal platforms. See Hosted control planes (Technology Preview) for additional information.
1.1.2. Cluster lifecycle known issues
Review the known issues for cluster lifecycle with multicluster engine operator. The following list contains known issues for this release, or known issues that continued from the previous release. For your OpenShift Container Platform cluster, see OpenShift Container Platform release notes.
1.1.2.1. Cluster management
Cluster lifecycle known issues and limitations are part of the Cluster lifecycle with multicluster engine operator documentation.
1.1.2.1.1. Manual removal of the VolSync CSV required on managed cluster when removing the add-on
When you remove the VolSync ManagedClusterAddOn from the hub cluster, it removes the VolSync operator subscription on the managed cluster but does not remove the cluster service version (CSV). To remove the CSV from the managed clusters, run the following command on each managed cluster from which you are removing VolSync:
oc delete csv -n openshift-operators volsync-product.v0.6.0
If you have a different version of VolSync installed, replace v0.6.0 with your installed version.
1.1.2.1.2. Deleting a managed cluster set does not automatically remove its label
After you delete a ManagedClusterSet, the label that is added to each managed cluster that associates the cluster to the cluster set is not automatically removed. Manually remove the label from each of the managed clusters that were included in the deleted managed cluster set. The label resembles the following example: cluster.open-cluster-management.io/clusterset:<ManagedClusterSet Name>.
1.1.2.1.3. ClusterClaim error
If you create a Hive ClusterClaim against a ClusterPool and manually set the ClusterClaimspec lifetime field to an invalid golang time value, the product stops fulfilling and reconciling all ClusterClaims, not just the malformed claim.
If this error occurs. you see the following content in the clusterclaim-controller pod logs, which is a specific example with the pool name and invalid lifetime included:
E0203 07:10:38.266841 1 reflector.go:138] sigs.k8s.io/controller-runtime/pkg/cache/internal/informers_map.go:224: Failed to watch *v1.ClusterClaim: failed to list *v1.ClusterClaim: v1.ClusterClaimList.Items: []v1.ClusterClaim: v1.ClusterClaim.v1.ClusterClaim.Spec: v1.ClusterClaimSpec.Lifetime: unmarshalerDecoder: time: unknown unit "w" in duration "1w", error found in #10 byte of ...|time":"1w"}},{"apiVe|..., bigger context ...|clusterPoolName":"policy-aas-hubs","lifetime":"1w"}},{"apiVersion":"hive.openshift.io/v1","kind":"Cl|...You can delete the invalid claim.
If the malformed claim is deleted, claims begin successfully reconciling again without any further interaction.
1.1.2.1.4. The product channel out of sync with provisioned cluster
The clusterimageset is in fast channel, but the provisioned cluster is in stable channel. Currently the product does not sync the channel to the provisioned OpenShift Container Platform cluster.
Change to the right channel in the OpenShift Container Platform console. Click Administration > Cluster Settings > Details Channel.
1.1.2.1.5. Restoring the connection of a managed cluster with custom CA certificates to its restored hub cluster might fail
After you restore the backup of a hub cluster that managed a cluster with custom CA certificates, the connection between the managed cluster and the hub cluster might fail. This is because the CA certificate was not backed up on the restored hub cluster. To restore the connection, copy the custom CA certificate information that is in the namespace of your managed cluster to the <managed_cluster>-admin-kubeconfig secret on the restored hub cluster.
Tip: If you copy this CA certificate to the hub cluster before creating the backup copy, the backup copy includes the secret information. When the backup copy is used to restore in the future, the connection between the hub and managed clusters will automatically complete.
1.1.2.1.6. The local-cluster might not be automatically recreated
If the local-cluster is deleted while disableHubSelfManagement is set to false, the local-cluster is recreated by the MulticlusterHub operator. After you detach a local-cluster, the local-cluster might not be automatically recreated.
To resolve this issue, modify a resource that is watched by the
MulticlusterHuboperator. See the following example:oc delete deployment multiclusterhub-repo -n <namespace>
-
To properly detach the local-cluster, set the
disableHubSelfManagementto true in theMultiClusterHub.
1.1.2.1.7. Selecting a subnet is required when creating an on-premises cluster
When you create an on-premises cluster using the console, you must select an available subnet for your cluster. It is not marked as a required field.
1.1.2.1.8. Cluster provisioning with Infrastructure Operator fails
When creating OpenShift Container Platform clusters using the Infrastructure Operator, the file name of the ISO image might be too long. The long image name causes the image provisioning and the cluster provisioning to fail. To determine if this is the problem, complete the following steps:
View the bare metal host information for the cluster that you are provisioning by running the following command:
oc get bmh -n <cluster_provisioning_namespace>
Run the
describecommand to view the error information:oc describe bmh -n <cluster_provisioning_namespace> <bmh_name>
An error similar to the following example indicates that the length of the filename is the problem:
Status:
  Error Count:    1
  Error Message:  Image provisioning failed: ... [Errno 36] File name too long ...
If this problem occurs, it is typically on the following versions of OpenShift Container Platform, because the infrastructure operator was not using image service:
- 4.8.17 and earlier
- 4.9.6 and earlier
To avoid this error, upgrade your OpenShift Container Platform to version 4.8.18 or later, or 4.9.7 or later.
1.1.2.1.9. Local-cluster status offline after reimporting with a different name
When you accidentally try to reimport the cluster named local-cluster as a cluster with a different name, the status for local-cluster and for the reimported cluster display offline.
To recover from this case, complete the following steps:
Run the following command on the hub cluster to edit the setting for self-management of the hub cluster temporarily:
oc edit mch -n open-cluster-management multiclusterhub
-
Add the setting
spec.disableSelfManagement=true. Run the following command on the hub cluster to delete and redeploy the local-cluster:
oc delete managedcluster local-cluster
Enter the following command to remove the
local-clustermanagement setting:oc edit mch -n open-cluster-management multiclusterhub
-
Remove
spec.disableSelfManagement=truethat you previously added.
1.1.2.1.10. Cluster provision with Ansible automation fails in proxy environment
An Automation template that is configured to automatically provision a managed cluster might fail when both of the following conditions are met:
- The hub cluster has cluster-wide proxy enabled.
- The Ansible Automation Platform can only be reached through the proxy.
1.1.2.1.11. Version of the klusterlet operator must be the same as the hub cluster
If you import a managed cluster by installing the klusterlet operator, the version of the klusterlet operator must be the same as the version of the hub cluster or the klusterlet operator will not work.
1.1.2.1.12. Cannot delete managed cluster namespace manually
You cannot delete the namespace of a managed cluster manually. The managed cluster namespace is automatically deleted after the managed cluster is detached. If you delete the managed cluster namespace manually before the managed cluster is detached, the managed cluster shows a continuous terminating status after you delete the managed cluster. To delete this terminating managed cluster, manually remove the finalizers from the managed cluster that you detached.
1.1.2.1.13. Hub cluster and managed clusters clock not synced
Hub cluster and manage cluster time might become out-of-sync, displaying in the console unknown and eventually available within a few minutes. Ensure that the OpenShift Container Platform hub cluster time is configured correctly. See Customizing nodes.
1.1.2.1.14. Importing certain versions of IBM OpenShift Container Platform Kubernetes Service clusters is not supported
You cannot import IBM OpenShift Container Platform Kubernetes Service version 3.11 clusters. Later versions of IBM OpenShift Kubernetes Service are supported.
1.1.2.1.15. Automatic secret updates for provisioned clusters is not supported
When you change your cloud provider access key on the cloud provider side, you also need to update the corresponding credential for this cloud provider on the console of multicluster engine operator. This is required when your credentials expire on the cloud provider where the managed cluster is hosted and you try to delete the managed cluster.
1.1.2.1.16. Node information from the managed cluster cannot be viewed in search
Search maps RBAC for resources in the hub cluster. Depending on user RBAC settings, users might not see node data from the managed cluster. Results from search might be different from what is displayed on the Nodes page for a cluster.
1.1.2.1.17. Process to destroy a cluster does not complete
When you destroy a managed cluster, the status continues to display Destroying after one hour, and the cluster is not destroyed. To resolve this issue complete the following steps:
- Manually ensure that there are no orphaned resources on your cloud, and that all of the provider resources that are associated with the managed cluster are cleaned up.
Open the
ClusterDeploymentinformation for the managed cluster that is being removed by entering the following command:oc edit clusterdeployment/<mycluster> -n <namespace>
Replace
myclusterwith the name of the managed cluster that you are destroying.Replace
namespacewith the namespace of the managed cluster.-
Remove the
hive.openshift.io/deprovisionfinalizer to forcefully stop the process that is trying to clean up the cluster resources in the cloud. -
Save your changes and verify that
ClusterDeploymentis gone. Manually remove the namespace of the managed cluster by running the following command:
oc delete ns <namespace>
Replace
namespacewith the namespace of the managed cluster.
1.1.2.1.18. Cannot upgrade OpenShift Container Platform managed clusters on OpenShift Container Platform Dedicated with the console
You cannot use the Red Hat Advanced Cluster Management console to upgrade OpenShift Container Platform managed clusters that are in the OpenShift Container Platform Dedicated environment.
1.1.2.1.19. Work manager add-on search details
The search details page for a certain resource on a certain managed cluster might fail. You must ensure that the work-manager add-on in the managed cluster is in Available status before you can search.
1.1.2.1.20. Non-Red Hat OpenShift Container Platform managed clusters must have LoadBalancer enabled
Both Red Hat OpenShift Container Platform and non-OpenShift Container Platform clusters support the pod log feature, however non-OpenShift Container Platform clusters require LoadBalancer to be enabled to use the feature. Complete the following steps to enable LoadBalancer:
-
Cloud providers have different
LoadBalancerconfigurations. Visit your cloud provider documentation for more information. -
Verify if
LoadBalanceris enabled on your Red Hat Advanced Cluster Management by checking theloggingEndpointin the status ofmanagedClusterInfo. Run the following command to check if the
loggingEndpoint.IPorloggingEndpoint.Hosthas a valid IP address or host name:oc get managedclusterinfo <clusterName> -n <clusterNamespace> -o json | jq -r '.status.loggingEndpoint'
For more information about the LoadBalancer types, see the Service page in the Kubernetes documentation.
1.1.2.1.21. OpenShift Container Platform 4.10.z does not support hosted control plane clusters with proxy configuration
When you create a hosting service cluster with a cluster-wide proxy configuration on OpenShift Container Platform 4.10.z, the nodeip-configuration.service service does not start on the worker nodes.
1.1.2.1.22. Cannot provision OpenShift Container Platform 4.11 cluster on Azure
Provisioning an OpenShift Container Platform 4.11 cluster on Azure fails due to an authentication operator timeout error. To work around the issue, use a different worker node type in the install-config.yaml file or set the vmNetworkingType parameter to Basic. See the following install-config.yaml example:
compute:
- hyperthreading: Enabled
  name: 'worker'
  replicas: 3
  platform:
    azure:
      type:  Standard_D2s_v3
      osDisk:
        diskSizeGB: 128
      vmNetworkingType: 'Basic'
1.1.2.1.23. Client cannot reach iPXE script
iPXE is an open source network boot firmware. See iPXE for more details.
When booting a node, the URL length limitation in some DHCP servers cuts off the ipxeScript URL in the InfraEnv custom resource definition, resulting in the following error message in the console:
no bootable devices
To work around the issue, complete the following steps:
Apply the
InfraEnvcustom resource definition when using an assisted installation to expose thebootArtifacts, which might resemble the following file:status: agentLabelSelector: matchLabels: infraenvs.agent-install.openshift.io: qe2 bootArtifacts: initrd: https://assisted-image-service-multicluster-engine.redhat.com/images/0000/pxe-initrd?api_key=0000000&arch=x86_64&version=4.11 ipxeScript: https://assisted-service-multicluster-engine.redhat.com/api/assisted-install/v2/infra-envs/00000/downloads/files?api_key=000000000&file_name=ipxe-script kernel: https://mirror.openshift.com/pub/openshift-v4/x86_64/dependencies/rhcos/4.11/latest/rhcos-live-kernel-x86_64 rootfs: https://mirror.openshift.com/pub/openshift-v4/x86_64/dependencies/rhcos/4.11/latest/rhcos-live-rootfs.x86_64.img-
Create a proxy server to expose the
bootArtifactswith short URLs. Copy the
bootArtifactsand add them them to the proxy by running the following commands:for artifact in oc get infraenv qe2 -ojsonpath="{.status.bootArtifacts}" | jq ". | keys[]" | sed "s/\"//g" do curl -k oc get infraenv qe2 -ojsonpath="{.status.bootArtifacts.${artifact}}"` -o $artifact-
Add the
ipxeScriptartifact proxy URL to thebootpparameter inlibvirt.xml.
1.1.2.1.24. Cannot delete ClusterDeployment after upgrading Red Hat Advanced Cluster Management
If you are using the removed BareMetalAssets API in Red Hat Advanced Cluster Management 2.6, the ClusterDeployment cannot be deleted after upgrading to Red Hat Advanced Cluster Management 2.7 because the BareMetalAssets API is bound to the ClusterDeployment.
To work around the issue, run the following command to remove the finalizers before upgrading to Red Hat Advanced Cluster Management 2.7:
oc patch clusterdeployment <clusterdeployment-name> -p '{"metadata":{"finalizers":null}}' --type=merge1.1.2.1.25. A cluster deployed in a disconnected environment by using the central infrastructure management service might not install
When you deploy a cluster in a disconnected environment by using the central infrastructure management service, the cluster nodes might not start installing.
This issue occurs because the cluster uses a discovery ISO image that is created from the Red Hat Enterprise Linux CoreOS live ISO image that is shipped with OpenShift Container Platform versions 4.12.0 through 4.12.2. The image contains a restrictive /etc/containers/policy.json file that requires signatures for images sourcing from registry.redhat.io and registry.access.redhat.com. In a disconnected environment, the images that are mirrored might not have the signatures mirrored, which results in the image pull failing for cluster nodes at discovery. The Agent image fails to connect with the cluster nodes, which causes communication with the assisted service to fail.
To work around this issue, apply an ignition override to the cluster that sets the /etc/containers/policy.json file to unrestrictive. The ignition override can be set in the InfraEnv custom resource definition. The following example shows an InfraEnv custom resource definition with the override:
apiVersion: agent-install.openshift.io/v1beta1
kind: InfraEnv
metadata:
  name: cluster
  namespace: cluster
spec:
  ignitionConfigOverride: '{"ignition":{"version":"3.2.0"},"storage":{"files":[{"path":"/etc/containers/policy.json","mode":420,"overwrite":true,"contents":{"source":"data:text/plain;charset=utf-8;base64,ewogICAgImRlZmF1bHQiOiBbCiAgICAgICAgewogICAgICAgICAgICAidHlwZSI6ICJpbnNlY3VyZUFjY2VwdEFueXRoaW5nIgogICAgICAgIH0KICAgIF0sCiAgICAidHJhbnNwb3J0cyI6CiAgICAgICAgewogICAgICAgICAgICAiZG9ja2VyLWRhZW1vbiI6CiAgICAgICAgICAgICAgICB7CiAgICAgICAgICAgICAgICAgICAgIiI6IFt7InR5cGUiOiJpbnNlY3VyZUFjY2VwdEFueXRoaW5nIn1dCiAgICAgICAgICAgICAgICB9CiAgICAgICAgfQp9"}}]}}'
The following example shows the unrestrictive file that is created:
{
    "default": [
        {
            "type": "insecureAcceptAnything"
        }
    ],
    "transports": {
        "docker-daemon": {
        "": [
        {
            "type": "insecureAcceptAnything"
        }
        ]
    }
    }
}
After this setting is changed, the clusters install.
1.1.2.2. Hosted control plane
1.1.2.2.1. Console displays hosted cluster as Pending import
If the annotation and ManagedCluster name do not match, the console displays the cluster as Pending import. The cluster cannot be used by the multicluster engine operator. The same issue happens when there is no annotation and the ManagedCluster name does not match the Infra-ID value of the HostedCluster resource."
1.1.2.2.2. Console might list the same version multiple times when adding a node pool to a hosted cluster
When you use the console to add a new node pool to an existing hosted cluster, the same version of OpenShift Container Platform might appear more than once in the list of options. You can select any instance in the list for the version that you want.
1.1.2.2.3. Custom ingress domain is not applied correctly
You can specify a custom ingress domain by using the ClusterDeployment resource while installing a managed cluster, but the change is only applied after the installation by using the SyncSet resource. As a result, the spec field in the clusterdeployment.yaml file displays the custom ingress domain you specified, but the status still displays the default domain.
1.1.2.2.4. ManagedClusterSet API specification limitation
The selectorType: LaberSelector setting is not supported when using the ManagedClusterSet API. The selectorType: ExclusiveClusterSetLabel setting is supported.
1.1.3. Errata updates
For multicluster engine operator, the Errata updates are automatically applied when released.
Important: For reference, Errata links and GitHub numbers might be added to the content and used internally. Links that require access might not be available for the user.
FIPS notice: If you do not specify your own ciphers in spec.ingress.sslCiphers, then the multiclusterhub-operator provides a default list of ciphers. For 2.4, this list includes two ciphers that are not FIPS approved. If you upgrade from a version 2.4.x or earlier and want FIPS compliance, remove the following two ciphers from the multiclusterhub resource: ECDHE-ECDSA-CHACHA20-POLY1305 and ECDHE-RSA-CHACHA20-POLY1305.
1.1.3.1. Errata 2.2.12
- Delivers updates to one or more of the product container images.
1.1.3.2. Errata 2.2.11
1.1.3.3. Errata 2.2.10
- Delivers updates to one or more of the product container images.
1.1.3.4. Errata 2.2.9
- Delivers updates to one or more of the product container images and security fixes.
1.1.3.5. Errata 2.2.8
- Delivers updates to one or more of the product container images and security fixes.
1.1.3.6. Errata 2.2.7
- Delivers updates to one or more of the product container images and security fixes.
-
Fixes an issue that caused the console to display an incorrect scaling alert when adding nodes to a managed cluster that is not part of Hive
MachinePools. (ACM-5169)
1.1.3.7. Errata 2.2.6
- Fixes an issue that caused the klusterlet agent to fail when the total file size of secrets is too large. (ACM-5873)
1.1.3.8. Errata 2.2.5
- Delivers updates to one or more of the product container images and security fixes.
1.1.3.9. Errata 2.2.4
- Delivers updates to one or more of the product container images and security fixes.
1.1.3.10. Errata 2.2.3
- Delivers updates to one or more of the product container images and security fixes.
1.1.3.11. Errata 2.2.2
- Delivers updates to one or more of the product container images and security fixes.
1.1.3.12. Errata 2.2.1
- Delivers updates to one or more of the product container images and security fixes.
1.1.4. Deprecations and removals
Learn when parts of the product are deprecated or removed from multicluster engine operator. Consider the alternative actions in the Recommended action and details, which display in the tables for the current release and for two prior releases.
1.1.4.1. API deprecations and removals
multicluster engine operator follows the Kubernetes deprecation guidelines for APIs. See the Kubernetes Deprecation Policy for more details about that policy. multicluster engine operator APIs are only deprecated or removed outside of the following timelines:
-
All
V1APIs are generally available and supported for 12 months or three releases, whichever is greater. V1 APIs are not removed, but can be deprecated outside of that time limit. -
All
betaAPIs are generally available for nine months or three releases, whichever is greater. Beta APIs are not removed outside of that time limit. -
All
alphaAPIs are not required to be supported, but might be listed as deprecated or removed if it benefits users.
1.1.4.1.1. API deprecations
| Product or category | Affected item | Version | Recommended action | More details and links |
1.1.4.1.2. API removals
| Product or category | Affected item | Version | Recommended action | More details and links |
1.1.4.2. multicluster engine operator deprecations
A deprecated component, feature, or service is supported, but no longer recommended for use and might become obsolete in future releases. Consider the alternative actions in the Recommended action and details that are provided in the following table:
| Product or category | Affected item | Version | Recommended action | More details and links |
1.1.4.3. Removals
A removed item is typically function that was deprecated in previous releases and is no longer available in the product. You must use alternatives for the removed function. Consider the alternative actions in the Recommended action and details that are provided in the following table:
| Product or category | Affected item | Version | Recommended action | More details and links |
1.2. About cluster lifecycle with multicluster engine operator
The multicluster engine for Kubernetes operator is the cluster lifecycle operator that provides cluster management capabilities for Red Hat OpenShift Container Platform and Red Hat Advanced Cluster Management hub clusters. If you installed Red Hat Advanced Cluster Management, you do not need to install multicluster engine operator, as it is automatically installed.
See The multicluster engine for Kubernetes operator 2.2 support matrix for support information, as well as the following documentation:
To continue, see the remaining cluster lifecyle documentation at Cluster lifecycle with multicluster engine operator overview.
1.2.1. Requirements and recommendations
Before you install the multicluster engine operator, review the following system configuration requirements and settings:
1.2.1.1. Supported browsers and platforms
See important information about supported browsers and features in the The multicluster engine for Kubernetes operator 2.2 support matrix.
1.2.1.2. Network configuration
Important: The trusted CA bundle is available in the multicluster engine operator namespace, but that enhancement requires changes to your network. The trusted CA bundle ConfigMap uses the default name of trusted-ca-bundle. You can change this name by providing it to the operator in an environment variable named TRUSTED_CA_BUNDLE. See Configuring the cluster-wide proxy in the Networking section of Red Hat OpenShift Container Platform for more information.
Note: Registration Agent and Work Agent on the managed cluster do not support proxy settings because they communicate with apiserver on the hub cluster by establishing an mTLS connection, which cannot pass through the proxy.
Configure your network settings to allow the connections in the following sections:
1.2.1.2.1. The multicluster engine operator networking requirements
For the multicluster engine operator cluster networking requirements, see the following table:
| Direction | Connection | Port (if specified) |
|---|---|---|
| Outbound | Kubernetes API server of the provisioned managed cluster | 6443 |
| Outbound and inbound |
The | 443 |
| Inbound | The Kubernetes API server of the multicluster engine for Kubernetes cluster from the managed cluster | 6443 |
1.2.2. Console overview
OpenShift Container Platform console plug-ins are available with OpenShift Container Platform 4.10 web console and can be integrated. To use this feature, the console plug-ins must remain enabled. The multicluster engine operator displays certain console features from Infrastructure and Credentials navigation items. If you install Red Hat Advanced Cluster Management, you see more console capability.
Note: For OpenShift Container Platform 4.10 with the plug-ins enabled, you can access Red Hat Advanced Cluster Management within the OpenShift Container Platform console from the cluster switcher by selecting All Clusters from the drop-down menu.
- To disable the plug-in, be sure you are in the Administrator perspective in the OpenShift Container Platform console.
- Find Administration in the navigation and click Cluster Settings, then click Configuration tab.
-
From the list of Configuration resources, click the Console resource with the
operator.openshift.ioAPI group, which contains cluster-wide configuration for the web console. -
Click on the Console plug-ins tab. The
mceplug-in is listed. Note: If Red Hat Advanced Cluster Management is installed, it is also listed asacm. - Modify plug-in status from the table. In a few moments, you are prompted to refresh the console.
1.2.3. multicluster engine operator role-based access control
RBAC is validated at the console level and at the API level. Actions in the console can be enabled or disabled based on user access role permissions. View the following sections for more information on RBAC for specific lifecycles in the product:
1.2.3.1. Overview of roles
Some product resources are cluster-wide and some are namespace-scoped. You must apply cluster role bindings and namespace role bindings to your users for consistent access controls. View the table list of the following role definitions that are supported:
1.2.3.1.1. Table of role definition
| Role | Definition |
|---|---|
|
|
This is an OpenShift Container Platform default role. A user with cluster binding to the |
|
|
A user with cluster binding to the |
|
|
A user with cluster binding to the |
|
|
A user with cluster binding to the |
|
|
A user with cluster binding to the |
|
|
A user with cluster binding to the |
|
|
Admin, edit, and view are OpenShift Container Platform default roles. A user with a namespace-scoped binding to these roles has access to |
Important:
- Any user can create projects from OpenShift Container Platform, which gives administrator role permissions for the namespace.
-
If a user does not have role access to a cluster, the cluster name is not visible. The cluster name is displayed with the following symbol:
-.
RBAC is validated at the console level and at the API level. Actions in the console can be enabled or disabled based on user access role permissions. View the following sections for more information on RBAC for specific lifecycles in the product.
1.2.3.2. Cluster lifecycle RBAC
View the following cluster lifecycle RBAC operations:
Create and administer cluster role bindings for all managed clusters. For example, create a cluster role binding to the cluster role
open-cluster-management:cluster-manager-adminby entering the following command:oc create clusterrolebinding <role-binding-name> --clusterrole=open-cluster-management:cluster-manager-admin --user=<username>
This role is a super user, which has access to all resources and actions. You can create cluster-scoped
managedclusterresources, the namespace for the resources that manage the managed cluster, and the resources in the namespace with this role. You might need to add theusernameof the ID that requires the role association to avoid permission errors.Run the following command to administer a cluster role binding for a managed cluster named
cluster-name:oc create clusterrolebinding (role-binding-name) --clusterrole=open-cluster-management:admin:<cluster-name> --user=<username>
This role has read and write access to the cluster-scoped
managedclusterresource. This is needed because themanagedclusteris a cluster-scoped resource and not a namespace-scoped resource.Create a namespace role binding to the cluster role
adminby entering the following command:oc create rolebinding <role-binding-name> -n <cluster-name> --clusterrole=admin --user=<username>
This role has read and write access to the resources in the namespace of the managed cluster.
Create a cluster role binding for the
open-cluster-management:view:<cluster-name>cluster role to view a managed cluster namedcluster-nameEnter the following command:oc create clusterrolebinding <role-binding-name> --clusterrole=open-cluster-management:view:<cluster-name> --user=<username>
This role has read access to the cluster-scoped
managedclusterresource. This is needed because themanagedclusteris a cluster-scoped resource.Create a namespace role binding to the cluster role
viewby entering the following command:oc create rolebinding <role-binding-name> -n <cluster-name> --clusterrole=view --user=<username>
This role has read-only access to the resources in the namespace of the managed cluster.
View a list of the managed clusters that you can access by entering the following command:
oc get managedclusters.clusterview.open-cluster-management.io
This command is used by administrators and users without cluster administrator privileges.
View a list of the managed cluster sets that you can access by entering the following command:
oc get managedclustersets.clusterview.open-cluster-management.io
This command is used by administrators and users without cluster administrator privileges.
1.2.3.2.1. Cluster pools RBAC
View the following cluster pool RBAC operations:
As a cluster administrator, use cluster pool provision clusters by creating a managed cluster set and grant administrator permission to roles by adding the role to the group. View the following examples:
Grant
adminpermission to theserver-foundation-clustersetmanaged cluster set with the following command:oc adm policy add-cluster-role-to-group open-cluster-management:clusterset-admin:server-foundation-clusterset server-foundation-team-admin
Grant
viewpermission to theserver-foundation-clustersetmanaged cluster set with the following command:oc adm policy add-cluster-role-to-group open-cluster-management:clusterset-view:server-foundation-clusterset server-foundation-team-user
Create a namespace for the cluster pool,
server-foundation-clusterpool. View the following examples to grant role permissions:Grant
adminpermission toserver-foundation-clusterpoolfor theserver-foundation-team-adminby running the following commands:oc adm new-project server-foundation-clusterpool oc adm policy add-role-to-group admin server-foundation-team-admin --namespace server-foundation-clusterpool
As a team administrator, create a cluster pool named
ocp46-aws-clusterpoolwith a cluster set label,cluster.open-cluster-management.io/clusterset=server-foundation-clustersetin the cluster pool namespace:-
The
server-foundation-webhookchecks if the cluster pool has the cluster set label, and if the user has permission to create cluster pools in the cluster set. -
The
server-foundation-controllergrantsviewpermission to theserver-foundation-clusterpoolnamespace forserver-foundation-team-user.
-
The
When a cluster pool is created, the cluster pool creates a
clusterdeployment. Continue reading for more details:-
The
server-foundation-controllergrantsadminpermission to theclusterdeploymentnamespace forserver-foundation-team-admin. The
server-foundation-controllergrantsviewpermissionclusterdeploymentnamespace forserver-foundation-team-user.Note: As a
team-adminandteam-user, you haveadminpermission to theclusterpool,clusterdeployment, andclusterclaim.
-
The
1.2.3.2.2. Console and API RBAC table for cluster lifecycle
View the following console and API RBAC tables for cluster lifecycle:
Table 1.1. Console RBAC table for cluster lifecycle
| Resource | Admin | Edit | View |
|---|---|---|---|
| Clusters | read, update, delete | - | read |
| Cluster sets | get, update, bind, join | edit role not mentioned | get |
| Managed clusters | read, update, delete | no edit role mentioned | get |
| Provider connections | create, read, update, and delete | - | read |
Table 1.2. API RBAC table for cluster lifecycle
| API | Admin | Edit | View |
|---|---|---|---|
|
You can use | create, read, update, delete | read, update | read |
|
You can use | read | read | read |
|
| update | update | |
|
You can use | create, read, update, delete | read, update | read |
|
| read | read | read |
|
You can use | create, read, update, delete | read, update | read |
|
| create, read, update, delete | read, update | read |
|
| create, read, update, delete | read, update | read |
|
| create, read, update, delete | read, update | read |
|
| create, read, update, delete | read, update | read |
|
| create, read, update, delete | read, update | read |
|
| create, read, update, delete | read, update | read |
|
| create, read, update, delete | read, update | read |
1.2.3.2.3. Credentials role-based access control
The access to credentials is controlled by Kubernetes. Credentials are stored and secured as Kubernetes secrets. The following permissions apply to accessing secrets in Red Hat Advanced Cluster Management for Kubernetes:
- Users with access to create secrets in a namespace can create credentials.
- Users with access to read secrets in a namespace can also view credentials.
-
Users with the Kubernetes cluster roles of
adminandeditcan create and edit secrets. -
Users with the Kubernetes cluster role of
viewcannot view secrets because reading the contents of secrets enables access to service account credentials.
1.3. Installing and upgrading multicluster engine operator
The multicluster engine operator is a software operator that enhances cluster fleet management. The multicluster engine operator supportsRed Hat OpenShift Container Platform and Kubernetes cluster lifecycle management across clouds and data centers.
See the following documentation:
1.3.1. Installing while connected online
The multicluster engine operator is installed with Operator Lifecycle Manager, which manages the installation, upgrade, and removal of the components that encompass the multicluster engine operator.
Required access: Cluster administrator
Important:
-
For OpenShift Container Platform Dedicated environment, you must have
cluster-adminpermissions. By defaultdedicated-adminrole does not have the required permissions to create namespaces in the OpenShift Container Platform Dedicated environment. - By default, the multicluster engine operator components are installed on worker nodes of your OpenShift Container Platform cluster without any additional configuration. You can install multicluster engine operator onto worker nodes by using the OpenShift Container Platform OperatorHub web console interface, or by using the OpenShift Container Platform CLI.
- If you have configured your OpenShift Container Platform cluster with infrastructure nodes, you can install multicluster engine operator onto those infrastructure nodes by using the OpenShift Container Platform CLI with additional resource parameters. Not all of the multicluster engine operator components have infrastructure node support, so some worker nodes are still required when installing multicluster engine operator on infrastructure nodes. See the Installing multicluster engine on infrastructure nodes section for those details.
If you plan to import Kubernetes clusters that were not created by OpenShift Container Platform or multicluster engine for Kubernetes, you will need to configure an image pull secret. For information on how to configure an image pull secret and other advanced configurations, see options in the Advanced configuration section of this documentation.
1.3.1.1. Prerequisites
Before you install multicluster engine for Kubernetes, see the following requirements:
- Your Red Hat OpenShift Container Platform cluster must have access to the multicluster engine operator in the OperatorHub catalog from the OpenShift Container Platform console.
- You need access to the catalog.redhat.com.
OpenShift Container Platform version 4.8, or later, must be deployed in your environment, and you must be logged into with the OpenShift Container Platform CLI. See the following install documentation for OpenShift Container Platform:
-
Your OpenShift Container Platform command line interface (CLI) must be configured to run
occommands. See Getting started with the CLI for information about installing and configuring the OpenShift Container Platform CLI. - Your OpenShift Container Platform permissions must allow you to create a namespace.
- You must have an Internet connection to access the dependencies for the operator.
To install in a OpenShift Container Platform Dedicated environment, see the following:
- You must have the OpenShift Container Platform Dedicated environment configured and running.
-
You must have
cluster-adminauthority to the OpenShift Container Platform Dedicated environment where you are installing the engine.
- If you plan to create managed clusters by using the Assisted Installer that is provided with Red Hat OpenShift Container Platform, see Preparing to install with the Assisted Installer topic in the OpenShift Container Platform documentation for the requirements.
1.3.1.2. Confirm your OpenShift Container Platform installation
You must have a supported OpenShift Container Platform version, including the registry and storage services, installed and working. For more information about installing OpenShift Container Platform, see the OpenShift Container Platform documentation.
- Verify that multicluster engine operator is not already installed on your OpenShift Container Platform cluster. The multicluster engine operator allows only one single installation on each OpenShift Container Platform cluster. Continue with the following steps if there is no installation.
To ensure that the OpenShift Container Platform cluster is set up correctly, access the OpenShift Container Platform web console with the following command:
kubectl -n openshift-console get route console
See the following example output:
console console-openshift-console.apps.new-coral.purple-chesterfield.com
console   https   reencrypt/Redirect     None
-
Open the URL in your browser and check the result. If the console URL displays
console-openshift-console.router.default.svc.cluster.local, set the value foropenshift_master_default_subdomainwhen you install OpenShift Container Platform. See the following example of a URL:https://console-openshift-console.apps.new-coral.purple-chesterfield.com.
You can proceed to install multicluster engine operator.
1.3.1.3. Installing from the OperatorHub web console interface
Best practice: From the Administrator view in your OpenShift Container Platform navigation, install the OperatorHub web console interface that is provided with OpenShift Container Platform.
- Select Operators > OperatorHub to access the list of available operators, and select multicluster engine for Kubernetes operator.
-
Click
Install. On the Operator Installation page, select the options for your installation:
Namespace:
- The multicluster engine operator engine must be installed in its own namespace, or project.
-
By default, the OperatorHub console installation process creates a namespace titled
multicluster-engine. Best practice: Continue to use themulticluster-enginenamespace if it is available. -
If there is already a namespace named
multicluster-engine, select a different namespace.
- Channel: The channel that you select corresponds to the release that you are installing. When you select the channel, it installs the identified release, and establishes that the future errata updates within that release are obtained.
Approval strategy: The approval strategy identifies the human interaction that is required for applying updates to the channel or release to which you subscribed.
- Select Automatic, which is selected by default, to ensure any updates within that release are automatically applied.
- Select Manual to receive a notification when an update is available. If you have concerns about when the updates are applied, this might be best practice for you.
Note: To upgrade to the next minor release, you must return to the OperatorHub page and select a new channel for the more current release.
- Select Install to apply your changes and create the operator.
See the following process to create the MultiClusterEngine custom resource.
- In the OpenShift Container Platform console navigation, select Installed Operators > multicluster engine for Kubernetes.
- Select the MultiCluster Engine tab.
- Select Create MultiClusterEngine.
Update the default values in the YAML file. See options in the MultiClusterEngine advanced configuration section of the documentation.
- The following example shows the default template that you can copy into the editor:
apiVersion: multicluster.openshift.io/v1
kind: MultiClusterEngine
metadata:
  name: multiclusterengine
spec: {}
Select Create to initialize the custom resource. It can take up to 10 minutes for the multicluster engine operator engine to build and start.
After the MultiClusterEngine resource is created, the status for the resource is
Availableon the MultiCluster Engine tab.
1.3.1.4. Installing from the OpenShift Container Platform CLI
Create a multicluster engine operator engine namespace where the operator requirements are contained. Run the following command, where
namespaceis the name for your multicluster engine for Kubernetes engine namespace. The value fornamespacemight be referred to as Project in the OpenShift Container Platform environment:oc create namespace <namespace>
Switch your project namespace to the one that you created. Replace
namespacewith the name of the multicluster engine for Kubernetes engine namespace that you created in step 1.oc project <namespace>
Create a YAML file to configure an
OperatorGroupresource. Each namespace can have only one operator group. Replacedefaultwith the name of your operator group. Replacenamespacewith the name of your project namespace. See the following example:apiVersion: operators.coreos.com/v1 kind: OperatorGroup metadata: name: <default> namespace: <namespace> spec: targetNamespaces: - <namespace>
Run the following command to create the
OperatorGroupresource. Replaceoperator-groupwith the name of the operator group YAML file that you created:oc apply -f <path-to-file>/<operator-group>.yaml
Create a YAML file to configure an OpenShift Container Platform Subscription. Your file should look similar to the following example:
apiVersion: operators.coreos.com/v1alpha1
kind: Subscription
metadata:
  name: multicluster-engine
spec:
  sourceNamespace: openshift-marketplace
  source: redhat-operators
  channel: stable-2.1
  installPlanApproval: Automatic
  name: multicluster-engine
Note: For installing the multicluster engine for Kubernetes engine on infrastructure nodes, the see Operator Lifecycle Manager Subscription additional configuration section.
Run the following command to create the OpenShift Container Platform Subscription. Replace
subscriptionwith the name of the subscription file that you created:oc apply -f <path-to-file>/<subscription>.yaml
Create a YAML file to configure the
MultiClusterEnginecustom resource. Your default template should look similar to the following example:apiVersion: multicluster.openshift.io/v1 kind: MultiClusterEngine metadata: name: multiclusterengine spec: {}Note: For installing the multicluster engine operator on infrastructure nodes, see the MultiClusterEngine custom resource additional configuration section:
Run the following command to create the
MultiClusterEnginecustom resource. Replacecustom-resourcewith the name of your custom resource file:oc apply -f <path-to-file>/<custom-resource>.yaml
If this step fails with the following error, the resources are still being created and applied. Run the command again in a few minutes when the resources are created:
error: unable to recognize "./mce.yaml": no matches for kind "MultiClusterEngine" in version "operator.multicluster-engine.io/v1"
Run the following command to get the custom resource. It can take up to 10 minutes for the
MultiClusterEnginecustom resource status to display asAvailablein thestatus.phasefield after you run the following command:oc get mce -o=jsonpath='{.items[0].status.phase}'
If you are reinstalling the multicluster engine operator and the pods do not start, see Troubleshooting reinstallation failure for steps to work around this problem.
Notes:
-
A
ServiceAccountwith aClusterRoleBindingautomatically gives cluster administrator privileges to multicluster engine operator and to any user credentials with access to the namespace where you install multicluster engine operator.
1.3.1.5. Installing on infrastructure nodes
An OpenShift Container Platform cluster can be configured to contain infrastructure nodes for running approved management components. Running components on infrastructure nodes avoids allocating OpenShift Container Platform subscription quota for the nodes that are running those management components.
After adding infrastructure nodes to your OpenShift Container Platform cluster, follow the Installing from the OpenShift Container Platform CLI instructions and add the following configurations to the Operator Lifecycle Manager Subscription and MultiClusterEngine custom resource.
1.3.1.5.1. Add infrastructure nodes to the OpenShift Container Platform cluster
Follow the procedures that are described in Creating infrastructure machine sets in the OpenShift Container Platform documentation. Infrastructure nodes are configured with a Kubernetes taint and label to keep non-management workloads from running on them.
To be compatible with the infrastructure node enablement provided by multicluster engine operator, ensure your infrastructure nodes have the following taint and label applied:
metadata:
  labels:
    node-role.kubernetes.io/infra: ""
spec:
  taints:
  - effect: NoSchedule
    key: node-role.kubernetes.io/infra
1.3.1.5.2. Operator Lifecycle Manager Subscription additional configuration
Add the following additional configuration before applying the Operator Lifecycle Manager Subscription:
spec:
  config:
    nodeSelector:
      node-role.kubernetes.io/infra: ""
    tolerations:
    - key: node-role.kubernetes.io/infra
      effect: NoSchedule
      operator: Exists
1.3.1.5.3. MultiClusterEngine custom resource additional configuration
Add the following additional configuration before applying the MultiClusterEngine custom resource:
spec:
  nodeSelector:
    node-role.kubernetes.io/infra: ""
1.3.2. Install on disconnected networks
You might need to install the multicluster engine operator on Red Hat OpenShift Container Platform clusters that are not connected to the Internet. The procedure to install on a disconnected engine requires some of the same steps as the connected installation.
Important: You must install multicluster engine operator on a cluster that does not have Red Hat Advanced Cluster Management for Kubernetes earlier than 2.5 installed. The multicluster engine operator cannot co-exist with Red Hat Advanced Cluster Management for Kubernetes on versions earlier than 2.5 because they provide some of the same management components. It is recommended that you install multicluster engine operator on a cluster that has never previously installed Red Hat Advanced Cluster Management. If you are using Red Hat Advanced Cluster Management for Kubernetes at version 2.5.0 or later then multicluster engine operator is already installed on the cluster with it.
You must download copies of the packages to access them during the installation, rather than accessing them directly from the network during the installation.
1.3.2.1. Prerequisites
You must meet the following requirements before you install The multicluster engine operator:
- Red Hat OpenShift Container Platform version 4.8 or later must be deployed in your environment, and you must be logged in with the command line interface (CLI).
You need access to catalog.redhat.com.
Note: For managing bare metal clusters, you must have OpenShift Container Platform version 4.8 or later.
See the OpenShift Container Platform version 4.10, OpenShift Container Platform version 4.8.
-
Your Red Hat OpenShift Container Platform CLI must be version 4.8 or later, and configured to run
occommands. See Getting started with the CLI for information about installing and configuring the Red Hat OpenShift CLI. - Your Red Hat OpenShift Container Platform permissions must allow you to create a namespace.
- You must have a workstation with Internet connection to download the dependencies for the operator.
1.3.2.2. Confirm your OpenShift Container Platform installation
- You must have a supported OpenShift Container Platform version, including the registry and storage services, installed and working in your cluster. For information about OpenShift Container Platform version 4.8, see OpenShift Container Platform documentation.
When and if you are connected, you can ensure that the OpenShift Container Platform cluster is set up correctly by accessing the OpenShift Container Platform web console with the following command:
kubectl -n openshift-console get route console
See the following example output:
console console-openshift-console.apps.new-coral.purple-chesterfield.com
console   https   reencrypt/Redirect     None
The console URL in this example is:
https:// console-openshift-console.apps.new-coral.purple-chesterfield.com. Open the URL in your browser and check the result.If the console URL displays
console-openshift-console.router.default.svc.cluster.local, set the value foropenshift_master_default_subdomainwhen you install OpenShift Container Platform.
1.3.2.3. Installing in a disconnected environment
Important: You need to download the required images to a mirroring registry to install the operators in a disconnected environment. Without the download, you might receive ImagePullBackOff errors during your deployment.
Follow these steps to install the multicluster engine operator in a disconnected environment:
Create a mirror registry. If you do not already have a mirror registry, create one by completing the procedure in the Disconnected installation mirroring topic of the Red Hat OpenShift Container Platform documentation.
If you already have a mirror registry, you can configure and use your existing one.
Note: For bare metal only, you need to provide the certificate information for the disconnected registry in your
install-config.yamlfile. To access the image in a protected disconnected registry, you must provide the certificate information so the multicluster engine operator can access the registry.- Copy the certificate information from the registry.
-
Open the
install-config.yamlfile in an editor. -
Find the entry for
additionalTrustBundle: |. Add the certificate information after the
additionalTrustBundleline. The resulting content should look similar to the following example:additionalTrustBundle: | -----BEGIN CERTIFICATE----- certificate_content -----END CERTIFICATE----- sshKey: >-
Important: Additional mirrors for disconnected image registries are needed if the following Governance policies are required:
-
Container Security Operator policy: Locate the images in the
registry.redhat.io/quaysource. -
Compliance Operator policy: Locate the images in the
registry.redhat.io/compliancesource. Gatekeeper Operator policy: Locate the images in the
registry.redhat.io/rhacm2source.See the following example of mirrors lists for all three operators:
- mirrors: - <your_registry>/rhacm2 source: registry.redhat.io/rhacm2 - mirrors: - <your_registry>/quay source: registry.redhat.io/quay - mirrors: - <your_registry>/compliance source: registry.redhat.io/compliance-
Container Security Operator policy: Locate the images in the
-
Save the
install-config.yamlfile. Create a YAML file that contains the
ImageContentSourcePolicywith the namemce-policy.yaml. Note: If you modify this on a running cluster, it causes a rolling restart of all nodes.apiVersion: operator.openshift.io/v1alpha1 kind: ImageContentSourcePolicy metadata: name: mce-repo spec: repositoryDigestMirrors: - mirrors: - mirror.registry.com:5000/multicluster-engine source: registry.redhat.io/multicluster-engineApply the ImageContentSourcePolicy file by entering the following command:
oc apply -f mce-policy.yaml
Enable the disconnected Operator Lifecycle Manager Red Hat Operators and Community Operators.
the multicluster engine operator is included in the Operator Lifecycle Manager Red Hat Operator catalog.
- Configure the disconnected Operator Lifecycle Manager for the Red Hat Operator catalog. Follow the steps in the Using Operator Lifecycle Manager on restricted networks topic of theRed Hat OpenShift Container Platform documentation.
- Now that you have the image in the disconnected Operator Lifecycle Manager, continue to install the multicluster engine operator for Kubernetes from the Operator Lifecycle Manager catalog.
See Installing while connected online for the required steps.
1.3.3. Upgrading your cluster
After you create Red Hat OpenShift Container Platform clusters that you want to manage with multicluster engine operator, you can use the multicluster engine operator console to upgrade those clusters to the latest minor version that is available in the version channel that the managed cluster uses.
In a connected environment, the updates are automatically identified with notifications provided for each cluster that requires an upgrade in the console.
Notes:
To upgrade to a major version, you must verify that you meet all of the prerequisites for upgrading to that version. You must update the version channel on the managed cluster before you can upgrade the cluster with the console.
After you update the version channel on the managed cluster, the multicluster engine operator console displays the latest versions that are available for the upgrade.
This method of upgrading only works for OpenShift Container Platform managed clusters that are in a Ready state.
Important: You cannot upgrade Red Hat OpenShift Kubernetes Service managed clusters or OpenShift Container Platform managed clusters on Red Hat OpenShift Dedicated by using the multicluster engine operator console.
To upgrade your cluster in a connected environment, complete the following steps:
- From the navigation menu, navigate to Infrastructure > Clusters. If an upgrade is available, it is shown in the Distribution version column.
- Select the clusters in Ready state that you want to upgrade. A cluster must be an OpenShift Container Platform cluster to be upgraded with the console.
- Select Upgrade.
- Select the new version of each cluster.
- Select Upgrade.
If your cluster upgrade fails, the Operator generally retries the upgrade a few times, stops, and reports the status of the failing component. In some cases, the upgrade process continues to cycle through attempts to complete the process. Rolling your cluster back to a previous version following a failed upgrade is not supported. Contact Red Hat support for assistance if your cluster upgrade fails.
1.3.3.1. Selecting a channel
You can use the console to select a channel for your cluster upgrades on OpenShift Container Platform version 4.6, or later. After selecting a channel, you are automatically reminded of cluster upgrades that are available for both Errata versions (4.8.1 > 4.8.2 > 4.8.3, and so on) and release versions (4.8 > 4.9, and so on).
To select a channel for your cluster, complete the following steps:
- From the navigation, select Infrastructure > Clusters.
- Select the name of the cluster that you want to change to view the Cluster details page. If a different channel is available for the cluster, an edit icon is displayed in the Channel field.
- Click the edit icon to modify the setting in the field.
- Select a channel in the New channel field.
You can find the reminders for the available channel updates in the Cluster details page of the cluster.
1.3.3.2. Upgrading a disconnected cluster
You can use Red Hat OpenShift Update Service with multicluster engine operator to upgrade cluster in a disconnected environment.
In some cases, security concerns prevent clusters from being connected directly to the internet. This makes it difficult to know when upgrades are available, and how to process those upgrades. Configuring OpenShift Update Service can help.
OpenShift Update Service is a separate operator and operand that monitors the available versions of your managed clusters in a disconnected environment, and makes them available for upgrading your clusters in a disconnected environment. After OpenShift Update Service is configured, it can perform the following actions:
- Monitor when upgrades are available for your disconnected clusters.
- Identify which updates are mirrored to your local site for upgrading by using the graph data file.
- Notify you that an upgrade is available for your cluster by using the console.
The following topics explain the procedure for upgrading a disconnected cluster:
- Prerequisites
- Prepare your disconnected mirror registry
- Deploy the operator for OpenShift Update Service
- Build the graph data init container
- Configure certificate for the mirrored registry
- Deploy the OpenShift Update Service instance
- Override the default registry (optional)
- Deploy a disconnected catalog source
- Change the managed cluster parameter
- Viewing available upgrades
- Selecting a channel
- Upgrading the cluster
1.3.3.2.1. Prerequisites
You must have the following prerequisites before you can use OpenShift Update Service to upgrade your disconnected clusters:
A deployed hub cluster that is running on Red Hat OpenShift Container Platform version 4.6 or later with restricted OLM configured. See Using Operator Lifecycle Manager on restricted networks for details about how to configure restricted OLM.
Note: Make a note of the catalog source image when you configure restricted OLM.
- An OpenShift Container Platform cluster that is managed by the hub cluster
Access credentials to a local repository where you can mirror the cluster images. See Disconnected installation mirroring for more information about how to create this repository.
Note: The image for the current version of the cluster that you upgrade must always be available as one of the mirrored images. If an upgrade fails, the cluster reverts back to the version of the cluster at the time that the upgrade was attempted.
1.3.3.2.2. Prepare your disconnected mirror registry
You must mirror both the image that you want to upgrade to and the current image that you are upgrading from to your local mirror registry. Complete the following steps to mirror the images:
Create a script file that contains content that resembles the following example:
UPSTREAM_REGISTRY=quay.io PRODUCT_REPO=openshift-release-dev RELEASE_NAME=ocp-release OCP_RELEASE=4.12.2-x86_64 LOCAL_REGISTRY=$(hostname):5000 LOCAL_SECRET_JSON=/path/to/pull/secret 1 oc adm -a ${LOCAL_SECRET_JSON} release mirror \ --from=${UPSTREAM_REGISTRY}/${PRODUCT_REPO}/${RELEASE_NAME}:${OCP_RELEASE} \ --to=${LOCAL_REGISTRY}/ocp4 \ --to-release-image=${LOCAL_REGISTRY}/ocp4/release:${OCP_RELEASE}- 1
- Replace
/path/to/pull/secretwith the path to your OpenShift Container Platform pull secret.
Run the script to mirror the images, configure settings, and separate the release images from the release content.
You can use the output of the last line of this script when you create your
ImageContentSourcePolicy.
1.3.3.2.3. Deploy the operator for OpenShift Update Service
To deploy the operator for OpenShift Update Service in your OpenShift Container Platform environment, complete the following steps:
- On the hub cluster, access the OpenShift Container Platform operator hub.
-
Deploy the operator by selecting
Red Hat OpenShift Update Service Operator. Update the default values, if necessary. The deployment of the operator creates a new project namedopenshift-cincinnati. Wait for the installation of the operator to finish.
You can check the status of the installation by entering the
oc get podscommand on your OpenShift Container Platform command line. Verify that the operator is in therunningstate.
1.3.3.2.4. Build the graph data init container
OpenShift Update Service uses graph data information to determine the available upgrades. In a connected environment, OpenShift Update Service pulls the graph data information for available upgrades directly from the Cincinnati graph data GitHub repository. Because you are configuring a disconnected environment, you must make the graph data available in a local repository by using an init container. Complete the following steps to create a graph data init container:
Clone the graph data Git repository by entering the following command:
git clone https://github.com/openshift/cincinnati-graph-data
Create a file that contains the information for your graph data
init. You can find this sample Dockerfile in thecincinnati-operatorGitHub repository. The contents of the file is shown in the following sample:FROM registry.access.redhat.com/ubi8/ubi:8.1 1 RUN curl -L -o cincinnati-graph-data.tar.gz https://github.com/openshift/cincinnati-graph-data/archive/master.tar.gz 2 RUN mkdir -p /var/lib/cincinnati/graph-data/ 3 CMD exec /bin/bash -c "tar xvzf cincinnati-graph-data.tar.gz -C /var/lib/ cincinnati/graph-data/ --strip-components=1" 4
In this example:
Run the following commands to build the
graph data init container:podman build -f <path_to_Dockerfile> -t <${DISCONNECTED_REGISTRY}/cincinnati/cincinnati-graph-data-container>:latest 1 2 podman push <${DISCONNECTED_REGISTRY}/cincinnati/cincinnati-graph-data-container><2>:latest --authfile=</path/to/pull_secret>.json 3Note: You can also replace
podmanin the commands withdocker, if you don’t havepodmaninstalled.
1.3.3.2.5. Configure certificate for the mirrored registry
If you are using a secure external container registry to store your mirrored OpenShift Container Platform release images, OpenShift Update Service requires access to this registry to build an upgrade graph. Complete the following steps to configure your CA certificate to work with the OpenShift Update Service pod:
Find the OpenShift Container Platform external registry API, which is located in
image.config.openshift.io. This is where the external registry CA certificate is stored.See Configuring additional trust stores for image registry access in the OpenShift Container Platform documentation for more information.
-
Create a ConfigMap in the
openshift-confignamespace. Add your CA certificate under the key
updateservice-registry. OpenShift Update Service uses this setting to locate your certificate:apiVersion: v1 kind: ConfigMap metadata: name: trusted-ca data: updateservice-registry: | -----BEGIN CERTIFICATE----- ... -----END CERTIFICATE-----Edit the
clusterresource in theimage.config.openshift.ioAPI to set theadditionalTrustedCAfield to the name of the ConfigMap that you created.oc patch image.config.openshift.io cluster -p '{"spec":{"additionalTrustedCA":{"name":"trusted-ca"}}}' --type mergeReplace
trusted-cawith the path to your new ConfigMap. The OpenShift Update Service Operator watches theimage.config.openshift.ioAPI and the ConfigMap you created in theopenshift-confignamespace for changes, then restart the deployment if the CA cert has changed.
1.3.3.2.6. Deploy the OpenShift Update Service instance
When you finish deploying the OpenShift Update Service instance on your hub cluster, this instance is located where the images for the cluster upgrades are mirrored and made available to the disconnected managed cluster. Complete the following steps to deploy the instance:
If you do not want to use the default namespace of the operator, which is
openshift-cincinnati, create a namespace for your OpenShift Update Service instance:- In the OpenShift Container Platform hub cluster console navigation menu, select Administration > Namespaces.
- Select Create Namespace.
- Add the name of your namespace, and any other information for your namespace.
- Select Create to create the namespace.
- In the Installed Operators section of the OpenShift Container Platform console, select Red Hat OpenShift Update Service Operator.
- Select Create Instance in the menu.
Paste the contents from your OpenShift Update Service instance. Your YAML instance might resemble the following manifest:
apiVersion: cincinnati.openshift.io/v1beta2
kind: Cincinnati
metadata:
  name: openshift-update-service-instance
  namespace: openshift-cincinnati
spec:
  registry: <registry_host_name>:<port> 1
  replicas: 1
  repository: ${LOCAL_REGISTRY}/ocp4/release
  graphDataImage: '<host_name>:<port>/cincinnati-graph-data-container'2
- 1
- Replace the
spec.registryvalue with the path to your local disconnected registry for your images. - 2
- Replace the
spec.graphDataImagevalue with the path to your graph data init container. This is the same value that you used when you ran thepodman pushcommand to push your graph data init container.
- Select Create to create the instance.
-
From the hub cluster CLI, enter the
oc get podscommand to view the status of the instance creation. It might take a while, but the process is complete when the result of the command shows that the instance and the operator are running.
1.3.3.2.7. Override the default registry (optional)
Note: The steps in this section only apply if you have mirrored your releases into your mirrored registry.
OpenShift Container Platform has a default image registry value that specifies where it finds the upgrade packages. In a disconnected environment, you can create an override to replace that value with the path to your local image registry where you mirrored your release images.
Complete the following steps to override the default registry:
Create a YAML file named
mirror.yamlthat resembles the following content:apiVersion: operator.openshift.io/v1alpha1 kind: ImageContentSourcePolicy metadata: name: <your-local-mirror-name>1 spec: repositoryDigestMirrors: - mirrors: - <your-registry>2 source: registry.redhat.io
Note: You can find your path to your local mirror by entering the
oc adm release mirrorcommand.Using the command line of the managed cluster, run the following command to override the default registry:
oc apply -f mirror.yaml
1.3.3.2.8. Deploy a disconnected catalog source
On the managed cluster, disable all of the default catalog sources and create a new one. Complete the following steps to change the default location from a connected location to your disconnected local registry:
Create a YAML file named
source.yamlthat resembles the following content:apiVersion: config.openshift.io/v1 kind: OperatorHub metadata: name: cluster spec: disableAllDefaultSources: true --- apiVersion: operators.coreos.com/v1alpha1 kind: CatalogSource metadata: name: my-operator-catalog namespace: openshift-marketplace spec: sourceType: grpc image: '<registry_host_name>:<port>/olm/redhat-operators:v1'1 displayName: My Operator Catalog publisher: grpc- 1
- Replace the value of
spec.imagewith the path to your local restricted catalog source image.
On the command line of the managed cluster, change the catalog source by running the following command:
oc apply -f source.yaml
1.3.3.2.9. Change the managed cluster parameter
Update the ClusterVersion resource information on the managed cluster to change the default location from where it retrieves its upgrades.
From the managed cluster, confirm that the
ClusterVersionupstream parameter is currently the default public OpenShift Update Service operand by entering the following command:oc get clusterversion -o yaml
The returned content might resemble the following content:
apiVersion: v1
items:
- apiVersion: config.openshift.io/v1
  kind: ClusterVersion
  [..]
  spec:
    channel: stable-4.12
    upstream: https://api.openshift.com/api/upgrades_info/v1/graph
From the hub cluster, identify the route URL to the OpenShift Update Service operand by entering the following command:
oc get routes
Note the returned value for later steps.
On the command line of the managed cluster, edit the
ClusterVersionresource by entering the following command:oc edit clusterversion version
Replace the value of
spec.channelwith your new version.Replace the value of
spec.upstreamwith the path to your hub cluster OpenShift Update Service operand. You can complete the following steps to determine the path to your operand:Run the following command on the hub cluster:
oc get routes -A
-
Find the path to
cincinnati. The path the operand is the value in theHOST/PORTfield.
On the command line of the managed cluster, confirm that the upstream parameter in the
ClusterVersionis updated with the local hub cluster OpenShift Update Service URL by entering the following command:oc get clusterversion -o yaml
The results resemble the following content:
apiVersion: v1
items:
- apiVersion: config.openshift.io/v1
  kind: ClusterVersion
  [..]
  spec:
    channel: stable-4.12
    upstream: https://<hub-cincinnati-uri>/api/upgrades_info/v1/graph
1.3.3.2.10. Viewing available upgrades
On the Clusters page, the Distribution version of the cluster indicates that there is an upgrade available, if there is an upgrade in the disconnected registry. You can view the available upgrades by selecting the cluster and selecting Upgrade clusters from the Actions menu. If the optional upgrade paths are available, the available upgrades are listed.
Note: No available upgrade versions are shown if the current version is not mirrored into the local image repository.
1.3.3.2.11. Selecting a channel
You can use the console to select a channel for your cluster upgrades on OpenShift Container Platform version 4.6, or later. Those versions must be available on the mirror registry. Complete the steps in Selecting a channel to specify a channel for your upgrades.
1.3.3.2.12. Upgrading the cluster
After you configure the disconnected registry, multicluster engine operator and OpenShift Update Service use the disconnected registry to determine if upgrades are available. If no available upgrades are displayed, make sure that you have the release image of the current level of the cluster and at least one later level mirrored in the local repository. If the release image for the current version of the cluster is not available, no upgrades are available.
On the Clusters page, the Distribution version of the cluster indicates that there is an upgrade available, if there is an upgrade in the disconnected registry. You can upgrade the image by clicking Upgrade available and selecting the version for the upgrade. The managed cluster is updated to the selected version.
If your cluster upgrade fails, the Operator generally retries the upgrade a few times, stops, and reports the status of the failing component. In some cases, the upgrade process continues to cycle through attempts to complete the process. Rolling your cluster back to a previous version following a failed upgrade is not supported. Contact Red Hat support for assistance if your cluster upgrade fails.
1.3.4. Advanced configuration
The multicluster engine operator is installed using an operator that deploys all of the required components. The multicluster engine operator can be further configured during or after installation by adding one or more of the following attributes to the MultiClusterEngine custom resource:
1.3.4.1. Local-cluster enablement
By default, the cluster that is running multicluster engine operator manages itself. To install multicluster engine operator without the cluster managing itself, specify the following values in the spec.overrides.components settings in the MultiClusterEngine section:
apiVersion: multicluster.openshift.io/v1
kind: MultiClusterEngine
metadata:
  name: multiclusterengine
spec:
  overrides:
    components:
    - name: local-cluster
enabled: false-
The
namevalue identifies the hub cluster as alocal-cluster. -
The
enabledsetting specifies whether the feature is enabled or disabled. When the value istrue, the hub cluster manages itself. When the value isfalse, the hub cluster does not manage itself.
A hub cluster that is managed by itself is designated as the local-cluster in the list of clusters.
1.3.4.2. Custom image pull secret
If you plan to import Kubernetes clusters that were not created by OpenShift Container Platform or the multicluster engine operator, generate a secret that contains your OpenShift Container Platform pull secret information to access the entitled content from the distribution registry.
The secret requirements for OpenShift Container Platform clusters are automatically resolved by OpenShift Container Platform and multicluster engine for Kubernetes, so you do not have to create the secret if you are not importing other types of Kubernetes clusters to be managed.
Important: These secrets are namespace-specific, so make sure that you are in the namespace that you use for your engine.
- Download your OpenShift Container Platform pull secret file from cloud.redhat.com/openshift/install/pull-secret by selecting Download pull secret. Your OpenShift Container Platform pull secret is associated with your Red Hat Customer Portal ID, and is the same across all Kubernetes providers.
Run the following command to create your secret:
oc create secret generic <secret> -n <namespace> --from-file=.dockerconfigjson=<path-to-pull-secret> --type=kubernetes.io/dockerconfigjson
-
Replace
secretwith the name of the secret that you want to create. -
Replace
namespacewith your project namespace, as the secrets are namespace-specific. -
Replace
path-to-pull-secretwith the path to your OpenShift Container Platform pull secret that you downloaded.
-
Replace
The following example displays the spec.imagePullSecret template to use if you want to use a custom pull secret. Replace secret with the name of your pull secret:
apiVersion: multicluster.openshift.io/v1
kind: MultiClusterEngine
metadata:
  name: multiclusterengine
spec:
  imagePullSecret: <secret>
1.3.4.3. Target namespace
The operands can be installed in a designated namespace by specifying a location in the MultiClusterEngine custom resource. This namespace is created upon application of the MultiClusterEngine custom resource.
Important: If no target namespace is specified, the operator will install to the multicluster-engine namespace and will set it in the MultiClusterEngine custom resource specification.
The following example displays the spec.targetNamespace template that you can use to specify a target namespace. Replace target with the name of your destination namespace. Note: The target namespace cannot be the default namespace:
apiVersion: multicluster.openshift.io/v1
kind: MultiClusterEngine
metadata:
  name: multiclusterengine
spec:
  targetNamespace: <target>
1.3.4.4. availabilityConfig
The hub cluster has two availabilities: High and Basic. By default, the hub cluster has an availability of High, which gives hub cluster components a replicaCount of 2. This provides better support in cases of failover but consumes more resources than the Basic availability, which gives components a replicaCount of 1.
The following examples shows the spec.availabilityConfig template with Basic availability:
apiVersion: multicluster.openshift.io/v1
kind: MultiClusterEngine
metadata:
  name: multiclusterengine
spec:
  availabilityConfig: "Basic"
1.3.4.5. nodeSelector
You can define a set of node selectors in the MultiClusterEngine to install to specific nodes on your cluster. The following example shows spec.nodeSelector to assign pods to nodes with the label node-role.kubernetes.io/infra:
spec:
  nodeSelector:
    node-role.kubernetes.io/infra: ""
1.3.4.6. tolerations
You can define a list of tolerations to allow the MultiClusterEngine to tolerate specific taints defined on the cluster. The following example shows a spec.tolerations that matches a node-role.kubernetes.io/infra taint:
spec:
  tolerations:
  - key: node-role.kubernetes.io/infra
    effect: NoSchedule
    operator: Exists
The previous infra-node toleration is set on pods by default without specifying any tolerations in the configuration. Customizing tolerations in the configuration will replace this default behavior.
1.3.4.7. ManagedServiceAccount add-on (Technology Preview)
By default, the Managed-ServiceAccount add-on is disabled. This component when enabled allows you to create or delete a service account on a managed cluster. To install with this add-on enabled, include the following in the MultiClusterEngine specification in spec.overrides:
apiVersion: multicluster.openshift.io/v1
kind: MultiClusterEngine
metadata:
  name: multiclusterengine
spec:
  overrides:
    components:
    - name: managedserviceaccount-preview
      enabled: true
The Managed-ServiceAccount add-on can be enabled after creating MultiClusterEngine by editing the resource on the command line and setting the managedserviceaccount-preview component to enabled: true. Alternatively, you can run the following command and replace <multiclusterengine-name> with the name of your MultiClusterEngine resource.
oc patch MultiClusterEngine <multiclusterengine-name> --type=json -p='[{"op": "add", "path": "/spec/overrides/components/-","value":{"name":"managedserviceaccount-preview","enabled":true}}]'1.3.4.8. Hypershift add-on (Technology Preview)
By default, the Hypershift add-on is disabled. To install with this add-on enabled, include the following in the MultiClusterEngine values in spec.overrides:
apiVersion: multicluster.openshift.io/v1
kind: MultiClusterEngine
metadata:
  name: multiclusterengine
spec:
  overrides:
    components:
    - name: hypershift-preview
      enabled: true
The Hypershift add-on can be enabled after creating MultiClusterEngine by editing the resource on the command line, setting the hypershift-preview component to enabled: true. Alternatively, you can run the following command and replace <multiclusterengine-name> with the name of your MultiClusterEngine resource:
oc patch MultiClusterEngine <multiclusterengine-name> --type=json -p='[{"op": "add", "path": "/spec/overrides/components/-","value":{"name":"hypershift-preview","enabled":true}}]'1.3.5. Uninstalling
When you uninstall multicluster engine for Kubernetes, you see two different levels of the process: A custom resource removal and a complete operator uninstall. It might take up to five minutes to complete the uninstall process.
-
The custom resource removal is the most basic type of uninstall that removes the custom resource of the
MultiClusterEngineinstance but leaves other required operator resources. This level of uninstall is helpful if you plan to reinstall using the same settings and components. - The second level is a more complete uninstall that removes most operator components, excluding components such as custom resource definitions. When you continue with this step, it removes all of the components and subscriptions that were not removed with the custom resource removal. After this uninstall, you must reinstall the operator before reinstalling the custom resource.
1.3.5.1. Prerequisite: Detach enabled services
Before you uninstall the multicluster engine for Kubernetes engine, you must detach all of the clusters that are managed by that engine. To avoid errors, detach all clusters that are still managed by the engine, then try to uninstall again.
If you have managed clusters attached, you might see the following message.
Cannot delete MultiClusterEngine resource because ManagedCluster resource(s) exist
For more information about detaching clusters, see the Removing a cluster from management section by selecting the information for your provider in Creating a cluster.
1.3.5.2. Removing resources by using commands
-
If you have not already. ensure that your OpenShift Container Platform CLI is configured to run
occommands. See Getting started with the OpenShift CLI in the OpenShift Container Platform documentation for more information about how to configure theoccommands. Change to your project namespace by entering the following command. Replace namespace with the name of your project namespace:
oc project <namespace>
Enter the following command to remove the
MultiClusterEnginecustom resource:oc delete multiclusterengine --all
You can view the progress by entering the following command:
oc get multiclusterengine -o yaml
-
Enter the following commands to delete the multicluster-engine
ClusterServiceVersionin the namespace it is installed in:
❯ oc get csv
NAME                         DISPLAY                              VERSION   REPLACES   PHASE
multicluster-engine.v2.0.0   multicluster engine for Kubernetes   2.0.0                Succeeded

❯ oc delete clusterserviceversion multicluster-engine.v2.0.0
❯ oc delete sub multicluster-engine
The CSV version shown here may be different.
1.3.5.3. Deleting the components by using the console
When you use the RedHat OpenShift Container Platform console to uninstall, you remove the operator. Complete the following steps to uninstall by using the console:
- In the OpenShift Container Platform console navigation, select Operators > Installed Operators > multicluster engine for Kubernetes.
Remove the
MultiClusterEnginecustom resource.- Select the tab for Multiclusterengine.
- Select the Options menu for the MultiClusterEngine custom resource.
- Select Delete MultiClusterEngine.
Run the clean-up script according to the procedure in the following section.
Tip: If you plan to reinstall the same multicluster engine for Kubernetes version, you can skip the rest of the steps in this procedure and reinstall the custom resource.
- Navigate to Installed Operators.
- Remove the _ multicluster engine for Kubernetes_ operator by selecting the Options menu and selecting Uninstall operator.
1.3.5.4. Troubleshooting Uninstall
If the multicluster engine custom resource is not being removed, remove any potential remaining artifacts by running the clean-up script.
Copy the following script into a file:
#!/bin/bash
oc delete apiservice v1.admission.cluster.open-cluster-management.io v1.admission.work.open-cluster-management.io
oc delete validatingwebhookconfiguration multiclusterengines.multicluster.openshift.io
oc delete mce --all
1.4. Managing credentials
A credential is required to create and manage a Red Hat OpenShift Container Platform cluster on a cloud service provider with multicluster engine operator. The credential stores the access information for a cloud provider. Each provider account requires its own credential, as does each domain on a single provider.
You can create and manage your cluster credentials. Credentials are stored as Kubernetes secrets. Secrets are copied to the namespace of a managed cluster so that the controllers for the managed cluster can access the secrets. When a credential is updated, the copies of the secret are automatically updated in the managed cluster namespaces.
Note: Changes to the pull secret, SSH keys, or base domain of the cloud provider credentials are not reflected for existing managed clusters, as they have already been provisioned using the original credentials.
Required access: Edit
- Creating a credential for Amazon Web Services
- Creating a credential for Microsoft Azure
- Creating a credential for Google Cloud Platform
- Creating a credential for VMware vSphere
- Creating a credential for Red Hat OpenStack Platform
- Creating a credential for Red Hat Virtualization
- Creating a credential for Red Hat OpenShift Cluster Manager
- Creating a credential for Ansible Automation Platform
- Creating a credential for an on-premises environment
1.4.1. Creating a credential for Amazon Web Services
You need a credential to use multicluster engine operator console to deploy and manage an Red Hat OpenShift Container Platform cluster on Amazon Web Services (AWS).
Required access: Edit
Note: This procedure must be done before you can create a cluster with multicluster engine operator.
1.4.1.1. Prerequisites
You must have the following prerequisites before creating a credential:
- A deployed multicluster engine operator hub cluster
- Internet access for your multicluster engine operator hub cluster so it can create the Kubernetes cluster on Amazon Web Services (AWS)
- AWS login credentials, which include access key ID and secret access key. See Understanding and getting your security credentials.
- Account permissions that allow installing clusters on AWS. See Configuring an AWS account for instructions on how to configure.
1.4.1.2. Managing a credential by using the console
To create a credential from the multicluster engine operator console, complete the steps in the console.
Start at the navigation menu. Click Credentials to choose from existing credential options. Tip: Create a namespace specifically to host your credentials, both for convenience and added security.
You can optionally add a Base DNS domain for your credential. If you add the base DNS domain to the credential, it is automatically populated in the correct field when you create a cluster with this credential. See the following steps:
- Add your AWS access key ID for your AWS account. Log in to AWS to find your ID.
- Provide the contents for your new AWS Secret Access Key.
If you want to enable a proxy, enter the proxy information:
-
HTTP proxy URL: The URL that should be used as a proxy for
HTTPtraffic. -
HTTPS proxy URL: The secure proxy URL that should be used for
HTTPStraffic. If no value is provided, the same value as theHTTP Proxy URLis used for bothHTTPandHTTPS. -
No proxy domains: A comma-separated list of domains that should bypass the proxy. Begin a domain name with a period
.to include all of the subdomains that are in that domain. Add and asterisk*to bypass the proxy for all destinations. - Additional trust bundle: One or more additional CA certificates that are required for proxying HTTPS connections.
-
HTTP proxy URL: The URL that should be used as a proxy for
- Enter your Red Hat OpenShift pull secret. You can download your pull secret from Pull secret.
- Add your SSH private key and SSH public key, which allows you to connect to the cluster. You can use an existing key pair, or create a new one with key generation program.
See Generating an SSH private key and adding it to the agent for more information about how to generate a key.
You can create a cluster that uses this credential by completing the steps in Creating a cluster on Amazon Web Services or Creating a cluster on Amazon Web Services GovCloud.
You can edit your credential in the console. If the cluster was created by using this provider connection, then the <cluster-name>-aws-creds> secret from <cluster-namespace> will get updated with the new credentials.
Note: Updating credentials does not work for cluster pool claimed clusters.
When you are no longer managing a cluster that is using a credential, delete the credential to protect the information in the credential. Select Actions to delete in bulk, or select the options menu beside the credential that you want to delete.
1.4.1.3. Creating an opaque secret by using the API
To create an opaque secret for Amazon Web Services by using the API, apply YAML content in the YAML preview window that is similar to the following example:
kind: Secret
metadata:
    name: <managed-cluster-name>-aws-creds
    namespace: <managed-cluster-namespace>
type: Opaque
data:
    aws_access_key_id: $(echo -n "${AWS_KEY}" | base64 -w0)
    aws_secret_access_key: $(echo -n "${AWS_SECRET}" | base64 -w0)
Notes:
- Opaque secrets are not visible in the console.
- Opaque secrets are created in the managed cluster namespace you chose. Hive uses the opaque secret to provision the cluster. When provisioning the cluster by using the Red Hat Advanced Cluster Management console, the credentials you previoulsy created are copied to the managed cluster namespace as the opaque secret.
1.4.2. Creating a credential for Microsoft Azure
You need a credential to use multicluster engine operator console to create and manage a Red Hat OpenShift Container Platform cluster on Microsoft Azure or on Microsoft Azure Government.
Required access: Edit
Note: This procedure is a prerequisite for creating a cluster with multicluster engine operator.
1.4.2.1. Prerequisites
You must have the following prerequisites before creating a credential:
- A deployed multicluster engine operator hub cluster.
- Internet access for your multicluster engine operator hub cluster so that it can create the Kubernetes cluster on Azure.
- Azure login credentials, which include your Base Domain Resource Group and Azure Service Principal JSON. See azure.microsoft.com.
- Account permissions that allow installing clusters on Azure. See How to configure Cloud Services and Configuring an Azure account for more information.
1.4.2.2. Managing a credential by using the console
To create a credential from the multicluster engine operator console, complete the steps in the console. Start at the navigation menu. Click Credentials to choose from existing credential options. Tip: Create a namespace specifically to host your credentials, both for convenience and added security.
- Optional: Add a Base DNS domain for your credential. If you add the base DNS domain to the credential, it is automatically populated in the correct field when you create a cluster with this credential.
-
Select whether the environment for your cluster is
AzurePublicCloudorAzureUSGovernmentCloud. The settings are different for the Azure Government environment, so ensure that this is set correctly. - Add your Base domain resource group name for your Azure account. This entry is the resource name that you created with your Azure account. You can find your Base Domain Resource Group Name by selecting Home > DNS Zones in the Azure interface. See Create an Azure service principal with the Azure CLI to find your base domain resource group name.
Provide the contents for your Client ID. This value is generated as the
appIdproperty when you create a service principal with the following command:az ad sp create-for-rbac --role Contributor --name <service_principal> --scopes <subscription_path>
Replace service_principal with the name of your service principal.
Add your Client Secret. This value is generated as the
passwordproperty when you create a service principal with the following command:az ad sp create-for-rbac --role Contributor --name <service_principal> --scopes <subscription_path>
Replace service_principal with the name of your service principal. See Create an Azure service principal with the Azure CLI for more details.
Add your Subscription ID. This value is the
idproperty in the output of the following command:az account show
Add your Tenant ID. This value is the
tenantIdproperty in the output of the following command:az account show
If you want to enable a proxy, enter the proxy information:
-
HTTP proxy URL: The URL that should be used as a proxy for
HTTPtraffic. -
HTTPS proxy URL: The secure proxy URL that should be used for
HTTPStraffic. If no value is provided, the same value as theHTTP Proxy URLis used for bothHTTPandHTTPS. -
No proxy domains: A comma-separated list of domains that should bypass the proxy. Begin a domain name with a period
.to include all of the subdomains that are in that domain. Add and asterisk*to bypass the proxy for all destinations. - Additional trust bundle: One or more additional CA certificates that are required for proxying HTTPS connections.
-
HTTP proxy URL: The URL that should be used as a proxy for
- Enter your Red Hat OpenShift pull secret. You can download your pull secret from Pull secret.
- Add your SSH private key and SSH public key to use to connect to the cluster. You can use an existing key pair, or create a new pair using a key generation program. See Generating an SSH private key and adding it to the agent for more information about how to generate a key.
You can create a cluster that uses this credential by completing the steps in Creating a cluster on Microsoft Azure.
You can edit your credential in the console.
When you are no longer managing a cluster that is using a credential, delete the credential to protect the information in the credential. Select Actions to delete in bulk, or select the options menu beside the credential that you want to delete.
1.4.2.3. Creating an opaque secret by using the API
To create an opaque secret for Microsoft Azure by using the API instead of the console, apply YAML content in the YAML preview window that is similar to the following example:
kind: Secret
metadata:
    name: <managed-cluster-name>-azure-creds
    namespace: <managed-cluster-namespace>
type: Opaque
data:
    baseDomainResourceGroupName: $(echo -n "${azure_resource_group_name}" | base64 -w0)
    osServicePrincipal.json: $(base64 -w0 "${AZURE_CRED_JSON}")
Notes:
- Opaque secrets are not visible in the console.
- Opaque secrets are created in the managed cluster namespace you chose. Hive uses the opaque secret to provision the cluster. When provisioning the cluster by using the Red Hat Advanced Cluster Management console, the credentials you previoulsy created are copied to the managed cluster namespace as the opaque secret.
1.4.3. Creating a credential for Google Cloud Platform
You need a credential to use multicluster engine operator console to create and manage a Red Hat OpenShift Container Platform cluster on Google Cloud Platform (GCP).
Required access: Edit
Note: This procedure is a prerequisite for creating a cluster with multicluster engine operator.
1.4.3.1. Prerequisites
You must have the following prerequisites before creating a credential:
- A deployed multicluster engine operator hub cluster
- Internet access for your multicluster engine operator hub cluster so it can create the Kubernetes cluster on GCP
- GCP login credentials, which include user Google Cloud Platform Project ID and Google Cloud Platform service account JSON key. See Creating and managing projects.
- Account permissions that allow installing clusters on GCP. See Configuring a GCP project for instructions on how to configure an account.
1.4.3.2. Managing a credential by using the console
To create a credential from the multicluster engine operator console, complete the steps in the console.
Start at the navigation menu. Click Credentials to choose from existing credential options. Tip: Create a namespace specifically to host your credentials, for both convenience and security.
You can optionally add a Base DNS domain for your credential. If you add the base DNS domain to the credential, it is automatically populated in the correct field when you create a cluster with this credential. See the following steps:
- Add your Google Cloud Platform project ID for your GCP account. Log in to GCP to retrieve your settings.
- Add your Google Cloud Platform service account JSON key. See the (https://cloud.google.com/iam/docs/creating-managing-service-accounts) to create your service account JSON key. Follow the steps for the GCP console.
- Provide the contents for your new Google Cloud Platform service account JSON key.
If you want to enable a proxy, enter the proxy information:
-
HTTP proxy URL: The URL that should be used as a proxy for
HTTPtraffic. -
HTTPS proxy URL: The secure proxy URL that should be used for
HTTPStraffic. If no value is provided, the same value as theHTTP Proxy URLis used for bothHTTPandHTTPS. -
No proxy domains: A comma-separated list of domains that should bypass the proxy. Begin a domain name with a period
.to include all of the subdomains that are in that domain. Add and asterisk*to bypass the proxy for all destinations. - Additional trust bundle: One or more additional CA certificates that are required for proxying HTTPS connections.
-
HTTP proxy URL: The URL that should be used as a proxy for
- Enter your Red Hat OpenShift pull secret. You can download your pull secret from Pull secret.
- Add your SSH private key and SSH public key so you can access the cluster. You can use an existing key pair, or create a new pair using a key generation program.
See Generating an SSH private key and adding it to the agent for more information about how to generate a key.
You can use this connection when you create a cluster by completing the steps in Creating a cluster on Google Cloud Platform.
You can edit your credential in the console.
When you are no longer managing a cluster that is using a credential, delete the credential to protect the information in the credential. Select Actions to delete in bulk, or select the options menu beside the credential that you want to delete.
1.4.3.3. Creating an opaque secret by using the API
To create an opaque secret for Google Cloud Platform by using the API instead of the console, apply YAML content in the YAML preview window that is similar to the following example:
kind: Secret
metadata:
    name: <managed-cluster-name>-gcp-creds
    namespace: <managed-cluster-namespace>
type: Opaque
data:
    osServiceAccount.json: $(base64 -w0 "${GCP_CRED_JSON}")
Notes:
- Opaque secrets are not visible in the console.
- Opaque secrets are created in the managed cluster namespace you chose. Hive uses the opaque secret to provision the cluster. When provisioning the cluster by using the Red Hat Advanced Cluster Management console, the credentials you previoulsy created are copied to the managed cluster namespace as the opaque secret.
1.4.4. Creating a credential for VMware vSphere
You need a credential to use multicluster engine operator console to deploy and manage a Red Hat OpenShift Container Platform cluster on VMware vSphere. Note: Only OpenShift Container Platform versions 4.5.x, and later, are supported.
Required access: Edit
Note: This procedure must be done before you can create a cluster with multicluster engine operator.
1.4.4.1. Prerequisites
You must have the following prerequisites before you create a credential:
- A deployed hub cluster on OpenShift Container Platform version 4.6 or later.
- Internet access for your hub cluster so it can create the Kubernetes cluster on VMware vSphere.
VMware vSphere login credentials and vCenter requirements configured for OpenShift Container Platform when using installer-provisioned infrastructure. See Installing a cluster on vSphere with customizations. These credentials include the following information:
- vCenter account privileges.
- Cluster resources.
- DHCP available.
- ESXi hosts have time synchronized (for example, NTP).
1.4.4.2. Managing a credential by using the console
To create a credential from the multicluster engine operator console, complete the steps in the console.
Start at the navigation menu. Click Credentials to choose from existing credential options. Tip: Create a namespace specifically to host your credentials, both for convenience and added security.
You can optionally add a Base DNS domain for your credential. If you add the base DNS domain to the credential, it is automatically populated in the correct field when you create a cluster with this credential. See the following steps:
- Add your VMware vCenter server fully-qualified host name or IP address. The value must be defined in the vCenter server root CA certificate. If possible, use the fully-qualified host name.
- Add your VMware vCenter username.
- Add your VMware vCenter password.
Add your VMware vCenter root CA certificate.
-
You can download your certificate in the
download.zippackage with the certificate from your VMware vCenter server at:https://<vCenter_address>/certs/download.zip. Replace vCenter_address with the address to your vCenter server. -
Unpackage the
download.zip. Use the certificates from the
certs/<platform>directory that have a.0extension. Tip: You can use thels certs/<platform>command to list all of the available certificates for your platform.Replace
<platform>with the abbreviation for your platform:lin,mac, orwin.For example:
certs/lin/3a343545.0Best practice: Link together multiple certificates with a
.0extension by using the following command:cat certs/lin/*.0 > ca.crt
-
You can download your certificate in the
- Add your VMware vSphere cluster name.
- Add your VMware vSphere datacenter.
- Add your VMware vSphere default datastore.
- Add your VMware vSphere disk type.
- Add your VMware vSphere folder.
- Add your VMware vSphere resource pool.
For disconnected installations only: Complete the fields in the Configuration for disconnected installation subsection with the required information:
Image content source: This value contains the disconnected registry path. The path contains the hostname, port, and repository path to all of the installation images for disconnected installations. Example:
repository.com:5000/openshift/ocp-release.The path creates an image content source policy mapping in the
install-config.yamlto the Red Hat OpenShift Container Platform release images. As an example,repository.com:5000produces thisimageContentSourcecontent:- mirrors: - registry.example.com:5000/ocp4 source: quay.io/openshift-release-dev/ocp-release-nightly - mirrors: - registry.example.com:5000/ocp4 source: quay.io/openshift-release-dev/ocp-release - mirrors: - registry.example.com:5000/ocp4 source: quay.io/openshift-release-dev/ocp-v4.0-art-dev
Additional trust bundle: This value provides the contents of the certificate file that is required to access the mirror registry.
Note: If you are deploying managed clusters from a hub that is in a disconnected environment, and want them to be automatically imported post install, add an Image Content Source Policy to the
install-config.yamlfile by using theYAMLeditor. A sample entry is shown in the following example:- mirrors: - registry.example.com:5000/rhacm2 source: registry.redhat.io/rhacm2
If you want to enable a proxy, enter the proxy information:
-
HTTP proxy URL: The URL that should be used as a proxy for
HTTPtraffic. -
HTTPS proxy URL: The secure proxy URL that should be used for
HTTPStraffic. If no value is provided, the same value as theHTTP Proxy URLis used for bothHTTPandHTTPS. -
No proxy domains: A comma-separated list of domains that should bypass the proxy. Begin a domain name with a period
.to include all of the subdomains that are in that domain. Add and asterisk*to bypass the proxy for all destinations. - Additional trust bundle: One or more additional CA certificates that are required for proxying HTTPS connections.
-
HTTP proxy URL: The URL that should be used as a proxy for
- Enter your Red Hat OpenShift pull secret. You can download your pull secret from Pull secret.
Add your SSH private key and SSH public key, which allows you to connect to the cluster.
You can use an existing key pair, or create a new one with key generation program. See Generating a key pair for cluster node SSH access for more information.
You can create a cluster that uses this credential by completing the steps in Creating a cluster on VMware vSphere.
You can edit your credential in the console.
When you are no longer managing a cluster that is using a credential, delete the credential to protect the information in the credential. Select Actions to delete in bulk, or select the options menu beside the credential that you want to delete.
1.4.4.3. Creating an opaque secret by using the API
To create an opaque secret for VMware vSphere by using the API instead of the console, apply YAML content in the YAML preview window that is similar to the following example:
kind: Secret
metadata:
    name: <managed-cluster-name>-vsphere-creds
    namespace: <managed-cluster-namespace>
type: Opaque
data:
    username: $(echo -n "${VMW_USERNAME}" | base64 -w0)
    password.json: $(base64 -w0 "${VMW_PASSWORD}")
Notes:
- Opaque secrets are not visible in the console.
- Opaque secrets are created in the managed cluster namespace you chose. Hive uses the opaque secret to provision the cluster. When provisioning the cluster by using the Red Hat Advanced Cluster Management console, the credentials you previoulsy created are copied to the managed cluster namespace as the opaque secret.
1.4.5. Creating a credential for Red Hat OpenStack
You need a credential to use multicluster engine operator console to deploy and manage a Red Hat OpenShift Container Platform cluster on Red Hat OpenStack Platform. Note: Only OpenShift Container Platform versions 4.5.x, and later, are supported.
Note: This procedure must be done before you can create a cluster with multicluster engine operator.
1.4.5.1. Prerequisites
You must have the following prerequisites before you create a credential:
- A deployed hub cluster on OpenShift Container Platform version 4.6 or later.
- Internet access for your hub cluster so it can create the Kubernetes cluster on Red Hat OpenStack Platform.
- Red Hat OpenStack Platform login credentials and Red Hat OpenStack Platform requirements configured for OpenShift Container Platform when using installer-provisioned infrastructure. See Installing a cluster on OpenStack with customizations.
Download or create a
clouds.yamlfile for accessing the CloudStack API. Within theclouds.yamlfile:- Determine the cloud auth section name to use.
- Add a line for the password, immediately following the username line.
1.4.5.2. Managing a credential by using the console
To create a credential from the multicluster engine operator console, complete the steps in the console.
Start at the navigation menu. Click Credentials to choose from existing credential options. Tip: Create a namespace specifically to host your credentials, for both convenience and added security.
-
Add your Red Hat OpenStack Platform
clouds.yamlfile contents. The contents of theclouds.yamlfile, including the password, provide the required information for connecting to the Red Hat OpenStack Platform server. The file contents must include the password, which you add to a new line immediately after theusername. For configurations that use an internal certificate authority, modify your
clouds.yamlfile to reference the final location for the certificate bundle within the Hive deployer pod. Hive mounts the certificate bundle secret to/etc/openstack-cawithin the deployer pod. The files inside of that directory correspond to the keys in the secret that is provided when you create the cluster.Assuming that the key
ca.crtis used in the secret, add thecacertparameter to theclouds.yamlfile as shown in the following example:clouds: openstack: auth: auth_url: https://openstack.example.local:13000 username: "svc-openshift" project_id: aa0owet0wfwerj user_domain_name: "idm" password: REDACTED region_name: "regionOne" interface: "public" identity_api_version: 3 cacert: /etc/openstack-ca/ca.crt-
Add your Red Hat OpenStack Platform cloud name. This entry is the name specified in the cloud section of the
clouds.yamlto use for establishing communication to the Red Hat OpenStack Platform server. - You can optionally add a Base DNS domain for your credential. If you add the base DNS domain to the credential, it is automatically populated in the correct field when you create a cluster with this credential.
For disconnected installations only: Complete the fields in the Configuration for disconnected installation subsection with the required information:
- Cluster OS image: This value contains the URL to the image to use for Red Hat OpenShift Container Platform cluster machines.
Image content sources: This value contains the disconnected registry path. The path contains the hostname, port, and repository path to all of the installation images for disconnected installations. Example:
repository.com:5000/openshift/ocp-release.The path creates an image content source policy mapping in the
install-config.yamlto the Red Hat OpenShift Container Platform release images. As an example,repository.com:5000produces thisimageContentSourcecontent:- mirrors: - registry.example.com:5000/ocp4 source: quay.io/openshift-release-dev/ocp-release-nightly - mirrors: - registry.example.com:5000/ocp4 source: quay.io/openshift-release-dev/ocp-release - mirrors: - registry.example.com:5000/ocp4 source: quay.io/openshift-release-dev/ocp-v4.0-art-dev
Additional trust bundle: This value provides the contents of the certificate file that is required to access the mirror registry.
Note: If you are deploying managed clusters from a hub that is in a disconnected environment, and want them to be automatically imported post install, add an Image Content Source Policy to the
install-config.yamlfile by using theYAMLeditor. A sample entry is shown in the following example:- mirrors: - registry.example.com:5000/rhacm2 source: registry.redhat.io/rhacm2
If you want to enable a proxy, enter the proxy information:
-
HTTP proxy URL: The URL that should be used as a proxy for
HTTPtraffic. -
HTTPS proxy URL: The secure proxy URL that should be used for
HTTPStraffic. If no value is provided, the same value as theHTTP Proxy URLis used for bothHTTPandHTTPS. -
No proxy domains: A comma-separated list of domains that should bypass the proxy. Begin a domain name with a period
.to include all of the subdomains that are in that domain. Add and asterisk*to bypass the proxy for all destinations. - Additional trust bundle: One or more additional CA certificates that are required for proxying HTTPS connections.
-
HTTP proxy URL: The URL that should be used as a proxy for
- Enter your Red Hat OpenShift Pull Secret. You can download your pull secret from Pull secret.
- Add your SSH Private Key and SSH Public Key, which allows you to connect to the cluster. You can use an existing key pair, or create a new one with key generation program. See Generating a key pair for cluster node SSH access for more information.
- Click Create.
- Review the new credential information, then click Add. When you add the credential, it is added to the list of credentials.
You can create a cluster that uses this credential by completing the steps in Creating a cluster on Red Hat OpenStack Platform.
You can edit your credential in the console.
When you are no longer managing a cluster that is using a credential, delete the credential to protect the information in the credential. Select Actions to delete in bulk, or select the options menu beside the credential that you want to delete.
1.4.5.3. Creating an opaque secret by using the API
To create an opaque secret for Red Hat OpenStack Platform by using the API instead of the console, apply YAML content in the YAML preview window that is similar to the following example:
kind: Secret
metadata:
    name: <managed-cluster-name>-osp-creds
    namespace: <managed-cluster-namespace>
type: Opaque
data:
    clouds.yaml: $(base64 -w0 "${OSP_CRED_YAML}") cloud: $(echo -n "openstack" | base64 -w0)
Notes:
- Opaque secrets are not visible in the console.
- Opaque secrets are created in the managed cluster namespace you chose. Hive uses the opaque secret to provision the cluster. When provisioning the cluster by using the Red Hat Advanced Cluster Management console, the credentials you previoulsy created are copied to the managed cluster namespace as the opaque secret.
1.4.6. Creating a credential for Red Hat Virtualization
You need a credential to use multicluster engine operator console to deploy and manage a Red Hat OpenShift Container Platform cluster on Red Hat Virtualization.
Note: This procedure must be done before you can create a cluster with multicluster engine operator.
1.4.6.1. Prerequisites
You must have the following prerequisites before you create a credential:
- A deployed hub cluster on OpenShift Container Platform version 4.7 or later.
- Internet access for your hub cluster so it can create the Kubernetes cluster on Red Hat Virtualization.
Red Hat Virtualization login credentials for a configured Red Hat Virtualization environment. See Installation Guide in the Red Hat Virtualization documentation. The following list shows the required information:
- oVirt URL
- oVirt fully-qualified domain name (FQDN)
- oVirt username
- oVirt password
- oVirt CA/Certificate
- Optional: Proxy information, if you are enabling a proxy.
- Red Hat OpenShift Container Platform pull secret information. You can download your pull secret from Pull secret.
- SSH private and public keys for transferring information for the final cluster.
- Account permissions that allow installing clusters on oVirt.
1.4.6.2. Managing a credential by using the console
To create a credential from the multicluster engine operator console, complete the steps in the console.
Start at the navigation menu. Click Credentials to choose from existing credential options. Tip: Create a namespace specifically to host your credentials, for both convenience and added security.
- Add the basic information for your new credential. You can optionally add a Base DNS domain, which is automatically populated in the correct field when you create a cluster with this credential. If you do not add it to the credential, you can add it when you create the cluster.
- Add the required information for your Red Hat Virtualization environment.
If you want to enable a proxy, enter the proxy information:
-
HTTP Proxy URL: The URL that should be used as a proxy for
HTTPtraffic. -
HTTPS Proxy URL: The secure proxy URL that should be used when using
HTTPStraffic. If no value is provided, the same value as theHTTP Proxy URLis used for bothHTTPandHTTPS. -
No Proxy domains: A comma-separated list of domains that should bypass the proxy. Begin a domain name with a period
.to include all of the subdomains that are in that domain. Add and asterisk*to bypass the proxy for all destinations.
-
HTTP Proxy URL: The URL that should be used as a proxy for
- Enter your Red Hat OpenShift Container Platform pull secret. You can download your pull secret from Pull secret.
- Add your SSH Private Key and SSH Public Key, which allows you to connect to the cluster. You can use an existing key pair, or create a new one with a key generation program. See Generating akey pair for cluster node SSH access for more information.
- Review the new credential information, then click Add. When you add the credential, it is added to the list of credentials.
You can create a cluster that uses this credential by completing the steps in Creating a cluster on Red Hat Virtualization.
You can edit your credential in the console.
When you are no longer managing a cluster that is using a credential, delete the credential to protect the information in the credential. Select Actions to delete in bulk, or select the options menu beside the credential that you want to delete.
1.4.7. Creating a credential for Red Hat OpenShift Cluster Manager
Add an OpenShift Cluster Manager credential so that you can discover clusters.
Required access: Administrator
1.4.7.1. Prerequisites
You need access to a console.redhat.com account. Later you will need the value that can be obtained from console.redhat.com/openshift/token.
1.4.7.2. Managing a credential by using the console
You need to add your credential to discover clusters. To create a credential from the multicluster engine operator console, complete the steps in the console.
Start at the navigation menu. Click Credentials to choose from existing credential options. Tip: Create a namespace specifically to host your credentials, both for convenience and added security.
Your OpenShift Cluster Manager API token can be obtained from console.redhat.com/openshift/token.
You can edit your credential in the console.
When you are no longer managing a cluster that is using a credential, delete the credential to protect the information in the credential. Select Actions to delete in bulk, or select the options menu beside the credential that you want to delete.
If your credential is removed, or your OpenShift Cluster Manager API token expires or is revoked, then the associated discovered clusters are removed.
1.4.8. Creating a credential for Ansible Automation Platform
You need a credential to use multicluster engine operator console to deploy and manage an Red Hat OpenShift Container Platform cluster that is using Red Hat Ansible Automation Platform.
Required access: Edit
Note: This procedure must be done before you can create an Automation template to enable automation on a cluster.
1.4.8.1. Prerequisites
You must have the following prerequisites before creating a credential:
- A deployed multicluster engine operator hub cluster
- Internet access for your multicluster engine operator hub cluster
- Ansible login credentials, which includes Ansible Automation Platform hostname and OAuth token; see Credentials for Ansible Automation Platform.
- Account permissions that allow you to install hub clusters and work with Ansible. Learn more about Ansible users.
1.4.8.2. Managing a credential by using the console
To create a credential from the multicluster engine operator console, complete the steps in the console.
Start at the navigation menu. Click Credentials to choose from existing credential options. Tip: Create a namespace specifically to host your credentials, both for convenience and added security.
The Ansible Token and host URL that you provide when you create your Ansible credential are automatically updated for the automations that use that credential when you edit the credential. The updates are copied to any automations that use that Ansible credential, including those related to cluster lifecycle, governance, and application management automations. This ensures that the automations continue to run after the credential is updated.
You can edit your credential in the console. Ansible credentials are automatically updated in your automation that use that credential when you update them in the credential.
You can create an Ansible Job that uses this credential by completing the steps in Configuring Ansible Automation Platform tasks to run on managed clusters.
When you are no longer managing a cluster that is using a credential, delete the credential to protect the information in the credential. Select Actions to delete in bulk, or select the options menu beside the credential that you want to delete.
1.4.9. Creating a credential for an on-premises environment
You need a credential to use the console to deploy and manage a Red Hat OpenShift Container Platform cluster in an on-premises environment. The credential specifies the connections that are used for the cluster.
Required access: Edit
1.4.9.1. Prerequisites
You need the following prerequisites before creating a credential:
- A hub cluster that is deployed.
- Internet access for your hub cluster so it can create the Kubernetes cluster on your infrastructure environment.
- For a disconnected environment, you must have a configured mirror registry where you can copy the release images for your cluster creation. See Mirroring images for a disconnected installation in the OpenShift Container Platform documentation for more information.
- Account permissions that support installing clusters on the on-premises environment.
1.4.9.2. Managing a credential by using the console
To create a credential from the console, complete the steps in the console.
Start at the navigation menu. Click Credentials to choose from existing credential options. Tip: Create a namespace specifically to host your credentials, both for convenience and added security.
- Select Host inventory for your credential type.
- You can optionally add a Base DNS domain for your credential. If you add the base DNS domain to the credential, it is automatically populated in the correct field when you create a cluster with this credential. If you do not add the DNS domain, you can add it when you create your cluster.
- Enter your Red Hat OpenShift pull secret. You can download your pull secret from Pull secret. See Using image pull secrets for more information about pull secrets.
- Select Add to create your credential.
You can create a cluster that uses this credential by completing the steps in Creating a cluster in an on-premises environment.
When you are no longer managing a cluster that is using a credential, delete the credential to protect the information in the credential. Select Actions to delete in bulk, or select the options menu beside the credential that you want to delete.
1.5. Cluster lifecycle introduction
The multicluster engine operator is the cluster lifecycle operator that provides cluster management capabilities for OpenShift Container Platform and Red Hat Advanced Cluster Management hub clusters. The multicluster engine operator is a software operator that enhances cluster fleet management and supports OpenShift Container Platform cluster lifecycle management across clouds and data centers. You can use multicluster engine operator with or without Red Hat Advanced Cluster Management. Red Hat Advanced Cluster Management also installs multicluster engine operator automatically and offers further multicluster capabilities.
See the following documentation:
- Cluster lifecycle architecture
- Managing credentials overview
- Host inventory introduction
- Creating a cluster with the CLI
- Configuring additional manifests during cluster creation
- Creating a cluster on Amazon Web Services
- Creating a cluster on Amazon Web Services GovCloud
- Creating a cluster on Microsoft Azure
- Creating a cluster on Google Cloud Platform
- Creating a cluster on VMware vSphere
- Creating a cluster on Red Hat OpenStack Platform
- Creating a cluster on Red Hat Virtualization
- Creating a cluster in an on-premise environment
- Creating a cluster in a proxy environment
- Hibernating a created cluster (Technology Preview)
- Accessing your cluster
- Enabling cluster proxy add-ons
- Configuring Ansible Automation Platform tasks to run on managed clusters
- Using ManagedClusterSets with Placement
- Enabling ManagedServiceAccount
- Cluster lifecycle advanced configuration
- Removing a cluster from management
1.5.1. Cluster lifecycle architecture
Cluster lifecycle reuires two types of clusters: hub clusters and managed clusters.
The hub cluster is the OpenShift Container Platform (or Red Hat Advanced Cluster Management) main cluster with the multicluster engine operator automatically installed. You can create, manage, and monitor other Kubernetes clusters with the hub cluster. You can create clusters by using the hub cluster, while you can also import existing clusters to be managed by the hub cluster.
When you create a managed cluster, the cluster is created using the Red Hat OpenShift Container Platform cluster installer with the Hive resource. You can find more information about the process of installing clusters with the OpenShift Container Platform installer by reading OpenShift Container Platform installation overview in the OpenShift Container Platform documentation.
The following diagram shows the components that are installed with the multicluster engine for Kubernetes operator for cluster management:
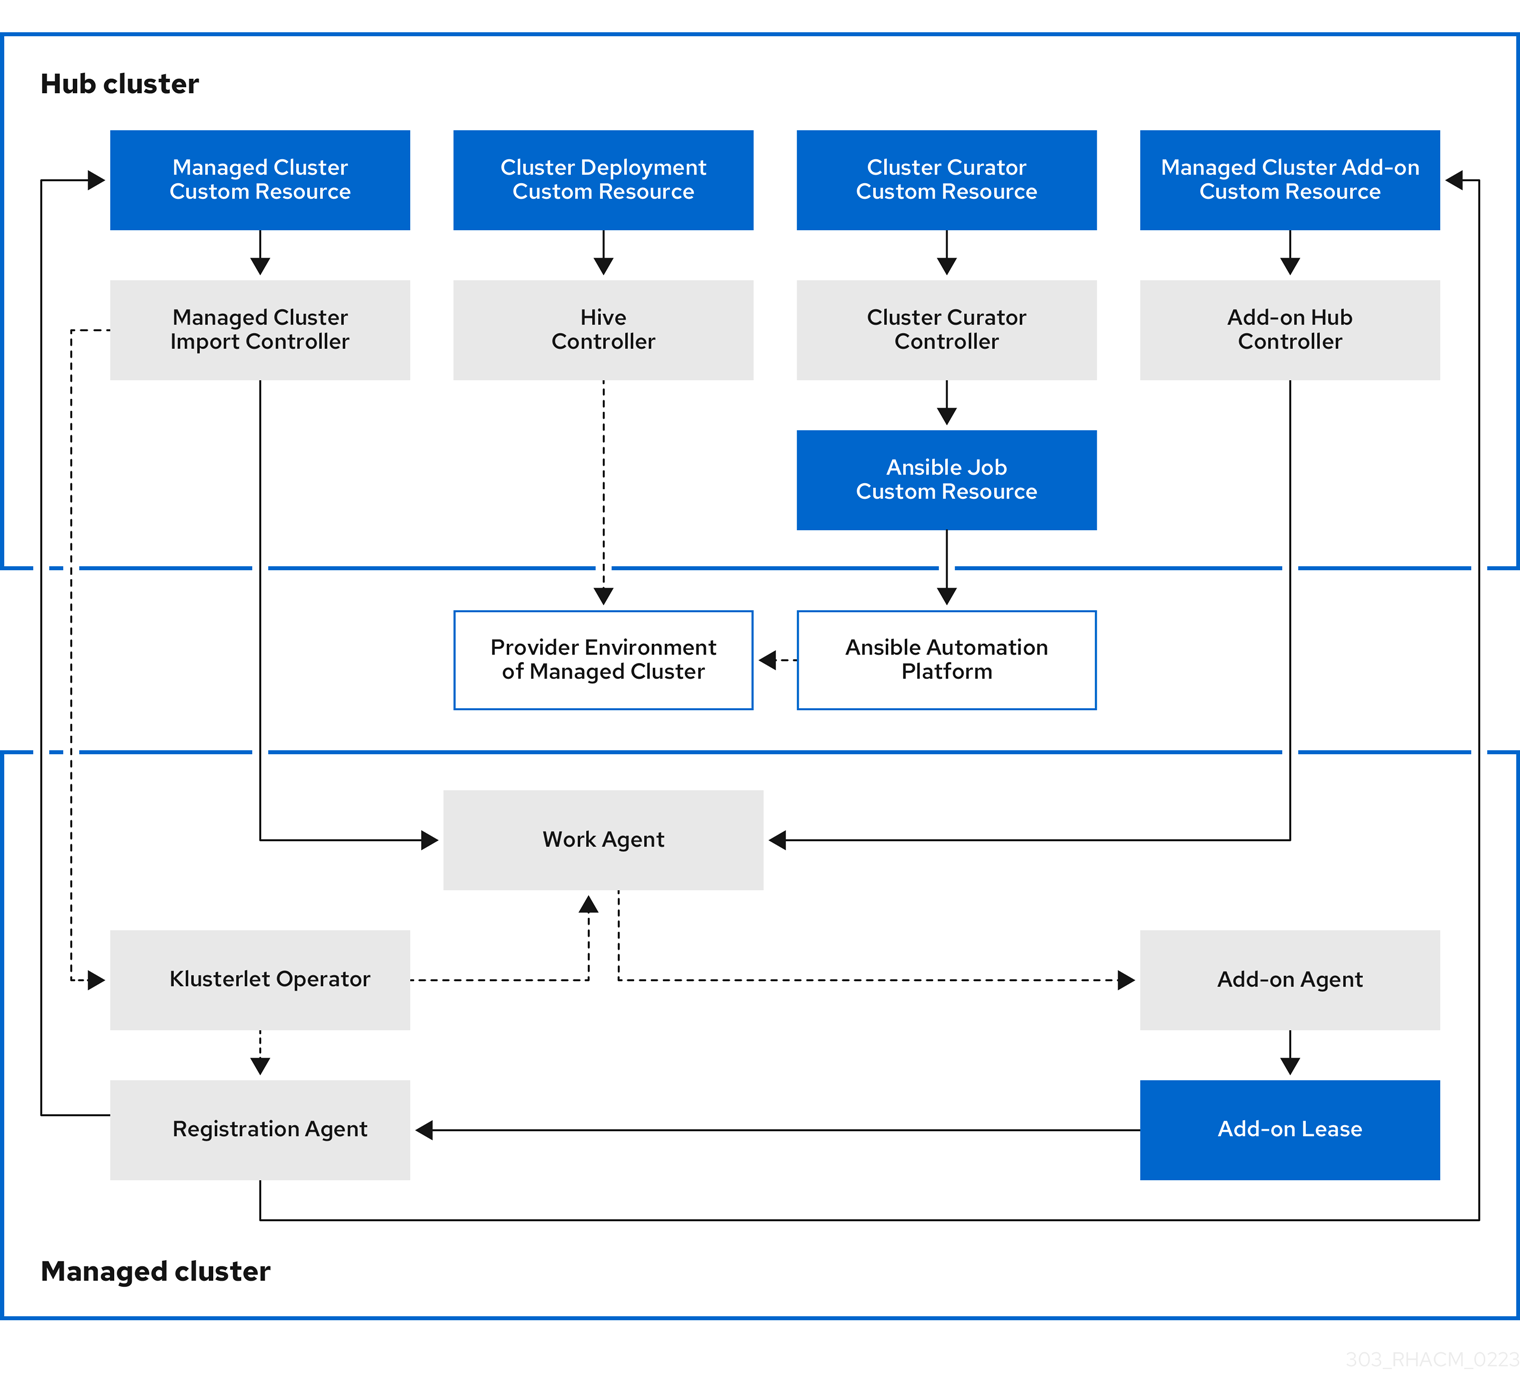
The components of the cluster lifecycle management architecture include the following items:
1.5.1.1. Hub cluster
- The managed cluster import controller deploys the klusterlet operator to the managed clusters.
- The Hive controller provisions the clusters that you create by using the multicluster engine for Kubernetes operator. The Hive Controller also destroys managed clusters that were created by the multicluster engine for Kubernetes operator.
- The cluster curator controller creates the Ansible jobs as the pre-hook or post-hook to configure the cluster infrastructure environment when creating or upgrading managed clusters.
- When a managed cluster add-on is enabled on the hub cluster, its add-on hub controller is deployed on the hub cluster. The add-on hub controller deploys the add-on agent to the managed clusters.
1.5.1.2. Managed cluster
- The klusterlet operator deploys the registration and work controllers on the managed cluster.
The Registration Agent registers the managed cluster and the managed cluster add-ons with the hub cluster. The Registration Agent also maintains the status of the managed cluster and the managed cluster add-ons. The following permissions are automatically created within the Clusterrole to allow the managed cluster to access the hub cluster:
- Allows the agent to get or update its owned cluster that the hub cluster manages
- Allows the agent to update the status of its owned cluster that the hub cluster manages
- Allows the agent to rotate its certificate
-
Allows the agent to
getorupdatethecoordination.k8s.iolease -
Allows the agent to
getits managed cluster add-ons - Allows the agent to update the status of its managed cluster add-ons
- The work agent applies the Add-on Agent to the managed cluster. The permission to allow the managed cluster to access the hub cluster is automatically created within the Clusterrole and allows the agent to send events to the hub cluster.
To continue adding and managing clusters, see the Cluster lifecycle introduction.
1.5.2. Release images
When you create a cluster on a provider by using multicluster engine operator, you must specify a release image to use for the new cluster. The release image specifies which version of Red Hat OpenShift Container Platform is used to build the cluster. By default, the clusterImageSets resources are used by OpenShift Container Platform to get the list of supported release images.
The acm-hive-openshift-releases GitHub repository contains the YAML files for the clusterImageSets that are supported by OpenShift Container Platform. The contents of this Git repository is organized using a directory structure to separate images based on the OpenShift Container Platform version and the release channel value: fast, stable, candidate. The branches in the Git repository maps to the OpenShift Container Platform release, where each branch contains clusterImageSets YAML files that are supported by the corresponding OpenShift Container Platform release.
In multicluster engine operator, a cluster image set controller that runs on the hub cluster. This controller queries the acm-hive-openshift-releases GitHub repository, at set intervals, for new clusterImageSets YAML files. By default, the controller synchronizes with the fast channel in the backplane-2.2 branch.
You can configure your ClusterImageSets with the following options.
Option 1: Specify the image reference for the specific
ClusterImageSetthat you want to use in the console when creating a cluster. Each new entry you specify persists and is available for all future cluster provisions. See the following example entry:quay.io/openshift-release-dev/ocp-release:4.12.8-x86_64
-
Option 2: Manually create and apply a
ClusterImageSetsYAML file from theacm-hive-openshift-releasesGitHub repository. -
Option 3: Follow the
README.mdin the cluster-image-set-controller GitHub repository to enable automatic updates ofClusterImageSetsfrom a forked GitHub repository.
The cluster image set controller can be configured to use other Git repositories for synchronization of the ClusterImageSets. The controller reads the Git repository configuration from the cluster-image-set-git-repo ConfigMap in the multicluster-engine namespace. You can use this ConfigMap to pause the controller from synchronizing the ClusterImageSets. This is achieved by specifying a non-existent/invalid URL in the gitRepoUrl field, as shown below.
apiVersion: v1
kind: ConfigMap
metadata:
  name: cluster-image-set-git-repo
  namespace: multicluster-engine
data:
  gitRepoUrl: https://github.com/stolostron/bad-acm-hive-openshift-releases.git
  gitRepoBranch: backplane-2.2
  gitRepoPath: clusterImageSets
  channel: fast
Note: Only release images with the label of: visible: 'true' are available to select when creating clusters in the console. An example of this label in a ClusterImageSet resource is provided in the following content:
apiVersion: config.openshift.io/v1
kind: ClusterImageSet
metadata:
  labels:
    channel: fast
    visible: 'true'
  name: img4.12.8-x86-64-appsub
spec:
  releaseImage: quay.io/openshift-release-dev/ocp-release:4.12.8-x86_64
Additional release images are stored, but are not visible in the console. To view all of the available release images, run kubectl get clusterimageset.
Continue reading to learn more about release images:
1.5.2.1. Specifying release images
When you create a cluster on a provider by using multicluster engine operator, you must specify a release image to use for the new cluster. The release image specifies which version of Red Hat OpenShift Container Platform is used to build the cluster. By default, the clusterImageSets resources are used by OpenShift Container Platform to get the list of supported release images.
Locating ClusterImageSetsConfiguring ClusterImageSetsCreating a release image to deploy a cluster on a different architecture
1.5.2.1.1. Locating ClusterImageSets
The files that reference the release images are YAML files that are maintained in the acm-hive-openshift-releases GitHub repository GitHub repository. Red Hat Advanced Cluster Management uses those files to create the list of the available release images in the console. This includes the latest fast channel images from OpenShift Container Platform.
The console only displays the latest release images for the three latest versions of OpenShift Container Platform. For example, you might see the following release images displayed in the console options:
- quay.io/openshift-release-dev/ocp-release:4.6.23-x86_64
- quay.io/openshift-release-dev/ocp-release:4.10.1-x86_64
Only the latest versions are in the console to encourage the creation of clusters with the latest release images. In some cases, you might need to create a cluster that is a specific version, which is why the older versions are available.
Note: Only release images with the visible: 'true' label are available to select when creating clusters in the console. An example of this label in a ClusterImageSet resource is provided in the following content:
apiVersion: config.openshift.io/v1
kind: ClusterImageSet
metadata:
  labels:
    channel: fast
    visible: 'true'
  name: img4.10.1-x86-64-appsub
spec:
  releaseImage: quay.io/openshift-release-dev/ocp-release:4.10.1-x86_64
Additional release images are stored, but are not visible in the console. To view all of the available release images, run kubectl get clusterimageset in your CLI.
The repository contains the clusterImageSets directory, which is the directory that you use when working with the release images. The clusterImageSets directory contains the following directories:
- Fast: Contains files that reference the latest versions of the release images for each OpenShift Container Platform version that is supported. The release images in this folder are tested, verified, and supported.
Releases: Contains files that reference all of the release images for each OpenShift Container Platform version (stable, fast, and candidate channels) Note: These releases have not all been tested and determined to be stable.
- Stable: Contains files that reference the latest two stable versions of the release images for each OpenShift Container Platform version that is supported.
Note: By default, the current list of release images is updated one time an hour. After upgrading the product, it may take up to an hour for the list to reflect the recommended release image versions for the new version of the product.
1.5.2.1.2. Configuring ClusterImageSets
You can configure your ClusterImageSets with the following options.
Option 1: Specify the image reference for the specific
ClusterImageSetthat you want to use in the console when creating a cluster. Each new entry you specify persists and is available for all future cluster provisions. See the following example entry:quay.io/openshift-release-dev/ocp-release:4.6.8-x86_64
-
Option 2: Manually create and apply a
ClusterImageSetsYAML file from theacm-hive-openshift-releasesGitHub repository. -
Option 3: Follow the
README.mdin the cluster-image-set-controller GitHub repository to enable automatic updates ofClusterImageSetsfrom a forked GitHub repository.
1.5.2.1.3. Creating a release image to deploy a cluster on a different architecture
You can create a cluster on an architecture that is different from the architecture of the hub cluster by manually creating a release image that contains the files for both architectures.
For example, you might need to create an x86_64 cluster from a hub cluster that is running on the ppc64le, aarch64, or s390x architecture. If you create the release image with both sets of files, the cluster creation succeeds because the new release image enables the OpenShift Container Platform release registry to provide a multi-architecture image manifest.
OpenShift Container Platform 4.11 and later supports multiple architectures by default. You can use the following clusterImageSet to provision a cluster:
apiVersion: hive.openshift.io/v1
kind: ClusterImageSet
metadata:
  labels:
    channel: fast
    visible: 'true'
  name: img4.12.0-multi-appsub
spec:
  releaseImage: quay.io/openshift-release-dev/ocp-release:4.12.0-multi
To create the release image for OpenShift Container Platform images that do not support multiple architectures, complete steps similar to the following example for your architecture type:
From the OpenShift Container Platform release registry, create a manifest list that includes
x86_64,s390x,aarch64, andppc64lerelease images.Pull the manifest lists for both architectures in your environment from the Quay repository using the following example commands:
podman pull quay.io/openshift-release-dev/ocp-release:4.10.1-x86_64
podman pull quay.io/openshift-release-dev/ocp-release:4.10.1-ppc64le
podman pull quay.io/openshift-release-dev/ocp-release:4.10.1-s390x
podman pull quay.io/openshift-release-dev/ocp-release:4.10.1-aarch64
Log in to your private repository where you maintain your images:
podman login <private-repo>
Replace
private-repowith the path to your repository.Add the release image manifest to your private repository by running the following commands that apply to your environment:
podman push quay.io/openshift-release-dev/ocp-release:4.10.1-x86_64 <private-repo>/ocp-release:4.10.1-x86_64
podman push quay.io/openshift-release-dev/ocp-release:4.10.1-ppc64le <private-repo>/ocp-release:4.10.1-ppc64le
podman push quay.io/openshift-release-dev/ocp-release:4.10.1-s390x <private-repo>/ocp-release:4.10.1-s390x
podman push quay.io/openshift-release-dev/ocp-release:4.10.1-aarch64 <private-repo>/ocp-release:4.10.1-aarch64
Replace
private-repowith the path to your repository.Create a manifest for the new information:
podman manifest create mymanifest
Add references to both release images to the manifest list:
podman manifest add mymanifest <private-repo>/ocp-release:4.10.1-x86_64
podman manifest add mymanifest <private-repo>/ocp-release:4.10.1-ppc64le
podman manifest add mymanifest <private-repo>/ocp-release:4.10.1-s390x
podman manifest add mymanifest <private-repo>/ocp-release:4.10.1-aarch64
Replace
private-repowith the path to your repository.Merge the list in your manifest list with the existing manifest:
podman manifest push mymanifest docker://<private-repo>/ocp-release:4.10.1
Replace
private-repowith the path to your repository.
On the hub cluster, create a release image that references the manifest in your repository.
Create a YAML file that contains information that is similar to the following example:
apiVersion: hive.openshift.io/v1
kind: ClusterImageSet
metadata:
  labels:
    channel: fast
    visible: "true"
  name: img4.10.1-appsub
spec:
  releaseImage: <private-repo>/ocp-release:4.10.1
Replace
private-repowith the path to your repository.Run the following command on your hub cluster to apply the changes:
oc apply -f <file-name>.yaml
Replace
file-namewith the name of the YAML file that you just created.
- Select the new release image when you create your OpenShift Container Platform cluster.
- If you deploy the managed cluster using the Red Hat Advanced Cluster Management console, specify the architecture for the managed cluster in the Architecture field during the cluster creation process.
The creation process uses the merged release images to create the cluster.
1.5.2.2. Maintaining a custom list of release images when connected
You might want to use the same release image for all of your clusters. To simplify, you can create your own custom list of release images that are available when creating a cluster. Complete the following steps to manage your available release images:
- Fork the acm-hive-openshift-releases GitHub repository 2.7 branch.
-
Add the YAML files for the images that you want available when you create a cluster. Add the images to the
./clusterImageSets/stable/or./clusterImageSets/fast/directory by using the Git console or the terminal. -
Create a
ConfigMapin themulticluster-enginenamespace namedcluster-image-set-git-repo. See the following example:
apiVersion: v1
kind: ConfigMap
metadata:
  name: cluster-image-set-git-repo
  namespace: multicluster-engine
data:
  gitRepoUrl: <forked acm-hive-openshift-releases repository URL>
  gitRepoBranch: backplane-2.2
  gitRepoPath: clusterImageSets
  channel: <fast or stable>
You can retrieve the available YAML files from the main repository by merging changes in to your forked repository with the following procedure:
- Commit and merge your changes to your forked repository.
-
To synchronize your list of fast release images after you clone the
acm-hive-openshift-releasesrepository, update the value of channel field in thecluster-image-set-git-repoConfigMaptofast. -
To synchronize and display the stable release images, update the value of channel field in the
cluster-image-set-git-repoConfigMaptostable.
After updating the ConfigMap, the list of available stable release images updates with the currently available images in about one minute. By default, Red Hat Advanced Cluster Management preloads a few ClusterImageSets.
You can use the following commands to list what is available and remove the defaults. Replace
<clusterImageSet_NAME>with the correct name:oc get clusterImageSets oc delete clusterImageSet <clusterImageSet_NAME>
View the list of currently available release images in the console when you are creating a cluster.
For information regarding other fields available through the ConfigMap, view the cluster-image-set-controller GitHub repository README.
1.5.2.3. Maintaining a custom list of release images while disconnected
In some cases, you need to maintain a custom list of release images when the hub cluster has no Internet connection. You can create your own custom list of release images that are available when creating a cluster. Complete the following steps to manage your available release images while disconnected:
- While you are on a connected system, navigate to the acm-hive-openshift-releases GitHub repository to access the cluster image sets that are available for version 2.7.
-
Copy the
clusterImageSetsdirectory to a system that can access the disconnected multicluster engine operator cluster. Add the mapping between the managed cluster and the disconnected repository with your cluster image sets by completing the following steps that fits your managed cluster:
-
For an OpenShift Container Platform managed cluster, see Configuring image registry repository mirroring for information about using your
ImageContentSourcePolicyobject to complete the mapping. -
For a managed cluster that is not an OpenShift Container Platform cluster, use the
ManageClusterImageRegistrycustom resource definition to override the location of the image sets. See Specifying registry images on managed clusters for import for information about how to override the cluster for the mapping.
-
For an OpenShift Container Platform managed cluster, see Configuring image registry repository mirroring for information about using your
-
Add the YAML files for the images that you want available when you create a cluster by using the console or CLI to manually add the
clusterImageSetYAML content. Modify the
clusterImageSetYAML files for the remaining OpenShift Container Platform release images to reference the correct offline repository where you store the images. Your updates resemble the following example wherespec.releaseImagerefers to the image registry that you are using:apiVersion: hive.openshift.io/v1 kind: ClusterImageSet metadata: labels: channel: fast name: img4.12.8-x86-64-appsub spec: releaseImage: IMAGE_REGISTRY_IPADDRESS_or_DNSNAME/REPO_PATH/ocp-release:4.12.8-x86_64Ensure that the images are loaded in the offline image registry that is referenced in the YAML file.
Create each of the
clusterImageSetsby entering the following command for each YAML file:oc create -f <clusterImageSet_FILE>
Replace
clusterImageSet_FILEwith the name of the cluster image set file. For example:oc create -f img4.11.9-x86_64.yaml
After running this command for each resource you want to add, the list of available release images are available.
-
Alternately you can paste the image URL directly in the create cluster console. Adding the image URL creates new
clusterImageSetsif they do not exist. - View the list of currently available release images in the console when you are creating a cluster.
1.5.3. Host inventory introduction
The host inventory management and on-premises cluster installation are available using the multicluster engine operator central infrastructure management feature. Central infrastructure management runs the Assisted Installer (also called infrastructure operator) as an operator on the hub cluster.
You can use the console to create a host inventory, which is a pool of bare metal or virtual machines that you can use to create on-premises OpenShift Container Platform clusters. These clusters can be standalone, with dedicated machines for the control plane, or hosted control planes, where the control plane runs as pods on a hub cluster.
You can install standalone clusters by using the console, API, or GitOps by using Zero Touch Provisioning (ZTP). See Installing GitOps ZTP in a disconnected environment in the Red Hat OpenShift Container Platform documentation for more information on ZTP.
A machine joins the host inventory after booting with a Discovery Image. The Discovery Image is a Red Hat CoreOS live image that contains the following:
- An agent that performs discovery, validation, and installation tasks.
- The necessary configuration for reaching the service on the hub cluster, including the endpoint, token, and static network configuration, if applicable.
You generally have a single Discovery Image for each infrastructure environment, which is a set of hosts sharing a common set of properties. The InfraEnv custom resource definition represents this infrastructure environment and associated Discovery Image. The image used is based on your OpenShift Container Platform version, which determines the operating system version that is selected.
After the host boots and the agent contacts the service, the service creates a new Agent custom resource on the hub cluster representing that host. The Agent resources make up the host inventory.
You can install hosts in the inventory as OpenShift nodes later. The agent writes the operating system to the disk, along with the necessary configuration, and reboots the host.
Continue reading to learn more about host inventories and central infrastructure management:
- Enabling the central infrastructure management service
- Enabling central infrastructure management on Amazon Web Services
- Creating a host inventory by using the console
- Creating a host inventory by using the command line interface
- Configuring advanced networking for an infrastructure environment
- Adding hosts to the host inventory by using the Discovery Image
- Automatically adding bare metal hosts to the host inventory
- Managing your host inventory
- Creating a cluster in an on-premises environment
1.5.3.1. Enabling the central infrastructure management service
The central infrastructure management service is provided with the multicluster engine operator and deploys OpenShift Container Platform clusters. Central infrastructure management is deployed automatically when you enable the MultiClusterHub Operator on the hub cluster, but you have to enable the service manually.
1.5.3.1.1. Prerequisites
See the following prerequisites before enabling the central infrastructure management service:
- You must have a deployed hub cluster on OpenShift Container Platform 4.10 or later with the supported Red Hat Advanced Cluster Management for Kubernetes version.
- You need internet access for your hub cluster (connected), or a connection to an internal or mirror registry that has a connection to the internet (disconnected) to retrieve the required images for creating the environment.
- You must open the required ports for bare metal provisoning. See Ensuring required ports are open in the OpenShift Container Platform documentation.
- You need a bare metal host custom resource definition.
- You need an OpenShift Container Platform pull secret. See Using image pull secrets for more information.
- You need a configured default storage class.
- For disconnected environments only, complete the procedure for Clusters at the network far edge in the OpenShift Container Platform documentation.
1.5.3.1.2. Creating a bare metal host custom resource definition
You need a bare metal host custom resource definition before enabling the central infrastructure management service.
Check if you already have a bare metal host custom resource definition by running the following command:
oc get crd baremetalhosts.metal3.io
- If you have a bare metal host custom resource definition, the output shows the date when the resource was created.
If you do not have the resource, you receive an error that resembles the following:
Error from server (NotFound): customresourcedefinitions.apiextensions.k8s.io "baremetalhosts.metal3.io" not found
If you do not have a bare metal host custom resource definition, download the metal3.io_baremetalhosts.yaml file and apply the content by running the following command to create the resource:
oc apply -f
1.5.3.1.3. Creating or modifying the Provisioning resource
You need a Provisioning resource before enabling the central infrastructure management service.
Check if you have the
Provisioningresource by running the following command:oc get provisioning
-
If you already have a
Provisioningresource, continue by Modifying theProvisioningresource. -
If you do not have a
Provisioningresource, you receive aNo resources founderror. Continue by Creating theProvisioningresource.
-
If you already have a
1.5.3.1.3.1. Modifying the Provisioning resource
If you already have a Provisioning resource, you must modify the resource if your hub cluster is installed on one of the following platforms:
- Bare metal
- Red Hat OpenStack Platform
- VMware vSphere
-
User-provisioned infrastructure (UPI) method and the platform is
None
If your hub cluster is installed on a different platform, continue at Enabling central infrastructure management in disconnected environments or Enabling central infrastructure management in connected environments.
Modify the
Provisioningresource to allow the Bare Metal Operator to watch all namespaces by running the following command:oc patch provisioning provisioning-configuration --type merge -p '{"spec":{"watchAllNamespaces": true }}'
1.5.3.1.3.2. Creating the Provisioning resource
If you do not have a Provisioning resource, complete the following steps:
Create the
Provisioningresource by adding the following YAML content:apiVersion: metal3.io/v1alpha1 kind: Provisioning metadata: name: provisioning-configuration spec: provisioningNetwork: "Disabled" watchAllNamespaces: true
Apply the content by running the following command:
oc apply -f
1.5.3.1.4. Enabling central infrastructure management in disconnected environments
To enable central infrastructure management in disconnected environments, complete the following steps:
Create a
ConfigMapin the same namespace as your infrastructure operator to specify the values forca-bundle.crtandregistries.conffor your mirror registry. Your fileConfigMapmight resemble the following example:apiVersion: v1 kind: ConfigMap metadata: name: <mirror-config> namespace: multicluster-engine labels: app: assisted-service data: ca-bundle.crt: | <certificate-content> registries.conf: | unqualified-search-registries = ["registry.access.redhat.com", "docker.io"] [[registry]] prefix = "" location = "registry.redhat.io/multicluster-engine" mirror-by-digest-only = true [[registry.mirror]] location = "mirror.registry.com:5000/multicluster-engine"Registries in the list of
unqualified-search-registriesare automatically added to an authentication ignore list in thePUBLIC_CONTAINER_REGISTRIESenvironment variable. The specified registries do not require authentication when the pull secret of the managed cluster is validated.Create the
AgentServiceConfigcustom resource by saving the following YAML content in theagent_service_config.yamlfile:apiVersion: agent-install.openshift.io/v1beta1 kind: AgentServiceConfig metadata: name: agent spec: databaseStorage: accessModes: - ReadWriteOnce resources: requests: storage: <db_volume_size> filesystemStorage: accessModes: - ReadWriteOnce resources: requests: storage: <fs_volume_size> mirrorRegistryRef: name: <mirror_config> 1 unauthenticatedRegistries: - <unauthenticated_registry> 2 imageStorage: accessModes: - ReadWriteOnce resources: requests: storage: <img_volume_size> 3 osImages: - openshiftVersion: "<ocp_version>" 4 version: "<ocp_release_version>" 5 url: "<iso_url>" 6 cpuArchitecture: "x86_64"- 1
- Replace
mirror_configwith the name of theConfigMapthat contains your mirror registry configuration details. - 2
- Include the optional
unauthenticated_registryparameter if you are using a mirror registry that does not require authentication. Entries on this list are not validated or required to have an entry in the pull secret. - 3
- Replace
img_volume_sizewith the size of the volume for theimageStoragefield, for example10Giper operating system image. The minimum value is10Gi, but the recommended value is at least50Gi. This value specifies how much storage is allocated for the images of the clusters. You need to allow 1 GB of image storage for each instance of Red Hat Enterprise Linux CoreOS that is running. You might need to use a higher value if there are many clusters and instances of Red Hat Enterprise Linux CoreOS. - 4
- Replace
ocp_versionwith the OpenShift Container Platform version to install, for example,4.13. - 5
- Replace
ocp_release_versionwith the specific install version, for example,49.83.202103251640-0. - 6
- Replace
iso_urlwith the ISO url, for example,https://mirror.openshift.com/pub/openshift-v4/x86_64/dependencies/rhcos/4.10/4.10.3/rhcos-4.10.3-x86_64-live.x86_64.iso. You can find other values at the 4.10.3 dependencies.
Important: If you are using the late binding feature and the spec.osImages releases in the AgentServiceConfig custom resource are version 4.13 or later, the OpenShift Container Platform release images that you use when creating your clusters must be version 4.13 or later. The Red Hat Enterprise Linux CoreOS images for version 4.13 and later are not compatible with images earlier than version 4.13.
You can verify that your central infrastructure management service is healthy by checking the assisted-service and assisted-image-service deployments and ensuring that their pods are ready and running.
1.5.3.1.5. Enabling central infrastructure management in connected environments
To enable central infrastructure management in connected environments, create the AgentServiceConfig custom resource by saving the following YAML content in the agent_service_config.yaml file:
apiVersion: agent-install.openshift.io/v1beta1
kind: AgentServiceConfig
metadata:
 name: agent
spec:
  databaseStorage:
    accessModes:
    - ReadWriteOnce
    resources:
      requests:
        storage: <db_volume_size> 1
  filesystemStorage:
    accessModes:
    - ReadWriteOnce
    resources:
      requests:
        storage: <fs_volume_size> 2
  imageStorage:
    accessModes:
    - ReadWriteOnce
    resources:
      requests:
storage: <img_volume_size> 3- 1
- Replace
db_volume_sizewith the volume size for thedatabaseStoragefield, for example10Gi. This value specifies how much storage is allocated for storing files such as database tables and database views for the clusters. The minimum value that is required is1Gi. You might need to use a higher value if there are many clusters. - 2
- Replace
fs_volume_sizewith the size of the volume for thefilesystemStoragefield, for example200Mper cluster and2-3Giper supported OpenShift Container Platform version. The minimum value that is required is1Gi, but the recommended value is at least100Gi. This value specifies how much storage is allocated for storing logs, manifests, andkubeconfigfiles for the clusters. You might need to use a higher value if there are many clusters. - 3
- Replace
img_volume_sizewith the size of the volume for theimageStoragefield, for example10Giper operating system image. The minimum value is10Gi, but the recommended value is at least50Gi. This value specifies how much storage is allocated for the images of the clusters. You need to allow 1 GB of image storage for each instance of Red Hat Enterprise Linux CoreOS that is running. You might need to use a higher value if there are many clusters and instances of Red Hat Enterprise Linux CoreOS.
Your central infrastructure management service is configured. You can verify that it is healthy by checking the assisted-service and assisted-image-service deployments and ensuring that their pods are ready and running.
1.5.3.1.6. Additional resources
- For additional information about zero touch provisioning, see Clusters at the network far edge in the OpenShift Container Platform documentation.
- See Using image pull secrets
1.5.3.2. Enabling central infrastructure management on Amazon Web Services
If you are running your hub cluster on Amazon Web Services and want to enable the central infrastructure management service, complete the following steps after Enabling the central infrastructure management service:
Make sure you are logged in at the hub cluster and find the unique domain configured on the
assisted-image-serviceby running the following command:oc get routes --all-namespaces | grep assisted-image-service
Your domain might resemble the following example:
assisted-image-service-multicluster-engine.apps.<yourdomain>.comMake sure you are logged in at the hub cluster and create a new
IngressControllerwith a unique domain using theNLBtypeparameter. See the following example:apiVersion: operator.openshift.io/v1 kind: IngressController metadata: name: ingress-controller-with-nlb namespace: openshift-ingress-operator spec: domain: nlb-apps.<domain>.com routeSelector: matchLabels: router-type: nlb endpointPublishingStrategy: type: LoadBalancerService loadBalancer: scope: External providerParameters: type: AWS aws: type: NLB-
Add
<yourdomain>to thedomainparameter inIngressControllerby replacing<domain>innlb-apps.<domain>.comwith<yourdomain>. Apply the new
IngressControllerby running the following command:oc apply -f ingresscontroller.yaml
Make sure that the value of the
spec.domainparameter of the newIngressControlleris not in conflict with an existingIngressControllerby completing the following steps:List all
IngressControllersby running the following command:oc get ingresscontroller -n openshift-ingress-operator
Run the following command on each of the
IngressControllers, except theingress-controller-with-nlbthat you just created:oc edit ingresscontroller <name> -n openshift-ingress-operator
If the
spec.domainreport is missing, add a default domain that matches all of the routes that are exposed in the cluster exceptnlb-apps.<domain>.com.If the
spec.domainreport is provided, make sure that thenlb-apps.<domain>.comroute is excluded from the specified range.
Run the following command to edit the
assisted-image-serviceroute to use thenlb-appslocation:oc edit route assisted-image-service -n <namespace>
The default namespace is where you installed the multicluster engine operator.
Add the following lines to the
assisted-image-serviceroute:metadata: labels: router-type: nlb name: assisted-image-serviceIn the
assisted-image-serviceroute, find the URL value ofspec.host. The URL might resemble the following example:assisted-image-service-multicluster-engine.apps.<yourdomain>.com
-
Replace
appsin the URL withnlb-appsto match the domain configured in the newIngressController. To verify that the central infrastructure management service is enabled on Amazon Web Services, run the following command to verify that the pods are healthy:
oc get pods -n multicluster-engine | grep assist
-
Create a new host inventory and ensure that the download URL uses the new
nlb-appsURL.
1.5.3.3. Creating a host inventory by using the console
You can create a host inventory (infrastructure environment) to discover physical or virtual machines that you can install your OpenShift Container Platform clusters on.
1.5.3.3.1. Prerequisites
- You must enable the central infrastructure management service. See Enabling the central infrastructure management service for more information.
1.5.3.3.2. Creating a host inventory
Complete the following steps to create a host inventory by using the console:
- From the console, navigate to Infrastructure > Host inventory and click Create infrastructure environment.
Add the following information to your host inventory settings:
-
Name: A unique name for your infrastructure environment. Creating an infrastructure environment by using the console also creates a new namespace for the
InfraEnvresource with the name you chose. If you createInfraEnvresources by using the command line interface and want to monitor the resources in the console, use the same name for your namespace and theInfraEnv. - Network type: Specifies if the hosts you add to your infrastructure environment use DHCP or static networking. Static networking configuration requires additional steps.
- Location: Specifies the geographic location of the hosts. The geographic location can be used to define which data center the hosts are located.
- Labels: Optional field where you can add labels to the hosts that are discovered with this infrastructure environment. The specified location is automatically added to the list of labels.
- Infrastructure provider credentials: Selecting an infrastructure provider credential automatically populates the pull secret and SSH public key fields with information in the credential. For more information, see Creating a credential for an on-premises environment.
- Pull secret: Your OpenShift Container Platform pull secret that enables you to access the OpenShift Container Platform resources. This field is automatically populated if you selected an infrastructure provider credential.
-
SSH public key: The SSH key that enables the secure communication with the hosts. You can use it to connect to the host for troubleshooting. After installing a cluster, you can no longer connect to the host with the SSH key. The key is generally in your
id_rsa.pubfile. The default file path is~/.ssh/id_rsa.pub. This field is automatically populated if you selected an infrastructure provider credential that contains the value of a SSH public key. If you want to enable proxy settings for your hosts, select the setting to enable it and enter the following information:
- HTTP Proxy URL: The URL of the proxy for HTTP requests.
- HTTPS Proxy URL: The URL of the proxy for HTTP requests. The URL must start with HTTP. HTTPS is not supported. If you do not provide a value, your HTTP proxy URL is used by default for both HTTP and HTTPS connections.
-
No Proxy domains: A list of domains separated by commas that you do not want to use the proxy with. Start a domain name with a period (
.) to include all of the subdomains that are in that domain. Add an asterisk (*) to bypass the proxy for all destinations.
- Optionally add your own Network Time Protocol (NTP) sources by providing a comma separated list of IP or domain names of the NTP pools or servers.
-
Name: A unique name for your infrastructure environment. Creating an infrastructure environment by using the console also creates a new namespace for the
If you need advanced configuration options that are not available in the console, continue to Creating a host inventory by using the command line interface.
If you do not need advanced configuration options, you can continue by configuring static networking, if required, and begin adding hosts to your infrastructure environment.
1.5.3.3.3. Accessing a host inventory
To access a host inventory, select Infrastructure > Host inventory in the console. Select your infrastructure environment from the list to view the details and hosts.
1.5.3.3.4. Additional resources
1.5.3.4. Creating a host inventory by using the command line interface
You can create a host inventory (infrastructure environment) to discover physical or virtual machines that you can install your OpenShift Container Platform clusters on. Use the command line interface instead of the console for automated deployments or for the following advanced configuration options:
- Automatically bind discovered hosts to an existing cluster definition
- Override the ignition configuration of the Discovery Image
- Control the iPXE behavior
- Modify kernel arguments for the Discovery Image
- Pass additional certificates that you want the host to trust during the discovery phase
- Select a Red Hat CoreOS version to boot for testing that is not the default option of the newest version
1.5.3.4.1. Prerequisite
- You must enable the central infrastructure management service. See Enabling the central infrastructure management service for more information.
1.5.3.4.2. Creating a host inventory
Complete the following steps to create a host inventory (infrastructure environment) by using the command line interface:
Log in to your hub cluster by running the following command:
oc login
Create a namespace for your resource.
Create the
namespace.yamlfile and add the following content:apiVersion: v1 kind: Namespace metadata: name: <your_namespace> 1- 1
- Use the same name for your namespace and your infrastructure environment to monitor your inventory in the console.
Apply the YAML content by running the following command:
oc apply -f namespace.yaml
Create a
Secretcustom resource containing your OpenShift Container Platform pull secret.Create the
pull-secret.yamlfile and add the following content:apiVersion: v1 kind: Secret type: kubernetes.io/dockerconfigjson metadata: name: pull-secret 1 namespace: <your_namespace> stringData: .dockerconfigjson: <your_pull_secret> 2
Apply the YAML content by running the following command:
oc apply -f pull-secret.yaml
Create the infrastructure environment.
Create the
infra-env.yamlfile and add the following content. Replace values where needed:apiVersion: agent-install.openshift.io/v1beta1 kind: InfraEnv metadata: name: myinfraenv namespace: <your_namespace> spec: proxy: httpProxy: <http://user:password@ipaddr:port> httpsProxy: <http://user:password@ipaddr:port> noProxy: additionalNTPSources: sshAuthorizedKey: pullSecretRef: name: <name> agentLabels: <key>: <value> nmStateConfigLabelSelector: matchLabels: <key>: <value> clusterRef: name: <cluster_name> namespace: <project_name> ignitionConfigOverride: '{"ignition": {"version": "3.1.0"}, …}' cpuArchitecture: x86_64 ipxeScriptType: DiscoveryImageAlways kernelArguments: - operation: append value: audit=0 additionalTrustBundle: <bundle> osImageVersion: <version>
Table 1.3. InfraEnv field table
| Field | Optional or required | Description |
|---|---|---|
|
| Optional |
Defines the proxy settings for agents and clusters that use the |
|
| Optional |
The URL of the proxy for HTTP requests. The URL must start with |
|
| Optional |
The URL of the proxy for HTTP requests. The URL must start with |
|
| Optional | A list of domains and CIDRs separated by commas that you do not want to use the proxy with. |
|
| Optional | A list of Network Time Protocol (NTP) sources (hostname or IP) to add to all hosts. They are added to NTP sources that are configured by using other options, such as DHCP. |
|
| Optional | SSH public keys that are added to all hosts for use in debugging during the discovery phase. The discovery phase is when the host boots the Discovery Image. |
|
| Required | The name of the Kubernetes secret containing your pull secret. |
|
| Optional |
Labels that are automatically added to the |
|
| Optional |
Consolidates advanced network configuration such as static IPs, bridges, and bonds for the hosts. The host network configuration is specified in one or more |
|
| Optional |
References an existing |
|
| Optional |
Modifies the ignition configuration of the Red Hat CoreOS live image, such as adding files. Make sure to only use |
|
| Optional | Choose one of the following supported CPU architectures: x86_64, aarch64, ppc64le, or s390x. The default value is x86_64. |
|
| Optional |
Causes the image service to always serve the iPXE script when set to the default value of |
|
| Optional |
Allows modifying the kernel arguments for when the Discovery Image boots. Possible values for |
|
| Optional |
A PEM-encoded X.509 certificate bundle, usually needed if the hosts are in a network with a re-encrypting man-in-the-middle (MITM) proxy, or if the hosts need to trust certificates for other purposes, such as container image registries. Hosts discovered by your |
|
| Optional |
The Red Hat CoreOS image version to use for your |
Apply the YAML content by running the following command:
oc apply -f infra-env.yaml
To verify that your host inventory is created, check the status with the following command:
oc describe infraenv myinfraenv -n <your_namespace>
See the following list of notable properties:
-
conditions: The standard Kubernetes conditions indicating if the image was created succesfully. -
isoDownloadURL: The URL to download the Discovery Image. -
createdTime: The time at which the image was last created. If you modify theInfraEnv, make sure that the timestamp has been updated before downloading a new image.
Note: If you modify the InfraEnv resource, make sure that the InfraEnv has created a new Discovery Image by looking at the createdTime property. If you already booted hosts, boot them again with the latest Discovery Image.
You can continue by configuring static networking, if required, and begin adding hosts to your infrastructure environment.
1.5.3.4.3. Additional resources
1.5.3.5. Configuring advanced networking for an infrastructure environment
For hosts that require networking beyond DHCP on a single interface, you must configure advanced networking. The required configuration includes creating one or more instances of the NMStateConfig resource that describes the networking for one or more hosts.
Each NMStateConfig resource must contain a label that matches the nmStateConfigLabelSelector on your InfraEnv resource. See Creating a host inventory by using the command line interface to learn more about the nmStateConfigLabelSelector.
The Discovery Image contains the network configurations defined in all referenced NMStateConfig resources. After booting, each host compares each configuration to its network interfaces and applies the appropriate configuration.
1.5.3.5.1. Prerequisites
- You must enable the central infrastructure management service.
- You must create a host inventory.
1.5.3.5.2. Configuring advanced networking by using the command line interface
To configure advanced networking for your infrastructure environment by using the command line interface, complete the following steps:
Create a file named
nmstateconfig.yamland add content that is similar to the following template. Replace values where needed:apiVersion: agent-install.openshift.io/v1beta1 kind: NMStateConfig metadata: name: mynmstateconfig namespace: <your-infraenv-namespace> labels: some-key: <some-value> spec: config: interfaces: - name: eth0 type: ethernet state: up mac-address: 02:00:00:80:12:14 ipv4: enabled: true address: - ip: 192.168.111.30 prefix-length: 24 dhcp: false - name: eth1 type: ethernet state: up mac-address: 02:00:00:80:12:15 ipv4: enabled: true address: - ip: 192.168.140.30 prefix-length: 24 dhcp: false dns-resolver: config: server: - 192.168.126.1 routes: config: - destination: 0.0.0.0/0 next-hop-address: 192.168.111.1 next-hop-interface: eth1 table-id: 254 - destination: 0.0.0.0/0 next-hop-address: 192.168.140.1 next-hop-interface: eth1 table-id: 254 interfaces: - name: "eth0" macAddress: "02:00:00:80:12:14" - name: "eth1" macAddress: "02:00:00:80:12:15"
Table 1.4. NMStateConfig field table
| Field | Optional or required | Description |
|---|---|---|
|
| Required | Use a name that is relevant to the host or hosts you are configuring. |
|
| Required |
The namespace must match the namespace of your |
|
| Required |
Add one or more labels that match the |
|
| Optional |
Describes the network settings in |
|
| Optional |
Describes the mapping between interface names found in the specified |
Note: The Image Service automatically creates a new image when you update any InfraEnv properties or change the NMStateConfig resources that match its label selector. If you add NMStateConfig resources after creating the InfraEnv resource, make sure that the InfraEnv creates a new Discovery Image by checking the createdTime property in your InfraEnv. If you already booted hosts, boot them again with the latest Discovery Image.
Apply the YAML content by running the following command:
oc apply -f nmstateconfig.yaml
1.5.3.5.3. Additional resources
1.5.3.6. Adding hosts to the host inventory by using the Discovery Image
After creating your host inventory (infrastructure environment) you can discover your hosts and add them to your inventory. To add hosts to your inventory, choose a method to download an ISO and attach it to each server. For example, you can download ISOs by using a virtual media or writing the ISO to a USB drive.
Important: To prevent the installation from failing, keep the Discovery ISO media connected to the device during the installation process and set each host to boot from the device one time.
1.5.3.6.1. Prerequisites
- You must enable the central infrastructure management service. See Enabling the central infrastructure management service for more information.
- You must create a host inventory. See Creating a host inventory by using the console for more information.
1.5.3.6.2. Adding hosts by using the console
Download the ISO by completing the following steps:
- Select Infrastructure > Host inventory in the console.
- Select your infrastructure environment from the list.
- Click Add hosts and select With Discovery ISO.
You now see a URL to download the ISO. Booted hosts appear in the host inventory table. Hosts might take a few minutes to appear. You must approve each host before you can use it. You can select hosts from the inventory table by clicking Actions and selecting Approve.
1.5.3.6.3. Adding hosts by using the command line interface
You can see the URL to download the ISO in the isoDownloadURL property in the status of your InfraEnv resource. See Creating a host inventory by using the command line interface for more information about the InfraEnv resource.
Each booted host creates an Agent resource in the same namespace. You must approve each host before you can use it.
1.5.3.6.4. Additional resources
1.5.3.7. Automatically adding bare metal hosts to the host inventory
After creating your host inventory (infrastructure environment) you can discover your hosts and add them to your inventory. You can automate booting the Discovery Image of your infrastructure environment by making the bare metal operator communicate with the Baseboard Management Controller (BMC) of each bare metal host by creating a BareMetalHost resource and associated BMC secret for each host. The automation is set by a label on the BareMetalHost that references your infrastructure environment.
The automation performs the following actions:
- Boots each bare metal host with the Discovery Image represented by the infrastructure environment
- Reboots each host with the latest Discovery Image in case the infrastructure environment or any associated network configurations is updated
-
Associates each
Agentresource with its correspondingBareMetalHostresource upon discovery -
Updates
Agentresource properties based on information from theBareMetalHost, such as hostname, role, and installation disk -
Approves the
Agentfor use as a cluster node
1.5.3.7.1. Prerequisites
- You must enable the central infrastructure management service.
- You must create a host inventory.
1.5.3.7.2. Adding bare metal hosts by using the console
Complete the following steps to automatically add bare metal hosts to your host inventory by using the console:
- Select Infrastructure > Host inventory in the console.
- Select your infrastructure environment from the list.
- Click Add hosts and select With BMC Form.
- Add the required information and click Create.
1.5.3.7.3. Adding bare metal hosts by using the command line interface
Complete the following steps to automatically add bare metal hosts to your host inventory by using the command line interface.
Create a BMC secret by applying the following YAML content and replacing values where needed:
apiVersion: v1 kind: Secret metadata: name: <bmc-secret-name> namespace: <your_infraenv_namespace> 1 type: Opaque data: username: <username> password: <password>- 1
- The namespace must be the same as the namespace of your
InfraEnv.
Create a bare metal host by applying the following YAML content and replacing values where needed:
apiVersion: metal3.io/v1alpha1
kind: BareMetalHost
metadata:
  name: <bmh-name>
  namespace: <your_infraenv_namespace> 1
  annotations:
    inspect.metal3.io: disabled
  labels:
    infraenvs.agent-install.openshift.io: <your-infraenv> 2
spec:
  online: true
  automatedCleaningMode: disabled 3
  bootMACAddress: <your-mac-address>  4
  bmc:
    address: <machine-address> 5
    credentialsName: <bmc-secret-name> 6
  rootDeviceHints:
    deviceName: /dev/sda 7
- 1
- The namespace must be the same as the namespace of your
InfraEnv. - 2
- The name must match the name of your
InfrEnvand exist in the same namespace. - 3
- If you do not set a value, the
metadatavalue is automatically used. - 4
- Make sure the MAC address matches the MAC address of one of the interaces on your host.
- 5
- Use the address of the BMC. See Port access for the out-of-band management IP address for more information.
- 6
- Make sure that the
credentialsNamevalue matches the name of the BMC secret you created. - 7
- Optional: Select the installation disk. See The BareMetalHost spec for the available root device hints. After the host is booted with the Discovery Image and the corresponding
Agentresource is created, the installation disk is set according to this hint.
After turning on the host, the image starts downloading. This might take a few minutes. When the host is discovered, an Agent custom resource is created automatically.
1.5.3.7.4. Additional resources
- For additional information about zero touch provisioning, see Clusters at the network far edge in the OpenShift Container Platform documentation.
- To learn about the required ports for using a bare metal host, see Port access for the out-of-band management IP address in the OpenShift Container Platform documentation.
- To learn about root device hints, see The BareMetalHost spec in the OpenShift Container Platform documentation.
- See Using image pull secrets
- See Creating a credential for an on-premises environment
1.5.3.8. Managing your host inventory
You can manage your host inventory and edit existing hosts by using the console, or by using the command line interface and editing the Agent resource.
1.5.3.8.1. Managing your host inventory by using the console
Each host that you successfully boot with the Discovery ISO appears as a row in your host inventory. You can use the console to edit and manage your hosts. If you booted the host manually and are not using the bare metal operator automation, you must approve the host in the console before you can use it. Hosts that are ready to be installed as OpenShift nodes have the Available status.
1.5.3.8.2. Managing your host inventory by using the command line interface
An Agent resource represents each host. You can set the following properties in an Agent resource:
clusterDeploymentNameSet this property to the namespace and name of the
ClusterDeploymentyou want to use if you want to install the host as a node in a cluster.Optional:
roleSets the role for the host in the cluster. Possible values are
master,worker, andauto-assign. The default value isauto-assign.hostnameSets the host name for the host. Optional if the host is automatically assigned a valid host name, for example by using DHCP.
approvedIndicates if the host can be installed as an OpenShift node. This property is a boolean with a default value of
False. If you booted the host manually and are not using the bare metal operator automation, you must set this property toTruebefore installing the host.installation_disk_idThe ID of the installation disk you chose that is visible in the inventory of the host.
installerArgsA JSON-formatted string containing overrides for the coreos-installer arguments of the host. You can use this property to modify kernel arguments. See the following example syntax:
["--append-karg", "ip=192.0.2.2::192.0.2.254:255.255.255.0:core0.example.com:enp1s0:none", "--save-partindex", "4"]
ignitionConfigOverridesA JSON-formatted string containing overrides for the ignition configuration of the host. You can use this property to add files to the host by using ignition. See the following example syntax:
{"ignition": "version": "3.1.0"}, "storage": {"files": [{"path": "/tmp/example", "contents": {"source": "data:text/plain;base64,aGVscGltdHJhcHBlZGluYXN3YWdnZXJzcGVj"}}]}}nodeLabelsA list of labels that are applied to the node after the host is installed. The
statusof anAgentresource has the following properties:roleSets the role for the host in the cluster. If you previously set a
rolein theAgentresource, the value appears in thestatus.inventoryContains host properties that the agent running on the host discovers.
progressThe host installation progress.
ntpSourcesThe configured Network Time Protocol (NTP) sources of the host.
conditionsContains the following standard Kubernetes conditions with a
TrueorFalsevalue:-
SpecSynced:
Trueif all specified properties are successfully applied.Falseif some error was encountered. -
Connected:
Trueif the agent connection to the installation service is not obstructed.Falseif the agent has not contacted the installation service in some time. -
RequirementsMet:
Trueif the host is ready to begin the installation. -
Validated:
Trueif all host validations pass. -
Installed:
Trueif the host is installed as an OpenShift node. -
Bound:
Trueif the host is bound to a cluster. -
Cleanup:
Falseif the request to delete theAgentresouce fails.
-
SpecSynced:
debugInfoContains URLs for downloading installation logs and events.
validationsInfoContains information about validations that the agent runs after the host is discovered to ensure that the installation is successful. Troubleshoot if the value is
False.installation_disk_idThe ID of the installation disk you chose that is visible in the inventory of the host.
1.5.3.8.3. Additional resources
1.5.4. Creating a cluster
Learn how to create Red Hat OpenShift Container Platform clusters across cloud providers with multicluster engine operator.
multicluster engine operator uses the Hive operator that is provided with OpenShift Container Platform to provision clusters for all providers except the on-premises clusters and hosted control planes. When provisioning the on-premises clusters, multicluster engine operator uses the central infrastructure management and Assisted Installer function that are provided with OpenShift Container Platform. The hosted clusters for hosted control planes are provisioned by using the HyperShift operator.
- Configuring additional manifests during cluster creation
- Creating a cluster on Amazon Web Services
- Creating a cluster on Amazon Web Services GovCloud
- Creating a cluster on Microsoft Azure
- Creating a cluster on Google Cloud Platform
- Creating a cluster on VMware vSphere
- Creating a cluster on Red Hat OpenStack Platform
- Creating a cluster on Red Hat Virtualization
- Creating a cluster in an on-premises environment
- Hosted control planes (Technology Preview)
1.5.4.1. Creating a cluster with the CLI
The multicluster engine for Kubernetes uses internal Hive components to create Red Hat OpenShift Container Platform clusters. See the following information to learn how to create clusters.
1.5.4.1.1. Prerequisites
Before creating a cluster, you must clone the clusterImageSets repository and apply it to your hub cluster. See the following steps:
Run the following command to clone:
git clone https://github.com/stolostron/acm-hive-openshift-releases.git
cd acm-hive-openshift-releases
git checkout origin/backplane-2.2
Run the following command to apply it to your hub cluster:
find clusterImageSets/fast -type d -exec oc apply -f {} \; 2> /dev/null
Select the Red Hat OpenShift Container Platform release images when you create a cluster.
1.5.4.1.2. Create a cluster with ClusterDeployment
A ClusterDeployment is a Hive custom resource that is used to control the lifecycle of a cluster.
Follow the Using Hive documentation to create the ClusterDeployment custom resource and create an individual cluster.
1.5.4.1.3. Create a cluster with ClusterPool
A ClusterPool is also a Hive custom resource that is used to create multiple clusters.
Follow the Cluster Pools documentation to create a cluster with the Hive ClusterPool API.
1.5.4.2. Configuring additional manifests during cluster creation
You can configure additional Kubernetes resource manifests during the installation process of creating your cluster. This can help if you need to configure additional manifests for scenarios such as configuring networking or setting up a load balancer.
Before you create your cluster, you need to add a reference to the ClusterDeployment resource that specifies a ConfigMap that contains the additional resource manifests.
Note: The ClusterDeployment resource and the ConfigMap must be in the same namespace. The following examples show how your content might look.
ConfigMap with resource manifests
ConfigMapthat contains a manifest with anotherConfigMapresource. The resource manifestConfigMapcan contain multiple keys with resource configurations added in adata.<resource_name>\.yamlpattern.kind: ConfigMap apiVersion: v1 metadata: name: <my-baremetal-cluster-install-manifests> namespace: <mynamespace> data: 99_metal3-config.yaml: | kind: ConfigMap apiVersion: v1 metadata: name: metal3-config namespace: openshift-machine-api data: http_port: "6180" provisioning_interface: "enp1s0" provisioning_ip: "172.00.0.3/24" dhcp_range: "172.00.0.10,172.00.0.100" deploy_kernel_url: "http://172.00.0.3:6180/images/ironic-python-agent.kernel" deploy_ramdisk_url: "http://172.00.0.3:6180/images/ironic-python-agent.initramfs" ironic_endpoint: "http://172.00.0.3:6385/v1/" ironic_inspector_endpoint: "http://172.00.0.3:5150/v1/" cache_url: "http://192.168.111.1/images" rhcos_image_url: "https://releases-art-rhcos.svc.ci.openshift.org/art/storage/releases/rhcos-4.3/43.81.201911192044.0/x86_64/rhcos-43.81.201911192044.0-openstack.x86_64.qcow2.gz"ClusterDeployment with resource manifest
ConfigMapreferencedThe resource manifest
ConfigMapis referenced underspec.provisioning.manifestsConfigMapRef.apiVersion: hive.openshift.io/v1 kind: ClusterDeployment metadata: name: <my-baremetal-cluster> namespace: <mynamespace> annotations: hive.openshift.io/try-install-once: "true" spec: baseDomain: test.example.com clusterName: <my-baremetal-cluster> controlPlaneConfig: servingCertificates: {} platform: baremetal: libvirtSSHPrivateKeySecretRef: name: provisioning-host-ssh-private-key provisioning: installConfigSecretRef: name: <my-baremetal-cluster-install-config> sshPrivateKeySecretRef: name: <my-baremetal-hosts-ssh-private-key> manifestsConfigMapRef: name: <my-baremetal-cluster-install-manifests> imageSetRef: name: <my-clusterimageset> sshKnownHosts: - "10.1.8.90 ecdsa-sha2-nistp256 AAAAE2VjZHNhLXvVVVKUYVkuyvkuygkuyTCYTytfkufTYAAAAIbmlzdHAyNTYAAABBBKWjJRzeUVuZs4yxSy4eu45xiANFIIbwE3e1aPzGD58x/NX7Yf+S8eFKq4RrsfSaK2hVJyJjvVIhUsU9z2sBJP8=" pullSecretRef: name: <my-baremetal-cluster-pull-secret>
1.5.4.3. Creating a cluster on Amazon Web Services
You can use the multicluster engine operator console to create a Red Hat OpenShift Container Platform cluster on Amazon Web Services (AWS).
When you create a cluster, the creation process uses the OpenShift Container Platform installer with the Hive resource. If you have questions about cluster creation after completing this procedure, see Installing on AWS in the OpenShift Container Platform documentation for more information about the process.
1.5.4.3.1. Prerequisites
See the following prerequisites before creating a cluster on AWS:
- You must have a deployed hub cluster.
- You need an AWS credential. See Creating a credential for Amazon Web Services for more information.
- You need a configured domain in AWS. See Configuring an AWS account for instructions on how to configure a domain.
- You must have Amazon Web Services (AWS) login credentials, which include user name, password, access key ID, and secret access key. See Understanding and Getting Your Security Credentials.
You must have an OpenShift Container Platform image pull secret. See Using image pull secrets.
Note: If you change your cloud provider access key on the cloud provider, you also need to manually update the corresponding credential for the cloud provider on the console. This is required when your credentials expire on the cloud provider where the managed cluster is hosted and you try to delete the managed cluster.
1.5.4.3.2. Creating your AWS cluster
See the following important information about creating an AWS cluster:
-
When you review your information and optionally customize it before creating the cluster, you can select YAML: On to view the
install-config.yamlfile content in the panel. You can edit the YAML file with your custom settings, if you have any updates. - When you create a cluster, the controller creates a namespace for the cluster and the resources. Ensure that you include only resources for that cluster instance in that namespace.
- Destroying the cluster deletes the namespace and all of the resources in it.
-
If you want to add your cluster to an existing cluster set, you must have the correct permissions on the cluster set to add it. If you do not have
cluster-adminprivileges when you are creating the cluster, you must select a cluster set on which you haveclusterset-adminpermissions. -
If you do not have the correct permissions on the specified cluster set, the cluster creation fails. Contact your cluster administrator to provide you with
clusterset-adminpermissions to a cluster set if you do not have any cluster set options to select. -
Every managed cluster must be associated with a managed cluster set. If you do not assign the managed cluster to a
ManagedClusterSet, it is automatically added to thedefaultmanaged cluster set. - If there is already a base DNS domain that is associated with the selected credential that you configured with your AWS account, that value is populated in the field. You can change the value by overwriting it. This name is used in the hostname of the cluster.
- The release image identifies the version of the OpenShift Container Platform image that is used to create the cluster. Select the image from the list of images that are available. If the image that you want to use is not available, you can enter the URL to the image that you want to use.
The node pools include the control plane pool and the worker pools. The control plane nodes share the management of the cluster activity. The information includes the following fields:
- Region: Specify the region where you want the node pool.
- CPU architecture: If the architecture type of the managed cluster is not the same as the architecture of your hub cluster, enter a value for the instruction set architecture of the machines in the pool. Valid values are amd64, ppc64le, s390x, and arm64.
- Zones: Specify where you want to run your control plane pools. You can select multiple zones within the region for a more distributed group of control plane nodes. A closer zone might provide faster performance, but a more distant zone might be more distributed.
- Instance type: Specify the instance type for your control plane node. You can change the type and size of your instance after it is created.
- Root storage: Specify the amount of root storage to allocate for the cluster.
You can create zero or more worker nodes in a worker pool to run the container workloads for the cluster. This can be in a single worker pool, or distributed across multiple worker pools. If zero worker nodes are specified, the control plane nodes also function as worker nodes. The optional information includes the following fields:
- Zones: Specify where you want to run your worker pools. You can select multiple zones within the region for a more distributed group of nodes. A closer zone might provide faster performance, but a more distant zone might be more distributed.
- Instance type: Specify the instance type of your worker pools. You can change the type and size of your instance after it is created.
- Node count: Specify the node count of your worker pool. This setting is required when you define a worker pool.
- Root storage: Specify the amount of root storage allocated for your worker pool. This setting is required when you define a worker pool.
- Networking details are required for your cluster, and multiple networks are required for using IPv6. You can add an additional network by clicking Add network.
Proxy information that is provided in the credential is automatically added to the proxy fields. You can use the information as it is, overwrite it, or add the information if you want to enable a proxy. The following list contains the required information for creating a proxy:
-
HTTP proxy: Specify the URL that should be used as a proxy for
HTTPtraffic. -
HTTPS proxy: Specify the secure proxy URL that should be used for
HTTPStraffic. If no value is provided, the same value as theHTTP Proxy URLis used for bothHTTPandHTTPS. -
No proxy sites: A comma-separated list of sites that should bypass the proxy. Begin a domain name with a period
.to include all of the subdomains that are in that domain. Add an asterisk*to bypass the proxy for all destinations. - Additional trust bundle: One or more additional CA certificates that are required for proxying HTTPS connections.
-
HTTP proxy: Specify the URL that should be used as a proxy for
1.5.4.3.3. Creating your cluster with the console
To create a new cluster, see the following procedure. If you have an existing cluster that you want to import instead, see Importing a target managed cluster to the hub cluster.
Note: You do not have to run the oc command that is provided with the cluster details to import the cluster. When you create the cluster, it is automatically configured under the management of multicluster engine operator.
- Navigate to Infrastructure > Clusters.
- On the Clusters page. Click Cluster > Create cluster and complete the steps in the console.
- Optional: Select YAML: On to view content updates as you enter the information in the console.
If you need to create a credential, see Creating a credential for Amazon Web Services for more information.
The name of the cluster is used in the hostname of the cluster.
1.5.4.3.4. Additional resources
- The AWS private configuration information is used when you are creating an AWS GovCloud cluster. See Creating a cluster on Amazon Web Services GovCloud for information about creating a cluster in that environment.
- See Configuring an AWS account for more information.
- See Specifying release images for more information about release images.
- Find more information about supported instant types by visiting your cloud provider sites, such as AWS General purpose instances.
1.5.4.4. Creating a cluster on Amazon Web Services GovCloud
You can use the console to create a Red Hat OpenShift Container Platform cluster on Amazon Web Services (AWS) or on AWS GovCloud. This procedure explains how to create a cluster on AWS GovCloud. See Creating a cluster on Amazon Web Services for the instructions for creating a cluster on AWS.
AWS GovCloud provides cloud services that meet additional requirements that are necessary to store government documents on the cloud. When you create a cluster on AWS GovCloud, you must complete additional steps to prepare your environment.
When you create a cluster, the creation process uses the OpenShift Container Platform installer with the Hive resource. If you have questions about cluster creation after completing this procedure, see Installing a cluster on AWS into a government region in the OpenShift Container Platform documentation for more information about the process. The following sections provide the steps for creating a cluster on AWS GovCloud:
1.5.4.4.1. Prerequisites
You must have the following prerequisites before creating an AWS GovCloud cluster:
- You must have AWS login credentials, which include user name, password, access key ID, and secret access key. See Understanding and Getting Your Security Credentials.
- You need an AWS credential. See Creating a credential for Amazon Web Services for more information.
- You need a configured domain in AWS. See Configuring an AWS account for instructions on how to configure a domain.
- You must have an OpenShift Container Platform image pull secret. See Using image pull secrets.
- You must have an Amazon Virtual Private Cloud (VPC) with an existing Red Hat OpenShift Container Platform cluster for the hub cluster. This VPC must be different from the VPCs that are used for the managed cluster resources or the managed cluster service endpoints.
- You need a VPC where the managed cluster resources are deployed. This cannot be the same as the VPCs that are used for the hub cluster or the managed cluster service endpoints.
- You need one or more VPCs that provide the managed cluster service endpoints. This cannot be the same as the VPCs that are used for the hub cluster or the managed cluster resources.
- Ensure that the IP addresses of the VPCs that are specified by Classless Inter-Domain Routing (CIDR) do not overlap.
-
You need a
HiveConfigcustom resource that references a credential within the Hive namespace. This custom resource must have access to create resources on the VPC that you created for the managed cluster service endpoints.
Note: If you change your cloud provider access key on the cloud provider, you also need to manually update the corresponding credential for the cloud provider on the multicluster engine operator console. This is required when your credentials expire on the cloud provider where the managed cluster is hosted and you try to delete the managed cluster.
1.5.4.4.2. Configure Hive to deploy on AWS GovCloud
While creating a cluster on AWS GovCloud is almost identical to creating a cluster on standard AWS, you have to complete some additional steps to prepare an AWS PrivateLink for the cluster on AWS GovCloud.
1.5.4.4.2.1. Create the VPCs for resources and endpoints
As listed in the prerequisites, two VPCs are required in addition to the VPC that contains the hub cluster. See Create a VPC in the Amazon Web Services documentation for specific steps for creating a VPC.
- Create a VPC for the managed cluster with private subnets.
- Create one or more VPCs for the managed cluster service endpoints with private subnets. Each VPC in a region has a limit of 255 VPC endpoints, so you need multiple VPCs to support more than 255 clusters in that region.
For each VPC, create subnets in all of the supported availability zones of the region. Each subnet must have at least 255 usable IP addresses because of the controller requirements.
The following example shows how you might structure subnets for VPCs that have 6 availability zones in the
us-gov-east-1region:vpc-1 (us-gov-east-1) : 10.0.0.0/20 subnet-11 (us-gov-east-1a): 10.0.0.0/23 subnet-12 (us-gov-east-1b): 10.0.2.0/23 subnet-13 (us-gov-east-1c): 10.0.4.0/23 subnet-12 (us-gov-east-1d): 10.0.8.0/23 subnet-12 (us-gov-east-1e): 10.0.10.0/23 subnet-12 (us-gov-east-1f): 10.0.12.0/2
vpc-2 (us-gov-east-1) : 10.0.16.0/20
  subnet-21 (us-gov-east-1a): 10.0.16.0/23
  subnet-22 (us-gov-east-1b): 10.0.18.0/23
  subnet-23 (us-gov-east-1c): 10.0.20.0/23
  subnet-24 (us-gov-east-1d): 10.0.22.0/23
  subnet-25 (us-gov-east-1e): 10.0.24.0/23
  subnet-26 (us-gov-east-1f): 10.0.28.0/23
- Ensure that all of the hub environments (hub cluster VPCs) have network connectivity to the VPCs that you created for VPC endpoints that use peering, transit gateways, and that all DNS settings are enabled.
- Collect a list of VPCs that are needed to resolve the DNS setup for the AWS PrivateLink, which is required for the AWS GovCloud connectivity. This includes at least the VPC of the multicluster engine operator instance that you are configuring, and can include the list of all of the VPCs where various Hive controllers exist.
1.5.4.4.2.2. Configure the security groups for the VPC endpoints
Each VPC endpoint in AWS has a security group attached to control access to the endpoint. When Hive creates a VPC endpoint, it does not specify a security group. The default security group of the VPC is attached to the VPC endpoint. The default security group of the VPC must have rules to allow traffic where VPC endpoints are created from the Hive installer pods. See Control access to VPC endpoints using endpoint policies in the AWS documentation for details.
For example, if Hive is running in hive-vpc(10.1.0.0/16), there must be a rule in the default security group of the VPC where the VPC endpoint is created that allows ingress from 10.1.0.0/16.
1.5.4.4.2.3. Set permissions for AWS PrivateLink
You need multiple credentials to configure the AWS PrivateLink. The required permissions for these credentials depend on the type of credential.
The credentials for ClusterDeployment require the following permissions:
ec2:CreateVpcEndpointServiceConfiguration
ec2:DescribeVpcEndpointServiceConfigurations
ec2:ModifyVpcEndpointServiceConfiguration
ec2:DescribeVpcEndpointServicePermissions
ec2:ModifyVpcEndpointServicePermissions
ec2:DeleteVpcEndpointServiceConfigurations
The credentials for HiveConfig for endpoint VPCs account
.spec.awsPrivateLink.credentialsSecretRefrequire the following permissions:ec2:DescribeVpcEndpointServices ec2:DescribeVpcEndpoints ec2:CreateVpcEndpoint ec2:CreateTags ec2:DescribeNetworkInterfaces ec2:DescribeVPCs ec2:DeleteVpcEndpoints route53:CreateHostedZone route53:GetHostedZone route53:ListHostedZonesByVPC route53:AssociateVPCWithHostedZone route53:DisassociateVPCFromHostedZone route53:CreateVPCAssociationAuthorization route53:DeleteVPCAssociationAuthorization route53:ListResourceRecordSets route53:ChangeResourceRecordSets route53:DeleteHostedZone
The credentials specified in the
HiveConfigcustom resource for associating VPCs to the private hosted zone (.spec.awsPrivateLink.associatedVPCs[$idx].credentialsSecretRef). The account where the VPC is located requires the following permissions:route53:AssociateVPCWithHostedZone route53:DisassociateVPCFromHostedZone ec2:DescribeVPCs
Ensure that there is a credential secret within the Hive namespace on the hub cluster.
The HiveConfig custom resource needs to reference a credential within the Hive namespace that has permissions to create resources in a specific provided VPC. If the credential that you are using to provision an AWS cluster in AWS GovCloud is already in the Hive namespace, then you do not need to create another one. If the credential that you are using to provision an AWS cluster in AWS GovCloud is not already in the Hive namespace, you can either replace your current credential or create an additional credential in the Hive namespace.
The HiveConfig custom resource needs to include the following content:
- An AWS GovCloud credential that has the required permissions to provision resources for the given VPC.
The addresses of the VPCs for the OpenShift Container Platform cluster installation, as well as the service endpoints for the managed cluster.
Best practice: Use different VPCs for the OpenShift Container Platform cluster installation and the service endpoints.
The following example shows the credential content:
spec:
  awsPrivateLink:
    ## The list of inventory of VPCs that can be used to create VPC
    ## endpoints by the controller.
    endpointVPCInventory:
    - region: us-east-1
      vpcID: vpc-1
      subnets:
      - availabilityZone: us-east-1a
        subnetID: subnet-11
      - availabilityZone: us-east-1b
        subnetID: subnet-12
      - availabilityZone: us-east-1c
        subnetID: subnet-13
      - availabilityZone: us-east-1d
        subnetID: subnet-14
      - availabilityZone: us-east-1e
        subnetID: subnet-15
      - availabilityZone: us-east-1f
        subnetID: subnet-16
    - region: us-east-1
      vpcID: vpc-2
      subnets:
      - availabilityZone: us-east-1a
        subnetID: subnet-21
      - availabilityZone: us-east-1b
        subnetID: subnet-22
      - availabilityZone: us-east-1c
        subnetID: subnet-23
      - availabilityZone: us-east-1d
        subnetID: subnet-24
      - availabilityZone: us-east-1e
        subnetID: subnet-25
      - availabilityZone: us-east-1f
        subnetID: subnet-26
    ## The credentialsSecretRef points to a secret with permissions to create.
    ## The resources in the account where the inventory of VPCs exist.
    credentialsSecretRef:
      name: <hub-account-credentials-secret-name>

    ## A list of VPC where various mce clusters exists.
    associatedVPCs:
    - region: region-mce1
      vpcID: vpc-mce1
      credentialsSecretRef:
        name: <credentials-that-have-access-to-account-where-MCE1-VPC-exists>
    - region: region-mce2
      vpcID: vpc-mce2
      credentialsSecretRef:
        name: <credentials-that-have-access-to-account-where-MCE2-VPC-exists>
You can include a VPC from all the regions where AWS PrivateLink is supported in the endpointVPCInventory list. The controller selects a VPC that meets the requirements for the ClusterDeployment.
For more information, refer to the Hive documentation.
1.5.4.4.3. Creating your cluster with the console
To create a cluster from the console, navigate to Infrastructure > Clusters > Create cluster AWS > Standalone and complete the steps in the console.
Note: This procedure is for creating a cluster. If you have an existing cluster that you want to import, see Importing a target managed cluster to the hub cluster for those steps.
The credential that you select must have access to the resources in an AWS GovCloud region, if you create an AWS GovCloud cluster. You can use an AWS GovCloud secret that is already in the Hive namespace if it has the required permissions to deploy a cluster. Existing credentials are displayed in the console. If you need to create a credential, see Creating a credential for Amazon Web Services for more information.
The name of the cluster is used in the hostname of the cluster.
Important: When you create a cluster, the controller creates a namespace for the cluster and its resources. Ensure that you include only resources for that cluster instance in that namespace. Destroying the cluster deletes the namespace and all of the resources in it.
Tip: Select YAML: On to view content updates as you enter the information in the console.
If you want to add your cluster to an existing cluster set, you must have the correct permissions on the cluster set to add it. If you do not have cluster-admin privileges when you are creating the cluster, you must select a cluster set on which you have clusterset-admin permissions. If you do not have the correct permissions on the specified cluster set, the cluster creation fails. Contact your cluster administrator to provide you with clusterset-admin permissions to a cluster set if you do not have any cluster set options to select.
Every managed cluster must be associated with a managed cluster set. If you do not assign the managed cluster to a ManagedClusterSet, it is automatically added to the default managed cluster set.
If there is already a base DNS domain that is associated with the selected credential that you configured with your AWS or AWS GovCloud account, that value is populated in the field. You can change the value by overwriting it. This name is used in the hostname of the cluster. See Configuring an AWS account for more information.
The release image identifies the version of the OpenShift Container Platform image that is used to create the cluster. If the version that you want to use is available, you can select the image from the list of images. If the image that you want to use is not a standard image, you can enter the URL to the image that you want to use. See Specifying release images for more information about release images.
The node pools include the control plane pool and the worker pools. The control plane nodes share the management of the cluster activity. The information includes the following fields:
-
Region: The region where you create your cluster resources. If you are creating a cluster on an AWS GovCloud provider, you must include an AWS GovCloud region for your node pools. For example,
us-gov-west-1. - CPU architecture: If the architecture type of the managed cluster is not the same as the architecture of your hub cluster, enter a value for the instruction set architecture of the machines in the pool. Valid values are amd64, ppc64le, s390x, and arm64.
- Zones: Specify where you want to run your control plane pools. You can select multiple zones within the region for a more distributed group of control plane nodes. A closer zone might provide faster performance, but a more distant zone might be more distributed.
- Instance type: Specify the instance type for your control plane node, which must be the same as the CPU architecture that you previously indicated. You can change the type and size of your instance after it is created.
- Root storage: Specify the amount of root storage to allocate for the cluster.
You can create zero or more worker nodes in a worker pool to run the container workloads for the cluster. They can be in a single worker pool, or distributed across multiple worker pools. If zero worker nodes are specified, the control plane nodes also function as worker nodes. The optional information includes the following fields:
- Pool name: Provide a unique name for your pool.
- Zones: Specify where you want to run your worker pools. You can select multiple zones within the region for a more distributed group of nodes. A closer zone might provide faster performance, but a more distant zone might be more distributed.
- Instance type: Specify the instance type of your worker pools. You can change the type and size of your instance after it is created.
- Node count: Specify the node count of your worker pool. This setting is required when you define a worker pool.
- Root storage: Specify the amount of root storage allocated for your worker pool. This setting is required when you define a worker pool.
Networking details are required for your cluster, and multiple networks are required for using IPv6. For an AWS GovCloud cluster, enter the values of the block of addresses of the Hive VPC in the Machine CIDR field. You can add an additional network by clicking Add network.
Proxy information that is provided in the credential is automatically added to the proxy fields. You can use the information as it is, overwrite it, or add the information if you want to enable a proxy. The following list contains the required information for creating a proxy:
-
HTTP proxy URL: Specify the URL that should be used as a proxy for
HTTPtraffic. -
HTTPS proxy URL: Specify the secure proxy URL that should be used for
HTTPStraffic. If no value is provided, the same value as theHTTP Proxy URLis used for bothHTTPandHTTPS. -
No proxy domains: A comma-separated list of domains that should bypass the proxy. Begin a domain name with a period
.to include all of the subdomains that are in that domain. Add an asterisk*to bypass the proxy for all destinations. - Additional trust bundle: One or more additional CA certificates that are required for proxying HTTPS connections.
When creating an AWS GovCloud cluster or using a private environment, complete the fields on the AWS private configuration page with the AMI ID and the subnet values. Ensure that the value of spec:platform:aws:privateLink:enabled is set to true in the ClusterDeployment.yaml file, which is automatically set when you select Use private configuration.
When you review your information and optionally customize it before creating the cluster, you can select YAML: On to view the install-config.yaml file content in the panel. You can edit the YAML file with your custom settings, if you have any updates.
Note: You do not have to run the oc command that is provided with the cluster details to import the cluster. When you create the cluster, it is automatically configured under the management of multicluster engine for Kubernetes operator.
Continue with Accessing your cluster for instructions for accessing your cluster.
1.5.4.5. Creating a cluster on Microsoft Azure
You can use the multicluster engine operator console to deploy a Red Hat OpenShift Container Platform cluster on Microsoft Azure or on Microsoft Azure Government.
When you create a cluster, the creation process uses the OpenShift Container Platform installer with the Hive resource. If you have questions about cluster creation after completing this procedure, see Installing on Azure in the OpenShift Container Platform documentation for more information about the process.
1.5.4.5.1. Prerequisites
See the following prerequisites before creating a cluster on Azure:
- You must have a deployed hub cluster.
- You need an Azure credential. See Creating a credential for Microsoft Azure for more information.
- You need a configured domain in Azure or Azure Government. See Configuring a custom domain name for an Azure cloud service for instructions on how to configure a domain.
- You need Azure login credentials, which include user name and password. See the Microsoft Azure Portal.
-
You need Azure service principals, which include
clientId,clientSecret, andtenantId. See azure.microsoft.com. - You need an OpenShift Container Platform image pull secret. See Using image pull secrets.
Note: If you change your cloud provider access key on the cloud provider, you also need to manually update the corresponding credential for the cloud provider on the console of multicluster engine operator. This is required when your credentials expire on the cloud provider where the managed cluster is hosted and you try to delete the managed cluster.
1.5.4.5.2. Creating your cluster with the console
To create a cluster from the multicluster engine operator console, navigate to Infrastructure > Clusters. On the Clusters page, click Create cluster and complete the steps in the console.
Note: This procedure is for creating a cluster. If you have an existing cluster that you want to import, see Importing a target managed cluster to the hub cluster for those steps.
If you need to create a credential, see Creating a credential for Microsoft Azure for more information.
The name of the cluster is used in the hostname of the cluster.
Important: When you create a cluster, the controller creates a namespace for the cluster and its resources. Ensure that you include only resources for that cluster instance in that namespace. Destroying the cluster deletes the namespace and all of the resources in it.
Tip: Select YAML: On to view content updates as you enter the information in the console.
If you want to add your cluster to an existing cluster set, you must have the correct permissions on the cluster set to add it. If you do not have cluster-admin privileges when you are creating the cluster, you must select a cluster set on which you have clusterset-admin permissions. If you do not have the correct permissions on the specified cluster set, the cluster creation fails. Contact your cluster administrator to provide you with clusterset-admin permissions to a cluster set if you do not have any cluster set options to select.
Every managed cluster must be associated with a managed cluster set. If you do not assign the managed cluster to a ManagedClusterSet, it is automatically added to the default managed cluster set.
If there is already a base DNS domain that is associated with the selected credential that you configured for your Azure account, that value is populated in that field. You can change the value by overwriting it. See Configuring a custom domain name for an Azure cloud service for more information. This name is used in the hostname of the cluster.
The release image identifies the version of the OpenShift Container Platform image that is used to create the cluster. If the version that you want to use is available, you can select the image from the list of images. If the image that you want to use is not a standard image, you can enter the URL to the image that you want to use. Release images for more information about release images.
The Node pools include the control plane pool and the worker pools. The control plane nodes share the management of the cluster activity. The information includes the following optional fields:
- Region: Specify a region where you want to run your node pools. You can select multiple zones within the region for a more distributed group of control plane nodes. A closer zone might provide faster performance, but a more distant zone might be more distributed.
- CPU architecture: If the architecture type of the managed cluster is not the same as the architecture of your hub cluster, enter a value for the instruction set architecture of the machines in the pool. Valid values are amd64, ppc64le, s390x, and arm64.
You can change the type and size of the Instance type and Root storage allocation (required) of your control plane pool after your cluster is created.
You can create one or more worker nodes in a worker pool to run the container workloads for the cluster. They can be in a single worker pool, or distributed across multiple worker pools. If zero worker nodes are specified, the control plane nodes also function as worker nodes. The information includes the following fields:
- Zones: Specifies here you want to run your worker pools. You can select multiple zones within the region for a more distributed group of nodes. A closer zone might provide faster performance, but a more distant zone might be more distributed.
- Instance type: You can change the type and size of your instance after it is created.
You can add an additional network by clicking Add network. You must have more than one network if you are using IPv6 addresses.
Proxy information that is provided in the credential is automatically added to the proxy fields. You can use the information as it is, overwrite it, or add the information if you want to enable a proxy. The following list contains the required information for creating a proxy:
-
HTTP proxy: The URL that should be used as a proxy for
HTTPtraffic. -
HTTPS proxy: The secure proxy URL that should be used for
HTTPStraffic. If no value is provided, the same value as theHTTP Proxy URLis used for bothHTTPandHTTPS. -
No proxy: A comma-separated list of domains that should bypass the proxy. Begin a domain name with a period
.to include all of the subdomains that are in that domain. Add an asterisk*to bypass the proxy for all destinations. - Additional trust bundle: One or more additional CA certificates that are required for proxying HTTPS connections.
When you review your information and optionally customize it before creating the cluster, you can click the YAML switch On to view the install-config.yaml file content in the panel. You can edit the YAML file with your custom settings, if you have any updates.
Note: You do not have to run the oc command that is provided with the cluster details to import the cluster. When you create the cluster, it is automatically configured under the management of multicluster engine operator.
Continue with Accessing your cluster for instructions for accessing your cluster.
1.5.4.6. Creating a cluster on Google Cloud Platform
Follow the procedure to create a Red Hat OpenShift Container Platform cluster on Google Cloud Platform (GCP). For more information about GCP, see Google Cloud Platform.
When you create a cluster, the creation process uses the OpenShift Container Platform installer with the Hive resource. If you have questions about cluster creation after completing this procedure, see Installing on GCP in the OpenShift Container Platform documentation for more information about the process.
1.5.4.6.1. Prerequisites
See the following prerequisites before creating a cluster on GCP:
- You must have a deployed hub cluster.
- You must have a GCP credential. See Creating a credential for Google Cloud Platform for more information.
- You must have a configured domain in GCP. See Setting up a custom domain for instructions on how to configure a domain.
- You need your GCP login credentials, which include user name and password.
- You must have an OpenShift Container Platform image pull secret. See Using image pull secrets.
Note: If you change your cloud provider access key on the cloud provider, you also need to manually update the corresponding credential for the cloud provider on the console of multicluster engine operator. This is required when your credentials expire on the cloud provider where the managed cluster is hosted and you try to delete the managed cluster.
1.5.4.6.2. Creating your cluster with the console
To create clusters from the multicluster engine operator console, navigate to Infrastructure > Clusters. On the Clusters page, click Create cluster and complete the steps in the console.
Note: This procedure is for creating a cluster. If you have an existing cluster that you want to import, see Importing a target managed cluster to the hub cluster for those steps.
If you need to create a credential, see Creating a credential for Google Cloud Platform for more information.
The name of your cluster is used in the hostname of the cluster. There are some restrictions that apply to naming your GCP cluster. These restrictions include not beginning the name with goog or containing a group of letters and numbers that resemble google anywhere in the name. See Bucket naming guidelines for the complete list of restrictions.
Important: When you create a cluster, the controller creates a namespace for the cluster and its resources. Ensure that you include only resources for that cluster instance in that namespace. Destroying the cluster deletes the namespace and all of the resources in it.
Tip: Select YAML: On to view content updates as you enter the information in the console.
If you want to add your cluster to an existing cluster set, you must have the correct permissions on the cluster set to add it. If you do not have cluster-admin privileges when you are creating the cluster, you must select a cluster set on which you have clusterset-admin permissions. If you do not have the correct permissions on the specified cluster set, the cluster creation fails. Contact your cluster administrator to provide you with clusterset-admin permissions to a cluster set if you do not have any cluster set options to select.
Every managed cluster must be associated with a managed cluster set. If you do not assign the managed cluster to a ManagedClusterSet, it is automatically added to the default managed cluster set.
If there is already a base DNS domain that is associated with the selected credential for your GCP account, that value is populated in the field. You can change the value by overwriting it. See Setting up a custom domain for more information. This name is used in the hostname of the cluster.
The release image identifies the version of the OpenShift Container Platform image that is used to create the cluster. If the version that you want to use is available, you can select the image from the list of images. If the image that you want to use is not a standard image, you can enter the URL to the image that you want to use. Release images for more information about release images.
The Node pools include the control plane pool and the worker pools. The control plane nodes share the management of the cluster activity. The information includes the following fields:
- Region: Specify a region where you want to run your control plane pools. A closer region might provide faster performance, but a more distant region might be more distributed.
- CPU architecture: If the architecture type of the managed cluster is not the same as the architecture of your hub cluster, enter a value for the instruction set architecture of the machines in the pool. Valid values are amd64, ppc64le, s390x, and arm64.
You can specify the instance type of your control plane pool. You can change the type and size of your instance after it is created.
You can create one or more worker nodes in a worker pool to run the container workloads for the cluster. They can be in a single worker pool, or distributed across multiple worker pools. If zero worker nodes are specified, the control plane nodes also function as worker nodes. The information includes the following fields:
- Instance type: You can change the type and size of your instance after it is created.
- Node count: This setting is required when you define a worker pool.
The networking details are required, and multiple networks are required for using IPv6 addresses. You can add an additional network by clicking Add network.
Proxy information that is provided in the credential is automatically added to the proxy fields. You can use the information as it is, overwrite it, or add the information if you want to enable a proxy. The following list contains the required information for creating a proxy:
-
HTTP proxy: The URL that should be used as a proxy for
HTTPtraffic. -
HTTPS proxy: The secure proxy URL that should be used for
HTTPStraffic. If no value is provided, the same value as theHTTP Proxy URLis used for bothHTTPandHTTPS. -
No proxy sites: A comma-separated list of sites that should bypass the proxy. Begin a domain name with a period
.to include all of the subdomains that are in that domain. Add an asterisk*to bypass the proxy for all destinations. - Additional trust bundle: One or more additional CA certificates that are required for proxying HTTPS connections.
When you review your information and optionally customize it before creating the cluster, you can select YAML: On to view the install-config.yaml file content in the panel. You can edit the YAML file with your custom settings, if you have any updates.
Note: You do not have to run the oc command that is provided with the cluster details to import the cluster. When you create the cluster, it is automatically configured under the management of multicluster engine operator.
Continue with Accessing your cluster for instructions for accessing your cluster.
1.5.4.7. Creating a cluster on VMware vSphere
You can use the multicluster engine operator console to deploy a Red Hat OpenShift Container Platform cluster on VMware vSphere.
When you create a cluster, the creation process uses the OpenShift Container Platform installer with the Hive resource. If you have questions about cluster creation after completing this procedure, see Installing on vSphere in the OpenShift Container Platform documentation for more information about the process.
1.5.4.7.1. Prerequisites
See the following prerequisites before creating a cluster on vSphere:
- You must have a hub cluster that is deployed on OpenShift Container Platform version 4.6 or later.
- You need a vSphere credential. See Creating a credential for VMware vSphere for more information.
- You need an OpenShift Container Platform image pull secret. See Using image pull secrets.
You must have the following information for the VMware instance where you are deploying:
- Required static IP addresses for API and Ingress instances
DNS records for:
-
api.<cluster_name>.<base_domain>which must point to the static API VIP -
*.apps.<cluster_name>.<base_domain>which must point to the static IP address for Ingress VIP
-
1.5.4.7.2. Creating your cluster with the console
To create a cluster from the multicluster engine operator console, navigate to Infrastructure > Clusters. On the Clusters page, click Create cluster and complete the steps in the console.
Note: This procedure is for creating a cluster. If you have an existing cluster that you want to import, see Importing a target managed cluster to the hub cluster for those steps.
If you need to create a credential, see Creating a credential for VMware vSphere for more information about creating a credential.
The name of your cluster is used in the hostname of the cluster.
Important: When you create a cluster, the controller creates a namespace for the cluster and its resources. Ensure that you include only resources for that cluster instance in that namespace. Destroying the cluster deletes the namespace and all of the resources in it.
Tip: Select YAML: On to view content updates as you enter the information in the console.
If you want to add your cluster to an existing cluster set, you must have the correct permissions on the cluster set to add it. If you do not have cluster-admin privileges when you are creating the cluster, you must select a cluster set on which you have clusterset-admin permissions. If you do not have the correct permissions on the specified cluster set, the cluster creation fails. Contact your cluster administrator to provide you with clusterset-admin permissions to a cluster set if you do not have any cluster set options to select.
Every managed cluster must be associated with a managed cluster set. If you do not assign the managed cluster to a ManagedClusterSet, it is automatically added to the default managed cluster set.
If there is already a base domain associated with the selected credential that you configured for your vSphere account, that value is populated in the field. You can change the value by overwriting it. See Installing a cluster on vSphere with customizations for more information. This value must match the name that you used to create the DNS records listed in the prerequisites section. This name is used in the hostname of the cluster.
The release image identifies the version of the OpenShift Container Platform image that is used to create the cluster. If the version that you want to use is available, you can select the image from the list of images. If the image that you want to use is not a standard image, you can enter the URL to the image that you want to use. See Specifying release images for more information about release images
Note: Only release images for OpenShift Container Platform versions 4.5.x and higher are supported.
The node pools include the control plane pool and the worker pools. The control plane nodes share the management of the cluster activity. The information includes the CPU architecture field. View the following field description:
- CPU architecture: If the architecture type of the managed cluster is not the same as the architecture of your hub cluster, enter a value for the instruction set architecture of the machines in the pool. Valid values are amd64, ppc64le, s390x, and arm64.
You can create one or more worker nodes in a worker pool to run the container workloads for the cluster. They can be in a single worker pool, or distributed across multiple worker pools. If zero worker nodes are specified, the control plane nodes also function as worker nodes. The information includes Cores per socket, CPUs, Memory_min MiB, _Disk size in GiB, and Node count.
Networking information is required. Multiple networks are required for using IPv6. Some of the required networking information is included the following fields:
- vSphere network name: Specify the VMware vSphere network name.
API VIP: Specify the IP address to use for internal API communication.
Note: This value must match the name that you used to create the DNS records listed in the prerequisites section. If not provided, the DNS must be pre-configured so that
api.resolves correctly.Ingress VIP: Specify the IP address to use for ingress traffic.
Note: This value must match the name that you used to create the DNS records listed in the prerequisites section. If not provided, the DNS must be pre-configured so that
test.apps.resolves correctly.
You can add an additional network by clicking Add network. You must have more than one network if you are using IPv6 addresses.
Proxy information that is provided in the credential is automatically added to the proxy fields. You can use the information as it is, overwrite it, or add the information if you want to enable a proxy. The following list contains the required information for creating a proxy:
-
HTTP proxy: Specify the URL that should be used as a proxy for
HTTPtraffic. -
HTTPS proxy: Specify the secure proxy URL that should be used for
HTTPStraffic. If no value is provided, the same value as theHTTP Proxy URLis used for bothHTTPandHTTPS. -
No proxy sites: Provide a comma-separated list of sites that should bypass the proxy. Begin a domain name with a period
.to include all of the subdomains that are in that domain. Add an asterisk*to bypass the proxy for all destinations. - Additional trust bundle: One or more additional CA certificates that are required for proxying HTTPS connections.
You can define the disconnected installation image by clicking Disconnected installation. When creating a cluster by using Red Hat OpenStack Platform provider and disconnected installation, if a certificate is required to access the mirror registry, you must enter it in the Additional trust bundle field in the Configuration for disconnected installation section when configuring your credential or the Disconnected installation section when creating a cluster.
You can click Add automation template to create a template.
When you review your information and optionally customize it before creating the cluster, you can click the YAML switch On to view the install-config.yaml file content in the panel. You can edit the YAML file with your custom settings, if you have any updates.
Note: You do not have to run the oc command that is provided with the cluster details to import the cluster. When you create the cluster, it is automatically configured under the management of multicluster engine operator.
Continue with Accessing your cluster for instructions for accessing your cluster.
1.5.4.8. Creating a cluster on Red Hat OpenStack Platform
You can use the multicluster engine operator console to deploy a Red Hat OpenShift Container Platform cluster on Red Hat OpenStack Platform.
When you create a cluster, the creation process uses the OpenShift Container Platform installer with the Hive resource. If you have questions about cluster creation after completing this procedure, see Installing on OpenStack in the OpenShift Container Platform documentation for more information about the process.
1.5.4.8.1. Prerequisites
See the following prerequisites before creating a cluster on Red Hat OpenStack Platform:
- You must have a hub cluster that is deployed on OpenShift Container Platform version 4.6, or later.
- You must have a Red Hat OpenStack Platform credential. See Creating a credential for Red Hat OpenStack Platform for more information.
- You need an OpenShift Container Platform image pull secret. See Using image pull secrets.
You need the following information for the Red Hat OpenStack Platform instance where you are deploying:
-
Flavor name for the control plane and worker instances; for example,
m1.xlarge - Network name for the external network to provide the floating IP addresses
- Required floating IP addresses for API and ingress instances
DNS records for:
-
api.<cluster_name>.<base_domain>, which must point to the floating IP address for the API -
*.apps.<cluster_name>.<base_domain>, which must point to the floating IP address for ingress
-
-
Flavor name for the control plane and worker instances; for example,
1.5.4.8.2. Creating your cluster with the console
To create a cluster from the multicluster engine operator console, navigate to Infrastructure > Clusters. On the Clusters page, click Create cluster and complete the steps in the console.
Note: This procedure is for creating a cluster. If you have an existing cluster that you want to import, see Importing a target managed cluster to the hub cluster for those steps.
If you need to create a credential, see Creating a credential for Red Hat OpenStack Platform for more information.
The name of the cluster is used in the hostname of the cluster. The name must contain fewer than 15 characters. This value must match the name that you used to create the DNS records listed in the credential prerequisites section.
Important: When you create a cluster, the controller creates a namespace for the cluster and its resources. Ensure that you include only resources for that cluster instance in that namespace. Destroying the cluster deletes the namespace and all of the resources in it.
Tip: Select YAML: On to view content updates as you enter the information in the console.
If you want to add your cluster to an existing cluster set, you must have the correct permissions on the cluster set to add it. If you do not have cluster-admin privileges when you are creating the cluster, you must select a cluster set on which you have clusterset-admin permissions. If you do not have the correct permissions on the specified cluster set, the cluster creation fails. Contact your cluster administrator to provide you with clusterset-admin permissions to a cluster set if you do not have any cluster set options to select.
Every managed cluster must be associated with a managed cluster set. If you do not assign the managed cluster to a ManagedClusterSet, it is automatically added to the default managed cluster set.
If there is already a base DNS domain that is associated with the selected credential that you configured for your Red Hat OpenStack Platform account, that value is populated in the field. You can change the value by overwriting it. See Managing domains in the Red Hat OpenStack Platform documentation for more information. This name is used in the hostname of the cluster.
The release image identifies the version of the OpenShift Container Platform image that is used to create the cluster. If the version that you want to use is available, you can select the image from the list of images. If the image that you want to use is not a standard image, you can enter the URL to the image that you want to use. Release images for more information about release images. Only release images for OpenShift Container Platform versions 4.6.x and higher are supported.
The node pools include the control plane pool and the worker pools. The control plane nodes share the management of the cluster activity. If the architecture type of the managed cluster is not the same as the architecture of your hub cluster, enter a value for the instruction set architecture of the machines in the pool. Valid values are amd64, ppc64le, s390x, and arm64.
You must add an instance type for your control plane pool, but you can change the type and size of your instance after it is created.
You can create one or more worker nodes in a worker pool to run the container workloads for the cluster. They can be in a single worker pool, or distributed across multiple worker pools. If zero worker nodes are specified, the control plane nodes also function as worker nodes. The information includes the following fields:
- Instance type: You can change the type and size of your instance after it is created.
- Node count: Specify the node count for your worker pool. This setting is required when you define a worker pool.
Networking details are required for your cluster. You must provide the values for one or more networks for an IPv4 network. For an IPv6 network, you must define more than one network.
You can add an additional network by clicking Add network. You must have more than one network if you are using IPv6 addresses.
Proxy information that is provided in the credential is automatically added to the proxy fields. You can use the information as it is, overwrite it, or add the information if you want to enable a proxy. The following list contains the required information for creating a proxy:
-
HTTP proxy: Specify the URL that should be used as a proxy for
HTTPtraffic. -
HTTPS proxy: The secure proxy URL that should be used for
HTTPStraffic. If no value is provided, the same value as theHTTP Proxyis used for bothHTTPandHTTPS. -
No proxy: Define a comma-separated list of sites that should bypass the proxy. Begin a domain name with a period
.to include all of the subdomains that are in that domain. Add an asterisk*to bypass the proxy for all destinations. - Additional trust bundle: One or more additional CA certificates that are required for proxying HTTPS connections.
You can define the disconnected installation image by clicking Disconnected installation. When creating a cluster by using Red Hat OpenStack Platform provider and disconnected installation, if a certificate is required to access the mirror registry, you must enter it in the Additional trust bundle field in the Configuration for disconnected installation section when configuring your credential or the Disconnected installation section when creating a cluster.
When you review your information and optionally customize it before creating the cluster, you can click the YAML switch On to view the install-config.yaml file content in the panel. You can edit the YAML file with your custom settings, if you have any updates.
When creating a cluster that uses an internal certificate authority (CA), you need to customize the YAML file for your cluster by completing the following steps:
With the YAML switch on at the review step, insert a
Secretobject at the top of the list with the CA certificate bundle. Note: If the Red Hat OpenStack Platform environment provides services using certificates signed by multiple authorities, the bundle must include the certificates to validate all of the required endpoints. The addition for a cluster namedocp3resembles the following example:apiVersion: v1 kind: Secret type: Opaque metadata: name: ocp3-openstack-trust namespace: ocp3 stringData: ca.crt: | -----BEGIN CERTIFICATE----- <Base64 certificate contents here> -----END CERTIFICATE----- -----BEGIN CERTIFICATE----- <Base64 certificate contents here> -----END CERTIFICATE----Modify the Hive
ClusterDeploymentobject to specify the value ofcertificatesSecretRefinspec.platform.openstack, similar to the following example:platform: openstack: certificatesSecretRef: name: ocp3-openstack-trust credentialsSecretRef: name: ocp3-openstack-creds cloud: openstackThe previous example assumes that the cloud name in the
clouds.yamlfile isopenstack.
Note: You do not have to run the oc command that is provided with the cluster details to import the cluster. When you create the cluster, it is automatically configured under the management of multicluster engine operator.
Continue with Accessing your cluster for instructions for accessing your cluster.
1.5.4.9. Creating a cluster on Red Hat Virtualization
You can use the multicluster engine operator console to create a Red Hat OpenShift Container Platform cluster on Red Hat Virtualization.
When you create a cluster, the creation process uses the OpenShift Container Platform installer with the Hive resource. If you have questions about cluster creation after completing this procedure, see Installing on RHV in the OpenShift Container Platform documentation for more information about the process.
1.5.4.9.1. Prerequisites
See the following prerequisites before creating a cluster on Red Hat Virtualization:
- You must have a deployed hub cluster.
- You need a Red Hat Virtualization credential. See Creating a credential for Red Hat Virtualization for more information.
- You need a configured domain and virtual machine proxy for the oVirt Engine virtual machines. See Installing on RHV in the Red Hat OpenShift Container Platform documentation for instructions on how to configure a domain.
- You must have Red Hat Virtualization login credentials, which include your Red Hat Customer Portal username and password.
- You need an OpenShift Container Platform image pull secret. You can download your pull secret from: Pull secret. See Using image pull secrets for more information about pull secrets.
Note: If you change your cloud provider access key on the cloud provider, you also need to manually update the corresponding credential for the cloud provider on the console of multicluster engine operator. This is required when your credentials expire on the cloud provider where the managed cluster is hosted and you try to delete the managed cluster.
1.5.4.9.2. Creating your cluster with the console
To create a cluster from the multicluster engine operator console, navigate to Infrastructure > Clusters. On the Clusters page, click Create cluster and complete the steps in the console.
Note: This procedure is for creating a cluster. If you have an existing cluster that you want to import, see Importing a target managed cluster to the hub cluster for those steps.
If you need to create a credential, see Creating a credential for Red Hat Virtualization for more information.
The name of your cluster is used in the hostname of the cluster.
Important: When you create a cluster, the controller creates a namespace for the cluster and its resources. Ensure that you include only resources for that cluster instance in that namespace. Destroying the cluster deletes the namespace and all of the resources in it.
Tip: Select YAML: On to view content updates as you enter the information in the console.
If you want to add your cluster to an existing cluster set, you must have the correct permissions on the cluster set to add it. If you do not have cluster-admin privileges when you are creating the cluster, you must select a cluster set on which you have clusterset-admin permissions. If you do not have the correct permissions on the specified cluster set, the cluster creation fails. Contact your cluster administrator to provide you with clusterset-admin permissions to a cluster set if you do not have any cluster set options to select.
Every managed cluster must be associated with a managed cluster set. If you do not assign the managed cluster to a ManagedClusterSet, it is automatically added to the default managed cluster set.
If there is already a base DNS domain that is associated with the selected credential that you configured for your Red Hat Virtualization account, that value is populated in that field. You can overwrite the value to change it.
The release image identifies the version of the OpenShift Container Platform image that is used to create the cluster. If the version that you want to use is available, you can select the image from the list of images. If the image that you want to use is not a standard image, you can enter the URL to the image that you want to use. Release images for more information about release images.
The information for your node pools includes the number of Cores, Sockets, Memory, and Disk size for the control plane pool. The three control plane nodes share the management of the cluster activity. The information includes the Architecture field. View the following field description:
- CPU architecture: If the architecture type of the managed cluster is not the same as the architecture of your hub cluster, enter a value for the instruction set architecture of the machines in the pool. Valid values are amd64, ppc64le, s390x, and arm64.
The worker pool information requires the pool name, number of cores, memory allocation, disk size allocation, and node count for your worker pools. Your worker nodes within the worker pool can be in a single worker pool, or distributed across multiple worker pools.
The following networking details are required from your preconfigured oVirt environment.
- oVirt network name
- vNIC Profile ID: Specify the virtual network interface card profile ID.
API VIP: Specify the IP address to use for internal API communication.
Note: This value must match the name that you used to create the DNS records listed in the prerequisites section. If not provided, the DNS must be pre-configured so that
api.resolves correctly.Ingress VIP: Specify the IP address to use for ingress traffic.
Note: This value must match the name that you used to create the DNS records listed in the prerequisites section. If not provided, the DNS must be pre-configured so that
test.apps.resolves correctly.-
Network type: The default value is
OpenShiftSDN. OVNKubernetes is the required setting for using IPv6. -
Cluster network CIDR: This is a number and list of IP addresses that can be used for the pod IP addresses. This block must not overlap another network block. The default value is
10.128.0.0/14. -
Network host prefix: Set the subnet prefix length for each node. The default value is
23. -
Service network CIDR: Provide a block of IP addresses for services. This block must not overlap another network block. The default value is
172.30.0.0/16. Machine CIDR: Provide a block of IP addresses that are used by the OpenShift Container Platform hosts. This block must not overlap another network block. The default value is
10.0.0.0/16.You can add an additional network by clicking Add network. You must have more than one network if you are using IPv6 addresses.
Proxy information that is provided in the credential is automatically added to the proxy fields. You can use the information as it is, overwrite it, or add the information if you want to enable a proxy. The following list contains the required information for creating a proxy:
-
HTTP proxy: Specify the URL that should be used as a proxy for
HTTPtraffic. -
HTTPS proxy: Specify the secure proxy URL that should be used for
HTTPStraffic. If no value is provided, the same value as theHTTP Proxy URLis used for bothHTTPandHTTPS. -
No proxy sites: Provide a comma-separated list of sites that should bypass the proxy. Begin a domain name with a period
.to include all of the subdomains that are in that domain. Add an asterisk*to bypass the proxy for all destinations. - Additional trust bundle: One or more additional CA certificates that are required for proxying HTTPS connections.
When you review your information and optionally customize it before creating the cluster, you can click the YAML switch On to view the install-config.yaml file content in the panel. You can edit the YAML file with your custom settings, if you have any updates.
Note: You do not have to run the oc command that is provided with the cluster details to import the cluster. When you create the cluster, it is automatically configured under the management of multicluster engine operator.
Continue with Accessing your cluster for instructions for accessing your cluster.
1.5.4.10. Creating a cluster in an on-premises environment
You can use the console to create an on-premises Red Hat OpenShift Container Platform cluster.
You can use this procedure to create single-node OpenShift (SNO) clusters, multi-node clusters, and compact three-node clusters on VMware vSphere, Red Hat OpenStack, Red Hat Virtualization Platform, and in a bare metal environment.
There is no platform integration with the platform where you install the cluster, as the platform value is set to platform=none. A single-node OpenShift cluster contains only a single node, which hosts the control plane services and the user workloads. This configuration can be helpful when you want to minimize the resource footprint of the cluster.
You can also provision multiple single-node OpenShift clusters on edge resources by using the zero touch provisioning feature, which is a feature that is available with Red Hat OpenShift Container Platform. For more information, see Deploying distributed units at scale in a disconnected environment in the OpenShift Container Platform documentation.
1.5.4.10.1. Prerequisites
See the following prerequisites before creating a cluster in an on-premises environment:
- You must have a deployed hub cluster on OpenShift Container Platform version 4.9, or later.
- You need a configured infrastructure environment with a host inventory of configured hosts.
- You must have internet access for your hub cluster (connected), or a connection to an internal or mirror registry that has a connection to the internet (disconnected) to retrieve the required images for creating the cluster.
- You need a configured on-premises credential.
- You need an OpenShift Container Platform image pull secret. See Using image pull secrets for more information.
1.5.4.10.2. Creating your cluster with the console
To create a cluster from the console, navigate to Infrastructure > Clusters. On the Clusters page, click Create cluster and complete the steps in the console.
- Select Host inventory as the type of cluster.
The following options are available for your assisted installation:
- Use existing discovered hosts: Select your hosts from a list of hosts that are in an existing host inventory.
- Discover new hosts: Discover hosts that are not already in an existing infrastructure environment. Discover your own hosts, rather than using one that is already in an infrastructure environment.
If you need to create a credential, see Creating a credential for an on-premises environment for more information.
The name for your cluster is used in the hostname of the cluster.
Important: When you create a cluster, the controller creates a namespace for the cluster and its resources. Ensure that you include only resources for that cluster instance in that namespace. Destroying the cluster deletes the namespace and all of the resources in it.
Tip: Select YAML: On to view content updates as you enter the information in the console.
If you want to add your cluster to an existing cluster set, you must have the correct permissions on the cluster set to add it. If you do not have cluster-admin privileges when you are creating the cluster, you must select a cluster set on which you have clusterset-admin permissions. If you do not have the correct permissions on the specified cluster set, the cluster creation fails. Contact your cluster administrator to provide you with clusterset-admin permissions to a cluster set if you do not have any cluster set options to select.
Every managed cluster must be associated with a managed cluster set. If you do not assign the managed cluster to a ManagedClusterSet, it is automatically added to the default managed cluster set.
If there is already a base DNS domain that is associated with the selected credential that you configured for your provider account, that value is populated in that field. You can change the value by overwriting it, but this setting cannot be changed after the cluster is created. The base domain of your provider is used to create routes to your Red Hat OpenShift Container Platform cluster components. It is configured in the DNS of your cluster provider as a Start of Authority (SOA) record.
The OpenShift version identifies the version of the OpenShift Container Platform image that is used to create the cluster. If the version that you want to use is available, you can select the image from the list of images. If the image that you want to use is not a standard image, you can enter the URL to the image that you want to use. Release images for more information about release images.
When you select an OpenShift version that is 4.9 or later, an option to select Install single node OpenShift (SNO) is displayed. A single-node OpenShift cluster contains a single node which hosts the control plane services and the user workloads.
If you want your cluster to be a single-node OpenShift cluster, select the single-node OpenShift option. You can add additional workers to single-node OpenShift clusters by completing the following steps:
- From the console, navigate to Infrastructure > Clusters and select the name of the cluster that you created or want to access.
- Select Actions > Add hosts to add additional workers.
Note: The single-node OpenShift control plane requires 8 CPU cores, while a control plane node for a multinode control plane cluster only requires 4 CPU cores.
After you review and save the cluster, your cluster is saved as a draft cluster. You can close the creation process and finish the process later by selecting the cluster name on the Clusters page.
If you are using existing hosts, select whether you want to select the hosts yourself, or if you want them to be selected automatically. The number of hosts is based on the number of nodes that you selected. For example, a SNO cluster only requires one host, while a standard three-node cluster requires three hosts.
The locations of the available hosts that meet the requirements for this cluster are displayed in the list of Host locations. For distribution of the hosts and a more high-availability configuration, select multiple locations.
If you are discovering new hosts with no existing infrastructure environment, complete the steps in Adding hosts to the host inventory by using the Discovery Image.
After the hosts are bound, and the validations pass, complete the networking information for your cluster by adding the following IP addresses:
API VIP: Specifies the IP address to use for internal API communication.
Note: This value must match the name that you used to create the DNS records listed in the prerequisites section. If not provided, the DNS must be pre-configured so that
api.resolves correctly.Ingress VIP: Specifies the IP address to use for ingress traffic.
Note: This value must match the name that you used to create the DNS records listed in the prerequisites section. If not provided, the DNS must be pre-configured so that
test.apps.resolves correctly.
You can view the status of the installation on the Clusters navigation page.
Continue with Accessing your cluster for instructions for accessing your cluster.
1.5.4.10.3. Creating your cluster with the command line
You can also create a cluster without the console by using the assisted installer feature within the central infrastructure management component. After you complete this procedure, you can boot the host from the discovery image that is generated. The order of the procedures is generally not important, but is noted when there is a required order.
1.5.4.10.3.1. Create the namespace
You need a namespace for your resources. It is more convenient to keep all of the resources in a shared namespace. This example uses sample-namespace for the name of the namespace, but you can use any name except assisted-installer. Create a namespace by creating and applying the following file:
apiVersion: v1
kind: Namespace
metadata:
  name: sample-namespace
1.5.4.10.3.2. Add the pull secret to the namespace
Add your pull secret to your namespace by creating and applying the following custom resource:
apiVersion: v1
kind: Secret
type: kubernetes.io/dockerconfigjson
metadata:
  name: <pull-secret>
  namespace: sample-namespace
stringData:
.dockerconfigjson: 'your-pull-secret-json' 1- 1
- Add the content of the pull secret. For example, this can include a
cloud.openshift.com,quay.io, orregistry.redhat.ioauthentication.
1.5.4.10.3.3. Generate a ClusterImageSet
Generate a CustomImageSet to specify the version of OpenShift Container Platform for your cluster by creating and applying the following custom resource:
apiVersion: hive.openshift.io/v1
kind: ClusterImageSet
metadata:
  name: openshift-v4.12.0
spec:
  releaseImage: quay.io/openshift-release-dev/ocp-release:4.12.0-rc.0-x86_64
1.5.4.10.3.4. Create the ClusterDeployment custom resource
The ClusterDeployment custom resource definition is an API that controls the lifecycle of the cluster. It references the AgentClusterInstall custom resource in the spec.ClusterInstallRef setting which defines the cluster parameters.
Create and apply a ClusterDeployment custom resource based on the following example:
apiVersion: hive.openshift.io/v1
kind: ClusterDeployment
metadata:
  name: single-node
  namespace: demo-worker4
spec:
  baseDomain: hive.example.com
  clusterInstallRef:
    group: extensions.hive.openshift.io
    kind: AgentClusterInstall
    name: test-agent-cluster-install 1
    version: v1beta1
  clusterName: test-cluster
  controlPlaneConfig:
    servingCertificates: {}
  platform:
    agentBareMetal:
      agentSelector:
        matchLabels:
          location: internal
  pullSecretRef:
name: <pull-secret> 2- 1
- Use the name of your
AgentClusterInstallresource. - 2
- Use the pull secret that you downloaded in Add the pull secret to the namespace.
1.5.4.10.3.5. Create the AgentClusterInstall custom resource
In the AgentClusterInstall custom resource, you can specify many of the requirements for the clusters. For example, you can specify the cluster network settings, platform, number of control planes, and worker nodes.
Create and add the a custom resource that resembles the following example:
apiVersion: extensions.hive.openshift.io/v1beta1
kind: AgentClusterInstall
metadata:
  name: test-agent-cluster-install
  namespace: demo-worker4
spec:
  platformType: BareMetal 1
  clusterDeploymentRef:
    name: single-node 2
  imageSetRef:
    name: openshift-v4.12.0 3
  networking:
    clusterNetwork:
    - cidr: 10.128.0.0/14
      hostPrefix: 23
    machineNetwork:
    - cidr: 192.168.111.0/24
    serviceNetwork:
    - 172.30.0.0/16
  provisionRequirements:
    controlPlaneAgents: 1
  sshPublicKey: ssh-rsa <your-public-key-here> 4
- 1
- Specify the platform type of the environment where the cluster is created. Valid values are
BareMetal,None,VSphere, orExternal. - 2
- Use the same name that you used for your
ClusterDeploymentresource. - 3
- Use the
ClusterImageSetthat you generated in Generate a ClusterImageSet. - 4
- You can specify your SSH public key, which enables you to access the host after it is installed.
1.5.4.10.3.6. Optional: Create the NMStateConfig custom resource
The NMStateConfig custom resource is only required if you have a host-level network configuration, such as static IP addresses. If you include this custom resource, you must complete this step before creating an InfraEnv custom resource. The NMStateConfig is referred to by the values for spec.nmStateConfigLabelSelector in the InfraEnv custom resource.
Create and apply your NMStateConfig custom resource, which resembles the following example. Replace values where needed:
apiVersion: agent-install.openshift.io/v1beta1
kind: NMStateConfig
metadata:
  name: <mynmstateconfig>
  namespace: <demo-worker4>
  labels:
    demo-nmstate-label: <value>
spec:
  config:
    interfaces:
      - name: eth0
        type: ethernet
        state: up
        mac-address: 02:00:00:80:12:14
        ipv4:
          enabled: true
          address:
            - ip: 192.168.111.30
              prefix-length: 24
          dhcp: false
      - name: eth1
        type: ethernet
        state: up
        mac-address: 02:00:00:80:12:15
        ipv4:
          enabled: true
          address:
            - ip: 192.168.140.30
              prefix-length: 24
          dhcp: false
    dns-resolver:
      config:
        server:
          - 192.168.126.1
    routes:
      config:
        - destination: 0.0.0.0/0
          next-hop-address: 192.168.111.1
          next-hop-interface: eth1
          table-id: 254
        - destination: 0.0.0.0/0
          next-hop-address: 192.168.140.1
          next-hop-interface: eth1
          table-id: 254
  interfaces:
    - name: "eth0"
      macAddress: "02:00:00:80:12:14"
    - name: "eth1"
      macAddress: "02:00:00:80:12:15"
Note: You must include the demo-nmstate-label label name and value in the InfraEnv resource spec.nmStateConfigLabelSelector.matchLabels field.
1.5.4.10.3.7. Create the InfraEnv custom resource
The InfraEnv custom resource provides the configuration to create the discovery ISO. Within this custom resource, you identify values for proxy settings, ignition overrides, and specify NMState labels. The value of spec.nmStateConfigLabelSelector in this custom resource references the NMStateConfig custom resource.
Note: If you plan to include the optional NMStateConfig custom resource, you must reference it in the InfraEnv custom resource. If you create the InfraEnv custom resource before you create the NMStateConfig custom resource edit the InfraEnv custom resource to reference the NMStateConfig custom resource and download the ISO after the reference is added.
Create and apply the following custom resource:
apiVersion: agent-install.openshift.io/v1beta1
kind: InfraEnv
metadata:
  name: myinfraenv
  namespace: demo-worker4
spec:
  clusterRef:
    name: single-node  1
    namespace: demo-worker4 2
  pullSecretRef:
    name: pull-secret
    sshAuthorizedKey: <your_public_key_here> 3
  nmStateConfigLabelSelector:
    matchLabels:
demo-nmstate-label: value 4- 1
- Replace the
clusterDeploymentresource name from Create the ClusterDeployment. - 2
- Replace the
clusterDeploymentresource namespace from Create the ClusterDeployment. - 3
- Optional: You can specify your SSH public key, which enables you to access the host when it is booted from the discovery ISO image.
- 4
- The label name and the label value must match the values in the
labelsection of theNMStateConfigcustom resource that you created in Optional: Create the NMStateConfig custom resource.
1.5.4.10.3.8. Boot the host from the discovery image
The remaining steps explain how to boot the host from the discovery ISO image that results from the previous procedures.
Download the discovery image from the namespace by running the following command:
curl --insecure -o image.iso $(kubectl -n sample-namespace get infraenvs.agent-install.openshift.io myinfraenv -o=jsonpath="{.status.isoDownloadURL}")- Move the discovery image to virtual media, a USB drive, or another storage location and boot the host from the discovery image that you downloaded.
The
Agentresource is created automatically. It is registered to the cluster and represents a host that booted from a discovery image. Approve theAgentcustom resource and start the installation by running the following command:oc -n sample-namespace patch agents.agent-install.openshift.io 07e80ea9-200c-4f82-aff4-4932acb773d4 -p '{"spec":{"approved":true}}' --type mergeReplace the agent name and UUID with your values.
You can confirm that it was approved when the output of the previous command includes an entry for the target cluster that includes a value of
truefor theAPPROVEDparameter.
1.5.4.11. Hibernating a created cluster (Technology Preview)
You can hibernate a cluster that was created using multicluster engine operator to conserve resources. A hibernating cluster requires significantly fewer resources than one that is running, so you can potentially lower your provider costs by moving clusters in and out of a hibernating state. This feature only applies to clusters that were created by multicluster engine operator in the following environments:
- Amazon Web Services
- Microsoft Azure
- Google Cloud Platform
1.5.4.11.1. Hibernate a cluster by using the console
To use the console to hibernate a cluster that was created by multicluster engine operator, complete the following steps:
- From the navigation menu, select Infrastructure > Clusters. Ensure that the Manage clusters tab is selected.
- Select Hibernate cluster from the Options menu for the cluster. Note: If the Hibernate cluster option is not available, you cannot hibernate the cluster. This can happen when the cluster is imported, and not created by multicluster engine operator.
The status for the cluster on the Clusters page is Hibernating when the process completes.
Tip: You can hibernate multiple clusters by selecting the clusters that you want to hibernate on the Clusters page, and selecting Actions > Hibernate clusters.
Your selected cluster is hibernating.
1.5.4.11.2. Hibernate a cluster by using the CLI
To use the CLI to hibernate a cluster that was created by multicluster engine operator, complete the following steps:
Enter the following command to edit the settings for the cluster that you want to hibernate:
oc edit clusterdeployment <name-of-cluster> -n <namespace-of-cluster>
Replace
name-of-clusterwith the name of the cluster that you want to hibernate.Replace
namespace-of-clusterwith the namespace of the cluster that you want to hibernate.-
Change the value for
spec.powerStatetoHibernating. Enter the following command to view the status of the cluster:
oc get clusterdeployment <name-of-cluster> -n <namespace-of-cluster> -o yaml
Replace
name-of-clusterwith the name of the cluster that you want to hibernate.Replace
namespace-of-clusterwith the namespace of the cluster that you want to hibernate.When the process of hibernating the cluster is complete, the value of the type for the cluster is
type=Hibernating.
Your selected cluster is hibernating.
1.5.4.11.3. Resuming normal operation of a hibernating cluster by using the console
To resume normal operation of a hibernating cluster by using the console, complete the following steps:
- From the navigation menu, select Infrastructure > Clusters. Ensure that the Manage clusters tab is selected.
- Select Resume cluster from the Options menu for the cluster that you want to resume.
The status for the cluster on the Clusters page is Ready when the process completes.
Tip: You can resume multiple clusters by selecting the clusters that you want to resume on the Clusters page, and selecting Actions > Resume clusters.
Your selected cluster is resuming normal operation.
1.5.4.11.4. Resuming normal operation of a hibernating cluster by using the CLI
To resume normal operation of a hibernating cluster by using the CLI, complete the following steps:
Enter the following command to edit the settings for the cluster:
oc edit clusterdeployment <name-of-cluster> -n <namespace-of-cluster>
Replace
name-of-clusterwith the name of the cluster that you want to hibernate.Replace
namespace-of-clusterwith the namespace of the cluster that you want to hibernate.-
Change the value for
spec.powerStatetoRunning. Enter the following command to view the status of the cluster:
oc get clusterdeployment <name-of-cluster> -n <namespace-of-cluster> -o yaml
Replace
name-of-clusterwith the name of the cluster that you want to hibernate.Replace
namespace-of-clusterwith the namespace of the cluster that you want to hibernate.When the process of resuming the cluster is complete, the value of the type for the cluster is
type=Running.
Your selected cluster is resuming normal operation.
1.5.4.12. Creating a cluster in a proxy environment
You can create a Red Hat OpenShift Container Platform cluster when your hub cluster is connected through a proxy server. One of the following situations must be true for the cluster creation to succeed:
- multicluster engine operator has a private network connection with the managed cluster that you are creating, with managed cluster access to the Internet by using a proxy.
- The managed cluster is on a infrastructure provider, but the firewall ports enable communication from the managed cluster to the hub cluster.
To create a cluster that is configured with a proxy, complete the following steps:
Configure the
cluster-wide-proxysetting on the hub cluster by adding the following information to yourinstall-configYAML that is stored in your Secret:apiVersion: v1 kind: Proxy baseDomain: <domain> proxy: httpProxy: http://<username>:<password>@<proxy.example.com>:<port> httpsProxy: https://<username>:<password>@<proxy.example.com>:<port> noProxy: <wildcard-of-domain>,<provisioning-network/CIDR>,<BMC-address-range/CIDR>
Replace
usernamewith the username for your proxy server.Replace
passwordwith the password to access your proxy server.Replace
proxy.example.comwith the path of your proxy server.Replace
portwith the communication port with the proxy server.Replace
wildcard-of-domainwith an entry for domains that should bypass the proxy.Replace
provisioning-network/CIDRwith the IP address of the provisioning network and the number of assigned IP addresses, in CIDR notation.Replace
BMC-address-range/CIDRwith the BMC address and the number of addresses, in CIDR notation.After you add the previous values, the settings are applied to your clusters.
- Provision the cluster by completing the procedure for creating a cluster. See Creating a cluster to select your provider.
Note: You can only use install-config YAML when deploying your cluster. After deploying your cluster, any new changes you make to install-config YAML do not apply. To update the configuration after deployment, you must policies. See Pod policy for more information.
1.5.5. Importing a target managed cluster to the hub cluster
You can import clusters from different Kubernetes cloud providers. After you import, the targeted cluster becomes a managed cluster for the multicluster engine operator hub cluster. Unless otherwise specified, complete the import tasks anywhere that you can access the hub cluster and the targeted managed cluster.
A hub cluster cannot manage any other hub cluster, but can manage itself. The hub cluster is configured to automatically be imported and self-managed. You do not need to manually import the hub cluster.
However, if you remove a hub cluster and try to import it again, you need to add the local-cluster:true label to the ManagedCluster resource.
Choose from the following instructions to set up your managed cluster:
Required user type or access level: Cluster administrator
1.5.5.1. Importing a managed cluster by using the console
After you install multicluster engine for Kubernetes operator, you are ready to import a cluster to manage. Continue reading the following topics learn how to import a managed cluster by using the console:
1.5.5.1.1. Prerequisites
- A deployed hub cluster. If you are importing bare metal clusters, the hub cluster must be installed on Red Hat OpenShift Container Platform version 4.8 or later.
- A cluster you want to manage.
-
The
base64command line tool. -
A defined
multiclusterhub.spec.imagePullSecretif you are importing a cluster that was not created by OpenShift Container Platform. This secret might have been created when multicluster engine for Kubernetes operator was installed. See Custom image pull secret for more information about how to define this secret.
Required user type or access level: Cluster administrator
1.5.5.1.2. Creating a new pull secret
If you need to create a new pull secret, complete the following steps:
- Download your Kubernetes pull secret from cloud.redhat.com.
- Add the pull secret to the namespace of your hub cluster.
Run the following command to create a new secret in the
open-cluster-managementnamespace:oc create secret generic pull-secret -n <open-cluster-management> --from-file=.dockerconfigjson=<path-to-pull-secret> --type=kubernetes.io/dockerconfigjson
Replace
open-cluster-managementwith the name of the namespace of your hub cluster. The default namespace of the hub cluster isopen-cluster-management.Replace
path-to-pull-secretwith the path to the pull secret that you downloaded.The secret is automatically copied to the managed cluster when it is imported.
-
Ensure that a previously installed agent is deleted from the cluster that you want to import. You must remove the
open-cluster-management-agentandopen-cluster-management-agent-addonnamespaces to avoid errors. For importing in a Red Hat OpenShift Dedicated environment, see the following notes:
- You must have the hub cluster deployed in a Red Hat OpenShift Dedicated environment.
-
The default permission in Red Hat OpenShift Dedicated is dedicated-admin, but that does not contain all of the permissions to create a namespace. You must have
cluster-adminpermissions to import and manage a cluster with multicluster engine operator.
-
Ensure that a previously installed agent is deleted from the cluster that you want to import. You must remove the
1.5.5.1.3. Importing a cluster
You can import existing clusters from the console for each of the available cloud providers.
Note: A hub cluster cannot manage a different hub cluster. A hub cluster is set up to automatically import and manage itself, so you do not have to manually import a hub cluster to manage itself.
By default, the namespace is used for the cluster name and namespace, but you can change it.
Important: When you create a cluster, the controller creates a namespace for the cluster and its resources. Ensure that you include only resources for that cluster instance in that namespace. Destroying the cluster deletes the namespace and all of the resources in it.
Every managed cluster must be associated with a managed cluster set. If you do not assign the managed cluster to a ManagedClusterSet, the cluster is automatically added to the default managed cluster set.
If you want to add the cluster to a different cluster set, you must have clusterset-admin privileges to the cluster set. If you do not have cluster-admin privileges when you are importing the cluster, you must select a cluster set on which you have clusterset-admin permissions. If you do not have the correct permissions on the specified cluster set, the cluster importing fails. Contact your cluster administrator to provide you with clusterset-admin permissions to a cluster set if you do not have cluster set options to select.
If you import a OpenShift Container Platform Dedicated cluster and do not specify a vendor by adding a label for vendor=OpenShiftDedicated, or if you add a label for vendor=auto-detect, a managed-by=platform label is automatically added to the cluster. You can use this added label to identify the cluster as a OpenShift Container Platform Dedicated cluster and retrieve the OpenShift Container Platform Dedicated clusters as a group.
The following table provides the available options for import mode, which specifies the method for importing the cluster:
| Run import commands manually | After completing and submitting the information in the console, including any Red Hat Ansible Automation Platform templates, run the provided command on the target cluster to import the cluster. |
| Enter your server URL and API token for the existing cluster | Provide the server URL and API token of the cluster that you are importing. You can specify a Red Hat Ansible Automation Platform template to run when the cluster is upgraded. |
|
Provide the |
Copy and paste the contents of the |
Note: You must have the Red Hat Ansible Automation Platform Resource Operator installed from OperatorHub to create and run an Ansible Automation Platform job. To configure a cluster API address, see Optional: Configuring the cluster API address
1.5.5.1.3.1. Additional steps for running import commands manually
This method requires you to run the provided command on the target cluster to import the cluster.
Important: The command contains pull secret information that is copied to each of the imported clusters. Anyone who can access the imported clusters can also view the pull secret information. Consider creating a secondary pull secret at https://cloud.redhat.com/ or create a service account to protect your personal credentials.
Generate and copy the import command:
- Select Infrastructure > Clusters from the console navigation.
- Select Import cluster.
-
Complete the Details and Automation information in the form, leaving the Import mode selection set to
Run import commands manually. After you click Generate command, the cluster overview page is displayed. - Click Copy command to copy the generated command to the clipboard.
For the OpenShift Container Platform Dedicated environment only, complete the following steps (if you are not using a OpenShift Container Platform Dedicated environment, skip to step 3):
- Log in to the OpenShift Container Platform console of the cluster that you want to import.
-
Create the
open-cluster-management-agentandopen-cluster-managementnamespaces or projects on the cluster that you are importing. - Find the klusterlet operator in the OpenShift Container Platform catalog.
Install it in the
open-cluster-managementnamespace or project that you created.Important: Do not install the operator in the
open-cluster-management-agentnamespace.Extract the bootstrap secret from the import command by completing the following steps:
-
Paste the import command into a file that you create named
import-command. Run the following command to insert the content into the new file:
cat import-command | awk '{split($0,a,"&&"); print a[3]}' | awk '{split($0,a,"|"); print a[1]}' | sed -e "s/^ echo //" | base64 -d-
Find and copy the secret with the name
bootstrap-hub-kubeconfigin the output. -
Apply the secret to the
open-cluster-management-agentnamespace on the managed cluster. Create the klusterlet resource using the example in the installed operator. Change the
clusterNamevalue to the same name as cluster name that was set during the import.Note: When the
managedclusterresource is successfully registered to the hub, there are two klusterlet operators that are installed. One klusterlet operator is in theopen-cluster-managementnamespace, and the other is in theopen-cluster-management-agentnamespace. Having multiple operators does not affect the function of the klusterlet.
-
Paste the import command into a file that you create named
Make sure that your
kubectlis logged in to the cluster that you want to import by entering the following command:kubectl cluster-info
-
Run the command that you copied to deploy the
open-cluster-management-agent-addonto the managed cluster.
If you want to configure a cluster API address, continue with the steps in Optional: Configuring the cluster API address.
1.5.5.1.3.2. Optional: Configuring the cluster API address
Complete the following steps to optionally configure the Cluster API address that is on the cluster details page by configuring the URL that is displayed in the table when you run the oc get managedcluster command:
-
Log in to your hub cluster with an ID that has
cluster-adminpermissions. -
Configure a
kubeconfigfile for your targeted managed cluster. Edit the managed cluster entry for the cluster that you are importing by running the following command:
oc edit managedcluster <cluster-name>
Replace
cluster-namewith the name of the managed cluster.Add the
ManagedClusterClientConfigssection to theManagedClusterspec in the YAML file, as shown in the following example:spec: hubAcceptsClient: true managedClusterClientConfigs: - url: <https://api.new-managed.dev.redhat.com>
Replace the value of the URL with the URL that provides external access to the managed cluster that you are importing.
1.5.5.1.4. Removing an imported cluster
Complete the following procedure to remove an imported cluster and the open-cluster-management-agent-addon that was created on the managed cluster.
On the Clusters page, click Actions > Detach cluster to remove your cluster from management.
Note: If you attempt to detach the hub cluster, which is named local-cluster, be aware that the default setting of disableHubSelfManagement is false. This setting causes the hub cluster to reimport itself and manage itself when it is detached and it reconciles the MultiClusterHub controller. It might take hours for the hub cluster to complete the detachment process and reimport. If you want to reimport the hub cluster without waiting for the processes to finish, you can run the following command to restart the multiclusterhub-operator pod and reimport faster:
oc delete po -n open-cluster-management `oc get pod -n open-cluster-management | grep multiclusterhub-operator| cut -d' ' -f1`
You can change the value of the hub cluster to not import automatically by changing the disableHubSelfManagement value to true. For more information, see the disableHubSelfManagement topic.
1.5.5.1.4.1. Additional resources
- See Custom image pull secret for more information about how to define a custom image pull secret.
- See the disableHubSelfManagement topic.
1.5.5.2. Importing a managed cluster by using the CLI
After you install multicluster engine for Kubernetes operator, you are ready to import a cluster and manage it by using the Red Hat OpenShift Container Platform CLI. Continue reading the following topics to learn how to import a managed cluster with the CLI by using the auto import secret, or by using manual commands.
Important: A hub cluster cannot manage a different hub cluster. A hub cluster is set up to automatically import and manage itself as a local cluster. You do not have to manually import a hub cluster to manage itself. If you remove a hub cluster and try to import it again, you need to add the local-cluster:true label.
1.5.5.2.1. Prerequisites
- A deployed hub cluster. If you are importing bare metal clusters, the hub cluster must be installed on OpenShift Container Platform version 4.6 or later.
- A separate cluster you want to manage.
-
The OpenShift Container Platform CLI version 4.6 or later, to run
occommands. See Getting started with the OpenShift CLI for information about installing and configuring the OpenShift Container Platform CLI. -
A defined
multiclusterhub.spec.imagePullSecretif you are importing a cluster that was not created by OpenShift Container Platform. This secret might have been created when multicluster engine for Kubernetes operator was installed. See Custom image pull secret for more information about how to define this secret.
1.5.5.2.2. Supported architectures
- Linux (x86_64, s390x, ppc64le)
- macOS
1.5.5.2.3. Preparing for cluster import
Before importing a managed cluster by using the CLI, you must complete the following steps:
Log in to your hub cluster by running the following command:
oc login
Run the following command on the hub cluster to create the project and namespace. The cluster name that is defined in
<cluster_name>is also used as the cluster namespace in the YAML file and commands:oc new-project <cluster_name>
Important: The
cluster.open-cluster-management.io/managedClusterlabel is automatically added to and removed from a managed cluster namespace. Do not manually add it to or remove it from a managed cluster namespace.Create a file named
managed-cluster.yamlwith the following example content:apiVersion: cluster.open-cluster-management.io/v1 kind: ManagedCluster metadata: name: <cluster_name> labels: cloud: auto-detect vendor: auto-detect spec: hubAcceptsClient: trueWhen the values for
cloudandvendorare set toauto-detect, Red Hat Advanced Cluster Management detects the cloud and vendor types automatically from the cluster that you are importing. You can optionally replace the values forauto-detectwith with the cloud and vendor values for your cluster. See the following example:cloud: Amazon vendor: OpenShift
Apply the YAML file to the
ManagedClusterresource by running the following command:oc apply -f managed-cluster.yaml
You can now continue with either Importing the cluster by using the auto import secret or Importing the cluster manually.
1.5.5.2.4. Importing a cluster by using the auto import secret
To import a managed cluster by using the auto import secret, you must create a secret that contains either a reference to the kubeconfig file of the cluster, or the kube API server and token pair of the cluster. Complete the following steps to import a cluster by using the auto import secret:
-
Retrieve the
kubeconfigfile, or the kube API server and token, of the managed cluster that you want to import. See the documentation for your Kubernetes cluster to learn where to locate yourkubeconfigfile or your kube API server and token. Create the
auto-import-secret.yamlfile in the ${CLUSTER_NAME} namespace.Create a YAML file named
auto-import-secret.yamlby using content that is similar to the following template:apiVersion: v1 kind: Secret metadata: name: auto-import-secret namespace: <cluster_name> stringData: autoImportRetry: "5" # If you are using the kubeconfig file, add the following value for the kubeconfig file # that has the current context set to the cluster to import: kubeconfig: |- <kubeconfig_file> # If you are using the token/server pair, add the following two values instead of # the kubeconfig file: token: <Token to access the cluster> server: <cluster_api_url> type: Opaque
Apply the YAML file in the <cluster_name> namespace by running the following command:
oc apply -f auto-import-secret.yaml
Note: By default, the auto import secret is used one time and deleted when the import process completes. If you want to keep the auto import secret, add
managedcluster-import-controller.open-cluster-management.io/keeping-auto-import-secretto the secret. You can add it by running the following command:oc -n <cluster_name> annotate secrets auto-import-secret managedcluster-import-controller.open-cluster-management.io/keeping-auto-import-secret=""
Validate the
JOINEDandAVAILABLEstatus for your imported cluster. Run the following command from the hub cluster:oc get managedcluster <cluster_name>
Log in to the managed cluster by running the following command on the cluster:
oc login
You can validate the pod status on the cluster that you are importing by running the following command:
oc get pod -n open-cluster-management-agent
You can now continue with Importing the klusterlet add-on.
1.5.5.2.5. Importing a cluster manually
Important: The import command contains pull secret information that is copied to each of the imported managed clusters. Anyone who can access the imported clusters can also view the pull secret information.
Complete the following steps to import a managed cluster manually:
Obtain the
klusterlet-crd.yamlfile that was generated by the import controller on your hub cluster by running the following command:oc get secret <cluster_name>-import -n <cluster_name> -o jsonpath={.data.crds\\.yaml} | base64 --decode > klusterlet-crd.yamlObtain the
import.yamlfile that was generated by the import controller on your hub cluster by running the following command:oc get secret <cluster_name>-import -n <cluster_name> -o jsonpath={.data.import\\.yaml} | base64 --decode > import.yamlProceed with the following steps in the cluster that you are importing:
Log in to the managed cluster that you are importing by entering the following command:
oc login
Apply the
klusterlet-crd.yamlthat you generated in step 1 by running the following command:oc apply -f klusterlet-crd.yaml
Apply the
import.yamlfile that you previously generated by running the following command:oc apply -f import.yaml
You can validate the
JOINEDandAVAILABLEstatus for the managed cluster that you are importing by running the following command from the hub cluster:oc get managedcluster <cluster_name>
You can now continue with Importing the klusterlet add-on.
1.5.5.2.6. Importing the klusterlet add-on
Implement the KlusterletAddonConfig klusterlet add-on configuration to enable other add-ons on your managed clusters. Create and apply the configuration file by completing the following steps:
Create a YAML file that is similar to the following example:
apiVersion: agent.open-cluster-management.io/v1 kind: KlusterletAddonConfig metadata: name: <cluster_name> namespace: <cluster_name> spec: applicationManager: enabled: true certPolicyController: enabled: true iamPolicyController: enabled: true policyController: enabled: true searchCollector: enabled: true-
Save the file as
klusterlet-addon-config.yaml. Apply the YAML by running the following command:
oc apply -f klusterlet-addon-config.yaml
Add-ons are installed after the managed cluster status you are importing is
AVAILABLE.You can validate the pod status of add-ons on the cluster you are importing by running the following command:
oc get pod -n open-cluster-management-agent-addon
1.5.5.2.7. Removing an imported cluster by using the command line interface
To remove a managed cluster by using the command line interface, run the following command:
oc delete managedcluster <cluster_name>
Replace <cluster_name> with the name of the cluster.
1.5.5.3. Importing an on-premises Red Hat OpenShift Container Platform cluster manually
After you install multicluster engine for Kubernetes operator, you are ready to import a cluster to manage. You can import an existing OpenShift Container Platform cluster so that you can add additional nodes. Continue reading the following topics to learn more:
1.5.5.3.1. Prerequisites
- Enable the central infrastructure management service.
1.5.5.3.2. Importing a cluster
Complete the following steps to import an OpenShift Container Platform cluster manually, without a static network or a bare metal host, and prepare it for adding nodes:
Create a namespace for the OpenShift Container Platform cluster that you want to import by applying the following YAML content:
apiVersion: v1
kind: Namespace
metadata:
  name: managed-cluster
Make sure that a ClusterImageSet matching the OpenShift Container Platform cluster you are importing exists by applying the following YAML content:
apiVersion: hive.openshift.io/v1
kind: ClusterImageSet
metadata:
  name: openshift-v4.11.18
spec:
  releaseImage: quay.io/openshift-release-dev/ocp-release@sha256:22e149142517dfccb47be828f012659b1ccf71d26620e6f62468c264a7ce7863
Add your pull secret to access the image by applying the following YAML content:
apiVersion: v1 kind: Secret type: kubernetes.io/dockerconfigjson metadata: name: pull-secret namespace: managed-cluster stringData: .dockerconfigjson: <pull-secret-json> 1- 1
- Replace <pull-secret-json> with your pull secret JSON.
Copy the
kubeconfigfrom your OpenShift Container Platform cluster to the hub cluster.Get the
kubeconfigfrom your OpenShift Container Platform cluster by running the following command. Make sure thatkubeconfigis set as the cluster being imported:oc get secret -n openshift-kube-apiserver node-kubeconfigs -ojson | jq '.data["lb-ext.kubeconfig"]' --raw-output | base64 -d > /tmp/kubeconfig.some-other-cluster
Copy the
kubeconfigto the hub cluster by running the following command. Make sure thatkubeconfigis set as your hub cluster:oc -n managed-cluster create secret generic some-other-cluster-admin-kubeconfig --from-file=kubeconfig=/tmp/kubeconfig.some-other-cluster
Create an
AgentClusterInstallcustom resource by applying the following YAML content. Replace values where needed:apiVersion: extensions.hive.openshift.io/v1beta1 kind: AgentClusterInstall metadata: name: <your-cluster-name> 1 namespace: <managed-cluster> spec: networking: userManagedNetworking: true clusterDeploymentRef: name: <your-cluster> imageSetRef: name: openshift-v4.11.18 provisionRequirements: controlPlaneAgents: 2 sshPublicKey: <""> 3
Create a
ClusterDeploymentby applying the following YAML content. Replace values where needed:apiVersion: hive.openshift.io/v1 kind: ClusterDeployment metadata: name: <your-cluster-name> 1 namespace: managed-cluster spec: baseDomain: <redhat.com> 2 installed: <true> 3 clusterMetadata: adminKubeconfigSecretRef: name: <your-cluster-name-admin-kubeconfig> 4 clusterID: <""> 5 infraID: <""> 6 clusterInstallRef: group: extensions.hive.openshift.io kind: AgentClusterInstall name: your-cluster-name-install version: v1beta1 clusterName: your-cluster-name platform: agentBareMetal: pullSecretRef: name: pull-secret
- 1
- Choose a name for your cluster.
- 2
- Make sure
baseDomainmatches the domain you are using for your OpenShift Container Platform cluster. - 3
- Set to
trueto automatically import your OpenShift Container Platform cluster as a production environment cluster. - 4
- Reference the
kubeconfigyou created in step 4. - 5 6
- Leave
clusterIDandinfraIDempty in production environments.
Add an
InfraEnvcustom resource to discover new hosts to add to your cluster by applying the following YAML content. Replace values where needed:Note: The following example might require additional configuration if you are not using a static IP address.
apiVersion: agent-install.openshift.io/v1beta1
kind: InfraEnv
metadata:
  name: your-infraenv
  namespace: managed-cluster
spec:
  clusterRef:
    name: your-cluster-name
    namespace: managed-cluster
  pullSecretRef:
    name: pull-secret
  sshAuthorizedKey: ""
Table 1.5. InfraEnv field table
| Field | Optional or required | Description |
|---|---|---|
|
| Optional |
The |
|
| Optional |
Add the optional |
If the import is successful, a URL to download an ISO file appears. Download the ISO file by running the following command, replacing <url> with the URL that appears:
Note: You can automate host discovery by using bare metal host.
oc get infraenv -n managed-cluster some-other-infraenv -ojson | jq ".status.<url>" --raw-output | xargs curl -k -o /storage0/isos/some-other.iso
1.5.5.3.3. Adding worker nodes to OpenShift Container Platform clusters
Complete the following steps to add production environment worker nodes to OpenShift Container Platform clusters:
Boot the machine that you want to use as a worker node from the ISO you previously downloaded.
Note: Make sure that the worker node meets the requirements for an OpenShift Container Platform worker node.
Wait for an agent to register after running the following command:
watch -n 5 "oc get agent -n managed-cluster"
If the agent registration is succesful, an agent is listed. Approve the agent for installation. This can take a few minutes.
Note: If the agent is not listed, exit the
watchcommand by pressing Ctrl and C, then log in to the worker node to troubleshoot.If you are using late binding, run the following command to associate pending unbound agents with your OpenShift Container Platform cluster. Skip to step 5 if you are not using late binding:
oc get agent -n managed-cluster -ojson | jq -r '.items[] | select(.spec.approved==false) |select(.spec.clusterDeploymentName==null) | .metadata.name'| xargs oc -n managed-cluster patch -p '{"spec":{"clusterDeploymentName":{"name":"some-other-cluster","namespace":"managed-cluster"}}}' --type merge agentApprove any pending agents for installation by running the following command:
oc get agent -n managed-cluster -ojson | jq -r '.items[] | select(.spec.approved==false) | .metadata.name'| xargs oc -n managed-cluster patch -p '{"spec":{"approved":true}}' --type merge agent
Wait for the installation of the worker node. When the worker node installation is complete, the worker node contacts the managed cluster with a Certificate Signing Request (CSR) to start the joining process. The CSR is automatically signed.
1.5.5.4. Specifying image registry on managed clusters for import
You might need to override the image registry on the managed clusters that you are importing. You can do this by creating a ManagedClusterImageRegistry custom resource definition.
The ManagedClusterImageRegistry custom resource definition is a namespace-scoped resource.
The ManagedClusterImageRegistry custom resource definition specifies a set of managed clusters for a Placement to select, but needs different images from the custom image registry. After the managed clusters are updated with the new images, the following label is added to each managed cluster for identification: open-cluster-management.io/image-registry=<namespace>.<managedClusterImageRegistryName>.
The following example shows a ManagedClusterImageRegistry custom resource definition:
apiVersion: imageregistry.open-cluster-management.io/v1alpha1
kind: ManagedClusterImageRegistry
metadata:
  name: <imageRegistryName>
  namespace: <namespace>
spec:
  placementRef:
    group: cluster.open-cluster-management.io
    resource: placements
    name: <placementName>
  pullSecret:
    name: <pullSecretName>
  registries:
  - mirror: <mirrored-image-registry-address>
    source: <image-registry-address>
  - mirror: <mirrored-image-registry-address>
    source: <image-registry-address>
In the spec section:
-
Replace
placementNamewith the name of a Placement in the same namespace that selects a set of managed clusters. -
Replace
pullSecretNamewith the name of the pull secret that is used to pull images from the custom image registry. List the values for each of the
sourceandmirrorregistries. Replace themirrored-image-registry-addressandimage-registry-addresswith the value for each of themirrorandsourcevalues of the registries.Example 1: To replace the source image registry named
registry.redhat.io/rhacm2withlocalhost:5000/rhacm2, andregistry.redhat.io/multicluster-enginewithlocalhost:5000/multicluster-engine, use the following example:registries: - mirror: localhost:5000/rhacm2/ source: registry.redhat.io/rhacm2 - mirror: localhost:5000/multicluster-engine source: registry.redhat.io/multicluster-engineExample 2: To replace the source image,
registry.redhat.io/rhacm2/registration-rhel8-operatorwithlocalhost:5000/rhacm2-registration-rhel8-operator, use the following example:registries: - mirror: localhost:5000/rhacm2-registration-rhel8-operator source: registry.redhat.io/rhacm2/registration-rhel8-operator
1.5.5.4.1. Importing a cluster that has a ManagedClusterImageRegistry
Complete the following steps to import a cluster that is customized with a ManagedClusterImageRegistry custom resource definition:
Create a pull secret in the namespace where you want your cluster to be imported. For these steps, the namespace is
myNamespace.$ kubectl create secret docker-registry myPullSecret \ --docker-server=<your-registry-server> \ --docker-username=<my-name> \ --docker-password=<my-password>
Create a Placement in the namespace that you created.
apiVersion: cluster.open-cluster-management.io/v1beta1
kind: Placement
metadata:
  name: myPlacement
  namespace: myNamespace
spec:
  clusterSets:
  - myClusterSet
  tolerations:
  - key: "cluster.open-cluster-management.io/unreachable"
    operator: Exists
Note: The
unreachabletoleration is required for the Placement to be able to select the cluster.Create a
ManagedClusterSetresource and bind it to your namespace.apiVersion: cluster.open-cluster-management.io/v1beta2 kind: ManagedClusterSet metadata: name: myClusterSet --- apiVersion: cluster.open-cluster-management.io/v1beta2 kind: ManagedClusterSetBinding metadata: name: myClusterSet namespace: myNamespace spec: clusterSet: myClusterSet
Create the
ManagedClusterImageRegistrycustom resource definition in your namespace.apiVersion: imageregistry.open-cluster-management.io/v1alpha1 kind: ManagedClusterImageRegistry metadata: name: myImageRegistry namespace: myNamespace spec: placementRef: group: cluster.open-cluster-management.io resource: placements name: myPlacement pullSecret: name: myPullSecret registry: myRegistryAddress- Import a managed cluster from the console and add it to a managed cluster set.
-
Copy and run the import commands on the managed cluster after the label
open-cluster-management.io/image-registry=myNamespace.myImageRegistryis added to the managed cluster.
1.5.6. Accessing your cluster
To access an Red Hat OpenShift Container Platform cluster that was created and is managed, complete the following steps:
- From the console, navigate to Infrastructure > Clusters and select the name of the cluster that you created or want to access.
Select Reveal credentials to view the user name and password for the cluster. Note these values to use when you log in to the cluster.
Note: The Reveal credentials option is not available for imported clusters.
- Select Console URL to link to the cluster.
- Log in to the cluster by using the user ID and password that you found in step three.
1.5.7. Scaling managed clusters
For clusters that you created, you can customize and resize your managed cluster specifications, such as virtual machine sizes and number of nodes. See the following options:
1.5.7.1. Scaling with MachinePool
For clusters that you provision with multicluster engine operator, a MachinePool resource is automatically created for you. You can further customize and resize your managed cluster specifications, such as virtual machine sizes and number of nodes, by using MachinePool.
-
Using the
MachinePoolresource is not supported for bare metal clusters. -
A
MachinePoolresource is a Kubernetes resource on the hub cluster that groups theMachineSetresources together on the managed cluster. -
The
MachinePoolresource uniformly configures a set of machine resources, including zone configurations, instance type, and root storage. -
With
MachinePool, you can manually configure the desired number of nodes or configure autoscaling of nodes on the managed cluster.
1.5.7.1.1. Configure autoscaling
Configuring autoscaling provides the flexibility of your cluster to scale as needed to lower your cost of resources by scaling down when traffic is low, and by scaling up to ensure that there are enough resources when there is a higher demand for resources.
To enable autoscaling on your
MachinePoolresources using the console, complete the following steps:- In the navigation, select Infrastructure > Clusters.
- Click the name of your target cluster and select the Machine pools tab.
- From the machine pools page, select Enable autoscale from the Options menu for the target machine pool.
Select the minimum and maximum number of machine set replicas. A machine set replica maps directly to a node on the cluster.
The changes might take several minutes to reflect on the console after you click Scale. You can view the status of the scaling operation by clicking View machines in the notification of the Machine pools tab.
To enable autoscaling on your
MachinePoolresources using the command line, complete the following steps:Enter the following command to view your list of machine pools, replacing
managed-cluster-namespacewith the namespace of your target managed cluster.oc get machinepools -n <managed-cluster-namespace>
Enter the following command to edit the YAML file for the machine pool:
oc edit machinepool <MachinePool-resource-name> -n <managed-cluster-namespace>
-
Replace
MachinePool-resource-namewith the name of yourMachinePoolresource. -
Replace
managed-cluster-namespacewith the name of the namespace of your managed cluster.
-
Replace
-
Delete the
spec.replicasfield from the YAML file. -
Add the
spec.autoscaling.minReplicassetting andspec.autoscaling.maxReplicasfields to the resource YAML. -
Add the minimum number of replicas to the
minReplicassetting. -
Add the maximum number of replicas into the
maxReplicassetting. - Save the file to submit the changes.
1.5.7.1.2. Disabling autoscaling
You can disable autoscaling by using the console or the command line.
To disable autoscaling by using the console, complete the following steps:
- In the navigation, select Infrastructure > Clusters.
- Click the name of your target cluster and select the Machine pools tab.
- From the machine pools page, select Disable autoscale from the Options menu for the target machine pool.
Select the number of machine set replicas that you want. A machine set replica maps directly with a node on the cluster.
It might take several minutes to display in the console after you click Scale. You can view the status of the scaling by clicking View machines in the notification on the Machine pools tab.
To disable autoscaling by using the command line, complete the following steps:
Enter the following command to view your list of machine pools:
oc get machinepools -n <managed-cluster-namespace>
Replace
managed-cluster-namespacewith the namespace of your target managed cluster.Enter the following command to edit the YAML file for the machine pool:
oc edit machinepool <name-of-MachinePool-resource> -n <namespace-of-managed-cluster>
Replace
name-of-MachinePool-resourcewith the name of yourMachinePoolresource.Replace
namespace-of-managed-clusterwith the name of the namespace of your managed cluster.-
Delete the
spec.autoscalingfield from the YAML file. -
Add the
spec.replicasfield to the resource YAML. -
Add the number of replicas to the
replicassetting. - Save the file to submit the changes.
1.5.7.1.3. Enabling manual scaling
You can scale manually from the console and from the command line.
1.5.7.1.3.1. Enabling manual scaling with the console
To scale your MachinePool resources using the console, complete the following steps:
-
Disable autoscaling for your
MachinePoolif it is enabled. See the previous steps. - From the console, click Infrastructure > Clusters.
- Click the name of your target cluster and select the Machine pools tab.
- From the machine pools page, select Scale machine pool from the Options menu for the targeted machine pool.
- Select the number of machine set replicas that you want. A machine set replica maps directly with a node on the cluster. Changes might take several minutes to reflect on the console after you click Scale. You can view the status of the scaling operation by clicking View machines from the notification of the Machine pools tab.
1.5.7.1.3.2. Enabling manual scaling with the command line
To scale your MachinePool resources by using the command line, complete the following steps:
Enter the following command to view your list of machine pools, replacing
<managed-cluster-namespace>with the namespace of your target managed cluster namespace:oc get machinepools -n <managed-cluster-namespace>
Enter the following command to edit the YAML file for the machine pool:
oc edit machinepool <MachinePool-resource-name> -n <managed-cluster-namespace>
-
Replace
MachinePool-resource-namewith the name of yourMachinePoolresource. -
Replace
managed-cluster-namespacewith the name of the namespace of your managed cluster.
-
Replace
-
Delete the
spec.autoscalingfield from the YAML file. -
Modify the
spec.replicasfield in the YAML file with the number of replicas you want. - Save the file to submit the changes.
1.5.8. Using cluster proxy add-ons
In some environments, a managed cluster is behind a firewall and cannot be accessed directly by the hub cluster. To gain access, you can set up a proxy add-on to access the kube-apiserver of the managed cluster to provide a more secure connection.
Important: The cluster-proxy-addon does not work when a hub cluster or managed cluster has a [cluster-wide proxy](https://docs.openshift.com/container-platform/4.12/networking/enable-cluster-wide-proxy.html) configuration.
Required access: Editor
To configure a cluster proxy add-on for a hub cluster and a managed cluster, complete the following steps:
Configure the
kubeconfigfile to access the managed clusterkube-apiserverby completing the following steps:Provide a valid access token for the managed cluster.
Note: : You can use the corresponding token of the service account. You can also use the default service account that is in the default namespace.
Export the
kubeconfigfile of the managed cluster by running the following command:export KUBECONFIG=<managed-cluster-kubeconfig>
Add a role to your service account that allows it to access pods by running the following commands:
oc create role -n default test-role --verb=list,get --resource=pods
oc create rolebinding -n default test-rolebinding --serviceaccount=default:default --role=test-role
Run the following command to locate the secret of the service account token:
oc get secret -n default | grep <default-token>
Replace
default-tokenwith the name of your secret.Run the following command to copy the token:
export MANAGED_CLUSTER_TOKEN=$(kubectl -n default get secret <default-token> -o jsonpath={.data.token} | base64 -d)Replace
default-tokenwith the name of your secret.
Configure the
kubeconfigfile on the Red Hat Advanced Cluster Management hub cluster.Export the current
kubeconfigfile on the hub cluster by running the following command:oc config view --minify --raw=true > cluster-proxy.kubeconfig
Modify the
serverfile with your editor. This example uses commands when usingsed. Runalias sed=gsed, if you are using OSX.export TARGET_MANAGED_CLUSTER=<managed-cluster-name> export NEW_SERVER=https://$(oc get route -n multicluster-engine cluster-proxy-addon-user -o=jsonpath='{.spec.host}')/$TARGET_MANAGED_CLUSTER sed -i'' -e '/server:/c\ server: '"$NEW_SERVER"'' cluster-proxy.kubeconfig export CADATA=$(oc get configmap -n openshift-service-ca kube-root-ca.crt -o=go-template='{{index .data "ca.crt"}}' | base64) sed -i'' -e '/certificate-authority-data:/c\ certificate-authority-data: '"$CADATA"'' cluster-proxy.kubeconfigDelete the original user credentials by entering the following commands:
sed -i'' -e '/client-certificate-data/d' cluster-proxy.kubeconfig
sed -i'' -e '/client-key-data/d' cluster-proxy.kubeconfig
sed -i'' -e '/token/d' cluster-proxy.kubeconfig
Add the token of the service account:
sed -i'' -e '$a\ token: '"$MANAGED_CLUSTER_TOKEN"'' cluster-proxy.kubeconfig
List all of the pods on the target namespace of the target managed cluster by running the following command:
oc get pods --kubeconfig=cluster-proxy.kubeconfig -n <default>
Replace the
defaultnamespace with the namespace that you want to use.Access other services on the managed cluster. This feature is available when the managed cluster is a Red Hat OpenShift Container Platform cluster. The service must use
service-serving-certificateto generate server certificates:From the managed cluster, use the following service account token:
export PROMETHEUS_TOKEN=$(kubectl get secret -n openshift-monitoring $(kubectl get serviceaccount -n openshift-monitoring prometheus-k8s -o=jsonpath='{.secrets[0].name}') -o=jsonpath='{.data.token}' | base64 -d)From the hub cluster, convert the certificate authority to a file by running the following command:
oc get configmap kube-root-ca.crt -o=jsonpath='{.data.ca\.crt}' > hub-ca.crt
Get Prometheus metrics of the managed cluster by using the following commands:
export SERVICE_NAMESPACE=openshift-monitoring
export SERVICE_NAME=prometheus-k8s
export SERVICE_PORT=9091
export SERVICE_PATH="api/v1/query?query=machine_cpu_sockets"
curl --cacert hub-ca.crt $NEW_SERVER/api/v1/namespaces/$SERVICE_NAMESPACE/services/$SERVICE_NAME:$SERVICE_PORT/proxy-service/$SERVICE_PATH -H "Authorization: Bearer $PROMETHEUS_TOKEN"
1.5.9. Configuring Ansible Automation Platform tasks to run on managed clusters
multicluster engine operator is integrated with Red Hat Ansible Automation Platform so that you can create prehook and posthook Ansible job instances that occur before or after creating or upgrading your clusters. Configuring prehook and posthook jobs for cluster destroy, and cluster scale actions are not supported.
Required access: Cluster administrator
1.5.9.1. Prerequisites
You must meet the following prerequisites to run Automation templates on your clusters:
- OpenShift Container Platform 4.6 or later
- Install the Ansible Automation Platform Resource Operator to connect Ansible jobs to the lifecycle of Git subscriptions. For best results when using the Automation template to launch Ansible Automation Platform jobs, the Ansible Automation Platform job template should be idempotent when it is run. You can find the Ansible Automation Platform Resource Operator in the OpenShift Container Platform OperatorHub.
1.5.9.2. Configuring an Automation template to run on a cluster by using the console
You can specify the Automation template that you want to use for a cluster when you create the cluster, when you import the cluster, or after you create the cluster.
To specify the template when creating or importing a cluster, select the Ansible template that you want to apply to the cluster in the Automation step. If there are no Automation templates, click Add automation template to create one.
To specify the template after creating a cluster, click Update automation template in the action menu of an existing cluster. You can also use the Update automation template option to update an existing automation template.
1.5.9.3. Creating an Automation template
To initiate an Ansible job with a cluster installation or upgrade, you must create an Automation template to specify when you want the jobs to run. They can be configured to run before or after the cluster installs or upgrades.
To specify the details about running the Ansible template while creating a template, complete the steps in the console:
- Select Infrastructure > Automation from the navigation.
Select the applicable path for your situation:
- If you want to create a new template, click Create Ansible template and continue with step 3.
- If you want to modify an existing template, click Edit template from the Options menu of the template that you want to modify and continue with step 5.
- Enter a unique name for your template, which contains lowercase alphanumeric characters or a hyphen (-).
Select the credential that you want to use for the new template. To link an Ansible credential to an Ansible template, complete the following steps:
- From the navigation, select Automation. Any template in the list of templates that is not linked to a credential contains a Link to credential icon that you can use to link the template to an existing credential. Only the credentials in the same namespace as the template are displayed.
- If there are no credentials that you can select, or if you do not want to use an existing credential, select Edit template from the Options menu for the template that you want to link.
- Click Add credential and complete the procedure in Creating a credential for Ansible Automation Platform if you have to create your credential.
- After you create your credential in the same namespace as the template, select the credential in the Ansible Automation Platform credential field when you edit the template.
- If you want to initiate any Ansible jobs before the cluster is installed, select Add an Automation template in the Pre-install Automation templates section.
Select or enter the name of the prehook and posthook Ansible jobs to add to the installation or upgrade of the cluster.
Note: The Automation template name must match the name of the Ansible job on the Ansible Automation Platform.
- Drag the Ansible jobs to change the order, if necessary.
- Repeat steps 5 - 7 for any Automation templates that you want to initiate after the cluster is installed in the Post-install Automation templates section, the Pre-upgrade Automation templates section, and the Post-upgrade Automation templates section.
Your Ansible template is configured to run on clusters that specify this template when the designated actions occur.
1.5.9.4. Viewing the status of an Ansible job
You can view the status of a running Ansible job to ensure that it started, and is running successfully. To view the current status of a running Ansible job, complete the following steps:
- In the menu, select Infrastructure > Clusters to access the Clusters page.
- Select the name of the cluster to view its details.
View the status of the last run of the Ansible job on the cluster information. The entry shows one of the following statuses:
-
When an install prehook or posthook job fails, the cluster status shows
Failed. When an upgrade prehook or posthook job fails, a warning is displayed in the Distribution field that the upgrade failed.
Tip: You can retry an upgrade from the Clusters page if the cluster prehook or posthook failed.
-
When an install prehook or posthook job fails, the cluster status shows
1.5.10. ClusterClaims
A ClusterClaim is a cluster-scoped custom resource definition (CRD) on a managed cluster. A ClusterClaim represents a piece of information that a managed cluster claims. You can use the ClusterClaim to detemine the Placement of the resource on the target clusters.
The following example shows a ClusterClaim that is identified in the YAML file:
apiVersion: cluster.open-cluster-management.io/v1alpha1
kind: ClusterClaim
metadata:
  name: id.openshift.io
spec:
  value: 95f91f25-d7a2-4fc3-9237-2ef633d8451c
The following table shows the defined ClusterClaims that might be on a cluster that multicluster engine operator manages:
| Claim name | Reserved | Mutable | Description |
|---|---|---|---|
|
| true | false | ClusterID defined in upstream proposal |
|
| true | true | Kubernetes version |
|
| true | false | Platform the managed cluster is running on, like AWS, GCE, and Equinix Metal |
|
| true | false | Product name, like OpenShift, Anthos, EKS and GKE |
|
| false | false | OpenShift Container Platform external ID, which is only available for an OpenShift Container Platform cluster |
|
| false | true | URL of the management console, which is only available for an OpenShift Container Platform cluster |
|
| false | true | OpenShift Container Platform version, which is only available for an OpenShift Container Platform cluster |
If any of the previous claims are deleted or updated on managed cluster, they are restored or rolled back to a previous version automatically.
After the managed cluster joins the hub, the ClusterClaims that are created on a managed cluster are synchronized with the status of the ManagedCluster resource on the hub. A managed cluster with ClusterClaims might look similar to the following example:
apiVersion: cluster.open-cluster-management.io/v1
kind: ManagedCluster
metadata:
  labels:
    cloud: Amazon
    clusterID: 95f91f25-d7a2-4fc3-9237-2ef633d8451c
    installer.name: multiclusterhub
    installer.namespace: open-cluster-management
    name: cluster1
    vendor: OpenShift
  name: cluster1
spec:
  hubAcceptsClient: true
  leaseDurationSeconds: 60
status:
  allocatable:
    cpu: '15'
    memory: 65257Mi
  capacity:
    cpu: '18'
    memory: 72001Mi
  clusterClaims:
    - name: id.k8s.io
      value: cluster1
    - name: kubeversion.open-cluster-management.io
      value: v1.18.3+6c42de8
    - name: platform.open-cluster-management.io
      value: AWS
    - name: product.open-cluster-management.io
      value: OpenShift
    - name: id.openshift.io
      value: 95f91f25-d7a2-4fc3-9237-2ef633d8451c
    - name: consoleurl.openshift.io
      value: 'https://console-openshift-console.apps.xxxx.dev04.red-chesterfield.com'
    - name: version.openshift.io
      value: '4.5'
  conditions:
    - lastTransitionTime: '2020-10-26T07:08:49Z'
      message: Accepted by hub cluster admin
      reason: HubClusterAdminAccepted
      status: 'True'
      type: HubAcceptedManagedCluster
    - lastTransitionTime: '2020-10-26T07:09:18Z'
      message: Managed cluster joined
      reason: ManagedClusterJoined
      status: 'True'
      type: ManagedClusterJoined
    - lastTransitionTime: '2020-10-30T07:20:20Z'
      message: Managed cluster is available
      reason: ManagedClusterAvailable
      status: 'True'
      type: ManagedClusterConditionAvailable
  version:
    kubernetes: v1.18.3+6c42de8
1.5.10.1. List existing ClusterClaims
You can use the kubectl command to list the ClusterClaims that apply to your managed cluster. This is helpful when you want to compare your ClusterClaim to an error message.
Note: Make sure you have list permission on resource clusterclaims.cluster.open-cluster-management.io.
Run the following command to list all existing ClusterClaims that are on the managed cluster:
kubectl get clusterclaims.cluster.open-cluster-management.io
1.5.10.2. Create custom ClusterClaims
You can create ClusterClaims with custom names on a managed cluster, which makes it easier to identify them. The custom ClusterClaims are synchronized with the status of the ManagedCluster resource on the hub cluster. The following content shows an example of a definition for a customized ClusterClaim:
apiVersion: cluster.open-cluster-management.io/v1alpha1
kind: ClusterClaim
metadata:
  name: <custom_claim_name>
spec:
  value: <custom_claim_value>
The max length of field spec.value is 1024. The create permission on resource clusterclaims.cluster.open-cluster-management.io is required to create a ClusterClaim.
1.5.11. ManagedClusterSets
A ManagedClusterSet is a group of managed clusters. A managed cluster set, can help you manage access to all of your managed clusters. You can also create a ManagedClusterSetBinding resource to bind a ManagedClusterSet resource to a namespace.
Each cluster must be a member of a managed cluster set. When you install the hub cluster, a ManagedClusterSet resource is created called default. All clusters that are not assigned to a managed cluster set are automatically assigned to the default managed cluster set. You cannot delete or update the default managed cluster set.
Continue reading to learn more about how to create and manage managed cluster sets:
1.5.11.1. Creating a ManagedClusterSet
You can group managed clusters together in a managed cluster set to limit the user access on managed clusters.
Required access: Cluster administrator
A ManagedClusterSet is a cluster-scoped resource, so you must have cluster administration permissions for the cluster where you are creating the ManagedClusterSet. A managed cluster cannot be included in more than one ManagedClusterSet. You can create a managed cluster set from either the multicluster engine operator console or from the CLI.
Note: Cluster pools that are not added to a managed cluster set are not added to the default ManagedClusterSet resource. After a cluster is claimed from the cluster pool, the cluster is added to the default ManagedClusterSet.
When you create a managed cluster, the following are automatically created to ease management:
-
A
ManagedClusterSetcalledglobal. -
The namespace called
open-cluster-management-global-set. A
ManagedClusterSetBindingcalledglobalto bind theglobalManagedClusterSetto theopen-cluster-management-global-setnamespace.Important: You cannot delete, update, or edit the
globalmanaged cluster set. Theglobalmanaged cluster set includes all managed clusters. See the following example:apiVersion: cluster.open-cluster-management.io/v1beta2 kind: ManagedClusterSetBinding metadata: name: global namespace: open-cluster-management-global-set spec: clusterSet: global
1.5.11.1.1. Creating a ManagedClusterSet by using the CLI
Add the following definition of the managed cluster set to your YAML file to create a managed cluster set by using the CLI:
apiVersion: cluster.open-cluster-management.io/v1beta2
kind: ManagedClusterSet
metadata:
  name: <cluster_set>
Replace <cluster_set> with the name of your managed cluster set.
1.5.11.1.2. Adding a cluster to a ManagedClusterSet
After you create your ManagedClusterSet, you can add clusters to your managed cluster set by either following the instructions in the console or by using the CLI.
1.5.11.1.3. Adding clusters to a ManagedClusterSet by using the CLI
Complete the following steps to add a cluster to a managed cluster set by using the CLI:
Ensure that there is an RBAC
ClusterRoleentry that allows you to create on a virtual subresource ofmanagedclustersets/join.Note: Without this permission, you cannot assign a managed cluster to a
ManagedClusterSet. If this entry does not exist, add it to your YAML file. See the following example:kind: ClusterRole apiVersion: rbac.authorization.k8s.io/v1 metadata: name: clusterrole1 rules: - apiGroups: ["cluster.open-cluster-management.io"] resources: ["managedclustersets/join"] resourceNames: ["<cluster_set>"] verbs: ["create"]Replace
<cluster_set>with the name of yourManagedClusterSet.Note: If you are moving a managed cluster from one
ManagedClusterSetto another, you must have that permission available on both managed cluster sets.Find the definition of the managed cluster in the YAML file. See the following example definition:
apiVersion: cluster.open-cluster-management.io/v1
kind: ManagedCluster
metadata:
  name: <cluster_name>
spec:
  hubAcceptsClient: true
Add the
cluster.open-cluster-management.io/clustersetparemeter and specify the name of theManagedClusterSet. See the following example:apiVersion: cluster.open-cluster-management.io/v1 kind: ManagedCluster metadata: name: <cluster_name> labels: cluster.open-cluster-management.io/clusterset: <cluster_set> spec: hubAcceptsClient: true
1.5.11.2. Assigning RBAC permissions to a ManagedClusterSet
You can assign users or groups to your cluster set that are provided by the configured identity providers on the hub cluster.
Required access: Cluster administrator
See the following table for the three ManagedClusterSet API RBAC permission levels:
| Cluster set | Access permissions | Create permissions |
|---|---|---|
|
| Full access permission to all of the cluster and cluster pool resources that are assigned to the managed cluster set. | Permission to create clusters, import clusters, and create cluster pools. The permissions must be assigned to the managed cluster set when it is created. |
|
|
Permission to bind the cluster set to a namespace by creating a | No permission to create clusters, import clusters, or create cluster pools. |
|
| Read only permission to all of the cluster and cluster pool resources that are assigned to the managed cluster set. | No permission to create clusters, import clusters, or create cluster pools. |
Note: You cannot apply the Cluster set admin permission for the global cluster set.
Complete the following steps to assign users or groups to your managed cluster set from the console:
- From the OpenShift Container Platform console, navigate to Infrastructure > Clusters.
- Select the Cluster sets tab.
- Select your target cluster set.
- Select the Access management tab.
- Select Add user or group.
- Search for, and select the user or group that you want to provide access.
- Select the Cluster set admin or Cluster set view role to give to the selected user or user group. See Overview of roles in multicluster engine operator Role-based access control for more information.
- Select Add to submit the changes.
Your user or group is displayed in the table. It might take a few seconds for the permission assignments for all of the managed cluster set resources to be propagated to your user or group.
See Using ManagedClusterSets with Placement for placement information.
1.5.11.3. Creating a ManagedClusterSetBinding resource
A ManagedClusterSetBinding resource binds a ManagedClusterSet resource to a namespace. Applications and policies that are created in the same namespace can only access clusters that are included in the bound managed cluster set resource.
Access permissions to the namespace automatically apply to a managed cluster set that is bound to that namespace. If you have access permissions to that namespace, you automatically have permissions to access any managed cluster set that is bound to that namespace. If you only have permissions to access the managed cluster set, you do not automatically have permissions to access other managed cluster sets on the namespace.
You can create a managed cluster set binding by using the console or the command line.
1.5.11.3.1. Creating a ManagedClusterSetBinding by using the console
Complete the following steps to create a ManagedClusterSetBinding by using the console:
- From the OpenShift Container Platform console, navigate to Infrastructure > Clusters and select the Cluster sets tab.
- Select the name of the cluster set that you want to create a binding for.
- Navigate to Actions > Edit namespace bindings.
- On the Edit namespace bindings page, select the namespace to which you want to bind the cluster set from the drop-down menu.
1.5.11.3.2. Creating a ManagedClusterSetBinding by using the CLI
Complete the following steps to create a ManagedClusterSetBinding by using the CLI:
Create the
ManagedClusterSetBindingresource in your YAML file.Note: When you create a managed cluster set binding, the name of the managed cluster set binding must match the name of the managed cluster set to bind. Your
ManagedClusterSetBindingresource might resemble the following information:apiVersion: cluster.open-cluster-management.io/v1beta2 kind: ManagedClusterSetBinding metadata: namespace: <namespace> name: <cluster_name> spec: clusterSet: <cluster_set>
Ensure that you have the bind permission on the target managed cluster set. View the following example of a
ClusterRoleresource, which contains rules that allow the user to bind to<cluster_set>:apiVersion: rbac.authorization.k8s.io/v1 kind: ClusterRole metadata: name: <clusterrole> rules: - apiGroups: ["cluster.open-cluster-management.io"] resources: ["managedclustersets/bind"] resourceNames: ["<cluster_set>"] verbs: ["create"]
1.5.11.4. Placing managed clusters by using taints and tolerations
You can control the placement of your managed clusters or managed cluster sets by using taints and tolerations. Taints and tolerations provide a way to prevent managed clusters from being selected for certain placements. This control can be helpful if you want to prevent certain managed clusters from being included in some placements. You can add a taint to the managed cluster, and add a toleration to the placement. If the taint and the toleration do not match, then the managed cluster is not selected for that placement.
1.5.11.4.1. Adding a taint to a managed cluster
Taints are specified in the properties of a managed cluster and allow a placement to repel a managed cluster or a set of managed clusters. You can add a taint to a managed cluster by entering a command that resembles the following example:
oc taint ManagedCluster <managed_cluster_name> key=value:NoSelect
The specification of a taint includes the following fields:
-
Required Key - The taint key that is applied to a cluster. This value must match the value in the toleration for the managed cluster to meet the criteria for being added to that placement. You can determine this value. For example, this value could be
barorfoo.example.com/bar. -
Optional Value - The taint value for the taint key. This value must match the value in the toleration for the managed cluster to meet the criteria for being added to that placement. For example, this value could be
value. Required Effect - The effect of the taint on placements that do not tolerate the taint, or what occurs when the taint and the toleration of the placement do not match. The value of the effects must be one of the following values:
-
NoSelect- Placements are not allowed to select a cluster unless they tolerate this taint. If the cluster was selected by the placement before the taint was set, the cluster is removed from the placement decision. -
NoSelectIfNew- The scheduler cannot select the cluster if it is a new cluster. Placements can only select the cluster if they tolerate the taint and already have the cluster in their cluster decisions.
-
-
Required
TimeAdded- The time when the taint was added. This value is automatically set.
1.5.11.4.2. Identifying built-in taints to reflect the status of managed clusters
When a managed cluster is not accessible, you do not want the cluster added to a placement. The following taints are automatically added to managed clusters that are not accessible:
cluster.open-cluster-management.io/unavailable- This taint is added to a managed cluster when the cluster has a condition ofManagedClusterConditionAvailablewith status ofFalse. The taint has the effect ofNoSelectand an empty value to prevent an unavailable cluster from being scheduled. An example of this taint is provided in the following content:apiVersion: cluster.open-cluster-management.io/v1 kind: ManagedCluster metadata: name: cluster1 spec: hubAcceptsClient: true taints: - effect: NoSelect key: cluster.open-cluster-management.io/unavailable timeAdded: '2022-02-21T08:11:54Z'cluster.open-cluster-management.io/unreachable- This taint is added to a managed cluster when the status of the condition forManagedClusterConditionAvailableis eitherUnknownor has no condition. The taint has effect ofNoSelectand an empty value to prevent an unreachable cluster from being scheduled. An example of this taint is provided in the following content:apiVersion: cluster.open-cluster-management.io/v1 kind: ManagedCluster metadata: name: cluster1 spec: hubAcceptsClient: true taints: - effect: NoSelect key: cluster.open-cluster-management.io/unreachable timeAdded: '2022-02-21T08:11:06Z'
1.5.11.4.3. Adding a toleration to a placement
Tolerations are applied to placements, and allow the placements to repel managed clusters that do not have taints that match the tolerations of the placement. The specification of a toleration includes the following fields:
- Optional Key - The key matches the taint key to allow the placement.
- Optional Value - The value in the toleration must match the value of the taint for the toleration to allow the placement.
Optional Operator - The operator represents the relationship between a key and a value. Valid operators are
equalandexists. The default value isequal. A toleration matches a taint when the keys are the same, the effects are the same, and the operator is one of the following values:-
equal- The operator isequaland the values are the same in the taint and the toleration. -
exists- The wildcard for value, so a placement can tolerate all taints of a particular category.
-
-
Optional Effect - The taint effect to match. When left empty, it matches all taint effects. The allowed values when specified are
NoSelectorNoSelectIfNew. -
Optional TolerationSeconds - The length of time, in seconds, that the toleration tolerates the taint before moving the managed cluster to a new placement. If the effect value is not
NoSelectorPreferNoSelect, this field is ignored. The default value isnil, which indicates that there is no time limit. The starting time of the counting of theTolerationSecondsis automatically listed as theTimeAddedvalue in the taint, rather than in the value of the cluster scheduled time or theTolerationSecondsadded time.
The following example shows how to configure a toleration that tolerates clusters that have taints:
Taint on the managed cluster for this example:
apiVersion: cluster.open-cluster-management.io/v1 kind: ManagedCluster metadata: name: cluster1 spec: hubAcceptsClient: true taints: - effect: NoSelect key: gpu value: "true" timeAdded: '2022-02-21T08:11:06Z'Toleration on the placement that allows the taint to be tolerated
apiVersion: cluster.open-cluster-management.io/v1beta1 kind: Placement metadata: name: placement1 namespace: default spec: tolerations: - key: gpu value: "true" operator: EqualWith the example tolerations defined,
cluster1could be selected by the placement because thekey: gpuandvalue: "true"match.
Note: A managed cluster is not guaranteed to be placed on a placement that contains a toleration for the taint. If other placements contain the same toleration, the managed cluster might be placed on one of those placements.
1.5.11.4.4. Specifying a temporary toleration
The value of TolerationSeconds specifies the period of time that the toleration tolerates the taint. This temporary toleration can be helpful when a managed cluster is offline and you can transfer applications that are deployed on this cluster to another managed cluster for a tolerated time.
For example, the managed cluster with the following taint becomes unreachable:
apiVersion: cluster.open-cluster-management.io/v1
kind: ManagedCluster
metadata:
  name: cluster1
spec:
  hubAcceptsClient: true
  taints:
    - effect: NoSelect
      key: cluster.open-cluster-management.io/unreachable
      timeAdded: '2022-02-21T08:11:06Z'
If you define a placement with a value for TolerationSeconds, as in the following example, the workload transfers to another available managed cluster after 5 minutes.
apiVersion: cluster.open-cluster-management.io/v1beta1
kind: Placement
metadata:
name: demo4
namespace: demo1
spec:
tolerations:
- key: cluster.open-cluster-management.io/unreachable
operator: Exists
tolerationSeconds: 300The application is moved to another managed cluster after the managed cluster is unreachable for 5 minutes.
1.5.11.5. Removing a managed cluster from a ManagedClusterSet
You might want to remove a managed cluster from a managed cluster set to move it to a different managed cluster set, or remove it from the management settings of the set. You can remove a managed cluster from a managed cluster set by using the console or the CLI.
Note: Every managed cluster must be assigned to a managed cluster set. If you remove a managed cluster from a ManagedClusterSet and do not assign it to a different ManagedClusterSet, the cluster is automatically added to the default managed cluster set.
1.5.11.5.1. Removing a cluster from a ManagedClusterSet by using the console
Complete the following steps to remove a cluster from a managed cluster set by using the console:
- Click Infrastructure > Clusters and ensure that the Cluster sets tab is selected.
- Select the name of the cluster set that you want to remove from the managed cluster set to view the cluster set details.
- Select Actions > Manage resource assignments.
On the Manage resource assignments page, remove the checkbox for the resources that you want to remove from the cluster set.
This step removes a resource that is already a member of the cluster set. You can see if the resource is already a member of a cluster set by viewing the details of the managed cluster.
Note: If you are moving a managed cluster from one managed cluster set to another, you must have the required RBAC permissions on both managed cluster sets.
1.5.11.5.2. Removing a cluster from a ManagedClusterSet by using the CLI
To remove a cluster from a managed cluster set by using the command line, complete the following steps:
Run the following command to display a list of managed clusters in the managed cluster set:
oc get managedclusters -l cluster.open-cluster-management.io/clusterset=<cluster_set>
Replace
cluster_setwith the name of the managed cluster set.- Locate the entry for the cluster that you want to remove.
Remove the label from the YAML entry for the cluster that you want to remove. See the following code for an example of the label:
labels: cluster.open-cluster-management.io/clusterset: clusterset1
Note: If you are moving a managed cluster from one cluster set to another, you must have the required RBAC permission on both managed cluster sets.
1.5.12. Using ManagedClusterSets with Placement
A Placement resource is a namespace-scoped resource that defines a rule to select a set of ManagedClusters from the ManagedClusterSets, which are bound to the placement namespace.
Required access: Cluster administrator, Cluster set administrator
1.5.12.1. Placement overview
See the following information about how placement with managed clusters works:
-
Kubernetes clusters are registered with the hub cluster as cluster-scoped
ManagedClusters. -
The
ManagedClustersare organized into cluster-scopedManagedClusterSets. -
The
ManagedClusterSetsare bound to workload namespaces. -
The namespace-scoped
Placementsspecify a portion ofManagedClusterSetsthat select a working set of the potentialManagedClusters. -
PlacementsfilterManagedClustersfrom the managed cluster set by using label and claim selectors. -
The placement of
ManagedClusterscan be controlled by using taints and tolerations. See Using taints and tolerations to place managed clusters for more information. -
Placementsrank the clusters by the requirements and select a subset of clusters from them.
Notes:
-
You need to bind at least one
ManagedClusterSetto a namespace by creating aManagedClusterSetBindingin that namespace. -
You need role-based access to
CREATEon the virtual sub-resource ofmanagedclustersets/bind.
See Placements API to know more details about the API.
1.5.12.2. Placement LabelSelector and ClaimSelector
You can select
ManagedClusterswith thelabelSelector. See the following sample where thelabelSelectoronly matches clusters with labelvendor: OpenShift:apiVersion: cluster.open-cluster-management.io/v1beta1 kind: Placement metadata: name: placement namespace: ns1 spec: predicates: - requiredClusterSelector: labelSelector: matchLabels: vendor: OpenShiftYou can select
ManagedClusterswithclaimSelector. See the following sample whereclaimSelectoronly matches clusters withregion.open-cluster-management.iowithus-west-1:apiVersion: cluster.open-cluster-management.io/v1beta1 kind: Placement metadata: name: placement namespace: ns1 spec: predicates: - requiredClusterSelector: claimSelector: matchExpressions: - key: region.open-cluster-management.io operator: In values: - us-west-1You can select
ManagedClustersfrom particularclusterSets. See the following sample whereclaimSelectoronly matchesclusterSets:clusterset1clusterset2:apiVersion: cluster.open-cluster-management.io/v1beta1 kind: Placement metadata: name: placement namespace: ns1 spec: clusterSets: - clusterset1 - clusterset2 predicates: - requiredClusterSelector: claimSelector: matchExpressions: - key: region.open-cluster-management.io operator: In values: - us-west-1Select desired number of
ManagedClusters. See the following sample wherenumberOfClustersis3:apiVersion: cluster.open-cluster-management.io/v1beta1 kind: Placement metadata: name: placement namespace: ns1 spec: numberOfClusters: 3 predicates: - requiredClusterSelector: labelSelector: matchLabels: vendor: OpenShift claimSelector: matchExpressions: - key: region.open-cluster-management.io operator: In values: - us-west-1
1.5.12.3. Placement Tolerations
-
Select
ManagedClusterswith matching taints.
Suppose your managed cluster has a taint as shown in the following example:
apiVersion: cluster.open-cluster-management.io/v1
kind: ManagedCluster
metadata:
  name: cluster1
spec:
  hubAcceptsClient: true
  taints:
    - effect: NoSelect
      key: gpu
      value: "true"
timeAdded: '2022-02-21T08:11:06Z'By default, the placement cannot select this cluster unless you define tolerations, as shown in the following example:
apiVersion: cluster.open-cluster-management.io/v1beta1
kind: Placement
metadata:
name: placement
namespace: ns1
spec:
tolerations:
- key: gpu
value: "true"
operator: Equal-
Select
ManagedClusterswith matching taints for a specified period of time.
The value of TolerationSeconds represents the length of time that the toleration tolerates the taint, is useful when a managed cluster is offline, users can make applications deployed on this cluster to be transferred to another available managed cluster after a tolerated time. The TolerationSeconds can automatically transfer applications that are deployed on a cluster that goes offline to another managed cluster after a specified length of time.
For example, the managed cluster that is defined by the following example content becomes unreachable:
apiVersion: cluster.open-cluster-management.io/v1
kind: ManagedCluster
metadata:
  name: cluster1
spec:
  hubAcceptsClient: true
  taints:
    - effect: NoSelect
      key: cluster.open-cluster-management.io/unreachable
      timeAdded: '2022-02-21T08:11:06Z'
If you define a placement with TolerationSeconds as shown in the following example, the workload is transferred to another available managed cluster after 5 minutes.
apiVersion: cluster.open-cluster-management.io/v1beta1
kind: Placement
metadata:
  name: placement
  namespace: ns1
spec:
  tolerations:
    - key: cluster.open-cluster-management.io/unreachable
      operator: Exists
      tolerationSeconds: 300
1.5.12.4. Placement PrioritizerPolicy
Select a cluster with the largest allocatable memory.
Note: Similar to Kubernetes Node Allocatable, 'allocatable' is defined as the amount of compute resources that are available for pods on each cluster.
apiVersion: cluster.open-cluster-management.io/v1beta1
kind: Placement
metadata:
  name: placement
  namespace: ns1
spec:
  numberOfClusters: 1
  prioritizerPolicy:
    configurations:
      - scoreCoordinate:
          builtIn: ResourceAllocatableMemory
Select a cluster with the largest allocatable CPU and memory, and make placement sensitive to resource changes.
apiVersion: cluster.open-cluster-management.io/v1beta1
kind: Placement
metadata:
  name: placement
  namespace: ns1
spec:
  numberOfClusters: 1
  prioritizerPolicy:
    configurations:
      - scoreCoordinate:
          builtIn: ResourceAllocatableCPU
        weight: 2
      - scoreCoordinate:
          builtIn: ResourceAllocatableMemory
        weight: 2
Select two clusters with the largest
addOnscore CPU ratio, and pin the placement decisions.apiVersion: cluster.open-cluster-management.io/v1beta1 kind: Placement metadata: name: placement namespace: ns1 spec: numberOfClusters: 2 prioritizerPolicy: mode: Exact configurations: - scoreCoordinate: builtIn: Steady weight: 3 - scoreCoordinate: type: AddOn addOn: resourceName: default scoreName: cpuratio
1.5.12.5. Placement decision
One or multiple PlacementDecisions with label cluster.open-cluster-management.io/placement={placement name} are created to represent the ManagedClusters selected by a Placement.
If a ManagedCluster is selected and added to a PlacementDecision, components that consume this Placement might apply the workload on this ManagedCluster. After the ManagedCluster is no longer selected and is removed from the PlacementDecisions, the workload that is applied on this ManagedCluster should be removed.
See PlacementDecisions API to know more details about the API.
See the following PlacementDecision sample:
apiVersion: cluster.open-cluster-management.io/v1beta1
kind: PlacementDecision
metadata:
  labels:
    cluster.open-cluster-management.io/placement: placement1
  name: placement1-kbc7q
  namespace: ns1
  ownerReferences:
    - apiVersion: cluster.open-cluster-management.io/v1beta1
      blockOwnerDeletion: true
      controller: true
      kind: Placement
      name: placement1
      uid: 05441cf6-2543-4ecc-8389-1079b42fe63e
status:
  decisions:
    - clusterName: cluster1
      reason: ''
    - clusterName: cluster2
      reason: ''
    - clusterName: cluster3
      reason: ''
1.5.12.6. Add-on status
You might want to select managed clusters for your placements according to the status of the add-ons that are deployed on them. For example, you want to select a managed cluster for your placement only if there is a specific add-on that is enabled on the cluster.
Specify the label for the add-on, as well as its status, when you create the Placement. A label is automatically created on a ManagedCluster resource if an add-on is enabled on the cluster. The label is automatically removed if the add-on is disabled.
Each add-on is represented by a label in the format of feature.open-cluster-management.io/addon-<addon_name>=<status_of_addon>.
Replace addon_name with the name of the add-on that should be enabled on the managed cluster that you want to select.
Replace status_of_addon with the status that the add-on should have if the cluster is selected. The possible values of status_of_addon are in the following list:
-
available: The add-on is enabled and available. -
unhealthy: The add-on is enabled, but the lease is not updated continuously. -
unreachable: The add-on is enabled, but there is no lease found for it. This can also be caused when the managed cluster is offline.
For example, an available application-manager add-on is represented by a label on the managed cluster that reads:
feature.open-cluster-management.io/addon-application-manager: available
See the following examples of creating placements based on add-ons and their status:
You can create a placement that includes all managed clusters that have
application-managerenabled on them by adding the following YAML content:apiVersion: cluster.open-cluster-management.io/v1beta1 kind: Placement metadata: name: placement1 namespace: ns1 spec: predicates: - requiredClusterSelector: labelSelector: matchExpressions: - key: feature.open-cluster-management.io/addon-application-manager operator: ExistsYou can create a placement that includes all managed clusters that have
application-managerenabled with anavailablestatus by adding the following YAML content:apiVersion: cluster.open-cluster-management.io/v1beta1 kind: Placement metadata: name: placement2 namespace: ns1 spec: predicates: - requiredClusterSelector: labelSelector: matchLabels: "feature.open-cluster-management.io/addon-application-manager": "available"You can create a placement that includes all managed clusters that have
application-managerdisabled by adding the following YAML content:apiVersion: cluster.open-cluster-management.io/v1beta1 kind: Placement metadata: name: placement3 namespace: ns1 spec: predicates: - requiredClusterSelector: labelSelector: matchExpressions: - key: feature.open-cluster-management.io/addon-application-manager operator: DoesNotExist
1.5.13. Managing cluster pools (Technology Preview)
Cluster pools provide rapid and cost-effective access to configured Red Hat OpenShift Container Platform clusters on-demand and at scale. Cluster pools provision a configurable and scalable number of OpenShift Container Platform clusters on Amazon Web Services, Google Cloud Platform, or Microsoft Azure that can be claimed when they are needed. They are especially useful when providing or replacing cluster environments for development, continuous integration, and production scenarios. You can specify a number of clusters to keep running so that they are available to be claimed immediately, while the remainder of the clusters will be kept in a hibernating state so that they can be resumed and claimed within a few minutes.
ClusterClaim resources are used to check out clusters from cluster pools. When a cluster claim is created, the pool assigns a running cluster to it. If no running clusters are available, a hibernating cluster is resumed to provide the cluster or a new cluster is provisioned. The cluster pool automatically creates new clusters and resumes hibernating clusters to maintain the specified size and number of available running clusters in the pool.
The procedure for creating a cluster pool is similar to the procedure for creating a cluster. Clusters in a cluster pool are not created for immediate use.
1.5.13.1. Creating a cluster pool
The procedure for creating a cluster pool is similar to the procedure for creating a cluster. Clusters in a cluster pool are not created for immediate use.
Required access: Administrator
1.5.13.1.1. Prerequisites
See the following prerequisites before creating a cluster pool:
- You need to deploy a multicluster engine operator hub cluster.
- You need Internet access for your multicluster engine operator hub cluster so that it can create the Kubernetes cluster on the provider environment.
- You need an AWS, GCP, or Microsoft Azure provider credential. See Managing credentials overview for more information.
- You need a configured domain in your provider environment. See your provider documentation for instructions about how to configure a domain.
- You need provider login credentials.
- You need your OpenShift Container Platform image pull secret. See Using image pull secrets.
Note: Adding a cluster pool with this procedure configures it so it automatically imports the cluster to be managed by multicluster engine operator when you claim a cluster from the pool. If you would like to create a cluster pool that does not automatically import the claimed cluster for management with the cluster claim, add the following annotation to your clusterClaim resource:
kind: ClusterClaim
metadata:
  annotations:
    cluster.open-cluster-management.io/createmanagedcluster: "false"
The word "false" must be surrounded by quotation marks to indicate that it is a string.
1.5.13.1.2. Create the cluster pool
To create a cluster pool, select Infrastructure > Clusters in the navigation menu. The Cluster pools tab lists the cluster pools that you can access. Select Create cluster pool and complete the steps in the console.
If you do not have a infrastructure credential that you want to use for the cluster pool, you can create one by selecting Add credential.
You can either select an existing namespace from the list, or type the name of a new one to create one. The cluster pool does not have to be in the same namespace as the clusters.
You can select a cluster set name if you want the RBAC roles for your cluster pool to share the role assignments of an existing cluster set. The cluster set for the clusters in the cluster pool can only be set when you create the cluster pool. You cannot change the cluster set association for the cluster pool or for the clusters in the cluster pool after you create the cluster pool. Any cluster that you claim from the cluster pool is automatically added to the same cluster set as the cluster pool.
Note: If you do not have cluster admin permissions, you must select a cluster set. The request to create a cluster set is rejected with a forbidden error if you do not include the cluster set name in this situation. If no cluster sets are available for you to select, contact your cluster administrator to create a cluster set and give you clusterset admin permissions to it.
The cluster pool size specifies the number of clusters that you want provisioned in your cluster pool, while the cluster pool running count specifies the number of clusters that the pool keeps running and ready to claim for immediate use.
The procedure is very similar to the procedure for creating clusters.
For specific information about the information that is required for your provider, see the following information:
1.5.13.2. Claiming clusters from cluster pools
ClusterClaim resources are used to check out clusters from cluster pools. A claim is completed when a cluster is running and ready in the cluster pool. The cluster pool automatically creates new running and hibernated clusters in the cluster pool to maintain the requirements that are specified for the cluster pool.
Note: When a cluster that was claimed from the cluster pool is no longer needed and is destroyed, the resources are deleted. The cluster does not return to the cluster pool.
Required access: Administrator
1.5.13.2.1. Prerequisite
You must have the following available before claiming a cluster from a cluster pool:
A cluster pool with or without available clusters. If there are available clusters in the cluster pool, the available clusters are claimed. If there are no available clusters in the cluster pool, a cluster is created to fulfill the claim. See Creating a cluster pool for information about how to create a cluster pool.
1.5.13.2.2. Claim the cluster from the cluster pool
When you create a cluster claim, you request a new cluster from the cluster pool. A cluster is checked out from the pool when a cluster is available. The claimed cluster is automatically imported as one of your managed clusters, unless you disabled automatic import.
Complete the following steps to claim a cluster:
- From the navigation menu, click Infrastructure > Clusters, and select the Cluster pools tab.
- Find the name of the cluster pool you want to claim a cluster from and select Claim cluster.
If a cluster is available, it is claimed and immediately appears in the Managed clusters tab. If there are no available clusters, it might take several minutes to resume a hibernated cluster or provision a new cluster. During this time, the claim status is pending. Expand the cluster pool to view or delete pending claims against it.
The claimed cluster remains a member of the cluster set that it was associated with when it was in the cluster pool. You cannot change the cluster set of the claimed cluster when you claim it.
Note: Changes to the pull secret, SSH keys, or base domain of the cloud provider credentials are not reflected for existing clusters that are claimed from a cluster pool, as they have already been provisioned using the original credentials. You cannot edit cluster pool information by using the console, but you can update it by updating its information using the CLI interface. You can also create a new cluster pool with a credential that contains the updated information. The clusters that are created in the new pool use the settings provided in the new credential.
1.5.13.3. Updating the cluster pool release image
When the clusters in your cluster pool remain in hibernation for some time, the Red Hat OpenShift Container Platform release image of the clusters might become backlevel. If this happens, you can upgrade the version of the release image of the clusters that are in your cluster pool.
Required access: Edit
Complete the following steps to update the OpenShift Container Platform release image for the clusters in your cluster pool:
Note: This procedure does not update clusters from the cluster pool that are already claimed in the cluster pool. After you complete this procedure, the updates to the release images only apply to the following clusters that are related to the cluster pool:
- Clusters that are created by the cluster pool after updating the release image with this procedure.
- Clusters that are hibernating in the cluster pool. The existing hibernating clusters with the old release image are destroyed, and new clusters with the new release image replace them.
- From the navigation menu, click Infrastructure > Clusters.
- Select the Cluster pools tab.
- Find the name of the cluster pool that you want to update in the Cluster pools table.
- Click the Options menu for the Cluster pools in the table, and select Update release image.
- Select a new release image to use for future cluster creations from this cluster pool.
The cluster pool release image is updated.
Tip: You can update the release image for multiple cluster pools with one action by selecting the box for each of the cluster pools and using the Actions menu to update the release image for the selected cluster pools.
1.5.13.4. Scaling cluster pools (Technology Preview)
You can change the number of clusters in the cluster pool by increasing or decreasing the number of clusters in the cluster pool size.
Required access: Cluster administrator
Complete the following steps to change the number of clusters in your cluster pool:
- From the navigation menu, click Infrastructure > Clusters.
- Select the Cluster pools tab.
- In the Options menu for the cluster pool that you want to change, select Scale cluster pool.
- Change the value of the pool size.
- Optionally, you can update the number of running clusters to increase or decrease the number of clusters that are immediately available when you claim them.
Your cluster pools are scaled to reflect your new values.
1.5.13.5. Destroying a cluster pool
If you created a cluster pool and determine that you no longer need it, you can destroy the cluster pool. When you destroy a cluster pool, all of the unclaimed hibernating clusters are destroyed and their resources are released.
Required access: Cluster administrator
To destroy a cluster pool, complete the following steps:
- From the navigation menu, click Infrastructure > Clusters.
- Select the Cluster pools tab.
In the Options menu for the cluster pool that you want to delete, select Destroy cluster pool. Any unclaimed clusters in the cluster pool are destroyed. It might take some time for all of the resources to be deleted, and the cluster pool remains visible in the console until all of the resources are deleted.
The namespace that contained the ClusterPool will not be deleted. Deleting the namespace will destroy any clusters that have been claimed from the ClusterPool, since the ClusterClaim resources for these clusters are created in the same namespace.
Tip: You can destroy multiple cluster pools with one action by selecting the box for each of the cluster pools and using the Actions menu to destroy the selected cluster pools.
1.5.14. Enabling ManagedServiceAccount add-ons (Technology Preview)
When you install the multicluster engine operator, the ManagedServiceAccount add-on is disabled by default. This component when enabled allows you to create or delete a service account on a managed cluster.
Required access: Editor
When a ManagedServiceAccount custom resource is created in the <managed_cluster> namespace on the hub cluster, a ServiceAccount is created on the managed cluster.
A TokenRequest is made with the ServiceAccount on the managed cluster to the Kubernetes API server on the managed cluster. The token is then stored in a Secret in the <target_managed_cluster> namespace on the hub cluster.
Note: The token can expire and be rotated. See TokenRequest for more information about token requests.
1.5.14.1. Prerequisites
- Red Hat OpenShift Container Platform version 4.11 or later must be deployed in your environment, and you must be logged in with the command line interface (CLI).
- You need the multicluster engine operator installed.
1.5.14.2. Enabling ManagedServiceAccount
To enable a Managed-ServiceAccount add-on for a hub cluster and a managed cluster, complete the following steps:
-
Enable the
ManagedServiceAccountadd-on on hub cluster. See Advanced configuration to learn more. Deploy the
ManagedServiceAccountadd-on and apply it to your target managed cluster. Create the following YAML file and replacetarget_managed_clusterwith the name of the managed cluster where you are applying theManaged-ServiceAccountadd-on:apiVersion: addon.open-cluster-management.io/v1alpha1 kind: ManagedClusterAddOn metadata: name: managed-serviceaccount namespace: <target_managed_cluster> spec: installNamespace: open-cluster-management-agent-addon
Run the following command to apply the file:
oc apply -f -
You have now enabled the
Managed-ServiceAccountplug-in for your managed cluster. See the following steps to configure aManagedServiceAccount.Create a
ManagedServiceAccountcustom resource with the following YAML source:apiVersion: authentication.open-cluster-management.io/v1alpha1 kind: ManagedServiceAccount metadata: name: <managed_serviceaccount_name> namespace: <target_managed_cluster> spec: rotation: {}-
Replace
managed_serviceaccount_namewith the name of yourManagedServiceAccount. -
Replace
target_managed_clusterwith the name of the managed cluster to which you are applying theManagedServiceAccount.
-
Replace
To verify, view the
tokenSecretRefattribute in theManagedServiceAccountobject status to find the secret name and namespace. Run the following command with your account and cluster name:oc get managedserviceaccount <managed_serviceaccount_name> -n <target_managed_cluster> -o yaml
View the
Secretcontaining the retrieved token that is connected to the createdServiceAccounton the managed cluster. Run the following command:oc get secret <managed_serviceaccount_name> -n <target_managed_cluster> -o yaml
1.5.15. Cluster lifecycle advanced configuration
You can configure some cluster settings during or after installation.
1.5.15.1. Customizing API server certificates
The managed clusters communicate with the hub cluster through a mutual connection with the OpenShift Kube API server external load balancer. The default OpenShift Kube API server certificate is issued by an internal Red Hat OpenShift Container Platform cluster certificate authority (CA) when OpenShift Container Platform is installed. If necessary, you can add or change certificates.
Changing the certificate might impact the communication between the managed cluster and the hub cluster. When you add the named certificate before installing the product, you can avoid an issue that might leave your managed clusters in an offline state.
The following list contains some examples of when you might need to update your certificates:
You want to replace the default certificate for the load balancer with your own certificate. By following the guidance in Adding API server certificates in the OpenShift Container Platform documentation, you can add a named certificate with host name
api.<cluster_name>.<base_domain>to replace the default API server certificate for the external load balancer. Replacing the certificate might cause some of your managed clusters to move to an offline state. If your clusters are in an offline state after upgrading the certificates, follow the troubleshooting instructions for Troubleshooting imported clusters offline after certificate change to resolve it.Note: Adding the named certificate before installing the product helps to avoid your clusters moving to an offline state.
The certificate for your external load balancer is expiring and you need to replace it. Complete the following steps to replace the certificate:
Locate your
APIServercustom resource, which resembles the following example:apiVersion: config.openshift.io/v1 kind: APIServer metadata: name: cluster spec: audit: profile: Default servingCerts: namedCertificates: - names: - api.mycluster.example.com servingCertificate: name: old-cert-secretCreate a new secret in the
openshift-confignamespace that contains the content of the existing and new certificates by running the following commands:Copy the old certificate into a new certificate:
cp old.crt combined.crt
Add the contents of the new certificate to the copy of the old certificate:
cat new.crt >> combined.crt
Apply the combined certificates to create a secret:
oc create secret tls combined-certs-secret --cert=combined.crt --key=old.key -n openshift-config
Update your
APIServerresource to reference the combined certificate as theservingCertificate.apiVersion: config.openshift.io/v1 kind: APIServer metadata: name: cluster spec: audit: profile: Default servingCerts: namedCertificates: - names: - api.mycluster.example.com servingCertificate: name: combined-cert-secret- After about 15 minutes, the CA bundle containing both new and old certificates is propagated to the managed clusters.
Create another secret named
new-cert-secretin theopenshift-confignamespace that contains only the new certificate information by entering the following command:oc create secret tls new-cert-secret --cert=new.crt --key=new.key -n openshift-config {code}Update the
APIServerresource by changing the name ofservingCertificateto reference thenew-cert-secret. Your resource might resemble the following example:apiVersion: config.openshift.io/v1 kind: APIServer metadata: name: cluster spec: audit: profile: Default servingCerts: namedCertificates: - names: - api.mycluster.example.com servingCertificate: name: new-cert-secret
After about 15 minutes, the old certificate is removed from the CA bundle, and the change is automatically propagated to the managed clusters.
Note: Managed clusters must use the host name api.<cluster_name>.<base_domain> to access the hub cluster. You cannot use named certificates that are configured with other host names.
1.5.15.2. Additional resources
1.5.16. Removing a cluster from management
When you remove an OpenShift Container Platform cluster from management that was created with multicluster engine operator, you can either detach it or destroy it. Detaching a cluster removes it from management, but does not completely delete it. You can import it again if you want to manage it. This is only an option when the cluster is in a Ready state.
The following procedures remove a cluster from management in either of the following situations:
- You already deleted the cluster and want to remove the deleted cluster from Red Hat Advanced Cluster Management.
- You want to remove the cluster from management, but have not deleted the cluster.
Important:
- Destroying a cluster removes it from management and deletes the components of the cluster.
When you detach a managed cluster, the related namespace is automatically deleted. Do not place custom resources in this namespace.
1.5.16.1. Removing a cluster by using the console
From the navigation menu, navigate to Infrastructure > Clusters and select Destroy cluster or Detach cluster from the options menu beside the cluster that you want to remove from management.
Tip: You can detach or destroy multiple clusters by selecting the check boxes of the clusters that you want to detach or destroy and selecting Detach or Destroy.
Note: If you attempt to detach the hub cluster while it is managed, which is called a local-cluster, check to see if the default setting of disableHubSelfManagement is false. This setting causes the hub cluster to reimport itself and manage itself when it is detached, and it reconciles the MultiClusterHub controller. It might take hours for the hub cluster to complete the detachment process and reimport.
To reimport the hub cluster without waiting for the processes to finish, you can enter the following command to restart the multiclusterhub-operator pod and reimport faster:
oc delete po -n open-cluster-management `oc get pod -n open-cluster-management | grep multiclusterhub-operator| cut -d' ' -f1`
You can change the value of the hub cluster to not import automatically by changing the disableHubSelfManagement value to true, as described in Installing while connected online.
1.5.16.2. Removing a cluster by using the command line
To detach a managed cluster by using the command line of the hub cluster, run the following command:
oc delete managedcluster $CLUSTER_NAME
To destroy the managed cluster after detaching, run the following command:
oc delete clusterdeployment <CLUSTER_NAME> -n $CLUSTER_NAME
Notes:
-
To prevent destroying the managed cluster, set the
spec.preserveOnDeleteparameter totruein theClusterDeploymentcustom resource. The default setting of
disableHubSelfManagementisfalse. Thefalse`setting causes the hub cluster, also called `local-cluster, to reimport and manage itself when it is detached and it reconciles theMultiClusterHubcontroller.The detachment and reimport process might take hours might take hours for the hub cluster to complete. If you want to reimport the hub cluster without waiting for the processes to finish, you can enter the following command to restart the
multiclusterhub-operatorpod and reimport faster:oc delete po -n open-cluster-management `oc get pod -n open-cluster-management | grep multiclusterhub-operator| cut -d' ' -f1`
You can change the value of the hub cluster to not import automatically by changing the
disableHubSelfManagementvalue totrue. See Installing while connected online.
1.5.16.3. Removing remaining resources after removing a cluster
If there are remaining resources on the managed cluster that you removed, there are additional steps that are required to ensure that you remove all of the remaining components. Situations when these extra steps are required include the following examples:
-
The managed cluster was detached before it was completely created, and components like the
klusterletremain on the managed cluster. - The hub that was managing the cluster was lost or destroyed before detaching the managed cluster, and there is no way to detach the managed cluster from the hub.
- The managed cluster was not in an online state when it was detached.
If one of these situations apply to your attempted detachment of a managed cluster, there are some resources that cannot be removed from managed cluster. Complete the following steps to detach the managed cluster:
-
Make sure you have the
occommand line interface configured. Make sure you have
KUBECONFIGconfigured on your managed cluster.If you run
oc get ns | grep open-cluster-management-agent, you should see two namespaces:open-cluster-management-agent Active 10m open-cluster-management-agent-addon Active 10m
Run the following command to remove the remaining resources:
oc delete namespaces open-cluster-management-agent open-cluster-management-agent-addon --wait=false
oc get crds | grep open-cluster-management.io | awk '{print $1}' | xargs oc delete crds --wait=false
oc get crds | grep open-cluster-management.io | awk '{print $1}' | xargs oc patch crds --type=merge -p '{"metadata":{"finalizers": []}}'
Run the following command to ensure that both namespaces and all open cluster management
crdsare removed:oc get crds | grep open-cluster-management.io | awk '{print $1}' oc get ns | grep open-cluster-management-agent
1.5.16.4. Defragmenting the etcd database after removing a cluster
Having many managed clusters can affect the size of the etcd database in the hub cluster. In OpenShift Container Platform 4.8, when you delete a managed cluster, the etcd database in the hub cluster is not automatically reduced in size. In some scenarios, the etcd database can run out of space. An error etcdserver: mvcc: database space exceeded is displayed. To correct this error, reduce the size of the etcd database by compacting the database history and defragmenting the etcd database.
Note: For OpenShift Container Platform version 4.9 and later, the etcd Operator automatically defragments disks and compacts the etcd history. No manual intervention is needed. The following procedure is for OpenShift Container Platform version 4.8 and earlier.
Compact the etcd history and defragment the etcd database in the hub cluster by completing the following procedure.
1.5.16.4.1. Prerequisites
-
Install the OpenShift CLI (
oc). -
Log in as a user with
cluster-adminprivileges.
1.5.16.4.2. Procedure
Compact the
etcdhistory.Open a remote shell session to the
etcdmember, for example:$ oc rsh -n openshift-etcd etcd-control-plane-0.example.com etcdctl endpoint status --cluster -w table
Run the following command to compact the
etcdhistory:sh-4.4#etcdctl compact $(etcdctl endpoint status --write-out="json" | egrep -o '"revision":[0-9]*' | egrep -o '[0-9]*' -m1)
Example output
$ compacted revision 158774421
-
Defragment the
etcddatabase and clear anyNOSPACEalarms as outlined in Defragmentingetcddata.
1.6. Discovery service introduction
You can discover OpenShift 4 clusters that are available from OpenShift Cluster Manager. After discovery, you can import your clusters to manage. The Discovery services uses the Discover Operator for back-end and console usage.
You must have an OpenShift Cluster Manager credential. See Creating a credential for Red Hat OpenShift Cluster Manager if you need to create a credential.
Required access: Administrator
1.6.1. Configure Discovery with the console
Use the product console to enable Discovery.
Required access: Access to the namespace where the credential was created.
1.6.1.1. Prerequisites
- You need a credential. See Creating a credential for Red Hat OpenShift Cluster Manager to connect to OpenShift Cluster Manager.
1.6.1.2. Configure Discovery
Configure Discovery in the console to find clusters. You can create multiple DiscoveryConfig resources with separate credentials. Follow instructions in the console.
1.6.1.3. View discovered clusters
After you set up your credentials and discover your clusters for import, you can view them in the console.
- Click Clusters > Discovered clusters
View the populated table with the following information:
- Name is the display name that is designated in OpenShift Cluster Manager. If the cluster does not have a display name, a generated name based on the cluster console URL is displayed. If the console URL is missing or was modified manually in OpenShift Cluster Manager, the cluster external ID is displayed.
- Namespace is the namespace where you created the credential and discovered clusters.
- Type is the discovered cluster Red Hat OpenShift type.
- Distribution version is the discovered cluster Red Hat OpenShift version.
- Infrastructure provider is the cloud provider of the discovered cluster.
- Last active is the last time the discovered cluster was active.
- Created when the discovered cluster was created.
- Discovered when the discovered cluster was discovered.
- You can search for any information in the table, as well. For example, to show only Discovered clusters in a particular namespace, search for that namespace.
- You can now click Import cluster to create managed clusters. See Import discovered clusters.
1.6.1.4. Import discovered clusters
After you discover clusters, you can import clusters that appear in the Discovered clusters tab of the console.
1.6.1.5. Prerequisites
You need access to the namespaces that were used to configure Discovery.
1.6.1.6. Import Discovered clusters
- Navigate to the existing Clusters page and click on the Discovered clusters tab.
- From the Discovered clusters table, find the cluster that you want to import.
- From the options menu, choose Import cluster.
- For discovered clusters, you can import manually using the documentation, or you can choose Import clusters automatically.
- To import automatically with your credentials or Kubeconfig file, copy and paste the content.
- Click Import.
1.6.2. Enable Discovery using the CLI
Enable discovery using the CLI to find clusters that are available from Red Hat OpenShift Cluster Manager.
Required access: Administrator
1.6.2.1. Prerequisites
- Create a credential to connect to Red Hat OpenShift Cluster Manager.
1.6.2.2. Discovery set up and process
Note: The DiscoveryConfig must be named discovery and must be created in the same namespace as the selected credential. See the following DiscoveryConfig sample:
apiVersion: discovery.open-cluster-management.io/v1
kind: DiscoveryConfig
metadata:
  name: discovery
  namespace: <NAMESPACE_NAME>
spec:
  credential: <SECRET_NAME>
  filters:
    lastActive: 7
    openshiftVersions:
    - "4.10"
    - "4.11"
- "4.8"-
Replace
SECRET_NAMEwith the credential that you previously set up. -
Replace
NAMESPACE_NAMEwith the namespace ofSECRET_NAME. -
Enter the maximum time since last activity of your clusters (in days) to discover. For example, with
lastActive: 7, clusters that active in the last 7 days are discovered. -
Enter the versions of Red Hat OpenShift clusters to discover as a list of strings. Note: Every entry in the
openshiftVersionslist specifies an OpenShift major and minor version. For example, specifying"4.11"will include all patch releases for the OpenShift version4.11, for example4.11.1,4.11.2.
1.6.2.3. View discovered clusters
View discovered clusters by running oc get discoveredclusters -n <namespace> where namespace is the namespace where the discovery credential exists.
1.6.2.3.1. DiscoveredClusters
Objects are created by the Discovery controller. These DiscoveredClusters represent the clusters that are found in OpenShift Cluster Manager by using the filters and credentials that are specified in the DiscoveryConfig discoveredclusters.discovery.open-cluster-management.io API. The value for name is the cluster external ID:
apiVersion: discovery.open-cluster-management.io/v1
kind: DiscoveredCluster
metadata:
  name: fd51aafa-95a8-41f7-a992-6fb95eed3c8e
  namespace: <NAMESPACE_NAME>
spec:
  activity_timestamp: "2021-04-19T21:06:14Z"
  cloudProvider: vsphere
  console: https://console-openshift-console.apps.qe1-vmware-pkt.dev02.red-chesterfield.com
  creation_timestamp: "2021-04-19T16:29:53Z"
  credential:
    apiVersion: v1
    kind: Secret
    name: <SECRET_NAME>
    namespace: <NAMESPACE_NAME>
  display_name: qe1-vmware-pkt.dev02.red-chesterfield.com
  name: fd51aafa-95a8-41f7-a992-6fb95eed3c8e
  openshiftVersion: 4.10
  status: Stale
1.7. Hosted control planes (Technology Preview)
With multicluster engine operator cluster management, you can deploy OpenShift Container Platform clusters by using two different control plane configurations: standalone or hosted control planes. The standalone configuration uses dedicated virtual machines or physical machines to host the OpenShift Container Platform control plane. With hosted control planes for OpenShift Container Platform, you create control planes as pods on a hosting cluster without the need for dedicated physical machines for each control plane.
Hosted control planes for OpenShift Container Platform are available as a Technology Preview feature on Amazon Web Services (AWS) and on bare metal. You can host the control planes on OpenShift Container Platform version 4.10.7 and later.
Note: Run the hub cluster and workers on the same platform for hosted control planes.
The control plane runs as pods that are contained in a single namespace and is associated with the hosted control plane cluster. When OpenShift Container Platform creates this type of hosted cluster, it creates a worker node that is independent of the control plane.
Hosted control plane clusters offer several advantages:
- Saves cost by removing the need to host dedicated control plane nodes
- Introduces separation between the control plane and the workloads, which improves isolation and reduces configuration errors that can require changes
- Decreases the cluster creation time by removing the requirement for control plane node bootstrapping
- Supports turn-key deployments or fully customized OpenShift Container Platform provisioning
For more information about hosted control planes, continue reading the following topics:
- Configuring the hosting cluster on AWS (Technology Preview)
- Managing hosted control planes on AWS (Technology Preview)
- Configuring the hosting cluster on bare metal (Technology Preview)
- Managing hosted control plane clusters on bare metal (Technology Preview)
- Disabling the hosted control feature (Technology Preview)
1.7.1. Configuring the hosting cluster on AWS (Technology Preview)
To configure hosted control planes, you need a hosting cluster and a hosted cluster. By deploying the HyperShift operator on an existing managed cluster by using the hypershift-addon managed cluster add-on, you can enable that cluster as a hosting cluster and start to create the hosted cluster.
The multicluster engine operator 2.2 supports only the default local-cluster and the hub cluster as the hosting cluster.
Hosted control planes is a Technology Preview feature, so the related components are disabled by default.
You can deploy hosted control planes by configuring an existing cluster to function as a hosting cluster. The hosting cluster is the Red Hat OpenShift Container Platform cluster where the control planes are hosted. Red Hat Advanced Cluster Management 2.7 can use the hub cluster, also known as the local-cluster, as the hosting cluster. See the following topics to learn how to configure the local-cluster as the hosting cluster.
Best practice: Be sure to run the hub cluster and workers on the same platform for hosted control planes.
- Prerequisites
- Creating the Amazon Web Services S3 bucket and S3 OIDC secret
- Creating a routable public zone
- Enabling external DNS
- Enabling AWS PrivateLink
- Enabling the hosted control planes feature
- Manually enabling the hypershift-addon managed cluster add-on for local-cluster
- Installing the hosted control planes CLI
- Additional resources
1.7.1.1. Prerequisites
You must have the following prerequisites to configure a hosting cluster:
- The multicluster engine for Kubernetes operator 2.2 and later installed on an OpenShift Container Platform cluster. The multicluster engine operator is automatically installed when you install Red Hat Advanced Cluster Management. The multicluster engine operator can also be installed without Red Hat Advanced Cluster Management as an Operator from the OpenShift Container Platform OperatorHub.
The multicluster engine operator must have at least one managed OpenShift Container Platform cluster. The
local-clusteris automatically imported in multicluster engine operator 2.2 and later. See Advanced configuration for more information about thelocal-cluster. You can check the status of your hub cluster by running the following command:oc get managedclusters local-cluster
- A hosting cluster with at least 3 worker nodes to run the HyperShift Operator.
- The AWS command line interface.
1.7.1.2. Creating the Amazon Web Services S3 bucket and S3 OIDC secret
If you plan to create and manage hosted clusters on AWS, complete the following steps:
Create an S3 bucket that has public access to host OIDC discovery documents for your clusters.
To create the bucket in the us-east-1 region, enter the following code:
BUCKET_NAME=<your_bucket_name>
aws s3api create-bucket --bucket $BUCKET_NAME
aws s3api delete-public-access-block --bucket $BUCKET_NAME
echo '{
    "Version": "2012-10-17",
    "Statement": [
        {
            "Effect": "Allow",
            "Principal": "*",
            "Action": "s3:GetObject",
            "Resource": "arn:aws:s3:::${BUCKET_NAME}/*"
        }
    ]
}' | envsubst > policy.json
aws s3api put-bucket-policy --bucket $BUCKET_NAME --policy file://policy.json
To create the bucket in a region other than the us-east-1 region, enter the following code:
BUCKET_NAME=your-bucket-name
REGION=us-east-2
aws s3api create-bucket --bucket $BUCKET_NAME \
  --create-bucket-configuration LocationConstraint=$REGION \
  --region $REGION
aws s3api delete-public-access-block --bucket $BUCKET_NAME
echo '{
    "Version": "2012-10-17",
    "Statement": [
        {
            "Effect": "Allow",
            "Principal": "*",
            "Action": "s3:GetObject",
            "Resource": "arn:aws:s3:::${BUCKET_NAME}/*"
        }
    ]
}' | envsubst > policy.json
aws s3api put-bucket-policy --bucket $BUCKET_NAME --policy file://policy.json
-
Create an OIDC S3 secret named
hypershift-operator-oidc-provider-s3-credentialsfor the HyperShift operator. -
Save the secret in the
local-clusternamespace. See the following table to verify that the secret contains the following fields:
Field name Description bucketContains an S3 bucket with public access to host OIDC discovery documents for your HyperShift clusters.
credentialsA reference to a file that contains the credentials of the
defaultprofile that can access the bucket. By default, HyperShift only uses thedefaultprofile to operate thebucket.regionSpecifies the region of the S3 bucket.
The following example shows a sample AWS secret template:
oc create secret generic hypershift-operator-oidc-provider-s3-credentials --from-file=credentials=$HOME/.aws/credentials --from-literal=bucket=<s3-bucket-for-hypershift> --from-literal=region=<region> -n local-cluster
Note: Disaster recovery backup for the secret is not automatically enabled. Run the following command to add the label that enables the
hypershift-operator-oidc-provider-s3-credentialssecret to be backed up for disaster recovery:oc label secret hypershift-operator-oidc-provider-s3-credentials -n local-cluster cluster.open-cluster-management.io/backup=true
1.7.1.3. Creating a routable public zone
To access applications in your guest clusters, the public zone must be routable. If the public zone exists, skip this step. Otherwise, the public zone will affect the existing functions.
Run the following command to create a public zone for cluster DNS records:
BASE_DOMAIN=www.example.com
aws route53 create-hosted-zone --name $BASE_DOMAIN --caller-reference $(whoami)-$(date --rfc-3339=date)
1.7.1.4. Enabling external DNS
If you plan to provision hosted control plane clusters with service-level DNS (external DNS), complete the following steps:
-
Create an AWS credential secret for the HyperShift Operator and name it
hypershift-operator-external-dns-credentialsin thelocal-clusternamespace. See the following table to verify that the secret contains the required fields:
Field name Description Optional or required providerThe DNS provider that manages the service-level DNS zone.
Required
domain-filterThe service-level domain.
Required
credentialsThe credential file that supports all external DNS types.
Optional when using AWS keys
aws-access-key-idThe credential access key id.
Optional when using the AWS DNS service
aws-secret-access-keyThe credential access key secret.
Optional when using the AWS DNS service
See External DNS in the HyperShift documentation for more information. The following example shows the sample
hypershift-operator-external-dns-credentialssecret template:oc create secret generic hypershift-operator-external-dns-credentials --from-literal=provider=aws --from-literal=domain-filter=service.my.domain.com --from-file=credentials=<credentials-file> -n local-cluster
Note: Disaster recovery backup for the secret is not automatically enabled. Run the following command to add the label that enables the
hypershift-operator-external-dns-credentialssecret to be backed up for disaster recovery:oc label secret hypershift-operator-external-dns-credentials -n local-cluster cluster.open-cluster-management.io/backup=""
1.7.1.5. Enabling AWS PrivateLink
If you plan to provision hosted control plane clusters on the AWS platform with PrivateLink, complete the following steps:
-
Create an AWS credential secret for the HyperShift Operator and name it
hypershift-operator-private-link-credentials. The secret must reside in the managed cluster namespace that is the namespace of the managed cluster being used as the hosting cluster. If you usedlocal-cluster, create the secret in thelocal-clusternamespace. See the following table to confirm that the secret contains the required fields:
Field name
Description
Optional or required
regionRegion for use with Private Link
Required
aws-access-key-idThe credential access key id.
Required
aws-secret-access-keyThe credential access key secret.
Required
See Deploying AWS private clusters in the HyperShift documentation for more information. The following example shows the sample
hypershift-operator-private-link-credentialssecret template:oc create secret generic hypershift-operator-private-link-credentials --from-literal=aws-access-key-id=<aws-access-key-id> --from-literal=aws-secret-access-key=<aws-secret-access-key> --from-literal=region=<region> -n local-cluster
Note: Disaster recovery backup for the secret is not automatically enabled. Run the following command to add the label that enables the
hypershift-operator-private-link-credentialssecret to be backed up for disaster recovery:oc label secret hypershift-operator-private-link-credentials -n local-cluster cluster.open-cluster-management.io/backup=""
1.7.1.6. Enabling the hosted control planes feature
The hosted control planes feature is disabled by default. Enabling the feature automatically also enables the hypershift-addon managed cluster add-on. You can run the following command to enable the feature:
oc patch mce multiclusterengine --type=merge -p '{"spec":{"overrides":{"components":[{"name":"hypershift-preview","enabled": true}]}}}'
Run the following command to verify that the hypershift-preview and hypershift-local-hosting features are enabled in the MultiClusterEngine custom resource.
oc get mce multiclusterengine -o yaml
apiVersion: multicluster.openshift.io/v1
kind: MultiClusterEngine
metadata:
  name: multiclusterengine
spec:
  overrides:
    components:
    - name: hypershift-preview
      enabled: true
    - name: hypershift-local-hosting
      enabled: true
1.7.1.6.1. Manually enabling the hypershift-addon managed cluster add-on for local-cluster
Enabling the hosted control planes feature automatically enables the hypershift-addon managed cluster add-on. If you need to enable the hypershift-addon managed cluster add-on manually, complete the following steps to use the hypershift-addon to install the HyperShift Operator on local-cluster:
Create the
ManagedClusterAddonHyperShift add-on by creating a file that resembles the following example:apiVersion: addon.open-cluster-management.io/v1alpha1 kind: ManagedClusterAddOn metadata: name: hypershift-addon namespace: local-cluster spec: installNamespace: open-cluster-management-agent-addon
Apply the file by running the following command:
oc apply -f <filename>
Replace
filenamewith the name of the file that you created.Confirm that the
hypershift-addonis installed by running the following command:oc get managedclusteraddons -n local-cluster hypershift-addon
If the add-on is installed, the output resembles the following example:
NAME               AVAILABLE   DEGRADED   PROGRESSING
hypershift-addon   True
Your HyperShift add-on is installed and the hosting cluster is available to create and manage HyperShift clusters.
1.7.1.7. Installing the hosted control planes CLI
The hosted control planes (HyperShift) CLI is used to create and manage OpenShift Container Platform hosted control plane clusters. After enabling the hosted control planes feature, you can install the hosted control planes CLI by completing the following steps:
- From the OpenShift Container Platform console, click the Help icon > Command Line Tools.
Click Download hypershift CLI for your platform.
Note: The download is only visible if you have enabled the
hypershift-previewfeature.Unpack the downloaded archive by running the following command:
tar xvzf hypershift.tar.gz
Run the following command to make the binary file executable:
chmod +x hypershift
Run the following command to move the binary file to a directory in your path:
sudo mv hypershift /usr/local/bin/.
You can now use the hypershift create cluster command to create and manage hosted clusters. Use the following command to list the available parameters:
hypershift create cluster aws --help
1.7.1.8. Additional resources
- For more information about the AWS credential secret, see Deploying AWS private clusters in the HyperShift documentation.
- For more information about external DNS, see External DNS in the HyperShift documentation.
- You can now deploy the SR-IOV Operator. See Deploying the SR-IOV Operator for hosted control planes to learn more about deploying the SR-IOV Operator.
1.7.2. Managing hosted control plane clusters on AWS (Technology Preview)
You can use the multicluster engine for Kubernetes operator console to create a Red Hat OpenShift Container Platform hosted cluster. Hosted control planes are available as a Technology Preview on Amazon Web Services (AWS). If you use hosted control planes on AWS, you can create a hosted cluster by using the console, or you can import a hosted cluster by using either the console or the CLI.
1.7.2.1. Prerequisites
You must configure hosted control planes before you can create hosted control plane clusters. See Configuring hosted control planes (Technology Preview) for more information.
1.7.2.2. Creating a hosted control plane cluster on AWS with the console
To create a hosted control plane cluster from the multicluster engine operator console, navigate to Infrastructure > Clusters. On the Clusters page, click Create cluster > Amazon Web Services > Hosted and complete the steps in the console.
Note: After you reach the console, use the basic information that is provided to create a cluster in the command line.
1.7.2.3. Deploying a hosted cluster on AWS with the command line
After setting up the HyperShift command line interface and enabling the local-cluster as the hosting cluster, you can deploy a hosted cluster on AWS by completing the following steps:
Set environment variables as follows, replacing variables as needed with your credentials:
export REGION=us-east-1
export CLUSTER_NAME=clc-name-hs1
export INFRA_ID=clc-name-hs1
export BASE_DOMAIN=dev09.red-chesterfield.com
export AWS_CREDS=$HOME/name-aws
export PULL_SECRET=/Users/username/pull-secret.txt
export BUCKET_NAME=acmqe-hypershift
export BUCKET_REGION=us-east-1
Verify that
CLUSTER_NAMEandINFRA_IDhave the same values, otherwise the cluster might not appear correctly in the multicluster engine for Kubernetes operator console. To see descriptions for each variable, run the following commandhypershift create cluster aws --help
- Verify that you are logged into your hub cluster.
Run the following command to create the hosted cluster:
hypershift create cluster aws \
    --name $CLUSTER_NAME \
    --infra-id $INFRA_ID \
    --aws-creds $AWS_CREDS \
    --pull-secret $PULL_SECRET \
    --region $REGION \
    --generate-ssh \
    --node-pool-replicas 3 \
    --namespace <hypershift-hosting-service-cluster>
Note: By default, all
HostedClusterandNodePoolcustom resources are created in theclustersnamespace. If you specify the--namespace <namespace>parameter,HostedClusterandNodePoolcustom resources are created in the namespace you chose.You can check the status of your hosted cluster by running the following command:
oc get hostedclusters -n <hypershift-hosting-service-cluster>
1.7.2.4. Importing a hosted control plane cluster on AWS
You can import a hosted control plane cluster with the console.
- Navigate to Infrastructure > Clusters and select the hosted cluster that you want to import.
Click Import hosted cluster.
Note: For your discovered hosted cluster, you can also import from the console, but the cluster must be in an upgradable state. Import on your cluster is disabled if the hosted cluster is not in an upgradable state because the hosted control plane is not available. Click Import to begin the process. The status is
Importingwhile the cluster receives updates and then changes toReady.
You can also import a hosted control plane cluster on AWS with the CLI by completing the following steps:
Add an annotation to the
HostedClustercustom resource by running the following command:oc edit hostedcluster <cluster_name> -n clusters
Replace
<cluster_name>with the name of your hosted cluster.Run the following command to add the annotations to the
HostedClustercustom resource:cluster.open-cluster-management.io/hypershiftdeployment: local-cluster/<cluster_name> cluster.open-cluster-management.io/managedcluster-name: <cluster_name>
Replace
<cluster_name>with the name of your hosted cluster.Create your
ManagedClusterresource by using the following sample YAML file:apiVersion: cluster.open-cluster-management.io/v1 kind: ManagedCluster metadata: annotations: import.open-cluster-management.io/hosting-cluster-name: local-cluster import.open-cluster-management.io/klusterlet-deploy-mode: Hosted open-cluster-management/created-via: other labels: cloud: auto-detect cluster.open-cluster-management.io/clusterset: default name: <cluster_name> vendor: OpenShift name: <cluster_name> spec: hubAcceptsClient: true leaseDurationSeconds: 60Replace
<cluster_name>with the name of your hosted cluster.Run the following command to apply the resource:
oc apply -f <file_name>
Replace <file_name> with the YAML file name you created in the previous step.
Create your
KlusterletAddonConfigresource by using the following sample YAML file. This only applies to Red Hat Advanced Cluster Management. If you have installed multicluster engine operator only, skip this step:apiVersion: agent.open-cluster-management.io/v1 kind: KlusterletAddonConfig metadata: name: <cluster_name> namespace: <cluster_name> spec: clusterName: <cluster_name> clusterNamespace: <cluster_name> clusterLabels: cloud: auto-detect vendor: auto-detect applicationManager: enabled: true certPolicyController: enabled: true iamPolicyController: enabled: true policyController: enabled: true searchCollector: enabled: falseReplace
<cluster_name>with the name of your hosted cluster.Run the following command to apply the resource:
oc apply -f <file_name>
Replace <file_name> with the YAML file name you created in the previous step.
After the import process is complete, your hosted cluster becomes visible in the console. You can also check the status of your hosted cluster by running the following command:
oc get managedcluster <cluster_name>
1.7.2.5. Accessing a hosting cluster on AWS
The access secrets for hosted control plane clusters are stored in the hypershift-management-cluster namespace. Learn about the following secret name formats:
-
kubeconfigsecret:<hostingNamespace>-<name>-admin-kubeconfig(clusters-hypershift-demo-admin-kubeconfig) -
kubeadminpassword secret:<hostingNamespace>-<name>-kubeadmin-password(clusters-hypershift-demo-kubeadmin-password)
1.7.2.6. Destroying a hosted cluster on AWS
To destroy a hosted cluster and its managed cluster resource, complete the following steps:
Delete the hosted cluster and its back-end resources by running the following command:
hypershift destroy cluster aws --name <cluster_name> --infra-id <infra_id> --aws-creds <aws-credentials> --base-domain <base_domain> --destroy-cloud-resources
Replace names where necessary.
Delete the managed cluster resource on multicluster engine operator by running the following command:
oc delete managedcluster <cluster_name>
Replace
cluster_namewith the name of your cluster.
1.7.3. Configuring the hosting cluster on bare metal (Technology Preview)
To configure hosted control planes, you need a hosting cluster and a hosted cluster. You can enable a managed cluster to be a hosting cluster by using the hypershift add-on to deploy the HyperShift Operator on that cluster. Then, you can start to create the hosted cluster.
The multicluster engine operator 2.2 supports only the default local-cluster and the hub cluster as the hosting cluster.
Hosted control planes is a Technology Preview feature, so the related components are disabled by default.
You can deploy hosted control planes by configuring a cluster to function as a hosting cluster. The hosting cluster is the OpenShift Container Platform cluster where the control planes are hosted.
On Red Hat Advanced Cluster Management 2.7, you can use the managed hub cluster, also known as the local-cluster, as the hosting cluster.
Important:
- Run the hub cluster and workers on the same platform for hosted control planes.
- To provision hosted control planes on bare metal, you can use the Agent platform. The Agent platform uses the central infrastructure management service to add worker nodes to a hosted cluster.
-
Each bare metal host must be started with a Discovery Image that the central infrastructure management provides. You can start the hosts manually or through automation by using
Cluster-Baremetal-Operator. After each host starts, it runs an Agent process to discover the host details and complete the installation. AnAgentcustom resource represents each host. - When you create a hosted cluster with the Agent platform, HyperShift installs the Agent Cluster API provider in the hosted control plane namespace.
- When you scale up a node pool, a machine is created. The Cluster API provider finds an Agent that is approved, is passing validations, is not currently in use, and meets the requirements that are specified in the node pool specification. You can monitor the installation of an Agent by checking its status and conditions.
When you scale down a node pool, Agents are unbound from the corresponding cluster. Before you can reuse the clusters, you must restart them by using the Discovery image to update the number of nodes.
1.7.3.1. Prerequisites
You must have the following prerequisites to configure a hosting cluster:
- You need the multicluster engine for Kubernetes operator 2.2 and later installed on an OpenShift Container Platform cluster. The multicluster engine operator is automatically installed when you install Red Hat Advanced Cluster Management. You can also install multicluster engine operator without Red Hat Advanced Cluster Management as an Operator from the OpenShift Container Platform OperatorHub.
You need the multicluster engine operator must have at least one managed OpenShift Container Platform cluster. The
local-clusteris automatically imported in multicluster engine operator 2.2 and later. See Advanced configuration for more information about thelocal-cluster. You can check the status of your hub cluster by running the following command:oc get managedclusters local-cluster
- You need a hosting cluster with at least 3 worker nodes to run the HyperShift Operator.
- You must enable the hosted control planes feature. For more information, see Enabling the hosted control planes feature.
1.7.3.2. Configuring DNS
The API Server for the hosted cluster is exposed as a NodePort service. A DNS entry must exist for api.${HOSTED_CLUSTER_NAME}.${BASEDOMAIN} that points to destination where the API Server can be reached.
The DNS entry can be as simple as a record that points to one of the nodes in the managed cluster that is running the hosted control plane. The entry can also point to a load balancer that is deployed to redirect incoming traffic to the Ingress pods.
See the following example DNS configuration:
api.example.krnl.es.    IN A 192.168.122.20
api.example.krnl.es.    IN A 192.168.122.21
api.example.krnl.es.    IN A 192.168.122.22
api-int.example.krnl.es.    IN A 192.168.122.20
api-int.example.krnl.es.    IN A 192.168.122.21
api-int.example.krnl.es.    IN A 192.168.122.22
`*`.apps.example.krnl.es. IN A 192.168.122.23
1.7.3.3. Additional resources
- For an introduction to the central infrastructure management service, see Kube API - Getting Started Guide.
- See Load balancing requirements for user-provisioned infrastructure for more information about load balancers.
- You can now deploy the SR-IOV Operator. See Deploying the SR-IOV Operator for hosted control planes to learn more about deploying the SR-IOV Operator.
1.7.4. Managing hosted control plane clusters on bare metal (Technology Preview)
You can use the multicluster engine for Kubernetes operator console to create and manage a Red Hat OpenShift Container Platform hosted cluster. Hosted control planes are available as a Technology Preview on Amazon Web Services (AWS) and bare metal.
- Prerequisites
- Creating a hosted cluster on bare metal
- Creating an InfraEnv
- Adding agents
- Accessing the hosted cluster
- Scaling the NodePool object
- Handling Ingress
- Enabling node auto-scaling for the hosted cluster
- Verifying hosted cluster creation
- Destroying a hosted cluster on bare metal
- Additional resources
1.7.4.1. Prerequisites
You must configure hosted control planes for bare metal before you can create hosted control plane clusters. See Configuring the hosting cluster on bare metal (Technology Preview) for more information.
1.7.4.2. Creating a hosted control plane cluster on Bare Metal Agent with the console
To create a hosted control plane cluster from the multicluster engine operator console, navigate to Infrastructure > Clusters. On the Clusters page, click Create cluster > Host Inventory > Hosted control plane and complete the steps in the console.
Important: When you create a cluster, the multicluster engine operator controller creates a namespace for the cluster and its resources. Ensure that you include only resources for that cluster instance in that namespace. Destroying the cluster deletes the namespace and all of the resources in it.
If you want to add your cluster to an existing cluster set, you must have the correct permissions on the cluster set to add it. If you do not have cluster-admin privileges when you are creating the cluster, you must select a cluster set on which you have clusterset-admin permissions. If you do not have the correct permissions on the specified cluster set, the cluster creation fails. Contact your cluster administrator to provide you with clusterset-admin permissions if you do not have any cluster set options to select.
Every managed cluster must be associated with a managed cluster set. If you do not assign the managed cluster to a ManagedClusterSet, it is automatically added to the default managed cluster set.
The release image identifies the version of the OpenShift Container Platform image that is used to create the cluster. Hosted control plane clusters must use one of the provided release images.
Proxy information that is provided in the infrastructure environment is automatically added to the proxy fields. You can use the existing information, overwrite it, or add the information if you want to enable a proxy. The following list contains the required information for creating a proxy:
-
HTTP proxy URL: The URL that should be used as a proxy for
HTTPtraffic. -
HTTPS proxy URL: The secure proxy URL that should be used for
HTTPStraffic. If no value is provided, the same value as theHTTP Proxy URLis used for bothHTTPandHTTPS. -
No proxy domains: A comma-separated list of domains that should bypass the proxy. Begin a domain name with a period
.to include all of the subdomains that are in that domain. Add an asterisk*to bypass the proxy for all destinations. - Additional trust bundle: The contents of the certificate file that is required to access the mirror registry.
Note: You have to run the oc command that is provided with the cluster details to import the cluster. When you create the cluster, it is not automatically configured with the management of Red Hat Advanced Cluster Management.
1.7.4.3. Creating a hosted cluster on bare metal using the command line
Verify that you have a default storage class configured for your cluster. Otherwise, you might end up with pending PVCs.
Enter the following commands:
export CLUSTERS_NAMESPACE="clusters"
export HOSTED_CLUSTER_NAME="example"
export HOSTED_CONTROL_PLANE_NAMESPACE="${CLUSTERS_NAMESPACE}-${HOSTED_CLUSTER_NAME}"
export BASEDOMAIN="krnl.es"
export PULL_SECRET_FILE=$PWD/pull-secret
export MACHINE_CIDR=192.168.122.0/24
# Typically the namespace is created by the hypershift-operator
# but agent cluster creation generates a capi-provider role that
# needs the namespace to already exist
oc create ns ${HOSTED_CONTROL_PLANE_NAMESPACE}

hypershift create cluster agent \
    --name=${HOSTED_CLUSTER_NAME} \
    --pull-secret=${PULL_SECRET_FILE} \
    --agent-namespace=${HOSTED_CONTROL_PLANE_NAMESPACE} \
    --base-domain=${BASEDOMAIN} \
    --api-server-address=api.${HOSTED_CLUSTER_NAME}.${BASEDOMAIN} \
After a few moments, verify that your hosted control plane pods are up and running by entering the following command:
oc -n ${HOSTED_CONTROL_PLANE_NAMESPACE} get podsExample output
NAME                                             READY   STATUS    RESTARTS   AGE
capi-provider-7dcf5fc4c4-nr9sq                   1/1     Running   0          4m32s
catalog-operator-6cd867cc7-phb2q                 2/2     Running   0          2m50s
certified-operators-catalog-884c756c4-zdt64      1/1     Running   0          2m51s
cluster-api-f75d86f8c-56wfz                      1/1     Running   0          4m32s
cluster-autoscaler-7977864686-2rz4c              1/1     Running   0          4m13s
cluster-network-operator-754cf4ffd6-lwfm2        1/1     Running   0          2m51s
cluster-policy-controller-784f995d5-7cbrz        1/1     Running   0          2m51s
cluster-version-operator-5c68f7f4f8-lqzcm        1/1     Running   0          2m51s
community-operators-catalog-58599d96cd-vpj2v     1/1     Running   0          2m51s
control-plane-operator-f6b4c8465-4k5dh           1/1     Running   0          4m32s
etcd-0                                           1/1     Running   0          4m13s
hosted-cluster-config-operator-c4776f89f-dt46j   1/1     Running   0          2m51s
ignition-server-7cd8676fc5-hjx29                 1/1     Running   0          4m22s
ingress-operator-75484cdc8c-zhdz5                1/2     Running   0          2m51s
konnectivity-agent-c5485c9df-jsm9s               1/1     Running   0          4m13s
konnectivity-server-85dc754888-7z8vm             1/1     Running   0          4m13s
kube-apiserver-db5fb5549-zlvpq                   3/3     Running   0          4m13s
kube-controller-manager-5fbf7b7b7b-mrtjj         1/1     Running   0          90s
kube-scheduler-776c59d757-kfhv6                  1/1     Running   0          3m12s
machine-approver-c6b947895-lkdbk                 1/1     Running   0          4m13s
oauth-openshift-787b87cff6-trvd6                 2/2     Running   0          87s
olm-operator-69c4657864-hxwzk                    2/2     Running   0          2m50s
openshift-apiserver-67f9d9c5c7-c9bmv             2/2     Running   0          89s
openshift-controller-manager-5899fc8778-q89xh    1/1     Running   0          2m51s
openshift-oauth-apiserver-569c78c4d-568v8        1/1     Running   0          2m52s
packageserver-ddfffb8d7-wlz6l                    2/2     Running   0          2m50s
redhat-marketplace-catalog-7dd77d896-jtxkd       1/1     Running   0          2m51s
redhat-operators-catalog-d66b5c965-qwhn7         1/1     Running   0          2m51s
1.7.4.4. Creating an InfraEnv
An InfraEnv is a environment where hosts that are starting the live ISO can join as agents. In this case, the agents are created in the same namespace as your hosted control plane.
To create an
InfraEnv, enter the following commands:export SSH_PUB_KEY=$(cat $HOME/.ssh/id_rsa.pub) envsubst <<"EOF" | oc apply -f - apiVersion: agent-install.openshift.io/v1beta1 kind: InfraEnv metadata: name: ${HOSTED_CLUSTER_NAME} namespace: ${HOSTED_CONTROL_PLANE_NAMESPACE} spec: pullSecretRef: name: pull-secret sshAuthorizedKey: ${SSH_PUB_KEY} EOFTo generate a live ISO that allows virtual machines or bare metal machines to join as agents, enter the following command:
oc -n ${HOSTED_CONTROL_PLANE_NAMESPACE} get InfraEnv ${HOSTED_CLUSTER_NAME} -ojsonpath="{.status.isoDownloadURL}"
1.7.4.5. Adding agents
You can add agents by manually configuring the machine to start with the live ISO or by using Metal3.
To manually add agents, follow these steps:
-
Download the live ISO and use it to start a node (bare metal or VM). At startup, the node communicates with the Assisted Service and registers as an agent in the same namespace as the
InfraEnv. After each agent is created, you can optionally set its
installation_disk_idandhostnamein the spec. Then, approve it to indicate that the agent is ready for use.oc -n ${HOSTED_CONTROL_PLANE_NAMESPACE} get agentsExample output
NAME                                   CLUSTER   APPROVED   ROLE          STAGE
86f7ac75-4fc4-4b36-8130-40fa12602218                        auto-assign
e57a637f-745b-496e-971d-1abbf03341ba                        auto-assign
oc -n ${HOSTED_CONTROL_PLANE_NAMESPACE} patch agent 86f7ac75-4fc4-4b36-8130-40fa12602218 -p '{"spec":{"installation_disk_id":"/dev/sda","approved":true,"hostname":"worker-0.example.krnl.es"}}' --type merge

oc -n ${HOSTED_CONTROL_PLANE_NAMESPACE} patch agent 23d0c614-2caa-43f5-b7d3-0b3564688baa -p '{"spec":{"installation_disk_id":"/dev/sda","approved":true,"hostname":"worker-1.example.krnl.es"}}' --type merge
oc -n ${HOSTED_CONTROL_PLANE_NAMESPACE} get agentsExample output
NAME                                   CLUSTER   APPROVED   ROLE          STAGE
86f7ac75-4fc4-4b36-8130-40fa12602218             true       auto-assign
e57a637f-745b-496e-971d-1abbf03341ba             true       auto-assign
-
Download the live ISO and use it to start a node (bare metal or VM). At startup, the node communicates with the Assisted Service and registers as an agent in the same namespace as the
To add agents by using Metal3, follow these instructions:
Use the Assisted Service to create the custom ISO and the Baremetal Operator to perform the installation.
Important: Because the
BareMetalHostobjects are created outside the bare metal operator namespace, you must configure the Operator to watch all namespaces.oc patch provisioning provisioning-configuration --type merge -p '{"spec":{"watchAllNamespaces": true }}'The
metal3pod is restarted in theopenshift-machine-apinamespace.Wait until the
metal3pod is ready again:until oc wait -n openshift-machine-api $(oc get pods -n openshift-machine-api -l baremetal.openshift.io/cluster-baremetal-operator=metal3-state -o name) --for condition=containersready --timeout 10s >/dev/null 2>&1 ; do sleep 1 ; done
Create your
BareMetalHostobjects. You need to configure a few variables that are required to start your bare-metal nodes.-
BMC_USERNAME: Username to connect to the BMC. -
BMC_PASSWORD: Password to connect to the BMC. -
BMC_IP: IP used by Metal3 to connect to the BMC. -
WORKER_NAME: Name of the BaremetalHost object (this value is also used as the hostname) -
BOOT_MAC_ADDRESS: MAC address of the NIC that is connected to the MachineNetwork. -
UUID: Redfish UUID, this is usually1. If you are using sushy-tools, this value is a long UUID. If you are using iDrac, this value isSystem.Embedded.1. You might need to check with the vendor. -
REDFISH_SCHEME: The Redfish provider to use. If you are using hardware that uses a standard Redfish implementation, you can set this value toredfish-virtualmedia. iDRAC usesidrac-virtualmedia. iLO5 usesilo5-virtualmedia. You might need to check with the vendor. REDFISH: Redfish connection endpoint.export BMC_USERNAME=$(echo -n "root" | base64 -w0) export BMC_PASSWORD=$(echo -n "calvin" | base64 -w0) export BMC_IP="192.168.124.228" export WORKER_NAME="ocp-worker-0" export BOOT_MAC_ADDRESS="aa:bb:cc:dd:ee:ff" export UUID="1" export REDFISH_SCHEME="redfish-virtualmedia" export REDFISH="${REDFISH_SCHEME}://${BMC_IP}/redfish/v1/Systems/${UUID}"
-
Create the
BareMetalHostby following these steps:Create the BMC Secret:
oc apply -f -
apiVersion: v1
data:
  password: ${BMC_PASSWORD}
  username: ${BMC_USERNAME}
kind: Secret
metadata:
  name: ${WORKER_NAME}-bmc-secret
  namespace: ${HOSTED_CONTROL_PLANE_NAMESPACE}
type: Opaque
Create the BMH:
Note: The
infraenvs.agent-install.openshift.iolabel is used to specify whichInfraEnvis used to start the BMH. Thebmac.agent-install.openshift.io/hostnamelabel is used to manually set a hostname.If you want to manually specify the installation disk, you can use the
rootDeviceHintsin the BMH specification. IfrootDeviceHintsare not provided, the agent picks the installation disk that better suits the installation requirements. For more information aboutrootDeviceHints, see the rootDeviceHints section of theBareMetalHostdocumentation.oc apply -f - apiVersion: metal3.io/v1alpha1 kind: BareMetalHost metadata: name: ${WORKER_NAME} namespace: ${HOSTED_CONTROL_PLANE_NAMESPACE} labels: infraenvs.agent-install.openshift.io: ${HOSTED_CLUSTER_NAME} annotations: inspect.metal3.io: disabled bmac.agent-install.openshift.io/hostname: ${WORKER_NAME} spec: automatedCleaningMode: disabled bmc: disableCertificateVerification: True address: ${REDFISH} credentialsName: ${WORKER_NAME}-bmc-secret bootMACAddress: ${BOOT_MAC_ADDRESS} online: trueThe agent is automatically approved. If it is not approved, confirm that the
bootMACAddressis correct.The BMH is provisioned:
oc -n ${HOSTED_CONTROL_PLANE_NAMESPACE} get bmhExample output
NAME           STATE          CONSUMER   ONLINE   ERROR   AGE
ocp-worker-0   provisioning              true             2m50s
The BMH eventually reaches the
provisionedstate:oc -n ${HOSTED_CONTROL_PLANE_NAMESPACE} get bmhExample output
NAME           STATE          CONSUMER   ONLINE   ERROR   AGE
ocp-worker-0   provisioned               true             72s
Provisioned means that the node was configured to start from the virtualCD correctly. It takes a few moments for the agent to be displayed:
oc -n ${HOSTED_CONTROL_PLANE_NAMESPACE} get agentExample output
NAME                                   CLUSTER   APPROVED   ROLE          STAGE
4dac1ab2-7dd5-4894-a220-6a3473b67ee6             true       auto-assign
The agent is automatically approved.
Repeat this process with the other two nodes:
oc -n ${HOSTED_CONTROL_PLANE_NAMESPACE} get agentExample output
NAME                                   CLUSTER   APPROVED   ROLE          STAGE
4dac1ab2-7dd5-4894-a220-6a3473b67ee6             true       auto-assign
d9198891-39f4-4930-a679-65fb142b108b             true       auto-assign
da503cf1-a347-44f2-875c-4960ddb04091             true       auto-assign
1.7.4.6. Accessing the hosted cluster
The hosted control plane is running and the agents are ready to join the hosted cluster. Before the agents join the hosted cluster, you need to access the hosted cluster.
Generate the kubeconfig by entering the following command:
hypershift create kubeconfig --namespace ${CLUSTERS_NAMESPACE} --name ${HOSTED_CLUSTER_NAME} > ${HOSTED_CLUSTER_NAME}.kubeconfigIf you access the cluster, you can see that you do not have any nodes and that the ClusterVersion is trying to reconcile the Red Hat OpenShift Container Platform release:
oc --kubeconfig ${HOSTED_CLUSTER_NAME}.kubeconfig get clusterversion,nodesExample output
NAME                                         VERSION   AVAILABLE   PROGRESSING   SINCE   STATUS
clusterversion.config.openshift.io/version             False       True          8m6s    Unable to apply 4.12z: some cluster operators have not yet rolled out
To get the cluster running, you need to add nodes to it.
1.7.4.7. Scaling the NodePool object
You add nodes to your hosted cluster by scaling the NodePool object.
Scale the NodePool object to two nodes:
oc -n ${CLUSTERS_NAMESPACE} scale nodepool ${NODEPOOL_NAME} --replicas 2The ClusterAPI agent provider randomly picks two agents that are then assigned to the hosted cluster. Those agents go through different states and finally join the hosted cluster as OpenShift Container Platform nodes. The states pass from
bindingtodiscoveringtoinsufficienttoinstallingtoinstalling-in-progresstoadded-to-existing-cluster.oc -n ${HOSTED_CONTROL_PLANE_NAMESPACE} get agentExample output
NAME                                   CLUSTER         APPROVED   ROLE          STAGE
4dac1ab2-7dd5-4894-a220-6a3473b67ee6   hypercluster1   true       auto-assign
d9198891-39f4-4930-a679-65fb142b108b                   true       auto-assign
da503cf1-a347-44f2-875c-4960ddb04091   hypercluster1   true       auto-assign

oc -n ${HOSTED_CONTROL_PLANE_NAMESPACE} get agent -o jsonpath='{range .items[*]}BMH: {@.metadata.labels.agent-install\.openshift\.io/bmh} Agent: {@.metadata.name} State: {@.status.debugInfo.state}{"\n"}{end}'

BMH: ocp-worker-2 Agent: 4dac1ab2-7dd5-4894-a220-6a3473b67ee6 State: binding
BMH: ocp-worker-0 Agent: d9198891-39f4-4930-a679-65fb142b108b State: known-unbound
BMH: ocp-worker-1 Agent: da503cf1-a347-44f2-875c-4960ddb04091 State: insufficient
After the agents reach the
added-to-existing-clusterstate, verify that you can see the OpenShift Container Platform nodes:oc --kubeconfig ${HOSTED_CLUSTER_NAME}.kubeconfig get nodesExample output
NAME           STATUS   ROLES    AGE     VERSION
ocp-worker-1   Ready    worker   5m41s   v1.24.0+3882f8f
ocp-worker-2   Ready    worker   6m3s    v1.24.0+3882f8f
ClusterOperators start to reconcile by adding workloads to the nodes. You can also see that two machines were created when you scaled up the
NodePoolobject:oc -n ${HOSTED_CONTROL_PLANE_NAMESPACE} get machinesExample output
NAME                            CLUSTER               NODENAME       PROVIDERID                                     PHASE     AGE   VERSION
hypercluster1-c96b6f675-m5vch   hypercluster1-b2qhl   ocp-worker-1   agent://da503cf1-a347-44f2-875c-4960ddb04091   Running   15m   4.12z
hypercluster1-c96b6f675-tl42p   hypercluster1-b2qhl   ocp-worker-2   agent://4dac1ab2-7dd5-4894-a220-6a3473b67ee6   Running   15m   4.12z
The
clusterversionreconcile eventually reaches a point where only Ingress and Console cluster operators are missing:oc --kubeconfig ${HOSTED_CLUSTER_NAME}.kubeconfig get clusterversion,co NAME VERSION AVAILABLE PROGRESSING SINCE STATUS clusterversion.config.openshift.io/version False True 40m Unable to apply 4.12z: the cluster operator console has not yet successfully rolled out NAME VERSION AVAILABLE PROGRESSING DEGRADED SINCE MESSAGE clusteroperator.config.openshift.io/console 4.12z False False False 11m RouteHealthAvailable: failed to GET route (https://console-openshift-console.apps.hypercluster1.domain.com): Get "https://console-openshift-console.apps.hypercluster1.domain.com": dial tcp 10.19.3.29:443: connect: connection refused clusteroperator.config.openshift.io/csi-snapshot-controller 4.12z True False False 10m clusteroperator.config.openshift.io/dns 4.12z True False False 9m16s clusteroperator.config.openshift.io/image-registry 4.12z True False False 9m5s clusteroperator.config.openshift.io/ingress 4.12z True False True 39m The "default" ingress controller reports Degraded=True: DegradedConditions: One or more other status conditions indicate a degraded state: CanaryChecksSucceeding=False (CanaryChecksRepetitiveFailures: Canary route checks for the default ingress controller are failing) clusteroperator.config.openshift.io/insights 4.12z True False False 11m clusteroperator.config.openshift.io/kube-apiserver 4.12z True False False 40m clusteroperator.config.openshift.io/kube-controller-manager 4.12z True False False 40m clusteroperator.config.openshift.io/kube-scheduler 4.12z True False False 40m clusteroperator.config.openshift.io/kube-storage-version-migrator 4.12z True False False 10m clusteroperator.config.openshift.io/monitoring 4.12z True False False 7m38s clusteroperator.config.openshift.io/network 4.12z True False False 11m clusteroperator.config.openshift.io/openshift-apiserver 4.12z True False False 40m clusteroperator.config.openshift.io/openshift-controller-manager 4.12z True False False 40m clusteroperator.config.openshift.io/openshift-samples 4.12z True False False 8m54s clusteroperator.config.openshift.io/operator-lifecycle-manager 4.12z True False False 40m clusteroperator.config.openshift.io/operator-lifecycle-manager-catalog 4.12z True False False 40m clusteroperator.config.openshift.io/operator-lifecycle-manager-packageserver 4.12z True False False 40m clusteroperator.config.openshift.io/service-ca 4.12z True False False 11m clusteroperator.config.openshift.io/storage 4.12z True False False 11m
1.7.4.8. Handling Ingress
Every OpenShift Container Platform cluster comes set up with a default application ingress controller that is expected have an external DNS record associated with it. For example, if you create a HyperShift cluster named example with the base domain krnl.es, you can expect the wildcard domain *.apps.example.krnl.es to be routable.
You can set up a load balancer and wildcard DNS record for the *.apps. This process requires deploying MetalLB, configuring a new load balancer service that routes to the ingress deployment, and assigning a wildcard DNS entry to the load balancer IP address.
Set up MetalLB so that when you create a service of the
LoadBalancertype, MetalLB adds an external IP address for the service.cat <<"EOF" | oc --kubeconfig ${HOSTED_CLUSTER_NAME}.kubeconfig apply -f - --- apiVersion: v1 kind: Namespace metadata: name: metallb labels: openshift.io/cluster-monitoring: "true" annotations: workload.openshift.io/allowed: management --- apiVersion: operators.coreos.com/v1 kind: OperatorGroup metadata: name: metallb-operator-operatorgroup namespace: metallb --- apiVersion: operators.coreos.com/v1alpha1 kind: Subscription metadata: name: metallb-operator namespace: metallb spec: channel: "stable" name: metallb-operator source: redhat-operators sourceNamespace: openshift-marketplaceAfter the Operator is running, create the MetalLB instance:
cat <<"EOF" | oc --kubeconfig ${HOSTED_CLUSTER_NAME}.kubeconfig apply -f -
apiVersion: metallb.io/v1beta1
kind: MetalLB
metadata:
  name: metallb
  namespace: metallb
EOF
Configure the MetalLB Operator by creating an
IPAddressPoolwith a single IP address. This IP address must be on the same subnet as the network that the cluster nodes use.Important: Change the
INGRESS_IPenvironment variable to match your environment’s address.export INGRESS_IP=192.168.122.23 envsubst <<"EOF" | oc --kubeconfig ${HOSTED_CLUSTER_NAME}.kubeconfig apply -f - apiVersion: metallb.io/v1beta1 kind: IPAddressPool metadata: name: ingress-public-ip namespace: metallb spec: protocol: layer2 autoAssign: false addresses: - ${INGRESS_IP}-${INGRESS_IP} --- apiVersion: metallb.io/v1beta1 kind: L2Advertisement metadata: name: ingress-public-ip namespace: metallb spec: ipAddressPools: - ingress-public-ip EOFExpose the OpenShift Container Platform Router via MetalLB by following these steps:
Set up the LoadBalancer Service that routes ingress traffic to the ingress deployment.
cat <<"EOF" | oc --kubeconfig ${HOSTED_CLUSTER_NAME}.kubeconfig apply -f -
kind: Service
apiVersion: v1
metadata:
  annotations:
    metallb.universe.tf/address-pool: ingress-public-ip
  name: metallb-ingress
  namespace: openshift-ingress
spec:
  ports:
    - name: http
      protocol: TCP
      port: 80
      targetPort: 80
    - name: https
      protocol: TCP
      port: 443
      targetPort: 443
  selector:
    ingresscontroller.operator.openshift.io/deployment-ingresscontroller: default
  type: LoadBalancer
EOF
Enter the following command to reach the OpenShift Container Platform console:
curl -kI https://console-openshift-console.apps.example.krnl.es

HTTP/1.1 200 OK
Check the
clusterversionandclusteroperatorvalues to verify that everything is running. Enter the following command:oc --kubeconfig ${HOSTED_CLUSTER_NAME}.kubeconfig get clusterversion,coExample output
NAME                                         VERSION   AVAILABLE   PROGRESSING   SINCE   STATUS
clusterversion.config.openshift.io/version   4.12z    True        False         3m32s   Cluster version is 4.12z

NAME                                                                           VERSION   AVAILABLE   PROGRESSING   DEGRADED   SINCE   MESSAGE
clusteroperator.config.openshift.io/console                                    4.12z    True        False         False      3m50s
clusteroperator.config.openshift.io/csi-snapshot-controller                    4.12z    True        False         False      25m
clusteroperator.config.openshift.io/dns                                        4.12z    True        False         False      23m
clusteroperator.config.openshift.io/image-registry                             4.12z    True        False         False      23m
clusteroperator.config.openshift.io/ingress                                    4.12z    True        False         False      53m
clusteroperator.config.openshift.io/insights                                   4.12z    True        False         False      25m
clusteroperator.config.openshift.io/kube-apiserver                             4.12z    True        False         False      54m
clusteroperator.config.openshift.io/kube-controller-manager                    4.12z    True        False         False      54m
clusteroperator.config.openshift.io/kube-scheduler                             4.12z    True        False         False      54m
clusteroperator.config.openshift.io/kube-storage-version-migrator              4.12z    True        False         False      25m
clusteroperator.config.openshift.io/monitoring                                 4.12z    True        False         False      21m
clusteroperator.config.openshift.io/network                                    4.12z    True        False         False      25m
clusteroperator.config.openshift.io/openshift-apiserver                        4.12z    True        False         False      54m
clusteroperator.config.openshift.io/openshift-controller-manager               4.12z    True        False         False      54m
clusteroperator.config.openshift.io/openshift-samples                          4.12z    True        False         False      23m
clusteroperator.config.openshift.io/operator-lifecycle-manager                 4.12z    True        False         False      54m
clusteroperator.config.openshift.io/operator-lifecycle-manager-catalog         4.12z    True        False         False      54m
clusteroperator.config.openshift.io/operator-lifecycle-manager-packageserver   4.12z    True        False         False      54m
clusteroperator.config.openshift.io/service-ca                                 4.12z    True        False         False      25m
clusteroperator.config.openshift.io/storage                                    4.12z    True        False         False      25m
1.7.4.9. Enabling node auto-scaling for the hosted cluster
When you need more capacity in your hosted cluster and spare agents are available, you can enable auto-scaling to install new agents.
To enable auto-scaling, enter the following command. In this case, the minimum number of nodes is 2, and the maximum number is 5.
oc -n ${CLUSTERS_NAMESPACE} patch nodepool ${HOSTED_CLUSTER_NAME} --type=json -p '[{"op": "remove", "path": "/spec/replicas"},{"op":"add", "path": "/spec/autoScaling", "value": { "max": 5, "min": 2 }}]'If 10 minutes pass without requiring the additional capacity, the agent is decommissioned and placed in the spare queue again.
Create a workload that requires a new node.
cat <<EOF | oc --kubeconfig ${HOSTED_CLUSTER_NAME}.kubeconfig apply -f -
apiVersion: apps/v1
kind: Deployment
metadata:
  creationTimestamp: null
  labels:
    app: reversewords
  name: reversewords
  namespace: default
spec:
  replicas: 40
  selector:
    matchLabels:
      app: reversewords
  strategy: {}
  template:
    metadata:
      creationTimestamp: null
      labels:
        app: reversewords
  spec:
    containers:
    - image: quay.io/mavazque/reversewords:latest
      name: reversewords
      resources:
        requests:
          memory: 2Gi
status: {}
EOF
Verify that the remaining agents are deployed by entering the following command. In this example, the spare agent,
d9198891-39f4-4930-a679-65fb142b108b, is provisioned:oc -n ${HOSTED_CONTROL_PLANE_NAMESPACE} get agent -o jsonpath='{range .items[*]}BMH: {@.metadata.labels.agent-install\.openshift\.io/bmh} Agent: {@.metadata.name} State: {@.status.debugInfo.state}{"\n"}{end}'Example output
BMH: ocp-worker-2 Agent: 4dac1ab2-7dd5-4894-a220-6a3473b67ee6 State: added-to-existing-cluster
BMH: ocp-worker-0 Agent: d9198891-39f4-4930-a679-65fb142b108b State: installing-in-progress
BMH: ocp-worker-1 Agent: da503cf1-a347-44f2-875c-4960ddb04091 State: added-to-existing-cluster
If you check the nodes by entering the following command, the new node is displayed in the output. In this example,
ocp-worker-0is added to the cluster:oc --kubeconfig ${HOSTED_CLUSTER_NAME}.kubeconfig get nodesExample output
NAME           STATUS   ROLES    AGE   VERSION
ocp-worker-0   Ready    worker   35s   v1.24.0+3882f8f
ocp-worker-1   Ready    worker   40m   v1.24.0+3882f8f
ocp-worker-2   Ready    worker   41m   v1.24.0+3882f8f
To remove the node, delete the workload by entering the following command:
oc --kubeconfig ${HOSTED_CLUSTER_NAME}.kubeconfig -n default delete deployment reversewordsWait 10 minutes and confirm that the node was removed by entering the following command:
oc --kubeconfig ${HOSTED_CLUSTER_NAME}.kubeconfig get nodesExample output
NAME           STATUS   ROLES    AGE   VERSION
ocp-worker-1   Ready    worker   51m   v1.24.0+3882f8f
ocp-worker-2   Ready    worker   52m   v1.24.0+3882f8f
oc -n ${HOSTED_CONTROL_PLANE_NAMESPACE} get agent -o jsonpath='{range .items[*]}BMH: {@.metadata.labels.agent-install\.openshift\.io/bmh} Agent: {@.metadata.name} State: {@.status.debugInfo.state}{"\n"}{end}'

BMH: ocp-worker-2 Agent: 4dac1ab2-7dd5-4894-a220-6a3473b67ee6 State: added-to-existing-cluster
BMH: ocp-worker-0 Agent: d9198891-39f4-4930-a679-65fb142b108b State: known-unbound
BMH: ocp-worker-1 Agent: da503cf1-a347-44f2-875c-4960ddb04091 State: added-to-existing-cluster
1.7.4.10. Verifying hosted cluster creation
After the deployment process is complete, you can verify that the hosted cluster was created successfully. Follow these steps a few minutes after you create the hosted cluster.
Obtain the kubeconfig for your new hosted cluster by entering the extract command:
oc extract -n kni21 secret/kni21-admin-kubeconfig --to=- > kubeconfig-kni21
# kubeconfig
Use the kubeconfig to view the cluster Operators of the hosted cluster. Enter the following command:
oc get co --kubeconfig=kubeconfig-kni21
Example output
NAME                                       VERSION   AVAILABLE   PROGRESSING   DEGRADED   SINCE   MESSAGE
console                                    4.10.26   True        False         False      2m38s
csi-snapshot-controller                    4.10.26   True        False         False      4m3s
dns                                        4.10.26   True        False         False      2m52s
image-registry                             4.10.26   True        False         False      2m8s
ingress                                    4.10.26   True        False         False      22m
kube-apiserver                             4.10.26   True        False         False      23m
kube-controller-manager                    4.10.26   True        False         False      23m
kube-scheduler                             4.10.26   True        False         False      23m
kube-storage-version-migrator              4.10.26   True        False         False      4m52s
monitoring                                 4.10.26   True        False         False      69s
network                                    4.10.26   True        False         False      4m3s
node-tuning                                4.10.26   True        False         False      2m22s
openshift-apiserver                        4.10.26   True        False         False      23m
openshift-controller-manager               4.10.26   True        False         False      23m
openshift-samples                          4.10.26   True        False         False      2m15s
operator-lifecycle-manager                 4.10.26   True        False         False      22m
operator-lifecycle-manager-catalog         4.10.26   True        False         False      23m
operator-lifecycle-manager-packageserver   4.10.26   True        False         False      23m
service-ca                                 4.10.26   True        False         False      4m41s
storage                                    4.10.26   True        False         False      4m43s
You can also view the running pods on your hosted cluster by entering the following command:
oc get pods -A --kubeconfig=kubeconfig-kni21
Example output
NAMESPACE NAME READY STATUS RESTARTS AGE kube-system konnectivity-agent-khlqv 0/1 Running 0 3m52s kube-system konnectivity-agent-nrbvw 0/1 Running 0 4m24s kube-system konnectivity-agent-s5p7g 0/1 Running 0 4m14s kube-system kube-apiserver-proxy-asus3-vm1.kni.schmaustech.com 1/1 Running 0 5m56s kube-system kube-apiserver-proxy-asus3-vm2.kni.schmaustech.com 1/1 Running 0 6m37s kube-system kube-apiserver-proxy-asus3-vm3.kni.schmaustech.com 1/1 Running 0 6m17s openshift-cluster-node-tuning-operator cluster-node-tuning-operator-798fcd89dc-9cf2k 1/1 Running 0 20m openshift-cluster-node-tuning-operator tuned-dhw5p 1/1 Running 0 109s openshift-cluster-node-tuning-operator tuned-dlp8f 1/1 Running 0 110s openshift-cluster-node-tuning-operator tuned-l569k 1/1 Running 0 109s openshift-cluster-samples-operator cluster-samples-operator-6b5bcb9dff-kpnbc 2/2 Running 0 20m openshift-cluster-storage-operator cluster-storage-operator-5f784969f5-vwzgz 1/1 Running 1 (113s ago) 20m openshift-cluster-storage-operator csi-snapshot-controller-6b7687b7d9-7nrfw 1/1 Running 0 3m8s openshift-cluster-storage-operator csi-snapshot-controller-6b7687b7d9-csksg 1/1 Running 0 3m9s openshift-cluster-storage-operator csi-snapshot-controller-operator-7f4d9fc5b8-hkvrk 1/1 Running 0 20m openshift-cluster-storage-operator csi-snapshot-webhook-6759b5dc8b-7qltn 1/1 Running 0 3m12s openshift-cluster-storage-operator csi-snapshot-webhook-6759b5dc8b-f8bqk 1/1 Running 0 3m12s openshift-console-operator console-operator-8675b58c4c-flc5p 1/1 Running 1 (96s ago) 20m openshift-console console-5cbf6c7969-6gk6z 1/1 Running 0 119s openshift-console downloads-7bcd756565-6wj5j 1/1 Running 0 4m3s openshift-dns-operator dns-operator-77d755cd8c-xjfbn 2/2 Running 0 21m openshift-dns dns-default-jwjkz 2/2 Running 0 113s openshift-dns dns-default-kfqnh 2/2 Running 0 113s openshift-dns dns-default-xlqsm 2/2 Running 0 113s openshift-dns node-resolver-jzxnd 1/1 Running 0 110s openshift-dns node-resolver-xqdr5 1/1 Running 0 110s openshift-dns node-resolver-zl6h4 1/1 Running 0 110s openshift-image-registry cluster-image-registry-operator-64fcfdbf5-r7d5t 1/1 Running 0 20m openshift-image-registry image-registry-7fdfd99d68-t9pq9 1/1 Running 0 53s openshift-image-registry node-ca-hkfnr 1/1 Running 0 56s openshift-image-registry node-ca-vlsdl 1/1 Running 0 56s openshift-image-registry node-ca-xqnsw 1/1 Running 0 56s openshift-ingress-canary ingress-canary-86z6r 1/1 Running 0 4m13s openshift-ingress-canary ingress-canary-8jhxk 1/1 Running 0 3m52s openshift-ingress-canary ingress-canary-cv45h 1/1 Running 0 4m24s openshift-ingress router-default-6bb8944f66-z2lxr 1/1 Running 0 20m openshift-kube-storage-version-migrator-operator kube-storage-version-migrator-operator-56b57b4844-p9zgp 1/1 Running 1 (2m16s ago) 20m openshift-kube-storage-version-migrator migrator-58bb4d89d5-5sl9w 1/1 Running 0 3m30s openshift-monitoring alertmanager-main-0 6/6 Running 0 100s openshift-monitoring cluster-monitoring-operator-5bc5885cd4-dwbc4 2/2 Running 0 20m openshift-monitoring grafana-78f798868c-wd84p 3/3 Running 0 94s openshift-monitoring kube-state-metrics-58b8f97f6c-6kp4v 3/3 Running 0 104s openshift-monitoring node-exporter-ll7cp 2/2 Running 0 103s openshift-monitoring node-exporter-tgsqg 2/2 Running 0 103s openshift-monitoring node-exporter-z99gr 2/2 Running 0 103s openshift-monitoring openshift-state-metrics-677b9fb74f-qqp6g 3/3 Running 0 104s openshift-monitoring prometheus-adapter-f69fff5f9-7tdn9 0/1 Running 0 17s openshift-monitoring prometheus-k8s-0 6/6 Running 0 93s openshift-monitoring prometheus-operator-6b9d4fd9bd-tqfcx 2/2 Running 0 2m2s openshift-monitoring telemeter-client-74d599658c-wqw5j 3/3 Running 0 101s openshift-monitoring thanos-querier-64c8757854-z4lll 6/6 Running 0 98s openshift-multus multus-additional-cni-plugins-cqst9 1/1 Running 0 6m14s openshift-multus multus-additional-cni-plugins-dbmkj 1/1 Running 0 5m56s openshift-multus multus-additional-cni-plugins-kcwl9 1/1 Running 0 6m14s openshift-multus multus-admission-controller-22cmb 2/2 Running 0 3m52s openshift-multus multus-admission-controller-256tn 2/2 Running 0 4m13s openshift-multus multus-admission-controller-mz9jm 2/2 Running 0 4m24s openshift-multus multus-bxgvr 1/1 Running 0 6m14s openshift-multus multus-dmkdc 1/1 Running 0 6m14s openshift-multus multus-gqw2f 1/1 Running 0 5m56s openshift-multus network-metrics-daemon-6cx4x 2/2 Running 0 5m56s openshift-multus network-metrics-daemon-gz4jp 2/2 Running 0 6m13s openshift-multus network-metrics-daemon-jq9j4 2/2 Running 0 6m13s openshift-network-diagnostics network-check-source-8497dc8f86-cn4nm 1/1 Running 0 5m59s openshift-network-diagnostics network-check-target-d8db9 1/1 Running 0 5m58s openshift-network-diagnostics network-check-target-jdbv8 1/1 Running 0 5m58s openshift-network-diagnostics network-check-target-zzmdv 1/1 Running 0 5m55s openshift-network-operator network-operator-f5b48cd67-x5dcz 1/1 Running 0 21m openshift-sdn sdn-452r2 2/2 Running 0 5m56s openshift-sdn sdn-68g69 2/2 Running 0 6m openshift-sdn sdn-controller-4v5mv 2/2 Running 0 5m56s openshift-sdn sdn-controller-crscc 2/2 Running 0 6m1s openshift-sdn sdn-controller-fxtn9 2/2 Running 0 6m1s openshift-sdn sdn-n5jm5 2/2 Running 0 6m openshift-service-ca-operator service-ca-operator-5bf7f9d958-vnqcg 1/1 Running 1 (2m ago) 20m openshift-service-ca service-ca-6c54d7944b-v5mrw 1/1 Running 0 3m8s
1.7.4.11. Destroying a hosted cluster on bare metal
You can use the console to destroy bare metal hosted clusters. Complete the following steps to destroy a hosted cluster on bare metal:
- In the console, navigate to Infrastructure > Clusters.
- On the Clusters page, select the cluster that you want to destroy.
- In the Actions menu, select Destroy clusters to remove the cluster.
1.7.4.12. Additional resources
- For more information about MetalLB, see About MetalLB and the MetalLB Operator in the OpenShift Container Platform documentation.
-
For more information about
rootDeviceHints, see the rootDeviceHints section of theBareMetalHostdocumentation.
1.7.5. Disabling the hosted control plane feature
You can uninstall the HyperShift Operator and disable the hosted control plane. When disabling the hosted control plane cluster feature, you must destroy the hosted cluster and the managed cluster resource on multicluster engine operator, as described in the Managing hosted control plane clusters topics.
1.7.5.1. Uninstalling the HyperShift operator
To uninstall the HyperShift Operator and disable the hypershift-addon from the local-cluster, complete the following steps:
Run the following command to ensure that there is no hosted cluster running:
oc get hostedcluster -A
Important: If a hosted cluster is running, the HyperShift Operator does not uninstall, even if the
hypershift-addonis disabled.Disable the
hypershift-addonby running the following command:oc patch mce multiclusterengine --type=merge -p '{"spec":{"overrides":{"components":[{"name":"hypershift-local-hosting","enabled": false}]}}}'Tip: You can also disable the
hypershift-addonfor thelocal-clusterfrom the multicluster engine operator console after disabling thehypershift-addon.
1.7.5.2. Disabling the hosted control planes feature
You must first uninstall the HyperShift Operator before disabling the hosted control planes feature. Run the following command to disable the hosted control planes feature:
oc patch mce multiclusterengine --type=merge -p '{"spec":{"overrides":{"components":[{"name":"hypershift-preview","enabled": false}]}}}'
You can verify that the hypershift-preview and hypershift-local-hosting features are disabled in the MultiClusterEngine custom resource by running the following command:
oc get mce multiclusterengine -o yaml
See the following example where hypershift-preview and hypershift-local-hosting have their enabled: flags set to false:
apiVersion: multicluster.openshift.io/v1
kind: MultiClusterEngine
metadata:
name: multiclusterengine
spec:
overrides:
components:
- name: hypershift-preview
enabled: false
- name: hypershift-local-hosting
enabled: false1.7.5.3. Additional resources
1.8. APIs
You can access the following APIs for cluster lifecycle management with the multicluster engine operator. User required access: You can only perform actions that your role is assigned. For more information, review the API documentation for each of the following resources:
1.8.1. Clusters API
1.8.1.1. Overview
This documentation is for the cluster resource for multicluster engine for Kubernetes. Cluster resource has four possible requests: create, query, delete and update.
1.8.1.1.1. URI scheme
BasePath : /kubernetes/apis
Schemes : HTTPS
1.8.1.1.2. Tags
- cluster.open-cluster-management.io : Create and manage clusters
1.8.1.2. Paths
1.8.1.2.1. Query all clusters
GET /cluster.open-cluster-management.io/v1/managedclusters
1.8.1.2.1.1. Description
Query your clusters for more details.
1.8.1.2.1.2. Parameters
| Type | Name | Description | Schema |
|---|---|---|---|
| Header |
COOKIE | Authorization: Bearer {ACCESS_TOKEN} ; ACCESS_TOKEN is the user access token. | string |
1.8.1.2.1.3. Responses
| HTTP Code | Description | Schema |
|---|---|---|
| 200 | Success | No Content |
| 403 | Access forbidden | No Content |
| 404 | Resource not found | No Content |
| 500 | Internal service error | No Content |
| 503 | Service unavailable | No Content |
1.8.1.2.1.4. Consumes
-
cluster/yaml
1.8.1.2.1.5. Tags
- cluster.open-cluster-management.io
1.8.1.2.2. Create a cluster
POST /cluster.open-cluster-management.io/v1/managedclusters
1.8.1.2.2.1. Description
Create a cluster
1.8.1.2.2.2. Parameters
| Type | Name | Description | Schema |
|---|---|---|---|
| Header |
COOKIE | Authorization: Bearer {ACCESS_TOKEN} ; ACCESS_TOKEN is the user access token. | string |
| Body |
body | Parameters describing the cluster to be created. |
1.8.1.2.2.3. Responses
| HTTP Code | Description | Schema |
|---|---|---|
| 200 | Success | No Content |
| 403 | Access forbidden | No Content |
| 404 | Resource not found | No Content |
| 500 | Internal service error | No Content |
| 503 | Service unavailable | No Content |
1.8.1.2.2.4. Consumes
-
cluster/yaml
1.8.1.2.2.5. Tags
- cluster.open-cluster-management.io
1.8.1.2.2.6. Example HTTP request
1.8.1.2.2.6.1. Request body
{
"apiVersion" : "cluster.open-cluster-management.io/v1",
"kind" : "ManagedCluster",
"metadata" : {
"labels" : {
"vendor" : "OpenShift"
},
"name" : "cluster1"
},
"spec": {
"hubAcceptsClient": true,
"managedClusterClientConfigs": [
{
"caBundle": "test",
"url": "https://test.com"
}
]
},
"status" : { }
}1.8.1.2.3. Query a single cluster
GET /cluster.open-cluster-management.io/v1/managedclusters/{cluster_name}1.8.1.2.3.1. Description
Query a single cluster for more details.
1.8.1.2.3.2. Parameters
| Type | Name | Description | Schema |
|---|---|---|---|
| Header |
COOKIE | Authorization: Bearer {ACCESS_TOKEN} ; ACCESS_TOKEN is the user access token. | string |
| Path |
cluster_name | Name of the cluster that you want to query. | string |
1.8.1.2.3.3. Responses
| HTTP Code | Description | Schema |
|---|---|---|
| 200 | Success | No Content |
| 403 | Access forbidden | No Content |
| 404 | Resource not found | No Content |
| 500 | Internal service error | No Content |
| 503 | Service unavailable | No Content |
1.8.1.2.3.4. Tags
- cluster.open-cluster-management.io
1.8.1.2.4. Delete a cluster
DELETE /cluster.open-cluster-management.io/v1/managedclusters/{cluster_name}1.8.1.2.4.1. Description
Delete a single cluster
1.8.1.2.4.2. Parameters
| Type | Name | Description | Schema |
|---|---|---|---|
| Header |
COOKIE | Authorization: Bearer {ACCESS_TOKEN} ; ACCESS_TOKEN is the user access token. | string |
| Path |
cluster_name | Name of the cluster that you want to delete. | string |
1.8.1.2.4.3. Responses
| HTTP Code | Description | Schema |
|---|---|---|
| 200 | Success | No Content |
| 403 | Access forbidden | No Content |
| 404 | Resource not found | No Content |
| 500 | Internal service error | No Content |
| 503 | Service unavailable | No Content |
1.8.1.2.4.4. Tags
- cluster.open-cluster-management.io
1.8.1.3. Definitions
1.8.1.3.1. Cluster
| Name | Schema |
|---|---|
|
apiVersion | string |
|
kind | string |
|
metadata | object |
|
spec |
spec
| Name | Schema |
|---|---|
|
hubAcceptsClient | bool |
|
managedClusterClientConfigs | < managedClusterClientConfigs > array |
|
leaseDurationSeconds | integer (int32) |
managedClusterClientConfigs
| Name | Description | Schema |
|---|---|---|
|
URL | string | |
|
CABundle |
Pattern : | string (byte) |
1.8.2. Clustersets API (v1beta2)
1.8.2.1. Overview
This documentation is for the Clusterset resource for multicluster engine for Kubernetes. Clusterset resource has four possible requests: create, query, delete and update.
1.8.2.1.1. URI scheme
BasePath : /kubernetes/apis
Schemes : HTTPS
1.8.2.1.2. Tags
- cluster.open-cluster-management.io : Create and manage Clustersets
1.8.2.2. Paths
1.8.2.2.1. Query all clustersets
GET /cluster.open-cluster-management.io/v1beta2/managedclustersets
1.8.2.2.1.1. Description
Query your Clustersets for more details.
1.8.2.2.1.2. Parameters
| Type | Name | Description | Schema |
|---|---|---|---|
| Header |
COOKIE | Authorization: Bearer {ACCESS_TOKEN} ; ACCESS_TOKEN is the user access token. | string |
1.8.2.2.1.3. Responses
| HTTP Code | Description | Schema |
|---|---|---|
| 200 | Success | No Content |
| 403 | Access forbidden | No Content |
| 404 | Resource not found | No Content |
| 500 | Internal service error | No Content |
| 503 | Service unavailable | No Content |
1.8.2.2.1.4. Consumes
-
clusterset/yaml
1.8.2.2.1.5. Tags
- cluster.open-cluster-management.io
1.8.2.2.2. Create a clusterset
POST /cluster.open-cluster-management.io/v1beta2/managedclustersets
1.8.2.2.2.1. Description
Create a Clusterset.
1.8.2.2.2.2. Parameters
| Type | Name | Description | Schema |
|---|---|---|---|
| Header |
COOKIE | Authorization: Bearer {ACCESS_TOKEN} ; ACCESS_TOKEN is the user access token. | string |
| Body |
body | Parameters describing the clusterset to be created. |
1.8.2.2.2.3. Responses
| HTTP Code | Description | Schema |
|---|---|---|
| 200 | Success | No Content |
| 403 | Access forbidden | No Content |
| 404 | Resource not found | No Content |
| 500 | Internal service error | No Content |
| 503 | Service unavailable | No Content |
1.8.2.2.2.4. Consumes
-
clusterset/yaml
1.8.2.2.2.5. Tags
- cluster.open-cluster-management.io
1.8.2.2.2.6. Example HTTP request
1.8.2.2.2.6.1. Request body
{
"apiVersion" : "cluster.open-cluster-management.io/v1beta2",
"kind" : "ManagedClusterSet",
"metadata" : {
"name" : "clusterset1"
},
"spec": { },
"status" : { }
}1.8.2.2.3. Query a single clusterset
GET /cluster.open-cluster-management.io/v1beta2/managedclustersets/{clusterset_name}1.8.2.2.3.1. Description
Query a single clusterset for more details.
1.8.2.2.3.2. Parameters
| Type | Name | Description | Schema |
|---|---|---|---|
| Header |
COOKIE | Authorization: Bearer {ACCESS_TOKEN} ; ACCESS_TOKEN is the user access token. | string |
| Path |
clusterset_name | Name of the clusterset that you want to query. | string |
1.8.2.2.3.3. Responses
| HTTP Code | Description | Schema |
|---|---|---|
| 200 | Success | No Content |
| 403 | Access forbidden | No Content |
| 404 | Resource not found | No Content |
| 500 | Internal service error | No Content |
| 503 | Service unavailable | No Content |
1.8.2.2.3.4. Tags
- cluster.open-cluster-management.io
1.8.2.2.4. Delete a clusterset
DELETE /cluster.open-cluster-management.io/v1beta2/managedclustersets/{clusterset_name}1.8.2.2.4.1. Description
Delete a single clusterset.
1.8.2.2.4.2. Parameters
| Type | Name | Description | Schema |
|---|---|---|---|
| Header |
COOKIE | Authorization: Bearer {ACCESS_TOKEN} ; ACCESS_TOKEN is the user access token. | string |
| Path |
clusterset_name | Name of the clusterset that you want to delete. | string |
1.8.2.2.4.3. Responses
| HTTP Code | Description | Schema |
|---|---|---|
| 200 | Success | No Content |
| 403 | Access forbidden | No Content |
| 404 | Resource not found | No Content |
| 500 | Internal service error | No Content |
| 503 | Service unavailable | No Content |
1.8.2.2.4.4. Tags
- cluster.open-cluster-management.io
1.8.2.3. Definitions
1.8.2.3.1. Clusterset
| Name | Schema |
|---|---|
|
apiVersion | string |
|
kind | string |
|
metadata | object |
1.8.3. Clustersetbindings API (v1beta2)
1.8.3.1. Overview
This documentation is for the clustersetbinding resource for multicluster engine for Kubernetes. Clustersetbinding resource has four possible requests: create, query, delete and update.
1.8.3.1.1. URI scheme
BasePath : /kubernetes/apis
Schemes : HTTPS
1.8.3.1.2. Tags
- cluster.open-cluster-management.io : Create and manage clustersetbindings
1.8.3.2. Paths
1.8.3.2.1. Query all clustersetbindings
GET /cluster.open-cluster-management.io/v1beta2/namespaces/{namespace}/managedclustersetbindings1.8.3.2.1.1. Description
Query your clustersetbindings for more details.
1.8.3.2.1.2. Parameters
| Type | Name | Description | Schema |
|---|---|---|---|
| Header |
COOKIE | Authorization: Bearer {ACCESS_TOKEN} ; ACCESS_TOKEN is the user access token. | string |
| Path |
namespace | Namespace that you want to use, for example, default. | string |
1.8.3.2.1.3. Responses
| HTTP Code | Description | Schema |
|---|---|---|
| 200 | Success | No Content |
| 403 | Access forbidden | No Content |
| 404 | Resource not found | No Content |
| 500 | Internal service error | No Content |
| 503 | Service unavailable | No Content |
1.8.3.2.1.4. Consumes
-
clustersetbinding/yaml
1.8.3.2.1.5. Tags
- cluster.open-cluster-management.io
1.8.3.2.2. Create a clustersetbinding
POST /cluster.open-cluster-management.io/v1beta2/namespaces/{namespace}/managedclustersetbindings1.8.3.2.2.1. Description
Create a clustersetbinding.
1.8.3.2.2.2. Parameters
| Type | Name | Description | Schema |
|---|---|---|---|
| Header |
COOKIE | Authorization: Bearer {ACCESS_TOKEN} ; ACCESS_TOKEN is the user access token. | string |
| Path |
namespace | Namespace that you want to use, for example, default. | string |
| Body |
body | Parameters describing the clustersetbinding to be created. |
1.8.3.2.2.3. Responses
| HTTP Code | Description | Schema |
|---|---|---|
| 200 | Success | No Content |
| 403 | Access forbidden | No Content |
| 404 | Resource not found | No Content |
| 500 | Internal service error | No Content |
| 503 | Service unavailable | No Content |
1.8.3.2.2.4. Consumes
-
clustersetbinding/yaml
1.8.3.2.2.5. Tags
- cluster.open-cluster-management.io
1.8.3.2.2.6. Example HTTP request
1.8.3.2.2.6.1. Request body
{
"apiVersion" : "cluster.open-cluster-management.io/v1",
"kind" : "ManagedClusterSetBinding",
"metadata" : {
"name" : "clusterset1",
"namespace" : "ns1"
},
"spec": {
"clusterSet": "clusterset1"
},
"status" : { }
}1.8.3.2.3. Query a single clustersetbinding
GET /cluster.open-cluster-management.io/v1beta2/namespaces/{namespace}/managedclustersetbindings/{clustersetbinding_name}1.8.3.2.3.1. Description
Query a single clustersetbinding for more details.
1.8.3.2.3.2. Parameters
| Type | Name | Description | Schema |
|---|---|---|---|
| Header |
COOKIE | Authorization: Bearer {ACCESS_TOKEN} ; ACCESS_TOKEN is the user access token. | string |
| Path |
namespace | Namespace that you want to use, for example, default. | string |
| Path |
clustersetbinding_name | Name of the clustersetbinding that you want to query. | string |
1.8.3.2.3.3. Responses
| HTTP Code | Description | Schema |
|---|---|---|
| 200 | Success | No Content |
| 403 | Access forbidden | No Content |
| 404 | Resource not found | No Content |
| 500 | Internal service error | No Content |
| 503 | Service unavailable | No Content |
1.8.3.2.3.4. Tags
- cluster.open-cluster-management.io
1.8.3.2.4. Delete a clustersetbinding
DELETE /cluster.open-cluster-management.io/v1beta2/managedclustersetbindings/{clustersetbinding_name}1.8.3.2.4.1. Description
Delete a single clustersetbinding.
1.8.3.2.4.2. Parameters
| Type | Name | Description | Schema |
|---|---|---|---|
| Header |
COOKIE | Authorization: Bearer {ACCESS_TOKEN} ; ACCESS_TOKEN is the user access token. | string |
| Path |
namespace | Namespace that you want to use, for example, default. | string |
| Path |
clustersetbinding_name | Name of the clustersetbinding that you want to delete. | string |
1.8.3.2.4.3. Responses
| HTTP Code | Description | Schema |
|---|---|---|
| 200 | Success | No Content |
| 403 | Access forbidden | No Content |
| 404 | Resource not found | No Content |
| 500 | Internal service error | No Content |
| 503 | Service unavailable | No Content |
1.8.3.2.4.4. Tags
- cluster.open-cluster-management.io
1.8.3.3. Definitions
1.8.3.3.1. Clustersetbinding
| Name | Schema |
|---|---|
|
apiVersion | string |
|
kind | string |
|
metadata | object |
|
spec |
spec
| Name | Schema |
|---|---|
|
clusterSet | string |
1.8.4. Clusterview API (v1alpha1)
1.8.4.1. Overview
This documentation is for the clusterview resource for multicluster engine for Kubernetes. The clusterview resource provides a CLI command that enables you to view a list of the managed clusters and managed cluster sets that that you can access. The three possible requests are: list, get, and watch.
1.8.4.1.1. URI scheme
BasePath : /kubernetes/apis
Schemes : HTTPS
1.8.4.1.2. Tags
- clusterview.open-cluster-management.io : View a list of managed clusters that your ID can access.
1.8.4.2. Paths
1.8.4.2.1. Get managed clusters
GET /managedclusters.clusterview.open-cluster-management.io
1.8.4.2.1.1. Description
View a list of the managed clusters that you can access.
1.8.4.2.1.2. Parameters
| Type | Name | Description | Schema |
|---|---|---|---|
| Header |
COOKIE | Authorization: Bearer {ACCESS_TOKEN} ; ACCESS_TOKEN is the user access token. | string |
1.8.4.2.1.3. Responses
| HTTP Code | Description | Schema |
|---|---|---|
| 200 | Success | No Content |
| 403 | Access forbidden | No Content |
| 404 | Resource not found | No Content |
| 500 | Internal service error | No Content |
| 503 | Service unavailable | No Content |
1.8.4.2.1.4. Consumes
-
managedcluster/yaml
1.8.4.2.1.5. Tags
- clusterview.open-cluster-management.io
1.8.4.2.2. List managed clusters
LIST /managedclusters.clusterview.open-cluster-management.io
1.8.4.2.2.1. Description
View a list of the managed clusters that you can access.
1.8.4.2.2.2. Parameters
| Type | Name | Description | Schema |
|---|---|---|---|
| Header |
COOKIE | Authorization: Bearer {ACCESS_TOKEN} ; ACCESS_TOKEN is the user access token. | string |
| Body |
body | Name of the user ID for which you want to list the managed clusters. | string |
1.8.4.2.2.3. Responses
| HTTP Code | Description | Schema |
|---|---|---|
| 200 | Success | No Content |
| 403 | Access forbidden | No Content |
| 404 | Resource not found | No Content |
| 500 | Internal service error | No Content |
| 503 | Service unavailable | No Content |
1.8.4.2.2.4. Consumes
-
managedcluster/yaml
1.8.4.2.2.5. Tags
- clusterview.open-cluster-management.io
1.8.4.2.2.6. Example HTTP request
1.8.4.2.2.6.1. Request body
{
"apiVersion" : "clusterview.open-cluster-management.io/v1alpha1",
"kind" : "ClusterView",
"metadata" : {
"name" : "<user_ID>"
},
"spec": { },
"status" : { }
}1.8.4.2.3. Watch the managed cluster sets
WATCH /managedclusters.clusterview.open-cluster-management.io
1.8.4.2.3.1. Description
Watch the managed clusters that you can access.
1.8.4.2.3.2. Parameters
| Type | Name | Description | Schema |
|---|---|---|---|
| Header |
COOKIE | Authorization: Bearer {ACCESS_TOKEN} ; ACCESS_TOKEN is the user access token. | string |
| Path |
clusterview_name | Name of the user ID that you want to watch. | string |
1.8.4.2.3.3. Responses
| HTTP Code | Description | Schema |
|---|---|---|
| 200 | Success | No Content |
| 403 | Access forbidden | No Content |
| 404 | Resource not found | No Content |
| 500 | Internal service error | No Content |
| 503 | Service unavailable | No Content |
1.8.4.2.4. List the managed cluster sets.
GET /managedclustersets.clusterview.open-cluster-management.io
1.8.4.2.4.1. Description
List the managed clusters that you can access.
1.8.4.2.4.2. Parameters
| Type | Name | Description | Schema |
|---|---|---|---|
| Header |
COOKIE | Authorization: Bearer {ACCESS_TOKEN} ; ACCESS_TOKEN is the user access token. | string |
| Path |
clusterview_name | Name of the user ID that you want to watch. | string |
1.8.4.2.4.3. Responses
| HTTP Code | Description | Schema |
|---|---|---|
| 200 | Success | No Content |
| 403 | Access forbidden | No Content |
| 404 | Resource not found | No Content |
| 500 | Internal service error | No Content |
| 503 | Service unavailable | No Content |
1.8.4.2.5. List the managed cluster sets.
LIST /managedclustersets.clusterview.open-cluster-management.io
1.8.4.2.5.1. Description
List the managed clusters that you can access.
1.8.4.2.5.2. Parameters
| Type | Name | Description | Schema |
|---|---|---|---|
| Header |
COOKIE | Authorization: Bearer {ACCESS_TOKEN} ; ACCESS_TOKEN is the user access token. | string |
| Path |
clusterview_name | Name of the user ID that you want to watch. | string |
1.8.4.2.5.3. Responses
| HTTP Code | Description | Schema |
|---|---|---|
| 200 | Success | No Content |
| 403 | Access forbidden | No Content |
| 404 | Resource not found | No Content |
| 500 | Internal service error | No Content |
| 503 | Service unavailable | No Content |
1.8.4.2.6. Watch the managed cluster sets.
WATCH /managedclustersets.clusterview.open-cluster-management.io
1.8.4.2.6.1. Description
Watch the managed clusters that you can access.
1.8.4.2.6.2. Parameters
| Type | Name | Description | Schema |
|---|---|---|---|
| Header |
COOKIE | Authorization: Bearer {ACCESS_TOKEN} ; ACCESS_TOKEN is the user access token. | string |
| Path |
clusterview_name | Name of the user ID that you want to watch. | string |
1.8.4.2.6.3. Responses
| HTTP Code | Description | Schema |
|---|---|---|
| 200 | Success | No Content |
| 403 | Access forbidden | No Content |
| 404 | Resource not found | No Content |
| 500 | Internal service error | No Content |
| 503 | Service unavailable | No Content |
1.8.5. Managed service account (Technology Preview)
1.8.5.1. Overview
This documentation is for the ManagedServiceAccount resource for the multicluster engine operator. The ManagedServiceAccount resource has four possible requests: create, query, delete, and update.
1.8.5.1.1. URI scheme
BasePath : /kubernetes/apis
Schemes : HTTPS
1.8.5.1.2. Tags
-
managedserviceaccounts.multicluster.openshift.io`: Create and manageManagedServiceAccounts
1.8.5.2. Paths
1.8.5.2.1. Create a ManagedServiceAccount
POST /apis/multicluster.openshift.io/v1alpha1/ManagedServiceAccounts
1.8.5.2.1.1. Description
Create a ManagedServiceAccount.
1.8.5.2.1.2. Parameters
| Type | Name | Description | Schema |
|---|---|---|---|
| Header |
COOKIE | Authorization: Bearer {ACCESS_TOKEN} ; ACCESS_TOKEN is the user access token. | string |
| Body |
body | Parameters describing the ManagedServiceAccount to be created. | ManagedServiceAccount |
1.8.5.2.1.3. Responses
| HTTP Code | Description | Schema |
|---|---|---|
| 200 | Success | No Content |
| 403 | Access forbidden | No Content |
| 404 | Resource not found | No Content |
| 500 | Internal service error | No Content |
| 503 | Service unavailable | No Content |
1.8.5.2.1.4. Consumes
-
managedserviceaccount/yaml
1.8.5.2.1.5. Tags
- managedserviceaccount.multicluster.openshift.io
1.8.5.2.1.5.1. Request body
{
"apiVersion": "apiextensions.k8s.io/v1",
"kind": "CustomResourceDefinition",
"metadata": {
"annotations": {
"controller-gen.kubebuilder.io/version": "v0.4.1"
},
"creationTimestamp": null,
"name": "managedserviceaccount.authentication.open-cluster-management.io"
},
"spec": {
"group": "authentication.open-cluster-management.io",
"names": {
"kind": "ManagedServiceAccount",
"listKind": "ManagedServiceAccountList",
"plural": "managedserviceaccounts",
"singular": "managedserviceaccount"
},
"scope": "Namespaced",
"versions": [
{
"name": "v1alpha1",
"schema": {
"openAPIV3Schema": {
"description": "ManagedServiceAccount is the Schema for the managedserviceaccounts\nAPI",
"properties": {
"apiVersion": {
"description": "APIVersion defines the versioned schema of this representation\nof an object. Servers should convert recognized schemas to the latest\ninternal value, and may reject unrecognized values. More info: https://git.k8s.io/community/contributors/devel/sig-architecture/api-conventions.md#resources",
"type": "string"
},
"kind": {
"description": "Kind is a string value representing the REST resource this\nobject represents. Servers may infer this from the endpoint the client\nsubmits requests to. Cannot be updated. In CamelCase. More info: https://git.k8s.io/community/contributors/devel/sig-architecture/api-conventions.md#types-kinds",
"type": "string"
},
"metadata": {
"type": "object"
},
"spec": {
"description": "ManagedServiceAccountSpec defines the desired state of ManagedServiceAccount",
"properties": {
"rotation": {
"description": "Rotation is the policy for rotation the credentials.",
"properties": {
"enabled": {
"default": true,
"description": "Enabled prescribes whether the ServiceAccount token\nwill be rotated from the upstream",
"type": "boolean"
},
"validity": {
"default": "8640h0m0s",
"description": "Validity is the duration for which the signed ServiceAccount\ntoken is valid.",
"type": "string"
}
},
"type": "object"
},
"ttlSecondsAfterCreation": {
"description": "ttlSecondsAfterCreation limits the lifetime of a ManagedServiceAccount.\nIf the ttlSecondsAfterCreation field is set, the ManagedServiceAccount\nwill be automatically deleted regardless of the ManagedServiceAccount's\nstatus. When the ManagedServiceAccount is deleted, its lifecycle\nguarantees (e.g. finalizers) will be honored. If this field is unset,\nthe ManagedServiceAccount won't be automatically deleted. If this\nfield is set to zero, the ManagedServiceAccount becomes eligible\nfor deletion immediately after its creation. In order to use ttlSecondsAfterCreation,\nthe EphemeralIdentity feature gate must be enabled.",
"exclusiveMinimum": true,
"format": "int32",
"minimum": 0,
"type": "integer"
}
},
"required": [
"rotation"
],
"type": "object"
},
"status": {
"description": "ManagedServiceAccountStatus defines the observed state of\nManagedServiceAccount",
"properties": {
"conditions": {
"description": "Conditions is the condition list.",
"items": {
"description": "Condition contains details for one aspect of the current\nstate of this API Resource. --- This struct is intended for direct\nuse as an array at the field path .status.conditions. For example,\ntype FooStatus struct{ // Represents the observations of a\nfoo's current state. // Known .status.conditions.type are:\n\"Available\", \"Progressing\", and \"Degraded\" // +patchMergeKey=type\n // +patchStrategy=merge // +listType=map // +listMapKey=type\n Conditions []metav1.Condition `json:\"conditions,omitempty\"\npatchStrategy:\"merge\" patchMergeKey:\"type\" protobuf:\"bytes,1,rep,name=conditions\"`\n\n // other fields }",
"properties": {
"lastTransitionTime": {
"description": "lastTransitionTime is the last time the condition\ntransitioned from one status to another. This should be when\nthe underlying condition changed. If that is not known, then\nusing the time when the API field changed is acceptable.",
"format": "date-time",
"type": "string"
},
"message": {
"description": "message is a human readable message indicating\ndetails about the transition. This may be an empty string.",
"maxLength": 32768,
"type": "string"
},
"observedGeneration": {
"description": "observedGeneration represents the .metadata.generation\nthat the condition was set based upon. For instance, if .metadata.generation\nis currently 12, but the .status.conditions[x].observedGeneration\nis 9, the condition is out of date with respect to the current\nstate of the instance.",
"format": "int64",
"minimum": 0,
"type": "integer"
},
"reason": {
"description": "reason contains a programmatic identifier indicating\nthe reason for the condition's last transition. Producers\nof specific condition types may define expected values and\nmeanings for this field, and whether the values are considered\na guaranteed API. The value should be a CamelCase string.\nThis field may not be empty.",
"maxLength": 1024,
"minLength": 1,
"pattern": "^[A-Za-z]([A-Za-z0-9_,:]*[A-Za-z0-9_])?$",
"type": "string"
},
"status": {
"description": "status of the condition, one of True, False, Unknown.",
"enum": [
"True",
"False",
"Unknown"
],
"type": "string"
},
"type": {
"description": "type of condition in CamelCase or in foo.example.com/CamelCase.\n--- Many .condition.type values are consistent across resources\nlike Available, but because arbitrary conditions can be useful\n(see .node.status.conditions), the ability to deconflict is\nimportant. The regex it matches is (dns1123SubdomainFmt/)?(qualifiedNameFmt)",
"maxLength": 316,
"pattern": "^([a-z0-9]([-a-z0-9]*[a-z0-9])?(\\.[a-z0-9]([-a-z0-9]*[a-z0-9])?)*/)?(([A-Za-z0-9][-A-Za-z0-9_.]*)?[A-Za-z0-9])$",
"type": "string"
}
},
"required": [
"lastTransitionTime",
"message",
"reason",
"status",
"type"
],
"type": "object"
},
"type": "array"
},
"expirationTimestamp": {
"description": "ExpirationTimestamp is the time when the token will expire.",
"format": "date-time",
"type": "string"
},
"tokenSecretRef": {
"description": "TokenSecretRef is a reference to the corresponding ServiceAccount's\nSecret, which stores the CA certficate and token from the managed\ncluster.",
"properties": {
"lastRefreshTimestamp": {
"description": "LastRefreshTimestamp is the timestamp indicating\nwhen the token in the Secret is refreshed.",
"format": "date-time",
"type": "string"
},
"name": {
"description": "Name is the name of the referenced secret.",
"type": "string"
}
},
"required": [
"lastRefreshTimestamp",
"name"
],
"type": "object"
}
},
"type": "object"
}
},
"type": "object"
}
},
"served": true,
"storage": true,
"subresources": {
"status": {}
}
}
]
},
"status": {
"acceptedNames": {
"kind": "",
"plural": ""
},
"conditions": [],
"storedVersions": []
}
}1.8.5.2.2. Query a single ManagedServiceAccount
GET /cluster.open-cluster-management.io/v1alpha1/namespaces/{namespace}/managedserviceaccounts/{managedserviceaccount_name}1.8.5.2.2.1. Description
Query a single ManagedServiceAccount for more details.
1.8.5.2.2.2. Parameters
| Type | Name | Description | Schema |
|---|---|---|---|
| Header |
COOKIE | Authorization: Bearer {ACCESS_TOKEN} ; ACCESS_TOKEN is the user access token. | string |
| Path |
managedserviceaccount_name |
Name of the | string |
1.8.5.2.2.3. Responses
| HTTP Code | Description | Schema |
|---|---|---|
| 200 | Success | No Content |
| 403 | Access forbidden | No Content |
| 404 | Resource not found | No Content |
| 500 | Internal service error | No Content |
| 503 | Service unavailable | No Content |
1.8.5.2.2.4. Tags
- cluster.open-cluster-management.io
1.8.5.2.3. Delete a ManagedServiceAccount
DELETE /cluster.open-cluster-management.io/v1alpha1/namespaces/{namespace}/managedserviceaccounts/{managedserviceaccount_name}1.8.5.2.3.1. Description
Delete a single ManagedServiceAccount.
1.8.5.2.3.2. Parameters
| Type | Name | Description | Schema |
|---|---|---|---|
| Header |
COOKIE | Authorization: Bearer {ACCESS_TOKEN} ; ACCESS_TOKEN is the user access token. | string |
| Path |
managedserviceaccount_name |
Name of the | string |
1.8.5.2.3.3. Responses
| HTTP Code | Description | Schema |
|---|---|---|
| 200 | Success | No Content |
| 403 | Access forbidden | No Content |
| 404 | Resource not found | No Content |
| 500 | Internal service error | No Content |
| 503 | Service unavailable | No Content |
1.8.5.2.3.4. Tags
- cluster.open-cluster-management.io
1.8.5.3. Definitions
1.8.5.3.1. ManagedServiceAccount
| Name | Description | Schema |
|---|---|---|
|
apiVersion |
The versioned schema of the | string |
|
kind | String value that represents the REST resource. | string |
|
metadata |
The meta data of the | object |
|
spec |
The specification of the |
1.8.6. MultiClusterEngine API
1.8.6.1. Overview
This documentation is for the MultiClusterEngine resource for multicluster engine for Kubernetes. The MultiClusterEngine resource has four possible requests: create, query, delete, and update.
1.8.6.1.1. URI scheme
BasePath : /kubernetes/apis
Schemes : HTTPS
1.8.6.1.2. Tags
- multiclusterengines.multicluster.openshift.io : Create and manage MultiClusterEngines
1.8.6.2. Paths
1.8.6.2.1. Create a MultiClusterEngine
POST /apis/multicluster.openshift.io/v1alpha1/multiclusterengines
1.8.6.2.1.1. Description
Create a MultiClusterEngine.
1.8.6.2.1.2. Parameters
| Type | Name | Description | Schema |
|---|---|---|---|
| Header |
COOKIE | Authorization: Bearer {ACCESS_TOKEN} ; ACCESS_TOKEN is the user access token. | string |
| Body |
body | Parameters describing the MultiClusterEngine to be created. | MultiClusterEngine |
1.8.6.2.1.3. Responses
| HTTP Code | Description | Schema |
|---|---|---|
| 200 | Success | No Content |
| 403 | Access forbidden | No Content |
| 404 | Resource not found | No Content |
| 500 | Internal service error | No Content |
| 503 | Service unavailable | No Content |
1.8.6.2.1.4. Consumes
-
MultiClusterEngines/yaml
1.8.6.2.1.5. Tags
- multiclusterengines.multicluster.openshift.io
1.8.6.2.1.5.1. Request body
{
"apiVersion": "apiextensions.k8s.io/v1",
"kind": "CustomResourceDefinition",
"metadata": {
"annotations": {
"controller-gen.kubebuilder.io/version": "v0.4.1"
},
"creationTimestamp": null,
"name": "multiclusterengines.multicluster.openshift.io"
},
"spec": {
"group": "multicluster.openshift.io",
"names": {
"kind": "MultiClusterEngine",
"listKind": "MultiClusterEngineList",
"plural": "multiclusterengines",
"shortNames": [
"mce"
],
"singular": "multiclusterengine"
},
"scope": "Cluster",
"versions": [
{
"additionalPrinterColumns": [
{
"description": "The overall state of the MultiClusterEngine",
"jsonPath": ".status.phase",
"name": "Status",
"type": "string"
},
{
"jsonPath": ".metadata.creationTimestamp",
"name": "Age",
"type": "date"
}
],
"name": "v1alpha1",
"schema": {
"openAPIV3Schema": {
"description": "MultiClusterEngine is the Schema for the multiclusterengines\nAPI",
"properties": {
"apiVersion": {
"description": "APIVersion defines the versioned schema of this representation\nof an object. Servers should convert recognized schemas to the latest\ninternal value, and may reject unrecognized values. More info: https://git.k8s.io/community/contributors/devel/sig-architecture/api-conventions.md#resources",
"type": "string"
},
"kind": {
"description": "Kind is a string value representing the REST resource this\nobject represents. Servers may infer this from the endpoint the client\nsubmits requests to. Cannot be updated. In CamelCase. More info: https://git.k8s.io/community/contributors/devel/sig-architecture/api-conventions.md#types-kinds",
"type": "string"
},
"metadata": {
"type": "object"
},
"spec": {
"description": "MultiClusterEngineSpec defines the desired state of MultiClusterEngine",
"properties": {
"imagePullSecret": {
"description": "Override pull secret for accessing MultiClusterEngine\noperand and endpoint images",
"type": "string"
},
"nodeSelector": {
"additionalProperties": {
"type": "string"
},
"description": "Set the nodeselectors",
"type": "object"
},
"targetNamespace": {
"description": "Location where MCE resources will be placed",
"type": "string"
},
"tolerations": {
"description": "Tolerations causes all components to tolerate any taints.",
"items": {
"description": "The pod this Toleration is attached to tolerates any\ntaint that matches the triple <key,value,effect> using the matching\noperator <operator>.",
"properties": {
"effect": {
"description": "Effect indicates the taint effect to match. Empty\nmeans match all taint effects. When specified, allowed values\nare NoSchedule, PreferNoSchedule and NoExecute.",
"type": "string"
},
"key": {
"description": "Key is the taint key that the toleration applies\nto. Empty means match all taint keys. If the key is empty,\noperator must be Exists; this combination means to match all\nvalues and all keys.",
"type": "string"
},
"operator": {
"description": "Operator represents a key's relationship to the\nvalue. Valid operators are Exists and Equal. Defaults to Equal.\nExists is equivalent to wildcard for value, so that a pod\ncan tolerate all taints of a particular category.",
"type": "string"
},
"tolerationSeconds": {
"description": "TolerationSeconds represents the period of time\nthe toleration (which must be of effect NoExecute, otherwise\nthis field is ignored) tolerates the taint. By default, it\nis not set, which means tolerate the taint forever (do not\nevict). Zero and negative values will be treated as 0 (evict\nimmediately) by the system.",
"format": "int64",
"type": "integer"
},
"value": {
"description": "Value is the taint value the toleration matches\nto. If the operator is Exists, the value should be empty,\notherwise just a regular string.",
"type": "string"
}
},
"type": "object"
},
"type": "array"
}
},
"type": "object"
},
"status": {
"description": "MultiClusterEngineStatus defines the observed state of MultiClusterEngine",
"properties": {
"components": {
"items": {
"description": "ComponentCondition contains condition information for\ntracked components",
"properties": {
"kind": {
"description": "The resource kind this condition represents",
"type": "string"
},
"lastTransitionTime": {
"description": "LastTransitionTime is the last time the condition\nchanged from one status to another.",
"format": "date-time",
"type": "string"
},
"message": {
"description": "Message is a human-readable message indicating\ndetails about the last status change.",
"type": "string"
},
"name": {
"description": "The component name",
"type": "string"
},
"reason": {
"description": "Reason is a (brief) reason for the condition's\nlast status change.",
"type": "string"
},
"status": {
"description": "Status is the status of the condition. One of True,\nFalse, Unknown.",
"type": "string"
},
"type": {
"description": "Type is the type of the cluster condition.",
"type": "string"
}
},
"type": "object"
},
"type": "array"
},
"conditions": {
"items": {
"properties": {
"lastTransitionTime": {
"description": "LastTransitionTime is the last time the condition\nchanged from one status to another.",
"format": "date-time",
"type": "string"
},
"lastUpdateTime": {
"description": "The last time this condition was updated.",
"format": "date-time",
"type": "string"
},
"message": {
"description": "Message is a human-readable message indicating\ndetails about the last status change.",
"type": "string"
},
"reason": {
"description": "Reason is a (brief) reason for the condition's\nlast status change.",
"type": "string"
},
"status": {
"description": "Status is the status of the condition. One of True,\nFalse, Unknown.",
"type": "string"
},
"type": {
"description": "Type is the type of the cluster condition.",
"type": "string"
}
},
"type": "object"
},
"type": "array"
},
"phase": {
"description": "Latest observed overall state",
"type": "string"
}
},
"type": "object"
}
},
"type": "object"
}
},
"served": true,
"storage": true,
"subresources": {
"status": {}
}
}
]
},
"status": {
"acceptedNames": {
"kind": "",
"plural": ""
},
"conditions": [],
"storedVersions": []
}
}1.8.6.2.2. Query all MultiClusterEngines
GET /apis/multicluster.openshift.io/v1alpha1/multiclusterengines
1.8.6.2.2.1. Description
Query your multicluster engine for more details.
1.8.6.2.2.2. Parameters
| Type | Name | Description | Schema |
|---|---|---|---|
| Header |
COOKIE | Authorization: Bearer {ACCESS_TOKEN} ; ACCESS_TOKEN is the user access token. | string |
1.8.6.2.2.3. Responses
| HTTP Code | Description | Schema |
|---|---|---|
| 200 | Success | No Content |
| 403 | Access forbidden | No Content |
| 404 | Resource not found | No Content |
| 500 | Internal service error | No Content |
| 503 | Service unavailable | No Content |
1.8.6.2.2.4. Consumes
-
operator/yaml
1.8.6.2.2.5. Tags
- multiclusterengines.multicluster.openshift.io
1.8.6.2.3. Delete a MultiClusterEngine operator
DELETE /apis/multicluster.openshift.io/v1alpha1/multiclusterengines/{name}1.8.6.2.3.1. Parameters
| Type | Name | Description | Schema |
|---|---|---|---|
| Header |
COOKIE | Authorization: Bearer {ACCESS_TOKEN} ; ACCESS_TOKEN is the user access token. | string |
| Path |
name | Name of the multiclusterengine that you want to delete. | string |
1.8.6.2.3.2. Responses
| HTTP Code | Description | Schema |
|---|---|---|
| 200 | Success | No Content |
| 403 | Access forbidden | No Content |
| 404 | Resource not found | No Content |
| 500 | Internal service error | No Content |
| 503 | Service unavailable | No Content |
1.8.6.2.3.3. Tags
- multiclusterengines.multicluster.openshift.io
1.8.6.3. Definitions
1.8.6.3.1. MultiClusterEngine
| Name | Description | Schema |
|---|---|---|
|
apiVersion | The versioned schema of the MultiClusterEngines. | string |
|
kind | String value that represents the REST resource. | string |
|
metadata | Describes rules that define the resource. | object |
|
spec | MultiClusterEngineSpec defines the desired state of MultiClusterEngine. | See List of specs |
1.8.6.3.2. List of specs
| Name | Description | Schema |
|---|---|---|
|
nodeSelector | Set the nodeselectors. | map[string]string |
|
imagePullSecret | Override pull secret for accessing MultiClusterEngine operand and endpoint images. | string |
|
tolerations | Tolerations causes all components to tolerate any taints. | []corev1.Toleration |
|
targetNamespace | Location where MCE resources will be placed. | string |
1.8.7. Placements API (v1beta1)
1.8.7.1. Overview
This documentation is for the Placement resource for multicluster engine for Kubernetes. Placement resource has four possible requests: create, query, delete and update.
1.8.7.1.1. URI scheme
BasePath : /kubernetes/apis
Schemes : HTTPS
1.8.7.1.2. Tags
- cluster.open-cluster-management.io : Create and manage Placements
1.8.7.2. Paths
1.8.7.2.1. Query all Placements
GET /cluster.open-cluster-management.io/v1beta1/namespaces/{namespace}/placements1.8.7.2.1.1. Description
Query your Placements for more details.
1.8.7.2.1.2. Parameters
| Type | Name | Description | Schema |
|---|---|---|---|
| Header |
COOKIE | Authorization: Bearer {ACCESS_TOKEN} ; ACCESS_TOKEN is the user access token. | string |
1.8.7.2.1.3. Responses
| HTTP Code | Description | Schema |
|---|---|---|
| 200 | Success | No Content |
| 403 | Access forbidden | No Content |
| 404 | Resource not found | No Content |
| 500 | Internal service error | No Content |
| 503 | Service unavailable | No Content |
1.8.7.2.1.4. Consumes
-
placement/yaml
1.8.7.2.1.5. Tags
- cluster.open-cluster-management.io
1.8.7.2.2. Create a Placement
POST /cluster.open-cluster-management.io/v1beta1/namespaces/{namespace}/placements1.8.7.2.2.1. Description
Create a Placement.
1.8.7.2.2.2. Parameters
| Type | Name | Description | Schema |
|---|---|---|---|
| Header |
COOKIE | Authorization: Bearer {ACCESS_TOKEN} ; ACCESS_TOKEN is the user access token. | string |
| Body |
body | Parameters describing the placement to be created. |
1.8.7.2.2.3. Responses
| HTTP Code | Description | Schema |
|---|---|---|
| 200 | Success | No Content |
| 403 | Access forbidden | No Content |
| 404 | Resource not found | No Content |
| 500 | Internal service error | No Content |
| 503 | Service unavailable | No Content |
1.8.7.2.2.4. Consumes
-
placement/yaml
1.8.7.2.2.5. Tags
- cluster.open-cluster-management.io
1.8.7.2.2.6. Example HTTP request
1.8.7.2.2.6.1. Request body
{
"apiVersion" : "cluster.open-cluster-management.io/v1beta1",
"kind" : "Placement",
"metadata" : {
"name" : "placement1",
"namespace": "ns1"
},
"spec": {
"predicates": [
{
"requiredClusterSelector": {
"labelSelector": {
"matchLabels": {
"vendor": "OpenShift"
}
}
}
}
]
},
"status" : { }
}1.8.7.2.3. Query a single Placement
GET /cluster.open-cluster-management.io/v1beta1/namespaces/{namespace}/placements/{placement_name}1.8.7.2.3.1. Description
Query a single Placement for more details.
1.8.7.2.3.2. Parameters
| Type | Name | Description | Schema |
|---|---|---|---|
| Header |
COOKIE | Authorization: Bearer {ACCESS_TOKEN} ; ACCESS_TOKEN is the user access token. | string |
| Path |
placement_name | Name of the Placement that you want to query. | string |
1.8.7.2.3.3. Responses
| HTTP Code | Description | Schema |
|---|---|---|
| 200 | Success | No Content |
| 403 | Access forbidden | No Content |
| 404 | Resource not found | No Content |
| 500 | Internal service error | No Content |
| 503 | Service unavailable | No Content |
1.8.7.2.3.4. Tags
- cluster.open-cluster-management.io
1.8.7.2.4. Delete a Placement
DELETE /cluster.open-cluster-management.io/v1beta1/namespaces/{namespace}/placements/{placement_name}1.8.7.2.4.1. Description
Delete a single Placement.
1.8.7.2.4.2. Parameters
| Type | Name | Description | Schema |
|---|---|---|---|
| Header |
COOKIE | Authorization: Bearer {ACCESS_TOKEN} ; ACCESS_TOKEN is the user access token. | string |
| Path |
placement_name | Name of the Placement that you want to delete. | string |
1.8.7.2.4.3. Responses
| HTTP Code | Description | Schema |
|---|---|---|
| 200 | Success | No Content |
| 403 | Access forbidden | No Content |
| 404 | Resource not found | No Content |
| 500 | Internal service error | No Content |
| 503 | Service unavailable | No Content |
1.8.7.2.4.4. Tags
- cluster.open-cluster-management.io
1.8.7.3. Definitions
1.8.7.3.1. Placement
| Name | Description | Schema |
|---|---|---|
|
apiVersion | The versioned schema of the Placement. | string |
|
kind | String value that represents the REST resource. | string |
|
metadata | The meta data of the Placement. | object |
|
spec | The specification of the Placement. |
spec
| Name | Description | Schema |
|---|---|---|
|
ClusterSets | A subset of ManagedClusterSets from which the ManagedClusters are selected. If it is empty, ManagedClusters is selected from the ManagedClusterSets that are bound to the Placement namespace. Otherwise, ManagedClusters are selected from the intersection of this subset and the ManagedClusterSets are bound to the placement namespace. | string array |
|
numberOfClusters | The desired number of ManagedClusters to be selected. | integer (int32) |
|
predicates | A subset of cluster predicates to select ManagedClusters. The conditional logic is OR. | clusterPredicate array |
clusterPredicate
| Name | Description | Schema |
|---|---|---|
|
requiredClusterSelector | A cluster selector to select ManagedClusters with a label and cluster claim. |
clusterSelector
| Name | Description | Schema |
|---|---|---|
|
labelSelector | A selector of ManagedClusters by label. | object |
|
claimSelector | A selector of ManagedClusters by claim. |
clusterClaimSelector
| Name | Description | Schema |
|---|---|---|
|
matchExpressions | A subset of the cluster claim selector requirements. The conditional logic is AND. | < object > array |
1.8.8. PlacementDecisions API (v1beta1)
1.8.8.1. Overview
This documentation is for the PlacementDecision resource for multicluster engine for Kubernetes. PlacementDecision resource has four possible requests: create, query, delete and update.
1.8.8.1.1. URI scheme
BasePath : /kubernetes/apis
Schemes : HTTPS
1.8.8.1.2. Tags
- cluster.open-cluster-management.io : Create and manage PlacementDecisions.
1.8.8.2. Paths
1.8.8.2.1. Query all PlacementDecisions
GET /cluster.open-cluster-management.io/v1beta1/namespaces/{namespace}/placementdecisions1.8.8.2.1.1. Description
Query your PlacementDecisions for more details.
1.8.8.2.1.2. Parameters
| Type | Name | Description | Schema |
|---|---|---|---|
| Header |
COOKIE | Authorization: Bearer {ACCESS_TOKEN} ; ACCESS_TOKEN is the user access token. | string |
1.8.8.2.1.3. Responses
| HTTP Code | Description | Schema |
|---|---|---|
| 200 | Success | No Content |
| 403 | Access forbidden | No Content |
| 404 | Resource not found | No Content |
| 500 | Internal service error | No Content |
| 503 | Service unavailable | No Content |
1.8.8.2.1.4. Consumes
-
placementdecision/yaml
1.8.8.2.1.5. Tags
- cluster.open-cluster-management.io
1.8.8.2.2. Create a PlacementDecision
POST /cluster.open-cluster-management.io/v1beta1/namespaces/{namespace}/placementdecisions1.8.8.2.2.1. Description
Create a PlacementDecision.
1.8.8.2.2.2. Parameters
| Type | Name | Description | Schema |
|---|---|---|---|
| Header |
COOKIE | Authorization: Bearer {ACCESS_TOKEN} ; ACCESS_TOKEN is the user access token. | string |
| Body |
body | Parameters describing the PlacementDecision to be created. |
1.8.8.2.2.3. Responses
| HTTP Code | Description | Schema |
|---|---|---|
| 200 | Success | No Content |
| 403 | Access forbidden | No Content |
| 404 | Resource not found | No Content |
| 500 | Internal service error | No Content |
| 503 | Service unavailable | No Content |
1.8.8.2.2.4. Consumes
-
placementdecision/yaml
1.8.8.2.2.5. Tags
- cluster.open-cluster-management.io
1.8.8.2.2.6. Example HTTP request
1.8.8.2.2.6.1. Request body
{
"apiVersion" : "cluster.open-cluster-management.io/v1beta1",
"kind" : "PlacementDecision",
"metadata" : {
"labels" : {
"cluster.open-cluster-management.io/placement" : "placement1"
},
"name" : "placement1-decision1",
"namespace": "ns1"
},
"status" : { }
}1.8.8.2.3. Query a single PlacementDecision
GET /cluster.open-cluster-management.io/v1beta1/namespaces/{namespace}/placementdecisions/{placementdecision_name}1.8.8.2.3.1. Description
Query a single PlacementDecision for more details.
1.8.8.2.3.2. Parameters
| Type | Name | Description | Schema |
|---|---|---|---|
| Header |
COOKIE | Authorization: Bearer {ACCESS_TOKEN} ; ACCESS_TOKEN is the user access token. | string |
| Path |
placementdecision_name | Name of the PlacementDecision that you want to query. | string |
1.8.8.2.3.3. Responses
| HTTP Code | Description | Schema |
|---|---|---|
| 200 | Success | No Content |
| 403 | Access forbidden | No Content |
| 404 | Resource not found | No Content |
| 500 | Internal service error | No Content |
| 503 | Service unavailable | No Content |
1.8.8.2.3.4. Tags
- cluster.open-cluster-management.io
1.8.8.2.4. Delete a PlacementDecision
DELETE /cluster.open-cluster-management.io/v1beta1/namespaces/{namespace}/placementdecisions/{placementdecision_name}1.8.8.2.4.1. Description
Delete a single PlacementDecision.
1.8.8.2.4.2. Parameters
| Type | Name | Description | Schema |
|---|---|---|---|
| Header |
COOKIE | Authorization: Bearer {ACCESS_TOKEN} ; ACCESS_TOKEN is the user access token. | string |
| Path |
placementdecision_name | Name of the PlacementDecision that you want to delete. | string |
1.8.8.2.4.3. Responses
| HTTP Code | Description | Schema |
|---|---|---|
| 200 | Success | No Content |
| 403 | Access forbidden | No Content |
| 404 | Resource not found | No Content |
| 500 | Internal service error | No Content |
| 503 | Service unavailable | No Content |
1.8.8.2.4.4. Tags
- cluster.open-cluster-management.io
1.8.8.3. Definitions
1.8.8.3.1. PlacementDecision
| Name | Description | Schema |
|---|---|---|
|
apiVersion | The versioned schema of PlacementDecision. | string |
|
kind | String value that represents the REST resource. | string |
|
metadata | The meta data of PlacementDecision. | object |
1.9. Troubleshooting
Before using the Troubleshooting guide, you can run the oc adm must-gather command to gather details, logs, and take steps in debugging issues. For more details, see Running the must-gather command to troubleshoot.
Additionally, check your role-based access. See multicluster engine operator Role-based access control for details.
1.9.1. Documented troubleshooting
View the list of troubleshooting topics for the multicluster engine operator:
Installation:
To view the main documentation for the installing tasks, see Installing and upgrading multicluster engine operator.
Cluster management:
To view the main documentation about managing your clusters, see Cluster lifecycle introduction.
- Troubleshooting adding day-two nodes to an existing cluster fails with pending user action
- Troubleshooting an offline cluster
- Troubleshooting a managed cluster import failure
- Reimporting cluster fails with unknown authority error
- Troubleshooting cluster with pending import status
- Troubleshooting imported clusters offline after certificate change
- Troubleshooting cluster status changing from offline to available
- Troubleshooting cluster creation on VMware vSphere
- Troubleshooting cluster in console with pending or failed status
- Troubleshooting OpenShift Container Platform version 3.11 cluster import failure
- Troubleshooting Klusterlet with degraded conditions
- Namespace remains after deleting a cluster
- Auto-import-secret-exists error when importing a cluster
- Troubleshooting missing PlacementDecision after creating Placement
- Troubleshooting a discovery failure of bare metal hosts on Dell hardware
1.9.2. Running the must-gather command to troubleshoot
To get started with troubleshooting, learn about the troubleshooting scenarios for users to run the must-gather command to debug the issues, then see the procedures to start using the command.
Required access: Cluster administrator
1.9.2.1. Must-gather scenarios
Scenario one: Use the Documented troubleshooting section to see if a solution to your problem is documented. The guide is organized by the major functions of the product.
With this scenario, you check the guide to see if your solution is in the documentation.
-
Scenario two: If your problem is not documented with steps to resolve, run the
must-gathercommand and use the output to debug the issue. -
Scenario three: If you cannot debug the issue using your output from the
must-gathercommand, then share your output with Red Hat Support.
1.9.2.2. Must-gather procedure
See the following procedure to start using the must-gather command:
-
Learn about the
must-gathercommand and install the prerequisites that you need at Gathering data about your cluster in the RedHat OpenShift Container Platform documentation. Log in to your cluster. For the usual use-case, you should run the
must-gatherwhile you are logged into your engine cluster.Note: If you want to check your managed clusters, find the
gather-managed.logfile that is located in thecluster-scoped-resourcesdirectory:<your-directory>/cluster-scoped-resources/gather-managed.log>
Check for managed clusters that are not set
Truefor the JOINED and AVAILABLE column. You can run themust-gathercommand on those clusters that are not connected withTruestatus.Add the multicluster engine for Kubernetes image that is used for gathering data and the directory. Run the following command, where you insert the image and the directory for the output:
oc adm must-gather --image=registry.redhat.io/multicluster-engine/must-gather-rhel8:v2.2 --dest-dir=<directory>
Go to your specified directory to see your output, which is organized in the following levels:
-
Two peer levels:
cluster-scoped-resourcesandnamespaceresources. - Sub-level for each: API group for the custom resource definitions for both cluster-scope and namespace-scoped resources.
-
Next level for each: YAML file sorted by
kind.
-
Two peer levels:
1.9.2.3. Must-gather in a disconnected environment
Complete the following steps to run the must-gather command in a disconnected environment:
- In a disconnected environment, mirror the Red Hat operator catalog images into their mirror registry. For more information, see Install on disconnected networks.
- Run the following command to extract logs, which reference the image from their mirror registry:
REGISTRY=registry.example.com:5000 IMAGE=$REGISTRY/multicluster-engine/must-gather-rhel8@sha256:ff9f37eb400dc1f7d07a9b6f2da9064992934b69847d17f59e385783c071b9d8 oc adm must-gather --image=$IMAGE --dest-dir=./data
You can open a bug for the product team here.
1.9.3. Troubleshooting: Adding day-two nodes to an existing cluster fails with pending user action
Adding a node, or scaling out, to your existing cluster that is created by the multicluster engine for Kubernetes operator with Zero Touch Provisioning or Host inventory create methods fails during installation. The installation process works correctly during the Discovery phase, but fails on the installation phase.
The configuration of the network is failing. From the hub cluster in the integrated console, you see a Pending user action. In the description, you can see it failing on the rebooting step.
The error message about failing is not very accurate, since the agent that is running in the installing host cannot report information.
1.9.3.1. Symptom: Installation for day two workers fails
After the Discover phase, the host reboots to continue the installation, but it cannot configure the network. Check for the following symptoms and messages:
From the hub cluster in the integrated console, check for
Pendinguser action on the adding node, with theRebootingindicator:This host is pending user action. Host timed out when pulling ignition. Check the host console... Rebooting
From the Red Hat OpenShift Container Platform configuration managed cluster, check the
MachineConfigsof the existing cluster. Check if any of theMachineConfigscreate any file on the following directories:-
/sysroot/etc/NetworkManager/system-connections/ -
/sysroot/etc/sysconfig/network-scripts/
-
-
From the terminal of the installing host, check the failing host for the following messages. You can use
journalctlto see the log messages:
info: networking config is defined in the real root info: will not attempt to propagate initramfs networking
If you get the last message in the log, the networking configuration is not propagated because it already found an existing network configuration on the folders previously listed in the Symptom.
1.9.3.2. Resolving the problem: Recreate the node merging network configuration
Perform the following task to use a proper network configuration during the installation:
- Delete the node from your hub cluster.
- Repeat your previous process to install the node in the same way.
-
Create the
BareMetalHostobject of the node with the following annotation:
"bmac.agent-install.openshift.io/installer-args": "[\"--append-karg\", \"coreos.force_persist_ip\"]"
The node starts the installation. After the Discovery phase, the node merges the network configuration between the changes on the existing cluster and the initial configuration.
1.9.4. Troubleshooting installation status stuck in installing or pending
When installing the multicluster engine operator, the MultiClusterEngine remains in Installing phase, or multiple pods maintain a Pending status.
1.9.4.1. Symptom: Stuck in Pending status
More than ten minutes passed since you installed MultiClusterEngine and one or more components from the status.components field of the MultiClusterEngine resource report ProgressDeadlineExceeded. Resource constraints on the cluster might be the issue.
Check the pods in the namespace where MultiClusterEngine was installed. You might see Pending with a status similar to the following:
reason: Unschedulable
message: '0/6 nodes are available: 3 Insufficient cpu, 3 node(s) had taint {node-role.kubernetes.io/master:
}, that the pod didn't tolerate.'In this case, the worker nodes resources are not sufficient in the cluster to run the product.
1.9.4.2. Resolving the problem: Adjust worker node sizing
If you have this problem, then your cluster needs to be updated with either larger or more worker nodes. See Sizing your cluster for guidelines on sizing your cluster.
1.9.5. Troubleshooting reinstallation failure
When reinstalling multicluster engine operator, the pods do not start.
1.9.5.1. Symptom: Reinstallation failure
If your pods do not start after you install the multicluster engine operator, it is often because items from a previous installation of multicluster engine operator were not removed correctly when it was uninstalled.
In this case, the pods do not start after completing the installation process.
1.9.5.2. Resolving the problem: Reinstallation failure
If you have this problem, complete the following steps:
- Run the uninstallation process to remove the current components by following the steps in Uninstalling.
- Install the Helm CLI binary version 3.2.0, or later, by following the instructions at Installing Helm.
-
Ensure that your Red Hat OpenShift Container Platform CLI is configured to run
occommands. See Getting started with the OpenShift CLI in the OpenShift Container Platform documentation for more information about how to configure theoccommands. Copy the following script into a file:
#!/bin/bash MCE_NAMESPACE=<namespace> oc delete multiclusterengine --all oc delete apiservice v1.admission.cluster.open-cluster-management.io v1.admission.work.open-cluster-management.io oc delete crd discoveredclusters.discovery.open-cluster-management.io discoveryconfigs.discovery.open-cluster-management.io oc delete mutatingwebhookconfiguration ocm-mutating-webhook managedclustermutators.admission.cluster.open-cluster-management.io oc delete validatingwebhookconfiguration ocm-validating-webhook oc delete ns $MCE_NAMESPACE
Replace
<namespace>in the script with the name of the namespace where multicluster engine operator was installed. Ensure that you specify the correct namespace, as the namespace is cleaned out and deleted.- Run the script to remove the artifacts from the previous installation.
- Run the installation. See Installing while connected online.
1.9.6. Troubleshooting an offline cluster
There are a few common causes for a cluster showing an offline status.
1.9.6.1. Symptom: Cluster status is offline
After you complete the procedure for creating a cluster, you cannot access it from the Red Hat Advanced Cluster Management console, and it shows a status of offline.
1.9.6.2. Resolving the problem: Cluster status is offline
Determine if the managed cluster is available. You can check this in the Clusters area of the Red Hat Advanced Cluster Management console.
If it is not available, try restarting the managed cluster.
If the managed cluster status is still offline, complete the following steps:
-
Run the
oc get managedcluster <cluster_name> -o yamlcommand on the hub cluster. Replace<cluster_name>with the name of your cluster. -
Find the
status.conditionssection. -
Check the messages for
type: ManagedClusterConditionAvailableand resolve any problems.
-
Run the
1.9.7. Troubleshooting a managed cluster import failure
If your cluster import fails, there are a few steps that you can take to determine why the cluster import failed.
1.9.7.1. Symptom: Imported cluster not available
After you complete the procedure for importing a cluster, you cannot access it from the console.
1.9.7.2. Resolving the problem: Imported cluster not available
There can be a few reasons why an imported cluster is not available after an attempt to import it. If the cluster import fails, complete the following steps, until you find the reason for the failed import:
On the hub cluster, run the following command to ensure that the import controller is running.
kubectl -n multicluster-engine get pods -l app=managedcluster-import-controller-v2
You should see two pods that are running. If either of the pods is not running, run the following command to view the log to determine the reason:
kubectl -n multicluster-engine logs -l app=managedcluster-import-controller-v2 --tail=-1
On the hub cluster, run the following command to determine if the managed cluster import secret was generated successfully by the import controller:
kubectl -n <managed_cluster_name> get secrets <managed_cluster_name>-import
If the import secret does not exist, run the following command to view the log entries for the import controller and determine why it was not created:
kubectl -n multicluster-engine logs -l app=managedcluster-import-controller-v2 --tail=-1 | grep importconfig-controller
On the hub cluster, if your managed cluster is
local-cluster, provisioned by Hive, or has an auto-import secret, run the following command to check the import status of the managed cluster.kubectl get managedcluster <managed_cluster_name> -o=jsonpath='{range .status.conditions[*]}{.type}{"\t"}{.status}{"\t"}{.message}{"\n"}{end}' | grep ManagedClusterImportSucceededIf the condition
ManagedClusterImportSucceededis nottrue, the result of the command indicates the reason for the failure.- Check the Klusterlet status of the managed cluster for a degraded condition. See Troubleshooting Klusterlet with degraded conditions to find the reason that the Klusterlet is degraded.
1.9.8. Reimporting cluster fails with unknown authority error
If you experience a problem when reimporting a managed cluster to your multicluster engine operator hub cluster, follow the procedure to troubleshoot the problem.
1.9.8.1. Symptom: Reimporting cluster fails with unknown authority error
After you provision an OpenShift Container Platform cluster with multicluster engine operator, reimporting the cluster might fail with a x509: certificate signed by unknown authority error when you change or add API server certificates to your OpenShift Container Platform cluster.
1.9.8.2. Identifying the problem: Reimporting cluster fails with unknown authority error
After failing to reimport your managed cluster, run the following command to get the import controller log on your multicluster engine operator hub cluster:
kubectl -n multicluster-engine logs -l app=managedcluster-import-controller-v2 -f
If the following error log appears, your managed cluster API server certificates might have changed:
ERROR Reconciler error {"controller": "clusterdeployment-controller", "object": {"name":"awscluster1","namespace":"awscluster1"}, "namespace": "awscluster1", "name": "awscluster1", "reconcileID": "a2cccf24-2547-4e26-95fb-f258a6710d80", "error": "Get \"https://api.awscluster1.dev04.red-chesterfield.com:6443/api?timeout=32s\": x509: certificate signed by unknown authority"}
To determine if your managed cluster API server certificates have changed, complete the following steps:
Run the following command to specify your managed cluster name by replacing
your-managed-cluster-namewith the name of your managed cluster:cluster_name=<your-managed-cluster-name>
Get your managed cluster
kubeconfigsecret name by running the following command:kubeconfig_secret_name=$(oc -n ${cluster_name} get clusterdeployments ${cluster_name} -ojsonpath='{.spec.clusterMetadata.adminKubeconfigSecretRef.name}')Export
kubeconfigto a new file by running the following commands:oc -n ${cluster_name} get secret ${kubeconfig_secret_name} -ojsonpath={.data.kubeconfig} | base64 -d > kubeconfig.oldexport KUBECONFIG=kubeconfig.old
Get the namespace from your managed cluster with
kubeconfigby running the following command:oc get ns
If you receive an error that resembles the following message, your cluster API server ceritificates have been changed and your kubeconfig file is invalid.
Unable to connect to the server: x509: certificate signed by unknown authority
1.9.8.3. Resolving the problem: Reimporting cluster fails with unknown authority error
The managed cluster administrator must create a new valid kubeconfig file for your managed cluster.
After creating a new kubeconfig, complete the following steps to update the new kubeconfig for your managed cluster:
Run the following commands to set your
kubeconfigfile path and cluster name. Replace<path_to_kubeconfig>with the path to your newkubeconfigfile. Replace<managed_cluster_name>with the name of your managed cluster:cluster_name=<managed_cluster_name> kubeconfig_file=<path_to_kubeconfig>
Run the following command to encode your new
kubeconfig:kubeconfig=$(cat ${kubeconfig_file} | base64 -w0)Note: On macOS, run the following command instead:
kubeconfig=$(cat ${kubeconfig_file} | base64)Run the following command to define the
kubeconfigjson patch:kubeconfig_patch="[\{\"op\":\"replace\", \"path\":\"/data/kubeconfig\", \"value\":\"${kubeconfig}\"}, \{\"op\":\"replace\", \"path\":\"/data/raw-kubeconfig\", \"value\":\"${kubeconfig}\"}]"Retrieve your administrator
kubeconfigsecret name from your managed cluster by running the following command:kubeconfig_secret_name=$(oc -n ${cluster_name} get clusterdeployments ${cluster_name} -ojsonpath='{.spec.clusterMetadata.adminKubeconfigSecretRef.name}')Patch your administrator
kubeconfigsecret with your newkubeconfigby running the following command:oc -n ${cluster_name} patch secrets ${kubeconfig_secret_name} --type='json' -p="${kubeconfig_patch}"
1.9.9. Troubleshooting cluster with pending import status
If you receive Pending import continually on the console of your cluster, follow the procedure to troubleshoot the problem.
1.9.9.1. Symptom: Cluster with pending import status
After importing a cluster by using the Red Hat Advanced Cluster Management console, the cluster appears in the console with a status of Pending import.
1.9.9.2. Identifying the problem: Cluster with pending import status
Run the following command on the managed cluster to view the Kubernetes pod names that are having the issue:
kubectl get pod -n open-cluster-management-agent | grep klusterlet-registration-agent
Run the following command on the managed cluster to find the log entry for the error:
kubectl logs <registration_agent_pod> -n open-cluster-management-agent
Replace registration_agent_pod with the pod name that you identified in step 1.
-
Search the returned results for text that indicates there was a networking connectivity problem. Example includes:
no such host.
1.9.9.3. Resolving the problem: Cluster with pending import status
Retrieve the port number that is having the problem by entering the following command on the hub cluster:
oc get infrastructure cluster -o yaml | grep apiServerURL
Ensure that the hostname from the managed cluster can be resolved, and that outbound connectivity to the host and port is occurring.
If the communication cannot be established by the managed cluster, the cluster import is not complete. The cluster status for the managed cluster is Pending import.
1.9.10. Troubleshooting imported clusters offline after certificate change
Installing a custom apiserver certificate is supported, but one or more clusters that were imported before you changed the certificate information can have an offline status.
1.9.10.1. Symptom: Clusters offline after certificate change
After you complete the procedure for updating a certificate secret, one or more of your clusters that were online are now displaying an offline status in the console.
1.9.10.2. Identifying the problem: Clusters offline after certificate change
After updating the information for a custom API server certificate, clusters that were imported and running before the new certificate are now in an offline state.
The errors that indicate that the certificate is the problem are found in the logs for the pods in the open-cluster-management-agent namespace of the offline managed cluster. The following examples are similar to the errors that are displayed in the logs:
Log of work-agent:
E0917 03:04:05.874759 1 manifestwork_controller.go:179] Reconcile work test-1-klusterlet-addon-workmgr fails with err: Failed to update work status with err Get "https://api.aaa-ocp.dev02.location.com:6443/apis/cluster.management.io/v1/namespaces/test-1/manifestworks/test-1-klusterlet-addon-workmgr": x509: certificate signed by unknown authority E0917 03:04:05.874887 1 base_controller.go:231] "ManifestWorkAgent" controller failed to sync "test-1-klusterlet-addon-workmgr", err: Failed to update work status with err Get "api.aaa-ocp.dev02.location.com:6443/apis/cluster.management.io/v1/namespaces/test-1/manifestworks/test-1-klusterlet-addon-workmgr": x509: certificate signed by unknown authority E0917 03:04:37.245859 1 reflector.go:127] k8s.io/client-go@v0.19.0/tools/cache/reflector.go:156: Failed to watch *v1.ManifestWork: failed to list *v1.ManifestWork: Get "api.aaa-ocp.dev02.location.com:6443/apis/cluster.management.io/v1/namespaces/test-1/manifestworks?resourceVersion=607424": x509: certificate signed by unknown authority
Log of registration-agent:
I0917 02:27:41.525026 1 event.go:282] Event(v1.ObjectReference{Kind:"Namespace", Namespace:"open-cluster-management-agent", Name:"open-cluster-management-agent", UID:"", APIVersion:"v1", ResourceVersion:"", FieldPath:""}): type: 'Normal' reason: 'ManagedClusterAvailableConditionUpdated' update managed cluster "test-1" available condition to "True", due to "Managed cluster is available"
E0917 02:58:26.315984 1 reflector.go:127] k8s.io/client-go@v0.19.0/tools/cache/reflector.go:156: Failed to watch *v1beta1.CertificateSigningRequest: Get "https://api.aaa-ocp.dev02.location.com:6443/apis/cluster.management.io/v1/managedclusters?allowWatchBookmarks=true&fieldSelector=metadata.name%3Dtest-1&resourceVersion=607408&timeout=9m33s&timeoutSeconds=573&watch=true"": x509: certificate signed by unknown authority
E0917 02:58:26.598343 1 reflector.go:127] k8s.io/client-go@v0.19.0/tools/cache/reflector.go:156: Failed to watch *v1.ManagedCluster: Get "https://api.aaa-ocp.dev02.location.com:6443/apis/cluster.management.io/v1/managedclusters?allowWatchBookmarks=true&fieldSelector=metadata.name%3Dtest-1&resourceVersion=607408&timeout=9m33s&timeoutSeconds=573&watch=true": x509: certificate signed by unknown authority
E0917 02:58:27.613963 1 reflector.go:127] k8s.io/client-go@v0.19.0/tools/cache/reflector.go:156: Failed to watch *v1.ManagedCluster: failed to list *v1.ManagedCluster: Get "https://api.aaa-ocp.dev02.location.com:6443/apis/cluster.management.io/v1/managedclusters?allowWatchBookmarks=true&fieldSelector=metadata.name%3Dtest-1&resourceVersion=607408&timeout=9m33s&timeoutSeconds=573&watch=true"": x509: certificate signed by unknown authority1.9.10.3. Resolving the problem: Clusters offline after certificate change
If your managed cluster is the local-cluster or your managed cluster was created by using multicluster engine operator, you must wait 10 minutes or longer to reimport your managed cluster.
To reimport your managed cluster immediately, you can delete your managed cluster import secret on the hub cluster and reimport it by using multicluster engine operator. Run the following command:
oc delete secret -n <cluster_name> <cluster_name>-import
Replace <cluster_name> with the name of the managed cluster that you want to import.
If you want to reimport a managed cluster that was imported by using multicluster engine operator, complete the following steps import the managed cluster again:
On the hub cluster, recreate the managed cluster import secret by running the following command:
oc delete secret -n <cluster_name> <cluster_name>-import
Replace
<cluster_name>with the name of the managed cluster that you want to import.On the hub cluster, expose the managed cluster import secret to a YAML file by running the following command:
oc get secret -n <cluster_name> <cluster_name>-import -ojsonpath='{.data.import\.yaml}' | base64 --decode > import.yamlReplace
<cluster_name>with the name of the managed cluster that you want to import.On the managed cluster, apply the
import.yamlfileby running the following command:oc apply -f import.yaml
Note: The previous steps do not detach the managed cluster from the hub cluster. The steps update the required manifests with current settings on the managed cluster, including the new certificate information.
1.9.11. Troubleshooting cluster status changing from offline to available
The status of the managed cluster alternates between offline and available without any manual change to the environment or cluster.
1.9.11.1. Symptom: Cluster status changing from offline to available
When the network that connects the managed cluster to the hub cluster is unstable, the status of the managed cluster that is reported by the hub cluster cycles between offline and available.
1.9.11.2. Resolving the problem: Cluster status changing from offline to available
To attempt to resolve this issue, complete the following steps:
Edit your
ManagedClusterspecification on the hub cluster by entering the following command:oc edit managedcluster <cluster-name>
Replace cluster-name with the name of your managed cluster.
-
Increase the value of
leaseDurationSecondsin yourManagedClusterspecification. The default value is 5 minutes, but that might not be enough time to maintain the connection with the network issues. Specify a greater amount of time for the lease. For example, you can raise the setting to 20 minutes.
1.9.12. Troubleshooting cluster creation on VMware vSphere
If you experience a problem when creating a Red Hat OpenShift Container Platform cluster on VMware vSphere, see the following troubleshooting information to see if one of them addresses your problem.
Note: Sometimes when the cluster creation process fails on VMware vSphere, the link is not enabled for you to view the logs. If this happens, you can identify the problem by viewing the log of the hive-controllers pod. The hive-controllers log is in the hive namespace.
1.9.12.1. Managed cluster creation fails with certificate IP SAN error
1.9.12.1.1. Symptom: Managed cluster creation fails with certificate IP SAN error
After creating a new Red Hat OpenShift Container Platform cluster on VMware vSphere, the cluster fails with an error message that indicates a certificate IP SAN error.
1.9.12.1.2. Identifying the problem: Managed cluster creation fails with certificate IP SAN error
The deployment of the managed cluster fails and returns the following errors in the deployment log:
time="2020-08-07T15:27:55Z" level=error msg="Error: error setting up new vSphere SOAP client: Post https://147.1.1.1/sdk: x509: cannot validate certificate for xx.xx.xx.xx because it doesn't contain any IP SANs" time="2020-08-07T15:27:55Z" level=error
1.9.12.1.3. Resolving the problem: Managed cluster creation fails with certificate IP SAN error
Use the VMware vCenter server fully-qualified host name instead of the IP address in the credential. You can also update the VMware vCenter CA certificate to contain the IP SAN.
1.9.12.2. Managed cluster creation fails with unknown certificate authority
1.9.12.2.1. Symptom: Managed cluster creation fails with unknown certificate authority
After creating a new Red Hat OpenShift Container Platform cluster on VMware vSphere, the cluster fails because the certificate is signed by an unknown authority.
1.9.12.2.2. Identifying the problem: Managed cluster creation fails with unknown certificate authority
The deployment of the managed cluster fails and returns the following errors in the deployment log:
Error: error setting up new vSphere SOAP client: Post https://vspherehost.com/sdk: x509: certificate signed by unknown authority"
1.9.12.2.3. Resolving the problem: Managed cluster creation fails with unknown certificate authority
Ensure you entered the correct certificate from the certificate authority when creating the credential.
1.9.12.3. Managed cluster creation fails with expired certificate
1.9.12.3.1. Symptom: Managed cluster creation fails with expired certificate
After creating a new Red Hat OpenShift Container Platform cluster on VMware vSphere, the cluster fails because the certificate is expired or is not yet valid.
1.9.12.3.2. Identifying the problem: Managed cluster creation fails with expired certificate
The deployment of the managed cluster fails and returns the following errors in the deployment log:
x509: certificate has expired or is not yet valid
1.9.12.3.3. Resolving the problem: Managed cluster creation fails with expired certificate
Ensure that the time on your ESXi hosts is synchronized.
1.9.12.4. Managed cluster creation fails with insufficient privilege for tagging
1.9.12.4.1. Symptom: Managed cluster creation fails with insufficient privilege for tagging
After creating a new Red Hat OpenShift Container Platform cluster on VMware vSphere, the cluster fails because there is insufficient privilege to use tagging.
1.9.12.4.2. Identifying the problem: Managed cluster creation fails with insufficient privilege for tagging
The deployment of the managed cluster fails and returns the following errors in the deployment log:
time="2020-08-07T19:41:58Z" level=debug msg="vsphere_tag_category.category: Creating..."
time="2020-08-07T19:41:58Z" level=error
time="2020-08-07T19:41:58Z" level=error msg="Error: could not create category: POST https://vspherehost.com/rest/com/vmware/cis/tagging/category: 403 Forbidden"
time="2020-08-07T19:41:58Z" level=error
time="2020-08-07T19:41:58Z" level=error msg=" on ../tmp/openshift-install-436877649/main.tf line 54, in resource \"vsphere_tag_category\" \"category\":"
time="2020-08-07T19:41:58Z" level=error msg=" 54: resource \"vsphere_tag_category\" \"category\" {"1.9.12.4.3. Resolving the problem: Managed cluster creation fails with insufficient privilege for tagging
Ensure that your VMware vCenter required account privileges are correct. See Image registry removed during information for more information.
1.9.12.5. Managed cluster creation fails with invalid dnsVIP
1.9.12.5.1. Symptom: Managed cluster creation fails with invalid dnsVIP
After creating a new Red Hat OpenShift Container Platform cluster on VMware vSphere, the cluster fails because there is an invalid dnsVIP.
1.9.12.5.2. Identifying the problem: Managed cluster creation fails with invalid dnsVIP
If you see the following message when trying to deploy a new managed cluster with VMware vSphere, it is because you have an older OpenShift Container Platform release image that does not support VMware Installer Provisioned Infrastructure (IPI):
failed to fetch Master Machines: failed to load asset \\\"Install Config\\\": invalid \\\"install-config.yaml\\\" file: platform.vsphere.dnsVIP: Invalid value: \\\"\\\": \\\"\\\" is not a valid IP
1.9.12.5.3. Resolving the problem: Managed cluster creation fails with invalid dnsVIP
Select a release image from a later version of OpenShift Container Platform that supports VMware Installer Provisioned Infrastructure.
1.9.12.6. Managed cluster creation fails with incorrect network type
1.9.12.6.1. Symptom: Managed cluster creation fails with incorrect network type
After creating a new Red Hat OpenShift Container Platform cluster on VMware vSphere, the cluster fails because there is an incorrect network type specified.
1.9.12.6.2. Identifying the problem: Managed cluster creation fails with incorrect network type
If you see the following message when trying to deploy a new managed cluster with VMware vSphere, it is because you have an older OpenShift Container Platform image that does not support VMware Installer Provisioned Infrastructure (IPI):
time="2020-08-11T14:31:38-04:00" level=debug msg="vsphereprivate_import_ova.import: Creating..." time="2020-08-11T14:31:39-04:00" level=error time="2020-08-11T14:31:39-04:00" level=error msg="Error: rpc error: code = Unavailable desc = transport is closing" time="2020-08-11T14:31:39-04:00" level=error time="2020-08-11T14:31:39-04:00" level=error time="2020-08-11T14:31:39-04:00" level=fatal msg="failed to fetch Cluster: failed to generate asset \"Cluster\": failed to create cluster: failed to apply Terraform: failed to complete the change"
1.9.12.6.3. Resolving the problem: Managed cluster creation fails with incorrect network type
Select a valid VMware vSphere network type for the specified VMware cluster.
1.9.12.7. Managed cluster creation fails with an error processing disk changes
1.9.12.7.1. Symptom: Adding the VMware vSphere managed cluster fails due to an error processing disk changes
After creating a new Red Hat OpenShift Container Platform cluster on VMware vSphere, the cluster fails because there is an error when processing disk changes.
1.9.12.7.2. Identifying the problem: Adding the VMware vSphere managed cluster fails due to an error processing disk changes
A message similar to the following is displayed in the logs:
ERROR ERROR Error: error reconfiguring virtual machine: error processing disk changes post-clone: disk.0: ServerFaultCode: NoPermission: RESOURCE (vm-71:2000), ACTION (queryAssociatedProfile): RESOURCE (vm-71), ACTION (PolicyIDByVirtualDisk)
1.9.12.7.3. Resolving the problem: Adding the VMware vSphere managed cluster fails due to an error processing disk changes
Use the VMware vSphere client to give the user All privileges for Profile-driven Storage Privileges.
1.9.13. Troubleshooting cluster in console with pending or failed status
If you observe Pending status or Failed status in the console for a cluster you created, follow the procedure to troubleshoot the problem.
1.9.13.1. Symptom: Cluster in console with pending or failed status
After creating a new cluster by using the console, the cluster does not progress beyond the status of Pending or displays Failed status.
1.9.13.2. Identifying the problem: Cluster in console with pending or failed status
If the cluster displays Failed status, navigate to the details page for the cluster and follow the link to the logs provided. If no logs are found or the cluster displays Pending status, continue with the following procedure to check for logs:
Procedure 1
Run the following command on the hub cluster to view the names of the Kubernetes pods that were created in the namespace for the new cluster:
oc get pod -n <new_cluster_name>
Replace
new_cluster_namewith the name of the cluster that you created.If no pod that contains the string
provisionin the name is listed, continue with Procedure 2. If there is a pod withprovisionin the title, run the following command on the hub cluster to view the logs of that pod:oc logs <new_cluster_name_provision_pod_name> -n <new_cluster_name> -c hive
Replace
new_cluster_name_provision_pod_namewith the name of the cluster that you created, followed by the pod name that containsprovision.- Search for errors in the logs that might explain the cause of the problem.
Procedure 2
If there is not a pod with
provisionin its name, the problem occurred earlier in the process. Complete the following procedure to view the logs:Run the following command on the hub cluster:
oc describe clusterdeployments -n <new_cluster_name>
Replace
new_cluster_namewith the name of the cluster that you created. For more information about cluster installation logs, see Gathering installation logs in the Red Hat OpenShift documentation.- See if there is additional information about the problem in the Status.Conditions.Message and Status.Conditions.Reason entries of the resource.
1.9.13.3. Resolving the problem: Cluster in console with pending or failed status
After you identify the errors in the logs, determine how to resolve the errors before you destroy the cluster and create it again.
The following example provides a possible log error of selecting an unsupported zone, and the actions that are required to resolve it:
No subnets provided for zones
When you created your cluster, you selected one or more zones within a region that are not supported. Complete one of the following actions when you recreate your cluster to resolve the issue:
- Select a different zone within the region.
- Omit the zone that does not provide the support, if you have other zones listed.
- Select a different region for your cluster.
After determining the issues from the log, destroy the cluster and recreate it.
See Creating a cluster for more information about creating a cluster.
1.9.14. Troubleshooting OpenShift Container Platform version 3.11 cluster import failure
1.9.14.1. Symptom: OpenShift Container Platform version 3.11 cluster import failure
After you attempt to import a Red Hat OpenShift Container Platform version 3.11 cluster, the import fails with a log message that resembles the following content:
customresourcedefinition.apiextensions.k8s.io/klusterlets.operator.open-cluster-management.io configured
clusterrole.rbac.authorization.k8s.io/klusterlet configured
clusterrole.rbac.authorization.k8s.io/open-cluster-management:klusterlet-admin-aggregate-clusterrole configured
clusterrolebinding.rbac.authorization.k8s.io/klusterlet configured
namespace/open-cluster-management-agent configured
secret/open-cluster-management-image-pull-credentials unchanged
serviceaccount/klusterlet configured
deployment.apps/klusterlet unchanged
klusterlet.operator.open-cluster-management.io/klusterlet configured
Error from server (BadRequest): error when creating "STDIN": Secret in version "v1" cannot be handled as a Secret:
v1.Secret.ObjectMeta:
v1.ObjectMeta.TypeMeta: Kind: Data: decode base64: illegal base64 data at input byte 1313, error found in #10 byte of ...|dhruy45="},"kind":"|..., bigger context ...|tye56u56u568yuo7i67i67i67o556574i"},"kind":"Secret","metadata":{"annotations":{"kube|...1.9.14.2. Identifying the problem: OpenShift Container Platform version 3.11 cluster import failure
This often occurs because the installed version of the kubectl command-line tool is 1.11, or earlier. Run the following command to see which version of the kubectl command-line tool you are running:
kubectl version
If the returned data lists version 1.11, or earlier, complete one of the fixes in Resolving the problem: OpenShift Container Platform version 3.11 cluster import failure.
1.9.14.3. Resolving the problem: OpenShift Container Platform version 3.11 cluster import failure
You can resolve this issue by completing one of the following procedures:
Install the latest version of the
kubectlcommand-line tool.-
Download the latest version of the
kubectltool from: Install and Set Up kubectl in the Kubernetes documentation. -
Import the cluster again after upgrading your
kubectltool.
-
Download the latest version of the
Run a file that contains the import command.
- Start the procedure in Importing a managed cluster with the CLI.
-
When you create the command to import your cluster, copy that command into a YAML file named
import.yaml. Run the following command to import the cluster again from the file:
oc apply -f import.yaml
1.9.15. Troubleshooting Klusterlet with degraded conditions
The Klusterlet degraded conditions can help to diagnose the status of Klusterlet agents on managed cluster. If a Klusterlet is in the degraded condition, the Klusterlet agents on managed cluster might have errors that need to be troubleshooted. See the following information for Klusterlet degraded conditions that are set to True.
1.9.15.1. Symptom: Klusterlet is in the degraded condition
After deploying a Klusterlet on managed cluster, the KlusterletRegistrationDegraded or KlusterletWorkDegraded condition displays a status of True.
1.9.15.2. Identifying the problem: Klusterlet is in the degraded condition
Run the following command on the managed cluster to view the Klusterlet status:
kubectl get klusterlets klusterlet -oyaml
-
Check
KlusterletRegistrationDegradedorKlusterletWorkDegradedto see if the condition is set toTrue. Proceed to Resolving the problem for any degraded conditions that are listed.
1.9.15.3. Resolving the problem: Klusterlet is in the degraded condition
See the following list of degraded statuses and how you can attempt to resolve those issues:
-
If the
KlusterletRegistrationDegradedcondition with a status of True and the condition reason is: BootStrapSecretMissing, you need create a bootstrap secret onopen-cluster-management-agentnamespace. -
If the
KlusterletRegistrationDegradedcondition displays True and the condition reason is a BootstrapSecretError, or BootstrapSecretUnauthorized, then the current bootstrap secret is invalid. Delete the current bootstrap secret and recreate a valid bootstrap secret onopen-cluster-management-agentnamespace. -
If the
KlusterletRegistrationDegradedandKlusterletWorkDegradeddisplays True and the condition reason is HubKubeConfigSecretMissing, delete the Klusterlet and recreate it. -
If the
KlusterletRegistrationDegradedandKlusterletWorkDegradeddisplays True and the condition reason is: ClusterNameMissing, KubeConfigMissing, HubConfigSecretError, or HubConfigSecretUnauthorized, delete the hub cluster kubeconfig secret fromopen-cluster-management-agentnamespace. The registration agent will bootstrap again to get a new hub cluster kubeconfig secret. -
If the
KlusterletRegistrationDegradeddisplays True and the condition reason is GetRegistrationDeploymentFailed or UnavailableRegistrationPod, you can check the condition message to get the problem details and attempt to resolve. -
If the
KlusterletWorkDegradeddisplays True and the condition reason is GetWorkDeploymentFailed or UnavailableWorkPod, you can check the condition message to get the problem details and attempt to resolve.
1.9.16. Namespace remains after deleting a cluster
When you remove a managed cluster, the namespace is normally removed as part of the cluster removal process. In rare cases, the namespace remains with some artifacts in it. In that case, you must manually remove the namespace.
1.9.16.1. Symptom: Namespace remains after deleting a cluster
After removing a managed cluster, the namespace is not removed.
1.9.16.2. Resolving the problem: Namespace remains after deleting a cluster
Complete the following steps to remove the namespace manually:
Run the following command to produce a list of the resources that remain in the <cluster_name> namespace:
oc api-resources --verbs=list --namespaced -o name | grep -E '^secrets|^serviceaccounts|^managedclusteraddons|^roles|^rolebindings|^manifestworks|^leases|^managedclusterinfo|^appliedmanifestworks'|^clusteroauths' | xargs -n 1 oc get --show-kind --ignore-not-found -n <cluster_name>
Replace
cluster_namewith the name of the namespace for the cluster that you attempted to remove.Delete each identified resource on the list that does not have a status of
Deleteby entering the following command to edit the list:oc edit <resource_kind> <resource_name> -n <namespace>
Replace
resource_kindwith the kind of the resource. Replaceresource_namewith the name of the resource. Replacenamespacewith the name of the namespace of the resource.-
Locate the
finalizerattribute in the in the metadata. -
Delete the non-Kubernetes finalizers by using the vi editor
ddcommand. -
Save the list and exit the
vieditor by entering the:wqcommand. Delete the namespace by entering the following command:
oc delete ns <cluster-name>
Replace
cluster-namewith the name of the namespace that you are trying to delete.
1.9.17. Auto-import-secret-exists error when importing a cluster
Your cluster import fails with an error message that reads: auto import secret exists.
1.9.17.1. Symptom: Auto import secret exists error when importing a cluster
When importing a hive cluster for management, an auto-import-secret already exists error is displayed.
1.9.17.2. Resolving the problem: Auto-import-secret-exists error when importing a cluster
This problem occurs when you attempt to import a cluster that was previously managed. When this happens, the secrets conflict when you try to reimport the cluster.
To work around this problem, complete the following steps:
To manually delete the existing
auto-import-secret, run the following command on the hub cluster:oc delete secret auto-import-secret -n <cluster-namespace>
Replace
cluster-namespacewith the namespace of your cluster.- Import your cluster again using the procedure in Importing a target managed cluster to a hub cluster.
Your cluster is imported.
1.9.18. Troubleshooting missing PlacementDecision after creating Placement
If no PlacementDescision is generated after creating a Placement, follow the procedure to troubleshoot the problem.
1.9.18.1. Symptom: Missing PlacementDecision after creating Placement
After creating a Placement, a PlacementDescision is not automatically generated.
1.9.18.2. Resolving the problem: Missing PlacementDecision after creating Placement
To resolve the issue, complete the following steps:
Check the
Placementconditions by running the following command:kubectl describe placement <placement-name>
Replace
placement-namewith the name of thePlacement.The output might resemble the following example:
Name: demo-placement Namespace: default Labels: <none> Annotations: <none> API Version: cluster.open-cluster-management.io/v1beta1 Kind: Placement Status: Conditions: Last Transition Time: 2022-09-30T07:39:45Z Message: Placement configurations check pass Reason: Succeedconfigured Status: False Type: PlacementMisconfigured Last Transition Time: 2022-09-30T07:39:45Z Message: No valid ManagedClusterSetBindings found in placement namespace Reason: NoManagedClusterSetBindings Status: False Type: PlacementSatisfied Number Of Selected Clusters: 0Check the output for the
StatusofPlacementMisconfiguredandPlacementSatisfied:-
If the
PlacementMisconfiguredStatusis true, yourPlacementhas configuration errors. Check the included message for more details on the configuration errors and how to resolve them. -
If the
PlacementSatisfiedStatusis false, no managed cluster satisfies yourPlacement. Check the included message for more details and how to resolve the error. In the previous example, noManagedClusterSetBindingswere found in the placement namespace.
-
If the
You can check the score of each cluster in
Eventsto find out why some clusters with lower scores are not selected. The output might resemble the following example:Name: demo-placement Namespace: default Labels: <none> Annotations: <none> API Version: cluster.open-cluster-management.io/v1beta1 Kind: Placement Events: Type Reason Age From Message ---- ------ ---- ---- ------- Normal DecisionCreate 2m10s placementController Decision demo-placement-decision-1 is created with placement demo-placement in namespace default Normal DecisionUpdate 2m10s placementController Decision demo-placement-decision-1 is updated with placement demo-placement in namespace default Normal ScoreUpdate 2m10s placementController cluster1:0 cluster2:100 cluster3:200 Normal DecisionUpdate 3s placementController Decision demo-placement-decision-1 is updated with placement demo-placement in namespace default Normal ScoreUpdate 3s placementController cluster1:200 cluster2:145 cluster3:189 cluster4:200
Note: The placement controller assigns a score and generates an event for each filtered
ManagedCluster. The placement controller genereates a new event when the cluster score changes.
1.9.19. Troubleshooting a discovery failure of bare metal hosts on Dell hardware
If the discovery of bare metal hosts fails on Dell hardware, the Integrated Dell Remote Access Controller (iDRAC) is likely configured to not allow certificates from unknown certificate authorities.
1.9.19.1. Symptom: Discovery failure of bare metal hosts on Dell hardware
After you complete the procedure for discovering bare metal hosts by using the baseboard management controller, an error message similar to the following is displayed:
ProvisioningError 51s metal3-baremetal-controller Image provisioning failed: Deploy step deploy.deploy failed with BadRequestError: HTTP POST https://<bmc_address>/redfish/v1/Managers/iDRAC.Embedded.1/VirtualMedia/CD/Actions/VirtualMedia.InsertMedia returned code 400. Base.1.8.GeneralError: A general error has occurred. See ExtendedInfo for more information Extended information: [
{"Message": "Unable to mount remote share https://<ironic_address>/redfish/boot-<uuid>.iso.", 'MessageArgs': ["https://<ironic_address>/redfish/boot-<uuid>.iso"], "MessageArgs@odata.count": 1, "MessageId": "IDRAC.2.5.RAC0720", "RelatedProperties": ["#/Image"], "RelatedProperties@odata.count": 1, "Resolution": "Retry the operation.", "Severity": "Informational"}
]1.9.19.2. Resolving the problem: Discovery failure of bare metal hosts on Dell hardware
The iDRAC is configured not to accept certificates from unknown certificate authorities.
To bypass the problem, disable the certificate verification on the baseboard management controller of the host iDRAC by completing the following steps:
- In the iDRAC console, navigate to Configuration > Virtual media > Remote file share.
-
Change the value of Expired or invalid certificate action to
Yes.