
Chapter 16. Red Hat Quay build enhancements
Prior to Red Hat Quay 3.7, Quay ran podman commands in virtual machines launched by pods. Running builds on virtual platforms requires enabling nested virtualization, which is not featured in Red Hat Enterprise Linux or OpenShift Container Platform. As a result, builds had to run on bare-metal clusters, which is an inefficient use of resources.
With Red Hat Quay 3.7., the bare-metal constraint required to run builds has been removed by adding an additional build option which does not contain the virtual machine layer. As a result, builds can be run on virtualized platforms. Backwards compatibility to run previous build configurations are also available.
16.1. Red Hat Quay enhanced build architecture
The preceding image shows the expected design flow and architecture of the enhanced build features:
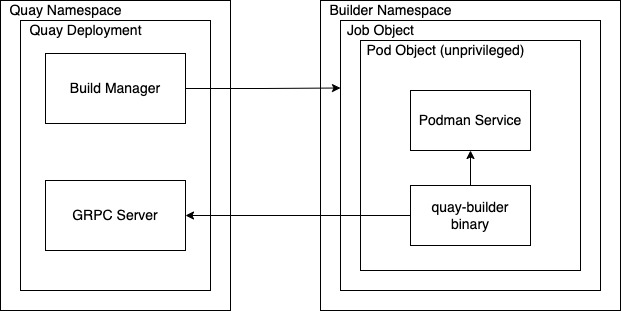
With this enhancement, the build manager first creates the Job Object. Then, the Job Object then creates a pod using the quay-builder-image. The quay-builder-image will contain the quay-builder binary and the Podman service. The created pod runs as unprivileged. The quay-builder binary then builds the image while communicating status and retrieving build information from the Build Manager.
16.2. Red Hat Quay build limitations
Running builds in Red Hat Quay in an unprivileged context might cause some commands that were working under the previous build strategy to fail. Attempts to change the build strategy could potentially cause performance issues and reliability with the build.
Running builds directly in a container will not have the same isolation as using virtual machines. Changing the build environment might also caused builds that were previously working to fail.
16.3. Creating a Red Hat Quay builders environment with OpenShift
16.3.1. OpenShift TLS component
The tls component allows you to control TLS configuration.
Red Hat Quay 3.7 does not support builders when the TLS component is managed by the Operator.
If you set tls to unmanaged, you supply your own ssl.cert and ssl.key files. In this instance, if you want your cluster to support builders, you must add both the Quay route and the builder route name to the SAN list in the cert, or alternatively use a wildcard. To add the builder route, use the following format:
[quayregistry-cr-name]-quay-builder-[ocp-namespace].[ocp-domain-name]:443
16.3.2. Using OpenShift Container Platform for Red Hat Quay builders
The following procedure describes how you can implement the builders feature in Red Hat Quay.
Prerequisites
- Builders require SSL certificates. For more information, see Adding TLS certificates to the Red Hat Quay container.
- If you are using AWS S3 storage, you must modify your storage bucket in the AWS console, prior to running builders. See "Modifying your AWS S3 storage bucket" in the following section for the required parameters.
- This procedure assumes you already have a cluster provisioned and a Quay Operator running.
- This procedure is for setting up a virtual namespace on OpenShift Container Platform.
16.3.2.1. Preparing OpenShift Container Platform for virtual builders
- Log in to your Red Hat Quay cluster using a cluster admin account.
Create a new project where your virtual builders will be run (e.g.,
virtual-builders).$ oc new-project virtual-builders
Create a
ServiceAccountin thisProjectthat will be used to run builds.$ oc create sa -n virtual-builders quay-builder
Provide the created service account with editing permissions so that it can run the build:
$ oc adm policy -n virtual-builders add-role-to-user edit system:serviceaccount:virtual-builders:quay-builder
Grant the Quay builder
anyuid sccpermissions:$ oc adm policy -n virtual-builders add-scc-to-user anyuid -z quay-builder
NoteThis action requires cluster admin privileges. This is required because builders must run as the Podman user for unprivileged or rootless builds to work.
Obtain the token for the Quay builder service account.
If using OpenShift Container Platform 4.10 or an earlier version, enter the following command:
oc sa get-token -n virtual-builders quay-builder
If using OpenShift Container Platform 4.11 or later, enter the following command:
$ oc create token quay-builder -n virtual-builders
Sample output
eyJhbGciOiJSUzI1NiIsImtpZCI6IldfQUJkaDVmb3ltTHZ0dGZMYjhIWnYxZTQzN2dJVEJxcDJscldSdEUtYWsifQ...
Determine the builder route:
$ oc get route -n quay-enterprise
Sample output
NAME                                  HOST/PORT                                                                    PATH   SERVICES                              PORT   TERMINATION     WILDCARD
...
example-registry-quay-builder         example-registry-quay-builder-quay-enterprise.apps.docs.quayteam.org                example-registry-quay-app             grpc   edge/Redirect   None
...
Generate a self-signed SSL certificate with the .crt extension:
$ oc extract cm/kube-root-ca.crt -n openshift-apiserver ca.crt
$ mv ca.crt extra_ca_cert_build_cluster.crt
Locate the secret for you config bundle in the Console, and choose Actions → Edit Secret and add the appropriate builder configuration:
FEATURE_USER_INITIALIZE: true
BROWSER_API_CALLS_XHR_ONLY: false
SUPER_USERS:
- <superusername>
FEATURE_USER_CREATION: false
FEATURE_QUOTA_MANAGEMENT: true
FEATURE_BUILD_SUPPORT: True
BUILDMAN_HOSTNAME: <sample_build_route> 1
BUILD_MANAGER:
  - ephemeral
  - ALLOWED_WORKER_COUNT: 1
    ORCHESTRATOR_PREFIX: buildman/production/
    JOB_REGISTRATION_TIMEOUT: 3600 2
    ORCHESTRATOR:
      REDIS_HOST: <sample_redis_hostname> 3
      REDIS_PASSWORD: ""
      REDIS_SSL: false
      REDIS_SKIP_KEYSPACE_EVENT_SETUP: false
    EXECUTORS:
      - EXECUTOR: kubernetesPodman
        NAME: openshift
        BUILDER_NAMESPACE: <sample_builder_namespace> 4
        SETUP_TIME: 180
        MINIMUM_RETRY_THRESHOLD:
        BUILDER_CONTAINER_IMAGE: <sample_builder_container_image> 5
        # Kubernetes resource options
        K8S_API_SERVER: <sample_k8s_api_server> 6
        K8S_API_TLS_CA: <sample_crt_file> 7
        VOLUME_SIZE: 8G
        KUBERNETES_DISTRIBUTION: openshift
        CONTAINER_MEMORY_LIMITS: 300m 8
        CONTAINER_CPU_LIMITS: 1G 9
        CONTAINER_MEMORY_REQUEST: 300m 10
        CONTAINER_CPU_REQUEST: 1G 11
        NODE_SELECTOR_LABEL_KEY: ""
        NODE_SELECTOR_LABEL_VALUE: ""
        SERVICE_ACCOUNT_NAME: <sample_service_account_name>
        SERVICE_ACCOUNT_TOKEN: <sample_account_token> 12
- 1
- The build route is obtained by running
oc get route -nwith the name of your OpenShift Operators namespace. A port must be provided at the end of the route, for example, and it should follow the following format:[quayregistry-cr-name]-quay-builder-[ocp-namespace].[ocp-domain-name]:443. - 2
- If the
JOB_REGISTRATION_TIMEOUTparameter is set too low, you might receive the following error:failed to register job to build manager: rpc error: code = Unauthenticated desc = Invalid build token: Signature has expired. It is suggested that this parameter be set to at least 240. - 3
- If your Redis host has a password or SSL certificates, you must update accordingly.
- 4
- Set to match the name of your virtual builders namespace, for example,
virtual-builders. - 5
- For early access, the
BUILDER_CONTAINER_IMAGEis currentlyquay.io/projectquay/quay-builder:3.7.0-rc.2. Note that this might change during the early access window. In the event this happens, customers will be alerted. - 6
- Obtained by running
oc cluster-info. - 7
- You must manually create and add your custom CA cert, for example,
K8S_API_TLS_CA: /conf/stack/extra_ca_certs/build_cluster.crt. - 8
- Defaults to 5120Mi if left unspecified.
- 9
- For virtual builds, you must ensure that there are enough resources in your cluster. Defaults to 1000m if left unspecified.
- 10
- Defaults to 3968Mi if left unspecified.
- 11
- Defaults to 500m if left unspecified.
- 12
- Obtained when running
oc create sa.
Sample config
FEATURE_USER_INITIALIZE: true
BROWSER_API_CALLS_XHR_ONLY: false
SUPER_USERS:
- quayadmin
FEATURE_USER_CREATION: false
FEATURE_QUOTA_MANAGEMENT: true
FEATURE_BUILD_SUPPORT: True
BUILDMAN_HOSTNAME: example-registry-quay-builder-quay-enterprise.apps.docs.quayteam.org:443
BUILD_MANAGER:
  - ephemeral
  - ALLOWED_WORKER_COUNT: 1
    ORCHESTRATOR_PREFIX: buildman/production/
    JOB_REGISTRATION_TIMEOUT: 3600
    ORCHESTRATOR:
      REDIS_HOST: example-registry-quay-redis
      REDIS_PASSWORD: ""
      REDIS_SSL: false
      REDIS_SKIP_KEYSPACE_EVENT_SETUP: false
    EXECUTORS:
      - EXECUTOR: kubernetesPodman
        NAME: openshift
        BUILDER_NAMESPACE: virtual-builders
        SETUP_TIME: 180
        MINIMUM_RETRY_THRESHOLD:
        BUILDER_CONTAINER_IMAGE: quay.io/projectquay/quay-builder:3.7.0-rc.2
        # Kubernetes resource options
        K8S_API_SERVER: api.docs.quayteam.org:6443
        K8S_API_TLS_CA: /conf/stack/extra_ca_certs/build_cluster.crt
        VOLUME_SIZE: 8G
        KUBERNETES_DISTRIBUTION: openshift
        CONTAINER_MEMORY_LIMITS: 1G
        CONTAINER_CPU_LIMITS: 1080m
        CONTAINER_MEMORY_REQUEST: 1G
        CONTAINER_CPU_REQUEST: 580m
        NODE_SELECTOR_LABEL_KEY: ""
        NODE_SELECTOR_LABEL_VALUE: ""
        SERVICE_ACCOUNT_NAME: quay-builder
        SERVICE_ACCOUNT_TOKEN: "eyJhbGciOiJSUzI1NiIsImtpZCI6IldfQUJkaDVmb3ltTHZ0dGZMYjhIWnYxZTQzN2dJVEJxcDJscldSdEUtYWsifQ"
16.3.2.2. Manually adding SSL certificates.
- Due to a known issue with the configuration tool, you must manually add your custom SSL certificates to properly run builders. Use the following procedure to manually add custom SSL certificates. For more information creating SSL certificates, see Adding TLS certificates to the Red Hat Quay container.
16.3.2.2.1. Create and sign certs
Create a certificate authority and sign a certificate. For more information, see Create a Certificate Authority and sign a certificate.
Note-
Add an
alt_namefor the URL of your Quay registry. -
Add an
alt_namefor theBUILDMAN_HOSTNAMEthat is specified in your config.yaml.
openssl.cnf
[req]
req_extensions = v3_req
distinguished_name = req_distinguished_name
[req_distinguished_name]
[ v3_req ]
basicConstraints = CA:FALSE
keyUsage = nonRepudiation, digitalSignature, keyEncipherment
subjectAltName = @alt_names
[alt_names]
DNS.1 = example-registry-quay-quay-enterprise.apps.docs.quayteam.org
DNS.2 = example-registry-quay-builder-quay-enterprise.apps.docs.quayteam.org
Sample commands
$ openssl genrsa -out rootCA.key 2048
$ openssl req -x509 -new -nodes -key rootCA.key -sha256 -days 1024 -out rootCA.pem
$ openssl genrsa -out ssl.key 2048
$ openssl req -new -key ssl.key -out ssl.csr
$ openssl x509 -req -in ssl.csr -CA rootCA.pem -CAkey rootCA.key -CAcreateserial -out ssl.cert -days 356 -extensions v3_req -extfile openssl.cnf
-
Add an
16.3.2.2.2. Set TLS to unmanaged
In your Quay Registry yaml, set kind: tls to managed: false:
  - kind: tls
    managed: false
In the events, you should see that the change is blocked until you set up the appropriate config:
    - lastTransitionTime: '2022-03-28T12:56:49Z'
      lastUpdateTime: '2022-03-28T12:56:49Z'
      message: >-
        required component `tls` marked as unmanaged, but `configBundleSecret`
        is missing necessary fields
      reason: ConfigInvalid
      status: 'True'
16.3.2.2.3. Create temporary secrets
Create a secret in your default namespace for the CA cert:
$ oc create secret generic -n quay-enterprise temp-crt --from-file extra_ca_cert_build_cluster.crt
Create a secret in your default namespace for the ssl.key and ssl.cert files:
$ oc create secret generic -n quay-enterprise quay-config-ssl --from-file ssl.cert --from-file ssl.key
16.3.2.2.4. Copy secret data to config.yaml
- Locate the new secrets in the console UI at Workloads → Secrets.
For each secret, locate the YAML view:
kind: Secret
apiVersion: v1
metadata:
  name: temp-crt
  namespace: quay-enterprise
  uid: a4818adb-8e21-443a-a8db-f334ace9f6d0
  resourceVersion: '9087855'
  creationTimestamp: '2022-03-28T13:05:30Z'
...
data:
  extra_ca_cert_build_cluster.crt: >-
    LS0tLS1CRUdJTiBDRVJUSUZJQ0FURS0tLS0tCk1JSURNakNDQWhxZ0F3SUJBZ0l....
type: Opaque
kind: Secret apiVersion: v1 metadata: name: quay-config-ssl namespace: quay-enterprise uid: 4f5ae352-17d8-4e2d-89a2-143a3280783c resourceVersion: '9090567' creationTimestamp: '2022-03-28T13:10:34Z' ... data: ssl.cert: >- LS0tLS1CRUdJTiBDRVJUSUZJQ0FURS0tLS0tCk1JSUVaakNDQTA2Z0F3SUJBZ0lVT... ssl.key: >- LS0tLS1CRUdJTiBSU0EgUFJJVkFURSBLRVktLS0tLQpNSUlFcFFJQkFBS0NBUUVBc... type: OpaqueLocate the secret for your Quay Registry configuration bundle in the UI, or via the command line by running a command such as:
$ oc get quayregistries.quay.redhat.com -o jsonpath="{.items[0].spec.configBundleSecret}{'\n'}" -n quay-enterpriseIn the OpenShift console, select the YAML tab for your config bundle secret, and add the data from the two secrets you created:
kind: Secret
apiVersion: v1
metadata:
  name: init-config-bundle-secret
  namespace: quay-enterprise
  uid: 4724aca5-bff0-406a-9162-ccb1972a27c1
  resourceVersion: '4383160'
  creationTimestamp: '2022-03-22T12:35:59Z'
...
data:
  config.yaml: >-
    RkVBVFVSRV9VU0VSX0lOSVRJQUxJWkU6IHRydWUKQlJ...
  extra_ca_cert_build_cluster.crt: >-
    LS0tLS1CRUdJTiBDRVJUSUZJQ0FURS0tLS0tCk1JSURNakNDQWhxZ0F3SUJBZ0ldw....
  ssl.cert: >-
    LS0tLS1CRUdJTiBDRVJUSUZJQ0FURS0tLS0tCk1JSUVaakNDQTA2Z0F3SUJBZ0lVT...
  ssl.key: >-
    LS0tLS1CRUdJTiBSU0EgUFJJVkFURSBLRVktLS0tLQpNSUlFcFFJQkFBS0NBUUVBc...
type: Opaque
Click Save. You should see the pods being re-started:
$ oc get pods -n quay-enterprise
Sample output
NAME                                                   READY   STATUS              RESTARTS   AGE
...
example-registry-quay-app-6786987b99-vgg2v             0/1     ContainerCreating   0          2s
example-registry-quay-app-7975d4889f-q7tvl             1/1     Running             0          5d21h
example-registry-quay-app-7975d4889f-zn8bb             1/1     Running             0          5d21h
example-registry-quay-app-upgrade-lswsn                0/1     Completed           0          6d1h
example-registry-quay-config-editor-77847fc4f5-nsbbv   0/1     ContainerCreating   0          2s
example-registry-quay-config-editor-c6c4d9ccd-2mwg2    1/1     Running             0          5d21h
example-registry-quay-database-66969cd859-n2ssm        1/1     Running             0          6d1h
example-registry-quay-mirror-764d7b68d9-jmlkk          1/1     Terminating         0          5d21h
example-registry-quay-mirror-764d7b68d9-jqzwg          1/1     Terminating         0          5d21h
example-registry-quay-redis-7cc5f6c977-956g8           1/1     Running             0          5d21h
After your Quay registry has reconfigured, check that your Quay app pods are running:
$ oc get pods -n quay-enterprise
Sample output
example-registry-quay-app-6786987b99-sz6kb             1/1     Running            0          7m45s
example-registry-quay-app-6786987b99-vgg2v             1/1     Running            0          9m1s
example-registry-quay-app-upgrade-lswsn                0/1     Completed          0          6d1h
example-registry-quay-config-editor-77847fc4f5-nsbbv   1/1     Running            0          9m1s
example-registry-quay-database-66969cd859-n2ssm        1/1     Running            0          6d1h
example-registry-quay-mirror-758fc68ff7-5wxlp          1/1     Running            0          8m29s
example-registry-quay-mirror-758fc68ff7-lbl82          1/1     Running            0          8m29s
example-registry-quay-redis-7cc5f6c977-956g8           1/1     Running            0          5d21h
In your browser, access the registry endpoint and validate that the certificate has been updated appropriately:
Common Name (CN)	example-registry-quay-quay-enterprise.apps.docs.quayteam.org
Organisation (O)	DOCS
Organisational Unit (OU)	QUAY
16.3.2.3. Using the UI to create a build trigger
- Log in to your Quay repository.
-
Click Create New Repository and create a new registry, for example,
testrepo. On the Repositories page, click Builds tab on the left hand pane. Alternatively, use the corresponding URL directly, for example:
https://example-registry-quay-quay-enterprise.apps.docs.quayteam.org/repository/quayadmin/testrepo?tab=builds
ImportantIn some cases, the builder might have issues resolving hostnames. This issue might be related to the
dnsPolicybeing set todefaulton the job object. Currently, there is no workaround for this issue. It will be resolved in a future version of Red Hat Quay.- Click Create Build Trigger → Custom Git Repository Push.
Enter the HTTPS or SSH style URL used to clone your Git repository, then click Continue. For example:
https://github.com/gabriel-rh/actions_test.git
- Check Tag manifest with the branch or tag name and then click Continue.
-
Enter the location of the Dockerfile to build when the trigger is invoked, for example,
/Dockerfileand click Continue. -
Enter the location of the context for the Docker build, for example,
/, and click Continue. - If warranted, create a Robot Account. Otherwise, click Continue.
- Click Continue to verify the parameters.
- On the Builds page, click Options icon of your Trigger Name, and then click Run Trigger Now.
- Enter a commit SHA from the Git repository and click Start Build.
You can check the status of your build by clicking the commit in the Build History page, or by running
oc get pods -n virtual-builders.$ oc get pods -n virtual-builders NAME READY STATUS RESTARTS AGE f192fe4a-c802-4275-bcce-d2031e635126-9l2b5-25lg2 1/1 Running 0 7s
$ oc get pods -n virtual-builders
NAME                                               READY   STATUS        RESTARTS   AGE
f192fe4a-c802-4275-bcce-d2031e635126-9l2b5-25lg2   1/1     Terminating   0          9s
$ oc get pods -n virtual-builders
No resources found in virtual-builders namespace.
When the build is finished, you can check the status of the tag under Tags on the left hand pane.
NoteWith early access, full build logs and timestamps of builds are currently unavailable.
16.3.2.4. Modifying your AWS S3 storage bucket
If you are using AWS S3 storage, you must modify your storage bucket in the AWS console, prior to running builders.
- Log in to your AWS console at s3.console.aws.com.
-
In the search bar, search for
S3and then click S3. -
Click the name of your bucket, for example,
myawsbucket. - Click the Permissions tab.
Under Cross-origin resource sharing (CORS), include the following parameters:
  [
      {
          "AllowedHeaders": [
              "Authorization"
          ],
          "AllowedMethods": [
              "GET"
          ],
          "AllowedOrigins": [
              "*"
          ],
          "ExposeHeaders": [],
          "MaxAgeSeconds": 3000
      },
      {
          "AllowedHeaders": [
              "Content-Type",
              "x-amz-acl",
              "origin"
          ],
          "AllowedMethods": [
              "PUT"
          ],
          "AllowedOrigins": [
              "*"
          ],
          "ExposeHeaders": [],
          "MaxAgeSeconds": 3000
      }
  ]