Chapter 17. Deploying an application
17.1. Tutorial: Deploying an application
17.1.1. Introduction
After successfully provisioning your cluster, you can deploy an application on it. This application allows you to become more familiar with some of the features of Red Hat OpenShift Service on AWS (ROSA) and Kubernetes.
17.1.1.1. Lab overview
In this lab, you will complete the following set of tasks designed to help you understand the concepts of deploying and operating container-based applications:
- Deploy a Node.js based app by using S2I and Kubernetes Deployment objects.
- Set up a continuous delivery (CD) pipeline to automatically push source code changes.
- Explore logging.
- Experience self healing of applications.
- Explore configuration management through configmaps, secrets, and environment variables.
- Use persistent storage to share data across pod restarts.
- Explore networking within Kubernetes and applications.
- Familiarize yourself with ROSA and Kubernetes functionality.
- Automatically scale pods based on loads from the Horizontal Pod Autoscaler.
- Use AWS Controllers for Kubernetes (ACK) to deploy and use an S3 bucket.
This lab uses either the ROSA CLI or ROSA web user interface (UI).
17.2. Tutorial: Deploying an application
17.2.1. Prerequisites
A Provisioned ROSA cluster
This lab assumes you have access to a successfully provisioned a ROSA cluster. If you have not yet created a ROSA cluster, see Red Hat OpenShift Service on AWS quick start guide for more information.
The OpenShift Command Line Interface (CLI)
For more information, see Getting started with the OpenShift CLI.
A GitHub Account
Use your existing GitHub account or register at https://github.com/signup.
17.3. Tutorial: Deploying an application
17.3.1. Lab overview
17.3.1.1. Lab resources
- Source code for the OSToy application
- OSToy front-end container image
- OSToy microservice container image
Deployment Definition YAML files:
ostoy-frontend-deployment.yamlapiVersion: v1 kind: PersistentVolumeClaim metadata: name: ostoy-pvc spec: accessModes: - ReadWriteOnce resources: requests: storage: 1Gi --- apiVersion: apps/v1 kind: Deployment metadata: name: ostoy-frontend labels: app: ostoy spec: selector: matchLabels: app: ostoy-frontend strategy: type: Recreate replicas: 1 template: metadata: labels: app: ostoy-frontend spec: # Uncomment to use with ACK portion of the workshop # If you chose a different service account name please replace it. # serviceAccount: ostoy-sa containers: - name: ostoy-frontend securityContext: allowPrivilegeEscalation: false runAsNonRoot: true seccompProfile: type: RuntimeDefault capabilities: drop: - ALL image: quay.io/ostoylab/ostoy-frontend:1.6.0 imagePullPolicy: IfNotPresent ports: - name: ostoy-port containerPort: 8080 resources: requests: memory: "256Mi" cpu: "100m" limits: memory: "512Mi" cpu: "200m" volumeMounts: - name: configvol mountPath: /var/config - name: secretvol mountPath: /var/secret - name: datavol mountPath: /var/demo_files livenessProbe: httpGet: path: /health port: 8080 initialDelaySeconds: 10 periodSeconds: 5 env: - name: ENV_TOY_SECRET valueFrom: secretKeyRef: name: ostoy-secret-env key: ENV_TOY_SECRET - name: MICROSERVICE_NAME value: OSTOY_MICROSERVICE_SVC - name: NAMESPACE valueFrom: fieldRef: fieldPath: metadata.namespace volumes: - name: configvol configMap: name: ostoy-configmap-files - name: secretvol secret: defaultMode: 420 secretName: ostoy-secret - name: datavol persistentVolumeClaim: claimName: ostoy-pvc --- apiVersion: v1 kind: Service metadata: name: ostoy-frontend-svc labels: app: ostoy-frontend spec: type: ClusterIP ports: - port: 8080 targetPort: ostoy-port protocol: TCP name: ostoy selector: app: ostoy-frontend --- apiVersion: route.openshift.io/v1 kind: Route metadata: name: ostoy-route spec: to: kind: Service name: ostoy-frontend-svc --- apiVersion: v1 kind: Secret metadata: name: ostoy-secret-env type: Opaque data: ENV_TOY_SECRET: VGhpcyBpcyBhIHRlc3Q= --- kind: ConfigMap apiVersion: v1 metadata: name: ostoy-configmap-files data: config.json: '{ "default": "123" }' --- apiVersion: v1 kind: Secret metadata: name: ostoy-secret data: secret.txt: VVNFUk5BTUU9bXlfdXNlcgpQQVNTV09SRD1AT3RCbCVYQXAhIzYzMlk1RndDQE1UUWsKU01UUD1sb2NhbGhvc3QKU01UUF9QT1JUPTI1 type: Opaqueostoy-microservice-deployment.yamlapiVersion: apps/v1 kind: Deployment metadata: name: ostoy-microservice labels: app: ostoy spec: selector: matchLabels: app: ostoy-microservice replicas: 1 template: metadata: labels: app: ostoy-microservice spec: containers: - name: ostoy-microservice securityContext: allowPrivilegeEscalation: false runAsNonRoot: true seccompProfile: type: RuntimeDefault capabilities: drop: - ALL image: quay.io/ostoylab/ostoy-microservice:1.5.0 imagePullPolicy: IfNotPresent ports: - containerPort: 8080 protocol: TCP resources: requests: memory: "128Mi" cpu: "50m" limits: memory: "256Mi" cpu: "100m" --- apiVersion: v1 kind: Service metadata: name: ostoy-microservice-svc labels: app: ostoy-microservice spec: type: ClusterIP ports: - port: 8080 targetPort: 8080 protocol: TCP selector: app: ostoy-microserviceS3 bucket manifest for ACK S3
s3-bucket.yamlapiVersion: s3.services.k8s.aws/v1alpha1 kind: Bucket metadata: name: ostoy-bucket namespace: ostoy spec: name: ostoy-bucket
To simplify deployment of the OSToy application, all of the objects required in the above deployment manifests are grouped together. For a typical enterprise deployment, a separate manifest file for each Kubernetes object is recommended.
17.3.1.2. About the OSToy application
OSToy is a simple Node.js application that you will deploy to a ROSA cluster to help explore the functionality of Kubernetes. This application has a user interface where you can:
- Write messages to the log (stdout / stderr).
- Intentionally crash the application to view self-healing.
- Toggle a liveness probe and monitor OpenShift behavior.
- Read config maps, secrets, and env variables.
- If connected to shared storage, read and write files.
- Check network connectivity, intra-cluster DNS, and intra-communication with the included microservice.
- Increase the load to view automatic scaling of the pods to handle the load using the Horizontal Pod Autoscaler.
- Optional: Connect to an AWS S3 bucket to read and write objects.
17.3.1.3. OSToy Application Diagram

17.3.1.4. Understanding the OSToy UI
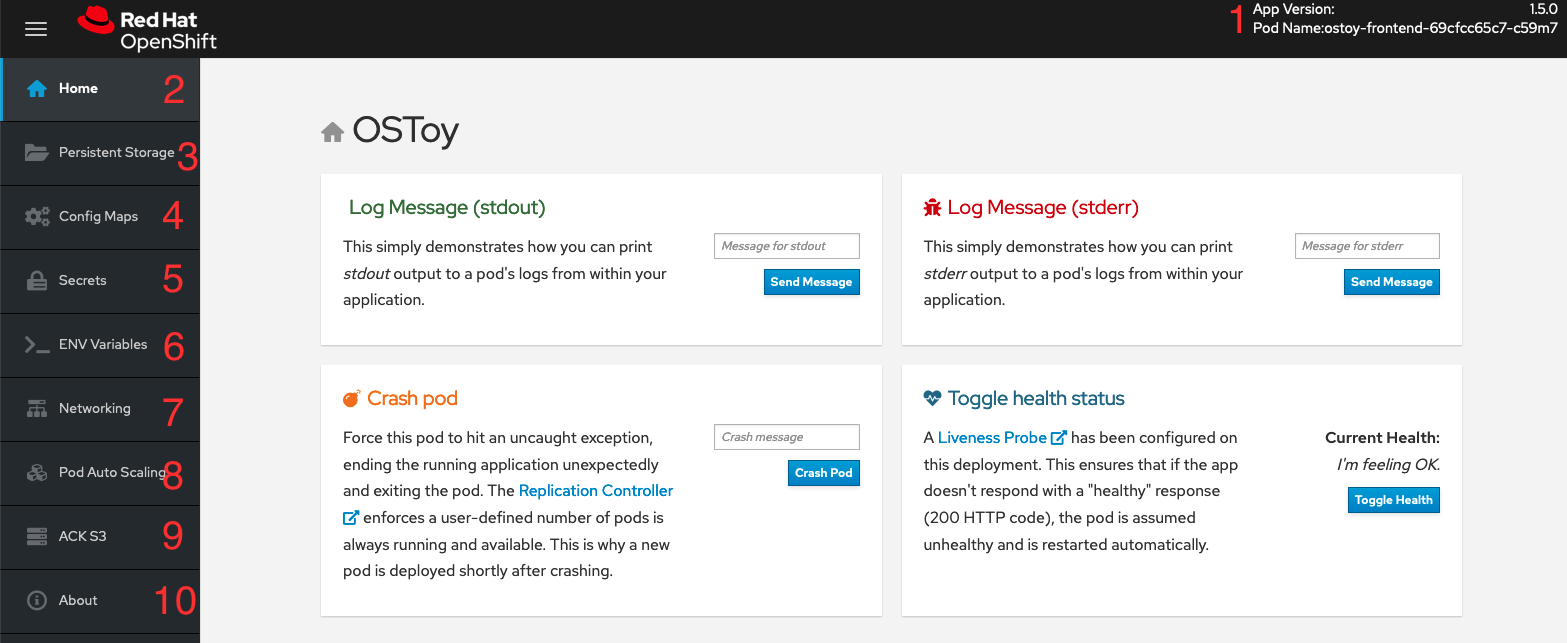
- Shows the pod name that served your browser the page.
- Home: The main page of the application where you can perform some of the functions listed which we will explore.
- Persistent Storage: Allows you to write data to the persistent volume bound to this application.
- Config Maps: Shows the contents of configmaps available to the application and the key:value pairs.
- Secrets: Shows the contents of secrets available to the application and the key:value pairs.
- ENV Variables: Shows the environment variables available to the application.
- Networking: Tools to illustrate networking within the application.
- Pod Auto Scaling: Tool to increase the load of the pods and test the HPA.
ACK S3: Optional: Integrate with AWS S3 to read and write objects to a bucket.
NoteIn order see the "ACK S3" section of OSToy, you must complete the ACK section of this workshop. If you decide not to complete that section, the OSToy application will still function.
- About: Displays more information about the application.
17.4. Tutorial: Networking
This tutorial shows how the OSToy app uses intra-cluster networking to separate functions by using microservices and visualize the scaling of pods.
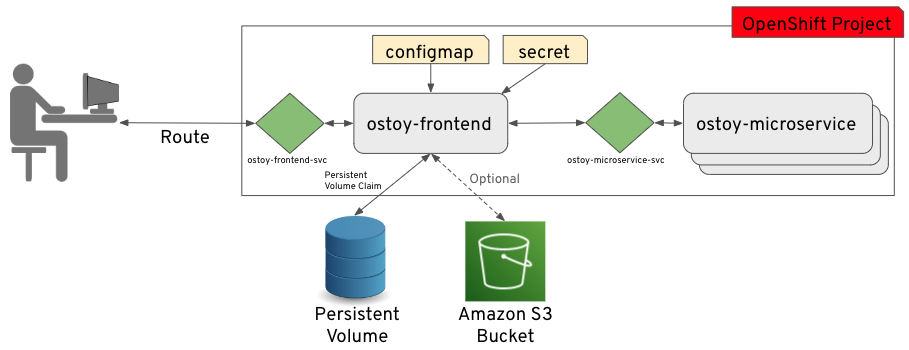
The diagram shows there are at least two separate pods, each with its own service.
One pod functions as the front end web application with a service and a publicly accessible route. The other pod functions as the backend microservice with a service object so that the front end pod can communicate with the microservice. This communication occurs across the pods if more than one. Because of these communication limits, this microservice is not accessible from outside this cluster or from other namespaces or projects if these are configured. The sole purpose of this microservice is to serve internal web requests and return a JSON object containing the current hostname, which is the pod’s name, and a randomly generated color string. This color string is used to display a box with that color displayed in the tile titled "Intra-cluster Communication".
For more information about the networking limitations, see About network policy.
17.4.1. Intra-cluster networking
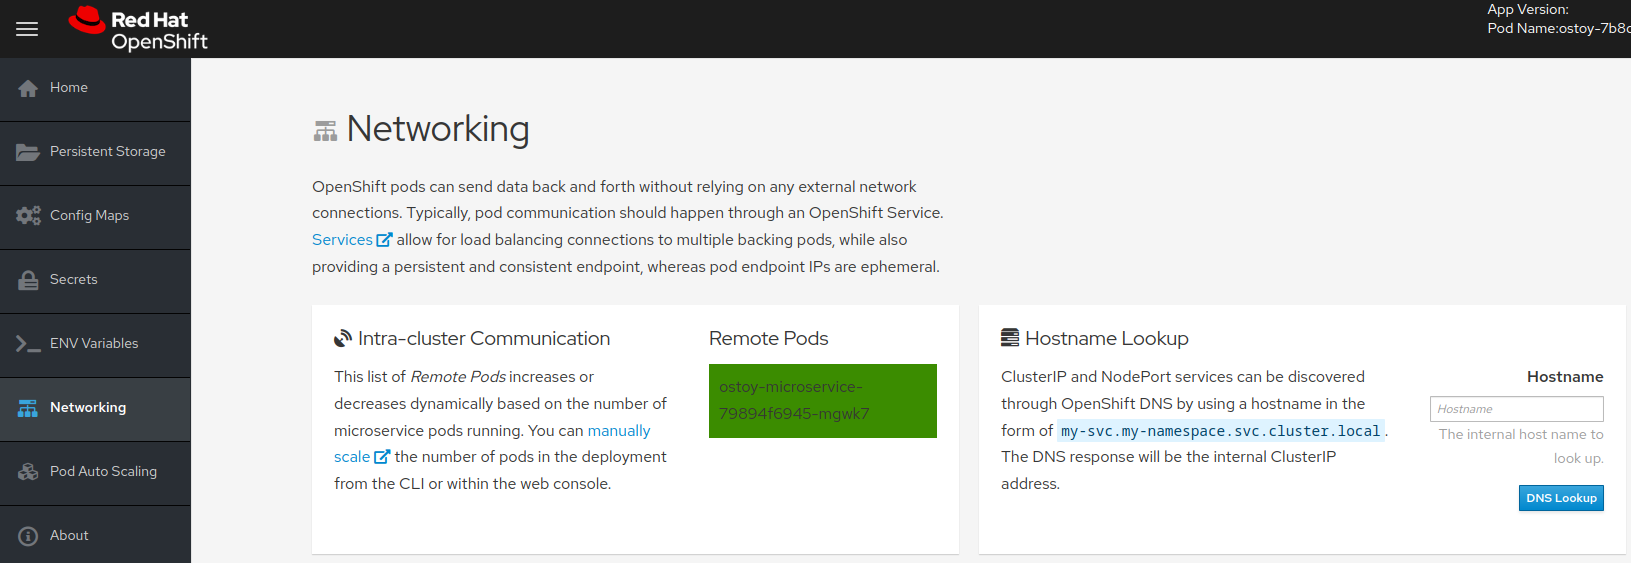
You can view your networking configurations in your OSToy application.
Procedure
- In the OSToy application, click Networking in the left menu.
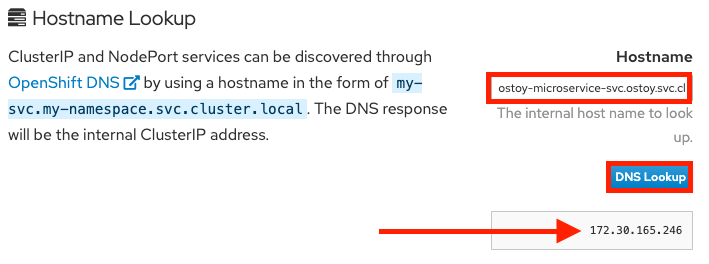
Review the networking configuration. The right tile titled "Hostname Lookup" illustrates how the service name created for a pod can be used to translate into an internal ClusterIP address.
Enter the name of the microservice created in the right tile ("Hostname Lookup") following the format of
<service_name>.<namespace>.svc.cluster.local. You can find this service name in the service definition ofostoy-microservice.yamlby running the following command:$ oc get service <name_of_service> -o yaml
Example output
apiVersion: v1
kind: Service
metadata:
  name: ostoy-microservice-svc
  labels:
    app: ostoy-microservice
spec:
  type: ClusterIP
  ports:
    - port: 8080
      targetPort: 8080
      protocol: TCP
  selector:
    app: ostoy-microservice
In this example, the full hostname is
ostoy-microservice-svc.ostoy.svc.cluster.local.You see an IP address returned. In this example it is
172.30.165.246. This is the intra-cluster IP address, which is only accessible from within the cluster.