
Networking
Configuring Red Hat OpenShift Service on AWS networking
Abstract
Chapter 1. DNS Operator in Red Hat OpenShift Service on AWS
The DNS Operator deploys and manages CoreDNS to provide a name resolution service to pods, enabling DNS-based Kubernetes Service discovery in Red Hat OpenShift Service on AWS.
1.1. Using DNS forwarding
You can use DNS forwarding to override the default forwarding configuration in the /etc/resolv.conf file in the following ways:
Specify name servers for every zone. If the forwarded zone is the Ingress domain managed by Red Hat OpenShift Service on AWS, then the upstream name server must be authorized for the domain.
ImportantYou must specify at least one zone. Otherwise, your cluster can lose functionality.
- Provide a list of upstream DNS servers.
- Change the default forwarding policy.
A DNS forwarding configuration for the default domain can have both the default servers specified in the /etc/resolv.conf file and the upstream DNS servers.
Procedure
Modify the DNS Operator object named
default:$ oc edit dns.operator/default
After you issue the previous command, the Operator creates and updates the config map named
dns-defaultwith additional server configuration blocks based onServer.ImportantWhen specifying values for the
zonesparameter, ensure that you only forward to specific zones, such as your intranet. You must specify at least one zone. Otherwise, your cluster can lose functionality.If none of the servers have a zone that matches the query, then name resolution falls back to the upstream DNS servers.
Configuring DNS forwarding
apiVersion: operator.openshift.io/v1
kind: DNS
metadata:
  name: default
spec:
  servers:
  - name: example-server 1
    zones: 2
    - example.com
    forwardPlugin:
      policy: Random 3
      upstreams: 4
      - 1.1.1.1
      - 2.2.2.2:5353
  upstreamResolvers: 5
    policy: Random 6
    upstreams: 7
    - type: SystemResolvConf 8
    - type: Network
      address: 1.2.3.4 9
      port: 53 10
- 1
- Must comply with the
rfc6335service name syntax. - 2
- Must conform to the definition of a subdomain in the
rfc1123service name syntax. The cluster domain,cluster.local, is an invalid subdomain for thezonesfield. - 3
- Defines the policy to select upstream resolvers. Default value is
Random. You can also use the valuesRoundRobin, andSequential. - 4
- A maximum of 15
upstreamsis allowed perforwardPlugin. - 5
- Optional. You can use it to override the default policy and forward DNS resolution to the specified DNS resolvers (upstream resolvers) for the default domain. If you do not provide any upstream resolvers, the DNS name queries go to the servers in
/etc/resolv.conf. - 6
- Determines the order in which upstream servers are selected for querying. You can specify one of these values:
Random,RoundRobin, orSequential. The default value isSequential. - 7
- Optional. You can use it to provide upstream resolvers.
- 8
- You can specify two types of
upstreams-SystemResolvConfandNetwork.SystemResolvConfconfigures the upstream to use/etc/resolv.confandNetworkdefines aNetworkresolver. You can specify one or both. - 9
- If the specified type is
Network, you must provide an IP address. Theaddressfield must be a valid IPv4 or IPv6 address. - 10
- If the specified type is
Network, you can optionally provide a port. Theportfield must have a value between1and65535. If you do not specify a port for the upstream, by default port 853 is tried.
Optional: When working in a highly regulated environment, you might need the ability to secure DNS traffic when forwarding requests to upstream resolvers so that you can ensure additional DNS traffic and data privacy.
ImportantWhen specifying values for the
zonesparameter, ensure that you only forward to specific zones, such as your intranet. You must specify at least one zone. Otherwise, your cluster can lose functionality.Cluster administrators can configure transport layer security (TLS) for forwarded DNS queries.
Configuring DNS forwarding with TLS
apiVersion: operator.openshift.io/v1
kind: DNS
metadata:
  name: default
spec:
  servers:
  - name: example-server 1
    zones: 2
    - example.com
    forwardPlugin:
      transportConfig:
        transport: TLS 3
        tls:
          caBundle:
            name: mycacert
          serverName: dnstls.example.com  4
      policy: Random 5
      upstreams: 6
      - 1.1.1.1
      - 2.2.2.2:5353
  upstreamResolvers: 7
    transportConfig:
      transport: TLS
      tls:
        caBundle:
          name: mycacert
        serverName: dnstls.example.com
    upstreams:
    - type: Network 8
      address: 1.2.3.4 9
      port: 53 10
- 1
- Must comply with the
rfc6335service name syntax. - 2
- Must conform to the definition of a subdomain in the
rfc1123service name syntax. The cluster domain,cluster.local, is an invalid subdomain for thezonesfield. The cluster domain,cluster.local, is an invalidsubdomainforzones. - 3
- When configuring TLS for forwarded DNS queries, set the
transportfield to have the valueTLS. By default, CoreDNS caches forwarded connections for 10 seconds. CoreDNS will hold a TCP connection open for those 10 seconds if no request is issued. With large clusters, ensure that your DNS server is aware that it might get many new connections to hold open because you can initiate a connection per node. Set up your DNS hierarchy accordingly to avoid performance issues. - 4
- When configuring TLS for forwarded DNS queries, this is a mandatory server name used as part of the server name indication (SNI) to validate the upstream TLS server certificate.
- 5
- Defines the policy to select upstream resolvers. Default value is
Random. You can also use the valuesRoundRobin, andSequential. - 6
- Required. You can use it to provide upstream resolvers. A maximum of 15
upstreamsentries are allowed perforwardPluginentry. - 7
- Optional. You can use it to override the default policy and forward DNS resolution to the specified DNS resolvers (upstream resolvers) for the default domain. If you do not provide any upstream resolvers, the DNS name queries go to the servers in
/etc/resolv.conf. - 8
Networktype indicates that this upstream resolver should handle forwarded requests separately from the upstream resolvers listed in/etc/resolv.conf. Only theNetworktype is allowed when using TLS and you must provide an IP address.- 9
- The
addressfield must be a valid IPv4 or IPv6 address. - 10
- You can optionally provide a port. The
portmust have a value between1and65535. If you do not specify a port for the upstream, by default port 853 is tried.
NoteIf
serversis undefined or invalid, the config map only contains the default server.
Verification
View the config map:
$ oc get configmap/dns-default -n openshift-dns -o yaml
Sample DNS ConfigMap based on previous sample DNS
apiVersion: v1 data: Corefile: | example.com:5353 { forward . 1.1.1.1 2.2.2.2:5353 } bar.com:5353 example.com:5353 { forward . 3.3.3.3 4.4.4.4:5454 1 } .:5353 { errors health kubernetes cluster.local in-addr.arpa ip6.arpa { pods insecure upstream fallthrough in-addr.arpa ip6.arpa } prometheus :9153 forward . /etc/resolv.conf 1.2.3.4:53 { policy Random } cache 30 reload } kind: ConfigMap metadata: labels: dns.operator.openshift.io/owning-dns: default name: dns-default namespace: openshift-dns- 1
- Changes to the
forwardPlugintriggers a rolling update of the CoreDNS daemon set.
Additional resources
- For more information on DNS forwarding, see the CoreDNS forward documentation.
Chapter 2. Ingress Operator in Red Hat OpenShift Service on AWS
2.1. Red Hat OpenShift Service on AWS Ingress Operator
When you create your Red Hat OpenShift Service on AWS cluster, pods and services running on the cluster are each allocated their own IP addresses. The IP addresses are accessible to other pods and services running nearby but are not accessible to outside clients. The Ingress Operator implements the IngressController API and is the component responsible for enabling external access to Red Hat OpenShift Service on AWS cluster services.
The Ingress Operator makes it possible for external clients to access your service by deploying and managing one or more HAProxy-based Ingress Controllers to handle routing. Red Hat Site Reliability Engineers (SRE) manage the Ingress Operator for Red Hat OpenShift Service on AWS clusters. While you cannot alter the settings for the Ingress Operator, you may view the default Ingress Controller configurations, status, and logs as well as the Ingress Operator status.
2.2. The Ingress configuration asset
The installation program generates an asset with an Ingress resource in the config.openshift.io API group, cluster-ingress-02-config.yml.
YAML Definition of the Ingress resource
apiVersion: config.openshift.io/v1
kind: Ingress
metadata:
  name: cluster
spec:
  domain: apps.openshiftdemos.com
The installation program stores this asset in the cluster-ingress-02-config.yml file in the manifests/ directory. This Ingress resource defines the cluster-wide configuration for Ingress. This Ingress configuration is used as follows:
- The Ingress Operator uses the domain from the cluster Ingress configuration as the domain for the default Ingress Controller.
-
The OpenShift API Server Operator uses the domain from the cluster Ingress configuration. This domain is also used when generating a default host for a
Routeresource that does not specify an explicit host.
2.3. Ingress Controller configuration parameters
The ingresscontrollers.operator.openshift.io resource offers the following configuration parameters.
| Parameter | Description |
|---|---|
|
|
The
If empty, the default value is |
|
|
|
|
|
You can configure the following
If not set, the default value is based on
|
|
|
The
The secret must contain the following keys and data: *
If not set, a wildcard certificate is automatically generated and used. The certificate is valid for the Ingress Controller The in-use certificate, whether generated or user-specified, is automatically integrated with Red Hat OpenShift Service on AWS built-in OAuth server. |
|
|
|
|
|
|
|
|
If not set, the defaults values are used. Note
The nodePlacement:
nodeSelector:
matchLabels:
kubernetes.io/os: linux
tolerations:
- effect: NoSchedule
operator: Exists |
|
|
If not set, the default value is based on the
When using the
The minimum TLS version for Ingress Controllers is Note
Ciphers and the minimum TLS version of the configured security profile are reflected in the Important
The Ingress Operator converts the TLS |
|
|
The
The |
|
|
|
|
|
|
|
|
By setting the
By default, the policy is set to
By setting These adjustments are only applied to cleartext, edge-terminated, and re-encrypt routes, and only when using HTTP/1.
For request headers, these adjustments are applied only for routes that have the
|
|
|
|
|
|
|
|
|
For any cookie that you want to capture, the following parameters must be in your
For example: httpCaptureCookies:
- matchType: Exact
maxLength: 128
name: MYCOOKIE
|
|
|
  httpCaptureHeaders:
    request:
    - maxLength: 256
      name: Connection
    - maxLength: 128
      name: User-Agent
    response:
    - maxLength: 256
      name: Content-Type
    - maxLength: 256
      name: Content-Length
|
|
|
|
|
|
The
|
|
|
The
These connections come from load balancer health probes or web browser speculative connections (preconnect) and can be safely ignored. However, these requests can be caused by network errors, so setting this field to |
All parameters are optional.
2.3.1. Ingress Controller TLS security profiles
TLS security profiles provide a way for servers to regulate which ciphers a connecting client can use when connecting to the server.
2.3.1.1. Understanding TLS security profiles
You can use a TLS (Transport Layer Security) security profile to define which TLS ciphers are required by various Red Hat OpenShift Service on AWS components. The Red Hat OpenShift Service on AWS TLS security profiles are based on Mozilla recommended configurations.
You can specify one of the following TLS security profiles for each component:
Table 2.1. TLS security profiles
| Profile | Description |
|---|---|
|
| This profile is intended for use with legacy clients or libraries. The profile is based on the Old backward compatibility recommended configuration.
The Note For the Ingress Controller, the minimum TLS version is converted from 1.0 to 1.1. |
|
| This profile is the recommended configuration for the majority of clients. It is the default TLS security profile for the Ingress Controller, kubelet, and control plane. The profile is based on the Intermediate compatibility recommended configuration.
The |
|
| This profile is intended for use with modern clients that have no need for backwards compatibility. This profile is based on the Modern compatibility recommended configuration.
The |
|
| This profile allows you to define the TLS version and ciphers to use. Warning
Use caution when using a |
When using one of the predefined profile types, the effective profile configuration is subject to change between releases. For example, given a specification to use the Intermediate profile deployed on release X.Y.Z, an upgrade to release X.Y.Z+1 might cause a new profile configuration to be applied, resulting in a rollout.
2.3.1.2. Configuring the TLS security profile for the Ingress Controller
To configure a TLS security profile for an Ingress Controller, edit the IngressController custom resource (CR) to specify a predefined or custom TLS security profile. If a TLS security profile is not configured, the default value is based on the TLS security profile set for the API server.
Sample IngressController CR that configures the Old TLS security profile
apiVersion: operator.openshift.io/v1
kind: IngressController
 ...
spec:
  tlsSecurityProfile:
    old: {}
    type: Old
 ...
The TLS security profile defines the minimum TLS version and the TLS ciphers for TLS connections for Ingress Controllers.
You can see the ciphers and the minimum TLS version of the configured TLS security profile in the IngressController custom resource (CR) under Status.Tls Profile and the configured TLS security profile under Spec.Tls Security Profile. For the Custom TLS security profile, the specific ciphers and minimum TLS version are listed under both parameters.
The HAProxy Ingress Controller image supports TLS 1.3 and the Modern profile.
The Ingress Operator also converts the TLS 1.0 of an Old or Custom profile to 1.1.
Prerequisites
-
You have access to the cluster as a user with the
cluster-adminrole.
Procedure
Edit the
IngressControllerCR in theopenshift-ingress-operatorproject to configure the TLS security profile:$ oc edit IngressController default -n openshift-ingress-operator
Add the
spec.tlsSecurityProfilefield:Sample
IngressControllerCR for aCustomprofileapiVersion: operator.openshift.io/v1 kind: IngressController ... spec: tlsSecurityProfile: type: Custom 1 custom: 2 ciphers: 3 - ECDHE-ECDSA-CHACHA20-POLY1305 - ECDHE-RSA-CHACHA20-POLY1305 - ECDHE-RSA-AES128-GCM-SHA256 - ECDHE-ECDSA-AES128-GCM-SHA256 minTLSVersion: VersionTLS11 ...- Save the file to apply the changes.
Verification
Verify that the profile is set in the
IngressControllerCR:$ oc describe IngressController default -n openshift-ingress-operator
Example output
Name:         default
Namespace:    openshift-ingress-operator
Labels:       <none>
Annotations:  <none>
API Version:  operator.openshift.io/v1
Kind:         IngressController
 ...
Spec:
 ...
  Tls Security Profile:
    Custom:
      Ciphers:
        ECDHE-ECDSA-CHACHA20-POLY1305
        ECDHE-RSA-CHACHA20-POLY1305
        ECDHE-RSA-AES128-GCM-SHA256
        ECDHE-ECDSA-AES128-GCM-SHA256
      Min TLS Version:  VersionTLS11
    Type:               Custom
 ...
2.3.1.3. Configuring mutual TLS authentication
You can configure the Ingress Controller to enable mutual TLS (mTLS) authentication by setting a spec.clientTLS value. The clientTLS value configures the Ingress Controller to verify client certificates. This configuration includes setting a clientCA value, which is a reference to a config map. The config map contains the PEM-encoded CA certificate bundle that is used to verify a client’s certificate. Optionally, you can also configure a list of certificate subject filters.
If the clientCA value specifies an X509v3 certificate revocation list (CRL) distribution point, the Ingress Operator downloads and manages a CRL config map based on the HTTP URI X509v3 CRL Distribution Point specified in each provided certificate. The Ingress Controller uses this config map during mTLS/TLS negotiation. Requests that do not provide valid certificates are rejected.
Prerequisites
-
You have access to the cluster as a user with the
cluster-adminrole. - You have a PEM-encoded CA certificate bundle.
If your CA bundle references a CRL distribution point, you must have also included the end-entity or leaf certificate to the client CA bundle. This certificate must have included an HTTP URI under
CRL Distribution Points, as described in RFC 5280. For example:Issuer: C=US, O=Example Inc, CN=Example Global G2 TLS RSA SHA256 2020 CA1 Subject: SOME SIGNED CERT X509v3 CRL Distribution Points: Full Name: URI:http://crl.example.com/example.crl
Procedure
In the
openshift-confignamespace, create a config map from your CA bundle:$ oc create configmap \ router-ca-certs-default \ --from-file=ca-bundle.pem=client-ca.crt \1 -n openshift-config- 1
- The config map data key must be
ca-bundle.pem, and the data value must be a CA certificate in PEM format.
Edit the
IngressControllerresource in theopenshift-ingress-operatorproject:$ oc edit IngressController default -n openshift-ingress-operator
Add the
spec.clientTLSfield and subfields to configure mutual TLS:Sample
IngressControllerCR for aclientTLSprofile that specifies filtering patternsapiVersion: operator.openshift.io/v1 kind: IngressController metadata: name: default namespace: openshift-ingress-operator spec: clientTLS: clientCertificatePolicy: Required clientCA: name: router-ca-certs-default allowedSubjectPatterns: - "^/CN=example.com/ST=NC/C=US/O=Security/OU=OpenShift$"
2.4. View the default Ingress Controller
The Ingress Operator is a core feature of Red Hat OpenShift Service on AWS and is enabled out of the box.
Every new Red Hat OpenShift Service on AWS installation has an ingresscontroller named default. It can be supplemented with additional Ingress Controllers. If the default ingresscontroller is deleted, the Ingress Operator will automatically recreate it within a minute.
Procedure
View the default Ingress Controller:
$ oc describe --namespace=openshift-ingress-operator ingresscontroller/default
2.5. View Ingress Operator status
You can view and inspect the status of your Ingress Operator.
Procedure
View your Ingress Operator status:
$ oc describe clusteroperators/ingress
2.6. View Ingress Controller logs
You can view your Ingress Controller logs.
Procedure
View your Ingress Controller logs:
$ oc logs --namespace=openshift-ingress-operator deployments/ingress-operator -c <container_name>
2.7. View Ingress Controller status
Your can view the status of a particular Ingress Controller.
Procedure
View the status of an Ingress Controller:
$ oc describe --namespace=openshift-ingress-operator ingresscontroller/<name>
2.8. Configuring the Ingress Controller
2.8.1. Setting a custom default certificate
As an administrator, you can configure an Ingress Controller to use a custom certificate by creating a Secret resource and editing the IngressController custom resource (CR).
Prerequisites
- You must have a certificate/key pair in PEM-encoded files, where the certificate is signed by a trusted certificate authority or by a private trusted certificate authority that you configured in a custom PKI.
Your certificate meets the following requirements:
- The certificate is valid for the ingress domain.
-
The certificate uses the
subjectAltNameextension to specify a wildcard domain, such as*.apps.ocp4.example.com.
You must have an
IngressControllerCR. You may use the default one:$ oc --namespace openshift-ingress-operator get ingresscontrollers
Example output
NAME      AGE
default   10m
If you have intermediate certificates, they must be included in the tls.crt file of the secret containing a custom default certificate. Order matters when specifying a certificate; list your intermediate certificate(s) after any server certificate(s).
Procedure
The following assumes that the custom certificate and key pair are in the tls.crt and tls.key files in the current working directory. Substitute the actual path names for tls.crt and tls.key. You also may substitute another name for custom-certs-default when creating the Secret resource and referencing it in the IngressController CR.
This action will cause the Ingress Controller to be redeployed, using a rolling deployment strategy.
Create a Secret resource containing the custom certificate in the
openshift-ingressnamespace using thetls.crtandtls.keyfiles.$ oc --namespace openshift-ingress create secret tls custom-certs-default --cert=tls.crt --key=tls.key
Update the IngressController CR to reference the new certificate secret:
$ oc patch --type=merge --namespace openshift-ingress-operator ingresscontrollers/default \
  --patch '{"spec":{"defaultCertificate":{"name":"custom-certs-default"}}}'
Verify the update was effective:
$ echo Q |\
  openssl s_client -connect console-openshift-console.apps.<domain>:443 -showcerts 2>/dev/null |\
  openssl x509 -noout -subject -issuer -enddate
where:
<domain>- Specifies the base domain name for your cluster.
Example output
subject=C = US, ST = NC, L = Raleigh, O = RH, OU = OCP4, CN = *.apps.example.com
issuer=C = US, ST = NC, L = Raleigh, O = RH, OU = OCP4, CN = example.com
notAfter=May 10 08:32:45 2022 GM
TipYou can alternatively apply the following YAML to set a custom default certificate:
apiVersion: operator.openshift.io/v1
kind: IngressController
metadata:
  name: default
  namespace: openshift-ingress-operator
spec:
  defaultCertificate:
    name: custom-certs-default
The certificate secret name should match the value used to update the CR.
Once the IngressController CR has been modified, the Ingress Operator updates the Ingress Controller’s deployment to use the custom certificate.
2.8.2. Removing a custom default certificate
As an administrator, you can remove a custom certificate that you configured an Ingress Controller to use.
Prerequisites
-
You have access to the cluster as a user with the
cluster-adminrole. -
You have installed the OpenShift CLI (
oc). - You previously configured a custom default certificate for the Ingress Controller.
Procedure
To remove the custom certificate and restore the certificate that ships with Red Hat OpenShift Service on AWS, enter the following command:
$ oc patch -n openshift-ingress-operator ingresscontrollers/default \
  --type json -p $'- op: remove\n  path: /spec/defaultCertificate'
There can be a delay while the cluster reconciles the new certificate configuration.
Verification
To confirm that the original cluster certificate is restored, enter the following command:
$ echo Q | \
  openssl s_client -connect console-openshift-console.apps.<domain>:443 -showcerts 2>/dev/null | \
  openssl x509 -noout -subject -issuer -enddate
where:
<domain>- Specifies the base domain name for your cluster.
Example output
subject=CN = *.apps.<domain>
issuer=CN = ingress-operator@1620633373
notAfter=May 10 10:44:36 2023 GMT
2.8.3. Autoscaling an Ingress Controller
Automatically scale an Ingress Controller to dynamically meet routing performance or availability requirements such as the requirement to increase throughput. The following procedure provides an example for scaling up the default IngressController.
Prerequisites
-
You have the OpenShift CLI (
oc) installed. -
You have access to an Red Hat OpenShift Service on AWS cluster as a user with the
cluster-adminrole. - You have the Custom Metrics Autoscaler Operator installed.
-
You are in the
openshift-ingress-operatorproject namespace.
Procedure
Create a service account to authenticate with Thanos by running the following command:
$ oc create serviceaccount thanos && oc describe serviceaccount thanos
Example output
Name:                thanos
Namespace:           openshift-ingress-operator
Labels:              <none>
Annotations:         <none>
Image pull secrets:  thanos-dockercfg-b4l9s
Mountable secrets:   thanos-dockercfg-b4l9s
Tokens:              thanos-token-c422q
Events:              <none>
Define a
TriggerAuthenticationobject within theopenshift-ingress-operatornamespace using the service account’s token.Define the variable
secretthat contains the secret by running the following command:$ secret=$(oc get secret | grep thanos-token | head -n 1 | awk '{ print $1 }')Create the
TriggerAuthenticationobject and pass the value of thesecretvariable to theTOKENparameter:$ oc process TOKEN="$secret" -f - <<EOF | oc apply -f - apiVersion: template.openshift.io/v1 kind: Template parameters: - name: TOKEN objects: - apiVersion: keda.sh/v1alpha1 kind: TriggerAuthentication metadata: name: keda-trigger-auth-prometheus spec: secretTargetRef: - parameter: bearerToken name: \${TOKEN} key: token - parameter: ca name: \${TOKEN} key: ca.crt EOF
Create and apply a role for reading metrics from Thanos:
Create a new role,
thanos-metrics-reader.yaml, that reads metrics from pods and nodes:thanos-metrics-reader.yaml
apiVersion: rbac.authorization.k8s.io/v1
kind: Role
metadata:
  name: thanos-metrics-reader
rules:
- apiGroups:
  - ""
  resources:
  - pods
  - nodes
  verbs:
  - get
- apiGroups:
  - metrics.k8s.io
  resources:
  - pods
  - nodes
  verbs:
  - get
  - list
  - watch
- apiGroups:
  - ""
  resources:
  - namespaces
  verbs:
  - get
Apply the new role by running the following command:
$ oc apply -f thanos-metrics-reader.yaml
Add the new role to the service account by entering the following commands:
$ oc adm policy add-role-to-user thanos-metrics-reader -z thanos --role-namespace=openshift-ingress-operator
$ oc adm policy -n openshift-ingress-operator add-cluster-role-to-user cluster-monitoring-view -z thanos
NoteThe argument
add-cluster-role-to-useris only required if you use cross-namespace queries. The following step uses a query from thekube-metricsnamespace which requires this argument.Create a new
ScaledObjectYAML file,ingress-autoscaler.yaml, that targets the default Ingress Controller deployment:Example
ScaledObjectdefinitionapiVersion: keda.sh/v1alpha1 kind: ScaledObject metadata: name: ingress-scaler spec: scaleTargetRef: 1 apiVersion: operator.openshift.io/v1 kind: IngressController name: default envSourceContainerName: ingress-operator minReplicaCount: 1 maxReplicaCount: 20 2 cooldownPeriod: 1 pollingInterval: 1 triggers: - type: prometheus metricType: AverageValue metadata: serverAddress: https://thanos-querier.openshift-monitoring.svc.cluster.local:9091 3 namespace: openshift-ingress-operator 4 metricName: 'kube-node-role' threshold: '1' query: 'sum(kube_node_role{role="worker",service="kube-state-metrics"})' 5 authModes: "bearer" authenticationRef: name: keda-trigger-auth-prometheus
- 1
- The custom resource that you are targeting. In this case, the Ingress Controller.
- 2
- Optional: The maximum number of replicas. If you omit this field, the default maximum is set to 100 replicas.
- 3
- The Thanos service endpoint in the
openshift-monitoringnamespace. - 4
- The Ingress Operator namespace.
- 5
- This expression evaluates to however many worker nodes are present in the deployed cluster.
ImportantIf you are using cross-namespace queries, you must target port 9091 and not port 9092 in the
serverAddressfield. You also must have elevated privileges to read metrics from this port.Apply the custom resource definition by running the following command:
$ oc apply -f ingress-autoscaler.yaml
Verification
Verify that the default Ingress Controller is scaled out to match the value returned by the
kube-state-metricsquery by running the following commands:Use the
grepcommand to search the Ingress Controller YAML file for replicas:$ oc get ingresscontroller/default -o yaml | grep replicas:
Example output
replicas: 3
Get the pods in the
openshift-ingressproject:$ oc get pods -n openshift-ingress
Example output
NAME                             READY   STATUS    RESTARTS   AGE
router-default-7b5df44ff-l9pmm   2/2     Running   0          17h
router-default-7b5df44ff-s5sl5   2/2     Running   0          3d22h
router-default-7b5df44ff-wwsth   2/2     Running   0          66s
2.8.4. Scaling an Ingress Controller
Manually scale an Ingress Controller to meeting routing performance or availability requirements such as the requirement to increase throughput. oc commands are used to scale the IngressController resource. The following procedure provides an example for scaling up the default IngressController.
Scaling is not an immediate action, as it takes time to create the desired number of replicas.
Procedure
View the current number of available replicas for the default
IngressController:$ oc get -n openshift-ingress-operator ingresscontrollers/default -o jsonpath='{$.status.availableReplicas}'Example output
2
Scale the default
IngressControllerto the desired number of replicas using theoc patchcommand. The following example scales the defaultIngressControllerto 3 replicas:$ oc patch -n openshift-ingress-operator ingresscontroller/default --patch '{"spec":{"replicas": 3}}' --type=mergeExample output
ingresscontroller.operator.openshift.io/default patched
Verify that the default
IngressControllerscaled to the number of replicas that you specified:$ oc get -n openshift-ingress-operator ingresscontrollers/default -o jsonpath='{$.status.availableReplicas}'Example output
3
TipYou can alternatively apply the following YAML to scale an Ingress Controller to three replicas:
apiVersion: operator.openshift.io/v1 kind: IngressController metadata: name: default namespace: openshift-ingress-operator spec: replicas: 3 1- 1
- If you need a different amount of replicas, change the
replicasvalue.
2.8.5. Configuring Ingress access logging
You can configure the Ingress Controller to enable access logs. If you have clusters that do not receive much traffic, then you can log to a sidecar. If you have high traffic clusters, to avoid exceeding the capacity of the logging stack or to integrate with a logging infrastructure outside of Red Hat OpenShift Service on AWS, you can forward logs to a custom syslog endpoint. You can also specify the format for access logs.
Container logging is useful to enable access logs on low-traffic clusters when there is no existing Syslog logging infrastructure, or for short-term use while diagnosing problems with the Ingress Controller.
Syslog is needed for high-traffic clusters where access logs could exceed the OpenShift Logging stack’s capacity, or for environments where any logging solution needs to integrate with an existing Syslog logging infrastructure. The Syslog use-cases can overlap.
Prerequisites
-
Log in as a user with
cluster-adminprivileges.
Procedure
Configure Ingress access logging to a sidecar.
To configure Ingress access logging, you must specify a destination using
spec.logging.access.destination. To specify logging to a sidecar container, you must specifyContainerspec.logging.access.destination.type. The following example is an Ingress Controller definition that logs to aContainerdestination:apiVersion: operator.openshift.io/v1 kind: IngressController metadata: name: default namespace: openshift-ingress-operator spec: replicas: 2 logging: access: destination: type: ContainerWhen you configure the Ingress Controller to log to a sidecar, the operator creates a container named
logsinside the Ingress Controller Pod:$ oc -n openshift-ingress logs deployment.apps/router-default -c logs
Example output
2020-05-11T19:11:50.135710+00:00 router-default-57dfc6cd95-bpmk6 router-default-57dfc6cd95-bpmk6 haproxy[108]: 174.19.21.82:39654 [11/May/2020:19:11:50.133] public be_http:hello-openshift:hello-openshift/pod:hello-openshift:hello-openshift:10.128.2.12:8080 0/0/1/0/1 200 142 - - --NI 1/1/0/0/0 0/0 "GET / HTTP/1.1"
Configure Ingress access logging to a Syslog endpoint.
To configure Ingress access logging, you must specify a destination using
spec.logging.access.destination. To specify logging to a Syslog endpoint destination, you must specifySyslogforspec.logging.access.destination.type. If the destination type isSyslog, you must also specify a destination endpoint usingspec.logging.access.destination.syslog.endpointand you can specify a facility usingspec.logging.access.destination.syslog.facility. The following example is an Ingress Controller definition that logs to aSyslogdestination:apiVersion: operator.openshift.io/v1 kind: IngressController metadata: name: default namespace: openshift-ingress-operator spec: replicas: 2 logging: access: destination: type: Syslog syslog: address: 1.2.3.4 port: 10514NoteThe
syslogdestination port must be UDP.
Configure Ingress access logging with a specific log format.
You can specify
spec.logging.access.httpLogFormatto customize the log format. The following example is an Ingress Controller definition that logs to asyslogendpoint with IP address 1.2.3.4 and port 10514:apiVersion: operator.openshift.io/v1 kind: IngressController metadata: name: default namespace: openshift-ingress-operator spec: replicas: 2 logging: access: destination: type: Syslog syslog: address: 1.2.3.4 port: 10514 httpLogFormat: '%ci:%cp [%t] %ft %b/%s %B %bq %HM %HU %HV'
Disable Ingress access logging.
To disable Ingress access logging, leave
spec.loggingorspec.logging.accessempty:apiVersion: operator.openshift.io/v1 kind: IngressController metadata: name: default namespace: openshift-ingress-operator spec: replicas: 2 logging: access: null
Allow the Ingress Controller to modify the HAProxy log length when using a sidecar.
Use
spec.logging.access.destination.syslog.maxLengthif you are usingspec.logging.access.destination.type: Syslog.apiVersion: operator.openshift.io/v1 kind: IngressController metadata: name: default namespace: openshift-ingress-operator spec: replicas: 2 logging: access: destination: type: Syslog syslog: address: 1.2.3.4 maxLength: 4096 port: 10514Use
spec.logging.access.destination.container.maxLengthif you are usingspec.logging.access.destination.type: Container.apiVersion: operator.openshift.io/v1 kind: IngressController metadata: name: default namespace: openshift-ingress-operator spec: replicas: 2 logging: access: destination: type: Container container: maxLength: 8192
2.8.6. Setting Ingress Controller thread count
A cluster administrator can set the thread count to increase the amount of incoming connections a cluster can handle. You can patch an existing Ingress Controller to increase the amount of threads.
Prerequisites
- The following assumes that you already created an Ingress Controller.
Procedure
Update the Ingress Controller to increase the number of threads:
$ oc -n openshift-ingress-operator patch ingresscontroller/default --type=merge -p '{"spec":{"tuningOptions": {"threadCount": 8}}}'NoteIf you have a node that is capable of running large amounts of resources, you can configure
spec.nodePlacement.nodeSelectorwith labels that match the capacity of the intended node, and configurespec.tuningOptions.threadCountto an appropriately high value.
2.8.7. Configuring an Ingress Controller to use an internal load balancer
When creating an Ingress Controller on cloud platforms, the Ingress Controller is published by a public cloud load balancer by default. As an administrator, you can create an Ingress Controller that uses an internal cloud load balancer.
If you want to change the scope for an IngressController, you can change the .spec.endpointPublishingStrategy.loadBalancer.scope parameter after the custom resource (CR) is created.
Figure 2.1. Diagram of LoadBalancer
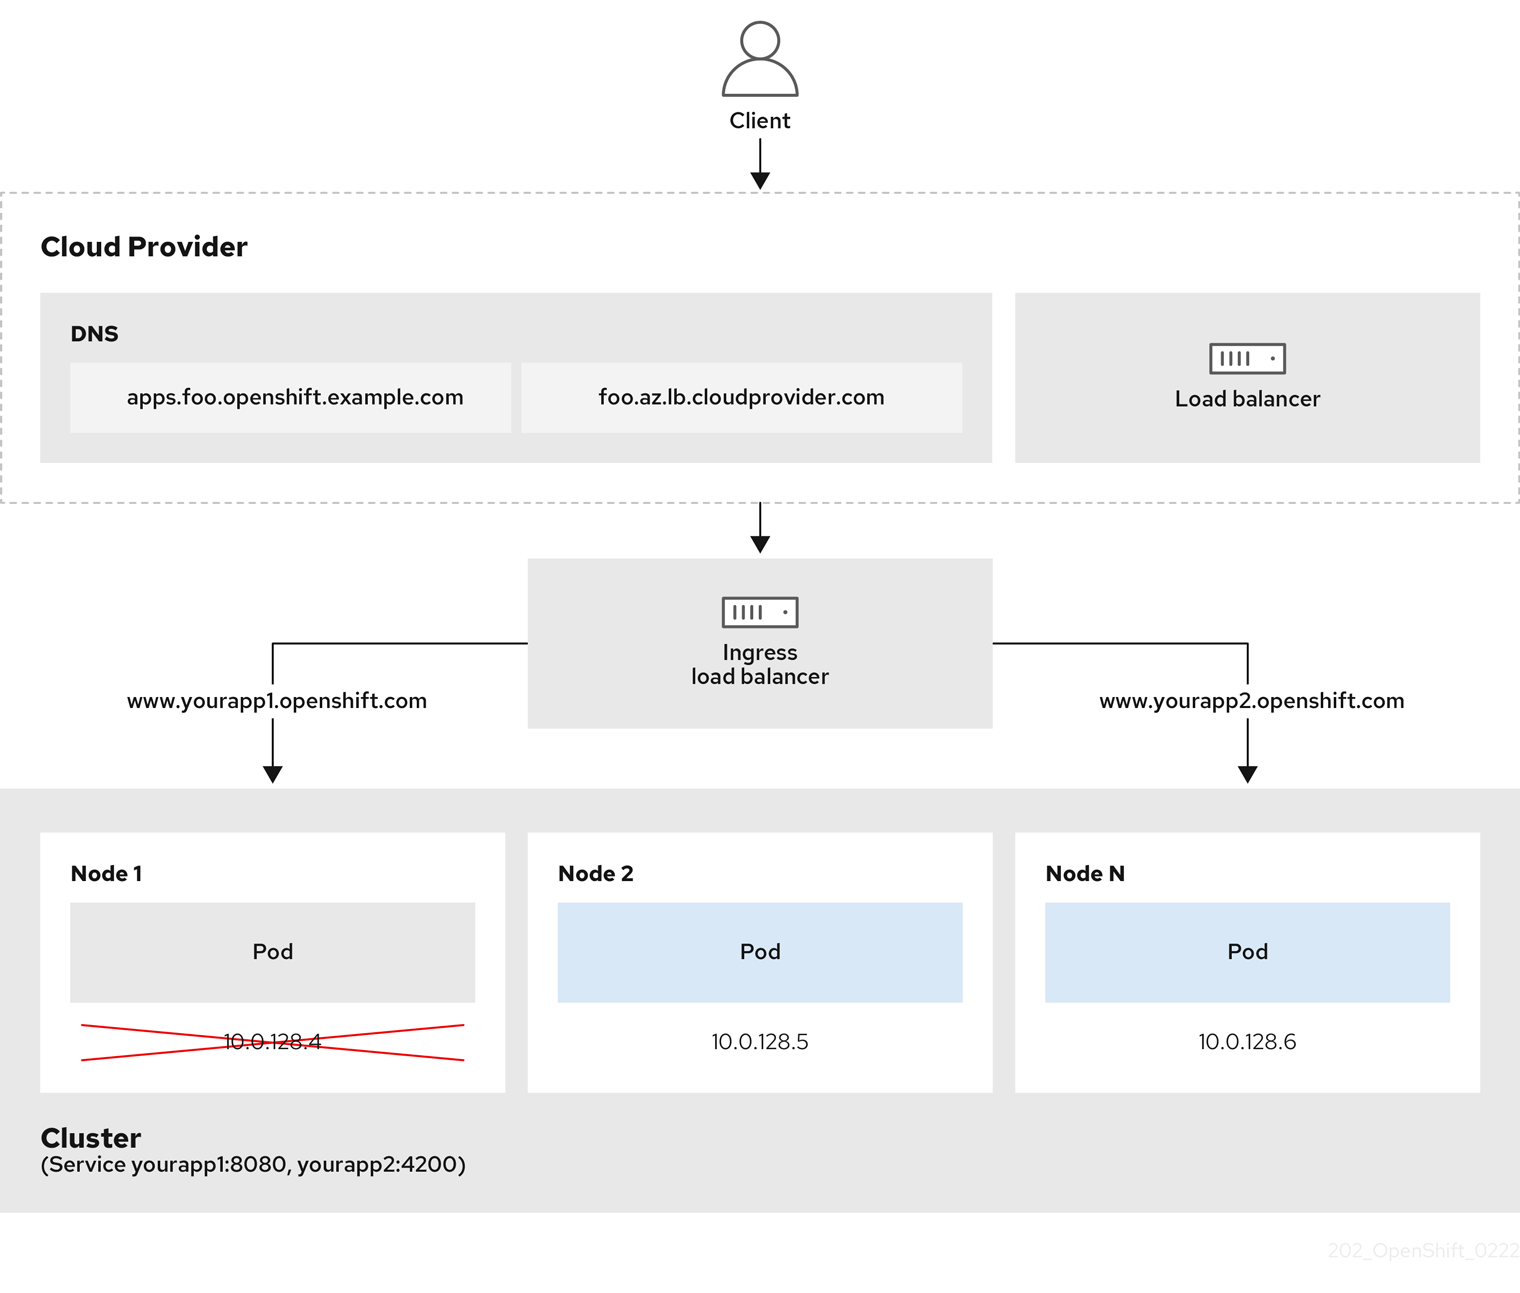
The preceding graphic shows the following concepts pertaining to Red Hat OpenShift Service on AWS Ingress LoadBalancerService endpoint publishing strategy:
- You can load balance externally, using the cloud provider load balancer, or internally, using the OpenShift Ingress Controller Load Balancer.
- You can use the single IP address of the load balancer and more familiar ports, such as 8080 and 4200 as shown on the cluster depicted in the graphic.
- Traffic from the external load balancer is directed at the pods, and managed by the load balancer, as depicted in the instance of a down node. See the Kubernetes Services documentation for implementation details.
Prerequisites
-
Install the OpenShift CLI (
oc). -
Log in as a user with
cluster-adminprivileges.
Procedure
Create an
IngressControllercustom resource (CR) in a file named<name>-ingress-controller.yaml, such as in the following example:apiVersion: operator.openshift.io/v1 kind: IngressController metadata: namespace: openshift-ingress-operator name: <name> 1 spec: domain: <domain> 2 endpointPublishingStrategy: type: LoadBalancerService loadBalancer: scope: Internal 3
Create the Ingress Controller defined in the previous step by running the following command:
$ oc create -f <name>-ingress-controller.yaml 1- 1
- Replace
<name>with the name of theIngressControllerobject.
Optional: Confirm that the Ingress Controller was created by running the following command:
$ oc --all-namespaces=true get ingresscontrollers
2.8.8. Setting the Ingress Controller health check interval
A cluster administrator can set the health check interval to define how long the router waits between two consecutive health checks. This value is applied globally as a default for all routes. The default value is 5 seconds.
Prerequisites
- The following assumes that you already created an Ingress Controller.
Procedure
Update the Ingress Controller to change the interval between back end health checks:
$ oc -n openshift-ingress-operator patch ingresscontroller/default --type=merge -p '{"spec":{"tuningOptions": {"healthCheckInterval": "8s"}}}'NoteTo override the
healthCheckIntervalfor a single route, use the route annotationrouter.openshift.io/haproxy.health.check.interval
2.8.9. Configuring the default Ingress Controller for your cluster to be internal
You can configure the default Ingress Controller for your cluster to be internal by deleting and recreating it.
If you want to change the scope for an IngressController, you can change the .spec.endpointPublishingStrategy.loadBalancer.scope parameter after the custom resource (CR) is created.
Prerequisites
-
Install the OpenShift CLI (
oc). -
Log in as a user with
cluster-adminprivileges.
Procedure
Configure the
defaultIngress Controller for your cluster to be internal by deleting and recreating it.$ oc replace --force --wait --filename - <<EOF apiVersion: operator.openshift.io/v1 kind: IngressController metadata: namespace: openshift-ingress-operator name: default spec: endpointPublishingStrategy: type: LoadBalancerService loadBalancer: scope: Internal EOF
2.8.10. Configuring the route admission policy
Administrators and application developers can run applications in multiple namespaces with the same domain name. This is for organizations where multiple teams develop microservices that are exposed on the same hostname.
Allowing claims across namespaces should only be enabled for clusters with trust between namespaces, otherwise a malicious user could take over a hostname. For this reason, the default admission policy disallows hostname claims across namespaces.
Prerequisites
- Cluster administrator privileges.
Procedure
Edit the
.spec.routeAdmissionfield of theingresscontrollerresource variable using the following command:$ oc -n openshift-ingress-operator patch ingresscontroller/default --patch '{"spec":{"routeAdmission":{"namespaceOwnership":"InterNamespaceAllowed"}}}' --type=mergeSample Ingress Controller configuration
spec: routeAdmission: namespaceOwnership: InterNamespaceAllowed ...TipYou can alternatively apply the following YAML to configure the route admission policy:
apiVersion: operator.openshift.io/v1
kind: IngressController
metadata:
  name: default
  namespace: openshift-ingress-operator
spec:
  routeAdmission:
    namespaceOwnership: InterNamespaceAllowed
2.8.11. Using wildcard routes
The HAProxy Ingress Controller has support for wildcard routes. The Ingress Operator uses wildcardPolicy to configure the ROUTER_ALLOW_WILDCARD_ROUTES environment variable of the Ingress Controller.
The default behavior of the Ingress Controller is to admit routes with a wildcard policy of None, which is backwards compatible with existing IngressController resources.
Procedure
Configure the wildcard policy.
Use the following command to edit the
IngressControllerresource:$ oc edit IngressController
Under
spec, set thewildcardPolicyfield toWildcardsDisallowedorWildcardsAllowed:spec: routeAdmission: wildcardPolicy: WildcardsDisallowed # or WildcardsAllowed
2.8.12. HTTP header configuration
Red Hat OpenShift Service on AWS provides different methods for working with HTTP headers. When setting or deleting headers, you can use specific fields in the Ingress Controller or an individual route to modify request and response headers. You can also set certain headers by using route annotations. The various ways of configuring headers can present challenges when working together.
You can only set or delete headers within an IngressController or Route CR, you cannot append them. If an HTTP header is set with a value, that value must be complete and not require appending in the future. In situations where it makes sense to append a header, such as the X-Forwarded-For header, use the spec.httpHeaders.forwardedHeaderPolicy field, instead of spec.httpHeaders.actions.
2.8.12.1. Order of precedence
When the same HTTP header is modified both in the Ingress Controller and in a route, HAProxy prioritizes the actions in certain ways depending on whether it is a request or response header.
- For HTTP response headers, actions specified in the Ingress Controller are executed after the actions specified in a route. This means that the actions specified in the Ingress Controller take precedence.
- For HTTP request headers, actions specified in a route are executed after the actions specified in the Ingress Controller. This means that the actions specified in the route take precedence.
For example, a cluster administrator sets the X-Frame-Options response header with the value DENY in the Ingress Controller using the following configuration:
Example IngressController spec
apiVersion: operator.openshift.io/v1
kind: IngressController
# ...
spec:
  httpHeaders:
    actions:
      response:
      - name: X-Frame-Options
        action:
          type: Set
          set:
            value: DENY
A route owner sets the same response header that the cluster administrator set in the Ingress Controller, but with the value SAMEORIGIN using the following configuration:
Example Route spec
apiVersion: route.openshift.io/v1
kind: Route
# ...
spec:
  httpHeaders:
    actions:
      response:
      - name: X-Frame-Options
        action:
          type: Set
          set:
            value: SAMEORIGIN
When both the IngressController spec and Route spec are configuring the X-Frame-Options header, then the value set for this header at the global level in the Ingress Controller will take precedence, even if a specific route allows frames.
This prioritzation occurs because the haproxy.config file uses the following logic, where the Ingress Controller is considered the front end and individual routes are considered the back end. The header value DENY applied to the front end configurations overrides the same header with the value SAMEORIGIN that is set in the back end:
frontend public
  http-response set-header X-Frame-Options 'DENY'

frontend fe_sni
  http-response set-header X-Frame-Options 'DENY'

frontend fe_no_sni
  http-response set-header X-Frame-Options 'DENY'

backend be_secure:openshift-monitoring:alertmanager-main
  http-response set-header X-Frame-Options 'SAMEORIGIN'
Additionally, any actions defined in either the Ingress Controller or a route override values set using route annotations.
2.8.12.2. Special case headers
The following headers are either prevented entirely from being set or deleted, or allowed under specific circumstances:
Table 2.2. Special case header configuration options
| Header name | Configurable using IngressController spec | Configurable using Route spec | Reason for disallowment | Configurable using another method |
|---|---|---|---|---|
|
| No | No |
The | No |
|
| No | Yes |
When the | No |
|
| No | No |
The |
Yes: the |
|
| No | No | The cookies that HAProxy sets are used for session tracking to map client connections to particular back-end servers. Allowing these headers to be set could interfere with HAProxy’s session affinity and restrict HAProxy’s ownership of a cookie. | Yes:
|
2.8.13. Setting or deleting HTTP request and response headers in an Ingress Controller
You can set or delete certain HTTP request and response headers for compliance purposes or other reasons. You can set or delete these headers either for all routes served by an Ingress Controller or for specific routes.
For example, you might want to migrate an application running on your cluster to use mutual TLS, which requires that your application checks for an X-Forwarded-Client-Cert request header, but the Red Hat OpenShift Service on AWS default Ingress Controller provides an X-SSL-Client-Der request header.
The following procedure modifies the Ingress Controller to set the X-Forwarded-Client-Cert request header, and delete the X-SSL-Client-Der request header.
Prerequisites
-
You have installed the OpenShift CLI (
oc). -
You have access to an Red Hat OpenShift Service on AWS cluster as a user with the
cluster-adminrole.
Procedure
Edit the Ingress Controller resource:
$ oc -n openshift-ingress-operator edit ingresscontroller/default
Replace the X-SSL-Client-Der HTTP request header with the X-Forwarded-Client-Cert HTTP request header:
apiVersion: operator.openshift.io/v1 kind: IngressController metadata: name: default namespace: openshift-ingress-operator spec: httpHeaders: actions: 1 request: 2 - name: X-Forwarded-Client-Cert 3 action: type: Set 4 set: value: "%{+Q}[ssl_c_der,base64]" 5 - name: X-SSL-Client-Der action: type: Delete- 1
- The list of actions you want to perform on the HTTP headers.
- 2
- The type of header you want to change. In this case, a request header.
- 3
- The name of the header you want to change. For a list of available headers you can set or delete, see HTTP header configuration.
- 4
- The type of action being taken on the header. This field can have the value
SetorDelete. - 5
- When setting HTTP headers, you must provide a
value. The value can be a string from a list of available directives for that header, for exampleDENY, or it can be a dynamic value that will be interpreted using HAProxy’s dynamic value syntax. In this case, a dynamic value is added.
NoteFor setting dynamic header values for HTTP responses, allowed sample fetchers are
res.hdrandssl_c_der. For setting dynamic header values for HTTP requests, allowed sample fetchers arereq.hdrandssl_c_der. Both request and response dynamic values can use thelowerandbase64converters.- Save the file to apply the changes.
2.8.14. Using X-Forwarded headers
You configure the HAProxy Ingress Controller to specify a policy for how to handle HTTP headers including Forwarded and X-Forwarded-For. The Ingress Operator uses the HTTPHeaders field to configure the ROUTER_SET_FORWARDED_HEADERS environment variable of the Ingress Controller.
Procedure
Configure the
HTTPHeadersfield for the Ingress Controller.Use the following command to edit the
IngressControllerresource:$ oc edit IngressController
Under
spec, set theHTTPHeaderspolicy field toAppend,Replace,IfNone, orNever:apiVersion: operator.openshift.io/v1 kind: IngressController metadata: name: default namespace: openshift-ingress-operator spec: httpHeaders: forwardedHeaderPolicy: Append
Example use cases
As a cluster administrator, you can:
Configure an external proxy that injects the
X-Forwarded-Forheader into each request before forwarding it to an Ingress Controller.To configure the Ingress Controller to pass the header through unmodified, you specify the
neverpolicy. The Ingress Controller then never sets the headers, and applications receive only the headers that the external proxy provides.Configure the Ingress Controller to pass the
X-Forwarded-Forheader that your external proxy sets on external cluster requests through unmodified.To configure the Ingress Controller to set the
X-Forwarded-Forheader on internal cluster requests, which do not go through the external proxy, specify theif-nonepolicy. If an HTTP request already has the header set through the external proxy, then the Ingress Controller preserves it. If the header is absent because the request did not come through the proxy, then the Ingress Controller adds the header.
As an application developer, you can:
Configure an application-specific external proxy that injects the
X-Forwarded-Forheader.To configure an Ingress Controller to pass the header through unmodified for an application’s Route, without affecting the policy for other Routes, add an annotation
haproxy.router.openshift.io/set-forwarded-headers: if-noneorhaproxy.router.openshift.io/set-forwarded-headers: neveron the Route for the application.NoteYou can set the
haproxy.router.openshift.io/set-forwarded-headersannotation on a per route basis, independent from the globally set value for the Ingress Controller.
2.8.15. Enabling HTTP/2 Ingress connectivity
You can enable transparent end-to-end HTTP/2 connectivity in HAProxy. It allows application owners to make use of HTTP/2 protocol capabilities, including single connection, header compression, binary streams, and more.
You can enable HTTP/2 connectivity for an individual Ingress Controller or for the entire cluster.
To enable the use of HTTP/2 for the connection from the client to HAProxy, a route must specify a custom certificate. A route that uses the default certificate cannot use HTTP/2. This restriction is necessary to avoid problems from connection coalescing, where the client re-uses a connection for different routes that use the same certificate.
The connection from HAProxy to the application pod can use HTTP/2 only for re-encrypt routes and not for edge-terminated or insecure routes. This restriction is because HAProxy uses Application-Level Protocol Negotiation (ALPN), which is a TLS extension, to negotiate the use of HTTP/2 with the back-end. The implication is that end-to-end HTTP/2 is possible with passthrough and re-encrypt and not with insecure or edge-terminated routes.
For non-passthrough routes, the Ingress Controller negotiates its connection to the application independently of the connection from the client. This means a client may connect to the Ingress Controller and negotiate HTTP/1.1, and the Ingress Controller may then connect to the application, negotiate HTTP/2, and forward the request from the client HTTP/1.1 connection using the HTTP/2 connection to the application. This poses a problem if the client subsequently tries to upgrade its connection from HTTP/1.1 to the WebSocket protocol, because the Ingress Controller cannot forward WebSocket to HTTP/2 and cannot upgrade its HTTP/2 connection to WebSocket. Consequently, if you have an application that is intended to accept WebSocket connections, it must not allow negotiating the HTTP/2 protocol or else clients will fail to upgrade to the WebSocket protocol.
Procedure
Enable HTTP/2 on a single Ingress Controller.
To enable HTTP/2 on an Ingress Controller, enter the
oc annotatecommand:$ oc -n openshift-ingress-operator annotate ingresscontrollers/<ingresscontroller_name> ingress.operator.openshift.io/default-enable-http2=true
Replace
<ingresscontroller_name>with the name of the Ingress Controller to annotate.
Enable HTTP/2 on the entire cluster.
To enable HTTP/2 for the entire cluster, enter the
oc annotatecommand:$ oc annotate ingresses.config/cluster ingress.operator.openshift.io/default-enable-http2=true
TipYou can alternatively apply the following YAML to add the annotation:
apiVersion: config.openshift.io/v1
kind: Ingress
metadata:
  name: cluster
  annotations:
    ingress.operator.openshift.io/default-enable-http2: "true"
2.8.16. Configuring the PROXY protocol for an Ingress Controller
A cluster administrator can configure the PROXY protocol when an Ingress Controller uses either the HostNetwork or NodePortService endpoint publishing strategy types. The PROXY protocol enables the load balancer to preserve the original client addresses for connections that the Ingress Controller receives. The original client addresses are useful for logging, filtering, and injecting HTTP headers. In the default configuration, the connections that the Ingress Controller receives only contain the source address that is associated with the load balancer.
This feature is not supported in cloud deployments. This restriction is because when Red Hat OpenShift Service on AWS runs in a cloud platform, and an IngressController specifies that a service load balancer should be used, the Ingress Operator configures the load balancer service and enables the PROXY protocol based on the platform requirement for preserving source addresses.
You must configure both Red Hat OpenShift Service on AWS and the external load balancer to either use the PROXY protocol or to use TCP.
The PROXY protocol is unsupported for the default Ingress Controller with installer-provisioned clusters on non-cloud platforms that use a Keepalived Ingress VIP.
Prerequisites
- You created an Ingress Controller.
Procedure
Edit the Ingress Controller resource:
$ oc -n openshift-ingress-operator edit ingresscontroller/default
Set the PROXY configuration:
If your Ingress Controller uses the hostNetwork endpoint publishing strategy type, set the
spec.endpointPublishingStrategy.hostNetwork.protocolsubfield toPROXY:Sample
hostNetworkconfiguration toPROXYspec: endpointPublishingStrategy: hostNetwork: protocol: PROXY type: HostNetworkIf your Ingress Controller uses the NodePortService endpoint publishing strategy type, set the
spec.endpointPublishingStrategy.nodePort.protocolsubfield toPROXY:Sample
nodePortconfiguration toPROXYspec: endpointPublishingStrategy: nodePort: protocol: PROXY type: NodePortService
2.8.17. Specifying an alternative cluster domain using the appsDomain option
As a cluster administrator, you can specify an alternative to the default cluster domain for user-created routes by configuring the appsDomain field. The appsDomain field is an optional domain for Red Hat OpenShift Service on AWS to use instead of the default, which is specified in the domain field. If you specify an alternative domain, it overrides the default cluster domain for the purpose of determining the default host for a new route.
For example, you can use the DNS domain for your company as the default domain for routes and ingresses for applications running on your cluster.
Prerequisites
- You deployed an Red Hat OpenShift Service on AWS cluster.
-
You installed the
occommand line interface.
Procedure
Configure the
appsDomainfield by specifying an alternative default domain for user-created routes.Edit the ingress
clusterresource:$ oc edit ingresses.config/cluster -o yaml
Edit the YAML file:
Sample
appsDomainconfiguration totest.example.comapiVersion: config.openshift.io/v1 kind: Ingress metadata: name: cluster spec: domain: apps.example.com 1 appsDomain: <test.example.com> 2
Verify that an existing route contains the domain name specified in the
appsDomainfield by exposing the route and verifying the route domain change:NoteWait for the
openshift-apiserverfinish rolling updates before exposing the route.Expose the route:
$ oc expose service hello-openshift
route.route.openshift.io/hello-openshift exposed
Example output:
$ oc get routes
NAME              HOST/PORT                                   PATH   SERVICES          PORT       TERMINATION   WILDCARD
hello-openshift   hello_openshift-<my_project>.test.example.com
hello-openshift   8080-tcp                 None
2.8.18. Converting HTTP header case
HAProxy lowercases HTTP header names by default, for example, changing Host: xyz.com to host: xyz.com. If legacy applications are sensitive to the capitalization of HTTP header names, use the Ingress Controller spec.httpHeaders.headerNameCaseAdjustments API field for a solution to accommodate legacy applications until they can be fixed.
Because Red Hat OpenShift Service on AWS includes HAProxy 2.6, be sure to add the necessary configuration by using spec.httpHeaders.headerNameCaseAdjustments before upgrading.
Prerequisites
-
You have installed the OpenShift CLI (
oc). -
You have access to the cluster as a user with the
cluster-adminrole.
Procedure
As a cluster administrator, you can convert the HTTP header case by entering the oc patch command or by setting the HeaderNameCaseAdjustments field in the Ingress Controller YAML file.
Specify an HTTP header to be capitalized by entering the
oc patchcommand.Enter the
oc patchcommand to change the HTTPhostheader toHost:$ oc -n openshift-ingress-operator patch ingresscontrollers/default --type=merge --patch='{"spec":{"httpHeaders":{"headerNameCaseAdjustments":["Host"]}}}'Annotate the route of the application:
$ oc annotate routes/my-application haproxy.router.openshift.io/h1-adjust-case=true
The Ingress Controller then adjusts the
hostrequest header as specified.
Specify adjustments using the
HeaderNameCaseAdjustmentsfield by configuring the Ingress Controller YAML file.The following example Ingress Controller YAML adjusts the
hostheader toHostfor HTTP/1 requests to appropriately annotated routes:Example Ingress Controller YAML
apiVersion: operator.openshift.io/v1
kind: IngressController
metadata:
  name: default
  namespace: openshift-ingress-operator
spec:
  httpHeaders:
    headerNameCaseAdjustments:
    - Host
The following example route enables HTTP response header name case adjustments using the
haproxy.router.openshift.io/h1-adjust-caseannotation:Example route YAML
apiVersion: route.openshift.io/v1 kind: Route metadata: annotations: haproxy.router.openshift.io/h1-adjust-case: true 1 name: my-application namespace: my-application spec: to: kind: Service name: my-application- 1
- Set
haproxy.router.openshift.io/h1-adjust-caseto true.
2.8.19. Using router compression
You configure the HAProxy Ingress Controller to specify router compression globally for specific MIME types. You can use the mimeTypes variable to define the formats of MIME types to which compression is applied. The types are: application, image, message, multipart, text, video, or a custom type prefaced by "X-". To see the full notation for MIME types and subtypes, see RFC1341.
Memory allocated for compression can affect the max connections. Additionally, compression of large buffers can cause latency, like heavy regex or long lists of regex.
Not all MIME types benefit from compression, but HAProxy still uses resources to try to compress if instructed to. Generally, text formats, such as html, css, and js, formats benefit from compression, but formats that are already compressed, such as image, audio, and video, benefit little in exchange for the time and resources spent on compression.
Procedure
Configure the
httpCompressionfield for the Ingress Controller.Use the following command to edit the
IngressControllerresource:$ oc edit -n openshift-ingress-operator ingresscontrollers/default
Under
spec, set thehttpCompressionpolicy field tomimeTypesand specify a list of MIME types that should have compression applied:apiVersion: operator.openshift.io/v1 kind: IngressController metadata: name: default namespace: openshift-ingress-operator spec: httpCompression: mimeTypes: - "text/html" - "text/css; charset=utf-8" - "application/json" ...
2.8.20. Exposing router metrics
You can expose the HAProxy router metrics by default in Prometheus format on the default stats port, 1936. The external metrics collection and aggregation systems such as Prometheus can access the HAProxy router metrics. You can view the HAProxy router metrics in a browser in the HTML and comma separated values (CSV) format.
Prerequisites
- You configured your firewall to access the default stats port, 1936.
Procedure
Get the router pod name by running the following command:
$ oc get pods -n openshift-ingress
Example output
NAME                              READY   STATUS    RESTARTS   AGE
router-default-76bfffb66c-46qwp   1/1     Running   0          11h
Get the router’s username and password, which the router pod stores in the
/var/lib/haproxy/conf/metrics-auth/statsUsernameand/var/lib/haproxy/conf/metrics-auth/statsPasswordfiles:Get the username by running the following command:
$ oc rsh <router_pod_name> cat metrics-auth/statsUsername
Get the password by running the following command:
$ oc rsh <router_pod_name> cat metrics-auth/statsPassword
Get the router IP and metrics certificates by running the following command:
$ oc describe pod <router_pod>
Get the raw statistics in Prometheus format by running the following command:
$ curl -u <user>:<password> http://<router_IP>:<stats_port>/metrics
Access the metrics securely by running the following command:
$ curl -u user:password https://<router_IP>:<stats_port>/metrics -k
Access the default stats port, 1936, by running the following command:
$ curl -u <user>:<password> http://<router_IP>:<stats_port>/metrics
Example 2.1. Example output
...
# HELP haproxy_backend_connections_total Total number of connections.
# TYPE haproxy_backend_connections_total gauge
haproxy_backend_connections_total{backend="http",namespace="default",route="hello-route"} 0
haproxy_backend_connections_total{backend="http",namespace="default",route="hello-route-alt"} 0
haproxy_backend_connections_total{backend="http",namespace="default",route="hello-route01"} 0
...
# HELP haproxy_exporter_server_threshold Number of servers tracked and the current threshold value.
# TYPE haproxy_exporter_server_threshold gauge
haproxy_exporter_server_threshold{type="current"} 11
haproxy_exporter_server_threshold{type="limit"} 500
...
# HELP haproxy_frontend_bytes_in_total Current total of incoming bytes.
# TYPE haproxy_frontend_bytes_in_total gauge
haproxy_frontend_bytes_in_total{frontend="fe_no_sni"} 0
haproxy_frontend_bytes_in_total{frontend="fe_sni"} 0
haproxy_frontend_bytes_in_total{frontend="public"} 119070
...
# HELP haproxy_server_bytes_in_total Current total of incoming bytes.
# TYPE haproxy_server_bytes_in_total gauge
haproxy_server_bytes_in_total{namespace="",pod="",route="",server="fe_no_sni",service=""} 0
haproxy_server_bytes_in_total{namespace="",pod="",route="",server="fe_sni",service=""} 0
haproxy_server_bytes_in_total{namespace="default",pod="docker-registry-5-nk5fz",route="docker-registry",server="10.130.0.89:5000",service="docker-registry"} 0
haproxy_server_bytes_in_total{namespace="default",pod="hello-rc-vkjqx",route="hello-route",server="10.130.0.90:8080",service="hello-svc-1"} 0
...
Launch the stats window by entering the following URL in a browser:
http://<user>:<password>@<router_IP>:<stats_port>
Optional: Get the stats in CSV format by entering the following URL in a browser:
http://<user>:<password>@<router_ip>:1936/metrics;csv
2.8.21. Customizing HAProxy error code response pages
As a cluster administrator, you can specify a custom error code response page for either 503, 404, or both error pages. The HAProxy router serves a 503 error page when the application pod is not running or a 404 error page when the requested URL does not exist. For example, if you customize the 503 error code response page, then the page is served when the application pod is not running, and the default 404 error code HTTP response page is served by the HAProxy router for an incorrect route or a non-existing route.
Custom error code response pages are specified in a config map then patched to the Ingress Controller. The config map keys have two available file names as follows: error-page-503.http and error-page-404.http.
Custom HTTP error code response pages must follow the HAProxy HTTP error page configuration guidelines. Here is an example of the default Red Hat OpenShift Service on AWS HAProxy router http 503 error code response page. You can use the default content as a template for creating your own custom page.
By default, the HAProxy router serves only a 503 error page when the application is not running or when the route is incorrect or non-existent. This default behavior is the same as the behavior on Red Hat OpenShift Service on AWS 4.8 and earlier. If a config map for the customization of an HTTP error code response is not provided, and you are using a custom HTTP error code response page, the router serves a default 404 or 503 error code response page.
If you use the Red Hat OpenShift Service on AWS default 503 error code page as a template for your customizations, the headers in the file require an editor that can use CRLF line endings.
Procedure
Create a config map named
my-custom-error-code-pagesin theopenshift-confignamespace:$ oc -n openshift-config create configmap my-custom-error-code-pages \ --from-file=error-page-503.http \ --from-file=error-page-404.http
ImportantIf you do not specify the correct format for the custom error code response page, a router pod outage occurs. To resolve this outage, you must delete or correct the config map and delete the affected router pods so they can be recreated with the correct information.
Patch the Ingress Controller to reference the
my-custom-error-code-pagesconfig map by name:$ oc patch -n openshift-ingress-operator ingresscontroller/default --patch '{"spec":{"httpErrorCodePages":{"name":"my-custom-error-code-pages"}}}' --type=mergeThe Ingress Operator copies the
my-custom-error-code-pagesconfig map from theopenshift-confignamespace to theopenshift-ingressnamespace. The Operator names the config map according to the pattern,<your_ingresscontroller_name>-errorpages, in theopenshift-ingressnamespace.Display the copy:
$ oc get cm default-errorpages -n openshift-ingress
Example output
NAME DATA AGE default-errorpages 2 25s 1- 1
- The example config map name is
default-errorpagesbecause thedefaultIngress Controller custom resource (CR) was patched.
Confirm that the config map containing the custom error response page mounts on the router volume where the config map key is the filename that has the custom HTTP error code response:
For 503 custom HTTP custom error code response:
$ oc -n openshift-ingress rsh <router_pod> cat /var/lib/haproxy/conf/error_code_pages/error-page-503.http
For 404 custom HTTP custom error code response:
$ oc -n openshift-ingress rsh <router_pod> cat /var/lib/haproxy/conf/error_code_pages/error-page-404.http
Verification
Verify your custom error code HTTP response:
Create a test project and application:
$ oc new-project test-ingress
$ oc new-app django-psql-example
For 503 custom http error code response:
- Stop all the pods for the application.
Run the following curl command or visit the route hostname in the browser:
$ curl -vk <route_hostname>
For 404 custom http error code response:
- Visit a non-existent route or an incorrect route.
Run the following curl command or visit the route hostname in the browser:
$ curl -vk <route_hostname>
Check if the
errorfileattribute is properly in thehaproxy.configfile:$ oc -n openshift-ingress rsh <router> cat /var/lib/haproxy/conf/haproxy.config | grep errorfile
2.8.22. Setting the Ingress Controller maximum connections
A cluster administrator can set the maximum number of simultaneous connections for OpenShift router deployments. You can patch an existing Ingress Controller to increase the maximum number of connections.
Prerequisites
- The following assumes that you already created an Ingress Controller
Procedure
Update the Ingress Controller to change the maximum number of connections for HAProxy:
$ oc -n openshift-ingress-operator patch ingresscontroller/default --type=merge -p '{"spec":{"tuningOptions": {"maxConnections": 7500}}}'WarningIf you set the
spec.tuningOptions.maxConnectionsvalue greater than the current operating system limit, the HAProxy process will not start. See the table in the "Ingress Controller configuration parameters" section for more information about this parameter.
2.9. Red Hat OpenShift Service on AWS Ingress Operator configurations
The following table details the components of the Ingress Operator and if Red Hat Site Reliability Engineers (SRE) maintains this component on Red Hat OpenShift Service on AWS clusters.
Table 2.3. Ingress Operator Responsibility Chart
| Ingress component | Managed by | Default configuration? |
|---|---|---|
| Scaling Ingress Controller | SRE | Yes |
| Ingress Operator thread count | SRE | Yes |
| Ingress Controller access logging | SRE | Yes |
| Ingress Controller sharding | SRE | Yes |
| Ingress Controller route admission policy | SRE | Yes |
| Ingress Controller wildcard routes | SRE | Yes |
| Ingress Controller X-Forwarded headers | SRE | Yes |
| Ingress Controller route compression | SRE | Yes |
Chapter 3. AWS Load Balancer Operator
The AWS Load Balancer Operator (ALBO) is an Operator supported by Red Hat that users can optionally install on SRE-managed Red Hat OpenShift Service on AWS (ROSA) clusters. The ALBO manages the lifecycle of the AWS-managed AWS Load Balancer Controller (ALBC) that provisions AWS Elastic Load Balancing v2 (ELBv2) services for applications running in ROSA clusters.
3.1. Installing an AWS Load Balancer Operator
You can install an AWS Load Balancer Operator (ALBO) if you meet certain requirements.
Prerequisites
- You have an existing Red Hat OpenShift Service on AWS (ROSA) cluster with bring-your-own-VPC (BYO-VPC) configuration across multiple availability zones (AZ) installed in STS mode.
-
You have access to the cluster as a user with the
dedicated-adminrole. - You have access to modify the VPC and subnets of the created ROSA cluster.
-
You have installed the ROSA CLI (
rosa). - You have installed the Amazon Web Services (AWS) CLI.
- You have installed the OpenShift CLI (oc).
- You are using OpenShift Container Platform (OCP) 4.13 or later.
When installing an ALBO for use with a ROSA cluster in an AWS Local Zone (LZ), you must enable the AWS LZ for the account, and AWS Elastic Load Balancing v2 (ELBv2) services must be available in the AWS LZ.
Procedure
Identify the cluster infrastructure ID and the cluster OpenID Connect (OIDC) DNS by running the following commands:
Identify the ROSA cluster INFRA ID:
$ rosa describe cluster --cluster=<cluster_name> | grep -i 'Infra ID'
or
$ oc get infrastructure cluster -o json | jq -r '.status.infrastructureName'
Identify the ROSA cluster OIDC DNS:
$ rosa describe cluster --cluster=<cluster_name> | grep -i 'OIDC'
Save the output from the commands. You will use this information in future steps within this procedure.
Create the AWS IAM policy required for the ALBO:
Log in to the ROSA cluster as a user with the
dedicated-adminrole and create a new project using the following command:$ oc new-project aws-load-balancer-operator
Assign the following trust policy to the newly-created AWS IAM role:
$ IDP='{Cluster_OIDC_Endpoint}' $ IDP_ARN="arn:aws:iam::{AWS_AccountNo}:oidc-provider/${IDP}" 1 $ cat <<EOF > albo-operator-trusted-policy.json { "Version": "2012-10-17", "Statement": [ { "Effect": "Allow", "Principal": { "Federated": "${IDP_ARN}" }, "Action": "sts:AssumeRoleWithWebIdentity", "Condition": { "StringEquals": { "${IDP}:sub": "system:serviceaccount:aws-load-balancer-operator:aws-load-balancer-operator-controller-manager" } } } ] } EOF- 1
- Replace '{AWS_AccountNo}' with your AWS account number and '{Cluster_OIDC_Endpoint}' with the OIDC DNS identified earlier in this procedure.
ImportantDo not include the
httpsportion of the OIDC DNS URL when replacing{Cluster_OIDC_Endpoint}with the OIDC DNS you identified earlier. Only the alphanumeric information that follows the/within the URL is needed.For more information on assigning trust policies to AWS IAM roles, see How to use trust policies with IAM roles.
Create and verify the role by using the generated trust policy:
$ aws iam create-role --role-name albo-operator --assume-role-policy-document file://albo-operator-trusted-policy.json
$ OPERATOR_ROLE_ARN=$(aws iam get-role --role-name albo-operator --output json | jq -r '.Role.Arn')
$ echo $OPERATOR_ROLE_ARN
For more information on creating AWS IAM roles, see Creating IAM roles.
Attach the operator’s permission policy to the role:
$ curl -o albo-operator-permission-policy.json https://raw.githubusercontent.com/alebedev87/aws-load-balancer-operator/aws-cli-commands-for-sts/hack/operator-permission-policy.json
aws iam put-role-policy --role-name albo-operator --policy-name perms-policy-albo-operator --policy-document file://albo-operator-permission-policy.json
For more information on adding AWS IAM permissions to AWS IAM roles, see Adding and removing IAM identity permissions.
Generate the operator’s AWS credentials:
$ cat <<EOF> albo-operator-aws-credentials.cfg
[default]
sts_regional_endpoints = regional
role_arn = ${OPERATOR_ROLE_ARN}
web_identity_token_file = /var/run/secrets/openshift/serviceaccount/token
EOF
For more information about formatting credentials files, see Using manual mode with Amazon Web Services Security Token Service.
Create the operator’s credentials secret with the generated AWS credentials:
$ oc -n aws-load-balancer-operator create secret generic aws-load-balancer-operator --from-file=credentials=albo-operator-aws-credentials.cfg
Create the AWS IAM policy required for the AWS Load Balancer Controller (ALBC):
Generate a trust policy file for your identity provider. The following example uses OpenID Connect:
$ IDP='{Cluster_OIDC_Endpoint}'
$ IDP_ARN="arn:aws:iam::{AWS_AccountNo}:oidc-provider/${IDP}"
$ cat <<EOF > albo-controller-trusted-policy.json
{
    "Version": "2012-10-17",
    "Statement": [
        {
            "Effect": "Allow",
            "Principal": {
                "Federated": "${IDP_ARN}"
            },
            "Action": "sts:AssumeRoleWithWebIdentity",
            "Condition": {
                "StringEquals": {
                    "${IDP}:sub": "system:serviceaccount:aws-load-balancer-operator:aws-load-balancer-controller-cluster"
                }
            }
        }
    ]
}
EOF
Create and verify the role by using the generated trust policy:
$ aws iam create-role --role-name albo-controller --assume-role-policy-document file://albo-controller-trusted-policy.json
$ CONTROLLER_ROLE_ARN=$(aws iam get-role --role-name albo-controller --output json | jq -r '.Role.Arn')
$ echo $CONTROLLER_ROLE_ARN
Attach the controller’s permission policy to the role:
$ curl -o albo-controller-permission-policy.json https://raw.githubusercontent.com/kubernetes-sigs/aws-load-balancer-controller/v2.4.7/docs/install/iam_policy.json
aws iam put-role-policy --role-name albo-controller --policy-name perms-policy-albo-controller --policy-document file://albo-controller-permission-policy.json
Generate the controller’s AWS credentials:
$ cat <<EOF > albo-controller-aws-credentials.cfg
[default]
sts_regional_endpoints = regional
role_arn = ${CONTROLLER_ROLE_ARN}
web_identity_token_file = /var/run/secrets/openshift/serviceaccount/token
EOF
Create the controller’s credentials secret by using the generated AWS credentials:
$ oc -n aws-load-balancer-operator create secret generic aws-load-balancer-controller-cluster --from-file=credentials=albo-controller-aws-credentials.cfg
Add the tags necessary for subnet discovery:
Add the following
{Key: Value}tag to the VPC hosting the ROSA cluster. Replace{Cluster Infra ID}with the Infra ID specified previously:* kubernetes.io/cluster/${Cluster Infra ID}:ownedAdd the following ELBv2
{Key: Value}tags to the private subnets and, optionally, to the public subnets:-
Private subnets:
kubernetes.io/role/internal-elb:1 Public subnets:
kubernetes.io/role/elb:1NoteInternet-facing and internal load balancers will be created within the AZ to which these subnets belong.
For more information on adding tags to AWS resources, including VPCs and subnets, see Tag your Amazon EC2 resources.
ImportantELBv2 resources (such as ALBs and NLBs) created by ALBO do not inherit custom tags set for ROSA clusters. You must set tags separately for these resources.
-
Private subnets:
Create ALBO:
apiVersion: operators.coreos.com/v1
kind: OperatorGroup
metadata:
  name: aws-load-balancer-operator
  namespace: aws-load-balancer-operator
spec:
  upgradeStrategy: Default
---
apiVersion: operators.coreos.com/v1alpha1
kind: Subscription
metadata:
  name: aws-load-balancer-operator
  namespace: aws-load-balancer-operator
spec:
  channel: stable-v1.0
  installPlanApproval: Automatic
  name: aws-load-balancer-operator
  source: redhat-operators
  sourceNamespace: openshift-marketplace
  startingCSV: aws-load-balancer-operator.v1.0.0
Create an AWS ALBC:
apiVersion: networking.olm.openshift.io/v1 kind: AWSLoadBalancerController metadata: name: cluster spec: subnetTagging: Manual credentials: name: aws-load-balancer-controller-clusterImportantBecause AWS ALBCs do not support creating ALBs associated with both AZs and AWS LZs, ROSA clusters can have ALBs associated exclusively with either AWS LZs or AZs but not both simultaneously.
For more information regarding AWS ALBC configurations, see the following topics:
Verification
Confirm successful installation by running the following commands:
Gather information about pods within the project:
$ oc get pods -n aws-load-balancer-operator
View the logs within the project:
$ oc logs -n aws-load-balancer-operator deployment/aws-load-balancer-operator-controller-manager -c manager
For detailed instructions on verifying that the ELBv2 was created for the application running in the ROSA cluster, see Creating an instance of AWS Load Balancer Controller.
3.2. Uninstalling an AWS Load Balancer Operator
To uninstall an AWS Load Balancer Operator (ALBO) and perform an overall cleanup of the associated resources, perform the following procedure.
Procedure
- Clean up the sample application by deleting the Load Balancers created and managed by the ALBO. For more information about deleting Load Balancers, see Delete an Application Load Balancer.
- Clean up the AWS VPC tags by removing the VPC tags that were added to the subnets for discovering subnets and for creating Application Load Balancers (ALBs). For more information, see Tag basics.
- Clean up ALBO components by deleting both the ALBO and the Application Load Balancer Controller (ALBC). For more information, see Deleting Operators from a cluster.
Chapter 4. OpenShift SDN default CNI network provider
4.1. Enabling multicast for a project
OpenShift SDN CNI is deprecated as of Red Hat OpenShift Service on AWS 4.14. As of Red Hat OpenShift Service on AWS 4.15, the network plugin is not an option for new installations. In a subsequent future release, the OpenShift SDN network plugin is planned to be removed and no longer supported. Red Hat will provide bug fixes and support for this feature until it is removed, but this feature will no longer receive enhancements. As an alternative to OpenShift SDN CNI, you can use OVN Kubernetes CNI instead.
4.1.1. About multicast
With IP multicast, data is broadcast to many IP addresses simultaneously.
- At this time, multicast is best used for low-bandwidth coordination or service discovery and not a high-bandwidth solution.
-
By default, network policies affect all connections in a namespace. However, multicast is unaffected by network policies. If multicast is enabled in the same namespace as your network policies, it is always allowed, even if there is a
deny-allnetwork policy. Cluster administrators should consider the implications to the exemption of multicast from network policies before enabling it.
Multicast traffic between Red Hat OpenShift Service on AWS pods is disabled by default. If you are using the OpenShift SDN network plugin, you can enable multicast on a per-project basis.
When using the OpenShift SDN network plugin in networkpolicy isolation mode:
-
Multicast packets sent by a pod will be delivered to all other pods in the project, regardless of
NetworkPolicyobjects. Pods might be able to communicate over multicast even when they cannot communicate over unicast. -
Multicast packets sent by a pod in one project will never be delivered to pods in any other project, even if there are
NetworkPolicyobjects that allow communication between the projects.
When using the OpenShift SDN network plugin in multitenant isolation mode:
- Multicast packets sent by a pod will be delivered to all other pods in the project.
- Multicast packets sent by a pod in one project will be delivered to pods in other projects only if each project is joined together and multicast is enabled in each joined project.
4.1.2. Enabling multicast between pods
You can enable multicast between pods for your project.
Prerequisites
-
Install the OpenShift CLI (
oc). -
You must log in to the cluster with a user that has the
cluster-adminor thededicated-adminrole.
Procedure
Run the following command to enable multicast for a project. Replace
<namespace>with the namespace for the project you want to enable multicast for.$ oc annotate netnamespace <namespace> \ netnamespace.network.openshift.io/multicast-enabled=true
Verification
To verify that multicast is enabled for a project, complete the following procedure:
Change your current project to the project that you enabled multicast for. Replace
<project>with the project name.$ oc project <project>
Create a pod to act as a multicast receiver:
$ cat <<EOF| oc create -f -
apiVersion: v1
kind: Pod
metadata:
  name: mlistener
  labels:
    app: multicast-verify
spec:
  containers:
    - name: mlistener
      image: registry.access.redhat.com/ubi9
      command: ["/bin/sh", "-c"]
      args:
        ["dnf -y install socat hostname && sleep inf"]
      ports:
        - containerPort: 30102
          name: mlistener
          protocol: UDP
EOF
Create a pod to act as a multicast sender:
$ cat <<EOF| oc create -f -
apiVersion: v1
kind: Pod
metadata:
  name: msender
  labels:
    app: multicast-verify
spec:
  containers:
    - name: msender
      image: registry.access.redhat.com/ubi9
      command: ["/bin/sh", "-c"]
      args:
        ["dnf -y install socat && sleep inf"]
EOF
In a new terminal window or tab, start the multicast listener.
Get the IP address for the Pod:
$ POD_IP=$(oc get pods mlistener -o jsonpath='{.status.podIP}')Start the multicast listener by entering the following command:
$ oc exec mlistener -i -t -- \
    socat UDP4-RECVFROM:30102,ip-add-membership=224.1.0.1:$POD_IP,fork EXEC:hostname
Start the multicast transmitter.
Get the pod network IP address range:
$ CIDR=$(oc get Network.config.openshift.io cluster \
    -o jsonpath='{.status.clusterNetwork[0].cidr}')
To send a multicast message, enter the following command:
$ oc exec msender -i -t -- \
    /bin/bash -c "echo | socat STDIO UDP4-DATAGRAM:224.1.0.1:30102,range=$CIDR,ip-multicast-ttl=64"
If multicast is working, the previous command returns the following output:
mlistener
Chapter 5. Network verification for ROSA clusters
Network verification checks run automatically when you deploy a Red Hat OpenShift Service on AWS (ROSA) cluster into an existing Virtual Private Cloud (VPC) or create an additional machine pool with a subnet that is new to your cluster. The checks validate your network configuration and highlight errors, enabling you to resolve configuration issues prior to deployment.
You can also run the network verification checks manually to validate the configuration for an existing cluster.
5.1. Understanding network verification for ROSA clusters
When you deploy a Red Hat OpenShift Service on AWS (ROSA) cluster into an existing Virtual Private Cloud (VPC) or create an additional machine pool with a subnet that is new to your cluster, network verification runs automatically. This helps you identify and resolve configuration issues prior to deployment.
When you prepare to install your cluster by using Red Hat OpenShift Cluster Manager, the automatic checks run after you input a subnet into a subnet ID field on the Virtual Private Cloud (VPC) subnet settings page. If you create your cluster by using the ROSA CLI (rosa) with the interactive mode, the checks run after you provide the required VPC network information. If you use the CLI without the interactive mode, the checks begin immediately prior to the cluster creation.
When you add a machine pool with a subnet that is new to your cluster, the automatic network verification checks the subnet to ensure that network connectivity is available before the machine pool is provisioned.
After automatic network verification completes, a record is sent to the service log. The record provides the results of the verification check, including any network configuration errors. You can resolve the identified issues before a deployment and the deployment has a greater chance of success.
You can also run the network verification manually for an existing cluster. This enables you to verify the network configuration for your cluster after making configuration changes. For steps to run the network verification checks manually, see Running the network verification manually.
5.2. Scope of the network verification checks
The network verification includes checks for each of the following requirements:
- The parent Virtual Private Cloud (VPC) exists.
- All specified subnets belong to the VPC.
-
The VPC has
enableDnsSupportenabled. -
The VPC has
enableDnsHostnamesenabled. - Egress is available to the required domain and port combinations that are specified in the AWS firewall prerequisites section.
5.3. Automatic network verification bypassing
You can bypass the automatic network verification if you want to deploy a Red Hat OpenShift Service on AWS (ROSA) cluster with known network configuration issues into an existing Virtual Private Cloud (VPC).
If you bypass the network verification when you create a cluster, the cluster has a limited support status. After installation, you can resolve the issues and then manually run the network verification. The limited support status is removed after the verification succeeds.
Bypassing automatic network verification by using OpenShift Cluster Manager
When you install a cluster into an existing VPC by using Red Hat OpenShift Cluster Manager, you can bypass the automatic verification by selecting Bypass network verification on the Virtual Private Cloud (VPC) subnet settings page.
5.4. Running the network verification manually
After installing a Red Hat OpenShift Service on AWS (ROSA) cluster, you can run the network verification checks manually by using Red Hat OpenShift Cluster Manager or the ROSA CLI (rosa).
Running the network verification manually using OpenShift Cluster Manager
You can manually run the network verification checks for an existing Red Hat OpenShift Service on AWS (ROSA) cluster by using Red Hat OpenShift Cluster Manager.
Prerequisites
- You have an existing ROSA cluster.
- You are the cluster owner or you have the cluster editor role.
Procedure
- Navigate to OpenShift Cluster Manager and select your cluster.
- Select Verify networking from the Actions drop-down menu.
Running the network verification manually using the CLI
You can manually run the network verification checks for an existing Red Hat OpenShift Service on AWS (ROSA) cluster by using the ROSA CLI (rosa).
When you run the network verification, you can specify a set of VPC subnet IDs or a cluster name.
Prerequisites
-
You have installed and configured the latest ROSA CLI (
rosa) on your installation host. - You have an existing ROSA cluster.
- You are the cluster owner or you have the cluster editor role.
Procedure
Verify the network configuration by using one of the following methods:
Verify the network configuration by specifying the cluster name. The subnet IDs are automatically detected:
$ rosa verify network --cluster <cluster_name> 1- 1
- Replace
<cluster_name>with the name of your cluster.
Example output
I: Verifying the following subnet IDs are configured correctly: [subnet-03146b9b52b6024cb subnet-03146b9b52b2034cc]
I: subnet-03146b9b52b6024cb: pending
I: subnet-03146b9b52b2034cc: passed
I: Run the following command to wait for verification to all subnets to complete:
rosa verify network --watch --status-only --region us-east-1 --subnet-ids subnet-03146b9b52b6024cb,subnet-03146b9b52b2034cc
Ensure that verification to all subnets has been completed:
$ rosa verify network --watch \ 1
                      --status-only \ 2
                      --region <region_name> \ 3
                      --subnet-ids subnet-03146b9b52b6024cb,subnet-03146b9b52b2034cc 4
- 1
- The
watchflag causes the command to complete after all the subnets under test are in a failed or passed state. - 2
- The
status-onlyflag does not trigger a run of network verification but returns the current state, for example,subnet-123 (verification still in-progress). By default, without this option, a call to this command always triggers a verification of the specified subnets. - 3
- Use a specific AWS region that overrides the AWS_REGION environment variable.
- 4
- Enter a list of subnet IDs separated by commas to verify. If any of the subnets do not exist, the error message
Network verification for subnet 'subnet-<subnet_number> not founddisplays and no subnets are checked.
Example output
I: Checking the status of the following subnet IDs: [subnet-03146b9b52b6024cb subnet-03146b9b52b2034cc]
I: subnet-03146b9b52b6024cb: passed
I: subnet-03146b9b52b2034cc: passed
TipTo output the full list of verification tests, you can include the
--debugargument when you run therosa verify networkcommand.
Verify the network configuration by specifying the VPC subnets IDs. Replace
<region_name>with your AWS region and<AWS_account_ID>with your AWS account ID:$ rosa verify network --subnet-ids 03146b9b52b6024cb,subnet-03146b9b52b2034cc --region <region_name> --role-arn arn:aws:iam::<AWS_account_ID>:role/my-Installer-Role
Example output
I: Verifying the following subnet IDs are configured correctly: [subnet-03146b9b52b6024cb subnet-03146b9b52b2034cc]
I: subnet-03146b9b52b6024cb: pending
I: subnet-03146b9b52b2034cc: passed
I: Run the following command to wait for verification to all subnets to complete:
rosa verify network --watch --status-only --region us-east-1 --subnet-ids subnet-03146b9b52b6024cb,subnet-03146b9b52b2034cc
Ensure that verification to all subnets has been completed:
$ rosa verify network --watch --status-only --region us-east-1 --subnet-ids subnet-03146b9b52b6024cb,subnet-03146b9b52b2034cc
Example output
I: Checking the status of the following subnet IDs: [subnet-03146b9b52b6024cb subnet-03146b9b52b2034cc]
I: subnet-03146b9b52b6024cb: passed
I: subnet-03146b9b52b2034cc: passed
Chapter 6. Configuring a cluster-wide proxy
If you are using an existing Virtual Private Cloud (VPC), you can configure a cluster-wide proxy during a Red Hat OpenShift Service on AWS (ROSA) cluster installation or after the cluster is installed. When you enable a proxy, the core cluster components are denied direct access to the internet, but the proxy does not affect user workloads.
Only cluster system egress traffic is proxied, including calls to the cloud provider API.
If you use a cluster-wide proxy, you are responsible for maintaining the availability of the proxy to the cluster. If the proxy becomes unavailable, then it might impact the health and supportability of the cluster.
6.1. Prerequisites for configuring a cluster-wide proxy
To configure a cluster-wide proxy, you must meet the following requirements. These requirements are valid when you configure a proxy during installation or postinstallation.
General requirements
- You are the cluster owner.
- Your account has sufficient privileges.
- You have an existing Virtual Private Cloud (VPC) for your cluster.
- The proxy can access the VPC for the cluster and the private subnets of the VPC. The proxy is also accessible from the VPC for the cluster and from the private subnets of the VPC.
You have added the following endpoints to your VPC endpoint:
-
ec2.<aws_region>.amazonaws.com -
elasticloadbalancing.<aws_region>.amazonaws.com s3.<aws_region>.amazonaws.comThese endpoints are required to complete requests from the nodes to the AWS EC2 API. Because the proxy works at the container level and not at the node level, you must route these requests to the AWS EC2 API through the AWS private network. Adding the public IP address of the EC2 API to your allowlist in your proxy server is not enough.
NoteWhen using a cluster-wide proxy, you must configure the
s3.<aws_region>.amazonaws.comendpoint as typeGateway. Also, you can configure theec2.<aws_region>.amazonaws.comandelasticloadbalancing.<aws_region>.amazonaws.comendpoints only as typeInterface.
-
Network requirements
If your proxy re-encrypts egress traffic, you must create exclusions to the domain and port combinations. The following table offers guidance into these exceptions.
Your proxy must exclude re-encrypting the following OpenShift URLs:
Address Protocol/Port Function observatorium-mst.api.openshift.comhttps/443
Required. Used for Managed OpenShift-specific telemetry.
sso.redhat.comhttps/443
The https://cloud.redhat.com/openshift site uses authentication from sso.redhat.com to download the cluster pull secret and use Red Hat SaaS solutions to facilitate monitoring of your subscriptions, cluster inventory, and chargeback reporting.
Your proxy must exclude re-encrypting the following site reliability engineering (SRE) and management URLs:
Address Protocol/Port Function *.osdsecuritylogs.splunkcloud.comOR
inputs1.osdsecuritylogs.splunkcloud.cominputs2.osdsecuritylogs.splunkcloud.cominputs4.osdsecuritylogs.splunkcloud.cominputs5.osdsecuritylogs.splunkcloud.cominputs6.osdsecuritylogs.splunkcloud.cominputs7.osdsecuritylogs.splunkcloud.cominputs8.osdsecuritylogs.splunkcloud.cominputs9.osdsecuritylogs.splunkcloud.cominputs10.osdsecuritylogs.splunkcloud.cominputs11.osdsecuritylogs.splunkcloud.cominputs12.osdsecuritylogs.splunkcloud.cominputs13.osdsecuritylogs.splunkcloud.cominputs14.osdsecuritylogs.splunkcloud.cominputs15.osdsecuritylogs.splunkcloud.comtcp/9997
Used by the splunk-forwarder-operator as a log forwarding endpoint to be used by Red Hat SRE for log-based alerting.
http-inputs-osdsecuritylogs.splunkcloud.comhttps/443
Used by the splunk-forwarder-operator as a log forwarding endpoint to be used by Red Hat SRE for log-based alerting.
ImportantThe use of a proxy server to perform TLS re-encryption is currently not supported if the server is acting as a transparent forward proxy where it is not configured on-cluster via the
--http-proxyor--https-proxyarguments.A transparent forward proxy intercepts the cluster traffic, but it is not actually configured on the cluster itself.
Additional Resources
- For the installation prerequisites for ROSA clusters that use the AWS Security Token Service (STS), see AWS prerequisites for ROSA with STS.
- For the installation prerequisites for ROSA clusters that do not use STS, see AWS prerequisites for ROSA.
6.2. Responsibilities for additional trust bundles
If you supply an additional trust bundle, you are responsible for the following requirements:
- Ensuring that the contents of the additional trust bundle are valid
- Ensuring that the certificates, including intermediary certificates, contained in the additional trust bundle have not expired
- Tracking the expiry and performing any necessary renewals for certificates contained in the additional trust bundle
- Updating the cluster configuration with the updated additional trust bundle
6.3. Configuring a proxy during installation
You can configure an HTTP or HTTPS proxy when you install a Red Hat OpenShift Service on AWS (ROSA) cluster into an existing Virtual Private Cloud (VPC). You can configure the proxy during installation by using Red Hat OpenShift Cluster Manager or the ROSA CLI (rosa).
6.3.1. Configuring a proxy during installation using OpenShift Cluster Manager
If you are installing a Red Hat OpenShift Service on AWS (ROSA) cluster into an existing Virtual Private Cloud (VPC), you can use Red Hat OpenShift Cluster Manager to enable a cluster-wide HTTP or HTTPS proxy during installation.
Prior to the installation, you must verify that the proxy is accessible from the VPC that the cluster is being installed into. The proxy must also be accessible from the private subnets of the VPC.
For detailed steps to configure a cluster-wide proxy during installation by using OpenShift Cluster Manager, see Creating a cluster with customizations by using OpenShift Cluster Manager.
6.3.2. Configuring a proxy during installation using the CLI
If you are installing a Red Hat OpenShift Service on AWS (ROSA) cluster into an existing Virtual Private Cloud (VPC), you can use the ROSA CLI (rosa) to enable a cluster-wide HTTP or HTTPS proxy during installation.
The following procedure provides details about the ROSA CLI (rosa) arguments that are used to configure a cluster-wide proxy during installation. For general installation steps using the ROSA CLI, see Creating a cluster with customizations using the CLI.
Prerequisites
- You have verified that the proxy is accessible from the VPC that the cluster is being installed into. The proxy must also be accessible from the private subnets of the VPC.
Procedure
Specify a proxy configuration when you create your cluster:
$ rosa create cluster \
 <other_arguments_here> \
 --additional-trust-bundle-file <path_to_ca_bundle_file> \ 1 2 3
 --http-proxy http://<username>:<password>@<ip>:<port> \ 4 5
 --https-proxy https://<username>:<password>@<ip>:<port> \ 6 7
 --no-proxy example.com 8
- 1 4 6
- The
additional-trust-bundle-file,http-proxy, andhttps-proxyarguments are all optional. - 2
- If you use the
additional-trust-bundle-fileargument without anhttp-proxyorhttps-proxyargument, the trust bundle is added to the trust store and used to verify cluster system egress traffic. In that scenario, the bundle is not configured to be used with a proxy. - 3
- The
additional-trust-bundle-fileargument is a file path pointing to a bundle of PEM-encoded X.509 certificates, which are all concatenated together. TheadditionalTrustBundleparameter is required unless the identity certificate of the proxy is signed by an authority from the RHCOS trust bundle. If you use an MITM transparent proxy network that does not require additional proxy configuration but requires additional CAs, you must provide the MITM CA certificate. - 5 7
- The
http-proxyandhttps-proxyarguments must point to a valid URL. - 8
- A comma-separated list of destination domain names, IP addresses, or network CIDRs to exclude proxying.
Preface a domain with
.to match subdomains only. For example,.y.commatchesx.y.com, but noty.com. Use*to bypass proxy for all destinations. If you scale up workers that are not included in the network defined by thenetworking.machineNetwork[].cidrfield from the installation configuration, you must add them to this list to prevent connection issues.This field is ignored if neither the
httpProxyorhttpsProxyfields are set.
6.4. Configuring a proxy after installation
You can configure an HTTP or HTTPS proxy after you install a Red Hat OpenShift Service on AWS (ROSA) cluster into an existing Virtual Private Cloud (VPC). You can configure the proxy after installation by using Red Hat OpenShift Cluster Manager or the ROSA CLI (rosa).
6.4.1. Configuring a proxy after installation using OpenShift Cluster Manager
You can use Red Hat OpenShift Cluster Manager to add a cluster-wide proxy configuration to an existing Red Hat OpenShift Service on AWS cluster in a Virtual Private Cloud (VPC).
You can also use OpenShift Cluster Manager to update an existing cluster-wide proxy configuration. For example, you might need to update the network address for the proxy or replace the additional trust bundle if any of the certificate authorities for the proxy expire.
The cluster applies the proxy configuration to the control plane and compute nodes. While applying the configuration, each cluster node is temporarily placed in an unschedulable state and drained of its workloads. Each node is restarted as part of the process.
Prerequisites
- You have an Red Hat OpenShift Service on AWS cluster .
- Your cluster is deployed in a VPC.
Procedure
- Navigate to OpenShift Cluster Manager and select your cluster.
- Under the Virtual Private Cloud (VPC) section on the Networking page, click Edit cluster-wide proxy.
On the Edit cluster-wide proxy page, provide your proxy configuration details:
Enter a value in at least one of the following fields:
- Specify a valid HTTP proxy URL.
- Specify a valid HTTPS proxy URL.
In the Additional trust bundle field, provide a PEM encoded X.509 certificate bundle. If you are replacing an existing trust bundle file, select Replace file to view the field. The bundle is added to the trusted certificate store for the cluster nodes. An additional trust bundle file is required unless the identity certificate for the proxy is signed by an authority from the Red Hat Enterprise Linux CoreOS (RHCOS) trust bundle.
If you use an MITM transparent proxy network that does not require additional proxy configuration but requires additional certificate authorities (CAs), you must provide the MITM CA certificate.
NoteIf you upload an additional trust bundle file without specifying an HTTP or HTTPS proxy URL, the bundle is set on the cluster but is not configured to be used with the proxy.
- Click Confirm.
Verification
- Under the Virtual Private Cloud (VPC) section on the Networking page, verify that the proxy configuration for your cluster is as expected.
6.4.2. Configuring a proxy after installation using the CLI
You can use the Red Hat OpenShift Service on AWS (ROSA) CLI (rosa) to add a cluster-wide proxy configuration to an existing ROSA cluster in a Virtual Private Cloud (VPC).
You can also use rosa to update an existing cluster-wide proxy configuration. For example, you might need to update the network address for the proxy or replace the additional trust bundle if any of the certificate authorities for the proxy expire.
The cluster applies the proxy configuration to the control plane and compute nodes. While applying the configuration, each cluster node is temporarily placed in an unschedulable state and drained of its workloads. Each node is restarted as part of the process.
Prerequisites
-
You have installed and configured the latest ROSA (
rosa) and OpenShift (oc) CLIs on your installation host. - You have a ROSA cluster that is deployed in a VPC.
Procedure
Edit the cluster configuration to add or update the cluster-wide proxy details:
$ rosa edit cluster \
 --cluster $CLUSTER_NAME \
 --additional-trust-bundle-file <path_to_ca_bundle_file> \ 1 2 3
 --http-proxy http://<username>:<password>@<ip>:<port> \ 4 5
 --https-proxy https://<username>:<password>@<ip>:<port> \ 6 7
  --no-proxy example.com 8
- 1 4 6
- The
additional-trust-bundle-file,http-proxy, andhttps-proxyarguments are all optional. - 2
- If you use the
additional-trust-bundle-fileargument without anhttp-proxyorhttps-proxyargument, the trust bundle is added to the trust store and used to verify cluster system egress traffic. In that scenario, the bundle is not configured to be used with a proxy. - 3
- The
additional-trust-bundle-fileargument is a file path pointing to a bundle of PEM-encoded X.509 certificates, which are all concatenated together. TheadditionalTrustBundleparameter is required unless the identity certificate of the proxy is signed by an authority from the RHCOS trust bundle. If you use an MITM transparent proxy network that does not require additional proxy configuration but requires additional CAs, you must provide the MITM CA certificate.NoteYou should not attempt to change the proxy or additional trust bundle configuration on the cluster directly. These changes must be applied by using the ROSA CLI (
rosa) or Red Hat OpenShift Cluster Manager. Any changes that are made directly to the cluster will be reverted automatically. - 5 7
- The
http-proxyandhttps-proxyarguments must point to a valid URL. - 8
- A comma-separated list of destination domain names, IP addresses, or network CIDRs to exclude proxying.
Preface a domain with
.to match subdomains only. For example,.y.commatchesx.y.com, but noty.com. Use*to bypass proxy for all destinations. If you scale up workers that are not included in the network defined by thenetworking.machineNetwork[].cidrfield from the installation configuration, you must add them to this list to prevent connection issues.This field is ignored if neither the
httpProxyorhttpsProxyfields are set.
Verification
List the status of the machine config pools and verify that they are updated:
$ oc get machineconfigpools
Example output
NAME     CONFIG                                             UPDATED   UPDATING   DEGRADED   MACHINECOUNT   READYMACHINECOUNT   UPDATEDMACHINECOUNT   DEGRADEDMACHINECOUNT   AGE
master   rendered-master-d9a03f612a432095dcde6dcf44597d90   True      False      False      3              3                   3                     0                      31h
worker   rendered-worker-f6827a4efe21e155c25c21b43c46f65e   True      False      False      6              6                   6                     0                      31h
Display the proxy configuration for your cluster and verify that the details are as expected:
$ oc get proxy cluster -o yaml
Example output
apiVersion: config.openshift.io/v1
kind: Proxy
spec:
  httpProxy: http://proxy.host.domain:<port>
  httpsProxy: https://proxy.host.domain:<port>
  <...more...>
status:
  httpProxy: http://proxy.host.domain:<port>
  httpsProxy: https://proxy.host.domain:<port>
  <...more...>
6.5. Removing a cluster-wide proxy
You can remove your cluster-wide proxy by using the ROSA CLI. After removing the cluster, you should also remove any trust bundles that are added to the cluster.
6.5.1. Removing the cluster-wide proxy using CLI
You must use the Red Hat OpenShift Service on AWS (ROSA) CLI, rosa, to remove the proxy’s address from your cluster.
Prerequisites
- You must have cluster administrator privileges.
-
You have installed the ROSA CLI (
rosa).
Procedure
Use the
rosa editcommand to modify the proxy. You must pass empty strings to the--http-proxyand--https-proxyarguments to clear the proxy from the cluster:$ rosa edit cluster -c <cluster_name> --http-proxy "" --https-proxy ""
NoteWhile your proxy might only use one of the proxy arguments, the empty fields are ignored, so passing empty strings to both the
--http-proxyand--https-proxyarguments do not cause any issues.Example Output
I: Updated cluster <cluster_name>
Verification
You can verify that the proxy has been removed from the cluster by using the
rosa describecommand:$ rosa describe cluster -c <cluster_name>
Before removal, the proxy IP displays in a proxy section:
Name:                       <cluster_name>
ID:                         <cluster_internal_id>
External ID:                <cluster_external_id>
OpenShift Version:          4.0
Channel Group:              stable
DNS:                        <dns>
AWS Account:                <aws_account_id>
API URL:                    <api_url>
Console URL:                <console_url>
Region:                     us-east-1
Multi-AZ:                   false
Nodes:
 - Control plane:           3
 - Infra:                   2
 - Compute:                 2
Network:
 - Type:                    OVNKubernetes
 - Service CIDR:            <service_cidr>
 - Machine CIDR:            <machine_cidr>
 - Pod CIDR:                <pod_cidr>
 - Host Prefix:             <host_prefix>
Proxy:
 - HTTPProxy:               <proxy_url>
Additional trust bundle:    REDACTED
After removing the proxy, the proxy section is removed:
Name:                       <cluster_name>
ID:                         <cluster_internal_id>
External ID:                <cluster_external_id>
OpenShift Version:          4.0
Channel Group:              stable
DNS:                        <dns>
AWS Account:                <aws_account_id>
API URL:                    <api_url>
Console URL:                <console_url>
Region:                     us-east-1
Multi-AZ:                   false
Nodes:
 - Control plane:           3
 - Infra:                   2
 - Compute:                 2
Network:
 - Type:                    OVNKubernetes
 - Service CIDR:            <service_cidr>
 - Machine CIDR:            <machine_cidr>
 - Pod CIDR:                <pod_cidr>
 - Host Prefix:             <host_prefix>
Additional trust bundle:    REDACTED
6.5.2. Removing certificate authorities on a Red Hat OpenShift Service on AWS cluster
You can remove certificate authorities (CA) from your cluster with the Red Hat OpenShift Service on AWS (ROSA) CLI, rosa.
Prerequisites
- You must have cluster administrator privileges.
-
You have installed the ROSA CLI (
rosa). - Your cluster has certificate authorities added.
Procedure
Use the
rosa editcommand to modify the CA trust bundle. You must pass empty strings to the--additional-trust-bundle-fileargument to clear the trust bundle from the cluster:$ rosa edit cluster -c <cluster_name> --additional-trust-bundle-file ""
Example Output
I: Updated cluster <cluster_name>
Verification
You can verify that the trust bundle has been removed from the cluster by using the
rosa describecommand:$ rosa describe cluster -c <cluster_name>
Before removal, the Additional trust bundle section appears, redacting its value for security purposes:
Name:                       <cluster_name>
ID:                         <cluster_internal_id>
External ID:                <cluster_external_id>
OpenShift Version:          4.0
Channel Group:              stable
DNS:                        <dns>
AWS Account:                <aws_account_id>
API URL:                    <api_url>
Console URL:                <console_url>
Region:                     us-east-1
Multi-AZ:                   false
Nodes:
 - Control plane:           3
 - Infra:                   2
 - Compute:                 2
Network:
 - Type:                    OVNKubernetes
 - Service CIDR:            <service_cidr>
 - Machine CIDR:            <machine_cidr>
 - Pod CIDR:                <pod_cidr>
 - Host Prefix:             <host_prefix>
Proxy:
 - HTTPProxy:               <proxy_url>
Additional trust bundle:    REDACTED
After removing the proxy, the Additional trust bundle section is removed:
Name:                       <cluster_name>
ID:                         <cluster_internal_id>
External ID:                <cluster_external_id>
OpenShift Version:          4.0
Channel Group:              stable
DNS:                        <dns>
AWS Account:                <aws_account_id>
API URL:                    <api_url>
Console URL:                <console_url>
Region:                     us-east-1
Multi-AZ:                   false
Nodes:
 - Control plane:           3
 - Infra:                   2
 - Compute:                 2
Network:
 - Type:                    OVNKubernetes
 - Service CIDR:            <service_cidr>
 - Machine CIDR:            <machine_cidr>
 - Pod CIDR:                <pod_cidr>
 - Host Prefix:             <host_prefix>
Proxy:
 - HTTPProxy:               <proxy_url>
Chapter 7. CIDR range definitions
You must specify non-overlapping ranges for the following CIDR ranges.
Machine CIDR ranges cannot be changed after creating your cluster.
When specifying subnet CIDR ranges, ensure that the subnet CIDR range is within the defined Machine CIDR. You must verify that the subnet CIDR ranges allow for enough IP addresses for all intended workloads, including at least eight IP addresses for possible AWS Load Balancers.
OVN-Kubernetes, the default network provider in Red Hat OpenShift Service on AWS 4.11 and later, uses the 100.64.0.0/16 IP address range internally. If your cluster uses OVN-Kubernetes, do not include the 100.64.0.0/16 IP address range in any other CIDR definitions in your cluster.
7.1. Machine CIDR
In the Machine CIDR field, you must specify the IP address range for machines or cluster nodes. This range must encompass all CIDR address ranges for your virtual private cloud (VPC) subnets. Subnets must be contiguous. A minimum IP address range of 128 addresses, using the subnet prefix /25, is supported for single availability zone deployments. A minimum address range of 256 addresses, using the subnet prefix /24, is supported for deployments that use multiple availability zones.
The default is 10.0.0.0/16. This range must not conflict with any connected networks.
When using ROSA with HCP, the static IP address 172.20.0.1 is reserved for the internal Kubernetes API address. The machine, pod, and service CIDRs ranges must not conflict with this IP address.
7.2. Service CIDR
In the Service CIDR field, you must specify the IP address range for services. It is recommended, but not required, that the address block is the same between clusters. This will not create IP address conflicts. The range must be large enough to accommodate your workload. The address block must not overlap with any external service accessed from within the cluster. The default is 172.30.0.0/16.
7.3. Pod CIDR
In the pod CIDR field, you must specify the IP address range for pods.
It is recommended, but not required, that the address block is the same between clusters. This will not create IP address conflicts. The range must be large enough to accommodate your workload. The address block must not overlap with any external service accessed from within the cluster. The default is 10.128.0.0/14.
7.4. Host Prefix
In the Host Prefix field, you must specify the subnet prefix length assigned to pods scheduled to individual machines. The host prefix determines the pod IP address pool for each machine.
For example, if the host prefix is set to /23, each machine is assigned a /23 subnet from the pod CIDR address range. The default is /23, allowing 512 cluster nodes, and 512 pods per node (both of which are beyond our maximum supported).
Chapter 8. Network policy
8.1. About network policy
As a cluster administrator, you can define network policies that restrict traffic to pods in your cluster.
8.1.1. About network policy
In a cluster using a network plugin that supports Kubernetes network policy, network isolation is controlled entirely by NetworkPolicy objects. In Red Hat OpenShift Service on AWS 4, OpenShift SDN supports using network policy in its default network isolation mode.
Network policy does not apply to the host network namespace. Pods with host networking enabled are unaffected by network policy rules. However, pods connecting to the host-networked pods might be affected by the network policy rules.
Network policies cannot block traffic from localhost or from their resident nodes.
By default, all pods in a project are accessible from other pods and network endpoints. To isolate one or more pods in a project, you can create NetworkPolicy objects in that project to indicate the allowed incoming connections. Project administrators can create and delete NetworkPolicy objects within their own project.
If a pod is matched by selectors in one or more NetworkPolicy objects, then the pod will accept only connections that are allowed by at least one of those NetworkPolicy objects. A pod that is not selected by any NetworkPolicy objects is fully accessible.
A network policy applies to only the TCP, UDP, ICMP, and SCTP protocols. Other protocols are not affected.
The following example NetworkPolicy objects demonstrate supporting different scenarios:
Deny all traffic:
To make a project deny by default, add a
NetworkPolicyobject that matches all pods but accepts no traffic:kind: NetworkPolicy apiVersion: networking.k8s.io/v1 metadata: name: deny-by-default spec: podSelector: {} ingress: []Only allow connections from the Red Hat OpenShift Service on AWS Ingress Controller:
To make a project allow only connections from the Red Hat OpenShift Service on AWS Ingress Controller, add the following
NetworkPolicyobject.apiVersion: networking.k8s.io/v1 kind: NetworkPolicy metadata: name: allow-from-openshift-ingress spec: ingress: - from: - namespaceSelector: matchLabels: network.openshift.io/policy-group: ingress podSelector: {} policyTypes: - IngressOnly accept connections from pods within a project:
To make pods accept connections from other pods in the same project, but reject all other connections from pods in other projects, add the following
NetworkPolicyobject:kind: NetworkPolicy apiVersion: networking.k8s.io/v1 metadata: name: allow-same-namespace spec: podSelector: {} ingress: - from: - podSelector: {}Only allow HTTP and HTTPS traffic based on pod labels:
To enable only HTTP and HTTPS access to the pods with a specific label (
role=frontendin following example), add aNetworkPolicyobject similar to the following:kind: NetworkPolicy apiVersion: networking.k8s.io/v1 metadata: name: allow-http-and-https spec: podSelector: matchLabels: role: frontend ingress: - ports: - protocol: TCP port: 80 - protocol: TCP port: 443Accept connections by using both namespace and pod selectors:
To match network traffic by combining namespace and pod selectors, you can use a
NetworkPolicyobject similar to the following:kind: NetworkPolicy apiVersion: networking.k8s.io/v1 metadata: name: allow-pod-and-namespace-both spec: podSelector: matchLabels: name: test-pods ingress: - from: - namespaceSelector: matchLabels: project: project_name podSelector: matchLabels: name: test-pods
NetworkPolicy objects are additive, which means you can combine multiple NetworkPolicy objects together to satisfy complex network requirements.
For example, for the NetworkPolicy objects defined in previous samples, you can define both allow-same-namespace and allow-http-and-https policies within the same project. Thus allowing the pods with the label role=frontend, to accept any connection allowed by each policy. That is, connections on any port from pods in the same namespace, and connections on ports 80 and 443 from pods in any namespace.
8.1.1.1. Using the allow-from-router network policy
Use the following NetworkPolicy to allow external traffic regardless of the router configuration:
apiVersion: networking.k8s.io/v1
kind: NetworkPolicy
metadata:
  name: allow-from-router
spec:
  ingress:
  - from:
    - namespaceSelector:
        matchLabels:
          policy-group.network.openshift.io/ingress: ""1
  podSelector: {}
  policyTypes:
- Ingress- 1
policy-group.network.openshift.io/ingress:""label supports both OpenShift-SDN and OVN-Kubernetes.
8.1.1.2. Using the allow-from-hostnetwork network policy
Add the following allow-from-hostnetwork NetworkPolicy object to direct traffic from the host network pods:
apiVersion: networking.k8s.io/v1
kind: NetworkPolicy
metadata:
  name: allow-from-hostnetwork
spec:
  ingress:
  - from:
    - namespaceSelector:
        matchLabels:
          policy-group.network.openshift.io/host-network: ""
  podSelector: {}
  policyTypes:
  - Ingress
8.1.2. Optimizations for network policy with OpenShift SDN
Use a network policy to isolate pods that are differentiated from one another by labels within a namespace.
It is inefficient to apply NetworkPolicy objects to large numbers of individual pods in a single namespace. Pod labels do not exist at the IP address level, so a network policy generates a separate Open vSwitch (OVS) flow rule for every possible link between every pod selected with a podSelector.
For example, if the spec podSelector and the ingress podSelector within a NetworkPolicy object each match 200 pods, then 40,000 (200*200) OVS flow rules are generated. This might slow down a node.
When designing your network policy, refer to the following guidelines:
Reduce the number of OVS flow rules by using namespaces to contain groups of pods that need to be isolated.
NetworkPolicyobjects that select a whole namespace, by using thenamespaceSelectoror an emptypodSelector, generate only a single OVS flow rule that matches the VXLAN virtual network ID (VNID) of the namespace.- Keep the pods that do not need to be isolated in their original namespace, and move the pods that require isolation into one or more different namespaces.
- Create additional targeted cross-namespace network policies to allow the specific traffic that you do want to allow from the isolated pods.
8.1.3. Optimizations for network policy with OVN-Kubernetes network plugin
When designing your network policy, refer to the following guidelines:
-
For network policies with the same
spec.podSelectorspec, it is more efficient to use one network policy with multipleingressoregressrules, than multiple network policies with subsets ofingressoregressrules. Every
ingressoregressrule based on thepodSelectorornamespaceSelectorspec generates the number of OVS flows proportional tonumber of pods selected by network policy + number of pods selected by ingress or egress rule. Therefore, it is preferable to use thepodSelectorornamespaceSelectorspec that can select as many pods as you need in one rule, instead of creating individual rules for every pod.For example, the following policy contains two rules:
apiVersion: networking.k8s.io/v1
kind: NetworkPolicy
metadata:
  name: test-network-policy
spec:
  podSelector: {}
  ingress:
  - from:
    - podSelector:
        matchLabels:
          role: frontend
  - from:
    - podSelector:
        matchLabels:
          role: backend
The following policy expresses those same two rules as one:
apiVersion: networking.k8s.io/v1
kind: NetworkPolicy
metadata:
  name: test-network-policy
spec:
  podSelector: {}
  ingress:
  - from:
    - podSelector:
        matchExpressions:
        - {key: role, operator: In, values: [frontend, backend]}
The same guideline applies to the
spec.podSelectorspec. If you have the sameingressoregressrules for different network policies, it might be more efficient to create one network policy with a commonspec.podSelectorspec. For example, the following two policies have different rules:apiVersion: networking.k8s.io/v1 kind: NetworkPolicy metadata: name: policy1 spec: podSelector: matchLabels: role: db ingress: - from: - podSelector: matchLabels: role: frontend --- apiVersion: networking.k8s.io/v1 kind: NetworkPolicy metadata: name: policy2 spec: podSelector: matchLabels: role: client ingress: - from: - podSelector: matchLabels: role: frontendThe following network policy expresses those same two rules as one:
apiVersion: networking.k8s.io/v1
kind: NetworkPolicy
metadata:
  name: policy3
spec:
  podSelector:
    matchExpressions:
    - {key: role, operator: In, values: [db, client]}
  ingress:
  - from:
    - podSelector:
        matchLabels:
          role: frontend
You can apply this optimization when only multiple selectors are expressed as one. In cases where selectors are based on different labels, it may not be possible to apply this optimization. In those cases, consider applying some new labels for network policy optimization specifically.
8.1.4. Next steps
8.2. Creating a network policy
As a user with the admin role, you can create a network policy for a namespace.
8.2.1. Example NetworkPolicy object
The following annotates an example NetworkPolicy object:
kind: NetworkPolicy
apiVersion: networking.k8s.io/v1
metadata:
  name: allow-27107 1
spec:
  podSelector: 2
    matchLabels:
      app: mongodb
  ingress:
  - from:
    - podSelector: 3
        matchLabels:
          app: app
    ports: 4
    - protocol: TCP
      port: 27017
- 1
- The name of the NetworkPolicy object.
- 2
- A selector that describes the pods to which the policy applies. The policy object can only select pods in the project that defines the NetworkPolicy object.
- 3
- A selector that matches the pods from which the policy object allows ingress traffic. The selector matches pods in the same namespace as the NetworkPolicy.
- 4
- A list of one or more destination ports on which to accept traffic.
8.2.2. Creating a network policy using the CLI
To define granular rules describing ingress or egress network traffic allowed for namespaces in your cluster, you can create a network policy.
If you log in with a user with the cluster-admin role, then you can create a network policy in any namespace in the cluster.
Prerequisites
-
Your cluster uses a network plugin that supports
NetworkPolicyobjects, such as the OVN-Kubernetes network plugin or the OpenShift SDN network plugin withmode: NetworkPolicyset. This mode is the default for OpenShift SDN. -
You installed the OpenShift CLI (
oc). -
You are logged in to the cluster with a user with
adminprivileges. - You are working in the namespace that the network policy applies to.
Procedure
Create a policy rule:
Create a
<policy_name>.yamlfile:$ touch <policy_name>.yaml
where:
<policy_name>- Specifies the network policy file name.
Define a network policy in the file that you just created, such as in the following examples:
Deny ingress from all pods in all namespaces
This is a fundamental policy, blocking all cross-pod networking other than cross-pod traffic allowed by the configuration of other Network Policies.
kind: NetworkPolicy
apiVersion: networking.k8s.io/v1
metadata:
  name: deny-by-default
spec:
  podSelector: {}
  policyTypes:
  - Ingress
  ingress: []
Allow ingress from all pods in the same namespace
kind: NetworkPolicy
apiVersion: networking.k8s.io/v1
metadata:
  name: allow-same-namespace
spec:
  podSelector:
  ingress:
  - from:
    - podSelector: {}
Allow ingress traffic to one pod from a particular namespace
This policy allows traffic to pods labelled
pod-afrom pods running innamespace-y.kind: NetworkPolicy apiVersion: networking.k8s.io/v1 metadata: name: allow-traffic-pod spec: podSelector: matchLabels: pod: pod-a policyTypes: - Ingress ingress: - from: - namespaceSelector: matchLabels: kubernetes.io/metadata.name: namespace-y
To create the network policy object, enter the following command:
$ oc apply -f <policy_name>.yaml -n <namespace>
where:
<policy_name>- Specifies the network policy file name.
<namespace>- Optional: Specifies the namespace if the object is defined in a different namespace than the current namespace.
Example output
networkpolicy.networking.k8s.io/deny-by-default created
If you log in to the web console with cluster-admin privileges, you have a choice of creating a network policy in any namespace in the cluster directly in YAML or from a form in the web console.
8.2.3. Creating a default deny all network policy
This is a fundamental policy, blocking all cross-pod networking other than network traffic allowed by the configuration of other deployed network policies. This procedure enforces a default deny-by-default policy.
If you log in with a user with the cluster-admin role, then you can create a network policy in any namespace in the cluster.
Prerequisites
-
Your cluster uses a network plugin that supports
NetworkPolicyobjects, such as the OVN-Kubernetes network plugin or the OpenShift SDN network plugin withmode: NetworkPolicyset. This mode is the default for OpenShift SDN. -
You installed the OpenShift CLI (
oc). -
You are logged in to the cluster with a user with
adminprivileges. - You are working in the namespace that the network policy applies to.
Procedure
Create the following YAML that defines a
deny-by-defaultpolicy to deny ingress from all pods in all namespaces. Save the YAML in thedeny-by-default.yamlfile:kind: NetworkPolicy apiVersion: networking.k8s.io/v1 metadata: name: deny-by-default namespace: default 1 spec: podSelector: {} 2 ingress: [] 3
Apply the policy by entering the following command:
$ oc apply -f deny-by-default.yaml
Example output
networkpolicy.networking.k8s.io/deny-by-default created
8.2.4. Creating a network policy to allow traffic from external clients
With the deny-by-default policy in place you can proceed to configure a policy that allows traffic from external clients to a pod with the label app=web.
If you log in with a user with the cluster-admin role, then you can create a network policy in any namespace in the cluster.
Follow this procedure to configure a policy that allows external service from the public Internet directly or by using a Load Balancer to access the pod. Traffic is only allowed to a pod with the label app=web.
Prerequisites
-
Your cluster uses a network plugin that supports
NetworkPolicyobjects, such as the OVN-Kubernetes network plugin or the OpenShift SDN network plugin withmode: NetworkPolicyset. This mode is the default for OpenShift SDN. -
You installed the OpenShift CLI (
oc). -
You are logged in to the cluster with a user with
adminprivileges. - You are working in the namespace that the network policy applies to.
Procedure
Create a policy that allows traffic from the public Internet directly or by using a load balancer to access the pod. Save the YAML in the
web-allow-external.yamlfile:kind: NetworkPolicy apiVersion: networking.k8s.io/v1 metadata: name: web-allow-external namespace: default spec: policyTypes: - Ingress podSelector: matchLabels: app: web ingress: - {}Apply the policy by entering the following command:
$ oc apply -f web-allow-external.yaml
Example output
networkpolicy.networking.k8s.io/web-allow-external created
This policy allows traffic from all resources, including external traffic as illustrated in the following diagram:
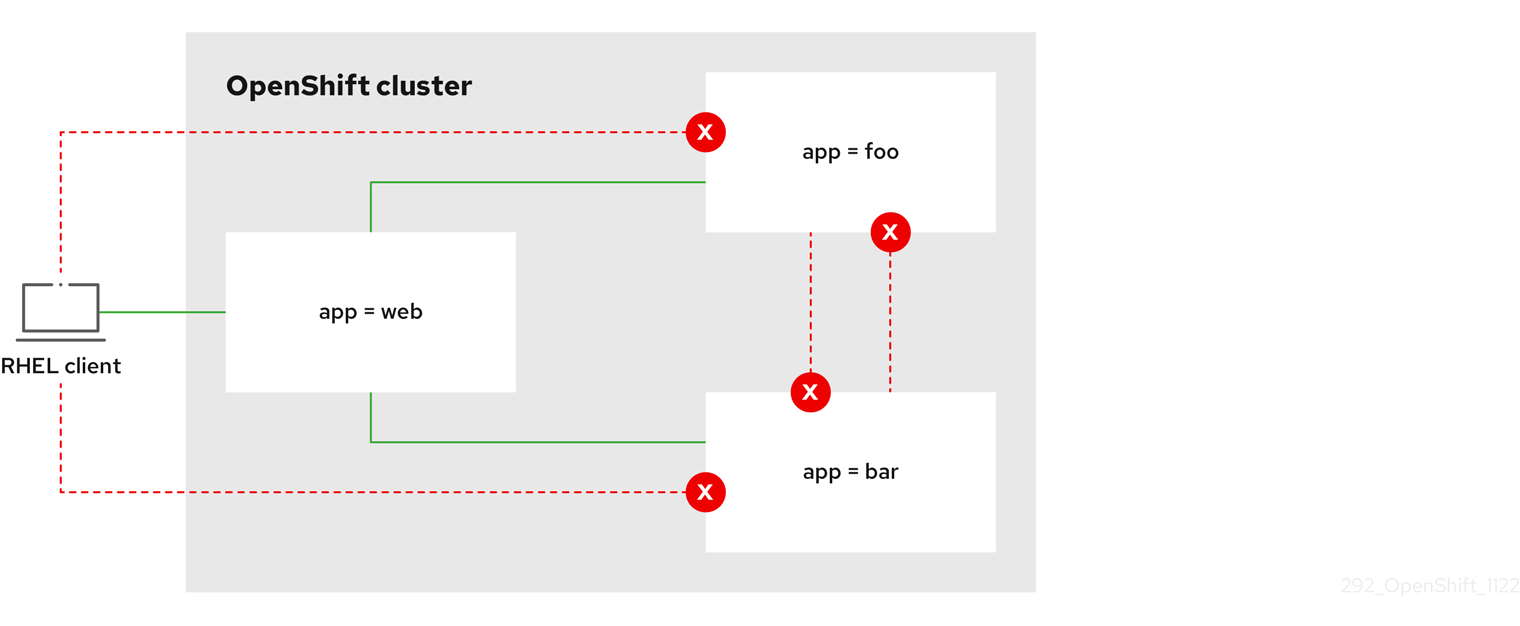
8.2.5. Creating a network policy allowing traffic to an application from all namespaces
If you log in with a user with the cluster-admin role, then you can create a network policy in any namespace in the cluster.
Follow this procedure to configure a policy that allows traffic from all pods in all namespaces to a particular application.
Prerequisites
-
Your cluster uses a network plugin that supports
NetworkPolicyobjects, such as the OVN-Kubernetes network plugin or the OpenShift SDN network plugin withmode: NetworkPolicyset. This mode is the default for OpenShift SDN. -
You installed the OpenShift CLI (
oc). -
You are logged in to the cluster with a user with
adminprivileges. - You are working in the namespace that the network policy applies to.
Procedure
Create a policy that allows traffic from all pods in all namespaces to a particular application. Save the YAML in the
web-allow-all-namespaces.yamlfile:kind: NetworkPolicy apiVersion: networking.k8s.io/v1 metadata: name: web-allow-all-namespaces namespace: default spec: podSelector: matchLabels: app: web 1 policyTypes: - Ingress ingress: - from: - namespaceSelector: {} 2NoteBy default, if you omit specifying a
namespaceSelectorit does not select any namespaces, which means the policy allows traffic only from the namespace the network policy is deployed to.Apply the policy by entering the following command:
$ oc apply -f web-allow-all-namespaces.yaml
Example output
networkpolicy.networking.k8s.io/web-allow-all-namespaces created
Verification
Start a web service in the
defaultnamespace by entering the following command:$ oc run web --namespace=default --image=nginx --labels="app=web" --expose --port=80
Run the following command to deploy an
alpineimage in thesecondarynamespace and to start a shell:$ oc run test-$RANDOM --namespace=secondary --rm -i -t --image=alpine -- sh
Run the following command in the shell and observe that the request is allowed:
# wget -qO- --timeout=2 http://web.default
Expected output
<!DOCTYPE html>
<html>
<head>
<title>Welcome to nginx!</title>
<style>
html { color-scheme: light dark; }
body { width: 35em; margin: 0 auto;
font-family: Tahoma, Verdana, Arial, sans-serif; }
</style>
</head>
<body>
<h1>Welcome to nginx!</h1>
<p>If you see this page, the nginx web server is successfully installed and
working. Further configuration is required.</p>

<p>For online documentation and support please refer to
<a href="http://nginx.org/">nginx.org</a>.<br/>
Commercial support is available at
<a href="http://nginx.com/">nginx.com</a>.</p>

<p><em>Thank you for using nginx.</em></p>
</body>
</html>
8.2.6. Creating a network policy allowing traffic to an application from a namespace
If you log in with a user with the cluster-admin role, then you can create a network policy in any namespace in the cluster.
Follow this procedure to configure a policy that allows traffic to a pod with the label app=web from a particular namespace. You might want to do this to:
- Restrict traffic to a production database only to namespaces where production workloads are deployed.
- Enable monitoring tools deployed to a particular namespace to scrape metrics from the current namespace.
Prerequisites
-
Your cluster uses a network plugin that supports
NetworkPolicyobjects, such as the OVN-Kubernetes network plugin or the OpenShift SDN network plugin withmode: NetworkPolicyset. This mode is the default for OpenShift SDN. -
You installed the OpenShift CLI (
oc). -
You are logged in to the cluster with a user with
adminprivileges. - You are working in the namespace that the network policy applies to.
Procedure
Create a policy that allows traffic from all pods in a particular namespaces with a label
purpose=production. Save the YAML in theweb-allow-prod.yamlfile:kind: NetworkPolicy apiVersion: networking.k8s.io/v1 metadata: name: web-allow-prod namespace: default spec: podSelector: matchLabels: app: web 1 policyTypes: - Ingress ingress: - from: - namespaceSelector: matchLabels: purpose: production 2Apply the policy by entering the following command:
$ oc apply -f web-allow-prod.yaml
Example output
networkpolicy.networking.k8s.io/web-allow-prod created
Verification
Start a web service in the
defaultnamespace by entering the following command:$ oc run web --namespace=default --image=nginx --labels="app=web" --expose --port=80
Run the following command to create the
prodnamespace:$ oc create namespace prod
Run the following command to label the
prodnamespace:$ oc label namespace/prod purpose=production
Run the following command to create the
devnamespace:$ oc create namespace dev
Run the following command to label the
devnamespace:$ oc label namespace/dev purpose=testing
Run the following command to deploy an
alpineimage in thedevnamespace and to start a shell:$ oc run test-$RANDOM --namespace=dev --rm -i -t --image=alpine -- sh
Run the following command in the shell and observe that the request is blocked:
# wget -qO- --timeout=2 http://web.default
Expected output
wget: download timed out
Run the following command to deploy an
alpineimage in theprodnamespace and start a shell:$ oc run test-$RANDOM --namespace=prod --rm -i -t --image=alpine -- sh
Run the following command in the shell and observe that the request is allowed:
# wget -qO- --timeout=2 http://web.default
Expected output
<!DOCTYPE html>
<html>
<head>
<title>Welcome to nginx!</title>
<style>
html { color-scheme: light dark; }
body { width: 35em; margin: 0 auto;
font-family: Tahoma, Verdana, Arial, sans-serif; }
</style>
</head>
<body>
<h1>Welcome to nginx!</h1>
<p>If you see this page, the nginx web server is successfully installed and
working. Further configuration is required.</p>

<p>For online documentation and support please refer to
<a href="http://nginx.org/">nginx.org</a>.<br/>
Commercial support is available at
<a href="http://nginx.com/">nginx.com</a>.</p>

<p><em>Thank you for using nginx.</em></p>
</body>
</html>
8.2.7. Creating a network policy using OpenShift Cluster Manager
To define granular rules describing the ingress or egress network traffic allowed for namespaces in your cluster, you can create a network policy.
Prerequisites
- You logged in to OpenShift Cluster Manager.
- You created an Red Hat OpenShift Service on AWS cluster.
- You configured an identity provider for your cluster.
- You added your user account to the configured identity provider.
- You created a project within your Red Hat OpenShift Service on AWS cluster.
Procedure
- From OpenShift Cluster Manager, click on the cluster you want to access.
- Click Open console to navigate to the OpenShift web console.
- Click on your identity provider and provide your credentials to log in to the cluster.
- From the administrator perspective, under Networking, click NetworkPolicies.
- Click Create NetworkPolicy.
- Provide a name for the policy in the Policy name field.
- Optional: You can provide the label and selector for a specific pod if this policy applies only to one or more specific pods. If you do not select a specific pod, then this policy will be applicable to all pods on the cluster.
- Optional: You can block all ingress and egress traffic by using the Deny all ingress traffic or Deny all egress traffic checkboxes.
- You can also add any combination of ingress and egress rules, allowing you to specify the port, namespace, or IP blocks you want to approve.
Add ingress rules to your policy:
Select Add ingress rule to configure a new rule. This action creates a new Ingress rule row with an Add allowed source drop-down menu that enables you to specify how you want to limit inbound traffic. The drop-down menu offers three options to limit your ingress traffic:
- Allow pods from the same namespace limits traffic to pods within the same namespace. You can specify the pods in a namespace, but leaving this option blank allows all of the traffic from pods in the namespace.
- Allow pods from inside the cluster limits traffic to pods within the same cluster as the policy. You can specify namespaces and pods from which you want to allow inbound traffic. Leaving this option blank allows inbound traffic from all namespaces and pods within this cluster.
- Allow peers by IP block limits traffic from a specified Classless Inter-Domain Routing (CIDR) IP block. You can block certain IPs with the exceptions option. Leaving the CIDR field blank allows all inbound traffic from all external sources.
- You can restrict all of your inbound traffic to a port. If you do not add any ports then all ports are accessible to traffic.
Add egress rules to your network policy:
Select Add egress rule to configure a new rule. This action creates a new Egress rule row with an Add allowed destination"* drop-down menu that enables you to specify how you want to limit outbound traffic. The drop-down menu offers three options to limit your egress traffic:
- Allow pods from the same namespace limits outbound traffic to pods within the same namespace. You can specify the pods in a namespace, but leaving this option blank allows all of the traffic from pods in the namespace.
- Allow pods from inside the cluster limits traffic to pods within the same cluster as the policy. You can specify namespaces and pods from which you want to allow outbound traffic. Leaving this option blank allows outbound traffic from all namespaces and pods within this cluster.
- Allow peers by IP block limits traffic from a specified CIDR IP block. You can block certain IPs with the exceptions option. Leaving the CIDR field blank allows all outbound traffic from all external sources.
- You can restrict all of your outbound traffic to a port. If you do not add any ports then all ports are accessible to traffic.
8.3. Viewing a network policy
As a user with the admin role, you can view a network policy for a namespace.
8.3.1. Example NetworkPolicy object
The following annotates an example NetworkPolicy object:
kind: NetworkPolicy
apiVersion: networking.k8s.io/v1
metadata:
  name: allow-27107 1
spec:
  podSelector: 2
    matchLabels:
      app: mongodb
  ingress:
  - from:
    - podSelector: 3
        matchLabels:
          app: app
    ports: 4
    - protocol: TCP
      port: 27017
- 1
- The name of the NetworkPolicy object.
- 2
- A selector that describes the pods to which the policy applies. The policy object can only select pods in the project that defines the NetworkPolicy object.
- 3
- A selector that matches the pods from which the policy object allows ingress traffic. The selector matches pods in the same namespace as the NetworkPolicy.
- 4
- A list of one or more destination ports on which to accept traffic.
8.3.2. Viewing network policies using the CLI
You can examine the network policies in a namespace.
If you log in with a user with the cluster-admin role, then you can view any network policy in the cluster.
Prerequisites
-
You installed the OpenShift CLI (
oc). -
You are logged in to the cluster with a user with
adminprivileges. - You are working in the namespace where the network policy exists.
Procedure
List network policies in a namespace:
To view network policy objects defined in a namespace, enter the following command:
$ oc get networkpolicy
Optional: To examine a specific network policy, enter the following command:
$ oc describe networkpolicy <policy_name> -n <namespace>
where:
<policy_name>- Specifies the name of the network policy to inspect.
<namespace>- Optional: Specifies the namespace if the object is defined in a different namespace than the current namespace.
For example:
$ oc describe networkpolicy allow-same-namespace
Output for
oc describecommandName: allow-same-namespace Namespace: ns1 Created on: 2021-05-24 22:28:56 -0400 EDT Labels: <none> Annotations: <none> Spec: PodSelector: <none> (Allowing the specific traffic to all pods in this namespace) Allowing ingress traffic: To Port: <any> (traffic allowed to all ports) From: PodSelector: <none> Not affecting egress traffic Policy Types: Ingress
If you log in to the web console with cluster-admin privileges, you have a choice of viewing a network policy in any namespace in the cluster directly in YAML or from a form in the web console.
8.3.3. Viewing network policies using OpenShift Cluster Manager
You can view the configuration details of your network policy in Red Hat OpenShift Cluster Manager.
Prerequisites
- You logged in to OpenShift Cluster Manager.
- You created an Red Hat OpenShift Service on AWS cluster.
- You configured an identity provider for your cluster.
- You added your user account to the configured identity provider.
- You created a network policy.
Procedure
- From the Administrator perspective in the OpenShift Cluster Manager web console, under Networking, click NetworkPolicies.
- Select the desired network policy to view.
- In the Network Policy details page, you can view all of the associated ingress and egress rules.
Select YAML on the network policy details to view the policy configuration in YAML format.
NoteYou can only view the details of these policies. You cannot edit these policies.
8.4. Deleting a network policy
As a user with the admin role, you can delete a network policy from a namespace.
8.4.1. Deleting a network policy using the CLI
You can delete a network policy in a namespace.
If you log in with a user with the cluster-admin role, then you can delete any network policy in the cluster.
Prerequisites
-
Your cluster uses a network plugin that supports
NetworkPolicyobjects, such as the OVN-Kubernetes network plugin or the OpenShift SDN network plugin withmode: NetworkPolicyset. This mode is the default for OpenShift SDN. -
You installed the OpenShift CLI (
oc). -
You are logged in to the cluster with a user with
adminprivileges. - You are working in the namespace where the network policy exists.
Procedure
To delete a network policy object, enter the following command:
$ oc delete networkpolicy <policy_name> -n <namespace>
where:
<policy_name>- Specifies the name of the network policy.
<namespace>- Optional: Specifies the namespace if the object is defined in a different namespace than the current namespace.
Example output
networkpolicy.networking.k8s.io/default-deny deleted
If you log in to the web console with cluster-admin privileges, you have a choice of deleting a network policy in any namespace in the cluster directly in YAML or from the policy in the web console through the Actions menu.
8.4.2. Deleting a network policy using OpenShift Cluster Manager
You can delete a network policy in a namespace.
Prerequisites
- You logged in to OpenShift Cluster Manager.
- You created an Red Hat OpenShift Service on AWS cluster.
- You configured an identity provider for your cluster.
- You added your user account to the configured identity provider.
Procedure
- From the Administrator perspective in the OpenShift Cluster Manager web console, under Networking, click NetworkPolicies.
Use one of the following methods for deleting your network policy:
Delete the policy from the Network Policies table:
- From the Network Policies table, select the stack menu on the row of the network policy you want to delete and then, click Delete NetworkPolicy.
Delete the policy using the Actions drop-down menu from the individual network policy details:
- Click on Actions drop-down menu for your network policy.
- Select Delete NetworkPolicy from the menu.
8.5. Configuring multitenant isolation with network policy
As a cluster administrator, you can configure your network policies to provide multitenant network isolation.
If you are using the OpenShift SDN network plugin, configuring network policies as described in this section provides network isolation similar to multitenant mode but with network policy mode set.
8.5.1. Configuring multitenant isolation by using network policy
You can configure your project to isolate it from pods and services in other project namespaces.
Prerequisites
-
Your cluster uses a network plugin that supports
NetworkPolicyobjects, such as the OVN-Kubernetes network plugin or the OpenShift SDN network plugin withmode: NetworkPolicyset. This mode is the default for OpenShift SDN. This mode is the default for OpenShift SDN. -
You installed the OpenShift CLI (
oc). -
You are logged in to the cluster with a user with
adminprivileges.
Procedure
Create the following
NetworkPolicyobjects:A policy named
allow-from-openshift-ingress.$ cat << EOF| oc create -f - apiVersion: networking.k8s.io/v1 kind: NetworkPolicy metadata: name: allow-from-openshift-ingress spec: ingress: - from: - namespaceSelector: matchLabels: policy-group.network.openshift.io/ingress: "" podSelector: {} policyTypes: - Ingress EOFNotepolicy-group.network.openshift.io/ingress: ""is the preferred namespace selector label for OpenShift SDN. You can use thenetwork.openshift.io/policy-group: ingressnamespace selector label, but this is a legacy label.A policy named
allow-from-openshift-monitoring:$ cat << EOF| oc create -f - apiVersion: networking.k8s.io/v1 kind: NetworkPolicy metadata: name: allow-from-openshift-monitoring spec: ingress: - from: - namespaceSelector: matchLabels: network.openshift.io/policy-group: monitoring podSelector: {} policyTypes: - Ingress EOFA policy named
allow-same-namespace:$ cat << EOF| oc create -f - kind: NetworkPolicy apiVersion: networking.k8s.io/v1 metadata: name: allow-same-namespace spec: podSelector: ingress: - from: - podSelector: {} EOFA policy named
allow-from-kube-apiserver-operator:$ cat << EOF| oc create -f - apiVersion: networking.k8s.io/v1 kind: NetworkPolicy metadata: name: allow-from-kube-apiserver-operator spec: ingress: - from: - namespaceSelector: matchLabels: kubernetes.io/metadata.name: openshift-kube-apiserver-operator podSelector: matchLabels: app: kube-apiserver-operator policyTypes: - Ingress EOFFor more details, see New
kube-apiserver-operatorwebhook controller validating health of webhook.
Optional: To confirm that the network policies exist in your current project, enter the following command:
$ oc describe networkpolicy
Example output
Name:         allow-from-openshift-ingress
Namespace:    example1
Created on:   2020-06-09 00:28:17 -0400 EDT
Labels:       <none>
Annotations:  <none>
Spec:
  PodSelector:     <none> (Allowing the specific traffic to all pods in this namespace)
  Allowing ingress traffic:
    To Port: <any> (traffic allowed to all ports)
    From:
      NamespaceSelector: network.openshift.io/policy-group: ingress
  Not affecting egress traffic
  Policy Types: Ingress


Name:         allow-from-openshift-monitoring
Namespace:    example1
Created on:   2020-06-09 00:29:57 -0400 EDT
Labels:       <none>
Annotations:  <none>
Spec:
  PodSelector:     <none> (Allowing the specific traffic to all pods in this namespace)
  Allowing ingress traffic:
    To Port: <any> (traffic allowed to all ports)
    From:
      NamespaceSelector: network.openshift.io/policy-group: monitoring
  Not affecting egress traffic
  Policy Types: Ingress
Chapter 9. OVN-Kubernetes network plugin
9.1. Configuring an egress IP address
As a cluster administrator, you can configure the OVN-Kubernetes Container Network Interface (CNI) network plugin to assign one or more egress IP addresses to a namespace, or to specific pods in a namespace.
9.1.1. Egress IP address architectural design and implementation
The Red Hat OpenShift Service on AWS egress IP address functionality allows you to ensure that the traffic from one or more pods in one or more namespaces has a consistent source IP address for services outside the cluster network.
For example, you might have a pod that periodically queries a database that is hosted on a server outside of your cluster. To enforce access requirements for the server, a packet filtering device is configured to allow traffic only from specific IP addresses. To ensure that you can reliably allow access to the server from only that specific pod, you can configure a specific egress IP address for the pod that makes the requests to the server.
An egress IP address assigned to a namespace is different from an egress router, which is used to send traffic to specific destinations.
In ROSA with HCP clusters, application pods and ingress router pods run on the same node. If you configure an egress IP address for an application project in this scenario, the IP address is not used when you send a request to a route from the application project.
The assignment of egress IP addresses to control plane nodes with the EgressIP feature is not supported.
The following examples illustrate the annotation from nodes on several public cloud providers. The annotations are indented for readability.
Example cloud.network.openshift.io/egress-ipconfig annotation on AWS
cloud.network.openshift.io/egress-ipconfig: [
  {
    "interface":"eni-078d267045138e436",
    "ifaddr":{"ipv4":"10.0.128.0/18"},
    "capacity":{"ipv4":14,"ipv6":15}
  }
]
The following sections describe the IP address capacity for supported public cloud environments for use in your capacity calculation.
9.1.1.1. Amazon Web Services (AWS) IP address capacity limits
On AWS, constraints on IP address assignments depend on the instance type configured. For more information, see IP addresses per network interface per instance type
9.1.1.2. Assignment of egress IPs to pods
To assign one or more egress IPs to a namespace or specific pods in a namespace, the following conditions must be satisfied:
-
At least one node in your cluster must have the
k8s.ovn.org/egress-assignable: ""label. -
An
EgressIPobject exists that defines one or more egress IP addresses to use as the source IP address for traffic leaving the cluster from pods in a namespace.
If you create EgressIP objects prior to labeling any nodes in your cluster for egress IP assignment, Red Hat OpenShift Service on AWS might assign every egress IP address to the first node with the k8s.ovn.org/egress-assignable: "" label.
To ensure that egress IP addresses are widely distributed across nodes in the cluster, always apply the label to the nodes you intent to host the egress IP addresses before creating any EgressIP objects.
9.1.1.3. Assignment of egress IPs to nodes
When creating an EgressIP object, the following conditions apply to nodes that are labeled with the k8s.ovn.org/egress-assignable: "" label:
- An egress IP address is never assigned to more than one node at a time.
- An egress IP address is equally balanced between available nodes that can host the egress IP address.
If the
spec.EgressIPsarray in anEgressIPobject specifies more than one IP address, the following conditions apply:- No node will ever host more than one of the specified IP addresses.
- Traffic is balanced roughly equally between the specified IP addresses for a given namespace.
- If a node becomes unavailable, any egress IP addresses assigned to it are automatically reassigned, subject to the previously described conditions.
When a pod matches the selector for multiple EgressIP objects, there is no guarantee which of the egress IP addresses that are specified in the EgressIP objects is assigned as the egress IP address for the pod.
Additionally, if an EgressIP object specifies multiple egress IP addresses, there is no guarantee which of the egress IP addresses might be used. For example, if a pod matches a selector for an EgressIP object with two egress IP addresses, 10.10.20.1 and 10.10.20.2, either might be used for each TCP connection or UDP conversation.
9.1.1.4. Architectural diagram of an egress IP address configuration
The following diagram depicts an egress IP address configuration. The diagram describes four pods in two different namespaces running on three nodes in a cluster. The nodes are assigned IP addresses from the 192.168.126.0/18 CIDR block on the host network.
Both Node 1 and Node 3 are labeled with k8s.ovn.org/egress-assignable: "" and thus available for the assignment of egress IP addresses.
The dashed lines in the diagram depict the traffic flow from pod1, pod2, and pod3 traveling through the pod network to egress the cluster from Node 1 and Node 3. When an external service receives traffic from any of the pods selected by the example EgressIP object, the source IP address is either 192.168.126.10 or 192.168.126.102. The traffic is balanced roughly equally between these two nodes.
The following resources from the diagram are illustrated in detail:
NamespaceobjectsThe namespaces are defined in the following manifest:
Namespace objects
apiVersion: v1 kind: Namespace metadata: name: namespace1 labels: env: prod --- apiVersion: v1 kind: Namespace metadata: name: namespace2 labels: env: prodEgressIPobjectThe following
EgressIPobject describes a configuration that selects all pods in any namespace with theenvlabel set toprod. The egress IP addresses for the selected pods are192.168.126.10and192.168.126.102.EgressIPobjectapiVersion: k8s.ovn.org/v1 kind: EgressIP metadata: name: egressips-prod spec: egressIPs: - 192.168.126.10 - 192.168.126.102 namespaceSelector: matchLabels: env: prod status: items: - node: node1 egressIP: 192.168.126.10 - node: node3 egressIP: 192.168.126.102For the configuration in the previous example, Red Hat OpenShift Service on AWS assigns both egress IP addresses to the available nodes. The
statusfield reflects whether and where the egress IP addresses are assigned.
9.1.2. EgressIP object
The following YAML describes the API for the EgressIP object. The scope of the object is cluster-wide; it is not created in a namespace.
apiVersion: k8s.ovn.org/v1
kind: EgressIP
metadata:
  name: <name> 1
spec:
  egressIPs: 2
  - <ip_address>
  namespaceSelector: 3
    ...
  podSelector: 4
    ...
- 1
- The name for the
EgressIPsobject. - 2
- An array of one or more IP addresses.
- 3
- One or more selectors for the namespaces to associate the egress IP addresses with.
- 4
- Optional: One or more selectors for pods in the specified namespaces to associate egress IP addresses with. Applying these selectors allows for the selection of a subset of pods within a namespace.
The following YAML describes the stanza for the namespace selector:
Namespace selector stanza
namespaceSelector: 1
  matchLabels:
    <label_name>: <label_value>
- 1
- One or more matching rules for namespaces. If more than one match rule is provided, all matching namespaces are selected.
The following YAML describes the optional stanza for the pod selector:
Pod selector stanza
podSelector: 1
  matchLabels:
    <label_name>: <label_value>
- 1
- Optional: One or more matching rules for pods in the namespaces that match the specified
namespaceSelectorrules. If specified, only pods that match are selected. Others pods in the namespace are not selected.
In the following example, the EgressIP object associates the 192.168.126.11 and 192.168.126.102 egress IP addresses with pods that have the app label set to web and are in the namespaces that have the env label set to prod:
Example EgressIP object
apiVersion: k8s.ovn.org/v1
kind: EgressIP
metadata:
  name: egress-group1
spec:
  egressIPs:
  - 192.168.126.11
  - 192.168.126.102
  podSelector:
    matchLabels:
      app: web
  namespaceSelector:
    matchLabels:
      env: prod
In the following example, the EgressIP object associates the 192.168.127.30 and 192.168.127.40 egress IP addresses with any pods that do not have the environment label set to development:
Example EgressIP object
apiVersion: k8s.ovn.org/v1
kind: EgressIP
metadata:
  name: egress-group2
spec:
  egressIPs:
  - 192.168.127.30
  - 192.168.127.40
  namespaceSelector:
    matchExpressions:
    - key: environment
      operator: NotIn
      values:
      - development
9.1.3. Labeling a node to host egress IP addresses
You can apply the k8s.ovn.org/egress-assignable="" label to a node in your cluster so that Red Hat OpenShift Service on AWS can assign one or more egress IP addresses to the node.
Prerequisites
-
Install the ROSA CLI (
rosa). - Log in to the cluster as a cluster administrator.
Procedure
To label a node so that it can host one or more egress IP addresses, enter the following command:
$ rosa edit machinepool <machinepool_name> --cluster=<cluster_name> --labels "k8s.ovn.org/egress-assignable="
ImportantThis command replaces any exciting node labels on your machinepool. You should include any of the desired labels to the
--labelsfield to ensure that your existing node labels persist.
9.1.4. Next steps
9.1.5. Additional resources
Chapter 10. Configuring Routes
10.1. Route configuration
10.1.1. Creating an HTTP-based route
A route allows you to host your application at a public URL. It can either be secure or unsecured, depending on the network security configuration of your application. An HTTP-based route is an unsecured route that uses the basic HTTP routing protocol and exposes a service on an unsecured application port.
The following procedure describes how to create a simple HTTP-based route to a web application, using the hello-openshift application as an example.
Prerequisites
-
You installed the OpenShift CLI (
oc). - You are logged in as an administrator.
- You have a web application that exposes a port and a TCP endpoint listening for traffic on the port.
Procedure
Create a project called
hello-openshiftby running the following command:$ oc new-project hello-openshift
Create a pod in the project by running the following command:
$ oc create -f https://raw.githubusercontent.com/openshift/origin/master/examples/hello-openshift/hello-pod.json
Create a service called
hello-openshiftby running the following command:$ oc expose pod/hello-openshift
Create an unsecured route to the
hello-openshiftapplication by running the following command:$ oc expose svc hello-openshift
Verification
To verify that the
routeresource that you created, run the following command:$ oc get routes -o yaml <name of resource> 1- 1
- In this example, the route is named
hello-openshift.
Sample YAML definition of the created unsecured route:
apiVersion: route.openshift.io/v1
kind: Route
metadata:
  name: hello-openshift
spec:
  host: hello-openshift-hello-openshift.<Ingress_Domain> 1
  port:
    targetPort: 8080 2
  to:
    kind: Service
    name: hello-openshift
- 1
<Ingress_Domain>is the default ingress domain name. Theingresses.config/clusterobject is created during the installation and cannot be changed. If you want to specify a different domain, you can specify an alternative cluster domain using theappsDomainoption.- 2
targetPortis the target port on pods that is selected by the service that this route points to.NoteTo display your default ingress domain, run the following command:
$ oc get ingresses.config/cluster -o jsonpath={.spec.domain}
10.1.2. Configuring route timeouts
You can configure the default timeouts for an existing route when you have services in need of a low timeout, which is required for Service Level Availability (SLA) purposes, or a high timeout, for cases with a slow back end.
Prerequisites
- You need a deployed Ingress Controller on a running cluster.
Procedure
Using the
oc annotatecommand, add the timeout to the route:$ oc annotate route <route_name> \ --overwrite haproxy.router.openshift.io/timeout=<timeout><time_unit> 1- 1
- Supported time units are microseconds (us), milliseconds (ms), seconds (s), minutes (m), hours (h), or days (d).
The following example sets a timeout of two seconds on a route named
myroute:$ oc annotate route myroute --overwrite haproxy.router.openshift.io/timeout=2s
10.1.3. HTTP Strict Transport Security
HTTP Strict Transport Security (HSTS) policy is a security enhancement, which signals to the browser client that only HTTPS traffic is allowed on the route host. HSTS also optimizes web traffic by signaling HTTPS transport is required, without using HTTP redirects. HSTS is useful for speeding up interactions with websites.
When HSTS policy is enforced, HSTS adds a Strict Transport Security header to HTTP and HTTPS responses from the site. You can use the insecureEdgeTerminationPolicy value in a route to redirect HTTP to HTTPS. When HSTS is enforced, the client changes all requests from the HTTP URL to HTTPS before the request is sent, eliminating the need for a redirect.
Cluster administrators can configure HSTS to do the following:
- Enable HSTS per-route
- Disable HSTS per-route
- Enforce HSTS per-domain, for a set of domains, or use namespace labels in combination with domains
HSTS works only with secure routes, either edge-terminated or re-encrypt. The configuration is ineffective on HTTP or passthrough routes.
10.1.3.1. Enabling HTTP Strict Transport Security per-route
HTTP strict transport security (HSTS) is implemented in the HAProxy template and applied to edge and re-encrypt routes that have the haproxy.router.openshift.io/hsts_header annotation.
Prerequisites
- You are logged in to the cluster with a user with administrator privileges for the project.
-
You installed the
ocCLI.
Procedure
To enable HSTS on a route, add the
haproxy.router.openshift.io/hsts_headervalue to the edge-terminated or re-encrypt route. You can use theoc annotatetool to do this by running the following command:$ oc annotate route <route_name> -n <namespace> --overwrite=true "haproxy.router.openshift.io/hsts_header"="max-age=31536000;\ 1 includeSubDomains;preload"- 1
- In this example, the maximum age is set to
31536000ms, which is approximately eight and a half hours.
NoteIn this example, the equal sign (
=) is in quotes. This is required to properly execute the annotate command.Example route configured with an annotation
apiVersion: route.openshift.io/v1 kind: Route metadata: annotations: haproxy.router.openshift.io/hsts_header: max-age=31536000;includeSubDomains;preload 1 2 3 ... spec: host: def.abc.com tls: termination: "reencrypt" ... wildcardPolicy: "Subdomain"- 1
- Required.
max-agemeasures the length of time, in seconds, that the HSTS policy is in effect. If set to0, it negates the policy. - 2
- Optional. When included,
includeSubDomainstells the client that all subdomains of the host must have the same HSTS policy as the host. - 3
- Optional. When
max-ageis greater than 0, you can addpreloadinhaproxy.router.openshift.io/hsts_headerto allow external services to include this site in their HSTS preload lists. For example, sites such as Google can construct a list of sites that havepreloadset. Browsers can then use these lists to determine which sites they can communicate with over HTTPS, even before they have interacted with the site. Withoutpreloadset, browsers must have interacted with the site over HTTPS, at least once, to get the header.
10.1.3.2. Disabling HTTP Strict Transport Security per-route
To disable HTTP strict transport security (HSTS) per-route, you can set the max-age value in the route annotation to 0.
Prerequisites
- You are logged in to the cluster with a user with administrator privileges for the project.
-
You installed the
ocCLI.
Procedure
To disable HSTS, set the
max-agevalue in the route annotation to0, by entering the following command:$ oc annotate route <route_name> -n <namespace> --overwrite=true "haproxy.router.openshift.io/hsts_header"="max-age=0"
TipYou can alternatively apply the following YAML to create the config map:
Example of disabling HSTS per-route
metadata:
  annotations:
    haproxy.router.openshift.io/hsts_header: max-age=0
To disable HSTS for every route in a namespace, enter the following command:
$ oc annotate route --all -n <namespace> --overwrite=true "haproxy.router.openshift.io/hsts_header"="max-age=0"
Verification
To query the annotation for all routes, enter the following command:
$ oc get route --all-namespaces -o go-template='{{range .items}}{{if .metadata.annotations}}{{$a := index .metadata.annotations "haproxy.router.openshift.io/hsts_header"}}{{$n := .metadata.name}}{{with $a}}Name: {{$n}} HSTS: {{$a}}{{"\n"}}{{else}}{{""}}{{end}}{{end}}{{end}}'Example output
Name: routename HSTS: max-age=0
10.1.4. Using cookies to keep route statefulness
Red Hat OpenShift Service on AWS provides sticky sessions, which enables stateful application traffic by ensuring all traffic hits the same endpoint. However, if the endpoint pod terminates, whether through restart, scaling, or a change in configuration, this statefulness can disappear.
Red Hat OpenShift Service on AWS can use cookies to configure session persistence. The Ingress controller selects an endpoint to handle any user requests, and creates a cookie for the session. The cookie is passed back in the response to the request and the user sends the cookie back with the next request in the session. The cookie tells the Ingress Controller which endpoint is handling the session, ensuring that client requests use the cookie so that they are routed to the same pod.
Cookies cannot be set on passthrough routes, because the HTTP traffic cannot be seen. Instead, a number is calculated based on the source IP address, which determines the backend.
If backends change, the traffic can be directed to the wrong server, making it less sticky. If you are using a load balancer, which hides source IP, the same number is set for all connections and traffic is sent to the same pod.
10.1.4.1. Annotating a route with a cookie
You can set a cookie name to overwrite the default, auto-generated one for the route. This allows the application receiving route traffic to know the cookie name. By deleting the cookie it can force the next request to re-choose an endpoint. So, if a server was overloaded it tries to remove the requests from the client and redistribute them.
Procedure
Annotate the route with the specified cookie name:
$ oc annotate route <route_name> router.openshift.io/cookie_name="<cookie_name>"
where:
<route_name>- Specifies the name of the route.
<cookie_name>- Specifies the name for the cookie.
For example, to annotate the route
my_routewith the cookie namemy_cookie:$ oc annotate route my_route router.openshift.io/cookie_name="my_cookie"
Capture the route hostname in a variable:
$ ROUTE_NAME=$(oc get route <route_name> -o jsonpath='{.spec.host}')where:
<route_name>- Specifies the name of the route.
Save the cookie, and then access the route:
$ curl $ROUTE_NAME -k -c /tmp/cookie_jar
Use the cookie saved by the previous command when connecting to the route:
$ curl $ROUTE_NAME -k -b /tmp/cookie_jar
10.1.5. Path-based routes
Path-based routes specify a path component that can be compared against a URL, which requires that the traffic for the route be HTTP based. Thus, multiple routes can be served using the same hostname, each with a different path. Routers should match routes based on the most specific path to the least.
The following table shows example routes and their accessibility:
Table 10.1. Route availability
| Route | When Compared to | Accessible |
|---|---|---|
| www.example.com/test | www.example.com/test | Yes |
| www.example.com | No | |
| www.example.com/test and www.example.com | www.example.com/test | Yes |
| www.example.com | Yes | |
| www.example.com | www.example.com/text | Yes (Matched by the host, not the route) |
| www.example.com | Yes |
An unsecured route with a path
apiVersion: route.openshift.io/v1
kind: Route
metadata:
  name: route-unsecured
spec:
  host: www.example.com
  path: "/test" 1
  to:
    kind: Service
    name: service-name
- 1
- The path is the only added attribute for a path-based route.
Path-based routing is not available when using passthrough TLS, as the router does not terminate TLS in that case and cannot read the contents of the request.
10.1.6. HTTP header configuration
Red Hat OpenShift Service on AWS provides different methods for working with HTTP headers. When setting or deleting headers, you can use specific fields in the Ingress Controller or an individual route to modify request and response headers. You can also set certain headers by using route annotations. The various ways of configuring headers can present challenges when working together.
You can only set or delete headers within an IngressController or Route CR, you cannot append them. If an HTTP header is set with a value, that value must be complete and not require appending in the future. In situations where it makes sense to append a header, such as the X-Forwarded-For header, use the spec.httpHeaders.forwardedHeaderPolicy field, instead of spec.httpHeaders.actions.
10.1.6.1. Order of precedence
When the same HTTP header is modified both in the Ingress Controller and in a route, HAProxy prioritizes the actions in certain ways depending on whether it is a request or response header.
- For HTTP response headers, actions specified in the Ingress Controller are executed after the actions specified in a route. This means that the actions specified in the Ingress Controller take precedence.
- For HTTP request headers, actions specified in a route are executed after the actions specified in the Ingress Controller. This means that the actions specified in the route take precedence.
For example, a cluster administrator sets the X-Frame-Options response header with the value DENY in the Ingress Controller using the following configuration:
Example IngressController spec
apiVersion: operator.openshift.io/v1
kind: IngressController
# ...
spec:
  httpHeaders:
    actions:
      response:
      - name: X-Frame-Options
        action:
          type: Set
          set:
            value: DENY
A route owner sets the same response header that the cluster administrator set in the Ingress Controller, but with the value SAMEORIGIN using the following configuration:
Example Route spec
apiVersion: route.openshift.io/v1
kind: Route
# ...
spec:
  httpHeaders:
    actions:
      response:
      - name: X-Frame-Options
        action:
          type: Set
          set:
            value: SAMEORIGIN
When both the IngressController spec and Route spec are configuring the X-Frame-Options header, then the value set for this header at the global level in the Ingress Controller will take precedence, even if a specific route allows frames.
This prioritzation occurs because the haproxy.config file uses the following logic, where the Ingress Controller is considered the front end and individual routes are considered the back end. The header value DENY applied to the front end configurations overrides the same header with the value SAMEORIGIN that is set in the back end:
frontend public
  http-response set-header X-Frame-Options 'DENY'

frontend fe_sni
  http-response set-header X-Frame-Options 'DENY'

frontend fe_no_sni
  http-response set-header X-Frame-Options 'DENY'

backend be_secure:openshift-monitoring:alertmanager-main
  http-response set-header X-Frame-Options 'SAMEORIGIN'
Additionally, any actions defined in either the Ingress Controller or a route override values set using route annotations.
10.1.6.2. Special case headers
The following headers are either prevented entirely from being set or deleted, or allowed under specific circumstances:
Table 10.2. Special case header configuration options
| Header name | Configurable using IngressController spec | Configurable using Route spec | Reason for disallowment | Configurable using another method |
|---|---|---|---|---|
|
| No | No |
The | No |
|
| No | Yes |
When the | No |
|
| No | No |
The |
Yes: the |
|
| No | No | The cookies that HAProxy sets are used for session tracking to map client connections to particular back-end servers. Allowing these headers to be set could interfere with HAProxy’s session affinity and restrict HAProxy’s ownership of a cookie. | Yes:
|
10.1.7. Setting or deleting HTTP request and response headers in a route
You can set or delete certain HTTP request and response headers for compliance purposes or other reasons. You can set or delete these headers either for all routes served by an Ingress Controller or for specific routes.
For example, you might want to enable a web application to serve content in alternate locations for specific routes if that content is written in multiple languages, even if there is a default global location specified by the Ingress Controller serving the routes.
The following procedure creates a route that sets the Content-Location HTTP request header so that the URL associated with the application, https://app.example.com, directs to the location https://app.example.com/lang/en-us. Directing application traffic to this location means that anyone using that specific route is accessing web content written in American English.
Prerequisites
-
You have installed the OpenShift CLI (
oc). - You are logged into an Red Hat OpenShift Service on AWS cluster as a project administrator.
- You have a web application that exposes a port and an HTTP or TLS endpoint listening for traffic on the port.
Procedure
Create a route definition and save it in a file called
app-example-route.yaml:YAML definition of the created route with HTTP header directives
apiVersion: route.openshift.io/v1 kind: Route # ... spec: host: app.example.com tls: termination: edge to: kind: Service name: app-example httpHeaders: actions: 1 response: 2 - name: Content-Location 3 action: type: Set 4 set: value: /lang/en-us 5- 1
- The list of actions you want to perform on the HTTP headers.
- 2
- The type of header you want to change. In this case, a response header.
- 3
- The name of the header you want to change. For a list of available headers you can set or delete, see HTTP header configuration.
- 4
- The type of action being taken on the header. This field can have the value
SetorDelete. - 5
- When setting HTTP headers, you must provide a
value. The value can be a string from a list of available directives for that header, for exampleDENY, or it can be a dynamic value that will be interpreted using HAProxy’s dynamic value syntax. In this case, the value is set to the relative location of the content.
Create a route to your existing web application using the newly created route definition:
$ oc -n app-example create -f app-example-route.yaml
For HTTP request headers, the actions specified in the route definitions are executed after any actions performed on HTTP request headers in the Ingress Controller. This means that any values set for those request headers in a route will take precedence over the ones set in the Ingress Controller. For more information on the processing order of HTTP headers, see HTTP header configuration.
10.1.8. Route-specific annotations
The Ingress Controller can set the default options for all the routes it exposes. An individual route can override some of these defaults by providing specific configurations in its annotations. Red Hat does not support adding a route annotation to an operator-managed route.
To create a whitelist with multiple source IPs or subnets, use a space-delimited list. Any other delimiter type causes the list to be ignored without a warning or error message.
Table 10.3. Route annotations
| Variable | Description | Environment variable used as default |
|---|---|---|
|
|
Sets the load-balancing algorithm. Available options are |
|
|
|
Disables the use of cookies to track related connections. If set to | |
|
| Specifies an optional cookie to use for this route. The name must consist of any combination of upper and lower case letters, digits, "_", and "-". The default is the hashed internal key name for the route. | |
|
|
Sets the maximum number of connections that are allowed to a backing pod from a router. | |
|
|
Setting | |
|
|
Limits the number of concurrent TCP connections made through the same source IP address. It accepts a numeric value. | |
|
|
Limits the rate at which a client with the same source IP address can make HTTP requests. It accepts a numeric value. | |
|
|
Limits the rate at which a client with the same source IP address can make TCP connections. It accepts a numeric value. | |
|
| Sets a server-side timeout for the route. (TimeUnits) |
|
|
| This timeout applies to a tunnel connection, for example, WebSocket over cleartext, edge, reencrypt, or passthrough routes. With cleartext, edge, or reencrypt route types, this annotation is applied as a timeout tunnel with the existing timeout value. For the passthrough route types, the annotation takes precedence over any existing timeout value set. |
|
|
|
You can set either an IngressController or the ingress config . This annotation redeploys the router and configures the HA proxy to emit the haproxy |
|
|
| Sets the interval for the back-end health checks. (TimeUnits) |
|
|
| Sets an allowlist for the route. The allowlist is a space-separated list of IP addresses and CIDR ranges for the approved source addresses. Requests from IP addresses that are not in the allowlist are dropped.
The maximum number of IP addresses and CIDR ranges directly visible in the | |
|
| Sets a Strict-Transport-Security header for the edge terminated or re-encrypt route. | |
|
| Sets the rewrite path of the request on the backend. | |
|
| Sets a value to restrict cookies. The values are:
This value is applicable to re-encrypt and edge routes only. For more information, see the SameSite cookies documentation. | |
|
|
Sets the policy for handling the
|
|
If the number of IP addresses and CIDR ranges in an allowlist exceeds 61, they are written into a separate file that is then referenced from
haproxy.config. This file is stored in thevar/lib/haproxy/router/whitelistsfolder.NoteTo ensure that the addresses are written to the allowlist, check that the full list of CIDR ranges are listed in the Ingress Controller configuration file. The etcd object size limit restricts how large a route annotation can be. Because of this, it creates a threshold for the maximum number of IP addresses and CIDR ranges that you can include in an allowlist.
Environment variables cannot be edited.
Router timeout variables
TimeUnits are represented by a number followed by the unit: us *(microseconds), ms (milliseconds, default), s (seconds), m (minutes), h *(hours), d (days).
The regular expression is: [1-9][0-9]*(us\|ms\|s\|m\|h\|d).
| Variable | Default | Description |
|---|---|---|
|
|
| Length of time between subsequent liveness checks on back ends. |
|
|
| Controls the TCP FIN timeout period for the client connecting to the route. If the FIN sent to close the connection does not answer within the given time, HAProxy closes the connection. This is harmless if set to a low value and uses fewer resources on the router. |
|
|
| Length of time that a client has to acknowledge or send data. |
|
|
| The maximum connection time. |
|
|
| Controls the TCP FIN timeout from the router to the pod backing the route. |
|
|
| Length of time that a server has to acknowledge or send data. |
|
|
| Length of time for TCP or WebSocket connections to remain open. This timeout period resets whenever HAProxy reloads. |
|
|
|
Set the maximum time to wait for a new HTTP request to appear. If this is set too low, it can cause problems with browsers and applications not expecting a small
Some effective timeout values can be the sum of certain variables, rather than the specific expected timeout. For example, |
|
|
| Length of time the transmission of an HTTP request can take. |
|
|
| Allows the minimum frequency for the router to reload and accept new changes. |
|
|
| Timeout for the gathering of HAProxy metrics. |
A route setting custom timeout
apiVersion: route.openshift.io/v1
kind: Route
metadata:
  annotations:
    haproxy.router.openshift.io/timeout: 5500ms 1
...
- 1
- Specifies the new timeout with HAProxy supported units (
us,ms,s,m,h,d). If the unit is not provided,msis the default.
Setting a server-side timeout value for passthrough routes too low can cause WebSocket connections to timeout frequently on that route.
A route that allows only one specific IP address
metadata:
  annotations:
    haproxy.router.openshift.io/ip_whitelist: 192.168.1.10
A route that allows several IP addresses
metadata:
  annotations:
    haproxy.router.openshift.io/ip_whitelist: 192.168.1.10 192.168.1.11 192.168.1.12
A route that allows an IP address CIDR network
metadata:
  annotations:
    haproxy.router.openshift.io/ip_whitelist: 192.168.1.0/24
A route that allows both IP an address and IP address CIDR networks
metadata:
  annotations:
    haproxy.router.openshift.io/ip_whitelist: 180.5.61.153 192.168.1.0/24 10.0.0.0/8
A route specifying a rewrite target
apiVersion: route.openshift.io/v1
kind: Route
metadata:
  annotations:
    haproxy.router.openshift.io/rewrite-target: / 1
...
- 1
- Sets
/as rewrite path of the request on the backend.
Setting the haproxy.router.openshift.io/rewrite-target annotation on a route specifies that the Ingress Controller should rewrite paths in HTTP requests using this route before forwarding the requests to the backend application. The part of the request path that matches the path specified in spec.path is replaced with the rewrite target specified in the annotation.
The following table provides examples of the path rewriting behavior for various combinations of spec.path, request path, and rewrite target.
Table 10.4. rewrite-target examples:
| Route.spec.path | Request path | Rewrite target | Forwarded request path |
|---|---|---|---|
| /foo | /foo | / | / |
| /foo | /foo/ | / | / |
| /foo | /foo/bar | / | /bar |
| /foo | /foo/bar/ | / | /bar/ |
| /foo | /foo | /bar | /bar |
| /foo | /foo/ | /bar | /bar/ |
| /foo | /foo/bar | /baz | /baz/bar |
| /foo | /foo/bar/ | /baz | /baz/bar/ |
| /foo/ | /foo | / | N/A (request path does not match route path) |
| /foo/ | /foo/ | / | / |
| /foo/ | /foo/bar | / | /bar |
10.1.9. Creating a route using the default certificate through an Ingress object
If you create an Ingress object without specifying any TLS configuration, Red Hat OpenShift Service on AWS generates an insecure route. To create an Ingress object that generates a secure, edge-terminated route using the default ingress certificate, you can specify an empty TLS configuration as follows.
Prerequisites
- You have a service that you want to expose.
-
You have access to the OpenShift CLI (
oc).
Procedure
Create a YAML file for the Ingress object. In this example, the file is called
example-ingress.yaml:YAML definition of an Ingress object
apiVersion: networking.k8s.io/v1 kind: Ingress metadata: name: frontend ... spec: rules: ... tls: - {} 1- 1
- Use this exact syntax to specify TLS without specifying a custom certificate.
Create the Ingress object by running the following command:
$ oc create -f example-ingress.yaml
Verification
Verify that Red Hat OpenShift Service on AWS has created the expected route for the Ingress object by running the following command:
$ oc get routes -o yaml
Example output
apiVersion: v1
items:
- apiVersion: route.openshift.io/v1
  kind: Route
  metadata:
    name: frontend-j9sdd 1
    ...
  spec:
  ...
    tls: 2
      insecureEdgeTerminationPolicy: Redirect
      termination: edge 3
  ...
10.1.10. Creating a route using the destination CA certificate in the Ingress annotation
The route.openshift.io/destination-ca-certificate-secret annotation can be used on an Ingress object to define a route with a custom destination CA certificate.
Prerequisites
- You may have a certificate/key pair in PEM-encoded files, where the certificate is valid for the route host.
- You may have a separate CA certificate in a PEM-encoded file that completes the certificate chain.
- You must have a separate destination CA certificate in a PEM-encoded file.
- You must have a service that you want to expose.
Procedure
Add the
route.openshift.io/destination-ca-certificate-secretto the Ingress annotations:apiVersion: networking.k8s.io/v1 kind: Ingress metadata: name: frontend annotations: route.openshift.io/termination: "reencrypt" route.openshift.io/destination-ca-certificate-secret: secret-ca-cert 1 ...- 1
- The annotation references a kubernetes secret.
The secret referenced in this annotation will be inserted into the generated route.
Example output
apiVersion: route.openshift.io/v1
kind: Route
metadata:
  name: frontend
  annotations:
    route.openshift.io/termination: reencrypt
    route.openshift.io/destination-ca-certificate-secret: secret-ca-cert
spec:
...
  tls:
    insecureEdgeTerminationPolicy: Redirect
    termination: reencrypt
    destinationCACertificate: |
      -----BEGIN CERTIFICATE-----
      [...]
      -----END CERTIFICATE-----
...
Additional resources
10.2. Secured routes
Secure routes provide the ability to use several types of TLS termination to serve certificates to the client. The following sections describe how to create re-encrypt, edge, and passthrough routes with custom certificates.
10.2.1. Creating a re-encrypt route with a custom certificate
You can configure a secure route using reencrypt TLS termination with a custom certificate by using the oc create route command.
Prerequisites
- You must have a certificate/key pair in PEM-encoded files, where the certificate is valid for the route host.
- You may have a separate CA certificate in a PEM-encoded file that completes the certificate chain.
- You must have a separate destination CA certificate in a PEM-encoded file.
- You must have a service that you want to expose.
Password protected key files are not supported. To remove a passphrase from a key file, use the following command:
$ openssl rsa -in password_protected_tls.key -out tls.key
Procedure
This procedure creates a Route resource with a custom certificate and reencrypt TLS termination. The following assumes that the certificate/key pair are in the tls.crt and tls.key files in the current working directory. You must also specify a destination CA certificate to enable the Ingress Controller to trust the service’s certificate. You may also specify a CA certificate if needed to complete the certificate chain. Substitute the actual path names for tls.crt, tls.key, cacert.crt, and (optionally) ca.crt. Substitute the name of the Service resource that you want to expose for frontend. Substitute the appropriate hostname for www.example.com.
Create a secure
Routeresource using reencrypt TLS termination and a custom certificate:$ oc create route reencrypt --service=frontend --cert=tls.crt --key=tls.key --dest-ca-cert=destca.crt --ca-cert=ca.crt --hostname=www.example.com
If you examine the resulting
Routeresource, it should look similar to the following:YAML Definition of the Secure Route
apiVersion: route.openshift.io/v1
kind: Route
metadata:
  name: frontend
spec:
  host: www.example.com
  to:
    kind: Service
    name: frontend
  tls:
    termination: reencrypt
    key: |-
      -----BEGIN PRIVATE KEY-----
      [...]
      -----END PRIVATE KEY-----
    certificate: |-
      -----BEGIN CERTIFICATE-----
      [...]
      -----END CERTIFICATE-----
    caCertificate: |-
      -----BEGIN CERTIFICATE-----
      [...]
      -----END CERTIFICATE-----
    destinationCACertificate: |-
      -----BEGIN CERTIFICATE-----
      [...]
      -----END CERTIFICATE-----
See
oc create route reencrypt --helpfor more options.
10.2.2. Creating an edge route with a custom certificate
You can configure a secure route using edge TLS termination with a custom certificate by using the oc create route command. With an edge route, the Ingress Controller terminates TLS encryption before forwarding traffic to the destination pod. The route specifies the TLS certificate and key that the Ingress Controller uses for the route.
Prerequisites
- You must have a certificate/key pair in PEM-encoded files, where the certificate is valid for the route host.
- You may have a separate CA certificate in a PEM-encoded file that completes the certificate chain.
- You must have a service that you want to expose.
Password protected key files are not supported. To remove a passphrase from a key file, use the following command:
$ openssl rsa -in password_protected_tls.key -out tls.key
Procedure
This procedure creates a Route resource with a custom certificate and edge TLS termination. The following assumes that the certificate/key pair are in the tls.crt and tls.key files in the current working directory. You may also specify a CA certificate if needed to complete the certificate chain. Substitute the actual path names for tls.crt, tls.key, and (optionally) ca.crt. Substitute the name of the service that you want to expose for frontend. Substitute the appropriate hostname for www.example.com.
Create a secure
Routeresource using edge TLS termination and a custom certificate.$ oc create route edge --service=frontend --cert=tls.crt --key=tls.key --ca-cert=ca.crt --hostname=www.example.com
If you examine the resulting
Routeresource, it should look similar to the following:YAML Definition of the Secure Route
apiVersion: route.openshift.io/v1
kind: Route
metadata:
  name: frontend
spec:
  host: www.example.com
  to:
    kind: Service
    name: frontend
  tls:
    termination: edge
    key: |-
      -----BEGIN PRIVATE KEY-----
      [...]
      -----END PRIVATE KEY-----
    certificate: |-
      -----BEGIN CERTIFICATE-----
      [...]
      -----END CERTIFICATE-----
    caCertificate: |-
      -----BEGIN CERTIFICATE-----
      [...]
      -----END CERTIFICATE-----
See
oc create route edge --helpfor more options.
10.2.3. Creating a passthrough route
You can configure a secure route using passthrough termination by using the oc create route command. With passthrough termination, encrypted traffic is sent straight to the destination without the router providing TLS termination. Therefore no key or certificate is required on the route.
Prerequisites
- You must have a service that you want to expose.
Procedure
Create a
Routeresource:$ oc create route passthrough route-passthrough-secured --service=frontend --port=8080
If you examine the resulting
Routeresource, it should look similar to the following:A Secured Route Using Passthrough Termination
apiVersion: route.openshift.io/v1
kind: Route
metadata:
  name: route-passthrough-secured 1
spec:
  host: www.example.com
  port:
    targetPort: 8080
  tls:
    termination: passthrough 2
    insecureEdgeTerminationPolicy: None 3
  to:
    kind: Service
    name: frontend
The destination pod is responsible for serving certificates for the traffic at the endpoint. This is currently the only method that can support requiring client certificates, also known as two-way authentication.