
Red Hat Training
A Red Hat training course is available for RHEL 8
Chapter 2. Configuring an Ethernet connection
NetworkManager creates a connection profile for each Ethernet adapter that is installed in a host. By default, this profile uses DHCP for both IPv4 and IPv6 connections. Modify this automatically-created profile or add a new one in the following cases:
- The network requires custom settings, such as a static IP address configuration.
- You require multiple profiles because the host roams among different networks.
Red Hat Enterprise Linux provides administrators different options to configure Ethernet connections. For example:
-
Use
nmclito configure connections on the command line. -
Use
nmtuito configure connections in a text-based user interface. -
Use the GNOME Settings menu or
nm-connection-editorapplication to configure connections in a graphical interface. -
Use
nmstatectlto configure connections through the Nmstate API. - Use RHEL system roles to automate the configuration of connections on one or multiple hosts.
If you want to manually configure Ethernet connections on hosts running in the Microsoft Azure cloud, disable the cloud-init service or configure it to ignore the network settings retrieved from the cloud environment. Otherwise, cloud-init will override on the next reboot the network settings that you have manually configured.
2.1. Configuring an Ethernet connection by using nmcli
If you connect a host to the network over Ethernet, you can manage the connection’s settings on the command line by using the nmcli utility.
Prerequisites
- A physical or virtual Ethernet Network Interface Controller (NIC) exists in the server’s configuration.
Procedure
List the NetworkManager connection profiles:
# nmcli connection show
NAME                UUID                                  TYPE      DEVICE
Wired connection 1  a5eb6490-cc20-3668-81f8-0314a27f3f75  ethernet  enp1s0
By default, NetworkManager creates a profile for each NIC in the host. If you plan to connect this NIC only to a specific network, adapt the automatically-created profile. If you plan to connect this NIC to networks with different settings, create individual profiles for each network.
If you want to create an additional connection profile, enter:
# nmcli connection add con-name <connection-name> ifname <device-name> type ethernetSkip this step to modify an existing profile.
Optional: Rename the connection profile:
# nmcli connection modify "Wired connection 1" connection.id "Internal-LAN"On hosts with multiple profiles, a meaningful name makes it easier to identify the purpose of a profile.
Display the current settings of the connection profile:
# nmcli connection show Internal-LAN
...
connection.interface-name:     enp1s0
connection.autoconnect:        yes
ipv4.method:                   auto
ipv6.method:                   auto
...
Configure the IPv4 settings:
To use DHCP, enter:
# nmcli connection modify Internal-LAN ipv4.method autoSkip this step if
ipv4.methodis already set toauto(default).To set a static IPv4 address, network mask, default gateway, DNS servers, and search domain, enter:
# nmcli connection modify Internal-LAN ipv4.method manual ipv4.addresses 192.0.2.1/24 ipv4.gateway 192.0.2.254 ipv4.dns 192.0.2.200 ipv4.dns-search example.com
Configure the IPv6 settings:
To use stateless address autoconfiguration (SLAAC), enter:
# nmcli connection modify Internal-LAN ipv6.method autoSkip this step if
ipv6.methodis already set toauto(default).To set a static IPv6 address, network mask, default gateway, DNS servers, and search domain, enter:
# nmcli connection modify Internal-LAN ipv6.method manual ipv6.addresses 2001:db8:1::fffe/64 ipv6.gateway 2001:db8:1::fffe ipv6.dns 2001:db8:1::ffbb ipv6.dns-search example.com
To customize other settings in the profile, use the following command:
# nmcli connection modify <connection-name> <setting> <value>Enclose values with spaces or semicolons in quotes.
Activate the profile:
# nmcli connection up Internal-LAN
Verification
Display the IP settings of the NIC:
# ip address show enp1s0
2: enp1s0: <BROADCAST,MULTICAST,UP,LOWER_UP> mtu 1500 qdisc fq_codel state UP group default qlen 1000
    link/ether 52:54:00:17:b8:b6 brd ff:ff:ff:ff:ff:ff
    inet 192.0.2.1/24 brd 192.0.2.255 scope global noprefixroute enp1s0
       valid_lft forever preferred_lft forever
    inet6 2001:db8:1::fffe/64 scope global noprefixroute
       valid_lft forever preferred_lft forever
Display the IPv4 default gateway:
# ip route show default
default via 192.0.2.254 dev enp1s0 proto static metric 102
Display the IPv6 default gateway:
# ip -6 route show default
default via 2001:db8:1::ffee dev enp1s0 proto static metric 102 pref medium
Display the DNS settings:
# cat /etc/resolv.conf
search example.com
nameserver 192.0.2.200
nameserver 2001:db8:1::ffbb
If multiple connection profiles are active at the same time, the order of
nameserverentries depend on the DNS priority values in these profile and the connection types.Use the
pingutility to verify that this host can send packets to other hosts:# ping <host-name-or-IP-address>
Troubleshooting
- Verify that the network cable is plugged-in to the host and a switch.
- Check whether the link failure exists only on this host or also on other hosts connected to the same switch.
- Verify that the network cable and the network interface are working as expected. Perform hardware diagnosis steps and replace defect cables and network interface cards.
- If the configuration on the disk does not match the configuration on the device, starting or restarting NetworkManager creates an in-memory connection that reflects the configuration of the device. For further details and how to avoid this problem, see the NetworkManager duplicates a connection after restart of NetworkManager service solution.
Additional resources
2.2. Configuring an Ethernet connection by using the nmcli interactive editor
If you connect a host to the network over Ethernet, you can manage the connection’s settings on the command line by using the nmcli utility.
Prerequisites
- A physical or virtual Ethernet Network Interface Controller (NIC) exists in the server’s configuration.
Procedure
List the NetworkManager connection profiles:
# nmcli connection show
NAME                UUID                                  TYPE      DEVICE
Wired connection 1  a5eb6490-cc20-3668-81f8-0314a27f3f75  ethernet  enp1s0
By default, NetworkManager creates a profile for each NIC in the host. If you plan to connect this NIC only to a specific network, adapt the automatically-created profile. If you plan to connect this NIC to networks with different settings, create individual profiles for each network.
Start
nmcliin interactive mode:To create an additional connection profile, enter:
# nmcli connection edit type ethernet con-name "<connection-name>"To modify an existing connection profile, enter:
# nmcli connection edit con-name "<connection-name>"
Optional: Rename the connection profile:
nmcli> set connection.id Internal-LANOn hosts with multiple profiles, a meaningful name makes it easier to identify the purpose of a profile.
Do not use quotes to set an ID that contains spaces to avoid that
nmclimakes the quotes part of the name. For example, to setExample Connectionas ID, enterset connection.id Example Connection.Display the current settings of the connection profile:
nmcli> print
...
connection.interface-name:     enp1s0
connection.autoconnect:        yes
ipv4.method:                   auto
ipv6.method:                   auto
...
If you create a new connection profile, set the network interface:
nmcli> set connection.interface-name enp1s0Configure the IPv4 settings:
To use DHCP, enter:
nmcli> set ipv4.method autoSkip this step if
ipv4.methodis already set toauto(default).To set a static IPv4 address, network mask, default gateway, DNS servers, and search domain, enter:
nmcli> ipv4.addresses 192.0.2.1/24
Do you also want to set 'ipv4.method' to 'manual'? [yes]: yes
nmcli> ipv4.gateway 192.0.2.254
nmcli> ipv4.dns 192.0.2.200
nmcli> ipv4.dns-search example.com
Configure the IPv6 settings:
To use stateless address autoconfiguration (SLAAC), enter:
nmcli> set ipv6.method autoSkip this step if
ipv6.methodis already set toauto(default).To set a static IPv6 address, network mask, default gateway, DNS servers, and search domain, enter:
nmcli> ipv6.addresses 2001:db8:1::fffe/64
Do you also want to set 'ipv6.method' to 'manual'? [yes]: yes
nmcli> ipv6.gateway 2001:db8:1::fffe
nmcli> ipv6.dns 2001:db8:1::ffbb
nmcli> ipv6.dns-search example.com
Save and activate the connection:
nmcli> save persistentLeave the interactive mode:
nmcli> quit
Verification
Display the IP settings of the NIC:
# ip address show enp1s0
2: enp1s0: <BROADCAST,MULTICAST,UP,LOWER_UP> mtu 1500 qdisc fq_codel state UP group default qlen 1000
    link/ether 52:54:00:17:b8:b6 brd ff:ff:ff:ff:ff:ff
    inet 192.0.2.1/24 brd 192.0.2.255 scope global noprefixroute enp1s0
       valid_lft forever preferred_lft forever
    inet6 2001:db8:1::fffe/64 scope global noprefixroute
       valid_lft forever preferred_lft forever
Display the IPv4 default gateway:
# ip route show default
default via 192.0.2.254 dev enp1s0 proto static metric 102
Display the IPv6 default gateway:
# ip -6 route show default
default via 2001:db8:1::ffee dev enp1s0 proto static metric 102 pref medium
Display the DNS settings:
# cat /etc/resolv.conf
search example.com
nameserver 192.0.2.200
nameserver 2001:db8:1::ffbb
If multiple connection profiles are active at the same time, the order of
nameserverentries depend on the DNS priority values in these profile and the connection types.Use the
pingutility to verify that this host can send packets to other hosts:# ping <host-name-or-IP-address>
Troubleshooting
- Verify that the network cable is plugged-in to the host and a switch.
- Check whether the link failure exists only on this host or also on other hosts connected to the same switch.
- Verify that the network cable and the network interface are working as expected. Perform hardware diagnosis steps and replace defect cables and network interface cards.
- If the configuration on the disk does not match the configuration on the device, starting or restarting NetworkManager creates an in-memory connection that reflects the configuration of the device. For further details and how to avoid this problem, see the NetworkManager duplicates a connection after restart of NetworkManager service solution
Additional resources
-
nm-settings(5)man page -
nmcli(1)man page - Configuring NetworkManager to avoid using a specific profile to provide a default gateway
- Configuring the order of DNS servers
2.3. Configuring an Ethernet connection by using nmtui
If you connect a host to the network over Ethernet, you can manage the connection’s settings in a text-based user interface by using the nmtui application. Use nmtui to create new profiles and to update existing ones on a host without a graphical interface.
In nmtui:
- Navigate by using the cursor keys.
- Press a button by selecting it and hitting Enter.
- Select and deselect checkboxes by using Space.
Prerequisites
- A physical or virtual Ethernet Network Interface Controller (NIC) exists in the server’s configuration.
Procedure
If you do not know the network device name you want to use in the connection, display the available devices:
# nmcli device status
DEVICE     TYPE      STATE                   CONNECTION
enp1s0     ethernet  unavailable             --
...
Start
nmtui:# nmtui- Select Edit a connection, and press Enter.
Choose whether to add a new connection profile or to modify an existing one:
To create a new profile:
- Press the Add button.
- Select Ethernet from the list of network types, and press Enter.
- To modify an existing profile, select the profile from the list, and press Enter.
Optional: Update the name of the connection profile.
On hosts with multiple profiles, a meaningful name makes it easier to identify the purpose of a profile.
- If you create a new connection profile, enter the network device name into the Device field.
Depending on your environment, configure the IP address settings in the
IPv4 configurationandIPv6 configurationareas accordingly. For this, press the button next to these areas, and select:- Disabled, if this connection does not require an IP address.
- Automatic, if a DHCP server dynamically assigns an IP address to this NIC.
Manual, if the network requires static IP address settings. In this case, you must fill further fields:
- Press the Show button next to the protocol you want to configure to display additional fields.
Press the Add button next to Addresses, and enter the IP address and the subnet mask in Classless Inter-Domain Routing (CIDR) format.
If you do not specify a subnet mask, NetworkManager sets a
/32subnet mask for IPv4 addresses and/64for IPv6 addresses.- Enter the address of the default gateway.
- Press the Add button next to DNS servers, and enter the DNS server address.
- Press the Add button next to Search domains, and enter the DNS search domain.
Figure 2.1. Example of an Ethernet connection with static IP address settings
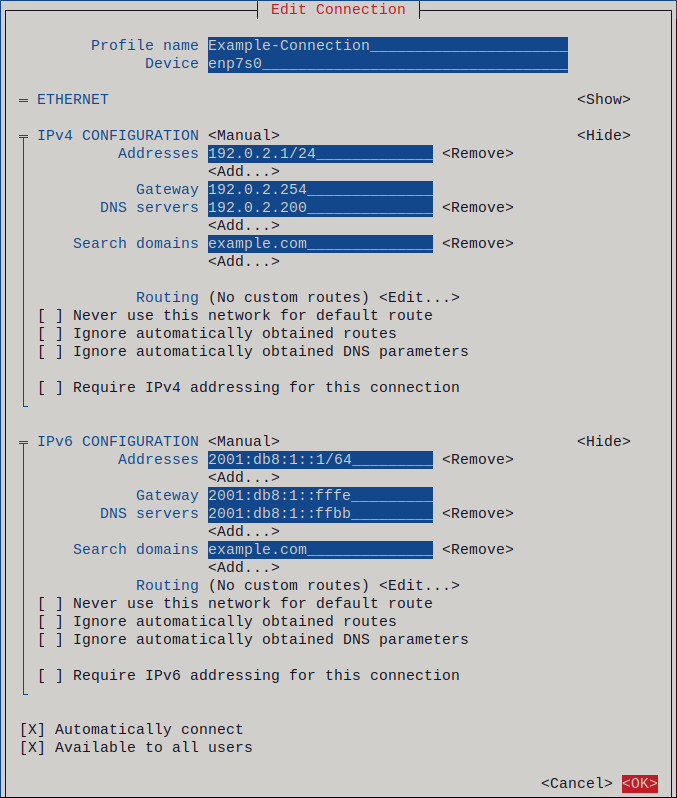
- Press the OK button to create and automatically activate the new connection.
- Press the Back button to return to the main menu.
-
Select Quit, and press Enter to close the
nmtuiapplication.
Verification
Display the IP settings of the NIC:
# ip address show enp1s0
2: enp1s0: <BROADCAST,MULTICAST,UP,LOWER_UP> mtu 1500 qdisc fq_codel state UP group default qlen 1000
    link/ether 52:54:00:17:b8:b6 brd ff:ff:ff:ff:ff:ff
    inet 192.0.2.1/24 brd 192.0.2.255 scope global noprefixroute enp1s0
       valid_lft forever preferred_lft forever
    inet6 2001:db8:1::fffe/64 scope global noprefixroute
       valid_lft forever preferred_lft forever
Display the IPv4 default gateway:
# ip route show default
default via 192.0.2.254 dev enp1s0 proto static metric 102
Display the IPv6 default gateway:
# ip -6 route show default
default via 2001:db8:1::ffee dev enp1s0 proto static metric 102 pref medium
Display the DNS settings:
# cat /etc/resolv.conf
search example.com
nameserver 192.0.2.200
nameserver 2001:db8:1::ffbb
If multiple connection profiles are active at the same time, the order of
nameserverentries depend on the DNS priority values in these profile and the connection types.Use the
pingutility to verify that this host can send packets to other hosts:# ping <host-name-or-IP-address>
Troubleshooting
- Verify that the network cable is plugged-in to the host and a switch.
- Check whether the link failure exists only on this host or also on other hosts connected to the same switch.
- Verify that the network cable and the network interface are working as expected. Perform hardware diagnosis steps and replace defect cables and network interface cards.
- If the configuration on the disk does not match the configuration on the device, starting or restarting NetworkManager creates an in-memory connection that reflects the configuration of the device. For further details and how to avoid this problem, see the NetworkManager duplicates a connection after restart of NetworkManager service solution.
2.4. Configuring an Ethernet connection by using control-center
If you connect a host to the network over Ethernet, you can manage the connection’s settings with a graphical interface by using the GNOME Settings menu.
Note that control-center does not support as many configuration options as the nm-connection-editor application or the nmcli utility.
Prerequisites
- A physical or virtual Ethernet Network Interface Controller (NIC) exists in the server’s configuration.
- GNOME is installed.
Procedure
-
Press the Super key, enter
Settings, and press Enter. - Select Network in the navigation on the left.
Choose whether to add a new connection profile or to modify an existing one:
- To create a new profile, click the button next to the Ethernet entry.
- To modify an existing profile, click the gear icon next to the profile entry.
Optional: On the Identity tab, update the name of the connection profile.
On hosts with multiple profiles, a meaningful name makes it easier to identify the purpose of a profile.
Depending on your environment, configure the IP address settings on the IPv4 and IPv6 tabs accordingly:
-
To use DHCP or IPv6 stateless address autoconfiguration (SLAAC), select
Automatic (DHCP)as method (default). To set a static IP address, network mask, default gateway, DNS servers, and search domain, select
Manualas method, and fill the fields on the tabs:
-
To use DHCP or IPv6 stateless address autoconfiguration (SLAAC), select
Depending on whether you add or modify a connection profile, click the or button to save the connection.
The GNOME
control-centerautomatically activates the connection.
Verification
Display the IP settings of the NIC:
# ip address show enp1s0
2: enp1s0: <BROADCAST,MULTICAST,UP,LOWER_UP> mtu 1500 qdisc fq_codel state UP group default qlen 1000
    link/ether 52:54:00:17:b8:b6 brd ff:ff:ff:ff:ff:ff
    inet 192.0.2.1/24 brd 192.0.2.255 scope global noprefixroute enp1s0
       valid_lft forever preferred_lft forever
    inet6 2001:db8:1::fffe/64 scope global noprefixroute
       valid_lft forever preferred_lft forever
Display the IPv4 default gateway:
# ip route show default
default via 192.0.2.254 dev enp1s0 proto static metric 102
Display the IPv6 default gateway:
# ip -6 route show default
default via 2001:db8:1::ffee dev enp1s0 proto static metric 102 pref medium
Display the DNS settings:
# cat /etc/resolv.conf
search example.com
nameserver 192.0.2.200
nameserver 2001:db8:1::ffbb
If multiple connection profiles are active at the same time, the order of
nameserverentries depend on the DNS priority values in these profile and the connection types.Use the
pingutility to verify that this host can send packets to other hosts:# ping <host-name-or-IP-address>
Troubleshooting steps
- Verify that the network cable is plugged-in to the host and a switch.
- Check whether the link failure exists only on this host or also on other hosts connected to the same switch.
- Verify that the network cable and the network interface are working as expected. Perform hardware diagnosis steps and replace defect cables and network interface cards.
- If the configuration on the disk does not match the configuration on the device, starting or restarting NetworkManager creates an in-memory connection that reflects the configuration of the device. For further details and how to avoid this problem, see the NetworkManager duplicates a connection after restart of NetworkManager service solution.
2.5. Configuring an Ethernet connection by using nm-connection-editor
If you connect a host to the network over Ethernet, you can manage the connection’s settings with a graphical interface by using the nm-connection-editor application.
Prerequisites
- A physical or virtual Ethernet Network Interface Controller (NIC) exists in the server’s configuration.
- GNOME is installed.
Procedure
Open a terminal, and enter:
$ nm-connection-editorChoose whether to add a new connection profile or to modify an existing one:
To create a new profile:
- Click the button
- Select Ethernet as connection type, and click .
- To modify an existing profile, double-click the profile entry.
Optional: Update the name of the profile in the Connection Name field.
On hosts with multiple profiles, a meaningful name makes it easier to identify the purpose of a profile.
If you create a new profile, select the device on the
Ethernettab: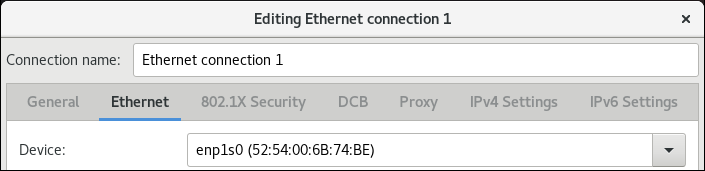
Depending on your environment, configure the IP address settings on the IPv4 Settings and IPv6 Settings tabs accordingly:
-
To use DHCP or IPv6 stateless address autoconfiguration (SLAAC), select
Automatic (DHCP)as method (default). To set a static IP address, network mask, default gateway, DNS servers, and search domain, select
Manualas method, and fill the fields on the tabs: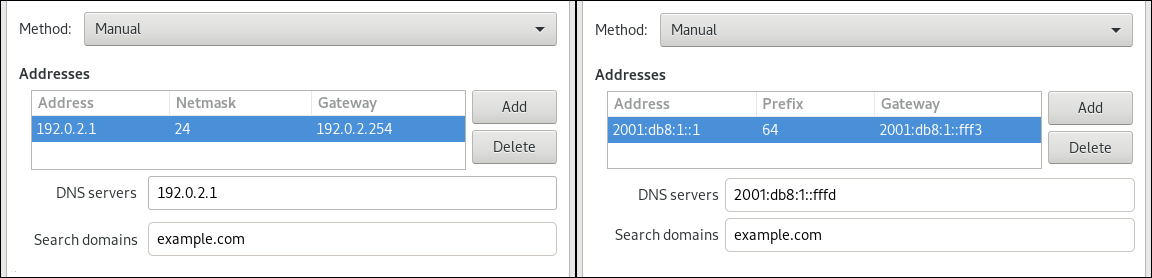
-
To use DHCP or IPv6 stateless address autoconfiguration (SLAAC), select
- Click .
- Close nm-connection-editor.
Verification
Display the IP settings of the NIC:
# ip address show enp1s0
2: enp1s0: <BROADCAST,MULTICAST,UP,LOWER_UP> mtu 1500 qdisc fq_codel state UP group default qlen 1000
    link/ether 52:54:00:17:b8:b6 brd ff:ff:ff:ff:ff:ff
    inet 192.0.2.1/24 brd 192.0.2.255 scope global noprefixroute enp1s0
       valid_lft forever preferred_lft forever
    inet6 2001:db8:1::fffe/64 scope global noprefixroute
       valid_lft forever preferred_lft forever
Display the IPv4 default gateway:
# ip route show default
default via 192.0.2.254 dev enp1s0 proto static metric 102
Display the IPv6 default gateway:
# ip -6 route show default
default via 2001:db8:1::ffee dev enp1s0 proto static metric 102 pref medium
Display the DNS settings:
# cat /etc/resolv.conf
search example.com
nameserver 192.0.2.200
nameserver 2001:db8:1::ffbb
If multiple connection profiles are active at the same time, the order of
nameserverentries depend on the DNS priority values in these profile and the connection types.Use the
pingutility to verify that this host can send packets to other hosts:# ping <host-name-or-IP-address>
Troubleshooting steps
- Verify that the network cable is plugged-in to the host and a switch.
- Check whether the link failure exists only on this host or also on other hosts connected to the same switch.
- Verify that the network cable and the network interface are working as expected. Perform hardware diagnosis steps and replace defect cables and network interface cards.
- If the configuration on the disk does not match the configuration on the device, starting or restarting NetworkManager creates an in-memory connection that reflects the configuration of the device. For further details and how to avoid this problem, see the NetworkManager duplicates a connection after restart of NetworkManager service solution.
2.6. Configuring an Ethernet connection with a static IP address by using nmstatectl
Use the nmstatectl utility to configure an Ethernet connection through the Nmstate API. The Nmstate API ensures that, after setting the configuration, the result matches the configuration file. If anything fails, nmstatectl automatically rolls back the changes to avoid leaving the system in an incorrect state.
Prerequisites
- A physical or virtual Ethernet Network Interface Controller (NIC) exists in the server’s configuration.
-
The
nmstatepackage is installed.
Procedure
Create a YAML file, for example
~/create-ethernet-profile.yml, with the following content:--- interfaces: - name: enp1s0 type: ethernet state: up ipv4: enabled: true address: - ip: 192.0.2.1 prefix-length: 24 dhcp: false ipv6: enabled: true address: - ip: 2001:db8:1::1 prefix-length: 64 autoconf: false dhcp: false routes: config: - destination: 0.0.0.0/0 next-hop-address: 192.0.2.254 next-hop-interface: enp1s0 - destination: ::/0 next-hop-address: 2001:db8:1::fffe next-hop-interface: enp1s0 dns-resolver: config: search: - example.com server: - 192.0.2.200 - 2001:db8:1::ffbbThese settings define an Ethernet connection profile for the
enp1s0device with the following settings:-
A static IPv4 address -
192.0.2.1with the/24subnet mask -
A static IPv6 address -
2001:db8:1::1with the/64subnet mask -
An IPv4 default gateway -
192.0.2.254 -
An IPv6 default gateway -
2001:db8:1::fffe -
An IPv4 DNS server -
192.0.2.200 -
An IPv6 DNS server -
2001:db8:1::ffbb -
A DNS search domain -
example.com
-
A static IPv4 address -
Apply the settings to the system:
# nmstatectl apply ~/create-ethernet-profile.yml
Verification
Display the current state in YAML format:
# nmstatectl show enp1s0Display the IP settings of the NIC:
# ip address show enp1s0
2: enp1s0: <BROADCAST,MULTICAST,UP,LOWER_UP> mtu 1500 qdisc fq_codel state UP group default qlen 1000
    link/ether 52:54:00:17:b8:b6 brd ff:ff:ff:ff:ff:ff
    inet 192.0.2.1/24 brd 192.0.2.255 scope global noprefixroute enp1s0
       valid_lft forever preferred_lft forever
    inet6 2001:db8:1::fffe/64 scope global noprefixroute
       valid_lft forever preferred_lft forever
Display the IPv4 default gateway:
# ip route show default
default via 192.0.2.254 dev enp1s0 proto static metric 102
Display the IPv6 default gateway:
# ip -6 route show default
default via 2001:db8:1::ffee dev enp1s0 proto static metric 102 pref medium
Display the DNS settings:
# cat /etc/resolv.conf
search example.com
nameserver 192.0.2.200
nameserver 2001:db8:1::ffbb
If multiple connection profiles are active at the same time, the order of
nameserverentries depend on the DNS priority values in these profile and the connection types.Use the
pingutility to verify that this host can send packets to other hosts:# ping <host-name-or-IP-address>
Additional resources
-
nmstatectl(8)man page -
/usr/share/doc/nmstate/examples/directory
2.7. Configuring an Ethernet connection with a static IP address by using the network RHEL system role with an interface name
You can remotely configure an Ethernet connection by using the network RHEL system role.
Prerequisites
- You have prepared the control node and the managed nodes
- You are logged in to the control node as a user who can run playbooks on the managed nodes.
-
The account you use to connect to the managed nodes has
sudopermissions on them. - A physical or virtual Ethernet device exists in the server’s configuration.
- The managed nodes use NetworkManager to configure the network.
Procedure
Create a playbook file, for example
~/playbook.yml, with the following content:--- - name: Configure the network hosts: managed-node-01.example.com tasks: - name: Configure an Ethernet connection with static IP ansible.builtin.include_role: name: rhel-system-roles.network vars: network_connections: - name: enp1s0 interface_name: enp1s0 type: ethernet autoconnect: yes ip: address: - 192.0.2.1/24 - 2001:db8:1::1/64 gateway4: 192.0.2.254 gateway6: 2001:db8:1::fffe dns: - 192.0.2.200 - 2001:db8:1::ffbb dns_search: - example.com state: upThese settings define an Ethernet connection profile for the
enp1s0device with the following settings:-
A static IPv4 address -
192.0.2.1with a/24subnet mask -
A static IPv6 address -
2001:db8:1::1with a/64subnet mask -
An IPv4 default gateway -
192.0.2.254 -
An IPv6 default gateway -
2001:db8:1::fffe -
An IPv4 DNS server -
192.0.2.200 -
An IPv6 DNS server -
2001:db8:1::ffbb -
A DNS search domain -
example.com
-
A static IPv4 address -
Validate the playbook syntax:
$ ansible-playbook --syntax-check ~/playbook.ymlNote that this command only validates the syntax and does not protect against a wrong but valid configuration.
Run the playbook:
$ ansible-playbook ~/playbook.yml
Additional resources
-
/usr/share/ansible/roles/rhel-system-roles.network/README.mdfile -
/usr/share/doc/rhel-system-roles/network/directory
2.8. Configuring an Ethernet connection with a static IP address by using the network RHEL system role with a device path
You can remotely configure an Ethernet connection using the network RHEL system role.
You can identify the device path with the following command:
# udevadm info /sys/class/net/<device_name> | grep ID_PATH=Prerequisites
- You have prepared the control node and the managed nodes
- You are logged in to the control node as a user who can run playbooks on the managed nodes.
-
The account you use to connect to the managed nodes has
sudopermissions on them. - A physical or virtual Ethernet device exists in the server’s configuration.
- The managed nodes use NetworkManager to configure the network.
Procedure
Create a playbook file, for example
~/playbook.yml, with the following content:--- - name: Configure the network hosts: managed-node-01.example.com tasks: - name: Configure an Ethernet connection with static IP ansible.builtin.include_role: name: rhel-system-roles.network vars: network_connections: - name: example match: path: - pci-0000:00:0[1-3].0 - &!pci-0000:00:02.0 type: ethernet autoconnect: yes ip: address: - 192.0.2.1/24 - 2001:db8:1::1/64 gateway4: 192.0.2.254 gateway6: 2001:db8:1::fffe dns: - 192.0.2.200 - 2001:db8:1::ffbb dns_search: - example.com state: upThese settings define an Ethernet connection profile with the following settings:
-
A static IPv4 address -
192.0.2.1with a/24subnet mask -
A static IPv6 address -
2001:db8:1::1with a/64subnet mask -
An IPv4 default gateway -
192.0.2.254 -
An IPv6 default gateway -
2001:db8:1::fffe -
An IPv4 DNS server -
192.0.2.200 -
An IPv6 DNS server -
2001:db8:1::ffbb A DNS search domain -
example.comThe
matchparameter in this example defines that Ansible applies the play to devices that match PCI ID0000:00:0[1-3].0, but not0000:00:02.0. For further details about special modifiers and wild cards you can use, see thematchparameter description in the/usr/share/ansible/roles/rhel-system-roles.network/README.mdfile.
-
A static IPv4 address -
Validate the playbook syntax:
$ ansible-playbook --syntax-check ~/playbook.ymlNote that this command only validates the syntax and does not protect against a wrong but valid configuration.
Run the playbook:
$ ansible-playbook ~/playbook.yml
Additional resources
-
/usr/share/ansible/roles/rhel-system-roles.network/README.mdfile -
/usr/share/doc/rhel-system-roles/network/directory
2.9. Configuring an Ethernet connection with a dynamic IP address by using nmstatectl
Use the nmstatectl utility to configure an Ethernet connection through the Nmstate API. The Nmstate API ensures that, after setting the configuration, the result matches the configuration file. If anything fails, nmstatectl automatically rolls back the changes to avoid leaving the system in an incorrect state.
Prerequisites
- A physical or virtual Ethernet Network Interface Controller (NIC) exists in the server’s configuration.
- A DHCP server is available in the network.
-
The
nmstatepackage is installed.
Procedure
Create a YAML file, for example
~/create-ethernet-profile.yml, with the following content:--- interfaces: - name: enp1s0 type: ethernet state: up ipv4: enabled: true auto-dns: true auto-gateway: true auto-routes: true dhcp: true ipv6: enabled: true auto-dns: true auto-gateway: true auto-routes: true autoconf: true dhcp: trueThese settings define an Ethernet connection profile for the
enp1s0device. The connection retrieves IPv4 addresses, IPv6 addresses, default gateway, routes, DNS servers, and search domains from a DHCP server and IPv6 stateless address autoconfiguration (SLAAC).Apply the settings to the system:
# nmstatectl apply ~/create-ethernet-profile.yml
Verification
Display the current state in YAML format:
# nmstatectl show enp1s0Display the IP settings of the NIC:
# ip address show enp1s0
2: enp1s0: <BROADCAST,MULTICAST,UP,LOWER_UP> mtu 1500 qdisc fq_codel state UP group default qlen 1000
    link/ether 52:54:00:17:b8:b6 brd ff:ff:ff:ff:ff:ff
    inet 192.0.2.1/24 brd 192.0.2.255 scope global noprefixroute enp1s0
       valid_lft forever preferred_lft forever
    inet6 2001:db8:1::fffe/64 scope global noprefixroute
       valid_lft forever preferred_lft forever
Display the IPv4 default gateway:
# ip route show default
default via 192.0.2.254 dev enp1s0 proto static metric 102
Display the IPv6 default gateway:
# ip -6 route show default
default via 2001:db8:1::ffee dev enp1s0 proto static metric 102 pref medium
Display the DNS settings:
# cat /etc/resolv.conf
search example.com
nameserver 192.0.2.200
nameserver 2001:db8:1::ffbb
If multiple connection profiles are active at the same time, the order of
nameserverentries depend on the DNS priority values in these profile and the connection types.Use the
pingutility to verify that this host can send packets to other hosts:# ping <host-name-or-IP-address>
Additional resources
-
nmstatectl(8)man page -
/usr/share/doc/nmstate/examples/directory
2.10. Configuring an Ethernet connection with a dynamic IP address by using the network RHEL system role with an interface name
You can remotely configure an Ethernet connection using the network RHEL system role. For connections with dynamic IP address settings, NetworkManager requests the IP settings for the connection from a DHCP server.
Prerequisites
- You have prepared the control node and the managed nodes
- You are logged in to the control node as a user who can run playbooks on the managed nodes.
-
The account you use to connect to the managed nodes has
sudopermissions on them. - A physical or virtual Ethernet device exists in the server’s configuration.
- A DHCP server is available in the network
- The managed nodes use NetworkManager to configure the network.
Procedure
Create a playbook file, for example
~/playbook.yml, with the following content:--- - name: Configure the network hosts: managed-node-01.example.com tasks: - name: Configure an Ethernet connection with dynamic IP ansible.builtin.include_role: name: rhel-system-roles.network vars: network_connections: - name: enp1s0 interface_name: enp1s0 type: ethernet autoconnect: yes ip: dhcp4: yes auto6: yes state: upThese settings define an Ethernet connection profile for the
enp1s0device. The connection retrieves IPv4 addresses, IPv6 addresses, default gateway, routes, DNS servers, and search domains from a DHCP server and IPv6 stateless address autoconfiguration (SLAAC).Validate the playbook syntax:
$ ansible-playbook --syntax-check ~/playbook.ymlNote that this command only validates the syntax and does not protect against a wrong but valid configuration.
Run the playbook:
$ ansible-playbook ~/playbook.yml
Additional resources
-
/usr/share/ansible/roles/rhel-system-roles.network/README.mdfile -
/usr/share/doc/rhel-system-roles/network/directory
2.11. Configuring an Ethernet connection with a dynamic IP address by using the network RHEL system role with a device path
You can remotely configure an Ethernet connection using the network RHEL system role. For connections with dynamic IP address settings, NetworkManager requests the IP settings for the connection from a DHCP server.
You can identify the device path with the following command:
# udevadm info /sys/class/net/<device_name> | grep ID_PATH=Prerequisites
- You have prepared the control node and the managed nodes
- You are logged in to the control node as a user who can run playbooks on the managed nodes.
-
The account you use to connect to the managed nodes has
sudopermissions on them. - A physical or virtual Ethernet device exists in the server’s configuration.
- A DHCP server is available in the network.
- The managed hosts use NetworkManager to configure the network.
Procedure
Create a playbook file, for example
~/playbook.yml, with the following content:--- - name: Configure the network hosts: managed-node-01.example.com tasks: - name: Configure an Ethernet connection with dynamic IP ansible.builtin.include_role: name: rhel-system-roles.network vars: network_connections: - name: example match: path: - pci-0000:00:0[1-3].0 - &!pci-0000:00:02.0 type: ethernet autoconnect: yes ip: dhcp4: yes auto6: yes state: upThese settings define an Ethernet connection profile. The connection retrieves IPv4 addresses, IPv6 addresses, default gateway, routes, DNS servers, and search domains from a DHCP server and IPv6 stateless address autoconfiguration (SLAAC).
The
matchparameter defines that Ansible applies the play to devices that match PCI ID0000:00:0[1-3].0, but not0000:00:02.0.Validate the playbook syntax:
$ ansible-playbook --syntax-check ~/playbook.ymlNote that this command only validates the syntax and does not protect against a wrong but valid configuration.
Run the playbook:
$ ansible-playbook ~/playbook.yml
Additional resources
-
/usr/share/ansible/roles/rhel-system-roles.network/README.mdfile -
/usr/share/doc/rhel-system-roles/network/directory
2.12. Configuring multiple Ethernet interfaces by using a single connection profile by interface name
In most cases, one connection profile contains the settings of one network device. However, NetworkManager also supports wildcards when you set the interface name in connection profiles. If a host roams between Ethernet networks with dynamic IP address assignment, you can use this feature to create a single connection profile that you can use for multiple Ethernet interfaces.
Prerequisites
- Multiple physical or virtual Ethernet devices exist in the server’s configuration.
- A DHCP server is available in the network.
- No connection profile exists on the host.
Procedure
Add a connection profile that applies to all interface names starting with
enp:# nmcli connection add con-name Example connection.multi-connect multiple match.interface-name enp* type ethernet
Verification
Display all settings of the single connection profile:
# nmcli connection show Example connection.id: Example ... connection.multi-connect: 3 (multiple) match.interface-name:
enp*...3indicates the number of interfaces active on the connection profile at the same time, and not the number of network interfaces in the connection profile. The connection profile uses all devices that match the pattern in thematch.interface-nameparameter and, therefore, the connection profiles have the same Universally Unique Identifier (UUID).Display the status of the connections:
# nmcli connection show
NAME                    UUID                    TYPE     DEVICE
...
Example  6f22402e-c0cc-49cf-b702-eaf0cd5ea7d1  ethernet  enp7s0
Example  6f22402e-c0cc-49cf-b702-eaf0cd5ea7d1  ethernet  enp8s0
Example  6f22402e-c0cc-49cf-b702-eaf0cd5ea7d1  ethernet  enp9s0
Additional resources
-
nmcli(1)man page -
nm-settings(5)man page
2.13. Configuring a single connection profile for multiple Ethernet interfaces using PCI IDs
The PCI ID is a unique identifier of the devices connected to the system. The connection profile adds multiple devices by matching interfaces based on a list of PCI IDs. You can use this procedure to connect multiple device PCI IDs to the single connection profile.
Prerequisites
- Multiple physical or virtual Ethernet devices exist in the server’s configuration.
- A DHCP server is available in the network.
- No connection profile exists on the host.
Procedure
Identify the device path. For example, to display the device paths of all interfaces starting with
enp, enter :# udevadm info /sys/class/net/enp* | grep ID_PATH= ... E: ID_PATH=pci-0000:07:00.0 E: ID_PATH=pci-0000:08:00.0Add a connection profile that applies to all PCI IDs matching the
0000:00:0[7-8].0expression:# nmcli connection add type ethernet connection.multi-connect multiple match.path "pci-0000:07:00.0 pci-0000:08:00.0" con-name Example
Verification
Display the status of the connection:
# nmcli connection show
NAME   UUID     TYPE        DEVICE
Example      9cee0958-512f-4203-9d3d-b57af1d88466  ethernet  enp7s0
Example      9cee0958-512f-4203-9d3d-b57af1d88466  ethernet  enp8s0
...
To display all settings of the connection profile:
# nmcli connection show Example
connection.id:               Example
...
connection.multi-connect:    3 (multiple)
match.path:                  pci-0000:07:00.0,pci-0000:08:00.0
...
This connection profile uses all devices with a PCI ID which match the pattern in the
match.pathparameter and, therefore, the connection profiles have the same Universally Unique Identifier (UUID).
Additional resources
-
nmcli(1)man page -
nm-settings(5)man page