
Chapter 10. Configuring an OVS-DPDK deployment
This section describes how to deploy, use, and troubleshoot Open vSwitch Data Plane Development Kit (OVS-DPDK) for a Red Hat OpenStack Platform (RHOSP) environment. RHOSP operates in OVS client mode for OVS-DPDK deployments.
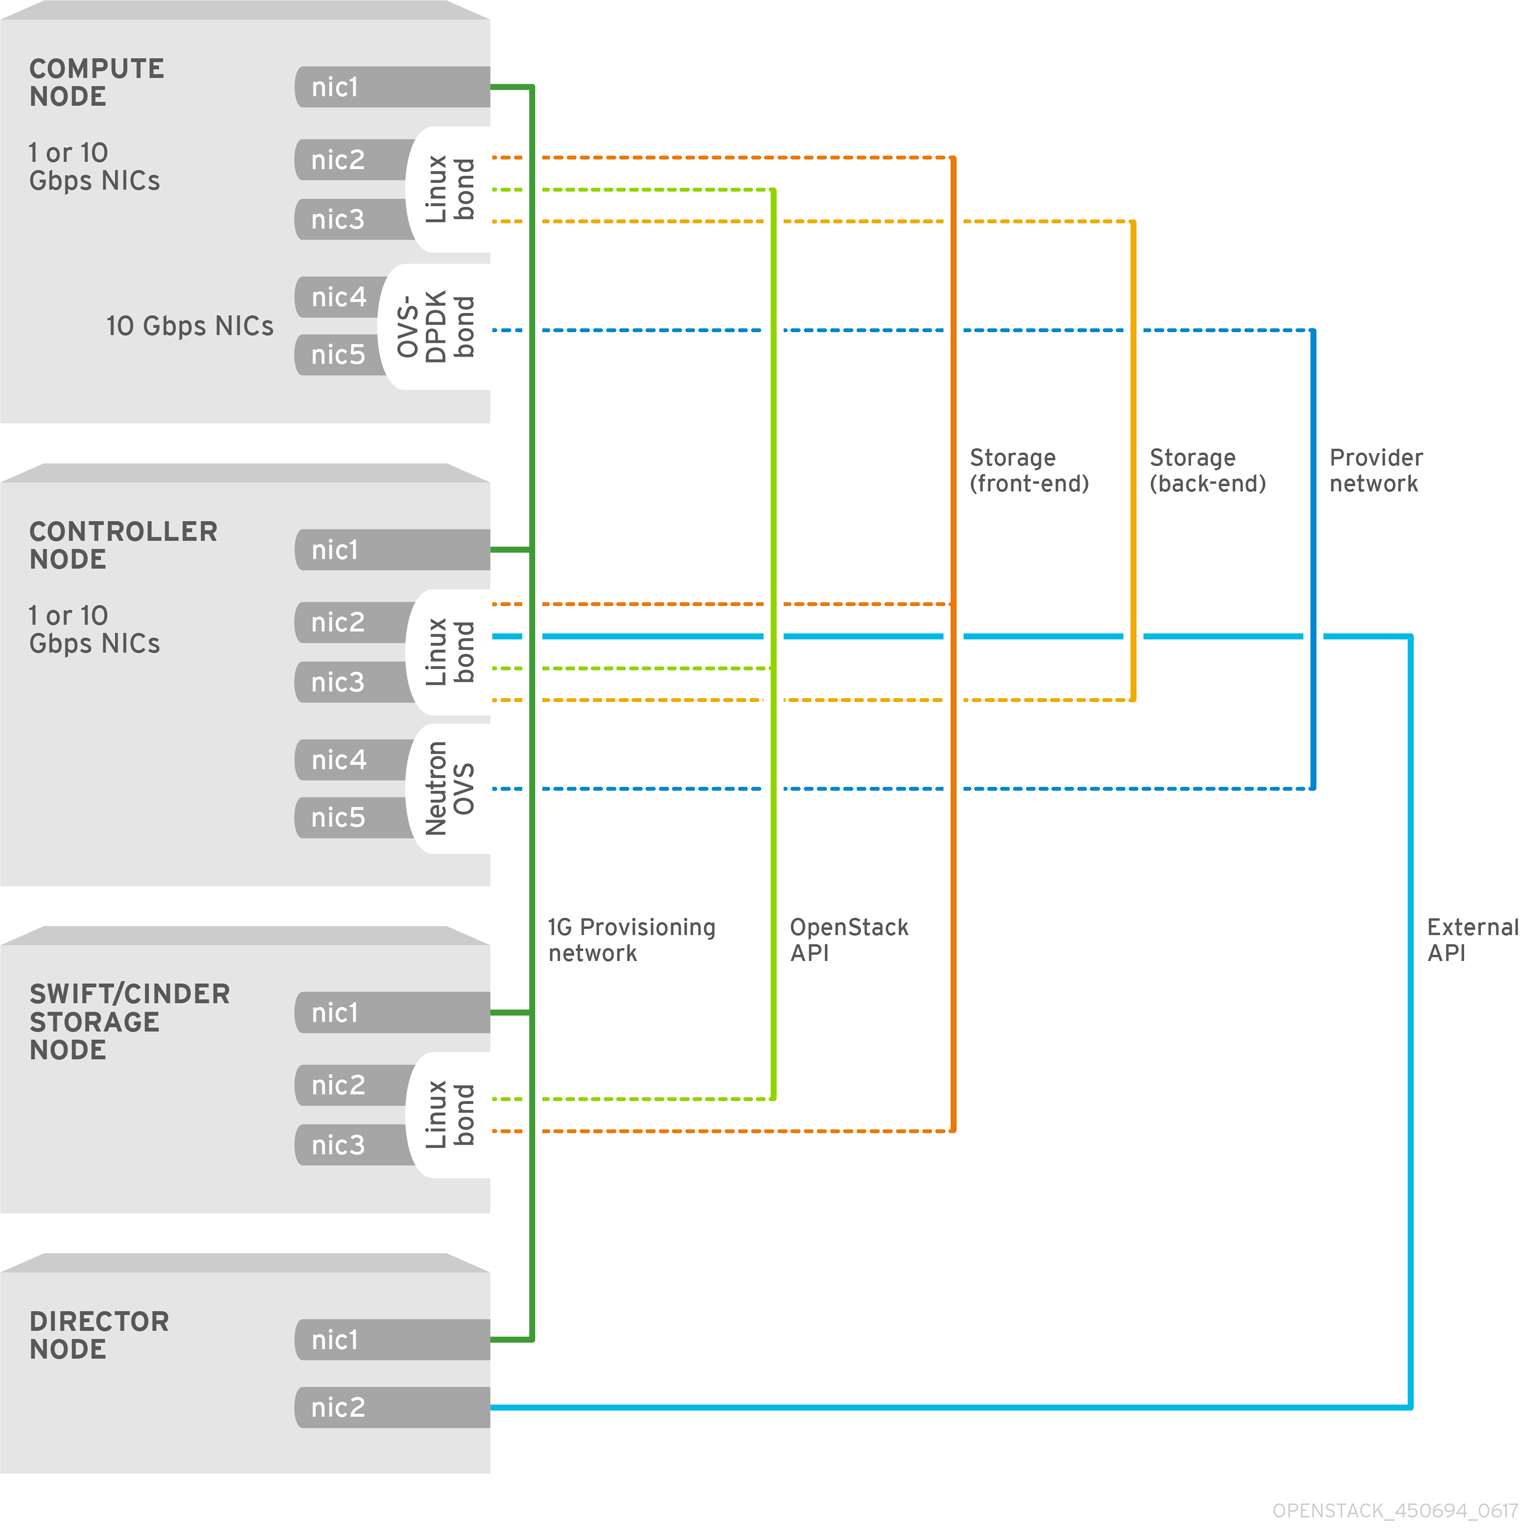
The following figure shows an OVS-DPDK topology with two bonded ports for the control plane and data plane:
Figure 10.1. Sample OVS-DPDK topology
This section includes examples that you must modify for your topology and use case. For more information, see Hardware requirements for NFV.
Prerequisites
A RHOSP undercloud.
You must install and configure the undercloud before you can deploy the overcloud. For more information, see Installing and managing Red Hat OpenStack Platform with director.
NoteRHOSP director modifies OVS-DPDK configuration files through the key-value pairs that you specify in templates and custom environment files. You must not modify the OVS-DPDK files directly.
-
Access to the undercloud host and credentials for the
stackuser.
Procedure
Use Red Hat OpenStack Platform (RHOSP) director to install and configure OVS-DPDK in a RHOSP environment. The high-level steps are:
- Review the known limitations for OVS-DPDK.
- Generate roles and image files.
- Create an environment file for your OVS-DPDK customizations.
- Configure a firewall for security groups.
- Create a bare metal nodes definition file.
- Create a NIC configuration template.
- Set the MTU value for OVS-DPDK interfaces.
- Set multiqueue for OVS-DPDK interfaces.
- Configure DPDK parameters for node provisioning.
Provision overcloud networks and VIPs.
For more information, see:
- Configuring and provisioning overcloud network definitions in the Installing and managing Red Hat OpenStack Platform with director guide.
- Configuring and provisioning network VIPs for the overcloud in the Installing and managing Red Hat OpenStack Platform with director guide.
Provision bare metal nodes.
Provisioning bare metal nodes for the overcloud in the Installing and managing Red Hat OpenStack Platform with director guide
- Deploy an OVS-DPDK overcloud.
Additional resources
10.1. Known limitations for OVS-DPDK
Observe the following limitations when configuring Red Hat OpenStack Platform in a Open vSwitch Data Plane Development Kit (OVS-DPDK) environment:
- Use Linux bonds for non-DPDK traffic, and control plane networks, such as Internal, Management, Storage, Storage Management, and Tenant. Ensure that both the PCI devices used in the bond are on the same NUMA node for optimum performance. Neutron Linux bridge configuration is not supported by Red Hat.
- You require huge pages for every instance running on the hosts with OVS-DPDK. If huge pages are not present in the guest, the interface appears but does not function.
- With OVS-DPDK, there is a performance degradation of services that use tap devices, such as Distributed Virtual Routing (DVR). The resulting performance is not suitable for a production environment.
-
When using OVS-DPDK, all bridges on the same Compute node must be of type
ovs_user_bridge. The director may accept the configuration, but Red Hat OpenStack Platform does not support mixingovs_bridgeandovs_user_bridgeon the same node.
Next steps
- Proceed to Section 10.2, “Generating roles and image files”.
10.2. Generating roles and image files
Red Hat OpenStack Platform (RHOSP) director uses roles to assign services to nodes. When deploying RHOSP in an OVS-DPDK environment, ComputeOvsDpdk is a custom role provided with your RHOSP installation that includes the ComputeNeutronOvsDpdk service, in addition to the default compute services.
The undercloud installation requires an environment file to determine where to obtain container images and how to store them.
Prerequisites
-
Access to the undercloud host and credentials for the
stackuser.
Procedure
-
Log in to the undercloud as the
stackuser. Source the
stackrcfile:$ source ~/stackrc
Generate a new roles data file, for example,
roles_data_compute_ovsdpdk.yaml, that includes theControllerandComputeOvsDpdkroles:$ openstack overcloud roles generate \ -o /home/stack/templates/roles_data_compute_ovsdpdk.yaml \ Controller ComputeOvsDpdk
NoteIf you are using multiple technologies in your RHOSP environment, OVS-DPDK, SR-IOV, and OVS hardware offload, you generate just one roles data file to include all the roles:
$ openstack overcloud roles generate -o /home/stack/templates/\
roles_data.yaml Controller ComputeOvsDpdk ComputeOvsDpdkSriov \
Compute:ComputeOvsHwOffload
Optional: You can configure OVS-DPDK to enter sleep mode when no packets are being forwarded, by using the TuneD profile,
cpu-partitioning-powersave.To configure
cpu-partitioning-powersave, replace the default TuneD profile with the power saving TuneD profile,cpu-partitioning-powersave, in your generated roles data file:TunedProfileName: "cpu-partitioning-powersave"
Example
In this generated roles data file,
/home/stack/templates/roles_data_compute_ovsdpdk.yaml, the default value ofTunedProfileNameis replaced withcpu-partitioning-powersave:$ sed -i \ 's/TunedProfileName:.*$/TunedProfileName: "cpu-partitioning-powersave"/' \ /home/stack/templates/roles_data_compute_ovsdpdk.yaml
To generate an images file, you run the
openstack tripleo container image preparecommand. The following inputs are needed:-
The roles data file that you generated in an earlier step, for example,
roles_data_compute_ovsdpdk.yaml. The DPDK environment file appropriate for your Networking service mechanism driver:
-
neutron-ovn-dpdk.yamlfile for ML2/OVN environments. neutron-ovs-dpdk.yamlfile for ML2/OVS environments.Example
In this example, the
overcloud_images.yamlfile is being generated for an ML2/OVN environment:$ sudo openstack tripleo container image prepare \ --roles-file ~/templates/roles_data_compute_ovsdpdk.yaml \ -e /usr/share/openstack-tripleo-heat-templates/environments/services/neutron-ovn-dpdk.yaml \ -e ~/containers-prepare-parameter.yaml \ --output-env-file=/home/stack/templates/overcloud_images.yaml
-
-
The roles data file that you generated in an earlier step, for example,
- Note the path and file name of the roles data file and the images file that you have created. You use these files later when you deploy your overcloud.
Next steps
Additional resources
- Saving power in OVS-DPDK deployments
- Composable services and custom roles in Installing and managing Red Hat OpenStack Platform with director
- Preparing container images in Installing and managing Red Hat OpenStack Platform with director
10.3. Creating an environment file for your OVS-DPDK customizations
You can use particular Red Hat OpenStack Platform configuration values in a custom environment YAML file to configure your OVS-DPDK deployment.
Prerequisites
-
Access to the undercloud host and credentials for the
stackuser.
Procedure
-
Log in to the undercloud as the
stackuser. Source the
stackrcfile:$ source ~/stackrc
-
Create a custom environment YAML file, for example,
ovs-dpdk-overrides.yaml. In the custom environment file, ensure that
AggregateInstanceExtraSpecsFilteris in the list of filters for theNovaSchedulerEnabledFiltersparameter that the Compute service (nova) uses to filter a node:parameter_defaults: NovaSchedulerEnabledFilters: - AvailabilityZoneFilter - ComputeFilter - ComputeCapabilitiesFilter - ImagePropertiesFilter - ServerGroupAntiAffinityFilter - ServerGroupAffinityFilter - PciPassthroughFilter - AggregateInstanceExtraSpecsFilterAdd role-specific parameters for the OVS-DPDK Compute nodes to the custom environment file.
Example
parameter_defaults:
  ComputeOvsDpdkParameters:
    NeutronBridgeMappings: "dpdk:br-dpdk"
    KernelArgs: "default_hugepagesz=1GB hugepagesz=1GB hugepages=64 iommu=pt intel_iommu=on isolcpus=2,4,6,8,10,12,14,16,18,22,24,26,28,30,32,34,36,38,3,5,7,9,11,13,15,17,19,23,25,27,29,31,33,35,37,39"
    TunedProfileName: "cpu-partitioning"
    IsolCpusList: "2,4,6,8,10,12,14,16,18,22,24,26,28,30,32,34,36,38,3,5,7,9,11,13,15,17,19,23,25,27,29,31,33,35,37,39"
    NovaReservedHostMemory: 4096
    OvsDpdkSocketMemory: "4096,4096"
    OvsDpdkMemoryChannels: "4"
    OvsDpdkCoreList: "0,20,1,21"
    NovaComputeCpuDedicatedSet: "4,6,8,10,12,14,16,18,24,26,28,30,32,34,36,38,5,7,9,11,13,15,17,19,27,29,31,33,35,37,39"
    NovaComputeCpuSharedSet: "0,20,1,21"
    OvsPmdCoreList: "2,22,3,23"
    OvsEnableDpdk: true
If you need to override any of the configuration defaults in those files, add your overrides to the custom environment file that you created in step 3.
RHOSP director uses the following files to configure OVS-DPDK:
ML2/OVN deployments
/usr/share/openstack-tripleo-heat-templates/environment/services/neutron-ovn-dpdk.yamlML2/OVS deployments
/usr/share/openstack-tripleo-heat-templates/environment/services/neutron-ovs-dpdk.yaml
- Note the path and file name of the custom environment file that you have created. You use this file later when you deploy your overcloud.
Next steps
10.4. Configuring a firewall for security groups
Data plane interfaces require high performance in a stateful firewall. To protect these interfaces, consider deploying a telco-grade firewall as a virtual network function (VNF) in your Red Hat OpenStack Platform (RHOSP) OVS-DPDK environment.
To configure control plane interfaces in an ML2/OVS deployment, set the NeutronOVSFirewallDriver parameter to openvswitch in your custom environment file under parameter_defaults. In an OVN deployment, you can implement security groups with Access Control Lists (ACL).
You cannot use the OVS firewall driver with hardware offload because the connection tracking properties of the flows are unsupported in the offload path.
Prerequisites
-
Access to the undercloud host and credentials for the
stackuser.
Procedure
-
Log in to the undercloud as the
stackuser. Source the
stackrcfile:$ source ~/stackrc
- Open the custom environment YAML file that you created in Section 10.3, “Creating an environment file for your OVS-DPDK customizations”, or create a new one.
Under
parameter_defaults, add the following key-value pair:parameter_defaults: ... NeutronOVSFirewallDriver: openvswitch
- If you created a new custom environment file, note its path and file name. You use this file later when you deploy your overcloud.
After you deploy the overcloud, run the
openstack port setcommand to disable the OVS firewall driver for data plane interfaces:$ openstack port set --no-security-group --disable-port-security ${PORT}
Next steps
Additional resources
- Composable services and custom roles in Installing and managing Red Hat OpenStack Platform with director
- Tested NICs for NFV
10.5. Creating a bare metal nodes definition file
Using Red Hat OpenStack Platform (RHOSP) director you provision your bare metal nodes for your OVS-DPDK environment by using a definition file. In the bare metal nodes definition file, define the quantity and attributes of the bare metal nodes that you want to deploy and assign overcloud roles to these nodes. Also define the network layout of the nodes.
Prerequisites
-
Access to the undercloud host and credentials for the
stackuser.
Procedure
-
Log in to the undercloud as the
stackuser. Source the
stackrcfile:$ source ~/stackrc
-
Create a bare metal nodes definition file, such as
overcloud-baremetal-deploy.yaml, as instructed in Provisioning bare metal nodes for the overcloud in the Installing and managing Red Hat OpenStack Platform with director guide. In the
overcloud-baremetal-deploy.yamlfile add a declaration to the Ansible playbook,cli-overcloud-node-kernelargs.yaml. The playbook contains kernel arguments to use when you are provisioning bare metal nodes.- name: ComputeOvsDpdk ... ansible_playbooks: - playbook: /usr/share/ansible/tripleo-playbooks/cli-overcloud-node-kernelargs.yaml ...If you want to set any extra Ansible variables when running the playbook, use the
extra_varsproperty to set them.For more information, see Bare-metal node provisioning attributes in the Installing and managing Red Hat OpenStack Platform with director guide.
NoteThe variables that you add to
extra_varsshould be the same role-specific parameters for the OVS-DPDK Compute nodes that you added to the custom environment file earlier in Create an environment file for your OVS-DPDK customizations.Example
- name: ComputeOvsDpdk
  ...
  ansible_playbooks:
  - playbook: /usr/share/ansible/tripleo-playbooks/cli-overcloud-node-kernelargs.yaml
    extra_vars:
      kernel_args: 'default_hugepagesz=1GB hugepagesz=1GB hugepages=64 iommu=pt intel_iommu=on isolcpus=2,4,6,8,10,12,14,16,18,20,22,24,26,28,30,32,34,36,38,3,5,7,9,11,13,15,17,19,21,23,25,27,29,31,33,35,37,39'
      tuned_isolated_cores: '2,4,6,8,10,12,14,16,18,20,22,24,26,28,30,32,34,36,38,3,5,7,9,11,13,15,17,19,21,23,25,27,29,31,33,35,37,39'
      tuned_profile: 'cpu-partitioning'
      reboot_wait_timeout: 1800
  - playbook: /usr/share/ansible/tripleo-playbooks/cli-overcloud-openvswitch-dpdk.yaml
    extra_vars:
      pmd: '2,22,3,23'
      memory_channels: '4'
      socket_mem: '4096,4096'
      pmd_auto_lb: true
      pmd_load_threshold: "70"
      pmd_improvement_threshold: "25"
      pmd_rebal_interval: "2"
Optional: You can configure OVS-DPDK to enter sleep mode when no packets are being forwarded, by using the TuneD profile,
cpu-partitioning-powersave.To configure
cpu-partitioning-powersave, add the following lines to your bare metal nodes definition file:... tuned_profile: "cpu-partitioning-powersave" ... - playbook: /home/stack/ospd-17.1-geneve-ovn-dpdk-sriov-ctlplane-dataplane-bonding-hybrid/playbooks/cli-overcloud-tuned-maxpower-conf.yaml - playbook: /home/stack/ospd-17.1-geneve-ovn-dpdk-sriov-ctlplane-dataplane-bonding-hybrid/playbooks/overcloud-nm-config.yaml extra_vars: reboot_wait_timeout: 900 ... pmd_sleep_max: "50" ...Example
- name: ComputeOvsDpdk ... ansible_playbooks: - playbook: /usr/share/ansible/tripleo-playbooks/cli-overcloud-node-kernelargs.yaml extra_vars: kernel_args: default_hugepagesz=1GB hugepagesz=1GB hugepages=64 iommu=pt intel_iommu=on isolcpus=2,4,6,8,10,12,14,16,18,20,22,24,26,28,30,32,34,36,38,3,5,7,9,11,13,15,17,19,21,23,25,27,29,31,33,35,37,39 tuned_isolated_cores: 2,4,6,8,10,12,14,16,18,20,22,24,26,28,30,32,34,36,38,3,5,7,9,11,13,15,17,19,21,23,25,27,29,31,33,35,37,39 tuned_profile: cpu-partitioning reboot_wait_timeout: 1800 - playbook: /home/stack/ospd-17.1-geneve-ovn-dpdk-sriov-ctlplane-dataplane-bonding-hybrid/playbooks/cli-overcloud-tuned-maxpower-conf.yaml - playbook: /home/stack/ospd-17.1-geneve-ovn-dpdk-sriov-ctlplane-dataplane-bonding-hybrid/playbooks/overcloud-nm-config.yaml extra_vars: reboot_wait_timeout: 900 - playbook: /usr/share/ansible/tripleo-playbooks/cli-overcloud-openvswitch-dpdk.yaml extra_vars: pmd: 2,22,3,23 memory_channels: 4 socket_mem: 4096,4096 pmd_auto_lb: true pmd_load_threshold: "70" pmd_improvement_threshold: "25" pmd_rebal_interval: "2" pmd_sleep_max: "50"-
Note the path and file name of the bare metal nodes definition file that you have created. You use this file later when you configure your NICs and as the input file for the
overcloud node provisioncommand when you provision your nodes.
Next steps
Additional resources
- Saving power in OVS-DPDK deployments
- Composable services and custom roles in Installing and managing Red Hat OpenStack Platform with director
- Tested NICs for NFV
10.6. Creating a NIC configuration template
Define your NIC configuration templates by modifying copies of the sample Jinja2 templates that ship with Red Hat OpenStack Platform (RHOSP).
Prerequisites
-
Access to the undercloud host and credentials for the
stackuser.
Procedure
-
Log in to the undercloud as the
stackuser. Source the
stackrcfile:$ source ~/stackrc
Copy a sample network configuration template.
Copy a NIC configuration Jinja2 template from the examples in the
/usr/share/ansible/roles/tripleo_network_config/templates/directory. Choose the one that most closely matches your NIC requirements. Modify it as needed.In your NIC configuration template, for example,
single_nic_vlans.j2, add your DPDK interfaces.NoteIn the sample NIC configuration template,
single_nic_vlans.j2, the nodes only use one single network interface as a trunk with VLANs. The native VLAN, the untagged traffic, is the control plane, and each VLAN corresponds to one of the RHOSP networks: internal API, storage, and so on.Example
...
  - type: ovs_dpdk_bond
    name: dpdkbond0
    mtu: 9000
    rx_queue: 1
    ovs_extra:
      - set Interface dpdk0 options:n_rxq_desc=4096
      - set Interface dpdk0 options:n_txq_desc=4096
      - set Interface dpdk1 options:n_rxq_desc=4096
      - set Interface dpdk1 options:n_txq_desc=4096
    members:
    - type: ovs_dpdk_port
      name: dpdk0
      driver: vfio-pci
      members:
      - type: interface
        name: nic5
    - type: ovs_dpdk_port
      name: dpdk1
      driver: vfio-pci
      members:
      - type: interface
        name: nic6
...
Add the custom network configuration template, for example,
single_nic_vlans.j2, to the bare metal nodes definition file, for example,overcloud-baremetal-deploy.yamlthat you created in Section 10.5, “Creating a bare metal nodes definition file”.Example
- name: ComputeOvsDpdk
  count: 2
  hostname_format: compute-%index%
  defaults:
    networks:
      - network: internal_api
        subnet: internal_api_subnet
      - network: tenant
        subnet: tenant_subnet
      - network: storage
        subnet: storage_subnet
    network_config:
      template: /home/stack/templates/single_nic_vlans.j2
...
Optional: You can configure OVS-DPDK to enter sleep mode when no packets are being forwarded, by using the TuneD profile,
cpu-partitioning-powersave.To configure
cpu-partitioning-powersave, ensure that you have set the queue size in your NIC configuration template.Example
... - type: ovs_dpdk_bond name: dpdkbond0 mtu: 9000 rx_queue: 1 ovs_extra: - set Interface dpdk0 options:n_rxq_desc=4096 - set Interface dpdk0 options:n_txq_desc=4096 - set Interface dpdk1 options:n_rxq_desc=4096 - set Interface dpdk1 options:n_txq_desc=4096 members: - type: ovs_dpdk_port name: dpdk0 driver: vfio-pci members: - type: interface name: nic5 - type: ovs_dpdk_port name: dpdk1 driver: vfio-pci members: - type: interface name: nic6 ...- Note the path and file name of the NIC configuration template that you have created. You use this file later when you deploy your overcloud.
Next steps
Additional resources
10.7. Setting the MTU value for OVS-DPDK interfaces
Red Hat OpenStack Platform (RHOSP) supports jumbo frames for OVS-DPDK. To set the maximum transmission unit (MTU) value for jumbo frames you must:
- Set the global MTU value for networking in a custom environment file.
Set the physical DPDK port MTU value in your NIC configuration template.
This value is also used by the vhost user interface.
- Set the MTU value within any guest instances on the Compute node to ensure that you have a comparable MTU value from end to end in your configuration.
You do not need any special configuration for the physical NIC because the NIC is controlled by the DPDK PMD, and has the same MTU value set by your NIC configuration template. You cannot set an MTU value larger than the maximum value supported by the physical NIC.
VXLAN packets include an extra 50 bytes in the header. Calculate your MTU requirements based on these additional header bytes. For example, an MTU value of 9000 means the VXLAN tunnel MTU value is 8950 to account for these extra bytes.
Prerequisites
-
Access to the undercloud host and credentials for the
stackuser.
Procedure
-
Log in to the undercloud as the
stackuser. Source the
stackrcfile:$ source ~/stackrc
- Open the custom environment YAML file that you created in Section 10.3, “Creating an environment file for your OVS-DPDK customizations”, or create a new one.
Under
parameter_defaultsset theNeutronGlobalPhysnetMtuparameter.Example
In this example,
NeutronGlobalPhysnetMtuis set to9000:parameter_defaults: # MTU global configuration NeutronGlobalPhysnetMtu: 9000
NoteEnsure that the
OvsDpdkSocketMemoryvalue in thenetwork-environment.yamlfile is large enough to support jumbo frames. For more information, see Memory parameters.-
Open your NIC configuration template, for example,
single_nic_vlans.j2, that you created in Section 10.6, “Creating a NIC configuration template”. Set the MTU value on the bridge to the Compute node.
  -
    type: ovs_bridge
    name: br-link0
    use_dhcp: false
    members:
      -
        type: interface
        name: nic3
        mtu: 9000
Set the MTU values for an OVS-DPDK bond:
- type: ovs_user_bridge name: br-link0 use_dhcp: false members: - type: ovs_dpdk_bond name: dpdkbond0 mtu: 9000 rx_queue: 2 members: - type: ovs_dpdk_port name: dpdk0 mtu: 9000 members: - type: interface name: nic4 - type: ovs_dpdk_port name: dpdk1 mtu: 9000 members: - type: interface name: nic5- Note the paths and file names of your NIC configuration template and your custom environment file. You use these files later when you deploy your overcloud.
Next steps
10.8. Setting multiqueue for OVS-DPDK interfaces
You can configure your OVS-DPDK deployment to automatically load balance queues to non-isolated Poll Mode Drivers (PMD)s, based on load, and queue usage. Open vSwitch can trigger automatic queue rebalancing in the following scenarios:
-
You enabled cycle-based assignment of RX queues by setting the value of
pmd-auto-lbtotrue. - Two or more non-isolated PMDs are present.
- More than one queue polls for at least one non-isolated PMD.
- The load value for aggregated PMDs exceeds 95% for a duration of one minute.
Multiqueue is experimental, and only supported with manual queue pinning.
Prerequisites
-
Access to the undercloud host and credentials for the
stackuser.
Procedure
-
Log in to the undercloud as the
stackuser. Source the
stackrcfile:$ source ~/stackrc
-
Open the NIC configuration template, such as
single_nic_vlans.j2, that you created in Section 10.6, “Creating a NIC configuration template”. Set the number of queues for interfaces in OVS-DPDK on the Compute node:
- type: ovs_user_bridge name: br-link0 use_dhcp: false members: - type: ovs_dpdk_bond name: dpdkbond0 mtu: 9000 rx_queue: 2 members: - type: ovs_dpdk_port name: dpdk0 mtu: 9000 members: - type: interface name: nic4 - type: ovs_dpdk_port name: dpdk1 mtu: 9000 members: - type: interface name: nic5- Note the path and file name of the NIC configuration template. You use this file later when you deploy your overcloud.
Next steps
10.9. Configuring DPDK parameters for node provisioning
You can configure your Red Hat OpenStack Platform (RHOSP) OVS-DPDK environment to automatically load balance the Open vSwitch (OVS) Poll Mode Driver (PMD) threads. You do this by editing parameters that RHOSP director uses during bare metal node provisioning and during overcloud deployment.
The OVS PMD threads perform the following tasks for user space context switching:
- Continuous polling of input ports for packets.
- Classifying received packets.
- Executing actions on the packets after classification.
Prerequisites
-
Access to the undercloud host and credentials for the
stackuser.
Procedure
-
Log in to the undercloud as the
stackuser. Source the
stackrcfile:$ source ~/stackrc
Set parameters in the bare metal nodes definition file that you created in Section 10.5, “Creating a bare metal nodes definition file”, for example
overcloud-baremetal-deploy.yaml:pmd_auto_lb-
Set to
trueto enable PMD automatic load balancing. pmd_load_threshold- Percentage of processing cycles that one of the PMD threads must use consistently before triggering the PMD load balance. Integer, range 0-100.
pmd_improvement_thresholdMinimum percentage of evaluated improvement across the non-isolated PMD threads that triggers a PMD auto load balance. Integer, range 0-100.
To calculate the estimated improvement, a dry run of the reassignment is done and the estimated load variance is compared with the current variance. The default is 25%.
pmd_rebal_intervalMinimum time in minutes between two consecutive PMD Auto Load Balance operations. Range 0-20,000 minutes.
Configure this value to prevent triggering frequent reassignments where traffic patterns are changeable. For example, you might trigger a reassignment once every 10 minutes or once every few hours.
Example
ansible_playbooks:
…
  - playbook: /usr/share/ansible/tripleo-playbooks/cli-overcloud-openvswitch-dpdk.yaml
  extra_vars:
   …
   pmd_auto_lb: true
   pmd_load_threshold: "70"
   pmd_improvement_threshold: "25"
   pmd_rebal_interval: "2"
- Open the custom environment YAML file that you created in Section 10.3, “Creating an environment file for your OVS-DPDK customizations”, or create a new one.
In the custom environment file, add the same bare metal node pre-provisioning values that you set in step 3. Use these equivalent parameters:
OvsPmdAutoLbHeat equivalent of
pmd_auto_lb.Set to
trueto enable PMD automatic load balancing.OvsPmdLoadThresholdHeat equivalent of
pmd_load_threshold.Percentage of processing cycles that one of the PMD threads must use consistently before triggering the PMD load balance. Integer, range 0-100.
OvsPmdImprovementThresholdHeat equivalent of
pmd_improvement_threshold.Minimum percentage of evaluated improvement across the non-isolated PMD threads that triggers a PMD auto load balance. Integer, range 0-100.
To calculate the estimated improvement, a dry run of the reassignment is done and the estimated load variance is compared with the current variance. The default is 25%.
OvsPmdRebalIntervalHeat equivalent of
pmd_rebal_interval.Minimum time in minutes between two consecutive PMD Auto Load Balance operations. Range 0-20,000 minutes.
Configure this value to prevent triggering frequent reassignments where traffic patterns are changeable. For example, you might trigger a reassignment once every 10 minutes or once every few hours.
Example
parameter_merge_strategies:
  ComputeOvsDpdkSriovParameters:merge
…
parameter_defaults:
  ComputeOvsDpdkSriovParameters:
   …
   OvsPmdAutoLb: true
   OvsPmdLoadThreshold: 70
   OvsPmdImprovementThreshold: 25
   OvsPmdRebalInterval: 2
- Note the paths and file names of your NIC configuration template and your custom environment file. You use these files later when you provision your bare metal nodes and deploy your overcloud.
Next steps
- Provision your networks and VIPs.
Provision your bare metal nodes.
Ensure that you use your bare metal nodes definition file, such as
overcloud-baremetal-deploy.yaml, as the input for running the provision command.- Proceed to Section 10.10, “Deploying an OVS-DPDK overcloud”.
Additional resources
- Configuring and provisioning overcloud network definitions in the Installing and managing Red Hat OpenStack Platform with director guide.
- Configuring and provisioning network VIPs for the overcloud in the Installing and managing Red Hat OpenStack Platform with director guide
- Provisioning bare metal nodes for the overcloud in the Installing and managing Red Hat OpenStack Platform with director guide.
10.10. Deploying an OVS-DPDK overcloud
The last step in deploying your Red Hat OpenStack Platform (RHOSP) overcloud in an OVS-DPDK environment is to run the openstack overcloud deploy command. Inputs to the command include all of the various overcloud templates and environment files that you constructed.
Prerequisites
-
Access to the undercloud host and credentials for the
stackuser. -
You have performed all of the steps listed in the earlier procedures in this section and have assembled all of the various heat templates and environment files to use as inputs for the
overcloud deploycommand.
Procedure
-
Log in to the undercloud host as the
stackuser. Source the
stackrcundercloud credentials file:$ source ~/stackrc
Enter the
openstack overcloud deploycommand.It is important to list the inputs to the
openstack overcloud deploycommand in a particular order. The general rule is to specify the default heat template files first followed by your custom environment files and custom templates that contain custom configurations, such as overrides to the default properties.Add your inputs to the
openstack overcloud deploycommand in the following order:A custom network definition file that contains the specifications for your SR-IOV network on the overcloud, for example,
network-data.yaml.For more information, see Network definition file configuration options in the Installing and managing Red Hat OpenStack Platform with director guide.
A roles file that contains the
ControllerandComputeOvsDpdkroles that RHOSP director uses to deploy your SR-IOV environment.Example:
roles_data_compute_ovsdpdk.yamlFor more information, see Section 10.2, “Generating roles and image files”.
The output file from provisioning your overcloud networks.
Example:
overcloud-networks-deployed.yamlFor more information, see Configuring and provisioning overcloud network definitions in the Installing and managing Red Hat OpenStack Platform with director guide.
The output file from provisioning your overcloud VIPs.
Example:
overcloud-vip-deployed.yamlFor more information, see Configuring and provisioning network VIPs for the overcloud in the Installing and managing Red Hat OpenStack Platform with director guide.
The output file from provisioning bare-metal nodes.
Example:
overcloud-baremetal-deployed.yamlFor more information, see:
- Section 10.9, “Configuring DPDK parameters for node provisioning”.
- Provisioning bare metal nodes for the overcloud in the Installing and managing Red Hat OpenStack Platform with director guide.
An images file that director uses to determine where to obtain container images and how to store them.
Example:
overcloud_images.yamlFor more information, see Section 10.2, “Generating roles and image files”.
An environment file for the Networking service (neutron) mechanism driver and router scheme that your environment uses:
ML2/OVN
-
Distributed virtual routing (DVR):
neutron-ovn-dvr-ha.yaml -
Centralized virtual routing:
neutron-ovn-ha.yaml
-
Distributed virtual routing (DVR):
ML2/OVS
-
Distributed virtual routing (DVR):
neutron-ovs-dvr.yaml -
Centralized virtual routing:
neutron-ovs.yaml
-
Distributed virtual routing (DVR):
An environment file for OVS-DPDK, depending on your mechanism driver:
ML2/OVN
-
neutron-ovn-dpdk.yaml
-
ML2/OVS
neutron-ovs-dpdk.yamlNoteIf you also have an SR-IOV environment, and want to locate SR-IOV and OVS-DPDK instances on the same node, include the following environment files in your deployment script:
ML2/OVN
neutron-ovn-sriov.yamlML2/OVS
neutron-sriov.yaml
One or more custom environment files that contain your configuration for:
- overrides of default configuration values for the OVS-DPDK environment.
- firewall as a virtual network function (VNF).
maximum transmission unit (MTU) value for jumbo frames.
Example:
ovs-dpdk-overrides.yamlFor more information, see:
- Section 10.3, “Creating an environment file for your OVS-DPDK customizations”.
- Section 10.4, “Configuring a firewall for security groups”.
Section 10.7, “Setting the MTU value for OVS-DPDK interfaces”.
Example
This excerpt from a sample
openstack overcloud deploycommand demonstrates the proper ordering of the command’s inputs for an OVS-DPDK, ML2/OVN environment that uses DVR:$ openstack overcloud deploy \ --log-file overcloud_deployment.log \ --templates /usr/share/openstack-tripleo-heat-templates/ \ --stack overcloud \ -n /home/stack/templates/network_data.yaml \ -r /home/stack/templates/roles_data_compute_ovsdpdk.yaml \ -e /home/stack/templates/overcloud-networks-deployed.yaml \ -e /home/stack/templates/overcloud-vip-deployed.yaml \ -e /home/stack/templates/overcloud-baremetal-deployed.yaml \ -e /home/stack/templates/overcloud-images.yaml \ -e /usr/share/openstack-tripleo-heat-templates/environments/services/\ neutron-ovn-dvr-ha.yaml -e /usr/share/openstack-tripleo-heat-templates/environments/services/\ neutron-ovn-dpdk.yaml \ -e /home/stack/templates/ovs-dpdk-overrides.yaml
Run the
openstack overcloud deploycommand.When the overcloud creation is finished, the RHOSP director provides details to help you access your overcloud.
Verification
- Perform the steps in Validating your overcloud deployment in the Installing and managing Red Hat OpenStack Platform with director guide.
Next steps
If you have configured a firewall, run the
openstack port setcommand to disable the OVS firewall driver for data plane interfaces:$ openstack port set --no-security-group --disable-port-security ${PORT}
Additional resources
- Creating your overcloud in the Installing and managing Red Hat OpenStack Platform with director guide
- overcloud deploy in the Command line interface reference
10.11. Creating a flavor and deploying an instance for OVS-DPDK
After you configure OVS-DPDK for your Red Hat OpenStack Platform deployment with NFV, you can create a flavor, and deploy an instance using the following steps:
Create an aggregate group, and add relevant hosts for OVS-DPDK. Define metadata, for example
dpdk=true, that matches defined flavor metadata.# openstack aggregate create dpdk_group # openstack aggregate add host dpdk_group [compute-host] # openstack aggregate set --property dpdk=true dpdk_group
NotePinned CPU instances can be located on the same Compute node as unpinned instances. For more information, see Configuring CPU pinning on Compute nodes in Configuring the Compute service for instance creation.
Create a flavor.
# openstack flavor create <flavor> --ram <MB> --disk <GB> --vcpus <#>
Set flavor properties. Note that the defined metadata,
dpdk=true, matches the defined metadata in the DPDK aggregate.# openstack flavor set <flavor> --property dpdk=true --property hw:cpu_policy=dedicated --property hw:mem_page_size=1GB --property hw:emulator_threads_policy=isolate
For details about the emulator threads policy for performance improvements, see Configuring emulator threads in Configuring the Compute service for instance creation.
Create the network.
# openstack network create net1 --provider-physical-network tenant --provider-network-type vlan --provider-segment <VLAN-ID>
# openstack subnet create subnet1 --network net1 --subnet-range 192.0.2.0/24 --dhcp
Optional: If you use multiqueue with OVS-DPDK, set the
hw_vif_multiqueue_enabledproperty on the image that you want to use to create a instance:# openstack image set --property hw_vif_multiqueue_enabled=true <image>
Deploy an instance.
# openstack server create --flavor <flavor> --image <glance image> --nic net-id=<network ID> <server_name>
10.12. Troubleshooting the OVS-DPDK configuration
This section describes the steps to troubleshoot the OVS-DPDK configuration.
Review the bridge configuration, and confirm that the bridge has
datapath_type=netdev.# ovs-vsctl list bridge br0 _uuid : bdce0825-e263-4d15-b256-f01222df96f3 auto_attach : [] controller : [] datapath_id : "00002608cebd154d" datapath_type : netdev datapath_version : "<built-in>" external_ids : {} fail_mode : [] flood_vlans : [] flow_tables : {} ipfix : [] mcast_snooping_enable: false mirrors : [] name : "br0" netflow : [] other_config : {} ports : [52725b91-de7f-41e7-bb49-3b7e50354138] protocols : [] rstp_enable : false rstp_status : {} sflow : [] status : {} stp_enable : falseOptionally, you can view logs for errors, such as if the container fails to start.
# less /var/log/containers/neutron/openvswitch-agent.log
Confirm that the Poll Mode Driver CPU mask of the
ovs-dpdkis pinned to the CPUs. In case of hyper threading, use sibling CPUs.For example, to check the sibling of
CPU4, run the following command:# cat /sys/devices/system/cpu/cpu4/topology/thread_siblings_list 4,20
The sibling of
CPU4isCPU20, therefore proceed with the following command:# ovs-vsctl set Open_vSwitch . other_config:pmd-cpu-mask=0x100010
Display the status:
# tuna -t ovs-vswitchd -CP
thread  ctxt_switches pid SCHED_ rtpri affinity voluntary nonvoluntary       cmd
3161	OTHER 	0    	6	765023      	614	ovs-vswitchd
3219   OTHER 	0    	6     	1        	0   	handler24
3220   OTHER 	0    	6     	1        	0   	handler21
3221   OTHER 	0    	6     	1        	0   	handler22
3222   OTHER 	0    	6     	1        	0   	handler23
3223   OTHER 	0    	6     	1        	0   	handler25
3224   OTHER 	0    	6     	1        	0   	handler26
3225   OTHER 	0    	6     	1        	0   	handler27
3226   OTHER 	0    	6     	1        	0   	handler28
3227   OTHER 	0    	6     	2        	0   	handler31
3228   OTHER 	0    	6     	2        	4   	handler30
3229   OTHER 	0    	6     	2        	5   	handler32
3230   OTHER 	0    	6	953538      	431   revalidator29
3231   OTHER 	0    	6   1424258      	976   revalidator33
3232   OTHER 	0    	6   1424693      	836   revalidator34
3233   OTHER 	0    	6	951678      	503   revalidator36
3234   OTHER 	0    	6   1425128      	498   revalidator35
*3235   OTHER 	0    	4	151123       	51       	pmd37*
*3236   OTHER 	0   	20	298967       	48       	pmd38*
3164   OTHER 	0    	6 	47575        	0  dpdk_watchdog3
3165   OTHER 	0    	6	237634        	0   vhost_thread1
3166   OTHER 	0    	6  	3665        	0       	urcu2