
Chapter 12. Setting up a WireGuard VPN by using the RHEL web console
WireGuard is a high-performance VPN solution that runs in the Linux kernel. It uses modern cryptography and is easier to configure than many other VPN solutions. Additionally, WireGuard’s small codebase reduces the surface for attacks and, therefore, improves security. For authentication and encryption, WireGuard uses keys similar to SSH.
WireGuard is provided as a Technology Preview only. Technology Preview features are not supported with Red Hat production Service Level Agreements (SLAs), might not be functionally complete, and Red Hat does not recommend using them for production. These previews provide early access to upcoming product features, enabling customers to test functionality and provide feedback during the development process.
See Technology Preview Features Support Scope on the Red Hat Customer Portal for information about the support scope for Technology Preview features.
Note that all hosts that participate in a WireGuard VPN are peers. This documentation uses the terms client to describe hosts that establish a connection and server to describe the host with the fixed hostname or IP address that the clients connect to and optionally route all traffic through this server.
WireGuard operates on the network layer (layer 3). Therefore, you cannot use DHCP and must assign static IP addresses or IPv6 link-local addresses to the tunnel devices on both the server and clients.
You can use WireGuard only if the Federal Information Processing Standard (FIPS) mode in RHEL is disabled.
12.1. Protocols and primitives used by WireGuard
WireGuard uses the following protocols and primitives:
- ChaCha20 for symmetric encryption, authenticated with Poly1305, using Authenticated Encryption with Associated Data (AEAD) construction as described in RFC7539
- Curve25519 for Elliptic-curve Diffie–Hellman (ECDH) key exchange
- BLAKE2s for hashing and keyed hashing, as described in RFC7693
- SipHash24 for hash table keys
- HKDF for key derivation, as described in RFC5869
12.2. How WireGuard uses tunnel IP addresses, public keys, and remote endpoints
When WireGuard sends a network packet to a peer:
- WireGuard reads the destination IP from the packet and compares it to the list of allowed IP addresses in the local configuration. If the peer is not found, WireGuard drops the packet.
- If the peer is valid, WireGuard encrypts the packet using the peer’s public key.
- The sending host looks up the most recent Internet IP address of the host and sends the encrypted packet to it.
When WireGuard receives a packet:
- WireGuard decrypts the packet using the private key of the remote host.
- WireGuard reads the internal source address from the packet and looks up whether the IP is configured in the list of allowed IP addresses in the settings for the peer on the local host. If the source IP is on the allowlist, WireGuard accepts the packet. If the IP address is not on the list, WireGuard drops the packet.
The association of public keys and allowed IP addresses is called Cryptokey Routing Table. This means that the list of IP addresses behaves similar to a routing table when sending packets, and as a kind of access control list when receiving packets.
12.3. Using a WireGuard client behind NAT and firewalls
WireGuard uses the UDP protocol and transmits data only when a peer sends packets. Stateful firewalls and network address translation (NAT) on routers track connections to enable a peer behind NAT or a firewall to receive packets.
To keep the connection active, WireGuard supports persistent keepalives. This means you can set an interval at which WireGuard sends keepalive packets. By default, the persistent keep-alive feature is disabled to reduce network traffic. Enable this feature on the client if you use the client in a network with NAT or if a firewall closes the connection after some time of inactivity.
Note that you cannot configure keepalive packets in WireGuard connections by using the RHEL web console. To configure this feature, edit the connection profile by using the nmcli utility.
12.4. Configuring a WireGuard server by using the RHEL web console
You can configure a WireGuard server by using the browser-based RHEL web console. Use this method to let NetworkManager manage the WireGuard connection.
Prerequisites
- You are logged in to the RHEL web console.
You know the following information:
- The static tunnel IP addresses and subnet masks of both the server and client
- The public key of the client
Procedure
- Select the Networking tab in the navigation on the left side of the screen.
- Click Add VPN in the Interfaces section.
-
If the
wireguard-toolsandsystemd-resolvedpackages are not already installed, the web console displays a corresponding notification. Click Install to install these packages. - Enter the name of the WireGuard device that you want to create.
Configure the key pair of this host:
If you want use the keys that the web console has created:
- Keep the pre-selected Generated option in the Private key area.
- Note the Public key value. You require this information when you configure the client.
If you want to use an existing private key:
- Select Paste existing key in the Private key area.
- Paste the private key into the text field. The web console automatically calculates the corresponding public key.
Set a listen port number, such as
51820, for incoming WireGuard connections.Always set a fixed port number on hosts that receive incoming WireGuard connections. If you do not set a port, WireGuard uses a random free port each time you activate the interface.
Set the tunnel IPv4 address and subnet mask of the server.
To also set an IPv6 address, you must edit the connection after you have created it.
Add peer configurations for each client that you want to allow to communicate with this server:
- Click Add peer.
- Enter the public key of the client.
- Leave the Endpoint field empty.
- Set the Allowed IPs field to the tunnel IP addresses of the clients that are allowed to send data to this server.
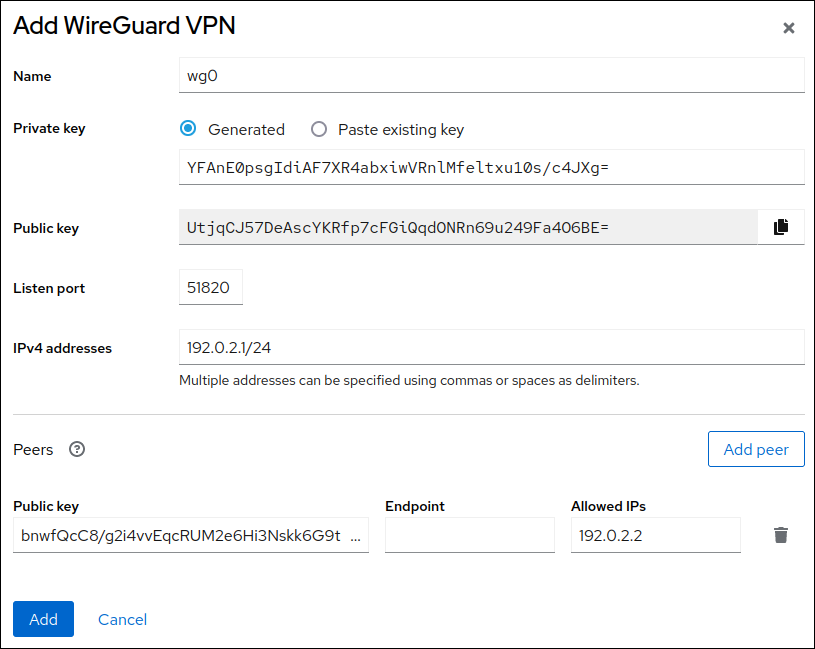
- Click Add to create the WireGuard connection.
If you want to also set a tunnel IPv6 address:
- Click on the WireGuard connection’s name in the Interfaces section.
- Click edit next to IPv6.
-
Set the Addresses field to
Manual, and enter the tunnel IPv6 address and prefix of the server. - Click Save.
Verification
Display the interface configuration of the
wg0device:# wg show wg0 interface: wg0 public key: UtjqCJ57DeAscYKRfp7cFGiQqdONRn69u249Fa4O6BE= private key: (hidden) listening port: 51820 peer: bnwfQcC8/g2i4vvEqcRUM2e6Hi3Nskk6G9t4r26nFVM= allowed ips: 192.0.2.2/32, 2001:db8:1::2/128
To display the private key in the output, use the
WG_HIDE_KEYS=never wg show wg0command.Display the IP configuration of the
wg0device:# ip address show wg0 20: wg0: <POINTOPOINT,NOARP,UP,LOWER_UP> mtu 1420 qdisc noqueue state UNKNOWN group default qlen 1000 link/none inet 192.0.2.1/24 brd 192.0.2.255 scope global noprefixroute wg0 valid_lft forever preferred_lft forever inet6 2001:db8:1::1/32 scope global noprefixroute valid_lft forever preferred_lft forever inet6 fe80::3ef:8863:1ce2:844/64 scope link noprefixroute valid_lft forever preferred_lft forever
12.5. Configuring firewalld on a WireGuard server by using the RHEL web console
You must configure the firewalld service on the WireGuard server to allow incoming connections from clients. Additionally, if clients should be able to use the WireGuard server as the default gateway and route all traffic through the tunnel, you must enable masquerading.
Prerequisites
- You are logged in to the RHEL web console.
Procedure
- Select the Networking tab in the navigation on the left side of the screen.
- Click Edit rules and zones in the Firewall section.
-
Enter
wireguardinto the Filter services field. Select the
wireguardentry from the list.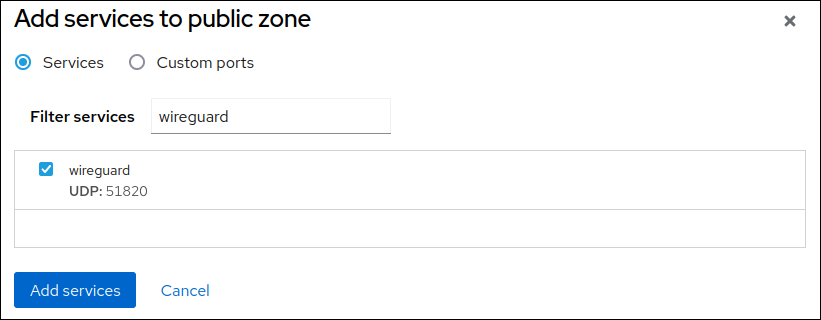
- Click Add services.
If clients should route all traffic through the tunnel and use the WireGuard server as the default gateway, enable masquerading for the
publiczone:# firewall-cmd --permanent --zone=public --add-masquerade # firewall-cmd --reload
Note that you cannot enable masquerading in
firewalldzones in the web console.
Verification
- Select the Networking tab in the navigation on the left side of the screen.
- Click Edit rules and zones in the Firewall section.
-
The list contains an entry for the
wireguardservice and displays the UDP port that you configured in the WireGuard connection profile. To verify that masquerading is enabled in the
firewalldpubliczone, enter:# firewall-cmd --list-all --zone=public public (active) ... ports: 51820/udp masquerade: yes ...
12.6. Configuring a WireGuard client by using the RHEL web console
You can configure a WireGuard client by using the browser-based RHEL web console. Use this method to let NetworkManager manage the WireGuard connection.
Prerequisites
- You are logged in to the RHEL web console.
You know the following information:
- The static tunnel IP addresses and subnet masks of both the server and client
- The public key of the server
Procedure
- Select the Networking tab in the navigation on the left side of the screen.
- Click Add VPN in the Interfaces section.
-
If the
wireguard-toolsandsystemd-resolvedpackages are not already installed, the web console displays a corresponding notification. Click Install to install these packages. - Enter the name of the WireGuard device that you want to create.
Configure the key pair of this host:
If you want use the keys that the web console has created:
- Keep the pre-selected Generated option in the Private key area.
- Note the Public key value. You require this information when you configure the client.
If you want to use an existing private key:
- Select Paste existing key in the Private key area.
- Paste the private key into the text field. The web console automatically calculates the corresponding public key.
-
Preserve the
0value in the Listen port field. Set the tunnel IPv4 address and subnet mask of the client.
To also set an IPv6 address, you must edit the connection after you have created it.
Add a peer configuration for the server that you want to allow to communicate with this client:
- Click Add peer.
- Enter the public key of the server.
-
Set the Endpoint field to the hostname or IP address and the port of the server, for example
server.example.com:51820. The client uses this information to establish the connection. Set the Allowed IPs field to the tunnel IP addresses of the clients that are allowed to send data to this server. For example, set the field to one of the following:
- The tunnel IP addresses of the server to allow only the server to communicate with this client. The value in the screen capture below configures this scenario.
-
0.0.0.0/0to allow any remote IPv4 address to communicate with this client. Use this setting to route all traffic through the tunnel and use the WireGuard server as default gateway.
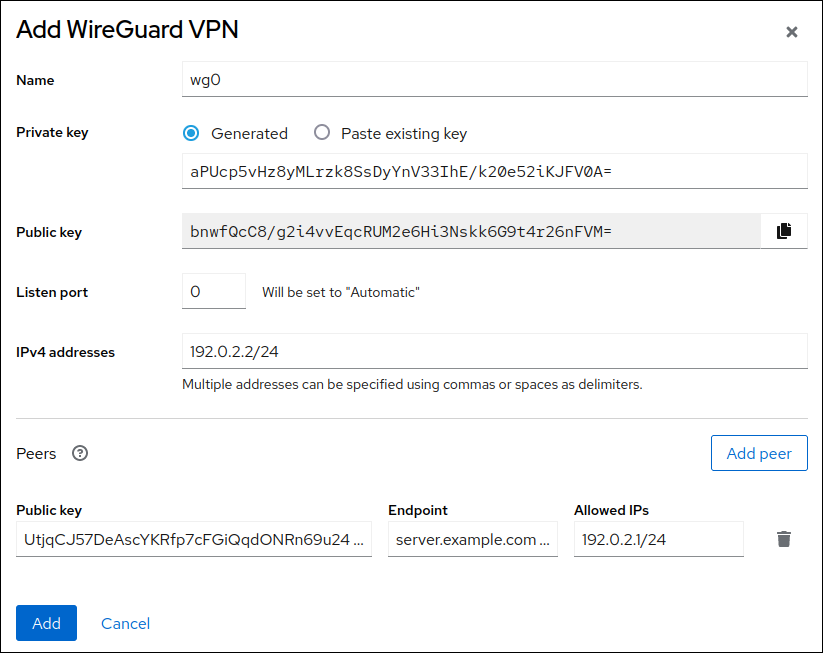
- Click Add to create the WireGuard connection.
If you want to also set a tunnel IPv6 address:
- Click on the WireGuard connection’s name in the Interfaces section.
- Click edit next to IPv6.
-
Set the Addresses field to
Manual, and enter the tunnel IPv6 address and prefix of the client. - Click Save.
Verification
Ping the IP addresses of the server:
# ping 192.0.2.1WireGuard establishes the connection when you try to send traffic through the tunnel.
Display the interface configuration of the
wg0device:# wg show wg0 interface: wg0 public key: bnwfQcC8/g2i4vvEqcRUM2e6Hi3Nskk6G9t4r26nFVM= private key: (hidden) listening port: 45513 peer: UtjqCJ57DeAscYKRfp7cFGiQqdONRn69u249Fa4O6BE= endpoint: server.example.com:51820 allowed ips: 192.0.2.1/32, 2001:db8:1::1/128 latest handshake: 1 minute, 41 seconds ago transfer: 824 B received, 1.01 KiB sent persistent keepalive: every 20 seconds
To display the private key in the output, use the
WG_HIDE_KEYS=never wg show wg0command.Note that the output has only the
latest handshakeandtransferentries if you have already sent traffic through the VPN tunnel.Display the IP configuration of the
wg0device:# ip address show wg0 10: wg0: <POINTOPOINT,NOARP,UP,LOWER_UP> mtu 1420 qdisc noqueue state UNKNOWN group default qlen 1000 link/none inet 192.0.2.2/24 brd 192.0.2.255 scope global noprefixroute wg0 valid_lft forever preferred_lft forever inet6 2001:db8:1::2/32 scope global noprefixroute valid_lft forever preferred_lft forever inet6 fe80::73d9:6f51:ea6f:863e/64 scope link noprefixroute valid_lft forever preferred_lft forever