Chapter 21. Configuring thin logical volumes using the web console
You can use thin-provisioned logical volumes to allocate more space for designated applications or servers than the actually available physical storage.
For details, see Creating thin-provisioned snapshot volumes.
Prerequisites
The RHEL 9 web console has been installed.
For details, see Installing the web console.
-
The
cockpit-storagedpackage is installed on your system. - Physical drives or other types of storage devices, which you want to use to create volume groups, are attached to your system.
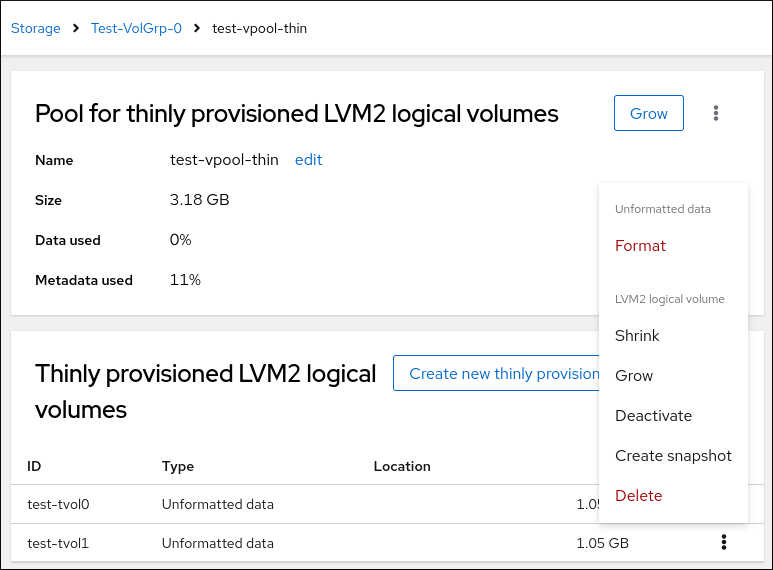
21.1. Creating pools for thinly provisioned volumes in the web console
Create a pool for thinly-provisioned volumes.
Prerequisites
Procedure
- Log in to the RHEL 9 web console.
- Click Storage.
- In the Storage table, click the volume group in which you want to create thin volumes.
- On the Logical volume group page, scroll to the LVM2 logical volumes section and click .
- In the Name field, enter a name for the new logical volume. Do not include spaces in the name.
In the drop-down menu, select Pool for thinly provisioned volumes.
This configuration enables you to create a logical volume with the maximum volume size which is equal to the sum of the capacities of all drives included in the volume group.

Define the size of the logical volume. Consider:
- How much space the system using this logical volume needs.
- How many logical volumes you want to create.
You do not have to use the whole space. If necessary, you can grow the logical volume later.
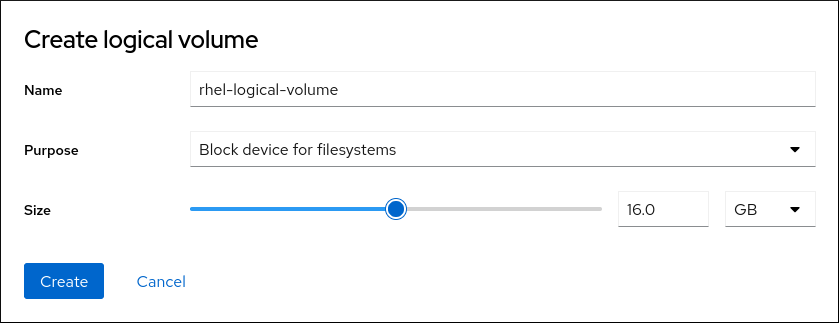
Click .
The pool for thin volumes is created and you can now add thin volumes to the pool.
21.2. Creating thinly provisioned logical volumes in the web console
You can use the web console to create a thin-provisioned logical volume in the pool. The pool can include multiple thin volumes and each thin volume can be as large as the pool for thin volumes itself.
Using thin volumes requires regular checkup of the actual free physical space of the logical volume.
Prerequisites
A pool for thin volumes created.
For details, see Creating pools for thin logical volumes in the web console.
Procedure
- Log in to the RHEL 9 web console.
- Click Storage.
- In the Storage table, click the menu button volume group in which you want to create thin volumes.
- On the Logical volume group page, scroll to the LVM2 logical volumes section and click the pool in which you want to create the thin logical volumes.
- On the Pool for thinly provisioned LVM2 logical volumes page, scroll to the Thinly provisioned LVM2 logical volumes section and click Create new thinly provisioned logical volume.
- In the Create thin volume dialog box, enter a name for the thin volume. Do not use spaces in the name.
- Define the size of the thin volume.
Click Create.
The thin logical volume is created. You must format the volume before you can use it.
21.3. Formatting logical volumes in the web console
Logical volumes act as physical drives. To use them, you must format them with a file system.
Formatting logical volumes erases all data on the volume.
The file system you select determines the configuration parameters you can use for logical volumes. For example, the XFS file system does not support shrinking volumes. For details, see Resizing logical volumes in the web console.
Prerequisites
-
The
cockpit-storagedpackage is installed on your system. - Logical volume created. For details, see Creating logical volumes in the web console.
- You have root access privileges to the system.
Procedure
- Log in to the RHEL 9 web console.
- Click .
- In the Storage table, click the volume group in the logical volumes is created.
- On the Logical volume group page, scroll to the LVM2 logical volumes section.
- Click the menu button, , next to the volume group you want to format.
From the drop-down menu, select .

- In the Name field, enter a name for the file system.
In the Mount Point field, add the mount path.
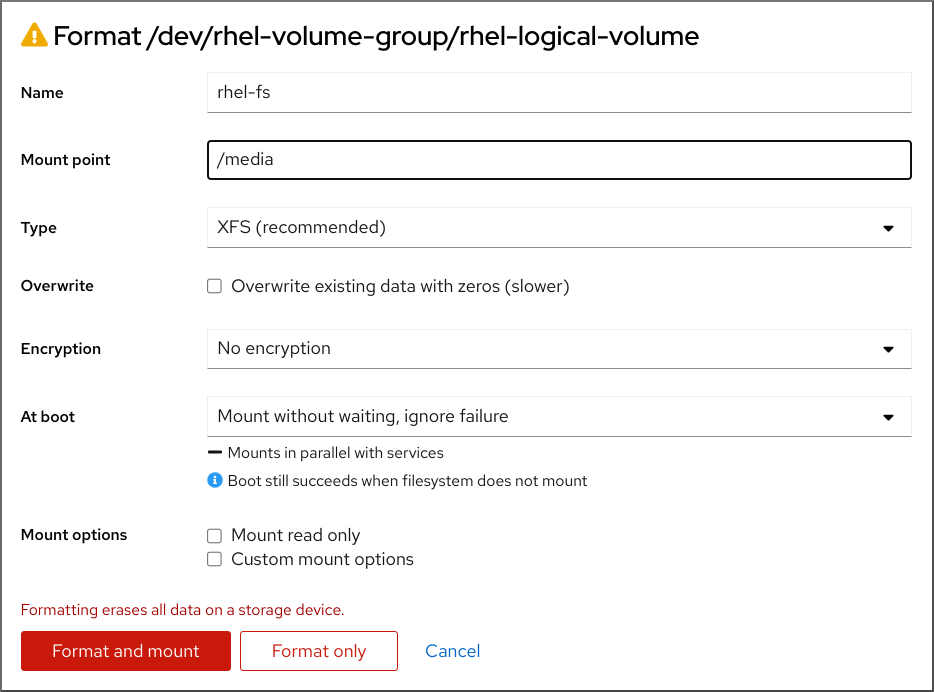
In the drop-down menu, select a file system:
XFS file system supports large logical volumes, switching physical drives online without outage, and growing an existing file system. Leave this file system selected if you do not have a different strong preference.
XFS does not support reducing the size of a volume formatted with an XFS file system
ext4 file system supports:
- Logical volumes
- Switching physical drives online without an outage
- Growing a file system
- Shrinking a file system
Select the Overwrite existing data with zeros checkbox if you want the RHEL web console to rewrite the whole disk with zeros. This option is slower because the program has to go through the whole disk, but it is more secure. Use this option if the disk includes any data and you need to overwrite it.
If you do not select the Overwrite existing data with zeros checkbox, the RHEL web console rewrites only the disk header. This increases the speed of formatting.
From the drop-down menu, select the type of encryption if you want to enable it on the logical volume.
You can select a version with either the LUKS1 (Linux Unified Key Setup) or LUKS2 encryption, which allows you to encrypt the volume with a passphrase.
- In the drop-down menu, select when you want the logical volume to mount after the system boots.
- Select the required Mount options.
Format the logical volume:
- If you want to format the volume and immediately mount it, click .
If you want to format the volume without mounting it, click .
Formatting can take several minutes depending on the volume size and which formatting options are selected.
Verification
On the Logical volume group page, scroll to the LVM2 logical volumes section and click the logical volume to check the details and additional options.
- If you selected the option, click the menu button at the end of the line of the logical volume, and select to use the logical volume.
21.4. Creating thinly-provisioned snapshot volumes with the web console
You can create snapshots of thin logical volumes in the RHEL web console to backup changes recorded on the disk from the last snapshot.
Prerequisites
- The web console is installed and accessible. For more information, see Installing and enabling the web console.
-
The
cockpit-storagedpackage is installed on your system. - A thin-provisioned volume is created. For more information see Configuring thin logical volumes using the web console.
Procedure
- Log in to the RHEL 9 web console.
- Click Storage.
- In the Storage table, click the volume group in which you want to create thin volumes.
- On the Logical volume group page, scroll to the LVM2 logical volumes section and click the pool in which you want to create the thin logical volumes.
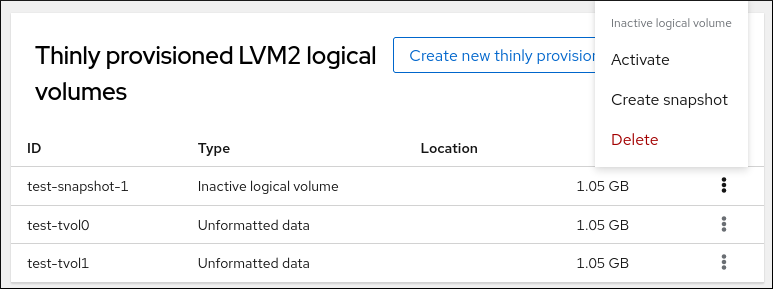
- On the Pool for thinly provisioned LVM2 logical volumes page, scroll to the Thinly provisioned LVM2 logical volumes section and click the menu button, , next to the logical volume.
From the drop-down menu, select Create snapshot.
In the Name field, enter a snapshot name.
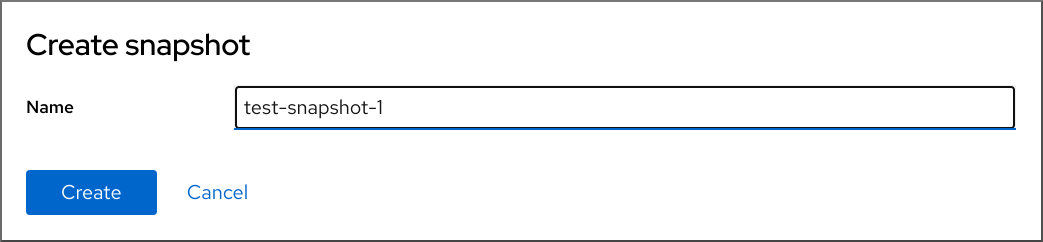
- Click .
- On the Pool for thinly provisioned LVM2 logical volumes page, scroll to the Thinly provisioned LVM2 logical volumes section and click the menu button, , next to the newly created snapshot.
From the drop-down menu, select Activate to activate the volume.