
Chapter 3. Managing access to repositories
As a Red Hat Quay user, you can create your own repositories and make them accessible to other users on your Red Hat Quay instance. As an alternative, you can create organizations to allow access to repositories based on teams. In both user and organization repositories, you can allow access to those repositories by creating credentials associated with robot accounts. Robot accounts make it easy for a variety of container clients (such as docker or podman) to access your repos, without requiring that the client have a Red Hat Quay user account.
3.1. Allowing access to user repositories
When you create a repository in a user namespace, you can add access to that repository to user accounts or through robot accounts.
3.1.1. Allowing user access to a user repository
To allow access to a repository associated with a user account, do the following:
- Log into your Red Hat Quay user account.
- Select a repository under your user namespace to which you want to share access.
- Select the Settings icon from the left column.
Type the name of the user to which you want to grant access to your repository. The user name should appear as you type, as shown in the following figure:
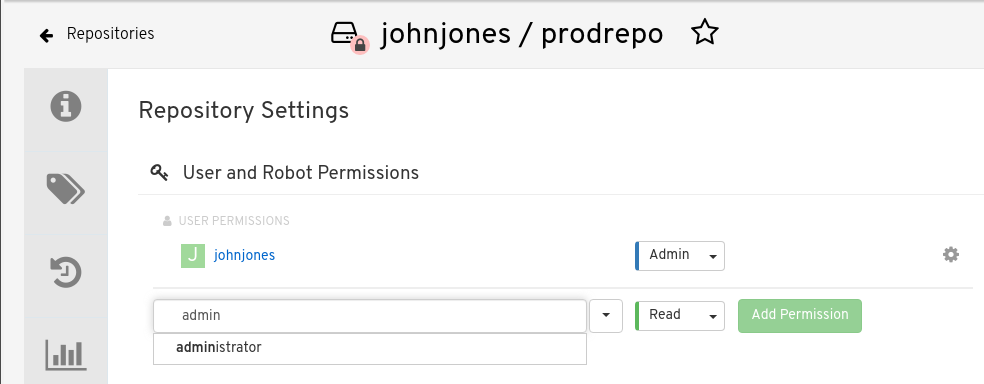
In the permissions box, select one of the following:
- Read - Allows the user to view the repository and pull from it.
- Write - Allows the user to view the repository, as well as pull images from or push images to the repository.
- Admin - Allows all administrative settings to the repository, as well as all Read and Write permissions.
- Select the Add Permission button. The user now has the assigned permission.
To remove the user permissions to the repository, select the Options icon to the right of the user entry, then select Delete Permission.
3.2. Allowing robot access to a user repository
Robot accounts are used to set up automated access to the repositories in your Red Hat Quay registry. They are similar to OpenShift service accounts. When you set up a robot account, you:
- Generate credentials that are associated with the robot account
- Identify repositories and images that the robot can push images to or pull images from
- Copy and paste generated credentials to use with different container clients (such as Docker, podman, Kubernetes, Mesos and others) to access each defined repository
Keep in mind that each robot account is limited to a single user namespace or organization. So, for example, the robot could provide access to all repositories accessible to a user jsmith, but not to any that are not in the user’s list of repositories.
The following procedure steps you through setting up a robot account to allow access to your repositories.
- Select Robot icon: From the Repositories view, select the Robot icon from the left column.
- Create Robot account: Select the Create Robot Account button.
- Set Robot name: Enter the name and description, then select the Create robot account button. The robot name becomes a combination of your user name, plus the robot name you set (for example, jsmith+myrobot)
Add permission to the robot account: From the Add permissions screen for the robot account, define the repositories you want the robot to access as follows:
- Put a check mark next to each repository the robot can access
For each repository, select one of the following, and click Add permissions:
- None - Robot has no permission to the repository
- Read - Robot can view and pull from the repository
- Write - Robot can read (pull) from and write (push) to the repository
- Admin - Full access to pull from and push to the repository, plus the ability to do administrative tasks associated with the repository
- Select the Add permissions button to apply the settings
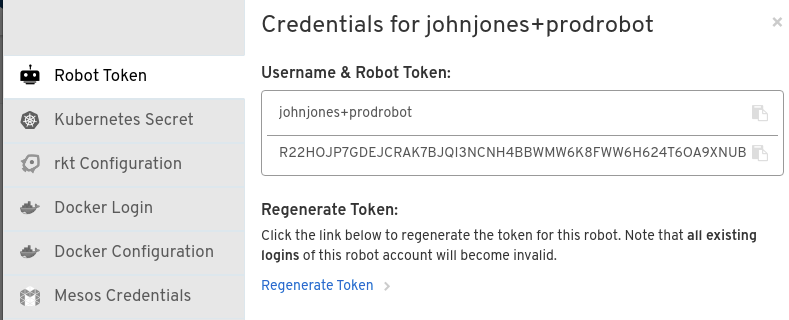
- Get credentials to access repositories via the robot: Back on the Robot Accounts page, select the Robot account name to see credential information for that robot.
Get the token: Select Robot Token, as shown in the following figure, to see the token that was generated for the robot. If you want to reset the token, select Regenerate Token.
It is important to understand that regenerating a token makes any previous tokens for this robot invalid.
Get credentials: Once you are satisfied with the generated token, get the resulting credentials in the following ways:
- Kubernetes Secret: Select this to download credentials in the form of a Kubernetes pull secret yaml file.
- rkt Configuration: Select this to download credentials for the rkt container runtime in the form of a json file.
-
Docker Login: Select this to copy a full
docker logincommand line that includes the credentials. - Docker Configuration: Select this to download a file to use as a Docker config.json file, to permanently store the credentials on your client system.
- Mesos Credentials: Select this to download a tarball that provides the credentials that can be identified in the uris field of a Mesos configuration file.
3.3. Allowing access to organization repositories
Once you have created an organization, you can associate a set of repositories directly to that organization. To add access to the repositories in that organization, you can add Teams (sets of users with the same permissions) and individual users. Essentially, an organization has the same ability to create repositories and robot accounts as a user does, but an organization is intended to set up shared repositories through groups of users (in teams or individually).
Other things to know about organizations:
- You cannot have an organization in another organization. To subdivide an organization, you use teams.
- Organizations can’t contain users directly. You must first add a team, then add one or more users to each team.
- Teams can be set up in organizations as just members who use the repos and associated images or as administrators with special privileges for managing the organization
3.3.1. Adding a Team to an organization
When you create a team for your organization you can select the team name, choose which repositories to make available to the team, and decide the level of access to the team.
- From the Organization view, select the Teams and Membership icon from the left column. You will see that an owners Team exists with Admin privilege for the user who created the Organization.
- Select Create New Team. You are prompted for the new team name to be associated with the organization. Type the team name, which must start with a lowercase letter, with the rest of the team name as any combination of lowercase letters and numbers (no capitals or special characters allowed).
- Select the Create team button. The Add permissions window appears, displaying a list of repositories in the organization.
Check each repository you want the team to be able to access. Then select one of the following permissions for each:
- Read - Team members are able to view and pull images
- Write - Team members can view, pull, and push images
- Admin - Team members have full read/write privilege, plus the ability to do administrative tasks related to the repository
- Select Add permissions to save the repository permissions for the team.
3.3.2. Setting a Team role
After you have added a team, you can set the role of that team within the organization. From the Teams and Membership screen within the organization, select the TEAM ROLE drop-down menu, as shown in the following figure:
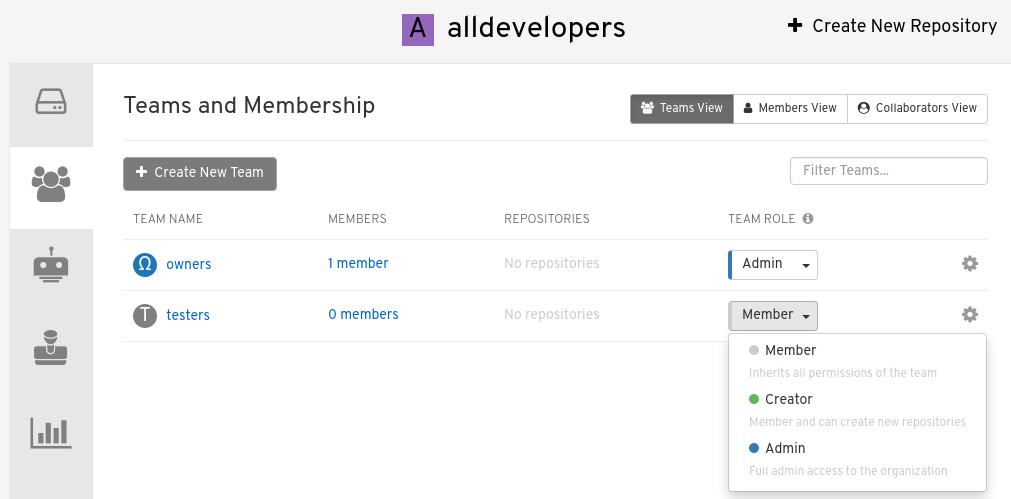
For the selected team, choose one of the following roles:
- Member - Inherits all permissions set for the team
- Creator - All member permissions, plus the ability to create new repositories
- Admin - Full administrative access to the organization, including the ability to create teams, add members, and set permissions.
3.3.3. Adding users to a Team
As someone with Admin privilege to an organization, you can add users and robots to a team. When you add a user, it sends an email to that user. The user remains pending until that user accepts the invitation.
To add users or robots to a team, start from the organization’s screen and do the following:
- Select the team you want to add users or robots to.
In the Team Members box, type one of the following:
- A username from an account on the Red Hat Quay registry
- The email address for a user account on the registry
- The name of a robot account. The name must be in the form of orgname+robotname
- In the case of the robot account, it is immediately added to the team. For a user account, an invitation to join is mailed to the user. Until the user accepts that invitation, the user remains in the INVITED TO JOIN state.
Next, the user accepts the email invitation to join the team. The next time the user logs in to the Red Hat Quay instance, the user moves from the INVITED TO JOIN list to the MEMBERS list for the organization.