
Chapter 11. Using version control
CodeReady Workspaces natively supports the Git version control system (VCS), which is provided by the JGit library. Versioning functionality is available in the IDE and in the terminal.
The following sections describe how to connect and authenticate users to a remote Git repository. Any operations that involve authentication on the remote repository need to be done via the IDE interface unless authentication is configured separately for the workspace machine (terminal, commands).
Private repositories require a secure SSH connection. In order to connect to Git repositories over SSH, an SSH key pair needs to be generated. SSH keys are saved in user preferences, so the same key can be used in all workspaces.
HTTPS Git URLs can only be used to push changes when OAuth authentication is enabled. See Enabling authentication with social accounts and brokering.
11.1. Generating and uploading SSH keys
SSH keys can be generated in the CodeReady Workspaces user interface.
- Go to Profile > Preferences > SSH > VCS, and click the button.
-
When prompted to provide the host name for your repository, use the bare host name (do not include
wwworhttps) as in the example below. - Save the resulting key to your Git-hosting provider account.
The host name is an actual host name of a VCS provider. Examples: github.com, bitbucket.org.
11.1.1. Using existing SSH keys
You can upload an existing public key instead of creating a new SSH key. When uploading a key, add the host name (using no www or https - as in the example below). Note that the Public key > View button is not be available when using this option because the public file should be generated already.
The following examples are specific to GitHub and GitLab, but a similar procedure can be used with all Git or SVN repository providers that use SSH authentication. See documentation provided by other providers for additional assistance.
The default type of SSH key does not work in CodeReady Workspaces. The git pull command fails on authorization. To work around the issue, you need a different type of an SSH key.
To convert an existing SSH key to the PEM format, run the following command and substitute <your_key_file> for the path to your key file.
$ ssh-keygen -p -f <your_key_file> -m PEM
Or, to generate a new PEM SSH key instead of the default RFC 4716/SSH2 key, omit the -p flag. Substitute <new_key_file> for the path to the new file.
$ ssh-keygen -f <new_key_file> -m PEMExample 11.1. GitHub example
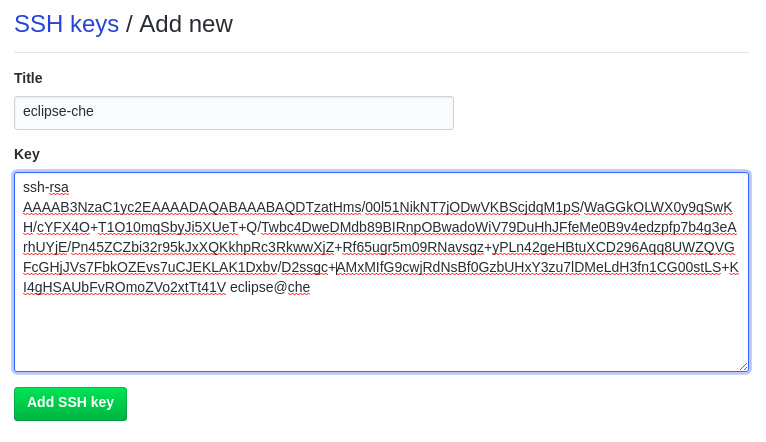
When not using GitHub OAuth, you can manually upload a key. To add the associated public key to a repository or account on github.com:
- Click your user icon (top right).
- Go to Settings > SSH and GPG keys and click the New SSH key button.
- Enter a title and paste the public key copied from CodeReady Workspaces to the Key text field.
Example 11.2. GitLab example
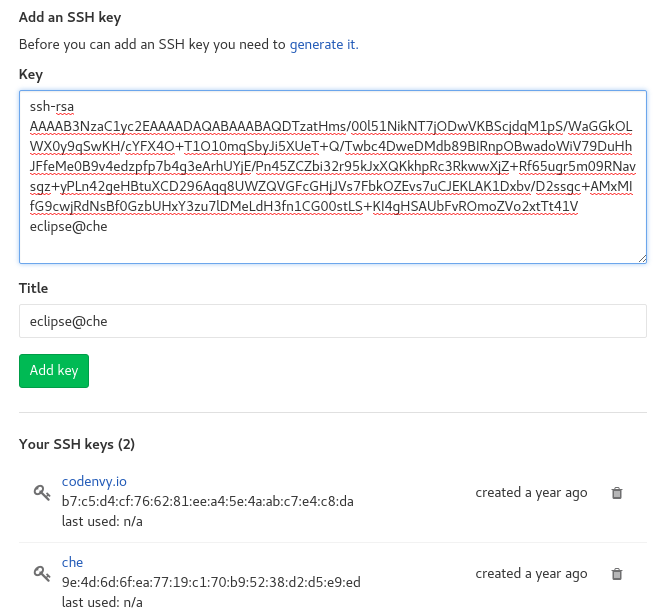
To add the associated public key to a Git repository or account on gitlab.com:
- Click your user icon (top right).
- Go to Settings > SSH Keys.
- Enter a title and paste the public key copied from CodeReady Workspaces to the Key text field.
11.2. Configuring GitHub OAuth
OAuth for Github allows users to import projects using SSH addresses (git@), push to repositories, and use the pull request panel. To enable automatic SSH key upload to GitHub for users:
- On github.com, click your user icon (top right).
- Go to Settings > Developer settings > OAuth Apps.
- Click the button.
-
In the Application name field, enter, for example,
CodeReady Workspaces. -
In the Homepage URL field, enter
http://${CHE_HOST}:${CHE_PORT}. In the Authorization callback URL field, enter
http://${CHE_HOST}:${CHE_PORT}/api/oauth/callback.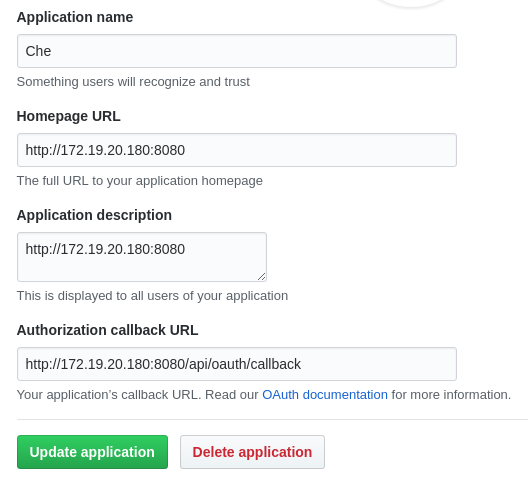
On OpenShift, update the deployment configuration.
CHE_OAUTH_GITHUB_CLIENTID=<your-github-client-id>
CHE_OAUTH_GITHUB_CLIENTSECRET=<your-github-secret>
CHE_OAUTH_GITHUB_AUTHURI=https://github.com/login/oauth/authorize
CHE_OAUTH_GITHUB_TOKENURI=https://github.com/login/oauth/access_token
CHE_OAUTH_GITHUB_REDIRECTURIS=http://${CHE_HOST}:${CHE_PORT}/api/oauth/callback
-
Substitute all occurrences of
${CHE_HOST}and${CHE_PORT}with the URL and port of your CodeReady Workspaces installation. -
Substitute
<your-github-client-id>and<your-github-secret>with your GitHub client ID and secret.
Once OAuth is configured, SSH keys are generated and uploaded automatically to GitHub by a user in the IDE in Profile > Preferences > SSH > VCS by clicking the Octocat icon. You can connect to your GitHub account and choose repositories to clone, rather than having to manually type (or paste) GitHub project URLs.
11.3. Configuring GitLab OAuth
OAuth integration with GitLab is not supported. Although GitLab supports OAuth for clone operations, pushes are not supported. A feature request to add support exists in the GitLab issue management system: Allow runners to push via their CI token.
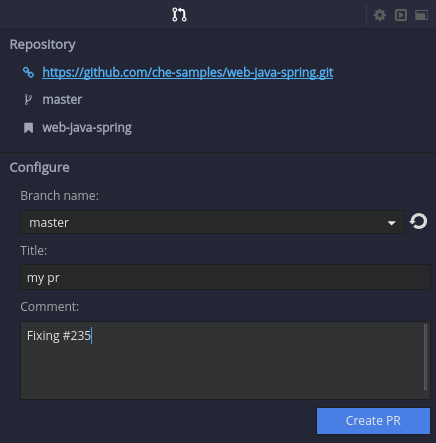
11.4. Submitting pull requests using the built-in Pull Request panel
CodeReady Workspaces provides a Pull Request panel to simplify the creation of pull requests for GitHub, BitBucket, and Microsoft VSTS (with Git) repositories.
11.5. Saving committer name and email
Committer name and email are set in Profile > Preferences > Git > Committer. Once set, every commit will include this information.
11.6. Interacting with Git from a workspace
After importing a repository, you can perform the most common Git operations using interactive menus or as terminal commands.
Terminal Git commands require their own authentication setup. This means that keys generated in the IDE work only when Git is used through the IDE menus. Git installed in a terminal is a different Git system. You can generate keys in ~/.ssh there as well.
Use keyboard shortcuts to access the most frequently used Git functionality faster:
| Commit | Alt+C |
| Push to remote | Alt+Shift+C |
| Pull from remote | Alt+P |
| Work with branches | Ctrl+B |
| Compare current changes with the latest repository version | Ctrl+Alt+D |
11.7. Git status highlighting in the project tree and editor
Files in project explorer and editor tabs can be colored according to their Git status:

- Green: new files that are staged in index
- Blue: files that contain changes
- Yellow: files that are not staged in index
The editor displays change markers according to file edits:
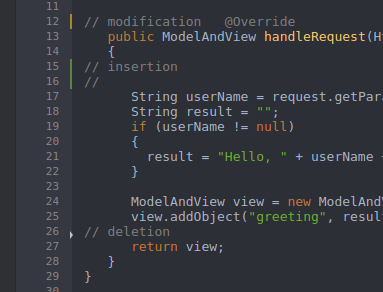
- Yellow marker: modified line(s)
- Green marker: new line(s)
- White triangle: removed line(s)
11.8. Performing Git operations
11.8.1. Commiting
Commit your changes by navigating to Git > Commit… in the main menu, or use the Alt+C shortcut.
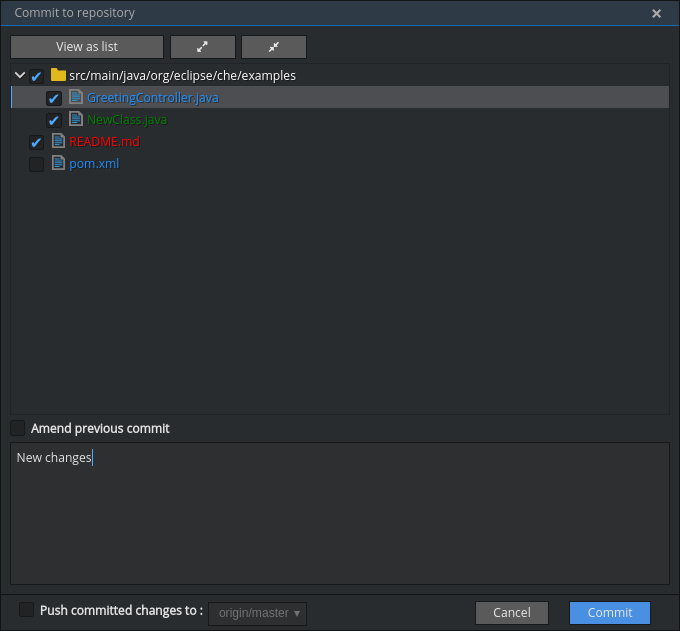
- Select files that will be added to index and committed. All files in the selected package or folder in the project explorer are checked by default.
- Type your commit message. Optionally, you can select Amend previous commit to modify the previous commit (for more details, see Git commit documentation).
- To push your commit to a remote repository by checking the Push committed changes to check-box and select a remote branch.
- Click to proceed (the button is active when at least one file is selected and a commit message is present, or Amend previous commit is checked).
Behavior for files in the list view is the same as in the Compare window (see Reviewing changed files section). Double-clicking a file opens diff window with it.
11.8.2. Pushing and pulling
Push your commits by navigating to Git > Remotes… > Push in the main menu, or use the Alt+Shift+C shortcut.
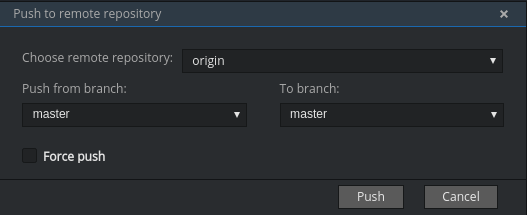
- Choose the remote repository.
- Choose the local and remote branch.
- Optionally, you can force select Force push.
Get changes from a remote repository by navigating to Git > Remotes… > Pull in the main menu, or use the Alt+P shortcut.
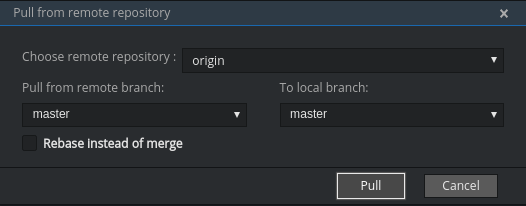
You can use Rebase instead of merge to keep your local commits on top (for more information, see Git pull documentation).
11.8.3. Managing branches
Manage your git branches by navigating to Git > Branches… in the main menu, or use the Ctrl+B shortcut.
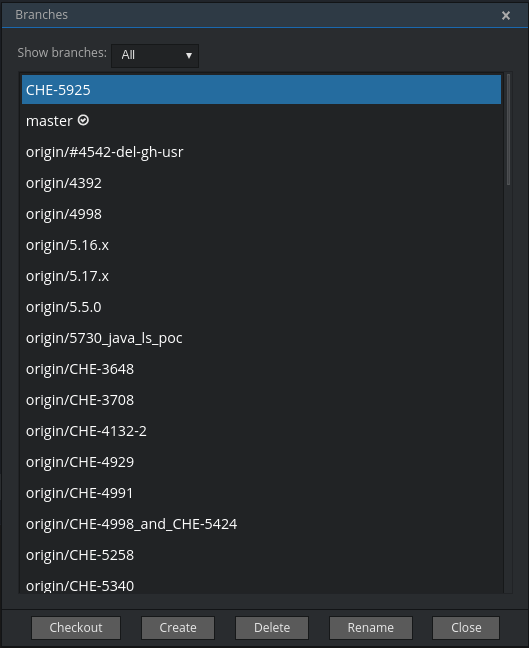
You can filter the branches view by choosing to see only local or remote branches.
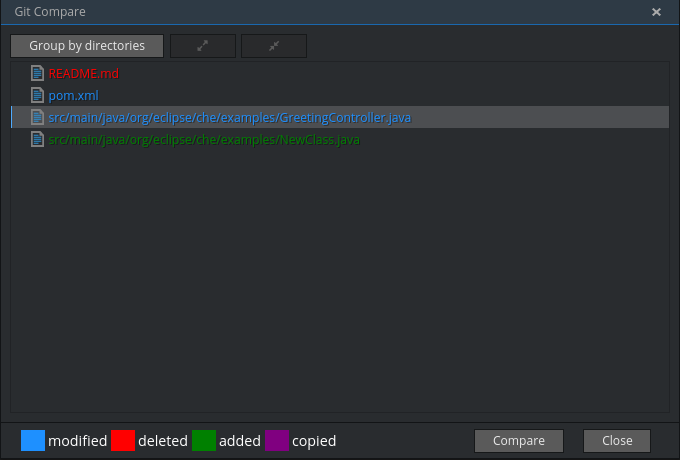
11.9. Reviewing changed files
The Git Compare window is used to show files that have changed.
To compare the current state of code to the latest local commit, navigate to Git > Compare > Select-to-what in the main menu, or use the Ctrl+Alt+D shortcut. Another way is to select an object in the project tree and choose Git > Select-to-what from the context menu of an item.
Listing changed files
The Git Compare window shows changed files in the selected object in the project explorer. To see all changes, select a project folder. If only one file has changed, a diff window is shown instead of the compare window.
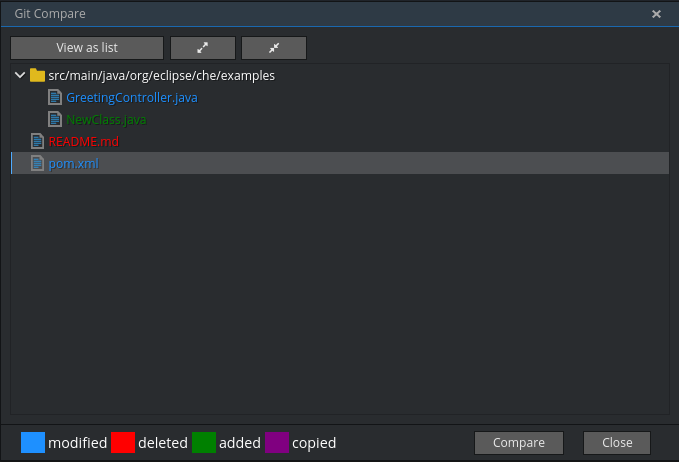
By default, affected files are listed as a tree.
The Expand all directories and Collapse all directories options help to get a better view. The button switches the view of changed files to a list, where each file is shown with its full path. To return to the tree view, click .
Viewing diffs
To view a diff for a file, select the file and click Compare, or double-click the file name.
You can review changes between two states of code. To view the diff, go to Git > Compare > Select-to-what in main menu. If more than one file has changed, a list of the changed files is opened first. To select a file to compare, double-click it, or select a file, and then click Compare. Another way to open a diff is to select a file in the Projects Explorer and choose Git > Select-to-what from its context menu or directly from the context menu in the editor.
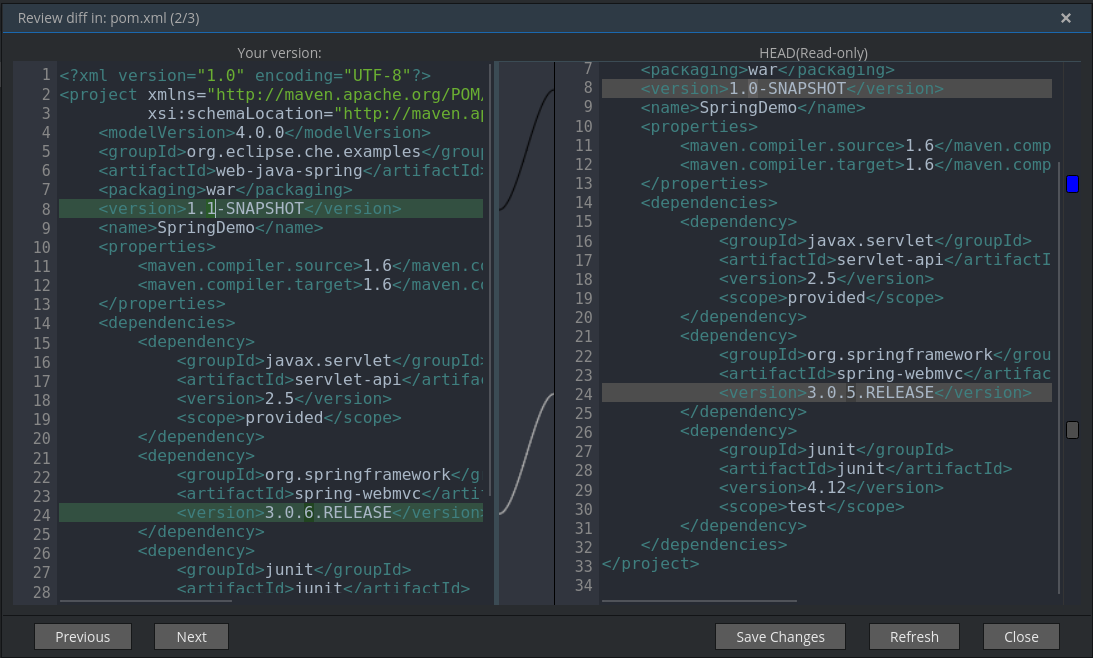
Your changes are shown on the left, and the file being compared to is on the right. The left pane can be used for editing and fixing your changes.
To review multiple files, you can navigate between them using the (or Alt+.) and (or Alt+,) buttons. The number of files for review is displayed in the title of the diff window.
The button updates the difference links between the two panes.