
Deploying AMQ Broker on OpenShift
For Use with AMQ Broker 7.11
Abstract
Making open source more inclusive
Red Hat is committed to replacing problematic language in our code, documentation, and web properties. We are beginning with these four terms: master, slave, blacklist, and whitelist. Because of the enormity of this endeavor, these changes will be implemented gradually over several upcoming releases. For more details, see our CTO Chris Wright’s message.
Chapter 1. Introduction to AMQ Broker on OpenShift Container Platform
Red Hat AMQ Broker 7.11 is available as a containerized image for use with OpenShift Container Platform (OCP) 4.12, 4.13, 4.14 or 4.15.
AMQ Broker is based on Apache ActiveMQ Artemis. It provides a message broker that is JMS-compliant. After you have set up the initial broker pod, you can quickly deploy duplicates by using OpenShift Container Platform features.
1.1. Version compatibility and support
For details about OpenShift Container Platform image version compatibility, see:
All deployments of AMQ Broker on OpenShift Container Platform now use RHEL 8 based images.
1.2. Unsupported features
Master-slave-based high availability
High availability (HA) achieved by configuring master and slave pairs is not supported. Instead, AMQ Broker uses the HA capabilities provided in OpenShift Container Platform.
External clients cannot use the topology information provided by AMQ Broker
When an AMQ Core Protocol JMS Client or an AMQ JMS Client connects to a broker in an OpenShift Container Platform cluster, the broker can send the client the IP address and port information for each of the other brokers in the cluster, which serves as a failover list for clients if the connection to the current broker is lost.
The IP address provided for each broker is an internal IP address, which is not accessible to clients that are external to the OpenShift Container Platform cluster. To prevent external clients from trying to connect to a broker using an internal IP address, set the following configuration in the URI used by the client to initially connect to a broker.
Client Configuration AMQ Core Protocol JMS Client
useTopologyForLoadBalancing=falseAMQ JMS Client
failover.amqpOpenServerListAction=IGNORE
1.3. Document conventions
This document uses the following conventions for the sudo command, file paths, and replaceable values.
The sudo command
In this document, sudo is used for any command that requires root privileges. You should always exercise caution when using sudo, as any changes can affect the entire system. For more information about using sudo, see Managing sudo access.
About the use of file paths in this document
In this document, all file paths are valid for Linux, UNIX, and similar operating systems (for example, /home/...). If you are using Microsoft Windows, you should use the equivalent Microsoft Windows paths (for example, C:\Users\...).
Replaceable values
This document sometimes uses replaceable values that you must replace with values specific to your environment. Replaceable values are lowercase, enclosed by angle brackets (< >), and are styled using italics and monospace font. Multiple words are separated by underscores (_) .
For example, in the following command, replace <project_name> with your own project name.
$ oc new-project <project_name>Chapter 2. Planning a deployment of AMQ Broker on OpenShift Container Platform
This section describes how to plan an Operator-based deployment.
Operators are programs that enable you to package, deploy, and manage OpenShift applications. Often, Operators automate common or complex tasks. Commonly, Operators are intended to provide:
- Consistent, repeatable installations
- Health checks of system components
- Over-the-air (OTA) updates
- Managed upgrades
Operators enable you to make changes while your broker instances are running, because they are always listening for changes to the Custom Resource (CR) instances that you used to configure your deployment. When you make changes to a CR, the Operator reconciles the changes with the existing broker deployment and updates the deployment to reflect the changes. In addition, the Operator provides a message migration capability, which ensures the integrity of messaging data. When a broker in a clustered deployment shuts down due to an intentional scaledown of the deployment, this capability migrates messages to a broker Pod that is still running in the same broker cluster.
2.1. Overview of high availability (HA)
The term high availability refers to a system that can remain operational even when part of that system fails or is shut down. For AMQ Broker on OpenShift Container Platform, this means ensuring the integrity and availability of messaging data if a broker Pod fails.
AMQ Broker uses the HA capabilities provided in OpenShift Container Platform to mitigate Pod failures:
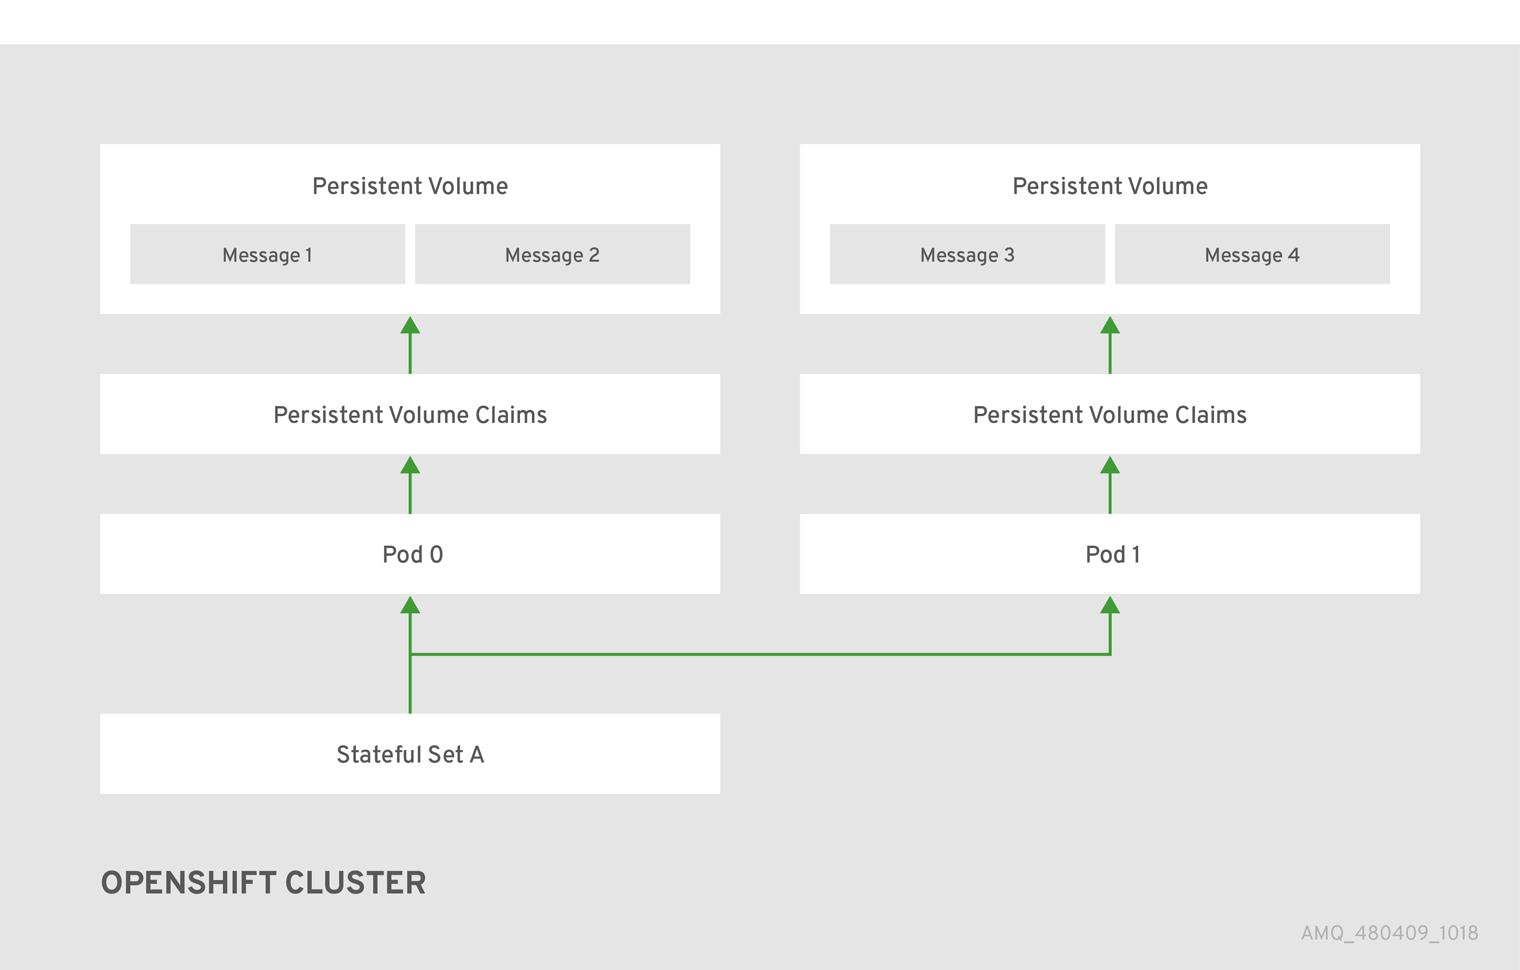
- If persistent storage is enabled on AMQ Broker, each broker Pod writes its data to a Persistent Volume (PV) that was claimed by using a Persistent Volume Claim (PVC). A PV remains available even after a Pod is deleted. If a broker Pod fails, OpenShift Container Platform restarts the Pod with the same name and uses the existing PV that contains the messaging data.
- You can run multiple broker Pods in a cluster and distribute Pods on separate nodes to protect against a node failure. In a cluster, each broker Pod writes its message data to its own PV which is then available to that broker Pod if it is restarted on a different node.
The following figure shows a clustered broker deployment. In this case, the two broker Pods in the broker cluster are still running.
Additional resources
For information on how to use persistent storage, see Section 2.7, “Operator deployment notes”.
For information on how to distribute broker Pods on separate nodes, see Section 4.14.2, “Controlling pod placement using tolerations”.
2.2. Overview of the AMQ Broker Operator Custom Resource Definitions
In general, a Custom Resource Definition (CRD) is a schema of configuration items that you can modify for a custom OpenShift object deployed with an Operator. By creating a corresponding Custom Resource (CR) instance, you can specify values for configuration items in the CRD. If you are an Operator developer, what you expose through a CRD essentially becomes the API for how a deployed object is configured and used. You can directly access the CRD through regular HTTP curl commands, because the CRD gets exposed automatically through Kubernetes.
You can install the AMQ Broker Operator using either the OpenShift command-line interface (CLI), or the Operator Lifecycle Manager, through the OperatorHub graphical interface. In either case, the AMQ Broker Operator includes the CRDs described below.
- Main broker CRD
You deploy a CR instance based on this CRD to create and configure a broker deployment.
Based on how you install the Operator, this CRD is:
-
The
broker_activemqartemis_crdfile in thecrdsdirectory of the Operator installation archive (OpenShift CLI installation method) -
The
ActiveMQArtemisCRD in theCustom Resource Definitionssection of the OpenShift Container Platform web console (OperatorHub installation method)
-
The
- Address CRD
You deploy a CR instance based on this CRD to create addresses and queues for a broker deployment.
Based on how you install the Operator, this CRD is:
-
The
broker_activemqartemisaddress_crdfile in thecrdsdirectory of the Operator installation archive (OpenShift CLI installation method) -
The
ActiveMQArtemisAddresssCRD in theCustom Resource Definitionssection of the OpenShift Container Platform web console (OperatorHub installation method)
-
The
- Security CRD
You deploy a CR instance based on this CRD to create users and associate those users with security contexts.
Based on how you install the Operator, this CRD is:
-
The
broker_activemqartemissecurity_crdfile in thecrdsdirectory of the Operator installation archive (OpenShift CLI installation method) -
The
ActiveMQArtemisSecurityCRD in theCustom Resource Definitionssection of the OpenShift Container Platform web console (OperatorHub installation method).
-
The
- Scaledown CRD
The Operator automatically creates a CR instance based on this CRD when instantiating a scaledown controller for message migration.
Based on how you install the Operator, this CRD is:
-
The
broker_activemqartemisscaledown_crdfile in thecrdsdirectory of the Operator installation archive (OpenShift CLI installation method) -
The
ActiveMQArtemisScaledownCRD in theCustom Resource Definitionssection of the OpenShift Container Platform web console (OperatorHub installation method).
-
The
Additional resources
To learn how to install the AMQ Broker Operator (and all included CRDs) using:
- The OpenShift CLI, see Section 3.2, “Installing the Operator using the CLI”
- The Operator Lifecycle Manager and OperatorHub graphical interface, see Section 3.3, “Installing the Operator using OperatorHub”.
For complete configuration references to use when creating CR instances based on the main broker and address CRDs, see:
2.3. Overview of the AMQ Broker Operator sample Custom Resources
The AMQ Broker Operator archive that you download and extract during installation includes sample Custom Resource (CR) files in the deploy/crs directory. These sample CR files enable you to:
- Deploy a minimal broker without SSL or clustering.
- Define addresses.
The broker Operator archive that you download and extract also includes CRs for example deployments in the deploy/examples/address and deploy/examples/artemis directories, as listed below.
address_queue.yaml- Deploys an address and queue with different names. Deletes the queue when the CR is undeployed.
address_topic.yaml- Deploys an address with a multicast routing type. Deletes the address when the CR is undeployed.
artemis_address_settings.yaml- Deploys a broker with specific address settings.
artemis_cluster_persistence.yaml- Deploys clustered brokers with persistent storage.
artemis_enable_metrics_plugin.yaml- Enables the Prometheus metrics plugin to collect metrics.
artemis_resources.yaml- Sets CPU and memory resource limits for the broker.
artemis_single.yaml- Deploys a single broker.
2.4. Watch options for a Cluster Operator deployment
When the Cluster Operator is running, it starts to watch for updates of AMQ Broker custom resources (CRs).
You can choose to deploy the Cluster Operator to watch CRs from:
- A single namespace (the same namespace containing the Operator)
- All namespaces
If you have already installed a previous version of the AMQ Broker Operator in a namespace on your cluster, Red Hat recommends that you do not install the AMQ Broker Operator 7.11 version to watch that namespace to avoid potential conflicts.
2.5. How the Operator determines the configuration to use to deploy images
In the ActiveMQArtemis CR, you can use any of the following configurations to deploy container images:
-
Specify a version number in the
spec.versionattribute and allow the Operator to choose the broker and init container images to deploy for that version number. -
Specify the registry URLs of the specific broker and init container images that you want the Operator to deploy in the
spec.deploymentPlan.imageandspec.deploymentPlan.initImageattributes. -
Set the value of the
spec.deploymentPlan.imageattribute toplaceholder, which means that the Operator chooses the latest broker and init container images that are known to the Operator version.
If you do not use any of these configurations to deploy container images, the Operator chooses the latest broker and init container images that are known to the Operator version.
After you save a CR, the Operator performs the following validation to determine the configuration to use.
The Operator checks if the CR contains a
spec.versionattribute.If the CR does not contain a
spec.versionattribute, the Operator checks if the CR contains aspec.deploymentPlan.imageand aspec.deployment.Plan.initImageattribute.-
If the CR contains a
spec.deploymentPlan.imageand aspec.deployment.Plan.initImageattribute, the Operator deploys the container images that are identified by their registry URLs. -
If the CR does not contain a
spec.deploymentPlan.imageand aspec.deployment.Plan.initImageattribute, the Operator chooses the container images to deploy. For more information, see Section 2.6, “How the Operator chooses container images”.
-
If the CR contains a
If the CR contains a
spec.versionattribute, the Operator verifies that the version number specified is within the valid range of versions that the Operator supports.-
If the value of the
spec.versionattribute is not valid, the Operator stops the deployment. If the value of the
spec.versionattribute is valid, the Operator checks if the CR contains aspec.deploymentPlan.imageand aspec.deployment.Plan.initImageattribute.-
If the CR contains a
spec.deploymentPlan.imageand aspec.deployment.Plan.initImageattribute, the Operator deploys the container images that are identified by their registry URLs. -
If the CR does not contain a
spec.deploymentPlan.imageand aspec.deployment.Plan.initImageattribute, the Operator chooses the container images to deploy. For more information, see Section 2.6, “How the Operator chooses container images”.
-
If the CR contains a
-
If the value of the
If the CR contains only one of the spec.deploymentPlan.image and the spec.deployment.Plan.initImage attributes, the Operator uses the spec.version number attribute to choose an image for the attribute that is not in the CR, or chooses the latest known image for that attribute if the spec.version attribute is not in the CR.
Red Hat recommends that you do not specify the spec.deploymentPlan.image attribute without the spec.deployment.Plan.initImage attribute, or vice versa, to prevent mismatched versions of broker and init container images from being deployed.
2.6. How the Operator chooses container images
If a CR does not contain a spec.deploymentPlan.image and a spec.deployment.Plan.initImage attribute, which specify the registry URLs of specific container images the Operator must deploy, the Operator automatically chooses the appropriate container images to deploy.
If you install the Operator using the OpenShift command-line interface, the Operator installation archive includes a sample CR file called broker_activemqartemis_cr.yaml. In the sample CR, the spec.deploymentPlan.image property is included and set to its default value of placeholder. This value indicates that the Operator does not choose a broker container image until you deploy the CR.
The spec.deploymentPlan.initImage property, which specifies the Init Container image, is not included in the broker_activemqartemis_cr.yaml sample CR file. If you do not explicitly include the spec.deploymentPlan.initImage property in your CR and specify a value, the Operator chooses a built-in Init Container image that matches the version of the Operator container image chosen.
To choose broker and Init Container images, the Operator first determines an AMQ Broker version of the images that is required. The Operator gets the version from the value of the spec.version property. If the spec.version property is not set, the Operator uses the latest version of the images for AMQ Broker.
The Operator then detects your container platform. The AMQ Broker Operator can run on the following container platforms:
- OpenShift Container Platform (x86_64)
- OpenShift Container Platform on IBM Z (s390x)
- OpenShift Container Platform on IBM Power Systems (ppc64le)
Based on the version of AMQ Broker and your container platform, the Operator then references two sets of environment variables in the operator.yaml configuration file. These sets of environment variables specify broker and Init Container images for various versions of AMQ Broker, as described in the following section.
2.6.1. Environment variables for broker and init container images
The environment variables included in the operator.yaml have the following naming convention.
| Container platform | Naming convention |
|---|---|
| OpenShift Container Platform |
|
| OpenShift Container Platform on IBM Z |
|
| OpenShift Container Platform on IBM Power Systems |
|
The following are examples of environment variable names for broker and init container images for each supported container platform.
| Container platform | Environment variable names |
|---|---|
| OpenShift Container Platform |
|
| OpenShift Container Platform on IBM Z |
|
| OpenShift Container Platform on IBM Power Systems |
|
The value of each environment variable specifies the address of a container image that is available from Red Hat. The image name is represented by a Secure Hash Algorithm (SHA) value. For example:
- name: RELATED_IMAGE_ActiveMQ_Artemis_Broker_Kubernetes_7116
  value: registry.redhat.io/amq7/amq-broker-rhel8@sha256:e8fa2a00e576ecb95561ffbdbf87b1c82d479c8791ab2c6ce741dd0d0b496d15
Therefore, based on an AMQ Broker version and your container platform, the Operator determines the applicable environment variable names for the broker and init container. The Operator uses the corresponding image values when starting the broker container.
Additional resources
- To learn how to use the AMQ Broker Operator to create a broker deployment, see Chapter 3, Deploying AMQ Broker on OpenShift Container Platform using the AMQ Broker Operator.
- For more information about how the Operator uses an Init Container to generate the broker configuration, see Section 4.1, “How the Operator generates the broker configuration”.
- To learn how to build and specify a custom Init Container image, see Section 4.9, “Specifying a custom Init Container image”.
2.7. Operator deployment notes
This section describes some important considerations when planning an Operator-based deployment
- Deploying the Custom Resource Definitions (CRDs) that accompany the AMQ Broker Operator requires cluster administrator privileges for your OpenShift cluster. When the Operator is deployed, non-administrator users can create broker instances via corresponding Custom Resources (CRs). To enable regular users to deploy CRs, the cluster administrator must first assign roles and permissions to the CRDs. For more information, see Creating cluster roles for Custom Resource Definitions in the OpenShift Container Platform documentation.
- When you update your cluster with the CRDs for the latest Operator version, this update affects all projects in the cluster. Any broker Pods deployed from previous versions of the Operator might become unable to update their status. When you click the Logs tab of a running broker Pod in the OpenShift Container Platform web console, you see messages indicating that 'UpdatePodStatus' has failed. However, the broker Pods and Operator in that project continue to work as expected. To fix this issue for an affected project, you must also upgrade that project to use the latest version of the Operator.
While you can create more than one broker deployment in a given OpenShift project by deploying multiple Custom Resource (CR) instances, typically, you create a single broker deployment in a project, and then deploy multiple CR instances for addresses.
Red Hat recommends you create broker deployments in separate projects.
If you intend to deploy brokers with persistent storage and do not have container-native storage in your OpenShift cluster, you need to manually provision Persistent Volumes (PVs) and ensure that these are available to be claimed by the Operator. For example, if you want to create a cluster of two brokers with persistent storage (that is, by setting
persistenceEnabled=truein your CR), you need to have two persistent volumes available. By default, each broker instance requires storage of 2 GiB.If you specify
persistenceEnabled=falsein your CR, the deployed brokers uses ephemeral storage. Ephemeral storage means that that every time you restart the broker Pods, any existing data is lost.For more information about provisioning persistent storage in OpenShift Container Platform, see:
You must add configuration for the items listed below to the main broker CR instance before deploying the CR for the first time. You cannot add configuration for these items to a broker deployment that is already running.
-
If you update a parameter in your CR that the Operator is unable to dynamically update in the StatefulSet, the Operator deletes the StatefulSet and recreates it with the updated parameter value. Deleting the StatefulSet causes all pods to be deleted and recreated, which causes a temporary broker outage. An example of a CR update that the Operator cannot dynamically update in the StatefulSet is if you change
persistenceEnabled=falsetopersistenceEnabled=true.
2.8. Identifying namespaces watched by existing Operators
If the cluster already contains installed Operators for AMQ Broker, and you want a new Operator to watch all or multiple namespaces, you must ensure that the new Operator does not watch any of the same namespaces as existing Operators. Use the following procedure to identify the namespaces watched by existing Operators.
Procedure
- In the left pane of the OpenShift Container Platform web console, click → .
-
In the Project drop-down list, select
All Projects. In the Filter Name box, specify a string, for example,
amq, to display the Operators for AMQ Broker that are installed on the cluster.NoteThe namespace column displays the namespace where each operator is deployed.
Check the namespaces that each installed Operator for AMQ Broker is configured to watch.
- Click the Operator name to display the Operator details and click the YAML tab.
Search for
WATCH_NAMESPACEand note the namespaces that the Operator watches.-
If the
WATCH_NAMESPACEsection has afieldPathfield that has a value ofmetadata.namespace, the Operator is watching the namespace where it is deployed. If the
WATCH_NAMESPACEsection has avaluefield that has list of namespaces, the Operator is watching the specified namespaces. For example:- name: WATCH_NAMESPACE value: "namespace1, namespace2"
If the
WATCH_NAMESPACEsection has avaluefield that is empty or has an asterisk, the Operator is watching all the namespaces on the cluster. For example:- name: WATCH_NAMESPACE value: ""
In this case, before you deploy the new Operator, you must either uninstall the existing Operator or reconfigure it to watch specific namespaces.
-
If the
The procedures in the next section show you how to install the Operator and use Custom Resources (CRs) to create broker deployments on OpenShift Container Platform. After you complete the procedures, the Operator runs in an individual Pod and each broker instance that you create runs as an individual Pod in a StatefulSet in the same project as the Operator. Later, you will see how to use a dedicated addressing CR to define addresses in your broker deployment.
Chapter 3. Deploying AMQ Broker on OpenShift Container Platform using the AMQ Broker Operator
3.1. Prerequisites
- Before you install the Operator and use it to create a broker deployment, you should consult the Operator deployment notes in Section 2.7, “Operator deployment notes”.
3.2. Installing the Operator using the CLI
Each Operator release requires that you download the latest AMQ Broker 7.11.6 Operator Installation and Example Files as described below.
The procedures in this section show how to use the OpenShift command-line interface (CLI) to install and deploy the latest version of the Operator for AMQ Broker 7.11 in a given OpenShift project. In subsequent procedures, you use this Operator to deploy some broker instances.
- For an alternative method of installing the AMQ Broker Operator that uses the OperatorHub graphical interface, see Section 3.3, “Installing the Operator using OperatorHub”.
- To learn about upgrading existing Operator-based broker deployments, see Chapter 6, Upgrading an Operator-based broker deployment.
3.2.1. Preparing to deploy the Operator
Before you deploy the Operator using the CLI, you must download the Operator installation files and prepare the deployment.
Procedure
- In your web browser, navigate to the Software Downloads page for AMQ Broker 7.11.6 releases.
-
Ensure that the value of the Version drop-down list is set to
7.11.6and the Patches tab is selected. Next to the latest AMQ Broker 7.11.6 Operator Installation and Example Files, click Download.
Download of the
amq-broker-operator-7.11.6-ocp-install-examples.zipcompressed archive automatically begins.Move the archive to your chosen directory. The following example moves the archive to a directory called
~/broker/operator.$ mkdir ~/broker/operator $ mv amq-broker-operator-7.11.6-ocp-install-examples.zip ~/broker/operator
In your chosen directory, extract the contents of the archive. For example:
$ cd ~/broker/operator
$ unzip amq-broker-operator-7.11.6-ocp-install-examples.zip
Switch to the directory that was created when you extracted the archive. For example:
$ cd amq-broker-operator-7.11.6-ocp-install-examples
Log in to OpenShift Container Platform as a cluster administrator. For example:
$ oc login -u system:admin
Specify the project in which you want to install the Operator. You can create a new project or switch to an existing one.
Create a new project:
$ oc new-project <project_name>Or, switch to an existing project:
$ oc project <project_name>
Specify a service account to use with the Operator.
-
In the
deploydirectory of the Operator archive that you extracted, open theservice_account.yamlfile. -
Ensure that the
kindelement is set toServiceAccount. -
If you want to change the default service account name, in the
metadatasection, replaceamq-broker-controller-managerwith a custom name. Create the service account in your project.
$ oc create -f deploy/service_account.yaml
-
In the
Specify a role name for the Operator.
-
Open the
role.yamlfile. This file specifies the resources that the Operator can use and modify. -
Ensure that the
kindelement is set toRole. -
If you want to change the default role name, in the
metadatasection, replaceamq-broker-operator-rolewith a custom name. Create the role in your project.
$ oc create -f deploy/role.yaml
-
Open the
Specify a role binding for the Operator. The role binding binds the previously-created service account to the Operator role, based on the names you specified.
-
Open the
role_binding.yamlfile. Ensure that the
namevalues forServiceAccountandRolematch those specified in theservice_account.yamlandrole.yamlfiles. For example:metadata: name: amq-broker-operator-rolebinding subjects: kind: ServiceAccount name: amq-broker-controller-manager roleRef: kind: Role name: amq-broker-operator-roleCreate the role binding in your project.
$ oc create -f deploy/role_binding.yaml
-
Open the
Specify a leader election role binding for the Operator. The role binding binds the previously-created service account to the leader election role, based on the names you specified.
Create a leader election role for the Operator.
$ oc create -f deploy/election_role.yaml
Create the leader election role binding in your project.
$ oc create -f deploy/election_role_binding.yaml
(Optional) If you want the Operator to watch multiple namespaces, complete the following steps:
NoteIf the OpenShift Container Platform cluster already contains installed Operators for AMQ Broker, you must ensure the new Operator does not watch any of the same namespaces as existing Operators. For information on how to identify the namespaces that are watched by existing Operators, see, Identifying namespaces watched by existing Operators.
-
In the deploy directory of the Operator archive that you downloaded and extracted, open the
operator_yamlfile. If you want the Operator to watch all namespaces in the cluster, in the
WATCH_NAMESPACEsection, add avalueattribute and set the value to an asterisk. Comment out the existing attributes in theWATCH_NAMESPACEsection. For example:- name: WATCH_NAMESPACE value: "*" # valueFrom: # fieldRef: # fieldPath: metadata.namespace
NoteTo avoid conflicts, ensure that multiple Operators do not watch the same namespace. For example, if you deploy an Operator to watch all namespaces on the cluster, you cannot deploy another Operator to watch individual namespaces. If Operators are already deployed on the cluster, you can specify a list of namespaces that the new Operator watches, as described in the following step.
If you want the Operator to watch multiple, but not all, namespaces on the cluster, in the
WATCH_NAMESPACEsection, specify a list of namespaces. Ensure that you exclude any namespaces that are watched by existing Operators. For example:- name: WATCH_NAMESPACE value: "namespace1, namespace2"`.
-
In the deploy directory of the Operator archive that you downloaded and extracted, open the
cluster_role_binding.yamlfile. In the Subjects section, specify a namespace that corresponds to the OpenShift Container Platform project to which you are deploying the Operator. For example:
Subjects:
- kind: ServiceAccount
  name: amq-broker-controller-manager
  namespace: operator-project
NoteIf you previously deployed brokers using an earlier version of the Operator, and you want to deploy the Operator to watch multiple namespaces, see Before you upgrade.
Create a cluster role in your project.
$ oc create -f deploy/cluster_role.yaml
Create a cluster role binding in your project.
$ oc create -f deploy/cluster_role_binding.yaml
-
In the deploy directory of the Operator archive that you downloaded and extracted, open the
In the procedure that follows, you deploy the Operator in your project.
3.2.2. Deploying the Operator using the CLI
The procedure in this section shows how to use the OpenShift command-line interface (CLI) to deploy the latest version of the Operator for AMQ Broker 7.11 in your OpenShift project.
Prerequisites
- You must have already prepared your OpenShift project for the Operator deployment. See Section 3.2.1, “Preparing to deploy the Operator”.
- Starting in AMQ Broker 7.3, you use a new version of the Red Hat Ecosystem Catalog to access container images. This new version of the registry requires you to become an authenticated user before you can access images. Before you can follow the procedure in this section, you must first complete the steps described in Red Hat Container Registry Authentication.
If you intend to deploy brokers with persistent storage and do not have container-native storage in your OpenShift cluster, you need to manually provision Persistent Volumes (PVs) and ensure that they are available to be claimed by the Operator. For example, if you want to create a cluster of two brokers with persistent storage (that is, by setting
persistenceEnabled=truein your Custom Resource), you need to have two PVs available. By default, each broker instance requires storage of 2 GiB.If you specify
persistenceEnabled=falsein your Custom Resource, the deployed brokers uses ephemeral storage. Ephemeral storage means that that every time you restart the broker Pods, any existing data is lost.For more information about provisioning persistent storage, see:
Procedure
In the OpenShift command-line interface (CLI), log in to OpenShift as a cluster administrator. For example:
$ oc login -u system:admin
Switch to the project that you previously prepared for the Operator deployment. For example:
$ oc project <project_name>Switch to the directory that was created when you previously extracted the Operator installation archive. For example:
$ cd ~/broker/operator/amq-broker-operator-7.11.6-ocp-install-examples
Deploy the CRDs that are included with the Operator. You must install the CRDs in your OpenShift cluster before deploying and starting the Operator.
Deploy the main broker CRD.
$ oc create -f deploy/crds/broker_activemqartemis_crd.yaml
Deploy the address CRD.
$ oc create -f deploy/crds/broker_activemqartemisaddress_crd.yaml
Deploy the scaledown controller CRD.
$ oc create -f deploy/crds/broker_activemqartemisscaledown_crd.yaml
Deploy the security CRD:
$ oc create -f deploy/crds/broker_activemqartemissecurity_crd.yaml
Link the pull secret associated with the account used for authentication in the Red Hat Ecosystem Catalog with the
default,deployer, andbuilderservice accounts for your OpenShift project.$ oc secrets link --for=pull default <secret_name> $ oc secrets link --for=pull deployer <secret_name> $ oc secrets link --for=pull builder <secret_name>
In the
deploydirectory of the Operator archive that you downloaded and extracted, open theoperator.yamlfile. Ensure that the value of thespec.containers.imageproperty corresponds to version 7.11.6-opr-2 of the Operator, as shown below.spec: template: spec: containers: #image: registry.redhat.io/amq7/amq-broker-rhel8-operator:7.10 image: registry.redhat.io/amq7/amq-broker-rhel8-operator@sha256:6a87f1a46da682870c4495bece5d8ef5b2fb62b4ecda9e6826664031757bf984NoteIn the
operator.yamlfile, the Operator uses an image that is represented by a Secure Hash Algorithm (SHA) value. The comment line, which begins with a number sign (#) symbol, denotes that the SHA value corresponds to a specific container image tag.Deploy the Operator.
$ oc create -f deploy/operator.yaml
In your OpenShift project, the Operator starts in a new Pod.
In the OpenShift Container Platform web console, the information on the Events tab of the Operator Pod confirms that OpenShift has deployed the Operator image that you specified, has assigned a new container to a node in your OpenShift cluster, and has started the new container.
In addition, if you click the Logs tab within the Pod, the output should include lines resembling the following:
...
{"level":"info","ts":1553619035.8302743,"logger":"kubebuilder.controller","msg":"Starting Controller","controller":"activemqartemisaddress-controller"}
{"level":"info","ts":1553619035.830541,"logger":"kubebuilder.controller","msg":"Starting Controller","controller":"activemqartemis-controller"}
{"level":"info","ts":1553619035.9306898,"logger":"kubebuilder.controller","msg":"Starting workers","controller":"activemqartemisaddress-controller","worker count":1}
{"level":"info","ts":1553619035.9311671,"logger":"kubebuilder.controller","msg":"Starting workers","controller":"activemqartemis-controller","worker count":1}
The preceding output confirms that the newly-deployed Operator is communicating with Kubernetes, that the controllers for the broker and addressing are running, and that these controllers have started some workers.
It is recommended that you deploy only a single instance of the AMQ Broker Operator in a given OpenShift project. Setting the spec.replicas property of your Operator deployment to a value greater than 1, or deploying the Operator more than once in the same project is not recommended.
Additional resources
- For an alternative method of installing the AMQ Broker Operator that uses the OperatorHub graphical interface, see Section 3.3, “Installing the Operator using OperatorHub”.
3.3. Installing the Operator using OperatorHub
3.3.1. Overview of the Operator Lifecycle Manager
In OpenShift Container Platform 4.5 and later, the Operator Lifecycle Manager (OLM) helps users install, update, and generally manage the lifecycle of all Operators and their associated services running across their clusters. It is part of the Operator Framework, an open source toolkit designed to manage Kubernetes-native applications (Operators) in an effective, automated, and scalable way.
The OLM runs by default in OpenShift Container Platform 4.5 and later, which aids cluster administrators in installing, upgrading, and granting access to Operators running on their cluster. The OpenShift Container Platform web console provides management screens for cluster administrators to install Operators, as well as grant specific projects access to use the catalog of Operators available on the cluster.
OperatorHub is the graphical interface that OpenShift cluster administrators use to discover, install, and upgrade Operators using the OLM. With one click, these Operators can be pulled from OperatorHub, installed on the cluster, and managed by the OLM, ready for engineering teams to self-service manage the software in development, test, and production environments.
When you have deployed the Operator, you can use Custom Resource (CR) instances to create broker deployments such as standalone and clustered brokers.
3.3.2. Deploying the Operator from OperatorHub
This procedure shows how to use OperatorHub to deploy the latest version of the Operator for AMQ Broker to a specified OpenShift project.
In OperatorHub, you can install only the latest Operator version that is provided in each channel. If you want to install an earlier version of an Operator, you must install the Operator by using the CLI. For more information, see Section 3.2, “Installing the Operator using the CLI”.
Prerequisites
-
The
Red Hat Integration - AMQ Broker for RHEL 8 (Multiarch)Operator must be available in OperatorHub. - You have cluster administrator privileges.
Procedure
- Log in to the OpenShift Container Platform web console as a cluster administrator.
- In left navigation menu, click → .
- On the Project drop-down menu at the top of the OperatorHub page, select the project in which you want to deploy the Operator.
On the OperatorHub page, use the Filter by keyword… box to find the
Red Hat Integration - AMQ Broker for RHEL 8 (Multiarch)Operator.NoteIn OperatorHub, you might find more than one Operator than includes
AMQ Brokerin its name. Ensure that you click theRed Hat Integration - AMQ Broker for RHEL 8 (Multiarch)Operator. When you click this Operator, review the information pane that opens. For AMQ Broker 7.11, the latest minor version tag of this Operator is7.11.6-opr-2.-
Click the
Red Hat Integration - AMQ Broker for RHEL 8 (Multiarch)Operator. On the dialog box that appears, click Install. On the Install Operator page:
Under Update Channel, select the
7.11.xchannel to receive updates for version 7.11 only. The7.11.xchannel is a Long Term Support (LTS) channel.Depending on when your OpenShift Container Platform cluster was installed, you may also see channels for older versions of AMQ Broker. The only other supported channel is
7.10.x, which is also an LTS channel.Under Installation Mode, choose which namespaces the Operator watches:
- A specific namespace on the cluster - The Operator is installed in that namespace and only monitors that namespace for CR changes.
- All namespaces - The Operator monitors all namespaces for CR changes.
NoteIf you previously deployed brokers using an earlier version of the Operator, and you want deploy the Operator to watch many namespaces, see Before you upgrade.
- From the Installed Namespace drop-down menu, select the project in which you want to install the Operator.
-
Under Approval Strategy, ensure that the radio button entitled
Automaticis selected. This option specifies that updates to the Operator do not require manual approval for installation to take place. - Click Install.
When the Operator installation is complete, the Installed Operators page opens. You should see that the Red Hat Integration - AMQ Broker for RHEL 8 (Multiarch) Operator is installed in the project namespace that you specified.
Additional resources
- To learn how to create a broker deployment in a project that has the Operator for AMQ Broker installed, see Section 3.4.1, “Deploying a basic broker instance”.
3.4. Creating Operator-based broker deployments
3.4.1. Deploying a basic broker instance
The following procedure shows how to use a Custom Resource (CR) instance to create a basic broker deployment.
While you can create more than one broker deployment in a given OpenShift project by deploying multiple Custom Resource (CR) instances, typically, you create a single broker deployment in a project, and then deploy multiple CR instances for addresses.
Red Hat recommends you create broker deployments in separate projects.
In AMQ Broker 7.11, if you want to configure the following items, you must add the appropriate configuration to the main broker CR instance before deploying the CR for the first time.
Prerequisites
You must have already installed the AMQ Broker Operator.
- To use the OpenShift command-line interface (CLI) to install the AMQ Broker Operator, see Section 3.2, “Installing the Operator using the CLI”.
- To use the OperatorHub graphical interface to install the AMQ Broker Operator, see Section 3.3, “Installing the Operator using OperatorHub”.
- You should understand how the Operator chooses a broker container image to use for your broker deployment. For more information, see Section 2.6, “How the Operator chooses container images”.
- Starting in AMQ Broker 7.3, you use a new version of the Red Hat Ecosystem Catalog to access container images. This new version of the registry requires you to become an authenticated user before you can access images. Before you can follow the procedure in this section, you must first complete the steps described in Red Hat Container Registry Authentication.
Procedure
When you have successfully installed the Operator, the Operator is running and listening for changes related to your CRs. This example procedure shows how to use a CR instance to deploy a basic broker in your project.
Start configuring a Custom Resource (CR) instance for the broker deployment.
Using the OpenShift command-line interface:
Log in to OpenShift as a user that has privileges to deploy CRs in the project in which you are creating the deployment.
oc login -u <user> -p <password> --server=<host:port>
-
Open the sample CR file called
broker_activemqartemis_cr.yamlthat was included in thedeploy/crsdirectory of the Operator installation archive that you downloaded and extracted.
Using the OpenShift Container Platform web console:
- Log in to the console as a user that has privileges to deploy CRs in the project in which you are creating the deployment.
- Start a new CR instance based on the main broker CRD. In the left pane, click → .
- Click the ActiveMQArtemis CRD.
- Click the Instances tab.
Click Create ActiveMQArtemis.
Within the console, a YAML editor opens, enabling you to configure a CR instance.
For a basic broker deployment, a configuration might resemble that shown below.
apiVersion: broker.amq.io/v1beta1
kind: ActiveMQArtemis
metadata:
  name: ex-aao
spec:
  deploymentPlan:
    size: 1
    image: placeholder
    requireLogin: false
    persistenceEnabled: true
    journalType: nio
    messageMigration: true
Observe that in the
broker_activemqartemis_cr.yamlsample CR file, theimageproperty is set to a default value ofplaceholder. This value indicates that, by default, theimageproperty does not specify a broker container image to use for the deployment. To learn how the Operator determines the appropriate broker container image to use, see Section 2.6, “How the Operator chooses container images”.NoteThe
broker_activemqartemis_cr.yamlsample CR uses a naming convention ofex-aao. This naming convention denotes that the CR is an example resource for the AMQ Broker Operator. AMQ Broker is based on the ActiveMQ Artemis project. When you deploy this sample CR, the resulting StatefulSet uses the nameex-aao-ss. Furthermore, broker Pods in the deployment are directly based on the StatefulSet name, for example,ex-aao-ss-0,ex-aao-ss-1, and so on. The application name in the CR appears in the deployment as a label on the StatefulSet. You might use this label in a Pod selector, for example.-
The
sizeproperty specifies the number of brokers to deploy. A value of2or greater specifies a clustered broker deployment. However, to deploy a single broker instance, ensure that the value is set to1. Deploy the CR instance.
Using the OpenShift command-line interface:
- Save the CR file.
Switch to the project in which you are creating the broker deployment.
$ oc project <project_name>Create the CR instance.
$ oc create -f <path/to/custom_resource_instance>.yaml
Using the OpenShift web console:
- When you have finished configuring the CR, click Create.
In the OpenShift Container Platform web console, click → . You see a new StatefulSet called
ex-aao-ss.- Click the ex-aao-ss StatefulSet. You see that there is one Pod, corresponding to the single broker that you defined in the CR.
- Within the StatefulSet, click the Pods tab. Click the ex-aao-ss Pod. On the Events tab of the running Pod, you see that the broker container has started. The Logs tab shows that the broker itself is running.
To test that the broker is running normally, access a shell on the broker Pod to send some test messages.
Using the OpenShift Container Platform web console:
- Click → .
- Click the ex-aao-ss Pod.
- Click the Terminal tab.
Using the OpenShift command-line interface:
Get the Pod names and internal IP addresses for your project.
$ oc get pods -o wide

NAME                          STATUS   IP
amq-broker-operator-54d996c   Running  10.129.2.14
ex-aao-ss-0                   Running  10.129.2.15
Access the shell for the broker Pod.
$ oc rsh ex-aao-ss-0
From the shell, use the
artemiscommand to send some test messages. Specify the internal IP address of the broker Pod in the URL. For example:sh-4.2$ ./amq-broker/bin/artemis producer --url tcp://10.129.2.15:61616 --destination queue://demoQueue
The preceding command automatically creates a queue called
demoQueueon the broker and sends a default quantity of 1000 messages to the queue.You should see output that resembles the following:
Connection brokerURL = tcp://10.129.2.15:61616
Producer ActiveMQQueue[demoQueue], thread=0 Started to calculate elapsed time ...

Producer ActiveMQQueue[demoQueue], thread=0 Produced: 1000 messages
Producer ActiveMQQueue[demoQueue], thread=0 Elapsed time in second : 3 s
Producer ActiveMQQueue[demoQueue], thread=0 Elapsed time in milli second : 3492 milli seconds
Additional resources
- For a complete configuration reference for the main broker Custom Resource (CR), see Section 8.1, “Custom Resource configuration reference”.
- To learn how to connect a running broker to AMQ Management Console, see Chapter 5, Connecting to AMQ Management Console for an Operator-based broker deployment.
3.4.2. Deploying clustered brokers
If there are two or more broker Pods running in your project, the Pods automatically form a broker cluster. A clustered configuration enables brokers to connect to each other and redistribute messages as needed, for load balancing.
The following procedure shows you how to deploy clustered brokers. By default, the brokers in this deployment use on demand load balancing, meaning that brokers will forward messages only to other brokers that have matching consumers.
Prerequisites
- A basic broker instance is already deployed. See Section 3.4.1, “Deploying a basic broker instance”.
Procedure
- Open the CR file that you used for your basic broker deployment.
For a clustered deployment, ensure that the value of
deploymentPlan.sizeis2or greater. For example:apiVersion: broker.amq.io/v1beta1 kind: ActiveMQArtemis metadata: name: ex-aao spec: deploymentPlan: size: 4 image: placeholder ...NoteIn the
metadatasection, you need to include thenamespaceproperty and specify a value only if you are using the OpenShift Container Platform web console to create your CR instance. The value that you should specify is the name of the OpenShift project for your broker deployment.- Save the modified CR file.
Log in to OpenShift as a user that has privileges to deploy CRs in the project in which you previously created your basic broker deployment.
$ oc login -u <user> -p <password> --server=<host:port>
Switch to the project in which you previously created your basic broker deployment.
$ oc project <project_name>At the command line, apply the change:
$ oc apply -f <path/to/custom_resource_instance>.yamlIn the OpenShift Container Platform web console, additional broker Pods starts in your project, according to the number specified in your CR. By default, the brokers running in the project are clustered.
Open the Logs tab of each Pod. The logs show that OpenShift has established a cluster connection bridge on each broker. Specifically, the log output includes a line like the following:
targetConnector=ServerLocatorImpl (identity=(Cluster-connection-bridge::ClusterConnectionBridge@6f13fb88
3.4.3. Applying Custom Resource changes to running broker deployments
The following are some important things to note about applying Custom Resource (CR) changes to running broker deployments:
-
You cannot dynamically update the
persistenceEnabledattribute in your CR. To change this attribute, scale your cluster down to zero brokers. Delete the existing CR. Then, recreate and redeploy the CR with your changes, also specifying a deployment size. -
As described in Section 3.2.2, “Deploying the Operator using the CLI”, if you create a broker deployment with persistent storage (that is, by setting
persistenceEnabled=truein your CR), you might need to provision Persistent Volumes (PVs) for the AMQ Broker Operator to claim for your broker Pods. If you scale down the size of your broker deployment, the Operator releases any PVs that it previously claimed for the broker Pods that are now shut down. However, if you remove your broker deployment by deleting your CR, AMQ Broker Operator does not release Persistent Volume Claims (PVCs) for any broker Pods that are still in the deployment when you remove it. In addition, these unreleased PVs are unavailable to any new deployment. In this case, you need to manually release the volumes. For more information, see Release a persistent volume in the OpenShift documentation. In AMQ Broker 7.11, if you want to configure the following items, you must add the appropriate configuration to the main CR instance before deploying the CR for the first time.
- During an active scaling event, any further changes that you apply are queued by the Operator and executed only when scaling is complete. For example, suppose that you scale the size of your deployment down from four brokers to one. Then, while scaledown is taking place, you also change the values of the broker administrator user name and password. In this case, the Operator queues the user name and password changes until the deployment is running with one active broker.
-
All CR changes – apart from changing the size of your deployment, or changing the value of the
exposeattribute for acceptors, connectors, or the console – cause existing brokers to be restarted. If you have multiple brokers in your deployment, only one broker restarts at a time.
3.5. Changing the logging level for the Operator
The default logging level for AMQ Broker Operator is info, which logs information and error messages. You can change the default logging level to increase or decrease the detail that is written to the Operator logs.
If you use the OpenShift Container Platform command-line interface to install the Operator, you can set the new logging level in the Operator configuration file, operator.yaml, either before or after you install the Operator. If you use Operator Hub, you can use the OpenShift Container Platform web console to set the logging level in the Operator subscription after you install the Operator.
The other available logging levels for the Operator are:
error- Writes error messages only to the log.
debug- Write all messages to the log including debugging messages.
Procedure
Using the OpenShift Container Platform command-line interface:
Log in as a cluster administrator. For example:
$ oc login -u system:admin
If the Operator is not installed, complete the following steps to change the logging level.
-
In the
deploydirectory of the Operator archive that you downloaded and extracted, open theoperator.yamlfile. Change the value of the
zap-log-levelattribute todebugorerror. For example:apiVersion: apps/v1 kind: Deployment metadata: labels: control-plane: controller-manager name: amq-broker-controller-manager spec: containers: - args: - --zap-log-level=error ...-
Save the
operator.yamlfile. - Install the Operator.
-
In the
If the Operator is already installed, use the
sedcommand to change the logging level in thedeploy/operator.yamlfile and redeploy the Operator. For example, the following command changes the logging level frominfotoerrorand redeploys the Operator:$ sed 's/--zap-log-level=info/--zap-log-level=error/' deploy/operator.yaml | oc apply -f -
Using the OpenShift Container Platform web console:
- Log in to the OpenShift Container Platform as a cluster administrator.
- In the left pane, click → .
- Click the Red Hat Integration - AMQ Broker for RHEL 8 (Multiarch) Operator.
- Click the Subscriptions tab.
- Click Actions.
- Click Edit Subscription.
Click the YAML tab.
Within the console, a YAML editor opens, enabling you to edit the subscription.
In the
configelement, add an environment variable calledARGSand specify a logging level ofinfo,debugorerror. In the following example, anARGSenvironment variable that specifies a logging level ofdebugis passed to the Operator container.apiVersion: operators.coreos.com/v1alpha1 kind: Subscription spec: ... config: env: - name: ARGS value: "--zap-log-level=debug" ...- Click Save.
3.6. Viewing status information for your broker deployment
You can view the status of a series of standard conditions reported by OpenShift Container Platform for your broker deployment. You can also view additional status information provided in the Custom Resource (CR) for your broker deployment.
Procedure
Open the CR instance for the broker deployment.
Using the OpenShift command-line interface:
- Log in to OpenShift Container Platform as a user that has privileges to view CRs in the project for the broker deployment.
View the CR for your deployment.
oc get ActiveMQArtemis <CR instance name> -n <namespace> -o yaml
Using the OpenShift Container Platform web console:
- Log in to the console as a user that has privileges to deploy CRs in the project for the broker deployment.
- In the left pane, click → .
- Click the Red Hat Integration - AMQ Broker for RHEL 8 (Multiarch) operator.
- Click the ActiveMQ Artemis tab.
- Click the name of the ActiveMQ Artemis instance.
View the status of the OpenShift Container Platform conditions for your broker deployment.
Using the OpenShift command-line interface:
-
Go to the
statussection of the CR and view theconditionsdetails.
-
Go to the
Using the OpenShift Container Platform web console:
In the Details tab, scroll down to the
Conditionssection.A condition has a status and a type. It might also have a reason, a message and other details. A condition has a status value of
Trueif the condition is met,Falseif the condition is not met, orUnknownif the status of the condition cannot be determined.NoteThe
Validcondition also has a status ofUnknownif the CR does not comply with the recommended use of thespec.deploymentPlan.image,spec.deploymentPlan.initImageand thespec.versionattribute in a CR. For more information, see Section 6.4.3, “Validation of restrictions applied to automatic upgrades”.Status information is provided for the following conditions:
Condition name Displays the status of… Valid
The validation of the CR. If the status of the
Validcondition isFalse, the Operator does not complete the reconciliation and update the StatefulSet until you first resolve the issue that caused the false status.Deployed
The availability of the StatefulSet, Pods and other resources.
Ready
A top-level condition which summarizes the other more detailed conditions. The
Readycondition has a status ofTrueonly if none of the other conditions have a status ofFalse.BrokerPropertiesApplied
The properties configured in the CR that use the
brokerPropertiesattribute. For more information about theBrokerPropertiesAppliedcondition, see Section 4.17, “Configuring items not exposed in the Custom Resource Definition”.JaasPropertiesApplied
The Java Authentication and Authorization Service (JAAS) login modules configured in the CR. For more information about the
JaasPropertiesAppliedcondition, see Section 4.3.1, “Configuring JAAS login modules in a secret”.
View additional status information for your broker deployment in the
statussection of the CR. The following additional status information is displayed:deploymentPlanSize- The number of broker Pods in the deployment.
podstatus- The status and name of each broker Pod in the deployment.
version- The version of the broker and the registry URLs of the broker and init container images that are deployed.
upgradeThe ability of the Operator to apply major, minor, patch and security updates to the deployment, which is determined by the values of the
spec.deploymentPlan.imageandspec.versionattributes in the CR.-
If the
spec.deploymentPlan.imageattribute specifies the registry URL of a broker container image, the status of all upgrade types isFalse, which means that the Operator cannot upgrade the existing container images. If the
spec.deploymentPlan.imageattribute is not in the CR or has a value ofplaceholder, the configuration of thespec.versionattribute affects theupgradestatus as follows:-
The status of
securityUpdatesisTrue, irrespective of whether thespec.versionattribute is configured or its value. -
The status of
patchUpdatesisTrueif the value of thespec.versionattribute has only a major and a minor version, for example, '7.10', so the Operator can upgrade to the latest patch version of the container images. -
The status of
minorUpdatesisTrueif the value of thespec.version attributehas only a major version, for example, '7', so the Operator can upgrade to the latest minor and patch versions of the container images. -
The status of
majorUpdatesisTrueif thespec.versionattribute is not in the CR, so any available upgrades can be deployed, including an upgrade from 7.x.x to 8.x.x, if this version is available.
-
The status of
-
If the
Chapter 4. Configuring Operator-based broker deployments
4.1. How the Operator generates the broker configuration
Before you use Custom Resource (CR) instances to configure your broker deployment, you should understand how the Operator generates the broker configuration.
When you create an Operator-based broker deployment, a Pod for each broker runs in a StatefulSet in your OpenShift project. An application container for the broker runs within each Pod.
The Operator runs a type of container called an Init Container when initializing each Pod. In OpenShift Container Platform, Init Containers are specialized containers that run before application containers. Init Containers can include utilities or setup scripts that are not present in the application image.
By default, the AMQ Broker Operator uses a built-in Init Container. The Init Container uses the main CR instance for your deployment to generate the configuration used by each broker application container.
If you have specified address settings in the CR, the Operator generates a default configuration and then merges or replaces that configuration with the configuration specified in the CR. This process is described in the section that follows.
4.1.1. How the Operator generates the address settings configuration
If you have included an address settings configuration in the main Custom Resource (CR) instance for your deployment, the Operator generates the address settings configuration for each broker as described below.
The Operator runs the Init Container before the broker application container. The Init Container generates a default address settings configuration. The default address settings configuration is shown below.
<address-settings> <!-- if you define auto-create on certain queues, management has to be auto-create --> <address-setting match="activemq.management#"> <dead-letter-address>DLQ</dead-letter-address> <expiry-address>ExpiryQueue</expiry-address> <redelivery-delay>0</redelivery-delay> <!-- with -1 only the global-max-size is in use for limiting --> <max-size-bytes>-1</max-size-bytes> <message-counter-history-day-limit>10</message-counter-history-day-limit> <address-full-policy>PAGE</address-full-policy> <auto-create-queues>true</auto-create-queues> <auto-create-addresses>true</auto-create-addresses> <auto-create-jms-queues>true</auto-create-jms-queues> <auto-create-jms-topics>true</auto-create-jms-topics> </address-setting> <!-- default for catch all --> <address-setting match="#"> <dead-letter-address>DLQ</dead-letter-address> <expiry-address>ExpiryQueue</expiry-address> <redelivery-delay>0</redelivery-delay> <!-- with -1 only the global-max-size is in use for limiting --> <max-size-bytes>-1</max-size-bytes> <message-counter-history-day-limit>10</message-counter-history-day-limit> <address-full-policy>PAGE</address-full-policy> <auto-create-queues>true</auto-create-queues> <auto-create-addresses>true</auto-create-addresses> <auto-create-jms-queues>true</auto-create-jms-queues> <auto-create-jms-topics>true</auto-create-jms-topics> </address-setting> <address-settings>- If you have also specified an address settings configuration in your Custom Resource (CR) instance, the Init Container processes that configuration and converts it to XML.
-
Based on the value of the
applyRuleproperty in the CR, the Init Container merges or replaces the default address settings configuration shown above with the configuration that you have specified in the CR. The result of this merge or replacement is the final address settings configuration that the broker will use. -
When the Init Container has finished generating the broker configuration (including address settings), the broker application container starts. When starting, the broker container copies its configuration from the installation directory previously used by the Init Container. You can inspect the address settings configuration in the
broker.xmlconfiguration file. For a running broker, this file is located in the/home/jboss/amq-broker/etcdirectory.
Additional resources
-
For an example of using the
applyRuleproperty in a CR, see Section 4.2.4, “Matching address settings to configured addresses in an Operator-based broker deployment”.
4.1.2. Directory structure of a broker Pod
When you create an Operator-based broker deployment, a Pod for each broker runs in a StatefulSet in your OpenShift project. An application container for the broker runs within each Pod.
The Operator runs a type of container called an Init Container when initializing each Pod. In OpenShift Container Platform, Init Containers are specialized containers that run before application containers. Init Containers can include utilities or setup scripts that are not present in the application image.
When generating the configuration for a broker instance, the Init Container uses files contained in a default installation directory. This installation directory is on a volume that the Operator mounts to the broker Pod and which the Init Container and broker container share. The path that the Init Container uses to mount the shared volume is defined in an environment variable called CONFIG_INSTANCE_DIR. The default value of CONFIG_INSTANCE_DIR is /amq/init/config. In the documentation, this directory is referred to as <install_dir>.
You cannot change the value of the CONFIG_INSTANCE_DIR environment variable.
By default, the installation directory has the following sub-directories:
| Sub-directory | Contents |
|---|---|
|
| Binaries and scripts needed to run the broker. |
|
| Configuration files. |
|
| The broker journal. |
|
| JARs and libraries needed to run the broker. |
|
| Broker log files. |
|
| Temporary web application files. |
When the Init Container has finished generating the broker configuration, the broker application container starts. When starting, the broker container copies its configuration from the installation directory previously used by the Init Container. When the broker Pod is initialized and running, the broker configuration is located in the /home/jboss/amq-broker directory (and subdirectories) of the broker.
Additional resources
- For more information about how the Operator chooses a container image for the built-in Init Container, see Section 2.6, “How the Operator chooses container images”.
- To learn how to build and specify a custom Init Container image, see Section 4.9, “Specifying a custom Init Container image”.
4.2. Configuring addresses and queues for Operator-based broker deployments
For an Operator-based broker deployment, you use two separate Custom Resource (CR) instances to configure address and queues and their associated settings.
To create address and queues on your brokers, you deploy a CR instance based on the address Custom Resource Definition (CRD).
-
If you used the OpenShift command-line interface (CLI) to install the Operator, the address CRD is the
broker_activemqartemisaddress_crd.yamlfile that was included in thedeploy/crdsof the Operator installation archive that you downloaded and extracted. -
If you used OperatorHub to install the Operator, the address CRD is the
ActiveMQArtemisAddressCRD listed under → in the OpenShift Container Platform web console.
-
If you used the OpenShift command-line interface (CLI) to install the Operator, the address CRD is the
To configure address and queue settings that you then match to specific addresses, you include configuration in the main Custom Resource (CR) instance used to create your broker deployment .
-
If you used the OpenShift CLI to install the Operator, the main broker CRD is the
broker_activemqartemis_crd.yamlfile that was included in thedeploy/crdsof the Operator installation archive that you downloaded and extracted. -
If you used OperatorHub to install the Operator, the main broker CRD is the
ActiveMQArtemisCRD listed under → in the OpenShift Container Platform web console.
In general, the address and queue settings that you can configure for a broker deployment on OpenShift Container Platform are fully equivalent to those of standalone broker deployments on Linux or Windows. However, you should be aware of some differences in how those settings are configured. Those differences are described in the following sub-section.
-
If you used the OpenShift CLI to install the Operator, the main broker CRD is the
4.2.1. Differences in configuration of address and queue settings between OpenShift and standalone broker deployments
-
To configure address and queue settings for broker deployments on OpenShift Container Platform, you add configuration to an
addressSettingssection of the main Custom Resource (CR) instance for the broker deployment. This contrasts with standalone deployments on Linux or Windows, for which you add configuration to anaddress-settingselement in thebroker.xmlconfiguration file. The format used for the names of configuration items differs between OpenShift Container Platform and standalone broker deployments. For OpenShift Container Platform deployments, configuration item names are in camel case, for example,
defaultQueueRoutingType. By contrast, configuration item names for standalone deployments are in lower case and use a dash (-) separator, for example,default-queue-routing-type.The following table shows some further examples of this naming difference.
Configuration item for standalone broker deployment Configuration item for OpenShift broker deployment address-full-policy
addressFullPolicy
auto-create-queues
autoCreateQueues
default-queue-routing-type
defaultQueueRoutingType
last-value-queue
lastValueQueue
Additional resources
For examples of creating addresses and queues and matching settings for OpenShift Container Platform broker deployments, see:
- To learn about all of the configuration options for addresses, queues, and address settings for OpenShift Container Platform broker deployments, see Section 8.1, “Custom Resource configuration reference”.
- For comprehensive information about configuring addresses, queues, and associated address settings for standalone broker deployments, see Configuring addresses and queues in Configuring AMQ Broker. You can use this information to create equivalent configurations for broker deployments on OpenShift Container Platform.
4.2.2. Creating addresses and queues for an Operator-based broker deployment
The following procedure shows how to use a Custom Resource (CR) instance to add an address and associated queue to an Operator-based broker deployment.
To create multiple addresses and/or queues in your broker deployment, you need to create separate CR files and deploy them individually, specifying new address and/or queue names in each case. In addition, the name attribute of each CR instance must be unique.
Prerequisites
You must have already installed the AMQ Broker Operator, including the dedicated Custom Resource Definition (CRD) required to create addresses and queues on your brokers. For information on two alternative ways to install the Operator, see:
- You should be familiar with how to use a CR instance to create a basic broker deployment. For more information, see Section 3.4.1, “Deploying a basic broker instance”.
Procedure
Start configuring a Custom Resource (CR) instance to define addresses and queues for the broker deployment.
Using the OpenShift command-line interface:
Log in to OpenShift as a user that has privileges to deploy CRs in the project for the broker deployment.
oc login -u <user> -p <password> --server=<host:port>
-
Open the sample CR file called
broker_activemqartemisaddress_cr.yamlthat was included in thedeploy/crsdirectory of the Operator installation archive that you downloaded and extracted.
Using the OpenShift Container Platform web console:
- Log in to the console as a user that has privileges to deploy CRs in the project for the broker deployment.
- Start a new CR instance based on the address CRD. In the left pane, click → .
- Click the ActiveMQArtemisAddresss CRD.
- Click the Instances tab.
Click Create ActiveMQArtemisAddress.
Within the console, a YAML editor opens, enabling you to configure a CR instance.
In the
specsection of the CR, add lines to define an address, queue, and routing type. For example:apiVersion: broker.amq.io/v1beta1 kind: ActiveMQArtemisAddress metadata: name: myAddressDeployment0 namespace: myProject spec: ... addressName: myAddress0 queueName: myQueue0 routingType: anycast ...The preceding configuration defines an address named
myAddress0with a queue namedmyQueue0and ananycastrouting type.NoteIn the
metadatasection, you need to include thenamespaceproperty and specify a value only if you are using the OpenShift Container Platform web console to create your CR instance. The value that you should specify is the name of the OpenShift project for your broker deployment.Deploy the CR instance.
Using the OpenShift command-line interface:
- Save the CR file.
Switch to the project for the broker deployment.
$ oc project <project_name>Create the CR instance.
$ oc create -f <path/to/address_custom_resource_instance>.yaml
Using the OpenShift web console:
- When you have finished configuring the CR, click Create.
4.2.3. Deleting addresses and queues for an Operator-based broker deployment
The following procedure shows how to use a Custom Resource (CR) instance to delete an address and associated queue from an Operator-based broker deployment.
Procedure
Ensure that you have an address CR file with the details, for example, the
name,addressNameandqueueName, of the address and queue you want to delete. For example:apiVersion: broker.amq.io/v1beta1 kind: ActiveMQArtemisAddress metadata: name: myAddressDeployment0 namespace: myProject spec: ... addressName: myAddress0 queueName: myQueue0 routingType: anycast ...In the
specsection of the address CR, add theremoveFromBrokerOnDeleteattribute and set to a value oftrue... spec: addressName: myAddress1 queueName: myQueue1 routingType: anycast removeFromBrokerOnDelete: true
Setting the
removeFromBrokerOnDeleteattribute totruecauses the Operator to remove the address and any associated message for all brokers in the deployment when you delete the address CR.Apply the updated address CR to set the
removeFromBrokerOnDeleteattribute for the address you want to delete.$ oc apply -f <path/to/address_custom_resource_instance>.yaml
Delete the address CR to delete the address from the brokers in the deployment.
$ oc delete -f <path/to/address_custom_resource_instance>.yaml
4.2.4. Matching address settings to configured addresses in an Operator-based broker deployment
If delivery of a message to a client is unsuccessful, you might not want the broker to make ongoing attempts to deliver the message. To prevent infinite delivery attempts, you can define a dead letter address and an associated dead letter queue. After a specified number of delivery attempts, the broker removes an undelivered message from its original queue and sends the message to the configured dead letter address. A system administrator can later consume undelivered messages from a dead letter queue to inspect the messages.
The following example shows how to configure a dead letter address and queue for an Operator-based broker deployment. The example demonstrates how to:
-
Use the
addressSettingsection of the main broker Custom Resource (CR) instance to configure address settings. - Match those address settings to addresses in your broker deployment.
Prerequisites
-
You created an
ActiveMQArtemisCR instance to deploy a broker. For more information, see Section 3.4.1, “Deploying a basic broker instance”. - You are familiar with the default address settings configuration that the Operator merges or replaces with the configuration specified in your CR instance. For more information, see Section 4.1.1, “How the Operator generates the address settings configuration”.
Procedure
Start configuring an address CR instance to add a dead letter address and queue to receive undelivered messages for each broker in the deployment.
Using the OpenShift command-line interface:
Log in to OpenShift as a user that has privileges to deploy CRs in the project for the broker deployment.
oc login -u <user> -p <password> --server=<host:port>
-
Open the sample CR file called
broker_activemqartemisaddress_cr.yamlthat was included in thedeploy/crsdirectory of the Operator installation archive that you downloaded and extracted.
Using the OpenShift Container Platform web console:
- Log in to the console as a user that has privileges to deploy CRs in the project for the broker deployment.
- Start a new CR instance based on the address CRD. In the left pane, click → .
- Click the ActiveMQArtemisAddresss CRD.
- Click the Instances tab.
Click Create ActiveMQArtemisAddress.
Within the console, a YAML editor opens, enabling you to configure a CR instance.
In the
specsection of the CR, add lines to specify a dead letter address and queue to receive undelivered messages. For example:apiVersion: broker.amq.io/v1beta1 kind: ActiveMQArtemisAddress metadata: name: ex-aaoaddress spec: ... addressName: myDeadLetterAddress queueName: myDeadLetterQueue routingType: anycast ...
The preceding configuration defines a dead letter address named
myDeadLetterAddresswith a dead letter queue namedmyDeadLetterQueueand ananycastrouting type.NoteIn the
metadatasection, you need to include thenamespaceproperty and specify a value only if you are using the OpenShift Container Platform web console to create your CR instance. The value that you should specify is the name of the OpenShift project for your broker deployment.Deploy the address CR instance.
Using the OpenShift command-line interface:
- Save the CR file.
Switch to the project for the broker deployment.
$ oc project <project_name>Create the address CR.
$ oc create -f <path/to/address_custom_resource_instance>.yaml
Using the OpenShift web console:
- When you have finished configuring the CR, click Create.
Edit the main broker CR instance for the broker deployment.
Using the OpenShift command-line interface:
Log in to OpenShift as a user that has privileges to edit and deploy CRs in the project for the broker deployment.
$ oc login -u <user> -p <password> --server=<host:port>
Edit the CR.
oc edit ActiveMQArtemis <CR instance name> -n <namespace>
Using the OpenShift Container Platform web console:
- Log in to the console as a user that has privileges to deploy CRs in the project for the broker deployment.
- In the left pane, click → .
- Click the Red Hat Integration - AMQ Broker for RHEL 8 (Multiarch) operator.
- Click the AMQ Broker tab.
- Click the name of the ActiveMQArtemis instance name.
Click the YAML tab.
Within the console, a YAML editor opens, enabling you to edit the CR instance.
NoteIn the
metadatasection, you need to include thenamespaceproperty and specify a value only if you are using the OpenShift Container Platform web console to create your CR instance. The value that you should specify is the name of the OpenShift project for your broker deployment.
In the
specsection of the CR, add a newaddressSettingssection that contains a singleaddressSettingsection, as shown below.spec: deploymentPlan: size: 1 image: placeholder requireLogin: false persistenceEnabled: true journalType: nio messageMigration: true addressSettings: addressSetting:Add a single instance of the
matchproperty to theaddressSettingblock. Specify an address-matching expression. For example:spec: deploymentPlan: size: 1 image: placeholder requireLogin: false persistenceEnabled: true journalType: nio messageMigration: true addressSettings: addressSetting: - match: myAddressmatch-
Specifies the address, or set of address to which the broker applies the configuration that follows. In this example, the value of the
matchproperty corresponds to a single address calledmyAddress.
Add properties related to undelivered messages and specify values. For example:
spec: deploymentPlan: size: 1 image: placeholder requireLogin: false persistenceEnabled: true journalType: nio messageMigration: true addressSettings: addressSetting: - match: myAddress deadLetterAddress: myDeadLetterAddress maxDeliveryAttempts: 5deadLetterAddress- Address to which the broker sends undelivered messages.
maxDeliveryAttemptsMaximum number of delivery attempts that a broker makes before moving a message to the configured dead letter address.
In the preceding example, if the broker makes five unsuccessful attempts to deliver a message to an address that begins with
myAddress, the broker moves the message to the specified dead letter address,myDeadLetterAddress.
(Optional) Apply similar configuration to another address or set of addresses. For example:
spec: deploymentPlan: size: 1 image: placeholder requireLogin: false persistenceEnabled: true journalType: nio messageMigration: true addressSettings: addressSetting: - match: myAddress deadLetterAddress: myDeadLetterAddress maxDeliveryAttempts: 5 - match: 'myOtherAddresses#' deadLetterAddress: myDeadLetterAddress maxDeliveryAttempts: 3In this example, the value of the second
matchproperty includes a hash wildcard character. The wildcard character means that the preceding configuration is applied to any address that begins with the stringmyOtherAddresses.NoteIf you use a wildcard expression as a value for the
matchproperty, you must enclose the value in single quotation marks, for example,'myOtherAddresses#'.At the beginning of the
addressSettingssection, add theapplyRuleproperty and specify a value. For example:spec: deploymentPlan: size: 1 image: placeholder requireLogin: false persistenceEnabled: true journalType: nio messageMigration: true addressSettings: applyRule: merge_all addressSetting: - match: myAddress deadLetterAddress: myDeadLetterAddress maxDeliveryAttempts: 5 - match: 'myOtherAddresses#' deadLetterAddress: myDeadLetterAddress maxDeliveryAttempts: 3The
applyRuleproperty specifies how the Operator applies the configuration that you add to the CR for each matching address or set of addresses. The values that you can specify are:merge_allFor address settings specified in both the CR and the default configuration that match the same address or set of addresses:
- Replace any property values specified in the default configuration with those specified in the CR.
- Keep any property values that are specified uniquely in the CR or the default configuration. Include each of these in the final, merged configuration.
- For address settings specified in either the CR or the default configuration that uniquely match a particular address or set of addresses, include these in the final, merged configuration.
merge_replace- For address settings specified in both the CR and the default configuration that match the same address or set of addresses, include the settings specified in the CR in the final, merged configuration. Do not include any properties specified in the default configuration, even if these are not specified in the CR.
- For address settings specified in either the CR or the default configuration that uniquely match a particular address or set of addresses, include these in the final, merged configuration.
replace_all- Replace all address settings specified in the default configuration with those specified in the CR. The final, merged configuration corresponds exactly to that specified in the CR.
NoteIf you do not explicitly include the
applyRuleproperty in your CR, the Operator uses a default value ofmerge_all.- Save the CR instance.
Additional resources
- To learn about all of the configuration options for addresses, queues, and address settings for OpenShift Container Platform broker deployments, see Section 8.1, “Custom Resource configuration reference”.
If you installed the AMQ Broker Operator using the OpenShift command-line interface (CLI), the installation archive that you downloaded and extracted contains some additional examples of configuring address settings. In the
deploy/examplesfolder of the installation archive, see:-
artemis-basic-address-settings-deployment.yaml -
artemis-merge-replace-address-settings-deployment.yaml -
artemis-replace-address-settings-deployment.yaml
-
- For comprehensive information about configuring addresses, queues, and associated address settings for standalone broker deployments, see Configuring addresses and queues in Configuring AMQ Broker. You can use this information to create equivalent configurations for broker deployments on OpenShift Container Platform.
- For more information about Init Containers in OpenShift Container Platform, see Using Init Containers to perform tasks before a pod is deployed in the OpenShift Container Platform documentation.
4.3. Configuring authentication and authorization
By default, AMQ Broker uses a Java Authentication and Authorization Service (JAAS) properties login module to authenticate and authorize users. The configuration for the default JAAS login module is stored in a /home/jboss/amq-broker/etc/login.config file on each broker Pod and reads user and role information from the artemis-users.properties and artemis-roles.properties files in the same directory. You add the user and role information to the properties files in the default login module by updating the ActiveMQArtemisSecurity Custom Resource (CR).
An alternative to updating the ActiveMQArtemisSecurity CR to add user and role information to the default properties files is to configure one or more JAAS login modules in a secret. This secret is mounted as a file on each broker Pod. Configuring JAAS login modules in a secret offers the following advantages over using the ActiveMQArtemisSecurity CR to add user and role information.
- If you configure a properties login module in a secret, the brokers do not need to restart each time you update the property files. For example, when you add a new user to a properties file and update the secret, the changes take effect without requiring a restart of the broker.
-
You can configure JAAS login modules that are not defined in the
ActiveMQArtemisSecurityCRD to authenticate users. For example, you can configure an LDAP login module or any other JAAS login module.
Both methods of configuring authentication and authorization for AMQ Broker are described in the following sections.
4.3.1. Configuring JAAS login modules in a secret
You can configure JAAS login modules in a secret to authenticate users with AMQ Broker. After you create the secret, you must add a reference to the secret in the main broker Custom Resource (CR) and also configure permissions in the CR to grant users access to AMQ Broker.
Procedure
Create a text file with your new JAAS login modules configuration and save the file as
login.config. By saving the file aslogin.config, the correct key is inserted in the secret that you create from the text file. The following is an example login module configuration:activemq { org.apache.activemq.artemis.spi.core.security.jaas.PropertiesLoginModule sufficient reload=true org.apache.activemq.jaas.properties.user="new-users.properties" org.apache.activemq.jaas.properties.role="new-roles.properties"; org.apache.activemq.artemis.spi.core.security.jaas.PropertiesLoginModule sufficient reload=false org.apache.activemq.jaas.properties.user="artemis-users.properties" org.apache.activemq.jaas.properties.role="artemis-roles.properties" baseDir="/home/jboss/amq-broker/etc"; };After you configure JAAS login modules in a secret and add a reference to the secret in the CR, the default login module is no longer used by AMQ Broker. However, a user in the
artemis-users.propertiesfile, which is referenced in the default login module, is required by the Operator to authenticate with the broker. To ensure that the Operator can authenticate with the broker after you configure a new JAAS login module, you must either:-
Include the default properties login module in the new login module configuration, as shown in the example above. In the example, the default properties login module uses the
artemis-users.propertiesandartemis-roles.propertiesfiles. If you include the default login module in the new login module configuration, you must set thebaseDirto the/home/jboss/amq-broker/etcdirectory, which contains the default properties files on each broker Pod. Add the user and role information required by the Operator to authenticate with the broker to a properties file referenced in the new login module configuration. You can copy this information from the default
artemis-users.propertiesandartemis-roles.propertiesfiles, which are in the/home/jboss/amq-broker/etc directoryon a broker Pod.NoteThe properties files referenced in a login module are loaded only when the broker calls the login module for the first time. A broker calls the login modules in the order that they are listed in the
login.configfile until it finds the login module to authenticate a user. By placing the login module that contains the credentials used by the Operator at the end of thelogin.configfile, all preceding login modules are called when the broker authenticates the Operator. As a result, any status message which states that property files are not visible on the broker is cleared.
-
Include the default properties login module in the new login module configuration, as shown in the example above. In the example, the default properties login module uses the
If the
login.configfile you created includes a properties login module, ensure that the users and roles files specified in the module contain user and role information. For example:- new-users.properties
ruben=ruben01!
anne=anne01!
rick=rick01!
bob=bob01!
- new-roles.properties
admin=ruben, rick
group1=bob
group2=anne
Use the
oc create secretcommand to create a secret from the text file that you created with the new login module configuration. If the login module configuration includes a properties login module, also include the associated users and roles files in the secret. For example:oc create secret generic custom-jaas-config --from-file=login.config --from-file=new-users.properties --from-file=new-roles.properties
NoteThe secret name must have a suffix of
-jaas-configso the Operator can recognize that the secret contains login module configuration and propagate any updates to each broker Pod.For more information about how to create secrets, see Secrets in the Kubernetes documentation.
Add the secret you created to the Custom Resource (CR) instance for your broker deployment.
Using the OpenShift command-line interface:
- Log in to OpenShift as a user that has privileges to deploy CRs in the project for the broker deployment.
Edit the CR for your deployment.
oc edit ActiveMQArtemis <CR instance name> -n <namespace>
Using the OpenShift Container Platform web console:
- Log in to the console as a user that has privileges to deploy CRs in the project for the broker deployment.
- In the left pane, click → .
- Click the Red Hat Integration - AMQ Broker for RHEL 8 (Multiarch) operator.
- Click the AMQ Broker tab.
- Click the name of the ActiveMQArtemis instance name.
Click the YAML tab.
Within the console, a YAML editor opens, enabling you to configure a CR instance.
Create an
extraMountselement and asecretselement and add the name of the secret. The following example adds a secret namedcustom-jaas-configto the CR.deploymentPlan: ... extraMounts: secrets: - "custom-jaas-config" ...In the CR, grant permissions to the roles that are configured on the broker.
In the
specsection of the CR, add abrokerPropertieselement and add the permissions. You can grant a role permissions to a single address. Or, you can specify a wildcard match using the#sign to grant a role permissions to all addresses. For example:spec: ... brokerProperties: - securityRoles.#.group2.send=true - securityRoles.#.group1.consume=true - securityRoles.#.group1.createAddress=true - securityRoles.#.group1.createNonDurableQueue=true - securityRoles.#.group1.browse=true ...
In the example, the group2 role is assigned
sendpermissions to all addresses and the group1 role is assignedconsume,createAddress,createNonDurableQueueandbrowsepermissions to all addresses.
Save the CR.
The Operator mounts the
login.configfile in the secret in a/amq/extra/secrets/secret namedirectory on each Pod and configures the broker JVM to read the mountedlogin.configfile instead of the defaultlogin.configfile. If thelogin.configfile contains a properties login module, the referenced users and roles properties file are also mounted on each Pod.View the status information in the CR to verify that the brokers in your deployment are using the JAAS login modules in the secret for authentication.
Using the OpenShift command-line interface:
Get the status conditions in the CR for your brokers.
$ oc get activemqartemis -o yaml
Using the OpenShift web console:
-
In the CR, navigate to the
statussection.
-
In the CR, navigate to the
In the status information, verify that a
JaasPropertiesAppliedtype is present, which indicates that the broker is using the JAAS login modules configured in the secret. For example:- lastTransitionTime: "2023-02-06T20:50:01Z" message: "" reason: Applied status: "True" type: JaasPropertiesApplied
When you update any of the files in the secret, the value of the
reasonfield showsOutofSyncuntil OpenShift Container Platform propagates the latest files in the secret to each broker Pod. For example, if you add a new user to thenew-users-propertiesfile and update the secret, you see the following status information until the updated file is propagated to each Pod:- lastTransitionTime: "2023-02-06T20:55:20Z" message: 'new-users.properties status out of sync, expected: 287641156, current: 2177044732' reason: OutOfSync status: "False" type: JaasPropertiesApplied
When you update user or role information in a properties file that is referenced in the secret, use the
oc set datacommand to update the secret. You must readd all the files to the secret again, including thelogin.configfile. For example, if you add a new user to thenew-users.propertiesfile that you created earlier in this procedure, use the following command to update thecustom-jaas-configsecret:oc set data secret/custom-jaas-config --from-file=login.config=login.config --from-file=new-users.properties=new-users.properties --from-file=new-roles.properties=new-roles.properties
The broker JVM reads the configuration in the login.config file only when it starts. If you change the configuration in the login.config file, for example, to add a new login module, and update the secret, the broker does not use the new configuration until the broker is restarted.
Additional Resources
Section 8.3, “Example: configuring AMQ Broker to use Red Hat Single Sign-On”
For information about the JAAS login module format, see JAAS Login Configuration File.
4.3.2. Configuring the default JAAS login module using the Security Custom Resource (CR)
You can use the ActiveMQArtemisSecurity Custom Resource (CR) to configure user and role information in the default JAAS properties login module to authenticate users with AMQ Broker. For an alternative method of configuring authentication and authorization on AMQ Broker by using secrets, see Section 4.3.1, “Configuring JAAS login modules in a secret”.
4.3.2.1. Configuring the default JAAS login module using the Security Custom Resource (CR)
The following procedure shows how to configure the default JAAS login module using the Security Custom Resource (CR).
Prerequisites
You must have already installed the AMQ Broker Operator. For information on two alternative ways to install the Operator, see:
- You should be familiar with broker security as described in Securing brokers
You can deploy the security CR before or after you create a broker deployment. However, if you deploy the security CR after creating the broker deployment, the broker pod is restarted to accept the new configuration.
Start configuring a Custom Resource (CR) instance to define users and associated security configuration for the broker deployment.
Using the OpenShift command-line interface:
Log in to OpenShift as a user that has privileges to deploy CRs in the project for the broker deployment.
oc login -u <user> -p <password> --server=<host:port>
Edit the CR for your deployment.
oc edit ActiveMQArtemis <CR instance name> -n <namespace>
Using the OpenShift Container Platform web console:
- Log in to the console as a user that has privileges to deploy CRs in the project for the broker deployment.
- In the left pane, click → .
- Click the Red Hat Integration - AMQ Broker for RHEL 8 (Multiarch) operator.
- Click the AMQ Broker tab.
- Click the name of the ActiveMQArtemis instance name
Click the YAML tab.
Within the console, a YAML editor opens, enabling you to configure a CR instance.
In the
specsection of the CR, add lines to define users and roles. For example:apiVersion: broker.amq.io/v1beta1 kind: ActiveMQArtemisSecurity metadata: name: ex-prop spec: loginModules: propertiesLoginModules: - name: "prop-module" users: - name: "sam" password: "samspassword" roles: - "sender" - name: "rob" password: "robspassword" roles: - "receiver" securityDomains: brokerDomain: name: "activemq" loginModules: - name: "prop-module" flag: "sufficient" securitySettings: broker: - match: "#" permissions: - operationType: "send" roles: - "sender" - operationType: "createAddress" roles: - "sender" - operationType: "createDurableQueue" roles: - "sender" - operationType: "consume" roles: - "receiver" ...NoteAlways specify values for the elements in the preceding example. For example, if you do not specify values for
securityDomains.brokerDomainor values for roles, the resulting configuration might cause unexpected results.The preceding configuration defines two users:
-
a
propertiesLoginModulenamedprop-modulethat defines a user namedsamwith a role namedsender. -
a
propertiesLoginModulenamedprop-modulethat defines a user namedrobwith a role namedreceiver.
The properties of these roles are defined in the
brokerDomainandbrokersections of thesecurityDomainssection. For example, thesendrole is defined to allow users with that role to create a durable queue on any address. By default, the configuration applies to all deployed brokers defined by CRs in the current namespace. To limit the configuration to particular broker deployments, use theapplyToCrNamesoption described in Section 8.1.3, “Security Custom Resource configuration reference”.NoteIn the
metadatasection, you need to include thenamespaceproperty and specify a value only if you are using the OpenShift Container Platform web console to create your CR instance. The value that you should specify is the name of the OpenShift project for your broker deployment.-
a
Deploy the CR instance.
Using the OpenShift command-line interface:
- Save the CR file.
Switch to the project for the broker deployment.
$ oc project <project_name>Create the CR instance.
$ oc create -f <path/to/security_custom_resource_instance>.yaml
Using the OpenShift web console:
- When you have finished configuring the CR, click Create.
4.3.2.2. Storing user passwords in a secret
In the Section 4.3.2.1, “Configuring the default JAAS login module using the Security Custom Resource (CR)” procedure, user passwords are stored in clear text in the ActiveMQArtemisSecurity CR. If you do not want to store passwords in clear text in the CR, you can exclude the passwords from the CR and store them in a secret. When you apply the CR, the Operator retrieves each user’s password from the secret and inserts it in the artemis-users.properties file on the broker pod.
Procedure
Use the
oc create secretcommand to create a secret and add each user’s name and password. The secret name must follow a naming convention ofsecurity-properties-module name, where module name is the name of the login module configured in the CR. For example:oc create secret generic security-properties-prop-module \ --from-literal=sam=samspassword \ --from-literal=rob=robspassword
In the
specsection of the CR, add the user names that you specified in the secret along with the role information, but do not include each user’s password. For example:apiVersion: broker.amq.io/v1beta1 kind: ActiveMQArtemisSecurity metadata: name: ex-prop spec: loginModules: propertiesLoginModules: - name: "prop-module" users: - name: "sam" roles: - "sender" - name: "rob" roles: - "receiver" securityDomains: brokerDomain: name: "activemq" loginModules: - name: "prop-module" flag: "sufficient" securitySettings: broker: - match: "#" permissions: - operationType: "send" roles: - "sender" - operationType: "createAddress" roles: - "sender" - operationType: "createDurableQueue" roles: - "sender" - operationType: "consume" roles: - "receiver" ...Deploy the CR instance.
Using the OpenShift command-line interface:
- Save the CR file.
Switch to the project for the broker deployment.
$ oc project <project_name>Create the CR instance.
$ oc create -f <path/to/address_custom_resource_instance>.yaml
Using the OpenShift web console:
- When you finish configuring the CR, click Create.
Additional resources
For more information about secrets in OpenShift Container Platform, see Providing sensitive data to pods in the OpenShift Container Platform documentation.
4.4. Configuring broker storage requirements
To use persistent storage in an Operator-based broker deployment, you set persistenceEnabled to true in the Custom Resource (CR) instance used to create the deployment. If you do not have container-native storage in your OpenShift cluster, you need to manually provision Persistent Volumes (PVs) and ensure that these are available to be claimed by the Operator using a Persistent Volume Claim (PVC). If you want to create a cluster of two brokers with persistent storage, for example, then you need to have two PVs available.
When you manually provision PVs in OpenShift Container Platform, ensure that you set the reclaim policy for each PV to Retain. If the reclaim policy for a PV is not set to Retain and the PVC that the Operator used to claim the PV is deleted, the PV is also deleted. Deleting a PV results in the loss of any data on the volume. For more information, about setting the reclaim policy, see Understanding persistent storage in the OpenShift Container Platform documentation.
By default, a PVC obtains 2 GiB of storage for each broker from the default storage class configured for the cluster. You can override the default size and storage class requested in the PVC, but only by configuring new values in the CR before deploying the CR for the first time.
4.4.1. Configuring broker storage size and storage class
The following procedure shows how to configure the Custom Resource (CR) instance for your broker deployment to specify the size and storage class of the Persistent Volume Claim (PVC) required by each broker for persistent message storage.
If you change the storage configuration in the CR after you deploy AMQ Broker, the updated configuration is not applied retrospectively to existing Pods. However, the updated configuration is applied to new Pods that are created if you scale up the deployment.
Prerequisites
- You should be familiar with how to use a CR instance to create a basic broker deployment. See Section 3.4.1, “Deploying a basic broker instance”.
You must have already provisioned Persistent Volumes (PVs) and made these available to be claimed by the Operator. For example, if you want to create a cluster of two brokers with persistent storage, you need to have two PVs available.
For more information about provisioning persistent storage, see Understanding persistent storage in the OpenShift Container Platform documentation.
Procedure
Start configuring a Custom Resource (CR) instance for the broker deployment.
Using the OpenShift command-line interface:
Log in to OpenShift as a user that has privileges to deploy CRs in the project in which you are creating the deployment.
oc login -u <user> -p <password> --server=<host:port>
-
Open the sample CR file called
broker_activemqartemis_cr.yamlthat was included in thedeploy/crsdirectory of the Operator installation archive that you downloaded and extracted.
Using the OpenShift Container Platform web console:
- Log in to the console as a user that has privileges to deploy CRs in the project in which you are creating the deployment.
- Start a new CR instance based on the main broker CRD. In the left pane, click → .
- Click the ActiveMQArtemis CRD.
- Click the Instances tab.
Click Create ActiveMQArtemis.
Within the console, a YAML editor opens, enabling you to configure a CR instance.
For a basic broker deployment, a configuration might resemble that shown below.
apiVersion: broker.amq.io/v1beta1
kind: ActiveMQArtemis
metadata:
  name: ex-aao
spec:
  deploymentPlan:
    size: 1
    image: placeholder
    requireLogin: false
    persistenceEnabled: true
    journalType: nio
    messageMigration: true
Observe that in the
broker_activemqartemis_cr.yamlsample CR file, theimageproperty is set to a default value ofplaceholder. This value indicates that, by default, theimageproperty does not specify a broker container image to use for the deployment. To learn how the Operator determines the appropriate broker container image to use, see Section 2.6, “How the Operator chooses container images”.To specify the broker storage size, in the
deploymentPlansection of the CR, add astoragesection. Add asizeproperty and specify a value. For example:spec: deploymentPlan: size: 1 image: placeholder requireLogin: false persistenceEnabled: true journalType: nio messageMigration: true storage: size: 4Gistorage.size-
Size, in bytes, of the Persistent Volume Claim (PVC) that each broker Pod requires for persistent storage. This property applies only when
persistenceEnabledis set totrue. The value that you specify must include a unit using byte notation (for example, K, M, G), or the binary equivalents (Ki, Mi, Gi).
To specify the storage class that each broker Pod requires for persistent storage, in the
storagesection, add astorageClassNameproperty and specify a value. For example:spec: deploymentPlan: size: 1 image: placeholder requireLogin: false persistenceEnabled: true journalType: nio messageMigration: true storage: size: 4Gi storageClassName: gp3storage.storageClassNameThe name of the storage class to request in the Persistent Volume Claim (PVC). Storage classes provide a way for administrators to describe and classify the available storage. For example, different storage classes might map to specific quality-of-service levels, backup policies and so on.
If you do do not specify a storage class, a persistent volume with the default storage class configured for the cluster is claimed by the PVC.
NoteIf you specify a storage class, a persistent volume is claimed by the PVC only if the volume’s storage class matches the specified storage class.
Deploy the CR instance.
Using the OpenShift command-line interface:
- Save the CR file.
Switch to the project in which you are creating the broker deployment.
$ oc project <project_name>Create the CR instance.
$ oc create -f <path/to/custom_resource_instance>.yaml
Using the OpenShift web console:
- When you have finished configuring the CR, click Create.
4.5. Configuring resource limits and requests for Operator-based broker deployments
When you create an Operator-based broker deployment, the broker Pods in the deployment run in a StatefulSet on a node in your OpenShift cluster. You can configure the Custom Resource (CR) instance for the deployment to specify the host-node compute resources used by the broker container that runs in each Pod. By specifying limit and request values for CPU and memory (RAM), you can ensure satisfactory performance of the broker Pods.
- You must add configuration for limits and requests to the CR instance for your broker deployment before deploying the CR for the first time. You cannot add the configuration to a broker deployment that is already running.
- It is not possible for Red Hat to recommend values for limits and requests because these are based on your specific messaging system use-cases and the resulting architecture that you have implemented. However, it is recommended that you test and tune these values in a development environment before configuring them for your production environment.
- The Operator runs a type of container called an Init Container when initializing each broker Pod. Any resource limits and requests that you configure for each broker container also apply to each Init Container. For more information about the use of Init Containers in broker deployments, see Section 4.1, “How the Operator generates the broker configuration”.
You can specify the following limit and request values:
CPU limit- For each broker container running in a Pod, this value is the maximum amount of host-node CPU that the container can consume. If a broker container attempts to exceed the specified CPU limit, OpenShift throttles the container. This ensures that containers have consistent performance, regardless of the number of Pods running on a node.
Memory limit- For each broker container running in a Pod, this value is the maximum amount of host-node memory that the container can consume. If a broker container attempts to exceed the specified memory limit, OpenShift terminates the container. The broker Pod restarts.
CPU requestFor each broker container running in a Pod, this value is the amount of host-node CPU that the container requests. The OpenShift scheduler considers the CPU request value during Pod placement, to bind the broker Pod to a node with sufficient compute resources.
The CPU request value is the minimum amount of CPU that the broker container requires to run. However, if there is no contention for CPU on the node, the container can use all available CPU. If you have specified a CPU limit, the container cannot exceed that amount of CPU usage. If there is CPU contention on the node, CPU request values provide a way for OpenShift to weigh CPU usage across all containers.
Memory requestFor each broker container running in a Pod, this value is the amount of host-node memory that the container requests. The OpenShift scheduler considers the memory request value during Pod placement, to bind the broker Pod to a node with sufficient compute resources.
The memory request value is the minimum amount of memory that the broker container requires to run. However, the container can consume as much available memory as possible. If you have specified a memory limit, the broker container cannot exceed that amount of memory usage.
CPU is measured in units called millicores. Each node in an OpenShift cluster inspects the operating system to determine the number of CPU cores on the node. Then, the node multiplies that value by 1000 to express the total capacity. For example, if a node has two cores, the CPU capacity of the node is expressed as 2000m. Therefore, if you want to use one-tenth of a single core, you specify a value of 100m.
Memory is measured in bytes. You can specify the value using byte notation (E, P, T, G, M, K) or the binary equivalents (Ei, Pi, Ti, Gi, Mi, Ki). The value that you specify must include a unit.
4.5.1. Configuring broker resource limits and requests
The following example shows how to configure the main Custom Resource (CR) instance for your broker deployment to set limits and requests for CPU and memory for each broker container that runs in a Pod in the deployment.
- You must add configuration for limits and requests to the CR instance for your broker deployment before deploying the CR for the first time. You cannot add the configuration to a broker deployment that is already running.
- It is not possible for Red Hat to recommend values for limits and requests because these are based on your specific messaging system use-cases and the resulting architecture that you have implemented. However, it is recommended that you test and tune these values in a development environment before configuring them for your production environment.
Prerequisites
- You should be familiar with how to use a CR instance to create a basic broker deployment. See Section 3.4.1, “Deploying a basic broker instance”.
Procedure
Start configuring a Custom Resource (CR) instance for the broker deployment.
Using the OpenShift command-line interface:
Log in to OpenShift as a user that has privileges to deploy CRs in the project in which you are creating the deployment.
oc login -u <user> -p <password> --server=<host:port>
-
Open the sample CR file called
broker_activemqartemis_cr.yamlthat was included in thedeploy/crsdirectory of the Operator installation archive that you downloaded and extracted.
Using the OpenShift Container Platform web console:
- Log in to the console as a user that has privileges to deploy CRs in the project in which you are creating the deployment.
- Start a new CR instance based on the main broker CRD. In the left pane, click → .
- Click the ActiveMQArtemis CRD.
- Click the Instances tab.
Click Create ActiveMQArtemis.
Within the console, a YAML editor opens, enabling you to configure a CR instance.
For a basic broker deployment, a configuration might resemble that shown below.
apiVersion: broker.amq.io/v1beta1
kind: ActiveMQArtemis
metadata:
  name: ex-aao
spec:
  deploymentPlan:
    size: 1
    image: placeholder
    requireLogin: false
    persistenceEnabled: true
    journalType: nio
    messageMigration: true
Observe that in the
broker_activemqartemis_cr.yamlsample CR file, theimageproperty is set to a default value ofplaceholder. This value indicates that, by default, theimageproperty does not specify a broker container image to use for the deployment. To learn how the Operator determines the appropriate broker container image to use, see Section 2.6, “How the Operator chooses container images”.In the
deploymentPlansection of the CR, add aresourcessection. Addlimitsandrequestssub-sections. In each sub-section, add acpuandmemoryproperty and specify values. For example:spec: deploymentPlan: size: 1 image: placeholder requireLogin: false persistenceEnabled: true journalType: nio messageMigration: true resources: limits: cpu: "500m" memory: "1024M" requests: cpu: "250m" memory: "512M"limits.cpu- Each broker container running in a Pod in the deployment cannot exceed this amount of host-node CPU usage.
limits.memory- Each broker container running in a Pod in the deployment cannot exceed this amount of host-node memory usage.
requests.cpu- Each broker container running in a Pod in the deployment requests this amount of host-node CPU. This value is the minimum amount of CPU required for the broker container to run.
requests.memory- Each broker container running in a Pod in the deployment requests this amount of host-node memory. This value is the minimum amount of memory required for the broker container to run.
Deploy the CR instance.
Using the OpenShift command-line interface:
- Save the CR file.
Switch to the project in which you are creating the broker deployment.
$ oc project <project_name>Create the CR instance.
$ oc create -f <path/to/custom_resource_instance>.yaml
Using the OpenShift web console:
- When you have finished configuring the CR, click Create.
4.6. Enabling access to AMQ Management Console
Each broker Pod in an Operator-based deployment hosts its own instance of AMQ Management Console at port 8161. You can enable access to the console in the Custom Resource instance for your broker deployment. After you enable access to the console, you can use the console to view and manage the broker in your web browser.
Procedure
Edit the Custom Resource (CR) instance for your broker deployment .
Using the OpenShift command-line interface:
Log in to OpenShift as a user that has privileges to deploy CRs in the project for the broker deployment.
oc login -u <user> -p <password> --server=<host:port>
Edit the CR for your deployment.
oc edit ActiveMQArtemis <CR instance name> -n <namespace>
Using the OpenShift Container Platform web console:
- Log in to the console as a user that has privileges to deploy CRs in the project for the broker deployment.
- In the left pane, click → .
- Click the Red Hat Integration - AMQ Broker for RHEL 8 (Multiarch) operator.
- Click the AMQ Broker tab.
- Click the name of the ActiveMQArtemis instance name.
Click the YAML tab.
Within the console, a YAML editor opens, which enables you to configure the CR instance.
In the
specsection of the CR, add aconsolesection. In theconsolesection, add theexposeattribute and set the value to.true. For example:spec: deploymentPlan: size: 1 image: placeholder requireLogin: false persistenceEnabled: true journalType: nio messageMigration: true console: expose: true- Save the CR.
Additional resources
For information about how to connect to AMQ Management Console, see Chapter 5, Connecting to AMQ Management Console for an Operator-based broker deployment
4.7. Setting environment variables for the broker containers
In the Custom Resource (CR) instance for your broker deployment, you can set environment variables that are passed to a AMQ Broker container.
For example, you can use standard environment variables such as TZ to set the timezone or JDK_JAVA_OPTIONS to prepend arguments to the command line arguments used by the Java launcher at startup. Or, you can use a custom variable for AMQ Broker, JAVA_ARGS_APPEND, to append custom arguments to the command line arguments used by the Java launcher.
Procedure
Edit the Custom Resource (CR) instance for your broker deployment.
Using the OpenShift command-line interface:
Enter the following command:
oc edit ActiveMQArtemis <CR instance name> -n <namespace>
Using the OpenShift Container Platform web console:
- Log in to the console as a user that has privileges to deploy CRs in the project for the broker deployment.
- In the left pane, click → .
- Click the Red Hat Integration - AMQ Broker for RHEL 8 (Multiarch) operator.
- Click the AMQ Broker tab.
- Click the name of the ActiveMQArtemis instance name.
Click the YAML tab.
Within the console, a YAML editor opens, which enables you to configure the CR instance.
In the
specsection of the CR, add anenvelement and add the environment variables that you want to set for the AMQ Broker container. For example:apiVersion: broker.amq.io/v1beta1 kind: ActiveMQArtemis metadata: name: ex-aao spec: ... env: - name: TZ value: Europe/Vienna - name: JAVA_ARGS_APPEND value: --Hawtio.realm=console - name: JDK_JAVA_OPTIONS value: -XshowSettings:system ...In the example, the CR configuration includes the following environment variables:
-
TZto set the timezone of the AMQ Broker container. -
JAVA_ARGS_APPENDto configure AMQ Management Console to use a realm namedconsolefor authentication. JDK_JAVA_OPTIONSto set the Java-XshowSettings:systemparameter, which displays system property settings for the Java Virtual Machine.NoteValues configured using the
JDK_JAVA_OPTIONSenvironment variable are prepended to the command line arguments used by the Java launcher. Values configured using theJAVA_ARGS_APPENDenvironment variable are appended to the arguments used by the launcher. If an argument is duplicated, the rightmost argument takes precedence.
-
Save the CR.
NoteRed Hat recommends that you do not change AMQ Broker environment variables that have an
AMQ_prefix and that you exercise caution if you want to change thePOD_NAMESPACEvariable.
Additional resources
- For more information about defining environment variables, see Define Environment Variables for a Container.
4.8. Overriding the default memory limit for a broker
You can override the default memory limit that is set for a broker. By default, a broker is assigned half of the maximum memory that is available to the broker’s Java Virtual Machine. The following procedure shows how to configure the Custom Resource (CR) instance for your broker deployment to override the default memory limit.
Prerequisites
- You should be familiar with how to use a CR instance to create a basic broker deployment. See Section 3.4.1, “Deploying a basic broker instance”.
Procedure
Start configuring a Custom Resource (CR) instance to create a basic broker deployment.
Using the OpenShift command-line interface:
Log in to OpenShift as a user that has privileges to deploy CRs in the project for the broker deployment.
oc login -u <user> -p <password> --server=<host:port>
-
Open the sample CR file called
broker_activemqartemis_cr.yamlthat was included in thedeploy/crsdirectory of the Operator installation archive that you downloaded and extracted.
Using the OpenShift Container Platform web console:
- Log in to the console as a user that has privileges to deploy CRs in the project for the broker deployment.
- Start a new CR instance based on the main broker CRD. In the left pane, click → .
- Click the ActiveMQArtemis CRD.
- Click the Instances tab.
Click Create ActiveMQArtemis.
Within the console, a YAML editor opens, enabling you to configure a CR instance.
For example, the CR for a basic broker deployment might resemble the following:
apiVersion: broker.amq.io/v1beta1
kind: ActiveMQArtemis
metadata:
  name: ex-aao
spec:
  deploymentPlan:
    size: 1
    image: placeholder
    requireLogin: false
    persistenceEnabled: true
    journalType: nio
    messageMigration: true
In the
specsection of the CR, add abrokerPropertiessection. Within thebrokerPropertiessection, add aglobalMaxSizeproperty and specify a memory limit. For example:spec: ... brokerProperties: - globalMaxSize=500m ...The default unit for the
globalMaxSizeproperty is bytes. To change the default unit, add a suffix of m (for MB) or g (for GB) to the value.Apply the changes to the CR.
Using the OpenShift command-line interface:
- Save the CR file.
Switch to the project for the broker deployment.
$ oc project <project_name>Apply the CR.
$ oc apply -f <path/to/broker_custom_resource_instance>.yaml
Using the OpenShift web console:
- When you finish editing the CR, click Save.
(Optional) Verify that the new value you set for the
globalMaxSizeproperty overrides the default memory limit assigned to the broker.- Connect to the AMQ Management Console. For more information, see Chapter 5, Connecting to AMQ Management Console for an Operator-based broker deployment.
- From the menu, select JMX.
- Select org.apache.activemq.artemis.
-
Search for
global. -
In the table that is displayed, confirm that the value in the Global max column is the same as the value that you configured for the
globalMaxSizeproperty.
4.9. Specifying a custom Init Container image
As described in Section 4.1, “How the Operator generates the broker configuration”, the AMQ Broker Operator uses a default, built-in Init Container to generate the broker configuration. To generate the configuration, the Init Container uses the main Custom Resource (CR) instance for your deployment. In certain situations, you might need to use a custom Init Container. For example, if you want to include extra runtime dependencies, .jar files, in the broker installation directory.
When you build a custom Init Container image, you must follow these important guidelines:
In the build script (for example, a Docker Dockerfile or Podman Containerfile) that you create for the custom image, the
FROMinstruction must specify the latest version of the AMQ Broker Operator built-in Init Container as the base image. In your script, include the following line:FROM registry.redhat.io/amq7/amq-broker-init-rhel8:7.11
-
The custom image must include a script called
post-config.shthat you include in a directory called/amq/scripts. Thepost-config.shscript is where you can modify or add to the initial configuration that the Operator generates. When you specify a custom Init Container, the Operator runs thepost-config.shscript after it uses your CR instance to generate a configuration, but before it starts the broker application container. -
As described in Section 4.1.2, “Directory structure of a broker Pod”, the path to the installation directory used by the Init Container is defined in an environment variable called
CONFIG_INSTANCE_DIR. Thepost-config.shscript should use this environment variable name when referencing the installation directory (for example,${CONFIG_INSTANCE_DIR}/lib) and not the actual value of this variable (for example,/amq/init/config/lib). -
If you want to include additional resources (for example,
.xmlor.jarfiles) in your custom broker configuration, you must ensure that these are included in the custom image and accessible to thepost-config.shscript.
The following procedure describes how to specify a custom Init Container image.
Prerequisites
- You must have built a custom Init Container image that meets the guidelines described above. For a complete example of building and specifying a custom Init Container image for the ArtemisCloud Operator, see custom Init Container image for JDBC-based persistence.
- To provide a custom Init Container image for the AMQ Broker Operator, you need to be able to add the image to a repository in a container registry such as the Quay container registry.
- You should understand how the Operator uses an Init Container to generate the broker configuration. For more information, see Section 4.1, “How the Operator generates the broker configuration”.
- You should be familiar with how to use a CR to create a broker deployment. For more information, see Section 3.4, “Creating Operator-based broker deployments”.
Procedure
Edit the CR instance for the broker deployment.
Using the OpenShift command-line interface:
- Log in to OpenShift Container Platform as a user that has privileges to deploy CRs in the project for the broker deployment.
Edit the CR for your deployment.
oc edit ActiveMQArtemis <CR instance name> -n <namespace>
Using the OpenShift Container Platform web console:
- Log in to OpenShift Container Platform as a user that has privileges to deploy CRs in the project for the broker deployment.
- In the left pane, click → .
- Click the ActiveMQArtemis CRD.
- Click the Instances tab.
- Click the instance for your broker deployment.
Click the YAML tab.
Within the console, a YAML editor opens, enabling you to edit the CR instance.
In the
deploymentPlansection of the CR, add aninitImageattribute and set the value to the URL of your custom Init Container image.apiVersion: broker.amq.io/v1beta1 kind: ActiveMQArtemis metadata: name: ex-aao spec: deploymentPlan: size: 1 image: placeholder initImage: <custom_init_container_image_url> requireLogin: false persistenceEnabled: true journalType: nio messageMigration: trueinitImageSpecifies the full URL for your custom Init Container image, which must be available from a container registry.
ImportantIf a CR has a custom init container image specified in the
spec.deploymentPlan.initImageattribute, Red Hat recommends that you also specify the URL of the corresponding broker container image in thespec.deploymentPlan.imageattribute to prevent automatic upgrades of the broker image. If you do not specify the URL of a specific broker container image in thespec.deploymentPlan.imageattribute, the broker image can be automatically upgraded. After the broker image is upgraded, the versions of the broker and custom init container image are different, which might prevent the broker from running.If you have a working deployment that has a custom init container, you can prevent any further upgrades of the broker container image to eliminate the risk of a newer broker image not working with your custom init container image. For more information about preventing upgrades to the broker image, see, Section 6.4.2, “Restricting automatic upgrades of images by using image URLs”.
- Save the CR.
Additional resources
- For a complete example of building and specifying a custom Init Container image for the ArtemisCloud Operator, see custom Init Container image for JDBC-based persistence.
4.10. Configuring Operator-based broker deployments for client connections
4.10.1. Configuring acceptors
To enable client connections to broker Pods in your OpenShift deployment, you define acceptors for your deployment. Acceptors define how a broker Pod accepts connections. You define acceptors in the main Custom Resource (CR) used for your broker deployment. When you create an acceptor, you specify information such as the messaging protocols to enable on the acceptor, and the port on the broker Pod to use for these protocols.
The following procedure shows how to define a new acceptor in the CR for your broker deployment.
Procedure
-
In the
deploy/crsdirectory of the Operator archive that you downloaded and extracted during your initial installation, open thebroker_activemqartemis_cr.yamlCustom Resource (CR) file. In the
acceptorselement, add a named acceptor. Add theprotocolsandportparameters. Set values to specify the messaging protocols to be used by the acceptor and the port on each broker Pod to expose for those protocols. For example:spec: ... acceptors: - name: my-acceptor protocols: amqp port: 5672 ...The configured acceptor exposes port 5672 to AMQP clients. The full set of values that you can specify for the
protocolsparameter is shown in the table.Protocol Value Core Protocol
coreAMQP
amqpOpenWire
openwireMQTT
mqttSTOMP
stompAll supported protocols
allNote- For each broker Pod in your deployment, the Operator also creates a default acceptor that uses port 61616. This default acceptor is required for broker clustering and has Core Protocol enabled.
- By default, the AMQ Broker management console uses port 8161 on the broker Pod. Each broker Pod in your deployment has a dedicated Service that provides access to the console. For more information, see Chapter 5, Connecting to AMQ Management Console for an Operator-based broker deployment.
To use another protocol on the same acceptor, modify the
protocolsparameter. Specify a comma-separated list of protocols. For example:spec: ... acceptors: - name: my-acceptor protocols: amqp,openwire port: 5672 ...The configured acceptor now exposes port 5672 to AMQP and OpenWire clients.
To specify the number of concurrent client connections that the acceptor allows, add the
connectionsAllowedparameter and set a value. For example:spec: ... acceptors: - name: my-acceptor protocols: amqp,openwire port: 5672 connectionsAllowed: 5 ...By default, an acceptor is exposed only to clients in the same OpenShift cluster as the broker deployment. To also expose the acceptor to clients outside OpenShift, add the
exposeparameter and set the value totrue.spec: ... acceptors: - name: my-acceptor protocols: amqp,openwire port: 5672 connectionsAllowed: 5 expose: true ... ...When you expose an acceptor to clients outside OpenShift, the Operator automatically creates a dedicated Service and Route for each broker Pod in the deployment.
To enable secure connections to the acceptor from clients outside OpenShift, add the
sslEnabledparameter and set the value totrue.spec: ... acceptors: - name: my-acceptor protocols: amqp,openwire port: 5672 connectionsAllowed: 5 expose: true sslEnabled: true ... ...When you enable SSL (that is, Secure Sockets Layer) security on an acceptor (or connector), you can add related configuration, such as:
- The secret name used to store authentication credentials in your OpenShift cluster. A secret is required when you enable SSL on the acceptor. For more information on generating this secret, see Section 4.10.2, “Securing broker-client connections”.
-
The Transport Layer Security (TLS) protocols to use for secure network communication. TLS is an updated, more secure version of SSL. You specify the TLS protocols in the
enabledProtocolsparameter. -
Whether the acceptor uses two-way TLS, also known as mutual authentication, between the broker and the client. You specify this by setting the value of the
needClientAuthparameter totrue.
Additional resources
- To learn how to configure TLS to secure broker-client connections, including generating a secret to store authentication credentials, see Section 4.10.2, “Securing broker-client connections”.
- For a complete Custom Resource configuration reference, including configuration of acceptors and connectors, see Section 8.1, “Custom Resource configuration reference”.
4.10.2. Securing broker-client connections
If you have enabled security on your acceptor or connector (that is, by setting sslEnabled to true), you must configure Transport Layer Security (TLS) to allow certificate-based authentication between the broker and clients. TLS is an updated, more secure version of SSL. There are two primary TLS configurations:
- One-way TLS
- Only the broker presents a certificate. The certificate is used by the client to authenticate the broker. This is the most common configuration.
- Two-way TLS
- Both the broker and the client present certificates. This is sometimes called mutual authentication.
The following procedures describe how to use self-signed certificates to configure one-way and two-way TLS. If a self-signed certificate is listed as a trusted certificate in a Java Virtual Machine (JVM) truststore, the JVM does not validate the expiry date of the certificate. In a production environment, Red Hat recommends that you use a certificate that is signed by a Certificate Authority.
The sections that follow describe:
For both one-way and two-way TLS, you complete the configuration by generating a secret that stores the credentials required for a successful TLS handshake between the broker and the client. This is the secret name that you must specify in the sslSecret parameter of your secured acceptor or connector. The secret must contain a Base64-encoded broker key store (both one-way and two-way TLS), a Base64-encoded broker trust store (two-way TLS only), and the corresponding passwords for these files, also Base64-encoded. The one-way and two-way TLS configuration procedures show how to generate this secret.
If you do not explicitly specify a secret name in the sslSecret parameter of a secured acceptor or connector, the acceptor or connector assumes a default secret name. The default secret name uses the format <custom_resource_name>-<acceptor_name>-secret or <custom_resource_name>-<connector_name>-secret. For example, my-broker-deployment-my-acceptor-secret.
Even if the acceptor or connector assumes a default secrete name, you must still generate this secret yourself. It is not automatically created.
4.10.2.1. Configuring a broker certificate for host name verification
This section describes some requirements for the broker certificate that you must generate when configuring one-way or two-way TLS.
When a client tries to connect to a broker Pod in your deployment, the verifyHost option in the client connection URL determines whether the client compares the Common Name (CN) of the broker’s certificate to its host name, to verify that they match. The client performs this verification if you specify verifyHost=true or similar in the client connection URL.
You might omit this verification in rare cases where you have no concerns about the security of the connection, for example, if the brokers are deployed on an OpenShift cluster in an isolated network. Otherwise, for a secure connection, it is advisable for a client to perform this verification. In this case, correct configuration of the broker key store certificate is essential to ensure successful client connections.
In general, when a client is using host verification, the CN that you specify when generating the broker certificate must match the full host name for the Route on the broker Pod that the client is connecting to. For example, if you have a deployment with a single broker Pod, the CN might look like the following:
CN=my-broker-deployment-0-svc-rte-my-openshift-project.my-openshift-domain
To ensure that the CN can resolve to any broker Pod in a deployment with multiple brokers, you can specify an asterisk (*) wildcard character in place of the ordinal of the broker Pod. For example:
CN=my-broker-deployment-*-svc-rte-my-openshift-project.my-openshift-domain
The CN shown in the preceding example successfully resolves to any broker Pod in the my-broker-deployment deployment.
In addition, the Subject Alternative Name (SAN) that you specify when generating the broker certificate must individually list all broker Pods in the deployment, as a comma-separated list. For example:
"SAN=DNS:my-broker-deployment-0-svc-rte-my-openshift-project.my-openshift-domain,DNS:my-broker-deployment-1-svc-rte-my-openshift-project.my-openshift-domain,..."
4.10.2.2. Configuring one-way TLS
The procedure in this section shows how to configure one-way Transport Layer Security (TLS) to secure a broker-client connection.
In one-way TLS, only the broker presents a certificate. This certificate is used by the client to authenticate the broker.
Prerequisites
- You should understand the requirements for broker certificate generation when clients use host name verification. For more information, see Section 4.10.2.1, “Configuring a broker certificate for host name verification”.
Procedure
Generate a self-signed certificate for the broker key store.
$ keytool -genkey -alias broker -keyalg RSA -keystore ~/broker.ks
Export the certificate from the broker key store, so that it can be shared with clients. Export the certificate in the Base64-encoded
.pemformat. For example:$ keytool -export -alias broker -keystore ~/broker.ks -file ~/broker_cert.pem
On the client, create a client trust store that imports the broker certificate.
$ keytool -import -alias broker -keystore ~/client.ts -file ~/broker_cert.pem
Log in to OpenShift Container Platform as an administrator. For example:
$ oc login -u system:admin
Switch to the project that contains your broker deployment. For example:
$ oc project <my_openshift_project>Create a secret to store the TLS credentials. For example:
$ oc create secret generic my-tls-secret \ --from-file=broker.ks=~/broker.ks \ --from-file=client.ts=~/client.ks \ --from-literal=keyStorePassword=<password> \ --from-literal=trustStorePassword=<password>
NoteWhen generating a secret, OpenShift requires you to specify both a key store and a trust store. The trust store key is generically named
client.ts. For one-way TLS between the broker and a client, a trust store is not actually required. However, to successfully generate the secret, you need to specify some valid store file as a value forclient.ts. The preceding step provides a "dummy" value forclient.tsby reusing the previously-generated broker key store file. This is sufficient to generate a secret with all of the credentials required for one-way TLS.Link the secret to the service account that you created when installing the Operator. For example:
$ oc secrets link sa/amq-broker-operator secret/my-tls-secret
Specify the secret name in the
sslSecretparameter of your secured acceptor or connector. For example:spec: ... acceptors: - name: my-acceptor protocols: amqp,openwire port: 5672 sslEnabled: true sslSecret: my-tls-secret expose: true connectionsAllowed: 5 ...
4.10.2.3. Configuring two-way TLS
The procedure in this section shows how to configure two-way Transport Layer Security (TLS) to secure a broker-client connection.
In two-way TLS, both the broker and client presents certificates. The broker and client use these certificates to authenticate each other in a process sometimes called mutual authentication.
Prerequisites
- You should understand the requirements for broker certificate generation when clients use host name verification. For more information, see Section 4.10.2.1, “Configuring a broker certificate for host name verification”.
Procedure
Generate a self-signed certificate for the broker key store.
$ keytool -genkey -alias broker -keyalg RSA -keystore ~/broker.ks
Export the certificate from the broker key store, so that it can be shared with clients. Export the certificate in the Base64-encoded
.pemformat. For example:$ keytool -export -alias broker -keystore ~/broker.ks -file ~/broker_cert.pem
On the client, create a client trust store that imports the broker certificate.
$ keytool -import -alias broker -keystore ~/client.ts -file ~/broker_cert.pem
On the client, generate a self-signed certificate for the client key store.
$ keytool -genkey -alias broker -keyalg RSA -keystore ~/client.ks
On the client, export the certificate from the client key store, so that it can be shared with the broker. Export the certificate in the Base64-encoded
.pemformat. For example:$ keytool -export -alias broker -keystore ~/client.ks -file ~/client_cert.pem
Create a broker trust store that imports the client certificate.
$ keytool -import -alias broker -keystore ~/broker.ts -file ~/client_cert.pem
Log in to OpenShift Container Platform as an administrator. For example:
$ oc login -u system:admin
Switch to the project that contains your broker deployment. For example:
$ oc project <my_openshift_project>Create a secret to store the TLS credentials. For example:
$ oc create secret generic my-tls-secret \ --from-file=broker.ks=~/broker.ks \ --from-file=client.ts=~/broker.ts \ --from-literal=keyStorePassword=<password> \ --from-literal=trustStorePassword=<password>
NoteWhen generating a secret, OpenShift requires you to specify both a key store and a trust store. The trust store key is generically named
client.ts. For two-way TLS between the broker and a client, you must generate a secret that includes the broker trust store, because this holds the client certificate. Therefore, in the preceding step, the value that you specify for theclient.tskey is actually the broker trust store file.Link the secret to the service account that you created when installing the Operator. For example:
$ oc secrets link sa/amq-broker-operator secret/my-tls-secret
Specify the secret name in the
sslSecretparameter of your secured acceptor or connector. For example:spec: ... acceptors: - name: my-acceptor protocols: amqp,openwire port: 5672 sslEnabled: true sslSecret: my-tls-secret expose: true connectionsAllowed: 5 ...
4.10.3. Networking services in your broker deployments
On the Networking pane of the OpenShift Container Platform web console for your broker deployment, there are two running services; a headless service and a ping service. The default name of the headless service uses the format <custom_resource_name>-hdls-svc, for example, my-broker-deployment-hdls-svc. The default name of the ping service uses a format of <custom_resource_name>-ping-svc, for example, `my-broker-deployment-ping-svc.
The headless service provides access to port 61616, which is used for internal broker clustering.
The ping service is used by the brokers for discovery, and enables brokers to form a cluster within the OpenShift environment. Internally, this service exposes port 8888.
4.10.4. Connecting to the broker from internal and external clients
The examples in this section show how to connect to the broker from internal clients (that is, clients in the same OpenShift cluster as the broker deployment) and external clients (that is, clients outside the OpenShift cluster).
4.10.4.1. Connecting to the broker from internal clients
To connect an internal client to a broker, in the client connection details, specify the DNS resolvable name of the broker pod. For example:
$ tcp://ex–aao-ss-0:<port>
If the internal client is using the Core protocol and the useTopologyForLoadBalancing=false key was not set in the connection URL, after the client connects to the broker for the first time, the broker can inform the client of the addresses of all the brokers in the cluster. The client can then load balance connections across all brokers.
If your brokers have durable subscription queues or request/reply queues, be aware of the caveats associated with using these queues when client connections are load balanced. For more information, see Section 4.10.4.4, “Caveats to load balancing client connections when you have durable subscription queues or reply/request queues”.
4.10.4.2. Connecting to the broker from external clients
When you expose an acceptor to external clients (that is, by setting the value of the expose parameter to true), the Operator automatically creates a dedicated service and route for each broker pod in the deployment.
An external client can connect to the broker by specifying the full host name of the route created for the broker pod. You can use a basic curl command to test external access to this full host name. For example:
$ curl https://my-broker-deployment-0-svc-rte-my-openshift-project.my-openshift-domain
The full host name of the route for the broker pod must resolve to the node that is hosting the OpenShift router. The OpenShift router uses the host name to determine where to send the traffic inside the OpenShift internal network. By default, the OpenShift router listens to port 80 for non-secured (that is, non-SSL) traffic and port 443 for secured (that is, SSL-encrypted) traffic. For an HTTP connection, the router automatically directs traffic to port 443 if you specify a secure connection URL (that is, https), or to port 80 if you specify a non-secure connection URL (that is, http).
If you want external clients to load balance connections across the brokers in the cluster:
-
Enable load balancing by configuring the
haproxy.router.openshift.io/balanceroundrobin option on the OpenShift route for each broker pod. If an external client uses the Core protocol, set the
useTopologyForLoadBalancing=falsekey in the client’s connection URL.Setting the
useTopologyForLoadBalancing=falsekey prevents a client from using the AMQ Broker Pod DNS names that are in the cluster topology information provided by the broker. The Pod DNS names resolve to internal IP addresses, which an external client cannot access.
If your brokers have durable subscription queues or request/reply queues, be aware of the caveats associated with using these queues when load balancing client connections. For more information, see Section 4.10.4.4, “Caveats to load balancing client connections when you have durable subscription queues or reply/request queues”.
If you don’t want external clients to load balance connections across the brokers in the cluster:
- In each client’s connection URL, specify the full host name of the route for each broker pod. The client attempts to connect to the first host name in the connection URL. However, if the first host name is unavailable, the client automatically connects to the next host name in the connection URL, and so on.
-
If an external client uses the Core protocol, set the
useTopologyForLoadBalancing=falsekey in the client’s connection URL to prevent the client from using the cluster topology information provided by the broker.
For non-HTTP connections:
- Clients must explicitly specify the port number (for example, port 443) as part of the connection URL.
- For one-way TLS, the client must specify the path to its trust store and the corresponding password, as part of the connection URL.
- For two-way TLS, the client must also specify the path to its key store and the corresponding password, as part of the connection URL.
Some example client connection URLs, for supported messaging protocols, are shown below.
External Core client, using one-way TLS
tcp://my-broker-deployment-0-svc-rte-my-openshift-project.my-openshift-domain:443?useTopologyForLoadBalancing=false&sslEnabled=true \
&trustStorePath=~/client.ts&trustStorePassword=<password>
The useTopologyForLoadBalancing key is explicitly set to false in the connection URL because an external Core client cannot use topology information returned by the broker. If this key is set to true or you do not specify a value, it results in a DEBUG log message.
External Core client, using two-way TLS
tcp://my-broker-deployment-0-svc-rte-my-openshift-project.my-openshift-domain:443?useTopologyForLoadBalancing=false&sslEnabled=true \ &keyStorePath=~/client.ks&keyStorePassword=<password> \ &trustStorePath=~/client.ts&trustStorePassword=<password>
External OpenWire client, using one-way TLS
ssl://my-broker-deployment-0-svc-rte-my-openshift-project.my-openshift-domain:443"
# Also, specify the following JVM flags
-Djavax.net.ssl.trustStore=~/client.ts -Djavax.net.ssl.trustStorePassword=<password>
External OpenWire client, using two-way TLS
ssl://my-broker-deployment-0-svc-rte-my-openshift-project.my-openshift-domain:443" # Also, specify the following JVM flags -Djavax.net.ssl.keyStore=~/client.ks -Djavax.net.ssl.keyStorePassword=<password> \ -Djavax.net.ssl.trustStore=~/client.ts -Djavax.net.ssl.trustStorePassword=<password>
External AMQP client, using one-way TLS
amqps://my-broker-deployment-0-svc-rte-my-openshift-project.my-openshift-domain:443?transport.verifyHost=true \
&transport.trustStoreLocation=~/client.ts&transport.trustStorePassword=<password>
External AMQP client, using two-way TLS
amqps://my-broker-deployment-0-svc-rte-my-openshift-project.my-openshift-domain:443?transport.verifyHost=true \ &transport.keyStoreLocation=~/client.ks&transport.keyStorePassword=<password> \ &transport.trustStoreLocation=~/client.ts&transport.trustStorePassword=<password>
4.10.4.3. Connecting to the Broker using a NodePort
As an alternative to using a route, an OpenShift administrator can configure a NodePort to connect to a broker pod from a client outside OpenShift. The NodePort should map to one of the protocol-specific ports specified by the acceptors configured for the broker.
By default, NodePorts are in the range 30000 to 32767, which means that a NodePort typically does not match the intended port on the broker Pod.
To connect from a client outside OpenShift to the broker via a NodePort, you specify a URL in the format <protocol>://<ocp_node_ip>:<node_port_number>.
4.10.4.4. Caveats to load balancing client connections when you have durable subscription queues or reply/request queues
Durable subscriptions
A durable subscription is represented as a queue on a broker and is created when a durable subscriber first connects to the broker. This queue exists and receives messages until the client unsubscribes. If the client reconnects to a different broker, another durable subscription queue is created on that broker. This can cause the following issues.
| Issue | Mitigation |
|---|---|
| Messages may get stranded in the original subscription queue. | Ensure that message redistribution is enabled. For more information, see Enabling message redistribution. |
| Messages may be received in the wrong order as there is a window during message redistribution when other messages are still routed. | None. |
| When a client unsubscribes, it deletes the queue only on the broker it last connected to. This means that the other queues can still exist and receive messages. | To delete other empty queues that may exist for a client that unsubscribed, configure both of the following properties:
Set the For more information, see Configuring automatic creation and deletion of addresses and queues. |
Request/Reply queues
When a JMS Producer creates a temporary reply queue, the queue is created on the broker. If the client that is consuming from the work queue and replying to the temporary queue connects to a different broker, the following issues can occur.
| Issue | Mitigation |
|---|---|
| Since the reply queue does not exist on the broker that the client is connected to, the client may generate an error. |
Ensure that the |
| Messages sent to the work queue may not be distributed. |
Ensure that messages are load balanced on demand by setting the |
Additional resources
For more information about using methods such as Routes and NodePorts for communicating from outside an OpenShift cluster with services running in the cluster, see:
- Configuring ingress cluster traffic overview in the OpenShift Container Platform documentation.
4.11. Configuring large message handling for AMQP messages
Clients might send large AMQP messages that can exceed the size of the broker’s internal buffer, causing unexpected errors. To prevent this situation, you can configure the broker to store messages as files when the messages are larger than a specified minimum value. Handling large messages in this way means that the broker does not hold the messages in memory. Instead, the broker stores the messages in a dedicated directory used for storing large message files.
For a broker deployment on OpenShift Container Platform, the large messages directory is /opt/<custom_resource_name>/data/large-messages on the Persistent Volume (PV) used by the broker for message storage. When the broker stores a message as a large message, the queue retains a reference to the file in the large messages directory.
You can configure the large message size limit in the broker configuration for the AMQP protocol only. For the AMQ Core and Openwire protocols, you can configure large message size limits in the client connection configuration. For more information, see the Red Hat AMQ Clients documentation.
4.11.1. Configuring AMQP acceptors for large message handling
The following procedure shows how to configure an acceptor to handle an AMQP message larger than a specified size as a large message.
Prerequisites
- You should be familiar with how to configure acceptors for Operator-based broker deployments. See Section 4.10.1, “Configuring acceptors”.
To store large AMQP messages in a dedicated large messages directory, your broker deployment must be using persistent storage (that is,
persistenceEnabledis set totruein the Custom Resource (CR) instance used to create the deployment). For more information about configuring persistent storage, see:
Procedure
Open the Custom Resource (CR) instance in which you previously defined an AMQP acceptor.
Using the OpenShift command-line interface:
$ oc edit -f <path/to/custom_resource_instance>.yamlUsing the OpenShift Container Platform web console:
- In the left navigation menu, click →
-
Click the
ActiveMQArtemisCRD. -
Click the
Instancestab. - Locate the CR instance that corresponds to your project namespace.
A previously-configured AMQP acceptor might resemble the following:
spec: ... acceptors: - name: my-acceptor protocols: amqp port: 5672 connectionsAllowed: 5 expose: true sslEnabled: true ...Specify the minimum size, in bytes, of an AMQP message that the broker handles as a large message. For example:
spec: ... acceptors: - name: my-acceptor protocols: amqp port: 5672 connectionsAllowed: 5 expose: true sslEnabled: true amqpMinLargeMessageSize: 204800 ... ...In the preceding example, the broker is configured to accept AMQP messages on port 5672. Based on the value of
amqpMinLargeMessageSize, if the acceptor receives an AMQP message with a body larger than or equal to 204800 bytes (that is, 200 kilobytes), the broker stores the message as a large message.The broker stores the message in the large messages directory (
/opt/<custom_resource_name>/data/large-messages, by default) on the persistent volume (PV) used by the broker for message storage.If you do not explicitly specify a value for the
amqpMinLargeMessageSizeproperty, the broker uses a default value of 102400 (that is, 100 kilobytes).If you set
amqpMinLargeMessageSizeto a value of-1, large message handling for AMQP messages is disabled.
4.12. Configuring broker health checks
You can configure health checks on AMQ Broker by using startup, liveness and readiness probes.
- A startup probe indicates whether the application within a container is started.
- A liveness probe determines if a container is still running.
- A readiness probe determines if a container is ready to accept service requests
If a startup probe or a liveness probe check of a Pod fails, the probe restarts the Pod.
AMQ Broker includes default readiness and liveness probes. The default liveness probe checks if the broker is running by pinging the broker’s HTTP port. The default readiness probe checks if the broker can accept network traffic by opening a connection to each of the acceptor ports configured for the broker.
A limitation of using the default liveness and readiness probes is that they are unable to identify underlying issues, for example, issues with the broker’s file system. You can create custom liveness and readiness probes that use the broker’s command-line utility, artemis, to run more comprehensive health checks.
AMQ Broker does not include a default startup probe. You can configure a startup probe in the ActiveMQArtemis Custom Resource (CR).
4.12.1. Configuring a startup probe
You can configure a startup probe to check if the AMQ Broker application within the broker container has started.
Procedure
Edit the CR instance for the broker deployment.
Using the OpenShift command-line interface:
- Log in to OpenShift Container Platform as a user that has privileges to deploy CRs in the project for the broker deployment.
Edit the CR for your deployment.
oc edit ActiveMQArtemis <CR instance name> -n <namespace>
Using the OpenShift Container Platform web console:
- Log in to OpenShift Container Platform as a user that has privileges to deploy CRs in the project for the broker deployment.
- In the left pane, click → .
- Click the ActiveMQArtemis CRD.
- Click the Instances tab.
- Click the instance for your broker deployment.
Click the YAML tab.
Within the console, a YAML editor opens, enabling you to edit the CR instance.
In the
deploymentPlansection of the CR, add astartupProbesection. For example:spec: deploymentPlan: startupProbe: exec: command: - /bin/bash - '-c' - /opt/amq/bin/artemis - 'check' - 'node' - '--up' - '--url' - 'tcp://$HOSTNAME:61616' initialDelaySeconds: 5 periodSeconds: 10 timeoutSeconds: 3 failureThreshold: 30command-
The startup probe command to run within the container. In the example, the startup probe uses the
artemis check nodecommand to verify that AMQ Broker has started in the container for a broker Pod. initialDelaySeconds-
The delay, in seconds, before the probe runs after the container starts. The default is
0. periodSeconds-
The interval, in seconds, at which the probe runs. The default is
10. timeoutSeconds-
Time, in seconds, that the startup probe command waits for a reply from the broker. If a response to the command is not received, the command is terminated. The default value is
1. failureThresholdThe minimum consecutive failures, including timeouts, of the startup probe after which the probe is deemed to have failed. When the probe is deemed to have failed, it restarts the Pod. The default value is
3.Depending on the resources of the cluster and the size of the broker journal, you might need to increase the failure threshold to allow the broker sufficient time to start and pass the probe check. Otherwise, the broker enters a loop condition whereby the failure threshold is reached repeatedly and the broker is restarted each time by the startup probe. For example, if you set the
failureThresholdto30and the probe runs at the default interval of 10 seconds, the broker has 300 seconds to start and pass the probe check.
- Save the CR.
Additional resources
For more information about liveness and readiness probes in OpenShift Container Platform, see Monitoring application health by using health checks in the OpenShift Container Platform documentation.
4.12.2. Configuring liveness and readiness probes
The following example shows how to configure the main Custom Resource (CR) instance for your broker deployment to run health checks by using liveness and readiness probes.
Prerequisites
- You should be familiar with how to use a CR instance to create a basic broker deployment. See Section 3.4.1, “Deploying a basic broker instance”.
Procedure
Edit the CR instance for the broker deployment.
Using the OpenShift command-line interface:
- Log in to OpenShift Container Platform as a user that has privileges to deploy CRs in the project for the broker deployment.
Edit the CR for your deployment.
oc edit ActiveMQArtemis <CR instance name> -n <namespace>
Using the OpenShift Container Platform web console:
- Log in to OpenShift Container Platform as a user that has privileges to deploy CRs in the project for the broker deployment.
- In the left pane, click → .
- Click the ActiveMQArtemis CRD.
- Click the Instances tab.
- Click the instance for your broker deployment.
- Click the YAML tab.
To configure a liveness probe, in the
deploymentPlansection of the CR, add alivenessProbesection. For example:spec: deploymentPlan: livenessProbe: initialDelaySeconds: 5 periodSeconds: 5 failureThreshold: 30initialDelaySecondsThe delay, in seconds, before the probe runs after the container starts. The default is
5.NoteIf the deployment also has a startup probe configured, you can set the delay to 0 for both a liveness and a readiness probe. Both of these probes run only after the startup probe has passed. If the startup probe has already passed, it confirms that the broker has started successfully, so a delay in running the liveness and readiness probes is not required.
periodSeconds-
The interval, in seconds, at which the probe runs. The default is
5. failureThresholdThe minimum consecutive failures, including timeouts, of the liveness probe that signify the probe has failed. When the probe fails, it restarts the Pod. The default value is 3.
If your deployment does not have a startup probe configured, which verifies that the broker application is started before the liveness probe runs, you might need to increase the failure threshold to allow the broker sufficient time to start and pass the liveness probe check. Otherwise, the broker can enter a loop condition whereby the failure threshold is reached repeatedly and the broker Pod is restarted each time by the liveness probe.
The time required by the broker to start and pass a liveness probe check depends on the resources of the cluster and the size of the broker journal. For example, if you set the
failureThresholdto 30 and the probe runs at the default interval of 5 seconds, the broker has 150 seconds to start and pass the liveness probe check.NoteIf you do not configure a liveness probe or if the handler is missing from a configured probe, the AMQ Broker Operator creates a default TCP probe that has the following configuration. The default TCP probe attempts to open a socket to the broker container on the specified port.
spec: deploymentPlan: livenessProbe: tcpSocket: port: 8181 initialDelaySeconds: 30 timeoutSeconds: 5
To configure a readiness probe, in the
deploymentPlansection of the CR, add areadinessProbesection. For example:spec: deploymentPlan: readinessProbe: initialDelaySeconds: 5 periodSeconds: 5If you don’t configure a readiness probe, a built-in script checks if all acceptors can accept connections.
If you want to configure more comprehensive health checks, add the
artemis checkcommand-line utility to the liveness or readiness probe configuration.If you want to configure a health check that creates a full client connection to the broker, in the
livenessProbeorreadinessProbesection, add anexecsection. In theexecsection, add acommandsection. In thecommandsection, add theartemis check nodecommand syntax. For example:spec: deploymentPlan: readinessProbe: exec: command: - bash - '-c' - /home/jboss/amq-broker/bin/artemis - check - node - '--silent' - '--acceptor' - <acceptor name> - '--user' - $AMQ_USER - '--password' - $AMQ_PASSWORD initialDelaySeconds: 30 timeoutSeconds: 5By default, the
artemis check nodecommand uses the URI of an acceptor calledartemis. If the broker has an acceptor calledartemis, you can exclude the--acceptor <acceptor name>option from the command.Note$AMQ_USERand$AMQ_PASSWORDare environment variables that are configured by the AMQ Operator.If you want to configure a health check that produces and consumes messages, which also validates the health of the broker’s file system, in the
livenessProbeorreadinessProbesection, add anexecsection. In theexecsection, add acommandsection. In thecommandsection, add theartemis check queuecommand syntax. For example:spec: deploymentPlan: readinessProbe: exec: command: - bash - '-c' - /home/jboss/amq-broker/bin/artemis - check - queue - '--name' - livenessqueue - '--produce' - "1" - '--consume' - "1" - '--silent' - '--user' - $AMQ_USER - '--password' - $AMQ_PASSWORD initialDelaySeconds: 30 timeoutSeconds: 5NoteThe queue name that you specify must be configured on the broker and have a
routingTypeofanycast. For example:apiVersion: broker.amq.io/v1beta1 kind: ActiveMQArtemisAddress metadata: name: livenessqueue namespace: activemq-artemis-operator spec: addressName: livenessqueue queueConfiguration: purgeOnNoConsumers: false maxConsumers: -1 durable: true enabled: true queueName: livenessqueue routingType: anycast
- Save the CR.
Additional resources
For more information about liveness and readiness probes in OpenShift Container Platform, see Monitoring application health by using health checks in the OpenShift Container Platform documentation.
4.13. Enabling message migration to support cluster scaledown
If you want to be able to scale down the number of brokers in a cluster and migrate messages to remaining Pods in the cluster, you must enable message migration.
When you scale down a cluster that has message migration enabled, a scaledown controller manages the message migration process.
4.13.1. Steps in message migration process
The message migration process follows these steps:
- When a broker Pod in the deployment shuts down due to an intentional scaledown of the deployment, the Operator automatically deploys a scaledown Custom Resource to prepare for message migration.
To check for Persistent Volumes (PVs) that have been orphaned, the scaledown controller looks at the ordinal on the volume claim. The controller compares the ordinal on the volume claim to that of the broker Pods that are still running in the StatefulSet (that is, the broker cluster) in the project.
If the ordinal on the volume claim is higher than the ordinal on any of the broker Pods still running in the broker cluster, the scaledown controller determines that the broker Pod at that ordinal has been shut down and that messaging data must be migrated to another broker Pod.
- The scaledown controller starts a drainer Pod. The drainer Pod connects to one of the other live broker Pods in the cluster and migrates messages to that live broker Pod.
The following figure illustrates how the scaledown controller (also known as a drain controller) migrates messages to a running broker Pod.
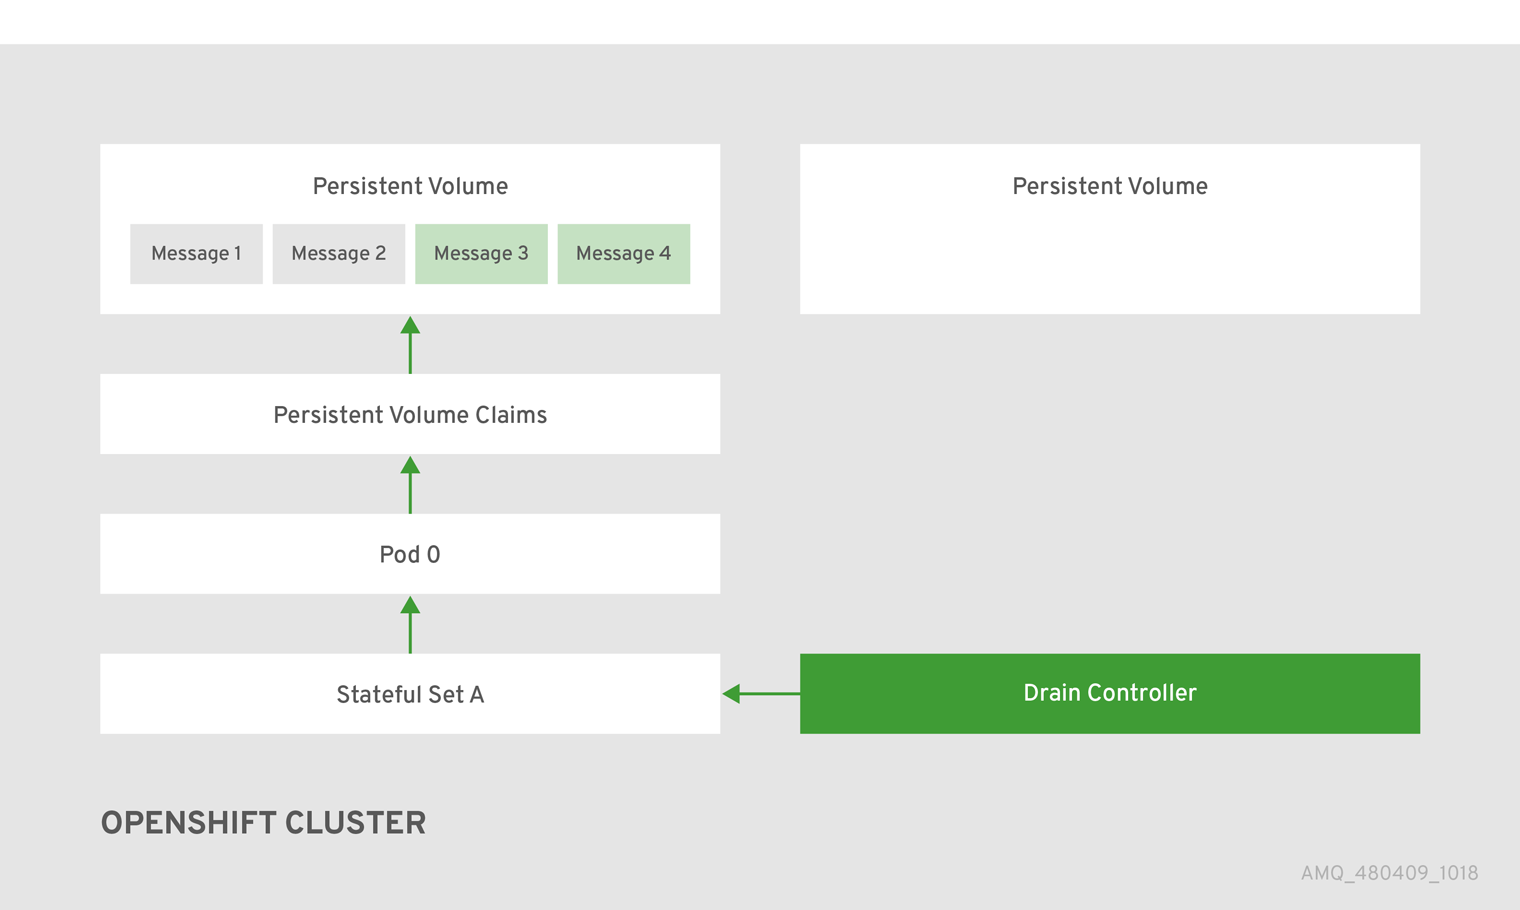
After the messages are migrated successfully to an operational broker Pod, the drainer Pod shuts down and the scaledown controller removes the PVC for the orphaned PV. The PV is returned to a "Released" state.
If the reclaim policy for the PV is set to retain, the PV cannot be used by another Pod until you delete and recreate the PV. For example, if you scale the cluster up after scaling it down, the PV is not available to a Pod started until you delete and recreate the PV.
Additional resources
- For an example of message migration when you scale down a broker deployment, see Section 4.13.2, “Enabling message migration”.
4.13.2. Enabling message migration
You can enable message migration in the ActiveMQArtemis Custom Resource (CR).
Prerequisites
- You already have a basic broker deployment. See Section 3.4.1, “Deploying a basic broker instance”.
- You understand how message migration works. For more information, see Section 4.13.1, “Steps in message migration process”.
- A scaledown controller operates only within a single OpenShift project. The controller cannot migrate messages between brokers in separate projects.
- If you scale a broker deployment down to 0 (zero), message migration does not occur, since there is no running broker Pod to which messaging data can be migrated. However, if you scale a deployment down to zero and then back up to a size that is smaller than the original deployment, drainer Pods are started for the brokers that remain shut down.
Procedure
Edit the CR instance for the broker deployment.
Using the OpenShift command-line interface:
- Log in to OpenShift Container Platform as a user that has privileges to deploy CRs in the project for the broker deployment.
Edit the CR for your deployment.
oc edit ActiveMQArtemis <CR instance name> -n <namespace>
Using the OpenShift Container Platform web console:
- Log in to OpenShift Container Platform as a user that has privileges to deploy CRs in the project for the broker deployment.
- In the left pane, click → .
- Click the ActiveMQArtemis CRD.
- Click the Instances tab.
- Click the instance for your broker deployment.
Click the YAML tab.
Within the console, a YAML editor opens, enabling you to edit the CR instance.
In the
deploymentPlansection of the CR, add amessageMigrationattribute and set totrue. If not already configured, add apersistenceEnabledattribute and also set totrue. For example:spec: deploymentPlan: messageMigration: true persistenceEnabled: true ...These settings mean that when you later scale down the size of your clustered broker deployment, the Operator automatically starts a scaledown controller and migrates messages to a broker Pod that is still running.
- Save the CR.
(Optional) Complete the following steps to scale down the cluster and view the message migration process.
In your existing broker deployment, verify which Pods are running.
$ oc get pods
You see output that looks like the following.
activemq-artemis-operator-8566d9bf58-9g25l 1/1 Running 0 3m38s ex-aao-ss-0 1/1 Running 0 112s ex-aao-ss-1 1/1 Running 0 8s
The preceding output shows that there are three Pods running; one for the broker Operator itself, and a separate Pod for each broker in the deployment.
Log into each Pod and send some messages to each broker.
Supposing that Pod
ex-aao-ss-0has a cluster IP address of172.17.0.6, run the following command:$ /opt/amq/bin/artemis producer --url tcp://172.17.0.6:61616 --user admin --password admin
Supposing that Pod
ex-aao-ss-1has a cluster IP address of172.17.0.7, run the following command:$ /opt/amq/bin/artemis producer --url tcp://172.17.0.7:61616 --user admin --password admin
The preceding commands create a queue called
TESTon each broker and add 1000 messages to each queue.Scale the cluster down from two brokers to one.
-
Open the main broker CR,
broker_activemqartemis_cr.yaml. -
In the CR, set
deploymentPlan.sizeto1. At the command line, apply the change:
$ oc apply -f deploy/crs/broker_activemqartemis_cr.yaml
You see that the Pod
ex-aao-ss-1starts to shut down. The scaledown controller starts a new drainer Pod of the same name. This drainer Pod also shuts down after it migrates all messages from broker Podex-aao-ss-1to the other broker Pod in the cluster,ex-aao-ss-0.
-
Open the main broker CR,
-
When the drainer Pod is shut down, check the message count on the
TESTqueue of broker Podex-aao-ss-0. You see that the number of messages in the queue is 2000, indicating that the drainer Pod successfully migrated 1000 messages from the broker Pod that shut down.
4.14. Controlling placement of broker pods on OpenShift Container Platform nodes
You can control the placement of AMQ Broker pods on OpenShift Container Platform nodes by using node selectors, tolerations, or affinity and anti-affinity rules.
- Node selectors
- A node selector allows you to schedule a broker pod on a specific node.
- Tolerations
- A toleration enables a broker pod to be scheduled on a node if the toleration matches a taint configured for the node. Without a matching pod toleration, a taint allows a node to refuse to accept a pod.
- Affinity/Anti-affinity
- Node affinity rules control which nodes a pod can be scheduled on based on the node’s labels. Pod affinity and anti-affinity rules control which nodes a pod can be scheduled on based on the pods already running on that node.
4.14.1. Placing pods on specific nodes using node selectors
A node selector specifies a key-value pair that requires the broker pod to be scheduled on a node that has matching key-value pair in the node label.
The following example shows how to configure a node selector to schedule a broker pod on a specific node.
Prerequisites
- You should be familiar with how to use a CR instance to create a basic broker deployment. See Section 3.4.1, “Deploying a basic broker instance”.
- Add a label to the OpenShift Container Platform node on which you want to schedule the broker pod. For more information about adding node labels, see Using node selectors to control pod placement in the OpenShift Container Platform documentation.
Procedure
Create a Custom Resource (CR) instance based on the main broker CRD.
Using the OpenShift command-line interface:
Log in to OpenShift as a user that has privileges to deploy CRs in the project for the broker deployment.
oc login -u <user> -p <password> --server=<host:port>
-
Open the sample CR file called
broker_activemqartemis_cr.yamlthat was included in thedeploy/crsdirectory of the Operator installation archive that you downloaded and extracted.
Using the OpenShift Container Platform web console:
- Log in to the console as a user that has privileges to deploy CRs in the project for the broker deployment.
- Start a new CR instance based on the main broker CRD. In the left pane, click → .
- Click the ActiveMQArtemis CRD.
- Click the Instances tab.
Click Create ActiveMQArtemis.
Within the console, a YAML editor opens, enabling you to configure a CR instance.
In the
deploymentPlansection of the CR, add anodeSelectorsection and add the node label that you want to match to select a node for the pod. For example:spec: deploymentPlan: nodeSelector: app: broker1In this example, the broker pod is scheduled on a node that has a
app: broker1label.Deploy the CR instance.
Using the OpenShift command-line interface:
- Save the CR file.
Switch to the project in which you are creating the broker deployment.
$ oc project <project_name>Create the CR instance.
$ oc create -f <path/to/custom_resource_instance>.yaml
Using the OpenShift web console:
- When you have finished configuring the CR, click Create.
Additional resources
For more information about node selectors in OpenShift Container Platform, see Placing pods on specific nodes using node selectors in the OpenShift Container Platform documentation.
4.14.2. Controlling pod placement using tolerations
Taints and tolerations control whether pods can or cannot be scheduled on specific nodes. A taint allows a node to refuse to schedule a pod unless the pod has a matching toleration. You can use taints to exclude pods from a node so the node is reserved for specific pods, such as broker pods, that have a matching toleration.
Having a matching toleration permits a broker pod to be scheduled on a node but does not guarantee that the pod is scheduled on that node. To guarantee that the broker pod is scheduled on the node that has a taint configured, you can configure affinity rules. For more information, see Section 4.14.3, “Controlling pod placement using affinity and anti-affinity rules”
The following example shows how to configure a toleration to match a taint that is configured on a node.
Prerequisites
- You should be familiar with how to use a CR instance to create a basic broker deployment. See Section 3.4.1, “Deploying a basic broker instance”.
Apply a taint to the nodes which you want to reserve for scheduling broker pods. A taint consists of a key, value, and effect. The taint effect determines if:
- existing pods on the node are evicted
- existing pods are allowed to remain on the node but new pods cannot be scheduled unless they have a matching toleration
- new pods can be scheduled on the node if necessary, but preference is to not schedule new pods on the node.
For more information about applying taints, see Controlling pod placement using node taints in the OpenShift Container Platform documentation.
Procedure
Create a Custom Resource (CR) instance based on the main broker CRD.
Using the OpenShift command-line interface:
Log in to OpenShift as a user that has privileges to deploy CRs in the project for the broker deployment.
oc login -u <user> -p <password> --server=<host:port>
-
Open the sample CR file called
broker_activemqartemis_cr.yamlthat was included in thedeploy/crsdirectory of the Operator installation archive that you downloaded and extracted.
Using the OpenShift Container Platform web console:
- Log in to the console as a user that has privileges to deploy CRs in the project for the broker deployment.
- Start a new CR instance based on the main broker CRD. In the left pane, click → .
- Click the ActiveMQArtemis CRD.
- Click the Instances tab.
Click Create ActiveMQArtemis.
Within the console, a YAML editor opens, enabling you to configure a CR instance.
In the
deploymentPlansection of the CR, add atolerationssection. In thetolerationssection, add a toleration for the node taint that you want to match. For example:spec: deploymentPlan: tolerations: - key: "app" value: "amq-broker" effect: "NoSchedule"In this example, the toleration matches a node taint of
app=amq-broker:NoSchedule, so the pod can be scheduled on a node that has this taint configured.
To ensure that the broker pods are scheduled correctly, do not specify a tolerationsSeconds attribute in the tolerations section of the CR.
Deploy the CR instance.
Using the OpenShift command-line interface:
- Save the CR file.
Switch to the project in which you are creating the broker deployment.
$ oc project <project_name>Create the CR instance.
$ oc create -f <path/to/custom_resource_instance>.yaml
Using the OpenShift web console:
- When you have finished configuring the CR, click Create.
Additional resources
For more information about taints and tolerations in OpenShift Container Platform, see Controlling pod placement using node taints in the OpenShift Container Platform documentation.
4.14.3. Controlling pod placement using affinity and anti-affinity rules
You can control pod placement using node affinity, pod affinity, or pod anti-affinity rules. Node affinity allows a pod to specify an affinity towards a group of target nodes. Pod affinity and anti-affinity allows you to specify rules about how pods can or cannot be scheduled relative to other pods that are already running on a node.
4.14.3.1. Controlling pod placement using node affinity rules
Node affinity allows a broker pod to specify an affinity towards a group of nodes that it can be placed on. A broker pod can be scheduled on any node that has a label with the same key-value pair as the affinity rule that you create for a pod.
The following example shows how to configure a broker to control pod placement by using node affinity rules.
Prerequisites
- You should be familiar with how to use a CR instance to create a basic broker deployment. See Section 3.4.1, “Deploying a basic broker instance”.
-
Assign a common label to the nodes in your OpenShift Container Platform cluster that can schedule the broker pod, for example,
zone: emea.
Procedure
Create a Custom Resource (CR) instance based on the main broker CRD.
Using the OpenShift command-line interface:
Log in to OpenShift as a user that has privileges to deploy CRs in the project for the broker deployment.
oc login -u <user> -p <password> --server=<host:port>
-
Open the sample CR file called
broker_activemqartemis_cr.yamlthat was included in thedeploy/crsdirectory of the Operator installation archive that you downloaded and extracted.
Using the OpenShift Container Platform web console:
- Log in to the console as a user that has privileges to deploy CRs in the project for the broker deployment.
- Start a new CR instance based on the main broker CRD. In the left pane, click → .
- Click the ActiveMQArtemis CRD.
- Click the Instances tab.
Click Create ActiveMQArtemis.
Within the console, a YAML editor opens, enabling you to configure a CR instance.
In the
deploymentPlansection of the CR, add the following sections:affinity,nodeAffinity,requiredDuringSchedulingIgnoredDuringExecution, andnodeSelectorTerms. In thenodeSelectorTermssection, add the- matchExpressionsparameter and specify the key-value string of a node label to match. For example:spec: deploymentPlan: affinity: nodeAffinity: requiredDuringSchedulingIgnoredDuringExecution: nodeSelectorTerms: - matchExpressions: - key: zone operator: In values: - emeaIn this example, the affinity rule allows the pod to be scheduled on any node that has a label with a key of
zoneand a value ofemea.Deploy the CR instance.
Using the OpenShift command-line interface:
- Save the CR file.
Switch to the project in which you are creating the broker deployment.
$ oc project <project_name>Create the CR instance.
$ oc create -f <path/to/custom_resource_instance>.yaml
Using the OpenShift web console:
- When you have finished configuring the CR, click Create.
Additional resources
For more information about affinity rules in OpenShift Container Platform, see Controlling pod placement on nodes using node affinity rules in the OpenShift Container Platform documentation.
4.14.3.2. Placing pods relative to other pods using anti-affinity rules
Anti-affinity rules allow you to constrain which nodes the broker pods can be scheduled on based on the labels of pods already running on that node.
A use case for using anti-affinity rules is to ensure that multiple broker pods in a cluster are not scheduled on the same node, which creates a single point of failure. If you do not control the placement of pods, 2 or more broker pods in a cluster can be scheduled on the same node.
The following example shows how to configure anti-affinity rules to prevent 2 broker pods in a cluster from being scheduled on the same node.
Prerequisites
- You should be familiar with how to use a CR instance to create a basic broker deployment. See Section 3.4.1, “Deploying a basic broker instance”.
Procedure
Create a CR instance for the first broker in the cluster based on the main broker CRD.
Using the OpenShift command-line interface:
Log in to OpenShift as a user that has privileges to deploy CRs in the project for the broker deployment.
oc login -u <user> -p <password> --server=<host:port>
-
Open the sample CR file called
broker_activemqartemis_cr.yamlthat was included in thedeploy/crsdirectory of the Operator installation archive that you downloaded and extracted.
Using the OpenShift Container Platform web console:
- Log in to the console as a user that has privileges to deploy CRs in the project for the broker deployment.
- Start a new CR instance based on the main broker CRD. In the left pane, click → .
- Click the ActiveMQArtemis CRD.
- Click the Instances tab.
Click Create ActiveMQArtemis.
Within the console, a YAML editor opens, enabling you to configure a CR instance.
In the
deploymentPlansection of the CR, add alabelssection. Create an identifying label for the first broker pod so that you can create an anti-affinity rule on the second broker pod to prevent both pods from being scheduled on the same node. For example:spec: deploymentPlan: labels: name: broker1Deploy the CR instance.
Using the OpenShift command-line interface:
- Save the CR file.
Switch to the project in which you are creating the broker deployment.
$ oc project <project_name>Create the CR instance.
$ oc create -f <path/to/custom_resource_instance>.yaml
Using the OpenShift web console:
- When you have finished configuring the CR, click Create.
Create a CR instance for the second broker in the cluster based on the main broker CRD.
In the
deploymentPlansection of the CR, add the following sections:affinity,podAntiAffinity,requiredDuringSchedulingIgnoredDuringExecution, andlabelSelector. In thelabelSelectorsection, add the- matchExpressionsparameter and specify the key-value string of the broker pod label to match, so this pod is not scheduled on the same node.spec: deploymentPlan: affinity: podAntiAffinity: requiredDuringSchedulingIgnoredDuringExecution: labelSelector: - matchExpressions: - key: name operator: In values: - broker1 topologyKey: topology.kubernetes.io/zoneIn this example, the pod anti-affinity rule prevents the pod from being placed on the same node as a pod that has a label with a key of
nameand a value ofbroker1, which is the label assigned to the first broker in the cluster.
Deploy the CR instance.
Using the OpenShift command-line interface:
- Save the CR file.
Switch to the project in which you are creating the broker deployment.
$ oc project <project_name>Create the CR instance.
$ oc create -f <path/to/custom_resource_instance>.yaml
Using the OpenShift web console:
- When you have finished configuring the CR, click Create.
Additional resources
For more information about affinity rules in OpenShift Container Platform, see Controlling pod placement on nodes using node affinity rules in the OpenShift Container Platform documentation.
4.15. Configuring logging for brokers
AMQ Broker uses the Log4j 2 logging utility to provide message logging. When you deploy a broker, it uses a default Log4j 2 configuration. If you want to change the default configuration, you must create a new Log4j 2 configuration in either a secret or a configMap. After you add the name of the secret or configMap to the main broker Custom Resource (CR), the Operator configures each broker to use the new logging configuration, which is stored in a file that the Operator mounts on each Pod.
Prerequisite
- You are familiar with the Log4j 2 configuration options.
Procedure
Prepare a file that contains the log4j 2 configuration that you want to use with AMQ Broker.
The default Log4j 2 configuration file that is used by a broker is located in the
/home/jboss/amq-broker/etc/log4j2.propertiesfile on each broker Pod. You can use the contents of the default configuration file as the basis for creating a new Log4j 2 configuration in a secret or configMap. To get the contents of the default Log4j 2 configuration file, complete the following steps.Using the OpenShift Container Platform web console:
- Click → .
- Click the ex-aao-ss Pod.
- Click the Terminal tab.
-
Use the
catcommand to display the contents of the/home/jboss/amq-broker/etc/log4j2.propertiesfile on a broker Pod and copy the contents. -
Paste the contents into a local file, where the OpenShift Container Platform CLI is installed, and save the file as
logging.properties.
Using the OpenShift command-line interface:
Get the name of a Pod in your deployment.
$ oc get pods -o wide NAME STATUS IP amq-broker-operator-54d996c Running 10.129.2.14 ex-aao-ss-0 Running 10.129.2.15
Use the
oc cpcommand to copy the log configuration file from a Pod to your local directory.$ oc cp <pod name>:/home/jboss/amq-broker/etc/log4j2.properties logging.properties -c <name>-container
Where the <name> part of the container name is the prefix before the
-ssstring in the Pod name. For example:$ oc cp ex-aao-ss-0:/home/jboss/amq-broker/etc/log4j2.properties logging.properties -c ex-aao-container
NoteWhen you create a configMap or secret from a file, the key in the configMap or secret defaults to the file name and the value defaults to the file content. By creating a secret from a file named
logging.properties, the required key for the new logging configuration is inserted in the secret or configMap.
Edit the
logging.propertiesfile and create the Log4j 2 configuration that you want to use with AMQ Broker.For example, with the default configuration, AMQ Broker logs messages to the console only. You might want to update the configuration so that AMQ Broker logs messages to disk also.
Add the updated Log4j 2 configuration to a secret or a ConfigMap.
Log in to OpenShift as a user that has privileges to create secrets or ConfigMaps in the project for the broker deployment.
oc login -u <user> -p <password> --server=<host:port>
If you want to configure the log settings in a secret, use the
oc create secretcommand. For example:oc create secret generic newlog4j-logging-config --from-file=logging.properties
If you want to configure the log settings in a ConfigMap, use the
oc create configmapcommand. For example:oc create configmap newlog4j-logging-config --from-file=logging.properties
The configMap or secret name must have a suffix of
-logging-config, so the Operator can recognize that the secret contains new logging configuration.
Add the secret or ConfigMap to the Custom Resource (CR) instance for your broker deployment.
Using the OpenShift command-line interface:
Log in to OpenShift as a user that has privileges to deploy CRs in the project for the broker deployment.
oc login -u <user> -p <password> --server=<host:port>
Edit the CR.
oc edit ActiveMQArtemis <CR instance name> -n <namespace>
Using the OpenShift Container Platform web console:
- Log in to the console as a user that has privileges to deploy CRs in the project for the broker deployment.
- In the left pane, click → .
- Click the Red Hat Integration - AMQ Broker for RHEL 8 (Multiarch) operator.
- Click the AMQ Broker tab.
- Click the name of the ActiveMQArtemis instance name
Click the YAML tab.
Within the console, a YAML editor opens, enabling you to configure a CR instance.
Add the secret or configMap that contains the Log4j 2 logging configuration to the CR. The following examples show a secret and a configMap added to the CR.
apiVersion: broker.amq.io/v1beta1 kind: ActiveMQArtemis metadata: name: ex-aao spec: deploymentPlan: ... extraMounts: secrets: - "newlog4j-logging-config" ...apiVersion: broker.amq.io/v1beta1 kind: ActiveMQArtemis metadata: name: ex-aao spec: deploymentPlan: ... extraMounts: configMaps: - "newlog4j-logging-config" ...
- Save the CR.
In each broker Pod, the Operator mounts a logging.properties file that contains the logging configuration in the secret or configMap that you created. In addition, the Operator configures each broker to use the mounted log configuration file instead of the default log configuration file.
If you update the logging configuration in a configMap or secret, each broker automatically uses the updated logging configuration.
4.16. Configuring a Pod disruption budget
A Pod disruption budget specifies the minimum number of Pods in a cluster that must be available simultaneously during a voluntary disruption, such as a maintenance window.
Procedure
Edit the CR instance for the broker deployment.
Using the OpenShift command-line interface:
- Log in to OpenShift Container Platform as a user that has privileges to deploy CRs in the project for the broker deployment.
Edit the CR for your deployment.
oc edit ActiveMQArtemis <CR instance name> -n <namespace>
Using the OpenShift Container Platform web console:
- Log in to OpenShift Container Platform as a user that has privileges to deploy CRs in the project for the broker deployment.
- In the left pane, click → .
- Click the ActiveMQArtemis CRD.
- Click the Instances tab.
- Click the instance for your broker deployment.
Click the YAML tab.
Within the console, a YAML editor opens, enabling you to edit the CR instance.
In the
specsection of the CR, add apodDisruptionBudgetelement and specify the minimum number of Pods in your deployment that must be available during a voluntary disruption. In the following example, a minimum of one Pod must be available:spec: ... podDisruptionBudget: minAvailable: 1 ...- Save the CR.
Additional resources
For more information about Pod disruption budgets, see Understanding how to use pod disruption budgets to specify the number of pods that must be up in the OpenShift Container Platform documentation.
4.17. Configuring items not exposed in the Custom Resource Definition
A Custom Resource Definition (CRD) is a schema of configuration items that you can modify for AMQ Broker. You can specify values for configuration items that are in the CRD in a corresponding Custom Resource (CR) instance. The Operator generates the configuration for each broker container from the CR instance.
You can include configuration items in the CR that are not exposed in the CRD by adding the items to a brokerProperties attribute. Items included in a brokerProperties attribute are stored in a secret, which is mounted as a properties file on the broker Pod. At startup, the properties file is applied to the internal java configuration bean after the XML configuration is applied.
In the following example, a single property is applied to the configuration bean.
spec:
    ...
    brokerProperties:
    - globalMaxSize=500m
    ...
In the following example, multiple properties are applied to nested collections of configuration beans to create a broker connection named target that mirror messages with another broker.
spec:
  ...
  brokerProperties
  - "AMQPConnections.target.uri=tcp://<hostname>:<port>"
  - "AMQPConnections.target.connectionElements.mirror.type=MIRROR"
  - "AMQPConnections.target.connectionElements.mirror.messageAcknowledgements=true"
  - "AMQPConnections.target.connectionElements.mirror.queueCreation=true"
  - "AMQPConnections.target.connectionElements.mirror.queueRemoval=true"
  ...
Using the brokerProperties attribute provides access to many configuration items that you cannot otherwise configure for AMQ Broker on OpenShift Container Platform. If used incorrectly, some properties can have serious consequences for your deployment. Always exercise caution when configuring properties by using this method.
Procedure
Edit the CR for your deployment.
Using the OpenShift web console:
Enter the following command:
oc edit ActiveMQArtemis <CR instance name> -n <namespace>
Using the OpenShift Container Platform web console:
- Log in to the console as a user that has privileges to deploy CRs in the project for the broker deployment.
- In the left pane, click → .
- Click the Red Hat Integration - AMQ Broker for RHEL 8 (Multiarch) operator.
- Click the AMQ Broker tab.
- Click the name of the ActiveMQArtemis instance name.
Click the YAML tab.
Within the console, a YAML editor opens, enabling you to edit the CR instance.
In the
specsection of the CR, add abrokerPropertieselement and add a list of properties in camel-case format. For example:spec: ... brokerProperties: - globalMaxSize=500m - maxDiskUsage=85 ...
- Save the CR.
(Optional) Check the status of the configuration.
Using the OpenShift command-line interface:
Get the status conditions for your brokers.
$ oc get activemqartemis -o yaml
Using the OpenShift web console:
- Navigate to the status section of the CR for your broker deployment.
Check the value of the
reasonfield in theBrokerPropertiesAppliedstatus information. For example:- lastTransitionTime: "2023-02-06T20:50:01Z" message: "" reason: Applied status: "True" type: BrokerPropertiesApplied
The possible values are:
Applied- OpenShift Container Platform propagated the updated secret to the properties file on each broker Pod.
AppliedWithError-
OpenShift Container Platform propagated the updated secret to the properties file on each broker Pod. However, an error was found in the
brokerPropertiesconfiguration. In thestatussection of the CR, check themessagefield to identify the invalid property and correct it in the CR. OutOfSync- OpenShift Container Platform has not yet propagated the updated secret to the properties file on each broker Pod. When OpenShift Container Platform propagates the updated secret to each Pod, the status is updated.
The broker checks periodically for configuration changes, including updates to the properties file that is mounted on the Pod, and reloads the configuration if it detects any changes. However, updates to properties that are read only when the broker starts, for example, JVM settings, are not reloaded until you restart the broker. For more information about which properties are reloaded, see Reloading configuration updates in Configuring AMQ Broker.
Additional Information
For a list of properties that you can configure in the brokerProperties element in a CR, see Broker Properties in Configuring AMQ Broker.
Chapter 5. Connecting to AMQ Management Console for an Operator-based broker deployment
Each broker Pod in an Operator-based deployment hosts its own instance of AMQ Management Console at port 8161.
The following procedures describe how to connect to AMQ Management Console for a deployed broker.
Prerequisites
- You created a broker deployment using the AMQ Broker Operator. For example, to learn how to use a sample CR to create a basic broker deployment, see Section 3.4.1, “Deploying a basic broker instance”.
- You enabled access to AMQ Management Console for the brokers in your deployment. For more information about enabling access to AMQ Management Console, see Section 4.6, “Enabling access to AMQ Management Console”.
5.1. Connecting to AMQ Management Console
When you enable access to AMQ Management Console in the Custom Resource (CR) instance for your broker deployment, the Operator automatically creates a dedicated Service and Route for each broker Pod to provide access to AMQ Management Console.
The default name of the automatically-created Service is in the form <custom-resource-name>-wconsj-<broker-pod-ordinal>-svc. For example, my-broker-deployment-wconsj-0-svc. The default name of the automatically-created Route is in the form <custom-resource-name>-wconsj-<broker-pod-ordinal>-svc-rte. For example, my-broker-deployment-wconsj-0-svc-rte.
This procedure shows you how to access the console for a running broker Pod.
Procedure
In the OpenShift Container Platform web console, click → .
On the Routes page, identify the
wconsjRoute for the given broker Pod. For example,my-broker-deployment-wconsj-0-svc-rte.Under Location, click the link that corresponds to the Route.
A new tab opens in your web browser.
Click the Management Console link.
The AMQ Management Console login page opens.
NoteCredentials are required to log in to AMQ Management Console only if the
requireLoginproperty of the CR is set totrue. This property specifies whether login credentials are required to log in to the broker and AMQ Management Console. By default, therequireLoginproperty is set tofalse. IfrequireLoginis set tofalse, you can log in to AMQ Management Console without supplying a valid username and password by entering any text when prompted for a username and password.If the
requireLoginproperty is set totrue, enter a username and password.You can enter the credentials for a preconfigured user that is available for connecting to the broker and AMQ Management Console. You can find these credentials in the
adminUserandadminPasswordproperties if these properties are configured in the Custom Resource (CR) instance. It these properties are not configured in the CR, the Operator automatically generates the credentials. To obtain the automatically generated credentials, see Section 5.2, “Accessing AMQ Management Console login credentials”.If you want to log in as any other user, note that a user must belong to a security role specified for the
hawtio.rolesystem property to have the permissions required to log in to AMQ Management Console. The default role for thehawtio.rolesystem property isadmin, which the preconfigured user belongs to.
5.2. Accessing AMQ Management Console login credentials
If you do not specify a value for adminUser and adminPassword in the Custom Resource (CR) instance used for your broker deployment, the Operator automatically generates these credentials and stores them in a secret. The default secret name is in the form <custom-resource-name>-credentials-secret, for example, my-broker-deployment-credentials-secret.
Values for adminUser and adminPassword are required to log in to the management console only if the requireLogin parameter of the CR is set to true.
If requireLogin is set to false, you can log in to the console without supplying a valid username password by entering any text when prompted for username and password.
This procedure shows how to access the login credentials.
Procedure
See the complete list of secrets in your OpenShift project.
- From the OpenShift Container Platform web console, click → .
From the command line:
$ oc get secrets
Open the appropriate secret to reveal the Base64-encoded console login credentials.
- From the OpenShift Container Platform web console, click the secret that includes your broker Custom Resource instance in its name. Click the YAML tab.
From the command line:
$ oc edit secret <my-broker-deployment-credentials-secret>
To decode a value in the secret, use a command such as the following:
$ echo 'dXNlcl9uYW1l' | base64 --decode
console_admin
Additional resources
- To learn more about using AMQ Management Console to view and manage brokers, see Managing brokers using AMQ Management Console in Managing AMQ Broker.
Chapter 6. Upgrading an Operator-based broker deployment
The procedures in this section show how to upgrade:
- The AMQ Broker Operator version, using both the OpenShift command-line interface (CLI) and OperatorHub
- The broker container image for an Operator-based broker deployment
6.1. Before you begin
This section describes some important considerations before you upgrade the Operator and broker container images for an Operator-based broker deployment.
- Upgrading the Operator using either the OpenShift command-line interface (CLI) or OperatorHub requires cluster administrator privileges for your OpenShift cluster.
If you originally used the CLI to install the Operator, you should also use the CLI to upgrade the Operator. If you originally used OperatorHub to install the Operator (that is, it appears under → for your project in the OpenShift Container Platform web console), you should also use OperatorHub to upgrade the Operator. For more information about these upgrade methods, see:
If the
redeliveryDelayMultiplierand theredeliveryCollisionAvoidanceFactorattributes are configured in the main broker CR in a 7.8.x or 7.9.x deployment, the new Operator is unable to reconcile any CR after you upgrade to 7.10.x. The reconcile fails because the data type of both attributes changed from float to string in 7.10.x.You can work around this issue by deleting the
redeliveryDelayMultiplierand theredeliveryCollisionAvoidanceFactorattributes from thespec.deploymentPlan.addressSettings.addressSettingattribute. Then, configure the attributes under thebrokerPropertiesattribute. For example:spec: ... brokerProperties: - "addressSettings.#.redeliveryMultiplier=2.1" - "addressSettings.#.redeliveryCollisionAvoidanceFactor=1.2"NoteUnder the
brokerPropertiesattribute, use theredeliveryMultiplierattribute name instead of theredeliveryDelayMultiplierattribute name that you deleted.
6.2. Upgrading the Operator using the CLI
The procedures in this section show how to use the OpenShift command-line interface (CLI) to upgrade different versions of the Operator to the latest version available for AMQ Broker 7.11.
6.2.1. Prerequisites
- You should use the CLI to upgrade the Operator only if you originally used the CLI to install the Operator. If you originally used OperatorHub to install the Operator (that is, the Operator appears under → for your project in the OpenShift Container Platform web console), you should use OperatorHub to upgrade the Operator. To learn how to upgrade the Operator using OperatorHub, see Section 6.3, “Upgrading the Operator using OperatorHub”.
6.2.2. Upgrading the Operator using the CLI
You can use the OpenShift command-line interface (CLI) to upgrade the Operator to the latest version for AMQ Broker 7.11.
Procedure
- In your web browser, navigate to the Software Downloads page for AMQ Broker 7.11.6.
-
Ensure that the value of the Version drop-down list is set to
7.11.6and the Patches tab is selected. Next to AMQ Broker 7.11.6 Operator Installation and Example Files, click Download.
Download of the
amq-broker-operator-7.11.6-ocp-install-examples.zipcompressed archive automatically begins.When the download has completed, move the archive to your chosen installation directory. The following example moves the archive to a directory called
~/broker/operator.$ mkdir ~/broker/operator $ mv amq-broker-operator-7.11.6-ocp-install-examples.zip ~/broker/operator
In your chosen installation directory, extract the contents of the archive. For example:
$ cd ~/broker/operator
$ unzip amq-broker-operator-operator-7.11.6-ocp-install-examples.zip
Log in to OpenShift Container Platform as an administrator for the project that contains your existing Operator deployment.
$ oc login -u <user>Switch to the OpenShift project in which you want to upgrade your Operator version.
$ oc project <project-name>In the
deploydirectory of the latest Operator archive that you downloaded and extracted, open theoperator.yamlfile.NoteIn the
operator.yamlfile, the Operator uses an image that is represented by a Secure Hash Algorithm (SHA) value. The comment line, which begins with a number sign (#) symbol, denotes that the SHA value corresponds to a specific container image tag.-
Open the
operator.yamlfile for your previous Operator deployment. Check that any non-default values that you specified in your previous configuration are replicated in the newoperator.yamlconfiguration file. In the new
operator.yamlfile, the Operator is namedamq-broker-controller-managerby default. If the name of the Operator in your previous deployment is notamq-broker-controller-manager, replace all instances ofamq-broker-controller-managerwith the previous Operator name. For example:spec: ... selector matchLabels name: amq-broker-operator ...In the new
operator.yamlfile, the service account for the Operator is namedamq-broker-controller-manager. In previous versions, the service account for the Operator was namedamq-broker-operator.If you want to use the service account name in your previous deployment, replace the name of the service account in the new
operator.yamlfile with the name used in the previous deployment. For example:spec: ... serviceAccountName: amq-broker-operator ...
If you want to use the new service account name,
amq-broker-controller-managerfor the Operator, update the service account, role, and role binding in your project.$ oc apply -f deploy/service_account.yaml
$ oc apply -f deploy/role.yaml
$ oc apply -f deploy/role_binding.yaml
Update the CRDs that are included with the Operator.
Update the main broker CRD.
$ oc apply -f deploy/crds/broker_activemqartemis_crd.yaml
Update the address CRD.
$ oc apply -f deploy/crds/broker_activemqartemisaddress_crd.yaml
Update the scaledown controller CRD.
$ oc apply -f deploy/crds/broker_activemqartemisscaledown_crd.yaml
Update the security CRD.
$ oc apply -f deploy/crds/broker_activemqartemissecurity_crd.yaml
If you are upgrading from AMQ Broker Operator 7.10.0 only, delete the Operator and the StatefulSet.
By default, the new Operator deletes the StatefulSet to remove custom and Operator metering labels, which were incorrectly added to the StatefulSet selector by the Operator in 7.10.0. When the Operator deletes the StatefulSet, it also deletes the existing broker Pods, which causes a temporary broker outage. If you want to avoid an outage, complete the following steps to delete the Operator and the StatefulSet without deleting the broker Pods.
Delete the Operator.
$ oc delete -f deploy/operator.yaml
Delete the StatefulSet with the
--cascade=orphanoption to orphan the broker Pods. The orphaned broker Pods continue to run after the StatefulSet is deleted.$ oc delete statefulset <statefulset-name> --cascade=orphan
If you are upgrading from AMQ Broker Operator 7.10.0 or 7.10.1, check if your main broker CR has labels called
applicationorActiveMQArtemisconfigured in thedeploymentPlan.labelsattribute.These labels are reserved for the Operator to assign labels to Pods and are not permitted as custom labels after 7.10.1. If these custom labels were configured in the main broker CR, the Operator-assigned labels on the Pods were overwritten by the custom labels. If either of these custom labels are configured in the main broker CR, complete the following steps to restore the correct labels on the Pods and remove the labels from the CR.
If you are upgrading from 7.10.0, you deleted the Operator in the previous step. If you are upgrading from 7.10.1, delete the Operator.
$ oc delete -f deploy/operator.yaml
Run the following command to restore the correct Pod labels. In the following example, 'ex-aao' is the name of the StatefulSet deployed.
$ for pod in $(oc get pods | grep -o '^ex-aao[^ ]*'); do oc label --overwrite pods $pod ActiveMQArtemis=ex-aao application=ex-aao-app; done
Delete the
applicationandActiveMQArtemislabels from thedeploymentPlan.labelsattribute in the CR.Log in to OpenShift as a user that has privileges to deploy CRs in the project for the broker deployment.
oc login -u <user> -p <password> --server=<host:port>
-
Open the sample CR file called
broker_activemqartemis_cr.yamlthat was included in thedeploy/crsdirectory of the Operator installation archive that you downloaded and extracted. -
In the
deploymentPlan.labelsattribute in the CR, delete any custom labels calledapplicationorActiveMQArtemis. - Save the CR file.
Deploy the CR instance.
Switch to the project for the broker deployment.
$ oc project <project_name>Apply the CR.
$ oc apply -f <path/to/broker_custom_resource_instance>.yaml
If you deleted the previous Operator, deploy the new Operator.
$ oc create -f deploy/operator.yaml
Apply the updated Operator configuration.
$ oc apply -f deploy/operator.yaml
The new Operator can recognize and manage your previous broker deployments. If you set values in the
imageorversionfield in the CR, the Operator’s reconciliation process upgrades the broker Pods to the corresponding images when the Operator starts. For more information, see Section 6.4, “Restricting automatic upgrades of broker container images”. Otherwise, the Operator upgrades each broker Pod to the latest container image.NoteIf the reconciliation process does not start, you can start the process by scaling the deployment. For more information, see Section 3.4.1, “Deploying a basic broker instance”.
- Add attributes to the CR for the new features that are available in the upgraded broker, as required.
6.3. Upgrading the Operator using OperatorHub
This section describes how to use OperatorHub to upgrade the Operator for AMQ Broker.
6.3.1. Prerequisites
- Use OperatorHub to upgrade the Operator only if you originally used OperatorHub to install the Operator (that is, the Operator appears under → for your project in the OpenShift Container Platform web console). By contrast, if you originally used the OpenShift command-line interface (CLI) to install the Operator, you should also use the CLI to upgrade the Operator. To learn how to upgrade the Operator using the CLI, see Section 6.2, “Upgrading the Operator using the CLI”.
- Upgrading the AMQ Broker Operator using OperatorHub requires cluster administrator privileges for your OpenShift cluster.
6.3.2. Before you begin
This section describes some important considerations before you use OperatorHub to upgrade an instance of the AMQ Broker Operator.
- The Operator Lifecycle Manager automatically updates the CRDs in your OpenShift cluster when you install the latest Operator version from OperatorHub. You do not need to remove existing CRDs. If you remove existing CRDs, all CRs and broker instances are also removed.
- When you update your cluster with the CRDs for the latest Operator version, this update affects all projects in the cluster. Any broker Pods deployed from previous versions of the Operator might become unable to update their status in the OpenShift Container Platform web console. When you click the Logs tab of a running broker Pod, you see messages indicating that 'UpdatePodStatus' has failed. However, the broker Pods and Operator in that project continue to work as expected. To fix this issue for an affected project, you must also upgrade that project to use the latest version of the Operator.
- The procedure to follow depends on the Operator version that you are upgrading from. Ensure that you follow the upgrade procedure that is for your current version.
6.3.3. Upgrading the Operator from pre-7.10.0 to 7.11.x
You must uninstall and reinstall the Operator to upgrade from pre-7.10.0 to 7.11.x.
Procedure
- Log in to the OpenShift Container Platform web console as a cluster administrator.
- Uninstall the existing AMQ Broker Operator from your project.
- In the left navigation menu, click → .
- From the Project drop-down menu at the top of the page, select the project in which you want to uninstall the Operator.
- Locate the Red Hat Integration - AMQ Broker instance that you want to uninstall.
- For your Operator instance, click the More Options icon (three vertical dots) on the right-hand side. Select Uninstall Operator.
- On the confirmation dialog box, click Uninstall.
Use OperatorHub to install the latest version of the Operator for AMQ Broker 7.11. For more information, see Section 3.3.2, “Deploying the Operator from OperatorHub”.
The new Operator can recognize and manage your previous broker deployments. If you set values in the
imageorversionfield in the CR, the Operator’s reconciliation process upgrades the broker Pods to the corresponding container images when the Operator starts. For more information, see Section 6.4, “Restricting automatic upgrades of broker container images”. Otherwise, the Operator upgrades each broker Pod to the latest container image.NoteIf the reconciliation process does not start, you can start the process by scaling the deployment. For more information, see Section 3.4.1, “Deploying a basic broker instance”.
6.3.4. Upgrading the Operator from 7.10.0 to 7.11.x
You must uninstall and reinstall the Operator to upgrade from 7.10.0 to 7.11.x.
Procedure
- Log in to the OpenShift Container Platform web console as a cluster administrator.
Uninstall the existing AMQ Broker Operator from your project.
- In the left navigation menu, click → .
- From the Project drop-down menu at the top of the page, select the project in which you want to uninstall the Operator.
- Locate the Red Hat Integration - AMQ Broker instance that you want to uninstall.
- For your Operator instance, click the More Options icon (three vertical dots) on the right-hand side. Select Uninstall Operator.
- On the confirmation dialog box, click Uninstall.
When you upgrade a 7.10.0 Operator, the new Operator deletes the StatefulSet to remove custom and Operator metering labels, which were incorrectly added to the StatefulSet selector by the Operator in 7.10.0. When the Operator deletes the StatefulSet, it also deletes the existing broker pods, which causes a temporary broker outage. If you want to avoid the outage, complete the following steps to delete the StatefulSet and orphan the broker pods so that they continue to run.
Log in to OpenShift Container Platform CLI as an administrator for the project that contains your existing Operator deployment:
$ oc login -u <user>Switch to the OpenShift project in which you want to upgrade your Operator version.
$ oc project <project-name>Delete the StatefulSet with the
--cascade=orphanoption to orphan the broker Pods. The orphaned broker Pods continue to run after the StatefulSet is deleted.$ oc delete statefulset <statefulset-name> --cascade=orphan
Check if your main broker CR has labels called
applicationorActiveMQArtemisconfigured in thedeploymentPlan.labelsattribute.In 7.10.0, it was possible to configure these custom labels in the CR. These labels are reserved for the Operator to assign labels to Pods and cannot be added as custom labels after 7.10.0. If these custom labels were configured in the main broker CR in 7.10.0, the Operator-assigned labels on the Pods were overwritten by the custom labels. If the CR has either of these labels, complete the following steps to restore the correct labels on the Pods and remove the labels from the CR.
In the OpenShift command-line interface (CLI), run the following command to restore the correct Pod labels. In the following example, 'ex-aao' is the name of the StatefulSet deployed.
$ for pod in $(oc get pods | grep -o '^ex-aao[^ ]*'); do oc label --overwrite pods $pod ActiveMQArtemis=ex-aao application=ex-aao-app; done
Delete the
applicationandActiveMQArtemislabels from thedeploymentPlan.labelsattribute in the CR.Using the OpenShift command-line interface:
Log in to OpenShift as a user that has privileges to deploy CRs in the project for the broker deployment.
oc login -u <user> -p <password> --server=<host:port>
Edit the CR for your deployment.
oc edit ActiveMQArtemis <statefulset name> -n <namespace>
-
In the
deploymentPlan.labelselement in the CR, delete any custom labels calledapplicationorActiveMQArtemis. - Save the CR.
Using the OpenShift Container Platform web console:
- Log in to the console as a user that has privileges to deploy CRs in the project for the broker deployment.
- In the left pane, click → .
- Click the ActiveMQArtemis CRD.
- Click the Instances tab.
- Click the instance for your broker deployment.
Click the YAML tab.
Within the console, a YAML editor opens, enabling you to configure a CR instance.
-
In the
deploymentPlan.labelselement in the CR, delete any custom labels calledapplicationorActiveMQArtemis. - Click Save.
Use OperatorHub to install the latest version of the Operator for AMQ Broker 7.11. For more information, see Section 3.3.2, “Deploying the Operator from OperatorHub”.
The new Operator can recognize and manage your previous broker deployments. If you set values in the
imageorversionfield in the CR, the Operator’s reconciliation process upgrades the broker Pods to the corresponding images when the Operator starts. For more information, see Section 6.4, “Restricting automatic upgrades of broker container images”. Otherwise, the Operator upgrades each broker Pod to the latest container image.NoteIf the reconciliation process does not start, you can start the process by scaling the deployment. For more information, see Section 3.4.1, “Deploying a basic broker instance”.
- Add attributes to the CR for the new features that are available in the upgraded broker, as required.
6.3.5. Upgrading the Operator from 7.10.1 to 7.11.x
You must uninstall and reinstall the Operator to upgrade from 7.10.1 to 7.11.x.
Procedure
- Log in to the OpenShift Container Platform web console as a cluster administrator.
Check if your main broker CR has labels called
applicationorActiveMQArtemisconfigured in thedeploymentPlan.labelsattribute.These labels are reserved for the Operator to assign labels to Pods and cannot be used after 7.10.1. If these custom labels were configured in the main broker CR, the Operator-assigned labels on the Pods were overwritten by the custom labels.
- If these custom labels are not configured in the main broker CR, use OperatorHub to install the latest version of the Operator for AMQ Broker 7.11. For more information, see Section 3.3.2, “Deploying the Operator from OperatorHub”.
If either of these custom labels are configured in the main broker CR, complete the following steps to uninstall the existing Operator, restore the correct Pod labels and remove the labels from the CR, before you install the new Operator.
NoteBy uninstalling the Operator, you can remove the custom labels without the Operator deleting the StatefulSet, which also deletes the existing broker pods and causes a temporary broker outage.
Uninstall the existing AMQ Broker Operator from your project.
- In the left navigation menu, click → .
- From the Project drop-down menu at the top of the page, select the project from which you want to uninstall the Operator.
- Locate the Red Hat Integration - AMQ Broker instance that you want to uninstall.
- For your Operator instance, click the More Options icon (three vertical dots) on the right-hand side. Select Uninstall Operator.
- On the confirmation dialog box, click Uninstall.
In the OpenShift command-line interface (CLI), run the following command to restore the correct Pod labels. In the following example, 'ex-aao' is the name of the StatefulSet deployed.
$ for pod in $(oc get pods | grep -o '^ex-aao[^ ]*'); do oc label --overwrite pods $pod ActiveMQArtemis=ex-aao application=ex-aao-app; done
Delete the
applicationandActiveMQArtemislabels from thedeploymentPlan.labelsattribute in the CR.Using the OpenShift command-line interface:
Log in to OpenShift as a user that has privileges to deploy CRs in the project for the broker deployment.
oc login -u <user> -p <password> --server=<host:port>
Edit the CR for your deployment.
oc edit ActiveMQArtemis <statefulset name> -n <namespace>
-
In the
deploymentPlan.labelsattribute in the CR, delete any custom labels calledapplicationorActiveMQArtemis. - Save the CR file.
Using the OpenShift Container Platform web console:
- Log in to the console as a user that has privileges to deploy CRs in the project for the broker deployment.
- In the left pane, click → .
- Click the ActiveMQArtemis CRD.
- Click the Instances tab.
- Click the instance for your broker deployment.
Click the YAML tab.
Within the console, a YAML editor opens, enabling you to configure a CR instance.
-
In the
deploymentPlan.labelsattribute in the CR, delete any custom labels calledapplicationorActiveMQArtemis. - Click Save.
Use OperatorHub to install the latest version of the Operator for AMQ Broker 7.11. For more information, see Section 3.3.2, “Deploying the Operator from OperatorHub”.
The new Operator can recognize and manage your previous broker deployments. If you set values in the
imageorversionfield in the CR, the Operator’s reconciliation process upgrades the broker Pods to the corresponding images when the Operator starts. For more information, see Section 6.4, “Restricting automatic upgrades of broker container images”. Otherwise, the Operator upgrades each broker Pod to the latest container image.NoteIf the reconciliation process does not start, you can start the process by scaling the deployment. For more information, see Section 3.4.1, “Deploying a basic broker instance”.
- Add attributes to the CR for the new features that are available in the upgraded broker, as required.
6.3.6. Upgrading the Operator from 7.10.2 or later to 7.11.x
You must uninstall and reinstall the Operator to upgrade from 7.10.2 or later to 7.11.x.
Procedure
- Log in to the OpenShift Container Platform web console as a cluster administrator.
- Uninstall the existing AMQ Broker Operator from your project.
- In the left navigation menu, click → .
- From the Project drop-down menu at the top of the page, select the project in which you want to uninstall the Operator.
- Locate the Red Hat Integration - AMQ Broker instance that you want to uninstall.
- For your Operator instance, click the More Options icon (three vertical dots) on the right-hand side. Select Uninstall Operator.
- On the confirmation dialog box, click Uninstall.
Use OperatorHub to install the latest version of the Operator for AMQ Broker 7.11. For more information, see Section 3.3.2, “Deploying the Operator from OperatorHub”.
The new Operator can recognize and manage your previous broker deployments. If you set values in the
imageorversionfield in the CR, the Operator’s reconciliation process upgrades the broker Pods to the corresponding images when the Operator starts. For more information, see Section 6.4, “Restricting automatic upgrades of broker container images”. Otherwise, the Operator upgrades each broker Pod to the latest container image.NoteIf the reconciliation process does not start, you can start the process by scaling the deployment. For more information, see Section 3.4.1, “Deploying a basic broker instance”.
6.4. Restricting automatic upgrades of broker container images
By default, the Operator automatically upgrades each broker in the deployment to use the latest available container images. In the Custom Resource (CR) for your deployment, you can restrict the ability of the Operator to upgrade the images by specifying a version number or the URLs of specific container images.
If you want to restrict automatic upgrades of broker container images, ensure that your CR has either a version number or the combined URLs of the broker and init container images.
6.4.1. Restricting automatic upgrades of images by using version numbers
You can restrict the version of the container images to which the brokers are automatically upgraded as new versions become available.
When you restrict upgrades based on version numbers, the Operator continues to automatically upgrade the brokers to use any new images that contain security fixes for the version deployed.
Procedure
Edit the main broker CR instance for the broker deployment.
Using the OpenShift command-line interface:
Log in to OpenShift as a user that has privileges to edit and deploy CRs in the project for the broker deployment.
$ oc login -u <user> -p <password> --server=<host:port>
Edit the CR.
oc edit ActiveMQArtemis <CR instance name> -n <namespace>
Using the OpenShift Container Platform web console:
- Log in to the console as a user that has privileges to deploy CRs in the project for the broker deployment.
- In the left pane, click → .
- Click the Red Hat Integration - AMQ Broker for RHEL 8 (Multiarch) operator.
- Click the AMQ Broker tab.
- Click the name of the ActiveMQArtemis instance name.
Click the YAML tab.
Within the console, a YAML editor opens, enabling you to edit the CR instance.
NoteIn the
statussection of the CR, the.status.version.brokerVersionfield shows the version of AMQ Broker that is currently deployed.
In the
spec.versionattribute, specify the version to which the Operator can upgrade the broker and init container images in your deployment. The following are examples of values that you can specify.- Examples
In the following example, the Operator upgrades the current container images in your deployment to 7.11.0.
spec:
   version: '7.11.0'
    ...
In the following example, the Operator upgrades the current container images in your deployment to the latest available 7.10.x images. For example, if your deployment is using 7.10.1 container images, the Operator automatically upgrades the images to 7.10.2 but not to 7.11.6.
spec:
    version: '7.10'
    ...
In the following example, the Operator upgrades the current container images in your deployment to the latest 7.x.x images. For example, if your deployment is using 7.10.2 images, the Operator automatically upgrades the images to 7.11.6.
spec: version: '7' ...NoteTo upgrade between minor versions of the container images, for example, from 7.10.x to 7.11.x, you require an Operator that has the same minor version as that of the new container images. For example, to upgrade from 7.10.2 to 7.11.6, a 7.11.x Operator must be installed.
- Save the CR.
Ensure that the CR does not contain a spec.deploymentPlan.image or a spec.deploymentPlan.initImage attribute in addition to a spec.version attribute. Both of these attributes override the spec.version attribute. If the CR has one of these attributes as well as the spec.version attribute, the versions of the broker and init images deployed can diverge, which might prevent the broker from running.
When you save the CR, the Operator first validates that an upgrade to the AMQ Broker version specified for spec.version is available for your existing deployment. If you specified an invalid version of AMQ Broker to which to upgrade, for example, a version that is not yet available, the Operator logs a warning message, and takes no further action.
However, if an upgrade to the specified version is available, then the Operator upgrades each broker in the deployment to use the broker container images that correspond to the new AMQ Broker version.
The broker container image that the Operator uses is defined in an environment variable in the operator.yaml configuration file of the Operator deployment. The environment variable name includes an identifier for the AMQ Broker version. For example, the environment variable RELATED_IMAGE_ActiveMQ_Artemis_Broker_Kubernetes_7116 corresponds to AMQ Broker 7.11.6.
When the Operator has applied the CR change, it restarts each broker Pod in your deployment so that each Pod uses the specified image version. If you have multiple brokers in your deployment, only one broker Pod shuts down and restarts at a time.
Additional resources
- To learn how the Operator uses environment variables to choose a broker container image, see Section 2.6, “How the Operator chooses container images”.
- To view the status of the deployment, see Section 6.4.3, “Validation of restrictions applied to automatic upgrades”
6.4.2. Restricting automatic upgrades of images by using image URLs
If you want to upgrade the brokers in your deployment to use specific container images, you can specify the registry URLs of the images in the CR. After the Operator upgrades the brokers to the specified container images, no further upgrades occur until you replace the image URLs in the CR. For example, the Operator does not automatically upgrade the brokers to use newer images that contain security fixes for the images deployed.
If you want to restrict automatic upgrades by using image URLs, specify URLs for both the spec.deploymentPlan.image and the spec.deploymentPlan.initImage attributes in the CR to ensure that the broker and init container images match. If you specify the URL of one container image only, the broker and init container image can diverge, which might prevent the broker from running.
If a CR has a spec.version attribute in addition to spec.deploymentPlan.image and spec.deploymentPlan.initImage attributes, the Operator ignores the spec.version attribute.
Procedure
Obtain the URLs of the broker and init container images to which the Operator can upgrade the current images.
- In the Red Hat Catalog, open the broker container component page: AMQ Broker for RHEL 8 (Multiarch).
- In the Architecture drop-down, select your architecture.
- In the Tag drop-down, select the tag that corresponds to the image you want to install. Tags are displayed in chronological order based on the release date. A tag consists of the release version and an assigned tag.
- Open the Get this image tab.
- In the Manifest field, click the Copy icon.
- Paste the URL into a text file.
- In the Red Hat Catalog, open the init container component page: AMQ Broker Init for RHEL 8 (Multiarch)
- To obtain the URL of the init container image, repeat the steps that you followed to obtain the URL of the broker container image.
Edit the main broker CR instance for the broker deployment.
Using the OpenShift command-line interface:
Log in to OpenShift as a user that has privileges to edit and deploy CRs in the project for the broker deployment.
$ oc login -u <user> -p <password> --server=<host:port>
Edit the CR.
oc edit ActiveMQArtemis <CR instance name> -n <namespace>
Using the OpenShift Container Platform web console:
- Log in to the console as a user that has privileges to deploy CRs in the project for the broker deployment.
- In the left pane, click → .
- Click the Red Hat Integration - AMQ Broker for RHEL 8 (Multiarch) operator.
- Click the AMQ Broker tab.
- Click the name of the ActiveMQArtemis instance name.
Click the YAML tab.
Within the console, a YAML editor opens, which enables you to configure the CR instance
Copy the URLs of the broker and init container images that you recorded in the text file and insert them in the
spec.deploymentPlan.imageandspec.deploymentPlan.initImagefields in the CR. For example:spec: ... deploymentPlan: image: registry.redhat.io/amq7/amq-broker-rhel8@e8fa2a00e576ecb95561ffbdbf87b1c82d479c8791ab2c6ce741dd0d0b496d15 initImage: registry.redhat.io/amq7/amq-broker-init-rhel8@f8c1fc7a4298ec691855c5067ed92b4859a92cea7b7ed9af1bba04469b5a315f ...
Save the CR.
When you save the CR, the Operator upgrades the brokers to use the new images and uses these images until you update the values of the
spec.deploymentPlan.imageandspec.deploymentPlan.initImageattributes again.
If you already deployed AMQ Broker without setting image URLs, you can set the image URLs retrospectively to prevent the Operator from upgrading the current images deployed. You can find the registry URLs for the images deployed in the .status.version.image and .status.version.initImage attributes, which are in the status section of the CR.
If you copy the image URLs from the .status.version.image and .status.version.initImage attributes and insert them in the spec.deploymentPlan.image and the spec.deploymentPlan.initImage attributes respectively, the Operator does not upgrade the images currently deployed.
Additional Resources
- To view the status of the deployment, see Section 6.4.3, “Validation of restrictions applied to automatic upgrades”.
6.4.3. Validation of restrictions applied to automatic upgrades
After you save a CR, the Operator validates that the CR does not contain either of the following:
-
A
spec.deploymentPlan.imageattribute without aspec.deploymentPlan.initImageattribute or vice versa. -
A
spec.versionattribute with either aspec.deploymentPlan.imageand aspec.deploymentPlan.initImageattribute, or both.
Either of these configurations can result in different versions of the broker and init container images after an upgrade, which might prevent your broker from starting. If a CR has either of these configurations, the Operator sets the status of the Valid condition to Unknown as a warning. For example, if a CR has a spec.deploymentPlan.image attribute without a spec.deploymentPlan.initImage attribute or vice versa, the Operator displays the following status information for the Valid condition in the CR.
status:
  conditions:
  - lastTransitionTime: "2023-05-18T15:17:22Z"
    message: Init image and broker image must both be configured as an interdependent pair
    observedGeneration: 1
    reason: InitImageMustBePairedWithBrokerImage
    status: "Unknown"
    type: Valid
A Valid condition that has a status value of Unknown does not prevent the Operator from updating the StatefulSet. However, Red Hat recommends that you fix the status of the Valid condition by specifying the combined spec.deploymentPlan.image `and `spec.deploymentPlan.initImage attributes or the spec.version attribute, but not both, in the CR.
If a CR has a spec.version attribute, the Operator also validates that the version format is correct and that the version is within the valid range that the Operator supports.
Chapter 7. Monitoring your brokers
7.1. Viewing brokers in Fuse Console
You can configure an Operator-based broker deployment to use Fuse Console for OpenShift instead of the AMQ Management Console. When you have configured your broker deployment appropriately, Fuse Console discovers the brokers and displays them on a dedicated Artemis tab. You can view the same broker runtime data that you do in the AMQ Management Console. You can also perform the same basic management operations, such as creating addresses and queues.
The following procedure describes how to configure the Custom Resource (CR) instance for a broker deployment to enable Fuse Console for OpenShift to discover and display brokers in the deployment.
Prerequisites
- Fuse Console for OpenShift must be deployed to an OCP cluster, or to a specific namespace on that cluster. If you have deployed the console to a specific namespace, your broker deployment must be in the same namespace, to enable the console to discover the brokers. Otherwise, it is sufficient for Fuse Console and the brokers to be deployed on the same OCP cluster. For more information on installing Fuse Online on OCP, see Installing and Operating Fuse Online on OpenShift Container Platform.
- You must have already created a broker deployment. For example, to learn how to use a Custom Resource (CR) instance to create a basic Operator-based deployment, see Section 3.4.1, “Deploying a basic broker instance”.
Procedure
Open the CR instance that you used for your broker deployment. For example, the CR for a basic deployment might resemble the following:
apiVersion: broker.amq.io/v1beta1
kind: ActiveMQArtemis
metadata:
  name: ex-aao
spec:
  deploymentPlan:
    size: 4
    image: registry.redhat.io/amq7/amq-broker-rhel8:7.11
        ...
In the
deploymentPlansection, add thejolokiaAgentEnabledandmanagementRBACEnabledproperties and specify values, as shown below.apiVersion: broker.amq.io/v1beta1 kind: ActiveMQArtemis metadata: name: ex-aao spec: deploymentPlan: size: 4 image: registry.redhat.io/amq7/amq-broker-rhel8:7.11 ... jolokiaAgentEnabled: true managementRBACEnabled: false- jolokiaAgentEnabled
-
Specifies whether Fuse Console can discover and display runtime data for the brokers in the deployment. To use Fuse Console, set the value to
true. - managementRBACEnabled
Specifies whether role-based access control (RBAC) is enabled for the brokers in the deployment. You must set the value to
falseto use Fuse Console because Fuse Console uses its own role-based access control.ImportantIf you set the value of
managementRBACEnabledtofalseto enable use of Fuse Console, management MBeans for the brokers no longer require authorization. You should not use the AMQ management console whilemanagementRBACEnabledis set tofalsebecause this potentially exposes all management operations on the brokers to unauthorized use.
- Save the CR instance.
Switch to the project in which you previously created your broker deployment.
$ oc project <project_name>At the command line, apply the change.
$ oc apply -f <path/to/custom_resource_instance>.yaml- In Fuse Console, to view Fuse applications, click the Online tab. To view running brokers, in the left navigation menu, click Artemis.
Additional resources
- For more information about using Fuse Console for OpenShift, see Monitoring and managing Red Hat Fuse applications on OpenShift.
- To learn about using AMQ Management Console to view and manage brokers in the same way that you can in Fuse Console, see Managing brokers using AMQ Management Console.
7.2. Monitoring broker runtime metrics using Prometheus
The sections that follow describe how to configure the Prometheus metrics plugin for AMQ Broker on OpenShift Container Platform. You can use the plugin to monitor and store broker runtime metrics. You might also use a graphical tool such as Grafana to configure more advanced visualizations and dashboards of the data that the Prometheus plugin collects.
The Prometheus metrics plugin enables you to collect and export broker metrics in Prometheus format. However, Red Hat does not provide support for installation or configuration of Prometheus itself, nor of visualization tools such as Grafana. If you require support with installing, configuring, or running Prometheus or Grafana, visit the product websites for resources such as community support and documentation.
7.2.1. Metrics overview
To monitor the health and performance of your broker instances, you can use the Prometheus plugin for AMQ Broker to monitor and store broker runtime metrics. The AMQ Broker Prometheus plugin exports the broker runtime metrics to Prometheus format, enabling you to use Prometheus itself to visualize and run queries on the data.
You can also use a graphical tool, such as Grafana, to configure more advanced visualizations and dashboards for the metrics that the Prometheus plugin collects.
The metrics that the plugin exports to Prometheus format are described below.
Broker metrics
artemis_address_memory_usage- Number of bytes used by all addresses on this broker for in-memory messages.
artemis_address_memory_usage_percentage-
Memory used by all the addresses on this broker as a percentage of the
global-max-sizeparameter. artemis_connection_count- Number of clients connected to this broker.
artemis_total_connection_count- Number of clients that have connected to this broker since it was started.
Address metrics
artemis_routed_message_count- Number of messages routed to one or more queue bindings.
artemis_unrouted_message_count- Number of messages not routed to any queue bindings.
Queue metrics
artemis_consumer_count- Number of clients consuming messages from a given queue.
artemis_delivering_durable_message_count- Number of durable messages that a given queue is currently delivering to consumers.
artemis_delivering_durable_persistent_size- Persistent size of durable messages that a given queue is currently delivering to consumers.
artemis_delivering_message_count- Number of messages that a given queue is currently delivering to consumers.
artemis_delivering_persistent_size- Persistent size of messages that a given queue is currently delivering to consumers.
artemis_durable_message_count- Number of durable messages currently in a given queue. This includes scheduled, paged, and in-delivery messages.
artemis_durable_persistent_size- Persistent size of durable messages currently in a given queue. This includes scheduled, paged, and in-delivery messages.
artemis_messages_acknowledged- Number of messages acknowledged from a given queue since the queue was created.
artemis_messages_added- Number of messages added to a given queue since the queue was created.
artemis_message_count- Number of messages currently in a given queue. This includes scheduled, paged, and in-delivery messages.
artemis_messages_killed- Number of messages removed from a given queue since the queue was created. The broker kills a message when the message exceeds the configured maximum number of delivery attempts.
artemis_messages_expired- Number of messages expired from a given queue since the queue was created.
artemis_persistent_size- Persistent size of all messages (both durable and non-durable) currently in a given queue. This includes scheduled, paged, and in-delivery messages.
artemis_scheduled_durable_message_count- Number of durable, scheduled messages in a given queue.
artemis_scheduled_durable_persistent_size- Persistent size of durable, scheduled messages in a given queue.
artemis_scheduled_message_count- Number of scheduled messages in a given queue.
artemis_scheduled_persistent_size- Persistent size of scheduled messages in a given queue.
For higher-level broker metrics that are not listed above, you can calculate these by aggregating lower-level metrics. For example, to calculate total message count, you can aggregate the artemis_message_count metrics from all queues in your broker deployment.
For an on-premise deployment of AMQ Broker, metrics for the Java Virtual Machine (JVM) hosting the broker are also exported to Prometheus format. This does not apply to a deployment of AMQ Broker on OpenShift Container Platform.
7.2.2. Enabling the Prometheus plugin using a CR
When you install AMQ Broker, a Prometheus metrics plugin is included in your installation. When enabled, the plugin collects runtime metrics for the broker and exports these to Prometheus format.
The following procedure shows how to enable the Prometheus plugin for AMQ Broker using a CR. This procedure supports new and existing deployments of AMQ Broker 7.9 or later.
See Section 7.2.3, “Enabling the Prometheus plugin for a running broker deployment using an environment variable” for an alternative procedure with running brokers.
Procedure
Open the CR instance that you use for your broker deployment. For example, the CR for a basic deployment might resemble the following:
apiVersion: broker.amq.io/v1beta1
kind: ActiveMQArtemis
metadata:
  name: ex-aao
spec:
  deploymentPlan:
    size: 4
    image: registry.redhat.io/amq7/amq-broker-rhel8:7.11
  ...
In the
deploymentPlansection, add theenableMetricsPluginproperty and set the value totrue, as shown below.apiVersion: broker.amq.io/v1beta1 kind: ActiveMQArtemis metadata: name: ex-aao spec: deploymentPlan: size: 4 image: registry.redhat.io/amq7/amq-broker-rhel8:7.11 ... enableMetricsPlugin: true- enableMetricsPlugin
- Specifies whether the Prometheus plugin is enabled for the brokers in the deployment.
- Save the CR instance.
Switch to the project in which you previously created your broker deployment.
$ oc project <project_name>At the command line, apply the change.
$ oc apply -f <path/to/custom_resource_instance>.yamlThe metrics plugin starts to gather broker runtime metrics in Prometheus format.
Additional resources
- For information about updating a running broker, see Section 3.4.3, “Applying Custom Resource changes to running broker deployments”.
7.2.3. Enabling the Prometheus plugin for a running broker deployment using an environment variable
The following procedure shows how to enable the Prometheus plugin for AMQ Broker using an environment variable. See Section 7.2.2, “Enabling the Prometheus plugin using a CR” for an alternative procedure.
Prerequisites
- You can enable the Prometheus plugin for a broker Pod created with the AMQ Broker Operator. However, your deployed broker must use the broker container image for AMQ Broker 7.7 or later.
Procedure
- Log in to the OpenShift Container Platform web console with administrator privileges for the project that contains your broker deployment.
- In the web console, click → . Choose the project that contains your broker deployment.
- To see the StatefulSets or DeploymentConfigs in your project, click → or → .
- Click the StatefulSet or DeploymentConfig that corresponds to your broker deployment.
- To access the environment variables for your broker deployment, click the Environment tab.
Add a new environment variable,
AMQ_ENABLE_METRICS_PLUGIN. Set the value of the variable totrue.When you set the
AMQ_ENABLE_METRICS_PLUGINenvironment variable, OpenShift restarts each broker Pod in the StatefulSet or DeploymentConfig. When there are multiple Pods in the deployment, OpenShift restarts each Pod in turn. When each broker Pod restarts, the Prometheus plugin for that broker starts to gather broker runtime metrics.
7.2.4. Accessing Prometheus metrics for a running broker Pod
This procedure shows how to access Prometheus metrics for a running broker Pod.
Prerequisites
- You must have already enabled the Prometheus plugin for your broker Pod. See Section 7.2.3, “Enabling the Prometheus plugin for a running broker deployment using an environment variable”.
Procedure
For the broker Pod whose metrics you want to access, you need to identify the Route you previously created to connect the Pod to the AMQ Broker management console. The Route name forms part of the URL needed to access the metrics.
- Click → .
For your chosen broker Pod, identify the Route created to connect the Pod to the AMQ Broker management console. Under Hostname, note the complete URL that is shown. For example:
http://rte-console-access-pod1.openshiftdomain
To access Prometheus metrics, in a web browser, enter the previously noted Route name appended with
“/metrics”. For example:http://rte-console-access-pod1.openshiftdomain/metrics
If your console configuration does not use SSL, specify http in the URL. In this case, DNS resolution of the host name directs traffic to port 80 of the OpenShift router. If your console configuration uses SSL, specify https in the URL. In this case, your browser defaults to port 443 of the OpenShift router. This enables a successful connection to the console if the OpenShift router also uses port 443 for SSL traffic, which the router does by default.
7.3. Monitoring broker runtime data using JMX
This example shows how to monitor a broker using the Jolokia REST interface to JMX.
Prerequisites
- Completion of Deploying a basic broker is recommended.
Procedure
Get the list of running pods:
$ oc get pods

NAME                 READY     STATUS    RESTARTS   AGE
ex-aao-ss-1   1/1       Running   0          14d
Run the
oc logscommand:$ oc logs -f ex-aao-ss-1 ... Running Broker in /home/jboss/amq-broker ... 2021-09-17 09:35:10,813 INFO [org.apache.activemq.artemis.integration.bootstrap] AMQ101000: Starting ActiveMQ Artemis Server 2021-09-17 09:35:10,882 INFO [org.apache.activemq.artemis.core.server] AMQ221000: live Message Broker is starting with configuration Broker Configuration (clustered=true,journalDirectory=data/journal,bindingsDirectory=data/bindings,largeMessagesDirectory=data/large-messages,pagingDirectory=data/paging) 2021-09-17 09:35:10,971 INFO [org.apache.activemq.artemis.core.server] AMQ221013: Using NIO Journal 2021-09-17 09:35:11,114 INFO [org.apache.activemq.artemis.core.server] AMQ221057: Global Max Size is being adjusted to 1/2 of the JVM max size (-Xmx). being defined as 2,566,914,048 2021-09-17 09:35:11,369 WARNING [org.jgroups.stack.Configurator] JGRP000014: BasicTCP.use_send_queues has been deprecated: will be removed in 4.0 2021-09-17 09:35:11,385 WARNING [org.jgroups.stack.Configurator] JGRP000014: Discovery.timeout has been deprecated: GMS.join_timeout should be used instead 2021-09-17 09:35:11,480 INFO [org.jgroups.protocols.openshift.DNS_PING] serviceName [ex-aao-ping-svc] set; clustering enabled 2021-09-17 09:35:24,540 INFO [org.openshift.ping.common.Utils] 3 attempt(s) with a 1000ms sleep to execute [GetServicePort] failed. Last failure was [javax.naming.CommunicationException: DNS error] ... 2021-09-17 09:35:25,044 INFO [org.apache.activemq.artemis.core.server] AMQ221034: Waiting indefinitely to obtain live lock 2021-09-17 09:35:25,045 INFO [org.apache.activemq.artemis.core.server] AMQ221035: Live Server Obtained live lock 2021-09-17 09:35:25,206 INFO [org.apache.activemq.artemis.core.server] AMQ221080: Deploying address DLQ supporting [ANYCAST] 2021-09-17 09:35:25,240 INFO [org.apache.activemq.artemis.core.server] AMQ221003: Deploying ANYCAST queue DLQ on address DLQ 2021-09-17 09:35:25,360 INFO [org.apache.activemq.artemis.core.server] AMQ221080: Deploying address ExpiryQueue supporting [ANYCAST] 2021-09-17 09:35:25,362 INFO [org.apache.activemq.artemis.core.server] AMQ221003: Deploying ANYCAST queue ExpiryQueue on address ExpiryQueue 2021-09-17 09:35:25,656 INFO [org.apache.activemq.artemis.core.server] AMQ221020: Started EPOLL Acceptor at ex-aao-ss-1.ex-aao-hdls-svc.broker.svc.cluster.local:61616 for protocols [CORE] 2021-09-17 09:35:25,660 INFO [org.apache.activemq.artemis.core.server] AMQ221007: Server is now live 2021-09-17 09:35:25,660 INFO [org.apache.activemq.artemis.core.server] AMQ221001: Apache ActiveMQ Artemis Message Broker version 2.16.0.redhat-00022 [amq-broker, nodeID=8d886031-179a-11ec-9e02-0a580ad9008b] 2021-09-17 09:35:26,470 INFO [org.apache.amq.hawtio.branding.PluginContextListener] Initialized amq-broker-redhat-branding plugin 2021-09-17 09:35:26,656 INFO [org.apache.activemq.hawtio.plugin.PluginContextListener] Initialized artemis-plugin plugin ...
Run your query to monitor your broker for
MaxConsumers:$ curl -k -u admin:admin http://console-broker.amq-demo.apps.example.com/console/jolokia/read/org.apache.activemq.artemis:broker=%22amq-broker%22,component=addresses,address=%22TESTQUEUE%22,subcomponent=queues,routing-type=%22anycast%22,queue=%22TESTQUEUE%22/MaxConsumers {"request":{"mbean":"org.apache.activemq.artemis:address=\"TESTQUEUE\",broker=\"amq-broker\",component=addresses,queue=\"TESTQUEUE\",routing-type=\"anycast\",subcomponent=queues","attribute":"MaxConsumers","type":"read"},"value":-1,"timestamp":1528297825,"status":200}
Chapter 8. Reference
8.1. Custom Resource configuration reference
A Custom Resource Definition (CRD) is a schema of configuration items for a custom OpenShift object deployed with an Operator. By deploying a corresponding Custom Resource (CR) instance, you specify values for configuration items shown in the CRD.
The following sub-sections detail the configuration items that you can set in Custom Resource instances based on the main broker CRD.
8.1.1. Broker Custom Resource configuration reference
A CR instance based on the main broker CRD enables you to configure brokers for deployment in an OpenShift project. The following table describes the items that you can configure in the CR instance.
Configuration items marked with an asterisk (*) are required in any corresponding Custom Resource (CR) that you deploy. If you do not explicitly specify a value for a non-required item, the configuration uses the default value.
| Entry | Sub-entry | Description and usage |
|---|---|---|
|
| Administrator user name required for connecting to the broker and management console.
If you do not specify a value, the value is automatically generated and stored in a secret. The default secret name has a format of Type: string Example: my-user Default value: Automatically-generated, random value | |
|
| Administrator password required for connecting to the broker and management console.
If you do not specify a value, the value is automatically generated and stored in a secret. The default secret name has a format of Type: string Example: my-password Default value: Automatically-generated, random value | |
|
| Broker deployment configuration | |
|
| Full path of the broker container image used for each broker in the deployment.
You do not need to explicitly specify a value for To learn how the Operator chooses a broker container image to use, see Section 2.6, “How the Operator chooses container images”. Type: string Example: registry.redhat.io/amq7/amq-broker-rhel8@sha256:e8fa2a00e576ecb95561ffbdbf87b1c82d479c8791ab2c6ce741dd0d0b496d15 Default value: placeholder | |
|
| Number of broker Pods to create in the deployment.
If you specify a value of 2 or greater, your broker deployment is clustered by default. The cluster user name and password are automatically generated and stored in the same secret as Type: int Example: 1 Default value: 1 | |
|
| Specify whether login credentials are required to connect to the broker. Type: Boolean Example: false Default value: true | |
|
|
Specify whether to use journal storage for each broker Pod in the deployment. If set to Type: Boolean Example: false Default value: true | |
|
| Init Container image used to configure the broker.
You do not need to explicitly specify a value for To learn how the Operator chooses a built-in Init Container image to use, see Section 2.6, “How the Operator chooses container images”. To learn how to specify a custom Init Container image, see Section 4.9, “Specifying a custom Init Container image”. Type: string Example: registry.redhat.io/amq7/amq-broker-init-rhel8@sha256:f8c1fc7a4298ec691855c5067ed92b4859a92cea7b7ed9af1bba04469b5a315f Default value: Not specified | |
|
| Specify whether to use asynchronous I/O (AIO) or non-blocking I/O (NIO). Type: string Example: aio Default value: nio | |
|
| When a broker Pod shuts down due to an intentional scaledown of the broker deployment, specify whether to migrate messages to another broker Pod that is still running in the broker cluster. Type: Boolean Example: false Default value: true | |
|
| Maximum amount of host-node CPU, in millicores, that each broker container running in a Pod in a deployment can consume. Type: string Example: "500m" Default value: Uses the same default value that your version of OpenShift Container Platform uses. Consult a cluster administrator. | |
|
| Maximum amount of host-node memory, in bytes, that each broker container running in a Pod in a deployment can consume. Supports byte notation (for example, K, M, G), or the binary equivalents (Ki, Mi, Gi). Type: string Example: "1024M" Default value: Uses the same default value that your version of OpenShift Container Platform uses. Consult a cluster administrator. | |
|
| Amount of host-node CPU, in millicores, that each broker container running in a Pod in a deployment explicitly requests. Type: string Example: "250m" Default value: Uses the same default value that your version of OpenShift Container Platform uses. Consult a cluster administrator. | |
|
| Amount of host-node memory, in bytes, that each broker container running in a Pod in a deployment explicitly requests. Supports byte notation (for example, K, M, G), or the binary equivalents (Ki, Mi, Gi). Type: string Example: "512M" Default value: Uses the same default value that your version of OpenShift Container Platform uses. Consult a cluster administrator. | |
|
|
Size, in bytes, of the Persistent Volume Claim (PVC) that each broker in a deployment requires for persistent storage. This property applies only when Type: string Example: 4Gi Default value: 2Gi | |
|
|
Specifies whether the Jolokia JVM Agent is enabled for the brokers in the deployment. If the value of this property is set to Type: Boolean Example: true Default value: false | |
|
|
Specifies whether role-based access control (RBAC) is enabled for the brokers in the deployment. To use Fuse Console, you must set the value to Type: Boolean Example: false Default value: true | |
|
| Specifies scheduling constraints for pods. For information about affinity properties, see the properties in the OpenShift Container Platform documentation. | |
|
| Specifies the pod’s tolerations. For information about tolerations properties, see the properties in the OpenShift Container Platform documentation. | |
|
| Specify a label that matches a node’s labels for the pod to be scheduled on that node. | |
|
| Specifies the name of the storage class to use for the Persistent Volume Claim (PVC). Storage classes provide a way for administrators to describe and classify the available storage. For example, a storage class might have specific quality-of-service levels, backup policies, or other administrative policies associated with it. Type: string Example: gp3 Default value: Not specified | |
|
| Configure a startup probe to check if the AMQ Broker application within the broker container has started. For information about startup probe properties, see the properties in the OpenShift Container Platform documentation. | |
|
| Configures a periodic health check on a running broker container to check that the broker is running. For information about liveness probe properties, see the properties in the OpenShift Container Platform documentation. | |
|
| Configures a periodic health check on a running broker container to check that the broker is accepting network traffic. For information about readiness probe properties, see the properties in the OpenShift Container Platform documentation. | |
|
| Mounts a secret or configMAP, that contains configuration information, as a file on a broker Pod. For example, you can mount a secret that contains customized logging configuration for AMQ Broker. Type: object Example See Section 4.15, “Configuring logging for brokers” Default value: Not specified | |
|
| Assign labels to a broker pod. Type: string Example: location: "production" Default value: Not specified | |
|
| Specify a service account name for the broker pod. Type: string Example: amq-broker-controller-manager Default value: default | |
|
| Specify the following pod-level security attributes and common container settings. * fsGroup * fsGroupChangePolicy * runAsGroup * runAsUser * runAsNonRoot * seLinuxOptions * seccompProfile * supplementalGroups * sysctls * windowsOptions
For information on | |
|
| Configuration of broker management console. | |
|
| Specify whether to expose the management console port for each broker in a deployment. Type: Boolean Example: true Default value: false | |
|
| Specify whether to use SSL on the management console port. Type: Boolean Example: true Default value: false | |
|
|
Secret where broker key store, trust store, and their corresponding passwords (all Base64-encoded) are stored. If you do not specify a value for Type: string Example: my-broker-deployment-console-secret Default value: Not specified | |
|
| Specify whether the management console requires client authorization. Type: Boolean Example: true Default value: false | |
|
| A single acceptor configuration instance. | |
|
| Name of acceptor. Type: string Example: my-acceptor Default value: Not applicable | |
|
| Port number to use for the acceptor instance. Type: int Example: 5672 Default value: 61626 for the first acceptor that you define. The default value then increments by 10 for every subsequent acceptor that you define. | |
|
| Messaging protocols to be enabled on the acceptor instance. Type: string Example: amqp,core Default value: all | |
|
|
Specify whether SSL is enabled on the acceptor port. If set to Type: Boolean Example: true Default value: false | |
|
| Secret where broker key store, trust store, and their corresponding passwords (all Base64-encoded) are stored.
If you do not specify a custom secret name for You must always create this secret yourself, even when the acceptor assumes a default name. Type: string Example: my-broker-deployment-my-acceptor-secret Default value: <custom_resource_name>-<acceptor_name>-secret | |
|
| Comma-separated list of cipher suites to use for TLS communication.
Specify the most secure cipher suite(s) supported by your client application. If you specify a comma-separated list of cipher suites that are common to both the broker and the client, or you do not specify any cipher suites, the broker and client mutually negotiate a cipher suite to use. If you do not know which cipher suites to specify, you can first establish a broker-client connection with your client running in debug mode to verify the cipher suites that are common to both the broker and the client. Then, configure
The cipher suites available depend on the TLS protocol versions used by the broker and clients. If the default TLS protocol version changes after you upgrade the broker, you might need to select an earlier TLS protocol version to ensure that the broker and the clients can use a common cipher suite. For more information, see Type: string Default value: Not specified | |
|
| Comma-separated list of protocols to use for TLS communication. Type: string Example: TLSv1,TLSv1.1,TLSv1.2 Default value: Not specified
If you don’t specify a TLS protocol version, the broker uses the JVM’s default version. If the broker uses the JVM’s default TLS protocol version and that version changes after you upgrade the broker, the TLS protocol versions used by the broker and clients might be incompatible. While it is recommended that you use the later TLS protocol version, you can specify an earlier version in | |
|
| The name of the provider of the keystore that the broker uses. Type: string Example: SunJCE Default value: Not specified | |
|
| The name of the provider of the truststore that the broker uses. Type: string Example: SunJCE Default value: Not specified | |
|
| The type of truststore that the broker uses. Type: string Example: JCEKS Default value: JKS | |
|
|
Specify whether the broker informs clients that two-way TLS is required on the acceptor. This property overrides Type: Boolean Example: true Default value: Not specified | |
|
|
Specify whether the broker informs clients that two-way TLS is requested on the acceptor, but not required. This property is overridden by Type: Boolean Example: true Default value: Not specified | |
|
| Specify whether to compare the Common Name (CN) of a client’s certificate to its host name, to verify that they match. This option applies only when two-way TLS is used. Type: Boolean Example: true Default value: Not specified | |
|
| Specify whether the SSL provider is JDK or OPENSSL. Type: string Example: OPENSSL Default value: JDK | |
|
|
Regular expression to match against the Type: string Example: some_regular_expression Default value: Not specified | |
|
| Specify whether to expose the acceptor to clients outside OpenShift Container Platform. When you expose an acceptor to clients outside OpenShift, the Operator automatically creates a dedicated Service and Route for each broker Pod in the deployment. Type: Boolean Example: true Default value: false | |
|
|
Prefix used by a client to specify that the Type: string Example: jms.queue Default value: Not specified | |
|
|
Prefix used by a client to specify that the Type: string Example: /topic/ Default value: Not specified | |
|
| Number of connections allowed on the acceptor. When this limit is reached, a DEBUG message is issued to the log, and the connection is refused. The type of client in use determines what happens when the connection is refused. Type: integer Example: 2 Default value: 0 (unlimited connections) | |
|
|
Minimum message size, in bytes, required for the broker to handle an AMQP message as a large message. If the size of an AMQP message is equal or greater to this value, the broker stores the message in a large messages directory ( Type: integer Example: 204800 Default value: 102400 (100 KB) | |
|
| If set to true, configures the broker acceptors with a 0.0.0.0 IP address instead of the internal IP address of the pod. When the broker acceptors have a 0.0.0.0 IP address, they bind to all interfaces configured for the pod and clients can direct traffic to the broker by using OpenShift Container Platform port-forwarding. Normally, you use this configuration to debug a service. For more information about port-forwarding, see Using port-forwarding to access applications in a container in the OpenShift Container Platform documentation. Note If port-forwarding is used incorrectly, it can create a security risk for your environment. Where possible, Red Hat recommends that you do not use port-forwarding in a production environment. Type: Boolean Example: true Default value: false | |
|
| A single connector configuration instance. | |
|
| Name of connector. Type: string Example: my-connector Default value: Not applicable | |
|
|
The type of connector to create; Type: string Example: vm Default value: tcp | |
|
| Host name or IP address to connect to. Type: string Example: 192.168.0.58 Default value: Not specified | |
|
| Port number to be used for the connector instance. Type: int Example: 22222 Default value: Not specified | |
|
|
Specify whether SSL is enabled on the connector port. If set to Type: Boolean Example: true Default value: false | |
|
| Secret where broker key store, trust store, and their corresponding passwords (all Base64-encoded) are stored.
If you do not specify a custom secret name for You must always create this secret yourself, even when the connector assumes a default name. Type: string Example: my-broker-deployment-my-connector-secret Default value: <custom_resource_name>-<connector_name>-secret | |
|
| Comma-separated list of cipher suites to use for TLS communication. Type: string NOTE: For a connector, it is recommended that you do not specify a list of cipher suites. Default value: Not specified | |
|
| The name of the provider of the keystore that the broker uses. Type: string Example: SunJCE Default value: Not specified | |
|
| The name of the provider of the truststore that the broker uses. Type: string Example: SunJCE Default value: Not specified | |
|
| The type of truststore that the broker uses. Type: string Example: JCEKS Default value: JKS | |
|
| Comma-separated list of protocols to use for TLS communication. Type: string Example: TLSv1,TLSv1.1,TLSv1.2 Default value: Not specified | |
|
|
Specify whether the broker informs clients that two-way TLS is required on the connector. This property overrides Type: Boolean Example: true Default value: Not specified | |
|
|
Specify whether the broker informs clients that two-way TLS is requested on the connector, but not required. This property is overridden by Type: Boolean Example: true Default value: Not specified | |
|
| Specify whether to compare the Common Name (CN) of client’s certificate to its host name, to verify that they match. This option applies only when two-way TLS is used. Type: Boolean Example: true Default value: Not specified | |
|
|
Specify whether the SSL provider is Type: string Example: OPENSSL Default value: JDK | |
|
|
Regular expression to match against the Type: string Example: some_regular_expression Default value: Not specified | |
|
| Specify whether to expose the connector to clients outside OpenShift Container Platform. Type: Boolean Example: true Default value: false | |
|
| Specifies how the Operator applies the configuration that you add to the CR for each matching address or set of addresses. The values that you can specify are:
Type: string Example: replace_all Default value: merge_all | |
|
| Address settings for a matching address or set of addresses. | |
|
|
Specify what happens when an address configured with
Type: string Example: DROP Default value: PAGE | |
|
| Specify whether the broker automatically creates an address when a client sends a message to, or attempts to consume a message from, a queue that is bound to an address that does not exist. Type: Boolean Example: false Default value: true | |
|
| Specify whether the broker automatically creates a dead letter address and queue to receive undelivered messages.
If the parameter is set to Type: Boolean Example: true Default value: false | |
|
| Specify whether the broker automatically creates an address and queue to receive expired messages.
If the parameter is set to Type: Boolean Example: true Default value: false | |
|
|
This property is deprecated. Use | |
|
|
This property is deprecated. Use | |
|
| Specify whether the broker automatically creates a queue when a client sends a message to, or attempts to consume a message from, a queue that does not yet exist. Type: Boolean Example: false Default value: true | |
|
| Specify whether the broker automatically deletes automatically-created addresses when the broker no longer has any queues. Type: Boolean Example: false Default value: true | |
|
| Time, in milliseconds, that the broker waits before automatically deleting an automatically-created address when the address has no queues. Type: integer Example: 100 Default value: 0 | |
|
|
This property is deprecated. Use | |
|
|
This property is deprecated. Use | |
|
| Specify whether the broker automatically deletes an automatically-created queue when the queue has no consumers and no messages. Type: Boolean Example: false Default value: true | |
|
| Specify whether the broker automatically deletes a manually-created queue when the queue has no consumers and no messages. Type: Boolean Example: true Default value: false | |
|
| Time, in milliseconds, that the broker waits before automatically deleting an automatically-created queue when the queue has no consumers. Type: integer Example: 10 Default value: 0 | |
|
| Maximum number of messages that can be in a queue before the broker evaluates whether the queue can be automatically deleted. Type: integer Example: 5 Default value: 0 | |
|
| When the configuration file is reloaded, this parameter specifies how to handle an address (and its queues) that has been deleted from the configuration file. You can specify the following values:
Type: string Example: FORCE Default value: OFF | |
|
| When the configuration file is reloaded, this setting specifies how the broker handles queues that have been deleted from the configuration file. You can specify the following values:
Type: string Example: FORCE Default value: OFF | |
|
| The address to which the broker sends dead (that is, undelivered) messages. Type: string Example: DLA Default value: None | |
|
| Prefix that the broker applies to the name of an automatically-created dead letter queue. Type: string Example: myDLQ. Default value: DLQ. | |
|
| Suffix that the broker applies to an automatically-created dead letter queue. Type: string Example: .DLQ Default value: None | |
|
| Routing type used on automatically-created addresses. Type: string Example: ANYCAST Default value: MULTICAST | |
|
| Number of consumers needed before message dispatch can begin for queues on an address. Type: integer Example: 5 Default value: 0 | |
|
| Default window size, in bytes, for a consumer. Type: integer Example: 300000 Default value: 1048576 (1024*1024) | |
|
|
Default time, in milliseconds, that the broker waits before dispatching messages if the value specified for Type: integer Example: 5 Default value: -1 (no delay) | |
|
| Specifies whether all queues on an address are exclusive queues by default. Type: Boolean Example: true Default value: false | |
|
| Number of buckets to use for message grouping. Type: integer Example: 0 (message grouping disabled) Default value: -1 (no limit) | |
|
| Key used to indicate to a consumer which message in a group is first. Type: string Example: firstMessageKey Default value: None | |
|
| Specifies whether to rebalance groups when a new consumer connects to the broker. Type: Boolean Example: true Default value: false | |
|
| Specifies whether to pause message dispatch while the broker is rebalancing groups. Type: Boolean Example: true Default value: false | |
|
| Specifies whether all queues on an address are last value queues by default. Type: Boolean Example: true Default value: false | |
|
| Default key to use for a last value queue. Type: string Example: stock_ticker Default value: None | |
|
| Maximum number of consumers allowed on a queue at any time. Type: integer Example: 100 Default value: -1 (no limit) | |
|
| Specifies whether all queues on an address are non-destructive by default. Type: Boolean Example: true Default value: false | |
|
| Specifies whether the broker purges the contents of a queue once there are no consumers. Type: Boolean Example: true Default value: false | |
|
|
Routing type used on automatically-created queues. The default value is Type: string Example: ANYCAST Default value: MULTICAST | |
|
| Default ring size for a matching queue that does not have a ring size explicitly set. Type: integer Example: 3 Default value: -1 (no size limit) | |
|
| Specifies whether a configured metrics plugin such as the Prometheus plugin collects metrics for a matching address or set of addresses. Type: Boolean Example: false Default value: true | |
|
| Address that receives expired messages. Type: string Example: myExpiryAddress Default value: None | |
|
| Expiration time, in milliseconds, applied to messages that are using the default expiration time. Type: integer Example: 100 Default value: -1 (no expiration time applied) | |
|
| Prefix that the broker applies to the name of an automatically-created expiry queue. Type: string Example: myExp. Default value: EXP. | |
|
| Suffix that the broker applies to the name of an automatically-created expiry queue. Type: string Example: .EXP Default value: None | |
|
| Specify whether a queue uses only last values or not. Type: Boolean Example: true Default value: false | |
|
| Specify how many messages a management resource can browse. Type: integer Example: 100 Default value: 200 | |
|
| String that matches address settings to addresses configured on the broker. You can specify an exact address name or use a wildcard expression to match the address settings to a set of addresses.
If you use a wildcard expression as a value for the Type: string Example: 'myAddresses*' Default value: None | |
|
| Specifies how many times the broker attempts to deliver a message before sending the message to the configured dead letter address. Type: integer Example: 20 Default value: 10 | |
|
| Expiration time, in milliseconds, applied to messages that are using an expiration time greater than this value. Type: integer Example: 20 Default value: -1 (no maximum expiration time applied) | |
|
| Maximum value, in milliseconds, between message redelivery attempts made by the broker. Type: integer Example: 100
Default value: The default value is ten times the value of | |
|
|
Maximum memory size, in bytes, for an address. Used when Type: string Example: 10Mb Default value: -1 (no limit) | |
|
|
Maximum size, in bytes, that an address can reach before the broker begins to reject messages. Used when the Type: integer Example: 500 Default value: -1 (no maximum size) | |
|
| Number of days for which a broker keeps a message counter history for an address. Type: integer Example: 5 Default value: 0 | |
|
| Expiration time, in milliseconds, applied to messages that are using an expiration time lower than this value. Type: integer Example: 20 Default value: -1 (no minimum expiration time applied) | |
|
| Number of page files to keep in memory to optimize I/O during paging navigation. Type: integer Example: 10 Default value: 5 | |
|
|
Paging size in bytes. Also supports byte notation such as Type: string Example: 20971520 Default value: 10485760 (approximately 10.5 MB) | |
|
| Time, in milliseconds, that the broker waits before redelivering a cancelled message. Type: integer Example: 100 Default value: 0 | |
|
| Time, in milliseconds, that the broker waits after the last consumer is closed on a queue before redistributing any remaining messages. Type: integer Example: 100 Default value: -1 (not set) | |
|
| Number of messages to keep for future queues created on an address. Type: integer Example: 100 Default value: 0 | |
|
| Specify whether a message will be sent to the configured dead letter address if it cannot be routed to any queues. Type: Boolean Example: true Default value: false | |
|
| How often, in seconds, that the broker checks for slow consumers. Type: integer Example: 15 Default value: 5 | |
|
|
Specifies what happens when a slow consumer is identified. Valid options are Type: string Example: KILL Default value: NOTIFY | |
|
| Minimum rate of message consumption, in messages per second, before a consumer is considered slow. Type: integer Example: 100 Default value: -1 (not set) | |
|
| Set environment variables for the broker. | |
|
| A list of property names and values to configure for the broker. Type: array | |
|
`name:<variable name> | A list of environment variable names and values to configure for the broker. Type: array Example:
name: TZ Default value: Not applicable |
|
| Configure broker properties that are not exposed in the broker’s Custom Resource Definitions (CRDs) and are, otherwise, not configurable in a Custom Resource(CR). | ||
|
|
A list of property names and values to configure for the broker. One property,
The default unit for the Type: string Example: globalMaxSize=512m Default value: Not applicable |
|
8.1.2. Address Custom Resource configuration reference
A CR instance based on the address CRD enables you to define addresses and queues for the brokers in your deployment. The following table details the items that you can configure.
Configuration items marked with an asterisk (*) are required in any corresponding Custom Resource (CR) that you deploy. If you do not explicitly specify a value for a non-required item, the configuration uses the default value.
| Entry | Description and usage |
|---|---|
|
| Address name to be created on broker. Type: string Example: address0 Default value: Not specified |
|
|
Queue name to be created on broker. If Type: string Example: queue0 Default value: Not specified |
|
|
Specify whether the Operator removes existing addresses for all brokers in a deployment when you remove the address CR instance for that deployment. The default value is Type: Boolean Example: true Default value: false |
|
|
Routing type to be used; Type: string Example: anycast Default value: multicast |
8.1.3. Security Custom Resource configuration reference
A CR instance based on the security CRD enables you to define the security configuration for the brokers in your deployment, including:
- users and roles
-
login modules, including
propertiesLoginModule,guestLoginModuleandkeycloakLoginModule - role based access control
- console access control
Many of the options require you understand the broker security concepts described in Securing brokers
The following table details the items that you can configure.
Configuration items marked with an asterisk (*) are required in any corresponding Custom Resource (CR) that you deploy. If you do not explicitly specify a value for a non-required item, the configuration uses the default value.
| Entry | Sub-entry | Description and usage |
|---|---|---|
| loginModules | One or more login module configurations. A login module can be one of the following types:
| |
| propertiesLoginModule | name* | Name of login module. Type: string Example: my-login Default value: Not applicable |
| users.name* | Name of user. Type: string Example: jdoe Default value: Not applicable | |
| users.password* | password of user. Type: string Example: password Default value: Not applicable | |
| users.roles | Names of roles. Type: string Example: viewer Default value: Not applicable | |
| guestLoginModule | name* | Name of guest login module. Type: string Example: guest-login Default value: Not applicable |
| guestUser | Name of guest user. Type: string Example: myguest Default value: Not applicable | |
| guestRole | Name of role for guest user. Type: string Example: guest Default value: Not applicable | |
| keycloakLoginModule | name | Name for KeycloakLoginModule Type: string Example: sso Default value: Not applicable |
| moduleType | Type of KeycloakLoginModule (directAccess or bearerToken) Type: string Example: bearerToken Default value: Not applicable | |
| configuration | The following configuration items are related to Red Hat Single Sign-On and detailed information is available from the OpenID Connect documentation. | |
| configuration.realm* | Realm for KeycloakLoginModule Type: string Example: myrealm Default value: Not applicable | |
| configuration.realmPublicKey | Public key for the realm Type: string Default value: Not applicable | |
| configuration.authServerUrl* | URL of the keycloak authentication server Type: string Default value: Not applicable | |
| configuration.sslRequired | Specify whether SSL is required Type: string Valid values are 'all', 'external' and 'none'. | |
| configuration.resource* | Resource Name The client-id of the application. Each application has a client-id that is used to identify the application. | |
| configuration.publicClient | Specify whether it is public client. Type: Boolean Default value: false Example: false | |
| configuration.credentials.key | Specify the credentials key. Type: string Default value: Not applicable Type: string Default value: Not applicable | |
| configuration.credentials.value | Specify the credentials value Type: string Default value: Not applicable | |
| configuration.useResourceRoleMappings | Specify whether to use resource role mappings Type: Boolean Example: false | |
| configuration.enableCors | Specify whether to enable Cross-Origin Resource Sharing (CORS) It will handle CORS preflight requests. It will also look into the access token to determine valid origins. Type: Boolean Default value: false | |
| configuration.corsMaxAge | CORS max age If CORS is enabled, this sets the value of the Access-Control-Max-Age header. | |
| configuration.corsAllowedMethods | CORS allowed methods If CORS is enabled, this sets the value of the Access-Control-Allow-Methods header. This should be a comma-separated string. | |
| configuration.corsAllowedHeaders | CORS allowed headers If CORS is enabled, this sets the value of the Access-Control-Allow-Headers header. This should be a comma-separated string. | |
| configuration.corsExposedHeaders | CORS exposed headers If CORS is enabled, this sets the value of the Access-Control-Expose-Headers header. This should be a comma-separated string. | |
| configuration.exposeToken | Specify whether to expose access token Type: Boolean Default value: false | |
| configuration.bearerOnly | Specify whether to verify bearer token Type: Boolean Default value: false | |
| configuration.autoDetectBearerOnly | Specify whether to only auto-detect bearer token Type: Boolean Default value: false | |
| configuration.connectionPoolSize | Size of the connection pool Type: Integer Default value: 20 | |
| configuration.allowAnyHostName | Specify whether to allow any host name Type: Boolean Default value: false | |
| configuration.disableTrustManager | Specify whether to disable trust manager Type: Boolean Default value: false | |
| configuration.trustStore* | Path of a trust store This is REQUIRED unless ssl-required is none or disable-trust-manager is true. | |
| configuration.trustStorePassword* | Truststore password This is REQUIRED if truststore is set and the truststore requires a password. | |
| configuration.clientKeyStore | Path of a client keystore Type: string Default value: Not applicable | |
| configuration.clientKeyStorePassword | Client keystore password Type: string Default value: Not applicable | |
| configuration.clientKeyPassword | Client key password Type: string Default value: Not applicable | |
| configuration.alwaysRefreshToken | Specify whether to always refresh token Type: Boolean Example: false | |
| configuration.registerNodeAtStartup | Specify whether to register node at startup Type: Boolean Example: false | |
| configuration.registerNodePeriod | Period for re-registering node Type: string Default value: Not applicable | |
| configuration.tokenStore | Type of token store (session or cookie) Type: string Default value: Not applicable | |
| configuration.tokenCookiePath | Cookie path for a cookie store Type: string Default value: Not applicable | |
| configuration.principalAttribute | OpenID Connect ID Token attribute to populate the UserPrincipal name with OpenID Connect ID Token attribute to populate the UserPrincipal name with. If token attribute is null, defaults to sub. Possible values are sub, preferred_username, email, name, nickname, given_name, family_name. | |
| configuration.proxyUrl | The proxy URL | |
| configuration.turnOffChangeSessionIdOnLogin | Specify whether to change session id on a successful login Type: Boolean Example: false | |
| configuration.tokenMinimumTimeToLive | Minimum time to refresh an active access token Type: Integer Default value: 0 | |
| configuration.minTimeBetweenJwksRequests | Minimum interval between two requests to Keycloak to retrieve new public keys Type: Integer Default value: 10 | |
| configuration.publicKeyCacheTtl | Maximum interval between two requests to Keycloak to retrieve new public keys Type: Integer Default value: 86400 | |
| configuration.ignoreOauthQueryParameter | Whether to turn off processing of the access_token query parameter for bearer token processing Type: Boolean Example: false | |
| configuration.verifyTokenAudience | Verify whether the token contains this client name (resource) as an audience Type: Boolean Example: false | |
| configuration.enableBasicAuth | Whether to support basic authentication Type: Boolean Default value: false | |
| configuration.confidentialPort | The confidential port used by the Keycloak server for secure connections over SSL/TLS Type: Integer Example: 8443 | |
| configuration.redirectRewriteRules.key | The regular expression used to match the Redirect URI. Type: string Default value: Not applicable | |
| configuration.redirectRewriteRules.value | The replacement String Type: string Default value: Not applicable | |
| configuration.scope | The OAuth2 scope parameter for DirectAccessGrantsLoginModule Type: string Default value: Not applicable | |
| securityDomains | Broker security domains | |
| brokerDomain.name | Broker domain name Type: string Example: activemq Default value: Not applicable | |
| brokerDomain.loginModules |
One or more login modules. Each entry must be previously defined in the | |
| brokerDomain.loginModules.name | Name of login module Type: string Example: prop-module Default value: Not applicable | |
| brokerDomain.loginModules.flag |
Same as propertiesLoginModule, Type: string Example: sufficient Default value: Not applicable | |
| brokerDomain.loginModules.debug | Debug | |
| brokerDomain.loginModules.reload | Reload | |
| consoleDomain.name | Broker domain name Type: string Example: activemq Default value: Not applicable | |
| consoleDomain.loginModules | A single login module configuration. | |
| consoleDomain.loginModules.name | Name of login module Type: string Example: prop-module Default value: Not applicable | |
| consoleDomain.loginModules.flag |
Same as propertiesLoginModule, Type: string Example: sufficient Default value: Not applicable | |
| consoleDomain.loginModules.debug | Debug Type: Boolean Example: false | |
| consoleDomain.loginModules.reload | Reload Type: Boolean Example: true Default: false | |
| securitySettings |
Additional security settings to add to | |
| broker.match | The address match pattern for a security setting section. See AMQ Broker wildcard syntax for details about the match pattern syntax. | |
| broker.permissions.operationType | The operation type of a security setting, as described in Setting permissions. Type: string Example: createAddress Default value: Not applicable | |
| broker.permissions.roles | The security settings are applied to these roles, as described in Setting permissions. Type: string Example: root Default value: Not applicable | |
| securitySettings.management |
Options to configure | |
| hawtioRoles | The roles allowed to log into the Broker console. Type: string Example: root Default value: Not applicable | |
| connector.host | The connector host for connecting to the management API. Type: string Example: myhost Default value: localhost | |
| connector.port | The connector port for connecting to the management API. Type: integer Example: 1099 Default value: 1099 | |
| connector.jmxRealm | The JMX realm of the management API. Type: string Example: activemq Default value: activemq | |
| connector.objectName | The JMX object name of the management API. Type: String Example: connector:name=rmi Default: connector:name=rmi | |
| connector.authenticatorType | The management API authentication type. Type: String Example: password Default: password | |
| connector.secured | Whether the management API connection is secured. Type: Boolean Example: true Default value: false | |
| connector.keyStoreProvider | The keystore provider for the management connector. Required if you have set connector.secured="true". The default value is JKS. | |
| connector.keyStorePath | Location of the keystore. Required if you have set connector.secured="true". | |
| connector.keyStorePassword | The keystore password for the management connector. Required if you have set connector.secured="true". | |
| connector.trustStoreProvider | The truststore provider for the management connector Required if you have set connector.secured="true". Type: String Example: JKS Default: JKS | |
| connector.trustStorePath | Location of the truststore for the management connector. Required if you have set connector.secured="true". Type: string Default value: Not applicable | |
| connector.trustStorePassword | The truststore password for the management connector. Required if you have set connector.secured="true". Type: string Default value: Not applicable | |
| connector.passwordCodec | The password codec for management connector The fully qualified class name of the password codec to use as described in Encrypting a password in a configuration file. | |
| authorisation.allowedList.domain | The domain of allowedList Type: string Default value: Not applicable | |
| authorisation.allowedList.key | The key of allowedList Type: string Default value: Not applicable | |
| authorisation.defaultAccess.method | The method of defaultAccess List Type: string Default value: Not applicable | |
| authorisation.defaultAccess.roles | The roles of defaultAccess List Type: string Default value: Not applicable | |
| authorisation.roleAccess.domain | The domain of roleAccess List Type: string Default value: Not applicable | |
| authorisation.roleAccess.key | The key of roleAccess List Type: string Default value: Not applicable | |
| authorisation.roleAccess.accessList.method | The method of roleAccess List Type: string Default value: Not applicable | |
| authorisation.roleAccess.accessList.roles | The roles of roleAccess List Type: string Default value: Not applicable | |
| applyToCrNames | Apply this security config to the brokers defined by the named CRs in the current namespace. A value of * or empty string means applying to all brokers. Type: string Example: my-broker Default value: All brokers defined by CRs in the current namespace. |
8.2. Example JAAS login module configurations
The following example shows a JAAS login module configuration that has both a properties login module and an LDAP login module configured. The properties login module references the default login module that contains the credentials used by the Operator to authenticate with the broker.
	activemq {
  		org.apache.activemq.artemis.spi.core.security.jaas.LDAPLoginModule required
     		debug=true
	   		initialContextFactory=com.sun.jndi.ldap.LdapCtxFactory
	    	connectionURL="LDAP://localhost:389"
	    	connectionUsername="CN=Administrator,CN=Users,OU=System,DC=example,DC=com"
	   		connectionPassword=redhat.123
	    	connectionProtocol=s
	    	connectionTimeout="5000"
	    	authentication=simple
     		userBase="dc=example,dc=com"
	    	userSearchMatching="(CN={0})"
    		userSearchSubtree=true
	    	readTimeout="5000"
     		roleBase="dc=example,dc=com"
     		roleName=cn
     		roleSearchMatching="(member={0})"
     		roleSearchSubtree=true;

		org.apache.activemq.artemis.spi.core.security.jaas.PropertiesLoginModule
			reload=true
			org.apache.activemq.jaas.properties.user="artemis-users.properties"
			org.apache.activemq.jaas.properties.role="artemis-roles.properties"
			baseDir="/home/jboss/amq-broker/etc";
};
The following example shows a JAAS login module configuration that has two properties login modules in separate realms.
-
The default properties login module is in a realm named
consoleand has the properties files that are used by the Operator and AMQ Management Console to authenticate with the broker. -
The login module in the
activemqrealm has new properties files, which, for example, could contain the credentials to authenticate users for messaging.
You might want to create separate realms to, for example, apply specific security controls to the realm that contains the login module used by the Operator to authenticate with the broker.
activemq {
 	org.apache.activemq.artemis.spi.core.security.jaas.PropertiesLoginModule
	 	reload=true
		org.apache.activemq.jaas.properties.user="new-users.properties"
		org.apache.activemq.jaas.properties.role="new-roles.properties"
};

console {
org.apache.activemq.artemis.spi.core.security.jaas.PropertiesLoginModule
		reload=true
 		org.apache.activemq.jaas.properties.user="artemis-users.properties"
		org.apache.activemq.jaas.properties.role="artemis-roles.properties"
		baseDir="/home/jboss/amq-broker/etc";
};
By default, AMQ Management Console uses the default properties login module in the activemq realm for authentication. If the default properties login module is configured in another realm, as in the example, you must set an environment variable in the broker CR to configure AMQ Management Console to use that realm. For example:
spec:
  ...
  env:
  - name: JAVA_ARGS_APPEND
    value: --Hawtio.realm=console
  ...
For more information about setting environment variables in a CR, see Section 4.7, “Setting environment variables for the broker containers”.
8.3. Example: configuring AMQ Broker to use Red Hat Single Sign-On
This example shows how to configure AMQ Broker to use Red Hat Single Sign-On for authentication and authorization by using JAAS login modules.
Prerequisites
A Red Hat Single Sign-On instance integrated with an LDAP directory.
- The LDAP directory is populated with users and role information for AMQ Broker.
- Red Hat Single Sign-On is configured to federate users from the LDAP server.
- Red Hat Single Sign-On is configured to use the role-ldap-mapper to map role information from LDAP to Red Hat Single Sign-On.
A Red Hat Single Sign-On realm that has:
A client configured with the following settings for applications, such as AMQ Management Console, that can use the oAuth protocol to obtain a token:
Authentication flow: Standard flow
Valid Redirect URIs: An OpenShift Container Platform route for AMQ Management Console. For example, http://artemis-wconsj-0-svc-rte-kc-ldap-tests-0eae49.apps.redhat-412t.broker.app-services-dev.net/console/*
A separate client configured with the following settings if you have messaging client applications that cannot use the oAuth protocol to obtain a token:
Authentication flow: Direct Access Grants
Valid Redirect URIs: *
Each realm in Red Hat Single Sign-On includes a client named Broker. This client is not related to AMQ Broker.
Procedure
Create a text file named
login.configand add the JAAS login module configuration to connect AMQ Broker with Red Hat Single Sign-On. For example:console { // ensure the operator can connect to the broker by referencing the existing properties config org.apache.activemq.artemis.spi.core.security.jaas.PropertiesLoginModule sufficient org.apache.activemq.jaas.properties.user="artemis-users.properties" org.apache.activemq.jaas.properties.role="artemis-roles.properties" baseDir="/home/jboss/amq-broker/etc"; org.keycloak.adapters.jaas.BearerTokenLoginModule sufficient keycloak-config-file="/amq/extra/secrets/sso-jaas-config/_keycloak-bearer-token.json" role-principal-class=org.apache.activemq.artemis.spi.core.security.jaas.RolePrincipal; }; activemq { org.keycloak.adapters.jaas.BearerTokenLoginModule sufficient keycloak-config-file="/amq/extra/secrets/sso-jaas-config/_keycloak-bearer-token.json" role-principal-class=org.apache.activemq.artemis.spi.core.security.jaas.RolePrincipal; org.keycloak.adapters.jaas.DirectAccessGrantsLoginModule sufficient keycloak-config-file="/amq/extra/secrets/sso-jaas-config/_keycloak-direct-access.json" role-principal-class=org.apache.activemq.artemis.spi.core.security.jaas.RolePrincipal; org.apache.activemq.artemis.spi.core.security.jaas.PrincipalConversionLoginModule required principalClassList=org.keycloak.KeycloakPrincipal; };Note-
The path to the
.jsonconfiguration files must be in the format/amq/extra/secrets/name-jaas-config. For name, specify a string value. You must use the same string value and a-jaas-configsuffix to name the secret that you create later in this procedure. -
In the example
login.configfile, a realm namedconsoleis used to authenticate AMQ Management Console users and a realm namedactivemqto authenticate messaging clients.
-
The path to the
The following login modules are configured in the example login.config file.
| Login module | Description and usage |
|---|---|
| org.apache.activemq.artemis.spi.core.security.jaas.PropertiesLoginModule |
This is the default login module and contains the |
| org.keycloak.adapters.jaas.BearerTokenLoginModule | This login module is for applications, for example, AMQ Management Console, that can use the oAuth protocol to obtain a token. When a user opens AMQ Management Console in a browser window, they are redirected to the Red Hat Single Sign-On console to log in to obtain a bearer token. |
| org.keycloak.adapters.jaas.DirectAccessGrantsLoginModule | This login module is required for non-HTTP applications, such as messaging clients, which cannot use the oAuth protocol. Using this login module, the broker first authenticates the client using a secret that is configured in Red Hat Single Sign-On and then obtains a token on behalf of the client. |
| org.apache.activemq.artemis.spi.core.security.jaas.PrincipalConversionLoginModule | This login module is required to convert the Keycloak principal received into a JAAS principal that can be used by AMQ Broker. |
In the login.config file example, each .json properties file name has an underscore prefix. The Operator ignores files prefixed with an underscore when it reports the status of the JaasPropertiesApplied condition. If the file names do not have an underscore prefix, the status of the JaasPropertiesApplied condition shows OutofSync permanently because the broker does not recognize properties files used by third party login modules. For more information about status reporting, see Section 4.3.2.1, “Configuring the default JAAS login module using the Security Custom Resource (CR)”.
Create text files for each of the
.jsonproperties files that are referenced in the login modules and configure the details required to connect AMQ Broker to Red Hat Single Sign-On. For example:_keycloak-bearer-token.json{ "realm": "amq-broker-ldap", "resource": "amq-console", "auth-server-url": "https://keycloak-svc-rte-kc-ldap-tests-0eae49.apps.412t.broker.app-services-dev.net", "principal-attribute": "preferred_username", "use-resource-role-mappings": false, "ssl-required": "external", "confidential-port": 0 }_keycloak-direct-access.json{ "realm": "amq-broker-ldap", "resource": "amq-broker", "auth-server-url": "https://keycloak-svc-rte-kc-ldap-tests-0eae49.apps.412t.broker.app-services-dev.net", "principal-attribute": "preferred_username", "use-resource-role-mappings": false, "ssl-required": "external", "credentials": { "secret": "Lfk6g1ZKlGzNT6eRkz0d1scM4M29Ohmn" } }- realm
- The realm configured to authenticate the AMQ Broker applications and services in Red Hat Single Sign-On.
- resource
- The client ID of a client that is configured in Red Red Hat Single Sign-On.
- auth-server-url
- The base URL of the Red Hat Single Sign-On server.
- principal-attribute
- The token attribute with which to populate the UserPrincipal name.
- use-resource-role-mappings
- If set to true, Red Hat Single Sign-On looks inside the token for application level role mappings for the user. If false, it looks at the realm level for user role mappings. The default value is false.
- ssl-required
-
Ensures that all communication to and from the Red Hat Single Sign-On server is over HTTPS. The default value is
external, which means that HTTPS is required by default for external requests. - credentials
- A secret configured in Red Hat Single Sign-On which the broker uses to log in to Red Hat Single Sign-On and obtain a token on behalf of the client.
Create a text file named
_keycloak-js-client.jsonand add the configuration required for AMQ Management Console to redirect users to the URL of the Red Hat Single Sign-On Admin Console, where they enter their credentials. For example:{ "realm": "amq-broker-ldap", "clientId": "amq-console", "url": "https://keycloak-svc-rte-kc-ldap-tests-0eae49.apps.412t.broker.app-services-dev.net" }Use the
oc create secretcommand to create a secret that contains the files that are referenced in the login module configuration. For example:oc create secret generic sso-jaas-config --from-file=login.config --from-file=artemis-users.properties --from-file=artemis-roles.properties --from-file=_keycloak-bearer-token.json --from-file=_keycloak-direct-access.json --from-file=_keycloak-js-client.json
Note-
The secret name must have a suffix of
-jaas-configso the Operator can recognize that the secret contains login module configuration and propagate any updates to each broker Pod. -
The secret name must match the last directory name in the path to the
.jsonconfiguration files, which you specified in thelogin.configfile. For example, if the path to the configuration files is/amq/extra/secrets/sso-jaas-config, you must specify a secret name ofsso-jaas-config.
For more information about how to create secrets, see Secrets in the Kubernetes documentation.
-
The secret name must have a suffix of
Add the secret you created to the ActiveMQArtemis Custom Resource (CR) instance for your broker deployment.
Using the OpenShift command-line interface:
- Log in to OpenShift as a user that has privileges to deploy CRs in the project for the broker deployment.
Edit the CR for your deployment.
oc edit ActiveMQArtemis <CR instance name> -n <namespace>
Using the OpenShift Container Platform web console:
- Log in to the console as a user that has privileges to deploy CRs in the project for the broker deployment.
- In the left pane, click → .
- Click the Red Hat Integration - AMQ Broker for RHEL 8 (Multiarch) operator.
- Click the AMQ Broker tab.
- Click the name of the ActiveMQArtemis instance name.
Click the YAML tab.
Within the console, a YAML editor opens, enabling you to configure a CR instance.
Create an
extraMountsattribute and asecretsattribute and add the name of the secret. The following example adds a secret namedcustom-jaas-configto the CR.deploymentPlan: ... extraMounts: secrets: - "sso-jaas-config" ...In the
ActiveMQArtemisCR, create an environment variable that contains the hawtio settings required by AMQ Management Console to use Red Hat Single Sign-On for authentication. The contents of the environment variable are passed as arguments to the Java application launcher when the JVM that hosts a broker is started. For example:env: - name: JAVA_ARGS_APPEND value: -Dhawtio.rolePrincipalClasses=org.apache.activemq.artemis.spi.core.security.jaas.RolePrincipal -Dhawtio.keycloakEnabled=true -Dhawtio.keycloakClientConfig=/amq/extra/secrets/sso-jaas-config/_keycloak-js-client.json -Dhawtio.authenticationEnabled=true -Dhawtio.realm=consoleFor more information on hawtio settings, see the hawtio documentation.
In the
specsection of theActiveMQArtemisCR, add abrokerPropertiesattribute and add permissions for the roles configured in the LDAP directory. You can grant a role permissions to a single address. Or, you can specify a wildcard match using the#sign to grant a role permissions to all addresses. For example:spec: ... brokerProperties: - securityRoles.#.producers.send=true - securityRoles.#.consumers.consume=true ...
Save the CR.
The Operator mounts the files in the secret in a
/amq/extra/secrets/secret namedirectory on each Pod and configures the broker JVM to read the mountedlogin.configfile, which contains the SSO configuration, instead of the defaultlogin.configfile.
8.4. Logging
In addition to viewing the OpenShift logs, you can troubleshoot a running AMQ Broker on OpenShift Container Platform image by viewing the AMQ logs that are output to the container’s console.
Procedure
- At the command line, run the following command:
$ oc logs -f <pass:quotes[<pod-name>]> <pass:quotes[<container-name>]>
Revised on 2024-04-18 15:50:12 UTC