
Installing RHEL AI with Azure Marketplace
Table of Contents
Introduction
Red Hat Enterprise Linux AI is now available through the Microsoft Azure Marketplace. This allows you to create self-managed Red Hat Enterprise Linux AI virtual machine deployments which are billed on pay-per-use basis (hourly, per GPU) with your Azure subscription. This is done by using a Red Hat Enterprise Linux AI image that is billed on an hourly basis through your Azure subscription. This document explains how to install such a machine and take advantage of this billing model.
Disclaimer: Links contained herein to external website(s) are provided for convenience only. Red Hat has not reviewed the links and is not responsible for the content or its availability. The inclusion of any link to an external website does not imply endorsement by Red Hat of the website or their entities, products or services. You agree that Red Hat is not responsible or liable for any loss or expenses that may result due to your use of (or reliance on) the external site or content.
Understanding the installation process
This guide assumes basic familiarity with the overall design concepts and installation procedure of Red Hat Enterprise Linux AI. For a general introduction, please refer to our product documentation.
The deployment of Red Hat Enterprise Linux AI via the Azure Marketplace is conducted using the same utilities and procedures as a regular self-managed Red Hat Enterprise Linux AI installation. The setup process using the Azure Marketplace image is identical to a regular Azure installation.
Limitations
Red Hat Enterprise Linux AI installation using Azure Marketplace is only supported on specific instance types. Please refer to the following table. For more information please refer to product documentation.
| Hardware vendor | Supported accelerators (GPUs) | Aggregate GPU Memory | Azure Instances | Recommended additional disk storage |
| NVIDIA | 8xA100 | 640 GB | Standard_ND96amsr_A100_v4 | 3 TB |
| NVIDIA | 4xA100 | 320 GB | Standard_ND96asr_A100_v4 | 3 TB |
| NVIDIA | 8xH100 | 640 GB | Standard_ND96isr_H100_v5 | 3 TB |
| AMD | 8xMI300X | 1535 GB | Standard_ND96is_MI300X_v5 | 3 TB |
Installation Steps for RHEL AI - Microsoft Azure Marketplace (PAYG)
Procedure
Follow these steps if you are using Azure Portal UI. The below fields in Azure are required to be completed for creating a VM ( not all fields are shown )
-
For EMEA customers please use the image provided Red Hat Enterprise Linux AI Limited
-
For any other regions please use the image provided Red Hat Enterprise Linux AI Inc
-
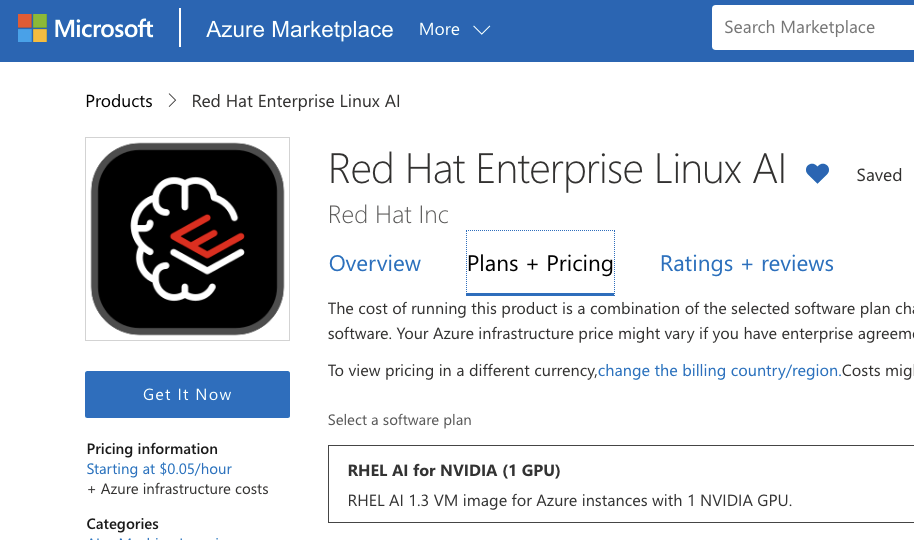
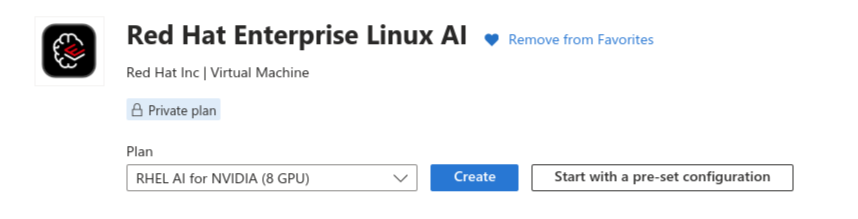
Select the Plans + Pricing option. Use the pull-down menu to select the software plan that provides the number of GPUs you wish to provision. Click the Get It Now button, review the software plan details shown and create the app in Azure.
- On the following screen, click the Create button to move to the Create a virtual machine screen.
Create a Virtual Machine
[Project Details]
-
Select a Subscription
-
Create or select a Resource group
[Instance Details]
-
Create a Virtual machine name.
-
Select the Region where resource quotas are available.
-
Availability options
[No infrastructure redundancy required]
IMPORTANT: Please select “No Infrastructure redundancy required” and no other options, otherwise you will not see the RHEL AI Images.
- Image
[RHEL AI for NVIDIA - x64 Gen 2]
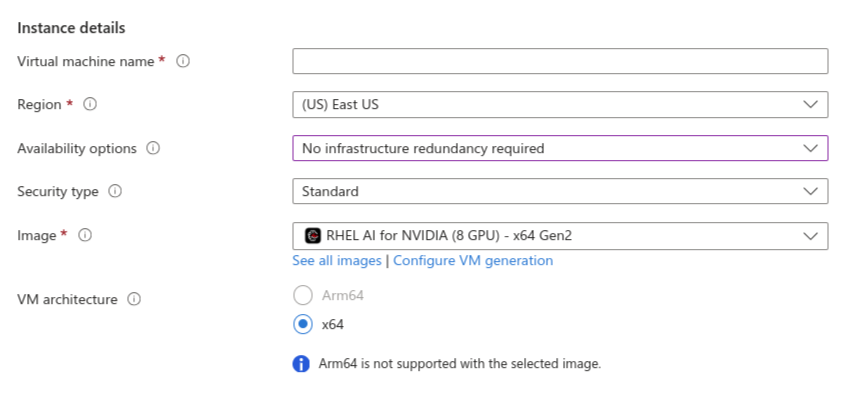
- Size
Select a virtual machine size that provides the required capabilities (vCPUs, GPUs, etc.).
Click on See all sizes
Tip: When selecting a VM size under ‘See all sizes’, add a 'Type: GPU' filter for faster selection.

If you do not see the Images listed, please click on Request Quota under Size not available section for that desired image as below and complete the Microsoft Azure process.

[Administrator account]
-
Select preferred Authentication type (SSH public key / password) and complete the required fields specific to the selected type (denoted with an asterisk).
-
Create a username (default is azureuser).
[Inbound port rules]
- SSH (22) will be allowed by default for access to the VM.

Deploy :
-
Select Review and Create to run the validation check, then select create
-
Select Go to resource when deployment is complete to see the instance details.
-
Follow Azure documentation for connecting to the virtual machine
Post Installation
- After starting the instance and before running any ilab command, set the
ILAB_HOMEenvironment variable and change the file mode on the/var/mntparitition
$ echo 'export ILAB_HOME=/var/mnt/' >> $HOME/.bash_profile
$ source $HOME/.bash_profile
$ sudo chmod 1777 /var/mnt
Support
- Please follow the Microsoft Azure support process to open Microsoft cases with issues related to Azure. e.g. availability of GPU SKUs / Instances in any Azure region. Please request the
Quotasas described above under Create Virtual Machines.
- Please subscribe your machines to Red Hat Subscription following the RHEL Azure marketplace documentation and follow the Red Hat Support process. to open cases with Red Hat for RHEL AI issues.
Comments