
How to register a Red Hat Enterprise Linux system running on AWS to Insights
How to register a Red Hat Enterprise Linux system running on AWS to Insights
This document is going to walk through the necessary steps to register a cloud based system to Red Hat Insights.
The initial version of this document will focus specifically on AWS.
There are three main steps that we will cover below.
Create - If you don’t already have a Red Hat SSO account, you will need to create one.
Connect - Once you have an account, you need to connect your Red Hat Enterprise Linux systems to your account.
Correct - After you connect to Insights you can see common support, security, and best practice type issues on your systems. It is simple and easy to correct these issues.
Create
In order to register a cloud based system to Insights, first you need to have a Red Hat single sign on (SSO) account.
This is the same account that you might use to read a knowledge base entry or download software.
If you already have an account - great! You’re all set.
Don’t have an account? Click here to create one: LINK
Creating a Red Hat SSO account only takes a few moments.
Note: For a net new account you will also need to request a Red Hat Enterprise Linux (RHEL) trial to complete the setup of your account.
Sign into your newly created account then request a RHEL trial.This is a temporary measure and this note will be removed once the backend work is completed to resolve this issue.
The next step is to connect your system to Red Hat.
Connect
Prerequisites: These steps assume that you have a RHEL instance on a cloud provider already running and you know how to connect to it via the command line.
There are a couple different ways to connect. We’re going to start with the simplest way to get connected which just requires the username and password you just created.
Later in the document we’ll cover other options which may be of interest once you get the basics figured out.
Connect has two parts - connecting the system to Red Hat using subscription manager, then connecting to Insights using Red Hat Connector (RHC) which uses RHEL 8.4 and newer systems.
Red Hat Connector (RHC) is a new, optional, command line utility that simplifies the connected experience and can also enables infrastructureless remediation, allowing you to fix the things that Insights finds, right from cloud.redhat.com.
First - let’s register through subscription manager.
[user@myhost ~]# subscription-manager register
Registering to: subscription.rhsm.redhat.com:443/subscription
Username: myuser
Password:
The system has been registered with ID: xxxxxxxx-xxxx-xxxx-xxxx-xxxxxxxxxxxx
The registered system name is: myhost.us-east-2.compute.internal
[user@myhost ~]#
Note: If you receive: error: 'NoneType' object is not subscriptable
You may have encountered an issue where your account did not completely get setup.
The easiest way to resolve this is to request a Red Hat Enterprise Linux evaluation subscription which will initiate a backend process that will resolve the issue.
Go to the RHEL trial page and request a trial.
Now that the system is registered to Red Hat, we want to install Ansible so that later operations can automatically be performed.
It should be noted that usage of Red Hat Enterprise Linux (RHEL), whether provided via PAYG or BYOS, provides access to and compatibility with Ansible Engine. The Ansible Engine repositories are made accessible as a convenience for the use of the **rhc **package, Red Hat Enterprise Linux (RHEL) System Roles, as well as other layered products in the Red Hat product portfolio. However, the RHEL subscription does not include full support for Ansible Engine outside the scope of compatibility of these two features.
To install Ansible you may need to update RHUI (Red Hat Update Infrastructure) in your cloud provider:
dnf update rh-amazon-rhui-client
Then install Ansible:
dnf install ansible -y
Once Ansible is installed, the next step is to connect via Red Hat Connector (RHC).
While RHC should be installed on RHEL 8.4 and higher versions, it is a newer package and may not be installed on some of the marketplace images.
There are two parts to RHC - the rhc package which does the basic registration and the rhc-worker-playbook which contains Ansible playbooks for more advanced operations.
To install both packages run the command:
dnf install rhc rhc-worker-playbook -y
If these packages are already installed, update them to be sure they are at the latest version:
dnf update rhc rhc-worker-playbook -y
Once RHC is installed and updated, the connect command is simple:
rhc connect
This should result in:
[user@myhost ~]# rhc connect
Connecting myhost to Red Hat.
This might take a few seconds.

● This system is already connected to Red Hat Subscription Management
● Activated the Red Hat connector daemon

Manage your Red Hat connector systems: https://red.ht/connector
[user@myhost ~]#
Note: RHC connect will use the playbooks that are part of rhc-worker-playbook to performs actions in the background such as connecting to Red Hat Insights.
These will take a few minutes to complete.Logs can be seen by using the command:
journalctl -u rhcd -f
Correct
In this step we will connect to Insights at cloud.redhat.com and review the findings and correct them. It is important to note that the specific findings that are referred to in this section will likely not be the exact same as the findings on your system. This is expected.
Visit the Red Hat Hybrid Cloud page then click “Console log in” in the upper right.
Log into the Hybrid Cloud Console using your Red Hat SSO account that you created in the Create section. (If you are already logged on via SSO then you will not be prompted to log in.)
Note:The first time you visit a Red Hat web property like cloud.redhat.com, you will be prompted to agree to the Red Hat Terms and Conditions. Read them, select the "I have read and agree to the terms" checkbox, then click Submit.
If it is your first time ever visiting this page, you will be presented with a tour and information about the pages. Feel free to take the tour and learn what you can. Pick back up here once the tour concludes. This is also true for many subsequent pages, but I will not refer to the tours in the rest of this section.
On the left hand navigation bar, click Red Hat Enterprise Linux. (It should be noted that Insights also is available for Red Hat OpenShift and Red Hat Ansible Automation Platforms.)
!

If for some reason you do not see the menu on the left side, you may need to click the menu icon in the upper left corner. This button shows or hides the left hand navigation bar.
Finding a thing to correct
You are now at the Dashboard page for Insights for Red Hat Enterprise Linux (RHEL). Here I will reiterate that what I see and reflect in images below in my dashboard will differ from what you see. I created a RHEL 8.4 marketplace image and now just have that single machine registered.
There aren’t many recommendations since 8.4 is a newer release, but we do have some vulnerabilities which indicate Common Vulnerability and Exposures (CVE) that need to be addressed on these hosts.
The dashboard areas for Vulnerabilities tells you about CVEs with security rules[1] as well as CVEs with known public exploits[2]. It also breaks down the CVEs present by the Common Vulnerability Scoring System (CVSS).
[1] Security Rules are CVEs where Red Hat has done additional analysis to provide detailed information on the impact, remediation, and additional effects of the CVE particular to Red Hat environments. This extra level of analysis indicates that these vulnerabilities should be prioritized when possible.
[2] Known exploits are CVEs with a known public exploit and as a result any systems with unresolved CVEs of this type are at a greater risk. This flag does not mean that YOUR system has been exploited, it just means that the risk or a public exploit is there as a result of this CVE.

Keep in mind that Insights will aggregate this information across ALL hosts registered to Insights. At this point there is only a single system, but 49 total CVEs listed on that one host.
In order to start correcting this system, let's focus on one of the CVEs with a known exploit. Since this has a higher risk associated with it, we want to address these first where it makes sense.
Click “View known exploits” on the dashboard. (Alternatively we could click Vulnerability and then click CVEs on the left navigation bar and add a filter for known exploits. The link on the dashboard takes care of these steps for us.)

I do want to draw attention to the two filters that are applied in the interface now.
- In red, Systems exposed: 1 or more means that we are only looking at systems that are impacted by CVEs. If a CVE is not applicable to any systems registered to Insights, that CVE won’t be displayed.
- In blue, Known exploit: Has a known exploit means that we are only showing CVEs that have a known exploit.
Clearing either of these filters will change what is displayed on screen.
For now I want to look into the older of the two CVEs. In my case this is CVE-2021-3560.
Click on it to see additional details about the CVE including a description, severity, the CVSS base score and the reason for the rating (hint: click the “?” for an explanation of what the vectors mean if you aren’t familiar), and a link to the Red Hat CVE database for additional information. If you want more information about labels such as the Known exploit label, you can expand it for a description.
In the exposed systems section you can see the systems exposed to this CVE and details about the system such as the operating system (OS), status (which is a status you can set to identify where the system is in the remediation process), when the host was last seen (Insights reports once daily), and if there is an Ansible playbook available to remediate the issue.

Creating a remediation playbook
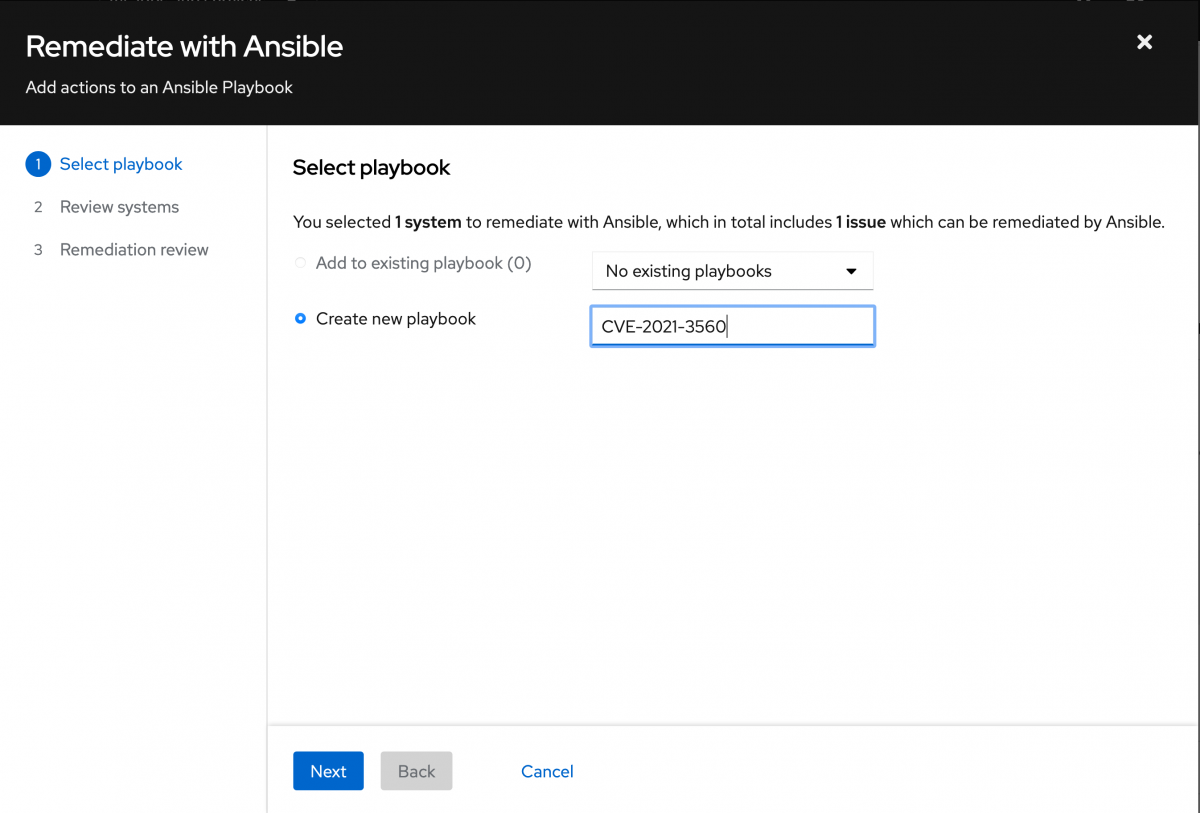
Now we have an issue we want to remediate on our system. Click the checkbox to the left of the system, then click the Remediate button. This will start a wizard which will create a playbook to fix this issue.
First give the playbook a name and click next.
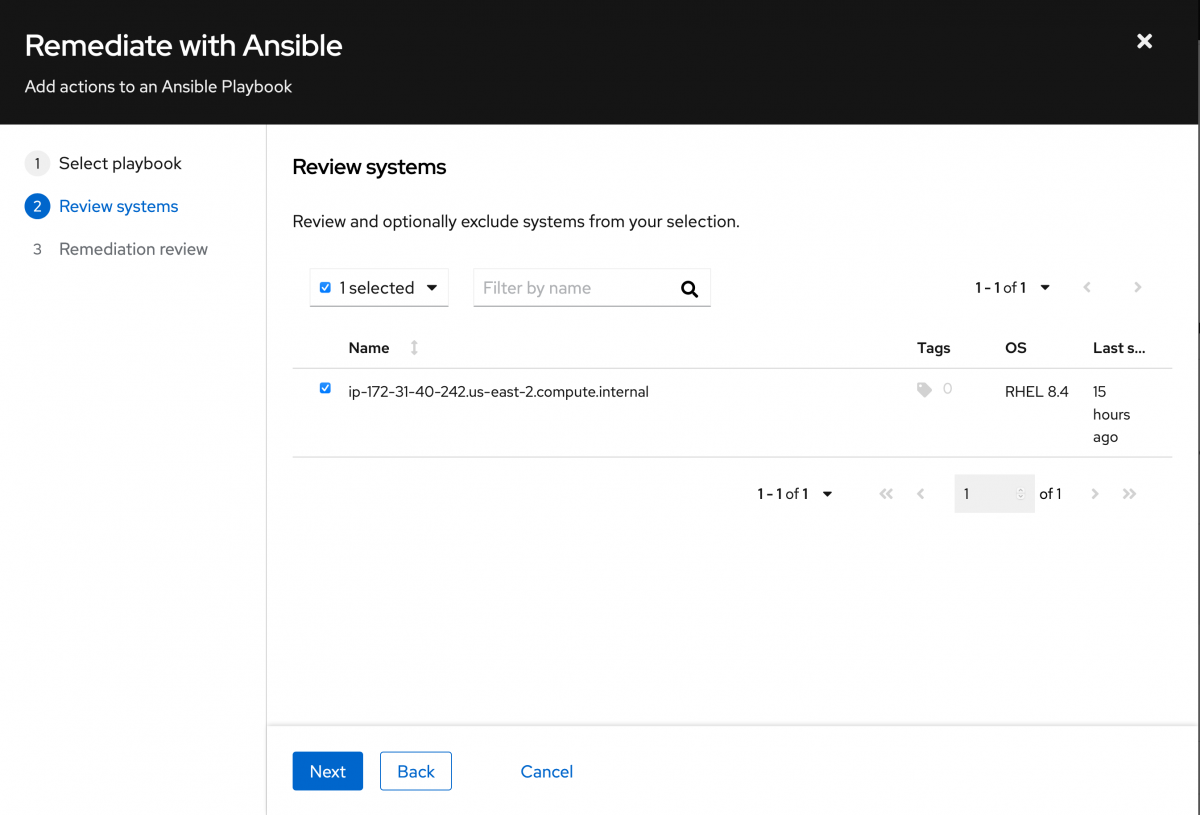
Then review the systems that are a part of this playbook. In this case we only have one, so click Next.
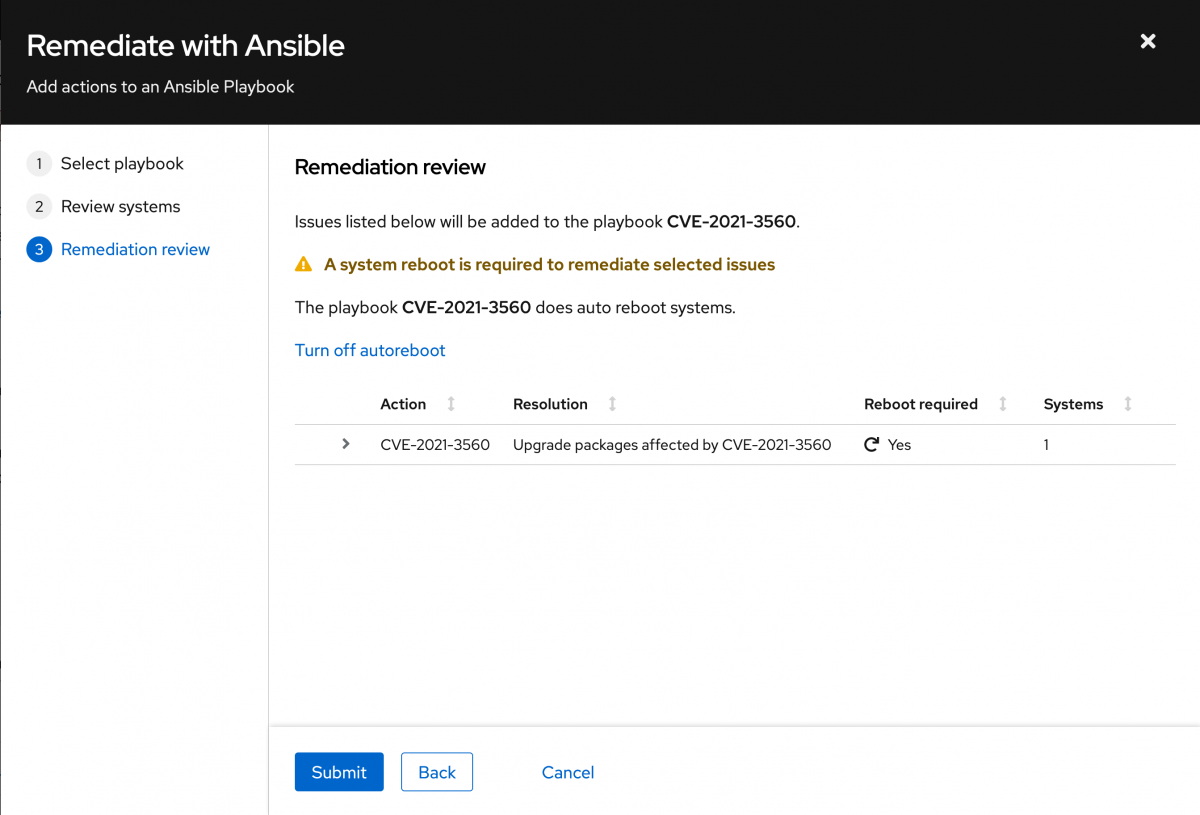
Review the actions that you will be taking, and click Submit.
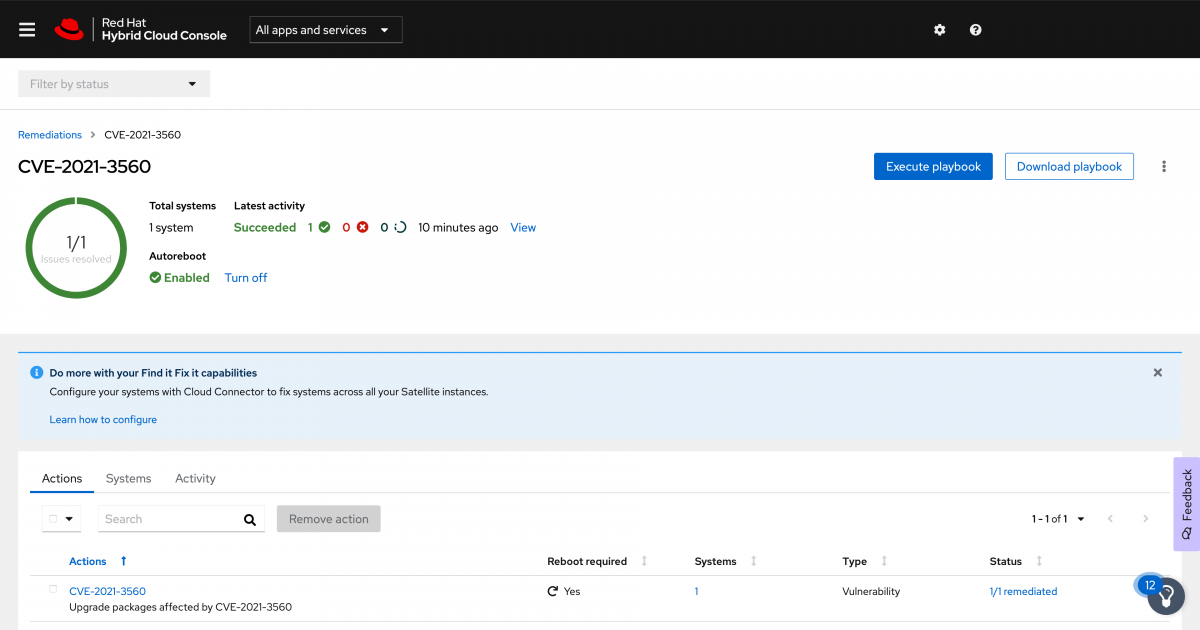
You can now clock the playbook name either in the upper right corner or in the center of the wizard. This will redirect you to the playbook within the Remediations service of Insights.
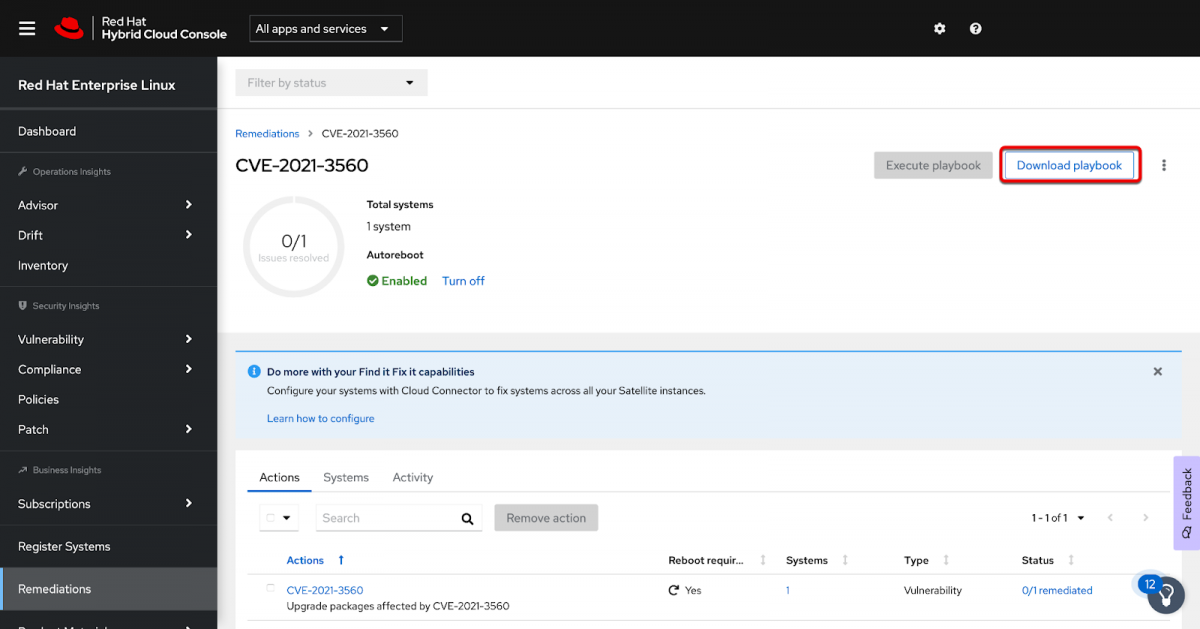
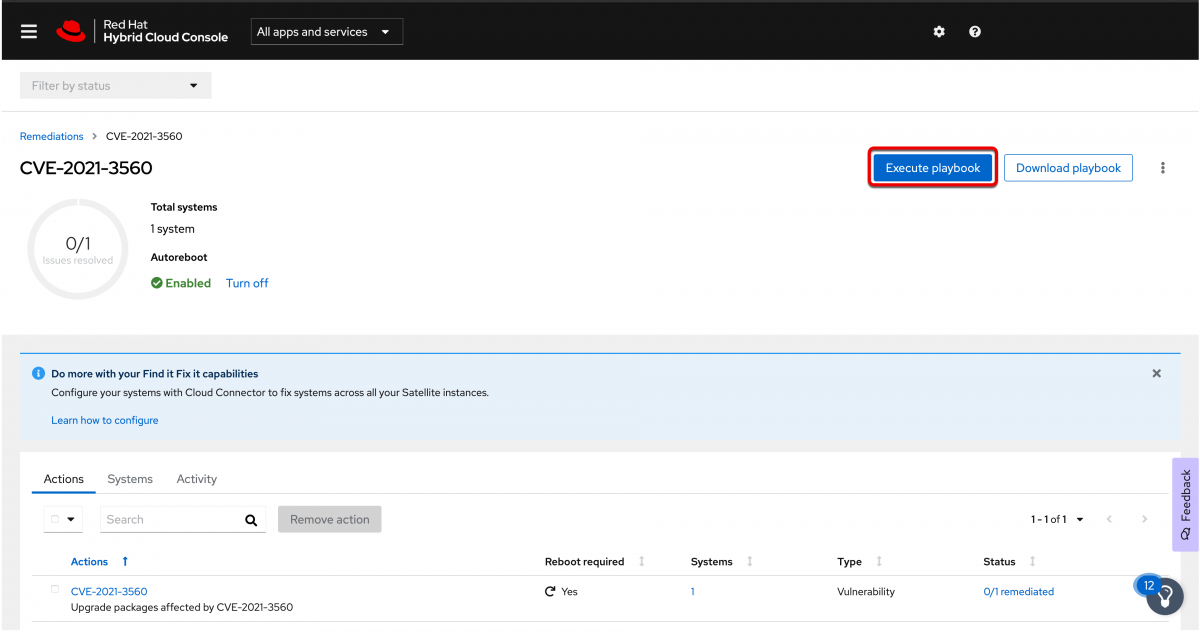
This shows you the Remediation plan inside of Insights. You can download the playbook you created by clicking the Download playbook button in the upper right corner.
This will download a .zip file which when extracted contains a .yml file. You can open that file and see exactly what Insights is going to do using the Ansible .yml format.
Running the playbook from Insights
There is another piece that we want to configure as well. You may have noticed in the previous screenshot that along with the Download playbook button there is an Execute playbook button. It is currently greyed out.
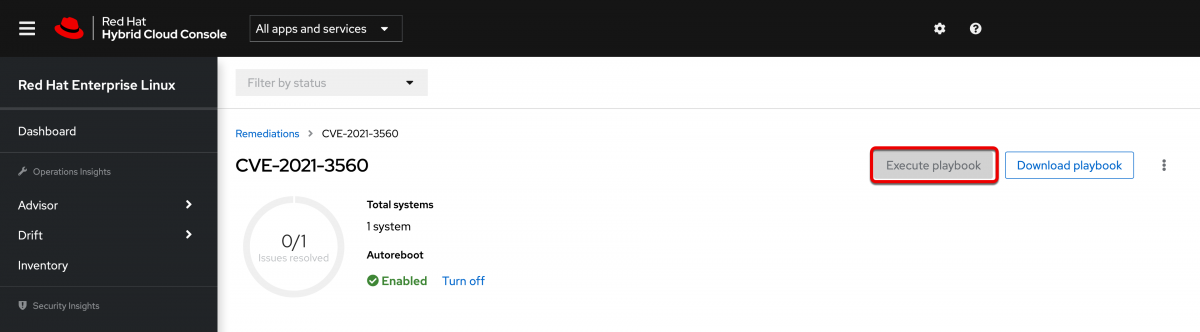
When properly configured this will let you run the playbook inside of Insights.
Because this is actually performing elevated operations on the system, such as applying patches or making system changes, you do need to explicitly give a user access to perform this task. This requires the Remediations Administrator role.
If you have been following along in this guide, you made your own Red Hat account. This means that you are the owner of the account and have what is called Organization Administrator (Org Admin) permissions. Assuming that you are the org admin, then you can make all of these changes. If you didn’t create the account you will need to find your org admin and ask them to give you elevated permissions inside of the Hybrid Cloud Console to perform these next steps.
Configuring Remediations Administrator access
To provide your account with the Remediations Administrator role, you need to update the role based access control (RBAC) of the Hybrid Cloud Console. You do this by clicking the gear icon in the upper right, then clicking settings.

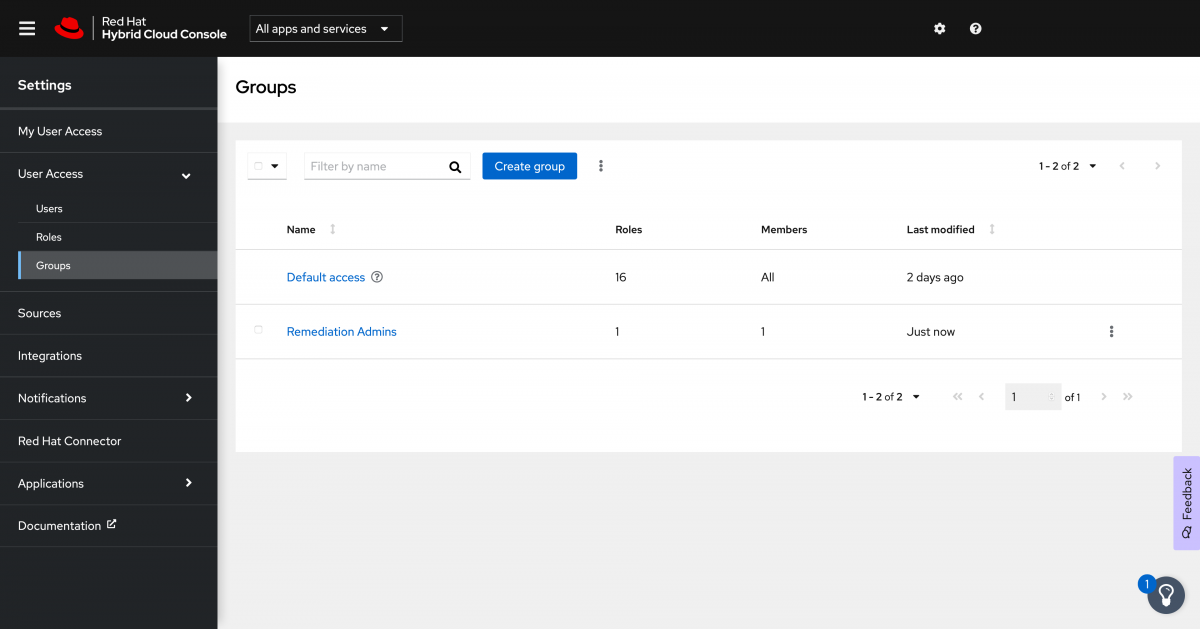
On the left hand navigation bar, click User Access to expand it, then click Groups.
If nobody has ever edited the RBAC of the Hybrid Cloud Console, then you will see a group called “Default access”. Any user of the Hybrid Cloud Console will use this access group by default. This group has the most common permissions of the Hybrid Cloud Console, but it is missing a few of them, such as the Remediations Administrator.
Since you probably don’t want EVERY user of your account to be able to change your systems, I would recommend creating a new group and giving that group elevated permissions.
To do this, click the “Create group” button.
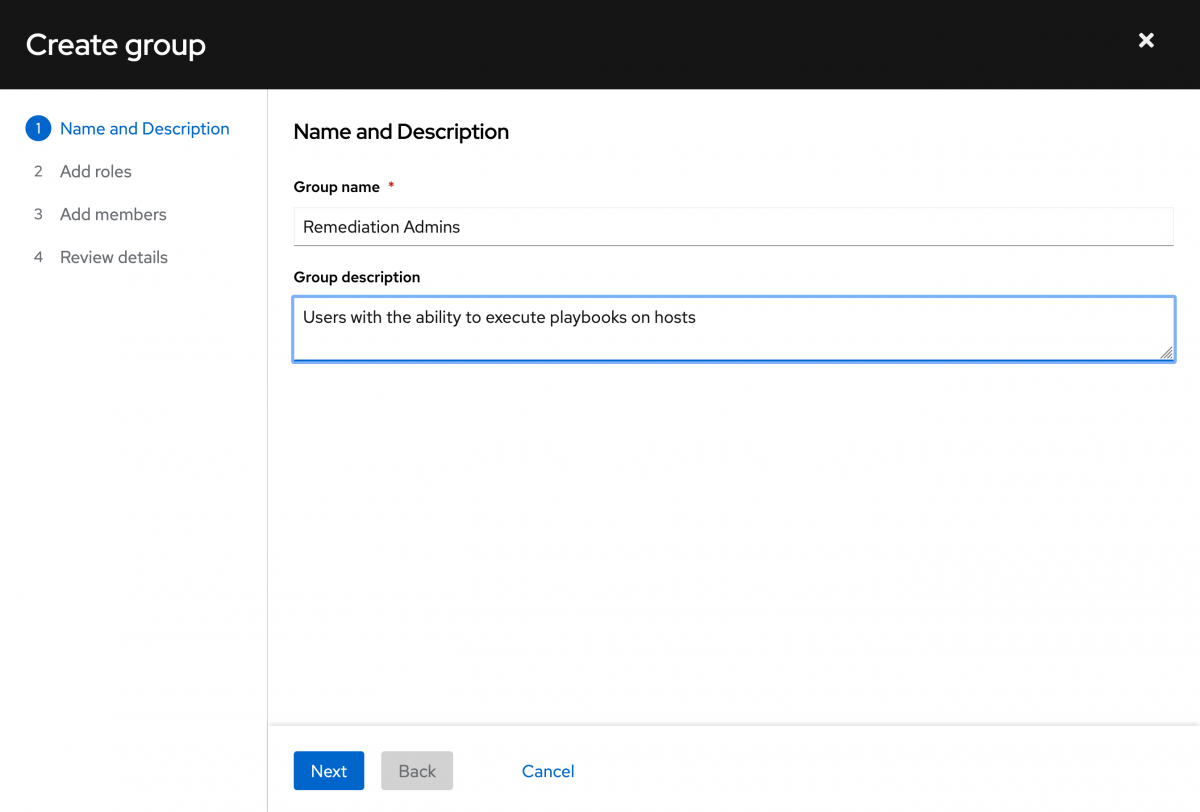
Give your group a name and a description. I’ll just call my Remediation Admins.
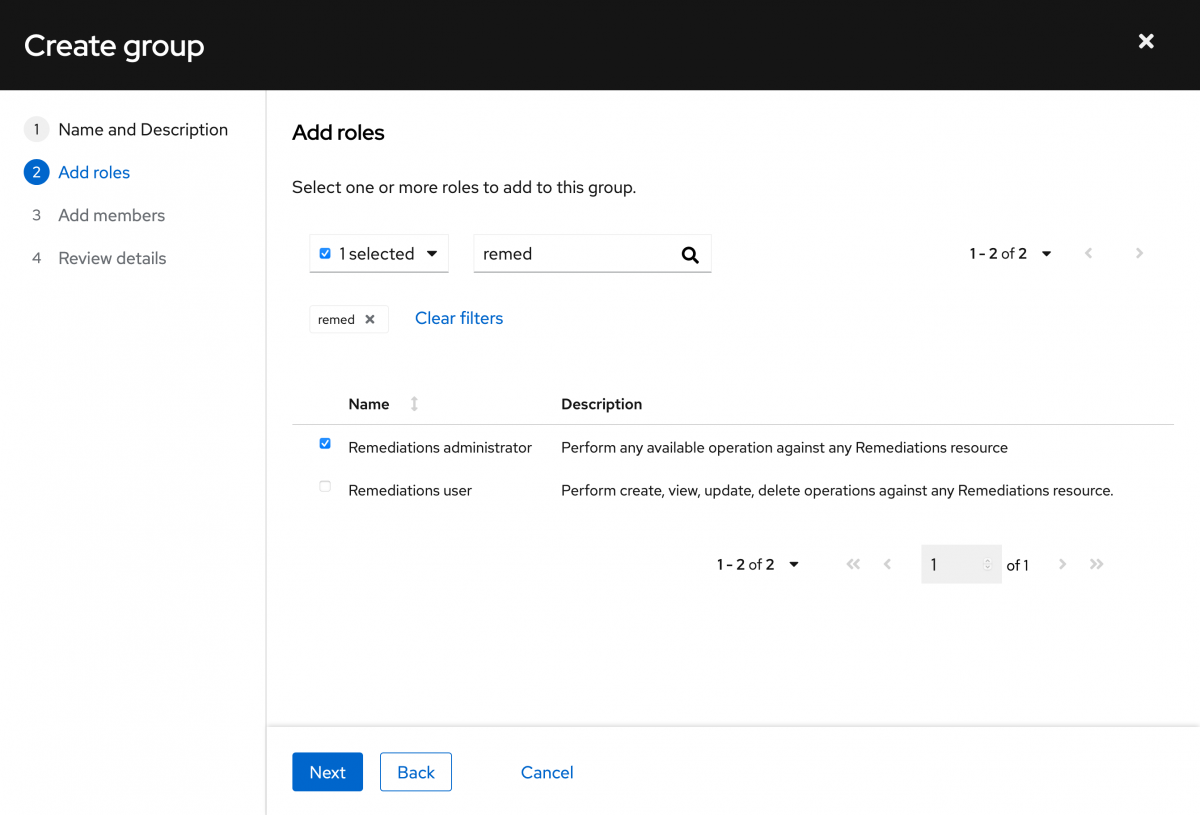
Next you need to add the desired roles to your new group. Since the group we need is Remediations Administrator, I can just filter and start typing remediation - I got to “remed” before the type ahead caught up with me. Select the desired role, then click Next.
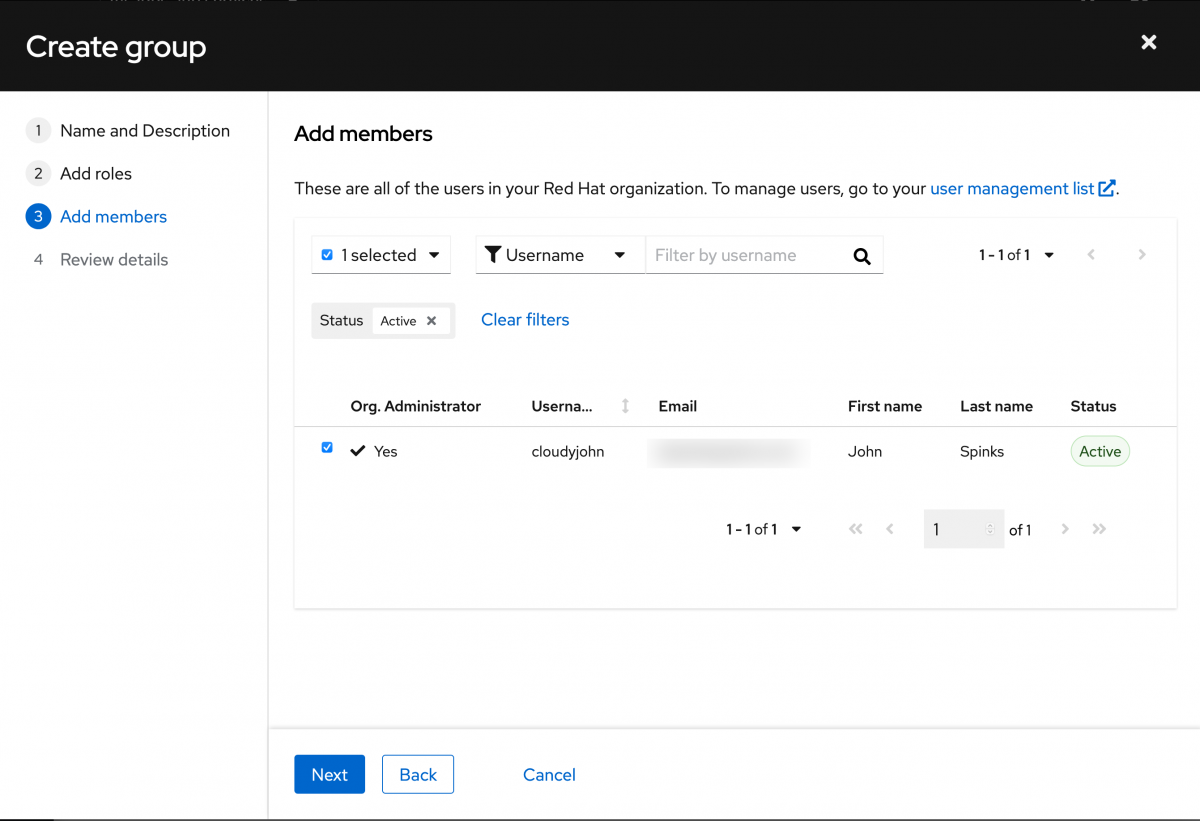
Next add the members that you want to be a part of the group. In this case I just have a single member, so I’ll select it and click Next.
Review the details and click Submit.
You now have a new group with the appropriate role and user.
The RBAC model is additive, so your user will get all of the permissions it needs from the Default access group for accessing the different services and will get the elevated permissions that it needs from the Remediation Admins group in order to actually execute the playbooks.
Correct the issue
With that user created, let’s return to the Remediations section of Insights.
Locate and select your remediation plan. This time you should notice that the Execute playbook button is now available to select.
Click the execute playbook button and you will be presented with what we call a preflight check. This is going to check the status of any systems that are a part of the remediation plan and will let you know if they are available to be remediated via the execute playbook button.
Note: If you have systems that are connected to Insights but are not connected via either RHC or a Red Hat Satellite, then you will not be able to perform remediation via the execute playbook button.

In this case the preflight check is letting us know that the system that is a part of this remediation plan is directly connected via Red Hat Connector and is ready for remediation. Click the execute button to run the playbook on the host.
Once the job has been started you can view the status from Insights as well.
You can either select the activity tab or click View to the right of the latest activity. Both are highlighted in red in the image below.

If you click the View tab you are taken to the most recent job run and you will need to click the connection type, in this case Direct connected.
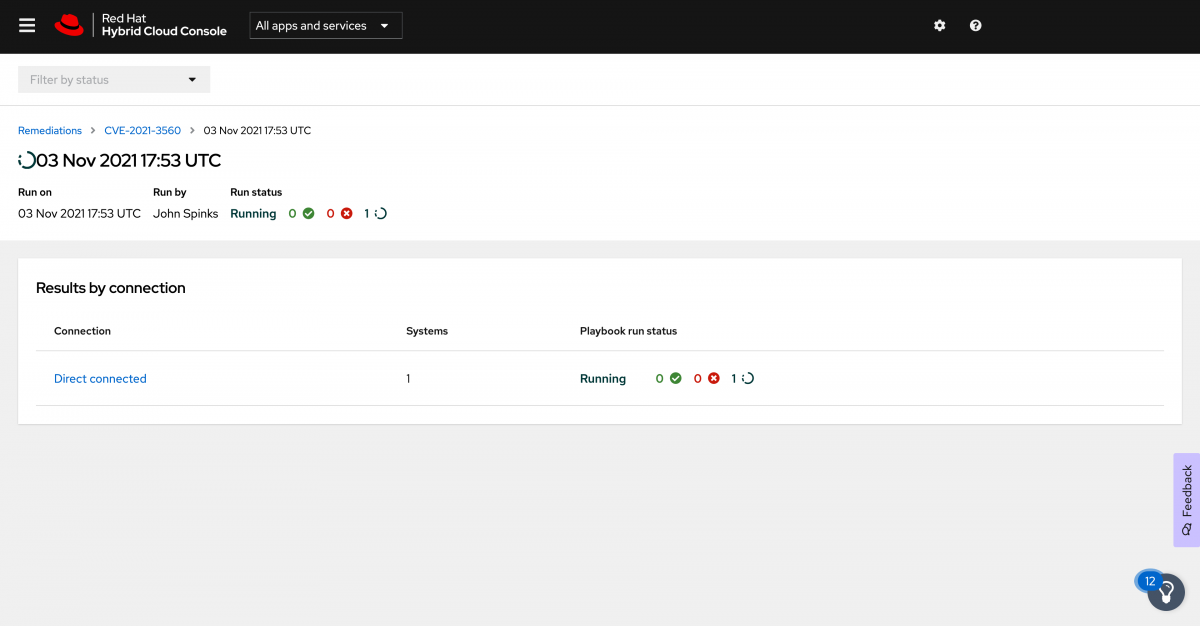
When you click the Direct connected type you will then see the unique identifier name for each host where the job is running. Since I am only running this on one host, I only have one entry. Expand it to see the details. Here you can see the playbook running in real time.
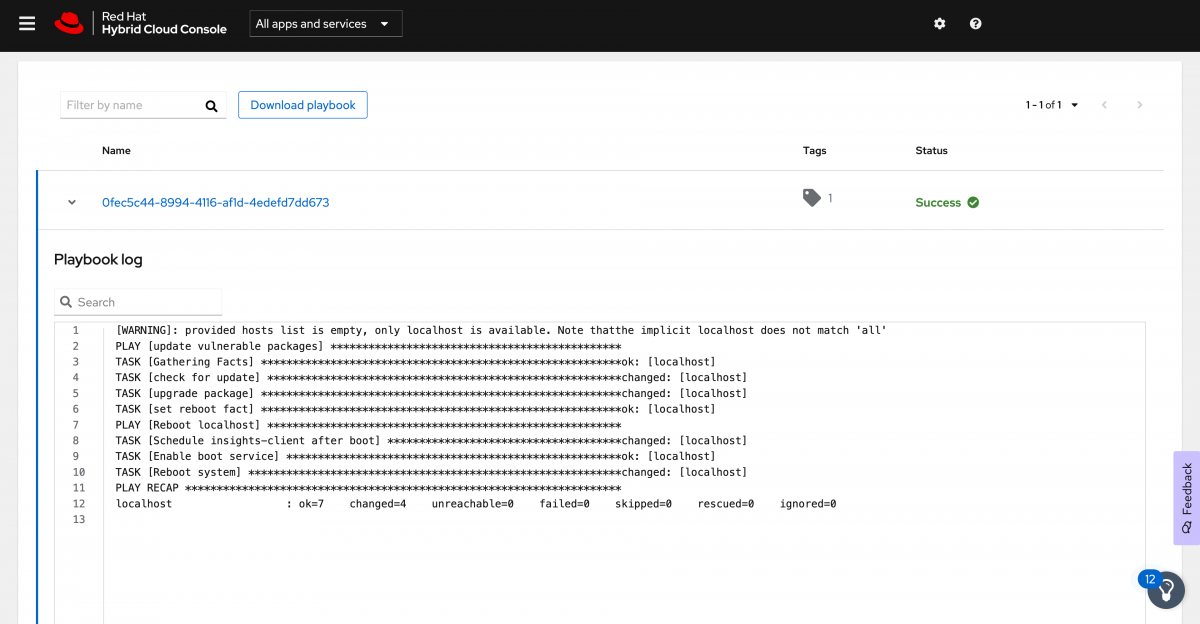
When this completes or whenever you are ready return to the Remediations playbook.
Here you can see the status of the job.
Who do I call for support if I am having trouble with these steps?
For pay as you go (PAYG) systems (which are not covered by a yearly Red Hat Subscription), contact the cloud provider for support.
If you are using bring your own subscription (BYOS) systems (which are covered by a yearly Red Hat subscription), contact Red Hat for support.
Usage of Red Hat Enterprise Linux (RHEL), whether provided via PAYG or BYOS, provides access to and compatibility with Ansible Engine. The Ansible Engine repositories are made accessible as a convenience for the use of the **rhc **package, Red Hat Enterprise Linux (RHEL) System Roles, as well as other layered products in the Red Hat product portfolio. However, the RHEL subscription does not include full support for Ansible Engine outside the scope of compatibility of these two features.
An Ansible Automation Platform support subscription is required for all other use of Ansible Engine and Ansible Tower. Additional information can be found at Top Support Policies for Red Hat Ansible Automation.
Summary
You have successfully created a new Red Hat account, connected your system to Red Hat Insights, and corrected issues that Insights has found.
There is always more to learn, so the rest of this doc is going to cover some more options on how to connect and why you might want to use these other methods.
Additional ways to Connect
In the Connect section above we covered how to connect to Red Hat using subscription manager and your Red Hat SSO username and password. This method, while simple and common may not be the best for your situation, so we’re going to cover some other ways that you can connect your systems to Red Hat and why you might want to use those methods.
Recap: Connecting with username and password
This is the method covered above and is the easiest to understand - you have a username and password. When prompted, enter this information to complete registration.
Best for: People that want to simply register without any additional configuration
To refer to how to use this method, see the Connect section above.
Connecting with Activation Keys
Another way that you could connect to Red Hat is through the use of activation keys.
Activation keys supply granular host based subscription and content management configuration information at the time of registration and are frequently used to help support entitlement based workflows where you have the need to attach a specific subscription to a host.
Even for a new user though, activation keys can be very helpful in your automation workflows where you don’t want to hardcode a user or password.
Best for:
Customers who register through automation mechanisms
Hybrid Cloud customers who are already using activation keys in their environments
Customers that do not have or do not want to provide cloud provider authentication information
To use the Activation Keys method, you first need to create an activation key.
This is something that only an organization administrator can do.
If you have followed this guide and created a new Red Hat account then congratulations - you are the org admin!
If this is a new account, then there are no existing activation keys - you will need to create them.
Activation keys are created on the customer portal. This link is easiest, however to guide you in the future you should start by logging into the customer portal at access.redhat.com.
From there, in the upper left click Subscriptions, then in the toolbar click Manage, then click Activation Keys. Once on the Activation Keys page, click New.
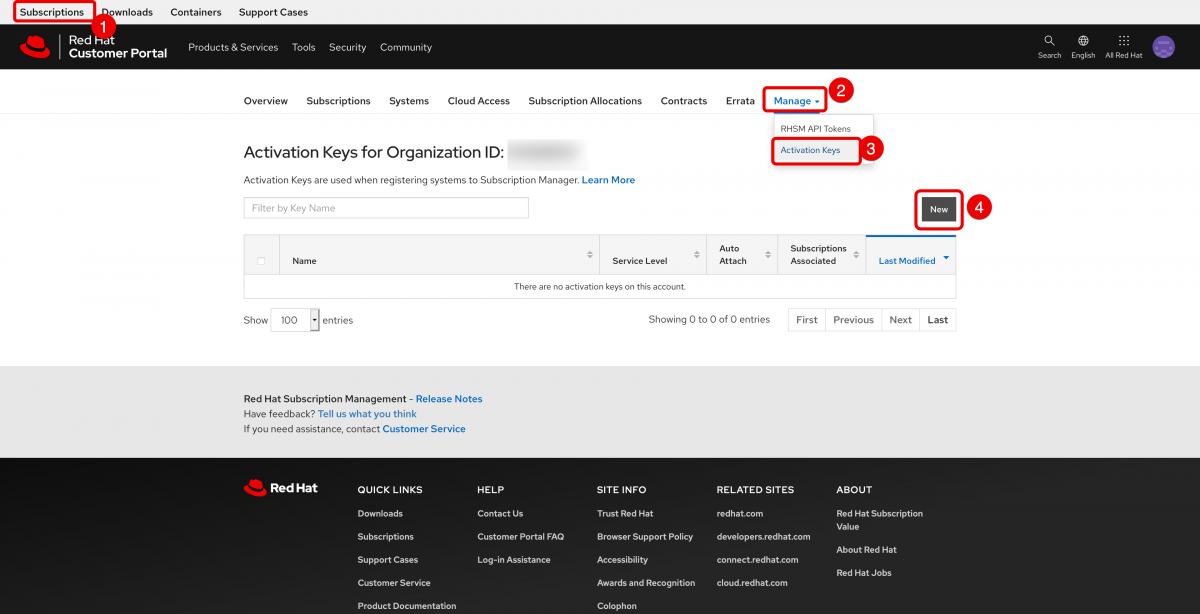
For the purposes of connecting a cloud based system, all you need to do is name the activation key and click Create.

Now you have an activation key created.
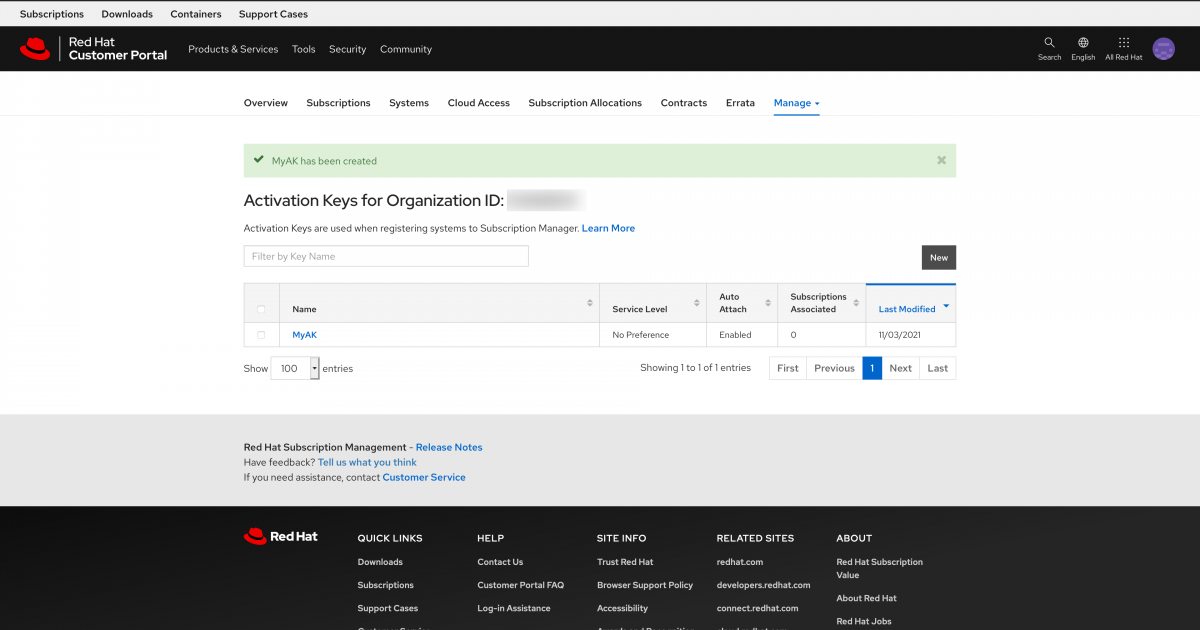
Now that you have an activation key, you will need the organization ID (shown in the screenshot above) and the name of the activation key.
The command is:
subscription-manager register --org <ORG ID> --activationkey=<AK Name>
Here is an example on a new AWS system:
[user@myhost ~]# subscription-manager register --org 8675309 --activationkey=MyAK
The system has been registered with ID: xxxxxxxx-xxxx-xxxx-xxxx-xxxxxxxxxxxx
The registered system name is: myhost.us-east-2.compute.internal
Installed Product Current Status:
Product Name: Red Hat Enterprise Linux for x86_64
Status:       Subscribed

[user@myhost ~]#
To complete getting connected you need to install rhc, rhc-worker-playbook, and ansible:
dnf install rhc rhc-worker-playbook ansible -y
Then connect with rhc
rhc connect
Now you’re connected with an activation key.
These commands are easy to embed into automation and you’re not passing or saving username and password information.
Connecting with Hybrid Cloud Your Way
The newest way of connecting is called Hybrid Cloud Your Way. As the name implies, this is more aimed at people that are using both pay as you go(PAYG) and bring your own subscription (BYOS) models. There are a number of features that this method offers, but in general it is more about a larger connected experience and less about connecting to individual systems and running commands.
Features include:
- Auto registration[1] (new images will be registered to Red Hat automatically)
- Gold images[2]
- Insights
- Additional Subscription info from Cloud providers
[1] Additional setup is needed for PAYG customers to use auto registration as marketplace images do not ship with the necessary bits to perform this.
[2] PAYG is not eligible as this is included with specific paid Red Hat subscriptions and is intended for use with BYOS.
Best for People deploying RHEL in the public cloud that want the simplest possible experience. This requires some initial setup and also has large benefits for customers that are using both pay as you go and bring your own subscription models.
Hybrid Cloud Your Way is initiated from the Sources page of the Hybrid Cloud Console. This is a one time setup per cloud provider account.
You will have the option to configure:
- Cost management, which will analyze, forecast, and optimize your Red Hat OpenShift cluster costs in hybrid cloud environments.
- RHEL management, which enables the following options:
- Subscription data - displays precise public cloud usage data
- Autoregistration - new cloud instances can be automatically connected to your Red Hat account. (may require additional configuration)
- Red Hat gold images - Red Hat images are unlocked in select cloud providers. This requires a qualifying Red Hat subscription - marketplace images do not unlock gold images as they are intended for use with bring your own subscription environments.
You will need:
- Red Hat Account credentials
- Cloud provider account credentials (Chapter 12 of “Getting Started with the Subscriptions Service” guide covers details of the actions that are needed in AWS)
Note: Azure currently requires an instance running Red Hat Enterprise Linux (RHEL). An Ansible playbook is run as part of the Azure setup process.
Adding AWS as a Source
Go to the Sources page of the Hybrid Cloud Console

Note: Only an organization administrator can create a source.
In the context of this document, and the creator of the Red Hat account you are by default the organization administrator.
If you are in an existing organization you may need to contact your organization administrator and ask them to perform these steps.
Select your public cloud provider, In this case AWS. This will initiate the “Add a cloud source” wizard.
Note: Different cloud providers may have different options available in the following screens.

Name your source, then click Next.
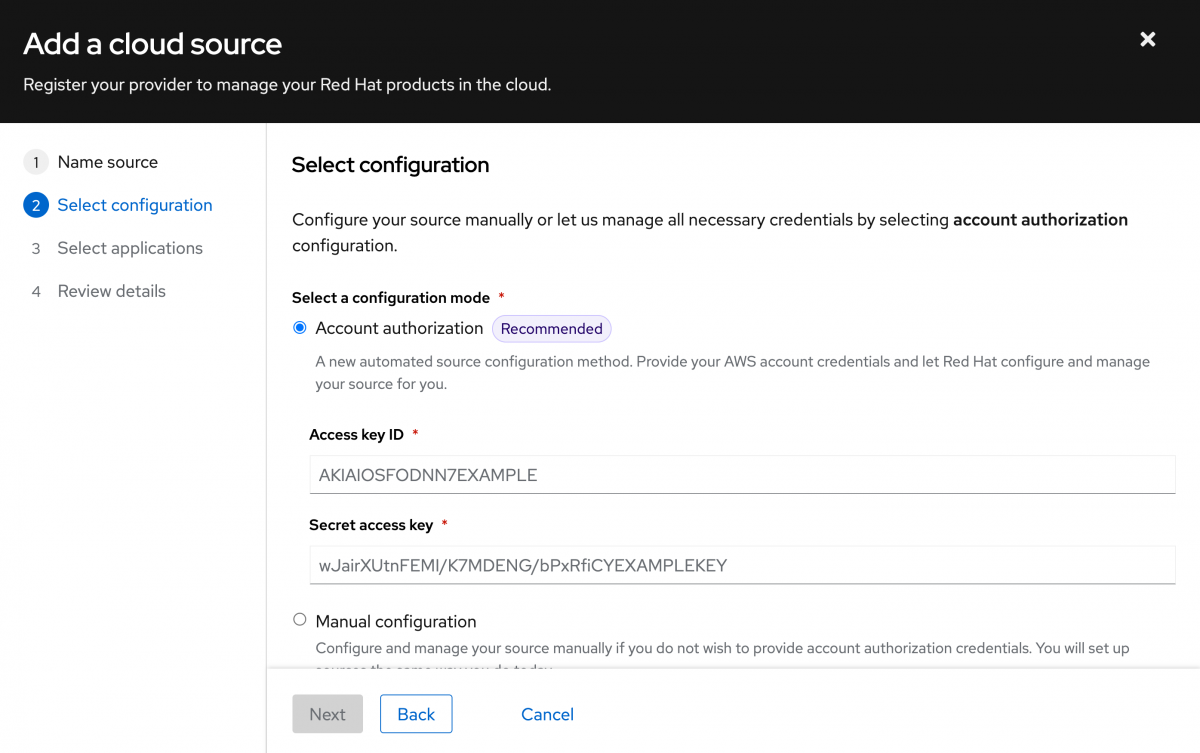
Select your configuration mode.
The Account authorization mode is recommended as it is the simplest option.
This does require an Access key ID and a secret access key.
If you do not wish to provide this information, you may also choose the manual configuration (not covered in this doc).
The manual configuration option will have you create an IAM policy and IAM role in AWS for this connection instead of providing the credentials.
With a manual connection you can select to configure RHEL management or Cost management, but not both (you will need to repeat the wizard a second time if you want both options).
I will select Account authorization, then input the Access key ID and Secret access key that I created for this purpose. Click Next.
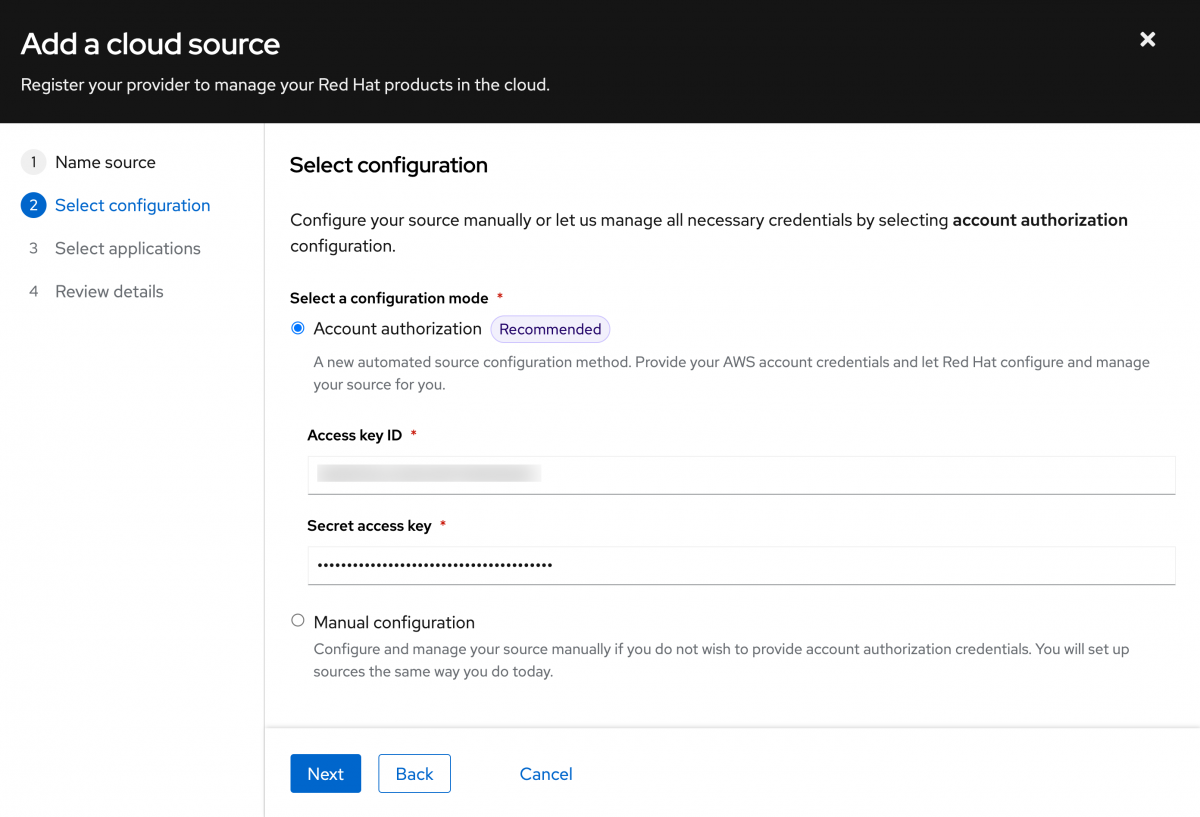
Using the Account authorization method you can choose to enable both Cost management and RHEL management. Make your selections then click Next.

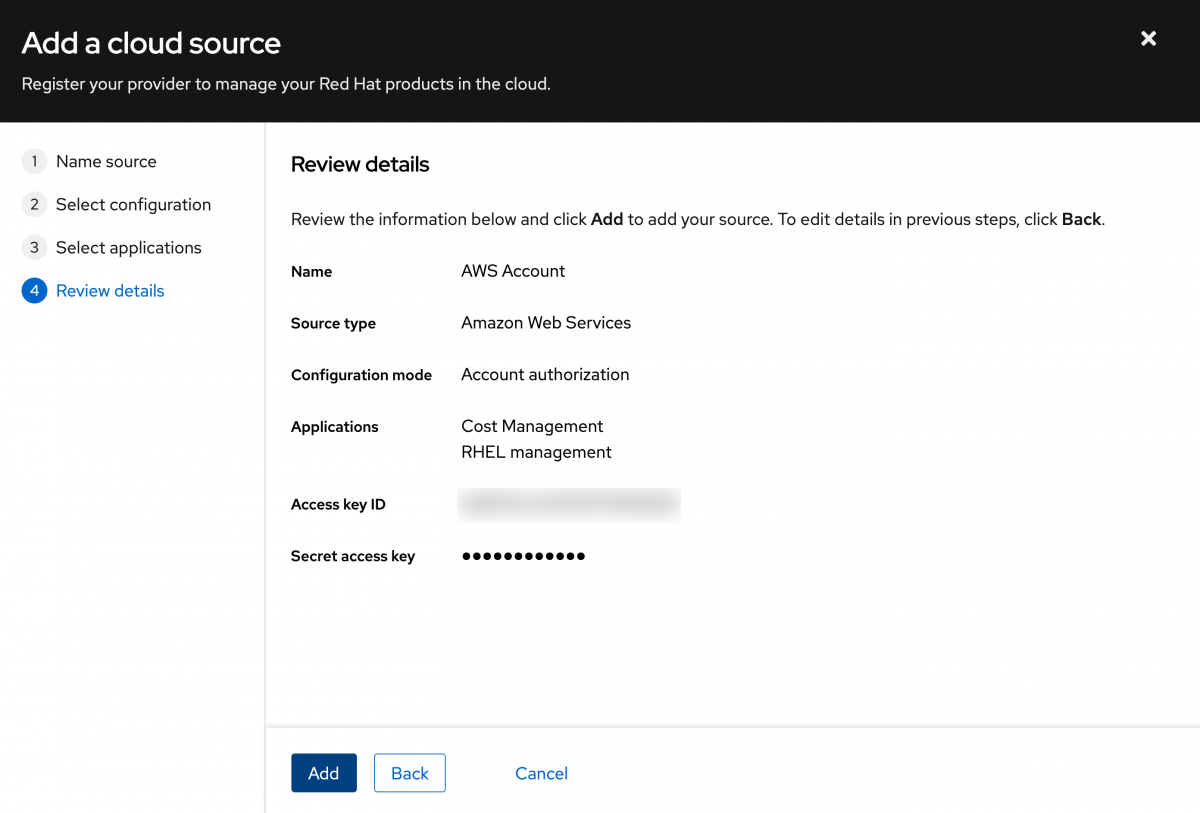
Review your settings, then click “Add”.
This will take some time to complete. You will be presented with a screen similar to the following:
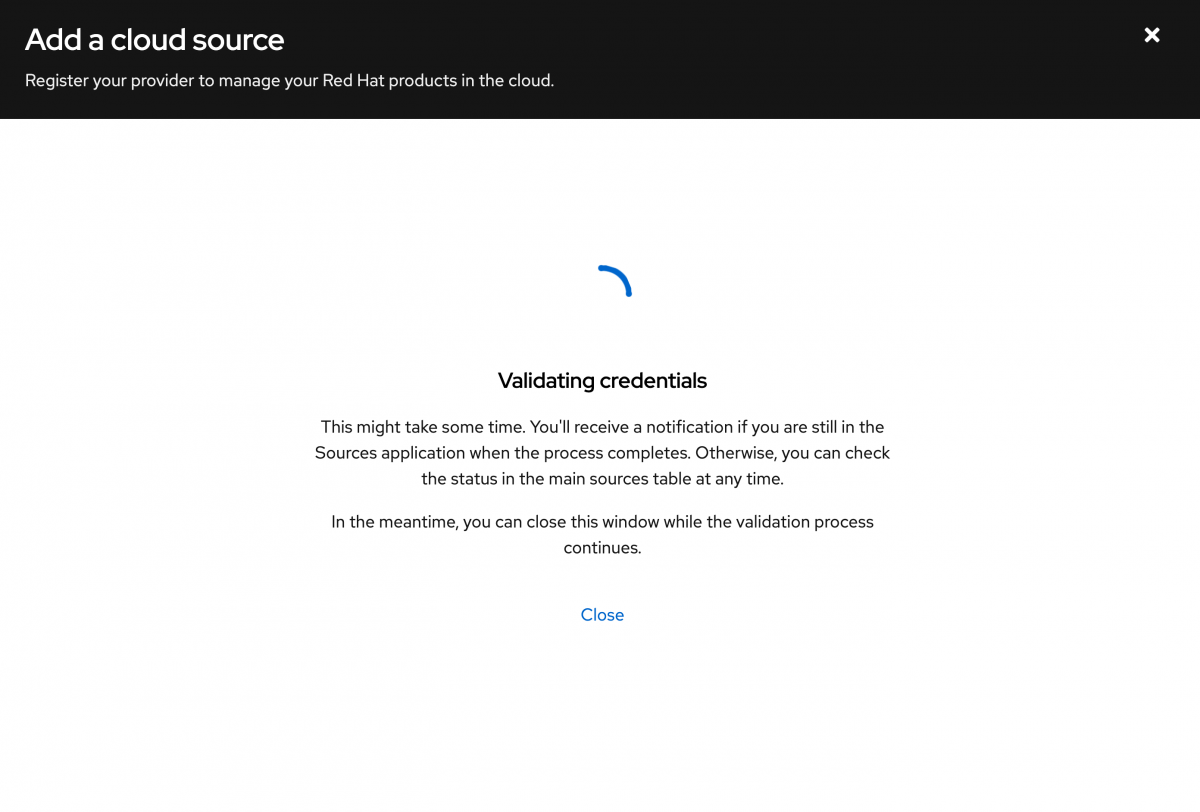
Click Close which will return you to the Sources page.
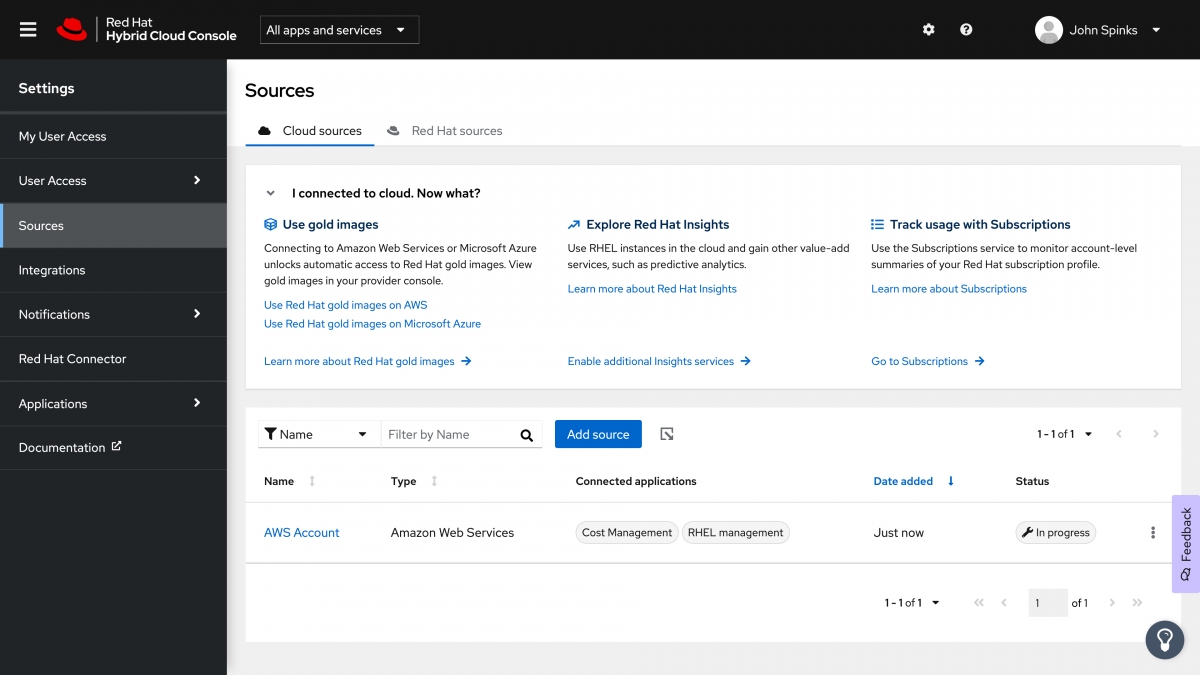
It is common for this to take several minutes - During this time the status will be reported as “In progress”. It took less than 10 minutes in my account.
Note: In my account this page did not automatically refresh to show the available status. I manually refreshed and the page was updated at that time.

Now both Cost Management and RHEL management show as connected applications.
Note: If you have a qualifying Red Hat subscription and are looking to use Red Hat gold images, it may take up to 24 hours for the gold images to be shown.
(It took less than 15 minutes in my account)
You can see gold images in Images -> AMIs under Private images.
Auto Registration
Now that you have created this connection, the auto registration is one of the most interesting features.
From your cloud provider you start a new instance of Red Hat Enterprise Linux.
Through the connection we just made we are able to identify that hosts on this public cloud provider account are associated with that Red Hat account.
As a result we can automatically register the host to your account.
This skips the subscription-manager step that you have to do earlier in the doc.
You can verify this on the host by running the command:
subscription-manager identity
This will return output similar to:
[user@host ~]$ sudo subscription-manager identity
system identity: xxxxxxxx-xxxx-xxxx-xxxx-xxxxxxxxxxxx
name: host
org name: 8675309
org ID: 1234567890
[user@host ~]$
This indicates that the host has been registered to your Red Hat account with no additional action on your part.
Note: It may take several minutes for auto registration to complete.
You will still need to run rhc to get the other benefits mentioned in this document.
As a reminder, you would need to run:
dnf update rh-amazon-rhui-client rhc -y
dnf install ansible rhc-worker-playbook-y
rhc connect
Comments