
Provisioning a Red Hat Enterprise Linux 7 virtual machine for Azure Stack
Table of Contents
Before you start
-
Review Red Hat's support statement and Microsoft's servicing policy. See What are the support policies for Azure Stack?
-
Review the differences between Microsoft Azure public cloud and Azure Stack.
-
RHEL 7.1 is the earliest version of RHEL supported in Azure Stack.
-
Get the Azure Resource Manager endpoint and cloud name for your Azure Stack environment. These are supplied by your Azure Stack administrator.
-
Use the Azure command-line interface (CLI) to manage resources in Azure Stack. See Install the Azure CLI for installation instructions. Return to these instructions after installing the CLI.
-
This procedure assumes you are creating and managing Azure Stack resources from a RHEL (or Fedora) system located outside of the Azure Stack environment.
Register and log in to the Azure Stack environment
You register and log in to the Azure Stack environment to create resources and whenever you need to manage resources in the environment.
-
Register with the Azure Stack environment using the
az cloud registercommand.Note:
--nameis the Azure Stack cloud name and--endpoint-resource-manageris the Azure Stack endpoint URL. Both of these are supplied by the local Azure Stack administrator. The storage account suffix is usually a portion of the full endpoint. (See the example.)$ az cloud register --name <Azure-Stack-Cloud-Name> --endpoint-resource-manager "https://<resource-manager-endpoint>" --suffix-storage-endpoint <suffix-for-storage-accounts>Example:
[stackuser@localhost ~]$ az cloud register -n AzureStack --endpoint-resource-manager "https://xxxxxxxxxxx.westus.stackpoc.com" --suffix-storage-endpoint westus.stackpoc.com -
Set your environment to the active Azure Stack cloud.
$ az cloud set -n <Azure-Stack-Cloud-Name>Example:
[stackuser@localhost ~]$ az cloud set -n AzureStack Switched active cloud to 'AzureStack'. Use 'az login' to log in to this cloud. Use 'az account set' to set the active subscription. -
Log in to your Azure Stack account using the Azure CLI. If you are already logged in, enter
az account showto view account details.Note: If managing resources in multiple Azure Stack environments, make sure the default environment is the environment where you want to create resources.
$ az loginExample:
[stackuser@localhost ~] $ az login To sign in, use a web browser to open the page https://microsoft.com/devicelogin and enter the code ATZXXXXJY to authenticate. [ { "cloudName": "AzureStack", "id": "f11c973e-xxxx-xxxx-xxxx-xxxxxxxxxxxxx", "isDefault": true, "name": "Account-Name", "state": "Enabled", "tenantId": "a3f33ab9-xxxx-xxxx-xxxx-xxxxxxxxxxxxx", "user": { "name": "stackuser@azurestackaccount.onmicrosoft.com", "type": "user" } -
Update the environment configuration to use the Azure Stack API version profile.
$ az cloud update --profile 2017-03-09-profile
Create Azure Stack resources
Create the following resources for your components.
-
Create a resource group.
$ az group create --name <MyResourceGroup> --location <MyAzureStackLocation>Example:
[stackuser@localhost ~] $ az group create --name azurestack-003 -l westus { "id": "/subscriptions/f11c973e-xxxx-xxxx-xxxx-xxxxxxxxxxxxx/resourceGroups/azurestack-003", "location": "westus", "name": "azurestack-003", "properties": { "provisioningState": "Succeeded" }, "tags": null } -
Create a storage account.
Note: Locally redundant storage (Standard_LRS) is the only redundant storage option applicable to Azure Stack. See Azure Stack Storage: Differences and considerations.
$ az storage account create --resource-group <MyResourceGroup> --name <MyStorageAccount> --sku Standard_LRSExample:
[stackuser@localhost ~] $ az storage account create --resource-group azurestack-003 --name stackaccount003 --sku Standard_LRS ...omitted }, "primaryLocation": "westus", "provisioningState": "Succeeded", "resourceGroup": "azurestack-003", "secondaryEndpoints": null, "secondaryLocation": null, "sku": { "name": "Standard_LRS", "tier": "Standard" }, "statusOfPrimary": "Available", "statusOfSecondary": null, "tags": null, "type": "Microsoft.Storage/storageaccounts" } -
Create a storage container.
$ az storage container create --account-name <MyStorageAccount> --name <MyStorageContainer>Example:
[stackuser@localhost ~] $ az storage container create --account-name account003 --name storagecontainer003 { "created": true } -
Create a virtual network.
$ az network vnet create --resource-group <MyResourceGroup> --name <MyVnet> --subnet-name <MyVnetSubnet>Example:
[stackuser@localhost ~] $ az network vnet create --resource-group azurestack-003 --name stack003vnet --subnet-name stack003subnet

{
  "newVNet": {
    "additionalProperties": {},
    "addressSpace": {
      "additionalProperties": {},
      "addressPrefixes": [
        "10.0.0.0/16"
      ]

...omitted

      "ipConfigurations": null,
      "name": "stack003subnet",
      "networkSecurityGroup": null,
      "provisioningState": "Succeeded",
      "resourceGroup": "azurestack-003",
      "routeTable": null
    }
  ],
  "tags": {},
  "type": "Microsoft.Network/virtualNetworks"
  }
}
Create an Azure Network Security Group and SSH inbound rule
Azure Stack environments do not have a default public firewall. To protect your resources, create an Azure Network Security Group (NSG) for the resource group. You assign all VMs to this NSG when creating the VMs.
The following steps create the minimum Inbound NSG rule required to launch an SSH session from your local system to your VMs. The default NSG Outbound rule is to allow all traffic outbound. If you need to set additional inbound or outbound rules, see the following resources.
- To create, add, or modify rules using the Azure CLI, refer to Create a network security group.
- To create, add, or modify using the Azure portal, refer to Create a network security group using the Azure portal.
-
Create an Azure NSG for the resource group.
$ az network nsg create --name <nsg-name> --resource-group <MyResourceGroup> --location <MyAzureStackLocation>Example:
[stackuser@localhost ~]$ az network nsg create --name stack003nsg --resource-group azurestack-003 --location westus -
Show the Azure NSG for the resource group.
$ az network nsg show --name <nsg-name> --resource-group <MyResourceGroup> --output tableExample:
[stackuser@localhost ~] $ az network nsg show --name stack003nsg --resource-group azurestack-003 --output table Location Name ProvisioningState ResourceGroup ResourceGuid ---------- ----------- ------------------- --------------------- ------------------------------------ westus stack003nsg Succeeded azurestack-003 xxxxxxxx-xxxx-xxxx-xxxx-xxxxxxxxxxxx -
Create an inbound NSG rule to allow SSH TCP traffic over port 22 from a trusted source (such as your system's IP address) or a range of trusted IP addresses.
Note: Inbound is the default direction when using this command. You add
--direction Outboundif you are creating an Outbound rule.$ az network nsg rule create --resource-group <MyResourceGroup> --nsg-name <nsg-name> --name <nsg-rule-name> --priority 100 --source-address-prefix <trusted-IP-address/range> --destination-address-prefix '*' --destination-port-range 22 --access Allow --protocol Tcp --description "<description-of-the-nsg-rule>"Example:
[stackuser@localhost ~] $ az network nsg rule create --resource-group -azurestack-003 --nsg-name stack003nsg --name Port_22 --priority 100 --source-address-prefix 192.0.2.185 --destination-address-prefix '*' --destination-port-range 22 --access Allow --protocol Tcp --description "SSH admin access" { "access": "Allow", "additionalProperties": {}, "description": "SSH admin access", "destinationAddressPrefix": "*", "destinationPortRange": "22", "direction": "Inbound", "etag": "W/\"xxxxxxxx-xxxx-xxxx-xxxx-xxxxxxxxxxxxx"", "id": "/subscriptions/..../..../..../..../..../..../stack003nsg/securityRules/Inbound", "name": "Inbound", "priority": 100, "protocol": "Tcp", "provisioningState": "Succeeded", "resourceGroup": "azurestack-003", "sourceAddressPrefix": "192.0.2.185", "sourcePortRange": "*" } -
Verify that the network security group rule(s) are correct. Add
--output tableif you do not want json output.$ az network nsg rule list --resource-group <MyResourceGroup> --nsg-name <nsg-name>Example:
[stackuser@localhost ~] $ az network nsg rule list --resource-group azurestack-003 --nsg-name stack003nsg
[
  {
    "access": "Allow",
    "additionalProperties": {},
      "description": "SSH admin access",
      "destinationAddressPrefix": "*",
      "destinationPortRange": "22",
      "direction": "Inbound",
      "priority": 100,
      "protocol": "Tcp",
      "provisioningState": "Succeeded",
      "resourceGroup": "azurestack-003",
      "sourceAddressPrefix": "192.0.2.185",
      "sourcePortRange": "*"
  }
]
Create a base RHEL 7 VM using virt-manager
Note the following configuration settings are currently required for Azure Stack VMs.
| Setting | Requirement |
|---|---|
| ssh | ssh must be enabled to provide remote access to your Azure VMs. |
| dhcp | The primary virtual adapter should be configured for dhcp (IPv4 only). |
| Swap Space | Do not create a dedicated swap file or swap partition. Swap space is configured using the Windows Azure Linux Agent (WALinuxAgent). |
| NIC | Choose virtio device for the primary virtual network adapter. |
| encryption | Do not use full disk encryption for the operating system disk. Red Hat does not currently support operating system disk encryption for RHEL VMs in Azure Stack. Data disks can be encrypted. |
Complete the following steps to create the VM.
-
Download the latest version of Red Hat Enterprise Linux from the Red Hat Customer Portal. The Red Hat Enterprise Linux KVM Guest Image is recommended.
Note: RHEL 7.1 is the earliest version of RHEL supported in Azure Stack.
-
Move the image to
/var/lib/libvirt/images. -
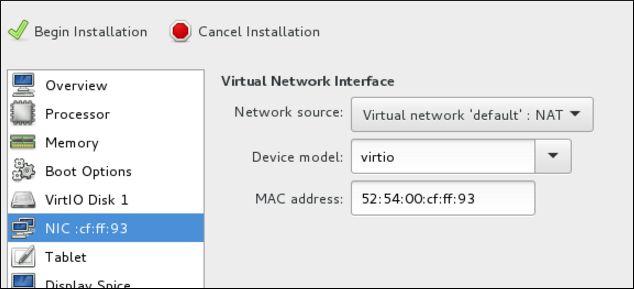
Create a new VM using virt-manager. Note the following when creating the VM.
- Import an existing disk image and select the downloaded qcow2 file.
- Accept or change the memory and CPU settings to your application requirements.
- Select the Customize configuration before install check box.
- On the custom configuration dialog box, make sure that virtio is set as the NIC Device model, and then begin installation.
-
The VM may hang momentarily at the
IPV6 eth0line when booting up. This is normal at this point in the installation.
For detailed virt-manager instructions, see Create the RHEL VM from a RHEL KVM Guest Image.
-
Shut down the VM when you see the login prompt.
-
From your RHEL system, set up root access to the VM. Use
virt-customizeto generate a root password for the VM.# virt-customize -a <guest-image-path> --root-password password:<password>Example:
# virt-customize -a /var/lib/libvirt/images/rhel-server-7.x-update-4-x86_64-kvm.qcow2 --root-password password:<password> [ 0.0] Examining the guest ... [ 103.0] Setting a random seed [ 103.0] Setting passwords [ 112.0] Finishing off -
Verify root access by starting the VM and logging in as root.
Install Hyper-V device drivers (if not present)
Microsoft provides network and storage device drivers as part of their Linux Integration Services for the Hyper-V package. Hyper-V device drivers may need to be installed on the RHEL VM prior to importing it to Microsoft Azure.
Use the lsinitrd | grep hv command to verify that the drivers are installed. If they are not installed, complete the following steps to manually configure the Hyper-V device drivers.
-
On the RHEL VM, add the driver parameters to the
/etc/dracut.conffile. Note the spaces before and after the quotes.add_drivers+=" hv_vmbus " add_drivers+=" hv_netvsc " add_drivers+=" hv_storvsc " -
Regenerate the initramfs image.
# dracut -f -v -
Verify the configuration changes.
# lsinitrd | grep hv
Configure the image for Azure Stack
Complete the following steps to configure the image.
-
Stop and remove cloud-init. Azure Stack VMs use the WALinuxAgent for provisioning, along with managing Azure extensions.
# systemctl stop cloud-init # yum remove cloud-init -
Edit the
/etc/ssh/sshd_configfile and enable password authentication.PasswordAuthentication yes -
Edit
/etc/sysconfig/network-scripts/ifcfg-eth0so it matches the following list of configuration details.DEVICE=eth0 BOOTPROTO=dhcp ONBOOT=yes TYPE=Ethernet USERCTL=no PEERDNS=yes IPV6INIT=no -
Remove any persistent network device rules.
# rm -f /etc/udev/rules.d/70-persistent-net.rules # rm -f /etc/udev/rules.d/75-persistent-net-generator.rules -
Set the network service to start automatically.
# chkconfig network on -
Set ssh to start automatically.
# systemctl enable sshd # systemctl is-enabled sshd # systemctl restart sshd -
Add crashkernel=256M to the start of the GRUB_CMDLINE_LINUX line in the
/etc/default/grubfile. If crashkernel=auto is present, change this entry to crashkernel=256M.Add the following options to the end of the GRUB_CMDLINE_LINUX line.
earlyprintk=ttyS0
console=ttyS0
rootdelay=300
Remove the following options, if present.
rhgb quiet -
Regenerate the
grub.cfgfile.# grub2-mkconfig -o /boot/grub2/grub.cfg -
Register the VM with Red Hat Subscription Manager.
# subscription-manager register --username <MyUsername> --password <password> -
Attach the subscription to the Red Hat Enterprise Linux 7 Server repository.
# subscription-manager attach --pool=<POOL_ID> -
Enable the RHEL Extras repository.
# subscription-manager repos --enable rhel-7-server-extras-rpms -
Install the Windows Azure Linux Agent (WALinuxAgent).
# yum install WALinuxAgent # systemctl enable waagent.service -
Edit the following lines in the
/etc/waagent.conffile. Set swap space for whatever is appropriate for the nodes.Provisioning.DeleteRootPassword=n ResourceDisk.Filesystem=ext4 ResourceDisk.EnableSwap=y ResourceDisk.SwapSizeMB=2048 -
Unregister the VM.
# subscription-manager unregister -
Deprovision the VM.
# waagent -deprovision -force -
Clean the shell history and shut down the VM.
# export HISTSIZE=0
# poweroff
Convert the RHEL image to VHD format
Refer to Convert the RHEL Image to VHD for steps to convert the image to VHD. Return to this article when the image is converted.
Upload the image and create the Azure Stack VM
Complete the following steps to create the RHEL VM in Azure Stack.
Note: To complete this procedure, you need the resource names you set up in Create Azure resources.
-
Upload the VHD image file.
$ az storage blob upload --account-name <MyStorageAccount> --container-name <MyContainer> --type page --file <path-to-local-vhd> --name <image-name>.vhdExample:
[stackuser@localhost ~]$ az storage blob upload --account-name account003 --container-name storagecontainer003 --type page --file rhelserver75.vhd -n rhel75gold.vhd Finished[#############################################################] 100.0000% -
Get the URL for the VHD image file. Use the URL in the next step.
$ az storage blob url --account-name <MyStorageAccount> --container-name <MyContainer> --name <image-name>.vhdExample:
[stackuser@localhost]$ az storage blob url --account-name account003 --container-name storagecontainer003 --name rhel75gold.vhd "https://account003.blob.westus.stackpoc.com/storagecontainer003/rhel75gold.vhd" -
Create the RHEL 7 Azure VM in Azure Stack. The example uses the VM size Standard_A2. Refer to Virtual machine sizes supported in Azure Stack for higher-capacity options.
$ az vm create --resource-group <MyResourceGroup> --storage-account <MyStorageAccount> --location <MyAzureStackLocation> --name <vm-name> --vnet-name <MyVnet> --subnet <MySubnet> --nsg <network-security-group> --size Standard_A2 --image "<storage-blob-url>" --os-type linux --use-unmanaged-disk --admin-username <MyAdminName> --authentication-type password --admin-password **********Example:
[stackuser@localhost ~] $ az vm create --resource-group azurestack-003 --storage-account account003 --location westus --name rhel75vm001 --vnet-name stack003vnet --subnet stack003subnet --nsg stack003nsg --size Standard_A2 --image "https://account003.blob.westus.stackpoc.com/storagecontainer003/rhel75gold.vhd" --os-type linux --use-unmanaged-disk --admin-username stackuser --authentication-type password --admin-password Password12345!You have created resources and a RHEL VM in Azure Stack.
Note: You can repeat this step for each RHEL VM you want to create. Change the VM name and simple operating system disk name for each VM created.
Comments