
Automating system administration by using RHEL system roles
Consistent and repeatable configuration of RHEL deployments across multiple hosts with Red Hat Ansible Automation Platform playbooks
Abstract
Making open source more inclusive
Red Hat is committed to replacing problematic language in our code, documentation, and web properties. We are beginning with these four terms: master, slave, blacklist, and whitelist. Because of the enormity of this endeavor, these changes will be implemented gradually over several upcoming releases. For more details, see our CTO Chris Wright’s message.
Providing feedback on Red Hat documentation
We appreciate your feedback on our documentation. Let us know how we can improve it.
Submitting feedback through Jira (account required)
- Log in to the Jira website.
- Click Create in the top navigation bar.
- Enter a descriptive title in the Summary field.
- Enter your suggestion for improvement in the Description field. Include links to the relevant parts of the documentation.
- Click Create at the bottom of the dialogue.
Chapter 1. Introduction to RHEL system roles
By using RHEL system roles, you can remotely manage the system configurations of multiple RHEL systems across major versions of RHEL.
Important terms and concepts
The following describes important terms and concepts in an Ansible environment:
- Control node
- A control node is the system from which you run Ansible commands and playbooks. Your control node can be an Ansible Automation Platform, Red Hat Satellite, or a RHEL 9, 8, or 7 host. For more information, see Preparing a control node on RHEL 8.
- Managed node
- Managed nodes are the servers and network devices that you manage with Ansible. Managed nodes are also sometimes called hosts. Ansible does not have to be installed on managed nodes. For more information, see Preparing a managed node.
- Ansible playbook
- In a playbook, you define the configuration you want to achieve on your managed nodes or a set of steps for the system on the managed node to perform. Playbooks are Ansible’s configuration, deployment, and orchestration language.
- Inventory
- In an inventory file, you list the managed nodes and specify information such as IP address for each managed node. In the inventory, you can also organize the managed nodes by creating and nesting groups for easier scaling. An inventory file is also sometimes called a hostfile.
Available roles on a Red Hat Enterprise Linux 8 control node
On a Red Hat Enterprise Linux 8 control node, the rhel-system-roles package provides the following roles:
| Role name | Role description | Chapter title |
|---|---|---|
|
| Certificate Issuance and Renewal | Requesting certificates by using RHEL system roles |
|
| Web console | Installing and configuring web console with the cockpit RHEL system role |
|
| System-wide cryptographic policies | Setting a custom cryptographic policy across systems |
|
| Firewalld | Configuring firewalld by using system roles |
|
| HA Cluster | Configuring a high-availability cluster by using system roles |
|
| Kernel Dumps | Configuring kdump by using RHEL system roles |
|
| Kernel Settings | Using Ansible roles to permanently configure kernel parameters |
|
| Logging | Using the logging system role |
|
| Metrics (PCP) | Monitoring performance by using RHEL system roles |
|
| Microsoft SQL Server | Configuring Microsoft SQL Server by using the microsoft.sql.server Ansible role |
|
| Networking | Using the network RHEL system role to manage InfiniBand connections |
|
| Network Bound Disk Encryption client | Using the nbde_client and nbde_server system roles |
|
| Network Bound Disk Encryption server | Using the nbde_client and nbde_server system roles |
|
| Postfix | Variables of the postfix role in system roles |
|
| PostgreSQL | Installing and configuring PostgreSQL by using the postgresql RHEL system role |
|
| SELinux | Configuring SELinux by using system roles |
|
| SSH client | Configuring secure communication with the ssh system roles |
|
| SSH server | Configuring secure communication with the ssh system roles |
|
| Storage | Managing local storage by using RHEL system roles |
|
| Terminal Session Recording | Configuring a system for session recording by using the tlog RHEL system role |
|
| Time Synchronization | Configuring time synchronization by using RHEL system roles |
|
| VPN | Configuring VPN connections with IPsec by using the vpn RHEL system role |
Additional resources
- Red Hat Enterprise Linux (RHEL) system roles
-
/usr/share/ansible/roles/rhel-system-roles.<role_name>/README.mdfile -
/usr/share/doc/rhel-system-roles/<role_name>/directory
Chapter 2. Preparing a control node and managed nodes to use RHEL system roles
Before you can use individual RHEL system roles to manage services and settings, you must prepare the control node and managed nodes.
2.1. Preparing a control node on RHEL 8
Before using RHEL system roles, you must configure a control node. This system then configures the managed hosts from the inventory according to the playbooks.
Prerequisites
RHEL 8.6 or later is installed. For more information about installing RHEL, see Performing a standard RHEL 8 installation.
NoteIn RHEL 8.5 and earlier versions, Ansible packages were provided through Ansible Engine instead of Ansible Core, and with a different level of support. Do not use Ansible Engine because the packages might not be compatible with Ansible automation content in RHEL 8.6 and later. For more information, see Scope of support for the Ansible Core package included in the RHEL 9 and RHEL 8.6 and later AppStream repositories.
- The system is registered to the Customer Portal.
-
A
Red Hat Enterprise Linux Serversubscription is attached to the system. -
Optional: An
Ansible Automation Platformsubscription is attached to the system.
Procedure
Create a user named
ansibleto manage and run playbooks:[root@control-node]# useradd ansibleSwitch to the newly created
ansibleuser:[root@control-node]# su - ansiblePerform the rest of the procedure as this user.
Create an SSH public and private key:
[ansible@control-node]$ ssh-keygen
Generating public/private rsa key pair.
Enter file in which to save the key (/home/ansible/.ssh/id_rsa):
Enter passphrase (empty for no passphrase): <password>
Enter same passphrase again: <password>
...
Use the suggested default location for the key file.
- Optional: To prevent Ansible from prompting you for the SSH key password each time you establish a connection, configure an SSH agent.
Create the
~/.ansible.cfgfile with the following content:[defaults] inventory = /home/ansible/inventory remote_user = ansible [privilege_escalation] become = True become_method = sudo become_user = root become_ask_pass = True
NoteSettings in the
~/.ansible.cfgfile have a higher priority and override settings from the global/etc/ansible/ansible.cfgfile.With these settings, Ansible performs the following actions:
- Manages hosts in the specified inventory file.
-
Uses the account set in the
remote_userparameter when it establishes SSH connections to managed nodes. -
Uses the
sudoutility to execute tasks on managed nodes as therootuser. - Prompts for the root password of the remote user every time you apply a playbook. This is recommended for security reasons.
Create an
~/inventoryfile in INI or YAML format that lists the hostnames of managed hosts. You can also define groups of hosts in the inventory file. For example, the following is an inventory file in the INI format with three hosts and one host group namedUS:managed-node-01.example.com [US] managed-node-02.example.com ansible_host=192.0.2.100 managed-node-03.example.com
Note that the control node must be able to resolve the hostnames. If the DNS server cannot resolve certain hostnames, add the
ansible_hostparameter next to the host entry to specify its IP address.Install RHEL system roles:
On a RHEL host without Ansible Automation Platform, install the
rhel-system-rolespackage:[root@control-node]# yum install rhel-system-rolesThis command installs the collections in the
/usr/share/ansible/collections/ansible_collections/redhat/rhel_system_roles/directory, and theansible-corepackage as a dependency.On Ansible Automation Platform, perform the following steps as the
ansibleuser:-
Define Red Hat automation hub as the primary source for content in the
~/.ansible.cfgfile. Install the
redhat.rhel_system_rolescollection from Red Hat automation hub:[ansible@control-node]$ ansible-galaxy collection install redhat.rhel_system_rolesThis command installs the collection in the
~/.ansible/collections/ansible_collections/redhat/rhel_system_roles/directory.
-
Define Red Hat automation hub as the primary source for content in the
Next steps
- Prepare the managed nodes. For more information, see Preparing a managed node.
Additional resources
- Scope of support for the Ansible Core package included in the RHEL 9 and RHEL 8.6 and later AppStream repositories
- How to register and subscribe a system to the Red Hat Customer Portal using subscription-manager
-
The
ssh-keygen(1)manual page - Connecting to remote machines with SSH keys using ssh-agent
- Ansible configuration settings
- How to build your inventory
- Updates to using Ansible in RHEL 8.6 and 9.0
2.2. Preparing a managed node
Managed nodes are the systems listed in the inventory and which will be configured by the control node according to the playbook. You do not have to install Ansible on managed hosts.
Prerequisites
- You prepared the control node. For more information, see Preparing a control node on RHEL 8.
You have SSH access from the control node.
ImportantDirect SSH access as the
rootuser is a security risk. To reduce this risk, you will create a local user on this node and configure asudopolicy when preparing a managed node. Ansible on the control node can then use the local user account to log in to the managed node and run playbooks as different users, such asroot.
Procedure
Create a user named
ansible:[root@managed-node-01]# useradd ansibleThe control node later uses this user to establish an SSH connection to this host.
Set a password for the
ansibleuser:[root@managed-node-01]# passwd ansible Changing password for user ansible. New password: <password> Retype new password: <password> passwd: all authentication tokens updated successfully.
You must enter this password when Ansible uses
sudoto perform tasks as therootuser.Install the
ansibleuser’s SSH public key on the managed node:Log in to the control node as the
ansibleuser, and copy the SSH public key to the managed node:[ansible@control-node]$ ssh-copy-id managed-node-01.example.com /usr/bin/ssh-copy-id: INFO: Source of key(s) to be installed: "/home/ansible/.ssh/id_rsa.pub" The authenticity of host 'managed-node-01.example.com (192.0.2.100)' can't be established. ECDSA key fingerprint is SHA256:9bZ33GJNODK3zbNhybokN/6Mq7hu3vpBXDrCxe7NAvo.When prompted, connect by entering
yes:Are you sure you want to continue connecting (yes/no/[fingerprint])? yes /usr/bin/ssh-copy-id: INFO: attempting to log in with the new key(s), to filter out any that are already installed /usr/bin/ssh-copy-id: INFO: 1 key(s) remain to be installed -- if you are prompted now it is to install the new keysWhen prompted, enter the password:
ansible@managed-node-01.example.com's password: <password>

Number of key(s) added: 1

Now try logging into the machine, with:   "ssh 'managed-node-01.example.com'"
and check to make sure that only the key(s) you wanted were added.
Verify the SSH connection by remotely executing a command on the control node:
[ansible@control-node]$ ssh managed-node-01.example.com whoami
ansible
Create a
sudoconfiguration for theansibleuser:Create and edit the
/etc/sudoers.d/ansiblefile by using thevisudocommand:[root@managed-node-01]# visudo /etc/sudoers.d/ansibleThe benefit of using
visudoover a normal editor is that this utility provides basic sanity checks and checks for parse errors before installing the file.Configure a
sudoerspolicy in the/etc/sudoers.d/ansiblefile that meets your requirements, for example:To grant permissions to the
ansibleuser to run all commands as any user and group on this host after entering theansibleuser’s password, use:ansible ALL=(ALL) ALL
To grant permissions to the
ansibleuser to run all commands as any user and group on this host without entering theansibleuser’s password, use:ansible ALL=(ALL) NOPASSWD: ALL
Alternatively, configure a more fine-granular policy that matches your security requirements. For further details on
sudoerspolicies, see thesudoers(5)manual page.
Verification
Verify that you can execute commands from the control node on an all managed nodes:
[ansible@control-node]$ ansible all -m ping
BECOME password: <password>
managed-node-01.example.com | SUCCESS => {
    	"ansible_facts": {
    	    "discovered_interpreter_python": "/usr/bin/python3"
    	},
    	"changed": false,
    	"ping": "pong"
}
...
The hard-coded all group dynamically contains all hosts listed in the inventory file.
Verify that privilege escalation works correctly by running the
whoamiutility on a managed host by using the Ansiblecommandmodule:[ansible@control-node]$ ansible managed-node-01.example.com -m command -a whoami BECOME password: <password> managed-node-01.example.com | CHANGED | rc=0 >> root
If the command returns root, you configured
sudoon the managed nodes correctly.
Additional resources
- Preparing a control node on RHEL 8
-
sudoers(5)manual page
Chapter 3. Ansible vault
Sometimes your playbook needs to use sensitive data such as passwords, API keys, and other secrets to configure managed hosts. Storing this information in plain text in variables or other Ansible-compatible files is a security risk because any user with access to those files can read the sensitive data.
With Ansible vault, you can encrypt, decrypt, view, and edit sensitive information. They could be included as:
- Inserted variable files in an Ansible Playbook
- Host and group variables
- Variable files passed as arguments when executing the playbook
- Variables defined in Ansible roles
You can use Ansible vault to securely manage individual variables, entire files, or even structured data like YAML files. This data can then be safely stored in a version control system or shared with team members without exposing sensitive information.
Files are protected with symmetric encryption of the Advanced Encryption Standard (AES256), where a single password or passphrase is used both to encrypt and decrypt the data. Note that the way this is done has not been formally audited by a third party.
To simplify management, it makes sense to set up your Ansible project so that sensitive variables and all other variables are kept in separate files, or directories. Then you can protect the files containing sensitive variables with the ansible-vault command.
Creating an encrypted file
The following command prompts you for a new vault password. Then it opens a file for storing sensitive variables using the default editor.
# ansible-vault create vault.yml
New Vault password: <vault_password>
Confirm New Vault password: <vault_password>
Viewing an encrypted file
The following command prompts you for your existing vault password. Then it displays the sensitive contents of an already encrypted file.
# ansible-vault view vault.yml
Vault password: <vault_password>
my_secret: "yJJvPqhsiusmmPPZdnjndkdnYNDjdj782meUZcw"
Editing an encrypted file
The following command prompts you for your existing vault password. Then it opens the already encrypted file for you to update the sensitive variables using the default editor.
# ansible-vault edit vault.yml
Vault password: <vault_password>
Encrypting an existing file
The following command prompts you for a new vault password. Then it encrypts an existing unencrypted file.
# ansible-vault encrypt vault.yml
New Vault password: <vault_password>
Confirm New Vault password: <vault_password>
Encryption successful
Decrypting an existing file
The following command prompts you for your existing vault password. Then it decrypts an existing encrypted file.
# ansible-vault decrypt vault.yml
Vault password: <vault_password>
Decryption successful
Changing the password of an encrypted file
The following command prompts you for your original vault password, then for the new vault password.
# ansible-vault rekey vault.yml
Vault password: <vault_password>
New Vault password: <vault_password>
Confirm New Vault password: <vault_password>
Rekey successful
Basic application of Ansible vault variables in a playbook
---
- name: Create user accounts for all servers
  hosts: managed-node-01.example.com
  vars_files:
    - vault.yml
  tasks:
    - name: Create user from vault.yml file
      user:
        name: "{{ username }}"
        password: "{{ pwhash }}"
You read-in the file with variables (vault.yml) in the vars_files section of your Ansible Playbook, and you use the curly brackets the same way you would do with your ordinary variables. Then you either run the playbook with the ansible-playbook --ask-vault-pass command and you enter the password manually. Or you save the password in a separate file and you run the playbook with the ansible-playbook --vault-password-file /path/to/my/vault-password-file command.
Additional resources
-
ansible-vault(1),ansible-playbook(1)man pages - Ansible vault
- Ansible vault Best Practices
Chapter 4. Ansible IPMI modules in RHEL
4.1. The rhel_mgmt collection
The Intelligent Platform Management Interface (IPMI) is a specification for a set of standard protocols to communicate with baseboard management controller (BMC) devices. The IPMI modules allow you to enable and support hardware management automation. The IPMI modules are available in:
-
The
rhel_mgmtCollection. The package name isansible-collection-redhat-rhel_mgmt. -
The RHEL 8 AppStream, as part of the new
ansible-collection-redhat-rhel_mgmtpackage.
The following IPMI modules are available in the rhel_mgmt collection:
-
ipmi_boot: Management of boot device order -
ipmi_power: Power management for machine
The mandatory parameters used for the IPMI Modules are:
-
ipmi_bootparameters:
| Module name | Description |
|---|---|
| name | Hostname or ip address of the BMC |
| password | Password to connect to the BMC |
| bootdev | Device to be used on next boot * network * floppy * hd * safe * optical * setup * default |
| User | Username to connect to the BMC |
-
ipmi_powerparameters:
| Module name | Description |
|---|---|
| name | BMC Hostname or IP address |
| password | Password to connect to the BMC |
| user | Username to connect to the BMC |
| State | Check if the machine is on the desired status * on * off * shutdown * reset * boot |
4.2. Using the ipmi_boot module
The following example shows how to use the ipmi_boot module in a playbook to set a boot device for the next boot. For simplicity, the examples use the same host as the Ansible control host and managed host, thus executing the modules on the same host where the playbook is executed.
Prerequisites
- You have prepared the control node and the managed nodes.
- You are logged in to the control node as a user who can run playbooks on the managed nodes.
-
The account you use to connect to the managed nodes has
sudopermissions on them. -
The
ansible-collection-redhat-rhel_mgmtpackage is installed. -
The
python3-pyghmipackage is installed either on the control node or the managed nodes. -
The IPMI BMC that you want to control is accessible over network from the control node or the managed host (if not using
localhostas the managed host). Note that the host whose BMC is being configured by the module is generally different from the managed host, as the module contacts the BMC over the network using the IPMI protocol. - You have credentials to access BMC with an appropriate level of access.
Procedure
Create a playbook file, for example
~/playbook.yml, with the following content:--- - name: Set boot device to be used on next boot hosts: managed-node-01.example.com tasks: - name: Ensure boot device is HD redhat.rhel_mgmt.ipmi_boot: user: <admin_user> password: <password> bootdev: hdValidate the playbook syntax:
$ ansible-playbook --syntax-check ~/playbook.ymlNote that this command only validates the syntax and does not protect against a wrong but valid configuration.
Run the playbook:
$ ansible-playbook ~/playbook.yml
Verification
-
When you run the playbook, Ansible returns
success.
Additional resources
-
/usr/share/ansible/collections/ansible_collections/redhat/rhel_mgmt/README.mdfile
4.3. Using the ipmi_power module
This example shows how to use the ipmi_boot module in a playbook to check if the system is turned on. For simplicity, the examples use the same host as the Ansible control host and managed host, thus executing the modules on the same host where the playbook is executed.
Prerequisites
- You have prepared the control node and the managed nodes.
- You are logged in to the control node as a user who can run playbooks on the managed nodes.
-
The account you use to connect to the managed nodes has
sudopermissions on them. -
The
ansible-collection-redhat-rhel_mgmtpackage is installed. -
The
python3-pyghmipackage is installed either on the control node or the managed nodes. -
The IPMI BMC that you want to control is accessible over network from the control node or the managed host (if not using
localhostas the managed host). Note that the host whose BMC is being configured by the module is generally different from the managed host, as the module contacts the BMC over the network using the IPMI protocol. - You have credentials to access BMC with an appropriate level of access.
Procedure
Create a playbook file, for example
~/playbook.yml, with the following content:--- - name: Power management hosts: managed-node-01.example.com tasks: - name: Ensure machine is powered on redhat.rhel_mgmt.ipmi_power: user: <admin_user> password: <password> state: onValidate the playbook syntax:
$ ansible-playbook --syntax-check ~/playbook.ymlNote that this command only validates the syntax and does not protect against a wrong but valid configuration.
Run the playbook:
$ ansible-playbook ~/playbook.yml
Verification
-
When you run the playbook, Ansible returns
true.
Additional resources
-
/usr/share/ansible/collections/ansible_collections/redhat/rhel_mgmt/README.mdfile
Chapter 5. The Redfish modules in RHEL
The Redfish modules for remote management of devices are now part of the redhat.rhel_mgmt Ansible collection. With the Redfish modules, you can easily use management automation on bare-metal servers and platform hardware by getting information about the servers or control them through an Out-Of-Band (OOB) controller, using the standard HTTPS transport and JSON format.
5.1. The Redfish modules
The redhat.rhel_mgmt Ansible collection provides the Redfish modules to support hardware management in Ansible over Redfish. The redhat.rhel_mgmt collection is available in the ansible-collection-redhat-rhel_mgmt package. To install it, see Installing the redhat.rhel_mgmt Collection using the CLI.
The following Redfish modules are available in the redhat.rhel_mgmt collection:
-
redfish_info: Theredfish_infomodule retrieves information about the remote Out-Of-Band (OOB) controller such as systems inventory. -
redfish_command: Theredfish_commandmodule performs Out-Of-Band (OOB) controller operations like log management and user management, and power operations such as system restart, power on and off. -
redfish_config: Theredfish_configmodule performs OOB controller operations such as changing OOB configuration, or setting the BIOS configuration.
5.2. Redfish modules parameters
The parameters used for the Redfish modules are:
redfish_info parameters: | Description |
|---|---|
|
| (Mandatory) - Base URI of OOB controller. |
|
| (Mandatory) - List of categories to execute on OOB controller. The default value is ["Systems"]. |
|
| (Mandatory) - List of commands to execute on OOB controller. |
|
| Username for authentication to OOB controller. |
|
| Password for authentication to OOB controller. |
redfish_command parameters: | Description |
|---|---|
|
| (Mandatory) - Base URI of OOB controller. |
|
| (Mandatory) - List of categories to execute on OOB controller. The default value is ["Systems"]. |
|
| (Mandatory) - List of commands to execute on OOB controller. |
|
| Username for authentication to OOB controller. |
|
| Password for authentication to OOB controller. |
redfish_config parameters: | Description |
|---|---|
|
| (Mandatory) - Base URI of OOB controller. |
|
| (Mandatory) - List of categories to execute on OOB controller. The default value is ["Systems"]. |
|
| (Mandatory) - List of commands to execute on OOB controller. |
|
| Username for authentication to OOB controller. |
|
| Password for authentication to OOB controller. |
|
| BIOS attributes to update. |
5.3. Using the redfish_info module
The following example shows how to use the redfish_info module in a playbook to get information about the CPU inventory. For simplicity, the example uses the same host as the Ansible control host and managed host, thus executing the modules on the same host where the playbook is executed.
Prerequisites
- You have prepared the control node and the managed nodes.
- You are logged in to the control node as a user who can run playbooks on the managed nodes.
-
The account you use to connect to the managed nodes has
sudopermissions on them. -
The
ansible-collection-redhat-rhel_mgmtpackage is installed. -
The
python3-pyghmipackage is installed either on the control node or the managed nodes. - OOB controller access details.
Procedure
Create a playbook file, for example
~/playbook.yml, with the following content:--- - name: Manage out-of-band controllers using Redfish APIs hosts: managed-node-01.example.com tasks: - name: Get CPU inventory redhat.rhel_mgmt.redfish_info: baseuri: "<URI>" username: "<username>" password: "<password>" category: Systems command: GetCpuInventory register: resultValidate the playbook syntax:
$ ansible-playbook --syntax-check ~/playbook.ymlNote that this command only validates the syntax and does not protect against a wrong but valid configuration.
Run the playbook:
$ ansible-playbook ~/playbook.yml
Verification
- When you run the playbook, Ansible returns the CPU inventory details.
Additional resources
-
/usr/share/ansible/collections/ansible_collections/redhat/rhel_mgmt/README.mdfile
5.4. Using the redfish_command module
The following example shows how to use the redfish_command module in a playbook to turn on a system. For simplicity, the example uses the same host as the Ansible control host and managed host, thus executing the modules on the same host where the playbook is executed.
Prerequisites
- You have prepared the control node and the managed nodes.
- You are logged in to the control node as a user who can run playbooks on the managed nodes.
-
The account you use to connect to the managed nodes has
sudopermissions on them. -
The
ansible-collection-redhat-rhel_mgmtpackage is installed. -
The
python3-pyghmipackage is installed either on the control node or the managed nodes. - OOB controller access details.
Procedure
Create a playbook file, for example
~/playbook.yml, with the following content:--- - name: Manage out-of-band controllers using Redfish APIs hosts: managed-node-01.example.com tasks: - name: Power on system redhat.rhel_mgmt.redfish_command: baseuri: "<URI>" username: "<username>" password: "<password>" category: Systems command: PowerOnValidate the playbook syntax:
$ ansible-playbook --syntax-check ~/playbook.ymlNote that this command only validates the syntax and does not protect against a wrong but valid configuration.
Run the playbook:
$ ansible-playbook ~/playbook.yml
Verification
- The system powers on.
Additional resources
-
/usr/share/ansible/collections/ansible_collections/redhat/rhel_mgmt/README.mdfile
5.5. Using the redfish_config module
The following example shows how to use the redfish_config module in a playbook to configure a system to boot with UEFI. For simplicity, the example uses the same host as the Ansible control host and managed host, thus executing the modules on the same host where the playbook is executed.
Prerequisites
- You have prepared the control node and the managed nodes.
- You are logged in to the control node as a user who can run playbooks on the managed nodes.
-
The account you use to connect to the managed nodes has
sudopermissions on them. -
The
ansible-collection-redhat-rhel_mgmtpackage is installed. -
The
python3-pyghmipackage is installed either on the control node or the managed nodes. - OOB controller access details.
Procedure
Create a playbook file, for example
~/playbook.yml, with the following content:--- - name: Manages out-of-band controllers using Redfish APIs hosts: managed-node-01.example.com tasks: - name: Set BootMode to UEFI redhat.rhel_mgmt.redfish_config: baseuri: "<URI>" username: "<username>" password: "<password>" category: Systems command: SetBiosAttributes bios_attributes: BootMode: UefiValidate the playbook syntax:
$ ansible-playbook --syntax-check ~/playbook.ymlNote that this command only validates the syntax and does not protect against a wrong but valid configuration.
Run the playbook:
$ ansible-playbook ~/playbook.yml
Verification
- The system boot mode is set to UEFI.
Additional resources
-
/usr/share/ansible/collections/ansible_collections/redhat/rhel_mgmt/README.mdfile
Chapter 6. Integrating RHEL systems into AD directly by using the RHEL system role
With the ad_integration system role, you can automate a direct integration of a RHEL system with Active Directory (AD) by using Red Hat Ansible Automation Platform.
6.1. The ad_integration RHEL system role
Using the ad_integration system role, you can directly connect a RHEL system to Active Directory (AD).
The role uses the following components:
- SSSD to interact with the central identity and authentication source
-
realmdto detect available AD domains and configure the underlying RHEL system services, in this case SSSD, to connect to the selected AD domain
The ad_integration role is for deployments using direct AD integration without an Identity Management (IdM) environment. For IdM environments, use the ansible-freeipa roles.
Additional resources
-
/usr/share/ansible/roles/rhel-system-roles.ad_integration/README.mdfile -
/usr/share/doc/rhel-system-roles/ad_integration/directory - Connecting RHEL systems directly to AD using SSSD
6.2. Connecting a RHEL system directly to AD by using the ad_integration RHEL system role
You can use the ad_integration system role to configure a direct integration between a RHEL system and an AD domain by running an Ansible playbook.
Starting with RHEL8, RHEL no longer supports RC4 encryption by default. If it is not possible to enable AES in the AD domain, you must enable the AD-SUPPORT crypto policy and allow RC4 encryption in the playbook.
Time between the RHEL server and AD must be synchronized. You can ensure this by using the timesync system role in the playbook.
In this example, the RHEL system joins the domain.example.com AD domain, by using the AD Administrator user and the password for this user stored in the Ansible vault. The playbook also sets the AD-SUPPORT crypto policy and allows RC4 encryption. To ensure time synchronization between the RHEL system and AD, the playbook sets the adserver.domain.example.com server as the timesync source.
Prerequisites
- You have prepared the control node and the managed nodes.
- You are logged in to the control node as a user who can run playbooks on the managed nodes.
-
The account you use to connect to the managed nodes has
sudopermissions on them. The following ports on the AD domain controllers are open and accessible from the RHEL server:
Table 6.1. Ports Required for Direct Integration of Linux Systems into AD Using the
ad_integrationsystem roleSource Port Destination Port Protocol Service 1024:65535
53
UDP and TCP
DNS
1024:65535
389
UDP and TCP
LDAP
1024:65535
636
TCP
LDAPS
1024:65535
88
UDP and TCP
Kerberos
1024:65535
464
UDP and TCP
Kerberos change/set password (
kadmin)1024:65535
3268
TCP
LDAP Global Catalog
1024:65535
3269
TCP
LDAP Global Catalog SSL/TLS
1024:65535
123
UDP
NTP/Chrony (Optional)
1024:65535
323
UDP
NTP/Chrony (Optional)
Procedure
Create a playbook file, for example
~/playbook.yml, with the following content:--- - name: Configure a direct integration between a RHEL system and an AD domain hosts: managed-node-01.example.com roles: - rhel-system-roles.ad_integration vars: ad_integration_realm: "domain.example.com" ad_integration_password: !vault | vault encrypted password ad_integration_manage_crypto_policies: true ad_integration_allow_rc4_crypto: true ad_integration_timesync_source: "adserver.domain.example.com"Validate the playbook syntax:
$ ansible-playbook --syntax-check ~/playbook.ymlNote that this command only validates the syntax and does not protect against a wrong but valid configuration.
Run the playbook:
$ ansible-playbook ~/playbook.yml
Verification
Display an AD user details, such as the
administratoruser:$ getent passwd administrator@ad.example.com administrator@ad.example.com:*:1450400500:1450400513:Administrator:/home/administrator@ad.example.com:/bin/bash
Additional resources
-
/usr/share/ansible/roles/rhel-system-roles.ad_integration/README.mdfile -
/usr/share/doc/rhel-system-roles/ad_integration/directory
Chapter 7. Requesting certificates by using the RHEL system role
You can use the certificate system role to issue and manage certificates.
7.1. The certificate RHEL system role
Using the certificate system role, you can manage issuing and renewing TLS and SSL certificates using Ansible Core.
The role uses certmonger as the certificate provider, and currently supports issuing and renewing self-signed certificates and using the IdM integrated certificate authority (CA).
You can use the following variables in your Ansible playbook with the certificate system role:
certificate_wait- to specify if the task should wait for the certificate to be issued.
certificate_requests- to represent each certificate to be issued and its parameters.
Additional resources
-
/usr/share/ansible/roles/rhel-system-roles.certificate/README.mdfile -
/usr/share/doc/rhel-system-roles/certificate/directory
7.2. Requesting a new self-signed certificate by using the certificate RHEL system role
With the certificate system role, you can use Ansible Core to issue self-signed certificates.
This process uses the certmonger provider and requests the certificate through the getcert command.
Prerequisites
- You have prepared the control node and the managed nodes.
- You are logged in to the control node as a user who can run playbooks on the managed nodes.
-
The account you use to connect to the managed nodes has
sudopermissions on them.
Procedure
Create a playbook file, for example
~/playbook.yml, with the following content:--- - hosts: managed-node-01.example.com roles: - rhel-system-roles.certificate vars: certificate_requests: - name: mycert dns: "*.example.com" ca: self-sign-
Set the
nameparameter to the desired name of the certificate, such asmycert. -
Set the
dnsparameter to the domain to be included in the certificate, such as*.example.com. -
Set the
caparameter toself-sign.
By default,
certmongerautomatically tries to renew the certificate before it expires. You can disable this by setting theauto_renewparameter in the Ansible playbook tono.-
Set the
Validate the playbook syntax:
$ ansible-playbook --syntax-check ~/playbook.ymlNote that this command only validates the syntax and does not protect against a wrong but valid configuration.
Run the playbook:
$ ansible-playbook ~/playbook.yml
Additional resources
-
/usr/share/ansible/roles/rhel-system-roles.certificate/README.mdfile -
/usr/share/doc/rhel-system-roles/certificate/directory
7.3. Requesting a new certificate from IdM CA by using the certificate RHEL system role
With the certificate system role, you can use anible-core to issue certificates while using an IdM server with an integrated certificate authority (CA). Therefore, you can efficiently and consistently manage the certificate trust chain for multiple systems when using IdM as the CA.
This process uses the certmonger provider and requests the certificate through the getcert command.
Prerequisites
- You have prepared the control node and the managed nodes.
- You are logged in to the control node as a user who can run playbooks on the managed nodes.
-
The account you use to connect to the managed nodes has
sudopermissions on them.
Procedure
Create a playbook file, for example
~/playbook.yml, with the following content:--- - hosts: managed-node-01.example.com roles: - rhel-system-roles.certificate vars: certificate_requests: - name: mycert dns: www.example.com principal: HTTP/www.example.com@EXAMPLE.COM ca: ipa-
Set the
nameparameter to the desired name of the certificate, such asmycert. -
Set the
dnsparameter to the domain to be included in the certificate, such aswww.example.com. -
Set the
principalparameter to specify the Kerberos principal, such asHTTP/www.example.com@EXAMPLE.COM. -
Set the
caparameter toipa.
By default,
certmongerautomatically tries to renew the certificate before it expires. You can disable this by setting theauto_renewparameter in the Ansible playbook tono.-
Set the
Validate the playbook syntax:
$ ansible-playbook --syntax-check ~/playbook.ymlNote that this command only validates the syntax and does not protect against a wrong but valid configuration.
Run the playbook:
$ ansible-playbook ~/playbook.yml
Additional resources
-
/usr/share/ansible/roles/rhel-system-roles.certificate/README.mdfile -
/usr/share/doc/rhel-system-roles/certificate/directory
7.4. Specifying commands to run before or after certificate issuance by using the certificate RHEL system role
With the certificate Role, you can use Ansible Core to execute a command before and after a certificate is issued or renewed.
In the following example, the administrator ensures stopping the httpd service before a self-signed certificate for www.example.com is issued or renewed, and restarting it afterwards.
Prerequisites
- You have prepared the control node and the managed nodes.
- You are logged in to the control node as a user who can run playbooks on the managed nodes.
-
The account you use to connect to the managed nodes has
sudopermissions on them.
Procedure
Create a playbook file, for example
~/playbook.yml, with the following content:--- - hosts: managed-node-01.example.com roles: - rhel-system-roles.certificate vars: certificate_requests: - name: mycert dns: www.example.com ca: self-sign run_before: systemctl stop httpd.service run_after: systemctl start httpd.service-
Set the
nameparameter to the desired name of the certificate, such asmycert. -
Set the
dnsparameter to the domain to be included in the certificate, such aswww.example.com. -
Set the
caparameter to the CA you want to use to issue the certificate, such asself-sign. -
Set the
run_beforeparameter to the command you want to execute before this certificate is issued or renewed, such assystemctl stop httpd.service. -
Set the
run_afterparameter to the command you want to execute after this certificate is issued or renewed, such assystemctl start httpd.service.
By default,
certmongerautomatically tries to renew the certificate before it expires. You can disable this by setting theauto_renewparameter in the Ansible playbook tono.-
Set the
Validate the playbook syntax:
$ ansible-playbook --syntax-check ~/playbook.ymlNote that this command only validates the syntax and does not protect against a wrong but valid configuration.
Run the playbook:
$ ansible-playbook ~/playbook.yml
Additional resources
-
/usr/share/ansible/roles/rhel-system-roles.certificate/README.mdfile -
/usr/share/doc/rhel-system-roles/certificate/directory
Chapter 8. Installing and configuring web console by using the RHEL system role
With the cockpit RHEL system role, you can install and configure the web console in your system.
8.1. The cockpit RHEL system role
You can use the cockpit system role to automatically deploy and enable the web console and thus be able to manage your RHEL systems from a web browser.
8.2. Installing the web console by using the cockpit RHEL system role
You can use the cockpit system role to install and enable the RHEL web console.
By default, the RHEL web console uses a self-signed certificate. For security reasons, you can specify a certificate that was issued by a trusted certificate authority instead.
In this example, you use the cockpit system role to:
- Install the RHEL web console.
-
Allow the web console to manage
firewalld. -
Set the web console to use a certificate from the
ipatrusted certificate authority instead of using a self-signed certificate. - Set the web console to use a custom port 9050.
You do not have to call the firewall or certificate system roles in the playbook to manage the Firewall or create the certificate. The cockpit system role calls them automatically as needed.
Prerequisites
- You have prepared the control node and the managed nodes.
- You are logged in to the control node as a user who can run playbooks on the managed nodes.
-
The account you use to connect to the managed nodes has
sudopermissions on them.
Procedure
Create a playbook file, for example
~/playbook.yml, with the following content:--- - name: Manage the RHEL web console hosts: managed-node-01.example.com tasks: - name: Install RHEL web console ansible.builtin.include_role: name: rhel-system-roles.cockpit vars: cockpit_packages: default cockpit_port:9050 cockpit_manage_selinux: true cockpit_manage_firewall: true cockpit_certificates: - name: /etc/cockpit/ws-certs.d/01-certificate dns: ['localhost', 'www.example.com'] ca: ipa group: cockpit-wsValidate the playbook syntax:
$ ansible-playbook --syntax-check ~/playbook.ymlNote that this command only validates the syntax and does not protect against a wrong but valid configuration.
Run the playbook:
$ ansible-playbook ~/playbook.yml
Additional resources
-
/usr/share/ansible/roles/rhel-system-roles.cockpit/README.mdfile -
/usr/share/doc/rhel-system-roles/cockpitdirectory - Requesting certificates using RHEL system roles.
Chapter 9. Setting a custom cryptographic policy by using the RHEL system role
As an administrator, you can use the crypto_policies RHEL system role to quickly and consistently configure custom cryptographic policies across many different systems using the Ansible Core package.
9.1. Setting a custom cryptographic policy by using the crypto_policies RHEL system role
You can use the crypto_policies system role to configure a large number of managed nodes consistently from a single control node.
Prerequisites
- You have prepared the control node and the managed nodes.
- You are logged in to the control node as a user who can run playbooks on the managed nodes.
-
The account you use to connect to the managed nodes has
sudopermissions on them.
Procedure
Create a playbook file, for example
~/playbook.yml, with the following content:--- - name: Configure crypto policies hosts: managed-node-01.example.com tasks: - name: Configure crypto policies ansible.builtin.include_role: name: rhel-system-roles.crypto_policies vars: - crypto_policies_policy: FUTURE - crypto_policies_reboot_ok: trueYou can replace the FUTURE value with your preferred crypto policy, for example:
DEFAULT,LEGACY, andFIPS:OSPP.The
crypto_policies_reboot_ok: truesetting causes the system to reboot after the system role changes the cryptographic policy.Validate the playbook syntax:
$ ansible-playbook --syntax-check ~/playbook.ymlNote that this command only validates the syntax and does not protect against a wrong but valid configuration.
Run the playbook:
$ ansible-playbook ~/playbook.yml
Because the FIPS:OSPP system-wide subpolicy contains further restrictions for cryptographic algorithms required by the Common Criteria (CC) certification, the system is less interoperable after you set it. For example, you cannot use RSA and DH keys shorter than 3072 bits, additional SSH algorithms, and several TLS groups. Setting FIPS:OSPP also prevents connecting to Red Hat Content Delivery Network (CDN) structure. Furthermore, you cannot integrate Active Directory (AD) into the IdM deployments that use FIPS:OSPP, communication between RHEL hosts using FIPS:OSPP and AD domains might not work, or some AD accounts might not be able to authenticate.
Note that your system is not CC-compliant after you set the FIPS:OSPP cryptographic subpolicy. The only correct way to make your RHEL system compliant with the CC standard is through the installation of the cc-config package. See the Common Criteria section in the Compliance Activities and Government Standards Knowledgebase article for a list of certified RHEL versions, validation reports, and links to CC guides hosted at the National Information Assurance Partnership (NIAP) website.
Verification
On the control node, create another playbook named, for example,
verify_playbook.yml:--- - name: Verification hosts: managed-node-01.example.com tasks: - name: Verify active crypto policy ansible.builtin.include_role: name: rhel-system-roles.crypto_policies - debug: var: crypto_policies_activeValidate the playbook syntax:
$ ansible-playbook --syntax-check ~/verify_playbook.ymlRun the playbook:
$ ansible-playbook ~/verify_playbook.yml
TASK [debug] **************************
ok: [host] => {
    "crypto_policies_active": "FUTURE"
}
The
crypto_policies_activevariable shows the policy active on the managed node.
Additional resources
-
/usr/share/ansible/roles/rhel-system-roles.crypto_policies/README.mdfile -
/usr/share/doc/rhel-system-roles/crypto_policies/directory
Chapter 10. Configuring firewalld by using the RHEL system role
You can use the firewall RHEL system role to configure settings of the firewalld service on multiple clients at once. This solution:
- Provides an interface with efficient input settings.
-
Keeps all intended
firewalldparameters in one place.
After you run the firewall role on the control node, the RHEL system role applies the firewalld parameters to the managed node immediately and makes them persistent across reboots.
10.1. Introduction to the firewall RHEL system role
RHEL system roles is a set of contents for the Ansible automation utility. This content together with the Ansible automation utility provides a consistent configuration interface to remotely manage multiple systems.
The rhel-system-roles.firewall role from the RHEL system roles was introduced for automated configurations of the firewalld service. The rhel-system-roles package contains this RHEL system role, and also the reference documentation.
To apply the firewalld parameters on one or more systems in an automated fashion, use the firewall RHEL system role variable in a playbook. A playbook is a list of one or more plays that is written in the text-based YAML format.
You can use an inventory file to define a set of systems that you want Ansible to configure.
With the firewall role you can configure many different firewalld parameters, for example:
- Zones.
- The services for which packets should be allowed.
- Granting, rejection, or dropping of traffic access to ports.
- Forwarding of ports or port ranges for a zone.
Additional resources
-
/usr/share/ansible/roles/rhel-system-roles.firewall/README.mdfile -
/usr/share/doc/rhel-system-roles/firewall/directory - Working with playbooks
- How to build your inventory
10.2. Resetting the firewalld settings by using the firewall RHEL system role
With the firewall RHEL system role, you can reset the firewalld settings to their default state. If you add the previous:replaced parameter to the variable list, the RHEL system role removes all existing user-defined settings and resets firewalld to the defaults. If you combine the previous:replaced parameter with other settings, the firewall role removes all existing settings before applying new ones.
Perform this procedure on the Ansible control node.
Prerequisites
- You have prepared the control node and the managed nodes.
- You are logged in to the control node as a user who can run playbooks on the managed nodes.
-
The account you use to connect to the managed nodes has
sudopermissions on them.
Procedure
Create a playbook file, for example
~/playbook.yml, with the following content:--- - name: Reset firewalld example hosts: managed-node-01.example.com tasks: - name: Reset firewalld ansible.builtin.include_role: name: rhel-system-roles.firewall vars: firewall: - previous: replacedValidate the playbook syntax:
$ ansible-playbook --syntax-check ~/playbook.ymlNote that this command only validates the syntax and does not protect against a wrong but valid configuration.
Run the playbook:
$ ansible-playbook ~/playbook.yml
Verification
Run this command as
rooton the managed node to check all the zones:# firewall-cmd --list-all-zones
Additional resources
-
/usr/share/ansible/roles/rhel-system-roles.firewall/README.mdfile -
/usr/share/doc/rhel-system-roles/firewall/directory
10.3. Forwarding incoming traffic in firewalld from one local port to a different local port by using the firewall RHEL system role
With the firewall role you can remotely configure firewalld parameters with persisting effect on multiple managed hosts.
Perform this procedure on the Ansible control node.
Prerequisites
- You have prepared the control node and the managed nodes.
- You are logged in to the control node as a user who can run playbooks on the managed nodes.
-
The account you use to connect to the managed nodes has
sudopermissions on them.
Procedure
Create a playbook file, for example
~/playbook.yml, with the following content:--- - name: Configure firewalld hosts: managed-node-01.example.com tasks: - name: Forward incoming traffic on port 8080 to 443 ansible.builtin.include_role: name: rhel-system-roles.firewall vars: firewall: - { forward_port: 8080/tcp;443;, state: enabled, runtime: true, permanent: true }Validate the playbook syntax:
$ ansible-playbook --syntax-check ~/playbook.ymlNote that this command only validates the syntax and does not protect against a wrong but valid configuration.
Run the playbook:
$ ansible-playbook ~/playbook.yml
Verification
On the managed host, display the
firewalldsettings:# firewall-cmd --list-forward-ports
Additional resources
-
/usr/share/ansible/roles/rhel-system-roles.firewall/README.mdfile -
/usr/share/doc/rhel-system-roles/firewall/directory
10.4. Managing ports in firewalld by using the firewall RHEL system role
You can use the firewall RHEL system role to open or close ports in the local firewall for incoming traffic and make the new configuration persist across reboots. For example you can configure the default zone to permit incoming traffic for the HTTPS service.
Perform this procedure on the Ansible control node.
Prerequisites
- You have prepared the control node and the managed nodes.
- You are logged in to the control node as a user who can run playbooks on the managed nodes.
-
The account you use to connect to the managed nodes has
sudopermissions on them.
Procedure
Create a playbook file, for example
~/playbook.yml, with the following content:--- - name: Configure firewalld hosts: managed-node-01.example.com tasks: - name: Allow incoming HTTPS traffic to the local host ansible.builtin.include_role: name: rhel-system-roles.firewall vars: firewall: - port: 443/tcp service: http state: enabled runtime: true permanent: trueThe
permanent: trueoption makes the new settings persistent across reboots.Validate the playbook syntax:
$ ansible-playbook --syntax-check ~/playbook.ymlNote that this command only validates the syntax and does not protect against a wrong but valid configuration.
Run the playbook:
$ ansible-playbook ~/playbook.yml
Verification
On the managed node, verify that the
443/tcpport associated with theHTTPSservice is open:# firewall-cmd --list-ports 443/tcp
Additional resources
-
/usr/share/ansible/roles/rhel-system-roles.firewall/README.mdfile -
/usr/share/doc/rhel-system-roles/firewall/directory
10.5. Configuring a firewalld DMZ zone by using the firewall RHEL system role
As a system administrator, you can use the firewall RHEL system role to configure a dmz zone on the enp1s0 interface to permit HTTPS traffic to the zone. In this way, you enable external users to access your web servers.
Perform this procedure on the Ansible control node.
Prerequisites
- You have prepared the control node and the managed nodes.
- You are logged in to the control node as a user who can run playbooks on the managed nodes.
-
The account you use to connect to the managed nodes has
sudopermissions on them.
Procedure
Create a playbook file, for example
~/playbook.yml, with the following content:--- - name: Configure firewalld hosts: managed-node-01.example.com tasks: - name: Creating a DMZ with access to HTTPS port and masquerading for hosts in DMZ ansible.builtin.include_role: name: rhel-system-roles.firewall vars: firewall: - zone: dmz interface: enp1s0 service: https state: enabled runtime: true permanent: trueValidate the playbook syntax:
$ ansible-playbook --syntax-check ~/playbook.ymlNote that this command only validates the syntax and does not protect against a wrong but valid configuration.
Run the playbook:
$ ansible-playbook ~/playbook.yml
Verification
On the managed node, view detailed information about the
dmzzone:# firewall-cmd --zone=dmz --list-all dmz (active) target: default icmp-block-inversion: no interfaces: enp1s0 sources: services: https ssh ports: protocols: forward: no masquerade: no forward-ports: source-ports: icmp-blocks:
Additional resources
-
/usr/share/ansible/roles/rhel-system-roles.firewall/README.mdfile -
/usr/share/doc/rhel-system-roles/firewall/directory
Chapter 11. Configuring a high-availability cluster by using the RHEL system role
With the ha_cluster system role, you can configure and manage a high-availability cluster that uses the Pacemaker high availability cluster resource manager.
11.1. Variables of the ha_cluster RHEL system role
In an ha_cluster system role playbook, you define the variables for a high availability cluster according to the requirements of your cluster deployment.
The variables you can set for an ha_cluster system role are as follows:
ha_cluster_enable_repos-
A boolean flag that enables the repositories containing the packages that are needed by the
ha_clustersystem role. When this variable is set totrue, the default value, you must have active subscription coverage for RHEL and the RHEL High Availability Add-On on the systems that you will use as your cluster members or the system role will fail. ha_cluster_enable_repos_resilient_storage-
(RHEL 8.10 and later) A boolean flag that enables the repositories containing resilient storage packages, such as
dlmorgfs2. For this option to take effect,ha_cluster_enable_reposmust be set totrue. The default value of this variable isfalse. ha_cluster_manage_firewall(RHEL 8.8 and later) A boolean flag that determines whether the
ha_clustersystem role manages the firewall. Whenha_cluster_manage_firewallis set totrue, the firewall high availability service and thefence-virtport are enabled. Whenha_cluster_manage_firewallis set tofalse, theha_clustersystem role does not manage the firewall. If your system is running thefirewalldservice, you must set the parameter totruein your playbook.You can use the
ha_cluster_manage_firewallparameter to add ports, but you cannot use the parameter to remove ports. To remove ports, use thefirewallsystem role directly.As of RHEL 8.8, the firewall is no longer configured by default, because it is configured only when
ha_cluster_manage_firewallis set totrue.ha_cluster_manage_selinux(RHEL 8.8 and later) A boolean flag that determines whether the
ha_clustersystem role manages the ports belonging to the firewall high availability service using theselinuxsystem role. Whenha_cluster_manage_selinuxis set totrue, the ports belonging to the firewall high availability service are associated with the SELinux port typecluster_port_t. Whenha_cluster_manage_selinuxis set tofalse, theha_clustersystem role does not manage SELinux.If your system is running the
selinuxservice, you must set this parameter totruein your playbook. Firewall configuration is a prerequisite for managing SELinux. If the firewall is not installed, the managing SELinux policy is skipped.You can use the
ha_cluster_manage_selinuxparameter to add policy, but you cannot use the parameter to remove policy. To remove policy, use theselinuxsystem role directly.ha_cluster_cluster_presentA boolean flag which, if set to
true, determines that HA cluster will be configured on the hosts according to the variables passed to the role. Any cluster configuration not specified in the role and not supported by the role will be lost.If
ha_cluster_cluster_presentis set tofalse, all HA cluster configuration will be removed from the target hosts.The default value of this variable is
true.The following example playbook removes all cluster configuration on
node1andnode2- hosts: node1 node2 vars: ha_cluster_cluster_present: false roles: - rhel-system-roles.ha_clusterha_cluster_start_on_boot-
A boolean flag that determines whether cluster services will be configured to start on boot. The default value of this variable is
true. ha_cluster_fence_agent_packages-
List of fence agent packages to install. The default value of this variable is
fence-agents-all,fence-virt. ha_cluster_extra_packagesList of additional packages to be installed. The default value of this variable is no packages.
This variable can be used to install additional packages not installed automatically by the role, for example custom resource agents.
It is possible to specify fence agents as members of this list. However,
ha_cluster_fence_agent_packagesis the recommended role variable to use for specifying fence agents, so that its default value is overridden.ha_cluster_hacluster_password-
A string value that specifies the password of the
haclusteruser. Thehaclusteruser has full access to a cluster. To protect sensitive data, vault encrypt the password, as described in Encrypting content with Ansible Vault. There is no default password value, and this variable must be specified. ha_cluster_hacluster_qdevice_password-
(RHEL 8.9 and later) A string value that specifies the password of the
haclusteruser for a quorum device. This parameter is needed only if theha_cluster_quorumparameter is configured to use a quorum device of typenetand the password of thehaclusteruser on the quorum device is different from the password of thehaclusteruser specified with theha_cluster_hacluster_passwordparameter. Thehaclusteruser has full access to a cluster. To protect sensitive data, vault encrypt the password, as described in Encrypting content with Ansible Vault. There is no default value for this password. ha_cluster_corosync_key_srcThe path to Corosync
authkeyfile, which is the authentication and encryption key for Corosync communication. It is highly recommended that you have a uniqueauthkeyvalue for each cluster. The key should be 256 bytes of random data.If you specify a key for this variable, it is recommended that you vault encrypt the key, as described in Encrypting content with Ansible Vault.
If no key is specified, a key already present on the nodes will be used. If nodes do not have the same key, a key from one node will be distributed to other nodes so that all nodes have the same key. If no node has a key, a new key will be generated and distributed to the nodes.
If this variable is set,
ha_cluster_regenerate_keysis ignored for this key.The default value of this variable is null.
ha_cluster_pacemaker_key_srcThe path to the Pacemaker
authkeyfile, which is the authentication and encryption key for Pacemaker communication. It is highly recommended that you have a uniqueauthkeyvalue for each cluster. The key should be 256 bytes of random data.If you specify a key for this variable, it is recommended that you vault encrypt the key, as described in Encrypting content with Ansible Vault.
If no key is specified, a key already present on the nodes will be used. If nodes do not have the same key, a key from one node will be distributed to other nodes so that all nodes have the same key. If no node has a key, a new key will be generated and distributed to the nodes.
If this variable is set,
ha_cluster_regenerate_keysis ignored for this key.The default value of this variable is null.
ha_cluster_fence_virt_key_srcThe path to the
fence-virtorfence-xvmpre-shared key file, which is the location of the authentication key for thefence-virtorfence-xvmfence agent.If you specify a key for this variable, it is recommended that you vault encrypt the key, as described in Encrypting content with Ansible Vault.
If no key is specified, a key already present on the nodes will be used. If nodes do not have the same key, a key from one node will be distributed to other nodes so that all nodes have the same key. If no node has a key, a new key will be generated and distributed to the nodes. If the
ha_clustersystem role generates a new key in this fashion, you should copy the key to your nodes' hypervisor to ensure that fencing works.If this variable is set,
ha_cluster_regenerate_keysis ignored for this key.The default value of this variable is null.
ha_cluster_pcsd_public_key_srcr,ha_cluster_pcsd_private_key_srcThe path to the
pcsdTLS certificate and private key. If this is not specified, a certificate-key pair already present on the nodes will be used. If a certificate-key pair is not present, a random new one will be generated.If you specify a private key value for this variable, it is recommended that you vault encrypt the key, as described in Encrypting content with Ansible Vault.
If these variables are set,
ha_cluster_regenerate_keysis ignored for this certificate-key pair.The default value of these variables is null.
ha_cluster_pcsd_certificates(RHEL 8.8 and later) Creates a
pcsdprivate key and certificate using thecertificatesystem role.If your system is not configured with a
pcsdprivate key and certificate, you can create them in one of two ways:-
Set the
ha_cluster_pcsd_certificatesvariable. When you set theha_cluster_pcsd_certificatesvariable, thecertificatesystem role is used internally and it creates the private key and certificate forpcsdas defined. -
Do not set the
ha_cluster_pcsd_public_key_src,ha_cluster_pcsd_private_key_src, or theha_cluster_pcsd_certificatesvariables. If you do not set any of these variables, theha_clustersystem role will createpcsdcertificates by means ofpcsditself. The value ofha_cluster_pcsd_certificatesis set to the value of the variablecertificate_requestsas specified in thecertificatesystem role. For more information about thecertificatesystem role, see Requesting certificates using RHEL system roles.
-
Set the
The following operational considerations apply to the use of the
ha_cluster_pcsd_certificatevariable:-
Unless you are using IPA and joining the systems to an IPA domain, the
certificatesystem role creates self-signed certificates. In this case, you must explicitly configure trust settings outside of the context of RHEL system roles. System roles do not support configuring trust settings. -
When you set the
ha_cluster_pcsd_certificatesvariable, do not set theha_cluster_pcsd_public_key_srcandha_cluster_pcsd_private_key_srcvariables. -
When you set the
ha_cluster_pcsd_certificatesvariable,ha_cluster_regenerate_keysis ignored for this certificate - key pair.
-
Unless you are using IPA and joining the systems to an IPA domain, the
The default value of this variable is
[].For an example
ha_clustersystem role playbook that creates TLS certificates and key files in a high availability cluster, see Creating pcsd TLS certificates and key files for a high availability cluster.ha_cluster_regenerate_keys-
A boolean flag which, when set to
true, determines that pre-shared keys and TLS certificates will be regenerated. For more information about when keys and certificates will be regenerated, see the descriptions of theha_cluster_corosync_key_src,ha_cluster_pacemaker_key_src,ha_cluster_fence_virt_key_src,ha_cluster_pcsd_public_key_src, andha_cluster_pcsd_private_key_srcvariables. -
The default value of this variable is
false. ha_cluster_pcs_permission_listConfigures permissions to manage a cluster using
pcsd. The items you configure with this variable are as follows:-
type-userorgroup -
name- user or group name allow_list- Allowed actions for the specified user or group:-
read- View cluster status and settings -
write- Modify cluster settings except permissions and ACLs -
grant- Modify cluster permissions and ACLs -
full- Unrestricted access to a cluster including adding and removing nodes and access to keys and certificates
-
-
The structure of the
ha_cluster_pcs_permission_listvariable and its default values are as follows:ha_cluster_pcs_permission_list: - type: group name: hacluster allow_list: - grant - read - writeha_cluster_cluster_name-
The name of the cluster. This is a string value with a default of
my-cluster. ha_cluster_transport(RHEL 8.7 and later) Sets the cluster transport method. The items you configure with this variable are as follows:
-
type(optional) - Transport type:knet,udp, orudpu. Theudpandudputransport types support only one link. Encryption is always disabled forudpandudpu. Defaults toknetif not specified. -
options(optional) - List of name-value dictionaries with transport options. -
links(optional) - List of list of name-value dictionaries. Each list of name-value dictionaries holds options for one Corosync link. It is recommended that you set thelinknumbervalue for each link. Otherwise, the first list of dictionaries is assigned by default to the first link, the second one to the second link, and so on. -
compression(optional) - List of name-value dictionaries configuring transport compression. Supported only with theknettransport type. -
crypto(optional) - List of name-value dictionaries configuring transport encryption. By default, encryption is enabled. Supported only with theknettransport type.
-
For a list of allowed options, see the
pcs -h cluster setuphelp page or thesetupdescription in theclustersection of thepcs(8) man page. For more detailed descriptions, see thecorosync.conf(5) man page.The structure of the
ha_cluster_transportvariable is as follows:ha_cluster_transport: type: knet options: - name: option1_name value: option1_value - name: option2_name value: option2_value links: - - name: option1_name value: option1_value - name: option2_name value: option2_value - - name: option1_name value: option1_value - name: option2_name value: option2_value compression: - name: option1_name value: option1_value - name: option2_name value: option2_value crypto: - name: option1_name value: option1_value - name: option2_name value: option2_valueFor an example
ha_clustersystem role playbook that configures a transport method, see Configuring Corosync values in a high availability cluster.ha_cluster_totem(RHEL 8.7 and later) Configures Corosync totem. For a list of allowed options, see the
pcs -h cluster setuphelp page or thesetupdescription in theclustersection of thepcs(8) man page. For a more detailed description, see thecorosync.conf(5) man page.The structure of the
ha_cluster_totemvariable is as follows:ha_cluster_totem: options: - name: option1_name value: option1_value - name: option2_name value: option2_valueFor an example
ha_clustersystem role playbook that configures a Corosync totem, see Configuring Corosync values in a high availability cluster.ha_cluster_quorum(RHEL 8.7 and later) Configures cluster quorum. You can configure the following items for cluster quorum:
-
options(optional) - List of name-value dictionaries configuring quorum. Allowed options are:auto_tie_breaker,last_man_standing,last_man_standing_window, andwait_for_all. For information about quorum options, see thevotequorum(5) man page. device(optional) - (RHEL 8.8 and later) Configures the cluster to use a quorum device. By default, no quorum device is used.-
model(mandatory) - Specifies a quorum device model. Onlynetis supported model_options(optional) - List of name-value dictionaries configuring the specified quorum device model. For modelnet, you must specifyhostandalgorithmoptions.Use the
pcs-addressoption to set a custompcsdaddress and port to connect to theqnetdhost. If you do not specify this option, the role connects to the defaultpcsdport on thehost.-
generic_options(optional) - List of name-value dictionaries setting quorum device options that are not model specific. heuristics_options(optional) - List of name-value dictionaries configuring quorum device heuristics.For information about quorum device options, see the
corosync-qdevice(8) man page. The generic options aresync_timeoutandtimeout. For modelnetoptions see thequorum.device.netsection. For heuristics options, see thequorum.device.heuristicssection.To regenerate a quorum device TLS certificate, set the
ha_cluster_regenerate_keysvariable totrue.
-
-
The structure of the
ha_cluster_quorumvariable is as follows:ha_cluster_quorum: options: - name: option1_name value: option1_value - name: option2_name value: option2_value device: model: string model_options: - name: option1_name value: option1_value - name: option2_name value: option2_value generic_options: - name: option1_name value: option1_value - name: option2_name value: option2_value heuristics_options: - name: option1_name value: option1_value - name: option2_name value: option2_valueFor an example
ha_clustersystem role playbook that configures cluster quorum, see Configuring Corosync values in a high availability cluster. For an exampleha_clustersystem role playbook that configures a cluster using a quorum device, see Configuring a high availability cluster using a quorum device.ha_cluster_sbd_enabled(RHEL 8.7 and later) A boolean flag which determines whether the cluster can use the SBD node fencing mechanism. The default value of this variable is
false.For an example
ha_clustersystem role playbook that enables SBD, see Configuring a high availability cluster with SBD node fencing.ha_cluster_sbd_options(RHEL 8.7 and later) List of name-value dictionaries specifying SBD options. Supported options are:
-
delay-start- defaults tono -
startmode- defaults toalways -
timeout-action- defaults toflush,reboot watchdog-timeout- defaults to5For information about these options, see the
Configuration via environmentsection of thesbd(8) man page.
-
For an example
ha_clustersystem role playbook that configures SBD options, see Configuring a high availability cluster with SBD node fencing.When using SBD, you can optionally configure watchdog and SBD devices for each node in an inventory. For information about configuring watchdog and SBD devices in an inventory file, see Specifying an inventory for the ha_cluster system role.
ha_cluster_cluster_propertiesList of sets of cluster properties for Pacemaker cluster-wide configuration. Only one set of cluster properties is supported.
The structure of a set of cluster properties is as follows:
ha_cluster_cluster_properties:
  - attrs:
      - name: property1_name
        value: property1_value
      - name: property2_name
        value: property2_value
By default, no properties are set.
The following example playbook configures a cluster consisting of
node1andnode2and sets thestonith-enabledandno-quorum-policycluster properties.- hosts: node1 node2 vars: ha_cluster_cluster_name: my-new-cluster ha_cluster_hacluster_password: password ha_cluster_cluster_properties: - attrs: - name: stonith-enabled value: 'true' - name: no-quorum-policy value: stop roles: - rhel-system-roles.ha_clusterha_cluster_node_options(RHEL 8. 10 and later) This variable defines various settings which vary from cluster node to cluster node. It sets the options for the specified nodes, but does not specify which nodes form the cluster. You specify which nodes form the cluster with the
hostsparameter in an inventory or a playbook.The items you configure with this variable are as follows:
-
node_name(mandatory) - Name of the node for which to define Pacemaker node attributes. -
attributes(optional) - List of sets of Pacemaker node attributes for the node. Currently no more than one set for each node is supported.
-
The structure of the
ha_cluster_node_optionsvariable is as follows:ha_cluster_node_options: - node_name: node1 attributes: - attrs: - name: attribute1 value: value1_node1 - name: attribute2 value: value2_node1 - node_name: node2 attributes: - attrs: - name: attribute1 value: value1_node2 - name: attribute2 value: value2_node2By default, no node options are defined.
For an example
ha_clusterSystem Role playbook that includes node options configuration, see Configuring a high availability cluster with node attributes.ha_cluster_resource_primitivesThis variable defines pacemaker resources configured by the system role, including fencing resources. You can configure the following items for each resource:
-
id(mandatory) - ID of a resource. -
agent(mandatory) - Name of a resource or fencing agent, for exampleocf:pacemaker:Dummyorstonith:fence_xvm. It is mandatory to specifystonith:for STONITH agents. For resource agents, it is possible to use a short name, such asDummy, instead ofocf:pacemaker:Dummy. However, if several agents with the same short name are installed, the role will fail as it will be unable to decide which agent should be used. Therefore, it is recommended that you use full names when specifying a resource agent. -
instance_attrs(optional) - List of sets of the resource’s instance attributes. Currently, only one set is supported. The exact names and values of attributes, as well as whether they are mandatory or not, depend on the resource or fencing agent. -
meta_attrs(optional) - List of sets of the resource’s meta attributes. Currently, only one set is supported. -
copy_operations_from_agent(optional) - (RHEL 8.9 and later) Resource agents usually define default settings for resource operations, such asintervalandtimeout, optimized for the specific agent. If this variable is set totrue, then those settings are copied to the resource configuration. Otherwise, clusterwide defaults apply to the resource. If you also define resource operation defaults for the resource with theha_cluster_resource_operation_defaultsrole variable, you can set this tofalse. The default value of this variable istrue. operations(optional) - List of the resource’s operations.-
action(mandatory) - Operation action as defined by pacemaker and the resource or fencing agent. -
attrs(mandatory) - Operation options, at least one option must be specified.
-
-
The structure of the resource definition that you configure with the
ha_clustersystem role is as follows:- id: resource-id agent: resource-agent instance_attrs: - attrs: - name: attribute1_name value: attribute1_value - name: attribute2_name value: attribute2_value meta_attrs: - attrs: - name: meta_attribute1_name value: meta_attribute1_value - name: meta_attribute2_name value: meta_attribute2_value copy_operations_from_agent: bool operations: - action: operation1-action attrs: - name: operation1_attribute1_name value: operation1_attribute1_value - name: operation1_attribute2_name value: operation1_attribute2_value - action: operation2-action attrs: - name: operation2_attribute1_name value: operation2_attribute1_value - name: operation2_attribute2_name value: operation2_attribute2_valueBy default, no resources are defined.
For an example
ha_clustersystem role playbook that includes resource configuration, see Configuring a high availability cluster with fencing and resources.ha_cluster_resource_groupsThis variable defines pacemaker resource groups configured by the system role. You can configure the following items for each resource group:
-
id(mandatory) - ID of a group. -
resources(mandatory) - List of the group’s resources. Each resource is referenced by its ID and the resources must be defined in theha_cluster_resource_primitivesvariable. At least one resource must be listed. -
meta_attrs(optional) - List of sets of the group’s meta attributes. Currently, only one set is supported.
-
The structure of the resource group definition that you configure with the
ha_clustersystem role is as follows:ha_cluster_resource_groups: - id: group-id resource_ids: - resource1-id - resource2-id meta_attrs: - attrs: - name: group_meta_attribute1_name value: group_meta_attribute1_value - name: group_meta_attribute2_name value: group_meta_attribute2_valueBy default, no resource groups are defined.
For an example
ha_clustersystem role playbook that includes resource group configuration, see Configuring a high availability cluster with fencing and resources.ha_cluster_resource_clonesThis variable defines pacemaker resource clones configured by the system role. You can configure the following items for a resource clone:
-
resource_id(mandatory) - Resource to be cloned. The resource must be defined in theha_cluster_resource_primitivesvariable or theha_cluster_resource_groupsvariable. -
promotable(optional) - Indicates whether the resource clone to be created is a promotable clone, indicated astrueorfalse. -
id(optional) - Custom ID of the clone. If no ID is specified, it will be generated. A warning will be displayed if this option is not supported by the cluster. -
meta_attrs(optional) - List of sets of the clone’s meta attributes. Currently, only one set is supported.
-
The structure of the resource clone definition that you configure with the
ha_clustersystem role is as follows:ha_cluster_resource_clones: - resource_id: resource-to-be-cloned promotable: true id: custom-clone-id meta_attrs: - attrs: - name: clone_meta_attribute1_name value: clone_meta_attribute1_value - name: clone_meta_attribute2_name value: clone_meta_attribute2_valueBy default, no resource clones are defined.
For an example
ha_clustersystem role playbook that includes resource clone configuration, see Configuring a high availability cluster with fencing and resources.ha_cluster_resource_defaults(RHEL 8.9 and later) This variable defines sets of resource defaults. You can define multiple sets of defaults and apply them to resources of specific agents using rules. The defaults you specify with the
ha_cluster_resource_defaultsvariable do not apply to resources which override them with their own defined values.Only meta attributes can be specified as defaults.
You can configure the following items for each defaults set:
-
id(optional) - ID of the defaults set. If not specified, it is autogenerated. -
rule(optional) - Rule written usingpcssyntax defining when and for which resources the set applies. For information on specifying a rule, see theresource defaults set createsection of thepcs(8) man page. -
score(optional) - Weight of the defaults set. -
attrs(optional) - Meta attributes applied to resources as defaults.
-
The structure of the
ha_cluster_resource_defaultsvariable is as follows:ha_cluster_resource_defaults: meta_attrs: - id: defaults-set-1-id rule: rule-string score: score-value attrs: - name: meta_attribute1_name value: meta_attribute1_value - name: meta_attribute2_name value: meta_attribute2_value - id: defaults-set-2-id rule: rule-string score: score-value attrs: - name: meta_attribute3_name value: meta_attribute3_value - name: meta_attribute4_name value: meta_attribute4_valueFor an example
ha_clustersystem role playbook that configures resource defaults, see Configuring a high availability cluster with resource and resource operation defaults.ha_cluster_resource_operation_defaults(RHEL 8.9 and later) This variable defines sets of resource operation defaults. You can define multiple sets of defaults and apply them to resources of specific agents and specific resource operations using rules. The defaults you specify with the
ha_cluster_resource_operation_defaultsvariable do not apply to resource operations which override them with their own defined values. By default, theha_clustersystem role configures resources to define their own values for resource operations. For information about overriding these defaults with theha_cluster_resource_operations_defaultsvariable, see the description of thecopy_operations_from_agentitem inha_cluster_resource_primitives.Only meta attributes can be specified as defaults.
The structure of the
ha_cluster_resource_operations_defaultsvariable is the same as the structure for theha_cluster_resource_defaultsvariable, with the exception of how you specify a rule. For information about specifying a rule to describe the resource operation to which a set applies, see theresource op defaults set createsection of thepcs(8) man page.ha_cluster_stonith_levels(RHEL 8.10 and later) This variable defines STONITH levels, also known as fencing topology. Fencing levels configure a cluster to use multiple devices to fence nodes. You can define alternative devices in case one device fails and you can require multiple devices to all be executed successfully to consider a node successfully fenced. For more information on fencing levels, see Configuring fencing levels in Configuring and managing high availability clusters.
You can configure the following items when defining fencing levels:
-
level(mandatory) - Order in which to attempt the fencing level. Pacemaker attempts levels in ascending order until one succeeds. -
target(optional) - Name of a node this level applies to. You must specify one of the following three selections:
-
target_pattern- POSIX extended regular expression matching the names of the nodes this level applies to. -
target_attribute- Name of a node attribute that is set for the node this level applies to. -
target_attributeandtarget_value- Name and value of a node attribute that is set for the node this level applies to.
-
resouce_ids(mandatory) - List of fencing resources that must all be tried for this level.By default, no fencing levels are defined.
-
The structure of the fencing levels definition that you configure with the
ha_clusterSystem Role is as follows:ha_cluster_stonith_levels: - level: 1..9 target: node_name target_pattern: node_name_regular_expression target_attribute: node_attribute_name target_value: node_attribute_value resource_ids: - fence_device_1 - fence_device_2 - level: 1..9 target: node_name target_pattern: node_name_regular_expression target_attribute: node_attribute_name target_value: node_attribute_value resource_ids: - fence_device_1 - fence_device_2For an example
ha_clusterSystem Role playbook that configures fencing defaults, see Configuring a high availability cluster with fencing levels.ha_cluster_constraints_locationThis variable defines resource location constraints. Resource location constraints indicate which nodes a resource can run on. You can specify a resources specified by a resource ID or by a pattern, which can match more than one resource. You can specify a node by a node name or by a rule.
You can configure the following items for a resource location constraint:
-
resource(mandatory) - Specification of a resource the constraint applies to. -
node(mandatory) - Name of a node the resource should prefer or avoid. -
id(optional) - ID of the constraint. If not specified, it will be autogenerated. options(optional) - List of name-value dictionaries.score- Sets the weight of the constraint.-
A positive
scorevalue means the resource prefers running on the node. -
A negative
scorevalue means the resource should avoid running on the node. -
A
scorevalue of-INFINITYmeans the resource must avoid running on the node. -
If
scoreis not specified, the score value defaults toINFINITY.
-
A positive
-
By default no resource location constraints are defined.
The structure of a resource location constraint specifying a resource ID and node name is as follows:
ha_cluster_constraints_location:
  - resource:
      id: resource-id
    node: node-name
    id: constraint-id
    options:
      - name: score
        value: score-value
      - name: option-name
        value: option-value
The items that you configure for a resource location constraint that specifies a resource pattern are the same items that you configure for a resource location constraint that specifies a resource ID, with the exception of the resource specification itself. The item that you specify for the resource specification is as follows:
-
pattern(mandatory) - POSIX extended regular expression resource IDs are matched against.
-
The structure of a resource location constraint specifying a resource pattern and node name is as follows:
ha_cluster_constraints_location:
  - resource:
      pattern: resource-pattern
    node: node-name
    id: constraint-id
    options:
      - name: score
        value: score-value
      - name: resource-discovery
        value: resource-discovery-value
You can configure the following items for a resource location constraint that specifies a resource ID and a rule:
resource(mandatory) - Specification of a resource the constraint applies to.-
id(mandatory) - Resource ID. -
role(optional) - The resource role to which the constraint is limited:Started,Unpromoted,Promoted.
-
-
rule(mandatory) - Constraint rule written usingpcssyntax. For further information, see theconstraint locationsection of thepcs(8) man page. - Other items to specify have the same meaning as for a resource constraint that does not specify a rule.
The structure of a resource location constraint that specifies a resource ID and a rule is as follows:
ha_cluster_constraints_location:
  - resource:
      id: resource-id
      role: resource-role
    rule: rule-string
    id: constraint-id
    options:
      - name: score
        value: score-value
      - name: resource-discovery
        value: resource-discovery-value
The items that you configure for a resource location constraint that specifies a resource pattern and a rule are the same items that you configure for a resource location constraint that specifies a resource ID and a rule, with the exception of the resource specification itself. The item that you specify for the resource specification is as follows:
-
pattern(mandatory) - POSIX extended regular expression resource IDs are matched against.
-
The structure of a resource location constraint that specifies a resource pattern and a rule is as follows:
ha_cluster_constraints_location:
  - resource:
      pattern: resource-pattern
      role: resource-role
    rule: rule-string
    id: constraint-id
    options:
      - name: score
        value: score-value
      - name: resource-discovery
        value: resource-discovery-value
For an example
ha_clustersystem role playbook that creates a cluster with resource constraints, see Configuring a high availability cluster with resource constraints.ha_cluster_constraints_colocationThis variable defines resource colocation constraints. Resource colocation constraints indicate that the location of one resource depends on the location of another one. There are two types of colocation constraints: a simple colocation constraint for two resources, and a set colocation constraint for multiple resources.
You can configure the following items for a simple resource colocation constraint:
resource_follower(mandatory) - A resource that should be located relative toresource_leader.-
id(mandatory) - Resource ID. -
role(optional) - The resource role to which the constraint is limited:Started,Unpromoted,Promoted.
-
resource_leader(mandatory) - The cluster will decide where to put this resource first and then decide where to putresource_follower.-
id(mandatory) - Resource ID. -
role(optional) - The resource role to which the constraint is limited:Started,Unpromoted,Promoted.
-
-
id(optional) - ID of the constraint. If not specified, it will be autogenerated. options(optional) - List of name-value dictionaries.score- Sets the weight of the constraint.-
Positive
scorevalues indicate the resources should run on the same node. -
Negative
scorevalues indicate the resources should run on different nodes. -
A
scorevalue of+INFINITYindicates the resources must run on the same node. -
A
scorevalue of-INFINITYindicates the resources must run on different nodes. -
If
scoreis not specified, the score value defaults toINFINITY.
-
Positive
By default no resource colocation constraints are defined.
The structure of a simple resource colocation constraint is as follows:
ha_cluster_constraints_colocation:
  - resource_follower:
      id: resource-id1
      role: resource-role1
    resource_leader:
      id: resource-id2
      role: resource-role2
    id: constraint-id
    options:
      - name: score
        value: score-value
      - name: option-name
        value: option-value
You can configure the following items for a resource set colocation constraint:
resource_sets(mandatory) - List of resource sets.-
resource_ids(mandatory) - List of resources in a set. -
options(optional) - List of name-value dictionaries fine-tuning how resources in the sets are treated by the constraint.
-
-
id(optional) - Same values as for a simple colocation constraint. -
options(optional) - Same values as for a simple colocation constraint.
The structure of a resource set colocation constraint is as follows:
ha_cluster_constraints_colocation:
  - resource_sets:
      - resource_ids:
          - resource-id1
          - resource-id2
        options:
          - name: option-name
            value: option-value
    id: constraint-id
    options:
      - name: score
        value: score-value
      - name: option-name
        value: option-value
For an example
ha_clustersystem role playbook that creates a cluster with resource constraints, see Configuring a high availability cluster with resource constraints.ha_cluster_constraints_orderThis variable defines resource order constraints. Resource order constraints indicate the order in which certain resource actions should occur. There are two types of resource order constraints: a simple order constraint for two resources, and a set order constraint for multiple resources.
You can configure the following items for a simple resource order constraint:
resource_first(mandatory) - Resource that theresource_thenresource depends on.-
id(mandatory) - Resource ID. -
action(optional) - The action that must complete before an action can be initiated for theresource_thenresource. Allowed values:start,stop,promote,demote.
-
resource_then(mandatory) - The dependent resource.-
id(mandatory) - Resource ID. -
action(optional) - The action that the resource can execute only after the action on theresource_firstresource has completed. Allowed values:start,stop,promote,demote.
-
-
id(optional) - ID of the constraint. If not specified, it will be autogenerated. -
options(optional) - List of name-value dictionaries.
By default no resource order constraints are defined.
The structure of a simple resource order constraint is as follows:
ha_cluster_constraints_order:
  - resource_first:
      id: resource-id1
      action: resource-action1
    resource_then:
      id: resource-id2
      action: resource-action2
    id: constraint-id
    options:
      - name: score
        value: score-value
      - name: option-name
        value: option-value
You can configure the following items for a resource set order constraint:
resource_sets(mandatory) - List of resource sets.-
resource_ids(mandatory) - List of resources in a set. -
options(optional) - List of name-value dictionaries fine-tuning how resources in the sets are treated by the constraint.
-
-
id(optional) - Same values as for a simple order constraint. -
options(optional) - Same values as for a simple order constraint.
The structure of a resource set order constraint is as follows:
ha_cluster_constraints_order:
  - resource_sets:
      - resource_ids:
          - resource-id1
          - resource-id2
        options:
          - name: option-name
            value: option-value
    id: constraint-id
    options:
      - name: score
        value: score-value
      - name: option-name
        value: option-value
For an example
ha_clustersystem role playbook that creates a cluster with resource constraints, see Configuring a high availability cluster with resource constraints.ha_cluster_constraints_ticketThis variable defines resource ticket constraints. Resource ticket constraints indicate the resources that depend on a certain ticket. There are two types of resource ticket constraints: a simple ticket constraint for one resource, and a ticket order constraint for multiple resources.
You can configure the following items for a simple resource ticket constraint:
resource(mandatory) - Specification of a resource the constraint applies to.-
id(mandatory) - Resource ID. -
role(optional) - The resource role to which the constraint is limited:Started,Unpromoted,Promoted.
-
-
ticket(mandatory) - Name of a ticket the resource depends on. -
id(optional) - ID of the constraint. If not specified, it will be autogenerated. options(optional) - List of name-value dictionaries.-
loss-policy(optional) - Action to perform on the resource if the ticket is revoked.
-
By default no resource ticket constraints are defined.
The structure of a simple resource ticket constraint is as follows:
ha_cluster_constraints_ticket:
  - resource:
      id: resource-id
      role: resource-role
    ticket: ticket-name
    id: constraint-id
    options:
      - name: loss-policy
        value: loss-policy-value
      - name: option-name
        value: option-value
You can configure the following items for a resource set ticket constraint:
resource_sets(mandatory) - List of resource sets.-
resource_ids(mandatory) - List of resources in a set. -
options(optional) - List of name-value dictionaries fine-tuning how resources in the sets are treated by the constraint.
-
-
ticket(mandatory) - Same value as for a simple ticket constraint. -
id(optional) - Same value as for a simple ticket constraint. -
options(optional) - Same values as for a simple ticket constraint.
The structure of a resource set ticket constraint is as follows:
ha_cluster_constraints_ticket:
  - resource_sets:
      - resource_ids:
          - resource-id1
          - resource-id2
        options:
          - name: option-name
            value: option-value
    ticket: ticket-name
    id: constraint-id
    options:
      - name: option-name
        value: option-value
For an example
ha_clustersystem role playbook that creates a cluster with resource constraints, see Configuring a high availability cluster with resource constraints.ha_cluster_qnetd(RHEL 8.8 and later) This variable configures a
qnetdhost which can then serve as an external quorum device for clusters.You can configure the following items for a
qnetdhost:-
present(optional) - Iftrue, configure aqnetdinstance on the host. Iffalse, removeqnetdconfiguration from the host. The default value isfalse. If you set thistrue, you must setha_cluster_cluster_presenttofalse. -
start_on_boot(optional) - Configures whether theqnetdinstance should start automatically on boot. The default value istrue. -
regenerate_keys(optional) - Set this variable totrueto regenerate theqnetdTLS certificate. If you regenerate the certificate, you must either re-run the role for each cluster to connect it to theqnetdhost again or runpcsmanually.
-
You cannot run
qnetdon a cluster node because fencing would disruptqnetdoperation.For an example
ha_clustersystem role playbook that configures a cluster using a quorum device, see Configuring a cluster using a quorum device.
Additional resources
-
/usr/share/ansible/roles/rhel-system-roles.ha_cluster/README.mdfile -
/usr/share/doc/rhel-system-roles/ha_cluster/directory
11.2. Specifying an inventory for the ha_cluster RHEL system role
When configuring an HA cluster using the ha_cluster system role playbook, you configure the names and addresses of the nodes for the cluster in an inventory.
11.2.1. Configuring node names and addresses in an inventory
For each node in an inventory, you can optionally specify the following items:
-
node_name- the name of a node in a cluster. -
pcs_address- an address used bypcsto communicate with the node. It can be a name, FQDN or an IP address and it can include a port number. -
corosync_addresses- list of addresses used by Corosync. All nodes which form a particular cluster must have the same number of addresses and the order of the addresses matters.
The following example shows an inventory with targets node1 and node2. node1 and node2 must be either fully qualified domain names or must otherwise be able to connect to the nodes as when, for example, the names are resolvable through the /etc/hosts file.
all:
  hosts:
    node1:
      ha_cluster:
        node_name: node-A
        pcs_address: node1-address
        corosync_addresses:
          - 192.168.1.11
          - 192.168.2.11
    node2:
      ha_cluster:
        node_name: node-B
        pcs_address: node2-address:2224
        corosync_addresses:
          - 192.168.1.12
          - 192.168.2.12
Additional resources
-
/usr/share/ansible/roles/rhel-system-roles.ha_cluster/README.mdfile -
/usr/share/doc/rhel-system-roles/ha_cluster/directory
11.2.2. Configuring watchdog and SBD devices in an inventory
(RHEL 8.7 and later) When using SBD, you can optionally configure watchdog and SBD devices for each node in an inventory. Even though all SBD devices must be shared to and accessible from all nodes, each node can use different names for the devices. Watchdog devices can be different for each node as well. For information about the SBD variables you can set in a system role playbook, see the entries for ha_cluster_sbd_enabled and ha_cluster_sbd_options in Variables of the ha_cluster system role.
For each node in an inventory, you can optionally specify the following items:
-
sbd_watchdog_modules(optional) - (RHEL 8.9 and later) Watchdog kernel modules to be loaded, which create/dev/watchdog*devices. Defaults to empty list if not set. -
sbd_watchdog_modules_blocklist(optional) - (RHEL 8.9 and later) Watchdog kernel modules to be unloaded and blocked. Defaults to empty list if not set. -
sbd_watchdog- Watchdog device to be used by SBD. Defaults to/dev/watchdogif not set. -
sbd_devices- Devices to use for exchanging SBD messages and for monitoring. Defaults to empty list if not set.
The following example shows an inventory that configures watchdog and SBD devices for targets node1 and node2.
all:
  hosts:
    node1:
      ha_cluster:
        sbd_watchdog_modules:
          - module1
          - module2
        sbd_watchdog: /dev/watchdog2
        sbd_devices:
          - /dev/vdx
          - /dev/vdy
    node2:
      ha_cluster:
        sbd_watchdog_modules:
          - module1
        sbd_watchdog_modules_blocklist:
          - module2
        sbd_watchdog: /dev/watchdog1
        sbd_devices:
          - /dev/vdw
          - /dev/vdz
For information about creating a high availability cluster that uses SBD fencing, see Configuring a high availability cluster with SBD node fencing.
Additional resources
-
/usr/share/ansible/roles/rhel-system-roles.ha_cluster/README.mdfile -
/usr/share/doc/rhel-system-roles/ha_cluster/directory
11.3. Creating pcsd TLS certificates and key files for a high availability cluster
(RHEL 8.8 and later)
You can use the ha_cluster system role to create TLS certificates and key files in a high availability cluster. When you run this playbook, the ha_cluster system role uses the certificate system role internally to manage TLS certificates.
The ha_cluster system role replaces any existing cluster configuration on the specified nodes. Any settings not specified in the role will be lost.
Prerequisites
- You have prepared the control node and the managed nodes.
- You are logged in to the control node as a user who can run playbooks on the managed nodes.
-
The account you use to connect to the managed nodes has
sudopermissions on them. - The systems that you will use as your cluster members have active subscription coverage for RHEL and the RHEL High Availability Add-On.
- The inventory file specifies the cluster nodes as described in Specifying an inventory for the ha_cluster system role.
Procedure
Create a playbook file, for example
~/playbook.yml, with the following content:--- - name: Create TLS certificates and key files in a high availability cluster hosts: node1 node2 roles: - rhel-system-roles.ha_cluster vars: ha_cluster_cluster_name: my-new-cluster ha_cluster_hacluster_password: <password> ha_cluster_manage_firewall: true ha_cluster_manage_selinux: true ha_cluster_pcsd_certificates: - name: FILENAME common_name: "{{ ansible_hostname }}" ca: self-signThis playbook configures a cluster running the
firewalldandselinuxservices and creates a self-signedpcsdcertificate and private key files in/var/lib/pcsd. Thepcsdcertificate has the file nameFILENAME.crtand the key file is namedFILENAME.key.When creating your playbook file for production, vault encrypt the password, as described in Encrypting content with Ansible Vault.
Validate the playbook syntax:
$ ansible-playbook --syntax-check ~/playbook.ymlNote that this command only validates the syntax and does not protect against a wrong but valid configuration.
Run the playbook:
$ ansible-playbook ~/playbook.yml
Additional resources
-
/usr/share/ansible/roles/rhel-system-roles.ha_cluster/README.mdfile -
/usr/share/doc/rhel-system-roles/ha_cluster/directory Requesting certificates using RHEL system roles
11.4. Configuring a high availability cluster running no resources
The following procedure uses the ha_cluster system role, to create a high availability cluster with no fencing configured and which runs no resources.
The ha_cluster system role replaces any existing cluster configuration on the specified nodes. Any settings not specified in the role will be lost.
Prerequisites
- You have prepared the control node and the managed nodes.
- You are logged in to the control node as a user who can run playbooks on the managed nodes.
-
The account you use to connect to the managed nodes has
sudopermissions on them. - The systems that you will use as your cluster members have active subscription coverage for RHEL and the RHEL High Availability Add-On.
- The inventory file specifies the cluster nodes as described in Specifying an inventory for the ha_cluster system role.
Procedure
Create a playbook file, for example
~/playbook.yml, with the following content:--- - name: Create a high availability cluster with no fencing and which runs no resources hosts: node1 node2 roles: - rhel-system-roles.ha_cluster vars: ha_cluster_cluster_name: my-new-cluster ha_cluster_hacluster_password: <password> ha_cluster_manage_firewall: true ha_cluster_manage_selinux: trueThis example playbook file configures a cluster running the
firewalldandselinuxservices with no fencing configured and which runs no resources.When creating your playbook file for production, vault encrypt the password, as described in Encrypting content with Ansible Vault.
Validate the playbook syntax:
$ ansible-playbook --syntax-check ~/playbook.ymlNote that this command only validates the syntax and does not protect against a wrong but valid configuration.
Run the playbook:
$ ansible-playbook ~/playbook.yml
Additional resources
-
/usr/share/ansible/roles/rhel-system-roles.ha_cluster/README.mdfile -
/usr/share/doc/rhel-system-roles/ha_cluster/directory
11.5. Configuring a high availability cluster with fencing and resources
The following procedure uses the ha_cluster system role to create a high availability cluster that includes a fencing device, cluster resources, resource groups, and a cloned resource.
The ha_cluster system role replaces any existing cluster configuration on the specified nodes. Any settings not specified in the role will be lost.
Prerequisites
- You have prepared the control node and the managed nodes.
- You are logged in to the control node as a user who can run playbooks on the managed nodes.
-
The account you use to connect to the managed nodes has
sudopermissions on them. - The systems that you will use as your cluster members have active subscription coverage for RHEL and the RHEL High Availability Add-On.
- The inventory file specifies the cluster nodes as described in Specifying an inventory for the ha_cluster system role.
Procedure
Create a playbook file, for example
~/playbook.yml, with the following content:--- - name: Create a high availability cluster that includes a fencing device and resources hosts: node1 node2 roles: - rhel-system-roles.ha_cluster vars: ha_cluster_cluster_name: my-new-cluster ha_cluster_hacluster_password: <password> ha_cluster_manage_firewall: true ha_cluster_manage_selinux: true ha_cluster_resource_primitives: - id: xvm-fencing agent: 'stonith:fence_xvm' instance_attrs: - attrs: - name: pcmk_host_list value: node1 node2 - id: simple-resource agent: 'ocf:pacemaker:Dummy' - id: resource-with-options agent: 'ocf:pacemaker:Dummy' instance_attrs: - attrs: - name: fake value: fake-value - name: passwd value: passwd-value meta_attrs: - attrs: - name: target-role value: Started - name: is-managed value: 'true' operations: - action: start attrs: - name: timeout value: '30s' - action: monitor attrs: - name: timeout value: '5' - name: interval value: '1min' - id: dummy-1 agent: 'ocf:pacemaker:Dummy' - id: dummy-2 agent: 'ocf:pacemaker:Dummy' - id: dummy-3 agent: 'ocf:pacemaker:Dummy' - id: simple-clone agent: 'ocf:pacemaker:Dummy' - id: clone-with-options agent: 'ocf:pacemaker:Dummy' ha_cluster_resource_groups: - id: simple-group resource_ids: - dummy-1 - dummy-2 meta_attrs: - attrs: - name: target-role value: Started - name: is-managed value: 'true' - id: cloned-group resource_ids: - dummy-3 ha_cluster_resource_clones: - resource_id: simple-clone - resource_id: clone-with-options promotable: yes id: custom-clone-id meta_attrs: - attrs: - name: clone-max value: '2' - name: clone-node-max value: '1' - resource_id: cloned-group promotable: yesThis example playbook file configures a cluster running the
firewalldandselinuxservices. The cluster includes fencing, several resources, and a resource group. It also includes a resource clone for the resource group.When creating your playbook file for production, vault encrypt the password, as described in Encrypting content with Ansible Vault.
Validate the playbook syntax:
$ ansible-playbook --syntax-check ~/playbook.ymlNote that this command only validates the syntax and does not protect against a wrong but valid configuration.
Run the playbook:
$ ansible-playbook ~/playbook.yml
Additional resources
-
/usr/share/ansible/roles/rhel-system-roles.ha_cluster/README.mdfile -
/usr/share/doc/rhel-system-roles/ha_cluster/directory
11.6. Configuring a high availability cluster with resource and resource operation defaults
(RHEL 8.9 and later) The following procedure uses the ha_cluster system role to create a high availability cluster that defines resource and resource operation defaults.
The ha_cluster system role replaces any existing cluster configuration on the specified nodes. Any settings not specified in the role will be lost.
Prerequisites
- You have prepared the control node and the managed nodes.
- You are logged in to the control node as a user who can run playbooks on the managed nodes.
-
The account you use to connect to the managed nodes has
sudopermissions on them. - The systems that you will use as your cluster members have active subscription coverage for RHEL and the RHEL High Availability Add-On.
- The inventory file specifies the cluster nodes as described in Specifying an inventory for the ha_cluster system role.
Procedure
Create a playbook file, for example
~/playbook.yml, with the following content:--- - name: Create a high availability cluster that defines resource and resource operation defaults hosts: node1 node2 roles: - rhel-system-roles.ha_cluster vars: ha_cluster_cluster_name: my-new-cluster ha_cluster_hacluster_password: <password> ha_cluster_manage_firewall: true ha_cluster_manage_selinux: true # Set a differentresource-stickinessvalue during # and outside work hours. This allows resources to # automatically move back to their most # preferred hosts, but at a time that # does not interfere with business activities. ha_cluster_resource_defaults: meta_attrs: - id: core-hours rule: date-spec hours=9-16 weekdays=1-5 score: 2 attrs: - name: resource-stickiness value: INFINITY - id: after-hours score: 1 attrs: - name: resource-stickiness value: 0 # Default the timeout on all 10-second-interval # monitor actions on IPaddr2 resources to 8 seconds. ha_cluster_resource_operation_defaults: meta_attrs: - rule: resource ::IPaddr2 and op monitor interval=10s score: INFINITY attrs: - name: timeout value: 8sThis example playbook file configures a cluster running the
firewalldandselinuxservices. The cluster includes resource and resource operation defaults.When creating your playbook file for production, vault encrypt the password, as described in Encrypting content with Ansible Vault.
Validate the playbook syntax:
$ ansible-playbook --syntax-check ~/playbook.ymlNote that this command only validates the syntax and does not protect against a wrong but valid configuration.
Run the playbook:
$ ansible-playbook ~/playbook.yml
Additional resources
-
/usr/share/ansible/roles/rhel-system-roles.ha_cluster/README.mdfile -
/usr/share/doc/rhel-system-roles/ha_cluster/directory
11.7. Configuring a high availability cluster with fencing levels
(RHEL 8.10 and later) The following procedure uses the ha_cluster System Role to create a high availability cluster that defines fencing levels.
Prerequisites
You have
ansible-coreinstalled on the node from which you want to run the playbook.NoteYou do not need to have
ansible-coreinstalled on the cluster member nodes.-
You have the
rhel-system-rolespackage installed on the system from which you want to run the playbook. - The systems that you will use as your cluster members have active subscription coverage for RHEL and the RHEL High Availability Add-On.
The ha_cluster System Role replaces any existing cluster configuration on the specified nodes. Any settings not specified in the role will be lost.
Procedure
- Create an inventory file specifying the nodes in the cluster, as described in Specifying an inventory for the ha_cluster System Role.
Create a playbook file, for example
new-cluster.yml.NoteWhen creating your playbook file for production, vault encrypt the password, as described in Encrypting content with Ansible Vault.
The following example playbook file configures a cluster running the
firewalldandselinuxservices. The cluster includes resource and resource operation defaults.- hosts: node1 node2 vars: ha_cluster_cluster_name: my-new-cluster ha_cluster_hacluster_password: password ha_cluster_manage_firewall: true ha_cluster_manage_selinux: true ha_cluster_resource_primitives: - id: apc1 agent: 'stonith:fence_apc_snmp' instance_attrs: - attrs: - name: ip value: apc1.example.com - name: username value: user - name: password value: secret - name: pcmk_host_map value: node1:1;node2:2 - id: apc2 agent: 'stonith:fence_apc_snmp' instance_attrs: - attrs: - name: ip value: apc2.example.com - name: username value: user - name: password value: secret - name: pcmk_host_map value: node1:1;node2:2 # Nodes have redundant power supplies, apc1 and apc2. Cluster must # ensure that when attempting to reboot a node, both power supplies # are turned off before either power supply is turned back on. ha_cluster_stonith_levels: - level: 1 target: node1 resource_ids: - apc1 - apc2 - level: 1 target: node2 resource_ids: - apc1 - apc2 roles: - linux-system-roles.ha_cluster- Save the file.
Run the playbook, specifying the path to the inventory file inventory you created in Step 1.
# ansible-playbook -i inventory new-cluster.yml
11.8. Configuring a high availability cluster with resource constraints
The following procedure uses the ha_cluster system role to create a high availability cluster that includes resource location constraints, resource colocation constraints, resource order constraints, and resource ticket constraints.
The ha_cluster system role replaces any existing cluster configuration on the specified nodes. Any settings not specified in the role will be lost.
Prerequisites
- You have prepared the control node and the managed nodes.
- You are logged in to the control node as a user who can run playbooks on the managed nodes.
-
The account you use to connect to the managed nodes has
sudopermissions on them. - The systems that you will use as your cluster members have active subscription coverage for RHEL and the RHEL High Availability Add-On.
- The inventory file specifies the cluster nodes as described in Specifying an inventory for the ha_cluster system role.
Procedure
Create a playbook file, for example
~/playbook.yml, with the following content:--- - name: Create a high availability cluster with resource constraints hosts: node1 node2 roles: - rhel-system-roles.ha_cluster vars: ha_cluster_cluster_name: my-new-cluster ha_cluster_hacluster_password: <password> ha_cluster_manage_firewall: true ha_cluster_manage_selinux: true # In order to use constraints, we need resources the constraints will apply # to. ha_cluster_resource_primitives: - id: xvm-fencing agent: 'stonith:fence_xvm' instance_attrs: - attrs: - name: pcmk_host_list value: node1 node2 - id: dummy-1 agent: 'ocf:pacemaker:Dummy' - id: dummy-2 agent: 'ocf:pacemaker:Dummy' - id: dummy-3 agent: 'ocf:pacemaker:Dummy' - id: dummy-4 agent: 'ocf:pacemaker:Dummy' - id: dummy-5 agent: 'ocf:pacemaker:Dummy' - id: dummy-6 agent: 'ocf:pacemaker:Dummy' # location constraints ha_cluster_constraints_location: # resource ID and node name - resource: id: dummy-1 node: node1 options: - name: score value: 20 # resource pattern and node name - resource: pattern: dummy-\d+ node: node1 options: - name: score value: 10 # resource ID and rule - resource: id: dummy-2 rule: '#uname eq node2 and date in_range 2022-01-01 to 2022-02-28' # resource pattern and rule - resource: pattern: dummy-\d+ rule: node-type eq weekend and date-spec weekdays=6-7 # colocation constraints ha_cluster_constraints_colocation: # simple constraint - resource_leader: id: dummy-3 resource_follower: id: dummy-4 options: - name: score value: -5 # set constraint - resource_sets: - resource_ids: - dummy-1 - dummy-2 - resource_ids: - dummy-5 - dummy-6 options: - name: sequential value: "false" options: - name: score value: 20 # order constraints ha_cluster_constraints_order: # simple constraint - resource_first: id: dummy-1 resource_then: id: dummy-6 options: - name: symmetrical value: "false" # set constraint - resource_sets: - resource_ids: - dummy-1 - dummy-2 options: - name: require-all value: "false" - name: sequential value: "false" - resource_ids: - dummy-3 - resource_ids: - dummy-4 - dummy-5 options: - name: sequential value: "false" # ticket constraints ha_cluster_constraints_ticket: # simple constraint - resource: id: dummy-1 ticket: ticket1 options: - name: loss-policy value: stop # set constraint - resource_sets: - resource_ids: - dummy-3 - dummy-4 - dummy-5 ticket: ticket2 options: - name: loss-policy value: fenceThis example playbook file configures a cluster running the
firewalldandselinuxservices. The cluster includes resource location constraints, resource colocation constraints, resource order constraints, and resource ticket constraints.When creating your playbook file for production, vault encrypt the password, as described in Encrypting content with Ansible Vault.
Validate the playbook syntax:
$ ansible-playbook --syntax-check ~/playbook.ymlNote that this command only validates the syntax and does not protect against a wrong but valid configuration.
Run the playbook:
$ ansible-playbook ~/playbook.yml
Additional resources
-
/usr/share/ansible/roles/rhel-system-roles.ha_cluster/README.mdfile -
/usr/share/doc/rhel-system-roles/ha_cluster/directory
11.9. Configuring Corosync values in a high availability cluster
(RHEL 8.7 and later) The following procedure uses the ha_cluster system role to create a high availability cluster that configures Corosync values.
The ha_cluster system role replaces any existing cluster configuration on the specified nodes. Any settings not specified in the role will be lost.
Prerequisites
- You have prepared the control node and the managed nodes.
- You are logged in to the control node as a user who can run playbooks on the managed nodes.
-
The account you use to connect to the managed nodes has
sudopermissions on them. - The systems that you will use as your cluster members have active subscription coverage for RHEL and the RHEL High Availability Add-On.
- The inventory file specifies the cluster nodes as described in Specifying an inventory for the ha_cluster system role.
Procedure
Create a playbook file, for example
~/playbook.yml, with the following content:--- - name: Create a high availability cluster that configures Corosync values hosts: node1 node2 roles: - rhel-system-roles.ha_cluster vars: ha_cluster_cluster_name: my-new-cluster ha_cluster_hacluster_password: <password> ha_cluster_manage_firewall: true ha_cluster_manage_selinux: true ha_cluster_transport: type: knet options: - name: ip_version value: ipv4-6 - name: link_mode value: active links: - - name: linknumber value: 1 - name: link_priority value: 5 - - name: linknumber value: 0 - name: link_priority value: 10 compression: - name: level value: 5 - name: model value: zlib crypto: - name: cipher value: none - name: hash value: none ha_cluster_totem: options: - name: block_unlisted_ips value: 'yes' - name: send_join value: 0 ha_cluster_quorum: options: - name: auto_tie_breaker value: 1 - name: wait_for_all value: 1This example playbook file configures a cluster running the
firewalldandselinuxservices that configures Corosync properties.When creating your playbook file for production, Vault encrypt the password, as described in Encrypting content with Ansible Vault.
Validate the playbook syntax:
$ ansible-playbook --syntax-check ~/playbook.ymlNote that this command only validates the syntax and does not protect against a wrong but valid configuration.
Run the playbook:
$ ansible-playbook ~/playbook.yml
Additional resources
-
/usr/share/ansible/roles/rhel-system-roles.ha_cluster/README.mdfile -
/usr/share/doc/rhel-system-roles/ha_cluster/directory
11.10. Configuring a high availability cluster with SBD node fencing
(RHEL 8.7 and later) The following procedure uses the ha_cluster system role to create a high availability cluster that uses SBD node fencing.
The ha_cluster system role replaces any existing cluster configuration on the specified nodes. Any settings not specified in the role will be lost.
This playbook uses an inventory file that loads a watchdog module (supported in RHEL 8.9 and later) as described in Configuring watchdog and SBD devices in an inventory.
Prerequisites
- You have prepared the control node and the managed nodes.
- You are logged in to the control node as a user who can run playbooks on the managed nodes.
-
The account you use to connect to the managed nodes has
sudopermissions on them. - The systems that you will use as your cluster members have active subscription coverage for RHEL and the RHEL High Availability Add-On.
- The inventory file specifies the cluster nodes as described in Specifying an inventory for the ha_cluster system role.
Procedure
Create a playbook file, for example
~/playbook.yml, with the following content:--- - name: Create a high availability cluster that uses SBD node fencing hosts: node1 node2 roles: - rhel-system-roles.ha_cluster vars: ha_cluster_cluster_name: my-new-cluster ha_cluster_hacluster_password: <password> ha_cluster_manage_firewall: true ha_cluster_manage_selinux: true ha_cluster_sbd_enabled: yes ha_cluster_sbd_options: - name: delay-start value: 'no' - name: startmode value: always - name: timeout-action value: 'flush,reboot' - name: watchdog-timeout value: 30 # Suggested optimal values for SBD timeouts: # watchdog-timeout * 2 = msgwait-timeout (set automatically) # msgwait-timeout * 1.2 = stonith-timeout ha_cluster_cluster_properties: - attrs: - name: stonith-timeout value: 72 ha_cluster_resource_primitives: - id: fence_sbd agent: 'stonith:fence_sbd' instance_attrs: - attrs: # taken from host_vars - name: devices value: "{{ ha_cluster.sbd_devices | join(',') }}" - name: pcmk_delay_base value: 30This example playbook file configures a cluster running the
firewalldandselinuxservices that uses SBD fencing and creates the SBD Stonith resource.When creating your playbook file for production, vault encrypt the password, as described in Encrypting content with Ansible Vault.
Validate the playbook syntax:
$ ansible-playbook --syntax-check ~/playbook.ymlNote that this command only validates the syntax and does not protect against a wrong but valid configuration.
Run the playbook:
$ ansible-playbook ~/playbook.yml
Additional resources
-
/usr/share/ansible/roles/rhel-system-roles.ha_cluster/README.mdfile -
/usr/share/doc/rhel-system-roles/ha_cluster/directory
11.11. Configuring a high availability cluster using a quorum device
(RHEL 8.8 and later) To configure a high availability cluster with a separate quorum device by using the ha_cluster System Role, first set up the quorum device. After setting up the quorum device, you can use the device in any number of clusters.
11.11.1. Configuring a quorum device
To configure a quorum device using the ha_cluster system role, follow these steps. Note that you cannot run a quorum device on a cluster node.
The ha_cluster system role replaces any existing cluster configuration on the specified nodes. Any settings not specified in the role will be lost.
Prerequisites
- You have prepared the control node and the managed nodes.
- You are logged in to the control node as a user who can run playbooks on the managed nodes.
-
The account you use to connect to the managed nodes has
sudopermissions on them. - The system that you will use to run the quorum device has active subscription coverage for RHEL and the RHEL High Availability Add-On.
- The inventory file specifies the quorum devices as described in Specifying an inventory for the ha_cluster system role.
Procedure
Create a playbook file, for example
~/playbook.yml, with the following content:--- - name: Configure a quorum device hosts: nodeQ roles: - rhel-system-roles.ha_cluster vars: ha_cluster_cluster_present: false ha_cluster_hacluster_password: <password> ha_cluster_manage_firewall: true ha_cluster_manage_selinux: true ha_cluster_qnetd: present: trueThis example playbook file configures a quorum device on a system running the
firewalldandselinuxservices.When creating your playbook file for production, vault encrypt the password, as described in Encrypting content with Ansible Vault.
Validate the playbook syntax:
$ ansible-playbook --syntax-check ~/playbook.ymlNote that this command only validates the syntax and does not protect against a wrong but valid configuration.
Run the playbook:
$ ansible-playbook ~/playbook.yml
Additional resources
-
/usr/share/ansible/roles/rhel-system-roles.ha_cluster/README.mdfile -
/usr/share/doc/rhel-system-roles/ha_cluster/directory
11.11.2. Configuring a cluster to use a quorum device
To configure a cluster to use a quorum device, follow these steps.
The ha_cluster system role replaces any existing cluster configuration on the specified nodes. Any settings not specified in the role will be lost.
Prerequisites
- You have prepared the control node and the managed nodes.
- You are logged in to the control node as a user who can run playbooks on the managed nodes.
-
The account you use to connect to the managed nodes has
sudopermissions on them. - The systems that you will use as your cluster members have active subscription coverage for RHEL and the RHEL High Availability Add-On.
- The inventory file specifies the cluster nodes as described in Specifying an inventory for the ha_cluster system role.
- You have configured a quorum device.
Procedure
Create a playbook file, for example
~/playbook.yml, with the following content:--- - name: Configure a cluster to use a quorum device hosts: node1 node2 roles: - rhel-system-roles.ha_cluster vars: ha_cluster_cluster_name: my-new-cluster ha_cluster_hacluster_password: <password> ha_cluster_manage_firewall: true ha_cluster_manage_selinux: true ha_cluster_quorum: device: model: net model_options: - name: host value: nodeQ - name: algorithm value: lmsThis example playbook file configures a cluster running the
firewalldandselinuxservices that uses a quorum device.When creating your playbook file for production, vault encrypt the password, as described in Encrypting content with Ansible Vault.
Validate the playbook syntax:
$ ansible-playbook --syntax-check ~/playbook.ymlNote that this command only validates the syntax and does not protect against a wrong but valid configuration.
Run the playbook:
$ ansible-playbook ~/playbook.yml
Additional resources
-
/usr/share/ansible/roles/rhel-system-roles.ha_cluster/README.mdfile -
/usr/share/doc/rhel-system-roles/ha_cluster/directory
11.12. Configuring a high availability cluster with node attributes
(RHEL 8.10 and later) The following procedure uses the ha_cluster System Role to create a high availability cluster that configures node attributes.
Prerequisites
You have
ansible-coreinstalled on the node from which you want to run the playbook.NoteYou do not need to have
ansible-coreinstalled on the cluster member nodes.-
You have the
rhel-system-rolespackage installed on the system from which you want to run the playbook. - The systems that you will use as your cluster members have active subscription coverage for RHEL and the RHEL High Availability Add-On.
The ha_cluster System Role replaces any existing cluster configuration on the specified nodes. Any settings not specified in the role will be lost.
Procedure
- Create an inventory file specifying the nodes in the cluster, as described in Specifying an inventory for the ha_cluster System Role.
Create a playbook file, for example
new-cluster.yml.NoteWhen creating your playbook file for production, vault encrypt the password, as described in Encrypting content with Ansible Vault.
The following example playbook file configures a cluster running the
firewalldandselinuxservices with node attributes configured for the nodes in the cluster.- hosts: node1 node2 vars: ha_cluster_cluster_name: my-new-cluster ha_cluster_hacluster_password: password ha_cluster_manage_firewall: true ha_cluster_manage_selinux: true ha_cluster_node_options: - node_name: node1 attributes: - attrs: - name: attribute1 value: value1A - name: attribute2 value: value2A - node_name: node2 attributes: - attrs: - name: attribute1 value: value1B - name: attribute2 value: value2B roles: - linux-system-roles.ha_cluster- Save the file.
Run the playbook, specifying the path to the inventory file inventory you created in Step 1.
# ansible-playbook -i inventory new-cluster.yml
11.13. Configuring an Apache HTTP server in a high availability cluster with the ha_cluster RHEL system role
This procedure configures an active/passive Apache HTTP server in a two-node Red Hat Enterprise Linux High Availability Add-On cluster using the ha_cluster system role.
The ha_cluster system role replaces any existing cluster configuration on the specified nodes. Any settings not specified in the role will be lost.
Prerequisites
- You have prepared the control node and the managed nodes.
- You are logged in to the control node as a user who can run playbooks on the managed nodes.
-
The account you use to connect to the managed nodes has
sudopermissions on them. - The systems that you will use as your cluster members have active subscription coverage for RHEL and the RHEL High Availability Add-On.
- The inventory file specifies the cluster nodes as described in Specifying an inventory for the ha_cluster system role.
- You have configured an LVM logical volume with an XFS file system, as described in Configuring an LVM volume with an XFS file system in a Pacemaker cluster.
- You have configured an Apache HTTP server, as described in Configuring an Apache HTTP Server.
- Your system includes an APC power switch that will be used to fence the cluster nodes.
Procedure
Create a playbook file, for example
~/playbook.yml, with the following content:--- - name: Configure active/passive Apache server in a high availability cluster hosts: z1.example.com z2.example.com roles: - rhel-system-roles.ha_cluster vars: ha_cluster_hacluster_password: <password> ha_cluster_cluster_name: my_cluster ha_cluster_manage_firewall: true ha_cluster_manage_selinux: true ha_cluster_fence_agent_packages: - fence-agents-apc-snmp ha_cluster_resource_primitives: - id: myapc agent: stonith:fence_apc_snmp instance_attrs: - attrs: - name: ipaddr value: zapc.example.com - name: pcmk_host_map value: z1.example.com:1;z2.example.com:2 - name: login value: apc - name: passwd value: apc - id: my_lvm agent: ocf:heartbeat:LVM-activate instance_attrs: - attrs: - name: vgname value: my_vg - name: vg_access_mode value: system_id - id: my_fs agent: Filesystem instance_attrs: - attrs: - name: device value: /dev/my_vg/my_lv - name: directory value: /var/www - name: fstype value: xfs - id: VirtualIP agent: IPaddr2 instance_attrs: - attrs: - name: ip value: 198.51.100.3 - name: cidr_netmask value: 24 - id: Website agent: apache instance_attrs: - attrs: - name: configfile value: /etc/httpd/conf/httpd.conf - name: statusurl value: http://127.0.0.1/server-status ha_cluster_resource_groups: - id: apachegroup resource_ids: - my_lvm - my_fs - VirtualIP - WebsiteThis example playbook file configures a previously-created Apache HTTP server in an active/passive two-node HA cluster running the
firewalldandselinuxservices.This example uses an APC power switch with a host name of
zapc.example.com. If the cluster does not use any other fence agents, you can optionally list only the fence agents your cluster requires when defining theha_cluster_fence_agent_packagesvariable, as in this example.When creating your playbook file for production, vault encrypt the password, as described in Encrypting content with Ansible Vault.
Validate the playbook syntax:
$ ansible-playbook --syntax-check ~/playbook.ymlNote that this command only validates the syntax and does not protect against a wrong but valid configuration.
Run the playbook:
$ ansible-playbook ~/playbook.ymlWhen you use the
apacheresource agent to manage Apache, it does not usesystemd. Because of this, you must edit thelogrotatescript supplied with Apache so that it does not usesystemctlto reload Apache.Remove the following line in the
/etc/logrotate.d/httpdfile on each node in the cluster.# /bin/systemctl reload httpd.service > /dev/null 2>/dev/null || true
For RHEL 8.6 and later, replace the line you removed with the following three lines, specifying
/var/run/httpd-website.pidas the PID file path where website is the name of the Apache resource. In this example, the Apache resource name isWebsite./usr/bin/test -f /var/run/httpd-Website.pid >/dev/null 2>/dev/null && /usr/bin/ps -q $(/usr/bin/cat /var/run/httpd-Website.pid) >/dev/null 2>/dev/null && /usr/sbin/httpd -f /etc/httpd/conf/httpd.conf -c "PidFile /var/run/httpd-Website.pid" -k graceful > /dev/null 2>/dev/null || true
For RHEL 8.5 and earlier, replace the line you removed with the following three lines.
/usr/bin/test -f /run/httpd.pid >/dev/null 2>/dev/null &&
/usr/bin/ps -q $(/usr/bin/cat /run/httpd.pid) >/dev/null 2>/dev/null &&
/usr/sbin/httpd -f /etc/httpd/conf/httpd.conf -c "PidFile /run/httpd.pid" -k graceful > /dev/null 2>/dev/null || true
Verification
From one of the nodes in the cluster, check the status of the cluster. Note that all four resources are running on the same node,
z1.example.com.If you find that the resources you configured are not running, you can run the
pcs resource debug-start resourcecommand to test the resource configuration.[root@z1 ~]# pcs status Cluster name: my_cluster Last updated: Wed Jul 31 16:38:51 2013 Last change: Wed Jul 31 16:42:14 2013 via crm_attribute on z1.example.com Stack: corosync Current DC: z2.example.com (2) - partition with quorum Version: 1.1.10-5.el7-9abe687 2 Nodes configured 6 Resources configured Online: [ z1.example.com z2.example.com ] Full list of resources: myapc (stonith:fence_apc_snmp): Started z1.example.com Resource Group: apachegroup my_lvm (ocf::heartbeat:LVM-activate): Started z1.example.com my_fs (ocf::heartbeat:Filesystem): Started z1.example.com VirtualIP (ocf::heartbeat:IPaddr2): Started z1.example.com Website (ocf::heartbeat:apache): Started z1.example.comOnce the cluster is up and running, you can point a browser to the IP address you defined as the
IPaddr2resource to view the sample display, consisting of the simple word "Hello".Hello
To test whether the resource group running on
z1.example.comfails over to nodez2.example.com, put nodez1.example.cominstandbymode, after which the node will no longer be able to host resources.[root@z1 ~]# pcs node standby z1.example.comAfter putting node
z1instandbymode, check the cluster status from one of the nodes in the cluster. Note that the resources should now all be running onz2.[root@z1 ~]# pcs status Cluster name: my_cluster Last updated: Wed Jul 31 17:16:17 2013 Last change: Wed Jul 31 17:18:34 2013 via crm_attribute on z1.example.com Stack: corosync Current DC: z2.example.com (2) - partition with quorum Version: 1.1.10-5.el7-9abe687 2 Nodes configured 6 Resources configured Node z1.example.com (1): standby Online: [ z2.example.com ] Full list of resources: myapc (stonith:fence_apc_snmp): Started z1.example.com Resource Group: apachegroup my_lvm (ocf::heartbeat:LVM-activate): Started z2.example.com my_fs (ocf::heartbeat:Filesystem): Started z2.example.com VirtualIP (ocf::heartbeat:IPaddr2): Started z2.example.com Website (ocf::heartbeat:apache): Started z2.example.comThe web site at the defined IP address should still display, without interruption.
To remove
z1fromstandbymode, enter the following command.[root@z1 ~]# pcs node unstandby z1.example.comNoteRemoving a node from
standbymode does not in itself cause the resources to fail back over to that node. This will depend on theresource-stickinessvalue for the resources. For information about theresource-stickinessmeta attribute, see Configuring a resource to prefer its current node.
Additional resources
-
/usr/share/ansible/roles/rhel-system-roles.ha_cluster/README.mdfile -
/usr/share/doc/rhel-system-roles/ha_cluster/directory
Chapter 12. Configuring the systemd journal by using the RHEL system role
With the journald RHEL system role you can automate the systemd journal, and configure persistent logging by using the Red Hat Ansible Automation Platform.
12.1. Configuring persistent logging by using the journald RHEL system role
As a system administrator, you can configure persistent logging by using the journald RHEL system role. The following example shows how to set up the journald RHEL system role variables in a playbook to achieve the following goals:
- Configuring persistent logging
- Specifying the maximum size of disk space for journal files
-
Configuring
journaldto keep log data separate for each user - Defining the synchronization interval
Prerequisites
- You have prepared the control node and the managed nodes.
- You are logged in to the control node as a user who can run playbooks on the managed nodes.
-
The account you use to connect to the managed nodes has
sudopermissions on them.
Procedure
Create a playbook file, for example
~/playbook.yml, with the following content:--- - name: Configure persistent logging hosts: managed-node-01.example.com vars: journald_persistent: true journald_max_disk_size: 2048 journald_per_user: true journald_sync_interval: 1 roles: - rhel-system-roles.journaldAs a result, the
journaldservice stores your logs persistently on a disk to the maximum size of 2048 MB, and keeps log data separate for each user. The synchronization happens every minute.Validate the playbook syntax:
$ ansible-playbook --syntax-check ~/playbook.ymlNote that this command only validates the syntax and does not protect against a wrong but valid configuration.
Run the playbook:
$ ansible-playbook ~/playbook.yml
Additional resources
-
/usr/share/ansible/roles/rhel-system-roles.journald/README.mdfile -
/usr/share/doc/rhel-system-roles/journald/directory
Chapter 13. Configuring automatic crash dumps by using the RHEL system role
To manage kdump using Ansible, you can use the kdump role, which is one of the RHEL system roles available in RHEL 8.
Using the kdump role enables you to specify where to save the contents of the system’s memory for later analysis.
13.1. Configuring the kernel crash dumping mechanism by using the kdump RHEL system role
You can set basic kernel dump parameters on multiple systems by using the kdump system role by running an Ansible playbook.
The kdump Systeme Role replaces the kdump configuration of the managed hosts entirely by replacing the /etc/kdump.conf file. Additionally, if the kdump role is applied, all previous kdump settings are also replaced, even if they are not specified by the role variables, by replacing the /etc/sysconfig/kdump file.
Prerequisites
- You have prepared the control node and the managed nodes.
- You are logged in to the control node as a user who can run playbooks on the managed nodes.
-
The account you use to connect to the managed nodes has
sudopermissions on them.
Procedure
Create a playbook file, for example
~/playbook.yml, with the following content:--- - hosts: managed-node-01.example.com roles: - rhel-system-roles.kdump vars: kdump_path: /var/crashValidate the playbook syntax:
$ ansible-playbook --syntax-check ~/playbook.ymlNote that this command only validates the syntax and does not protect against a wrong but valid configuration.
Run the playbook:
$ ansible-playbook ~/playbook.yml
Additional resources
-
/usr/share/ansible/roles/rhel-system-roles.kdump/README.mdfile -
/usr/share/doc/rhel-system-roles/kdump/directory
Chapter 14. Configuring kernel parameters permanently by using the RHEL system role
You can use the kernel_settings RHEL system role to configure kernel parameters on multiple clients at once. This solution:
- Provides a friendly interface with efficient input setting.
- Keeps all intended kernel parameters in one place.
After you run the kernel_settings role from the control machine, the kernel parameters are applied to the managed systems immediately and persist across reboots.
Note that RHEL system role delivered over RHEL channels are available to RHEL customers as an RPM package in the default AppStream repository. RHEL system role are also available as a collection to customers with Ansible subscriptions over Ansible Automation Hub.
14.1. Introduction to the kernel_settings RHEL system role
RHEL system roles is a set of roles that provide a consistent configuration interface to remotely manage multiple systems.
RHEL system roles were introduced for automated configurations of the kernel using the kernel_settings RHEL system role. The rhel-system-roles package contains this system role, and also the reference documentation.
To apply the kernel parameters on one or more systems in an automated fashion, use the kernel_settings role with one or more of its role variables of your choice in a playbook. A playbook is a list of one or more plays that are human-readable, and are written in the YAML format.
You can use an inventory file to define a set of systems that you want Ansible to configure according to the playbook.
With the kernel_settings role you can configure:
-
The kernel parameters using the
kernel_settings_sysctlrole variable -
Various kernel subsystems, hardware devices, and device drivers using the
kernel_settings_sysfsrole variable -
The CPU affinity for the
systemdservice manager and processes it forks using thekernel_settings_systemd_cpu_affinityrole variable -
The kernel memory subsystem transparent hugepages using the
kernel_settings_transparent_hugepagesandkernel_settings_transparent_hugepages_defragrole variables
Additional resources
-
/usr/share/ansible/roles/rhel-system-roles.kernel_settings/README.mdfile -
/usr/share/doc/rhel-system-roles/kernel_settings/directory - Working with playbooks
- How to build your inventory
14.2. Applying selected kernel parameters by using the kernel_settings RHEL system role
Follow these steps to prepare and apply an Ansible playbook to remotely configure kernel parameters with persisting effect on multiple managed operating systems.
Prerequisites
- You have prepared the control node and the managed nodes.
- You are logged in to the control node as a user who can run playbooks on the managed nodes.
-
The account you use to connect to the managed nodes has
sudopermissions on them.
Procedure
Create a playbook file, for example
~/playbook.yml, with the following content:--- - name: Configure kernel settings hosts: managed-node-01.example.com roles: - rhel-system-roles.kernel_settings vars: kernel_settings_sysctl: - name: fs.file-max value: 400000 - name: kernel.threads-max value: 65536 kernel_settings_sysfs: - name: /sys/class/net/lo/mtu value: 65000 kernel_settings_transparent_hugepages: madvise-
name: optional key which associates an arbitrary string with the play as a label and identifies what the play is for. -
hosts: key in the play which specifies the hosts against which the play is run. The value or values for this key can be provided as individual names of managed hosts or as groups of hosts as defined in theinventoryfile. -
vars: section of the playbook which represents a list of variables containing selected kernel parameter names and values to which they have to be set. role: key which specifies what RHEL system role is going to configure the parameters and values mentioned in thevarssection.NoteYou can modify the kernel parameters and their values in the playbook to fit your needs.
-
Validate the playbook syntax:
$ ansible-playbook --syntax-check ~/playbook.ymlNote that this command only validates the syntax and does not protect against a wrong but valid configuration.
Run the playbook:
$ ansible-playbook ~/playbook.yml- Restart your managed hosts and check the affected kernel parameters to verify that the changes have been applied and persist across reboots.
Additional resources
-
/usr/share/ansible/roles/rhel-system-roles.kernel_settings/README.mdfile -
/usr/share/doc/rhel-system-roles/kernel_settings/directory - Working With Playbooks
- Using Variables
- Roles
Chapter 15. Configuring logging by using the RHEL system role
As a system administrator, you can use the logging RHEL system role to configure a Red Hat Enterprise Linux host as a logging server to collect logs from many client systems.
15.1. The logging RHEL system role
With the logging RHEL system role, you can deploy logging configurations on local and remote hosts.
Logging solutions provide multiple ways of reading logs and multiple logging outputs.
For example, a logging system can receive the following inputs:
- Local files
-
systemd/journal - Another logging system over the network
In addition, a logging system can have the following outputs:
-
Logs stored in the local files in the
/var/logdirectory - Logs sent to Elasticsearch
- Logs forwarded to another logging system
With the logging RHEL system role, you can combine the inputs and outputs to fit your scenario. For example, you can configure a logging solution that stores inputs from journal in a local file, whereas inputs read from files are both forwarded to another logging system and stored in the local log files.
Additional resources
-
/usr/share/ansible/roles/rhel-system-roles.logging/README.mdfile -
/usr/share/doc/rhel-system-roles/logging/directory - RHEL system roles
15.2. Applying a local logging RHEL system role
Prepare and apply an Ansible playbook to configure a logging solution on a set of separate machines. Each machine records logs locally.
Prerequisites
- You have prepared the control node and the managed nodes.
- You are logged in to the control node as a user who can run playbooks on the managed nodes.
-
The account you use to connect to the managed nodes has
sudopermissions on them.
You do not have to have the rsyslog package installed, because the RHEL system role installs rsyslog when deployed.
Procedure
Create a playbook file, for example
~/playbook.yml, with the following content:--- - name: Deploying basics input and implicit files output hosts: managed-node-01.example.com roles: - rhel-system-roles.logging vars: logging_inputs: - name: system_input type: basics logging_outputs: - name: files_output type: files logging_flows: - name: flow1 inputs: [system_input] outputs: [files_output]Validate the playbook syntax:
$ ansible-playbook --syntax-check ~/playbook.ymlNote that this command only validates the syntax and does not protect against a wrong but valid configuration.
Run the playbook:
$ ansible-playbook ~/playbook.yml
Verification
Test the syntax of the
/etc/rsyslog.conffile:# rsyslogd -N 1 rsyslogd: version 8.1911.0-6.el8, config validation run... rsyslogd: End of config validation run. Bye.Verify that the system sends messages to the log:
Send a test message:
# logger testView the
/var/log/messageslog, for example:# cat /var/log/messages Aug 5 13:48:31 <hostname> root[6778]: test
Where
<hostname>is the host name of the client system. Note that the log contains the user name of the user that entered the logger command, in this caseroot.
Additional resources
-
/usr/share/ansible/roles/rhel-system-roles.logging/README.mdfile -
/usr/share/doc/rhel-system-roles/logging/directory
15.3. Filtering logs in a local logging RHEL system role
You can deploy a logging solution which filters the logs based on the rsyslog property-based filter.
Prerequisites
- You have prepared the control node and the managed nodes.
- You are logged in to the control node as a user who can run playbooks on the managed nodes.
-
The account you use to connect to the managed nodes has
sudopermissions on them.
You do not have to have the rsyslog package installed, because the RHEL system role installs rsyslog when deployed.
Procedure
Create a playbook file, for example
~/playbook.yml, with the following content:--- - name: Deploying files input and configured files output hosts: managed-node-01.example.com roles: - rhel-system-roles.logging vars: logging_inputs: - name: files_input type: basics logging_outputs: - name: files_output0 type: files property: msg property_op: contains property_value: error path: /var/log/errors.log - name: files_output1 type: files property: msg property_op: "!contains" property_value: error path: /var/log/others.log logging_flows: - name: flow0 inputs: [files_input] outputs: [files_output0, files_output1]Using this configuration, all messages that contain the
errorstring are logged in/var/log/errors.log, and all other messages are logged in/var/log/others.log.You can replace the
errorproperty value with the string by which you want to filter.You can modify the variables according to your preferences.
Validate the playbook syntax:
$ ansible-playbook --syntax-check ~/playbook.ymlNote that this command only validates the syntax and does not protect against a wrong but valid configuration.
Run the playbook:
$ ansible-playbook ~/playbook.yml
Verification
Test the syntax of the
/etc/rsyslog.conffile:# rsyslogd -N 1 rsyslogd: version 8.1911.0-6.el8, config validation run... rsyslogd: End of config validation run. Bye.Verify that the system sends messages that contain the
errorstring to the log:Send a test message:
# logger errorView the
/var/log/errors.loglog, for example:# cat /var/log/errors.log Aug 5 13:48:31 hostname root[6778]: error
Where
hostnameis the host name of the client system. Note that the log contains the user name of the user that entered the logger command, in this caseroot.
Additional resources
-
/usr/share/ansible/roles/rhel-system-roles.logging/README.mdfile -
/usr/share/doc/rhel-system-roles/logging/directory
15.4. Applying a remote logging solution by using the logging RHEL system role
Follow these steps to prepare and apply a Red Hat Ansible Core playbook to configure a remote logging solution. In this playbook, one or more clients take logs from systemd-journal and forward them to a remote server. The server receives remote input from remote_rsyslog and remote_files and outputs the logs to local files in directories named by remote host names.
Prerequisites
- You have prepared the control node and the managed nodes.
- You are logged in to the control node as a user who can run playbooks on the managed nodes.
-
The account you use to connect to the managed nodes has
sudopermissions on them.
You do not have to have the rsyslog package installed, because the RHEL system role installs rsyslog when deployed.
Procedure
Create a playbook file, for example
~/playbook.yml, with the following content:--- - name: Deploying remote input and remote_files output hosts: managed-node-01.example.com roles: - rhel-system-roles.logging vars: logging_inputs: - name: remote_udp_input type: remote udp_ports: [ 601 ] - name: remote_tcp_input type: remote tcp_ports: [ 601 ] logging_outputs: - name: remote_files_output type: remote_files logging_flows: - name: flow_0 inputs: [remote_udp_input, remote_tcp_input] outputs: [remote_files_output] - name: Deploying basics input and forwards output hosts: managed-node-02.example.com roles: - rhel-system-roles.logging vars: logging_inputs: - name: basic_input type: basics logging_outputs: - name: forward_output0 type: forwards severity: info target: <host1.example.com> udp_port: 601 - name: forward_output1 type: forwards facility: mail target: <host1.example.com> tcp_port: 601 logging_flows: - name: flows0 inputs: [basic_input] outputs: [forward_output0, forward_output1] [basic_input] [forward_output0, forward_output1]Where
<host1.example.com>is the logging server.NoteYou can modify the parameters in the playbook to fit your needs.
WarningThe logging solution works only with the ports defined in the SELinux policy of the server or client system and open in the firewall. The default SELinux policy includes ports 601, 514, 6514, 10514, and 20514. To use a different port, modify the SELinux policy on the client and server systems.
Validate the playbook syntax:
$ ansible-playbook --syntax-check ~/playbook.ymlNote that this command only validates the syntax and does not protect against a wrong but valid configuration.
Run the playbook:
$ ansible-playbook ~/playbook.yml
Verification
On both the client and the server system, test the syntax of the
/etc/rsyslog.conffile:# rsyslogd -N 1 rsyslogd: version 8.1911.0-6.el8, config validation run (level 1), master config /etc/rsyslog.conf rsyslogd: End of config validation run. Bye.Verify that the client system sends messages to the server:
On the client system, send a test message:
# logger testOn the server system, view the
/var/log/<host2.example.com>/messageslog, for example:# cat /var/log/<host2.example.com>/messages Aug 5 13:48:31 <host2.example.com> root[6778]: test
Where
<host2.example.com>is the host name of the client system. Note that the log contains the user name of the user that entered the logger command, in this caseroot.
Additional resources
-
/usr/share/ansible/roles/rhel-system-roles.logging/README.mdfile -
/usr/share/doc/rhel-system-roles/logging/directory
15.5. Using the logging RHEL system role with TLS
Transport Layer Security (TLS) is a cryptographic protocol designed to allow secure communication over the computer network.
As an administrator, you can use the logging RHEL system role to configure a secure transfer of logs using Red Hat Ansible Automation Platform.
15.5.1. Configuring client logging with TLS
You can use an Ansible playbook with the logging RHEL system role to configure logging on RHEL clients and transfer logs to a remote logging system using TLS encryption.
This procedure creates a private key and certificate, and configures TLS on all hosts in the clients group in the Ansible inventory. The TLS protocol encrypts the message transmission for secure transfer of logs over the network.
You do not have to call the certificate RHEL system role in the playbook to create the certificate. The logging RHEL system role calls it automatically.
In order for the CA to be able to sign the created certificate, the managed nodes must be enrolled in an IdM domain.
Prerequisites
- You have prepared the control node and the managed nodes.
- You are logged in to the control node as a user who can run playbooks on the managed nodes.
-
The account you use to connect to the managed nodes has
sudopermissions on them. - The managed nodes are enrolled in an IdM domain.
Procedure
Create a playbook file, for example
~/playbook.yml, with the following content:--- - name: Deploying files input and forwards output with certs hosts: managed-node-01.example.com roles: - rhel-system-roles.logging vars: logging_certificates: - name: logging_cert dns: ['localhost', 'www.example.com'] ca: ipa logging_pki_files: - ca_cert: /local/path/to/ca_cert.pem cert: /local/path/to/logging_cert.pem private_key: /local/path/to/logging_cert.pem logging_inputs: - name: input_name type: files input_log_path: /var/log/containers/*.log logging_outputs: - name: output_name type: forwards target: your_target_host tcp_port: 514 tls: true pki_authmode: x509/name permitted_server: 'server.example.com' logging_flows: - name: flow_name inputs: [input_name] outputs: [output_name]The playbook uses the following parameters:
logging_certificates-
The value of this parameter is passed on to
certificate_requestsin thecertificateRHEL system role and used to create a private key and certificate. logging_pki_filesUsing this parameter, you can configure the paths and other settings that logging uses to find the CA, certificate, and key files used for TLS, specified with one or more of the following sub-parameters:
ca_cert,ca_cert_src,cert,cert_src,private_key,private_key_src, andtls.NoteIf you are using
logging_certificatesto create the files on the target node, do not useca_cert_src,cert_src, andprivate_key_src, which are used to copy files not created bylogging_certificates.ca_cert-
Represents the path to the CA certificate file on the target node. Default path is
/etc/pki/tls/certs/ca.pemand the file name is set by the user. cert-
Represents the path to the certificate file on the target node. Default path is
/etc/pki/tls/certs/server-cert.pemand the file name is set by the user. private_key-
Represents the path to the private key file on the target node. Default path is
/etc/pki/tls/private/server-key.pemand the file name is set by the user. ca_cert_src-
Represents the path to the CA certificate file on the control node which is copied to the target host to the location specified by
ca_cert. Do not use this if usinglogging_certificates. cert_src-
Represents the path to a certificate file on the control node which is copied to the target host to the location specified by
cert. Do not use this if usinglogging_certificates. private_key_src-
Represents the path to a private key file on the control node which is copied to the target host to the location specified by
private_key. Do not use this if usinglogging_certificates. tls-
Setting this parameter to
trueensures secure transfer of logs over the network. If you do not want a secure wrapper, you can settls: false.
Validate the playbook syntax:
$ ansible-playbook --syntax-check ~/playbook.ymlNote that this command only validates the syntax and does not protect against a wrong but valid configuration.
Run the playbook:
$ ansible-playbook ~/playbook.yml
Additional resources
-
/usr/share/ansible/roles/rhel-system-roles.logging/README.mdfile -
/usr/share/doc/rhel-system-roles/logging/directory - Requesting certificates using RHEL system roles.
15.5.2. Configuring server logging with TLS
You can use an Ansible playbook with the logging RHEL system role to configure logging on RHEL servers and set them to receive logs from a remote logging system using TLS encryption.
This procedure creates a private key and certificate, and configures TLS on all hosts in the server group in the Ansible inventory.
You do not have to call the certificate RHEL system role in the playbook to create the certificate. The logging RHEL system role calls it automatically.
In order for the CA to be able to sign the created certificate, the managed nodes must be enrolled in an IdM domain.
Prerequisites
- You have prepared the control node and the managed nodes.
- You are logged in to the control node as a user who can run playbooks on the managed nodes.
-
The account you use to connect to the managed nodes has
sudopermissions on them. - The managed nodes are enrolled in an IdM domain.
Procedure
Create a playbook file, for example
~/playbook.yml, with the following content:--- - name: Deploying remote input and remote_files output with certs hosts: managed-node-01.example.com roles: - rhel-system-roles.logging vars: logging_certificates: - name: logging_cert dns: ['localhost', 'www.example.com'] ca: ipa logging_pki_files: - ca_cert: /local/path/to/ca_cert.pem cert: /local/path/to/logging_cert.pem private_key: /local/path/to/logging_cert.pem logging_inputs: - name: input_name type: remote tcp_ports: 514 tls: true permitted_clients: ['clients.example.com'] logging_outputs: - name: output_name type: remote_files remote_log_path: /var/log/remote/%FROMHOST%/%PROGRAMNAME:::secpath-replace%.log async_writing: true client_count: 20 io_buffer_size: 8192 logging_flows: - name: flow_name inputs: [input_name] outputs: [output_name]The playbook uses the following parameters:
logging_certificates-
The value of this parameter is passed on to
certificate_requestsin thecertificateRHEL system role and used to create a private key and certificate. logging_pki_filesUsing this parameter, you can configure the paths and other settings that logging uses to find the CA, certificate, and key files used for TLS, specified with one or more of the following sub-parameters:
ca_cert,ca_cert_src,cert,cert_src,private_key,private_key_src, andtls.NoteIf you are using
logging_certificatesto create the files on the target node, do not useca_cert_src,cert_src, andprivate_key_src, which are used to copy files not created bylogging_certificates.ca_cert-
Represents the path to the CA certificate file on the target node. Default path is
/etc/pki/tls/certs/ca.pemand the file name is set by the user. cert-
Represents the path to the certificate file on the target node. Default path is
/etc/pki/tls/certs/server-cert.pemand the file name is set by the user. private_key-
Represents the path to the private key file on the target node. Default path is
/etc/pki/tls/private/server-key.pemand the file name is set by the user. ca_cert_src-
Represents the path to the CA certificate file on the control node which is copied to the target host to the location specified by
ca_cert. Do not use this if usinglogging_certificates. cert_src-
Represents the path to a certificate file on the control node which is copied to the target host to the location specified by
cert. Do not use this if usinglogging_certificates. private_key_src-
Represents the path to a private key file on the control node which is copied to the target host to the location specified by
private_key. Do not use this if usinglogging_certificates. tls-
Setting this parameter to
trueensures secure transfer of logs over the network. If you do not want a secure wrapper, you can settls: false.
Validate the playbook syntax:
$ ansible-playbook --syntax-check ~/playbook.ymlNote that this command only validates the syntax and does not protect against a wrong but valid configuration.
Run the playbook:
$ ansible-playbook ~/playbook.yml
Additional resources
-
/usr/share/ansible/roles/rhel-system-roles.logging/README.mdfile -
/usr/share/doc/rhel-system-roles/logging/directory - Requesting certificates using RHEL system roles.
15.6. Using the logging RHEL system roles with RELP
Reliable Event Logging Protocol (RELP) is a networking protocol for data and message logging over the TCP network. It ensures reliable delivery of event messages and you can use it in environments that do not tolerate any message loss.
The RELP sender transfers log entries in form of commands and the receiver acknowledges them once they are processed. To ensure consistency, RELP stores the transaction number to each transferred command for any kind of message recovery.
You can consider a remote logging system in between the RELP Client and RELP Server. The RELP Client transfers the logs to the remote logging system and the RELP Server receives all the logs sent by the remote logging system.
Administrators can use the logging RHEL system role to configure the logging system to reliably send and receive log entries.
15.6.1. Configuring client logging with RELP
You can use the logging RHEL system role to configure logging in RHEL systems that are logged on a local machine and can transfer logs to the remote logging system with RELP by running an Ansible playbook.
This procedure configures RELP on all hosts in the clients group in the Ansible inventory. The RELP configuration uses Transport Layer Security (TLS) to encrypt the message transmission for secure transfer of logs over the network.
Prerequisites
- You have prepared the control node and the managed nodes.
- You are logged in to the control node as a user who can run playbooks on the managed nodes.
-
The account you use to connect to the managed nodes has
sudopermissions on them.
Procedure
Create a playbook file, for example
~/playbook.yml, with the following content:--- - name: Deploying basic input and relp output hosts: managed-node-01.example.com roles: - rhel-system-roles.logging vars: logging_inputs: - name: basic_input type: basics logging_outputs: - name: relp_client type: relp target: logging.server.com port: 20514 tls: true ca_cert: /etc/pki/tls/certs/ca.pem cert: /etc/pki/tls/certs/client-cert.pem private_key: /etc/pki/tls/private/client-key.pem pki_authmode: name permitted_servers: - '*.server.example.com' logging_flows: - name: example_flow inputs: [basic_input] outputs: [relp_client]The playbook uses following settings:
target- This is a required parameter that specifies the host name where the remote logging system is running.
port- Port number the remote logging system is listening.
tlsEnsures secure transfer of logs over the network. If you do not want a secure wrapper you can set the
tlsvariable tofalse. By defaulttlsparameter is set to true while working with RELP and requires key/certificates and triplets {ca_cert,cert,private_key} and/or {ca_cert_src,cert_src,private_key_src}.-
If the {
ca_cert_src,cert_src,private_key_src} triplet is set, the default locations/etc/pki/tls/certsand/etc/pki/tls/privateare used as the destination on the managed node to transfer files from control node. In this case, the file names are identical to the original ones in the triplet -
If the {
ca_cert,cert,private_key} triplet is set, files are expected to be on the default path before the logging configuration. - If both triplets are set, files are transferred from local path from control node to specific path of the managed node.
-
If the {
ca_cert-
Represents the path to CA certificate. Default path is
/etc/pki/tls/certs/ca.pemand the file name is set by the user. cert-
Represents the path to certificate. Default path is
/etc/pki/tls/certs/server-cert.pemand the file name is set by the user. private_key-
Represents the path to private key. Default path is
/etc/pki/tls/private/server-key.pemand the file name is set by the user. ca_cert_src-
Represents local CA certificate file path which is copied to the target host. If
ca_certis specified, it is copied to the location. cert_src-
Represents the local certificate file path which is copied to the target host. If
certis specified, it is copied to the location. private_key_src-
Represents the local key file path which is copied to the target host. If
private_keyis specified, it is copied to the location. pki_authmode-
Accepts the authentication mode as
nameorfingerprint. permitted_servers- List of servers that will be allowed by the logging client to connect and send logs over TLS.
inputs- List of logging input dictionary.
outputs- List of logging output dictionary.
Validate the playbook syntax:
$ ansible-playbook --syntax-check ~/playbook.ymlNote that this command only validates the syntax and does not protect against a wrong but valid configuration.
Run the playbook:
$ ansible-playbook ~/playbook.yml
Additional resources
-
/usr/share/ansible/roles/rhel-system-roles.logging/README.mdfile -
/usr/share/doc/rhel-system-roles/logging/directory
15.6.2. Configuring server logging with RELP
You can use the logging RHEL system role to configure logging in RHEL systems as a server and can receive logs from the remote logging system with RELP by running an Ansible playbook.
This procedure configures RELP on all hosts in the server group in the Ansible inventory. The RELP configuration uses TLS to encrypt the message transmission for secure transfer of logs over the network.
Prerequisites
- You have prepared the control node and the managed nodes.
- You are logged in to the control node as a user who can run playbooks on the managed nodes.
-
The account you use to connect to the managed nodes has
sudopermissions on them.
Procedure
Create a playbook file, for example
~/playbook.yml, with the following content:--- - name: Deploying remote input and remote_files output hosts: managed-node-01.example.com roles: - rhel-system-roles.logging vars: logging_inputs: - name: relp_server type: relp port: 20514 tls: true ca_cert: /etc/pki/tls/certs/ca.pem cert: /etc/pki/tls/certs/server-cert.pem private_key: /etc/pki/tls/private/server-key.pem pki_authmode: name permitted_clients: - '*example.client.com' logging_outputs: - name: remote_files_output type: remote_files logging_flows: - name: example_flow inputs: relp_server outputs: remote_files_outputThe playbooks uses the following settings:
port- Port number the remote logging system is listening.
tlsEnsures secure transfer of logs over the network. If you do not want a secure wrapper you can set the
tlsvariable tofalse. By defaulttlsparameter is set to true while working with RELP and requires key/certificates and triplets {ca_cert,cert,private_key} and/or {ca_cert_src,cert_src,private_key_src}.-
If the {
ca_cert_src,cert_src,private_key_src} triplet is set, the default locations/etc/pki/tls/certsand/etc/pki/tls/privateare used as the destination on the managed node to transfer files from control node. In this case, the file names are identical to the original ones in the triplet -
If the {
ca_cert,cert,private_key} triplet is set, files are expected to be on the default path before the logging configuration. - If both triplets are set, files are transferred from local path from control node to specific path of the managed node.
-
If the {
ca_cert-
Represents the path to CA certificate. Default path is
/etc/pki/tls/certs/ca.pemand the file name is set by the user. cert-
Represents the path to the certificate. Default path is
/etc/pki/tls/certs/server-cert.pemand the file name is set by the user. private_key-
Represents the path to private key. Default path is
/etc/pki/tls/private/server-key.pemand the file name is set by the user. ca_cert_src-
Represents local CA certificate file path which is copied to the target host. If
ca_certis specified, it is copied to the location. cert_src-
Represents the local certificate file path which is copied to the target host. If
certis specified, it is copied to the location. private_key_src-
Represents the local key file path which is copied to the target host. If
private_keyis specified, it is copied to the location. pki_authmode-
Accepts the authentication mode as
nameorfingerprint. permitted_clients- List of clients that will be allowed by the logging server to connect and send logs over TLS.
inputs- List of logging input dictionary.
outputs- List of logging output dictionary.
Validate the playbook syntax:
$ ansible-playbook --syntax-check ~/playbook.ymlNote that this command only validates the syntax and does not protect against a wrong but valid configuration.
Run the playbook:
$ ansible-playbook ~/playbook.yml
Additional resources
-
/usr/share/ansible/roles/rhel-system-roles.logging/README.mdfile -
/usr/share/doc/rhel-system-roles/logging/directory
Chapter 16. Monitoring performance by using the RHEL system role
As a system administrator, you can use the metrics RHEL system role with any Ansible Automation Platform control node to monitor the performance of a system.
16.1. Introduction to the metrics RHEL system role
RHEL system roles is a collection of Ansible roles and modules that provide a consistent configuration interface to remotely manage multiple RHEL systems. The metrics system role configures performance analysis services for the local system and, optionally, includes a list of remote systems to be monitored by the local system. The metrics system role enables you to use pcp to monitor your systems performance without having to configure pcp separately, as the set-up and deployment of pcp is handled by the playbook.
Additional resources
-
/usr/share/ansible/roles/rhel-system-roles.metrics/README.mdfile -
/usr/share/doc/rhel-system-roles/metrics/directory
16.2. Using the metrics RHEL system role to monitor your local system with visualization
This procedure describes how to use the metrics RHEL system role to monitor your local system while simultaneously provisioning data visualization via Grafana.
Prerequisites
- You have prepared the control node and the managed nodes.
- You are logged in to the control node as a user who can run playbooks on the managed nodes.
-
The account you use to connect to the managed nodes has
sudopermissions on them. localhostis configured in the inventory file on the control node:localhost ansible_connection=local
Procedure
Create a playbook file, for example
~/playbook.yml, with the following content:--- - name: Manage metrics hosts: localhost roles: - rhel-system-roles.metrics vars: metrics_graph_service: yes metrics_manage_firewall: true metrics_manage_selinux: trueBecause the
metrics_graph_serviceboolean is set tovalue="yes",Grafanais automatically installed and provisioned withpcpadded as a data source. Becausemetrics_manage_firewallandmetrics_manage_selinuxare both set totrue, the metrics role uses thefirewallandselinuxsystem roles to manage the ports used by the metrics role.Validate the playbook syntax:
$ ansible-playbook --syntax-check ~/playbook.ymlNote that this command only validates the syntax and does not protect against a wrong but valid configuration.
Run the playbook:
$ ansible-playbook ~/playbook.yml
Verification
-
To view visualization of the metrics being collected on your machine, access the
grafanaweb interface as described in Accessing the Grafana web UI.
Additional resources
-
/usr/share/ansible/roles/rhel-system-roles.metrics/README.mdfile -
/usr/share/doc/rhel-system-roles/metrics/directory
16.3. Using the metrics RHEL system role to set up a fleet of individual systems to monitor themselves
This procedure describes how to use the metrics system role to set up a fleet of machines to monitor themselves.
Prerequisites
- You have prepared the control node and the managed nodes.
- You are logged in to the control node as a user who can run playbooks on the managed nodes.
-
The account you use to connect to the managed nodes has
sudopermissions on them.
Procedure
Create a playbook file, for example
~/playbook.yml, with the following content:--- - name: Configure a fleet of machines to monitor themselves hosts: managed-node-01.example.com roles: - rhel-system-roles.metrics vars: metrics_retention_days: 0 metrics_manage_firewall: true metrics_manage_selinux: trueBecause
metrics_manage_firewallandmetrics_manage_selinuxare both set totrue, the metrics role uses thefirewallandselinuxroles to manage the ports used by themetricsrole.Validate the playbook syntax:
$ ansible-playbook --syntax-check ~/playbook.ymlNote that this command only validates the syntax and does not protect against a wrong but valid configuration.
Run the playbook:
$ ansible-playbook ~/playbook.yml
Additional resources
-
/usr/share/ansible/roles/rhel-system-roles.metrics/README.mdfile -
/usr/share/doc/rhel-system-roles/metrics/directory
16.4. Using the metrics RHEL system role to monitor a fleet of machines centrally using your local machine
This procedure describes how to use the metrics system role to set up your local machine to centrally monitor a fleet of machines while also provisioning visualization of the data via grafana and querying of the data via redis.
Prerequisites
- You have prepared the control node and the managed nodes.
- You are logged in to the control node as a user who can run playbooks on the managed nodes.
-
The account you use to connect to the managed nodes has
sudopermissions on them. localhostis configured in the inventory file on the control node:localhost ansible_connection=local
Procedure
Create a playbook file, for example
~/playbook.yml, with the following content:- name: Set up your local machine to centrally monitor a fleet of machines hosts: localhost roles: - rhel-system-roles.metrics vars: metrics_graph_service: yes metrics_query_service: yes metrics_retention_days: 10 metrics_monitored_hosts: ["database.example.com", "webserver.example.com"] metrics_manage_firewall: yes metrics_manage_selinux: yesBecause the
metrics_graph_serviceandmetrics_query_servicebooleans are set tovalue="yes",grafanais automatically installed and provisioned withpcpadded as a data source with thepcpdata recording indexed intoredis, allowing thepcpquerying language to be used for complex querying of the data. Becausemetrics_manage_firewallandmetrics_manage_selinuxare both set totrue, themetricsrole uses thefirewallandselinuxroles to manage the ports used by themetricsrole.Validate the playbook syntax:
$ ansible-playbook --syntax-check ~/playbook.ymlNote that this command only validates the syntax and does not protect against a wrong but valid configuration.
Run the playbook:
$ ansible-playbook ~/playbook.yml
Verification
-
To view a graphical representation of the metrics being collected centrally by your machine and to query the data, access the
grafanaweb interface as described in Accessing the Grafana web UI.
Additional resources
-
/usr/share/ansible/roles/rhel-system-roles.metrics/README.mdfile -
/usr/share/doc/rhel-system-roles/metrics/directory
16.5. Setting up authentication while monitoring a system by using the metrics RHEL system role
PCP supports the scram-sha-256 authentication mechanism through the Simple Authentication Security Layer (SASL) framework. The metrics RHEL system role automates the steps to setup authentication by using the scram-sha-256 authentication mechanism. This procedure describes how to setup authentication by using the metrics RHEL system role.
Prerequisites
- You have prepared the control node and the managed nodes.
- You are logged in to the control node as a user who can run playbooks on the managed nodes.
-
The account you use to connect to the managed nodes has
sudopermissions on them.
Procedure
Edit an existing playbook file, for example
~/playbook.yml, and add the authentication-related variables:--- - name: Set up authentication by using the scram-sha-256 authentication mechanism hosts: managed-node-01.example.com roles: - rhel-system-roles.metrics vars: metrics_retention_days: 0 metrics_manage_firewall: true metrics_manage_selinux: true metrics_username: <username> metrics_password: <password>Validate the playbook syntax:
$ ansible-playbook --syntax-check ~/playbook.ymlNote that this command only validates the syntax and does not protect against a wrong but valid configuration.
Run the playbook:
$ ansible-playbook ~/playbook.yml
Verification
Verify the
saslconfiguration:# pminfo -f -h "pcp://managed-node-01.example.com?username=<username>" disk.dev.read Password: <password> disk.dev.read inst [0 or "sda"] value 19540
Additional resources
-
/usr/share/ansible/roles/rhel-system-roles.metrics/README.mdfile -
/usr/share/doc/rhel-system-roles/metrics/directory
16.6. Using the metrics RHEL system role to configure and enable metrics collection for SQL Server
This procedure describes how to use the metrics RHEL system role to automate the configuration and enabling of metrics collection for Microsoft SQL Server via pcp on your local system.
Prerequisites
- You have prepared the control node and the managed nodes.
- You are logged in to the control node as a user who can run playbooks on the managed nodes.
-
The account you use to connect to the managed nodes has
sudopermissions on them. - You have installed Microsoft SQL Server for Red Hat Enterprise Linux and established a trusted connection to an SQL server.
- You have installed the Microsoft ODBC driver for SQL Server for Red Hat Enterprise Linux.
localhostis configured in the inventory file on the control node:localhost ansible_connection=local
Procedure
Create a playbook file, for example
~/playbook.yml, with the following content:--- - name: Configure and enable metrics collection for Microsoft SQL Server hosts: localhost roles: - rhel-system-roles.metrics vars: metrics_from_mssql: true metrics_manage_firewall: true metrics_manage_selinux: trueBecause
metrics_manage_firewallandmetrics_manage_selinuxare both set totrue, themetricsrole uses thefirewallandselinuxroles to manage the ports used by themetricsrole.Validate the playbook syntax:
$ ansible-playbook --syntax-check ~/playbook.ymlNote that this command only validates the syntax and does not protect against a wrong but valid configuration.
Run the playbook:
$ ansible-playbook ~/playbook.yml
Verification
Use the
pcpcommand to verify that SQL Server PMDA agent (mssql) is loaded and running:# pcp platform: Linux sqlserver.example.com 4.18.0-167.el8.x86_64 #1 SMP Sun Dec 15 01:24:23 UTC 2019 x86_64 hardware: 2 cpus, 1 disk, 1 node, 2770MB RAM timezone: PDT+7 services: pmcd pmproxy pmcd: Version 5.0.2-1, 12 agents, 4 clients pmda: root pmcd proc pmproxy xfs linux nfsclient mmv kvm mssql jbd2 dm pmlogger: primary logger: /var/log/pcp/pmlogger/sqlserver.example.com/20200326.16.31 pmie: primary engine: /var/log/pcp/pmie/sqlserver.example.com/pmie.log
Additional resources
-
/usr/share/ansible/roles/rhel-system-roles.metrics/README.mdfile -
/usr/share/doc/rhel-system-roles/metrics/directory - Performance Co-Pilot for Microsoft SQL Server with RHEL 8.2 blog post
Chapter 17. Configuring Microsoft SQL Server by using the RHEL system role
As an administrator, you can use the microsoft.sql.server Ansible role to install, configure, and start Microsoft SQL Server (SQL Server). The microsoft.sql.server Ansible role optimizes your operating system to improve performance and throughput for the SQL Server. The role simplifies and automates the configuration of your Red Hat Enterprise Linux host with recommended settings to run the SQL Server workloads.
17.1. Installing and configuring SQL server by using the microsoft.sql.server system role with existing certificate files
You can use the microsoft.sql.server Ansible role to install and configure SQL Server version 2019. The playbook in this example also configures the server to use an existing sql_cert certificate and private key files for TLS encryption.
Prerequisites
- You have prepared the control node and the managed nodes.
- You are logged in to the control node as a user who can run playbooks on the managed nodes.
-
The account you use to connect to the managed nodes has
sudopermissions on them. - Minimum 2 GB RAM
-
The
ansible-collection-microsoft-sqlpackage is installed on the managed node. - The managed node uses one of the following versions: RHEL 7.9, RHEL 8, RHEL 9.4 or later.
Procedure
Create a playbook file, for example
~/playbook.yml, with the following content:--- - name: Install and configure SQL Server hosts: managed-node-01.example.com roles: - microsoft.sql.server vars: mssql_accept_microsoft_odbc_driver_17_for_sql_server_eula: true mssql_accept_microsoft_cli_utilities_for_sql_server_eula: true mssql_accept_microsoft_sql_server_standard_eula: true mssql_version: 2019 mssql_manage_firewall: true mssql_tls_enable: true mssql_tls_cert: sql_crt.pem mssql_tls_private_key: sql_cert.key mssql_tls_version: 1.2 mssql_tls_force: false mssql_password: <password> mssql_edition: Developer mssql_tcp_port: 1433Validate the playbook syntax:
$ ansible-playbook --syntax-check ~/playbook.ymlNote that this command only validates the syntax and does not protect against a wrong but valid configuration.
Run the playbook:
$ ansible-playbook ~/playbook.yml
Additional resources
-
/usr/share/ansible/roles/microsoft.sql-server/README.mdfile
17.2. Installing and configuring SQL server by using the microsoft.sql.server system role with the certificate RHEL system role
You can use the microsoft.sql.server Ansible role to install and configure SQL Server version 2019. The playbook in this example also configures the server to use TLS encryption and creates a self-signed sql_cert certificate file and private key by using the certificate system role.
You do not have to call the certificate system role in the playbook to create the certificate. The microsoft.sql.server Ansible role calls it automatically.
Prerequisites
- You have prepared the control node and the managed nodes.
- You are logged in to the control node as a user who can run playbooks on the managed nodes.
-
The account you use to connect to the managed nodes has
sudopermissions on them. - Minimum 2 GB RAM
-
The
ansible-collection-microsoft-sqlpackage is installed on the managed node. - The managed nodes are enrolled in a Red Hat Identity Management (IdM) domain.
- The managed node uses one of the following versions: RHEL 7.9, RHEL 8, RHEL 9.4 or later.
Procedure
Create a playbook file, for example
~/playbook.yml, with the following content:--- - name: Install and configure SQL Server hosts: managed-node-01.example.com roles: - microsoft.sql.server vars: mssql_accept_microsoft_odbc_driver_17_for_sql_server_eula: true mssql_accept_microsoft_cli_utilities_for_sql_server_eula: true mssql_accept_microsoft_sql_server_standard_eula: true mssql_version: 2019 mssql_manage_firewall: true mssql_tls_enable: true mssql_tls_certificates: - name: sql_cert dns: *.example.com ca: self-sign mssql_password: <password> mssql_edition: Developer mssql_tcp_port: 1433Validate the playbook syntax:
$ ansible-playbook --syntax-check ~/playbook.ymlNote that this command only validates the syntax and does not protect against a wrong but valid configuration.
Run the playbook:
$ ansible-playbook ~/playbook.yml
Additional resources
-
/usr/share/ansible/roles/microsoft.sql-server/README.mdfile - Requesting certificates by using RHEL system roles
17.3. Setting up custom storage paths for data and logs
To store your data or logs in a different directory than the default one, specify the custom storage path using the mssql_datadir, mssql_datadir_mode, mssql_logdir, and mssql_logdir_mode variables in an existing playbook. When you define a custom path, the role creates the provided directory and ensures correct permissions and ownership for it.
If you later decide to remove the variables, the storage paths will not change back to the default ones but will store the data or logs in the latest defined paths.
Prerequisites
- You have prepared the control node and the managed nodes.
- You are logged in to the control node as a user who can run playbooks on the managed nodes.
-
The account you use to connect to the managed nodes has
sudopermissions on them. - Minimum 2 GB RAM
-
The
ansible-collection-microsoft-sqlpackage is installed on the managed node. - The managed node uses one of the following versions: RHEL 7.9, RHEL 8, RHEL 9.4 or later.
Procedure
Edit an existing playbook file, for example
~/playbook.yml, and add the storage and log-related variables:--- - name: Install and configure SQL Server hosts: managed-node-01.example.com roles: - microsoft.sql.server vars: mssql_accept_microsoft_odbc_driver_17_for_sql_server_eula: true mssql_accept_microsoft_cli_utilities_for_sql_server_eula: true mssql_accept_microsoft_sql_server_standard_eula: true mssql_version: 2019 mssql_manage_firewall: true mssql_tls_enable: true mssql_tls_cert: sql_crt.pem mssql_tls_private_key: sql_cert.key mssql_tls_version: 1.2 mssql_tls_force: false mssql_password: <password> mssql_edition: Developer mssql_tcp_port: 1433 mssql_datadir: /var/lib/mssql/ mssql_datadir_mode: '0700' mssql_logdir: /var/log/mssql/ mssql_logdir_mode: '0700'Enter the permission modes in single quotation marks so that Ansible parses it as a string and not as an octal number.
If you do not specify the mode and the destination directory does not exist, the role uses the default umask on the system when setting the mode. If you do not specify the mode and the destination directory does exist, the role uses the mode of the existing directory.
Validate the playbook syntax:
$ ansible-playbook --syntax-check ~/playbook.ymlNote that this command only validates the syntax and does not protect against a wrong but valid configuration.
Run the playbook:
$ ansible-playbook ~/playbook.yml
Additional resources
-
/usr/share/ansible/roles/microsoft.sql-server/README.mdfile
17.4. Preparing and running a playbook to enable SQL Server authentication with Active Directory
To be able to automatically authenticate your Microsoft SQL server with Active Directory, you need to set up an microsoft.sql.server Ansible playbook with variables according to your use case.
Prerequisites
- You have prepared the control node and the managed nodes.
- You are logged in to the control node as a user who can run playbooks on the managed nodes.
-
The account you use to connect to the managed nodes has
sudopermissions on them. - Minimum 2 GB RAM
-
The
ansible-collection-microsoft-sqlpackage is installed on the managed node. - The managed node uses one of the following versions: RHEL 7.9, RHEL 8, RHEL 9.4 or later.
Procedure
Create a playbook file, for example
~/playbook.yml, with the following content:--- - name: Configure with AD server authentication hosts: managed-node-01.example.com roles: - microsoft.sql.server vars: # General variables mssql_accept_microsoft_odbc_driver_17_for_sql_server_eula: true mssql_accept_microsoft_cli_utilities_for_sql_server_eula: true mssql_accept_microsoft_sql_server_standard_eula: true mssql_version: 2022 mssql_password: "<password>" mssql_edition: Evaluation mssql_manage_firewall: true # AD Integration required variables mssql_ad_configure: true mssql_ad_sql_user_name: sqluser mssql_ad_sql_password: "<password>" ad_integration_realm: domain.com ad_integration_user: Administrator ad_integration_password: <password>Validate the playbook syntax:
$ ansible-playbook --syntax-check ~/playbook.ymlNote that this command only validates the syntax and does not protect against a wrong but valid configuration.
Run the playbook:
$ ansible-playbook ~/playbook.yml
Additional resources
-
/usr/share/ansible/roles/microsoft.sql-server/README.mdfile
17.5. Configuring SQL Server to authenticate with Active Directory (AD) Server
The following procedure shows how to configure SQL Server to authenticate with Active Directory (AD) Server.
Prerequisites
- An Active Directory domain controller is configured on your network.
- An applicable RDNS (Reverse DNS) zone exists for both the domain controller and the IP address of the Linux machine that will be running SQL Server.
- A PTR record that points to your domain controllers exists.
- The SQL Server host resolves relative domain name, fully qualified domain name, and the IP of the domain controller to the fully qualified domain name of the domain controller.
Procedure
- Log in to your AD server through the web UI.
- Navigate to Tools > Active Directory Users and Computers > domain.com > Users > sqluser > Account.
- In the Account options list, select This account supports Kerberos AES 128 bit encryption and This account supports Kerberos AES 256 bit encryption.
- Click Apply
Verification
Use
sshto log in to the client.domain.com machine:# ssh -l <sqluser>@<domain.com> <client.domain.com>
Obtain the Kerberos ticket for the Administrator user:
# kinit Administrator@<domain.com>Use the
sqlcmdutility to log in to the SQL Server and, for example, run the following query to view the current user:# /opt/mssql-tools/bin/sqlcmd -S. -Q 'SELECT SYSTEM_USER'
Chapter 18. Configuring NBDE by using RHEL system roles
18.1. Introduction to the nbde_client and nbde_server RHEL system roles (Clevis and Tang)
RHEL system roles is a collection of Ansible roles and modules that provide a consistent configuration interface to remotely manage multiple RHEL systems.
RHEL 8.3 introduced Ansible roles for automated deployments of Policy-Based Decryption (PBD) solutions using Clevis and Tang. The rhel-system-roles package contains these system roles, related examples, and also the reference documentation.
The nbde_client system role enables you to deploy multiple Clevis clients in an automated way. Note that the nbde_client role supports only Tang bindings, and you cannot use it for TPM2 bindings at the moment.
The nbde_client role requires volumes that are already encrypted using LUKS. This role supports to bind a LUKS-encrypted volume to one or more Network-Bound (NBDE) servers - Tang servers. You can either preserve the existing volume encryption with a passphrase or remove it. After removing the passphrase, you can unlock the volume only using NBDE. This is useful when a volume is initially encrypted using a temporary key or password that you should remove after you provision the system.
If you provide both a passphrase and a key file, the role uses what you have provided first. If it does not find any of these valid, it attempts to retrieve a passphrase from an existing binding.
PBD defines a binding as a mapping of a device to a slot. This means that you can have multiple bindings for the same device. The default slot is slot 1.
The nbde_client role provides also the state variable. Use the present value for either creating a new binding or updating an existing one. Contrary to a clevis luks bind command, you can use state: present also for overwriting an existing binding in its device slot. The absent value removes a specified binding.
Using the nbde_client system role, you can deploy and manage a Tang server as part of an automated disk encryption solution. This role supports the following features:
- Rotating Tang keys
- Deploying and backing up Tang keys
Additional resources
-
/usr/share/ansible/roles/rhel-system-roles.nbde_server/README.mdfile -
/usr/share/ansible/roles/rhel-system-roles.nbde_client/README.mdfile -
/usr/share/doc/rhel-system-roles/nbde_server/directory -
/usr/share/doc/rhel-system-roles/nbde_client/directory
18.2. Using the nbde_server RHEL system role for setting up multiple Tang servers
Follow the steps to prepare and apply an Ansible playbook containing your Tang server settings.
Prerequisites
- You have prepared the control node and the managed nodes.
- You are logged in to the control node as a user who can run playbooks on the managed nodes.
-
The account you use to connect to the managed nodes has
sudopermissions on them.
Procedure
Create a playbook file, for example
~/playbook.yml, with the following content:--- - hosts: managed-node-01.example.com roles: - rhel-system-roles.nbde_server vars: nbde_server_rotate_keys: yes nbde_server_manage_firewall: true nbde_server_manage_selinux: trueThis example playbook ensures deploying of your Tang server and a key rotation.
When
nbde_server_manage_firewallandnbde_server_manage_selinuxare both set totrue, thenbde_serverrole uses thefirewallandselinuxroles to manage the ports used by thenbde_serverrole.Validate the playbook syntax:
$ ansible-playbook --syntax-check ~/playbook.ymlNote that this command only validates the syntax and does not protect against a wrong but valid configuration.
Run the playbook:
$ ansible-playbook ~/playbook.yml
Verification
To ensure that networking for a Tang pin is available during early boot by using the
grubbytool on the systems where Clevis is installed, enter:# grubby --update-kernel=ALL --args="rd.neednet=1"
Additional resources
-
/usr/share/ansible/roles/rhel-system-roles.nbde_server/README.mdfile -
/usr/share/doc/rhel-system-roles/nbde_server/directory
18.3. Setting up multiple Clevis clients by using the nbde_client RHEL system role
With the nbde_client RHEL system role, you can prepare and apply an Ansible playbook that contains your Clevis client settings on multiple systems.
The nbde_client system role supports only Tang bindings. Therefore, you cannot use it for TPM2 bindings.
Prerequisites
- You have prepared the control node and the managed nodes.
- You are logged in to the control node as a user who can run playbooks on the managed nodes.
-
The account you use to connect to the managed nodes has
sudopermissions on them.
Procedure
Create a playbook file, for example
~/playbook.yml, with the following content:- hosts: managed-node-01.example.com roles: - rhel-system-roles.nbde_client vars: nbde_client_bindings: - device: /dev/rhel/root encryption_key_src: /etc/luks/keyfile servers: - http://server1.example.com - http://server2.example.com - device: /dev/rhel/swap encryption_key_src: /etc/luks/keyfile servers: - http://server1.example.com - http://server2.example.comThis example playbook configures Clevis clients for automated unlocking of two LUKS-encrypted volumes when at least one of two Tang servers is available
The
nbde_clientsystem role supports only scenarios with Dynamic Host Configuration Protocol (DHCP). To use NBDE for clients with static IP configuration use the following playbook:- hosts: managed-node-01.example.com roles: - rhel-system-roles.nbde_client vars: nbde_client_bindings: - device: /dev/rhel/root encryption_key_src: /etc/luks/keyfile servers: - http://server1.example.com - http://server2.example.com - device: /dev/rhel/swap encryption_key_src: /etc/luks/keyfile servers: - http://server1.example.com - http://server2.example.com tasks: - name: Configure a client with a static IP address during early boot ansible.builtin.command: cmd: grubby --update-kernel=ALL --args='GRUB_CMDLINE_LINUX_DEFAULT="ip={{ <ansible_default_ipv4.address> }}::{{ <ansible_default_ipv4.gateway> }}:{{ <ansible_default_ipv4.netmask> }}::{{ <ansible_default_ipv4.alias> }}:none"'In this playbook, replace the
<ansible_default_ipv4.*>strings with IP addresses of your network, for example:ip={{ 192.0.2.10 }}::{{ 192.0.2.1 }}:{{ 255.255.255.0 }}::{{ ens3 }}:none.Validate the playbook syntax:
$ ansible-playbook --syntax-check ~/playbook.ymlNote that this command only validates the syntax and does not protect against a wrong but valid configuration.
Run the playbook:
$ ansible-playbook ~/playbook.yml
Additional resources
-
/usr/share/ansible/roles/rhel-system-roles.nbde_client/README.mdfile -
/usr/share/doc/rhel-system-roles/nbde_client/directory - Looking forward to Linux network configuration in the initial ramdisk (initrd) article
Chapter 19. Configuring network settings by using the RHEL system role
Administrators can automate network-related configuration and management tasks by using the network RHEL system role.
19.1. Configuring an Ethernet connection with a static IP address by using the network RHEL system role with an interface name
You can remotely configure an Ethernet connection by using the network RHEL system role.
Prerequisites
- You have prepared the control node and the managed nodes.
- You are logged in to the control node as a user who can run playbooks on the managed nodes.
-
The account you use to connect to the managed nodes has
sudopermissions on them. - A physical or virtual Ethernet device exists in the server’s configuration.
- The managed nodes use NetworkManager to configure the network.
Procedure
Create a playbook file, for example
~/playbook.yml, with the following content:--- - name: Configure the network hosts: managed-node-01.example.com tasks: - name: Configure an Ethernet connection with static IP ansible.builtin.include_role: name: rhel-system-roles.network vars: network_connections: - name: enp1s0 interface_name: enp1s0 type: ethernet autoconnect: yes ip: address: - 192.0.2.1/24 - 2001:db8:1::1/64 gateway4: 192.0.2.254 gateway6: 2001:db8:1::fffe dns: - 192.0.2.200 - 2001:db8:1::ffbb dns_search: - example.com state: upThese settings define an Ethernet connection profile for the
enp1s0device with the following settings:-
A static IPv4 address -
192.0.2.1with a/24subnet mask -
A static IPv6 address -
2001:db8:1::1with a/64subnet mask -
An IPv4 default gateway -
192.0.2.254 -
An IPv6 default gateway -
2001:db8:1::fffe -
An IPv4 DNS server -
192.0.2.200 -
An IPv6 DNS server -
2001:db8:1::ffbb -
A DNS search domain -
example.com
-
A static IPv4 address -
Validate the playbook syntax:
$ ansible-playbook --syntax-check ~/playbook.ymlNote that this command only validates the syntax and does not protect against a wrong but valid configuration.
Run the playbook:
$ ansible-playbook ~/playbook.yml
Additional resources
-
/usr/share/ansible/roles/rhel-system-roles.network/README.mdfile -
/usr/share/doc/rhel-system-roles/network/directory
19.2. Configuring an Ethernet connection with a static IP address by using the network RHEL system role with a device path
You can remotely configure an Ethernet connection using the network RHEL system role.
You can identify the device path with the following command:
# udevadm info /sys/class/net/<device_name> | grep ID_PATH=Prerequisites
- You have prepared the control node and the managed nodes.
- You are logged in to the control node as a user who can run playbooks on the managed nodes.
-
The account you use to connect to the managed nodes has
sudopermissions on them. - A physical or virtual Ethernet device exists in the server’s configuration.
- The managed nodes use NetworkManager to configure the network.
Procedure
Create a playbook file, for example
~/playbook.yml, with the following content:--- - name: Configure the network hosts: managed-node-01.example.com tasks: - name: Configure an Ethernet connection with static IP ansible.builtin.include_role: name: rhel-system-roles.network vars: network_connections: - name: example match: path: - pci-0000:00:0[1-3].0 - &!pci-0000:00:02.0 type: ethernet autoconnect: yes ip: address: - 192.0.2.1/24 - 2001:db8:1::1/64 gateway4: 192.0.2.254 gateway6: 2001:db8:1::fffe dns: - 192.0.2.200 - 2001:db8:1::ffbb dns_search: - example.com state: upThese settings define an Ethernet connection profile with the following settings:
-
A static IPv4 address -
192.0.2.1with a/24subnet mask -
A static IPv6 address -
2001:db8:1::1with a/64subnet mask -
An IPv4 default gateway -
192.0.2.254 -
An IPv6 default gateway -
2001:db8:1::fffe -
An IPv4 DNS server -
192.0.2.200 -
An IPv6 DNS server -
2001:db8:1::ffbb A DNS search domain -
example.comThe
matchparameter in this example defines that Ansible applies the play to devices that match PCI ID0000:00:0[1-3].0, but not0000:00:02.0. For further details about special modifiers and wild cards you can use, see thematchparameter description in the/usr/share/ansible/roles/rhel-system-roles.network/README.mdfile.
-
A static IPv4 address -
Validate the playbook syntax:
$ ansible-playbook --syntax-check ~/playbook.ymlNote that this command only validates the syntax and does not protect against a wrong but valid configuration.
Run the playbook:
$ ansible-playbook ~/playbook.yml
Additional resources
-
/usr/share/ansible/roles/rhel-system-roles.network/README.mdfile -
/usr/share/doc/rhel-system-roles/network/directory
19.3. Configuring an Ethernet connection with a dynamic IP address by using the network RHEL system role with an interface name
You can remotely configure an Ethernet connection using the network RHEL system role. For connections with dynamic IP address settings, NetworkManager requests the IP settings for the connection from a DHCP server.
Prerequisites
- You have prepared the control node and the managed nodes.
- You are logged in to the control node as a user who can run playbooks on the managed nodes.
-
The account you use to connect to the managed nodes has
sudopermissions on them. - A physical or virtual Ethernet device exists in the server’s configuration.
- A DHCP server is available in the network
- The managed nodes use NetworkManager to configure the network.
Procedure
Create a playbook file, for example
~/playbook.yml, with the following content:--- - name: Configure the network hosts: managed-node-01.example.com tasks: - name: Configure an Ethernet connection with dynamic IP ansible.builtin.include_role: name: rhel-system-roles.network vars: network_connections: - name: enp1s0 interface_name: enp1s0 type: ethernet autoconnect: yes ip: dhcp4: yes auto6: yes state: upThese settings define an Ethernet connection profile for the
enp1s0device. The connection retrieves IPv4 addresses, IPv6 addresses, default gateway, routes, DNS servers, and search domains from a DHCP server and IPv6 stateless address autoconfiguration (SLAAC).Validate the playbook syntax:
$ ansible-playbook --syntax-check ~/playbook.ymlNote that this command only validates the syntax and does not protect against a wrong but valid configuration.
Run the playbook:
$ ansible-playbook ~/playbook.yml
Additional resources
-
/usr/share/ansible/roles/rhel-system-roles.network/README.mdfile -
/usr/share/doc/rhel-system-roles/network/directory
19.4. Configuring an Ethernet connection with a dynamic IP address by using the network RHEL system role with a device path
You can remotely configure an Ethernet connection using the network RHEL system role. For connections with dynamic IP address settings, NetworkManager requests the IP settings for the connection from a DHCP server.
You can identify the device path with the following command:
# udevadm info /sys/class/net/<device_name> | grep ID_PATH=Prerequisites
- You have prepared the control node and the managed nodes.
- You are logged in to the control node as a user who can run playbooks on the managed nodes.
-
The account you use to connect to the managed nodes has
sudopermissions on them. - A physical or virtual Ethernet device exists in the server’s configuration.
- A DHCP server is available in the network.
- The managed hosts use NetworkManager to configure the network.
Procedure
Create a playbook file, for example
~/playbook.yml, with the following content:--- - name: Configure the network hosts: managed-node-01.example.com tasks: - name: Configure an Ethernet connection with dynamic IP ansible.builtin.include_role: name: rhel-system-roles.network vars: network_connections: - name: example match: path: - pci-0000:00:0[1-3].0 - &!pci-0000:00:02.0 type: ethernet autoconnect: yes ip: dhcp4: yes auto6: yes state: upThese settings define an Ethernet connection profile. The connection retrieves IPv4 addresses, IPv6 addresses, default gateway, routes, DNS servers, and search domains from a DHCP server and IPv6 stateless address autoconfiguration (SLAAC).
The
matchparameter defines that Ansible applies the play to devices that match PCI ID0000:00:0[1-3].0, but not0000:00:02.0.Validate the playbook syntax:
$ ansible-playbook --syntax-check ~/playbook.ymlNote that this command only validates the syntax and does not protect against a wrong but valid configuration.
Run the playbook:
$ ansible-playbook ~/playbook.yml
Additional resources
-
/usr/share/ansible/roles/rhel-system-roles.network/README.mdfile -
/usr/share/doc/rhel-system-roles/network/directory
19.5. Configuring VLAN tagging by using the network RHEL system role
You can use the network RHEL system role to configure VLAN tagging. This example adds an Ethernet connection and a VLAN with ID 10 on top of this Ethernet connection. As the child device, the VLAN connection contains the IP, default gateway, and DNS configurations.
Depending on your environment, adjust the play accordingly. For example:
-
To use the VLAN as a port in other connections, such as a bond, omit the
ipattribute, and set the IP configuration in the child configuration. -
To use team, bridge, or bond devices in the VLAN, adapt the
interface_nameandtypeattributes of the ports you use in the VLAN.
Prerequisites
- You have prepared the control node and the managed nodes.
- You are logged in to the control node as a user who can run playbooks on the managed nodes.
-
The account you use to connect to the managed nodes has
sudopermissions on them.
Procedure
Create a playbook file, for example
~/playbook.yml, with the following content:--- - name: Configure the network hosts: managed-node-01.example.com tasks: - name: Configure a VLAN that uses an Ethernet connection ansible.builtin.include_role: name: rhel-system-roles.network vars: network_connections: # Add an Ethernet profile for the underlying device of the VLAN - name: enp1s0 type: ethernet interface_name: enp1s0 autoconnect: yes state: up ip: dhcp4: no auto6: no # Define the VLAN profile - name: enp1s0.10 type: vlan ip: address: - "192.0.2.1/24" - "2001:db8:1::1/64" gateway4: 192.0.2.254 gateway6: 2001:db8:1::fffe dns: - 192.0.2.200 - 2001:db8:1::ffbb dns_search: - example.com vlan_id: 10 parent: enp1s0 state: upThese settings define a VLAN to operate on top of the
enp1s0device. The VLAN interface has the following settings:-
A static IPv4 address -
192.0.2.1with a/24subnet mask -
A static IPv6 address -
2001:db8:1::1with a/64subnet mask -
An IPv4 default gateway -
192.0.2.254 -
An IPv6 default gateway -
2001:db8:1::fffe -
An IPv4 DNS server -
192.0.2.200 -
An IPv6 DNS server -
2001:db8:1::ffbb -
A DNS search domain -
example.com VLAN ID -
10The
parentattribute in the VLAN profile configures the VLAN to operate on top of theenp1s0device. As the child device, the VLAN connection contains the IP, default gateway, and DNS configurations.
-
A static IPv4 address -
Validate the playbook syntax:
$ ansible-playbook --syntax-check ~/playbook.ymlNote that this command only validates the syntax and does not protect against a wrong but valid configuration.
Run the playbook:
$ ansible-playbook ~/playbook.yml
Additional resources
-
/usr/share/ansible/roles/rhel-system-roles.network/README.mdfile -
/usr/share/doc/rhel-system-roles/network/directory
19.6. Configuring a network bridge by using the network RHEL system role
You can remotely configure a network bridge by using the network RHEL system role.
Prerequisites
- You have prepared the control node and the managed nodes.
- You are logged in to the control node as a user who can run playbooks on the managed nodes.
-
The account you use to connect to the managed nodes has
sudopermissions on them. - Two or more physical or virtual network devices are installed on the server.
Procedure
Create a playbook file, for example
~/playbook.yml, with the following content:--- - name: Configure the network hosts: managed-node-01.example.com tasks: - name: Configure a network bridge that uses two Ethernet ports ansible.builtin.include_role: name: rhel-system-roles.network vars: network_connections: # Define the bridge profile - name: bridge0 type: bridge interface_name: bridge0 ip: address: - "192.0.2.1/24" - "2001:db8:1::1/64" gateway4: 192.0.2.254 gateway6: 2001:db8:1::fffe dns: - 192.0.2.200 - 2001:db8:1::ffbb dns_search: - example.com state: up # Add an Ethernet profile to the bridge - name: bridge0-port1 interface_name: enp7s0 type: ethernet controller: bridge0 port_type: bridge state: up # Add a second Ethernet profile to the bridge - name: bridge0-port2 interface_name: enp8s0 type: ethernet controller: bridge0 port_type: bridge state: upThese settings define a network bridge with the following settings:
-
A static IPv4 address -
192.0.2.1with a/24subnet mask -
A static IPv6 address -
2001:db8:1::1with a/64subnet mask -
An IPv4 default gateway -
192.0.2.254 -
An IPv6 default gateway -
2001:db8:1::fffe -
An IPv4 DNS server -
192.0.2.200 -
An IPv6 DNS server -
2001:db8:1::ffbb -
A DNS search domain -
example.com Ports of the bridge -
enp7s0andenp8s0NoteSet the IP configuration on the bridge and not on the ports of the Linux bridge.
-
A static IPv4 address -
Validate the playbook syntax:
$ ansible-playbook --syntax-check ~/playbook.ymlNote that this command only validates the syntax and does not protect against a wrong but valid configuration.
Run the playbook:
$ ansible-playbook ~/playbook.yml
Additional resources
-
/usr/share/ansible/roles/rhel-system-roles.network/README.mdfile -
/usr/share/doc/rhel-system-roles/network/directory
19.7. Configuring a network bond by using the network RHEL system role
You can remotely configure a network bond by using the network RHEL system role.
Prerequisites
- You have prepared the control node and the managed nodes.
- You are logged in to the control node as a user who can run playbooks on the managed nodes.
-
The account you use to connect to the managed nodes has
sudopermissions on them. - Two or more physical or virtual network devices are installed on the server.
Procedure
Create a playbook file, for example
~/playbook.yml, with the following content:--- - name: Configure the network hosts: managed-node-01.example.com tasks: - name: Configure a network bond that uses two Ethernet ports ansible.builtin.include_role: name: rhel-system-roles.network vars: network_connections: # Define the bond profile - name: bond0 type: bond interface_name: bond0 ip: address: - "192.0.2.1/24" - "2001:db8:1::1/64" gateway4: 192.0.2.254 gateway6: 2001:db8:1::fffe dns: - 192.0.2.200 - 2001:db8:1::ffbb dns_search: - example.com bond: mode: active-backup state: up # Add an Ethernet profile to the bond - name: bond0-port1 interface_name: enp7s0 type: ethernet controller: bond0 state: up # Add a second Ethernet profile to the bond - name: bond0-port2 interface_name: enp8s0 type: ethernet controller: bond0 state: upThese settings define a network bond with the following settings:
-
A static IPv4 address -
192.0.2.1with a/24subnet mask -
A static IPv6 address -
2001:db8:1::1with a/64subnet mask -
An IPv4 default gateway -
192.0.2.254 -
An IPv6 default gateway -
2001:db8:1::fffe -
An IPv4 DNS server -
192.0.2.200 -
An IPv6 DNS server -
2001:db8:1::ffbb -
A DNS search domain -
example.com -
Ports of the bond -
enp7s0andenp8s0 Bond mode -
active-backupNoteSet the IP configuration on the bond and not on the ports of the Linux bond.
-
A static IPv4 address -
Validate the playbook syntax:
$ ansible-playbook --syntax-check ~/playbook.ymlNote that this command only validates the syntax and does not protect against a wrong but valid configuration.
Run the playbook:
$ ansible-playbook ~/playbook.yml
Additional resources
-
/usr/share/ansible/roles/rhel-system-roles.network/README.mdfile -
/usr/share/doc/rhel-system-roles/network/directory
19.8. Configuring an IPoIB connection by using the network RHEL system role
You can use the network RHEL system role to remotely create NetworkManager connection profiles for IP over InfiniBand (IPoIB) devices. For example, remotely add an InfiniBand connection for the mlx4_ib0 interface with the following settings by running an Ansible playbook:
-
An IPoIB device -
mlx4_ib0.8002 -
A partition key
p_key-0x8002 -
A static
IPv4address -192.0.2.1with a/24subnet mask -
A static
IPv6address -2001:db8:1::1with a/64subnet mask
Perform this procedure on the Ansible control node.
Prerequisites
- You have prepared the control node and the managed nodes.
- You are logged in to the control node as a user who can run playbooks on the managed nodes.
-
The account you use to connect to the managed nodes has
sudopermissions on them. -
An InfiniBand device named
mlx4_ib0is installed in the managed nodes. - The managed nodes use NetworkManager to configure the network.
Procedure
Create a playbook file, for example
~/playbook.yml, with the following content:--- - name: Configure the network hosts: managed-node-01.example.com tasks: - name: Configure IPoIB ansible.builtin.include_role: name: rhel-system-roles.network vars: network_connections: # InfiniBand connection mlx4_ib0 - name: mlx4_ib0 interface_name: mlx4_ib0 type: infiniband # IPoIB device mlx4_ib0.8002 on top of mlx4_ib0 - name: mlx4_ib0.8002 type: infiniband autoconnect: yes infiniband: p_key: 0x8002 transport_mode: datagram parent: mlx4_ib0 ip: address: - 192.0.2.1/24 - 2001:db8:1::1/64 state: upIf you set a
p_keyparameter as in this example, do not set aninterface_nameparameter on the IPoIB device.Validate the playbook syntax:
$ ansible-playbook --syntax-check ~/playbook.ymlNote that this command only validates the syntax and does not protect against a wrong but valid configuration.
Run the playbook:
$ ansible-playbook ~/playbook.yml
Verification
On the
managed-node-01.example.comhost, display the IP settings of themlx4_ib0.8002device:# ip address show mlx4_ib0.8002 ... inet 192.0.2.1/24 brd 192.0.2.255 scope global noprefixroute ib0.8002 valid_lft forever preferred_lft forever inet6 2001:db8:1::1/64 scope link tentative noprefixroute valid_lft forever preferred_lft forever
Display the partition key (P_Key) of the
mlx4_ib0.8002device:# cat /sys/class/net/mlx4_ib0.8002/pkey 0x8002Display the mode of the
mlx4_ib0.8002device:# cat /sys/class/net/mlx4_ib0.8002/mode datagram
Additional resources
-
/usr/share/ansible/roles/rhel-system-roles.network/README.mdfile -
/usr/share/doc/rhel-system-roles/network/directory
19.9. Routing traffic from a specific subnet to a different default gateway by using the network RHEL system role
You can use policy-based routing to configure a different default gateway for traffic from certain subnets. For example, you can configure RHEL as a router that, by default, routes all traffic to internet provider A using the default route. However, traffic received from the internal workstations subnet is routed to provider B.
To configure policy-based routing remotely and on multiple nodes, you can use the network RHEL system role.
This procedure assumes the following network topology:
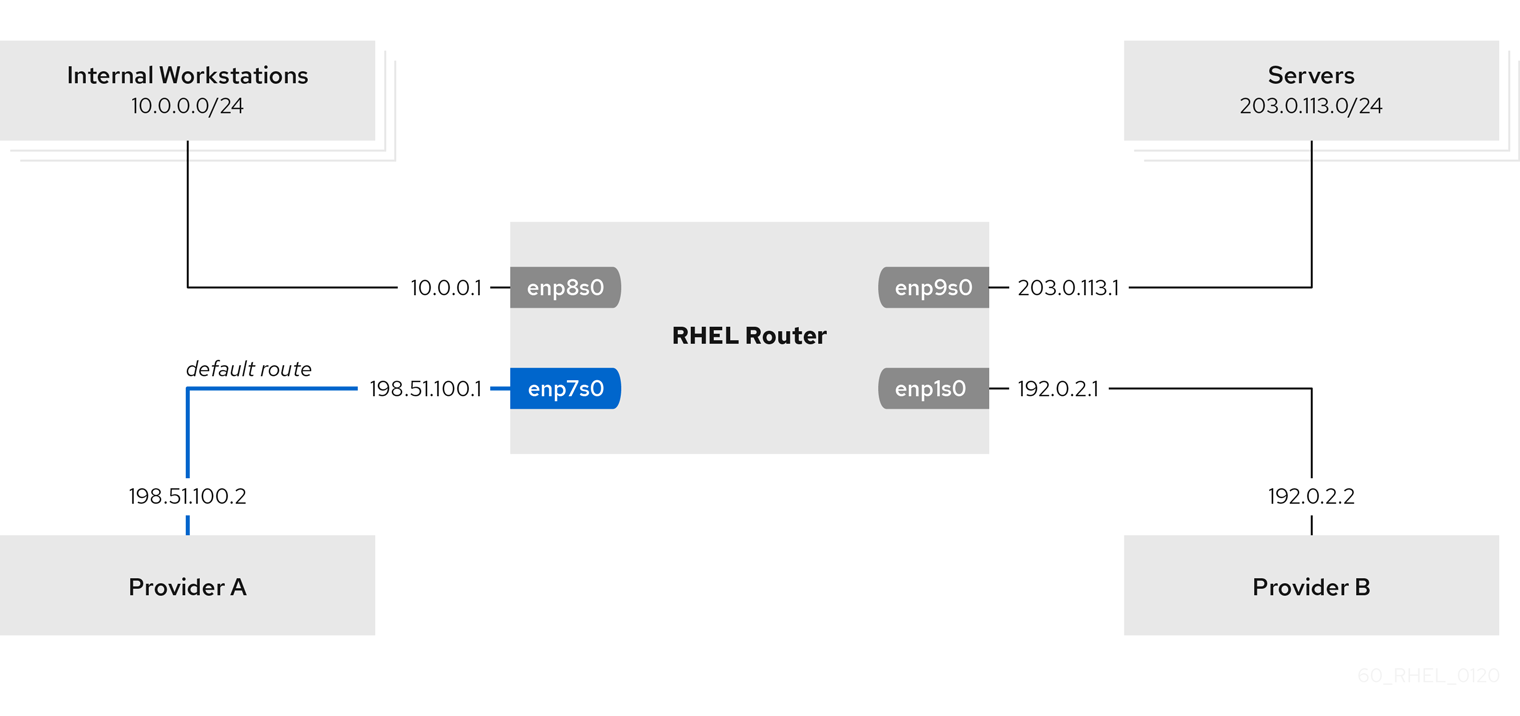
Prerequisites
- You have prepared the control node and the managed nodes.
- You are logged in to the control node as a user who can run playbooks on the managed nodes.
-
The account you use to connect to the managed nodes has
sudopermissions on them. -
The managed nodes uses the
NetworkManagerandfirewalldservices. The managed nodes you want to configure has four network interfaces:
-
The
enp7s0interface is connected to the network of provider A. The gateway IP in the provider’s network is198.51.100.2, and the network uses a/30network mask. -
The
enp1s0interface is connected to the network of provider B. The gateway IP in the provider’s network is192.0.2.2, and the network uses a/30network mask. -
The
enp8s0interface is connected to the10.0.0.0/24subnet with internal workstations. -
The
enp9s0interface is connected to the203.0.113.0/24subnet with the company’s servers.
-
The
-
Hosts in the internal workstations subnet use
10.0.0.1as the default gateway. In the procedure, you assign this IP address to theenp8s0network interface of the router. -
Hosts in the server subnet use
203.0.113.1as the default gateway. In the procedure, you assign this IP address to theenp9s0network interface of the router.
Procedure
Create a playbook file, for example
~/playbook.yml, with the following content:--- - name: Configuring policy-based routing hosts: managed-node-01.example.com tasks: - name: Routing traffic from a specific subnet to a different default gateway ansible.builtin.include_role: name: rhel-system-roles.network vars: network_connections: - name: Provider-A interface_name: enp7s0 type: ethernet autoconnect: True ip: address: - 198.51.100.1/30 gateway4: 198.51.100.2 dns: - 198.51.100.200 state: up zone: external - name: Provider-B interface_name: enp1s0 type: ethernet autoconnect: True ip: address: - 192.0.2.1/30 route: - network: 0.0.0.0 prefix: 0 gateway: 192.0.2.2 table: 5000 state: up zone: external - name: Internal-Workstations interface_name: enp8s0 type: ethernet autoconnect: True ip: address: - 10.0.0.1/24 route: - network: 10.0.0.0 prefix: 24 table: 5000 routing_rule: - priority: 5 from: 10.0.0.0/24 table: 5000 state: up zone: trusted - name: Servers interface_name: enp9s0 type: ethernet autoconnect: True ip: address: - 203.0.113.1/24 state: up zone: trustedValidate the playbook syntax:
$ ansible-playbook --syntax-check ~/playbook.ymlNote that this command only validates the syntax and does not protect against a wrong but valid configuration.
Run the playbook:
$ ansible-playbook ~/playbook.yml
Verification
On a RHEL host in the internal workstation subnet:
Install the
traceroutepackage:# yum install tracerouteUse the
tracerouteutility to display the route to a host on the internet:# traceroute redhat.com traceroute to redhat.com (209.132.183.105), 30 hops max, 60 byte packets 1 10.0.0.1 (10.0.0.1) 0.337 ms 0.260 ms 0.223 ms 2 192.0.2.1 (192.0.2.1) 0.884 ms 1.066 ms 1.248 ms ...The output of the command displays that the router sends packets over
192.0.2.1, which is the network of provider B.
On a RHEL host in the server subnet:
Install the
traceroutepackage:# yum install tracerouteUse the
tracerouteutility to display the route to a host on the internet:# traceroute redhat.com traceroute to redhat.com (209.132.183.105), 30 hops max, 60 byte packets 1 203.0.113.1 (203.0.113.1) 2.179 ms 2.073 ms 1.944 ms 2 198.51.100.2 (198.51.100.2) 1.868 ms 1.798 ms 1.549 ms ...The output of the command displays that the router sends packets over
198.51.100.2, which is the network of provider A.
On the RHEL router that you configured using the RHEL system role:
Display the rule list:
# ip rule list
0:      from all lookup local
5:    from 10.0.0.0/24 lookup 5000
32766:  from all lookup main
32767:  from all lookup default
By default, RHEL contains rules for the tables
local,main, anddefault.Display the routes in table
5000:# ip route list table 5000 0.0.0.0/0 via 192.0.2.2 dev enp1s0 proto static metric 100 10.0.0.0/24 dev enp8s0 proto static scope link src 192.0.2.1 metric 102Display the interfaces and firewall zones:
# firewall-cmd --get-active-zones
external
  interfaces: enp1s0 enp7s0
trusted
  interfaces: enp8s0 enp9s0
Verify that the
externalzone has masquerading enabled:# firewall-cmd --info-zone=external external (active) target: default icmp-block-inversion: no interfaces: enp1s0 enp7s0 sources: services: ssh ports: protocols: masquerade: yes ...
Additional resources
-
/usr/share/ansible/roles/rhel-system-roles.network/README.mdfile -
/usr/share/doc/rhel-system-roles/network/directory
19.10. Configuring a static Ethernet connection with 802.1X network authentication by using the network RHEL system role
You can remotely configure an Ethernet connection with 802.1X network authentication by using the network RHEL system role.
Prerequisites
- You have prepared the control node and the managed nodes.
- You are logged in to the control node as a user who can run playbooks on the managed nodes.
-
The account you use to connect to the managed nodes has
sudopermissions on them. - The network supports 802.1X network authentication.
- The managed nodes uses NetworkManager.
The following files required for TLS authentication exist on the control node:
-
The client key is stored in the
/srv/data/client.keyfile. -
The client certificate is stored in the
/srv/data/client.crtfile. -
The Certificate Authority (CA) certificate is stored in the
/srv/data/ca.crtfile.
-
The client key is stored in the
Procedure
Create a playbook file, for example
~/playbook.yml, with the following content:--- - name: Configure an Ethernet connection with 802.1X authentication hosts: managed-node-01.example.com tasks: - name: Copy client key for 802.1X authentication ansible.builtin.copy: src: "/srv/data/client.key" dest: "/etc/pki/tls/private/client.key" mode: 0600 - name: Copy client certificate for 802.1X authentication ansible.builtin.copy: src: "/srv/data/client.crt" dest: "/etc/pki/tls/certs/client.crt" - name: Copy CA certificate for 802.1X authentication ansible.builtin.copy: src: "/srv/data/ca.crt" dest: "/etc/pki/ca-trust/source/anchors/ca.crt" - name: Configure connection ansible.builtin.include_role: name: rhel-system-roles.network vars: network_connections: - name: enp1s0 type: ethernet autoconnect: yes ip: address: - 192.0.2.1/24 - 2001:db8:1::1/64 gateway4: 192.0.2.254 gateway6: 2001:db8:1::fffe dns: - 192.0.2.200 - 2001:db8:1::ffbb dns_search: - example.com ieee802_1x: identity: user_name eap: tls private_key: "/etc/pki/tls/private/client.key" private_key_password: "password" client_cert: "/etc/pki/tls/certs/client.crt" ca_cert: "/etc/pki/ca-trust/source/anchors/ca.crt" domain_suffix_match: example.com state: upThese settings define an Ethernet connection profile for the
enp1s0device with the following settings:-
A static IPv4 address -
192.0.2.1with a/24subnet mask -
A static IPv6 address -
2001:db8:1::1with a/64subnet mask -
An IPv4 default gateway -
192.0.2.254 -
An IPv6 default gateway -
2001:db8:1::fffe -
An IPv4 DNS server -
192.0.2.200 -
An IPv6 DNS server -
2001:db8:1::ffbb -
A DNS search domain -
example.com -
802.1X network authentication using the
TLSExtensible Authentication Protocol (EAP)
-
A static IPv4 address -
Validate the playbook syntax:
$ ansible-playbook --syntax-check ~/playbook.ymlNote that this command only validates the syntax and does not protect against a wrong but valid configuration.
Run the playbook:
$ ansible-playbook ~/playbook.yml
Additional resources
-
/usr/share/ansible/roles/rhel-system-roles.network/README.mdfile -
/usr/share/doc/rhel-system-roles/network/directory
19.11. Setting the default gateway on an existing connection by using the network RHEL system role
In most situations, administrators set the default gateway when they create a connection. However, you can also set or update the default gateway setting on a previously created connection by using the network RHEL system role to set the default gateway.
When you run a play that uses the network RHEL system role and if the setting values do not match the values specified in the play, the role overrides the existing connection profile with the same name. To prevent resetting these values to their defaults, always specify the whole configuration of the network connection profile in the play, even if the configuration, for example the IP configuration, already exists.
Depending on whether it already exists, the procedure creates or updates the enp1s0 connection profile with the following settings:
-
A static IPv4 address -
198.51.100.20with a/24subnet mask -
A static IPv6 address -
2001:db8:1::1with a/64subnet mask -
An IPv4 default gateway -
198.51.100.254 -
An IPv6 default gateway -
2001:db8:1::fffe -
An IPv4 DNS server -
198.51.100.200 -
An IPv6 DNS server -
2001:db8:1::ffbb -
A DNS search domain -
example.com
Prerequisites
- You have prepared the control node and the managed nodes.
- You are logged in to the control node as a user who can run playbooks on the managed nodes.
-
The account you use to connect to the managed nodes has
sudopermissions on them.
Procedure
Create a playbook file, for example
~/playbook.yml, with the following content:--- - name: Configure the network hosts: managed-node-01.example.com tasks: - name: Configure an Ethernet connection with static IP and default gateway ansible.builtin.include_role: name: rhel-system-roles.network vars: network_connections: - name: enp1s0 type: ethernet autoconnect: yes ip: address: - 198.51.100.20/24 - 2001:db8:1::1/64 gateway4: 198.51.100.254 gateway6: 2001:db8:1::fffe dns: - 198.51.100.200 - 2001:db8:1::ffbb dns_search: - example.com state: upValidate the playbook syntax:
$ ansible-playbook --syntax-check ~/playbook.ymlNote that this command only validates the syntax and does not protect against a wrong but valid configuration.
Run the playbook:
$ ansible-playbook ~/playbook.yml
Additional resources
-
/usr/share/ansible/roles/rhel-system-roles.network/README.mdfile -
/usr/share/doc/rhel-system-roles/network/directory
19.12. Configuring a static route by using the network RHEL system role
You can use the network RHEL system role to configure static routes.
When you run a play that uses the network RHEL system role and if the setting values do not match the values specified in the play, the role overrides the existing connection profile with the same name. To prevent resetting these values to their defaults, always specify the whole configuration of the network connection profile in the play, even if the configuration, for example the IP configuration, already exists.
Prerequisites
- You have prepared the control node and the managed nodes.
- You are logged in to the control node as a user who can run playbooks on the managed nodes.
-
The account you use to connect to the managed nodes has
sudopermissions on them.
Procedure
Create a playbook file, for example
~/playbook.yml, with the following content:--- - name: Configure the network hosts: managed-node-01.example.com tasks: - name: Configure an Ethernet connection with static IP and additional routes ansible.builtin.include_role: name: rhel-system-roles.network vars: network_connections: - name: enp7s0 type: ethernet autoconnect: yes ip: address: - 192.0.2.1/24 - 2001:db8:1::1/64 gateway4: 192.0.2.254 gateway6: 2001:db8:1::fffe dns: - 192.0.2.200 - 2001:db8:1::ffbb dns_search: - example.com route: - network: 198.51.100.0 prefix: 24 gateway: 192.0.2.10 - network: 2001:db8:2:: prefix: 64 gateway: 2001:db8:1::10 state: upDepending on whether it already exists, the procedure creates or updates the
enp7s0connection profile with the following settings:-
A static IPv4 address -
192.0.2.1with a/24subnet mask -
A static IPv6 address -
2001:db8:1::1with a/64subnet mask -
An IPv4 default gateway -
192.0.2.254 -
An IPv6 default gateway -
2001:db8:1::fffe -
An IPv4 DNS server -
192.0.2.200 -
An IPv6 DNS server -
2001:db8:1::ffbb -
A DNS search domain -
example.com Static routes:
-
198.51.100.0/24with gateway192.0.2.10 -
2001:db8:2::/64with gateway2001:db8:1::10
-
-
A static IPv4 address -
Validate the playbook syntax:
$ ansible-playbook --syntax-check ~/playbook.ymlNote that this command only validates the syntax and does not protect against a wrong but valid configuration.
Run the playbook:
$ ansible-playbook ~/playbook.yml
Verification
On the managed nodes:
Display the IPv4 routes:
# ip -4 route
...
198.51.100.0/24 via 192.0.2.10 dev enp7s0
Display the IPv6 routes:
# ip -6 route
...
2001:db8:2::/64 via 2001:db8:1::10 dev enp7s0 metric 1024 pref medium
Additional resources
-
/usr/share/ansible/roles/rhel-system-roles.network/README.mdfile -
/usr/share/doc/rhel-system-roles/network/directory
19.13. Configuring an ethtool offload feature by using the network RHEL system role
You can use the network RHEL system role to configure ethtool features of a NetworkManager connection.
When you run a play that uses the network RHEL system role and if the setting values do not match the values specified in the play, the role overrides the existing connection profile with the same name. To prevent resetting these values to their defaults, always specify the whole configuration of the network connection profile in the play, even if the configuration, for example the IP configuration, already exists.
Prerequisites
- You have prepared the control node and the managed nodes.
- You are logged in to the control node as a user who can run playbooks on the managed nodes.
-
The account you use to connect to the managed nodes has
sudopermissions on them.
Procedure
Create a playbook file, for example
~/playbook.yml, with the following content:--- - name: Configure the network hosts: managed-node-01.example.com tasks: - name: Configure an Ethernet connection with ethtool features ansible.builtin.include_role: name: rhel-system-roles.network vars: network_connections: - name: enp1s0 type: ethernet autoconnect: yes ip: address: - 198.51.100.20/24 - 2001:db8:1::1/64 gateway4: 198.51.100.254 gateway6: 2001:db8:1::fffe dns: - 198.51.100.200 - 2001:db8:1::ffbb dns_search: - example.com ethtool: features: gro: "no" gso: "yes" tx_sctp_segmentation: "no" state: upThis playbook creates the
enp1s0connection profile with the following settings, or updates it if the profile already exists:-
A static
IPv4address -198.51.100.20with a/24subnet mask -
A static
IPv6address -2001:db8:1::1with a/64subnet mask -
An
IPv4default gateway -198.51.100.254 -
An
IPv6default gateway -2001:db8:1::fffe -
An
IPv4DNS server -198.51.100.200 -
An
IPv6DNS server -2001:db8:1::ffbb -
A DNS search domain -
example.com ethtoolfeatures:- Generic receive offload (GRO): disabled
- Generic segmentation offload (GSO): enabled
- TX stream control transmission protocol (SCTP) segmentation: disabled
-
A static
Validate the playbook syntax:
$ ansible-playbook --syntax-check ~/playbook.ymlNote that this command only validates the syntax and does not protect against a wrong but valid configuration.
Run the playbook:
$ ansible-playbook ~/playbook.yml
Additional resources
-
/usr/share/ansible/roles/rhel-system-roles.network/README.mdfile -
/usr/share/doc/rhel-system-roles/network/directory
19.14. Configuring an ethtool coalesce settings by using the network RHEL system role
You can use the network RHEL system role to configure ethtool coalesce settings of a NetworkManager connection.
When you run a play that uses the network RHEL system role and if the setting values do not match the values specified in the play, the role overrides the existing connection profile with the same name. To prevent resetting these values to their defaults, always specify the whole configuration of the network connection profile in the play, even if the configuration, for example the IP configuration, already exists.
Prerequisites
- You have prepared the control node and the managed nodes.
- You are logged in to the control node as a user who can run playbooks on the managed nodes.
-
The account you use to connect to the managed nodes has
sudopermissions on them.
Procedure
Create a playbook file, for example
~/playbook.yml, with the following content:--- - name: Configure the network hosts: managed-node-01.example.com tasks: - name: Configure an Ethernet connection with ethtool coalesce settings ansible.builtin.include_role: name: rhel-system-roles.network vars: network_connections: - name: enp1s0 type: ethernet autoconnect: yes ip: address: - 198.51.100.20/24 - 2001:db8:1::1/64 gateway4: 198.51.100.254 gateway6: 2001:db8:1::fffe dns: - 198.51.100.200 - 2001:db8:1::ffbb dns_search: - example.com ethtool: coalesce: rx_frames: 128 tx_frames: 128 state: upThis playbook creates the
enp1s0connection profile with the following settings, or updates it if the profile already exists:-
A static IPv4 address -
198.51.100.20with a/24subnet mask -
A static IPv6 address -
2001:db8:1::1with a/64subnet mask -
An IPv4 default gateway -
198.51.100.254 -
An IPv6 default gateway -
2001:db8:1::fffe -
An IPv4 DNS server -
198.51.100.200 -
An IPv6 DNS server -
2001:db8:1::ffbb -
A DNS search domain -
example.com ethtoolcoalesce settings:-
RX frames:
128 -
TX frames:
128
-
RX frames:
-
A static IPv4 address -
Validate the playbook syntax:
$ ansible-playbook --syntax-check ~/playbook.ymlNote that this command only validates the syntax and does not protect against a wrong but valid configuration.
Run the playbook:
$ ansible-playbook ~/playbook.yml
Additional resources
-
/usr/share/ansible/roles/rhel-system-roles.network/README.mdfile -
/usr/share/doc/rhel-system-roles/network/directory
19.15. Increasing the ring buffer size to reduce a high packet drop rate by using the network RHEL system role
Increase the size of an Ethernet device’s ring buffers if the packet drop rate causes applications to report a loss of data, timeouts, or other issues.
Ring buffers are circular buffers where an overflow overwrites existing data. The network card assigns a transmit (TX) and receive (RX) ring buffer. Receive ring buffers are shared between the device driver and the network interface controller (NIC). Data can move from NIC to the kernel through either hardware interrupts or software interrupts, also called SoftIRQs.
The kernel uses the RX ring buffer to store incoming packets until the device driver can process them. The device driver drains the RX ring, typically by using SoftIRQs, which puts the incoming packets into a kernel data structure called an sk_buff or skb to begin its journey through the kernel and up to the application that owns the relevant socket.
The kernel uses the TX ring buffer to hold outgoing packets which should be sent to the network. These ring buffers reside at the bottom of the stack and are a crucial point at which packet drop can occur, which in turn will adversely affect network performance.
When you run a play that uses the network RHEL system role and if the setting values do not match the values specified in the play, the role overrides the existing connection profile with the same name. To prevent resetting these values to their defaults, always specify the whole configuration of the network connection profile in the play, even if the configuration, for example the IP configuration, already exists.
Prerequisites
- You have prepared the control node and the managed nodes.
- You are logged in to the control node as a user who can run playbooks on the managed nodes.
-
The account you use to connect to the managed nodes has
sudopermissions on them. - You know the maximum ring buffer sizes that the device supports.
Procedure
Create a playbook file, for example
~/playbook.yml, with the following content:--- - name: Configure the network hosts: managed-node-01.example.com tasks: - name: Configure an Ethernet connection with increased ring buffer sizes ansible.builtin.include_role: name: rhel-system-roles.network vars: network_connections: - name: enp1s0 type: ethernet autoconnect: yes ip: address: - 198.51.100.20/24 - 2001:db8:1::1/64 gateway4: 198.51.100.254 gateway6: 2001:db8:1::fffe dns: - 198.51.100.200 - 2001:db8:1::ffbb dns_search: - example.com ethtool: ring: rx: 4096 tx: 4096 state: upThis playbook creates the
enp1s0connection profile with the following settings, or updates it if the profile already exists:-
A static
IPv4address -198.51.100.20with a/24subnet mask -
A static
IPv6address -2001:db8:1::1with a/64subnet mask -
An
IPv4default gateway -198.51.100.254 -
An
IPv6default gateway -2001:db8:1::fffe -
An
IPv4DNS server -198.51.100.200 -
An
IPv6DNS server -2001:db8:1::ffbb -
A DNS search domain -
example.com Maximum number of ring buffer entries:
- Receive (RX): 4096
- Transmit (TX): 4096
-
A static
Validate the playbook syntax:
$ ansible-playbook --syntax-check ~/playbook.ymlNote that this command only validates the syntax and does not protect against a wrong but valid configuration.
Run the playbook:
$ ansible-playbook ~/playbook.yml
Additional resources
-
/usr/share/ansible/roles/rhel-system-roles.network/README.mdfile -
/usr/share/doc/rhel-system-roles/network/directory
19.16. Network states for the network RHEL System role
The network RHEL system role supports state configurations in playbooks to configure the devices. For this, use the network_state variable followed by the state configurations.
Benefits of using the network_state variable in a playbook:
- Using the declarative method with the state configurations, you can configure interfaces, and the NetworkManager creates a profile for these interfaces in the background.
-
With the
network_statevariable, you can specify the options that you require to change, and all the other options will remain the same as they are. However, with thenetwork_connectionsvariable, you must specify all settings to change the network connection profile.
For example, to create an Ethernet connection with dynamic IP address settings, use the following vars block in your playbook:
| Playbook with state configurations | Regular playbook |
vars:
  network_state:
    interfaces:
    - name: enp7s0
      type: ethernet
      state: up
      ipv4:
        enabled: true
        auto-dns: true
        auto-gateway: true
        auto-routes: true
        dhcp: true
      ipv6:
        enabled: true
        auto-dns: true
        auto-gateway: true
        auto-routes: true
        autoconf: true
        dhcp: true
|
vars:
  network_connections:
    - name: enp7s0
      interface_name: enp7s0
      type: ethernet
      autoconnect: yes
      ip:
        dhcp4: yes
        auto6: yes
      state: up
|
For example, to only change the connection status of dynamic IP address settings that you created as above, use the following vars block in your playbook:
| Playbook with state configurations | Regular playbook |
vars:
  network_state:
    interfaces:
    - name: enp7s0
      type: ethernet
      state: down
|
vars:
  network_connections:
    - name: enp7s0
      interface_name: enp7s0
      type: ethernet
      autoconnect: yes
      ip:
        dhcp4: yes
        auto6: yes
      state: down
|
Additional resources
-
/usr/share/ansible/roles/rhel-system-roles.network/README.mdfile -
/usr/share/doc/rhel-system-roles/network/directory
Chapter 20. Managing containers by using the podman RHEL system role
With the podman RHEL system role, you can manage Podman configuration, containers, and systemd services that run Podman containers.
20.1. Creating a rootless container with bind mount
You can use the podman RHEL system role to create rootless containers with bind mount by running an Ansible playbook and with that, manage your application configuration.
Prerequisites
- You have prepared the control node and the managed nodes.
- You are logged in to the control node as a user who can run playbooks on the managed nodes.
-
The account you use to connect to the managed nodes has
sudopermissions on them.
Procedure
Create a playbook file, for example
~/playbook.yml, with the following content:- hosts: managed-node-01.example.com vars: podman_create_host_directories: true podman_firewall: - port: 8080-8081/tcp state: enabled - port: 12340/tcp state: enabled podman_selinux_ports: - ports: 8080-8081 setype: http_port_t podman_kube_specs: - state: started run_as_user: dbuser run_as_group: dbgroup kube_file_content: apiVersion: v1 kind: Pod metadata: name: db spec: containers: - name: db image: quay.io/db/db:stable ports: - containerPort: 1234 hostPort: 12340 volumeMounts: - mountPath: /var/lib/db:Z name: db volumes: - name: db hostPath: path: /var/lib/db - state: started run_as_user: webapp run_as_group: webapp kube_file_src: /path/to/webapp.yml roles: - linux-system-roles.podmaThis procedure creates a pod with two containers. The
podman_kube_specsrole variable describes a pod.-
The
run_as_userandrun_as_groupfields specify that containers are rootless. The
kube_file_contentfield containing a Kubernetes YAML file defines the first container nameddb. You can generate the Kubernetes YAML file using thepodman kube generatecommand.-
The
dbcontainer is based on thequay.io/db/db:stablecontainer image. -
The
dbbind mount maps the/var/lib/dbdirectory on the host to the/var/lib/dbdirectory in the container. TheZflag labels the content with a private unshared label, therefore, only thedbcontainer can access the content.
-
The
-
The
kube_file_srcfield defines the second container. The content of the/path/to/webapp.ymlfile on the controller node will be copied to thekube_filefield on the managed node. -
Set the
podman_create_host_directories: trueto create the directory on the host. This instructs the role to check the kube specification forhostPathvolumes and create those directories on the host. If you need more control over the ownership and permissions, usepodman_host_directories.
-
The
Validate the playbook syntax:
$ ansible-playbook --syntax-check --ask-vault-pass ~/playbook.ymlNote that this command only validates the syntax and does not protect against a wrong but valid configuration.
Run the playbook:
$ ansible-playbook --ask-vault-pass ~/playbook.yml
Additional resources
-
/usr/share/ansible/roles/rhel-system-roles.podman/README.mdfile -
/usr/share/doc/rhel-system-roles/podman/directory
20.2. Creating a rootful container with Podman volume
You can use the podman RHEL system role to create a rootful container with a Podman volume by running an Ansible playbook and with that, manage your application configuration.
Prerequisites
- You have prepared the control node and the managed nodes.
- You are logged in to the control node as a user who can run playbooks on the managed nodes.
-
The account you use to connect to the managed nodes has
sudopermissions on them.
Procedure
Create a playbook file, for example
~/playbook.yml, with the following content:- hosts: managed-node-01.example.com vars: podman_firewall: - port: 8080/tcp state: enabled podman_kube_specs: - state: started kube_file_content: apiVersion: v1 kind: Pod metadata: name: ubi8-httpd spec: containers: - name: ubi8-httpd image: registry.access.redhat.com/ubi8/httpd-24 ports: - containerPort: 8080 hostPort: 8080 volumeMounts: - mountPath: /var/www/html:Z name: ubi8-html volumes: - name: ubi8-html persistentVolumeClaim: claimName: ubi8-html-volume roles: - linux-system-roles.podmanThe procedure creates a pod with one container. The
podman_kube_specsrole variable describes a pod.-
By default, the
podmanrole creates rootful containers. The
kube_file_contentfield containing a Kubernetes YAML file defines the container namedubi8-httpd.The
ubi8-httpdcontainer is based on theregistry.access.redhat.com/ubi8/httpd-24container image.-
The
ubi8-html-volumemaps the/var/www/htmldirectory on the host to the container. TheZflag labels the content with a private unshared label, therefore, only theubi8-httpdcontainer can access the content. -
The pod mounts the existing persistent volume named
ubi8-html-volumewith the mount path/var/www/html.
-
The
-
By default, the
Validate the playbook syntax:
$ ansible-playbook --syntax-check ~/playbook.ymlNote that this command only validates the syntax and does not protect against a wrong but valid configuration.
Run the playbook:
$ ansible-playbook ~/playbook.yml
Additional resources
-
/usr/share/ansible/roles/rhel-system-roles.podman/README.mdfile -
/usr/share/doc/rhel-system-roles/podman/directory
20.3. Creating a Quadlet application with secrets
You can use the podman RHEL system role to create a Quadlet application with secrets by running an Ansible playbook.
Prerequisites
- You have prepared the control node and the managed nodes.
- You are logged in to the control node as a user who can run playbooks on the managed nodes.
-
The account you use to connect to the managed nodes has
sudopermissions on them. -
The certificate and the corresponding private key that the web server in the container should use are stored in the
~/certificate.pemand~/key.pemfiles.
Procedure
Display the contents of the certificate and private key files:
$ cat ~/certificate.pem
-----BEGIN CERTIFICATE-----
...
-----END CERTIFICATE-----

$ cat ~/key.pem
-----BEGIN PRIVATE KEY-----
...
-----END PRIVATE KEY-----
You require this information in a later step.
Store your sensitive variables in an encrypted file:
Create the vault:
$ ansible-vault create vault.yml
New Vault password: <vault_password>
Confirm New Vault password: <vault_password>
After the
ansible-vault createcommand opens an editor, enter the sensitive data in the<key>: <value>format:root_password: <root_password> certificate: |- -----BEGIN CERTIFICATE----- ... -----END CERTIFICATE----- key: |- -----BEGIN PRIVATE KEY----- ... -----END PRIVATE KEY-----Ensure that all lines in the
certificateandkeyvariables start with two spaces.- Save the changes, and close the editor. Ansible encrypts the data in the vault.
Create a playbook file, for example
~/playbook.yml, with the following content:- name: Deploy a wordpress CMS with MySQL database hosts: managed-node-01.example.com vars_files: - vault.yml tasks: - name: Create and run the container ansible.builtin.include_role: name: rhel-system-roles.podman vars: podman_create_host_directories: true podman_activate_systemd_unit: false podman_quadlet_specs: - name: quadlet-demo type: network file_content: | [Network] Subnet=192.168.30.0/24 Gateway=192.168.30.1 Label=app=wordpress - file_src: quadlet-demo-mysql.volume - template_src: quadlet-demo-mysql.container.j2 - file_src: envoy-proxy-configmap.yml - file_src: quadlet-demo.yml - file_src: quadlet-demo.kube activate_systemd_unit: true podman_firewall: - port: 8000/tcp state: enabled - port: 9000/tcp state: enabled podman_secrets: - name: mysql-root-password-container state: present skip_existing: true data: "{{ root_password }}" - name: mysql-root-password-kube state: present skip_existing: true data: | apiVersion: v1 data: password: "{{ root_password | b64encode }}" kind: Secret metadata: name: mysql-root-password-kube - name: envoy-certificates state: present skip_existing: true data: | apiVersion: v1 data: certificate.key: {{ key | b64encode }} certificate.pem: {{ certificate | b64encode }} kind: Secret metadata: name: envoy-certificatesThe procedure creates a WordPress content management system paired with a MySQL database. The
podman_quadlet_specs rolevariable defines a set of configurations for the Quadlet, which refers to a group of containers or services that work together in a certain way. It includes the following specifications:-
The Wordpress network is defined by the
quadlet-demonetwork unit. -
The volume configuration for MySQL container is defined by the
file_src: quadlet-demo-mysql.volumefield. -
The
template_src: quadlet-demo-mysql.container.j2field is used to generate a configuration for the MySQL container. -
Two YAML files follow:
file_src: envoy-proxy-configmap.ymlandfile_src: quadlet-demo.yml. Note that .yml is not a valid Quadlet unit type, therefore these files will just be copied and not processed as a Quadlet specification. -
The Wordpress and envoy proxy containers and configuration are defined by the
file_src: quadlet-demo.kubefield. The kube unit refers to the previous YAML files in the[Kube]section asYaml=quadlet-demo.ymlandConfigMap=envoy-proxy-configmap.yml.
-
The Wordpress network is defined by the
Validate the playbook syntax:
$ ansible-playbook --syntax-check --ask-vault-pass ~/playbook.ymlNote that this command only validates the syntax and does not protect against a wrong but valid configuration.
Run the playbook:
$ ansible-playbook --ask-vault-pass ~/playbook.yml
Additional resources
-
/usr/share/ansible/roles/rhel-system-roles.podman/README.mdfile -
/usr/share/doc/rhel-system-roles/podman/directory
Chapter 21. Configuring Postfix MTA by using the RHEL system role
With the postfix RHEL system role, you can consistently streamline automated configurations of the Postfix service, a Sendmail-compatible mail transfer agent (MTA) with modular design and a variety of configuration options. The rhel-system-roles package contains this RHEL system role, and also the reference documentation.
21.1. Using the postfix RHEL system role to automate basic Postfix MTA administration
You can install, configure and start the Postfix Mail Transfer Agent on the managed nodes by using the postfix RHEL system role.
Prerequisites
- You have prepared the control node and the managed nodes.
- You are logged in to the control node as a user who can run playbooks on the managed nodes.
-
The account you use to connect to the managed nodes has
sudopermissions on them.
Procedure
Create a playbook file, for example
~/playbook.yml, with the following content:--- - name: Manage postfix hosts: managed-node-01.example.com roles: - rhel-system-roles.postfix vars: postfix_conf: relay_domains: $mydestination relayhost: example.comIf you want Postfix to use a different hostname than the fully-qualified domain name (FQDN) that is returned by the
gethostname()function, add themyhostnameparameter under thepostfix_conf:line in the file:myhostname = smtp.example.com
If the domain name differs from the domain name in the
myhostnameparameter, add themydomainparameter. Otherwise, the$myhostnameminus the first component is used.mydomain = <example.com>Use
postfix_manage_firewall: truevariable to ensure that the SMTP port is open in the firewall on the servers.Manage the SMTP related ports,
25/tcp,465/tcp, and587/tcp. If the variable is set tofalse, thepostfixrole does not manage the firewall. The default isfalse.NoteThe
postfix_manage_firewallvariable is limited to adding ports. It cannot be used for removing ports. If you want to remove ports, use thefirewallRHEL system role directly.If your scenario involves using non-standard ports, set the
postfix_manage_selinux: truevariable to ensure that the port is properly labeled for SELinux on the servers.NoteThe
postfix_manage_selinuxvariable is limited to adding rules to the SELinux policy. It cannot remove rules from the policy. If you want to remove rules, use theselinuxRHEL system role directly.
Validate the playbook syntax:
$ ansible-playbook --syntax-check ~/playbook.ymlNote that this command only validates the syntax and does not protect against a wrong but valid configuration.
Run the playbook:
$ ansible-playbook ~/playbook.yml
Additional resources
-
/usr/share/ansible/roles/rhel-system-roles.postfix/README.mdfile -
/usr/share/doc/rhel-system-roles/postfix/directory
Chapter 22. Installing and configuring PostgreSQL by using the RHEL system role
As a system administrator, you can use the postgresql RHEL system role to install, configure, manage, start, and improve performance of the PostgreSQL server.
22.1. Introduction to the postgresql RHEL system role
To install, configure, manage, and start the PostgreSQL server using Ansible, you can use the postgresql RHEL system role.
You can also use the postgresql role to optimize the database server settings and improve performance.
The role supports the currently released and supported versions of PostgreSQL on RHEL 8 and RHEL 9 managed nodes.
22.2. Configuring the PostgreSQL server by using the postgresql RHEL system role
You can use the postgresql RHEL system role to install, configure, manage, and start the PostgreSQL server.
The postgresql role replaces PostgreSQL configuration files in the /var/lib/pgsql/data/ directory on the managed hosts. Previous settings are changed to those specified in the role variables, and lost if they are not specified in the role variables.
Prerequisites
- You have prepared the control node and the managed nodes.
- You are logged in to the control node as a user who can run playbooks on the managed nodes.
-
The account you use to connect to the managed nodes has
sudopermissions on them.
Procedure
Create a playbook file, for example
~/playbook.yml, with the following content:--- - name: Manage PostgreSQL hosts: managed-node-01.example.com roles: - rhel-system-roles.postgresql vars: postgresql_version: "13"Validate the playbook syntax:
$ ansible-playbook --syntax-check ~/playbook.ymlNote that this command only validates the syntax and does not protect against a wrong but valid configuration.
Run the playbook:
$ ansible-playbook ~/playbook.yml
Additional resources
-
/usr/share/ansible/roles/rhel-system-roles.postgresql/README.mdfile -
/usr/share/doc/rhel-system-roles/postgresql/directory - Using PostgreSQL
Chapter 23. Registering the system by using the RHEL system role
The rhc RHEL system role enables administrators to automate the registration of multiple systems with Red Hat Subscription Management (RHSM) and Satellite servers. The role also supports Insights-related configuration and management tasks by using Ansible.
23.1. Introduction to the rhc RHEL system role
RHEL system role is a set of roles that provides a consistent configuration interface to remotely manage multiple systems. The remote host configuration (rhc) RHEL system role enables administrators to easily register RHEL systems to Red Hat Subscription Management (RHSM) and Satellite servers. By default, when you register a system by using the rhc RHEL system role, the system is connected to Insights. Additionally, with the rhc RHEL system role, you can:
- Configure connections to Red Hat Insights
- Enable and disable repositories
- Configure the proxy to use for the connection
- Configure insights remediations and, auto updates
- Set the release of the system
- Configure insights tags
23.2. Registering a system by using the rhc RHEL system role
You can register your system to Red Hat by using the rhc RHEL system role. By default, the rhc RHEL system role connects the system to Red Hat Insights when you register it.
Prerequisites
- You have prepared the control node and the managed nodes.
- You are logged in to the control node as a user who can run playbooks on the managed nodes.
-
The account you use to connect to the managed nodes has
sudopermissions on them.
Procedure
Store your sensitive variables in an encrypted file:
Create the vault:
$ ansible-vault create vault.yml
New Vault password: <password>
Confirm New Vault password: <vault_password>
After the
ansible-vault createcommand opens an editor, enter the sensitive data in the<key>: <value>format:activationKey: <activation_key> username: <username> password: <password>
- Save the changes, and close the editor. Ansible encrypts the data in the vault.
Create a playbook file, for example
~/playbook.yml, with the following content:To register by using an activation key and organization ID (recommended), use the following playbook:
---
- name: Registering system using activation key and organization ID
  hosts: managed-node-01.example.com
  vars_files:
    - vault.yml
  roles:
    - role: rhel-system-roles.rhc
  vars:
    rhc_auth:
      activation_keys:
        keys:
          -  "{{ activationKey }}"
    rhc_organization: organizationID
To register by using a username and password, use the following playbook:
---
- name: Registering system with username and password
  hosts: managed-node-01.example.com
  vars_files:
    - vault.yml
  vars:
    rhc_auth:
      login:
        username: "{{ username }}"
        password: "{{ password }}"
  roles:
    - role: rhel-system-roles.rhc
Validate the playbook syntax:
$ ansible-playbook --syntax-check --ask-vault-pass ~/playbook.ymlNote that this command only validates the syntax and does not protect against a wrong but valid configuration.
Run the playbook:
$ ansible-playbook --ask-vault-pass ~/playbook.yml
Additional resources
-
/usr/share/ansible/roles/rhel-system-roles.rhc/README.mdfile -
/usr/share/doc/rhel-system-roles/rhc/directory - Ansible Vault
23.3. Registering a system with Satellite by using the rhc RHEL system role
When organizations use Satellite to manage systems, it is necessary to register the system through Satellite. You can remotely register your system with Satellite by using the rhc RHEL system role.
Prerequisites
- You have prepared the control node and the managed nodes.
- You are logged in to the control node as a user who can run playbooks on the managed nodes.
-
The account you use to connect to the managed nodes has
sudopermissions on them.
Procedure
Store your sensitive variables in an encrypted file:
Create the vault:
$ ansible-vault create vault.yml
New Vault password: <password>
Confirm New Vault password: <vault_password>
After the
ansible-vault createcommand opens an editor, enter the sensitive data in the<key>: <value>format:activationKey: <activation_key>- Save the changes, and close the editor. Ansible encrypts the data in the vault.
Create a playbook file, for example
~/playbook.yml, with the following content:--- - name: Register to the custom registration server and CDN hosts: managed-node-01.example.com vars_files: - vault.yml roles: - role: rhel-system-roles.rhc vars: rhc_auth: login: activation_keys: keys: - "{{ activationKey }}" rhc_organization: organizationID rhc_server: hostname: example.com port: 443 prefix: /rhsm rhc_baseurl: http://example.com/pulp/contentValidate the playbook syntax:
$ ansible-playbook --syntax-check --ask-vault-pass ~/playbook.ymlNote that this command only validates the syntax and does not protect against a wrong but valid configuration.
Run the playbook:
$ ansible-playbook --ask-vault-pass ~/playbook.yml
Additional resources
-
/usr/share/ansible/roles/rhel-system-roles.rhc/README.mdfile -
/usr/share/doc/rhel-system-roles/rhc/directory - Ansible Vault
23.4. Disabling the connection to Insights after the registration by using the rhc RHEL system role
When you register a system by using the rhc RHEL system role, the role by default, enables the connection to Red Hat Insights. You can disable it by using the rhc RHEL system role, if not required.
Prerequisites
- You have prepared the control node and the managed nodes.
- You are logged in to the control node as a user who can run playbooks on the managed nodes.
-
The account you use to connect to the managed nodes has
sudopermissions on them. - You have registered the system.
Procedure
Create a playbook file, for example
~/playbook.yml, with the following content:--- - name: Disable Insights connection hosts: managed-node-01.example.com roles: - role: rhel-system-roles.rhc vars: rhc_insights: state: absentValidate the playbook syntax:
$ ansible-playbook --syntax-check ~/playbook.ymlNote that this command only validates the syntax and does not protect against a wrong but valid configuration.
Run the playbook:
$ ansible-playbook ~/playbook.yml
Additional resources
-
/usr/share/ansible/roles/rhel-system-roles.rhc/README.mdfile -
/usr/share/doc/rhel-system-roles/rhc/directory
23.5. Enabling repositories by using the rhc RHEL system role
You can remotely enable or disable repositories on managed nodes by using the rhc RHEL system role.
Prerequisites
- You have prepared the control node and the managed nodes.
- You are logged in to the control node as a user who can run playbooks on the managed nodes.
-
The account you use to connect to the managed nodes has
sudopermissions on them. - You have details of the repositories which you want to enable or disable on the managed nodes.
- You have registered the system.
Procedure
Create a playbook file, for example
~/playbook.yml, with the following content:To enable a repository:
---
- name: Enable repository
  hosts: managed-node-01.example.com
  roles:
    - role: rhel-system-roles.rhc
  vars:
    rhc_repositories:
      - {name: "RepositoryName", state: enabled}
To disable a repository:
---
- name: Disable repository
  hosts: managed-node-01.example.com
  vars:
    rhc_repositories:
      - {name: "RepositoryName", state: disabled}
  roles:
    - role: rhel-system-roles.rhc
Validate the playbook syntax:
$ ansible-playbook --syntax-check ~/playbook.ymlNote that this command only validates the syntax and does not protect against a wrong but valid configuration.
Run the playbook:
$ ansible-playbook ~/playbook.yml
Additional resources
-
/usr/share/ansible/roles/rhel-system-roles.rhc/README.mdfile -
/usr/share/doc/rhel-system-roles/rhc/directory
23.6. Setting release versions by using the rhc RHEL system role
You can limit the system to use only repositories for a particular minor RHEL version instead of the latest one. This way, you can lock your system to a specific minor RHEL version.
Prerequisites
- You have prepared the control node and the managed nodes.
- You are logged in to the control node as a user who can run playbooks on the managed nodes.
-
The account you use to connect to the managed nodes has
sudopermissions on them. - You know the minor RHEL version to which you want to lock the system. Note that you can only lock the system to the RHEL minor version that the host currently runs or a later minor version.
- You have registered the system.
Procedure
Create a playbook file, for example
~/playbook.yml, with the following content:--- - name: Set Release hosts: managed-node-01.example.com roles: - role: rhel-system-roles.rhc vars: rhc_release: "8.6"Validate the playbook syntax:
$ ansible-playbook --syntax-check ~/playbook.ymlNote that this command only validates the syntax and does not protect against a wrong but valid configuration.
Run the playbook:
$ ansible-playbook ~/playbook.yml
Additional resources
-
/usr/share/ansible/roles/rhel-system-roles.rhc/README.mdfile -
/usr/share/doc/rhel-system-roles/rhc/directory
23.7. Using a proxy server when registering the host by using the rhc RHEL system role
If your security restrictions allow access to the Internet only through a proxy server, you can specify the proxy’s settings in the playbook when you register the system using the rhc RHEL system role.
Prerequisites
- You have prepared the control node and the managed nodes.
- You are logged in to the control node as a user who can run playbooks on the managed nodes.
-
The account you use to connect to the managed nodes has
sudopermissions on them.
Procedure
Store your sensitive variables in an encrypted file:
Create the vault:
$ ansible-vault create vault.yml
New Vault password: <password>
Confirm New Vault password: <vault_password>
After the
ansible-vault createcommand opens an editor, enter the sensitive data in the<key>: <value>format:username: <username> password: <password> proxy_username: <proxyusernme> proxy_password: <proxypassword>
- Save the changes, and close the editor. Ansible encrypts the data in the vault.
Create a playbook file, for example
~/playbook.yml, with the following content:To register to the Red Hat Customer Portal by using a proxy:
---
- name: Register using proxy
  hosts: managed-node-01.example.com
  vars_files:
    - vault.yml
  roles:
    - role: rhel-system-roles.rhc
  vars:
    rhc_auth:
      login:
        username: "{{ username }}"
        password: "{{ password }}"
    rhc_proxy:
      hostname: proxy.example.com
      port: 3128
      username: "{{ proxy_username }}"
      password: "{{ proxy_password }}"
To remove the proxy server from the configuration of the Red Hat Subscription Manager service:
---
- name: To stop using proxy server for registration
  hosts: managed-node-01.example.com
  vars_files:
    - vault.yml
  vars:
    rhc_auth:
      login:
        username: "{{ username }}"
        password: "{{ password }}"
    rhc_proxy: {"state":"absent"}
  roles:
    - role: rhel-system-roles.rhc
Validate the playbook syntax:
$ ansible-playbook --syntax-check --ask-vault-pass ~/playbook.ymlNote that this command only validates the syntax and does not protect against a wrong but valid configuration.
Run the playbook:
$ ansible-playbook --ask-vault-pass ~/playbook.yml
Additional resources
-
/usr/share/ansible/roles/rhel-system-roles.rhc/README.mdfile -
/usr/share/doc/rhel-system-roles/rhc/directory - Ansible Vault
23.8. Disabling auto updates of Insights rules by using the rhc RHEL system role
You can disable the automatic collection rule updates for Red Hat Insights by using the rhc RHEL system role. By default, when you connect your system to Red Hat Insights, this option is enabled. You can disable it by using the rhc RHEL system role.
If you disable this feature, you risk using outdated rule definition files and not getting the most recent validation updates.
Prerequisites
- You have prepared the control node and the managed nodes.
- You are logged in to the control node as a user who can run playbooks on the managed nodes.
-
The account you use to connect to the managed nodes has
sudopermissions on them. - You have registered the system.
Procedure
Store your sensitive variables in an encrypted file:
Create the vault:
$ ansible-vault create vault.yml
New Vault password: <password>
Confirm New Vault password: <vault_password>
After the
ansible-vault createcommand opens an editor, enter the sensitive data in the<key>: <value>format:username: <username> password: <password>
- Save the changes, and close the editor. Ansible encrypts the data in the vault.
Create a playbook file, for example
~/playbook.yml, with the following content:--- - name: Disable Red Hat Insights autoupdates hosts: managed-node-01.example.com vars_files: - vault.yml roles: - role: rhel-system-roles.rhc vars: rhc_auth: login: username: "{{ username }}" password: "{{ password }}" rhc_insights: autoupdate: false state: presentValidate the playbook syntax:
$ ansible-playbook --syntax-check --ask-vault-pass ~/playbook.ymlNote that this command only validates the syntax and does not protect against a wrong but valid configuration.
Run the playbook:
$ ansible-playbook --ask-vault-pass ~/playbook.yml
Additional resources
-
/usr/share/ansible/roles/rhel-system-roles.rhc/README.mdfile -
/usr/share/doc/rhel-system-roles/rhc/directory - Ansible Vault
23.9. Disabling Insights remediations by using the rhc RHEL system role
You can configure systems to automatically update the dynamic configuration by using the rhc RHEL system role. When you connect your system to Red hat Insights, it is enabled by default. You can disable it, if not required.
Enabling remediation with the rhc RHEL system role ensures your system is ready to be remediated when connected directly to Red Hat. For systems connected to a Satellite, or Capsule, enabling remediation must be achieved differently. For more information about Red Hat Insights remediations, see Red Hat Insights Remediations Guide.
Prerequisites
- You have prepared the control node and the managed nodes.
- You are logged in to the control node as a user who can run playbooks on the managed nodes.
-
The account you use to connect to the managed nodes has
sudopermissions on them. - You have Insights remediations enabled.
- You have registered the system.
Procedure
Create a playbook file, for example
~/playbook.yml, with the following content:--- - name: Disable remediation hosts: managed-node-01.example.com roles: - role: rhel-system-roles.rhc vars: rhc_insights: remediation: absent state: presentValidate the playbook syntax:
$ ansible-playbook --syntax-check ~/playbook.ymlNote that this command only validates the syntax and does not protect against a wrong but valid configuration.
Run the playbook:
$ ansible-playbook ~/playbook.yml
Additional resources
-
/usr/share/ansible/roles/rhel-system-roles.rhc/README.mdfile -
/usr/share/doc/rhel-system-roles/rhc/directory
23.10. Configuring Insights tags by using the rhc RHEL system role
You can use tags for system filtering and grouping. You can also customize tags based on the requirements.
Prerequisites
- You have prepared the control node and the managed nodes.
- You are logged in to the control node as a user who can run playbooks on the managed nodes.
-
The account you use to connect to the managed nodes has
sudopermissions on them.
Procedure
Store your sensitive variables in an encrypted file:
Create the vault:
$ ansible-vault create vault.yml
New Vault password: <password>
Confirm New Vault password: <vault_password>
After the
ansible-vault createcommand opens an editor, enter the sensitive data in the<key>: <value>format:username: <username> password: <password>
- Save the changes, and close the editor. Ansible encrypts the data in the vault.
Create a playbook file, for example
~/playbook.yml, with the following content:--- - name: Creating tags hosts: managed-node-01.example.com vars_files: - vault.yml roles: - role: rhel-system-roles.rhc vars: rhc_auth: login: username: "{{ username }}" password: "{{ password }}" rhc_insights: tags: group: group-name-value location: location-name-value description: - RHEL8 - SAP sample_key:value state: presentValidate the playbook syntax:
$ ansible-playbook --syntax-check --ask-vault-pass ~/playbook.ymlNote that this command only validates the syntax and does not protect against a wrong but valid configuration.
Run the playbook:
$ ansible-playbook --ask-vault-pass ~/playbook.yml
Additional resources
-
/usr/share/ansible/roles/rhel-system-roles.rhc/README.mdfile -
/usr/share/doc/rhel-system-roles/rhc/directory - System Filtering and groups Red Hat Insights.
- Ansible Vault
23.11. Unregistering a system by using the rhc RHEL system role
You can unregister the system from Red Hat if you no longer need the subscription service.
Prerequisites
- You have prepared the control node and the managed nodes.
- You are logged in to the control node as a user who can run playbooks on the managed nodes.
-
The account you use to connect to the managed nodes has
sudopermissions on them. - The system is already registered.
Procedure
Create a playbook file, for example
~/playbook.yml, with the following content:--- - name: Unregister the system hosts: managed-node-01.example.com roles: - role: rhel-system-roles.rhc vars: rhc_state: absentValidate the playbook syntax:
$ ansible-playbook --syntax-check ~/playbook.ymlNote that this command only validates the syntax and does not protect against a wrong but valid configuration.
Run the playbook:
$ ansible-playbook ~/playbook.yml
Additional resources
-
/usr/share/ansible/roles/rhel-system-roles.rhc/README.mdfile -
/usr/share/doc/rhel-system-roles/rhc/directory
Chapter 24. Configuring SELinux by using the RHEL system role
You can configure and manage SELinux permissions on other systems by using the selinux RHEL system role.
24.1. Introduction to the selinux RHEL system role
RHEL system roles is a collection of Ansible roles and modules that provide a consistent configuration interface to remotely manage multiple RHEL systems. You can perform the following actions by using the selinux RHEL system role:
- Cleaning local policy modifications related to SELinux booleans, file contexts, ports, and logins.
- Setting SELinux policy booleans, file contexts, ports, and logins.
- Restoring file contexts on specified files or directories.
- Managing SELinux modules.
The /usr/share/doc/rhel-system-roles/selinux/example-selinux-playbook.yml example playbook installed by the rhel-system-roles package demonstrates how to set the targeted policy in enforcing mode. The playbook also applies several local policy modifications and restores file contexts in the /tmp/test_dir/ directory.
Additional resources
-
/usr/share/ansible/roles/rhel-system-roles.selinux/README.mdfile -
/usr/share/doc/rhel-system-roles/selinux/directory
24.2. Using the selinux RHEL system role to apply SELinux settings on multiple systems
With the selinux RHEL system role, you can prepare and apply an Ansible playbook with your verified SELinux settings.
Prerequisites
- You have prepared the control node and the managed nodes.
- You are logged in to the control node as a user who can run playbooks on the managed nodes.
-
The account you use to connect to the managed nodes has
sudopermissions on them.
Procedure
Prepare your playbook. You can either start from scratch or modify the example playbook installed as a part of the
rhel-system-rolespackage:# cp /usr/share/doc/rhel-system-roles/selinux/example-selinux-playbook.yml <my-selinux-playbook.yml> # vi <my-selinux-playbook.yml>
Change the content of the playbook to fit your scenario. For example, the following part ensures that the system installs and enables the
selinux-local-1.ppSELinux module:selinux_modules: - { path: "selinux-local-1.pp", priority: "400" }- Save the changes, and exit the text editor.
Validate the playbook syntax:
# ansible-playbook <my-selinux-playbook.yml> --syntax-checkNote that this command only validates the syntax and does not protect against a wrong but valid configuration.
Run your playbook:
# ansible-playbook <my-selinux-playbook.yml>
Additional resources
-
/usr/share/ansible/roles/rhel-system-roles.selinux/README.mdfile -
/usr/share/doc/rhel-system-roles/selinux/directory - SELinux hardening with Ansible Knowledgebase article
24.3. Managing ports by using the selinux RHEL system role
You can automate managing port access in SELinux consistently across multiple systems by using the selinux RHEL system role. This might be useful, for example, when configuring an Apache HTTP server to listen on a different port. You can do this by creating a playbook with the selinux RHEL system role that assigns the http_port_t SELinux type to a specific port number. After you run the playbook on the managed nodes, specific services defined in the SELinux policy can access this port.
You can automate managing port access in SELinux either by using the seport module, which is quicker than using the entire role, or by using the selinux RHEL system role, which is more useful when you also make other changes in SELinux configuration. The methods are equivalent, in fact the selinux RHEL system role uses the seport module when configuring ports. Each of the methods has the same effect as entering the command semanage port -a -t http_port_t -p tcp <port_number> on the managed node.
Prerequisites
- You have prepared the control node and the managed nodes.
- You are logged in to the control node as a user who can run playbooks on the managed nodes.
-
The account you use to connect to the managed nodes has
sudopermissions on them. -
Optional: To verify port status by using the
semanagecommand, thepolicycoreutils-python-utilspackage must be installed.
Procedure
To configure just the port number without making other changes, use the
seportmodule:- name: Allow Apache to listen on tcp port <port_number> community.general.seport: ports: <port_number> proto: tcp setype: http_port_t state: present
Replace
<port_number>with the port number to which you want to assign thehttp_port_ttype.For more complex configuration of the managed nodes that involves other customizations of SELinux, use the
selinuxRHEL system role. Create a playbook file, for example,~/playbook.yml, and add the following content:--- - name: Modify SELinux port mapping example hosts: all vars: # Map tcp port <port_number> to the 'http_port_t' SELinux port type selinux_ports: - ports: <port_number> proto: tcp setype: http_port_t state: present tasks: - name: Include selinux role ansible.builtin.include_role: name: rhel-system-roles.selinuxReplace
<port_number>with the port number to which you want to assign thehttp_port_ttype.
Verification
Verify that the port is assigned to the
http_port_ttype:# semanage port --list | grep http_port_t http_port_t tcp <port_number>, 80, 81, 443, 488, 8008, 8009, 8443, 9000
Additional resources
-
/usr/share/ansible/roles/rhel-system-roles.selinux/README.mdfile -
/usr/share/doc/rhel-system-roles/selinux/directory
Chapter 25. Securing file access by using the RHEL system role
With the fapolicyd System Role, you can prevent execution of unknown code on RHEL by using the Red Hat Ansible Automation Platform.
25.1. Configuring protection against unknown code execution with the fapolicyd RHEL system role
You can use the fapolicyd System Role to prevent execution of unknown code by running an Ansible playbook.
Prerequisites
- You have prepared the control node and the managed nodes.
- You are logged in to the control node as a user who can run playbooks on the managed nodes.
-
The account you use to connect to the managed nodes has
sudopermissions on them.
Procedure
Create a playbook file, for example
~/playbook.yml, with the following content:--- - name: Preventing execution of unknown code hosts: all vars: fapolicyd_setup_integrity: sha256 fapolicyd_setup_trust: rpmdb,file fapolicyd_add_trusted_file: - </usr/bin/my-ls> - </opt/third-party/app1> - </opt/third-party/app2> roles: - rhel-system-roles.fapolicydYou can further customize the protection by using the following variables of the
linux-system-roles.fapolicydRHEL System Role:fapolicyd_setup_integrity-
You can set one of the following types of integrity:
none,sha256, andsize. fapolicyd_setup_trust-
You can set trust file types
file,rpmd, anddeb. fapolicyd_add_trusted_file-
You can list executable files that you trust and that
fapolicyddoes not prevent from executing.
Validate the playbook syntax:
# ansible-playbook ~/playbook.yml --syntax-checkNote that this command only validates the syntax and does not protect against a wrong but valid configuration.
Run the playbook:
# ansible-playbook ~/playbook.yml
Additional resources
-
/usr/share/ansible/roles/rhel-system-roles.fapolicyd/README.mdfile
Chapter 26. Configuring secure communication by using RHEL system roles
As an administrator, you can use the sshd system role to configure SSH servers and the ssh system role to configure SSH clients consistently on any number of RHEL systems at the same time by using Red Hat Ansible Automation Platform.
26.1. Variables of the sshd RHEL system role
In an sshd system role playbook, you can define the parameters for the SSH configuration file according to your preferences and limitations.
If you do not configure these variables, the system role produces an sshd_config file that matches the RHEL defaults.
In all cases, Booleans correctly render as yes and no in sshd configuration. You can define multi-line configuration items using lists. For example:
sshd_ListenAddress:
  - 0.0.0.0
  - '::'
renders as:
ListenAddress 0.0.0.0
ListenAddress ::
Additional resources
-
/usr/share/ansible/roles/rhel-system-roles.sshd/README.mdfile -
/usr/share/doc/rhel-system-roles/sshd/directory
26.2. Configuring OpenSSH servers by using the sshd RHEL system role
You can use the sshd system role to configure multiple SSH servers by running an Ansible playbook.
You can use the sshd system role with other system roles that change SSH and SSHD configuration, for example the Identity Management RHEL system roles. To prevent the configuration from being overwritten, make sure that the sshd role uses namespaces (RHEL 8 and earlier versions) or a drop-in directory (RHEL 9).
Prerequisites
- You have prepared the control node and the managed nodes.
- You are logged in to the control node as a user who can run playbooks on the managed nodes.
-
The account you use to connect to the managed nodes has
sudopermissions on them.
Procedure
Create a playbook file, for example
~/playbook.yml, with the following content:--- - name: SSH server configuration hosts: managed-node-01.example.com tasks: - name: Configure sshd to prevent root and password login except from particular subnet ansible.builtin.include_role: name: rhel-system-roles.sshd vars: sshd: PermitRootLogin: no PasswordAuthentication: no Match: - Condition: "Address 192.0.2.0/24" PermitRootLogin: yes PasswordAuthentication: yesThe playbook configures the managed node as an SSH server configured so that:
-
password and
rootuser login is disabled -
password and
rootuser login is enabled only from the subnet192.0.2.0/24
-
password and
Validate the playbook syntax:
$ ansible-playbook --syntax-check ~/playbook.ymlNote that this command only validates the syntax and does not protect against a wrong but valid configuration.
Run the playbook:
$ ansible-playbook ~/playbook.yml
Verification
Log in to the SSH server:
$ ssh <username>@<ssh_server>Verify the contents of the
sshd_configfile on the SSH server:$ cat /etc/ssh/sshd_config ... PasswordAuthentication no PermitRootLogin no ... Match Address 192.0.2.0/24 PasswordAuthentication yes PermitRootLogin yes ...Check that you can connect to the server as root from the
192.0.2.0/24subnet:Determine your IP address:
$ hostname -I
192.0.2.1
If the IP address is within the
192.0.2.1-192.0.2.254range, you can connect to the server.Connect to the server as
root:$ ssh root@<ssh_server>
Additional resources
-
/usr/share/ansible/roles/rhel-system-roles.sshd/README.mdfile -
/usr/share/doc/rhel-system-roles/sshd/directory
26.3. Using the sshd RHEL system role for non-exclusive configuration
Normally, applying the sshd system role overwrites the entire configuration. This may be problematic if you have previously adjusted the configuration, for example, with a different system role or playbook. To apply the sshd system role for only selected configuration options while keeping other options in place, you can use the non-exclusive configuration.
You can apply a non-exclusive configuration:
- In RHEL 8 and earlier by using a configuration snippet.
-
In RHEL 9 and later by using files in a drop-in directory. The default configuration file is already placed in the drop-in directory as
/etc/ssh/sshd_config.d/00-ansible_system_role.conf.
Prerequisites
- You have prepared the control node and the managed nodes.
- You are logged in to the control node as a user who can run playbooks on the managed nodes.
-
The account you use to connect to the managed nodes has
sudopermissions on them.
Procedure
Create a playbook file, for example
~/playbook.yml, with the following content:For managed nodes that run RHEL 8 or earlier:
---
- name: Non-exclusive sshd configuration
  hosts: managed-node-01.example.com
  tasks:
    - name: <Configure SSHD to accept some useful environment variables>
      ansible.builtin.include_role:
        name: rhel-system-roles.sshd
      vars:
        sshd_config_namespace: <my-application>
        sshd:
          # Environment variables to accept
          AcceptEnv:
            LANG
            LS_COLORS
            EDITOR
For managed nodes that run RHEL 9 or later:
- name: Non-exclusive sshd configuration
  hosts: managed-node-01.example.com
  tasks:
    - name: <Configure sshd to accept some useful environment variables>
      ansible.builtin.include_role:
        name: rhel-system-roles.sshd
      vars:
        sshd_config_file: /etc/ssh/sshd_config.d/<42-my-application>.conf
        sshd:
          # Environment variables to accept
          AcceptEnv:
            LANG
            LS_COLORS
            EDITOR
In the
sshd_config_filevariable, define the.conffile into which thesshdsystem role writes the configuration options. Use a two-digit prefix, for example42-to specify the order in which the configuration files will be applied.
Validate the playbook syntax:
$ ansible-playbook --syntax-check ~/playbook.ymlNote that this command only validates the syntax and does not protect against a wrong but valid configuration.
Run the playbook:
$ ansible-playbook ~/playbook.yml
Verification
Verify the configuration on the SSH server:
For managed nodes that run RHEL 8 or earlier:
# cat /etc/ssh/sshd_config.d/42-my-application.conf
# Ansible managed
#
AcceptEnv LANG LS_COLORS EDITOR
For managed nodes that run RHEL 9 or later:
# cat /etc/ssh/sshd_config
...
# BEGIN sshd system role managed block: namespace <my-application>
Match all
  AcceptEnv LANG LS_COLORS EDITOR
# END sshd system role managed block: namespace <my-application>
Additional resources
-
/usr/share/ansible/roles/rhel-system-roles.sshd/README.mdfile -
/usr/share/doc/rhel-system-roles/sshd/directory
26.4. Overriding the system-wide cryptographic policy on an SSH server by using the sshd RHEL system role
You can override the system-wide cryptographic policy on an SSH server by using the sshd RHEL system role.
Prerequisites
- You have prepared the control node and the managed nodes.
- You are logged in to the control node as a user who can run playbooks on the managed nodes.
-
The account you use to connect to the managed nodes has
sudopermissions on them.
Procedure
Create a playbook file, for example
~/playbook.yml, with the following content:- name: Overriding the system-wide cryptographic policy hosts: managed-node-01.example.com roles: - rhel_system_roles.sshd vars: sshd_sysconfig: true sshd_sysconfig_override_crypto_policy: true sshd_KexAlgorithms: ecdh-sha2-nistp521 sshd_Ciphers: aes256-ctr sshd_MACs: hmac-sha2-512-etm@openssh.com sshd_HostKeyAlgorithms: rsa-sha2-512,rsa-sha2-256-
sshd_KexAlgorithms:: You can choose key exchange algorithms, for example,ecdh-sha2-nistp256,ecdh-sha2-nistp384,ecdh-sha2-nistp521,diffie-hellman-group14-sha1, ordiffie-hellman-group-exchange-sha256. -
sshd_Ciphers:: You can choose ciphers, for example,aes128-ctr,aes192-ctr, oraes256-ctr. -
sshd_MACs:: You can choose MACs, for example,hmac-sha2-256,hmac-sha2-512, orhmac-sha1. -
sshd_HostKeyAlgorithms:: You can choose a public key algorithm, for example,ecdsa-sha2-nistp256,ecdsa-sha2-nistp384,ecdsa-sha2-nistp521,ssh-rsa, orssh-dss.
On RHEL 9 managed nodes, the system role writes the configuration into the
/etc/ssh/sshd_config.d/00-ansible_system_role.conffile, where cryptographic options are applied automatically. You can change the file by using thesshd_config_filevariable. However, to ensure the configuration is effective, use a file name that lexicographicaly preceeds the/etc/ssh/sshd_config.d/50-redhat.conffile, which includes the configured crypto policies.On RHEL 8 managed nodes, you must enable override by setting the
sshd_sysconfig_override_crypto_policyandsshd_sysconfigvariables totrue.-
Validate the playbook syntax:
$ ansible-playbook --syntax-check ~/playbook.ymlNote that this command only validates the syntax and does not protect against a wrong but valid configuration.
Run the playbook:
$ ansible-playbook ~/playbook.yml
Verification
You can verify the success of the procedure by using the verbose SSH connection and check the defined variables in the following output:
$ ssh -vvv <ssh_server>
...
debug2: peer server KEXINIT proposal
debug2: KEX algorithms: ecdh-sha2-nistp521
debug2: host key algorithms: rsa-sha2-512,rsa-sha2-256
debug2: ciphers ctos: aes256-ctr
debug2: ciphers stoc: aes256-ctr
debug2: MACs ctos: hmac-sha2-512-etm@openssh.com
debug2: MACs stoc: hmac-sha2-512-etm@openssh.com
...
Additional resources
-
/usr/share/ansible/roles/rhel-system-roles.sshd/README.mdfile -
/usr/share/doc/rhel-system-roles/sshd/directory
26.5. Variables of the ssh RHEL system role
In an ssh system role playbook, you can define the parameters for the client SSH configuration file according to your preferences and limitations.
If you do not configure these variables, the system role produces a global ssh_config file that matches the RHEL defaults.
In all cases, booleans correctly render as yes or no in ssh configuration. You can define multi-line configuration items using lists. For example:
LocalForward:
  - 22 localhost:2222
  - 403 localhost:4003
renders as:
LocalForward 22 localhost:2222
LocalForward 403 localhost:4003
The configuration options are case sensitive.
Additional resources
-
/usr/share/ansible/roles/rhel-system-roles.ssh/README.mdfile -
/usr/share/doc/rhel-system-roles/ssh/directory
26.6. Configuring OpenSSH clients by using the ssh RHEL system role
You can use the ssh system role to configure multiple SSH clients by running an Ansible playbook.
You can use the ssh system role with other system roles that change SSH and SSHD configuration, for example the Identity Management RHEL system roles. To prevent the configuration from being overwritten, make sure that the ssh role uses a drop-in directory (default in RHEL 8 and later).
Prerequisites
- You have prepared the control node and the managed nodes.
- You are logged in to the control node as a user who can run playbooks on the managed nodes.
-
The account you use to connect to the managed nodes has
sudopermissions on them.
Procedure
Create a playbook file, for example
~/playbook.yml, with the following content:--- - name: SSH client configuration hosts: managed-node-01.example.com tasks: - name: "Configure ssh clients" ansible.builtin.include_role: name: rhel-system-roles.ssh vars: ssh_user: root ssh: Compression: true GSSAPIAuthentication: no ControlMaster: auto ControlPath: ~/.ssh/.cm%C Host: - Condition: example Hostname: server.example.com User: user1 ssh_ForwardX11: noThis playbook configures the
rootuser’s SSH client preferences on the managed nodes with the following configurations:- Compression is enabled.
-
ControlMaster multiplexing is set to
auto. -
The
examplealias for connecting to theserver.example.comhost isuser1. -
The
examplehost alias is created, which represents a connection to theserver.example.comhost the with theuser1user name. - X11 forwarding is disabled.
Validate the playbook syntax:
$ ansible-playbook --syntax-check ~/playbook.ymlNote that this command only validates the syntax and does not protect against a wrong but valid configuration.
Run the playbook:
$ ansible-playbook ~/playbook.yml
Verification
Verify that the managed node has the correct configuration by displaying the SSH configuration file:
# cat ~/root/.ssh/config
# Ansible managed
Compression yes
ControlMaster auto
ControlPath ~/.ssh/.cm%C
ForwardX11 no
GSSAPIAuthentication no
Host example
  Hostname example.com
  User user1
Additional resources
-
/usr/share/ansible/roles/rhel-system-roles.ssh/README.mdfile -
/usr/share/doc/rhel-system-roles/ssh/directory
Chapter 27. Managing local storage by using the RHEL system role
To manage LVM and local file systems (FS) by using Ansible, you can use the storage role, which is one of the RHEL system roles available in RHEL 8.
Using the storage role enables you to automate administration of file systems on disks and logical volumes on multiple machines and across all versions of RHEL starting with RHEL 7.7.
27.1. Introduction to the storage RHEL system role
The storage role can manage:
- File systems on disks which have not been partitioned
- Complete LVM volume groups including their logical volumes and file systems
- MD RAID volumes and their file systems
With the storage role, you can perform the following tasks:
- Create a file system
- Remove a file system
- Mount a file system
- Unmount a file system
- Create LVM volume groups
- Remove LVM volume groups
- Create logical volumes
- Remove logical volumes
- Create RAID volumes
- Remove RAID volumes
- Create LVM volume groups with RAID
- Remove LVM volume groups with RAID
- Create encrypted LVM volume groups
- Create LVM logical volumes with RAID
Additional resources
-
/usr/share/ansible/roles/rhel-system-roles.storage/README.mdfile -
/usr/share/doc/rhel-system-roles/storage/directory
27.2. Creating an XFS file system on a block device by using the storage RHEL system role
The example Ansible playbook applies the storage role to create an XFS file system on a block device using the default parameters.
The storage role can create a file system only on an unpartitioned, whole disk or a logical volume (LV). It cannot create the file system on a partition.
Prerequisites
- You have prepared the control node and the managed nodes.
- You are logged in to the control node as a user who can run playbooks on the managed nodes.
-
The account you use to connect to the managed nodes has
sudopermissions on them.
Procedure
Create a playbook file, for example
~/playbook.yml, with the following content:--- - hosts: managed-node-01.example.com roles: - rhel-system-roles.storage vars: storage_volumes: - name: barefs type: disk disks: - sdb fs_type: xfs-
The volume name (
barefsin the example) is currently arbitrary. Thestoragerole identifies the volume by the disk device listed under thedisks:attribute. -
You can omit the
fs_type: xfsline because XFS is the default file system in RHEL 8. To create the file system on an LV, provide the LVM setup under the
disks:attribute, including the enclosing volume group. For details, see Managing logical volumes by using the storage RHEL system role.Do not provide the path to the LV device.
-
The volume name (
Validate the playbook syntax:
$ ansible-playbook --syntax-check ~/playbook.ymlNote that this command only validates the syntax and does not protect against a wrong but valid configuration.
Run the playbook:
$ ansible-playbook ~/playbook.yml
Additional resources
-
/usr/share/ansible/roles/rhel-system-roles.storage/README.mdfile -
/usr/share/doc/rhel-system-roles/storage/directory
27.3. Persistently mounting a file system by using the storage RHEL system role
The example Ansible applies the storage role to immediately and persistently mount an XFS file system.
Prerequisites
- You have prepared the control node and the managed nodes.
- You are logged in to the control node as a user who can run playbooks on the managed nodes.
-
The account you use to connect to the managed nodes has
sudopermissions on them.
Procedure
Create a playbook file, for example
~/playbook.yml, with the following content:--- - hosts: managed-node-01.example.com roles: - rhel-system-roles.storage vars: storage_volumes: - name: barefs type: disk disks: - sdb fs_type: xfs mount_point: /mnt/data mount_user: somebody mount_group: somegroup mount_mode: 0755-
This playbook adds the file system to the
/etc/fstabfile, and mounts the file system immediately. -
If the file system on the
/dev/sdbdevice or the mount point directory do not exist, the playbook creates them.
-
This playbook adds the file system to the
Validate the playbook syntax:
$ ansible-playbook --syntax-check ~/playbook.ymlNote that this command only validates the syntax and does not protect against a wrong but valid configuration.
Run the playbook:
$ ansible-playbook ~/playbook.yml
Additional resources
-
/usr/share/ansible/roles/rhel-system-roles.storage/README.mdfile -
/usr/share/doc/rhel-system-roles/storage/directory
27.4. Managing logical volumes by using the storage RHEL system role
The example Ansible playbook applies the storage role to create an LVM logical volume in a volume group.
Prerequisites
- You have prepared the control node and the managed nodes.
- You are logged in to the control node as a user who can run playbooks on the managed nodes.
-
The account you use to connect to the managed nodes has
sudopermissions on them.
Procedure
Create a playbook file, for example
~/playbook.yml, with the following content:- hosts: managed-node-01.example.com roles: - rhel-system-roles.storage vars: storage_pools: - name: myvg disks: - sda - sdb - sdc volumes: - name: mylv size: 2G fs_type: ext4 mount_point: /mnt/dat-
The
myvgvolume group consists of the following disks:/dev/sda,/dev/sdb, and/dev/sdc. -
If the
myvgvolume group already exists, the playbook adds the logical volume to the volume group. -
If the
myvgvolume group does not exist, the playbook creates it. -
The playbook creates an Ext4 file system on the
mylvlogical volume, and persistently mounts the file system at/mnt.
-
The
Validate the playbook syntax:
$ ansible-playbook --syntax-check ~/playbook.ymlNote that this command only validates the syntax and does not protect against a wrong but valid configuration.
Run the playbook:
$ ansible-playbook ~/playbook.yml
Additional resources
-
/usr/share/ansible/roles/rhel-system-roles.storage/README.mdfile -
/usr/share/doc/rhel-system-roles/storage/directory
27.5. Enabling online block discard by using the storage RHEL system role
The example Ansible playbook applies the storage role to mount an XFS file system with online block discard enabled.
Prerequisites
- You have prepared the control node and the managed nodes.
- You are logged in to the control node as a user who can run playbooks on the managed nodes.
-
The account you use to connect to the managed nodes has
sudopermissions on them.
Procedure
Create a playbook file, for example
~/playbook.yml, with the following content:--- - hosts: managed-node-01.example.com roles: - rhel-system-roles.storage vars: storage_volumes: - name: barefs type: disk disks: - sdb fs_type: xfs mount_point: /mnt/data mount_options: discardValidate the playbook syntax:
$ ansible-playbook --syntax-check ~/playbook.ymlNote that this command only validates the syntax and does not protect against a wrong but valid configuration.
Run the playbook:
$ ansible-playbook ~/playbook.yml
Additional resources
-
/usr/share/ansible/roles/rhel-system-roles.storage/README.mdfile -
/usr/share/doc/rhel-system-roles/storage/directory
27.6. Creating and mounting an Ext4 file system by using the storage RHEL system role
The example Ansible playbook applies the storage role to create and mount an Ext4 file system.
Prerequisites
- You have prepared the control node and the managed nodes.
- You are logged in to the control node as a user who can run playbooks on the managed nodes.
-
The account you use to connect to the managed nodes has
sudopermissions on them.
Procedure
Create a playbook file, for example
~/playbook.yml, with the following content:--- - hosts: managed-node-01.example.com roles: - rhel-system-roles.storage vars: storage_volumes: - name: barefs type: disk disks: - sdb fs_type: ext4 fs_label: label-name mount_point: /mnt/data-
The playbook creates the file system on the
/dev/sdbdisk. -
The playbook persistently mounts the file system at the
/mnt/datadirectory. -
The label of the file system is
label-name.
-
The playbook creates the file system on the
Validate the playbook syntax:
$ ansible-playbook --syntax-check ~/playbook.ymlNote that this command only validates the syntax and does not protect against a wrong but valid configuration.
Run the playbook:
$ ansible-playbook ~/playbook.yml
Additional resources
-
/usr/share/ansible/roles/rhel-system-roles.storage/README.mdfile -
/usr/share/doc/rhel-system-roles/storage/directory
27.7. Creating and mounting an Ext3 file system by using the storage RHEL system role
The example Ansible playbook applies the storage role to create and mount an Ext3 file system.
Prerequisites
- You have prepared the control node and the managed nodes.
- You are logged in to the control node as a user who can run playbooks on the managed nodes.
-
The account you use to connect to the managed nodes has
sudopermissions on them.
Procedure
Create a playbook file, for example
~/playbook.yml, with the following content:--- - hosts: all roles: - rhel-system-roles.storage vars: storage_volumes: - name: barefs type: disk disks: - sdb fs_type: ext3 fs_label: label-name mount_point: /mnt/data mount_user: somebody mount_group: somegroup mount_mode: 0755-
The playbook creates the file system on the
/dev/sdbdisk. -
The playbook persistently mounts the file system at the
/mnt/datadirectory. -
The label of the file system is
label-name.
-
The playbook creates the file system on the
Validate the playbook syntax:
$ ansible-playbook --syntax-check ~/playbook.ymlNote that this command only validates the syntax and does not protect against a wrong but valid configuration.
Run the playbook:
$ ansible-playbook ~/playbook.yml
Additional resources
-
/usr/share/ansible/roles/rhel-system-roles.storage/README.mdfile -
/usr/share/doc/rhel-system-roles/storage/directory
27.8. Resizing an existing file system on LVM by using the storage RHEL system role
The example Ansible playbook applies the storage RHEL system role to resize an LVM logical volume with a file system.
Prerequisites
- You have prepared the control node and the managed nodes.
- You are logged in to the control node as a user who can run playbooks on the managed nodes.
-
The account you use to connect to the managed nodes has
sudopermissions on them.
Procedure
Create a playbook file, for example
~/playbook.yml, with the following content:--- - name: Create LVM pool over three disks hosts: managed-node-01.example.com tasks: - name: Resize LVM logical volume with file system ansible.builtin.include_role: name: rhel-system-roles.storage vars: storage_pools: - name: myvg disks: - /dev/sda - /dev/sdb - /dev/sdc volumes: - name: mylv1 size: 10 GiB fs_type: ext4 mount_point: /opt/mount1 - name: mylv2 size: 50 GiB fs_type: ext4 mount_point: /opt/mount2This playbook resizes the following existing file systems:
-
The Ext4 file system on the
mylv1volume, which is mounted at/opt/mount1, resizes to 10 GiB. -
The Ext4 file system on the
mylv2volume, which is mounted at/opt/mount2, resizes to 50 GiB.
-
The Ext4 file system on the
Validate the playbook syntax:
$ ansible-playbook --syntax-check ~/playbook.ymlNote that this command only validates the syntax and does not protect against a wrong but valid configuration.
Run the playbook:
$ ansible-playbook ~/playbook.yml
Additional resources
-
/usr/share/ansible/roles/rhel-system-roles.storage/README.mdfile -
/usr/share/doc/rhel-system-roles/storage/directory
27.9. Creating a swap volume by using the storage RHEL system role
This section provides an example Ansible playbook. This playbook applies the storage role to create a swap volume, if it does not exist, or to modify the swap volume, if it already exist, on a block device by using the default parameters.
Prerequisites
- You have prepared the control node and the managed nodes.
- You are logged in to the control node as a user who can run playbooks on the managed nodes.
-
The account you use to connect to the managed nodes has
sudopermissions on them.
Procedure
Create a playbook file, for example
~/playbook.yml, with the following content:--- - name: Create a disk device with swap hosts: managed-node-01.example.com roles: - rhel-system-roles.storage vars: storage_volumes: - name: swap_fs type: disk disks: - /dev/sdb size: 15 GiB fs_type: swapThe volume name (
swap_fsin the example) is currently arbitrary. Thestoragerole identifies the volume by the disk device listed under thedisks:attribute.Validate the playbook syntax:
$ ansible-playbook --syntax-check ~/playbook.ymlNote that this command only validates the syntax and does not protect against a wrong but valid configuration.
Run the playbook:
$ ansible-playbook ~/playbook.yml
Additional resources
-
/usr/share/ansible/roles/rhel-system-roles.storage/README.mdfile -
/usr/share/doc/rhel-system-roles/storage/directory
27.10. Configuring a RAID volume by using the storage RHEL system role
With the storage system role, you can configure a RAID volume on RHEL by using Red Hat Ansible Automation Platform and Ansible-Core. Create an Ansible playbook with the parameters to configure a RAID volume to suit your requirements.
Device names might change in certain circumstances, for example, when you add a new disk to a system. Therefore, to prevent data loss, do not use specific disk names in the playbook.
Prerequisites
- You have prepared the control node and the managed nodes.
- You are logged in to the control node as a user who can run playbooks on the managed nodes.
-
The account you use to connect to the managed nodes has
sudopermissions on them.
Procedure
Create a playbook file, for example
~/playbook.yml, with the following content:--- - name: Configure the storage hosts: managed-node-01.example.com tasks: - name: Create a RAID on sdd, sde, sdf, and sdg ansible.builtin.include_role: name: rhel-system-roles.storage vars: storage_safe_mode: false storage_volumes: - name: data type: raid disks: [sdd, sde, sdf, sdg] raid_level: raid0 raid_chunk_size: 32 KiB mount_point: /mnt/data state: presentValidate the playbook syntax:
$ ansible-playbook --syntax-check ~/playbook.ymlNote that this command only validates the syntax and does not protect against a wrong but valid configuration.
Run the playbook:
$ ansible-playbook ~/playbook.yml
Additional resources
-
/usr/share/ansible/roles/rhel-system-roles.storage/README.mdfile -
/usr/share/doc/rhel-system-roles/storage/directory - Managing RAID
27.11. Configuring an LVM pool with RAID by using the storage RHEL system role
With the storage system role, you can configure an LVM pool with RAID on RHEL by using Red Hat Ansible Automation Platform. You can set up an Ansible playbook with the available parameters to configure an LVM pool with RAID.
Prerequisites
- You have prepared the control node and the managed nodes.
- You are logged in to the control node as a user who can run playbooks on the managed nodes.
-
The account you use to connect to the managed nodes has
sudopermissions on them.
Procedure
Create a playbook file, for example
~/playbook.yml, with the following content:--- - name: Configure LVM pool with RAID hosts: managed-node-01.example.com roles: - rhel-system-roles.storage vars: storage_safe_mode: false storage_pools: - name: my_pool type: lvm disks: [sdh, sdi] raid_level: raid1 volumes: - name: my_volume size: "1 GiB" mount_point: "/mnt/app/shared" fs_type: xfs state: presentTo create an LVM pool with RAID, you must specify the RAID type by using the
raid_levelparameter.Validate the playbook syntax:
$ ansible-playbook --syntax-check ~/playbook.ymlNote that this command only validates the syntax and does not protect against a wrong but valid configuration.
Run the playbook:
$ ansible-playbook ~/playbook.yml
Additional resources
-
/usr/share/ansible/roles/rhel-system-roles.storage/README.mdfile -
/usr/share/doc/rhel-system-roles/storage/directory - Managing RAID
27.12. Configuring a stripe size for RAID LVM volumes by using the storage RHEL system role
With the storage system role, you can configure a stripe size for RAID LVM volumes on RHEL by using Red Hat Ansible Automation Platform. You can set up an Ansible playbook with the available parameters to configure an LVM pool with RAID.
Prerequisites
- You have prepared the control node and the managed nodes.
- You are logged in to the control node as a user who can run playbooks on the managed nodes.
-
The account you use to connect to the managed nodes has
sudopermissions on them.
Procedure
Create a playbook file, for example
~/playbook.yml, with the following content:--- - name: Configure stripe size for RAID LVM volumes hosts: managed-node-01.example.com roles: - rhel-system-roles.storage vars: storage_safe_mode: false storage_pools: - name: my_pool type: lvm disks: [sdh, sdi] volumes: - name: my_volume size: "1 GiB" mount_point: "/mnt/app/shared" fs_type: xfs raid_level: raid1 raid_stripe_size: "256 KiB" state: presentValidate the playbook syntax:
$ ansible-playbook --syntax-check ~/playbook.ymlNote that this command only validates the syntax and does not protect against a wrong but valid configuration.
Run the playbook:
$ ansible-playbook ~/playbook.yml
Additional resources
-
/usr/share/ansible/roles/rhel-system-roles.storage/README.mdfile -
/usr/share/doc/rhel-system-roles/storage/directory - Managing RAID
27.13. Compressing and deduplicating a VDO volume on LVM by using the storage RHEL system role
The example Ansible playbook applies the storage RHEL system role to enable compression and deduplication of Logical Volumes (LVM) by using Virtual Data Optimizer (VDO).
Because of the storage system role use of LVM VDO, only one volume per pool can use the compression and deduplication.
Prerequisites
- You have prepared the control node and the managed nodes.
- You are logged in to the control node as a user who can run playbooks on the managed nodes.
-
The account you use to connect to the managed nodes has
sudopermissions on them.
Procedure
Create a playbook file, for example
~/playbook.yml, with the following content:- name: Create LVM VDO volume under volume group 'myvg' hosts: managed-node-01.example.com roles: - rhel-system-roles.storage vars: storage_pools: - name: myvg disks: - /dev/sdb volumes: - name: mylv1 compression: true deduplication: true vdo_pool_size: 10 GiB size: 30 GiB mount_point: /mnt/app/sharedIn this example, the
compressionanddeduplicationpools are set to true, which specifies that the VDO is used. The following describes the usage of these parameters:-
The
deduplicationis used to deduplicate the duplicated data stored on the storage volume. - The compression is used to compress the data stored on the storage volume, which results in more storage capacity.
-
The vdo_pool_size specifies the actual size the volume takes on the device. The virtual size of VDO volume is set by the
sizeparameter.
-
The
Validate the playbook syntax:
$ ansible-playbook --syntax-check ~/playbook.ymlNote that this command only validates the syntax and does not protect against a wrong but valid configuration.
Run the playbook:
$ ansible-playbook ~/playbook.yml
Additional resources
-
/usr/share/ansible/roles/rhel-system-roles.storage/README.mdfile -
/usr/share/doc/rhel-system-roles/storage/directory
27.14. Creating a LUKS2 encrypted volume by using the storage RHEL system role
You can use the storage role to create and configure a volume encrypted with LUKS by running an Ansible playbook.
Prerequisites
- You have prepared the control node and the managed nodes.
- You are logged in to the control node as a user who can run playbooks on the managed nodes.
-
The account you use to connect to the managed nodes has
sudopermissions on them.
Procedure
Create a playbook file, for example
~/playbook.yml, with the following content:--- - name: Create and configure a volume encrypted with LUKS hosts: managed-node-01.example.com roles: - rhel-system-roles.storage vars: storage_volumes: - name: barefs type: disk disks: - sdb fs_type: xfs fs_label: label-name mount_point: /mnt/data encryption: true encryption_password: <password>You can also add other encryption parameters, such as
encryption_key,encryption_cipher,encryption_key_size, andencryption_luks, to the playbook file.Validate the playbook syntax:
$ ansible-playbook --syntax-check ~/playbook.ymlNote that this command only validates the syntax and does not protect against a wrong but valid configuration.
Run the playbook:
$ ansible-playbook ~/playbook.yml
Verification
View the encryption status:
# cryptsetup status sdb /dev/mapper/sdb is active and is in use. type: LUKS2 cipher: aes-xts-plain64 keysize: 512 bits key location: keyring device: /dev/sdb ...Verify the created LUKS encrypted volume:
# cryptsetup luksDump /dev/sdb Version: 2 Epoch: 6 Metadata area: 16384 [bytes] Keyslots area: 33521664 [bytes] UUID: a4c6be82-7347-4a91-a8ad-9479b72c9426 Label: (no label) Subsystem: (no subsystem) Flags: allow-discards Data segments: 0: crypt offset: 33554432 [bytes] length: (whole device) cipher: aes-xts-plain64 sector: 4096 [bytes] ...
Additional resources
-
/usr/share/ansible/roles/rhel-system-roles.storage/README.mdfile -
/usr/share/doc/rhel-system-roles/storage/directory - Encrypting block devices by using LUKS
27.15. Expressing pool volume sizes as percentage by using the storage RHEL system role
The example Ansible playbook applies the storage system role to enable you to express Logical Manager Volumes (LVM) volume sizes as a percentage of the pool’s total size.
Prerequisites
- You have prepared the control node and the managed nodes.
- You are logged in to the control node as a user who can run playbooks on the managed nodes.
-
The account you use to connect to the managed nodes has
sudopermissions on them.
Procedure
Create a playbook file, for example
~/playbook.yml, with the following content:--- - name: Express volume sizes as a percentage of the pool's total size hosts: managed-node-01.example.com roles: - rhel-system-roles.storage vars: storage_pools: - name: myvg disks: - /dev/sdb volumes: - name: data size: 60% mount_point: /opt/mount/data - name: web size: 30% mount_point: /opt/mount/web - name: cache size: 10% mount_point: /opt/cache/mountThis example specifies the size of LVM volumes as a percentage of the pool size, for example:
60%. Alternatively, you can also specify the size of LVM volumes as a percentage of the pool size in a human-readable size of the file system, for example,10gor50 GiB.Validate the playbook syntax:
$ ansible-playbook --syntax-check ~/playbook.ymlNote that this command only validates the syntax and does not protect against a wrong but valid configuration.
Run the playbook:
$ ansible-playbook ~/playbook.yml
Additional resources
-
/usr/share/ansible/roles/rhel-system-roles.storage/README.mdfile -
/usr/share/doc/rhel-system-roles/storage/directory
Chapter 28. Managing systemd units by using the RHEL system role
With the systemd RHEL system role you can deploy unit files and manage systemd units on multiple systems by using the Red Hat Ansible Automation Platform.
You can use the systemd_units variable in systemd RHEL system role playbooks to gain insights into the status of systemd units on a target system. The variable displays a list of dictionaries. Each dictionary entry describes the state and configuration of one systemd unit present on the managed host. The systemd_units variable is updated as the final step of task execution and captures the state after the role has run all tasks.
28.1. Deploying and starting a systemd unit by using the systemd RHEL system role
You can apply the systemd RHEL system role to perform tasks related to systemd unit management on the target hosts. You will set the systemd RHEL system role variables in a playbook to define which unit files systemd manages, starts, and enables.
Prerequisites
- You have prepared the control node and the managed nodes.
- You are logged in to the control node as a user who can run playbooks on the managed nodes.
-
The account you use to connect to the managed nodes has
sudopermissions on them.
Procedure
Create a playbook file, for example
~/playbook.yml, with the following content:--- - name: Deploy and start systemd unit hosts: managed-node-01.example.com roles: - rhel-system-roles.systemd vars: systemd_unit_files: - <name1>.service - <name2>.service - <name3>.service systemd_started_units: - <name1>.service - <name2>.service - <name3>.service systemd_enabled_units: - <name1>.service - <name2>.service - <name3>.serviceValidate the playbook syntax:
$ ansible-playbook --syntax-check ~/playbook.ymlNote that this command only validates the syntax and does not protect against a wrong but valid configuration.
Run the playbook:
$ ansible-playbook ~/playbook.yml
Additional resources
-
/usr/share/ansible/roles/rhel-system-roles.systemd/README.mdfile -
/usr/share/doc/rhel-system-roles/systemd/directory
Chapter 29. Configuring time synchronization by using the RHEL system role
With the timesync RHEL system role, you can manage time synchronization on multiple target machines on RHEL using Red Hat Ansible Automation Platform.
29.1. The timesync RHEL system role
You can manage time synchronization on multiple target machines using the timesync RHEL system role.
The timesync role installs and configures an NTP or PTP implementation to operate as an NTP client or PTP replica in order to synchronize the system clock with NTP servers or grandmasters in PTP domains.
Note that using the timesync role also facilitates the Migrating to chrony, because you can use the same playbook on all versions of Red Hat Enterprise Linux starting with RHEL 6 regardless of whether the system uses ntp or chrony to implement the NTP protocol.
-
/usr/share/ansible/roles/rhel-system-roles.timesync/README.mdfile -
/usr/share/doc/rhel-system-roles/timesync/directory
29.2. Applying the timesync RHEL system role for a single pool of servers
The following example shows how to apply the timesync role in a situation with just one pool of servers.
The timesync role replaces the configuration of the given or detected provider service on the managed host. Previous settings are lost, even if they are not specified in the role variables. The only preserved setting is the choice of provider if the timesync_ntp_provider variable is not defined.
Prerequisites
- You have prepared the control node and the managed nodes.
- You are logged in to the control node as a user who can run playbooks on the managed nodes.
-
The account you use to connect to the managed nodes has
sudopermissions on them.
Procedure
Create a playbook file, for example
~/playbook.yml, with the following content:--- - name: Manage time synchronization hosts: managed-node-01.example.com roles: - rhel-system-roles.timesync vars: timesync_ntp_servers: - hostname: 2.rhel.pool.ntp.org pool: yes iburst: yesValidate the playbook syntax:
$ ansible-playbook --syntax-check ~/playbook.ymlNote that this command only validates the syntax and does not protect against a wrong but valid configuration.
Run the playbook:
$ ansible-playbook ~/playbook.yml
Additional resources
-
/usr/share/ansible/roles/rhel-system-roles.timesync/README.mdfile -
/usr/share/doc/rhel-system-roles/timesync/directory
29.3. Applying the timesync RHEL system role on client servers
You can use the timesync role to enable Network Time Security (NTS) on NTP clients. Network Time Security (NTS) is an authentication mechanism specified for Network Time Protocol (NTP). It verifies that NTP packets exchanged between the server and client are not altered.
The timesync role replaces the configuration of the given or detected provider service on the managed host. Previous settings are lost even if they are not specified in the role variables. The only preserved setting is the choice of provider if the timesync_ntp_provider variable is not defined.
Prerequisites
- You have prepared the control node and the managed nodes.
- You are logged in to the control node as a user who can run playbooks on the managed nodes.
-
The account you use to connect to the managed nodes has
sudopermissions on them. -
The
chronyNTP provider version is 4.0 or later.
Procedure
Create a playbook file, for example
~/playbook.yml, with the following content:--- - name: Enable Network Time Security on NTP clients hosts: managed-node-01.example.com roles: - rhel-system-roles.timesync vars: timesync_ntp_servers: - hostname: ptbtime1.ptb.de iburst: yes nts: yesptbtime1.ptb.deis an example of a public server. You may want to use a different public server or your own server.Validate the playbook syntax:
$ ansible-playbook --syntax-check ~/playbook.ymlNote that this command only validates the syntax and does not protect against a wrong but valid configuration.
Run the playbook:
$ ansible-playbook ~/playbook.yml
Verification
Perform a test on the client machine:
# chronyc -N authdata Name/IP address Mode KeyID Type KLen Last Atmp NAK Cook CLen ===================================================================== ptbtime1.ptb.de NTS 1 15 256 157 0 0 8 100- Check that the number of reported cookies is larger than zero.
Additional resources
-
/usr/share/ansible/roles/rhel-system-roles.timesync/README.mdfile -
/usr/share/doc/rhel-system-roles/timesync/directory
Chapter 30. Configuring a system for session recording by using the RHEL system role
With the tlog RHEL system role, you can configure a system for terminal session recording on RHEL by using Red Hat Ansible Automation Platform.
30.1. The tlog RHEL system role
You can configure a RHEL system for terminal session recording on RHEL using the tlog RHEL system role.
You can configure the recording to take place per user or user group by means of the SSSD service.
Additional resources
-
/usr/share/ansible/roles/rhel-system-roles.ha_cluster/README.mdfile -
/usr/share/doc/rhel-system-roles/ha_cluster/directory - Recording Sessions
30.2. Components and parameters of the tlog RHEL system role
The Session Recording solution has the following components:
-
The
tlogutility - System Security Services Daemon (SSSD)
- Optional: The web console interface
Additional resources
-
/usr/share/ansible/roles/rhel-system-roles.ha_cluster/README.mdfile -
/usr/share/doc/rhel-system-roles/ha_cluster/directory - Recording Sessions
30.3. Deploying the tlog RHEL system role
Follow these steps to prepare and apply an Ansible playbook to configure a RHEL system to log session recording data to the systemd journal.
The playbook installs the tlog RHEL system role on the system you specified. The role includes tlog-rec-session, a terminal session I/O logging program, that acts as the login shell for a user. It also creates an SSSD configuration drop file that can be used by the users and groups that you define. SSSD parses and reads these users and groups, and replaces their user shell with tlog-rec-session. Additionally, if the cockpit package is installed on the system, the playbook also installs the cockpit-session-recording package, which is a Cockpit module that allows you to view and play recordings in the web console interface.
Prerequisites
- You have prepared the control node and the managed nodes.
- You are logged in to the control node as a user who can run playbooks on the managed nodes.
-
The account you use to connect to the managed nodes has
sudopermissions on them.
Procedure
Create a playbook file, for example
~/playbook.yml, with the following content:--- - name: Deploy session recording hosts: managed-node-01.example.com roles: - rhel-system-roles.tlog vars: tlog_scope_sssd: some tlog_users_sssd: - recorded-usertlog_scope_sssd-
The
somevalue specifies you want to record only certain users and groups, notallornone. tlog_users_sssd- Specifies the user you want to record a session from. Note that this does not add the user for you. You must set the user by yourself.
Validate the playbook syntax:
$ ansible-playbook --syntax-check ~/playbook.ymlNote that this command only validates the syntax and does not protect against a wrong but valid configuration.
Run the playbook:
$ ansible-playbook ~/playbook.yml
Verification
Navigate to the folder where the SSSD configuration drop file is created:
# cd /etc/sssd/conf.d/Check the file content:
# cat /etc/sssd/conf.d/sssd-session-recording.confYou can see that the file contains the parameters you set in the playbook.
- Log in as a user whose session will be recorded.
- Play back a recorded session.
Additional resources
-
/usr/share/ansible/roles/rhel-system-roles.tlog/README.mdfile -
/usr/share/doc/rhel-system-roles/tlog/directory
30.4. Deploying the tlog RHEL system role for excluding lists of groups or users
You can use the tlog system role to support the SSSD session recording configuration options exclude_users and exclude_groups. Follow these steps to prepare and apply an Ansible playbook to configure a RHEL system to exclude users or groups from having their sessions recorded and logged in the systemd journal.
The playbook installs the tlog RHEL system role on the system you specified. The role includes tlog-rec-session, a terminal session I/O logging program, that acts as the login shell for a user. It also creates an /etc/sssd/conf.d/sssd-session-recording.conf SSSD configuration drop file that can be used by users and groups except those that you defined as excluded. SSSD parses and reads these users and groups, and replaces their user shell with tlog-rec-session. Additionally, if the cockpit package is installed on the system, the playbook also installs the cockpit-session-recording package, which is a Cockpit module that allows you to view and play recordings in the web console interface.
Prerequisites
- You have prepared the control node and the managed nodes.
- You are logged in to the control node as a user who can run playbooks on the managed nodes.
-
The account you use to connect to the managed nodes has
sudopermissions on them.
Procedure
Create a playbook file, for example
~/playbook.yml, with the following content:--- - name: Deploy session recording excluding users and groups hosts: managed-node-01.example.com roles: - rhel-system-roles.tlog vars: tlog_scope_sssd: all tlog_exclude_users_sssd: - jeff - james tlog_exclude_groups_sssd: - adminstlog_scope_sssd-
The value
allspecifies that you want to record all users and groups. tlog_exclude_users_sssd- Specifies the user names of the users you want to exclude from the session recording.
tlog_exclude_groups_sssd- Specifies the group you want to exclude from the session recording.
Validate the playbook syntax:
$ ansible-playbook --syntax-check ~/playbook.ymlNote that this command only validates the syntax and does not protect against a wrong but valid configuration.
Run the playbook:
$ ansible-playbook ~/playbook.yml
Verification
Navigate to the folder where the SSSD configuration drop file is created:
# cd /etc/sssd/conf.d/Check the file content:
# cat sssd-session-recording.confYou can see that the file contains the parameters you set in the playbook.
- Log in as a user whose session will be recorded.
- Play back a recorded session.
Additional resources
-
/usr/share/ansible/roles/rhel-system-roles.tlog/README.mdfile -
/usr/share/doc/rhel-system-roles/tlog/directory
Chapter 31. Configuring VPN connections with IPsec by using the RHEL system role
With the vpn system role, you can configure VPN connections on RHEL systems by using Red Hat Ansible Automation Platform. You can use it to set up host-to-host, network-to-network, VPN Remote Access Server, and mesh configurations.
For host-to-host connections, the role sets up a VPN tunnel between each pair of hosts in the list of vpn_connections using the default parameters, including generating keys as needed. Alternatively, you can configure it to create an opportunistic mesh configuration between all hosts listed. The role assumes that the names of the hosts under hosts are the same as the names of the hosts used in the Ansible inventory, and that you can use those names to configure the tunnels.
The vpn RHEL system role currently supports only Libreswan, which is an IPsec implementation, as the VPN provider.
31.1. Creating a host-to-host VPN with IPsec by using the vpn RHEL system role
You can use the vpn system role to configure host-to-host connections by running an Ansible playbook on the control node, which configures all managed nodes listed in an inventory file.
Prerequisites
- You have prepared the control node and the managed nodes.
- You are logged in to the control node as a user who can run playbooks on the managed nodes.
-
The account you use to connect to the managed nodes has
sudopermissions on them.
Procedure
Create a playbook file, for example
~/playbook.yml, with the following content:- name: Host to host VPN hosts: managed-node-01.example.com, managed-node-02.example.com roles: - rhel-system-roles.vpn vars: vpn_connections: - hosts: managed-node-01.example.com: managed-node-02.example.com: vpn_manage_firewall: true vpn_manage_selinux: trueThis playbook configures the connection
managed-node-01.example.com-to-managed-node-02.example.comby using pre-shared key authentication with keys auto-generated by the system role. Becausevpn_manage_firewallandvpn_manage_selinuxare both set totrue, thevpnrole uses thefirewallandselinuxroles to manage the ports used by thevpnrole.To configure connections from managed hosts to external hosts that are not listed in the inventory file, add the following section to the
vpn_connectionslist of hosts:vpn_connections: - hosts: managed-node-01.example.com: <external_node>: hostname: <IP_address_or_hostname>This configures one additional connection:
managed-node-01.example.com-to-<external_node>NoteThe connections are configured only on the managed nodes and not on the external node.
Optional: You can specify multiple VPN connections for the managed nodes by using additional sections within
vpn_connections, for example, a control plane and a data plane:- name: Multiple VPN hosts: managed-node-01.example.com, managed-node-02.example.com roles: - rhel-system-roles.vpn vars: vpn_connections: - name: control_plane_vpn hosts: managed-node-01.example.com: hostname: 192.0.2.0 # IP for the control plane managed-node-02.example.com: hostname: 192.0.2.1 - name: data_plane_vpn hosts: managed-node-01.example.com: hostname: 10.0.0.1 # IP for the data plane managed-node-02.example.com: hostname: 10.0.0.2Validate the playbook syntax:
$ ansible-playbook --syntax-check ~/playbook.ymlNote that this command only validates the syntax and does not protect against a wrong but valid configuration.
Run the playbook:
$ ansible-playbook ~/playbook.yml
Verification
On the managed nodes, confirm that the connection is successfully loaded:
# ipsec status | grep <connection_name>Replace <connection_name> with the name of the connection from this node, for example
managed_node1-to-managed_node2.NoteBy default, the role generates a descriptive name for each connection it creates from the perspective of each system. For example, when creating a connection between
managed_node1andmanaged_node2, the descriptive name of this connection onmanaged_node1ismanaged_node1-to-managed_node2but onmanaged_node2the connection is namedmanaged_node2-to-managed_node1.On the managed nodes, confirm that the connection is successfully started:
# ipsec trafficstatus | grep <connection_name>Optional: If a connection does not successfully load, manually add the connection by entering the following command. This provides more specific information indicating why the connection failed to establish:
# ipsec auto --add <connection_name>NoteAny errors that may occur during the process of loading and starting the connection are reported in the
/var/log/pluto.logfile. Because these logs are hard to parse, manually add the connection to obtain log messages from the standard output instead.
Additional resources
-
/usr/share/ansible/roles/rhel-system-roles.vpn/README.mdfile -
/usr/share/doc/rhel-system-roles/vpn/directory
31.2. Creating an opportunistic mesh VPN connection with IPsec by using the vpn RHEL system role
You can use the vpn system role to configure an opportunistic mesh VPN connection that uses certificates for authentication by running an Ansible playbook on the control node, which will configure all the managed nodes listed in an inventory file.
Prerequisites
- You have prepared the control node and the managed nodes.
- You are logged in to the control node as a user who can run playbooks on the managed nodes.
-
The account you use to connect to the managed nodes has
sudopermissions on them. -
The IPsec Network Security Services (NSS) crypto library in the
/etc/ipsec.d/directory contains the necessary certificates.
Procedure
Create a playbook file, for example
~/playbook.yml, with the following content:- name: Mesh VPN hosts: managed-node-01.example.com, managed-node-02.example.com, managed-node-03.example.com roles: - rhel-system-roles.vpn vars: vpn_connections: - opportunistic: true auth_method: cert policies: - policy: private cidr: default - policy: private-or-clear cidr: 198.51.100.0/24 - policy: private cidr: 192.0.2.0/24 - policy: clear cidr: 192.0.2.7/32 vpn_manage_firewall: true vpn_manage_selinux: trueAuthentication with certificates is configured by defining the
auth_method: certparameter in the playbook. By default, the node name is used as the certificate nickname. In this example, this ismanaged-node-01.example.com. You can define different certificate names by using thecert_nameattribute in your inventory.In this example procedure, the control node, which is the system from which you will run the Ansible playbook, shares the same classless inter-domain routing (CIDR) number as both of the managed nodes (192.0.2.0/24) and has the IP address 192.0.2.7. Therefore, the control node falls under the private policy which is automatically created for CIDR 192.0.2.0/24.
To prevent SSH connection loss during the play, a clear policy for the control node is included in the list of policies. Note that there is also an item in the policies list where the CIDR is equal to default. This is because this playbook overrides the rule from the default policy to make it private instead of private-or-clear.
Because
vpn_manage_firewallandvpn_manage_selinuxare both set totrue, thevpnrole uses thefirewallandselinuxroles to manage the ports used by thevpnrole.Validate the playbook syntax:
$ ansible-playbook --syntax-check ~/playbook.ymlNote that this command only validates the syntax and does not protect against a wrong but valid configuration.
Run the playbook:
$ ansible-playbook ~/playbook.yml
Additional resources
-
/usr/share/ansible/roles/rhel-system-roles.vpn/README.mdfile -
/usr/share/doc/rhel-system-roles/vpn/directory