
Federation with Keycloak and FreeIPA
Resolution
Federation allows your FreeIPA users to log in to Dashboard without revealing their credentials to any OpenStack services. Instead, when Dashboard needs a user’s credentials, it will forward the user to Keycloak and allow them to enter their FreeIPA credentials there. As a result, Keycloak asserts back to Dashboard that the user has successfully authenticated, and Dashboard then allows the user to access the project.
Important
The steps in this guide are not supported by Red Hat and have not been formally tested. This guide has no warranties of any kind, and thorough testing is recommended. For deployments based on Red Hat OpenStack Platform director, see https://access.redhat.com/documentation/en-us/red_hat_openstack_platform/10/html-single/federate_with_identity_service/
Tip
Identity Provider (IdP) - the service that stores the user accounts. In this case, the user accounts held in FreeIPA, are presented to Keystone using Keycloak.
Service Provider (SP) - the service that requires authentication from the users in the IdP. In this case, keystone is the service provider that grants Dashboard access to FreeIPA users.
The Federation Workflow
In the diagram below, Keystone (the SP) communicates with Keycloak (the IdP), which provides the necessary SAML2 WebSSO. Keycloak is also able to serve as a universal adapter for other IdPs. In this configuration, you can point Keystone at Keycloak, and Keycloak will forward requests on to the Identity Providers that it supports (known as authentication modules), these currently include FreeIPA and Active Directory. This is done by having the Service Provider (SP) and Identity Provider (IdP) exchange metadata, which each sysadmin then makes a decision to trust. The result is that the IdP can confidently make assertions, and the SP can then receive these assertions.

Requirements
-
Keystone must be running within httpd.
-
These steps were tested in a lab running the following:
-
CentOS 7
-
FreeIPA - providing DNS and certificate services.
-
Keycloak - version 2.4
-
OpenStack - RDO deployed as all-in-one Packstack.
-
Configuration Overview
This guide describes the following procedures needed to federate with
FreeIPA:
-
Install Keycloak and get it running with a minimal configuration
-
Install the FreeIPA clients
-
Configure Keycloak to retrieve accounts from FreeIPA
-
Configure encryption certificates
-
Install the Keycloak client
-
Configure Dashboard to use FreeIPA certificates
-
Configure Dashboard for Federation
-
Configure Keystone for Federation
-
Configure Keystone to use FreeIPA certificates
-
Configure Keystone to use the Identity Provider (IdP)
Certificate Overview
This diagram gives an overview of where encryption certificates are generated, and where they will be configured. The specific configuration steps are described throughout this guide.
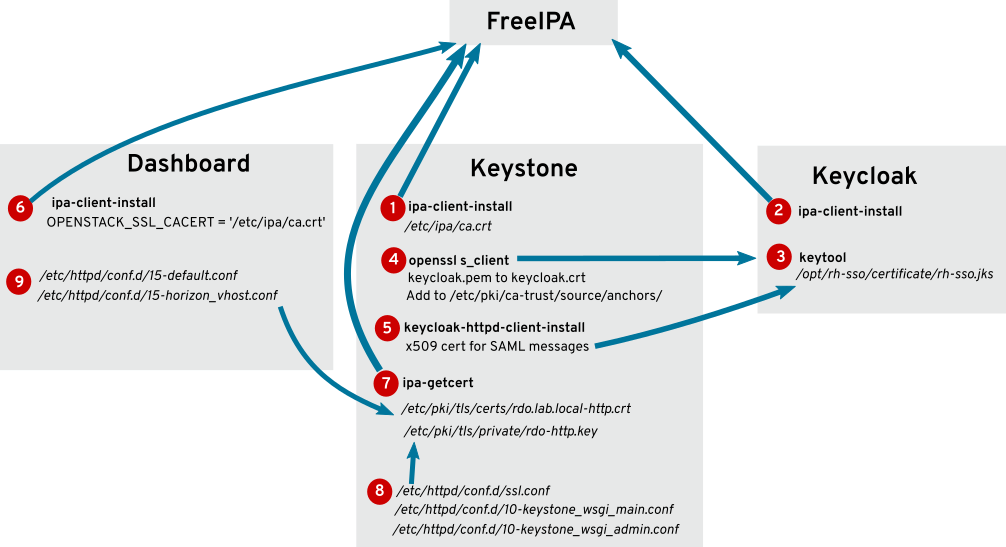
1. The FreeIPA CA is added to the OpenStack node as part of ipa-client-install.
2. The FreeIPA CA is added to the Keycloak server as part of ipa-client-install.
3. A self-signed certificate is generated for Keycloak using keytool.
4. The Keycloak certificate is retrieved and saved to the OpenStack node using openssl s_client.
5. The Keycloak client is installed, and configures the x509 certificate.
6. The FreeIPA certificate is added to the Dashboard configuration.
7. Certificates are requested from FreeIPA and saved on the OpenStack node.
8. The previously requested FreeIPA certificates are added to the Keystone HTTPD configuration.
9. The previously requested FreeIPA certificates are added to the Dashboard HTTPD configuration.
Install Keycloak
Keycloak should be installed on a standalone server.
1. Install Java:
yum install java-1.8.0-openjdk.x86_64
2. Download the Keycloak zip file from www.keycloak.org
3. Extract the zip file to /opt/keycloak/. For example:
mkdir -p /opt/keycloak/keycloak-2.4.0.Final/
unzip keycloak-2.4.0.Final.zip -d /opt/keycloak/
4. Open the required firewall ports:
firewall-cmd --permanent --add-port=8080/tcp
firewall-cmd --permanent --add-port=8443/tcp
firewall-cmd --permanent --add-port=9990/tcp
firewall-cmd --reload
5. The Keycloak standalone.xml file must be configured to suit your deployment, and to use a certificate for encryption purposes. For more information, refer to the Keycloak documentation: http://www.keycloak.org/documentation.html
To get Keycloak up and running quickly for testing purposes, all you need to do is generate a new self-signed certificate, add the security realm, and configure HTTPS:
5a. Generate the certificate:
mkdir -p /opt/keycloak/certificate/
keytool -genkey -alias keycloak.fed.local -keyalg RSA -keystore keycloak.jks -validity 10950
cp keycloak.jks /opt/keycloak/certificate/
5b. Add a new security realm that uses the certificate. For example, in the configuration file /opt/keycloak/keycloak-2.4.0.Final/standalone/configuration/standalone.xml
-
Under this section:
<management> <security-realms> -
Add the following (changing the password as needed):
        <security-realm name="UndertowRealm">
            <server-identities>
                <ssl>
                    <keystore path="/opt/keycloak/certificate/keycloak.jks" keystore-password="RedactedComplexPassword" />
                </ssl>
            </server-identities>
        </security-realm>
5c. Configure the realm to use HTTPS. Add the following settings to the default-server section in standalone.xml:
                <https-listener name="https" socket-binding="https" security-realm="UndertowRealm"/>
                <http-listener name="sslterminated" socket-binding="http-sslterminated"
                  proxy-address-forwarding="true" redirect-socket="proxy-https"/>
-
For example, under this section:
<server name="default-server"> <http-listener name="default" socket-binding="http" redirect-socket="https"/> <host name="default-host" alias="localhost"> <location name="/" handler="welcome-content"/> <filter-ref name="server-header"/> <filter-ref name="x-powered-by-header"/> </host> -
Add the following:
            <https-listener name="https" socket-binding="https" security-realm="UndertowRealm"/>
            <http-listener name="sslterminated" socket-binding="http-sslterminated"
              proxy-address-forwarding="true" redirect-socket="proxy-https"/>
5d. Add the following socket bindings:
        <socket-binding name="http-sslterminated" port="${jboss.http-sslterminated.port:8480}"/>
        <socket-binding name="proxy-https" port="443"/>
-
For example, under this section:
<socket-binding-group name="standard-sockets" default-interface="public" port-offset="${jboss.socket.binding.port-offset:0}"> <socket-binding name="management-http" interface="management" port="${jboss.management.http.port:9990}"/> <socket-binding name="management-https" interface="management" port="${jboss.management.https.port:9993}"/> <socket-binding name="ajp" port="${jboss.ajp.port:8009}"/> <socket-binding name="http" port="${jboss.http.port:8080}"/> <socket-binding name="https" port="${jboss.https.port:8443}"/> <socket-binding name="txn-recovery-environment" port="4712"/> <socket-binding name="txn-status-manager" port="4713"/> -
Add the following:
    <socket-binding name="http-sslterminated" port="${jboss.http-sslterminated.port:8480}"/>
    <socket-binding name="proxy-https" port="443"/>
6. Start the Keycloak server. Running the service on 0.0.0.0 will have Keycloak listen on all IP addresses configured on the server:
# bash /opt/keycloak/keycloak-2.4.0.Final/bin/standalone.sh -b=0.0.0.0
7. Create the Keycloak admin account. From a new session, run the following (changing the -p password to suit your requirements):
# bash /opt/keycloak/keycloak-2.4.0.Final/bin/add-user-keycloak.sh -r master -u admin -p RedactedComplexPassword
8. Restart the Keycloak server. The next section configures Keycloak to run as a systemd service.
ctrl-c
# bash /opt/keycloak/keycloak-2.4.0.Final/bin/standalone.sh -b=0.0.0.0
Configure the Keycloak service
Follow this procedure if you need to run Keycloak as a systemd service, which allows you to manage it using systemctl, and have it start automatically on boot.
1. Create a service account for keycloak named svc-keycloak:
useradd svc-keycloak -p RedactedComplexPassword
2. Create the systemd service file: /etc/systemd/system/keycloak.service
[Unit]
Description=Keycloak
After=network.target

[Service]
Type=idle
ExecStart=/opt/keycloak/keycloak-2.4.0.Final/bin/standalone.sh -b=0.0.0.0 -c standalone.xml
TimeoutStartSec=600
TimeoutStopSec=600
User=svc-keycloak
Group=svc-keycloak

[Install]
WantedBy=multi-user.target
3. Enable and start the Keycloak service:
# systemctl daemon-reload
# systemctl enable keycloak.service
# systemctl start keycloak.service
4. Add the hostname and FQDN to the /etc/hosts entry for 127.0.0.1. For example:
127.0.0.1 keycloak.fed.local keycloak localhost localhost.localdomain localhost4 localhost4.localdomain4
Edit the Mellon Configuration
Additional mellon configuration is required for your deployment: As you will be using a list of groups during the IdP-assertion-to-Keystone mapping phase, the keystone mapping engine expects lists to be in a certain format (one value with items separated by a semicolon (;)). As a result, you must configure mellon so that when it receives multiple values for an attribute, it must know to combine the multiple attributes into a single value with items separated by a semicolon. This mellon directive will accomplish that:
MellonMergeEnvVars On ";"
- To configure this setting in your deployment:
$ vi /etc/httpd/conf.d/v3_mellon_keycloak_master.conf
-
Locate the
<Location /v3>block and add a line to it. For example:
...
MellonMergeEnvVars On ";"
Add User Attributes for SAML Assertion
The SAML assertion sends user account properties to keystone; these are called attributes in SAML. You will need to instruct RH-SSO to return the required attributes in the assertion. Then, when keystone receives the SAML assertion, it will map those attributes into user metadata in a manner which keystone can then process. The process of mapping IdP attributes into keystone data is called Federated Mapping and will be covered later in this guide.
Keycloak calls the process of adding returned attributes "Protocol Mapping". Protocol mapping is a property of the RH-SSO client (for example, the service provider (SP) added to the RH-SSO realm). The process for adding SAML any given attribute follows a similar pattern.
In the Keycloak administration web console, perform the following
actions:
1. Select $FED_RHSSO_REALM from the drop-down list in the upper left corner.
2. Select Clients from the left side Configure panel.
3. Select the SP client that was setup by keycloak-httpd-client-install. It will be identified by its SAML EntityId.
4. Select the Mappers tab from the horizontal list of tabs appearing at the top of the client panel.
5. In the Mappers panel in the upper right are two buttons: Create and Add Builtin. Use one of these buttons to add a protocol mapper to the client. You can add any attributes you need, but for this example you will only need the list of groups the user is a member of (because group membership is how you will authorize the user).
6. Add Group Information to the Assertion:
6.1. Click on the Create button in the Mappers panel.
6.2. In the Create Protocol Mapper panel select Group list from the Mapper type drop-down list.
6.3. Enter "Group List" as a name in the Name field.
6.4. Enter "groups" as the name of the SAML attribute in the Group attribute name field.
Note
This is the name of the attribute as it will appear in the SAML assertion. When the Keystone mapper looks for names in the
Remotesection of the mapping declaration it is the SAML attribute names it is looking for. Whenever you add an attribute in RH-SSO to be passed in the assertion you will need to specify the SAML attribute name, it is the RH-SSO protocol mapper where that name is defined.
7. In the SAML Attribute NameFormat field select Basic.
8. In the Single Group Attribute toggle box select On.
9. Click Save at the bottom of the panel.
Note
keycloak-httpd-client-installadds a group mapper when run.
Configure FreeIPA
In this guide, FreeIPA is situated externally to the OpenStack deployment and is the source of all user and group information. Keycloak will be configured to use FreeIPA as its User Federation, performing an LDAP search against FreeIPA to obtain user and group information.
Create a test user
You will also need a test user account in FreeIPA. You can either use an existing user or create a new one; the examples in this guide use "John Doe" with a uid of jdoe. You can create the jdoe user in FreeIPA:
$ kinit admin
$ ipa user-add --first John --last Doe --email jdoe@fed.local jdoe
Assign a password to the user:
$ ipa passwd jdoe
Configure Keycloak and OpenStack to use FreeIPA
1. Join the OpenStack controller and the Keycloak node to the IPA domain:
# yum install ipa-client
# ipa-client-install --force-join
On the FreeIPA server, register the HTTP service using the FQDN of the OpenStack controller node:
# kinit admin
# ipa service-add HTTP/rdo.fed.local
2. The Keycloak administration console is accessible at port 8443 using your browser. For example: https://keycloak.fed.local:8443/auth/
Log in to Keycloak using the admin credentials set in standalone.xml, and navigate to User Federation → Add Provider (near the top right)→ LDAP.
3. From the Vendor drop down list, select Red Hat Directory Server. Complete the following fields. You will likely need to change these example to suit your deployment:
Note
You will need to change the
UUID LDAP attributevalue to
ipaUniqueID.
| Property | Value |
|---|---|
|
Console Display Name |
FreeIPA |
|
Edit Mode |
READ_ONLY |
|
Sync Registrations |
Off |
|
Vendor |
Red Hat Directory Server |
|
Username LDAP attribute |
uid |
|
RDN LDAP attribute |
uid |
|
UUID LDAP attribute |
ipaUniqueID |
|
User Object Classes |
inetOrgPerson, organizationalPerson |
|
Connection URL |
ldaps://freeipa.fed.local:636 |
|
Users DN |
cn=users,cn=accounts,dc=fed,dc=local |
|
Authentication Type |
simple |
|
Bind DN |
uid=admin,cn=users,cn=accounts,dc=fed,dc=local |
|
Bind Credential |
Enter the password of the above account. |
Click Test connection to validate the settings you entered above.
-
Set
Allow Kerberos authenticationtoOff. -
Click
Saveand thenSynchronize all users.
Navigate to the Users button on the left pane. Now when you click
View all users, you can expect to see your FreeIPA users listed there.
4. In Keycloak, create a group called openstack-users:
- Under the
Managepane on the left, clickGroups→New.
The members of this group will later be granted permission to access the federated_project.
Install the FreeIPA CA certificate
This procedure retrieves the CA certificate from FreeIPA and adds it to your OpenStack controller; in a later procedure, you will request the SSL certificates from FreeIPA.
1. On the OpenStack Controller, retrieve the certificate presented by Keycloak and add it to the trust:
# openssl s_client -showcerts -connect keycloak.fed.local:8443 </dev/null 2>/dev/null|openssl x509 -outform PEM >keycloak.pem
# cat keycloak.pem >> /etc/pki/tls/certs/ca-bundle.crt
# openssl x509 -outform der -in keycloak.pem -out keycloak.crt
# cp keycloak.crt /etc/pki/ca-trust/source/anchors/
# update-ca-trust --force-enable
Install the Keycloak client
1. On the OpenStack controller, install the Keycloak client. The supplied keycloak-httpd-client-install parameters are an example only; you will need to update them for your deployment.
# yum install keycloak-httpd-client-install mod_auth_mellon mod_auth_gssapi mod_lookup_identity

# keycloak-httpd-client-install \
      --client-originate-method registration \
      --force \
      --mellon-https-port 5000 \
      --mellon-hostname rdo.fed.local \
      --mellon-root '/v3' \
      --keycloak-server-url https://keycloak.fed.local:8443 \
      --keycloak-auth-role root-admin \
      --keycloak-admin-password RedactedComplexPassword \
      --app-name v3 \
      --keycloak-realm master \
       --mellon-https-port 5000 \
      -l "/v3/auth/OS-FEDERATION/websso/mapped" \
      -l "/v3/auth/OS-FEDERATION/identity_providers/keycloak/protocols/mapped/websso" \
      -l "/v3/OS-FEDERATION/identity_providers/keycloak/protocols/mapped/auth"
The resulting output should include:
[Step  1] Connect to Keycloak Server
[Step  2] Create Directories
[Step  3] Set up template environment
[Step  4] Set up Service Provider X509 Certificiates
[Step  5] Build Mellon httpd config file
[Step  6] Build Mellon SP metadata file
[Step  7] Query realms from Keycloak server
[Step  8] Use existing realm on Keycloak server
[Step  9] Query realm clients from Keycloak server
[Step 10] Force delete client on Keycloak server
[Step 11] Get new initial access token
[Step 12] Creating new client using registration service
[Step 13] Enable saml.force.post.binding
[Step 14] Add group attribute mapper to client
[Step 15] Retrieve IdP metadata from Keycloak server
[Step 16] Completed Successfully
2. Configure SELinux
setsebool -P httpd_dbus_sssd on
setsebool -P allow_httpd_mod_auth_pam on
setsebool -P nis_enabled 1
You might get the following output. This can be ignored:
Full path required for exclude: net:[4026532280].
Full path required for exclude: net:[4026532280].
Full path required for exclude: net:[4026532375].
Full path required for exclude: net:[4026532375].
Configure Keystone for Federation
1. Edit /etc/keystone/keystone.conf and update the trusted_dashboard value to suit your deployment.
Note
You may need to install the
openstack-utilspackage to get theopenstack-configutility:yum install openstack-utils
openstack-config --set /etc/keystone/keystone.conf identity domain_configurations_from_database true
openstack-config --set /etc/keystone/keystone.conf auth methods external,password,token,oauth1,mapped
openstack-config --set /etc/keystone/keystone.conf federation remote_id_attribute MELLON_IDP
openstack-config --set /etc/keystone/keystone.conf federation trusted_dashboard https://rdo.fed.local/dashboard/auth/websso/
openstack-config --set /etc/keystone/keystone.conf federation sso_callback_template /etc/keystone/sso_callback_template.html
As a result, the following entries in keystone.conf should have been updated:
[identity]
domain_configurations_from_database = true

[auth]
methods = external,password,token,oauth1,mapped

[catalog]
driver = keystone.catalog.backends.sql.Catalog

[federation]
remote_id_attribute = MELLON_IDP
trusted_dashboard = https://rdo.fed.local/dashboard/auth/websso/
sso_callback_template = /etc/keystone/sso_callback_template.html
Configure Keystone to use FreeIPA certificates
Keycloak requires that your Keystone endpoints configured to use SSL. This section configures keystone to use certificates generated by FreeIPA.
1. Request certificates from FreeIPA:
ipa-getcert request -w -v -r -f /etc/pki/tls/certs/rdo.fed.local-http.crt -k /etc/pki/tls/private/rdo-http.key -N CN=rdo.fed.local -D rdo.fed.local -U id-kp-serverAuth -K HTTP/rdo.fed.local
This will generate a .crt and a .key file using the supplied paths.
2. Edit /etc/httpd/conf.d/ssl.conf and replace the following values with the paths to the files from the previous step:
SSLCertificateFile /etc/pki/tls/certs/rdo.fed.local-http.crt
SSLCertificateKeyFile /etc/pki/tls/private/rdo-http.key
SSLCertificateChainFile /etc/ipa/ca.crt
3. Configure the keystone vhost for SSL in both /etc/httpd/conf.d/10-keystone_wsgi_main.conf and /etc/httpd/conf.d/10-keystone_wsgi_admin.conf:
SSLEngine on
SSLCertificateFile /etc/pki/tls/certs/rdo.fed.local-http.crt
SSLCertificateKeyFile /etc/pki/tls/private/rdo-http.key
SSLCACertificateFile /etc/ipa/ca.crt
Note
For
SSLCertificateFileandSSLCertificateKeyFile, enter the paths to the certificates generated with the earlier ipa-getcert command.
4. Validate the httpd configuration, then restart httpd if no syntax errors are reported:
# httpd -t
# systemctl restart httpd
Note
Consider reviewing your SELinux settings if the HTTP service is unable to start.
Configure Dashboard to use FreeIPA certificates
This section configures the Dashboard vhost to use the certificates generated by FreeIPA in the previous step. Edit the following files:
-
/etc/httpd/conf.d/15-default.conf
-
/etc/httpd/conf.d/15-horizon_vhost.conf
Add the following settings:
SSLEngine on
SSLCertificateFile /etc/pki/tls/certs/rdo.fed.local-http.crt
SSLCertificateKeyFile /etc/pki/tls/private/rdo-http.key
SSLCACertificateFile /etc/ipa/ca.crt
Configure Dashboard for Federation
These steps configure Dashboard to present an alternative SAML option at the login page, using SSL settings.
1. Configure Dashboard for federation:
Edit /etc/openstack-dashboard/local_settings
OPENSTACK_KEYSTONE_URL = "https://rdo.fed.local:5000/v3"
OPENSTACK_HOST = "rdo.fed.local"
OPENSTACK_KEYSTONE_DEFAULT_ROLE = "_member_"

WEBSSO_ENABLED = True
WEBSSO_CHOICES = (('credentials', _('Keystone Credentials')),
                  ("mapped", _("Keycloak"))
                  )
WEBSSO_INITIAL_CHOICE='mapped'
OPENSTACK_SSL_CACERT = '/etc/ipa/ca.crt'
These options are described here:
-
OPENSTACK_KEYSTONE_URL- This must be the FQDN of the OpenStack controller. -
credentials- By enabling the credentials option, you will allow users with local keystone accounts to still be able to use those to login to Dashboard. -
saml2- This enables the SAML2 option, which will forward authentication requests to the IdP (Keycloak). You can enter an appropriately descriptive name here, this example uses FreeIPA to indicate that the user accounts are located within FreeIPA.
2. Restart the dashboard service. This will also have the effect of restarting keystone, since it is now integrated with httpd.
# systemctl restart httpd
As a result, dashboard users will now see a drop-down list that lets them to choose to authenticate using their FreeIPA credentials, or a built-in Identity Service login. As shown above, you can set the default option using WEBSSO_INITIAL_CHOICE by specifying one of the options enabled previously: credentials or mapped. For example:
WEBSSO_INITIAL_CHOICE = "mapped"
Configure Keystone to use the Identity Provider
Keystone allows a single source of Identity (the Identity Provider) to handle multiple protocols, such as SAML, or OpenID Connect. As covered below, you must first add Keycloak as the identity provider, then upload a mapping file, and finally associate the mapping file with a specific protocol for the identity provider.
This integration uses mod_lookup_identity. This Apache module retrieves metadata about the authenticated user, which is used for mapping values between Keycloak and Keystone. This means that Keystone is able to translate user attributes from Keycloak (such as username and group membership) into data that it can relate to.
1. Add the identity provider. Check that you are using keystone v3 from the command line, then confirm the name of your Keycloak realm; this example uses a keycloak realm named master.
$ openstack identity provider create --remote-id https://keycloak.fed.local:8443/auth/realms/master keycloak
During the authentication process, Keycloak will send a user’s attributes (such as username and group membership) through to keystone, which needs to be able to match these attributes with the equivalent keystone values. These values are aligned using the mapping process, illustrated below:
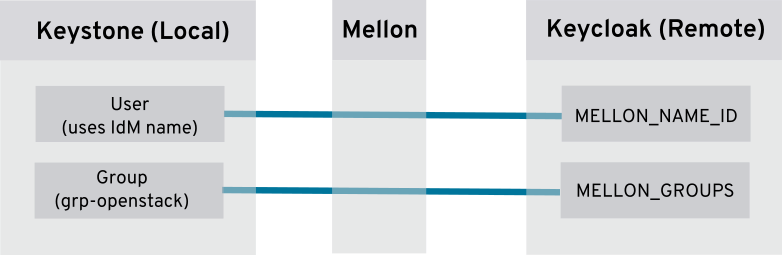
2. Create a new file called mapping_rules.json that describes and matches the attributes. See the example below:
[
    {
        "local": [
            {
                "user": {
                    "name": "{0}"
                },
                "group": {
                    "domain": {
                        "name": "federated_domain"
                    },
                    "name": "federated_users"
                }
            }
        ],
        "remote": [
            {
                "type": "MELLON_NAME_ID"
            },
            {
                "type": "MELLON_GROUPS",
                "any_one_of": ["openstack-users"]
            }
        ]
    }
]
3. Import the mapping_rules.json file into keycloak_mapping:
$ openstack mapping create --rules mapping_rules.json keycloak_mapping
4. Create the project, domain and the federation protocol, and associate the mapping with the protocol:
$ openstack domain create federated_domain
$ openstack project create  --domain federated_domain federated_project
$ openstack federation protocol create --identity-provider keycloak --mapping keycloak_mapping mapped
5. Create the group that will authorize federated users:
$ openstack group create federated_users --domain federated_domain
6. Retrieve the group id, and use it to add the group to the
_member_ roles:
$ openstack group list
+----------------------------------+-----------------+
| ID                               | Name            |
+----------------------------------+-----------------+
| a7c4978dd38c4d04b7538061c46b594e | federated_users |
+----------------------------------+-----------------+

$ openstack role add --group a7c4978dd38c4d04b7538061c46b594e --domain federated_domain _member_
$ openstack role add --group a7c4978dd38c4d04b7538061c46b594e --project federated_project _member_
As a result, adding a user to the Keycloak group openstack-users will give them member-level access to the federated_project.
Testing the Federation Process
A FreeIPA user that is a member of the openstack-users Keycloak group will be able to login to the OpenStack dashboard and access the federated_project:
1. Navigate to the OpenStack dashboard page. For example: https://rdo.fed.local/dashboard
2. At the Authenticate using drop-down list, select keycloak and click Connect.
3. You are then automatically forwarded to the keycloak server. The URL will be similar to this example: https://keycloak.fed.local:8443/auth/realms/master/login-actions/authenticate
4. Enter your FreeIPA credentials and click Log in.
5. You are briefly redirected to a page that says Please wait....
6. You are then redirected to the OpenStack dashboard as an authenticated user, where you are able to see the OpenStack resources that your account has been authorised to access (based on your role membership).
7. Click on the various tabs to confirm that you are able to view the network and compute resources without errors.
8. Create a test instance to validate that the services are properly configured to communicate with HTTPS keystone.
Troubleshooting
httpd service not starting
If the httpd service does not restart successfully, use the httpd command to validate the configuration file syntax. For example:
[root@rdo ~]# httpd -t
AH00526: Syntax error on line 53 of /etc/httpd/conf.d/10-keystone_wsgi_admin.conf:
Invalid command 'deliberateTypo', perhaps misspelled or defined by a module not included in the server configuration
If that does not help with resolving the issue, you might need to check that SELinux is not preventing the service from starting.
Postresponse error in URL
If you get postresponse errors after attempting to login, and the following error appears in /var/log/httpd/keystone_wsgi_main_error.log:
`NotOnOrAfter in SubjectConfirmationData was in the past`
Then you might need to review the token timeout values in Keycloak: Realm Settings → Tokens.
404 Error
If you receive a 404 error when accessing the HTTPS dashboard, confirm that the VirtualHost configuration is using port 443.
In both /etc/httpd/conf.d/15-default.conf, and /etc/httpd/conf.d/15-horizon_vhost.conf check that the port is 443, and not 80:
<VirtualHost *:443>
This solution is part of Red Hat’s fast-track publication program, providing a huge library of solutions that Red Hat engineers have created while supporting our customers. To give you the knowledge you need the instant it becomes available, these articles may be presented in a raw and unedited form.
Comments