
Setting up Ansible on VirtualBox with NX-OSv
Table of Contents
Get the Cisco NXOSv image
Cisco allows download of this image with a valid contract through their website Cisco.com. They offer Vagrant box images, OVA, qcow2 and of course a vmdk. We will go ahead and setup a VM and connect to a CentOS box running Ansible.
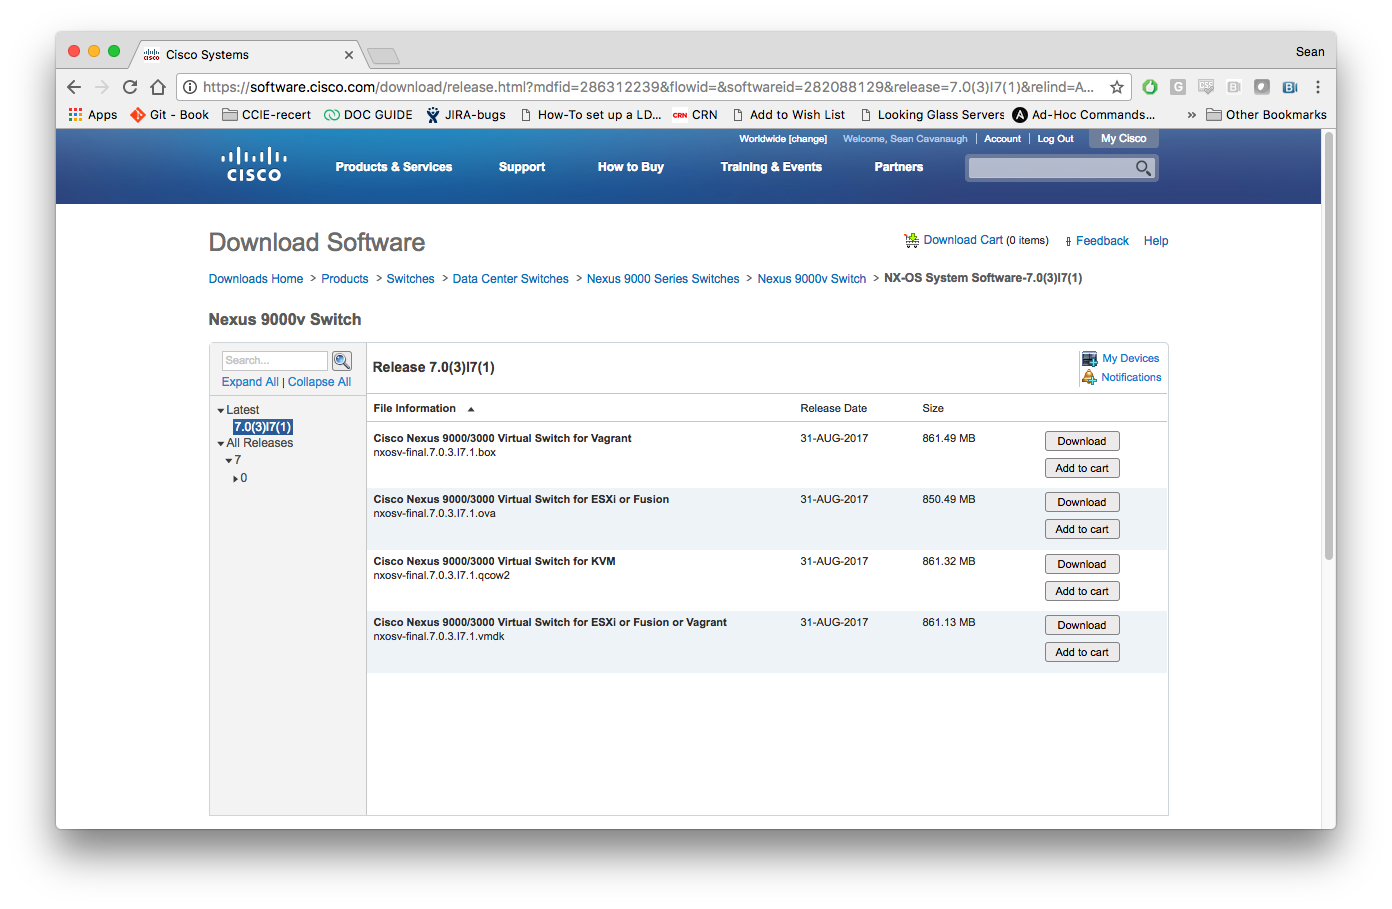
Cisco has detailed directions on their website here.
https://www.cisco.com/c/en/us/td/docs/switches/datacenter/nexus9000/sw/7-x/nx-osv/configuration/guide/b_NX-OSv_9000/b_NX-OSv_chapter_01.html
However I will briefly show my setup using the directions Cisco provides.
Setup Virtual Box
Open up Virtualbox and click on the new button:

The official Cisco directions say to assign this Type to Linux, Version to Other Linux and to assign 8192MB of memory. I went ahead and clicked “Do not add a virtual hard disk” since we have to do a special step there.
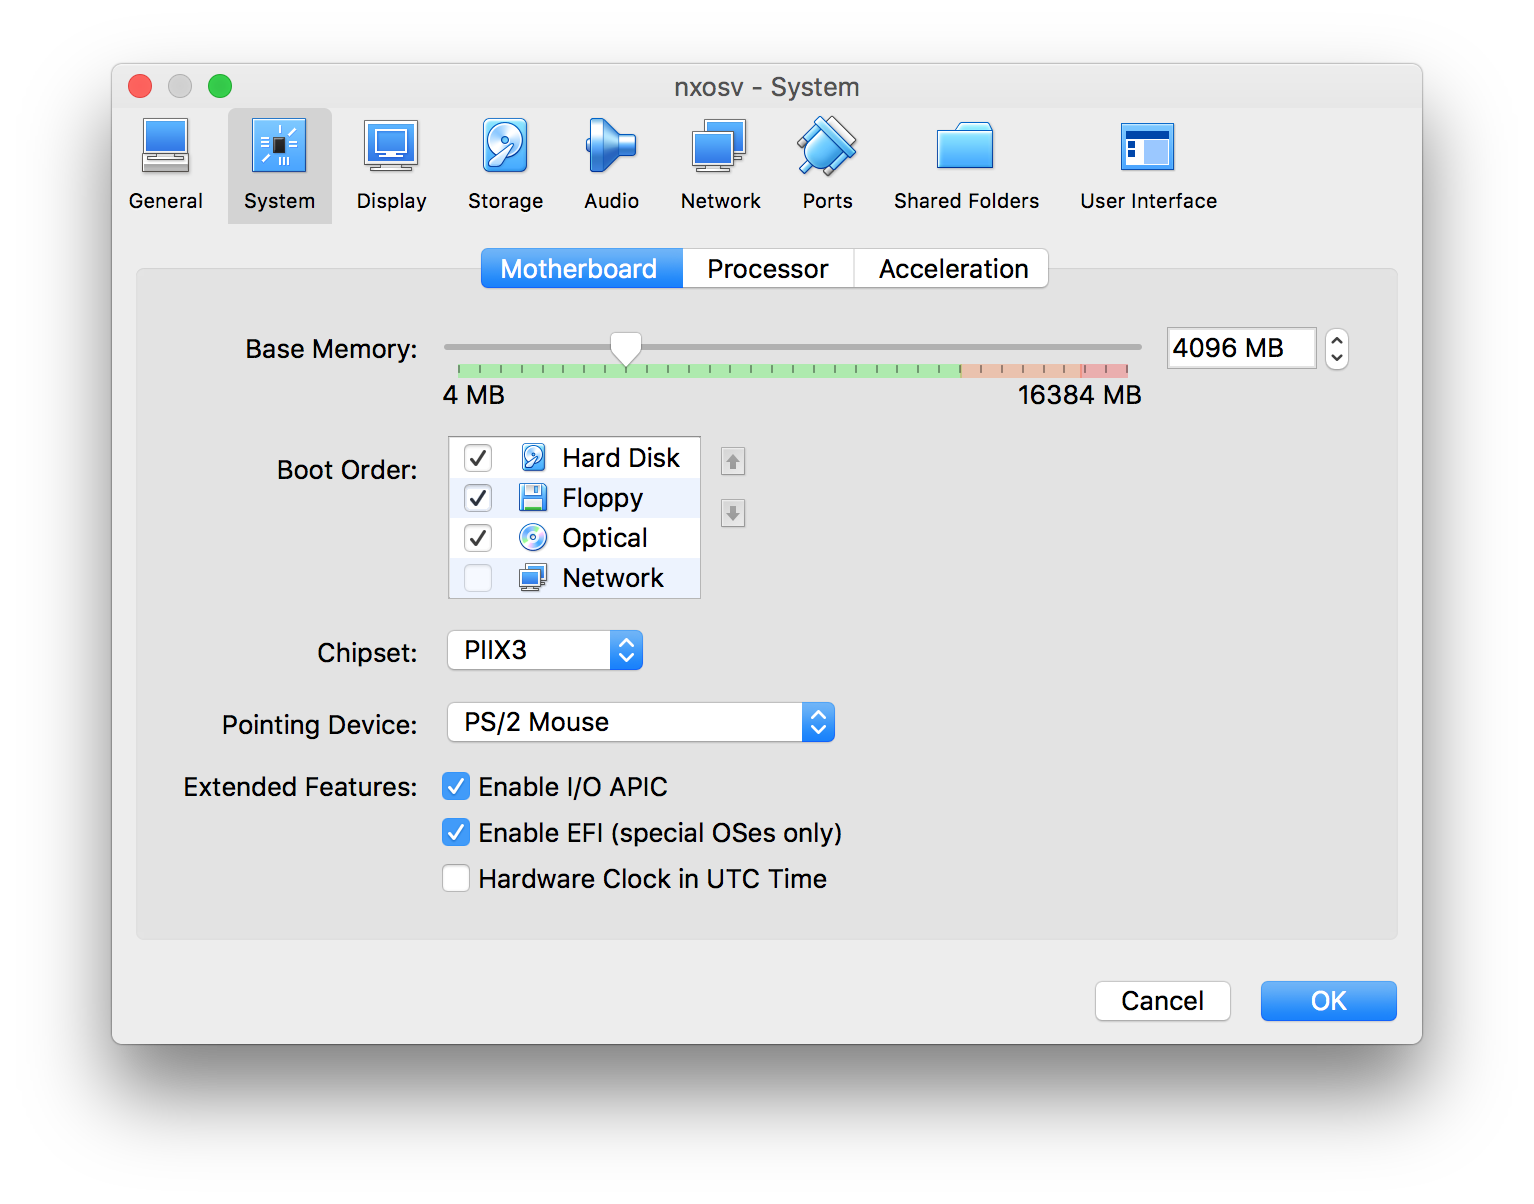
Go to the settings and click the System button at the top. Make sure to enable EFI. Enable I/O APIC was already selected in my case. Cisco also directs users to change the boot order so the Hard Disk always boots first. Also make sure the Pointing Device to PS/2 Mouse since a later step requires disabling USB.
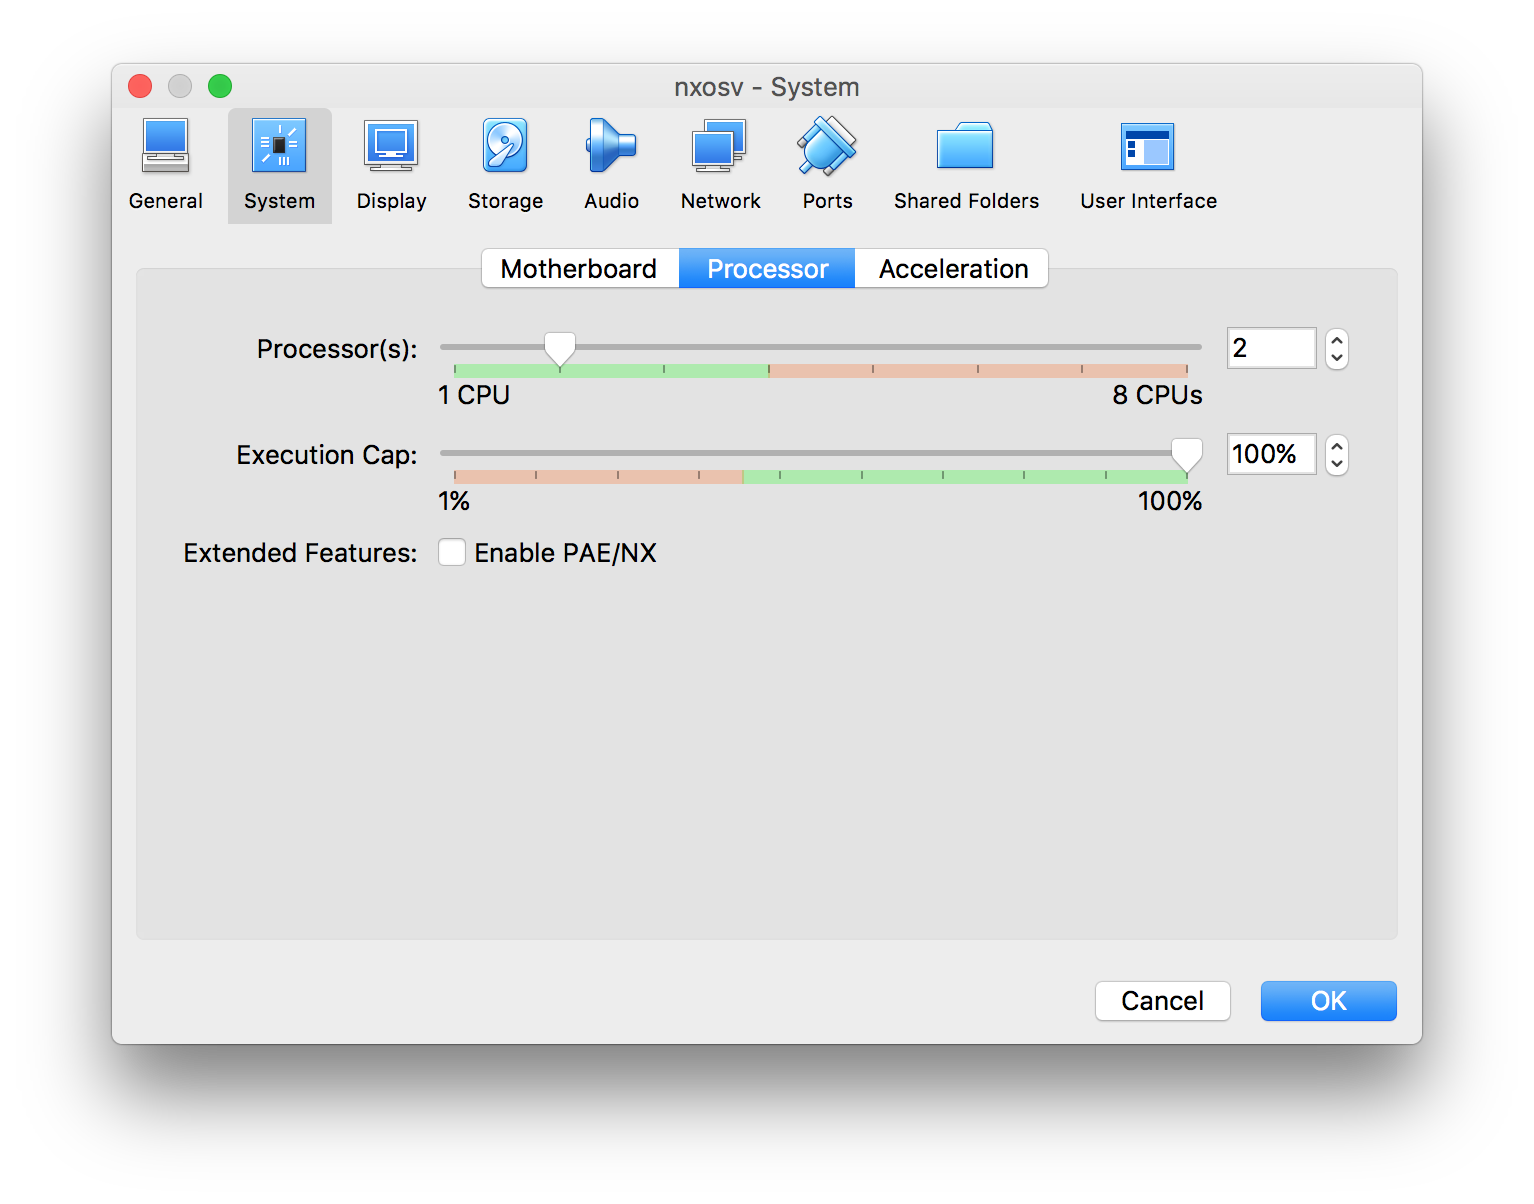
Next click the Processor tab and change the CPUs to 2.
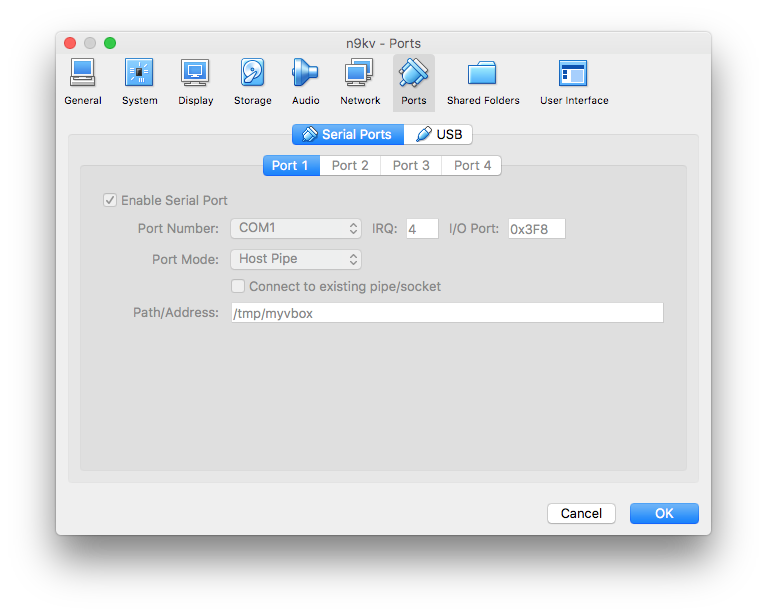
Next, enable the Serial Port, and change the Port Mode to Host Pipe. Uncheck the Connect to existing pipe/socket so that Virtualbox will create this socket For us. The Path/Address is a user defined value, for this demonstration I use /tmp/myvbox.
Click on the Start button to boot the VM

Instead of clicking on the console, we are going to connect via socat. To install socat on macOS install Homebrew, then use Homebrew to install socat
To install Homebrew:
ruby -e "$(curl -fsSL https://raw.githubusercontent.com/Homebrew/install/master/install)"
To install socat:
brew install socat
Finally we are going to use socat to get on the serial console of the running NX-OSv device.
socat unix-connect:/tmp/myvbox
If everything is setup correctly your terminal window will look like this:
SEANs-MacBook-Pro:tmp sean$ socat unix-connect:/tmp/myvbox stdin


User Access Verification
switch login:
Setting up networking on NX-OSv
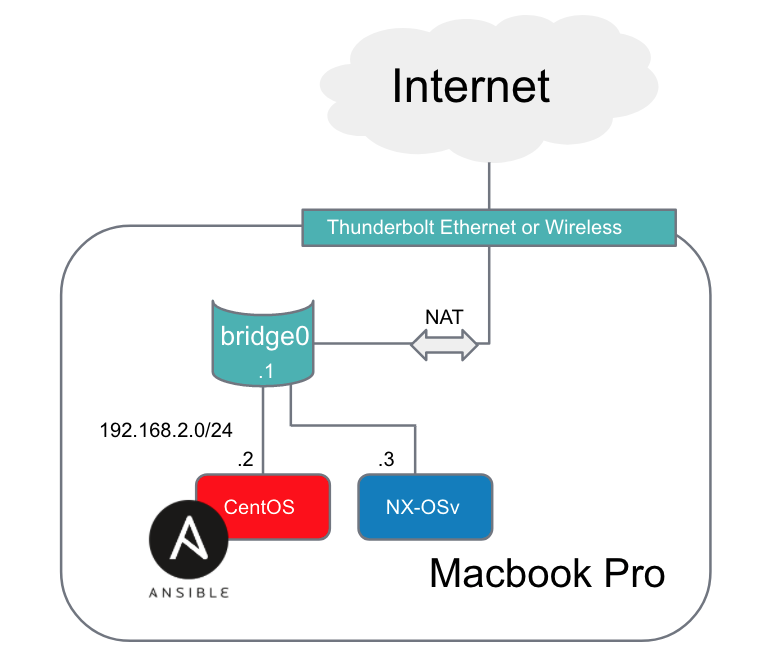
Here is a quick sketch of the network setup we want to create:
Prior to configuring everything through Ansible, we need to gain SSH reachability to the box. In real physical switches where we have dozens if not hundreds of switches we could use POAP (PowerOn Auto-Provisioning) which is documented here on Cisco’s website. This could take care of the initial SSH reachability, then we could provision the rest of the network with Ansible.
To make the NX-OSv box reachable we need to do 3 things:
- Assign the NX-OSv interface to the bridge0 on the Macbook Pro
- Assign a static IP address to the mgmt0 interface on the NX-OSv box
- Assign a default route to the bridge interface (also known as a SVI or Switch VLAN interface). This is optional but will allow outside reachability to the internet.
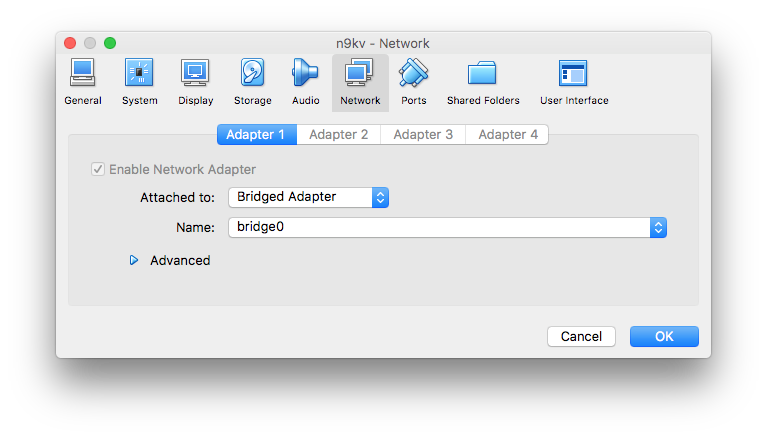
Assign the NX-OSv interface to the bridge0
Click on the VM and go to Settings and click on the Network button. Go to Adapter 1, change it to a Bridge Adapter and tie it to the bridge0 as shown in the screenshot below:
Assign a static IP address to the mgmt0
In the serial console we opened earlier we will configure an IP address on the mgmt0 interface. This IP address just needs to be on the same subnet as the IP address on the bridge0 interface.
switch# conf t
switch(config)# int mgmt0
switch(config-if)# ip address 192.168.2.3/24
switch(config-if)# exit
Assign a default route (optional)
We will allow our NX-OSv device reachability to the internet through the bridge interface. Assign a default route (gateway of last resort) to the bridge0 interface.
switch(config)# ip route 0.0.0.0/0 192.168.2.1
switch(config)# end
switch# copy running-config startup-config
copy running-config startup-config
[########################################] 100%
Copy complete, now saving to disk (please wait)...
Copy complete.
switch#
Test connectivity by using the ping command. Make sure to use the right vrf (NX-OS defaults the management interface into the management vrf context.
switch# ping 192.168.2.1 vrf management
ping 192.168.2.1 vrf management
PING 192.168.2.1 (192.168.2.1): 56 data bytes
64 bytes from 192.168.2.1: icmp_seq=0 ttl=63 time=0.904 ms
64 bytes from 192.168.2.1: icmp_seq=1 ttl=63 time=0.987 ms
64 bytes from 192.168.2.1: icmp_seq=2 ttl=63 time=0.539 ms
64 bytes from 192.168.2.1: icmp_seq=3 ttl=63 time=0.714 ms
64 bytes from 192.168.2.1: icmp_seq=4 ttl=63 time=0.652 ms

--- 192.168.2.1 ping statistics ---
5 packets transmitted, 5 packets received, 0.00% packet loss
round-trip min/avg/max = 0.539/0.759/0.987 ms
switch#
Ansible Setup
Whether you are using Ansible Ad-Hoc commands or Ansible playbooks you will need a couple files setup in addition to installing Ansible:
- Inventory - this is a list of hosts and/or groups that Ansible command and playbooks can be run on.
- Ansible Configuration File (optional) - this allows you to specify some configuration settings if you don’t want to use the defaults, or want to specify a specific settings for this particular folder of playbooks.
My setup:
My local hosts file (which I use instead of using /etc/ansible/hosts)
[root@localhost ~]# cat hosts
localhost

[mac]
192.168.2.1

[cisco]
n9k ansible_host=192.168.2.3 ansible_network_os=nxos ansible_user=admin ansible_password=Bullf00d!
My Ansible.cfg file:
[root@localhost ~]# cat ansible.cfg
[defaults]
host_key_checking = False
inventory = hosts

[paramiko_connection]
host_key_auto_add = True
Explanation of Configuration Settings:
- host_key_checking host key checking is disabled. This has security implications but is fine for just playing around. This gets rid of yes/no prompts for initial SSH access
- inventory Specifies a specific inventory file (name is user defined)
- host_key_auto_add tells Ansible to automatically accept host keys (same as host_key_checking but for network nodes)
A list of all configuration settings for the ansible.cfg file can be found here.
Testing Ansible Ad-Hoc commands with NX-OS
Like all Ansible modules, networking modules can be run as a one-liner Ad-Hoc method. This is less common but very easy to setup:
ansible -m nxos_command -c network_cli -u admin -k -a "commands='show ver'" cisco
- m specifies the module to use. A list of networking modules can be found here.
- c specifies connection to reach network devices.
- u specifies username to login to the specified nodes
- k ask for connection password
- a module arguments, in this case the arguments are provided by the module documentation for nxos_command.
- cisco This can be an Ansible group or host. In this case this is a user defined group as displayed above in the hosts file.
When the Ad-Hoc command is run you will get output like the following:
SSH password: (user manually enters password)
n9k | SUCCESS => {
    "changed": false,
    "failed": false,
<output removed for brevity>
            "Software",
            "  BIOS: version ",
            "  NXOS: version 7.0(3)I7(1)",
            "  BIOS compile time:  ",
            "  NXOS image file is: bootflash:///nxos.7.0.3.I7.1.bin",
            "  NXOS compile time:  8/31/2017 14:00:00 [08/31/2017 22:29:32]",
<output removed for brevity>
The Ad-Hoc method allows us to send a simple one-liner command to grab a “show version” from our n9k. Immediately you can see the potential of Ansible where you can grab all the versions of code from hundreds of NX-OS devices at the same time.
Testing an Ansible Playbook with NX-OS
An Ansible playbook allows us a repeatable way to run a set of commands. For best practices we are going to follow Ansible best practices.
Here is the simple playbook that performs the same functionality as the Ad-Hoc method shown previously.
[root@localhost ~]# cat showversion.yml
---
- hosts: cisco
  connection: network_cli
  gather_facts: False
  tasks:
    - name: run show version
      nxos_command:
        commands: show version
Run the playbook with the ansible-playbook command (vs the ansible command used in the Ad-Hoc method).
[root@localhost ~]# ansible-playbook showversion.yml

PLAY [cisco] *******************************************************************

TASK [run show version] ********************************************************
ok: [n9k]

PLAY RECAP *********************************************************************
n9k                        : ok=1    changed=0    unreachable=0    failed=0
Lets dissect the playbook:
- hosts: cisco
This is the network hosts we want to run the playbook on, as specified in the hosts file
connection: network_cli
The connection method is using network_cli. This will execute module code locally on the Ansible control node and knows the target hosts are networking platforms like Cisco NX-OS and can take advantage of persistent SSH and dealing with networking prompts.
gather_facts: False
Skip gathering facts.
tasks:
All tasks (networking modules) will be listed below the tasks keyword.
- name: run show version
This is user defined text that prints out when we run the playbook
nxos_command:
This is the actual module we want to run.
commands: show version
This is the actual command we want to run on the target network hosts. This is an argument that the nxos_command module takes.
One of the things you might notice is we did not receive the stdout from the command we ran on the N9k. We can use the debug module to easily grab that from a playbook. First lets look at my new output so you can see the end result:
[root@localhost ~]# ansible-playbook showversion.yml

PLAY [cisco] ***********************************************************************************************************

TASK [run show version] *************************************************************************************************
ok: [n9k]

TASK [debug] ***********************************************************************************************************
ok: [n9k] => {
    "result.stdout_lines[0][14]": "  NXOS: version 7.0(3)I7(1)"
}

PLAY RECAP ***********************************************************************************************************
n9k                        : ok=2    changed=0    unreachable=0    failed=0
Here is the modified playbook:
[root@localhost ~]# cat showversion.yml
---
- hosts: cisco
  connection: network_cli
  gather_facts: False
  tasks:
    - name: run show version
      nxos_command:
        commands: show version
      register: result
    - debug:
        var: result.stdout_lines[0][14]
Here are the modifications made to the playbook:
register: result
We will register the output of this task (nxos_command) to a user defined variable (result in this case).
- debug:
The debug module is a special module for grabbing the output of variables, including registered variables. More documentation is provided here.
var: result.stdout_lines[0][14]
So it is possible to debug the entire output which will include a list of lists called stdout_lines. After debugging the entirety of stdout_lines I realized the 14th line contains the version number. NOTE: it is a lot cleaner just to use nxos_facts to grab the version.
Going further
The only thing that needs to be modified to run on more hosts is additional network hosts added to your inventory!
Comments