
Host Configuration Guide
A guide to managing hosts in a Red Hat Satellite 6 environment.
Edition 1.0
Legal Notice
Abstract
Chapter 1. Using the Red Hat Satellite Content Dashboard
- Content Host Subscription Status
- An overview of the subscriptions currently consumed by the hosts registered to Satellite. A subscription is a purchased certificate that unlocks access to software, upgrades, and security fixes for hosts. The following table shows the possible states of subscriptions.
Table 1.1. Host Subscription States
StateDescriptionIconInvalid Subscriptions Hosts that have products installed, but have not consumed a subscription. These hosts need attention immediately.
Insufficient Subscriptions Hosts that have consumed a subscription and have a valid entitlement, but that are not consuming their full entitlements. These hosts should be monitored to ensure they are configured as expected.
Current Subscriptions Hosts that have a valid entitlement and are consuming their full entitlements. Click the subscription type to view content hosts associated with subscriptions of the selected type.
 - Latest Notifications
- A list of messages produced by hosts including administration information, product and subscription changes, and any errors. Click the gear button to change the number of notifications displayed.Monitor this section for global notifications sent to all users and to detect any unusual activity or errors.
- Sync Overview
- An overview of all products or repositories enabled in Satellite and their Synchronization status. All products that are in the queue for synchronization, are unsynchronized or have been previously synchronized are listed in this section. Click a product name to view the synchronization status. Click the gear button to change the number of notifications displayed.
- Host Collections
- A list of all host collections in Satellite and their status, including the number of content hosts in each host collection. Click a host collection name to view that host collection. Click the gear button to change the number of notifications displayed.
- Current Subscription Totals
- An overview of the current subscription totals that shows the number of active subscriptions, the number of subscriptions that expire in the next 120 days, and the number of subscriptions that have recently expired. Click the number to list subscriptions of the selected type.
- Content Views Overview
- A list of all Content Views in Satellite and their publish status. Click the gear button to change the number of notifications displayed.
- Errata Overview
- A list of all errata available for hosts registered to Satellite. Click the gear button to change the number of notifications displayed.
Note
Chapter 2. Using Content Views
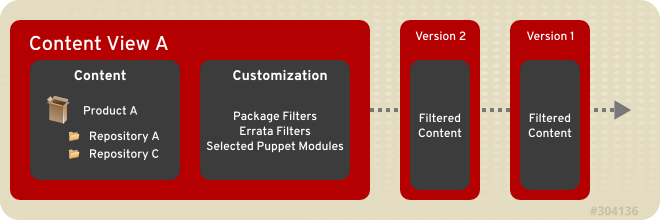
Figure 2.1. This diagram details the creation of new versions of a Content View. These content view versions are promoted along an environment path during the application life cycle.
2.1. Creating a Content View
Procedure 2.1. To Create a Content View:
- Log in as a Satellite administrator.
- Click → .
- Click .
- Specify the Name of the content view. The Label field is automatically populated when the Name field is filled out. Optionally, provide a description of the content view.
- Select the Composite View check box to combine a series of published content views into one and choose which content view.
Note
If you select Composite View it will override any filtering and allow you to choose a group of published content views and bundle those views into a composite one. - Click .
2.2. Adding Repositories to the Content View
RHEL7_Base, entering RHEL7 will not return any results, instead enter RHEL7*. Alternatively, *Base* also retrieves the content view RHEL7_Base.
Procedure 2.2. To Associate a Repository with a Content View:
- Click → and choose the Content View to add repositories to.
- Depending on the type of content you want to store:
- To add a Yum repository, click Yum Content and select from the drop-down menu. From the submenu, click .
- To add a Puppet repository, click Puppet Modules and click .
- To add a Docker repository, click Docker Content and click in the submenu.
- Select the repositories to add and click .
2.3. Filtering Content
2.3.1. Creating a Filter
Procedure 2.3. To Create a Filter:
- Navigate to → and select the Content View you want to filter.
- Click → and click .
- In the Name field, specify the name of the new filter and choose a content type from the Content Type drop-down menu. Choose whether the filter includes or excludes the selected content type by selecting the Type drop-down menu. Optionally, insert a description in the Description field.
- Click to save your new filter.
2.3.2. Adding Content to a Filter
Procedure 2.4. To Add Content to a Filter:
- Navigate to → and select the Content View you want to filter.
- Click → and click the name of the filter you want to edit. Depending on the type of filter selected, perform the following actions:
- If the filter is made for packages, specify a package name on the Packages subtab, and select a value from the drop-down menu. Click to add the package to the filter.
- If the filter is made for package groups, click the Add subtab, and choose the desired package group. Click .
- If the filter is made for errata, click the Add subtab. Select the errata type (Security, Enhancement, or Bugfix), and specify a start date and end date. Click .
- If the filter is made for errata - date and type, on the Erratum Date Range subtab, select the errata type (Security, Enhancement, or Bugfix) and specify a start date and end date. Click .
- On the Affected Repositories subtab, choose whether the filter will affect all or a subset of repositories. If you choose a subset of repositories, select the desired repositories and click .
- Click . Insert a comment if desired, then click .
2.3.3. Removing Content from a Filter
Procedure 2.5. To Remove Content from a Filter:
- Navigate to → and select the Content View you want to filter.
- Click → and click the name of the filter you want to edit. Depending on the type of filter selected, perform the following actions:
- If the filter is made for packages, click the Packages subtab and select the Package Name check box next to the package to be removed. Click to remove the package from the filter.
- If the filter is made for package groups, click the List/Remove subtab and select the Name check box next to the package group to be removed. Click to remove the package group from the filter.
- If the filter is made for errata, click the List/Remove subtab select the Errata ID check box next to the errata to be removed. Click to remove the errata from the filter.
- If the filter is made for errata - date and type, on the Erratum Date Range subtab, check the errata type (Security, Enhancement, or Bugfix). Specify the start date and end date. Click .
- On the Affected Repositories subtab, choose whether the filter will affect all or a subset of repositories. If you choose a subset of repositories, select the desired repositories and click .
- Click . Insert a comment if desired, and click .
2.4. Publishing a Content View
Procedure 2.7. To Publish a Content View Definition:
- Click → .
- Click on the content view to be published.
- Click .
- Fill in a comment.
- Click .
Chapter 3. Viewing and Applying Errata
Important
- Security Advisory describes fixed security issues found in the package. The security impact of the issue can be Low, Moderate, Important, or Critical.
- Bug Fix Advisory describes bug fixes for the package.
- Product Enhancement Advisory describes enhancements and new features added to the package.
Note
- Applicable: erratum applies to one or more content hosts, which means it updates packages present on the content host. Applicable errata are not yet accessible by the content host.
- Installable: erratum applies to one or more content hosts and it has been made available to the content host. Installable errata are present in the content host’s life cycle environment and content view, but are not yet installed. This way, errata can be installed by users who have permissions to manage content hosts, but are not entitled for errata management at higher levels.
3.1. Inspecting Available Errata
Procedure 3.1. To Inspect Available Errata:
- Navigate to → to view the list of available errata.
- Use the filtering tools at the top of the page to limit the number of displayed errata:
- Select the repository to be inspected from the drop-down list. All Repositories is selected by default.
- The Applicable check box is selected by default to view only errata applicable to the selected repository. Select the Installable check box to view only errata marked as installable.
- To search the table of errata, type the query in the Search field in the form of:
parameter operator value
See Table 3.1, “Parameters Available for Errata Search” for the list of parameters available for search. Find the list of applicable operators in "Supported Operators for Granular Search" in the Server Administration Guide. Automatic suggestion works as you type. You can also combine queries with the use of and and or operators. For example, to display only security advisories related to the kernel package, type:type = security and package_name = kernel
Press Enter to start the search.
- Click the Errata ID of the erratum you want to inspect:
- The Details tab contains the description of the updated package as well as documentation of important fixes and enhancements provided by the update.
- On the Content Hosts tab, you can apply the erratum to selected content hosts as described in Section 3.2, “Applying Errata to Content Hosts”.
- The Repositories tab lists repositories that already contain the erratum. You can filter repositories by the environment and content view, and search for them by the repository name.
Table 3.1. Parameters Available for Errata Search
| Parameter | Description | Example |
|---|---|---|
| bug | Search by the Bugzilla number. | bug = 1172165 |
| cve | Search by the CVE number. | cve = CVE-2015-0235 |
| id | Search by the errata ID. The auto-suggest system displays a list of available IDs as you type. | id = RHBA-2014:2004 |
| issued | Search by the issue date. You can specify the exact date, like "Feb16,2015", or use keywords, for example "Yesterday", or "1 hour ago". The time range can be specified with the use of the "<" and ">" operators. | issued < "Jan 12,2015" |
| package | Search by the full package build name. The auto-suggest system displays a list of available packages as you type. | package = glib2-2.22.5-6.el6.i686 |
| package_name | Search by the package name. The auto-suggest system displays a list of available packages as you type. | package_name = glib2 |
| severity | Search by the severity of the issue fixed by the security update. Specify Critical, Important, or Moderate. | severity = Critical |
| title | Search by the advisory title. | title ~ openssl |
| type | Search by the advisory type. Specify security, bugfix, or enhancement. | type = bugfix |
| updated | Search by the date of the last update. You can use the same formats as with the issued parameter. | updated = "6 days ago" |
3.2. Applying Errata to Content Hosts
Procedure 3.2. To Apply a Single Erratum to Content Hosts:
- Navigate to → to view the list of available errata.
- Click the Errata ID of the erratum you want to apply.
- On the Content Hosts tab, select one or more content hosts to be updated. You can filter the available content hosts by the environment, and search for them by name. If you select the check box at the top of the page, only the content hosts that already have the installable erratum in their life cycle environment are displayed.
- Click .
- If the erratum is applicable, a new minor version of the content view is created. If you select Apply Errata to Content Hosts Immediately after publishing, Satellite will automatically install the erratum on the content host when promoting the updated content view. Otherwise, the erratum will be made available for installation on the content host. Installable errata can be applied later using the same procedure, or manually per content host as described in Procedure 3.4, “To Apply Installable Errata to a Content Host:”.
- If the erratum is installable, which means it is already present in the selected content host's life cycle environment but is not installed yet, no new content view version is created.
- Click .
Procedure 3.3. To Apply Multiple Errata to Content Hosts:
- Navigate to → to view the list of available errata.
- Select errata you want to apply by selecting the check box to the left of the Errata ID field.
- Click to apply all selected errata.
- Select one or more content hosts to be updated. You can filter the available content hosts by the environment, and search for them by name. If you select the check box at the top of the page, only content hosts that already have the installable errata in their life cycle environment are displayed.
- Click . If some of the selected errata are applicable, a new minor version of the content view is created. If you select Apply Errata to Content Hosts Immediately after publishing, Satellite will automatically install errata on the content host when promoting the updated content view. If only installable errata are selected, they are installed without creating a new content view version.
Procedure 3.4. To Apply Installable Errata to a Content Host:
- Navigate to → .
- Click the name of the content host you want to manage.
- On the Errata tab, select errata you want to install.
- Click to install the selected updates.
3.3. Subscribing to Errata Notifications
Chapter 4. Security Compliance Management
root account. In Satellite 6, tools provided by the OpenSCAP project are used to implement security compliance auditing. For more information about OpenSCAP see the Red Hat Enterprise Linux 7 Security Guide. The Satellite web UI enables scheduled compliance auditing and reporting on all hosts under management by Red Hat Satellite.
- XCCDF: The Extensible Configuration Checklist Description Format (version 1.2)
- OVAL: Open Vulnerability and Assessment Language (version 5.11)
- Asset Identification (version 1.1)
- ARF: Asset Reporting Format (version 1.1)
- CCE: Common Configuration Enumeration (version 5.0)
- CPE: Common Platform Enumeration (version 2.3)
- CVE: Common Vulnerabilities and Exposures
- CVSS: Common Vulnerability Scoring System (version 2.0)
4.1. Installation
- Procedure 4.4, “Upload Extra SCAP Content” (Optional)
Procedure 4.1. Install OpenSCAP Packages
- On the Satellite Server, install the OpenSCAP plug-in and content.
# satellite-installer --enable-foreman-plugin-openscap
Successful installation is indicated by a progress indicator, and the wordSuccess!. The OpenSCAP plugin adds to the Satellite web UI a Compliance section, under the menu, containing the following pages:# yum install puppet-foreman_scap_client
- On all external Capsule Servers, install the OpenSCAP plug-in and content.
Note
If OpenSCAP functionality is to be enabled on a Capsule Server, Puppet must already have been enabled on that server.# satellite-installer --enable-foreman-proxy-plugin-openscap
Successful installation is indicated by a progress indicator, and the wordSuccess!. This provides the Puppet classes required to set up hosts to perform OpenSCAP scans and creates the Cron jobs for automated compliance scanning. - On external Capsule Servers with the Puppet master role, install the OpenSCAP client.
# yum install puppet-foreman_scap_client
To identify the relevant external Capsule Servers, open the Satellite web UI, navigate to → and identify those external Capsule Servers with Puppet listed in the Features column.
4.2. SCAP Concepts
4.2.1. SCAP Content
root user account. Rules can be grouped into one or more profiles, allowing multiple profiles to share a rule. SCAP content consists of both rules and profiles.
- On Red Hat Enterprise Linux 6, content for Red Hat Enterprise Linux 6 is installed.
- On Red Hat Enterprise Linux 7, content for both Red Hat Enterprise Linux 6 and Red Hat Enterprise Linux 7 is installed.
4.2.1.1. Loading Default OpenSCAP Content
Procedure 4.2. Load the Default OpenSCAP Content
- Load the OpenSCAP content on the Satellite Server.
# foreman-rake foreman_openscap:bulk_upload:default
4.2.1.2. Importing OpenSCAP Puppet Modules
Procedure 4.3. Import OpenSCAP Puppet Modules
- OpenSCAP requires a Puppet environment, but by default they are only created for Content Views which contain Puppet modules. To list available Puppet environments, open the Satellite web UI and navigate to → .If there are no Puppet environments, open a CLI session on the Satellite Server and create a directory for the
productionPuppet environment.# mkdir -p /etc/puppet/environments/production/modules
- Import the OpenSCAP content into selected Puppet environments. Each host which is to be audited with OpenSCAP must be associated with a Puppet environment.
- In the Satellite web UI, select from the context menu Any Organization and Any Location.
- Navigate to → .
- Click , then .
- For each Puppet environment associated with hosts to be audited using OpenSCAP, select the check box, then click . If no other Puppet environment exists, select the production environment.The foreman_scap_client Puppet module, amongst others, will be added to the selected environments.
- Verify that the foreman_scap_client Puppet module has been added.Navigate to → , then click in the Puppet environment's row. The procedure has been successful if the foreman_scap_client Puppet class is listed.
4.2.1.3. Uploading Extra SCAP Content
Procedure 4.4. Upload Extra SCAP Content
- Log in to the Satellite web UI.
- Navigate to → and click Upload New SCAP Content.
- Enter a title in the Title text box. For example:
RHEL 7.2 SCAP Content. - Click , navigate to the location containing the SCAP content file and select .
- Click .
Successfully created RHEL 7.2 SCAP Content will be shown and the list of SCAP Contents will include the new title.
4.2.2. XCCDF Profile
4.2.3. Compliance Policy
4.3. Managing Compliance Policies
4.3.1. Creating a Policy
Procedure 4.5. To Create a Policy:
- In the Satellite web UI, navigate to → , click and follow the wizard’s steps.
- Enter a name for this policy, a description (optional), then click .
- Select the SCAP Content and XCCDF Profile to be applied, then click .
- Specify the scheduled time when the policy is to be applied, then click .Select , , or from the Period drop-down list.
- If you select , also select the desired day of the week from the drop-down list.
- If you select , also specify the desired day of the month in the Day of month field.
- If you select , enter a valid Cron expression in the Cron line field.
The option allows for greater flexibility in the policy's schedule than either the or options. - Select the locations to which the policy is to be applied, then click .
- Select the organizations to which the policy is to be applied, then click .
- Select the host groups to which the policy is to be applied, then click .
- Click .
SCAP Content tab provides the name of the SCAP content file which will be distributed to the directory /var/lib/openscap/content/ on all target hosts.
4.3.2. Viewing a Policy
4.3.3. Editing a Policy
Procedure 4.7. To Edit a Policy:
- In the Satellite web UI, navigate to → .
- From the drop-down list to the right of the policy's name, select .
- Edit the necessary attributes.
- Click .
4.3.4. Deleting a Policy
- In the Satellite web UI, navigate to → .
- From the drop-down list to the right of the policy's name, select .
- Click in the confirmation message.
4.4. Monitoring Compliance
- Verifying policy compliance.
- Detecting changes in compliance.
4.4.1. Compliance Policy Dashboard
- A ring chart illustrating a high-level view of hosts' compliance with the policy.
- A statistical breakdown of hosts' compliance with the policy, in tabular format.
- Links to the policy's latest report for each host.
Failed statistic provides a useful metric for prioritizing compliance effort. Those hosts detected as Never audited should also be a priority, since their status is unknown.

4.4.2. Compliance Reports Overview

4.4.3. Searching Compliance Reports
and, not and has. Regular expressions are not valid search criteria, however multiple fields can be used in a single search expression.
Logical Operators
not: Negates an expression.has: Object must have a specified property.and: Combines search criteria.
failed > 5
prod-. host ~ prod- AND date > "Nov 5, 2015"
rhel7_audit from an hour ago.
"1 hour ago" AND compliance_policy = date = "1 hour ago" AND compliance_policy = rhel7_audit
Procedure 4.8. To Bookmark a Search:
- Apply your search criteria.
- From the Search list select Bookmark this search.
- Complete the Name field.If you want the bookmark available to other users of this Satellite instance, select the Public check box.
- Click .
4.4.4. Viewing a Compliance Report
- Introduction
- Evaluation Characteristics
- Compliance and Scoring
- Rule Overview
4.4.4.1. Evaluation Characteristics
Evaluation Characteristics
-
Target machine - The fully-qualified domain name (FQDN) of the evaluated host. Example:
test-system.example.com. -
Benchmark URL - The URL of the SCAP content against which the host was evaluated. Example:
/var/lib/openscap/content/1fbdc87d24db51ca184419a2b6f. -
Benchmark ID - The identifier of the benchmark against which the host was evaluated. A benchmark is a set of profiles. Example:
xccdf_org.ssgproject.content_benchmark_RHEL_7. -
Profile ID - The identifier of the profile against which the host was evaluated. Example:
xccdf_org.ssgproject_content_profile_rht-ccp. -
Started at - The date and time at which the evaluation started, in ISO 8601 format. Example:
2015-09-12T14:40:02. -
Finished at - The date and time at which the evaluation finished, in ISO 8601 format. Example:
2015-09-12T14:40:05. -
Performed by - The local account name under which the evaluation was performed on the host. Example:
root.

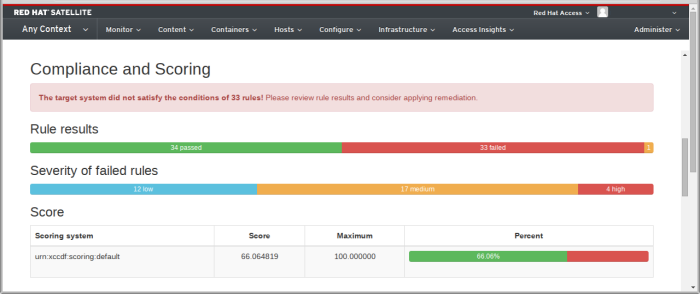
4.4.4.2. Compliance and Scoring
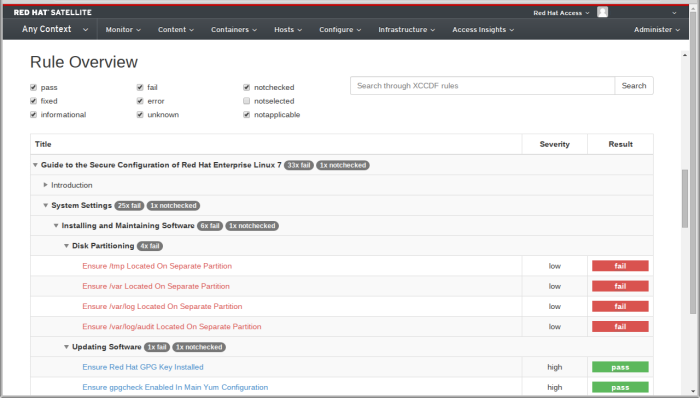
4.4.4.3. Rule Overview
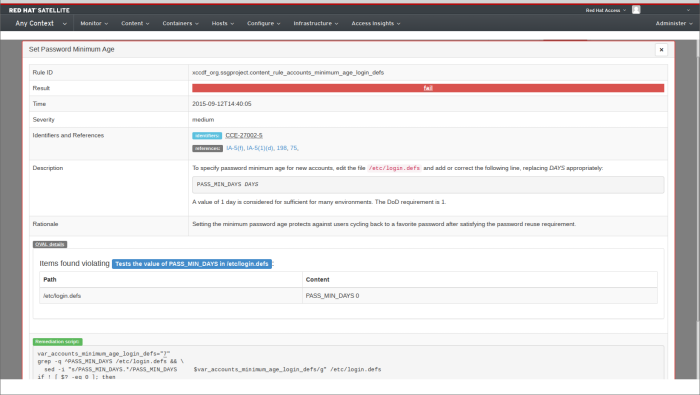
4.4.4.4. Examining Rule Results
Warning
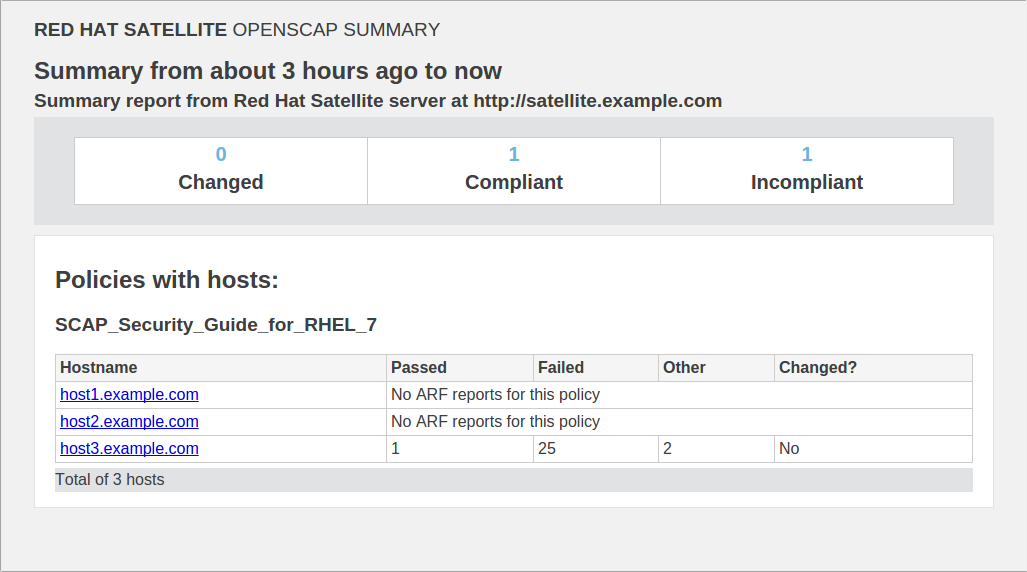
4.4.5. Compliance Email Notifications
- Details of the time period it covers.
- Totals for all hosts by status: changed, compliant, and incompliant.
- A tabular breakdown of each host and the result of its latest policy, including totals of the rules that passed, failed, changed, or where results were unknown.
Chapter 5. Working with Containers
Container: An application sandbox. Each container is based on an image that holds necessary configuration data. When you launch a container from an image, a writable layer is added on top of this image. Every time you commit a container a new image layer is added to store your changes.Image: A static snapshot of the container's configuration that is never modified. Any changes made to the container can be saved only by creating a new image layer. Each image depends on one or more parent images.Platform image: An image that has no parent. Platform images define the runtime environment, packages and utilities necessary for containerized applications to run. The platform image is not writable, so any changes are reflected in the copied images stacked on top of it. For information on how to access Red Hat Enterprise Linux platform images from Red Hat Satellite see Example 5.1, “Creating a Red Hat Enterprise Linux Container in Satellite”.Registry: A public or private archive that contains images available for download. Some registries allow users to upload images to make them available to others. Red Hat Satellite allows you to import images from local and external registries. Satellite itself can act as an image registry for hosts, however, hosts cannot push changes back to the registry. For more information, see Section 5.1.1, “Creating Containers”Tag: A mark used to differentiate images in a repository, typically by the version of the application stored in the image. Repositories are used to group similar images in a container registry. Images only have unique alphanumeric identifiers, so naming in form or repository:tag provides a human-readable way of identifying images. For more information, see Section 5.5, “Using Container Tags” and Section 5.2, “Managing Repositories”.
5.1. Managing Containers
Prerequisites
Procedure 5.1. To Prepare a Container Host:
- Prepare a Red Hat Enterprise Linux 7 server for hosting images and enable the
dockerservice on this server as described in the Getting Docker in RHEL 7 section of the Get Started with Docker Formatted Container Images on Red Hat Systems guide on the Red Hat Customer Portal [2]. You can deploy the container host either on the same machine as the Satellite Server or independently.Note
Red Hat Enterprise Linux 7 is currently the only supported system for a container host. The docker package is available in the rhel-7-server-extras-rpms repository. Red Hat Enterprise Linux 6 systems are currently not supported to host containers. - Run the following command on the container host to install the Satellite Server's CA certificate:
rpm -Uvh https://satellite.example.com/pub/katello-ca-consumer-latest.noarch.rpm
Here, satellite.example.com is the fully qualified domain name of your Satellite Server. Skip this step if the container host is already registered as a Satellite host. - Depending on the location of the container host, perform the following tasks:
- If the container host is on the same machine as the Satellite Server:
- Create a docker user group and add the foreman user to it:
# groupadd docker
# usermod -aG docker foreman
- Modify the OPTIONS variable in the
/etc/sysconfig/dockerfile as follows:OPTIONS='--selinux-enabled -G docker'
- Restart the affected services to apply the changes:
# systemctl restart docker.service
# katello-service restart
- If the container host is on a different machine than the Satellite Server:
- Open a port on the container host to communicate with the Satellite Server. To do so, modify the OPTIONS variable in the
/etc/sysconfig/dockerfile as follows:OPTIONS='--selinux-enabled -H tcp://0.0.0.0:2375 -H unix:///var/run/docker.sock'
You can use port2376if TLS is enabled. - Restart the docker service and verify your settings as follows:
# systemctl restart docker.service
# systemctl status docker.service
Procedure 5.2. To Create a Docker Compute Resource:
- Make sure the port 5000 is enabled on the Satellite Server. The container host uses this port to pull images from Content Views on the Satellite Server.
- Create the compute resource as described in Procedure 8.9, “To Add a Compute Resource:”. Specify the resource URL according to the location of the container host:
- If the container host is on the same machine as the Satellite Server, set unix://var/run/docker.sock as the resource URL.
- If the container host is on a different machine than the Satellite Server, specify the URL in the form of:
http://container_host_fqdn:2375
Here, container_host_fqdn stands for the fully qualified domain name of the container host, and the port number opened on the container host for communication with Satellite can be either2375or, if using TLS,2376.
- Click to test if the container host is available.
- Click to create the compute resource.
5.1.1. Creating Containers
- Local content: represented by the
Content Viewoption when creating a container. This option allows you to import an image from a repository that is already present on a Capsule Server in a certain content view and life cycle environment. For more information on how to create and populate a local registry, see Section 5.2, “Managing Repositories”. - Docker Hub: allows you to search the Docker Hub registry and pull images from there. Make sure that you pull only trusted images with verified content.
- External Registry: allows you to import images from a previously created external registry. For more information on creating registries in Red Hat Satellite, see Section 5.3, “Importing External Registries”.
Note
Procedure 5.3. To Create a Container:
- Navigate to → . Alternatively, navigate to → and click .
- In the Preliminary stage of container creation, configure the following settings:
- On the Compute resource tab, select the compute resource from the Deployed on drop-down menu. For more information on compute resources, see Section 8.3.4, “Compute Resources”.
- On the Locations tab, select the locations where the new container will be available.
- On the Organizations tab, select the organizations where the new container will be available.
Click to proceed. - In the Image stage of container creation, import an image that will act as a base for your container. This can be a platform image, or a previously created layered image. Select from one of the following options:
- Select the Content View tab to import the image from a life cycle environment. Specify the life cycle environment, content view, repository, tag, and Capsule Server.
- Select the Docker hub tab to import the image from the Docker Hub registry. After you type the image name to the Search field, Satellite automatically searches the compute resource. Click the looking glass icon to search the Docker Hub. Select the image from the list of search results and pick a tag from the drop-down list.
- Select the External registry tab to import the image from an existing registry. Select the registry from the drop-down menu, and search it by the image name. Satellite populates the Tag field with tags available for the selected image name. For more information, see Section 5.3, “Importing External Registries”.
Click to proceed. - In the Configuration stage of container creation, set the following parameters:
- Provide the container name.
- Specify a command to run inside the container.
- Specify an entrypoint, which is a command that is executed automatically as soon as the container starts. The default entrypoint is
/bin/sh -c. - Assign CPUs to the container. For example,
0-2,16represents CPUs 0, 1, 2, and 16. - Define the relative share of CPU time for the container.
- Specify a memory limit for the container. For example,
512mlimits the container memory usage to 512 MB.
Click to proceed. - In the final stage of container creation named Environment, select if you want to allocate a pseudo-tty, attach STDIN, STDOUT, and STDERR to the container. Click to create a custom environment variable for the container. Select the Run? check box to start the container automatically after it is created.
- Click to create the container.
Example 5.1. Creating a Red Hat Enterprise Linux Container in Satellite
- Create a custom registry as described in Section 5.3, “Importing External Registries”. Specify registry.access.redhat.com as the registry URL.
- Create a new container as described in Section 5.1.1, “Creating Containers”. In the Image stage of container creation, navigate to the External registry tab and select the registry created in the previous step. Use the search field to find the desired version of the Red Hat Enterprise Linux image. Proceed through the Configuration and Environment stages to finalize the container.
5.1.2. Monitoring Containers
Procedure 5.4. To Investigate a Container:
- Navigate to → .
- On the Containers page, every Docker compute resource has a dedicated tab. Each of these tabs contains the table of available containers together with selected parameters of each container. Select the tab of the compute resource you want to inspect.
- To view the container metadata, click the name of the container you want to inspect. Satellite displays the table of container properties.
- On the Processes tab, you can view processes that are currently running in the container. Click on the process name to view the metadata of the process.
- If the container is running, you can view its standard output in the Logs tab. If you selected the allocate a pseudo-tty check box when creating a container, the console is interactive. Otherwise, it displays the initial standard output produced when the container started.
5.1.3. Starting, Committing, and Removing Containers
Procedure 5.5. To Start or Stop a Container:
- Navigate to → to view the list of available containers.
- Click next to the container you want to start. After starting the container, the button changes to , which allows for stopping the container. These actions are equivalent to the
docker startanddocker stopcommands.
Procedure 5.6. To Commit a Container:
- Navigate to → to view the list of available containers.
- Click the name of the container you want to commit.
- Click . Satellite prompts you to:
- Specify a repository name. This can be a single name or combined with the user name, for example user/my-rhel-image.
- Assign a tag to the image.
- Provide your contact information.
- Provide an informative comment about the image.
- Click .
Note
Procedure 5.7. To Remove a Container:
- Navigate to → to view the list of available containers.
- Click the name of the container you want to delete.
- Click .
- In the alert box, click to remove the container.
5.2. Managing Repositories
5.2.1. Creating Repositories
Procedure 5.8. To Create a Docker Repository:
- Navigate to → . Click , specify the product name and click .
- Select the product you created in the previous step and navigate to the Repositories tab. Click .
- Specify the repository name and select
dockerfrom the Type drop-down menu. This unlocks additional fields where you specify the URL of the content source you want to synchronize in this registry. Specify which repository you want to pull from the content source in the Upstream Repository Name field.Note
In the previous version of Red Hat Satellite it was possible to upload locally stored container images to the repository. With Red Hat Satellite 6.2, this is no longer possible. - Click to create the repository. First the URL and repository name is validated, then the repository is created.
5.3. Importing External Registries
Procedure 5.9. To Import an External Registry:
- Navigate to → . Click .
- On the Registry tab, specify the name and URL of the registry. These settings are required. Optionally, provide a brief description of the registry. Specify a user name and password if required for accessing the registry.
- On the Locations tab, select the locations where the new registry will be available.
- On the Organizations tab, select the organizations where the new registry will be available.
- Click to create the registry.
5.4. Importing Images to Compute Resources
Procedure 5.10. To Import an Image to a Compute Resource:
- Navigate to → to view a list of compute resources.
- Select the docker compute resource you want to edit.
- Click .
- Specify the image details including the image name, operating system, architecture, user credentials, and a parent image. Select User data to enable user input for this image.
- Click .
5.5. Using Container Tags
Procedure 5.11. To Search Registries by Tags:
- Navigate to → .
- Use the search field to filter tags by the image name, tag, or repository name. Automatic suggestion works as you type. For example, the following query searches for tags applied on images from the repository named test_repo:
repository = test_repo
- Click the name of the tag you want to view. Satellite displays a list of images that use this tag.
- Select an image to view its environment and content view version. The Published At field shows the URL that you can use to pull the image from the command line.
centos to search for all centos tags.
Chapter 6. Configuring Activation Keys
- Associated subscriptions and subscription attach behavior.
- Available products and repositories.
- A life cycle environment and a content view.
- Host collection membership.
6.1. Creating an Activation Key
Procedure 6.1. To Create an Activation Key:
- Click → .
- Click . Perform the following actions:
- Specify the activation key name. This setting is required.
- Optionally, clear the Unlimited Hosts check box if you want to limit the number of host that can be associated with the activation key. Specify the number in the Limit field. .
- Optionally, enter a suitable description in the Description field. You can also select the Environment and Content View to which this key should apply.
- Click to create the activation key.
6.2. Defining Subscription Properties of an Activation Key
- Are there any subscriptions associated with the activation key?
- Is the auto-attach option enabled?
- Activation key with no subscriptions specified. With no subscriptions specified and auto-attach enabled, hosts using the activation key search for the best fitting subscription from the ones provided by the Satellite Server. This is akin to running the
subscription-manager --auto-attachcommand. - Activation key providing a custom subscription pool for auto-attach. If there are subscriptions specified and auto-attach is enabled, hosts using the activation key select the best fitting subscription from the list specified in the activation key.
- Activation key with the exact set of subscriptions. If there are subscriptions specified and auto-attach is disabled, hosts using the activation key are associated with all subscriptions specified in the activation key.
Note
6.2.1. Adding and Removing Subscriptions
Procedure 6.2. To Add a Subscription to an Activation Key:
- Click → .
- Click the activation key name you want to edit.
- On the Subscriptions tab, select the Add subtab.
- From the list of available subscriptions, select the subscriptions you want to add.
- Click .
Procedure 6.3. To Remove Subscriptions from an Activation Key:
- Click → .
- A list of activation keys is displayed. Click the activation key you want to remove subscriptions from.
- Click the tab.
- Under the List/Remove subtab, a list of attached subscriptions is displayed. Select the subscriptions to be removed.
- Click .
6.2.2. Enabling Auto-Attach
Procedure 6.4. To Enable Auto-Attach on an Activation Key:
- Click → .
- Click the activation key name that you want to edit.
- Click the Subscriptions tab.
- Click the edit icon next to Auto-Attach.
- Select the check box to enable auto-attach.
- Click Save.
Note
6.2.3. Setting the Service Level
Procedure 6.5. To Set the Service Level on an Activation Key:
- Click → .
- Click the activation key name you want to edit.
- Click the Details tab.
- Click the edit icon next to Service Level.
- Select the required service level from the drop-down list. The drop-down list only contains service levels available to the activation key.
- Click Save.
6.3. Editing Activation Keys
6.3.1. Adding and Removing Host Collections
Procedure 6.6. To Add Host Collections to an Activation Key:
- Click → .
- Click the activation key that you want to add a host collection to.
- On the Host Collections tab click the Add subtab to display the list of available host collections.
- Select the host collections you want to add, and then click .
Procedure 6.7. To Remove Host Collections from the Activation Key:
- Click → .
- A list of activation keys is displayed. Click the activation key you want to remove host collections from.
- Click the tab.
- Under List/Remove subtab, a list of host collections attached to the activation key is displayed. Select the check box of the host collections you want to remove.
- Click to remove host collections from the activation key.
6.3.2. Editing Product Content
Procedure 6.8. To Edit Product Content on an Activation Key:
- Click → .
- Click the activation key name that you want to edit.
- Click the Product Content tab to view the products and repositories associated with the activation key through subscriptions.
- Click the edit icon next to the repository you want to edit.
- From the drop-down menu, select if the repository will be enabled or disabled. Click Save to apply the change.
6.3.3. Setting a Life Cycle Environment and a Content View
Procedure 6.9. To Set a Life Cycle Environment and a Content View for an Activation Key:
- Click → .
- Click the activation key name that you want to edit.
- Click the check box next to the environment you want to associate with the activation key. Select a content view from the drop-down menu.
- Click .
6.4. Removing an Activation Key
Procedure 6.10. To Remove an Activation Key:
- Click → .
- Click the activation key name that you want to remove.
- In the upper right of the Activation Key details panel, click .
- In the alert box, click to confirm that you want to remove the key.
6.5. Automated Host Registration with Activation Keys
Procedure 6.11. To Automatically Register a Host with an Activation Key:
- Clear any old registration data from the system:
# subscription-manager clean
- Download and install a copy of the CA Certificate for the host from the Satellite Server:
# rpm -Uvh http://satellite.example.com/pub/katello-ca-consumer-latest.noarch.rpm
- Register the system to the required organization on the Satellite Server. Use the --activationkey flag to register the system using the activation key. Enter the user authentication details when prompted.
# subscription-manager register --org "Default_Organization" --activationkey "Test_Key"
- When the system is registered, it gains access to repository content but administrators will not be able perform package and errata management until the Katello agent has been installed on the client system. To do so, execute:
# yum install katello-agent
Combining Multiple Activation Keys for Host Registration
# subscription-manager register --org "ACME" --activationkey "ak-VDC,ak-OpenShift"
Chapter 7. Configuring GPG Keys
7.1. Creating a GPG Key
Procedure 7.1. To Add a GPG Key to Satellite:
- Click → and then click .
- In the Name field enter a name for the GPG key.
- Either upload the GPG key file or paste the GPG key contents into the text box.
- Click to add the GPG key to Satellite.
Chapter 8. Configuring the Provisioning Environment
8.1. Creating a Host Group
Procedure 8.1. To Add a Host Group to Satellite:
- Click → and then click New Host Group.
- Enter the required details for the Host Group, and then click .
Table 8.1. Table of Host Group Attributes
|
Submenu
|
Options
|
Description
|
|---|---|---|
|
Host Group
|
Parent
|
The parent Host Group for the new Host Group.
|
|
Name
|
The name of the Host Group.
| |
|
Life Cycle Environment
|
The environment containing this Host Group.
| |
|
Puppet CA
|
The Red Hat Satellite Capsule Server to use for the Puppet CA server.
| |
|
Puppet Master
|
The Red Hat Satellite Capsule Server to use as the Puppet Master.
| |
|
Puppet Classes
|
Included Classes
|
The Puppet Classes included with the Host Group.
|
|
Available Classes
|
The Puppet Classes available to use with the Host Group.
| |
|
Network
|
Domain
|
The domain for hosts in the Host Group.
|
|
Subnet
|
The subnet for hosts in the Host Group.
| |
|
Operating System
|
Architecture
|
The default architecture for systems in the Host Group.
|
|
Operating Systems
|
The default operating system for systems in the Host Group.
| |
|
Media
|
The location of the installation media for the operating system.
| |
|
Partition Table
|
A file system partition layout for the operating system installation.
| |
|
Root Password
|
The root password for the operating system.
| |
|
Parameters
|
Add Parameter
|
Provides a Name and Value pair to set parameters for the Host Group.
|
|
Organizations
|
Organizations
|
The organizations that own this host group.
|
|
Activation Keys
|
Content Environment
|
Defines the activation keys made available in templates as
@host.params['kt_activation_keys'].
|
8.2. Parameters
Types of Parameters
- Simple Parameters
- String parameters that define a relationship between a key and value pair. They cannot be overridden by user configuration, but they are overridden according to Satellite's parameter hierarchy. The following parameters are simple parameters in Red Hat Satellite: Global, organization-level, location-level, domain-level, operating system level, host group, and host parameters.
- Smart Parameters
- Complex parameters that define a value for a key but allow conditional arguments, validation, and overrides for specific object types. Smart parameters enable a Puppet class to get external data. They are used in Puppet Classes called parameterized classes in Puppet terminology. The hierarchy for these parameters can be configured the in the web UI.
- Global Parameters
- Default parameters that apply to every host in Satellite. Configured in → .
- Organization-level parameters
- Parameters that affect all hosts in a given organization. Organization-level parameters override Global parameters. Configured in → → → .
- Location-level parameters
- Parameters that affect all hosts in a given location. Location-level parameters override Organization-level and Global parameters. Configured in → → →
- Domain Parameters
- Parameters that affect all hosts in a given domain. Domain parameters override Location-level and higher parameters. Configured in → → → .
- Operating System Level Parameters
- Parameters that affect all hosts with a given operating system. Operating system level parameters override Domain and higher parameters. Configured in → → → .
- Host Group Parameters
- Parameters that affect all hosts in a given Host Group. Host Group parameters override Operating system level and higher parameters. Configured in → → → .
- Host Parameters
- Parameters that affect a specific host. All previously inherited parameters are visible on the Parameters subtab and can be overridden. Configured in → → → .
Using Parameters with Puppet Classes
- Smart Variables
- A tool to provide global parameters to the Puppet Master, in key-value form, for classes that do not have Smart parameters. They enable overriding parameter values in a Puppet manifest. They are intended for use when a class does not have Smart parameters or in special cases when a global parameter is desired. They can have multiple possible values, all depending on hierarchical context or various conditions a user can apply. They existed before Puppet had parameterized classes and today are kept either for backward compatibility or for the use of global parameters where you want validations, to use only with specific Puppet classes, and for types other than string (because otherwise you could just use the simple parameters).
- Parameterized Classes
- Puppet classes containing Smart parameters. The classes are imported from the Puppet Master and the name of the parameter, for example
$::name(preferred) or$name, is defined by the person who wrote the class and cannot be changed. They enable you to decide the value of the variable for a specific class rather than globally.
/etc/foreman/settings.yaml configuration file because they are overwritten the next time you run the satellite-installer command.
Important
Parametrized_Classes_in_ENC is set to True.
8.2.1. Creating a Global Simple Parameter
Procedure 8.2. To Create a Global Simple Parameter:
- Click → .
- Click .
- Type a Name for the parameter's key.
- Enter a Value for the parameter.
- Optionally select if you want the value to be hidden in the web UI.
- Click Submit.
8.2.2. Configuring Smart Variables
Procedure 8.3. To Configure Smart Variables:
- Click → .
- Select a class from the list.
- Click the Smart Variables tab. This displays a new screen. The left section contains a list of possible parameters the class supports. The right section contains the configuration options for the parameter selected. Click the to add a new parameter. Otherwise, select a parameter from the left-hand list.
- Type a name for the parameter in the Key field.
- Edit the Description text box to add any plain text notes.
- Select the Key type of data to pass. This is most commonly a string, but other data types are supported.
- Enter a Default Value for the parameter to be sent to the Puppet Master if no host match occurs.
- Optionally select Hidden value if the field contains data you do not want to be displayed while you are working.
- Use the Optional Input Validator section to restrict the allowed values for the parameter. Choose a Validator type (either a list of comma separated values or a regular expression, regexp) and input the allowed values or regular expression code in the Validator rule field.
- The Prioritize attribute order section provides options for overriding values for specific hosts based upon conditional arguments. The attribute type and its value is known as a matcher.
- Set the Order of precedence in which the host attributes or Facts are to be evaluated against the matchers by arranging the entries in the list. You can add to the default list. To create a logical AND condition between matchers, arrange them on one line as a comma separated list.
- Click to add a conditional argument. The attributes to match against should correspond to the entries in the Order list. If no matcher is configured then only the default value can be used for the override feature.For example, if the desired value of the parameter to be supplied to the Puppet Master is
testfor any host with a fully qualified domain name ofserver1.example.com, then specify the matcher asfqdn=server1.example.comand the Value astest.The precedence for matching is as follows:It is recommend to use an attribute that is present in Facter and cannot be confused with a host attribute. Host attributes can be either host parameters or associations to the host, such as host group, domain, and organization. The matcher must only be something the host has one of, for example config group cannot be used because the host can have many config groups but a host only has one location so location is a valid matcher.- If the matcher is a host attribute, use that.
- If there are no attributes with that name, look for a matching host parameter (which is inherited according to the parameter hierarchy).
- If there is still no match, check the host Facts.
Dynamic data is possible by using parameters and Puppet Facts in the Value field in Embedded Ruby (ERB) template syntax. For example, to use a Puppet Fact as part of the value:<%= @host.facts['network_eth0'] %>
To list available Puppet Facts navigate to → .
- Click to save your changes.
8.2.3. Importing Parameterized Classes from a Puppet Master
Note
Procedure 8.4. To Import Parameterized Classes:
- In the Satellite web UI, select from the context menu Any Organization and Any Location.
- Click → .
- Click Import from Host Name to import parameterized classes from your Puppet Master.
- The Puppet Classes page displays with the new classes listed.
8.2.4. Configuring Smart Class Parameters
Procedure 8.5. To Configure Smart Class Parameters:
- Click → .
- Select a class from the list that has parameters as indicated in the Parameters column.
- Click the Smart Class Parameter tab. This displays a new screen. The left section contains a list of possible parameters the class supports. The right section contains the configuration options for the parameter selected.
- Select a parameter from the left-hand list.
- Edit the Description text box to add any plain text notes.
- Select Override to allow Satellite control over this variable. If the check box is not selected, Satellite does not pass the new variable to Puppet.
- Select the Key type of data to pass. This is most commonly a string, but other data types are supported.
- Enter a Default Value for the parameter to be sent to the Puppet Master if no host match occurs.
- Optionally select Use Puppet Default to not send a value to the Puppet Master unless an override match occurs.
- Optionally select Hidden value if the field contains data you do not want to be displayed while you are working.
- Use the Optional input validator section to restrict the allowed values for the parameter. Choose a Validator type (either a list of comma separated values or a regular expression, regexp) and input the allowed values or regular expression code in the Validator rule field.
- The Prioritize attribute order section will appear if the Override option is selected. This provides options for overriding values for specific hosts based upon conditional arguments. The attribute type and its value is known as a matcher.
- Set the Order of precedence in which the host attributes or Facts are to be evaluated against the matchers by arranging the entries in the list. You can add to the default list. To create a logical AND condition between matchers, arrange them on one line as a comma separated list.
- Click to add a conditional argument. The attributes to match against should correspond to the entries in the Order list. If no matcher is configured then only the default value can be used for the override feature.For example, if the desired value of the parameter to be supplied to the Puppet Master is
testfor any host with a fully qualified domain name ofserver1.example.com, then specify the matcher asfqdn=server1.example.comand the Value astest.The precedence for matching is as follows:It is recommend to use an attribute that is present in Facter and cannot be confused with a host attribute.- If the matcher is a host attribute, use that.
- If there are no attributes with that name, look for a matching host parameter (which is inherited according to the parameter hierarchy).
- If there is still no match, check the host Facts.
Dynamic data is possible by using parameters and Puppet Facts in the Value field in Embedded Ruby (ERB) template syntax. For example, to use a Puppet Fact as part of the value:<%= @host.facts['network_eth0'] %>
To list available Puppet Facts navigate to → .
- Click to save your changes.
8.3. Configuring Provisioning Settings
8.3.1. Domains
Procedure 8.6. To Create a Domain:
- Click → .
- Click . On the Domain tab, specify the following settings:
- Specify a Name for the Domain. This is the required DNS domain name.
- Type a Description for the Domain.
- Select a DNS-enabled Capsule Server.
- On the Parameters tab, specify domain parameters.
- On the Locations tab, select locations for the domain.
- On the Organizations tab, select organizations for the domain.
Important
Ensure that the Locations and Organizations are configured as they will help with future debugging. - Click .
8.3.2. Subnets
8.3.2.1. Creating a Subnet
Procedure 8.7. To Create a Subnet:
- Click → .
- Click New Subnet. On the Subnet tab, specify the following settings:
- Specify a Name, Network address (IP address), and Network mask for the subnet. These settings are required.
- Optionally, specify the Gateway address, Primary DNS server, Secondary DNS server, and VLAN ID. Note that the gateway address and DNS server settings are optional only with IPAM and Boot modes set to DHCP (default). If you decide to change these default modes, you also have to specify gateway and DNS.You can also select the IPAM mode (DHCP, Internal DB, or None) and define the IP assignment range with the Start of IP range and End of IP range fields.
- Select the default Boot mode for the subnet (DHCP or Static).
- On the Domains tab, select the applicable domains for the subnet.
- On the Capsules tab, select the Capsule Servers to be used for hosting the DHCP Proxy, TFTP Proxy, DNS Proxy, and Discovery Proxy services.
- On the Locations tab, select locations for the subnet.
- On the Organizations tab, select organizations for the subnet.
Important
Ensure that the Locations and Organizations are configured as they will help with future debugging. - Click .
8.3.3. Architectures
Procedure 8.8. To Create an Architecture:
- Click → and then click New Architecture.
- Specify a Name for the architecture.
- Select any Operating Systems that include this architecture. If none are available, you can create and assign them under → .
- Click .
8.3.4. Compute Resources
Procedure 8.9. To Add a Compute Resource:
- Navigate to → .
- Click New Compute Resource. On the Compute Resource tab, specify the following settings:
- Specify a Name and a Provider type for the Compute Resource. Optionally, insert a Description.
- Depending on the provider type chosen, the next few fields ask for authentication and datacenter details. Refer to the following table for more information about each provider type.
Table 8.2. Provider Settings
TypeDescriptionRHEVSuits Red Hat Enterprise Virtualization environments. Requires the URL of the Manager API, a valid Username and Password, and a Datacenter on the system to abstract compute resources. Click Load Datacenters to populate the drop-down menu. Optionally, you can specify a Quota ID and provide one or more certificate authorities in the X509 Certification Authorities field.LibvirtSuits Libvirt-based environments. Requires the URL of the virtual machine. Select the Display type. Click to test if the virtual machine is available. Select Console passwords to set a randomly generated password on the display connection.VMwareSuits VMware-based environments. Requires the host name of the VCenter/Server, a valid VMware Username and Password, and a Datacenter to abstract compute resources. Click Load Datacenters to populate the drop-down menu. You can specify a certificate Fingerprint and select Console passwords to set a randomly generated password on the display connection.RHEL OpenStack PlatformSuits OpenStack-based environments. Requires the URL of the OpenStack server, a valid OpenStack Username and Password, and a Tenant to abstract compute resources. Click Load Tenants to populate the drop-down menu.RackspaceSuits Rackspace public cloud accounts. Requires the URL of the Rackspace API, a valid Rackspace Username and API Key, and a Region to abstract compute resources. Click to make sure your connection to the chosen region is valid.EC2Suits Amazon EC2 public cloud accounts. Requires the Access Key and Secret Key available from any valid Amazon EC2 account. Requires a Region to act as a Datacenter for resource abstraction. Click to populate the selection drop-down menu.GoogleSuits Google Compute Engine public cloud accounts. Requires the Google Project ID, a valid Client Email and a Certificate path to the p12 file. You can also specify a Zone to abstract compute resources. Click to populate the drop-down menu.DockerSuits container registries. Requires the URL of the internal or external compute resource. Optionally, specify a Username, Password, and a contact Email. Click to test if the connection is available.
- On the Locations tab, select desired locations to add them to the Selected Items list.
- On the Organizations tab, select the desired organizations to add them to the Selected Items list.
Important
Ensure that the Locations and Organizations are configured as they will help with future debugging. - Click .
8.3.5. Configuring Libvirt as a Compute Resource
# yum install qemu-kvm libvirt virt-manager
- If the web UI browser is running on separate system to
virt-manager, proceed to Procedure 8.11, “To Configure SSH Access to Libvirt:”. - If the web UI browser is running on the same system as
virt-manager, complete the following procedure to add a Libvirt compute resource.
Procedure 8.10. To Add a Libvirt Compute Resource:
- Navigate to → .
- Click New Compute Resource. On the Compute Resource tab, specify the following settings:
- Specify a Name and from the Provider drop-down menu, select Libvirt as the type for the Compute Resource. Optionally, insert a Description.
- In the field, enter a string as follows:
qemu:///system
- From the drop-down menu, select .
- Optionally select the check box if this compute resource will only be used for new Libvirt guests. This option cannot be used together with previously configured Libvirt guests.
- Click . If the connection is successful the button turns green.
- Click to save the configuration.
- Select the tab. Previously configured Libvirt guests will be shown.
Procedure 8.11. To Configure SSH Access to Libvirt:
- Ensure the SSH file permissions and SELinux context for the
foremanuser are correct:#
ls -Zd /usr/share/foreman/.sshdrwx------. foreman foreman system_u:object_r:ssh_home_t:s0 /usr/share/foreman/.ssh - Create SSH keys for the
foremanuser:#
su - foreman -s /bin/bash-bash-4.2$ssh-keygenGenerating public/private rsa key pair. Enter file in which to save the key (/usr/share/foreman/.ssh/id_rsa): Enter passphrase (empty for no passphrase): Enter same passphrase again: Your identification has been saved in /usr/share/foreman/.ssh/id_rsa. Your public key has been saved in /usr/share/foreman/.ssh/id_rsa.pub. The key fingerprint is: 07:47:a9:23:d2:fe:2f:07:fb:55:75:46:3e:8e:6e:69 foreman@satellite.example.com The key's randomart image is: +--[ RSA 2048]----+ | .. .| | .. o | | . ... .=| | . o oo ooo| | o .S.. ... | | . .. ... | | . o .E | | + ..o | | =o | +-----------------+ - Copy the
SSHpublic key to the remote hypervisor system. For example, if your Libvirt host is kvm.example.com:-bash-4.2$
ssh-copy-id root@kvm.example.comThe authenticity of host 'kvm.example.com (192.168.1.2)' can't be established. ECDSA key fingerprint is 78:79:41:d0:b8:40:d5:4a:6d:7f:22:03:bd:cd:a0:dd. Are you sure you want to continue connecting (yes/no)? yes /usr/bin/ssh-copy-id: INFO: attempting to log in with the new key(s), to filter out any that are already installed /usr/bin/ssh-copy-id: INFO: 1 key(s) remain to be installed -- if you are prompted now it is to install the new keys foreman@192.168.1.2's password: Number of key(s) added: 1 Now try logging into the machine, with: "ssh 'root@kvm.example.com'" and check to make sure that only the key(s) you wanted were added. - Make an
SSHconnection to the remote system to confirm that no password prompt appears:-bash-4.2$
ssh root@kvm.example.comYou should not be prompted for the password. The public key can be found in the.ssh/authorized_keysfile on the remote system. Exit after successfully logging in and checking the keys:-bash-4.2$
exit - In the web UI, navigate to → and click .
- In the field enter a suitable name.
- From the drop-down menu, select .
- In the field, enter a string in the following format:
qemu+ssh://root@kvm.example.com/system
Where kvm.example.com is the FQDN of your Libvirt host. - From the drop-down menu, select .
- Optionally select the check box if this compute resource will only be used for new Libvirt guests. This option cannot be used together with previously configured Libvirt guests.
- Click . If the connection is successful the button turns green.
- Click to save the configuration.
- Select the tab. Previously configured Libvirt guests will be shown.
Procedure 8.12. To Configure the noVNC Console:
- SSH keys must be configured for the
foremanuser on the Satellite Server's base system (as explained previously). - Existing Libvirt guests must be configured to use VNC server as the display type, the port settings set to
Auto, and no VNC password selected.
- On the hypervisor host system, configure the firewall to allow
VNCservice on ports5900 to 5930:- On Red Hat Enterprise Linux 6:
#
iptables -A INPUT -p tcp --dport 5900:5930 -j ACCEPT#service iptables save - On Red Hat Enterprise Linux 7:
#
firewall-cmd --add-port=5900-5930/tcp#firewall-cmd --add-port=5900-5930/tcp --permanent
- In the browser used for the web UI, trust the Satellite Server certificate as follows:
- Visit the public downloads page of the Satellite Server, for example
https://satellite.example.com/pub/, and click the certificate filekatello-server-ca.crt. - Select to trust the certificate for identifying websites.
- In the browser used for the web UI, disable HTTP strict transport security (HSTS). HSTS is described in RFC 6797. For example, in Firefox, enter
About:Configin the browser address bar and set the following boolean toTrue:network.websocket.allowInsecureFromHTTPS
- Ensure you are using the FQDN in the browser for the web UI. NoVNC will not work if the domain name in the URL does not match the CN value in the certificate, which should be the same as the FQDN. Use a command as follows to check the CN value:
#
openssl x509 -text -noout -in /etc/pki/katello/certs/katello-apache.crt | grep CNIssuer: C=US, ST=North Carolina, L=Raleigh, O=Katello, OU=SomeOrgUnit, CN=satellite.example.com Subject: C=US, ST=North Carolina, O=Katello, OU=SomeOrgUnit, CN=satellite.example.com output truncated - Navigate to +. Select the name of a Libvirt resource. On the tab, select the name of a Libvirt guest. Ensure the machine is powered on and then select . The console window appears after the noVNC handshake completes.
8.3.6. Hardware Models
Procedure 8.13. To Create a Hardware Model:
- Click → .
- Click .
- Specify a Name for the Hardware Model.
- For SPARC builds, insert the CPU Hardware model and Vendor class. Other architectures do not require values in these fields.
- Type a description of the Hardware Model in the Information field.
- Click .
8.3.7. Installation Media
Procedure 8.14. To Add an Installation Medium:
- Click → .
- Click New Medium. On the Medium tab, specify the following settings:
- Type a Name for the Installation Media. This setting is required.
- Type a Path to the Installation Medium. Options include either a URL or a valid NFS server. This setting is required.
- Select an Operating System Family to define the type of the Installation Medium.
- On the Locations tab, select the desired locations to add them to the Selected Items list.
- On the Organizations tab, select the desired organizations to add them to the Selected Items list.
Important
Ensure that the Locations and Organizations are configured as they will help with future debugging. - Click .
8.3.8. Partition Tables
Procedure 8.15. To Create a Partition Table:
- Click → .
- Click .
- Type a Name for the partition table.
- Specify the Layout of the partition table. The Layout field also accepts dynamic disk partitioning scripts.
- Select the operating system from the OS Family drop-down list.
- Click .
8.3.9. Provisioning Templates
Procedure 8.16. To Create a Provisioning Template:
- Click → .
- Click New Template. On the Provisioning Template tab, specify the following settings:
- Specify a Name for the template.
- Insert your template in the Template editor field. Alternatively, click to upload the template. This replaces the content in the Template editor field with the content of your chosen file.
- Optionally, type a comment in the Audit Comment field. Satellite adds the comment to the template history to track changes. View the template history under the History tab.
- On the Type tab, select Snippet to store the template code without defining it as particular script or template type, or select the type from the Type drop-down menu.
- On the Association tab, select host groups, environments and operating systems to be associated with the template. Select the operating systems from the Applicable Operating Systems list. Click and select a Hostgroup and Environment to limit the template's use. Note that associations are not available for templates of type snippet.
- On the Association tab, you can view the history of existing templates. No history is available when creating a new template.
- On the Locations tab, select locations for the template.
- On the Organizations tab, select organizations for the template.
Important
Ensure that the Locations and Organizations are configured as they will help with future debugging. - Click .
8.3.10. Configuring gPXE to Reduce Provisioning Times
HTTP to reduce download time. To make use of gPXE, proceed as follows:
- On systems configured to be a
TFTPserver, copy/usr/share/syslinux/gpxelinuxk.0to/var/lib/tftpboot. - In the
PXE Handoffsection of/etc/dhcp/dhcpd.conf, change theDHCPfilenameoption frompxelinux.0togpxelinuxk.0. - Create provisioning templates as follows and then assign them, together with the default template, to the operating systems.
Procedure 8.17. To Configure a gPXE Provisioning Template:
- Click → .
- Find the template and select .
- Enter a name, for example,
Kickstart default gPXELinux. - In the Template editor, search and replace
@initrdwith@host.url_for_boot(:initrd) - In the Template editor, search and replace
@kernelwith@host.url_for_boot(:kernel) - Select the tab. From the drop-down menu, select .
- On the Association tab, select host groups, environments and operating systems to be associated with the template. Select the operating systems from the Applicable Operating Systems list. Click and select a Hostgroup and Environment to limit the template's use.
- Click .
8.3.11. Operating Systems
RedHat family. Families allow Satellite to change certain behaviors when provisioning hosts.
Procedure 8.18. To Add an Operating System:
- Click → .
- Click New Operating system. On the Operating System tab, specify the following settings:
- Type the Name of the Operating System and its Major Version. These settings are required.
- Optionally, define the Minor Version, select the OS Family, and add a Description of the operating system.
- Select a Root password hash (MD5, SHA256, of SHA512).
- Select the Architectures from the list of available Architectures. If none are available, create and assign them under → as described in Section 8.3.3, “Architectures”.
- On the Partition tables tab, select the applicable file system layouts from the list. For more information on creating partition tables, see Section 8.3.8, “Partition Tables”.
- On the Installation Media tab, select the applicable installation media from the list. For more information on adding installation media, see Section 8.3.7, “Installation Media”.
- On the Templates tab, you can assign provisioning templates when editing an existing operating system. This option is not available when creating a new operating system. For more information on creating provisioning templates, see Section 8.3.9, “Provisioning Templates”.
- On the Parameters tab, you can add parameters for the operating system.
- Click .
8.4. Storing and Maintaining Host Information
- Foreman: Provides for the provisioning and life cycle management of physical and virtual systems. Foreman automatically configures these systems using various methods, including kickstart and Puppet modules.
- Puppet: A client/server architecture for configuring hosts, consisting of the Puppet Master (server) and the Puppet Agent (client).
- Facter: Puppet's system inventory tool. Facter gathers basic information (facts) about hosts such as hardware details, network settings, OS type and version, IP addresses, MAC addresses, SSH keys, and more. These facts are then made available in Puppet manifests as variables.
8.4.1. The Puppet Architecture
- It compiles a catalog
- It applies that catalog to the appropriate host
--noop parameter had been used, to the Puppet Master, which in turn sends the results to Foreman. This catalog describes the desired state for one specific host. It lists the resources to manage on that host, including any dependencies between those resources. The agent applies the catalog to the host.
/etc/puppet/puppet.conf file using the runinterval parameter. You can also run puppet agent apply to initiate communication manually.
8.4.2. Using Facter and Facts
httpd service should always be running and Puppet knows how to handle that. If you are managing different operating systems, you can use the osfamily fact to create conditional expressions to tell Puppet which service to watch or which package to install. You can use the operatingsystemmajrelease and versioncmp parameters to create conditional expressions based on different versions of the same operating system. See Example 8.1, “Using Conditional Expressions with Facts” for an example of using conditional expressions.
Example 8.1. Using Conditional Expressions with Facts
if $:: osfamily == 'RedHat' {
  if $::operatingsystemmajrelease == '6' {
   $ntp_service_name = 'ntpd'
   }

  elseif versioncmp($::operatingsystemmajrelease, '7') >= 0 {
   $ntp_service_name = 'chrony'
   }
 }
Note
8.4.2.1. Displaying Facts for a Particular Host
facter -p) and also from the web UI ( → ). You can browse the list of facts or use the Search box to search for specific facts. For example, type "facts." to display a list of available facts.
Note
Procedure 8.19. To View Facts for a Particular Host:
- On the main menu, click → and then click the name of the host that you want to inspect.
- In the Details pane, click to display all known facts about the host.
Note
- For any fact listed on this page, you can click to display a chart of the distribution of this fact name over all managed hosts.
- You can bookmark a search to make it easier to use in the future. When you have refined your search, click the drop-down arrow next to the button, and click . Bookmarked searches appear in the drop-down list, and also under → on the main menu.
8.4.2.2. Searching for Hosts based on Facts
facts.architecture = x86_64.
Procedure 8.20. To Search for Hosts Based on Facts:
- On the main menu, click → to display the Fact Values page.
- In the Search field, start typing the name of the fact that you want to filter by. You can search by specific name, name/value pairs, and so on.
- Click to retrieve the list of matching hosts.
8.4.2.3. Custom Fact Reporting
- The manifest
pkginventoryis obtained from Puppet Forge and saved to the base system. - The Puppet module is added to a content view and then this is promoted to a system and deployed to that system.
- The facts for the system are then queried using a package name. In this example, for a host called hostname and using a Satellite user with credentials username and password, the following API query would return the facts that matched the search string "bash":
curl -u username:password -X GET http://localhost/api/hosts/:hostname/facts?search=bash
{"hostname":{"pkg_bash":"4.2.45-5.el7_0.4"}}
The search returns the package version. This could then be used to populate an external database.
Adding the pkginventory Puppet Module
pkginventory Puppet module to the Red Hat Satellite Server application, download the module from https://forge.puppetlabs.com/ody/pkginventory to the base system where the Satellite Server application is installed and then follow the procedures below.
Procedure 8.21. To Upload a Puppet Module to a Repository:
- Download the Puppet module to the base system. Modules that are downloaded will have a
.tar.gzextension. - Click → and then click the product name in the Name field associated with the Puppet module repository. For example, Custom Products.
- On the Repositories tab, select the Puppet Modules repository you want to modify. For example, Puppet Modules.
- In the Upload Puppet Module section, click , and navigate to the module that you downloaded.
- Click .
Procedure 8.22. To Add a Module to a Content View:
- Click → and then select a content view from the menu.
- On the Puppet Modules tab, click . A list of installed modules appears.
- From the Actions column, click to select the module you want to add. A table of available versions appears.
- Click next to the version of the module that you want to add.
- Click to create the new Content View.
- Optionally add a description and click .
Chapter 9. Configuring Hosts
9.1. Creating a Host
Procedure 9.1. To Create a Host:
- Click → .
- On the Host tab, enter the required details.
- On the Puppet Classes tab, select the puppet classes you want to include.
- On the Network tab, perform the following actions:
- Enter the Domain and Realm details. It is required to specify a domain to make the host provisioning possible. This automatically updates the Subnet list with a selection of suitable subnets.
- Enter the Primary Interface details. If there is a DHCP-enabled Capsule Server on the selected subnet, the IP address is automatically suggested. Click Suggest new to generate a different address.
- Optionally, click to include an additional network interface. See Section 9.6, “Configuring an Additional Network Interface” for details.
- On the Operating System tab, enter the required details. You can select a partition table from the drop-down list or enter a custom partition table in the Custom partition table field. You cannot specify both.
- On the Parameters tab, click Add Parameter to add any required parameters. This includes all Puppet Class Parameters and Host Parameters associated with the host.
- On the Additional Information tab, enter additional information about the host.
- Click Submit to complete your provisioning request.
9.2. Configuring a Host for Registration
Prerequisites
- Hosts must be using the following Red Hat Enterprise Linux Version:
- 5.8 or later (5.7 or later on s390x)
- 6.4 or later
- 7.0 or later
- All architectures of Red Hat Enterprise Linux are supported (i386, x86_64, s390x, ppc_64).
- On the Red Hat Satellite Server, ensure that the date and time are correct and synchronized with the client.
- On each client system, address the following requirements:
- Ensure that the date and time are correct and synchronized with the server.
- Enable
ntpdor a similar time synchronization tool in all virtual environments:For Red Hat Enterprise Linux 6:# chkconfig ntpd on; service ntpd start
For Red Hat Enterprise Linux 7:# systemctl start chronyd; systemctl enable chronyd
- Hosts must have the daemon
rhsmcertdrunning.Check the status ofrhsmcertd.# service rhsmcertd status
If necessary startrhsmcertd.# service rhsmcertd start
Procedure 9.2. To Automatically Configure a Host:
- Take note of the Red Hat Satellite's fully qualified domain name (FQDN), for example satellite.example.com.
- Open a terminal console and log in as root.
- Download and install a copy of the CA Certificate for the host from the Red Hat Satellite FQDN:
# rpm -Uvh http://satellite.example.com/pub/katello-ca-consumer-latest.noarch.rpm
Note
katello-ca-consumer-hostname-1.0-1.noarch.rpm is an additional katello-ca-consumer rpm available that contains the server's host name. The katello-ca-consumer-latest.noarch.rpm rpm will always reflect the most updated version. Both serve the same purpose.Important
Importing the CA Certificate from Red Hat Satellite FQDN will restart any running Docker Daemons.
9.3. Registration
9.3.1. Registering a Host
dev-node.example.com, entering a search string dev-node will not return any results, instead use dev-node*. Alternatively, *node* will also find the content view dev-node.example.com.
Prerequisites
- Complete all steps in Section 9.2, “Configuring a Host for Registration”.
- Ensure an activation key exists for the host, or create an activation key. See Chapter 6, Configuring Activation Keys for instructions on creating an activation key, or use the command
man subscription-managerto view the various options.
Procedure 9.3. To Register Hosts:
- Open a console and log in as
root. - Clear old host data to ensure updated host data is uploaded correctly.
# subscription-manager clean
- Register the host using the Red Hat Subscription Manager (RHSM):
# subscription-manager register --org your_org_name --activationkey your_activation_key
Example 9.1. Command Output after Registration:
# subscription-manager register --org MyOrg --activationkey TestKey-1
The system has been registered with id: 62edc0f8-855b-4184-b1b8-72a9dc793b96
--environment option. For example, to register a host to the content view "MyView" in a "Development" life cycle environment:
# subscription-manager register --org your_org_name --environment Development/MyView --activationkey your_activation_key
Note
Procedure 9.4. To Point Red Hat Enterprise Linux 6.3 to the Repository:
- On Red Hat Satellite, select → .
- Click the name of the host that needs to be changed.
- In the Content Host Content section click the edit icon to the right of Release Version.
- Select "6.3" from the drop-down menu.
- Click .
9.3.2. Registering Host Systems to a Capsule Server
- The client system must be configured for registration.
- Ensure the Satellite tools repository appropriate to the host to be registered is enabled and synchronized.
Procedure 9.5. Registering Host Systems to the Capsule Server
- Click → , and click .
- Choose the required Capsule Server in the Content Source drop-down list.
- Install the pre-built bootstrap RPM:
#
rpm -Uvh http://capsule.example.com/pub/katello-ca-consumer-latest.noarch.rpm - Run
subscription-managerin a console on the client host.- You can use an Activation Key to register:
#
subscription-manager register --org=organization_label --activationkey="activationkey1" - Alternatively, authenticate with a user name and password:
#
subscription-manager register --org=organization_label --environment="Library"
- Attach a subscription:
#
subscription-manager list --available --all#subscription-manager attach --pool=pool_ID - Enable the Satellite tools repository:
#
Replace version withsubscription-manager repos --enable=rhel-version-server-satellite-tools-6.2-rpms6or7depending on the Red Hat Enterprise Linux version you are using. - Enable any additional repositories required for this host:
#
subscription-manager repos --enable=repository-to-be-enabled
9.3.3. Installing the Katello Agent
goferd service. This service must be enabled so that the Red Hat Satellite Server or Capsule Server can provide information about errata that are applicable for content hosts.
Prerequisites
Satellite Tools repository. The Red Hat Common repositories are no longer used and are not compatible with Satellite version 6.1 and later.
Satellite Tools repository must be enabled, synchronized to the Red Hat Satellite Server and made available to your hosts as it provides the required packages.
Procedure 9.6. To Verify the Satellite Tools Repository is Enabled:
- Open the Satellite web UI, navigate to → and click on the RPMs tab.
- Find and expand the Red Hat Enterprise Linux Server item.
- Find and expand the Red Hat Satellite Tools 6.2 (for RHEL VERSION Server) (RPMs) item.If the Red Hat Satellite Tools 6.2 items are not visible, it may be because they are not included in the subscription manifest obtained from the Customer Portal. To correct that, log in to the Customer Portal, add these repositories, download the subscription manifest and import it into Satellite.
- Ensure the Enabled check box beside the repository's name is selected. If not, select it.
Satellite Tools repository for every supported major version of Red Hat Enterprise Linux running on your hosts.
Procedure 9.7. To Install Katello Agent:
- On the host, open a terminal console and log in as the
rootuser. - Verify that the
satellite-toolsrepository is enabled, using the following command:# yum repolist enabled | grep -i satellite-tools
If thesatellite-toolsis not enabled, enable it using the following command:# subscription-manager repos --enable satellite-tools
- Install the
katello-agentRPM package using the following command:# yum install katello-agent
goferd service is started and enabled automatically after successful installation of katello-agent.
9.3.4. Installing and Configuring the Puppet Agent
Prerequisites
Satellite Tools repository. The Red Hat Common repositories are no longer used and are not compatible with Satellite version 6.1 and later.
Satellite Tools repository must be enabled, synchronized to the Red Hat Satellite Server and made available to your hosts as it provides the required packages.
Procedure 9.8. To Verify the Satellite Tools Repository is Enabled:
- Open the Satellite web UI, navigate to → and click on the RPMs tab.
- Find and expand the Red Hat Enterprise Linux Server item.
- Find and expand the Red Hat Satellite Tools 6.2 (for RHEL VERSION Server) (RPMs) item.If the Red Hat Satellite Tools 6.2 items are not visible, it may be because they are not included in the subscription manifest obtained from the Customer Portal. To correct that, log in to the Customer Portal, add these repositories, download the subscription manifest and import it into Satellite.
- Ensure the Enabled check box beside the repository's name is selected. If not, select it.
Procedure 9.9. To Install and Enable the Puppet Agent:
- On the host, open a terminal console and log in as the
rootuser. - Verify that the
satellite-toolsrepository is enabled, using the following command:# yum repolist enabled | grep -i satellite-tools
If thesatellite-toolsis not enabled, enable it using the following command:# subscription-manager repos --enable satellite-tools
- Install the Puppet agent RPM package using the following command:
# yum install puppet
- Configure the puppet agent to start at boot:
- On Red Hat Enterprise Linux 6:
# chkconfig puppet on
- On Red Hat Enterprise Linux 7:
# systemctl enable puppet
- The host must be registered to the Red Hat Satellite Server.
- The Satellite Tools repository must be enabled.
- Puppet packages must be installed on the host.
Procedure 9.10. To Configure the Puppet Agent:
- Configure the Puppet agent by specifying the server and environment settings in the
/etc/puppet/puppet.conffile:# vi /etc/puppet/puppet.conf
[main]
    # The Puppet log directory.
    # The default value is '$vardir/log'.
    logdir = /var/log/puppet

    # Where Puppet PID files are kept.
    # The default value is '$vardir/run'.
    rundir = /var/run/puppet

    # Where SSL certificates are kept.
    # The default value is '$confdir/ssl'.
    ssldir = /var/lib/puppet/ssl

...

[agent]
    # The file in which puppetd stores a list of the classes
    # associated with the retrieved configuratiion.  Can be loaded in
    # the separate ``puppet`` executable using the ``--loadclasses``
    # option.
    # The default value is '$confdir/classes.txt'.
    classfile = $vardir/classes.txt
    pluginsync = true
    report = true
    ignoreschedules = true
    daemon = false
    ca_server = satellite.example.com
    server = satellite.example.com
    environment = KT_Example_Org_Library_RHEL6Server_3

    # Where puppetd caches the local configuration.  An
    # extension indicating the cache format is added automatically.
    # The default value is '$confdir/localconfig'.
    localconfig = $vardir/localconfig

...
Important
Set theenvironmentparameter to the name of the Puppet environment to which the host belongs. A Puppet environment is a collection of Puppet modules that can be associated with a host or a host group.- To find the host's Puppet environment, navigate to → and inspect the Environment column in the host table.
- To assign a Puppet environment to a host, navigate to → and click next to the selected host.
- To list Puppet environments enabled on the Satellite Server, navigate to → . You can also inspect the
/etc/puppet/environments/directory on the Satellite Server to find what Puppet modules and manifests are associated with Puppet environments.
For more information see the Red Hat Satellite Puppet Guide. - Run the Puppet agent on the host:
# puppet agent -t --server satellite.example.com
- Sign the SSL certificate for the Puppet client through the Satellite Server web UI:
- Log in to the Satellite Server through the web UI.
- Select → .
- Select from the drop-down menu to the right of the required Capsule.
- Click to the right of the required host.
- Enter the
puppet agentcommand again:# puppet agent -t --server satellite.example.com
Note
9.4. Assigning a Host to a Specific Organization
- Navigate to → .
- Select the check box of the host you want to change.
- From the Select Action menu at the upper right of the screen, select Assign Organization. A new option window will open.
- Navigate to the Select Organization menu and choose the desired organization for your host. Select the check box Fix Organization on Mismatch.
Note
A mismatch happens if there is a resource associated with a host, such as a domain or subnet, and at the same time not associated with the organization you want to assign the host to. The option Fix Organization on Mismatch will add such a resource to the organization, and is therefore the recommended choice. The option Fail on Mismatch, on the other hand, will always result in an error message. For example, reassigning a host from one organization to another will fail, even if there is no actual mismatch in settings. - Click Submit to complete the assigning of the organization to your host.
9.5. Assigning a Host to a Specific Location
- Navigate to → .
- Select the check box of the host you want to change.
- From the Select Action menu at the upper right of the screen, select Assign Location. A new option window will open.
- Navigate to the Select Location menu and choose the desired location for your host. Select the check box Fix Location on Mismatch.
Note
A mismatch happens if there is a resource associated with a host, such as a domain or subnet, and at the same time not associated with the organization you want to assign the host to. The option Fix Organization on Mismatch will add such a resource to the organization, and is therefore the recommended choice. The option Fail on Mismatch, on the other hand, will always result in an error message. For example, reassigning a host from one organization to another will fail, even if there is no actual mismatch in settings. - Click Submit to complete the assigning of the location to your host.
9.6. Configuring an Additional Network Interface
- : Allows you to specify an additional physical or virtual interface. There are two types of virtual interfaces you can create. Use VLAN when the host needs to communicate with several (virtual) networks using a single interface, while these networks are not accessible to each other. Another type of virtual interface is alias, which is an additional IP address attached to an existing interface. See Section 9.6.2, “Adding a Virtual Interface”, or Section 9.6.1, “Adding a Physical Interface” for details.
- : Creates a bonded interface. NIC bonding is a way to bind multiple network interfaces together into a single interface that appears as a single device and has a single MAC address. This enables two or more network interfaces to act as one, simultaneously increasing the bandwidth and providing redundancy. See Section 9.6.3, “Adding a Bonded Interface” for details.
- : Baseboard Management Controller (BMC) allows you to remotely monitor and manage physical state of machines. See Enabling Power Management on Managed Hosts in the Red Hat Satellite Installation Guide for more information on BMC, and Section 9.6.4, “Adding a Baseboard Management Controller (BMC) Interface” for details on configuring a BMC interface.
Note
/etc/sysconfig/network-scripts/ifcfg-$interface_id.
Note
9.6.1. Adding a Physical Interface
Procedure 9.11. To Add a Physical Interface:
- Navigate to → to view available hosts.
- Click next to the host you want to edit.
- On the Network tab, click .
- Keep the Interface option selected in the menu.
- Specify a MAC address of the additional interface. This setting is required.
- Specify the device Identifier, for example eth0 or eth1.1. Identifier is used for bonded interfaces (in the Attached devices field, see Procedure 9.13, “To Add a Bonded Interface:”), VLANs and aliases (in the Attached to field, see Procedure 9.12, “To Add a Virtual Interface:”).
- Specify the DNS name associated with the host's IP address. Satellite saves this name in the Capsule Server associated with the selected domain (the "DNS A" field) and the Capsule Server associated with the selected subnet (the "DNS PTR" field). A single host can therefore have several DNS entries.
- Select a domain from the Domain drop-down menu. To create and manage domains, navigate to → .
- Select a subnet from the Subnet drop-down menu. To create and manage subnets, navigate to → .
- Specify the interface IP address. Managed interfaces with assigned DHCP Capsule Server require this setting for creating a DHCP lease. DHCP-enabled managed interfaces provide an automatic suggestion of IP address.
- Decide if the interface will be managed. If the Managed check box is selected, the interface configuration is pulled from the associated Capsule Server during provisioning, and DNS and DHCP entries are created. If using kickstart provisioning, a configuration file is automatically created for the interface.
- Select the Virtual NIC check box to create a virtual interface. See Section 9.6.2, “Adding a Virtual Interface” for details.
- Click to save the interface configuration, and then click to apply the changes to the host.
9.6.2. Adding a Virtual Interface
- An alias interface automatically inherits a MAC address from the interface it is attached to, therefore you can create an alias without specifying a MAC address.
- The interface must be specified in a subnet with boot mode set to
static.
Procedure 9.12. To Add a Virtual Interface:
- Navigate to → to view available hosts.
- Click next to the host you want to edit.
- On the Network tab, click .
- Keep the Interface option selected in the menu.
- Specify the general interface settings. The applicable configuration options are the same as for the physical interfaces described in Section 9.6.1, “Adding a Physical Interface”.Specify MAC address for managed virtual interfaces so that the configuration files for provisioning are generated correctly. However, MAC address is not required for virtual interfaces that are not managed.If creating a VLAN, specify ID in the form of eth1.10 in the Identifier field. If creating an alias, use ID in the form of eth1:10.
- Select the Virtual NIC check box. Additional configuration options specific to virtual interfaces are appended to the form:
- Tag: You can specify tags per interface to provide a higher-level segmentation of the network. If left blank, managed interfaces inherit the tag form the VLAN ID of the associated subnet, given that this subnet has the VLAN ID specified. User-specified entries from this field are not applied on alias interfaces.
- Attached to: Specify the identifier of the physical interface to which the virtual interface belongs, for example eth1. This setting is required.
- Click to save the interface configuration. Then click to apply the changes to the host.
9.6.3. Adding a Bonded Interface
Procedure 9.13. To Add a Bonded Interface:
- Navigate to → to view available hosts.
- Click next to the host you want to edit.
- On the Network tab, click .
- Select Bond from the menu. Additional type-specific configuration options are appended to the form.
- Specify the general interface settings. The applicable configuration options are the same as for the physical interfaces described in Section 9.6.1, “Adding a Physical Interface”. Bonded interfaces use IDs in the form of bond0 in the Identifier field. It is sufficient if you specify a single MAC address in the MAC address field.
- Specify the configuration options specific to bonded interfaces:
- Mode: Select the bonding mode that defines a policy for fault tolerance and load balancing. See Table 9.1, “Bonding Modes Available in Red Hat Satellite” for a brief description of individual bonding modes.
- Attached devices: Specify a comma separated list of identifiers of attached devices. These can be physical interfaces or VLANs.
- Bond options: Specify a space separated list of configuration options, for example miimon=100. There are several configuration options you can specify for the bonded interface, see Red Hat Enterprise Linux 7 Networking Guide for details.
- Click to save the interface configuration. Then click to apply the changes to the host.
Table 9.1. Bonding Modes Available in Red Hat Satellite
| Bonding Mode | Description |
|---|---|
| balance-rr | Transmissions are received and sent out sequentially on each bonded interface. |
| active-backup | Transmissions are received and sent out via the first available bonded interface. Another bonded interface is only used if the active bonded interface fails. |
| balance-xor | Transmissions are based on the selected hash policy. In this mode, traffic destined for specific peers will always be sent over the same interface. |
| broadcast | All transmissions are sent on all bonded interfaces. |
| 802.a3 | Creates aggregation groups that share the same settings. Transmits and receives on all interfaces in the active group. |
| balance-tlb | The outgoing traffic is distributed according to the current load on each bonded interface. |
| balance-alb | Receive load balancing is achieved through Address Resolution Protocol (ARP) negotiation. |
9.6.4. Adding a Baseboard Management Controller (BMC) Interface
- BMC is enabled on the Capsule Server. If required, see Procedure 9.14, “To Enable BMC Power Management on an Existing Capsule Server:”.
- The ipmitool package is installed.
- You know the MAC address, IP address, and other details of the BMC interface on the host, and the appropriate credentials for that interface.
Note
You only need the MAC address for the BMC interface if the BMC interface is managed. This is so that it can create a DHCP reservation.
Procedure 9.14. To Enable BMC Power Management on an Existing Capsule Server:
- Use the satellite-installer routine to configure BMC power management on the Capsule Server by running the following command with the following options:
#satellite-installer --foreman-proxy-bmc=true --foreman-proxy-bmc-default-provider=ipmitool - Refresh the features for the Capsule Server.
- Log in to the Satellite web UI, and navigate to → .
- Identify the Capsule Sever whose features you need to refresh. In the drop-down list on the right, click Refresh features. The list of features in the Features column should now include BMC.
Procedure 9.15. To Add a BMC Interface:
- Navigate to → to view available hosts.
- Click next to the host you want to edit.
- On the Network tab, click .
- Select BMC from the menu. Type-specific configuration options are appended to the form.
- Specify the general interface settings. The applicable configuration options are the same as for the physical interfaces described in Section 9.6.1, “Adding a Physical Interface”.
- Specify the configuration options specific to BMC interfaces:
- Username, Password: Specify any authentication credentials required by BMC.
- Provider: Specify the BMC provider.
- Click to save the interface configuration, and then click to apply the changes to the host.
9.7. Removing a Host
Procedure 9.16. To Remove a Host:
- Click → or → .
- Choose the hosts to be removed.
- Click and choose Delete Hosts from the drop-down menu.
- A confirmation pop-up box will appear. Select to remove the host from Red Hat Satellite permanently.
Chapter 10. Discovering Bare-metal Hosts on Satellite
Satellite Server (Satellite Server Discovery plug-in) <--> Satellite Capsule (Satellite Capsule Discovery plug-in) <--> Discovered Host (Satellite Discovery image)
- The Satellite Server Discovery plug-in
- This runs on the Satellite Server and provides API and UI functionality for working with discovered hosts. The tfm-rubygem-foreman_discovery package contains this plug-in.
- The Satellite Capsule Server Discovery plug-in
- This is a communication proxy between discovered hosts on a provisioning network and the Satellite Server. The rubygem-smart_proxy_discovery package contains this plug-in.
- The Satellite Discovery image
- This is the minimal operating system based on Red Hat Enterprise Linux that is PXE-booted on hosts to acquire initial hardware information and to check in to the Satellite Server. Discovered hosts keep running the Satellite Discovery image until they are rebooted into Anaconda, which then initiates the provisioning process. The foreman-discovery-image package contains this image. It must be installed on the Satellite Capsule Server that provides TFTP services.
10.1. Configuring the Satellite Discovery Plug-in
10.1.1. Deploying the Satellite Discovery Image
# yum install foreman-discovery-image
$ rpm -ql foreman-discovery-image
/usr/share/foreman-discovery-image
/usr/share/foreman-discovery-image/fdi-image-rhel_7-2.1.0-20150212.1.iso
$ find /var/lib/tftpboot/boot
/var/lib/tftpboot/boot
/var/lib/tftpboot/boot/fdi-image-rhel_7-2.1.0-20150212.1-img
/var/lib/tftpboot/boot/fdi-image-rhel_7-2.1.0-20150212.1-vmlinuz
/var/lib/tftpboot/boot/fdi-image-rhel_7-img
/var/lib/tftpboot/boot/fdi-image-rhel_7-vmlinuz
Note
10.1.2. Configuring PXE-booting
- The KERNEL and APPEND lines in the template use symbolic links, created when installing the foreman-discovery-image package (see Section 10.1.1, “Deploying the Satellite Discovery Image”). The URLs are relative to the
/var/lib/tftpboot/directory. Ensure theAPPENDparameters are specified on a single line. - The
proxy.typevariable can be set to eitherproxy(recommended) orforeman. When the variable is set toproxy, all communication goes through the Satellite Capsule Server. When the variable is set toforeman, the communication goes directly to Satellite Server. Examples in this chapter assumeproxy.typeis set toproxy. - The
proxy.urlvariable specifies the URL of the Satellite Capsule Server or Satellite Server, depending on theproxy.typesetting. BothHTTPandHTTPSschemes are supported. The default port is 9090 for accessing the Satellite Capsule Server (proxy.type=proxy), and 80 for for direct communication with the Satellite Server (proxy.type=foreman). - The
IPAPPEND 2setting detects interfaces connected to the provisioning network. The image will not boot correctly if this option is removed or modified.
Procedure 10.1. To Configure PXE-booting:
- In the Satellite web UI, navigate to → .
- Edit the PXELinux global default template. Add the following menu entry to the template:
LABEL discovery
MENU LABEL Foreman Discovery
MENU DEFAULT
KERNEL boot/fdi-image-rhel_7-vmlinuz
APPEND initrd=boot/fdi-image-rhel_7-img rootflags=loop root=live:/fdi.iso rootfstype=auto ro rd.live.image acpi=force rd.luks=0 rd.md=0 rd.dm=0 rd.lvm=0 rd.bootif=0 rd.neednet=0 nomodeset proxy.url=https://SATELLITE_CAPSULE_URL:9090 proxy.type=proxy
IPAPPEND 2
- Set the new menu entry to be the default by modifying the
ONTIMEOUTvariable:ONTIMEOUT discovery
- Click at the top of the Provisioning Templates page. This instructs the TFTP proxy to rewrite the
pxelinux.cfg/defaultfile. Repeat this step every time a change is made to the default template to ensure that the changes are deployed on the TFTP Satellite Capsule Server.
proxy.url variable from the PXE-boot template. In this case, the Discovery image searches the DNS configuration file for an SRV record named x-foreman.tcp. The proxy.url variable must be set to proxy in this case. The DNS server must also be suitably configured. For example, the following configuration statement specifies the Capsule Server to be used with HTTPS:
_x-foreman._tcp SRV 0 5 9090 capsule
Note
Important
BOOTIF variable. BOOTIF is set automatically by the IPAPPEND variable in the PXE template. This means that when a system has multiple NICs, DNS will only work for the interface that it was booted from.
10.1.3. Reviewing Global Discovery Settings
-
discovery_organization,discovery_location - These variables specify where to place the discovered hosts. By default, the discovered hosts are automatically placed under the first organization and location created.
-
discovery_fact - This variable specifies which incoming fact to use to determine the MAC address of the discovered host. By default, the PXELinux BOOTIF kernel command line option is used.
-
discovery_auto - This variable enables automatic provisioning according to specified rules. Set to false by default. Red Hat recommends that you test the configuration with manual provisioning before enabling
discovery_auto. See Section 10.3, “Provisioning Discovered Hosts” for more information. -
discovery_fact_column - This variable allows you to add any fact reported by Facter as an additional column in the list of discovered hosts.
10.2. Configuring the Satellite Capsule Server Discovery Plug-in
foreman_url setting exists in the Satellite Capsule Server configuration file. The setting can appear as follows:
# grep foreman_url /etc/foreman-proxy/settings.yml
:foreman_url: https://satellite.example.com
satellite-installer command configures this variable automatically, but Red Hat recommends that you check that the host responds correctly and there are no firewall rules blocking communication.
10.2.1. Configuring Discovery Subnets
10.2.2. Using Hammer with the Discovery Plug-in
hammer command with the Discovery plug-in, you need to enable the Discovery plug-in in /etc/hammer/cli.modules.d/foreman_discovery.yml as follows:
:foreman_discovery:
  :enable_module: true
hammer uses.
10.2.3. Reviewing User Permissions
Discovery. You can assign this role to non-administrative users to allow them to use the Discovery plug-in. Alternatively, assign the perform_discovery permission to an existing role. For more information on roles and permissions, see the Server Administration Guide.
10.3. Provisioning Discovered Hosts
10.3.1. Manually Provisioning Hosts
Procedure 10.2. To Manually Provision a Discovered Host:
- Navigate to → .
- Select the host you want to provision and click .
- On the host's Edit page, complete the necessary details, and then click .
10.3.2. Decommissioning Discovered Hosts
Procedure 10.3. To Decommission a Discovered Host:
- Shut down the host.
- Navigate to → .
- In the Name column find the host you want to decommission and then select from the corresponding drop-down menu.
10.3.3. Automatically Provisioning Hosts
Procedure 10.4. To Create a Provisioning Rule:
- Navigate to → .
- Click . Specify the following parameters of the provisioning rule:
- Name is the name of the rule displayed in the list of rules. This name must not contain spaces or non-alphanumeric characters.
- Search is the search statement used to match discovered hosts for the particular rule. You can use scoped search syntax to define it. See Section 10.3.4, “Scoped Search Syntax” for examples of using scoped search.
- Host Group is the host group to be assigned to a matching host before starting the provisioning process. Make sure that the selected host group has all the required parameters set; required parameters are marked with an asterisk (*).
- Hostname defines a pattern for assigning human-readable host names to the matching hosts. When left blank, the host name is assigned in the format "macMACADDRESS" by default. The same syntax used for provisioning templates is used in this instance. See Section 10.3.5, “Host Name Patterns” for more information and examples.
- Hosts limit is the maximum number of provisioned hosts per rule. If the limit is reached, the rule will not take effect until one or more hosts are deleted. Typical use cases are rules per server rack or row when it is necessary to change provisioning parameters such as host name or host group per entry. You can set this value to zero (0) to specify no limit.
- Priority specifies the order of execution of rules. The value must be greater than or equal to zero. A lower value indicates a higher priority. If two rules have the same priority, the first rule encountered is applied.
- Enabled provides the option to temporarily enable or disable rules.
- Click to save the rule.
discovery_auto variable to provide automatic provisioning according to specified rules.
Procedure 10.5. To Enable Automatic Provisioning:
- Navigate to → → in the Satellite web UI.
- Locate
discovery_autoin the Name column, and set its value totrue. - Click .
10.3.4. Scoped Search Syntax
- facts.architecture = x86_64
- facts.bios_vendor ~ 'Dell*'
- facts.macaddress = "aa:bb:cc:dd:ee:ff"
- facts.macaddress_eth0 = "aa:bb:cc:dd:ee:ff"
- facts.ipaddress_eth1 ~ "192.168.*"
- facts.architecture ^ (x86_64,i386)
Note
Table 10.1. Facts that Allow Numerical Comparison
| Search Parameter | Description | Example Usage |
|---|---|---|
| cpu_count | The number of CPUs | cpu_count >= 8 |
| disk_count | The number of disks attached | disk_count < 10 |
| disks_size | The total amount of disk space (in MiB) | disks_size > 1000000 |
10.3.5. Host Name Patterns
@host attribute, the rand() function for random integers is available. For example:
- application-server-<%= rand(99999) %>
- load-balancer-<%= @host.facts['bios_vendor'] + '-' + rand(99999) %>
- wwwsrv-<%= @host.hostgroup.name %>
- minion-<%= @host.discovery_rule.name %>
- db-server-<%= @host.ip.gsub('.','-') + '-' + @host.hostgroup.subnet.name %>>
Important
10.3.6. Using the Discovery Plug-in on the Command Line
hammer command to perform certain tasks related to discovery. Run the hammer -h command to verify your configuration:
$ hammer -h | grep discovery
 discovery                     Manipulate discovered hosts.
 discovery_rule                Manipulate discovered rules.
hammer discovery -h command to view the available options. For example, you can use the following command to reboot a discovered host (assuming its ID is 130):
$ hammer discovery reboot -id 130
Host reboot started
10.4. Extending the Discovery Image
.
├── autostart.d
│   └── 01_zip.sh
├── bin
│   └── ntpdate
├── facts
│   └── test.rb
└── lib
    ├── libcrypto.so.1.0.0
    └── ruby
└── test.rb- The
autostart.ddirectory contains scripts that are executed in POSIX order by the image when it starts, but before the host is registered to Satellite. - The
bindirectory is added to the $PATH variable; you can place binary files here and use them in the autostart scripts. - The
factsdirectory is added to the FACTERLIB variable so that custom facts can be configured and sent to Satellite. - The
libdirectory is added to the LD_LIBRARY_PATH variable andlib/rubyis added to the RUBYLIB variable, so that binary files in/bincan be executed correctly.
/opt/extension directory on the image.
zip -r my_extension.zip .
fdi.zips option where the paths are relative to the TFTP root. For example, if you have two archives at $TFTP/zip1.zip and $TFTP/boot/zip2.zip, use the following syntax:
fdi.zips=zip1.zip,boot/zip2.zip
10.5. Troubleshooting Satellite Discovery
- Try redeploying the default PXE Linux template.
- Verify the
pxelinux.cfg/defaultconfiguration file on the TFTP Capsule Server. - Ensure adequate network connectivity between hosts, the Capsule Server, and the Satellite Server.
- Verify the
proxy.urlandproxy.typeoptions in the default PXE Linux template. - Ensure that the DNS is working correctly for that image, or use an IP address in the
proxy.urloption in the default PXE Linux template. - Ensure that the DHCP server is delivering IP addresses to the booted image correctly.
- Ensure the discovered host (or virtual machine) has at least 500 MB of memory. Less memory can lead to various random kernel panic errors as the image needs to be extracted in-memory.
discovery-debug command. It prints out system logs, network configuration, list of facts, and other information on the standard output. The typical use case is to redirect this output and copy it with the scp command for further investigation.
- discover-host - initial facts upload
- foreman-discovery - facts refresh, reboot remote commands
- nm-prepare - boot script which pre-configures NetworkManager
- NetworkManager - networking information
fdi.ssh=1 fdi.rootpw=redhat
Chapter 11. Running Remote Jobs on Satellite Hosts
Note
- Install, update, or remove software packages
- Bootstrap a configuration management agent
- Trigger a Puppet, Salt, or Chef run
11.1. Establishing a Secure Connection for Remote Commands
/etc/foreman-proxy/settings.d/remote_execution_ssh.yml file. They include the following options:
- ssh_identity_file
- File to load the SSH key from. By default, set to
/usr/share/foreman-proxy/.ssh/id_rsa_foreman_proxy. - local_working_dir
- Directory used on the Satellite or Capsule to run the scripts necessary for remote execution. By default, set to
/var/tmp. - remote_working_dir
- Directory on the client system that is used to execute the remote execution jobs. By default, set to
/var/tmp.
Note
noexec set for the /var/ volume or file system, change the remote_working_dir as otherwise the remote execution job will fail since the script cannot be executed.
# chcon --reference=/var new_placeSee the Maintaining SELinux Labels section of the SELinux User's and Administrator's Guide for more information on working with SELinux labels.
Distributing the SSH Keys for Remote Execution
- To distribute keys manually, execute the following command on the Capsule:
# ssh-copy-id -i ~foreman-proxy/.ssh/id_rsa_foreman_proxy.pub root@target.example.com
Here target.example.com is the host name of the target host. Repeat for each target host you want to manage. - To use the Satellite API to download the public key directly from the Capsule, execute the following command on each target host:
# curl https://myproxy.example.com:9090/ssh/pubkey >> ~/.ssh/authorized_keys
Here myproxy.example.com stands for the host name of the Capsule. - To include the public key in newly-provisioned hosts, modify for example the Kickstart default finish template to include the following line:
<%= snippet 'remote_execution_ssh_keys' %>
11.2. Configuring and Running Remote Commands
11.2.1. Setting up Job Templates
Procedure 11.1. To Create a Job Template:
- Navigate to → .
- Click . As an alternative, you can modify an existing template – in the Actions column, select Clone from the drop-down menu.
- Configure the job template:
- On the Template tab, enter a unique name for your job template. Select Default to make the template available for all organizations and locations. You can insert the template manually using Template editor or upload it from a text file by clicking . Templates use Embedded Ruby (ERB) template syntax, see Section 11.2.4, “Creating Advanced Templates” for more information. An advanced template is required, for example, for executing remote jobs that perform power actions; see Example 11.4, “Including Power Actions in Templates” for information on how to include the Power Action - SSH Default template in a custom template.
- On the Job tab, you can define the job category (define your own or select from the default categories listed in Table 11.1, “Default Job Template Categories”) as well as the effective user; these settings can be configured also when invoking the job (see Procedure 11.2, “To Execute a Remote Job:”). You can also define input parameters for template commands. These parameters are then requested when executing the job.
- Remaining tabs enable setting the template type, organizations and locations as well as viewing the template history.
- Click . When the page refreshes, your new template should appear in the list of job templates.
Important
Table 11.1. Default Job Template Categories
|
Job template category
|
Description
|
|---|---|
| Packages | Templates for performing package related actions. Install, update, and remove actions are included by default. |
| Puppet | Templates for executing Puppet runs on target hosts. |
| Power | Templates for performing power related actions. Restart and shutdown actions are included by default. |
| Commands | Templates for executing custom commands on remote hosts. |
| Services | Templates for performing service related actions. Start, stop, restart, and status actions are included by default. |
| Katello | Templates for performing content related actions. These templates are used mainly from different parts of the Satellite web UI (for example bulk actions UI for content hosts), but can be used separately to perform operations such as errata installation. |
Example 11.1. Creating a restorecon Template
SELinux context for all files in the selected directory on target hosts.
- Navigate to → . Click .
- Insert Run Command - restorecon in the Name field. Select Default to make the template available to all organizations. Add the following text to the Template editor:
restorecon -RvF <%= input("directory") %>The<%= input("directory") %>string will be replaced by a user-defined directory during job invocation. - On the Job tab, perform the following actions:
- Set Job category to
Commands. - Click to allow job customization. Insert
directoryto the Name field. The input name must match the value specified in the Template editor. - Click Required so that the command cannot be executed without the user specified parameter.
- Select
User inputfrom the Input type drop-down list. Also provide a Description to be shown during job invocation, for example Target directory for restorecon.
- Click .
11.2.2. Executing Remote Jobs
Procedure 11.2. To Execute a Remote Job:
- Navigate to → and select the target hosts for your remote job. You can use the search field to narrow down the host list.
- From the Select Action menu at the upper right of the screen select Run Job. This will take you to the Job invocation page. Alternatively, if you target just one host, click its name and click on the host information page. Note that you can invoke jobs also from the Job Templates page by using the button.
- On the Job invocation page, define the main job settings:
- Select the Job category and the Job template you want to use. These settings are required.
- Optionally, select a stored search string in the Bookmark list to specify the target hosts.
- Optionally, further limit the targeted hosts by inserting a Search query. The Resolves to line displays the number of hosts affected by your query. Use the refresh button to recalculate the number after changing the query. The preview icon will list the targeted hosts.
- The remaining settings depend on the selected job template. See Procedure 11.1, “To Create a Job Template:” for information on adding custom parameters to a template.
- Optionally, click Display advanced fields. Some of the advanced settings depend on the job template, the following settings are general:
- Effective user defines the user for executing the remote job, by default it is the SSH user.
- Concurrency level defines the maximum number of jobs executed at once, Time span lets you distribute the job execution over a defined time interval. These settings help to spread the load of mass job execution on your infrastructure.
- Type of query defines when the search query is evaluated. This helps to keep the query up to date for scheduled tasks.
- If you want to execute the job immediately, ensure that Schedule is set to
Execute now. You can also define a one-time future job, or set up a recurring job. For recurring tasks, you can define start and end dates, number and frequency of runs. You can also use cron syntax to define repetition. - Click . This displays the Job Overview page, and when the job completes, also displays the status of the job.
Example 11.2. Executing a restorecon Template on Multiple Hosts
/home/ directory.
- Navigate to → and select target hosts. Select Run Job from the Select Action drop-down list.
- In the Job invocation page, select the
Commandsjob category and theRun Command - restoreconjob template. - Type
/homein the directory field. - Set Schedule to
Execute now. - Click . You are taken to the Job invocation page where you can monitor the status of job execution.
11.2.3. Monitoring Remote Jobs
Procedure 11.3. To Monitor a Job:
- Navigate to the Job page. This page is automatically displayed if you triggered the job with the
Execute nowsetting. To monitor scheduled jobs, navigate to → and select the job run you wish to inspect. - On the Job page, click the Hosts tab. This displays the list of hosts on which the job is running.
- In the Host column, click the name of the host that you want to inspect. This displays the Detail of Commands page where you can monitor the job execution in real time.
- Click at any time to return to the Job Details page.
11.2.4. Creating Advanced Templates
httpd service on Red Hat Enterprise Linux systems:
<%= render_template 'Package Action - SSH Default', :action => 'install', :package => 'httpd' %>
<%= render_template 'Service Action - SSH Default', :action => 'start', :service_name => 'httpd' %>
input() method to allow users to define input for the rendered template on job execution. For example, you can use the following syntax:
<%= render_template 'Package Action - SSH Default', :action => 'install', :package => input("package") %> Example 11.3. Rendering a restorecon Template
/home/ directory on target hosts.
<%= render_template("Run Command - restorecon", :directory => "/home") %>Example 11.4. Including Power Actions in Templates
<%= render_template("Power Action - SSH Default", :action => "restart") %>11.3. Configuring Global Settings
Table 11.2. Global Settings for Remote Execution
|
Parameter Name
|
Description
|
|---|---|
|
remote_execution_effective_user
|
This is the default effective user for any job. When the job is executed the effective user of the process is changed accordingly (for example, by sudo). This option can be overridden per job template and job invocation.
|
|
remote_execution_effective_user_method
|
Specifies which method to use to set the effective user on the target host. Currently only su and sudo are supported.
|
|
remote_execution_fallback_proxy
|
Search the host for any Capsule with remote execution configured. This is useful when the host has no subnet or if the subnet does not have a Capsule with remote execution enabled.
|
|
remote_execution_global_proxy
|
Search for a remote execution Capsule outside of the Capsules assigned to the host. If Locations or Organizations are enabled, the search will be limited to the host's Organization or Location.
|
|
remote_execution_ssh_user
|
The default user to use while the Capsule connects to the target using SSH. You can set the
remote_execution_ssh_user variable to override this on a per-host basis.
You can set this by Host, Host Group, Operating System, Domain, Location, or Organization. This can also be a different user from the
remote_execution_effective_user.
|
| remote_execution_sync_templates | Defines whether job templates should be synchronized from disk when seeding a database. |
Important
/etc/foreman/settings.yaml configuration file, but any manual changes that you make to this file are overwritten the next time you run satellite-installer. Consequently, Red Hat recommends that you modify these parameters in the web UI. Alternatively, use the foreman-rake config command from a console.
11.3.1. Choosing a Capsule for Remote Execution
remote_execution_global_proxy variable to false to disable this behavior. This may be necessary in more complex environments, where not all Capsules can be used due to possible network isolation. In this configuration, you can assign a pool of Capsules to each subnet, and jobs are load balanced across them.
remote_execution_fallback_proxy variable to true to enable fallback mode. In this configuration, remote execution will use any Capsule associated with the host, such as its Puppet Master, provided that Capsule also has remote execution configured.
11.4. Delegating Permissions for Remote Execution
- Remote Execution Manager: This role allows access to all remote execution features and functionality.
- Remote Execution User: This role only allows running jobs; it does not provide permission to modify job templates.
view_job_templates permission, the user can only see and trigger jobs based on matching job templates. You can use the view_hosts and view_smart_proxies permissions to limit which hosts or Capsules are visible to the role.
execute_template_invocation permission is a special permission that is checked immediately before execution of a job begins. This permission defines which job template you can run on a particular host. This allows for even more granularity when specifying permissions. For more information on working with roles and permissions see "Creating and Managing Roles" in the Server Administration Guide.
execute_template_invocation permission:
name = Reboot and host.name = staging.example.com
name = Reboot and host.name ~ *.staging.example.com
name = "Restart service" and host_group.name = webservers
Note
Chapter 12. Configuring Host Collections
- Add hosts to a collection.
- Apply a mass installation of packages, errata, or package groups to all host members of a host collection.
- Update specific packages, errata, or specific package groups to all host members.
12.1. Creating a Host Collection
Procedure 12.1. To Create a Host Collection:
- Click → .
- Click .
- Add the Name and Description of the host collection.
- Deselect to specify the maximum number of hosts that will be allowed to the group. Otherwise, leave it checked to allow unlimited hosts to join the host collection.
- Click .
12.2. Adding Hosts to a Host Collection
Prerequisites
Procedure 12.2. To Add Hosts to a Host Collection:
- Click → .
- Click the host collection where the host should be added.
- On the tab, select the Add subtab.
- Select the hosts to be added from the table and click .
12.3. Adding Content to Host Collections
12.3.1. Adding Packages to a Host Collection
Prerequisites
- The content to be added should be available in one of the existing repositories or added prior to this procedure.
- Content should be promoted to the environment where the hosts are assigned.
Procedure 12.3. To Add Packages to Host Collections:
- Click → .
- Click the host collection where the package should be added.
- On the tab, click .
- To update all packages, click the button to use the default method. Alternatively, select the drop-down icon to the right of the button to select a method to use. Selecting the menu entry will take you to the Job invocation page where you can customize the action.
- Select the Package or Package Group radio button as required.
- In the field provided, specify the package or package group name. Then click:
- — to install a new package using the default method. Alternatively, select the drop-down icon to the right of the button and select a method to use. Selecting the menu entry will take you to the Job invocation page where you can customize the action.
- — to update an existing package in the host collection using the default method. Alternatively, select the drop-down icon to the right of the button and select a method to use. Selecting the menu entry will take you to the Job invocation page where you can customize the action.
12.3.2. Adding Errata to a Host Collection
Prerequisites
- The errata to be added should be available in one of the existing repositories or added prior to this procedure.
- Errata should be promoted to the environment where the hosts are assigned.
Procedure 12.4. To Add Errata to a Host Collection:
- Click → .
- Select the host collection where the errata should be added.
- On the tab, click .
- Select the errata you want to add to the host collection and click the button to use the default method. Alternatively, select the drop-down icon to the right of the button to select a method to use. Selecting the menu entry will take you to the Job invocation page where you can customize the action.
12.4. Removing Content from a Host Collection
Procedure 12.5. To Remove Content from a Host Collection:
- Click → .
- Click the host collection where the package should be removed.
- On the tab, click .
- Select the Package or Package Group radio button as required.
- In the field provided, specify the package or package group name.
- Click the button to remove the package or package group using the default method. Alternatively, select the drop-down icon to the right of the button and select a method to use. Selecting the menu entry will take you to the Job invocation page where you can customize the action.
12.5. Changing the Life Cycle Environment or Content View of a Host Collection
Procedure 12.6. To Change the Life Cycle Environment or Content View of a Host Collection:
- Click → .
- Selection the host collection where the life cycle environment or content view should be changed.
- On the tab, click Change assigned Life Cycle Environment or Content View.
- Select the life cycle environment to be assigned to the host collection.
- Select the required content view from the drop-down list.
- Click .
12.6. Removing a Host from a Host Collection
Procedure 12.7. To Remove Hosts from a Host Collection:
- Click → .
- Choose the desired host collection.
- On the tab, select the List/Remove subtab.
- Select the hosts you want to remove from the host collection and click .
12.7. Removing a Host Collection
Procedure 12.8. To Remove a Host Collection:
- Click → .
- Choose the host collection to be removed.
- Click . An alert box appears:
Are you sure you want to remove host collection Host Collection Name?
- Click .
Appendix A. Template Writing Reference
A.1. Writing ERB Templates
- <% %> – marks enclosing Ruby code within the ERB template. The code is executed when the template is rendered. It can contain Ruby control flow structures as well as Satellite specific functions and variables. For example:
<% if @host.operatingsystem.family == "Redhat" && @host.operatingsystem.major.to_i > 6 %> systemctl <%= input("action") %> <%= input("service") %> <% else %> service <%= input("service") %> <%= input("action") %> <% end -%> - <%= %> – the code output is inserted into the template. This is useful for variable substitution, for example:
echo <%= @host.name %>
- <% -%>, <%= -%> – by default, a newline character is inserted after a Ruby block if it is closed at the end of a line. To suppress this behavior, modify the enclosing mark. For example, the following template:
curl <%= @host.ip -%>
/mydir
is rendered the same as:curl <%= @host.ip %>/mydir
In practice, this is used to reduce the number of lines in rendered templates (where Ruby syntax permits). - <%# %> – marks enclosing a comment that will be ignored during template rendering:
<%# A comment %>
A.2. Troubleshooting ERB Templates
- Directly in the template editor – when editing a template (under → , → , or → ), on the Template tab click and select a host from the drop-down menu. The template then renders in the text field using the selected host's parameters. Preview failures can help to identify issues in your template.
- At the host's details page – select a host at → and click the Templates tab to list templates associated with the host. Select Review from the drop-down menu next to the selected template to view it's rendered version.
A.3. Satellite Specific Functions and Variables
Table A.1. Generic Functions
| Name | Description |
|---|---|
| indent(n) | Indents the block of code by n spaces, useful when using a snippet template that is not indented. |
| foreman_url(kind) | Returns the full URL to host-rendered templates of the given kind. For example, templates of the "provision" type usually reside at http://HOST/unattended/provision. |
| snippet(name) | Renders the specified snippet template. Useful for nesting provisioning templates. |
| snippets(file) | Renders the specified snippet found in the Foreman database, attempts to load it from the unattended/snippets/ directory if it is not found in the database. |
| snippet_if_exists(name) | Renders the specified snippet, skips if no snippet with the specified name is found. |
Example A.1. Using the snippet and indent Functions
<%= indent 4 do
snippet 'subscription_manager_registration'
end %>
Table A.2. Functions Specific to Job Templates
| Name | Description |
|---|---|
| input(input_name) | Returns the value of the specified input on the job execution. |
| render_template(name, parameters) | Renders the specified template, similar to the generic snippet() function but enables passing arguments to the template. |
Table A.3. Host Specific Variables and Functions
| Name | Description |
|---|---|
| @host.architecture | The architecture of the host. |
| @host.bond_interfaces | Returns an array of all bonded interfaces. See Note. |
| @host.capabilities | The method of system provisioning, can be either build (for example kickstart) or image. |
| @host.certname | The SSL certificate name of the host. |
| @host.diskLayout | The disk layout of the host. Can be inherited from the operating system. |
| @host.domain | The domain of the host. |
| @host.environment | The Puppet environment of the host. |
| @host.facts | Returns a Ruby hash of facts from Facter. For example to access the 'ipaddress' fact from the output, specify @host.facts['ipaddress']. |
| @host.grub_pass | Returns the host's GRUB password. |
| @host.hostgroup | The host group of the host. |
| @host.info['parameters'] | Returns a Ruby hash containing information on host parameters. For example, use @host.info['parameters']['lifecycle_environment'] to get the life cycle environment of a host. |
| @host.image_build? | Returns true if the host is provisioned using an image. |
| @host.interfaces | Contains an array of all available host interfaces including the primary interface. See Note. |
| @host.interfaces_with_identifier('IDs') | Returns array of interfaces with given identifier. You can pass an array of multiple identifiers as an input, for example @host.interfaces_with_identifier(['eth0', 'eth1']). See Note. |
| @host.ip | The IP address of the host. |
| @host.location | The location of the host. |
| @host.mac | The MAC address of the host. |
| @host.managed_interfaces | Returns an array of managed interfaces (excluding BMC and bonded interfaces). See Note. |
| @host.medium | The assigned operating system installation medium. |
| @host.name | The full name of the host. |
| @host.operatingsystem.family | The operating system family. |
| @host.operatingsystem.major | The major version number of the assigned operating system. |
| @host.operatingsystem.minor | The minor version number of the assigned operating system. |
| @host.operatingsystem.name | The assigned operating system name. |
| @host.operatingsystem.boot_files_uri(@host.medium,@host.architecture) | Full path to the kernel and initrd, returns an array. |
| @host.os.medium_uri(@host) | The URI used for provisioning (path configured in installation media). |
| @host.param_false?(name) | Returns false if host parameter of a given name evaluates to false. |
| @host.param_true?(name) | Returns true if host parameter of a given name evaluates to true. |
| @host.params['parameter_name'] | Returns the value of specified parameters. |
| @host.primary_interface | Returns the primary interface of the host. |
| @host.provider | The compute resource provider. |
| @host.provision_interface | Returns the provisioning interface of the host. Returns an interface object. |
| @host.ptable | The partition table name. |
| @host.puppetmaster | The Puppet master the host should use. |
| @host.pxe_build? | Returns true if the host is provisioned using the network or PXE. |
| @host.shortname | The short name of the host. |
| @host.sp_ip | The IP address of the BMC interface. |
| @host.sp_mac | The MAC address of the BMC interface. |
| @host.sp_name | The name of the BMC interface. |
| @host.sp_subnet | The subnet of the BMC network. |
| @host.subnet.dhcp | Returns true if a DHCP proxy is configured for this host. |
| @host.subnet.dns_primary | The primary DNS server of the host. |
| @host.subnet.dns_secondary | The secondary DNS server of the host. |
| @host.subnet.gateway | The gateway of the host. |
| @host.subnet.mask | The subnet mask of the host. |
| @host.url_for_boot(:initrd) | Full path to the initrd image associated with this host. Not recommended, as it does not interpolate variables. |
| @host.url_for_boot(:kernel) | Full path to the kernel associated with this host. Not recommended, as it does not interpolate variables, prefer boot_files_uri. |
| @provisioning_type | Equals to 'host' or 'hostgroup' depending on type of provisioning. |
| @static | Returns true if the network configuration is static. |
| @template_name | Name of the template being rendered. |
| grub_pass | Returns the GRUB password wrapped in md5pass argument, that is --md5pass=#{@host.grub_pass}. |
| ks_console | Returns a string assembled using the port and the baud rate of the host which can be added to a kernel line. For example console=ttyS1,9600. |
| root_pass | Returns the root password configured for the system. |
Note
@host.interfaces or @host.bond_interfaces return interface data grouped in an array. To extract a parameter value of a specific interface, use Ruby methods to parse the array. For example, to get information about the first interface from an array and use it in a kickstart template:
<% myinterface = @host.interfaces.first %>
IPADDR="<%= myinterface.ip %>"
NETMASK="<%= myinterface.subnet.mask %>"
GATEWAY="<%= myinterface.subnet.gateway %>"
<% ifnames = []
@host.interfaces.each do |i|
  ifnames.push(i.name)
end %>
Example A.2. Using Host Specific Variables
<%
pm_set = @host.puppetmaster.empty? ? false : true
puppet_enabled = pm_set || @host.param_true?('force-puppet')
puppetlabs_enabled = @host.param_true?('enable-puppetlabs-repo')
%><% os_major = @host.operatingsystem.major.to_i os_minor = @host.operatingsystem.minor.to_i %> <% if ((os_minor < 2) && (os_major < 14)) -%> ... <% end -%>
<% subnet = @host.subnet %>
<% if subnet.respond_to?(:dhcp_boot_mode?) -%>
<%= snippet 'kickstart_networking_setup' %>
<% end -%>
<% @host.ip.split('.').last %>Table A.4. Kickstart Specific Variables
| Name | Description |
|---|---|
| @arch | The host architecture name, same as @host.architecture.name. |
| @dynamic | Returns true if the partition table being used is a %pre script (has the #Dynamic option as the first line of the table). |
| @epel | A command which will automatically install the correct version of the epel-release rpm. Use in a %post script. |
| @mediapath | The full kickstart line to provide the URL command. |
| @osver | The operating system major version number, same as @host.operatingsystem.major. |
Comments