Create OSE environment on AWS using demo-ansible
TABLE OF CONTENTS
Part1: Setup Installation Host
Part2: Setup AWS Route 53
Part 3: Setup in AWS EC2
Part 4: Getting Access Key Credentials
Part 5: Setup to run the demo-ansible
Part 6: Access to your AWS environment
Part 7: Remove AWS environment
SUMMARY
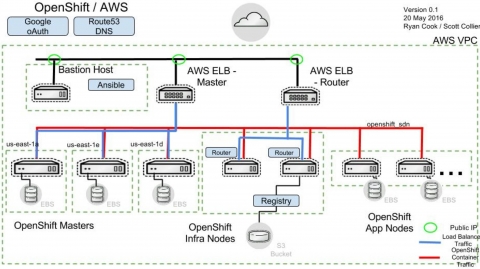
Demo-ansible (https://github.com/2015-Middleware-Keynote/demo-ansible) automates the steps for building out an OpenShift environment quickly.
This article will walk through step by step to build out an OpenShift environment using demo-ansible. The environment is suitable for running a workshop with many users.

In order to run the demo-ansible script, preparation steps are required.
Part 1: Setup Installation Host
1. Install the required packages shown as below onto where demo-ansible will be executed. Please see below steps for more details.
2. Purchase a domain name (myexample.com for example) from any service provider, such as godaddy.com or namecheap.com, or any other.
3. Create account in AWS
This is the list of required packages for demo-ansible script:
- Python version 2.7.x (3.x untested and may not work)
- Python Click version 4.0 or greater
- Python Boto version 2.38.0 or greater
- pyOpenSSL version 0.15.1 or greater
- Ansible version 1.9.4
Install the above packages on Mac
sudo easy_install pip
sudo pip install ansible
sudo pip install click
sudo pip install boto
sudo pip install pyopenssl
For Windows and Linux user, install the above packages on Fedora (Windows user can use Fedora virtual machines to run the demo-ansible. Please checkout http://linuxpitstop.com/install-fedora-22-workstation-on-virtualbox/ to install Fedora on a virtual machine)
sudo yum -y install python-pip
sudo pip install click
sudo pip install boto
sudo yum install -y pyOpenSSL
sudo yum install -y http://195.220.108.108/linux/fedora-secondary/updates/22/s390x/a/ansible-1.9.4.1.fc22.noarch.rpm
Part 2: Setup AWS Route 53
1. In AWS, go to Service —> route53, create a hosted zone
2. Enter a subdomain name as the hosted zone ( ose.myexample.com) and click create
3. Upon creation, you will get 4 NS records from AWS route53
4. Login to your DNS service provider website, add all the NS records from the hosted zone in AWS into your DNS service provider account
Part 3: Setup in AWS EC2
1. In AWS, go to Services —> EC2
2. Click onto Key Pairs, create a Key Pair and download the private key (mykeypair for example) to where demo-ansible will be executed. The private key will be used to login to the hosts in AWS environment.
Part 4: Getting Access Key Credentials
1. In AWS, on top right corner, under your account name, select security credentials
2. Expand the “Access Keys (Access Key ID and Secret Access Key)” session
3. Create new access key and download a file that has the values of AWS_ACCESS_KEY_ID and AWS_SECRET_ACCESS_KEY. This information is needed in Part 5 step #4
Part 5: Setup to run the demo-ansible
1. Create a ansible-scripts directory and change directory into it
2. git clone https://github.com/2015-Middleware-Keynote/demo-ansible
3. git clone https://github.com/thoraxe/openshift-ansible
For example the above step #1 - step #3
Note that demo-ansible is being updated all the time. Please be aware the checkout version may be different from time to time.
mkdir ansible-scripts/
cd ansible-scripts/
git clone https://github.com/2015-Middleware-Keynote/demo-ansible.git
cd demo-ansible
git checkout demo-ansible-2.3.0
cd ..
git clone https://github.com/openshift/openshift-ansible.git
cd openshift-ansible
git fetch origin :remotes/origin/openshift-ansible-3.0.94-1-hotfix
git checkout openshift-ansible-3.0.94-1-hotfix
cd ..
'4. Export AWS keys from the access key credential session (in Part 4)
export AWS_ACCESS_KEY_ID=foo
export AWS_SECRET_ACCESS_KEY=bar
'5. ssh-add /path/private_key_file_name (in Part 3)
'6. To create an OpenShift environment
cd demo-ansible

 ./run.py --verbose --no-confirm --keypair mykeypair --r53-zone ose.myexample.com --app-dns-prefix apps --rhsm-user subscription_username --rhsm-pass subscription_password --default-password openshift3 --cluster-id ose --region us-west-2 --ami ami-775e4f16
By default, you will get 3 master nodes, 1 infra node, and 1 node. m4.large is default for the master and node instance type. m4.2xlarge is default for infra instance type.
You can specify more infra nodes by --num-infra, and more nodes by --num-nodes.
Run
./run.py --help
to more options to customized your environment.
Part 6: Access to your AWS environment
Once the nodes is setup, you will be able to see all instances under AWS console --> services (Top menu) --> EC2 --> instances (left nav). You will be able to get details for each nodes (including public and private IP addresses).
Here is the command to login to the master:
ssh -i /path/to/key.pem (This key is from Part #3) openshift@openshift-master.ose.
you can also use the IP address to login if you like via public IP of the instances.
ssh -i /path/to/key.pem (This key is from Part #3) openshift@
Part 7: Remove AWS environment
1. Login AWS console
2. Click Services (top menu) --> CloudFormation
3. Select the stack and click Action --> Delete stack.


Comments