
Evaluating OpenStack: Simple Networking in Red Hat Enterprise Linux OpenStack Platform 5
OpenStack Networking Overview
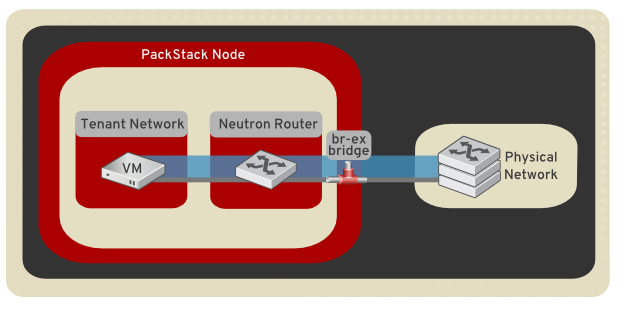
This article describes the steps necessary to configure networking in your Packstack All-in-One deployment. All Compute and OpenStack Networking services reside on a single host. After using the steps in this article, all ingress/egress network traffic is bridged to the physical network infrastructure. In addition, this particular all-in-one configuration is intended for a single node deployment. As a result, the networking type is set to local, and does not make use of VXLAN or VLAN networking.
Note: This article is applicable to Red Hat OpenStack Platform 5. For more recent information, see the Red Hat OpenStack Platform 10 version.
Note: This article assumes an existing Packstack installation is present, using Red Hat Enterprise Linux OpenStack Platform 5. Refer to the Evaluating OpenStack: Single-Node Deployment article for instructions on building an all-in-one Packstack environment. Ensure NetworkManager has been disabled before proceeding:
# systemctl disable NetworkManager.service
# systemctl stop NetworkManager.service
Overview of Configuration Steps
- The default Packstack topology is removed (network, subnet, and router).
- A physical NIC is mapped to a virtual bridge. This step allows OpenStack Networking traffic to reach the physical network.
- The virtual network topology is created with a new network, public subnet, and router:
Assumptions
This article assumes that the destination host has the following network configuration. You can adjust the steps to suit your deployment:
- 1 x physical NIC allocated with the following IP details:
Table 1. eth0
| Setting | Value |
|---|---|
| IP address | 192.168.120.10 |
| Subnet mask | 255.255.255.0 |
| Default gateway | 192.168.120.1 |
| DNS server | 192.168.120.1 |
1. Clear Packstack's Default Network Configuration
The default Packstack configuration creates a public_subnet and configures a gateway on router1. These need to be recreated with the appropriate settings. Use the following steps to remove the defaults:
# cd ~
# source keystonerc_admin
# neutron router-gateway-clear router1
# neutron subnet-delete public_subnet
# neutron net-delete public
2. Map the Physical NIC to the Bridge
1) Map a physical NIC to the virtual Open vSwitch bridge. The virtual bridge acts as the intermediary between the physical network and any virtual networks:
# vi /etc/sysconfig/network-scripts/ifcfg-eth0
DEVICE=eth0
TYPE=OVSPort
DEVICETYPE=ovs
OVS_BRIDGE=br-ex
ONBOOT=yes
2) Configure the virtual bridge with the IP address details that were previously allocated to eth0:
# vi /etc/sysconfig/network-scripts/ifcfg-br-ex
DEVICE=br-ex
DEVICETYPE=ovs
TYPE=OVSBridge
BOOTPROTO=static
IPADDR=192.168.120.10
NETMASK=255.255.255.0
GATEWAY=192.168.120.1
DNS1=192.168.120.1
ONBOOT=yes
3) Restart your server for the changes to take effect:
# reboot
3. Create The New OpenStack Networking Topology
Recreate the Network Topology
Note: You can open the Network Topology tab in Dashboard to observe the results of the following commands.
# cd ~
# source keystonerc_admin
# neutron net-create public --router:external=True
# neutron subnet-create --name public_subnet --enable_dhcp=False --allocation_pool start=192.168.120.20,end=192.168.120.100 --gateway=192.168.120.1 public 192.168.120.0/24
# neutron net-create private_network
# neutron subnet-create private_network 192.168.200.0/24 --name private_vmsubnet
# neutron router-create router2
# neutron router-gateway-set router2 public
# neutron router-interface-add router2 private_vmsubnet
You can now build an instance using Dashboard and assign it to private_network in the Networking tab.
4. SSH To An Instance
Enabling SSH access to an instance requires security group (firewall) configuration, the allocation of a floating IP address, and the generation of a SSH keypair. These steps are detailed in the following procedure:
Allow Incoming ICMP and SSH Traffic
List the security groups to determine which one to configure for SSH and ICMP access:
# neutron security-group-list
+--------------------------------------+---------+-------------+
| id                                   | name    | description |
+--------------------------------------+---------+-------------+
| 1822f9b1-f7bf-47d0-8e57-950a66036ce5 | default | default     |
| 71141e31-11f8-496e-aa1c-8ef1cc95eb77 | default | default     |
| f897bc94-66b8-4485-974d-0a4256ebe3c4 | default | default     |
+--------------------------------------+---------+-------------+
Add Security Group Rules
The neutron commands allow incoming SSH and ICMP traffic
    # neutron security-group-rule-create --protocol icmp --direction ingress 1822f9b1-f7bf-47d0-8e57-950a66036ce5
    # neutron security-group-rule-create --protocol tcp --port-range-min 22 --port-range-max 22 --direction ingress 1822f9b1-f7bf-47d0-8e57-950a66036ce5
Allocate a Floating IP Address
Floating IP addresses enable external network connectivity for instances. In the following procedure, a floating IP address is created and associated with the instance's network port.
1) Use the neutron command to create a floating IP address:
# neutron floatingip-create public
+---------------------+--------------------------------------+
| Field               | Value                                |
+---------------------+--------------------------------------+
| fixed_ip_address    |                                      |
| floating_ip_address | 192.168.120.20                       |
| floating_network_id | 7a03e6bc-234d-402b-9fb2-0af06c85a8a3 |
| id                  | 9d7e2603482d                         |
| port_id             |                                      |
| router_id           |                                      |
| status              | ACTIVE                               |
| tenant_id           | 9e67d44eab334f07bf82fa1b17d824b6     |
+---------------------+--------------------------------------+
2) Locate the ID of the port associated with your instance. This will match the fixed IP address allocated to the instance. This port ID is used in the following step to associate the instance's port ID with the floating IP address ID. You can further distinguish the correct port ID by ensuring the MAC address in the third column matches the one on the instance.
# neutron port-list
+--------+------+-------------+--------------------------------------------------------+
| id     | name | mac_address | fixed_ips                                              |
+--------+------+-------------+--------------------------------------------------------+
| ce8320 |      | 3e:37:09:4b | {"subnet_id": "361f27", "ip_address": "192.168.120.2"} |
| d88926 |      | 3e:1d:ea:31 | {"subnet_id": "361f27", "ip_address": "192.168.120.5"} |
| 8190ab |      | 3e:a3:3d:2f | {"subnet_id": "b74dbb", "ip_address": "192.168.120.20"}|
+--------+------+-------------+--------------------------------------------------------+
3) Use the neutron command to associate the floating IP address with an instance:
# neutron floatingip-associate 9d7e2603482d 8190ab
Generate a Security Keypair
The nova command below generates a keypair and adds it to the Compute service. The resulting sshaccess.pem file contains the private key, which can be presented when attempting to SSH to the instance.
# nova keypair-add sshaccess > sshaccess.pem
You can now SSH to the instance's floating IP address by presenting the sshaccess.pem key:
# ssh -i sshaccess.pem root@192.168.120.20
[root@corp-vm-01 ~]#
Network connectivity for the instance's operating system
You can now proceed to configure your instance's operating system for connectivity. You'll need to configure the default gateway and DNS settings manually if they're not served out using DHCP:
- The default gateway IP address will need to be situated on the same subnet as your instance, 192.168.120.1 in this example.
- At least one DNS server will need to be specified in the interface's settings for name resolution to work.
Comments