
Red Hat Training
A Red Hat training course is available for Red Hat OpenStack Platform
Installing OpenShift Container Platform on Bare Metal using director
A Guide to Installing OpenShift Container Platform (OCP) on Bare Metal using director.
Abstract
Chapter 1. Installing OpenShift Container Platform on Bare Metal using director
This guide explains how to use director to deploy OCP 3.11 onto bare metal nodes. Note that this approach is expected to be deprecated and removed in Red Hat OpenStack Platform 15. Instead, you can use openshift-ansible to deploy OCP 3.11 onto bare metal nodes. In addition, you can still use director and ironic in the overcloud to provision Red Hat Enterprise Linux onto bare metal nodes.
This guide explains how Red Hat OpenStack director can deploy Red Hat OpenShift Container Platform (OCP) clusters onto bare metal nodes, or in virtual nodes in an overcloud. If you are deploying into a virtual environment, see Section 1.3, “Deploying in a virtualized environment” below.
1.1. Prerequisites
- Working undercloud - A completed installation of the Red Hat OpenStack director undercloud; the OCP deployment will serve as part of the overcloud.
-
Storage requirements - The
openshift-cns.yamltemplate configures two different GlusterFS clusters: one on the Infra nodes for the container registry, and another on the Worker nodes for the workload. As a result, to get quorum you will need at least three Infra nodes and three Worker nodes. In addition, each Infra and Worker node requires a minimum of one additional disk (other than the OS disk) for gluster storage. The list of disks is defined by theOpenShiftGlusterDiskparameter, as described in this guide. Minimum node count - The minimum number of nodes you can use is determined by your approach to storage:
- Using Gluster storage: Minimum of 3x Master, 3x Infra, and 3x Worker nodes. This provides full High Availability (HA).
- Using local storage: Minimum of 3x Master, 2x Infra, and 1x Worker node. This provides HA for services running on Master and Infra nodes, but not for the storage used by the registry and apps.
1.2. Deploying OCP nodes using director
This guide explains how to use director to deploy OCP 3.11 onto bare metal nodes. Note that this approach is expected to be deprecated and removed in Red Hat OpenStack Platform 15. Instead, you can use openshift-ansible to deploy OCP 3.11 onto bare metal nodes. In addition, you can still use director and ironic in the overcloud to provision Red Hat Enterprise Linux onto bare metal nodes.
You can use director to deploy Red Hat OpenShift Container Platform (OCP) clusters onto bare metal nodes. Director deploys the operating system onto the nodes and then configures OCP using openshift-ansible. You can also use director to manage the bare metal nodes.
Director installs the OCP services through composable roles for OpenShiftMaster, OpenShiftWorker (also known as the application node), and OpenShiftInfra. When you import a bare metal node using instackenv.json, you can then tag it to use a specific composable role. For more information on using composable roles, see https://access.redhat.com/documentation/en-us/red_hat_openstack_platform/14/html/advanced_overcloud_customization/roles.
Director does not manage updates or upgrades for OpenShift. You should instead follow the recommended OpenShift upgrade paths.
The following diagram shows the basic network topology that director creates when you install OpenShift Container Platform on bare metal nodes:
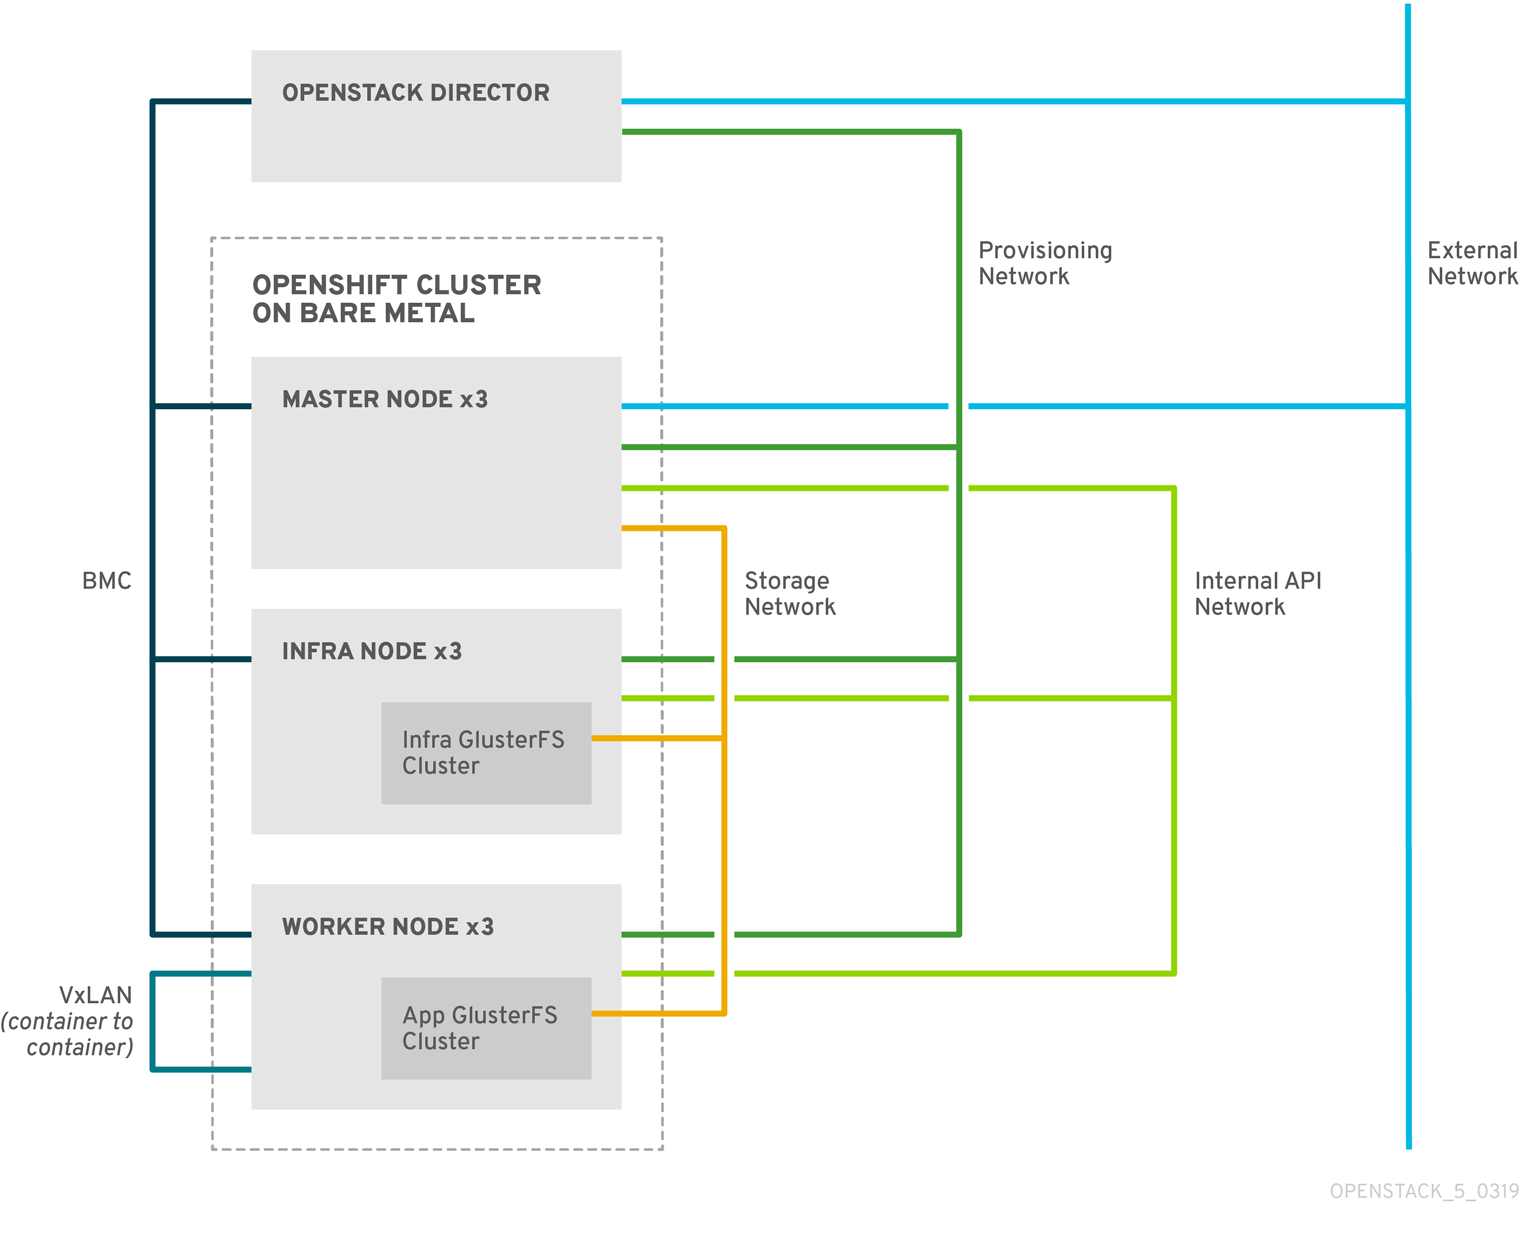
- Provisioning
- The network that director uses to provision bare metal nodes and configure these nodes with their respective roles.
- BMC
- The network that director uses to control the bare metal nodes with a baseboard management controller (BMC).
- External
-
The network that director and
OpenShiftMasternodes use for external traffic. - Internal API
- The network that bare metal nodes use for communication with other nodes
- Storage
- The network that bare metal nodes use for GlusterFS traffic.
- VxLAN
- The internal OpenShift Container Platform network that containers use for communication with other containers.
1.2.1. OCP roles and services
The OpenShiftMaster role consists of the following services:
ServicesDefault:
- OS::TripleO::Services::ContainerImagePrepare
- OS::TripleO::Services::Docker
- OS::TripleO::Services::HAproxy
- OS::TripleO::Services::Keepalived
- OS::TripleO::Services::Ntp
- OS::TripleO::Services::OpenShift::Master
- OS::TripleO::Services::Rhsm
- OS::TripleO::Services::Sshd
- OS::TripleO::Services::TripleoFirewall
- OS::TripleO::Services::TripleoPackages
The OpenShiftWorker role (application node) consists of the following services:
ServicesDefault:
- OS::TripleO::Services::Docker
- OS::TripleO::Services::Ntp
- OS::TripleO::Services::OpenShift::GlusterFS
- OS::TripleO::Services::OpenShift::Worker
- OS::TripleO::Services::Rhsm
- OS::TripleO::Services::Sshd
- OS::TripleO::Services::TripleoFirewall
The OpenShiftInfra role is a type of worker role that runs only infrastructure pods. It consists of the following services:
ServicesDefault:
- OS::TripleO::Services::Docker
- OS::TripleO::Services::Ntp
- OS::TripleO::Services::OpenShift::GlusterFS
- OS::TripleO::Services::OpenShift::Infra
- OS::TripleO::Services::Rhsm
- OS::TripleO::Services::Sshd
- OS::TripleO::Services::TripleoFirewall
1.2.2. Defining the OCP roles
This procedure generates the OCP roles so that you can later assign them to hardware nodes.
On the undercloud node, source the RC file. For example, this might be called
undercloudrcorstackrc:$ source stackrc
Generate the OCP roles:
$ openstack overcloud roles generate -o /home/stack/openshift_roles_data.yaml OpenShiftMaster OpenShiftWorker OpenShiftInfra
This command generates a file named
/home/stack/openshift_roles_data.yaml, which describes the roles and services. For example:- name: OpenShiftMaster CountDefault: 1 ServicesDefault: - OS::TripleO::Services::ContainerImagePrepare - OS::TripleO::Services::Docker - OS::TripleO::Services::HAproxy - OS::TripleO::Services::Keepalived - OS::TripleO::Services::Ntp - OS::TripleO::Services::OpenShift::Master - OS::TripleO::Services::Rhsm - OS::TripleO::Services::Sshd - OS::TripleO::Services::TripleoFirewall - OS::TripleO::Services::TripleoPackages - name: OpenShiftWorker CountDefault: 1 ServicesDefault: - OS::TripleO::Services::Docker - OS::TripleO::Services::Ntp - OS::TripleO::Services::OpenShift::GlusterFS - OS::TripleO::Services::OpenShift::Worker - OS::TripleO::Services::Rhsm - OS::TripleO::Services::Sshd - OS::TripleO::Services::TripleoFirewall - name: OpenShiftInfra CountDefault: 1 ServicesDefault: - OS::TripleO::Services::Docker - OS::TripleO::Services::Ntp - OS::TripleO::Services::OpenShift::GlusterFS - OS::TripleO::Services::OpenShift::Infra - OS::TripleO::Services::Rhsm - OS::TripleO::Services::Sshd - OS::TripleO::Services::TripleoFirewall
View the new OCP roles:
$ openstack overcloud roles list
The result should include entries for
OpenShiftMaster,OpenShiftWorker, andOpenShiftInfra.To see more information on the
OpenShiftMasterrole:$ openstack overcloud role show OpenShiftMaster
1.2.3. Configuring the container registry
After you deploy the undercloud, you must configure director to locate the container registry.
Generate a
/home/stack/containers-prepare-parameter.yamlfile:$ openstack tripleo container image prepare default \ --local-push-destination \ --output-env-file containers-prepare-parameter.yaml
For example, edit
/home/stack/containers-prepare-parameter.yamland add the following settings. Adjust these values to suit your deployment:parameter_defaults: ContainerImagePrepare: - push_destination: true set: ceph_image: rhceph-3-rhel7 ceph_namespace: registry.access.redhat.com/rhceph ceph_tag: latest name_prefix: openstack- name_suffix: '' namespace: registry.access.redhat.com/rhosp14 neutron_driver: null openshift_cluster_monitoring_image: ose-cluster-monitoring-operator openshift_cluster_monitoring_namespace: registry.access.redhat.com/openshift3 openshift_cluster_monitoring_tag: v3.11 openshift_cockpit_image: registry-console openshift_cockpit_namespace: registry.access.redhat.com/openshift3 openshift_cockpit_tag: v3.11 openshift_configmap_reload_image: ose-configmap-reloader openshift_configmap_reload_namespace: registry.access.redhat.com/openshift3 openshift_configmap_reload_tag: v3.11 openshift_etcd_image: etcd openshift_etcd_namespace: registry.access.redhat.com/rhel7 openshift_etcd_tag: latest openshift_gluster_block_image: rhgs-gluster-block-prov-rhel7 openshift_gluster_image: rhgs-server-rhel7 openshift_gluster_namespace: registry.access.redhat.com/rhgs3 openshift_gluster_tag: latest openshift_grafana_namespace: registry.access.redhat.com/openshift3 openshift_grafana_tag: v3.11 openshift_heketi_image: rhgs-volmanager-rhel7 openshift_heketi_namespace: registry.access.redhat.com/rhgs3 openshift_kube_rbac_proxy_image: ose-kube-rbac-proxy openshift_kube_rbac_proxy_namespace: registry.access.redhat.com/openshift3 openshift_kube_rbac_proxy_tag: v3.11 openshift_kube_state_metrics_image: ose-kube-state-metrics openshift_kube_state_metrics_namespace: registry.access.redhat.com/openshift3 openshift_kube_state_metrics_tag: v3.11 openshift_namespace: registry.access.redhat.com/openshift3 openshift_oauth_proxy_tag: v3.11 openshift_prefix: ose openshift_prometheus_alertmanager_tag: v3.11 openshift_prometheus_config_reload_image: ose-prometheus-config-reloader openshift_prometheus_config_reload_namespace: registry.access.redhat.com/openshift3 openshift_prometheus_config_reload_tag: v3.11 openshift_prometheus_node_exporter_tag: v3.11 openshift_prometheus_operator_image: ose-prometheus-operator openshift_prometheus_operator_namespace: registry.access.redhat.com/openshift3 openshift_prometheus_operator_tag: v3.11 openshift_prometheus_tag: v3.11 openshift_tag: v3.11 tag: latest tag_from_label: '{version}-{release}'
1.2.4. Creating the OCP profiles
This procedure describes how to enroll a physical node as an OpenShift node.
Create a flavor for each OCP role. Adjust these values to suit your requirements:
$ openstack flavor create --id auto --ram 4096 --disk 40 --vcpus 1 --swap 500 m1.OpenShiftMaster
$ openstack flavor create --id auto --ram 4096 --disk 40 --vcpus 1 --swap 500 m1.OpenShiftWorker
$ openstack flavor create --id auto --ram 4096 --disk 40 --vcpus 1 --swap 500 m1.OpenShiftInfra
Map the flavors to the required profile:
$ openstack flavor set --property "capabilities:profile"="OpenShiftMaster" --property "capabilities:boot_option"="local" m1.OpenShiftMaster
$ openstack flavor set --property "capabilities:profile"="OpenShiftWorker" --property "capabilities:boot_option"="local" m1.OpenShiftWorker
$ openstack flavor set --property "capabilities:profile"="OpenShiftInfra" --property "capabilities:boot_option"="local" m1.OpenShiftInfra
Add your nodes to
instackenv.json. You must define them to use thecapabilitiesfield. For example:{ "arch":"x86_64", "cpu":"4", "disk":"60", "mac":[ "00:0c:29:9f:5f:05" ], "memory":"16384", "pm_type":"ipmi", "capabilities":"profile:OpenShiftMaster", "name": "OpenShiftMaster_1" }, { "arch":"x86_64", "cpu":"4", "disk":"60", "mac":[ "00:0c:29:91:b9:2d" ], "memory":"16384", "pm_type":"ipmi", "capabilities":"profile:OpenShiftWorker", "name": "OpenShiftWorker_1" } { "arch":"x86_64", "cpu":"4", "disk":"60", "mac":[ "00:0c:29:91:b9:6a" ], "memory":"16384", "pm_type":"ipmi", "capabilities":"profile:OpenShiftInfra", "name": "OpenShiftInfra_1" }Import and introspect the OCP nodes as you normally would for your deployment. For example:
$ openstack overcloud node import ~/instackenv.json
$ openstack overcloud node introspect --all-manageable --provide
Verify that the overcloud nodes have been assigned the correct profile:
$ openstack overcloud profiles list
+--------------------------------------+--------------------+-----------------+-----------------+-------------------+
| Node UUID                            | Node Name          | Provision State | Current Profile | Possible Profiles |
+--------------------------------------+--------------------+-----------------+-----------------+-------------------+
| 72b2b1fc-6ba4-4779-aac8-cc47f126424d | openshift-worker01 | available       | OpenShiftWorker |                   |
| d64dc690-a84d-42dd-a88d-2c588d2ee67f | openshift-worker02 | available       | OpenShiftWorker |                   |
| 74d2fd8b-a336-40bb-97a1-adda531286d9 | openshift-worker03 | available       | OpenShiftWorker |                   |
| 0eb17ec6-4e5d-4776-a080-ca2fdcd38e37 | openshift-infra02  | available       | OpenShiftInfra  |                   |
| 92603094-ba7c-4294-a6ac-81f8271ce83e | openshift-infra03  | available       | OpenShiftInfra  |                   |
| b925469f-72ec-45fb-a403-b7debfcf59d3 | openshift-master01 | available       | OpenShiftMaster |                   |
| 7e9e80f4-ad65-46e1-b6b4-4cbfa2eb7ea7 | openshift-master02 | available       | OpenShiftMaster |                   |
| c2bcdd3f-38c3-491b-b971-134cab9c4171 | openshift-master03 | available       | OpenShiftMaster |                   |
| ece0ef2f-6cc8-4912-bc00-ffb3561e0e00 | openshift-infra01  | available       | OpenShiftInfra  |                   |
| d3a17110-88cf-4930-ad9a-2b955477aa6c | openshift-custom01 | available       | None            |                   |
| 07041e7f-a101-4edb-bae1-06d9964fc215 | openshift-custom02 | available       | None            |                   |
+--------------------------------------+--------------------+-----------------+-----------------+-------------------+
To define the node count and flavor for each node type, create a new file called
node-count.yaml. For example:parameter_defaults: OpenShiftMasterCount: 3 OvercloudOpenShiftMasterFlavor: m1.OpenShiftMaster OpenShiftInfraCount: 2 OvercloudOpenShiftInfraFlavor: m1.OpenShiftInfra OpenShiftWorkerCount: 2 OvercloudOpenShiftWorkerFlavor: m1.OpenShiftWorker
This file is executed later as part of your
openstack overcloud deploy, described later in this guide.
1.2.5. Defining the OpenShift environment
Create a file named openshift_env.yaml. This defines the OpenShift-related settings that director will later apply as part of the openstack overcloud deploy procedure.
To complete this information, you will need a working DNS and NTP environment, and your IP address allocation strategy must already be defined. You will also need to know how you intend to segment your network for internal and external access, your OpenShift storage strategy, and how you plan to authenticate OpenShift users.
Once your architecture is clearly defined, you will be able to complete the required settings below:
-
CloudName- The DNS name of your OpenStack deployment. This entry must resolve to the public VIP. -
PublicVirtualFixedIPs- By default, director assigns the VIP randomly from the allocation pool. You can override this here. -
CloudNameInternal- The DNS name of your Internal API. This entry must resolve to the internal VIP. -
InternalApiVirtualFixedIPs- By default, director assigns the VIP randomly from the allocation pool. You can override this here. -
OpenShiftInfraParameters- ForOpenShiftInfrarole nodes, only required for container native storage (CNS) deployments. Use withOpenShiftGlusterDisksto list the disks to be used for GlusterFS. -
OpenShiftWorkerParameters- ForOpenShiftWorkerrole nodes, only required for CNS deployments. Use with *OpenShiftGlusterDisksto list the disks to be used for GlusterFS. -
NtpServer- Define multiple NTP server entries here. -
ControlPlaneDefaultRoute- Add the IP address of the gateway to the provisioning network. This parameter can be used inside the NIC templates, and define the default route on thectlplanenetwork for non-master nodes. -
EC2MetadataIp- Add the IP address of the EC2 metadata server. This might also be the IP address of the undercloud node. -
ControlPlaneSubnetCidr- Use CIDR of the control plane network. -
DnsServers- The DNS server must be able to resolve the DNS entries described in this file, such as internal,public,apps.
The following are openshift-ansible parameters, and should be placed under the OpenShiftGlobalVariables Heat parameter.
-
openshift_master_identity_providers- Allows you to define the identity provider and its supporting settings. For example, *htpasswd_authwill requireloginandname, among others. -
openshift_master_cluster_hostname- This value must match theCloudNameInternalparameter. -
openshift_master_cluster_public_hostname- This value must match theCloudNameparameter. -
openshift_master_default_subdomain- Allows you to define the subdomain that is given to new applications.
For example, you will need to update these values to suit your deployment:
resource_registry:
  OS::TripleO::OpenShiftMaster::Net::SoftwareConfig: /home/stack/templates/nic-configs/master-nic.yaml
  OS::TripleO::OpenShiftWorker::Net::SoftwareConfig: /home/stack/templates/nic-configs/worker-nic.yaml
  OS::TripleO::OpenShiftInfra::Net::SoftwareConfig: /home/stack//templates/nic-configs/infra-nic.yaml
parameter_defaults:
  # by default Director assigns the VIP random from the allocation pool
  # by using the FixedIPs we can set the VIPs to predictable IPs before starting the deployment

  CloudName: openshift.localdomain
  PublicVirtualFixedIPs: [{'ip_address':'192.168.122.150'}]

  CloudNameInternal: internal.openshift.localdomain
  InternalApiVirtualFixedIPs: [{'ip_address':'172.17.1.150'}]

  CloudDomain: openshift.localdomain

  ## Required for CNS deployments only
  OpenShiftInfraParameters:
    OpenShiftGlusterDisks:
      - /dev/vdb

  ## Required for CNS deployments only
  OpenShiftWorkerParameters:
    OpenShiftGlusterDisks:
      - /dev/vdb
      - /dev/vdc

  NtpServer: ["clock.redhat.com","clock2.redhat.com"]

  ControlPlaneDefaultRoute: 172.16.0.1
  EC2MetadataIp: 172.16.0.1
  ControlPlaneSubnetCidr: 24

  # The DNS server below should have entries for resolving {internal,public,apps}.openshift.localdomain names
  DnsServers:
     - 192.168.122.1
     - 8.8.8.8

  OpenShiftGlobalVariables:
    openshift_master_identity_providers:
    - name: 'htpasswd_auth'
      login: 'true'
      challenge: 'true'
      kind: 'HTPasswdPasswordIdentityProvider'
    openshift_master_htpasswd_users:
      sysadmin: 'example string'
      admin: 'example string'
    #openshift_master_cluster_hostname should match the CloudNameInternal parameter
    openshift_master_cluster_hostname: internal.openshift.localdomain
    #openshift_master_cluster_public_hostname should match the CloudName parameter
    openshift_master_cluster_public_hostname: public.openshift.localdomain
    openshift_master_default_subdomain: apps.openshift.localdomain
For custom networks or interfaces, you will need to use custom network interface templates:
resource_registry:
OS::TripleO::OpenShiftMaster::Net::SoftwareConfig: /home/stack/master-nic.yaml
OS::TripleO::OpenShiftWorker::Net::SoftwareConfig: /home/stack/worker-nic.yaml
OS::TripleO::OpenShiftInfra::Net::SoftwareConfig: /home/stack/infra-nic.yaml
You can find examples of these YAML files below in Section 1.6, “Example YAML files”.
1.2.6. Registering overcloud nodes to the OpenShift repository
Your overcloud nodes require access to the OpenShift repository to install the OCP packages.
- To configure RHSM in your director-based deployment, see https://access.redhat.com/documentation/en-us/red_hat_openstack_platform/14/html/advanced_overcloud_customization/ansible-based-registration.
To complete the RHSM configuration, you might need to complete the following tasks:
- Obtain a RHSM account from your administrator.
- Identify the right pool ID to use.
For more information on general RHSM usage, see https://access.redhat.com/documentation/en-us/red_hat_subscription_management/1/html-single/rhsm/index.
To make the OpenShift packages available to your nodes, add an entry for rhel-7-server-ose-3.11-rpms to your /home/stack/rhsm.yaml file. For example:
resource_registry:
  OS::TripleO::Services::Rhsm: /usr/share/openstack-tripleo-heat-templates/extraconfig/services/rhsm.yaml
parameter_defaults:
  RhsmVars:
    rhsm_repos:
      - rhel-7-server-rpms
      - rhel-7-server-extras-rpms
      - rhel-7-server-ose-3.11-rpms
    rhsm_pool_ids: "1234567123456712345671234567"
    rhsm_method: "portal"
    rhsm_username: cdn_username
    rhsm_password: cdn_password
    rhsm_autosubscribe: true
For information on creating the /home/stack/rhsm.yaml file, see https://access.redhat.com/documentation/en-us/red_hat_openstack_platform/14/html-single/advanced_overcloud_customization/index#registering-the-overcloud-with-the-rhsm-composable-service.
Alternatively, use an activation key that has sufficient subscriptions available to enable the repositories. For example:
resource_registry:
  OS::TripleO::Services::Rhsm: /usr/share/openstack-tripleo-heat-templates/extraconfig/services/rhsm.yaml
parameter_defaults:
  RhsmVars:
    rhsm_repos:
      - rhel-7-server-rpms
      - rhel-7-server-extras-rpms
      - rhel-7-server-ose-3.11-rpms
    rhsm_pool_ids: "1234567123456712345671234567"
    rhsm_method: "portal"
    rhsm_username: cdn_username
    rhsm_password: cdn_password
    rhsm_autosubscribe: true
1.2.7. Deploying the OCP nodes
As a result of the previous steps, you now have two new YAML files:
-
openshift_env.yaml -
openshift_roles_data.yaml -
node-count.yaml
You will also need the following files, which should have already been created during the overcloud deployment process:
-
containers-default-parameters.yaml -
rhsm.yaml
For custom network deployments, you might need templates for NICs and network configuration, such as:
-
master-nic.yaml -
infra-nic.yaml -
worker-nic.yaml -
network_data_openshift.yaml
You can find examples of these YAML files below in Section 1.6, “Example YAML files”.
Do not use OVS bridges (including os-net-config managed) on the OCP bare metal nodes; instead you should consider using Linux bridges or bonds. For more information on the interface settings, see https://access.redhat.com/documentation/en-us/red_hat_openstack_platform/14/html-single/advanced_overcloud_customization/#network-interface-reference.
There is currently a known issue where director can hang while deploying OCP. This occurs because the fix described in BZ#1671861 is not a part of the overcloud-full image for the Red Hat OpenStack Platform 14 z1 release. As a workaround, prior to deploying the overcloud, follow the steps below to update the docker package in the overcloud-full image. For more information on this procedure, see https://access.redhat.com/articles/1556833. After completing these steps, you can expect the director to successfully deploy OCP:
$ sudo yum install -y libguestfs-tools
$ virt-customize --selinux-relabel -a overcloud-full.qcow2 --install docker
$ source stackrc
$ openstack overcloud image upload --update-existing
Add these YAML files to your
openstack overcloud deploycommand. For example, for container native storage (CNS) deployments:$ openstack overcloud deploy \ --stack openshift \ --templates \ -r /home/stack/openshift_roles_data.yaml \ -n /usr/share/openstack-tripleo-heat-templates/network_data_openshift.yaml \ -e /usr/share/openstack-tripleo-heat-templates/environments/network-isolation.yaml \ -e /usr/share/openstack-tripleo-heat-templates/environments/openshift.yaml \ -e /usr/share/openstack-tripleo-heat-templates/environments/openshift-cns.yaml \ -e /home/stack/openshift_env.yaml \ -e /home/stack/containers-prepare-parameter.yaml \ -e /home/stack/templates/node-count.yaml \ -e /home/stack/rhsm.yaml
For example, for non-CNS deployments:
$ openstack overcloud deploy \
--stack openshift \
--templates \
-r /home/stack/openshift_roles_data.yaml \
-n /usr/share/openstack-tripleo-heat-templates/network_data_openshift.yaml \
-e /usr/share/openstack-tripleo-heat-templates/environments/network-isolation.yaml \
-e /usr/share/openstack-tripleo-heat-templates/environments/openshift.yaml \
-e /home/stack/openshift_env.yaml \
-e /home/stack/containers-prepare-parameter.yaml \
-e /home/stack/templates/node-count.yaml \
-e /home/stack/rhsm.yaml
NoteTo check the status of the deployment process, use
openstack overcloud status. For more information, see https://access.redhat.com/documentation/en-us/red_hat_openstack_platform/14/html-single/director_installation_and_usage/#checking-overcloud-deployment-status.To deploy custom networks or interfaces, you will need to explicitly specify them. For example:
$ openstack overcloud deploy \
--stack openshift \
--templates \
-r /home/stack/openshift_roles_data.yaml \
-n /home/stack/network_data_openshift.yaml \
-e /usr/share/openstack-tripleo-heat-templates/environments/network-isolation.yaml \
-e /usr/share/openstack-tripleo-heat-templates/environments/openshift.yaml \
-e /usr/share/openstack-tripleo-heat-templates/environments/openshift-cns.yaml \
-e /home/stack/openshift_env.yaml \
-e /home/stack/containers-prepare-parameter.yaml \
-e /home/stack/templates/node-count.yaml \
-e /home/stack/rhsm.yaml \
-e /home/stack/custom-nics.yaml
1.2.8. Post deployment workarounds
To work around some of the known issues that arise after the deployment has successfully completed, you will need to run the following:
To address https://bugzilla.redhat.com/show_bug.cgi?id=1640382, follow this workaround:
After deployment, retrieve the heketi secret key by running the following command on one of the master nodes:
$ sudo oc get secret heketi-storage-admin-secret --namespace glusterfs -o json | jq -r .data.key | base64 -d'
Use the resulting value to set the following parameters in an environment file:
-
openshift_storage_glusterfs_heketi_admin_key -
openshift_storage_glusterfs_registry_heketi_admin_key
-
To address https://bugzilla.redhat.com/show_bug.cgi?id=1644889, follow this workaround:
After deployment, run the following on undercloud:
$ source ~/stackrc
$ tripleo-ansible-inventory --stack openshift --static-yaml-inventory /home/stack/openshift_inventory.yaml
$ export ANSIBLE_HOST_KEY_CHECKING=False
$ ansible -i openshift_inventory.yaml -m shell -b -a 'rpm -e --nodeps python-setuptools-0.9.8-7.el7.noarch; yum -y install python-setuptools' overcloud
1.2.9. Reviewing the OCP deployment
When the overcloud deploy procedure completes, review the state of your OCP nodes.
List all of your bare metal nodes. You should see your master and worker nodes.
$ openstack baremetal node list
Locate one of the master nodes:
$ openstack server list
SSH to one of the OpenShift master nodes. For example:
$ ssh heat-admin@192.168.122.43
Change to the
rootuser:$ sudo -i
Review the container orchestration configuration:
$ cat .kube/config
Login to OCP:
$ oc login -u admin
Review existing projects:
$ oc get projects
Review the OCP status:
$ oc status
Logout from OCP:
$ oc logout
1.2.10. Deploying a test app using OCP
This procedure describes how to create a test application in your new OCP deployment.
Login as a developer:
$ oc login -u developer
Logged into "https://192.168.64.3:8443" as "developer" using existing credentials.

You have one project on this server: "myproject"

Using project "myproject".
Create a new project:
$ oc new-project test-project
Now using project "test-project" on server "https://192.168.64.3:8443".

You can add applications to this project with the 'new-app' command. For example, try:

    oc new-app centos/ruby-22-centos7~https://github.com/openshift/ruby-ex.git

to build a new example application in Ruby.
Create a new app. This example creates a CakePHP application:
$ oc new-app https://github.com/sclorg/cakephp-ex
--> Found image 9dd8c80 (29 hours old) in image stream "openshift/php" under tag "7.1" for "php"

    Apache 2.4 with PHP 7.1
    -----------------------
    PHP 7.1 available as container is a base platform for building and running various PHP 7.1 applications and frameworks. PHP is an HTML-embedded scripting language. PHP attempts to make it easy for developers to write dynamically generated web pages. PHP also offers built-in database integration for several commercial and non-commercial database management systems, so writing a database-enabled webpage with PHP is fairly simple. The most common use of PHP coding is probably as a replacement for CGI scripts.

    Tags: builder, php, php71, rh-php71

    * The source repository appears to match: php
    * A source build using source code from https://github.com/sclorg/cakephp-ex will be created
      * The resulting image will be pushed to image stream "cakephp-ex:latest"
      * Use 'start-build' to trigger a new build
    * This image will be deployed in deployment config "cakephp-ex"
    * Ports 8080/tcp, 8443/tcp will be load balanced by service "cakephp-ex"
      * Other containers can access this service through the hostname "cakephp-ex"

--> Creating resources ...
    imagestream "cakephp-ex" created
    buildconfig "cakephp-ex" created
    deploymentconfig "cakephp-ex" created
    service "cakephp-ex" created
--> Success
    Build scheduled, use 'oc logs -f bc/cakephp-ex' to track its progress.
    Application is not exposed. You can expose services to the outside world by executing one or more of the commands below:
     'oc expose svc/cakephp-ex'
    Run 'oc status' to view your app.
Review the new app:
$ oc status --suggest
In project test-project on server https://192.168.64.3:8443

svc/cakephp-ex - 172.30.171.214 ports 8080, 8443
  dc/cakephp-ex deploys istag/cakephp-ex:latest <-
    bc/cakephp-ex source builds https://github.com/sclorg/cakephp-ex on openshift/php:7.1
      build #1 running for 52 seconds - e0f0247: Merge pull request #105 from jeffdyoung/ppc64le (Honza Horak <hhorak@redhat.com>)
    deployment #1 waiting on image or update

Info:
  * dc/cakephp-ex has no readiness probe to verify pods are ready to accept traffic or ensure deployment is successful.
    try: oc set probe dc/cakephp-ex --readiness ...
  * dc/cakephp-ex has no liveness probe to verify pods are still running.
    try: oc set probe dc/cakephp-ex --liveness ...

View details with 'oc describe <resource>/<name>' or list everything with 'oc get all'.
Review the pods:
$ oc get pods
NAME                 READY     STATUS      RESTARTS   AGE
cakephp-ex-1-2kmkj   1/1       Running     0          5m
cakephp-ex-1-build   0/1       Completed   0          10m
Check that the example application is working:
$ curl -s 172.30.171.214:8080 | grep "Welcome"
  <title>Welcome to OpenShift</title>
       	<h1>Welcome to your CakePHP application on OpenShift</h1>
Logout from OCP:
$ oc logout
Previously, OpenShift Container Platform (OCP) assigned a subnet to each node. OCP 3.10 now uses Kuryr to allocate a subnet to each network namespace. For more information, see https://access.redhat.com/documentation/en-us/openshift_container_platform/3.10/html-single/configuring_clusters/#install-config-configuring-kuryr-sdn.
Additional resources
- For more information about installing OpenShift Container Platform clusters, see Installing Clusters.
- For more information about configuring OpenShift Container Platform clusters, see Configuring Clusters.
1.3. Deploying in a virtualized environment
This section describes validation procedures to follow prior to deploying in a virtual environment.
- Ensure that you have installed Red Hat OpenStack director.
- Run the hardware and network requirements validations. You can run these validation either from Red Hat OpenStack director, or using the command line. These are described in the following section.
1.3.1. Running the validations from Red Hat OpenStack director
To run the validations from director:
-
To open the
Validationspanel, click the validations icon at the top right of the window. To search for the OpenShift validations, type the word "OpenShift" in the validations search field. There are two OpenShift validations:
- Network requirements.
- Hardware requirements.
- To run an OpenShift validation, select the required validation from the list and click the play icon.
1.3.2. Running the validations from the command line
To run the hardware requirements validation:
$ openstack action execution run tripleo.validations.run_validation '{"validation": "openshift-hw-requirements", "plan": "overcloud"}'To run the network requirements validation:
$ openstack action execution run tripleo.validations.run_validation '{"validation": "openshift-nw-requirements", "plan": "overcloud"}'openstack workflow execution create tripleo.validations.v1.run_validation '{"plan": "overcloud", "validation_name": "openshift-nw-requirements"}'If the validations fail, you can still attempt to install OpenShift, however, it is advised that you fulfil the requirements of the validation before you install OpenShift.
The default plan used in a director installation is named overcloud. If you are working with your own set of heat templates, use the name you chose when creating your custom plan.
Once the validations have completed, to install and configure OpenShift on OpenStack, see https://docs.openshift.com/container-platform/3.11/install_config/configuring_openstack.html.
1.4. Managing your OCP nodes
This chapter contains procedures for managing your OCP nodes.
1.4.1. Adding new nodes
This procedure explains how to scale out your OCP deployment by adding more Master, Infra, or Worker nodes.
Add your new nodes to
instackenv.jsonand use thecapabilitiesfield to assign them to the roles you created earlier. Thenamefield is a unique value for each node. This example adds two newOpenShiftWorkernodes :{ "arch":"x86_64", "cpu":"4", "disk":"60", "mac":[ "00:0c:29:11:c1:4d" ], "memory":"16384", "pm_type":"ipmi", "capabilities":"profile:OpenShiftWorker", "name": "openshift-worker04" } { "arch":"x86_64", "cpu":"4", "disk":"60", "mac":[ "00:0c:29:52:5a:3a" ], "memory":"16384", "pm_type":"ipmi", "capabilities":"profile:OpenShiftWorker", "name": "openshift-worker05" }Import and introspect the new nodes. For example:
$ openstack overcloud node import ~/instackenv.json
$ openstack overcloud node introspect --all-manageable --provide
Verify that the new nodes have been correctly assigned to their roles. This example shows that the new nodes (
openshift-worker04andopenshift-worker05) have received theOpenShiftWorkerrole (profile):$ openstack overcloud profiles list +--------------------------------------+--------------------+-----------------+-----------------+-------------------+ | Node UUID | Node Name | Provision State | Current Profile | Possible Profiles | +--------------------------------------+--------------------+-----------------+-----------------+-------------------+ | 72b2b1fc-6ba4-4779-aac8-cc47f126424d | openshift-worker01 | available | OpenShiftWorker | | | d64dc690-a84d-42dd-a88d-2c588d2ee67f | openshift-worker02 | available | OpenShiftWorker | | | 74d2fd8b-a336-40bb-97a1-adda531286d9 | openshift-worker03 | available | OpenShiftWorker | | | 8e5c0d5e-53ac-48e3-8395-4b66ad122e38 | openshift-worker04 | available | OpenShiftWorker | | | 46bbfac6-9167-44ce-aed2-d446a2e4f2a0 | openshift-worker05 | available | OpenShiftWorker | | | 0eb17ec6-4e5d-4776-a080-ca2fdcd38e37 | openshift-infra02 | available | OpenShiftInfra | | | 92603094-ba7c-4294-a6ac-81f8271ce83e | openshift-infra03 | available | OpenShiftInfra | | | b925469f-72ec-45fb-a403-b7debfcf59d3 | openshift-master01 | available | OpenShiftMaster | | | 7e9e80f4-ad65-46e1-b6b4-4cbfa2eb7ea7 | openshift-master02 | available | OpenShiftMaster | | | c2bcdd3f-38c3-491b-b971-134cab9c4171 | openshift-master03 | available | OpenShiftMaster | | | ece0ef2f-6cc8-4912-bc00-ffb3561e0e00 | openshift-infra01 | available | OpenShiftInfra | | | d3a17110-88cf-4930-ad9a-2b955477aa6c | openshift-custom01 | available | None | | | 07041e7f-a101-4edb-bae1-06d9964fc215 | openshift-custom02 | available | None | | +--------------------------------------+--------------------+-----------------+-----------------+-------------------+
Increase the node count values in your
node-count.yamlby the number of new nodes you are adding. The following example previously had3nodes inOpenShiftWorkerCount, and has been updated to reflect the new total of5:OpenShiftWorkerCount: 5 OvercloudOpenShiftWorkerFlavor: m1.OpenShiftWorker
Re-run your existing
openstack overcloud deploycommand to deploy the new nodes. For example:$ openstack overcloud deploy \ --stack openshift \ --templates \ -r /home/stack/openshift_roles_data.yaml \ -n /home/stack/network_data_openshift.yaml \ -e /usr/share/openstack-tripleo-heat-templates/environments/network-isolation.yaml \ -e /usr/share/openstack-tripleo-heat-templates/environments/openshift.yaml \ -e /usr/share/openstack-tripleo-heat-templates/environments/openshift-cns.yaml \ -e /home/stack/openshift_env.yaml \ -e /home/stack/containers-prepare-parameter.yaml \ -e /home/stack/templates/node-count.yaml \ -e /home/stack/rhsm.yaml \ -e /home/stack/custom-nics.yaml
Check that your nodes have been correctly added:
$ oc get nodes -o wide
This output lists all the OCP nodes, including Master, Infra, and Worker (
compute); all of them should be in theReadystate.Confirm that the role labels are assigned as expected:
-
Infra nodes:
node-role.kubernetes.io/infra=true -
Master nodes:
node-role.kubernetes.io/master=true -
Worker nodes:
node-role.kubernetes.io/compute=true.
-
Infra nodes:
1.4.2. Deleting a worker node
To remove a worker node, you will need to remove it from both the overcloud and OpenShift.
Delete a worker node from the overcloud. For example:
$ openstack overcloud node delete --stack openshift bb3a5660-ba68-47fb-8664-fb6941598c01
The node enters a
NotReadystate in OpenShift:$ oc get nodes NAME STATUS ROLES AGE VERSION openshift-infra-0 Ready infra 1h v1.11.0+d4cacc0 openshift-infra-1 Ready infra 1h v1.11.0+d4cacc0 openshift-infra-2 Ready infra 1h v1.11.0+d4cacc0 openshift-master-0 Ready master 1h v1.11.0+d4cacc0 openshift-master-1 Ready master 1h v1.11.0+d4cacc0 openshift-master-2 Ready master 1h v1.11.0+d4cacc0 openshift-worker-0 NotReady compute 1h v1.11.0+d4cacc0 openshift-worker-1 Ready compute 1h v1.11.0+d4cacc0 openshift-worker-2 Ready compute 1h v1.11.0+d4cacc0
Manually delete the node from OpenShift:
$ oc delete node openshift-worker-0
1.4.3. Replacing a master node
This section explains how to replace a master node.
Eject the desired master node from the
etcdcluster. For example:#/usr/local/bin/master-exec etcd etcd etcdctl --cert-file /etc/etcd/peer.crt --key-file /etc/etcd/peer.key --ca-file /etc/etcd/ca.crt --endpoints https://openshift-master-2:2379 member remove $node_id
Remove the master node from the overcloud. For example:
$ openstack overcloud node delete --stack d6492755-18a7-410d-a69c-63f1948b055f \
--templates \
-e /usr/share/openstack-tripleo-heat-templates/environments/network-isolation.yaml \
-e /usr/share/openstack-tripleo-heat-templates/environments/openshift.yaml \
-e /usr/share/openstack-tripleo-heat-templates/environments/openshift-cns.yaml \
-e /home/stack/openshift_env.yaml \
-e /home/stack/nodes.yaml \
-e /home/stack/containers-prepare-parameter.yaml \
d2a82428-0fe2-428f-a00c-c95b33a63ca7
-
Use
openstack overcloud deployto deploy the replacement master node. For more information, see Section 1.2.7, “Deploying the OCP nodes”.
An issue can arise if you remove a master node using openstack overcloud node delete and do not manually remove it from the etcd cluster. If you then attempt to scale up or down, the deployment process might fail with an error similar to this:
-
From
playbook-etcd.log. In this example,172.17.1.25is the removed master:
TASK [etcd : Add new etcd members to cluster] **********************************
FAILED - RETRYING: Add new etcd members to cluster (3 retries left).
FAILED - RETRYING: Add new etcd members to cluster (2 retries left).
FAILED - RETRYING: Add new etcd members to cluster (1 retries left).
fatal: [openshift-master-3 -> 192.168.24.23]: FAILED! => {"attempts": 3, "changed": true, "cmd": ["/usr/local/bin/master-exec", "etcd", "etcd", "etcdctl", "--cert-file", "/etc/etcd/peer.crt", "--key-file", "/etc/etcd/peer.key", "--ca-file", "/etc/etcd/ca.crt", "--endpoints", "https://openshift-master-2:2379", "member", "add", "openshift-master-3", "https://172.17.1.23:2380"], "delta": "0:00:01.506743", "end": "2018-11-26 00:54:47.504738", "msg": "non-zero return code", "rc": 1, "start": "2018-11-26 00:54:45.997995", "stderr": "client: etcd cluster is unavailable or misconfigured; error #0: dial tcp 172.17.1.25:2379: getsockopt: no route to host\n; error #1: client: etcd member https://172.17.1.14:2379 has no leader\n; error #2: client: etcd member https://172.17.1.12:2379 has no leader", "stderr_lines": ["client: etcd cluster is unavailable or misconfigured; error #0: dial tcp 172.17.1.25:2379: getsockopt: no route to host", "; error #1: client: etcd member https://172.17.1.14:2379 has no leader", "; error #2: client: etcd member https://172.17.1.12:2379 has no leader"], "stdout": "", "stdout_lines": []}
This occurs because the node being removed is still an etcd member. As a workaround, you can manually remove the node from the etcd cluster, as described in this section.
1.5. Troubleshooting
1.5.1. Failed deployment attempt
If your deployment attempt triggers the scaleup playbook, rather than deploy, then it might fail with the following error. This issue could arise in certain cases where a deployment was previously interrupted before completion:
TASK [etcd : Ensure CA certificate exists on etcd_ca_host] *********************
ok: [openshift-master-2 -> 192.168.24.7]

TASK [etcd : fail] *************************************************************
fatal: [openshift-master-2]: FAILED! => {"changed": false, "msg": "CA certificate /etc/etcd/ca/ca.crt doesn't exist on CA host openshift-master-2. Apply 'etcd_ca' action from `etcd` role to openshift-master-2.\n"}

NO MORE HOSTS LEFT *************************************************************

PLAY RECAP *********************************************************************
localhost                  : ok=39   changed=0    unreachable=0    failed=0
openshift-infra-0          : ok=192  changed=70   unreachable=0    failed=0
openshift-infra-1          : ok=192  changed=70   unreachable=0    failed=0
openshift-infra-2          : ok=199  changed=70   unreachable=0    failed=0
openshift-master-0         : ok=204  changed=70   unreachable=0    failed=0
openshift-master-1         : ok=204  changed=70   unreachable=0    failed=0
openshift-master-2         : ok=234  changed=70   unreachable=0    failed=1
openshift-worker-0         : ok=192  changed=70   unreachable=0    failed=0
openshift-worker-1         : ok=192  changed=70   unreachable=0    failed=0
openshift-worker-2         : ok=192  changed=70   unreachable=0    failed=0


INSTALLER STATUS ***************************************************************
Initialization              : Complete (0:02:28)
Node Bootstrap Preparation  : Complete (0:05:22)


Failure summary:


  1. Hosts:    openshift-master-2
     Play:     Create etcd client certificates for master hosts
     Task:     etcd : fail
Message: CA certificate /etc/etcd/ca/ca.crt doesn't exist on CA host openshift-master-2. Apply 'etcd_ca' action from `etcd` role to openshift-master-2.The following procedure will permanently delete your entire overcloud deployment, including all instances and physical nodes.
To address this issue, delete the Heat stack before attempting to redeploy. For example:
Delete the OpenStack deployment:
NoteThis step will permanently delete your entire overcloud deployment, including all instances and physical nodes.
$ openstack overcloud delete example_stack_name
You can use
openstack stack listto determine whether the deletion process has been completed.-
Once the deletion has finished, re-run the
openstack overcloud deployprocess.
1.6. Example YAML files
The following YAML files are intended to serve as a reference to help you get started with creating your own versions:
1.6.1. master-nic.yaml
heat_template_version: rocky
description: >
  Software Config to drive os-net-config with 2 bonded nics on a bridge with VLANs attached for the Openshift Master role.
parameters:
  ControlPlaneIp:
    default: ''
    description: IP address/subnet on the ctlplane network
    type: string
  ControlPlaneSubnetCidr:
    default: ''
    description: >
      The subnet CIDR of the control plane network. (The parameter is
      automatically resolved from the ctlplane subnet's cidr attribute.)
    type: string
  ControlPlaneDefaultRoute:
    default: ''
    description: The default route of the control plane network. (The parameter
      is automatically resolved from the ctlplane subnet's gateway_ip attribute.)
    type: string

  StorageIpSubnet:
    default: ''
    description: IP address/subnet on the storage network
    type: string
  StorageNetworkVlanID:
    default: 30
    description: Vlan ID for the storage network traffic.
    type: number
  StorageInterfaceRoutes:
    default: []
    description: >
      Routes for the storage network traffic.
      JSON route e.g. [{'destination':'10.0.0.0/16', 'nexthop':'10.0.0.1'}]
      Unless the default is changed, the parameter is automatically resolved
      from the subnet host_routes attribute.
    type: json
  StorageMgmtIpSubnet:
    default: ''
    description: IP address/subnet on the storage_mgmt network
    type: string
  StorageMgmtNetworkVlanID:
    default: 40
    description: Vlan ID for the storage_mgmt network traffic.
    type: number
  StorageMgmtInterfaceRoutes:
    default: []
    description: >
      Routes for the storage_mgmt network traffic.
      JSON route e.g. [{'destination':'10.0.0.0/16', 'nexthop':'10.0.0.1'}]
      Unless the default is changed, the parameter is automatically resolved
      from the subnet host_routes attribute.
    type: json
  InternalApiIpSubnet:
    default: ''
    description: IP address/subnet on the internal_api network
    type: string
  InternalApiNetworkVlanID:
    default: 20
    description: Vlan ID for the internal_api network traffic.
    type: number
  InternalApiInterfaceRoutes:
    default: []
    description: >
      Routes for the internal_api network traffic.
      JSON route e.g. [{'destination':'10.0.0.0/16', 'nexthop':'10.0.0.1'}]
      Unless the default is changed, the parameter is automatically resolved
      from the subnet host_routes attribute.
    type: json
  TenantIpSubnet:
    default: ''
    description: IP address/subnet on the tenant network
    type: string
  TenantNetworkVlanID:
    default: 50
    description: Vlan ID for the tenant network traffic.
    type: number
  TenantInterfaceRoutes:
    default: []
    description: >
      Routes for the tenant network traffic.
      JSON route e.g. [{'destination':'10.0.0.0/16', 'nexthop':'10.0.0.1'}]
      Unless the default is changed, the parameter is automatically resolved
      from the subnet host_routes attribute.
    type: json
  ExternalIpSubnet:
    default: ''
    description: IP address/subnet on the external network
    type: string
  ExternalNetworkVlanID:
    default: 10
    description: Vlan ID for the external network traffic.
    type: number
  ExternalInterfaceDefaultRoute:
    default: '10.0.0.1'
    description: default route for the external network
    type: string
  ExternalInterfaceRoutes:
    default: []
    description: >
      Routes for the external network traffic.
      JSON route e.g. [{'destination':'10.0.0.0/16', 'nexthop':'10.0.0.1'}]
      Unless the default is changed, the parameter is automatically resolved
      from the subnet host_routes attribute.
    type: json
  ManagementIpSubnet:
    default: ''
    description: IP address/subnet on the management network
    type: string
  ManagementNetworkVlanID:
    default: 60
    description: Vlan ID for the management network traffic.
    type: number
  ManagementInterfaceRoutes:
    default: []
    description: >
      Routes for the management network traffic.
      JSON route e.g. [{'destination':'10.0.0.0/16', 'nexthop':'10.0.0.1'}]
      Unless the default is changed, the parameter is automatically resolved
      from the subnet host_routes attribute.
    type: json
  DnsServers: # Override this via parameter_defaults
    default: []
    description: >
      DNS servers to use for the Overcloud (2 max for some implementations).
      If not set the nameservers configured in the ctlplane subnet's
      dns_nameservers attribute will be used.
    type: comma_delimited_list
  EC2MetadataIp:
    default: ''
    description: The IP address of the EC2 metadata server. (The parameter
      is automatically resolved from the ctlplane subnet's host_routes attribute.)
    type: string
  BondInterfaceOvsOptions:
    default: bond_mode=active-backup
    description: 'The ovs_options or bonding_options string for the bond
      interface. Set things like lacp=active and/or bond_mode=balance-slb
      for OVS bonds or like mode=4 for Linux bonds using this option.'
    type: string
resources:
  OsNetConfigImpl:
    type: OS::Heat::SoftwareConfig
    properties:
      group: script
      config:
        str_replace:
          template:
            get_file: /usr/share/openstack-tripleo-heat-templates/network/scripts/run-os-net-config.sh
          params:
            $network_config:
              network_config:
              - type: interface
                name: nic1
                use_dhcp: false
                addresses:
                - ip_netmask:
                    list_join:
                    - /
                    - - get_param: ControlPlaneIp
                      - get_param: ControlPlaneSubnetCidr
                routes:
                  list_concat_unique:
                    - - ip_netmask: 169.254.169.254/32
                        next_hop:
                          get_param: EC2MetadataIp
              - type: linux_bond
                name: bond1
                dns_servers:
                  get_param: DnsServers
                addresses:
                - ip_netmask:
                    get_param: ExternalIpSubnet
                routes:
                  list_concat_unique:
                    - get_param: ExternalInterfaceRoutes
                    - - default: true
                        next_hop:
                          get_param: ExternalInterfaceDefaultRoute
                bonding_options:
                  get_param: BondInterfaceOvsOptions
                members:
                - type: interface
                  name: nic2
                  primary: true
                - type: interface
                  name: nic3
              - type: vlan
                device: bond1
                vlan_id:
                  get_param: StorageNetworkVlanID
                addresses:
                - ip_netmask:
                    get_param: StorageIpSubnet
                routes:
                  list_concat_unique:
                    - get_param: StorageInterfaceRoutes
              - type: vlan
                device: bond1
                vlan_id:
                  get_param: InternalApiNetworkVlanID
                addresses:
                - ip_netmask:
                    get_param: InternalApiIpSubnet
                routes:
                  list_concat_unique:
                    - get_param: InternalApiInterfaceRoutes
outputs:
  OS::stack_id:
    description: The OsNetConfigImpl resource.
    value:
      get_resource: OsNetConfigImpl
1.6.2. infra-nic.yaml
heat_template_version: rocky
description: >
  Software Config to drive os-net-config with 2 bonded nics on a bridge with VLANs attached for the Openshift Infra role.
parameters:
  ControlPlaneIp:
    default: ''
    description: IP address/subnet on the ctlplane network
    type: string
  ControlPlaneSubnetCidr:
    default: ''
    description: >
      The subnet CIDR of the control plane network. (The parameter is
      automatically resolved from the ctlplane subnet's cidr attribute.)
    type: string
  ControlPlaneDefaultRoute:
    default: ''
    description: The default route of the control plane network. (The parameter
      is automatically resolved from the ctlplane subnet's gateway_ip attribute.)
    type: string

  StorageIpSubnet:
    default: ''
    description: IP address/subnet on the storage network
    type: string
  StorageNetworkVlanID:
    default: 30
    description: Vlan ID for the storage network traffic.
    type: number
  StorageInterfaceRoutes:
    default: []
    description: >
      Routes for the storage network traffic.
      JSON route e.g. [{'destination':'10.0.0.0/16', 'nexthop':'10.0.0.1'}]
      Unless the default is changed, the parameter is automatically resolved
      from the subnet host_routes attribute.
    type: json
  StorageMgmtIpSubnet:
    default: ''
    description: IP address/subnet on the storage_mgmt network
    type: string
  StorageMgmtNetworkVlanID:
    default: 40
    description: Vlan ID for the storage_mgmt network traffic.
    type: number
  StorageMgmtInterfaceRoutes:
    default: []
    description: >
      Routes for the storage_mgmt network traffic.
      JSON route e.g. [{'destination':'10.0.0.0/16', 'nexthop':'10.0.0.1'}]
      Unless the default is changed, the parameter is automatically resolved
      from the subnet host_routes attribute.
    type: json
  InternalApiIpSubnet:
    default: ''
    description: IP address/subnet on the internal_api network
    type: string
  InternalApiNetworkVlanID:
    default: 20
    description: Vlan ID for the internal_api network traffic.
    type: number
  InternalApiInterfaceRoutes:
    default: []
    description: >
      Routes for the internal_api network traffic.
      JSON route e.g. [{'destination':'10.0.0.0/16', 'nexthop':'10.0.0.1'}]
      Unless the default is changed, the parameter is automatically resolved
      from the subnet host_routes attribute.
    type: json
  TenantIpSubnet:
    default: ''
    description: IP address/subnet on the tenant network
    type: string
  TenantNetworkVlanID:
    default: 50
    description: Vlan ID for the tenant network traffic.
    type: number
  TenantInterfaceRoutes:
    default: []
    description: >
      Routes for the tenant network traffic.
      JSON route e.g. [{'destination':'10.0.0.0/16', 'nexthop':'10.0.0.1'}]
      Unless the default is changed, the parameter is automatically resolved
      from the subnet host_routes attribute.
    type: json
  ExternalIpSubnet:
    default: ''
    description: IP address/subnet on the external network
    type: string
  ExternalNetworkVlanID:
    default: 10
    description: Vlan ID for the external network traffic.
    type: number
  ExternalInterfaceDefaultRoute:
    default: '10.0.0.1'
    description: default route for the external network
    type: string
  ExternalInterfaceRoutes:
    default: []
    description: >
      Routes for the external network traffic.
      JSON route e.g. [{'destination':'10.0.0.0/16', 'nexthop':'10.0.0.1'}]
      Unless the default is changed, the parameter is automatically resolved
      from the subnet host_routes attribute.
    type: json
  ManagementIpSubnet:
    default: ''
    description: IP address/subnet on the management network
    type: string
  ManagementNetworkVlanID:
    default: 60
    description: Vlan ID for the management network traffic.
    type: number
  ManagementInterfaceRoutes:
    default: []
    description: >
      Routes for the management network traffic.
      JSON route e.g. [{'destination':'10.0.0.0/16', 'nexthop':'10.0.0.1'}]
      Unless the default is changed, the parameter is automatically resolved
      from the subnet host_routes attribute.
    type: json
  DnsServers: # Override this via parameter_defaults
    default: []
    description: >
      DNS servers to use for the Overcloud (2 max for some implementations).
      If not set the nameservers configured in the ctlplane subnet's
      dns_nameservers attribute will be used.
    type: comma_delimited_list
  EC2MetadataIp:
    default: ''
    description: The IP address of the EC2 metadata server. (The parameter
      is automatically resolved from the ctlplane subnet's host_routes attribute.)
    type: string
  BondInterfaceOvsOptions:
    default: bond_mode=active-backup
    description: 'The ovs_options or bonding_options string for the bond
      interface. Set things like lacp=active and/or bond_mode=balance-slb
      for OVS bonds or like mode=4 for Linux bonds using this option.'
    type: string
resources:
  OsNetConfigImpl:
    type: OS::Heat::SoftwareConfig
    properties:
      group: script
      config:
        str_replace:
          template:
            get_file: /usr/share/openstack-tripleo-heat-templates/network/scripts/run-os-net-config.sh
          params:
            $network_config:
              network_config:
              - type: interface
                name: nic1
                use_dhcp: false
                addresses:
                - ip_netmask:
                    list_join:
                    - /
                    - - get_param: ControlPlaneIp
                      - get_param: ControlPlaneSubnetCidr
                routes:
                  list_concat_unique:
                    - - ip_netmask: 169.254.169.254/32
                        next_hop:
                          get_param: EC2MetadataIp
              - type: linux_bond
                name: bond1
                dns_servers:
                  get_param: DnsServers
                addresses:
                - ip_netmask:
                    get_param: ExternalIpSubnet
                routes:
                  list_concat_unique:
                    - get_param: ExternalInterfaceRoutes
                    - - default: true
                        next_hop:
                          get_param: ExternalInterfaceDefaultRoute
                bonding_options:
                  get_param: BondInterfaceOvsOptions
                members:
                - type: interface
                  name: nic2
                  primary: true
                - type: interface
                  name: nic3
              - type: vlan
                device: bond1
                vlan_id:
                  get_param: StorageNetworkVlanID
                addresses:
                - ip_netmask:
                    get_param: StorageIpSubnet
                routes:
                  list_concat_unique:
                    - get_param: StorageInterfaceRoutes
              - type: vlan
                device: bond1
                vlan_id:
                  get_param: InternalApiNetworkVlanID
                addresses:
                - ip_netmask:
                    get_param: InternalApiIpSubnet
                routes:
                  list_concat_unique:
                    - get_param: InternalApiInterfaceRoutes
outputs:
  OS::stack_id:
    description: The OsNetConfigImpl resource.
    value:
      get_resource: OsNetConfigImpl
1.6.3. worker-nic.yaml
heat_template_version: rocky
description: >
  Software Config to drive os-net-config with 2 bonded nics on a bridge with VLANs attached for the Openshift worker role.
parameters:
  ControlPlaneIp:
    default: ''
    description: IP address/subnet on the ctlplane network
    type: string
  ControlPlaneSubnetCidr:
    default: ''
    description: >
      The subnet CIDR of the control plane network. (The parameter is
      automatically resolved from the ctlplane subnet's cidr attribute.)
    type: string
  ControlPlaneDefaultRoute:
    default: ''
    description: The default route of the control plane network. (The parameter
      is automatically resolved from the ctlplane subnet's gateway_ip attribute.)
    type: string

  StorageIpSubnet:
    default: ''
    description: IP address/subnet on the storage network
    type: string
  StorageNetworkVlanID:
    default: 30
    description: Vlan ID for the storage network traffic.
    type: number
  StorageInterfaceRoutes:
    default: []
    description: >
      Routes for the storage network traffic.
      JSON route e.g. [{'destination':'10.0.0.0/16', 'nexthop':'10.0.0.1'}]
      Unless the default is changed, the parameter is automatically resolved
      from the subnet host_routes attribute.
    type: json
  StorageMgmtIpSubnet:
    default: ''
    description: IP address/subnet on the storage_mgmt network
    type: string
  StorageMgmtNetworkVlanID:
    default: 40
    description: Vlan ID for the storage_mgmt network traffic.
    type: number
  StorageMgmtInterfaceRoutes:
    default: []
    description: >
      Routes for the storage_mgmt network traffic.
      JSON route e.g. [{'destination':'10.0.0.0/16', 'nexthop':'10.0.0.1'}]
      Unless the default is changed, the parameter is automatically resolved
      from the subnet host_routes attribute.
    type: json
  InternalApiIpSubnet:
    default: ''
    description: IP address/subnet on the internal_api network
    type: string
  InternalApiNetworkVlanID:
    default: 20
    description: Vlan ID for the internal_api network traffic.
    type: number
  InternalApiInterfaceRoutes:
    default: []
    description: >
      Routes for the internal_api network traffic.
      JSON route e.g. [{'destination':'10.0.0.0/16', 'nexthop':'10.0.0.1'}]
      Unless the default is changed, the parameter is automatically resolved
      from the subnet host_routes attribute.
    type: json
  TenantIpSubnet:
    default: ''
    description: IP address/subnet on the tenant network
    type: string
  TenantNetworkVlanID:
    default: 50
    description: Vlan ID for the tenant network traffic.
    type: number
  TenantInterfaceRoutes:
    default: []
    description: >
      Routes for the tenant network traffic.
      JSON route e.g. [{'destination':'10.0.0.0/16', 'nexthop':'10.0.0.1'}]
      Unless the default is changed, the parameter is automatically resolved
      from the subnet host_routes attribute.
    type: json
  ExternalIpSubnet:
    default: ''
    description: IP address/subnet on the external network
    type: string
  ExternalNetworkVlanID:
    default: 10
    description: Vlan ID for the external network traffic.
    type: number
  ExternalInterfaceDefaultRoute:
    default: '10.0.0.1'
    description: default route for the external network
    type: string
  ExternalInterfaceRoutes:
    default: []
    description: >
      Routes for the external network traffic.
      JSON route e.g. [{'destination':'10.0.0.0/16', 'nexthop':'10.0.0.1'}]
      Unless the default is changed, the parameter is automatically resolved
      from the subnet host_routes attribute.
    type: json
  ManagementIpSubnet:
    default: ''
    description: IP address/subnet on the management network
    type: string
  ManagementNetworkVlanID:
    default: 60
    description: Vlan ID for the management network traffic.
    type: number
  ManagementInterfaceRoutes:
    default: []
    description: >
      Routes for the management network traffic.
      JSON route e.g. [{'destination':'10.0.0.0/16', 'nexthop':'10.0.0.1'}]
      Unless the default is changed, the parameter is automatically resolved
      from the subnet host_routes attribute.
    type: json
  DnsServers: # Override this via parameter_defaults
    default: []
    description: >
      DNS servers to use for the Overcloud (2 max for some implementations).
      If not set the nameservers configured in the ctlplane subnet's
      dns_nameservers attribute will be used.
    type: comma_delimited_list
  EC2MetadataIp:
    default: ''
    description: The IP address of the EC2 metadata server. (The parameter
      is automatically resolved from the ctlplane subnet's host_routes attribute.)
    type: string
  BondInterfaceOvsOptions:
    default: bond_mode=active-backup
    description: 'The ovs_options or bonding_options string for the bond
      interface. Set things like lacp=active and/or bond_mode=balance-slb
      for OVS bonds or like mode=4 for Linux bonds using this option.'
    type: string
resources:
  OsNetConfigImpl:
    type: OS::Heat::SoftwareConfig
    properties:
      group: script
      config:
        str_replace:
          template:
            get_file: /usr/share/openstack-tripleo-heat-templates/network/scripts/run-os-net-config.sh
          params:
            $network_config:
              network_config:
              - type: interface
                name: nic1
                use_dhcp: false
                addresses:
                - ip_netmask:
                    list_join:
                    - /
                    - - get_param: ControlPlaneIp
                      - get_param: ControlPlaneSubnetCidr
                routes:
                  list_concat_unique:
                    - - ip_netmask: 169.254.169.254/32
                        next_hop:
                          get_param: EC2MetadataIp
              - type: linux_bond
                name: bond1
                dns_servers:
                  get_param: DnsServers
                addresses:
                - ip_netmask:
                    get_param: ExternalIpSubnet
                routes:
                  list_concat_unique:
                    - get_param: ExternalInterfaceRoutes
                    - - default: true
                        next_hop:
                          get_param: ExternalInterfaceDefaultRoute
                bonding_options:
                  get_param: BondInterfaceOvsOptions
                members:
                - type: interface
                  name: nic2
                  primary: true
                - type: interface
                  name: nic3
              - type: vlan
                device: bond1
                vlan_id:
                  get_param: StorageNetworkVlanID
                addresses:
                - ip_netmask:
                    get_param: StorageIpSubnet
                routes:
                  list_concat_unique:
                    - get_param: StorageInterfaceRoutes
              - type: vlan
                device: bond1
                vlan_id:
                  get_param: InternalApiNetworkVlanID
                addresses:
                - ip_netmask:
                    get_param: InternalApiIpSubnet
                routes:
                  list_concat_unique:
                    - get_param: InternalApiInterfaceRoutes
outputs:
  OS::stack_id:
    description: The OsNetConfigImpl resource.
    value:
      get_resource: OsNetConfigImpl
1.6.4. network_data_openshift.yaml
- name: Storage
  vip: true
  vlan: 301
  name_lower: storage
  ip_subnet: '172.17.3.0/24'
  allocation_pools: [{'start': '172.17.3.10', 'end': '172.17.3.200'}]
- name: InternalApi
  name_lower: internal_api
  vip: true
  vlan: 101
  ip_subnet: '172.17.1.0/24'
  allocation_pools: [{'start': '172.17.1.10', 'end': '172.17.1.200'}]
- name: External
  vip: true
  name_lower: external
  ip_subnet: '192.168.122.0/24'
  allocation_pools: [{'start': '192.168.122.100', 'end': '192.168.122.129'}]
  gateway_ip: '192.168.122.1'