
Red Hat Training
A Red Hat training course is available for Red Hat Fuse
Chapter 3. To Add a Content-Based Router
Abstract
This tutorial walks you through adding a content-based router with logging to a route.
Goals
In this tutorial you will:
- add a content based-router to a route
- configure the content-based router
- add a log endpoint to each output branch of the content-based router
- rewire the route to use the content-based router and log its output
Prerequisites
To complete this tutorial you will need the simple-route project you created in Chapter 1, To Create a New Route.
Procedure
To add a content-based router with logging to your route:
- In Project Explorer, double-click
simple-route/src/main/resources/META-INF/spring/camelContext.xmlto open your simple-route project. - Select the connector joining the two endpoint nodes
file:src/data?noop=trueandfile:target/messages/others. - Right-click it to open the context menu, and select → to delete the connector.NoteAlternatively, you can delete the connector by selecting it, then selecting from the toolbar's menu.
- On the canvas, select the terminal endpoint node,
file:target/messages/others, and drag it out of the way. - On the canvas, select the starting endpoint node,
file:src/data?noop=true, and right-click it to open the context menu. - Select → → .A choice node (
 ) appears on the canvas connected to the starting endpoint node.
- On the canvas, select the choice node, then right-click it to open the context menu.
- Select → → .A when node (
 ) appears on the canvas connected to the choice node. The Properties editor opens, displaying the when node's property fields for you to edit, as shown in Figure 3.1.
Figure 3.1. When property editor
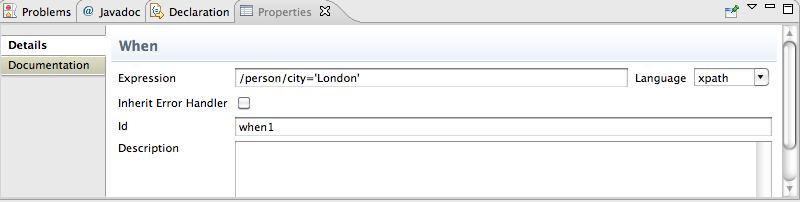
- In the Expression field, enter
/person/city='London'.This XPath expression determines which messages will transit this path in the route. - From the Language drop-down menu, select xpath.
- In the Id field, enter when1.
- On the canvas, reselect the Choice node, then right-click it to open the context menu.
- Select → → .An otherwise node (
) appears on the canvas, connected to the choice node.
The otherwise node will eventually route to the terminal endpoint (
file:target/messages/others) any message that does not match the XPath expression set for the when1 node. - On the canvas, select the when1 node, and then right-click it to open the context menu.
- Select → →A log node (
) appears on the canvas, connected to the when1 node. The Properties editor opens, displaying the log node's property fields for you to edit.
- In the Message field, enter
uk messages, and in the Log Name field, enter1.NoteIn Fuse Integration perspective's Messages View, the tooling inserts the contents of the log node's Id field in theTrace Node Idcolumn for message instances, when tracing is enabled on the route (see Figure 4.4). In the Console, it adds the contents of the log node's Message field to the log data whenever the route runs. - On the canvas, select the otherwise node, and then right-click it to open the context menu.
- Select → →A log node (
) appears on the canvas, connected to the otherwise node. The Properties editor opens, displaying the log node's property fields for you to edit.
- In the Message field, enter
other messages, and in the Log Name field, enter2. - On the canvas, select the log 1 node, and then right-click it to open the context menu.
- Select → →An Endpoint node (
) appears on the canvas, connected to the log 1 node. The Properties editor opens, displaying the Endpoint node's property fields for you to edit.
- In the Uri field, enter
file:target/messages/uk, and leave the other property fields blank. - On the canvas, select the log 2 node, and then drag its connector arrow (
 ) to the terminal endpoint node,
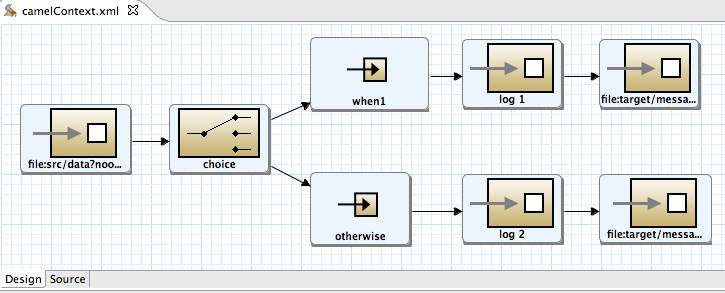
 file:target/messages/others, and release it. - To quickly realign all of the nodes on the canvas, right-click the canvas to open the context menu, and then select .The route on the canvas should resemble Figure 3.2.
Figure 3.2. Completed content-based router with logs
- On the toolbar, select → to save the completed route.
- Click the Source tab at the bottom, left of the canvas to display the XML for the route.The
camelContextelement will look like that shown in Example 3.1.Example 3.1. XML for content-based router
<?xml version="1.0" encoding="UTF-8"?>
<beans xmlns="http://www.springframework.org/schema/beans"
       xmlns:camel="http://camel.apache.org/schema/spring"
       xmlns:xsi="http://www.w3.org/2001/XMLSchema-instance"
       xsi:schemaLocation="http://www.springframework.org/schema/beans
        http://www.springframework.org/schema/beans/spring-beans-3.0.xsd
        http://camel.apache.org/schema/spring
        http://camel.apache.org/schema/spring/camel-spring.xsd">

  <camelContext trace="false" xmlns="http://camel.apache.org/schema/spring">
    <route>
        <from uri="file:src/data?noop=true"/>
        <choice>
            <when id="when1">
                <xpath>/person/city='London'</xpath>
                <log logName="1" message="uk messages"/>
                <to uri="file:target/messages/uk"/>
            </when>
            <otherwise>
                <log logName="2" message="other messages"/>
                <to uri="file:target/messages/others"/>
            </otherwise>
        </choice>
    </route>
</camelContext>

</beans>
Next steps
You can run the new route as described in the section called “Running the route”.
Further reading
To learn more about message enrichment see:
- the
whenEIP in Red Hat JBoss Fuse: Enterprise Implementing Integration Patterns