
Chapter 7. Setting up an IPsec VPN
A virtual private network (VPN) is a way of connecting to a local network over the internet. IPsec provided by Libreswan is the preferred method for creating a VPN. Libreswan is a user-space IPsec implementation for VPN. A VPN enables the communication between your LAN, and another, remote LAN by setting up a tunnel across an intermediate network such as the internet. For security reasons, a VPN tunnel always uses authentication and encryption. For cryptographic operations, Libreswan uses the NSS library.
7.1. Configuring a VPN connection with control-center
If you use Red Hat Enterprise Linux with a graphical interface, you can configure a VPN connection in the GNOME control-center.
Prerequisites
-
The
NetworkManager-libreswan-gnomepackage is installed.
Procedure
-
Press the Super key, type
Settings, and press Enter to open thecontrol-centerapplication. -
Select the
Networkentry on the left. - Click the + icon.
-
Select
VPN. Select the
Identitymenu entry to see the basic configuration options:General
Gateway— The name orIPaddress of the remote VPN gateway.Authentication
Type-
IKEv2 (Certificate)- client is authenticated by certificate. It is more secure (default). IKEv1 (XAUTH)- client is authenticated by user name and password, or a pre-shared key (PSK).The following configuration settings are available under the
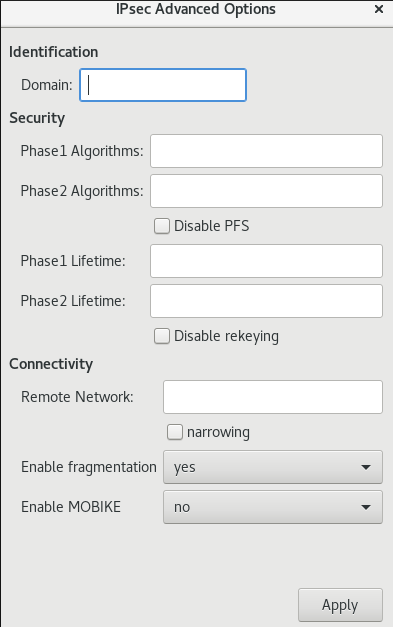
Advancedsection:Figure 7.1. Advanced options of a VPN connection
 Warning
When configuring an IPsec-based VPN connection using the
gnome-control-centerapplication, theAdvanceddialog displays the configuration, but it does not allow any changes. As a consequence, users cannot change any advanced IPsec options. Use thenm-connection-editorornmclitools instead to perform configuration of the advanced properties.Identification
Domain— If required, enter the Domain Name.Security
-
Phase1 Algorithms— corresponds to theikeLibreswan parameter — enter the algorithms to be used to authenticate and set up an encrypted channel. Phase2 Algorithms— corresponds to theespLibreswan parameter — enter the algorithms to be used for theIPsecnegotiations.Check the
Disable PFSfield to turn off Perfect Forward Secrecy (PFS) to ensure compatibility with old servers that do not support PFS.-
Phase1 Lifetime— corresponds to theikelifetimeLibreswan parameter — how long the key used to encrypt the traffic will be valid. Phase2 Lifetime— corresponds to thesalifetimeLibreswan parameter — how long a particular instance of a connection should last before expiring.Note that the encryption key should be changed from time to time for security reasons.
Remote network— corresponds to therightsubnetLibreswan parameter — the destination private remote network that should be reached through the VPN.Check the
narrowingfield to enable narrowing. Note that it is only effective in IKEv2 negotiation.-
Enable fragmentation— corresponds to thefragmentationLibreswan parameter — whether or not to allow IKE fragmentation. Valid values areyes(default) orno. -
Enable Mobike— corresponds to themobikeLibreswan parameter — whether to allow Mobility and Multihoming Protocol (MOBIKE, RFC 4555) to enable a connection to migrate its endpoint without needing to restart the connection from scratch. This is used on mobile devices that switch between wired, wireless, or mobile data connections. The values areno(default) oryes.
-
Select the menu entry:
IPv4 Method
-
Automatic (DHCP)— Choose this option if the network you are connecting to uses aDHCPserver to assign dynamicIPaddresses. -
Link-Local Only— Choose this option if the network you are connecting to does not have aDHCPserver and you do not want to assignIPaddresses manually. Random addresses will be assigned as per RFC 3927 with prefix169.254/16. -
Manual— Choose this option if you want to assignIPaddresses manually. Disable—IPv4is disabled for this connection.DNS
In the
DNSsection, whenAutomaticisON, switch it toOFFto enter the IP address of a DNS server you want to use separating the IPs by comma.Routes
Note that in the
Routessection, whenAutomaticisON, routes from DHCP are used, but you can also add additional static routes. WhenOFF, only static routes are used.-
Address— Enter theIPaddress of a remote network or host. -
Netmask— The netmask or prefix length of theIPaddress entered above. -
Gateway— TheIPaddress of the gateway leading to the remote network or host entered above. Metric— A network cost, a preference value to give to this route. Lower values will be preferred over higher values.Use this connection only for resources on its network
Select this check box to prevent the connection from becoming the default route. Selecting this option means that only traffic specifically destined for routes learned automatically over the connection or entered here manually is routed over the connection.
-
To configure
IPv6settings in aVPNconnection, select the menu entry:IPv6 Method
-
Automatic— Choose this option to useIPv6Stateless Address AutoConfiguration (SLAAC) to create an automatic, stateless configuration based on the hardware address and Router Advertisements (RA). -
Automatic, DHCP only— Choose this option to not use RA, but request information fromDHCPv6directly to create a stateful configuration. -
Link-Local Only— Choose this option if the network you are connecting to does not have aDHCPserver and you do not want to assignIPaddresses manually. Random addresses will be assigned as per RFC 4862 with prefixFE80::0. -
Manual— Choose this option if you want to assignIPaddresses manually. Disable—IPv6is disabled for this connection.Note that
DNS,Routes,Use this connection only for resources on its networkare common toIPv4settings.
-
-
Once you have finished editing the
VPNconnection, click the button to customize the configuration or the button to save it for the existing one. -
Switch the profile to
ONto active theVPNconnection.
Additional resources
-
nm-settings-libreswan(5)
7.2. Configuring a VPN connection using nm-connection-editor
If you use Red Hat Enterprise Linux with a graphical interface, you can configure a VPN connection in the nm-connection-editor application.
Prerequisites
-
The
NetworkManager-libreswan-gnomepackage is installed. If you configure an Internet Key Exchange version 2 (IKEv2) connection:
- The certificate is imported into the IPsec network security services (NSS) database.
- The nickname of the certificate in the NSS database is known.
Procedure
Open a terminal, and enter:
$ nm-connection-editor- Click the button to add a new connection.
-
Select the
IPsec based VPNconnection type, and click . On the
VPNtab:Enter the host name or IP address of the VPN gateway into the
Gatewayfield, and select an authentication type. Based on the authentication type, you must enter different additional information:-
IKEv2 (Certifiate)authenticates the client by using a certificate, which is more secure. This setting requires the nickname of the certificate in the IPsec NSS database IKEv1 (XAUTH)authenticates the user by using a user name and password (pre-shared key). This setting requires that you enter the following values:- User name
- Password
- Group name
- Secret
-
If the remote server specifies a local identifier for the IKE exchange, enter the exact string in the
Remote IDfield. In the remote server runs Libreswan, this value is set in the server’sleftidparameter.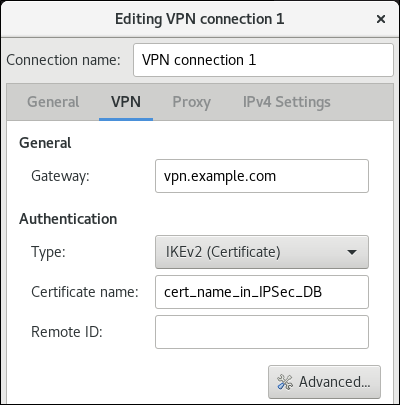
Optionally, configure additional settings by clicking the button. You can configure the following settings:
Identification
-
Domain— If required, enter the domain name.
-
Security
-
Phase1 Algorithmscorresponds to theikeLibreswan parameter. Enter the algorithms to be used to authenticate and set up an encrypted channel. Phase2 Algorithmscorresponds to theespLibreswan parameter. Enter the algorithms to be used for theIPsecnegotiations.Check the
Disable PFSfield to turn off Perfect Forward Secrecy (PFS) to ensure compatibility with old servers that do not support PFS.-
Phase1 Lifetimecorresponds to theikelifetimeLibreswan parameter. This parameter defines how long the key used to encrypt the traffic is valid. -
Phase2 Lifetimecorresponds to thesalifetimeLibreswan parameter. This parameter defines how long a security association is valid.
-
Connectivity
Remote networkcorresponds to therightsubnetLibreswan parameter and defines the destination private remote network that should be reached through the VPN.Check the
narrowingfield to enable narrowing. Note that it is only effective in the IKEv2 negotiation.-
Enable fragmentationcorresponds to thefragmentationLibreswan parameter and defines whether or not to allow IKE fragmentation. Valid values areyes(default) orno. -
Enable Mobikecorresponds to themobikeLibreswan parameter. The parameter defines whether to allow Mobility and Multihoming Protocol (MOBIKE) (RFC 4555) to enable a connection to migrate its endpoint without needing to restart the connection from scratch. This is used on mobile devices that switch between wired, wireless or mobile data connections. The values areno(default) oryes.
On the
IPv4 Settingstab, select the IP assignment method and, optionally, set additional static addresses, DNS servers, search domains, and routes.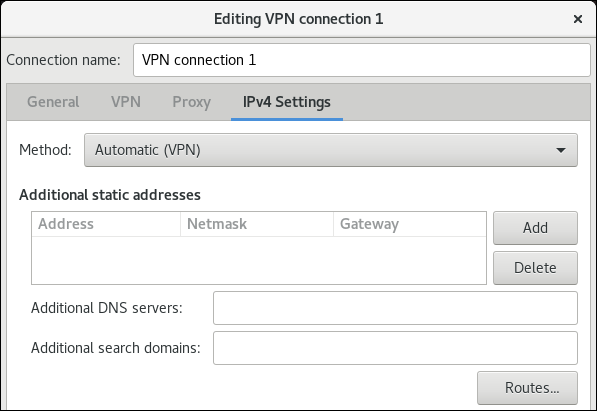
- Save the connection.
-
Close
nm-connection-editor.
When you add a new connection by clicking the button, NetworkManager creates a new configuration file for that connection and then opens the same dialog that is used for editing an existing connection. The difference between these dialogs is that an existing connection profile has a Details menu entry.
Additional resources
-
nm-settings-libreswan(5)man page
7.3. Configuring automatic detection and usage of ESP hardware offload to accelerate an IPsec connection
Offloading Encapsulating Security Payload (ESP) to the hardware accelerates IPsec connections over Ethernet. By default, Libreswan detects if hardware supports this feature and, as a result, enables ESP hardware offload. In case that the feature was disabled or explicitly enabled, you can switch back to automatic detection.
Prerequisites
- The network card supports ESP hardware offload.
- The network driver supports ESP hardware offload.
- The IPsec connection is configured and works.
Procedure
-
Edit the Libreswan configuration file in the
/etc/ipsec.d/directory of the connection that should use automatic detection of ESP hardware offload support. -
Ensure the
nic-offloadparameter is not set in the connection’s settings. If you removed
nic-offload, restart theipsecservice:# systemctl restart ipsec
Verification
If the network card supports ESP hardware offload support, following these steps to verify the result:
Display the
tx_ipsecandrx_ipseccounters of the Ethernet device the IPsec connection uses:# ethtool -S enp1s0 | egrep "_ipsec" tx_ipsec: 10 rx_ipsec: 10Send traffic through the IPsec tunnel. For example, ping a remote IP address:
# ping -c 5 remote_ip_addressDisplay the
tx_ipsecandrx_ipseccounters of the Ethernet device again:# ethtool -S enp1s0 | egrep "_ipsec" tx_ipsec: 15 rx_ipsec: 15If the counter values have increased, ESP hardware offload works.
Additional resources
7.4. Configuring ESP hardware offload on a bond to accelerate an IPsec connection
Offloading Encapsulating Security Payload (ESP) to the hardware accelerates IPsec connections. If you use a network bond for fail-over reasons, the requirements and the procedure to configure ESP hardware offload are different from those using a regular Ethernet device. For example, in this scenario, you enable the offload support on the bond, and the kernel applies the settings to the ports of the bond.
Prerequisites
- All network cards in the bond support ESP hardware offload.
-
The network driver supports ESP hardware offload on a bond device. In RHEL, only the
ixgbedriver supports this feature. - The bond is configured and works.
-
The bond uses the
active-backupmode. The bonding driver does not support any other modes for this feature. - The IPsec connection is configured and works.
Procedure
Enable ESP hardware offload support on the network bond:
# nmcli connection modify bond0 ethtool.feature-esp-hw-offload onThis command enables ESP hardware offload support on the
bond0connection.Reactivate the
bond0connection:# nmcli connection up bond0Edit the Libreswan configuration file in the
/etc/ipsec.d/directory of the connection that should use ESP hardware offload, and append thenic-offload=yesstatement to the connection entry:conn example ... nic-offload=yes
Restart the
ipsecservice:# systemctl restart ipsec
Verification
Display the active port of the bond:
# grep "Currently Active Slave" /proc/net/bonding/bond0
Currently Active Slave: enp1s0
Display the
tx_ipsecandrx_ipseccounters of the active port:# ethtool -S enp1s0 | egrep "_ipsec" tx_ipsec: 10 rx_ipsec: 10Send traffic through the IPsec tunnel. For example, ping a remote IP address:
# ping -c 5 remote_ip_addressDisplay the
tx_ipsecandrx_ipseccounters of the active port again:# ethtool -S enp1s0 | egrep "_ipsec" tx_ipsec: 15 rx_ipsec: 15If the counter values have increased, ESP hardware offload works.
Additional resources
- Configuring network bonding
- Configuring a VPN with IPsec section in the Securing networks document
7.5. Configuring an IPsec based VPN connection by using nmstatectl
IPsec (Internet Protocol Security) is a security protocol suite, provided by Libreswan, for implementation of VPN. IPsec includes protocols to initiate authentication at the time of connection establishment and manage keys during the data transfer. When an application deploys in a network and communicates by using the IP protocol, IPsec can protect data communication.
To manage an IPsec-based configuration for authenticating VPN connections, you can use the nmstatectl utility. This utility provides command line access to a declarative API for host network management. The following are the authentication types for the host-to-subnet and host-to-host communication modes:
- Host-to-subnet PKI authentication
- Host-to-subnet RSA authentication
- Host-to-subnet PSK authentication
- Host-to-host tunnel mode authentication
- Host-to-host transport mode authentication
7.5.1. Configuring a host-to-subnet IPSec VPN with PKI authentication and tunnel mode by using nmstatectl
If you want to use encryption based on the trusted entity authentication in IPsec, Public Key Infrastructure (PKI) provides secure communication by using cryptographic keys between two hosts. Both communicating hosts generate private and public keys where each host maintains a private key by sharing public key with the trusted entity Certificate Authority (CA). The CA generates a digital certificate after verifying the authenticity. In case of encryption and decryption, the host uses a private key for encryption and public key for decryption.
By using Nmstate, a declarative API for network management, you can configure a PKI authentication-based IPsec connection. After setting the configuration, the Nmstate API ensures that the result matches with the configuration file. If anything fails, nmstate automatically rolls back the changes to avoid an incorrect state of the system.
To establish encrypted communication in host-to-subnet configuration, remote IPsec end provides another IP to host by using parameter dhcp: true. In the case of defining systems for IPsec in nmstate, the left-named system is the local host while the right-named system is the remote host. The following procedure needs to run on both hosts.
Prerequisites
- By using a password, you have generated a PKCS #12 file that stores certificates and cryptographic keys.
Procedure
Install the required packages:
# dnf install nmstate libreswan NetworkManager-libreswanRestart the NetworkManager service:
# systemctl restart NetworkManagerAs
Libreswanwas already installed, remove its old database files and re-create them:# systemctl stop ipsec # rm /etc/ipsec.d/*db # ipsec initnss
Enable and start the
ipsecservice:# systemctl enable --now ipsecImport the PKCS#12 file:
# ipsec import node-example.p12When importing the PKCS#12 file, enter the password that was used to create the file.
Create a YAML file, for example
~/create-pki-authentication.yml, with the following content:--- interfaces: - name: 'example_ipsec_conn1' 1 type: ipsec ipv4: enabled: true dhcp: true libreswan: ipsec-interface: 'yes' 2 left: '192.0.2.250' 3 leftid: '%fromcert' 4 leftcert: 'local-host.example.com' 5 right: '192.0.2.150' 6 rightid: '%fromcert' 7 ikev2: 'insist' 8 ikelifetime: '24h' 9 salifetime: '24h' 10
The YAML file defines the following settings:
- 1
- An IPsec connection name
- 2
- The value
yesmeanslibreswancreates an IPsecxfrmvirtual interfaceipsec<number>and automatically finds the next available number - 3
- A static IPv4 address of public network interface for a local host
- 4
- On a local host, the value of
%fromcertsets the ID to a Distinguished Name (DN) that is fetched from a loaded certificate - 5
- A Distinguished Name (DN) of a local host’s public key
- 6
- A static IPv4 address of public network interface for a remote host
- 7
- On a remote host, the value of
%fromcertsets the ID to a Distinguished Name (DN) that is fetched from a loaded certificate. - 8
insistvalue accepts and receives only the Internet Key Exchange (IKEv2) protocol- 9
- The duration of IKE protocol
- 10
- The duration of IPsec security association (SA)
Apply settings to the system:
# nmstatectl apply ~/create-pki-authentication.yml
Verification
Verify IPsec status:
# ip xfrm statusVerify IPsec policies:
# ip xfrm policy
Additional resources
-
ipsec.conf(5)man page
7.5.2. Configuring a host-to-subnet IPSec VPN with RSA authentication and tunnel mode by using nmstatectl
If you want to use asymmetric cryptography-based key authentication in IPsec, the RSA algorithm provides secure communication by using either of private and public keys for encryption and decryption between two hosts. This method uses a private key for encryption, and a public key for decryption.
By using Nmstate, a declarative API for network management, you can configure RSA-based IPsec authentication. After setting the configuration, the Nmstate API ensures that the result matches with the configuration file. If anything fails, nmstate automatically rolls back the changes to avoid an incorrect state of the system.
To establish encrypted communication in host-to-subnet configuration, remote IPsec end provides another IP to host by using parameter dhcp: true. In the case of defining systems for IPsec in nmstate, the left-named system is the local host while the right-named system is the remote host. The following procedure needs to run on both hosts.
Procedure
Install the required packages:
# dnf install nmstate libreswan NetworkManager-libreswanRestart the NetworkManager service:
# systemctl restart NetworkManagerIf
Libreswanwas already installed, remove its old database files and re-create them:# systemctl stop ipsec # rm /etc/ipsec.d/*db # ipsec initnss
Generate a RSA key pair on each host:
# ipsec newhostkey --outputDisplay the public keys:
# ipsec showhostkey --listThe previous step returned the generated key
ckaid. Use thatckaidwith the following command on left, for example:# ipsec showhostkey --left --ckaid <0sAwEAAesFfVZqFzRA9F>The output of the previous command generated the
leftrsasigkey=line required for the configuration. Do the same on the second host (right):# ipsec showhostkey --right --ckaid <0sAwEAAesFfVZqFzRA9E>Enable the
ipsecservice to automatically start it on boot:# systemctl enable --now ipsecCreate a YAML file, for example
~/create-rsa-authentication.yml, with the following content:--- interfaces: - name: 'example_ipsec_conn1' 1 type: ipsec 2 ipv4: enabled: true dhcp: true libreswan: ipsec-interface: '99' 3 leftrsasigkey: '0sAwEAAesFfVZqFzRA9F' 4 left: '192.0.2.250' 5 leftid: 'local-host-rsa.example.com' 6 right: '192.0.2.150' 7 rightrsasigkey: '0sAwEAAesFfVZqFzRA9E' 8 rightid: 'remote-host-rsa.example.com' 9 ikev2: 'insist' 10
The YAML file defines the following settings:
- 1
- An IPsec connection name
- 2
- An interface name
- 3
- The value
99means thatlibreswancreates an IPsecxfrmvirtual interfaceipsec<number>and automatically finds the next available number - 4
- The RSA public key of a local host
- 5
- A static IPv4 address of public network interface of a local host
- 6
- A Distinguished Name (DN) for a local host
- 7
- The RSA public key of a remote host
- 8
- A static IPv4 address of public network interface of a remote host
- 9
- A Distinguished Name(DN) for a remote host
- 10
insistvalue accepts and receives only the Internet Key Exchange (IKEv2) protocol
Apply the settings to the system:
# nmstatectl apply ~/create-rsa-authentication.yml
Verification
Display the IP settings of the network interface:
# ip addr show example_ipsec_conn1Verify IPsec status:
# ip xfrm statusVerify IPsec policies:
# ip xfrm policy
Additional resources
-
ipsec.conf(5)man page
7.5.3. Configuring a host-to-subnet IPSec VPN with PSK authentication and tunnel mode by using nmstatectl
If you want to use encryption based on mutual authentication in IPsec, the Pre-Shared Key (PSK) method provides secure communication by using a secret key between two hosts. A file stores the secret key and the same key encrypts the data flowing through the tunnel.
By using Nmstate, a declarative API for network management, you can configure PSK-based IPsec authentication. After setting the configuration, the Nmstate API ensures that the result matches with the configuration file. If anything fails, nmstate automatically rolls back the changes to avoid incorrect state of the system.
To establish encrypted communication in host-to-subnet configuration, remote IPsec end provides another IP to host by using parameter dhcp: true. In the case of defining systems for IPsec in nmstate, the left-named system is the local host while the right-named system is the remote host. The following procedure needs to run on both hosts.
As this method uses static strings for authentication and encryption, use it only for testing/development purposes.
Procedure
Install the required packages:
# dnf install nmstate libreswan NetworkManager-libreswanRestart the NetworkManager service:
# systemctl restart NetworkManagerIf
Libreswanwas already installed, remove its old database files and re-create them:# systemctl stop ipsec # rm /etc/ipsec.d/*db # ipsec initnss
Enable the
ipsecservice to automatically start it on boot:# systemctl enable --now ipsecCreate a YAML file, for example
~/create-pks-authentication.yml, with the following content:--- interfaces: - name: 'example_ipsec_conn1' 1 type: ipsec ipv4: enabled: true dhcp: true libreswan: ipsec-interface: 'no' 2 right: '192.0.2.250' 3 rightid: 'remote-host.example.org' 4 left: '192.0.2.150' 5 leftid: 'local-host.example.org' 6 psk: "example_password" ikev2: 'insist' 7
The YAML file defines the following settings:
- 1
- An IPsec connection name
- 2
- Setting
novalue indicates thatlibreswancreates onlyxfrmpolicies, and not a virtualxfrminterface - 3
- A static IPv4 address of public network interface of a remote host
- 4
- A Distinguished Name (DN) for a remote host
- 5
- A static IPv4 address of public network interface of a local host
- 6
- A Distinguished Name (DN) for a local host
- 7
insistvalue accepts and receives only the Internet Key Exchange (IKEv2) protocol
Apply the settings to the system:
# nmstatectl apply ~/create-pks-authentication.yml
Verification
Display the IP settings of network interface:
# ip addr show example_ipsec_conn1Verify IPsec status:
# ip xfrm statusVerify IPsec policies:
# ip xfrm policy
7.5.4. Configuring a host-to-host IPsec VPN with PKI authentication and tunnel mode by using nmstatectl
IPsec (Internet Protocol Security) is a security protocol suite to authenticate and encrypt IP communications within networks and devices. The Libreswan software provides an IPsec implementation for VPNs.
In tunnel mode, the source and destination IP address of communication is encrypted in the IPsec tunnel. External network sniffers can only get left IP and right IP. In general, for tunnel mode, it supports host-to-host, host-to-subnet, and subnet-to-subnet. In this mode, a new IP packet encapsulates an existing packet along with its payload and header. Encapsulation in this mode protects IP data, source, and destination headers over an unsecure network. This mode is useful to transfer data in subnet-to-subnet, remote access connections, and untrusted networks, such as open public Wi-Fi networks. By default, IPsec establishes a secure channel between two sites in tunnel mode. With the following configuration, you can establish a VPN connection as a host-to-host architecture.
By using Nmstate, a declarative API for network management, you can configure an IPsec VPN connection. After setting the configuration, the Nmstate API ensures that the result matches with the configuration file. If anything fails, nmstate automatically rolls back the changes to avoid incorrect state of the system.
In host-to-host configuration, you need to set leftmodecfgclient: no so that it can’t receive network configuration from the server, hence the value no. In the case of defining systems for IPsec in nmstate, the left-named system is the local host while the right-named system is the remote host. The following procedure needs to run on both hosts.
Prerequisites
- By using a password, you have generated a PKCS #12 file that stores certificates and cryptographic keys.
Procedure
Install the required packages:
# dnf install nmstate libreswan NetworkManager-libreswanRestart the NetworkManager service:
# systemctl restart NetworkManagerAs
Libreswanwas already installed, remove its old database files and re-create them:# systemctl stop ipsec # rm /etc/ipsec.d/*db # ipsec initnss
Import the PKCS#12 file:
# ipsec import node-example.p12When importing the PKCS#12 file, enter the password that was used to generate the file.
Enable and start the
ipsecservice:# systemctl enable --now ipsecCreate a YAML file, for example
~/create-p2p-vpn-authentication.yml, with the following content:--- interfaces: - name: 'example_ipsec_conn1' 1 type: ipsec libreswan: left: '192.0.2.250' 2 leftid: 'local-host.example.com' 3 leftcert: 'local-host.example.com' 4 leftmodecfgclient: 'no' 5 right: '192.0.2.150' 6 rightid: 'remote-host.example.com' 7 rightsubnet: '192.0.2.150/32' 8 ikev2: 'insist' 9
The YAML file defines the following settings:
- 1
- An IPsec connection name
- 2
- A static IPv4 address of public network interface for a local host
- 3
- A distinguished Name (DN) of a local host
- 4
- A certificate name installed on a local host
- 5
- The value for not to retrieve client configuration from a remote host
- 6
- A static IPv4 address of public network interface for a remote host
- 7
- A distinguished Name (DN) of a remote host
- 8
- The subnet range of a remote host -
192.0.2.150with32IPv4 addresses - 9
- The value to accept and receive only the Internet Key Exchange (IKEv2) protocol
Apply the settings to the system:
# nmstatectl apply ~/create-p2p-vpn-authentication.yml
Verification
Display the created P2P policy:
# ip xfrm policyVerify IPsec status:
# ip xfrm status
Additional resources
-
ipsec.conf(5)man page
7.5.5. Configuring a host-to-host IPsec VPN with PSK authentication and transport mode by using nmstatectl
IPsec (Internet Protocol Security) is a security protocol suite to authenticate and encrypt IP communications within networks and devices. The Libreswan utility provides IPsec based implementation for VPN.
In transport mode, encryption works only for the payload of an IP packet. Also, a new IPsec header gets appended to the IP packet by keeping the original IP header as it is. Transport mode does not encrypt the source and destination IP of communication but copies them to an external IP header. Hence, encryption protects only IP data across the network. This mode is useful to transfer data in a host-to-host connection of a network. This mode is often used along with the GRE tunnel to save 20 bytes (IP header) of overheads. By default, the IPsec utility uses tunnel mode. To use transfer mode, set type: transport for host-to-host connection data transfer.
By using Nmstate, a declarative API for network management, you can configure an IPsec VPN connection. After setting the configuration, the Nmstate API ensures that the result matches with the configuration file. If anything fails, nmstate automatically rolls back the changes to avoid incorrect state of the system. To override the default tunnel mode, specify transport mode.
In the case of defining systems for IPsec in nmstate, the left-named system is the local host while the right-named system is the remote host. The following procedure needs to run on both hosts.
Prerequisites
- By using a password, you have generated a PKCS #12 file that stores certificates and cryptographic keys.
Procedure
Install the required packages:
# dnf install nmstate libreswan NetworkManager-libreswanRestart the NetworkManager service:
# systemctl restart NetworkManagerAs
Libreswanwas already installed, remove its old database files and re-create them:# systemctl stop ipsec # rm /etc/ipsec.d/*db # ipsec initnss
Import the PKCS#12 file:
# ipsec import node-example.p12When importing the PKCS#12 file, enter the password that was used to create the file.
Enable and start the
ipsecservice:# systemctl enable --now ipsecCreate a YAML file, for example
~/create-p2p-transport-authentication.yml, with the following content:--- interfaces: - name: 'example_ipsec_conn1' 1 type: ipsec libreswan: type: 'transport' 2 ipsec-interface: '99' 3 left: '192.0.2.250' 4 leftid: '%fromcert' 5 leftcert: 'local-host.example.org' 6 right: '192.0.2.150' 7 prefix-length: '32' 8 rightid: '%fromcert' 9 ikev2: 'insist' 10 ikelifetime: '24h' 11 salifetime: '24h' 12
The YAML file defines the following settings:
- 1
- An IPsec connection name
- 2
- An IPsec mode
- 3
- The value
99means thatlibreswancreates an IPsecxfrmvirtual interfaceipsec<number>and automatically finds the next available number - 4
- A static IPv4 address of public network interface for a local host
- 5
- On a local host, the value of
%fromcertsets the ID to a Distinguished Name (DN) which is fetched from a loaded certificate - 6
- A Distinguished Name (DN) of a local host’s public key
- 7
- A static IPv4 address of public network interface for a remote host
- 8
- The subnet mask of a static IPv4 address of a local host
- 9
- On a remote host, the value of
%fromcertsets the ID to a Distinguished Name (DN) which is fetched from a loaded certificate - 10
- The value to accept and receive only the Internet Key Exchange (IKEv2) protocol
- 11
- The duration of IKE protocol
- 12
- The duration of IPsec security association (SA)
Apply the settings to the system:
# nmstatectl apply ~/create-p2p-transport-authentication.yml
Verification
Verify IPsec status:
# ip xfrm statusVerify IPsec policies:
# ip xfrm policy
Additional resources
-
ipsec.conf(5)man page