
Infrastructure
For Use with Red Hat 3Scale 2.0
Abstract
Chapter 1. API Deployment On Microsoft Azure
Since APIs are platform agnostic, they can be deployed on any platform. This tutorial is fast web API deployment on Microsoft Azure. You will use the Ruby Grape gem to create the API interface, an NGINX proxy, Thin server, and Capistrano to deploy using the command line.
For the purpose of this tutorial, you can use any Ruby-based API running on Thin server, or you can clone the Echo-API.
1.1. Create and configure Microsoft Azure VM
Start to generate a X509 certificate with a 2048-bit RSA keypair to ssh into your Azure VM. It will be useful when you will set up your VM.
To generate this type of key, you can run the following command:
openssl req -x509 -nodes -days 365 -newkey rsa:2048 -keyout myPrivateKey.key -out myCert.pem
Now, get started by creating your Microsoft Azure account. For this tutorial, you can use the free trial option. Once the Azure account is created, go to the Dashboard on the Virtual Machines tab. There, you will be guided to create your first VM. Choose the from gallery option and select an Ubuntu Server 12.04 LTS.
On step 2 you will be able to upload the pem you created earlier, you should not be prompted for your password again.
In steps 3 and 4, choose the options that best suit your needs.
It will take a couple of minutes for your VM to be ready. When it is, you will be able to access its dashboard where you can monitor activity (CPU, disk, network) of your VM and upgrade its size.
The VM comes with a few packages installed, so you’ll need to access it to install other components. Once the key is created, you can ssh to your VM.
ssh -i myPrivateKey.key -p 22 username@servicename.cloudapp.net
Once in the VM, run the following commands to install everything you need:
sudo apt-get -y update
sudo apt-get -y upgrade
sudo apt-get -y install ruby1.9.3 build-essential libsqlite3-dev libpcre3 libpcre3-dev libssl-dev openssl libreadline6 libreadline6-dev libxml2-dev libxslt1-dev
You can check that Ruby installation is complete by running:
ruby -v
It should output something like ruby 1.9.3p194 (2012-04-20 revision 35410) [x86_64-linux].
You also need to install bundler and thin:
sudo gem install bundler
sudo gem install thin
Now, you should have everything you need on the VM. Go back to its dashboard and click on the endpoints tab. There, add the HTTP endpoint on port 80, and the fields should autofill.
1.2. Install OpenResty
In order to streamline this step, we recommend that you install the fantastic OpenResty web application. It’s the standard NGINX core bundled with almost all the necessary third-party NGINX modules built in.
On your Azure VM Compile and install NGINX:
cd ~
sudo wget http://agentzh.org/misc/nginx/ngx_openresty-VERSION.tar.gz
sudo tar -zxvf ngx_openresty-VERSION.tar.gz
cd ngx_openresty-VERSION/
sudo ./configure --prefix=/opt/openresty --with-luajit --with-http_iconv_module -j2
sudo make
sudo make install
1.3. Configure your GitHub repo
This tutorial uses GitHub to host the code. If you don’t already have a repo for your API, make sure to create one and host it on github.com. If you’re not familiar with Git and GitHub, check out this great tutorial.
To use Git on your VM and have access to your GitHub repo, you need to generate an SSH key on your VM and add it to Github as explained here.
1.3.1. Warning
Hosting your code on a public GitHub repo makes it vulnerable. Make sure it does not contain any sensitive information such as provider keys before pushing it publicly.
1.4. Configure your API
This is how the system will work:
- Thin server will be launched on port 8000.
-
The upstream
YOURAPINAMEis listening on localhost:8000. -
Upcoming connections on port 80 (as defined in the
serversection) are "redirected" toYOURAPINAME.
1.4.1. On 3scale
Rather than reinvent the wheel and implement rate limits, access controls, and analytics from scratch, you’ll use 3scale. If you don’t have an account yet, sign up here, activate it, and log in to the new instance through the links provided. The first time you log in, choose the option for some sample data to be created, so you’ll have some API keys to use later. Go through the tour to get a glimpse of the systems functionality (optional) and then go ahead with implementation.
To get some instant results, start with the API gateway in the staging environment, which can be used while in development. Then configure an NGINX proxy, which can scale up for full production deployments.
There is some documentation on configuring the API proxy here and more advanced configuration options here.
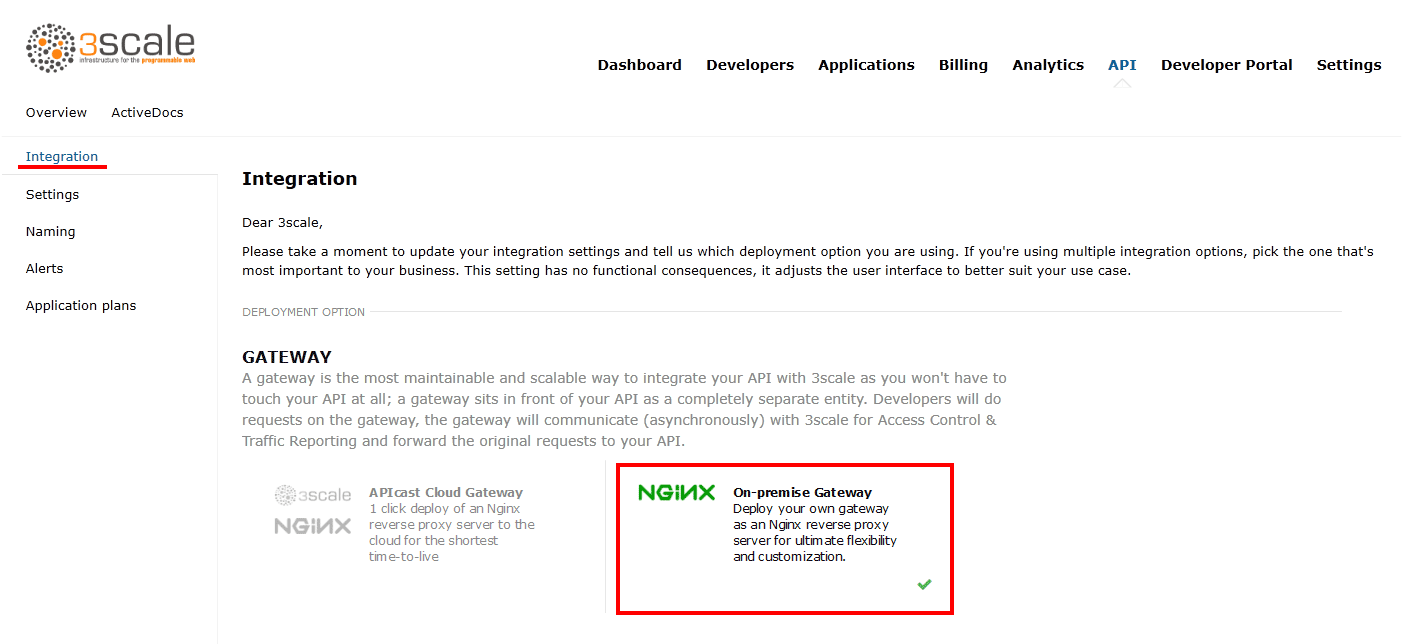
Once you sign in to your 3scale account, launch your API on the main Dashboard screen or Go to API→Select the service (API)→Integration in the sidebar→Proxy https://www.3scale.net/2015/06/how-to-deploy-an-api-amazon-ec2/
Set the address of your API backend -
`http://YOURAPP.cloudapp.net:80`
After creating some app credentials in 3scale, you can test your API by hitting the staging API gateway endpoint:
`https://XXX.staging.apicast.io/v1/words/awesome.json?app_id=APP_ID&app_key=APP_KEY`
where, XXX is specific to your staging API gateway and APP_ID and APP_KEY are the ID and key of one of the sample applications you created when you first logged in to your 3scale account. (If you missed that step, just create a developer account and an application within that account.)
Try it without app credentials, next with incorrect credentials. Then once authenticated, within and over any rate limits that you’ve defined. Once it’s working to your satisfaction, download the config files for NGINX.
Any time you have errors, check whether you can access the API directly: your-public-dns:3000/v1/words/awesome.json. If it’s not available, check whether the AWS instance is running and whether the Thin server is running on the instance.*
There, you will be able to change your API backend address to http://YOURAPP.cloudapp.net:80.
Once you’re done, click on Download your nginx config. That will download an archive containing the .conf and .lua file you’re going to use to configure your app.
Modify the .conf accordingly:
If the API gateway and the API are on the same VM, delete the block:
upstream backend_YOURAPP.cloudapp.net{
server ....
}…and replace it with…
upstream YOURAPINAME {
server 127.0.0.1:8000;
}YOURAPINAME can only contain URL valid characters as defined in RFC 3986.
In the .lua file, modify the line ngx.var.proxy_pass = "http://backend_YOURAPP.cloudapp.net".
With ngx.var.proxy_pass = "http://YOURAPINAME" in all cases.
Replace server_name api.2445580546262.proxy.3scale.net; with
server_name YOURSERVICENAME.cloudapp.net;
In the server block, add this on top:
root /home/USERNAME/apps/YOURAPINAME/current;
access_log /home/USERNAME/apps/YOURAPINAME/current/log/thin.log;
error_log /home/USERNAME/apps/YOURAPINAME/current/log/error.log;
Replace access_by_lua_file lua_tmp.lua;
…with… access_by_lua_file /opt/openresty/nginx/conf/lua_tmp.lua;
Before post_action /out_of_band_authrep_action; add:
proxy_set_header X-Forwarded-For $proxy_add_x_forwarded_for;
proxy_set_header Host $http_host;
Finally, rename those files nginx.conf and tmp_lua.lua.
1.4.2. Capistrano setup
Use Capistrano to deploy the API. Capistrano is an automation tool, which will let you set up tasks for your deployments and execute them using a command line interface. Capistrano is used on your local machine to deploy on your remote VM.
To install Capistrano, add this line to your gem file: gem 'capistrano'
Run the following command locally to install the new gems and set up Capistrano: bundle capify.
Copy nginx.conf and tmp_lua.lua into /config.
1.5. Capistrano setup
When you ran the capify command, you created two files, Capfile and deploy.rb. In deploy.rb, you describe all the commands necessary to deploy your app.
In /config edit deploy.rb and replace the content with the following:
require "bundler/capistrano"
set :application, "YOURAPINAME"
set :user,"USERNAME"
set :scm, :git
set :repository, "git@github.com:GITHUBUSERNAME/REPO.git"
set :branch, "master"

set :use_sudo, false

server "VNDNSname", :web, :app, :db, primary: true

set :deploy_to, "/home/#{user}/apps/#{application}"
default_run_options[:pty] = true
ssh_options[:forward_agent] = false
ssh_options[:port] = 22
ssh_options[:keys] = ["/PATH/TO/myPrivateKey.key"]

namespace :deploy do
    task :start, :roles => [:web, :app] do
      run "cd #{deploy_to}/current && nohup bundle exec thin start -C config/production_config.yml -R config.ru"
      sudo "/opt/openresty/nginx/sbin/nginx -p /opt/openresty/nginx/ -c /opt/openresty/nginx/conf/nginx.conf"
    end

    task :stop, :roles => [:web, :app] do
      run "kill -QUIT cat /opt/openresty/nginx/logs/nginx.pid"
      run "cd #{deploy_to}/current && nohup bundle exec thin stop -C config/production_config.yml -R config.ru"
    end

    task :restart, :roles => [:web, :app] do
      deploy.stop
      deploy.start
    end

    task :setup_config, roles: :app do
      sudo "ln -nfs #{current_path}/config/nginx.conf /opt/openresty/nginx/conf/nginx.conf"
      sudo "ln -nfs #{current_path}/config/lua_tmp.lua /opt/openresty/nginx/conf/lua_tmp.lua"
      sudo "mkdir -p #{shared_path}/config"
    end
    after "deploy:setup", "deploy:setup_config"
end
This will ensure that Capistrano doesn’t try to run rake:migrate. (This is not a Rails project!)
task :cold do
  deploy.update
  deploy.start
end
In above text, replace the following:
-
VNDNSnamewith your .cloudapp.net DNS. -
YOURAPINAMEwith your applicationame. -
USERNAMEwith the username used to login into the VM. -
GITHUBUSERNAMEwith your Github username. -
REPOwith your Github repo name. -
/PATH/TOwith the path to access the SSH key created before.
The above works well if you don’t have a database in your API. If you do have a database, comment the lines:
task :cold do
  deploy.update
  deploy.start
end
You also need to add a file production_config.yml in /config to configure the Thin server.
environment: production
chdir: /home/USERNAME/apps/YOURAPINAME/current/
address: 127.0.0.1
user: USERNAME
port: 8000
pid: /home/USERNAME/apps/YOURAPINAME/current/tmp/thin.pid
rackup: /home/USERNAME/apps/YOURAPINAME/current/config.ru
log: /home/USERNAME/apps/YOURAPINAME/current/log/thin.log
max_conns: 1024
timeout: 30
max_persistent_conns: 512
daemonize: true
Again, change usernames and paths accordingly.
Commit the changes on the project and upload them to GitHub.
git add .
git commit -m "adding config files"
git push
You are almost done.
1.6. Deploy
From your local development machine, run the following command to set up the remote Azure VM:
cap deploy:setup
You should not be prompted for a password if the path to your ssh key is correct.
Capistrano will connect to your VM and create an apps directory under the home directory of the user account.
Now, you can deploy your API to the VM and launch Thin server using the command: cap deploy:cold
This command should get the latest commit on your GitHub. Launch OpenResty and Thin server.
Your API should now be available on the URL:
MYAPI.cloudapp.net/path/to/resources
1.6.1. Troubleshooting
If you are not able to access to your API, ssh to your VM and check that you can call it on localhost using curl. Like this:
curl -X GET http://localhost:8000/v2/words/hello.json?app_id=APPID&app_key=APPKEY`
If it works, there is something wrong in nginx configuration.
You can check nginx logs on your VM with
cat /opt/openresty/nginx/logs/error.log
You should now have an API running on an Azure Linux instance.
Hope you enjoyed this tutorial. Please let us know if you have any questions or comments. We look forward to hearing from you.
Chapter 2. Deploy An API On Amazon EC2 For AWS Rookies
At 3scale we find Amazon to be a fantastic platform for running APIs due to the complete control you have on the application stack. However, for people new to AWS, the learning curve is quite steep. So we put together our best practices into this short tutorial. Besides Amazon EC2, we’ll use the Ruby Grape gem to create the API interface and an NGINX gateway to handle access control. Best of all everything in this tutorial is completely free.
2.1. Prerequisites
For the purpose of this tutorial you’ll need a running API based on Ruby and Thin server. If you don’t have one you can simply clone an example repo as described below in the “Deploying the Application” section.
We’ll begin with the creation and configuration of the Amazon EC2 instance. If you already have an EC2 instance (micro or not), you can jump to the next step, “Preparing Instance for Deployment”.
2.2. Create and configure EC2 instance
Start by signing up for the Amazon Elastic Compute Cloud (Amazon EC2). The free tier is enough to cover all your basic needs. Once the account is created, go to the EC2 dashboard under your AWS Management Console and click on the “launch instance” button. That will transfer you to a pop-up window where you’ll continue the process:
- Choose the classic wizard
- Choose an AMI (Ubuntu Server 12.04.1 LTS 32bit, T1micro instance) leaving all the other settings for “instance details” as default
- Create a key pair and download it. This will be the key that you’ll use to make an ssh connection to the server. It’s VERY IMPORTANT!
- Add inbound rules for the firewall with source always 0.0.0.0/0 (HTTP, HTTPS, ALL ICMP, TCP port 3000 used by the Ruby Thin server)
2.3. Prepare instance for deployment
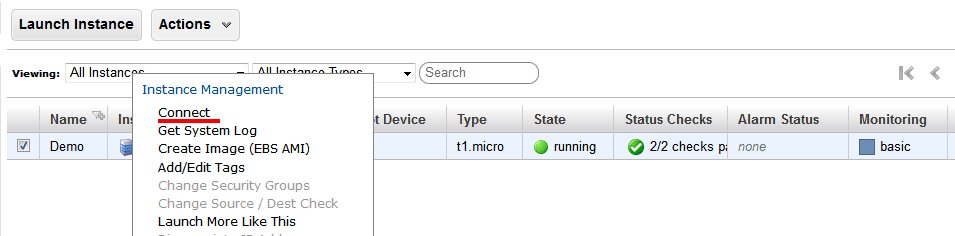
Once the instance is created and running, you can connect there directly from the console (Windows users from PuTTY). Right click on your instance, connect, and choose Connect with a standalone SSH Client.
Follow the steps and change the username to “ubuntu” (instead of “root”) in the given example.
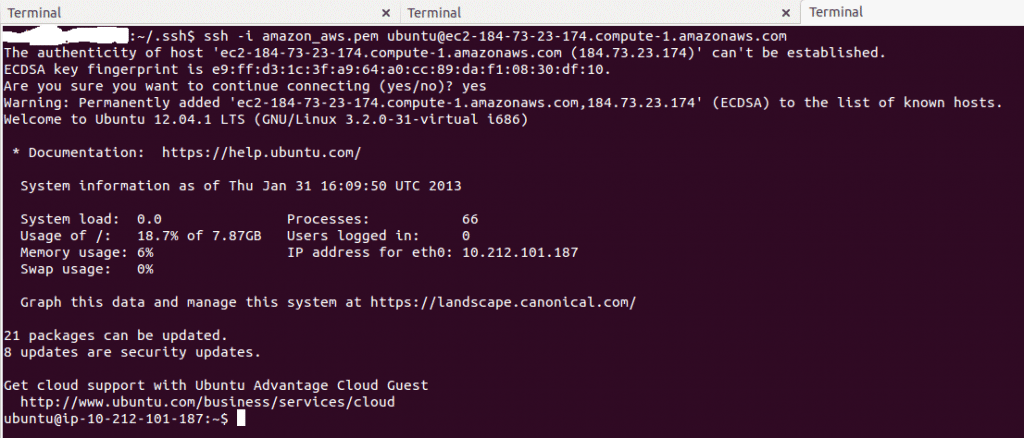
After executing this step you are connected to your instance. You’ll have to install new packages. Some of them require root credentials, so you’ll have to set a new root password: sudo passwd root. Then login as root: su root.
Now with root credentials, execute: sudo apt-get update
Switch back to your normal user with exit command and install all required packages:
- Install the libraries that will be required by rvm, Ruby, and Git:
sudo apt-get install build-essential git zlib1g-dev libssl-dev libreadline-gplv2-dev imagemagick libxml2-dev libxslt1-dev openssl zlib1g libyaml-dev libxslt-dev autoconf libc6-dev ncurses-dev automake libtool bison libpq-dev libpq5 libeditline-dev

sudo apt-get install libreadline6 libreadline6-devrvm install 1.9.3 rvm use 1.9.3 --default
2.4. Deploying the application
Our example, the Sentiment API, is located on GitHub. Try cloning the repository:
git clone git@github.com:jerzyn/api-demo.git
You can review the code and tutorial on creating and deploying this app here and here. Note the changes — we’re using only v1, as authentication will go through the gateway.
Now you can deploy the app by issuing bundle install.
Now you can start the thin server: thin start.
To access the API directly (without any security or access control) access: your-public-ip:3000/v1/words/awesome.json You can find your public IP in the AWS EC2 Dashboard > Instances in the details window of your instance.

2.4.1. Optional
If you want to assign a custom domain to your Amazon instance, you’ll have to do one thing: Add an A record to the DNS record of your domain, mapping the domain to the public IP address.
Your domain provider should either give you some way to set the A record (the IPv4 address), or it will give you a way to edit the nameservers of your domain. If they don’t allow you to set the A record directly find a DNS management service, register your domain as a zone there, and the service will give you the nameservers to enter in the admin panel of your domain provider. You can then add the A record for the domain. Some possible DNS management services include ZoneEdit (basic, free) or Amazon route 53.
At this point, your API is open to the world. This is good and bad—it’s great that you’re sharing, but bad that without rate limits a few apps could kill the resources of your server and you would have no insight into who is using your API and how it’s being used. The solution is to add API management.
2.5. Enabling API management with 3scale
Rather than reinventing the wheel and implement rate limits, access controls, and analytics from scratch, you can leverage the 3scale API Management Platform. Sign up for a 3scale account if you haven’t already, activate it, and log in through the links provided. The first time you log in, some sample data will be created for you so you’ll have an API key to use later. You can go through the wizard to get an idea of the system’s functionality (optional). Then start with the implementation.
To get some instant results, we’ll start with the API gateway in the staging environment which can be used while in development. Then we’ll configure an NGINX gateway that can scale up for full production deployments. Here’s some documentation on the configuration of the API gateway, as well as more advanced configuration options.
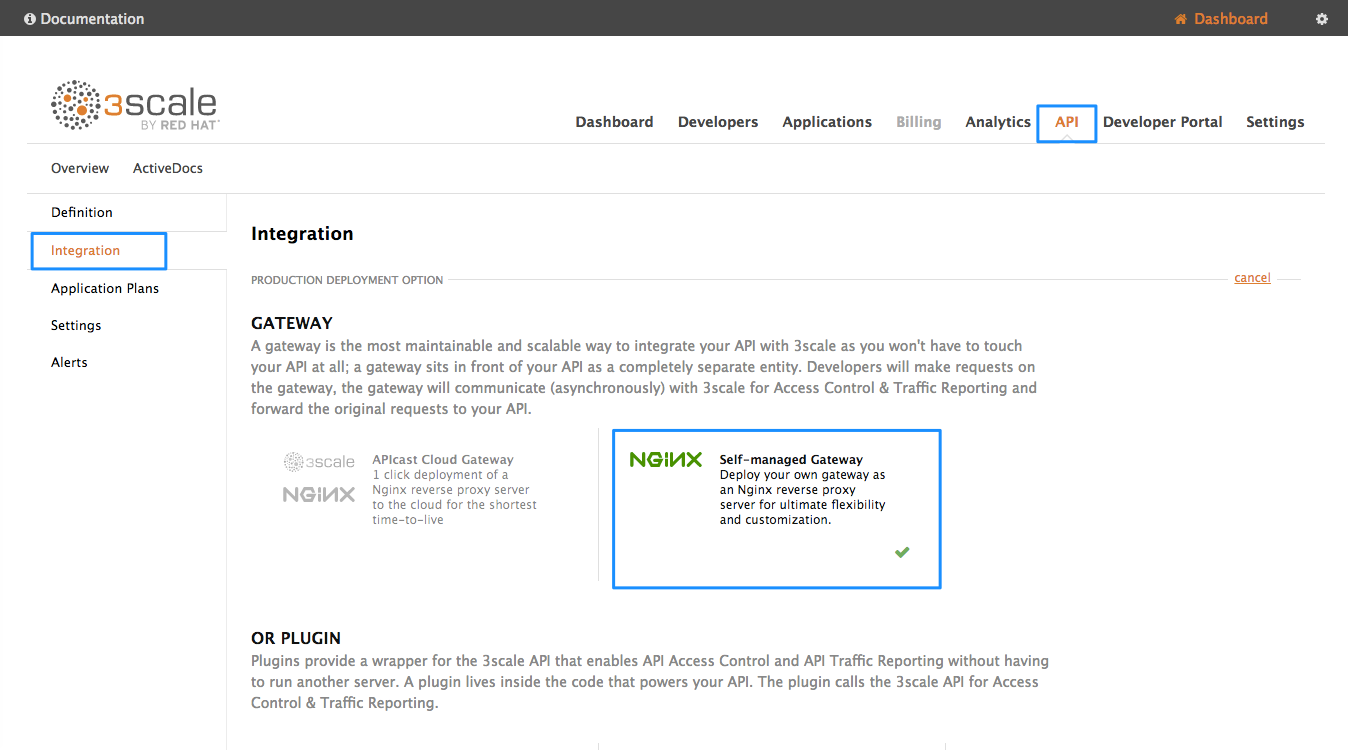
Once you’ve signed in to your 3scale account, go to Dashboard > API > Select the service (API) > Integration > edit integration settings and then choose APIcast Self-managed.
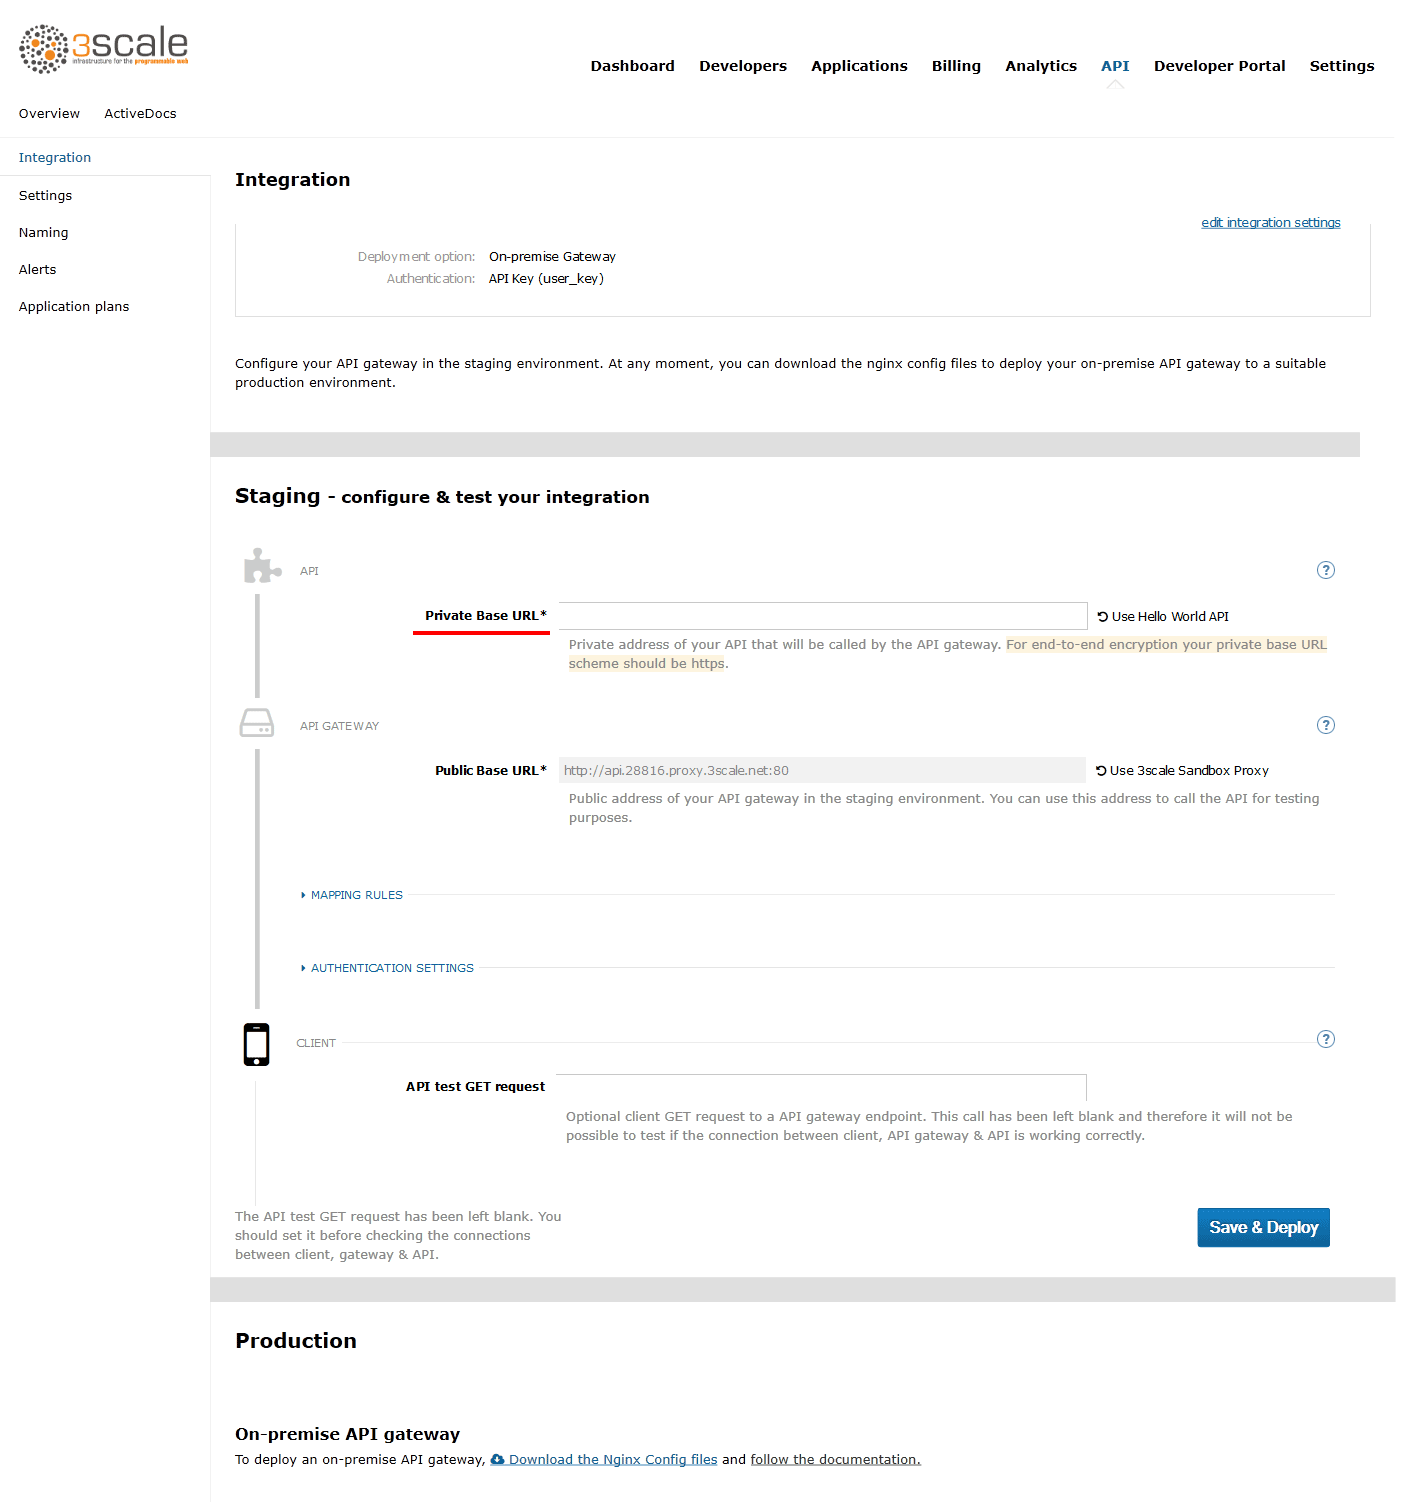
Set the address of of your API backend. This has to be the public IP address unless the custom domain has been set, including http protocol and port 3000. Now you can save the changes to the API gateway in the staging environment to test your API by hitting the staging endpoint.
http://api.XXX.proxy.3scale.net/v1/words/awesome.json?user_key=USER_KEY
Where XXX is specific to your 3scale account and USER_KEY is the authentication key of one of the sample applications created when you first logged into your 3scale account. (If you missed that step just create a developer account and an application within that account.)
Try it without app credentials; next with incorrect credentials; and then once authenticated, within and over any rate limits you have defined. Once it’s working to your satisfaction you can download the config files for NGINX.
Whenever you have errors, check whether you can access the API directly: your-public-dns:3000/v1/words/awesome.json. If that is not available, you need to check whether the AWS instance is running and whether the Thin server is running on the instance.
2.6. Install and deploy APIcast (your API gateway)
Finally, to deploy install and deploy APIcast, follow the steps in the APIcast 2.0 self-managed tutorial for 'local' deploy.
You’re almost finished! The last step is to start the NGINX gateway and put some traffic through it. If it’s not running yet (remember the Thin server has to be started first), go to your EC2 instance terminal (the one you were connecting through ssh before) and start it now.
The last step will be verifying that the traffic goes through with a proper authorization. To do that, access:
http://your-public-ip/v1/words/awesome.json?app_id=APP_ID&app_key=APP_KEY
where APP_ID and APP_KEY are key and ID of the application you want to access through the API call.
Once everything is confirmed as working correctly, you’ll want to block public access to the API backend on port 3000, which bypasses any access controls.
Chapter 3. 3scale AMP On-premises Installation Guide
In this guide you’ll learn how to install 3scale 2.0 (on-premises) on OpenShift using OpenShift templates.
3.1. 1. 3scale AMP OpenShift Templates
As of 3scale API Management Platform (AMP) 2.0, Red Hat provides an OpenShift template. You can use this template to deploy AMP onto OpenShift Container Platform 3.3 and 3.4.
The 3scale AMP template is composed of the following:
- Two built-in APIcast API gateways
- One AMP admin portal and developer portal with persistent storage
3.2. 2. System Requirements
The 3scale AMP OpenShift template requires the following:
3.2.1. Environment Requirements
Persistent Volumes:
- 3 RWO (ReadWriteOnce) persistent volumes for Redis and MySQL persistence
- 1 RWX (ReadWriteMany) persistent volume for CMS and System-app Assets
The RWX persistent volume must be configured to be group writable. Refer to the OpenShift documentation for a list of persistent volume types which support the required access modes.
3.2.2. Hardware Requirements
Hardware requirements depend on your usage needs. Red Hat recommends you test and configure your environment to meet your specific requirements. Consider the following recommendations when configuring your environment for 3scale on OpenShift:
- Compute optimized nodes for deployments on cloud environments (AWS c4.2xlarge or Azure Standard_F8).
- Very large installations may require a separate node (AWS M4 series or Azure Av2 series) for Redis if memory needs exceed your current node’s available RAM.
- Separate nodes between routing and compute tasks
- Dedicate compute nodes to 3scale specific tasks
-
Set the
PUMA_WORKERSvariable of the backend listener to the number of cores in your compute node
3.3. 3. Configure Nodes and Entitlements
Before you can deploy 3scale on OpenShift, you must configure your nodes and the entitlements required for your environment to fetch images from Red Hat.
Perform the following steps to configure entitlements:
- Install Red Hat Enterprise Linux (RHEL) onto each of your nodes
- Register your nodes with Red Hat using the Red Hat Subscription Manager (RHSM)
- Attach your nodes to your 3scale subscription using RHSM.
Install OpenShift onto your nodes, complying with the following requirements:
- You must use OpenShift version 3.3 or 3.4
- You must configure persistent storage on a file system that supports multiple writes.
- Install the OpenShift command line interface
-
Enable access to the
rhel-7-server-3scale-amp-2.0-rpmsrepository using the subscription manager:
sudo subscription-manager repos --enable=rhel-7-server-3scale-amp-2.0-rpms
-
Install the
3scale-amp-templateAMP template. The template will be saved in/opt/amp/templates.
sudo yum install 3scale-amp-template
3.4. 4. Deploy the 3scale AMP on OpenShift using a Template
3.4.1. Prerequisites:
- An OpenShift cluster configured as specified in the Chapter 3, Configure Nodes and Entitlements section
- A domain, preferably wildcard, that resolves to your OpenShift cluster.
- Access to the Red Hat container catalog
- (Optional) A working SMTP server for email functionality
Follow these procedures to install AMP onto OpenShift using a .yml template:
3.4.2. 4.1. Import the AMP Template
Once you meet the Prerequisites, you can import the AMP template into your OpenShift cluster.
Perform the following steps to import the AMP template into your OpenShift cluster:
- Download amp.yml from the 3scale GitHub page
- From a terminal session log in to OpenShift:
oc login
- Select your project, or create a new project:
oc project <project_name>
oc new-project <project_name>
Enter the
oc new-appcommand:-
Specify the
--fileoption with the path to the amp.yml file Specify the
--paramoption with theWILDCARD_DOMAINparameter set to the domain of your OpenShift cluster:oc new-app --file /path/to/amp.yml --param WILDCARD_DOMAIN=<WILDCARD_DOMAIN>
NoteIf you encounter a timeout error after entering
oc new-app, you may need to manually create persistent storage volumes. See Section 7.7, “Deployment Script is Unable to Create Persistent Storage Volumes”, in the troubleshooting guide, for information on how to do this.
-
Specify the
The terminal will output the URL and credentials for your newly created AMP admin portal. Save these details for future reference.
NoteYou may need to wait a few minutes for AMP to fully deploy on OpenShift for your login and credentials to work.
3.4.3. 4.2. Configure Wildcard Domains (Optional, Tech Preview)
Wildcard domains allow you to direct subdomain traffic through your wildcard domain.
The Wildcard Domain feature is a tech preview.
Use of the wildcard domain feature requires the following:
- OpenShift version 3.4
- a wildcard domain that is not being used for any other routes, or as another project’s namespace domain
- your router must be configured to allow wildcard routes
Perform the following steps to configure a wildcard domain:
From a terminal session, log in to OpenShift:
oc login
- Create a wildcard router configured with your wildcard domain
- Download the wildcard.yml template from the 3scale GitHub page
Switch to the project which contains your AMP deployment:
oc project <project_name>
Enter the
oc new-appcommand, specifying the following:-
the
-fileoption and the path to the wildcard.yml template -
the
--paramoption and the WILDCARD_DOMAIN of your openshift cluster the
--paramoption and the TENANT_NAME from the project which contains your AMP deploymentoc new-app -f wildcard.yml --param WILDCARD_DOMAIN=<a-domain-that-resolves-to-your-ocp-cluster.com> --param TENANT_NAME=3scale
-
the
Once configured, your AMP deployment will connect to the built-in APIcast gateways automatically and direct all subdomain traffic through your wildcard domain.
Considerations
Consider the following limitations when using the wildcard domain feature:
- API endpoints must end with the -staging or -production suffix (e.g. api1-production.example.com, api1-staging.example.com), If your API endpoints do not have one of these suffixes, calls will return a 500 error code.
- You must deploy the router in same project as the AMP
- This template will work only with an AMP.yml deploymentMore Information
For information about wildcard domains on OpenShift, visit Using Wildcard Routes (for a Subdomain).
3.4.4. 4.3. Configure SMTP Variables (Optional)
OpenShift uses email to send notifications and invite new users. If you intend to use these features, you must provide your own SMTP server and configure SMTP variables in the SMTP config map.
Follow these steps to configure the SMTP variables in the SMTP config map:
If you are not already logged in, log in to OpenShift:
oc login
Configure variables for the SMTP config map. Use the
oc patchcommand, specify theconfigmapandsmtpobjects, followed by the-poption and write the following new values in JSON for the following variables:Variable
Description
address
Allows you to specify a remote mail server as a relay
username
Specify your mail server username
password
Specify your mail server password
domain
Specify a HELO domain
port
Specify the port on which the mail server is listening for new connections
authentication
Specify the authentication type of your mail server. Allowed values:
plain( sends the password in the clear),login(send password Base64 encoded), orcram_md5(exchange information and a cryptographic Message Digest 5 algorithm to hash important information)openssl.verify.mode
Specify how OpenSSL checks certificates when using TLS. Allowed values:
none,peer,client_once, orfail_if_no_peer_cert.Example:
oc patch configmap smtp -p '{"data":{"address":"<your_address>"}}'
oc patch configmap smtp -p '{"data":{"username":"<your_username>"}}'
oc patch configmap smtp -p '{"data":{"password":"<your_password>"}}'
Once you have set the configmap variables, redeploy the
system-app,system-resque, andsystem-sidekiqpods:oc deploy system-app --latest oc deploy system-resque --latest oc deploy system-sidekiq --latest
3.5. 5. 3scale AMP Template Parameters
Template parameters configure environment variables of the AMP yml template during and after deployment.
| Name | Description | Default Value | Required? |
| AMP_RELEASE | AMP release tag. | 2.0.0-CR2-redhat-2 | yes |
| ADMIN_PASSWORD | A randomly generated AMP administrator account password. | N/A | yes |
| ADMIN_USERNAME | AMP administrator account username. | admin | yes |
| APICAST_ACCESS_TOKEN | Read Only Access Token that APIcast will use to download its configuration. | N/A | yes |
| ADMIN_ACCESS_TOKEN | Admin Access Token with all scopes and write permissions for API access. | N/A | no |
| WILDCARD_DOMAIN |
Root domain for the wildcard routes. For example, a root domain | N/A | yes |
| TENANT_NAME | Tenant name under the root that Admin UI will be available with -admin suffix. | 3scale | yes |
| MYSQL_USER | Username for MySQL user that will be used for accessing the database. | mysql | yes |
| MYSQL_PASSWORD | Password for the MySQL user. | N/A | yes |
| MYSQL_DATABASE | Name of the MySQL database accessed. | system | yes |
| MYSQL_ROOT_PASSWORD | Password for Root user. | N/A | yes |
| SYSTEM_BACKEND_USERNAME | Internal 3scale API username for internal 3scale api auth. | 3scale_api_user | yes |
| SYSTEM_BACKEND_PASSWORD | Internal 3scale API password for internal 3scale api auth. | N/A | yes |
| REDIS_IMAGE | Redis image to use | rhscl/redis-32-rhel7:3.2 | yes |
| MYSQL_IMAGE | Mysql image to use | rhscl/mysql-56-rhel7:5.6-13.5 | yes |
| SYSTEM_BACKEND_SHARED_SECRET | Shared secret to import events from backend to system. | N/A | yes |
| SYSTEM_APP_SECRET_KEY_BASE | System application secret key base | N/A | yes |
| APICAST_MANAGEMENT_API | Scope of the APIcast Management API. Can be disabled, status or debug. At least status required for health checks. | status | no |
| APICAST_OPENSSL_VERIFY | Turn on/off the OpenSSL peer verification when downloading the configuration. Can be set to true/false. | false | no |
| APICAST_RESPONSE_CODES | Enable logging response codes in APIcast. | true | no |
3.6. 6. Use APIcast with AMP on OpenShift
APIcast with AMP on OpenShift differs from APIcast with AMP hosted and requires unique configuration procedures.
The topics in this section explain how to deploy APIcast with AMP on OpenShift.
3.6.1. 6.1. Deploy APIcast Templates on an Existing OpenShift Cluster Containing Your AMP
AMP OpenShift templates contain 2 built-in APIcast API gateways by default. If you require more API gateways, or require separate APIcast deployments, you can deploy additional APIcast templates onto your OpenShift cluster.
Follow the steps below to deploy additional API gateways onto your OpenShift cluster:
Create an /docs/accounts/tokens[access token] with the following configurations:
- scoped to Account Management API
- has read-only access
Log in to your APIcast Cluster:
oc login
Create a secret, which allows APIcast to communicate with AMP. Specify
new-basicauth,apicast-configuration-url-secret, and the--passwordparameter with the access token, tenant name, and wildcard domain of your AMP deployment:oc secret new-basicauth apicast-configuration-url-secret --password=https://<APICAST_ACCESS_TOKEN>@<TENANT_NAME>-admin.<WILDCARD_DOMAIN>
NoteTENANT_NAMEis the name under the root that Admin UI will be available with.TENANT_NAMEdefault value is "3scale". If you used a custom value in your AMP deployment, then you must input that value here.Import the APIcast template by downloading the apicast.yml, located on the 3scale GitHub, and running the
oc new-appcommand, specifying the--fileoption with theapicast.ymlfile:oc new-app --file /path/to/file/apicast.yml
3.6.2. 6.2. Connect APIcast from an OpenShift Cluster Outside of an OpenShift Cluster Containing Your AMP
If you deploy APIcast onto a different OpenShift cluster, outside of your AMP cluster, you must connect over the public route.
Create an /docs/accounts/tokens[access token] with the following configurations:
- scoped to Account Management API
- has read-only access
Log in to your APIcast Cluster:
oc login
Create a secret, which allows APIcast to communicate with AMP. Specify
new-basicauth,apicast-configuration-url-secret, and the--passwordparameter with the access token, tenant name, and wildcard domain of your AMP deployment:oc secret new-basicauth apicast-configuration-url-secret --password=https://<APICAST_ACCESS_TOKEN>@<TENANT_NAME>-admin.<WILDCARD_DOMAIN>
NoteTENANT_NAMEis the name under the root that Admin UI will be available with.TENANT_NAMEdefault value is "3scale". If you used a custom value in your AMP deployment, then you must input that value here.Deploy APIcast onto an OpenShift cluster outside of the OpenShift Cluster with the oc new-app command. Specify the
--fileoption and the file path of yourapicast.ymlfile:oc new-app --file /path/to/file/apicast.yml
Update the apicast
BACKEND_ENDPOINT_OVERRIDEenvironment variable set to the URLbackend.followed by the wildcard domain of the OpenShift Cluster containing your AMP deployment:oc env dc/apicast --overwrite BACKEND_ENDPOINT_OVERRIDE=https://backend.<WILDCARD_DOMAIN>
3.6.3. 6.3. Connect APIcast from Other Deployments
Once you have deployed APIcast on other platforms, such as the /docs/deployment-options/apicast-docker[Docker] containerized environment or /docs/deployment-options/apicast-v2-self-managed[native installations], you can connect them to AMP on OpenShift by configuring the BACKEND_ENDPOINT_OVERRIDE environment variable in your AMP OpenShift Cluster:
Log in to your AMP OpenShift Cluster:
oc login
Configure the system-app object
BACKEND_ENDPOINT_OVERRIDEenvironment variable:If you are using a native installation:
BACKEND_ENDPOINT_OVERRIDE=https://backend.<your_openshift_subdomain> bin/apicast
If are using the Docker containerized environment:
docker run -e BACKEND_ENDPOINT_OVERRIDE=https://backend.<your_openshift_subdomain>
3.6.4. 6.4. Change Built-In APIcast Default Behavior
In external APIcast deployments, you can modify default behavior by changing template parameters in the APIcast OpenShift template.
In built-in APIcast deployments, AMP and APIcast are deployed from a single template. You must modify environment variables after deployment if you wish to change default behavior for built-in APIcast deployments.
3.6.5. 6.5. Connect Multiple APIcast Deployments on a Single OpenShift Cluster over Internal Service Routes
If you deploy multiple APIcast gateways into the same OpenShift cluster, you can configure them to connect using internal routes through the backend listener service instead of the default external route configuration.
You must have an OpenShift SDN plugin installed to connect over internal service routes. How you connect depends on which SDN you have installed.
ovs-subnet
If you are using the ovs-subnet OpenShift SDN plugin, follow these steps to connect over internal routes:
Log in to your OpenShift Cluster, if you have not already done so:
oc login
Enter the
oc new-appcommand with the path to theapicast.ymlfile:-
Specify the
--paramoption with theBACKEND_ENDPOINT_OVERRIDEparameter set to the domain of your OpenShift cluster’s AMP project:
-
Specify the
oc new-app -f apicast.yml --param BACKEND_ENDPOINT_OVERRIDE=http://backend-listener.<AMP_PROJECT>.svc.cluster.local:3000
ovs-multitenant
If you are using the 'ovs-multitenant' Openshift SDN plugin, follow these steps to connect over internal routes:
Log in to your OpenShift Cluster, if you have not already done so:
oc login
As admin, specify the
oadmcommand with thepod-networkandjoin-projectsoptions to set up communication between both projects:oadm pod-network join-projects --to=<AMP_PROJECT> <APICAST_PROJECT>
Enter the
oc new-appcotion with the path to theapicast.ymlfile-
Specify the
--paramoption with theBACKEND_ENDPOINT_OVERRIDEparameter set to the domain of your OpenShift cluster’s AMP project:
-
Specify the
oc new-app -f apicast.yml --param BACKEND_ENDPOINT_OVERRIDE=http://backend-listener.<AMP_PROJECT>.svc.cluster.local:3000
More information
For information on Openshift SDN and project network isolation, visit: Openshift SDN
3.7. 7. Troubleshooting
This section contains a list of common installation issues, and provides guidance for resolution.
- 7.1, “Previous Deployment Leaves Dirty Persistent Volume Claims”
- 7.2, “Incorrectly Pulling from the Docker Registry”
- 7.3, “Permissions Issues for MySQL when Persistent Volumes are Mounted Locally”
- 7.4, “Unable to Upload Logo or Images Because Persistent Volumes are not Writable by OpenShift”
- 7.5, “Create Secure Routes on OpenShift”
- 7.6, “APIcast on a Different Project from AMP Fails to Deploy Due to Problem with Secrets”
- 7.7, “Deployment Script is Unable to Create Persistent Storage Volumes”
3.7.1. 7.1. Previous Deployment Leaves Dirty Persistent Volume Claims
Problem
A previous deployment attempt leaves a dirty Persistent Volume Claim (PVC), causing the MySQL container to fail to start.
Cause
Deleting a project in OpenShift does not clean the PVCs associated with it.
Solution
Find the PVC containing the erroneous MySQL data with
oc get pvc:# oc get pvc NAME STATUS VOLUME CAPACITY ACCESSMODES AGE backend-redis-storage Bound vol003 100Gi RWO,RWX 4d mysql-storage Bound vol006 100Gi RWO,RWX 4d system-redis-storage Bound vol008 100Gi RWO,RWX 4d system-storage Bound vol004 100Gi RWO,RWX 4d
-
Stop the deployment of the system-mysql pod by clicking
cancel deploymentin the OpenShift UI. - Delete everything under the MySQL path to clean the volume.
-
Start a new
system-mysqldeployment.
3.7.2. 7.2. Incorrectly Pulling from the Docker Registry
Problem
The following error occurs during installation:
svc/system-redis - 1EX.AMP.LE.IP:6379
  dc/system-redis deploys docker.io/rhscl/redis-32-rhel7:3.2-5.3
    deployment #1 failed 13 minutes ago: config change
Cause
OpenShift searches for and pulls container images by issuing the docker command. This command refers to the docker.io Docker registry, instead of the registry.access.redhat.com Red Hat container registry.
This occurs when the system contains an unexpected version of the Docker containerized environment.
Solution
Use the appropriate version of the Docker containerized environment.
3.7.3. 7.3. Permissions Issues for MySQL when Persistent Volumes are Mounted Locally
Problem
The system-msql pod crashes and does not deploy, causing other systems dependant on it to fail deployment. The pod’s log displays the following error:
[ERROR] Can't start server : on unix socket: Permission denied
[ERROR] Do you already have another mysqld server running on socket: /var/lib/mysql/mysql.sock ?
[ERROR] Aborting
Cause
The MySQL process is started with inappropriate user permissions.
Solution
The directories used for the persistent volumes MUST have the write permissions for the root group. Having rw permissions for the root user is not enough, as the MySQL service runs as a different user in the root group. Execute the following as root user:
chmod -R g+w /path/for/pvs
Execute the following command to prevent SElinux from blocking access:
chcon -Rt svirt_sandbox_file_t /path/for/pvs
3.7.4. 7.4. Unable to Upload Logo or Images Because Persistent Volumes are not Writable by OpenShift
Problem
Unable to upload a logo using OpenShift version 3.4. system-app logs display the following error:
Errno::EACCES (Permission denied @ dir_s_mkdir - /opt/system/public//system/provider-name/2
Cause
Persistent volumes are not writable by OpenShift.
Solution
Ensure your persistent volume is writable by OpenShift. It should be owned by root group and be group writable.
3.7.5. 7.5. Create Secure Routes on OpenShift
Problem
Test calls do not work after creation of a new service and routes on OpenShift. Direct calls via curl also fail, stating: service not available.
Cause
3scale requires HTTPS routes by default, and OpenShift routes are not secured.
Solution
Ensure the "secure route" checkbox is enabled in your OpenShift router settings.
3.7.6. 7.6. APIcast on a Different Project from AMP Fails to Deploy Due to Problem with Secrets
Problem
APIcast deploy fails (pod doesn’t turn blue). The following error appears in the logs:
update acceptor rejected apicast-3: pods for deployment "apicast-3" took longer than 600 seconds to become ready
The following error appears in the pod:
Error synching pod, skipping: failed to "StartContainer" for "apicast" with RunContainerError: "GenerateRunContainerOptions: secrets \"apicast-configuration-url-secret\" not found"
Cause
The secret was not properly set up.
Solution
When creating a secret with APIcast v3, specify apicast-configuration-url-secret:
oc secret new-basicauth apicast-configuration-url-secret --password=https://<ACCESS_TOKEN>@<TENANT_NAME>-admin.<WILDCARD_DOMAIN>
3.7.7. 7.7. Deployment Script is Unable to Create Persistent Storage Volumes
Problem
A command creating a persistent volume claim in the amp.yml script might fail. If the command fails, you see the following error message:
timeout expired waiting for volumes to attach/mount for pod
Cause
This error is caused by a bug in Kubernetes.
Solution
Perform the following steps to correct the error and deploy AMP:
Remove the project that contains the failed installation:
oc delete project <project_name>
Create a new project or select an existing project:
oc new-project <project_name>
oc project <project_name>
- Download pvc.yml, located on the 3scale GitHub.
From a terminal session within the same folder as the downloaded template run
oc new-app, specifying the--file optionand the pvc.yml file:oc new-app --file pvc.yml
NoteThe pvc.yml script may take a few minutes to create the persistent volume claims on your OpenShift cluster.
- Continue the installation process at the #import_the_amp_template[Section 4.1, “Import the AMP Template”] task
During your next deployment, you may see an error related to persistent volume claims, you can safely ignore this message.
Chapter 4. 3scale AMP 2.0 On-Premises Operations and Scaling Guide
4.1. 1. Introduction
This document describes operations and scaling tasks of a Red Hat 3scale AMP 2.0 On-Premises installation.
4.1.1. 1.1. Prerequisites
Before you can perform the steps in this guide, you must have installed and initially configured AMP On-Premises on OpenShift 3.3 or 3.4.
This document is not intended for local installations on laptops or similar end user equipment.
4.1.1.1. Further Reading
4.2. 2. Re-deploying APIcast
Once you have deployed AMP On-Premises and your chosen APIcast deployment method, you can test and promote system changes through your AMP dashboard. By default, APIcast deployments on OpenShift, both built-in and on other OpenShift clusters, are configured to allow you to publish changes to your staging and production gateways through the AMP UI.
Redeploy APIcast on OpenShift:
- Make system changes
- In the UI, deploy to staging and test
- In the UI, promote to production
- By default, APIcast retrieves and publishes the promoted update once every 5 minutes
If you are using APIcast on the Docker containerized environment or a native installation, you must configure your staging and production gateways, as well as configure how often your gateway retrieves published changes. Once you have configured your APIcast gateways, you can redeploy APIcast through the AMP UI.
To redeploy APIcast on the Docker containerized environment or a native installations:
- Configure your APIcast gateway and connect it to AMP On-Premises
- Make system changes
- In the UI, deploy to staging and test
- In the UI, promote to production
- APIcast will retrieve and publish the promoted update at the configured frequency
4.3. 3 Scaling up AMP On Premises
4.3.1. 3.1. Scaling up Storage
As your APIcast deployment grows, you may need to increase the amount of storage available. How you scale up storage depends on which type of file system you are using for your persistent storage.
If you are using a network file system (NFS), you can scale up your persistent volume using the oc edit pv command:
oc edit pv <pv_name>
If you are using any other storage method, you must scale up your persistent volume manually using either of the following methods:
4.3.1.1. 3.1.1. Method 1, Backup and Swap Persistent Volumes
- Back up the data on your existing persistent volume
- Create and attach a target persistent volume, scaled for your new size requirements
-
Create a pre-bound persistent volume claim, specify: The size of your new PVC The persistent volume name using the
volumeNamefield - Restore data from your backup onto your newly created PV
Modify your deployment configuration with the name of your new PV:
oc edit dc/system-app
- Verify your new PV is configured and working correctly
- Delete your previous PVC to release its claimed resources
4.3.1.2. 3.1.2. Method 2. Back up and Redeploy AMP
- Back up the data on your existing persistent volume
- Shut down your 3scale pods
- Create and attach a target persistent volume, scaled for your new size requirements
- Restore data from your backup onto your newly created PV
Create a pre-bound persistent volume claim. Specify:
- The size of your new PVC
-
The persistent volume name using the
volumeNamefield
- Deploy your AMP.yml
- Verify your new PV is configured and working correctly.
- Delete your previous PVC to release its claimed resources.
4.3.2. 3.2. Scaling up Performance
4.3.2.1. 3.2.1. Configuring 3scale On-Premises Deployments
By default, 3scale deployments run 1 process per pod. You can increase performance by running more processes per pod. Red Hat recommends running 1-2 processes per core on each node.
Perform the following steps to add more processes to a pod:
Log in to your OpenShift cluster
oc login
Switch to your 3scale project
oc project <project_name>
Set the appropriate environment variable to the the desired number of processes per pod
-
APICAST_WORKERSfor APIcast pods (Red Hat recommends no more than 2 per deployment) -
PUMA_WORKERSfor backend pods UNICORN_WORKERSfor system podsoc env dc/apicast --overwrite APICAST_WORKERS=<number_of_processes>
oc env dc/backend --overwrite PUMA_WORKERS=<number_of_processes>
oc env dc/system-app --overwrite UNICORN_WORKERS=<number_of_processes>
-
4.3.2.2. 3.2.2. Vertical and Horizontal Hardware Scaling
You can increase the performance of your AMP deployment on OpenShift by adding resources. You can add more compute nodes as pods to your OpenShift cluster (horizontal scaling), or you can allocate more resources to existing compute nodes (vertical scaling).
Horizontal Scaling
You can add more compute nodes as pods to your OpenShift. As long as your additional compute nodes match the existing nodes in your cluster, you do not have to reconfigure any environment variables.
Vertical Scaling
You can allocate more resources to existing compute nodes. If you allocate more resources, you must add additional processes to your pods to increase performance.
Note
Red Hat does not recommend mixing compute nodes of a different specification or configuration on your 3scale deployment.
4.3.2.3. 3.2.3. Scaling Up Routers
As your traffic increases, you must ensure your OCP routers can adequately handle requests. If your routers are limiting the throughput of your requests, you must scale up your router nodes.
4.3.2.4. 3.2.4. Further Reading
- Scaling tasks, adding hardware compute nodes to OpenShift
- Adding Compute Nodes
- Routers
4.4. 4. Operations Troubleshooting
4.4.1. 4.1. Access Your Logs
Each component’s deployment configuration contains logs for access and exceptions. If you encounter issues with your deployment, check these logs for details.
Follow these steps to access logs in 3scale:
Find the ID of the pod you want logs for:
oc get pods
Enter
oc logsand the ID of your chosen pod:oc logs <pod>
The system pod has 2 containers, each with a separate log. To access a container’s log, specify the --container parameter with the system-provider and system-developer:
oc logs <pod> --container=system-provider
oc logs <pod> --container=system-developer
4.4.2. 4.2. Job Queues
Job Queues contain logs of information sent from the system-resque and system-sidekiq pods. Use these logs to check if your cluster is processing data. You can query the logs using the OpenShift CLI:
oc get jobs
oc logs <job>
Chapter 5. How To Deploy A Full-stack API Solution With Fuse, 3scale, And OpenShift
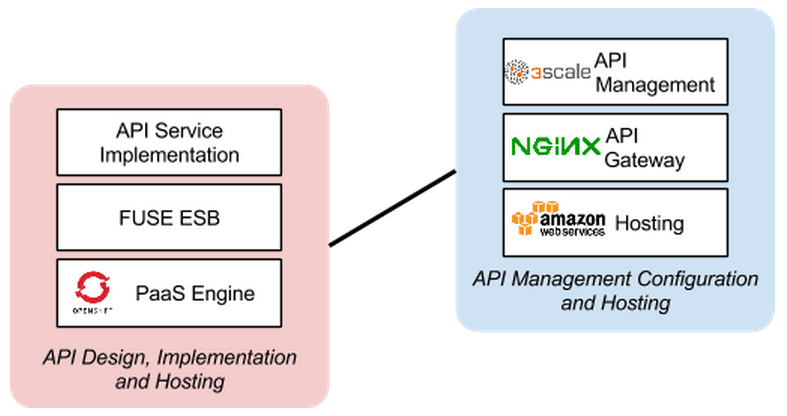
This tutorial describes how to get a full-stack API solution (API design, development, hosting, access control, monetization, etc.) using Red Hat JBoss xPaaS for OpenShift and 3scale API Management Platform - Cloud.
The tutorial is based on a collaboration between Red Hat and 3scale to provide a full-stack API solution. This solution includes design, development, and hosting of your API on the Red Hat JBoss xPaaS for OpenShift, combined with the 3scale API Management Platform for full control, visibility, and monetization features.
The API itself can be deployed on Red Hat JBoss xPaaS for OpenShift, which can be hosted in the cloud as well as on premise (that’s the Red Hat part). The API management (the 3scale part) can be hosted on Amazon Web Services (AWS), using 3scale APIcast or OpenShift. This gives a wide range of different configuration options for maximum deployment flexibility.
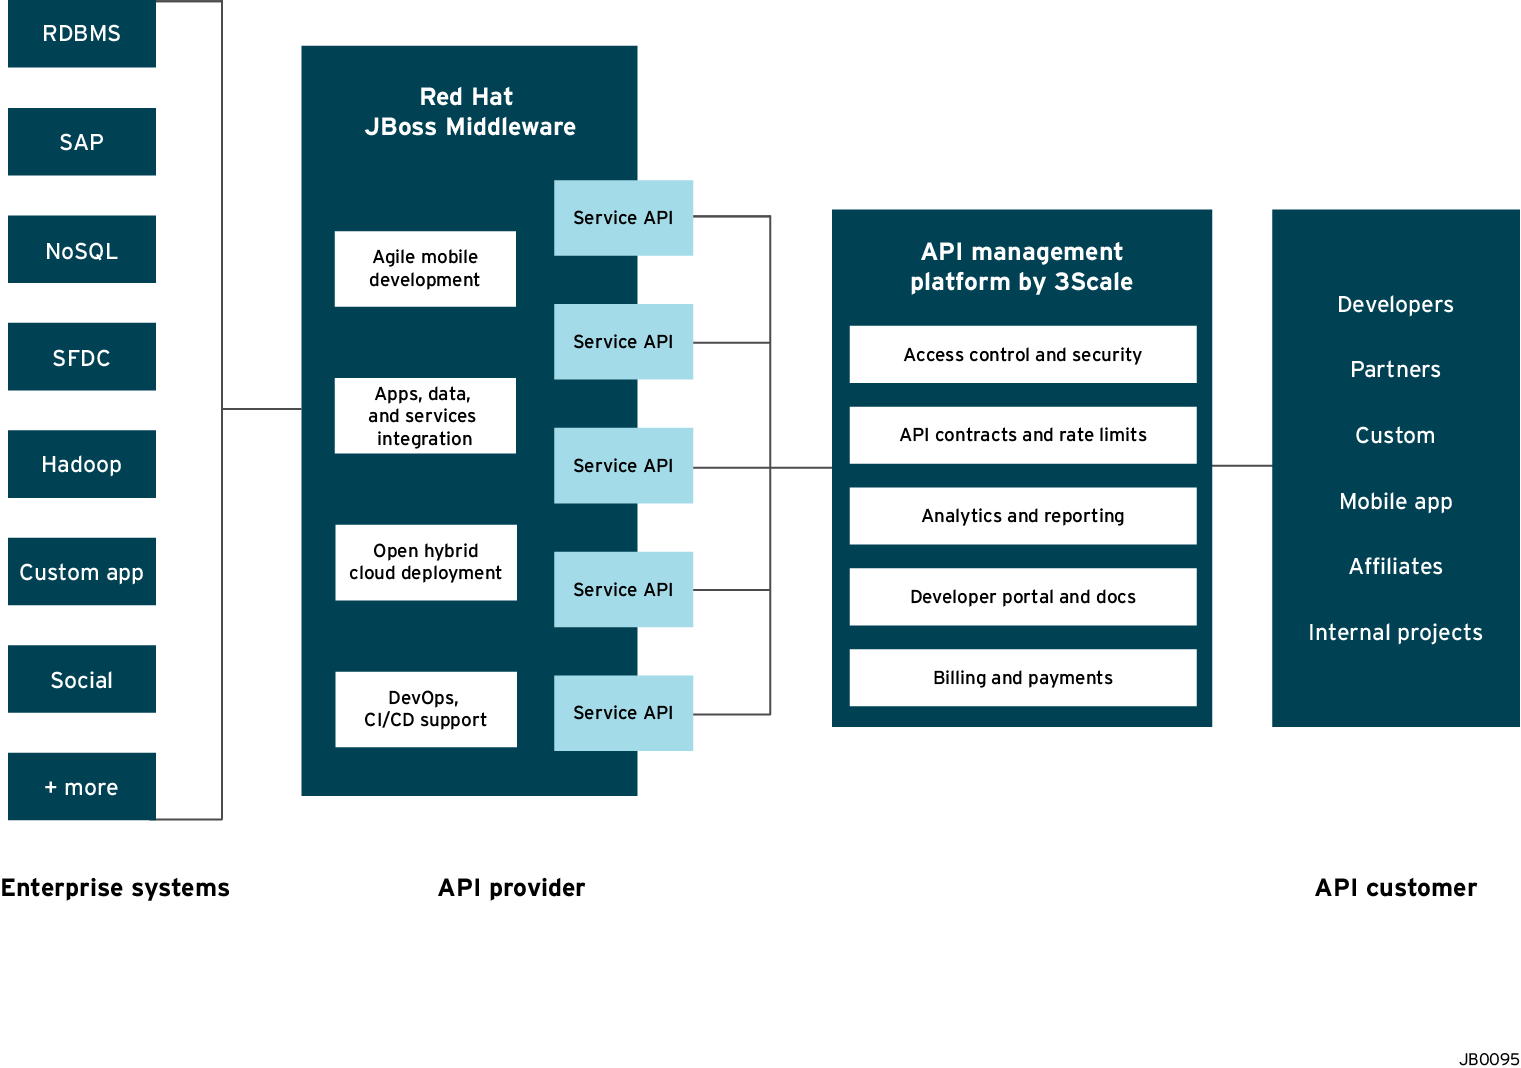
The diagram below summarizes the main elements of this joint solution. It shows the whole integration chain including enterprise backend systems, middleware, API management, and API customers.
For specific support questions, please contact support.
This tutorial shows three different deployment scenarios step by step:
- Scenario 1 – A Fuse on OpenShift application containing the API. The API is managed by 3scale with the API gateway hosted on Amazon Web Services (AWS) using the 3scale AMI.
- Scenario 2 – A Fuse on OpenShift application containing the API. The API is managed by 3scale with the API gateway hosted on APIcast (3scale’s cloud hosted API gateway).
- Scenario 3 – A Fuse on OpenShift application containing the API. The API is managed by 3scale with the API gateway hosted on OpenShift
This tutorial is split into four parts:
- Part 1: Fuse on OpenShift setup to design and implement the API
- Part 2: Configuration of 3scale API Management
- Part 3: Integration of your API services
- Part 4: Testing the API and API management
The diagram below shows the roles the various parts play in this configuration.
5.1. Part 1: Fuse on OpenShift setup
You will create a Fuse on OpenShift application that contains the API to be managed. You will use the REST quickstart that is included with Fuse 6.1. This requires a medium or large gear, as using the small gear will result in memory errors and/or horrible performance.
5.1.1. Step 1
Sign in to your OpenShift online account. Sign up for an OpenShift online account if you don’t already have one.
5.1.2. Step 2
Click the "add application" button after signing in.

5.1.3. Step 3
Under xPaaS, select the Fuse type for the application.
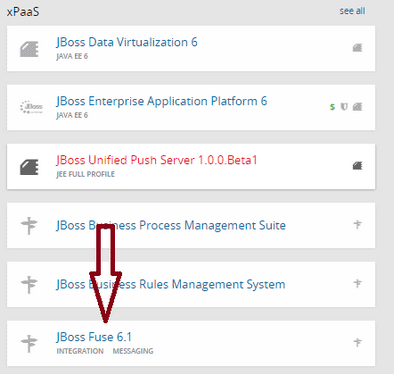
5.1.4. Step 4
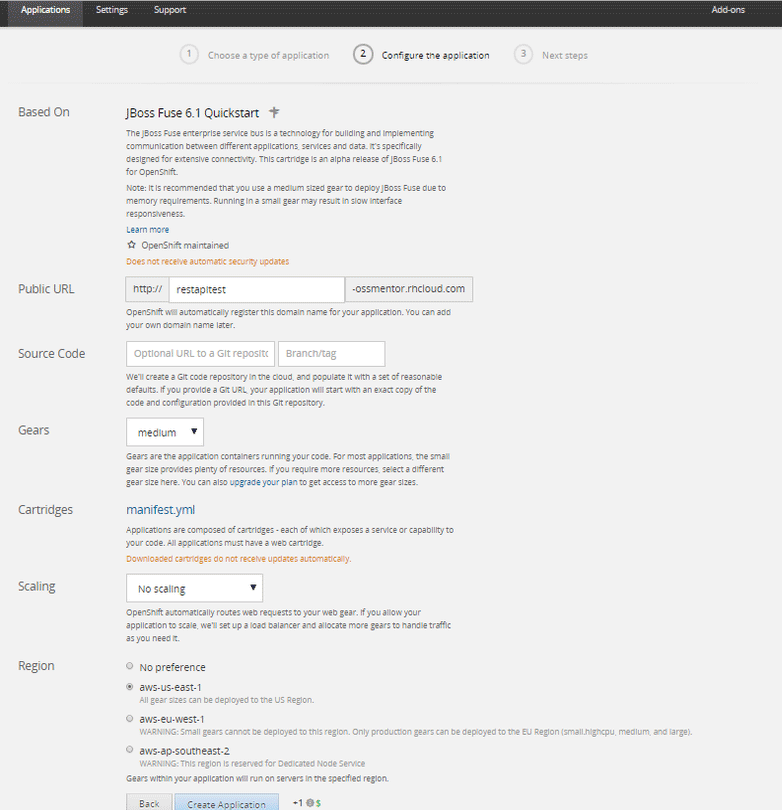
Now configure the application. Enter the subdomain you’d like your application to show up under, such as "restapitest". This will give a full URL of the form "appname-domain.rhcloud.com" – in the example below "restapitest-ossmentor.rhcloud.com". Change the gear size to medium or large, which is required for the Fuse cartridge. Now click on "create application".
5.1.5. Step 5
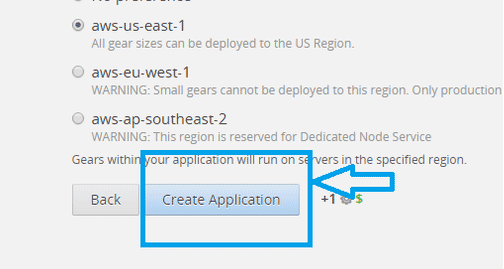
Click "create application".
5.1.6. Step 6
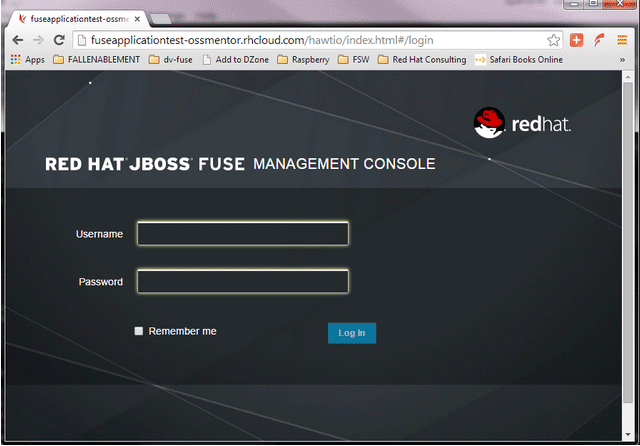
Browse the application hawtio console and sign in.
5.1.7. Step 7
After signing in, click on the "runtime" tab and the container, and add the REST API example.
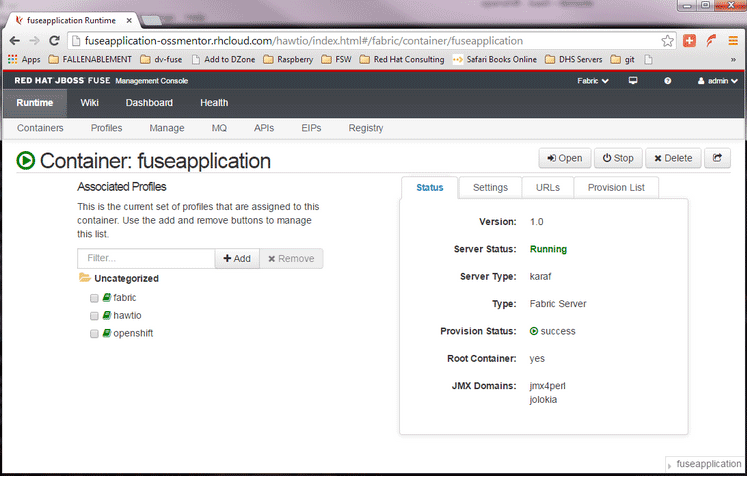
5.1.8. Step 8
Click on the "add a profile" button.
5.1.9. Step 9
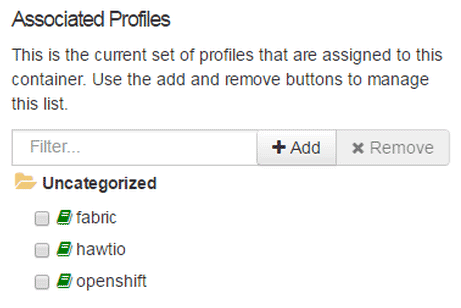
Scroll down to examples/quickstarts and click the "REST" checkbox, then "add". The REST profile should show up on the container associated profile page.

5.1.10. Step 10
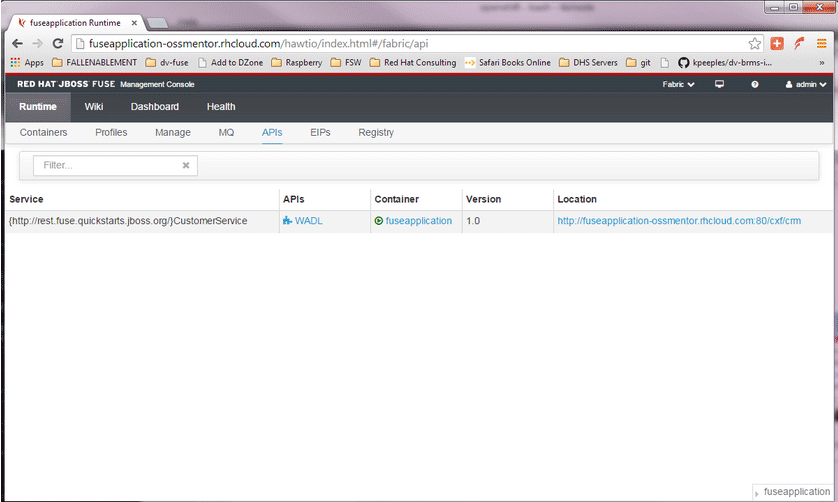
Click on the runtime/APIs tab to verify the REST API profile.
5.1.11. Step 11
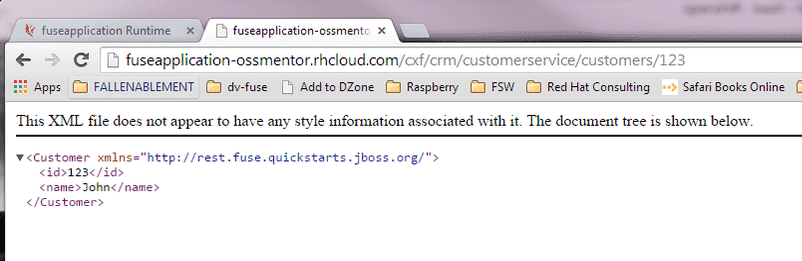
Verify the REST API is working. Browse to customer 123, which will return the ID and name in XML format.
5.2. Part 2: Configure 3scale API Management
To protect the API that you just created in Part 1 using 3scale API Management, you first must conduct the according configuration, which is then later deployed according to one of the three scenarios presented.
Once you have your API set up on OpenShift, you can start setting it up on 3scale to provide the management layer for access control and usage monitoring.
5.2.1. Step 1
Log in to your 3scale account. You can sign up for a 3scale account at www.3scale.net if you don’t already have one. When you log in to your account for the first time, follow the wizard to learn the basics about integrating your API with 3scale.
5.2.2. Step 2
In API > Integration, you can enter the public URL for the Fuse application on OpenShift that you just created, e.g. "restapitest-ossmentor.rhcloud.com" and click on Test. This will test your setup against the 3scale API Gateway in the staging environment. The staging API gateway allows you to test your 3scale setup before deploying your proxy configuration to AWS.

5.2.3. Step 3
The next step is to set up the API methods that you want to monitor and rate limit. To do that go to API > Definition and click on 'New method'.
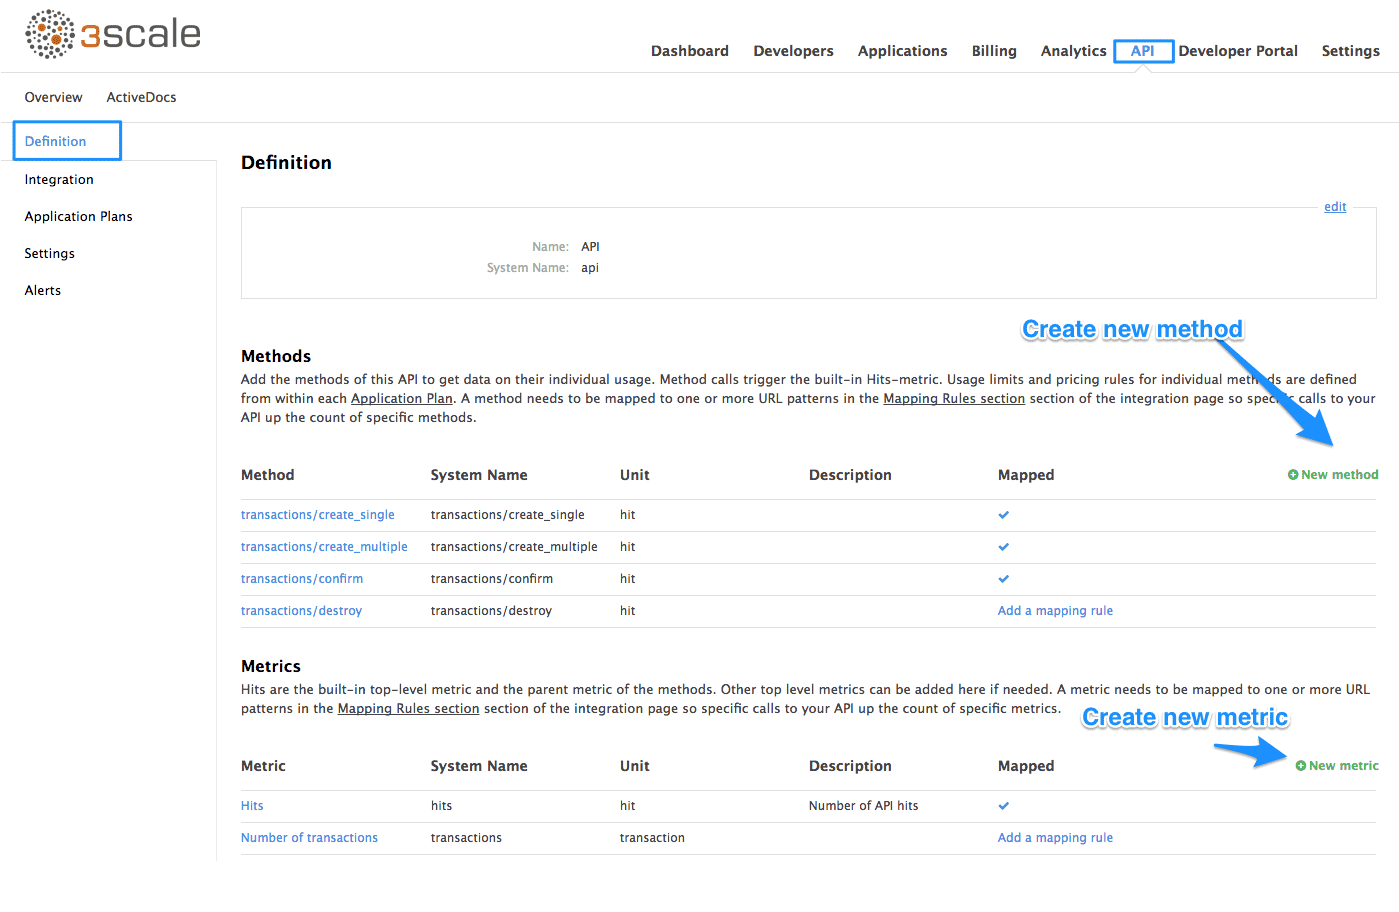
For more details on creating methods, visit our API definition tutorial.
5.2.4. Step 4
Once you have all of the methods that you want to monitor and control set up under the application plan, you’ll need to map these to actual HTTP methods on endpoints of your API. Go back to the integration page and expand the "mapping rules" section.

Create mapping rules for each of the methods you created under the application plan.

Once you have done that, your mapping rules will look something like this:
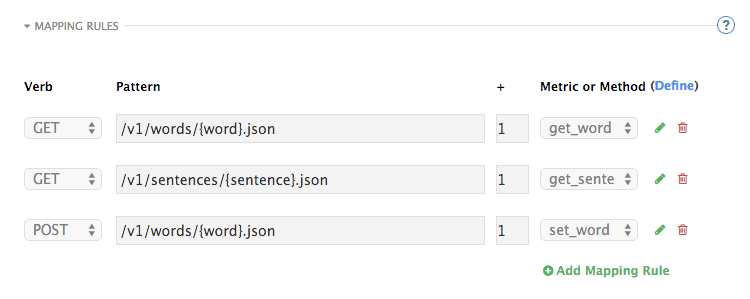
For more details on mapping rules, visit our tutorial about mapping rules.
5.2.5. Step 5
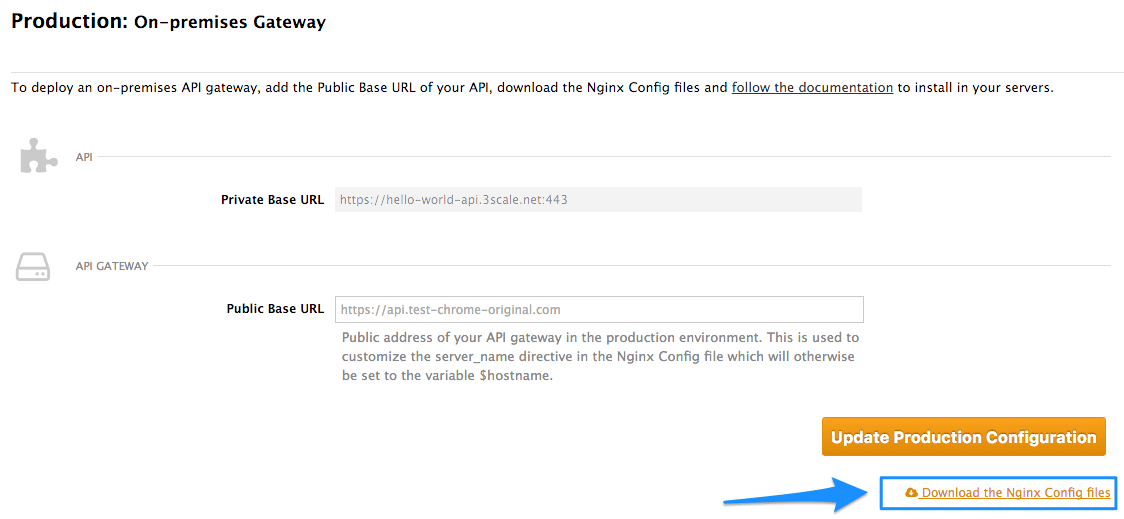
Once you’ve clicked "update and test" to save and test your configuration, you are ready to download the set of configuration files that will allow you to configure your API gateway on AWS. For the API gateway, you should use a high-performance, open-source proxy called nginx. You will find the necessary configuration files for nginx on the same integration page by scrolling down to the "production" section.
The next section will now take you through various hosting scenarios.
5.3. Part 3: Integration of your API services
There are different ways in which you can integrate your API services in 3scale. Choose the one that best fits your needs:
5.4. Part 4: Testing the API and API Management
Testing the correct functioning of the API and the API Management is independent from the chosen scenario. You can use your favorite REST client and run the following commands.
5.4.1. Step 1
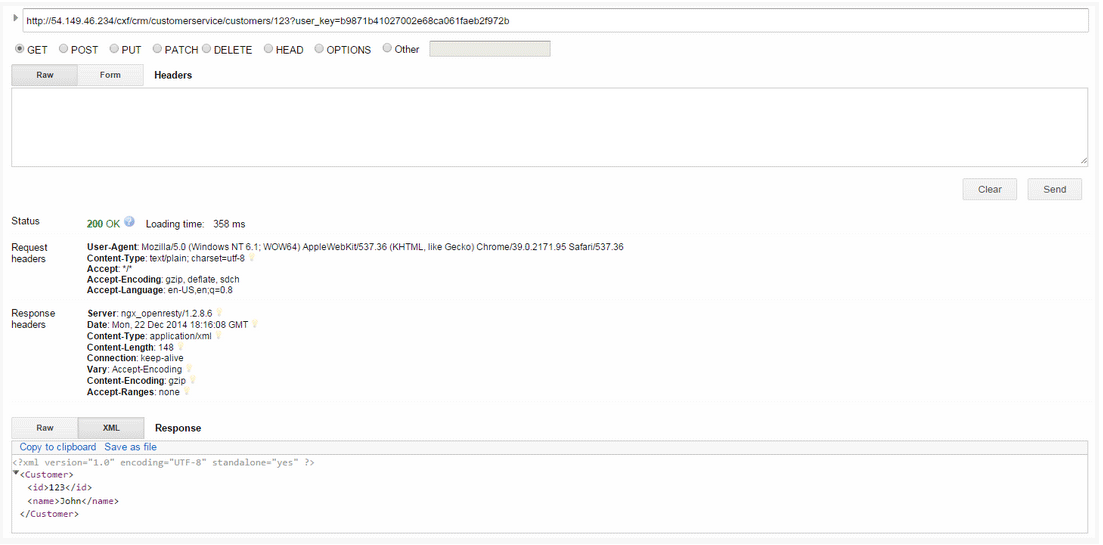
Retrieve the customer instance with id 123.
http://54.149.46.234/cxf/crm/customerservice/customers/123?user_key=b9871b41027002e68ca061faeb2f972b
5.4.2. Step 2
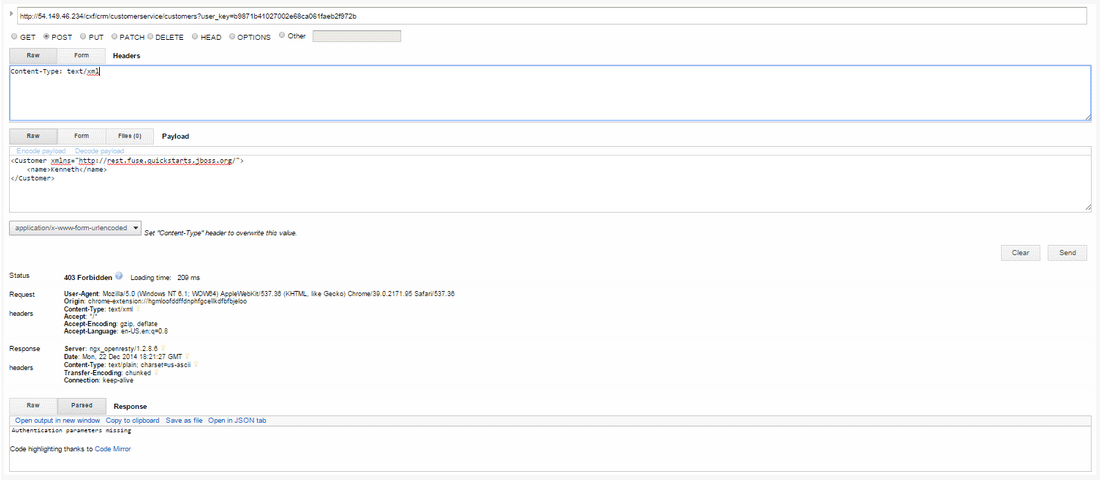
Create a customer.
http://54.149.46.234/cxf/crm/customerservice/customers?user_key=b9871b41027002e68ca061faeb2f972b
5.4.3. Step 3
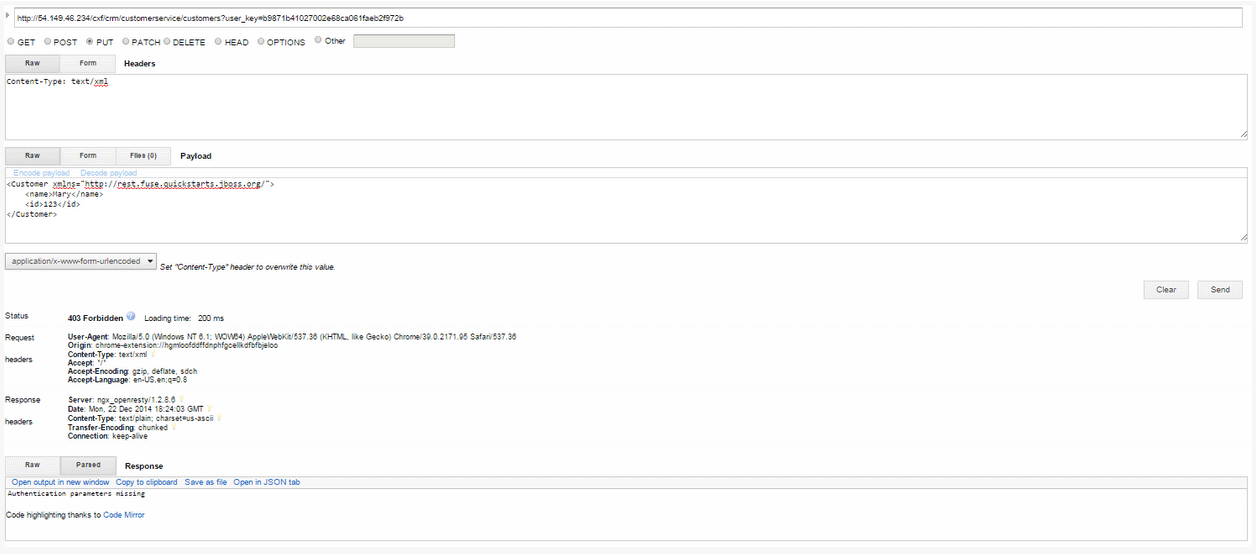
Update the customer instance with id 123.
http://54.149.46.234/cxf/crm/customerservice/customers?user_key=b9871b41027002e68ca061faeb2f972b
5.4.4. Step 4
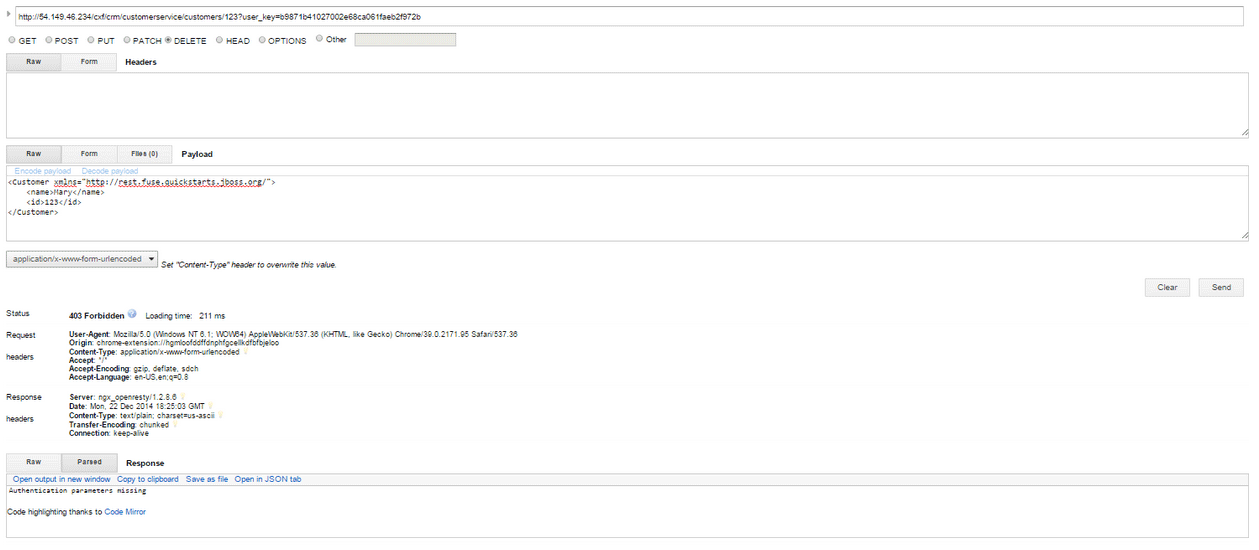
Delete the customer instance with id 123.
http://54.149.46.234/cxf/crm/customerservice/customers/123?user_key=b9871b41027002e68ca061faeb2f972b
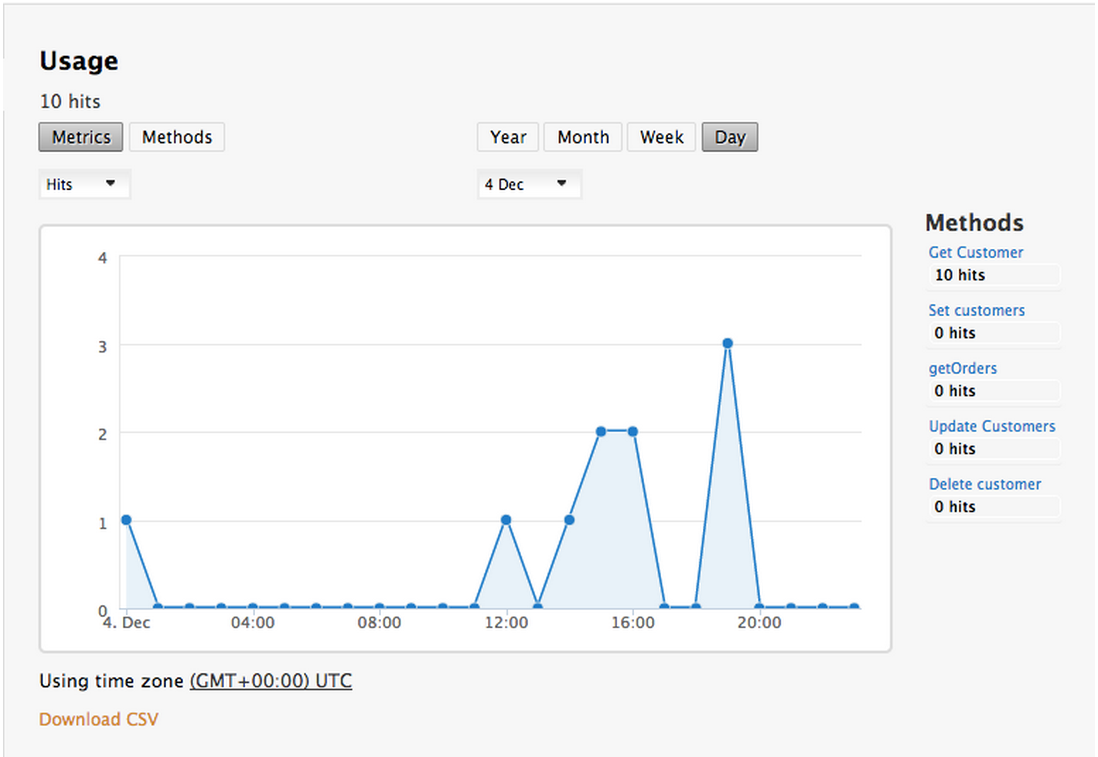
5.4.5. Step 5
Check the API Management analytics of your API.
If you now log back in to your 3scale account and go to Monitoring > Usage, you can see the various hits of the API endpoints represented as graphs.
This is just one element of API Management that brings you full visibility and control over your API. Other features include:
- Access control
- Usage policies and rate limits
- Reporting
- API documentation and developer portals
- Monetization and billing
For more details about the specific API Management features and their benefits, please refer to the 3scale API Management Platform product description.
For more details about the specific Red Hat JBoss Fuse product features and their benefits, please refer to the JBOSS FUSE Overview.
For more details about running Red Hat JBoss Fuse on OpenShift, please refer to the Getting Started with JBoss Fuse on OpenShift.