
Chapter 3. Installation Options
Red Hat JBoss BPM Suite comes in two versions:
- Executable JAR installer for installation on Red Hat JBoss Enterprise Application Platform (EAP) 6.4.
ZIP file install which itself comes in two versions:
-
jboss-bpmsuite-6.3-deployable-eap6.x.zip: version adapted for deployment on Red Hat JBoss Enterprise Application Platform (EAP 6.4). -
jboss-bpmsuite-6.3-deployable-generic.zip: the deployable version with additional libraries adapted for deployment on Red Hat JBoss Web Server (EWS), Apache Tomcat 6, and Apache Tomcat 7.
-
Depending on your environment, you may choose the installation option best suited for your project needs.
Red Hat JBoss BPM Suite is designed to work with UTF-8 encoding. If a different encoding system is used by the underlying JVM, unexpected errors might occur. To ensure UTF-8 is used by the JVM, use the following system property: "-Dfile.encoding=UTF-8".
From Red Hat JBoss BPM Suite 6.1 onwards, you must have Red Hat JBoss EAP 6.4 or better already installed before attempting to install Red Hat JBoss BPM Suite.
3.1. Red Hat JBoss BPM Suite Installer Installation
This section describes the steps required to install Red Hat JBoss BPM Suite using the JAR file installer installation method. The JAR file is an executable file that installs Red Hat JBoss BPM Suite on an existing Red Hat JBoss EAP 6 installation.
Note that the provided Red Hat JBoss BPM Suite JAR file installer does not support the Red Hat JBoss EAP distribution installed by yum or RPM Package Manager. In this case, download the Red Hat JBoss BPM Suite 6.3.0 Deployable for EAP 6 file and follow the steps described in Section 3.2, “Installing Red Hat JBoss BPM Suite on Red Hat JBoss Enterprise Application Platform”.
Due to IBM JDK not being able to use keystores generated on other JDKs, it is not possible to install Red Hat JBoss BPM Suite into an existing Red Hat JBoss EAP running on IBM JDK with a keystore generated on another JDK.
3.1.1. Installing Red Hat JBoss BPM Suite Using Installer
The installer for Red Hat JBoss BPM Suite is an executable Java JAR file. You can use it to install Red Hat JBoss BPM Suite on an existing Red Hat JBoss EAP 6.4 installation.
For security reasons, you should run the installer as a non-root user.
Prerequisite
Before attempting to install Red Hat JBoss BPM Suite, ensure you have already installed Red Hat JBoss EAP 6.4.7 or better, and create a back up. Ensure that your user has sufficient rights to complete the installation.
Make sure you have the JAR binary present in $PATH before running the installer. On Red Hat Enterprise Linux, it is present in the package java-$JAVA_VERSION-openjdk-devel.
Navigate to the folder where you downloaded the installer file in a command prompt and execute the following command.
java -jar jboss-bpmsuite-6.3.0.GA-installer.jar
NoteWhen running the installer on Windows, you may be prompted to provide administrator credentials during the installation. To prevent this, add the
izpack.mode=privilegedoption to the installation command:java -Dizpack.mode=privileged -jar jboss-bpmsuite-6.3.0.GA-installer.jar
Furthermore, when running the installer with a 32-bit Java Virtual Machine, you can encounter memory limitations. To solve the issue, run:
java -XX:MaxHeapSize=4g -jar jboss-bpmsuite-6.3.0.GA-installer.jar
The graphical installer will execute and display a splash screen and a license agreement page.
- Accept the license to proceed.
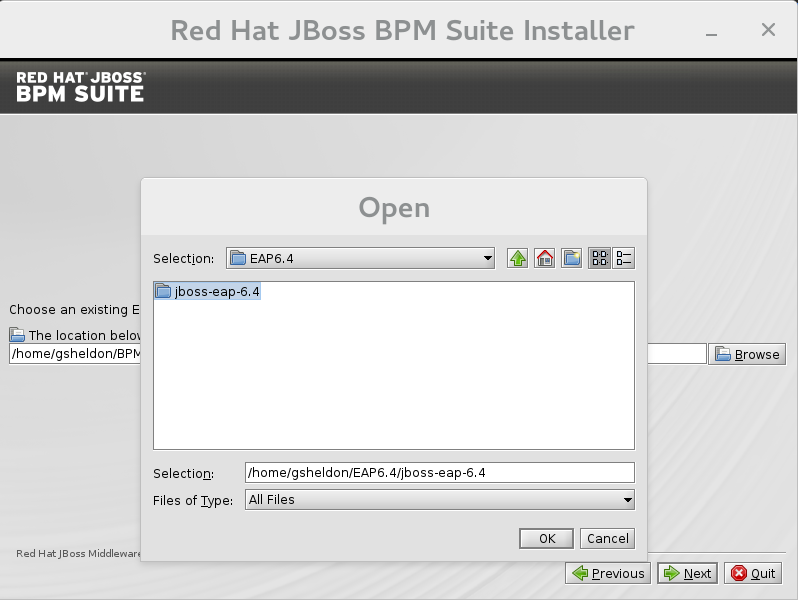
In the next screen, provide the parent location of an existing Red Hat JBoss EAP where Red Hat JBoss BPM Suite must be installed. The screenshot below depicts an example directory path:
Figure 3.1. Red Hat JBoss BPM Suite for JBoss EAP Directory Path
In the next two screens, create two users: the first one for the management console of the Red Hat JBoss EAP (ManagementRealm) and the second one for managing Red Hat JBoss BPM Suite itself (ApplicationRealm).
Creation of the first user for the management console of Red Hat JBoss EAP is optional and you may skip it if it is not required.
Make a note of these user names and passwords as you will need them to access the Red Hat JBoss EAP server (if you do decide to create it) and the Red Hat JBoss BPM Suite application respectively.
Unless advanced configuration is performed, the Red Hat JBoss BPM Suite user password will be used as the default password for both client and server JMS SSL keystores, as well as password vault keystores.
ImportantMake sure that the selected user name does not conflict with any known title of a role or a group. See Section 5.1, “Defining Roles”.
For example, if there is a role called
admin, you should not create a user with the user nameadmin.NoteThe passwords that you create must have at least 8 characters and must contain at least one number and one non-alphanumeric character (not including the character
&).NoteThe application role assigned to the second user that you create is the
adminrole. You can assign additional roles to this user at this stage.- Next, set up the security environment of your new Red Hat JBoss BPM Suite installation. Decide to enable or disable the Java Security Manager in this step by clicking on the check box. The Java Security Manager makes your system more secure but may downgrade performance. You need to make a decision based on your environment.
- Choose whether you want to setup pure IPv6 configuration on the server that the installation is taking place. This will allow you to setup runtime IPv6 specific configurations later.
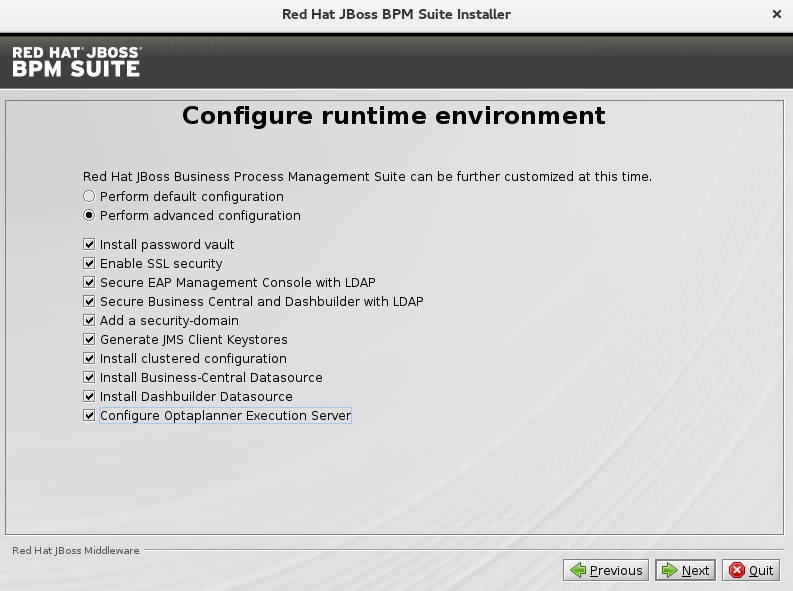
Configure runtime environment.
This step provides the option of using a default configuration or specifying an advanced configuration.
Default Configuration
Choose Perform default configuration for the runtime environment in the next step and click Next to review the installation details. If you are happy with the details, click Next to start the actual installation or click Previous to go back and make changes.
Advanced Configuration
Choose to enable advanced configuration options. Select Perform advanced configuration and choose the advanced configuration options you want to enable for your environment using the check boxes.
Figure 3.2. Advanced Configuration Options
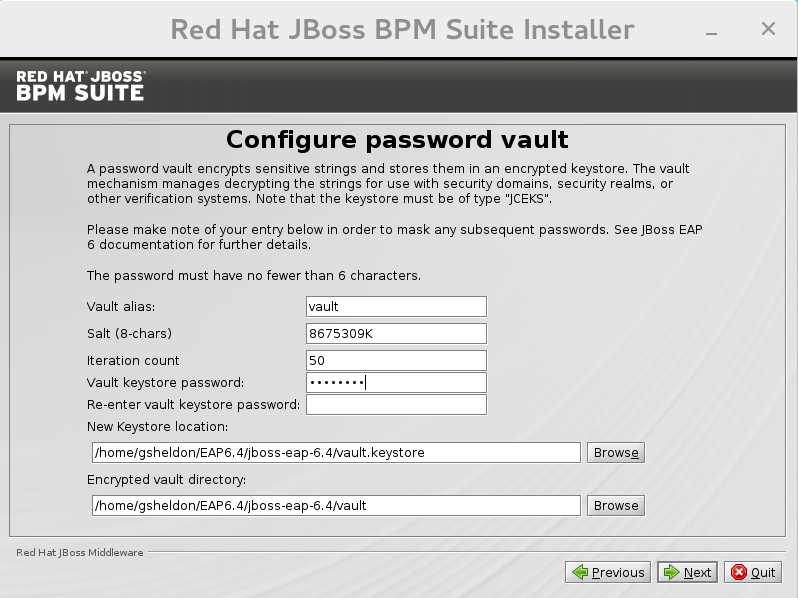
Configure Password Vault
Vault passwords are used to obfuscate passwords in the various server descriptors using a Java secret key generated during the installation process, or manually using the keytool. This prevents passwords from being stored as plain text in the descriptors. The Iteration count and Salt are both parameters to the encryption process.
In the case of Red Hat JBoss BPM Suite, a vault is always installed, even if the user does not choose to install one with their own parameters. When this occurs, default values will be used.
For more information about vault passwords, see the Red Hat JBoss EAP Security Guide.
Figure 3.3. Configure Password Vault
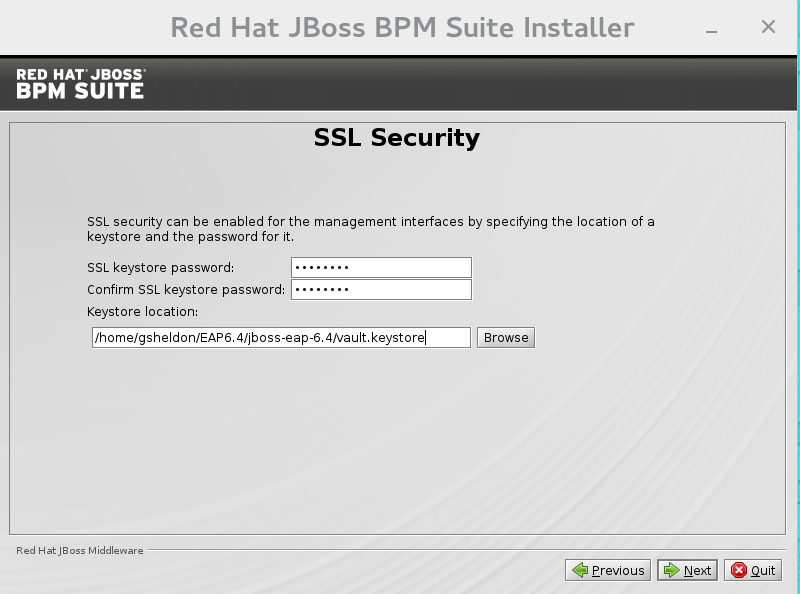
SSL Security
This screen allows you to add the
<ssl>and<truststore>elements to the ManagementRealm security realm using the provided keystore.-
The
<ssl>element causes the server to present the certificate within the keystore as its identity, which allows the user to apply their official certificate. -
The
<truststore>element enables Client-Cert authentication. This means that, if a remote client attempts to connect to any resource managed by the ManagementRealm, the client can present a certificate, and if an entry in the truststore matches, will be authenticated without needing to provide a user name/password.
The end result is an encrypted connection that is secure between the client and the server for the ManagementRealm.
Figure 3.4. SSL Security Configuration
-
The
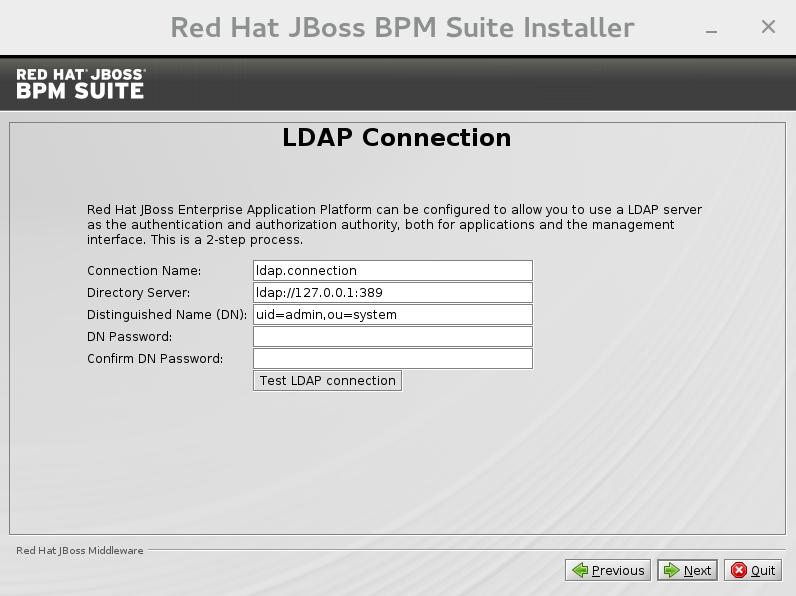
LDAP Connection
This step in the installer allows the user to define an LDAP server, which in turn defines users which should be allowed to authenticate with the ManagementRealm. This replaces the default configuration.
The LDAP Connection screen allows users to define how to connect to the LDAP server.
- Distinguished Name (DN): the user that can connect to the LDAP server. Typically the DN will uniquely define a special user for this purpose.
Figure 3.5. LDAP Connection Configuration
LDAP Security (Management Console)
The Management Console LDAP Configuration screen allows you to set up a security realm. This defines the
<security-realm>element to be added to the descriptors, and utilizes the connection defined previously.Figure 3.6. Management Console LDAP Configuration
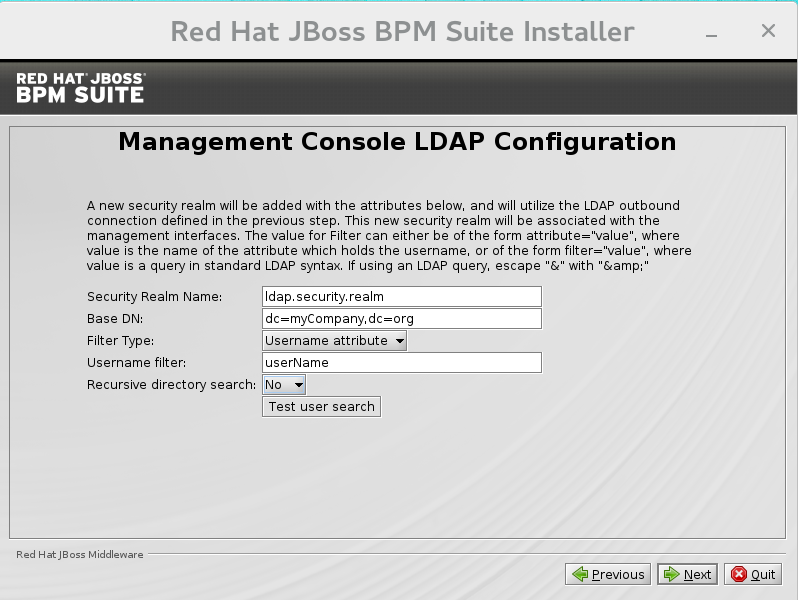
- Base DN: Will typically define a 'base search' or 'root context' to begin searching for users.
- Filter Type: Tells Red Hat JBoss EAP how to find the LDAP attribute that defines a user; it is can be a simple attribute, but can also be a complex LDAP filter.
-
Username filter: The LDAP attribute which holds the user name values. A user name entered in this field is used for search queries as a value of the
uidattribute. If a user chooses LDAP Syntax Query as a filter type, this query must be specified in this field. - Recursive directory search: If enabled, Red Hat JBoss EAP will traverse the LDAP tree recursively, starting at Base DN. Otherwise, the search will be limited to Base DN.
LDAP Security (Business Central)
Most of the following fields are similar to the Base DN. Contexts are used to search for roles, which allows it to perform authorization in addition to authentication. Otherwise, the context fields are analogous to the Base DN from the previous, and attribute fields are analogous to user name attribute. The filters allow fine grained control over which values of the given attribute will be accepted.
In Red Hat JBoss BPM Suite, the
jbpm.usergroup.callback.propertiesandjbpm.user.info.propertiesfiles used byLDAPUserGroupInfoandLDAPUserInfocomponents of Task Service, are also filled by values entered on the Business Central LDAP Configuration page.Input values from Business Central LDAP Configuration page are used to configure a new security domain, which make use of
LdapExtendedlogin module. This security domain is set as default for Business Central web application. For more information about security domains and login modules, see the Red Hat JBoss EAP Security Guide.Figure 3.7. Business Central LDAP Configuration

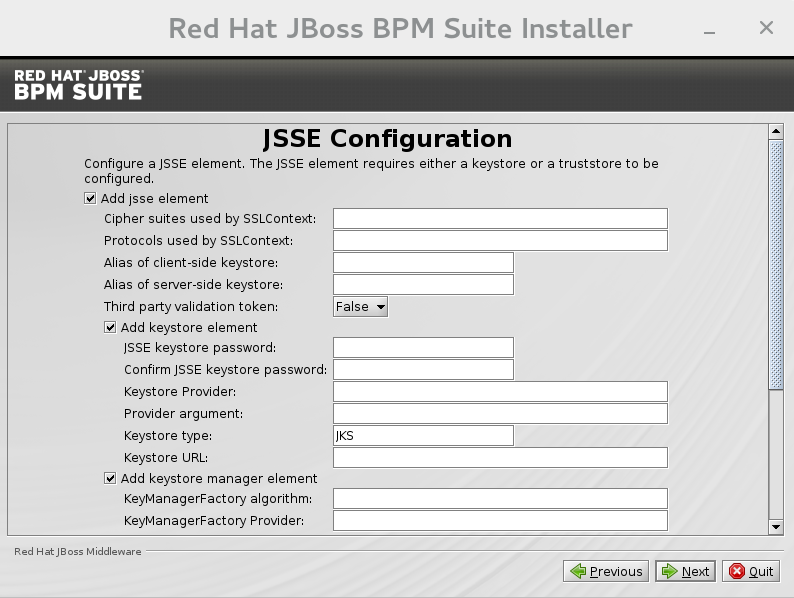
Security Domain and JSSE Configuration
The Security Domain screen allows you to configure all of the elements of the
<security-domain>security subsystem for managing security information, including JSSE configuration. For more detailed information about configuring security domains, see the Red Hat JBoss EAP Security Guide.Figure 3.8. Security Domain
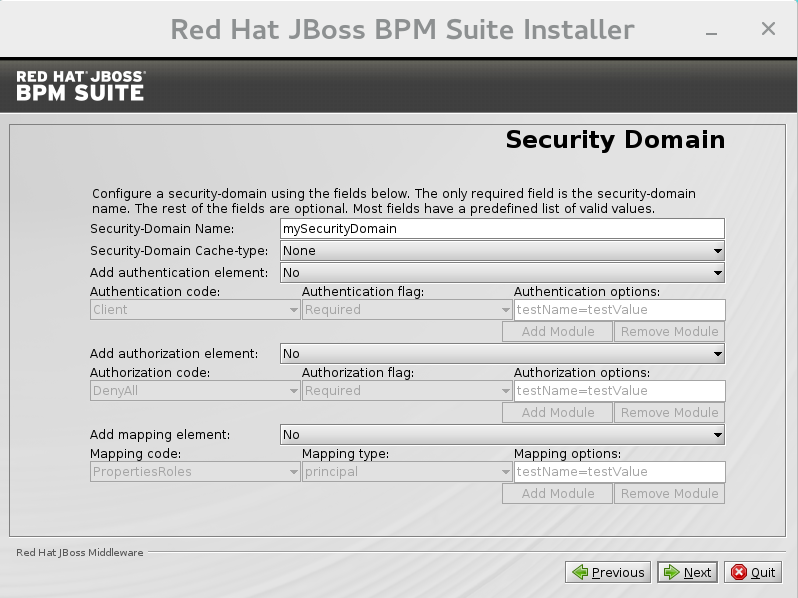
Figure 3.9. JSSE Configuration
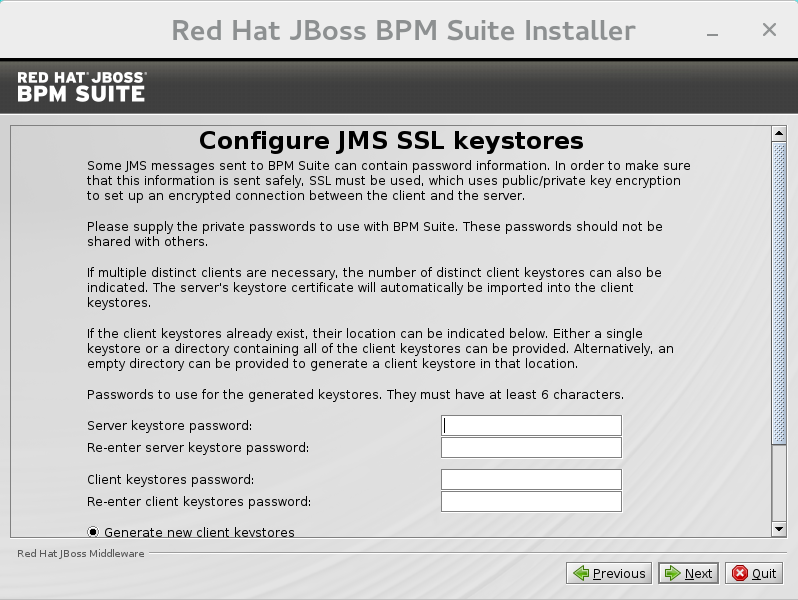
Configure JMS SSL Keystores
This screen allows the encryption of JMS messages sent to Business Central. The client keystores are distributed to systems that need to communicate with the server to facilitate encrypted communications. You can use your pre-existing keystores or generate new ones.
Figure 3.10. Configuring JMS SSL Keystores
Configure Clustering
Selecting this option installs Red Hat JBoss BPM Suite ready for clustered operation. For more information, see Section 6.5, “Clustering on Red Hat JBoss EAP”.
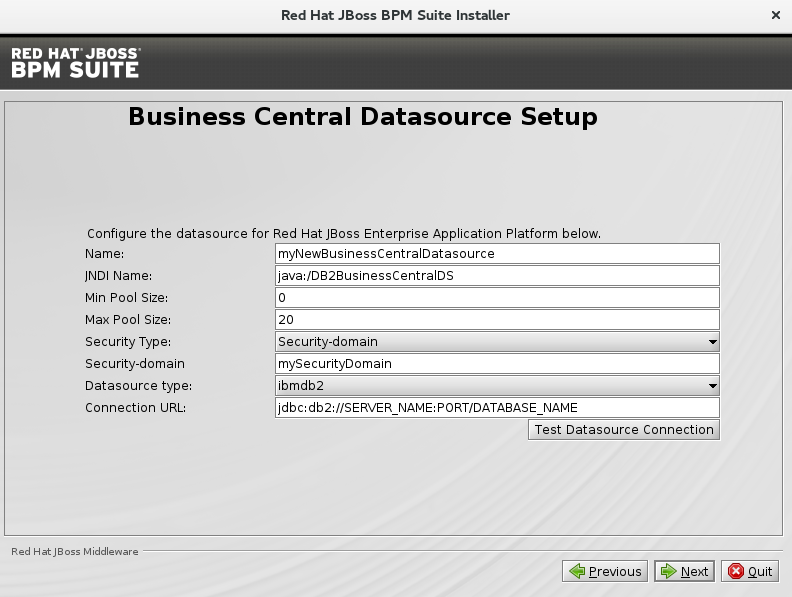
Business Central Datasource Setup
After cluster configuration, the next screen allows you to configure the Business Central data source.
Figure 3.11. Business Central Datasource Setup
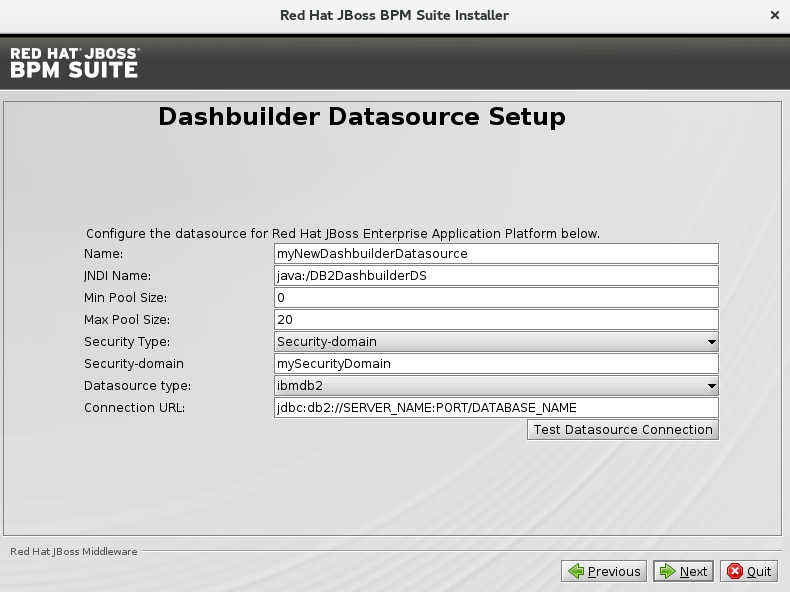
Dashbuilder Datasource Setup
This screen allows you to configure the Dashbuilder data source.
Figure 3.12. Dashbuilder Datasource Setup
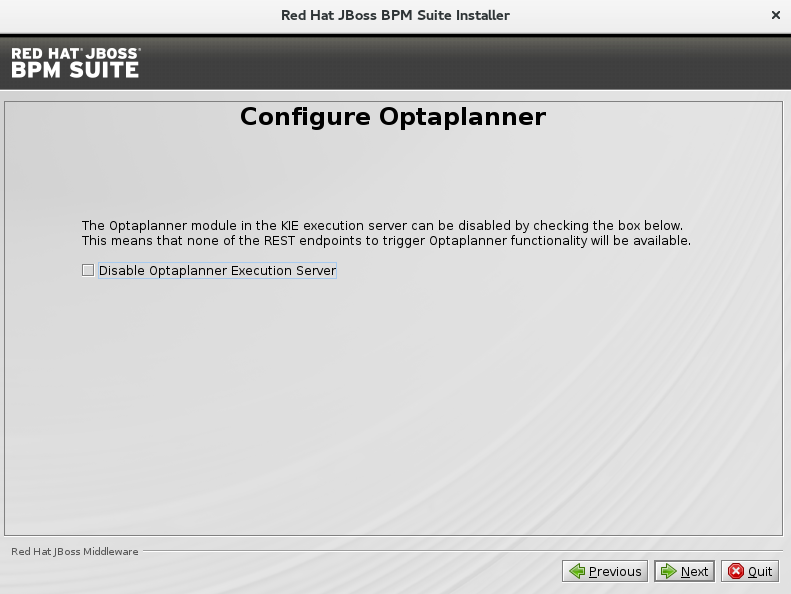
Configure Business Resource Planner
This screen allows you to configure Business Resource Planner.
Figure 3.13. Configure Business Resource Planner
- The installer will go through the steps to install Red Hat JBoss BPM Suite and will perform post installation configuration steps when you click Next. The installer can also start the Red Hat JBoss BPM Suite server in the mode of your choosing (standalone or domain, more information in Section 6.1, “Starting Server”) and connect to it to validate the installation. Click Next to get to the last screen where you can generate the installation script and properties file. Click Done to quit the installer.
You have successfully installed Red Hat JBoss BPM Suite using the installer.
3.1.2. Installing Red Hat JBoss BPM Suite Using Installer in CLI Mode
The installer for Red Hat JBoss BPM Suite can also be executed through the command-line interface (CLI). The procedure below demonstrates the steps that you are likely to encounter using this option to install Red Hat JBoss BPM Suite.
Prerequisite
Before attempting to install Red Hat JBoss BPM Suite, ensure you have already installed Red Hat JBoss EAP 6.4.7 or better, and create a back up. Ensure that your user has sufficient rights to complete the installation.
Make sure you have the JAR binary present in $PATH before running the installer. On Red Hat Enterprise Linux, it is present in the package java-$JAVA_VERSION-openjdk-devel.
Navigate to the folder where you downloaded the installer file in a command prompt and execute the following command.
java -jar jboss-bpmsuite-6.3.0.GA-installer.jar -console
The command-line interactive process will start and display the End-User license agreement. You will be prompted to select an option at the end of this license:
press 1 to continue, 2 to quit, 3 to redisplay.
Enter
1to begin the installation and type in the parent directory of an existing Red Hat JBoss EAP installation.The location below must specify the JBOSS_HOME of an existing EAP installation. [/home/user/BPMSuite-6.3.0/jboss-eap-6.4]
The installer will verify the location of the Red Hat JBoss EAP installation at the provided location. Enter
1to confirm and continue.Optional: create a user for the management console of Red Hat JBoss EAP (ManagementRealm):
Create an administrative user
This user will be added to the host container's management realm for administrative purposes. It can be used to access the management console, the management CLI or other applications secured in this realm.
Enter
0to skip creating a new administrative user or1to create one. If you do decide to create one, then follow these steps:Enter a user name:
Admin username: [admin]
Create and confirm a password for the user of the EAP management console:
The password must have at least 8 characters, and contain at least one number and one non-alphanumeric symbol (not including the character &).

Admin password: []

Confirm admin password: [******************************]
After this user has been created successfully, continue to the next step.
Create a Red Hat JBoss BPM Suite administrator user.
Create a Business Process Management Suite Admin User
Create a BPM Suite admin user. The user will be added to the ApplicationRealm, and can be used to access the Business Central Console. The User will be assigned the 'admin' application roles. The BPM Suite username cannot be any of the following: 'admin', 'analyst', 'user', 'manager' or 'developer'.

BPM Suite username: [bpmsAdmin]
ImportantMake sure that the selected user name does not conflict with any known title of a role or a group.
For example, if there is a role called
admin, you should not create a user with the user nameadmin.Enter a user name for this user and then create and confirm a password.
The password must have at least 8 characters, and contain at least one number and one non-alphanumeric symbol (not including the character &).

BPM Suite password: []

Confirm BPM Suite password: [****************]
After the passwords have been entered and confirmed, you will be given an optional step to define other roles for this user (besides the
adminrole). Enter these roles in a comma-separated list or just press Enter to skip this part.(Optional) You can add this user to additional roles that will be used for task management. These roles are custom named and used again when building your processes with human tasks. Add your custom named roles in a comma separated list below. Additional user roles: []
Configure the Java Security Manager by either pressing
1to select it or0to deselect it.Configure the Java Security Manager A Java security manager offers JVM level security beyond what is provided by the application container. It enforces access rules at the JVM runtime based on one or more security policies. This installer will place two security policies in the installation directory with the filenames 'security.policy' and 'kie.policy' regardless of choice. Those policies will be enabled at runtime if the option below is selected. Please note that a security manager imposes a significant performance overhead when enabled. It is suggested the included policies be applied in production if user requirements call for a stronger measure than what is already provided by the application container's authentication and authorization mechanism. Please see the JBoss Business Process Management Suite administrative documentation for further details and consideration. [ ] Enable the Java security manager Input 1 to select, 0 to deselect:
After the Java Security Manager choice, choose an option from the prompt below:
press 1 to continue, 2 to quit, 3 to redisplay.
Specify whether or not you are using IPv6.
IPv6 configuration

If this computer is using a pure IPv6 configuration, please check the box below. A pure IPv6 setup requires additional configuration at runtime to ensure the proper bindings of the management and http interfaces.
[ ] Enable pure IPv6 configuration
Input 1 to select, 0 to deselect:
After selecting or deselecting IPv6 configuration, select one of the following options:
press 1 to continue, 2 to quit, 3 to redisplay.
Configure the runtime environment by either choosing the default configuration or advanced options.
Configure runtime environment
Red Hat JBoss Business Process Management Suite can be further customized at this time.
0  [x] Perform default configuration
1  [ ] Perform advanced configuration
If you select
1, Perform advanced configuration, complete the following configurations:[ ] Install password vault Input 1 to select, 0 to deselect:
  [ ] Enable SSL security
Input 1 to select, 0 to deselect:
  [ ] Secure EAP Management Console with LDAP
Input 1 to select, 0 to deselect:
  [ ] Secure Business Central and Dashbuilder with LDAP
Input 1 to select, 0 to deselect:
  [ ] Add a security-domain
Input 1 to select, 0 to deselect:
  [ ] Generate JMS Client Keystores
Input 1 to select, 0 to deselect:
  [ ] Install clustered configuration
Input 1 to select, 0 to deselect:
  [ ] Install Business-Central Datasource
Input 1 to select, 0 to deselect:
  [ ] Install Dashbuilder Datasource
Input 1 to select, 0 to deselect:
  [ ] Configure Optaplanner Execution Server
Input 1 to select, 0 to deselect:
Next, choose an option from the prompt below:
press 1 to continue, 2 to quit, 3 to redisplay.
-
The
.jarfile will begin to upack and configure. After a successful installation, the command line will ask you if you would like to generate an automatic installation script and properties file.
Installation has completed successfully.
Application installed on /home/user/BPMSuite-6.3.0/jboss-eap-6.4
Would you like to generate an automatic intallation script and properties file?
(y/n) [n]:
If you select
y, provide a path for the automatic installation script:Select path for the automatic installation script: [/home/user/BPMSuite-6.3.0/jboss-eap-6.4/AUTO_SCRIPT_FILENAME]
This generated script will allow the user to run the installer in the following way for future installations:
java -jar jboss-bpmsuite-6.3.0.GA-installer.jar AUTO_SCRIPT_FILENAME
NoteRunning the installer in this way will result in an installation identical to the installation from which the auto script was generated. Note that sensitive values, such as passwords, will need to be provided from an external file or provided at auto installation time. The optional argument below allows the user to provide these values automatically:
-variablefile VARIABLE_FILENAME
Sensitive values can also be provided using the following argument:
-variables key1=value1,key2=value2
The command-line will provide the following message upon a successful auto script creation and/or console installation:
XML written successfully.
[ Console installation done ]
[BPMS_Installer]$
- Start Red Hat JBoss EAP as described in Section 6.1, “Starting Server”.
-
Navigate to
http://localhost:8080/business-centralin a web browser. - Log in with the correct user name/password as given to the Red Hat JBoss BPM Suite user in the Create and confirm a password for the Red Hat JBoss BPM Suite user step.
3.1.3. Troubleshooting Red Hat JBoss BPM Suite Installer
- The Red Hat JBoss BPM Suite installation failed. How do I reinstall Red Hat JBoss BPM Suite?
If the installer detects Red Hat JBoss BPM Suite applications, the installation will not continue. In case of a failed installation:
-
Change into
EAP_HOME/standalone/deployments. Delete all Red Hat JBoss BPM Suite deployments, that is:
-
business-central.war -
dashbuilder.war -
kie-server.war
-
- Start the installer again.
-
Change into