
Chapter 8. Managing file systems using the Web Console
8.1. Formatting a logical volume using the Web Console
Follow these steps to format a logical volume with a file system using the Web Console.
- Log in to the Web Console.
- Click the hostname → Storage.
- Click any volume group under Volume Group. The Volume Group Overview page opens.
- Click the logical volume.
On the Filesystem subtab, click Format.
Figure 8.1. The logical volume summary
 Note
NoteIf this logical volume does not have an existing file system, this tab is labelled
Unrecognised Data.- Specify whether to Erase existing data completely by overwriting it with zeroes.
- Specify the file system Type to use.
- Specify a Name for the file system.
Specify whether to use default or customized Mounting behavior.
If you selected
Custom, specify a Mount Point and check any Mount options you want this file system to use.- Click Format.
8.2. Configuring a mount point using the Web Console
- Log in to the Web Console.
- Click the hostname → Storage.
- Click any volume group under Volume Group. The Volume Group Overview page opens.
- Click the logical volume.
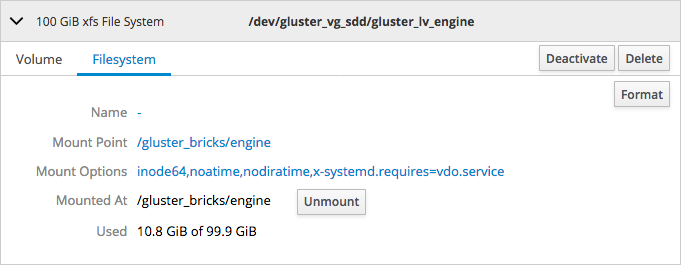
On the Filesystem subtab, click the value of Mount Point.
Figure 8.2. The logical volume summary
For this volume the mount point is
/gluster_bricks/engineThe Filesystem Mounting window opens.
Specify a behavior to use for Mounting.
If you select
Custom, specify a Mount Point and check any Mount Options you want to use.- Click Apply.
8.3. Mounting a file system using the Web Console
- Log in to the Web Console.
- Click the hostname → Storage.
- Click any volume group under Volume Group. The Volume Group Overview page opens.
- Click the logical volume.
- On the Filesystem subtab, click Mount.
8.4. Unmounting a file system using the Web Console
- Log in to the Web Console.
- Click the hostname → Storage.
- Click any volume group under Volume Group. The Volume Group Overview page opens.
- Click the logical volume.
On the Filesystem subtab, click Unmount.
Figure 8.3. The logical volume summary