Chapter 5. Hello World Process
This chapter continues with the Hello World example. See the instructions to create an end to end business process to demonstrate the creation of a basic Hello World process.
5.1. Creating Business Process
To create a new business process definition, do the following:
- Click Authoring → Project Authoring to display the Project Authoring perspective.
-
In the Project Explorer view on the left, select the
Loan Applicationorganizational unit, thehelloworldreporepository, and theHello Worldproject. On the perspective menu, click New Item → Business Process and define the process definition details:
-
Enter the name of the business process as
Hello World. -
Select the
org.bpms.helloworldpackage. This defines the location where you will create your business process definition.
-
Enter the name of the business process as
- Click Ok.
The Process Designer with the canvas of the created process definition opens.
5.2. Modeling Business Process
After you create the business process definition, design the business process in the Business Process Designer. The Business Process Designer should be open in a tab on the right. If you closed the tab, in the Project Explorer, click HelloWorld under BUSINESS PROCESSES to re-open the Business Process Designer. Ensure you select the correct package (org.bpms.helloworld).
To design the process content:
-
Click the Start Event element (
 ) to see the quick linker items appear around the node.

-
Click the Task (
 ) icon to create an outgoing Sequence Flow and a Task element connected to the Start Event.
-
Click
 in the upper left corner of the Business Process Designer tab to expand the Object Library palette.
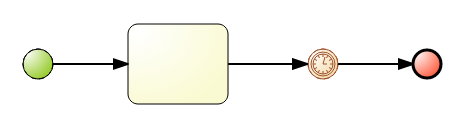
- Drag-and-drop the Timer from the palette (under Catching Intermediate Events) and connect the Task to the Timer Element using the Edge element from the quick linker menu.
- Create an End Event element connected to the Timer Event element (either using the quick linker feature or dragging it from the palette).
Figure 5.1. Draft of the Hello World Process
5.3. Defining Element Properties
To define the element properties:
-
Click the arrow (
 ) in the upper right hand corner to expand the Properties tab.
Click on an empty spot on the canvas. The Properties tab displays the properties of the Hello World process.
The required properties are pre-defined. However, you can change their values if necessary.
The Start Element and End Element have only optional properties. However, tasks must have a type with type-specific properties defined. Click the task and define the required properties:
-
Name:
ScriptTask -
Task Type:
Script -
Script Language:
java -
Script: Click
 and enter:
 System.out.println("Hello World!");
You have defined a task that will perform a script on execution. The script is defined in Java and executes
System.out.println("Hello World!"), which means it will writeHello World!to the standard output of the server. By default, the standard output of the server is the console the server was started in.-
Name:
Define properties of the Timer to make the process wait during runtime, so you can inspect its execution. Click on the Timer and define the time it will wait for execution:
-
Time Duration: Click
and enter:
5m.
The process will wait for 5 minutes on the Timer Event after it executes the Script Task.
-
Time Duration: Click
-
Click the Timer element and enter Name:
Timerand then save your process by clicking Save at the top of the Business Process Editor. The Save this item prompt is displayed. Enter the Check-in comment.
NoteThe check-in comment would be a short description of the kind of change you made and has to be entered every time an asset is saved.
-
Click
 on the toolbar of the Process Designer with the process and select Start validating to ensure the defined process is valid. The outline of any element with one or multiple validation mistakes turns orange. For information on the validation feature, see the Red Hat JBoss BPM Suite User Guide.
Further information on Process Elements and their properties is available in the Red Hat JBoss BPM Suite User Guide.
5.4. Building and Deploying
Before you can instantiate your Hello World process, build and deploy the project to the Execution Server:
- On the main menu of Business Central, click Authoring → Project Authoring.
- In the Project Explorer, locate the Hello World project.
- Open the project in the Project Editor: in Project Explorer, click Open Project Editor.
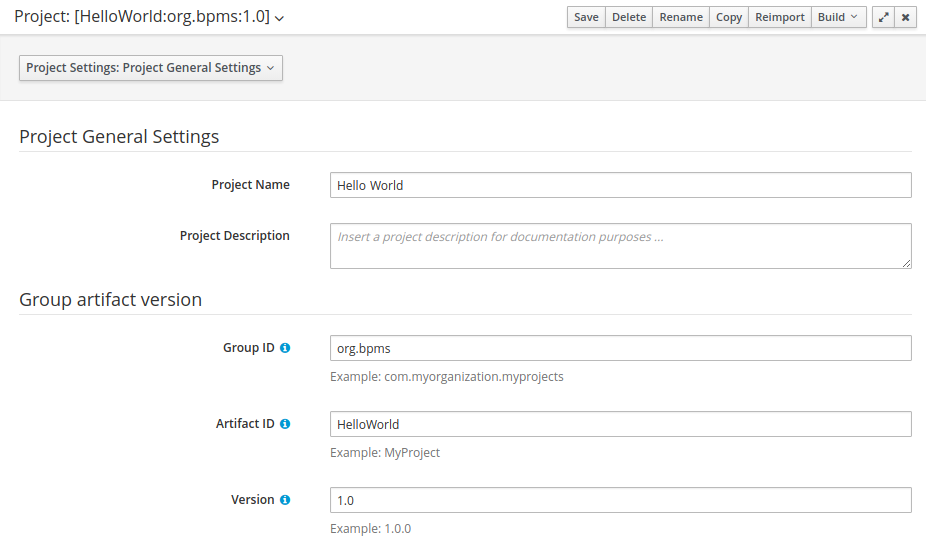
Check that the correct project details are displayed on the project screen and choose Build → Build & Deploy in the upper right hand corner of the project screen view.
Figure 5.2. Project Editor with the Hello World Project Properties
A green notification appears in the upper part of the screen informing you that the project has been built and deployed to the Execution Server and is available for instantiation.
5.5. Instantiating Business Process
To create an instance of the Hello World process, that is, to run the business process, do the following:
- Click Process Management → Process Definitions on the main menu.
-
On the displayed Process Definitions tab, locate the
Hello Worldprocess definition. If none is available, click the Refresh button to have the process definition displayed on the list. Click Start (
 ) next to the process definition entry and in the dialog box, click Submit to confirm that you want to instantiate the process.
The process is instantiated with the currently logged-in user as the process owner and the process form is displayed. When you define the form for your business process, it serves to request input from a user during process instantiation. See the Red Hat JBoss BPM Suite User Guide for further information.
The Process Instance Details view is displayed with details about the started process instance. The Hello World! message appears in standard output, typically the terminal emulator in which the server was started. Then the process instance waits for the Timer to finish.
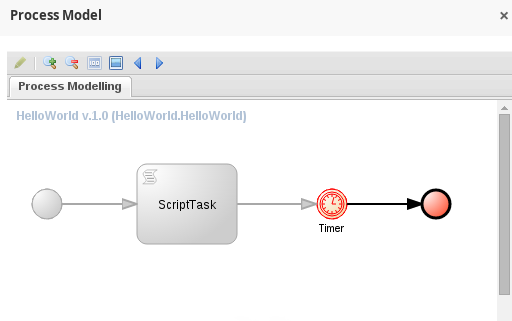
Click Options → Process Model to see the current execution status.
Figure 5.3. HelloWorld Realtime Execution Diagram: the Timer Event Being Executed
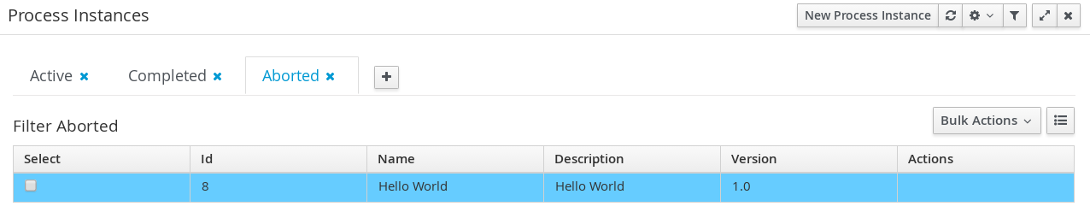
5.6. Aborting Business Process
If you followed Section 5.5, “Instantiating Business Process”, the Execution Server contains an active Hello World process instance. You can check process instances in the Process Instances view:
To display the view, click Process Management → Process Instances.
In the Process Instances view, you can view the instance details by clicking on the row of a chosen process. Also, you can perform basic administration actions, such as sending a signal to a process instance (
 ) or aborting it (
 ).
).
After a business process is instantiated, it is waiting for the Timer Event. To abort the instance, click
on the row with the instance information. The instance will disappear from the list of Active process instances and appear in the Aborted list.
Figure 5.4. List of Aborted Process Instances