
Chapter 2. Business Central Configuration
All Business Central configuration settings are loaded from the EAP_HOME/standalone/deployments/business-central.war/WEB-INF/web.xml file. If you deploy Business Central on Red Hat JBoss EAP server, files jboss-web.xml and jboss-deployment-structure.xml contain configuration settings as well.
Business Central can be run on different platforms. For more information, see Red Hat JBoss BPM Suite Installation and Configuration Guide.
2.1. Access Control
The access control mechanism includes authorization and authentication. To grant a specific user access to Red Hat JBoss BPM Suite, the user needs to have the respective roles assigned:
-
admin: Administrates Red Hat JBoss BPM Suite system and has full access rights to make any changes necessary, including the ability to add and remove users from the system. -
analyst: Creates and designs processes and forms, instantiates the processes, and deploys artifacts. This role is very similar to thedeveloperrole, with the exception that analysts do not have access to the asset repository and deployments. -
developer: Implements code required by processes. Users with this role cannot access administration tasks. -
user: Claims, performs, and invokes other actions, such as escalation and rejection, on the assigned tasks. The user role grants no access to authoring functions. -
manager: Monitors the system and its statistics. Users with this role can access only dashboards.
Creating users is described in section Creating Users of the Red Hat JBoss BPM Suite Installation and Configuration Guide.
Roles assigned to a user can be updated in the EAP_HOME/standalone/configuration/application-roles.properties file.
Workbench Configuration
Within Red Hat JBoss BPM Suite, users may set up roles using LDAP to modify existing roles. Users may modify the roles in the workbench configuration to ensure the unique LDAP based roles conform to enterprise standards by editing the deployments directory located at JBOSS_HOME/standalone/deployments/business-central.war/WEB-INF/classes/workbench-policy.propeties.
If authenticating user via LDAP over Git, administrators must set system property org.uberfire.domain to the name of login module it should use to authenticate users via the Git service. This must be set in the standalone.xmlfile in EAP.
You can further customize Business Central with parameters no_build or no_search. The parameters disable the build and search functionality. Include one or both parameters in the Business Central URL, for example http://SERVER:PORT/business-central/kie-wb.jsp?no_build&no_search.
Authentication in Human Tasks
Every Task that needs to be executed is assigned to one or multiple roles or groups, so that any user with the given role or the given group assigned can claim the Task instance and execute it. Tasks can also be assigned to one or multiple users directly. JBoss BPM Suite uses the UserGroupCallback interface to assign tasks to user.
A group for a Human Task must not be named after an existing user of the system. Doing so causes intermittent issues.
LDAP Configuration
You can configure LDAP domain during the installation of Red Hat JBoss BPM Suite. See the Red Hat JBoss BPM Suite Installation Guide for further information. When already installed, Business Central uses JBoss Security Domains defined in EAP_HOME/standalone/configuration/standalone/configuration/standalone.xml by default. The security domain is referenced in business-central.war/WEB-INF/jboss-web.xml.
To configure LDAP on your existing Red Hat JBoss BPM Suite installation:
Define an LDAP security domain.
-
In
standalone.xml, locate<security-domains>. Add your login module:
<!-- Including an LDAP based security domain to enable LDAP based authentication and authorization for users of Business Central console  -->
 1
 <security-domain name="ldap" cache-type="default">
  <authentication>
   2
   <login-module code="org.jboss.security.auth.spi.LdapExtLoginModule" flag="required">
    <module-option name="java.naming.provider.url" value="ldap://10.10.10.10:389"/>
    <module-option name="java.naming.factory.initial" value="com.sun.jndi.ldap.LdapCtxFactory"/>
    <module-option name="java.naming.security.authentication" value="simple"/>
    <module-option name="bindDN" value="uid=admin,ou=system"/>
    <module-option name="bindCredential" value="secret"/>
    <module-option name="baseCtxDN" value="ou=People,dc=jboss,dc=org"/>
    <module-option name="baseFilter" value="(uid={0})"/>
    <module-option name="rolesCtxDN" value="ou=Groups,dc=jboss,dc=org"/>
    <module-option name="roleFilter" value="(member={0})"/>
    <module-option name="roleAttributeID" value="cn"/>
    <module-option name="roleNameAttributeID" value="cn"/>
    <module-option name="roleRecursion" value="2"/>
    <module-option name="roleAttributeIsDN" value="false"/>
    <module-option name="parseRoleNameFromDN" value="false"/>
    <module-option name="java.naming.referral" value="follow"/>
    <module-option name="searchScope" value="SUBTREE_SCOPE"/>
   </login-module>
  </authentication>
 </security-domain>
...
For more information about the LDAP login module, see Ldap Login Module from the Red Hat JBoss EAP Login Module Reference.
Locate
<hornetq-server>and add the following lines:<security-domain>ldap</security-domain> <security-enabled>true</security-enabled>
Refer to your LDAP security domain in
jboss-web.xml:<jboss-web> <security-domain>ldap</security-domain> </jboss-web>
-
In
If you require LDAP integration in task services, provide the task service configuration.
-
Open
EAP_HOME/standalone/deployments/business-central.war/WEB-INF/beans.xml. -
Change
<class>org.jbpm.services.cdi.producer.JAASUserGroupInfoProducer</class>to<class>org.jbpm.services.cdi.producer.LDAPUserGroupInfoProducer</class>. Create a
jbpm.usergroup.callback.propertiesfile inEAP_HOME/standalone/deployments/business-central.war/WEB-INF/classes/jbpm.usergroup.callback.propertiesand provide your usergroup callback properties, for example:java.naming.provider.url=ldap://localhost:10389 ldap.bind.user=uid\=admin,ou\=system ldap.bind.pwd=secret ldap.user.ctx=ou\=People,dc\=jboss,dc\=org ldap.role.ctx=ou\=Groups,dc\=jboss,dc\=org ldap.user.roles.ctx=ou\=Groups,dc\=jboss,dc\=org ldap.user.filter=(uid\={0}) ldap.role.filter=(cn\={0}) ldap.user.roles.filter=(member\={0}) ldap.search.scope=SUBTREE_SCOPECreate a
jbpm.user.info.propertiesfile inEAP_HOME/standalone/deployments/business-central.war/WEB-INF/classes/jbpm.user.info.propertiesand provide your user info properties, for example:java.naming.provider.url=ldap://localhost:10389 ldap.bind.user=uid\=admin,ou\=system ldap.bind.pwd=secret ldap.user.ctx=ou\=People,dc\=jboss,dc\=org ldap.role.ctx=ou\=Groups,dc\=jboss,dc\=org ldap.user.filter=(uid\={0}) ldap.role.filter=(cn\={0}) ldap.search.scope=SUBTREE_SCOPE
-
Open
-
Ensure correct roles assigned to the users in your LDAP server, for example
admin,analyst, and others.
You can define your own roles in EAP_HOME/standalone/deployments/business-central.war/WEB-INF/classes/workbench-policy.properties.
2.2. Business Central Profile Configuration
Red Hat JBoss BPM Suite 6 (or better) server is capable of starting the Business Central application in three different modes:
- Full profile: Default profile that is active without additional configuration required (UI and remote services e.g. REST).
- Execution server profile: Disables completely UI components of the application and allows only remote access e.g. via REST interface.
- UI server profile: Disables remote services e.g REST and allows only UI access to the application.
To change the profile use the following configuration steps.
Procedure: Configuring Business Central Profiles
Select the desired
web.xmlinsideBPMS_HOME/standalone/deployments/business-central.war/WEB-INF/. The following files are provided:-
web.xml(default) for full profile -
web-exec-server.xmlfor execution server profile -
web-ui-server.xmlfor UI server profile
-
To activate a profile other than the default full profile, the web-<PROFILE>.xml file must be renamed to
web.xml. The following steps demonstrate one way to enable the execution server profile:Backup the
web.xmlfile from the full profile$ mv web.xml web-full.xml
Rename the
web-exec-server.xmlfile:$ mv web-exec-server.xml web.xml
Start application server with additional system property to instruct the profile manager to activate given profile.
-
Dorg.kie.active.profile=full- To activate full profile or skip the property completely -
Dorg.kie.active.profile=exec-server- To activate execution server profile -
Dorg.kie.active.profile=ui-server- To activate UI server profile
-
2.3. Branding Business Central Application
The Business Central web application can be customized by overriding some of its default styles. The personalized Business Central branding allows you to get a consistent appearance across all your applications, while it is also possible to create a different user interfaces for each team within your company. The customizable elements are built by using HTML files and images, which enables an easy and flexible customization of the application without having to recompile the code.
The following Business Central application elements can be customized:
- In the login screen, the foreground corner images, company logo, and project logo can be changed.
- The upper application banner displayed after logging in can be personalized.
- In help pop-up windows, the label text and splash help images can be customized.
2.3.1. Customizing Business Central Login Page
Procedure: Changing Foreground Corner Images
- Start the EAP server and open Business Central in a web browser.
-
To change the upper right corner foreground image, copy the substitute PNG file named
bg-login.pngto theEAP_HOME/standalone/deployments/business-central.war/img/directory in your Red Hat JBoss BPM Suite installation. -
To change the lower right corner foreground image, copy the substitute PNG file named
bg-login-2.pngto theEAP_HOME/standalone/deployments/business-central.war/img/directory in your Red Hat JBoss BPM Suite installation. - Force a full reload of the login page, bypassing the cache, to view the changes. For example, in most Linux and Windows web browsers, press +.
Procedure: Changing Company Logo and Project Logo
- Start the EAP server and open Business Central in a web browser.
-
Navigate to the
EAP_HOME/standalone/deployments/business-central.war/img/directory in your Red Hat JBoss BPM Suite installation. -
To change the company logo that appears at the upper right hand corner of the login page, replace the default image
login-screen-logo.pngwith a new image in the PNG format. -
To change the project logo that appears above the login text fields, replace the default image
RH_JBoss_BPMS_Logo.svgwith a new SVG file. - Force a full reload of the login page, bypassing the cache, to view the changes.
2.3.2. Customizing Business Central Application Header
- Start the EAP server, open Business Central in a web browser, and log in with your user credentials.
-
Copy your new application header image in the SVG format to the
EAP_HOME/standalone/deployments/business-central.war/banner/directory in your Red Hat JBoss BPM Suite installation. -
Open
EAP_HOME/standalone/deployments/business-central.war/banner/banner.htmlfile in a text editor. In the
banner.htmlfile, edit the following<img>tag to provide the name of your new header image:<img src="banner/logo.svg"/>
- Force a full reload of the page, bypassing the cache, to view the changes.
2.3.3. Customizing Business Central Splash Help Windows
Each splash page and its corresponding HTML file are located in the EAP_HOME/standalone/deployments/business-central.war/plugins/ directory. The files contain information about the images and the text to be displayed. For example, the authoring_perspective.splash.js splash page points to the authoring_perspective.splash.html file, which contains the names, captions, and location of all the image files that appear in the splash help pop-up windows of the Business Central Authoring perspective.
Procedure: Changing Splash Help Images and Captions
- Start the EAP server, open Business Central in a web browser, and log in with your user credentials.
-
Copy the new splash help images to the
EAP_HOME/standalone/deployments/business-central.war/images/directory in your Red Hat JBoss BPM Suite installation. -
Open the corresponding HTML file from the
pluginsdirectory in a text editor. Edit the HTML file to point to your new splash help image. For example, to change the first image that appears in the Authoring perspective splash help, edit the following
<img>tag in theauthoring_perspective.splash.htmlfile to add your new image:<img src="images/authoring_perspective1.png" alt="">
To change the image caption that appears on the splash help, edit the
<h4>and<p>tag contents in the<div>tag below the correspoding<img>tag:<div class="carousel-caption"> <h4>Authoring</h4> <p>Modularized and customizable workbench</p> </div>
- Force a full reload, bypassing the cache, and access the splash help pop-up windows to view the changes.
2.4. Deployment Descriptors
Processes and rules within Red Hat JBoss BPM Suite 6 onwards are stored in Apache Maven based packaging, and are known as knowledge archives or KJAR. The rules, processes, assets, etc. are part of a jar file built and managed by Maven. A file kept inside the META-INF directory of the KJAR called kmodule.xml can be used to define the knowledge bases and sessions. This kmodule.xml file, by default, is empty.
Whenever a runtime component such as Business Central is about to process the KJAR, it looks up kmodule.xml to build the runtime representation.
Deployment Descriptors, a new feature introduced in the 6.1 branch of Red Hat JBoss BPM Suite, allows you fine grained control over your deployment and supplements the kmodule.xml file. The presence of these descriptors is optional and your deployment will proceed successfully without them. The properties that you can set using these descriptors are purely technical in nature and include meta values like persistence, auditing and runtime strategy.
These descriptors allow you to configure the execution server on multiple levels (server level default, different deployment descriptor per KJAR and so on). This allows you to make simple customizations to the execution server’s out-of-the-box configuration (possibly per KJAR).
You define these descriptors in a file called kie-deployment-descriptor.xml and place this file next to your kmodule.xml file in the META-INF folder. You can change this default location (and the filename) by specifying it as a system parameter:
-Dorg.kie.deployment.desc.location=file:/path/to/file/company-deployment-descriptor.xml
2.4.1. Deployment Descriptor Configuration
Deployment descriptors allow the user to configure the execution server on multiple levels:
- Server level: The main level and the one that applies to all KJARs deployed on the server.
- Kjar level: This allows you to configure descriptors on a per KJAR basis.
- Deploy time level: Descriptors that apply while a KJAR is being deployed.
The granular configuration items specified by the deployment descriptors take precedence over the server level ones, except in case of configuration items that are collection based, which are merged. The hierarchy works like this: deploy time configuration > KJAR configuration > server configuration.
The deploy time configuration applies to deployments done via the REST API.
For example, if the persistence mode (one of the items you can configure) defined at the server level is NONE but the same mode is specified as JPA at the KJAR level, the actual mode will be JPA for that KJAR. If nothing is specified for the persistence mode in the deployment descriptor for that KJAR (or if there is no deployment descriptor), it will fall back to the server level configuration, which in this case is NONE (or to JPA if there is no server level deployment descriptor).
Can You Override this Hierarchal Merge Mode Behavior?
Yes. In the default way, if there are deployment descriptors present at multiple levels, the configuration properties are merged with the granular ones overriding the coarse values, and with missing configuration items at the granular level being supplied with those values from the higher levels. The end result is a merged Deployment Descriptor configuration. This default merge mode is called the MERGE_COLLECTIONS mode. However, you can change it (see Section 2.4.2, “Managing Deployment Descriptors”) if it does not suit your environment to one of the following modes:
-
KEEP_ALL: In this mode, all higher level values override all lower level values (server level values replace KJAR level values) -
OVERRIDE_ALL: In this mode, all lower level values override all higher level values (KJAR values replace server level values) -
OVERRIDE_EMPTY: In this mode, all non empty configuration items from lower levels replace those at higher levels, including items that are represented as collections. -
MERGE_COLLECTIONS (DEFAULT): In this mode, all non empty configuration items from lower level replace those from higher levels (like inOVERRIDE_EMPTY), but collection properties are merged (combined).
Deployment Descriptors from dependent KJARs are placed lower than the actual KJAR being deployed, but they still have higher hierarchy than the server level.
Do I Need to Provide a Full Deployment Descriptor for All Kjars?
No, and this is where the beauty of the merge between different files can help you. Providing partial Deployment Descriptors is possible and recommended. For example, if you want to only override the audit mode in a KJAR, then you just need to provide that and the rest of the values will be merged from server level or higher level KJARs.
It is worth noting that when using OVERRIDE_ALL merge mode, all configuration items should be specified since the relevant KJAR will always use them and will not merge with any other deployment descriptor in the hierarchy.
What Can You Configure?
High level technical configuration details can be configured via deployment descriptors. The following table lists these along with the permissible and default values for each.
Table 2.1. Deployment Descriptors
| Configuration | XML Entry | Permissible Values | Default Value |
|---|---|---|---|
| Persistence unit name for runtime data | persistence-unit | Any valid persistence package name | org.jbpm.domain |
| Persistence unit name for audit data | audit-persistence-unit | Any valid persistence package name | org.jbpm.domain |
| Persistence mode | persistence-mode | JPA, NONE | JPA |
| Audit mode | audit-mode | JPA, JMS or NONE | JPA |
| Runtime Strategy | runtime-strategy | SINGLETON, PER_REQUEST or PER_PROCESS_INSTANCE | SINGLETON |
| List of Event Listeners to be registered | event-listeners |
Valid listener class names as | No default value |
| List of Task Event Listeners to be registered | task-event-listeners |
Valid listener class names as | No default value |
| List of Work Item Handlers to be registered | work-item-handlers |
Valid Work Item Handler classes given as | No default value |
| List of Globals to be registered | globals |
Valid Global variables given as | No default value |
| Marshalling strategies to be registered (for pluggable variable persistence) | marshalling-strategies |
Valid | No default value |
| Required Roles to be granted access to the resources of the KJAR | required-roles | String role names | No default value |
| Additional Environment Entries for Knowledge Session | environment-entries |
Valid | No default value |
| Additional configuration options of Knowledge Session | configurations |
Valid | No default value |
How Do You Provide Values For Collections-Based Configuration Items?
In the table of valid configuration items earlier, you would have noticed that the valid values for the collection based items are either ObjectModel or NamedObjectModel. Both are similar and provide a definition of the object to be built or created at runtime, with the exception that the NamedObjectModel object details name the object to be looked. Both these types are defined using an identifier, optional parameters and resolver (to resolve the object).
- Identifier
- Defines all the information about the object, such as fully qualified class name, Spring bean id or an MVEL expression.
- Parameters
- Optional parameters that should be used while creating instances of objects from this model.
- Resolver
- Identifier of the resolver that will be used to create object instances from the model, that is reflection, mvel, or Spring.
As an example, if you have built a custom marshaling strategy and want your deployments to use that strategy instead of the default, you will need to provide that strategy as an ObjectModel, with the identifier being com.mycompany.MyStrategy, resolver being reflection (the easiest and the default) and any parameters that are required for your strategy to work. Reflection will then be used to create an instance of this strategy using the fully qualified class name that you have provided as the identifier.
<marshalling-strategy>
 <resolver>reflection</resolver>
 <identifier>com.myCompany.MyStrategy</identifier>
 <parameters>
    <parameter xsi:type="xs:string" xmlns:xs="http://www.w3.org/2001/XMLSchema">
      param
    </parameter>
  </parameters>
</marshalling-strategy>
In the case that reflection based on resolver is not enough (as demonstrated in the previous example), you can use a resolver based on MVEL expression as the identifier of the object model. While evaluating expressions, you can substitute out-of-the-box parameters. For example:
<marshalling-strategy>
  <resolver>mvel</resolver>
  <identifier>new com.myCompany.CustomStrategy(runtimeManager)</identifier>
</marshalling-strategy>
The Spring based resolver allows you to look up a bean by its identifier from a Spring application context. Whenever JBoss BPM Suite is used with Spring, this resolver helps in deploying KJARs into the runtime. As an example (note that the identifier in this case is a named bean in the Spring context):
<marshalling-strategy>
 <resolver>spring</resolver>
 <identifier>customStrategy</identifier>
</marshalling-strategy>
2.4.2. Managing Deployment Descriptors
Deployment Descriptors can be edited via the Business Central in one of two ways. Either graphically (by clicking on Authoring → Project Authoring → Deployment Descriptor or by clicking on Authoring → Administration menu and then clicking through to the META-INF folder in the File Explorer. Click on the kie-deployment-descriptor.xml file to edit it manually.
Every time a project is created, a stock kie-deployment-descriptor.xml file is generated with default values as described earlier.
Overriding Hierarchical Merge Mode Behavior
To change the default mode of MERGE_COLLECTIONS to one of KEEP_ALL, OVERRIDE_ALL, or OVERRIDE_EMPTY, you can use the following methods, depending on the requirement.
-
Set the system property
org.kie.dd.mergemodeto one of these values. This merge mode will become default for all KJARs deployed in the system, unless you override it at a KJAR level via the next method. - When deploying a new deployment unit via Business Central (Deploy → Deployments) you can select what merge mode should be used for that particular KJAR.
-
When deploying via the REST API, you can add
mergemodequery parameter to the command URL to one of these modes to set the merge mode for that deployment.
Restricting Access to the Runtime Engine
One of the configuration items discussed earlier, required-roles, can be edited via the Deployment Descriptors. This property restricts access to the runtime engine on a per KJAR or per server level by ensuring that access to certain processes is only granted to users that belong to groups defined by this property.
The security role can be used to restrict access to process definitions or restrict access at runtime.
The default behavior is to add required roles to this property based on repository restrictions. You can of course, edit these properties manually if required, as described above by providing roles that match actual roles defined in the security realm.
2.5. Managing Deployment Override Policy
If a user tries to deploy an artifact with a GAV (Group-Id, Artifact-Id and Version) that already exists in the system, the deployment will fail and an error message will be displayed in the Messages panel.
This feature prevents the user from overwriting an existing deployment by mistake.
By default this feature is enabled, that is, by default the system will prevent the user from overwriting an existing installation with the same GAV.
However, there may be cases when the user may want to overwrite existing deployments with the same GAV. Although you cannot enable overwriting on a per-deployment basis, you can set this up for the system as a whole by using the system setting org.kie.override.deploy.enabled. This setting, is false by default. Change it to true to enable overwriting of deployments with the same GAV by providing it at startup time of your server (-Dorg.kie.override.deploy.enabled=true).
2.6. Extending Business Central
Starting with version 6.1 of Red Hat JBoss BPM Suite, Business Central can be configured to add new screens, menus, editors, splashscreens and perspectives by the Administrator. These elements can extend functionality of Business Central and can be accessed through the Extensions → Plugin Management.
You can now define your own Javascript and HTML based plugins to extend Business Central and add them without having to worry about copying files in the underlying filesystem. Let us add a new screen in the system to show you the basics of this functionality.
2.6.1. Plugin Management
You access the Plugin Management screen by clicking on Extensions → Plugin Management. This brings up the Plugin Explorer screen that lists all the existing plugins under their respective categories:
- Perspective Plugin
- Screen Plugin
- Editor Plugin
- Splashscreen Plugin
- and Dynamic Menu
Open any of these, and you will see the existing plugins in each category, including the uneditable system generated ones.
Let us create a new plugin that echoes "Hello World" when users visit the screen for that plugin. In general, the steps to creating a new plugin are:
- Create a new screen
- Create a new perspective (and add the new screen to it)
- Create a new menu (and add the new perspective to it)
- Apps (optional)
Adding a New Screen
Click the
 button and select New Screen. You will be prompted to enter the name of this new screen. Enter "HelloWorldJS" and press the OK button. The Screen plugin editor will open, divided into 4 sections: Template, CSS, JavaScript and Media.
All manually created elements go into their respective categories in case you want to edit them later. In this case, to open the Screen plugin editor again if you close it, open the Screen Plugin category and scroll past the system generated screens to your manually created plugin and click on it to open the Screen plugin editor again.
Template is where your HTML goes, CSS is for styling, JavaScript is for your functions and Media is for uploading and managing images.
Since we are making a simple Hello World plugin, enter the following code in the Template section: <div>My Hello World Screen</div>. This can be any HTML code, and you can use the supplied Angular and Knockout frameworks. For the purposes of this example, we are not using any of those frameworks, but you can choose to by selecting them from the drop down in the Template section.
Enter your JavaScript code in the JavaScript section. Some common methods and properties are defined for you, including main, on_close and on_open. For this demo, select the on_open and enter the following: function () { alert('Hello World'); }
Click the Save button to finish creating the screen. After you save the screen, refresh business central so that the Screen Plugin is listed in the Screen Component of Perspective plugin.
Adding New Perspective
Once a screen has been created, you need to create a perspective on which this screen will reside. Perspectives can also be created similar to the way a screen is created by clicking on the New button and then selecting New Perspective. You can now provide a name for this perspective, say HelloWorldPerspective. This will open the Perspective plugin editor, similar to the Screen plugin editor.
The Perspective Editor is like a drag and drop grid builder for screens and HTML components. Remove any existing grids and then drag a 6×6 grid on the right hand side to the left hand side.
Next, open the Components category and drag a Screen Component on the right hand side to the left hand side (in any grid). This will open the Edit Component dialog box that allows you to select the screen created in the previous step (HelloWorldJS). Click the OK button and then click Save to save this perspective. To tag your perspective, enter Home in the tag name field and click Tags. Click OK and save the changes.
You can open this perspective again from the Perspective plugins listed on the left hand side.
Adding New Menu
The final step in creating our plugin is to add a dynamic menu from where the new screen/perspective can be called up. To do so, go to Extensions → Plugin Management and then click on the New button to select New Dynamic Menu. Give this dynamic menu a name (HelloWorldMenu) and then click the OK button. The dynamic menu editor opens up.
Enter the perspective name (HelloWorldPerspective) as the Activity Id and the name for the drop down menu (HelloWorldMenuDropDown). Click OK and then Save.
This new menu will be added to your workbench the next time you refresh Business Central. Refresh it now to see HelloWorldMenu added to your top level menu. Click on it to reveal HelloWorldMenuDropDown, which when clicked will open your perspective/screen with the message Hello World.
You have created your first Plugin!
Working with Apps (Optional)
If you create multiple plugins, you can use the Apps directory feature to organize your own components and plugins, instead of having to rely on just the top menu entries.
When you save a new perspective, you can add labels (tags) for them and these labels (tags) are used to associate a perspective with an App directory. You can open the App directories by clicking on Extensions → Apps.
The Apps directory provides an alternate way to open your perspective. When you created your HelloWorldPerspective, you entered the tag Home. The Apps directory by default contains a single directory called Home with which you associated your perspective. This is where you will find it when you open the Apps directory. You can click on it to run the perspective now.
You can create multiple directories and associate perspectives with those directories depending on functional and vertical business requirements. For example, you could create an HR directory and then associate all HR related perspectives with that directory to better manage Apps.
You can create a new directory by clicking the
 button.
2.6.2. The JavaScript (JS) API for Extensions
The extensibility of Business Central is achieved by an underlying JavaScript (JS) API which is automatically loaded if it is placed in the plugins folder of the Business Central webapp (typically: INSTALL_DIR/business-central.war/plugins/), or it can be loaded via regular JavaScript calls.
This API is divided into multiple sets depending on the functionality it performs.
- Register Perspective API
Allows for the dynamic creation of perspectives. The example below creates a panel using the
registerPerspectivemethod:$registerPerspective({ id: "Home", is_default: true, panel_type: "org.uberfire.client.workbench.panels.impl.MultiListWorkbenchPanelPresenter", view: { parts: [ { place: "welcome", min_height: 100, parameters: {} } ], panels: [ { width: 250, min_width: 200, position: "west", panel_type: "org.uberfire.client.workbench.panels.impl.MultiListWorkbenchPanelPresenter", parts: [ { place: "YouTubeVideos", parameters: {} } ] }, { position: "east", panel_type: "org.uberfire.client.workbench.panels.impl.MultiListWorkbenchPanelPresenter", parts: [ { place: "TodoListScreen", parameters: {} } ] }, { height: 400, position: "south", panel_type: "org.uberfire.client.workbench.panels.impl.MultiTabWorkbenchPanelPresenter", parts: [ { place: "YouTubeScreen", parameters: {} } ] } ] } });- Editor API
Allows you to dynamically create editors and associate them with a file type. The example below creates a sample editor and associates it with
filenamefile type.$registerEditor({ "id": "sample editor", "type": "editor", "templateUrl": "editor.html", "resourceType": "org.uberfire.client.workbench.type.AnyResourceType", "on_concurrent_update":function(){ alert('on_concurrent_update callback') $vfs_readAllString(document.getElementById('filename').innerHTML, function(a) { document.getElementById('editor').value= a; }); }, "on_startup": function (uri) { $vfs_readAllString(uri, function(a) { alert('sample on_startup callback') }); }, "on_open":function(uri){ $vfs_readAllString(uri, function(a) { document.getElementById('editor').value=a; }); document.getElementById('filename').innerHTML = uri; } });In addition to
on_startupandon_openmethods seen in the previous example, the API exposes the following callback events for managing the editor’s lifecycle:-
on_concurrent_update; -
on_concurrent_delete; -
on_concurrent_rename; -
on_concurrent_copy; -
on_rename; -
on_delete; -
on_copy; -
on_update; -
on_open; -
on_close; -
on_focus; -
on_lost_focus; -
on_may_close; -
on_startup; -
on_shutdown;
You can display this editor via an HTML template:
<div id="sampleEditor"> <p>Sample JS editor (generated by editor-sample.js)</p> <textarea id="editor"></textarea> <p>Current file:</p><span id="filename"></span> <button id="save" type="button" onclick="$vfs_write(document.getElementById('filename').innerHTML, document.getElementById('editor').value, function(a) {});">Save</button> <br> <p>This button change the file content, and uberfire send a callback to the editor:</p> <button id="reset" type="button" onclick="$vfs_write(document.getElementById('filename').innerHTML, 'Something else', function(a) {});">Reset File</button> </div>-
- PlaceManager API
-
The methods of this API allow you to request that the Business Central display a particular component associated with a target:
$goToPlace("componentIdentifier"); - Register plugin API
The methods of this API allow you to create dynamic plugins (that will be transformed in Business Central screens) via the JS API.
$registerPlugin( {
    id: "my_angular_js",
    type: "angularjs",
    templateUrl: "angular.sample.html",
    title: function () {
        return "angular " + Math.floor(Math.random() * 10);
    },
    on_close: function () {
        alert("this is a pure JS alert!");
    }
});
The plugin references the
angular.sample.htmltemplate:<div ng-controller="TodoCtrl"> <span>{{remaining()}} of {{todos.length}} remaining</span> [ <a href="" ng-click="archive()">archive</a> ] <ul class="unstyled"> <li ng-repeat="todo in todos"> <input type="checkbox" ng-model="todo.done"> <span class="done-{{todo.done}}">{{todo.text}}</span> </li> </ul> <form ng-submit="addTodo()"> <input type="text" ng-model="todoText" size="30" placeholder="add new todo here"> <input class="btn-primary" type="submit" value="add"> </form> <form ng-submit="goto()"> <input type="text" ng-model="placeText" size="30" placeholder="place to go"> <input class="btn-primary" type="submit" value="goTo"> </form> </div>A plugin can be hooked to Business Central events via a series of JavaScript callbacks:
-
on_concurrent_update; -
on_concurrent_delete; -
on_concurrent_rename; -
on_concurrent_copy; -
on_rename; -
on_delete; -
on_copy; -
on_update; -
on_open; -
on_close; -
on_focus; -
on_lost_focus; -
on_may_close; -
on_startup; -
on_shutdown;
-
- Register splash screens API
use the methods in this API to create splash screens.
$registerSplashScreen({ id: "home.splash", templateUrl: "home.splash.html", body_height: 325, title: function () { return "Cool Home Splash " + Math.floor(Math.random() * 10); }, display_next_time: true, interception_points: ["Home"] });- Virtual File System (VFS) API
with this API, you can read and write a file saved in the file system using an asynchronous call.
$vfs_readAllString(uri,  function(a) {
  //callback logic
});

$vfs_write(uri,content,  function(a) {
  //callback logic
})
2.7. Configuring Table Columns
Business Central allows you to configure views that contain lists of items in the form of tables. You can resize columns, move columns, add or remove the default list of columns and sort the columns. This functionality is provided for all views that contain tables.
Once you make changes to the columns of a table view, these changes are persisted for the current logged in user.
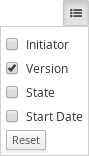
Adding and Removing Columns
Tables that allow columns to be configured have the
 button in the top right corner. Clicking on this button opens up the list of columns that can added or removed to the current table with a check box next to each column:
Resizing Columns
To resize columns, place your cursor between the edges of the column header and move in the direction that you want:

Moving Columns
To re-order and drag and drop a column in a different position, hover your mouse over the rightmost area of the column header:

You can now grab the column and move it:

Drop it over the column header that you want to move it to.
Sorting Columns
To sort columns, click on the desired column’s header. To reverse-sort, click on the header again.