
Client Configuration Guide for Red Hat Insights with FedRAMP
Configuration options and use cases for the Insights client
Abstract
Chapter 1. Insights client overview
The Insights client (insights-client) is the client for Red Hat Insights for Red Hat Enterprise Linux. Run insights-client from the command line.
1.1. Red Hat Insights client distribution
Insights client is available for the following releases of Red Hat Enterprise Linux (RHEL).
| RHEL release | Comments |
|---|---|
| RHEL 9 | Distributed with Insights client pre-installed. |
| RHEL 8 | Distributed with Insights client pre-installed, unless RHEL 8 was installed as a minimal installation. |
| RHEL 7 | Distributed with the Insights client RPM package loaded but not installed. |
| RHEL 6.10 and later | You must download the Insights client RPM package and install it. |
Additional resources
Chapter 2. Installing insights-client
You can install Red Hat Insights for Red Hat Enterprise Linux on an existing system that is managed by Red Hat infrastructure, or you can install it on a minimal installation of Red Hat Enterprise Linux.
After you install the Insights client, you need to register your system. For more information about registering systems, refer to Configuring authentication.
2.1. Installing insights-client on an existing system managed by Red Hat Update Infrastructure
Use these instructions to deploy Insights for Red Hat Enterprise Linux on an existing, cloud marketplace-purchased Red Hat Enterprise Linux system managed by Red Hat Update Infrastructure (RHUI).
Prerequisites
- Root-level access for the system.
Procedure
Enter the following command to install the current version of the Insights client package:
RHEL versions 6 and 7
[root@server ~]# yum install insights-client
RHEL version 8 and later
[root@server ~]# dnf install insights-client
2.2. How the Insights client CLI and configuration file interact
The Insights client runs automatically, according to its scheduler settings. By default, it runs every 24 hours. To run the client interactively, enter the insights-client command.
When the client runs, the following values and settings control its behavior:
-
Values that you provide when you run
insights-clientfrom the CLI temporarily override the preset configuration file settings and system environment settings. Any values that you provide for options in theinsights-clientcommand are used only for that instance of Insights client. -
Settings in the configuration files (
/etc/insights-client/insights-client.confand/etc/insights-client/remove.conf) override system environment settings. -
Values of any system environment variables (
printenv) are not affected by the CLI or the client configuration files.
If you are using RHEL 6.9 or earlier, the client command is redhat-access-insights.
2.3. Installing Insights client on a minimal installation of RHEL
The Insights client is not automatically installed on systems running the minimal installation of Red Hat Enterprise Linux 8.
For more information about minimal installations, see Configuring software selection in Performing a standard RHEL installation.
Prerequisites
- Root-level access to the system.
Procedure
- To create a minimal installation with the Insights client, select Minimal Installation from the RHEL Software Selection options in the Anaconda installer.
-
Make sure to select the Standard checkbox in the Additional Software for Selected Environment section. The Standard option includes the
insights-clientpackage in the RHEL installation.
If you do not select the Standard checkbox, RHEL installs without the insights-client package. If that happens, use dnf install to install the Insights client at a later time.
2.4. How to resolve the Insights Client/real-time scheduling issue
The Insights client executes a number of commands that collect data on your system. Therefore, it has a configuration restriction that limits its CPU usage to no more than 30%. This restriction is defined in the configuration file:
insights-client-boot.service: CPUQuota=30%
This configuration prevents the Insights client from creating a CPU spike on your system. This spike could interfere with other applications running on your system. Specifically, it could prevent applications that depend on real-time scheduling from initiating.
If you need to enable real-time scheduling you can disable the CPU quota restriction. The risk of removing this configuration is minimal. However, it is possible that when the Insights client runs, the CPU usage may become unusually high. If this situation occurs and negatively impacts other services on your system, please contact Red Hat support for assistance.
Chapter 3. Configuring authentication
Basic Authentication has been deprecated. If you are using Basic Authentication, you must change to one of the currently supported authenticated methods. For more information about changing from Basic Authentication to certificate-based authentication for user access, refer to How to switch from Basic Auth to Certificate Authentication for Red Hat Insights.
3.1. Authentication methods
Depending on how you use Red Hat Insights for Red Hat Enterprise Linux, you must use one of the following authentication methods:
Certificate-based authentication (CERT)
Certificate-based authentication is the default authentication method. Certificates are generated when you register a system with Red Hat Subscription Manager (RHSM), or when your system is managed by Red Hat Satellite system management. The client configuration file includes
authmethod=CERTby default. No additional configuration changes are required.Activation keys
The preferred authentication method uses activation keys, along with the Organization ID, to register a system with Red Hat hosted services such as RHSM or remote host configuration (RHC).
The activation keys for your organization are listed on the Activation Keys page in the Red Hat Hybrid Cloud Console. You can use an activation key as an authentication token to register a system with Red Hat hosted services, such as Red Hat Subscription Manager (RHSM) or remote host configuration (RHC). Administrators can create, edit, and delete activation keys for your organization.
Additional resources
- Creating and managing activation keys in the Red Hat Hybrid Cloud Console.
- Getting started with activation keys on the Red Hat Hybrid Cloud Console
- How to switch from Basic Auth to Certificate Authentication for Red Hat Insights
- Transition of Red Hat Hybrid Cloud Console APIs from basic authentication to token-based authentication via service accounts
- Creating and Managing Service Accounts
3.2. Using activation keys for authentication
An activation key is a preshared authentication token that enables authorized users to register and configure systems. It eliminates the need to store, use, and share a personal username and password combination, which increases security and facilitates automation.
You can use an activation key and a numeric organization identifier (organization ID) to register a system with Red Hat hosted services, such as Red Hat Subscription Manager (RHSM) or remote host configuration (rhc). Your organization’s activation keys and organization ID are displayed on the Activation Keys page in the Hybrid Cloud Console.
For more information about how to create and manage activation keys for your systems, see Creating and managing activation keys in the Red Hat Hybrid Cloud Console.
3.3. Registering systems with Red Hat Hosted Services
After you install the Insights client, you need to register your system. This requires two steps:
- Registering with Red Hat hosted services, such as Red Hat Subscription Manager (RHSM) or remote host configuration (rhc).
- Registering the system with the Insights client
For more information about registering the system with Insights client, refer to Configuring insights-client.
Prerequisites
- Admin login access to each system
- Activation key
- Organization ID
Procedure
RHEL 7 and 8
To register a system running Red Hat Enterprise Linux version 7 or 8, use an activation key and your Organization ID to register with RHSM.
# subscription-manager register --activationkey=_activation_key_name_ --org=_organization_ID_
RHEL 9
To register a system running RHEL 9 or later, use an activation key to register with the rhc client. If you do not want to run rhc management services on your system, use the same commands for RHEL 9 systems as you would for RHEL 7 or RHEL 8.
# rhc connect --activation-key example_key --organization
Additional resources
- For more information about installing Insights, refer to Getting Started with Red Hat Insights
- For more information about the rhc client, refer to Remote Host Configuration and Management
- Getting started with activation keys on the Red Hat Hybrid Cloud Console
- Creating and managing activation keys in the Red Hat Hybrid Cloud Console.
- Getting Started with RHEL System Registration
- For more information about registering the system with Insights client, refer to Configuring insights-client.
Chapter 4. Configuring insights-client
After you install Insights client, you must register your system with Red Hat Insights for Red Hat Enterprise Linux. Registration enables you to use Red Hat Insights for Red Hat Enterprise Linux services.
4.1. Registering your system with Red Hat Insights
You can use the insights-client command to register a system with Red Hat Insights.
As an option, you can assign a display name for your host when you register your system. The display name identifies the system in the Insights UI. If you do not assign a display name when you register the system, Insights uses the default hostname for the system.
Prerequisites
- Root-level permissions for your system.
- The Insights client is installed on your system.
Procedure
Enter the
insights-clientcommand with the--registeroption.[root@insights]# insights-client --register
Optional. To specify the display name for the system, include the
--display-nameoption. For example:[root@insights]# insights-client --register --display-name ITC-4 System display name changed from None to ITC-4
Verification
Enter the
insights-clientcommand with the--statusoption.[root@insights]# insights-client --status System is registered locally via .registered file. Registered at 2019-08-20T12:56:48.356814 Insights API confirms registration.
You can now access the cloud-based Red Hat Insights for Red Hat Enterprise Linux services.
4.2. Unregistering your system with Insights
You can unregister your system with Red Hat Insights for Red Hat Enterprise Linux. When you do so, your system information is no longer uploaded to Insights for Red Hat Enterprise Linux.
Prerequisites
- Root-level access to your system.
- Your system is registered with Insights for Red Hat Enterprise Linux.
Procedure
Enter the
insights-clientcommand with the--unregisteroption.[root@insights]# insights-client --unregister Successfully unregistered from the Red Hat Insights Service
Verification
Enter the
insights-clientcommand with the--statusoption.[root@insights]# insights-client --status System is NOT registered locally via .registered file. Unregistered at 2021-03-12T10:36:39.257300 Insights API says this machine was unregistered at 2021-03-12T00:36:39.000Z
4.3. Re-registering your system with Red Hat Insights
To re-register systems in Red Hat Insights for Red Hat Enterprise Linux, and also avoid any duplicate host entries in the Insights inventory service after re-registering, run the insights-client command twice using two options:
-
--unregister -
--register
Prerequisites
- Root-level permissions for your system.
- The Insights client is installed on your system.
Procedure
Enter the
insights-clientcommand with the--unregisteroption.[root@insights]# insights-client --unregister
Enter the
insights-clientcommand with the--registeroption.[root@insights]# insights-client --register
Verification
Successful implementation of the re-registration commands using insights-client command with the —-unregister option followed by the insights-client command with the —-register option results in the following message:
[root@insights]# Successfully uploaded report for <machine name>
View the Red Hat Insights console at https://console.openshiftusgov.com/insights/
4.4. Changing the host display name
You can change the host display name as it appears in the GUI. Make this change either when you register the system with Red Hat Insights for Red Hat Enterprise Linux, or after registration. If you do not assign a display name when you register the system, Red Hat Insights for Red Hat Enterprise Linux uses the value in /etc/hostname.
This procedure is optional. Determine if you want to use a display name in addition to the default hostname.
Using the insights-client command to set the display name takes effect immediately, but does not run the Insights client.
If you obfuscate the host name, the hostname configured in /etc/hostname is obfuscated. Assign a display name so that you can identify a host even when its hostname is obfuscated.
Prerequisites
- Root-level access to the system.
Procedure
Enter the
insights-clientcommand with the--display-nameoption and specify a display name.[root@insights]# insights-client --display-name ITC-4 System display name changed from None to ITC-4
To create a display name that contains spaces, use double quotes.
[root@insights]# insights-client --display-name "ITC-4 B9 4th floor"
System display name changed from None to ITC-4 B9 4th floor
4.5. Displaying the client version
You can display the client version and client core version.
Prerequisites
- Root-level access to your system.
Procedure
Enter the
insights-clientcommand with the--versionoption.[root@insights]# insights-client --version Client: 3.0.6-0 Core: 3.0.121-1
Additional resources
Chapter 5. Insights client data obfuscation
The Insights client provides obfuscation for both IP addresses and host names. Obfuscation uses a Python SoS process to replace the host name and IP address with preset values when it processes the Insights client archive. The processed archive file is then sent to Red Hat Insights for Red Hat Enterprise Linux.
You can enable or disable obfuscation in the /etc/insights-client/insights-client.conf configuration file. You can either choose to obfuscate the system IP address, or you can choose to obfuscate both the IP address and host name. You cannot select obfuscation for only the host name.
You cannot choose the values for obfuscation. The Python SoS process automatically selects the values.
The Red Hat Insights for Red Hat Enterprise Linux compliance service uses OpenSCAP tools to generate compliance reports based on information from the host system. The collaboration with OpenSCAP prevents the compliance service’s ability to completely obfuscate or redact host name and IP address data. Also, host information is sent to Insights for Red Hat Enterprise Linux when a compliance data collection job launches on the host system. Red Hat Insights for Red Hat Enterprise Linux is working to improve obfuscation options for host information.
For information about how Red Hat Insights for Red Hat Enterprise Linux handles data collection, see Red Hat Insights Data & Application Security.
5.1. Obfuscating the IPv4 address
You can obfuscate the IPv4 host address in the archive file before it is sent to Red Hat Insights for Red Hat Enterprise Linux.
When you choose IP address obfuscation, your host address in the archive file is changed to the value provided in the Python SoS file. You cannot configure the value provided for obfuscation. You also cannot mask or select the portion of the host IP address to obfuscate.
IP address obfuscation is supported only for IPv4 addresses.
Procedure
-
Open the
/etc/insights-client/insights-client.conffile with an editor. Locate the line that contains the following setting:
#obfuscate=False
Remove the
#and changeFalsetoTrue.obfuscate=True
-
Save and close the the
/etc/insights-client/insights-client.conffile.
Example
Original host IP address
192.168.0.24
Obfuscated host IP address as it appears in Red Hat Insights for Red Hat Enterprise Linux
10.230.230.1
If you choose IP address obfuscation on another system, the Python SoS process changed its IP address to the same obfuscated value in the archive file. In this example, the additional system also shows an obfuscated IP address of 10.230.230.1. In the Red Hat Insights for Red Hat Enterprise Linux GUI, you might see multiple systems with the same IP address as a result of obfuscation.
5.2. Obfuscating the host name
You can obfuscate the host name in the archive file before it is sent to Red Hat Insights for Red Hat Enterprise Linux. The hostname in /etc/hostname changes to host0 if you have a single host name assigned to your system. Additional host names change to host1, host2, up to the number of host names you configured for your system.
You can assign a display name to your system that is not obfuscated. The display name appears in Red Hat Insights for Red Hat Enterprise Linux application. Only the /etc/hostname is obfuscated.
You must also obfuscate the IP address if you want to obfuscate the host name.
Prerequisites
- You have obfuscated the IP address. For more information, see Obfuscating the IPv4 address.
Procedure
-
Open the
/etc/insights-client/insights-client.conffile with an editor. Locate the line that contains
obfuscate_hostname.#obfuscate_hostname=False
Remove the
#and changeFalsetoTrue.obfuscate_hostname=True
-
Save and close the the
/etc/insights-client/insights-client.conffile. (Optional) Use the
insights-clientcommand with the--display-nameoption to assign a display name for your system. The display name is not obfuscated.[root@insights]# insights-client --display-name ITC-4
When you choose host name obfuscation, the /etc/hostname value in the archive file is changed to the value that is provided in the Python SoS file. The obfuscated host name then displays in Red Hat Insights for Red Hat Enterprise Linux application.
Example
Original
/etc/hostnameRTP.data.center.01
Obfuscated
/etc/hostnameas it appears in Red Hat Insights for Red Hat Enterprise Linuxhost0
If you configure host name obfuscation on another system, its name uses the same obfuscation values. In the Red Hat Insights for Red Hat Enterprise Linux GUI, you might see multiple systems with the same hostname as a result of obfuscation.
Additional resources
Chapter 6. Insights client data redaction
Red Hat Insights for Red Hat Enterprise Linux collects a minimal amount of data, including data that might contain personally identifiable information (PII). To prevent PII (or other configuration data) from being collected, apply data redaction.
6.1. Insights client data redaction options
The Insights client provides data redaction options. Depending on your version of RHEL, there are two methods for controlling data redaction.
Table 6.1. Data redaction and RHEL versions
| RHEL Version | Redaction method |
|---|---|
| RHEL 6.9, 7.8, 8.2, and earlier | Configuration file
|
| RHEL 6.10, 7.9, 8.3 and later | YAML files
|
You must create the remove.conf configuration file or the YAML files. They are not installed by default.
Additional resources
- For information about how Red Hat Insights for Red Hat Enterprise Linux handles data collection, see Red Hat Insights Data & Application Security.
6.2. Using remove.conf to redact data
When you use a configuration file for data redaction, the contents of the file control which data is redacted, as well as how it is redacted. The default configuration file is /etc/insights-client/remove.conf. As an option, you can also configure the Insights client to use a different redaction configuration file.
Based on your entries in the redaction configuration file, you can specify one or more of the following actions:
- Eliminate specific files and their content from data collection
- Eliminate selected command output from data collection
- Eliminate information that matches a pattern
-
Substitute specific strings with a default
keywordstring
When you configure redaction by elimination, the redacted information is never recorded in the archive file. Redaction is performed by preprocessing the data before it is captured in the archive file.
For redaction by string substitution, the archive file is processed by a Python SoS process before it is sent to Red Hat Insights for Red Hat Enterprise Linux.
The remove.conf file does not support regular expression matching.
You can use command line options to control the archive file output. For example, you can generate the archive file, but not send it to Red Hat Insights for Red Hat Enterprise Linux. You can inspect and verify the redaction results before sending the archive.
When you redact files and command output, that information is not available to compare against the Insights for Red Hat Enterprise Linux rules. These omissions might cause Insights for Red Hat Enterprise Linux to not identify issues that apply to your system.
6.2.1. Configuring Insights data redaction using remove.conf
The /etc/insights-client/remove.conf file controls Insights client data redaction. You must manually create this file.
Use this redaction method if you are running Red Hat Enterprise Linux 6.9, 7.8, 8.2, and earlier.
Prerequisites
- Root-level access to your system.
Procedure
Use an editor to create the
/etc/insights-client/remove.conffile template.[remove] files=/etc/cluster/cluster.conf,/etc/hosts commands=/bin/dmesg,/bin/hostname patterns=password,username keywords=super$ecret,ultra$ecret+
- Optional. Delete any lines in the file that you do not want to apply to Insights client redaction.
- Save the file and exit the editor.
Use the command line to verify that the
remove.conffile permissions are set forrootowner only.[root@insights]# ll remove.conf -rw-------. 1 root root 145 Sep 25 17:39 remove.conf
6.2.2. Redacting specific file content
You can use the remove.conf file to select specific files to redact. The files that you select and their content are not included in the archive file.
Prerequisites
-
The
/etc/insights-client/remove.conffile must exist. If you have not already created theremove.conffile, create it. - Root-level access to your system.
Procedure
Open the
/etc/insights-client/remove.conffile in an editor.[remove] files=/etc/cluster/cluster.conf,/etc/hosts commands=/bin/dmesg,/bin/hostname patterns=password,username keywords=super$ecret,ultra$ecret+
On the
files=line, add or remove the files that you want to redact from the archive file.NoteEach file name is separated by a single comma. Do not use spaces.
-
Optional. If you do not want to redact any files from the Insights client archive, remove the
files=line. - Save and close the file.
6.2.3. Redacting specific commands
You can use the remove.conf file to redact specific commands. The output of the redacted commands is not included in the archive file.
Prerequisites
-
The
/etc/insights-client/remove.conffile must exist. If you have not already created theremove.conffile, create it. - Root-level access to your system.
Procedure
Open the
/etc/insights-client/remove.conffile in an editor.[remove] files=/etc/cluster/cluster.conf,/etc/hosts commands=/bin/dmesg,/bin/hostname patterns=password,username keywords=super$ecret,ultra$ecret+
On the
commands=line, add the commands that you want to redact from the archive file, or remove any that you do not want redacted.NoteSeparate each command with a single comma. Do not use spaces.
-
Optional. If you do not want to redact any files from the Insights client archive, remove the
files=line. - Save and close the file.
6.2.4. Redacting string patterns
You can use the remove.conf file to redact specific string patterns from the archive file.
If you specify a string pattern to redact, the process redacts all the lines in the archive file that contain that pattern. For example, if the string pattern is name, that pattern matches and redacts hostname, filename, username.
Regular expressions and wildcard matching (egrep) are not supported.
Prerequisites
-
The
/etc/insights-client/remove.conffile must exist. If you have not already created theremove.conffile, create it. - Root-level access to your system.
Procedure
Open the
/etc/insights-client/remove.conffile in an editor.[remove] files=/etc/cluster/cluster.conf,/etc/hosts commands=/bin/dmesg,/bin/hostname patterns=password,username keywords=super$ecret,ultra$ecret+
On the
patterns=line, add any string patterns that you want to redact from the archive file.NoteSeparate each string pattern with a single comma. Do not use spaces.
-
Optional. If you do not want to redact any patterns from the archive file, remove the
patterns=line. - Save and close the file.
6.2.5. Redacting keywords
You can use the remove.conf file to redact specific keywords. The Python SoS process replaces the keywords you select with keyword0, keyword1, keyword2, etc., in the archive file.
Prerequisites
-
The
/etc/insights-client/remove.conffile must exist. If you have not already created theremove.conffile, create it. - Root-level access to your system.
Procedure
Open the
/etc/insights-client/remove.conffile in an editor.[remove] files=/etc/cluster/cluster.conf,/etc/hosts commands=/bin/dmesg,/bin/hostname patterns=password,username keywords=super$ecret,ultra$ecret+
On the
keywords=line, add any keywords that you want to redact from the archive file.NoteSeparate each string pattern with a single comma. Do not use spaces.
-
Optional. If you do not want to redact any keywords from the archive file, remove the
keywords=line. - Save and close the file.
6.2.6. Validating the remove.conf file
You can validate the remove.conf file to make sure its syntax is correct before using it for redaction.
Prerequisites
-
The
/etc/insights-client/remove.conffile must exist. If you have not already created theremove.conffile, create it. - Root-level access to your system.
Procedure
Enter the
insights-clientcommand with the--validateoption.[root@insights]# insights-client --validate
- Correct any errors that the command displays.
6.3. Using YAML files for redaction
When you use YAML files for redaction, two files control the redaction actions:
-
file-redaction.yaml -
file-content-redaction.yaml
You can use one or both files, depending on the content you want to redact. When the Python SoS process runs, it redacts the specified content before it can be captured in the archive file.
Use this redaction method if you are running Red Hat Enterprise Linux 6.10, 7.9, 8.3 and later.
How the YAML files work
The /etc/insights-client/file-redaction.yaml lists commands and files that you want redacted. When the process runs, it redacts the output of the listed commands and files.
The /etc/insights-client/file-content-redaction.yaml defines pattern redaction and keyword replacement. For pattern redaction, the process redacts patterns or regular expressions that match those specified in the YAML file. For keyword replacement, the process replaces the specified keywords with generic identifiers.
6.3.1. Configuring the YAML command for file redaction
The /etc/insights-client/file-redaction.yaml file lists the commands and system files that you want redacted. When the Python SoS process runs, it does not include the output of the listed commands or files in the uploaded archive file.
Prerequisites
- You must be familiar with the basics of YAML syntax. Explaining YAML is beyond the scope of this procedure.
- You must have root-level access to the system.
Procedure
Use an editor to create the
/etc/insights-client/file-redaction.yamlfile.Example
# file-redaction.yaml --- # Exclude the entire output of commands # Specify the full command path or the symbolic name in .cache.json commands: - /bin/rpm -qa - /bin/ls - ethtool_i # Exclude the entire output of files # Specify the full filename path or the symbolic name in .cache.json files: - /etc/audit/auditd.conf - cluster_conf
Verify that the
file-redaction.yamlfile permissions are set forrootowner only.[root@insights]# ll file-redaction.yaml -rw-------. 1 root root 145 Sep 25 17:39 file-redaction.yaml
6.3.2. Configuring YAML pattern and keyword redaction
The /etc/insights-client/file-content-redaction.yaml file redacts files using two methods: pattern redaction and keyword replacement. Pattern redaction uses either a pattern match or regular expression match. In keyword replacement, a Python SoS process replaces the keyword with a generic identifier.
Prerequisites
- You must be familiar with the basics of YAML syntax. Explaining YAML is beyond the scope of this procedure.
- You must have root-level access to the system.
Procedure
Use an editor to create the
/etc/insights-client/file-content-redaction.yamlfile.Example
# file-content-redaction.yaml --- # Pattern redaction per matching line # Lines that match a pattern are excluded from files and command output. # Patterns are processed in the order that they are listed. # Example patterns: - "a_string_1" - "a_string_2" # Regular expression pattern redaction per line # Use "regex:" to wrap patterns with regular expressions" # Example patterns: regex: - "abc.*def" - "localhost[[:digit:]]" # Keyword replacement redaction # Replace keywords in files and command output with generic identifiers # Keyword does not support regex # Example keywords: - "1.1.1.1" - "My Name" - "a_name"
Make sure the
file-content-redaction.yamlfile permissions are set forrootowner only.[root@insights]# ll file-content-redaction.yaml -rw-------. 1 root root 145 Sep 25 17:39 file-content-redaction.yaml
6.4. Verifying the Insights client archive
You can verify the contents of the archive file. By inspecting the archive file, you can confirm what data is sent to Red Hat Insights for Red Hat Enterprise Linux.
If you use obfuscation or redaction, you can inspect the archive before it is sent. If you want to preserve the archive file, you can keep it on your system.
6.4.1. Verifying the archive before uploading
To inspect the archive before the Python SoS script uploads it to Red Hat Insights for Red Hat Enterprise Linux, run Insights client and then save the file without uploading it. This allows you to view the information that the client sends to Insights for Red Hat Enterprise Linux, and to verify your obfuscation or redaction settings.
The archive file is stored in the /var/tmp/ directory. When insights-client completes, it displays the file name.
Prerequisites
-
If you use redaction, make sure the
/etc/insights-client/remove.conffile is properly configured. -
If you use obfuscation, make sure the
/etc/insights-client/insights-client.conffile is properly configured.
Procedure
Enter the
insights-clientcommand with the--no-uploadoption.[root@insights]# insights-client --no-upload
The command displays informational messages when redaction or obfuscation is applied.
WARNING: Excluding data from files Starting to collect Insights data for ITC-4 WARNING: Skipping patterns found in remove.conf WARNING: Skipping command /bin/dmesg WARNING: Skipping command /bin/hostname WARNING: Skipping file /etc/cluster/cluster.conf WARNING: Skipping file /etc/hosts Archive saved at /var/tmp/qsINM9/insights-ITC-4-20190925180232.tar.gz
Navigate to the temporary storage directory as shown in the
Archive saved atmessage.[root@insights]# cd /var/tmp/qsINM9/
Unpack the compressed
tar.gzfile.[root@insights]# tar -xzf insights-ITC-4-20190925180232.tar.gz
The script creates a new directory that contains the files.
6.4.2. Verifying the Insights client archive after uploading
To keep a copy of the archive for inspection after the Python SoS script uploads it to Red Hat Insights for Red Hat Enterprise Linux, run insights-client and then save the file. This allows you to verify the information that the client sends to Insights for Red Hat Enterprise Linux, and to verify your obfuscation or redaction settings.
Prerequisites
-
If you use redaction, make sure the
/etc/insights-client/remove.conffile is properly configured. -
If you use obfuscation, make sure the
/etc/insights-client/insights-client.conffile is properly configured.
Procedure
Enter the
insights-clientcommand with the--keep-archiveoption.[root@insights]# insights-client --keep-archive
The command displays informational messages.
Starting to collect Insights data for ITC-4 Uploading Insights data. Successfully uploaded report from ITC-4 to account 6229994. Insights archive retained in /var/tmp/ozM8bY/insights-ITC-4-20190925181622.tar.gz
Navigate to the temporary storage directory displayed in the
Insights archive retained inmessage.[root@insights]# cd /var/tmp/ozM8bY/
Unpack the compressed
tar.gzfile.[root@insights]# tar -xzf insights-ITC-4-20190925181622.tar.gz
The script creates a new directory that contains the files.
Chapter 7. System filtering and groups
Red Hat Insights for Red Hat Enterprise Linux enables you to filter systems in inventory, as well as by individual service. Insights for Red Hat Enterprise Linux also allows you to filter groups of systems by three criteria:
- Groups running SAP workloads
- Satellite host groups
- Custom filters that you define in a YAML file
As of Spring 2022, inventory, advisor, compliance, vulnerability, patch, drift, and policies enable filtering by groups and tags. Other services will follow.
Use the global Filter Results box to filter by SAP workloads, Satellite host groups, or custom filters added to the Insights client configuration and file filters added to the Insights client configuration file.
Prerequisites
- The Insights client is installed and registered on each system.
- Root-level permissions on the system.
7.1. SAP workloads
As Linux becomes the mandatory operating system for SAP ERP workloads in 2025, Red Hat Enterprise Linux and Red Hat Insights for Red Hat Enterprise Linux are working to make Insights for Red Hat Enterprise Linux the management tool of choice for SAP administrators.
As part of this ongoing effort, Insights for Red Hat Enterprise Linux automatically tags systems running SAP workloads and by SAP ID (SID), without any customization needed by administrators. To filter those workloads throughout the Insights for Red Hat Enterprise Linux application, use the global Filter Results drop-down menu.
7.2. Satellite host groups
Satellite host groups are configured in Satellite and automatically recognized by Insights for Red Hat Enterprise Linux.
7.3. Custom system tagging
You can apply custom grouping and tagging to your systems. This enables you to add contextual markers to individual systems, filter by those tags in the Insights for Red Hat Enterprise Linux application, and more easily focus on related systems. This functionality can be especially valuable when deploying Insights for Red Hat Enterprise Linux at scale, with many hundreds or thousands of systems under management.
In addition to the ability to add custom tags to several Insights for Red Hat Enterprise Linux services, you can add predefined tags. The advisor service can use these tags to create targeted recommendations for your systems that might require more attention, such as those systems that require a higher level of security.
7.3.1. Filter structure
Filters use a namespace=value or key=value paired structure.
-
Namespace. The namespace is the name of the ingestion point, insights-client. This value cannot be changed. The
tags.yamlfile is abstracted from the namespace, which is injected by the client before upload. - Key. You can create the key or use a predefined key from the system. You can use a mix of capitalization, letters, numbers, symbols and whitespace.
- Value. You can define your own descriptive string value. You can use a mix of capitalization, letters, numbers, symbols and whitespace.
7.3.2. Creating a custom group and the tags.yaml file
To create and add tags to /etc/insights-client/tags.yaml, use insights-client with the --group=<name-you-choose> option. This command option performs the following actions:
-
Creates the
etc/insights-client/tags.yamlfile -
Adds the
group=key and<name-you-choose>value totags.yaml - Uploads a fresh archive from the system to the Insights for Red Hat Enterprise Linux application making the new tag immediately visible along with your latest results
Prerequisites
- Root-level access to your system.
Procedure
Run the following command as root, adding your custom group name in place of
<name-you-choose>:[root@server ~]# insights-client --group=<name-you-choose>
-
Optional. To add additional tags, edit the
/etc/insights-client/tags.yamlfile. - Navigate to Inventory > Systems and log in if necessary.
- Click the Filter by tags drop-down menu. You can also use the search box to enter all or part of the tag’s name to automatically show systems with that text in the tags.
- Scroll up or down the list to locate the tag.
- Click the tag to filter by it.
Verify that your system is among the results on the advisor systems list.
- Navigate to Inventory > Systems and log in if necessary.
- Activate the Name filter and begin typing the system name until you see your system, then select it.
- The tag symbol is a darker color, and the number beside it shows the correct number of tags applied.
7.3.3. Editing tags.yaml to add or change tags
After you create the group tag, you can edit the contents of tags.yaml to add or modify tags.
The following procedure shows how to edit the /etc/insights-client/tags.yaml file, then verify the tag exists in the Red Hat Insights > RHEL > Inventory.
Prerequisites
- Root-level access to your system.
Procedure
Open the tag configuration file,
tags.yaml, in an editor.[root@server ~]# vim /etc/insights-client/tags.yaml
Edit the file contents or add additional
key=valuepairs. Add additionalkey=valuepairs if needed. Use a mix of capitalization, letters, numbers, symbols, and whitespace. The following example shows how to organizetags.yamlwhen adding more than one tag to a system.# tags --- group: _group-name-value_ location: _location-name-value_ description: - RHEL8 - SAP key 4: value
- Save your changes and close the editor.
Generate an upload to Insights for Red Hat Enterprise Linux.
[root@server ~]# insights-client
- Navigate to Inventory > Systems and log in if necessary.
In the Filter Results box, click the down arrow and select one of the filters or enter the name of the filter and select it.
NoteYou can search by the tag key or by its value.
- Find your system among the results.
- Verify that the filter icon is darkened and shows a number representing the number of filters applied to the system.
7.4. Using predefined system tags to get more accurate Red Hat Insights advisor service recommendations and enhanced security
Red Hat Insights advisor service recommendations treat every system equally. However, some systems might require more security than others, or require different networking performance levels. In addition to the ability to add custom tags, Red Hat Insights for Red Hat Enterprise Linux provides predefined tags that the advisor service can use to create targeted recommendations for your systems that might require more attention.
To opt in and get the extended security hardening and enhanced detection and remediation capabilities offered by predefined tags, you need to configure the tags. After configuration, the advisor service provides recommendations based on tailored severity levels, and preferred network performance that apply to your systems.
To configure the tags, use the /etc/insights-client/tags.yaml file to tag systems with predefined tags in a similar way that you might use it to tag systems in the inventory service. The predefined tags are configured using the same key=value structure used to create custom tags. Details about the Red Hat-predefined tags are in the following table.
Table 7.1. List of Supported Predefined Tags
| Key | Value | Note |
|---|---|---|
| security |
|
With the |
|
|
| The preferred network performance (either latency or throughput according to your business requirement) would affect the severity of an advisor service recommendation to a system. |
The predefined tag keys names are reserved. If you already use the key security, with a value that differs from one of the predefined values, you will not see a change in your recommendations. You will only see a change in recommendations if your existing key=value is the same as one of the predefined keys. For example, if you have a key=value of security: high, your recommendations will not change because of the Red Hat-predefined tags. If you currently have a key=value pair of security: strict, you will see a change in the recommendations for your systems.
Additional resources
7.4.1. Configuring predefined tags
You can use the Red Hat Insights for Red Hat Enterprise Linux advisor service’s predefined tags to adjust the behavior of recommendations for your systems to gain extended security hardening and enhanced detection and remediation capabilities. You can configure the predefined tags by following this procedure.
Prerequisites
- You have root-level access to your system
- You have Insights client installed
- You have systems registered within the Insights client
-
You have already created the
tags.yamlfile. See Creating a tags.yaml file and adding a custom group
Procedure
Using the command line, and your preferred editor, open
/etc/insights-client/tags.yaml. (The following example uses Vim.)[root@server ~]# vi /etc/insights-client/tags.yaml
Edit the
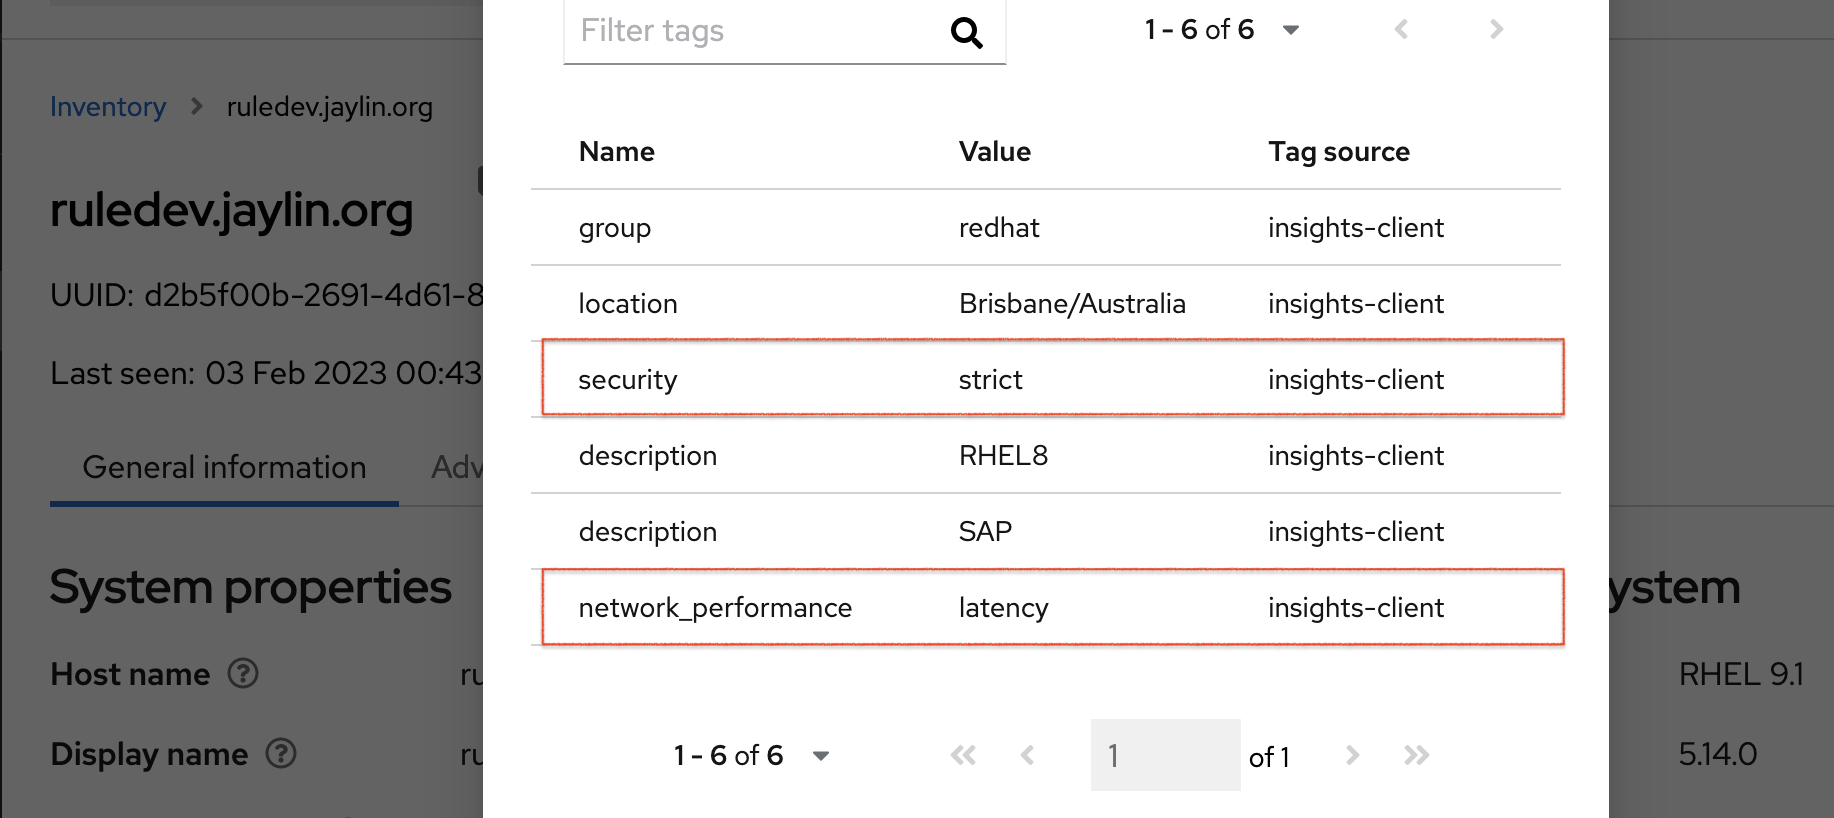
/etc/insights-client/tags.yamlfile to add the predefinedkey=valuepair for the tags. This example shows how to addsecurity: strictandnetwork_performance: latencytags.# cat /etc/insights-client/tags.yaml group: redhat location: Brisbane/Australia description: - RHEL8 - SAP security: strict network_performance: latency
- Save your changes.
- Close the editor.
Optional: Run the
insights-clientcommand to generate an upload to Red Hat Insights for Red Hat Enterprise Linux, or wait until the next scheduled Red Hat Insights upload.[root@server ~]# insights-client
Confirming that predefined tags are in your production area
After generating an upload to Red Hat Insights (or waiting for the next scheduled Insights upload), you can find out whether the tags are in the production environment by accessing Red Hat Insights > RHEL > Inventory. Find your system and look for the newly created tags. You see a table that shows:
- Name
- Value
- Tag Source (for example, insights-client).
The following image shows an example of what you see in inventory after creating the tag.
Example of recommendations after applying a predefined tag
The following image of the advisor service shows a system with the network_performance: latency tag configured.

The system shows a recommendation with a higher Total Risk level of Important. The system without the network_performance: latency tag has a Total Risk of Moderate. You can make decisions about prioritizing the system with higher Total Risk.
Chapter 8. Changing the insights-client schedule
You can disable, enable, and modify the schedule that controls when the Insights client runs. By default, the Insights client runs every 24 hours. The timers in the default schedules vary so that all systems do not run the client at the same time.
8.1. Disabling the Insights client schedule
You must disable the client schedule before you can change the default Insights client settings and create a new schedule.
The procedure you use to disable the insights-client schedule depends on your Red Hat Enterprise Linux and client versions.
Additional resources
8.1.1. Disabling the client schedule on RHEL 7.4 and earlier with Client 1.x
Client 1.x is no longer supported.
The --no-schedule option is deprecated in Client 3.x and later.
Prerequisites
- Root-level access to your system.
Procedure
Enter the
insights-clientcommand with the--versionoption to verify the client version.[root@insights]# insights-client --version Client: 1.0.2-0 Core: 1.0.76-1
Enter the
insights-clientcommand with the--no-scheduleoption to disable the client schedule. This command removes the symbolic link in/etc/cron.daily.[root@insights]# insights-client --no-schedule
Open the
/etc/insights-client/insights-client.conffile with an editor and add the following line.no_schedule=True
8.1.2. Disabling the client schedule for RHEL 7.5 and later with Insights client 1.x
Insights client 1.x is no longer supported.
The --no-schedule option is deprecated in Insights client 3.x and later.
Prerequisites
- Root-level access to your system.
Procedure
Enter the
insights-clientcommand with the--versionoption to verify the client version.[root@insights]# insights-client --version Client: 1.0.2-0 Core: 1.0.76-1
Enter the
insights-clientcommand with the--no-scheduleoption to disable the client schedule.[root@insights]# insights-client --no-schedule
8.1.3. Disabling the client schedule for RHEL 6, RHEL 7 and later with Client 3.x
Client 1.x is no longer supported.
The --no-schedule option is deprecated in Client 3.x and later.
Prerequisites
- Root-level access to your system.
Procedure
Enter the
insights-clientcommand with the--versionoption to verify the client version.[root@insights]# insights-client --version Client: 3.0.6-0 Core: 3.0.121-1
Enter the
insights-clientcommand with the--disable-scheduleoption to disable the client schedule.[root@insights]# insights-client --disable-schedule
8.2. Enabling the Insights client schedule
When you first enable the client schedule, it runs using its default settings. If you make changes to the schedule, those settings take precedence.
When you run insights-client from the command line, Insights client runs using the settings you specify for only that session. When the next scheduled run takes place, it uses the default settings.
8.2.1. Enabling the Insights client schedule on RHEL 7.4 or earlier and Client 1.x
You can enable the client schedule so that it runs on its default settings. If you change the default schedule settings, the changed settings take precedence.
Prerequisites
- Root-level access to your system.
- The client schedule is disabled.
- (Optional) You modified the default schedule.
Procedure
To verify the client version, enter the
insights-clientcommand with the--versionoption.[root@insights]# insights-client --version Client: 1.0.2-0 Core: 1.0.76-1
Open the
/etc/insights-client/insights-client.conffile with an editor. Add the following line to the file. If your configuration file already has a value forno_schedule, change it toFalse.no_schedule=False
Enter the
insights-clientcommand with the--registeroption to enable the client.[root@insights]# insights-client --register
8.2.2. Enabling the Insights client schedule on RHEL 7.5 or later and Client 1.x
You can enable the client schedule so that it runs on its default settings. If you change the default schedule settings, the changed settings take precedence.
Client 1.x is no longer supported.
Prerequisites
- Root-level access to your system.
- The client schedule is disabled.
- (Optional) You modified the default schedule.
Procedure
To verify the client version, enter the
insights-clientcommand with the--versionoption.[root@insights]# insights-client --version Client: 1.0.2-0 Core: 1.0.76-1
Enter the
insights-clientcommand with the--registeroption to enable the client schedule.[root@insights]# insights-client --register
8.2.3. Enabling the Insights client schedule on RHEL 7 or later and Client 3.x
You can enable the client schedule so that it runs on its default settings. If you change the default schedule settings, the changed settings take precedence.
Prerequisites
- Root-level access to your system.
- The client schedule is disabled.
- (Optional) You modified the default schedule.
Procedure
To verify the client version, enter the
insights-clientcommand with the--versionoption.[root@insights]# insights-client --version Client: 3.0.6-0 Core: 3.0.121-1
Enter the
insights-clientcommand with the--enable-scheduleoption to enable the client schedule.[root@insights]# insights-client --enable-schedule
8.3. Modifying the Insights client schedule
To change when the Insights client runs, modify the schedule. The method that you use depends on the RHEL release and client version that your system is running.
Select the procedure that matches your version of RHEL.
-
For Red Hat Enterprise Linux 7.4 and earlier, use
cronto modify the system schedule. -
For Red Hat Enterprise Linux 7.5 and later, update the
systemdsettings and theinsights-client-timerfile.
8.3.1. Scheduling the Insights client with cron
Use this procedure for systems running RHEL 7.4 releases and earlier with Client version 1.x.
Client 1.x is no longer supported.
To change the default schedule for running insights-client, update a system cron file.
In Red Hat Enterprise Linux, the /etc/crontab file automatically executes scripts in several subdirectories at regular periods.
/etc/cron.hourly /etc/cron.daily /etc/cron.weekly /etc/cron.monthly
Prerequisites
- Root-level access to your system.
- The Insights client schedule is disabled.
Procedure
-
Select a schedule and set up
cronto executeinsights-clienton it. -
Enable the
insights-clientschedule when you finish making changes.
Additional resources
-
Review the man pages for
crontab(1)andcron(8)to understand thecrondependencies. -
What is
cronand how is it used?
8.3.2. Scheduling insights-client using systemd settings
Use this for systems running RHEL 7.5 and later with Client 3.x.
You can change the default schedule for running insights-client by updating the system systemd settings and the insights-client.timer file.
Prerequisites
- Root-level access to your system.
Procedure
To edit the settings in the
insights-client.timerfile, enter thesystemctl editcommand and the file name.[root@insights]# systemctl edit insights-client.timer
This action opens an empty file with the default system editor.
Enter different settings to modify the schedule. The values in this example are the default settings for
systemd.[Timer] OnCalendar=daily RandomizedDelaySec=14400
Enable the
insights-clientschedule.[root@insights]# insights-client --enable-schedule
Additional resources
-
Review the man pages for
systemctl(1),systemd.timer(5), andsystemd.time(7)to understandsystemd -
What is
cronand how is it used?
8.3.3. Refreshing the package cache for systems managed by Red Hat Satellite
Insights now provides the optional --build-packagecache command to provide accurate reporting for applicable updates on Satellite-managed systems. This option rebuilds the yum/dnf package caches for insights-client, and creates a refreshed list of applicable updates for the system.
You can run the command manually to rebuild the package caches immediately, or you can edit the client configuration file (/etc/insights-client/insights-client.conf) to rebuild the package caches automatically each time the system checks in to Insights.
Additional resources
-
For more information about how to run the
--build-packagecachecommand, see System Patching using Remediation Playbooks. -
For more information about the
--build-packagecacheoptions, see the following KCS article: https://access.redhat.com/solutions/7041171 - For more information about managing errata in Red Hat Satellite, see Managing content.
Chapter 9. Enabling and disabling automatic rule updates for Insights
By default, automatic collection rule updates are enabled for Insights. You can edit the client configuration file to disable them or re-enable them.
9.1. Disabling automatic rule updates for Insights
You can disable the automatic collection rule updates for Red Hat Insights for Red Hat Enterprise Linux. If you do so, you risk using outdated rule definition files and not getting the most recent validation updates.
Prerequisites
- Root-level access to your system.
- Automatic rule updates are enabled.
Procedure
-
Open the
/etc/insights-client/insights-client.conffile with an editor. Locate the line that contains
#auto_update=True
Remove the
#and changeTruetoFalse.auto_update=False
-
Save and close the the
/etc/insights-client/insights-client.conffile.
9.2. Enabling automatic rule updates for Insights
You can re-enable the automatic collection rule updates for Red Hat Insights for Red Hat Enterprise Linux, if you previously disabled updates. By default, automatic rule update is enabled.
Prerequisites
- Root-level access to your system.
- Automatic rule collection is disabled.
Procedure
-
Open the
/etc/insights-client/insights-client.conffile with an editor. Locate the line that contains
auto_update=False
Change
FalsetoTrue.auto_update=True
-
Save and close the the
/etc/insights-client/insights-client.conffile.
Chapter 10. Creating a diagnostic log for support
If you need help from the Red Hat support team, you can create and share diagnostic log files. These log files can help the support team to troubleshoot issues with insights-client.
10.1. Creating a diagnostic log
You can create a diagnostic log to share with the support team.
Prerequisites
- Root-level access to your system.
Procedure
Enter the
insights-clientcommand with the--supportoption.[root@insights]# insights-client --support
The command displays informational messages while creating the support file.
Collecting logs... Insights version: insights-core-3.0.121-1 Registration check: status: True unreachable: False . . . . Copying Insights logs to archive... Support information collected in /var/tmp/H_Y43a/insights-client-logs-20190927144011.tar.gz
Navigate to the collection directory as shown in the
Support information collected inmessage.[root@insights]# cd /var/tmp/H_Y43a
Unpack the compressed
tar.gzfile.[root@insights]# tar -xzf insights-client-logs-20190927144011.tar.gz
Unzipping the
tar.gzfile produces a new directory containing the log files. You can share thetar.gzfile with the support team if requested.
Appendix A. Command options for insights-client
As a system administrator with root privileges, you can use the insights-client command and its options to control the Insights client operation on your system. Because the insights-client.rpm is updated less frequently than individual components in Insights for Red Hat Enterprise Linux, the man page might not include the most recent information about insights-client.
Each time you enter the insights-client command, the client collects data and sends it to Insights for Red Hat Enterprise Linux.
Using the insights-client --display-name command to set the display name takes effect immediately, but does not run the Insights client.
A.1. Options for the Insights client
Table A.1. insights-client user command options
| Option | Description |
|---|---|
|
| Display help information |
|
|
Register the host to Insights for Red Hat Enterprise Linux using the information in |
|
| Unregister the host from Insights for Red Hat Enterprise Linux. |
|
|
Set or change the host display name in the GUI. Use with |
|
|
Add host to GROUP during registration. Group names are defined in |
|
| Set the number of times to retry an upload. The default is 1. The retry interval is 180 seconds, which is how long the Insights client waits until retrying the upload. NOTE: In the scheduler, the number of retries is 3. |
|
|
Validate the structure of the |
|
| Only log error messages to console. |
|
| Log nothing to console. |
|
| Enable the job schedule. By default, the Insights client runs daily, at or near midnight.
NOTE: If you are using Client 1.x, use the |
|
| Disable the nightly job schedule. |
|
|
Use a custom configuration file CONF instead of the default |
|
|
Select the compressor that is used when creating the archive. Available options are |
|
|
Runs the client but does not upload the archive to Red Hat Insights for Red Hat Enterprise Linux or CMSfR web application. The archive is stored in the |
|
|
Run the client without using network functionality. Implies |
|
|
Output the log data to the specified LOGFILE. The default log file is |
|
|
Fetch diagnostic information from the API. The system must be registered and uploaded at least once before using |
|
| Scan the system with OpenSCAP and upload the report. |
|
|
Upload a specific archive PAYLOAD file to Red Hat Insights for Red Hat Enterprise Linux. Requires |
|
|
Set the content-type for the PAYLOAD file. Type can be gz, bz2, xz, and none. The TYPE must match the |
|
| Retrieve analysis results from Red Hat Insights for Red Hat Enterprise Linux. |
|
|
Display analysis results fetched by |
|
| Write collection to a specified directory instead of uploading. |
|
| Write collection to a specified archive instead of uploading. |
The insights-client command has several options that are useful when debugging its operation.
Table A.2. insights-client debug options
| Option | Description |
|---|---|
|
|
Print the versions of |
|
| Test connectivity to the Red Hat Insights for Red Hat Enterprise Linux services. |
|
| This option is being deprecated. To re-register your system, see Re-registering your system with Red Hat Insights. |
|
| Log all debug output to the console. |
|
|
Runs the client but does not upload the archive. The archive is stored in the |
|
| Keep the archive after uploading. |
|
| Generate a diagnostic log for support. |
|
| Display host registration status. |
|
| Log network calls to the console. |
Appendix B. Options for the redaction configuration file
The configuration file /etc/insights-client/remove.conf controls how the Insights for Red Hat Enterprise Linux client redacts data.
As of RHEL RHEL 6.10, 7.9, 8.3 and later, using remove.conf is deprecated and replaced by two YAML files.
The Insights client performs redaction on the archive file based on the information in remove.conf. Most redaction activity occurs before the archive file is generated and sent to the Red Hat Insights for Red Hat Enterprise Linux service.
B.1. Options for the Insights client redaction file
File name and location
The suggested name is /etc/insights-client/remove.conf for the redaction configuration file. You must have root permission in order to create this file. It is not created automatically as part of the Insights client deployment.
The /etc/insights-client/insights-client.conf configuration file specifies the name and location of the redaction configuration file.
File template for remove.conf
The following is an example template for the remove.conf file:
[remove]
files=/etc/cluster/cluster.conf,/etc/hosts
commands=/bin/dmesg,/bin/hostname
patterns=password,username
keywords=super$ecret,ultra$ecret+
- A single comma with no space separates each entered value.
- Do not include the line for data you do not want redacted.
-
Regular expressions and wildcard matching (
egrep) are not supported. - All entries are case-sensitive.
Table B.1. remove.conf configuration options
| Option | Description |
|---|---|
|
|
This must be the first line of the |
|
| The listed files are excluded from data collecting. |
|
| The output from commands listed here is excluded from data collecting. The command names must exactly match the command names in the collection rules. |
|
| Any line in the archive file that matches all or part of a pattern is deleted. |
|
|
The keyword is replaced with an actual value of
For example, if you define two keywords, |
Appendix C. Options for the redaction configuration YAML files
As of RHEL RHEL 6.10, 7.9, 8.3 and later, Insights client uses YAML files to configure redaction. In earlier releases, the remove.conf file controls redaction.
C.1. Options for the redaction configuration YAML files
As of RHEL RHEL 6.10, 7.9, 8.3 and later, Insights client uses YAML files to configure redaction. In earlier releases, the remove.conf file controls redaction.
Table C.1. File redaction example for file-redaction.yaml
| Content | Description |
|---|---|
# file-redaction.yaml --- | An optional comment containing the file name. |
# Exclude the entire output of commands # Specify the full command path or the symbolic name in .cache.json commands: - /bin/rpm -qa - /bin/ls - ethtool_i |
The entire output from
In the |
# Exclude the entire output of files # Specify the full filename path or the symbolic name in .cache.json files: - /etc/audit/auditd.conf - cluster_conf | For the specified files, the file name and the file content are excluded from the archive file.
In the |
Table C.2. Content redaction example for file-content-redaction.yaml
| Content | Description |
|---|---|
# file-content-redaction.yaml --- | An optional comment containing the file name. |
# Pattern redaction per matching line # Lines that match a pattern are excluded from files and command output. # Patterns are processed in the order that they are listed. # Example patterns: - "a_string_1" - "a_string_2" |
When the patterns match exactly any lines that contain |
# # Regular expression pattern redaction per line # Patterns with regular expressions (regex) are wrapped with "regex:" # Example patterns: regex: - "abc.*def" - "localhost[[:digit:]]" # |
Regular expressions are wrapped with |
# Lines matching these regular expressions are excluded # from output. patterns: regex: - "*\.conf" - "^include" |
The
In this example, lines are redacted from the archive file if any string contains |
# Replace keywords in files and command output with generic identifiers by the Python soscleaner module keywords: - "1.1.1.1" - "My Name" - "a_name" |
The strings in the
For example, each instance of the string
The strings that you define in the |
Appendix D. Command options for insights-client
You can use the settings in the /etc/insights-client/insights-client.conf configuration file to change how the Insights client operates on your system.
D.1. Options for the Insights client configuration file
When the configuration file and the CLI have similar options, the CLI option is executed when you enter the insights-client command. When the scheduler runs the client, the configuration file options are executed.
You must enter the choices exactly as shown. True and False use initial capital letters.
To enable an option in the configuration file, remove the # as the first character of the line and provide a value for the option. The changes take effect either at the next scheduled run, or when you enter the insights-client command.
Table D.1. insights-client.conf configuration options
| Option | Description |
|---|---|
| [insights-client] | Required first line of the configuration file, even if you specify a different location or name for the client configuration file. |
| #loglevel=DEBUG |
Change the log level. Options are: DEBUG, INFO, WARNING, ERROR, CRITICAL. The default is DEBUG. The default log file location is |
| #auto_config=True |
Attempt to auto configure with Satellite server. Values can be Note
When |
| #authmethod=CERT | Set the authentication method. Valid option is CERT. The default value is CERT. |
| #username= |
|
| #password= |
|
| #base_url=cert-api.access.redhat.com:443/r/insights | Base URL for the API. |
| #proxy= | URL for your proxy. Example: http://user:pass@192.168.100.50:8080 |
| #auto_update=True |
Automatically update the dynamic configuration. The default is |
| #obfuscate=False |
Obfuscate IPv4 addresses. The default is |
| #obfuscate_hostname=False |
Obfuscate hostname. You must set |
| #display_name= |
Display name for registration. The default is to use |
| #cmd_timeout=120 | Timeout for commands run during collection, in seconds. The command processes are terminated when the timeout value is hit. |
| #http_timeout=120 | Timeout for HTTP calls, in seconds |
| #remove_file=/etc/insights-client/remove.conf | Location of redaction file Insights client may prevent processes from initializing real-time scheduling. |
Providing feedback on Red Hat documentation
We appreciate and prioritize your feedback regarding our documentation. Provide as much detail as possible, so that your request can be quickly addressed.
Prerequisites
- You are logged in to the Red Hat Customer Portal.
Procedure
To provide feedback, perform the following steps:
- Click the following link: Create Issue
- Describe the issue or enhancement in the Summary text box.
- Provide details about the issue or requested enhancement in the Description text box.
- Type your name in the Reporter text box.
- Click the Create button.
This action creates a documentation ticket and routes it to the appropriate documentation team. Thank you for taking the time to provide feedback.