
2.3. Clusters
2.3.1. Introduction to Clusters
A cluster is a logical grouping of hosts that share the same storage domains and have the same type of CPU (either Intel or AMD). If the hosts have different generations of CPU models, they use only the features present in all models.
Each cluster in the system must belong to a data center, and each host in the system must belong to a cluster. Virtual machines are dynamically allocated to any host in a cluster and can be migrated between them, according to policies defined on the cluster and settings on the virtual machines. The cluster is the highest level at which power and load-sharing policies can be defined.
The number of hosts and number of virtual machines that belong to a cluster are displayed in the results list under Host Count and VM Count, respectively.
Clusters run virtual machines or Red Hat Gluster Storage Servers. These two purposes are mutually exclusive: A single cluster cannot support virtualization and storage hosts together.
Red Hat Virtualization creates a default cluster in the default data center during installation.
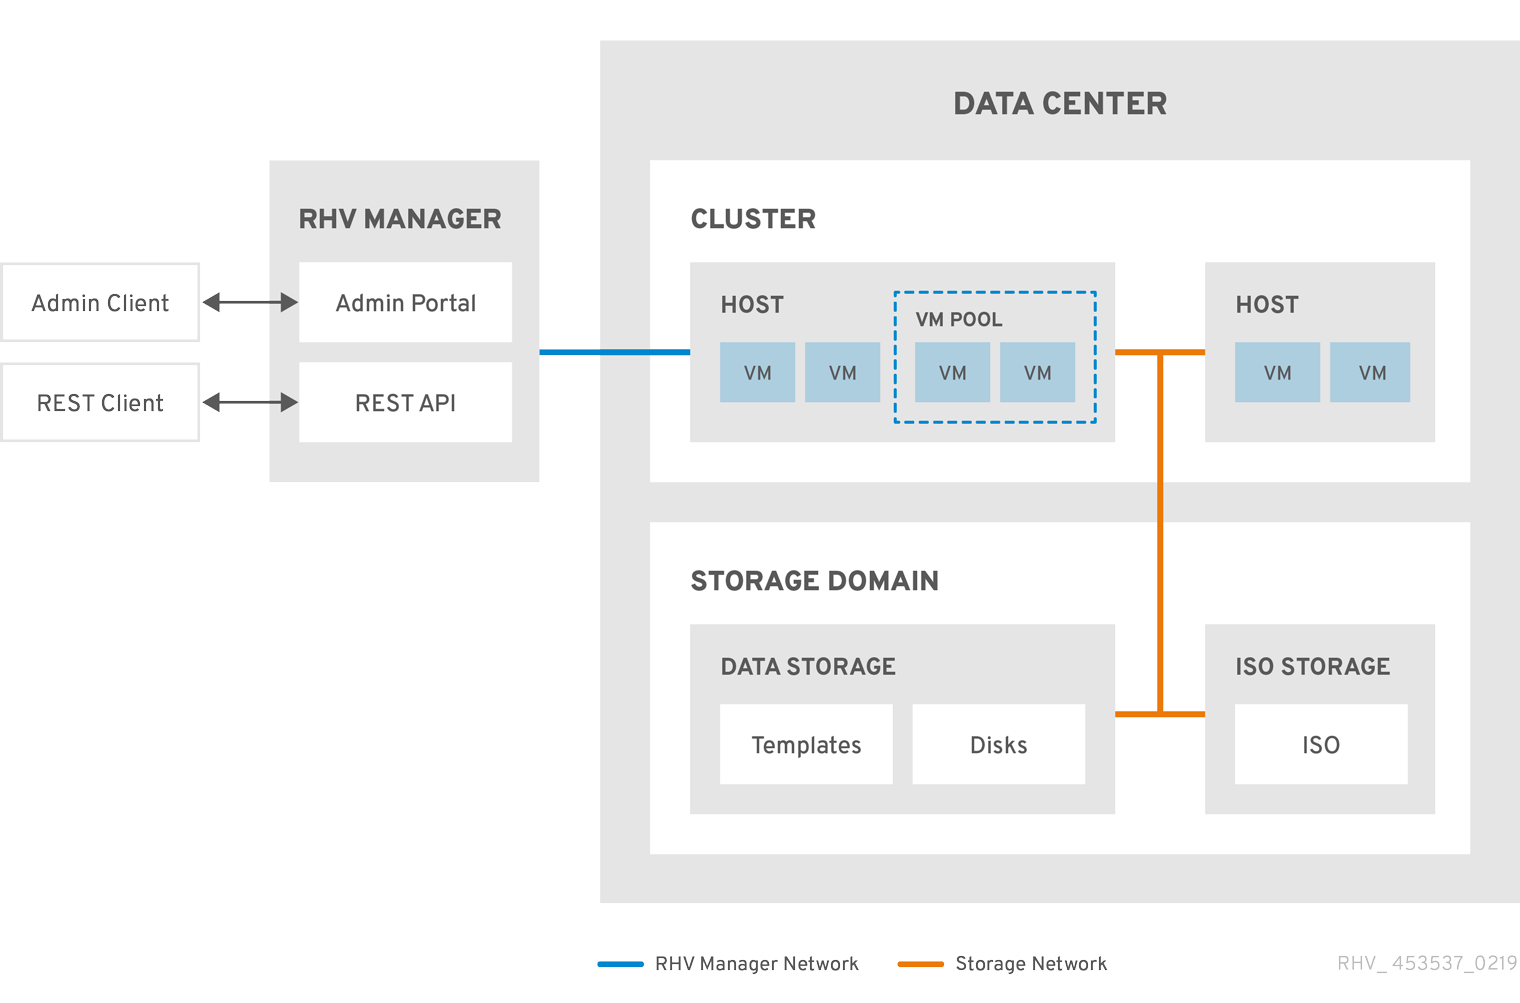
Figure 2.2. Cluster
2.3.2. Cluster Tasks
Some cluster options do not apply to Gluster clusters. For more information about using Red Hat Gluster Storage with Red Hat Virtualization, see Configuring Red Hat Virtualization with Red Hat Gluster Storage.
2.3.2.1. Creating a New Cluster
A data center can contain multiple clusters, and a cluster can contain multiple hosts. All hosts in a cluster must have the same CPU architecture. To optimize your CPU types, create your hosts before you create your cluster. After creating the cluster, you can configure the hosts using the Guide Me button.
Procedure
- Click → .
- Click New.
- Select the Data Center the cluster will belong to from the drop-down list.
- Enter the Name and Description of the cluster.
- Select a network from the Management Network drop-down list to assign the management network role.
- Select the CPU Architecture.
For CPU Type, select the oldest CPU processor family among the hosts that will be part of this cluster. The CPU types are listed in order from the oldest to newest.
ImportantA hosts whose CPU processor family is older than the one you specify with CPU Type cannot be part of this cluster. For details, see Which CPU family should a RHEV3 or RHV4 cluster be set to?.
- Select the FIPS Mode of the cluster from the drop-down list.
- Select the Compatibility Version of the cluster from the drop-down list.
- Select the Switch Type from the drop-down list.
Select the Firewall Type for hosts in the cluster, either Firewalld (default) or iptables.
Noteiptables is only supported on Red Hat Enterprise Linux 7 hosts, in clusters with compatibility version 4.2 or 4.3. You can only add Red Hat Enterprise Linux 8 hosts to clusters with firewall type firewalld
- Select either the Enable Virt Service or Enable Gluster Service check box to define whether the cluster will be populated with virtual machine hosts or with Gluster-enabled nodes.
- Optionally select the Enable to set VM maintenance reason check box to enable an optional reason field when a virtual machine is shut down from the Manager, allowing the administrator to provide an explanation for the maintenance.
- Optionally select the Enable to set Host maintenance reason check box to enable an optional reason field when a host is placed into maintenance mode from the Manager, allowing the administrator to provide an explanation for the maintenance.
- Optionally select the /dev/hwrng source (external hardware device) check box to specify the random number generator device that all hosts in the cluster will use. The /dev/urandom source (Linux-provided device) is enabled by default.
- Click the Optimization tab to select the memory page sharing threshold for the cluster, and optionally enable CPU thread handling and memory ballooning on the hosts in the cluster.
- Click the Migration Policy tab to define the virtual machine migration policy for the cluster.
- Click the Scheduling Policy tab to optionally configure a scheduling policy, configure scheduler optimization settings, enable trusted service for hosts in the cluster, enable HA Reservation, and select a serial number policy.
- Click the Console tab to optionally override the global SPICE proxy, if any, and specify the address of a SPICE proxy for hosts in the cluster.
- Click the Fencing policy tab to enable or disable fencing in the cluster, and select fencing options.
- Click the MAC Address Pool tab to specify a MAC address pool other than the default pool for the cluster. For more options on creating, editing, or removing MAC address pools, see MAC Address Pools.
- Click to create the cluster and open the Cluster - Guide Me window.
-
The Guide Me window lists the entities that need to be configured for the cluster. Configure these entities or postpone configuration by clicking the Configure Later button. Configuration can be resumed by selecting the cluster and clicking More Actions (
 ), then clicking Guide Me.
2.3.2.2. General Cluster Settings Explained
The table below describes the settings for the General tab in the New Cluster and Edit Cluster windows. Invalid entries are outlined in orange when you click , prohibiting the changes being accepted. In addition, field prompts indicate the expected values or range of values.
Table 2.4. General Cluster Settings
| Field | Description/Action |
|---|---|
| Data Center | The data center that will contain the cluster. The data center must be created before adding a cluster. |
| Name | The name of the cluster. This text field has a 40-character limit and must be a unique name with any combination of uppercase and lowercase letters, numbers, hyphens, and underscores. |
| Description / Comment | The description of the cluster or additional notes. These fields are recommended but not mandatory. |
| Management Network | The logical network that will be assigned the management network role. The default is ovirtmgmt. This network will also be used for migrating virtual machines if the migration network is not properly attached to the source or the destination hosts. On existing clusters, the management network can only be changed using the Manage Networks button in the Logical Networks tab in the details view. |
| CPU Architecture | The CPU architecture of the cluster. All hosts in a cluster must run the architecture you specify. Different CPU types are available depending on which CPU architecture is selected.
|
| CPU Type | The oldest CPU family in the cluster. For a list of CPU types, see CPU Requirements in the Planning and Prerequisites Guide. You cannot change this after creating the cluster without significant disruption. Set CPU type to the oldest CPU model in the cluster. Only features present in all models can be used. For both Intel and AMD CPU types, the listed CPU models are in logical order from the oldest to the newest. |
| Chipset/Firmware Type | This setting is only available if the CPU Architecture of the cluster is set to x86_64. This setting specifies the chipset and firmware type. Options are:
For more information, see UEFI and the Q35 chipset in the Administration Guide. |
| Change Existing VMs/Templates from 1440fx to Q35 Chipset with Bios | Select this check box to change existing workloads when the cluster’s chipset changes from I440FX to Q35. |
| FIPS Mode | The FIPS mode used by the cluster. All hosts in the cluster must run the FIPS mode you specify or they will become non-operational.
|
| Compatibility Version | The version of Red Hat Virtualization. You will not be able to select a version earlier than the version specified for the data center. |
| Switch Type | The type of switch used by the cluster. Linux Bridge is the standard Red Hat Virtualization switch. OVS provides support for Open vSwitch networking features. |
| Firewall Type | Specifies the firewall type for hosts in the cluster, either firewalld (default) or iptables. iptables is only supported on Red Hat Enterprise Linux 7 hosts, in clusters with compatibility version 4.2 or 4.3. You can only add Red Hat Enterprise Linux 8 hosts to clusters with firewall type firewalld. If you change an existing cluster’s firewall type, you must reinstall all hosts in the cluster to apply the change. |
| Default Network Provider | Specifies the default external network provider that the cluster will use. If you select Open Virtual Network (OVN), the hosts added to the cluster are automatically configured to communicate with the OVN provider. If you change the default network provider, you must reinstall all hosts in the cluster to apply the change. |
| Maximum Log Memory Threshold |
Specifies the logging threshold for maximum memory consumption as a percentage or as an absolute value in MB. A message is logged if a host’s memory usage exceeds the percentage value or if a host’s available memory falls below the absolute value in MB. The default is |
| Enable Virt Service | If this check box is selected, hosts in this cluster will be used to run virtual machines. |
| Enable Gluster Service | If this check box is selected, hosts in this cluster will be used as Red Hat Gluster Storage Server nodes, and not for running virtual machines. |
| Import existing gluster configuration | This check box is only available if the Enable Gluster Service radio button is selected. This option allows you to import an existing Gluster-enabled cluster and all its attached hosts to Red Hat Virtualization Manager. The following options are required for each host in the cluster that is being imported:
|
| Additional Random Number Generator source | If the check box is selected, all hosts in the cluster have the additional random number generator device available. This enables passthrough of entropy from the random number generator device to virtual machines. |
| Gluster Tuned Profile | This check box is only available if the Enable Gluster Service check box is selected. This option specifies the virtual-host tuning profile to enable more aggressive writeback of dirty memory pages, which benefits the host performance. |
2.3.2.3. Optimization Settings Explained
Memory Considerations
Memory page sharing allows virtual machines to use up to 200% of their allocated memory by utilizing unused memory in other virtual machines. This process is based on the assumption that the virtual machines in your Red Hat Virtualization environment will not all be running at full capacity at the same time, allowing unused memory to be temporarily allocated to a particular virtual machine.
CPU Considerations
For non-CPU-intensive workloads, you can run virtual machines with a total number of processor cores greater than the number of cores in the host (the number of processor cores for a single virtual machine must not exceed the number of cores in the host). The following benefits can be achieved:
- You can run a greater number of virtual machines, which reduces hardware requirements.
- You can configure virtual machines with CPU topologies that are otherwise not possible, such as when the number of virtual cores is between the number of host cores and the number of host threads.
- For best performance, and especially for CPU-intensive workloads, you should use the same topology in the virtual machine as in the host, so the host and the virtual machine expect the same cache usage. When the host has hyperthreading enabled, QEMU treats the host’s hyperthreads as cores, so the virtual machine is not aware that it is running on a single core with multiple threads. This behavior might impact the performance of a virtual machine, because a virtual core that actually corresponds to a hyperthread in the host core might share a single cache with another hyperthread in the same host core, while the virtual machine treats it as a separate core.
The table below describes the settings for the Optimization tab in the New Cluster and Edit Cluster windows.
Table 2.5. Optimization Settings
| Field | Description/Action |
|---|---|
| Memory Optimization |
|
| CPU Threads | Selecting the Count Threads As Cores check box enables hosts to run virtual machines with a total number of processor cores greater than the number of cores in the host (the number of processor cores for a single virtual machine must not exceed the number of cores in the host). When this check box is selected, the exposed host threads are treated as cores that virtual machines can use. For example, a 24-core system with 2 threads per core (48 threads total) can run virtual machines with up to 48 cores each, and the algorithms to calculate host CPU load would compare load against twice as many potential utilized cores. |
| Memory Balloon | Selecting the Enable Memory Balloon Optimization check box enables memory overcommitment on virtual machines running on the hosts in this cluster. When this check box is selected, the Memory Overcommit Manager (MoM) starts ballooning where and when possible, with a limitation of the guaranteed memory size of every virtual machine.
To have a balloon running, the virtual machine needs to have a balloon device with relevant drivers. Each virtual machine includes a balloon device unless specifically removed. Each host in this cluster receives a balloon policy update when its status changes to It is important to understand that in some scenarios ballooning may collide with KSM. In such cases MoM will try to adjust the balloon size to minimize collisions. Additionally, in some scenarios ballooning may cause sub-optimal performance for a virtual machine. Administrators are advised to use ballooning optimization with caution. |
| KSM control | Selecting the Enable KSM check box enables MoM to run Kernel Same-page Merging (KSM) when necessary and when it can yield a memory saving benefit that outweighs its CPU cost. |
2.3.2.4. Migration Policy Settings Explained
A migration policy defines the conditions for live migrating virtual machines in the event of host failure. These conditions include the downtime of the virtual machine during migration, network bandwidth, and how the virtual machines are prioritized.
Table 2.6. Migration Policies Explained
| Policy | Description |
|---|---|
| Cluster default (Minimal downtime) |
Overrides in |
| Minimal downtime | A policy that lets virtual machines migrate in typical situations. Virtual machines should not experience any significant downtime. The migration will be aborted if the virtual machine migration does not converge after a long time (dependent on QEMU iterations, with a maximum of 500 milliseconds). The guest agent hook mechanism is enabled. |
| Post-copy migration | When used, post-copy migration pauses the migrating virtual machine vCPUs on the source host, transfers only a minimum of memory pages, activates the virtual machine vCPUs on the destination host, and transfers the remaining memory pages while the virtual machine is running on the destination. The post-copy policy first tries pre-copy to verify whether convergence can occur. The migration switches to post-copy if the virtual machine migration does not converge after a long time. This significantly reduces the downtime of the migrated virtual machine, and also guarantees that the migration finishes regardless of how rapidly the memory pages of the source virtual machine change. It is optimal for migrating virtual machines in heavy continuous use, which would not be possible to migrate with standard pre-copy migration. The disadvantage of this policy is that in the post-copy phase, the virtual machine may slow down significantly as the missing parts of memory are transferred between the hosts. Warning If the network connection breaks prior to the completion of the post-copy process, the Manager pauses and then kills the running virtual machine. Do not use post-copy migration if the virtual machine availability is critical or if the migration network is unstable. |
| Suspend workload if needed | A policy that lets virtual machines migrate in most situations, including virtual machines running heavy workloads. Because of this, virtual machines may experience a more significant downtime than with some of the other settings. The migration may still be aborted for extreme workloads. The guest agent hook mechanism is enabled. |
The bandwidth settings define the maximum bandwidth of both outgoing and incoming migrations per host.
Table 2.7. Bandwidth Explained
| Policy | Description |
|---|---|
| Auto | Bandwidth is copied from the Rate Limit [Mbps] setting in the data center Host Network QoS. If the rate limit has not been defined, it is computed as a minimum of link speeds of sending and receiving network interfaces. If rate limit has not been set, and link speeds are not available, it is determined by local VDSM setting on sending host. |
| Hypervisor default | Bandwidth is controlled by local VDSM setting on sending Host. |
| Custom | Defined by user (in Mbps). This value is divided by the number of concurrent migrations (default is 2, to account for ingoing and outgoing migration). Therefore, the user-defined bandwidth must be large enough to accommodate all concurrent migrations.
For example, if the |
The resilience policy defines how the virtual machines are prioritized in the migration.
Table 2.8. Resilience Policy Settings
| Field | Description/Action |
|---|---|
| Migrate Virtual Machines | Migrates all virtual machines in order of their defined priority. |
| Migrate only Highly Available Virtual Machines | Migrates only highly available virtual machines to prevent overloading other hosts. |
| Do Not Migrate Virtual Machines | Prevents virtual machines from being migrated. |
Table 2.9. Additional Properties Settings
| Field | Description/Action |
|---|---|
| Enable Migration Encryption | Allows the virtual machine to be encrypted during migration.
|
| Parallel Migrations | Allows you to specify whether and how many parallel migration connections to use.
|
| Number of VM Migration Connections | This setting is only available when Custom is selected. The preferred number of custom parallel migrations, between 2 and 255. |
2.3.2.5. Scheduling Policy Settings Explained
Scheduling policies allow you to specify the usage and distribution of virtual machines between available hosts. Define the scheduling policy to enable automatic load balancing across the hosts in a cluster. Regardless of the scheduling policy, a virtual machine will not start on a host with an overloaded CPU. By default, a host’s CPU is considered overloaded if it has a load of more than 80% for 5 minutes, but these values can be changed using scheduling policies. See Scheduling Policies in the Administration Guide for more information.
Table 2.10. Scheduling Policy Tab Properties
| Field | Description/Action |
|---|---|
| Select Policy | Select a policy from the drop-down list.
|
| Properties | The following properties appear depending on the selected policy. Edit them if necessary:
|
| Scheduler Optimization | Optimize scheduling for host weighing/ordering.
|
| Enable Trusted Service |
Enable integration with an OpenAttestation server. Before this can be enabled, use the |
| Enable HA Reservation | Enable the Manager to monitor cluster capacity for highly available virtual machines. The Manager ensures that appropriate capacity exists within a cluster for virtual machines designated as highly available to migrate in the event that their existing host fails unexpectedly. |
| Serial Number Policy | Configure the policy for assigning serial numbers to each new virtual machine in the cluster:
|
| Custom Serial Number | Specify the custom serial number to apply to new virtual machines in the cluster. |
When a host’s free memory drops below 20%, ballooning commands like mom.Controllers.Balloon - INFO Ballooning guest:half1 from 1096400 to 1991580 are logged to /var/log/vdsm/mom.log. /var/log/vdsm/mom.log is the Memory Overcommit Manager log file.
2.3.2.6. MaxFreeMemoryForOverUtilized and MinFreeMemoryForUnderUtilized cluster scheduling policy properties
The scheduler has a background process that migrates virtual machines according to the current cluster scheduling policy and its parameters. Based on the various criteria and their relative weights in a policy, the scheduler continuously categorizes hosts as source hosts or destination hosts and migrates individual virtual machines from the former to the latter.
The following description explains how the evenly_distributed and power_saving cluster scheduling policies interact with the MaxFreeMemoryForOverUtilized and MinFreeMemoryForUnderUtilized properties. Although both policies consider CPU and memory load, CPU load is not relevant for the MaxFreeMemoryForOverUtilized and MinFreeMemoryForUnderUtilized properties.
If you define the MaxFreeMemoryForOverUtilized and MinFreeMemoryForUnderUtilized properties as part of the evenly_distributed policy:
- Hosts that have less free memory than MaxFreeMemoryForOverUtilized are overutilized and become source hosts.
- Hosts that have more free memory than MinFreeMemoryForUnderUtilized are underutilized and become destination hosts.
- If MaxFreeMemoryForOverUtilized is not defined, the scheduler does not migrate virtual machines based on the memory load. (It continues migrating virtual machines based on the policy’s other criteria, such as CPU load.)
- If MinFreeMemoryForUnderUtilized is not defined, the scheduler considers all hosts eligible to become destination hosts.
If you define the MaxFreeMemoryForOverUtilized and MinFreeMemoryForUnderUtilized properties as part of the power_saving policy:
- Hosts that have less free memory than MaxFreeMemoryForOverUtilized are overutilized and become source hosts.
- Hosts that have more free memory than MinFreeMemoryForUnderUtilized are underutilized and become source hosts.
- Hosts that have more free memory than MaxFreeMemoryForOverUtilized are not overutilized and become destination hosts.
- Hosts that have less free memory than MinFreeMemoryForUnderUtilized are not underutilized and become destination hosts.
- The scheduler prefers migrating virtual machines to hosts that are neither overutilized nor underutilized. If there are not enough of these hosts, the scheduler can migrate virtual machines to underutilized hosts. If the underutilized hosts are not needed for this purpose, the scheduler can power them down.
- If MaxFreeMemoryForOverUtilized is not defined, no hosts are overutilized. Therefore, only underutilized hosts are source hosts, and destination hosts include all hosts in the cluster.
- If MinFreeMemoryForUnderUtilized is not defined, only overutilized hosts are source hosts, and hosts that are not overutilized are destination hosts.
To prevent the host from overutilization of all the physical CPUs, define the virtual CPU to physical CPU ratio - VCpuToPhysicalCpuRatio with a value between 0.1 and 2.9. When this parameter is set, hosts with a lower CPU utilization are preferred when scheduling a virtual machine.
If adding a virtual machine causes the ratio to exceed the limit, both the VCpuToPhysicalCpuRatio and the CPU utilization are considered.
In a running environment, if the host VCpuToPhysicalCpuRatio exceeds 2.5, some virtual machines might be load balanced and moved to hosts with a lower VCpuToPhysicalCpuRatio.
Additional resources
2.3.2.7. Cluster Console Settings Explained
The table below describes the settings for the Console tab in the New Cluster and Edit Cluster windows.
Table 2.11. Console Settings
| Field | Description/Action |
|---|---|
| Define SPICE Proxy for Cluster | Select this check box to enable overriding the SPICE proxy defined in global configuration. This feature is useful in a case where the user (who is, for example, connecting via the VM Portal) is outside of the network where the hypervisors reside. |
| Overridden SPICE proxy address | The proxy by which the SPICE client connects to virtual machines. The address must be in the following format: protocol://[host]:[port] |
2.3.2.8. Fencing Policy Settings Explained
The table below describes the settings for the Fencing Policy tab in the New Cluster and Edit Cluster windows.
Table 2.12. Fencing Policy Settings
| Field | Description/Action |
|---|---|
| Enable fencing | Enables fencing on the cluster. Fencing is enabled by default, but can be disabled if required; for example, if temporary network issues are occurring or expected, administrators can disable fencing until diagnostics or maintenance activities are completed. Note that if fencing is disabled, highly available virtual machines running on non-responsive hosts will not be restarted elsewhere. |
| Skip fencing if host has live lease on storage | If this check box is selected, any hosts in the cluster that are Non Responsive and still connected to storage will not be fenced. |
| Skip fencing on cluster connectivity issues | If this check box is selected, fencing will be temporarily disabled if the percentage of hosts in the cluster that are experiencing connectivity issues is greater than or equal to the defined Threshold. The Threshold value is selected from the drop-down list; available values are 25, 50, 75, and 100. |
| Skip fencing if gluster bricks are up | This option is only available when Red Hat Gluster Storage functionality is enabled. If this check box is selected, fencing is skipped if bricks are running and can be reached from other peers. See Chapter 2. Configure High Availability using Fencing Policies and Appendix A. Fencing Policies for Red Hat Gluster Storage in Maintaining Red Hat Hyperconverged Infrastructure for more information. |
| Skip fencing if gluster quorum not met | This option is only available when Red Hat Gluster Storage functionality is enabled. If this check box is selected, fencing is skipped if bricks are running and shutting down the host will cause loss of quorum. See Chapter 2. Configure High Availability using Fencing Policies and Appendix A. Fencing Policies for Red Hat Gluster Storage in Maintaining Red Hat Hyperconverged Infrastructure for more information. |
2.3.2.9. Setting Load and Power Management Policies for Hosts in a Cluster
The evenly_distributed and power_saving scheduling policies allow you to specify acceptable memory and CPU usage values, and the point at which virtual machines must be migrated to or from a host. The vm_evenly_distributed scheduling policy distributes virtual machines evenly between hosts based on a count of the virtual machines. Define the scheduling policy to enable automatic load balancing across the hosts in a cluster. For a detailed explanation of each scheduling policy, see Cluster Scheduling Policy Settings.
Procedure
- Click → and select a cluster.
- Click Edit.
- Click the Scheduling Policy tab.
Select one of the following policies:
- none
vm_evenly_distributed
- Set the minimum number of virtual machines that must be running on at least one host to enable load balancing in the HighVmCount field.
- Define the maximum acceptable difference between the number of virtual machines on the most highly-utilized host and the number of virtual machines on the least-utilized host in the MigrationThreshold field.
- Define the number of slots for virtual machines to be reserved on SPM hosts in the SpmVmGrace field.
- Optionally, in the HeSparesCount field, enter the number of additional self-hosted engine nodes on which to reserve enough free memory to start the Manager virtual machine if it migrates or shuts down. See Configuring Memory Slots Reserved for the self-hosted engine for more information.
evenly_distributed
- Set the time (in minutes) that a host can run a CPU load outside of the defined utilization values before the scheduling policy takes action in the CpuOverCommitDurationMinutes field.
- Enter the CPU utilization percentage at which virtual machines start migrating to other hosts in the HighUtilization field.
- Optionally, in the HeSparesCount field, enter the number of additional self-hosted engine nodes on which to reserve enough free memory to start the Manager virtual machine if it migrates or shuts down. See Configuring Memory Slots Reserved for the self-hosted engine for more information.
Optionally, to prevent the host from overutilization of all the physical CPUs, define the virtual CPU to physical CPU ratio - VCpuToPhysicalCpuRatio with a value between 0.1 and 2.9. When this parameter is set, hosts with a lower CPU utilization are preferred when scheduling a virtual machine.
If adding a virtual machine causes the ratio to exceed the limit, both the VCpuToPhysicalCpuRatio and the CPU utilization are considered.
In a running environment, if the host VCpuToPhysicalCpuRatio exceeds 2.5, some virtual machines might be load balanced and moved to hosts with a lower VCpuToPhysicalCpuRatio.
power_saving
- Set the time (in minutes) that a host can run a CPU load outside of the defined utilization values before the scheduling policy takes action in the CpuOverCommitDurationMinutes field.
- Enter the CPU utilization percentage below which the host will be considered under-utilized in the LowUtilization field.
- Enter the CPU utilization percentage at which virtual machines start migrating to other hosts in the HighUtilization field.
- Optionally, in the HeSparesCount field, enter the number of additional self-hosted engine nodes on which to reserve enough free memory to start the Manager virtual machine if it migrates or shuts down. See Configuring Memory Slots Reserved for the self-hosted engine for more information.
Choose one of the following as the Scheduler Optimization for the cluster:
- Select Optimize for Utilization to include weight modules in scheduling to allow best selection.
- Select Optimize for Speed to skip host weighting in cases where there are more than ten pending requests.
-
If you are using an OpenAttestation server to verify your hosts, and have set up the server’s details using the
engine-configtool, select the Enable Trusted Service check box.
OpenAttestation and Intel Trusted Execution Technology (Intel TXT) are no longer available.
- Optionally select the Enable HA Reservation check box to enable the Manager to monitor cluster capacity for highly available virtual machines.
Optionally select a Serial Number Policy for the virtual machines in the cluster:
-
System Default: Use the system-wide defaults, which are configured in the Manager database using the engine configuration tool and the
DefaultSerialNumberPolicyandDefaultCustomSerialNumberkey names. The default value forDefaultSerialNumberPolicyis to use the Host ID. See Scheduling Policies in the Administration Guide for more information. - Host ID: Set each virtual machine’s serial number to the UUID of the host.
- Vm ID: Set each virtual machine’s serial number to the UUID of the virtual machine.
- Custom serial number: Set each virtual machine’s serial number to the value you specify in the following Custom Serial Number parameter.
-
System Default: Use the system-wide defaults, which are configured in the Manager database using the engine configuration tool and the
- Click .
2.3.2.10. Updating the MoM Policy on Hosts in a Cluster
The Memory Overcommit Manager handles memory balloon and KSM functions on a host. Changes to these functions for a cluster pass to hosts the next time a host moves to a status of Up after being rebooted or in maintenance mode. However, if necessary you can apply important changes to a host immediately by synchronizing the MoM policy while the host is Up. The following procedure must be performed on each host individually.
Procedure
- Click → .
- Click the cluster’s name. This opens the details view.
- Click the Hosts tab and select the host that requires an updated MoM policy.
- Click Sync MoM Policy.
The MoM policy on the host is updated without having to move the host to maintenance mode and back Up.
2.3.2.11. Creating a CPU Profile
CPU profiles define the maximum amount of processing capability a virtual machine in a cluster can access on the host on which it runs, expressed as a percent of the total processing capability available to that host. CPU profiles are created based on CPU profiles defined under data centers, and are not automatically applied to all virtual machines in a cluster; they must be manually assigned to individual virtual machines for the profile to take effect.
This procedure assumes you have already defined one or more CPU quality of service entries under the data center to which the cluster belongs.
Procedure
- Click → .
- Click the cluster’s name. This opens the details view.
- Click the CPU Profiles tab.
- Click New.
- Enter a Name and a Description for the CPU profile.
- Select the quality of service to apply to the CPU profile from the QoS list.
- Click .
2.3.2.12. Removing a CPU Profile
Remove an existing CPU profile from your Red Hat Virtualization environment.
Procedure
- Click → .
- Click the cluster’s name. This opens the details view.
- Click the CPU Profiles tab and select the CPU profile to remove.
- Click Remove.
- Click .
If the CPU profile was assigned to any virtual machines, those virtual machines are automatically assigned the default CPU profile.
2.3.2.13. Importing an Existing Red Hat Gluster Storage Cluster
You can import a Red Hat Gluster Storage cluster and all hosts belonging to the cluster into Red Hat Virtualization Manager.
When you provide details such as the IP address or host name and password of any host in the cluster, the gluster peer status command is executed on that host through SSH, then displays a list of hosts that are a part of the cluster. You must manually verify the fingerprint of each host and provide passwords for them. You will not be able to import the cluster if one of the hosts in the cluster is down or unreachable. As the newly imported hosts do not have VDSM installed, the bootstrap script installs all the necessary VDSM packages on the hosts after they have been imported, and reboots them.
Procedure
- Click → .
- Click New.
- Select the Data Center the cluster will belong to.
- Enter the Name and Description of the cluster.
Select the Enable Gluster Service check box and the Import existing gluster configuration check box.
The Import existing gluster configuration field is only displayed if the Enable Gluster Service is selected.
In the Hostname field, enter the host name or IP address of any server in the cluster.
The host SSH Fingerprint displays to ensure you are connecting with the correct host. If a host is unreachable or if there is a network error, an error Error in fetching fingerprint displays in the Fingerprint field.
- Enter the Password for the server, and click .
- The Add Hosts window opens, and a list of hosts that are a part of the cluster displays.
- For each host, enter the Name and the Root Password.
If you wish to use the same password for all hosts, select the Use a Common Password check box to enter the password in the provided text field.
Click Apply to set the entered password all hosts.
Verify that the fingerprints are valid and submit your changes by clicking OK.
The bootstrap script installs all the necessary VDSM packages on the hosts after they have been imported, and reboots them. You have now successfully imported an existing Red Hat Gluster Storage cluster into Red Hat Virtualization Manager.
2.3.2.14. Explanation of Settings in the Add Hosts Window
The Add Hosts window allows you to specify the details of the hosts imported as part of a Gluster-enabled cluster. This window appears after you have selected the Enable Gluster Service check box in the New Cluster window and provided the necessary host details.
Table 2.13. Add Gluster Hosts Settings
| Field | Description |
|---|---|
| Use a common password | Tick this check box to use the same password for all hosts belonging to the cluster. Enter the password in the Password field, then click the Apply button to set the password on all hosts. |
| Name | Enter the name of the host. |
| Hostname/IP | This field is automatically populated with the fully qualified domain name or IP of the host you provided in the New Cluster window. |
| Root Password | Enter a password in this field to use a different root password for each host. This field overrides the common password provided for all hosts in the cluster. |
| Fingerprint | The host fingerprint is displayed to ensure you are connecting with the correct host. This field is automatically populated with the fingerprint of the host you provided in the New Cluster window. |
2.3.2.15. Removing a Cluster
Move all hosts out of a cluster before removing it.
You cannot remove the Default cluster, as it holds the Blank template. You can, however, rename the Default cluster and add it to a new data center.
Procedure
- Click → and select a cluster.
- Ensure there are no hosts in the cluster.
- Click Remove.
- Click
2.3.2.16. Memory Optimization
To increase the number of virtual machines on a host, you can use memory overcommitment, in which the memory you assign to virtual machines exceeds RAM and relies on swap space.
However, there are potential problems with memory overcommitment:
- Swapping performance - Swap space is slower and consumes more CPU resources than RAM, impacting virtual machine performance. Excessive swapping can lead to CPU thrashing.
- Out-of-memory (OOM) killer - If the host runs out of swap space, new processes cannot start, and the kernel’s OOM killer daemon begins shutting down active processes such as virtual machine guests.
To help overcome these shortcomings, you can do the following:
- Limit memory overcommitment using the Memory Optimization setting and the Memory Overcommit Manager (MoM).
- Make the swap space large enough to accommodate the maximum potential demand for virtual memory and have a safety margin remaining.
- Reduce virtual memory size by enabling memory ballooning and Kernel Same-page Merging (KSM).
2.3.2.17. Memory Optimization and Memory Overcommitment
You can limit the amount of memory overcommitment by selecting one of the Memory Optimization settings: None (0%), 150%, or 200%.
Each setting represents a percentage of RAM. For example, with a host that has 64 GB RAM, selecting 150% means you can overcommit memory by an additional 32 GB, for a total of 96 GB in virtual memory. If the host uses 4 GB of that total, the remaining 92 GB are available. You can assign most of that to the virtual machines (Memory Size on the System tab), but consider leaving some of it unassigned as a safety margin.
Sudden spikes in demand for virtual memory can impact performance before the MoM, memory ballooning, and KSM have time to re-optimize virtual memory. To reduce that impact, select a limit that is appropriate for the kinds of applications and workloads you are running:
- For workloads that produce more incremental growth in demand for memory, select a higher percentage, such as 200% or 150%.
- For more critical applications or workloads that produce more sudden increases in demand for memory, select a lower percentage, such as 150% or None (0%). Selecting None helps prevent memory overcommitment but allows the MoM, memory balloon devices, and KSM to continue optimizing virtual memory.
Always test your Memory Optimization settings by stress testing under a wide range of conditions before deploying the configuration to production.
To configure the Memory Optimization setting, click the Optimization tab in the New Cluster or Edit Cluster windows. See Cluster Optimization Settings Explained.
Additional comments:
- The Host Statistics views display useful historical information for sizing the overcommitment ratio.
- The actual memory available cannot be determined in real time because the amount of memory optimization achieved by KSM and memory ballooning changes continuously.
- When virtual machines reach the virtual memory limit, new apps cannot start.
- When you plan the number of virtual machines to run on a host, use the maximum virtual memory (physical memory size and the Memory Optimization setting) as a starting point. Do not factor in the smaller virtual memory achieved by memory optimizations such as memory ballooning and KSM.
2.3.2.18. Swap Space and Memory Overcommitment
Red Hat provides these recommendations for configuring swap space.
When applying these recommendations, follow the guidance to size the swap space as "last effort memory" for a worst-case scenario. Use the physical memory size and Memory Optimization setting as a basis for estimating the total virtual memory size. Exclude any reduction of the virtual memory size from optimization by the MoM, memory ballooning, and KSM.
To help prevent an OOM condition, make the swap space large enough to handle a worst-case scenario and still have a safety margin available. Always stress-test your configuration under a wide range of conditions before deploying it to production.
2.3.2.19. The Memory Overcommit Manager (MoM)
The Memory Overcommit Manager (MoM) does two things:
- It limits memory overcommitment by applying the Memory Optimization setting to the hosts in a cluster, as described in the preceding section.
- It optimizes memory by managing the memory ballooning and KSM, as described in the following sections.
You do not need to enable or disable MoM.
When a host’s free memory drops below 20%, ballooning commands like mom.Controllers.Balloon - INFO Ballooning guest:half1 from 1096400 to 1991580 are logged to /var/log/vdsm/mom.log, the Memory Overcommit Manager log file.
2.3.2.20. Memory Ballooning
Virtual machines start with the full amount of virtual memory you have assigned to them. As virtual memory usage exceeds RAM, the host relies more on swap space. If enabled, memory ballooning lets virtual machines give up the unused portion of that memory. The freed memory can be reused by other processes and virtual machines on the host. The reduced memory footprint makes swapping less likely and improves performance.
The virtio-balloon package that provides the memory balloon device and drivers ships as a loadable kernel module (LKM). By default, it is configured to load automatically. Adding the module to the denyist or unloading it disables ballooning.
The memory balloon devices do not coordinate directly with each other; they rely on the host’s Memory Overcommit Manager (MoM) process to continuously monitor each virtual machine needs and instruct the balloon device to increase or decrease virtual memory.
Performance considerations:
- Red Hat does not recommend memory ballooning and overcommitment for workloads that require continuous high-performance and low latency. See Configuring High-Performance Virtual Machines, Templates, and Pools.
- Use memory ballooning when increasing virtual machine density (economy) is more important than performance.
- Memory ballooning does not have a significant impact on CPU utilization. (KSM consumes some CPU resources, but consumption remains consistent under pressure.)
To enable memory ballooning, click the Optimization tab in the New Cluster or Edit Cluster windows. Then select the Enable Memory Balloon Optimization checkbox. This setting enables memory overcommitment on virtual machines running on the hosts in this cluster. When this check box is selected, the MoM starts ballooning where and when possible, with a limitation of the guaranteed memory size of every virtual machine. See Cluster Optimization Settings Explained.
Each host in this cluster receives a balloon policy update when its status changes to Up. If necessary, you can manually update the balloon policy on a host without having to change the status. See Updating the MoM Policy on Hosts in a Cluster.
2.3.2.21. Kernel Same-page Merging (KSM)
When a virtual machine runs, it often creates duplicate memory pages for items such as common libraries and high-use data. Furthermore, virtual machines that run similar guest operating systems and applications produce duplicate memory pages in virtual memory.
When enabled, Kernel Same-page Merging (KSM) examines the virtual memory on a host, eliminates duplicate memory pages, and shares the remaining memory pages across multiple applications and virtual machines. These shared memory pages are marked copy-on-write; if a virtual machine needs to write changes to the page, it makes a copy first before writing its modifications to that copy.
While KSM is enabled, the MoM manages KSM. You do not need to configure or control KSM manually.
KSM increases virtual memory performance in two ways. Because a shared memory page is used more frequently, the host is more likely to the store it in cache or main memory, which improves the memory access speed. Additionally, with memory overcommitment, KSM reduces the virtual memory footprint, reducing the likelihood of swapping and improving performance.
KSM consumes more CPU resources than memory ballooning. The amount of CPU KSM consumes remains consistent under pressure. Running identical virtual machines and applications on a host provides KSM with more opportunities to merge memory pages than running dissimilar ones. If you run mostly dissimilar virtual machines and applications, the CPU cost of using KSM may offset its benefits.
Performance considerations:
- After the KSM daemon merges large amounts of memory, the kernel memory accounting statistics may eventually contradict each other. If your system has a large amount of free memory, you might improve performance by disabling KSM.
- Red Hat does not recommend KSM and overcommitment for workloads that require continuous high-performance and low latency. See Configuring High-Performance Virtual Machines, Templates, and Pools.
- Use KSM when increasing virtual machine density (economy) is more important than performance.
To enable KSM, click the Optimization tab in the New Cluster or Edit Cluster windows. Then select the Enable KSM checkbox. This setting enables MoM to run KSM when necessary and when it can yield a memory saving benefit that outweighs its CPU cost. See Cluster Optimization Settings Explained.
2.3.2.22. UEFI and the Q35 chipset
The Intel Q35 chipset, the default chipset for new virtual machines, includes support for the Unified Extensible Firmware Interface (UEFI), which replaces legacy BIOS.
Alternatively you can configure a virtual machine or cluster to use the legacy Intel i440fx chipset, which does not support UEFI.
UEFI provides several advantages over legacy BIOS, including the following:
- A modern boot loader
- SecureBoot, which authenticates the digital signatures of the boot loader
- GUID Partition Table (GPT), which enables disks larger than 2 TB
To use UEFI on a virtual machine, you must configure the virtual machine’s cluster for 4.4 compatibility or later. Then you can set UEFI for any existing virtual machine, or to be the default BIOS type for new virtual machines in the cluster. The following options are available:
Table 2.14. Available BIOS Types
| BIOS Type | Description |
|---|---|
| Q35 Chipset with Legacy BIOS | Legacy BIOS without UEFI (Default for clusters with compatibility version 4.4) |
| Q35 Chipset with UEFI BIOS | BIOS with UEFI |
| Q35 Chipset with SecureBoot | UEFI with SecureBoot, which authenticates the digital signatures of the boot loader |
| Legacy | i440fx chipset with legacy BIOS |
Setting the BIOS type before installing the operating system
You can configure a virtual machine to use the Q35 chipset and UEFI before installing an operating system. Converting a virtual machine from legacy BIOS to UEFI is not supported after installing an operating system.
2.3.2.23. Configuring a cluster to use the Q35 Chipset and UEFI
After upgrading a cluster to Red Hat Virtualization 4.4, all virtual machines in the cluster run the 4.4 version of VDSM. You can configure a cluster’s default BIOS type, which determines the default BIOS type of any new virtual machines you create in that cluster. If necessary, you can override the cluster’s default BIOS type by specifying a different BIOS type when you create a virtual machine.
Procedure
- In the VM Portal or the Administration Portal, click → .
- Select a cluster and click Edit.
- Click General.
Define the default BIOS type for new virtual machines in the cluster by clicking the BIOS Type dropdown menu, and selecting one of the following:
- Legacy
- Q35 Chipset with Legacy BIOS
- Q35 Chipset with UEFI BIOS
- Q35 Chipset with SecureBoot
- From the Compatibility Version dropdown menu select 4.4. The Manager checks that all running hosts are compatible with 4.4, and if they are, the Manager uses 4.4 features.
- If any existing virtual machines in the cluster should use the new BIOS type, configure them to do so. Any new virtual machines in the cluster that are configured to use the BIOS type Cluster default now use the BIOS type you selected. For more information, see Configuring a virtual machine to use the Q35 Chipset and UEFI.
Because you can change the BIOS type only before installing an operating system, for any existing virtual machines that are configured to use the BIOS type Cluster default, change the BIOS type to the previous default cluster BIOS type. Otherwise the virtual machine might not boot. Alternatively, you can reinstall the virtual machine’s operating system.
2.3.2.24. Configuring a virtual machine to use the Q35 Chipset and UEFI
You can configure a virtual machine to use the Q35 chipset and UEFI before installing an operating system. Converting a virtual machine from legacy BIOS to UEFI, or from UEFI to legacy BIOS, might prevent the virtual machine from booting. If you change the BIOS type of an existing virtual machine, reinstall the operating system.
If the virtual machine’s BIOS type is set to Cluster default, changing the BIOS type of the cluster changes the BIOS type of the virtual machine. If the virtual machine has an operating system installed, changing the cluster BIOS type can cause booting the virtual machine to fail.
Procedure
To configure a virtual machine to use the Q35 chipset and UEFI:
- In the VM Portal or the Administration Portal click → .
- Select a virtual machine and click Edit.
- On the General tab, click Show Advanced Options.
- Click → .
Select one of the following from the BIOS Type dropdown menu:
- Cluster default
- Q35 Chipset with Legacy BIOS
- Q35 Chipset with UEFI BIOS
- Q35 Chipset with SecureBoot
- Click .
- From the Virtual Machine portal or the Administration Portal, power off the virtual machine. The next time you start the virtual machine, it will run with the new BIOS type you selected.
2.3.2.25. Changing the Cluster Compatibility Version
Red Hat Virtualization clusters have a compatibility version. The cluster compatibility version indicates the features of Red Hat Virtualization supported by all of the hosts in the cluster. The cluster compatibility is set according to the version of the least capable host operating system in the cluster.
Prerequisites
- To change the cluster compatibility level, you must first update all the hosts in your cluster to a level that supports your desired compatibility level. Check if there is an icon next to the host indicating an update is available.
Limitations
Virtio NICs are enumerated as a different device after upgrading the cluster compatibility level to 4.6. Therefore, the NICs might need to be reconfigured. Red Hat recommends that you test the virtual machines before you upgrade the cluster by setting the cluster compatibility level to 4.6 on the virtual machine and verifying the network connection.
If the network connection for the virtual machine fails, configure the virtual machine with a custom emulated machine that matches the current emulated machine, for example pc-q35-rhel8.3.0 for 4.5 compatibility version, before upgrading the cluster.
Procedure
- In the Administration Portal, click → .
- Select the cluster to change and click .
- On the General tab, change the Compatibility Version to the desired value.
- Click . The Change Cluster Compatibility Version confirmation dialog opens.
- Click to confirm.
An error message might warn that some virtual machines and templates are incorrectly configured. To fix this error, edit each virtual machine manually. The Edit Virtual Machine window provides additional validations and warnings that show what to correct. Sometimes the issue is automatically corrected and the virtual machine’s configuration just needs to be saved again. After editing each virtual machine, you will be able to change the cluster compatibility version.
After updating a cluster’s compatibility version, you must update the cluster compatibility version of all running or suspended virtual machines by rebooting them from the Administration Portal, or using the REST API, or from within the guest operating system. Virtual machines that require a reboot are marked with the pending changes icon (
 ). You cannot change the cluster compatibility version of a virtual machine snapshot that is in preview. You must first commit or undo the preview.
In a self-hosted engine environment, the Manager virtual machine does not need to be restarted.
Although you can wait to reboot the virtual machines at a convenient time, rebooting immediately is highly recommended so that the virtual machines use the latest configuration. Virtual machines that have not been updated run with the old configuration, and the new configuration could be overwritten if other changes are made to the virtual machine before the reboot.
Once you have updated the compatibility version of all clusters and virtual machines in a data center, you can then change the compatibility version of the data center itself.