
Red Hat Training
A Red Hat training course is available for Red Hat Gluster Storage
Installation Guide
Installing Red Hat Gluster Storage 3.1
Abstract
Chapter 1. Planning Red Hat Gluster Storage Installation
1.1. About Red Hat Gluster Storage
Red Hat Gluster Storage Server for On-Premise enables enterprises to treat physical storage as a virtualized, scalable, and centrally managed pool of storage by using commodity server and storage hardware.
Red Hat Gluster Storage Server for Public Cloud packages GlusterFS as an Amazon Machine Image (AMI) for deploying scalable NAS in the AWS public cloud. This powerful storage server provides a highly available, scalable, virtualized, and centrally managed pool of storage for Amazon users.
1.2. Prerequisites
XFS - Format the back-end file system using XFS for glusterFS bricks. XFS can journal metadata, resulting in faster crash recovery. The XFS file system can also be defragmented and expanded while mounted and active.
Note
ext3 or ext4 to upgrade to a supported version of Red Hat Gluster Storage using the XFS back-end file system.
Format glusterFS bricks using XFS on the Logical Volume Manager to prepare for the installation.
- Synchronize time across all Red Hat Gluster Storage servers using the Network Time Protocol (NTP) daemon.
1.2.1. Network Time Protocol Setup
ntpd daemon to automatically synchronize the time during the boot process as follows:
- Edit the NTP configuration file
/etc/ntp.confusing a text editor such as vim or nano.# nano /etc/ntp.conf
- Add or edit the list of public NTP servers in the
ntp.conffile as follows:server 0.rhel.pool.ntp.org server 1.rhel.pool.ntp.org server 2.rhel.pool.ntp.org
The Red Hat Enterprise Linux 6 version of this file already contains the required information. Edit the contents of this file if customization is required. - Optionally, increase the initial synchronization speed by appending the
iburstdirective to each line:server 0.rhel.pool.ntp.org iburst server 1.rhel.pool.ntp.org iburst server 2.rhel.pool.ntp.org iburst
- After the list of servers is complete, set the required permissions in the same file. Ensure that only
localhosthas unrestricted access:restrict default kod nomodify notrap nopeer noquery restrict -6 default kod nomodify notrap nopeer noquery restrict 127.0.0.1 restrict -6 ::1
- Save all changes, exit the editor, and restart the NTP daemon:
# service ntpd restart
- Ensure that the
ntpddaemon starts at boot time:# chkconfig ntpd on
ntpdate command for a one-time synchronization of NTP. For more information about this feature, see the Red Hat Enterprise Linux Deployment Guide.
1.3. Hardware Compatibility
1.4. Port Information
Table 1.1. TCP Port Numbers
| Port Number | Usage |
|---|---|
| 22 | For sshd used by geo-replication. |
| 111 | For rpc port mapper. |
| 139 | For netbios service. |
| 445 | For CIFS protocol. |
| 965 | For NFS's Lock Manager (NLM). |
| 2049 | For glusterFS's NFS exports (nfsd process). |
| 24007 | For glusterd (for management). |
| 24009 - 24108 | For client communication with Red Hat Gluster Storage 2.0. |
| 38465 | For NFS mount protocol. |
| 38466 | For NFS mount protocol. |
| 38468 | For NFS's Lock Manager (NLM). |
| 38469 | For NFS's ACL support. |
| 39543 | For oVirt (Red Hat Gluster Storage-Console). |
| 49152 - 49251 | For client communication with Red Hat Gluster Storage 2.1 and for brick processes depending on the availability of the ports. The total number of ports required to be open depends on the total number of bricks exported on the machine. |
| 54321 | For VDSM (Red Hat Gluster Storage Console). |
| 55863 | For oVirt (Red Hat Gluster Storage-Console). |
Table 1.2. TCP Port Numbers used for Object Storage (Swift)
| Port Number | Usage |
|---|---|
| 443 | For HTTPS request. |
| 6010 | For Object Server. |
| 6011 | For Container Server. |
| 6012 | For Account Server. |
| 8080 | For Proxy Server. |
Table 1.3. TCP Port Numbers for Nagios Monitoring
| Port Number | Usage |
|---|---|
| 80 | For HTTP protocol (required only if Nagios server is running on a Red Hat Gluster Storage node). |
| 443 | For HTTPS protocol (required only for Nagios server). |
| 5667 | For NSCA service (required only if Nagios server is running on a Red Hat Gluster Storage node). |
| 5666 | For NRPE service (required in all Red Hat Gluster Storage nodes). |
Table 1.4. UDP Port Numbers
| Port Number | Usage |
|---|---|
| 111 | For RPC Bind. |
| 963 | For NFS's Lock Manager (NLM). |
1.5. Supported Versions of Red Hat Gluster Storage
Table 1.5. Version Details
| RHGS version | glusterfs and glusterfs-fuse | RHGS op-version | Samba | NFS |
|---|---|---|---|---|
| 3.0 | 3.6.0.28-1 | 30000 | SMB 1, 2.0 | NFSv3 |
| 3.0 Update 1 | 3.6.0.29-1 | 30000 | SMB 1, 2.0 | NFSv3 |
| 3.0 Update 2 | 3.6.0.29-3 | 30000 | SMB 1, 2.0 | NFSv3 |
| 3.0 Update 3 | 3.6.0.42-1 | 30000 | SMB 1, 2.0 | NFSv3 |
| 3.0 Update 4 | 3.6.0.53-1 | 30004 | SMB 1, 2.0, 2.1, 3.0 | NFSv3, NFSv4 |
| 3.1 | 3.7.1-11 | 30703 | SMB 1, 2.0, 2.1, 3.0 | NFSv3, NFSv4 |
| 3.1 Update 1 | 3.7.1-16 | 30703 | SMB 1, 2.0, 2.1, 3.0 | NFSv3, NFSv4 |
| 3.1 Update 2 | 3.7.5-19 | 30707 | SMB 1, 2.0, 2.1, 3.0 | NFSv3, NFSv4 |
rhel-x86_64-server-rhsclient-6).
Chapter 2. Installing Red Hat Gluster Storage
Important
- Technology preview packages will also be installed with this installation of Red Hat Gluster Storage Server. For more information about the list of technology preview features, see Chapter 4. Technology Previews in the Red Hat Gluster Storage 3.1 Release Notes.
- While cloning a Red Hat Gluster Storage Server installed on a virtual machine, the
/var/lib/glusterd/glusterd.infofile will be cloned to the other virtual machines, hence causing all the cloned virtual machines to have the same UUID. Ensure to remove the/var/lib/glusterd/glusterd.infofile before the virtual machine is cloned. The file will be automatically created with a UUID on initial start-up of the glusterd daemon on the cloned virtual machines.
2.1. Obtaining Red Hat Gluster Storage
2.1.1. Obtaining Red Hat Gluster Storage Server for On-Premise
- Visit the Red Hat Customer Service Portal at https://access.redhat.com/login and enter your user name and password to log in.
- Click Downloads to visit the Software & Download Center.
- In the Red Hat Gluster Storage Server area, click to download the latest version of the software.
2.1.2. Obtaining Red Hat Gluster Storage Server for Public Cloud
2.2. Installing from an ISO Image
2.2.1. Installing Red Hat Gluster Storage 3.1 on Red Hat Enterprise Linux 6.7
- Download an ISO image file for Red Hat Gluster Storage Server as described in Section 2.1, “Obtaining Red Hat Gluster Storage”The installation process launches automatically when you boot the system using the ISO image file.Press Enter to begin the installation process.
Note
For some hypervisors, while installing Red Hat Gluster Storage on a virtual machine, you must select theInstall System with basic video driveroption. - The Configure TCP/IP screen displays.To configure your computer to support TCP/IP, accept the default values for Internet Protocol Version 4 (IPv4) and Internet Protocol Version 6 (IPv6) and click OK. Alternatively, you can manually configure network settings for both Internet Protocol Version 4 (IPv4) and Internet Protocol Version 6 (IPv6).
Important
NLM Locking protocol implementation in Red Hat Gluster Storage does not support clients over IPv6.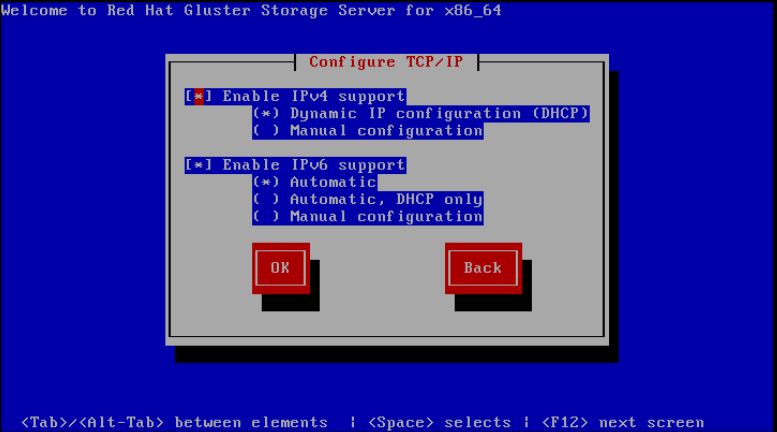
Figure 2.1. Configure TCP/IP
- The Welcome screen displays.Click Next.
- The Language Selection screen displays. Select the preferred language for the installation and the system default and click Next.
- The Keyboard Configuration screen displays. Select the preferred keyboard layout for the installation and the system default and click Next.
- The Storage Devices screen displays. Select Basic Storage Devices.Click Next.
- The Hostname configuration screen displays.Enter the hostname for the computer. You can also configure network interfaces if required. Click Next.
- The Time Zone Configuration screen displays. Set your time zone by selecting the city closest to your computer's physical location.
- The Set Root Password screen displays.The root account's credentials will be used to install packages, upgrade RPMs, and perform most system maintenance. As such, setting up a root account and password is one of the most important steps in the installation process.
Note
The root user (also known as the superuser) has complete access to the entire system. For this reason, you should only log in as the root user to perform system maintenance or administration.The Set Root Password screen prompts you to set a root password for your system. You cannot proceed to the next stage of the installation process without entering a root password.Enter the root password into the Root Password field. The characters you enter will be masked for security reasons. Then, type the same password into the Confirm field to ensure the password is set correctly. After you set the root password, click Next. - The Partitioning Type screen displays.Partitioning allows you to divide your hard drive into isolated sections that each behave as their own hard drive. Partitioning is particularly useful if you run multiple operating systems. If you are unsure how to partition your system, see An Introduction to Disk Partitions in Red Hat Enterprise Linux 6 Installation Guide for more information.In this screen you can choose to create the default partition layout in one of four different ways, or choose to partition storage devices manually to create a custom layout.If you are not comfortable partitioning your system, choose one of the first four options. These options allow you to perform an automated installation without having to partition your storage devices yourself. Depending on the option you choose, you can still control what data, if any, is removed from the system. Your options are:
- Use All Space
- Replace Existing Linux System(s)
- Shrink Current System
- Use Free Space
- Create Custom Layout
Choose the preferred partitioning method by clicking the radio button to the left of its description in the dialog box.Click Next once you have made your selection. For more information on disk partitioning, see Disk Partitioning Setup in the Red Hat Enterprise Linux 6 Installation Guide.Important
- It is recommended to create a separate
/varpartition that is large enough (50GB - 100GB) for log files, geo-replication related miscellaneous files, and other files. - If a user does not select Create Custom Layout, all the connected/detected disks will be used in the Volume Group for the
/and/homefilesystems.
- The Boot Loader screen displays with the default settings.Click Next.
- The Minimal Selection screen displays.Click Next to retain the default selections and proceed with the installation.
- To customize your package set further, select the Customize now option and click Next. This will take you to the Customizing the Software Selection screen.Click Next to retain the default selections and proceed with the installation.
- For Red Hat Gluster Storage 3.0.4 or later, if you require the Samba packages, ensure you select the RH-Gluster-Samba-Server component, in the Customizing the Software Selection screen. If you require samba active directory integration with gluster, ensure you select RH-Gluster-AD-Integration component. For NFS-Ganesha select RH-Gluster-NFS-Ganesha.
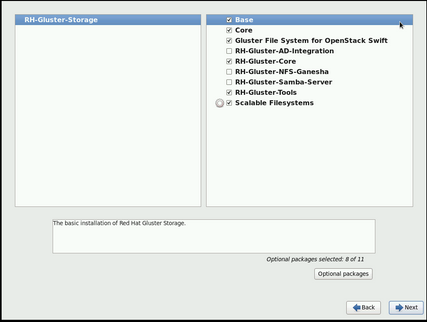
Figure 2.2. Customize Packages
- The Package Installation screen displays.Red Hat Gluster Storage Server reports the progress on the screen as it installs the selected packages in the system.
- On successful completion, the Installation Complete screen displays.
- Click Reboot to reboot the system and complete the installation of Red Hat Gluster Storage Server.Ensure that you remove any installation media if it is not automatically ejected upon reboot.Congratulations! Your Red Hat Gluster Storage Server installation is now complete.
2.2.2. Installing Red Hat Gluster Storage 3.1 on Red Hat Enterprise Linux 7.2
- Download an ISO image file for Red Hat Gluster Storage Server as described in Section 2.1, “Obtaining Red Hat Gluster Storage”
- In the Welcome to Red Hat Gluster Storage 3.1 screen, select the language that will be used for the rest of the installation and click Continue. This selection will also become the default for the installed system, unless changed later.
Note
One language is pre-selected by default on top of the list. If network access is configured at this point (for example, if you booted from a network server instead of local media), the pre-selected language will be determined based on automatic location detection using the GeoIP module. - The Installation Summary screen is the central location for setting up an installation.
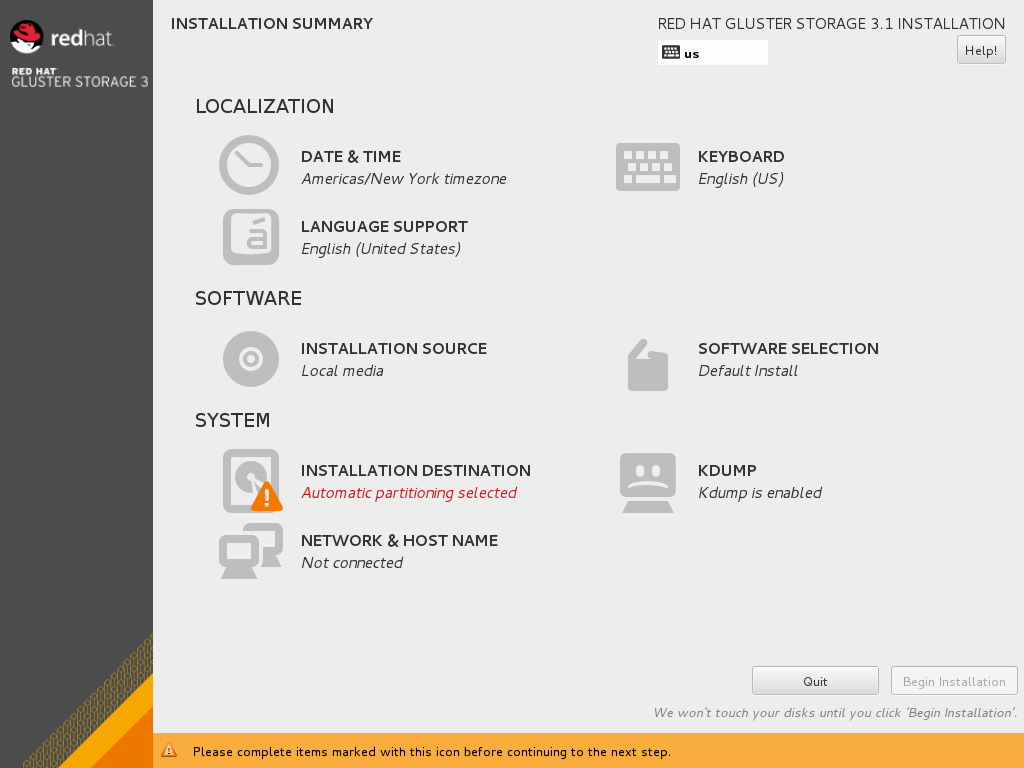
Figure 2.3. Installation Summary
Instead of directing you through consecutive screens, the Red Hat Gluster Storage 3.1 installation program on Red Hat Enterprise Linux 7.2 allows you to configure the installation in the order you choose.Select a menu item to configure a section of the installation. When you have completed configuring a section, or if you would like to complete that section later, click the Done button located in the upper left corner of the screen.Only sections marked with a warning symbol are mandatory. A note at the bottom of the screen warns you that these sections must be completed before the installation can begin. The remaining sections are optional. Beneath each section's title, the current configuration is summarized. Using this you can determine whether you need to visit the section to configure it further.The following list provides a brief information of each of the menu item on the Installation Summary screen:- Date & Time
To configure time zone, date, and optional settings for network time, select Date & Time.
- Language Support
To install support for additional locales and language dialects, select Language Support.
- Keyboard Configuration
To add multiple keyboard layouts to your system, select Keyboard.
- Installation Source
To specify a file or a location to install Red Hat Enterprise Linux from, select Installation Source. On this screen, you can choose between locally available installation media, such as a DVD or an ISO file, or a network location.
- Network & Hostname
To configure essential networking features for your system, select Network & Hostname.
Important
When the Red Hat Gluster Storage 3.1 on Red Hat Enterprise Linux 7.2 installation finishes and the system boots for the first time, any network interfaces which you configured during the installation will be activated. However, the installation does not prompt you to configure network interfaces on some common installation paths - for example, when you install Red Hat Gluster Storage 3.1 on Red Hat Enterprise Linux 7.2 from a DVD to a local hard drive.When you install Red Hat Gluster Storage 3.1 on Red Hat Enterprise Linux 7.2 from a local installation source to a local storage device, be sure to configure at least one network interface manually if you require network access when the system boots for the first time. You will also need to set the connection to connect automatically after boot when editing the configuration. - Software Selection
To specify which packages will be installed, select Software Selection. If you require the following optional Add-Ons, then select the required Add-Ons and click Done:
- RH-Gluster-AD-Integration
- RH-Gluster-NFS-Ganesha
- RH-Gluster-Samba-Server
- Installation Destination
To select the disks and partition the storage space on which you will install Red Hat Gluster Storage, select Installation Destination. For more information on Installation Destination, see Section 6.13 in the Red Hat Enterprise Linux 7 Installation Guide.
- Kdump
Kdump is a kernel crash dumping mechanism which, in the event of a system crash, captures information that can be invaluable in determining the cause of the crash. Use this option to select whether or not to use Kdump on the system
- After making the necessary configurations, click Begin Installation on the Installation Summary screen.
Warning
Up to this point in the installation process, no lasting changes have been made on your computer. When you click Begin Installation, the installation program will allocate space on your hard drive and start to transfer Red Hat Gluster Storage into this space. Depending on the partitioning option that you chose, this process might include erasing data that already exists on your computer.To revise any of the choices that you made up to this point, return to the relevant section of the Installation Summary screen. To cancel installation completely, click Quit or switch off your computer.If you have finished customizing the installation and are certain that you want to proceed, click Begin Installation.After you click Begin Installation, allow the installation process to complete. If the process is interrupted, for example, by you switching off or resetting the computer, or by a power outage, you will probably not be able to use your computer until you restart and complete the Red Hat Gluster Storage installation process - Once you click Begin Installation, the progress screen appears. Red Hat Gluster Storage reports the installation progress on the screen as it writes the selected packages to your system. Following is a brief description of the options on this screen:
- Root Password
The Root Password menu item is used to set the password for the root account. The root account is used to perform critical system management and administration tasks. The password can be configured either while the packages are being installed or afterwards, but you will not be able to complete the installation process until it has been configured.
- User Creation
Creating a user account is optional and can be done after installation, but it is recommended to do it on this screen. A user account is used for normal work and to access the system. Best practice suggests that you always access the system via a user account and not the root account.
- After the installation is completed, click Reboot to reboot your system and begin using Red Hat Gluster Storage.
2.3. Installing Red Hat Gluster Storage Server on Red Hat Enterprise Linux (Layered Install)
Important
- Layered Installation is not available to all customers. Contact your Red Hat representative for more details on whether you can use it.
- It is recommended to create a separate
/varpartition that is large enough (50GB - 100GB) for log files, geo-replication related miscellaneous files, and other files.
Perform a base install of Red Hat Enterprise Linux Server
Red Hat Gluster Storage requires a kernel version of 2.6.32-431.17.1 or higher. This is available in Red Hat Enterprise Linux 6.5 and higher, and in Red Hat Enterprise Linux 7.Register the System with Subscription Manager
Run the following command and enter your Red Hat Network user name and password to register the system with the Red Hat Network:# subscription-manager register
Identify Available Entitlement Pools
Run the following commands to find entitlement pools containing the repositories required to install Red Hat Gluster Storage:# subscription-manager list --available | grep -A8 "Red Hat Enterprise Linux Server" # subscription-manager list --available | grep -A8 "Red Hat Storage"
Attach Entitlement Pools to the System
Use the pool identifiers located in the previous step to attach theRed Hat Enterprise Linux ServerandRed Hat Gluster Storageentitlements to the system. Run the following command to attach the entitlements:# subscription-manager attach --pool=[POOLID]
For example:# subscription-manager attach --pool=8a85f9814999f69101499c05aa706e47
Disable all Existing Repositories
Execute the following command to disable any existing repositories:# subscription-manager repos --disable "*"
Enable the Required Channels
For Red Hat Gluster Storage 3.1 on Red Hat Enterprise Linux 6.7- Run the following commands to enable the repositories required to install Red Hat Gluster Storage:
# subscription-manager repos --enable=rhel-6-server-rpms
# subscription-manager repos --enable=rhel-scalefs-for-rhel-6-server-rpms
# subscription-manager repos --enable=rhs-3-for-rhel-6-server-rpms
- For Red Hat Gluster Storage 3.0.4 and later, if you require Samba, then enable the following repository:
# subscription-manager repos --enable=rh-gluster-3-samba-for-rhel-6-server-rpms
For more information about installing Samba, see Chapter 3, Deploying Samba on Red Hat Gluster Storage - If you require NFS-Ganesha then enable the following repository:
# subscription-manager repos
--enable=rh-gluster-3-nfs-for-rhel-6-server-rpms
For more information about installing NFS-Ganesha, see Chapter 4, Deploying NFS-Ganesha on Red Hat Gluster Storage.
For Red Hat Gluster Storage 3.1 on Red Hat Enterprise Linux 7.x- Run the following commands to enable the repositories required to install Red Hat Gluster Storage
# subscription-manager repos --enable=rhel-7-server-rpms
# subscription-manager repos --enable=rh-gluster-3-for-rhel-7-server-rpms
- For Red Hat Gluster Storage 3.0.4 and later, if you require Samba, then enable the following repository:
# subscription-manager repos --enable=rh-gluster-3-samba-for-rhel-7-server-rpms
For more information about installing Samba, see Chapter 3, Deploying Samba on Red Hat Gluster Storage - If you require NFS-Ganesha then enable the following repository:
# subscription-manager repos
--enable=rh-gluster-3-nfs-for-rhel-7-server-rpms
For more information about installing NFS-Ganesha, see Chapter 4, Deploying NFS-Ganesha on Red Hat Gluster Storage.
Verify if the Channels are Enabled
Run the following command to verify if the channels are enabled:# yum repolist
Install Red Hat Gluster Storage
Run the following command to install Red Hat Gluster Storage:# yum install redhat-storage-server
- For Red Hat Gluster Storage 3.0.4 and later, if you require Samba, then execute the following command to install Samba:
# yum groupinstall RH-Gluster-Samba-Server
- If you require Samba Active Directory integration with gluster, execute the following command:
# yum groupinstall RH-Gluster-AD-Integration
- To install NFS-Ganesha, see Chapter 4, Deploying NFS-Ganesha on Red Hat Gluster Storage
Reboot
Reboot the system.
2.4. Installing from a PXE Server
Network Boot or Boot Services. Once you properly configure PXE booting, the computer can boot the Red Hat Gluster Storage Server installation system without any other media.
- Ensure that the network cable is attached. The link indicator light on the network socket should be lit, even if the computer is not switched on.
- Switch on the computer.
- A menu screen appears. Press the number key that corresponds to the preferred option.
2.5. Installing from Red Hat Satellite Server
For more information on how to create an activation key, see Activation Keys in the Red Hat Network Satellite Reference Guide.
- In the Details tab of the Activation Keys screen, select
Red Hat Enterprise Linux Server (v.6 for 64-bit x86_64)from the Base Channels drop-down list.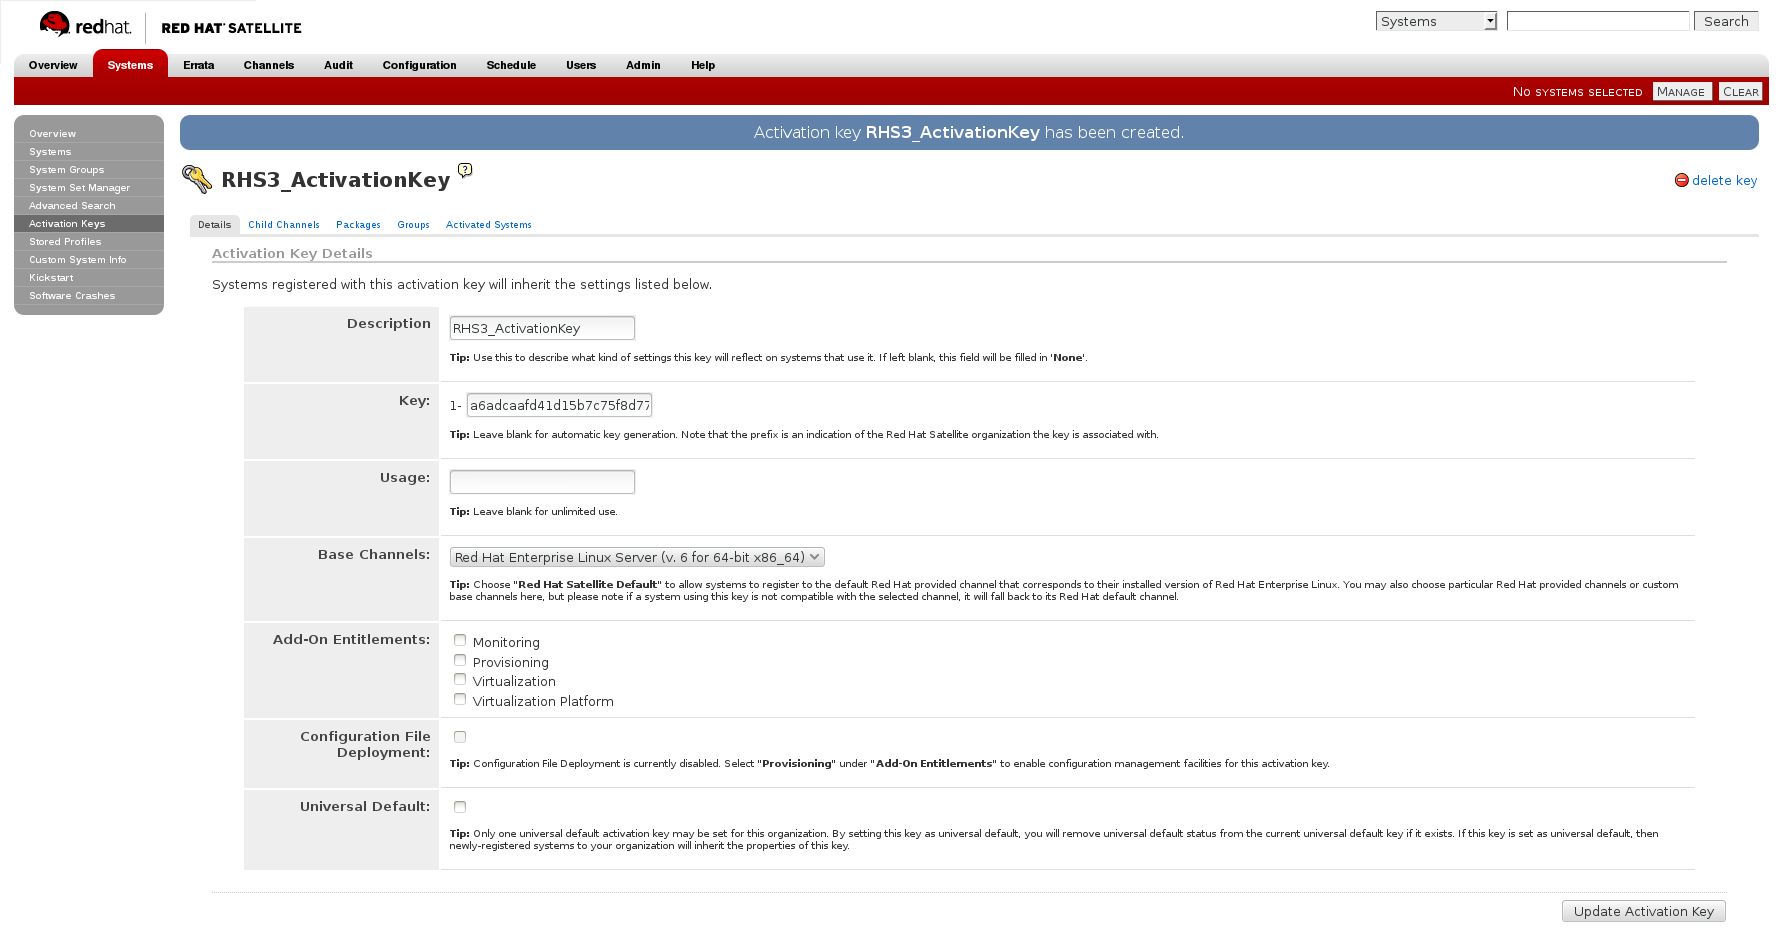
Figure 2.4. Base Channels
- In the Child Channels tab of the Activation Keys screen, select the following child channels:
RHEL Server Scalable File System (v. 6 for x86_64)
Red Hat Gluster Storage Server 3 (RHEL 6 for x86_64)
For Red Hat Gluster Storage 3.0.4 or later, if you require the Samba package, then select the following child channel:Red Hat Gluster 3 Samba (RHEL 6 for x86_64)
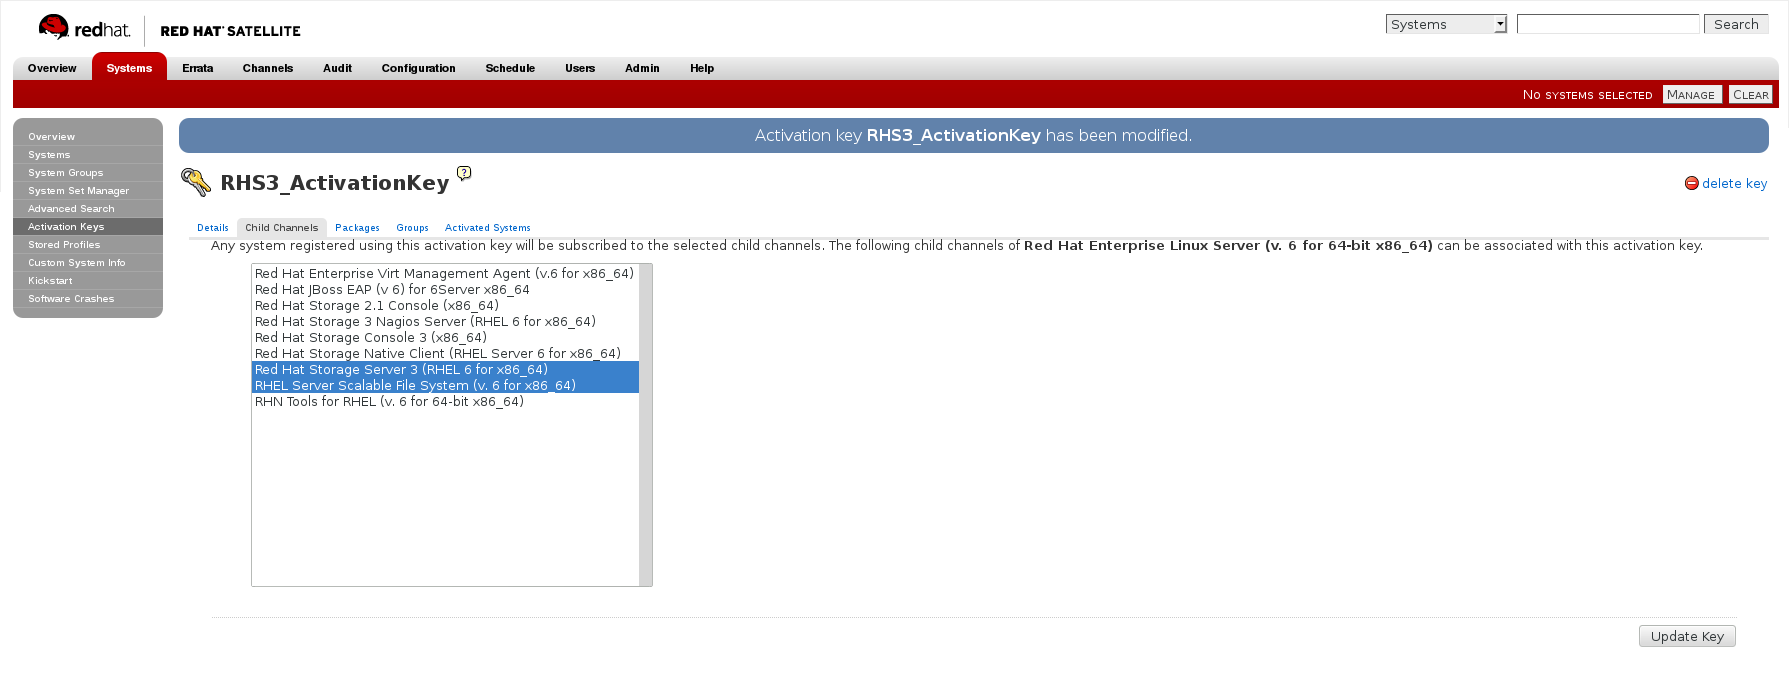
Figure 2.5. Child Channels
- In the Packages tab of the Activation Keys screen, enter the following package name:
redhat-storage-server
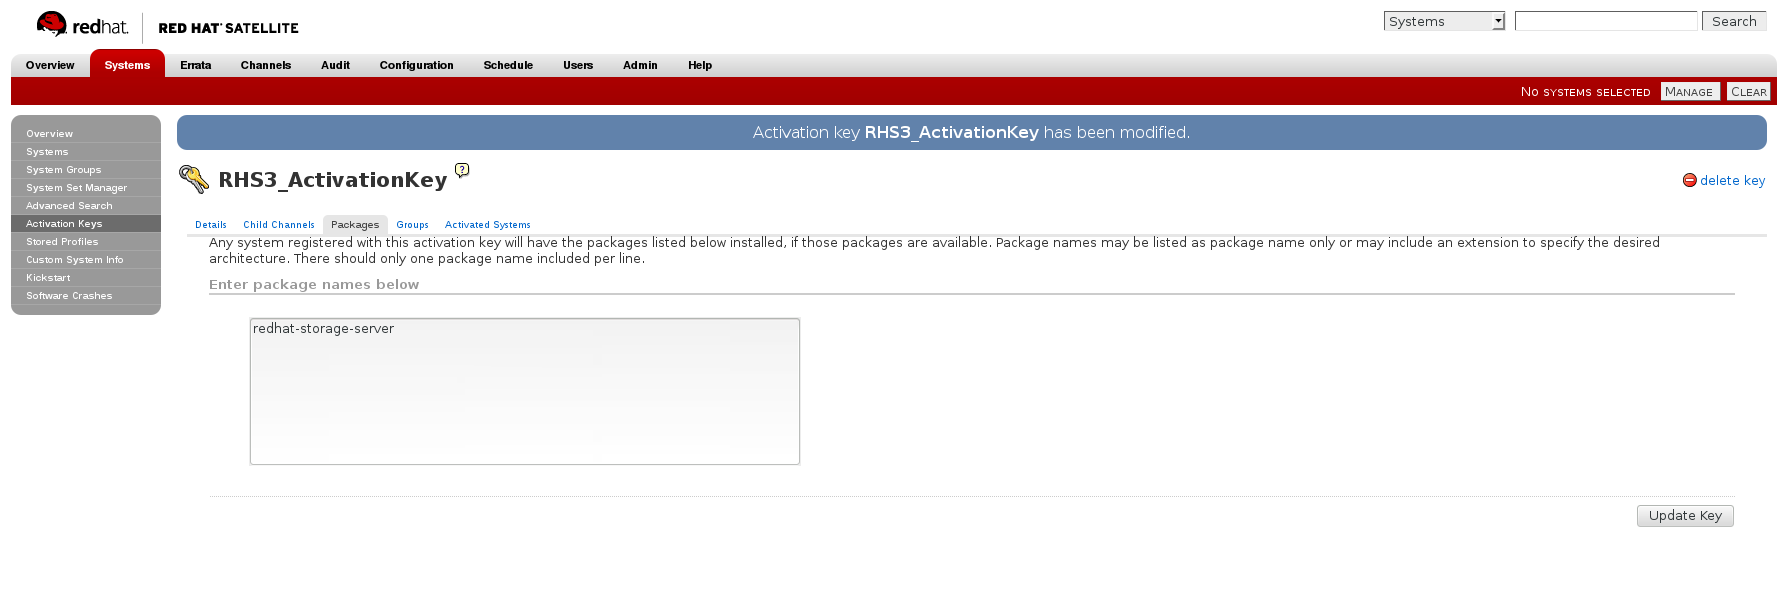
Figure 2.6. Package
- For Red Hat Gluster Storage 3.0.4 or later, if you require the Samba package, then enter the following package name:
samba
For more information on creating a kickstart profile, see Kickstart in the Red Hat Network Satellite Reference Guide.
- When creating a kickstart profile, the following
Base ChannelandTreemust be selected.Base Channel: Red Hat Enterprise Linux Server (v.6 for 64-bit x86_64)Tree: ks-rhel-x86_64-server-6-6.5 - Do not associate any child channels with the kickstart profile.
- Associate the previously created activation key with the kickstart profile.
Important
- By default, the kickstart profile chooses
md5as the hash algorithm for user passwords.You must change this algorithm tosha512by providing the following settings in theauthfield of theKickstart Details,Advanced Optionspage of the kickstart profile:--enableshadow --passalgo=sha512
- After creating the kickstart profile, you must change the root password in the Kickstart Details, Advanced Options page of the kickstart profile and add a root password based on the prepared sha512 hash algorithm.
For more information on installing Red Hat Gluster Storage Server using a kickstart profile, see Kickstart in Red Hat Network Satellite Reference Guide.
2.6. Subscribing to the Red Hat Gluster Storage Server Channels
Note
Register the System with Subscription Manager
Run the following command and enter your Red Hat Network user name and password to register the system with Subscription Manager:# subscription-manager register --auto-attach
Enable the Required Channels for Red Hat Gluster Storage on Red Hat Enterprise Linux
For Red Hat Gluster Storage 3.1 on Red Hat Enterprise Linux 6.7- Run the following commands to enable the repositories required to install Red Hat Gluster Storage:
# subscription-manager repos --enable=rhel-6-server-rpms
# subscription-manager repos --enable=rhel-scalefs-for-rhel-6-server-rpms
# subscription-manager repos --enable=rhs-3-for-rhel-6-server-rpms
- For Red Hat Gluster Storage 3.0.4 or later, if you require Samba, then enable the following repository:
# subscription-manager repos --enable=rh-gluster-3-samba-for-rhel-6-server-rpms
- For Red Hat Gluster Storage 3.1, if NFS-Ganesha is required, then enable the following repository:
# subscription-manager repos
--enable=rh-gluster-3-nfs-for-rhel-6-server-rpms
For Red Hat Gluster Storage 3.1 on Red Hat Enterprise Linux 7.2- Run the following commands to enable the repositories required to install Red Hat Gluster Storage
# subscription-manager repos --enable=rhel-7-server-rpms
# subscription-manager repos --enable=rh-gluster-3-for-rhel-7-server-rpms
- For Red Hat Gluster Storage 3.0.4 or later, if you require Samba, then enable the following repository:
# subscription-manager repos --enable=rh-gluster-3-samba-for-rhel-7-server-rpms
- For Red Hat Gluster Storage 3.1, if NFS-Ganesha is required, then enable the following repository:
# subscription-manager repos
--enable=rh-gluster-3-nfs-for-rhel-7-server-rpms
- For Red Hat Gluster Storage 3.1, if you require CTDB, then enable the following repository:
# subscription-manager repos --enable=rh-gluster-3-samba-for-rhel-7-server-rpms
Verify if the Channels are Enabled
Run the following command to verify if the channels are enabled:# yum repolist
Configure the Client System to Access Red Hat Satellite
Configure the client system to access Red Hat Satellite. Refer section Registering Clients with Red Hat Satellite Server in Red Hat Satellite 5.6 Client Configuration Guide.Register to the Red Hat Satellite Server
Run the following command to register the system to the Red Hat Satellite Server:# rhn_register
Register to the Standard Base Channel
In the select operating system release page, selectAll available updatesand follow the prompts to register the system to the standard base channel for RHEL6 - rhel-x86_64-server-6. The standard base channel for RHEL 7 is RHEL7-rhel-x86_64-server-7Subscribe to the Required Red Hat Gluster Storage Server Channels
For Red Hat Gluster Storage 3.1 on Red Hat Enterprise Linux 6.7- Run the following command to subscribe the system to the required Red Hat Gluster Storage server channel:
# rhn-channel --add --channel rhel-x86_64-server-6-rhs-3 --channel rhel-x86_64-server-sfs-6
- For Red Hat Gluster Storage 3.0.4 or later, if you require Samba, then execute the following command to enable the required channel:
# rhn-channel --add --channel rhel-x86_64-server-6-rh-gluster-3-samba
- For Red Hat Gluster Storage 3.1, for NFS-Ganesha enable the following channel:
# rhn-channel --add --channel
rhel-x86_64-server-6-rh-gluster-3-nfs
For Red Hat Gluster Storage 3.1 on Red Hat Enterprise Linux 7.2- Run the following command to subscribe the system to the required Red Hat Gluster Storage server channels for RHEL 7:
# rhn-channel --add --channel rhel-x86_64-server-7-rh-gluster-3
- For Red Hat Gluster Storage 3.0.4 or later, if you require Samba, then execute the following command to enable the required channel:
# rhn-channel --add --channel rhel-x86_64-server-7-rh-gluster-3-samba
- For Red Hat Gluster Storage 3.1, for NFS-Ganesha enable the following channel:
# rhn-channel --add --channel
rhel-x86_64-server-7-rh-gluster-3-nfs
- For Red Hat Gluster Storage 3.1, if CTDB is required, then enable the following channel:
# rhn-channel --add --channel rhel-x86_64-server-7-rh-gluster-3-samba
Verify if the System is Registered Successfully
Run the following command to verify if the system is registered successfully:# rhn-channel --list rhel-x86_64-server-7 rhel-x86_64-server-7-rh-gluster-3
2.7. Managing the glusterd Service
glusterd service automatically starts on all the servers in the trusted storage pool. The service can be manually started and stopped using the glusterd service commands.
glusterd also offers elastic volume management.
gluster CLI commands to decouple logical storage volumes from physical hardware. This allows the user to grow, shrink, and migrate storage volumes without any application downtime. As storage is added to the cluster, the volumes are distributed across the cluster. This distribution ensures that the cluster is always available despite changes to the underlying hardware.
2.7.1. Manually Starting and Stopping glusterd
glusterd service.
- Manually start
glusterdas follows:# /etc/init.d/glusterd start
or# service glusterd start
- Manually stop
glusterdas follows:# /etc/init.d/glusterd stop
or# service glusterd stop
2.8. Installing Ansible to Support gdeploy
Note
Chapter 3. Deploying Samba on Red Hat Gluster Storage
3.1. Prerequisites
- You must install Red Hat Gluster Storage Server 3.0.4 on the target server.
Warning
- For layered installation of Red Hat Gluster Storage, ensure to have only the default Red Hat Enterprise Linux server installation, without the Samba or CTDB packages installed from Red Hat Enterprise Linux.
- The Samba version 3 is being deprecated from Red Hat Gluster Storage 3.0 Update 4. Further updates will not be provided for samba-3.x. It is recommended that you upgrade to Samba-4.x, which is provided in a separate channel or repository, for all updates including the security updates.
- CTDB version 2.5 is not supported from Red Hat Gluster Storage 3.1 Update 2. To use CTDB in Red Hat Gluster Storage 3.1.2 and later, you must upgrade the system to CTDB 4.x, which is provided in the Samba channel of Red Hat Gluster Storage.
- Downgrade of Samba from Samba 4.x to Samba 3.x is not supported.
- Ensure that Samba is upgraded on all the nodes simultaneously, as running different versions of Samba in the same cluster will lead to data corruption.
- Enable the channel where the Samba packages are available:For Red Hat Gluster Storage 3.1 on Red Hat Enterprise Linux 6.x
- If you have registered your machine using Red Hat Subscription Manager, enable the repository by running the following command:
# subscription-manager repos --enable=rh-gluster-3-samba-for-rhel-6-server-rpms
- If you have registered your machine using Satellite server, enable the channel by running the following command:
# rhn-channel --add --channel rhel-x86_64-server-6-rh-gluster-3-samba
For Red Hat Gluster Storage 3.1 on Red Hat Enterprise Linux 7.x- If you have registered your machine using Red Hat Subscription Manager, enable the repository by running the following command:
# subscription-manager repos --enable=rh-gluster-3-samba-for-rhel-7-server-rpms
- If you have registered your machine using Satellite server, enable the channel by running the following command:
# rhn-channel --add --channel rhel-x86_64-server-7-rh-gluster-3-samba
3.2. Installing Samba Using ISO
Figure 3.1. Customize Packages
3.3. Installing Samba Using yum
# yum groupinstall RH-Gluster-Samba-Server
# yum groupinstall RH-Gluster-AD-Integration
- To install the basic Samba packages, execute the following command:
# yum install samba
- If you require the
smbclienton the server, then execute the following command:# yum install samba-client
- If you require an Active directory setup, then execute the following commands:
# yum install samba-winbind
# yum install samba-winbind-clients
# yum install samba-winbind-krb5-locator
- Verify if the following packages are installed.
samba-libs
samba-winbind-krb5-locator
samba-winbind-modules
samba-vfs-glusterfs
samba-winbind
samba-client
samba-common
samba-winbind-clients
samba
Chapter 4. Deploying NFS-Ganesha on Red Hat Gluster Storage
- Installing NFS-Ganesha using yum
- Installing NFS-Ganesha during an ISO Installation
4.1. Prerequisites
Enable the channel where the NFS-Ganesha packages are available:
- If you have registered your machine using Red Hat Subscription Manager, enable the repository by running the following command:
# subscription-manager repos
--enable=rh-gluster-3-nfs-for-rhel-6-server-rpms
- If you have registered your machine using Satellite server, enable the channel by running the following command:
# rhn-channel --add --channel
rhel-x86_64-server-6-rh-gluster-3-nfs
- To subscribe to the HA channel, execute the following command:
# rhn-channel --add --channel rhel-x86_64-server-ha-6
- To add the HA repository, execute the following command:
# subscription-manager repos --enable=rhel-6-server-rpms --enable=rhel-ha-for-rhel-6-server-rpms
Enable the channel where the NFS-Ganesha packages are available:
- If you have registered your machine using Red Hat Subscription Manager, enable the repository by running the following command:
# subscription-manager repos
--enable=rh-gluster-3-nfs-for-rhel-7-server-rpms
- If you have registered your machine using Satellite server, enable the channel by running the following command:
# rhn-channel --add --channel
rhel-x86_64-server-7-rh-gluster-3-nfs
- To subscribe to the HA channel, execute the following command:
# rhn-channel --add --channel rhel-x86_64-server-ha-7
- To add the HA repository, execute the following command:
# subscription-manager repos --enable=rhel-7-server-rpms --enable=rhel-ha-for-rhel-7-server-rpms
4.2. Installing NFS-Ganesha during an ISO Installation
- While installing Red Hat Storage using an ISO, in the Customizing the Software Selection screen, select RH-Gluster-NFS-Ganesha and click Next.
- Proceed with the remaining installation steps for installing Red Hat Gluster Storage. For more information on how to install Red Hat Storage using an ISO, see Installing from an ISO Image.
- For Red Hat Enterprise Linux 6.7, install Pacemaker by executing the following command:
# yum install pacemaker
4.3. Installing NFS-Ganesha using yum
- For Red Hat Enterprise Linux 7: The glusterfs-ganesha package can be installed using the following command:
# yum install glusterfs-ganesha
NFS-Ganesha is installed along with the above package. nfs-ganesha-gluster and HA packages are also installed.For Red Hat Enterprise Linux 6: Install Pacemaker and the glusterfs-ganesha package:# yum install pacemaker
# yum install glusterfs-ganesha
Chapter 5. Deploying gstatus on Red Hat Gluster Storage
- Installing gstatus during an ISO Installation
- Installing using yum or the Red Hat Satellite Server or Red Hat Network
5.1. Installing gstatus during an ISO Installation
- While installing Red Hat Storage using an ISO, in the Customizing the Software Selection screen, select Red Hat Storage Tools Group and click Optional Packages.
- From the list of packages, select gstatus and click Close.
- Proceed with the remaining installation steps for installing Red Hat Storage. For more information on how to install Red Hat Storage using an ISO, see Installing from an ISO Image.
5.2. Installing using yum or the Red Hat Satellite Server or Red Hat Network
# yum install gstatus
Note
# yum list gstatus

Installed Packages
gstatus.x86_640.65-1@rhs-3-for-rhel-6-server-rpms
Chapter 6. Deploying Containerized Red Hat Gluster Storage with Atomic Host
6.1. Supported Deployment Configuration
6.2. Supported Versions
Table 6.1. Supported Versions
| Red Hat Gluster Storage Server | Docker | Red Hat Enterprsie Linux Atomic Host |
|---|---|---|
| 3.1.2 | 1.8 | 7.2 |
6.3. Downloading the Red Hat Gluster Storage Image from the Red Hat Registry
- You can verify the docker service is running with the following command:
# systemctl status docker docker.service - Docker Application Container Engine Loaded: loaded (/usr/lib/systemd/system/docker.service; enabled) Active: active (running) since Fri 2016-01-22 12:03:34 CEST; 3h 19min ago Docs: http://docs.docker.com Main PID: 843 (docker) CGroup: /system.slice/docker.service └─843 /usr/bin/docker -d --selinux-enabled - Download the Red Hat Gluster Storage Container images from the Red Hat Docker Registry using the following command:
# docker pull registry.access.redhat.com/rhgs3/rhgs-server-rhel7
- Verify that you have a Red Hat Gluster Storage image on a Red Hat Enterprise Linux Atomic Host 7.2 by checking the contents of the /etc/redhat-release file. First, on the host system:
# cat /etc/redhat-release
Red Hat Enterprise Linux Atomic Host 7.2
- And next, you can check the Red Hat Gluster Storage Container Image, again from the host system (no need to log into the container image):
# docker run rhgs3/rhgs-server-rhel7 cat /etc/redhat-storage-release
Red Hat Gluster Storage Server 3.1 Update 2 (Container)
Chapter 7. Deploying the Hortonworks Data Platform 2.1 on Red Hat Gluster Storage
Warning
Important
- Dispersed Volumes and Distributed Dispersed Volume
- Red Hat Enterprise Linux 7.x
7.1. Prerequisites
7.1.1. Supported Versions
Table 7.1. Red Hat Gluster Storage Server Support Matrix
| Red Hat Gluster Storage Server version | HDP version | Ambari version |
|---|---|---|
| 3.1 | 2.1 | 1.6.1 |
7.1.2. Software and Hardware Requirements
- Must have at least the following hardware specification:
- 2 x 2 GHz 4 core processors
- 32 GB RAM
- 500 GB of storage capacity
- 1 x 1 GbE NIC
- Must have iptables disabled.
- Must use fully qualified domain names (FQDN). For example rhs-1.server.com is acceptable, but rhs-1 is not allowed.
- SELinux must be in
disabledmode. - Time on all the servers must be uniform. It is recommended to set up a NTP (Network Time Protocol) service to keep the time synchronized.
- Either, all servers must be configured to use a DNS server and must be able to use DNS for FQDN resolution or all the storage nodes must have the FQDN of all of the servers in the cluster listed in their
/etc/hostsfile. - Must have the following users and groups available on all the servers.
User Group yarn hadoop mapred hadoop hive hadoop hcat hadoop ambari-qa hadoop hbase hadoop tez hadoop zookeeper hadoop oozie hadoop falcon hadoop The specific UIDs and GIDs for the respective users and groups are up to the Administrator of the trusted storage pool, but they must be consistent across the trusted storage pool. For example, if the "hadoop" user has a UID as 591 on one server, the hadoop user must have UID as 591 on all other servers. This can be quite a lot of work to manage using Local Authentication and it is common and acceptable to install a central authentication solution such as LDAP or Active Directory for your cluster, so that users and groups can be easily managed in one place. However, to use local authentication, you can run the script below on each server to create the users and groups and ensure they are consistent across the cluster:groupadd hadoop -g 590; useradd -u 591 mapred -g hadoop; useradd -u 592 yarn -g hadoop; useradd -u 594 hcat -g hadoop; useradd -u 595 hive -g hadoop; useradd -u 590 ambari-qa -g hadoop; useradd -u 593 tez -g hadoop; useradd -u 596 oozie -g hadoop; useradd -u 597 zookeeper -g hadoop; useradd -u 598 falcon -g hadoop; useradd -u 599 hbase -g hadoop
7.1.3. Existing Red Hat Gluster Storage Trusted Storage Pool
Note
disabled mode. The rhs-hadoop-install script does not recognize SELinux in permissive mode and requires SELinux to be disabled completely. This requires additional restart of all storage machines.
Important
/mnt/brick1 as the mount point for Red Hat Gluster Storage bricks and /mnt/glusterfs/volname as the mount point for Red Hat Gluster Storage volume. It is possible that you have an existing Red Hat Gluster Storage volume that has been created with different mount points for the Red Hat Gluster Storage bricks and volumes. If the mount points differ from the convention, replace the prefix listed in this installation guide with the prefix that you have.
7.1.4. New Red Hat Gluster Storage Trusted Storage Pool
Note
7.1.5. Red Hat Gluster Storage Server Requirements
rhs-big-data-3-for-rhel-6-server-rpms channel on this server.
- If you have registered your machine using Red Hat Subscription Manager, enable the repository by running the following command:
# subscription-manager repos --enable=rhs-big-data-3-for-rhel-6-server-rpms
- If you have registered your machine using Satellite server, enable the channel by running the following command:
# rhn-channel --add --channel rhel-x86_64-server-6-rhs-bigdata-3
7.1.6. Hortonworks Ambari Server Requirements
It is mandatory to setup a passwordless-SSH connection from the Ambari Server to all other servers within the trusted storage pool. Instructions for installing and configuring Hortonworks Ambari is provided in the further sections of this chapter.
rhel-6-server-rh-common-rpms channel on this server.
- If you have registered your machine using Red Hat Subscription Manager, enable the repository by running the following command:
# subscription-manager repos --enable=rhel-6-server-rh-common-rpms
- If you have registered your machine using Satellite server, enable the channel by running the following command:
# rhn-channel --add --channel rhel-x86_64-server-rh-common-6
Warning
Note
rhs-big-data-3-for-rhel-6-server-rpms channel on that server.
- If you have registered your machine using Red Hat Subscription Manager, enable the repository by running the following command:
# subscription-manager repos --enable=rhs-big-data-3-for-rhel-6-server-rpms
- If you have registered your machine using Satellite server, enable the channel by running the following command:
# rhn-channel --add --channel rhel-x86_64-server-6-rhs-bigdata-3
7.1.7. YARN Master Server Requirements
rhel-6-server-rh-common-rpms and rhel-6-server-rhs-client-1-rpms channels on the YARN server.
- If you have registered your machine using Red Hat Subscription Manager, enable the repositories by running the following command:
# subscription-manager repos --enable=rhel-6-server-rh-common-rpms --enable=rhel-6-server-rhs-client-1-rpms
- If you have registered your machine using Satellite server, enable the channel by running the following command:
# rhn-channel --add --channel rhel-x86_64-server-rh-common-6
# rhn-channel --add --channel rhel-x86_64-server-rhsclient-6
Note
rhs-big-data-3-for-rhel-6-server-rpms channel on that server.
- If you have registered your machine using Red Hat Subscription Manager, enable the repository by running the following command:
# subscription-manager repos --enable=rhs-big-data-3-for-rhel-6-server-rpms
- If you have registered your machine using Satellite server, enable the channel by running the following command:
# rhn-channel --add --channel rhel-x86_64-server-6-rhs-bigdata-3
7.2. Installing the Hadoop FileSystem Plugin for Red Hat Gluster Storage
7.2.1. Adding the Hadoop Installer for Red Hat Gluster Storage
# yum install rhs-hadoop rhs-hadoop-install
7.2.2. Configuring the Trusted Storage Pool for use with Hadoop
Note
- Open the terminal window of the server designated to be the Ambari Management Server and navigate to the
/usr/share/rhs-hadoop-install/directory. - Run the hadoop cluster configuration script as given below:
setup_cluster.sh [-y] [--quiet | --verbose | --debug] [--force-ambari-update] [--hadoop-mgmt-node <node>] [--yarn-master <node>] [--profile <profile>] [--ambari-repo <url>] <node-list-spec>
where <node-list-spec> is<node1>:<brickmnt1>:<blkdev1> <node2>[:<brickmnt2>][:<blkdev2>] [<node3>[:<brickmnt3>][:<blkdev3>]] ... [<nodeN>[:<brickmntN>][:<blkdevN>]]
where<brickmnt>is the name of the XFS mount for the above<blkdev>, for example,/mnt/brick1or/external/HadoopBrick. When a Red Hat Gluster Storage volume is created its bricks has the volume name appended, so<brickmnt>is a prefix for the volume's bricks. Example: If a new volume is namedHadoopVolthen its brick list would be:<node>:/mnt/brick1/HadoopVolor<node>:/external/HadoopBrick/HadoopVol. Each brickmnt is mounted as follows with the following mount options:noatime,inode64.<blkdev>is the name of a Logical Volume device path, for example,/dev/VG1/LV1or/dev/mapper/VG1-LV1. Since LVM is a prerequisite for Red Hat Gluster Storage, the<blkdev>is not expected to be a raw block path, such as/dev/sdb.Note
A minimum of two nodes, one brick mount, and one block device are required. A node can be repeated in <node-list>. For example, if host-1 has two different brick mounts and block devices then <node-list> could look like:host-1:/mnt/brick1:/dev/vg1/lv1,host-2 host-1:/mnt/brick2:/dev/vg1/lv2, andhost-2:/mnt/brick2:/dev/vg1/lv2.-ycauses all prompts to be auto-answered ayes. The default is that the user must respond to each prompt.--quietis the default and produces the least output from the script.--verboseoutputs more information about the steps taken by the script.--debugis the greatest level of output and is same as seen in the/var/log/rhs-hadoop-install.loglog file.Note
The/var/log/rhs-hadoop-install.loglog file contains the--debuglevel of detailed information regardless of the verbose level chosen when running the script.--profileis the server-global profile name to set via thetuned-admcommand. For example,--profile rhs-high-throughput. If specified, profile is set on each storage node in the cluster and applies to all workloads on these storage nodes. Default is that no profile is set.--ambari-reponames the URL to be used when updating the ambari agents and/or ambari server. The default is to use the URL hard-coded in thebin/gen_ambari_repo_url.shscript.--force-ambari-updatecauses the ambari-agent and ambari-server to be re-installed and re-started on all nodes in the cluster, even if they are already running. The default is to install the ambari-agent on all nodes where it is not running, and to install the ambari-server if it too is not running. For a new cluster, the agents and ambari-server will be installed. When adding nodes to an existing cluster, the new nodes will have the ambari-agent installed and started, and the existing nodes, by default, will not have the agent nor ambari-server re-installed. For verifying an existing cluster, by default, the ambari-agent and ambari-server willnotbe re-installed. However, if--force-ambari-updateis specified the ambari-agents and ambari-server will always be installed/re-installed.--hadoop-mgmt-nodeis the hostname of the ambari management server. Default is localhost.--yarn-masteris the hostname of the YARN resource manager server. Default is localhost.
Given below is an example of running the setup_cluster.sh script on the Ambari Management server and four Red Hat Gluster Storage Nodes which have the same logical volume and mount point intended to be used as a Red Hat Gluster Storage brick../setup_cluster.sh --yarn-master yarn.hdp rhs-1.hdp:/mnt/brick1:/dev/rhs_vg1/rhs_lv1 rhs-2.hdp rhs-3.hdp rhs-4.hdp
Note
If a brick mount is omitted, the brick mount of the first node is used and if one block device is omitted, the block device of the first node is used.
7.2.3. Creating Volumes for use with Hadoop
Note
hadoop or mapredlocal.
- Open the terminal window of the server designated to be the Ambari Management Server and navigate to the
/usr/share/rhs-hadoop-install/directory. - Run the hadoop cluster configuration script as given below:
create_vol.sh [-y][--quiet | --verbose | --debug] VOLNAME [--replica
count] <volMountPrefix> <node-list>where-ycauses all prompts to be auto-answered "yes". The default is that the user must respond to each prompt.--quietis the default and produces the least output from the script.--verboseoutputs more information about the steps taken by the script.--debugis the greatest level of output and is as seen in the/var/log/rhs-hadoop-install.loglog file.Note
The/var/log/rhs-hadoop-install.loglog file contains the--debuglevel of detailed information regardless of the verbose level chosen when running the script.--replicacount is the replica count. You can specify the replica count as 2 or 3. By default, the replica count is 2. The number of bricks must be a multiple of the replica count. The order in which bricks are specified determines how bricks are mirrored with each other. For example, first n bricks, where n is the replica count.<node-list>is: <node1>:<brickmnt> <node2>[:<brickmnt2>] <node3>[:<brickmnt3>] ... [<nodeN>[:<brickmntN>VOLNAMEis the name of the new Red Hat Gluster Storage volume. By default, theperformance.stat-prefetch=off,cluster.eager-lock=on, andperformance.quick-read=offperformance related options are set on the volume. The new volume will be mounted on all storage nodes, even nodes not directly spanned by the volume, and on the yarn-master node.- volMountPrefix is the name of the gluster-fuse mount path without the volume name. For example,
/mnt/glusterfsor/distributed. brickmntis the name of the XFS mount for the block devices used by the above nodes, for example,/mnt/brick1or/external/HadoopBrick. When a Red Hat Gluster Storage volume is created its bricks will have the volume name appended, sobrickmntis a prefix for the volume's bricks. For example, if a new volume is namedHadoopVolthen its brick list would be:<node>:/mnt/brick1/HadoopVolor<node>:/external/HadoopBrick/HadoopVol.
Note
The node-list forcreate_vol.shis similar to thenode-list-specused bysetup_cluster.shexcept that a block device is not specified increate_vol.Given below is an example on how to create a volume named HadoopVol, using four Red Hat Gluster Storage Servers, each with the same brick mount and mount the volume on/mnt/glusterfs./create_vol.sh HadoopVol /mnt/glusterfs rhs-1.hdp:/mnt/brick1 rhs-2.hdp rhs-3.hdp rhs-4.hdp
7.2.4. Deploying and Configuring the HDP 2.1 Stack on Red Hat Gluster Storage using Ambari Manager
Before deploying and configuring the HDP stack, perform the following steps:
- Open the terminal window of the server designated to be the Ambari Management Server and replace the
HDP 2.1.GlusterFS repoinfo.xmlfile by theHDP 2.1 repoinfo.xmlfile.cp /var/lib/ambari-server/resources/stacks/HDP/2.1/repos/repoinfo.xml /var/lib/ambari-server/resources/stacks/HDP/2.1.GlusterFS/repos/
You will be prompted to overwrite/2.1.GlusterFS/repos/repoinfo.xmlfile, typeyesto overwrite the file. - Restart the Ambari Server.
# ambari-server restart
Important
HDFS as the storage selection in the HDP 2.1.GlusterFS stack is not supported. If you want to deploy HDFS, then you must select the HDP 2.1 stack (not HDP 2.1.GlusterFS) and follow the instructions of the Hortonworks documentation.
2.1.GlusterFS supported stack. The other unsupported *GlusterFS stacks might be available for selection.
- Launch a web browser and enter
http://hostname:8080in the URL by replacing hostname with the hostname of your Ambari Management Server.Note
If the Ambari Console fails to load in the browser, it is usually because iptables is still running. Stop iptables by opening a terminal window and runservice iptables stopcommand. - Enter
adminandadminfor the username and password. - Assign a name to your cluster, such as
MyCluster. - Select the
HDP 2.1 GlusterFS Stack(if not already selected by default) and clickNext. - On the
Install Optionsscreen:- For
Target Hosts, add the YARN server and all the nodes in the trusted storage pool. - Select
Provide your SSH Private Key to automatically register hostsand provide your Ambari Server private key that was used to set up passwordless-SSH across the cluster. - Click
Register and Confirmbutton. It may take a while for this process to complete.
- For
Confirm Hosts, it may take awhile for all the hosts to be confirmed.- After this process is complete, you can ignore any warnings from the Host Check related to File and Folder Issues, Package Issues and User Issues as these are related to customizations that are required for Red Hat Gluster Storage.
- Click
Nextand ignore the Confirmation Warning.
- For
Choose Services, unselect HDFS and as a minimum select GlusterFS, Ganglia, YARN+MapReduce2, ZooKeeper and Tez.Note
- The use of Storm and Falcon have not been extensively tested and as yet are not supported.
- Do not select the Nagios service, as it is not supported. For more information, see subsection 21.1. Deployment Scenarios of chapter 21. Administering the Hortonworks Data Platform on Red Hat Gluster Storage in the Red Hat Gluster Storage 3.0 Administration Guide.
- This section describes how to deploy HDP on Red Hat Gluster Storage. Selecting
HDFSas the storage selection in the HDP 2.1 GlusterFS stack is not supported. If users wish to deploy HDFS, then they must select the HDP 2.1 (not HDP 2.1.GlusterFS) and follow the instructions in the Hortonworks documentation.
- For
Assign Masters, set all the services to your designated YARN Master Server.- For ZooKeeper, select your YARN Master Server and at least 2 additional servers within your cluster.
- Click
Nextto proceed.
- For
Assign Slaves and Clients, select all the nodes asNodeManagersexcept the YARN Master Server.- Click
Clientcheckbox for each selected node. - Click
Nextto proceed.
- On the
Customize Servicesscreen:- Click YARN tab, scroll down to the yarn.nodemanager.log-dirs and yarn.nodemanager.local-dirs properties and remove any entries that begin with
/mnt/glusterfs/.Important
New Red Hat Gluster Storage and Hadoop Clusters use the naming convention of/mnt/glusterfs/volnameas the mount point for Red Hat Gluster Storage volumes. If you have existing Red Hat Gluster Storage volumes that has been created with different mount points, then remove the entries of those mount points. - Update the following property on the YARN tab - Application Timeline Server section:
Key Value yarn.timeline-service.leveldb-timeline-store.path /tmp/hadoop/yarn/timeline - Review other tabs that are highlighted in red. These require you to enter additional information, such as passwords for the respective services.
- On the
Reviewscreen, review your configuration and then clickDeploybutton. - On the
Summaryscreen, click theCompletebutton and ignore any warnings and the statement. This is normal as there is still some addition configuration that is required before we can start the services. - Click
Nextto proceed to the Ambari Dashboard. Select the YARN service on the top left and clickStop-All. Do not clickStart-Alluntil you perform the steps in section Section 7.5, “Verifying the Configuration”.
7.2.5. Enabling Existing Volumes for use with Hadoop
Important
create_vol.sh script, you must follow the steps listed in this section as well.
enable_vol.sh script below to validate the volume's setup and to update Hadoop's core-site.xml configuration file which makes the volume accessible to Hadoop.
create_vol.sh script, it is important to ensure that both the bricks and the volumes that you intend to use are properly mounted and configured. If they are not, the enable_vol.sh script will display and log volume configuration errors. Perform the following steps to mount and configure bricks and volumes with required parameters on all storage servers:
- Bricks need to be an XFS formatted logical volume and mounted with the
noatimeandinode64parameters. For example, if we assume the logical volume path is/dev/rhs_vg1/rhs_lv1and that path is being mounted on/mnt/brick1then the/etc/fstabentry for the mount point should look as follows:/dev/rhs_vg1/rhs_lv1 /mnt/brick1 xfs noatime,inode64 0 0
- Volumes must be mounted with the
_netdevsetting. Assuming your volume name isHadoopVol, the server's FQDN isrhs-1.hdpand your intended mount point for the volume is/mnt/glusterfs/HadoopVolthen the/etc/fstabentry for the mount point of the volume must be as follows:rhs-1.hdp:/HadoopVol /mnt/glusterfs/HadoopVol glusterfs _netdev 0 0
Volumes that are to be used with Hadoop also need to have specific volume level parameters set on them. In order to set these, shell into a node within the appropriate volume's trusted storage pool and run the following commands (the examples assume the volume name is HadoopVol):# gluster volume set HadoopVol performance.stat-prefetch off # gluster volume set HadoopVol cluster.eager-lock on # gluster volume set HadoopVol performance.quick-read off
- Perform the following to create several Hadoop directories on that volume:
- Open the terminal window of one of the Red Hat Gluster Storage nodes in the trusted storage pool and navigate to the
/usr/share/rhs-hadoop-installdirectory. - Run the
bin/add_dirs.sh volume-mount-dir , list-of-directories, where volume-mount-dir is the path name for the glusterfs-fuse mount of the volume you intend to enable for Hadoop (including the name of the volume) and list-of-directories is the list generated by runningbin/gen_dirs.sh -dscript. For example:# bin/add_dirs.sh /mnt/glusterfs/HadoopVol $(bin/gen_dirs.sh -d)
enable_vol.sh script.
default volume, which is the volume used when input and/or output URIs are unqualified. Unqualified URIs are common in Hadoop jobs, so defining the default volume, which can be set by enable_vol.sh script, is important. The default volume is the first volume appearing in the fs.glusterfs.volume property in the /etc/hadoop/conf/core-site.xml configuration file. The enable_vol.sh supports the --make-default option which, if specified, causes the supplied volume to be pre-pended to the above property and thus become the default volume. The default behavior for enable_vol.sh is to not make the target volume the default volume, meaning the volume name is appended, rather than prepended, to the above property value.
--user and --pass options are required for the enable_vol.sh script to login into Ambari instance of the cluster to reconfigure Red Hat Gluster Storage volume related configuration.
Note
enable_vol script for the first time, you must specify the --make-default option.
- Open the terminal window of the server designated to be the Ambari Management Server and navigate to the
/usr/share/rhs-hadoop-install/directory. - Run the Hadoop Trusted Storage pool configuration script as given below:
# enable_vol.sh [-y] [--quiet | --verbose | --debug] [--make-default] [--hadoop-mgmt-node node] [--yarn-master yarn-node][--rhs-node storage-node] [--user ambari-admin-user] [--pass admin-password] VOLNAME
For Example;# enable_vol.sh --yarn-master yarn.hdp --rhs-node rhs-1.hdp HadoopVol --make-default
- VOLNAME is the name of the Red Hat Gluster Storage volume.
--yarn-masteris the hostname of the YARN resource manager server. Default is localhost.--rhs-nodeis the name of any of the existing Red Hat Gluster Storage nodes in the cluster. It is required unless this script is being run from a storage node. This value is necessary in order to run the gluster CLI.--userand--passare required to update the hadoop configuration files (core-site.xml) residing on each node spanned by the volume. You must updatecore-site.xmlfile for a volume to be visible to Hadoop jobs. These options are defaulted to the Ambari defaults.--make-defaultindicates that VOLNAME is to be made the default volume by pre-pending it to thecore-site.xmlvolumes list property. The default behavior is to not alter the default volume name incore-site.xmlfile.--quietis the default and produces the least output from the script.--verboseoutputs more information about the steps taken by the script.--debugis the greatest level of output and is same as seen in the/var/log/rhs-hadoop-install.loglog file.Note
The/var/log/rhs-hadoop-install.loglog file contains the--debuglevel of detailed information regardless of the verbose level chosen when running the script.-ycauses all prompts to be auto-answered "yes". The default is that the user must respond to each prompt.VOLNAMEis the name of the new Red Hat Gluster Storage volume.
Note
If--yarn-masterand/or--rhs-nodeoptions are omitted then the default of localhost (the node from which the script is being executed) is assumed. Example:./enable_vol.sh --yarn-master yarn.hdp --rhs-node rhs-1.hdp HadoopVol --make-default
7.3. Adding and Removing Users
# useradd -u 1005 -g hadoop tom
Note
min.user.id value in the /etc/hadoop/conf/container-executor.cfg file on every Red Hat Gluster Storage server that is running a NodeManager.
HadoopVol according to the examples given in installation instructions.
# mkdir /mnt/glusterfs/HadoopVol/user/<username>
# chown <username>:hadoop /mnt/glusterfs/HadoopVol/user/<username>
# chmod 0755 /mnt/glusterfs/HadoopVol/user/<username>
To disable a user from submitting Hadoop Jobs, remove the user from the Hadoop group.
7.4. Disabling a Volume for use with Hadoop
enable_vol.sh script.
enable_vol.sh script, see Section 7.2.5, “Enabling Existing Volumes for use with Hadoop”.
/etc/hadoop/conf/core-site.xml file. Specifically, the volume's name is removed from the fs.glusterfs.volumes property list, and the fs.glusterfs.volume.fuse.volname property is deleted. All Ambari services are automatically restarted.
- Open the terminal window of the server designated to be the Ambari Management Server and navigate to the
/usr/share/rhs-hadoop-install/directory. - Run the Hadoop cluster configuration script as shown below:
disable_vol.sh [-y] [--quiet | --verbose | --debug] [--hadoop-mgmt-node node] [--yarn-master node] [--rhs-node storage-node][--user admin-user] [--pass admin-password] VOLNAME
For example,disable_vol.sh --rhs-node rhs-1.hdp --yarn-master yarn.hdp HadoopVol
7.5. Verifying the Configuration
# chown -R yarn:hadoop /mnt/brick1/hadoop/yarn/
# chmod -R 0755 /mnt/brick1/hadoop/yarn/
Note
/usr/lib/hadoop/ directory. Then su to one of the users you have enabled for Hadoop (such as tom) and submit a Hadoop Job:
# su tom
# cd /usr/lib/hadoop
# bin/hadoop jar /usr/lib/hadoop-mapreduce/hadoop-mapreduce-examples-2.4.0.2.1.7.0-784.jar teragen 1000 in
TeraGen only generates data. TeraSort reads and sorts the output of TeraGen. In order to fully test the cluster is operational, one needs to run TeraSort as well.
# bin/hadoop jar /usr/lib/hadoop-mapreduce/hadoop-mapreduce-examples-2.4.0.2.1.7.0-784.jar terasort in out
7.6. Troubleshooting
This is due to a bug caused by Ambari expecting a local hadoop group on an LDAP enabled cluster. Due to the fact the users and groups are centrally managed with LDAP, Ambari is not able to find the group. In order to resolve this issue:
- Shell into the Ambari Server and navigate to
/var/lib/ambari-server/resources/scripts - Replace the $AMBARI-SERVER-FQDN with the FQDN of your Ambari Server and the $AMBARI-CLUSTER-NAME with the cluster name that you specified for your cluster within Ambari and run the following command:
./configs.sh set $AMBARI-SERVER-FQDN $AMBARI-CLUSTER-NAME global ignore_groupsusers_create "true"
- In the Ambari console, click
Retryin theCluster Installation Wizard.
This is due to a permissions bug in WebHCAT. In order to start the service, it must be restarted multiple times and requires several file permissions to be changed. To resolve this issue, begin by starting the service. After each start attempt, WebHCAT will attempt to copy a different jar with root permissions. Every time it does this you need to chmod 755 the jar file in /mnt/glusterfs/HadoopVolumeName/apps/webhcat. The three files it copies to this directory are hadoop-streaming-2.4.0.2.1.5.0-648.jar, HDP-webhcat/hive.tar.gz and HDP-webhcat/pig.tar.gz. After you have set the permissions on all three files, the service will start and be operational on the fourth attempt.
This error occurs if the clocks are not synchronized across the trusted storage pool. The time in all the servers must be uniform in the trusted storage pool. It is recommended to set up a NTP (Network Time Protocol) service to keep the bricks' time synchronized, and avoid out-of-time synchronization effects.
This error occurs when the user IDs(UID) and group IDs(GID) are not consistent across the trusted storage pool. For example, user "tom" has a UID of 1002 on server1, but on server2, the user tom has a UID of 1003. The simplest and recommended approach is to leverage LDAP authentication to resolve this issue. After creating the necessary users and groups on an LDAP server, the servers within the trusted storage pool can be configured to use the LDAP server for authentication. For more information on configuring authentication, see Chapter 12. Configuring Authentication of Red Hat Enterprise Linux 6 Deployment Guide.
Chapter 8. Updating to Red Hat Gluster Storage 3.1.x
Note
Warning
Note
- Asynchronous errata update releases of Red Hat Gluster Storage include all fixes that were released asynchronously since the last release as a cumulative update.
- When there are large number of snapshots, ensure to deactivate the snapshots before performing an update. The snapshots can be activated after the update is complete. For more information, see Chapter 4.1 Starting and Stopping the glusterd service in the Red Hat Gluster Storage 3 Administration Guide.
8.1. Updating Red Hat Gluster Storage from 3.0.x to 3.1.x in the Offline Mode
Important
- If
dracutpackages are previously installed, then exclude thedracutpackages while updating to Red Hat Gluster Storage 3.1 during offline ISO update using the following command:# yum update -x dracut -x dracut-kernel
- Offline upgrade results in a downtime as the volume is offline during upgrade.
- Make a complete backup using a reliable backup solution. This Solution covers one possible approach: https://access.redhat.com/solutions/1484053.If you use an alternative backup solution:
- Ensure that you have sufficient space available for a complete backup.
- Copy the .glusterfs directory before copying any data files.
- Ensure that no new files are created on Red Hat Gluster Storage file systems during the backup.
- Ensure that all extended attributes, ACLs, owners, groups, and symbolic and hard links are backed up.
- Check that the backup restores correctly before you continue with the migration.
- Delete the existing Logical Volume (LV) and recreate a new thinly provisioned LV. For more information, see https://access.redhat.com/site/documentation/en-US/Red_Hat_Enterprise_Linux/6/html/Logical_Volume_Manager_Administration/thinprovisioned_volumes.html
- Restore backed up content to the newly created thinly provisioned LV.When you are certain that your backup works, execute the following steps to update Red Hat Gluster Storage in the offline mode:
# yum update
The update process automatically restarts theglusterdmanagement deamon. The glusterfs server processes,glusterfsdis not restarted by default since restarting this daemon affects the active read and write operations.After all the nodes in the cluster are updated, the volume must be restarted for the changes to be applied. Red Hat recommends that you restart the system when there are no active read and write operations running on the cluster.To restart the volume, run the following commands:# gluster volume stop volname # gluster volume start volname
- When all nodes have been upgraded, run the following command to update the
op-versionof the cluster. This helps to prevent any compatibility issues within the cluster.# gluster volume set all cluster.op-version 30707
8.2. Updating NFS-Ganesha in the Offline Mode
Note
- Stop the nfs-ganesha service on all the nodes of the cluster by executing the following command:
# service nfs-ganesha stop
- Verify the status by executing the following command on all the nodes:
# pcs status
- Stop the glusterd service and kill any running gluster process on all the nodes:
# service glusterd stop
# pkill glusterfs
# pkill glusterfsd
- Place the entire cluster in standby mode on all the nodes by executing the following command:
# pcs cluster standby <node-name>
For example:# pcs cluster standby nfs1 # pcs status Cluster name: G1455878027.97 Last updated: Tue Feb 23 08:05:13 2016 Last change: Tue Feb 23 08:04:55 2016 Stack: cman Current DC: nfs1 - partition with quorum Version: 1.1.11-97629de 4 Nodes configured 16 Resources configured Node nfs1: standby Online: [ nfs2 nfs3 nfs4 ] ....
- Stop the cluster software on all the nodes using pcs, by executing the following command:
# pcs cluster stop <node-name>
Ensure that it stops pacemaker and cman.For example:# pcs cluster stop nfs1 nfs1: Stopping Cluster (pacemaker)... nfs1: Stopping Cluster (cman)...
- Update the NFS-Ganesha packages on all the nodes by executing the following command:
# yum update nfs-ganesha
# yum update glusterfs-ganesha
Note
- This will install glusterfs-ganesha and nfs-ganesha-gluster package along with other dependent gluster packages.
- Some warnings might appear during the upgrade related to shared_storage which can be ignored.
- Verify on all the nodes that the required packages are updated, the nodes are fully functional and are using the correct versions. If anything does not seem correct, then do not proceed until the situation is resolved. Contact the Red Hat Global Support Services for assistance if needed.
- Start the cluster software on all the nodes by executing the following command:
# pcs cluster start <node-name>
For example:# pcs cluster start nfs1 nfs1: Starting Cluster...
- Check the pcs status output to determine if everything appears as it should. Once the nodes are functioning properly, reactivate it for service by taking it out of standby mode by executing the following command:
# pcs cluster unstandby <node-name>
For example:# pcs cluster unstandby nfs1 # pcs status Cluster name: G1455878027.97 Last updated: Tue Feb 23 08:14:01 2016 Last change: Tue Feb 23 08:13:57 2016 Stack: cman Current DC: nfs3 - partition with quorum Version: 1.1.11-97629de 4 Nodes configured 16 Resources configured Online: [ nfs1 nfs2 nfs3 nfs4 ] ....
Make sure there are no failures and unexpected results. - Start glusterd service on all the nodes by executing the following command:
# service glusterd start
- Mount the shared storage volume created before update on all the nodes:
# mount -t glusterfs localhost:/gluster_shared_storage /var/run/gluster/shared_storage
- Verify if glusterfs-nfs is running after the update on all the nodes:
# ps -aux|grep nfs
- Disable glusterfs-nfs running (if, on any node):
# gluster volume set <volname> nfs.disable on
- Start the nfs-ganesha service on all the nodes by executing the following command:
# service nfs-ganesha start
Important
8.3. In-service Software Update to Red Hat Gluster Storage 3.1.x from 3.y.z
Important
Note
- NFS-Ganesha does not support in-service update, hence all the running services and IO's have to be stopped before starting the update process. For more information see, Section 8.2, “Updating NFS-Ganesha in the Offline Mode”.
- Ensure that the system is registered to the Red Hat Network. For more information refer to, Section 2.6, “Subscribing to the Red Hat Gluster Storage Server Channels”
- Updating Red Hat Gluster Storage using ISO can be performed only from the previous release. This means that upgrading to Red Hat Gluster Storage 3.1 using ISO can only be done from Red Hat Gluster Storage 3.0 Update 4. For a complete list of supported Red Hat Gluster Storage releases, see Section 1.5, “Supported Versions of Red Hat Gluster Storage”.
- Ensure not to perform any volume operations while the cluster is getting updated.
Warning
- While Red Hat Gluster Storage supports in-service upgrades, the SMB and CTDB services do not. The procedure outlined in this section does involve service interruptions to the SMB and CTDB services.
- Samba version 3 is being deprecated from Red Hat Gluster Storage 3.0 Update 4. Further updates will not be provided for samba-3.x. It is recommended that you upgrade to Samba-4.x, which is provided in a separate channel or repository, for all updates including the security updates.
- Downgrading Samba from Samba 4.x to Samba 3.x is not supported.
- Ensure that Samba is upgraded on all the nodes simultaneously, as running different versions of Samba in the same cluster will lead to data corruption.
- Stop the gluster services on the storage server using the following commands:
# service glusterd stop
# pkill glusterfs
# pkill glusterfsd
- For Red Hat Gluster Storage 3.0.4 or later on Red Hat Enterprise Linux 6.7, if you require Samba, then enable the following repository:
# subscription-manager repos --enable=rh-gluster-3-samba-for-rhel-6-server-rpms
- Stop the CTDB and SMB services across all nodes in the Samba cluster using the following command. This is because different versions of Samba cannot run in the same Samba cluster.
# service ctdb stop
Stopping the CTDB service also stops the SMB service. - To verify if the CTDB and SMB services are stopped, execute the following command:
ps axf | grep -E '(ctdb|smb|winbind|nmb)[d]'
- Update the server using the following command:
# yum update
- Reboot the server if a kernel update was included as part of the update process in the previous step.
Note
If a reboot of the server was not required, then start the gluster services on the storage server using the following command:# service glusterd start
- If the CTDB and SMB services were stopped earlier, then start the services by executing the following command.
# service ctdb start
- To verify if the CTDB and SMB services have started, execute the following command:
ps axf | grep -E '(ctdb|smb|winbind|nmb)[d]'
- Start self-heal on the volume.
# gluster volume heal volname
- To verify if you have upgraded to the latest version of the Red Hat Gluster Storage server execute the following command:
# gluster --version
- Ensure that all the bricks are online. To check the status, execute the following command:
# gluster volume status
- Ensure self-heal is complete on the replica using the following command:
# gluster volume heal volname info
- Repeat the above steps on the other node of the replica pair.
Note
In the case of a distributed-replicated setup, repeat the above steps on all replica pairs. - When all nodes have been upgraded, run the following command to update the
op-versionof the cluster. This helps to prevent any compatibility issues within the cluster.# gluster volume set all cluster.op-version 30707
Chapter 9. Upgrading from Red Hat Gluster Storage 2.1.x to Red Hat Gluster Storage 3.1
Note
9.1. Offline Upgrade from Red Hat Gluster Storage 2.1.x to Red Hat Gluster Storage 3.1
9.1.1. Upgrading from Red Hat Gluster Storage 2.1.x to Red Hat Gluster Storage 3.1 for Systems Subscribed to Red Hat Network
- Unmount the clients using the following command:
umount mount-point
- Stop the volumes using the following command:
gluster volume stop volname
- Unmount the data partition(s) on the servers using the following command:
umount mount-point
- To verify if the volume status is stopped, use the following command:
# gluster volume info
If there is more than one volume, stop all of the volumes. - Stop the
glusterdservices on all the servers using the following command:# service glusterd stop
Important
- You can upgrade to Red Hat Gluster Storage 3.1 from Red Hat Gluster Storage 2.1 Update 4 or later. If your current version is lower than Update 4, then upgrade it to Update 4 before upgrading to Red Hat Gluster Storage 3.1.
- Upgrade the servers before upgrading the clients.
- Execute the following command to kill all gluster processes:
# pkill gluster
- To check the system's current subscription status run the following command:
# migrate-rhs-classic-to-rhsm --status
Note
Themigrate-rhs-classic-to-rhsmcommand is only available in Red Hat Gluster Storage 2.1 Update 4 or higher. If your system doesn't have this command, ensure that you have updated the redhat-storage-release package to the latest version. - Execute the following command to migrate from Red Hat Network Classic to Red Hat Subscription Manager.
# migrate-rhs-classic-to-rhsm --rhn-to-rhsm
- Enable the Red Hat Gluster Storage 3.0 repositories with the following command:
# migrate-rhs-classic-to-rhsm --upgrade --version 3
- If you require Samba, and you are using Red Hat Gluster Storage 3.0.4 or later on Red Hat Enterprise Linux 6.7, enable the following repository:
# subscription-manager repos --enable=rh-gluster-3-samba-for-rhel-6-server-rpms
Warning
- The Samba version 3 is being deprecated from Red Hat Gluster Storage 3.0 Update 4. Further updates will not be provided for samba-3.x. It is recommended that you upgrade to Samba-4.x, which is provided in a separate channel or repository, for all updates including the security updates.
- Downgrade of Samba from Samba 4.x to Samba 3.x is not supported.
- Ensure that Samba is upgraded on all the nodes simultaneously, as running different versions of Samba in the same cluster will lead to data corruption.
- Stop the CTDB and SMB services across all nodes in the Samba cluster using the following command. This is because different versions of Samba cannot run in the same Samba cluster.
# service ctdb stop
- To verify if the CTDB and SMB services are stopped, execute the following command:
ps axf | grep -E '(ctdb|smb|winbind|nmb)[d]'
- To verify if the migration from Red Hat Network Classic to Red Hat Subscription Manager is successful, execute the following command:
# migrate-rhs-classic-to-rhsm --status
- To upgrade the server from Red Hat Gluster Storage 3.0 to 3.1, use the following command:
# yum update
Note
It is recommended to add the child channel of Red Hat Enterprise Linux 6 that contains the native client to refresh the clients and access the new features in Red Hat Gluster Storage 3.1. For more information, refer to Installing Native Client in the Red Hat Gluster Storage Administration Guide. - Reboot the servers. This is required as the kernel is updated to the latest version.
- When all nodes have been upgraded, run the following command to update the
op-versionof the cluster. This helps to prevent any compatibility issues within the cluster.# gluster volume set all cluster.op-version 30707
9.1.2. Upgrading from Red Hat Gluster Storage 2.1.x to Red Hat Gluster Storage 3.1 for Systems Subscribed to Red Hat Satellite Server
- Unmount all the clients using the following command:
umount mount-name
- Stop the volumes using the following command:
# gluster volume stop volname
- Unmount the data partition(s) on the servers using the following command:
umount mount-point
- Ensure that the Red Hat Gluster Storage 2.1 server is updated to Red Hat Gluster Storage 2.1 Update 4 or later, by running the following command:
# yum update
- Create an Activation Key at the Red Hat Satellite Server, and associate it with the following channels. For more information, refer to Section 2.5, “Installing from Red Hat Satellite Server”
Base Channel: Red Hat Enterprise Linux Server (v.6 for 64-bit x86_64)

Child channels:
RHEL Server Scalable File System (v. 6 for x86_64)
Red Hat Gluster Storage Server 3 (RHEL 6 for x86_64)
- For Red Hat Gluster Storage 3.0.4 or later, if you require the Samba package add the following child channel:
Red Hat Gluster 3 Samba (RHEL 6 for x86_64)
- Unregister your system from Red Hat Satellite by following these steps:
- Log in to the Red Hat Satellite server.
- Click on the Systems tab in the top navigation bar and then the name of the old or duplicated system in the System List.
- Click the delete system link in the top-right corner of the page.
- To confirm the system profile deletion by clicking the Delete System button.
- On the updated Red Hat Gluster Storage 3.0 Update 4 server, run the following command:
# rhnreg_ks --username username --password password --force --activationkey Activation Key ID
This uses the prepared Activation Key and re-registers the system to the Red Hat Gluster Storage 3.0 channels on the Red Hat Satellite Server. - Verify if the channel subscriptions have changed to the following:
# rhn-channel --list
rhel-x86_64-server-6
rhel-x86_64-server-6-rhs-3
rhel-x86_64-server-sfs-6
For Red Hat Gluster Storage 3.0.4 or later, if you have enabled the Samba channel, then verify if you have the following channel:rhel-x86_64-server-6-rh-gluster-3-samba
- Run the following command to upgrade to Red Hat Gluster Storage 3.0.
# yum update
- Reboot, and run volume and data integrity checks.
- When all nodes have been upgraded, run the following command to update the
op-versionof the cluster. This helps to prevent any compatibility issues within the cluster.# gluster volume set all cluster.op-version 30707
9.1.3. Upgrading from Red Hat Gluster Storage 2.1.x to Red Hat Gluster Storage 3.1 using an ISO
yum command. For more information, refer to Section 9.1.1, “Upgrading from Red Hat Gluster Storage 2.1.x to Red Hat Gluster Storage 3.1 for Systems Subscribed to Red Hat Network”.
Note
- Ensure that you perform the steps listed in this section on all the servers.
- In the case of a geo-replication set-up, perform the steps listed in this section on all the master and slave servers.
- You cannot access data during the upgrade process, and a downtime should be scheduled with applications, clients, and other end-users.
- Get the volume information and peer status using the following commands:
# gluster volume infoThe command displays the volume information similar to the following:Volume Name: volname Type: Distributed-Replicate Volume ID: d6274441-65bc-49f4-a705-fc180c96a072 Status: Started Number of Bricks: 2 x 2 = 4 Transport-type: tcp Bricks: Brick1: server1:/rhs/brick1/brick1 Brick2: server2:/rhs/brick1/brick2 Brick3: server3:/rhs/brick1/brick3 Brick4: server4:/rhs/brick1/brick4 Options Reconfigured: geo-replication.indexing: on
# gluster peer statusThe command displays the peer status information similar to the following:# gluster peer status Number of Peers: 3 Hostname: server2 Port: 24007 Uuid: 2dde2c42-1616-4109-b782-dd37185702d8 State: Peer in Cluster (Connected) Hostname: server3 Port: 24007 Uuid: 4224e2ac-8f72-4ef2-a01d-09ff46fb9414 State: Peer in Cluster (Connected) Hostname: server4 Port: 24007 Uuid: 10ae22d5-761c-4b2e-ad0c-7e6bd3f919dc State: Peer in Cluster (Connected)
Note
Make a note of this information to compare with the output after upgrading. - In case of a geo-replication set-up, stop the geo-replication session using the following command:
# gluster volume geo-replication master_volname slave_node::slave_volname stop
- In case of a CTDB/Samba set-up, stop the CTDB service using the following command:
# service ctdb stop ;Stopping the CTDB service also stops the SMB service
- Verify if the CTDB and the SMB services are stopped using the following command:
ps axf | grep -E '(ctdb|smb|winbind|nmb)[d]'
- In case of an object store set-up, turn off object store using the following commands:
# service gluster-swift-proxy stop
# service gluster-swift-account stop
# service gluster-swift-container stop
# service gluster-swift-object stop
- Stop all the gluster volumes using the following command:
# gluster volume stop volname
- Stop the
glusterdservices on all the nodes using the following command:# service glusterd stop
- If there are any gluster processes still running, terminate the process using
kill. - Ensure all gluster processes are stopped using the following command:
# pgrep gluster
- Back up the following configuration directory and files on the backup directory:
/var/lib/glusterd,/etc/swift,/etc/samba,/etc/ctdb,/etc/glusterfs./var/lib/samba,/var/lib/ctdbEnsure that the backup directory is not the operating system partition.# cp -a /var/lib/glusterd /backup-disk/ # cp -a /etc/swift /backup-disk/ # cp -a /etc/samba /backup-disk/ # cp -a /etc/ctdb /backup-disk/ # cp -a /etc/glusterfs /backup-disk/ # cp -a /var/lib/samba /backup-disk/ # cp -a /var/lib/ctdb /backup-disk/
Also, back up any other files or configuration files that you might require to restore later. You can create a backup of everything in/etc/. - Locate and unmount the data disk partition that contains the bricks using the following command:
# mount | grep backend-disk
   # umount /dev/device
For example, use thegluster volume infocommand to display the backend-disk information:Volume Name: volname Type: Distributed-Replicate Volume ID: d6274441-65bc-49f4-a705-fc180c96a072 Status: Started Number of Bricks: 2 x 2 = 4 Transport-type: tcp Bricks: Brick1: server1:/rhs/brick1/brick1 Brick2: server2:/rhs/brick1/brick2 Brick3: server3:/rhs/brick1/brick3 Brick4: server4:/rhs/brick1/brick4 Options Reconfigured: geo-replication.indexing: on
In the above example, the backend-disk is mounted at /rhs/brick1# findmnt /rhs/brick1 TARGET SOURCE FSTYPE OPTIONS /rhs/brick1 /dev/mapper/glustervg-brick1 xfs rw,relatime,attr2,delaylog,no # umount /rhs/brick1
- Insert the DVD with Red Hat Gluster Storage 3.1 ISO and reboot the machine. The installation starts automatically. You must install Red Hat Gluster Storage on the system with the same network credentials, IP address, and host name.
Warning
During installation, while creating a custom layout, ensure that you choose Create Custom Layout to proceed with installation. If you choose Replace Existing Linux System(s), it formats all disks on the system and erases existing data.Select Create Custom Layout. Click Next.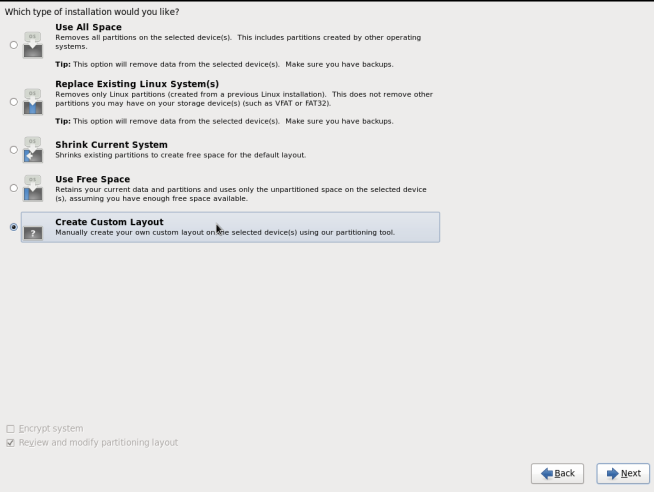
Figure 9.1. Custom Layout Window
- Select the disk on which to install Red Hat Gluster Storage. Click Next.For Red Hat Gluster Storage to install successfully, you must select the same disk that contained the operating system data previously.
Warning
While selecting your disk, do not select the disks containing bricks.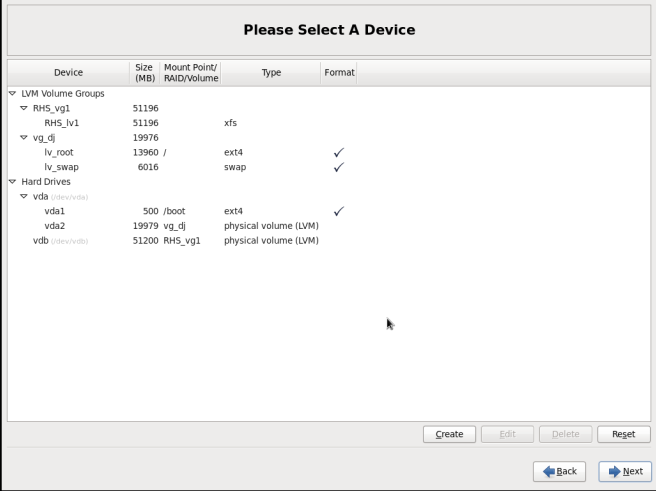
Figure 9.2. Select Disk Partition Window
- After installation, ensure that the host name and IP address of the machine is the same as before.
Warning
If the IP address and host name are not the same as before, you will not be able to access the data present in your earlier environment. - After installation, the system automatically starts
glusterd. Stop the gluster service using the following command:# service glusterd stop Stopping glusterd: [OK]
- Add entries to
/etc/fstabto mount data disks at the same path as before.Note
Ensure that the mount points exist in your trusted storage pool environment. - Mount all data disks using the following command:
# mount -a
- Back up the latest
glusterdusing the following command:# cp -a /var/lib/glusterd /var/lib/glusterd-backup
- Copy
/var/lib/glusterdand/etc/glusterfsfrom your backup disk to the OS disk.# cp -a /backup-disk/glusterd/* /var/lib/glusterd # cp -a /backup-disk/glusterfs/* /etc/glusterfs
Note
Do not restore the swift, samba and ctdb configuration files from the backup disk. However, any changes in swift, samba, and ctdb must be applied separately in the new configuration files from the backup taken earlier. - Copy back the latest hooks scripts to
/var/lib/glusterd/hooks.# cp -a /var/lib/glusterd-backup/hooks /var/lib/glusterd
- Ensure you restore any other files from the backup that was created earlier.
- You must restart the
glusterdmanagement daemon using the following commands:# glusterd --xlator-option *.upgrade=yes -N # service glusterd start Starting glusterd: [OK]
- Start the volume using the following command:
# gluster volume start volname  force
volume start: volname : success
Note
Repeat the above steps on all the servers in your trusted storage pool environment. - In case you have a pure replica volume (1*n) where n is the replica count, perform the following additional steps:
- Run the
fix-layoutcommand on the volume using the following command:# gluster volume rebalance volname fix-layout start
- Wait for the
fix-layoutcommand to complete. You can check the status for completion using the following command:# gluster volume rebalance volname status
- Stop the volume using the following command:
# gluster volume stop volname
- Force start the volume using the following command:
# gluster volume start volname force
- In case of an Object Store set-up, any configuration files that were edited should be renamed to end with a
.rpmsavefile extension, and other unedited files should be removed. - Re-configure the Object Store. For information on configuring Object Store, refer to Section 18.5 in Chapter 18. Managing Object Store of the Red Hat Gluster Storage Administration Guide.
- Get the volume information and peer status of the created volume using the following commands:
# gluster volume info
# gluster peer status
Ensure that the output of these commands has the same values that they had before you started the upgrade.Note
In Red Hat Gluster Storage 3.0, thegluster peer statusoutput does not display the port number. - Verify the upgrade.
- If all servers in the trusted storage pool are not upgraded, the
gluster peer statuscommand displays the peers as disconnected or rejected.The command displays the peer status information similar to the following:# gluster peer status Number of Peers: 3 Hostname: server2 Uuid: 2dde2c42-1616-4109-b782-dd37185702d8 State: Peer Rejected (Connected) Hostname: server3 Uuid: 4224e2ac-8f72-4ef2-a01d-09ff46fb9414 State: Peer in Cluster (Connected) Hostname: server4 Uuid: 10ae22d5-761c-4b2e-ad0c-7e6bd3f919dc State: Peer Rejected (Disconnected)
- If all systems in the trusted storage pool are upgraded, the
gluster peer statuscommand displays peers as connected.The command displays the peer status information similar to the following:# gluster peer status Number of Peers: 3 Hostname: server2 Uuid: 2dde2c42-1616-4109-b782-dd37185702d8 State: Peer in Cluster (Connected) Hostname: server3 Uuid: 4224e2ac-8f72-4ef2-a01d-09ff46fb9414 State: Peer in Cluster (Connected) Hostname: server4 Uuid: 10ae22d5-761c-4b2e-ad0c-7e6bd3f919dc State: Peer in Cluster (Connected)
- If all the volumes in the trusted storage pool are started, the
gluster volume infocommand displays the volume status as started.Volume Name: volname Type: Distributed-Replicate Volume ID: d6274441-65bc-49f4-a705-fc180c96a072 Status: Started Number of Bricks: 2 x 2 = 4 Transport-type: tcp Bricks: Brick1: server1:/rhs/brick1/brick1 Brick2: server2:/rhs/brick1/brick2 Brick3: server3:/rhs/brick1/brick3 Brick4: server4:/rhs/brick1/brick4 Options Reconfigured: geo-replication.indexing: on
- If you have a geo-replication setup, re-establish the geo-replication session between the master and slave using the following steps:
- Run the following commands on any one of the master nodes:
# cd /usr/share/glusterfs/scripts/ # sh generate-gfid-file.sh localhost:${master-vol} $PWD/get-gfid.sh /tmp/tmp.atyEmKyCjo/upgrade-gfid-values.txt # scp /tmp/tmp.atyEmKyCjo/upgrade-gfid-values.txt root@${slavehost}:/tmp/ - Run the following commands on a slave node:
# cd /usr/share/glusterfs/scripts/
# sh slave-upgrade.sh localhost:${slave-vol} /tmp/tmp.atyEmKyCjo/upgrade-gfid-values.txt $PWD/gsync-sync-gfid
Note
If the SSH connection for your setup requires a password, you will be prompted for a password for all machines where the bricks are residing. - Re-create and start the geo-replication sessions.For information on creating and starting geo-replication sessions, refer to Managing Geo-replication in the Red Hat Gluster Storage Administration Guide.
Note
It is recommended to add the child channel of Red Hat Enterprise Linux 6 containing the native client, so that you can refresh the clients and get access to all the new features in Red Hat Gluster Storage 3.1. For more information, refer to the Upgrading Native Client section in the Red Hat Gluster Storage Administration Guide. - Remount the volume to the client and verify for data consistency. If the gluster volume information and gluster peer status information matches with the information collected before migration, you have successfully upgraded your environment to Red Hat Gluster Storage 3.0.
9.2. In-Service Software Upgrade to Upgrade from Red Hat Gluster Storage 2.1.x to Red Hat Gluster Storage 3.1
9.2.1. Pre-upgrade Tasks
9.2.1.1. Upgrade Requirements for Red Hat Gluster Storage 3.1
- In-service software upgrade is supported only for nodes with replicate and distributed replicate volumes.
- If you want to use snapshots for your existing environment, each brick must be an independent thinly provisioned logical volume (LV). If you do not plan to use snapshots, thickly provisioned volumes remain supported.
- The Logical Volume which contains the brick must not be used for any other purpose.
- Only linear LVM is supported with Red Hat Gluster Storage 3.0. For more information, see https://access.redhat.com/site/documentation/en-US/Red_Hat_Enterprise_Linux/4/html-single/Cluster_Logical_Volume_Manager/#lv_overview
- Recommended SetupIn addition to the following list, you must ensure to read Chapter 9 Configuring Red Hat Gluster Storage for Enhancing Performance in the Red Hat Gluster Storage 3.1 Administration Guide for enhancing performance:
- For each brick, create a dedicated thin pool that contains the brick of the volume and its (thin) brick snapshots. With the current thinly provisioned volume design, avoid placing the bricks of different gluster volumes in the same thin pool.
- The recommended thin pool chunk size is 256KB. There might be exceptions to this in cases where we have a detailed information of the customer's workload.
- The recommended pool metadata size is 0.1% of the thin pool size for a chunk size of 1MB or larger. In special cases, where we recommend a chunk size less than 256KB, use a pool metadata size of 0.5% of thin pool size.
- When server-side quorum is enabled, ensure that bringing one node down does not violate server-side quorum. Add dummy peers to ensure the server-side quorum will not be violated until the completion of rolling upgrade using the following command:
Note
If you have a geo-replication session, then to add a node follow the steps mentioned in Section 12.5.1 Starting Geo-replication for a New Brick or New Node in the Red Hat Gluster Storage 3.1 Administration Guide.# gluster peer probe DummyNodeName
For Example 1When the server-side quorum percentage is set to the default value (>50%), for a plain replicate volume with two nodes and one brick on each machine, a dummy node which does not contain any bricks must be added to the trusted storage pool to provide high availability of the volume using the command mentioned above.
For Example 2In a three node cluster, if the server-side quorum percentage is set to 77%, then bringing down one node would violate the server-side quorum. In this scenario, you have to add two dummy nodes to meet server-side quorum.
- If the client-side quorum is enabled then, run the following command to disable the client-side quorum:
# gluster volume reset <vol-name> cluster.quorum-type
Note
This is recommended for 2-way replicated volumes and not for 3-way replicated volumes. When the client-side quorum is disabled for a 3-way replicated volumes, there are chances that the files might go into split-brain. - If there are any geo-replication sessions running between the master and slave, then stop this session by executing the following command:
# gluster volume geo-replication MASTER_VOL SLAVE_HOST::SLAVE_VOL stop
- Ensure the Red Hat Gluster Storage server is registered to the required channels:
rhel-x86_64-server-6
rhel-x86_64-server-6-rhs-3
rhel-x86_64-server-sfs-6
To subscribe to the channels, run the following command:# rhn-channel --add --channel=<channel>
9.2.1.2. Restrictions for In-Service Software Upgrade
- Do not perform in-service software upgrade when the I/O or load is high on the Red Hat Gluster Storage server.
- Do not perform any volume operations on the Red Hat Gluster Storage server
- Do not change the hardware configurations.
- Do not run mixed versions of Red Hat Gluster Storage for an extended period of time. For example, do not have a mixed environment of Red Hat Gluster Storage 3.1 and Red Hat Gluster Storage 3.0 Update 4 for a prolonged time.
- Do not combine different upgrade methods.
- It is not recommended to use in-service software upgrade for migrating to thinly provisioned volumes, but to use offline upgrade scenario instead. For more information see, Section 8.1, “Updating Red Hat Gluster Storage from 3.0.x to 3.1.x in the Offline Mode”
9.2.1.3. Configuring repo for Upgrading using ISO
Note
- Mount the ISO image file under any directory using the following command:
mount -o loop <ISO image file> <mount-point>
For example:mount -o loop RHSS-2.1U1-RC3-20131122.0-RHS-x86_64-DVD1.iso /mnt
- Set the repo options in a file in the following location:
/etc/yum.repos.d/<file_name.repo>
- Add the following information to the repo file:
[local]
name=local
baseurl=file:///mnt
enabled=1
gpgcheck=0
9.2.1.4. Preparing and Monitoring the Upgrade Activity
- Check the peer status using the following commad:
# gluster peer status
For example:# gluster peer status Number of Peers: 2 Hostname: 10.70.42.237 Uuid: 04320de4-dc17-48ff-9ec1-557499120a43 State: Peer in Cluster (Connected) Hostname: 10.70.43.148 Uuid: 58fc51ab-3ad9-41e1-bb6a-3efd4591c297 State: Peer in Cluster (Connected)
- Check the volume status using the following command:
# gluster volume status
For example:# gluster volume status Status of volume: r2 Gluster process Port Online Pid ------------------------------------------------------------------------------ Brick 10.70.43.198:/brick/r2_0 49152 Y 32259 Brick 10.70.42.237:/brick/r2_1 49152 Y 25266 Brick 10.70.43.148:/brick/r2_2 49154 Y 2857 Brick 10.70.43.198:/brick/r2_3 49153 Y 32270 NFS Server on localhost 2049 Y 25280 Self-heal Daemon on localhost N/A Y 25284 NFS Server on 10.70.43.148 2049 Y 2871 Self-heal Daemon on 10.70.43.148 N/A Y 2875 NFS Server on 10.70.43.198 2049 Y 32284 Self-heal Daemon on 10.70.43.198 N/A Y 32288 Task Status of Volume r2 ------------------------------------------------------------------------------ There are no active volume tasks
- Check the rebalance status using the following command:
# gluster volume rebalance r2 status
Node   Rebalanced-files  size      scanned   failures    skipped   status   run time in secs
---------   -----------    ---------   --------   ---------  ------  --------  --------------
10.70.43.198         0       0Bytes       99       0           0    completed     1.00
10.70.43.148         49      196Bytes    100       0           0    completed     3.00
- Ensure that there are no pending self-heals before proceeding with in-service software upgrade using the following command:
# gluster volume heal volname info
The following example shows a self-heal completion:# gluster volume heal drvol info Gathering list of entries to be healed on volume drvol has been successful Brick 10.70.37.51:/rhs/brick1/dir1 Number of entries: 0 Brick 10.70.37.78:/rhs/brick1/dir1 Number of entries: 0 Brick 10.70.37.51:/rhs/brick2/dir2 Number of entries: 0 Brick 10.70.37.78:/rhs/brick2/dir2 Number of entries: 0
9.2.2. Upgrade Process with Service Impact
ReST requests that are in transition will fail during in-service software upgrade. Hence it is recommended to stop all swift services before in-service software upgrade using the following commands:
# service openstack-swift-proxy stop
# service openstack-swift-account stop
# service openstack-swift-container stop
# service openstack-swift-object stop
When you NFS mount a volume, any new or outstanding file operations on that file system will hang uninterruptedly during in-service software upgrade until the server is upgraded.
Ongoing I/O on Samba shares will fail as the Samba shares will be temporarily unavailable during the in-service software upgrade, hence it is recommended to stop the Samba service using the following command:
# service ctdb stop ;Stopping CTDB will also stop the SMB service.
In-service software upgrade is not supported for distributed volume. In case you have a distributed volume in the cluster, stop that volume using the following command:
# gluster volume stop <VOLNAME>
# gluster volume start <VOLNAME>
The virtual machine images are likely to be modified constantly. The virtual machine listed in the output of the volume heal command does not imply that the self-heal of the virtual machine is incomplete. It could mean that the modifications on the virtual machine are happening constantly.
9.2.3. In-Service Software Upgrade
- Back up the following configuration directory and files on the backup directory:
/var/lib/glusterd, /etc/swift, /etc/samba, /etc/ctdb, /etc/glusterfs, /var/lib/samba, /var/lib/ctdb# cp -a /var/lib/glusterd /backup-disk/ # cp -a /etc/swift /backup-disk/ # cp -a /etc/samba /backup-disk/ # cp -a /etc/ctdb /backup-disk/ # cp -a /etc/glusterfs /backup-disk/ # cp -a /var/lib/samba /backup-disk/ # cp -a /var/lib/ctdb /backup-disk/
Note
- If you have a CTDB environment, then to upgrade to Red Hat Gluster Storage 3.1, see Section 9.2.4.1, “In-Service Software Upgrade for a CTDB Setup”.
- Stop the gluster services on the storage server using the following commands:
# service glusterd stop
# pkill glusterfs
# pkill glusterfsd
- To check the system's current subscription status run the following command:
# migrate-rhs-classic-to-rhsm --status
Note
Themigrate-rhs-classic-to-rhsmcommand is only available in Red Hat Gluster Storage 2.1 Update 4 or higher. If your system doesn't have this command, ensure that you have updated the redhat-storage-release package to the latest version. - Execute the following command to migrate from Red Hat Network Classic to Red Hat Subscription Manager
# migrate-rhs-classic-to-rhsm --rhn-to-rhsm
- To enable the Red Hat Gluster Storage 3.1 repos, execute the following command:
# migrate-rhs-classic-to-rhsm --upgrade --version 3
- To verify if the migration from Red Hat Network Classic to Red Hat Subscription Manager is successful, execute the following command:
# migrate-rhs-classic-to-rhsm --status
- Update the server using the following command:
# yum update
- If the volumes are thickly provisioned, then perform the following steps to migrate to thinly provisioned volumes:
Note
Migrating from thickly provisioned volume to thinly provisioned volume during in-service-software-upgrade takes a significant amount of time based on the data you have in the bricks. You must migrate only if you plan on using snapshots for your existing environment and plan to be online during the upgrade. If you do not plan to use snapshots, you can skip the migration steps from LVM to thinp. However, if you plan to use snapshots on your existing environment, the offline method to upgrade is recommended. For more information regarding offline upgrade, see Section 8.1, “Updating Red Hat Gluster Storage from 3.0.x to 3.1.x in the Offline Mode”Contact a Red Hat Support representative before migrating from thickly provisioned volumes to thinly provisioned volumes using in-service software upgrade.- Unmount all the bricks associated with the volume by executing the following command:
# umount mount point
For example:# umount /dev/RHS_vg/brick1
- Remove the LVM associated with the brick by executing the following command:
# lvremove logical_volume_name
For example:# lvremove /dev/RHS_vg/brick1
- Remove the volume group by executing the following command:
# vgremove -ff volume_group_name
For example:vgremove -ff RHS_vg
- Remove the physical volume by executing the following command:
# pvremove -ff physical_volume
- If the physical volume(PV) not created then create the PV for a RAID 6 volume by executing the following command, else proceed with the next step:
# pvcreate --dataalignment 2560K /dev/vdb
For more information refer Section 12.1 Prerequisites in the Red Hat Gluster Storage 3 Administration Guide - Create a single volume group from the PV by executing the following command:
# vgcreate volume_group_name disk
For example:vgcreate RHS_vg /dev/vdb
- Create a thinpool using the following command:
# lvcreate -L size --poolmetadatasize md size --chunksize chunk size -T pool device
For example:lvcreate -L 2T --poolmetadatasize 16G --chunksize 256 -T /dev/RHS_vg/thin_pool
- Create a thin volume from the pool by executing the following command:
# lvcreate -V size -T pool device -n thinp
For example:lvcreate -V 1.5T -T /dev/RHS_vg/thin_pool -n thin_vol
- Create filesystem in the new volume by executing the following command:
mkfs.xfs -i size=512 thin pool device
For example:mkfs.xfs -i size=512 /dev/RHS_vg/thin_vol
The back-end is now converted to a thinly provisioned volume. - Mount the thinly provisioned volume to the brick directory and setup the extended attributes on the bricks. For example:
# setfattr -n trusted.glusterfs.volume-id \ -v 0x$(grep volume-id /var/lib/glusterd/vols/volname/info \ | cut -d= -f2 | sed 's/-//g') $brick
- To ensure Red Hat Gluster Storage Server node is healthy after reboot and so that it can then be joined back to the cluster, it is recommended that you disable glusterd during boot using the following command:
# chkconfig glusterd off
- Reboot the server.
- Perform the following operations to change the Automatic File Replication extended attributes so that the heal process happens from a brick in the replica subvolume to the thin provisioned brick.
- Create a FUSE mount point from any server to edit the extended attributes. Using the NFS and CIFS mount points, you will not be able to edit the extended attributes.Note that /mnt/r2 is the FUSE mount path.
- Create a new directory on the mount point and ensure that a directory with such a name is not already present.
# mkdir /mnt/r2/name-of-nonexistent-dir
- Delete the directory and set the extended attributes.
# rmdir /mnt/r2/name-of-nonexistent-dir
# setfattr -n trusted.non-existent-key -v abc /mnt/r2
# setfattr -x trusted.non-existent-key /mnt/r2
- Ensure that the extended attributes of the brick in the replica subvolume(In this example,
brick: /dev/RHS_vg/brick2, extended attribute: trusted.afr.r2-client-1), is not set to zero.# getfattr -d -m. -e hex /dev/RHS_vg/brick2 # file: /dev/RHS_vg/brick2 security.selinux=0x756e636f6e66696e65645f753a6f626a6563745f723a66696c655f743a733000 trusted.afr.r2-client-0=0x000000000000000000000000 trusted.afr.r2-client-1=0x000000000000000300000002 trusted.gfid=0x00000000000000000000000000000001 trusted.glusterfs.dht=0x0000000100000000000000007ffffffe trusted.glusterfs.volume-id=0xde822e25ebd049ea83bfaa3c4be2b440
- Start the
glusterdservice using the following command:# service glusterd start
- To automatically start the
glusterddaemon every time the system boots, run the following command:# chkconfig glusterd on
- Start self-heal on the volume.
# gluster volume heal vol-name
- To verify if you have upgraded to the latest version of the Red Hat Gluster Storage server execute the following command:
# gluster --version
- Ensure that all the bricks are online. To check the status execute the following command:
# gluster volume status
For example:# gluster volume status Status of volume: r2 Gluster process Port Online Pid ------------------------------------------------------------------------------ Brick 10.70.43.198:/brick/r2_0 49152 Y 32259 Brick 10.70.42.237:/brick/r2_1 49152 Y 25266 Brick 10.70.43.148:/brick/r2_2 49154 Y 2857 Brick 10.70.43.198:/brick/r2_3 49153 Y 32270 NFS Server on localhost 2049 Y 25280 Self-heal Daemon on localhost N/A Y 25284 NFS Server on 10.70.43.148 2049 Y 2871 Self-heal Daemon on 10.70.43.148 N/A Y 2875 NFS Server on 10.70.43.198 2049 Y 32284 Self-heal Daemon on 10.70.43.198 N/A Y 32288 Task Status of Volume r2 ------------------------------------------------------------------------------ There are no active volume tasks
- Ensure self-heal is complete on the replica using the following command:
# gluster volume heal volname info
The following example shows self heal completion:# gluster volume heal drvol info Gathering list of entries to be healed on volume drvol has been successful Brick 10.70.37.51:/rhs/brick1/dir1 Number of entries: 0 Brick 10.70.37.78:/rhs/brick1/dir1 Number of entries: 0 Brick 10.70.37.51:/rhs/brick2/dir2 Number of entries: 0 Brick 10.70.37.78:/rhs/brick2/dir2 Number of entries: 0
- Repeat the above steps on the other node of the replica pair.
Note
In the case of a distributed-replicate setup, repeat the above steps on all the replica pairs. - When all nodes have been upgraded, run the following command to update the
op-versionof the cluster. This helps to prevent any compatibility issues within the cluster.# gluster volume set all cluster.op-version 30707
Note
If you want to enable Snapshot, see Section 12.4. Troubleshooting in the Red Hat Gluster Storage 3 Administration Guide. - If the client-side quorum was disabled before upgrade, then upgrade it by executing the following command:
# gluster volume set volname cluster.quorum-type auto
- If a dummy node was created earlier, then detatch it by executing the following command:
# gluster peer detatch <dummy_node name>
- If the geo-replication session between master and slave was disabled before upgrade, then configure the meta volume and restart the session::
# gluster volume set all cluster.enable-shared-storage enable
gluster volume geo-replication Volume1 example.com::slave-vol config use_meta_volume true
# gluster volume geo-replication MASTER_VOL SLAVE_HOST::SLAVE_VOL start
9.2.4. Special Consideration for In-Service Software Upgrade
9.2.4.1. In-Service Software Upgrade for a CTDB Setup
- To ensure that the CTDB does not start automatically after a reboot run the following command on each node of the CTDB cluster:
# chkconfig ctdb off
- Stop the CTDB service on the Red Hat Gluster Storage node using the following command on each node of the CTDB cluster:
# service ctdb stop
- To verify if the CTDB and SMB services are stopped, execute the following command:
ps axf | grep -E '(ctdb|smb|winbind|nmb)[d]'
- Stop the gluster services on the storage server using the following commands:
# service glusterd stop
# pkill glusterfs
# pkill glusterfsd
- In
/etc/fstab, comment out the line containing the volume used for CTDB service as shown in the following example:# HostName:/volname /gluster/lock glusterfs defaults,transport=tcp 0 0
- Update the server using the following command:
# yum update
- If SELinux support is required, then enable SELinux by following the steps mentioned in, Chapter 11, Enabling SELinux
- After SELinux is enabled, set the following boolean:For Samba
setsebool -P samba_load_libgfapi 1For CTDBsetsebool -P use_fusefs_home_dirs 1 - To ensure the
glusterdservice does not start automatically after reboot, execute the following command:# chkconfig glusterd off
- Reboot the server.
- Update the META=all with the gluster volume information in the following scripts:
/var/lib/glusterd/hooks/1/start/post/S29CTDBsetup.sh /var/lib/glusterd/hooks/1/stop/pre/S29CTDB-teardown.sh
- In
/etc/fstab, uncomment the line containing the volume used for CTDB service as shown in the following example:HostName:/volname /gluster/lock glusterfs defaults,transport=tcp 0 0
- To automatically start the
glusterddaemon every time the system boots, run the following command:# chkconfig glusterd on
- To automatically start the ctdb daemon every time the system boots, run the following command:
# chkconfig ctdb on
- Start the
glusterdservice using the following command:# service glusterd start
- Mount the CTDB volume by running the following command:
# mount -a
- Start the CTDB service using the following command:
# service ctdb start
- To verify if CTDB is running successfully, execute the following commands:
# ctdb status
# ctdb ip
# ctdb ping -n all
After upgrading the Red Hat Gluster Storage server, upgrade the CTDB package by executing the following steps:
Note
- Upgrading CTDB on all the nodes must be done simultaneously to avoid any data corruption.
- The following steps have to performed only when upgrading CTDB from CTDB 1.x to CTDB 2.x.
- Stop the CTDB service on all the nodes of the CTDB cluster by executing the following command. Ensure it is performed on all the nodes simultaneously as two different versions of CTDB cannot run at the same time in the CTDB cluster:
# service ctdb stop
- Perform the following operations on all the nodes used as samba servers:
- Remove the following soft links:
/etc/sysconfig/ctdb
/etc/ctdb/nodes
/etc/ctdb/public_addresses
- Copy the following files from the CTDB volume to the corresponding location by executing the following command on each node of the CTDB cluster:
cp /gluster/lock/nodes /etc/ctdb/nodes
cp /gluster/lock/public_addresses /etc/ctdb/public_addresses
- Stop and delete the CTDB volume by executing the following commands on one of the nodes of the CTDB cluster:
# gluster volume stop volname
# gluster volume delete volname
- To remove the existing CTDB package execute the following command:
# yum remove ctdb
- To install CTDB, execute the following command:
# yum install ctdb2.5
9.2.4.2. Verifying In-Service Software Upgrade
# gluster --version
9.2.4.3. Upgrading the Native Client
Chapter 10. Upgrading from Red Hat Gluster Storage 3.0 to Red Hat Gluster Storage 3.1 in a Red Hat Enterprise Virtualization-Red Hat Gluster Storage Environment
yum.
10.1. Upgrading using an ISO
- Using Red Hat Enterprise Virtualization Manager, stop all the virtual machine instances.The Red Hat Gluster Storage volume on the instances will be stopped during the upgrade.
- Using Red Hat Enterprise Virtualization Manager, move the data domain of the data center to Maintenance mode.
- Using Red Hat Enterprise Virtualization Manager, stop the volume (the volume used for data domain) containing Red Hat Gluster Storage nodes in the data center.
- Using Red Hat Enterprise Virtualization Manager, move all Red Hat Gluster Storage nodes to Maintenance mode.
- Perform the ISO Upgrade as mentioned in Section 9.1.3, “Upgrading from Red Hat Gluster Storage 2.1.x to Red Hat Gluster Storage 3.1 using an ISO”.
Figure 10.1. Red Hat Gluster Storage Node
- Re-install the Red Hat Gluster Storage nodes from Red Hat Enterprise Virtualization Manager.
Note
- Re-installation for the Red Hat Gluster Storage nodes should be done from Red Hat Enterprise Virtualization Manager. The newly upgraded Red Hat Gluster Storage 3.1 nodes lose their network configuration and other configurations, such as iptables configuration, done earlier while adding the nodes to Red Hat Enterprise Virtualization Manager. Re-install the Red Hat Gluster Storage nodes to have the bootstrapping done.
- You can re-configure the Red Hat Gluster Storage nodes using the option provided under Action Items, as shown in Figure 10.2, “Red Hat Gluster Storage Node before Upgrade ”, and perform bootstrapping.
Figure 10.2. Red Hat Gluster Storage Node before Upgrade
- Perform the steps above in all Red Hat Gluster Storage nodes.
- Start the volume once all the nodes are shown in Up status in Red Hat Enterprise Virtualization Manager.
- Upgrade the native client bits for Red Hat Enterprise Linux 6 or Red Hat Enterprise Linux 7, based on the Red Hat Enterprise Linux server hypervisor used.
Note
If Red Hat Enterprise Virtualization Hypervisor is used as hypervisor, then install the suitable build of Red Hat Enterprise Virtualization Hypervisor containing the latest native client.
Figure 10.3. Red Hat Gluster Storage Node after Upgrade
- Using Red Hat Enterprise Virtualization Manager, activate the data domain and start all the virtual machine instances in the data center.
10.2. Upgrading using yum
- Using Red Hat Enterprise Virtualization Manager, stop all virtual machine instances in the data center.
- Using Red Hat Enterprise Virtualization Manager, move the data domain backed by gluster volume to Maintenance mode.
- Using Red Hat Enterprise Virtualization Manager, move all Red Hat Gluster Storage nodes to Maintenance mode.
- Perform
yumupdate as mentioned in Section 9.1.1, “Upgrading from Red Hat Gluster Storage 2.1.x to Red Hat Gluster Storage 3.1 for Systems Subscribed to Red Hat Network”. - Once the Red Hat Gluster Storage nodes are rebooted and up, them using Red Hat Enterprise Virtualization Manager.
Note
Re-installation of Red Hat Gluster Storage nodes is required, as the network configurations and bootstrapping configurations done prior to upgrade are preserved, unlike ISO upgrade. - Using Red Hat Enterprise Virtualization Manager, start the volume.
- Upgrade the native client bits for Red Hat Enterprise Linux 6 or Red Hat Enterprise Linux 7, based on the Red Hat Enterprise Linux server hypervisor used.
Note
If Red Hat Enterprise Virtualization Hypervisor is used as hypervisor, reinstall Red Hat Enterprise Virtualization Hypervisor containing the latest version of Red Hat Gluster Storage native client. - Activate the data domain and start all the virtual machine instances.
Chapter 11. Enabling SELinux
# rpm -q package_name
Important
dracut utility has to be run to put SELinux awareness into the initramfs file system. Failing to do so causes SELinux to not start during system startup.
- Before SELinux is enabled, each file on the file system must be labeled with an SELinux context. Before this happens, confined domains may be denied access, preventing your system from booting correctly. To prevent this, configure
SELINUX=permissivein/etc/selinux/config:# This file controls the state of SELinux on the system. # SELINUX= can take one of these three values: # enforcing - SELinux security policy is enforced. # permissive - SELinux prints warnings instead of enforcing. # disabled - No SELinux policy is loaded. SELINUX=permissive # SELINUXTYPE= can take one of these two values: # targeted - Targeted processes are protected, # mls - Multi Level Security protection. SELINUXTYPE=targeted
- As the Linux root user, reboot the system. During the next boot, file systems are labeled. The label process labels each file with an SELinux context:
*** Warning -- SELinux targeted policy relabel is required.
*** Relabeling could take a very long time, depending on file
*** system size and speed of hard drives.
****
Each * (asterisk) character on the bottom line represents 1000 files that have been labeled. In the above example, four * characters represent 4000 files have been labeled. The time it takes to label all files depends on the number of files on the system and the speed of hard drives. On modern systems, this process can take as short as 10 minutes. - In permissive mode, the SELinux policy is not enforced, but denial messages are still logged for actions that would have been denied in enforcing mode. Before changing to enforcing mode, as the Linux root user, run the following command to confirm that SELinux did not deny actions during the last boot:
# grep "SELinux is preventing" /var/log/messages
If SELinux did not deny any actions during the last boot, this command returns no output. - If there were no denial messages in /var/log/messages, configure SELINUX=enforcing in /etc/selinux/config:
# This file controls the state of SELinux on the system.
# SELINUX= can take one of these three values:
#       enforcing - SELinux security policy is enforced.
#       permissive - SELinux prints warnings instead of enforcing.
#       disabled - No SELinux policy is loaded.
SELINUX=enforcing
# SELINUXTYPE= can take one of these two values:
#       targeted - Targeted processes are protected,
#       mls - Multi Level Security protection.
SELINUXTYPE=targeted
- Reboot your system. After reboot, confirm that getenforce returns Enforcing
~]$ getenforce
Enforcing
Chapter 12. Using the Gluster Command Line Interface
Note
--mode=script to any CLI command ensures that the command executes without confirmation prompts.
Run the Gluster CLI on any Red Hat Gluster Storage Server by either invoking the commands or running the Gluster CLI in interactive mode. The gluster command can be remotely used via SSH.
# gluster peer COMMAND
status command:
# gluster peer status
Alternatively, run the Gluster CLI in interactive mode using the following command:
# gluster
gluster>
gluster> COMMAND
status to view the status of the peer server:
- Start Gluster CLI's interactive mode:
# gluster
- Request the peer server status:
gluster> status
- The peer server status displays.
help to view the gluster help options.
- Start Gluster CLI's interactive mode:
# gluster
- Request the help options:
gluster> help
- A list of gluster commands and options displays.
Appendix A. Revision History
| Revision History | |||||
|---|---|---|---|---|---|
| Revision 3.1-30 | Wed May 03 2016 | ||||
| |||||
| Revision 3.1-26 | Tue Mar 1 2016 | ||||
| |||||
| Revision 3.1-24 | Wed Feb 17 2016 | ||||
| |||||
| Revision 3.1-23 | Fri Jan 29 2016 | ||||
| |||||
| Revision 3.1-22 | Thu Jan 14 2016 | ||||
| |||||
| Revision 3.1-21 | Tue Dec 15 2015 | ||||
| |||||
| Revision 3.1-20 | Tue Dec 08 2015 | ||||
| |||||
| Revision 3.1-19 | Fri Nov 20 2015 | ||||
| |||||
| Revision 3.1-18 | Wed Nov 18 2015 | ||||
| |||||
| Revision 3.1-17 | Mon Nov 02 2015 | ||||
| |||||
| Revision 3.1-16 | Thu Oct 29 2015 | ||||
| |||||
| Revision 3.1-7 | Thu Oct 01 2015 | ||||
| |||||
| Revision 3.1-6 | Tue Aug 04 2015 | ||||
| |||||
| Revision 3.1-3 | Tue July 28 2015 | ||||
| |||||
| Revision 3.1-1 | Tue Jul 28 2015 | ||||
| |||||