
Chapter 1. Overview of GNOME environments
You can switch between several user interfaces and graphics back ends in GNOME.
To function properly, GNOME requires your system to support 3D acceleration. This includes bare metal systems, as well as hypervisor solutions such as VMWare.
If GNOME does not start or performs poorly on your VMWare virtual machine (VM), see the following solution: Why does the GUI fail to start on my VMware virtual machine?
1.1. GNOME environments, back ends, and display protocols
In RHEL 9, there are two available GNOME environments:
- GNOME Standard
- GNOME Classic
Both environments can use two different protocols as their graphical back ends:
The Wayland protocol, which uses GNOME Shell as the Wayland compositor and display server.
This solution of display server is further referred as GNOME Shell on Wayland.
- The X11 protocol, which uses X.Org as the display server.
The default combination in RHEL 9 is the GNOME Standard environment using GNOME Shell on Wayland as the display server. However, due to certain Wayland limitations, you might want to switch the graphics protocol stack to X11. You can also switch from GNOME Standard to GNOME Classic.
Thus, you can select from the following combinations of back ends and environments when logging in:
- GNOME Shell on Wayland (the default combination in RHEL 9)
- GNOME Shell on X11
- GNOME Classic on Wayland
- GNOME Classic on X11
Additional resources
- For information about how to switch the environments, see Selecting GNOME environment and display protocol.
1.2. GNOME Standard
The GNOME Standard user interface includes these major components:
- Top bar
- The horizontal bar at the top of the screen provides access to some of the basic functions of GNOME Standard, such as the Activities Overview, clock and calendar, system status icons, and the system menu.
- System menu

The system menu is located in the upper-right corner, and provides the following functionality:
- Updating settings
- Controlling the sound volume
- Accessing your Wi-Fi connection
- Switching the user
- Logging out
- Turning off the computer
- Activities Overview
The Activities Overview features windows and applications views that let you run applications and windows and switch between them.
The search entry at the top allows for searching various items available on the desktop, including applications, documents, files, and configuration tools.
The horizontal bar on the bottom contains a list of favorite and running applications. You can add or remove applications from the default list of favorites.
- Message tray
- The message tray provides access to pending notifications. The message tray shows when you press Super+M.
The GNOME Standard desktop

1.3. GNOME Classic
GNOME Classic represents a mode for users who prefer a more traditional desktop experience that is similar to the GNOME 2 environment used with RHEL 6. It is based on GNOME 3 technologies, and at the same time it includes multiple features similar to GNOME 2.
The GNOME Classic user interface consists of these major components:
- Applications and Places
The Applications menu is displayed at the upper-left corner of the screen. It gives you access to applications organized into categories. If you enable window overview, you can also open the Activities Overview from that menu.
The Places menu is displayed next to the Applications menu on the top bar. It gives you quick access to important folders, for example Downloads or Pictures.
- Taskbar
The taskbar is displayed at the bottom of the screen, and features:
- A window list
- A notification icon displayed next to the window list
- A short identifier for the current workspace and total number of available workspaces displayed next to the notification icon
- Four available workspaces
- In GNOME Classic, the number of available workspaces is set to 4 by default.
- Minimize and maximize buttons
- Window title bars in GNOME Classic feature the minimize and maximize buttons that let you quickly minimize the windows to the window list, or maximize them to take up all of the space on the desktop.
- A traditional Super+Tab window switcher
- In GNOME Classic, windows in the Super+Tab window switcher are not grouped by application.
- System menu
The system menu is located in the upper-right corner, and enables the following actions:
- Updating settings
- Controlling the sound volume
- Accessing your Wi-Fi connection
- Switching the user
- Logging out
- Turning off the computer
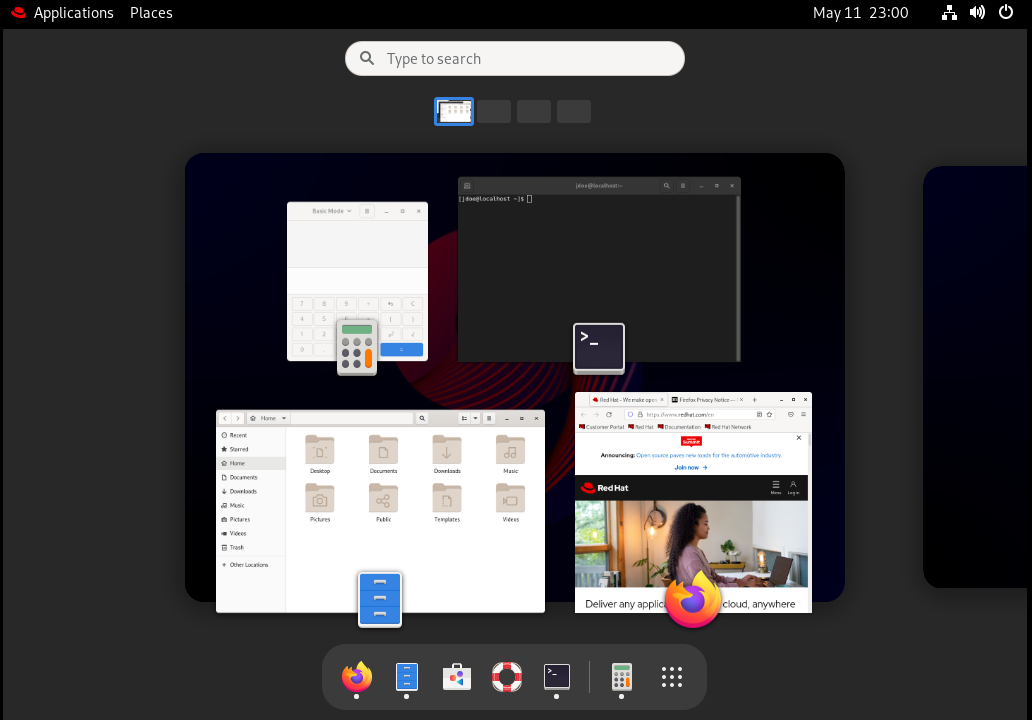
The GNOME Classic desktop with the Favorites submenu of the Applications menu

1.4. Enabling window overview in GNOME Classic
In GNOME Classic, the overview of open windows is not available by default. This procedure enables the window overview for all users on the system.
Enabling the window overview by this procedure is not a permanent change. Each update of the gnome-classic-session package overwrites the configuration file to the default settings, which disable the window overview.
To keep the window overview enabled, apply the procedure after each update of gnome-classic-session.
Procedure
-
Open the
/usr/share/gnome-shell/modes/classic.jsonfile as therootuser. Find the following line in the file:
"hasOverview": false
Change the line to the following:
"hasOverview": true
-
Save changes, and close the
/usr/share/gnome-shell/modes/classic.jsonfile. - Restart the user session.
Verification steps
- In your GNOME Classic session, open multiple windows.
- Press the Super key to open the window overview.
In the overview, check that:
- The Dash (the horizontal panel on the bottom of the screen) is displayed.
- The bottom panel is not displayed.
Window overview with "hasOverview": true
With the default settings (
"hasOverview": false), the overview has the following features:- The Dash is not displayed.
- The bottom panel is displayed. It includes the Window picker button in its left part and the workspace switcher in its right part.
Window overview with "hasOverview": false

1.5. Graphics back ends in RHEL 9
In RHEL 9, you can choose between two protocols to build a graphical user interface:
- Wayland
- The Wayland protocol uses GNOME Shell as its compositor and display server, which is further referred to as GNOME Shell on Wayland.
- X11
- The X11 protocol uses X.Org as the display server. Displaying graphics based on this protocol works the same way as in RHEL 7, where this was the only option.
New installations of RHEL 9 automatically select GNOME Shell on Wayland. However, you can switch to X.Org, or select the required combination of GNOME environment and display server.
X11 applications
Client applications need to be ported to the Wayland protocol or use a graphical toolkit that has a Wayland backend, such as GTK, to be able to work natively with the compositor and display server based on Wayland.
Legacy X11 applications that cannot be ported to Wayland automatically use Xwayland as a proxy between the X11 legacy clients and the Wayland compositor. Xwayland functions both as an X11 server and a Wayland client. The role of Xwayland is to translate the X11 protocol into the Wayland protocol and reversely, so that X11 legacy applications can work with the display server based on Wayland.
On GNOME Shell on Wayland, Xwayland starts automatically at login, which ensures that most X11 legacy applications work as expected when using GNOME Shell on Wayland. However, the X11 and Wayland protocols are different, and certain clients that rely on features specific to X11 might behave differently under Xwayland. For such specific clients, you can switch to the X.Org display server.
Input devices
RHEL 9 uses a unified input stack, libinput, which manages all common device types, such as mice, touchpads, touchscreens, tablets, trackballs and pointing sticks. This unified stack is used both by the X.Org and by the GNOME Shell on Wayland compositor.
GNOME Shell on Wayland uses libinput directly for all devices, and no switchable driver support is available. Under X.Org, libinput is implemented as the X.Org libinput driver, and you can optionally enable the legacy X.Org evdev driver if libinput does not support your input device.
Additional resources
-
You can find the current list of environments for which Wayland is not available in the
/usr/lib/udev/rules.d/61-gdm.rulesfile. - For additional information about the Wayland project, see Wayland documentation.
1.6. Selecting GNOME environment and display protocol
The default desktop environment for RHEL 9 is GNOME Standard with GNOME Shell on Wayland as the display server. However, due to certain limitations of Wayland, you might want to switch the graphics protocol stack. You might also want to switch from GNOME Standard to GNOME Classic.
The change of GNOME environment and graphics protocol stack is persistent across user logouts, and also when powering off or rebooting the computer.
Procedure
From the login screen (GDM), click the gear button in the right bottom corner of the screen.
NoteYou cannot access this option from the lock screen. The login screen appears when you first start RHEL or when you log out of your current session.

From the drop-down menu that appears, select the option that you prefer.
In the menu, the X.Org display server is also marked as X11.
1.7. Disabling Wayland for all users
You can disable the Wayland session for all users on the system, so that they always log in with the X11 session.
Procedure
-
Open the
/etc/gdm/custom.conffile as therootuser. Locate the following line in the
[daemon]section of the file:#WaylandEnable=false
Uncomment the line by remove the
#character. As a result, the line says:WaylandEnable=false
- Reboot the system.