
Red Hat Training
A Red Hat training course is available for Red Hat Gluster Storage
Chapter 6. Upgrading Red Hat Storage
This chapter describes the procedure to upgrade to Red Hat Storage 3.0 from Red Hat Storage 2.1.
6.1. Upgrading from Red Hat Storage 2.1 to Red Hat Storage 3.0 using an ISO
This method re-images the software in the storage server by keeping the data intact after a backup-restore of the configuration files. This method is quite invasive and should only be used if a local yum repository or an Internet connection to access Red Hat Network is not available.
The preferable method to upgrade is using the
yum command. For more information, refer to Section 6.2, “Upgrading from Red Hat Storage 2.1 to Red Hat Storage 3.0 for Systems Subscribed to Red Hat Network”.
Note
- Ensure that you perform the steps listed in this section on all the servers.
- In the case of a geo-replication set-up, perform the steps listed in this section on all the master and slave servers.
- You cannot access data during the upgrade process, and a downtime should be scheduled with applications, clients, and other end-users.
- Get the volume information and peer status using the following commands:
# gluster volume infoThe command displays the volume information similar to the following:Volume Name: volname Type: Distributed-Replicate Volume ID: d6274441-65bc-49f4-a705-fc180c96a072 Status: Started Number of Bricks: 2 x 2 = 4 Transport-type: tcp Bricks: Brick1: server1:/rhs/brick1/brick1 Brick2: server2:/rhs/brick1/brick2 Brick3: server3:/rhs/brick1/brick3 Brick4: server4:/rhs/brick1/brick4 Options Reconfigured: geo-replication.indexing: on
# gluster peer statusThe command displays the peer status information similar to the following:# gluster peer status Number of Peers: 3 Hostname: server2 Port: 24007 Uuid: 2dde2c42-1616-4109-b782-dd37185702d8 State: Peer in Cluster (Connected) Hostname: server3 Port: 24007 Uuid: 4224e2ac-8f72-4ef2-a01d-09ff46fb9414 State: Peer in Cluster (Connected) Hostname: server4 Port: 24007 Uuid: 10ae22d5-761c-4b2e-ad0c-7e6bd3f919dc State: Peer in Cluster (Connected)
Note
Make a note of this information to compare with the output after upgrading. - In case of a geo-replication set-up, stop the geo-replication session using the following command:
# gluster volume geo-replication master_volname slave_node::slave_volname stop
- In case of a CTDB/Samba set-up, stop the CTDB service using the following command:
# service ctdb stop ;Stopping the CTDB service also stops the SMB service
- Verify if the CTDB and the SMB services are stopped using the following command:
ps axf | grep -E '(ctdb|smb|winbind|nmb)[d]'
- In case of an object store set-up, turn off object store using the following commands:
# service gluster-swift-proxy stop
# service gluster-swift-account stop
# service gluster-swift-container stop
# service gluster-swift-object stop
- Stop all the gluster volumes using the following command:
# gluster volume stop volname
- Stop the
glusterdservices on all the nodes using the following command:# service glusterd stop
- If there are any gluster processes still running, terminate the process using
kill. - Ensure all gluster processes are stopped using the following command:
# pgrep gluster
- Back up the following configuration directory and files on the backup directory:
/var/lib/glusterd,/etc/swift,/etc/samba,/etc/ctdb,/etc/glusterfs./var/lib/samba,/var/lib/ctdbEnsure that the backup directory is not the operating system partition.# cp -a /var/lib/glusterd /backup-disk/ # cp -a /etc/swift /backup-disk/ # cp -a /etc/samba /backup-disk/ # cp -a /etc/ctdb /backup-disk/ # cp -a /etc/glusterfs /backup-disk/ # cp -a /var/lib/samba /backup-disk/ # cp -a /var/lib/ctdb /backup-disk/
Also, back up any other files or configuration files that you might require to restore later. You can create a backup of everything in/etc/. - Locate and unmount the data disk partition that contains the bricks using the following command:
# mount | grep backend-disk
   # umount /dev/device
For example, use thegluster volume infocommand to display the backend-disk information:Volume Name: volname Type: Distributed-Replicate Volume ID: d6274441-65bc-49f4-a705-fc180c96a072 Status: Started Number of Bricks: 2 x 2 = 4 Transport-type: tcp Bricks: Brick1: server1:/rhs/brick1/brick1 Brick2: server2:/rhs/brick1/brick2 Brick3: server3:/rhs/brick1/brick3 Brick4: server4:/rhs/brick1/brick4 Options Reconfigured: geo-replication.indexing: on
In the above example, the backend-disk is mounted at /rhs/brick1# findmnt /rhs/brick1 TARGET SOURCE FSTYPE OPTIONS /rhs/brick1 /dev/mapper/glustervg-brick1 xfs rw,relatime,attr2,delaylog,no # umount /rhs/brick1
- Insert the DVD with Red Hat Storage 3.0 ISO and reboot the machine. The installation starts automatically. You must install Red Hat Storage on the system with the same network credentials, IP address, and host name.
Warning
During installation, while creating a custom layout, ensure that you choose Create Custom Layout to proceed with installation. If you choose Replace Existing Linux System(s), it formats all disks on the system and erases existing data.Select Create Custom Layout. Click Next.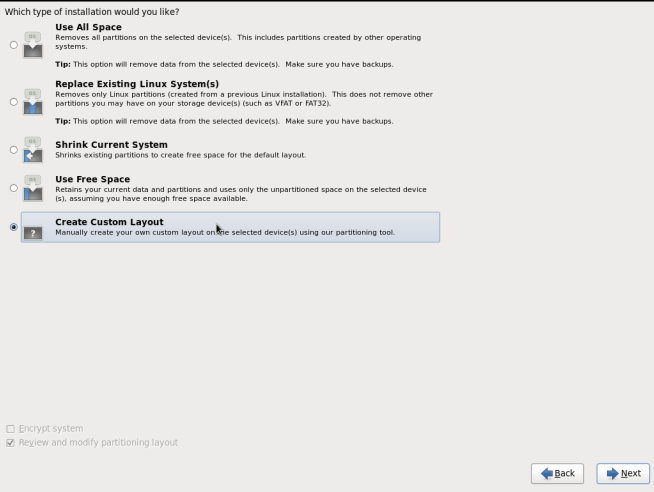
Figure 6.1. Custom Layout Window
- Select the disk on which to install Red Hat Storage. Click Next.For Red Hat Storage to install successfully, you must select the same disk that contained the operating system data previously.
Warning
While selecting your disk, do not select the disks containing bricks.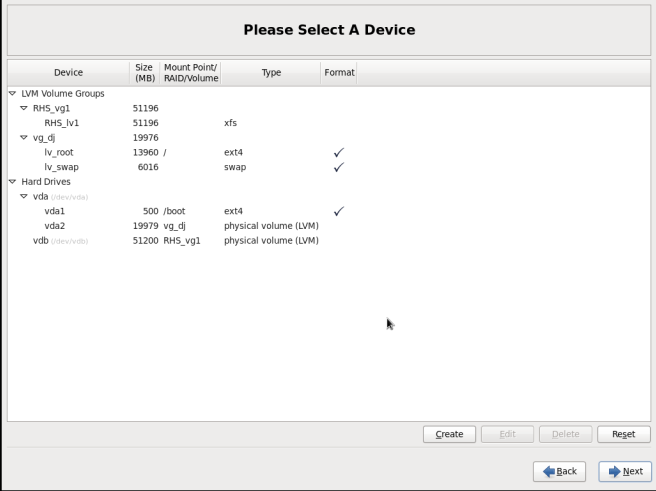
Figure 6.2. Select Disk Partition Window
- After installation, ensure that the host name and IP address of the machine is the same as before.
Warning
If the IP address and host name are not the same as before, you will not be able to access the data present in your earlier environment. - After installation, the system automatically starts
glusterd. Stop the gluster service using the following command:# service glusterd stop Stopping glusterd: [OK]
- Add entries to
/etc/fstabto mount data disks at the same path as before.Note
Ensure that the mount points exist in your trusted storage pool environment. - Mount all data disks using the following command:
# mount -a
- Back up the latest
glusterdusing the following command:# cp -a /var/lib/glusterd /var/lib/glusterd-backup
- Copy
/var/lib/glusterdand/etc/glusterfsfrom your backup disk to the OS disk.# cp -a /backup-disk/glusterd/* /var/lib/glusterd # cp -a /backup-disk/glusterfs/* /etc/glusterfs
Note
Do not restore the swift, samba and ctdb configuration files from the backup disk. However, any changes in swift, samba, and ctdb must be applied separately in the new configuration files from the backup taken earlier. - Copy back the latest hooks scripts to
/var/lib/glusterd/hooks.# cp -a /var/lib/glusterd-backup/hooks /var/lib/glusterd
- Ensure you restore any other files from the backup that was created earlier.
- You must restart the
glusterdmanagement daemon using the following commands:# glusterd --xlator-option *.upgrade=yes -N # service glusterd start Starting glusterd: [OK]
- Start the volume using the following command:
# gluster volume start volname  force
volume start: volname : success
Note
Repeat the above steps on all the servers in your trusted storage pool environment. - In case you have a pure replica volume (1*n) where n is the replica count, perform the following additional steps:
- Run the
fix-layoutcommand on the volume using the following command:# gluster volume rebalance volname fix-layout start
- Wait for the
fix-layoutcommand to complete. You can check the status for completion using the following command:# gluster volume rebalance volname status
- Stop the volume using the following command:
# gluster volume stop volname
- Force start the volume using the following command:
# gluster volume start volname force
- In case of an Object Store set-up, any configuration files that were edited should be renamed to end with a
.rpmsavefile extension, and other unedited files should be removed. - Re-configure the Object Store. For information on configuring Object Store, refer to Section 18.5 in Chapter 18. Managing Object Store of the Red Hat Storage Administration Guide.
- Get the volume information and peer status of the created volume using the following commands:
# gluster volume info
# gluster peer status
Ensure that the output of these commands has the same values that they had before you started the upgrade.Note
In Red Hat Storage 3.0, thegluster peer statusoutput does not display the port number. - Verify the upgrade.
- If all servers in the trusted storage pool are not upgraded, the
gluster peer statuscommand displays the peers as disconnected or rejected.The command displays the peer status information similar to the following:# gluster peer status Number of Peers: 3 Hostname: server2 Uuid: 2dde2c42-1616-4109-b782-dd37185702d8 State: Peer Rejected (Connected) Hostname: server3 Uuid: 4224e2ac-8f72-4ef2-a01d-09ff46fb9414 State: Peer in Cluster (Connected) Hostname: server4 Uuid: 10ae22d5-761c-4b2e-ad0c-7e6bd3f919dc State: Peer Rejected (Disconnected)
- If all systems in the trusted storage pool are upgraded, the
gluster peer statuscommand displays peers as connected.The command displays the peer status information similar to the following:# gluster peer status Number of Peers: 3 Hostname: server2 Uuid: 2dde2c42-1616-4109-b782-dd37185702d8 State: Peer in Cluster (Connected) Hostname: server3 Uuid: 4224e2ac-8f72-4ef2-a01d-09ff46fb9414 State: Peer in Cluster (Connected) Hostname: server4 Uuid: 10ae22d5-761c-4b2e-ad0c-7e6bd3f919dc State: Peer in Cluster (Connected)
- If all the volumes in the trusted storage pool are started, the
gluster volume infocommand displays the volume status as started.Volume Name: volname Type: Distributed-Replicate Volume ID: d6274441-65bc-49f4-a705-fc180c96a072 Status: Started Number of Bricks: 2 x 2 = 4 Transport-type: tcp Bricks: Brick1: server1:/rhs/brick1/brick1 Brick2: server2:/rhs/brick1/brick2 Brick3: server3:/rhs/brick1/brick3 Brick4: server4:/rhs/brick1/brick4 Options Reconfigured: geo-replication.indexing: on
- If you have a geo-replication setup, re-establish the geo-replication session between the master and slave using the following steps:
- Run the following commands on any one of the master nodes:
# cd /usr/share/glusterfs/scripts/ # sh generate-gfid-file.sh localhost:${master-vol} $PWD/get-gfid.sh /tmp/tmp.atyEmKyCjo/upgrade-gfid-values.txt # scp /tmp/tmp.atyEmKyCjo/upgrade-gfid-values.txt root@${slavehost}:/tmp/ - Run the following commands on a slave node:
# cd /usr/share/glusterfs/scripts/
# sh slave-upgrade.sh localhost:${slave-vol} /tmp/tmp.atyEmKyCjo/upgrade-gfid-values.txt $PWD/gsync-sync-gfid
Note
If the SSH connection for your setup requires a password, you will be prompted for a password for all machines where the bricks are residing. - Re-create and start the geo-replication sessions.For information on creating and starting geo-replication sessions, refer to Managing Geo-replication in the Red Hat Storage Administration Guide.
Note
It is recommended to add the child channel of Red Hat Enterprise Linux 6 containing the native client, so that you can refresh the clients and get access to all the new features in Red Hat Storage 3.0. For more information, refer to the Upgrading Native Client section in the Red Hat Storage Administration Guide. - Remount the volume to the client and verify for data consistency. If the gluster volume information and gluster peer status information matches with the information collected before migration, you have successfully upgraded your environment to Red Hat Storage 3.0.