
Assessing and Reporting Malware Signatures on RHEL Systems
Know when systems in your RHEL infrastructure are exposed to malware risks
Abstract
Chapter 1. Insights for RHEL malware detection service overview
The Red Hat Insights for Red Hat Enterprise Linux malware detection service is a monitoring and assessment tool that scans RHEL systems for the presence of malware. The malware detection service incorporates YARA pattern-matching software and malware detection signatures. Signatures are provided in partnership with the IBM X-Force threat intelligence team working closely with the Red Hat threat intelligence team.
In the malware detection service UI, User Access-authorized administrators and viewers can
- See the list of signatures against which their RHEL systems are scanned.
- See aggregate results for all RHEL systems with malware detection enabled in the Insights client.
- See results for individual systems.
- Know when a system shows evidence of the presence of malware.
These features give security threat assessors and IT incident-response teams valuable information to prepare a response.
The malware detection service does not recommend resolutions to resolve or remediate malware incidents.
The strategy to take in addressing a malware threat depends on a lot of criteria and considerations specific to each system and organization. Your organization’s security incident response team is best qualified to design and implement an effective mitigation and remediation strategy for each circumstance.
1.1. YARA malware signatures
YARA signature detection is the cornerstone of the Insights for Red Hat Enterprise Linux malware detection service. YARA signatures are descriptions of malware types expressed as patterns. Each description consists of a set of strings and a boolean expression that define a rule. When one or more of the conditions in a signature exist on a scanned RHEL system, YARA records a hit on that system.
1.2. IBM X-Force Threat Intelligence signatures
The Insights for Red Hat Enterprise Linux malware detection service includes predefined signatures developed by the IBM X-Force Threat Intelligence team to expose malware running on RHEL systems. Signatures compiled by the X-Force threat intelligence team are identifiable in the malware detection service by the XFTI- prefix, for example, XFTI_FritzFrog.
Chapter 2. Get started using the Insights for RHEL malware detection service
To begin using the malware detection service, you must perform the following actions. Procedures for each action follow in this chapter.
Some procedures require sudo access on the system and others require that the administrator performing the actions be a member of a User Access group with the Malware detection administrator role.
Table 2.1. Procedure and access requirements to set up malware detection service.
| Action | Description | Required privileges |
|---|---|---|
| Install YARA and configure the Insights client | Install the YARA application and configure the Insights client to use the malware detection service | Sudo access |
| Configure User Access on the Red Hat Hybrid Cloud Console | In Red Hat Hybrid Cloud Console > the Settings icon (⚙) > Identity & Access Management > User Access > Groups, create malware detection groups, and then add the appropriate roles and members to the groups | Organization Administrator on the Red Hat account |
| View results | See the results of system scans in the Hybrid Cloud Console | Membership in a User Access group with the Malware detection viewer role |
2.1. Installing YARA and configuring the Insights client
Perform the following procedure to install YARA and the malware detection controller on the RHEL system, then run test and full malware detection scans and report data to the Insights for Red Hat Enterprise Linux application.
Prerequisites
- The system operating system version must be RHEL8 or RHEL9.
- The administrator must have sudo access on the system.
- The system must have the Insights client package installed, and be registered to Insights for Red Hat Enterprise Linux.
Procedure
Install YARA.
Yara RPMs for RHEL8 and RHEL9 are available on the Red Hat Customer Portal:
$ sudo dnf install yara
NoteInsights for Red Hat Enterprise Linux malware detection is not supported on RHEL7.
If not yet completed, register the system with Insights for Red Hat Enterprise Linux.
ImportantThe Insights client package must be installed on the system and the system registered with Insights for Red Hat Enterprise Linux before the malware detection service can be used.
Install the Insights client RPM.
$ sudo yum install insights-client
Test the connection to Insights for Red Hat Enterprise Linux.
$ sudo insights-client --test-connection
Register the system with Insights for Red Hat Enterprise Linux.
$ sudo insights-client --register
Run the Insights client malware detection collector.
$ sudo insights-client --collector malware-detection
The collector takes the following actions for this initial run:
-
Creates a malware detection configuration file in
/etc/insights-client/malware-detection-config.yml Performs a test scan and uploads the results
NoteThis is a very minimal scan of your system with a simple test rule. The test scan is mainly to help verify that the installation, operation, and uploads are working correctly for the malware detection service. There will be a couple of matches found but this is intentional and nothing to worry about. Results from the initial test scan will not appear in the malware detection service UI.
-
Creates a malware detection configuration file in
Perform a full filesystem scan.
Edit
/etc/insights-client/malware-detection-config.ymland set thetest_scanoption to false.test_scan: false
Consider setting the following options to minimize scan time:
-
filesystem_scan_only- to only scan certain directories on the system -
filesystem_scan_exclude- to exclude certain directories from being scanned -
filesystem_scan_since- to scan only recently modified files
-
Re-run the client collector:
$ sudo insights-client --collector malware-detection
Optionally, scan processes. This will scan the filesystem first, followed by a scan of all processes. After the filesystem and process scans are complete, view the results at Security > Malware.
ImportantBy default, scanning processes is disabled. There is an issue with YARA and scanning processes on Linux systems that may cause poor system performance. This problem will be fixed in an upcoming release of YARA, but until then it is recommended to NOT scan processes.
To enable process scanning, set
scan_processes: truein/etc/insights-client/malware-detection-config.yml.scan_processes: true
Consider setting these processes related options while you are there: processes_scan_only - to only scan certain processes on the system processess_scan_exclude - to exclude certain processes from being scanned processes_scan_since - to scan only recently started processes
Save the changes and run the collector again.
$ sudo insights-client --collector malware-detection
2.2. User Access considerations
An Organization Administrator on your account configures settings in User Access to control access to Red Hat Insights for Red Hat Enterprise Linux features. All users on your account have access to most of the data in Insights for Red Hat Enterprise Linux. However, performing some actions requires users to have elevated access.
Access is granted in User Access in the Red Hat Hybrid Cloud Console. To grant or change access, an Organization Administrator or User Access administrator must add you to a User Access group with the required roles in Red Hat Hybrid Cloud Console > the Settings icon (⚙) > Identity & Access Management > User Access > Users.
In this documentation, prerequisites for procedures declare whether you need elevated access to perform the procedure.
Important predefined groups and roles relevant to understanding User Access are:
- Default access group
- Default admin access group
- Organization Administrator role
Brief overview about some predefined groups and roles
The following predefined groups and roles are relevant to access:
- Default access group. All users on the account are members of the Default access group. Members of the Default access group have read-only access, which allows you to view most information in Insights for Red Hat Enterprise Linux.
- Default admin access group. All users on the account who are Organization Administrators are members of this group. Users cannot modify the roles in the Red Hat-managed Default admin access group. Members of the Default admin access group have read-write access, which allows you to view and perform other actions in Insights for Red Hat Enterprise Linux.
- Organization Administrator role. All users on the account who are Organization Administrators can create and modify User Access groups and grant access to other account users. To find out whether you are an Organization Administrator, click your name in the Red Hat Hybrid Cloud Console header, in the upper right of your screen, and see whether the words “Org. Administrator” show under your username.
Requesting elevated access If you do not have access to features that you need, you can:
Contact Customer Service to get Organization Administrator details for your account.
- Provide your account number when you send the request.
Contact the Organization Administrator and ask for access, providing the following information:
- The name of the role you need access to, for example, Remediations administrator
- A link to full User Access documentation, to help inform the Organization Administrator about how to give you access.
2.2.1. User Access roles for the Malware detection service
The following predefined roles on the Red Hat Hybrid Cloud Console enable access to malware detection features in Insights for Red Hat Enterprise Linux:
There is no "default-group" role for malware detection service users. For users to be able to view data or control settings in the malware detection service, they must be members of an User Access group with one of the following roles:
- Malware detection viewer
- Malware detection administrator
2.3. Viewing malware detection scan results in the Red Hat Hybrid Cloud Console
View results of system scans on the Hybrid Cloud Console.
Prerequisites
- YARA and the Insights client are installed and configured on the RHEL system.
- You must be logged into the Hybrid Cloud Console.
- You are a member of a Hybrid Cloud Console User Access group with the Malware detection administrator or Malware detection viewer role.
Procedures
- Navigate to Security > Malware > Systems.
- View the dashboard to get a quick synopsis of all of your RHEL systems with malware detection enabled and reporting results.
- To see results for a specific system, use the Filter by name search box to search for the system by name.
Chapter 3. Additional malware service concepts
The following additional information might be useful in using malware detection service.
3.1. System scan
At release, Malware detection administrators must initiate the Insights for Red Hat Enterprise Linux malware detection service collector scan on demand. Alternatively, administrators can run the collector command as a playbook or by using another automation method.
The recommended frequency of scanning is up to your security team; however, because the scan can take significant time to run, the Insights for Red Hat Enterprise Linux malware detection service team recommends running the malware detection scan weekly.
3.1.1. Initiating a malware detection scan
Perform the following procedure to run a malware detection scan. After the scan is complete, data are reported in the Insights for Red Hat Enterprise Linux malware detection service. The scan time depends on a number of factors, including configuration options, number of running processes, etc.
Prerequisites
Running the Insights client command requires sudo access on the system.
Procedure
-
Run
$ sudo insights-client --collector malware-detection. - View results at Security > Malware.
3.2. Disabling malware signatures
There might be certain malware signatures that are not of interest to you. This might be due to an intentional configuration, test scan, or a high-noise situation wherein the malware detection service reports matches that are not applicable to your security priorities.
For example, the signatures XFTI_EICAR_AV_Test and XFTI_WICAR_Javascript_Test are used to detect the EICAR Anti Malware Testfile and WICAR Javascript Crypto Miner test malware. They are intentional test signatures but do not represent actual malware threats. Signatures such as these can be disabled so that matches against them are not reported in the Red Hat Hybrid Cloud Console.
Once a signature is disabled, the malware detection service removes any existing matches against that signature from the Hybrid Cloud Console and ignores the signature in future scans. If the signature is re-enabled, the malware detection service again looks for the signature in future malware-detection scans and shows resulting matches.
Disabling a signature does not erase the history of previous matches for that signature.
Prerequisites
- You are a member of a Hybrid Cloud Console User Access group with the Malware detection administrator role. Only users with this role can disable and re-enable signatures.
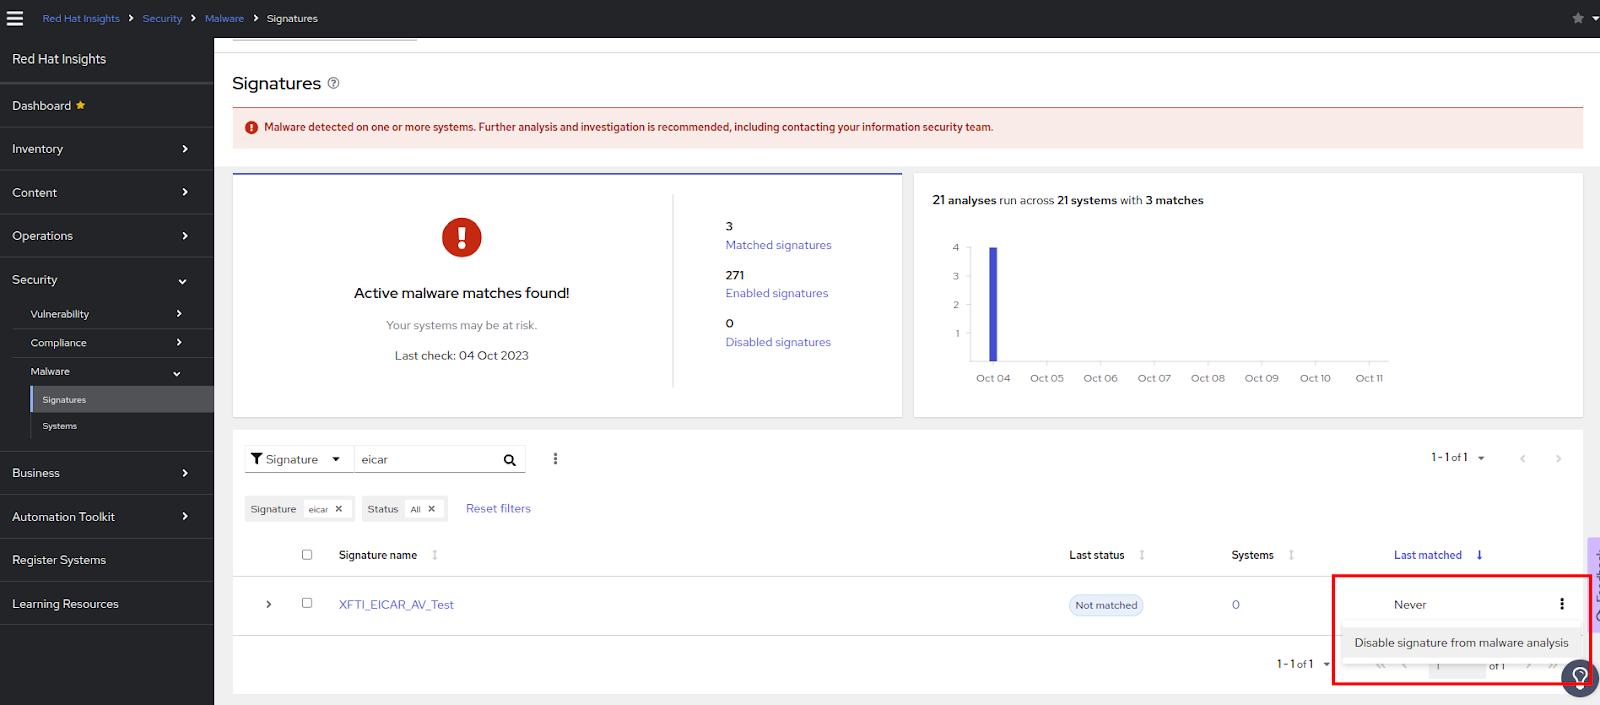
Procedure to disable a signature
- Navigate to Security > Malware > Signatures.
- Find the signature to disable.
Click the options icon (⋮) at the end of the signature row and select Disable signature from malware analysis.
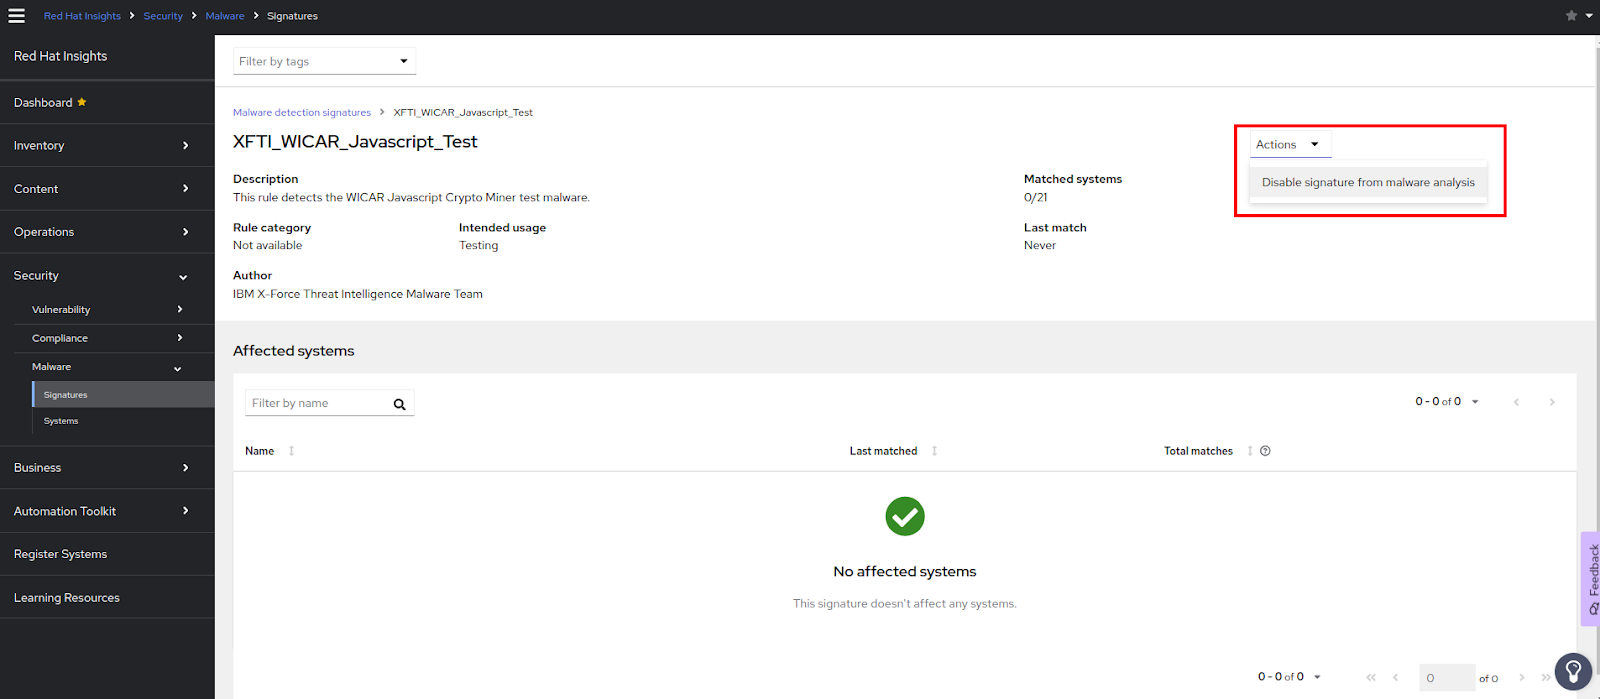
Alternate procedure to disable a signature
You can also disable the signature from the signature information page.
- Navigate to Security > Malware > Signatures.
- Find the signature to disable.
- Click the signature name.
On the signature details page, click the Actions dropdown and select Disable signature from malware analysis.
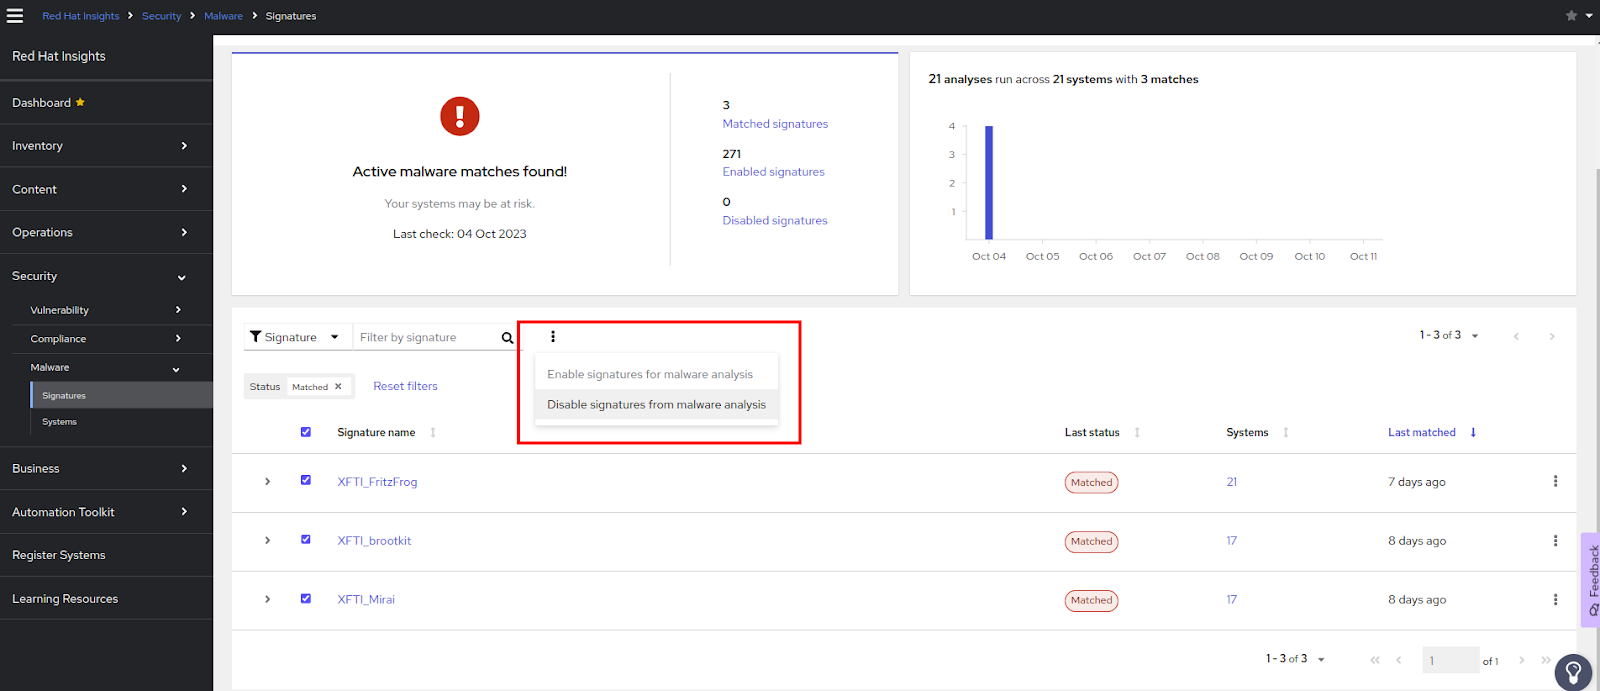
Disabling several signatures at the same time
You can disable several signatures at the same time by checking the box at the start of each signature row, then clicking the options icon (⋮) next to the filter fields and selecting Disable signatures from malware analysis.
Viewing disabled malware signatures
All users can view disabled malware signatures.
- Navigate to Security > Malware > Signatures. View the number of disabled malware signatures in the dashboard at the top of the page.
Set filters to show the disabled signatures.
- Set the primary filter to Signatures included in malware analysis.
- Set the secondary filter to Disabled signatures.
Re-enabling malware signatures
Follow the same procedures as before to re-enable previously disabled signatures.
3.3. Interpreting malware detection service results
In most cases, running a malware detection scan with YARA will result in no signature matches. This means that YARA did not find any matching strings or boolean expressions when comparing a known set of malware signatures to the files included in the scan. The malware detection service will send these results to Red Hat Insights and you can see the details of the system scan and lack of matches in the Insights for Red Hat Enterprise Linux malware detection service UI.
In the case that the malware detection scan with YARA does detect a match, it will send the results of that match to Red Hat Insights and you can see details of the match in the malware detection service UI, including the file and date. System scan and signature match history is displayed for the last 14 days so you can detect patterns and provide this information to your security incident response team. For example, if a signature match was found in one scan, but not found in the next scan of the same system, that can indicate the presence of malware that is detectable only when a certain process is running.
3.4. Additional configuration options for the malware detection collector
The /etc/insights-client/malware-detection-config.yml file includes several configuration options.
Configuration options
filesystem_scan_onlyThis is essentially an allowlist option whereby you specify which files/directories to scan. ONLY the items specified will be scanned. It can be a single item, or a list of items (adhering to yaml syntax for specifying lists of items). If this option is empty, it essentially means scan all files/directories (depending on other options).
filesystem_scan_excludeThis is essentially a denylist option whereby you specify which files/directories NOT to scan. A number of directories are already listed meaning they will be excluded by default. These include virtual filesystem directories, eg /proc, /sys, /cgroup; directories that might have external mounted filesystems, eg /mnt and /media; and some other directories recommended to not be scanned, eg /dev and /var/log/insights-client (to prevent false positives). You are free to modify the list to add (or subtract) files/directories.
Note that if the same item is specified both in filesystem_scan_only and filesystem_scan_exclude, eg /home, then filesystem_scan_exclude will ‘win’. That is, /home will not be scanned. Another example, it’s possible to filesysem_scan_only a parent directory, eg /var and then filesystem_scan_exclude certain directories within that, eg /var/lib and /var/log/insights-client. Then everything in /var except for /var/lib and /var/log/insights-client will be scanned.
filesystem_scan_sinceOnly scan files that have been modified ‘since’, where since can be an integer representing days ago or ‘last’ meaning since last filesystem scan. For example, filesystem_scan_since: 1 means only scan files that have been created or modified since 1 day ago (within the last day); filesystem_scan_since: 7 means only scan files that have been created/modified since 7 days ago (within the last week); and filesystem_scan_since: last means only scan files that have been created/modified since the last successful filesystem_scan of the malware-client.
exclude_network_filesystem_mountpoints and network_filesystem_typesSetting
exclude_network_filesystem_mountpoints: truemeans that the malware detection collector will not scan mountpoints of mounted network filesystems. This is the default setting and is to prevent scanning external filesystems, resulting in unnecessary and increased network traffic and slower scanning. The filesystems it considers to be network filesystems are listed in thenetwork_filesystem_typesoption. So any filesystem types that are in that list and that are mounted will be excluded from scanning. These mountpoints are essentially added to the list of excluded directories from thefilesystem_scan_excludeoption. If you setexclude_network_filesystem_mountpoints: falseyou can still exclude mountpoints with thefilesystem_scan_excludeoption.network_filesystem_typesDefine network filesystem types.
-
scan_processes
Scan_process is disabled by default to prevent an impact on system performance when scanning numerous or large processes. When the status is false, no processes are scanned and the processes_scan options that follow are ignored.
+ Include running processes in the scan.
processes_scan_onlyThis is similar to filesystem_scan_only but applies to processes. Processes may be specified as a single PID, eg 123, or a range of PIDs, eg 1000..2000, or by process name, eg Chrome. For example, the following values: 123, 1000..2000, and Chrome, would mean that PID 123, PIDs from 1000 to 2000 inclusive and PIDs for process names containing the string ‘chrome’ would ONLY be scanned.
processes_scan_excludeThis is similar to filesystem_scan_exclude but applies to processes. Like processes_scan_only, processes may be specified as a single PID, a range of PIDs, or by process name. If a process appears in both processes_scan_only and processes_scan_exclude, then processes_scan_exclude will ‘win’ and the process will be excluded.
processes_scan_sinceThis is similar to filesystem_scan_since but applies to processes. Only scan processes that have been started ‘since’, where since can be an integer representing days ago or ‘last’ meaning since the last successful processes scan of the malware-client.
Environment variables
All of the options in the /etc/insights-client/malware-detection-config.yml file can also be set using environment variables. Using the environment variable overrides the value of the same option in the configuration file. The environment variable has the same name as the configuration file option, but is uppercase. For example, the configuration file option test_scan is the environment variable TEST_SCAN.
For the FILESYSTEM_SCAN_ONLY, FILESYSTEM_SCAN_EXCLUDE, PROCESSES_SCAN_ONLY, PROCESSES_SCAN_EXCLUDE, and NETWORK_FILESYSTEM_TYPES environment variables, use a list of comma separated values. For example, to scan only directories /etc, /tmp and /var/lib, use the following environment variable:
FILESYSTEM_SCAN_ONLY=/etc,/tmp,/var/lib
To specify this on the command line (along with disabling test scan), use the following:
$ sudo FILESYSTEM_SCAN_ONLY=/etc,/tmp,/var/lib TEST_SCAN=false insights-client --collector malware-detection
Resources
For more information about the Insights client, see Client Configuration Guide for Red Hat Insights.
3.5. Enabling notifications and integrations for malware events
You can enable the notifications service on Red Hat Hybrid Cloud Console to send notifications whenever the malware service detects a signature match on at least one system scan and generates an alert. Using the notifications service frees you from having to continually check the Red Hat Insights for Red Hat Enterprise Linux dashboard for alerts.
For example, you can configure the notifications service to automatically send an email message whenever the malware service detects a possible threat to your systems, or to send an email digest of all the alerts that the malware service generates each day.
In addition to sending email messages, you can configure the notifications service to send event data in other ways:
- Using an authenticated client to query Red Hat Insights APIs for event data
- Using webhooks to send events to third-party applications that accept inbound requests
- Integrating notifications with applications such as Splunk to route malware events to the application dashboard
Malware service notifications include the following information:
- name of the affected system
- how many signature matches were found during the system scan
- a link to view the details on Red Hat Hybrid Cloud Console
Enabling the notifications service requires three main steps:
- First, an Organization administrator creates a User access group with the Notifications administrator role, and then adds account members to the group.
- Next, a Notifications administrator sets up behavior groups for events in the notifications service. Behavior groups specify the delivery method for each notification. For example, a behavior group can specify whether email notifications are sent to all users, or just to Organization administrators.
- Finally, users who receive email notifications from events must set their user preferences so that they receive individual emails for each event.
Additional resources
- For more information about how to set up notifications for malware alerts, see Configuring notifications on the Red Hat Hybrid Cloud Console.
Providing feedback on Red Hat documentation
We appreciate and prioritize your feedback regarding our documentation. Provide as much detail as possible, so that your request can be quickly addressed.
Prerequisites
- You are logged in to the Red Hat Customer Portal.
Procedure
To provide feedback, perform the following steps:
- Click the following link: Create Issue
- Describe the issue or enhancement in the Summary text box.
- Provide details about the issue or requested enhancement in the Description text box.
- Type your name in the Reporter text box.
- Click the Create button.
This action creates a documentation ticket and routes it to the appropriate documentation team. Thank you for taking the time to provide feedback.