
Chapter 6. Authentication
There are a few features you should be aware of when configuring authentication for your realm. Many organizations have strict password and OTP policies that you can enforce via settings in the Admin Console. You may or may not want to require different credential types for authentication. You may want to give users the option to login via Kerberos or disable or enable various built-in credential types. This chapter covers all of these topics.
6.1. Password Policies
Each new realm created has no password policies associated with it. Users can have as short, as long, as complex, as insecure a password, as they want. Simple settings are fine for development or learning Red Hat Single Sign-On, but unacceptable in production environments. Red Hat Single Sign-On has a rich set of password policies you can enable through the Admin Console.
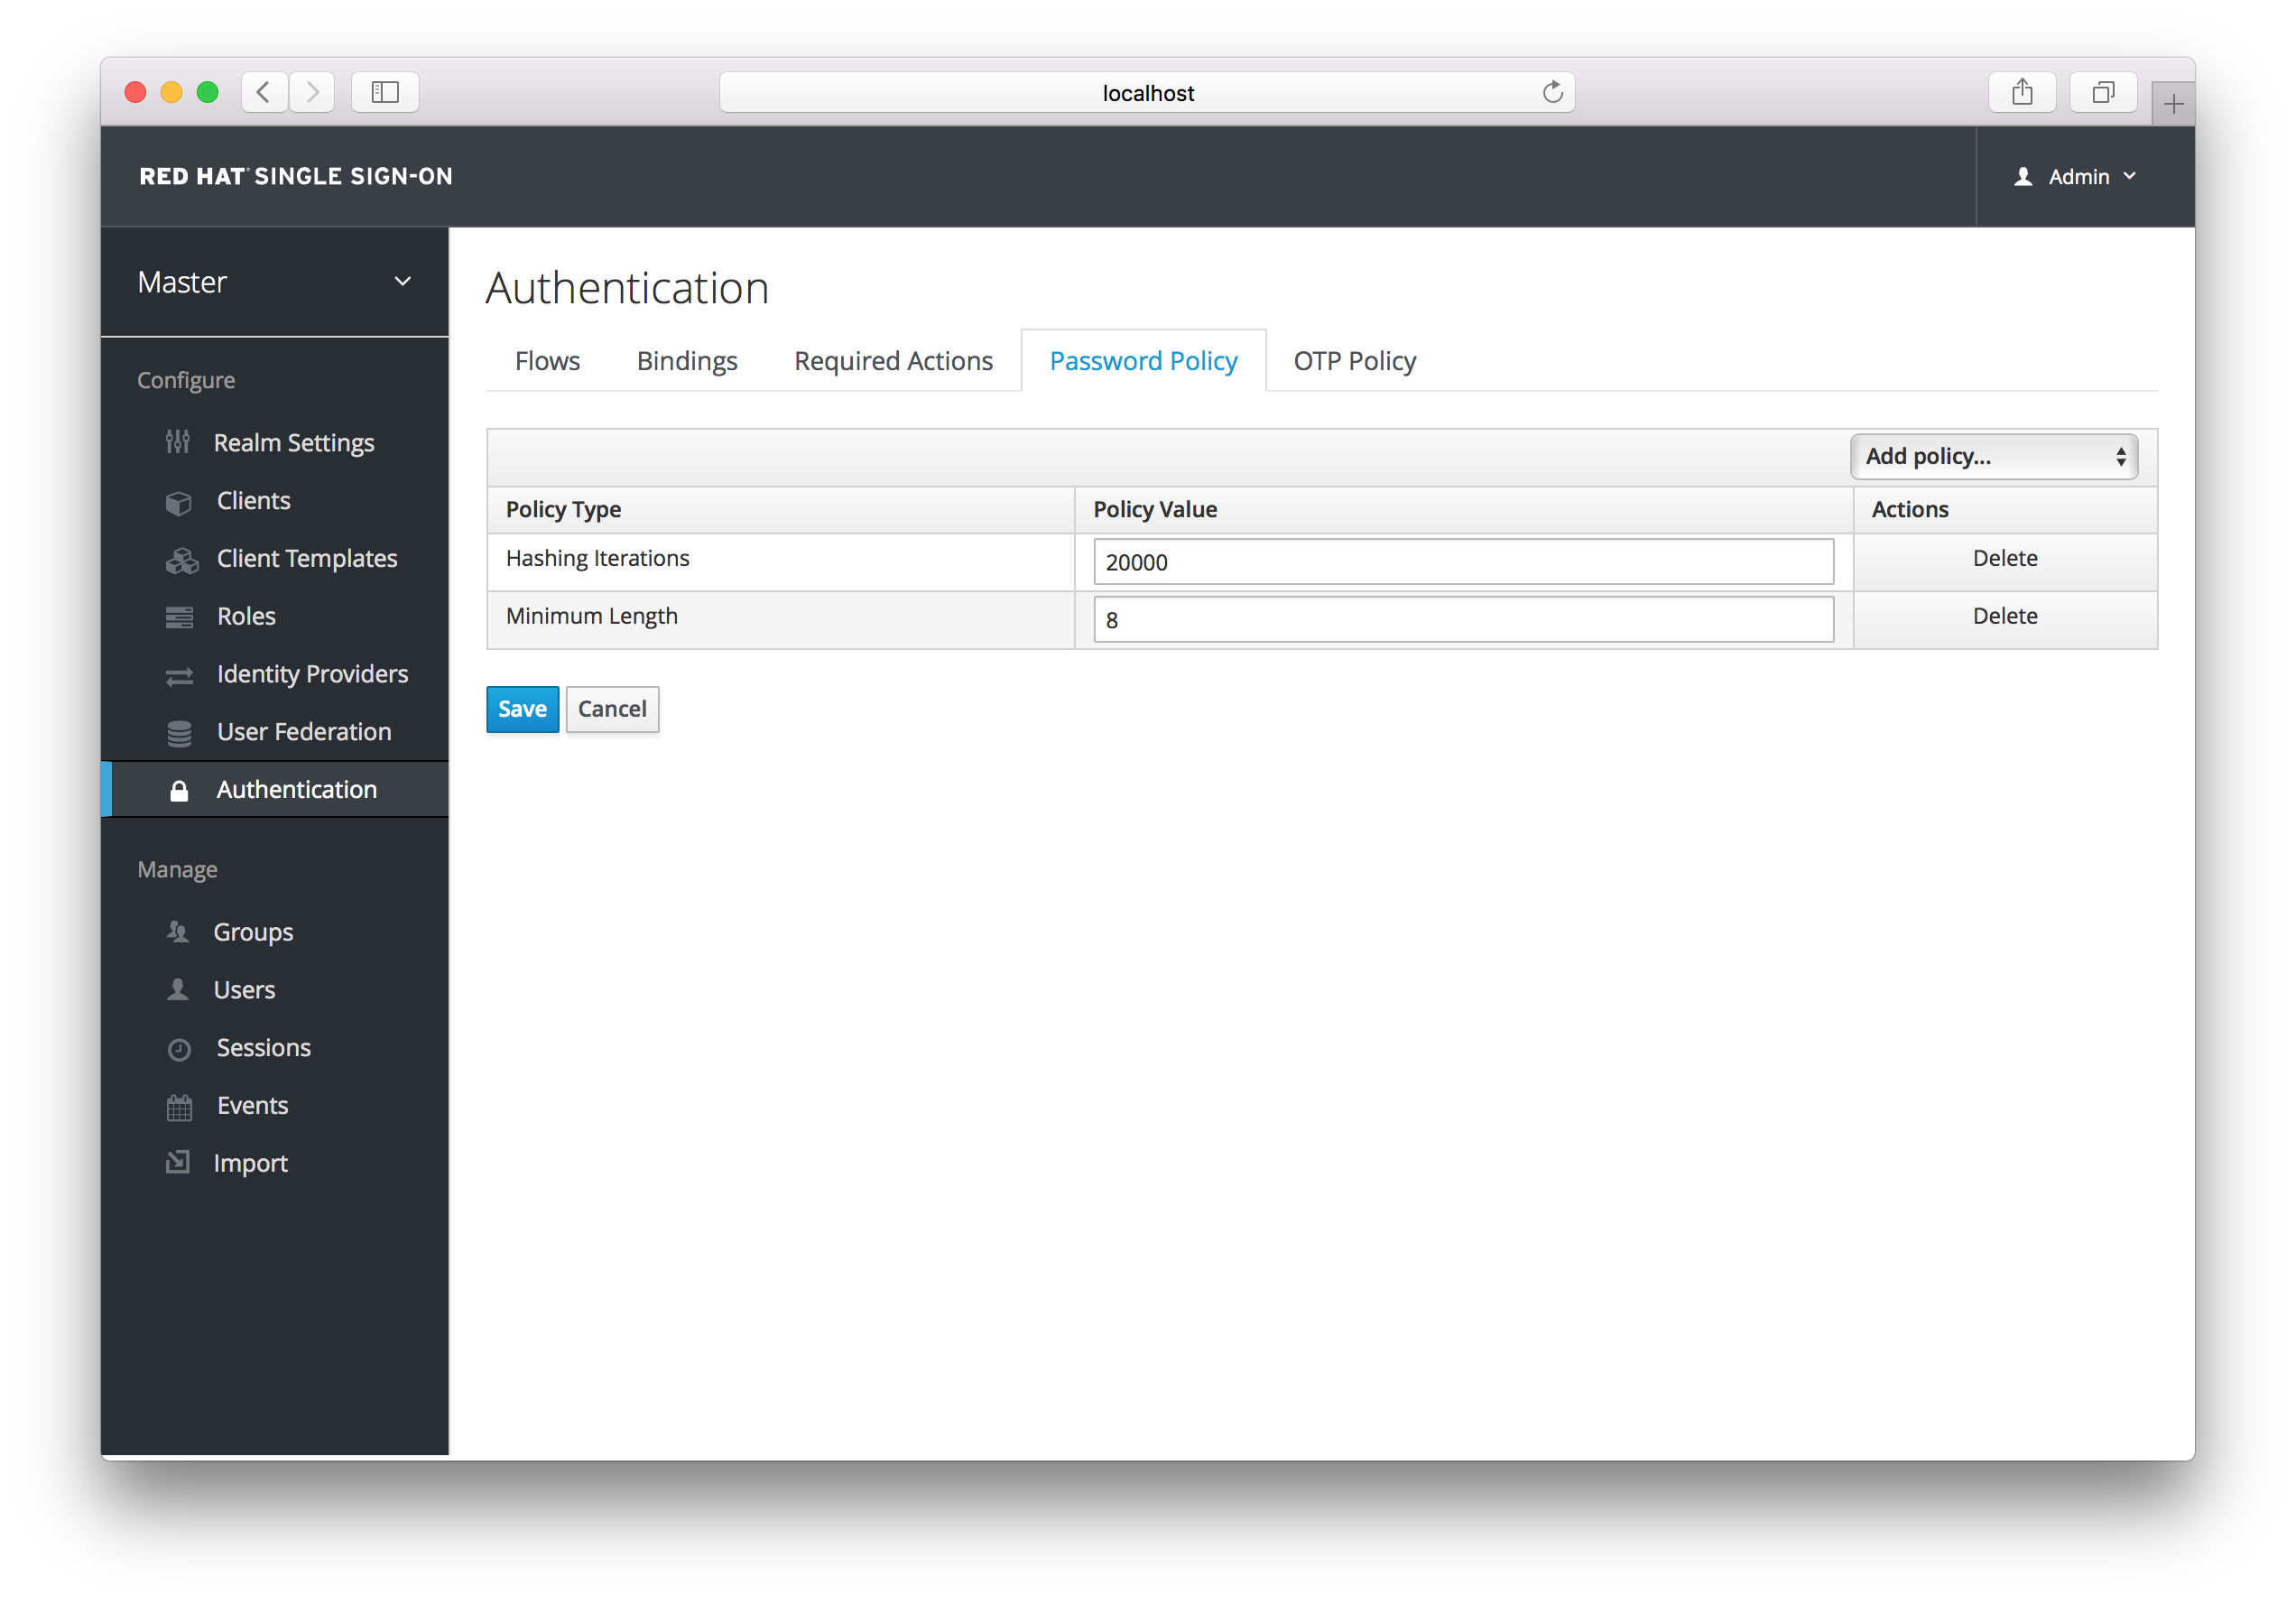
Click on the Authentication left menu item and go to the Password Policy tab. Choose the policy you want to add in the right side drop down list box. This will add the policy in the table on the screen. Choose the parameters for the policy. Hit the Save button to store your changes.
Password Policy
After saving your policy, user registration and the Update Password required action will enforce your new policy. An example of a user failing the policy check:
Failed Password Policy
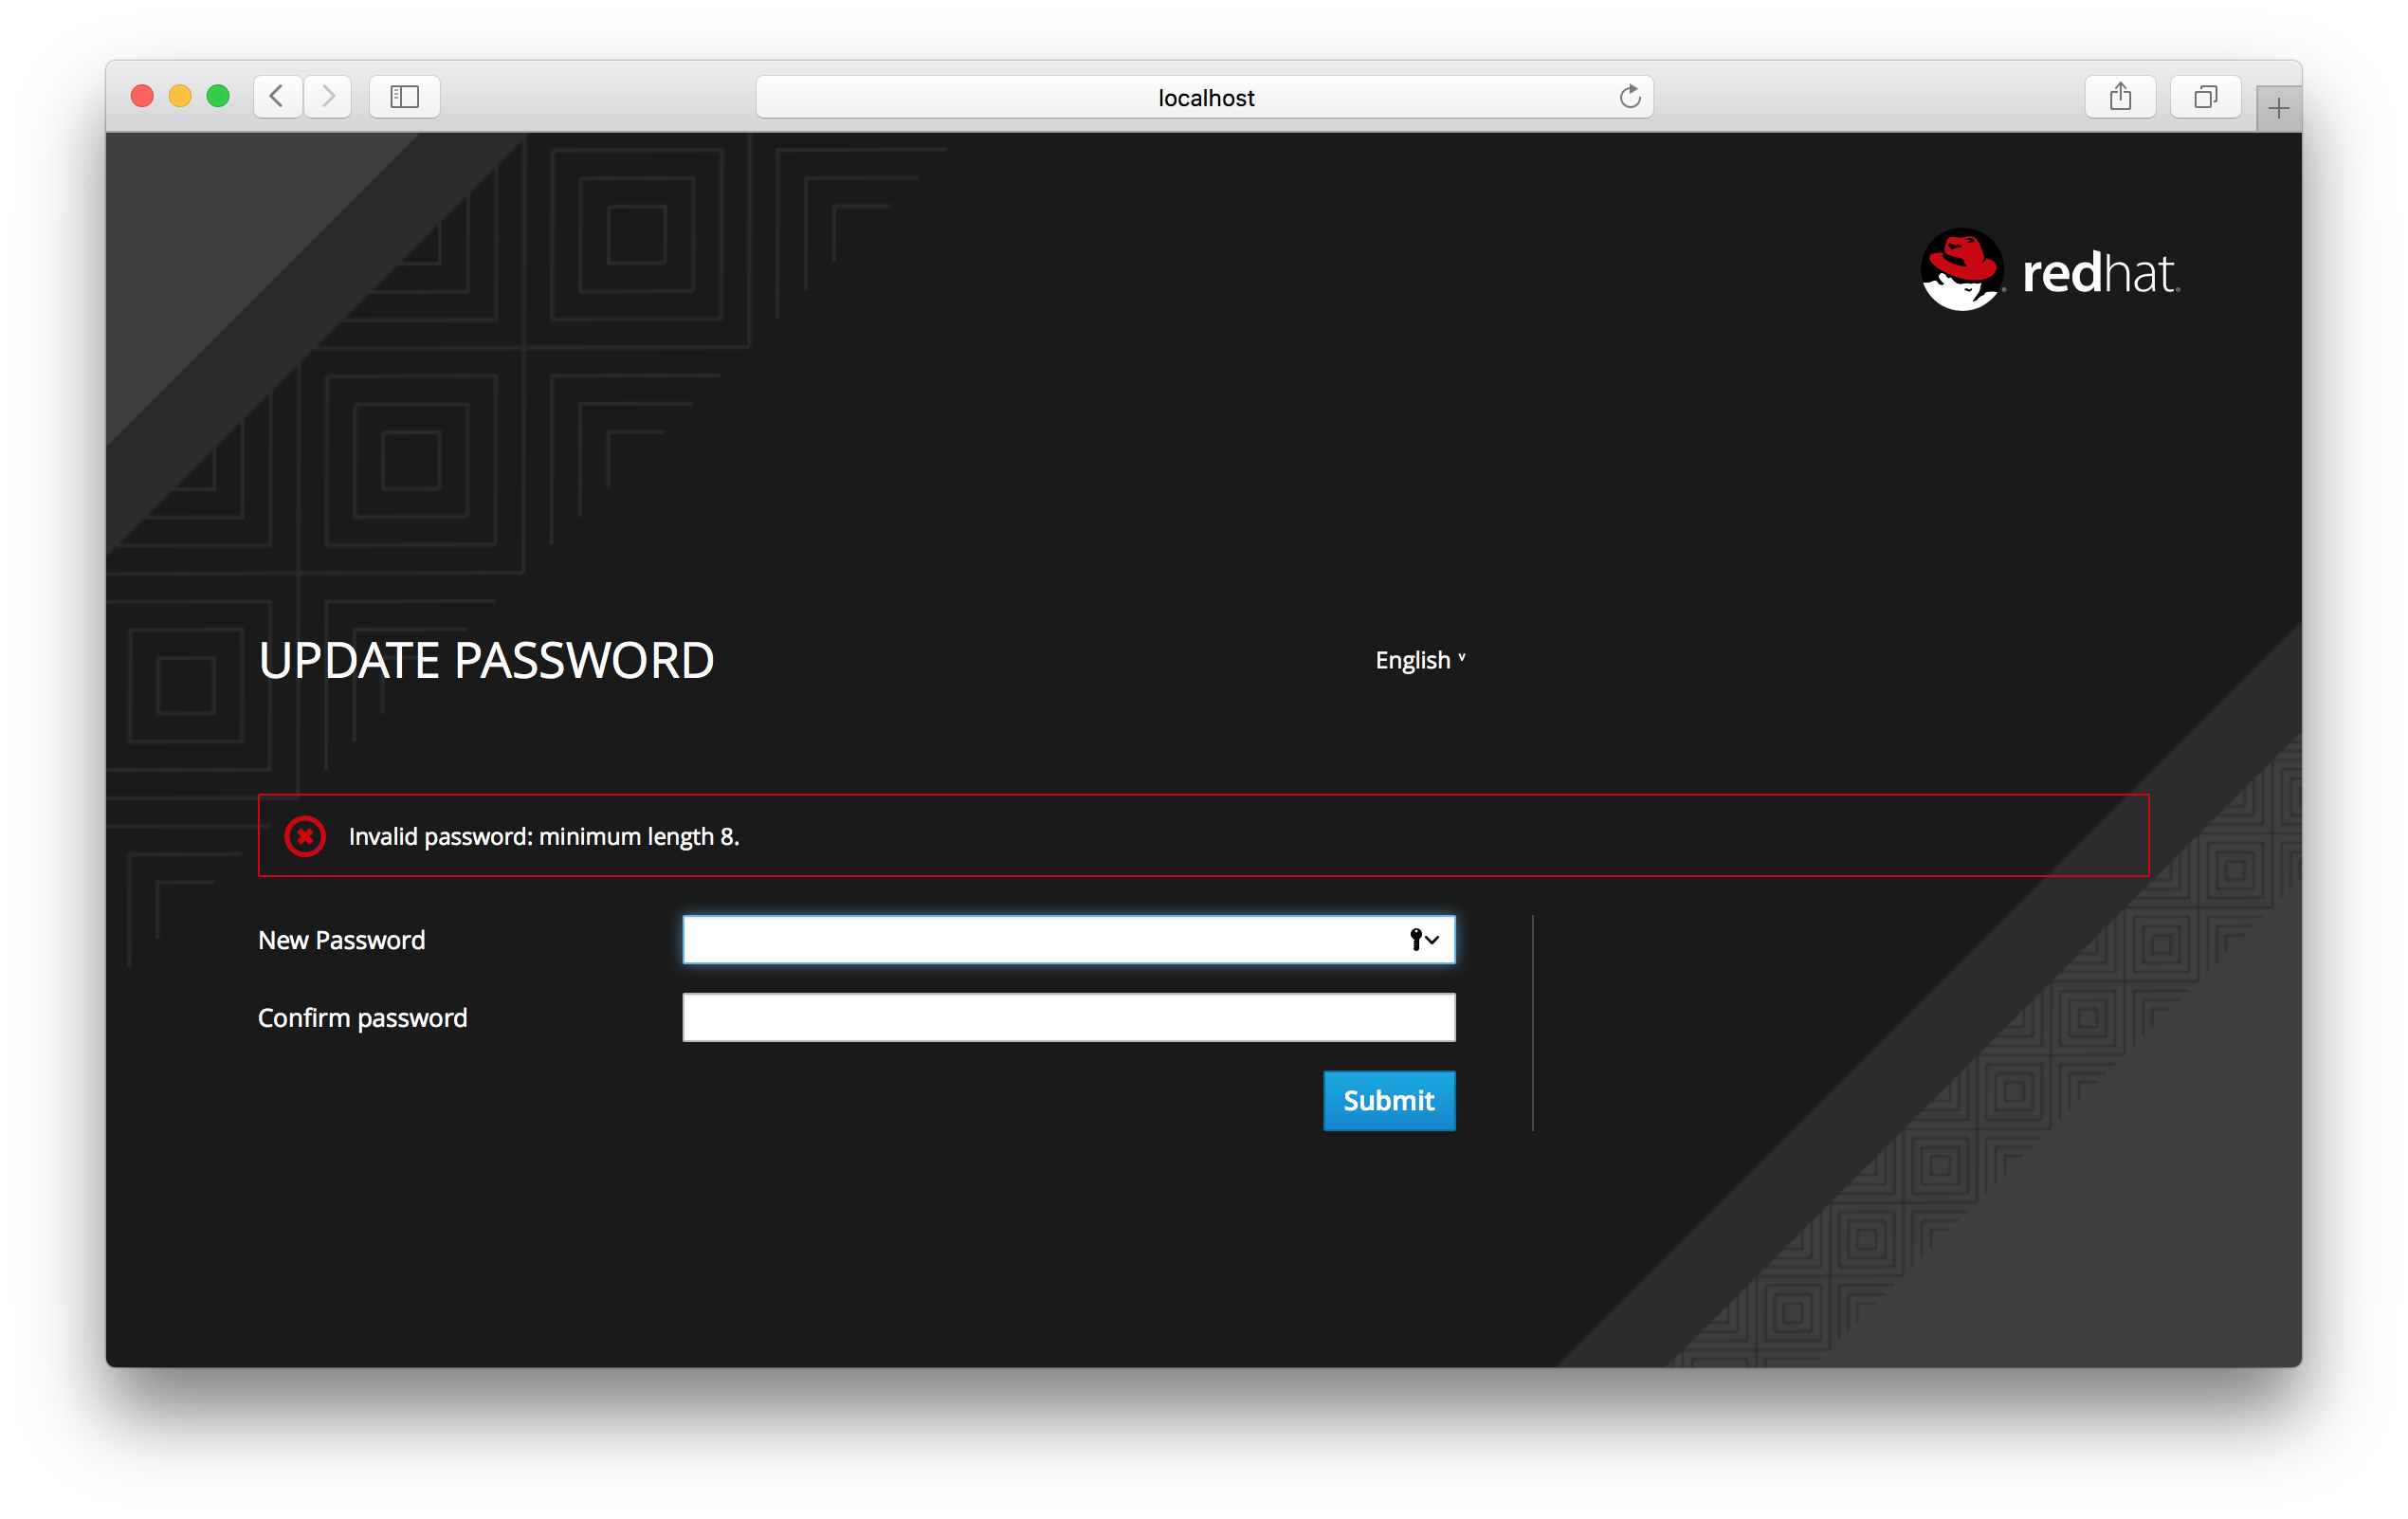
If the password policy is updated, an Update Password action must be set for every user. An automatic trigger is scheduled as a future enhancement.
6.1.1. Password Policy Types
Here’s an explanation of each policy type:
- Hashing Algorithm
- Passwords are not stored as clear text. Instead they are hashed using standard hashing algorithms before they are stored or validated. The only currently supported algorithm is PBKDF2.
- Hashing Iterations
- This value specifies the number of times a password will be hashed before it is stored or verified. The default value is 20,000. This hashing is done in the rare case that a hacker gets access to your password database. Once they have access to the database, they can reverse engineer user passwords. The industry recommended value for this parameter changes every year as CPU power improves. A higher hashing iteration value takes more CPU power for hashing, and can impact performance. You’ll have to weigh what is more important to you. Performance or protecting your passwords stores. There may be more cost effective ways of protecting your password stores.
- Digits
- The number of digits required to be in the password string.
- Lowercase Characters
- The number of lower case letters required to be in the password string.
- Uppercase Characters
- The number of upper case letters required to be in the password string.
- Special Characters
- The number of special characters like '?!#%$' required to be in the password string.
- Not Username
- When set, the password is not allowed to be the same as the username.
- Regular Expression
- Define one or more Perl regular expression patterns that passwords must match.
- Expire Password
- The number of days for which the password is valid. After the number of days has expired, the user is required to change their password.
- Not Recently Used
- This policy saves a history of previous passwords. The number of old passwords stored is configurable. When a user changes their password they cannot use any stored passwords.
6.2. OTP Policies
Red Hat Single Sign-On has a number of policies you can set up for your FreeOTP or Google Authenticator One-Time Password generator. Click on the Authentication left menu item and go to the OTP Policy tab.
OTP Policy
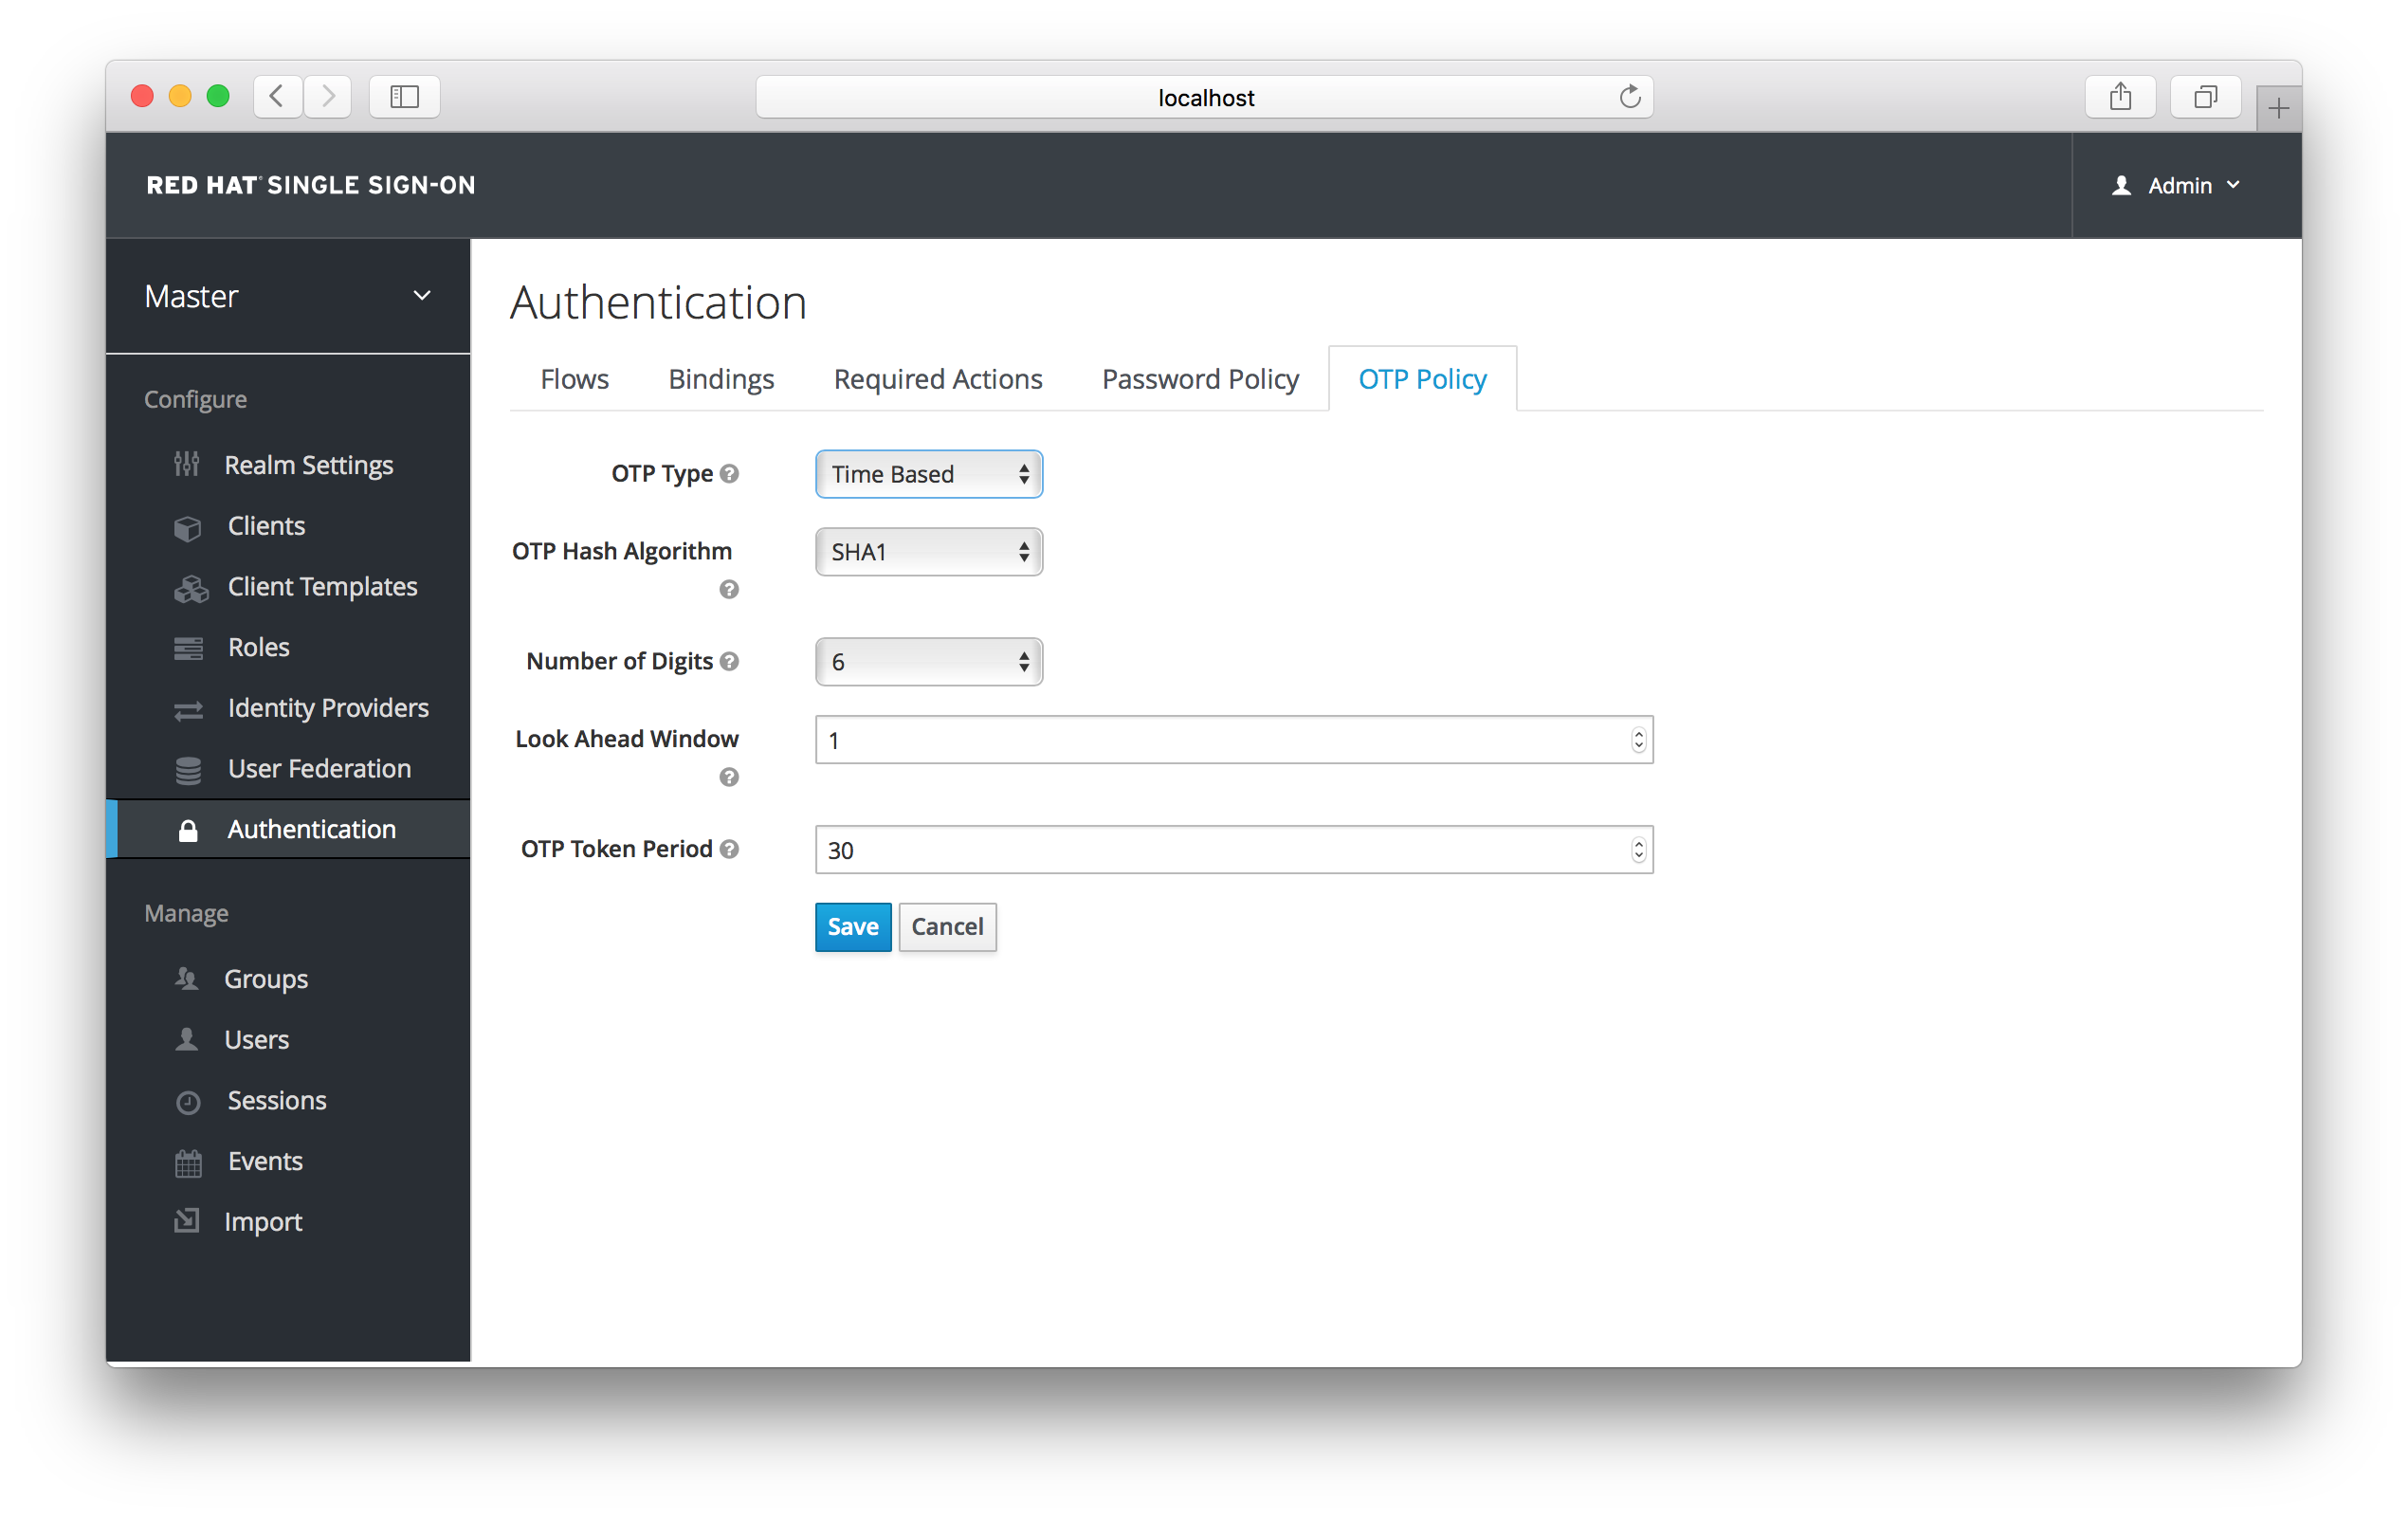
Any policies you set here will be used to validate one-time passwords. When configuring OTP, FreeOTP and Google Authenticator can scan a QR code that is generated on the OTP set up page that Red Hat Single Sign-On has. The bar code is also generated from information configured on the OTP Policy tab.
6.2.1. TOTP vs. HOTP
There are two different algorithms to choose from for your OTP generators. Time Based (TOTP) and Counter Based (HOTP). For TOTP, your token generator will hash the current time and a shared secret. The server validates the OTP by comparing the all hashes within a certain window of time to the submitted value. So, TOTPs are valid only for a short window of time (usually 30 seconds). For HOTP a shared counter is used instead of the current time. The server increments the counter with each successful OTP login. So, valid OTPs only change after a successful login.
TOTP is considered a little more secure because the matchable OTP is only valid for a short window of time while the OTP for HOTP can be valid for an indeterminate amount of time. HOTP is much more user friendly as the user won’t have to hurry to enter in their OTP before the time interval is up. With the way Red Hat Single Sign-On has implemented TOTP this distinction becomes a little more blurry. HOTP requires a database update every time the server wants to increment the counter. This can be a performance drain on the authentication server when there is heavy load. So, to provide a more efficient alternative, TOTP does not remember passwords used. This bypasses the need to do any DB updates, but the downside is that TOTPs can be re-used in the valid time interval. For future versions of Red Hat Single Sign-On it is planned that you will be able to configure whether TOTP checks older OTPs in the time interval.
6.2.2. TOTP Configuration Options
- OTP Hash Algorithm
- Default is SHA1, more secure options are SHA256 and SHA512.
- Number of Digits
- How many characters is the OTP? Short means more user friendly as it is less the user has to type. More means more security.
- Look Ahead Window
- How many intervals ahead should the server try and match the hash? This exists so just in case the clock of the TOTP generator or authentication server get out of sync. The default value of 1 is usually good enough. For example, if the time interval for a new token is every 30 seconds, the default value of 1 means that it will only accept valid tokens in that 30 second window. Each increment of this config value will increase the valid window by 30 seconds.
- OTP Token Period
- Time interval in seconds a new TOTP will be generated by the token generator. And, the time window the server is matching a hash.
6.2.3. HOTP Configuration Options
- OTP Hash Algorithm
- Default is SHA1, more secure options are SHA256 and SHA512.
- Number of Digits
- How many characters is the OTP? Short means more user friendly as it is less the user has to type. More means more security.
- Look Ahead Window
- How many counters ahead should the server try and match the hash? The default value is 1. This exists to cover the case where the user’s counter gets ahead of the server’s. This can often happen as users often increment the counter manually too many times by accident. This value really should be increased to a value of 10 or so.
- Initial Counter
- What is the value of the initial counter?
6.3. Authentication Flows
An authentication flow is a container for all authentications, screens, and actions that must happen during login, registration, and other Red Hat Single Sign-On workflows. If you go to the admin console Authentication left menu item and go to the Flows tab, you can view all the defined flows in the system and what actions and checks each flow requires. This section does a walk through of the browser login flow. In the left drop down list select browser to come to the screen shown below:
Browser Flow
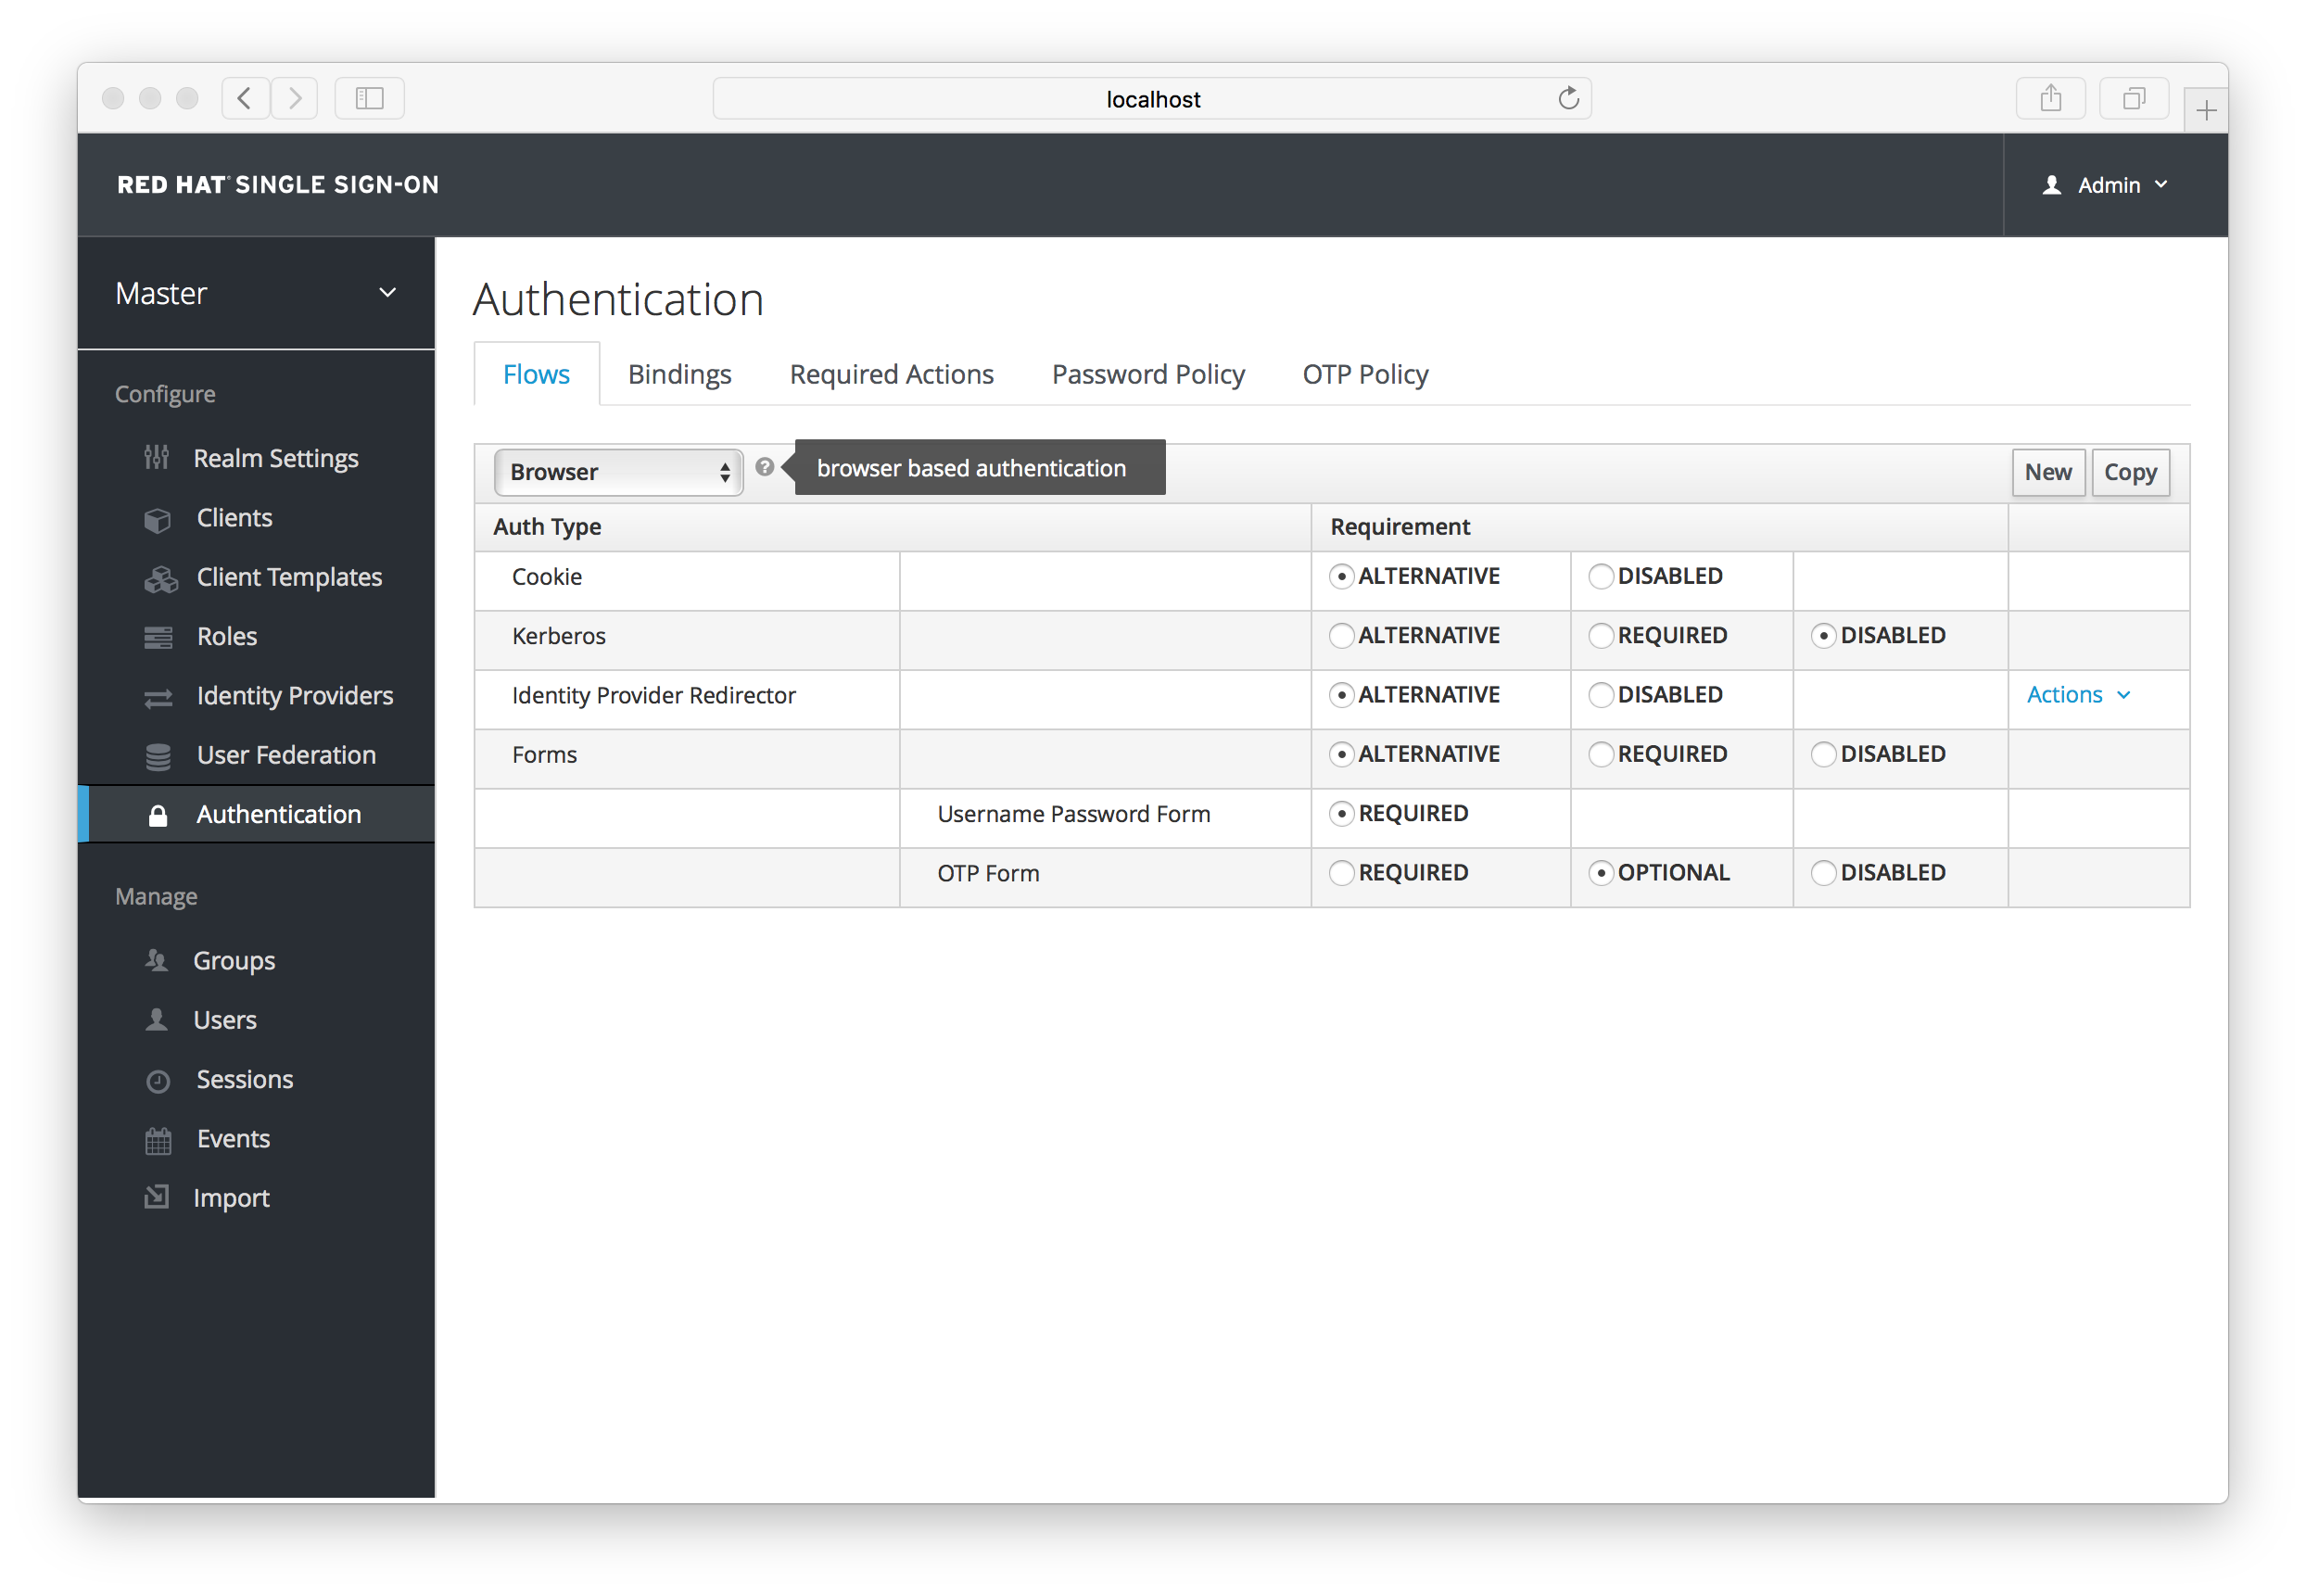
If you hover over the tooltip (the tiny question mark) to the right of the flow selection list, this will describe what the flow is and does.
The Auth Type column is the name of authentication or action that will be executed. If an authentication is indented this means it is in a sub-flow and may or may not be executed depending on the behavior of its parent. The Requirement column is a set of radio buttons which define whether or not the action will execute. Let’s describe what each radio button means:
- Required
-
This authentication execution must execute successfully. If the user doesn’t have that type of authentication mechanism configured and there is a required action associated with that authentication type, then a required action will be attached to that account. For example, if you switch
OTP FormtoRequired, users that don’t have an OTP generator configured will be asked to do so. - Optional
- If the user has the authentication type configured, it will be executed. Otherwise, it will be ignored.
- Disabled
- If disabled, the authentication type is not executed.
- Alternative
- This means that at least one alternative authentication type must execute successfully at that level of the flow.
This is better described in an example. Let’s walk through the browser authentication flow.
-
The first authentication type is
Cookie. When a user successfully logs in for the first time, a session cookie is set. If this cookie has already been set, then this authentication type is successful. Since the cookie provider returned success and each execution at this level of the flow is alternative, no other execution is executed and this results in a successful login. - Next the flow looks at the Kerberos execution. This authenticator is disabled by default and will be skipped.
-
The next execution is a subflow called Forms. Since this subflow is marked as alternative it will not be executed if the
Cookieauthentication type passed. This subflow contains additional authentication type that needs to be executed. The executions for this subflow are loaded and the same processing logic occurs - The first execution in the Forms subflow is the Username Password Form. This authentication type renders the username and password page. It is marked as required so the user must enter in a valid username and password.
- The next execution is the OTP Form. This is marked as optional. If the user has OTP set up, then this authentication type must run and be successful. If the user doesn’t have OTP set up, this authentication type is ignored.
6.4. Kerberos
Red Hat Single Sign-On supports login with a Kerberos ticket through the SPNEGO protocol. SPNEGO (Simple and Protected GSSAPI Negotiation Mechanism) is used to authenticate transparently through the web browser after the user has been authenticated when logging-in his session. For non-web cases or when ticket is not available during login, Red Hat Single Sign-On also supports login with Kerberos username/password.
A typical use case for web authentication is the following:
- User logs into his desktop (Such as a Windows machine in Active Directory domain or Linux machine with Kerberos integration enabled).
- User then uses his browser (IE/Firefox/Chrome) to access a web application secured by Red Hat Single Sign-On.
- Application redirects to Red Hat Single Sign-On login.
-
Red Hat Single Sign-On renders HTML login screen together with status 401 and HTTP header
WWW-Authenticate: Negotiate -
In case that the browser has Kerberos ticket from desktop login, it transfers the desktop sign on information to the Red Hat Single Sign-On in header
Authorization: Negotiate 'spnego-token'. Otherwise it just displays the login screen. - Red Hat Single Sign-On validates token from the browser and authenticates the user. It provisions user data from LDAP (in case of LDAPFederationProvider with Kerberos authentication support) or let user to update his profile and prefill data (in case of KerberosFederationProvider).
- Red Hat Single Sign-On returns back to the application. Communication between Red Hat Single Sign-On and application happens through OpenID Connect or SAML messages. The fact that Red Hat Single Sign-On was authenticated through Kerberos is hidden from the application. So Red Hat Single Sign-On acts as broker to Kerberos/SPNEGO login.
For setup there are 3 main parts:
- Setup and configuration of Kerberos server (KDC)
- Setup and configuration of Red Hat Single Sign-On server
- Setup and configuration of client machines
6.4.1. Setup of Kerberos server
This is platform dependent. Exact steps depend on your OS and the Kerberos vendor you’re going to use. Consult Windows Active Directory, MIT Kerberos and your OS documentation for how exactly to setup and configure Kerberos server.
At least you will need to:
- Add some user principals to your Kerberos database. You can also integrate your Kerberos with LDAP, which means that user accounts will be provisioned from LDAP server.
Add service principal for "HTTP" service. For example if your Red Hat Single Sign-On server will be running on
www.mydomain.orgyou may need to add principalHTTP/www.mydomain.org@MYDOMAIN.ORGassuming that MYDOMAIN.ORG will be your Kerberos realm.For example on MIT Kerberos you can run a "kadmin" session. If you are on the same machine where is MIT Kerberos, you can simply use the command:
sudo kadmin.local
Then add HTTP principal and export his key to a keytab file with the commands like:
addprinc -randkey HTTP/www.mydomain.org@MYDOMAIN.ORG
ktadd -k /tmp/http.keytab HTTP/www.mydomain.org@MYDOMAIN.ORG
The Keytab file /tmp/http.keytab will need to be accessible on the host where Red Hat Single Sign-On server will be running.
6.4.2. Setup and configuration of Red Hat Single Sign-On server
You need to install a kerberos client on your machine. This is also platform dependent. If you are on Fedora, Ubuntu or RHEL, you can install the package freeipa-client, which contains a Kerberos client and several other utilities. Configure the kerberos client (on linux it’s in file /etc/krb5.conf ). You need to put your Kerberos realm and at least configure the HTTP domains your server will be running on. For the example realm MYDOMAIN.ORG you may configure the domain_realm section like this:
[domain_realm]
  .mydomain.org = MYDOMAIN.ORG
  mydomain.org = MYDOMAIN.ORG
Next you need to export the keytab file with the HTTP principal and make sure the file is accessible to the process under which Red Hat Single Sign-On server is running. For production, it’s ideal if it’s readable just by this process and not by someone else. For the MIT Kerberos example above, we already exported keytab to /tmp/http.keytab . If your KDC and Red Hat Single Sign-On are running on same host, you have that file already available.
6.4.2.1. Enable SPNEGO Processing
Red Hat Single Sign-On does not have the SPNEGO protocol support turned on by default. So, you have to go to the browser flow and enable Kerberos.
Browser Flow
Switch the Kerberos requirement from disabled to either alternative or required. Alternative basically means that Kerberos is optional. If the user’s browser hasn’t been configured to work with SPNEGO/Kerberos, then Red Hat Single Sign-On will fall back to the regular login screens. If you set the requirement to required then all users must have Kerberos enabled for their browser.
6.4.2.2. Configure Kerberos User Storage Federation Provider
Now that the SPNEGO protocol is turned on at the authentication server, you’ll need to configure how Red Hat Single Sign-On interprets the Kerberos ticket. This is done through User Storage Federation. We have 2 different federation providers with Kerberos authentication support.
If you want to authenticate with Kerberos backed by an LDAP server, you have to first configure the LDAP Federation Provider. If you look at the configuration page for your LDAP provider you’ll see a Kerberos Integration section.
LDAP Kerberos Integration
Turning on the switch Allow Kerberos authentication will make Red Hat Single Sign-On use the Kerberos principal to lookup information about the user so that it can be imported into the Red Hat Single Sign-On environment.
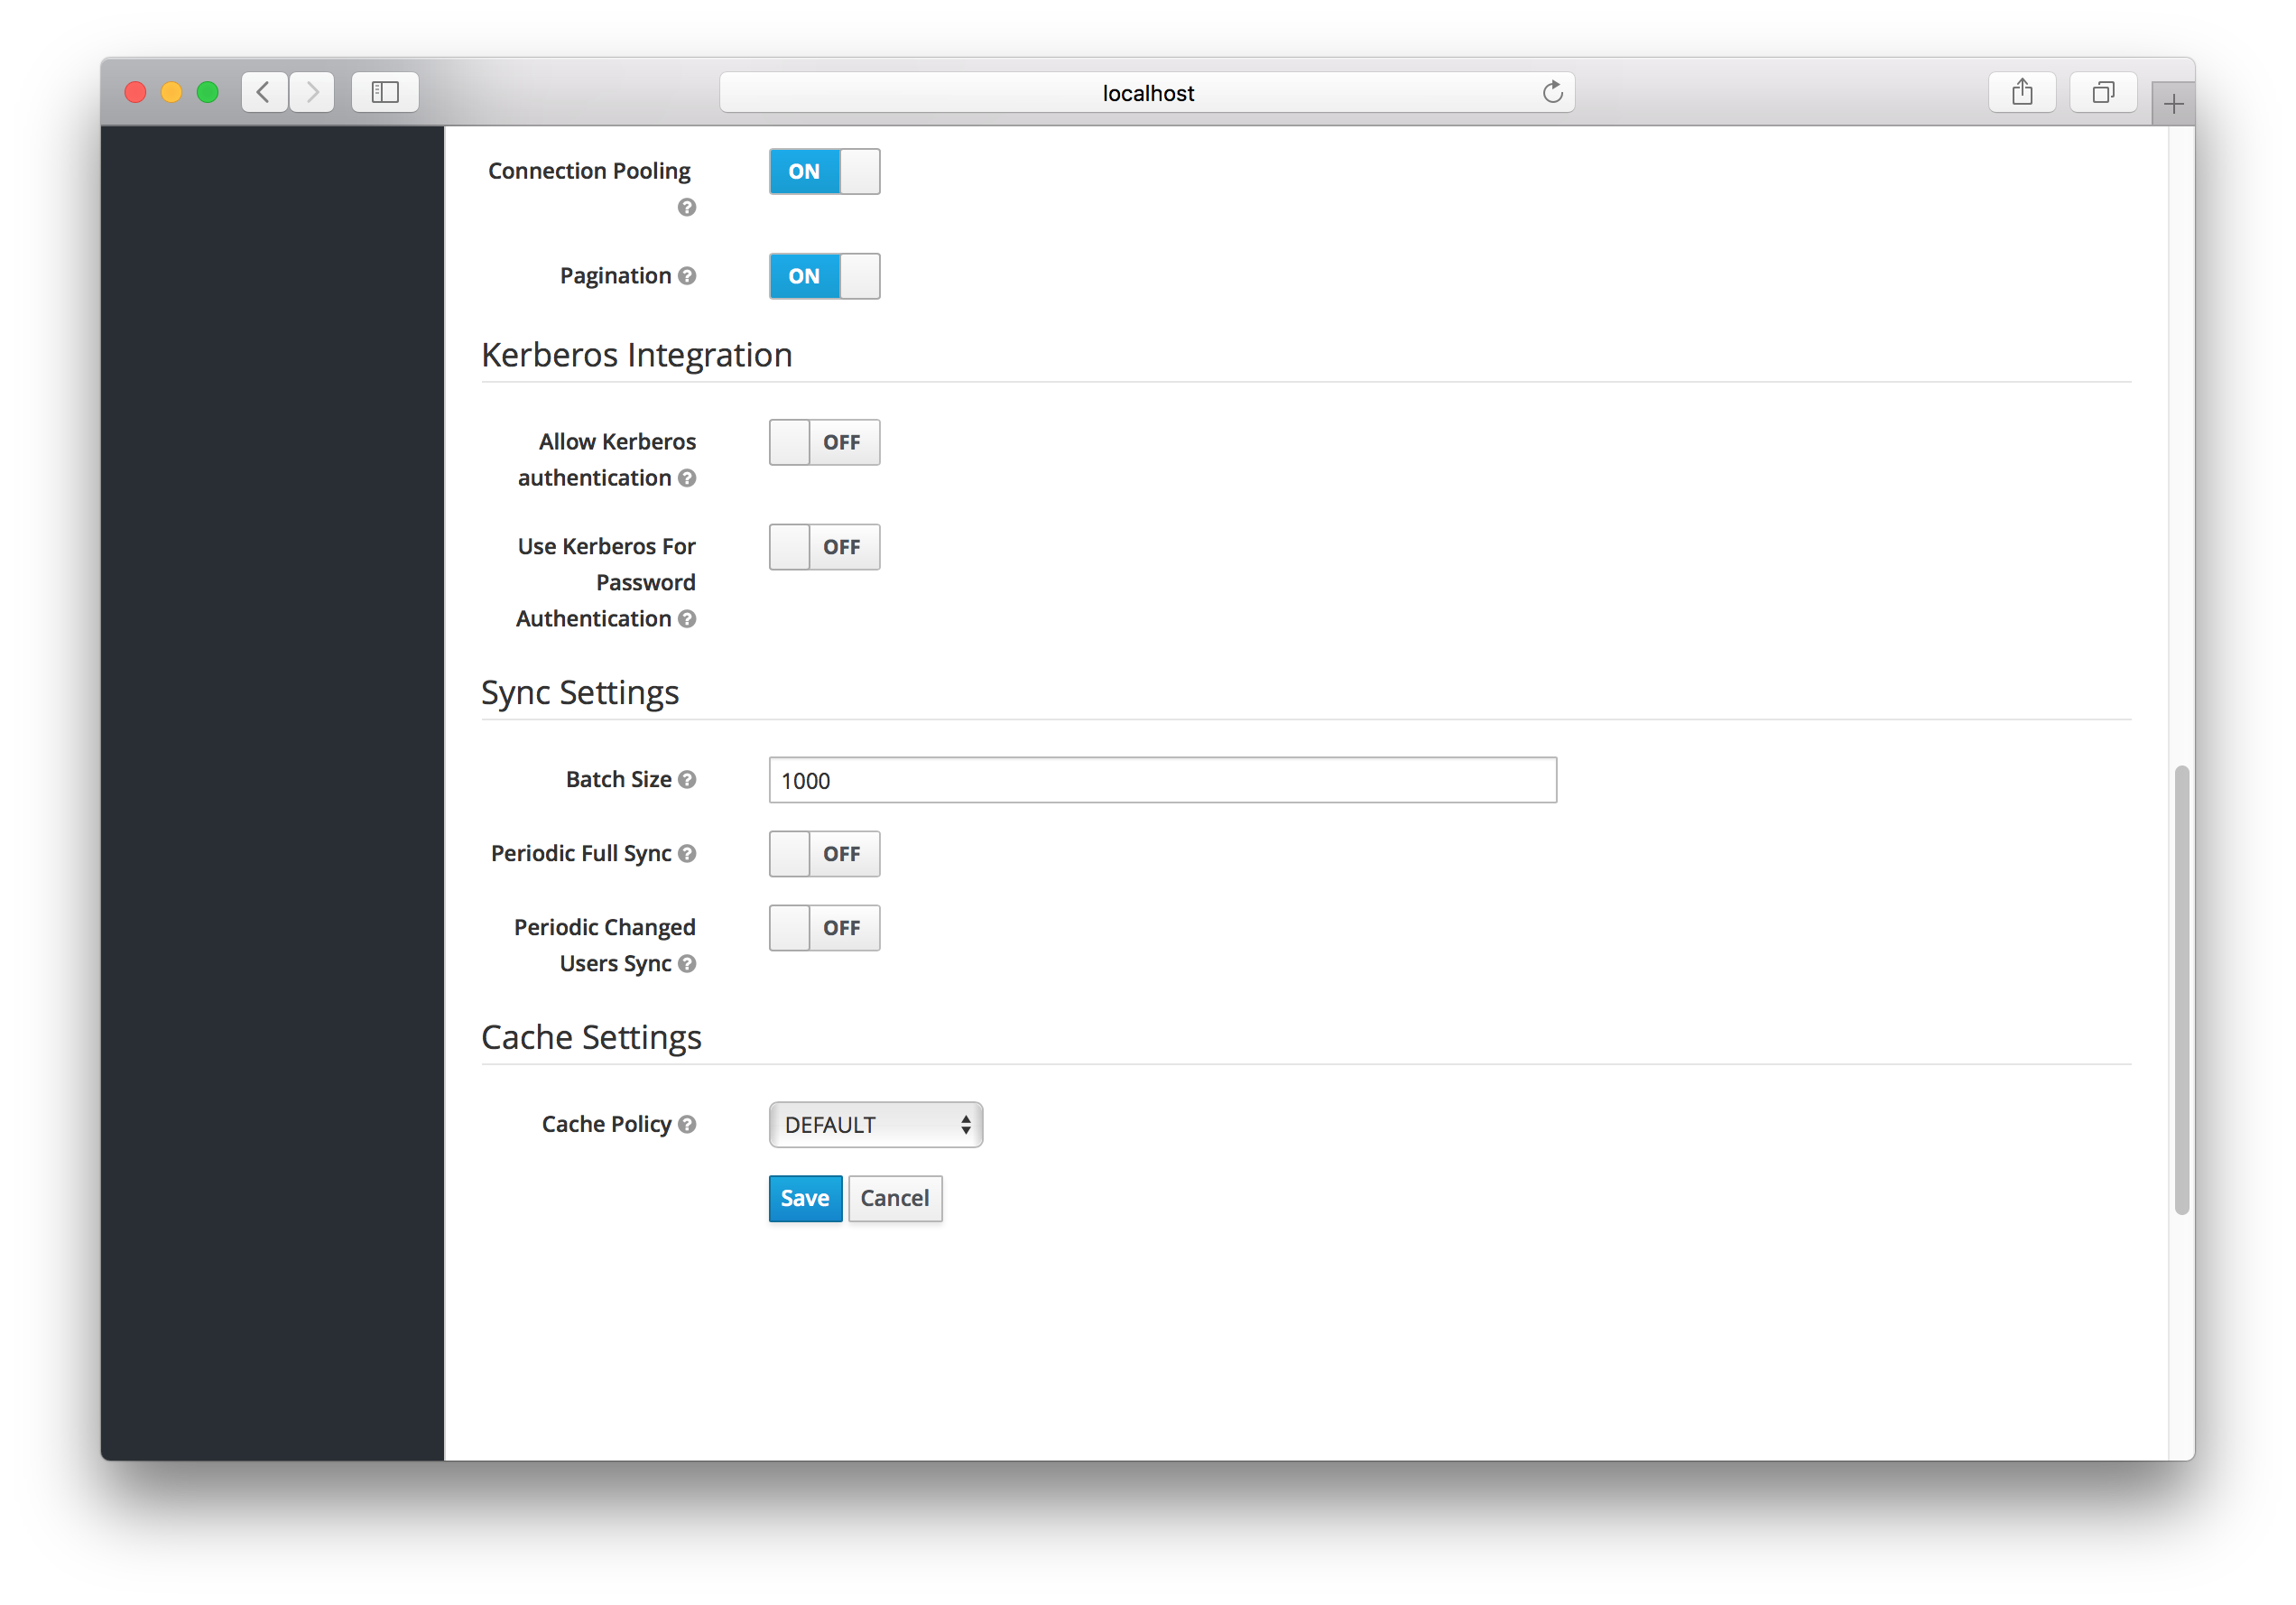
If your Kerberos solution is not backed by an LDAP server, you have to use the Kerberos User Storage Federation Provider. Go to the User Federation left menu item and select Kerberos from the Add provider select box.
Kerberos User Storage Provider
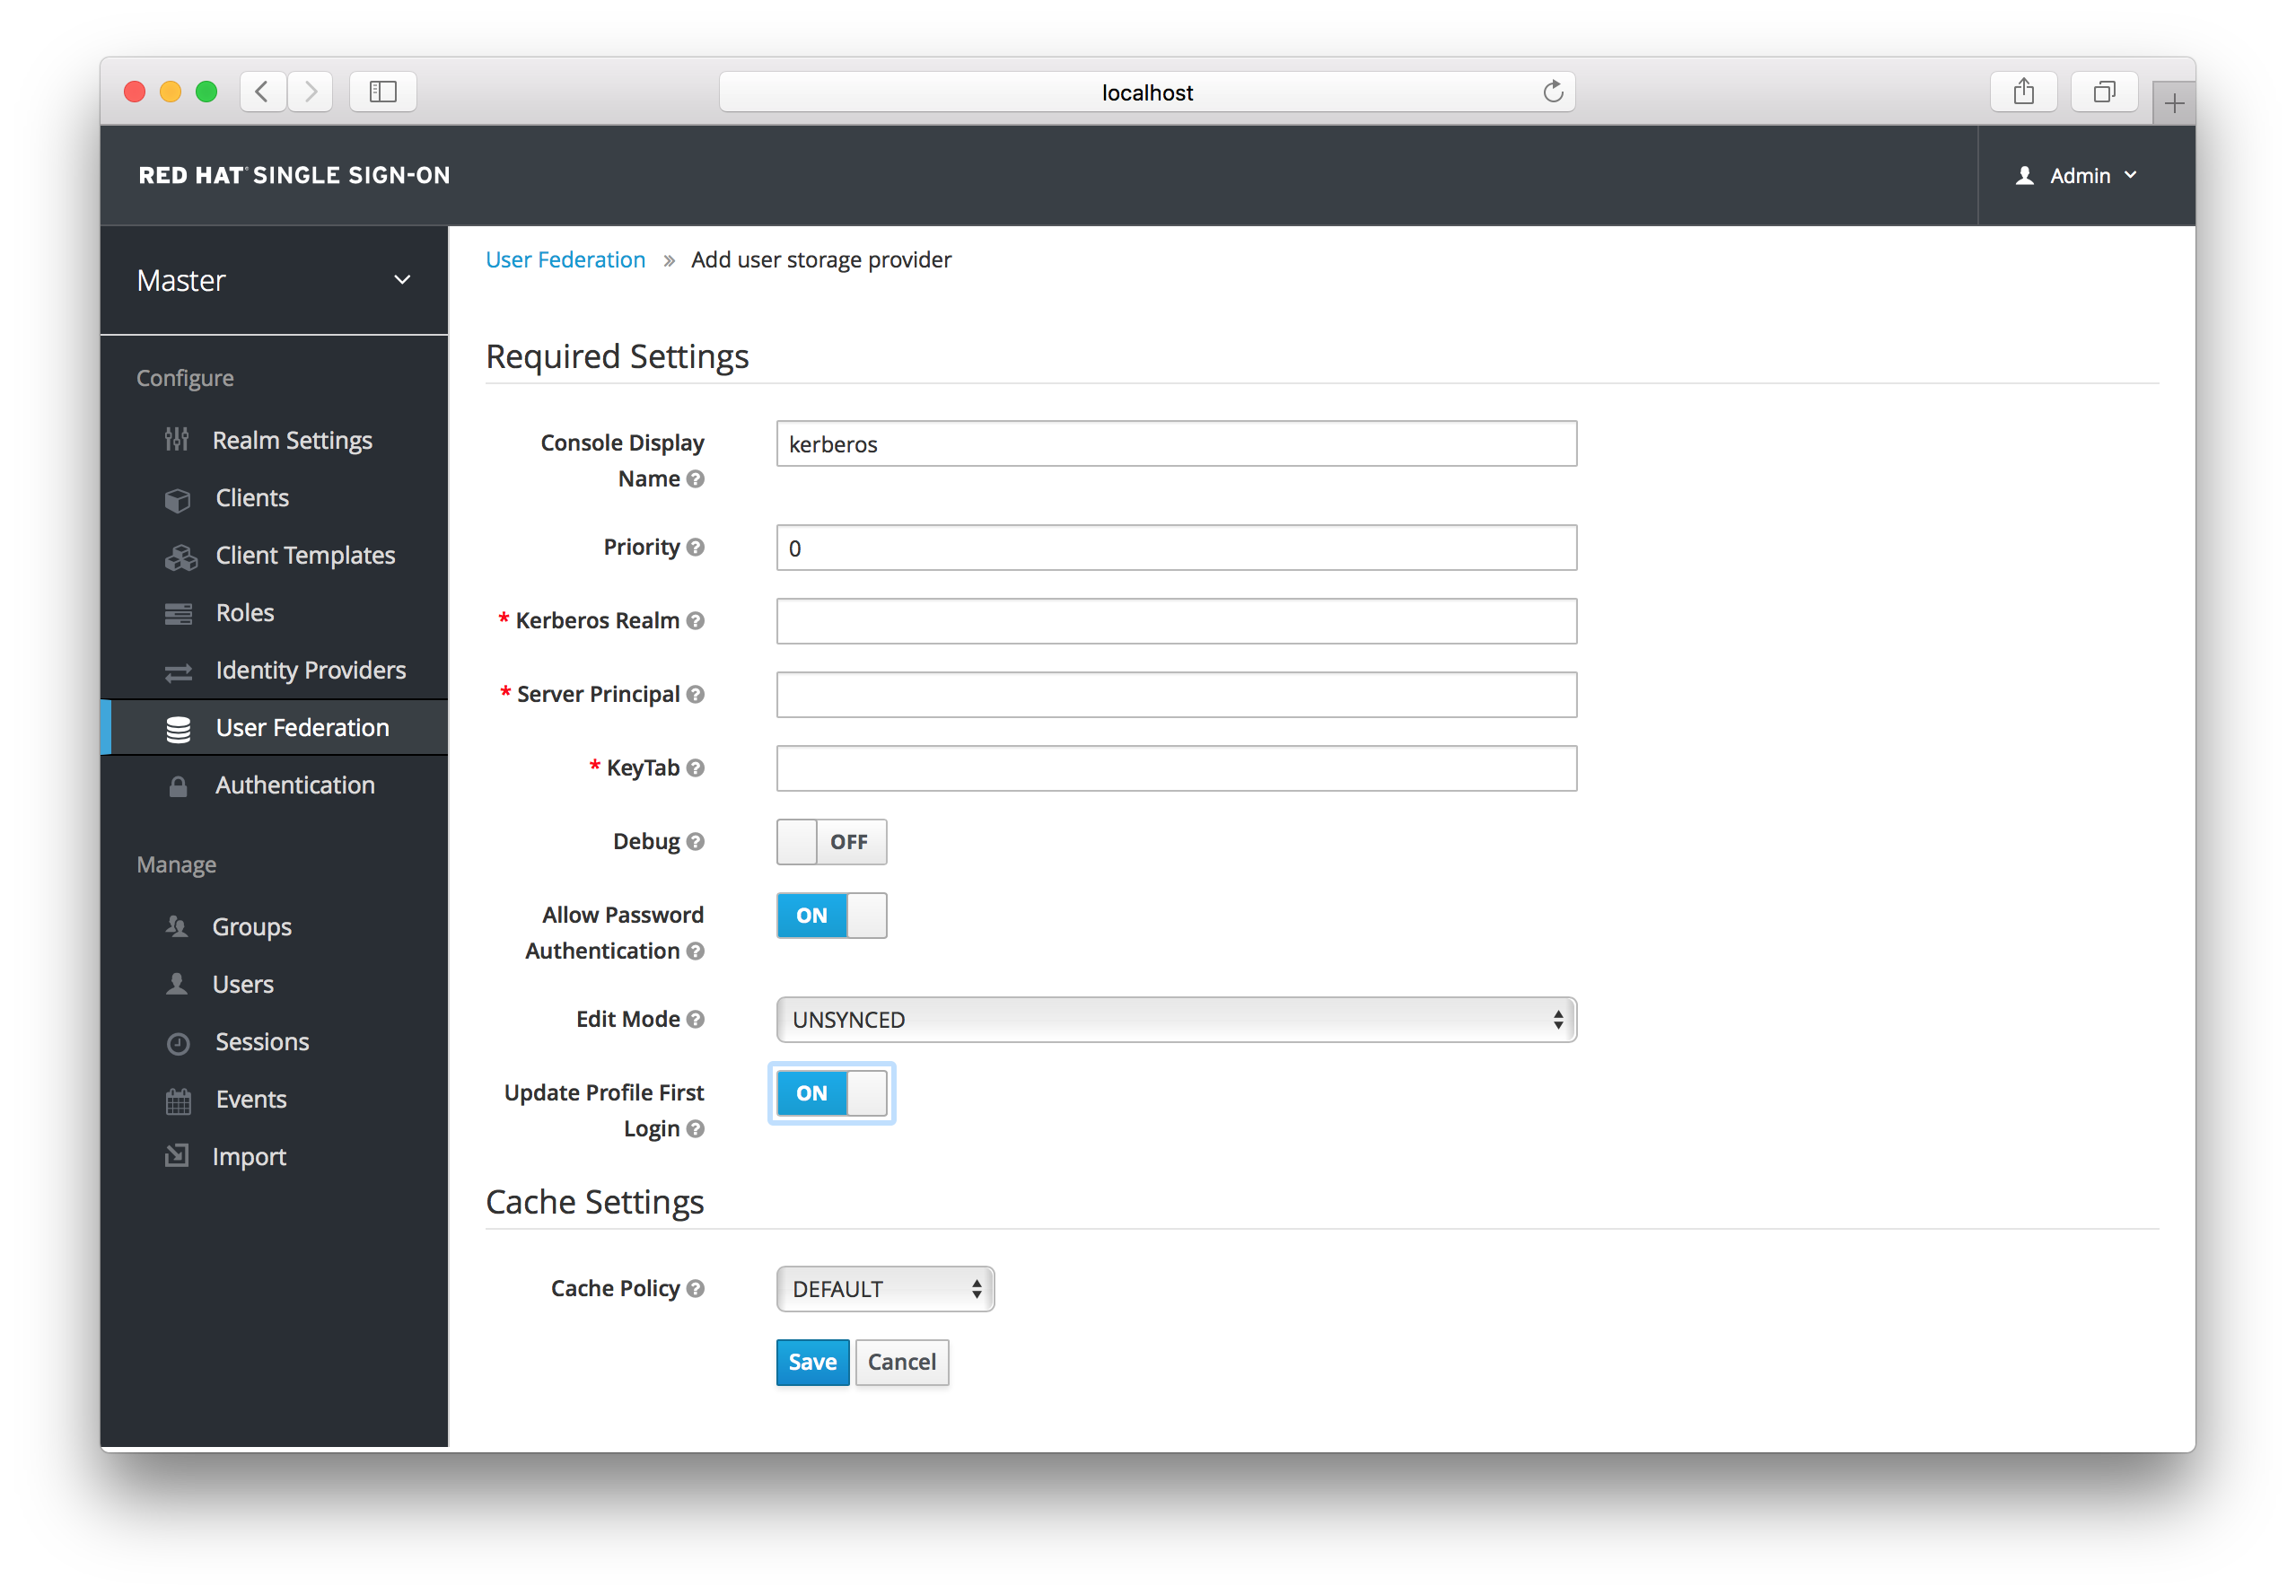
This provider parses the Kerberos ticket for simple principal information and does a small import into the local Red Hat Single Sign-On database. User profile information like first name, last name, and email are not provisioned.
6.4.3. Setup and configuration of client machines
Clients need to install kerberos client and setup krb5.conf as described above. Additionally they need to enable SPNEGO login support in their browser. See configuring Firefox for Kerberos if you are using that browser. URI .mydomain.org must be allowed in the network.negotiate-auth.trusted-uris config option.
In a Windows domain, clients usually don’t need to configure anything special as IE is already able to participate in SPNEGO authentication for the Windows domain.
6.4.4. Credential Delegation
Kerberos 5 supports the concept of credential delegation. In this scenario, your applications may want access to the Kerberos ticket so that they can re-use it to interact with other services secured by Kerberos. Since the SPNEGO protocol is processed in the Red Hat Single Sign-On server, you have to propagate the GSS credential to your application within the OpenID Connect token claim or a SAML assertion attribute that is transmitted to your application from the Red Hat Single Sign-On server. To have this claim inserted into the token or assertion, each application will need to enable the built-in protocol mapper called gss delegation credential. This is enabled in the Mappers tab of the application’s client page. See Protocol Mappers chapter for more details.
Applications will need to deserialize the claim it receives from Red Hat Single Sign-On before it can use it to make GSS calls against other services. Once you deserialize the credential from the access token to the GSSCredential object, the GSSContext will need to be created with this credential passed to the method GSSManager.createContext for example like this:
// Obtain accessToken in your application.
KeycloakPrincipal keycloakPrincipal = (KeycloakPrincipal) servletReq.getUserPrincipal();
AccessToken accessToken = keycloakPrincipal.getKeycloakSecurityContext().getToken();

// Retrieve kerberos credential from accessToken and deserialize it
String serializedGssCredential = (String) accessToken.getOtherClaims().
    get(org.keycloak.common.constants.KerberosConstants.GSS_DELEGATION_CREDENTIAL);

GSSCredential deserializedGssCredential = org.keycloak.common.util.KerberosSerializationUtils.
    deserializeCredential(serializedGssCredential);

// Create GSSContext to call other kerberos-secured services
GSSContext context = gssManager.createContext(serviceName, krb5Oid,
    deserializedGssCredential, GSSContext.DEFAULT_LIFETIME);
Note that you also need to configure forwardable kerberos tickets in krb5.conf file and add support for delegated credentials to your browser.
Credential delegation has some security implications so only use it if you really need it. It’s highly recommended to use it together with HTTPS. See for example this article for more details.
6.4.5. Troubleshooting
If you have issues, we recommend that you enable additional logging to debug the problem:
-
Enable
Debugflag in admin console for Kerberos or LDAP federation providers -
Enable TRACE logging for category
org.keycloakin logging section ofstandalone/configuration/standalone.xmlto receive more infostandalone/log/server.log -
Add system properties
-Dsun.security.krb5.debug=trueand-Dsun.security.spnego.debug=true