
Administration and Configuration Guide
For Use with Red Hat JBoss Enterprise Application Platform 6
Abstract
Chapter 1. Introduction
1.1. About Red Hat JBoss Enterprise Application Platform 6
1.2. Features of JBoss EAP 6
Table 1.1. JBoss EAP 6.3.0 Features
| Feature | Description |
|---|---|
| Java Certification | Java Enterprise Edition 6 Full Profile and Web Profile certified. |
| Managed Domain |
|
| Management Console and Management CLI | New domain or standalone server management interfaces. XML configuration file editing is no longer required. The Management CLI also includes a batch mode that can script and automate management tasks. |
| Simplified directory layout | The modules directory now contains all application server modules. The common and server-specific lib directories are deprecated. The domain and standalone directories contain the artifacts and configuration files for domain and standalone deployments respectively. |
| Modular classloading mechanism | Modules are loaded and unloaded on demand. This improves performance, has security benefits and reduces start-up and restart times. |
| Streamlined Data source management | Database drivers are deployed just like other services. In addition, datasources are created and managed directly in the Management Console or Management CLI. |
| Reduced and more efficient resource use. | JBoss EAP 6 uses fewer system resources and uses them more efficiently than previous versions. Among other benefits, JBoss EAP 6 starts and stops faster than JBoss EAP 5. |
1.3. About JBoss EAP 6 Operating Modes
1.4. About Standalone Servers
1.5. About Managed Domains
domain.sh or domain.bat script is run. Host controllers are configured to delegate domain management tasks to the domain controller.
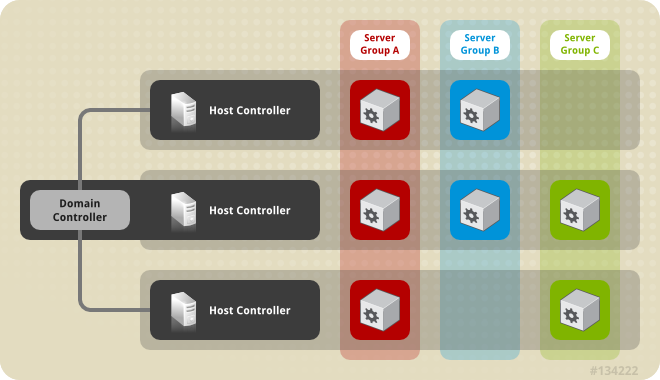
Figure 1.1. Graphical Representation of a Managed Domain
1.6. About the Domain Controller
- Maintain the domain's central management policy.
- Ensure all host controllers are aware of its current contents.
- Assist the host controllers in ensuring that all running JBoss EAP 6 instances are configured in accordance with this policy.
domain/configuration/domain.xml file. This file is in the unzipped JBoss EAP 6 installation file, on the domain controller's host's filesystem.
domain.xml file must be located in the domain/configuration/ directory of the host controller set to run as the domain controller. This file is not mandatory for installations on host controllers that are not meant to run as a domain controller. The presence of a domain.xml file on such a server does no harm, however.
domain.xml file contains the profile configurations that can be run on the server instances in a domain. A profile configuration includes the detailed settings of the various subsystems that comprise a profile. The domain configuration also includes the definition of socket groups and the server group definitions.
1.7. About Domain Controller Discovery and Failover
<domain-controller>
    <remote security-realm="ManagementRealm">
          <discovery-options>
              <static-discovery name="primary" host="172.16.81.100" port="9999"/>
              <static-discovery name="backup" host="172.16.81.101" port="9999"/>
          </discovery-options>
    </remote>
</domain-controller>- name
- The name for this domain controller discovery option
- host
- The remote domain controller's host name.
- port
- The remote domain controller's port.
--backup option can be promoted to act as the domain controller.
Note
--backup option will cause that controller to maintain a local copy of the domain configuration. This configuration will be used if the host controller is reconfigured to act as the domain controller.
Procedure 1.1. Promoting a host controller to be the domain controller
- Ensure the original domain controller has, or is, stopped.
- Use the Management CLI to connect to the host controller that is to become the new domain controller.
- Execute the following command to configure the host controller to act as the new domain controller.
/host=HOST_NAME:write-local-domain-controller - Execute the following command to reload the host controller.
reload --host=HOST_NAME
1.8. About Host Controller
domain.sh or domain.bat script is run on a host.
domain/configuration/host.xml file located in the unzipped JBoss EAP 6 installation file on its host's filesystem. The host.xml file contains the following configuration information that is specific to the particular host:
- The names of the JBoss EAP 6 instances meant to run from this installation.
- Any of the following configurations:
- How the host controller contacts the domain controller to register itself and access the domain configuration.
- How to find and contact a remote domain controller.
- That the host controller is to act as the domain controller
- Configurations specific to the local physical installation. For example, named interface definitions declared in
domain.xmlcan be mapped to an actual machine-specific IP address inhost.xml. And abstract path names in domain.xml can be mapped to actual filesystem paths inhost.xml.
1.9. About Server Groups
<server-group name="main-server-group" profile="default">
 <socket-binding-group ref="standard-sockets"/>
  <deployments>
   <deployment name="foo.war_v1" runtime-name="foo.war"/>
   <deployment name="bar.ear" runtime-name="bar.ear"/>
  </deployments>
</server-group>
- name: the server group name.
- profile: the server group profile name.
- socket-binding-group: the default socket binding group used for servers in the group. This name can be overridden on a per-server basis in
host.xml. However, this is a mandatory element for every server group and the domain can not start if it is missing.
- deployments: the deployment content to be deployed on the servers in the group.
- system-properties: the system properties to be set on servers in the group
- jvm: the default JVM settings for all servers in the group. The host controller merges these settings with any other configuration provided in
host.xmlto derive the settings used to launch the server's JVM.
1.10. About JBoss EAP 6 Profiles
Chapter 2. Application Server Management
2.1. Start and Stop JBoss EAP 6
2.1.1. Start JBoss EAP 6
2.1.2. Start JBoss EAP 6 as a Standalone Server
This topic covers the steps to start JBoss EAP 6 as a Standalone Server.
Procedure 2.1. Start the Platform Service as a Standalone Server
For Red Hat Enterprise Linux.
Run the command:EAP_HOME/bin/standalone.shFor Microsoft Windows Server.
Run the command:EAP_HOME\bin\standalone.batOptional: Specify additional parameters.
To print a list of additional parameters to pass to the start-up scripts, use the-hparameter.
The JBoss EAP 6 Standalone Server instance starts.
2.1.3. Start JBoss EAP 6 as a Managed Domain
The domain controller must be started before any slave servers in any server groups in the domain. Use this procedure first on the domain controller, and then on each associated host controller and each other host associated with the domain.
Procedure 2.2. Start the Platform Service as a Managed Domain
For Red Hat Enterprise Linux.
Run the command:EAP_HOME/bin/domain.shFor Microsoft Windows Server.
Run the command:EAP_HOME\bin\domain.batOptional: Pass additional parameters to the start-up script.
For a list of parameters you can pass to the start-up script, use the-hparameter.
The JBoss EAP 6 Managed Domain instance starts.
2.1.4. Configure the Name of a Host in a Managed Domain
Every host running in a managed domain must have a unique host name. To ease administration and allow for the use of the same host configuration files on multiple hosts, the server uses the following precedence for determining the host name.
- If set, the
hostelementnameattribute in thehost.xmlconfiguration file. - The value of the
jboss.host.namesystem property. - The value that follows the final period (".") character in the
jboss.qualified.host.namesystem property, or the entire value if there is no final period (".") character. - The value that follows the period (".") character in the
HOSTNAMEenvironment variable for POSIX-based operating systems, theCOMPUTERNAMEenvironment variable for Microsoft Windows, or the entire value if there is no final period (".") character.
Procedure 2.3. Configure the Host Name Using a System Property
- Open the host configuration file for editing, for example,
host.xml. - Find the
hostelement in the file, for example:<host name="master" xmlns="urn:jboss:domain:1.6">
- If it is present, remove the
name="HOST_NAME"hostelement should now look like the following example.<host xmlns="urn:jboss:domain:1.6">
- Start the server passing the
-Djboss.host.nameargument, for example:-Djboss.host.name=HOST_NAME
Procedure 2.4. Configure the Host Name Using a Specific Name
- Start the JBoss EAP slave host using the following syntax:
For example:bin/domain.sh --host-config=HOST_FILE_NAMEbin/domain.sh --host-config=host-slave01.xml - Launch the Management CLI.
- Use the following syntax to replace the host name:
For example:/host=EXISTING_HOST_NAME:write-attribute(name="name",value=UNIQUE_HOST_NAME)
You should see the following result./host=master:write-attribute(name="name",value="host-slave01")"outcome" => "success"
This modifies the hostnameattribute in thehost-slave01.xmlfile as follows:<host name="host-slave01" xmlns="urn:jboss:domain:1.6">
- You must reload the server configuration using the old host name to complete the process
For example:reload --host=EXISTING_HOST_NAMEreload --host=master
2.1.5. Create Managed Domain on Two Machines
Note
- IP1 = IP address of the domain controller (Machine 1)
- IP2 = IP address of the host (Machine 2)
Procedure 2.5. Create managed domain on two machines
On Machine 1
- Use the add-user.sh script to add management user. For example,
slave01, so the host can authenticate the domain controller. Note theSECRET_VALUEfrom theadd-useroutput. - Start domain with
host-master.xmlconfig file, which is preconfigured for dedicated domain controller. - Use
-bmanagement=$IP1to make domain controller visible to other machines.[$JBOSS_HOME/bin]$ ./domain.sh --host-config=host-master.xml -bmanagement=$IP1
On Machine 2
- Update
$JBOSS_HOME/domain/configuration/host-slave.xmlfile with user credentials.<?xml version='1.0' encoding='UTF-8'?> <host xmlns="urn:jboss:domain:1.6" name="slave01"> <!-- add user name here --> <management> <security-realms> <security-realm name="ManagementRealm"> <server-identities> <secret value="$SECRET_VALUE" /> <!-- use secret value from add-user.sh output--> </server-identities> ... - Start host.
[$JBOSS_HOME/bin]$ ./domain.sh --host-config=host-slave.xml -Djboss.domain.master.address=$IP1 -b=$IP2
Now we can manage the domain.
via CLI:[$JBOSS_HOME/bin]$ ./jboss-cli.sh -c --controller=$IP1
via Web Console:http://$IP1:9990
Access the server index page:http://$IP2:8080/ http://$IP2:8230/
2.1.6. Start JBoss EAP 6 with an Alternative Configuration
Prerequisites
- Before using an alternate configuration file, prepare it using the default configuration as a template. For a Managed Domain, the configuration file needs to be placed in the
EAP_HOME/domain/configuration/directory. For a Standalone Server, the configuration file should be placed in theEAP_HOME/standalone/configuration/directory.
Note
EAP_HOME/docs/examples/configs/ directory. Use these examples to enable extra features such as clustering or the Transactions XTS API.
standalone-picketlink.xml, standalone-genericjms.xml and standalone-hornetq-colocated.xml.
Procedure 2.6. Start the Instance with an Alternative Configuration
Standalone server
For a Standalone Server, provide the filename of the configuration file as an option to the--server-configparameter. The configuration file must be located in theEAP_HOME/standalone/configuration/directory, and you need to specify the file path relative to that directory.Example 2.1. Using an alternate configuration file for a Standalone Server in Red Hat Enterprise Linux
[user@host bin]$
./standalone.sh --server-config=standalone-alternate.xmlThis example uses theEAP_HOME/standalone/configuration/standalone-alternate.xmlconfiguration file.Example 2.2. Using an alternate configuration file for a Standalone Server in Microsoft Windows Server
C:\EAP_HOME\bin>
standalone.bat --server-config=standalone-alternate.xmlThis example uses theEAP_HOME\standalone\configuration\standalone-alternative.xmlconfiguration file.Managed Domain
For a Managed Domain, provide the file name of the configuration file as an option to the--domain-configparameter. The file must be present in theEAP_HOME/domain/configuration/directory, and you need to specify the path relative to that directory.Example 2.3. Using an alternate configuration file for a Managed Domain in Red Hat Enterprise Linux
[user@host bin]$
./domain.sh --domain-config=domain-alternate.xmlThis example uses theEAP_HOME/domain/configuration/domain-alternate.xmlconfiguration file.Example 2.4. Using an alternate configuration file for a Managed Domain in Microsoft Windows Server
C:\EAP_HOME\bin>
domain.bat --domain-config=domain-alternate.xmlThis example uses theEAP_HOME\domain\configuration\domain-alternate.xmlconfiguration file.
JBoss Enterprise Application Platform is now running, using your alternate configuration file.
2.1.7. Stop JBoss EAP 6
Note
Procedure 2.7. Stop an instance of JBoss EAP 6
Stop an instance which was started interactively from a command prompt.
Press Ctrl-C in the terminal where JBoss EAP 6 is running.
Procedure 2.8. Stop an instance which was started as an operating system service.
Depending on your operating system, use one of the following procedures.Red Hat Enterprise Linux
For Red Hat Enterprise Linux, if you have written a service script, use itsstopfacility. This needs to be written into the script. Then you can useservice scriptname stop, where scriptname is the name of your script.Microsoft Windows Server
In Microsoft Windows, use thenet servicecommand, or stop the service from the Services applet in the Control Panel.
Procedure 2.9. Stop an instance which is running in the background (Red Hat Enterprise Linux)
- Obtain the process ID (PID) of the process:
If only a single instance is running (standalone mode)
Either of the following commands will return the PID of a single instance of JBoss EAP 6:pidof javajps(Thejpscommand will return an ID for two processes; one forjboss-modules.jarand one for jps itself. Use the ID forjboss-modules.jarto stop the EAP instance)
If multiple EAP instances are running (domain mode)
Identifying the correct process to end if more than one instance of EAP is running requires more comprehensive commands be used.- The
jpscommand can be used in verbose mode to provide more information about the java processes it finds.Below is an abridged output from a verbosejpscommand identifying the different EAP processes running by PID and role:$ jps -v 12155 jboss-modules.jar -D[Server:server-one] -XX:PermSize=256m -XX:MaxPermSize=256m -Xms1303m ... 12196 jboss-modules.jar -D[Server:server-two] -XX:PermSize=256m -XX:MaxPermSize=256m -Xms1303m ... 12096 jboss-modules.jar -D[Host Controller] -Xms64m -Xmx512m -XX:MaxPermSize=256m ... 11872 Main -Xms128m -Xmx750m -XX:MaxPermSize=350m -XX:ReservedCodeCacheSize=96m -XX:+UseCodeCacheFlushing ... 11248 jboss-modules.jar -D[Standalone] -XX:+UseCompressedOops -verbose:gc ... 12892 Jps ... 12080 jboss-modules.jar -D[Process Controller] -Xms64m -Xmx512m -XX:MaxPermSize=256m ...
- The
ps auxcommand can also be used to return information about multiple EAP instances.Below is an abridged output from a verboseps auxcommand identifying the different EAP processes running by PID and role:$ ps aux | grep java username 12080 0.1 0.9 3606588 36772 pts/0 Sl+ 10:09 0:01 /path/to/java -D[Process Controller] -server -Xms128m -Xmx128m -XX:MaxPermSize=256m ... username 12096 1.0 4.1 3741304 158452 pts/0 Sl+ 10:09 0:13 /path/to/java -D[Host Controller] -Xms128m -Xmx128m -XX:MaxPermSize=256m ... username 12155 1.7 8.9 4741800 344224 pts/0 Sl+ 10:09 0:22 /path/to/java -D[Server:server-one] -XX:PermSize=256m -XX:MaxPermSize=256m -Xms1000m -Xmx1000m -server - ... username 12196 1.8 9.4 4739612 364436 pts/0 Sl+ 10:09 0:22 /path/to/java -D[Server:server-two] -XX:PermSize=256m -XX:MaxPermSize=256m -Xms1000m -Xmx1000m -server ...
In the above examples, the Process Controller processes are the processes to stop in order to stop the entire domain.Thegreputility can be used with either of these commands to identify the Process Controller:jps -v | grep "Process Controller"ps aux | grep "Process Controller"
- Send the process the
TERMsignal, by runningkill PID, where PID is the process ID identified by one of the commands above.
Each of these alternatives shuts JBoss EAP 6 down cleanly so that data is not lost.
2.1.8. Reference of Switches and Arguments to pass at Server Runtime
standalone.xml, domain.xml and host.xml configuration files. This might include starting the server with an alternative set of socket bindings or a secondary configuration. A list of these available parameters can be accessed by passing the help switch at startup.
Example 2.5.
-h or --help switches. The results of the help switch are explained in the table below.
[localhost bin]$ standalone.sh -h[localhost bin]$ domain.sh -hTable 2.1. Table of runtime switches and arguments
| Argument or Switch | Mode | Description |
|---|---|---|
--admin-only | Standalone | Set the server's running type to ADMIN_ONLY. This will cause it to open administrative interfaces and accept management requests, but not start other runtime services or accept end user requests. |
--admin-only | Domain | Set the host controller's running type to ADMIN_ONLY causing it to open administrative interfaces and accept management requests but not start servers or, if this host controller is the master for the domain, accept incoming connections from slave host controllers. |
-b <value>, -b=<value> | Standalone, Domain | Set system property jboss.bind.address to the given value. |
-b<interface>=<value> | Standalone, Domain | Set system property jboss.bind.address.<interface> to the given value. |
--backup | Domain | Keep a copy of the persistent domain configuration even if this host is not the Domain Controller. |
-c <config>, -c=<config> | Standalone | Name of the server configuration file to use. The default is standalone.xml. |
-c <config>, -c=<config> | Domain | Name of the server configuration file to use. The default is domain.xml. |
--cached-dc | Domain | If the host is not the Domain Controller and cannot contact the Domain Controller at boot, boot using a locally cached copy of the domain configuration. |
--debug [<port>] | Standalone | Activate debug mode with an optional argument to specify the port. Only works if the launch script supports it. |
-D<name>[=<value>] | Standalone, Domain | Set a system property. |
--domain-config=<config> | Domain | Name of the server configuration file to use. The default is domain.xml. |
-h, --help | Standalone, Domain | Display the help message and exit. |
--host-config=<config> | Domain | Name of the host configuration file to use. The default is host.xml. |
--interprocess-hc-address=<address> | Domain | Address on which the host controller should listen for communication from the process controller. |
--interprocess-hc-port=<port> | Domain | Port on which the host controller should listen for communication from the process controller. |
--master-address=<address> | Domain | Set system property jboss.domain.master.address to the given value. In a default slave Host Controller config, this is used to configure the address of the master Host Controller. |
--master-port=<port> | Domain | Set system property jboss.domain.master.port to the given value. In a default slave Host Controller config, this is used to configure the port used for native management communication by the master Host Controller. |
--read-only-server-config=<config> | Standalone | Name of the server configuration file to use. This differs from --server-config and -c in that the original file is never overwritten. |
--read-only-domain-config=<config> | Domain | Name of the domain configuration file to use. This differs from --domain-config and -c in that the initial file is never overwritten. |
--read-only-host-config=<config> | Domain | Name of the host configuration file to use. This differs from --host-config in that the initial file is never overwritten. |
-P <url>, -P=<url>, --properties=<url> | Standalone, Domain | Load system properties from the given URL. |
--pc-address=<address> | Domain | Address on which the process controller listens for communication from processes it controls. |
--pc-port=<port> | Domain | Port on which the process controller listens for communication from processes it controls. |
-S<name>[=<value>] | Standalone | Set a security property. |
--server-config=<config> | Standalone | Name of the server configuration file to use. The default is standalone.xml. |
-u <value>, -u=<value> | Standalone, Domain | Set system property jboss.default.multicast.address to the given value. |
-v, -V, --version | Standalone, Domain | Display the application server version and exit. |
2.2. Start and Stop Servers
2.2.1. Start and Stop Servers Using the Management CLI
Prerequisites
A Standalone Server instance can be started by the command line scripts, and shut down from the Management CLI with the shutdown command. If you require the instance again, run the startup process again as described in Section 2.1.2, “Start JBoss EAP 6 as a Standalone Server”.
Example 2.6. Stop a Standalone Server instance via the Management CLI
[standalone@localhost:9999 /] shutdown
If you are running a Managed Domain, the Management Console allows you to selectively start or stop specific servers in the domain. This includes server groups across the whole of the domain, as well as specific server instances on a host.
Example 2.7. Stop a Server Host in a Managed Domain via the Management CLI
shutdown command is used to shut down a declared Managed Domain host. This example stops a server host named master by declaring the instance name before calling the shutdown operation. Use the tab key to assist with string completion and to expose visible variables such as available host values.
[domain@localhost:9999 /] /host=master:shutdown
Example 2.8. Start and Stop a Server Group in a Managed Domain via the Management CLI
main-server-group by declaring the group before calling the start and stop operations. Use the tab key to assist with string completion and to expose visible variables such as available server group name values.
[domain@localhost:9999 /] /server-group=main-server-group:start-servers
[domain@localhost:9999 /] /server-group=main-server-group:stop-servers
Example 2.9. Start and Stop a Server Instance in a Managed Domain via the Management CLI
server-one on the master host by declaring the host and server configuration before calling the start and stop operations. Use the tab key to assist with string completion and to expose visible variables such as available host and server configuration values.
[domain@localhost:9999 /] /host=master/server-config=server-one:start
[domain@localhost:9999 /] /host=master/server-config=server-one:stop
2.2.2. Start a Server Using the Management Console
Prerequisites
Procedure 2.10. Start the Server for a Managed Domain
- Select the Runtime tab at the top of the console. Expand the menu and select .
- From the list of Server Instances, select the server you want to start. Servers that are running are indicated by a check mark.Hover the cursor over an instance in this list to show options in blue text below the server's details.
- To start the instance, click on the text when it appears. A confirmation dialogue box will open. Click to start the server.
The selected server is started and running.
2.2.3. Stop a Server Using the Management Console
Prerequisites
Procedure 2.11. Stop a Server in a Managed Domain Using the Management Console
- Select the Runtime tab from the top of the console. Expand the menu and select .
- A list of available Server Instances is displayed on the Hosts, groups and server instances table. Servers that are running are indicated by a check mark.
- Hover the cursor over the chosen server. Click on the text that appears. A confirmation dialogue window will appear.
- Click to stop the server.
The selected server is stopped.
2.3. Filesystem Paths
2.3.1. Filesystem Paths
domain.xml, host.xml and standalone.xml configurations all include a section where paths can be declared. Other sections of the configuration can then reference those paths by their logical name, avoiding the declaration of the absolute path for each instance. This benefits configuration and administration efforts as it allows specific host configurations to resolve to universal logical names.
jboss.server.log.dir path that points to the server's log directory.
Example 2.10. Relative path example for the logging directory
<file relative-to="jboss.server.log.dir" path="server.log"/>
Table 2.2. Standard Paths
| Value | Description |
|---|---|
jboss.home.dir | The root directory of the JBoss EAP 6 distribution. |
user.home | The user home directory. |
user.dir | The user's current working directory. |
java.home | The Java installation directory |
jboss.server.base.dir | The root directory for an individual server instance. |
jboss.server.data.dir | The directory the server will use for persistent data file storage. |
jboss.server.config.dir | The directory that contains the server configuration. |
jboss.server.log.dir | The directory the server will use for log file storage. |
jboss.server.temp.dir | The directory the server will use for temporary file storage. |
jboss.controller.temp.dir | The directory the host controller will use for temporary file storage. |
If you are running a standalone server, you can override the jboss.server.base.dir, jboss.server.log.dir, or jboss.server.config.dir paths in one of two ways.
- You can pass arguments on the command line when you start the server. For example:
bin/standalone.sh -Djboss.server.log.dir=/var/log - You can modify the
JAVA_OPTSvariable in the server configuration file. Open theEAP_HOME/bin/standalone.conffile and add the following line at the end of the file:JAVA_OPTS="$JAVA_OPTS Djboss.server.log.dir=/var/log"
You can also create your own custom path. For example, you may want to define a relative path to use for logging:
my.relative.path=/var/logmy.relative.path,
2.4. Configuration Files
2.4.1. About JBoss EAP 6 Configuration Files
Table 2.3. Configuration File Locations
| Server mode | Location | Purpose |
|---|---|---|
| domain.xml | EAP_HOME/domain/configuration/domain.xml | This is the main configuration file for a managed domain. Only the domain master reads this file. On other domain members, it can be removed. |
| host.xml | EAP_HOME/domain/configuration/host.xml | This file includes configuration details specific to a physical host in a managed domain, such as network interfaces, socket bindings, the name of the host, and other host-specific details. The host.xml file includes all of the features of both host-master.xml and host-slave.xml, which are described below. This file is not present for standalone servers. |
| host-master.xml | EAP_HOME/domain/configuration/host-master.xml | This file includes only the configuration details necessary to run a server as a managed domain master server. This file is not present for standalone servers. |
| host-slave.xml | EAP_HOME/domain/configuration/host-slave.xml | This file includes only the configuration details necessary to run a server as a managed domain slave server. This file is not present for standalone servers. |
| standalone.xml | EAP_HOME/standalone/configuration/standalone.xml | This is the default configuration file for a standalone server. It contains all information about the standalone server, including subsystems, networking, deployments, socket bindings, and other configurable details. This configuration is used automatically when you start your standalone server. |
| standalone-full.xml | EAP_HOME/standalone/configuration/standalone-full.xml | This is an example configuration for a standalone server. It includes support for every possible subsystem except for those required for high availability. To use it, stop your server and restart using the following command: EAP_HOME/bin/standalone.sh -c standalone-full.xml |
| standalone-ha.xml | EAP_HOME/standalone/configuration/standalone-ha.xml | This example configuration file enables all of the default subsystems and adds the mod_cluster and JGroups subsystems for a standalone server, so that it can participate in a high-availability or load-balancing cluster. This file is not applicable for a managed domain. To use this configuration, stop your server and restart using the following command: EAP_HOME/bin/standalone.sh -c standalone-ha.xml |
| standalone-full-ha.xml | EAP_HOME/standalone/configuration/standalone-full-ha.xml | This is an example configuration for a standalone server. It includes support for every possible subsystem, including those required for high availability. To use it, stop your server and restart using the following command: EAP_HOME/bin/standalone.sh -c standalone-full-ha.xml |
2.4.2. Descriptor-based Property Replacement
standalone.xml or domain.xml:
<subsystem xmlns="urn:jboss:domain:ee:1.1">
  <spec-descriptor-property-replacement>
    true
  </spec-descriptor-property-replacement>
  <jboss-descriptor-property-replacement>
    true
  </jboss-descriptor-property-replacement>
</subsystem>ejb-jar.xml and persistence.xml can be replaced. By default this is disabled.
jboss-ejb3.xmljboss-app.xmljboss-web.xml*-jms.xml*-ds.xml
@ActivationConfigProperty(propertyName = "connectionParameters", propertyValue = "host=192.168.1.1;port=5445")
connectionParameters can be specified via the command-line as:
./standalone.sh -DconnectionParameters='host=10.10.64.1;port=5445'
<activation-config>
  <activation-config-property>
    <activation-config-property-name>
      connectionParameters
      </activation-config-property-name>
    <activation-config-property-value>
      ${jms.connection.parameters:'host=10.10.64.1;port=5445'}
    </activation-config-property-value>
  </activation-config-property>
</activation-config>
${jms.connection.parameters:'host=10.10.64.1;port=5445'} allows the connection parameters to be overridden by a command-line supplied parameter, while providing a default value.
2.4.3. Enabling/Disabling Descriptor Based Property Replacement
Finite control over descriptor property replacement was introduced in jboss-as-ee_1_1.xsd. This task covers the steps required to configure descriptor based property replacement.
- When set to
true, property replacements are enabled. - When set to
false, property replacements are disabled.
Procedure 2.12. jboss-descriptor-property-replacement
jboss-descriptor-property-replacement is used to enable or disable property replacement in the following descriptors:
jboss-ejb3.xmljboss-app.xmljboss-web.xml*-jms.xml*-ds.xml
jboss-descriptor-property-replacement is true.
- In the Management CLI, run the following command to determine the value of
jboss-descriptor-property-replacement:/subsystem=ee:read-attribute(name="jboss-descriptor-property-replacement")
- Run the following command to configure the behavior:
/subsystem=ee:write-attribute(name="jboss-descriptor-property-replacement",value=VALUE)
Procedure 2.13. spec-descriptor-property-replacement
spec-descriptor-property-replacement is used to enable or disable property replacement in the following descriptors:
ejb-jar.xmlpersistence.xml
spec-descriptor-property-replacement is false.
- In the Management CLI, run the following command to confirm the value of
spec-descriptor-property-replacement:/subsystem=ee:read-attribute(name="spec-descriptor-property-replacement")
- Run the following command to configure the behavior:
/subsystem=ee:write-attribute(name="spec-descriptor-property-replacement",value=VALUE)
The descriptor based property replacement tags have been successfully configured.
2.4.4. Configuration File History
standalone.xml, as well as the domain.xml and host.xml files. While these files may be modified by direct editing, the recommended method is to configure the application server model with the available management operations, including the Management CLI and the Management Console.
2.4.5. Start the Server with a Previous Configuration
standalone.xml. The same concept applies to a managed domain with domain.xml and host.xml respectively.
- Identify the backed up version that you want to start. This example will recall the instance of the server model prior to the first modification after successfully booting up.
EAP_HOME/standalone/configuration/standalone_xml_history/current/standalone.v1.xml - Start the server with this configuration of the backed up model by passing in the relative filename under
jboss.server.config.dir.EAP_HOME/bin/standalone.sh --server-config=standalone_xml_history/current/standalone.v1.xml
The application server starts with the selected configuration.
Note
EAP_HOME/domain/configuration/domain_xml_history/current/domain.v1.xml
jboss.domain.config.dir.
EAP_HOME/bin/domain.sh --domain-config=domain_xml_history/current/domain.v1.xml
2.4.6. Save a Configuration Snapshot Using the Management CLI
Configuration snapshots are a point-in-time copy of the current server configuration. These copies can be saved and loaded by the administrator.
standalone.xml configuration file, but the same process applies to the domain.xml and host.xml configuration files.
Prerequisites
Procedure 2.14. Take a Configuration Snapshot and Save It
Save a snapshot
Run thetake-snapshotoperation to capture a copy of the current server configuration.[standalone@localhost:9999 /] :take-snapshot { "outcome" => "success", "result" => "/home/User/EAP_HOME/standalone/configuration/standalone_xml_history/snapshot/20110630-172258657standalone.xml"
A snapshot of the current server configuration has been saved.
2.4.7. Load a Configuration Snapshot Using the Management CLI
standalone.xml file, but the same process applies to the domain.xml and host.xml files.
Procedure 2.15. Load a Configuration Snapshot
- Identify the snapshot to be loaded. This example will recall the following file from the snapshot directory. The default path for the snapshot files is as follows.
EAP_HOME/standalone/configuration/standalone_xml_history/snapshot/20110812-191301472standalone.xml
The snapshots are expressed by their relative paths, by which the above example can be written as follows.jboss.server.config.dir/standalone_xml_history/snapshot/20110812-191301472standalone.xml
- Start the server with the selected configuration snapshot by passing in the filename.
EAP_HOME/bin/standalone.sh --server-config=standalone_xml_history/snapshot/20110913-164449522standalone.xml
The server restarts with the configuration selected in the loaded snapshot.
2.4.8. Delete a Configuration Snapshot Using Management CLI
Prerequisites
standalone.xml file, but the same process applies to the domain.xml and host.xml files.
Procedure 2.16. Delete a Specific Snapshot
- Identify the snapshot to be deleted. This example will delete the following file from the snapshot directory.
EAP_HOME/standalone/configuration/standalone_xml_history/snapshot/20110630-165714239standalone.xml
- Run the
:delete-snapshotcommand to delete a specific snapshot, specifying the name of the snapshot as in the example below.[standalone@localhost:9999 /]
:delete-snapshot(name="20110630-165714239standalone.xml"){"outcome" => "success"}
The snapshot has been deleted.
Procedure 2.17. Delete All Snapshots
- Run the
:delete-snapshot(name="all")command to delete all snapshots as in the example below.[standalone@localhost:9999 /]
:delete-snapshot(name="all"){"outcome" => "success"}
All snapshots have been deleted.
2.4.9. List All Configuration Snapshots Using Management CLI
Prerequisites
standalone.xml file, but the same process applies to the domain.xml and host.xml files.
Procedure 2.18. List All Configuration Snapshots
List all snapshots
List all of the saved snapshots by running the:list-snapshotscommand.[standalone@localhost:9999 /]
:list-snapshots{ "outcome" => "success", "result" => { "directory" => "/home/hostname/EAP_HOME/standalone/configuration/standalone_xml_history/snapshot", "names" => [ "20110818-133719699standalone.xml", "20110809-141225039standalone.xml", "20110802-152010683standalone.xml", "20110808-161118457standalone.xml", "20110912-151949212standalone.xml", "20110804-162951670standalone.xml" ] } }
The snapshots are listed.
Chapter 3. Management Interfaces
3.1. Manage the Application Server
3.2. Management Application Programming Interfaces (APIs)
JBoss EAP 6 offers three different approaches to configure and manage servers, being a web interface, a command line client and a set of XML configuration files. While the recommended methods for editing the configuration file include the Management Console and Management CLI, edits made to the configuration by all three are always synchronized across the different views and finally persisted to the XML files. Note that edits made to the XML configuration files while a server instance is running will be overwritten by the server model.
The Management Console is an example of a web interface built with the Google Web Toolkit (GWT). The Management Console communicates with the server using the HTTP management interface. The HTTP API endpoint is the entry point for management clients that rely on the HTTP protocol to integrate with the management layer. It uses a JSON encoded protocol and a de-typed, RPC-style API to describe and execute management operations against a Managed Domain or Standalone Server. The HTTP API is used by the web console, but offers integration capabilities for a wide range of other clients too.
Example 3.1. HTTP API Configuration File Example
<management-interfaces>
  [...]
  <http-interface security-realm="ManagementRealm">
     <socket-binding http="management-http"/>
  </http-interface>
</management-interfaces>Table 3.1. URLs to access the Management Console
| URL | Description |
|---|---|
http://localhost:9990/console | The Management Console accessed on the local host, controlling the Managed Domain configuration. |
http://hostname:9990/console | The Management Console accessed remotely, naming the host and controlling the Managed Domain configuration. |
http://hostname:9990/management | The HTTP Management API runs on the same port as the Management Console, displaying the raw attributes and values exposed to the API. |
An example of a Native API tool is the Management CLI. This management tool is available for a Managed Domain or Standalone Server instance, allowing the a user to connect to the domain controller or a Standalone Server instance and execute management operations available through the de-typed management model.
Example 3.2. Native API Configuration File Example
<management-interfaces>
  <native-interface security-realm="ManagementRealm">
    <socket-binding native="management-native"/>
  </native-interface>
  [...]
</management-interfaces>3.3. About the Management Console and Management CLI
3.4. The Management Console
3.4.1. Management Console
3.4.2. Log in to the Management Console
Prerequisites
- You must create an administrative user as described here: Section 4.1.1, “Add the User for the Management Interfaces”.JBoss EAP 6 must be running.
Navigate to the Management Console start page
Launch your web browser and navigate to the Management Console in your web browser at http://localhost:9990/console/App.htmlNote
Port 9990 is predefined as the Management Console socket binding.- Enter the username and password of the account that you created previously to log in to the Management Console login screen.
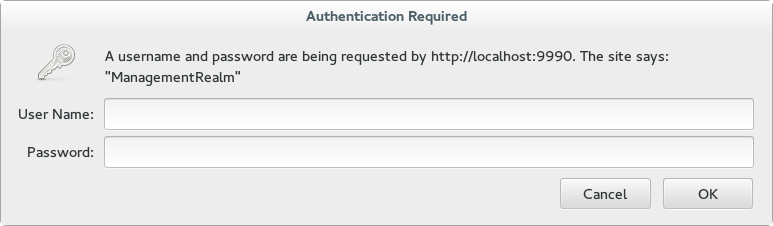
Figure 3.1. Log in screen for the Management Console
Once logged in, you are redirected to the following address and the the Management Console landing page appears: http://localhost:9990/console/App.html#home
3.4.3. Change the Language of the Management Console
Supported Languages
- German (de)
- Simplified Chinese (zh-Hans)
- Brazilian Portuguese (pt-BR)
- French (fr)
- Spanish (es)
- Japanese (ja)
Procedure 3.1. Change the Language of the Web-based Management Console
Log into the Management Console.
Log into the web-based Management Console.Open the Settings dialog.
Near the bottom right of the screen is a Settings label. Click it to open the settings for the Management Console.Select the desired language.
Select the desired language from the Locale selection box. Select Save. A confirmation box informs you that you need to reload the application. Click Confirm. Refresh your web browser to use the new locale.
3.4.4. Analytics in EAP Console
Google Analytics is a free web analytics service which provides comprehensive usage statistics on a website. It provides vital data regarding a site's visitors like their visits, page views, pages per visit and average time spent on site. Google Analytics provides more visibility around a website's presence and its users.
JBoss EAP 6.3 provides users the option to enable/disable Google Analytics in the management console. The Google Analytics feature aims to help Red Hat EAP team understand how the customers are using the console and which parts of the console matter the most to the customers. This information will in-turn help the team adapt the console design, features and content to the immediate needs of the customers.
3.4.5. Enable/Disable Google Analytics in EAP Console
- Log in to the administration console
- Click on the right-hand bottom of your console

Figure 3.2. Log in screen of the Administration Console
- Select checkbox on the
Settingswindow and click button. Reload the application to activate the new settings.
Figure 3.3. Settings Window (Enable Usage Data Collection)
Settings window to remove the selection. Click button.
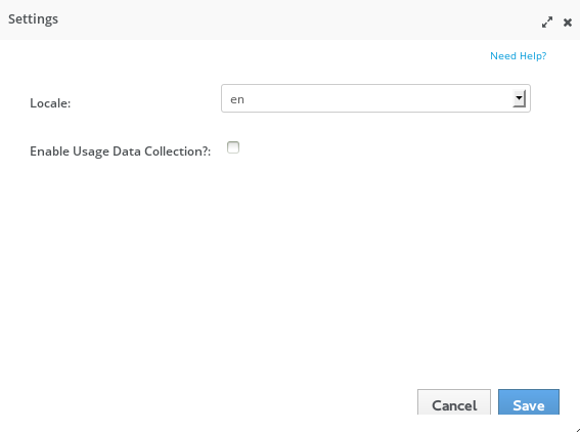
Figure 3.4. Settings Window (Disable Usage Data Collection)
Note
3.4.6. Configure a Server Using the Management Console
Prerequisites
Procedure 3.2. Configure the Server
- Select the Domain tab from the top of the console. Available server instances will be displayed in a table.
- Select the server instance from the Available Server Configurations table.
- Click above the details of the chosen server.
- Make changes to the configuration attributes.
- Click to finish.
The server configuration is changed, and will take effect next time the server restarts.
3.4.7. Add a Deployment in the Management Console
Prerequisites
- Select the Runtime tab at the top of the console.
- For a standalone server, expand the menu and select . For a managed domain, expand the menu and select . The Manage Deployments panel appears.
- Select on the Content Repository tab. A Create Deployment dialog box appears.
- In the dialog box, click . Browse to the file you want to deploy and select it for upload. Click to proceed.
- Verify the deployment name and runtime name that appear in the Create Deployments dialog box. Click to upload the file once the names are verified.
The selected content is uploaded to the server and is now ready for deployment.
3.4.8. Create a New Server in the Management Console
Prerequisites
Procedure 3.3. Create a New Server Configuration
Navigate to the Server Configurations page in the Management Console
Select the Domain tab from the top of the console.Create a new configuration
- Select the button above the Available Server Configuration table.
- Enter the basic server settings in the Create Server Configuration dialog.
- Select the button to save the new server configuration.
The new server is created and listed in the Server Configurations list.
3.4.9. Change the Default Log Levels Using the Management Console
Procedure 3.4. Edit the Logging Levels
Navigate to the Logging panel in the Management Console
- If you are working with a managed domain, select the Configuration tab at the top of the console, then select the relevant profile from the drop-down list on the left of the console.
- For either a managed domain or a standalone server, expand the menu from the list on the left of the console and click the Logging entry.
- Click on the Log Categories tab in the top of the console.
Edit logger details
Edit the details for any of the entries in the Log Categories table.- Select an entry in the Log Categories table, then click in the Details section below.
- Set the log level for the category with the Log Level drop-down box. Click the button when done.
The log levels for the relevant categories are now updated.
3.4.10. Create a New Server Group in the Management Console
Prerequisites
Procedure 3.5. Configure and Add a new Server Group
Navigate to the Server Groups view
Select the Domain tab from the top of the console.- Expand the Server label in the menu in the left hand column. Select Server Groups.
Add a server group
Click the button to add a new server group.Configure the server group
- Enter a name for the server group.
- Select the profile for the server group.
- Select the socket binding for the server group.
- Click the Save button to save your new group.
The new server group is visible in the Management Console.
3.5. The Management CLI
3.5.1. About the Management Command Line Interface (CLI)
3.5.2. Launch the Management CLI
Prerequisites:
Procedure 3.6. Launch CLI in Linux or Microsoft Windows Server
Launch the CLI in Linux
Run theEAP_HOME/bin/jboss-cli.shfile by entering the following at a command line:$ EAP_HOME/bin/jboss-cli.sh
Launch the CLI in Microsoft Windows Server
Run theEAP_HOME\bin\jboss-cli.batfile by double-clicking it, or by entering the following at a command line:C:\>EAP_HOME\bin\jboss-cli.bat
3.5.3. Quit the Management CLI
quit command:
[domain@localhost:9999 /] quit3.5.4. Connect to a Managed Server Instance Using the Management CLI
Prerequisites
Procedure 3.7. Connect to a Managed Server Instance
Run the
connectcommandFrom the Management CLI, enter theconnectcommand:[disconnected /]
connectConnected to domain controller at localhost:9999- Alternatively, to connect to a managed server when starting the Management CLI on a Linux system, use the
--connectparameter:$
EAP_HOME/bin/jboss-cli.sh --connect - The
--connectparameter can be used to specify the host and port of the server. To connect to the address192.168.0.1with the port value9999the following would apply:$
EAP_HOME/bin/jboss-cli.sh --connect --controller=192.168.0.1:9999
3.5.5. Obtain Help with the Management CLI
Sometimes you might need guidance if you need to learn a CLI command or feel unsure about what to do. The Management CLI features a help dialog with general and context-sensitive options. (Note that the help commands dependent on the operation context require an established connection to either a standalone or domain controller. These commands will not appear in the listing unless the connection has been established.)
Prerequisites
For general help
From the Management CLI, enter thehelpcommand:[standalone@localhost:9999 /]
helpObtain context-sensitive help
From the Management CLI, enter thehelp -commandsextended command:[standalone@localhost:9999 /]
help --commands- For a more detailed description of a specific command, enter the command, followed by
--help.[standalone@localhost:9999 /]
deploy --help
The CLI help information is displayed.
3.5.6. Use the Management CLI in Batch Mode
Batch processing allows a number of operation requests to be grouped in a sequence and executed together as a unit. If any of the operation requests in the sequence fail, the entire group of operations is rolled back.
Prerequisites
Procedure 3.8. Batch Mode Commands and Operations
Enter batch mode
Enter batch mode with thebatchcommand.[standalone@localhost:9999 /] batch [standalone@localhost:9999 / #]
Batch mode is indicated by the hash symbol (#) in the prompt.Add operation requests to the batch
Once in batch mode, enter operation requests as normal. The operation requests are added to the batch in the order they are entered.Refer to Section 3.5.8, “Use Operations and Commands in the Management CLI” for details on formatting operation requests.Run the batch
Once the entire sequence of operation requests is entered, run the batch with therun-batchcommand.[standalone@localhost:9999 / #] run-batch The batch executed successfully.
Refer to Section 3.5.7, “CLI Batch Mode Commands” for a full list of commands available for working with batches.Batch commands stored in external files
Frequently run batch commands can be stored in an external text file and can either be loaded by passing the full path to the file as an argument to thebatchcommand or executed directly by being an argument to therun-batchcommand.You can create a batch command file using a text editor. Each command must be on a line by itself and the CLI should be able to access it.The following command will load amyscript.txtfile in the batch mode. All commands in this file will now be accessible to be edited or removed. New commands can be inserted. Changes made in this batch session do not persist to themyscript.txtfile.[standalone@localhost:9999 /] batch --file=myscript.txt
The following will instantly run the batch commands stored in the filemyscript.txt[standalone@localhost:9999 /] run-batch --file=myscript.txt
The entered sequence of operation requests is completed as a batch.
3.5.7. CLI Batch Mode Commands
Table 3.2. CLI Batch Mode Commands
| Command Name | Description |
|---|---|
| list-batch | List of the commands and operations in the current batch. |
| edit-batch-line line-number edited-command | Edit a line in the current batch by providing the line number to edit and the edited command. Example: edit-batch-line 2 data-source disable --name=ExampleDS. |
| move-batch-line fromline toline | Re-order the lines in the batch by specifying the line number you want to move as the first argument and its new position as the second argument. Example: move-batch-line 3 1. |
| remove-batch-line linenumber | Remove the batch command at the specified line. Example: remove-batch-line 3. |
| holdback-batch [batchname] |
You can postpone or store a current batch by using this command. Use this if you want to suddenly execute something in the CLI outside the batch. To return to this heldback batch, simply type
batch again at the CLI command line.
If you provide a batchname while using
holdback-batch command the batch will be stored under that name. To return to the named batch, use the command batch batchname. Calling the batch command without a batchname will start a new (unnamed) batch. There can be only one unnamed heldback batch.
To see a list of all heldback batches, use the
batch -l command.
|
| discard-batch | Dicards the currently active batch. |
3.5.8. Use Operations and Commands in the Management CLI
Prerequisites
Procedure 3.9. Create, Configure and Execute Requests
Construct the operation request
Operation requests allow for low-level interaction with the management model. They provide a controlled way to edit server configurations. An operation request consists of three parts:- an address, prefixed with a slash (
/). - an operation name, prefixed with a colon (
:). - an optional set of parameters, contained within parentheses (
()).
Determine the address
The configuration is presented as a hierarchical tree of addressable resources. Each resource node offers a different set of operations. The address specifies which resource node to perform the operation on. An address uses the following syntax:/node-type=node-name
- node-type is the resource node type. This maps to an element name in the configuration XML.
- node-name is the resource node name. This maps to the
nameattribute of the element in the configuration XML. - Separate each level of the resource tree with a slash (
/).
Refer to the configuration XML files to determine the required address. TheEAP_HOME/standalone/configuration/standalone.xmlfile holds the configuration for a standalone server and theEAP_HOME/domain/configuration/domain.xmlandEAP_HOME/domain/configuration/host.xmlfiles hold the configuration for a managed domain.Example 3.3. Example operation addresses
To perform an operation on the logging subsystem, use the following address in an operation request:/subsystem=logging
To perform an operation on the Java datasource, use the following address in an operation request:/subsystem=datasources/data-source=java
Determine the operation
Operations differ for each different type of resource node. An operation uses the following syntax::operation-name
- operation-name is the name of the operation to request.
Use theread-operation-namesoperation on any resource address in a standalone server to list the available operations.Example 3.4. Available operations
To list all available operations for the logging subsystem, enter the following request for a standalone server:[standalone@localhost:9999 /] /subsystem=logging:read-operation-names { "outcome" => "success", "result" => [ "add", "read-attribute", "read-children-names", "read-children-resources", "read-children-types", "read-operation-description", "read-operation-names", "read-resource", "read-resource-description", "remove", "undefine-attribute", "whoami", "write-attribute" ] }Determine any parameters
Each operation may require different parameters.Parameters use the following syntax:(parameter-name=parameter-value)
- parameter-name is the name of the parameter.
- parameter-value is the value of the parameter.
- Multiple parameters are separated by commas (
,).
To determine any required parameters, perform theread-operation-descriptioncommand on a resource node, passing the operation name as a parameter. Refer to Example 3.5, “Determine operation parameters” for details.Example 3.5. Determine operation parameters
To determine any required parameters for theread-children-typesoperation on the logging subsystem, enter theread-operation-descriptioncommand as follows:[standalone@localhost:9999 /] /subsystem=logging:read-operation-description(name=read-children-types) { "outcome" => "success", "result" => { "operation-name" => "read-children-types", "description" => "Gets the type names of all the children under the selected resource", "reply-properties" => { "type" => LIST, "description" => "The children types", "value-type" => STRING }, "read-only" => true } }
Enter the full operation request
Once the address, operation, and any parameters have been determined, enter the full operation request.Example 3.6. Example operation request
[standalone@localhost:9999 /]
/subsystem=web/connector=http:read-resource(recursive=true)
The management interface performs the operation request on the server configuration.
3.5.9. Management CLI Configuration Options
jboss-cli.xml - is loaded each time the CLI is started. It must be located either in the directory $EAP_HOME/bin or a directory specified in the system property jboss.cli.config.
-
default-controller - Configuration of the controller to which to connect if the
connectcommand is executed without any parameters.default-controller Parameters
-
host - Hostname of the controller. Default:
localhost. -
port - Port number on which to connect to the controller. Default: 9999.
-
-
validate-operation-requests - Indicates whether the parameter list of the operation requests is to be validated before the requests are sent to the controller for execution. Type: Boolean. Default:
true. -
history - This element contains the configuration for the commands and operations history log.
historyParameters-
enabled - Indicates whether or not the
historyis enabled. Type: Boolean. Default:true. - file-name
- Name of the file in which the history is to be stored. Default =
.jboss-cli-history. - file-dir
- Directory in which the history is to be stored. Default =
$USER_HOME - max-size
- Maximum size of the history file. Default: 500.
-
- resolve-parameter-values
- Whether to resolve system properties specified as command argument (or operation parameter) values before sending the operation request to the controller or let the resolution happen on the server side. Type: Boolean. Default =
false. - connection-timeout
- The time allowed to establish a connection with the controller. Type: Integer. Default: 5000 seconds.
- ssl
- This element contains the configuration for the Key and Trust stores used for SSL.
Warning
Red Hat recommends that you explicitly disable SSL in favor of TLSv1.1 or TLSv1.2 in all affected packages.sslParameters- vault
- Type:
vaultType - key-store
- Type: string.
- key-store-password
- Type: string.
- alias
- Type: string
- key-password
- Type: string
- trust-store
- Type: string.
- trust-store-password
- Type: string.
- modify-trust-store
- If set to
true, the CLI will prompt the user when unrecognised certificates are received and allow them to be stored in the truststore. Type: Boolean. Default:true.
vaultTypeIf neithercodenormoduleare specified, the default implementation will be used. Ifcodeis specified but notmodule, it will look for the specified class in the Picketbox module. Ifmoduleandcodeare specified, it will look for the class specified bycodein the module specified by 'module'.- code
- Type: String.
- module
- Type: String
-
silent - Specifies if informational and error messages are to be output to the terminal. Even if the
falseis specified, the messages will still be logged using the logger if its configuration allows and/or if the output target was specified as part of the command line using >. Default:False.
3.5.10. Reference of Management CLI Commands
Prerequisites
The topic Section 3.5.5, “Obtain Help with the Management CLI” describes how to access the Management CLI help features, including a help dialogue with general and context sensitive options. The help commands are dependent on the operation context and require an established connection to either a standalone or domain controller. These commands will not appear in the listing unless the connection has been established.
Table 3.3.
| Command | Description |
|---|---|
batch | Starts the batch mode by creating a new batch or, depending on the existing held back batches, re-activates one. If there are no held back batches this command invoked w/o arguments will start a new batch. If there is an unnamed held back batch, this command will re-activate it. If there are named held back batches, they can be activated by executing this command with the name of the held back batch as the argument. |
cd | Changes the current node path to the argument. The current node path is used as the address for operation requests that do not contain the address part. If an operation request does include the address, the included address is considered relative to the current node path. The current node path may end on a node-type. In that case, to execute an operation specifying a node-name would be sufficient, such as logging:read-resource. |
clear | Clears the screen. |
command | Allows you to add new, remove and list existing generic type commands. A generic type command is a command that is assigned to a specific node type and which allows you to perform any operation available for an instance of that type. It can also modify any of the properties exposed by the type on any existing instance. |
connect | Connects to the controller on the specified host and port. |
connection-factory | Defines a connection factory. |
data-source | Manages JDBC datasource configurations in the datasource subsystem. |
deploy | Deploys the application designated by the file path or enables an application that is pre-existing but disabled in the repository. If executed without arguments, this command will list all the existing deployments. |
help | Displays the help message. Can be used with the --commands argument to provide context sensitive results for the given commands. |
history | Displays the CLI command history in memory and displays a status of whether the history expansion is enabled or disabled. Can be used with arguments to clear, disable and enable the history expansion as required. |
jms-queue | Defines a JMS queue in the messaging subsystem. |
jms-topic | Defines a JMS topic in the messaging subsystem. |
ls | List the contents of the node path. By default the result is printed in columns using the whole width of the terminal. Using the -l switch will print results on one name per line. |
pwd | Prints the full node path of the current working node. |
quit | Terminates the command line interface. |
read-attribute | Prints the value and, depending on the arguments, the description of the attribute of a managed resource. |
read-operation | Displays the description of a specified operation, or lists all available operations if none is specified. |
undeploy | Undeploys an application when run with the name of the intended application. Can be run with arguments to remove the application from the repository also. Prints the list of all existing deployments when executed without an application specified. |
version | Prints the application server version and environment information. |
xa-data-source | Manages JDBC XA datasource configuration in the datasource subsystem. |
3.5.11. Reference of Management CLI Operations
Operations in the Management CLI can be exposed by using the read-operation-names operation described in the topic Section 3.6.5, “Display the Operation Names using the Management CLI”. The operation descriptions can be exposed by using the read-operation-descriptions operation described in the topic Section 3.6.4, “Display an Operation Description using the Management CLI”.
Table 3.4. Management CLI operations
| Operation Name | Description |
|---|---|
add-namespace | Adds a namespace prefix mapping to the namespaces attribute's map. |
add-schema-location | Adds a schema location mapping to the schema-locations attribute's map. |
delete-snapshot | Deletes a snapshot of the server configuration from the snapshots directory. |
full-replace-deployment | Add previously uploaded deployment content to the list of content available for use, replace existing content of the same name in the runtime, and remove the replaced content from the list of content available for use. Refer to link for further information. |
list-snapshots | Lists the snapshots of the server configuration saved in the snapshots directory. |
read-attribute | Displays the value of an attribute for the selected resource. |
read-children-names | Displays the names of all children under the selected resource with the given type. |
read-children-resources | Displays information about all of a resource's children that are of a given type. |
read-children-types | Displays the type names of all the children under the selected resource. |
read-config-as-xml | Reads the current configuration and displays it in XML format. |
read-operation-description | Displays the details of an operation on the given resource. |
read-operation-names | Displays the names of all the operations for the given resource. |
read-resource | Displays a model resource's attribute values along with either basic or complete information about any child resources. |
read-resource-description | Displays the description of a resource's attributes, types of children and operations. |
reload | Reloads the server by shutting all services down and restarting. |
remove-namespace | Removes a namespace prefix mapping from the namespaces attribute map. |
remove-schema-location | Removes a schema location mapping from the schema-locations attribute map. |
replace-deployment | Replace existing content in the runtime with new content. The new content must have been previously uploaded to the deployment content repository. |
resolve-expression | Operation that accepts an expression as input or a string that can be parsed into an expression, and resolves it against the local system properties and environment variables. |
resolve-internet-address | Takes a set of interface resolution criteria and finds an IP address on the local machine that matches the criteria, or fails if no matching IP address can be found. |
server-set-restart-required | Puts the server into a restart-required mode |
shutdown | Shuts down the server via a call to System.exit(0). |
start-servers | Starts all configured servers in a Managed Domain that are not currently running. |
stop-servers | Stops all servers currently running in a Managed Domain. |
take-snapshot | Takes a snapshot of the server configuration and saves it to the snapshots directory. |
upload-deployment-bytes | Indicates that the deployment content in the included byte array should be added to the deployment content repository. Note that this operation does not indicate the content should be deployed into the runtime. |
upload-deployment-stream | Indicates that the deployment content available at the included input stream index should be added to the deployment content repository. Note that this operation does not indicate the content should be deployed into the runtime. |
upload-deployment-url | Indicates that the deployment content available at the included URL should be added to the deployment content repository. Note that this operation does not indicate the content should be deployed into the runtime. |
validate-address | Validates the operation's address. |
write-attribute | Sets the value of an attribute for the selected resource. |
3.6. Management CLI Operations
3.6.1. Display the Attributes of a Resource with the Management CLI
Prerequisites
The read-attribute operation is a global operation used to read the current runtime value of a selected attribute. It can be used to expose only the values that have been set by the user, ignoring any default or undefined values. The request properties include the following parameters.
Request Properties
name- The name of the attribute to get the value for under the selected resource.
include-defaults- A Boolean parameter that can be set to
falseto restrict the operation results to only show attributes set by the user and ignore default values.
Procedure 3.10. Display the Current Runtime Value of a Selected Attribute
Run the
read-attributeoperationFrom the Management CLI, use theread-attributeoperation to display the value of a resource attribute. For more details on operation requests, refer to the topic Section 3.5.8, “Use Operations and Commands in the Management CLI”.[standalone@localhost:9999 /]
:read-attribute(name=name-of-attribute)
read-attribute operation is the ability to expose the current runtime value of a specific attribute. Similar results can be achieved with the read-resource operation, but only with the addition of the include-runtime request property, and only as part of a list of all available resources for that node. The read-attribute operation is intended for fine-grained attribute queries, as the following example shows.
Example 3.7. Run the read-attribute operation to expose the public interface IP
read-attribute to return the exact value in the current runtime.
[standalone@localhost:9999 /] /interface=public:read-attribute(name=resolved-address)
{
    "outcome" => "success",
    "result" => "127.0.0.1"
}
resolved-address attribute is a runtime value, so it is not displayed in the results of the standard read-resource operation.
[standalone@localhost:9999 /] /interface=public:read-resource
{
    "outcome" => "success",
    "result" => {
        "any" => undefined,
        "any-address" => undefined,
        "any-ipv4-address" => undefined,
        "any-ipv6-address" => undefined,
        "inet-address" => expression "${jboss.bind.address:127.0.0.1}",
        "link-local-address" => undefined,
        "loopback" => undefined,
        "loopback-address" => undefined,
        "multicast" => undefined,
        "name" => "public",
        "nic" => undefined,
        "nic-match" => undefined,
        "not" => undefined,
        "point-to-point" => undefined,
        "public-address" => undefined,
        "site-local-address" => undefined,
        "subnet-match" => undefined,
        "up" => undefined,
        "virtual" => undefined
    }
}
resolved-address and other runtime values, you must use the include-runtime request property.
[standalone@localhost:9999 /] /interface=public:read-resource(include-runtime=true)
{
    "outcome" => "success",
    "result" => {
        "any" => undefined,
        "any-address" => undefined,
        "any-ipv4-address" => undefined,
        "any-ipv6-address" => undefined,
        "inet-address" => expression "${jboss.bind.address:127.0.0.1}",
        "link-local-address" => undefined,
        "loopback" => undefined,
        "loopback-address" => undefined,
        "multicast" => undefined,
        "name" => "public",
        "nic" => undefined,
        "nic-match" => undefined,
        "not" => undefined,
        "point-to-point" => undefined,
        "public-address" => undefined,
        "resolved-address" => "127.0.0.1",
        "site-local-address" => undefined,
        "subnet-match" => undefined,
        "up" => undefined,
        "virtual" => undefined
    }
}
The current runtime attribute value is displayed.
3.6.2. Display the Active User in the Management CLI
Prerequisites
The whoami operation is a global operation used to identify the attributes of the current active user. The operation exposes the identity of the username and the realm that they are assigned to. The whoami operation is useful for administrators managing multiple users accounts across multiple realms, or to assist in keeping track of active users across domain instances with multiple terminal session and users accounts.
Procedure 3.11. Display the Active User in the Management CLI Using the whoami Operation
Run the
whoamioperationFrom the Management CLI, use thewhoamioperation to display the active user account.[standalone@localhost:9999 /]
:whoamiThe following example uses thewhoamioperation in a standalone server instance to show that the active user is username, and that the user is assigned to theManagementRealmrealm.Example 3.8. Use the
whoamiin a standalone instance[standalone@localhost:9999 /]:whoami { "outcome" => "success", "result" => {"identity" => { "username" => "username", "realm" => "ManagementRealm" }} }
Your current active user account is displayed.
3.6.3. Display System and Server Information in the Management CLI
Prerequisites
Procedure 3.12. Display System and Server Information in the Management CLI
Run the
versioncommandFrom the Management CLI, enter theversioncommand:[domain@localhost:9999 /]
version
Your application server version and environment information is displayed.
3.6.4. Display an Operation Description using the Management CLI
Prerequisites
Procedure 3.13. Execute the Command in Management CLI
Run the
read-operation-descriptionoperationFrom the Management CLI, useread-operation-descriptionto display information about the operation. The operation requires additional parameters in the format of a key-value pair to indicate which operation to display. For more details on operation requests, refer to the topic Section 3.5.8, “Use Operations and Commands in the Management CLI”.[standalone@localhost:9999 /]
:read-operation-description(name=name-of-operation)
Example 3.9. Display the list-snapshots operation description
list-snapshots operation.
[standalone@localhost:9999 /] :read-operation-description(name=list-snapshots)
{
    "outcome" => "success",
    "result" => {
        "operation-name" => "list-snapshots",
        "description" => "Lists the snapshots",
        "request-properties" => {},
        "reply-properties" => {
            "type" => OBJECT,
            "value-type" => {
                "directory" => {
                    "type" => STRING,
                    "description" => "The directory where the snapshots are stored",
                    "expressions-allowed" => false,
                    "required" => true,
                    "nillable" => false,
                    "min-length" => 1L,
                    "max-length" => 2147483647L
                },
                "names" => {
                    "type" => LIST,
                    "description" => "The names of the snapshots within the snapshots directory",
                    "expressions-allowed" => false,
                    "required" => true,
                    "nillable" => false,
                    "value-type" => STRING
                }
            }
        },
        "access-constraints" => {"sensitive" => {"snapshots" => {"type" => "core"}}},
        "read-only" => false
    }
}The description is displayed for the chosen operation.
3.6.5. Display the Operation Names using the Management CLI
Prerequisites
Procedure 3.14. Execute the Command in Management CLI
Run the
read-operation-namesoperationFrom the Management CLI, use theread-operation-namesoperation to display the names of the available operations. For more details on operation requests, refer to the topic Section 3.5.8, “Use Operations and Commands in the Management CLI”.[standalone@localhost:9999 /]
:read-operation-names
Example 3.10. Display the operation names using the Management CLI
read-operation-names operation.
[standalone@localhost:9999 /]:read-operation-names
{
    "outcome" => "success",
    "result" => [
        "add-namespace",
        "add-schema-location",
        "delete-snapshot",
        "full-replace-deployment",
        "list-snapshots",
        "read-attribute",
        "read-children-names",
        "read-children-resources",
        "read-children-types",
        "read-config-as-xml",
        "read-operation-description",
        "read-operation-names",
        "read-resource",
        "read-resource-description",
        "reload",
        "remove-namespace",
        "remove-schema-location",
        "replace-deployment",
        "resolve-expression",
        "resolve-internet-address",
        "server-set-restart-required",
        "shutdown",
        "take-snapshot",
        "undefine-attribute",
        "upload-deployment-bytes",
        "upload-deployment-stream",
        "upload-deployment-url",
        "validate-address",
        "validate-operation",
        "whoami",
        "write-attribute"
    ]
}The available operation names are displayed.
3.6.6. Display Available Resources using the Management CLI
Prerequisites
The read-resource operation is a global operation used to read resource values. It can be used to expose either basic or complete information about the resources of the current or child nodes, along with a range of request properties to expand or limit the scope of the operation results. The request properties include the following parameters.
Request Properties
recursive- Whether to recursively include complete information about child resources.
recursive-depth- The depth to which information about child resources should be included.
proxies- Whether to include remote resources in a recursive query. For example including the host level resources from slave Host Controllers in a query of the Domain Controller.
include-runtime- Whether to include runtime attributes in the response, such as attribute values that do not come from the persistent configuration. This request property is set to false by default.
include-defaults- A boolean request property that serves to enable or disable the reading of default attributes. When set to false only the attributes set by the user are returned, ignoring any that remain undefined.
Procedure 3.15. Execute the Command in Management CLI
Run the
read-resourceoperationFrom the Management CLI, use theread-resourceoperation to display the available resources.[standalone@localhost:9999 /]
:read-resourceThe following example shows how you might use theread-resourceoperation on a standalone server instance to expose general resource information. The results resemble thestandalone.xmlconfiguration file, displaying the system resources, extensions, interfaces and subsystems installed or configured for the server instance. These can be further queried directly.Example 3.11. Using the
read-resourceoperation at the root level[standalone@localhost:9999 /]:read-resource { "outcome" => "success", "result" => { "deployment" => undefined, "deployment-overlay" => undefined, "management-major-version" => 1, "management-micro-version" => 0, "management-minor-version" => 4, "name" => "longgrass", "namespaces" => [], "product-name" => "EAP", "product-version" => "6.3.0.GA", "release-codename" => "Janus", "release-version" => "7.2.0.Final-redhat-3", "schema-locations" => [], "system-property" => undefined, "core-service" => { "management" => undefined, "service-container" => undefined, "server-environment" => undefined, "platform-mbean" => undefined }, "extension" => { "org.jboss.as.clustering.infinispan" => undefined, "org.jboss.as.connector" => undefined, "org.jboss.as.deployment-scanner" => undefined, "org.jboss.as.ee" => undefined, "org.jboss.as.ejb3" => undefined, "org.jboss.as.jaxrs" => undefined, "org.jboss.as.jdr" => undefined, "org.jboss.as.jmx" => undefined, "org.jboss.as.jpa" => undefined, "org.jboss.as.jsf" => undefined, "org.jboss.as.logging" => undefined, "org.jboss.as.mail" => undefined, "org.jboss.as.naming" => undefined, "org.jboss.as.pojo" => undefined, "org.jboss.as.remoting" => undefined, "org.jboss.as.sar" => undefined, "org.jboss.as.security" => undefined, "org.jboss.as.threads" => undefined, "org.jboss.as.transactions" => undefined, "org.jboss.as.web" => undefined, "org.jboss.as.webservices" => undefined, "org.jboss.as.weld" => undefined }, "interface" => { "management" => undefined, "public" => undefined, "unsecure" => undefined }, "path" => { "jboss.server.temp.dir" => undefined, "user.home" => undefined, "jboss.server.base.dir" => undefined, "java.home" => undefined, "user.dir" => undefined, "jboss.server.data.dir" => undefined, "jboss.home.dir" => undefined, "jboss.server.log.dir" => undefined, "jboss.server.config.dir" => undefined, "jboss.controller.temp.dir" => undefined }, "socket-binding-group" => {"standard-sockets" => undefined}, "subsystem" => { "logging" => undefined, "datasources" => undefined, "deployment-scanner" => undefined, "ee" => undefined, "ejb3" => undefined, "infinispan" => undefined, "jaxrs" => undefined, "jca" => undefined, "jdr" => undefined, "jmx" => undefined, "jpa" => undefined, "jsf" => undefined, "mail" => undefined, "naming" => undefined, "pojo" => undefined, "remoting" => undefined, "resource-adapters" => undefined, "sar" => undefined, "security" => undefined, "threads" => undefined, "transactions" => undefined, "web" => undefined, "webservices" => undefined, "weld" => undefined } } }Run the
read-resourceoperation against a child nodeTheread-resourceoperation can be run to query child nodes from the root. The structure of the operation first defines the node to expose, and then appends the operation to run against it.[standalone@localhost:9999 /]
/subsystem=web/connector=http:read-resourceIn the following example, specific resource information about a web subsystem component can be exposed by directing theread-resourceoperation towards the specific web subsystem node.Example 3.12. Expose child node resources from the root node
[standalone@localhost:9999 /] /subsystem=web/connector=http:read-resource
{
    "outcome" => "success",
    "result" => {
        "configuration" => undefined,
        "enable-lookups" => false,
        "enabled" => true,
        "executor" => undefined,
        "max-connections" => undefined,
        "max-post-size" => 2097152,
        "max-save-post-size" => 4096,
        "name" => "http",
        "protocol" => "HTTP/1.1",
        "proxy-name" => undefined,
        "proxy-port" => undefined,
        "redirect-port" => 443,
        "scheme" => "http",
        "secure" => false,
        "socket-binding" => "http",
        "ssl" => undefined,
        "virtual-server" => undefined
    }
}
The same results are possible by using thecdcommand to navigate into the child nodes and run theread-resourceoperation directly.Example 3.13. Expose child node resources by changing directories
[standalone@localhost:9999 /] cd subsystem=web
[standalone@localhost:9999 subsystem=web] cd connector=http
[standalone@localhost:9999 connector=http] :read-resource
{
    "outcome" => "success",
    "result" => {
        "configuration" => undefined,
        "enable-lookups" => false,
        "enabled" => true,
        "executor" => undefined,
        "max-connections" => undefined,
        "max-post-size" => 2097152,
        "max-save-post-size" => 4096,
        "name" => "http",
        "protocol" => "HTTP/1.1",
        "proxy-name" => undefined,
        "proxy-port" => undefined,
        "redirect-port" => 443,
        "scheme" => "http",
        "secure" => false,
        "socket-binding" => "http",
        "ssl" => undefined,
        "virtual-server" => undefined
    }
}
Use the recursive parameter to include active values in results
The recursive parameter can be used to expose the values of all attributes, including non-persistent values, those passed at startup, or other attributes otherwise active in the runtime model.[standalone@localhost:9999 /]
/interface=public:read-resource(include-runtime=true)Compared to the previous example, the inclusion of theinclude-runtimerequest property exposes additional active attributes, such as the bytes sent and bytes received by the HTTP connector.Example 3.14. Expose additional and active values with the
include-runtimeparameter[standalone@localhost:9999 /] /subsystem=web/connector=http:read-resource(include-runtime=true) { "outcome" => "success", "result" => { "any" => undefined, "any-address" => undefined, "any-ipv4-address" => undefined, "any-ipv6-address" => undefined, "inet-address" => expression "${jboss.bind.address:127.0.0.1}", "link-local-address" => undefined, "loopback" => undefined, "loopback-address" => undefined, "multicast" => undefined, "name" => "public", "nic" => undefined, "nic-match" => undefined, "not" => undefined, "point-to-point" => undefined, "public-address" => undefined, "resolved-address" => "127.0.0.1", "site-local-address" => undefined, "subnet-match" => undefined, "up" => undefined, "virtual" => undefined } }
3.6.7. Display Available Resource Descriptions using the Management CLI
Prerequisites
Procedure 3.16. Execute the Command in Management CLI
Run the
read-resource-descriptionoperationFrom the Management CLI, use theread-resource-descriptionoperation to read and display the available resources. For more details on operation requests, refer to the topic Section 3.5.8, “Use Operations and Commands in the Management CLI”.[standalone@localhost:9999 /]
:read-resource-descriptionUse optional parameters
Theread-resource-descriptionoperation allows the use of the additional parameters.- Use the
operationsparameter to include descriptions of the resource's operations.[standalone@localhost:9999 /]
:read-resource-description(operations=true) - Use the
inheritedparameter to include or exclude descriptions of the resource's inherited operations. The default state is true.[standalone@localhost:9999 /]
:read-resource-description(inherited=false) - Use the
recursiveparameter to include recursive descriptions of the child resources.[standalone@localhost:9999 /]
:read-resource-description(recursive=true) - Use the
localeparameter to get the resource description in. If null, the default locale will be used.[standalone@localhost:9999 /]
:read-resource-description(locale=true)
Descriptions of the available resources are displayed.
3.6.8. Reload the Application Server using the Management CLI
Prerequisites
reload operation to shut down all services and restart the runtime. After the reload is complete the management CLI will automatically reconnect.
Example 3.15. Reload the Application Server
[standalone@localhost:9999 /]:reload
{"outcome" => "success"}
3.6.9. Shut the Application Server down using the Management CLI
Prerequisites
Procedure 3.17. Shut down the Application Server
Run the
shutdownoperation- From the Management CLI, use the
shutdownoperation to shut the server down via theSystem.exit(0)system call. For more details on operation requests, refer to the topic Section 3.5.8, “Use Operations and Commands in the Management CLI”.- In the standalone mode, use the following command:
[standalone@localhost:9999 /]
:shutdown - In the domain mode, use the following command with the appropriate host name:
[domain@localhost:9999 /]
/host=master:shutdown
- To connect to a detached CLI instance and shut down the server, execute the following command:
jboss-cli.sh --connect command=:shutdown
- To connect to a remote CLI instance and shut down the server, execute the following command:
[disconnected /] connect IP_ADDRESS
Connected to IP_ADDRESS:PORT_NUMBER
[192.168.1.10:9999 /] :shutdown
Replace IP_ADDRESS with the IP address of your instance.
The application server is shut down. The Management CLI will be disconnected as the runtime is unavailable.
3.6.10. Configure an Attribute with the Management CLI
Prerequisites
The write-attribute operation is a global operation used to write or modify a selected resource attribute. You can use the operation to make persistent changes and to modify the configuration settings of your managed server instances. The request properties include the following parameters.
Request Properties
name- The name of the attribute to set the value for under the selected resource.
value- The desired value of the attribute under the selected resource. May be null if the underlying model supports null values.
Procedure 3.18. Configure a Resource Attribute with the Management CLI
Run the
write-attributeoperationFrom the Management CLI, use thewrite-attributeoperation to modify the value of a resource attribute. The operation can be run at the child node of the resource or at the root node of the Management CLI where the full resource path is specified.
Example 3.16. Disable the deployment scanner with the write-attribute operation
write-attribute operation to disable the deployment scanner. The operation is run from the root node, using tab completion to aid in populating the correct resource path.
[standalone@localhost:9999 /] /subsystem=deployment-scanner/scanner=default:write-attribute(name=scan-enabled,value=false)
{"outcome" => "success"}
read-attribute operation.
[standalone@localhost:9999 /] /subsystem=deployment-scanner/scanner=default:read-attribute(name=scan-enabled)
{
    "outcome" => "success",
    "result" => false
}
read-resource operation. In the following example, this particular configuration shows the scan-enabled attribute is now set to false.
[standalone@localhost:9999 /] /subsystem=deployment-scanner/scanner=default:read-resource
{
    "outcome" => "success",
    "result" => {
        "auto-deploy-exploded" => false,
        "auto-deploy-xml" => true,
        "auto-deploy-zipped" => true,
        "deployment-timeout" => 600,
        "path" => "deployments",
        "relative-to" => "jboss.server.base.dir",
        "scan-enabled" => false,
        "scan-interval" => 5000
    }
}
The resource attribute is updated.
3.6.11. Configure System Properties Using the Management CLI
Procedure 3.19. Configure System Properties Using the Management CLI
- Start the JBoss EAP server.
- Launch the Management CLI using the command for your operating system.For Linux:
For Windows:EAP_HOME/bin/jboss-cli.sh --connectEAP_HOME\bin\jboss-cli.bat --connect - Add a system property.The command you use depends on whether you are running a standalone server or a managed domain. If you are running a managed domain, you can add system properties to any or all of the servers running in that domain.
- Add a system property on a standalone server using the following syntax:
/system-property=PROPERTY_NAME:add(value=PROPERTY_VALUE)
Example 3.17. Add a system property to a standalone server
[standalone@localhost:9999 /] /system-property=property.mybean.queue:add(value=java:/queue/MyBeanQueue) {"outcome" => "success"} - Add a system property to all hosts and servers in a managed domain using the following syntax:
/system-property=PROPERTY_NAME:add(value=PROPERTY_VALUE)
Example 3.18. Add a system property to all servers in a managed domain
[domain@localhost:9999 /] /system-property=property.mybean.queue:add(value=java:/queue/MyBeanQueue) { "outcome" => "success", "result" => undefined, "server-groups" => {"main-server-group" => {"host" => {"master" => { "server-one" => {"response" => {"outcome" => "success"}}, "server-two" => {"response" => {"outcome" => "success"}} }}}} } - Add a system property to a host and its server instances in a managed domain using the following syntax:
/host=master/system-property=PROPERTY_NAME:add(value=PROPERTY_VALUE)
Example 3.19. Add a system property to a host and its servers in a domain
[domain@localhost:9999 /] /host=master/system-property=property.mybean.queue:add(value=java:/queue/MyBeanQueue) { "outcome" => "success", "result" => undefined, "server-groups" => {"main-server-group" => {"host" => {"master" => { "server-one" => {"response" => {"outcome" => "success"}}, "server-two" => {"response" => {"outcome" => "success"}} }}}} } - Add a system property to a server instance in a managed domain using the following syntax:
/host=master/server-config=server-one/system-property=PROPERTY_NAME:add(value=PROPERTY_VALUE)
Example 3.20. Add a system property to a server instance in a managed domain
[domain@localhost:9999 /] /host=master/server-config=server-one/system-property=property.mybean.queue:add(value=java:/queue/MyBeanQueue)
{
    "outcome" => "success",
    "result" => undefined,
    "server-groups" => {"main-server-group" => {"host" => {"master" => {"server-one" => {"response" => {"outcome" => "success"}}}}}}
}
- Read a system property.The command you use depends on whether you are running a standalone server or a managed domain.
- Read a system property from a standalone server using the following syntax:
/system-property=PROPERTY_NAME:read-resource
Example 3.21. Read a system property from a standalone server
[standalone@localhost:9999 /] /system-property=property.mybean.queue:read-resource { "outcome" => "success", "result" => {"value" => "java:/queue/MyBeanQueue"} } - Read a system property from all hosts and servers in a managed domain using the following syntax:
/system-property=PROPERTY_NAME:read-resource
Example 3.22. Read a system property from all servers in a managed domain
[domain@localhost:9999 /] /system-property=property.mybean.queue:read-resource { "outcome" => "success", "result" => { "boot-time" => true, "value" => "java:/queue/MyBeanQueue" } } - Read a system property from a host and its server instances in a managed domain using the following syntax:
/host=master/system-property=PROPERTY_NAME:read-resource
Example 3.23. Read a system property from a host and its servers in a domain
[domain@localhost:9999 /] /host=master/system-property=property.mybean.queue:read-resource { "outcome" => "success", "result" => { "boot-time" => true, "value" => "java:/queue/MyBeanQueue" } } - Read a system property from a server instance in a managed domain using the following syntax:
/host=master/server-config=server-one/system-property=PROPERTY_NAME:read-resource
Example 3.24. Read a system property from a server instance in a managed domain
[domain@localhost:9999 /] /host=master/server-config=server-one/system-property=property.mybean.queue:read-resource
{
    "outcome" => "success",
    "result" => {
        "boot-time" => true,
        "value" => "java:/queue/MyBeanQueue"
    }
}
- Remove a system property.The command you use depends on whether you are running a standalone server or a managed domain.
- Remove a system property from a standalone server using the following syntax:
/system-property=PROPERTY_NAME:remove
Example 3.25. Remove a system property from a standalone server
[standalone@localhost:9999 /] /system-property=property.mybean.queue:remove {"outcome" => "success"} - Remove a system property from all hosts and servers in a managed domain using the following syntax:
/system-property=PROPERTY_NAME:remove
Example 3.26. Remove a system property from all hosts and servers in a domain
[domain@localhost:9999 /] /system-property=property.mybean.queue:remove { "outcome" => "success", "result" => undefined, "server-groups" => {"main-server-group" => {"host" => {"master" => { "server-one" => {"response" => {"outcome" => "success"}}, "server-two" => {"response" => {"outcome" => "success"}} }}}} } - Remove a system property from a host and its server instances in a managed domain using the following syntax:
/host=master/system-property=PROPERTY_NAME:remove
Example 3.27. Remove a system property from a host and its instances in a domain
[domain@localhost:9999 /] /host=master/system-property=property.mybean.queue:remove { "outcome" => "success", "result" => undefined, "server-groups" => {"main-server-group" => {"host" => {"master" => { "server-one" => {"response" => {"outcome" => "success"}}, "server-two" => {"response" => {"outcome" => "success"}} }}}} } - Remove a system property from a server instance in a managed domain using the following syntax:
/host=master/server-config=server-one/system-property=PROPERTY_NAME:remove
Example 3.28. Remove a system property from a server in a managed domain
[domain@localhost:9999 /] /host=master/server-config=server-one/system-property=property.mybean.queue:remove
{
    "outcome" => "success",
    "result" => undefined,
    "server-groups" => {"main-server-group" => {"host" => {"master" => {"server-one" => {"response" => {"outcome" => "success"}}}}}}
}
3.7. The Management CLI Command History
3.7.1. Use the Management CLI Command History
.jboss-cli-history. This history file is configured by default to record up to a maximum of 500 CLI commands.
history command by itself will return the history of the current session, or with additional arguments will disable, enable or clear the history from the session memory. The Management CLI also features the ability to use your keyboard's arrow keys to go back and forth in the history of commands and operations.
Functions of the Management CLI history
3.7.2. Show the Management CLI Command history
Prerequisites
Procedure 3.20. Show the Management CLI Command History
Run the
historycommandFrom the Management CLI, enter thehistorycommand:[standalone@localhost:9999 /]
history
The CLI command history stored in memory since the CLI startup or the history clear command is displayed.
3.7.3. Clear the Management CLI Command history
Prerequisites
Procedure 3.21. Clear the Management CLI Command history
Run the
history --clearcommandFrom the Management CLI, enter thehistory --clearcommand:[standalone@localhost:9999 /]
history --clear
The history of commands recorded since the CLI startup is cleared from the session memory. The command history is still present in the .jboss-cli-history file saved to the user's home directory.
3.7.4. Disable the Management CLI Command history
Prerequisites
Procedure 3.22. Disable the Management CLI Command history
Run the
history --disablecommandFrom the Management CLI, enter thehistory --disablecommand:[standalone@localhost:9999 /]
history --disable
Commands made in the CLI will not be recorded either in memory or in the .jboss-cli-history file saved to the user's home directory.
3.7.5. Enable the Management CLI Command history
Prerequisites
Procedure 3.23. Enable the Management CLI Command history
Run the
history --enablecommandFrom the Management CLI, enter thehistory --enablecommand:[standalone@localhost:9999 /]
history --enable
Commands made in the CLI are recorded in memory and in the .jboss-cli-history file saved to the user's home directory.
3.8. Management Interface Audit Logging
3.8.1. About Management Interface Audit Logging
Note
3.8.2. Enable Management Interface Audit Logging from the Management CLI
file to the file EAP_HOME/standalone/data/audit-log.log.
/core-service=management/access=audit/logger=audit-log:write-attribute(name=enabled,value=true)
/core-service=management/access=audit:read-resource(recursive=true)
logger configuration attributes are available.
- log-boot
- If set to
true, management operations when booting the server are included in the audit log,falseotherwise. Default:true. - log-read-only
- If set to
true, all operations will be audit logged. If set tofalseonly operations that change the model will be logged. Default:false.
3.8.3. About a Management Interface Audit Logging Formatter
Table 3.5. JSON Formatter Attributes
| Attribute | Description |
|---|---|
| include-date | Boolean value which defines whether or not the timestamp is included in the formatted log records. |
| date-separator | A string containing characters to separate the date and the rest of the formatted log message. This is ignored if include-date=false. |
| date-format | The date format to use for the timestamp as understood by java.text.SimpleDateFormat. Ignored if include-date=false. |
| compact | If true it will format the JSON on one line. There may still be values containing new lines, so if having the whole record on one line is important, set escape-new-line or escape-control-characters to true. |
| escape-control-characters | If true it will escape all control characters (ASCII entries with a decimal value < 32) with the ASCII code in octal; for example, a new line becomes '#012'. If this is true, it will override escape-new-line=false. |
| escape-new-line | If true it will escape all new lines with the ASCII code in octal; for example #012. |
Table 3.6. JSON Formatter Fields
| Field Name | Description |
|---|---|
| type | This can have the values core, meaning it is a management operation, or jmx meaning it comes from the JMX subsystem (see the JMX subsystem for configuration of the JMX subsystem's audit logging). |
| r/o | Has the value true if the operation does not change the management model, false otherwise. |
| booting | Has the value true if the operation was executed during the bootup process, false if it was executed once the server is up and running. |
| version | The version number of the JBoss EAP instance. |
| user | The username of the authenticated user. If the operation occurs via the Management CLI on the same machine as the running server, the special user $local is used. |
| domainUUID | An ID to link together all operations as they are propagated from the domain controller to its servers, slave host controllers, and slave host controller servers. |
| access | This can have one of the following values:
|
| remote-address | The address of the client executing this operation. |
| success | Has the value true if the operation succeeded, false if it was rolled back |
| ops | The operations being executed. This is a list of the operations serialized to JSON. At boot this is the operations resulting from parsing the XML. Once booted the list typically contains a single entry. |
3.8.4. About a Management Interface Audit Logging File Handler
Table 3.7. File Handler Audit Log Attributes
| Attribute | Description | Read Only |
|---|---|---|
| formatter | The name of a JSON formatter to use to format the log records. | False |
| path | The path of the audit log file. | False |
| relative-to | The name of another previously named path, or of one of the standard paths provided by the system. If relative-to is provided, the value of the path attribute is treated as relative to the path specified by this attribute. | False |
| failure-count | The number of logging failures since the handler was initialized. | True |
| max-failure-count | The maximum number of logging failures before disabling this handler. | False |
| disabled-due-to-failure | Takes the value true if this handler was disabled due to logging failures. | True |
3.8.5. About a Management Interface Audit Logging Syslog Handler
Table 3.8. Syslog Handler Attributes
| Attribute | Description | Default Value |
|---|---|---|
app-name | The application name to add to the syslog records as defined in section 6.2.5 of RFC-5424. If not specified it will default to the name of the product. | undefined |
disabled-due-to-failure | Takes the value true if this handler was disabled due to logging failures. | false |
facility | The facility to use for syslog logging as defined in section 6.2.1 of RFC-5424, and section 4.1.1 of RFC-3164. | USER_LEVEL |
failure-count | The number of logging failures since the handler was initialized. | 0 (zero) |
formatter | The name of the formatter to use to format the log records. | null |
host | The hostname of the syslog server. | localhost |
max-failure-count | The maximum number of logging failures before disabling this handler. | 10 |
max-length | The maximum length of a log message (in bytes), including the header. If undefined, it will default to 1024 bytes if the syslog-format is RFC3164, or 2048 bytes if the syslog-format is RFC5424. | undefined |
port | The port on which the syslog server is listening. | 514 |
protocol | The protocol to use for the syslog handler. Must be one and only one of udp, tcp or tls. | null |
syslog-format | Syslog format: RFC-5424 or RFC-3164. | RFC5424 |
truncate | Whether or not a message, including the header, is to be truncated if the length in bytes is greater than the maximum length. If set to false messages will be split and sent with the same header values. | false |
3.8.6. Enable Management Interface Audit Logging to a Syslog Server
Note
/host=HOST_NAME to the /core-service commands if the change is to be applied to a managed domain.
Procedure 3.24. Enable Logging to a Syslog Server
Create a syslog handler named
msyslog[standalone@localhost:9999 /]batch [standalone@localhost:9999 /]/core-service=management/access=audit/syslog-handler=mysyslog:add(formatter=json-formatter) [standalone@localhost:9999 /]/core-service=management/access=audit/syslog-handler=mysyslog/protocol=udp:add(host=localhost,port=514) [standalone@localhost:9999 /]run-batch
Add a reference to the syslog handler.
[standalone@localhost:9999 /]/core-service=management/access=audit/logger=audit-log/handler=mysyslog:add
Management interface audit log entries are logged on the syslog server.
Chapter 4. User Management
4.1. User Creation
4.1.1. Add the User for the Management Interfaces
JBoss EAP 6's management instances are secured by default as there are no user accounts available initially, (unless you have installed the platform using the graphical installer.) This is a precautionary measure designed to prevent security breaches that can arise from simple configuration errors.
Procedure 4.1. Create the Initial Administrative User for the Remote Management Interfaces
Run the
add-user.shoradd-user.batscript.Change to theEAP_HOME/bin/directory. Invoke the appropriate script for your operating system.- Red Hat Enterprise Linux
[user@host bin]$./add-user.sh- Microsoft Windows Server
C:\bin>add-user.bat
Choose to add a Management user.
Press ENTER to select the default optionato add a Management user.This user is added to theManagementRealmand is authorized to perform management operations using the web-based Management Console or command-line based Management CLI. The other choice,b, adds a user to theApplicationRealm, and provides no particular permissions. That realm is provided for use with applications.Enter the desired username and password.
When prompted, enter the username and password. You will be prompted to confirm the password.Enter group information.
Add the group or groups to which the user belongs. If the user belongs to multiple groups, enter a comma-separated list. Leave it blank if you do not want the user to belong to any groups.Review the information and confirm.
You are prompted to confirm the information. If you are satisfied, typeyes.Choose whether the user represents a remote JBoss EAP 6 server instance.
Besides administrators, the other type of user which occasionally needs to be added to JBoss EAP 6 in theManagementRealmis a user representing another instance of JBoss EAP 6, which must be able to authenticate to join a cluster as a member. The next prompt allows you to designate your added user for this purpose. If you selectyes, you will be given a hashedsecretvalue, representing the user's password, which would need to be added to a different configuration file. For the purposes of this task, answernoto this question.Enter additional users.
You can enter additional users if desired, by repeating the procedure. You can also add them at any time on a running system. Instead of choosing the default security realm, you can add users to other realms to fine-tune their authorizations.Create users non-interactively.
You can create users non-interactively, by passing in each parameter at the command line. This approach is not recommended on shared systems, because the passwords will be visible in log and history files. The syntax for the command, using the management realm, is:[user@host bin]$./add-user.sh username passwordTo use the application realm, use the-aparameter.[user@host bin]$./add-user.sh -a username password- You can suppress the normal output of the add-user script by passing the
--silentparameter. This applies only if the minimum parametersusernameandpasswordhave been specified. Error messages will still be shown.
Any users you add are activated within the security realms you have specified. Users active within the ManagementRealm realm are able to manage JBoss EAP 6 from remote systems.
4.1.2. Pass Arguments to the User Management add-user Script
add-user.sh or add-user.bat command interactively or you can pass the arguments on the command line. This section describes the options available when passing command line arguments to the add-user script.
add-user.sh or add-user.bat command. see Section 4.1.3, “Add-user Command Arguments” .
add-user.sh or add-user.bat command, see Section 4.1.5, “Add-user Script Command Line Examples” .
4.1.3. Add-user Command Arguments
add-user.sh or add-user.bat command.
Table 4.1. Add-user Command Arguments
| Command Line Argument | Argument Value | Description |
|---|---|---|
|
-a
|
N/A
|
This argument specifies to create a user in the application realm. If omitted, the default is to create a user in the management realm.
|
|
-dc
|
DOMAIN_CONFIGURATION_DIRECTORY
|
This argument specifies the domain configuration directory that will contain the properties files. If it is omitted, the default directory is
EAP_HOME/domain/configuration/.
|
|
-sc
|
SERVER_CONFIGURATION_DIRECTORY
|
This argument specifies an alternate standalone server configuration directory that will contain the properties files. If it is omitted, the default directory is
EAP_HOME/standalone/configuration/.
|
|
-up
--user-properties
|
USER_PROPERTIES_FILE
|
This argument specifies the name of the alternate user properties file. It can be an absolute path or it can be a file name used in conjunction with the
-sc or -dc argument that specifies the alternate configuration directory.
|
|
-g
--group
|
GROUP_LIST
|
A comma-separated list of groups to assign to this user.
|
|
-gp
--group-properties
|
GROUP_PROPERTIES_FILE
|
This argument specifies the name of the alternate group properties file. It can be an absolute path or it can be a file name used in conjunction with the
-sc or -dc argument that specifies the alternate configuration directory.
|
|
-p
--password
|
PASSWORD
|
The password of the user. The password must satisfy the following requirements:
|
|
-u
--user
|
USER_NAME
|
The name of the user. Only alphanumeric characters and the following symbols are valid: ,./=@\.
|
|
-r
--realm
|
REALM_NAME
|
The name of the realm used to secure the management interfaces. If omitted, the default is
ManagementRealm.
|
|
-s
--silent
|
N/A
|
Run the add-user script with no output to the console.
|
|
-h
--help
|
N/A
|
Display usage information for the add-user script.
|
4.1.4. Specify Alternate Properties Files for User Management Information
By default, user and role information created using the add-user.sh or add-user.bat script are stored in properties files located in the server configuration directory. The server configuration information is stored in the EAP_HOME/standalone/configuration/ directory and the domain configuration information is stored in the EAP_HOME/domain/configuration/ directory. This topic describes how to override the default file names and locations.
Procedure 4.2. Specify Alternate Properties Files
- To specify an alternate directory for the server configuration, use the
-scargument. This argument specifies an alternate directory that will contain the server configuration properties files. - To specify an alternate directory for the domain configuration, use the
-dcargument. This argument specifies an alternate directory that will contain the domain configuration properties files. - To specify an alternate user configuration properties file, use the
-upor--user-propertiesargument. It can be an absolute path or it can be a file name used in conjunction with the-scor-dcargument that specifies the alternate configuration directory. - To specify an alternate group configuration properties file, use the
-gpor--group-propertiesargument. It can be an absolute path or it can be a file name used in conjunction with the-scor-dcargument that specifies the alternate configuration directory.
Note
add-user command is intended to operate on existing properties files. Any alternate properties files specified in command line arguments must exist or you will see the following error:
JBAS015234: No appusers.properties files found
4.1.5. Add-user Script Command Line Examples
add-user.sh or add-user.bat command. Unless noted, these commands assume the configuration of a standalone server.
Example 4.1. Create a user belonging to a single group using the default properties files.
EAP_HOME/bin/add-user.sh -a -u 'appuser1' -p 'password1!' -g 'guest'- The user
appuser1is added to the following default properties files that store user information.EAP_HOME/standalone/configuration/application-users.propertiesEAP_HOME/domain/configuration/application-users.properties
- The user
appuser1with groupguestis added to the default properties files that store group information.EAP_HOME/standalone/configuration/application-roles.propertiesEAP_HOME/domain/configuration/application-roles.properties
Example 4.2. Create a user belonging to multiple groups using the default properties files.
EAP_HOME/bin/add-user.sh -a -u 'appuser1' -p 'password1!' -g 'guest,app1group,app2group'- The user
appuser1is added to the following default properties files that store user information.EAP_HOME/standalone/configuration/application-users.propertiesEAP_HOME/domain/configuration/application-users.properties
- The user
appuser1with groupsguest,app1group, andapp2groupis added to the default properties files that store group information.EAP_HOME/standalone/configuration/application-roles.propertiesEAP_HOME/domain/configuration/application-roles.properties
Example 4.3. Create a user with admin privileges in the default realm using the default properties files.
EAP_HOME/bin/add-user.sh -u 'adminuser1' -p 'password1!' -g 'admin'- The user
adminuser1is added to the following default properties files that store user information.EAP_HOME/standalone/configuration/mgmt-users.propertiesEAP_HOME/domain/configuration/mgmt-users.properties
- The user
adminuser1with groupadminis added to the default properties files that store group information.EAP_HOME/standalone/configuration/mgmt-groups.propertiesEAP_HOME/domain/configuration/mgmt-groups.properties
Example 4.4. Create a user belonging to single group using alternate properties files to store the information.
EAP_HOME/bin/add-user.sh -a -u appuser1 -p password1! -g app1group -sc /home/someusername/userconfigs/ -up appusers.properties -gp appgroups.properties - The user
appuser1is added to the following properties file and that file is now the default file to store user information./home/someusername/userconfigs/appusers.properties
- The user
appuser1with groupapp1groupis added to the following properties file and that file is now the default file to store group information./home/someusername/userconfigs/appgroups.properties
Chapter 5. Network and Port Configuration
5.1. Interfaces
5.1.1. About Interfaces
domain.xml, host.xml and standalone.xml configuration files all include interface declarations. The declaration criteria can reference a wildcard address or specify a set of one of more characteristics that an interface or address must have in order to be a valid match. The following examples show multiple possible configurations of interface declarations, typically defined in either the standalone.xml or host.xml configuration files. This allows any remote host groups to maintain their own specific interface attributes, while still allowing reference to the any interface groups in the domain.xml configuration file of the domain controller.
inet-address value specified for both the management and public relative name groups.
Example 5.1. An interface group created with an inet-address value
<interfaces>
  <interface name="management">
   <inet-address value="127.0.0.1"/>
  </interface>
  <interface name="public">
   <inet-address value="127.0.0.1"/>
  </interface>
</interfaces>
any-address element to declare a wildcard address.
Example 5.2. A global group created with a wildcard declaration
<interface name="global">
   <!-- Use the wild-card address -->
   <any-address/>
</interface>
external.
Example 5.3. An external group created with an NIC value
<interface name="external">
   <nic name="eth0"/>
</interface>
Example 5.4. A default group created with specific conditional values
<interface name="default">
   <!-- Match any interface/address on the right subnet if it's
        up, supports multicast, and isn't point-to-point -->
   <subnet-match value="192.168.0.0/16"/>
   <up/>
   <multicast/>
   <not>
      <point-to-point/>
   </not>
</interface>
5.1.2. Configure Interfaces
standalone.xml and host.xml configuration files offer three named interfaces with relative interface tokens for each. Use the management console or management CLI to configure additional attributes and values, as listed in the table below. The relative interface bindings can be replaced with specific values as required but note that if you do so, you will be unable to pass an interface value at server runtime, as the -b switch can only override a relative value.
Example 5.5. Default Interface Configurations
<interfaces>
  <interface name="management">
    <inet-address value="${jboss.bind.address.management:127.0.0.1}"/>
  </interface>
  <interface name="public">
    <inet-address value="${jboss.bind.address:127.0.0.1}"/>
  </interface>
  <interface name="unsecure">
    <inet-address value="${jboss.bind.address.unsecure:127.0.0.1}"/>
  </interface>
</interfaces>
Table 5.1. Interface Attributes and Values
| Interface Element | Description |
|---|---|
any | Empty element of the address exclusion type, used to constrain the selection criteria. |
any-address | Empty element indicating that sockets using this interface should be bound to a wildcard address. The IPv6 wildcard address (::) will be used unless the java.net.preferIpV4Stack system property is set to true, in which case the IPv4 wildcard address (0.0.0.0) will be used. If a socket is bound to an IPv6 anylocal address on a dual-stack machine, it can accept both IPv6 and IPv4 traffic; if it is bound to an IPv4 (IPv4-mapped) anylocal address, it can only accept IPv4 traffic. |
any-ipv4-address | Empty element indicating that sockets using this interface should be bound to the IPv4 wildcard address (0.0.0.0). |
any-ipv6-address | Empty element indicating that sockets using this interface should be bound to the IPv6 wildcard address (::). |
inet-address | Either a IP address in IPv6 or IPv4 dotted decimal notation, or a hostname that can be resolved to an IP address. |
link-local-address | Empty element indicating that part of the selection criteria for an interface should be whether or not an address associated with it is link-local. |
loopback | Empty element indicating that part of the selection criteria for an interface should be whether or not it is a loopback interface. |
loopback-address | A loopback address that may not actually be configured on the machine's loopback interface. Differs from inet-addressType in that the given value will be used even if no NIC can be found that has the IP address associated with it. |
multicast | Empty element indicating that part of the selection criteria for an interface should be whether or not it supports multicast. |
nic | The name of a network interface (e.g. eth0, eth1, lo). |
nic-match | A regular expression against which the names of the network interfaces available on the machine can be matched to find an acceptable interface. |
not | Empty element of the address exclusion type, used to constrain the selection criteria. |
point-to-point | Empty element indicating that part of the selection criteria for an interface should be whether or not it is a point-to-point interface. |
public-address | Empty element indicating that part of the selection criteria for an interface should be whether or not it has a publicly routable address. |
site-local-address | Empty element indicating that part of the selection criteria for an interface should be whether or not an address associated with it is site-local. |
subnet-match | A network IP address and the number of bits in the address' network prefix, written in "slash notation"; e.g. "192.168.0.0/16". |
up | Empty element indicating that part of the selection criteria for an interface should be whether or not it is currently up. |
virtual | Empty element indicating that part of the selection criteria for an interface should be whether or not it is a virtual interface. |
Configure Interface Attributes
You can use tab completion to complete the command string as you type, as well as to expose the available attributes.Configure Interface Attributes with the Management CLI
Use the Management CLI to add new interfaces and write new values to the interface attributes.Add a New Interface
Theaddoperation creates new interfaces as required. Theaddcommand runs from the root of the Management CLI session, and in the following example it creates a new interface name title interfacename, with aninet-addressdeclared as 12.0.0.2./interface=interfacename/:add(inet-address=12.0.0.2)
Edit Interface Attributes
Thewrite-attributeoperation writes new values to an attribute. The following example updates theinet-addressvalue to 12.0.0.8./interface=interfacename/:write-attribute(name=inet-address, value=12.0.0.8)
Verify Interface Attributes
Confirm that the attribute values have changed by running theread-resourceoperation with theinclude-runtime=trueparameter to expose all current values active in the server model. For example:[standalone@localhost:9999 interface=public]
:read-resource(include-runtime=true)
Configure Interface Attributes with the Management Console
Log into the Management Console.
Log into the Management Console of your Managed Domain or Standalone Server instance.Navigate to the Interfaces screen
Navigate to Configuration tab.
Select the Configuration tab from the top of the screen.For Domain Mode only
Select a profile from the Profile drop-down menu at the top left of the screen.
Select Interfaces from the Navigation Menu.
Expand the General Configuration menu. Select the Interfaces menu item from the navigation menu.Add a New Interface
- Click .
- Enter any required values for Name, Inet Address and Address Wildcard.
- Click .
Edit Interface Attributes
- Select the interface that you need to edit from the Available Interfaces list and click .
- Enter any required values for Name, Inet Address and Address Wildcard.
- Click .
5.2. Socket Binding Groups
5.2.1. About Socket Binding Groups
domain.xml and standalone.xml configuration files. Other sections of the configuration can then reference those sockets by their logical name, rather than having to include the full details of the socket configuration. This allows you to reference relative socket configurations which may otherwise vary on different machines.
Example 5.6. Default socket bindings for the standalone configuration
standalone.xml configuration file are grouped under standard-sockets. This group is also referenced to the public interface, using the same logical referencing methodology.
<socket-binding-group name="standard-sockets" default-interface="public">
    <socket-binding name="http" port="8080"/>
    <socket-binding name="https" port="8443"/>
    <socket-binding name="jacorb" port="3528"/>
    <socket-binding name="jacorb-ssl" port="3529"/>
    <socket-binding name="jmx-connector-registry" port="1090" interface="management"/>
    <socket-binding name="jmx-connector-server" port="1091" interface="management"/>
    <socket-binding name="jndi" port="1099"/>
    <socket-binding name="messaging" port="5445"/>
    <socket-binding name="messaging-throughput" port="5455"/>
    <socket-binding name="osgi-http" port="8090" interface="management"/>
    <socket-binding name="remoting" port="4447"/>
    <socket-binding name="txn-recovery-environment" port="4712"/>
    <socket-binding name="txn-status-manager" port="4713"/>
</socket-binding-group>
Example 5.7. Default socket bindings for the domain configuration
domain.xml configuration file contain four groups: the standard-sockets, ha-sockets, full-sockets and the full-ha-sockets groups. These groups are also referenced to an interface called public.
<socket-binding-groups>
    <socket-binding-group name="standard-sockets" default-interface="public">
        <!-- Needed for server groups using the 'default' profile  -->
        <socket-binding name="ajp" port="8009"/>
        <socket-binding name="http" port="8080"/>
        <socket-binding name="https" port="8443"/>
        <socket-binding name="osgi-http" interface="management" port="8090"/>
        <socket-binding name="remoting" port="4447"/>
        <socket-binding name="txn-recovery-environment" port="4712"/>
        <socket-binding name="txn-status-manager" port="4713"/>
        <outbound-socket-binding name="mail-smtp">
            <remote-destination host="localhost" port="25"/>
        </outbound-socket-binding>
    </socket-binding-group>
    <socket-binding-group name="ha-sockets" default-interface="public">
        <!-- Needed for server groups using the 'ha' profile  -->
        <socket-binding name="ajp" port="8009"/>
        <socket-binding name="http" port="8080"/>
        <socket-binding name="https" port="8443"/>
        <socket-binding name="jgroups-mping" port="0" multicast-address="${jboss.default.multicast.address:230.0.0.4}" multicast-port="45700"/>
        <socket-binding name="jgroups-tcp" port="7600"/>
        <socket-binding name="jgroups-tcp-fd" port="57600"/>
        <socket-binding name="jgroups-udp" port="55200" multicast-address="${jboss.default.multicast.address:230.0.0.4}" multicast-port="45688"/>
        <socket-binding name="jgroups-udp-fd" port="54200"/>
        <socket-binding name="modcluster" port="0" multicast-address="224.0.1.105" multicast-port="23364"/>
        <socket-binding name="osgi-http" interface="management" port="8090"/>
        <socket-binding name="remoting" port="4447"/>
        <socket-binding name="txn-recovery-environment" port="4712"/>
        <socket-binding name="txn-status-manager" port="4713"/>
        <outbound-socket-binding name="mail-smtp">
            <remote-destination host="localhost" port="25"/>
        </outbound-socket-binding>
    </socket-binding-group>
    <socket-binding-group name="full-sockets" default-interface="public">
        <!-- Needed for server groups using the 'full' profile  -->
        <socket-binding name="ajp" port="8009"/>
        <socket-binding name="http" port="8080"/>
        <socket-binding name="https" port="8443"/>
        <socket-binding name="jacorb" interface="unsecure" port="3528"/>
        <socket-binding name="jacorb-ssl" interface="unsecure" port="3529"/>
        <socket-binding name="messaging" port="5445"/>
        <socket-binding name="messaging-group" port="0" multicast-address="${jboss.messaging.group.address:231.7.7.7}" multicast-port="${jboss.messaging.group.port:9876}"/>
        <socket-binding name="messaging-throughput" port="5455"/>
        <socket-binding name="osgi-http" interface="management" port="8090"/>
        <socket-binding name="remoting" port="4447"/>
        <socket-binding name="txn-recovery-environment" port="4712"/>
        <socket-binding name="txn-status-manager" port="4713"/>
        <outbound-socket-binding name="mail-smtp">
            <remote-destination host="localhost" port="25"/>
        </outbound-socket-binding>
    </socket-binding-group>
    <socket-binding-group name="full-ha-sockets" default-interface="public">
        <!-- Needed for server groups using the 'full-ha' profile  -->
        <socket-binding name="ajp" port="8009"/>
        <socket-binding name="http" port="8080"/>
        <socket-binding name="https" port="8443"/>
        <socket-binding name="jacorb" interface="unsecure" port="3528"/>
        <socket-binding name="jacorb-ssl" interface="unsecure" port="3529"/>
        <socket-binding name="jgroups-mping" port="0" multicast-address="${jboss.default.multicast.address:230.0.0.4}" multicast-port="45700"/>
        <socket-binding name="jgroups-tcp" port="7600"/>
        <socket-binding name="jgroups-tcp-fd" port="57600"/>
        <socket-binding name="jgroups-udp" port="55200" multicast-address="${jboss.default.multicast.address:230.0.0.4}" multicast-port="45688"/>
        <socket-binding name="jgroups-udp-fd" port="54200"/>
        <socket-binding name="messaging" port="5445"/>
        <socket-binding name="messaging-group" port="0" multicast-address="${jboss.messaging.group.address:231.7.7.7}" multicast-port="${jboss.messaging.group.port:9876}"/>
        <socket-binding name="messaging-throughput" port="5455"/>
        <socket-binding name="modcluster" port="0" multicast-address="224.0.1.105" multicast-port="23364"/>
        <socket-binding name="osgi-http" interface="management" port="8090"/>
        <socket-binding name="remoting" port="4447"/>
        <socket-binding name="txn-recovery-environment" port="4712"/>
        <socket-binding name="txn-status-manager" port="4713"/>
        <outbound-socket-binding name="mail-smtp">
            <remote-destination host="localhost" port="25"/>
        </outbound-socket-binding>
    </socket-binding-group>
</socket-binding-groups>
standalone.xml and domain.xml source files in the application server directory. The recommended method of managing bindings is to use either the Management Console or the Management CLI. The advantages of using the Management Console include a graphical user interface with a dedicated Socket Binding Group screen under the General Configuration section. The Management CLI offers an API and workflow based around a command line approach that allows for batch processing and the use of scripts across the higher and lower levels of the application server configuration. Both interfaces allow for changes to be persisted or otherwise saved to the server configuration.
5.2.2. Configure Socket Bindings
standard-sockets group, and is unable to create any further groups. Instead you can create alternate standalone server configuration files. For a managed domain however, you can create multiple socket binding groups and configure the socket bindings that they contain as you require. The following table shows the available attributes for each socket binding.
Table 5.2. Socket Binding Attributes
| Attribute | Description | Role |
|---|---|---|
name | Logical name of the socket configuration that should be used elsewhere in the configuration. | Required |
port | Base port to which a socket based on this configuration should be bound. Note that servers can be configured to override this base value by applying an increment or decrement to all port values. | Required |
interface | Logical name of the interface to which a socket based on this configuration should be bound. If not defined, the value of the default-interface attribute from the enclosing socket binding group will be used. | Optional |
multicast-address | If the socket will be used for multicast, the multicast address to use. | Optional |
multicast-port | If the socket will be used for multicast, the multicast port to use. | Optional |
fixed-port | If true, declares that the value of port must always be used for the socket and should not be overridden by applying an increment or decrement. | Optional |
Configure Socket Bindings in Socket Binding Groups
Choose either the management CLI or the management console to configure your socket bindings as required.Configure Socket Bindings Using the Management CLI
Use the management CLI to configure socket bindings.Add a New Socket Binding
Use theaddoperation to create a new address setting if required. You can run this command from the root of the management CLI session, which in the following examples creates a new socket binding titled newsocket, with aportattribute declared as 1234. The examples apply for both a standalone server and a managed domain editing on thestandard-socketssocket binding group as shown.[domain@localhost:9999 /] /socket-binding-group=standard-sockets/socket-binding=newsocket/:add(port=1234)
Edit Pattern Attributes
Use thewrite-attributeoperation to write a new value to an attribute. You can use tab completion to help complete the command string as you type, as well as to expose the available attributes. The following example updates theportvalue to 2020[domain@localhost:9999 /] /socket-binding-group=standard-sockets/socket-binding=newsocket/:write-attribute(name=port,value=2020)
Confirm Pattern Attributes
Confirm the values are changed by running theread-resourceoperation with theinclude-runtime=trueparameter to expose all current values active in the server model.[domain@localhost:9999 /] /socket-binding-group=standard-sockets/socket-binding=newsocket/:read-resource
Configure Socket Bindings Using the Management Console
Use the management console to configure socket bindings.Log into the Management Console.
Log into the management console of your managed domain or standalone server.Navigate to the Configuration tab.
Select the Configuration tab at the top of the screen.Select the Socket Binding item from the navigation menu.
Expand the General Configuration menu. Select Socket Binding. If you are using a managed domain, select the desired group in the Socket Binding Groups list.Add a New Socket Binding
- Click the button.
- Enter any required values for Name, Port and Binding Group.
- Click to finish.
Edit Socket Binding
- Select a socket binding from the list and click .
- Enter any required values such as Name, Interface or Port.
- Click to finish.
5.2.3. Network Ports Used By JBoss EAP 6
- Whether your server groups use one of the default socket binding groups, or a custom group.
- The requirements of your individual deployments.
Note
8080, and your server uses a port offset of 100, its HTTP port is 8180.
The default socket binding groups
full-ha-socketsfull-socketsha-socketsstandard-sockets
Table 5.3. Reference of the default socket bindings
| Name | Port | Multicast Port | Description | full-ha-sockets | full-sockets | ha-socket | standard-socket |
|---|---|---|---|---|---|---|---|
ajp | 8009 | Apache JServ Protocol. Used for HTTP clustering and load balancing. | Yes | Yes | Yes | Yes | |
http | 8080 | The default port for deployed web applications. | Yes | Yes | Yes | Yes | |
https | 8443 | SSL-encrypted connection between deployed web applications and clients. | Yes | Yes | Yes | Yes | |
jacorb | 3528 | CORBA services for JTS transactions and other ORB-dependent services. | Yes | Yes | No | No | |
jacorb-ssl | 3529 | SSL-encrypted CORBA services. | Yes | Yes | No | No | |
jgroups-diagnostics | 7500 | Multicast. Used for peer discovery in HA clusters. Not configurable using the Management Interfaces. | Yes | No | Yes | No | |
jgroups-mping | 45700 | Multicast. Used to discover initial membership in a HA cluster. | Yes | No | Yes | No | |
jgroups-tcp | 7600 | Unicast peer discovery in HA clusters using TCP. | Yes | No | Yes | No | |
jgroups-tcp-fd | 57600 | Used for HA failure detection over TCP. | Yes | No | Yes | No | |
jgroups-udp | 55200 | 45688 | Multicast peer discovery in HA clusters using UDP. | Yes | No | Yes | No |
jgroups-udp-fd | 54200 | Used for HA failure detection over UDP. | Yes | No | Yes | No | |
messaging | 5445 | JMS service. | Yes | Yes | No | No | |
messaging-group | Referenced by HornetQ JMS broadcast and discovery groups. | Yes | Yes | No | No | ||
messaging-throughput | 5455 | Used by JMS Remoting. | Yes | Yes | No | No | |
mod_cluster | 23364 | Multicast port for communication between JBoss EAP 6 and the HTTP load balancer. | Yes | No | Yes | No | |
osgi-http | 8090 | Used by internal components which use the OSGi subsystem. Not configurable using the Management Interfaces. | Yes | Yes | Yes | Yes | |
remoting | 4447 | Used for remote EJB invocation. | Yes | Yes | Yes | Yes | |
txn-recovery-environment | 4712 | The JTA transaction recovery manager. | Yes | Yes | Yes | Yes | |
txn-status-manager | 4713 | The JTA / JTS transaction manager. | Yes | Yes | Yes | Yes |
In addition to the socket binding groups, each host controller opens two more ports for management purposes:
9990- The Web Management Console port9999- The port used by the Management Console and Management API
5.2.4. About Port Offsets for Socket Binding Groups
5.2.5. Configure Port Offsets
Configure Port Offsets
Choose either the Management CLI or the Management Console to configure your port offsets.Configure Port Offsets Using the Management CLI
Use the Management CLI to configure port offsets.Edit Port Offsets
Use thewrite-attributeoperation to write a new value to the port offset atttribute. The following example updates thesocket-binding-port-offsetvalue of server-two to 250. This server is a member of the default local host group. A restart is required for the changes to take effect.[domain@localhost:9999 /] /host=master/server-config=server-two/:write-attribute(name=socket-binding-port-offset,value=250)
Confirm Port Offset Attributes
Confirm the values are changed by running theread-resourceoperation with theinclude-runtime=trueparameter to expose all current values active in the server model.[domain@localhost:9999 /] /host=master/server-config=server-two/:read-resource(include-runtime=true)
Configure Port Offsets Using the Management Console
Use the Management Console to configure port offsets.Log into the Management Console.
Log into the Management Console of your Managed Domain.Select the Domain tab
Select the Domain tab at the top of the screen.Edit Port Offset Attributes
- Select the server under the
Available Server Configurationslist and click at the top of the attibutes list below. - Enter any desired values in the Port Offset field.
- Click to finish.
5.2.6. Configuration of Message Size in Remoting
MAX_INBOUND_MESSAGE_SIZE) and the maximum outbound message size (MAX_OUTBOUND_MESSAGE_SIZE) to ensure that messages are received and sent within appropriate size limits.
MAX_OUTBOUND_MESSAGE_SIZE), the server throws an exception and cancels the transmission of data. However the connection remains open and the sender can choose to close the message if needed.
MAX_INBOUND_MESSAGE_SIZE) the message is closed asynchronously with the connection still open.
5.3. IPv6
5.3.1. Configure JVM Stack Preferences for IPv6 Networking
- Summary
- This topic covers enabling IPv6 networking for the JBoss EAP 6 installation.
Procedure 5.1. Disable the IPv4 Stack Java Property
- Open the relevant file for the installation:
For a Standalone Server:
OpenEAP_HOME/bin/standalone.conf.For a Managed Domain:
OpenEAP_HOME/bin/domain.conf.
- Change the IPv4 Stack Java property to false:
-Djava.net.preferIPv4Stack=false
For example:# Specify options to pass to the Java VM. # if [ "x$JAVA_OPTS" = "x" ]; then JAVA_OPTS="-Xms64m -Xmx512m -XX:MaxPermSize=256m -Djava.net.preferIPv4Stack=false -Dorg.jboss.resolver.warning=true -Dsun.rmi.dgc.client.gcInterval=3600000 -Dsun.rmi.dgc.server.gcInterval=3600000 -Djava.net.preferIPv6Addresses=true" fi
5.3.2. Configure the Interface Declarations for IPv6 Networking
Follow these steps to configure the interface inet address to the IPv6 default:
Procedure 5.2. Configure the Interface for IPv6 Networking
- Select the Configuration tab at the top of the screen.
- Expand the General Configuration menu and select Interfaces.
- Select the interface from the Available Interfaces list.
- Click in the detail list.
- Set the inet address to:
${jboss.bind.address.management:[ADDRESS]} - Click to finish.
- Restart the server to implement the changes.
5.3.3. Configure JVM Stack Preferences for IPv6 Addresses
- Summary
- This topic covers configuring the JBoss EAP 6 installation to prefer IPv6 addresses through the configuration files.
Procedure 5.3. Configure the JBoss EAP 6 Installation to Prefer IPv6 Addresses
- Open the relevant file for the installation:
For a Standalone Server:
OpenEAP_HOME/bin/standalone.conf.For a Managed Domain:
OpenEAP_HOME/bin/domain.conf.
- Append the following Java property to the Java VM options:
-Djava.net.preferIPv6Addresses=true
For example:# Specify options to pass to the Java VM. # if [ "x$JAVA_OPTS" = "x" ]; then JAVA_OPTS="-Xms64m -Xmx512m -XX:MaxPermSize=256m -Djava.net.preferIPv4Stack=false -Dorg.jboss.resolver.warning=true -Dsun.rmi.dgc.client.gcInterval=3600000 -Dsun.rmi.dgc.server.gcInterval=3600000 -Djava.net.preferIPv6Addresses=true" fi
Chapter 6. Datasource Management
6.1. Introduction
6.1.1. About JDBC
6.1.2. JBoss EAP 6 Supported Databases
6.1.3. Types of Datasources
datasources and XA datasources.
6.1.4. The Example Datasource
Warning
6.1.5. Deployment of -ds.xml files
*-ds.xml datasource configuration file was required in the deployment directory of the server configuration. *-ds.xml files can still be deployed in JBoss EAP 6, following the 1.1 data sources schema available under Schemas here: http://www.ironjacamar.org/documentation.html.
Warning
Important
*-ds.xml files.
6.2. JDBC Drivers
6.2.1. Install a JDBC Driver with the Management Console
Before your application can connect to a JDBC datasource, your datasource vendor's JDBC drivers need to be installed in a location where JBoss EAP 6 can use them. JBoss EAP 6 allows you to deploy these drivers like any other deployment. This means that you can deploy them across multiple servers in a server group, if you use a managed domain.
Before performing this task, you need to meet the following prerequisites:
- Download the JDBC driver from your database vendor.
Note
Procedure 6.1. Modify the JDBC Driver JAR
- Change to, or create, an empty temporary directory.
- Create a META-INF subdirectory.
- Create a META-INF/services subdirectory.
- Create a META-INF/services/java.sql.Driver file, which contains one line indicating the fully-qualified class name of the JDBC driver.
- Use the JAR command-line tool to update the JAR like this:
jar \-uf jdbc-driver.jar META-INF/services/java.sql.Driver
- If you use a managed domain, deploy the JAR file to a server group. Otherwise, deploy it to your server. See Section 10.2.2, “Enable a Deployed Application Using the Management Console”.
The JDBC driver is deployed, and is available for your applications to use.
6.2.2. Install a JDBC Driver as a Core Module
Before performing this task, you need to meet the following prerequisites:
- Download the JDBC driver from your database vendor. JDBC driver download locations are listed here: Section 6.2.3, “JDBC Driver Download Locations”.
- Extract the archive.
Procedure 6.2. Install a JDBC Driver as a Core Module
- Create a file path structure under the
EAP_HOME/modules/directory. For example, for a MySQL JDBC driver, create a directory structure as follows:EAP_HOME/modules/com/mysql/main/. - Copy the JDBC driver JAR into the
main/subdirectory. - In the
main/subdirectory, create amodule.xmlfile similar to the example in Section 7.1.1, “Modules”. ThemoduleXSD is defined in theEAP_HOME/docs/schema/module-1_2.xsdfile. - Start the Server.
- Start the Management CLI.
- Run the CLI command to add the JDBC driver module to the server configuration.The command you choose depends on the number of classes listed in the
/META-INF/services/java.sql.Driverfile located in the JDBC driver JAR. For example, the/META-INF/services/java.sql.Driverfile in the MySQL 5.1.20 JDBC JAR lists two classes:When there is more than one entry, you must also specify the name of the driver class. Failure to do so results in an error similar to the following:com.mysql.jdbc.Drivercom.mysql.fabric.jdbc.FabricMySQLDriver
JBAS014749: Operation handler failed: Service jboss.jdbc-driver.mysql is already registered
- Run the CLI command for JDBC JARs containing one class entry.
/subsystem=datasources/jdbc-driver=DRIVER_NAME:add(driver-name=DRIVER_NAME,driver-module-name=MODULE_NAME,driver-xa-datasource-class-name=XA_DATASOURCE_CLASS_NAME)
Example 6.1. Example CLI Command for Standalone Mode for JDBC JARs with one driver class
/subsystem=datasources/jdbc-driver=mysql:add(driver-name=mysql,driver-module-name=com.mysql,driver-xa-datasource-class-name=com.mysql.jdbc.jdbc2.optional.MysqlXADataSource)
Example 6.2. Example CLI Command for Domain Mode for JDBC JARs with one driver class
/profile=ha/subsystem=datasources/jdbc-driver=mysql:add(driver-name=mysql,driver-module-name=com.mysql,driver-xa-datasource-class-name=com.mysql.jdbc.jdbc2.optional.MysqlXADataSource)
- Run the CLI command for JDBC JARs containing multiple class entries.
/subsystem=datasources/jdbc-driver=DRIVER_NAME:add(driver-name=DRIVER_NAME,driver-module-name=MODULE_NAME,driver-xa-datasource-class-name=XA_DATASOURCE_CLASS_NAME, driver-class-name=DRIVER_CLASS_NAME)
Example 6.3. Example CLI Command for Standalone Mode for JDBC JARs with multiple driver class entries
/subsystem=datasources/jdbc-driver=mysql:add(driver-name=mysql,driver-module-name=com.mysql,driver-xa-datasource-class-name=com.mysql.jdbc.jdbc2.optional.MysqlXADataSource, driver-class-name=com.mysql.jdbc.Driver)
Example 6.4. Example CLI Command for Domain Mode for JDBC JARs with multiple driver class entries
/profile=ha/subsystem=datasources/jdbc-driver=mysql:add(driver-name=mysql,driver-module-name=com.mysql,driver-xa-datasource-class-name=com.mysql.jdbc.jdbc2.optional.MysqlXADataSource, driver-class-name=com.mysql.jdbc.Driver)
The JDBC driver is now installed and set up as a core module, and is available to be referenced by application datasources.
6.2.3. JDBC Driver Download Locations
Table 6.1. JDBC driver download locations
| Vendor | Download Location |
|---|---|
| MySQL | |
| PostgreSQL | |
| Oracle | |
| IBM | |
| Sybase | |
| Microsoft |
6.2.4. Access Vendor Specific Classes
This topic covers the steps required to use the JDBC specific classes. This is necessary when an application needs to use vendor specific functionality that is not part of the JDBC API.
Warning
Important
Important
Prerequisites
Procedure 6.3. Add a Dependency to the Application
Configure the
MANIFEST.MFfile- Open the application's
META-INF/MANIFEST.MFfile in a text editor. - Add a dependency for the JDBC module and save the file.
Dependencies: MODULE_NAME
Example 6.5. Example Dependency
Dependencies: com.mysql
Create a
jboss-deployment-structure.xmlfileCreate a file calledjboss-deployment-structure.xmlin theMETA-INF/orWEB-INFfolder of the application.Example 6.6. Example
jboss-deployment-structure.xmlfile<jboss-deployment-structure> <deployment> <dependencies> <module name="com.mysql" /> </dependencies> </deployment> </jboss-deployment-structure>
Example 6.7. Access the Vendor Specific API
import java.sql.Connection;
import org.jboss.jca.adapters.jdbc.WrappedConnection;

  Connection c = ds.getConnection();
  WrappedConnection wc = (WrappedConnection)c;
  com.mysql.jdbc.Connection mc = wc.getUnderlyingConnection();
6.3. Non-XA Datasources
6.3.1. Create a Non-XA Datasource with the Management Interfaces
This topic covers the steps required to create a non-XA datasource, using either the Management Console or the Management CLI.
Prerequisites
- The JBoss EAP 6 server must be running.
Note
Procedure 6.4. Create a Datasource using either the Management CLI or the Management Console
Management CLI
- Launch the CLI tool and connect to your server.
- Run the following command to create a non-XA datasource, configuring the variables as appropriate:
data-source add --name=DATASOURCE_NAME --jndi-name=JNDI_NAME --driver-name=DRIVER_NAME --connection-url=CONNECTION_URL
- Enable the datasource:
data-source enable --name=DATASOURCE_NAME
Management Console
- Login to the Management Console.
Navigate to the Datasources panel in the Management Console
- Select the Configuration tab from the top of the console.
- For Domain mode only, select a profile from the drop-down box in the top left.
- Expand the menu on the left of the console, then expand the menu.
- Select from the menu on the left of the console.
Create a new datasource
- Click at the top of the Datasources panel.
- Enter the new datasource attributes in the Create Datasource wizard and proceed with the button.
- Enter the JDBC driver details in the Create Datasource wizard and click to continue.
- Enter the connection settings in the Create Datasource wizard.
- Click the button to test the connection to the datasource and verify the settings are correct.
- Click to finish
The non-XA datasource has been added to the server. It is now visible in either the standalone.xml or domain.xml file, as well as the management interfaces.
6.3.2. Modify a Non-XA Datasource with the Management Interfaces
This topic covers the steps required to modify a non-XA datasource, using either the Management Console or the Management CLI.
Prerequisites
Note
jta parameter is set to true.
Procedure 6.5. Modify a Non-XA Datasource
Management CLI
- Use the
write-attributecommand to configure a datasource attribute:/subsystem=datasources/data-source=DATASOURCE_NAME:write-attribute(name=ATTRIBUTE_NAME,value=ATTRIBUTE_VALUE)
- Reload the server to confirm the changes:
:reload
Management Console
Navigate to the Datasources panel in the Management Console
- Select the Configuration tab from the top of the console.
- For Domain mode only, select a profile from the drop-down box in the top left.
- Expand the menu on the left of the console, then expand the menu.
- Select from expanded menu.
Edit the datasource
- Select a datasource from the Available Datasources list. The datasource attributes are displayed below.
- Click to edit the datasource attributes.
- Click to finish.
The non-XA datasource has been configured. The changes are now visible in either the standalone.xml or domain.xml file, as well as the management interfaces.
- To create a new datasource, refer here: Section 6.3.1, “Create a Non-XA Datasource with the Management Interfaces”.
- To remove the datasource, refer here: Section 6.3.3, “Remove a Non-XA Datasource with the Management Interfaces”.
6.3.3. Remove a Non-XA Datasource with the Management Interfaces
This topic covers the steps required to remove a non-XA datasource from JBoss EAP 6, using either the Management Console or the Management CLI.
Prerequisites
Procedure 6.6. Remove a Non-XA Datasource
Management CLI
- Run the following command to remove a non-XA datasource:
data-source remove --name=DATASOURCE_NAME
Management Console
Navigate to the Datasources panel in the Management Console
- Select the Configuration tab from the top of the console.
- For Domain mode only, select a profile from the drop-down box in the top left.
- Expand the menu on the left of the console, then expand the menu.
- Select .
- Select the datasource to be deleted, then click .
The non-XA datasource has been removed from the server.
- To add a new datasource, refer here: Section 6.3.1, “Create a Non-XA Datasource with the Management Interfaces”.
6.4. XA Datasources
6.4.1. Create an XA Datasource with the Management Interfaces
Prerequisites:
This topic covers the steps required to create an XA datasource, using either the Management Console or the Management CLI.
Note
Procedure 6.7. Create an XA Datasource, Using Either the Management CLI or the Management Console
Management CLI
- Run the following command to create an XA datasource, configuring the variables as appropriate:
xa-data-source add --name=XA_DATASOURCE_NAME --jndi-name=JNDI_NAME --driver-name=DRIVER_NAME --xa-datasource-class=XA_DATASOURCE_CLASS
Configure the XA datasource properties
Set the server name
Run the following command to configure the server name for the host:/subsystem=datasources/xa-data-source=XA_DATASOURCE_NAME/xa-datasource-properties=ServerName:add(value=HOSTNAME)
Set the database name
Run the following command to configure the database name:/subsystem=datasources/xa-data-source=XA_DATASOURCE_NAME/xa-datasource-properties=DatabaseName:add(value=DATABASE_NAME)
- Enable the datasource:
xa-data-source enable --name=XA_DATASOURCE_NAME
Management Console
Navigate to the Datasources panel in the Management Console
- Select the Configuration tab from the top of the console.
- For Domain mode only, select a profile from the drop-down box at the top left.
- Expand the menu on the left of the console, then expand the menu.
- Select .
- Select the XA Datasource tab.
Create a new XA datasource
- Click .
- Enter the new XA datasource attributes in the Create XA Datasource wizard and click .
- Enter the JDBC driver details in the Create XA Datasource wizard and click .
- Enter the XA properties and click .
- Enter the connection settings in the Create XA Datasource wizard.
- Click the button to test the connection to the XA datasource and verify the settings are correct.
- Click to finish
The XA datasource has been added to the server. It is now visible in either the standalone.xml or domain.xml file, as well as the management interfaces.
See Also:
6.4.2. Modify an XA Datasource with the Management Interfaces
This topic covers the steps required to modify an XA datasource, using either the Management Console or the Management CLI.
Prerequisites
Procedure 6.8. Modify an XA Datasource, Using Either the Management CLI or the Management Console
Management CLI
Configure XA datasource attributes
Use thewrite-attributecommand to configure a datasource attribute:/subsystem=datasources/xa-data-source=XA_DATASOURCE_NAME:write-attribute(name=ATTRIBUTE_NAME,value=ATTRIBUTE_VALUE)
Configure XA datasource properties
Run the following command to configure an XA datasource subresource:/subsystem=datasources/xa-data-source=DATASOURCE_NAME/xa-datasource-properties=PROPERTY_NAME:add(value=PROPERTY_VALUE)
- Reload the server to confirm the changes:
:reload
Management Console
Navigate to the Datasources panel in the Management Console
- Select the Configuration tab from the top of the console.
- For Domain Mode only, select a profile from the drop-down box at top left.
- Expand the menu on the left of the console, then expand the menu.
- Select .
- Select the XA Datasource tab.
Edit the datasource
- Select the relevant XA datasource from the Available XA Datasources list. The XA datasource attributes are displayed in the Attributes panel below it.
- Select the button to edit the datasource attributes.
- Edit the XA datasource attributes and select the button when done.
The XA datasource has been configured. The changes are now visible in either the standalone.xml or domain.xml file, as well as the management interfaces.
- To create a new datasource, refer here: Section 6.4.1, “Create an XA Datasource with the Management Interfaces”.
- To remove the datasource, refer here: Section 6.4.3, “Remove an XA Datasource with the Management Interfaces”.
6.4.3. Remove an XA Datasource with the Management Interfaces
This topic covers the steps required to remove an XA datasource from JBoss EAP 6, using either the Management Console or the Management CLI.
Prerequisites
Procedure 6.9. Remove an XA Datasource Using Either the Management CLI or the Management Console
Management CLI
- Run the following command to remove an XA datasource:
xa-data-source remove --name=XA_DATASOURCE_NAME
Management Console
Navigate to the Datasources panel in the Management Console
- Select the Configuration tab from the top of the console.
- For Domain mode only, select a profile from the drop-down box in the top left.
- Expand the menu on the left of the console, then expand the menu.
- Select .
- Select the XA Datasource tab.
- Select the registered XA datasource to be deleted, and click to permanently delete the XA datasource.
The XA datasource has been removed from the server.
- To add a new XA datasource, refer here: Section 6.4.1, “Create an XA Datasource with the Management Interfaces”.
6.4.4. XA Recovery
6.4.4.1. About XA Recovery Modules
com.arjuna.ats.jta.recovery.XAResourceRecovery.
6.4.4.2. Configure XA Recovery Modules
Table 6.2. General Configuration Attributes
| Attribute | Description |
|---|---|
| recovery-username |
The username the recovery module should use to connect to the resource for recovery.
|
| recovery-password |
The password the recovery module should use to connect to the resource for recovery.
|
| recovery-security-domain |
The security domain the recovery module should use to connect to the resource for recovery.
|
| recovery-plugin-class-name |
If you need to use a custom recovery module, set this attribute to the fully-qualified class name of the module. The module should extend class
com.arjuna.ats.jta.recovery.XAResourceRecovery.
|
| recovery-plugin-properties |
If you use a custom recovery module which requires properties to be set, set this attribute to the list of comma-separated key=value pairs for the properties.
|
Vendor-Specific Configuration Information
- Oracle
- If the Oracle datasource is configured incorrectly, you may see errors like the following in your log output:
WARN [com.arjuna.ats.jta.logging.loggerI18N] [com.arjuna.ats.internal.jta.recovery.xarecovery1] Local XARecoveryModule.xaRecovery got XA exception javax.transaction.xa.XAException, XAException.XAER_RMERR
To resolve this error, ensure that the Oracle user configured inrecovery-usernamehas access to the tables needed for recovery. The following SQL statement shows the correct grants for Oracle 11g or Oracle 10g R2 instances patched for Oracle bug 5945463.GRANT SELECT ON sys.dba_pending_transactions TO recovery-username; GRANT SELECT ON sys.pending_trans$ TO recovery-username; GRANT SELECT ON sys.dba_2pc_pending TO recovery-username; GRANT EXECUTE ON sys.dbms_xa TO recovery-username;
If you use an Oracle 11 version prior to 11g, change the finalEXECUTEstatement to the following:GRANT EXECUTE ON sys.dbms_system TO recovery-username;
- PostgreSQL
- See the PostgreSQL documentation for instructions on enabling prepared (i.e. XA) transactions. Version 8.4-701 of PostgreSQL's JDBC driver has a bug in
org.postgresql.xa.PGXAConnectionwhich breaks recovery in certain situations. This is fixed in newer versions. - MySQL
- Based on http://bugs.mysql.com/bug.php?id=12161, XA transaction recovery did not work in some versions of MySQL 5. This is addressed in MySQL 6.1. Refer to the bug URL or to the MySQL documentation for more information.
- IBM DB2
- IBM DB2 expects method
XAResource.recoverto be called only during the designated resynchronization stage which occurs when the application server is restarted after a crash or failure. This is a design decision in the DB2 implementation, and out of the scope of this documentation. - Sybase
- Sybase expects XA transactions to be enabled on the database. Without correct database configuration, XA transactions will not work.
enable xact coordinationenables or disables Adaptive Server transaction coordination services. When this parameter is enabled, Adaptive Server ensures that updates to remote Adaptive Server data commit or roll back with the original transaction. To enable transaction coordination, use:sp_configure 'enable xact coordination', 1
.
6.5. Datasource Security
6.5.1. About Datasource Security
- Security domains: Section 11.6.1, “About Security Domains”.
- Password vaults: Section 11.13.1, “Password Vault System”.
Example 6.8. Security Domain Example
 <security-domain name="DsRealm" cache-type="default">
  <authentication>
    <login-module code="ConfiguredIdentity" flag="required">
      <module-option name="userName" value="sa"/>
      <module-option name="principal" value="sa"/>
      <module-option name="password" value="sa"/>
    </login-module>
  </authentication>
</security-domain><datasources>
<datasource jndi-name="java:jboss/datasources/securityDs"
pool-name="securityDs">
<connection-url>jdbc:h2:mem:test;DB_CLOSE_DELAY=-1</connection-url>
<driver>h2</driver>
<new-connection-sql>select current_user()</new-connection-sql>
<security>
<security-domain>DsRealm</security-domain>
</security>
</datasource>
</datasources>Example 6.9. Password Vault Example
<security>
  <user-name>admin</user-name>
  <password>${VAULT::ds_ExampleDS::password::N2NhZDYzOTMtNWE0OS00ZGQ0LWE4MmEtMWNlMDMyNDdmNmI2TElORV9CUkVBS3ZhdWx0}</password>
</security>
6.6. Database Connection Validation
6.6.1. Configure Database Connection Validation Settings
Database maintenance, network problems, or other outage events may cause JBoss EAP 6 to lose the connection to the database. You enable database connection validation using the <validation> element within the <datasource> section of the server configuration file. Follow the steps below to configure the datasource settings to enable database connection validation in JBoss EAP 6.
Procedure 6.10. Configure Database Connection Validation Settings
Choose a Validation Method
Select one of the following validation methods.<validate-on-match>true</validate-on-match>
When the<validate-on-match>option is set totrue, the database connection is validated every time it is checked out from the connection pool using the validation mechanism specified in the next step.If a connection is not valid, a warning is written to the log and it retrieves the next connection in the pool. This process continues until a valid connection is found. If you prefer not to cycle through every connection in the pool, you can use the<use-fast-fail>option. If a valid connection is not found in the pool, a new connection is created. If the connection creation fails, an exception is returned to the requesting application.This setting results in the quickest recovery but creates the highest load on the database. However, this is the safest selection if the minimal performance hit is not a concern.<background-validation>true</background-validation>
When the<background-validation>option is set totrue, it is used in combination with the<background-validation-millis>value to determine how often background validation runs. The default value for the<background-validation-millis>parameter is 0 milliseconds, meaning it is disabled by default. This value should not be set to the same value as your<idle-timeout-minutes>setting.It is a balancing act to determine the optimum<background-validation-millis>value for a particular system. The lower the value, the more frequently the pool is validated and the sooner invalid connections are removed from the pool. However, lower values take more database resources. Higher values result in less frequent connection validation checks and use less database resources, but dead connections are undetected for longer periods of time.
Note
If the<validate-on-match>option is set totrue, the<background-validation>option should be set tofalse. The reverse is also true. If the<background-validation>option is set totrue, the<validate-on-match>option should be set tofalse.Choose a Validation Mechanism
Select one of the following validation mechanisms.Specify a <valid-connection-checker> Class Name
This is the preferred mechanism as it optimized for the particular RDBMS in use. JBoss EAP 6 provides the following connection checkers:- org.jboss.jca.adapters.jdbc.extensions.db2.DB2ValidConnectionChecker
- org.jboss.jca.adapters.jdbc.extensions.mssql.MSSQLValidConnectionChecker
- org.jboss.jca.adapters.jdbc.extensions.mysql.MySQLReplicationValidConnectionChecker
- org.jboss.jca.adapters.jdbc.extensions.mysql.MySQLValidConnectionChecker
- org.jboss.jca.adapters.jdbc.extensions.novendor.JDBC4ValidConnectionChecker
- org.jboss.jca.adapters.jdbc.extensions.novendor.NullValidConnectionChecker
- org.jboss.jca.adapters.jdbc.extensions.oracle.OracleValidConnectionChecker
- org.jboss.jca.adapters.jdbc.extensions.postgres.PostgreSQLValidConnectionChecker
- org.jboss.jca.adapters.jdbc.extensions.sybase.SybaseValidConnectionChecker
Specify SQL for <check-valid-connection-sql>
You provide the SQL statement used to validate the connection.The following is an example of how you might specify a SQL statement to validate a connection for Oracle:<check-valid-connection-sql>select 1 from dual</check-valid-connection-sql>
For MySQL or PostgreSQL, you might specify the following SQL statement:<check-valid-connection-sql>select 1</check-valid-connection-sql>
Set the <exception-sorter> Class Name
When an exception is marked as fatal, the connection is closed immediately, even if the connection is participating in a transaction. Use the exception sorter class option to properly detect and clean up after fatal connection exceptions. JBoss EAP 6 provides the following exception sorters:- org.jboss.jca.adapters.jdbc.extensions.db2.DB2ExceptionSorter
- org.jboss.jca.adapters.jdbc.extensions.informix.InformixExceptionSorter
- org.jboss.jca.adapters.jdbc.extensions.mysql.MySQLExceptionSorter
- org.jboss.jca.adapters.jdbc.extensions.novendor.NullExceptionSorter
- org.jboss.jca.adapters.jdbc.extensions.oracle.OracleExceptionSorter
- org.jboss.jca.adapters.jdbc.extensions.postgres.PostgreSQLExceptionSorter
- org.jboss.jca.adapters.jdbc.extensions.sybase.SybaseExceptionSorter
6.7. Datasource Configuration
6.7.1. Datasource Parameters
Table 6.3. Datasource parameters common to non-XA and XA datasources
| Parameter | Description |
|---|---|
| jndi-name | The unique JNDI name for the datasource. |
| pool-name | The name of the management pool for the datasource. |
| enabled | Whether or not the datasource is enabled. |
| use-java-context |
Whether to bind the datasource to global JNDI.
|
| spy |
Enable
spy functionality on the JDBC layer. This logs all JDBC traffic to the datasource. Note that the logging category jboss.jdbc.spy must also be set to the log level DEBUG in the logging subsystem.
|
| use-ccm | Enable the cached connection manager. |
| new-connection-sql | A SQL statement which executes when the connection is added to the connection pool. |
| transaction-isolation |
One of the following:
|
| url-selector-strategy-class-name | A class that implements interface org.jboss.jca.adapters.jdbc.URLSelectorStrategy. |
| security |
Contains child elements which are security settings. See Table 6.8, “Security parameters”.
|
| validation |
Contains child elements which are validation settings. See Table 6.9, “Validation parameters”.
|
| timeout |
Contains child elements which are timeout settings. See Table 6.10, “Timeout parameters”.
|
| statement |
Contains child elements which are statement settings. See Table 6.11, “Statement parameters”.
|
Table 6.4. Non-XA datasource parameters
| Parameter | Description |
|---|---|
| jta | Enable JTA integration for non-XA datasources. Does not apply to XA datasources. |
| connection-url | The JDBC driver connection URL. |
| driver-class | The fully-qualified name of the JDBC driver class. |
| connection-property |
Arbitrary connection properties passed to the method
Driver.connect(url,props). Each connection-property specifies a string name/value pair. The property name comes from the name, and the value comes from the element content.
|
| pool |
Contains child elements which are pooling settings. See Table 6.6, “Pool parameters common to non-XA and XA datasources”.
|
| url-delimiter |
The delimiter for URLs in a connection-url for High Availability (HA) clustered databases.
|
Table 6.5. XA datasource parameters
| Parameter | Description |
|---|---|
| xa-datasource-property |
A property to assign to implementation class
XADataSource. Specified by name=value. If a setter method exists, in the format setName, the property is set by calling a setter method in the format of setName(value).
|
| xa-datasource-class |
The fully-qualified name of the implementation class
javax.sql.XADataSource.
|
| driver |
A unique reference to the classloader module which contains the JDBC driver. The accepted format is driverName#majorVersion.minorVersion.
|
| xa-pool |
Contains child elements which are pooling settings. See Table 6.6, “Pool parameters common to non-XA and XA datasources” and Table 6.7, “XA pool parameters”.
|
| recovery |
Contains child elements which are recovery settings. See Table 6.12, “Recovery parameters”.
|
Table 6.6. Pool parameters common to non-XA and XA datasources
| Parameter | Description |
|---|---|
| min-pool-size | The minimum number of connections a pool holds. |
| max-pool-size | The maximum number of connections a pool can hold. |
| prefill | Whether to try to prefill the connection pool. An empty element denotes a true value. The default is false. |
| use-strict-min | Whether the pool-size is strict. Defaults to false. |
| flush-strategy |
Whether the pool is flushed in the case of an error. Valid values are:
The default is
FailingConnectionOnly.
|
| allow-multiple-users | Specifies if multiple users will access the datasource through the getConnection(user, password) method, and whether the internal pool type accounts for this behavior. |
Table 6.7. XA pool parameters
| Parameter | Description |
|---|---|
| is-same-rm-override | Whether the javax.transaction.xa.XAResource.isSameRM(XAResource) class returns true or false. |
| interleaving | Whether to enable interleaving for XA connection factories. |
| no-tx-separate-pools |
Whether to create separate sub-pools for each context. This is required for Oracle datasources, which do not allow XA connections to be used both inside and outside of a JTA transaction.
Using this option will cause your total pool size to be twice
max-pool-size, because two actual pools will be created.
|
| pad-xid | Whether to pad the Xid. |
| wrap-xa-resource |
Whether to wrap the XAResource in an
org.jboss.tm.XAResourceWrapper instance.
|
Table 6.8. Security parameters
| Parameter | Description |
|---|---|
| user-name | The username to use to create a new connection. |
| password | The password to use to create a new connection. |
| security-domain | Contains the name of a JAAS security-manager which handles authentication. This name correlates to the application-policy/name attribute of the JAAS login configuration. |
| reauth-plugin | Defines a reauthentication plug-in to use to reauthenticate physical connections. |
Table 6.9. Validation parameters
| Parameter | Description |
|---|---|
| valid-connection-checker |
An implementation of interface
org.jboss.jca.adaptors.jdbc.ValidConnectionChecker which provides a SQLException.isValidConnection(Connection e) method to validate a connection. An exception means the connection is destroyed. This overrides the parameter check-valid-connection-sql if it is present.
|
| check-valid-connection-sql | An SQL statement to check validity of a pool connection. This may be called when a managed connection is taken from a pool for use. |
| validate-on-match |
Indicates whether connection level validation is performed when a connection factory attempts to match a managed connection for a given set.
Specifying "true" for
validate-on-match is typically not done in conjunction with specifying "true" for background-validation. Validate-on-match is needed when a client must have a connection validated prior to use. This parameter is false by default.
|
| background-validation |
Specifies that connections are validated on a background thread. Background validation is a performance optimization when not used with
validate-on-match. If validate-on-match is true, using background-validation could result in redundant checks. Background validation does leave open the opportunity for a bad connection to be given to the client for use (a connection goes bad between the time of the validation scan and prior to being handed to the client), so the client application must account for this possibility.
|
| background-validation-millis | The amount of time, in milliseconds, that background validation runs. |
| use-fast-fail |
If true, fail a connection allocation on the first attempt, if the connection is invalid. Defaults to
false.
|
| stale-connection-checker |
An instance of
org.jboss.jca.adapters.jdbc.StaleConnectionChecker which provides a Boolean isStaleConnection(SQLException e) method. If this method returns true, the exception is wrapped in an org.jboss.jca.adapters.jdbc.StaleConnectionException, which is a subclass of SQLException.
|
| exception-sorter |
An instance of
org.jboss.jca.adapters.jdbc.ExceptionSorter which provides a Boolean isExceptionFatal(SQLException e) method. This method validates whether an exception is broadcast to all instances of javax.resource.spi.ConnectionEventListener as a connectionErrorOccurred message.
|
Table 6.10. Timeout parameters
| Parameter | Description |
|---|---|
| use-try-lock | Uses tryLock() instead of lock(). This attempts to obtain the lock for the configured number of seconds, before timing out, rather than failing immediately if the lock is unavailable. Defaults to 60 seconds. As an example, to set a timeout of 5 minutes, set <use-try-lock>300</use-try-lock>. |
| blocking-timeout-millis | The maximum time, in milliseconds, to block while waiting for a connection. After this time is exceeded, an exception is thrown. This blocks only while waiting for a permit for a connection, and does not throw an exception if creating a new connection takes a long time. Defaults to 30000, which is 30 seconds. |
| idle-timeout-minutes |
The maximum time, in minutes, before an idle connection is closed. The actual maximum time depends upon the idleRemover scan time, which is half of the smallest
idle-timeout-minutes of any pool.
|
| set-tx-query-timeout |
Whether to set the query timeout based on the time remaining until transaction timeout. Any configured query timeout is used if no transaction exists. Defaults to
false.
|
| query-timeout | Timeout for queries, in seconds. The default is no timeout. |
| allocation-retry | The number of times to retry allocating a connection before throwing an exception. The default is 0, so an exception is thrown upon the first failure. |
| allocation-retry-wait-millis |
How long, in milliseconds, to wait before retrying to allocate a connection. The default is 5000, which is 5 seconds.
|
| xa-resource-timeout |
If non-zero, this value is passed to method
XAResource.setTransactionTimeout.
|
Table 6.11. Statement parameters
| Parameter | Description |
|---|---|
| track-statements |
Whether to check for unclosed statements when a connection is returned to a pool and a statement is returned to the prepared statement cache. If false, statements are not tracked.
Valid values
|
| prepared-statement-cache-size | The number of prepared statements per connection, in a Least Recently Used (LRU) cache. |
| share-prepared-statements |
Whether asking for the same statement twice without closing it uses the same underlying prepared statement. The default is
false.
|
Table 6.12. Recovery parameters
| Parameter | Description |
|---|---|
| recover-credential | A username/password pair or security domain to use for recovery. |
| recover-plugin |
An implementation of the
org.jboss.jca.core.spi.recoveryRecoveryPlugin class, to be used for recovery.
|
6.7.2. Datasource Connection URLs
Table 6.13. Datasource Connection URLs
| Datasource | Connection URL |
|---|---|
| PostgreSQL | jdbc:postgresql://SERVER_NAME:PORT/DATABASE_NAME |
| MySQL | jdbc:mysql://SERVER_NAME:PORT/DATABASE_NAME |
| Oracle | jdbc:oracle:thin:@ORACLE_HOST:PORT:ORACLE_SID |
| IBM DB2 | jdbc:db2://SERVER_NAME:PORT/DATABASE_NAME |
| Microsoft SQLServer | jdbc:microsoft:sqlserver://SERVER_NAME:PORT;DatabaseName=DATABASE_NAME |
6.7.3. Datasource Extensions
Table 6.14. Datasource Extensions
| Datasource Extension | Configuration Parameter | Description |
|---|---|---|
| org.jboss.jca.adapters.jdbc.spi.ExceptionSorter | <exception-sorter> | Checks whether an SQLException is fatal for the connection on which it was thrown |
| org.jboss.jca.adapters.jdbc.spi.StaleConnection | <stale-connection-checker> | Wraps stale SQLExceptions in a org.jboss.jca.adapters.jdbc.StaleConnectionException |
| org.jboss.jca.adapters.jdbc.spi.ValidConnection | <valid-connection-checker> | Checks whether a connection is valid for use by the application |
Extension Implementations
- Generic
- org.jboss.jca.adapters.jdbc.extensions.novendor.NullExceptionSorter
- org.jboss.jca.adapters.jdbc.extensions.novendor.NullStaleConnectionChecker
- org.jboss.jca.adapters.jdbc.extensions.novendor.NullValidConnectionChecker
- org.jboss.jca.adapters.jdbc.extensions.novendor.JDBC4ValidConnectionChecker
- PostgreSQL
- org.jboss.jca.adapters.jdbc.extensions.postgres.PostgreSQLExceptionSorter
- org.jboss.jca.adapters.jdbc.extensions.postgres.PostgreSQLValidConnectionChecker
- MySQL
- org.jboss.jca.adapters.jdbc.extensions.mysql.MySQLExceptionSorter
- org.jboss.jca.adapters.jdbc.extensions.mysql.MySQLReplicationValidConnectionChecker
- org.jboss.jca.adapters.jdbc.extensions.mysql.MySQLValidConnectionChecker
- IBM DB2
- org.jboss.jca.adapters.jdbc.extensions.db2.DB2ExceptionSorter
- org.jboss.jca.adapters.jdbc.extensions.db2.DB2StaleConnectionChecker
- org.jboss.jca.adapters.jdbc.extensions.db2.DB2ValidConnectionChecker
- Sybase
- org.jboss.jca.adapters.jdbc.extensions.sybase.SybaseExceptionSorter
- org.jboss.jca.adapters.jdbc.extensions.sybase.SybaseValidConnectionChecker
- Microsoft SQLServer
- org.jboss.jca.adapters.jdbc.extensions.mssql.MSSQLValidConnectionChecker
- Oracle
- org.jboss.jca.adapters.jdbc.extensions.oracle.OracleExceptionSorter
- org.jboss.jca.adapters.jdbc.extensions.oracle.OracleStaleConnectionChecker
- org.jboss.jca.adapters.jdbc.extensions.oracle.OracleValidConnectionChecker
6.7.4. View Datasource Statistics
jdbc and pool using appropriately modified versions of the commands below:
Procedure 6.11.
/subsystem=datasources/data-source=ExampleDS/statistics=jdbc:read-resource(include-runtime=true)
/subsystem=datasources/data-source=ExampleDS/statistics=pool:read-resource(include-runtime=true)
Note
include-runtime=true argument, as all statistics are runtime only information and the default is false.
6.7.5. Datasource Statistics
The following table contains a list of the supported datasource core statistics:
Table 6.15. Core Statistics
| Name | Description |
|---|---|
ActiveCount |
The number of active connections. Each of the connections is either in use by an application or available in the pool
|
AvailableCount |
The number of available connections in the pool.
|
AverageBlockingTime |
The average time spent blocking on obtaining an exclusive lock on the pool. The value is in milliseconds.
|
AverageCreationTime |
The average time spent creating a connection. The value is in milliseconds.
|
CreatedCount |
The number of connections created.
|
DestroyedCount |
The number of connections destroyed.
|
InUseCount |
The number of connections currently in use.
|
MaxCreationTime |
The maximum time it took to create a connection. The value is in milliseconds.
|
MaxUsedCount |
The maximum number of connections used.
|
MaxWaitCount |
The maximum number of requests waiting for a connection at the same time.
|
MaxWaitTime |
The maximum time spent waiting for an exclusive lock on the pool.
|
TimedOut |
The number of timed out connections.
|
TotalBlockingTime |
The total time spent waiting for an exclusive lock on the pool. The value is in milliseconds.
|
TotalCreationTime |
The total time spent creating connections. The value is in milliseconds.
|
WaitCount |
The number of requests that had to wait for a connection.
|
The following table contains a list of the supported datasource JDBC statistics:
Table 6.16. JDBC Statistics
| Name | Description |
|---|---|
PreparedStatementCacheAccessCount |
The number of times that the statement cache was accessed.
|
PreparedStatementCacheAddCount |
The number of statements added to the statement cache.
|
PreparedStatementCacheCurrentSize |
The number of prepared and callable statements currently cached in the statement cache.
|
PreparedStatementCacheDeleteCount |
The number of statements discarded from the cache.
|
PreparedStatementCacheHitCount |
The number of times that statements from the cache were used.
|
PreparedStatementCacheMissCount |
The number of times that a statement request could not be satisfied with a statement from the cache.
|
Core and JDBC statistics using appropriately modified versions of the following commands:
/subsystem=datasources/data-source=ExampleDS/statistics=pool:write-attribute(name=statistics-enabled,value=true)
/subsystem=datasources/data-source=ExampleDS/statistics=jdbc:write-attribute(name=statistics-enabled,value=true)
6.8. Example Datasources
6.8.1. Example PostgreSQL Datasource
Example 6.10.
<datasources>
  <datasource jndi-name="java:jboss/PostgresDS" pool-name="PostgresDS">
    <connection-url>jdbc:postgresql://localhost:5432/postgresdb</connection-url>
    <driver>postgresql</driver>
    <security>
      <user-name>admin</user-name>
      <password>admin</password>
    </security>
    <validation>
      <background-validation>true</background-validation>
      <valid-connection-checker class-name="org.jboss.jca.adapters.jdbc.extensions.postgres.PostgreSQLValidConnectionChecker"></valid-connection-checker>
      <exception-sorter class-name="org.jboss.jca.adapters.jdbc.extensions.postgres.PostgreSQLExceptionSorter"></exception-sorter>
    </validation>
  </datasource>
  <drivers>
    <driver name="postgresql" module="org.postgresql">
      <xa-datasource-class>org.postgresql.xa.PGXADataSource</xa-datasource-class>
    </driver>
  </drivers>
</datasources>module.xml file for the PostgreSQL datasource above.
<module xmlns="urn:jboss:module:1.1" name="org.postgresql">
  <resources>
    <resource-root path="postgresql-9.1-902.jdbc4.jar"/>
  </resources>
  <dependencies>
    <module name="javax.api"/>
    <module name="javax.transaction.api"/>
  </dependencies>
</module>6.8.2. Example PostgreSQL XA Datasource
Example 6.11.
<datasources>
  <xa-datasource jndi-name="java:jboss/PostgresXADS" pool-name="PostgresXADS">
    <driver>postgresql</driver>
    <xa-datasource-property name="ServerName">localhost</xa-datasource-property>
    <xa-datasource-property name="PortNumber">5432</xa-datasource-property>
    <xa-datasource-property name="DatabaseName">postgresdb</xa-datasource-property>
    <security>
      <user-name>admin</user-name>
      <password>admin</password>
    </security>
    <validation>
      <background-validation>true</background-validation>
      <valid-connection-checker class-name="org.jboss.jca.adapters.jdbc.extensions.postgres.PostgreSQLValidConnectionChecker">
      </valid-connection-checker>
      <exception-sorter class-name="org.jboss.jca.adapters.jdbc.extensions.postgres.PostgreSQLExceptionSorter">
      </exception-sorter>
    </validation>
  </xa-datasource>
  <drivers>
    <driver name="postgresql" module="org.postgresql">
      <xa-datasource-class>org.postgresql.xa.PGXADataSource</xa-datasource-class>
    </driver>
  </drivers>
</datasources>module.xml file for the PostgreSQL XA datasource above.
<module xmlns="urn:jboss:module:1.1" name="org.postgresql">
  <resources>
    <resource-root path="postgresql-9.1-902.jdbc4.jar"/>
  </resources>
  <dependencies>
    <module name="javax.api"/>
    <module name="javax.transaction.api"/>
  </dependencies>
</module>6.8.3. Example MySQL Datasource
Example 6.12.
<datasources>
  <datasource jndi-name="java:jboss/MySqlDS" pool-name="MySqlDS">
    <connection-url>jdbc:mysql://mysql-localhost:3306/jbossdb</connection-url>
    <driver>mysql</driver>
    <security>
      <user-name>admin</user-name>
      <password>admin</password>
    </security>
    <validation>
      <background-validation>true</background-validation>
      <valid-connection-checker class-name="org.jboss.jca.adapters.jdbc.extensions.mysql.MySQLValidConnectionChecker"></valid-connection-checker>
      <exception-sorter class-name="org.jboss.jca.adapters.jdbc.extensions.mysql.MySQLExceptionSorter"></exception-sorter>
    </validation>
  </datasource>
  <drivers>
    <driver name="mysql" module="com.mysql">
      <xa-datasource-class>com.mysql.jdbc.jdbc2.optional.MysqlXADataSource</xa-datasource-class>
    </driver>
  </drivers>
</datasources>module.xml file for the MySQL datasource above.
<module xmlns="urn:jboss:module:1.1" name="com.mysql">
  <resources>
    <resource-root path="mysql-connector-java-5.0.8-bin.jar"/>
  </resources>
  <dependencies>
    <module name="javax.api"/>
    <module name="javax.transaction.api"/>
  </dependencies>
</module>6.8.4. Example MySQL XA Datasource
Example 6.13.
<datasources>
  <xa-datasource jndi-name="java:jboss/MysqlXADS" pool-name="MysqlXADS">
  <driver>mysql</driver>
    <xa-datasource-property name="ServerName">localhost</xa-datasource-property>
    <xa-datasource-property name="DatabaseName">mysqldb</xa-datasource-property>
    <security>
      <user-name>admin</user-name>
      <password>admin</password>
    </security>
    <validation>
      <background-validation>true</background-validation>
      <valid-connection-checker class-name="org.jboss.jca.adapters.jdbc.extensions.mysql.MySQLValidConnectionChecker"></valid-connection-checker>
      <exception-sorter class-name="org.jboss.jca.adapters.jdbc.extensions.mysql.MySQLExceptionSorter"></exception-sorter>
    </validation>
  </xa-datasource>
  <drivers>
    <driver name="mysql" module="com.mysql">
      <xa-datasource-class>com.mysql.jdbc.jdbc2.optional.MysqlXADataSource</xa-datasource-class>
    </driver>
  </drivers>
</datasources>module.xml file for the MySQL XA datasource above.
<module xmlns="urn:jboss:module:1.1" name="com.mysql">
  <resources>
    <resource-root path="mysql-connector-java-5.0.8-bin.jar"/>
  </resources>
  <dependencies>
    <module name="javax.api"/>
    <module name="javax.transaction.api"/>
  </dependencies>
</module>6.8.5. Example Oracle Datasource
Note
Example 6.14.
<datasources>
  <datasource jndi-name="java:/OracleDS" pool-name="OracleDS">
    <connection-url>jdbc:oracle:thin:@localhost:1521:XE</connection-url>
    <driver>oracle</driver>
    <security>
      <user-name>admin</user-name>
      <password>admin</password>
    </security>
    <validation>
      <background-validation>true</background-validation>
      <valid-connection-checker class-name="org.jboss.jca.adapters.jdbc.extensions.oracle.OracleValidConnectionChecker"></valid-connection-checker>
      <stale-connection-checker class-name="org.jboss.jca.adapters.jdbc.extensions.oracle.OracleStaleConnectionChecker"></stale-connection-checker>
      <exception-sorter class-name="org.jboss.jca.adapters.jdbc.extensions.oracle.OracleExceptionSorter"></exception-sorter>
    </validation>
  </datasource>
  <drivers>
    <driver name="oracle" module="com.oracle">
      <xa-datasource-class>oracle.jdbc.xa.client.OracleXADataSource</xa-datasource-class>
    </driver>
  </drivers>
</datasources>module.xml file for the Oracle datasource above.
<module xmlns="urn:jboss:module:1.1" name="com.oracle">
  <resources>
    <resource-root path="ojdbc6.jar"/>
  </resources>
  <dependencies>
    <module name="javax.api"/>
    <module name="javax.transaction.api"/>
  </dependencies>
</module>6.8.6. Example Oracle XA Datasource
Note
Important
user is the user defined to connect from JBoss to Oracle:
- GRANT SELECT ON sys.dba_pending_transactions TO user;
- GRANT SELECT ON sys.pending_trans$ TO user;
- GRANT SELECT ON sys.dba_2pc_pending TO user;
- GRANT EXECUTE ON sys.dbms_xa TO user; (If using Oracle 10g R2 (patched) or Oracle 11g)ORGRANT EXECUTE ON sys.dbms_system TO user; (If using an unpatched Oracle version prior to 11g)
Example 6.15.
<datasources>
  <xa-datasource jndi-name="java:/XAOracleDS" pool-name="XAOracleDS">
    <driver>oracle</driver>
    <xa-datasource-property name="URL">jdbc:oracle:oci8:@tc</xa-datasource-property>
    <security>
      <user-name>admin</user-name>
      <password>admin</password>
    </security>
    <xa-pool>
      <is-same-rm-override>false</is-same-rm-override>
      <no-tx-separate-pools />
    </xa-pool>
    <validation>
      <background-validation>true</background-validation>
      <valid-connection-checker class-name="org.jboss.jca.adapters.jdbc.extensions.oracle.OracleValidConnectionChecker"></valid-connection-checker>
      <stale-connection-checker class-name="org.jboss.jca.adapters.jdbc.extensions.oracle.OracleStaleConnectionChecker"></stale-connection-checker>
      <exception-sorter class-name="org.jboss.jca.adapters.jdbc.extensions.oracle.OracleExceptionSorter"></exception-sorter>
    </validation>
  </xa-datasource>
  <drivers>
    <driver name="oracle" module="com.oracle">
      <xa-datasource-class>oracle.jdbc.xa.client.OracleXADataSource</xa-datasource-class>
    </driver>
  </drivers>
</datasources>module.xml file for the Oracle XA datasource above.
<module xmlns="urn:jboss:module:1.1" name="com.oracle">
  <resources>
    <resource-root path="ojdbc6.jar"/>
  </resources>
  <dependencies>
    <module name="javax.api"/>
    <module name="javax.transaction.api"/>
  </dependencies>
</module>6.8.7. Example Microsoft SQLServer Datasource
Example 6.16.
<datasources>
  <datasource jndi-name="java:/MSSQLDS" pool-name="MSSQLDS">
    <connection-url>jdbc:microsoft:sqlserver://localhost:1433;DatabaseName=MyDatabase</connection-url>
    <driver>sqlserver</driver>
    <security>
      <user-name>admin</user-name>
      <password>admin</password>
    </security>
    <validation>
      <background-validation>true</background-validation>
      <valid-connection-checker class-name="org.jboss.jca.adapters.jdbc.extensions.mssql.MSSQLValidConnectionChecker"></valid-connection-checker>
    </validation>
  </datasource>
  <drivers>
    <driver name="sqlserver" module="com.microsoft">
      <xa-datasource-class>com.microsoft.sqlserver.jdbc.SQLServerXADataSource</xa-datasource-class>
    </driver>
</datasources>module.xml file for the Microsoft SQLServer datasource above.
<module xmlns="urn:jboss:module:1.1" name="com.microsoft">
  <resources>
    <resource-root path="sqljdbc4.jar"/>
  </resources>
  <dependencies>
    <module name="javax.api"/>
    <module name="javax.transaction.api"/>
  </dependencies>
</module>6.8.8. Example Microsoft SQLServer XA Datasource
Example 6.17.
<datasources>
  <xa-datasource jndi-name="java:/MSSQLXADS" pool-name="MSSQLXADS">
    <driver>sqlserver</driver>
    <xa-datasource-property name="ServerName">localhost</xa-datasource-property>
    <xa-datasource-property name="DatabaseName">mssqldb</xa-datasource-property>
    <xa-datasource-property name="SelectMethod">cursor</xa-datasource-property>
    <security>
      <user-name>admin</user-name>
      <password>admin</password>
    </security>
    <xa-pool>
      <is-same-rm-override>false</is-same-rm-override>
    </xa-pool>
    <validation>
      <background-validation>true</background-validation>
      <valid-connection-checker class-name="org.jboss.jca.adapters.jdbc.extensions.mssql.MSSQLValidConnectionChecker"></valid-connection-checker>
    </validation>
  </xa-datasource>
  <drivers>
    <driver name="sqlserver" module="com.microsoft">
      <xa-datasource-class>com.microsoft.sqlserver.jdbc.SQLServerXADataSource</xa-datasource-class>
    </driver>
  </drivers>
</datasources>module.xml file for the Microsoft SQLServer XA datasource above.
<module xmlns="urn:jboss:module:1.1" name="com.microsoft">
  <resources>
    <resource-root path="sqljdbc4.jar"/>
  </resources>
  <dependencies>
    <module name="javax.api"/>
    <module name="javax.transaction.api"/>
  </dependencies>
</module>6.8.9. Example IBM DB2 Datasource
Example 6.18.
<datasources>
  <datasource jndi-name="java:/DB2DS" pool-name="DB2DS">
    <connection-url>jdbc:db2:ibmdb2db</connection-url>
    <driver>ibmdb2</driver>
    <pool>
      <min-pool-size>0</min-pool-size>
      <max-pool-size>50</max-pool-size>
    </pool>
    <security>
      <user-name>admin</user-name>
      <password>admin</password>
    </security>
    <validation>
      <background-validation>true</background-validation>
      <valid-connection-checker class-name="org.jboss.jca.adapters.jdbc.extensions.db2.DB2ValidConnectionChecker"></valid-connection-checker>
      <stale-connection-checker class-name="org.jboss.jca.adapters.jdbc.extensions.db2.DB2StaleConnectionChecker"></stale-connection-checker>
      <exception-sorter class-name="org.jboss.jca.adapters.jdbc.extensions.db2.DB2ExceptionSorter"></exception-sorter>
    </validation>
  </datasource>
  <drivers>
    <driver name="ibmdb2" module="com.ibm">
      <xa-datasource-class>com.ibm.db2.jdbc.DB2XADataSource</xa-datasource-class>
    </driver>
  </drivers>
</datasources>
module.xml file for the IBM DB2 datasource above.
<module xmlns="urn:jboss:module:1.1" name="com.ibm">
  <resources>
    <resource-root path="db2jcc4.jar"/>
  </resources>
  <dependencies>
    <module name="javax.api"/>
    <module name="javax.transaction.api"/>
  </dependencies>
</module>6.8.10. Example IBM DB2 XA Datasource
Example 6.19.
<datasources>
  <xa-datasource jndi-name="java:/DB2XADS" pool-name="DB2XADS">
    <driver>ibmdb2</driver>
    <xa-datasource-property name="DatabaseName">ibmdb2db</xa-datasource-property>
    <xa-datasource-property name="ServerName">hostname</xa-datasource-property>
    <xa-datasource-property name="PortNumber">port</xa-datasource-property>
    <security>
      <user-name>admin</user-name>
      <password>admin</password>
    </security>
    <xa-pool>
      <is-same-rm-override>false</is-same-rm-override>
    </xa-pool>
    <validation>
      <background-validation>true</background-validation>
      <valid-connection-checker class-name="org.jboss.jca.adapters.jdbc.extensions.db2.DB2ValidConnectionChecker"></valid-connection-checker>
      <stale-connection-checker class-name="org.jboss.jca.adapters.jdbc.extensions.db2.DB2StaleConnectionChecker"></stale-connection-checker>
      <exception-sorter class-name="org.jboss.jca.adapters.jdbc.extensions.db2.DB2ExceptionSorter"></exception-sorter>
    </validation>
    <recovery>
      <recover-plugin class-name="org.jboss.jca.core.recovery.ConfigurableRecoveryPlugin">
        <config-property name="EnableIsValid">false</config-property>
        <config-property name="IsValidOverride">false</config-property>
        <config-property name="EnableClose">false</config-property>
      </recover-plugin>
    </recovery>
  </xa-datasource>
  <drivers>
    <driver name="ibmdb2" module="com.ibm">
      <xa-datasource-class>com.ibm.db2.jcc.DB2XADataSource</xa-datasource-class>
    </driver>
  </drivers>
</datasources>module.xml file for the IBM DB2 XA datasource above.
<module xmlns="urn:jboss:module:1.1" name="com.ibm">
  <resources>
    <resource-root path="db2jcc4.jar"/>
    <resource-root path="db2jcc_license_cisuz.jar"/>
    <resource-root path="db2jcc_license_cu.jar"/>
  </resources>
  <dependencies>
    <module name="javax.api"/>
    <module name="javax.transaction.api"/>
  </dependencies>
</module>6.8.11. Example Sybase Datasource
Example 6.20.
<datasources>
  <datasource jndi-name="java:jboss/SybaseDB" pool-name="SybaseDB" enabled="true">
    <connection-url>jdbc:sybase:Tds:localhost:5000/DATABASE?JCONNECT_VERSION=6</connection-url>
    <security>
      <user-name>admin</user-name>
      <password>admin</password>
    </security>
    <validation>
      <background-validation>true</background-validation>
      <valid-connection-checker class-name="org.jboss.jca.adapters.jdbc.extensions.sybase.SybaseValidConnectionChecker"></valid-connection-checker>
      <exception-sorter class-name="org.jboss.jca.adapters.jdbc.extensions.sybase.SybaseExceptionSorter"></exception-sorter>
    </validation>
  </datasource>
  <drivers>
    <driver name="sybase" module="com.sybase">
      <datasource-class>com.sybase.jdbc4.jdbc.SybDataSource</datasource-class>
      <xa-datasource-class>com.sybase.jdbc4.jdbc.SybXADataSource</xa-datasource-class>
    </driver>
  </drivers>
</datasources>module.xml file for the Sybase datasource above.
<module xmlns="urn:jboss:module:1.1" name="com.sybase">
  <resources>
    <resource-root path="jconn2.jar"/>
  </resources>
  <dependencies>
    <module name="javax.api"/>
    <module name="javax.transaction.api"/>
  </dependencies>
</module>6.8.12. Example Sybase XA Datasource
Example 6.21.
<datasources>
  <xa-datasource jndi-name="java:jboss/SybaseXADS" pool-name="SybaseXADS" enabled="true">
    <xa-datasource-property name="NetworkProtocol">Tds</xa-datasource-property>
    <xa-datasource-property name="ServerName">myserver</xa-datasource-property>
    <xa-datasource-property name="PortNumber">4100</xa-datasource-property>
    <xa-datasource-property name="DatabaseName">mydatabase</xa-datasource-property>
    <security>
      <user-name>admin</user-name>
      <password>admin</password>
    </security>
    <validation>
      <background-validation>true</background-validation>
      <valid-connection-checker class-name="org.jboss.jca.adapters.jdbc.extensions.sybase.SybaseValidConnectionChecker"></valid-connection-checker>
      <exception-sorter class-name="org.jboss.jca.adapters.jdbc.extensions.sybase.SybaseExceptionSorter"></exception-sorter>
    </validation>
  </xa-datasource>
  <drivers>
    <driver name="sybase" module="com.sybase">
      <datasource-class>com.sybase.jdbc4.jdbc.SybDataSource</datasource-class>
      <xa-datasource-class>com.sybase.jdbc4.jdbc.SybXADataSource</xa-datasource-class>
    </driver>
  </drivers>
</datasources>module.xml file for the Sybase XA datasource above.
<module xmlns="urn:jboss:module:1.1" name="com.sybase">
  <resources>
    <resource-root path="jconn2.jar"/>
  </resources>
  <dependencies>
    <module name="javax.api"/>
    <module name="javax.transaction.api"/>
  </dependencies>
</module>Chapter 7. Configuring Modules
7.1. Introduction
7.1.1. Modules
- Static Modules
- Static Modules are predefined in the
EAP_HOME/modules/directory of the application server. Each sub-directory represents one module and defines amain/subdirectory that contains a configuration file (module.xml) and any required JAR files. The name of the module is defined in themodule.xmlfile. All the application server provided APIs are provided as static modules, including the Java EE APIs as well as other APIs such as JBoss Logging.Example 7.1. Example module.xml file
<?xml version="1.0" encoding="UTF-8"?>
<module xmlns="urn:jboss:module:1.0" name="com.mysql">
  <resources>
    <resource-root path="mysql-connector-java-5.1.15.jar"/>
  </resources>
  <dependencies>
    <module name="javax.api"/>
    <module name="javax.transaction.api"/>
  </dependencies>
</module>
The module name,com.mysql, should match the directory structure for the module, excluding themain/subdirectory name.The modules provided in JBoss EAP distributions are located in asystemdirectory within theJBOSS_HOME/modulesdirectory. This keeps them separate from any modules provided by third parties.Any Red Hat provided layered products that layer on top of JBoss EAP 6.1 or later will also install their modules within thesystemdirectory.Creating custom static modules can be useful if many applications are deployed on the same server that use the same third party libraries. Instead of bundling those libraries with each application, a module containing these libraries can be created and installed by the JBoss administrator. The applications can then declare an explicit dependency on the custom static modules.Users must ensure that custom modules are installed into theJBOSS_HOME/modulesdirectory, using a one directory per module layout. This ensures that custom versions of modules that already exist in thesystemdirectory are loaded instead of the shipped versions. In this way, user provided modules will take precedence over system modules.If you use theJBOSS_MODULEPATHenvironment variable to change the locations in which JBoss EAP searches for modules, then the product will look for asystemsubdirectory structure within one of the locations specified. Asystemstructure must exist somewhere in the locations specified withJBOSS_MODULEPATH. - Dynamic Modules
- Dynamic Modules are created and loaded by the application server for each JAR or WAR deployment (or subdeployment in an EAR). The name of a dynamic module is derived from the name of the deployed archive. Because deployments are loaded as modules, they can configure dependencies and be used as dependencies by other deployments.
7.1.2. Global Modules
7.1.3. Module Dependencies
Example 7.2. Module dependencies
- Module A declares an explicit dependency on Module C, or
- Module B exports its dependency on Module C.
7.1.4. Subdeployment Class Loader Isolation
7.2. Disable Subdeployment Module Isolation for All Deployments
Warning
Stop the server
Halt the JBoss EAP 6 server.Open the server configuration file
Open the server configuration file in a text editor.This file will be different for a managed domain or standalone server. In addition, non-default locations and file names may be used. The default configuration files aredomain/configuration/domain.xmlandstandalone/configuration/standalone.xmlfor managed domains and standalone servers respectively.Locate the EE Subsystem Configuration
Locate the EE Subsystem configuration element in the configuration file. The<profile>element of the configuration file contains several subsystem elements. The EE Subsystem element has the namespace ofurn:jboss:domain:ee:1.2.<profile> ... <subsystem xmlns="urn:jboss:domain:ee:1.2" /> ...
The default configuration has a single self-closing tag but a custom configuration may have separate open and closing tags (possibly with other elements within) like this:<subsystem xmlns="urn:jboss:domain:ee:1.2" ></subsystem>
Replace self-closing tags if necessary
If the EE Subsystem element is a single self-closing tag then replace with appropriate opening and closing tags like this:<subsystem xmlns="urn:jboss:domain:ee:1.2" ></subsystem>
Add ear-subdeployments-isolated element
Add theear-subdeployments-isolatedelement as a child of the EE Subsystem element and add the content offalselike this:<subsystem xmlns="urn:jboss:domain:ee:1.2" ><ear-subdeployments-isolated>false</ear-subdeployments-isolated></subsystem>
Start the server
Relaunch the JBoss EAP 6 server to start it running with the new configuration.
The server will now be running with Subdeployment Module Isolation disabled for all deployments.
7.3. Add a module to all deployments
Prerequisites
- You must know the name of the modules that are to be configured as global modules. Refer to Section 7.6.1, “Included Modules” for the list of static modules included with JBoss EAP 6. If the module is in another deployment, refer to Section 7.6.2, “Dynamic Module Naming” to determine the module name.
Procedure 7.1. Add a module to the list of global modules
- Login to the management console. Section 3.4.2, “Log in to the Management Console”
- Navigate to the EE Subsystem panel.
- Select the Configuration tab from the top of the console.
Domain Mode Only
- Select the appropriate profile from the drop-down box in the top left.
- Expand the menu on the left of the console.
- Select → from the menu on the left of the console.
- Click in the Subsystem Defaults section. The Create Module dialog appears.
- Type in the name of the module and optionally the module slot.
- Click to add the new global module, or click to abort.
- If you click , the dialog will close and the specified module will be added to the list of global modules.
- If you click , the dialog will close and no changes will be made.
The modules added to the list of global modules will be added as dependencies to every deployment.
7.4. Create a Custom Module
Procedure 7.2. Create a Custom Module
- Create and populate the
module/directory structure.- Create a directory structure under the
EAP_HOME/moduledirectory to contain the files and JARs. For example:$ cd EAP_HOME/modules/$ mkdir -p myorg-conf/main/properties - Move the properties files to the
EAP_HOME/modules/myorg-conf/main/properties/directory you created in the previous step. - Create a
module.xmlfile in theEAP_HOME/modules/myorg-conf/main/directory containing the following XML:<module xmlns="urn:jboss:module:1.1" name="myorg-conf"> <resources> <resource-root path="properties"/> </resources> </module>
- Modify the
eesubsystem in the server configuration file. You can use the JBoss CLI or you can manually edit the file.- Follow these steps to modify the server configuration file using the JBoss CLI.
- Start the server and connect to the Management CLI.
- For Linux, enter the following at the command line:
$ EAP_HOME/bin/jboss-cli.sh --connect
- For Windows, enter the following at a command line:
C:\>EAP_HOME\bin\jboss-cli.bat --connect
You should see the following response:Connected to standalone controller at localhost:9999
- To create the
myorg-conf<global-modules> element in theeesubsystem, type the following in the command line:/subsystem=ee:write-attribute(name=global-modules, value=[{"name"=>"myorg-conf","slot"=>"main"}])You should see the following result:{"outcome" => "success"}
- Follow these steps if you prefer to manually edit the server configuration file.
- Stop the server and open the server configuration file in a text editor. If you are running a standalone server, this is the
EAP_HOME/standalone/configuration/standalone.xmlfile, or theEAP_HOME/domain/configuration/domain.xmlfile if you are running a managed domain. - Find the
eesubsystem and add the global module formyorg-conf. The following is an example of theeesubsystem element, modified to include themyorg-confelement:<subsystem xmlns="urn:jboss:domain:ee:1.0" > <global-modules> <module name="myorg-conf" slot="main" /> </global-modules> </subsystem>
- Assuming you copied a file named
my.propertiesinto the correct module location, you are now able to load properties files using code similar to the following:Thread.currentThread().getContextClassLoader().getResource("my.properties");
7.5. Define an External JBoss Module Directory
By default, JBoss EAP looks for modules in the EAP_HOME/modules/ directory. You can direct JBoss EAP to look in one or more external directories by defining a JBOSS_MODULEPATH environment variable or by setting the variable in the startup configuration file. This topic describes both methods.
Procedure 7.3. Set the JBOSS_MODULEPATH Environment Variable
- To specify one or more external module directories, define the
JBOSS_MODULEPATHenvironment variable.For Linux, use a colon to delimit a list of directories. For example:export JBOSS_MODULEPATH=EAP_HOME/modules/:/home/username/external/modules/directory/
For Windows, use a semicolon to delimit a list of directories. For example:SET JBOSS_MODULEPATH=EAP_HOME\modules\;D:\JBoss-Modules\
Procedure 7.4. Set the JBOSS_MODULEPATH Variable in the Startup Configuration File
- If you prefer not to set a global environment variable, you can set the
JBOSS_MODULEPATHvariable in the JBoss EAP startup configuration file. If you are running a standalone server, this is theEAP_HOME/bin/standalone.conffile. If the server is running in a managed domain, this is theEAP_HOME/bin/domain.conffile.The following is an example of the command that sets theJBOSS_MODULEPATHvariable in thestandalone.conffileJBOSS_MODULEPATH="EAP_HOME/modules/:/home/username/external/modules/directory/"
7.6. Reference
7.6.1. Included Modules
7.6.2. Dynamic Module Naming
- Deployments of WAR and JAR files are named with the following format:
deployment.DEPLOYMENT_NAME
For example,inventory.warandstore.jarwill have the module names ofdeployment.inventory.waranddeployment.store.jarrespectively. - Subdeployments within an Enterprise Archive are named with the following format:
deployment.EAR_NAME.SUBDEPLOYMENT_NAME
For example, the subdeployment ofreports.warwithin the enterprise archiveaccounts.earwill have the module name ofdeployment.accounts.ear.reports.war.
Chapter 8. Jsvc
8.1. Introduction
8.1.1. About Jsvc
Note
prunsrv.exe in the Native Utilities for Windows Server download available from the Red Hat Customer Portal.
8.1.2. Start and Stop JBoss EAP using Jsvc
Prerequisites
- If JBoss EAP was installed using the Zip method:
- Install the Native Utilities package for your operating system, available for download from the Red Hat Customer Portal. See Install Native Components and Native Utilities (Zip, Installer) in the Installation Guide.
- Create the user account under which the JBoss EAP 6 instance will run. The account used to start and stop the server must have read and write access to the directory in which JBoss EAP was installed.
- If JBoss EAP was installed using the RPM method, install the apache-commons-daemon-jsvc-eap6 package. See Install Native Components and Native Utilities (RPM Installation) in the Installation Guide.
The following instructions are to start or stop JBoss EAP in standalone mode.
Table 8.1. Jsvc File locations For Zip installations - Standalone Mode
| File Reference in Instructions | File Location |
|---|---|
| EAP-HOME |
${eap-installation-location}/jboss-eap-${version}
|
| JSVC-BIN |
EAP_HOME/modules/system/layers/base/native/sbin/jsvc
|
| JSVC-JAR |
EAP_HOME/modules/system/layers/base/native/sbin/commons-daemon.jar
|
| CONF-DIR |
EAP_HOME/standalone/configuration
|
| LOG-DIR |
EAP_HOME/standalone/log
|
Table 8.2. Jsvc File Locations for RPM Installations - Standalone Mode
| File Reference in Instructions | File Location |
|---|---|
| EAP-HOME |
/usr/share/jbossas
|
| JSVC-BIN |
/usr/bin/jsvc-eap6/jsvc
|
| JSVC-JAR |
EAP_HOME/modules/system/layers/base/native/sbin/commons-daemon.jar
|
| CONF-DIR |
/etc/jbossas/standalone
|
| LOG-DIR |
/var/log/jbossas/standalone
|
Start JBoss EAP in Standalone Mode
JSVC_BIN \
 -outfile LOG_DIR/jsvc.out.log   \
 -errfile LOG_DIR/jsvc.err.log   \
 -pidfile LOG_DIR/jsvc.pid  \
 -user jboss \
 -D[Standalone] -XX:+UseCompressedOops -Xms1303m \
 -Xmx1303m -XX:MaxPermSize=256m \
 -Djava.net.preferIPv4Stack=true
 -Djboss.modules.system.pkgs=org.jboss.byteman \
 -Djava.awt.headless=true \
 -Dorg.jboss.boot.log.file=LOG_DIR/server.log \
 -Dlogging.configuration=file:CONF_DIR/logging.properties \
 -Djboss.modules.policy-permissions \
 -cp EAP_HOME/jboss-modules.jar:JSVC_JAR \
 -Djboss.home.dir=EAP_HOME \
 -Djboss.server.base.dir=EAP_HOME/standalone   \
 @org.jboss.modules.Main -start-method main \
 -mp EAP_HOME/modules \
 -jaxpmodule javax.xml.jaxp-provider \
 org.jboss.as.standalone
Stop JBoss EAP in Standalone Mode
JSVC_BIN \
 -stop \
 -outfile LOG_DIR/jsvc.out.log   \
 -errfile LOG_DIR/jsvc.err.log   \
 -pidfile LOG_DIR/jsvc.pid  \
 -user jboss \
 -D[Standalone] -XX:+UseCompressedOops -Xms1303m \
 -Xmx1303m -XX:MaxPermSize=256m \
 -Djava.net.preferIPv4Stack=true \
 -Djboss.modules.system.pkgs=org.jboss.byteman \
 -Djava.awt.headless=true \
 -Dorg.jboss.boot.log.file=LOG_DIR/server.log \
 -Dlogging.configuration=file:CONF_DIR/logging.properties \
 -Djboss.modules.policy-permissions \
 -cp EAP_HOME/jboss-modules.jar:JSVC_JAR \
 -Djboss.home.dir=EAP_HOME \
 -Djboss.server.base.dir=EAP_HOME/standalone   \
 @org.jboss.modules.Main -start-method main \
 -mp EAP_HOME/modules \
 -jaxpmodule javax.xml.jaxp-provider \
 org.jboss.as.standalone
The following instructions are to start or stop JBoss EAP in domain mode. Note that for domain mode, you must replace the JAVA_HOME variable with the Java home directory.
Table 8.3. Jsvc File Locations for Zip Installations - Domain Mode
| File Reference in Instructions | File Location |
|---|---|
| EAP-HOME |
${eap-installation-location}/jboss-eap-${version}
|
| JSVC-BIN |
EAP_HOME/modules/system/layers/base/native/sbin/jsvc
|
| JSVC-JAR |
EAP_HOME/modules/system/layers/base/native/sbin/commons-daemon.jar
|
| CONF-DIR |
EAP_HOME/domain/configuration
|
| LOG-DIR |
EAP_HOME/domain/log
|
Table 8.4. Jsvc File Locations for RPM Installations - Domain Mode
| File Reference in Instructions | File Location |
|---|---|
| EAP-HOME |
/usr/share/jbossas
|
| JSVC-BIN |
/usr/bin/jsvc-eap6/jsvc
|
| JSVC-JAR |
EAP_HOME/modules/system/layers/base/native/sbin/commons-daemon.jar
|
| CONF-DIR |
/etc/jbossas/domain
|
| LOG-DIR |
/var/log/jbossas/domain
|
Start JBoss EAP in Domain Mode
JSVC_BIN \
 -outfile LOG_DIR/jsvc.out.log   \
 -errfile LOG_DIR/jsvc.err.log   \
 -pidfile LOG_DIR/jsvc.pid  \
 -user jboss \
 -nodetach -D"[Process Controller]" -server -Xms64m \
 -Xmx512m -XX:MaxPermSize=256m \
 -Djava.net.preferIPv4Stack=true  \
 -Djboss.modules.system.pkgs=org.jboss.byteman \
 -Djava.awt.headless=true  \
 -Dorg.jboss.boot.log.file=LOG_DIR/process-controller.log \
 -Dlogging.configuration=file:CONF_DIR/logging.properties \
 -Djboss.modules.policy-permissions \
 -cp "EAP_HOME/jboss-modules.jar:JSVC_JAR" \
 org.apache.commons.daemon.support.DaemonWrapper \
 -start org.jboss.modules.Main -start-method main \
 -mp EAP_HOME/modules org.jboss.as.process-controller \
 -jboss-home EAP_HOME -jvm $JAVA_HOME/bin/java \
 -mp EAP_HOME/modules -- \
 -Dorg.jboss.boot.log.file=LOG_DIR/host-controller.log \
 -Dlogging.configuration=file:CONF_DIR/logging.properties \
 -Djboss.modules.policy-permissions \
 -server -Xms64m -Xmx512m -XX:MaxPermSize=256m \
 -Djava.net.preferIPv4Stack=true \
 -Djboss.modules.system.pkgs=org.jboss.byteman \
 -Djava.awt.headless=true -- -default-jvm $JAVA_HOME/bin/java
Stop JBoss EAP in Domain Mode
JSVC_BIN \
 -stop \
 -outfile LOG_DIR/jsvc.out.log   \
 -errfile LOG_DIR/jsvc.err.log   \
 -pidfile LOG_DIR/jsvc.pid  \
 -user jboss \
 -nodetach -D"[Process Controller]" -server -Xms64m \
 -Xmx512m -XX:MaxPermSize=256m \
 -Djava.net.preferIPv4Stack=true  \
 -Djboss.modules.system.pkgs=org.jboss.byteman \
 -Djava.awt.headless=true  \
 -Dorg.jboss.boot.log.file=LOG_DIR/process-controller.log \
 -Dlogging.configuration=file:CONF_DIR/logging.properties \
 -Djboss.modules.policy-permissions \
 -cp "EAP_HOME/jboss-modules.jar:JSVC_JAR" \
 org.apache.commons.daemon.support.DaemonWrapper \
 -start org.jboss.modules.Main -start-method main \
 -mp EAP_HOME/modules org.jboss.as.process-controller \
 -jboss-home EAP_HOME -jvm $JAVA_HOME/bin/java \
 -mp EAP_HOME/modules -- \
 -Dorg.jboss.boot.log.file=LOG_DIR/host-controller.log \
 -Dlogging.configuration=file:CONF_DIR/logging.properties \
 -Djboss.modules.policy-permissions \
 -server -Xms64m -Xmx512m -XX:MaxPermSize=256m \
 -Djava.net.preferIPv4Stack=true \
 -Djboss.modules.system.pkgs=org.jboss.byteman \
 -Djava.awt.headless=true -- -default-jvm $JAVA_HOME/bin/java
Note
Chapter 9. Global Valves
9.1. About Valves
- Global Valves are configured at the server level and apply to all applications deployed to the server. Instructions to configure Global Valves are located in the Administration and Configuration Guide for JBoss EAP.
- Valves configured at the application level are packaged with the application deployment and only affect the specific application. Instructions to configure Valves at the application level are located in the Development Guide for JBoss EAP.
9.2. About Global Valves
9.3. About Authenticator Valves
org.apache.catalina.authenticator.AuthenticatorBase and overrides the authenticate(Request request, Response response, LoginConfig config) method.
9.4. Install a Global Valve
Pre-requisities:
- The valve must already be created and packaged in a JAR file.
- A
module.xmlfile must already be created for the module.Refer to Section 7.1.1, “Modules” for an example ofmodule.xmlfile.
Procedure 9.1. Install a Global Module
Create module installation directory
A directory for the module to be installed in must be created in the modules directory of the application server.EAP_HOME/modules/system/layers/base/MODULENAME/main
$ mkdir -P EAP_HOME/modules/system/layers/base/MODULENAME/main
Copy files
Copy the JAR andmodule.xmlfiles to the directory created in step 1.$ cp MyValves.jar module.xml EAP_HOME/modules/system/layers/base/MODULENAME/main
9.5. Configure a Global Valve
Procedure 9.2. Configure a Global Valve
Enable the Valve
Use theaddoperation to add a new valve entry./subsystem=web/valve=VALVENAME:add(module="MODULENAME",class-name="CLASSNAME")
You need to specify the following values:VALVENAME, the name that is used to refer to this valve in application configuration.MODULENAME, the module that contains the value being configured.CLASSNAME, the classname of the specific valve in the module.
/subsystem=web/valve=clientlimiter:add(module="clientlimitermodule",class-name="org.jboss.samplevalves.RestrictedUserAgentsValve")
Optionally: Specify Parameters
If the valve has configuration parameters, specify these with theadd-paramoperation./subsystem=web/valve=testvalve:add-param(param-name="NAME", param-value="VALUE")
/subsystem=web/valve=testvalve:add-param(
   param-name="restrictedUserAgents",
   param-value="^.*MS Web Services Client Protocol.*$"
)
Chapter 10. Application Deployment
10.1. About Application Deployment
Administration
Management CLI
Development
Deployment Scanner
10.2. Deploy with the Management Console
10.2.1. Manage Application Deployment in the Management Console
10.2.2. Enable a Deployed Application Using the Management Console
Prerequisites
Procedure 10.1. Enable a Deployed Application using the Management Console
- Select the Runtime tab from the top of the console.
- For a Managed Domain, expand the
Domainmenu. - For a Standalone server expand the
Servermenu.
- Select Manage Deployments.
- The deployment method for applications will differ depending on whether you are deploying to a standalone server instance or a managed domain.
Enable an application on a standalone server instance
The Available Deployments table shows all available application deployments and their status.- To enable an application in a standalone server instance, select the application, then click .
- Click to confirm that the application will be enabled on the server instance.
Enable an application in a managed domain
The Content Repository tab contains an Available Deployment Content table showing all available application deployments and their status.- To enable an application in a Managed Domain, select the application to be deployed. Click above the Available Deployment Content table.
- Check the boxes for each of the server groups that you want the application to be added to and click to finish.
- Select Server Groups tab to view the Server Groups table. Your application is now deployed to the server groups that you have selected.
The application is deployed on the relevant server or server group.
10.2.3. Disable a Deployed Application Using the Management Console
Prerequisites
Procedure 10.2. Disable a Deployed Application using the Management Console
- Select the Runtime tab from the top of the console.
- For a Managed Domain, expand the menu.
- For a Standalone server, expand the Menu.
- Select Manage Deployments.
- The method used to disable an application will differ depending on whether you are deploying to a standalone server instance or a managed domain.
Disable a deployed application on a Standalone server instance
The Available Deployments table shows all available application deployments and their status.- Select the application to be disabled. Click to disable the selected application.
- Click to confirm that the application will be disabled on the server instance.
Disable a deployed application on a managed domain
The Manage Deployments Content screen contains a Content Repository tab. The Available Deployment Content table shows all available application deployments and their status.- Select the Server Groups tab to view the server groups and the status of their deployed applications.
- Select the name of the server in the Server Group table to undeploy an application from. Click View to see the applications.
- Select the application and click to disable the application for the selected server.
- Click to confirm that the application will be disabled on the server instance.
- Repeat as required for other server groups. The application status is confirmed for each server group in the Group Deployments table for that server group.
The application is undeployed from the relevant server or server group.
10.2.4. Undeploy an Application Using the Management Console
Prerequisites
Procedure 10.3. Undeploy an Application Using the Management Console
- Select the Runtime tab from the top of the console.
- For a Managed Domain, expand the menu.
- For a Standalone server, expand the Menu.
- Select Manage Deployments.
- The method used to undeploy an application will differ depending on whether you are undeploying from a standalone server instance or a managed domain.
Undeploy a deployed application from a Standalone server instance
The Available Deployments table shows all available application deployments and their status.- Select the application to be undeployed. Click to undeploy the selected application.
- Click to confirm that the application will be undeployed on the server instance.
Undeploy a deployed application from a managed domain
The Manage Deployments Content screen contains a Content Repository tab. The Available Deployment Content table shows all available application deployments and their status.- Select the Server Groups tab to view the server groups and the status of their deployed applications.
- Select the name of the server in the Server Group table to undeploy an application from. Click View to see the applications.
- Select the application and click to undeploy the application for the selected server.
- Click to confirm that the application will be undeployed on the server instance.
- Repeat as required for other server groups. The application status is confirmed for each server group in the Group Deployments table for that server group.
The application is undeployed from the relevant server or server group. On a standalone instance the deployment content is also removed. On a managed domain, the deployment content remains in the content repository and is only undeployed from the server group.
10.3. Deploy with the Management CLI
10.3.1. Manage Application Deployment in the Management CLI
10.3.2. Deploy an Application in a Standalone Server Using the Management CLI
Prerequisites
Procedure 10.4. Deploy an Application in a Standalone Server
Run the
deploycommandFrom the Management CLI, enter thedeploycommand with the path to the application deployment.[standalone@localhost:9999 /]
deploy /path/to/test-application.warNote that a successful deploy does not produce any output to the CLI.
The specified application is now deployed in the standalone server.
10.3.3. Undeploy an Application in a Standalone Server Using the Management CLI
Prerequisites
Procedure 10.5. Undeploy an Application in a Standalone Server
undeploy command will undeploy and delete the deployment content from a standalone instance of JBoss EAP. To retain the deployment content, add the parameter --keep-content.
Run the
undeploycommandTo undeploy the application and delete the deployment content, enter the Management CLIundeploycommand with the filename of the application deployment.[standalone@localhost:9999 /]
undeploy test-application.warTo undeploy the application, but retain the deployment content, enter the Management CLIundeploycommand with the filename of the application deployment and the parameter--keep-content.[standalone@localhost:9999 /]
undeploy test-application.war--keep-content
The specified application is now undeployed. Note that the undeploy command does not produce any output to the Management CLI if it is successful.
10.3.4. Deploy an Application in a Managed Domain Using the Management CLI
Prerequisites
Procedure 10.6. Deploy an Application in a Managed Domain
Run the
deploycommandFrom the Management CLI, enter thedeploycommand with the path to the application deployment. Include the--all-server-groupsparameter to deploy to all server groups.[domain@localhost:9999 /]
deploy /path/to/test-application.war --all-server-groups- Alternatively, define specific server groups for the deployment with the
--server-groupsparameter.[domain@localhost:9999 /]
deploy /path/to/test-application.war --server-groups=server_group_1,server_group_2
Note that a successful deploy does not produce any output to the CLI.
The specified application is now deployed to a server group in your managed domain.
10.3.5. Undeploy an Application in a Managed Domain Using the Management CLI
Prerequisites
Procedure 10.7. Undeploy an Application in a Managed Domain
Run the
undeploycommandFrom the Management CLI, enter theundeploycommand with the filename of the application deployment. The application can be undeployed from any server group that it was originally deployed to with the addition of the--all-relevant-server-groupsparameter.[domain@localhost:9999 /]undeploytest-application.war--all-relevant-server-groupsNote that a successful undeploy does not produce any output to the CLI.
The specified application is now undeployed.
10.4. Deploy with the HTTP API
10.4.1. Deploy an application using the HTTP API
Applications can be deployed via the HTTP API using the following instructions.
Procedure 10.8. Deploy an application using DeployDmrToJson.java
- Use
DeployDmrToJson.javato generate a request to JSON to deploy your application.Example 10.1. DeployDmrToJson.java class
import org.jboss.dmr.ModelNode; import java.net.URL; public class DeployDmrToJson { public static void main(String[] args) throws Exception { if(args.length < 1) throw new IllegalArgumentException("The first argument must be a URL"); URL url = new URL(args[0]); String[] pathElements = url.getFile().split("/"); String name = pathElements[pathElements.length-1]; ModelNode deploy = getDeploy(url.toExternalForm(), name); ModelNode undeploy = getUndeploy(name); System.out.println("Deploy\n------------------------------\n"); System.out.println("Formatted:\n" + deploy.toJSONString(false)); System.out.println("Unformatted:\n" + deploy.toJSONString(true)); System.out.println("\nUndeploy\n------------------------------\n"); System.out.println("Formatted:\n" + undeploy.toJSONString(false)); System.out.println("Unformatted:\n" + undeploy.toJSONString(true)); } public static ModelNode getUndeploy(String name) { ModelNode undeployRequest = new ModelNode(); undeployRequest.get("operation").set("undeploy"); undeployRequest.get("address", "deployment").set(name); ModelNode removeRequest = new ModelNode(); removeRequest.get("operation").set("remove"); removeRequest.get("address", "deployment").set(name); ModelNode composite = new ModelNode(); composite.get("operation").set("composite"); composite.get("address").setEmptyList(); final ModelNode steps = composite.get("steps"); steps.add(undeployRequest); steps.add(removeRequest); return composite; } public static ModelNode getDeploy(String url, String name) { ModelNode deployRequest = new ModelNode(); deployRequest.get("operation").set("deploy"); deployRequest.get("address", "deployment").set(name); ModelNode addRequest = new ModelNode(); addRequest.get("operation").set("add"); addRequest.get("address", "deployment").set(name); addRequest.get("content").get(0).get("url").set(url); ModelNode composite = new ModelNode(); composite.get("operation").set("composite"); composite.get("address").setEmptyList(); final ModelNode steps = composite.get("steps"); steps.add(addRequest); steps.add(deployRequest); return composite; } } - Run the class using a command based on the following instructions:
Example 10.2. Execute command
java -cp .:$JBOSS_HOME/modules/org/jboss/dmr/main/jboss-dmr-1.1.1.Final-redhat-1.jar DeployDmrToJson \
file:///Users/username/support/helloWorld.war/dist/helloWorld.war
- When the class is run the following command formats will be displayed. Use either the
deployorundeploycommand relevant to your requirements.Example 10.3. Deploy and undeploy command
Deploy ------------------------------ Formatted: { "operation" : "composite", "address" : [], "steps" : [ { "operation" : "add", "address" : {"deployment" : "helloWorld.war"}, "content" : [{"url" : "file:/Users/username/support/helloWorld.war/dist/helloWorld.war"}] }, { "operation" : "deploy", "address" : {"deployment" : "helloWorld.war"} } ] } Unformatted: {"operation" : "composite", "address" : [], "steps" : [{"operation" : "add", "address" : {"deployment" : "helloWorld.war"}, "content" : [{"url" : "file:/Users/username/support/helloWorld.war/dist/helloWorld.war"}]},{"operation" : "deploy", "address" : {"deployment" : "helloWorld.war"}}]} Undeploy ------------------------------ Formatted: { "operation" : "composite", "address" : [], "steps" : [ { "operation" : "undeploy", "address" : {"deployment" : "helloWorld.war"} }, { "operation" : "remove", "address" : {"deployment" : "helloWorld.war"} } ] } Unformatted: {"operation" : "composite", "address" : [], "steps" : [{"operation" : "undeploy", "address" : {"deployment" : "helloWorld.war"}},{"operation" : "remove", "address" : {"deployment" : "helloWorld.war"}}]} - Use the following command to deploy or undeploy an application. Replace
json requestwith the request outlined above.Example 10.4. Execute command
curl -f --digest -u "<user>:<pass>" -H Content-Type:\ application/json -d '<json request>' "http://localhost:9990/management"
10.5. Deploy with the Deployment Scanner
10.5.1. Manage Application Deployment in the Deployment Scanner
10.5.2. Deploy an Application to a Standalone Server Instance with the Deployment Scanner
Prerequisites
This task shows a method for deploying applications to a standalone server instance with the deployment scanner. As indicated in the Section 10.1, “About Application Deployment” topic, this method is retained for the convenience of developers, where the Management Console and Management CLI methods are recommended for application management under production environments.
Procedure 10.9. Use the Deployment Scanner to Deploy Applications
Copy content to the deployment folder
Copy the application file to the deployment folder found atEAP_HOME/standalone/deployments/.Deployment scanning modes
There are two application deployment methods. You can choose between automatic and manual deployment scanner modes. Before starting either of the deployment methods, read Section 10.5.8, “Configure the Deployment Scanner with the Management CLI”.Automatic deployment
The deployment scanner picks up a change to the state of the folder and creates a marker file as defined in Section 10.5.8, “Configure the Deployment Scanner with the Management CLI”.Manual deployment
The deployment scanner requires a marker file to trigger the deployment process. The following example uses the Unixtouchcommand to create a new.dodeployfile.Example 10.5. Deploy with the
touchcommand[user@host bin]$
touch$EAP_HOME/standalone/deployments/example.war.dodeploy
The application file is deployed to the application server. A marker file is created in the deployment folder to indicate the successful deployment, and the application is flagged as Enabled in the Management Console.
Example 10.6. Deployment folder contents after deployment
example.war
example.war.deployed
10.5.3. Undeploy an Application from a Standalone Server Instance with the Deployment Scanner
Prerequisites
This task shows a method for undeploying applications from a standalone server instance that have been deployed with the deployment scanner. As indicated in the Section 10.1, “About Application Deployment” topic, this method is retained for the convenience of developers, where the Management Console and Management CLI methods are recommended for application management under production environments.
Note
Procedure 10.10. Undeploy an Application using one of these Methods
Undeploy the application
There are two methods to undeploy the application depending on whether you want to delete the application from the deployment folder or only alter its deployment status.Undeploy by deleting the marker file
Delete the deployed application'sexample.war.deployedmarker file to trigger the deployment scanner to begin undeploying the application from the runtime.- Result
- The deployment scanner undeploys the application and creates a
example.war.undeployedmarker file. The application remains in the deployment folder.
Undeploy by removing the application
Remove the application from the deployment directory to trigger the deployment scanner to begin undeploying the application from the runtime.- Result
- The deployment scanner undeploys the application and creates a
filename.filetype.undeployedmarker file. The application is not present in the deployment folder.
The application file is undeployed from the application server and is not visible in the Deployments screen of the Management Console.
10.5.4. Redeploy an Application to a Standalone Server Instance with the Deployment Scanner
Prerequisites
This task shows a method for redeploying applications to a standalone server instance that have been deployed with the deployment scanner. As indicated in the Section 10.1, “About Application Deployment” topic, this method is retained for the convenience of developers, where the Management Console and Management CLI methods are recommended for application management under production environments.
Procedure 10.11. Redeploy an Application to a Standalone Server
Redeploy the application
There are three possible methods to redeploy an application deployed with the deployment scanner. These methods trigger the deployment scanner to initiate a deployment cycle, and can be chosen to suit personal preference.Redeploy by altering the marker file
Trigger the deployment scanner redeployment by altering the marker file's access and modification timestamp. In the following Linux example, a Unixtouchcommand is used.Example 10.7. Redeploy with the Unix
touchcommand[user@host bin]$
touchEAP_HOME/standalone/deployments/example.war.dodeployResultThe deployment scanner detects a change in the marker file and redeploys the application. A new
.deployedfile marker replaces the previous.Redeploy by creating a new
.dodeploymarker fileTrigger the deployment scanner redeployment by creating a new.dodeploymarker file. Refer to the manual deployment instructions in Section 10.5.2, “Deploy an Application to a Standalone Server Instance with the Deployment Scanner”.Redeploy by deleting the marker file
As described in Section 10.5.5, “Reference for Deployment Scanner Marker Files”, deleting a deployed application's.deployedmarker file will trigger an undeployment and create an.undeployedmarker. Deleting the undeployment marker will trigger the deployment cycle again. Refer to Section 10.5.3, “Undeploy an Application from a Standalone Server Instance with the Deployment Scanner” for further information.
The application file is redeployed.
10.5.5. Reference for Deployment Scanner Marker Files
Marker files are a part of the deployment scanner subsystem. These files mark the status of an application within the deployment directory of the standalone server instance. A marker file has the same name as the application, with the file suffix indicating the state of the application's deployment. The following table defines the types and responses for each marker file.
Example 10.8. Marker file example
testapplication.war.
testapplication.war.deployedTable 10.1. Marker filetype definitions
| Filename Suffix | Origin | Description |
|---|---|---|
.dodeploy | User generated | Indicates that the content should be deployed or redeployed into the runtime. |
.skipdeploy | User generated | Disables auto-deploy of an application while present. Useful as a method of temporarily blocking the auto-deployment of exploded content, preventing the risk of incomplete content edits pushing live. Can be used with zipped content, although the scanner detects in-progress changes to zipped content and waits until completion. |
.isdeploying | System generated | Indicates the initiation of deployment. The marker file will be deleted when the deployment process completes. |
.deployed | System generated | Indicates that the content has been deployed. The content will be undeployed if this file is deleted. |
.failed | System generated | Indicates deployment failure. The marker file contains information about the cause of failure. If the marker file is deleted, the content will be visible to the auto-deployment again. |
.isundeploying | System generated | Indicates a response to a .deployed file deletion. The content will be undeployed and the marker will be automatically deleted upon completion. |
.undeployed | System generated | Indicates that the content has been undeployed. Deletion of the marker file has no impact to content redeployment. |
.pending | System generated | Indicates that deployment instructions will be sent to the server pending resolution of a detected issue. This marker serves as a global deployment road-block. The scanner will not instruct the server to deploy or undeploy any other content while this condition exists. |
10.5.6. Reference for Deployment Scanner Attributes
write-attribute operation. For more information on configuration options, refer to the topic Section 10.5.8, “Configure the Deployment Scanner with the Management CLI”.
Table 10.2. Deployment Scanner Attributes
| Name | Description | Type | Default Value |
|---|---|---|---|
auto-deploy-exploded | Allows the automatic deployment of exploded content without requiring a .dodeploy marker file. Recommended for only basic development scenarios to prevent exploded application deployment from occurring during changes by the developer or operating system. | Boolean | False |
auto-deploy-xml | Allows the automatic deployment of XML content without requiring a .dodeploy marker file. | Boolean | True |
auto-deploy-zipped | Allows the automatic deployment of zipped content without requiring a .dodeploy marker file. | Boolean | True |
deployment-timeout | The time value in seconds for the deployment scanner to allow a deployment attempt before being cancelled. | Long | 600 |
path | Defines the actual filesystem path to be scanned. If the relative-to attribute is specified, the path value acts as a relative addition to that directory or path. | String | deployments |
relative-to | Reference to a filesystem path defined in the paths section of the server configuration XML file. | String | jboss.server.base.dir |
scan-enabled | Allows the automatic scanning for applications by scan-interval and at startup. | Boolean | True |
scan-interval | The time interval in milliseconds between scans of the repository. A value of less than 1 restricts the scanner to operate only at startup. | Int | 5000 |
10.5.7. Configure the Deployment Scanner
10.5.8. Configure the Deployment Scanner with the Management CLI
Prerequisites
While there are multiple methods of configuring the deployment scanner, the Management CLI can be used to expose and modify the attributes by use of batch scripts or in real time. You can modify the behavior of the deployment scanner by use of the read-attribute and write-attribute global command line operations. Further information about the deployment scanner attributes are defined in the topic Section 10.5.6, “Reference for Deployment Scanner Attributes”.
standalone.xml.
<subsystem xmlns="urn:jboss:domain:deployment-scanner:1.1">
    <deployment-scanner path="deployments" relative-to="jboss.server.base.dir" scan-interval="5000"/>
</subsystem>
Procedure 10.12. Configure the Deployment Scanner
Determine the deployment scanner attributes to configure
Configuring the deployment scanner via the Management CLI requires that you first expose the correct attribute names. You can do this with theread-resourcesoperation at either the root node, or by using thecdcommand to change into the subsystem child node. You can also display the attributes with thelscommand at this level.Expose the deployment scanner attributes with the
read-resourceoperationUse theread-resourceoperation to expose the attributes defined by the default deployment scanner resource.[standalone@localhost:9999 /]/subsystem=deployment-scanner/scanner=default:read-resource { "outcome" => "success", "result" => { "auto-deploy-exploded" => false, "auto-deploy-xml" => true, "auto-deploy-zipped" => true, "deployment-timeout" => 600, "path" => "deployments", "relative-to" => "jboss.server.base.dir", "scan-enabled" => true, "scan-interval" => 5000 } }Expose the deployment scanner attributes with the
lscommandUse thelscommand with the-loptional argument to display a table of results that include the subsystem node attributes, values, and type. You can learn more about thelscommand and its arguments by exposing the CLI help entry by typingls --help. For more information about the help menu in the Management CLI, refer to the topic Section 3.5.5, “Obtain Help with the Management CLI”.[standalone@localhost:9999 /] ls -l /subsystem=deployment-scanner/scanner=default ATTRIBUTE VALUE TYPE auto-deploy-exploded false BOOLEAN auto-deploy-xml true BOOLEAN auto-deploy-zipped true BOOLEAN deployment-timeout 600 LONG path deployments STRING relative-to jboss.server.base.dir STRING scan-enabled true BOOLEAN scan-interval 5000 INT
Configure the deployment scanner with the
write-attributeoperationOnce you have determined the name of the attribute to modify, use thewrite-attributeto specify the attribute name and the new value to write to it. The following examples are all run at the child node level, which can be accessed by using thecdcommand and tab completion to expose and change into the default scanner node.[standalone@localhost:9999 /] cd subsystem=deployment-scanner/scanner=default
Enable automatic deployment of exploded content
Use thewrite-attributeoperation to enable the automatic deployment of exploded application content.[standalone@localhost:9999 scanner=default] :write-attribute(name=auto-deploy-exploded,value=true) {"outcome" => "success"}Disable the automatic deployment of XML content
Use thewrite-attributeoperation to disable the automatic deployment of XML application content.[standalone@localhost:9999 scanner=default] :write-attribute(name=auto-deploy-xml,value=false) {"outcome" => "success"}Disable the automatic deployment of zipped content
Use thewrite-attributecommand to disable the automatic deployment of zipped application content.[standalone@localhost:9999 scanner=default] :write-attribute(name=auto-deploy-zipped,value=false) {"outcome" => "success"}Configure the path attribute
Use thewrite-attributeoperation to modify the path attribute, substituting the examplenewpathnamevalue for the new path name for the deployment scanner to monitor. Note that the server will require a reload to take effect.[standalone@localhost:9999 scanner=default] :write-attribute(name=path,value=newpathname) { "outcome" => "success", "response-headers" => { "operation-requires-reload" => true, "process-state" => "reload-required" } }Configure the relative path attribute
Use thewrite-attributeoperation to modify the relative reference to the filesystem path defined in the paths section of the configuration XML file. Note that the server will require a reload to take effect.[standalone@localhost:9999 scanner=default] :write-attribute(name=relative-to,value=new.relative.dir) { "outcome" => "success", "response-headers" => { "operation-requires-reload" => true, "process-state" => "reload-required" } }Disable the deployment scanner
Use thewrite-attributeoperation to disable the deployment scanner by setting thescan-enabledvalue to false.[standalone@localhost:9999 scanner=default] :write-attribute(name=scan-enabled,value=false) {"outcome" => "success"}Change the scan interval
Use thewrite-attributeoperation to modify the scan interval time from 5000 milliseconds to 10000 milliseconds.[standalone@localhost:9999 scanner=default] :write-attribute(name=scan-interval,value=10000) {"outcome" => "success"}
Your configuration changes are saved to the deployment scanner.
10.6. Deploy with Maven
10.6.1. Manage Application Deployment with Maven
10.6.2. Deploy an Application with Maven
Prerequisites
This task shows a method for deploying applications with Maven. The example provided uses the jboss-helloworld.war application found in the JBoss EAP 6 Quickstarts collection. The helloworld project contains a POM file which initializes the jboss-as-maven-plugin. This plug-in provides simple operations to deploy and undeploy applications to and from the application server.
Procedure 10.13. Deploy an application with Maven
- Open a terminal session and navigate to the directory containing the quickstart examples.
Example 10.9. Change into the helloworld application directory
[localhost]$ cd /QUICKSTART_HOME/helloworld
- Run the Maven deploy command to deploy the application. If the application is already running, it will be redeployed.
[localhost]$ mvn package jboss-as:deploy
- View the results.
- The deployment can be confirmed by viewing the operation logs in the terminal window.
Example 10.10. Maven confirmation for helloworld application
[INFO] ------------------------------------------------------------------------
[INFO] BUILD SUCCESS
[INFO] ------------------------------------------------------------------------
[INFO] Total time: 32.629s
[INFO] Finished at: Fri Mar 14 09:09:50 EDT 2014
[INFO] Final Memory: 23M/204M
[INFO] ------------------------------------------------------------------------
- The deployment can also be confirmed in the status stream of the active application server instance.
Example 10.11. Application server confirmation for helloworld application
09:09:49,167 INFO  [org.jboss.as.repository] (management-handler-thread - 1) JBAS014900: Content added at location /home/username/EAP_HOME/standalone/data/content/32/4b4ef9a4bbe7206d3674a89807203a2092fc70/content
09:09:49,175 INFO  [org.jboss.as.server.deployment] (MSC service thread 1-7) JBAS015876: Starting deployment of "jboss-helloworld.war" (runtime-name: "jboss-helloworld.war")
09:09:49,563 INFO  [org.jboss.weld.deployer] (MSC service thread 1-8) JBAS016002: Processing weld deployment jboss-helloworld.war
09:09:49,611 INFO  [org.jboss.weld.deployer] (MSC service thread 1-1) JBAS016005: Starting Services for CDI deployment: jboss-helloworld.war
09:09:49,680 INFO  [org.jboss.weld.Version] (MSC service thread 1-1) WELD-000900 1.1.17 (redhat)
09:09:49,705 INFO  [org.jboss.weld.deployer] (MSC service thread 1-2) JBAS016008: Starting weld service for deployment jboss-helloworld.war
09:09:50,080 INFO  [org.jboss.web] (ServerService Thread Pool -- 55) JBAS018210: Register web context: /jboss-helloworld
09:09:50,425 INFO  [org.jboss.as.server] (management-handler-thread - 1) JBAS018559: Deployed "jboss-helloworld.war" (runtime-name : "jboss-helloworld.war")
The application is deployed to the application server.
10.6.3. Undeploy an Application with Maven
Prerequisites
This task shows a method for undeploying applications with Maven. The example provided uses the jboss-helloworld.war application found in the JBoss EAP 6 Quickstarts collection. The helloworld project contains a POM file which initializes the jboss-as-maven-plugin. This plug-in provides simple operations to deploy and undeploy applications to and from the application server.
Procedure 10.14. Undeploy an Application with Maven
- Open a terminal session and navigate to the directory containing the quickstart examples.
Example 10.12. Change into the helloworld application directory
[localhost]$ cd /QUICKSTART_HOME/helloworld
- Run the Maven undeploy command to undeploy the application.
[localhost]$ mvn jboss-as:undeploy
- View the results.
- The undeployment can be confirmed by viewing the operation logs in the terminal window.
Example 10.13. Maven confirmation for undeploy of helloworld application
[INFO] ------------------------------------------------------------------------
[INFO] BUILD SUCCESSFUL
[INFO] ------------------------------------------------------------------------
[INFO] Total time: 1 second
[INFO] Finished at: Mon Oct 10 17:33:02 EST 2011
[INFO] Final Memory: 11M/212M
[INFO] ------------------------------------------------------------------------
- The undeployment can also be confirmed in the status stream of the active application server instance.
Example 10.14. Application server confirmation for undeploy of helloworld application
09:51:40,512 INFO  [org.jboss.web] (ServerService Thread Pool -- 69) JBAS018224: Unregister web context: /jboss-helloworld
09:51:40,522 INFO  [org.jboss.weld.deployer] (MSC service thread 1-3) JBAS016009: Stopping weld service for deployment jboss-helloworld.war
09:51:40,536 INFO  [org.jboss.as.server.deployment] (MSC service thread 1-1) JBAS015877: Stopped deployment jboss-helloworld.war (runtime-name: jboss-helloworld.war) in 27ms
09:51:40,621 INFO  [org.jboss.as.repository] (management-handler-thread - 10) JBAS014901: Content removed from location /home/username/EAP_HOME/jboss-eap-6.3/standalone/data/content/44/e1f3c55c84b777b0fc201d69451223c09c9da5/content
09:51:40,621 INFO  [org.jboss.as.server] (management-handler-thread - 10) JBAS018558: Undeployed "jboss-helloworld.war" (runtime-name: "jboss-helloworld.war")
The application is undeployed from the application server.
10.7. Control the order of Deployed Applications on JBoss EAP 6
Procedure 10.15. Control the order of deployment in EAP 6.0.X
- Create CLI scripts that will deploy and undeploy the applications in sequential order when the server is started/stopped.
- CLI also supports the concept of batch mode which allows you to group commands and operations and execute them together as an atomic unit. If at least one of the commands or operations fails, all the other successfully executed commands and operations in the batch are rolled back.
Procedure 10.16. Control the order of deployment in EAP 6.1.X and later
- Create (if it doesn't exist) a
jboss-all.xmlfile in theapp.ear/META-INFfolder, whereapp.earis the application archive that depends on another application archive to be deployed before it is. - Make a
jboss-deployment-dependenciesentry in this file as shown below. Note that in the listing below,framework.earis the dependency application archive that should be deployed beforeapp.earapplication archive is.<jboss umlns="urn:jboss:1.0"> <jboss-deployment-dependencies xmlns="urn:jboss:deployment-dependencies:1.0"> <dependency name="framework.ear" /> </jboss-deployment-dependencies> </jboss>
10.8. Deployment Descriptor Overrides
Procedure 10.17. Override the deployment descriptor using the Management CLI
app.war and you wish to override it's WEB-INF/web.xml file with another web.xml file located in /home/user/web.xml.
- Add a deployment overlay and add content to it. You can achieve this in the following two ways:
Using DMR tree
/deployment-overlay=myoverlay:add/deployment-overlay=myoverlay/content=WEB-INF\/web.xml:add(content={url=file:///home/user/web.xml})You can also add more content rules using the second statement.
Using convenience methods
deployment-overlay add --name=myoverlay --content=WEB-INF/web.xml=/home/user/web.xml
- Link the overlay to a deployment archive. You can achieve this in the following two ways:
Using DMR tree
/deployment-overlay=myoverlay/deployment=app.war:addUsing convenience methods
deployment-overlay link --name=myoverlay --deployments=app.warYou may specify multiple archive names separated by commas.
Note that the deployment archive name need not exist on the server. You are specifying the name, but not yet linking it to an actual deployment. Redeploy the application
/deployment=app.war:redeploy
Chapter 11. Securing JBoss EAP 6
11.1. About the Security Subsystem
security subsystem provides security infrastructure for applications. The subsystem uses a security context associated with the current request to expose the capabilities of the authentication manager, authorization manager, audit manager, and mapping manager to the relevant container.
security subsystem is preconfigured by default, so security elements rarely need to be changed. The only security element that may need to be changed is whether to use deep-copy-subject-mode. In most cases, administrators will focus on the configuration of security domains.
See Section 11.4, “About Deep Copy Subject Mode” for details about deep copy subject mode.
A security domain is a set of Java Authentication and Authorization Service (JAAS) declarative security configurations which one or more applications use to control authentication, authorization, auditing, and mapping. Three security domains are included by default: jboss-ejb-policy, jboss-web-policy, and other. You can create as many security domains as you need to accommodate your application requirements. See Section 11.6.12, “Use a Security Domain in Your Application” for details about security domain.
11.2. About the Structure of the Security Subsystem
Example 11.1. Example Security Subsystem Configuration
<subsystem xmlns="urn:jboss:domain:security:1.2">
	<security-management>
		...
	</security-management>
	<security-domains>
        <security-domain name="other" cache-type="default">
            <authentication>
                <login-module code="Remoting" flag="optional">
                    <module-option name="password-stacking" value="useFirstPass"/>
                </login-module>
                <login-module code="RealmUsersRoles" flag="required">
                    <module-option name="usersProperties" value="${jboss.domain.config.dir}/application-users.properties"/>
                    <module-option name="rolesProperties" value="${jboss.domain.config.dir}/application-roles.properties"/>
                    <module-option name="realm" value="ApplicationRealm"/>
                    <module-option name="password-stacking" value="useFirstPass"/>
                </login-module>
            </authentication>
        </security-domain>
        <security-domain name="jboss-web-policy" cache-type="default">
            <authorization>
                <policy-module code="Delegating" flag="required"/>
            </authorization>
        </security-domain>
        <security-domain name="jboss-ejb-policy" cache-type="default">
            <authorization>
                <policy-module code="Delegating" flag="required"/>
            </authorization>
        </security-domain>
    </security-domains>
    <vault>
    	...
    </vault>
</subsystem>
<security-management>, <subject-factory> and <security-properties> elements are not present in the default configuration. The <subject-factory> and <security-properties> elements have been deprecated in JBoss EAP 6.1 onwards.
11.3. Configure the Security Subsystem
- <security-management>
- This section overrides high-level behaviors of the security subsystem. It contains an optional setting
deep-copy-subject-mode, that specifies whether to copy or link to security tokens, for additional thread safety. - <security-domains>
- A container element which holds multiple security domains. A security domain may contain information about authentication, authorization, mapping, and auditing modules, as well as JASPI authentication and JSSE configuration. Your application would specify a security domain to manage its security information.
- <security-properties>
- Contains names and values of properties which are set on the java.security.Security class.
11.4. About Deep Copy Subject Mode
11.5. Enable Deep Copy Subject Mode
Procedure 11.1. Enable Deep Copy Security Mode from the Management Console
Log into the Management Console.
Managed Domain: Select the appropriate profile.
In a managed domain, the security subsystem is configured per profile, and you can enable or disable the deep copy security mode independently in each profile.To select a profile, click Configuration at the top of the screen, and then select a profile from the Profile drop down box at the top left.Open the Security Subsystem configuration menu.
Expand the Security menu, then select Security Subsystem.Enable Deep Copy Subject mode.
Click . Check the box beside Deep Copy Subjects to enable deep copy subject mode.
If you prefer to use the management CLI to enable this option, use one of the following commands.
Example 11.2. Managed Domain
/profile=full/subsystem=security/:write-attribute(name=deep-copy-subject-mode,value=TRUE)
Example 11.3. Standalone Server
/subsystem=security/:write-attribute(name=deep-copy-subject-mode,value=TRUE)
11.6. Security Domains
11.6.1. About Security Domains
11.6.2. About Picketbox
- Section 11.6.5, “About Authorization” and access control
- Section 11.6.10, “About Security Mapping” of principals, roles, and attributes
11.6.3. About Authentication
11.6.4. Configure Authentication in a Security Domain
Procedure 11.2. Setup Authentication Settings for a Security Domain
Open the security domain's detailed view.
- Click the Configuration label at the top of the management console.
- Select the profile to modify from the Profile selection box at the top left of the Profile view.
- Expand the Security menu, and select Security Domains.
- Click the View link for the security domain you want to edit.
Navigate to the Authentication subsystem configuration.
Select the Authentication label at the top of the view if it is not already selected.The configuration area is divided into two areas: Login Modules and Details. The login module is the basic unit of configuration. A security domain can include several login modules, each of which can include several attributes and options.Add an authentication module.
Click Add to add a JAAS authentication module. Fill in the details for your module.The Code is the class name of the module. The Flag setting controls how the module relates to other authentication modules within the same security domain.Explanation of the FlagsThe Java Enterprise Edition 6 specification provides the following explanation of the flags for security modules. The following list is taken from http://docs.oracle.com/javase/6/docs/technotes/guides/security/jaas/JAASRefGuide.html#AppendixA. Refer to that document for more detailed information.
Flag Details required The LoginModule is required to succeed. If it succeeds or fails, authentication still continues to proceed down the LoginModule list.requisite LoginModule is required to succeed. If it succeeds, authentication continues down the LoginModule list. If it fails, control immediately returns to the application (authentication does not proceed down the LoginModule list).sufficient The LoginModule is not required to succeed. If it does succeed, control immediately returns to the application (authentication does not proceed down the LoginModule list). If it fails, authentication continues down the LoginModule list.optional The LoginModule is not required to succeed. If it succeeds or fails, authentication still continues to proceed down the LoginModule list.Edit authentication settings
After you have added your module, you can modify its Code or Flags by clicking in the Details section of the screen. Be sure the Attributes tab is selected.Optional: Add or remove module options.
If you need to add options to your module, click its entry in the Login Modules list, and select the Module Options tab in the Details section of the page. Click the button, and provide the key and value for the option. Use the button to remove an option.
Your authentication module is added to the security domain, and is immediately available to applications which use the security domain.
jboss.security.security_domain Module Option
By default, each login module defined in a security domain has the jboss.security.security_domain module option added to it automatically. This option causes problems with login modules which check to make sure that only known options are defined. The IBM Kerberos login module, com.ibm.security.auth.module.Krb5LoginModule is one of these.
true when starting JBoss EAP 6. Add the following to your start-up parameters.
-Djboss.security.disable.secdomain.option=true
11.6.5. About Authorization
11.6.6. Configure Authorization in a Security Domain
Procedure 11.3. Setup Authorization in a Security Domain
Open the security domain's detailed view.
- Click the Configuration label at the top of the management console.
- In a managed domain, select the profile to modify from the Profile drop down box at the top left.
- Expand the Security menu item, and select Security Domains.
- Click the View link for the security domain you want to edit.
Navigate to the Authorization subsystem configuration.
Select the Authorization label at the top of the screen.The configuration area is divided into two areas: Policies and Details. The login module is the basic unit of configuration. A security domain can include several authorization policies, each of which can include several attributes and options.Add a policy.
Click Add to add a JAAS authorization policy module. Fill in the details for your module.The Code is the class name of the module. The Flag controls how the module relates to other authorization policy modules within the same security domain.Explanation of the FlagsThe Java Enterprise Edition 6 specification provides the following explanation of the flags for security modules. The following list is taken from http://docs.oracle.com/javase/6/docs/technotes/guides/security/jaas/JAASRefGuide.html#AppendixA. Refer to that document for more detailed information.
Flag Details required The LoginModule is required to succeed. If it succeeds or fails, authorization still continues to proceed down the LoginModule list.requisite LoginModule is required to succeed. If it succeeds, authorization continues down the LoginModule list. If it fails, control immediately returns to the application (authorization does not proceed down the LoginModule list).sufficient The LoginModule is not required to succeed. If it does succeed, control immediately returns to the application (authorization does not proceed down the LoginModule list). If it fails, authorization continues down the LoginModule list.optional The LoginModule is not required to succeed. If it succeeds or fails, authorization still continues to proceed down the LoginModule list.Edit authorization settings
After you have added your module, you can modify its Code or Flags by clicking in the Details section of the screen. Be sure the Attributes tab is selected.Optional: Add or remove module options.
If you need to add options to your module, click its entry in the Policies list, and select the Module Options tab in the Details section of the page. Click and provide the key and value for the option. Use the button to remove an option.
Your authorization policy module is added to the security domain, and is immediately available to applications which use the security domain.
11.6.7. About Security Auditing
11.6.8. Configure Security Auditing
Procedure 11.4. Setup Security Auditing for a Security Domain
Open the security domain's detailed view.
- Click Configuration at the top of the screen.
- In a managed domain, select a profile to modify from the Profile selection box at the top left.
- Expand the Security menu and select Security Domains.
- Click View for the security domain you want to edit.
Navigate to the Auditing subsystem configuration.
Select the Audit tab at the top of the screen.The configuration area is divided into two areas: Provider Modules and Details. The provider module is the basic unit of configuration. A security domain can include several provider modules each of which can include attributes and options.Add a provider module.
Click Add. Fill in the Code section with the classname of the provider module.Verify if your module is working
The goal of an audit module is to provide a way to monitor the events in the security subsystem. This monitoring can be done by means of writing to a log file, email notifications or any other measurable auditing mechanism.For example, JBoss EAP 6 includes theLogAuditProvidermodule by default. If enabled following the steps above, this audit module writes security notifications to aaudit.logfile in thelogsubfolder within theEAP_HOMEdirectory.To verify if the steps above have worked in the context of theLogAuditProvider, perform an action that is likely to trigger a notification and then check the audit log file.For a full list of included security auditing provider modules, see here: Section 12.4, “Included Security Auditing Provider Modules”Optional: Add, edit, or remove module options.
To add options to your module, click its entry in the Modules list, and select the Module Options tab in the Details section of the page. Click , and provide the key and value for the option.To edit an option that already exists, click to remove it, and click to add it again with the correct options.
Your security auditing module is added to the security domain, and is immediately available to applications which use the security domain.
11.6.9. About the Audit Log
LogAuditProvider module is enabled, JBoss EAP 6 maintains an audit log which records authentication and authorization in applications and login modules. The file is named audit.log by default and stored in the log subdirectory of the EAP_HOME directory. This behavior is determined by the configuration of the logging subsystem's log handlers. The output of the LogAuditProvider module could be sent to a syslog server in addition to or instead of a file, by using the syslog log handler.
LogAuditProvider module outputs only to cumulative audit.log file. To implement a periodic rotating file handler called AUDIT, enter the following management CLI command.
/subsystem=logging/periodic-rotating-file-handler=AUDIT/:add(suffix=.yyyy-MM-dd,formatter=%d{HH:mm:ss,SSS} %-5p [%c] (%t) %s%E%n,level=TRACE,file={"relative-to" => "jboss.server.log.dir","path" => "audit.log"})
See Also:
11.6.10. About Security Mapping
11.6.11. Configure Security Mapping in a Security Domain
Procedure 11.5. Setup Security Mapping Settings in a Security Domain
Open the security domain's detailed view.
- Click the Configuration label at the top of the management console.
- In a managed domain, select a profile from the Profile selection box at the top left.
- Expand the Security menu, and select Security Domains.
- Click View for the security domain you want to edit.
Navigate to the Mapping subsystem configuration.
Select the Mapping label at the top of the screen.The configuration area is divided into two areas: Modules and Details. The mapping module is the basic unit of configuration. A security domain can include several mapping modules, each of which can include several attributes and options.Add a security mapping module.
Click Add.Fill in the details for your module. The Code is the class name of the module. The Type field refers to the type of mapping this module performs. Allowed values are principal, role, attribute or credential.Edit a security mapping module
After you have added your module, you can modify its Code or Type.- Select the Attributes tab.
- Click in the Details section of the screen.
Optional: Add, edit, or remove module options.
To add options to your module, click its entry in the Modules list, and select the Module Options tab in the Details section of the page. Click , and provide the key and value for the option.To edit an option that already exists, click Remove to remove it, and add it again with the new value.Use the button to remove an option.
Your security mapping module is added to the security domain, and is immediately available to applications which use the security domain.
11.6.12. Use a Security Domain in Your Application
To use a security domain in your application, first you need to define the security domain in the server's configuration and then enable it for an application in the application's deployment descriptor. Then you must add the required annotations to the EJB that uses it. This topic covers the steps required to use a security domain in your application.
Warning
Procedure 11.6. Configure Your Application to Use a Security Domain
Define the Security Domain
You need to define the security domain in the server's configuration file, and then enable it for an application in the application's descriptor file.Configure the security domain in the server's configuration file
The security domain is configured in thesecuritysubsystem of the server's configuration file. If the JBoss EAP 6 instance is running in a managed domain, this is thedomain/configuration/domain.xmlfile. If the JBoss EAP 6 instance is running as a standalone server, this is thestandalone/configuration/standalone.xmlfile.Theother,jboss-web-policy, andjboss-ejb-policysecurity domains are provided by default in JBoss EAP 6. The following XML example was copied from thesecuritysubsystem in the server's configuration file.Thecache-typeattribute of a security domain specifies a cache for faster authentication checks. Allowed values aredefaultto use a simple map as the cache, orinfinispanto use an Infinispan cache.<subsystem xmlns="urn:jboss:domain:security:1.2"> <security-domains> <security-domain name="other" cache-type="default"> <authentication> <login-module code="Remoting" flag="optional"> <module-option name="password-stacking" value="useFirstPass"/> </login-module> <login-module code="RealmDirect" flag="required"> <module-option name="password-stacking" value="useFirstPass"/> </login-module> </authentication> </security-domain> <security-domain name="jboss-web-policy" cache-type="default"> <authorization> <policy-module code="Delegating" flag="required"/> </authorization> </security-domain> <security-domain name="jboss-ejb-policy" cache-type="default"> <authorization> <policy-module code="Delegating" flag="required"/> </authorization> </security-domain> </security-domains> </subsystem>You can configure additional security domains as needed using the Management Console or CLI.Enable the security domain in the application's descriptor file
The security domain is specified in the<security-domain>child element of the<jboss-web>element in the application'sWEB-INF/jboss-web.xmlfile. The following example configures a security domain namedmy-domain.<jboss-web> <security-domain>my-domain</security-domain> </jboss-web>This is only one of many settings which you can specify in theWEB-INF/jboss-web.xmldescriptor.
Add the Required Annotation to the EJB
You configure security in the EJB using the@SecurityDomainand@RolesAllowedannotations. The following EJB code example limits access to theothersecurity domain by users in theguestrole.package example.ejb3; import java.security.Principal; import javax.annotation.Resource; import javax.annotation.security.RolesAllowed; import javax.ejb.SessionContext; import javax.ejb.Stateless; import org.jboss.ejb3.annotation.SecurityDomain; /** * Simple secured EJB using EJB security annotations * Allow access to "other" security domain by users in a "guest" role. */ @Stateless @RolesAllowed({ "guest" }) @SecurityDomain("other") public class SecuredEJB { // Inject the Session Context @Resource private SessionContext ctx; /** * Secured EJB method using security annotations */ public String getSecurityInfo() { // Session context injected using the resource annotation Principal principal = ctx.getCallerPrincipal(); return principal.toString(); } }For more code examples, see theejb-securityquickstart in the JBoss EAP 6 Quickstarts bundle, which is available from the Red Hat Customer Portal.
11.6.13. Java Authorization Contract for Containers (JACC)
11.6.13.1. About Java Authorization Contract for Containers (JACC)
11.6.13.2. Configure Java Authorization Contract for Containers (JACC) Security
jboss-web.xml to include the correct parameters.
To add JACC support to the security domain, add the JACC authorization policy to the authorization stack of the security domain, with the required flag set. The following is an example of a security domain with JACC support. However, the security domain is configured in the Management Console or Management CLI, rather than directly in the XML.
<security-domain name="jacc" cache-type="default">
    <authentication>
        <login-module code="UsersRoles" flag="required">
        </login-module>
    </authentication>
    <authorization>
        <policy-module code="JACC" flag="required"/>
    </authorization>
</security-domain>
The jboss-web.xml is located in the WEB-INF/ directory of your deployment, and contains overrides and additional JBoss-specific configuration for the web container. To use your JACC-enabled security domain, you need to include the <security-domain> element, and also set the <use-jboss-authorization> element to true. The following application is properly configured to use the JACC security domain above.
<jboss-web>
    <security-domain>jacc</security-domain>
    <use-jboss-authorization>true</use-jboss-authorization>
</jboss-web>
Configuring EJBs to use a security domain and to use JACC differs from Web Applications. For an EJB, you can declare method permissions on a method or group of methods, in the ejb-jar.xml descriptor. Within the <ejb-jar> element, any child <method-permission> elements contain information about JACC roles. Refer to the example configuration for more details. The EJBMethodPermission class is part of the Java Enterprise Edition 6 API, and is documented at http://docs.oracle.com/javaee/6/api/javax/security/jacc/EJBMethodPermission.html.
Example 11.4. Example JACC Method Permissions in an EJB
<ejb-jar>
  <assembly-descriptor>
    <method-permission>
      <description>The employee and temp-employee roles may access any method of the EmployeeService bean </description>
      <role-name>employee</role-name>
      <role-name>temp-employee</role-name>
      <method>
        <ejb-name>EmployeeService</ejb-name>
        <method-name>*</method-name>
      </method>
    </method-permission>
  </assembly-descriptor>
</ejb-jar>
jboss-ejb3.xml descriptor, in the <security> child element. In addition to the security domain, you can also specify the run-as principal, which changes the principal the EJB runs as.
Example 11.5. Example Security Domain Declaration in an EJB
<ejb-jar>
	<assembly-descriptor>
		<security>
  		<ejb-name>*</ejb-name>
  		<security-domain>myDomain</security-domain>
  		<run-as-principal>myPrincipal</run-as-principal>
		</security>
 	</assembly-descriptor>
</ejb-jar>
11.6.14. Java Authentication SPI for Containers (JASPI)
11.6.14.1. About Java Authentication SPI for Containers (JASPI) Security
11.6.14.2. Configure Java Authentication SPI for Containers (JASPI) Security
<authentication-jaspi> element to your security domain. The configuration is similar to a standard authentication module, but login module elements are enclosed in a <login-module-stack> element. The structure of the configuration is:
Example 11.6. Structure of the authentication-jaspi element
<authentication-jaspi>
	<login-module-stack name="...">
	  <login-module code="..." flag="...">
	    <module-option name="..." value="..."/>
	  </login-module>
	</login-module-stack>
	<auth-module code="..." login-module-stack-ref="...">
	  <module-option name="..." value="..."/>
	</auth-module>
</authentication-jaspi>
EAP_HOME/domain/configuration/domain.xml or EAP_HOME/standalone/configuration/standalone.xml.
11.7. Securing IIOP
11.7.1. About JBoss IIOP
11.7.2. About IOR
- Object type.
- Host name of the server.
- Port number of the server.
- An object key, which identifies the object.
11.7.3. IOR Security Parameters
Prerequisites
- Enable IOR settings with the following management CLI command.
/subsystem=jacorb/ior-settings=default:add
- Ensure the JacORB subsystem is enabled. For example, it is already enabled in the
fullprofile, but not in the default (web) profile. For details on how to enable the JacORB subsystem see Section 21.4.2, “Configure the ORB for JTS Transactions”.
Table 11.1. iorSASContextType
| Parameter | Description | Valid Values |
|---|---|---|
caller-propagation | Indicates whether or not the caller should be propagated in the SAS context | none, supported |
/subsystem=jacorb/ior-settings=default/setting=sas-context:add
/subsystem=jacorb/ior-settings=default/setting=sas-context:write-attribute(name=caller-propagation, value=NONE|SUPPORTED)
Table 11.2. iorASContextType
| Parameter | Description | Type | Valid Values |
|---|---|---|---|
auth-method | Authentication method. | String | none, username_password |
realm | Authentication Service realm name. | String | Default value: Default |
required | Indicates if authentication is required. | Boolean | true, false |
/subsystem=jacorb/ior-settings=default/setting=as-context:add
/subsystem=jacorb/ior-settings=default/setting=as-context:write-attribute(name=ATTRIBUTE, value=VALUE)
Table 11.3. iorTransportconfigType
| Parameter | Description | Valid Values |
|---|---|---|
integrity | Indicates whether or not the transport must require integrity protection. | none, supported, or required. |
confidentiality | Indicates whether or not the transport must require confidentiality protection. | none, supported, or required. |
trust-in-target | Indicates if the transport must require trust in target to be established. | none, supported |
trust-in-client | Indicates if the transport must require trust in client to be established. | none, supported, or required. |
detect-replay | Indicates whether the transport must require replay detection or not. | none, supported, or required. |
detect-misordering | Indicates whether or not the transport must require misordering detection. | none, supported, or required. |
/subsystem=jacorb/ior-settings=default/setting=transport-config:add
/subsystem=jacorb/ior-settings=default/setting=transport-config:write-attribute(name=ATTRIBUTE, value=VALUE)
11.8. Management Interface Security
11.8.1. Default User Security Configuration
All management interfaces in JBoss EAP 6 are secured by default. This security takes two different forms:
- Local interfaces are secured by a SASL contract between local clients and the server they connect to. This security mechanism is based on the client's ability to access the local filesystem. This is because access to the local filesystem would allow the client to add a user or otherwise change the configuration to thwart other security mechanisms. This adheres to the principle that if physical access to the filesystem is achieved, other security mechanisms are superfluous. The mechanism happens in four steps:
Note
HTTP access is considered to be remote, even if you connect to the localhost using HTTP.- The client sends a message to the server which includes a request to authenticate with the local SASL mechanism.
- The server generates a one-time token, writes it to a unique file, and sends a message to the client with the full path of the file.
- The client reads the token from the file and sends it to the server, verifying that it has local access to the filesystem.
- The server verifies the token and then deletes the file.
- Remote clients, including local HTTP clients, use realm-based security. The default realm with the permissions to configure the JBoss EAP 6 instance remotely using the management interfaces is
ManagementRealm. A script is provided which allows you to add users to this realm (or realms you create). For more information on adding users, see the Getting Started chapter of the JBoss EAP 6 Installation Guide. For each user, the username and a hashed password are stored in a file.- Managed domain
EAP_HOME/domain/configuration/mgmt-users.properties- Standalone server
EAP_HOME/standalone/configuration/mgmt-users.properties
Even though the contents of themgmt-users.propertiesare masked, the file must still be treated as a sensitive file. It is recommended that it be set to the file mode of600, which gives no access other than read and write access by the file owner.
11.8.2. Overview of Advanced Management Interface Configuration
EAP_HOME/domain/configuration/host.xml or EAP_HOME/standalone/configuration/standalone.xml controls which network interfaces the host controller process binds to, which types of management interfaces are available at all, and which type of authentication system is used to authenticate users on each interface. This topic discusses how to configure the Management Interfaces to suit your environment.
<management> element that includes the following four configurable child elements. The security realms and outbound connections are each first defined, and then applied to the management interfaces as attributes.
- <security-realms>
- <outbound-connections>
- <management-interfaces>
- <audit-log>
Note
The security realm is responsible for the authentication and authorization of users allowed to administer JBoss EAP 6 via the Management API, Management CLI, or web-based Management Console.
ManagementRealm and ApplicationRealm. Each of these security realms uses a -users.properties file to store users and hashed passwords, and a -roles.properties to store mappings between users and roles. Support is also included for an LDAP-enabled security realm.
Note
Some security realms connect to external interfaces, such as an LDAP server. An outbound connection defines how to make this connection. A pre-defined connection type, ldap-connection, sets all of the required and optional attributes to connect to the LDAP server and verify the credential.
A management interface includes properties about how connect to and configure JBoss EAP. Such information includes the named network interface, port, security realm, and other configurable information about the interface. Two interfaces are included in a default installation:
http-interfaceis the configuration for the web-based Management Console.native-interfaceis the configuration for the command-line Management CLI and the REST-like Management API.
11.8.3. About LDAP
11.8.4. Use LDAP to Authenticate to the Management Interfaces
- Create an outbound connection to the LDAP server.
- Create an LDAP-enabled security realm.
- Reference the new security domain in the Management Interface.
The LDAP outbound connection allows the following attributes:
Table 11.4. Attributes of an LDAP Outbound Connection
| Attribute | Required | Description |
|---|---|---|
url | yes |
The URL address of the directory server.
|
search-dn | no |
The fully distinguished name (DN) of the user authorized to perform searches.
|
search-credentials | no |
The password of the user authorized to perform searches.
|
initial-context-factory | no |
The initial context factory to use when establishing the connection. Defaults to
com.sun.jndi.ldap.LdapCtxFactory.
|
security-realm | no |
The security realm to reference to obtain a configured
SSLContext to use when establishing the connection.
|
Example 11.7. Add an LDAP Outbound Connection
- Search DN:
cn=search,dc=acme,dc=com - Search Credential:
myPass - URL:
ldap://127.0.0.1:389
/host=master/core-service=management/security-realm=ldap_security_realm:add
/host=master/core-service=management/ldap-connection=ldap_connection/:add(search-credential=myPass,url=ldap://127.0.0.1:389,search-dn="cn=search,dc=acme,dc=com")
The Management Interfaces can authenticate against LDAP server instead of the property-file based security realms configured by default. The LDAP authenticator operates by first establishing a connection to the remote directory server. It then performs a search using the username which the user passed to the authentication system, to find the fully-qualified distinguished name (DN) of the LDAP record. A new connection is established, using the DN of the user as the credential, and password supplied by the user. If this authentication to the LDAP server is successful, the DN is verified to be valid.
- connection
- The name of the connection defined in
outbound-connectionsto use to connect to the LDAP directory. - advanced-filter
- The fully defined filter used to search for a user based on the supplied user ID. The filter must contain a variable in the following format:
{0}. This is later replaced with the user name supplied by the user. - base-dn
- The distinguished name of the context to begin searching for the user.
- recursive
- Whether the search should be recursive throughout the LDAP directory tree, or only search the specified context. Defaults to
false. - user-dn
- The attribute of the user that holds the distinguished name. This is subsequently used to test authentication as the user can complete. Defaults to
dn. - username-attribute
- The name of the attribute to search for the user. This filter performs a simple search where the user name entered by the user matches the specified attribute.
- allow-empty-passwords
- This attribute determines whether an empty password is accepted. The default value for this attribute is
false. - Either
username-filteroradvanced-filtermust be specified - The
advanced-filterattribute contains a filter query in the standard LDAP syntax, for example:(&(sAMAccountName={0})(memberOf=cn=admin,cn=users,dc=acme,dc=com))
Example 11.8. XML Representing an LDAP-enabled Security Realm
- connection -
ldap_connection - base-dn -
cn=users,dc=acme,dc=com. - username-filter -
attribute="sambaAccountName"
<security-realm name="ldap_security_realm">
   <authentication>
      <ldap connection="ldap_connection" base-dn="cn=users,dc=acme,dc=com">
         <username-filter attribute="sambaAccountName" />
      </ldap>
  </authentication>
</security-realm>
Warning
Example 11.9. Add an LDAP Security Realm
/host=master/core-service=management/security-realm=ldap_security_realm/authentication=ldap:add(base-dn="DC=mycompany,DC=org", recursive=true, username-attribute="MyAccountName", connection="ldap_connection")
After you create a security realm, you need to reference it in the configuration of your management interface. The management interface will use the security realm for HTTP digest authentication.
Example 11.10. Apply the Security Realm to the HTTP Interface
/host=master/core-service=management/management-interface=http-interface/:write-attribute(name=security-realm,value=ldap_security_realm)
Example 11.11. Apply the Security Realm to the Native Interface
/host=master/core-service=management/management-interface=native-interface/:write-attribute(name=security-realm,value=ldap_security_realm)
11.8.5. Disable the HTTP Management Interface
Note
console-enabled attribute of the HTTP interface to false, instead of disabling the interface completely.
/host=master/core-service=management/management-interface=http-interface/:write-attribute(name=console-enabled,value=false)
Example 11.12. Read the Configuration of the HTTP Interface
/host=master/core-service=management/management-interface=http-interface/:read-resource(recursive=true,proxies=false,include-runtime=false,include-defaults=true)
{
    "outcome" => "success",
    "result" => {
        "console-enabled" => true,
        "interface" => "management",
        "port" => expression "${jboss.management.http.port:9990}",
        "secure-port" => undefined,
        "security-realm" => "ManagementRealm"
    }
}
Example 11.13. Remove the HTTP Interface
/host=master/core-service=management/management-interface=http-interface/:remove
Example 11.14. Re-Create the HTTP Interface
/host=master/core-service=management/management-interface=http-interface:add(console-enabled=true,interface=management,port="${jboss.management.http.port:9990}",security-realm=ManagementRealm)11.8.6. Remove Silent Authentication from the Default Security Realm
The default installation of JBoss EAP 6 contains a method of silent authentication for a local Management CLI user. This allows the local user the ability to access the Management CLI without username or password authentication. This functionality is enabled as a convenience, and to assist local users running Management CLI scripts without requiring authentication. It is considered a useful feature given that access to the local configuration typically also gives the user the ability to add their own user details or otherwise disable security checks.
local element within the security-realm section of the configuration file. This applies to both the standalone.xml for a Standalone Server instance, or host.xml for a Managed Domain. You should only consider the removal of the local element if you understand the impact that it might have on your particular server configuration.
local element visible in the following example.
Example 11.15. Example of the local element in the security-realm
<security-realms>
    <security-realm name="ManagementRealm">
        <authentication>
            <local default-user="$local"/>
            <properties path="mgmt-users.properties" relative-to="jboss.server.config.dir"/>
        </authentication>
    </security-realm>
    <security-realm name="ApplicationRealm">
        <authentication>
            <local default-user="$local" allowed-users="*"/>
            <properties path="application-users.properties" relative-to="jboss.server.config.dir"/>
        </authentication>
        <authorization>
            <properties path="application-roles.properties" relative-to="jboss.server.config.dir"/>
        </authorization>
    </security-realm>
</security-realms>
Procedure 11.7. Remove Silent Authentication from the Default Security Realm
Remove silent authentication with the Management CLI
Remove thelocalelement from the Management Realm and Application Realm as required.- Remove the
localelement from the Management Realm.For Standalone Servers
/core-service=management/security-realm=ManagementRealm/authentication=local:remove
For Managed Domains
/host=HOST_NAME/core-service=management/security-realm=ManagementRealm/authentication=local:remove
- Remove the
localelement from the Application Realm.For Standalone Servers
/core-service=management/security-realm=ApplicationRealm/authentication=local:remove
For Managed Domains
/host=HOST_NAME/core-service=management/security-realm=ApplicationRealm/authentication=local:remove
The silent authentication mode is removed from the ManagementRealm and the ApplicationRealm.
11.8.7. Disable Remote Access to the JMX Subsystem
/profile=default prefix from the commands.
Note
Example 11.16. Remove the Remoting Connector from the JMX Subsystem
/profile=default/subsystem=jmx/remoting-connector=jmx/:remove
Example 11.17. Remove the JMX Subsystem
/profile=default/subsystem=jmx/:remove
11.8.8. Configure Security Realms for the Management Interfaces
The management interfaces are configured to use the ManagementRealm security realm by default. The ManagementRealm stores its user password combinations in the file mgmt-users.properties.
Example 11.18. Default ManagementRealm
/host=master/core-service=management/security-realm=ManagementRealm/:read-resource(recursive=true,proxies=false,include-runtime=false,include-defaults=true)
{
    "outcome" => "success",
    "result" => {
        "authorization" => undefined,
        "server-identity" => undefined,
        "authentication" => {"properties" => {
            "path" => "mgmt-users.properties",
            "plain-text" => false,
            "relative-to" => "jboss.domain.config.dir"
        }}
    }
}
The following commands create a new security realm called TestRealm and set the directory for the relevant properties file.
Example 11.19. Create a new Security Realm
/host=master/core-service=management/security-realm=TestRealm/:add/host=master/core-service=management/security-realm=TestRealm/authentication=properties/:add(path=TestUsers.properties, relative-to=jboss.domain.config.dir)
To use Security Domain to authenticate to the Management interfaces:
security-realm attribute of the management interface:
Example 11.20. Specify a Security Realm to use for the HTTP Management Interface
/host=master/core-service=management/management-interface=http-interface/:write-attribute(name=security-realm,value=TestRealm)11.9. Securing the Management Interfaces with Role-Based Access Control
11.9.1. About Role-Based Access Control (RBAC)
11.9.2. Role-Based Access Control in the Management Console and CLI
- The Management Console
- In the management console some controls and views are disabled (greyed out) or not visible at all depending on the permissions of the role to which the user has been assigned.If you do not have read permissions to a resource attribute, that attribute will appear blank in the console. For example, most roles cannot read the username and password fields for datasources.If you do not have write permissions to a resource attribute, that attribute will be disabled (greyed-out) in the edit form for the resource. If you do not have write permissions to the resource, then the edit button for the resource will not appear.If a user does not have permissions to access a resource or attribute (it is "unaddressable" for that role), it will not appear in the console for that user. An example of that is the access control system itself which is only visible to a few roles by default.
- The Management CLI or API
- Users of the Management CLI or management API will encounter slightly different behavior in the API when RBAC is enabled.Resources and attributes that cannot be read are filtered from results. If the filtered items are addressable by the role, their names are listed as
filtered-attributesin theresponse-headerssection of the result. If a resource or attribute is not addressable by the role, it is not listed.Attempting to access a resource that is not addressable will result in aresource not founderror.If a user attempts to write or read a resource that they can address but lack the appropriate write or read permissions, aPermission Deniederror is returned.
11.9.3. Supported Authentication Schemes
username/password, client certificate, and local user.
- Username/Password
- Users are authenticated using a username and password combination which is verified against either the
mgmt-users.propertiesfile, or an LDAP server. - Client Certificate
- Using the Trust Store.
- Local User
jboss-cli.shauthenticates automatically as Local User if the server that is running on the same machine. By default Local User is a member of theSuperUsergroup.
mgmt-users.properties file or an LDAP server, those systems can supply user group information. This information can also be used by JBoss EAP to assign roles to users.
11.9.4. The Standard Roles
- Monitor
- Users of the Monitor role have the fewest permissions and can only read the current configuration and state of the server. This role is intended for users who need to track and report on the performance of the server.Monitors cannot modify server configuration nor can they access sensitive data or operations.
- Operator
- The Operator role extends the Monitor role by adding the ability to modify the runtime state of the server. This means that Operators can reload and shutdown the server as well as pause and resume JMS destinations. The Operator role is ideal for users who are responsible for the physical or virtual hosts of the application server so they can ensure that servers can be shutdown and restarted corrected when needed.Operators cannot modify server configuration or access sensitive data or operations.
- Maintainer
- The Maintainer role has access to view and modify runtime state and all configuration except sensitive data and operations. The Maintainer role is the general purpose role that doesn't have access to sensitive data and operation. The Maintainer role allows users to be granted almost complete access to administer the server without giving those users access to passwords and other sensitive information.Maintainers cannot access sensitive data or operations.
- Administrator
- The Administrator role has unrestricted access to all resources and operations on the server except the audit logging system. The Administrator role has access to sensitive data and operations. This role can also configure the access control system. The Administrator role is only required when handling sensitive data or configuring users and roles.Administrators cannot access the audit logging system and cannot change themselves to the Auditor or SuperUser role.
- SuperUser
- The SuperUser role has no restrictions and has complete access to all resources and operations of the server including the audit logging system. This role is equivalent to the administrator users of earlier versions of JBoss EAP 6 (6.0 and 6.1). If RBAC is disabled, all management users have permissions equivalent to the SuperUser role.
- Deployer
- The Deployer role has the same permissions as the Monitor, but can modify configuration and state for deployments and any other resource type enabled as an application resource.
- Auditor
- The Auditor role has all the permissions of the Monitor role and can also view (but not modify) sensitive data, and has full access to the audit logging system. The Auditor role is the only role other than SuperUser that can access the audit logging system.Auditors cannot modify sensitive data or resources. Only read access is permitted.
11.9.5. About Role Permissions
Table 11.5. Role Permissions Matrix
|
Monitor
|
Operator
|
Maintainer
|
Deployer
|
Auditor
|
Administrator
|
SuperUser
| |
|
Read Config and State
|
X
|
X
|
X
|
X
|
X
|
X
|
X
|
|
Read Sensitive Data [2]
|
X
|
X
|
X
| ||||
|
Modify Sensitive Data [2]
|
X
|
X
| |||||
|
Read/Modify Audit Log
|
X
|
X
| |||||
|
Modify Runtime State
|
X
|
X
|
X[1]
|
X
|
X
| ||
|
Modify Persistent Config
|
X
|
X[1]
|
X
|
X
| |||
|
Read/Modify Access Control
|
X
|
X
|
11.9.6. About Constraints
- Application Constraints
- Application Constraints define sets of resources and attributes that can be accessed by users of the Deployer role. By default the only enabled Application Constraint is core which includes deployments, deployment overlays. Application Constraints are also included (but not enabled by default) for datasources, logging, mail, messaging, naming, resource-adapters and security. These constraints allow Deployer users to not only deploy applications but also configure and maintain the resources that are required by those applications.Application constraint configuration is in the Management API at
/core-service=management/access=authorization/constraint=application-classification. - Sensitivity Constraints
- Sensitivity Constraints define sets of resources that are considered "sensitive". A sensitive resource is generally one that is either secret, like a password, or one that will have serious impact on the operation of the server, like networking, JVM configuration, or system properties. The access control system itself is also considered sensitive.The only roles permitted to write to sensitive resources are Administrator and SuperUser. The Auditor role is only able to read sensitive resources. No other roles have access.Sensitivity constraint configuration is in the Management API at
/core-service=management/access=authorization/constraint=sensitivity-classification. - Vault Expression Constraint
- The Vault Expression constraint defines if reading or writing vault expressions is consider a sensitive operation. By default both reading and writing vault expressions is a sensitive operation.Vault Expression constraint configuration is in the Management API at
/core-service=management/access=authorization/constraint=vault-expression.
11.9.7. About JMX and Role-Based Access Control
- The Management API of JBoss EAP 6 is exposed as JMX Management Beans. These Management Beans are referred to as "core mbeans" and access to them is controlled and filtered exactly the same as the underlying Management API itself.
- The JMX subsystem is configured with write permissions being "sensitive". This means only users of the Administrator and SuperUser roles can make changes to that subsystem. Users of the Auditor role can also read this subsystem configuration.
- By default Management Beans registered by deployed applications and services (non-core mbeans) can be accessed by all management users, but only users of the Maintainer, Operator, Administrator, SuperUser roles can write to them.
11.9.8. Configuring Role-Based Access Control
11.9.8.1. Overview of RBAC Configuration Tasks
- View and configure what roles are assigned to (or excluded from) each user
- View and configure what roles are assigned to (or excluded from) each group
- View group and user membership per role.
- Configure default membership per role.
- Create a scoped role
- Enable and disable RBAC
- Change permission combination policy
- Configuring Application Resource and Resource Sensitivity Constraints
11.9.8.2. Enabling Role-Based Access Control
simple to rbac. This can be done using the Management CLI or by editing the server configuration XML file if the server is offline. When RBAC is disabled or enabled on a running server, the server configuration must be reloaded before it takes effect.
SuperUser role if it is run on the same machine as the server.
Procedure 11.8. Enabling RBAC
- To enable RBAC with the Management CLI, use the
write-attributeoperation of the access authorization resource to set the provider attribute torbac./core-service=management/access=authorization:write-attribute(name=provider, value=rbac)
[standalone@localhost:9999 /] /core-service=management/access=authorization:write-attribute(name=provider, value=rbac)
{
    "outcome" => "success",
    "response-headers" => {
        "operation-requires-reload" => true,
        "process-state" => "reload-required"
    }
}
[standalone@localhost:9999 /] /:reload
{
    "outcome" => "success",
    "result" => undefined
}
Procedure 11.9. Disabling RBAC
- To disable RBAC with the Management CLI, use the
write-attributeoperation of the access authorization resource to set the provider attribute tosimple./core-service=management/access=authorization:write-attribute(name=provider, value=simple)
[standalone@localhost:9999 /] /core-service=management/access=authorization:write-attribute(name=provider, value=simple)
{
    "outcome" => "success",
    "response-headers" => {
        "operation-requires-reload" => true,
        "process-state" => "reload-required"
    }
}
[standalone@localhost:9999 /] /:reload
{
    "outcome" => "success",
    "result" => undefined
}
provider attribute of the access-control element of the management element. Set the value to rbac to enable, and simple to disable.
<management>

        <access-control provider="rbac">
            <role-mapping>
                <role name="SuperUser">
                    <include>
                        <user name="$local"/>
                    </include>
                </role>
            </role-mapping>
        </access-control>

</management>11.9.8.3. Changing the Permission Combination Policy
permissive or rejecting. The default is permissive.
permissive, if any role is assigned to the user that permits an action, then the action is allowed.
rejecting, if multiple roles are assigned to a user, then no action is allowed. This means that when the policy is set to rejecting each user should only be assigned one role. Users with multiple roles will not be able to use the Management Console or the Management CLI when the policy is set to rejecting.
permission-combination-policy attribute to either permissive or rejecting. This can be done using the Management CLI or by editing the server configuration XML file if the server is offline.
Procedure 11.10. Set the Permission Combination Policy
- Use the
write-attributeoperation of the access authorization resource to set thepermission-combination-policyattribute to the required policy name./core-service=management/access=authorization:write-attribute(name=permission-combination-policy, value=POLICYNAME)
The valid policy names are rejecting and permissive.[standalone@localhost:9999 /] /core-service=management/access=authorization:write-attribute(name=permission-combination-policy, value=rejecting) {"outcome" => "success"} [standalone@localhost:9999 access=authorization]
permission-combination-policy attribute of the access-control element.
<access-control provider="rbac" permission-combination-policy="rejecting">
  <role-mapping>
    <role name="SuperUser">
      <include>
        <user name="$local"/>
      </include>
    </role>
  </role-mapping>
</access-control>11.9.9. Managing Roles
11.9.9.1. About Role Membership
- The user is:
- listed as a user to be included in the role, or
- a member of a group that is listed to be included in the role.
- The user is not:
- listed as a user to exclude from the role, or
- a member of a group that is listed to be excluded from the role.
11.9.9.2. Configure User Role Assignment
SuperUser or Administrator roles can perform this configuration.
- Login to the Management Console.
- Click on the tab.
- Expand the Access Control menu and select .
- Select the tab.
Procedure 11.11. Create a new role assignment for a user
- Login to the Management console.
- Navigate to the tab of the Role Assignment section.
- Click the button at the top right of the user list. Add User dialog appears.

Figure 11.1. Add User Dialog
- Specify user name, and optionally realm.
- Set the type menu to include or exclude.
- Click the checkbox of the roles to include or exclude. To check multiple items, hold down the Control key (Command key on OSX).
- Click to finish.When successful, the Add User dialog closes, and the list of users is updated to reflect the changes made. If unsuccessful a
Failed to save role assignmentmessage is displayed.
Procedure 11.12. Update the role assignment for a user
- Login to the Management console.
- Navigate to the tab of the Role Assignment section.
- Select user from the list.
- Click . The selection panel enters edit mode.
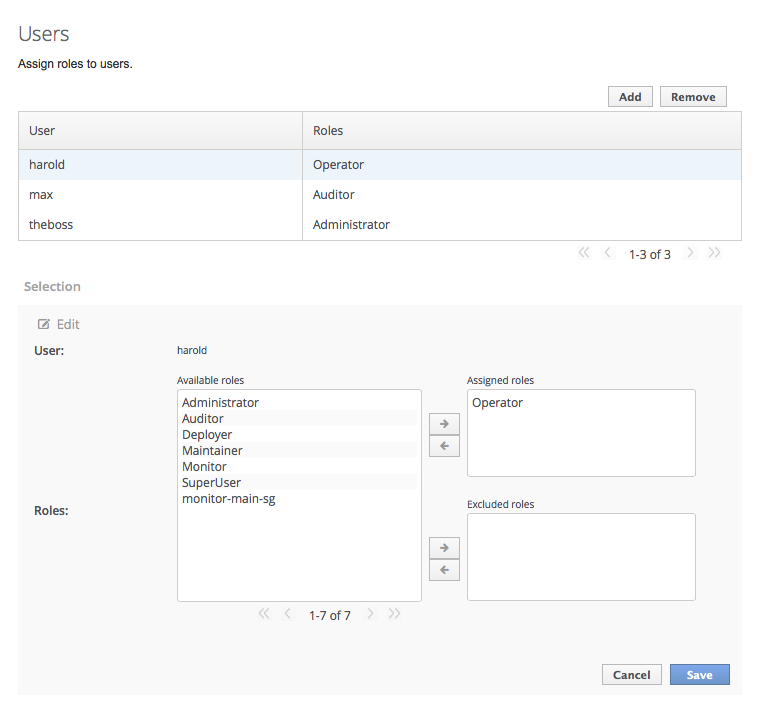
Figure 11.2. Selection Edit View
Here you can add and remove assigned and excluded roles for the user.- To add an assigned role, select the required role from the list of available roles on the left and click button with the right-facing arrow next to the assigned roles list. The role moves from the available list to the assigned list.
- To remove an assigned role, selected the required role from the assigned roles list on the right and click the button with the left-facing arrow next to the assigned roles list. The role moves from the assigned list to the available list.
- To add an excluded role, select the required role from the list of available roles on the left and click button with the right-facing arrow next to the excluded roles list. The role moves from the available list to the excluded list.
- To remove an excluded role, selected the required role from the excluded roles list on the right and click the button with the left-facing arrow next to the excluded roles list. The role moves from the excluded list to the available list.
- Click to finish.When successful, the edit view closes, and the list of users is updated to reflect the changes made. If unsuccessful a
Failed to save role assignmentmessage is displayed.
Procedure 11.13. Remove role assignment for a user
- Login to the Management console.
- Navigate to the tab of the Role Assignment section.
- Select the user from the list.
- Click . The Remove Role Assignment confirmation prompt appears.
- Click .When successful, the user will no longer appear in the list of user role assignments.
Important
11.9.9.3. Configure User Role Assignment using the Management CLI
/core-service=management/access=authorization as role-mapping elements.
/core-service=management/access=authorization location:
[standalone@localhost:9999] cd /core-service=management/access=authorization
Procedure 11.14. Viewing Role Assignment Configuration
- Use the :read-children-names operation to get a complete list of the configured roles:
/core-service=management/access=authorization:read-children-names(child-type=role-mapping)
[standalone@localhost:9999 access=authorization] :read-children-names(child-type=role-mapping) { "outcome" => "success", "result" => [ "Administrator", "Deployer", "Maintainer", "Monitor", "Operator", "SuperUser" ] } - Use the
read-resourceoperation of a specified role-mapping to get the full details of a specific role:/core-service=management/access=authorization/role-mapping=ROLENAME:read-resource(recursive=true)
[standalone@localhost:9999 access=authorization] ./role-mapping=Administrator:read-resource(recursive=true)
{
    "outcome" => "success",
    "result" => {
        "include-all" => false,
        "exclude" => undefined,
        "include" => {
            "user-theboss" => {
                "name" => "theboss",
                "realm" => undefined,
                "type" => "USER"
            },
            "user-harold" => {
                "name" => "harold",
                "realm" => undefined,
                "type" => "USER"
            },
            "group-SysOps" => {
                "name" => "SysOps",
                "realm" => undefined,
                "type" => "GROUP"
            }
        }
    }
}
[standalone@localhost:9999 access=authorization]
Procedure 11.15. Add a new role
- Use the
addoperation to add a new role configuration./core-service=management/access=authorization/role-mapping=ROLENAME:add
ROLENAME is the name of the role that the new mapping is for.[standalone@localhost:9999 access=authorization] ./role-mapping=Auditor:add {"outcome" => "success"} [standalone@localhost:9999 access=authorization]
Procedure 11.16. Add a user as included in a role
- Use the
addoperation to add a user entry to the includes list of the role./core-service=management/access=authorization/role-mapping=ROLENAME/include=ALIAS:add(name=USERNAME, type=USER)
ROLENAME is the name of the role being configured.ALIASis a unique name for this mapping. Red Hat recommends that you use a naming convention for your aliases such asuser-USERNAME.USERNAME is the name of the user being added to the include list.[standalone@localhost:9999 access=authorization] ./role-mapping=Auditor/include=user-max:add(name=max, type=USER) {"outcome" => "success"} [standalone@localhost:9999 access=authorization]
Procedure 11.17. Add a user as excluded in a role
- Use the
addoperation to add a user entry to the excludes list of the role./core-service=management/access=authorization/role-mapping=ROLENAME/exclude=ALIAS:add(name=USERNAME, type=USER)
ROLENAME is the name of the role being configured.USERNAME is the name of the user being added to the exclude list.ALIASis a unique name for this mapping. Red Hat recommends that you use a naming convention for your aliases such asuser-USERNAME.[standalone@localhost:9999 access=authorization] ./role-mapping=Auditor/exclude=user-max:add(name=max, type=USER) {"outcome" => "success"} [standalone@localhost:9999 access=authorization]
Procedure 11.18. Remove user role include configuration
- Use the
removeoperation to remove the entry./core-service=management/access=authorization/role-mapping=ROLENAME/include=ALIAS:remove
ROLENAME is the name of the role being configuredALIASis a unique name for this mapping. Red Hat recommends that you use a naming convention for your aliases such asuser-USERNAME.[standalone@localhost:9999 access=authorization] ./role-mapping=Auditor/include=user-max:remove {"outcome" => "success"} [standalone@localhost:9999 access=authorization]Removing the user from the list of includes does not remove the user from the system, nor does it guarantee that the role won't be assigned to the user. The role might still be assigned based on group membership.
Procedure 11.19. Remove user role exclude configuration
- Use the
removeoperation to remove the entry./core-service=management/access=authorization/role-mapping=ROLENAME/exclude=ALIAS:remove
ROLENAME is the name of the role being configured.ALIASis a unique name for this mapping. Red Hat recommends that you use a naming convention for your aliases such asuser-USERNAME.[standalone@localhost:9999 access=authorization] ./role-mapping=Auditor/exclude=user-max:remove {"outcome" => "success"} [standalone@localhost:9999 access=authorization]Removing the user from the list of excludes does not remove the user from the system, nor does it guarantee the role will be assigned to the user. Roles might still be excluded based on group membership.
11.9.9.4. About Roles and User Groups
mgmt-users.properties file or an LDAP server, can be members of user groups. A user group is an arbitrary label that can be assigned to one or more users.
mgmt-users.properties file, group information is stored in the mgmt-groups.properties file. When using LDAP the group information is stored in the LDAP sever and maintained by those responsible for the LDAP server.
11.9.9.5. Configure Group Role Assignment
SuperUser or Administrator roles can perform this configuration.
- Login to the Management Console.
- Click on the tab.
- Expand the menu and select .
- Select the tab.
Procedure 11.20. Create a new role assignment for a group
- Login to the Management console
- Navigate to the tab of the Role Assignment section.
- Click the button at the top right of the user list. Add Group dialog appears.
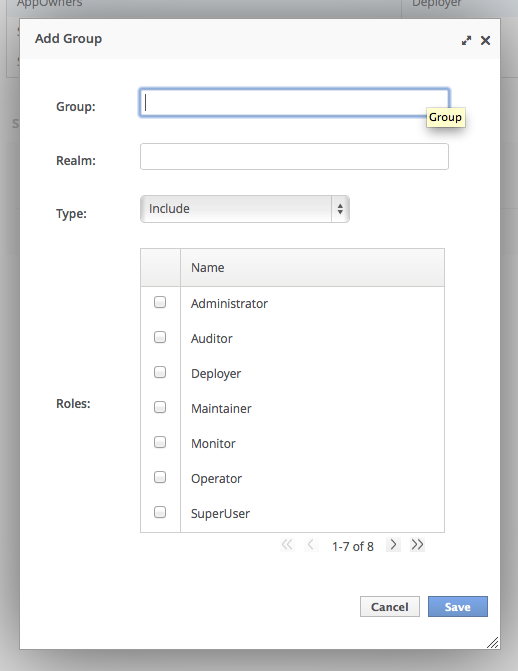
Figure 11.3. Add Group Dialog
- Specify the group name, and optionally the realm.
- Set the type menu to include or exclude.
- Click the checkbox of the roles to include or exclude. To check multiple items, hold down the Control key (Command key on OSX).
- Click to finish.When successful, the Add Group dialog closes, and the list of groups is updated to reflect the changes made. If unsuccessful a
Failed to save role assignmentmessage is displayed.
Procedure 11.21. Update a role assignment for a group
- Login to the Management console.
- Navigate to the tab of the Role Assignment section.
- Select the group from the list.
- Click Edit. The Selection view enters Edit mode.
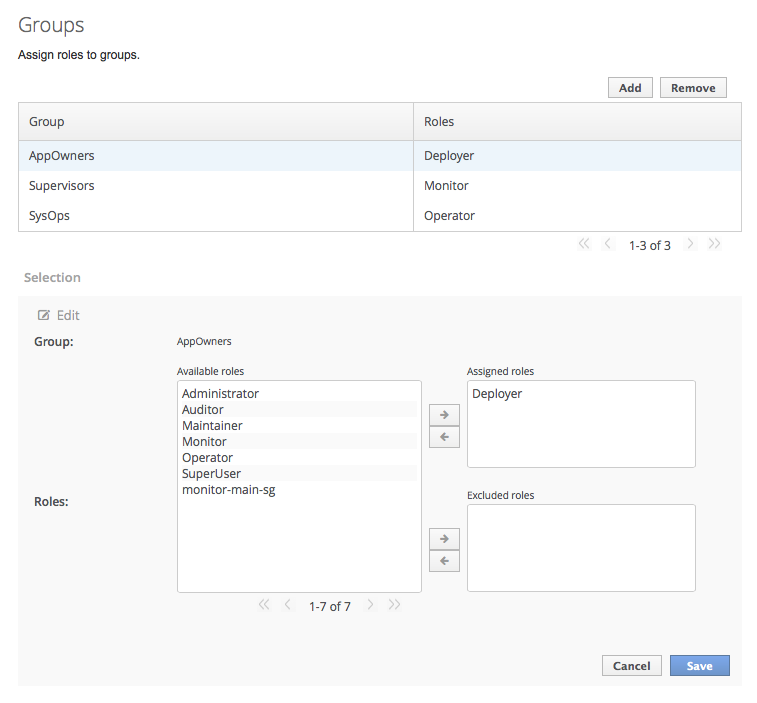
Figure 11.4. Selection View Edit Mode
Here you can add and remove assigned and excluded roles from the group:- To add assigned role, select the required role from the list of available roles on the left and click button with the right-facing arrow next to the assigned roles list. The role moves from the available list to the assigned list.
- To remove an assigned role, selected the required role from the assigned roles list on the right and click the button with the left-facing arrow next to the assigned roles list. The role moves from the assigned list to the available list.
- To add an excluded role, select the required role from the list of available roles on the left and click button with the right-facing arrow next to the excluded roles list. The role moves from the available list to the excluded list.
- To remove an excluded role, selected the required role from the excluded roles list on the right and click the button with the left-facing arrow next to the excluded roles list. The role moves from the excluded list to the available list.
- Click to finish.When successful, the edit view closes, and the list of groups is updated to reflect the changes made. If unsuccessful a message is displayed.
Procedure 11.22. Remove role assignment for a group
- Login to the Management console.
- Navigate to the tab of the section.
- Select the group from the list.
- Click . The Remove Role Assignment confirmation prompt appears.
- Click .When successful, the role will no longer appear in the list of group role assignments.Removing the group from the list of role assignments does not remove the user group from the system, nor does it guarantee that no roles will be assigned to members of that group. Each group member might still have a role assigned to them directly.
11.9.9.6. Configure Group Role Assignment using the Management CLI
/core-service=management/access=authorization as role-mapping elements.
/core-service=management/access=authorization location:
[standalone@localhost:9999] cd /core-service=management/access=authorization
Procedure 11.23. Viewing Group Role Assignment Configuration
- Use the
read-children-namesoperation to get a complete list of the configured roles:/core-service=management/access=authorization:read-children-names(child-type=role-mapping)
[standalone@localhost:9999 access=authorization] :read-children-names(child-type=role-mapping) { "outcome" => "success", "result" => [ "Administrator", "Deployer", "Maintainer", "Monitor", "Operator", "SuperUser" ] } - Use the
read-resourceoperation of a specified role-mapping to get the full details of a specific role:/core-service=management/access=authorization/role-mapping=ROLENAME:read-resource(recursive=true)
[standalone@localhost:9999 access=authorization] ./role-mapping=Administrator:read-resource(recursive=true) { "outcome" => "success", "result" => { "include-all" => false, "exclude" => undefined, "include" => { "user-theboss" => { "name" => "theboss", "realm" => undefined, "type" => "USER" }, "user-harold" => { "name" => "harold", "realm" => undefined, "type" => "USER" }, "group-SysOps" => { "name" => "SysOps", "realm" => undefined, "type" => "GROUP" } } } } [standalone@localhost:9999 access=authorization]
Procedure 11.24. Add a new role
- Use the
addoperation to add a new role configuration./core-service=management/access=authorization/role-mapping=ROLENAME:add
[standalone@localhost:9999 access=authorization] ./role-mapping=Auditor:add
{"outcome" => "success"}
[standalone@localhost:9999 access=authorization]
Procedure 11.25. Add a Group as included in a role
- Use the
addoperation to add a Group entry to the includes list of the role./core-service=management/access=authorization/role-mapping=ROLENAME/include=ALIAS:add(name=GROUPNAME, type=GROUP)
ROLENAME is the name of the role being configured.GROUPNAME is the name of the group being added to the include list.ALIASis a unique name for this mapping. Red Hat recommends that you use a naming convention for your aliases such asgroup-GROUPNAME.[standalone@localhost:9999 access=authorization] ./role-mapping=Auditor/include=group-investigators:add(name=investigators, type=GROUP) {"outcome" => "success"} [standalone@localhost:9999 access=authorization]
Procedure 11.26. Add a group as excluded in a role
- Use the
addoperation to add a group entry to the excludes list of the role./core-service=management/access=authorization/role-mapping=ROLENAME/exclude=ALIAS:add(name=GROUPNAME, type=GROUP)
ROLENAME is the name of the role being configuredGROUPNAME is the name of the group being added to the include listALIASis a unique name for this mapping. Red Hat recommends that you use a naming convention for your aliases such asgroup-GROUPNAME.[standalone@localhost:9999 access=authorization] ./role-mapping=Auditor/exclude=group-supervisors:add(name=supervisors, type=GROUP) {"outcome" => "success"} [standalone@localhost:9999 access=authorization]
Procedure 11.27. Remove group role include configuration
- Use the
removeoperation to remove the entry./core-service=management/access=authorization/role-mapping=ROLENAME/include=ALIAS:remove
ROLENAME is the name of the role being configuredALIASis a unique name for this mapping. Red Hat recommends that you use a naming convention for your aliases such asgroup-GROUPNAME.[standalone@localhost:9999 access=authorization] ./role-mapping=Auditor/include=group-investigators:remove {"outcome" => "success"} [standalone@localhost:9999 access=authorization]Removing the group from the list of includes does not remove the group from the system, nor does it guarantee that the role won't be assigned to users in this group. The role might still be assigned to users in the group individually.
Procedure 11.28. Remove a user group exclude entry
- Use the
removeoperation to remove the entry./core-service=management/access=authorization/role-mapping=ROLENAME/exclude=ALIAS:remove
ROLENAME is the name of the role being configured.ALIASis a unique name for this mapping. Red Hat recommends that you use a naming convention for your aliases such asgroup-GROUPNAME.[standalone@localhost:9999 access=authorization] ./role-mapping=Auditor/exclude=group-supervisors:remove {"outcome" => "success"} [standalone@localhost:9999 access=authorization]Removing the group from the list of excludes does not remove the group from the system. It also does not guarantee the role will be assigned to members of the group. Roles might still be excluded based on group membership.
11.9.9.7. About Authorization and Group Loading with LDAP
memberOf attributes; a group entity may map which users belong to it through uniqueMember attributes; or both mappings may be maintained by the LDAP server.
force attribute is set to "false". When force is true, the search is performed again during authorization (while loading groups). This is typically done when different servers perform authentication and authorization.
<authorization>
    <ldap connection="...">
    	<!-- OPTIONAL -->
       <username-to-dn force="true">
           <!-- Only one of the following. -->
           <username-is-dn />
           <username-filter base-dn="..." recursive="..." user-dn-attribute="..." attribute="..." />
           <advanced-filter base-dn="..." recursive="..." user-dn-attribute="..." filter="..." />
        </username-to-dn>

       <group-search group-name="..." iterative="..." group-dn-attribute="..." group-name-attribute="..." >
           <!-- One of the following -->
           <group-to-principal base-dn="..." recursive="..." search-by="...">
               <membership-filter principal-attribute="..." />
           </group-to-principal>
           <principal-to-group group-attribute="..." />
       </group-search>
    </ldap>
</authorization>
Important
force attribute. It is required, even when set to the default value of false.
username-to-dn
username-to-dn element specifies how to map the user name to the distinguished name of their entry in the LDAP directory. This element is only required when both of the following are true:
- The authentication and authorization steps are against different LDAP servers.
- The group search uses the distinguished name.
- 1:1 username-to-dn
- This specifies that the user name entered by the remote user is the user's distinguished name.
<username-to-dn force="false">
   <username-is-dn />
</username-to-dn>
This defines a 1:1 mapping and there is no additional configuration. - username-filter
- The next option is very similar to the simple option described above for the authentication step. A specified attribute is searched for a match against the supplied user name.
<username-to-dn force="true">
    <username-filter base-dn="dc=people,dc=harold,dc=example,dc=com" recursive="false" attribute="sn" user-dn-attribute="dn" />
</username-to-dn>
The attributes that can be set here are:base-dn: The distinguished name of the context to begin the search.recursive: Whether the search will extend to sub contexts. Defaults tofalse.attribute: The attribute of the users entry to try and match against the supplied user name. Defaults touid.user-dn-attribute: The attribute to read to obtain the users distinguished name. Defaults todn.
- advanced-filter
- The final option is to specify an advanced filter, as in the authentication section this is an opportunity to use a custom filter to locate the users distinguished name.
<username-to-dn force="true">
    <advanced-filter base-dn="dc=people,dc=harold,dc=example,dc=com" recursive="false" filter="sAMAccountName={0}" user-dn-attribute="dn" />
</username-to-dn>
For the attributes that match those in the username-filter example, the meaning and default values are the same. There is one new attribute:filter: Custom filter used to search for a user's entry where the user name will be substituted in the{0}place holder.
Important
The XML must remain valid after the filter is defined so if any special characters are used such as&ensure the proper form is used. For example&for the&character.
The Group Search
Example 11.21. Principal to Group - LDIF example.
TestUserOne who is a member of GroupOne, GroupOne is in turn a member of GroupFive. The group membership is shown by the use of a memberOf attribute which is set to the distinguished name of the group of which the user (or group) is a member.
memberOf attributes set, one for each group of which the user is directly a member.
dn: uid=TestUserOne,ou=users,dc=principal-to-group,dc=example,dc=org
objectClass: extensibleObject
objectClass: top
objectClass: groupMember
objectClass: inetOrgPerson
objectClass: uidObject
objectClass: person
objectClass: organizationalPerson
cn: Test User One
sn: Test User One
uid: TestUserOne
distinguishedName: uid=TestUserOne,ou=users,dc=principal-to-group,dc=example,dc=org
memberOf: uid=GroupOne,ou=groups,dc=principal-to-group,dc=example,dc=org
memberOf: uid=Slashy/Group,ou=groups,dc=principal-to-group,dc=example,dc=org
userPassword:: e1NTSEF9WFpURzhLVjc4WVZBQUJNbEI3Ym96UVAva0RTNlFNWUpLOTdTMUE9PQ==

dn: uid=GroupOne,ou=groups,dc=principal-to-group,dc=example,dc=org
objectClass: extensibleObject
objectClass: top
objectClass: groupMember
objectClass: group
objectClass: uidObject
uid: GroupOne
distinguishedName: uid=GroupOne,ou=groups,dc=principal-to-group,dc=example,dc=org
memberOf: uid=GroupFive,ou=subgroups,ou=groups,dc=principal-to-group,dc=example,dc=org

dn: uid=GroupFive,ou=subgroups,ou=groups,dc=principal-to-group,dc=example,dc=org
objectClass: extensibleObject
objectClass: top
objectClass: groupMember
objectClass: group
objectClass: uidObject
uid: GroupFive
distinguishedName: uid=GroupFive,ou=subgroups,ou=groups,dc=principal-to-group,dc=example,dc=org
Example 11.22. Group to Principal - LDIF Example
TestUserOne who is a member of GroupOne which is in turn a member of GroupFive - however in this case it is an attribute uniqueMember from the group to the user being used for the cross reference.
dn: uid=TestUserOne,ou=users,dc=group-to-principal,dc=example,dc=org
objectClass: top
objectClass: inetOrgPerson
objectClass: uidObject
objectClass: person
objectClass: organizationalPerson
cn: Test User One
sn: Test User One
uid: TestUserOne
userPassword:: e1NTSEF9SjR0OTRDR1ltaHc1VVZQOEJvbXhUYjl1dkFVd1lQTmRLSEdzaWc9PQ==

dn: uid=GroupOne,ou=groups,dc=group-to-principal,dc=example,dc=org
objectClass: top
objectClass: groupOfUniqueNames
objectClass: uidObject
cn: Group One
uid: GroupOne
uniqueMember: uid=TestUserOne,ou=users,dc=group-to-principal,dc=example,dc=org

dn: uid=GroupFive,ou=subgroups,ou=groups,dc=group-to-principal,dc=example,dc=org
objectClass: top
objectClass: groupOfUniqueNames
objectClass: uidObject
cn: Group Five
uid: GroupFive
uniqueMember: uid=TestUserFive,ou=users,dc=group-to-principal,dc=example,dc=org
uniqueMember: uid=GroupOne,ou=groups,dc=group-to-principal,dc=example,dc=org
General Group Searching
<group-search group-name="..." iterative="..." group-dn-attribute="..." group-name-attribute="..." >
    ...
</group-search>group-name: This attribute is used to specify the form that should be used for the group name returned as the list of groups of which the user is a member. This can either be the simple form of the group name or the group's distinguished name. If the distinguished name is required this attribute can be set toDISTINGUISHED_NAME. Defaults toSIMPLE.iterative: This attribute is used to indicate if, after identifying the groups a user is a member of, we should also iteratively search based on the groups to identify which groups the groups are a member of. If iterative searching is enabled we keep going until either we reach a group that is not a member if any other groups or a cycle is detected. Defaults tofalse.
Important
group-dn-attribute: On an entry for a group which attribute is its distinguished name. Defaults todn.group-name-attribute: On an entry for a group which attribute is its simple name. Defaults touid.
Example 11.23. Principal to Group Example Configuration
memberOf attribute on the user.
<authorization>
    <ldap connection="LocalLdap">
        <username-to-dn>
            <username-filter base-dn="ou=users,dc=principal-to-group,dc=example,dc=org" recursive="false" attribute="uid" user-dn-attribute="dn" />
        </username-to-dn>
        <group-search group-name="SIMPLE" iterative="true" group-dn-attribute="dn" group-name-attribute="uid">
            <principal-to-group group-attribute="memberOf" />
        </group-search>
    </ldap>
</authorization>principal-to-group element has been added with a single attribute.
group-attribute: The name of the attribute on the user entry that matches the distinguished name of the group the user is a member of. Defaults tomemberOf.
Example 11.24. Group to Principal Example Configuration
<authorization>
      <ldap connection="LocalLdap">
          <username-to-dn>
              <username-filter base-dn="ou=users,dc=group-to-principal,dc=example,dc=org" recursive="false" attribute="uid" user-dn-attribute="dn" />
          </username-to-dn>
          <group-search group-name="SIMPLE" iterative="true" group-dn-attribute="dn" group-name-attribute="uid">
              <group-to-principal base-dn="ou=groups,dc=group-to-principal,dc=example,dc=org" recursive="true" search-by="DISTINGUISHED_NAME">
                  <membership-filter principal-attribute="uniqueMember" />
              </group-to-principal>
          </group-search>
      </ldap>
</authorization>group-to-principal is added. This element is used to define how searches for groups that reference the user entry will be performed. The following attributes are set:
base-dn: The distinguished name of the context to use to begin the search.recursive: Whether sub-contexts also be searched. Defaults tofalse.search-by: The form of the role name used in searches. Valid values areSIMPLEandDISTINGUISHED_NAME. Defaults toDISTINGUISHED_NAME.
principal-attribute: The name of the attribute on the group entry that references the user entry. Defaults tomember.
11.9.9.8. About Scoped Roles
- A unique name.
- Which of the standard roles it is based on.
- If it applies to Server Groups or Hosts
- The list of server groups or hosts that it is restricted to.
- If all users are automatically include. This defaults to false.
- Host-scoped roles
- A role that is host-scoped restricts the permissions of that role to one or more hosts. This means access is provided to the relevant
/host=*/resource trees but resources that are specific to other hosts are hidden. - Server-Group-scoped roles
- A role that is server-group-scoped restricts the permissions of that role to one or more server groups. Additionally the role permissions will also apply to the profile, socket binding group, server config and server resources that are associated with the specified server-groups. Any sub-resources within any of those that are not logically related to the server-group will not be visible to the user.
11.9.9.9. Creating Scoped Roles
SuperUser or Administrator roles can perform this configuration.
- Login to the Management Console
- Click on the tab
- Expand the menu and select .
- Select tab, and then the tab within it.
Procedure 11.29. Add a New Scoped Role
- Login to the Management Console
- Navigate to the area of the tab.
- Click . The Add Scoped Role dialog appears.
- Specify the following details:
- Name, the unique name for the new scoped role.
- Base Role, the role which this role will base its permissions on.
- Type, whether this role will be restricted to hosts or server groups.
- Scope, the list of hosts or server groups that the role is restricted to. Multiple entries can be selected.
- Include All, should this role automatically include all users. Defaults to no.
- Click and the dialog will close and the newly created role will appear in the table.
Procedure 11.30. Edit a Scoped Role
- Login to the Management Console
- Navigate to the area of the tab.
- Click on the scoped role you want to edit in the table. The details of that role appears in the Selection panel below the table.
- Click in the Selection panel. The Selection panel enters edit mode.
- Update the details you need to change and click the button. The Selection panel returns to its previous state. Both the Selection panel and table show the newly updated details.
Procedure 11.31. View Scoped Role Members
- Login to the Management Console
- Navigate to the Scoped Roles area of the tab.
- Click on the scoped role in the table that you want to view the of, then click . The dialog appears. It shows users and groups that are included or excluded from the role.
- Click when you have finished reviewing this information.
Procedure 11.32. Delete a Scoped Role
Important
- Login to the Management Console
- Navigate to the area of the tab.
- Select the scoped role to be removed in the table.
- Click the button. The Remove Scoped Role dialog appears.
- Click .The dialog closes and the role is removed.
11.9.10. Configuring Constraints
11.9.10.1. Configure Sensitivity Constraints
/core-service=management/access=authorization/constraint=sensitivity-classification.
classification. The classifications are then grouped into types. There are 39 included classifications that are arranged into 13 types.
write-attribute operation to set the configured-requires-read, configured-requires-write, or configured-requires-addressable attribute. To make that type of operation sensitive set the value of the attribute to true, otherwise to make it nonsensitive set it to false. By default these attributes are not set and the values of default-requires-read, default-requires-write, and default-requires-addressable are used. Once the configured attribute is set it is that value that is used instead of the default. The default values cannot be changed.
Example 11.25. Make reading system properties a sensitive operation
[domain@localhost:9999 /] cd /core-service=management/access=authorization/constraint=sensitivity-classification/type=core/classification=system-property
[domain@localhost:9999 classification=system-property] :write-attribute(name=configured-requires-read, value=true)
{
    "outcome" => "success",
    "result" => undefined,
    "server-groups" => {"main-server-group" => {"host" => {"master" => {
        "server-one" => {"response" => {"outcome" => "success"}},
        "server-two" => {"response" => {"outcome" => "success"}}
    }}}}
}
[domain@localhost:9999 classification=system-property] :read-resource
{
    "outcome" => "success",
    "result" => {
        "configured-requires-addressable" => undefined,
        "configured-requires-read" => true,
        "configured-requires-write" => undefined,
        "default-requires-addressable" => false,
        "default-requires-read" => false,
        "default-requires-write" => true,
        "applies-to" => {
            "/host=master/system-property=*" => undefined,
            "/host=master/core-service=platform-mbean/type=runtime" => undefined,
            "/server-group=*/system-property=*" => undefined,
            "/host=master/server-config=*/system-property=*" => undefined,
            "/host=master" => undefined,
            "/system-property=*" => undefined,
            "/" => undefined
        }
    }
}
[domain@localhost:9999 classification=system-property]Table 11.6. Sensitivity Constraint Configuration outcomes
| Value | requires-read | requires-write | requires-addressable |
|---|---|---|---|
true
|
Read is sensitive.
Only
Auditor, Administrator, SuperUser can read.
|
Write is sensitive.
Only
Administrator and SuperUser can write
|
Addressing is sensitive.
Only
Auditor, Administrator, SuperUser can address.
|
false
|
Read is not sensitive.
Any management user can read.
|
Write is not sensitive.
Only
Maintainer, Administrator and SuperUser can write. Deployers can also write the resource is an application resource.
|
Addressing is not sensitive.
Any management user can address.
|
11.9.10.2. Configure Application Resource Constraints
/core-service=management/access=authorization/constraint=application-classification/.
classification. The classifications are then grouped into types. There are 14 included classifications that are arranged into 8 types. Each classification has an applies-to element which is a list of resource path patterns to which the classifications configuration applies.
core. Core includes deployments, deployment overlays, and the deployment operations.
write-attribute operation to set the configured-application attribute of the classification to true. To disable an Application Resource, set this attribute to false. By default these attributes are not set and the value of default-application attribute is used. The default value cannot be changed.
Example 11.26. Enabling the logger-profile application resource classification
[domain@localhost:9999 /] cd /core-service=management/access=authorization/constraint=application-classification/type=logging/classification=logging-profile
[domain@localhost:9999 classification=logging-profile] :write-attribute(name=configured-application, value=true)
{
    "outcome" => "success",
    "result" => undefined,
    "server-groups" => {"main-server-group" => {"host" => {"master" => {
        "server-one" => {"response" => {"outcome" => "success"}},
        "server-two" => {"response" => {"outcome" => "success"}}
    }}}}
}
[domain@localhost:9999 classification=logging-profile] :read-resource
{
    "outcome" => "success",
    "result" => {
        "configured-application" => true,
        "default-application" => false,
        "applies-to" => {"/profile=*/subsystem=logging/logging-profile=*" => undefined}
    }
}
[domain@localhost:9999 classification=logging-profile]
Important
Deployer user access to one datasource resource but not another. If this level of separation is required then it is recommended to configure the resources in different server groups and create different scoped Deployer roles for each group.
11.9.10.3. Configure the Vault Expression Constraint
/core-service=management/access=authorization/constraint=vault-expression.
write-attribute operation to set the attributes of configured-requires-write and configured-requires-read to true or false. By default these are not set and the values of default-requires-read and default-requires-write are used. The default values cannot be changed.
Example 11.27. Making writing to vault expressions a nonsensitive operation
[domain@localhost:9999 /] cd /core-service=management/access=authorization/constraint=vault-expression
[domain@localhost:9999 constraint=vault-expression] :write-attribute(name=configured-requires-write, value=false)
{
    "outcome" => "success",
    "result" => undefined,
    "server-groups" => {"main-server-group" => {"host" => {"master" => {
        "server-one" => {"response" => {"outcome" => "success"}},
        "server-two" => {"response" => {"outcome" => "success"}}
    }}}}
}
[domain@localhost:9999 constraint=vault-expression] :read-resource
{
    "outcome" => "success",
    "result" => {
        "configured-requires-read" => undefined,
        "configured-requires-write" => false,
        "default-requires-read" => true,
        "default-requires-write" => true
    }
}
[domain@localhost:9999 constraint=vault-expression]Table 11.7. Vault Expression Constraint Configuration outcomes
| Value | requires-read | requires-write |
|---|---|---|
true
|
Read operation is sensitive.
Only
Auditor, Administrator, and SuperUser can read.
|
Write operation is sensitive.
Only
Administrator, and SuperUser can write.
|
false
|
Read operation is not sensitive.
All management users can read.
|
Write operation is not sensitive.
Monitor, Administrator, and SuperUser can write. Deployers can also write if the vault expression is in an Application Resource.
|
11.9.11. Constraints Reference
11.9.11.1. Application Resource Constraints Reference
Type: core
- Classification: deployment-overlay
- default: true
- PATH: /deployment-overlay=*
- PATH: /deployment=*
- PATH: /Operation:upload-deployment-stream, full-replace-deployment, upload-deployment-url, upload-deployment-bytes
Type: datasources
- Classification: datasource
- default: false
- PATH: /deployment=*/subdeployment=*/subsystem=datasources/data-source=*
- PATH: /subsystem=datasources/data-source=*
- PATH: /subsystem=datasources/data-source=ExampleDS
- PATH: /deployment=*/subsystem=datasources/data-source=*
- Classification: jdbc-driver
- default: false
- PATH: /subsystem=datasources/jdbc-driver=*
- Classification: xa-data-source
- default: false
- PATH: /subsystem=datasources/xa-data-source=*
- PATH: /deployment=*/subsystem=datasources/xa-data-source=*
- PATH: /deployment=*/subdeployment=*/subsystem=datasources/xa-data-source=*
Type: logging
- Classification: logger
- default: false
- PATH: /subsystem=logging/logger=*
- PATH: /subsystem=logging/logging-profile=*/logger=*
- Classification: logging-profile
- default: false
- PATH: /subsystem=logging/logging-profile=*
Type: mail
- Classification: mail-session
- default: false
- PATH: /subsystem=mail/mail-session=*
Type: naming
- Classification: binding
- default: false
- PATH: /subsystem=naming/binding=*
Type: resource-adapters
- Classification: resource-adapters
- default: false
- PATH: /subsystem=resource-adapters/resource-adapter=*
Type: security
- Classification: security-domain
- default: false
- PATH: /subsystem=security/security-domain=*
11.9.11.2. Sensitivity Constraints Reference
Type: core
- Classification: access-control
- requires-addressable: true
- requires-read: true
- requires-write: true
- PATH: /core-service=management/access=authorization
- PATH: /subsystem=jmx ATTRIBUTE: non-core-mbean-sensitivity
- Classification: credential
- requires-addressable: false
- requires-read: true
- requires-write: true
- PATH: /subsystem=mail/mail-session=*/server=pop3 ATTRIBUTE: username , password
- PATH: /subsystem=mail/mail-session=*/server=imap ATTRIBUTE: username , password
- PATH: /subsystem=datasources/xa-data-source=* ATTRIBUTE: user-name, recovery-username, password, recovery-password
- PATH: /subsystem=mail/mail-session=*/custom=* ATTRIBUTE: username, password
- PATH: /subsystem=datasources/data-source=*" ATTRIBUTE: user-name, password
- PATH: /subsystem=remoting/remote-outbound-connection=*" ATTRIBUTE: username
- PATH: /subsystem=mail/mail-session=*/server=smtp ATTRIBUTE: username, password
- PATH: /subsystem=web/connector=*/configuration=ssl ATTRIBUTE: key-alias, password
- PATH: /subsystem=resource-adapters/resource-adapter=*/connection-definitions=*" ATTRIBUTE: recovery-username, recovery-password
- Classification: domain-controller
- requires-addressable: false
- requires-read: false
- requires-write: true
- Classification: domain-names
- requires-addressable: false
- requires-read: false
- requires-write: true
- Classification: extensions
- requires-addressable: false
- requires-read: false
- requires-write: true
- PATH: /extension=*
- Classification: jvm
- requires-addressable: false
- requires-read: false
- requires-write: true
- PATH: /core-service=platform-mbean/type=runtime ATTRIBUTE: input-arguments, boot-class-path, class-path, boot-class-path-supported, library-path
- Classification: management-interfaces
- requires-addressable: false
- requires-read: false
- requires-write: true
- /core-service=management/management-interface=native-interface
- /core-service=management/management-interface=http-interface
- Classification: module-loading
- requires-addressable: false
- requires-read: false
- requires-write: true
- PATH: /core-service=module-loading
- Classification: patching
- requires-addressable: false
- requires-read: false
- requires-write: true
- PATH: /core-service=patching/addon=*
- PATH: /core-service=patching/layer=*"
- PATH: /core-service=patching
- Classification: read-whole-config
- requires-addressable: false
- requires-read: true
- requires-write: true
- PATH: / OPERATION: read-config-as-xml
- Classification: security-domain
- requires-addressable: true
- requires-read: true
- requires-write: true
- PATH: /subsystem=security/security-domain=*
- Classification: security-domain-ref
- requires-addressable: true
- requires-read: true
- requires-write: true
- PATH: /subsystem=datasources/xa-data-source=* ATTRIBUTE: security-domain
- PATH: /subsystem=datasources/data-source=* ATTRIBUTE: security-domain
- PATH: /subsystem=ejb3 ATTRIBUTE: default-security-domain
- PATH: /subsystem=resource-adapters/resource-adapter=*/connection-definitions=* ATTRIBUTE: security-domain, recovery-security-domain, security-application, security-domain-and-application
- Classification: security-realm
- requires-addressable: true
- requires-read: true
- requires-write: true
- PATH: /core-service=management/security-realm=*
- Classification: security-realm-ref
- requires-addressable: true
- requires-read: true
- requires-write: true
- PATH: /subsystem=remoting/connector=* ATTRIBUTE: security-realm
- PATH: /core-service=management/management-interface=native-interface ATTRIBUTE: security-realm
- PATH: /core-service=management/management-interface=http-interface ATTRIBUTE: security-realm
- PATH: /subsystem=remoting/remote-outbound-connection=* ATTRIBUTE: security-realm
- Classification: security-vault
- requires-addressable: false
- requires-read: false
- requires-write: true
- PATH: /core-service=vault
- Classification: service-container
- requires-addressable: false
- requires-read: false
- requires-write: true
- PATH: /core-service=service-container
- Classification: snapshots
- requires-addressable: false
- requires-read: false
- requires-write: false
- PATH: / ATTRIBUTE: take-snapshot, list-snapshots, delete-snapshot
- Classification: socket-binding-ref
- requires-addressable: false
- requires-read: false
- requires-write: false
- PATH: /subsystem=mail/mail-session=*/server=pop3 ATTRIBUTE: outbound-socket-binding-ref
- PATH: /subsystem=mail/mail-session=*/server=imap ATTRIBUTE: outbound-socket-binding-ref
- PATH: /subsystem=remoting/connector=* ATTRIBUTE: socket-binding
- PATH: /subsystem=web/connector=* ATTRIBUTE: socket-binding
- PATH: /subsystem=remoting/local-outbound-connection=* ATTRIBUTE: outbound-socket-binding-ref
- PATH: /socket-binding-group=*/local-destination-outbound-socket-binding=* ATTRIBUTE: socket-binding-ref
- PATH: /subsystem=remoting/remote-outbound-connection=* ATTRIBUTE: outbound-socket-binding-ref
- PATH: /subsystem=mail/mail-session=*/server=smtp ATTRIBUTE: outbound-socket-binding-ref
- PATH: /subsystem=transactions ATTRIBUTE: process-id-socket-binding, status-socket-binding, socket-binding
- Classification: socket-config
- requires-addressable: false
- requires-read: false
- requires-write: true
- PATH: /interface=* OPERATION: resolve-internet-address
- PATH: /core-service=management/management-interface=native-interface ATTRIBUTE: port, interface, socket-binding
- PATH: /socket-binding-group=*
- PATH: /core-service=management/management-interface=http-interface ATTRIBUTE: port, secure-port, interface, secure-socket-binding, socket-binding
- PATH: / OPERATION: resolve-internet-address
- PATH: /subsystem=transactions ATTRIBUTE: process-id-socket-max-ports
- Classification: system-property
- requires-addressable: false
- requires-read: false
- requires-write: true
- PATH: /core-service=platform-mbean/type=runtime ATTRIBUTE: system-properties
- PATH: /system-property=*
- PATH: / OPERATION: resolve-expression
Type: datasources
- Classification: data-source-security
- requires-addressable: false
- requires-read: true
- requires-write: true
- PATH: /subsystem=datasources/xa-data-source=* ATTRIBUTE: user-name, security-domain, password
- PATH: /subsystem=datasources/data-source=* ATTRIBUTE: user-name, security-domain, password
Type: jdr
- Classification: jdr
- requires-addressable: false
- requires-read: false
- requires-write: true
- PATH: /subsystem=jdr OPERATION: generate-jdr-report
Type: jmx
- Classification: jmx
- requires-addressable: false
- requires-read: false
- requires-write: true
- PATH: /subsystem=jmx
Type: mail
- Classification: mail-server-security
- requires-addressable: false
- requires-read: false
- requires-write: true
- PATH: /subsystem=mail/mail-session=*/server=pop3 ATTRIBUTE: username, tls, ssl, password
- PATH: /subsystem=mail/mail-session=*/server=imap ATTRIBUTE: username, tls, ssl, password
- PATH: /subsystem=mail/mail-session=*/custom=* ATTRIBUTE: username, tls, ssl, password
- PATH: /subsystem=mail/mail-session=*/server=smtp ATTRIBUTE: username, tls, ssl, password
Type: naming
- Classification: jndi-view
- requires-addressable: false
- requires-read: true
- requires-write: true
- PATH: /subsystem=naming OPERATION: jndi-view
- Classification: naming-binding
- requires-addressable: false
- requires-read: false
- requires-write: false
- PATH: /subsystem=naming/binding=*
Type: remoting
- Classification: remoting-security
- requires-addressable: false
- requires-read: true
- requires-write: true
- PATH: /subsystem=remoting/connector=* ATTRIBUTE: authentication-provider, security-realm
- PATH: /subsystem=remoting/remote-outbound-connection=* ATTRIBUTE: username, security-realm
- PATH: /subsystem=remoting/connector=*/security=sasl
Type: resource-adapters
- Classification: resource-adapter-security
- requires-addressable: false
- requires-read: true
- requires-write: true
- PATH: /subsystem=resource-adapters/resource-adapter=*/connection-definitions=* ATTRIBUTE: security-domain, recovery-username, recovery-security-domain, security-application, security-domain-and-application, recovery-password
Type: security
- Classification: misc-security
- requires-addressable: false
- requires-read: true
- requires-write: true
- PATH: /subsystem=security ATTRIBUTE: deep-copy-subject-mode
Type: web
- Classification: web-access-log
- requires-addressable: false
- requires-read: false
- requires-write: false
- PATH: /subsystem=web/virtual-server=*/configuration=access-log
- Classification: web-connector
- requires-addressable: false
- requires-read: false
- requires-write: false
- PATH: /subsystem=web/connector=*
- Classification: web-ssl
- requires-addressable: false
- requires-read: true
- requires-write: true
- PATH: /subsystem=web/connector=*/configuration=ssl
- Classification: web-sso
- requires-addressable: false
- requires-read: true
- requires-write: true
- PATH: /subsystem=web/virtual-server=*/configuration=sso
- Classification: web-valve
- requires-addressable: false
- requires-read: false
- requires-write: false
- PATH: /subsystem=web/valve=*
11.10. Network Security
11.10.1. Secure the Management Interfaces
11.10.2. Specify Which Network Interface JBoss EAP 6 Uses
Isolating services so that they are accessible only to the clients who need them increases the security of your network. JBoss EAP 6 includes two interfaces in its default configuration, both of which bind to the IP address 127.0.0.1, or localhost, by default. One of the interfaces is called management, and is used by the Management Console, CLI, and API. The other is called public, and is used to deploy applications. These interfaces are not special or significant, but are provided as a starting point.
management interface uses ports 9990 and 9999 by default, and the public interface uses port 8080, or port 8443 if you use HTTPS.
Warning
Stop JBoss EAP 6.
Stop JBoss EAP 6 by sending an interrupt in the appropriate way for your operating system. If you are running JBoss EAP 6 as a foreground application, the typical way to do this is to press Ctrl+C.Restart JBoss EAP 6, specifying the bind address.
Use the-bcommand-line switch to start JBoss EAP 6 on a specific interface.Example 11.28. Specify the public interface.
EAP_HOME/bin/domain.sh -b 10.1.1.1
Example 11.29. Specify the management interface.
EAP_HOME/bin/domain.sh -bmanagement=10.1.1.1
Example 11.30. Specify different addresses for each interface.
EAP_HOME/bin/domain.sh -bmanagement=127.0.0.1 -b 10.1.1.1
Example 11.31. Bind the public interface to all network interfaces.
EAP_HOME/bin/domain.sh -b 0.0.0.0
-b command-line switch to specify an IP address at runtime, so this is not recommended. If you do decide to do this, be sure to stop JBoss EAP 6 completely before editing the XML file.
11.10.3. Network Ports Used By JBoss EAP 6
- Whether your server groups use one of the default socket binding groups, or a custom group.
- The requirements of your individual deployments.
Note
8080, and your server uses a port offset of 100, its HTTP port is 8180.
The default socket binding groups
full-ha-socketsfull-socketsha-socketsstandard-sockets
Table 11.8. Reference of the default socket bindings
| Name | Port | Multicast Port | Description | full-ha-sockets | full-sockets | ha-socket | standard-socket |
|---|---|---|---|---|---|---|---|
ajp | 8009 | Apache JServ Protocol. Used for HTTP clustering and load balancing. | Yes | Yes | Yes | Yes | |
http | 8080 | The default port for deployed web applications. | Yes | Yes | Yes | Yes | |
https | 8443 | SSL-encrypted connection between deployed web applications and clients. | Yes | Yes | Yes | Yes | |
jacorb | 3528 | CORBA services for JTS transactions and other ORB-dependent services. | Yes | Yes | No | No | |
jacorb-ssl | 3529 | SSL-encrypted CORBA services. | Yes | Yes | No | No | |
jgroups-diagnostics | 7500 | Multicast. Used for peer discovery in HA clusters. Not configurable using the Management Interfaces. | Yes | No | Yes | No | |
jgroups-mping | 45700 | Multicast. Used to discover initial membership in a HA cluster. | Yes | No | Yes | No | |
jgroups-tcp | 7600 | Unicast peer discovery in HA clusters using TCP. | Yes | No | Yes | No | |
jgroups-tcp-fd | 57600 | Used for HA failure detection over TCP. | Yes | No | Yes | No | |
jgroups-udp | 55200 | 45688 | Multicast peer discovery in HA clusters using UDP. | Yes | No | Yes | No |
jgroups-udp-fd | 54200 | Used for HA failure detection over UDP. | Yes | No | Yes | No | |
messaging | 5445 | JMS service. | Yes | Yes | No | No | |
messaging-group | Referenced by HornetQ JMS broadcast and discovery groups. | Yes | Yes | No | No | ||
messaging-throughput | 5455 | Used by JMS Remoting. | Yes | Yes | No | No | |
mod_cluster | 23364 | Multicast port for communication between JBoss EAP 6 and the HTTP load balancer. | Yes | No | Yes | No | |
osgi-http | 8090 | Used by internal components which use the OSGi subsystem. Not configurable using the Management Interfaces. | Yes | Yes | Yes | Yes | |
remoting | 4447 | Used for remote EJB invocation. | Yes | Yes | Yes | Yes | |
txn-recovery-environment | 4712 | The JTA transaction recovery manager. | Yes | Yes | Yes | Yes | |
txn-status-manager | 4713 | The JTA / JTS transaction manager. | Yes | Yes | Yes | Yes |
In addition to the socket binding groups, each host controller opens two more ports for management purposes:
9990- The Web Management Console port9999- The port used by the Management Console and Management API
11.10.4. Configure Network Firewalls to Work with JBoss EAP 6
Most production environments use firewalls as part of an overall network security strategy. If you need multiple server instances to communicate with each other or with external services such as web servers or databases, your firewall must take this into account. A well-managed firewall only opens the ports which are necessary for operation, and limits access to the ports to specific IP addresses, subnets, and network protocols.
Prerequisites
- Determine the ports you need to open.
- An understanding of your firewall software is required. This procedure uses the
system-config-firewallcommand in Red Hat Enterprise Linux 6. Microsoft Windows Server includes a built-in firewall, and several third-party firewall solutions are available for each platform. On Microsoft Windows Server, you can use PowerShell to configure the firewall.
This procedure configures a firewall in an environment with the following assumptions:
- The operating system is Red Hat Enterprise Linux 6.
- JBoss EAP 6 runs on host
10.1.1.2. Optionally, the server has its own firewall. - The network firewall server runs on host
10.1.1.1on interfaceeth0, and has an external interfaceeth1. - You want traffic on port
5445(a port used by JMS) forwarded to JBoss EAP 6. No other traffic should be allowed through the network firewall.
Procedure 11.33. Manage Network Firewalls and JBoss EAP 6 to work together
Log into the Management Console.
Log into the Management Console. By default, it runs on http://localhost:9990/console/.Determine the socket bindings used by the socket binding group.
- Click the Configuration label at the top of the Management Console.
- Expand the General Configuration menu. Select the Socket Binding.
- The Socket Binding Declarations screen appears. Initially, the
standard-socketsgroup is shown. Choose a different group by selecting it from the combo box on the right-hand side.
Note
If you use a standalone server, it has only one socket binding group.The list of socket names and ports is shown, eight values per page. You can go through the pages by using the arrow navigation below the table.Determine the ports you need to open.
Depending on the function of the particular port and the requirements of your environment, some ports may need to be opened on your firewall.Configure your firewall to forward traffic to JBoss EAP 6.
Perform these steps to configure your network firewall to allow traffic on the desired port.- Log into your firewall machine and access a command prompt, as the root user.
- Issue the command
system-config-firewallto launch the firewall configuration utility. A GUI or command-line utility launches, depending on the way you are logged into the firewall system. This task makes the assumption that you are logged in via SSH and using the command-line interface. - Use the TAB key on your keyboard to navigate to the button, and press the ENTER key. The Trusted Services screen appears.
- Do not change any values, but use the TAB key to navigate to the button, and press ENTER to advanced to the next screen. The Other Ports screen appears.
- Use the TAB key to navigate to the <Add> button, and press ENTER. The Port and Protocol screen appears.
- Enter
5445in the Port / Port Range field, then use the TAB key to move to the Protocol field, and entertcp. Use the TAB key to navigate to the button, and press ENTER. - Use the TAB key to navigate to the button until you reach the Port Forwarding screen.
- Use the TAB key to navigate to the <Add> button, and press the ENTER key.
- Fill in the following values to set up port forwarding for port
5445.- Source interface:
eth1 - Protocol:
tcp - Port / Port Range:
5445 - Destination IP address:
10.1.1.2 - Port / Port Range:
5445
Use the TAB key to navigate to the button, and press ENTER. - Use the TAB key to navigate to the button, and press ENTER.
- Use the TAB key to navigate to the button, and press ENTER. To apply the changes, read the warning and click .
Configure a firewall on your JBoss EAP 6 host.
Some organizations choose to configure a firewall on the JBoss EAP 6 server itself, and close all ports that are not necessary for its operation. See Section 11.10.3, “Network Ports Used By JBoss EAP 6” and determine which ports to open, then close the rest. The default configuration of Red Hat Enterprise Linux 6 closes all ports except22(used for Secure Shell (SSH) and5353(used for multicast DNS). While you are configuring ports, ensure you have physical access to your server so that you do not inadvertently lock yourself out.
Your firewall is configured to forward traffic to your internal JBoss EAP 6 server in the way you specified in your firewall configuration. If you chose to enable a firewall on your server, all ports are closed except the ones needed to run your applications.
Procedure 11.34. Configuring Firewall on Microsoft Windows using PowerShell
- Switch off firewall for debug purpose to determine whether the current network behavior is related to the firewall configuration.
Start-Process "$psHome\powershell.exe" -Verb Runas -ArgumentList '-command "NetSh Advfirewall set allprofiles state off"'
- Allow UDP connections on port 23364. For example:
Start-Process "$psHome\powershell.exe" -Verb Runas -ArgumentList '-command "NetSh Advfirewall firewall add rule name="UDP Port 23364" dir=in  action=allow protocol=UDP localport=23364"'
Start-Process "$psHome\powershell.exe" -Verb Runas -ArgumentList '-command "NetSh Advfirewall firewall add rule name="UDP Port 23364" dir=out action=allow protocol=UDP localport=23364"'
Procedure 11.35. Configure the Firewall on Red Hat Enterprise Linux 7 to Allow mod_cluster Advertising
- To allow mod_cluster advertising on Red Hat Enterprise Linux 7, you must enable the UDP port in the firewall as follows:
firewall-cmd --permanent --zone=public --add-port=23364/udp
Note
224.0.1.105:23364 is the default address and port for mod_cluster balancer advertising UDP multicast.
11.11. Java Security Manager
11.11.1. About the Java Security Manager
The Java Security Manager is a class that manages the external boundary of the Java Virtual Machine (JVM) sandbox, controlling how code executing within the JVM can interact with resources outside the JVM. When the Java Security Manager is activated, the Java API checks with the security manager for approval before executing a wide range of potentially unsafe operations.
11.11.2. Run JBoss EAP 6 Within the Java Security Manager
domain.sh or standalone.sh scripts. The following procedure guides you through the steps of configuring your instance to run within a Java Security Manager policy.
Prerequisites
- Before you following this procedure, you need to write a security policy, using the
policytoolcommand which is included with your Java Development Kit (JDK). This procedure assumes that your policy is located atEAP_HOME/bin/server.policy. As an alternative, write the security policy using any text editor and manually save it asEAP_HOME/bin/server.policy - The domain or standalone server must be completely stopped before you edit any configuration files.
Procedure 11.36. Configure the Security Manager for JBoss EAP 6
Open the configuration file.
Open the configuration file for editing. This file is located in one of two places, depending on whether you use a managed domain or standalone server. This is not the executable file used to start the server or domain.Managed Domain
- For Linux:
EAP_HOME/bin/domain.conf - For Windows:
EAP_HOME\bin\domain.conf.bat
Standalone Server
- For Linux:
EAP_HOME/bin/standalone.conf - For Windows:
EAP_HOME\bin\standalone.conf.bat
Add the Java options to the file.
To ensure the Java options are used, add them to the code block that begins with:if [ "x$JAVA_OPTS" = "x" ]; then
You can modify the-Djava.security.policyvalue to specify the exact location of your security policy. It should go onto one line only, with no line break. Using==when setting the-Djava.security.policyproperty specifies that the security manager will use only the specified policy file. Using=specifies that the security manager will use the specified policy combined with the policy set in thepolicy.urlsection ofJAVA_HOME/lib/security/java.security.Important
JBoss Enterprise Application Platform releases from 6.2.2 onwards require that the system propertyjboss.modules.policy-permissionsis set to true.Example 11.32. domain.conf
JAVA_OPTS="$JAVA_OPTS -Djava.security.manager -Djava.security.policy==$PWD/server.policy -Djboss.home.dir=/path/to/EAP_HOME -Djboss.modules.policy-permissions=true"
Example 11.33. domain.conf.bat
set "JAVA_OPTS=%JAVA_OPTS% -Djava.security.manager -Djava.security.policy==\path\to\server.policy -Djboss.home.dir=\path\to\EAP_HOME -Djboss.modules.policy-permissions=true"
Example 11.34. standalone.conf
JAVA_OPTS="$JAVA_OPTS -Djava.security.manager -Djava.security.policy==$PWD/server.policy -Djboss.home.dir=$JBOSS_HOME -Djboss.modules.policy-permissions=true"
Example 11.35. standalone.conf.bat
set "JAVA_OPTS=%JAVA_OPTS% -Djava.security.manager -Djava.security.policy==\path\to\server.policy -Djboss.home.dir=%JBOSS_HOME% -Djboss.modules.policy-permissions=true"
Start the domain or server.
Start the domain or server as normal.
11.11.3. About Java Security Manager Policies
A set of defined permissions for different classes of code. The Java Security Manager compares actions requested by applications against the security policy. If an action is allowed by the policy, the Security Manager will permit that action to take place. If the action is not allowed by the policy, the Security Manager will deny that action. The security policy can define permissions based on the location of code, on the code's signature, or based on the subject's principals.
java.security.manager and java.security.policy.
A security policy's entry consists of the following configuration elements, which are connected to the policytool:
- CodeBase
- The URL location (excluding the host and domain information) where the code originates from. This parameter is optional.
- SignedBy
- The alias used in the keystore to reference the signer whose private key was used to sign the code. This can be a single value or a comma-separated list of values. This parameter is optional. If omitted, presence or lack of a signature has no impact on the Java Security Manager.
- Principals
- A list of
principal_type/principal_namepairs, which must be present within the executing thread's principal set. The Principals entry is optional. If it is omitted, it signifies that the principals of the executing thread will have no impact on the Java Security Manager. - Permissions
- A permission is the access which is granted to the code. Many permissions are provided as part of the Java Enterprise Edition 6 (Java EE 6) specification.
11.11.4. Write a Java Security Manager Policy
An application called policytool is included with most JDK and JRE distributions, for the purpose of creating and editing Java Security Manager security policies. Detailed information about policytool is linked from http://docs.oracle.com/javase/6/docs/technotes/tools/.
Procedure 11.37. Setup a new Java Security Manager Policy
Start
policytool.Start thepolicytooltool in one of the following ways.Red Hat Enterprise Linux
From your GUI or a command prompt, run/usr/bin/policytool.Microsoft Windows Server
Runpolicytool.exefrom your Start menu or from thebin\of your Java installation. The location can vary.
Create a policy.
To create a policy, select . Add the parameters you need, then click .Edit an existing policy
Select the policy from the list of existing policies, and select the button. Edit the parameters as needed.Delete an existing policy.
Select the policy from the list of existing policies, and select the button.
11.11.5. Debug Security Manager Policies
java.security.debug option configures the level of security-related information reported. The command java -Djava.security.debug=help will produce help output with the full range of debugging options. Setting the debug level to all is useful when troubleshooting a security-related failure whose cause is completely unknown, but for general use it will produce too much information. A sensible general default is access:failure.
Procedure 11.38. Enable general debugging
This procedure will enable a sensible general level of security-related debug information.
Add the following line to the server configuration file.- If the JBoss EAP 6 instance is running in a managed domain, the line is added to the
bin/domain.conffile for Linux or thebin\domain.conf.batfile for Windows. - If the JBoss EAP 6 instance is running as a standalone server, the line is added to the
bin/standalone.conffile for Linux, or thebin\standalone.conf.batfile for Windows.
Linux
JAVA_OPTS="$JAVA_OPTS -Djava.security.debug=access:failure"
Windows
set "JAVA_OPTS=%JAVA_OPTS% -Djava.security.debug=access:failure"
A general level of security-related debug information has been enabled.
11.12. SSL Encryption
11.12.1. Implement SSL Encryption for the JBoss EAP 6 Web Server
Many web applications require an SSL-encrypted connection between clients and server, also known as a HTTPS connection. You can use this procedure to enable HTTPS on your server or server group.
Warning
Prerequisites
- A set of SSL encryption keys and an SSL encryption certificate. You may purchase these from a certificate-signing authority, or you can generate them yourself using command-line utilities. To generate encryption keys using utilities available on Red Hat Enterprise Linux, see Section 11.12.2, “Generate a SSL Encryption Key and Certificate”.
- The following details about your specific environment and setup:
- The full directory name where the certificate files are stored.
- The encryption password for your encryption keys.
- Management CLI running and connected to your domain controller or standalone server.
- Select appropriate cipher suites.
There are a number of available cryptographic primitives used as building blocks to form cipher suites. The first table lists recommended cryptographic primitives. The second lists cryptographic primitives which, while they may be used for compatibility with existing software, are not considered as secure as those recommended.
Warning
cipher-suite. Enabling weak ciphers is a significant security risk. Consult your JDK vendor's documentation before deciding on particular cipher suites as there may be compatibility issues.
Table 11.9. Recommended Cryptographic Primitives
| RSA with 2048 bit keys and OAEP |
| AES-128 in CBC mode |
| SHA-256 |
| HMAC-SHA-256 |
| HMAC-SHA-1 |
Table 11.10. Other Cryptographic Primitives
| RSA with key sizes larger than 1024 and legacy padding |
| AES-192 |
| AES-256 |
| 3DES (triple DES, with two or three 56 bit keys) |
| RC4 (strongly discouraged) |
| SHA-1 |
| HMAC-MD5 |
Note
/profile=default from the beginning of any management CLI commands.
Warning
Procedure 11.39. Configure the JBoss Web Server to use HTTPS
Add a new HTTPS connector.
Create a secure connector, named HTTPS, which uses thehttpsscheme, thehttpssocket binding (which defaults to8443), and is set to be secure./profile=default/subsystem=web/connector=HTTPS/:add(socket-binding=https,scheme=https,protocol=HTTP/1.1,secure=true)
Configure the SSL encryption certificate and keys.
Configure your SSL certificate, substituting your own values for the example ones. This example assumes that the keystore is copied to the server configuration directory, which isEAP_HOME/domain/configuration/for a managed domain./profile=default/subsystem=web/connector=HTTPS/ssl=configuration:add(name=https,certificate-key-file="${jboss.server.config.dir}/keystore.jks",password=SECRET, key-alias=KEY_ALIAS, cipher-suite=CIPHERS)Set the protocol to
TLSv1./profile=default/subsystem=web/connector=HTTPS/ssl=configuration/:write-attribute(name=protocol,value=TLSv1)
Deploy an application.
Deploy an application to a server group which uses the profile you have configured. If you use a standalone server, deploy an application to your server. HTTPS requests to it use the new SSL-encrypted connection.
11.12.2. Generate a SSL Encryption Key and Certificate
Prerequisites
- You need the
keytoolutility, which is provided by any Java Development Kit implementation. OpenJDK on Red Hat Enterprise Linux installs this command to/usr/bin/keytool. - Understand the syntax and parameters of the
keytoolcommand. This procedure uses extremely generic instructions, because further discussion of the specifics of SSL certificates or thekeytoolcommand are out of scope for this documentation.
Procedure 11.40. Generate a SSL Encryption Key and Certificate
Generate a keystore with public and private keys.
Run the following command to generate a keystore namedserver.keystorewith the aliasjbossin your current directory.keytool -genkeypair -alias jboss -keyalg RSA -keystore server.keystore -storepass mykeystorepass --dname "CN=jsmith,OU=Engineering,O=mycompany.com,L=Raleigh,S=NC,C=US"
The following table describes the parameters used in the keytool command:Parameter Description -genkeypairThe keytoolcommand to generate a key pair containing a public and private key.-aliasThe alias for the keystore. This value is arbitrary, but the alias jbossis the default used by the JBoss Web server.-keyalgThe key pair generation algorithm. In this case it is RSA.-keystoreThe name and location of the keystore file. The default location is the current directory. The name you choose is arbitrary. In this case, the file will be named server.keystore.-storepassThis password is used to authenticate to the keystore so that the key can be read. The password must be at least 6 characters long and must be provided when the keystore is accessed. In this case, we used mykeystorepass. If you omit this parameter, you will be prompted to enter it when you execute the command.-keypassThis is the password for the actual key.Note
Due to an implementation limitation this must be the same as the store password.--dnameA quoted string describing the distinguished name for the key, for example: "CN=jsmith,OU=Engineering,O=mycompany.com,L=Raleigh,C=US". This string is a concatenation of the following components: CN- The common name or host name. If the hostname is "jsmith.mycompany.com", theCNis "jsmith".OU- The organizational unit, for example "Engineering"O- The organization name, for example "mycompany.com".L- The locality, for example "Raleigh" or "London"S- The state or province, for example "NC". This parameter is optional.C- The 2 letter country code, for example "US" or "UK",
When you execute the above command, you are prompted for the following information:- If you did not use the
-storepassparameter on the command line, you are asked to enter the keystore password. Re-enter the new password at the next prompt. - If you did not use the
-keypassparameter on the command line, you are asked to enter the key password. Press Enter to set this to the same value as the keystore password.
When the command completes, the fileserver.keystorenow contains the single key with the aliasjboss.Verify the key.
Verify that the key works properly by using the following command.keytool -list -keystore server.keystore
You are prompted for the keystore password. The contents of the keystore are displayed (in this case, a single key calledjboss). Notice the type of thejbosskey, which isPrivateKeyEntry. This indicates that the keystore contains both a public and private entry for this key.Generate a certificate signing request.
Run the following command to generate a certificate signing request using the public key from the keystore you created in step 1.keytool -certreq -keyalg RSA -alias jboss -keystore server.keystore -file certreq.csr
You are prompted for the password in order to authenticate to the keystore. Thekeytoolcommand then creates a new certificate signing request calledcertreq.csrin the current working directory.Test the newly generated certificate signing request.
Test the contents of the certificate by using the following command.openssl req -in certreq.csr -noout -text
The certificate details are shown.Optional: Submit your certificate signing request to a Certificate Authority (CA).
A Certificate Authority (CA) can authenticate your certificate so that it is considered trustworthy by third-party clients. The CA supplies you with a signed certificate, and optionally with one or more intermediate certificates.Optional: Export a self-signed certificate from the keystore.
If you only need it for testing or internal purposes, you can use a self-signed certificate. You can export one from the keystore you created in step 1 as follows:keytool -export -alias jboss -keystore server.keystore -file server.crt
You are prompted for the password in order to authenticate to the keystore. A self-signed certificate, namedserver.crt, is created in the current working directory.Import the signed certificate, along with any intermediate certificates.
Import each certificate, in the order that you are instructed by the CA. For each certificate to import, replaceintermediate.caorserver.crtwith the actual file name. If your certificates are not provided as separate files, create a separate file for each certificate, and paste its contents into the file.Note
Your signed certificate and certificate keys are valuable assets. Be cautious with how you transport them between servers.keytool -import -keystore server.keystore -alias intermediateCA -file intermediate.ca
keytool -importcert -alias jboss -keystore server.keystore -file server.crt
Test that your certificates imported successfully.
Run the following command, and enter the keystore password when prompted. The contents of your keystore are displayed, and the certificates are part of the list.keytool -list -keystore server.keystore
Your signed certificate is now included in your keystore and is ready to be used to encrypt SSL connections, including HTTPS web server communications.
11.12.3. SSL Connector Reference
default. Change the profile name to the one you wish to configure, for a managed domain, or omit the /profile=default portion of the command, for a standalone server.
Table 11.11. SSL Connector Attributes
| Attribute | Description | CLI Command |
|---|---|---|
| name |
The display name of the SSL connector.
|
Attribute
name is read-only.
|
| verify-client |
The possible values of
verify-client differ, based upon whether the HTTP/HTTPS connector is used, or the native APR connector is used.
HTTP/HTTPS Connector
Possible values are Native APR Connector
Possible values are |
The first example command uses the HTTPS connector.
/profile=default/subsystem=web/connector=HTTPS/ssl=configuration/:write-attribute(name=verify-client,value=want)
The second example command uses the APR connector.
/profile=default/subsystem=web/connector=APR/ssl=configuration/:write-attribute(name=verify-client,value=require) |
| verify-depth |
The maximum number of intermediate certificate issuers checked before deciding that the clients do not have a valid certificate. The default value is
10.
|
/profile=default/subsystem=web/connector=HTTPS/ssl=configuration/:write-attribute(name=verify-depth,value=10) |
| certificate-key-file |
The full file path and file name of the keystore file where the signed server certificate is stored. With JSSE encryption, this certificate file will be the only one, while OpenSSL uses several files. The default value is the
.keystore file in the home directory of the user running JBoss EAP 6. If your keystoreType does not use a file, set the parameter to an empty string.
|
/profile=default/subsystem=web/connector=HTTPS/ssl=configuration/:write-attribute(name=certificate-key-file,value=../domain/configuration/server.keystore) |
| certificate-file |
If you use OpenSSL encryption, set the value of this parameter to the path to the file containing the server certificate.
|
/profile=default/subsystem=web/connector=HTTPS/ssl=configuration/:write-attribute(name=certificate-file,value=server.crt) |
| password |
The password for both the truststore and keystore. In the following example, replace PASSWORD with your own password.
|
/profile=default/subsystem=web/connector=HTTPS/ssl=configuration/:write-attribute(name=password,value=PASSWORD) |
| protocol |
The version of the SSL protocol to use. Supported values depend on the underlying SSL implementation (whether JSSE or OpenSSL). Refer to the Java SSE Documentation.
You can also specify a combination of protocols, which is comma separated. For example, TLSv1, TLSv1.1,TLSv1.2.
Warning
Red Hat recommends that you explicitly disable SSL in favor of TLSv1.1 or TLSv1.2 in all affected packages.
|
/profile=default/subsystem=web/connector=HTTPS/ssl=configuration/:write-attribute(name=protocol,value=ALL) /profile=default/subsystem=web/connector=HTTPS/ssl=configuration/:write-attribute(name=protocol,value="TLSv1, TLSv1.1,TLSv1.2") |
| cipher-suite |
A list of the encryption ciphers which are allowed. For JSSE syntax, it must be a comma-separated list. For OpenSSL syntax, it must be a colon-separated list. Ensure that you only use one syntax.
The default is
HIGH:!aNULL:!eNULL:!EXPORT:!DES:!RC4:!MD5.
The example only lists two possible ciphers, but real-world examples will likely use more.
Important
Using weak ciphers is a significant security risk. See http://www.nist.gov/manuscript-publication-search.cfm?pub_id=915295 for NIST recommendations on cipher suites.
For a list of available OpenSSL ciphers, see https://www.openssl.org/docs/apps/ciphers.html#CIPHER_STRINGS. Note that the following are not supported:
@SECLEVEL, SUITEB128, SUITEB128ONLY, SUITEB192.
|
/profile=default/subsystem=web/connector=HTTPS/ssl=configuration/:write-attribute(name=cipher-suite, value="TLS_RSA_WITH_AES_128_CBC_SHA,TLS_RSA_WITH_AES_256_CBC_SHA") |
| key-alias |
The alias used to for the server certificate in the keystore. In the following example, replace KEY_ALIAS with your certificate's alias.
|
/profile=default/subsystem=web/connector=HTTPS/ssl=configuration/:write-attribute(name=key-alias,value=KEY_ALIAS) |
| truststore-type |
The type of the truststore. Various types of truststores are available, including
PKCS12 and Java's standard JKS.
|
/profile=default/subsystem=web/connector=HTTPS/ssl=configuration/:write-attribute(name=truststore-type,value=jks) |
| keystore-type |
The type of the keystore, Various types of keystores are available, including
PKCS12 and Java's standard JKS.
|
/profile=default/subsystem=web/connector=HTTPS/ssl=configuration/:write-attribute(name=keystore-type,value=jks) |
| ca-certificate-file |
The file containing the CA certificates. This is the
truststoreFile, in the case of JSSE, and uses the same password as the keystore. The ca-certificate-file file is used to validate client certificates.
|
/profile=default/subsystem=web/connector=HTTPS/ssl=configuration/:write-attribute(name=certificate-file,value=ca.crt) |
| ca-certificate-password |
The Certificate password for the
ca-certificate-file. In the following example, replace the MASKED_PASSWORD with your own masked password.
|
/profile=default/subsystem=web/connector=HTTPS/ssl=configuration/:write-attribute(name=ca-certificate-password,value=MASKED_PASSWORD) |
| ca-revocation-url |
A file or URL which contains the revocation list. It refers to the
crlFile for JSSE or the SSLCARevocationFile for SSL.
|
/profile=default/subsystem=web/connector=HTTPS/ssl=configuration/:write-attribute(name=ca-revocation-url,value=ca.crl) |
| session-cache-size |
The size of the SSLSession cache. This attribute applies only to JSSE connectors. The default is
0, which specifies an unlimited cache size.
|
/profile=default/subsystem=web/connector=HTTPS/ssl=configuration/:write-attribute(name=session-cache-size,value=100) |
| session-timeout |
The number of seconds before a cached SSLSession expires. This attribute applies only to JSSE connectors. The default is
86400 seconds, which is 24 hours.
|
/profile=default/subsystem=web/connector=HTTPS/ssl=configuration/:write-attribute(name=session-timeout,value=43200) |
11.13. Password Vaults for Sensitive Strings
11.13.1. Password Vault System
11.13.2. Create a Java Keystore to Store Sensitive Strings
Prerequisites
- The
keytoolutility, provided by the Java Runtime Environment (JRE). Locate the path for the file, which on Red Hat Enterprise Linux is/usr/bin/keytool.
Warning
keytool utility from the same vendor as the JDK you use.
keytool from one vendor's JDK in a JBoss EAP instance running on a JDK from a different vendor results in the following exception:
java.io.IOException: com.sun.crypto.provider.SealedObjectForKeyProtector
Procedure 11.41. Set up a Java Keystore
Create a directory to store your keystore and other encrypted information.
Create a directory to store your keystore and other important information. The rest of this procedure assumes that the directory isEAP_HOME/vault/. Since this directory will contain sensitive information it should be accessible to only limited users. At a minimum the user account under which JBoss EAP is running requires read-write access.Determine the parameters to use with
keytoolutility.Decide on values for the following parameters:- alias
- The alias is a unique identifier for the vault or other data stored in the keystore. Aliases are case-insensitive.
- storetype
- The storetype specifies the keystore type. The value
jceksis recommended. - keyalg
- The algorithm to use for encryption. Use the documentation for your JRE and operating system to see which other choices may be available to you.
- keysize
- The size of an encryption key impacts how difficult it is to decrypt through brute force. For information on appropriate values, see the documentation distributed with the
keytoolutility. - storepass
- The value of
storepassis the password is used to authenticate to the keystore so that the key can be read. The password must be at least 6 characters long and must be provided when the keystore is accessed. If you omit this parameter, you will be prompted to enter it when you execute the command. - keypass
- The value of
keypassis the password used to access the specific key and must match the value of thestorepassparameter. - validity
- The value of
validityis the period (in days) for which the key will be valid. - keystore
- The value of
keystoreis the filepath and filename in which the keystore's values are to be stored. The keystore file is created when data is first added to it.Ensure you use the correct file path separator:/(forward slash) for Red Hat Enterprise Linux and similar operating systems,\(backslash) for Microsoft Windows Server.
Thekeytoolutility has many other options. See the documentation for your JRE or your operating system for more details.Run the
keytoolcommandLaunch your operating system's command line interface and run thekeytoolutility, supplying the information that you gathered.
Example 11.36. Create a Java Keystore
$ keytool -genseckey -alias vault -storetype jceks -keyalg AES -keysize 128 -storepass vault22 -keypass vault22 -validity 730 -keystore EAP_HOME/vault/vault.keystore
In this a keystore has been created in the file EAP_HOME/vault/vault.keystore. It stores a single key, with the alias vault, which will be used to store encrypted strings, such as passwords, for JBoss EAP.
11.13.3. Mask the Keystore Password and Initialize the Password Vault
Run the
vault.shcommand.RunEAP_HOME/bin/vault.sh. Start a new interactive session by typing0.Enter the directory where encrypted files will be stored.
This directory should be accessible to only limited users. At a minimum the user account under which JBoss EAP is running requires read-write access. If you followed Section 11.13.2, “Create a Java Keystore to Store Sensitive Strings”, your keystore is in a directory calledEAP_HOME/vault/.Note
Do not forget to include the trailing slash on the directory name. Either use/or\, depending on your operating system.Enter the path to the keystore.
Enter the full path to the keystore file. This example usesEAP_HOME/vault/vault.keystore.Encrypt the keystore password.
The following steps encrypt the keystore password, so that you can use it in configuration files and applications securely.Enter the keystore password.
When prompted, enter the keystore password.Enter a salt value.
Enter an 8-character salt value. The salt value, together with the iteration count (below), are used to create the hash value.Enter the iteration count.
Enter a number for the iteration count.Make a note of the masked password information.
The masked password, the salt, and the iteration count are printed to standard output. Make a note of them in a secure location. An attacker could use them to decrypt the password.Enter the alias of the vault.
When prompted, enter the alias of the vault. If you followed Section 11.13.2, “Create a Java Keystore to Store Sensitive Strings” to create your vault, the alias isvault.
Exit the interactive console.
Type2to exit the interactive console.
Your keystore password has been masked for use in configuration files and deployments. In addition, your vault is fully configured and ready to use.
11.13.4. Configure JBoss EAP 6 to Use the Password Vault
Before you can mask passwords and other sensitive attributes in configuration files, you need to make JBoss EAP 6 aware of the password vault which stores and decrypts them. Follow this procedure to enable this functionality.
Prerequisites
Procedure 11.42. Setup a Password Vault
Determine the correct values for the command.
Determine the values for the following parameters, which are determined by the commands used to create the keystore itself. For information on creating a keystore, refer the following topics: Section 11.13.2, “Create a Java Keystore to Store Sensitive Strings” and Section 11.13.3, “Mask the Keystore Password and Initialize the Password Vault”.Parameter Description KEYSTORE_URL The file system path or URI of the keystore file, usually called something likevault.keystoreKEYSTORE_PASSWORD The password used to access the keystore. This value should be masked.KEYSTORE_ALIAS The name of the keystore alias.SALT The salt used to encrypt and decrypt keystore values.ITERATION_COUNT The number of times the encryption algorithm is run.ENC_FILE_DIR The path to the directory from which the keystore commands are run. Typically the directory containing the password vault.host (managed domain only) The name of the host you are configuringUse the Management CLI to enable the password vault.
Run one of the following commands, depending on whether you use a managed domain or standalone server configuration. Substitute the values in the command with the ones from the first step of this procedure.Note
If you use Microsoft Windows Server, in the CLI command, escape each\character in a directory path with an additional\character. For example,C:\\data\\vault\\vault.keystore. This is because single\character is used for character escaping.Managed Domain
/host=YOUR_HOST/core-service=vault:add(vault-options=[("KEYSTORE_URL" => "PATH_TO_KEYSTORE"), ("KEYSTORE_PASSWORD" => "MASKED_PASSWORD"), ("KEYSTORE_ALIAS" => "ALIAS"), ("SALT" => "SALT"),("ITERATION_COUNT" => "ITERATION_COUNT"), ("ENC_FILE_DIR" => "ENC_FILE_DIR")])Standalone Server
/core-service=vault:add(vault-options=[("KEYSTORE_URL" => "PATH_TO_KEYSTORE"), ("KEYSTORE_PASSWORD" => "MASKED_PASSWORD"), ("KEYSTORE_ALIAS" => "ALIAS"), ("SALT" => "SALT"),("ITERATION_COUNT" => "ITERATION_COUNT"), ("ENC_FILE_DIR" => "ENC_FILE_DIR")])
The following is an example of the command with hypothetical values:/core-service=vault:add(vault-options=[("KEYSTORE_URL" => "/home/user/vault/vault.keystore"), ("KEYSTORE_PASSWORD" => "MASK-3y28rCZlcKR"), ("KEYSTORE_ALIAS" => "vault"), ("SALT" => "12438567"),("ITERATION_COUNT" => "50"), ("ENC_FILE_DIR" => "/home/user/vault/")])
JBoss EAP 6 is configured to decrypt masked strings using the password vault. To add strings to the vault and use them in your configuration, refer to the following topic: Section 11.13.6, “Store and Retrieve Encrypted Sensitive Strings in the Java Keystore”.
11.13.5. Configure JBoss EAP 6 to Use a Custom Implementation of the Password Vault
You can use your own implementation of SecurityVault to mask passwords and other sensitive attributes in configuration files.
Procedure 11.43. Use a Custom Implementation of the Password Vault
- Create a class that implements the interface
SecurityVault. - Create a module containing the class from the previous step, and specify a dependency on
org.picketboxwhere the interface isSecurityVault. - Enable the custom Password Vault in the JBoss EAP server configuration by adding the vault element with the following attributes:
- code
- The fully qualified name of class that implements
SecurityVault. - module
- The name of the module that contains the custom class.
Optionally, you can usevault-optionsparameters to initialize the custom class for a Password Vault. For example:/core-service=vault:add(code="custom.vault.implementation.CustomSecurityVault", module="custom.vault.module", vault-options=[("KEYSTORE_URL" => "PATH_TO_KEYSTORE"), ("KEYSTORE_PASSWORD" => "MASKED_PASSWORD"), ("KEYSTORE_ALIAS" => "ALIAS"), ("SALT" => "SALT"),("ITERATION_COUNT" => "ITERATION_COUNT"), ("ENC_FILE_DIR" => "ENC_FILE_DIR")])
JBoss EAP 6 is configured to decrypt masked strings using a custom implementation of the password vault.
11.13.6. Store and Retrieve Encrypted Sensitive Strings in the Java Keystore
Including passwords and other sensitive strings in plain-text configuration files is insecure. JBoss EAP 6 includes the ability to store and mask these sensitive strings in an encrypted keystore, and use masked values in configuration files.
Prerequisites
- The
EAP_HOME/bin/vault.shapplication must be accessible via a command-line interface.
Procedure 11.44. Setup the Java Keystore
Run the
vault.shcommand.RunEAP_HOME/bin/vault.sh. Start a new interactive session by typing0.Enter the directory where encrypted files will be stored.
If you followed Section 11.13.2, “Create a Java Keystore to Store Sensitive Strings”, your keystore is in the directoryEAP_HOME/vault. In most cases, it makes sense to store all of your encrypted information in the same place as the key store. Since this directory will contain sensitive information it should be accessible to only limited users. At a minimum the user account under which JBoss EAP is running requires read-write access.Note
Do not forget to include the trailing slash on the directory name. Either use/or\, depending on your operating system.Enter the path to the keystore.
Enter the full path to the keystore file. This example usesEAP_HOME/vault/vault.keystore.Enter the keystore password, vault name, salt, and iteration count.
When prompted, enter the keystore password, vault name, salt, and iteration count. A handshake is performed.Select the option to store a password.
Select option0to store a password or other sensitive string.Enter the value.
When prompted, enter the value twice. If the values do not match, you are prompted to try again.Enter the vault block.
Enter the vault block, which is a container for attributes which pertain to the same resource. An example of an attribute name would beds_ExampleDS. This will form part of the reference to the encrypted string, in your datasource or other service definition.Enter the attribute name.
Enter the name of the attribute you are storing. An example attribute name would bepassword.ResultA message such as the one below shows that the attribute has been saved.
Secured attribute value has been stored in vault.
Make note of the information about the encrypted string.
A message prints to standard output, showing the vault block, attribute name, shared key, and advice about using the string in your configuration. Make note of this information in a secure location. Example output is shown below.******************************************** Vault Block:ds_ExampleDS Attribute Name:password Configuration should be done as follows: VAULT::ds_ExampleDS::password::1 ********************************************
Use the encrypted string in your configuration.
Use the string from the previous step in your configuration, in place of a plain-text string. A datasource using the encrypted password above is shown below.... <subsystem xmlns="urn:jboss:domain:datasources:1.0"> <datasources> <datasource jndi-name="java:jboss/datasources/ExampleDS" enabled="true" use-java-context="true" pool-name="H2DS"> <connection-url>jdbc:h2:mem:test;DB_CLOSE_DELAY=-1</connection-url> <driver>h2</driver> <pool></pool> <security> <user-name>sa</user-name> <password>${VAULT::ds_ExampleDS::password::1}</password> </security> </datasource> <drivers> <driver name="h2" module="com.h2database.h2"> <xa-datasource-class>org.h2.jdbcx.JdbcDataSource</xa-datasource-class> </driver> </drivers> </datasources> </subsystem> ...You can use an encrypted string anywhere in your domain or standalone configuration file where expressions are allowed.Note
To check if expressions are allowed within a particular subsystem, run the following CLI command against that subsystem:/host=master/core-service=management/security-realm=TestRealm:read-resource-description(recursive=true)
From the output of running this command, look for the value for theexpressions-allowedparameter. If this is true, then you can use expressions within the configuration of this particular subsystem.After you store your string in the keystore, use the following syntax to replace any clear-text string with an encrypted one.${VAULT::VAULT_BLOCK::ATTRIBUTE_NAME::ENCRYPTED_VALUE}Here is a sample real-world value, where the vault block isds_ExampleDSand the attribute ispassword.<password>${VAULT::ds_ExampleDS::password::1}</password>
11.13.7. Store and Resolve Sensitive Strings In Your Applications
Configuration elements of JBoss EAP 6 support the ability to resolve encrypted strings against values stored in a Java Keystore, via the Security Vault mechanism. You can add support for this feature to your own applications.
Before performing this procedure, make sure that the directory for storing your vault files exists. It does not matter where you place them, as long as the user who executes JBoss EAP 6 has permission to read and write the files. This example places the vault/ directory into the /home/USER/vault/ directory. The vault itself is a file called vault.keystore inside the vault/ directory.
Example 11.37. Adding the Password String to the Vault
EAP_HOME/bin/vault.sh command. The full series of commands and responses is included in the following screen output. Values entered by the user are emphasized. Some output is removed for formatting. In Microsoft Windows, the name of the command is vault.bat. Note that in Microsoft Windows, file paths use the \ character as a directory separator, rather than the / character.
[user@host bin]$ ./vault.sh ********************************** **** JBoss Vault ******** ********************************** Please enter a Digit:: 0: Start Interactive Session 1: Remove Interactive Session 2: Exit0Starting an interactive session Enter directory to store encrypted files:/home/user/vault/Enter Keystore URL:/home/user/vault/vault.keystoreEnter Keystore password:...Enter Keystore password again:...Values match Enter 8 character salt:12345678Enter iteration count as a number (Eg: 44):25Enter Keystore Alias:vaultVault is initialized and ready for use Handshake with Vault complete Please enter a Digit:: 0: Store a password 1: Check whether password exists 2: Exit0Task: Store a password Please enter attribute value:saPlease enter attribute value again:saValues match Enter Vault Block:DSEnter Attribute Name:thePassSecured attribute value has been stored in vault. Please make note of the following: ******************************************** Vault Block:DS Attribute Name:thePass Configuration should be done as follows: VAULT::DS::thePass::1 ******************************************** Please enter a Digit:: 0: Store a password 1: Check whether password exists 2: Exit2
VAULT.
Example 11.38. Servlet Using a Vaulted Password
package vaulterror.web;

import java.io.IOException;
import java.io.Writer;

import javax.annotation.Resource;
import javax.annotation.sql.DataSourceDefinition;
import javax.servlet.ServletException;
import javax.servlet.annotation.WebServlet;
import javax.servlet.http.HttpServlet;
import javax.servlet.http.HttpServletRequest;
import javax.servlet.http.HttpServletResponse;
import javax.sql.DataSource;


/*@DataSourceDefinition(
        name = "java:jboss/datasources/LoginDS",
        user = "sa",
        password = "sa",
        className = "org.h2.jdbcx.JdbcDataSource",
        url = "jdbc:h2:tcp://localhost/mem:test"
)*/
@DataSourceDefinition(
        name = "java:jboss/datasources/LoginDS",
        user = "sa",
        password = "VAULT::DS::thePass::1",
        className = "org.h2.jdbcx.JdbcDataSource",
        url = "jdbc:h2:tcp://localhost/mem:test"
)
@WebServlet(name = "MyTestServlet", urlPatterns = { "/my/" }, loadOnStartup = 1)
public class MyTestServlet  extends HttpServlet {

    private static final long serialVersionUID = 1L;


    @Resource(lookup = "java:jboss/datasources/LoginDS")
    private DataSource ds;

    @Override
    protected void doGet(HttpServletRequest req, HttpServletResponse resp) throws ServletException, IOException {
        Writer writer = resp.getWriter();
        writer.write((ds != null) + "");
    }
}
11.14. FIPS 140-2 Compliant Encryption
11.14.1. About FIPS 140-2 Compliance
11.14.2. FIPS 140-2 Compliant Passwords
- Must be at least seven (7) characters in length.
- Must include characters from at least three (3) of the following character classes:
- ASCII digits,
- lowercase ASCII,
- uppercase ASCII,
- non-alphanumeric ASCII, and
- non-ASCII.
11.14.3. Enable FIPS 140-2 Cryptography for SSL on Red Hat Enterprise Linux 6
Prerequisites
- Red Hat Enterprise Linux 6 must already be configured to be FIPS 140-2 compliant. Refer to https://access.redhat.com/knowledge/solutions/137833.
Procedure 11.45. Enable FIPS 140-2 Compliant Cryptography for SSL
Create the database
Create the NSS database in a directory own by thejbossuser.$ mkdir -p /usr/share/jboss-as/nssdb $ chown jboss /usr/share/jboss-as/nssdb $ modutil -create -dbdir /usr/share/jboss-as/nssdb
Create NSS configuration file
Create a new text file with the namenss_pkcsll_fips.cfgin the/usr/share/jboss-asdirectory with the following contents:name = nss-fips nssLibraryDirectory=/usr/lib64 nssSecmodDirectory=/usr/share/jboss-as/nssdb nssModule = fips
The NSS configuration file must specify:- a name,
- the directory where the NSS library is located, and
- the directory where the NSS database was created as per step 1.
If you are not running a 64bit version of Red Hat Enterprise Linux 6 then setnssLibraryDirectoryto/usr/libinstead of/usr/lib64.Enable SunPKCS11 provider
Edit thejava.securityconfiguration file for your JRE ($JAVA_HOME/jre/lib/security/java.security) and add the following line:security.provider.1=sun.security.pkcs11.SunPKCS11 /usr/share/jboss-as/nss_pkcsll_fips.cfg
Note that the configuration file specified in this line is the file created in step 2.Any othersecurity.provider.Xlines in this file must have the value of their X increased by one to ensure that this provider is given priority.Enable FIPS mode for the NSS library
Run themodutilcommand as shown to enable FIPS mode:modutil -fips true -dbdir /usr/share/jboss-as/nssdb
Note that the directory specified here is the one created in step 1.You may get a security library error at this point requiring you to regenerate the library signatures for some of the NSS shared objects.Change the password on the FIPS token
Set the password on the FIPS token using the following command. Note that the name of the token must beNSS FIPS 140-2 Certificate DB.modutil -changepw "
NSS FIPS 140-2 Certificate DB" -dbdir /usr/share/jboss-as/nssdbThe password used for the FIPS token must be a FIPS compliant password.Create certificate using NSS tools
Enter the following command to create a certificate using the NSS tools.certutil -S -k rsa -n jbossweb -t "u,u,u" -x -s "CN=localhost, OU=MYOU, O=MYORG, L=MYCITY, ST=MYSTATE, C=MY" -d /usr/share/jboss-as/nssdb
Configure the HTTPS connector to use the PKCS11 keystore
Add a HTTPS connector using the following command in the JBoss CLI Tool:/subsystem=web/connector=https/:add(socket-binding=https,scheme=https,protocol=HTTP/1.1,secure=true)
Then add the SSL configuration with the following command, replacing PASSWORD with the FIPS compliant password from step 5./subsystem=web/connector=https/ssl=configuration:add(name=https,password=PASSWORD,keystore-type=PKCS11, cipher-suite="SSL_RSA_WITH_3DES_EDE_CBC_SHA,SSL_DHE_RSA_WITH_3DES_EDE_CBC_SHA, TLS_RSA_WITH_AES_128_CBC_SHA,TLS_DHE_DSS_WITH_AES_128_CBC_SHA, TLS_DHE_RSA_WITH_AES_128_CBC_SHA,TLS_RSA_WITH_AES_256_CBC_SHA, TLS_DHE_DSS_WITH_AES_256_CBC_SHA,TLS_DHE_RSA_WITH_AES_256_CBC_SHA, TLS_ECDH_ECDSA_WITH_3DES_EDE_CBC_SHA,TLS_ECDH_ECDSA_WITH_AES_128_CBC_SHA, TLS_ECDH_ECDSA_WITH_AES_256_CBC_SHA,TLS_ECDHE_ECDSA_WITH_3DES_EDE_CBC_SHA, TLS_ECDHE_ECDSA_WITH_AES_128_CBC_SHA,TLS_ECDHE_ECDSA_WITH_AES_256_CBC_SHA, TLS_ECDH_RSA_WITH_3DES_EDE_CBC_SHA,TLS_ECDH_RSA_WITH_AES_128_CBC_SHA, TLS_ECDH_RSA_WITH_AES_256_CBC_SHA,TLS_ECDHE_RSA_WITH_3DES_EDE_CBC_SHA, TLS_ECDHE_RSA_WITH_AES_128_CBC_SHA,TLS_ECDHE_RSA_WITH_AES_256_CBC_SHA, TLS_ECDH_anon_WITH_3DES_EDE_CBC_SHA,TLS_ECDH_anon_WITH_AES_128_CBC_SHA, TLS_ECDH_anon_WITH_AES_256_CBC_SHA")
Verify
Verify that the JVM can read the private key from the PKCS11 keystore by running the following command:keytool -list -storetype pkcs11
Example 11.39. XML configuration for HTTPS connector using FIPS 140-2 compliance
<connector name="https" protocol="HTTP/1.1" scheme="https" socket-binding="https" secure="true">
  <ssl name="https" password="****"
      cipher-suite="SSL_RSA_WITH_3DES_EDE_CBC_SHA,SSL_DHE_RSA_WITH_3DES_EDE_CBC_SHA,
         TLS_RSA_WITH_AES_128_CBC_SHA, TLS_DHE_DSS_WITH_AES_128_CBC_SHA,
         TLS_DHE_RSA_WITH_AES_128_CBC_SHA,TLS_RSA_WITH_AES_256_CBC_SHA,
         TLS_DHE_DSS_WITH_AES_256_CBC_SHA,TLS_DHE_RSA_WITH_AES_256_CBC_SHA,
         TLS_ECDH_ECDSA_WITH_3DES_EDE_CBC_SHA,TLS_ECDH_ECDSA_WITH_AES_128_CBC_SHA,
         TLS_ECDH_ECDSA_WITH_AES_256_CBC_SHA,TLS_ECDHE_ECDSA_WITH_3DES_EDE_CBC_SHA,
         TLS_ECDHE_ECDSA_WITH_AES_128_CBC_SHA,TLS_ECDHE_ECDSA_WITH_AES_256_CBC_SHA,
         TLS_ECDH_RSA_WITH_3DES_EDE_CBC_SHA,TLS_ECDH_RSA_WITH_AES_128_CBC_SHA,
         TLS_ECDH_RSA_WITH_AES_256_CBC_SHA,TLS_ECDHE_RSA_WITH_3DES_EDE_CBC_SHA,
         TLS_ECDHE_RSA_WITH_AES_128_CBC_SHA,TLS_ECDHE_RSA_WITH_AES_256_CBC_SHA,
         TLS_ECDH_anon_WITH_3DES_EDE_CBC_SHA,TLS_ECDH_anon_WITH_AES_128_CBC_SHA,
         TLS_ECDH_anon_WITH_AES_256_CBC_SHA"
      keystore-type="PKCS11"/>
</connector>cipher-suite attribute has linebreaks inserted to make it easier to read.
11.14.4. Enable FIPS 140-2 Cryptography in Apache HTTP Server
SSLFIPS on directive to Apache HTTP server configuration file: httpd.conf or ssl.conf. This directive must be used outside a VirtualHost configuration section.
SSLFIPS on directive activates the SSL library FIPS_mode flag. This mode applies to all SSL library operations. After adding this directive, you need to restart Apache HTTP server for the changes to become active.
Note
FIPS_mode flag) installed on your system.
Chapter 12. Security Administration Reference
12.1. Included Authentication Modules
Role within the Code name.
Code value or the full (package qualified) name to refer to the module.
Authentication Modules
Table 12.1. RealmDirect
| Code | RealmDirect
|
| Class | org.jboss.as.security.RealmDirectLoginModule
|
| Description |
A login module implementation to interface directly with the security realm. This login module allows all interactions with the backing store to be delegated to the realm removing the need for any duplicate and synchronized definitions. Used for remoting calls and management interface.
|
Table 12.2. RealmDirect Module Options
| Option | Type | Default | Description |
|---|---|---|---|
realm |
string
| ApplicationRealm
|
Name of the desired realm.
|
Table 12.3. Client
| Code | Client
|
| Class | org.jboss.security.ClientLoginModule
|
| Description |
This login module is designed to establish caller identity and credentials when JBoss EAP 6 is acting as a client. It should never be used as part of a security domain used for server authentication.
|
Table 12.4. Client Module Options
| Option | Type | Default | Description |
|---|---|---|---|
multi-threaded | true or false
| false
|
Set to true if each thread has its own principal and credential storage. Set to false to indicate that all threads in the VM share the same identity and credential.
|
password-stacking
| useFirstPass or false
| false
|
Set to
useFirstPass to indicate that this login module should look for information stored in the LoginContext to use as the identity. This option can be used when stacking other login modules with this one.
|
restore-login-identity
| true or false
| false
|
Set to true if the identity and credential seen at the start of the
login() method should be restored after the logout() method is invoked.
|
Table 12.5. Remoting
| Code | Remoting
|
| Class | org.jboss.as.security.remoting.RemotingLoginModule
|
| Description |
This login module is used to check if the request currently being authenticated is a request received over a Remoting connection, and if so the identity that was created during the Remoting authentication process is used and associated with the current request. If the request did not arrive over a Remoting connection this module does nothing and allows the JAAS based login to continue to the next module.
|
Table 12.6. Remoting Module Options
| Option | Type | Default | Description |
|---|---|---|---|
password-stacking | useFirstPass or false
| false
|
A value of
useFirstPass indicates that this login module should first look to the information stored in the LoginContext for the identity. This option can be used when stacking other login modules with this one.
|
principalClass
|
A fully-qualified classname.
|
none
|
A
Principal implementation class which contains a constructor that takes String arguments for the principal name.
|
unauthenticatedIdentity
|
A principal name.
|
none
|
Defines the principal name assigned to requests which contain no authentication information. This can allow unprotected servlets to invoke methods on EJBs that do not require a specific role. Such a principal has no associated roles and can only access unsecured EJBs or EJB methods that are associated with the
unchecked permission constraint.
|
Table 12.7. Certificate
| Code | Certificate
|
| Class | org.jboss.security.auth.spi.BaseCertLoginModule
|
| Description |
This login module is designed to authenticate users based on
X509 Certificates. A use case for this is CLIENT-CERT authentication of a web application.
|
Table 12.8. Certificate Module Options
| Option | Type | Default | Description |
|---|---|---|---|
securityDomain
| string | other
|
Name of the security domain that has the JSSE configuration for the truststore holding the trusted certificates.
|
verifier
| class |
none
|
The class name of the
org.jboss.security.auth.certs.X509CertificateVerifier to use for verification of the login certificate.
|
Table 12.9. CertificateRoles
| Code | CertificateRoles
|
| Class | org.jboss.security.auth.spi.CertRolesLoginModule
|
| Description |
This login module extends the Certificate login module to add role mapping capabilities from a properties file. It takes all of the same options as the Certificate login module, and adds the following options.
|
Table 12.10. CertificateRoles Module Options
| Option | Type | Default | Description |
|---|---|---|---|
rolesProperties
| string | roles.properties
|
The name of the resource or file containing the roles to assign to each user. The role properties file must be in the format
username=role1,role2 where the username is the DN of the certificate, escaping any = (equals) and space characters. The following example is in the correct format:
CN\=unit-tests-client,\ OU\=Red\ Hat\ Inc.,\ O\=Red\ Hat\ Inc.,\ ST\=North\ Carolina,\ C\=US |
defaultRolesProperties
| string | defaultRoles.properties
|
Name of the resource or file to fall back to if the
rolesProperties file cannot be found.
|
roleGroupSeparator
| A single character. | . (a single period)
|
Which character to use as the role group separator in the
rolesProperties file.
|
Table 12.11. Database
| Code | Database |
| Class | org.jboss.security.auth.spi.DatabaseServerLoginModule
|
| Description |
A JDBC-based login module that supports authentication and role mapping. It is based on two logical tables, with the following definitions.
|
Table 12.12. Database Module Options
| Option | Type | Default | Description |
|---|---|---|---|
digestCallback
| A fully-qualified classname |
none
|
The class name of the
DigestCallback implementation that includes pre/post digest content like salts for hashing the input password. Only used if hashAlgorithm has been specified.
|
dsJndiName
| A JNDI resource | java:/DefaultDS
|
The name of the JNDI resource storing the authentication information. This option is required.
|
hashAlgorithm
| String |
Use plain passwords
|
The message digest algorithm used to hash passwords. Supported algorithms depend on the Java Security Provider, but the following are supported:
MD5, SHA-1, and SHA-256.
|
hashCharset
| String |
The platform's default encoding
|
The name of the charset/encoding to use when converting the password String to a byte array. This includes all supported Java charset names.
|
hashEncoding
| String |
Base64
|
The string encoding format to use.
|
ignorePasswordCase
| boolean |
false
|
A flag indicating if the password comparison should ignore case.
|
inputValidator
| A fully-qualified classname |
none
|
The instance of the InputValidator implementation used to validate the username and password supplied by the client.
|
principalsQuery
| prepared SQL statement | select Password from Principals where PrincipalID=?
|
The prepared SQL query to obtain the information about the principal.
|
rolesQuery
| prepared SQL statement |
none
|
The prepared SQL query to obtain the information about the roles. It should be equivalent to
select Role, RoleGroup from Roles where PrincipalID=?, where Role is the role name and the RoleGroup column value should always be either Roles with a capital R or CallerPrincipal.
|
storeDigestCallback
| A fully-qualified classname |
none
|
The class name of the
DigestCallback implementation that includes pre/post digest content like salts for hashing the store/expected password. Only used if hashStorePassword or hashUserPassword is true and hashAlgorithm has been specified.
|
suspendResume
| boolean |
true
|
Whether any existing JTA transaction should be suspended during database operations.
|
throwValidatorError
| boolean |
false
|
A flag that indicates whether validation errors should be exposed to clients or not
|
transactionManagerJndiName
| JNDI Resource |
java:/TransactionManager
|
The JNDI name of the transaction manager used by the login module.
|
Table 12.13. DatabaseCertificate
| Code | DatabaseCertificate
|
| Class | org.jboss.security.auth.spi.DatabaseCertLoginModule
|
| Description |
This login module extends the Certificate login module to add role mapping capabilities from a database table. It has the same options plus these additional options:
|
Table 12.14. DatabaseCertificate Module Options
| Option | Type | Default | Description |
|---|---|---|---|
dsJndiName
| A JNDI resource | java:/DefaultDS
|
The name of the JNDI resource storing the authentication information. This option is required.
|
rolesQuery
| prepared SQL statement | select Role,RoleGroup from Roles where PrincipalID=?
|
SQL prepared statement to be executed in order to map roles. It should be an equivalent to
select Role, RoleGroup from Roles where PrincipalID=?, where Role is the role name and the RoleGroup column value should always be either Roles with a capital R or CallerPrincipal.
|
suspendResume
| true or false
| true
|
Whether any existing JTA transaction should be suspended during database operations.
|
Table 12.15. Identity
| Code | Identity
|
| Class | org.jboss.security.auth.spi.IdentityLoginModule
|
| Description |
Associates the principal specified in the module options with any subject authenticated against the module. The type of Principal class used is
org.jboss.security.SimplePrincipal. If no principal option is specified a principal with the name of guest is used.
|
Table 12.16. Identity Module Options
| Option | Type | Default | Description |
|---|---|---|---|
principal
| String | guest
|
The name to use for the principal.
|
roles
| comma-separated list of strings |
none
|
A comma-delimited list of roles which will be assigned to the subject.
|
Table 12.17. Ldap
| Code | Ldap
|
| Class | org.jboss.security.auth.spi.LdapLoginModule
|
| Description |
Authenticates against an LDAP server, when the username and password are stored in an LDAP server that is accessible using a JNDI LDAP provider. Many of the options are not required, because they are determined by the LDAP provider or the environment.
|
Table 12.18. Ldap Module Options
| Option | Type | Default | Description |
|---|---|---|---|
java.naming.factory.initial
| class name | com.sun.jndi.ldap.LdapCtxFactory
| InitialContextFactory implementation class name.
|
java.naming.provider.url
| ldap:// URL
|
If the value of
java.naming.security.protocol is SSL, ldap://localhost:636, otherwise ldap://localhost:389
|
URL for the LDAP server.
|
java.naming.security.authentication
| none, simple, or the name of a SASL mechanism
| simple
|
The security level to use to bind to the LDAP server.
|
java.naming.security.protocol
| transport protocol |
If unspecified, determined by the provider.
|
The transport protocol to use for secure access, such as SSL.
|
java.naming.security.principal
| string |
none
|
The name of the principal for authenticating the caller to the service. This is built from other properties described below.
|
java.naming.security.credentials
| credential type |
none
|
The type of credential used by the authentication scheme. Some examples include hashed password, clear-text password, key, or certificate. If this property is unspecified, the behavior is determined by the service provider.
|
principalDNPrefix
| string | |
Prefix added to the username to form the user DN. You can prompt the user for a username and build the fully-qualified DN by using the
principalDNPrefix and principalDNSuffix.
|
principalDNSuffix
| string | |
Suffix added to the username to form the user DN. You can prompt the user for a username and build the fully-qualified DN by using the
principalDNPrefix and principalDNSuffix.
|
useObjectCredential
| true or false
|
false
|
Whether the credential should be obtained as an opaque Object using the
org.jboss.security.auth.callback.ObjectCallback type of Callback rather than as a char[] password using a JAAS PasswordCallback. This allows for passing non-char[] credential information to the LDAP server.
|
rolesCtxDN
| fully-qualified DN |
none
|
The fully-qualified DN for the context to search for user roles.
|
userRolesCtxDNAttributeName
|
attribute
|
none
|
The attribute in the user object that contains the DN for the context to search for user roles. This differs from
rolesCtxDN in that the context to search for a user's roles may be unique for each user.
|
roleAttributeID
| attribute | roles
|
Name of the attribute containing the user roles.
|
roleAttributeIsDN
| true or false
| false
|
Whether or not the
roleAttributeID contains the fully-qualified DN of a role object. If false, the role name is taken from the value of the roleNameAttributeId attribute of the context name. Certain directory schemas, such as Microsoft Active Directory, require this attribute to be set to true.
|
roleNameAttributeID
| attribute | name
|
Name of the attribute within the
roleCtxDN context which contains the role name. If the roleAttributeIsDN property is set to true, this property is used to find the role object's name attribute.
|
uidAttributeID
| attribute | uid
|
Name of the attribute in the
UserRolesAttributeDN that corresponds to the user ID. This is used to locate the user roles.
|
matchOnUserDN
| true or false
| false
|
Whether or not the search for user roles should match on the user's fully-distinguished DN or the username only. If
true, the full user DN is used as the match value. If false, only the username is used as the match value against the uidAttributeName attribute.
|
allowEmptyPasswords
| true or false
| false
|
Whether to allow empty passwords. Most LDAP servers treat empty passwords as anonymous login attempts. To reject empty passwords, set this to
false.
|
Table 12.19. LdapExtended
| Code | LdapExtended
|
| Class | org.jboss.security.auth.spi.LdapExtLoginModule
|
| Description |
An alternate LDAP login module implementation that uses searches to locate the bind user and associated roles. The roles query recursively follows DNs to navigate a hierarchical role structure. It uses the same
java.naming options as the Ldap module, and uses the following options instead of the other options of the Ldap module.
The authentication happens in 2 steps:
|
Table 12.20. LdapExtended Module Options
| Option | Type | Default | Description |
|---|---|---|---|
baseCtxDN
| fully-qualified DN |
none
|
The fixed DN of the top-level context to begin the user search.
|
bindCredential
| string, optionally encrypted |
none
|
See the JBoss EAP Security Guide for more information.
|
bindDN
| fully-qualified DN |
none
|
The DN used to bind against the LDAP server for the user and roles queries. This DN needs read and search permissions on the
baseCtxDN and rolesCtxDN values.
|
baseFilter
| LDAP filter string |
none
|
A search filter used to locate the context of the user to authenticate. The input username or
userDN obtained from the login module callback is substituted into the filter anywhere a {0} expression is used. A common example for the search filter is (uid={0}).
|
rolesCtxDN
| fully-qualified DN |
none
|
The fixed DN of the context to search for user roles. This is not the DN where the actual roles are, but the DN where the objects containing the user roles are. For example, in a Microsoft Active Directory server, this is the DN where the user account is.
|
roleFilter
| LDAP filter string |
none
|
A search filter used to locate the roles associated with the authenticated user. The input username or
userDN obtained from the login module callback is substituted into the filter anywhere a {0} expression is used. The authenticated userDN is substituted into the filter anywhere a {1} is used. An example search filter that matches on the input username is (member={0}). An alternative that matches on the authenticated userDN is (member={1}).
|
roleAttributeIsDN | true or false
| false
|
Whether or not the
roleAttributeID contains the fully-qualified DN of a role object. If false, the role name is taken from the value of the roleNameAttributeId attribute of the context name. Certain directory schemas, such as Microsoft Active Directory, require this attribute to be set to true.
|
defaultRole
|
Role name
|
none
|
A role included for all authenticated users
|
parseRoleNameFromDN
| true or false
| false
|
A flag indicating if the DN returned by a query contains the roleNameAttributeID. If set to
true, the DN is checked for the roleNameATtributeID. If set to false, the DN is not checked for the roleNameAttributeID. This flag can improve the performance of LDAP queries.
|
parseUsername
| true or false
| false
|
A flag indicating if the DN is to be parsed for the username. If set to
true, the DN is parsed for the username. If set to false the DN is not parsed for the username. This option is used together with usernameBeginString and usernameEndString.
|
usernameBeginString
|
string
|
none
|
Defines the string which is to be removed from the start of the DN to reveal the username. This option is used together with
usernameEndString.
|
usernameEndString
|
string
|
none
|
Defines the string which is to be removed from the end of the DN to reveal the username. This option is used together with
usernameBeginString.
|
roleNameAttributeID
| attribute | name
|
Name of the attribute within the
roleCtxDN context which contains the role name. If the roleAttributeIsDN property is set to true, this property is used to find the role object's name attribute.
|
distinguishedNameAttribute
| attribute | distinguishedName
|
The name of the attribute in the user entry that contains the DN of the user. This may be necessary if the DN of the user itself contains special characters (backslash for example) that prevent correct user mapping. If the attribute does not exist, the entry's DN is used.
|
roleRecursion
| integer | 0
|
The numbers of levels of recursion the role search will go below a matching context. Disable recursion by setting this to
0.
|
searchTimeLimit
| integer | 10000 (10 seconds)
|
The timeout in milliseconds for user or role searches.
|
searchScope
|
One of:
OBJECT_SCOPE, ONELEVEL_SCOPE, SUBTREE_SCOPE
| SUBTREE_SCOPE
|
The search scope to use.
|
allowEmptyPasswords
| true or false
| false
|
Whether to allow empty passwords. Most LDAP servers treat empty passwords as anonymous login attempts. To reject empty passwords, set this to false.
|
referralUserAttributeIDToCheck
|
attribute
|
none
|
If you are not using referrals, this option can be ignored. When using referrals, this option denotes the attribute name which contains users defined for a certain role (for example,
member), if the role object is inside the referral. Users are checked against the content of this attribute name. If this option is not set, the check will always fail, so role objects cannot be stored in a referral tree.
|
Table 12.21. RoleMapping
| Code | RoleMapping
|
| Class | org.jboss.security.auth.spi.RoleMappingLoginModule
|
| Description |
Maps a role which is the end result of the authentication process to a declarative role. This module must be flagged as
optional when you add it to the security domain.
|
Table 12.22. RoleMapping Module Options
| Option | Type | Default | Description |
|---|---|---|---|
rolesProperties
| The fully-qualified file path and name of a properties file or resource | none
|
The fully-qualified file path and name of a properties file or resource which maps roles to replacement roles. The format is
original_role=role1,role2,role3
|
replaceRole
| true or false
| false
|
Whether to add to the current roles, or replace the current roles with the mapped ones. Replaces if set to
true.
|
Note
rolesProperties module option is required for RoleMapping.
Table 12.23. RunAs
| Code | RunAs
|
| Class | org.jboss.security.auth.spi.RunAsLoginModule
|
| Description |
A helper module that pushes a
run as role onto the stack for the duration of the login phase of authentication, and pops the run as role off the stack in either the commit or abort phase. This login module provides a role for other login modules that must access secured resources in order to perform their authentication, such as a login module which accesses a secured EJB. RunAsLoginModule must be configured before the login modules that require a run as role to be established.
|
Table 12.24. RunAs Options
| Option | Type | Default | Description |
|---|---|---|---|
roleName
| role name | nobody
|
The name of the role to use as the
run as role during the login phase.
|
principalName
| principal name | nobody
|
Name of the principal to use as the
run as principal during login phase. If not specified a default of nobody is used.
|
principalClass
| A fully-qualified classname. |
none
|
A
Principal implementation class which contains a constructor that takes String arguments for the principal name.
|
Table 12.25. Simple
| Code | Simple
|
| Class | org.jboss.security.auth.spi.SimpleServerLoginModule
|
| Description |
A module for quick setup of security for testing purposes. It implements the following simple algorithm:
|
Simple Module Options
The Simple module has no options.
Table 12.26. ConfiguredIdentity
| Code | ConfiguredIdentity
|
| Class | org.picketbox.datasource.security.ConfiguredIdentityLoginModule
|
| Description |
Associates the principal specified in the module options with any subject authenticated against the module. The type of Principal class used is
org.jboss.security.SimplePrincipal.
|
Table 12.27. ConfiguredIdentity Module Options
| Option | Type | Default | Description |
|---|---|---|---|
username
| string | none | The username for authentication. |
password
| encrypted string | "" |
The password to use for authentication. To encrypt the password, use the module directly at the command line.
Paste the result of this command into the module option's value field. The default value is an empty string.
|
principal
| Name of a principal | none
|
The principal which will be associated with any subject authenticated against the module.
|
Table 12.28. SecureIdentity
| Code | SecureIdentity
|
| Class | org.picketbox.datasource.security.SecureIdentityLoginModule
|
| Description |
This module is provided for legacy purposes. It allows you to encrypt a password and then use the encrypted password with a static principal. If your application uses
SecureIdentity, consider using a password vault mechanism instead.
|
Table 12.29. SecureIdentity Module Options
| Option | Type | Default | Description |
|---|---|---|---|
username
| string | none | The username for authentication. |
password
| encrypted string | "" |
The password to use for authentication. To encrypt the password, use the module directly at the command line.
Paste the result of this command into the module option's value field. The default value is an empty string.
|
managedConnectionFactoryName
| JCA resource | none |
The name of the JCA connection factory for your datasource.
|
Table 12.30. PropertiesUsers
| Code | PropertiesUsers
|
| Class | org.jboss.security.auth.spi.PropertiesUsersLoginModule
|
| Description |
Uses a properties file to store usernames and passwords for authentication. No authorization (role mapping) is provided. This module is only appropriate for testing.
|
Table 12.31. SimpleUsers
| Code | SimpleUsers
|
| Class | org.jboss.security.auth.spi.SimpleUsersLoginModule
|
| Description |
This login module stores the username and clear-text password using
module-option. module-option's name and value attributes specify a username and password. It is included for testing only, and is not appropriate for a production environment.
|
Table 12.32. LdapUsers
| Code | LdapUsers
|
| Class | org.jboss.security.auth.spi.LdapUsersLoginModule
|
| Description |
The
LdapUsers module is superseded by the ExtendedLDAP and AdvancedLdap modules.
|
Table 12.33. Kerberos
| Code | Kerberos
|
| Class | com.sun.security.auth.module.Krb5LoginModule. In the IBM JDK the classname is com.ibm.security.auth.module.Krb5LoginModule.
|
| Description |
Performs Kerberos login authentication, using GSSAPI. This module is part of the security framework from the API provided by Sun Microsystems. Details can be found at http://docs.oracle.com/javase/7/docs/jre/api/security/jaas/spec/com/sun/security/auth/module/Krb5LoginModule.html. This module needs to be paired with another module which handles the authentication and roles mapping.
|
Table 12.34. Kerberos Module Options
| Option | Type | Default | Description |
|---|---|---|---|
storekey
| true or false
| false |
Whether or not to add the
KerberosKey to the subject's private credentials.
|
doNotPrompt
| true or false
| false |
If set to
true, the user is not prompted for the password.
|
useTicketCache
|
Boolean value of
. true or false
| false |
If
true, the TGT is obtained from the ticket cache. If false, the ticket cache is not used.
|
ticketcache
| A file or resource representing a Kerberos ticket cache. |
The default depends on which operating system you use.
| The location of the ticket cache. |
useKeyTab
| true or false
| false | Whether to obtain the principal's key from a key table file. |
keytab
| A file or resource representing a Kerberos keytab. |
the location in the operating system's Kerberos configuration file, or
/home/user/krb5.keytab
| The location of the key table file. |
principal
| string | none |
The name of the principal. This can either be a simple user name or a service name such as
host/testserver.acme.com. Use this instead of obtaining the principal from the key table, or when the key table contains more than one principal.
|
useFirstPass
| true or false
| false |
Whether to retrieve the username and password from the module's shared state, using
javax.security.auth.login.name and javax.security.auth.login.password as the keys. If authentication fails, no retry attempt is made.
|
tryFirstPass
| true or false
| false |
Same as
useFirstPass, but if authentication fails, the module uses the CallbackHandler to retrieve a new username and password. If the second authentication fails, the failure is reported to the calling application.
|
storePass
| true or false
| false |
Whether to store the username and password in the module's shared state. This does not happen if the keys already exist in the shared state, or if authentication fails.
|
clearPass
| true or false
| false |
Set this to
true to clear the username and password from the shared state after both phases of authentication complete.
|
Table 12.35. SPNEGO
| Code | SPNEGO
|
| Class | org.jboss.security.negotiation.spnego.SPNEGOLoginModule
|
| Description |
Allows SPNEGO authentication to a Microsoft Active Directory server or other environment which supports SPNEGO. SPNEGO can also carry Kerberos credentials. This module needs to be paired with another module which handles authentication and role mapping.
|
Table 12.36. SPNEGO Module Options
| Option | Type | Default | Description |
|---|---|---|---|
serverSecurityDomain
| string
| null.
|
Defines the domain that is used to retrieve the identity of the server service through the kerberos login module. This property must be set.
|
removeRealmFromPrincipal
| boolean
| false
|
Specifies that the Kerberos realm should be removed from the principal before further processing.
|
usernamePasswordDomain
| string
| null
|
Specifies another security domain within the configuration that should be used as a failover login when Kerberos fails.
|
Table 12.37. AdvancedLdap
| Code | AdvancedLdap |
| Class | org.jboss.security.negotiation.AdvancedLdapLoginModule
|
| Description |
A module which provides additional functionality, such as SASL and the use of a JAAS security domain.
|
Table 12.38. AdvancedLdap Module Options
| Option | Type | Default | Description |
|---|---|---|---|
bindAuthentication
|
string
|
none
|
The type of SASL authentication to use for binding to the directory server.
|
java.naming.provider.url
| string
|
If the value of
java.naming.security.protocol is SSL, ldap://localhost:686, otherwise ldap://localhost:389
|
The URI of the directory server.
|
baseCtxDN
|
fully-qualified DN
|
none
|
The distinguished name to use as the base for searches.
|
baseFilter
|
String representing a LDAP search filter.
|
none
|
The filter to use to narrow down search results.
|
roleAttributeID
|
String value representing an LDAP attribute.
|
none
|
The LDAP attribute which contains the names of authorization roles.
|
roleAttributeIsDN
| true or false
| false
|
Whether the role attribute is a Distinguished Name (DN).
|
roleNameAttributeID
|
String representing an LDAP attribute.
|
none
|
The attribute contained within the
RoleAttributeId which contains the actual role attribute.
|
recurseRoles
| true or false
| false
|
Whether to recursively search the
RoleAttributeId for roles.
|
referralUserAttributeIDToCheck
|
attribute
|
none
|
If you are not using referrals, this option can be ignored. When using referrals, this option denotes the attribute name which contains users defined for a certain role (for example,
member), if the role object is inside the referral. Users are checked against the content of this attribute name. If this option is not set, the check will always fail, so role objects cannot be stored in a referral tree.
|
Table 12.39. AdvancedADLdap
| Code | AdvancedADLdap |
| Class | org.jboss.security.negotiation.AdvancedADLoginModule
|
| Description |
This module extends the
AdvancedLdap login module, and adds extra parameters that are relevant to Microsoft Active Directory.
|
Table 12.40. UsersRoles
| Code | UsersRoles |
| Class | org.jboss.security.auth.spi.UsersRolesLoginModul
|
| Description |
A simple login module that supports multiple users and user roles stored in two different properties files.
|
Table 12.41. UsersRoles Module Options
| Option | Type | Default | Description |
|---|---|---|---|
usersProperties
|
Path to a file or resource.
| users.properties
|
The file or resource which contains the user-to-password mappings. The format of the file is
username=password
|
rolesProperties
|
Path to a file or resource.
| roles.properties
|
The file or resource which contains the user-to-role mappings. The format of the file is
username=role1,role2,role3
|
password-stacking
| useFirstPass or false
| false
|
A value of
useFirstPass indicates that this login module should first look to the information stored in the LoginContext for the identity. This option can be used when stacking other login modules with this one.
|
hashAlgorithm
|
String representing a password hashing algorithm.
| none
|
The name of the
java.security.MessageDigest algorithm to use to hash the password. There is no default so this option must be explicitly set to enable hashing. When hashAlgorithm is specified, the clear text password obtained from the CallbackHandler is hashed before it is passed to UsernamePasswordLoginModule.validatePassword as the inputPassword argument. The password stored in the users.properties file must be comparably hashed.
|
hashEncoding
| base64 or hex
| base64
|
The string format for the hashed password, if hashAlgorithm is also set.
|
hashCharset
|
string
|
The default encoding set in the container's runtime environment
|
The encoding used to convert the clear-text password to a byte array.
|
unauthenticatedIdentity
|
principal name
|
none
|
Defines the principal name assigned to requests which contain no authentication information. This can allow unprotected servlets to invoke methods on EJBs that do not require a specific role. Such a principal has no associated roles and can only access unsecured EJBs or EJB methods that are associated with the
unchecked permission constraint.
|
Authentication modules are implementations of javax.security.auth.spi.LoginModule. Refer to the API documentation for more information about creating a custom authentication module.
12.2. Included Authorization Modules
| Code | Class |
|---|---|
| DenyAll | org.jboss.security.authorization.modules.AllDenyAuthorizationModule |
| PermitAll | org.jboss.security.authorization.modules.AllPermitAuthorizationModule |
| Delegating | org.jboss.security.authorization.modules.DelegatingAuthorizationModule |
| Web | org.jboss.security.authorization.modules.web.WebAuthorizationModule |
| JACC | org.jboss.security.authorization.modules.JACCAuthorizationModule |
| XACML | org.jboss.security.authorization.modules.XACMLAuthorizationModule |
This is a simple authorization module that always denies an authorization request. No configuration options are available.
This is a simple authorization module that always permits an authorization request. No configuration options are available.
This is the default authorization module that delegates decision making to the configured delegates.
This is the default web authorization module with the default Tomcat authorization logic (permit all).
This module enforces JACC semantics using two delegates (WebJACCPolicyModuleDelegate for web container authorization requests and EJBJACCPolicyModuleDelegate for EJB container requests). No configuration options available.
This module enforces XACML authorization using two delegates for web and EJB containers (WebXACMLPolicyModuleDelegate and EJBXACMLPolicyModuleDelegate). It creates a PDP object based on registered policies and evaluates web or EJB requests against it.
This is the base authorization module which has to be overridden and provides a facility for delegating to other authorization modules.
12.3. Included Security Mapping Modules
| Code | Class |
|---|---|
| PropertiesRoles | org.jboss.security.mapping.providers.role.PropertiesRolesMappingProvider |
| SimpleRoles | org.jboss.security.mapping.providers.role.SimpleRolesMappingProvider |
| DeploymentRoles | org.jboss.security.mapping.providers.DeploymentRolesMappingProvider |
| DatabaseRoles | org.jboss.security.mapping.providers.role.DatabaseRolesMappingProvider |
| LdapRoles | org.jboss.security.mapping.providers.role.LdapRolesMappingProvider |
| LdapAttributes | org.jboss.security.mapping.providers.attribute.LdapAttributeMappingProvider |
A Role Mapping Module that takes into consideration a principal to roles mapping that can be done in jboss-web.xml and jboss-app.xml deployment descriptors.
Example 12.1. Example
<jboss-web>
...
  <security-role>
      <role-name>Support</role-name>
      <principal-name>Mark</principal-name>
      <principal-name>Tom</principal-name>
  </security-role>
...
</jboss-web>
A Role to Roles Mapping Module that takes into consideration a principal to roles mapping that can be done in the deployment descriptors jboss-web.xml and jboss-app.xml. In this case principal-name denotes role to map other roles.
Example 12.2. Example
  <jboss-web>
 ...
    <security-role>
      <role-name>Employee</role-name>
      <principal-name>Support</principal-name>
      <principal-name>Sales</principal-name>
    </security-role>
 ...
  </jboss-web>
Role Mapping Provider that picks up the roles from the options and then appends them to the passed Group. Takes the properties style mapping of role name (key) with a comma separated list of roles (values).
A principal mapping provider that takes in a SimplePrincipal and converts into SimplePrincipal with a different principal name.
A MappingProvider that reads roles from a database.
dsJndiName: JNDI name of data source used to map roles to the user.rolesQuery: This option should be a prepared statement equivalent to "select RoleName from Roles where User=?" ? is substituted with current principal name.suspendResume: Boolean - To suspend and later resume transaction associated with current thread while performing search for roles.transactionManagerJndiName: JNDI name of Transaction mamager (default is java:/TransactionManager)
A mapping provider that assigns roles to an user using a LDAP server to search for the roles.
bindDN: The DN used to bind against the LDAP server for the user and roles queries. This DN needs read and search permissions on the baseCtxDN and rolesCtxDN values.bindCredential: The password for the bindDN. This can be encrypted if the jaasSecurityDomain is specified.rolesCtxDN: The fixed DN of the context to search for user roles. This is not the DN where the actual roles are, but the DN where the objects containing the user roles are. For example, in a Microsoft Active Directory server, this is the DN where the user account is.roleAttributeID: The LDAP attribute which contains the names of authorization roles.roleAttributeIsDN: Whether or not theroleAttributeIDcontains the fully-qualified DN of a role object. If false, the role name is taken from the value of theroleNameAttributeIdattribute of the context name. Certain directory schemas, such as Microsoft Active Directory, require this attribute to be set totrue.roleNameAttributeID: Name of the attribute within theroleCtxDNcontext which contains the role name. If theroleAttributeIsDNproperty is set totrue, this property is used to find the role object's name attribute.parseRoleNameFromDN: A flag indicating if the DN returned by a query contains the roleNameAttributeID. If set totrue, the DN is checked for the roleNameATtributeID. If set tofalse, the DN is not checked for the roleNameAttributeID. This flag can improve the performance of LDAP queries.roleFilter: A search filter used to locate the roles associated with the authenticated user. The input username oruserDNobtained from the login module callback is substituted into the filter anywhere a{0}expression is used. The authenticateduserDNis substituted into the filter anywhere a{1}is used. An example search filter that matches on the input username is(member={0}). An alternative that matches on the authenticateduserDNis(member={1}).roleRecursion: The numbers of levels of recursion the role search will go below a matching context. Disable recursion by setting this to0.searchTimeLimit: The timeout in milliseconds for the user/role searches. Defaults to 10000 (10 seconds).searchScope: The search scope to use.
A MappingProvider that reads roles from a properties file in the following format: username=role1,role2,...
rolesProperties: Properties formatted file name. Expansion of JBoss variables can be used in form of${jboss.variable}.
A simple MappingProvider that reads roles from the options map. The option attribute name is the name of principal to assign roles to and the attribute value is the comma separated role names to assign to the principal.
Example 12.3. Example
<module-option name="JavaDuke" value="JBossAdmin,Admin"/>
<module-option name="joe" value="Users"/>
Checks module and locates principal name from mapping context to create attribute e-mail address from module option named principalName + ".email" and maps it to the given principal.
Maps attributes from LDAP to the subject. The options include whatever options your LDAP JNDI provider supports.
Example 12.4. Examples of standard property names include:
Context.INITIAL_CONTEXT_FACTORY = "java.naming.factory.initial"
Context.SECURITY_PROTOCOL = "java.naming.security.protocol"
Context.PROVIDER_URL = "java.naming.provider.url"
Context.SECURITY_AUTHENTICATION = "java.naming.security.authentication"
bindDN: The DN used to bind against the LDAP server for the user and roles queries. This DN needs read and search permissions on the baseCtxDN and rolesCtxDN values.bindCredential: The password for the bindDN. This can be encrypted if the jaasSecurityDomain is specified.baseCtxDN: The fixed DN of the context to start the user search from.baseFilter: A search filter used to locate the context of the user to authenticate. The input username oruserDNas obtained from the login module callback is substituted into the filter anywhere a{0}expression is used. This substituion behavior comes from the standard__DirContext.search(Name, String, Object[], SearchControls cons)__method. An common example search filter is(uid={0}).searchTimeLimit: The timeout in milliseconds for the user/role searches. Defaults to 10000 (10 seconds).attributeList: A comma-separated list of attributes for the user. For example, mail,cn,sn,employeeType,employeeNumber.jaasSecurityDomain: The JaasSecurityDomain to use to decrypt thejava.naming.security.principal. The encrypted form of the password is that returned by theJaasSecurityDomain#encrypt64(byte[])method. Theorg.jboss.security.plugins.PBEUtilscan also be used to generate the encrypted form.
12.4. Included Security Auditing Provider Modules
| Code | Class |
|---|---|
| LogAuditProvider | org.jboss.security.audit.providers.LogAuditProvider |
Chapter 13. Subsystem Configuration
13.1. Subsystem Configuration Overview
JBoss EAP 6 uses a simplified configuration, with one configuration file per domain or per standalone server. In domain mode, a separate file exists for each host controller as well. Changes to the configuration persist automatically, so XML should not be edited manually. The configuration is scanned and overwritten automatically by the Management API. The command-line based Management CLI and web-based Management Console allow you to configure each aspect of JBoss EAP 6.
EAP_HOME/domain/configuration/domain.xml for a managed domain or EAP_HOME/standalone/configuration/standalone.xml for a standalone server. Many of the subsystems include configuration details that were configured via deployment descriptors in previous versions of JBoss EAP.
Each subsystem's configuration is defined in an XML schema. The configuration schemas are located in the EAP_HOME/docs/schema/ directory of your installation.
Simple Subsystems
ee– the Java EE 6 API implementationejb– the Enterprise JavaBeans (EJB) subsystemjaxrs– the JAX-RS API, provided by RESTeasy.sar– the subsystem which supports Service Archives.threads– the subsystem which supports process threads.weld– the Contexts and Dependency Injection API, provided by Weld.
Chapter 14. The Logging Subsystem
14.1. Introduction
14.1.1. Overview of Logging
14.1.2. Application Logging Frameworks Supported By JBoss LogManager
- JBoss Logging - included with JBoss EAP 6
- Apache Commons Logging - http://commons.apache.org/logging/
- Simple Logging Facade for Java (SLF4J) - http://www.slf4j.org/
- Apache log4j - http://logging.apache.org/log4j/1.2/
- Java SE Logging (java.util.logging) - http://download.oracle.com/javase/6/docs/api/java/util/logging/package-summary.html
14.1.3. Configure Boot Logging
logging.properties file is available when the server is starting up, these property configurations are used to record the events that occur before the logging subsystem is initialized. At that point, the logging subsystem takes over the recording of events.
logging subsystem using Management CLI or by manually editing the server configuration file, it updates the logging.properties file.
logging.properties file is missing from the installation, any log messages that normally appear during the boot process before the logging subsystem is initiated are lost. Once the logging subsystem is initialized, messages will again appear in the log.
Warning
logging.properties file unless you have a serious problem booting the server and need additional logging from the host or process controller.
14.1.4. About Garbage Collection Logging
standalone mode on all supported configurations except IBM JDK.
EAP_HOME/standalone/log/gc.log.digit. Log rotation has been enabled, with the number of log files limited to five and each file limited to a maximum size of three MiB.
14.1.5. Implicit Logging API Dependencies
add-logging-api-dependencies attribute that controls whether the container adds implicit logging API dependencies to deployments. By default this attribute is set to true, which means that all implicit logging API dependencies are added to deployments. If set to false, implicit logging API dependencies will not be added.
add-logging-api-dependencies attribute can be configured using the Management CLI. For example:
/subsystem=logging:write-attribute(name=add-logging-api-dependencies, value=false)14.1.6. Default Log File Locations
Table 14.1. Default Log File for a standalone server
| Log File | Description |
|---|---|
EAP_HOME/standalone/log/server.log |
Server Log. Contains all server log messages, including server startup messages.
|
EAP_HOME/standalone/log/gc.log |
Garbage collection log. Contains details of all garbage collection.
|
Table 14.2. Default Log Files for a managed domain
| Log File | Description |
|---|---|
EAP_HOME/domain/log/host-controller.log |
Host Controller boot log. Contains log messages related to the startup of the host controller.
|
EAP_HOME/domain/log/process-controller.log |
Process controller boot log. Contains log messages related to the startup of the process controller.
|
EAP_HOME/domain/servers/SERVERNAME/log/server.log |
The server log for the named server. Contains all log messages for that server, including server startup messages.
|
14.1.7. Filter Expressions for Logging
Note
filter-spec specified for the root logger is not inherited by other loggers. Instead a filter-spec must be specified per handler.
Table 14.3. Filter Expressions for Logging
|
Filter Type
expression
| Description | Parameters |
|---|---|---|
|
Accept
accept
| Accept all log messages | accept
|
|
Deny
deny
| Deny all log messages | deny
|
|
Not
not[filter expression]
| Returns the inverted value of the filter expression |
Takes single filter expression as a parameter
not(match("JBAS"))
|
|
All
all[filter expression]
| Returns concatenated value from multiple filter expressions. |
Takes multiple filter expressions delimited by commas
all(match("JBAS"),match("WELD"))
|
|
Any
any[filter expression]
| Returns one value from multiple filter expressions. |
Takes multiple filter expressions delimited by commas
any(match("JBAS"),match("WELD"))
|
|
Level Change
levelChange[level]
| Modifies the log record with the specified level |
Takes single string-based level as an argument
levelChange("WARN")
|
|
Levels
levels[levels]
| Filters log messages with a level listed in the list of levels |
Takes multiple string-based levels delimited by commas as argument
levels("DEBUG","INFO","WARN","ERROR")
|
|
Level Range
levelRange[minLevel,maxLevel]
| Filters log messages within the specified level range. |
The filter expression uses
[ to indicate a minimum inclusive level and a ] to indicate a maximum inclusive level. Alternatively, one can use ( or ) respectively to indicate exclusive. The first argument for the expression is the minimum level allowed, the second argument is the maximum level allowed.
Examples are shown below.
|
Match (match["pattern"]) | A regular-expression based filter. The unformatted message is used against the pattern specified in the expression. |
Takes a regular expression as argument
match("JBAS\d+")
|
Substitute (substitute["pattern","replacement value"]) | A filter which replaces the first match to the pattern with the replacement value |
The first argument for the expression is the pattern the second argument is the replacement text
substitute("JBAS","EAP")
|
Substitute All (substituteAll["pattern","replacement value"]) | A filter which replaces all matches of the pattern with the replacement value |
The first argument for the expression is the pattern the second argument is the replacement text
substituteAll("JBAS","EAP")
|
14.1.8. About Log Levels
TRACE, DEBUG, INFO, WARN, ERROR and FATAL.
WARN will only record messages of the levels WARN, ERROR and FATAL.
14.1.9. Supported Log Levels
Table 14.4. Supported Log Levels
| Log Level | Value | Description |
|---|---|---|
| FINEST | 300 |
-
|
| FINER | 400 |
-
|
| TRACE | 400 |
Use for messages that provide detailed information about the running state of an application. Log messages of
TRACE are usually only captured when debugging an application.
|
| DEBUG | 500 |
Use for messages that indicate the progress individual requests or activities of an application. Log messages of
DEBUG are usually only captured when debugging an application.
|
| FINE | 500 |
-
|
| CONFIG | 700 |
-
|
| INFO | 800 |
Use for messages that indicate the overall progress of the application. Often used for application startup, shutdown and other major lifecycle events.
|
| WARN | 900 |
Use to indicate a situation that is not in error but is not considered ideal. May indicate circumstances that may lead to errors in the future.
|
| WARNING | 900 |
-
|
| ERROR | 1000 |
Use to indicate an error that has occurred that could prevent the current activity or request from completing but will not prevent the application from running.
|
| SEVERE | 1000 |
-
|
| FATAL | 1100 |
Use to indicate events that could cause critical service failure and application shutdown and possibly cause JBoss EAP 6 to shutdown.
|
14.1.10. About Log Categories
14.1.11. About the Root Logger
server.log. This file is sometimes referred to as the server log.
14.1.12. About Log Handlers
Console, File, Periodic, Size, Async, Custom and syslog.
14.1.13. Types of Log Handlers
- Console
- Console log handlers write log messages to either the host operating system's standard out (stdout) or standard error (stderr) stream. These messages are displayed when JBoss EAP 6 is run from a command line prompt. The messages from a Console log handler are not saved unless the operating system is configured to capture the standard out or standard error stream.
- File
- File log handlers are the simplest log handlers that write log messages to a specified file.
- Periodic
- Periodic log handlers write log messages to a named file until a specified period of time has elapsed. Once the time period has passed then the file is renamed by appending the specified timestamp and the handler continues to write into a newly created log file with the original name.
- Size
- Size log handlers write log messages to a named file until the file reaches a specified size. When the file reaches a specified size, it is renamed with a numeric prefix and the handler continues to write into a newly created log file with the original name. Each size log handler must specify the maximum number of files to be kept in this fashion.
- Async
- Async log handlers are wrapper log handlers that provide asynchronous behavior for one or more other log handlers. These are useful for log handlers that may have high latency or other performance problems such as writing a log file to a network file system.
- Custom
- Custom log handlers enable to you to configure new types of log handlers that have been implemented. A custom handler must be implemented as a Java class that extends
java.util.logging.Handlerand be contained in a module. - syslog
- Syslog-handlers can be used to send messages to a remote logging server. This allows multiple applications to send their log messages to the same server, where they can all be parsed together.
14.1.14. About Log Formatters
java.util.Formatter class.
%d{HH:mm:ss,SSS} %-5p [%c] (%t) %s%E%n , creates log messages that look like:
15:53:26,546 INFO [org.jboss.as] (Controller Boot Thread) JBAS015951: Admin console listening on http://127.0.0.1:9990
14.1.15. Log Formatter Syntax
Table 14.5. Log Formatter Syntax
| Symbol | Description |
|---|---|
%c | The category of the logging event |
%p | The level of the log entry (info/debug/etc) |
%P | The localized level of the log entry |
%d | The current date/time (yyyy-MM-dd HH:mm:ss,SSS form) |
%r | The relative time (milliseconds since the log was initialized) |
%z | The time zone |
%k | A log resource key (used for localization of log messages) |
%m | The log message (including exception trace) |
%s | The simple log message (no exception trace) |
%e | The exception stack trace (no extended module information) |
%E | The exception stack trace (with extended module information) |
%t | The name of the current thread |
%n | A newline character |
%C | The class of the code calling the log method (slow) |
%F | The filename of the class calling the log method (slow) |
%l | The source location of the code calling the log method (slow) |
%L | The line number of the code calling the log method (slow) |
%M | The method of the code calling the log method (slow) |
%x | The Nested Diagnostic Context |
%X | The Message Diagnostic Context |
%% | A literal percent character (escaping) |
14.2. Configure Logging in the Management Console
- Log in to the Management Console
- Navigate to the logging subsystem configuration. This step varies between servers running as standalone servers and servers running in a managed domain.
Standalone Server
Click on , expand in the menu, and then click .Managed Domain
Click on , select the profile to edit from the drop-down menu. Expand in the menu, and then click .
- Edit the log level.
- Add and remove log handlers.
- Add and remove log categories.
- Edit log category properties.
- Add and remove log handlers from a category.
- Adding new handlers.
- Configuring handlers.
14.3. Logging Configuration in the CLI
The Management CLI must be running and connected to the relevant JBoss EAP instance. For further information see Section 3.5.2, “Launch the Management CLI”
14.3.1. Configure the Root Logger with the CLI
- Add log handlers to the root logger.
- Display the root logger configuration.
- Change the log level.
- Remove log handlers from the root logger.
Important
/subsystem=logging/logging-profile=NAME/ instead of /subsystem=logging/.
/subsystem=logging/ with /profile=NAME/subsystem=logging/.
- Add a Log Handler to the Root Logger
- Use the
add-handleroperation with the following syntax where HANDLER is the name of the log handler to be added./subsystem=logging/root-logger=ROOT:add-handler(name="HANDLER")
The log handler must already have been created before it can be added to the root logger.Example 14.1. Root Logger add-handler operation
[standalone@localhost:9999 /] /subsystem=logging/root-logger=ROOT:add-handler(name="FILE") {"outcome" => "success"} - Display the Contents of the Root Logger Configuration
- Use the
read-resourceoperation with the following syntax./subsystem=logging/root-logger=ROOT:read-resource
Example 14.2. Root Logger read-resource operation
[standalone@localhost:9999 /] /subsystem=logging/root-logger=ROOT:read-resource { "outcome" => "success", "result" => { "filter" => undefined, "filter-spec" => undefined, "handlers" => [ "CONSOLE", "FILE" ], "level" => "INFO" } } - Set the Log Level of the Root Logger
- Use the
write-attributeoperation with the following syntax where LEVEL is one of the supported log levels./subsystem=logging/root-logger=ROOT:write-attribute(name="level", value="LEVEL")
Example 14.3. Root Logger write-attribute operation to set the log level
[standalone@localhost:9999 /] /subsystem=logging/root-logger=ROOT:write-attribute(name="level", value="DEBUG") {"outcome" => "success"} - Remove a Log Handler from the Root Logger
- Use the
remove-handlerwith the following syntax, where HANDLER is the name of the log handler to be removed./subsystem=logging/root-logger=ROOT:remove-handler(name="HANDLER")
Example 14.4. Remove a Log Handler
[standalone@localhost:9999 /] /subsystem=logging/root-logger=ROOT:remove-handler(name="FILE")
{"outcome" => "success"}
14.3.2. Configure a Log Category in the CLI
- Add a new log category.
- Display the configuration of a log category.
- Set the log level.
- Add log handlers to a log category.
- Remove log handlers from a log category.
- Remove a log category.
Important
/subsystem=logging/logging-profile=NAME/ instead of /subsystem=logging/.
/subsystem=logging/ with /profile=NAME/subsystem=logging/.
- Add a log category
- Use the
addoperation with the following syntax. Replace CATEGORY with the category to be added./subsystem=logging/logger=CATEGORY:add
Example 14.5. Adding a new log category
[standalone@localhost:9999 /] /subsystem=logging/logger=com.company.accounts.rec:add {"outcome" => "success"} [standalone@localhost:9999 /] - Display a log category configuration
- Use the
read-resourceoperation with the following syntax. Replace CATEGORY with the name of the category./subsystem=logging/logger=CATEGORY:read-resource
Example 14.6. Log Category read-resource operation
[standalone@localhost:9999 /] /subsystem=logging/logger=org.apache.tomcat.util.modeler:read-resource { "outcome" => "success", "result" => { "category" => "org.apache.tomcat.util.modeler", "filter" => undefined, "filter-spec" => undefined, "handlers" => undefined, "level" => "WARN", "use-parent-handlers" => true } } [standalone@localhost:9999 /] - Set the log level
- Use the
write-attributeoperation with the following syntax. Replace CATEGORY with the name of the log category and LEVEL with the log level that is to be set./subsystem=logging/logger=CATEGORY:write-attribute(name="level", value="LEVEL")
Example 14.7. Setting a log level
[standalone@localhost:9999 /] /subsystem=logging/logger=com.company.accounts.rec:write-attribute(name="level", value="DEBUG") {"outcome" => "success"} [standalone@localhost:9999 /] - Set the log category to use the log handlers of the root logger.
- Use the
write-attributeoperation with the following syntax. Replace CATEGORY with the name of the log category. Replace BOOLEAN with true for this log category to use the handlers of the root logger. Replace it with false if it is to use only its own assigned handlers./subsystem=logging/logger=CATEGORY:write-attribute(name="use-parent-handlers", value="BOOLEAN")
Example 14.8. Setting use-parent-handlers
[standalone@localhost:9999 /] /subsystem=logging/logger=com.company.accounts.rec:write-attribute(name="use-parent-handlers", value="true") {"outcome" => "success"} [standalone@localhost:9999 /] - Add a log handlers to a log category
- Use the
add-handleroperation with the following syntax. Replace CATEGORY with the name of the category and HANDLER with the name of the handler to be added./subsystem=logging/logger=CATEGORY:add-handler(name="HANDLER")
The log handler must already have been created before it can be added to the root logger.Example 14.9. Adding a log handler
[standalone@localhost:9999 /] /subsystem=logging/logger=com.company.accounts.rec:add-handler(name="AccountsNFSAsync") {"outcome" => "success"} - Remove a log handler from a log category
- Use the
remove-handleroperation with the following syntax. Replace CATEGORY with the name of the category and HANDLER with the name of the log handler to be removed./subsystem=logging/logger=CATEGORY:remove-handler(name="HANDLER")
Example 14.10. Removing a log handler
[standalone@localhost:9999 /] /subsystem=logging/logger=jacorb:remove-handler(name="AccountsNFSAsync") {"outcome" => "success"} [standalone@localhost:9999 /] - Remove a category
- Use the
removeoperation with the following syntax. Replace CATEGORY with the name of the category to be removed./subsystem=logging/logger=CATEGORY:remove
Example 14.11. Removing a log category
[standalone@localhost:9999 /] /subsystem=logging/logger=com.company.accounts.rec:remove
{"outcome" => "success"}
[standalone@localhost:9999 /]
14.3.3. Configure a Console Log Handler in the CLI
- Add a new console log handler.
- Display the configuration of a console log handler.
- Set the handler's log level.
- Set the target for the handler's output.
- Set the encoding used for the handler's output.
- Set the formatter used for the handler's output.
- Set whether the handler uses autoflush or not.
- Remove a console log handler.
Important
/subsystem=logging/logging-profile=NAME/ instead of /subsystem=logging/.
/subsystem=logging/ with /profile=NAME/subsystem=logging/.
- Add a Console Log Handler
- Use the
addoperation with the following syntax. Replace HANDLER with the console log handler to be added./subsystem=logging/console-handler=HANDLER:add
Example 14.12. Add a Console Log Handler
[standalone@localhost:9999 /] /subsystem=logging/console-handler=ERRORCONSOLE:add {"outcome" => "success"} - Display a console log handler configuration
- Use the
read-resourceoperation with the following syntax. Replace HANDLER with the name of the console log handler./subsystem=logging/console-handler=HANDLER:read-resource
Example 14.13. Display a console log handler configuration
[standalone@localhost:9999 /] /subsystem=logging/console-handler=CONSOLE:read-resource { "outcome" => "success", "result" => { "autoflush" => true, "enabled" => true, "encoding" => undefined, "filter" => undefined, "filter-spec" => undefined, "formatter" => "%d{HH:mm:ss,SSS} %-5p [%c] (%t) %s%E%n", "level" => "INFO", "name" => "CONSOLE", "named-formatter" => "COLOR-PATTERN", "target" => "System.out" } } - Set the Log Level
- Use the
write-attributeoperation with the following syntax. Replace HANDLER with the name of the console log handler and LEVEL with the log level that is to be set./subsystem=logging/console-handler=HANDLER:write-attribute(name="level", value="INFO")
Example 14.14. Set the Log Level
[standalone@localhost:9999 /] /subsystem=logging/console-handler=ERRORCONSOLE:write-attribute(name="level", value="TRACE") {"outcome" => "success"} - Set the Target
- Use the
write-attributeoperation with the following syntax. Replace HANDLER with the name of the console log handler. Replace TARGET with eitherSystem.errorSystem.outfor the system error stream or standard out stream respectively./subsystem=logging/console-handler=HANDLER:write-attribute(name="target", value="TARGET")
Example 14.15. Set the Target
[standalone@localhost:9999 /] /subsystem=logging/console-handler=ERRORCONSOLE:write-attribute(name="target", value="System.err") {"outcome" => "success"} - Set the Encoding
- Use the
write-attributeoperation with the following syntax. Replace HANDLER with the name of the console log handler. Replace ENCODING with the name of the required character encoding system./subsystem=logging/console-handler=HANDLER:write-attribute(name="encoding", value="ENCODING")
Example 14.16. Set the Encoding
[standalone@localhost:9999 /] /subsystem=logging/console-handler=ERRORCONSOLE:write-attribute(name="encoding", value="utf-8") {"outcome" => "success"} - Set the Formatter
- Use the
write-attributeoperation with the following syntax. Replace HANDLER with the name of the console log handler. Replace FORMAT with the required formatter string./subsystem=logging/console-handler=HANDLER:write-attribute(name="formatter", value="FORMAT")
Example 14.17. Set the Formatter
[standalone@localhost:9999 /] /subsystem=logging/console-handler=ERRORCONSOLE:write-attribute(name="formatter", value="%d{HH:mm:ss,SSS} %-5p [%c] (%t) %s%E%n") {"outcome" => "success"} - Set the Auto Flush
- Use the
write-attributeoperation with the following syntax. Replace HANDLER with the name of the console log handler. Replace BOOLEAN withtrueif this handler is to immediately write its output./subsystem=logging/console-handler=HANDLER:write-attribute(name="autoflush", value="BOOLEAN")
Example 14.18. Set the Auto Flush
[standalone@localhost:9999 /] /subsystem=logging/console-handler=ERRORCONSOLE:write-attribute(name="autoflush", value="true") {"outcome" => "success"} - Remove a Console Log Handler
- Use the
removeoperation with the following syntax. Replace HANDLER with the name of the console log handler to be removed./subsystem=logging/console-handler=HANDLER:remove
Example 14.19. Remove a Console Log Handler
[standalone@localhost:9999 /] /subsystem=logging/console-handler=ERRORCONSOLE:remove
{"outcome" => "success"}
14.3.4. Configure a File Log Handler in the CLI
- Add a new file log handler.
- Display the configuration of a file log handler
- Set the handler's log level.
- Set the handler's appending behavior.
- Set whether the handler uses autoflush or not.
- Set the encoding used for the handler's output.
- Specify the file to which the log handler will write.
- Set the formatter used for the handler's output.
- Remove a file log handler.
Important
/subsystem=logging/logging-profile=NAME/ instead of /subsystem=logging/.
/subsystem=logging/ with /profile=NAME/subsystem=logging/.
- Add a file log handler
- Use the
addoperation with the following syntax. Replace PATH with the filename for the file that the log is being written to. Replace DIR with the name of the directory where the file is to be located. The value of DIR can be a path variable./subsystem=logging/file-handler=HANDLER:add(file={"path"=>"PATH", "relative-to"=>"DIR"})Example 14.20. Add a file log handler
[standalone@localhost:9999 /] /subsystem=logging/file-handler=accounts_log:add(file={"path"=>"accounts.log", "relative-to"=>"jboss.server.log.dir"}) {"outcome" => "success"} [standalone@localhost:9999 /] - Display a file log handler configuration
- Use the
read-resourceoperation with the following syntax. Replace HANDLER with the name of the file log handler./subsystem=logging/file-handler=HANDLER:read-resource
Example 14.21. Using the read-resource operation
[standalone@localhost:9999 /] /subsystem=logging/file-handler=accounts_log:read-resource { "outcome" => "success", "result" => { "append" => true, "autoflush" => true, "encoding" => undefined, "file" => { "path" => "accounts.log", "relative-to" => "jboss.server.log.dir" }, "filter" => undefined, "formatter" => "%d{HH:mm:ss,SSS} %-5p [%c] (%t) %s%E%n", "level" => undefined } } - Set the Log level
- Use the
write-attributeoperation with the following syntax. Replace HANDLER with the name of the file log handler. Replace LOG_LEVEL_VALUE with the log level that is to be set./subsystem=logging/file-handler=HANDLER:write-attribute(name="level", value="LOG_LEVEL_VALUE")
Example 14.22. Changing the log level
/subsystem=logging/file-handler=accounts_log:write-attribute(name="level", value="DEBUG") {"outcome" => "success"} [standalone@localhost:9999 /] - Set the append behaviour
- Use the
write-attributeoperation with the following syntax. Replace HANDLER with the name of the file log handler. Replace BOOLEAN with false if you required that a new log file be created each time the application server is launched. Replace BOOLEAN withtrueif the application server should continue to use the same file./subsystem=logging/file-handler=HANDLER:write-attribute(name="append", value="BOOLEAN")
Example 14.23. Changing the append property
[standalone@localhost:9999 /] /subsystem=logging/file-handler=accounts_log:write-attribute(name="append", value="true")
{
    "outcome" => "success",
    "response-headers" => {
        "operation-requires-reload" => true,
        "process-state" => "reload-required"
    }
}
[standalone@localhost:9999 /]
JBoss EAP 6 must be restarted for this change to take effect. - Set the Auto Flush
- Use the
write-attributeoperation with the following syntax. Replace HANDLER with the name of the file log handler. Replace BOOLEAN withtrueif this handler is to immediately write its output./subsystem=logging/file-handler=HANDLER:write-attribute(name="autoflush", value="BOOLEAN")
Example 14.24. Changing the autoflush property
[standalone@localhost:9999 /] /subsystem=logging/file-handler=accounts_log:write-attribute(name="autoflush", value="false")
{
    "outcome" => "success",
    "response-headers" => {"process-state" => "reload-required"}
}
[standalone@localhost:9999 /]
JBoss EAP 6 must be restarted for this change to take effect. - Set the Encoding
- Use the
write-attributeoperation with the following syntax. Replace HANDLER with the name of the file log handler. Replace ENCODING with the name of the required character encoding system./subsystem=logging/file-handler=HANDLER:write-attribute(name="encoding", value="ENCODING")
Example 14.25. Set the Encoding
[standalone@localhost:9999 /] /subsystem=logging/file-handler=accounts_log:write-attribute(name="encoding", value="utf-8") {"outcome" => "success"} - Change the file to which the log handler writes
- Use the
write-attributeoperation with the following syntax. Replace PATH with the filename for the file that the log is being written to. Replace DIR with the name of the directory where the file is to be located. The value of DIR can be a path variable./subsystem=logging/file-handler=HANDLER:write-attribute(name="file", value={"path"=>"PATH", "relative-to"=>"DIR"})Example 14.26. Change the file to which the log handler writes
[standalone@localhost:9999 /] /subsystem=logging/file-handler=accounts_log:write-attribute(name="file", value={"path"=>"accounts-debug.log", "relative-to"=>"jboss.server.log.dir"}) {"outcome" => "success"} [standalone@localhost:9999 /] - Set the Formatter
- Use the
write-attributeoperation with the following syntax. Replace HANDLER with the name of the file log handler. Replace FORMAT with the required formatter string./subsystem=logging/file-handler=HANDLER:write-attribute(name="formatter", value="FORMAT")
Example 14.27. Set the Formatter
[standalone@localhost:9999 /] /subsystem=logging/file-handler=accounts-log:write-attribute(name="formatter", value="%d{HH:mm:ss,SSS} %-5p [%c] (%t) %s%E%n") {"outcome" => "success"} [standalone@localhost:9999 /] - Remove a File Log Handler
- Use the
removeoperation with the following syntax. Replace HANDLER with the name of the file log handler to be removed./subsystem=logging/file-handler=HANDLER:remove
Example 14.28. Remove a File Log Handler
[standalone@localhost:9999 /] /subsystem=logging/file-handler=accounts_log:remove {"outcome" => "success"} [standalone@localhost:9999 /]A log handler can only be removed if it is not being referenced by a log category or an async log handler.
14.3.5. Configure a Periodic Log Handler in the CLI
- Add a new periodic log handler.
- Display the configuration of a periodic log handler
- Set the handler's log level.
- Set the handler's appending behavior.
- Set whether or not the handler uses
autoflush. - Set the encoding used for the handler's output.
- Specify the file to which the log handler will write.
- Set the formatter used for the handler's output.
- Set the suffix for rotated logs.
- Remove a periodic log handler.
Important
/subsystem=logging/logging-profile=NAME/ instead of /subsystem=logging/.
/subsystem=logging/ with /profile=NAME/subsystem=logging/.
- Add a new Periodic Rotating File log handler
- Use the
addoperation with the following syntax./subsystem=logging/periodic-rotating-file-handler=HANDLER:add(file={"path"=>"PATH", "relative-to"=>"DIR"}, suffix="SUFFIX")Replace HANDLER with the name of the log handler. Replace PATH with the filename for the file that the log is being written to. Replace DIR with the name of the directory where the file is to be located. The value of DIR can be a path variable. Replace SUFFIX with the file rotation suffix to be used.Example 14.29. Add a new handler
[standalone@localhost:9999 /] /subsystem=logging/periodic-rotating-file-handler=HOURLY_DEBUG:add(file={"path"=>"daily-debug.log", "relative-to"=>"jboss.server.log.dir"}, suffix=".yyyy.MM.dd") {"outcome" => "success"} [standalone@localhost:9999 /] - Display a Periodic Rotating File log handler configuration
- Use the
read-resourceoperation with the following syntax./subsystem=logging/periodic-rotating-file-handler=HANDLER:read-resource
Replace HANDLER with the name of the log handler.Example 14.30. Using the read-resource operation
[standalone@localhost:9999 /] /subsystem=logging/periodic-rotating-file-handler=HOURLY_DEBUG:read-resource { "outcome" => "success", "result" => { "append" => true, "autoflush" => true, "encoding" => undefined, "file" => { "path" => "daily-debug.log", "relative-to" => "jboss.server.log.dir" }, "filter" => undefined, "formatter" => "%d{HH:mm:ss,SSS} %-5p [%c] (%t) %s%E%n", "level" => undefined } } - Set the Log level
- Use the
write-attributeoperation with the following syntax./subsystem=logging/periodic-rotating-file-handler=HANDLER:write-attribute(name="level". value="LOG_LEVEL_VALUE")
Replace HANDLER with the name of the periodic log handler. Replace LOG_LEVEL_VALUE with the log level that is to be set.Example 14.31. Set the log level
[standalone@localhost:9999 /] /subsystem=logging/periodic-rotating-file-handler=HOURLY_DEBUG:write-attribute(name="level", value="DEBUG") {"outcome" => "success"} - Set the append behavior
- Use the
write-attributeoperation with the following syntax./subsystem=logging/periodic-rotating-handler=HANDLER:write-attribute(name="append", value="BOOLEAN")
Replace HANDLER with the name of the periodic log handler. Replace BOOLEAN withfalseif you required that a new log file be created each time the application server is launched. Replace BOOLEAN withtrueif the application server should continue to use the same file.JBoss EAP 6 must be restarted for this change to take effect.Example 14.32. Set the append behavior
[standalone@localhost:9999 /] /subsystem=logging/periodic-rotating-file-handler=HOURLY_DEBUG:write-attribute(name="append", value="true") { "outcome" => "success", "response-headers" => { "operation-requires-reload" => true, "process-state" => "reload-required" } } - Set the Auto Flush
- Use the
write-attributeoperation with the following syntax./subsystem=logging/periodic-rotating-file-handler=HANDLER:write-attribute(name="autoflush", value="BOOLEAN")
Replace HANDLER with the name of the periodic log handler. Replace BOOLEAN withtrueif this handler is to immediately write its output.JBoss EAP 6 must be restarted for this change to take effect.Example 14.33. Set the Auto Flush behavior
[standalone@localhost:9999 /] /subsystem=logging/periodic-rotating-file-handler=HOURLY_DEBUG:write-attribute(name="autoflush", value="false") { "outcome" => "success", "response-headers" => {"process-state" => "reload-required"} } - Set the Encoding
- Use the
write-attributeoperation with the following syntax./subsystem=logging/periodic-rotating-file-handler=HANDLER:write-attribute(name="encoding", value="ENCODING")
Replace HANDLER with the name of the periodic log handler. Replace ENCODING with the name of the required character encoding system.Example 14.34. Set the Encoding
[standalone@localhost:9999 /] /subsystem=logging/periodic-rotating-file-handler=HOURLY_DEBUG:write-attribute(name="encoding", value="utf-8") {"outcome" => "success"} - Change the file to which the log handler writes
- Use the
write-attributeoperation with the following syntax./subsystem=logging/periodic-rotating-file-handler=HANDLER:write-attribute(name="file", value={"path"=>"PATH", "relative-to"=>"DIR"})Replace HANDLER with the name of the periodic log handler. Replace PATH with the filename for the file that the log is being written to. Replace DIR with the name of the directory where the file is to be located. The value of DIR can be a path variable.Example 14.35. Change the file to which the log handler writes
[standalone@localhost:9999 /] /subsystem=logging/periodic-rotating-file-handler=HOURLY_DEBUG:write-attribute(name="file", value={"path"=>"daily-debug.log", "relative-to"=>"jboss.server.log.dir"}) {"outcome" => "success"} - Set the Formatter
- Use the
write-attributeoperation with the following syntax./subsystem=logging/periodic-rotating-file-handler=HANDLER:write-attribute(name="formatter", value="FORMAT")
Replace HANDLER with the name of the periodic log handler. Replace FORMAT with the required formatter string.Example 14.36. Set the Formatter
[standalone@localhost:9999 /] /subsystem=logging/periodic-rotating-file-handler=HOURLY_DEBUG:write-attribute(name="formatter", value="%d{HH:mm:ss,SSS} %-5p [%c] (%t) %s%E%n") {"outcome" => "success"} [standalone@localhost:9999 /] - Set the suffix for rotated logs
- Use the
write-attributeoperation with the following syntax./subsystem=logging/periodic-rotating-file-handler=HANDLER:write-attribute(name="suffix", value="SUFFIX")
Replace HANDLER with the name of the log handler. Replace SUFFIX with the required suffix string.Example 14.37.
[standalone@localhost:9999 /] /subsystem=logging/periodic-rotating-file-handler=HOURLY_DEBUG:write-attribute(name="suffix", value=".yyyy-MM-dd-HH") {"outcome" => "success"} [standalone@localhost:9999 /] - Remove a periodic log handler
- Use the
removeoperation with the following syntax./subsystem=logging/periodic-rotating-file-handler=HANDLER:remove
Replace HANDLER with the name of the periodic log handler.Example 14.38. Remove a periodic log handler
[standalone@localhost:9999 /] /subsystem=logging/periodic-rotating-file-handler=HOURLY_DEBUG:remove {"outcome" => "success"} [standalone@localhost:9999 /]
14.3.6. Configure a Size Log Handler in the CLI
- Add a new log handler.
- Display the configuration of the log handler
- Set the handler's log level.
- Set the handler's appending behavior.
- Set whether the handler uses autoflush or not.
- Set the encoding used for the handler's output.
- Specify the file to which the log handler will write.
- Set the formatter used for the handler's output.
- Set the maximum size of each log file
- Set the maximum number of backup logs to keep
- Set the rotate on boot option for the size rotation file handler
- Remove a log handler.
Important
/subsystem=logging/logging-profile=NAME/ instead of /subsystem=logging/.
- Add a new log handler
- Use the
addoperation with the following syntax./subsystem=logging/size-rotating-file-handler=HANDLER:add(file={"path"=>"PATH", "relative-to"=>"DIR"})Replace HANDLER with the name of the log handler. Replace PATH with the filename for the file that the log is being written to. Replace DIR with the name of the directory where the file is to be located. The value of DIR can be a path variable.Example 14.39. Add a new log handler
[standalone@localhost:9999 /] /subsystem=logging/size-rotating-file-handler=ACCOUNTS_TRACE:add(file={"path"=>"accounts_trace.log", "relative-to"=>"jboss.server.log.dir"}) {"outcome" => "success"} - Display the configuration of the log handler
- Use the
read-resourceoperation with the following syntax./subsystem=logging/size-rotating-file-handler=HANDLER:read-resource
Replace HANDLER with the name of the log handler.Example 14.40. Display the configuration of the log handler
[standalone@localhost:9999 /] /subsystem=logging/size-rotating-file-handler=ACCOUNTS_TRACE:read-resource { "outcome" => "success", "result" => { "append" => true, "autoflush" => true, "encoding" => undefined, "file" => { "path" => "accounts_trace.log", "relative-to" => "jboss.server.log.dir" }, "filter" => undefined, "formatter" => "%d{HH:mm:ss,SSS} %-5p [%c] (%t) %s%E%n", "level" => undefined, "max-backup-index" => 1, "rotate-size" => "2m" } } [standalone@localhost:9999 /] - Set the handler's log level
- Use the
write-attributeoperation with the following syntax./subsystem=logging/size-rotating-file-handler=HANDLER:write-attributel(name="level", value="LOG_LEVEL_VALUE")
Replace HANDLER with the name of the log handler. Replace LOG_LEVEL_VALUE with the log level that is to be set.Example 14.41. Set the handler's log level
[standalone@localhost:9999 /] /subsystem=logging/size-rotating-file-handler=ACCOUNTS_TRACE:write-attribute(name="level", value="TRACE") {"outcome" => "success"} [standalone@localhost:9999 /] - Set the handler's appending behavior
- Use the
write-attributeoperation with the following syntax./subsystem=logging/size-rotating-file-handler=HANDLER:write-attribute(name="append", value="BOOLEAN")
Replace HANDLER with the name of the log handler. Replace BOOLEAN withfalseif you required that a new log file be created each time the application server is launched. Replace BOOLEAN withtrueif the application server should continue to use the same file.JBoss EAP 6 must be restarted for this change to take effect.Example 14.42. Set the handler's appending behavior
[standalone@localhost:9999 /] /subsystem=logging/size-rotating-file-handler=ACCOUNTS_TRACE:write-attribute(name="append", value="true") { "outcome" => "success", "response-headers" => { "operation-requires-reload" => true, "process-state" => "reload-required" } } [standalone@localhost:9999 /] - Set whether the handler uses autoflush or not
- Use the
write-attributeoperation with the following syntax./subsystem=logging/size-rotating-file-handler=HANDLER:write-attribute(name="autoflush", value="BOOLEAN")
Replace HANDLER with the name of the log handler. Replace BOOLEAN withtrueif this handler is to immediately write its output.Example 14.43. Set whether the handler uses autoflush or not
[standalone@localhost:9999 /] /subsystem=logging/size-rotating-file-handler=ACCOUNTS_TRACE:write-attribute(name="autoflush", value="true") {"outcome" => "success"} [standalone@localhost:9999 /] - Set the encoding used for the handler's output
- Use the
write-attributeoperation with the following syntax./subsystem=logging/size-rotating-file-handler=HANDLER:write-attribute(name="encoding", value="ENCODING")
Replace HANDLER with the name of the log handler. Replace ENCODING with the name of the required character encoding system.Example 14.44. Set the encoding used for the handler's output
[standalone@localhost:9999 /] /subsystem=logging/size-rotating-file-handler=ACCOUNTS_TRACE:write-attribute(name="encoding", value="utf-8") {"outcome" => "success"}] - Specify the file to which the log handler will write
- Use the
write-attributeoperation with the following syntax./subsystem=logging/size-rotating-file-handler=HANDLER:write-attribute(name="file", value={"path"=>"PATH", "relative-to"=>"DIR"})Replace HANDLER with the name of the log handler. Replace PATH with the filename for the file that the log is being written to. Replace DIR with the name of the directory where the file is to be located. The value of DIR can be a path variable.Example 14.45. Specify the file to which the log handler will write
[standalone@localhost:9999 /] /subsystem=logging/size-rotating-file-handler=ACCOUNTS_TRACE:write-attribute(name="file", value={"path"=>"accounts_trace.log", "relative-to"=>"jboss.server.log.dir"}) {"outcome" => "success"} - Set the formatter used for the handler's output
- Use the
write-attributeoperation with the following syntax./subsystem=logging/size-rotating-file-handler=HANDLER:write-attribute(name="formatter", value="FORMATTER")
Replace HANDLER with the name of the log handler. Replace FORMAT with the required formatter string.Example 14.46. Set the formatter used for the handler's output
[standalone@localhost:9999 /] /subsystem=logging/size-rotating-file-handler=ACCOUNTS_TRACE:write-attribute(name="formatter", value="%d{HH:mm:ss,SSS} %-5p (%c) [%t] %s%E%n") {"outcome" => "success"} - Set the maximum size of each log file
- Use the
write-attributeoperation with the following syntax./subsystem=logging/size-rotating-file-handler=HANDLER:write-attribute(name="rotate-size", value="SIZE")
Replace HANDLER with the name of the log handler. Replace SIZE with maximum file size.Example 14.47. Set the maximum size of each log file
[standalone@localhost:9999 /] /subsystem=logging/size-rotating-file-handler=ACCOUNTS_TRACE:write-attribute(name="rotate-size", value="50m") {"outcome" => "success"} [standalone@localhost:9999 /] - Set the maximum number of backup logs to keep
- Use the
write-attributeoperation with the following syntax./subsystem=logging/size-rotating-file-handler=HANDLER:write-attribute(name="max-backup-index", value="NUMBER")
Replace HANDLER with the name of the log handler. Replace NUMBER with the required number of log files to keep.Example 14.48. Set the maximum number of backup logs to keep
[standalone@localhost:9999 /] /subsystem=logging/size-rotating-file-handler=ACCOUNTS_TRACE:write-attribute(name="max-backup-index", value="5") {"outcome" => "success"} [standalone@localhost:9999 /] - Set the rotate-on-boot option on the
size-rotating-file-handler - This option is only available for the
size-rotating-file-handlerfile handler. It defaults tofalse, meaning a new log file is not created on server restart.To change it, use thewrite-attributeoperation with the following syntax./subsystem=logging/size-rotating-file-handler=HANDLER:write-attribute(name="rotate-on-boot", value="BOOLEAN")
Replace HANDLER with the name of thesize-rotating-file-handlerlog handler. Replace BOOLEAN withtrueif a newsize-rotating-file-handlerlog file should be created on restart.Example 14.49. Specify to create a new
size-rotating-file-handlerlog file on server restart[standalone@localhost:9999 /] /subsystem=logging/size-rotating-file-handler=ACCOUNTS_TRACE:write-attribute(name="rotate-on-boot", value="true") {"outcome" => "success"} [standalone@localhost:9999 /] - Remove a log handler
- Use the
removeoperation with the following syntax./subsystem=logging/size-rotating-file-handler=HANDLER:remove
Replace HANDLER with the name of the log handler.Example 14.50. Remove a log handler
[standalone@localhost:9999 /] /subsystem=logging/size-rotating-file-handler=ACCOUNTS_TRACE:remove {"outcome" => "success"}
14.3.7. Configure a Async Log Handler in the CLI
- Add a new async log handler
- Display the configuration of an async log handler
- Change the log level
- Set the queue length
- Set the overflow action
- Add sub-handlers
- Remove sub-handlers
- Remove an async log handler
Important
/subsystem=logging/logging-profile=NAME/ instead of /subsystem=logging/.
/subsystem=logging/ with /profile=NAME/subsystem=logging/.
- Add a new async log handler
- Use the
addoperation with the following syntax./subsystem=logging/async-handler=HANDLER:add(queue-length="LENGTH")
Replace HANDLER with the name of the log handler. Replace LENGTH with value of the maximum number of log requests that can be held in queue.Example 14.51.
[standalone@localhost:9999 /] /subsystem=logging/async-handler=NFS_LOGS:add(queue-length="10") {"outcome" => "success"} - Display the configuration of an async log handler
- Use the
read-resourceoperation with the following syntax./subsystem=logging/async-handler=HANDLER:read-resource
Replace HANDLER with the name of the log handler.Example 14.52.
[standalone@localhost:9999 /] /subsystem=logging/async-handler=NFS_LOGS:read-resource { "outcome" => "success", "result" => { "encoding" => undefined, "filter" => undefined, "formatter" => "%d{HH:mm:ss,SSS} %-5p [%c] (%t) %s%E%n", "level" => undefined, "overflow-action" => "BLOCK", "queue-length" => "50", "subhandlers" => undefined } } [standalone@localhost:9999 /] - Change the log level
- Use the
write-attributeoperation with the following syntax./subsystem=logging/async-handler=HANDLER:write-attribute(name="level", value="LOG_LEVEL_VALUE")
Replace HANDLER with the name of the log handler. Replace LOG_LEVEL_VALUE with the log level that is to be set.Example 14.53.
[standalone@localhost:9999 /] /subsystem=logging/async-handler=NFS_LOGS:write-attribute(name="level", value="INFO") {"outcome" => "success"} [standalone@localhost:9999 /] - Set the queue length
- Use the
write-attributeoperation with the following syntax./subsystem=logging/async-handler=HANDLER:write-attribute(name="queue-length", value="LENGTH")
Replace HANDLER with the name of the log handler. Replace LENGTH with value of the maximum number of log requests that can be held in queue.JBoss EAP 6 must be restarted for this change to take effect.Example 14.54.
[standalone@localhost:9999 /] /subsystem=logging/async-handler=NFS_LOGS:write-attribute(name="queue-length", value="150") { "outcome" => "success", "response-headers" => { "operation-requires-reload" => true, "process-state" => "reload-required" } } - Set the overflow action
- Use the
write-attributeoperation with the following syntax./subsystem=logging/async-handler=HANDLER:write-attribute(name="overflow-action", value="ACTION")
Replace HANDLER with the name of the log handler. Replace ACTION with either DISCARD or BLOCK.Example 14.55.
[standalone@localhost:9999 /] /subsystem=logging/async-handler=NFS_LOGS:write-attribute(name="overflow-action", value="DISCARD") {"outcome" => "success"} [standalone@localhost:9999 /] - Add sub-handlers
- Use the
add-handleroperation with the following syntax./subsystem=logging/async-handler=HANDLER:add-handler(name="SUBHANDLER")
Replace HANDLER with the name of the log handler. Replace SUBHANDLER with the name of the log handler that is to be added as a sub-handler of this async handler.Example 14.56.
[standalone@localhost:9999 /] /subsystem=logging/async-handler=NFS_LOGS:add-handler(name="NFS_FILE") {"outcome" => "success"} [standalone@localhost:9999 /] - Remove sub-handlers
- Use the
remove-handleroperation with the following syntax./subsystem=logging/async-handler=HANDLER:remove-handler(name="SUBHANDLER")
Replace HANDLER with the name of the log handler. Replace SUBHANDLER with the name of the sub-handler to remove.Example 14.57.
[standalone@localhost:9999 /] /subsystem=logging/async-handler=NFS_LOGS:remove-handler(name="NFS_FILE") {"outcome" => "success"} [standalone@localhost:9999 /] - Remove an async log handler
- Use the
removeoperation with the following syntax./subsystem=logging/async-handler=HANDLER:remove
Replace HANDLER with the name of the log handler.Example 14.58.
[standalone@localhost:9999 /] /subsystem=logging/async-handler=NFS_LOGS:remove {"outcome" => "success"} [standalone@localhost:9999 /]
14.3.8. Configure a syslog-handler
Syslog protocol (RFC-3164 or RFC-5424). This allows multiple applications to send their log messages to the same server, where they can all be parsed together. This topic covers how to create and configure a handler using the Management CLI, and the available configuration options.
- Access and the correct permissions for the Management CLI.
Procedure 14.1. Add a syslog-handler
- Run the following command to add a syslog-handler:
/subsystem=logging/syslog-handler=HANDLER_NAME:add
Procedure 14.2. Configure a syslog-handler
- Run the following command to configure a syslog-handler attribute:
/subsystem=logging/syslog-handler=HANDLER_NAME:write-attribute(name=ATTRIBUTE_NAME,value=ATTRIBUTE_VALUE)
Procedure 14.3. Remove a syslog-handler
- Run the following command to remove an existing syslog-handler:
/subsystem=logging/syslog-handler=HANDLER_NAME:remove
Table 14.6. syslog-handler Configuration Attributes
| Attribute | Description | Default Value |
|---|---|---|
| port | The port the syslog server listens to. | 514 |
| app-name | The app name used when formatting the message in RFC5424 format. | null |
| enabled | If set to true the handler is enabled and functioning as normal. If set to false, the handler is ignored when processing log messages. | true |
| level | The log level specifying which message levels will be logged. Message levels lower than this will be discarded. | ALL |
| facility | As defined by RFC-5424 and RFC-3164 | user-level |
| server-address | The address of the syslog server | localhost |
| hostname | The name of the host the messages are being sent from. | null |
| syslog-format | Formats the log message according to the RFC specification | RFC5424 |
14.3.9. Configure a Custom Log Formatter in the CLI
In addition to the log formatter syntax specified in Section 14.1.15, “Log Formatter Syntax”, a custom log formatter can be created for use with any log handler. This example procedure will demonstrate this by creating a XML formatter for a console log handler.
Prerequisites
- Access to the Management CLI for the JBoss EAP 6 server.
- A previously configured log handler. This example procedure uses a console log handler.
Procedure 14.4. Configure a Custom XML Formatter for a Log Handler
- Create custom formatter.In this example, the following command creates a custom formatter named
XML_FORMATTERthat uses thejava.util.logging.XMLFormatterclass.[standalone@localhost:9999 /]
/subsystem=logging/custom-formatter=XML_FORMATTER:add(class=java.util.logging.XMLFormatter, module=org.jboss.logmanager) - Register a custom formatter for the log handler you want to use it with.In this example, the formatter from the previous step is added to a console log handler.
[standalone@localhost:9999 /]
/subsystem=logging/console-handler=HANDLER:write-attribute(name=named-formatter, value=XML_FORMATTER) - Restart the JBoss EAP 6 server for the change to take effect.
[standalone@localhost:9999 /]
shutdown --restart=true
The custom XML formatter is added to the console log handler. Output to the console log will be formatted in XML, for example:
<record> <date>2014-03-11T13:02:53</date> <millis>1394539373833</millis> <sequence>116</sequence> <logger>org.jboss.as</logger> <level>INFO</level> <class>org.jboss.as.server.BootstrapListener</class> <method>logAdminConsole</method> <thread>282</thread> <message>JBAS015951: Admin console listening on http://%s:%d</message> <param>127.0.0.1</param> <param>9990</param> </record>
14.4. Per-deployment Logging
14.4.1. About Per-deployment Logging
14.4.2. Disable Per-deployment Logging
Procedure 14.5. Disable Per-deployment Logging
Two methods of disabling per-deployment logging are available. One works on all versions of JBoss EAP 6, while the other works only on JBoss EAP 6.3 and higher.
JBoss EAP 6 (all versions)
Add the system property:org.jboss.as.logging.per-deployment=false
JBoss EAP 6.3 (and higher)
Exclude the logging subsystem using ajboss-deployment-structure.xmlfile. For details on how to do this, see Exclude a Subsystem from a Deployment in the Development Guide.
14.5. Logging Profiles
14.5.1. About Logging Profiles
Important
- A unique name. This is required.
- Any number of log handlers.
- Any number of log categories.
- Up to one root logger.
MANIFEST.MF file, using the logging-profile attribute.
14.5.2. Create a new Logging Profile using the CLI
/subsystem=logging/logging-profile=NAME:add
14.5.3. Configuring a Logging Profile using the CLI
- The root configuration path is
/subsystem=logging/logging-profile=NAME - A logging profile cannot contain other logging profiles.
Example 14.59. Creating and Configuring a Logging Profile
- Create the profile:
/subsystem=logging/logging-profile=accounts-app-profile:add
- Create file handler
/subsystem=logging/logging-profile=accounts-app-profile/file-handler=ejb-trace-file:add(file={path=>"ejb-trace.log", "relative-to"=>"jboss.server.log.dir"})/subsystem=logging/logging-profile=accounts-app-profile/file-handler=ejb-trace-file:write-attribute(name="level", value="DEBUG")
- Create logger category
/subsystem=logging/logging-profile=accounts-app-profile/logger=com.company.accounts.ejbs:add(level=TRACE)
- Assign file handler to category
/subsystem=logging/logging-profile=accounts-app-profile/logger=com.company.accounts.ejbs:add-handler(name="ejb-trace-file")
14.5.4. Specify a Logging Profile in an Application
MANIFEST.MF file.
Prerequisites:
- You must know the name of the logging profile that has been setup on the server for this application to use. Ask your server administrator for the name of the profile to use.
Procedure 14.6. Add Logging Profile configuration to an Application
Edit
MANIFEST.MFIf your application does not have aMANIFEST.MFfile: create one with the following content, replacing NAME with the required profile name.Manifest-Version: 1.0 Logging-Profile: NAME
If your application already has aMANIFEST.MFfile: add the following line to it, replacing NAME with the required profile name.Logging-Profile: NAME
Note
maven-war-plugin, you can put your MANIFEST.MF file in src/main/resources/META-INF/ and add the following configuration to your pom.xml file.
<plugin>
<artifactId>maven-war-plugin</artifactId>
<configuration>
<archive>
<manifestFile>src/main/resources/META-INF/MANIFEST.MF</manifestFile>
</archive>
</configuration>
</plugin>14.5.5. Example Logging Profile Configuration
MANIFEST.MF file of the application.
- The Name is
accounts-app-profile. - The Log Category is
com.company.accounts.ejbs. - The Log level
TRACE. - The Log handler is a file handler using the file
ejb-trace.log.
Example 14.60. CLI session
localhost:bin user$ ./jboss-cli.sh -c
[standalone@localhost:9999 /] /subsystem=logging/logging-profile=accounts-app-profile:add
{"outcome" => "success"}
[standalone@localhost:9999 /] /subsystem=logging/logging-profile=accounts-app-profile/file-handler=ejb-trace-file:add(file={path=>"ejb-trace.log", "relative-to"=>"jboss.server.log.dir"})
{"outcome" => "success"}
[standalone@localhost:9999 /] /subsystem=logging/logging-profile=accounts-app-profile/file-handler=ejb-trace-file:write-attribute(name="level", value="DEBUG")
{"outcome" => "success"}
[standalone@localhost:9999 /] /subsystem=logging/logging-profile=accounts-app-profile/logger=com.company.accounts.ejbs:add(level=TRACE)
{"outcome" => "success"}
[standalone@localhost:9999 /] /subsystem=logging/logging-profile=accounts-app-profile/logger=com.company.accounts.ejbs:add-handler(name="ejb-trace-file")
{"outcome" => "success"}
[standalone@localhost:9999 /]Example 14.61. XML Configuration
<logging-profiles>
<logging-profile name="accounts-app-profile">
<file-handler name="ejb-trace-file">
<level name="DEBUG"/>
<file relative-to="jboss.server.log.dir" path="ejb-trace.log"/>
</file-handler>
<logger category="com.company.accounts.ejbs">
<level name="TRACE"/>
<handlers>
<handler name="ejb-trace-file"/>
</handlers>
</logger>
</logging-profile>
</logging-profiles>Example 14.62. Application MANIFEST.MF file
Manifest-Version: 1.0 Logging-Profile: accounts-app-profile
14.6. Logging Configuration Properties
14.6.1. Root Logger Properties
Table 14.7. Root Logger Properties
| Property | Datatype | Description |
|---|---|---|
| level | String |
The maximum level of log message that the root logger records.
|
| handlers | String[] |
A list of log handlers that are used by the root logger.
|
| filter-spec | String |
An expression value that defines a filter. The following expression defines a filter that excludes log entries that do not match a pattern:
not(match("JBAS.*"))
|
Note
filter-spec specified for the root logger is not inherited by other handlers. Instead a filter-spec must be specified per handler.
14.6.2. Log Category Properties
Table 14.8. Log Category Properties
| Property | Datatype | Description |
|---|---|---|
| level | String |
The maximum level of log message that the log category records.
|
| handlers | String[] |
A list of log handlers that are used by the root logger.
|
| use-parent-handlers | Boolean |
If set to true, this category will use the log handlers of the root logger in addition to any other assigned handlers.
|
| category | String |
The log category from which log messages will be captured.
|
| filter-spec | String |
An expression value that defines a filter. The following expression defines a filter that does not match a pattern:
not(match("JBAS.*"))
|
14.6.3. Console Log Handler Properties
Table 14.9. Console Log Handler Properties
| Property | Datatype | Description |
|---|---|---|
| level | String |
The maximum level of log message the log handler records.
|
| encoding | String |
The character encoding scheme to be used for the output.
|
| formatter | String |
The log formatter used by this log handler.
|
| target | String |
The system output stream where the output of the log handler goes. This can be System.err or System.out for the system error stream or standard out stream respectively.
|
| autoflush | Boolean |
If set to true the log messages will be sent to the handlers target immediately upon receipt.
|
| name | String |
The unique identifier for this log handler.
|
| enabled | Boolean |
If set to
true, the handler is enabled and functioning as normal. If set to false, the handler is ignored when processing log messages.
|
| filter-spec | String |
An expression value that defines a filter. The following expression defines a filter that does not match a pattern:
not(match("JBAS.*"))
|
14.6.4. File Log Handler Properties
Table 14.10. File Log Handler Properties
| Property | Datatype | Description |
|---|---|---|
| level | String |
The maximum level of log message the log handler records.
|
| encoding | String |
The character encoding scheme to be used for the output.
|
| formatter | String |
The log formatter used by this log handler.
|
| append | Boolean |
If set to true then all messages written by this handler will be appended to the file if it already exists. If set to false a new file will be created each time the application server launches. Changes to
append require a server reboot to take effect.
|
| autoflush | Boolean |
If set to true the log messages will be sent to the handlers assigned file immediately upon receipt. Changes to
autoflush require a server reboot to take effect.
|
| name | String |
The unique identifier for this log handler.
|
| file | Object |
The object that represents the file where the output of this log handler is written to. It has two configuration properties,
relative-to and path.
|
| relative-to | String |
This is a property of the file object and is the directory where the log file is written to. JBoss EAP 6 file path variables can be specified here. The
jboss.server.log.dir variable points to the log/ directory of the server.
|
| path | String |
This is a property of the file object and is the name of the file where the log messages will be written. It is a relative path name that is appended to the value of the
relative-to property to determine the complete path.
|
| enabled | Boolean |
If set to
true, the handler is enabled and functioning as normal. If set to false, the handler is ignored when processing log messages.
|
| filter-spec | String |
An expression value that defines a filter. The following expression defines a filter that does not match a pattern:
not(match("JBAS.*"))
|
14.6.5. Periodic Log Handler Properties
Table 14.11. Periodic Log Handler Properties
| Property | Datatype | Description |
|---|---|---|
| append | Boolean |
If set to
true then all messages written by this handler will be appended to the file if it already exists. If set to false a new file will be created each time the application server launches. Changes to append require a server reboot to take effect.
|
| autoflush | Boolean |
If set to
true the log messages will be sent to the handlers assigned file immediately upon receipt. Changes to autoflush require a server reboot to take effect.
|
| encoding | String |
The character encoding scheme to be used for the output.
|
| formatter | String |
The log formatter used by this log handler.
|
| level | String |
The maximum level of log message the log handler records.
|
| name | String |
The unique identifier for this log handler.
|
| file | Object |
Object that represents the file to which the output of this log handler is written. It has two configuration properties,
relative-to and path.
|
| relative-to | String |
This is a property of the file object and is the directory containing the log file. File path variables can be specified here. The
jboss.server.log.dir variable points to the log/ directory of the server.
|
| path | String |
This is a property of the file object and is the name of the file where the log messages will be written. It is a relative path name that is appended to the value of the
relative-to property to determine the complete path.
|
| suffix | String |
This String is appended to the filename of the rotated logs and is used to determine the frequency of rotation. The format of the suffix is a dot (.) followed by a
date String which is able to be parsed by the SimpleDateFormat class. The log is rotated on the basis of the smallest time unit defined by the suffix. Note that the smallest time unit allowed in the suffix attribute is minutes.
For example, a
suffix value of .YYYY-MM-dd will result in daily log rotation. Assuming a log file named server.log and a suffix value of .YYYY-MM-dd, the log file rotated on 20 October 2014 would be named server.log.2014-10-19. For a periodic log handler, the suffix includes the previous value for the smallest time unit. In this example the value for dd is 19, the previous day.
|
| enabled | Boolean |
If set to
true, the handler is enabled and functioning as normal. If set to false, the handler is ignored when processing log messages.
|
| filter-spec | String |
An expression value that defines a filter. The following expression defines a filter that does not match a pattern:
not(match("JBAS.*")).
|
14.6.6. Size Log Handler Properties
Table 14.12. Size Log Handler Properties
| Property | Datatype | Description |
|---|---|---|
| append | Boolean |
If set to true then all messages written by this handler will be appended to the file if it already exists. If set to false a new file will be created each time the application server launches. Changes to append require a server reboot to take effect.
|
| autoflush | Boolean |
If set to true the log messages will be sent to the handlers assigned file immediately upon receipt. Changes to append require a server reboot to take effect.
|
| encoding | String |
The character encoding scheme to be used for the output.
|
| formatter | String |
The log formatter used by this log handler.
|
| level | String |
The maximum level of log message the log handler records.
|
| name | String |
The unique identifier for this log handler.
|
| file | Object |
Object that represents the file where the output of this log handler is written to. It has two configuration properties,
relative-to and path.
|
| relative-to | String |
This is a property of the file object and is the directory where the log file is written to. File path variables can be specified here. The
jboss.server.log.dir variable points to the log/ directory of the server.
|
| path | String |
This is a property of the file object and is the name of the file where the log messages will be written. It is a relative path name that is appended to the value of the
relative-to property to determine the complete path.
|
| rotate-size | Integer |
The maximum size that the log file can reach before it is rotated. A single character appended to the number indicates the size units:
b for bytes, k for kilobytes, m for megabytes, g for gigabytes. Eg. 50m for 50 megabytes.
|
| max-backup-index | Integer |
The maximum number of rotated logs that are kept. When this number is reached, the oldest log is reused.
|
| enabled | Boolean |
If set to
true, the handler is enabled and functioning as normal. If set to false, the handler is ignored when processing log messages.
|
| filter-spec | String |
An expression value that defines a filter. The following expression defines a filter that does not match a pattern:
not(match("JBAS.*"))
|
| rotate-on-boot | Boolean |
If set to
true, a new log file will be created on server restart. Default is false.
|
14.6.7. Async Log Handler Properties
Table 14.13. Async Log Handler Properties
| Property | Datatype | Description |
|---|---|---|
| level | String |
The maximum level of log message the log handler records.
|
| name | String |
The unique identifier for this log handler.
|
| queue-length | Integer |
Maximum number of log messages that will be held by this handler while waiting for sub-handlers to respond.
|
| overflow-action | String |
How this handler responds when its queue length is exceeded. This can be set to
BLOCK or DISCARD. BLOCK makes the logging application wait until there is available space in the queue. This is the same behavior as an non-async log handler. DISCARD allows the logging application to continue but the log message is deleted.
|
| subhandlers | String[] |
This is the list of log handlers to which this async handler passes its log messages.
|
| enabled | Boolean |
If set to
true, the handler is enabled and functioning as normal. If set to false, the handler is ignored when processing log messages.
|
| filter-spec | String |
An expression value that defines a filter. The following expression defines a filter that does not match a pattern:
not(match("JBAS.*"))
|
14.7. Sample XML Configuration for Logging
14.7.1. Sample XML Configuration for the Root Logger
<root-logger>
<level name="INFO"/>
<handlers>
<handler name="CONSOLE"/>
<handler name="FILE"/>
</handlers>
</root-logger>14.7.2. Sample XML Configuration for a Log Category
<logger category="com.company.accounts.rec">
<handlers>
<handler name="accounts-rec"/>
</handlers>
</logger>14.7.3. Sample XML Configuration for a Console Log Handler
<console-handler name="CONSOLE">
<level name="INFO"/>
<formatter>
<pattern-formatter pattern="%d{HH:mm:ss,SSS} %-5p [%c] (%t) %s%E%n"/>
</formatter>
</console-handler>14.7.4. Sample XML Configuration for a File Log Handler
<file-handler name="accounts-rec-trail" autoflush="true">
<level name="INFO"/>
<file relative-to="jboss.server.log.dir" path="accounts-rec-trail.log"/>
<append value="true"/>
</file-handler>14.7.5. Sample XML Configuration for a Periodic Log Handler
<periodic-rotating-file-handler name="FILE">
<formatter>
<pattern-formatter pattern="%d{HH:mm:ss,SSS} %-5p [%c] (%t) %s%E%n"/>
</formatter>
<file relative-to="jboss.server.log.dir" path="server.log"/>
<suffix value=".yyyy-MM-dd"/>
<append value="true"/>
</periodic-rotating-file-handler>14.7.6. Sample XML Configuration for a Size Log Handler
<size-rotating-file-handler name="accounts_debug" autoflush="false"> <level name="DEBUG"/> <file relative-to="jboss.server.log.dir" path="accounts-debug.log"/> <rotate-size value="500k"/> <max-backup-index value="5"/> <append value="true"/> </size-rotating-file-handler>
14.7.7. Sample XML Configuration for a Async Log Handler
<async-handler name="Async_NFS_handlers">
<level name="INFO"/>
<queue-length value="512"/>
<overflow-action value="block"/>
<subhandlers>
<handler name="FILE"/>
<handler name="accounts-record"/>
</subhandlers>
</async-handler>Chapter 15. Infinispan
15.1. About Infinispan
webfor Web Session Clusteringejbfor Stateful Session Bean Clusteringhibernatefor entity cachingsingletonfor singleton caching
Important
15.2. Clustering modes
Replicated Mode automatically detects and adds new instances on the cluster. Changes made to these instances will be replicated to all nodes on the cluster. Replicated mode typically works best in small clusters because of the amount of information that has to be replicated over the network. Infinispan can be configured to use UDP multicast, which alleviates network traffic congestion to a degree.
Distribution mode allows Infinispan to scale the cluster linearly. Distribution mode uses a consistent hash algorithm to determine where in a cluster a new node should be placed. The number of copies of information to be kept is configurable. There is a trade off between the number of copies kept, durability of the data and performance: the more copies that are kept, the more impact on performance, but the less likely you are to lose data in a server failure. The hash algorithm also works to reduce network traffic by locating entries without multicasting or storing metadata.
Replication can be performed either in either synchronous or asynchronous mode, and the mode chosen will depend on your requirements and your application. With synchronous replication, the thread that handles the user request will be blocked until replication has been successful. Only when replication has been successful will a response be sent back to the client, and the thread released. Synchronous replication will have an impact on network traffic because it requires a response from each node in the cluster. It has the advantage, however, of ensuring that all modifications have been made to all nodes in the cluster.
Asynchronous replication is carried out in the background. Infinispan implements a replication queue, which is used by a background thread to carry out replication. Replication is triggered either on a time basis, or on the queue size. A replication queue allows increased performance because there is no conversation being carried out between the cluster nodes. The trade off with asynchronous replication is that it is not quite so accurate. Failed replication attempts are written to a log, not notified in real time.
15.3. Cache Containers
- Cache Containers
- A cache container is repository for the caches used by a subsystem. For Infinispan default cache containers are defined in the configuration xml files (standalone-ha.xml, standalone-full-ha.xml, domain.xml). One cache is defined as the default cache, which is the cache that will be used for clustering.
Example 15.1. Cache container definitions from standalone-ha.xml configuration file
<subsystem xmlns="urn:jboss:domain:infinispan:1.5"> <cache-container name="singleton" aliases="cluster ha-partition" default-cache="default"> <transport lock-timeout="60000"/> <replicated-cache name="default" mode="SYNC" batching="true"> <locking isolation="REPEATABLE_READ"/> </replicated-cache> </cache-container> <cache-container name="web" aliases="standard-session-cache" default-cache="repl" module="org.jboss.as.clustering.web.infinispan"> <transport lock-timeout="60000"/> <replicated-cache name="repl" mode="ASYNC" batching="true"> <file-store/> </replicated-cache> <replicated-cache name="sso" mode="SYNC" batching="true"/> <distributed-cache name="dist" l1-lifespan="0" mode="ASYNC" batching="true"> <file-store/> </distributed-cache> </cache-container>Note the default cache defined in each cache container. In this example, in thewebcache container, thereplcache is defined as the default. Thereplcache will therefore be used to when clustering web sessions.The cache containers and cache attributes can be configured using the Management Console or CLI commands, but it is not advisable to change the names of either cache containers or caches. - Configure Cache Containers
- Cache containers for Infinispan can be configured using the CLI or the Management Console.
Procedure 15.1. Configure the Infinispan Cache Containers in the Management Console
- Select the tab from the top of the screen.
- For Domain mode only, select either or from the drop down menu at top left.
- Expand the menu, then expand the menu. Select .
- Select a cache container from the Cache Containers table.
Add, Remove or Set Default Cache Container
- To create a new cache container, click from the Cache Containers table.
- To remove a cache container, select the cache container in the Cache Containers table. Click and click to confirm.
- To set a cache container as default, click , enter a cache container name from the drop down list, click to confirm.
- To add or update the attributes of a cache container, select the cache container in the Cache Containers table. Select one from the , and tabs in the Details area of the screen, and click . For help about the content of the , and tabs, click Need Help?.
Procedure 15.2. Configure the Infinispan Cache Containers in the Management CLI
- To get a list of configurable attributes, enter the following CLI command:
/profile=profile name/subsystem=infinispan/cache-container=container name:read-resource
- You can use the Management CLI to add, remove and update cache containers. Before issuing any commands to do with cache containers, ensure that you use the correct profile in the Management CLI command.
Add a Cache Container
To add a cache container base your command on the following example:/profile=profile-name/subsystem=infinispan/cache-container="cache container name":add
Remove a Cache Container
To remove a cache container base your command on the following example:/profile=profile-name/subsystem=infinispan/cache-container="cache container name":remove
Update Cache Container attributes
Use the write-attribute operation to write a new value to an attribute. You can use tab completion to help complete the command string as you type, as well as to expose the available attributes. The following example updates statistics-enabled to true./profile=profile name/subsystem=infinispan/cache-container=cache container name:write-attribute(name=statistics-enabled,value=true)
15.4. Cache Stores
shared attribute to true on the JDBC-based cache stores.). If the cache stores are not defined as shared, database deadlocks may occur, along with other problems which impact performance.
15.5. About Infinispan Statistics
Warning
15.6. Enable Infinispan Statistics Collection
standalone.xml, standalone-ha.xml, domain.xml) or the management CLI.
15.6.1. Enable Infinispan Statistics Collection in the Startup Configuration File
Procedure 15.3. Enable Infinispan Statistics in the Startup Configuration File
- Add the attribute
statistics-enabled=VALUEto the requiredcache-containerorcacheXML tag under the Infinispan subsystem.
Example 15.2. Enable Statistics Collection for a cache
<replicated-cache name="sso" mode="SYNC" batching="true" statistics-enabled="true"/>
Example 15.3. Enable Statistics Collection for a cache-container
<cache-container name="singleton" aliases="cluster ha-partition" default-cache="default" statistics-enabled="true">
15.6.2. Enable Infinispan Statistics Collection from the Management CLI
Procedure 15.4. Enable Infinispan Statistics Collection from the Management CLI
CACHE_CONTAINERis the preferredcache-container(for example,web)CACHE_TYPEis the preferred cache type (for example,distributed-cache)CACHEis the cache name (for example,dist)
- Enter the following command:
/subsystem=infinispan/cache-container=CACHE_CONTAINER/CACHE_TYPE=CACHE:write-attribute(name=statistics-enabled,value=true)
- Enter the following command to reload the server:
:reload
Note
/subsystem=infinispan/cache-container=CACHE_CONTAINER/CACHE_TYPE=CACHE:undefine-attribute(name=statistics-enabled)
15.6.3. Verify Infinispan Statistics Collection is Enabled
Procedure 15.5. Verify Infinispan Statistics Collection is Enabled
cache or cache-container, use one of the following management CLI commands.
For a
cache/subsystem=infinispan/cache-container=CACHE_CONTAINER/CACHE_TYPE=CACHE:read-attribute(name=statistics-enabled)For a
cache-container/subsystem=infinispan/cache-container=CACHE_CONTAINER:read-attribute(name=statistics-enabled)
15.7. JGroups
15.7.1. About JGroups
- udp - the nodes in the cluster use UDP (User Datagram Protocol) multicasting to communicate with each other. UDP is generally faster but less reliable than TCP.
- tcp - the nodes in the cluster use TCP (Transmission Control Protocol) to communicate with each other. TCP tends to be slower than UDP, but will more reliably deliver data to its destination.
Chapter 16. JVM
16.1. About JVM
16.1.1. About JVM Settings
host.xml and domain.xml configuration files, and determined by the domain controller components responsible for starting and stopping server processes. In a standalone server instance, the server startup processes can pass command line settings at startup. These can be declared from the command line or via the System Properties screen in the Management Console.
An important feature of the managed domain is the ability to define JVM settings at multiple levels. You can configure custom JVM settings at the host level, by server group, or by server instance. The more specialized child elements will override the parent configuration, allowing for the declaration of specific server configurations without requiring exclusions at the group or host level. This also allows the parent configuration to be inherited by the other levels until settings are either declared in the configuration files or passed at runtime.
Example 16.1. JVM settings in the domain configuration file
domain.xml configuration file.
<server-groups>
<server-group name="main-server-group" profile="default">
<jvm name="default">
<heap size="64m" max-size="512m"/>
</jvm>
<socket-binding-group ref="standard-sockets"/>
</server-group>
<server-group name="other-server-group" profile="default">
<jvm name="default">
<heap size="64m" max-size="512m"/>
</jvm>
<socket-binding-group ref="standard-sockets"/>
</server-group>
</server-groups>
main-server-group is declaring a heap size of 64 megabytes, and a maximum heap size of 512 megabytes. Any server that belongs to this group will inherit these settings. You can change these settings for the group as a whole, by the host, or the individual server.
Example 16.2. Domain settings in the host configuration file
host.xml configuration file.
<servers>
<server name="server-one" group="main-server-group" auto-start="true">
<jvm name="default"/>
</server>
<server name="server-two" group="main-server-group" auto-start="true">
<jvm name="default">
<heap size="64m" max-size="256m"/>
</jvm>
<socket-bindings port-offset="150"/>
</server>
<server name="server-three" group="other-server-group" auto-start="false">
<socket-bindings port-offset="250"/>
</server>
</servers>
server-two belongs to the server group named main-server-group, inheriting the JVM settings from the default JVM group. In the previous example, the main heap size for main-server-group was set at 512 megabytes. By declaring the lower maximum heap size of 256 megabytes, server-two can override the domain.xml settings to fine-tune performance as desired.
The JVM settings for standalone server instances can be declared at runtime by setting the JAVA_OPTS environment variable before starting the server. An example of setting the JAVA_OPTS environment variable at the Linux command-line is:
[user@host bin]$ export JAVA_OPTS="-Xmx1024M"
C:\> set JAVA_OPTS="Xmx1024M"
standalone.conf file found in the EAP_HOME/bin folder, which contains examples of options to pass to the JVM.
Warning
16.1.2. Display the JVM Status in the Management Console
Prerequisites
Table 16.1. JVM Status Attributes
| Type | Description |
|---|---|
| Max | The maximum amount of memory that can be used for memory management. The maximum availabe memory is shown by the light grey bar. |
| Used | The amount of used memory. The amount of used memory is shown by the dark grey bar. |
| Committed | The amount of memory that is committed for the Java virtual machine to use. The committed memory is shown by the dark grey bar. |
| Init | The amount of memory that the Java virtual machine initially requests from the operating system for memory management. The init amount is shown by the dark grey bar. |
Procedure 16.1. Display the JVM Status in the Management Console
Display the JVM status for a standalone server instance
Select the tab from the top of the screen. Expand the menu, then expand the menu. Select .Display the JVM status for a managed domain
Select the tab from the top of the screen. Expand the menu, then expand the menu. Select .
- The managed domain can provide visibility of all server instances in the server group, but will only allow you to view one server at a time by selecting from the server menu. To view the status of other servers in your server group, click left of the screen to select from the host and servers displayed in your group. Select the required server or host and the JVM details will change. Click to finish.
The status of the JVM settings for the server instance are displayed.
16.1.3. Configuring JVM
Example 16.3. Use of <jvm-options>
<jvm name="default">
<heap size="1303m" max-size="1303m"/>
<permgen max-size="256m"/>
<jvm-options>
<option value="-XX:+UseCompressedOops"/>
</jvm-options>
</jvm>
To configure JVM using CLI, use the following syntax:
# cd /server-group=main-server-group/jvm=default
# :add-jvm-option(jvm-option="-XX:+UseCompressedOops")
{
"outcome" => "success",
"result" => undefined,
"server-groups" => {"main-server-group" => {"host" => {"master" => {
"server-one" => {"response" => {
"outcome" => "success",
"response-headers" => {
"operation-requires-restart" => true,
"process-state" => "restart-required"
}
}},
"server-two" => {"response" => {
"outcome" => "success",
"response-headers" => {
"operation-requires-restart" => true,
"process-state" => "restart-required"
}
}}
}}}}
}
# :read-resource
# Expected Result:
[domain@localhost:9999 jvm=default] :read-resource
{
"outcome" => "success",
"result" => {
"agent-lib" => undefined,
"agent-path" => undefined,
"env-classpath-ignored" => undefined,
"environment-variables" => undefined,
"heap-size" => "1303m",
"java-agent" => undefined,
"java-home" => undefined,
"jvm-options" => ["-XX:+UseCompressedOops"],
"max-heap-size" => "1303m",
"max-permgen-size" => "256m",
"permgen-size" => undefined,
"stack-size" => undefined,
"type" => undefined
}
}
To remove jvm-options entry, use the following syntax:
# cd /server-group=main-server-group/jvm=default
# :remove-jvm-option(jvm-option="-XX:+UseCompressedOops")
# Expected Result:
[domain@localhost:9999 jvm=default] :remove-jvm-option(jvm-option="-XX:+UseCompressedOops")
{
"outcome" => "success",
"result" => undefined,
"server-groups" => {"main-server-group" => {"host" => {"master" => {
"server-one" => {"response" => {
"outcome" => "success",
"response-headers" => {
"operation-requires-restart" => true,
"process-state" => "restart-required"
}
}},
"server-two" => {"response" => {
"outcome" => "success",
"response-headers" => {
"operation-requires-restart" => true,
"process-state" => "restart-required"
}
}}
}}}}
}
Chapter 17. Web Subsystem
17.1. Configure the Web Subsystem
To configure the Web Subsystem using the web-based Management Console, click the Configuration tab at the top of the screen. Expand the Subsystems menu and then expand the Web menu. Each configurable part of the Web subsystem is shown.
Note
ha or full-ha, in a managed domain, or if you start your standalone server with the standalone-ha or standalone-full-ha profile. mod_cluster configuration is covered in Section 19.5.2, “Configure the mod_cluster Subsystem”.
To configure the JSP Container, HTTP connectors, and virtual HTTP servers, click the Servlet/HTTP menu entry. Click the Edit button to change any values. Click the Advanced button to view advanced options. The options are explained below. Options for HTTP connectors and virtual servers are shown in separate tables.
Table 17.1. Servlet/HTTP Configuration Options
| Option | Description | CLI Command |
|---|---|---|
| Instance ID |
The identifier used to enable session affinity in load balancing scenarios. The identifier must be unique across all JBoss EAP servers in the cluster and is appended to the generated session identifier. This allows the front-end proxy to forward the specific session to the same JBoss EAP instance. The instance ID is not set as a default.
|
/profile=full-ha/subsystem=web:write-attribute(name=instance-id,value=worker1) |
| Disabled? |
If
true, disables the Java ServerPages (JSP) container. Defaults to false. This is useful if you do not use any JSPs.
|
/profile=full-ha/subsystem=web/configuration=jsp-configuration/:write-attribute(name=disabled,value=false) |
| Development? |
If
true, enables Development Mode, which produces more verbose debugging information. Defaults to false.
|
/profile=full-ha/subsystem=web/configuration=jsp-configuration/:write-attribute(name=development,value=false) |
| Keep Generated? |
Click Advanced to see this option, if it is hidden. If
true, keeps generated Servlets. Defaults to true.
|
/profile=full-ha/subsystem=web/configuration=jsp-configuration/:write-attribute(name=keep-generated,value=true) |
| Check Interval? |
Click Advanced to see this option, if it is hidden. A value in seconds, which determines how often to check for JSP updates using a background process. Defaults to
0.
|
/profile=full-ha/subsystem=web/configuration=jsp-configuration/:write-attribute(name=check-interval,value=0) |
| Display Source? |
Click Advanced to see this option, if it is hidden. If
true, the JSP source fragment is displayed when a runtime error occurs. Defaults to true.
|
/profile=full-ha/subsystem=web/configuration=jsp-configuration/:write-attribute(name=display-source-fragment,value=true) |
mod_cluster, mod_jk, mod_proxy, ISAPI, and NSAPI for load balancing and HA clustering. To configure a connector, select the Connectors tab and click Add. To remove a connector, select its entry and click Remove. To edit a connector, select its entry and click Edit.
Example 17.1. Create a New Connector
/profile=full-ha/subsystem=web/connector=ajp/:add(socket-binding=ajp,scheme=http,protocol=AJP/1.3,secure=false,name=ajp,max-post-size=2097152,enabled=true,enable-lookups=false,redirect-port=8433,max-save-post-size=4096)
Table 17.2. Connector Options
| Option | Description | CLI Command |
|---|---|---|
| Name |
A unique name for the connector, for display purposes.
|
/profile=full-ha/subsystem=web/connector=ajp/:read-attribute(name=name) |
| Socket Binding |
The named socket binding to which the connector is to be bound. A socket binding is a mapping between a socket name and a network port. Socket bindings are configured for each standalone server, or via socket binding groups in a managed domain. A socket binding group is applied to a server group.
|
/profile=full-ha/subsystem=web/connector=ajp/:write-attribute(name=socket-binding,value=ajp) |
| Scheme |
The web connector scheme, such as HTTP or HTTPS.
|
/profile=full-ha/subsystem=web/connector=ajp/:write-attribute(name=scheme,value=http) |
| Protocol |
The web connector protocol to use, such as AJP or HTTP.
|
/profile=full-ha/subsystem=web/connector=ajp/:write-attribute(name=protocol,value=AJP/1.3) |
| Enabled |
Whether or not this web connector is enabled.
|
/profile=full-ha/subsystem=web/connector=ajp/:write-attribute(name=enabled,value=true) |
| Redirect Port |
Used to specify a port number to be used in cases of redirection; the common ones being redirection to secure (
https) or AJP connector
|
/profile=full-ha/subsystem=web/connector=http:write-attribute(name=redirect-port,value=8443) |
| Redirect Binding |
Redirect binding is similar to redirect port in terms of behavior except that it requires specification of a socket-binding name in "value" instead of a port number.
redirect-binding provides higher configuration flexibility because it allows the use of pre-defined socket binding (https, AJP etc.) to the specific port for redirection. It gives the same results as redirect-port option.
|
/profile=full-ha/subsystem=web/connector=http:write-attribute(name=redirect-binding,value=https) |
Example 17.2. Add a New Virtual Server
/profile=full-ha/subsystem=web/virtual-server=default-host/:add(enable-welcome-root=true,default-web-module=ROOT.war,alias=["localhost","example.com"],name=default-host)
Table 17.3. Virtual Servers Options
| Option | Description | CLI Command |
|---|---|---|
| Name |
A unique name for the virtual server, for display purposes.
|
/profile=full-ha/subsystem=web/virtual-server=default-host/:read-attribute(name=name) |
| Alias |
A list of hostnames which should match this virtual server. In the Management Console, use one hostname per line.
|
/profile=full-ha/subsystem=web/virtual-server=default-host/:write-attribute(name=alias,value=["localhost","example.com"]) |
| Default Module |
The module whose web application should be deployed at the root node of this virtual server, and will be displayed when no directory is given in the HTTP request.
|
/profile=full-ha/subsystem=web/virtual-server=default-host/:write-attribute(name=default-web-module,value=ROOT.war) |
17.2. Replace the Default Welcome Web Application
Procedure 17.1. Replace the Default Welcome Web Application With Your Own Web Application
Disable the Welcome application.
Use the Management CLI scriptEAP_HOME/bin/jboss-cli.shto run the following command. You may need to change the profile to modify a different managed domain profile, or remove the/profile=defaultportion of the command for a standalone server./profile=default/subsystem=web/virtual-server=default-host:write-attribute(name=enable-welcome-root,value=false)
Configure your Web application to use the root context.
To configure your web application to use the root context (/) as its URL address, modify itsjboss-web.xml, which is located in theMETA-INF/orWEB-INF/directory. Replace its<context-root>directive with one that looks like the following.<jboss-web> <context-root>/</context-root> </jboss-web>Deploy your application.
Deploy your application to the server group or server you modified in the first step. The application is now available onhttp://SERVER_URL:PORT/.
Chapter 18. Web Services Subsystem
18.1. Configure Web Services Options
Table 18.1. Web Services Configuration Options
| Option | Description | CLI Command |
|---|---|---|
| Modify WSDL Address |
Whether the WSDL address can be modified by applications. Defaults to
true.
|
/profile=full-ha/subsystem=webservices/:write-attribute(name=modify-wsdl-address,value=true) |
| WSDL Host |
The WSDL contract of a JAX-WS Web Service includes a <soap:address> element which points to the location of the endpoint. If the value of <soap:address> is a valid URL, it is not overwritten unless
modify-wsdl-address is set to true. If the value of <soap:address> is not a valid URL, it is overwritten using the values of wsdl-host and either wsdl-port or wsdl-secure-port. If wsdl-host is set to jbossws.undefined.host, the requester's host address is used when the <soap-address> is rewritten. Defaults to ${jboss.bind.address:127.0.0.1}, which uses 127.0.0.1 if no bind address is specified when JBoss EAP 6 is started.
|
/profile=full-ha/subsystem=webservices/:write-attribute(name=wsdl-host,value=127.0.0.1) |
| WSDL Port |
The non-secure port that is used to rewrite the SOAP address. If this is set to
0 (the default), the port is identified by querying the list of installed connectors.
|
/profile=full-ha/subsystem=webservices/:write-attribute(name=wsdl-port,value=80) |
| WSDL Secure Port |
The secure port that is used to rewrite the SOAP address. If this is set to
0 (the default), the port is identified by querying the list of installed connectors.
|
/profile=full-ha/subsystem=webservices/:write-attribute(name=wsdl-secure-port,value=443) |
Note
To enable logging with Apache CXF, configure the following system property in standalone/domain.xml file:
<system-properties> <property name="org.apache.cxf.logging.enabled" value="true"/> </system-properties>
Chapter 19. HTTP Clustering and Load Balancing
19.1. Introduction
19.1.1. About High-Availability and Load Balancing Clusters
- Instances of the Application Server
- Web applications, when used in conjunction with the internal JBoss Web Server, Apache HTTP Server, Microsoft IIS, or Oracle iPlanet Web Server.
- Stateful, stateless, and entity Enterprise JavaBeans (EJBs)
- Single Sign On (SSO) Mechanisms
- Distributed cache
- HTTP sessions
- JMS services and Message-driven beans (MDBs)
jgroups and modcluster. The ha and full-ha profiles have these systems enabled. In JBoss EAP 6 these services start up and shut down on demand, but they will only start up if an application configured as distributable is deployed on the servers.
19.1.2. Components Which Can Benefit from High Availability
Several instances of JBoss EAP 6 (running as a standalone server) or a server group's members (running as part of a managed domain) can be configured to be highly available. This means that if one instance or member is stopped or disappears from the cluster, its work load is moved to a peer. The work load can be managed in such a way to provide load-balancing functionality as well, so that servers or server groups with more or better resources can take on a larger portion of the work load, or additional capacity can be added during times of high load.
The web server itself can be clustered for HA, using one of several compatible load balancing mechanisms. The most flexible is mod_cluster connector, which is tightly integrated with the JBoss EAP 6 container. Other choices include Apache mod_jk or mod_proxy connectors, or the ISAPI and NSAPI connectors.
Deployed applications can be made highly-available because of the Java Enterprise Edition 6 (Java EE 6) specification. Stateless or stateful session EJBs can be clustered so that if the node which is involved in the work disappears, another node can take over, and in the case of stateful session beans, preserve the state.
19.1.3. Overview of HTTP Connectors
Table 19.1. HTTP connector features and constraints
| Connector | Web server | Supported operating systems | Supported protocols | Adapts to deployment status | Supports sticky session |
|---|---|---|---|---|---|
| mod_cluster | httpd in JBoss Enterprise Web Server, httpd provided by operating system (Red Hat Enterprise Linux, Hewlett-Packard HP-UX) | Red Hat Enterprise Linux, Microsoft Windows Server, Oracle Solaris, Hewlett-Packard HP-UX | HTTP, HTTPS, AJP | Yes. Detects deployment and undeployment of applications and dynamically decides whether to direct client requests to a server based on whether the application is deployed on that server. | Yes |
| mod_jk | httpd in JBoss Enterprise Web Server, httpd provided by operating system (Red Hat Enterprise Linux, Hewlett-Packard HP-UX) | Red Hat Enterprise Linux, Microsoft Windows Server, Oracle Solaris, Hewlett-Packard HP-UX | AJP | No. Directs client requests to the container as long as the container is available, regardless of application status. | Yes |
| mod_proxy | httpd in JBoss Enterprise Web Server | Red Hat Enterprise Linux, Microsoft Windows Server, Oracle Solaris | HTTP, HTTPS, AJP | No. Directs client requests to the container as long as the container is available, regardless of application status. | Yes |
| ISAPI | Microsoft IIS | Microsoft Windows Server | AJP | No. Directs client requests to the container as long as the container is available, regardless of application status. | Yes |
| NSAPI | Oracle iPlanet Web Server | Oracle Solaris | AJP | No. Directs client requests to the container as long as the container is available, regardless of application status. | Yes |
Learn more about each HTTP Connector
19.1.4. Worker Node
A worker node, sometimes referred to as simply a node, is a JBoss EAP 6 server which accepts requests from one or more client-facing Web servers. JBoss EAP 6 can accept requests from its own web server such as Apache HTTP Server, Microsoft IIS, or Oracle iPlanet Web Server.
A cluster node is a member of a cluster of servers. Such a cluster may be load-balancing, high-availability, or both. In a load-balancing cluster, a central manager distributes work loads amongst its nodes equally, by some situation-specific measurement of equality. In a high-availability cluster, some nodes are actively doing work, and others are waiting to step in if one of the active nodes leaves the cluster.
19.2. Connector Configuration
19.2.1. Define Thread Pools for HTTP Connector in JBoss EAP 6
Thread Pools in JBoss EAP 6 can be shared between different components using the Executor model. These pools can be shared not only by different (HTTP) connectors, but also by other components within JBoss EAP 6 that support the Executor model. Getting the HTTP connector thread pool to match your current web performance requirements is a tricky art and requires close monitoring of the current thread pool and the current and anticipated web load demands. In this task, you will learn how to set the a thread pool for an HTTP Connector using the Executor model. You will learn how to set this using both the Command Line Interface and by modifying the XML configuration file.
Procedure 19.1. Setup a thread pool for an HTTP Connector
Define a thread factory
Open up your configuration file (standalone.xmlif modifying for a standalone server ordomain.xmlif modifying for a domain based configuration. This file will be in theEAP_HOME/standalone/configurationor theEAP_HOME/domain/configurationfolder).Add the following subsystem entry, changing the values to suit your server requirements.<subsystem xmlns="urn:jboss:domain:threads:1.1"> <thread-factory name="http-connector-factory" thread-name-pattern="HTTP-%t" priority="9" group-name="uq-thread-pool"/> </subsystem>If you prefer to use the CLI to do this task, then execute the following command in a CLI command prompt:[standalone@localhost:9999 /] ./subsystem=threads/thread-factory=http-connector-factory:add(thread-name-pattern="HTTP-%t", priority="9", group-name="uq-thread-pool")
Create an executor
You can use one of six in-built executor classes to act as the executor for this factory. The six executors are:unbounded-queue-thread-pool: This type of thread pool always accepts tasks. If fewer than the maximum number of threads are running, a new thread is started up to run the submitted task; otherwise, the task is placed into an unbounded FIFO queue to be executed when a thread is available.Note
The single-thread executor type provided byExecutors.singleThreadExecutor()is essentially an unbounded-queue executor with a thread limit of one. This type of executor is deployed using theunbounded-queue-thread-pool-executorelement.bounded-queue-thread-pool: This type of executor maintains a fixed-length queue and two pool sizes: acoresize and amaximumsize. When a task is accepted, if the number of running pool threads is less than thecoresize, a new thread is started to execute the task. If space remains in the queue, the task is placed in the queue. If the number of running pool threads is less than themaximumsize, a new thread is started to execute the task. If blocking is enabled on the executor, the calling thread will block until space becomes available in the queue. The task is delegated to the handoff executor, if a handoff executor is configured. Otherwise, the task is rejected.blocking-bounded-queue-thread-pool: A thread pool executor with a bounded queue where threads submittings tasks may block. Such a thread pool has a core and maximum size and a specified queue length. When a task is submitted, if the number of running threads is less than the core size, a new thread is created. Otherwise, if there is room in the queue, the task is enqueued. Otherwise, if the number of running threads is less than the maximum size, a new thread is created. Otherwise, the caller blocks until room becomes available in the queue.queueless-thread-pool: Sometimes, a simple thread pool is required to run tasks in separate threads, reusing threads as they complete their tasks with no intervening queue. This type of pool is ideal for handling tasks which are long-running, perhaps utilizing blocking I/O, since tasks are always started immediately upon acceptance rather than accepting a task and then delaying its execution until other running tasks have completed. This type of executor is declared using thequeueless-thread-pool-executorelement.blocking-queueless-thread-pool: A thread pool executor with no queue where threads submittings tasks may block. When a task is submitted, if the number of running threads is less than the maximum size, a new thread is created. Otherwise, the caller blocks until another thread completes its task and accepts the new one.scheduled-thread-pool:This is a special type of executor whose purpose is to execute tasks at specific times and time intervals, based on thejava.util.concurrent.ScheduledThreadPoolExecutorclass. This type of executor is configured with thescheduled-thread-pool-executorelement:
In this example, we will use theunbounded-queue-thread-poolto act as the executor. Modify the values ofmax-threadsandkeepalive-timeparameters to suit your server needs.<unbounded-queue-thread-pool name="uq-thread-pool"> <thread-factory name="http-connector-factory" /> <max-threads count="10" /> <keepalive-time time="30" unit="seconds" /> </unbounded-queue-thread-pool>
Or if you prefer to use the CLI:[standalone@localhost:9999 /] ./subsystem=threads/unbounded-queue-thread-pool=uq-thread-pool:add(thread-factory="http-connector-factory", keepalive-time={time=30, unit="seconds"}, max-threads=30)Make the HTTP web connector use this thread pool
In the same configuration file, locate the HTTP connector element under the web subsystem and modify it to use the thread pool defined in the previous steps.<connector name="http" protocol="HTTP/1.1" scheme="http" socket-binding="http" executor="uq-thread-pool" />
Again, if you prefer to use the CLI:[standalone@localhost:9999 /] ./subsystem=web/connector=http:write-attribute(name=executor, value="uq-thread-pool")
Restart the server
Restart the server (standalone or domain) so that the changes can take effect. Use the following CLI commands to confirm if the changes from the steps above have taken place:[standalone@localhost:9999 /] ./subsystem=threads:read-resource(recursive=true) { "outcome" => "success", "result" => { "blocking-bounded-queue-thread-pool" => undefined, "blocking-queueless-thread-pool" => undefined, "bounded-queue-thread-pool" => undefined, "queueless-thread-pool" => undefined, "scheduled-thread-pool" => undefined, "thread-factory" => {"http-connector-factory" => { "group-name" => "uq-thread-pool", "name" => "http-connector-factory", "priority" => 9, "thread-name-pattern" => "HTTP-%t" }}, "unbounded-queue-thread-pool" => {"uq-thread-pool" => { "keepalive-time" => { "time" => 30L, "unit" => "SECONDS" }, "max-threads" => 30, "name" => "uq-thread-pool", "thread-factory" => "http-connector-factory" }} } } [standalone@localhost:9999 /] ./subsystem=web/connector=http:read-resource(recursive=true) { "outcome" => "success", "result" => { "configuration" => undefined, "enable-lookups" => false, "enabled" => true, "executor" => "uq-thread-pool", "max-connections" => undefined, "max-post-size" => 2097152, "max-save-post-size" => 4096, "name" => "http", "protocol" => "HTTP/1.1", "proxy-name" => undefined, "proxy-port" => undefined, "redirect-port" => 443, "scheme" => "http", "secure" => false, "socket-binding" => "http", "ssl" => undefined, "virtual-server" => undefined } }
You have successfully created a thread factory and an executor and modified your HTTP Connector to use this thread pool.
19.3. Web Server Configuration
19.3.1. About the Standalone Apache HTTP Server
19.3.2. Install the Apache HTTP Server included with JBoss EAP 6 (Zip)
Prerequisites
- Root-level or administrator access.
- A supported version of Java installed.
- The following packages installed:
krb5-workstationmod_auth_kerb(required for Kerberos functionality)elinks(required for the apachectl functionality)- On Red Hat Enterprise Linux 7,
apr-util-ldap(LDAP authentication functionality)
- The Apache Portability Runtime (APR) must be installed. In Red Hat Enterprise Linux, install package
apr-util-devel.
Apache HTTP Server Zip archive contains symbolic links to several Kerberos modules, which is why the mod_auth_kerb package is a prerequisite. If Kerberos functionality is not required, there is no need to install the mod_auth_kerb package and the associated symbolic link can be deleted: EAP_HOME/httpd/modules/mod_auth_kerb.so.
Procedure 19.2. Install the Apache HTTP Server
Navigate to the JBoss EAP downloads list for your platform, on the Red Hat Customer Portal.
Log in to the Customer Portal at https://access.redhat.com. Click on Downloads, then Red Hat Enterprise Application Server in the list ofProduct Downloads. Select the correct JBoss EAP version from the Version drop-down menu.Choose the httpd binary from the list.
Find the Apache HTTP Server option for your operating system and architecture. Click the Download link. A Zip file containing the Apache HTTP Server distribution downloads to your computer.Extract the Zip to the system where the Apache HTTP Server binary will run.
Extract the Zip file on your preferred server, to a temporary location. The Zip file will contain thehttpddirectory under a jboss-ews-version-number folder. Copy thehttpdfolder and place it inside the directory where you installed the JBoss EAP 6, commonly referred to as EAP_HOME.Your Apache HTTP Server is now be located inEAP_HOME/httpd/directory. You can now use this location for HTTPD_HOME, as found in other JBoss EAP 6 documentation.Run the Post-installation script and create apache user and group accounts
In a terminal emulator, switch to the root user account, navigate to theEAP_HOME/httpddirectory and execute the following command../.postinstall
Next, check to see if a user calledapacheexists on the system by running the following command:id apache
If the user does not exist then it will need to be added, along with the appropriate usergroup. In order to achieve this, execute the following:/usr/sbin/groupadd -g 91 -r apache 2> /dev/null || : /usr/sbin/useradd -c "Apache" -u 48 -g 91 -s /sbin/nologin -r apache 2> /dev/null || :
Once this is completed, if theapacheuser will be running the httpd service, then the ownership of the HTTP directories will need to be changed to reflect this:chown -R apache:apache httpd
To test that the above commands have been successful, check that theapacheuser has execution permission to the Apache HTTP Server install path.ls -l
The output should be similar to:drwxrwxr-- 11 apache apache 4096 Feb 14 06:52 httpd
Configure the Apache HTTP Server.
Switch to the new user account using the following commandsudo su apache
and then configure the Apache HTTP server as theapacheuser to meet the needs of your organization. You can use the documentation available from the Apache Foundation at http://httpd.apache.org/ for general guidance.Start the Apache HTTP Server.
Start the Apache HTTP Server using the following command:EAP_HOME/httpd/sbin/apachectl start
Stop the Apache HTTP Server.
To stop the Apache HTTP Server, issue the following command:EAP_HOME/httpd/sbin/apachectl stop
19.3.3. Install Apache HTTP Server in Red Hat Enterprise Linux (RHEL) 5, 6, and 7 (RPM)
Prerequisites
- Root-level access.
- The latest version of elinks package installed (required for the apachectl functionality).
- Subscribe to Red Hat Enterprise Linux (RHEL) channels (to install Apache HTTP Server from RHEL channels).
- Subscribe to
jbappplatform-6-ARCH-server-VERS-rpmRed Hat Network (RHN) channel (to install EAP specific distribution of Apache HTTP Server).
- From Red Hat Enterprise Linux (RHEL) channels: An active subscription to Red Hat Enterprise Linux (RHEL) channels is necessary to install Apache HTTP server.
- From
jbappplatform-6-ARCH-server-VERS-rpmchannel (JBoss EAP specific distribution): JBoss EAP distributes its own version of the Apache HTTP Server. An active subscription tojbappplatform-6-ARCH-server-VERS-rpmchannel is necessary to install the JBoss EAP specific distribution of Apache HTTP Server.
Procedure 19.3. Install and Configure Apache HTTP Server in Red Hat Enterprise Linux 5 and 6 (RPM)
Install
httpdTo install the JBoss EAP specific version ofhttpdpackage run the following command:yum install httpd
To installhttpdexplicitly from Red Hat Enterprise Linux (RHEL) channels run the following command:yum install httpd --disablerepo=jbappplatform-6-*
Note
You must run only one of the above commands to install thehttpdpackage on your system.Set the Service Boot Behavior
You can define the service behavior for thehttpdservice at boot from the command line or with the service configuration graphical tool. Run the following command to define the behavior:chkconfig httpd on
To use the service configuration tool run the following command and change the service setting in the displayed window:system-config-services
Start
httpdStarthttpdusing the following command:service httpd start
Stop
httpdStophttpdusing the following command:service httpd stop
Procedure 19.4. Install and Configure Apache HTTP Server in Red Hat Enterprise Linux 7 (RPM)
Install
httpd22To install the JBoss EAP specific version ofhttpd22package run the following command:yum install httpd22
Set the Service Boot Behavior
Run the following command to start thehttpd22service at boot:systemctl enable httpd22.service
Start
httpd22Starthttpd22using the following command:systemctl start httpd22.service
Stop
httpd22Stophttpd22using the following command:systemctl stop httpd22.service
19.3.4. mod_cluster Configuration on httpd
mod_cluster is an httpd-based load balancer. It uses a communication channel to forward requests from httpd to one of a set of application server nodes. The following derivatives can be set to configure mod_cluster on httpd.
Note
Table 19.2. mod_cluster Derivatives
| Derivative | Description | Values |
|---|---|---|
| CreateBalancers | Defines how the balancers are created in the httpd VirtualHosts. This allows directives like: ProxyPass /balancer://mycluster1/. |
0: Create all VirtualHosts defined in httpd
1: Do not create balancers (at least one ProxyPass or ProxyMatch is required to define the balancer names)
2: Create only the main server
Default: 2
While using the value 1, do not forget to configure the balancer in the ProxyPass directive, because the default is an empty stickysession and
nofailover=Off and the values received via the MCMP CONFIG message are ignored.
|
| UseAlias | Check that the alias corresponds to the server name. |
0: Ignore aliases
1: Check aliases
Default: 0
|
| LBstatusRecalTime | Time interval in seconds for loadbalancing logic to recalculate the status of a node. |
Default: 5 seconds
|
| WaitForRemove | Time in seconds before a removed node is forgotten by httpd. |
Default: 10 seconds
|
| ProxyPassMatch/ProxyPass |
ProxyPassMatch and ProxyPass are mod_proxy directives which, when using
! (instead of the back-end url), prevent reverse-proxy in the path. This is used to allow httpd to serve static information like images. For example,
ProxyPassMatch ^(/.*\.gif)$ !
The above example allows httpd to serve the .gif files directly.
|
<subsystem xmlns="urn:jboss:domain:modcluster:1.2">
<mod-cluster-config advertise-socket="modcluster" connector="ajp">
- <dynamic-load-provider>
- <load-metric type="busyness"/>
- </dynamic-load-provider>
+ <simple-load-provider factor="0"/>
</mod-cluster-config>
</subsystem>
- Node A, Load: 10
- Node B, Load: 10
- Node C, Load: 0
The context of a mod_manager directive is VirtualHost in all cases, except when mentioned otherwise. server config context implies that the directive must be outside a VirtualHost configuration. If not, an error message is displayed and httpd does not start.
Table 19.3. mod_manager Derivatives
| Derivative | Description | Values |
|---|---|---|
| EnableMCPMReceive | Allow the VirtualHost to receive the MCPM from the nodes. Include EnableMCPMReceive in the httpd configuration to allow mod_cluster to work. Save it in the VirtualHost where you configure advertise. | |
| MemManagerFile |
The base name for the names that mod_manager uses to store configuration, generate keys for shared memory or locked files. This must be an absolute path name; the directories are created if needed. It is recommended that these files are placed on a local drive and not an NFS share.
Context: server config
| $server_root/logs/
|
| Maxcontext | The maximum number of contexts supported by mod_cluster
Context: server config
|
Default: 100
|
| Maxnode | The maximum number of nodes supported by mod_cluster.
Context: server config
|
Default: 20
|
| Maxhost | The maximum number of hosts (aliases) supported by mod_cluster. It also includes the maximum number of balancers.
Context: server config
| Default: 20 |
| Maxsessionid |
The number of active sessionid stored to provide the number of active sessions in the mod_cluster-manager handler. A session is inactive when mod_cluster does not receive any information from the session within 5 minutes.
Context: server config
This field is for demonstration and debugging purposes only.
| 0: the logic is not activated. |
| MaxMCMPMaxMessSize | The maximum size of MCMP messages from other Max directives | Calculated from other Max directives. Min: 1024 |
| ManagerBalancerName | The name of balancer to use when the JBoss AS/JBossWeb/Tomcat does not provide a balancer name. | mycluster
|
| PersistSlots | Tells mod_slotmem to persist nodes, aliases and contexts in files.
Context: server config
| Off |
| CheckNonce | Switch check of nonce when using mod_cluster-manager handler. |
on/off
Default: on - Nonce checked
|
| AllowDisplay | Switch additional display on mod_cluster-manager main page. |
on/off
Default: off - only version is displayed
|
| AllowCmd | Allow commands using mod_cluster-manager URL. |
on/off
Default: on - Commands allowed
|
| ReduceDisplay | Reduce the information displayed on the main mod_cluster-manager page, so that more number of nodes can be displayed on the page. |
on/off
Default: off - full information is displayed
|
| SetHandler mod_cluster-manager |
Displays information about the node that mod_cluster sees from the cluster. The information includes generic information and additionally counts the number of active sessions.
<Location /mod_cluster-manager> SetHandler mod_cluster-manager Order deny,allow Allow from 127.0.0.1 </Location> |
on/off
Default: off
|
Note
19.3.5. Use an External Web Server as the Web Front-end for JBoss EAP 6 Applications
For reasons to use an external web server as the web front-end, as well as advantages and disadvantages of the different HTTP connectors supported by JBoss EAP 6, refer to Section 19.1.3, “Overview of HTTP Connectors”. In some situations, you can use the Apache HTTP Server that comes with your operating system. Otherwise, you can use the Apache HTTP Server that ships as part of JBoss Enterprise Web Server.
19.3.6. Configure JBoss EAP 6 to Accept Requests From External Web Servers
JBoss EAP 6 does not need to know which proxy it is accepting requests from, only the port and protocol to look for. This is not true of mod_cluster, which is more tightly coupled to the configuration of JBoss EAP 6. But the following task works for mod_jk, mod_proxy, ISAPI, and NSAPI. Substitute the protocols and ports in the examples with the ones you need to configure.
mod_cluster, refer to Section 19.5.6, “Configure a mod_cluster Worker Node”.
Prerequisites
- You need to be logged into the Management CLI or Management Console to perform this task. The exact steps in the task use the Management CLI, but the same basic procedure is used in the Management Console.
- You need a list of which protocols you will be using, whether HTTP, HTTPS, or AJP.
Procedure 19.5. Edit Configuration and add Socket Bindings
Configure the
jvmRoutesystem property.By default, the jvmRoute is set to the same value as the server name. If you need to customize it, you can use a command like the following. Replace or remove the/profile=haportion of the command, depending on which profile you use or whether you use a standalone server. Replace the stringCUSTOM_ROUTE_NAMEwith your custom jvmRoute name.[user@localhost:9999 /]
/profile=ha/subsystem=web:write-attribute(name="instance-id",value="CUSTOM_ROUTE_NAME")List the connectors available in the web subsystem.
Note
This step is only necessary if you are not using thehaorfull-haprofiles for either a standalone server, or a server group in a Managed Domain. Those configurations already include all of the necessary connectors.In order for an external web server to be able to connect to JBoss EAP 6's web server, the web subsystem needs a connector. Each protocol needs its own connector, which is tied to a socket group.To list the connectors currently available, issue the following command:[standalone@localhost:9999 /]
/subsystem=web:read-children-names(child-type=connector)If there is no line indicating the connector your need (HTTP, HTTPS, AJP), you need to add the connector.Read the configuration of a connector.
To see the details of how a connector is configured, you can read its configuration. The following command reads the configuration of the AJP connector. The other connectors have similar configuration output.[standalone@localhost:9999 /]
/subsystem=web/connector=ajp:read-resource(recursive=true){ "outcome" => "success", "result" => { "enable-lookups" => false, "enabled" => true, "max-post-size" => 2097152, "max-save-post-size" => 4096, "protocol" => "AJP/1.3", "redirect-port" => 8443, "scheme" => "http", "secure" => false, "socket-binding" => "ajp", "ssl" => undefined, "virtual-server" => undefined } }Add the necessary connectors to the web subsystem.
To add a connector to the web subsystem, it needs to have a socket binding. The socket binding is added to the socket binding group used by your server or server group. The following steps assume that your server group isserver-group-oneand that your socket binding group isstandard-sockets.Add a socket to the socket binding group.
To add a socket to the socket binding group, issue the following command, replacing the protocol and port with the ones you need.[standalone@localhost:9999 /]
/socket-binding-group=standard-sockets/socket-binding=ajp:add(port=8009)Add the socket binding to the web subsystem.
Issue the following command to add a connector to the web subsystem, substituting the socket binding name and protocol with the ones you need.[standalone@localhost:9999 /]
/subsystem=web/connector=ajp:add(socket-binding=ajp, protocol="AJP/1.3", enabled=true, scheme="http")
19.4. Clustering
19.4.1. Use TCP Communication for the Clustering Subsystem
TCPPING protocol stack to your configuration and use it as the default mechanism. These configuration options are available in the command-line based Management CLI.
mod_cluster subsystem also uses UDP communication by default, and you can choose to use TCP here as well.
19.4.2. Configure the JGroups Subsystem to Use TCP
mod_cluster subsystem to use TCP as well, see Section 19.4.3, “Disable Advertising for the mod_cluster Subsystem”.
Modify the following script to suit your environment.
Copy the following script into a text editor. If you use a different profile on a managed domain, change the profile name. If you use a standalone server, remove the/profile=full-haportion of the commands. Modify the properties listed at the bottom of the command as follows. Each of these properties is optional.- initial_hosts
- A comma-separated list of the hosts which are considered well-known, and will be available to look up the initial membership.
- port_range
- If desired, you can assign a port range. If you assign a port range of 2, and the initial port is 7600, then TCPPING will attempt to contact each host on ports 7600-7601. This property is optional.
- timeout
- An optional timeout value, in milliseconds, for cluster members.
- num_initial_members
- The number of nodes before the cluster is considered to be complete. This property is optional.
batch ## If tcp is already added then you can remove it ## /profile=full-ha/subsystem=jgroups/stack=tcp:remove /profile=full-ha/subsystem=jgroups/stack=tcp:add(transport={"type" =>"TCP", "socket-binding" => "jgroups-tcp"}) /profile=full-ha/subsystem=jgroups/stack=tcp/:add-protocol(type=TCPPING) /profile=full-ha/subsystem=jgroups/stack=tcp/:add-protocol(type=MERGE2) /profile=full-ha/subsystem=jgroups/stack=tcp/:add-protocol(type=FD_SOCK,socket-binding=jgroups-tcp-fd) /profile=full-ha/subsystem=jgroups/stack=tcp/:add-protocol(type=FD) /profile=full-ha/subsystem=jgroups/stack=tcp/:add-protocol(type=VERIFY_SUSPECT) /profile=full-ha/subsystem=jgroups/stack=tcp/:add-protocol(type=BARRIER) /profile=full-ha/subsystem=jgroups/stack=tcp/:add-protocol(type=pbcast.NAKACK) /profile=full-ha/subsystem=jgroups/stack=tcp/:add-protocol(type=UNICAST2) /profile=full-ha/subsystem=jgroups/stack=tcp/:add-protocol(type=pbcast.STABLE) /profile=full-ha/subsystem=jgroups/stack=tcp/:add-protocol(type=pbcast.GMS) /profile=full-ha/subsystem=jgroups/stack=tcp/:add-protocol(type=UFC) /profile=full-ha/subsystem=jgroups/stack=tcp/:add-protocol(type=MFC) /profile=full-ha/subsystem=jgroups/stack=tcp/:add-protocol(type=FRAG2) /profile=full-ha/subsystem=jgroups/stack=tcp/:add-protocol(type=RSVP) /profile=full-ha/subsystem=jgroups:write-attribute(name=default-stack,value=tcp) run-batch /profile=full-ha/subsystem=jgroups/stack=tcp/protocol=TCPPING/property=initial_hosts/:add(value="HostA[7600],HostB[7600]") /profile=full-ha/subsystem=jgroups/stack=tcp/protocol=TCPPING/property=port_range/:add(value=0) /profile=full-ha/subsystem=jgroups/stack=tcp/protocol=TCPPING/property=timeout/:add(value=3000) /profile=full-ha/subsystem=jgroups/stack=tcp/protocol=TCPPING/property=num_initial_members/:add(value=3)Run the script in batch mode.
Warning
The servers running the profile have to be shutdown before executing the batch file.In a terminal emulator, navigate to the directory containing thejboss-cli.shscript and enter the command./jboss-cli.sh -c --file=
where SCRIPT_NAME is the name and path containing the script.SCRIPT_NAME
The TCPPING stack is now available to the JGroups subsystem. If it is used, the JGroups subsystem uses TCP for all network communication. To configure the mod_cluster subsystem to use TCP as well, see Section 19.4.3, “Disable Advertising for the mod_cluster Subsystem”.
19.4.3. Disable Advertising for the mod_cluster Subsystem
mod_cluster subsystem's balancer uses multicast UDP to advertise its availability to the background workers. If you wish, you can disable advertisement. Use the following procedure to configure this behavior.
Procedure 19.6.
Modify the httpd configuration.
Modify the httpd configuration to disable server advertising and to use a proxy list instead. The proxy list is configured on the worker, and contains all of themod_cluster-enabled Web servers the worker can talk to.Themod_clusterconfiguration for the Web server is typically located in/etc/httpd/or theetc/httpd/directory within the httpd installation, if it is installed in a non-standard location. Refer to Section 19.5.3, “Install the mod_cluster Module Into Apache HTTP Server or JBoss Enterprise Web Server (Zip)” and Section 19.5.5, “Configure Server Advertisement Properties for Your mod_cluster-enabled Web Server” for more information about the file itself. Open the file containing the virtual host which listens for MCPM requests (using theEnableMCPMReceivedirective), and disable server advertising by changing theServerAdvertisedirective as follows.ServerAdvertise Off
Disable advertising within the
mod_clustersubsystem of JBoss EAP 6, and provide a list of proxies.You can disable advertising for themod_clustersubsystem and provide a list of proxies, by using the web-based Management Console or the command-line Management CLI. The list of proxies is necessary because themod_clustersubsystem will not be able to automatically discover proxies if advertising is disabled.Management Console
If you use a managed domain, you can only configuremod_clusterin profiles where it is enabled, such as thehaandfull-haprofiles.- Log in to the Management Console and select the Configuration tab at the top of the screen. If you use a managed domain, select either the
haorfull-haprofile from the Profile drop-down menu at the top left. - Expand the Subsystems menu then expand the Web menu and select mod_cluster.
- Click Edit under the Advertising tab under
mod_cluster. To disable advertising, clear the check box next to Advertise, and click Save.
Figure 19.1.
mod_clusterAdvertising Configuration Screen - Click the Proxies tab. Click Edit and enter a list of proxy servers in the Proxy List field. The correct syntax is a comma-separated list of
HOSTNAME:PORTstrings, like the following:10.33.144.3:6666,10.33.144.1:6666
Click the Save button to finish.
Management CLI
The following two Management CLI commands create the same configuration as the Management Console instructions above. They assume that you run a managed domain and that your server group uses thefull-haprofile. If you use a different profile, change its name in the commands. If you use a standalone server using thestandalone-haprofile, remove the/profile=full-haportion of the commands./profile=full-ha/subsystem=modcluster/mod-cluster-config=configuration/:write-attribute(name=advertise,value=false) /profile=full-ha/subsystem=modcluster/mod-cluster-config=configuration/:write-attribute(name=proxy-list,value="10.33.144.3:6666,10.33.144.1:6666")
The httpd balancer no longer advertises its presence to worker nodes and UDP multicast is no longer used.
19.4.4. Switch UDP to TCP for HornetQ Clustering
Note
<cluster-password>${jboss.messaging.cluster.password:ChangeMe>}</cluster-password>
Remove the broadcast-groups and discovery-groups:
<broadcast-groups> <broadcast-group name="bg-group1"> <socket-binding>messaging-group</socket-binding> <broadcast-period>5000</broadcast-period> <connector-ref>netty</connector-ref> </broadcast-group> </broadcast-groups> <discovery-groups> <discovery-group name="dg-group1"> <socket-binding>messaging-group</socket-binding> <refresh-timeout>10000</refresh-timeout> </discovery-group> </discovery-groupsOptionally, remove the "messaging-group" socket-binding:
<socket-binding name="messaging-group" port="0" multicast-address="${jboss.messaging.group.address:231.7.7.7}" multicast-port="${jboss.messaging.group.port:9876}"/>Configure the appropriate Netty connector(s) - one for each of the other nodes in the cluster.
For example, if the cluster is 3 nodes then configure 2 Netty connectors, etc., if the cluster is 2 nodes then configure 1 Netty connector, etc. Here is a sample configuration for a 3-node cluster:<netty-connector name="other-cluster-node1" socket-binding="other-cluster-node1"/> <netty-connector name="other-cluster-node2" socket-binding="other-cluster-node2"/>
Configure the related socket bindings.
Note
The system property substitution can be used for either "host" or "port", if required.<outbound-socket-binding name="other-cluster-node1"> <remote-destination host="otherNodeHostName1" port="5445"/> </outbound-socket-binding> <outbound-socket-binding name="other-cluster-node2"> <remote-destination host="otherNodeHostName2" port="5445"/> </outbound-socket-binding>Configure the cluster-connection to use these connectors instead of the discovery-group, which is used by default:
<cluster-connection name="my-cluster"> <address>jms</address> <connector-ref>netty</connector-ref> <static-connectors> <connector-ref>other-cluster-node1</connector-ref> <connector-ref>other-cluster-node2</connector-ref> </static-connectors> </cluster-connection>This process has to be repeated on each of the cluster nodes so that each node has connectors to every other node in the cluster.Note
Do not configure a node with a connection to itself. This is considered as a misconfiguration.
19.5. Web, HTTP Connectors, and HTTP Clustering
19.5.1. About the mod_cluster HTTP Connector
- The mod_cluster Management Protocol (MCMP) is an additional connection between the JBoss Enterprise Application Platform 6 servers and the Apache HTTP Server with the mod_cluster module enabled. It is used by the JBoss Enterprise Application Platform servers to transmit server-side load balance factors and lifecycle events back to the Apache HTTP Server via a custom set of HTTP methods.
- Dynamic configuration of Apache HTTP Server with mod_cluster allows JBoss EAP 6 servers to join the load balancing arrangement without manual configuration.
- JBoss EAP 6 performs the load-balancing factor calculations, rather than relying on the Apache HTTP Server with mod_cluster. This makes load balancing metrics more accurate than other connectors.
- The mod_cluster connector gives fine-grained application lifecycle control. Each JBoss EAP 6 server forwards web application context lifecycle events to the Apache HTTP Server, informing it to start or stop routing requests for a given context. This prevents end users from seeing HTTP errors due to unavailable resources.
- AJP, HTTP or HTTPS transports can be used.
19.5.2. Configure the mod_cluster Subsystem
mod_cluster options are available as part of the Web subsystem configuration area. Click the Configuration tab. If you use a managed domain, select the correct profile to configure from the Profile selection box at the top left. By default, the ha and full-ha profiles have the mod_cluster subsystem enabled. If you use a standalone server, you need to use the standalone-ha or standalone-full-ha profile to start the server. Expand the Web menu in the and select mod_cluster. The options are explained in the tables below. Overall configuration is shown first, followed by configuration of sessions, web contexts, proxies, SSL, and Networking. Each of these has its own tab within the mod_cluster configuration screen.
Note
ha and full-ha profiles. For a managed domain these profiles are ha and full-ha, and for a standalone server they are standalone-ha and standalone-full-ha.
Table 19.4. mod_cluster Configuration Options
| Option | Description | CLI Command |
|---|---|---|
| Load Balancing Group |
If this is not null, requests are sent to a specific load balancing group on the load balancer. Leave this blank if you do not want to use load balancing groups. This is unset by default.
|
/subsystem=modcluster/mod-cluster-config=configuration/:write-attribute(name=load-balancing-group,value=myGroup) |
| Balancer |
The name of the balancer. This must match the configuration of the httpd proxy.
|
/subsystem=modcluster/mod-cluster-config=configuration/:write-attribute(name=balancer,value=myBalancer) |
| Advertise Socket |
The name of the socket binding to use for cluster advertising.
|
/subsystem=modcluster/mod-cluster-config=configuration/:write-attribute(name=advertise-socket,value=modcluster) |
| Advertise Security Key |
A string containing the security key for advertising.
|
/subsystem=modcluster/mod-cluster-config=configuration/:write-attribute(name=advertise-security-key,value=myKey) |
| Advertise |
Whether or not advertising is enabled. Defaults to
true.
|
/subsystem=modcluster/mod-cluster-config=configuration/:write-attribute(name=advertise,value=true) |
Table 19.5. mod_cluster Session Configuration Options
| Option | Description | CLI Command |
|---|---|---|
| Sticky Session |
Whether to use sticky sessions for requests. This means that after the client makes a connection to a specific cluster node, further communication is routed to that same node unless it becomes unavailable. This defaults to
true, which is the recommended setting.
|
/subsystem=modcluster/mod-cluster-config=configuration/:write-attribute(name=sticky-session,value=true) |
| Sticky Session Force |
If
true, a request is not redirected to a new cluster node if its initial node becomes unavailable but instead it fails. This defaults to false.
|
/subsystem=modcluster/mod-cluster-config=configuration/:write-attribute(name=sticky-session-force,value=false) |
| Sticky Session Remove |
Remove session information on failover. This defaults to
false.
|
/subsystem=modcluster/mod-cluster-config=configuration/:write-attribute(name=sticky-session-remove,value=false) |
Table 19.6. mod_cluster Web Context Configuration Options
| Option | Description | CLI Command |
|---|---|---|
| Auto Enable Contexts |
Whether to add new contexts to
mod_cluster by default or not. This defaults to true. If you change the default and need to enable context manually, the Web Application can enable its context using the enable() MBean method, or via the mod_cluster manager, which is a web application which runs on the httpd proxy on a named virtual host or port which is specified in that httpd's configuration.
|
/subsystem=modcluster/mod-cluster-config=configuration/:write-attribute(name=auto-enable-contexts,value=true) |
| Excluded Contexts |
A comma-separated list of contexts that
mod_cluster should ignore. If no host is indicated, the host is assumed to be localhost. ROOT indicates the root context of the Web Application. The default value is ROOT,invoker,jbossws,juddi,console.
|
/subsystem=modcluster/mod-cluster-config=configuration/:write-attribute(name=excluded-contexts,value="ROOT,invoker,jbossws,juddi,console") |
Table 19.7. mod_cluster Proxy Configuration Options
| Option | Description | CLI Command |
|---|---|---|
| Proxy URL |
If defined, this value will be prepended to the URL of MCMP commands.
|
/subsystem=modcluster/mod-cluster-config=configuration/:write-attribute(name=proxy-url,value=myhost) |
| Proxy List |
A comma-separated list of httpd proxy addresses, in the format
hostname:port. This indicates the list of proxies that the mod_cluster process will attempt to communicate with initially.
|
/subsystem=modcluster/mod-cluster-config=configuration/:write-attribute(name=proxy-list,value="127.0.0.1,127.0.0.2") |
mod_cluster
By default, mod_cluster communication happens over an unencrypted HTTP link. If you set the connector scheme to HTTPS (refer to Table 19.5, “mod_cluster Session Configuration Options”), the settings below tell mod_cluster where to find the information to encrypt the connection.
Table 19.8. mod_cluster SSL Configuration Options
| Option | Description | CLI Command |
|---|---|---|
| ssl |
Whether to enable SSL. Defaults to
false.
|
/subsystem=modcluster/mod-cluster-config=configuration/ssl=configuration/:write-attribute(name=ssl,value=true) |
| Key Alias |
The key alias, which was chosen when the certificate was created.
|
/subsystem=modcluster/mod-cluster-config=configuration/ssl=configuration/:write-attribute(name=key-alias,value=jboss) |
| Key Store |
The location of the key store containing client certificates.
|
/subsystem=modcluster/mod-cluster-config=configuration/ssl=configuration/:write-attribute(name=key-store,value=System.getProperty("user.home") + "/.keystore")
|
| Key Store Type |
The key store type
|
/subsystem=modcluster/mod-cluster-config=configuration/ssl=configuration/:write-attribute(name=key-store-type,value=JKS) |
| Key Store Provider |
The key store provider.
|
/subsystem=modcluster/mod-cluster-config=configuration/ssl=configuration/:write-attribute(name=key-store-provider,value=IBMJCE) |
| Password |
The password, which was chosen when the certificate was created.
|
/subsystem=modcluster/mod-cluster-config=configuration/ssl=configuration/:write-attribute(name=password,value=changeit) |
| Trust Algorithm |
The algorithm of the trust manager factory.
|
/subsystem=modcluster/mod-cluster-config=configuration/ssl=configuration/:write-attribute(name=trust-algorithm,value=PKIX) |
| Cert File |
The location of the certificate file.
|
/subsystem=modcluster/mod-cluster-config=configuration/ssl=configuration/:write-attribute(name=ca-certificate-file,value=${user.home}/jboss.crt)
|
| CRL File |
Certificate revocation list file.
|
/subsystem=modcluster/mod-cluster-config=configuration/ssl=configuration/:write-attribute(name=ca-crl-file,value=${user.home}/jboss.crl)
|
| Max Certificate Length |
The maximum length of a certificate held in the trust store. Defaults to
5.
|
/subsystem=modcluster/mod-cluster-config=configuration/ssl=configuration/:write-attribute(name=trust-max-cert-length,value=5) |
| Key File |
The location of the key file for the certificate.
|
/subsystem=modcluster/mod-cluster-config=configuration/ssl=configuration/:write-attribute(name=certificate-key-file,value=${user.home}/.keystore)
|
| Cipher Suite |
The allowed encryption cipher suite.
|
/subsystem=modcluster/mod-cluster-config=configuration/ssl=configuration/:write-attribute(name=cipher-suite,value=ALL) |
| Certificate Encoding Algorithms |
The algorithm of the key manager factory.
|
/subsystem=modcluster/mod-cluster-config=configuration/ssl=configuration/:write-attribute(name=encoding-algorithms,value=ALL) |
| Revocation URL |
The URL of the Certificate Authority revocation list.
|
/subsystem=modcluster/mod-cluster-config=configuration/ssl=configuration/:write-attribute(name=ca-revocation-url,value=jboss.crl) |
| Protocol |
The SSL protocols, which are enabled.
You can also specify a combination of protocols, which is comma separated. For example, TLSv1, TLSv1.1,TLSv1.2.
Warning
Red Hat recommends that you explicitly disable SSL in favor of TLSv1.1 or TLSv1.2 in all affected packages.
|
/subsystem=modcluster/mod-cluster-config=configuration/ssl=configuration/:write-attribute(name=protocol,value="TLSv1, TLSv1.1,TLSv1.2") |
mod_cluster Networking Options
The available mod_cluster networking options control several different timeout behaviors for different types of services with which the mod_cluster service communicates.
Table 19.9. mod_cluster Networking Configuration Options
| Option | Description | CLI Command |
|---|---|---|
| Node Timeout |
Timeout (in seconds) for proxy connections to a node. That is the time
mod_cluster will wait for the back-end response before returning error. That corresponds to timeout in the worker mod_proxy documentation. A value of -1 indicates no timeout. Note that mod_cluster always uses a cping/cpong before forwarding a request and the connectiontimeout value used by mod_cluster is the ping value.
|
/subsystem=modcluster/mod-cluster-config=configuration/:write-attribute(name=node-timeout,value=-1) |
| Socket Timeout |
Number of milliseconds to wait for a response from an httpd proxy to MCMP commands before timing out, and flagging the proxy as in error.
|
/subsystem=modcluster/mod-cluster-config=configuration/:write-attribute(name=socket-timeout,value=20) |
| Stop Context Timeout |
The amount of time, measure in units specified by stopContextTimeoutUnit, for which to wait for clean shutdown of a context (completion of pending requests for a distributable context; or destruction/expiration of active sessions for a non-distributable context).
|
/subsystem=modcluster/mod-cluster-config=configuration/:write-attribute(name=stop-context-timeout,value=10) |
| Session Draining Strategy |
Whether to drain sessions before undeploying a web application.
|
/subsystem=modcluster/mod-cluster-config=configuration/:write-attribute(name=session-draining-strategy,value=DEFAULT) |
| Max Attempts |
Number of times an httpd proxy will attempt to send a given request to a worker before giving up. The minimum value is
1, meaning try only once. The mod_proxy default is also 1, which means that no retry occurs.
|
/subsystem=modcluster/mod-cluster-config=configuration/:write-attribute(name=max-attempts,value=1) |
| Flush Packets |
Whether or not to enable packet flushing to the Web server. Defaults to
false.
|
/subsystem=modcluster/mod-cluster-config=configuration/:write-attribute(name=flush-packets,value=false) |
| Flush Wait |
How long, in seconds, to wait before flushing packets to the Web server. Defaults to
-1. A value of -1 means to wait forever before flushing packets.
|
/subsystem=modcluster/mod-cluster-config=configuration/:write-attribute(name=flush-wait,value=-1) |
| Ping |
How long, in seconds, to wait for a response to a ping from a cluster node. Defaults to
10 seconds.
|
/subsystem=modcluster/mod-cluster-config=configuration/:write-attribute(name=ping,value=10) |
| SMAX |
Soft maximum idle connection count (the same as
smax in worker mod_proxy documentation). The maximum value depends on the httpd thread configuration, and can be either ThreadsPerChild or 1.
|
profile=full-ha/subsystem=modcluster/mod-cluster-config=configuration/:write-attribute(name=smax,value=ThreadsPerChild) |
| TTL |
Time to live (in seconds) for idle connections above smax, default is 60
When
nodeTimeout is not defined the ProxyTimeout directive Proxy is used. If ProxyTimeout is not defined the server timeout Timeout is used. This defaults to 300 seconds. nodeTimeout, ProxyTimeout, and Timeout are set at the socket level.
|
/subsystem=modcluster/mod-cluster-config=configuration/:write-attribute(name=ttl,value=-1) |
| Node Timeout |
How long, in seconds, to wait for an available worker process from the external Web server to process a request. Defaults to
-1, which means that mod_cluster waits indefinitely for the httpd worker to process the request.
|
/subsystem=modcluster/mod-cluster-config=configuration/:write-attribute(name=node-timeout,value=-1) |
mod_cluster Load Provider Configuration Options
The following mod_cluster configuration options are not available in the management console, but can only be set using the management CLI.
1, and distributes work evenly without applying a load balancing algorithm. To add it, use the following management CLI command.
/subsystem=modcluster/mod-cluster-config=configuration/simple-load-provider:add
busyness as the determining load metric. The dynamic load provider options and possible load metrics are shown below.
Table 19.10. mod_cluster Dynamic Load Provider Options
| Option | Description | CLI Command |
|---|---|---|
| Decay |
The factor by which historical metrics should decay in significance.
|
/subsystem=modcluster/mod-cluster-config=configuration/dynamic-load-provider=configuration/:write-attribute(name=decay,value=2) |
| History |
The number of historic load metric records to consider when determining the load.
|
/subsystem=modcluster/mod-cluster-config=configuration/dynamic-load-provider=configuration/:write-attribute(name=history,value=9) |
| Load Metric |
The default load metric included with the dynamic load provider in JBoss EAP 6 is
busyness, which calculates the load of the worker node from the amount of threads in the thread pool being busy serving requests. You can set the capacity of this metric by which the actual load is divided: calculated_load / capacity. You can set multiple load metrics within the dynamic load provider.
|
/subsystem=modcluster/mod-cluster-config=configuration/dynamic-load-provider=configuration/load-metric=busyness/:write-attribute(name=capacity,value=1.0) /subsystem=modcluster/mod-cluster-config=configuration/dynamic-load-provider=configuration/load-metric=busyness/:write-attribute(name=type,value=busyness) /subsystem=modcluster/mod-cluster-config=configuration/dynamic-load-provider=configuration/load-metric=busyness/:write-attribute(name=weight,value=1) |
Load Metric Algorithms
- cpu
- The
cpuload metric uses average CPU load to determine which cluster node receives the next work load. - mem
- The
memload metric uses free native memory as a load metric. Usage of this metric is discouraged because it provides a value that includes buffers and cache, so it is always a very low figure on every decent system with good memory management. - heap
- The
heapload metric uses the heap usage to determine which cluster receives the next work load. - sessions
- The
sessionload metric uses the number of active sessions as a metric. - requests
- The
requestsload metric uses the number of client requests to determine which cluster node receives the next work load. For instance, capacity 1000 means that 1000 requests/sec is considered to be a full load. - send-traffic
- The
send-trafficload metric uses the amount of traffic sent from the worker node to the clients. E.g. the default capacity of 512 indicates that the node should be considered under full load if the average outbound traffic is 512 KB/s or higher. - receive-traffic
- The receive-traffic load metric uses the amount of traffic sent to the worker node from the clients. E.g. the default capacity of 1024 indicates that the node should be considered under full load if the average inbound traffic is 1024 KB/s or higher.
- busyness
- This metric represents the amount of threads from the thread pool being busy serving requests.
Example 19.1. Add a Load Metric
add-metric command.
/subsystem=modcluster/mod-cluster-config=configuration/:add-metric(type=sessions)
Example 19.2. Set a Value for an Existing Metric
write-attribute command.
/subsystem=modcluster/mod-cluster-config=configuration/dynamic-load-provider=configuration/load-metric=cpu/:write-attribute(name="weight",value="3")
Example 19.3. Change the Value of an Existing Metric
write-attribute command.
/subsystem=modcluster/mod-cluster-config=configuration/dynamic-load-provider=configuration/load-metric=cpu/:write-attribute(name="type",value="busyness")
Example 19.4. Remove an Existing Metric
remove-metric command.
/subsystem=modcluster/mod-cluster-config=configuration/:remove-metric(type=sessions)
19.5.3. Install the mod_cluster Module Into Apache HTTP Server or JBoss Enterprise Web Server (Zip)
Prerequisites
- To perform this task, you must be using Apache HTTP Server installed in Red Hat Enterprise Linux 6, or JBoss Enterprise Web Server, or the standalone Apache HTTP Server included as a separate downloadable component of JBoss EAP 6.
- If you need to install Apache HTTP Server in Red Hat Enterprise Linux 6, use the instructions from the Red Hat Enterprise Linux 6 Deployment Guide.
- If you need to install the standalone Apache HTTP Server included as a separate downloadable component of JBoss EAP 6, refer to Section 19.3.2, “Install the Apache HTTP Server included with JBoss EAP 6 (Zip)”.
- If you need to install JBoss Enterprise Web Server, use the instructions from the JBoss Enterprise Web Server Installation Guide.
- Download the Webserver Connecter Natives package for your operating system and architecture from the Red Hat Customer Portal at https://access.redhat.com. This package contains the mod_cluster binary web server modules precompiled for your operating system. After you extract the archive, the modules are located in the
EAP_HOME/modules/system/layers/base/native/lib/httpd/modulesdirectory.Theetc/directory contains some example configuration files, and theshare/directory contains some supplemental documentation. - You must be logged in with administrative (root) privileges.
Note
EAP_HOME/modules/system/layers/base/native/lib64/httpd/modules. You must use this path whenever you need access to the modules.
Procedure 19.7. Install the mod_cluster Module
Determine your Apache HTTP Server configuration location.
Your Apache HTTP Server configuration location will be different depending on whether you are using Red Hat Enterprise Linux's Apache HTTP Server, the standalone Apache HTTP Server included as a separate downloadable component with JBoss EAP 6, or the Apache HTTP Server available in JBoss Enterprise Web Server. It is one of the following three options, and is referred to in the rest of this task as HTTPD_HOME.- Apache HTTP Server -
/etc/httpd/ - JBoss EAP 6 Apache HTTP Server - This location is chosen by you, based on the requirements of your infrastructure.
- JBoss Enterprise Web Server Apache HTTP Server -
EWS_HOME/httpd/
Copy the modules to the Apache HTTP Server modules directory.
Copy the four modules (the files ending in.so) from theEAP_HOME/modules/system/layers/base/native/lib/httpd/modulesdirectory of the extracted Webserver Natives archive to theHTTPD_HOME/modules/directory.For JBoss Enterprise Web Server, disable the
mod_proxy_balancermodule.If you use JBoss Enterprise Web Server, themod_proxy_balancermodule is enabled by default. It is incompatible with mod_cluster. To disable it, edit theHTTPD_HOME/conf/httpd.confand comment out the following line by placing a#(hash) symbol before the line which loads the module. The line is shown without the comment and then with it, below.LoadModule proxy_balancer_module modules/mod_proxy_balancer.so
# LoadModule proxy_balancer_module modules/mod_proxy_balancer.so
Save and close the file.Configure the mod_cluster module.
The Webserver Natives archive contains a samplemod_cluster.conffile (EAP_HOME/modules/system/layers/base/native/etc/httpd/conf). This file can be used as a guide or copied and edited to create aHTTPD_HOME/httpd/conf.d/JBoss_HTTP.conffile.Note
Using the nameJBoss_HTTP.confis an arbitrary convention in this document. The configuration file will be loaded, regardless of its name, if it is saved in theconf.d/directory with the.confextension.Add the following to your configuration file:LoadModule slotmem_module modules/mod_slotmem.so LoadModule manager_module modules/mod_manager.so LoadModule proxy_cluster_module modules/mod_proxy_cluster.so LoadModule advertise_module modules/mod_advertise.so
This causes Apache HTTP Server to automatically load the modules thatmod_clusterneeds in order to function.Create a proxy server listener.
Continue editingHTTPD_HOME/httpd/conf.d/JBoss_HTTP.confand add the following minimal configuration, replacing the values in capital letters with suitable values for your environment.Listen IP_ADDRESS:PORT <VirtualHost IP_ADDRESS:PORT> <Location /> Order deny,allow Deny from all Allow from *.MYDOMAIN.COM </Location> KeepAliveTimeout 60 MaxKeepAliveRequests 0 EnableMCPMReceive On ManagerBalancerName mycluster ServerAdvertise On </VirtualHost>These directives create a new virtual server which listens onIP_ADDRESS:PORT, allows connections fromMYDOMAIN.COM, and advertises itself as a balancer calledmycluster. These directives are covered in detail in the documentation for Apache Web Server. To learn more about theServerAdvertiseandEnableMCPMReceivedirectives, and the implications of server advertisement, see Section 19.5.5, “Configure Server Advertisement Properties for Your mod_cluster-enabled Web Server”.Save the file and exit.Restart the Apache HTTP Server.
The way to restart the Apache HTTP Server depends on whether you are using Red Hat Enterprise Linux's Apache HTTP Server or the Apache HTTP Server included in JBoss Enterprise Web Server. Choose one of the two methods below.Red Hat Enterprise Linux 6 Apache HTTP Server
Issue the following command:[root@host]#
service httpd restartJBoss Enterprise Web Server HTTP Server
JBoss Enterprise Web Server runs on both Red Hat Enterprise Linux and Microsoft Windows Server. The method for restarting the Apache HTTP Server is different for each.Red Hat Enterprise Linux
In Red Hat Enterprise Linux, JBoss Enterprise Web Server installs its Apache HTTP Server as a service. To restart the Apache HTTP Server, issue the following two commands:[root@host ~]# service httpd stop[root@host ~]# service httpd startMicrosoft Windows Server
Issue the following commands in a command prompt with administrative privileges:C:\> net stop httpdC:\> net start httpd
The Apache HTTP Server is now configured as a load balancer, and can work with the mod_cluster subsystem running JBoss EAP 6. To configure JBoss EAP 6 to be aware of mod_cluster, see Section 19.5.6, “Configure a mod_cluster Worker Node”.
19.5.4. Install the mod_cluster Module Into Apache HTTP Server or JBoss Enterprise Web Server (RPM)
Prerequisites
- To perform this task, you must be using the Apache HTTP Server installed in Red Hat Enterprise Linux 6, JBoss Enterprise Web Server, or the standalone Apache HTTP Server included as a separate downloadable component of JBoss EAP 6.
- If you need to install Apache HTTP Server in Red Hat Enterprise Linux 6, use the instructions from the Red Hat Enterprise Linux 6 Deployment Guide.
- If you need to install the standalone Apache HTTP Server included as a separate downloadable component of JBoss EAP 6, refer to Section 19.3.2, “Install the Apache HTTP Server included with JBoss EAP 6 (Zip)” .
- If you need to install JBoss Enterprise Web Server, use the instructions from the JBoss Enterprise Web Server Installation Guide.
- You must be logged in with administrative (root) privileges.
- You must have an active subscription to the
jbappplatform-6-ARCH-server-VERS-rpmRHN channel.
- Install the
mod_cluster-nativepackage using YUM:yum install mod_cluster-native
- Apache HTTP Server 2.2.15:
- If you choose to stay on Apache HTTP Server 2.2.15, you must disable the
mod_proxy_balancermodule loaded by default by commmenting theLoadModule proxy_balancer_moduleline in the httpd.conf file.Either edit the file manually or use the following command:sed -i 's/^LoadModule proxy_balancer_module/#LoadModule proxy_balancer_module/;s/$//' /etc/httpd/conf/httpd.conf
- If you choose to upgrade to Apache HTTP Server 2.2.26, install the latest version using the following command.
yum install httpd
- To have the Apache HTTP Server service start at boot, enter the following command:
- For Red Hat Enterprise Linux 5 and 6:
service httpd add
- For Red Hat Enterprise Linux 7:
systemctl enable httpd22.service
- Start the mod_cluster balancer with the following command:
- For Red Hat Enterprise Linux 5 and 6:
service httpd start
- For Red Hat Enterprise Linux 7:
systemctl start httpd22.service
19.5.5. Configure Server Advertisement Properties for Your mod_cluster-enabled Web Server
For instructions on configuring your web server to interact with the mod_cluster load balancer, see Section 19.5.3, “Install the mod_cluster Module Into Apache HTTP Server or JBoss Enterprise Web Server (Zip)”. One aspect of the configuration which needs more explanation is server advertisement.
httpd.conf associated with your Apache HTTP Server instance. This is often /etc/httpd/conf/httpd.conf in Red Hat Enterprise Linux, or may be in the etc/ directory of your standalone Apache HTTP Server instance.
Procedure 19.8. Edit the httpd.conf file and implement the changes
Disable the
AdvertiseFrequencyparameter, if it exists.If you have a line like the following in your<VirtualHost>statement, comment it out by putting a#(hash) character before the first character. The value may be different from5.AdvertiseFrequency 5
Add the directive to disable server advertisement.
Add the following directive inside the<VirtualHost>statement, to disable server advertisement.ServerAdvertise Off
Enable the ability to receive MCPM messages.
Add the following directive to allow the Web server to receive MCPM messages from the worker nodes.EnableMCPMReceive On
Restart the Web server.
Restart the Web server by issuing one of the following, depending on whether you use Red Hat Enterprise Linux or Microsoft Windows Server.Red Hat Enterprise Linux
[root@host ]# service httpd restart
Microsoft Windows Server
C:\> net service http C:\> net service httpd start
The web server no longer advertises the IP address and port of your mod_cluster proxy. To reiterate, you need to configure your worker nodes to use a static address and port to communicate with the proxy. See Section 19.5.6, “Configure a mod_cluster Worker Node” for more details.
19.5.6. Configure a mod_cluster Worker Node
A mod_cluster worker node consists of a JBoss EAP 6 server. This server can be part of a server group in a Managed Domain, or a standalone server. A separate process runs within JBoss EAP 6, which manages all of the nodes of the cluster. This is called the master. For more conceptual information about worker nodes, refer to Section 19.1.4, “Worker Node”. For an overview of web server load balancing, refer to Section 19.1.3, “Overview of HTTP Connectors”.
mod_cluster subsystem. To configure the mod_cluster subsystem, refer to Configure the mod_cluster Subsystem in the Administration and Configuration Guide.
Worker Node Configuration
- A standalone server must be started with the
standalone-haorstandalone-full-haprofile. - A server group in a managed domain must use the
haorfull-haprofile, and theha-socketsorfull-ha-socketssocket binding group. JBoss EAP 6 ships with a cluster-enabled server group calledother-server-groupwhich meets these requirements.
Note
/profile=full-ha portion of the commands.
Procedure 19.9. Configure a Worker Node
Configure the network interfaces.
By default, the network interfaces all default to127.0.0.1. Every physical host that hosts either a standalone server or one or more servers in a server group needs its interfaces to be configured to use its public IP address, which the other servers can see.To change the IP address of a JBoss EAP 6 host, you need to shut it down and edit its configuration file directly. This is because the Management API which drives the Management Console and Management CLI relies on a stable management address.Follow these steps to change the IP address on each server in your cluster to the master's public IP address.- Start the JBoss EAP server using the profile described earlier in this topic.
- Launch the Management CLI, using the
EAP_HOME/bin/jboss-cli.shcommand in Linux or theEAP_HOME\bin\jboss-cli.batcommand in Microsoft Windows Server. Typeconnectto connect to the domain controller on the localhost, orconnect IP_ADDRESSto connect to a domain controller on a remote server. - Modify the external IP address for the
management,publicandunsecureinterfaces by typing the following commands. Be sure to replaceEXTERNAL_IP_ADDRESSin the command with the actual external IP address of the host.
You should see the following result for each command./interface=management:write-attribute(name=inet-address,value="${jboss.bind.address.management:EXTERNAL_IP_ADDRESS}"/interface=public:write-attribute(name=inet-address,value="${jboss.bind.address.public:EXTERNAL_IP_ADDRESS}"/interface=unsecure:write-attribute(name=inet-address,value="${jboss.bind.address.unsecure:EXTERNAL_IP_ADDRESS}":reload"outcome" => "success"
- For hosts that participate in a managed domain but are not the master, you must change the host name from
masterto a unique name. This name must be unique across slaves and will be used for the slave to identify to the cluster, so make a note of the name you use.- Start the JBoss EAP slave host using the following syntax:
For example:bin/domain.sh --host-config=HOST_SLAVE_XML_FILE_NAMEbin/domain.sh --host-config=host-slave01.xml - Launch the Management CLI.
- Use the following syntax to replace the host name:
For example:/host=master:write-attribute(name="name",value=UNIQUE_HOST_SLAVE_NAME)
You should see the following result./host=master:write-attribute(name="name",value="host-slave01")"outcome" => "success"
This modifies the XML in thehost-slave01.xmlfile as follows:<host name="host-slave01" xmlns="urn:jboss:domain:1.6">
- For newly configured hosts that need to join a managed domain, you must remove the
localelement and add theremoteelementhostattribute that points to the domain controller. This step does not apply for a standalone server.- Start the JBoss EAP slave host using the following syntax:
For example:bin/domain.sh --host-config=HOST_SLAVE_XML_FILE_NAMEbin/domain.sh --host-config=host-slave01.xml - Launch the Management CLI.
- Use the following syntax specify the domain controller:
For example:/host=UNIQUE_HOST_SLAVE_NAME/:write-remote-domain-controller(host=DOMAIN_CONTROLLER_IP_ADDRESS,port=${jboss.domain.master.port:9999},security-realm="ManagementRealm")
You should see the following result./host=host-slave01/:write-remote-domain-controller(host="192.168.1.200",port=${jboss.domain.master.port:9999},security-realm="ManagementRealm")"outcome" => "success"
This modifies the XML in thehost-slave01.xmlfile as follows:<domain-controller> <remote host="192.168.1.200" port="${jboss.domain.master.port:9999}" security-realm="ManagementRealm"/> </domain-controller>
Configure authentication for each slave server.
Each slave server needs a username and password created in the domain controller's or standalone master'sManagementRealm. On the domain controller or standalone master, run theEAP_HOME/bin/add-user.shcommand. Add a user with the same username as the slave, to theManagementRealm. When asked if this user will need to authenticate to an external JBoss AS instance, answeryes. An example of the input and output of the command is below, for a slave calledslave1, with passwordchangeme.user:bin user$ ./add-user.sh What type of user do you wish to add? a) Management User (mgmt-users.properties) b) Application User (application-users.properties) (a):
aEnter the details of the new user to add. Realm (ManagementRealm) : Username :slave1Password :changemeRe-enter Password :changemeAbout to add user 'slave1' for realm 'ManagementRealm' Is this correct yes/no?yesAdded user 'slave1' to file '/home/user/jboss-eap-6.0/standalone/configuration/mgmt-users.properties' Added user 'slave1' to file '/home/user/jboss-eap-6.0/domain/configuration/mgmt-users.properties' Is this new user going to be used for one AS process to connect to another AS process e.g. slave domain controller? yes/no? yes To represent the user add the following to the server-identities definition <secret value="Y2hhbmdlbWU=" />Copy the Base64-encoded
<secret>element from theadd-user.shoutput.If you plan to specify the Base64-encoded password value for authentication, copy the<secret>element value from the last line of theadd-user.shoutput as you will need it in the step below.Modify the slave host's security realm to use the new authentication.
You can specify the secret value in one of the following ways:Specify the Base64-encoded password value in the server configuration file using the Management CLI.
- Launch the Management CLI, using the
EAP_HOME/bin/jboss-cli.shcommand in Linux or theEAP_HOME\bin\jboss-cli.batcommand in Microsoft Windows Server. Typeconnectto connect to the domain controller on the localhost, orconnect IP_ADDRESSto connect to a domain controller on a remote server. - Specify the secret value by typing the following command. Be sure to replace the
SECRET_VALUEwith the secret value returned from theadd-useroutput from the previous step.
You should see the following result for each command./core-service=management/security-realm=ManagementRealm/server-identity=secret:add(value="SECRET_VALUE"):reload"outcome" => "success"
Configure the host to get the password from the vault.
- Use the
vault.shscript to generate a masked password. It will generate a string like the following:VAULT::secret::password::ODVmYmJjNGMtZDU2ZC00YmNlLWE4ODMtZjQ1NWNmNDU4ZDc1TElORV9CUkVBS3ZhdWx0.You can find more information on the vault in the Password Vaults for Sensitive Strings section of this guide starting here: Section 11.13.1, “Password Vault System”. - Launch the Management CLI, using the
EAP_HOME/bin/jboss-cli.shcommand in Linux or theEAP_HOME\bin\jboss-cli.batcommand in Microsoft Windows Server. Typeconnectto connect to the domain controller on the localhost, orconnect IP_ADDRESSto connect to a domain controller on a remote server. - Specify the secret value by typing the following command. Be sure to replace the
SECRET_VALUEwith the masked password generated in the previous step.
You should see the following result for each command./core-service=management/security-realm=ManagementRealm/server-identity=secret:add(value="${VAULT::secret::password::SECRET_VALUE}"):reload"outcome" => "success"
Note
When creating a password in the vault, it must be specified in plain text, not Base64-encoded.
Specify the password as a system property.
The following examples useserver.identity.passwordas the system property name for the password.- Specify the system property for the password in the server configuration file using the Management CLI.
- Launch the Management CLI, using the
EAP_HOME/bin/jboss-cli.shcommand in Linux or theEAP_HOME\bin\jboss-cli.batcommand in Microsoft Windows Server. Typeconnectto connect to the domain controller on the localhost, orconnect IP_ADDRESSto connect to a domain controller on a remote server. - Type the following command to configure the secret identity to use the system property.
You should see the following result for each command./core-service=management/security-realm=ManagementRealm/server-identity=secret:add(value="${server.identity.password}"):reload"outcome" => "success"
- When you specify the password as a system property, you can configure the host in either of the following ways:
- Start the server entering the password in plain text as a command line argument, for example:
-Dserver.identity.password=changeme
Note
The password must be entered in plain text and will be visible to anyone who issues aps -efcommand. - Place the password in a properties file and pass the properties file URL as a command line argument.
- Add the key/value pair to a properties file. For example:
server.identity.password=changeme
- Start the server with the command line arguments
--properties=URL_TO_PROPERTIES_FILE
.
Restart the server.
The slave will now authenticate to the master using its host name as the username and the encrypted string as its password.
Your standalone server, or servers within a server group of a managed domain, are now configured as mod_cluster worker nodes. If you deploy a clustered application, its sessions are replicated to all cluster nodes for failover, and it can accept requests from an external Web server or load balancer. Each node of the cluster discovers the other nodes using automatic discovery, by default.To configure automatic discovery, and the other specific settings of the mod_cluster subsystem, see Section 19.5.2, “Configure the mod_cluster Subsystem”. To configure the Apache HTTP Server,see Section 19.3.5, “Use an External Web Server as the Web Front-end for JBoss EAP 6 Applications”.
19.5.7. Migrate Traffic between Clusters
After creating a new cluster using JBoss EAP 6, you may want to migrate traffic from a previous cluster to the new one as part of an upgrade process. In this task, you will see the strategy that can be used to migrate this traffic with minimal outage or downtime.
Prerequisites
- A new cluster setup: Section 19.5.2, “Configure the
mod_clusterSubsystem” (We will call this cluster: Cluster NEW). - An old cluster setup that is being made redundant (We will call this cluster: Cluster OLD).
Procedure 19.10. Upgrade Process for Clusters
- Setup your new cluster using the steps described in the prerequisites.
- In both Cluster NEW and Cluster OLD, make sure that the configuration option
sticky-sessionis set totrue(this istrueby default). Enabling this option means that all new requests made to a cluster node in either cluster will continue to go to that node./profile=full-ha/subsystem=modcluster/mod-cluster-config=configuration/:write-attribute(name=sticky-session,value=true)
- Add the nodes in Cluster NEW to the mod_cluster configuration individually using the process described here: Section 19.5.6, “Configure a mod_cluster Worker Node”
- Configure the load balancer (mod_cluster) to stop the individual contexts in Cluster OLD. Stopping contexts (as opposed to disabling them) in Cluster OLD will allow the individual contexts to shutdown gracefully (and eventually shutdown the whole node). Existing sessions will still be served, but no new sessions will be directed to those nodes. The stopped contexts may take several minutes to several hours to stop.You can use the following CLI command to stop a context. Replace the parameter values with values that are relevant in your environment.
[standalone@localhost:9999 subsystem=modcluster] :stop-context(context=/myapp, virtualhost=default-host, waittime=50)
You have successfully upgraded a JBoss EAP 6 Cluster.
19.6. Apache mod_jk
19.6.1. About the Apache mod_jk HTTP Connector
mod_jk is a HTTP connector which is provided for customers who need it for compatibility purposes. It provides load balancing, and is a part of the jboss-eap-native-webserver-connectors that is contained in JBoss Web Container. For supported platforms, see https://access.redhat.com/site/articles/111663. The mod_jk connector is maintained by Apache, and its documentation is located at http://tomcat.apache.org/connectors-doc/.
mod_cluster HTTP connector, an Apache mod_jk HTTP connector does not know the status of deployments on servers or server groups, and cannot adapt where it sends its work accordingly.
mod_cluster, mod_jk communicates over the AJP 1.3 protocol.
Note
mod_cluster is a more advanced load balancer than mod_jk. mod_cluster provides all of the functionality of mod_jk and additional features. For more information about mod_cluster, see Section 19.5.1, “About the mod_cluster HTTP Connector”.
Next step: Configure a JBoss EAP 6 instance to participate in a mod_jk load balancing group
19.6.2. Configure JBoss EAP 6 to Communicate with Apache Mod_jk
The mod_jk HTTP connector has a single component, the mod_jk.so module loaded by the web server. This module receives client requests and forwards them to the container, in this case JBoss EAP 6. JBoss EAP 6 must also be configured to accept these requests and send replies back to the web server.
- In a managed domain, in server groups using the
haandfull-haprofiles, and thehaorfull-hasocket binding group. Theother-server-groupserver group is configured correctly in a default installation. - In a standalone server, the
standalone-haandstandalone-full-haprofiles are configured for clustered configurations. To start the standalone server with one of these profiles, issue the following command, from theEAP_HOME/directory. Substitute the appropriate profile name.[user@host bin]$
./bin/standalone.sh --server-config=standalone-ha.xml
19.6.3. Install the mod_jk Module Into the Apache HTTP Server (ZIP)
Prerequisites
- To perform this task, you must be using Apache HTTP Server installed on a supported environment or the Apache HTTP Server installed in JBoss Enterprise Web Server. Note that the Apache HTTP Server installed in JBoss Enterprise Web Server is part of the JBoss EAP 6 distribution.
- If you need to install Apache HTTP Server, use the instructions in the Red Hat Enterprise Linux Deployment Guide.
- If you need to install JBoss Enterprise Web Server, use the instructions from the JBoss Enterprise Web Server Installation Guide.
- If you are using Apache HTTP Server, download the JBoss EAP 6 Native Components package for your platform from the Red Hat Customer Portal at https://access.redhat.com. This package contains both the
mod_jkandmod_clusterbinaries precompiled for Red Hat Enterprise Linux. If you are using JBoss Enterprise Web Server, it already includes the binary formod_jk. - If you are using Red Hat Enterprise Linux (RHEL) 5 and native Apache HTTP server (httpd 2.2.3), load the mod_perl module prior to loading mod_jk module.
- You must be logged in with administrative (root) privileges.
Procedure 19.11. Install the mod_jk Module
Configure the mod_jk module.
- Create a new file called
HTTPD_HOME/conf.d/mod-jk.confand add the following to it:Note
TheJkMountdirective specifies which URLs Apache should forward to the mod_jk module. Based on the directive's configuration, mod_jk forwards the received URL to the correct Servlet containers.To serve static content directly, and only use the load balancer for Java applications, the URL path should be/application/*. To use mod_jk as a load balancer, use the value/*, to forward all URLs to mod_jk.# Load mod_jk module # Specify the filename of the mod_jk lib LoadModule jk_module modules/mod_jk.so # Where to find workers.properties JkWorkersFile conf/workers.properties # Where to put jk logs JkLogFile logs/mod_jk.log # Set the jk log level [debug/error/info] JkLogLevel info # Select the log format JkLogStampFormat "[%a %b %d %H:%M:%S %Y]" # JkOptions indicates to send SSK KEY SIZE JkOptions +ForwardKeySize -ForwardDirectories # JkRequestLogFormat JkRequestLogFormat "%w %V %T" # Mount your applications # The default setting only sends Java application data to mod_jk. # Use the commented-out line to send all URLs through mod_jk. # JkMount /* loadbalancer JkMount /application/* loadbalancer # Add shared memory. # This directive is present with 1.2.10 and # later versions of mod_jk, and is needed for # for load balancing to work properly JkShmFile logs/jk.shm # Add jkstatus for managing runtime data <Location /jkstatus/> JkMount status Order deny,allow Deny from all Allow from 127.0.0.1 </Location>
Look over the values and ensure they are reasonable for your setup. When you are satisfied, save the file. Specify a JKMountFile directive
In addition to the JKMount directive in themod-jk.conf, you can specify a file which contains multiple URL patterns to be forwarded to mod_jk.- Add the following to the
HTTPD_HOME/conf/mod-jk.conffile:# You can use external file for mount points. # It will be checked for updates each 60 seconds. # The format of the file is: /url=worker # /examples/*=loadbalancer JkMountFile conf/uriworkermap.properties
- Create a new file called
HTTPD_HOME/conf/uriworkermap.properties, with a line for each URL pattern to be matched. The following example shows examples of the syntax of the file.# Simple worker configuration file /*=loadbalancer
Copy the mod_jk.so file to the httpd's modules directory
Note
This is only necessary if the Apache HTTP server does not havemod_jk.soin itsmodules/directory. You can skip this step if you are using the Apache HTTP server included as a download as part of JBoss EAP 6.Extract the Native Web Server Connectors Zip package. Locate themod_jk.sofile in either theEAP_HOME/modules/system/layers/base/native/lib/httpd/modules/or theEAP_HOME/modules/system/layers/base/native/lib64/httpd/modules/directories, depending on whether your operating system is 32-bit or 64-bit.Copy the file to theHTTPD_HOME/modules/directory.
Configure the mod_jk worker nodes.
- Create a new file called
HTTPD_HOME/conf/workers.properties. Use the following example as your starting point, and modify the file to suit your needs.# Define list of workers that will be used # for mapping requests worker.list=loadbalancer,status # Define Node1 # modify the host as your host IP or DNS name. worker.node1.port=8009 worker.node1.host=node1.mydomain.com worker.node1.type=ajp13 worker.node1.ping_mode=A worker.node1.lbfactor=1 # Define Node2 # modify the host as your host IP or DNS name. worker.node2.port=8009 worker.node2.host=node2.mydomain.com worker.node2.type=ajp13 worker.node2.ping_mode=A worker.node2.lbfactor=1 # Load-balancing behavior worker.loadbalancer.type=lb worker.loadbalancer.balance_workers=node1,node2 worker.loadbalancer.sticky_session=1 # Status worker for managing load balancer worker.status.type=status
For a detailed description of the syntax of theworkers.propertiesfile, and advanced configuration options, see Section 19.6.5, “Configuration Reference for Apache Mod_jk Workers”.
Restart the Web Server.
The way to restart the web server depends on whether you are using Red Hat Enterprise Linux's Apache HTTP server or the Apache HTTP server included in JBoss Enterprise Web Server. Choose one of the following methods.Red Hat Enterprise Linux's Apache HTTP Server
Issue the following command:[root@host]#
service httpd restartJBoss Enterprise Web Server Apache HTTP Server
JBoss Enterprise Web Server runs on both Red Hat Enterprise Linux and Microsoft Windows Server. The method for restarting the web server is different for each.Red Hat Enterprise Linux, installed from RPM
In Red Hat Enterprise Linux, JBoss Enterprise Web Server installs its web server as a service. To restart the web server, issue the following two commands:[root@host ~]# service httpd stop [root@host ~]# service httpd start
Red Hat Enterprise Linux, installed from Zip
If you have installed the JBoss Enterprise Web Server Apache HTTP server from a Zip archive, use theapachectlcommand to restart the web server. Replace EWS_HOME with the directory where you unzipped JBoss Enterprise Web Server Apache HTTP server.[root@host ~]# EWS_HOME/httpd/sbin/apachectl restart
Microsoft Windows Server
Issue the following commands in a command prompt with administrative privileges:C:\> net stop Apache2.2 C:\> net start Apache2.2
Solaris
Issue the following commands in a command prompt with administrative privileges. Replace EWS_HOME with the directory where you unzipped JBoss Enterprise Web Server Apache HTTP server.[root@host ~] EWS_HOME/httpd/sbin/apachectl restart
The Apache HTTP server is now configured to use the mod_jk load balancer. To configure JBoss EAP 6 to be aware of mod_jk, see Section 19.3.6, “Configure JBoss EAP 6 to Accept Requests From External Web Servers”.
19.6.4. Install the Mod_jk Module Into the Apache HTTP Server (RPM)
Prerequisites
- To perform this task, you must be using Apache HTTP Server installed on a supported environment or the Apache HTTP Server installed in JBoss Enterprise Web Server. Note that the Apache HTTP Server installed in JBoss Enterprise Web Server is part of the JBoss EAP 6 distribution.
- If you need to install Apache HTTP Server, use the instructions from the Red Hat Enterprise Linux Deployment Guide, available from https://access.redhat.com/site/documentation/.
- If you need to install JBoss Enterprise Web Server, use the instructions from the JBoss Enterprise Web Server Installation Guide, available from https://access.redhat.com/site/documentation/.
- You must be logged in with administrative (root) privileges.
Procedure 19.12. Red Hat Enterprise Linux 5: mod_jk with Apache HTTP Server 2.2.3
- Install mod_jk-ap22 1.2.37 and its dependency mod_perl from the
jbappplatform-6-*-server-5-rpmchannel:yum install mod_jk
- Optional: Copy the sample configuration files for use:
cp /usr/share/doc/mod_jk-ap22-1.2.37/mod_jk.conf.sample /etc/httpd/conf.d/mod_jk.conf
cp /usr/share/doc/mod_jk-ap22-1.2.37/workers.properties.sample /etc/httpd/conf/workers.properties
These files should be edited to suit your needs. - Start the server:
service httpd start
Note
Cannot load /etc/httpd/modules/mod_jk.so into server: /etc/httpd/modules/mod_jk.so: undefined symbol: ap_get_server_description
/etc/httpd/conf.d/mod_jk.conf:
<IfModule !perl_module>
LoadModule perl_module modules/mod_perl.so
</IfModule>
LoadModule jk_module modules/mod_jk.soProcedure 19.13. Red Hat Enterprise Linux 5: mod_jk with JBoss EAP Apache HTTP Server 2.2.26
- Install both mod_jk and the latest Apache HTTP Server 2.2.26 provided by the
jbappplatform-6-*-server-5-rpmchannel with this command:yum install mod_jk httpd
- Optional: Copy the sample configuration files for use:
cp /usr/share/doc/mod_jk-ap22-1.2.37/mod_jk.conf.sample /etc/httpd/conf.d/mod_jk.conf
cp /usr/share/doc/mod_jk-ap22-1.2.37/workers.properties.sample /etc/httpd/conf/workers.properties
These files should be edited to suit your needs. - Start the server:
service httpd start
Procedure 19.14. Red Hat Enterprise Linux 6: mod_jk with JBoss EAP Apache HTTP Server 2.2.26
- Install mod_jk-ap22 1.2.37 and Apache HTTP Server 2.2.26 httpd package from the
jbappplatform-6-*-server-6-rpmchannel (any existing versions will be updated):yum install mod_jk httpd
- Optional: Copy the sample configuration files for use:
cp /usr/share/doc/mod_jk-ap22-1.2.37/mod_jk.conf.sample /etc/httpd/conf.d/mod_jk.conf
cp /usr/share/doc/mod_jk-ap22-1.2.37/workers.properties.sample /etc/httpd/conf/workers.properties
These files should be edited to suit your needs. - Start the server:
service httpd start
Procedure 19.15. Red Hat Enterprise Linux 6: mod_jk with Apache HTTP Server 2.2.15
- Install mod_jk with Apache HTTP Server 2.2.15 with the following command:
yum install mod_jk
- Optional: Copy the sample configuration files for use:
cp /usr/share/doc/mod_jk-ap22-1.2.37/mod_jk.conf.sample /etc/httpd/conf.d/mod_jk.conf
cp /usr/share/doc/mod_jk-ap22-1.2.37/workers.properties.sample /etc/httpd/conf/workers.properties
These files should be edited to suit your needs. - Start the server:
service httpd start
Procedure 19.16. Red Hat Enterprise Linux 7: mod_jk with JBoss EAP Apache HTTP Server 2.2.26
- Install mod_jk-ap22 1.2.37 and Apache HTTP Server 2.2.26 httpd22 package from the
jbappplatform-6-*-server-6-rpmchannel (any existing versions will be updated):yum install mod_jk
- Optional: Copy the sample configuration files for use:
cp /usr/share/doc/mod_jk-ap22-1.2.37/mod_jk.conf.sample /etc/httpd22/conf.d/mod_jk.conf
cp /usr/share/doc/mod_jk-ap22-1.2.37/workers.properties.sample /etc/httpd22/conf/workers.properties
These files should be edited to suit your needs. - Start the server:
systemctl start httpd22.service
19.6.5. Configuration Reference for Apache Mod_jk Workers
workers.properties file defines the behavior of the worker nodes which mod_jk passes client requests to. In Red Hat Enterprise Linux, the file resides in /etc/httpd/conf/workers.properties. The workers.properties file defines where the different servlet containers are located, and the way the work load should be balanced across them.
worker.WORKER_NAME.DIRECTIVE, where WORKER_NAME is a unique name for the worker, and DIRECTIVE is the setting to be applied to the worker.
Node templates specify default per-node settings. You can override the template within the node settings itself. You can see an example of node templates in Example 19.5, “Example workers.properties file”.
Table 19.11. Global properties
| Property | Description |
|---|---|
| worker.list | The list of worker names used by mod_jk. These workers are available to receive requests. |
Table 19.12. Per-worker properties
| Property | Description |
|---|---|
| type |
The type of the worker. The default type is
ajp13. Other possible values are ajp14, lb, status.
For more information on these directives, refer to the Apache Tomcat Connector AJP Protocol Reference at http://tomcat.apache.org/connectors-doc/ajp/ajpv13a.html.
|
| balance_workers |
Specifies the worker nodes that the load balancer must manage. You can use the directive multiple times for the same load balancer. It consists of a comma-separated list of worker names. This is set per worker, not per node. It affects all nodes balanced by that worker type.
|
| sticky_session |
Specifies whether requests from the same session are always routed to the same worker. The default is
0, meaning that sticky sessions are disabled. To enable sticky sessions, set it to 1. Sticky sessions should usually be enabled, unless all of your requests are truly stateless. This is set per worker, not per node. It affects all nodes balanced by that worker type.
|
Table 19.13. Per-node properties
| Property | Description |
|---|---|
| host |
The hostname or IP address of the worker. The worker node must support the
ajp protocol stack. The default value is localhost.
|
| port |
The port number of the remote server instance listening for defined protocol requests. The default value is
8009, which is the default listening port for AJP13 workers. The default value for AJP14 workers is 8011.
|
| ping_mode |
The conditions under which connections are probed for network status. The probe uses an empty AJP13 packet for CPing, and expects a CPong in response. Specify the conditions by using a combination of directive flags. The flags are not separated by a comma or any white-space. The ping_mode can be any combination of
C, P, I, and A.
|
| ping_timeout, connect_timeout, prepost_timeout, connection_ping_interval |
The timeout values for the connection probe settings above. The value is specified in milliseconds, and the default value for
ping_timeout is 10000.
|
| lbfactor |
Specifies the load-balancing factor for an individual worker, and only applies to a member worker of a load balancer. This is useful to give a more powerful server more of the work load. To give a worker 3 times the default load, set this to
3: worker.my_worker.lbfactor=3
|
Example 19.5. Example workers.properties file
worker.list=node1, node2, node3
worker.balancer1.sticky_sessions=1
worker.balancer1.balance_workers=node1
worker.balancer2.sticky_session=1
worker.balancer2.balance_workers=node2,node3
worker.nodetemplate.type=ajp13
worker.nodetemplate.port=8009
worker.node1.template=nodetemplate
worker.node1.host=localhost
worker.node1.ping_mode=CI
worker.node1.connection_ping_interval=9000
worker.node1.lbfactor=1
worker.node2.template=nodetemplate
worker.node2.host=192.168.1.1
worker.node2.ping_mode=A
worker.node3.template=nodetemplate
worker.node3.host=192.168.1.2
19.7. Apache mod_proxy
19.7.1. About the Apache mod_proxy HTTP Connector
mod_proxy and mod_jk. To learn more about mod_jk, refer to Section 19.6.1, “About the Apache mod_jk HTTP Connector”. JBoss EAP 6 supports use of either of these, although mod_cluster, the JBoss HTTP connector, more closely couples JBoss EAP 6 and the external httpd, and is the recommended HTTP connector. Refer to Section 19.1.3, “Overview of HTTP Connectors” for an overview of all supported HTTP connectors, including advantages and disadvantages.
mod_jk, mod_proxy supports connections over HTTP and HTTPS protocols. Each of them also support the AJP protocol.
mod_proxy can be configured in standalone or load-balanced configurations, and it supports the notion of sticky sessions.
mod_proxy module requires JBoss EAP 6 to have the HTTP, HTTPS or AJP web connector configured. This is part of the Web subsystem. Refer to Section 17.1, “Configure the Web Subsystem” for information on configuring the Web subsystem.
19.7.2. Install the Mod_proxy HTTP Connector into Apache HTTP Server
mod_proxy is a load-balancing module provided by Apache. This task presents a basic configuration. For more advanced configuration, or additional details, see Apache's mod_proxy documentation at https://httpd.apache.org/docs/2.2/mod/mod_proxy.html. For more details about mod_proxy from the perspective of JBoss EAP 6, see Section 19.7.1, “About the Apache mod_proxy HTTP Connector” and Section 19.1.3, “Overview of HTTP Connectors”.
Prerequisites
- Either httpd in JBoss Enterprise Web Server or Apache HTTP server needs to be installed. A standalone Apache HTTP server is provided as a separate download in the Red Hat Customer Portal, in the JBoss EAP 6 download area. See Section 19.3.2, “Install the Apache HTTP Server included with JBoss EAP 6 (Zip)” for information about this Apache HTTP server if you wish to use it.
- The
mod_proxymodules need to be installed. Apache HTTP server typically comes with themod_proxymodules already included. This is the case on Red Hat Enterprise Linux and the Apache HTTP Server that comes with the JBoss Enterprise Web Server. - You need
rootor administrator privileges to modify the Apache HTTP Server configuration. - In our example we assume that JBoss EAP 6 is configured with the HTTP or HTTPS web connector. This is part of the Web subsystem configuration. Refer to Section 17.1, “Configure the Web Subsystem” for information about configuring the Web subsystem.
Enable the
mod_proxymodules in the httpdLook for the following lines in yourHTTPD_HOME/conf/httpd.conffile. If they are not present, add them to the bottom. If they are present but the lines begin with a comment (#) character, remove the character. Save the file afterward. Usually, the modules are already present and enabled.LoadModule proxy_module modules/mod_proxy.so LoadModule proxy_balancer_module modules/mod_proxy_balancer.so LoadModule proxy_http_module modules/mod_proxy_http.so # Uncomment these to proxy FTP or HTTPS #LoadModule proxy_ftp_module modules/mod_proxy_ftp.so #LoadModule proxy_connect_module modules/mod_proxy_connect.so
Add a non-load-balancing proxy.
Add the following configuration to yourHTTPD_HOME/conf/httpd.conffile, directly beneath any other<VirtualHost>directives you may have. Replace the values with ones appropriate to your setup.This example uses a virtual host. See the next step to use the default httpd configuration.<VirtualHost *:80> # Your domain name ServerName Domain_NAME_HERE ProxyPreserveHost On # The IP and port of JBoss EAP 6 # These represent the default values, if your httpd is on the same host # as your JBoss EAP 6 managed domain or server ProxyPass / http://localhost:8080/ ProxyPassReverse / http://localhost:8080/ # The location of the HTML files, and access control information DocumentRoot /var/www <Directory /var/www> Options -Indexes Order allow,deny Allow from all </Directory> </VirtualHost>
After making your changes, save the file.Add a load-balancing proxy.
To usemod_proxyas a load balancer, and send work to multiple JBoss EAP 6 servers, add the following configuration to yourHTTPD_HOME/conf/httpd.conffile. The example IP addresses are fictional. Replace them with the appropriate values for your environment.<Proxy balancer://mycluster> Order deny,allow Allow from all # Add each JBoss Enterprise Application Server by IP address and port. # If the route values are unique like this, one node will not fail over to the other. BalancerMember http://192.168.1.1:8080 route=node1 BalancerMember http://192.168.1.2:8180 route=node2 </Proxy> <VirtualHost *:80> # Your domain name ServerName YOUR_DOMAIN_NAME ProxyPreserveHost On ProxyPass / balancer://mycluster/ # The location of the HTML files, and access control information DocumentRoot /var/www <Directory /var/www> Options -Indexes Order allow,deny Allow from all </Directory> </VirtualHost>
The examples above all communicate using the HTTP protocol. You can use AJP or HTTPS protocols instead, if you load the appropriatemod_proxymodules. Refer to Apache'smod_proxydocumentation http://httpd.apache.org/docs/2.2/mod/mod_proxy.html for more details.Enable sticky sessions.
Sticky sessions mean that if a client request originally goes to a specific JBoss EAP 6 node, all future requests will be sent to the same node, unless the node becomes unavailable. This is almost always the correct behavior.To enable sticky sessions formod_proxy, add thestickysessionparameter to theProxyPassstatement. This example also shows some other parameters which you can use. See Apache'smod_proxydocumentation at http://httpd.apache.org/docs/2.2/mod/mod_proxy.html for more information on them.ProxyPass /MyApp balancer://mycluster stickysession=JSESSIONID lbmethod=bytraffic nofailover=Off
Restart the Web Server.
Restart the web server for your changes to take effect.
Your Apache HTTP server is configured to use mod_proxy to send client requests to JBoss EAP 6 servers or clusters, either in a standard or load-balancing configuration. To configure JBoss EAP 6 to respond to these requests, see Section 19.3.6, “Configure JBoss EAP 6 to Accept Requests From External Web Servers”.
19.8. Microsoft ISAPI
19.8.1. About the Internet Server API (ISAPI) HTTP Connector
19.8.2. Download and Extract Webserver Connector Natives for Microsoft IIS
- In a web browser, navigate to the Red Hat Customer Support portal at https://access.redhat.com.
- Navigate to Downloads, then Red Hat JBoss Middleware Download Software, then select Enterprise Application Platform from the Product drop-down list.
- Select the appropriate version from the Version drop-down list.
- Choose the Download option of either Red Hat JBoss Enterprise Application Platform 6.3.0 Webserver Connector Natives for Windows Server 2008 x86_64 or Red Hat JBoss Enterprise Application Platform 6.3.0 Webserver Connector Natives for Windows Server 2008 i686 depending on the architecture of the server.
- Open the Zip file and copy the contents of the
jboss-eap-6.3/modules/system/layers/base/native/sbindirectory to a location on your server. It is assumed the contents were copied toC:\connectors\.
19.8.3. Configure Microsoft IIS to Use the ISAPI Redirector
Note
Procedure 19.17. Configure the IIS Redirector Using the IIS Manager (IIS 7)
- Open the IIS manager by clicking → , and typing
inetmgr. - In the tree view pane at the left, expand IIS 7.
- Double-click ISAPI and CGI Registrations to open it in a new window.
- In the Actions pane, click Add. The Add ISAPI or CGI Restriction window opens.
- Specify the following values:
- ISAPI or CGI Path:
c:\connectors\isapi_redirect.dll - Description:
jboss - Allow extension path to execute: select the check box.
- Click OK to close the Add ISAPI or CGI Restriction window.
Define a JBoss Native virtual directory
- Right-click Default Web Site, and click Add Virtual Directory. The Add Virtual Directory window opens.
- Specify the following values to add a virtual directory:
- Alias:
jboss - Physical Path:
C:\connectors\
- Click OK to save the values and close the Add Virtual Directory window.
Define a JBoss Native ISAPI Redirect Filter
- In the tree view pane, expand → .
- Double-click ISAPI Filters. The ISAPI Filters Features view appears.
- In the Actions pane, click Add. The Add ISAPI Filter window appears.
- Specify the following values in the Add ISAPI Filter window:
- Filter name:
jboss - Executable:
C:\connectors\isapi_redirect.dll
- Click OK to save the values and close the Add ISAPI Filters window.
Enable the ISAPI-dll handler
- Double-click the IIS 7 item in the tree view pane. The IIS 7 Home Features View opens.
- Double-click Handler Mappings. The Handler Mappings Features View appears.
- In the Group by combo box, select State. The Handler Mappings are displayed in Enabled and Disabled Groups.
- Find ISAPI-dll. If it is in the Disabled group, right-click it and select Edit Feature Permissions.
- Enable the following permissions:
- Read
- Script
- Execute
- Click OK to save the values, and close the Edit Feature Permissions window.
Microsoft IIS is now configured to use the ISAPI Redirector. Next, Section 19.3.6, “Configure JBoss EAP 6 to Accept Requests From External Web Servers”, then Section 19.8.4, “Configure the ISAPI Redirector to Send Client Requests to JBoss EAP 6” or Section 19.8.5, “Configure ISAPI to Balance Client Requests Across Multiple JBoss EAP 6 Servers”.
19.8.4. Configure the ISAPI Redirector to Send Client Requests to JBoss EAP 6
This task configures a group of JBoss EAP 6 servers to accept requests from the ISAPI redirector. It does not include configuration for load-balancing or high-availability failover. If you need these capabilities, refer to Section 19.8.5, “Configure ISAPI to Balance Client Requests Across Multiple JBoss EAP 6 Servers”.
Prerequisites
- You need full administrator access to the IIS server
Procedure 19.18. Edit Property Files and Setup Redirection
Create a directory to store logs, property files, and lock files.
The rest of this procedure assumes that you are using the directoryC:\connectors\for this purpose. If you use a different directory, modify the instructions accordingly.Create the
isapi_redirect.propertiesfile.Create a new file calledC:\connectors\isapi_redirect.properties. Copy the following contents into the file.# Configuration file for the ISAPI Redirector # Extension uri definition extension_uri=/jboss/isapi_redirect.dll # Full path to the log file for the ISAPI Redirector log_file=c:\connectors\isapi_redirect.log # Log level (debug, info, warn, error or trace) log_level=info # Full path to the workers.properties file worker_file=c:\connectors\workers.properties # Full path to the uriworkermap.properties file worker_mount_file=c:\connectors\uriworkermap.properties #Full path to the rewrite.properties file rewrite_rule_file=c:\connectors\rewrite.properties
If you do not want to use arewrite.propertiesfile, comment out the last line by placing a#character at the beginning of the line. See Step 5 for more information.Create the
uriworkermap.propertiesfileTheuriworkermap.propertiesfile contains mappings between deployed application URLs and which worker handles requests to them. The following example file shows the syntax of the file. Place youruriworkermap.propertiesfile intoC:\connectors\.# images and css files for path /status are provided by worker01 /status=worker01 /images/*=worker01 /css/*=worker01 # Path /web-console is provided by worker02 # IIS (customized) error page is used for http errors with number greater or equal to 400 # css files are provided by worker01 /web-console/*=worker02;use_server_errors=400 /web-console/css/*=worker01 # Example of exclusion from mapping, logo.gif won't be displayed # !/web-console/images/logo.gif=* # Requests to /app-01 or /app-01/something will be routed to worker01 /app-01|/*=worker01 # Requests to /app-02 or /app-02/something will be routed to worker02 /app-02|/*=worker02
Create the
workers.propertiesfile.Theworkers.propertiesfile contains mapping definitions between worker labels and server instances. The following example file shows the syntax of the file. Place this file into theC:\connectors\directory.# An entry that lists all the workers defined worker.list=worker01, worker02 # Entries that define the host and port associated with these workers # First JBoss EAP 6 server definition, port 8009 is standard port for AJP in EAP worker.worker01.host=127.0.0.1 worker.worker01.port=8009 worker.worker01.type=ajp13 # Second JBoss EAP 6 server definition worker.worker02.host=127.0.0.100 worker.worker02.port=8009 worker.worker02.type=ajp13
Create the
rewrite.propertiesfile.Therewrite.propertiesfile contains simple URL rewriting rules for specific applications. The rewritten path is specified using name-value pairs, as shown in the example below. Place this file into theC:\connectors\directory.#Simple example # Images are accessible under abc path /app-01/abc/=/app-01/images/
Restart the IIS server.
Restart your IIS server by using thenet stopandnet startcommands.C:\> net stop was /Y C:\> net start w3svc
The IIS server is configured to send client requests to the specific JBoss EAP 6 servers you have configured, on an application-specific basis.
19.8.5. Configure ISAPI to Balance Client Requests Across Multiple JBoss EAP 6 Servers
This configuration balances client requests across the JBoss EAP 6 servers you specify. If you prefer to send client requests to specific JBoss EAP 6 servers on a per-deployment basis, refer to Section 19.8.4, “Configure the ISAPI Redirector to Send Client Requests to JBoss EAP 6” instead.
Prerequisites
- Full administrator access on the IIS server.
Procedure 19.19. Balance Client Requests Across Multiple Servers
Create a directory to store logs, property files, and lock files.
The rest of this procedure assumes that you are using the directoryC:\connectors\for this purpose. If you use a different directory, modify the instructions accordingly.Create the
isapi_redirect.propertiesfile.Create a new file calledC:\connectors\isapi_redirect.properties. Copy the following contents into the file.# Configuration file for the ISAPI Redirector # Extension uri definition extension_uri=/jboss/isapi_redirect.dll # Full path to the log file for the ISAPI Redirector log_file==c:\connectors\isapi_redirect.log # Log level (debug, info, warn, error or trace) log_level=info # Full path to the workers.properties file worker_file=c:\connectors\workers.properties # Full path to the uriworkermap.properties file worker_mount_file=c:\connectors\uriworkermap.properties #OPTIONAL: Full path to the rewrite.properties file rewrite_rule_file=c:\connectors\rewrite.properties
If you do not want to use arewrite.propertiesfile, comment out the last line by placing a#character at the beginning of the line. See Step 5 for more information.Create the
uriworkermap.propertiesfile.Theuriworkermap.propertiesfile contains mappings between deployed application URLs and which worker handles requests to them. The following example file shows the syntax of the file, with a load-balanced configuration. The wildcard (*) character sends all requests for various URL sub-directories to the load-balancer calledrouter. The configuration of the load-balancer is covered in Step 4.Place youruriworkermap.propertiesfile intoC:\connectors\.# images, css files, path /status and /web-console will be # provided by nodes defined in the load-balancer called "router" /css/*=router /images/*=router /status=router /web-console|/*=router # Example of exclusion from mapping, logo.gif won't be displayed !/web-console/images/logo.gif=* # Requests to /app-01 and /app-02 will be routed to nodes defined # in the load-balancer called "router" /app-01|/*=router /app-02|/*=router # mapping for management console, nodes in cluster can be enabled or disabled here /jkmanager|/*=status
Create the
workers.propertiesfile.Theworkers.propertiesfile contains mapping definitions between worker labels and server instances. The following example file shows the syntax of the file. The load balancer is configured near the end of the file, to comprise workersworker01andworker02. Theworkers.propertiesfile follows the syntax of the same file used for Apache mod_jk configuration. For more information about the syntax of theworkers.propertiesfile, refer to Section 19.6.5, “Configuration Reference for Apache Mod_jk Workers”.Place this file into theC:\connectors\directory.# The advanced router LB worker worker.list=router,status # First EAP server definition, port 8009 is standard port for AJP in EAP # # lbfactor defines how much the worker will be used. # The higher the number, the more requests are served # lbfactor is useful when one machine is more powerful # ping_mode=A – all possible probes will be used to determine that # connections are still working worker.worker01.port=8009 worker.worker01.host=127.0.0.1 worker.worker01.type=ajp13 worker.worker01.ping_mode=A worker.worker01.socket_timeout=10 worker.worker01.lbfactor=3 # Second EAP server definition worker.worker02.port=8009 worker.worker02.host=127.0.0.100 worker.worker02.type=ajp13 worker.worker02.ping_mode=A worker.worker02.socket_timeout=10 worker.worker02.lbfactor=1 # Define the LB worker worker.router.type=lb worker.router.balance_workers=worker01,worker02 # Define the status worker for jkmanager worker.status.type=status
Create the
rewrite.propertiesfile.Therewrite.propertiesfile contains simple URL rewriting rules for specific applications. The rewritten path is specified using name-value pairs, as shown in the example below. Place this file into theC:\connectors\directory.#Simple example # Images are accessible under abc path /app-01/abc/=/app-01/images/
Restart the IIS server.
Restart your IIS server by using thenet stopandnet startcommands.C:\> net stop was /Y C:\> net start w3svc
The IIS server is configured to send client requests to the JBoss EAP 6 servers referenced in the workers.properties file, spreading the load across the servers in a 1:3 ratio. This ratio is derived from the load balancing factor (lbfactor) assigned to each server.
19.9. Oracle NSAPI
19.9.1. About the Netscape Server API (NSAPI) HTTP Connector
19.9.2. Configure the NSAPI Connector on Oracle Solaris
The NSAPI connector is a module that runs within Oracle iPlanet Web Server.
Prerequisites
- Your server is running Oracle Solaris 10 or greater, on either an Intel 32-bit, an Intel 64-bit, or a SPARC64 architecture.
- Oracle iPlanet Web Server 7.0.15 or later for Intel architectures, or 7.0.14 or later for SPARC architectures, is installed and configured, aside from the NSAPI connector
- JBoss EAP 6 is installed and configured on each server which will serve as a worker node. Refer to Section 19.3.6, “Configure JBoss EAP 6 to Accept Requests From External Web Servers”.
- The JBoss Native Components ZIP package is downloaded from the Customer Service Portal at https://access.redhat.com.
Procedure 19.20. Extract and Setup the NSAPI Connector
Extract the JBoss Native Components package.
The rest of this procedure assumes that the Native Components package is extracted to the EAP_HOME directory. For the rest of this procedure, the directory/opt/oracle/webserver7/config/is referred to as IPLANET_CONFIG. If your Oracle iPlanet configuration directory is different, modify the procedure accordingly.Disable servlet mappings.
Open theIPLANET_CONFIG/default.web.xmlfile and locate the section with the headingBuilt In Server Mappings. Disable the mappings to the following three servlets, by wrapping them in XML comment characters (<!--and-->).- default
- invoker
- jsp
The following example configuration shows the disabled mappings.<!-- ============== Built In Servlet Mappings =============== --> <!-- The servlet mappings for the built in servlets defined above. --> <!-- The mapping for the default servlet --> <!--servlet-mapping> <servlet-name>default</servlet-name> <url-pattern>/</url-pattern> </servlet-mapping--> <!-- The mapping for the invoker servlet --> <!--servlet-mapping> <servlet-name>invoker</servlet-name> <url-pattern>/servlet/*</url-pattern> </servlet-mapping--> <!-- The mapping for the JSP servlet --> <!--servlet-mapping> <servlet-name>jsp</servlet-name> <url-pattern>*.jsp</url-pattern> </servlet-mapping-->
Save and exit the file.Configure the iPlanet Web Server to load the NSAPI connector module.
Add the following lines to the end of theIPLANET_CONFIG/magnus.conffile, modifying file paths to suit your configuration. These lines define the location of thensapi_redirector.somodule, as well as theworkers.propertiesfile, which lists the worker nodes and their properties.Init fn="load-modules" funcs="jk_init,jk_service" shlib="EAP_HOME/modules/system/layers/base/native/lib/nsapi_redirector.so" shlib_flags="(global|now)" Init fn="jk_init" worker_file="IPLANET_CONFIG/connectors/workers.properties" log_level="info" log_file="IPLANET_CONFIG/connectors/nsapi.log" shm_file="IPLANET_CONFIG/connectors/tmp/jk_shm"
The configuration above is for a 32-bit architecture. If you use 64-bit Solaris, change the stringlib/nsapi_redirector.sotolib64/nsapi_redirector.so.Save and exit the file.Configure the NSAPI connector.
You can configure the NSAPI connector for a basic configuration, with no load balancing, or a load-balancing configuration. Choose one of the following options, after which your configuration will be complete.
19.9.3. Configure NSAPI as a Basic HTTP Connector
This task configures the NSAPI connector to redirect client requests to JBoss EAP 6 servers with no load-balancing or fail-over. The redirection is done on a per-deployment (and hence per-URL) basis. For a load-balancing configuration, refer to Section 19.9.4, “Configure NSAPI as a Load-balancing Cluster” instead.
Prerequisites
- You must complete Section 19.9.2, “Configure the NSAPI Connector on Oracle Solaris” before continuing with the current task.
Procedure 19.21. Setup the Basic HTTP Connector
Define the URL paths to redirect to the JBoss EAP 6 servers.
Note
InIPLANET_CONFIG/obj.conf, spaces are not allowed at the beginning of a line, except when the line is a continuation of the previous line.Edit theIPLANET_CONFIG/obj.conffile. Locate the section which starts with<Object name="default">, and add each URL pattern to match, in the format shown by the example file below. The stringjknsapirefers to the HTTP connector which will be defined in the next step. The example shows the use of wildcards for pattern matching.<Object name="default"> [...] NameTrans fn="assign-name" from="/status" name="jknsapi" NameTrans fn="assign-name" from="/images(|/*)" name="jknsapi" NameTrans fn="assign-name" from="/css(|/*)" name="jknsapi" NameTrans fn="assign-name" from="/nc(|/*)" name="jknsapi" NameTrans fn="assign-name" from="/jmx-console(|/*)" name="jknsapi" </Object>
Define the worker which serves each path.
Continue editing theIPLANET_CONFIG/obj.conffile. Add the following directly after the closing tag of the section you have just finished editing:</Object>.<Object name="jknsapi"> ObjectType fn=force-type type=text/plain Service fn="jk_service" worker="worker01" path="/status" Service fn="jk_service" worker="worker02" path="/nc(/*)" Service fn="jk_service" worker="worker01" </Object>
The example above redirects requests to the URL path/statusto the worker calledworker01, and all URL paths beneath/nc/to the worker calledworker02. The third line indicates that all URLs assigned to thejknsapiobject which are not matched by the previous lines are served toworker01.Save and exit the file.Define the workers and their attributes.
Create a file calledworkers.propertiesin theIPLANET_CONFIG/connectors/# An entry that lists all the workers defined worker.list=worker01, worker02 # Entries that define the host and port associated with these workers worker.worker01.host=127.0.0.1 worker.worker01.port=8009 worker.worker01.type=ajp13 worker.worker02.host=127.0.0.100 worker.worker02.port=8009 worker.worker02.type=ajp13
Theworkers.propertiesfile uses the same syntax as Apache mod_jk. For information about which options are available, refer to Section 19.6.5, “Configuration Reference for Apache Mod_jk Workers”.Save and exit the file.Restart the iPlanet Web Server.
Issue the following command to restart the iPlanet Web Server.IPLANET_CONFIG/../bin/stopserv IPLANET_CONFIG/../bin/startserv
iPlanet Web Server now sends client requests to the URLs you have configured to deployments on JBoss EAP 6.
19.9.4. Configure NSAPI as a Load-balancing Cluster
This task configures the NSAPI connector to redirect client requests to JBoss EAP 6 servers in a load-balancing configuration. To use NSAPI as a simple HTTP connector with no load-balancing, refer to Section 19.9.3, “Configure NSAPI as a Basic HTTP Connector” instead.
Prerequisites
- You must complete Section 19.9.2, “Configure the NSAPI Connector on Oracle Solaris” before continuing with the current task.
Procedure 19.22. Configure the Connector for Load-Balancing
Define the URL paths to redirect to the JBoss EAP 6 servers.
Note
InIPLANET_CONFIG/obj.conf, spaces are not allowed at the beginning of a line, except when the line is a continuation of the previous line.Edit theIPLANET_CONFIG/obj.conffile. Locate the section which starts with<Object name="default">, and add each URL pattern to match, in the format shown by the example file below. The stringjknsapirefers to the HTTP connector which will be defined in the next step. The example shows the use of wildcards for pattern matching.<Object name="default"> [...] NameTrans fn="assign-name" from="/status" name="jknsapi" NameTrans fn="assign-name" from="/images(|/*)" name="jknsapi" NameTrans fn="assign-name" from="/css(|/*)" name="jknsapi" NameTrans fn="assign-name" from="/nc(|/*)" name="jknsapi" NameTrans fn="assign-name" from="/jmx-console(|/*)" name="jknsapi" NameTrans fn="assign-name" from="/jkmanager/*" name="jknsapi" </Object>
Define the worker that serves each path.
Continue editing theIPLANET_CONFIG/obj.conffile. Directly after the closing tag for the section you modified in the previous step (</Object>), add the following new section and modify it to your needs:<Object name="jknsapi"> ObjectType fn=force-type type=text/plain Service fn="jk_service" worker="status" path="/jkmanager(/*)" Service fn="jk_service" worker="router" </Object>
Thisjksnapiobject defines the worker nodes used to serve each path that was mapped to thename="jksnapi"mapping in thedefaultobject. Everything except for URLs matching/jkmanager/*is redirected to the worker calledrouter.Define the workers and their attributes.
Create a file calledworkers.propertiesinIPLANET_CONFIG/connector/# The advanced router LB worker # A list of each worker worker.list=router,status # First JBoss EAP server # (worker node) definition. # Port 8009 is the standard port for AJP # worker.worker01.port=8009 worker.worker01.host=127.0.0.1 worker.worker01.type=ajp13 worker.worker01.ping_mode=A worker.worker01.socket_timeout=10 worker.worker01.lbfactor=3 # Second JBoss EAP server worker.worker02.port=8009 worker.worker02.host=127.0.0.100 worker.worker02.type=ajp13 worker.worker02.ping_mode=A worker.worker02.socket_timeout=10 worker.worker02.lbfactor=1 # Define the load-balancer called "router" worker.router.type=lb worker.router.balance_workers=worker01,worker02 # Define the status worker worker.status.type=status
Theworkers.propertiesfile uses the same syntax as Apache mod_jk. For information about which options are available, refer to Section 19.6.5, “Configuration Reference for Apache Mod_jk Workers”.Save and exit the file.Restart the iPlanet Web Server.
Choose one of the following procedures, depending on whether you run iPlanet Web Server 6.1 or 7.0.iPlanet Web Server 6.1
IPLANET_CONFIG/../stop IPLANET_CONFIG/../start
iPlanet Web Server 7.0
IPLANET_CONFIG/../bin/stopserv IPLANET_CONFIG/../bin/startserv
The iPlanet Web Server redirects the URL patterns you have configured to your JBoss EAP 6 servers in a load-balancing configuration.
Chapter 20. Messaging
20.1. Introduction
20.1.1. HornetQ
Messaging Subsystem
20.1.2. About Java Messaging Service (JMS)
20.1.3. Supported Messaging Styles
- Message Queue pattern
- The Message Queue pattern involves sending a message to a queue. Once in the queue, the message is usually made persistent to guarantee delivery. Once the message has moved through the queue, the messaging system delivers it to a message consumer. The message consumer acknowledges the delivery of the message once it is processed.When used with point-to-point messaging, the Message Queue pattern allows multiple consumers for a queue, but each message can only be received by a single consumer.
- Publish-Subscribe pattern
- The Publish-Subscribe pattern allows multiple senders to send messages to a single entity on the server. This entity is often known as a "topic". Each topic can be attended by multiple consumers, known as "subscriptions".Each subscription receives a copy of every message sent to the topic. This differs from the Message Queue pattern, where each message is only consumed by a single consumer.Subscriptions that are durable retain copies of each message sent to the topic until the subscriber consumes them. These copies are retained even in the event of a server restart. Non-durable subscriptions last only as long as the connection that created them.
20.2. Configuration of Transports
20.2.1. About Acceptors and Connectors
Acceptors and Connectors
Acceptor- An acceptor defines which types of connections are accepted by the HornetQ server.
Connector- A connector defines how to connect to a HornetQ server, and is used by the HornetQ client.
Invm and Netty
Invm- Invm is short for Intra Virtual Machine. It can be used when both the client and the server are running in the same JVM.
Netty- The name of a JBoss project. It must be used when the client and server are running in different JVMs.
standalone.xml and domain.xml. You can use either the Management Console or the Management CLI to define them.
20.2.2. Configuring Netty TCP
Example 20.1. Example of Netty TCP Configuration from Default EAP Configuration
<connectors>
<netty-connector name="netty" socket-binding="messaging"/>
<netty-connector name="netty-throughput" socket-binding="messaging-throughput">
<param key="batch-delay" value="50"/>
</netty-connector>
<in-vm-connector name="in-vm" server-id="0"/>
</connectors>
<acceptors>
<netty-acceptor name="netty" socket-binding="messaging"/>
<netty-acceptor name="netty-throughput" socket-binding="messaging-throughput">
<param key="batch-delay" value="50"/>
<param key="direct-deliver" value="false"/>
</netty-acceptor>
<in-vm-acceptor name="in-vm" server-id="0"/>
</acceptors>
Table 20.1. Netty TCP Configuration Properties
| Property | Default | Description |
|---|---|---|
| batch-delay | 0 milliseconds | Before writing packets to the transport, HornetQ can be configured to batch up writes for a maximum of batch-delay milliseconds. This increases the overall throughput for very small messages by increasing average latency for message transfer |
| direct-deliver | true | When a message arrives on the server and is delivered to waiting consumers, by default, the delivery is done on the same thread on which the message arrived. This gives good latency in environments with relatively small messages and a small number of consumers but reduces the throughput and latency. For highest throughput you can set this property as "false" |
| local-address | [local address available] | For a netty connector, this is used to specify the local address which the client will use when connecting to the remote address. If a local address is not specified then the connector will use any available local address |
| local-port | 0 | For a netty connector, this is used to specify which local port the client will use when connecting to the remote address. If the local-port default is used (0) then the connector will let the system pick up an ephemeral port. valid ports are 0 to 65535 |
| nio-remoting-threads | -1 | If configured to use NIO, HornetQ will, by default, use a number of threads equal to three times the number of cores (or hyper-threads) as reported by Runtime.getRuntime().availableProcessors() for processing incoming packets. To override this value, you can set a custom value for the number of threads |
| tcp-no-delay | true | If this is true then Nagle's algorithm will be enabled. This algorithm helps improve the efficiency of TCP/IP networks by reducing the number of packets sent over a network |
| tcp-send-buffer-size | 32768 bytes | This parameter determines the size of the TCP send buffer in bytes |
| tcp-receive-buffer-size | 32768 bytes | This parameter determines the size of the TCP receive buffer in bytes |
| use-nio | false | If this is true then Java non blocking NIO will be used. If set to false then old blocking Java IO will be used.If you need the server to handle many concurrent connections use non blocking Java NIO otherwise go for old (blocking) IO |
Note
20.2.3. Configuring Netty Secure Sockets Layer (SSL)
Warning
Note
<acceptors> <netty-acceptor name="netty" socket-binding="messaging"/> <param key="ssl-enabled" value="true"/> <param key="key-store-password" value="[keystore password]"/> <param key="key-store-path" value="[path to keystore file]"/> </netty-acceptor> </acceptors>
Table 20.2. Netty SSL Configuration Properties
| Property Name | Default | Description |
|---|---|---|
| ssl-enabled | true | This enables SSL |
| key-store-password | [keystore password] | When used on an acceptor this is the password for the server side keystore. When used on a connector this is the password for the client-side keystore. This is only relevant for a connector if you are using two way SSL (mutual authentication). This value can be configured on the server, but it is downloaded and used by the client |
| key-store-path | [path to keystore file] | When used on an acceptor this is the path to the server side SSL key store that holds the keys of all the clients that the server trusts. This is only relevant for an acceptor if you are using two way SSL (i.e. mutual authentication). When used on a connector this is the path to the client-side SSL key store which holds the public keys of all the servers which the client trusts. When used on a connector this is the password for the client-side truststore. This path is configured on the server, but it is downloaded and used by the client |
need-client-auth: This specifies the need for two way (mutual authentication) for client connections.trust-store-password: When used on an acceptor this is the password for the server side trust store. When used on a connector this is the password for the client side truststore. This is relevant for a connector for both one way and two way SSL. This value can be configured on the server, but it is downloaded and used by the clienttrust-store-path: When used on an acceptor this is the path to the server side SSL key store that holds the keys of all the clients that the server trusts. When used on a connector this is the path to the client side SSL key store which holds the public keys of all the servers that the client trusts. This is relevant for a connector for both one way and two way SSL. This path can be configured on the server, but it is downloaded and used by the client
20.2.4. Configuring Netty HTTP
Note
<socket-binding name="messaging-http" port="7080" />
<acceptors>
<netty-acceptor name="netty" socket-binding="messaging-http">
<param key="http-enabled" value="false"/>
<param key="http-client-idle-time" value="500"/>
<param key="http-client-idle-scan-period" value="500"/>
<param key="http-response-time" value="10000"/>
<param key="http-server-scan-period" value="5000"/>
<param key="http-requires-session-id" value="false"/>
</netty-acceptor>
</acceptors>
The following table describes the additional properties for configuring Netty HTTP:
Table 20.3. Netty HTTP Configuration Properties
| Property Name | Default | Description |
|---|---|---|
| http-enabled | false | If this is true HTTP is enabled |
| http-client-idle-time | 500 milliseconds | How long a client can be idle before sending an empty HTTP request to keep the connection alive |
| http-client-idle-scan-period | 500 milliseconds | How often (milliseconds) to scan for idle clients |
| http-response-time | 10000 milliseconds | The time period for which the server can wait before sending an empty HTTP response to keep the connection alive |
| http-server-scan-period | 5000 milliseconds | How often, in milliseconds, to scan for clients needing responses |
| http-requires-session-id | false | If this is true then client will wait after the first call to receive a session ID |
Warning
20.2.5. Configuring Netty Servlet
- Deploy the servlet: The following example describes a web application that uses the servlet:
<web-app> <servlet> <servlet-name>HornetQServlet</servlet-name> <servlet-class>org.jboss.netty.channel.socket.http.HttpTunnelingServlet</servlet-class> <init-param> <param-name>endpoint</param-name> <param-value>local:org.hornetq</param-value> </init-param> <load-on-startup>1</load-on-startup> </servlet> <servlet-mapping> <servlet-name>HornetQServlet</servlet-name> <url-pattern>/HornetQServlet</url-pattern> </servlet-mapping> </web-app>The init parameterendpointspecifies the host attribute of the Netty acceptor that the servlet will forward its packets to - Insert the Netty servlet acceptor on the server side configuration: The following example shows the definition of an acceptor in server configuration files (
standalone.xmlanddomain.xml):<acceptors> <acceptor name="netty-servlet"> <factory-class> org.hornetq.core.remoting.impl.netty.NettyAcceptorFactory </factory-class> <param key="use-servlet" value="true"/> <param key="host" value="org.hornetq"/> </acceptor> </acceptors> - The last step is to define a connector for the client in server configuration files (
standalone.xmlanddomain.xml):<netty-connector name="netty-servlet" socket-binding="http"> <param key="use-servlet" value="true"/> <param key="servlet-path" value="/messaging/HornetQServlet"/> </netty-connector>
- It is also possible to use the servlet transport over SSL by adding the following configuration to the connector:
<netty-connector name="netty-servlet" socket-binding="https"> <param key="use-servlet" value="true"/> <param key="servlet-path" value="/messaging/HornetQServlet"/> <param key="ssl-enabled" value="true"/> <param key="key-store-path" value="path to a key-store"/> <param key="key-store-password" value="key-store password"/> </connector>
Warning
Note
20.3. About Java Naming and Directory Interface (JNDI)
20.4. Dead Connection Detection
20.4.1. Closing Dead Connection Resources on the Server
finally block in the application's code.
finally block:
ServerLocator locator = null;
ClientSessionFactory sf = null;
ClientSession session = null;
try
{
locator = HornetQClient.createServerLocatorWithoutHA(..);
sf = locator.createClientSessionFactory();;
session = sf.createSession(...);
... do some operations with the session...
}
finally
{
if (session != null)
{
session.close();
}
if (sf != null)
{
sf.close();
}
if(locator != null)
{
locator.close();
}
}
The following example shows a JMS client application which closes its session and session factory in a finally block:
Connection jmsConnection = null;
try
{
ConnectionFactory jmsConnectionFactory = HornetQJMSClient.createConnectionFactoryWithoutHA(...);
jmsConnection = jmsConnectionFactory.createConnection();
... do some operations with the connection...
}
finally
{
if (connection != null)
{
connection.close();
}
}
The connection-ttl parameter determines the time period for which the server keeps the connection alive when it does not receive data or ping packets from the client. This parameter ensures that dead server resources like old sessions are sustained longer thereby allowing clients to reconnect when a failed network connection recovers.
connection-ttl parameter in HornetQConnectionFactory instance. If you are deploying JMS connection factory instances direct into JNDI; you can define connection-ttl parameter in standalone.xml and domain.xml server configuration files.
connection-ttl parameter is 60000 milliseconds. If you do not need clients to specify their own connection TTL; you can define the connection-ttl-override parameter in server configuration files to override all values. The connection-ttl-override parameter is disabled by default and has a value of -1.
HornetQ uses garbage collection to detect and close the sessions which are not explicitly closed in a finally block. HornetQ server logs a warning similar to the warning shown below before closing the sessions:
[Finalizer] 20:14:43,244 WARNING [org.hornetq.core.client.impl.DelegatingSession] I'm closing a ClientSession you left open. Please make sure you close all ClientSessions explicitly before let ting them go out of scope! [Finalizer] 20:14:43,244 WARNING [org.hornetq.core.client.impl.DelegatingSession] The session you didn't close was created here: java.lang.Exception at org.hornetq.core.client.impl.DelegatingSession.<init>(DelegatingSession.java:83) at org.acme.yourproject.YourClass (YourClass.java:666)The log message contains information about the code part where a JMS connection or user session was created and not closed later.
20.4.2. Detecting Client Side Failure
client-failure-check-period parameter then the client considers that the connection has failed. The client then initiates a failover or calls FailureListener instances.
ClientFailureCheckPeriod attribute on HornetQConnectionFactory instance. If you are deploying JMS connection factory instances directly into JNDI on the server side, you can specify client-failure-check-period parameter in standalone.xml and domain.xml server configuration files.
By default, packets received on the server side are executed on the remoting thread. It is possible to free up the remoting thread by processing operations asynchronously on any thread from the thread pool. You can configure asynchronous connection execution using async-connection-execution-enabled parameter in standalone.xml and domain.xml server configuration files. The default value of this parameter is "true".
Note
20.5. Work with Large Messages
20.5.1. Work with Large Messages
InputStream in the body of the message. When the message is sent HornetQ reads this InputStream and transmits data to the server in fragments.
OutputStream on the message to stream it in fragments to a disk file.
20.5.2. Configuring HornetQ Large Messages
In Standalone mode large messages are stored in EAP_HOME/standalone/data/largemessages directory. In Domain mode large messages are stored in EAP_HOME/domain/servers/SERVERNAME/data/largemessages directory. The configuration property large-messages-directory indicates the location where large messages are stored.
Important
20.5.3. Configuring Parameters
- Using HornetQ Core API on Client Side
- If you are using HornetQ Core API on client side you need to set
ServerLocator.setMinLargeMessageSizeparameter to specify minimum size of large messages. The minimum size of large messages(min-large-message-size) is set to 100KiB by default.ServerLocator locator = HornetQClient.createServerLocatorWithoutHA(new TransportConfiguration(NettyConnectorFactory.class.getName())) locator.setMinLargeMessageSize(25 * 1024); ClientSessionFactory factory = HornetQClient.createClientSessionFactory();
- Configuring server for Java Messaging Service (JMS) clients
- If you using Java Messaging Service (JMS) you need to specify the minimum size of large messages in the attribute
min-large-message-sizeof your server configuration files (standalone.xmlanddomain.xml). The minimum size of large messages(min-large-message-size) is set to 100KiB by default.Note
The value of the attributemin-large-message-sizeshould be in bytesYou may choose to compress large messages for fast and efficient transfer. All compression/de-compression operations are handled on client side. If the compressed message is smaller thanmin-large-message-size,it is sent to the server as a regular message. Using Java Messaging Service (JMS) you can compress large messages by setting the boolean propertycompress-large-messages"true" on the server locator or ConnectionFactory.<connection-factory name="ConnectionFactory"> <connectors> <connector-ref connector-name="netty"/> </connectors> ... <min-large-message-size>204800</min-large-message-size> <compress-large-messages>true</compress-large-messages> </connection-factory>
20.6. Paging
20.6.1. About Paging
Note
20.6.2. Page Files
page-size-bytes).
20.6.3. Configuration of Paging Folder
paging-directory parameter:
<hornetq-server> ... <paging-directory>/location/paging-directory</paging-directory> ... </hornetq-server>The
paging-directory parameter is used to specify a location/folder to store the page files. HornetQ creates one folder for each paging address in this paging directory. The page files are stored in these folders.
EAP_HOME/standalone/data/messagingpaging (standalone mode) and EAP_HOME/domain/servers/SERVERNAME/data/messagingpaging (domain mode).
20.6.4. Paging Mode
Note
max-size-bytes for an address, it means each matching address will have a maximum size that you specified. However it does not mean that the total overall size of all matching addresses is limited to max-size-bytes.
max-size-bytes) for an address in server configuration files (standalone.xml and domain.xml):
<address-settings>
<address-setting match="jms.someaddress">
<max-size-bytes>104857600</max-size-bytes>
<page-size-bytes>10485760</page-size-bytes>
<address-full-policy>PAGE</address-full-policy>
</address-setting>
</address-settings>
The following table describes the parameters on the address settings:
Table 20.4. Paging Address Settings
| Element | Default Value | Description |
|---|---|---|
| max-size-bytes | 10485760 |
This is used to specify the maximum memory size the address can have before entering nto paging mode
|
| page-size-bytes | 2097152 |
This is used to specify the size of each page file used on the paging system
|
| address-full-policy | PAGE |
This value of this attribute is used for paging decisions. You can set either of these values for this attribute:
PAGE: To enable paging and page messages beyond the set limit to disk, DROP: To silently drop messages which exceed the set limit, FAIL: To drop messages and send an exception to client message producers, BLOCK: To block client message producers when they send messages beyond the set limit
|
| page-max-cache-size | 5 |
The system will keep page files up to
page-max-cache-size in memory to optimize Input/Output during paging navigation
|
Important
address-full-policy to DROP, FAIL and BLOCK respectively. In the default configuration, all addresses are configured to page messages after an address reaches max-size-bytes.
When a message is routed to an address that has multiplte queues bound to it, there is only a single copy of the message in memory. Each queue only handles a reference to this original copy of the message. Thus the memory is freed up only when all the queues referencing the original message, have delivered the message.
Note
20.7. Diverts
standalone.xml and domain.xml).
- Exclusive Divert: A message is only diverted to a new address and not sent to the old address at all
- Non-exclusive Divert: A message continues to go the old address, and a copy of it is also sent to the new address. Non-exclusive diverts can be used for splitting the flow of messages
Transformer and an optional message filter. An optional message filter helps only divert messages which match the specified filter. A transformer is used for transforming messages to another form. When a transformer is specified; all diverted messages are transformed by the Transformer.
- Divert messages to a local store and forward queue. Setup a bridge which consumes from that queue and directs messages to an address on a different server
20.7.1. Exclusive Divert
exclusive attribute as true in standalone.xml and domain.xml server configuration files.
<divert name="prices-divert">
<address>jms.topic.priceUpdates</address>
<forwarding-address>jms.queue.priceForwarding</forwarding-address>
<filter string="office='New York'"/>
<transformer-class-name>
org.hornetq.jms.example.AddForwardingTimeTransformer
</transformer-class-name>
<exclusive>true</exclusive>
</divert>
The following list describes the attributes used in the above example:
address: Messages sent to this address are diverted to another addressforwarding-address: Messages are diverted to this address from the old addressfilter-string: Messages which match thefilter-stringvalue are diverted. All other messages are routed to the normal addresstransformer-class-name: If you specify this parameter; it executes transformation for each matching message. This allows you to change a message's body or property before it is divertedexclusive: Used to enable or disable exclusive divert
20.7.2. Non-exclusive Divert
exclusive property as false in standalone.xml and domain.xml server configuration files.
<divert name="order-divert"> <address>jms.queue.orders</address> <forwarding-address>jms.topic.spyTopic</forwarding-address> <exclusive>false</exclusive> </divert>The above example makes a copy of every message sent to
jms.queue.orders address and sends it to jms.topic.spyTopic address.
20.8. Configuration
20.8.1. Configure the JMS Server
EAP_HOME/domain/configuration/domain.xml file for domain servers, or in the EAP_HOME/standalone/configuration/standalone-full.xml file for standalone servers.
<subsystem xmlns="urn:jboss:domain:messaging:1.4"> element in the server configuration file contains all JMS configuration. Add any JMS ConnectionFactory, Queue, or Topic instances required for the JNDI.
Enable the JMS subsystem in JBoss EAP 6.
Within the<extensions>element, verify that the following line is present and is not commented out:<extension module="org.jboss.as.messaging"/>
Add the basic JMS subsystem.
If the Messaging subsystem is not present in your configuration file, add it.- Look for the
<profile>which corresponds to the profile you use, and locate its<subsystems>tag. - Paste the following XML immediately following the
<profile>tag.<subsystem xmlns="urn:jboss:domain:messaging:1.4"> <hornetq-server> <!-- ALL XML CONFIGURATION IS ADDED HERE --> </hornetq-server> </subsystem>All further configuration will be added to the empty line above.
Add basic configuration for JMS.
Add the following XML in the blank line after the<subsystem xmlns="urn:jboss:domain:messaging:1.4"><hornetq-server>tag:<journal-min-files>2</journal-min-files> <journal-type>NIO</journal-type> <persistence-enabled>true</persistence-enabled>
Customize the values above to meet your needs.Warning
The value ofjournal-file-sizemust be higher than or equal tomin-large-message-size(100KiB by default), or the server won't be able to store the message.Add connection factory instances to HornetQ
The client uses a JMSConnectionFactoryobject to make connections to the server. To add a JMS connection factory object to HornetQ, include a single<jms-connection-factories>tag and<connection-factory>element for each connection factory as follows:<jms-connection-factories> <connection-factory name="InVmConnectionFactory"> <connectors> <connector-ref connector-name="in-vm"/> </connectors> <entries> <entry name="java:/ConnectionFactory"/> </entries> </connection-factory> <connection-factory name="RemoteConnectionFactory"> <connectors> <connector-ref connector-name="netty"/> </connectors> <entries> <entry name="java:jboss/exported/jms/RemoteConnectionFactory"/> </entries> </connection-factory> <pooled-connection-factory name="hornetq-ra"> <transaction mode="xa"/> <connectors> <connector-ref connector-name="in-vm"/> </connectors> <entries> <entry name="java:/JmsXA"/> </entries> </pooled-connection-factory> </jms-connection-factories>Configure the
nettyconnectors and acceptorsThis JMS connection factory usesnettyacceptors and connectors. These are references to connector and acceptor objects deployed in the server configuration file. The connector object defines the transport and parameters used to connect to the HornetQ server. The acceptor object identifies the type of connections accepted by the HornetQ server.To configure thenettyconnectors, include the following settings:<connectors> <netty-connector name="netty" socket-binding="messaging"/> <netty-connector name="netty-throughput" socket-binding="messaging-throughput"> <param key="batch-delay" value="50"/> </netty-connector> <in-vm-connector name="in-vm" server-id="0"/> </connectors>To configure thenettyacceptors, include the following settings:<acceptors> <netty-acceptor name="netty" socket-binding="messaging"/> <netty-acceptor name="netty-throughput" socket-binding="messaging-throughput"> <param key="batch-delay" value="50"/> <param key="direct-deliver" value="false"/> </netty-acceptor> <in-vm-acceptor name="in-vm" server-id="0"/> </acceptors>Review the configuration
If you have followed the previous steps, your messaging subsystem should look like the following:<subsystem xmlns="urn:jboss:domain:messaging:1.4"> <hornetq-server> <journal-min-files>2</journal-min-files> <journal-type>NIO</journal-type> <persistence-enabled>true</persistence-enabled> <jms-connection-factories> <connection-factory name="InVmConnectionFactory"> <connectors> <connector-ref connector-name="in-vm"/> </connectors> <entries> <entry name="java:/ConnectionFactory"/> </entries> </connection-factory> <connection-factory name="RemoteConnectionFactory"> <connectors> <connector-ref connector-name="netty"/> </connectors> <entries> <entry name="java:jboss/exported/jms/RemoteConnectionFactory"/> </entries> </connection-factory> <pooled-connection-factory name="hornetq-ra"> <transaction mode="xa"/> <connectors> <connector-ref connector-name="in-vm"/> </connectors> <entries> <entry name="java:/JmsXA"/> </entries> </pooled-connection-factory> </jms-connection-factories> <connectors> <netty-connector name="netty" socket-binding="messaging"/> <netty-connector name="netty-throughput" socket-binding="messaging-throughput"> <param key="batch-delay" value="50"/> </netty-connector> <in-vm-connector name="in-vm" server-id="0"/> </connectors> <acceptors> <netty-acceptor name="netty" socket-binding="messaging"/> <netty-acceptor name="netty-throughput" socket-binding="messaging-throughput"> <param key="batch-delay" value="50"/> <param key="direct-deliver" value="false"/> </netty-acceptor> <in-vm-acceptor name="in-vm" server-id="0"/> </acceptors> </hornetq-server> </subsystem>Configure the socket binding groups
The netty connectors reference themessagingandmessaging-throughputsocket bindings. Themessagingsocket binding uses port 5445, and themessaging-throughputsocket binding uses port 5455. The<socket-binding-group>tag is in a separate section of the server configuration file. Ensure the following socket bindings are present in the<socket-binding-groups>element:<socket-binding-group name="standard-sockets" default-interface="public" port-offset="${jboss.socket.binding.port-offset:0}"> ... <socket-binding name="messaging" port="5445"/> <socket-binding name="messaging-throughput" port="5455"/> ... </socket-binding-group>Add queue instances to HornetQ
There are 4 ways to setup the queue instances (or JMS destinations) for HornetQ.- Use the Management ConsoleTo use the Management Console, the server must have been started in the
Message-Enabledmode. You can do this by using the-coption and forcing the use of thestandalone-full.xml(for standalone servers) configuration file. For example, in the standalone mode, the following will start the server in a message enabled mode./standalone.sh -c standalone-full.xml
Once the server has started, logon to the Management Console and select the tab. Expand the menu, then expand the menu and click . Next to Default on the JMS Messaging Provider table, click , and then click to enter details of the JMS destination. - Use the Management CLI:First, connect to the Management CLI:
bin/jboss-cli.sh --connect
Next, change into the messaging subsystem:cd /subsystem=messaging/hornetq-server=default
Finally, execute an add operation, replacing the examples values given below with your own:./jms-queue=testQueue:add(durable=false,entries=["java:jboss/exported/jms/queue/test"])
- Create a JMS configuration file and add it to the deployments folderStart by creating a JMS configuration file: example-jms.xml. Add the following entries to it, replacing the values with your own:
<?xml version="1.0" encoding="UTF-8"?> <messaging-deployment xmlns="urn:jboss:messaging-deployment:1.0"> <hornetq-server> <jms-destinations> <jms-queue name="testQueue"> <entry name="queue/test"/> <entry name="java:jboss/exported/jms/queue/test"/> </jms-queue> <jms-topic name="testTopic"> <entry name="topic/test"/> <entry name="java:jboss/exported/jms/topic/test"/> </jms-topic> </jms-destinations> </hornetq-server> </messaging-deployment>Save this file in the deployments folder and do a deployment. - Add entries in the JBoss EAP 6 configuration file.Using the standalone-full.xml as an example, find the messaging subsystem in this file.
<subsystem xmlns="urn:jboss:domain:messaging:1.4">
Add the following entries in it, again, replacing the example values with your own. You will need to add these entries in after the </jms-connection-factories> end tag but before the </hornetq-server> element:<jms-destinations> <jms-queue name="testQueue"> <entry name="queue/test"/> <entry name="java:jboss/exported/jms/queue/test"/> </jms-queue> <jms-topic name="testTopic"> <entry name="topic/test"/> <entry name="java:jboss/exported/jms/topic/test"/> </jms-topic> </jms-destinations>
Perform additional configuration
If you need additional settings, review the DTD inEAP_HOME/docs/schema/jboss-as-messaging_1_4.xsd.
20.8.2. Configure JMS Address Settings
<address-settings> configuration element.
Address wildcards can be used to match multiple similar addresses with a single statement, similar to how many systems use the asterisk ( *) character to match multiple files or strings with a single search. The following characters have special significance in a wildcard statement.
Table 20.5. JMS Wildcard Syntax
| Character | Description |
|---|---|
| . (a single period) | Denotes the space between words in a wildcard expression. |
| # (a pound or hash symbol) | Matches any sequence of zero or more words. |
| * (an asterisk) | Matches a single word. |
Table 20.6. JMS Wildcard Examples
| Example | Description |
|---|---|
| news.europe.# |
Matches
news.europe, news.europe.sport, news.europe.politic, but not news.usa or europe.
|
| news.* |
Matches
news.europe but not news.europe.sport.
|
| news.*.sport |
Matches
news.europe.sport and news.usa.sport, but not news.europe.politics.
|
Example 20.2. Default Address Setting Configuration
<address-settings>
<!--default for catch all-->
<address-setting match="#">
<dead-letter-address>jms.queue.DLQ</dead-letter-address>
<expiry-address>jms.queue.ExpiryQueue</expiry-address>
<redelivery-delay>0</redelivery-delay>
<max-size-bytes>10485760</max-size-bytes>
<address-full-policy>BLOCK</address-full-policy>
<message-counter-history-day-limit>10</message-counter-history-day-limit>
</address-setting>
</address-settings>
Table 20.7. Description of JMS Address Settings
| Element | Description | Default Value | Type |
|---|---|---|---|
address-full-policy
|
Determines what happens when an address where max-size-bytes is specified becomes full.
|
PAGE
|
STRING
|
dead-letter-address
|
If a dead letter address is specified, messages are moved to the dead letter address if
max-delivery-attempts delivery attempts have failed. Otherwise, these undelivered messages are discarded. Wildcards are allowed.
|
jms.queue.DLQ
|
STRING
|
expiry-address
|
If the expiry address is present, expired messages are sent to the address or addresses matched by it, instead of being discarded. Wildcards are allowed.
|
jms.queue.ExpiryQueue
|
STRING
|
last-value-queue
|
Defines whether a queue only uses last values or not.
|
false
|
BOOLEAN
|
max-delivery-attempts
|
The maximum number of times to attempt to re-deliver a message before it is sent to
dead-letter-address or discarded.
|
10
|
INT
|
max-size-bytes
|
The maximum bytes size.
|
10485760L
|
LONG
|
message-counter-history-day-limit
|
Day limit for the message counter history.
|
10
|
INT
|
page-max-cache-size
|
The number of page files to keep in memory to optimize IO during paging navigation.
|
5
|
INT
|
page-size-bytes
|
The paging size.
|
5
|
INT
|
redelivery-delay
|
Time to delay between re-delivery attempts of messages, expressed in milliseconds. If set to
0, re-delivery attempts occur indefinitely.
|
0L
|
LONG
|
redistribution-delay
|
Defines how long to wait when the last consumer is closed on a queue before redistributing any messages.
|
-1L
|
LONG
|
send-to-dla-on-no-route
|
A parameter for an address that sets the condition of a message not routed to any queues to instead be sent the to the dead letter address (DLA) indicated for that address.
|
false
|
BOOLEAN
|
Configure Address Setting and Pattern Attributes
Choose either the Management CLI or the Management Console to configure your pattern attributes as required.Configure the Address Settings Using the Management CLI
Use the Management CLI to configure address settings.Add a New Pattern
Use theaddoperation to create a new address setting if required. You can run this command from the root of the Management CLI session, which in the following examples creates a new pattern titled patternname, with amax-delivery-attemptsattribute declared as 5. The examples for both Standalone Server and a Managed Domain editing on thefullprofile are shown.[standalone@localhost:9999 /] /subsystem=messaging/hornetq-server=default/address-setting=patternname/:add(max-delivery-attempts=5)
[domain@localhost:9999 /] /profile=full/subsystem=messaging/hornetq-server=default/address-setting=patternname/:add(max-delivery-attempts=5)
Edit Pattern Attributes
Use thewriteoperation to write a new value to an attribute. You can use tab completion to help complete the command string as you type, as well as to expose the available attributes. The following example updates themax-delivery-attemptsvalue to 10[standalone@localhost:9999 /] /subsystem=messaging/hornetq-server=default/address-setting=patternname/:write-attribute(name=max-delivery-attempts,value=10)
[domain@localhost:9999 /] /profile=full/subsystem=messaging/hornetq-server=default/address-setting=patternname/:write-attribute(name=max-delivery-attempts,value=10)
Confirm Pattern Attributes
Confirm the values are changed by running theread-resourceoperation with theinclude-runtime=trueparameter to expose all current values active in the server model.[standalone@localhost:9999 /] /subsystem=messaging/hornetq-server=default/address-setting=patternname/:read-resource
[domain@localhost:9999 /] /profile=full/subsystem=messaging/hornetq-server=default/address-setting=patternname/:read-resource
Configure the Address Settings Using the Management Console
Use the Management Console to configure address settings.- Log into the Management Console of your Managed Domain or Standalone Server.
- Select the Configuration tab at the top of the screen. For Domain mode, select a profile from the Profile menu at the top left. Only the
fullandfull-haprofiles have themessagingsubsystem enabled. - Expand the Messaging menu, and select Destinations.
- A list of JMS Providers is shown. In the default configuration, only one provider, called
default, is shown. Click View to view the detailed settings for this provider. - Click the Address Settings tab. Either add a new pattern by clicking , or select an existing pattern and click to update the settings.
- If you are adding a new pattern, the Pattern field refers to the
matchparameter of theaddress-settingelement. You can also edit the Dead Letter Address, Expiry Address, Redelivery Delay, and Max Delivery Attempts. Other options need to be configured using the Management CLI.
20.8.3. Configure Messaging with HornetQ
standalone.xml or domain.xml configuration files. It is useful however to familiarize yourself with the messaging components of the default configuration files, where documentation examples using management tools give configuration file snippets for reference.
20.8.4. Enable Logging for HornetQ
- Editing server configuration files (
standalone-full.xmlandstandalone-full-ha.xml) manually - Editing server configuration files using the CLI
Procedure 20.1. Set HornetQ logging by editing server configuration files manually
- Open the server configuration file(s) for editing. For example
standalone-full.xmlandstandalone-full-ha.xml - Navigate to logging subsystem configuration in the file(s). The default configuration looks like this:
<logger category="com.arjuna"> <level name="TRACE"/> </logger> ... <logger category="org.apache.tomcat.util.modeler"> <level name="WARN"/> </logger> ....
- Add the
org.hornetqlogger category along with the desired logging level as shown in the following example:<logger category="com.arjuna"> <level name="TRACE"/> </logger> ... <logger category="org.hornetq"> <level name="INFO"/> </logger> ....
HornetQ logging is enabled and log messages are processed based on the configured log level.
You can also use CLI to add the org.hornetq logger category along with the desired logging level to server configuration file(s). For more information see: Section 14.3.2, “Configure a Log Category in the CLI”
20.8.5. Configuring HornetQ Core Bridge
Example 20.3. Example configuration for HornetQ Core Bridge:
<bridges>
<bridge name="myBridge">
<queue-name>jms.queue.InQueue</queue-name>
<forwarding-address>jms.queue.OutQueue</forwarding-address>
<ha>true</ha>
<reconnect-attempts>-1</reconnect-attempts>
<use-duplicate-detection>true</use-duplicate-detection>
<static-connectors>
<connector-ref>
bridge-connector
</connector-ref>
</static-connectors>
</bridge>
</bridges>
Table 20.8. HornetQ Core Bridge Attributes
| Attribute | Description |
|---|---|
| name |
All bridges must have a unique name on the server.
|
| queue-name |
This mandatory parameter is the unique name of the local queue that the bridge consumes from. The queue must already exist by the time the bridge is instantiated at start-up.
|
| forwarding-address |
This is the address on the target server that the message will be forwarded to. If a forwarding address is not specified, then the original address of the message will be retained.
|
| ha |
This optional parameter determines whether or not this bridge should support high availability.
true means it will connect to any available server in a cluster and support failover. The default value is false.
|
| reconnect-attempts |
This optional parameter determines the total number of reconnect attempts the bridge should make before giving up and shutting down. A value of -1 signifies an unlimited number of attempts. The default value is -1.
|
| use-duplicate-detection |
This optional parameter determines whether the bridge will automatically insert a duplicate id property into each message that it forwards.
|
| static-connectors |
The static-connectors is a list of connector-ref elements pointing to connector elements defined elsewhere. A connector encapsulates knowledge of what transport to use (TCP, SSL, HTTP etc) as well as the server connection parameters (host, port etc).
|
20.8.6. Configuring JMS Bridge
Example 20.4. Example configuration for JMS Bridge:
<subsystem>
<subsystem xmlns="urn:jboss:domain:messaging:1.3">
<hornetq-server>
...
</hornetq-server>
<jms-bridge name="myBridge">
<source>
<connection-factory name="ConnectionFactory"/>
<destination name="jms/queue/InQueue"/>
</source>
<target>
<connection-factory name="jms/RemoteConnectionFactory"/>
<destination name="jms/queue/OutQueue"/>
<context>
<property key="java.naming.factory.initial" value="org.jboss.naming.remote.client.InitialContextFactory"/>
<property key="java.naming.provider.url" value="remote://192.168.40.1:4447"/>
</context>
</target>
<quality-of-service>AT_MOST_ONCE</quality-of-service>
<failure-retry-interval>1000</failure-retry-interval>
<max-retries>-1</max-retries>
<max-batch-size>10</max-batch-size>
<max-batch-time>100</max-batch-time>
<add-messageID-in-header>true</add-messageID-in-header>
</jms-bridge>
...
</subsystem>
Table 20.9. HornetQ Core JMS Attributes
| Attribute | Description |
|---|---|
| name |
All bridges must have a unique name on the server.
|
| source connection-factory |
This injects the SourceCFF bean (also defined in the beans file). This bean creates the source ConnectionFactory.
|
| source destination name |
This injects the SourceDestinationFactory bean (also defined in the beans file). This bean creates the source Destination.
|
| target connection-factory |
This injects the TargetCFF bean (also defined in the beans file). This bean creates the target ConnectionFactory.
|
| target destination name |
This injects the TargetDestinationFactory bean (also defined in the beans file). This bean creates the target Destination.
|
| quality-of-service |
This parameter represents the required quality of service mode. The possible values are: AT_MOST_ONCE, DUPLICATES_OK, ONCE_AND_ONLY_ONCE
|
| failure-retry-interval |
This represents the amount of time in milliseconds to wait between trying to recreate connections to the source or target servers when the bridge has detected they have failed.
|
| max-retries |
This represents the number of attempts to recreate connections to the source or target servers when the bridge has detected they have failed. The bridge will give up after trying this number of times. -1 represents 'try forever'.
|
| max-batch-size |
This represents the maximum number of messages to consume from the source destination before sending them in a batch to the target destination. Its value must >= 1.
|
| max-batch-time |
This represents the maximum number of milliseconds to wait before sending a batch to target, even if the number of messages consumed has not reached MaxBatchSize. Its value must be -1 to represent 'wait forever', or >= 1 to specify an actual time.
|
| add-messageID-in-header |
If true, then the original message's message id will be appended in the message sent to the destination in the header HORNETQ_BRIDGE_MSG_ID_LIST. If the message is bridged more than once, each message id will be appended. This enables a distributed request-response pattern to be used.
When you receive the message you can send a response using the correlation id of the first message id, so when the original sender receives the message, it is easy to correlate.
|
20.8.7. Configure Delayed Redelivery
Delayed redelivery is defined in the <redelivery-delay> element, which is a child element of the <address-setting> configuration element in the Java Messaging Service (JMS) subsystem configuration.
<!-- delay redelivery of messages for 5s --> <address-setting match="jms.queue.exampleQueue"> <redelivery-delay>5000</redelivery-delay> </address-setting>
<redelivery-delay> is set to 0, there is no redelivery delay. Address wildcards can be used on the match attribute of <address-match> element to configure the redelivery delay for addresses that match the wildcard.
20.8.8. Configure Dead Letter Addresses
A dead letter address is defined in the <address-setting> element of the Java Messaging Service (JMS) subsystem configuration.
<!-- undelivered messages in exampleQueue will be sent to the dead letter address deadLetterQueue after 3 unsuccessful delivery attempts --> <address-setting match="jms.queue.exampleQueue"> <dead-letter-address>jms.queue.deadLetterQueue</dead-letter-address> <max-delivery-attempts>3</max-delivery-attempts> </address-setting>
<dead-letter-address> is not specified, messages are removed after trying to deliver <max-delivery-attempts> times. By default, messages delivery is attempted 10 times. Setting <max-delivery-attempts> to -1 allows infinite redelivery attempts. For example, a dead letter can be set globally for a set of matching addresses and you can set <max-delivery-attempts> to -1 for a specific address setting to allow infinite redelivery attempts only for this address. Address wildcards can also be used to configure dead letter settings for a set of addresses.
20.8.9. Configure Message Expiry Addresses
Message expiry addresses are defined in the address-setting configuration of the Java Messaging Service (JMS). For example:
<!-- expired messages in exampleQueue will be sent to the expiry address expiryQueue --> <address-setting match="jms.queue.exampleQueue"> <expiry-address>jms.queue.expiryQueue</expiry-address> </address-setting>
20.8.10. Reference for HornetQ Configuration Attributes
read-resource operation.
Example 20.5. Example
[standalone@localhost:9999 /] /subsystem=messaging/hornetq-server=default:read-resource
Table 20.10. HornetQ Attributes
| Attribute | Default Value | Type | Description |
|---|---|---|---|
allow-failback | true | BOOLEAN | Whether this server will automatically shutdown if the original live server comes back up |
async-connection-execution-enabled | true | BOOLEAN | Whether incoming packets on the server must be handed off to a thread from the thread pool for processing |
address-setting | An address setting defines some attributes that are defined against an address wildcard rather than a specific queue | ||
acceptor | An acceptor defines a way in which connections can be made to the HornetQ server | ||
backup-group-name | STRING | The name of a set of live/backups that must replicate with each other | |
backup | false | BOOLEAN | Whether this server is a backup server |
check-for-live-server | false | BOOLEAN | Whether a replicated live server must check the current cluster to see if there is already a live server with the same node ID |
clustered | false | BOOLEAN | [Deprecated] Whether the server is clustered |
cluster-password | CHANGE ME!! | STRING | The password used by cluster connections to communicate between the clustered nodes |
cluster-user | HORNETQ.CLUSTER.ADMIN.USER | STRING | The user used by cluster connections to communicate between the clustered nodes |
cluster-connection | Cluster connections group servers into clusters so that messages can be load balanced between the nodes of the cluster | ||
create-bindings-dir | true | BOOLEAN | Whether the server must create the bindings directory on start up |
create-journal-dir | true | BOOLEAN | Whether the server must create the journal directory on start up |
connection-ttl-override | -1L | LONG | If set, this will override how long (in ms) to keep a connection alive without receiving a ping |
connection-factory | Defines a connection factory | ||
connector | A connector can be used by a client to define how it connects to a server | ||
connector-service | |||
divert | A messaging resource that allows you to transparently divert messages routed to one address to some other address, without making any changes to any client application logic | ||
discovery-group | Multicast group to listen to receive broadcast from other servers announcing their connectors | ||
failback-delay | 5000 | LONG | How long to wait before failback occurs on live server restart |
failover-on-shutdown | false | BOOLEAN | Whether this backup server (if it is a backup server) must come live on a normal server shutdown |
grouping-handler | Makes decisions about which node in a cluster must handle a message with a group id assigned | ||
id-cache-size | 20000 | INT | The size of the cache for pre-creating message IDs |
in-vm-acceptor | Defines a way in which in-VM connections can be made to the HornetQ server | ||
in-vm-connector | Used by an in-VM client to define how it connects to a server | ||
jmx-domain | org.hornetq | STRING | The JMX domain used to register internal HornetQ MBeans in the MBeanServer |
jmx-management-enabled | false | BOOLEAN | Whether HornetQ must expose its internal management API via JMX. This is not recommended, as accessing these MBeans can lead to inconsistent configuration |
journal-buffer-size | 501760 (490KiB) | LONG | The size of the internal buffer on the journal |
journal-buffer-timeout | 500000 (0.5 milliseconds) for ASYNCIO journal and 3333333 (3.33 milliseconds) for NIO journal | LONG | The timeout (in nanoseconds) used to flush internal buffers on the journal |
journal-compact-min-files | 10 | INT | The minimal number of journal data files before we can start compacting |
journal-compact-percentage | 30 | INT | The percentage of live data on which we consider compacting the journal |
journal-file-size | 10485760 | LONG | The size (in bytes) of each journal file |
journal-max-io | 1 | INT | The maximum number of write requests that can be in the AIO queue at any one time. The default value changes to 500 when ASYNCIO journal is used |
journal-min-files | 2 | INT | How many journal files to pre-create |
journal-sync-non-transactional | true | BOOLEAN | Whether to wait for non transaction data to be synced to the journal before returning a response to the client |
journal-sync-transactional | true | BOOLEAN | Whether to wait for transaction data to be synchronized to the journal before returning a response to the client |
journal-type | ASYNCIO | String | The type of journal to use. This attribute can take the values "ASYNCIO" or "NIO" |
jms-topic | Defines a JMS topic | ||
live-connector-ref | reference | STRING | [Deprecated] The name of the connector used to connect to the live connector. If this server is not a backup that uses shared nothing HA, it's value is "undefined" |
log-journal-write-rate | false | BOOLEAN | Whether to periodically log the journal's write rate and flush rate |
mask-password | true | BOOLEAN | |
management-address | jms.queue.hornetq.management | STRING | Address to send management messages to |
management-notification-address | hornetq.notifications | STRING | The name of the address that consumers bind to in order to receive management notifications |
max-saved-replicated-journal-size | 2 | INT | The maximum number of backup journals to keep after failback occurs |
memory-measure-interval | -1 | LONG | Frequency to sample JVM memory in ms (or -1 to disable memory sampling) |
memory-warning-threshold | 25 | INT | Percentage of available memory which if exceeded results in a warning log |
message-counter-enabled | false | BOOLEAN | Whether message counters are enabled |
message-counter-max-day-history | 10 | INT | How many days to keep message counter history |
message-counter-sample-period | 10000 | LONG | The sample period (in ms) to use for message counters |
message-expiry-scan-period | 30000 | LONG | How often (in ms) to scan for expired messages |
message-expiry-thread-priority | 3 | INT | The priority of the thread expiring messages |
page-max-concurrent-io | 5 | INT | The maximum number of concurrent reads allowed on paging |
perf-blast-pages | -1 | INT | |
persist-delivery-count-before-delivery | false | BOOLEAN | Whether the delivery count is persisted before delivery. False means that this only happens after a message has been canceled |
persist-id-cache | true | BOOLEAN | Whether IDs are persisted to the journal |
persistence-enabled | true | BOOLEAN | Whether the server will use the file based journal for persistence |
pooled-connection-factory | Defines a managed connection factory | ||
remoting-interceptors | undefined | LIST | [Deprecated] The list of interceptor classes used by this server |
remoting-incoming-interceptors | undefined | LIST | The list of incoming interceptor classes used by this server |
remoting-outgoing-interceptors | undefined | LIST | The list of outgoing interceptor classes used by this server |
run-sync-speed-test | false | BOOLEAN | Whether to perform a diagnostic test on how fast your disk can sync on startup. Useful when determining performance issues |
replication-clustername | STRING | The name of the cluster connection to replicate from if more than one cluster connection is configured | |
runtime-queue | A runtime queue | ||
remote-connector | Used by a remote client to define how it connects to a server | ||
remote-acceptor | Defines a way in which remote connections can be made to the HornetQ server | ||
scheduled-thread-pool-max-size | 5 | INT | The number of threads that the main scheduled thread pool has |
security-domain | other | STRING | The security domain to use in order to verify user and role information |
security-enabled | true | BOOLEAN | Whether security is enabled |
security-setting | A security setting allows sets of permissions to be defined against queues based on their address | ||
security-invalidation-interval | 10000 | LONG | How long (in ms) to wait before invalidating the security cache |
server-dump-interval | -1 | LONG | How often to dump basic runtime information to the server log. A value less than 1 disables this feature |
shared store | true | BOOLEAN | Whether this server is using a shared store for failover |
thread-pool-max-size | 30 | INT | The number of threads that the main thread pool has. -1 means no limit |
transaction-timeout | 300000 | LONG | How long (in ms) before a transaction can be removed from the resource manager after create time |
transaction-timeout-scan-period | 1000 | LONG | How often (in ms) to scan for timeout transactions |
wild-card-routing-enabled | true | BOOLEAN | Whether the server supports wild card routing |
Warning
journal-file-size must be higher than the size of message sent to server, or the server will not be able to store the message.
20.8.11. Set Message Expiry
Sent messages can be set to expire on server if they're not delivered to consumer after specified amount of time (milliseconds). Using Java Messaging Service (JMS) or HornetQ Core API, the expiration time can be set directly on the message. For example:
// message will expire in 5000ms from now message.setExpiration(System.currentTimeMillis() + 5000);
MessageProducer includes a TimeToLive parameter which controls message expiry for the messages it sends:
// messages sent by this producer will be retained for 5s (5000ms) before expiration producer.setTimeToLive(5000);
- _HQ_ORIG_ADDRESS
- _HQ_ACTUAL_EXPIRY
producer.send(message, DeliveryMode.PERSISTENT, 0, 5000)
Expiry address are defined in the address-setting configuration:
<!-- expired messages in exampleQueue will be sent to the expiry address expiryQueue --> <address-setting match="jms.queue.exampleQueue"> <expiry-address>jms.queue.expiryQueue</expiry-address> </address-setting>
A reaper thread periodically inspects the queues to validate if messages have expired.
- message-expiry-scan-period
- message-expiry-thread-priority
20.9. Message Grouping
20.9.1. About Message Grouping
- All messages in a message group are grouped under a common group id. This means that they can be identified with a common group property
- All messages in a message group are serially processed and consumed by the same consumer irrespective of the number of customers on the queue. This means that a specific message group with a unique group id is always processed by one consumer when the consumer opens it. If the consumer closes the message group the entire message group is directed to another consumer in the queue
Important
20.9.2. Using HornetQ Core API on Client Side
_HQ_GROUP_ID is used to identify a message group in HornetQ Core API on client side. To pick a random unique message group id you can also set the autogroup property as "true" on the SessionFactory.
20.9.3. Configuring Server for Java Messaging Service (JMS) Clients
JMSXGroupID is used to identify a message group for Java Messaging Service (JMS) clients. If you wish to send a message group with different messages to one consumer you can set the same JMSXGroupID for different messages:
Message message = ...
message.setStringProperty("JMSXGroupID", "Group-0");
producer.send(message);
message = ...
message.setStringProperty("JMSXGroupID", "Group-0");
producer.send(message);
The second approach is to set the autogroup property as "true" on the HornetQConnectonFactory. The HornetQConnectionFactory will then pick up a random unique message group id. You can set the autogroup property in server configuration files (standalone.xml and domain.xml) as follows:
<connection-factory name="ConnectionFactory">
<connectors>
<connector-ref connector-name="netty-connector"/>
</connectors>
<entries>
<entry name="ConnectionFactory"/>
</entries>
<autogroup>true</autogroup>
</connection-factory>
An alternative to the above two approaches is to set a specific message group id through the connection factory. This will in-turn set the property JMSXGroupID to the specified value for all messages sent through this connection factory. To set a specific message group id on the connection factory, edit the group-id property in server configuration files (standalone.xml and domain.xml) as follows:
<connection-factory name="ConnectionFactory">
<connectors>
<connector-ref connector-name="netty-connector"/>
</connectors>
<entries>
<entry name="ConnectionFactory"/>
</entries>
<group-id>Group-0</group-id>
</connection-factory>
20.9.4. Clustered Grouping
local and remote.
standalone.xml and domain.xml) as follows:
<grouping-handler name="my-grouping-handler"> <type>LOCAL</type> <address>jms</address> <timeout>5000</timeout> </grouping-handler> <grouping-handler name="my-grouping-handler"> <type>REMOTE</type> <address>jms</address> <timeout>5000</timeout> </grouping-handler>The "timeout" attribute ensures that a routing decision is made quickly within the specified time. If a decision is not made within this time an exception is thrown.
20.9.5. Best Practices for Clustered Grouping
- If you create and close consumers regularly make sure that your consumers are distributed evenly across the different nodes. Once a queue is pinned, messages are automatically transferred to that queue regardless of removing customers from it
- If you wish to remove a queue which has a message group bound to it, make sure the queue is deleted by the session that is sending the messages. Doing this will ensure that other nodes will not try to route messages to this queue after it is removed
- As a failover mechanism always replicate the node which has the local grouping handler
20.10. Duplicate Message Detection
20.10.1. About Duplicate Message Detection
20.10.2. Using Duplicate Message Detection for Sending Messages
org.hornetq.api.core.HDR_DUPLICATE_DETECTION_ID, which is _HQ_DUPL_ID. The value of this property can be of type byte[] or SimpleString for core API. For Java Messaging Service (JMS) clients, it must be of the type String with a unique value. An easy way of generating a unique id is by generating a UUID.
... ClientMessage message = session.createMessage(true); SimpleString myUniqueID = "This is my unique id"; // Can use a UUID for this message.setStringProperty(HDR_DUPLICATE_DETECTION_ID, myUniqueID); ...The following example shows how to set the property for JMS clients:
... Message jmsMessage = session.createMessage(); String myUniqueID = "This is my unique id"; // Could use a UUID for this message.setStringProperty(HDR_DUPLICATE_DETECTION_ID.toString(), myUniqueID); ...
20.10.3. Configuring Duplicate ID Cache
org.hornetq.core.message.impl.HDR_DUPLICATE_DETECTION_ID property sent to each address. Each address maintains its own address cache.
id-cache-size in server configuration files (standalone.xml and domain.xml). The default value of this parameter is 2000 elements. If the cache has a maximum size of n elements, then the (n + 1)th ID stored will overwrite the 0th element in the cache.
persist-id-cache in server configuration files (standalone.xml and domain.xml). If this value is set "true" then each ID will be persisted to permanent storage as they are received. The default value for this parameter is true.
Note
20.10.4. Using Duplicate Detection with Bridges and Cluster Connections
use-duplicate-detection to "true" in server configuration files (standalone.xml and domain.xml). The default value of this parameter is "true".
use-duplicate-detection to "true" in server configuration files (standalone.xml and domain.xml). The default value of this parameter is "true".
20.11. JMS Bridges
20.11.1. About Bridges
Important
20.11.2. Create a JMS Bridge
A JMS bridge consumes messages from a source JMS queue or topic and sends them to a target JMS queue or topic, which is typically on a different server. It can be used to bridge messages between any JMS servers, as long as they are JMS 1.1 compliant. The source and destination JMS resources are looked up using JNDI and the client classes for the JNDI lookup must be bundled in a module. The module name is then declared in the JMS bridge configuration.
Procedure 20.2. Create a JMS Bridge
Configure the Bridge On the Source JMS Messaging Server
Configure the JMS bridge on the source server using the instructions provided for that server type. For an example of how to configure a JMS Bridge for a JBoss EAP 5.x server, see the topic entitled Create a JMS Bridge in the Migration Guide for JBoss EAP 6.Configure the Bridge on the Destination JBoss EAP 6 Server
In JBoss EAP 6.1 and later, the JMS bridge can be used to bridge messages from any JMS 1.1 compliant server. Because the source and target JMS resources are looked up using JNDI, the JNDI lookup classes of the source messaging provider, or message broker, must be bundled in a JBoss Module. The following steps use the fictitious 'MyCustomMQ' message broker as an example.- Create the JBoss module for the messaging provider.
- Create a directory structure under
EAP_HOME/modules/system/layers/base/for the new module. Themain/subdirectory will contain the client JARs andmodule.xmlfile. The following is an example of the directory structure created for the MyCustomMQ messaging provider:EAP_HOME/modules/system/layers/base/org/mycustommq/main/ - In the
main/subdirectory, create amodule.xmlfile containing the module definition for the messaging provider. The following is an example of themodule.xmlcreated for the MyCustomMQ messaging provider.<?xml version="1.0" encoding="UTF-8"?> <module xmlns="urn:jboss:module:1.1" name="org.mycustommq"> <properties> <property name="jboss.api" value="private"/> </properties> <resources> <!-- Insert resources required to connect to the source or target --> <resource-root path="mycustommq-1.2.3.jar" /> <resource-root path="mylogapi-0.0.1.jar" /> </resources> <dependencies> <!-- Add the dependencies required by JMS Bridge code --> <module name="javax.api" /> <module name="javax.jms.api" /> <module name="javax.transaction.api"/> <!-- Add a dependency on the org.hornetq module since we send --> <!-- messages tothe HornetQ server embedded in the local EAP instance --> <module name="org.hornetq" /> </dependencies> </module> - Copy the messaging provider JARs required for the JNDI lookup of the source resources to the module's
main/subdirectory. The directory structure for the MyCustomMQ module should now look like the following.modules/ `-- system `-- layers `-- base `-- org `-- mycustommq `-- main |-- mycustommq-1.2.3.jar |-- mylogapi-0.0.1.jar |-- module.xml
- Configure the JMS bridge in the
messagingsubsystem of the JBoss EAP 6 server.- Before you begin, stop the server and back up the current server configuration files. If you are running a standalone server, this is the
EAP_HOME/standalone/configuration/standalone-full-ha.xmlfile. If you are running a managed domain, back up both theEAP_HOME/domain/configuration/domain.xmland theEAP_HOME/domain/configuration/host.xmlfiles. - Add the
jms-bridgeelement to themessagingsubsystem in the server configuration file. Thesourceandtargetelements provide the names of the JMS resources used for JNDI lookups. Ifuserandpasswordcredentials are specified, they are passed as arguments when JMS connection is created.The following is an example of thejms-bridgeelement configured for the MyCustomMQ messaging provider:<subsystem xmlns="urn:jboss:domain:messaging:1.3"> ... <jms-bridge name="myBridge" module="org.mycustommq"> <source> <connection-factory name="ConnectionFactory"/> <destination name="sourceQ"/> <user>user1</user> <password>pwd1</password> <context> <property key="java.naming.factory.initial" value="org.mycustommq.jndi.MyCustomMQInitialContextFactory"/> <property key="java.naming.provider.url" value="tcp://127.0.0.1:9292"/> </context> </source> <target> <connection-factory name="java:/ConnectionFactory"/> <destination name="/jms/targetQ"/> </target> <quality-of-service>DUPLICATES_OK</quality-of-service> <failure-retry-interval>500</failure-retry-interval> <max-retries>1</max-retries> <max-batch-size>500</max-batch-size> <max-batch-time>500</max-batch-time> <add-messageID-in-header>true</add-messageID-in-header> </jms-bridge> </subsystem>In the above example, the JNDI properties are defined in thecontextelement for thesource. If thecontextelement is omitted, as in thetargetexample above, the JMS resources are looked up in the local instance.
20.12. Persistence
20.12.1. About Persistence in HornetQ
- Java New I/O (NIO)Uses standard Java NIO to interface with the file system. This provides extremely good performance and runs on any platform with a Java 6 or later runtime.
- Linux Asynchronous IO (AIO)Uses a native code wrapper to talk to the Linux asynchronous IO library (AIO). With AIO, HornetQ receives a message when data has been persisted. This removes the need for explicit syncs. AIO will typically provide better performance than Java NIO, but requires Linux kernel 2.6 or later and the libaio package.AIO also requires ext2, ext3, ext4, jfs or xfs type file systems.
- bindings journalStores bindings-related data, including the set of queues deployed on the server and their attributes. It also stores data such as ID sequence counters. The bindings journal is always a NIO journal, as it typically has low throughput in comparison to the message journal.The files on this journal are prefixed as hornetq-bindings. Each file has a bindings extension. File size is 1048576 bytes, and it is located in the bindings folder.
- JMS journalStores all JMS-related data, for example, any JMS queues, topics or connection factories and any JNDI bindings for these resources. Any JMS resources created with the management API are persisted to this journal. Any resources configured with configuration files are not. This journal is created only if JMS is in use.
- message journalStores all message-related data, including messages themselves and duplicate-id caches. By default, HornetQ uses AIO for this journal. If AIO is not available, it will automatically fall back to NIO.
20.13. HornetQ Clustering
standalone.xml and domain.xml).
standalone.xml and domain.xml).
Important
standalone.xml and domain.xml) and copy this configuration to other nodes to generate a symmetric cluster. However you must be careful when you are copying the server configuration files. You must not copy the HornetQ data (i.e. the bindings, journal, and large messages directories) from one node to another. When a node is started for the first time it persists a unique identifier to the journal directory which is needed for proper formation of clusters.
20.13.1. About Server Discovery
- Forward their connection details to messaging clients: Messaging clients intend to connect to servers of a cluster without specific details on the servers which are up and running at a given point of time
- Connect to other servers: Servers in a cluster want to establish cluster connections with other servers without specific details on of all other servers in a cluster
20.13.2. Broadcast Groups
broadcast-groups element of server configuration files (standalone.xml and domain.xml). A single HornetQ server can have many broadcast groups. You can define either a User Datagram Protocol (UDP) or a JGroup broadcast group.
20.13.2.1. User Datagram Protocol (UDP) Broadcast Group
<broadcast-groups>
<broadcast-group name="my-broadcast-group">
<local-bind-address>172.16.9.3</local-bind-address>
<local-bind-port>5432</local-bind-port>
<group-address>231.7.7.7</group-address>
<group-port>9876</group-port>
<broadcast-period>2000</broadcast-period>
<connector-ref>netty</connector-ref>
</broadcast-group>
</broadcast-groups>
Note
<broadcast-groups>
<broadcast-group name="my-broadcast-group">
<socket-binding>messaging-group</socket-binding>
<broadcast-period>2000</broadcast-period>
<connector-ref>netty</connector-ref>
</broadcast-group>
</broadcast-groups>
Table 20.11. UDP Broadcast Group Parameters
| Attribute | Description |
|---|---|
| name attribute |
Denotes the name of each broadcast group in a server. Each broadcast group must have a unique name.
|
| local-bind-address |
[Deprecated] This is a UDP specific attribute and specifies the local bind address which the datagram packet binds to. You must set this property to define the interface which you wish to use for your broadcasts. If this property is not specified then the socket binds to a wildcard address (a random kernel generated address).
|
| local-bind-port |
[Deprecated] This is a UDP specific attribute and is used to specify a local port which the datagram socket binds to. A default value of "-1" specifies an anonymous port to be used.
|
| group-address |
[Deprecated] This is a multicast address specific to UDP where messages are broadcast. This IP address has a range of 224.0.0.0 to 239.255.255.255, inclusive. The IP address 224.0.0 is reserved and can not be used.
|
| group-port |
[Deprecated] This denotes the UDP port number for broadcasting.
|
| socket-binding |
This denotes the broadcast group socket binding
|
| broadcast-period |
This parameter specifies the time between two broadcasts (milliseconds). It is optional.
|
| connector-ref |
This refers to the connector which will be broadcasted.
|
20.13.2.2. JGroups Broadcast Group
jgroups-stack and jgroups-channel. The example shown below defines a JGroups broadcast group:
<broadcast-groups>
<broadcast-group name="bg-group1">
<jgroups-stack>udp</jgroups-stack>
<jgroups-channel>udp</jgroups-channel>
<broadcast-period>2000</broadcast-period>
<connector-ref>netty</connector-ref>
</broadcast-group>
</broadcast-groups>
The JGroups broadcast group definition uses two main attributes:
jgroups-stackattribute: This denotes the name of a stack defined in theorg.jboss.as.clustering.jgroupssubsystemjgroups-channelattribute: This denotes the channel which JGroups channels connect to for broadcasting
20.13.3. Discovery Groups
Note
20.13.3.1. Configuring User Datagram Protocol (UDP) Discovery Group on the Server
<discovery-groups>
<discovery-group name="my-discovery-group">
<local-bind-address>172.16.9.7</local-bind-address>
<group-address>231.7.7.7</group-address>
<group-port>9876</group-port>
<refresh-timeout>10000</refresh-timeout>
</discovery-group>
</discovery-groups>
Note
<discovery-groups>
<discovery-group name="my-discovery-group">
<socket-binding>messaging-group</socket-binding>
<refresh-timeout>10000</refresh-timeout>
</discovery-group>
</discovery-groups>
Table 20.12. UDP Discovery Group Parameters
| Attribute | Description |
|---|---|
| name attribute |
This attribute denotes the name of your discovery group. Each discovery name must have a unique name per server.
|
| local-bind-address |
[Deprecated] This is an optional UDP specific attribute. It is used to configure a discovery group to listen on a specific interface when using multiple interfaces on the same machine.
|
| group-address |
[Deprecated] This is a compulsory UDP specific attribute. It is used to configure a discovery group to listen on the multicast IP address of a group. The value of this attribute must match the
group-address attribute of the broadcast group that you wish to listen from.
|
| group-port |
[Deprecated] This is a compulsory UDP specific attribute. It is used to configure the UDP port of the multicast group. The value of this attribute must match the
group-port attribute of the multicast group that you wish to listen from.
|
| socket-binding |
This denotes the discovery group socket binding
|
| refresh-timeout |
This is an optional UDP specific attribute. It is used to configure the time period (in milliseconds) for which the discovery group waits before removing a server's connector pair entry from the list after receiving the last broadcast from that server. The value of
refresh-timeout must be set significantly higher than the value of broadcast-period attribute on the broadcast group to prevent quick removal servers from the list when the broadcast process is still on. The default value of this attribute is 10,000 milliseconds.
|
20.13.3.2. Configuring JGroups Discovery Group on the Server
<discovery-groups>
<discovery-group name="dg-group1">
<jgroups-stack>udp</jgroups-stack>
<jgroups-channel>udp</jgroups-channel>
<refresh-timeout>10000</refresh-timeout>
</discovery-group>
</discovery-groups>
The JGroups discovery group definition uses two main attributes:
jgroups-stackattribute: This denotes the name of a stack defined in theorg.jboss.as.clustering.jgroupssubsystemjgroups-channelattribute: This attribute denotes the channel which JGroups channels connect to for receiving broadcasts
Note
20.13.3.3. Configuring Discovery Groups for Java Messaging Service (JMS) Clients
standalone.xml and domain.xml):
<connection-factory name="ConnectionFactory">
<discovery-group-ref discovery-group-name="my-discovery-group"/>
<entries>
<entry name="ConnectionFactory"/>
</entries>
</connection-factory>
The element discovery-group-ref is used to specify the name of a discovery group. When a client application downloads this connection factory from Java Naming and Directory Interface (JNDI) and creates JMS connections, these connections are load balanced across all the servers which the discovery group maintains by listening on the multicast address specified in the discovery group configuration.
final String groupAddress = "231.7.7.7"; final int groupPort = 9876; ConnectionFactory jmsConnectionFactory = HornetQJMSClient.createConnectionFactory(new DiscoveryGroupConfiguration(groupAddress, groupPort, new UDPBroadcastGroupConfiguration(groupAddress, groupPort, null, -1)), JMSFactoryType.CF); Connection jmsConnection1 = jmsConnectionFactory.createConnection(); Connection jmsConnection2 = jmsConnectionFactory.createConnection();
refresh-timeout attribute can be set on DiscoveryGroupConfiguration by using the setter method setDiscoveryRefreshTimeout(). For the connection factory to wait for a specific amount of time before creating the first connection, you can use the setter method setDiscoveryInitialWaitTimeout() on DiscoveryGroupConfiguration.
20.13.3.4. Configuring discovery for Core API
ClientSessionFactory instances, then you can specify the discovery group parameters directly when creating the session factory:
final String groupAddress = "231.7.7.7"; final int groupPort = 9876; ServerLocator factory = HornetQClient.createServerLocatorWithHA(new DiscoveryGroupConfiguration(groupAddress, groupPort, new UDPBroadcastGroupConfiguration(groupAddress, groupPort, null, -1)))); ClientSessionFactory factory = locator.createSessionFactory(); ClientSession session1 = factory.createSession(); ClientSession session2 = factory.createSession();The default value of
refresh-timeout attribute can be set on DiscoveryGroupConfiguration by using the setter method setDiscoveryRefreshTimeout(). You can use setDiscoveryInitialWaitTimeout() on DiscoveryGroupConfiguration for the session factory to wait for a specific amount of time before creating a session.
20.13.4. Server Side Load Balancing
- Symmetric Cluster: In a symmetric cluster every cluster node is connected directly to every other node in the cluster. To create a symmetric cluster every node in the cluster defines a cluster connection with the attribute
max-hopsset to 1.Note
In a symmetric cluster each node knows about all the queues that exist on all the other nodes and what consumers they have. With this knowledge it can determine how to load balance and redistribute messages around the nodes.
20.13.4.1. Configuring Cluster Connections
standalone.xml and domain.xml) in the element cluster-connection. There can be zero or more cluster connections defined per HornetQ server.
<cluster-connections>
<cluster-connection name="my-cluster">
<address>jms</address>
<connector-ref>netty-connector</connector-ref>
<check-period>1000</check-period>
<connection-ttl>5000</connection-ttl>
<min-large-message-size>50000</min-large-message-size>
<call-timeout>5000</call-timeout>
<retry-interval>500</retry-interval>
<retry-interval-multiplier>1.0</retry-interval-multiplier>
<max-retry-interval>5000</max-retry-interval>
<reconnect-attempts>-1</reconnect-attempts>
<use-duplicate-detection>true</use-duplicate-detection>
<forward-when-no-consumers>false</forward-when-no-consumers>
<max-hops>1</max-hops>
<confirmation-window-size>32000</confirmation-window-size>
<call-failover-timeout>30000</call-failover-timeout>
<notification-interval>1000</notification-interval>
<notification-attempts>2</notification-attempts>
<discovery-group-ref discovery-group-name="my-discovery-group"/>
</cluster-connection>
</cluster-connections>
The following table defines the configurable attributes:
Table 20.13. Cluster Connections Configurable Attributes
| Attribute | Description | Default |
|---|---|---|
address | Each cluster connection only applies to messages sent to an address that starts with this value. The address can be any value and you can have many cluster connections with different values of addresses, simultaneously balancing messages for those addresses, potentially to different clusters of servers. This does not use wild card matching. | |
connector-ref | This is a compulsory attribute which refers to the connector sent to other nodes in the cluster so that they have the correct cluster topology | |
check-period | This refers to the time period (in milliseconds) which is used to verify if a cluster connection has failed to receive pings from another server | 30,000 milliseconds |
connection-ttl | This specifies how long a cluster connection must stay alive if it stops receiving messages from a specific node in the cluster | 60,000 milliseconds |
min-large-message-size | If the message size (in bytes) is larger than this value then it will be split into multiple segments when sent over the network to other cluster members | 102400 milliseconds |
call-timeout | This specifies the time period (milliseconds) for which a packet sent over a cluster connection waits (for a reply) before throwing an exception | 30,000 milliseconds |
retry-interval | If the cluster connection is created between nodes of a cluster and the target node has not been started, or is being rebooted, then the cluster connections from other nodes will retry connecting to the target until it comes back up. The parameter retry-interval defines the interval (milliseconds) between retry attempts | 500 milliseconds |
retry-interval-multiplier | This is used to increment the retry-interval after each retry attempt | 1 |
max-retry-interval | This refers to the maximum delay (in milliseconds) for retries | 2000 milliseconds |
reconnect-attempts | This defines the number of times the system will try to connect a node on the cluster | -1 (infinite retries) |
use-duplicate-detection | Cluster connections use bridges to link the nodes, and bridges can be configured to add a duplicate id property in each message that is forwarded. If the target node of the bridge crashes and then recovers, messages might be resent from the source node. By enabling duplicate detection any duplicate messages will be filtered out and ignored on receipt at the target node. | True |
forward-when-no-consumers | This parameter determines whether or not messages will be distributed in a round robin fashion between other nodes of the cluster regardless of whether there are matching or indeed any consumers on other nodes | False |
max-hops | This determines how messages are load balanced to other HornetQ serves which are connected to this server | -1 |
confirmation-window-size | The size (in bytes) of the window used for sending confirmations from the server connected to | 1048576 |
call-failover-timeout | This is used when a call is made during a failover attempt | -1 (no timeout) |
notification-interval | This determines how often (in milliseconds) the cluster connection must broadcast itself when attaching to the cluster | 1000 milliseconds |
notification-attempts | This defines as to how many times the cluster connection must broadcast itself when connecting to the cluster | 2 |
discovery-group-ref | This parameter determines which discovery group is used to obtain the list of other servers in the cluster which the current cluster connection will make connections to |
standalone.xml and domain.xml):
<cluster-user>HORNETQ.CLUSTER.ADMIN.USER</cluster-user> <cluster-password>NEW USER</cluster-password>
Warning
20.14. High Availability
20.14.1. High Availability Introduction
Dedicated Topology: This topology comprises of two EAP servers. In the first server HornetQ is configured as a live server. In the second server HornetQ is configured as a backup server. The EAP server which has HornetQ configured as a backup server, acts only as a container for HornetQ. This server is inactive and can not host deployments like EJBs, MDBs or Servlets.Collocated Topology: This topology contains two EAP servers. Each EAP server contains two HornetQ servers (a live server and a backup server). The HornetQ live server on first EAP server and the HornetQ backup server on the second EAP server form a live backup pair. Whereas the HornetQ live server on the second EAP server and the HornetQ backup server on the first EAP server form another live backup pair.
Important
Note
standalone-full-ha.xml. The configuration changes can be applied to standalone-full-ha.xml, or any configuration files derived from it.
20.14.3. About HornetQ Storage Configurations
- GFS2 on a SAN, using the ASYNCIO journal type.
- NFSv4, using either the ASYNCIO or NIO journal type.
Important
- The Red Hat Enterprise Linux NFS client cache must be disabled.
Note
20.14.4. About HornetQ Journal Types
- ASYNCIO
- NIO
libaio and the Native Components package are installed where JBoss EAP 6 is running. See the Installation Guide for instructions on installing the Native Components package.
Important
<journal-type> in the Messaging subsystem.
20.14.6. HornetQ Message Replication
Warning
standalone-full-ha.xml file. A backup server will only replicate with a live server with the same group name. The group name must be defined in the backup-group-name parameter in the standalone-full-ha.xml file on each server.
allow-failback attribute is set to true.
20.14.7. Configuring the HornetQ Servers for Replication
standalone-full-ha.xml files on each server to have the following settings:
<shared-store>false</shared-store>
<backup-group-name>NameOfLiveBackupPair</backup-group-name>
<check-for-live-server>true</check-for-live-server>
.
.
.
<cluster-connections>
<cluster-connection name="my-cluster">
...
</cluster-connection>
</cluster-connections>Table 20.15. HornetQ Replicating Setup Attributes
| Attribute | Description |
|---|---|
| shared-store |
Whether this server is using shared store or not. Default is false.
|
| backup-group-name |
This is the unique name which identifies a live/backup pair that should replicate with each other
|
| check-for-live-server |
If a replicated live server should check the current cluster to see if there is already a live server with the same node id. Default is false.
|
| failover-on-shutdown |
Whether this backup server (if it is a backup server) becomes the live server on a normal server shutdown. Default is false.
|
<backup>true</backup>
Table 20.16. HornetQ Backup Server Setup Attributes
| Attribute | Description |
|---|---|
| allow-failback |
Whether this server will automatically shutdown if the original live server comes back up. Default is true.
|
| max-saved-replicated-journal-size |
The maximum number of backup journals to keep after failback occurs. Specifying this attribute is only necessary if allow-failback is true. Default value is 2, which means that after 2 failbacks the backup server must be restarted in order to be able to replicate journal from live server and become backup again.
|
20.14.8. About High-availability (HA) Failover
allow-failback attribute is set to true, it becomes the live server again. When the original live server takes over, the backup server reverts to being backup for the live server.
Important
failover-on-shutdown property to true in the standalone.xml configuration file:
<failover-on-shutdown>true</failover-on-shutdown>
failover-on-shutdown property is set to false.
allow-failback property to true in the standalone.xml configuration file:
<allow-failback>true</allow-failback>
check-for-live-server property to true in standalone.xml configuration file:
<check-for-live-server>true</check-for-live-server>
20.14.9. Deployments on HornetQ Backup Servers
Chapter 21. Transaction Subsystem
21.1. Transaction Subsystem Configuration
21.1.1. Transactions Configuration Overview
The following procedures show you how to configure the transactions subsystem of JBoss EAP 6.
21.1.2. Configure the Transaction Manager
default, you may need to modify the steps and commands in the following ways.
Notes about the Example Commands
- For the Management Console, the
defaultprofile is the one which is selected when you first log into the console. If you need to modify the Transaction Manager's configuration in a different profile, select your profile instead ofdefault, in each instruction.Similarly, substitute your profile for thedefaultprofile in the example CLI commands. - If you use a Standalone Server, only one profile exists. Ignore any instructions to choose a specific profile. In CLI commands, remove the
/profile=defaultportion of the sample commands.
Note
transactions subsystem must be enabled. It is enabled by default, and required for many other subsystems to function properly, so it is very unlikely that it would be disabled.
To configure the TM using the web-based Management Console, select the Configuration tab from the top of the screen. If you use a managed domain, choose the correct profile from the Profile selection box at the top left. Expand the Container menu and select Transactions.
In the Management CLI, you can configure the TM using a series of commands. The commands all begin with /profile=default/subsystem=transactions/ for a managed domain with profile default, or /subsystem=transactions for a Standalone Server.
Important
Table 21.1. TM Configuration Options
| Option | Description | CLI Command |
|---|---|---|
|
Enable Statistics
|
Whether to enable transaction statistics. These statistics can be viewed in the Management Console in the Subsystem Metrics section of the Runtime tab.
| /profile=default/subsystem=transactions/:write-attribute(name=enable-statistics,value=true)
|
|
Default Timeout
|
The default transaction timeout. This defaults to
300 seconds. You can override this programmatically, on a per-transaction basis.
| /profile=default/subsystem=transactions/:write-attribute(name=default-timeout,value=300)
|
|
Object Store Path
|
A relative or absolute filesystem path where the TM object store stores data. By default relative to the
object-store-relative-to parameter's value.
| /profile=default/subsystem=transactions/:write-attribute(name=object-store-path,value=tx-object-store)
|
|
Object Store Path Relative To
|
References a global path configuration in the domain model. The default value is the data directory for JBoss EAP 6, which is the value of the property
jboss.server.data.dir, and defaults to EAP_HOME/domain/data/ for a Managed Domain, or EAP_HOME/standalone/data/ for a Standalone Server instance. The value of the object store object-store-path TM attribute is relative to this path.
| /profile=default/subsystem=transactions/:write-attribute(name=object-store-relative-to,value=jboss.server.data.dir)
|
|
Socket Binding
|
Specifies the name of the socket binding used by the Transaction Manager for recovery and generating transaction identifiers, when the socket-based mechanism is used. Refer to
process-id-socket-max-ports for more information on unique identifier generation. Socket bindings are specified per server group in the Server tab of the Management Console.
| /profile=default/subsystem=transactions/:write-attribute(name=socket-binding,value=txn-recovery-environment)
|
|
Recovery Listener
|
Whether or not the Transaction Recovery process should listen on a network socket. Defaults to
false.
| /profile=default/subsystem=transactions/:write-attribute(name=recovery-listener,value=false)
|
Table 21.2. Advanced TM Configuration Options
| Option | Description | CLI Command |
|---|---|---|
|
jts
|
Whether to use Java Transaction Service (JTS) transactions. Defaults to
false, which uses JTA transactions only.
| /profile=default/subsystem=transactions/:write-attribute(name=jts,value=false)
|
|
node-identifier
|
The node identifier for the Transaction Manager. This option is required in the following situations:
node-identifier must be unique for each Transaction Manager as it is required to enforce data integrity during recovery. The node-identifier must also be unique for JTA because multiple nodes may interact with the same resource manager or share a transaction object store.
| /profile=default/subsystem=transactions/:write-attribute(name=node-identifier,value=1)
|
|
process-id-socket-max-ports
|
The Transaction Manager creates a unique identifier for each transaction log. Two different mechanisms are provided for generating unique identifiers: a socket-based mechanism and a mechanism based on the process identifier of the process.
In the case of the socket-based identifier, a socket is opened and its port number is used for the identifier. If the port is already in use, the next port is probed, until a free one is found. The
process-id-socket-max-ports represents the maximum number of sockets the TM will try before failing. The default value is 10.
| /profile=default/subsystem=transactions/:write-attribute(name=process-id-socket-max-ports,value=10)
|
|
process-id-uuid
|
Set to
true to use the process identifier to create a unique identifier for each transaction. Otherwise, the socket-based mechanism is used. Defaults to true. Refer to process-id-socket-max-ports for more information.
| /profile=default/subsystem=transactions/:write-attribute(name=process-id-uuid,value=true)
|
|
use-hornetq-store
|
Use HornetQ's journaled storage mechanisms instead of file-based storage, for the transaction logs. This is disabled by default, but can improve I/O performance. It is not recommended for JTS transactions on separate Transaction Managers. When changing this option, the server has to be restarted using the
shutdown command for the change to take effect.
| /profile=default/subsystem=transactions/:write-attribute(name=use-hornetq-store,value=false)
|
21.1.3. Configure Your Datasource to Use JTA Transaction API
This task shows you how to enable Java Transaction API (JTA) on your datasource.
You must meet the following conditions before continuing with this task:
- Your database or other resource must support Java Transaction API. If in doubt, consult the documentation for your database or other resource.
- Create a datasource. Refer to Section 6.3.1, “Create a Non-XA Datasource with the Management Interfaces”.
- Stop JBoss EAP 6.
- Have access to edit the configuration files directly, in a text editor.
Procedure 21.1. Configure the Datasource to use Java Transaction API
Open the configuration file in a text editor.
Depending on whether you run JBoss EAP 6 in a managed domain or standalone server, your configuration file will be in a different location.Managed domain
The default configuration file for a managed domain is inEAP_HOME/domain/configuration/domain.xmlfor Red Hat Enterprise Linux, andEAP_HOME\domain\configuration\domain.xmlfor Microsoft Windows Server.Standalone server
The default configuration file for a standalone server is inEAP_HOME/standalone/configuration/standalone.xmlfor Red Hat Enterprise Linux, andEAP_HOME\standalone\configuration\standalone.xmlfor Microsoft Windows Server.
Locate the
<datasource>tag that corresponds to your datasource.The datasource will have thejndi-nameattribute set to the one you specified when you created it. For example, the ExampleDS datasource looks like this:<datasource jndi-name="java:jboss/datasources/ExampleDS" pool-name="H2DS" enabled="true" jta="true" use-java-context="true" use-ccm="true">
Set the
jtaattribute totrue.Add the following to the contents of your<datasource>tag, as they appear in the previous step:jta="true"Save the configuration file.
Save the configuration file and exit the text editor.Start JBoss EAP 6.
Relaunch the JBoss EAP 6 server.
JBoss EAP 6 starts, and your datasource is configured to use Java Transaction API.
21.1.4. Configure an XA Datasource
In order to add an XA Datasource, you need to log into the Management Console. See Section 3.4.2, “Log in to the Management Console” for more information.
Add a new datasource.
Add a new datasource to JBoss EAP 6. Follow the instructions in Section 6.3.1, “Create a Non-XA Datasource with the Management Interfaces”, but click the XA Datasource tab at the top.Configure additional properties as appropriate.
All datasource parameters are listed in Section 6.7.1, “Datasource Parameters”.
Your XA Datasource is configured and ready to use.
21.1.5. About Transaction Log Messages
DEBUG log level for the transaction logger. For detailed debugging, use the TRACE log level. Refer to Section 21.1.6, “Configure Logging for the Transaction Subsystem” for information on configuring the transaction logger.
TRACE log level. Following are some of the most commonly-seen messages. This list is not comprehensive, so you may see other messages than these.
Table 21.3. Transaction State Change
| Transaction Begin |
When a transaction begins, the following code is executed:
com.arjuna.ats.arjuna.coordinator.BasicAction::Begin:1342 tsLogger.logger.trace("BasicAction::Begin() for action-id "+ get_uid());
|
| Transaction Commit |
When a transaction commits, the following code is executed:
com.arjuna.ats.arjuna.coordinator.BasicAction::End:1342 tsLogger.logger.trace("BasicAction::End() for action-id "+ get_uid());
|
| Transaction Rollback |
When a transaction rolls back, the following code is executed:
com.arjuna.ats.arjuna.coordinator.BasicAction::Abort:1575 tsLogger.logger.trace("BasicAction::Abort() for action-id "+ get_uid());
|
| Transaction Timeout |
When a transaction times out, the following code is executed:
com.arjuna.ats.arjuna.coordinator.TransactionReaper::doCancellations:349 tsLogger.logger.trace("Reaper Worker " + Thread.currentThread() + " attempting to cancel " + e._control.get_uid());
You will then see the same thread rolling back the transaction as shown above.
|
21.1.6. Configure Logging for the Transaction Subsystem
Use this procedure to control the amount of information logged about transactions, independent of other logging settings in JBoss EAP 6. The main procedure shows how to do this in the web-based Management Console. The Management CLI command is given afterward.
Procedure 21.2. Configure the Transaction Logger Using the Management Console
Navigate to the Logging configuration area.
In the Management Console, click the Configuration tab. If you use a managed domain, choose the server profile you wish to configure, from the Profile selection box at the top left.Expand the Core menu, and select Logging.Edit the
com.arjunaattributes.Select the Log Categories tab. Selectcom.arjunaand lick Edit in the Details section. This is where you can add class-specific logging information. Thecom.arjunaclass is already present. You can change the log level and whether to use parent handlers.- Log Level
- The log level is
WARNby default. Because transactions can produce a large quantity of logging output, the meaning of the standard logging levels is slightly different for the transaction logger. In general, messages tagged with levels at a lower severity than the chosen level are discarded.Transaction Logging Levels, from Most to Least Verbose
- TRACE
- DEBUG
- INFO
- WARN
- ERROR
- FAILURE
- Use Parent Handlers
- Whether the logger should send its output to its parent logger. The default behavior is
true.
- Changes take effect immediately.
21.2. Transaction Administration
21.2.1. Browse and Manage Transactions
log-store. An API operation called probe reads the transaction logs and creates a node for each log. You can call the probe command manually, whenever you need to refresh the log-store. It is normal for transaction logs to appear and disappear quickly.
Example 21.1. Refresh the Log Store
default in a managed domain. For a standalone server, remove the profile=default from the command.
/profile=default/subsystem=transactions/log-store=log-store/:probe
Example 21.2. View All Prepared Transactions
ls command.
ls /profile=default/subsystem=transactions/log-store=log-store/transactions
Manage a Transaction
- View a transaction's attributes.
- To view information about a transaction, such as its JNDI name, EIS product name and version, or its status, use the
:read-resourceCLI command./profile=default/subsystem=transactions/log-store=log-store/transactions=0\:ffff7f000001\:-b66efc2\:4f9e6f8f\:9:read-resource
- View the participants of a transaction.
- Each transaction log contains a child element called
participants. Use theread-resourceCLI command on this element to see the participants of the transaction. Participants are identified by their JNDI names./profile=default/subsystem=transactions/log-store=log-store/transactions=0\:ffff7f000001\:-b66efc2\:4f9e6f8f\:9/participants=java\:\/JmsXA:read-resource
The result may look similar to this:{ "outcome" => "success", "result" => { "eis-product-name" => "HornetQ", "eis-product-version" => "2.0", "jndi-name" => "java:/JmsXA", "status" => "HEURISTIC", "type" => "/StateManager/AbstractRecord/XAResourceRecord" } }The outcome status shown here is in aHEURISTICstate and is eligible for recover. See Recover a transaction. for more details. - Delete a transaction.
- Each transaction log supports a
:deleteoperation, to delete the transaction log representing the transaction./profile=default/subsystem=transactions/log-store=log-store/transactions=0\:ffff7f000001\:-b66efc2\:4f9e6f8f\:9:delete
- Recover a transaction.
- Each transaction log supports recovery via the
:recoverCLI command.Recovery of Heuristic Transactions and Participants
- If the transaction's status is
HEURISTIC, the recovery operation changes the state toPREPAREand triggers a recovery. - If one of the transaction's participants is heuristic, the recovery operation tries to replay the
commitoperation. If successful, the participant is removed from the transaction log. You can verify this by re-running the:probeoperation on thelog-storeand checking that the participant is no longer listed. If this is the last participant, the transaction is also deleted.
- Refresh the status of a transaction which needs recovery.
- If a transaction needs recovery, you can use the
:refreshCLI command to be sure it still requires recovery, before attempting the recovery./profile=default/subsystem=transactions/log-store=log-store/transactions=0\:ffff7f000001\:-b66efc2\:4f9e6f8f\:9/participants=2:refresh
If Transaction Manager statistics are enabled, you can view statistics about the Transaction Manager and transaction subsystem. See Section 21.1.2, “Configure the Transaction Manager” for information about how to enable Transaction Manager statistics.
Table 21.4. Transaction Subsystem Statistics
| Statistic | Description | CLI Command |
|---|---|---|
| Total |
The total number of transactions processed by the Transaction Manager on this server.
|
/host=master/server=server-one/subsystem=transactions/:read-attribute(name=number-of-transactions,include-defaults=true) |
| Committed |
The number of committed transactions processed by the Transaction Manager on this server.
|
/host=master/server=server-one/subsystem=transactions/:read-attribute(name=number-of-committed-transactions,include-defaults=true) |
| Aborted |
The number of aborted transactions processed by the Transaction Manager on this server.
|
/host=master/server=server-one/subsystem=transactions/:read-attribute(name=number-of-aborted-transactions,include-defaults=true) |
| Timed Out |
The number of timed out transactions processed by the Transaction Manager on this server.
|
/host=master/server=server-one/subsystem=transactions/:read-attribute(name=number-of-timed-out-transactions,include-defaults=true) |
| Heuristics |
Not available in the Management Console. Number of transactions in a heuristic state.
|
/host=master/server=server-one/subsystem=transactions/:read-attribute(name=number-of-heuristics,include-defaults=true) |
| In-Flight Transactions |
Not available in the Management Console. Number of transactions which have begun but not yet terminated.
|
/host=master/server=server-one/subsystem=transactions/:read-attribute(name=number-of-inflight-transactions,include-defaults=true) |
| Failure Origin - Applications |
The number of failed transactions whose failure origin was an application.
|
/host=master/server=server-one/subsystem=transactions/:read-attribute(name=number-of-application-rollbacks,include-defaults=true) |
| Failure Origin - Resources |
The number of failed transactions whose failure origin was a resource.
|
/host=master/server=server-one/subsystem=transactions/:read-attribute(name=number-of-resource-rollbacks,include-defaults=true) |
| Participant ID |
The ID of the participant.
|
/host=master/server=server-one/subsystem=transactions/log-store=log-store/transactions=0\:ffff7f000001\:-b66efc2\:4f9e6f8f\:9:read-children-names(child-type=participants) |
| List of all transactions |
The complete list of transactions.
|
/host=master/server=server-one/subsystem=transactions/log-store=log-store:read-children-names(child-type=transactions) |
21.3. Transaction References
21.3.1. JBoss Transactions Errors and Exceptions
UserTransaction class, see the UserTransaction API specification at http://docs.oracle.com/javaee/6/api/javax/transaction/UserTransaction.html.
21.3.2. Limitations on JTA Transactions
21.4. ORB Configuration
21.4.1. About Common Object Request Broker Architecture (CORBA)
21.4.2. Configure the ORB for JTS Transactions
Note
full and full-ha profiles only. In a standalone server, it is available when you use the standalone-full.xml or standalone-full-ha.xml configurations.
Procedure 21.3. Configure the ORB using the Management Console
View the profile settings.
Select Configuration from the top of the management console. If you use a managed domain, select either the full or full-ha profile from the selection box at the top left.Modify the Initializers Settings
Expand the Subsystems menu. Expand the Container menu and select JacORB.In the form that appears in the main screen, select the Initializers tab and click the Edit button.Enable the security interceptors by setting the value of Security toon.To enable the ORB for JTS, set the Transaction Interceptors value toon, rather than the defaultspec.Refer to the Need Help? link in the form for detailed explanations about these values. Click Save when you have finished editing the values.Advanced ORB Configuration
Refer to the other sections of the form for advanced configuration options. Each section includes a Need Help? link with detailed information about the parameters.
You can configure each aspect of the ORB using the Management CLI. The following commands configure the initializers to the same values as the procedure above, for the Management Console. This is the minimum configuration for the ORB to be used with JTS.
/profile=full portion of the commands.
Example 21.3. Enable the Security Interceptors
/profile=full/subsystem=jacorb/:write-attribute(name=security,value=on)
Example 21.4. Enable Transactions in the JacORB Subsystem
/profile=full/subsystem=jacorb/:write-attribute(name=transactions,value=on)
Example 21.5. Enable JTS in the Transaction Subsystem
/profile=full/subsystem=transactions:write-attribute(name=jts,value=true)
Note
21.5. JDBC Object Store Support
21.5.1. JDBC Store for Transactions
Note
jta="false" in the datasource section of the server's configuration file.
Procedure 21.4. Enable Use of a JDBC Datasource as a Transactions Object Store
- Set
use-jdbc-storetotrue./subsystem=transactions:write-attribute(name=use-jdbc-store, value=true) - Set
jdbc-store-datasourceto the JNDI name for the data source to use./subsystem=transactions:write-attribute(name=jdbc-store-datasource, value=java:jboss/datasources/TransDS) - Restart the JBoss EAP server for the changes to take effect.
shutdown --restart=true
Table 21.5. Transactions JDBC Store Properties
| Property | Description |
|---|---|
use-jdbc-store
|
Set this to "true" to enable the JDBC store for transactions.
|
jdbc-store-datasource
|
The JNDI name of the JDBC datasource used for storage.
|
jdbc-action-store-drop-table
|
Drop and recreate the action store tables at launch. Optional, defaults to "false".
|
jdbc-action-store-table-prefix
|
The prefix for the action store table names. Optional.
|
jdbc-communication-store-drop-table
|
Drop and recreate the communication store tables at launch. Optional, defaults to "false".
|
jdbc-communication-store-table-prefix
|
The prefix for the communication store table names. Optional.
|
jdbc-state-store-drop-table
|
Drop and recreate the state store tables at launch. Optional, defaults to "false".
|
jdbc-state-store-table-prefix
|
The prefix for the state store table names. Optional.
|
Chapter 22. Mail subsystem
22.1. Use custom transports in mail subsystem
outbound-socket-binding-ref which is a reference to the outbound mail socket binding and is defined with the host address and port number.
outbound-socket-binding-ref and allow custom host property formats.
Procedure 22.1.
- Add new mail session. The command below creates new session called mySession and sets JNDI to
java:jboss/mail/MySession:/subsystem=mail/mail-session=mySession:add(jndi-name=java:jboss/mail/MySession)
- Add an outbound socket binding. The command below adds a socket binding named
my-smtp-bindingwhich points tolocalhost:25./socket-binding-group=standard-sockets/remote-destination-outbound-socket-binding=my-smtp-binding:add(host=localhost, port=25)
- Add an SMTP server with
outbind-socket-binding-ref. The command below adds an SMTP calledmy-smtp-bindingand defines a username, password and TLS configuration./subsystem=mail/mail-session=mySession/server=smtp:add(outbound-socket-binding-ref= my-smtp-binding, username=user, password=pass, tls=true)
- Repeat this process for POP3 and IMAP:
/socket-binding-group=standard-sockets/remote-destination-outbound-socket-binding=my-pop3-binding:add(host=localhost, port=110)
/subsystem=mail/mail-session=mySession/server=pop3:add(outbound-socket-binding-ref=my-pop3-binding, username=user, password=pass)
/socket-binding-group=standard-sockets/remote-destination-outbound-socket-binding=my-imap-binding:add(host=localhost, port=143)
/subsystem=mail/mail-session=mySession/server=imap:add(outbound-socket-binding-ref=my-imap-binding, username=user, password=pass)
- To use a custom server, create a new custom mail server without an outbound socket binding (as it is optional) and instead provide the host information as part of properties.
/subsystem=mail/mail-session=mySession/custom=myCustomServer:add(username=user,password=pass, properties={"host" => "myhost", "my-property" =>"value"})When defining custom protocols, any property name that contains a dot (.) is considered to be a fully-qualified name and passed as it is supplied. Any other format (my-property, for example) will be translated into the following format:mail.server-name.my-property.
<subsystem xmlns="urn:jboss:domain:mail:1.1">
<mail-session jndi-name="java:/Mail" from="user.name@domain.org">
<smtp-server outbound-socket-binding-ref="mail-smtp" tls="true">
<login name="user" password="password"/>
</smtp-server>
<pop3-server outbound-socket-binding-ref="mail-pop3"/>
<imap-server outbound-socket-binding-ref="mail-imap">
<login name="nobody" password="password"/>
</imap-server>
</mail-session>
<mail-session debug="true" jndi-name="java:jboss/mail/Default">
<smtp-server outbound-socket-binding-ref="mail-smtp"/>
</mail-session>
<mail-session debug="true" jndi-name="java:jboss/mail/Custom">
<custom-server name="smtp">
<login name="username" password="password"/>
<property name="host" value="mail.example.com"/>
</custom-server>
<custom-server name="pop3" outbound-socket-binding-ref="mail-pop3">
<property name="custom_prop" value="some-custom-prop-value"/>
<property name="some.fully.qualified.property" value="fully-qualified-prop-name"/>
</custom-server>
</mail-session>
<mail-session debug="true" jndi-name="java:jboss/mail/Custom2">
<custom-server name="pop3" outbound-socket-binding-ref="mail-pop3">
<property name="custom_prop" value="some-custom-prop-value"/>
</custom-server>
</mail-session>
</subsystem>Chapter 23. Enterprise JavaBeans
23.1. Introduction
23.1.1. Overview of Enterprise JavaBeans
23.1.2. Overview of Enterprise JavaBeans for Administrators
- Click on the Configuration tab at the top of the Management Console.
- If you are running in Domain mode, select a profile from the Profiles drop down menu on the top left.
- Expand the Subsystems menu.
- Expand the Container menu, then select EJB 3.
23.1.3. Enterprise Beans
Important
23.1.4. Session Beans
23.1.5. Message-Driven Beans
23.2. Configuring Bean Pools
23.2.1. Bean Pools
23.2.2. Create a Bean Pool
Procedure 23.1. Create a bean pool using the Management Console
- Login to the Management Console. Refer to Section 3.4.2, “Log in to the Management Console”.
- Click on the tab at the top of the screen. Expand the menu and select . Select the tab.
- Click . The Add EJB3 Bean Pools dialog appears.
- Specify the required details, Name, Max Pool Size, Timeout value, and Timeout unit.
- Click button to finish.
Procedure 23.2. Create a bean pool using the CLI
- Launch the CLI tool and connect to your server. Refer to Section 3.5.4, “Connect to a Managed Server Instance Using the Management CLI”.
- Use the
addoperation with the following syntax./subsystem=ejb3/strict-max-bean-instance-pool=BEANPOOLNAME:add(max-pool-size=MAXSIZE, timeout=TIMEOUT, timeout-unit="UNIT")
- Replace BEANPOOLNAME with the required name for the bean pool.
- Replace MAXSIZE with the maximum size of the bean pool.
- Replace TIMEOUT
- Replace UNIT with the required time unit. Allowed values are:
NANOSECONDS,MICROSECONDS,MILLISECONDS,SECONDS,MINUTES,HOURS, andDAYS.
- Use the
read-resourceoperation to confirm the creation of the bean pool./subsystem=ejb3/strict-max-bean-instance-pool=BEANPOOLNAME:read-resource
Example 23.1. Create a Bean Pool using the CLI
[standalone@localhost:9999 /] /subsystem=ejb3/strict-max-bean-instance-pool=ACCTS_BEAN_POOL:add(max-pool-size=500, timeout=5000, timeout-unit="SECONDS")
{"outcome" => "success"}
[standalone@localhost:9999 /]Example 23.2. XML Configuration Sample
<subsystem xmlns="urn:jboss:domain:ejb3:1.2">
<pools>
<bean-instance-pools>
<strict-max-pool name="slsb-strict-max-pool" max-pool-size="20"
instance-acquisition-timeout="5"
instance-acquisition-timeout-unit="MINUTES" />
<strict-max-pool name="mdb-strict-max-pool" max-pool-size="20"
instance-acquisition-timeout="5"
instance-acquisition-timeout-unit="MINUTES" />
</bean-instance-pools>
</pools>
</subsystem>23.2.3. Remove a Bean Pool
Prerequisites:
- The bean pool that you want to remove cannot be in use. Refer to Section 23.2.5, “Assign Bean Pools for Session and Message-Driven Beans” to ensure that it is not being used.
Procedure 23.3. Remove a bean pool using the Management Console
- Login to the Management Console. Refer to Section 3.4.2, “Log in to the Management Console”.
- Click on the tab at the top of the screen. Expand the menu and select . Select the tab.
- Select the bean pool to remove in the list.
- Click . The Remove Item dialog appears.
- Click to confirm.
Procedure 23.4. Remove a bean pool using the CLI
- Launch the CLI tool and connect to your server. Refer to Section 3.5.4, “Connect to a Managed Server Instance Using the Management CLI”.
- Use the
removeoperation with the following syntax./subsystem=ejb3/strict-max-bean-instance-pool=BEANPOOLNAME:remove
- Replace BEANPOOLNAME with the required name for the bean pool.
Example 23.3. Removing a Bean Pool using the CLI
[standalone@localhost:9999 /] /subsystem=ejb3/strict-max-bean-instance-pool=ACCTS_BEAN_POOL:remove
{"outcome" => "success"}
[standalone@localhost:9999 /]23.2.4. Edit a Bean Pool
Procedure 23.5. Edit a bean pool using the Management Console
- Login to the Management Console. Section 3.4.2, “Log in to the Management Console”
- Click on the tab at the top of the screen. Expand the menu and select . Select the tab.
- Select the bean pool you want to edit.
- Click .
- Edit the details you want to change. Only Max Pool Size, Timeout value, and Timeout Unit can be changed.
- Click to finish.
Procedure 23.6. Edit a bean pool using the CLI
- Launch the CLI tool and connect to your server. Refer to Section 3.5.4, “Connect to a Managed Server Instance Using the Management CLI”.
- Use the
write-attributeoperation with the following syntax for each attribute of the bean pool to be changed./subsystem=ejb3/strict-max-bean-instance-pool=BEANPOOLNAME:write-attribute(name="ATTRIBUTE", value="VALUE")
- Replace BEANPOOLNAME with the required name for the bean pool.
- Replace ATTRIBUTE with the name of the attribute to be edited. The attributes that can be edited in this way are
max-pool-size,timeout, andtimeout-unit. - Replace VALUE with the required value of the attribute.
- Use the
read-resourceoperation to confirm the changes to the bean pool./subsystem=ejb3/strict-max-bean-instance-pool=BEANPOOLNAME:read-resource
Example 23.4. Set the Timeout Value of a Bean Pool using the CLI
[standalone@localhost:9999 /] /subsystem=ejb3/strict-max-bean-instance-pool=HSBeanPool:write-attribute(name="timeout", value="1500")
{"outcome" => "success"}
[standalone@localhost:9999 /]23.2.5. Assign Bean Pools for Session and Message-Driven Beans
slsb-strict-max-pool and mdb-strict-max-pool for stateless session beans and message-driven beans respectively.
Procedure 23.7. Assign Bean Pools for Session and Message-Driven Beans using the Management Console
- Login to the Management Console. Section 3.4.2, “Log in to the Management Console”
- Click on the tab at the top of the screen. Expand the menu and select . Select the tab.
- Click .
- Select the bean pool to use for each type of bean from the appropriate combo-box.
- Click to finish.
Procedure 23.8. Assign Bean Pools for Session and Message-Driven Beans using the CLI
- Launch the CLI tool and connect to your server. Refer to Section 3.5.4, “Connect to a Managed Server Instance Using the Management CLI”.
- Use the
write-attributeoperation with the following syntax./subsystem=ejb3:write-attribute(name="BEANTYPE", value="BEANPOOL")
- Replace BEANTYPE with
default-mdb-instance-poolfor Message-Driven Beans ordefault-slsb-instance-poolfor stateless session beans. - Replace BEANPOOL with the name of the bean pool to assign.
- Use the
read-resourceoperation to confirm the changes./subsystem=ejb3:read-resource
Example 23.5. Assign a Bean Pool for Session Beans using the CLI
[standalone@localhost:9999 /] /subsystem=ejb3:write-attribute(name="default-slsb-instance-pool", value="LV_SLSB_POOL")
{"outcome" => "success"}
[standalone@localhost:9999 /]Example 23.6. XML Configuration Sample
<subsystem xmlns="urn:jboss:domain:ejb3:1.2">
<session-bean>
<stateless>
<bean-instance-pool-ref pool-name="slsb-strict-max-pool"/>
</stateless>
<stateful default-access-timeout="5000" cache-ref="simple"/>
<singleton default-access-timeout="5000"/>
</session-bean>
<mdb>
<resource-adapter-ref resource-adapter-name="hornetq-ra"/>
<bean-instance-pool-ref pool-name="mdb-strict-max-pool"/>
</mdb>
</subsystem>23.3. Configuring EJB Thread Pools
23.3.1. Enterprise Bean Thread Pools
23.3.2. Create a Thread Pool
Procedure 23.9. Create an EJB Thread Pool using the Management Console
- Login to the Management Console. Section 3.4.2, “Log in to the Management Console”
- Click on the tab at the top of the screen. Expand the menu and select . Select the tab.
- Click . The Add EJB3 Thread Pools dialog appears.
- Specify the required details, Name, Max. Threads, and Keep-Alive Timeout value.
- Click to finish.
Procedure 23.10. Create a Thread Pool using the CLI
- Launch the CLI tool and connect to your server. Refer to Section 3.5.4, “Connect to a Managed Server Instance Using the Management CLI”.
- Use the
addoperation with the following syntax./subsystem=ejb3/thread-pool=THREADPOOLNAME:add(max-threads=MAXSIZE, keepalive-time={"time"=>"TIME", "unit"=>UNIT"})- Replace THREADPOOLNAME with the required name for the thread pool.
- Replace MAXSIZE with the maximum size of the thread pool.
- Replace UNIT with the required time unit to be used for the required keep-alive time. Allowed values are:
NANOSECONDS,MICROSECONDS,MILLISECONDS,SECONDS,MINUTES,HOURS, andDAYS. - Replace TIME with the integer value of the required keep-alive time. This value is a number of UNITs.
- Use the
read-resourceoperation to confirm the creation of the bean pool./subsystem=ejb3/strict-max-bean-instance-pool=THREADPOOLNAME:read-resource
Example 23.7. Create a Thread Pool using the CLI
[standalone@localhost:9999 /] /subsystem=ejb3/thread-pool=testmepool:add(max-threads=50, keepalive-time={"time"=>"150", "unit"=>"SECONDS"})
{"outcome" => "success"}
[standalone@localhost:9999 /]Example 23.8. XML Configuration Sample
<subsystem xmlns="urn:jboss:domain:ejb3:1.2">
<thread-pools>
<thread-pool name="default" max-threads="20" keepalive-time="150"/>
</thread-pools>
</subsystem>23.3.3. Remove a Thread Pool
Prerequisites
- The thread pool that you want to remove cannot be in use. Refer to the following tasks to ensure that the thread pool is not in use:
Procedure 23.11. Remove an EJB thread pool using the Management Console
- Login to the Management Console. Section 3.4.2, “Log in to the Management Console”.
- Click on the tab at the top of the screen. Expand the menu and select . Select the tab.
- Select the thread pool to you want to remove.
- Click . The Remove Item dialog appears.
- Click to confirm.
Procedure 23.12. Remove a thread pool using the CLI
- Launch the CLI tool and connect to your server. Refer to Section 3.5.4, “Connect to a Managed Server Instance Using the Management CLI”.
- Use the
removeoperation with the following syntax./subsystem=ejb3/thread-pool=THREADPOOLNAME:remove
- Replace THREADPOOLNAME with the name of the thread pool.
Example 23.9. Removing a Thread Pool using the CLI
[standalone@localhost:9999 /] /subsystem=ejb3/thread-pool=ACCTS_THREADS:remove
{"outcome" => "success"}
[standalone@localhost:9999 /]23.3.4. Edit a Thread Pool
Procedure 23.13. Edit a Thread Pool using the Management Console
- Login to the Management Console. Section 3.4.2, “Log in to the Management Console”.
- Click on the tab at the top of the screen. Expand the menu and select . Select the tab.
- Select the thread pool you want to edit.
- Click .
- Edit the details you want to change. Only the
Thread Factory,Max Threads,Keepalive Timeout, andKeepalive Timeout Unitvalues can be edited. - Click to finish.
Procedure 23.14. Edit a thread pool using the CLI
- Launch the CLI tool and connect to your server. Refer to Section 3.5.4, “Connect to a Managed Server Instance Using the Management CLI”.
- Use the
write_attributeoperation with the following syntax for each attribute of the thread pool to be changed./subsystem=ejb3/thread-pool=THREADPOOLNAME:write-attribute(name="ATTRIBUTE", value="VALUE")
- Replace THREADPOOLNAME with the name of the thread pool.
- Replace ATTRIBUTE with the name of the attribute to be edited. The attributes that can be edited in this way are
keepalive-time,max-threads, andthread-factory. - Replace VALUE with the required value of the attribute.
- Use the
read-resourceoperation to confirm the changes to the thread pool./subsystem=ejb3/thread-pool=THREADPOOLNAME:read-resource
Important
keepalive-time attribute with the CLI the required value is an object representation. It has the following syntax.
/subsystem=ejb3/thread-pool=THREADPOOLNAME:write-attribute(name="keepalive-time", value={"time" => "VALUE","unit" => "UNIT"}Example 23.10. Set the Maxsize Value of a Thread Pool using the CLI
[standalone@localhost:9999 /] /subsystem=ejb3/thread-pool=HSThreads:write-attribute(name="max-threads", value="50")
{"outcome" => "success"}
[standalone@localhost:9999 /]Example 23.11. Set the keepalive-time Time Value of a Thread Pool using the CLI
[standalone@localhost:9999 /] /subsystem=ejb3/thread-pool=HSThreads:write-attribute(name="keepalive-time", value={"time"=>"150"})
{"outcome" => "success"}
[standalone@localhost:9999 /]23.4. Configuring Session Beans
23.4.1. Session Bean Access Timeout
@javax.ejb.AccessTimeout annotation on the method. It can be specified on the session bean (which applies to all the bean's methods) and on specific methods to override the configuration for the bean.
23.4.2. Set Default Session Bean Access Timeout Values
Procedure 23.15. Set Default Session Bean Access Timeout Values using the Management Console
- Login to the Management Console. See Section 3.4.2, “Log in to the Management Console”.
- Click on the tab at the top of the screen. Expand the menu and select . Select the tab.
- Click . The fields in the Details area can now be edited.
- Enter the required values in the Stateful Access Timeout and/or Singleton Access Timeout text boxes.
- Click to finish.
Procedure 23.16. Set Session Bean Access Timeout Values Using the CLI
- Launch the CLI tool and connect to your server. Refer to Section 3.5.4, “Connect to a Managed Server Instance Using the Management CLI”.
- Use the
write-attributeoperation with the following syntax./subsystem=ejb3:write-attribute(name="BEANTYPE", value=TIME)
- Replace BEANTYPE with
default-stateful-bean-access-timeoutfor Stateful Session Beans, ordefault-singleton-bean-access-timeoutfor Singleton Session Beans. - Replace TIME with the required timeout value.
- Use the
read-resourceoperation to confirm the changes./subsystem=ejb3:read-resource
Example 23.12. Setting the Default Stateful Bean Access Timeout value to 9000 with the CLI
[standalone@localhost:9999 /] /subsystem=ejb3:write-attribute(name="default-stateful-bean-access-timeout", value=9000)
{"outcome" => "success"}
[standalone@localhost:9999 /]Example 23.13. XML Configuration Sample
<subsystem xmlns="urn:jboss:domain:ejb3:1.2">
<session-bean>
<stateless>
<bean-instance-pool-ref pool-name="slsb-strict-max-pool"/>
</stateless>
<stateful default-access-timeout="5000" cache-ref="simple"/>
<singleton default-access-timeout="5000"/>
</session-bean>
</subsystem>23.5. Configuring Message-Driven Beans
23.5.1. Set Default Resource Adapter for Message-Driven Beans
hornetq-ra.
Procedure 23.17. Set the Default Resource Adapter for Message-Driven Beans using the Management Console
- Login to the Management Console. Section 3.4.2, “Log in to the Management Console”
- Click on the tab at the top of the screen. Expand the menu and select . Select the tab.
- Click . The fields in the Details area can now be edited.
- Enter the name of the resource adapter to be used in the Default Resource Adapter text box.
- Click to finish.
Procedure 23.18. Set the Default Resource Adapter for Message-Driven Beans using the CLI
- Launch the CLI tool and connect to your server. Refer to Section 3.5.4, “Connect to a Managed Server Instance Using the Management CLI”.
- Use the
write-attributeoperation with the following syntax./subsystem=ejb3:write-attribute(name="default-resource-adapter-name", value="RESOURCE-ADAPTER")
Replace RESOURCE-ADAPTER with name of the resource adapter to be used. - Use the
read-resourceoperation to confirm the changes./subsystem=ejb3:read-resource
Example 23.14. Set the Default Resource Adapter for Message-Driven Beans using the CLI
[standalone@localhost:9999 subsystem=ejb3] /subsystem=ejb3:write-attribute(name="default-resource-adapter-name", value="EDIS-RA")
{"outcome" => "success"}
[standalone@localhost:9999 subsystem=ejb3]Example 23.15. XML Configuration Sample
<subsystem xmlns="urn:jboss:domain:ejb3:1.2">
<mdb>
<resource-adapter-ref resource-adapter-name="hornetq-ra"/>
<bean-instance-pool-ref pool-name="mdb-strict-max-pool"/>
</mdb>
</subsystem>23.6. Configuring the EJB3 Timer Service
23.6.1. EJB3 Timer Service
23.6.2. Configure the EJB3 timer Service
Procedure 23.19. Configure the EJB3 Timer Service
- Login to the Management Console. See Section 3.4.2, “Log in to the Management Console”.
- Click on the tab at the top of the screen. Expand the menu and select . Select the tab, click on .
- Click Edit. The fields in the Details area can now be edited.
- You can select a different EJB3 thread pool used for the Timer Service if additional thread pools have been configured, and you can change the directory used to save the Timer Service data. The Timer Service data directory configuration consists of two values:
Path, the directory that data is stored in; andRelative To, the directory which containsPath. By defaultRelative Tois set to a Filesystem Path Variable. - Click to finish.
23.7. Configuring the EJB Asynchronous Invocation Service
23.7.1. EJB3 Asynchronous Invocation Service
23.7.2. Configure the EJB3 Asynchronous Invocation Service Thread Pool
Procedure 23.20. Configure the EJB3 Asynchronous Invocation Service thread pool
- Login to the Management Console. See Section 3.4.2, “Log in to the Management Console”.
- Click on the tab at the top of the screen. Expand the menu and select . Select the tab, click on .
- Click .
- Select the EJB3 thread pool to use from the list. The thread pool must have been already created.
- Click to finish.
23.8. Configuring the EJB3 Remote Invocation Service
23.8.1. EJB3 Remote Service
23.8.2. Configure the EJB3 Remote Service
Procedure 23.21. Configure the EJB3 Remote Service
- Login to the Management Console. See Section 3.4.2, “Log in to the Management Console”.
- Click on the tab at the top of the screen. Expand the menu and select . Select the tab, click on .
- Click .
- You can select a different EJB3 thread pool used for the Remote Service if additional thread pools have been configured. You can change the connector used to register the EJB remoting channel.
- Click to finish.
23.9. Configuring EJB 2.x Entity Beans
23.9.1. EJB Entity Beans
23.9.2. Container-Managed Persistence
23.9.3. Enable EJB 2.x Container-Managed Persistence
org.jboss.as.cmp extension. CMP is enabled by default in the managed domain and standalone server full configurations, e.g. standalone-full.xml.
org.jboss.as.cmp module to the list of enabled extensions in the server configuration file.
<extensions>
<extension module="org.jboss.as.cmp"/>
</extensions><subsystem xmlns="urn:jboss:domain:cmp:1.1"/>
org.jboss.as.cmp module.
23.9.4. Configure EJB 2.x Container-Managed Persistence
- UUID-based key generators
- A UUID-based key generator creates keys using Universally Unique Identifiers. UUID key generators only need to have a unique name, they have no other configuration.UUID-based key generators can be added using the CLI using the following command syntax.
/subsystem=cmp/uuid-keygenerator=UNIQUE_NAME:add
Example 23.16. Add UUID Key Generator
To add a UUID-based key generator with the name ofuuid_identities, use this CLI command:/subsystem=cmp/uuid-keygenerator=uuid_identities:add
The XML configuration created by this command is:<subsystem xmlns="urn:jboss:domain:cmp:1.0"> <key-generators> <uuid name="uuid_identities" /> </key-generators> </subsystem> - HiLo Key Generators
- HiLo key generators use a database to create and store entity identity keys. HiLo Key generators must have unique names and are configured with properties that specify the datasource used to store the data as well as the names of the table and columns that store the keys.HiLo key generators can be added using the CLI using the following command syntax:
/subsystem=cmp/hilo-keygenerator=UNIQUE_NAME/:add(property=value, property=value, ...)
Example 23.17. Add a HiLo Key Generator
/subsystem=cmp/hilo-keygenerator=HiLoKeyGeneratorFactory:add(create-table=true,create-table-ddl="create table HILOSEQUENCES (SEQUENCENAME varchar(50) not null, HIGHVALUES integer not null, constraint hilo_pk primary key (SEQUENCENAME))",data-source=java:jboss/datasources/ExampleDS, id-column=HIGHVALUES,sequence-column=SEQUENCENAME,table-name=HILOSEQUENCES,sequence-name=general,block-size=10)
The XML configuration created by this command is:<subsystem xmlns="urn:jboss:domain:cmp:1.1"> <key-generators> <hilo name="HiLoKeyGeneratorFactory"> <block-size>10</block-size> <create-table>true</create-table> <create-table-ddl>create table HILOSEQUENCES (SEQUENCENAME varchar(50) not null, HIGHVALUES integer not null, constraint hilo_pk primary key (SEQUENCENAME))</create-table-ddl> <data-source>java:jboss/datasources/ExampleDS</data-source> <id-column>HIGHVALUES</id-column> <sequence-column>SEQUENCENAME</sequence-column> <sequence-name>general</sequence-name> <table-name>HILOSEQUENCES</table-name> </hilo> </key-generators> </subsystem>Note
The block-size must be set to a value !=0, otherwise the generated PKey will not incremented and therefore the creation of entities fail with a DuplicateKeyException.Note
The select-hi-ddl must be set as 'FOR UPDATE' in case of cluster to ensure the consistency. All databases do not support the locking feature.
23.9.5. CMP Subsystem Properties for HiLo Key Generators
Table 23.1. CMP Subsystem Properties for HiLo Key Generators
| Property | Data type | Description |
|---|---|---|
block-size | long |
The block size.
|
create-table | boolean |
If set to
TRUE, a table called table-name will be created using the contents of create-table-ddl if that table is not found.
|
create-table-ddl | string |
The DDL commands used to create the table specified in
table-name if the table is not found and create-table is set to TRUE.
|
data-source | token |
The data source used to connect to the database.
|
drop-table | boolean |
To determine whether to drop the tables.
|
id-column | token |
The ID column name.
|
select-hi-ddl | string | The SQL command which will return the largest key currently stored. |
sequence-column | token |
The sequence column name.
|
sequence-name | token |
The name of the sequence.
|
table-name | token |
The name of the table used to store the key information.
|
Chapter 24. Java Connector Architecture (JCA)
24.1. Introduction
24.1.1. About the Java EE Connector API (JCA)
24.1.2. Java Connector Architecture (JCA)
- connections
- transactions
- security
- life-cycle
- work instances
- transaction inflow
- message inflow
24.1.3. Resource Adapters
24.2. Configure the Java Connector Architecture (JCA) Subsystem
- Archive validation
- This setting whether archive validation will be performed on the deployment units.
- The following table describes the attributes you can set for archive validation.
Table 24.1. Archive validation attributes
Attribute Default Value Description enabledtrue Specifies whether archive validation is enabled.fail-on-errortrue Specifies whether an archive validation error report fails the deployment.fail-on-warnfalse Specifies whether an archive validation warning report fails the deployment. - If an archive does not implement the Java EE Connector Architecture specification correctly and archive validation is enabled, an error message will display during deployment describing the problem. For example:
Severity: ERROR Section: 19.4.2 Description: A ResourceAdapter must implement a "public int hashCode()" method. Code: com.mycompany.myproject.ResourceAdapterImpl Severity: ERROR Section: 19.4.2 Description: A ResourceAdapter must implement a "public boolean equals(Object)" method. Code: com.mycompany.myproject.ResourceAdapterImpl
- If archive validation is not specified, it is considered present and the
enabledattribute defaults to true.
- Bean validation
- This setting determines whether bean validation (JSR-303) will be performed on the deployment units.
- The following table describes the attributes you can set for bean validation.
Table 24.2. Bean validation attributes
Attribute Default Value Description enabledtrue Specifies whether bean validation is enabled. - If bean validation is not specified, it is considered present and the
enabledattribute defaults to true.
- Work managers
- There are two types of work managers:
- Default work manager
- The default work manager and its thread pools.
- Custom work manager
- A custom work manager definition and its thread pools.
- The following table describes the attributes you can set for work managers.
Table 24.3. Work manager attributes
Attribute Description nameSpecifies the name of the work manager. This is required for custom work managers.short-running-threadsThread pool for standard Work instances. Each work manager has one short-running thread pool.long-running-threadsThread pool for JCA 1.6 Work instances that set theLONG_RUNNINGhint. Each work manager can have one optional long-running thread pool. - The following table describes the attributes you can set for work manager thread pools.
Table 24.4. Thread pool attributes
Attribute Description allow-core-timeoutBoolean setting that determines whether core threads may time out. The default value is false.core-threadsThe core thread pool size. This must be smaller than the maximum thread pool size.queue-lengthThe maximum queue length.max-threadThe maximum thread pool size.keepalive-timeSpecifies the amount of time that pool threads should be kept after doing work.thread-factoryReference to the thread factory .
- Bootstrap contexts
- Used to define custom bootstrap contexts.
- The following table describes the attributes you can set for bootstrap contexts.
Table 24.5. Bootstrap context attributes
Attribute Description nameSpecifies the name of the bootstrap context.workmanagerSpecifies the name of the work manager to use for this context.
- Cached connection manager
- Used for debugging connections and supporting lazy enlistment of a connection in a transaction, tracking whether they are used and released properly by the application.
- The following table describes the attributes you can set for the cached connection manager.
Table 24.6. Cached connection manager attributes
Attribute Default Value Description debugfalse Outputs warning on failure to explicitly close connections.errorfalse Throws exception on failure to explicitly close connections.
Procedure 24.1. Configure the JCA subsystem using the Management Console
- Click on the tab at the top of the screen. Expand the menu and select .
- If the server is running in Domain mode, select a profile from the Profile drop-down menu at top left.
- Configure the settings for the JCA subsystem using the three tabs.
Common Config
The Common Config tab contains settings for the cached connection manager, archive validation and bean validation (JSR-303). Each of these is contained in their own tab as well. These settings can be changed by opening the appropriate tab, clicking the edit button, making the required changes, and then clicking on the save button.
Figure 24.1. JCA Common Configuration
Work Managers
The Work Manager tab contains the list of configured Work Managers. New Work Managers can be added, removed, and their thread pools configured here. Each Work Manager can have one short-running thread pool and an optional long-running thread pool.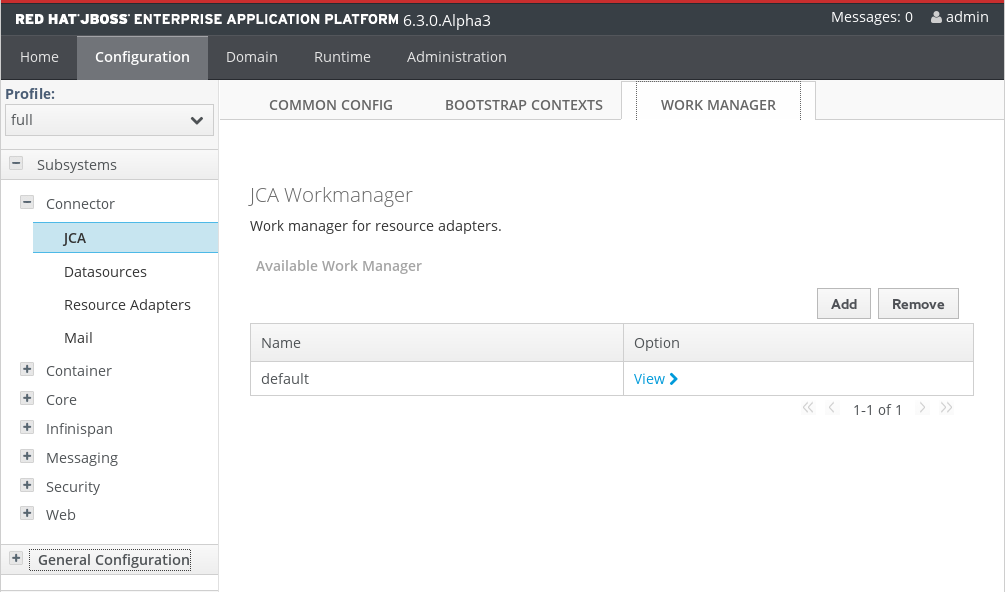
Figure 24.2. Work Managers
The thread pool attributes can be configured by clicking on the selected resource adapter.
Figure 24.3. Work Manager Thread Pools
Bootstrap Contexts
The Bootstrap Contexts tab contains the list of configured Bootstrap Contexts. New Bootstrap Context objects can be added, removed, and configured. Each Bootstrap Context must be assigned a Work Manager.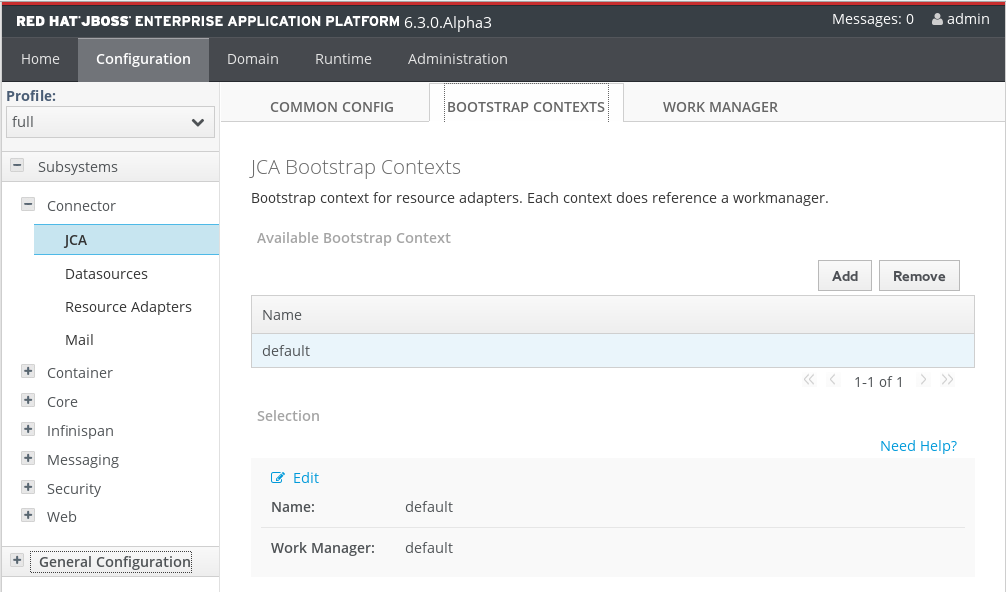
Figure 24.4. Bootstrap Contexts
24.3. Deploy a Resource Adapter
Procedure 24.2. Deploy a resource adapter using the Management CLI
- Open a command prompt for your operating system.
- Connect to the Management CLI.
- For Linux, enter the following at the command line:
$ EAP_HOME/bin/jboss-cli.sh --connect $ Connected to standalone controller at localhost:9999
- For Windows, enter the following at a command line:
C:\>EAP_HOME\bin\jboss-cli.bat --connect C:\> Connected to standalone controller at localhost:9999
- Deploy the resource adapter.
- To deploy the resource adapter to a standalone server, enter the following at a command line:
$ deploy path/to/resource-adapter-name.rar
- To deploy the resource adapter to all server groups in a managed domain, enter the following at a command line:
$ deploy path/to/resource-adapter-name.rar --all-server-groups
Procedure 24.3. Deploy a resource adapter using the Management Console
- Login to the Management Console. See Section 3.4.2, “Log in to the Management Console”.
- Click on the Runtime tab at the top of the screen. Select Manage Deployments.Click .
- Browse to the resource adapter archive and select it. Then click .
- Verify the deployment names, then click .
- The resource adapter archive should now appear in the list in a disabled state.
- Enable the resource adapter.
- In Domain mode, click . Select which Server Groups to assign the resource adapter to. Click to finish.
- In Standalone mode, select the Application Component from the list. Click . Click on the Are You Sure? dialog to enable the component.
Procedure 24.4. Deploy a resource adapter manually
- Copy the resource adapter archive to the server deployments directory,
- For a standalone server, copy the resource adapter archive to the
EAP_HOME/standalone/deployments/directory. - For a managed domain, you must use the Management Console or Management CLI to deploy the resource adapter archive to the server groups.
24.4. Configure a Deployed Resource Adapter
Note
[standalone@localhost:9999 /] prompt. Do not type the text within the curly braces. That is the output you should see as a result of the command, for example, {"outcome" => "success"}.
Procedure 24.5. Configure a resource adapter using the Management CLI
- Open a command prompt for your operating system.
- Connect to the Management CLI.
- For Linux, enter the following at the command line:
$ EAP_HOME/bin/jboss-cli.sh --connect
You should see the following result output:$ Connected to standalone controller at localhost:9999
- For Windows, enter the following at a command line:
C:\>EAP_HOME\bin\jboss-cli.bat --connect
You should see the following result output:C:\> Connected to standalone controller at localhost:9999
- Add the resource adapter configuration.
[standalone@localhost:9999 /] /subsystem=resource-adapters/resource-adapter=eis.rar:add(archive=eis.rar, transaction-support=XATransaction) {"outcome" => "success"} - Configure the
serverresource adapter level <config-property>.[standalone@localhost:9999 /] /subsystem=resource-adapters/resource-adapter=eis.rar/config-properties=server/:add(value=localhost) {"outcome" => "success"} - Configure the
portresource adapter level <config-property>.[standalone@localhost:9999 /] /subsystem=resource-adapters/resource-adapter=eis.rar/config-properties=port/:add(value=9000) {"outcome" => "success"} - Add a connection definition for a managed connection factory.
[standalone@localhost:9999 /] /subsystem=resource-adapters/resource-adapter=eis.rar/connection-definitions=cfName:add(class-name=com.acme.eis.ra.EISManagedConnectionFactory, jndi-name=java:/eis/AcmeConnectionFactory) {"outcome" => "success"} - Configure the
namemanaged connection factory level <config-property>.[standalone@localhost:9999 /] /subsystem=resource-adapters/resource-adapter=eis.rar/connection-definitions=cfName/config-properties=name/:add(value=Acme Inc) {"outcome" => "success"} - Add an admin object.
[standalone@localhost:9999 /] /subsystem=resource-adapters/resource-adapter=eis.rar/admin-objects=aoName:add(class-name=com.acme.eis.ra.EISAdminObjectImpl, jndi-name=java:/eis/AcmeAdminObject) {"outcome" => "success"} - Configure the
thresholdadmin object property.[standalone@localhost:9999 /] /subsystem=resource-adapters/resource-adapter=eis.rar/admin-objects=aoName/config-properties=threshold/:add(value=10) {"outcome" => "success"} - Activate the resource adapter.
[standalone@localhost:9999 /] /subsystem=resource-adapters/resource-adapter=eis.rar:activate {"outcome" => "success"} - View the newly configured and activated resource adapter.
[standalone@localhost:9999 /] /subsystem=resource-adapters/resource-adapter=eis.rar:read-resource(recursive=true) { "outcome" => "success", "result" => { "archive" => "eis.rar", "beanvalidationgroups" => undefined, "bootstrap-context" => undefined, "transaction-support" => "XATransaction", "admin-objects" => {"aoName" => { "class-name" => "com.acme.eis.ra.EISAdminObjectImpl", "enabled" => true, "jndi-name" => "java:/eis/AcmeAdminObject", "use-java-context" => true, "config-properties" => {"threshold" => {"value" => 10}} }}, "config-properties" => { "server" => {"value" => "localhost"}, "port" => {"value" => 9000} }, "connection-definitions" => {"cfName" => { "allocation-retry" => undefined, "allocation-retry-wait-millis" => undefined, "background-validation" => false, "background-validation-millis" => undefined, "blocking-timeout-wait-millis" => undefined, "class-name" => "com.acme.eis.ra.EISManagedConnectionFactory", "enabled" => true, "flush-strategy" => "FailingConnectionOnly", "idle-timeout-minutes" => undefined, "interleaving" => false, "jndi-name" => "java:/eis/AcmeConnectionFactory", "max-pool-size" => 20, "min-pool-size" => 0, "no-recovery" => undefined, "no-tx-separate-pool" => false, "pad-xid" => false, "pool-prefill" => false, "pool-use-strict-min" => false, "recovery-password" => undefined, "recovery-plugin-class-name" => undefined, "recovery-plugin-properties" => undefined, "recovery-security-domain" => undefined, "recovery-username" => undefined, "same-rm-override" => undefined, "security-application" => undefined, "security-domain" => undefined, "security-domain-and-application" => undefined, "use-ccm" => true, "use-fast-fail" => false, "use-java-context" => true, "use-try-lock" => undefined, "wrap-xa-resource" => true, "xa-resource-timeout" => undefined, "config-properties" => {"name" => {"value" => "Acme Inc"}} }} } }
Procedure 24.6. Configure a resource adapter using the Web-based Management Console
- Login to the Management Console. See Section 3.4.2, “Log in to the Management Console”.
- Click on the Configuration tab at the top of the screen. Expand the menu and select Resource Adapters.
- In Domain mode, select a Profile from the drop-down at top left.
Click . - Enter the archive name and choose transaction type
XATransactionfrom the TX: drop-down box. Then click . - Select the Properties tab. Click .
- Enter
serverfor the Name and the host name, for examplelocalhost, for the Value. Then click to finish. - Click again. Enter
portfor the Name and the port number, for example9000, for the Value. Then click to finish. - The
serverandportproperties now appear in the Properties panel. Click the View link under the Option column for the listed resource adapter to view the Connection Definitions. - Click Add above the Available Connection Definitions table to add a connection definition.
- Enter the JNDI Name and the fully qualified class name of the Connection Class. Then click to finish.
- Select the new Connection Definition, the select the Properties tab. Click to enter the Key and Value data for this connection definition. Click to finish.
- The connection definition is complete, but disabled. Select the connection definition and click to enable the connection definition.
- A dialog asks
Really modify Connection Definition?" for the JNDI name. Click . The connection definition should now appear asEnabled. - Click the Admin Objects tab at the top of the page to create and configure admin objects. Then click .
- Enter the JNDI Name and the fully qualified Class Name for the admin object. Then click .
- Select the Properties tab, then click to add admin object properties.
- Enter an admin object configuration property, for example
threshold, in the Name field. Enter the configuration property value, for example10, in the Value field. Then click to save the property. - The admin object is complete, but disabled. Click to enable the admin object.
- A dialog asks
Really modify Admin Ojbect?for the JNDI name. Click . The admin object should now appear asEnabled. - You must reload the server configuration to complete the process. Click on the Runtime tab. Expand the menu. Select Overview in the left navigation panel.
- Reload the servers
- In Domain mode, hover the mouse over a server group. Select Restart Group.
- In Standalone mode, a button will be available. Click .
- A dialog asks
Do you want to reload the server configuration?for the specified server. Click . The server configuration is up to date.
Procedure 24.7. Configure a resource adapter manually
- Stop the JBoss EAP 6 server.
Important
You must stop the server before editing the server configuration file for your change to be persisted on server restart. - Open the server configuration file for editing.
- For a standalone server, this is the
EAP_HOME/standalone/configuration/standalone.xmlfile. - For a managed domain, this is the
EAP_HOME/domain/configuration/domain.xmlfile.
- Find the
urn:jboss:domain:resource-adapterssubsystem in the configuration file. - If there are no resource adapters defined for this subsystem, first replace:
<subsystem xmlns="urn:jboss:domain:resource-adapters:1.1"/>
with this:<subsystem xmlns="urn:jboss:domain:resource-adapters:1.1"> <resource-adapters> <!-- <resource-adapter> configuration listed below --> </resource-adapters> </subsystem> - Replace the
<!-- <resource-adapter> configuration listed below -->with the XML definition for your resource adapter. The following is the XML representation of the resource adapter configuration created using the Management CLI and Web-based Management Console described above.<resource-adapter> <archive> eis.rar </archive> <transaction-support>XATransaction</transaction-support> <config-property name="server"> localhost </config-property> <config-property name="port"> 9000 </config-property> <connection-definitions> <connection-definition class-name="com.acme.eis.ra.EISManagedConnectionFactory" jndi-name="java:/eis/AcmeConnectionFactory" pool-name="java:/eis/AcmeConnectionFactory"> <config-property name="name"> Acme Inc </config-property> </connection-definition> </connection-definitions> <admin-objects> <admin-object class-name="com.acme.eis.ra.EISAdminObjectImpl" jndi-name="java:/eis/AcmeAdminObject" pool-name="java:/eis/AcmeAdminObject"> <config-property name="threshold"> 10 </config-property> </admin-object> </admin-objects> </resource-adapter> Start the server
Relaunch the JBoss EAP 6 server to start it running with the new configuration.
24.5. Resource Adapter Descriptor Reference
Table 24.7. Main elements
| Element | Description |
|---|---|
bean-validation-groups | Specifies bean validation group that should be used |
bootstrap-context | Specifies the unique name of the bootstrap context that should be used |
config-property | The config-property specifies resource adapter configuration properties. |
transaction-support | Define the type of transaction supported by this resource adapter. Valid values are: NoTransaction, LocalTransaction, XATransaction |
connection-definitions | Specifies the connection definitions |
admin-objects | Specifies the administration objects |
Table 24.8. Bean validation groups elements
| Element | Description |
|---|---|
bean-validation-group | Specifies the fully qualified class name for a bean validation group that should be used for validation |
Table 24.9. Connection definition / admin object attributes
| Attribute | Description |
|---|---|
class-name | Specifies the fully qualified class name of a managed connection factory or admin object |
jndi-name | Specifies the JNDI name |
enabled | Should the object be activated |
use-java-context | Specifies if a java:/ JNDI context should be used |
pool-name | Specifies the pool name for the object |
use-ccm | Enable the cached connection manager |
Table 24.10. Connection definition elements
| Element | Description |
|---|---|
config-property | The config-property specifies managed connection factory configuration properties. |
pool | Specifies pooling settings |
xa-pool | Specifies XA pooling settings |
security | Specifies security settings |
timeout | Specifies time out settings |
validation | Specifies validation settings |
recovery | Specifies the XA recovery settings |
Table 24.11. Pool elements
| Element | Description |
|---|---|
min-pool-size | The min-pool-size element indicates the minimum number of connections a pool should hold. These are not created until a Subject is known from a request for a connection. This default to 0 |
max-pool-size | The max-pool-size element indicates the maximum number of connections for a pool. No more than max-pool-size connections will be created in each sub-pool. This defaults to 20. |
prefill | Whether to attempt to prefill the connection pool. Default is false |
use-strict-min | Specifies if the min-pool-size should be considered strictly. Default false |
flush-strategy | Specifies how the pool should be flush in case of an error. Valid values are: FailingConnectionOnly (default), IdleConnections, EntirePool |
Table 24.12. XA pool elements
| Element | Description |
|---|---|
min-pool-size | The min-pool-size element indicates the minimum number of connections a pool should hold. These are not created until a Subject is known from a request for a connection. This default to 0 |
max-pool-size | The max-pool-size element indicates the maximum number of connections for a pool. No more than max-pool-size connections will be created in each sub-pool. This defaults to 20. |
prefill | Whether to attempt to prefill the connection pool. Default is false |
use-strict-min | Specifies if the min-pool-size should be considered strictly. Default false |
flush-strategy | Specifies how the pool should be flush in case of an error. Valid values are: FailingConnectionOnly (default), IdleConnections, EntirePool |
is-same-rm-override | The is-same-rm-override element allows one to unconditionally set whether the javax.transaction.xa.XAResource.isSameRM(XAResource) returns true or false |
interleaving | An element to enable interleaving for XA connection factories |
no-tx-separate-pools | Oracle does not like XA connections getting used both inside and outside a JTA transaction. To workaround the problem you can create separate sub-pools for the different contexts |
pad-xid | Should the Xid be padded |
wrap-xa-resource | Should the XAResource instances be wrapped in a org.jboss.tm.XAResourceWrapper instance |
Table 24.13. Security elements
| Element | Description |
|---|---|
application | Indicates that application supplied parameters (such as from getConnection(user, pw)) are used to distinguish connections in the pool. |
security-domain | Indicates Subject (from security domain) are used to distinguish connections in the pool. The content of the security-domain is the name of the JAAS security manager that will handle authentication. This name correlates to the JAAS login-config.xml descriptor application-policy/name attribute. |
security-domain-and-application | Indicates that either application supplied parameters (such as from getConnection(user, pw)) or Subject (from security domain) are used to distinguish connections in the pool. The content of the security-domain is the name of the JAAS security manager that will handle authentication. This name correlates to the JAAS login-config.xml descriptor application-policy/name attribute. |
Table 24.14. Time out elements
| Element | Description |
|---|---|
blocking-timeout-millis | The blocking-timeout-millis element indicates the maximum time in milliseconds to block while waiting for a connection before throwing an exception. Note that this blocks only while waiting for a permit for a connection, and will never throw an exception if creating a new connection takes an inordinately long time. The default is 30000 (30 seconds). |
idle-timeout-minutes | The idle-timeout-minutes elements indicates the maximum time in minutes a connection may be idle before being closed. The actual maximum time depends also on the IdleRemover scan time, which is 1/2 the smallest idle-timeout-minutes of any pool. |
allocation-retry | The allocation retry element indicates the number of times that allocating a connection should be tried before throwing an exception. The default is 0. |
allocation-retry-wait-millis | The allocation retry wait millis element indicates the time in milliseconds to wait between retrying to allocate a connection. The default is 5000 (5 seconds). |
xa-resource-timeout | Passed to XAResource.setTransactionTimeout(). Default is zero which does not invoke the setter. Specified in seconds |
Table 24.15. Validation elements
| Element | Description |
|---|---|
background-validation | An element to specify that connections should be validated on a background thread versus being validated prior to use |
background-validation-minutes | The background-validation-minutes element specifies the amount of time, in minutes, that background validation will run. |
use-fast-fail | Whether fail a connection allocation on the first connection if it is invalid (true) or keep trying until the pool is exhausted of all potential connections (false). Default is false |
Table 24.16. Admin object elements
| Element | Description |
|---|---|
config-property | Specifies an administration object configuration property. |
Table 24.17. Recovery elements
| Element | Description |
|---|---|
recover-credential | Specifies the user name / password pair or security domain that should be used for recovery. |
recover-plugin | Specifies an implementation of the org.jboss.jca.core.spi.recovery.RecoveryPlugin class. |
jboss-as-resource-adapters_1_0.xsd and http://www.ironjacamar.org/doc/schema/ironjacamar_1_0.xsd for automatic activation.
24.6. View Defined Connection Statistics
deployment=name.rar subtree.
/subsystem level as this ensures they are accessible for any rar that is not defined in any configuration in the standalone.xml or domain.xml files.
Example 24.1.
/deployment=example.rar/subsystem=resource-adapters/statistics=statistics/connection-definitions=java\:\/testMe:read-resource(include-runtime=true)
Note
include-runtime=true argument, as all statistics are runtime only information and the default is false.
24.7. Resource Adapter Statistics
The following table contains a list of the supported resource adapter core statistics:
Table 24.18. Core Statistics
| Name | Description |
|---|---|
ActiveCount |
The number of active connections. Each of the connections is either in use by an application or available in the pool
|
AvailableCount |
The number of available connections in the pool.
|
AverageBlockingTime |
The average time spent blocking on obtaining an exclusive lock on the pool. The value is in milliseconds.
|
AverageCreationTime |
The average time spent creating a connection. The value is in milliseconds.
|
CreatedCount |
The number of connections created.
|
DestroyedCount |
The number of connections destroyed.
|
InUseCount |
The number of connections currently in use.
|
MaxCreationTime |
The maximum time it took to create a connection. The value is in milliseconds.
|
MaxUsedCount |
The maximum number of connections used.
|
MaxWaitCount |
The maximum number of requests waiting for a connection at the same time.
|
MaxWaitTime |
The maximum time spent waiting for an exclusive lock on the pool.
|
TimedOut |
The number of timed out connections.
|
TotalBlockingTime |
The total time spent waiting for an exclusive lock on the pool. The value is in milliseconds.
|
TotalCreationTime |
The total time spent creating connections. The value is in milliseconds.
|
WaitCount |
The number of requests that had to wait for a connection.
|
24.8. Deploy the WebSphere MQ Resource Adapter
WebSphere MQ is IBM's Messaging Oriented Middleware (MOM) software that allows applications on distributed systems to communicate with each other. This is accomplished through the use of messages and message queues. WebSphere MQ is responsible for delivering messages to the message queues and for transferring data to other queue managers using message channels. For more information about WebSphere MQ, see WebSphere MQ.
This topic covers the steps to deploy and configure the WebSphere MQ Resource Adapter in Red Hat JBoss Enterprise Application Platform 6. This can be accomplished by manually editing configuration files, using the Management CLI tool, or using the web-based Management Console.
Note
WARN [com.arjuna.ats.jta] (Periodic Recovery) ARJUNA016027: Local XARecoveryModule.xaRecovery got XA exception XAException.XAER_INVAL: javax.transaction.xa.XAException: The method 'xa_recover' has failed with errorCode '-5'.For this reason, it is recommended that you use version 7.5.0.4 or later. A detailed description of this issue can be found here: http://www-01.ibm.com/support/docview.wss?uid=swg1IC97579.
Before you get started, you must verify the version of the WebSphere MQ resource adapter and understand some of the WebSphere MQ configuration properties.
- The WebSphere MQ resource adapter is supplied as a Resource Archive (RAR) file called
wmq.jmsra-VERSION.rar. You must use version7.5.0.0 and higher. - You must know the values of the following WebSphere MQ configuration properties. Refer to the WebSphere MQ product documentation for details about these properties.
- MQ.QUEUE.MANAGER: The name of the WebSphere MQ queue manager
- MQ.HOST.NAME: The host name used to connect to the WebSphere MQ queue manager
- MQ.CHANNEL.NAME: The server channel used to connect to the WebSphere MQ queue manager
- MQ.QUEUE.NAME: The name of the destination queue
- MQ.TOPIC.NAME: The name of the destination topic
- MQ.PORT: The port used to connect to the WebSphere MQ queue manager
- MQ.CLIENT: The transport type
- For outbound connections, you must also be familiar with the following configuration property:
- MQ.CONNECTIONFACTORY.NAME: The name of the connection factory instance that will provide the connection to the remote system
Note
Procedure 24.8. Deploy the Resource Adapter Manually
- If you need transaction support with the WebSphereMQ resource adapter, you must repackage the
wmq.jmsra-VERSION.rararchive to include themqetclient.jar. You can use the following command:[user@host ~]$
Be sure to replace the VERSION with the correct version number.jar -uf wmq.jmsra-VERSION.rar mqetclient.jar - Copy the
wmq.jmsra-VERSION.rarfile to theEAP_HOME/standalone/deployments/directory. - Add the resource adapter to the server configuration file.
- Open the
EAP_HOME/standalone/configuration/standalone-full.xmlfile in an editor. - Find the
urn:jboss:domain:resource-adapterssubsystem in the configuration file. - If there are no resource adapters defined for this subsystem, first replace:
<subsystem xmlns="urn:jboss:domain:resource-adapters:1.1"/>
with this:<subsystem xmlns="urn:jboss:domain:resource-adapters:1.1"> <resource-adapters> <!-- <resource-adapter> configuration listed below --> </resource-adapters> </subsystem> - The resource adapter configuration depends on whether you need transaction support and recovery. If you do not need transaction support, choose the first configuration step below. If you do need transaction support, choose the second configuration step.
- For non-transactional deployments, replace the
<!-- <resource-adapter> configuration listed below -->with the following:<resource-adapter> <archive> wmq.jmsra-VERSION.rar </archive> <transaction-support>NoTransaction</transaction-support> <connection-definitions> <connection-definition class-name="com.ibm.mq.connector.outbound.ManagedConnectionFactoryImpl" jndi-name="java:jboss/MQ.CONNECTIONFACTORY.NAME" pool-name="MQ.CONNECTIONFACTORY.NAME"> <config-property name="hostName"> MQ.HOST.NAME </config-property> <config-property name="port"> MQ.PORT </config-property> <config-property name="channel"> MQ.CHANNEL.NAME </config-property> <config-property name="transportType"> MQ.CLIENT </config-property> <config-property name="queueManager"> MQ.QUEUE.MANAGER </config-property> <security> <security-domain>MySecurityDomain</security-domain> </security> </connection-definition> </connection-definitions> <admin-objects> <admin-object class-name="com.ibm.mq.connector.outbound.MQQueueProxy" jndi-name="java:jboss/MQ.QUEUE.NAME" pool-name="MQ.QUEUE.NAME"> <config-property name="baseQueueName"> MQ.QUEUE.NAME </config-property> <config-property name="baseQueueManagerName"> MQ.QUEUE.MANAGER </config-property> <admin-object class-name="com.ibm.mq.connector.outbound.MQTopicProxy" jndi-name="java:jboss/MQ.TOPIC.NAME" pool-name="MQ.TOPIC.NAME"> <config-property name="baseTopicName"> MQ.TOPIC.NAME </config-property> <config-property name="brokerPubQueueManager"> MQ.QUEUE.MANAGER </config-property> </admin-object> </admin-object> </admin-objects> </resource-adapter>Be sure to replace the VERSION with the actual version in the name of the RAR. - For transactional deployments, replace the
<!-- <resource-adapter> configuration listed below -->with the following:<resource-adapter> <archive> wmq.jmsra-VERSION.rar </archive> <transaction-support>XATransaction</transaction-support> <connection-definitions> <connection-definition class-name="com.ibm.mq.connector.outbound.ManagedConnectionFactoryImpl" jndi-name="java:jboss/MQ.CONNECTIONFACTORY.NAME" pool-name="MQ.CONNECTIONFACTORY.NAME"> <config-property name="hostName"> MQ.HOST.NAME </config-property> <config-property name="port"> MQ.PORT </config-property> <config-property name="channel"> MQ.CHANNEL.NAME </config-property> <config-property name="transportType"> MQ.CLIENT </config-property> <config-property name="queueManager"> MQ.QUEUE.MANAGER </config-property> <security> <security-domain>MySecurityDomain</security-domain> </security> <recovery> <recover-credential> <user-name>USER_NAME</user-name> <password>PASSWORD</password> </recover-credential> </recovery> </connection-definition> </connection-definitions> <admin-objects> <admin-object class-name="com.ibm.mq.connector.outbound.MQQueueProxy" jndi-name="java:jboss/MQ.QUEUE.NAME" pool-name="MQ.QUEUE.NAME"> <config-property name="baseQueueName"> MQ.QUEUE.NAME </config-property> <config-property name="baseQueueManagerName"> MQ.QUEUE.MANAGER </config-property> </admin-object> <admin-object class-name="com.ibm.mq.connector.outbound.MQTopicProxy" jndi-name="java:jboss/MQ.TOPIC.NAME" pool-name="MQ.TOPIC.NAME"> <config-property name="baseTopicName"> MQ.TOPIC.NAME </config-property> <config-property name="brokerPubQueueManager"> MQ.QUEUE.MANAGER </config-property> </admin-object> </admin-objects> </resource-adapter>Be sure to replace the VERSION with the actual version in the name of the RAR. You must also replace the USER_NAME and PASSWORD with the valid user name and password.Note
To support transactions, the <transaction-support> element was set toXATransaction. To support XA recovery, the <recovery> element was added to the connection definition.
- If you want to change the default provider for the EJB3 messaging system in JBoss EAP 6 from HornetQ to WebSphere MQ, modify the
urn:jboss:domain:ejb3:1.2subsystem as follows:Replace:<mdb> <resource-adapter-ref resource-adapter-name="hornetq-ra"/> <bean-instance-pool-ref pool-name="mdb-strict-max-pool"/> </mdb>with:<mdb> <resource-adapter-ref resource-adapter-name="wmq.jmsra-VERSION.rar"/> <bean-instance-pool-ref pool-name="mdb-strict-max-pool"/> </mdb>Be sure to replace the VERSION with the actual version in the name of the RAR.
Procedure 24.9. Modify the MDB code to use the resource adapter
- Configure the ActivationConfigProperty and ResourceAdapter in the MDB code as follows:
@MessageDriven( name="WebSphereMQMDB", activationConfig = { @ActivationConfigProperty(propertyName = "destinationType",propertyValue = "javax.jms.Queue"), @ActivationConfigProperty(propertyName = "useJNDI", propertyValue = "false"), @ActivationConfigProperty(propertyName = "hostName", propertyValue = "MQ.HOST.NAME"), @ActivationConfigProperty(propertyName = "port", propertyValue = "MQ.PORT"), @ActivationConfigProperty(propertyName = "channel", propertyValue = "MQ.CHANNEL.NAME"), @ActivationConfigProperty(propertyName = "queueManager", propertyValue = "MQ.QUEUE.MANAGER"), @ActivationConfigProperty(propertyName = "destination", propertyValue = "MQ.QUEUE.NAME"), @ActivationConfigProperty(propertyName = "transportType", propertyValue = "MQ.CLIENT") }) @ResourceAdapter(value = "wmq.jmsra-VERSION.rar") @TransactionAttribute(TransactionAttributeType.NOT_SUPPORTED) public class WebSphereMQMDB implements MessageListener { }Be sure to replace the VERSION with the actual version in the name of the RAR.
24.9. Install JBoss Active MQ Resource Adapter
24.10. Configure a Generic JMS Resource Adapter for Use with a Third-party JMS Provider
JBoss EAP 6 can be configured to work with third-party JMS providers, however not all JMS providers produce a JMS JCA resource adapter for integration with Java application platforms. This procedure covers the steps required to configure the generic JMS resource adapter included in JBoss EAP 6 to connect to a JMS provider. In this procedure, Tibco EMS 6.3 is used as an example JMS provider, however other JMS providers may need a different configuration.
Important
This procedure assumes that a JMS provider server is already configured and ready for use. Any binaries required for the provider's JMS implementation will be needed. You will also need to know the values of the following JMS provider properties:
- PROVIDER_HOST:PROVIDER_PORT: The host name and port number of the JMS provider server.
- PROVIDER_CONNECTION_FACTORY: The name of the connection factory deployed on the JMS provider server. This must be XA.
- PROVIDER_QUEUE, PROVIDER_TOPIC: The names of the queues and topics on the JMS provider server that are to be used.
Procedure 24.10. Configure a Generic JMS Resource Adapter
- Create an
ObjectFactoryimplementation for the JNDI binding of queues and topics:- Using the code below as a template, replace the server details with your JMS provider server values.
import java.util.Hashtable; import java.util.Properties; public class RemoteJMSObjectFactory implements ObjectFactory { private Context context = null; public RemoteJMSObjectFactory() { } public Object getObjectInstance(Object obj, Name name, Context nameCtx, Hashtable<?, ?> environment) throws Exception { try { String jndi = (String) obj; final Properties env = new Properties(); env.put(Context.INITIAL_CONTEXT_FACTORY, "com.tibco.tibjms.naming.TibjmsInitialContextFactory"); env.put(Context.URL_PKG_PREFIXES, "com.tibco.tibjms.naming"); env.put(Context.PROVIDER_URL, "tcp://TIBCO_HOST:TIBCO_PORT"); context = new InitialContext(env); Object o = context.lookup(jndi); return o; } catch (NamingException e) { e.printStackTrace(); throw e; } } } - Compile the above code, and save the resulting class file in a JAR file named
remoteJMSObjectFactory.jar
- Create a
genericjmsmodule for your JBoss EAP 6 instance:- Create the following directory structure:
EAP_HOME/modules/system/layers/base/org/jboss/genericjms/provider/main - Copy the
remoteJMSObjectFactory.jarfile toEAP_HOME/modules/system/layers/base/org/jboss/genericjms/provider/main - Copy the binaries required for the provider's JMS implementation to
EAP_HOME/modules/system/layers/base/org/jboss/genericjms/provider/main. For Tibco EMS, the binaries required aretibjms.jarandtibcrypt.jarfrom the Tibco installation's/libdirectory. - Create a
module.xmlfile inEAP_HOME/modules/system/layers/base/org/jboss/genericjms/provider/mainas below, listing the JAR files from the previous steps as resources:<module xmlns="urn:jboss:module:1.1" name="org.jboss.genericjms.provider"> <resources> <resource-root path="tibjms.jar"/> <resource-root path="tibcrypt.jar"/> <resource-root path="remoteJMSObjectFactory.jar"/> </resources> <dependencies> <module name="javax.api"/> <module name="javax.jms.api"/> </dependencies> </module>
- Add the generic JMS module as a dependency for all deployments as global modules.
Note
In this procedure,EAP_HOME/standalone/configuration/standalone-full.xmlis used as the JBoss EAP 6 configuration file.InEAP_HOME/standalone/configuration/standalone-full.xml, under<subsystem xmlns="urn:jboss:domain:ee:1.1">, add:<global-modules> <module name="org.jboss.genericjms.provider" slot="main"/> <module name="org.jboss.common-core" slot="main"/> </global-modules>
- Replace the default HornetQ resource adapter with the generic resource adapter.In
EAP_HOME/standalone/configuration/standalone-full.xml, replace<subsystem xmlns="urn:jboss:domain:ejb3:1.4"> <mdb>, with:<mdb> <resource-adapter-ref resource-adapter-name="org.jboss.genericjms"/> <bean-instance-pool-ref pool-name="mdb-strict-max-pool"/> </mdb>
- Add bindings for your JMS topics and queues as remote objects as necessary.In
EAP_HOME/standalone/configuration/standalone-full.xml, under<subsystem xmlns="urn:jboss:domain:naming:1.3">, add the bindings, replacing PROVIDER_QUEUE and PROVIDER_TOPIC as necessary:<bindings> <object-factory name="PROVIDER_QUEUE" module="org.jboss.genericjms.provider" class="org.jboss.qa.RemoteJMSObjectFactory"/> <object-factory name="PROVIDER_TOPIC" module="org.jboss.genericjms.provider" class="org.jboss.qa.RemoteJMSObjectFactory"/> </bindings>
- In
EAP_HOME/standalone/configuration/standalone-full.xml, add the generic resource adapter configuration to<subsystem xmlns="urn:jboss:domain:resource-adapters:1.1">.Replace PROVIDER_CONNECTION_FACTORY, PROVIDER_HOST, and PROVIDER_PORT with the JMS provider values.<resource-adapters> <resource-adapter id="org.jboss.genericjms"> <module slot="main" id="org.jboss.genericjms"/> <transaction-support>NoTransaction</transaction-support> <connection-definitions> <connection-definition class-name="org.jboss.resource.adapter.jms.JmsManagedConnectionFactory" jndi-name="java:/jms/PROVIDER_CONNECTION_FACTORY" pool-name="PROVIDER_CONNECTION_FACTORY"> <config-property name="JndiParameters"> java.naming.factory.initial=com.tibco.tibjms.naming.TibjmsInitialContextFactory;java.naming.provider.url=tcp://PROVIDER_HOST:PROVIDER_PORT </config-property> <config-property name="ConnectionFactory"> PROVIDER_CONNECTION_FACTORY </config-property> <security> <application/> </security> </connection-definition> </connection-definitions> </resource-adapter> </resource-adapters>
The generic JMS resource adapter is now configured and ready for use.
user and password properties (replace the property values as needed).
@MessageDriven(activationConfig = {
@ActivationConfigProperty(propertyName = "destinationType", propertyValue = "javax.jms.Queue"),
@ActivationConfigProperty(propertyName = "jndiParameters", propertyValue = "java.naming.factory.initial=com.tibco.tibjms.naming.TibjmsInitialContextFactory;java.naming.provider.url=tcp://PROVIDER_HOST:PROVIDER_PORT")
@ActivationConfigProperty(propertyName = "destination", propertyValue = "PROVIDER_QUEUE"),
@ActivationConfigProperty(propertyName = "connectionFactory", propertyValue = "PROVIDER_CONNECTION_FACTORY"),
@ActivationConfigProperty(propertyName = "user", propertyValue = "USER"),
@ActivationConfigProperty(propertyName = "password", propertyValue = "PASSWORD"),
})
@ResourceAdapter("org.jboss.genericjms")
public class SampleMdb implements MessageListener {
@Override
public void onMessage(Message message) {
}
}Chapter 25. Deploy JBoss EAP 6 on Amazon EC2
25.1. Introduction
25.1.1. About Amazon EC2
25.1.2. About Amazon Machine Instances (AMIs)
25.1.3. About JBoss Cloud Access
25.1.4. JBoss Cloud Access Features
- Red Hat Enterprise Linux 6
- JBoss EAP 6
- The JBoss Operations Network (JON) 3 agent
- Product updates with RPMs using Red Hat Update Infrastructure.
Important
25.1.5. Supported Amazon EC2 Instance Types
Table 25.1. Supported Amazon EC2 Instance Types
| Instance Type | Description |
|---|---|
| Standard Instance |
Standard Instances are general purpose environments with a balanced memory-to-CPU ratio.
|
| High Memory Instance |
High Memory Instances have more memory allocated to them than Standard Instances. High Memory Instances are suited for high throughput applications such as databases or memory caching applications.
|
| High CPU Instance |
High CPU Instances have more CPU resources allocated than memory and are suited for relatively low throughput but CPU intensive applications.
|
Important
Micro (t1.micro) is not suitable for deployment of JBoss EAP 6.
25.1.6. Supported Red Hat AMIs
RHEL-osversion-JBEAP-version-arch-creationdate
6.3.
6.2.
x86_64 or i386.
20120501.
RHEL-6.2-JBEAP-6.0.0-x86_64-20120501.
25.2. Deploying JBoss EAP 6 on Amazon EC2
25.2.1. Overview of Deploying JBoss EAP 6 on Amazon EC2
- JBoss EAP 6
- Red Hat Enterprise Linux 6
- Amazon Web Services
25.2.2. Non-clustered JBoss EAP 6
25.2.2.1. About Non-clustered Instances
25.2.2.2. Non-clustered Instances
25.2.2.2.1. Launch a Non-clustered JBoss EAP 6 Instance
This topic covers the steps required to launch a non-clustered instance of JBoss EAP 6 on a Red Hat AMI (Amazon Machine Image).
Prerequisites
- A suitable Red Hat AMI. Refer to Section 25.1.6, “Supported Red Hat AMIs”.
- A pre-configured Security Group which allows incoming requests on at least ports 22, 8080, and 9990.
Procedure 25.1. Launch a Non-clustered Instance of JBoss EAP 6 on a Red Hat AMI (Amazon Machine Image)
- Configure the
User Datafield. The configurable parameters are available here: Section 25.4.1, “Permanent Configuration Parameters”, Section 25.4.2, “Custom Script Parameters”.Example 25.1. Example User Data Field
The example shows the User Data field for a non-clustered JBoss EAP 6 instance. The password for the useradminhas been set toadminpwd.JBOSSAS_ADMIN_PASSWORD=adminpwd JBOSS_IP=0.0.0.0 #listen on all IPs and interfaces # In production, access to these ports needs to be restricted for security reasons PORTS_ALLOWED="9990 9443" cat> $USER_SCRIPT << "EOF" # Get the application to be deployed from an Internet URL # mkdir -p /usr/share/java/jboss-ec2-eap-applications # wget https://<your secure storage hostname>/<path>/<app name>.war -O /usr/share/java/jboss-ec2-eap-applications/<app name>.war # Create a file of CLI commands to be executed after starting the server cat> $USER_CLI_COMMANDS << "EOC" # deploy /usr/share/java/jboss-ec2-eap-applications/<app name>.war EOC EOF
For Production Instances
For a production instance, add the following line beneath theUSER_SCRIPTline of theUser Datafield, to ensure security updates are applied on boot.yum -y update
Note
yum -y updateshould be run regularly, to apply security fixes and enhancements.- Launch the Red Hat AMI instance.
A non-clustered instance of JBoss EAP 6 has been configured, and launched on a Red Hat AMI.
25.2.2.2.2. Deploy an Application on a non-clustered JBoss EAP 6 Instance
This topic covers deploying an application to a non-clustered JBoss EAP 6 instance on a Red Hat AMI.
Deploy the Sample Application
Add the following lines to theUser Datafield:# Deploy the sample application from the local filesystem deploy --force /usr/share/java/jboss-ec2-eap-samples/hello.war
Example 25.2. Example User Data Field with Sample Application
This example uses the sample application provided on the Red Hat AMI. It also includes basic configuration for a non-clustered JBoss EAP 6 instance. The password for the useradminhas been set toadminpwd.JBOSSAS_ADMIN_PASSWORD=adminpwd JBOSS_IP=0.0.0.0 #listen on all IPs and interfaces # In production, access to these ports needs to be restricted for security reasons PORTS_ALLOWED="9990 9443" cat> $USER_SCRIPT << "EOF" # Create a file of CLI commands to be executed after starting the server cat> $USER_CLI_COMMANDS << "EOC" # Deploy the sample application from the local filesystem deploy --force /usr/share/java/jboss-ec2-eap-samples/hello.war EOC EOF
Deploy a Custom Application
Add the following lines to theUser Datafield, configuring the application name and the URL:# Get the application to be deployed from an Internet URL mkdir -p /usr/share/java/jboss-ec2-eap-applications wget https://<your secure storage hostname>/<path>/<app name>.war -O /usr/share/java/jboss-ec2-eap-applications/<app name>.war
Example 25.3. Example User Data Field with Custom Application
This example uses an application calledMyApp, and includes basic configuration for a non-clustered JBoss EAP 6 instance. The password for the useradminhas been set toadminpwd.JBOSSAS_ADMIN_PASSWORD=adminpwd JBOSS_IP=0.0.0.0 #listen on all IPs and interfaces # In production, access to these ports needs to be restricted for security reasons PORTS_ALLOWED="9990 9443" cat> $USER_SCRIPT << "EOF" # Get the application to be deployed from an Internet URL mkdir -p /usr/share/java/jboss-ec2-eap-applications wget https://PATH_TO_MYAPP/MyApp.war -O /usr/share/java/jboss-ec2-eap-applications/MyApp.war # Create a file of CLI commands to be executed after starting the server cat> $USER_CLI_COMMANDS << "EOC" deploy /usr/share/java/jboss-ec2-eap-applications/MyApp.war EOC EOF
- Launch the Red Hat AMI instance.
The application has been successfully deployed to JBoss EAP 6.
25.2.2.2.3. Test the Non-clustered JBoss EAP 6 Instance
This topic covers the steps required to test that the non-clustered JBoss EAP 6 is running correctly.
Procedure 25.2. Test the Non-clustered JBoss EAP 6 Instance is Running Correctly
- Determine the instance's
Public DNS, located in the instance's details pane. - Navigate to
http://<public-DNS>:8080. - Confirm that the JBoss EAP home page appears, including a link to the Admin console. If the home page is not available, refer here: Section 25.5.1, “About Troubleshooting Amazon EC2”.
- Click on the Admin Console hyperlink.
- Log in:
- Username:
admin - Password: Specified in the
User Datafield here: Section 25.2.2.2.1, “Launch a Non-clustered JBoss EAP 6 Instance”.
Test the Sample Application
Navigate tohttp://<public-DNS>:8080/helloto test that the sample application is running successfully. The textHello World!should appear in the browser. If the text is not visible, refer here: Section 25.5.1, “About Troubleshooting Amazon EC2”.- Log out of the JBoss EAP 6 Admin Console.
The JBoss EAP 6 instance is running correctly.
25.2.2.3. Non-clustered Managed Domains
25.2.2.3.1. Launch an Instance to Serve as a Domain Controller
This topic covers the steps required to launch a non-clustered JBoss EAP 6 managed domain on a Red Hat AMI (Amazon Machine Image).
Prerequisites
- A suitable Red Hat AMI. Refer to Section 25.1.6, “Supported Red Hat AMIs”.
Procedure 25.3. Launch a non-clustered JBoss EAP 6 managed domain on a Red Hat AMI
- In the Security Group tab, ensure all traffic is allowed. Red Hat Enterprise Linux's built-in firewall capabilities can be used to restrict access if desired.
- Set the public subnet of the VPC to running.
- Select a static IP.
- Configure the
User Datafield. The configurable parameters are available here: Section 25.4.1, “Permanent Configuration Parameters”, Section 25.4.2, “Custom Script Parameters”. For further information on domain controller discovery on Amazon EC2, see Section 25.2.2.3.4, “Configuring Domain Controller Discovery and Failover on Amazon EC2”.Example 25.4. Example User Data Field
The example shows the User Data field for a non-clustered JBoss EAP 6 managed domain. The password for the useradminhas been set toadmin.## password that will be used by slave host controllers to connect to the domain controller JBOSSAS_ADMIN_PASSWORD=admin ## subnet prefix this machine is connected to SUBNET=10.0.0. ## S3 domain controller discovery setup # JBOSS_DOMAIN_S3_SECRET_ACCESS_KEY=<your secret key> # JBOSS_DOMAIN_S3_ACCESS_KEY=<your access key> # JBOSS_DOMAIN_S3_BUCKET=<your bucket name> #### to run the example no modifications below should be needed #### JBOSS_DOMAIN_CONTROLLER=true PORTS_ALLOWED="9999 9990 9443" JBOSS_IP=`hostname | sed -e 's/ip-//' -e 'y/-/./'` #listen on public/private EC2 IP address cat > $USER_SCRIPT << "EOF" ## Get the application to be deployed from an Internet URL # mkdir -p /usr/share/java/jboss-ec2-eap-applications # wget https://<your secure storage hostname>/<path>/<app name>.war -O /usr/share/java/jboss-ec2-eap-applications/<app name>.war ## Create a file of CLI commands to be executed after starting the server cat> $USER_CLI_COMMANDS << "EOC" # Add the modcluster subsystem to the default profile to set up a proxy /profile=default/subsystem=web/connector=ajp:add(name=ajp,protocol=AJP/1.3,scheme=http,socket-binding=ajp) /:composite(steps=[ {"operation" => "add", "address" => [ ("profile" => "default"), ("subsystem" => "modcluster") ] },{ "operation" => "add", "address" => [ ("profile" => "default"), ("subsystem" => "modcluster"), ("mod-cluster-config" => "configuration") ], "advertise" => "false", "proxy-list" => "${jboss.modcluster.proxyList}", "connector" => "ajp"}, { "operation" => "add", "address" => [ ("profile" => "default"), ("subsystem" => "modcluster"), ("mod-cluster-config" => "configuration"), ("dynamic-load-provider" => "configuration") ]}, { "operation" => "add", "address" => [ ("profile" => "default"), ("subsystem" => "modcluster"), ("mod-cluster-config" => "configuration"), ("dynamic-load-provider" => "configuration"), ("load-metric" => "busyness")], "type" => "busyness"} ]) # Deploy the sample application from the local filesystem deploy /usr/share/java/jboss-ec2-eap-samples/hello.war --server-groups=main-server-group EOC ## this will workaround the problem that in a VPC, instance hostnames are not resolvable echo -e "127.0.0.1\tlocalhost.localdomain localhost" > /etc/hosts echo -e "::1\tlocalhost6.localdomain6 localhost6" >> /etc/hosts for (( i=1 ; i<255 ; i++ )); do echo -e "$SUBNET$i\tip-${SUBNET//./-}$i" ; done >> /etc/hosts EOF For Production Instances
For a production instance, add the following line beneath theUSER_SCRIPTline of theUser Datafield, to ensure security updates are applied on boot.yum -y update
Note
yum -y updateshould be run regularly, to apply security fixes and enhancements.- Launch the Red Hat AMI instance.
A non-clustered JBoss EAP 6 managed domain has been configured, and launched on a Red Hat AMI.
25.2.2.3.2. Launch One or More Instances to Serve as Host Controllers
This topic covers the steps required to launch one or more instances of JBoss EAP 6 to serve as non-clustered host controllers on a Red Hat AMI (Amazon Machine Image).
Prerequisites
- Configure and launch the non-clustered domain controller. Refer to Section 25.2.2.3.1, “Launch an Instance to Serve as a Domain Controller” .
Procedure 25.4. Launch Host Controllers
- Select an AMI.
- Define the desired number of instances (the number of slave host controllers).
- Select the VPC and instance type.
- Click on Security Group.
- Ensure that all traffic from the JBoss EAP 6 subnet is allowed.
- Define other restrictions as desired.
- Add the following into the User Data field:
## mod cluster proxy addresses MOD_CLUSTER_PROXY_LIST=10.0.0.4:7654 ## host controller setup ### static domain controller discovery setup JBOSS_DOMAIN_MASTER_ADDRESS=10.0.0.5 ### S3 domain controller discovery setup # JBOSS_DOMAIN_S3_SECRET_ACCESS_KEY=<your secret key> # JBOSS_DOMAIN_S3_ACCESS_KEY=<your access key> # JBOSS_DOMAIN_S3_BUCKET=<your bucket name> JBOSS_HOST_PASSWORD=<password for slave host controllers> ## subnet prefix this machine is connected to SUBNET=10.0.1. #### to run the example no modifications below should be needed #### JBOSS_HOST_USERNAME=admin PORTS_ALLOWED="1024:65535" JBOSS_IP=`hostname | sed -e 's/ip-//' -e 'y/-/./'` #listen on public/private EC2 IP address cat > $USER_SCRIPT << "EOF" ## Server instance configuration sed -i "s/other-server-group/main-server-group/" $JBOSS_CONFIG_DIR/$JBOSS_HOST_CONFIG ## this will workaround the problem that in a VPC, instance hostnames are not resolvable echo -e "127.0.0.1\tlocalhost.localdomain localhost" > /etc/hosts echo -e "::1\tlocalhost6.localdomain6 localhost6" >> /etc/hosts for (( i=1 ; i<255 ; i++ )); do echo -e "$SUBNET$i\tip-${SUBNET//./-}$i" ; done >> /etc/hosts EOFFor further information on domain controller discovery on Amazon EC2, see Section 25.2.2.3.4, “Configuring Domain Controller Discovery and Failover on Amazon EC2”. For Production Instances
For a production instance, add the following line beneath theUSER_SCRIPTline of theUser Datafield, to ensure security updates are applied on boot.yum -y update
Note
yum -y updateshould be run regularly, to apply security fixes and enhancements.- Launch the Red Hat AMI instance.
The JBoss EAP 6 non-clustered host controllers are configured and launched on a Red Hat AMI.
25.2.2.3.3. Test the Non-Clustered JBoss EAP 6 Managed Domain
This topic covers the steps required to test the non-clustered JBoss EAP 6 managed domain on a Red Hat AMI (Amazon Machine Image).
Prerequisites
- Configure and launch the domain controller. See Section 25.2.2.3.1, “Launch an Instance to Serve as a Domain Controller” .
- Configure and launch the host controllers. See Section 25.2.2.3.2, “Launch One or More Instances to Serve as Host Controllers” .
Procedure 25.5. Test the Web Server
- Navigate to
http://ELASTIC_IP_OF_APACHE_HTTPDin a browser to confirm the web server is running successfully.
Procedure 25.6. Test the Domain Controller
- Navigate to
http://ELASTIC_IP_OF_DOMAIN_CONTROLLER:9990/console - Log in using the username of
adminand the password specified in the User Data field for the domain controller and the admin console landing page for a managed domain should appear (http://ELASTIC_IP_OF_DOMAIN_CONTROLLER:9990/console/App.html#server-instances). - Click the Server label at the top right side of the screen, and select any of the host controllers in the Host dropdown menu at the top left side of the screen.
- Verify that each host controller has two server configurations called
server-oneandserver-twoand that they both belong to themain-server-group. - Log out of the JBoss EAP 6 Admin Console.
Procedure 25.7. Test the Host Controllers
- Navigate to
http://ELASTIC_IP_OF_APACHE_HTTPD/helloto test that the sample application is running successfully. The textHello World!should appear in the browser.If the text is not visible, refer here: Section 18.5.1, "About Troubleshooting Amazon EC2". - Connect to the Apache HTTP server instance:
$ ssh -L7654:localhost:7654 ELASTIC_IP_OF_APACHE_HTTPD
- Navigate to
http://localhost:7654/mod_cluster-managerto confirm all instances are running correctly.
The JBoss EAP 6 web server, domain controller, and host controllers are running correctly on a Red Hat AMI.
25.2.2.3.4. Configuring Domain Controller Discovery and Failover on Amazon EC2
JBOSS_DOMAIN_S3_ACCESS_KEY, JBOSS_DOMAIN_S3_SECRET_ACCESS_KEY, and JBOSS_DOMAIN_S3_BUCKET parameters to the JBoss EAP 6 instance when launching it. See Section 25.4.1, “Permanent Configuration Parameters” for configurable parameters. Alternatively, you can manually configure domain discovery using the following configuration.
- access-key
- The Amazon AWS user account access key.
- secret-access-key
- The Amazon AWS user account secret access key.
- location
- The Amazon S3 bucket to be used.
Example 25.5. Host Controller Configuration
<domain-controller>
<remote security-realm="ManagementRealm">
<discovery-options>
<discovery-option name="s3-discovery" code="org.jboss.as.host.controller.discovery.S3Discovery" module="org.jboss.as.host-controller">
<property name="access-key" value="S3_ACCESS_KEY"/>
<property name="secret-access-key" value="S3_SECRET_ACCESS_KEY"/>
<property name="location" value="S3_BUCKET_NAME"/>
</discovery-option>
</discovery-options>
</remote>
</domain-controller>Example 25.6. Domain Controller Configuration
<domain-controller>
<local>
<discovery-options>
<discovery-option name="s3-discovery" code="org.jboss.as.host.controller.discovery.S3Discovery" module="org.jboss.as.host-controller">
<property name="access-key" value="S3_ACCESS_KEY"/>
<property name="secret-access-key" value="S3_SECRET_ACCESS_KEY"/>
<property name="location" value="S3_BUCKET_NAME"/>
</discovery-option>
</discovery-options>
</local>
</domain-controller>25.2.3. Clustered JBoss EAP 6
25.2.3.1. About Clustered Instances
standalone-ec2-ha.xml and standalone-mod_cluster-ec2-ha.xml. Each of these configuration files provides clustering without the use of multicast because Amazon EC2 does not support multicast. This is done by using TCP unicast for cluster communications and S3_PING as the discovery protocol. The standalone-mod_cluster-ec2-ha.xml configuration also provides easy registration with mod_cluster proxies.
domain-ec2.xml configuration file provides two profiles for use in clustered managed domains: ec2-ha, and mod_cluster-ec2-ha.
25.2.3.2. Create a Relational Database Service Database Instance
This topic covers the steps to create a relational database service database instance, using MySQL as an example.
Warning
Important
Procedure 25.8. Create a Relational Database Service Database Instance
- Click on the RDS in the AWS console.
- Subscribe to the service if needed.
- Click on Launch DB instance.
- Click on MySQL.
- Select a version. For example,
5.5.12. - Select small instance.
- Ensure Multi-AZ Deployment and Auto upgrade are
off. - Set Storage to
5GB. - Define the database administrator's username and password and click .
- Select a database name to be created with the instance, and click .
- Disable back-ups and maintenance, if necessary.
- Confirm the settings.
The database is created. It will initialize and be ready for use after a few minutes.
25.2.3.3. About Virtual Private Clouds
25.2.3.4. Create a Virtual Private Cloud (VPC)
This topic covers the steps required to create a Virtual Private Cloud, using a database external to the VPC as an example. Your security policies may require connection to the database to be encrypted. Please refer to Amazon's RDS FAQ for details about encrypting the database connections.
Important
- Go to the VPC tab in the AWS console.
- Subscribe to the service if needed.
- Click on "Create new VPC".
- Choose a VPC with one public and one private subnet.
- Set the public subnet to be
10.0.0.0/24. - Set the private subnet to be
10.0.1.0/24.
- Go to Elastic IPs.
- Create an elastic IP for use by the mod_cluster proxy/NAT instance.
- Go to Security groups and create a security group to allow all traffic in and out.
- Go to Network ACLs
- Create an ACL to allow all traffic in and out.
- Create an ACL to allow all traffic out and traffic in on only TCP ports
22,8009,8080,8443,9443,9990and16163.
The Virtual Private Cloud has been successfully created.
25.2.3.5. Launch an Apache HTTP Server Instance to Serve as a mod_cluster Proxy and a NAT Instance for the VPC
This topic covers the steps required to launch an Apache HTTP server instance to serve as a mod_cluster proxy and a NAT instance for the Virtual Private Cloud.
Prerequisites
Procedure 25.9. Launch an Apache HTTP server Instance to Serve as a mod_cluster proxy and a NAT Instance for the VPC
- Create an elastic IP for this instance.
- Select an AMI.
- Go to Security Group and allow all traffic (use Red Hat Enterprise Linux's built-in firewall capabilities to restrict access if desired).
- Select "
running" in the public subnet of the VPC. - Select a static IP (e.g.
10.0.0.4). - Put the following in the User Data: field:
JBOSSCONF=disabled cat > $USER_SCRIPT << "EOS" echo 1 > /proc/sys/net/ipv4/ip_forward echo 0 > /proc/sys/net/ipv4/conf/all/rp_filter echo 0 > /proc/sys/net/ipv4/conf/eth0/rp_filter iptables -I INPUT 4 -s 10.0.1.0/24 -p tcp --dport 7654 -j ACCEPT iptables -I INPUT 4 -p tcp --dport 80 -j ACCEPT iptables -I FORWARD -m state --state RELATED,ESTABLISHED -j ACCEPT iptables -I FORWARD -s 10.0.1.0/24 -j ACCEPT iptables -t nat -A POSTROUTING -o eth0 ! -s 10.0.0.4 -j MASQUERADE # balancer module incompatible with mod_cluster sed -i -e 's/LoadModule proxy_balancer_module/#\0/' /etc/httpd/conf/httpd.conf cat > /etc/httpd/conf.d/mod_cluster.conf << "EOF" #LoadModule proxy_module modules/mod_proxy.so #LoadModule proxy_ajp_module modules/mod_proxy_ajp.so LoadModule slotmem_module modules/mod_slotmem.so LoadModule manager_module modules/mod_manager.so LoadModule proxy_cluster_module modules/mod_proxy_cluster.so LoadModule advertise_module modules/mod_advertise.so Listen 7654 # workaround JBPAPP-4557 MemManagerFile /var/cache/mod_proxy/manager <VirtualHost *:7654> <Location /mod_cluster-manager> SetHandler mod_cluster-manager Order deny,allow Deny from all Allow from 127.0.0.1 </Location> <Location /> Order deny,allow Deny from all Allow from 10. Allow from 127.0.0.1 </Location> KeepAliveTimeout 60 MaxKeepAliveRequests 0 ManagerBalancerName mycluster ServerAdvertise Off EnableMCPMReceive On </VirtualHost> EOF echo "`hostname | sed -e 's/ip-//' -e 'y/-/./'` `hostname`" >> /etc/hosts semanage port -a -t http_port_t -p tcp 7654 #add port in the apache port list for the below to work setsebool -P httpd_can_network_relay 1 #for mod_proxy_cluster to work chcon -t httpd_config_t -u system_u /etc/httpd/conf.d/mod_cluster.conf #### Uncomment the following line when launching a managed domain #### # setsebool -P httpd_can_network_connect 1 service httpd start EOS - Disable the Amazon EC2 cloud source/destination checking for this instance so it can act as a router.
- Right-click on the running Apache HTTP server instance and choose "Change Source/Dest check".
- Click on Yes, Disable.
- Assign the elastic IP to this instance.
The Apache HTTP server instance has been launched successfully.
25.2.3.6. Configure the VPC Private Subnet Default Route
This topic covers the steps required to configure the VPC private subnet default route. JBoss EAP 6 cluster nodes will run in the private subnet of the VPC, but cluster nodes require Internet access for S3 connectivity. A default route needs to be set to go through the NAT instance.
Procedure 25.10. Configure the VPC Private Subnet Default Route
- Navigate to the Apache HTTP server instance in the Amazon AWS console.
- Navigate to the → .
- Click on the routing table used by the private subnet.
- In the field for a new route enter
0.0.0.0/0. - Click on "Select a target".
- Select "
Enter Instance ID". - Choose the ID of the running Apache HTTP server instance.
The default route has been successfully configured for the VPC subnet.
25.2.3.7. About Identity and Access Management (IAM)
25.2.3.8. Configure IAM Setup
This topic covers the configuration steps required for setting up IAM for clustered JBoss EAP 6 instances. The S3_PING protocol uses an S3 bucket to discover other cluster members. JGroups version 3.0.x requires Amazon AWS account access and secret keys to authenticate against the S3 service.
S3_PING protocol used by JGroups). The IAM user and S3 bucket used for S3 discovery must be different from the IAM user and S3 bucket used for clustering.
Procedure 25.11. Configure IAM Setup
- Go to the IAM tab in the AWS console.
- Click on users.
- Select Create New Users.
- Choose a name, and ensure the Generate an access key for each User option is checked.
- Select Download credentials, and save them in a secure location.
- Close the window.
- Click on the newly created user.
- Make note of the
User ARMvalue. This value is required to set up the S3 bucket, documented here: Section 25.2.3.10, “Configure S3 Bucket Setup”.
The IAM user account has been successfully created.
25.2.3.9. About the S3 Bucket
25.2.3.10. Configure S3 Bucket Setup
This topic covers the steps required to configure a new S3 bucket.
Prerequisites
Procedure 25.12. Configure S3 Bucket Setup
- Open the S3 tab in the AWS console.
- Click on Create Bucket.
- Choose a name for the bucket and click .
Note
Bucket names are unique across the entire S3. Names cannot be reused. - Right click on the new bucket and select Properties.
- Click Add bucket policy in the permissions tab.
- Click New policy to open the policy creation wizard.
- Copy the following content into the new policy, replacing
arn:aws:iam::05555555555:user/jbosscluster*with the value defined here: Section 25.2.3.8, “Configure IAM Setup”. Change both instances ofclusterbucket123to the name of the bucket defined in step 3 of this procedure.{ "Version": "2008-10-17", "Id": "Policy1312228794320", "Statement": [ { "Sid": "Stmt1312228781799", "Effect": "Allow", "Principal": { "AWS": [ "arn:aws:iam::055555555555:user/jbosscluster" ] }, "Action": [ "s3:ListBucketVersions", "s3:GetObjectVersion", "s3:ListBucket", "s3:PutBucketVersioning", "s3:DeleteObject", "s3:DeleteObjectVersion", "s3:GetObject", "s3:ListBucketMultipartUploads", "s3:ListMultipartUploadParts", "s3:PutObject", "s3:GetBucketVersioning" ], "Resource": [ "arn:aws:s3:::clusterbucket123/*", "arn:aws:s3:::clusterbucket123" ] } ] }
A new S3 bucket has been created, and configured successfully.
25.2.3.11. Clustered Instances
25.2.3.11.1. Launch Clustered JBoss EAP 6 AMIs
This topic covers the steps required to launch clustered JBoss EAP 6 AMIs.
Prerequisites
Warning
JBOSS_CLUSTER_ID variable for information on how to make such a configuration work reliably: Section 25.4.1, “Permanent Configuration Parameters”.
Important
Warning
Procedure 25.13. Launch Clustered JBoss EAP 6 AMIs
- Select an AMI.
- Define the desired number of instances (the cluster size).
- Select the VPC and instance type.
- Click on Security Group.
- Ensure that all traffic from the JBoss EAP 6 cluster subnet is allowed.
- Define other restrictions as desired.
- Add the following into the User Data field:
Example 25.7. Example User Data Field
## mod cluster proxy addresses MOD_CLUSTER_PROXY_LIST=10.0.0.4:7654 ## clustering setup JBOSS_JGROUPS_S3_PING_SECRET_ACCESS_KEY=<your secret key> JBOSS_JGROUPS_S3_PING_ACCESS_KEY=<your access key> JBOSS_JGROUPS_S3_PING_BUCKET=<your bucket name> ## password to access admin console JBOSSAS_ADMIN_PASSWORD=<your password for opening admin console> ## database credentials configuration JAVA_OPTS="$JAVA_OPTS -Ddb.host=instancename.something.rds.amazonaws.com -Ddb.database=mydatabase -Ddb.user=<user> -Ddb.passwd=<pass>" ## subnet prefix this machine is connected to SUBNET=10.0.1. #### to run the example no modifications below should be needed #### PORTS_ALLOWED="1024:65535" JBOSS_IP=`hostname | sed -e 's/ip-//' -e 'y/-/./'` #listen on public/private EC2 IP address cat > $USER_SCRIPT << "EOF" ## Get the application to be deployed from an Internet URL # mkdir -p /usr/share/java/jboss-ec2-eap-applications # wget https://<your secure storage hostname>/<path>/<app name>.war -O /usr/share/java/jboss-ec2-eap-applications/<app name>.war ## install the JDBC driver as a core module yum -y install mysql-connector-java mkdir -p /usr/share/jbossas/modules/com/mysql/main cp -v /usr/share/java/mysql-connector-java-*.jar /usr/share/jbossas/modules/com/mysql/main/mysql-connector-java.jar cat > /usr/share/jbossas/modules/com/mysql/main/module.xml <<"EOM" <?xml version="1.0" encoding="UTF-8"?> <module xmlns="urn:jboss:module:1.0" name="com.mysql"> <resources> <resource-root path="mysql-connector-java.jar"/> </resources> <dependencies> <module name="javax.api"/> </dependencies> </module> EOM cat > $USER_CLI_COMMANDS << "EOC" ## Deploy sample application from local filesystem deploy --force /usr/share/java/jboss-ec2-eap-samples/cluster-demo.war ## ExampleDS configuration for MySQL database data-source remove --name=ExampleDS /subsystem=datasources/jdbc-driver=mysql:add(driver-name="mysql",driver-module-name="com.mysql") data-source add --name=ExampleDS --connection-url="jdbc:mysql://${db.host}:3306/${db.database}" --jndi-name=java:jboss/datasources/ExampleDS --driver-name=mysql --user-name="${db.user}" --password="${db.passwd}" /subsystem=datasources/data-source=ExampleDS:enable /subsystem=datasources/data-source=ExampleDS:test-connection-in-pool EOC ## this will workaround the problem that in a VPC, instance hostnames are not resolvable echo -e "127.0.0.1\tlocalhost.localdomain localhost" > /etc/hosts echo -e "::1\tlocalhost6.localdomain6 localhost6" >> /etc/hosts for (( i=1 ; i<255 ; i++ )); do echo -e "$SUBNET$i\tip-${SUBNET//./-}$i" ; done >> /etc/hosts EOF
The clustered JBoss EAP 6 AMIs have been configured and launched successfully.
25.2.3.11.2. Test the Clustered JBoss EAP 6 Instance
This topic covers the steps to confirm that the clustered JBoss EAP 6 instances are running correctly.
Procedure 25.14. Testing the Clustered Instance
- Navigate to http://ELASTIC_IP_OF_APACHE_HTTPD in a browser to confirm the web server is running successfully.
Test the Clustered Nodes
- Navigate to http://ELASTIC_IP_OF_APACHE_HTTPD/cluster-demo/put.jsp in a browser.
- Verify that one of the cluster nodes logs the following message:
Putting date now
- Stop the cluster node that logged the message in the previous step.
- Navigate to http://ELASTIC_IP_OF_APACHE_HTTPD/cluster-demo/get.jsp in a browser.
- Verify that the time shown is the same as the time that was PUT using
put.jspin Step 2-a. - Verify that one of the running cluster nodes logs the following message:
Getting date now
- Restart the stopped clustered node.
- Connect to the Apache HTTP server instance:
ssh -L7654:localhost:7654 <ELASTIC_IP_OF_APACHE_HTTPD>
- Navigate to http://localhost:7654/mod_cluster-manager to confirm all instances are running correctly.
The clustered JBoss EAP 6 instances have been tested, and confirmed to be working correctly.
25.2.3.12. Clustered Managed Domains
25.2.3.12.1. Launch an Instance to Serve as a Cluster Domain Controller
This topic covers the steps required to launch a clustered JBoss EAP 6 managed domain on a Red Hat AMI (Amazon Machine Image).
Prerequisites
- A suitable Red Hat AMI. Refer to Section 25.1.6, “Supported Red Hat AMIs” .
Procedure 25.15. Launch a Cluster Domain Contoller
- Create an elastic IP for this instance.
- Select an AMI.
- Go to Security Group and allow all traffic (use Red Hat Enterprise Linux's built-in firewall capabilities to restrict access if desired).
- Choose "running" in the public subnet of the VPC.
- Choose a static IP (e.g.
10.0.0.5). - Put the following in the User Data: field:
## mod cluster proxy addresses MOD_CLUSTER_PROXY_LIST=10.0.0.4:7654 ## password that will be used by slave host controllers to connect to the domain controller JBOSSAS_ADMIN_PASSWORD=<password for slave host controllers> ## subnet prefix this machine is connected to SUBNET=10.0.0. ## S3 domain controller discovery setup # JBOSS_DOMAIN_S3_SECRET_ACCESS_KEY=<your secret key> # JBOSS_DOMAIN_S3_ACCESS_KEY=<your access key> # JBOSS_DOMAIN_S3_BUCKET=<your bucket name> #### to run the example no modifications below should be needed #### JBOSS_DOMAIN_CONTROLLER=true PORTS_ALLOWED="9999 9990 9443" JBOSS_IP=`hostname | sed -e 's/ip-//' -e 'y/-/./'` #listen on public/private EC2 IP address cat > $USER_SCRIPT << "EOF" ## Get the application to be deployed from an Internet URL # mkdir -p /usr/share/java/jboss-ec2-eap-applications # wget https://<your secure storage hostname>/<path>/<app name>.war -O /usr/share/java/jboss-ec2-eap-applications/<app name>.war ## Install the JDBC driver as a core module yum -y install mysql-connector-java mkdir -p /usr/share/jbossas/modules/com/mysql/main cp -v /usr/share/java/mysql-connector-java-*.jar /usr/share/jbossas/modules/com/mysql/main/mysql-connector-java.jar cat > /usr/share/jbossas/modules/com/mysql/main/module.xml <<"EOM" <?xml version="1.0" encoding="UTF-8"?> <module xmlns="urn:jboss:module:1.0" name="com.mysql"> <resources> <resource-root path="mysql-connector-java.jar"/> </resources> <dependencies> <module name="javax.api"/> </dependencies> </module> EOM cat > $USER_CLI_COMMANDS << "EOC" ## Deploy the sample application from the local filesystem deploy /usr/share/java/jboss-ec2-eap-samples/cluster-demo.war --server-groups=other-server-group ## ExampleDS configuration for MySQL database data-source --profile=mod_cluster-ec2-ha remove --name=ExampleDS /profile=mod_cluster-ec2-ha/subsystem=datasources/jdbc-driver=mysql:add(driver-name="mysql",driver-module-name="com.mysql") data-source --profile=mod_cluster-ec2-ha add --name=ExampleDS --connection-url="jdbc:mysql://${db.host}:3306/${db.database}" --jndi-name=java:jboss/datasources/ExampleDS --driver-name=mysql --user-name="${db.user}" --password="${db.passwd}" /profile=mod_cluster-ec2-ha/subsystem=datasources/data-source=ExampleDS:enable EOC ## this will workaround the problem that in a VPC, instance hostnames are not resolvable echo -e "127.0.0.1\tlocalhost.localdomain localhost" > /etc/hosts echo -e "::1\tlocalhost6.localdomain6 localhost6" >> /etc/hosts for (( i=1 ; i<255 ; i++ )); do echo -e "$SUBNET$i\tip-${SUBNET//./-}$i" ; done >> /etc/hosts EOF For Production Instances
For a production instance, add the following line beneath theUSER_SCRIPTline of theUser Datafield, to ensure security updates are applied on boot.yum -y update
Note
yum -y updateshould be run regularly, to apply security fixes and enhancements.- Launch the Red Hat AMI instance.
A clustered JBoss EAP 6 managed domain is configured and launched on a Red Hat AMI.
25.2.3.12.2. Launch One or More Instances to Serve as Cluster Host Controllers
This topic covers the steps required to launch one or more instances of JBoss EAP 6 to serve as cluster host controllers on a Red Hat AMI (Amazon Machine Image).
Prerequisites
- Configure and launch the cluster domain controller. Refer to Section 25.2.3.12.1, “Launch an Instance to Serve as a Cluster Domain Controller” .
Procedure 25.16. Launch Host Controllers
- Select an AMI.
- Define the desired number of instances (the number of slave host controllers).
- Select the VPC and instance type.
- Click on Security Group.
- Ensure that all traffic from the JBoss EAP 6 cluster subnet is allowed.
- Define other restrictions as desired.
- Add the following into the User Data field:
## mod cluster proxy addresses MOD_CLUSTER_PROXY_LIST=10.0.0.4:7654 ## clustering setup JBOSS_JGROUPS_S3_PING_SECRET_ACCESS_KEY=<your secret key> JBOSS_JGROUPS_S3_PING_ACCESS_KEY=<your access key> JBOSS_JGROUPS_S3_PING_BUCKET=<your bucket name> ## host controller setup ### static domain controller discovery setup JBOSS_DOMAIN_MASTER_ADDRESS=10.0.0.5 ### S3 domain controller discovery setup # JBOSS_DOMAIN_S3_SECRET_ACCESS_KEY=<your secret key> # JBOSS_DOMAIN_S3_ACCESS_KEY=<your access key> # JBOSS_DOMAIN_S3_BUCKET=<your bucket name> JBOSS_HOST_PASSWORD=<password for slave host controllers> ## database credentials configuration JAVA_OPTS="$JAVA_OPTS -Ddb.host=instancename.something.rds.amazonaws.com -Ddb.database=mydatabase -Ddb.user=<user> -Ddb.passwd=<pass>" ## subnet prefix this machine is connected to SUBNET=10.0.1. #### to run the example no modifications below should be needed #### JBOSS_HOST_USERNAME=admin PORTS_ALLOWED="1024:65535" JBOSS_IP=`hostname | sed -e 's/ip-//' -e 'y/-/./'` #listen on public/private EC2 IP address cat > $USER_SCRIPT << "EOF" ## Server instance configuration sed -i "s/main-server-group/other-server-group/" $JBOSS_CONFIG_DIR/$JBOSS_HOST_CONFIG ## install the JDBC driver as a core module yum -y install mysql-connector-java mkdir -p /usr/share/jbossas/modules/com/mysql/main cp -v /usr/share/java/mysql-connector-java-*.jar /usr/share/jbossas/modules/com/mysql/main/mysql-connector-java.jar cat > /usr/share/jbossas/modules/com/mysql/main/module.xml <<"EOM" <?xml version="1.0" encoding="UTF-8"?> <module xmlns="urn:jboss:module:1.0" name="com.mysql"> <resources> <resource-root path="mysql-connector-java.jar"/> </resources> <dependencies> <module name="javax.api"/> </dependencies> </module> EOM ## this will workaround the problem that in a VPC, instance hostnames are not resolvable echo -e "127.0.0.1\tlocalhost.localdomain localhost" > /etc/hosts echo -e "::1\tlocalhost6.localdomain6 localhost6" >> /etc/hosts for (( i=1 ; i<255 ; i++ )); do echo -e "$SUBNET$i\tip-${SUBNET//./-}$i" ; done >> /etc/hosts EOF For Production Instances
For a production instance, add the following line beneath theUSER_SCRIPTline of theUser Datafield, to ensure security updates are applied on boot.yum -y update
Note
yum -y updateshould be run regularly, to apply security fixes and enhancements.- Launch the Red Hat AMI instance.
The JBoss EAP 6 cluster host controllers are configured and launched on a Red Hat AMI.
25.2.3.12.3. Test the Clustered JBoss EAP 6 Managed Domain
This topic covers the steps required to test the clustered JBoss EAP 6 managed domain on a Red Hat AMI (Amazon Machine Image).
Prerequisites
- Configure and launch the cluster domain controller. See Section 25.2.3.12.1, “Launch an Instance to Serve as a Cluster Domain Controller” .
- Configure and launch the cluster host controllers. See Section 25.2.3.12.2, “Launch One or More Instances to Serve as Cluster Host Controllers” .
Procedure 25.17. Test the Apache HTTP server instance
- Navigate to
http://ELASTIC_IP_OF_APACHE_HTTP_SERVERin a browser to confirm the web server is running successfully.
Procedure 25.18. Test the Domain Controller
- Navigate to
http://ELASTIC_IP_OF_DOMAIN_CONTROLLER:9990/console - Log in using the username
adminand the password specified in the User Data field for the domain controller. Once logged in, the administration console landing page for a managed domain should appear (http://ELASTIC_IP_OF_DOMAIN_CONTROLLER:9990/console/App.html#server-instances). - Click the Server label at the top right side of the screen. Select any of the host controllers in the Host dropdown menu at the top left side of the screen.
- Verify that this host controller has two server configurations called
server-oneandserver-twoand verify that they both belong to theother-server-group.
Procedure 25.19. Test the Host Controllers
- Navigate to
http://ELASTIC_IP_OF_APACHE_HTTP_SERVER/cluster-demo/put.jspin a browser. - Verify that one of the host controllers logs the following message:
Putting date now. - Stop the server instance that logged the message in the previous step (see Stop a Server Using the Management Console).
- Navigate to
http://ELASTIC_IP_OF_APACHE_HTTP_SERVER/cluster-demo/get.jspin a browser. - Verify that the time shown is the same as the time that was
PUTusingput.jspin Step 2. - Verify that one of the running server instances logs the following message:
Getting date now. - Restart the stopped server instance (see Section 2.8.3, Start a Server Using the Management Console)
- Connect to the Apache HTTP server instance.
$ ssh -L7654:localhost:7654 ELASTIC_IP_OF_APACHE_HTTP_SERVER
- Navigate to
http://localhost:7654/mod_cluster-managerto confirm all instances are running correctly.
The JBoss EAP 6 web server, domain controller, and host controllers are running correctly on a Red Hat AMI.
25.3. Establishing Monitoring with JBoss Operations Network (JON)
25.3.1. About AMI Monitoring
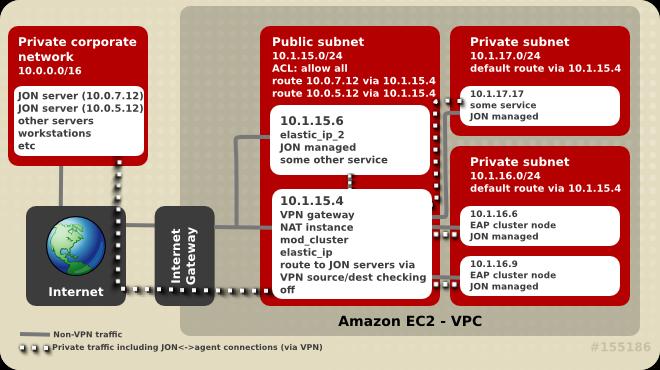
Figure 25.1. JON Server connectivity
25.3.2. About Connectivity Requirements
7080 on all JON servers, except in the case of SSL where port 7443 is used. Each JON server must be able to access each of the connected agents on a unique host and port pairing. The agent port is usually 16163.
25.3.3. About Network Address Translation (NAT)
rhq.communications.connector.* description for the agent-configuration.xml configuration file.
25.3.4. About Amazon EC2 and DNS
25.3.5. About Routing in EC2
source/destination checking routing feature activated by default. This feature drops any packets being sent to the server which have a destination different from the machine's IP address. If the VPN solution selected for connecting agents to the JON server includes a router, this feature needs to be turned off for the server or servers acting as routers or VPN gateways. This configuration setting can be accessed via the Amazon AWS console. Disabled source/destination checking is also required in a Virtual Private Cloud (VPC).
10.0.0.0/8 network. Instances usually have a public IP address also, but only network traffic on the internal IP address within the same availability zone is free. To avoid using the 10.0.0.0/8 network in private addressing, there are a few things to consider.
- When creating a VPC, avoid allocating addresses already in use in the private network to avoid connectivity problems.
- If an instance needs access to availability zone local resources, make sure Amazon EC2 private addresses are used and traffic is not routed through the VPN.
- If an Amazon EC2 instance will access a small subset of corporate private network addresses (for example only JON servers), only these addresses should be routed through the VPN. This increases security and lowers the chance of Amazon EC2 or private network address space collisions.
25.3.6. About Terminating and Restarting with JON
JON_AGENT_ADDR in /etc/sysconfig/jon-agent-ec2 to reflect the new IP address and restart the agent.
25.3.7. Configure an Instance to Register with JBoss Operations Network
- For JBoss EAP 6, add this to the User Data field.
JON_SERVER_ADDR=jon2.it.example.com ## if instance not already configured to resolve its hostname JON_AGENT_ADDR=`ip addr show dev eth0 primary to 0/0 | sed -n 's#.*inet \([0-9.]\+\)/.*#\1#p'` PORTS_ALLOWED=16163 # insert other JON options when necessary.
See Section 25.4.1, “Permanent Configuration Parameters”, parameters starting withJON_for the format of JON options.
25.4. User Script Configuration
25.4.1. Permanent Configuration Parameters
The following parameters can be used to influence the configuration and operation of JBoss EAP 6. Their contents are written to /etc/sysconfig/jbossas and /etc/sysconfig/jon-agent-ec2.
Table 25.2. Configurable Parameters
| Name | Description | Default |
|---|---|---|
| JBOSS_JGROUPS_S3_PING_ACCESS_KEY | Amazon AWS user account access key for S3_PING discovery if clustering is used. | N/A |
| JBOSS_JGROUPS_S3_PING_SECRET_ACCESS_KEY | Amazon AWS user account secret access key. | N/A |
| JBOSS_JGROUPS_S3_PING_BUCKET | Amazon S3 bucket to be used for S3_PING discovery. | N/A |
| JBOSS_CLUSTER_ID |
ID of cluster member nodes. Only used for clustering. Accepted values are (in order):
| Last octet of eth0's IP address |
| MOD_CLUSTER_PROXY_LIST | Comma-delimited list of IPs/hostnames of mod_cluster proxies if mod_cluster is to be used. | N/A |
| PORTS_ALLOWED | List of incoming ports to be allowed by firewall in addition to the default ones. | N/A |
| JBOSSAS_ADMIN_PASSWORD | Password for the admin user. | N/A |
| JON_SERVER_ADDR | JON server hostname or IP with which to register. This is only used for registration, after that the agent may communicate with other servers in the JON cluster. | N/A |
| JON_SERVER_PORT | Port used by the agent to communicate with the server. | 7080 |
| JON_AGENT_NAME | Name of JON agent, must be unique. | Instance's ID |
| JON_AGENT_PORT | Port that the agent listens on. | 16163 |
| JON_AGENT_ADDR | IP address that the JON agent is to be bound to. This is used when the server has more than one public address, (e.g. VPN). | JON agent chooses the IP of local hostname by default. |
| JON_AGENT_OPTS | Additional JON agent system properties which can be used for configuring SSL, NAT and other advanced settings. | N/A |
| JBOSS_SERVER_CONFIG |
Name of JBoss EAP 6 server configuration file to use. If JBOSS_DOMAIN_CONTROLLER=true, then
domain-ec2.xml is used. Otherwise:
| standalone.xml, standalone-full.xml, standalone-ec2-ha.xml, standalone-mod_cluser-ec2-ha.xml, domain-ec2.xml depending on the other parameters. |
| JAVA_OPTS | Custom values to be added to the variable before JBoss EAP 6 starts. | JAVA_OPTS is built from the values of other parameters. |
| JBOSS_IP | IP address that the server is to be bound to. | 127.0.0.1 |
| JBOSSCONF | The name of the JBoss EAP 6 profile to start. To prevent JBoss EAP 6 from starting, JBOSSCONF can be set to disabled | standalone |
|
JBOSS_DOMAIN_CONTROLLER
|
Sets whether or not this instance will run as a domain controller.
| false
|
|
JBOSS_DOMAIN_MASTER_ADDRESS
|
IP address of remote domain controller.
|
N/A
|
|
JBOSS_HOST_NAME
|
The logical host name (within the domain). This needs to be distinct.
|
The value of the HOSTNAME environment variable.
|
|
JBOSS_HOST_USERNAME
|
The username the host controller should use when registering with the domain controller. If not provided, the JBOSS_HOST_NAME is used instead.
|
JBOSS_HOST_NAME
|
|
JBOSS_HOST_PASSWORD
|
The password the host controller should use when registering with the domain controller.
|
N/A
|
|
JBOSS_HOST_CONFIG
|
If JBOSS_DOMAIN_CONTROLLER=true, then
host-master.xml is used. If JBOSS_DOMAIN_MASTER_ADDRESS is present, then host-slave.xml is used.
| host-master.xml or host-slave.xml, depending on the other parameters.
|
| JBOSS_DOMAIN_S3_ACCESS_KEY | Amazon AWS user account access key for S3 domain controller discovery. | N/A |
| JBOSS_DOMAIN_S3_SECRET_ACCESS_KEY | Amazon AWS user account secret access key for S3 domain controller discovery. | N/A |
| JBOSS_DOMAIN_S3_BUCKET | Amazon S3 bucket to be used for S3 domain controller discovery. | N/A |
25.4.2. Custom Script Parameters
The following parameters can be used in the user customization section of the User Data: field.
Table 25.3. Configurable Parameters
| Name | Description |
|---|---|
|
JBOSS_DEPLOY_DIR
|
Deploy directory of the active profile (for example,
/var/lib/jbossas/standalone/deployments/). Deployable archives placed in this directory will be deployed. Red Hat recommends using the Management Console or CLI tool to manage deployments instead of using the deploy directory.
|
|
JBOSS_CONFIG_DIR
|
Config directory of the active profile (for example,
/var/lib/jbossas/standalone/configuration).
|
|
JBOSS_HOST_CONFIG
|
Name of the active host configuration file (for example,
host-master.xml). Red Hat recommends using the Management Console or CLI tools to configure the server instead of editing the configuration file.
|
|
JBOSS_SERVER_CONFIG
|
Name of the active server configuration file (for example,
standalone-ec2-ha.xml). Red Hat recommends using the Management Console or CLI tools to configure the server instead of editing the configuration file.
|
|
USER_SCRIPT
|
Path to the custom configuration script, which is available prior to sourcing user-data configuration.
|
|
USER_CLI_COMMANDS
|
Path to a custom file of CLI commands, which is available prior to sourcing user-data configuration.
|
25.5. Troubleshooting
25.5.1. About Troubleshooting Amazon EC2
25.5.2. Diagnostic Information
/var/log/jboss_user-data.outis the output of the jboss-ec2-eap init script and user custom configuration script./var/cache/jboss-ec2-eap/contains the actual user data, custom script, and custom CLI commands used at instance start-up./var/logalso contains all the logs collected from machine start up, JBoss EAP 6, httpd and most other services.
Appendix A. Supplemental References
A.1. Download Files from the Red Hat Customer Portal
Prerequisites
- Before you begin this task, you need a Customer Portal account. Browse to https://access.redhat.com and click the Register link in the upper right corner to create an account.
Procedure A.1. Log in and Download Files from the Red Hat Customer Portal
- Browse to https://access.redhat.com and click the Log in link in the top right corner. Enter your credentials and click Log In.Result
You are logged into RHN and you are returned to the main web page at https://access.redhat.com.
Navigate to the Downloads page.
Use one of the following options to navigate to the Downloads page.- Click the Downloads link in the top navigation bar.
- Navigate directly to https://access.redhat.com/downloads/.
Select the product and version to download.
Use one of the following ways to choose the correct product and version to download.- Step through the navigation one level at a time.
- Search for your product using the search area at the top right-hand side of the screen.
Download the appropriate file for your operating system and installation method of choice.
Depending on the product you choose, you may have the choice of a Zip archive, RPM, or native installer for a specific operating system and architecture. Click either the file name or the Download link to the right of the file you want to download.
The file is downloaded to your computer.
A.2. Configure the Default JDK on Red Hat Enterprise Linux
alternatives command.
Important
Note
Prerequisites
- In order to complete this task, you need to have superuser access, either through direct login or by means of the
sudocommand.
Procedure A.2. Configure the Default JDK
Determine the paths for your preferred
javaandjavacbinaries.You can use the commandrpm -ql packagename |grep binto find the locations of binaries installed from RPMs. The default locations of thejavaandjavacbinaries on Red Hat Enterprise Linux 32-bit systems are as follows.Table A.1. Default locations for
javaandjavacbinariesJDK Path OpenJDK 1.6 /usr/lib/jvm/jre-1.6.0-openjdk/bin/java/usr/lib/jvm/java-1.6.0-openjdk/bin/javacOracle JDK 1.6 /usr/lib/jvm/jre-1.6.0-sun/bin/java/usr/lib/jvm/java-1.6.0-sun/bin/javacSet the alternative you wish to use for each.
Run the following commands to set your system to use a specificjavaandjavac:/usr/sbin/alternatives --config javaor/usr/sbin/alternatives --config javac. Follow the on-screen instructions.Optional: Set the
java_sdk_1.6.0alternative choice.If you want to use Oracle JDK, you need to set the alternative forjava_sdk_1.6.0.as well. Use the following command:/usr/sbin/alternatives --config java_sdk_1.6.0. The correct path is usually/usr/lib/jvm/java-1.6.0-sun. You can do a file listing to verify it.
The alternative JDK is selected and active.
Appendix B. Revision History
| Revision History | |||
|---|---|---|---|
| Revision 6.3.0-51 | Tuesday November 18 2014 | ||
| |||
| Revision 6.3.0-38 | Monday August 4 2014 | ||
| |||