
Red Hat Training
A Red Hat training course is available for Red Hat JBoss Developer Studio
Chapter 3. Developing for the Cloud with OpenShift 2
3.1. Creating Your First OpenShift Online Application
OpenShift Tools provides an all-in-one New OpenShift Application wizard for creating new OpenShift applications from templates and existing projects. This wizard is the starting point for creating all new OpenShift Online applications from the IDE and also for importing OpenShift Online applications to your workspace.
The New OpenShift Application wizard is an ideal starting point for new users to OpenShift and OpenShift Tools as it guides you through all the steps necessary to set up the IDE to use your OpenShift Online account and configure your account ready for applications.
The instructions here demonstrate how to use this wizard and a default OpenShift application template to create a basic OpenShift Online application. This includes one-time steps, such as signing up for an OpenShift Online account, creating an OpenShift Online domain and uploading SSH keys. If you have previously used OpenShift Online or OpenShift Tools, you can omit unnecessary one-time steps as appropriate.
3.1.1. Starting the New OpenShift Application Wizard
-
In
JBoss Central, underStart from scratch, clickOpenShift Application.
3.1.2. Signing up for an OpenShift Online Account
If you do not have an OpenShift Online account, you should complete the following steps:
Click the link provided to sign up for an OpenShift account and follow the instructions on the OpenShift website.
Figure 3.1. Link to Sign up for a New OpenShift Online User Account

-
When you have completed the sign-up process, restart the
OpenShift Applicationwizard from JBoss Central.
3.1.3. Connecting to OpenShift Online
Complete the fields about your OpenShift Online account as follows:
-
From the
Connectionlist, selectNew Connection. -
Ensure the disabled
Serverfield stateshttps://openshift.redhat.com. In the
UsernameandPasswordfields, type your account credentials.Figure 3.2. Connection Information Provided for OpenShift Online Account

-
From the
-
Click
Next.
3.1.4. Enabling Communication between the IDE and OpenShift
If your OpenShift Online account has no SSH public keys stored, you are prompted with the Add SSH Keys wizard and you should complete the following steps:
-
Click
New. Complete the fields about the SSH Keys to be created as follows:
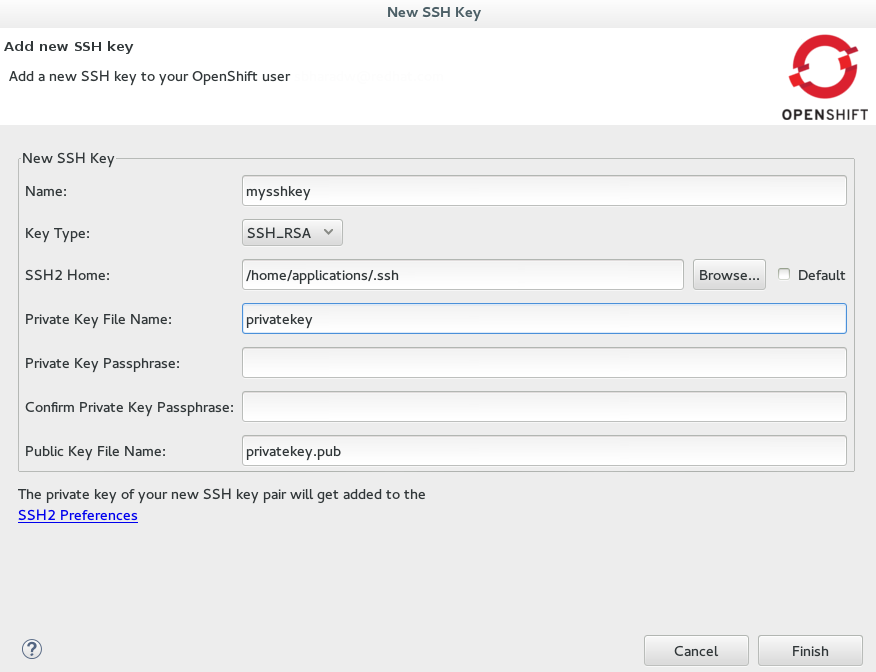
-
In the
Namefield, type a name for the SSH key pair. -
From the
Key Typelist, ensureSSH_RSAis selected. -
In the
SSH2 Homefield, ensure your .ssh directory path is correct. In the
Private Key File Namefield, type a name for the private key file name. ThePublic Key File Namefield populates automatically with the name of the private key file name with .pub appended.Figure 3.3. New SSH Key Information for OpenShift Online Provided
-
In the
-
Click
Finish. -
Click
Finishto close theAdd SSH Keyswindow.
3.1.5. Creating a Domain
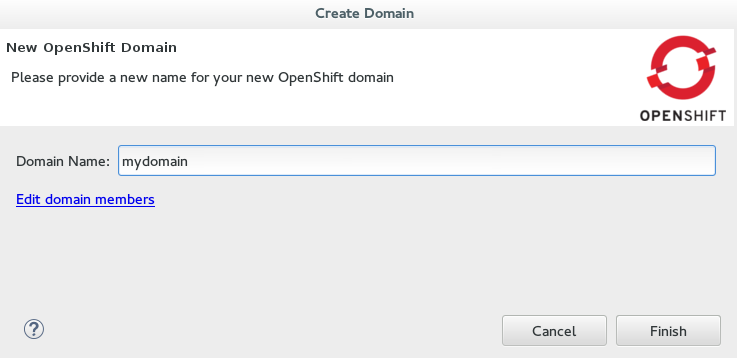
If your OpenShift Online account has no domains, you are prompted with the Create Domain wizard and you should complete the following step:
In the
Domain Namefield, type an alphanumeric name for your new OpenShift Online domain and clickFinish. The provided domain name must be unique across all domains on OpenShift Online; if it is not unique, you are directed back to theCreate Domainwindow to provide a unique domain name.Figure 3.4. New OpenShift Domain Name Provided
3.1.6. Providing Essential New Application Details
Complete the fields about the type of OpenShift application you want to create as follows:
-
Ensure
Create a new OpenShift applicationis selected. Expand
Basic Cartridgesand selectJBoss Application Server 7.Figure 3.5. Basic Cartridge Selected for the New OpenShift Online Application

-
Ensure
-
Click
Next. Complete the fields about your OpenShift application as follows:
-
Ensure the
Domainfield displays the OpenShift Online domain with which you want to host your application. -
In the
Namefield, type an alphanumeric name for your application. -
From the
Gear profilelist, selectsmall. Select the
Enable scalingcheck box.Figure 3.6. New OpenShift Application Information Provided

-
Ensure the
-
Click
Next.
3.1.7. Configuring the Corresponding Workspace Project for the New Application
Complete the fields about the corresponding workspace project as follows:
-
Ensure the
Create a new projectcheck box is selected. -
Ensure the
Create and set up a server for easy publishingcheck box is selected. This automatically creates an OpenShift server adapter for the application, enabling you to easily publish project changes to the OpenShift server.
-
Ensure the
-
Click
Next. Ensure the location in the
Git Clone Destinationfield corresponds to where you want to make a local git repository for the project source code.Figure 3.7. Git Clone Destination Specified

3.1.8. Creating the OpenShift Online Application
-
Click
Finishfor the wizard to start generating the new OpenShift application. This process may take some time to complete. -
If you are prompted that the authenticity of the host cannot be established and asked whether you want to continue connecting, ensure that the host name matches that of your application and domain and click
Yes.
3.1.9. Viewing the OpenShift Online Application
-
In the
OpenShift Explorerview, expand the connection and domain. -
Right-click
{application name}and click → .
Your OpenShift Online application is displayed in the IDE default web browser.
3.1.10. Some OpenShift Terminology
- Gear: A server container with a set of resources that allow you to run your application
Cartridge: Plug-ins that house the framework or components that can be used to create and run your application
- Standalone cartridge: Languages and application servers that serve your application
- Embedded cartridge: Functionality to enhance your application
- Scaling: Enables your application to react to changes in traffic and automatically allocate the necessary resources to handle the current demand
3.1.11. Did You Know?
-
You can also start the
New OpenShift Applicationwizard from theOpenShift Explorerview by right-clicking a connection, domain or existing application and clicking → or from the IDE main menus by clicking → → . -
To save time when logging in to OpenShift Online in future, you can click the
Save Passwordcheck box in theSign in to OpenShiftwindow. The password is retained in secure storage provided by the IDE and automatically populates thePasswordfield for the associated connection. -
Using the
New OpenShift Applicationwizard, you can also create a new OpenShift application from an existing workspace project or a Git source. - Each time you start the IDE or switch workspaces the IDE is initially disconnected from OpenShift. When you attempt to complete an action that requires an active OpenShift connection, you are automatically prompted to reconnect.
3.2. Developing an Existing OpenShift Application
OpenShift Tools enables you to import existing OpenShift Online applications into the IDE so that you can take advantage of the IDE features in further developing your applications. As illustrated in this article, during the import process you can configure the IDE for easy republishing to OpenShift Online.
Develop an existing OpenShift application by:
3.2.1. Importing an Existing OpenShift Online Application
Applications associated with your OpenShift Online account(s) are listed in the OpenShift Explorer view. The source code for these applications can be individually imported into the IDE using the OpenShift Tools Import OpenShift Application wizard.
To import an existing OpenShift Online application as a new project in the existing IDE workspace, complete the following steps:
-
In the
OpenShift Explorerview, ensure your OpenShift Online connection is listed or click theConnectionicon and complete your OpenShift Online account details to create a new connection.
-
In the
OpenShift Explorerview, expand the connection and domain to locate the application you want to import. -
Right-click
{application name}and clickImport Application. Complete the fields about the application to be imported as follows:
-
Ensure that
Use my existing OpenShift applicationis selected. Ensure that the name of the application you want to import is listed. If this is not the case, type the name of the application or click
Browseto select the application.Figure 3.8. Existing OpenShift Online Application Information Provided

-
Ensure that
-
Click
Next. Complete the fields about the corresponding new workspace project as follows:
-
Ensure the
Create a new projectcheck box is selected. -
Ensure the
Create and set up a server adapter for easy publishingcheck box is selected.
-
Ensure the
-
Click
Next. -
Ensure the location in the
Git Clone Destinationfield corresponds to where you want to make a local copy of the OpenShift Online application Git repository. -
Ensure a public SSH key is uploaded to OpenShift Online and private key location is specified in the IDE preferences by clicking
SSH Keys Wizardand reviewing the information. -
Click
Finish.
If you are prompted that the authenticity of the host cannot be established and asked whether you want to continue connecting, ensure that the host name matches that of your application and domain and click Yes.
When the import process is complete, the project is listed in the Project Explorer view and a server adapter is listed for the application in the Servers view.
OpenShift Tools makes a number of small changes to the application source code on import. It adds several IDE-specific files to the project and modifies the .gitignore file so that you are not prompted about these files each time you commit project changes to the Git repository.
3.2.2. Modifying the Application Source Code
The files contained in your project depend on the type of project that you have imported. Here a common OpenShift application file, index.html, is changed as an example of modifying the project source code. You can opt to change this file or another file of your project.
To modify the index.html file, complete the following steps:
-
In the
Project Explorerview, expand{project name} → src → main → webapp. -
Double-click
index.htmlto open it in the JBoss Tools HTML Editor. After the opening <body> tag add the following line:
<h1>This is a change made to my OpenShift Online app from the IDE.</h1>
-
Save the
index.htmlfile by pressing Ctrl+S (or Cmd+S).
Note that in the Project Explorer view, index.html has > prepended to show that the source code has changed since the last Git commit.
3.2.3. Republishing the Modified Application
You must commit and push any changes you have made to the project source code and then republish the application before you can see changes reflected in the OpenShift Online application. As an example of committing and pushing source code changes to the OpenShift Online application repository and republishing the application, here the index.html file changed earlier is used. You can opt to use the project file that you changed earlier.
To commit and push the index.html changes and republish the application to OpenShift Online, complete the following steps:
-
In the
Serversview, right-click{application name} at OpenShiftand clickPublish. Or you can drag thefrom theProject Explorerview and drop it on the server adapter in theServersview. Complete the fields about the project changes to commit and push to the OpenShift Online application Git repository as follows:
In the
Commit messagefield, type the following messageAdded new heading in body of index.html
In the table of files, ensure the
index.htmlfile is selected.Figure 3.9. Commit Message Provided and Changed Project File Selected
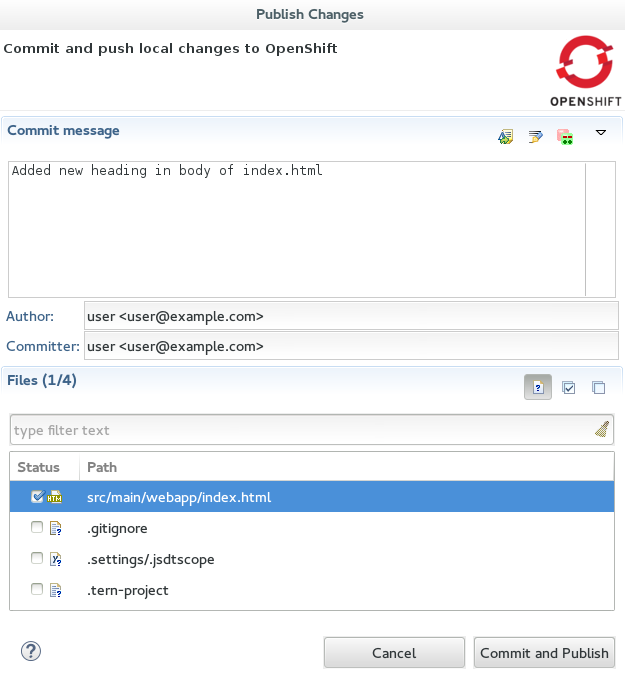
-
Click
Commit and Publish.
The republishing process can take some time. When the Console view shows Deployment completed with status: success, the republishing process is complete.
3.2.4. Viewing the Modified Application
After the modified application is republished, you can view the live updated version at the OpenShift Online application URL.
To view the modified OpenShift Online application in the IDE default web browser, complete the following steps:
-
In the
OpenShift Explorerview, expand the connection and the domain. -
Right-click
{application name}and click → .
Your modified and republished OpenShift Online application is displayed in the IDE default web browser.
3.2.5. Did You Know?
- On the first occasion that you republish your application to OpenShift Online, you may be prompted to provide a username and email address for use by Git. The IDE looks for a default Git configuration file on your system from which to obtain this information and if the IDE cannot find the file it prompts you to provide the values. You can specify the location of your system Git configuration file in the IDE Preferences, under → → .
-
You can review the progress of republishing applications to OpenShift Online in the
Consoleview. -
You can also open the OpenShift application in a web browser from the
Serversview by right-clicking{application name} at OpenShiftand clicking → . - You can change the IDE default web browser to be either the IDE internal web browser, BrowserSim (when installed) or an external web browser. Click → and select from the available web browser options or click → → → to extend the list of available external web browsers.
3.3. Custom Publishing Your OpenShift Application
Through the IDE you can manage your OpenShift Online application beyond simply its source code. OpenShift Online allows customization of the build and deployment process with markers and action hooks, each of which can be added to the application configuration files using OpenShift Tools and existing IDE functionality. Further, the Git commit and push processes for your changed application source code and configuration files can be customized through the IDE preferences to meet your needs.
Custom publish your OpenShift application by:
3.3.1. Adding a Marker to the Application
OpenShift Tools provides the Configure Markers wizard for adding markers to and removing them from your OpenShift application. The wizard lists markers that are already applied to your application and those that are available to add given the cartridge configuration of your application. The wizard manages the adding and removing of markers from your application, creating or deleting marker files and adding or removing them from the Git index respectively.
As an example, here the hot deploy marker is added to the application, which triggers OpenShift to publish application changes without first restarting the application cartridges and hence making the republishing faster.
To add the hot deploy marker to the application, complete the following steps:
-
In the
Project Explorerview, right-click{project name}and click → . From the
Markertable, selectHot Deployand clickOK.Figure 3.10. Hot Deploy Marker Selected
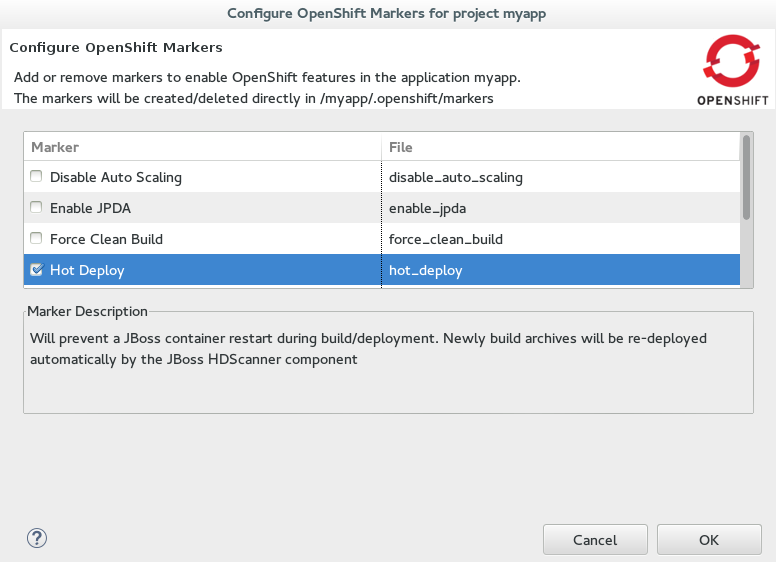
An empty
.openshift/markers/hot_deployfile is added to the application. OpenShift Tools automatically completes thegit addaction so that this new file is added to the Git index and can be committed and pushed to the OpenShift application repository when ready.
3.3.2. Adding an Action Hook to the Application
Using IDE features, you can quickly add action hooks to your OpenShift application. Adding an action hook requires creating a script file named according to the phase in which it is to run, locating it in the application .openshift/action_hooks directory, adding the file to the Git index and ensuring the file is executable by all.
As an example, here a post deploy action hook is added to the application, which triggers a simple bash script to execute on the application main gear after the application is deployed.
To add a post deploy action hook to the application, complete the following steps:
Create the post deploy action hook
-
In the
Navigatorview, expand{project name} → .openshift. -
Right-click
action_hooksand click → . -
In the
File namefield, typepost_deployand clickFinish. In the file editor, add the following lines to the post_deploy file:
#!/bin/bash
echo "This is my post-deploy bash script”
- Save the file by pressing Ctrl+S (or Cmd+S).
Make the post deploy action hook executable
-
In the
Navigatorview, right-click thepost_deployfile and clickProperties. In the
Permissionstable, select theExecutecheck boxes for all user types.Figure 3.11. Execute Permissions Check Boxes Selected for All Users
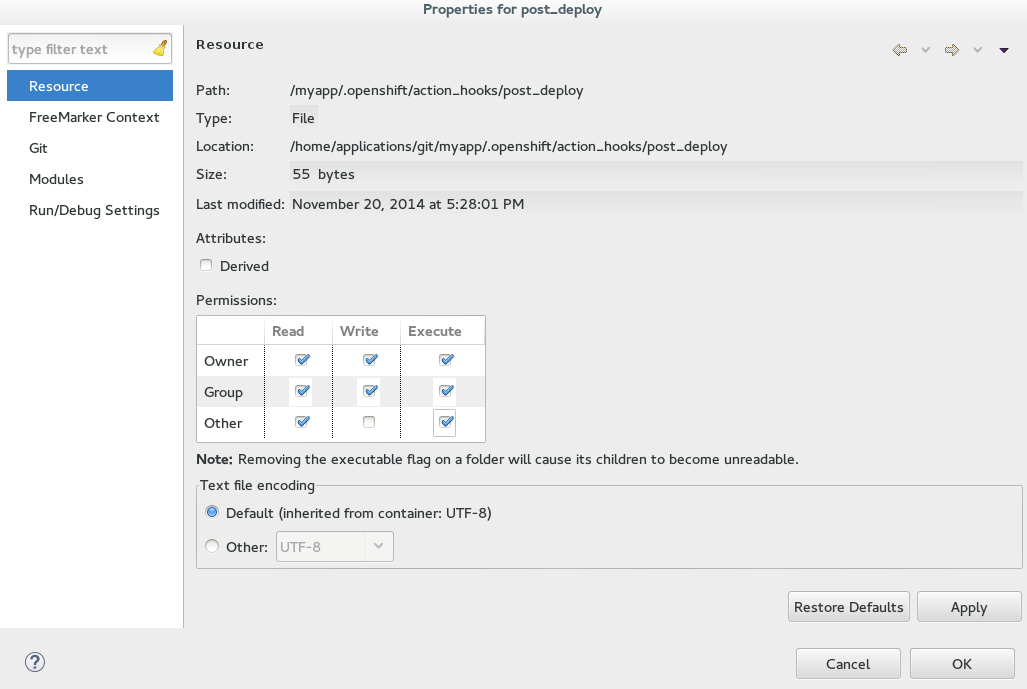
-
Click
Applyand clickOK.
3.3.3. Extending the Git Remote Connection Timeout
As your application source code grows in size, the remote connection from the IDE to the OpenShift Online application Git repository may not remain open long enough for the push process to complete. The default Git remote connection timeout is set to 30 seconds after which the connection is closed. But you can extend the Git timeout through the IDE preferences to ensure that the push process is provided with sufficient time to complete.
To extend the Git remote connection timeout, complete the following steps:
- Click → → → .
In the
Remote connection timeout (seconds)field, type a value in seconds.Figure 3.12. Git Remote Connection Timeout Set
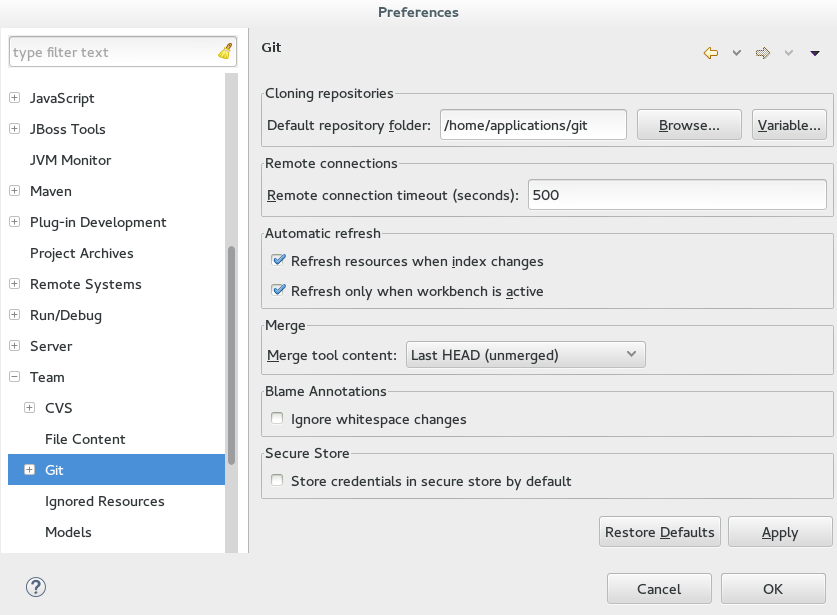
-
Click
Applyand clickOKto close thePreferenceswindow.
3.3.4. Republishing the Application
Before markers and action hooks take effect on your application building and deployment process you must commit the files and push changes to the OpenShift application repository. OpenShift Tools assists you to perform these Git actions as part of the republishing process.
To republish the application, complete the following steps:
-
In the
Serversview, right-click{application name} at OpenShiftand clickPublish. Complete the fields about the application changes to commit and push to the OpenShift Online application repository as follows:
In the
Commit messagefield, type the following message:Added hot_deploy marker and post_deploy bash script
In the
Filestable, ensure thehot_deployfile is selected and select thepost_deployfile.Figure 3.13. Commit Message Supplied and Files Selected for Committing and Publishing
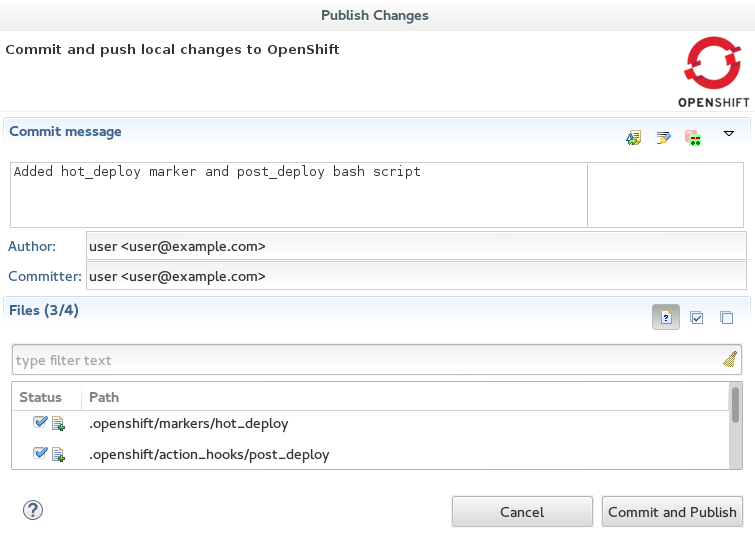
-
Click
Commit and Publish.
The Console view becomes the view in focus showing the application publication progress. A snippet of the output demonstrating the effect of the hot deploy marker and post deploy action hook is shown here for the sample application:
Not stopping cartridge xyz because hot deploy is enabled
Building git ref 'master', commit abc123

Activating deployment
Deploying xyz cartridge
Not starting cartridge xyz because hot deploy is enabled
This is my post-deploy bash script
-------------------------
Git Post-Receive Result: success
Activation status: success
Deployment completed with status: success
Note that the server has not been stopped and restarted because hot deploy is enabled and the bash script is run post application deployment as required.
3.3.5. Terminology
- Git: The revision control system used by OpenShift.
-
Marker: A set-named empty file added in the OpenShift application in the
.openshift/markersdirectory; markers are used to specify configuration to the OpenShift server. -
Action hook: A user-specified script that is added to the OpenShift application, in the
.openshift/action_hooksdirectory; scripts are run by OpenShift at specified stages of the application build and deploy process as denoted by the file name.
3.3.6. Did You Know?
-
You can also access the
Configure Markerswizard from theServerview by right-clicking{application name} at OpenShiftand clicking → . -
You can add files to the Git index at any time by right-clicking the file in, for example, the
Navigatorview and clicking → . -
You can see more information relating to the application Git repository by opening the
Gitperspective or individual Git views. All of these can be assessed from theWindowmenu.
3.4. Debugging an OpenShift Java Application
OpenShift Tools enables you to debug your deployed OpenShift applications within the IDE, enabling you to take advantage of the IDE debugging tools. This article specifically details the steps needed to set up an OpenShift Online Java application for debugging. A number of configuration tasks are required both locally and remotely to enable the IDE debugger to connect to the OpenShift server and OpenShift Tools for achieving this. Some tasks only need to be completed once for each OpenShift Online application but others must be completed every time you reconnect to OpenShift Online from the IDE.
Debug an OpenShift Java application by:
This article guides you through each of these configuration requirements and must be completed in the given order.
Your application must be deployed on OpenShift before attempting to configure the OpenShift application for debugging and enabling port forwarding.
3.4.1. Configuring the OpenShift Application for Debugging
You must first configure your OpenShift application for debugging, which requires setting the Enable JPDA (Java Platform Debugger Architecture) marker in your application source code and republishing the application. Marker information is retained with the application so you only need to complete this task once for each OpenShift Online application:
To configure the OpenShift application for debugging, complete the following steps:
-
In the
Project Explorerview, right-click{project name}and click → . In the
Configure OpenShift Markerswindow, select theEnable JPDAcheck box and clickOK.Figure 3.14. OpenShift Enable JPDA Marker Selected

-
In the
Serversview, right-click{application name} at OpenShiftand clickPublish. -
In the
Publish Changeswindow, in theCommit messagefield type a message for the commit. -
From the
Fileslist, ensure the.openshift/markers/enable_jpdacheck box is selected and clickCommit and Publish.
The project changes are pushed to the remote Git repository and the application is automatically updated on the OpenShift server.
When debugging is enabled on the OpenShift application a debug port is assigned; for default Java applications the debug port is 8787. To perform the remaining tasks, it is important to know which port is the debug port. To identify the debug port for other applications, see the cartridge documentation.
3.4.2. Enabling Port Forwarding for the Local and Remote Debug Ports
After the OpenShift application is configured for debugging, you must enable port forwarding for the local (IDE) and remote (OpenShift server) debug ports. You can achieve this with the OpenShift Tools Application port forwarding wizard, which connects all local ports to their remote counterpart ports, including the local and remote debug ports.
Port forwarding is automatically stopped when your OpenShift Online connection closes; this includes closing the IDE or changing workspaces. You must enable port forwarding every time you reconnect to OpenShift Online from the IDE.
To enable port forwarding, complete the following steps:
-
In the
OpenShift Explorerview, right-click{application name}and clickPort Forwarding. In the
Application port forwardingwindow, clickStart All. Ensure theStatusvalue showsStartedfor the debug ports and clickOKto close theApplication port forwardingwindow.Figure 3.15. Port Forwarding Started for All Ports

3.4.3. Configuring and Connecting the IDE Debugger
With port forwarding configured for the debug ports, you must create a debug configuration for the OpenShift server and connect the IDE debugger. You can then review debug output in the Debug and Console views. The debug configuration is retained with the workspace so you only need to create a new debug configuration once for each OpenShift Online application. But you must restart each debug configuration every time you reconnect to OpenShift Online from the IDE.
To configure and connect the IDE Debugger, complete the following steps:
-
In the global toolbar of the JBoss perspective, click the drop-down list for the
Debugicon and selectDebug Configurations. -
From the debug configurations list, select
Remote Java Applicationand click theNew launch configurationicon
In the
Connecttab, complete the following fields:-
In the
Projectfield, type the name of the workspace project associated with the OpenShift application or clickBrowseto locate the project. -
In the
Portfield, type the value of the debug port. Click
Applyand then clickDebug.Figure 3.16. Debug Configuration Ready for Your OpenShift Application

-
In the
Connecting to the OpenShift server may take some time to complete and you can monitor the progress in the Progress bar or Progress view.
3.4.4. Did You Know?
-
Setting the Enable JPDA marker adds an
.openshift/markers/enable_jpdafile to your project. To locate the hidden.openshiftdirectory and access the file, open theNavigatorview. -
You can also access the
Port Forwardingwizard by right-clicking{application name} at OpenShiftin theServersview, and clicking → . -
The
Debugperspective automatically arranges useful views for debugging. To open theDebugperspective, click → → . -
You can set the debugger to look up source code for classes it encounters that are not contained in your project, for example classes used by application servers defined in the IDE. When inputing values for the launch configuration, in the
Sourcetab clickAdd. From the list of source containers, selectJBoss Maven Source Containerand clickOK. The JBoss Maven Source Container uses indexes available from Maven repositories to locate the source code. From the list, select a runtime server, the libraries of which will be indexed in the JBoss Maven Source Container, and clickOK.
3.5. Deploying a Workspace Project to OpenShift Online
OpenShift Tools enables you to deploy existing workspace projects to OpenShift Online using the OpenShift Application wizard. The wizard creates a templated OpenShift application based on your cartridge choices, modifies the project as necessary for use with OpenShift Online and commits the project code to the local application Git repository ready for publishing. The wizard can also generate a server adapter for easy publishing of the application both for first deployment and for future changes.
Deploy a workspace project to OpenShift Online by:
3.5.1. Preparing a Workspace Project for OpenShift Online Deployment
In preparing workspace projects for OpenShift Online, the OpenShift Application wizard merges the existing project content with the key metadata files from a new OpenShift application and connects the project to the OpenShift application Git repository.
To prepare an existing workspace project for OpenShift Online, complete the following steps:
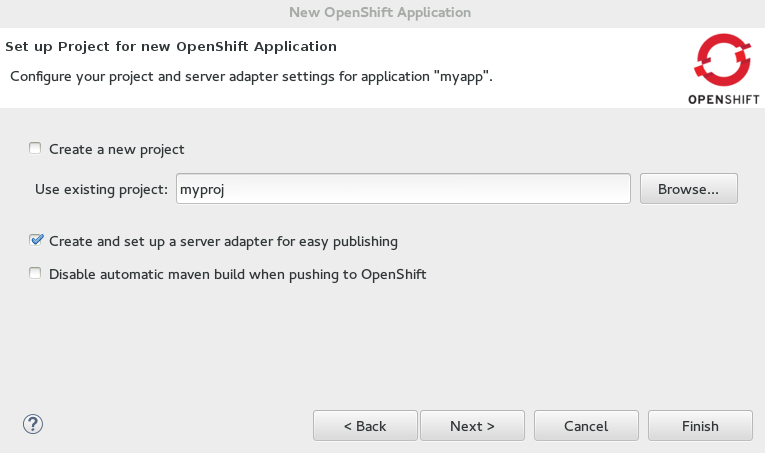
-
In the
Project Explorer, right-click{project name}and click → . Complete the fields about your OpenShift Online account as follows:
-
In the
Connectionlist, select the connection. -
In the
Passwordfield, type your OpenShift Online account password.
-
In the
-
Click
Next. Complete the fields about the type of OpenShift application you want to create as follows:
-
Ensure
Create a new OpenShift applicationis selected. -
Expand
Basic Cartridgesand select the core cartridge to match the application type; for example, for applications with Java-based server-side functionality selectjbossas-7,jboss-wildfly-8, orjbosseap-6.
-
Ensure
-
Click
Next. Complete the fields about your OpenShift application as follows:
- Ensure that the 'Domain' list displays the domain in which you want to host your application.
-
Ensure the
Namefield contains a valid alphanumeric name for your application. -
In the
Gear profilefield, select the gear size that you want for your application or leave blank to use the default gear profile. -
Select the
Enable Scalingcheck box to make your application scalable.
-
Click
Next. Complete the fields about the corresponding workspace project as follows:
-
Ensure the
Create a new projectcheck box is clear. -
Ensure the
Use existing projectfield lists the workspace project that you want to deploy on OpenShift. Ensure the
Create and set up a server adapter for easy publishingcheck box is selected.Figure 3.17. Existing Workspace Project Selected for the New OpenShift Application
-
Ensure the
-
Click
Next. -
Ensure the location in the
Git Clone Destinationfield exists and corresponds to where you want to make a local git repository for the project source code. -
Ensure a public SSH key is uploaded to OpenShift Online and private key location specified in the IDE preferences by clicking
SSH Keyswizard and reviewing the information. -
Click
Finish. -
At the prompt informing that changes will be made to the workspace project, click
OK.
If you are prompted that the authenticity of the host cannot be established and asked whether you want to continue connecting, ensure that the host name matches that of your application and domain and click Yes.
3.5.2. Deploying the OpenShift Online Application
When the workspace project is prepared, you must republish the OpenShift Online application to push the project source code to your waiting OpenShift Online application and trigger a build and redeployment of the application. Republishing can be achieved using the server adapter created by the OpenShift Application wizard and completes the deployment of the workspace project to OpenShift Online.
To deploy the OpenShift Online application, complete the following steps:
-
In the
Serversview, right-click{application name} at OpenShiftand clickFull Publish. -
When prompted if you want to publish the committed project changes to OpenShift, click
Yes.
The Console view becomes the view in focus showing the application publication progress. After the workspace project is published at OpenShift Online, the following message displays in the Console view:
Deployment completed with status: success
3.5.3. Viewing the Deployed OpenShift Online Application
After the application is published, you can view the live version at the OpenShift Online application URL.
To view the OpenShift Online application in a web browser, complete the following steps:
-
In the
OpenShift Explorerview, expand the connection and the domain. -
Right-click
{application name}and click → .
Your deployed OpenShift Online application is displayed in the IDE default web browser.
3.5.4. Did You Know?
-
You can find the URL of your OpenShift Online application from the
OpenShift Explorerview by right-clicking{application name}and clickingDetailsor from theServersview by right-clicking{application name} on OpenShiftand clicking → . - You can set the preference for which type of web browser the IDE opens by default. Click → and click the type of web browser.
-
If your project is large, it may require more time than the default set by the IDE to push changes to the application OpenShift Online Git repository. You can increase the Git timeout by clicking → → → and changing the
OpenShift request timeout (in seconds)value. -
You can also access the same wizard for deploying an existing workspace project to OpenShift Online from JBoss Central by click
OpenShift ApplicationunderStart from scratch.
3.6. Configuring SSH Keys for OpenShift
OpenShift Online uses SSH authentication for development tasks that interact directly with gears such as pushing code changes to application OpenShift Online Git repositories, reading application log files, listing and setting environment variables, and port forwarding.
You must have an SSH key pair configured for your OpenShift Online account before using OpenShift Tools features to create, edit and manage OpenShift Online applications. This requires a private-public key pair, with the private key stored on your local system and its location specified in the IDE and the associated public key stored on the OpenShift Online server and associated with your account.
OpenShift Tools enables you to quickly complete these requirements with the assistance of a multipurpose SSH wizard. If you are new to OpenShift Online, the wizards can help you configure a new or existing SSH key pair. If you are already using OpenShift Online through the web interface or RHC client tools, you only need to specify the private key location in the IDE preferences to complete the SSH key configuration.
Configure the SSH keys for OpenShift by:
3.6.1. Option A: Creating and Using a New SSH Key Pair
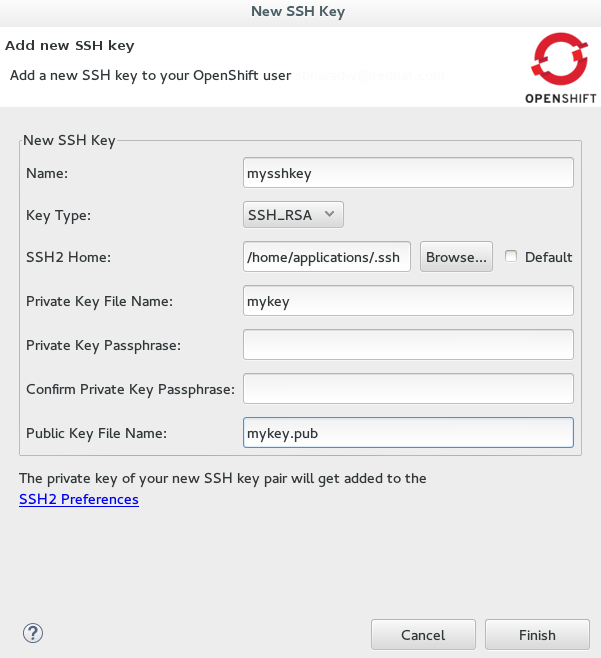
You can use the OpenShift Tools Manage SSH Keys wizard to create a new SSH key pair. In addition to creating an SSH key pair, this wizard completes the OpenShift Online SSH configuration process by automatically uploading the public key to the OpenShift Online server and setting the location of the corresponding private key in the IDE preferences. This option may be applicable if you have not used your system with OpenShift Online before.
To create and use a new SSH key pair, complete the following steps:
-
In the
OpenShift Explorerview, right-click the connection and clickManage SSH Keys. -
In the
Manage SSH Keyswizard, clickNew. Complete the fields about the new SSH keys as follows:
-
In the
Namefield, type a name to distinguish the key pair from any other keys associated with the connection. -
From the
Key Typelist, selectSSH_RSA. -
Ensure that the
SSH2 Homefield contains the location where you want to create the files associated with the key pair. To change the location, clear theDefaultcheck box and type the location in theSSH2 Homefield or clickBrowseto navigate to the desired location. In the
Private Key File Namefield, type a name for the private key file. ThePublic Key File Namefield is automatically completed and displays the private key file name appended with.pub.Figure 3.18. Completed Fields for the New SSH Key Pair
-
In the
-
Click
Finishand clickOKto close theManage SSH Keyswizard.
3.6.2. Option B: Using an Existing SSH Key Pair
You can use the OpenShift Tools Manage SSH Keys wizard to use an already generated SSH key pair with OpenShift Online. This wizard uploads the public key to the OpenShift Online server and sets the location of the corresponding private key in the IDE preferences. This option may be applicable if you have removed a SSH key pair from your OpenShift account, still have the generated key files available on your system and want to reassociate them with your OpenShift account.
To use an existing SSH key pair, complete the following steps:
-
In the
OpenShift Explorerview, right-click the connection and clickManage SSH Keys. -
Click
Add Existing. Complete the fields about the existing public SSH key as follows:
-
In the
Namefield, type a name for the SSH key. In the
Public Keyfield, type the path of the public key file or clickBrowseto locate the public key file.Figure 3.19. Completed Fields for Adding an Existing SSH Public Key

-
In the
-
Click the
SSH2 Preferenceslink. -
In the
Private keysfield, clickAdd Private Keyand locate the private key file. -
Click
Applyand clickOKto close thePreferenceswindow. -
Click
Finishand clickOK.
3.6.3. Option C: Specifying an Existing Private Key File
When using a public key that is already uploaded to OpenShift Online, you must ensure the location of the corresponding private key is set in the IDE preferences. This option may be applicable if you are an existing OpenShift Online user and you have not yet accessed OpenShift Online from your IDE workspace or you are using multiple IDE workspaces.
To specify an existing private key file, complete the following steps:
- Click → → → → .
-
In the
Generaltab, clickAdd Private Keyand locate the private key file. -
Click
Applyand clickOKto close thePreferenceswindow.
3.6.4. Did You Know?
-
To quickly open the
OpenShift Explorerview, in theIDE Quick Accessfield typeOpenShift Explorerand chooseOpenShift Explorerview from the list of items. - For added security, you can add a passphrase to the private SSH keys associated with your OpenShift account when you create them. You must enter the passphrase for the specific key for each OpenShift Tools action that uses the SSH key for authentication with OpenShift Online.
-
IDE preferences are workspace specific and therefore you must specify private key location under
Preferencesfor each workspace. -
You can remove an existing public SSH key from your OpenShift Online account with the
Manage SSH Keyswizard. Note that this only disassociates keys with your OpenShift account. The files associated with a removed SSH key pair still exist in the local location where they were generated and the private key is still set in the IDE preferences. -
If you are using the OpenShift Online web interface or RHC client tools to manage SSH keys simultaneously with OpenShift Tools, the information specified by OpenShift Tools about keys may be out of sync. You can resync the information in the
Manage SSH Keyswizard with theRefreshbutton. -
You can change the default location used by the IDE to store newly created SSH keys. Click → → → → . In the
Generaltab, in theSSH2 homefield type the new location.
3.6.5. Troubleshoot SSH Key Issues
3.6.5.1. “You have no SSH public keys in your OpenShift account”
Error Message
You have no SSH public keys in your OpenShift account user@example.com yet, please add your key(s) or create new one(s).
Figure 3.20. No SSH Keys Window Displaying the Error Message
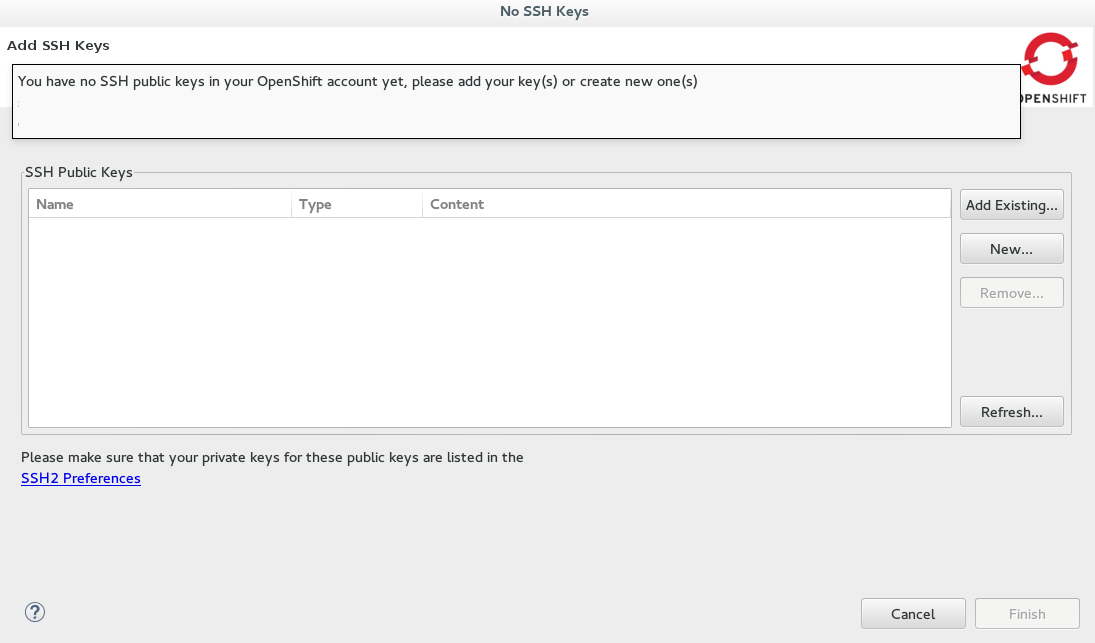
Issue
There are no SSH public keys assigned to your OpenShift account. After you have connected to OpenShift Online from the IDE, the No SSH Keys window appears informing you that there are no SSH public keys associated with your account.
Resolution
In the No SSH Keys window, click Add Existing or New and add an SSH public key to your OpenShift Online account as detailed in Option A, Create and Use a New SSH Key Pair and Option B, Use an Existing SSH Key Pair above.
3.6.5.2. “Please make sure that you added your private key to the ssh preferences.”
Error Message
Could not clone the repository. Authentication failed. Please make sure that you added your private key to the ssh preferences.
Figure 3.21. Problem Occured Window Displaying the Error Message

Issue
An SSH public key is associated with your OpenShift Online account but the IDE cannot locate the companion private key. Consequently, the IDE cannot complete actions for the OpenShift applications associated with your account. This error may be encountered when creating new OpenShift applications or importing existing OpenShift applications into the IDE.
Resolution
Click OK to close the Problem Occurred window. The OpenShift Application wizard opens. Click the SSH2 Preferences link to add the private key as detailed in Option C, Specify an Existing Private Key Location above.